

Page 1

DIGITAL VOICE RECORDER
(Premises/Goods delivery) Wendenstrasse 14-18, 20097 Hamburg, Germany. Tel. +49 (0)40-237730
(Letters) Postfach 10 49 08. 20034 Hamburg, Germany.
http://www.olympus-europa.com
OL YMPUS EUROP A HOLDING GMBH
Shinjuku Monolith, 3-1 Nishi-Shinjuku 2-chome, Shinjyuku-ku, Tokyo 163-0914, Japan. Tel. +81 (0)3-3340-2111
http://www.olympus.com
OL YMPUS IMAGING CORP .
VN-8700PC
VN-8600PC
VN-8500PC
EN
INSTRUCTIONS
Thank you f or purchasing a n Olympus Digital Voice R ecorder.
Please read these inst ructions for i nformation
about using the product correctl y and safely.
Keep the i nstruction s handy for future reference.
To ensure successfu l recordings, we recom mend that
you test the record func tion and volume be fore use.
Register your product on www.olympus-consumer.com/register and get
For customers in Europe
“CE” mark indicates that this product complies with the European requirements for safety,
health,environment and customer protection.
This symbol [crossed-out wheeled bin WEEE Annex IV] indicates separate collection of
waste electrical and electronic equipment in the EU countries. Please do not throw the
equipme nt into the domesti c refuse. Please u se the return and col lection sy stems available
in your country for the disposal of this product.
Applicable Product : VN-8700PC/VN-8600PC/VN-8500PC
This symbol [crossed -out wheeled bin Directive 2006/66/EC Annex II] indicates separate
collec tion of waste bat teries in the EU countri es. Please do not thro w the batteries in to the
domesti c refuse. Please us e the return and coll ection syste ms available in you r country for
the disposal of the waste batteries.
additional benefits from Olympus!
Introduction
• The contents of this document may be changed in the future without advanced
notice. Contact o ur Customer Support Cente r for the latest inf ormation relat ing to
product names and model numbers.
• The screen and recorder illustrations shown in this manual were produced during
the development stages and may differ from the actual product. The utmost care
has been taken to ensure the integrity of the contents of this document. In the
unlikel y event that a questio nable item, err or, or omi ssion is found, please con tact
our Customer Support Center.
• Any liability for passive damages or damage of any kind occurred due to data loss
incurred by a defect of the product, repair performed by the third party other
than Olympus or an Olympus authorized service station, or any other reason is
excluded.
Trademarks and registered trademarks
• IBM and PC/AT are the trademarks or registered trademarks of International
Business Machines Corporation.
• Microsoft, Windows and Windows Media are registered trademarks of Microsoft
Corporation.
• Macintosh is a trademark of Apple Inc.
• MPEG Layer-3 audio coding technology licensed from Fraunhofer IIS and
Thomson.
Other p roduct and b rand names ment ioned herei n may be the trade marks or reg istered
trademarks of their respective owners.
h Safety precautions
Before using your new recorder, read this manual carefully to ensure that you know how to operate
it safely and cor rectly. Keep this manua l in an easily accessible location for future refere nce.
• Th e warning symb ols indicate imp ortant saf ety related inf ormation. To protec t yourself and o thers from
pe rs on al i nj ur y or da mag e t o pr op er ty , it is e ss ent ia l th at you al way s r ead th e wa rn ing s a nd i nf or mat io n
provided.
--
1
EN-BD2717-01
AP1006
Page 2
Getting started
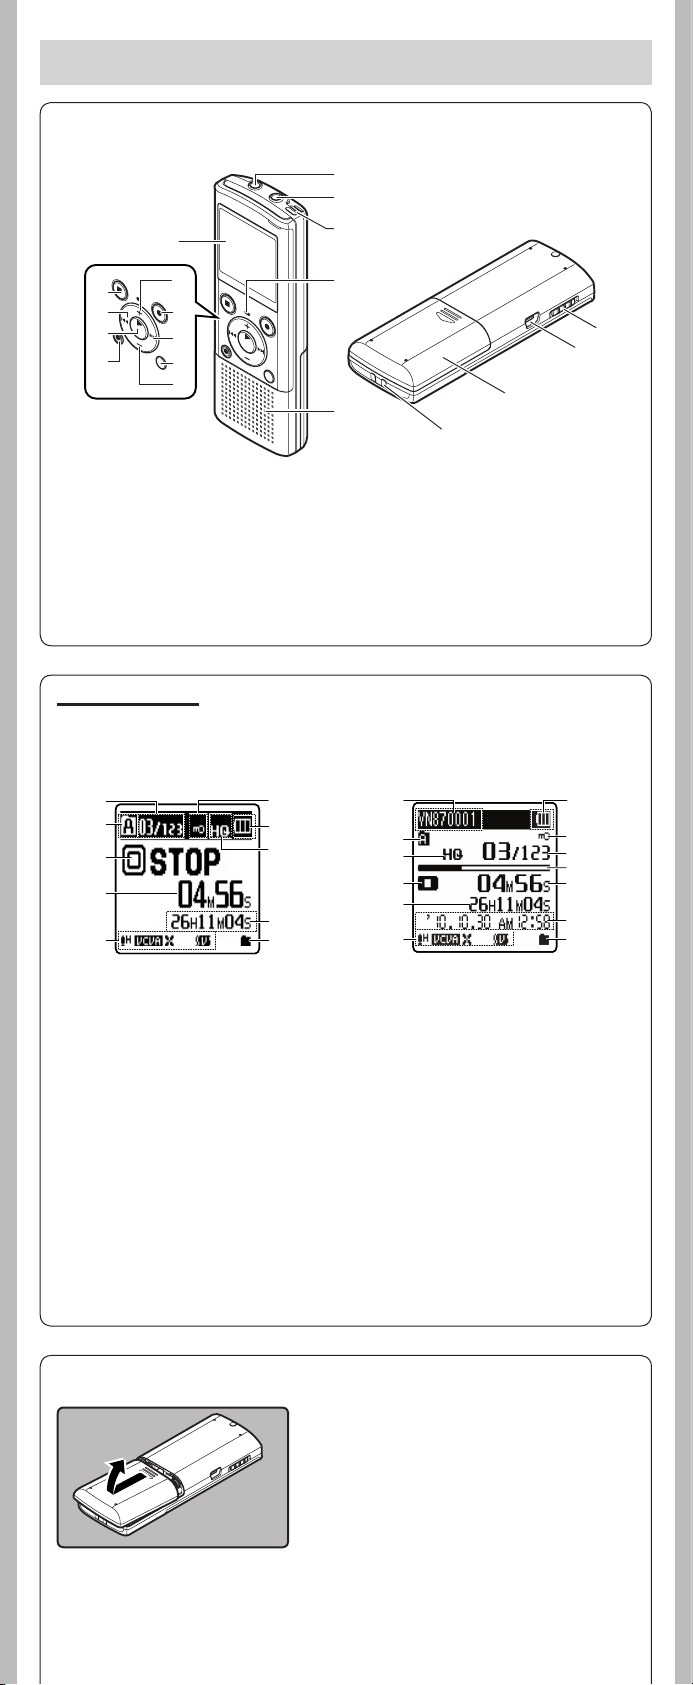
h Identification of parts
%
1
2
3
$
#
@
!
1
EAR
(Earphone) jack
2
MIC
(Microphone)
6
7
8
9
0
jack
3 Built-in microphone
4 Recording indicator
light
5 Built-in speaker
6
+
button
7
8 9button
9
0
!
@
`
4
5
REC
(s ) (Record)
button
FOLDER/INDEX /SCENE
button
–
button
ERASE
button
OK/MENU
button
*
(
# 0 button
$
STOP
(4) button
% Display (LCD panel)
^
POWER/HOLD
& USB connector
* Battery cover
( Strap hole
&
switch
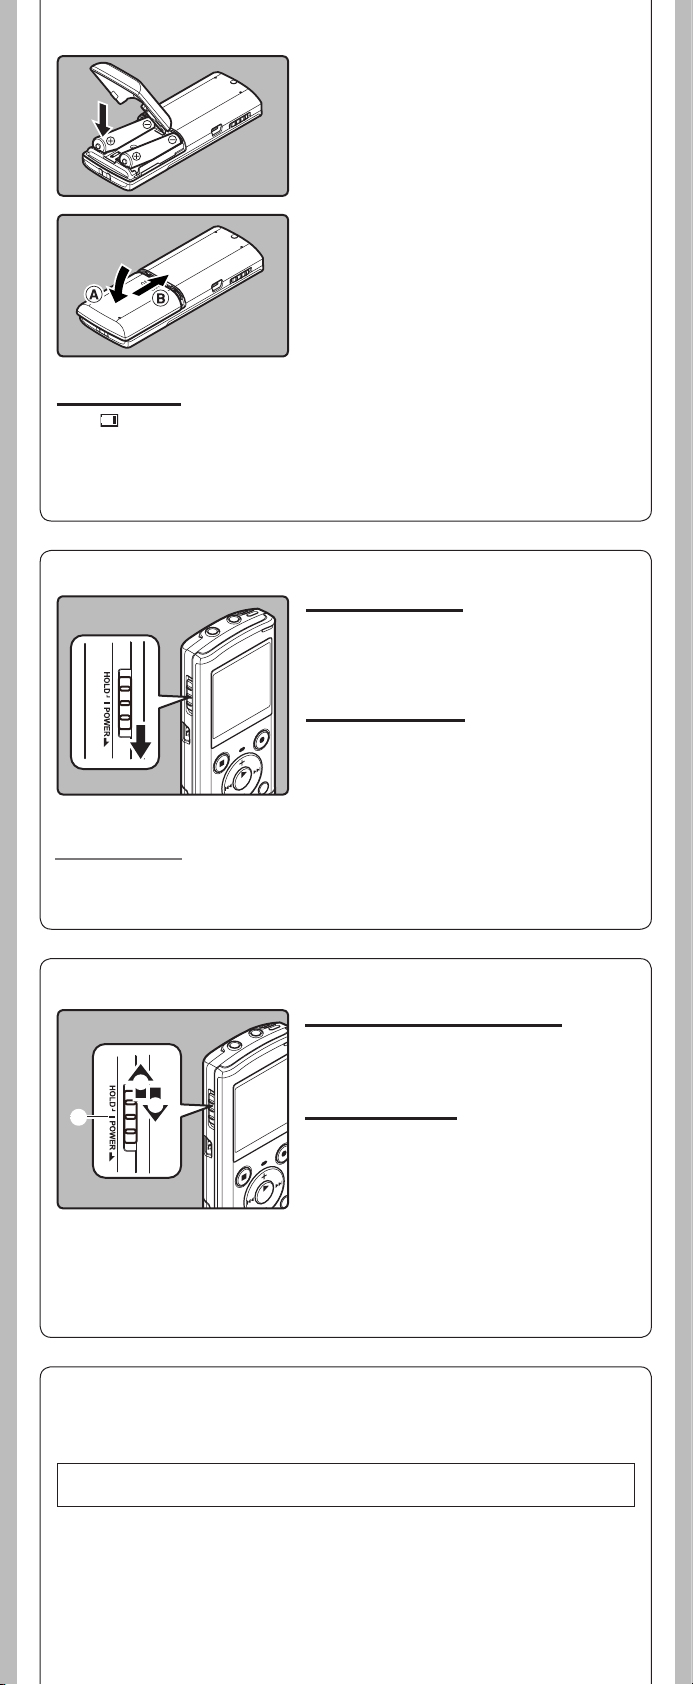
Display (LCD panel):
The displayed charac ter size on the screen can be changed. (please see “Font Size” ☞ P. 13)
When the [Font Size] is set to [Large]. When the [Font Size] is set to [Small].
1
2
3
4
5
6
7
8
9
0
!
2
8
3
9
5
7
6
1
@
4
#
0
^
1 Current file
[0] Low Cut Filter
number/ Total
number of recorded
[$] Voice Filter
files in the folder
2 Folder indicator
3 Recorder status
indicator
6 File lock indicator
7 Battery indicator
8 Recording mode
4 During recording
mode:
Elapsed recording time
9 During recording
During playback
mode:
Elapsed playback time
During playback or
5 [?] Microphone
Sensitivity indicator
[!] VCVA
indicator
h Inserting batteries
indicator
indicator
*1
0 Playback mode
indicator
! File name
*2
@ During recording
mode:
Remaining memory bar
*2
indicator
indicator
mode:
Remaining recording
time
During playback or
stop mode:
Playback position bar
*2
indicator
# Recording date and
time
*2
stop mode:
File length
*1 For VN-8700PC, VN-8600PC
only.
*2 This item will be displayed
when the [Font Size] is set
to [Small] only.
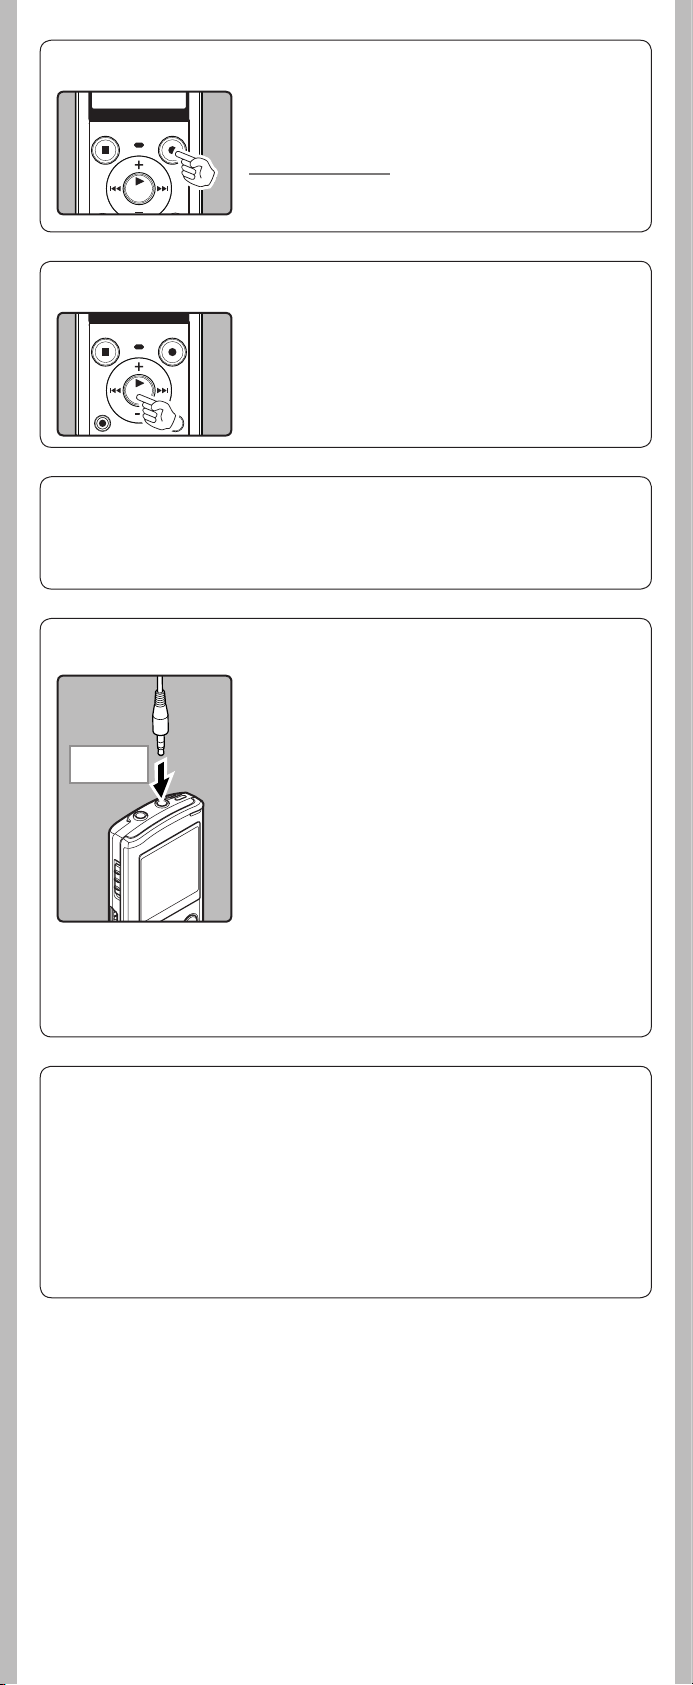
1 Lightly press down on the arrow and
slide the battery cover open.
• Manganese batteries may not be used in this
recorder.
• Be sure to stop the recorder before replacing
the batteries. Unloading the batteries while the
recorder is in use may cause a malfunction such
as corrupting the file, etc.
--
2
Page 3
2 Insert size-AAA alkaline battery,
C
A
B
observing the correct = and polarities.
3 Close the battery cover completely
by pressing to the direction A, then
sliding to the direction B
Battery indicator:
When [ ] appear s on the display, repla ce the batterie s as soon as possib le. When the bat teries are
too weak, [s] and [Batter y Low] appears on the display and the recorder shuts down.
• Remove the batteries if you are not going to use the recorder for an extended period of time.
• When changing batteries, AAA alkaline batteries or Olympus Ni-MH rechargeable batteries are
recommended.
.
h Turning on/off the power
Turning on the power:
While the recorder is turned off, slide the
POWER/HOLD
by the arrow.
• The display will turn on, and the power will be turned
on.
Turning off the power:
Slide the
indicated by the arrow for 1 seconds or longer.
• The display shuts o , and the power will be turned
o .
• The resume function remembers the stop position
before the power is turned o .
switch in the direction indicated
POWER/HOLD
switch in the direction
Power save mode
If the recorder is stopped/not used for over 5 minutes after it is turned on, it goes into standby
(power-save) mode, and the display shuts off.
• To exit standby mode and turn on the display, press any but ton.
h HOLD
Set the recorder to HOLD mode (A):
Slide the
position.
• After [Hold] app ears on the display, the re corder is set
POWER/HOLD
to HOLD mode.
switch to the HOLD
Exit HOLD mode (B):
Slide the
POWER/HOLD
switch to the C posi-
tion.
Notes:
• If you press any button in HOLD mode, the clock display ashes for 2 seconds, but it will not
operate the recorder.
• If HOLD is applied during playback (recording), operation is disabled with the playback (recording)
state unchanged (When play back has ended and the recording has ended due to the remaining
memory being used up, it will stop).
h Setting time and date [Time & Date]
If you set the time and date b eforehand, the inf ormation when the f ile is recorded is automaticall y
stored for each file. Setting the time and date beforehand enables easier file management.
When you i nstall ba tteries fo r the firs t time or eac h time you rep lace the bat teries, th e
“Hour” indication will flash.
- -
3
Page 4

1 Press the 9 or 0
button to select the item
to set.
• Selec t the item from the “hour”,
“minute”, “ year”, “ month” and
“day” with a flashing point.
2 Press the + or – button to
set.
• Follow the same s teps by pressing the 9 or 0 button
to select the next item, and press the
• You can select b etween 12 and 24 hour display by p ressing
the FOLDER/INDEX/SCENE but ton while setting the hour
and minute.
• You can selec t the order of th e “month”, “day” and “ year” by
pressing the FOLDER/INDEX/SCENE button while setting
them.
3 Press the `
OK/MENU
button to complete the
setting.
• The clock will start from the set date and time. Press the
` OK/MENU button according to the time signal.
• While the recorder is during stop mode, press and hold
the STOP (4) button to display the [Time & Date], and
[Remain].
Changing the time and date
Select [
Time & Dat e
(please see “Menu setting” ☞ P. 9, “ Time & Date” ☞ P.1 4)
] from th e menu on the [
h Notes on the Folders
The record er provides fi ve folders, [F], [G], [H], [I] and [ W]. To change
the folde r selectio n, press the FOLDER/INDEX/SCENE button while the
recorder is stopped.
a Folder indicator
+
or − button to set.
Device Menu
a
].
Note:
• Each folder can store up to 20 0 les.
About recording
h Recording
Before s tarting recording, select a folder between [&] to [*]. These five folders can be selectively
used to distinguish the kind of recording; for example, Folder [&] might be used to store private
information, while Folder ['] might be dedicated to holding business information.
1 Press the
SCENE
desired folder.
a Folder indicator
• Newly recorded audio will be
saved as the last file in the selected folder.
2 Press the
to start recording.
• Turn the microphone in the
direction of the source to be
recorded.
b Recording mode/ c Elapsed
recording time/ d Remaining
recording time
• [Rec Mode] cannot be
changed in the recording
standby mode or while
recording. Configure this while
the recorder is stopped.
FOLDER/ INDEX/
bu tt on to s el ec t th e
REC
(s ) button
a
b
c
d
3 Press the
STOP
(4) button
to stop recording.
e File length
e
Note:
For VN-8700PC/VN-8600PC only
• If a recordi ng is made in stereo mo des ([192 kbp s] or [128 k bps] ), it w ill be a monaural reco rding
through th e built-in microp hone, and the sam e audio will be reco rded on both Lef t channel (Lch)
and Right channel (Rch).
4
- -
Page 5
h Pause
While the recorder is during recording mode, press the
REC
(s) button.
• The record er will time out af ter 60 minutes when le ft in “Rec
Pause”.
Resume Recording:
REC
Press the
• Recording will resume at the point of interruption.
(s) button again.
h To quickly check on the recorded contents
While the recorder is during recording mode, press the
`
OK/MENU
• Stop recording and the f ile that was just recorded will be
button.
played back.
h Microphone sensitivity
Microphone sensitivity is adjustable to meet recording needs.
Select [
Mic Sense
(please see“Menu setting” ☞ P. 9, “ Mic Sense” ☞ P.11)
] from th e menu on the [
Rec Menu
].
h Recording from external microphone or other devices
The external microphone and other devices can be connected
and the sound can be recorded. Co nnect as follows by the device
to be used.
• Do not plug and unplug devices into the recor der’s jack while it
is recording.
To MIC jack
Recording with external microphone:
Connect an external microphone to the
MIC
jack of
the recorder.
Notes:
• The built-in microphone will become inoperable when an
external microphone is plugged into the recorder ’s MIC jack.
• Microphones supported by plug-in power can also be used.
• When the e xternal stere o microphone is use d while [Rec Mode]
is set to a monaural recording mode, audio will be recorded to
the L channel only
• When an external monaural microphone is used while
[Rec Mode] is set to a stereo re cording mode , it enables reco rding
only with the L channel microphone
*
For VN-8700PC/ VN-8600PC only.
Notes:
• To ensure reco rding from the b eginning, st art recordin g after you see t he display and the re cording
indicator lights on.
• When remaining recording time is less than 60 seconds, the recording indicator light starts ashing.
When the recording time is decreasing to 30 or 10 seconds, the light ashes faster.
• [Folder Full] will appear whe n the recording cann ot be made any furthe r. Sel ect on other folde r
or delete any unnecessary les before recording.
• [Memory Full] will appear when the memory is full. Delete any unnecessary les before recording
any further.
• When exte rnal devices are connec ted, perform a test recordi ng and then adjust the output level
for the external devices.
• When you a djust the vario us sound qualit y settings re lated to playback on th e recorder, the audio
output signal sent out from the EAR jack will change as well.
*
.
*
.
--
5
Page 6
About playback
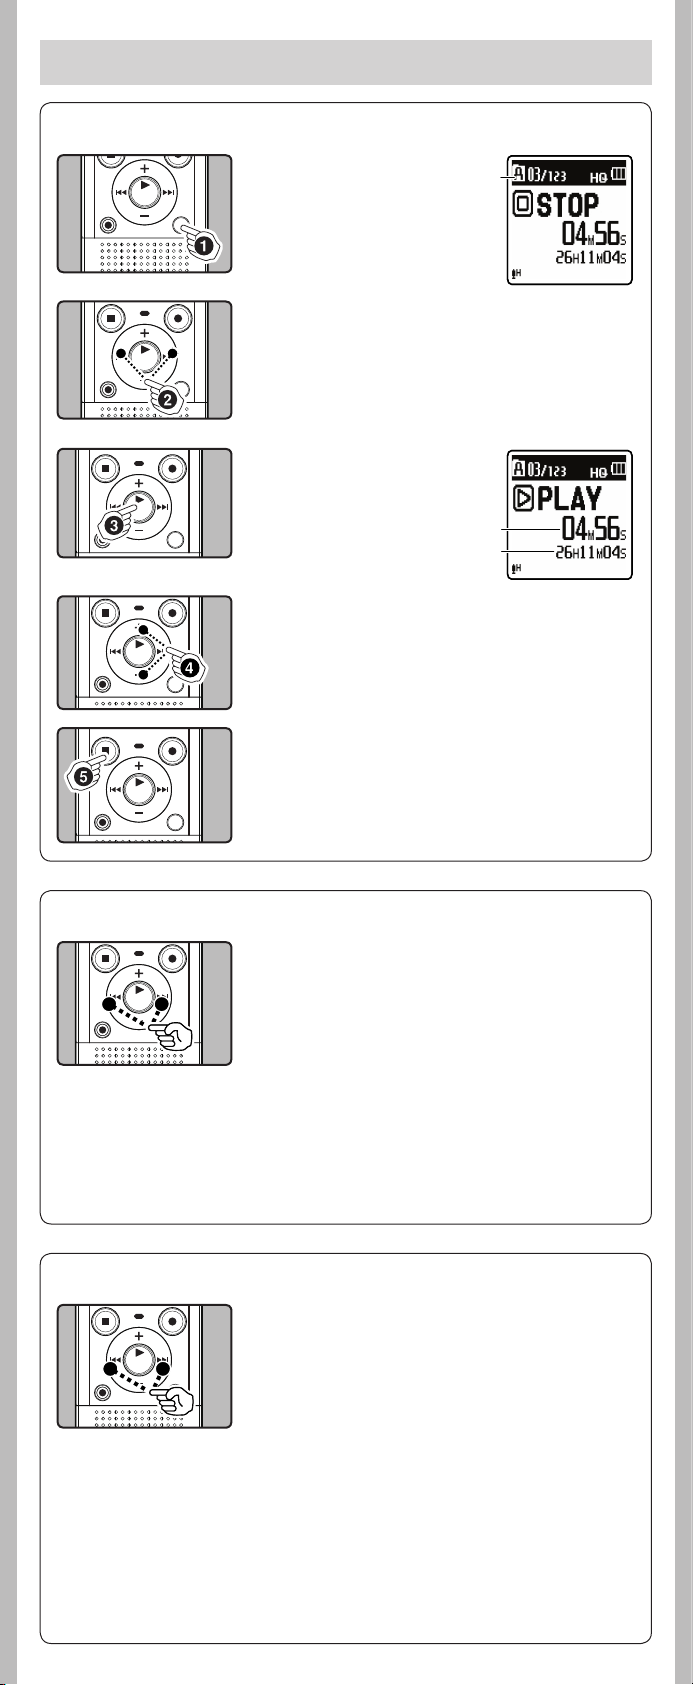
h Playback
1 Press the
SCENE
FOLDER/ INDEX/
bu tt on to s el ec t th e
a
desired folder.
a Folder indicator
2 Press the 9 or 0
button to select the file
to playback.
3 Press t he `
OK/MENU
button to start playback.
b Elapsed playback time/
c File length
b
c
4 Press t he + or − button to adjust to a
comfortable listening volume.
• The volume can be adjusted within a range from [00] to
[30].
5 Press the
STOP
(4 ) button at any point you
want to stop the playback.
• This will stop the file being playe d back midway. When the
resume function is activated the stopped location will be
registered, even if the power is turned of f. The next time
the power is t urned on, playb ack may be resumed fr om the
registered stopped location.
h Forwarding and Rewinding
While the recorder is during stop mode, press and hold
the 9 or 0 button.
• If you release th e button, it will sto p. Press the `
button to start playback from where it was stopped.
OK/MENU
While the recorder is during playback mode, press and
hold the 9 or 0 button.
• When you release the button the recorder will resume
normal playback.
• If there is an index mark or temp mark in the middle of the
file, the recorder will stop at that location.
• 9 : The recorder stops when it reaches the end of the
file. Continue pressing the 9 button to proceed
with the cue from the beginning of the nex t file.
0: The recorder stops when it reaches the beginning
of the file. Continue pressing the 0 button
to proceed with the review from the end of the
previous file.
h Locating the beginning of the file
While the recorder is during stop mode or playback
mode, press the 9 button.
• The recorder skips to the beginning of the next file.
While the recorder is during playback mode, press the
0 button.
• The recorder skips to the beginning of the current file.
While the recorder is during stop mode, press the 0
button.
• The reco rder skips to the b eginning of the p revious fil e. If the
recorder s top the midway of th e file, return to t he beginning
of the file.
While the recorder is during playback mode, press the
0 button twice.
Notes:
• When you sk ip to the beginnin g of the le d uri ng p lay bac k, t he re cor der wil l st art pla yba ck at the
position of an index mark or temp mark. The index mark and temp mark will be skipped when
you perform the operation in stop mode.
• When [Skip Space] set to o ther than [File Sk ip], the recorder will skip forward/reverse the speci ed
time, then will star t playback.
• The recorder skips to the beginning of the previous f ile.
- -
6
Page 7
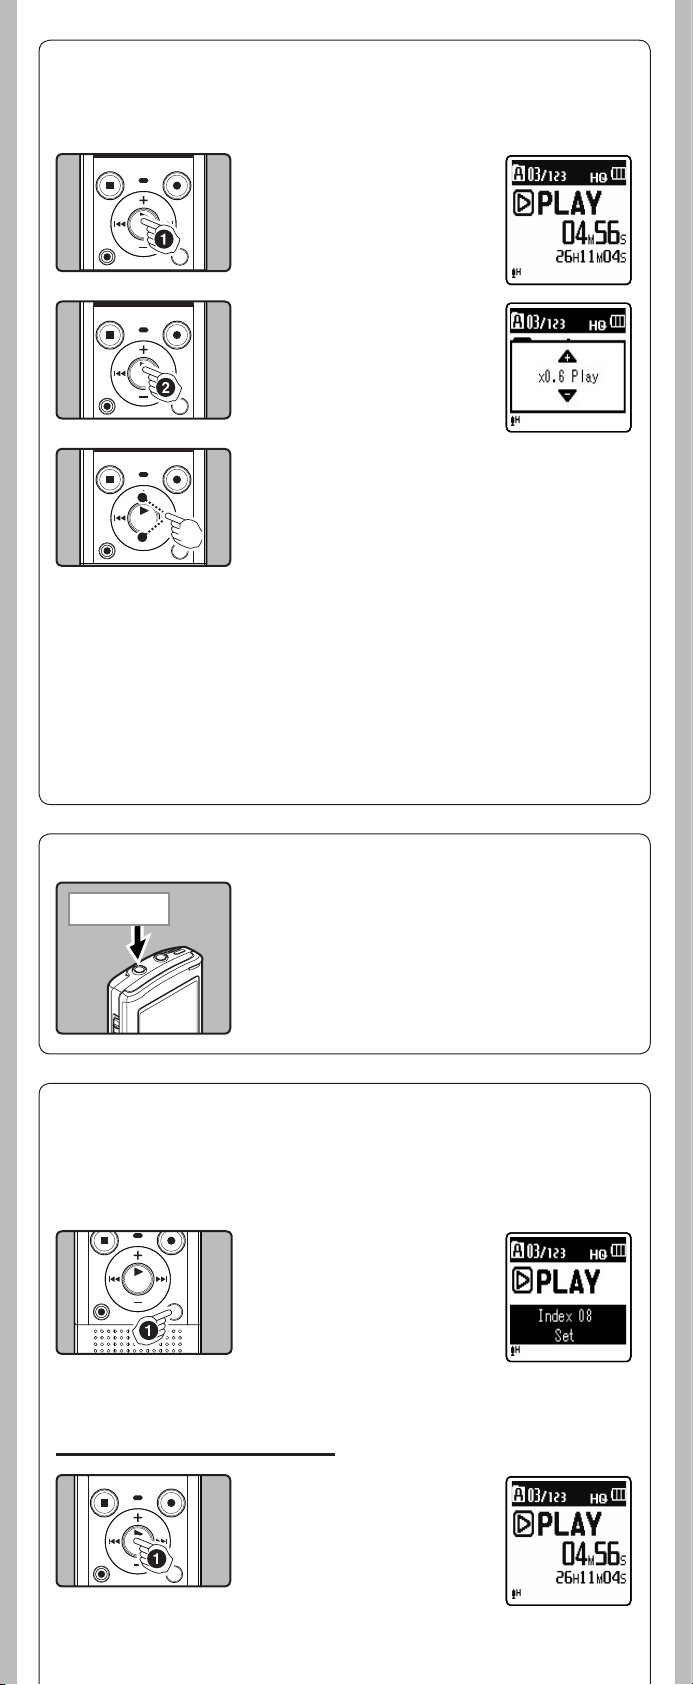
h Changing play speed
The playback speed of the file can be changed between 0.5 and 2 times speed. Change the speed
according to need such as listening to m eeting content at a fast speed or reviewing spots that yo u
couldn't catch in a language lesson at a slow speed.
1 Press t he `
OK/MENU
button to start playback.
2 While the recorder is dur-
ing playback mode, press
the `
OK/MENU
button to
open the playback speed
adjustment display.
3 Press the + or − bu tt on t o a dju st t he pla yb ack
speed.
• [x1.0 Play] (Normal playback)
Playback at normal speed.
3
[x0.5 Play] – [x0.9 Play] (Slow playback)
Playback speed slows down.
[x1.1 Play] – [x2.0 Play] (Fast playback)
Playback speed becomes faster.
4 Press the `
OK/MENU
button to complete the
setting.
• If you leave the recorder for 3 seconds, the set ting will be
applied and the recorder will return back to the original
screen.
Even if playback is stopped, the changed playback speed will be retained. The next playback will
be at that speed.
Note:
• As in normal playback mode, you can stop playback, cue a le, or inser t an index mark in slow
playback and fast playback modes as well.
h Playback through earphone
To EAR jack
An earphone can be connected to the
recorder for listening.
• When the earphone is used, the recorder speaker will be
switched-off.
Notes:
• To avoid irritation to the ear, inser t the earphone after turning
down the volume level.
• When you listen with the earphone during playback, do not
raise the volume too much. It may cause hearing impairment
and decrease in hearing ability.
EAR
jack of the
h Setting an index mark or a temp mark
If index marks and temp marks are placed, you can quickly find a location you want to listen to in
fast for ward and fast r ewind and when cui ng a file. Inde x marks canno t be placed on fi les created on
machines ot her than this record er, but temp marks can b e placed instead to tem porarily rem ember
desired locations. Temp marks are temporar y markings. They will be automatically erased if you
move to another f ile or connect the recorder to a computer.
1 While the recorder is
during recording mode
or playback mode, press
the
FOLDER/INDEX/SCENE
button.
• Even after an index or temp
mark is placed, recording or
playback will continue so you
can place index or temp marks
in other locations in a similar
manner.
Clearing an index mark or a temp mark:
1 Locate the index or temp
mark you want to clear.
7
- -
Page 8

2 Press the 9 or 0 but-
ton to select the index or
temp mark to erase.
3 While the index or temp
number appears for
approximately 2 seconds
on the display, press the
ERASE
button.
• The index or temp mark is
erased.
• Index or temp numbers after the erased index or temp
number will automatically move up.
Notes:
• Up to 16 index and temp marks can be set in a le. If you try to place more than 16 index or
temp marks, [Index Full] message will appear for index marks, and [Te mp Ma rk Fu ll] for temp
marks.
• Index or temp marks cannot be set or erased in a locked le.
h How to begin segment repeat playback
This func tion enables repeated playback of par t of the file being played.
1 Press t he `
OK/MENU
button to start playback.
2 Press t he
REC
(s) button
at the point you want
to start segment repeat
playback.
• Fast forwarding and rewinding
can be conducted when [w] is
flashing in the same manner as
during normal playback, and
you can quickly proceed as far as the end position.
• When it reaches to the end of the file while [w] is flashing,
the point w ill become the en d position, an d repeat playba ck
will start.
3 Press the
REC
(s) button
again at the p osition wh ere
you want to end segment
repeat playback.
• The recorder repeatedly plays
back the segment until the
segment repeat playback is
cancelled.
Note:
• A s i n no rm al p la yb ack mo de, pl ayb ac k sp ee d c an b e c han ge d d uri ng se gme nt rep ea t pl ay ba ck a s
we ll. If a n in dex mar k an d te mp m ark a re i nse rt ed o r el imi nat ed d uri ng s egm en t re pea t pl ayb ack ,
segment repeat playback will be canceled and it will return to normal playback mode.
Cancel the segment repeat playback function:
Pressing any of the following buttons will release the
segment repeat playback.
a Press the
b Press the
c Press the 9 button
d Press the 0 button
STOP
(4 ) button
REC
(s ) b utton
h Erasing
A selected file can be erased from a folder. Also, all files in a folder can be erased simultaneously.
1 Select the folder or file
you want to erase.
8
- -
Page 9

3
2 While the recorder is dur-
ing stop mode, press the
ERASE
button.
3 Press the + or − button to
select [
Erase in Folder
[
File Er ase
4 Press t he `
].
OK/MENU
] or
button.
5 Press t he + button to
select [
Start
].
6 Press t he `
• The display changes to [Erase!] and erasing will star t.
• [Erase Done] is displayed when the file is erased. File
numbers will be reassigned automatically.
Notes:
• The locked les and les set as read-only cannot be erased.
• If an action is not selected within 8 seconds, the recorder will return to stop status.
• It may take over 10 seconds to complete processing. Never remove batteries during this time
becaus e data may be corrupte d. In addition , replace the bat teries with new on es in order to ensure
that the bat teries will not run out while processing.
• You cannot delete folders through the recorder.
OK/MENU
button.
Menu setting
h Menu setting method
Items in menus are categorized so that you can quickly set a desired item. You can set each menu
item as follows.
1 While the recorder is dur-
ing stop mode, playback
mode or recording mode,
press the `
ton for 1second or longer.
OK/MENU
but-
+
2 Press t he
or − button
to move to the item you
want to set.
3 Press the `
OK/MENU
9 button to move the
cursor to the item to set.
4 Press the
+
or − button
to move to the item you
want to set.
9
- -
or
Page 10

5 Press t he `
• Moves to the setting of the selected item.
OK/MENU
or 9 button.
6 Press the + or − button to
change the setting.
7 Press t he `
OK/MENU
button to complete the
setting.
• You will be informed that the
settings have been established
via the screen.
• Pressing the 0 button
without pressing the
`OK/MENU button will cancel
the settings and return you to
the previous screen.
8 Press t he
STOP
(4) button to close the menu
screen.
• If you enter the menu during recording or playback and
press the 0 button, it will allow you to return back to
the previous screen without interrupting recording or
playback.
Notes:
• The recorder will stop if you leave it idle for 3 minutes during a menu setup operation, when a
selected item is not applied.
• Wh en ente ring m enu se tting s duri ng reco rding or play back , the me nu set tings will b e cance lled
if 8 seconds elapse with no buttons being pressed.
h File Menu
Erase Lock
Locking a f ile keeps imp ortant data f rom being accid entally erase d. Locked
files are not erased when you select to erase all f iles from a folder.
1 Select [
In Menu mode selection:
a File lock indicator
Erase Lock
[
File Me nu
[On]: Locks the file and prevents it from being erased.
[Off]: Unlocks the file and allows it to be erased.
] from the menu on the
].
a
File Divide (For VN-8700PC/VN-8600PC only)
Files with large capacities and long recording times can be split so that they are easier to manage
and edit.
1 Select the file you want to divide.
2 Start Playback or fast-forward the file, and stop
the playback at divide position.
3 Select [
Menu
4 Press the
the `
• [Dividing!] will be displayed and file splitting will start.
Notes:
• Only MP3 le recorded on this recorder can be divided.
• The recorder cannot divide les when the number of les in the folder exceeds 198.
• Locked les cannot be divided.
• After splitting the le, the front part of the le will be renamed as [File name_1.MP3] and the
latter part of the le will be named as [File name_2.MP3].
• If a le has an ex tremely short recording time, it may not be divide even if it is a MP3 le.
• Do not remove the batter y during dividing le. This may damage the data.
File Divide
].
+
bu tt on t o s ele ct [
OK/MENU
Splitting is completed when [File divide comple ted] is
displayed.
] from the menu on the [
Start
], and then press
button.
File
Property
Select the files for which you would like to
confirm information in advance before operating the menu.
1 Select [
[Name] (File name), [Date] (Time stamp),
[Size] (File size), [Bit Rate] (File format) will
appear on the display.
Property
menu on the [
] from the
File Me nu
].
10
- -
Page 11

h Rec Menu
Mic Sense
Microphone sensitivity (Built-in or external microphone) is adjustable to
meet recording needs.
1 Select [
In Menu mode selection:
a Microphone sensitivity indicator
Notes:
• When y ou would like to clear ly record a speake r’s voice, set [Mic Sense] to [Low] and hold record er’s
built-in microphone close to the speaker ’s mouth (5-10 cm).
• If the [Rec Scene] is set to a s etting other t han [Off], the [Mic Sense] function will not be available.
Set [Rec S cene] to [Off] to use this func tion.
Rec Mode
Besides s tereo* and monau ral recording , you can also sele ct recordin g with
priority to sound quality, and recording with priority to recording time.
Select the recording mode appropriate to your needs.
* For VN-8700PC/VN-8600PC only.
1 Select [
In Menu mode selection:
*
For VN-8700PC/VN-8600PC only.
a Recording mode indicator
Notes:
• To ensure reco rding from the b eginning, st art recordin g after you see t he display and the re cording
indicator light on.
• To record a meeting and lecture clearly, set other than [LP] in [Rec Mode].
• When the external monaural microphone is used while [Rec Mode] is set to a stereo recording
mode, it enables recording only with the L channel microphone (For VN-8700PC /VN-8600PC
only).
• If the [Rec Scene] is set to a s etting other t han [Off], the [Rec Mode] function will not be available.
Set [Rec S cene] to [Off] to use this func tion.
Mic Sense
Rec Menu
[
[High]: High recording sensitivity suitable for conferences with
many participants and recording audio at a distance or low
volume.
[Low]: Standard recording sensitivity suitable for dictation.
Rec Mode
[
Rec Menu
When [
MP3]*
[192 kb ps] (Stereo), [128 k bps] (Stereo), [48 kbps] (Monaural)
When [
WMA
[HQ] (high quality sound recording), [SP] (standard recording), [LP] (long-term recording)
] from the menu on the
].
a
a
] from the menu on the
].
(Stereo/Monaural) is selected:
] (Monaural) is selected:
Low Cut Filter
The recorder has a Low Cut Filter function to minimize low-frequency
sounds and record voices more clearly. This function can reduce noise
from air conditioners, projectors and other similar noises.
1 Select [
In Menu mode selection:
a Low Cut Filter indicator
Note:
• If the [Rec Scene] is set to a set ting other than [Off], the [Low Cut Filter] func tion will not be
available. Set [Re c Scene] to [Off] to use this function.
Low Cut Filter
[
Rec Menu
[On]: Enables the Low Cut Filter function.
[Off]: Disables this func tion.
].
] from the menu on the
a
VCVA
Wh en the mi cr oph on e s ens es th at s ou nd s ha ve r ea che d a pr ese t t hr esh ol d
volume level, the built-in Variable Control Voice Actuator (VCVA) starts
recording automatically, and stops when the volume drops below the
threshold level. The VCVA feature ex tends recording time and conserves
memory by stopping recording during silent periods, which helps the
playback to be more ef ficient.
1 Select [
VCVA
] from the menu on the [
Rec Menu
In Menu mode selection:
[On]: Enables the VCVA function.
[Off]: Disables this func tion. Will resume recording in normal mode.
a VCVA indicator
Adjust the start/stop actuation level:
If the surrounding noise is loud, the starting sensitivity of the VCVA can be adjusted according to
the recording situation.
1 Press t he
• When the sound volume is lower than the preset threshold sound
level, recording automatically stops after 1 sec approximately,
and [Standby] flashes on the display. The recording indicator
light glows when recording starts and flashes when recording
pauses.
REC
(s) button to start recording.
a
].
11
- -
Page 12

2 Press the 9 or 0 button adjust the start/stop
actuation level.
• The VCVA level can be set to any of 15 different values.
• The higher the value, the more sensitive the recorder to sounds.
At the highest value, even the faintest sound will activate
recording.
Notes:
• The star t/stop actuation level also varies depending on the selected
microphone sensitivity mode.
• If the starting level is not adjusted within 2 seconds, the display will return to the previous.
• To ensure successful re cordings, prior testing and adjustment of the start/stop actuation level is
recommended.
• If the [Rec Scene] is set to a setting other than [Off], the [VCVA] func tion will not be available.
Set [Rec S cene] to [Off] to use this func tion.
Rec Scene
The recording setting can be selec ted from the [Memo], [Meeting],
[Conference] templates to suit the recording scene or situation. You can
also save a recording setting of your choice.
1 Select [
2 Press the
In Menu mode selection:
a Rec Scene indicator
• To change the [Rec Scene], return the screen to [Scene Select] by
pressing a nd holding the FOLDER/INDEX/SCENE button for 1 second
or longer while the recorder is during stop mode.
Rec Scene
[
Rec Menu
+
then press the `
When [
Scene Select
Press the + or – but ton to select the r ecording scene yo u want to set,
and then press `OK/MENU button.
[Off]: Disables this func tion.
[Memo]: Suitable for dictation.
[Meeting]: Suitable for recording meetings.
[Conference]: Suitable for seminars with a small number of
[User Setting]: Recording with menu settings saved using
When [
Scene Save
Press `OK/MENU button.
• You can save the current [Rec Menu] menu settings in [User
Setting].
] from the menu on the
].
or − bu tt on t o s ele ct th e it em t o s et , an d
OK/MENU
] is selected:
people.
[Scene Save].
] is selected:
or 9 button.
a
Note:
• If the [Rec Scene] is set to a s etting other th an [Off], the menu se ttings for the re cording func tions
will not be available.Set the [Rec Scene] to [Off] to use these functions.
h Play Menu
Voice Filter (For VN-8700PC/VN-8600PC only)
The recorder has a Voice Filter Function to cut low and high frequency
tones during normal, fast, or slow playback, and enable clear audio
playback.
1 Select [
In Menu mode selection:
a Voice Filter indicator
Play Mode
You can select the playback mode that fits your preference.
1 Select [
In Menu mode selection:
a Playback mode indicator
Voice Filte r
[
Play Menu
[On]: Enables the Voice Filter function.
[Off]: Disables this func tion.
].
Play Mode
[
Play Menu
When [
[File]: Stop af ter playing back the current file.
[Folder]: Play files continuously in the current folder until the last
When [
[Repeat]: Sets to repeat playback mode.
[Off]: Disables this func tion.
].
Play Area
file and stop.
Repeat
] from the menu on the
] from the menu on the
] is selected:
] is selected:
a
a
--
12
Page 13

Notes:
• In [File] mode, when the recorder comes to the end of the last le in the folder, [End] ashes for
two seconds on the display and the recorder stops at the start of the last le.
• In [Folder] mode, when the recorder comes to the end of the last le in the folder, [End] ashes
for two seconds on the display and the recorder stops at the start of the rst le in the folder.
Skip Space
This func tion enabl es you to skip (for ward) or revers e skip (rewind) a f ile being played f or a set period . This functio n is convenient for qu ickly skipp ing
to another playback position or repeatedly playing back shor t phrases.
1 Select [
In Menu mode selection:
Forward/Reverse Skip Playback:
1 Press t he `
2 Press t he 9 or 0 button.
Note:
• If there is an index mark /temp mark or a cue cl oser than the skip space, the reco rder will forwar d
skip/reverse skip to that position.
Skip Space
[
Play Menu
When [
Forward Skip
[File Skip], [10sec. Ski p], [30sec. Skip], [1min. Skip], [5min. Skip], [10m in. Skip]
When [
Reverse Ski p
[File Skip], [1sec. S kip] – [5sec. Skip], [10sec . Skip], [30sec . Skip], [1min. Skip],
[5min. Skip], [10min. Skip]
• The recorder will skip (forward) or reverse skip (rewind) a set space and start playing back.
] from the menu on the
].
] is selected:
] is selected:
OK/MENU
button to start playback.
h LCD/Sou nd Men u
Font Size
Changing the displayed character size on the display.
1 Select [
In Menu mode selection:
Note:
• When the [Font Siz e] is set to [Small], the la you t o f t he d is pl ay w il l ch an ge so t ha t mo re in fo rma ti on
is displayed (please see “Display (LCD panel)” ☞ P.2 ).
Contrast
Display contrast can be adjusted in 12 levels.
You can adjust the LCD display contrast level from [01] to [12].
1 Select [
LED
You can set it so the LED indicator light does not turn on.
1 Select [
In Menu mode selection:
Font Size
[
LCD/Sound Menu
[Large]: Text is displayed large characters.
[Small]: Text is displayed small characters.
Contrast
[
LCD/Sound Menu
LED
[
LCD/Sound Menu
[On]: LED light will be set.
[Off]: LED light will be cancelled.
] from the menu on the
].
] from the menu on the
].
] from the menu on the
].
Beep
The recorder beeps to alert you to button operations or warn you of errors.
System sounds may be turned off.
1 Select [
In Menu mode selection:
Beep
[
LCD/Sound Menu
[On]: Enables the Beep function.
[Off]: Disables this func tion.
] from the menu on the
].
13
- -
Page 14

Language(Lang)
You can select the display language for this recorder.
1 Select [
[English], [Deutsch], [Françai s], [Español], [Italiano], [Polski],
[Русский], [中⽂]
Note:
• The selec table language di ers depending on the region.
Language(Lang)
[
LCD/Sound Menu
] from the menu on the
].
h Device Menu
Time & Date
If the current time and date is not correct, set it.
1 Select [
(please see “Setting t ime and date [Time & Date]”☞ P. 3)
Reset Settings
This returns the functions back to their initial settings (factor y default).
1 Select [
Menu settings after setting reset (initial settings):
Time & Date
[
Device Menu
Reset Settings
[
Device Menu
] from the menu on the
].
] from the menu on the
].
Rec Menu:
[Mic Sense] [High]
[Rec Mode] [192 kb ps]
[HQ]
[Low Cut Filter] [Off]
[VCVA] [Off]
[Rec Sce ne] [Off]
*1
*2
Play Menu:
[Voi ce Filter]*1 [Off]
[Play Mode]
[Play Area] [File]
[Repeat] [Off]
Note:
• After res etting the set tings, the time set tings and le numbers w ill be preserve d from before the
reset and will not return to their initial set tings.
[Skip Space]
[Forward Skip] [File Skip]
[Reverse Skip] [File Skip]
LCD/Sound Menu:
[Font Size] [Large]
[Contrast] [Level 06]
[LED] [On]
[Beep] [On]
[Language(Lang)] [English]
*1 For VN-8700PC/VN-8600PC only
*2 For VN-8500PC only
Format
If you format the recorder, all files will be re moved and all function settings will return to def aults
except date and time set tings. Transfer any impor tant files to a computer before format ting the
recorder.
1 Select [
2 Press the
Format
the menu on the [
Menu
].
lect [
Start
the `
OK/MENU
• After [Data will be cle ared]
message is on for two seconds,
[Start] and [Cancel] will turn
on.
] from
Device
+
button to se-
], and then press
button.
3 Press the + button again
to select [
press the `
Start
], and then
OK/MENU
but-
ton.
• Formatting begins and
[Format !] flashes on the
display.
• [Format Done] appears when
formatting ends.
Notes:
• It may take over 10 seconds to complete processing. Never remove batteries during this time
becaus e data may be corrupte d. In addition , replace the bat teries with new on es in order to ensure
that the bat teries will not run out while processing.
• Never format the recorder from a PC.
• When the recorder is formatted, all the saved data, including locked les and read- only les, are
erased.
• After formatting, recorded audio le names may start from [0001].
• When returning the set tings for the functions to their initial settings, use [Reset Settings].
14
- -
Page 15

System info.
You can check the r ecorder’s infor mation on the
menu screen.
1 Select [
[Model] (Model Name), [
sion) and [
on the display.
System info.
menu on the [
Serial No.
] from the
Device Menu
Versi on
] (Serial Number) appears
].
] (System ver-
Using the recorder on your PC
Apart from using this unit as a recorder, you can use it as an external memory for your computer, as a
storage device.
• T he f il es re cor de d by th is r ec ord er can be pla ye d ba ck on y ou r co mp ute r u sin g W in dow s M edi a P lay er.
You can also trans fer the WMA file s downloaded wi th Windows Medi a Player to your recorde r and listen
to them (excluding files with copyright protection).
Notes:
• While tr ansmitting dat a, [Busy] is appeared, a nd the recording i ndicator light ashes. NEVER disconnect
the USB while the recording indicator light is ashing. If you do, the data will be destroyed.
• In the Mac OS operational environment, WMA format les cannot be played back.
h Operating environment
Windows:
Operating System: Microsoft Windows XP/Vista/7 (Standard Installation)
Compatib le PC’s: Windows PC’s equipped with more than one free USB port
Macintosh:
Operating System: Mac OS X 10.4.11 - 10.6 (Standard Installation)
Compatib le PC’s: Apple Macintosh series equipped with more than one free USB port
Note:
• Even if operational environment is satis ed, we do not support such as upgraded OS, the multi-
boot environment and self-modi ed PC’s.
h Connecting to your PC
1 Turn the recorder’s power ON.
2 Connect the USB connection cable to
the USB port of the PC.
3 Make sure that the recorder is
stopped, and then connect the USB
cable to the connecting port on this
recorder.
Windows:
When you open [My Computer], it will be recog-
nized by the drive name of the product name.
Macintosh:
When connec ted, the recorder will be recognized
by the drive name of the product name on the
desktop.
• [Remote] is appeared on recorder if the USB
cable is connected.
Notes:
• Do not use USB connection cables other than the supplied cable. Using cables from other
manufacturers could result in damage to the recorder. Do not use the supplied USB extension
cable with devices from other manufacturers.
• Refer to the user’s manual for your PC regarding the USB port on your PC.
• Be sure to push the cable connector all the way in. O therwise, the recorder may not operate
properly.
• When conn ecting the recor der through an USB hub th e operation may be come unstable. I n such
cases, refrain from using a USB hub.
Disconnecting from your PC:
Windows:
1 Click [ ]on the task bar located at the lower-right corner of the
screen. Click [
• The drive l etter will dif fer depend ing
on the PC being used.
2 When the safe to remove hardware window appears, click [OK].
3 Disconnect the recorder from the PC.
Safely r emove USB Mass Storage Devi ce
15
- -
].
Page 16

Macintosh:
1 Move the drive icon for this
recorder that is appear on
the desktop to the garbage
bin by Drag & Drop it.
2 Disconnect the recorder from
the PC.
Note:
• NEVER disconnect the USB while the recording indicator light is ashing. If you do, the data will
be destroyed.
Safe and proper usage
General precautions
• Do not leave the recorder i n hot, humid loca tions such as ins ide a closed autom obile
under direct sunlight or on the beach in the summer.
• Do not store the recorder in places exposed to excessive moisture or dust.
• Do not use organic solvents such as alcohol and lacquer thinner to clean the unit.
• Do not pl ac e th e r ec or der on to p of or n ea r e le ct ri c ap pl ia nce s s uc h as TV s or re fr ige ra tors.
• Avoid recording or playing back near cellular phones or other wireless equipment,
as they may cause interference and noise. If you experience noise, move to another
place, or move the recorder further away from such equipment.
• Avoid sand or dirt. These can cause irreparable damage.
• Avoid strong vibrations or shocks.
• Do not disassemble, repair or modify the unit yourself.
• Do not operate the unit while operating a vehicle (such as a bicycle, motorcycle, or
go-cart).
• Keep the unit out of the reach of children.
<Warning regarding data loss>
Re co rd ed co nte nt in m em or y m ay be d es tr oy ed o r e ra se d by op er at ing mi st ak es , un it ma lf un ct io n,
or during repair work.
It is recommended to back up and save important content to other media such as a computer
hard disk.
Any liability for passive damages or damage of any kind occurred due to data loss incurred by a
defect of the product, repair per formed by the third party other than Olympus or an Olympus
authorized service station, or any other reasons is exclu ded from the Oly mpus’s liability.
Batteries
f Danger:
• Batteries should never be exposed to flame, heated, short-circuited or disassembled.
• Never store batteries where they will be exposed to direct sunlight, or subjected to
high temperatures in a hot vehicle, near a heat source, etc.
f Warning:
• Do not solder lead wires or terminals directly onto a battery or modify it.
• Do not connect the = and - terminals together. This may cause fire, overheating or
electric shock.
• Wh en car ry in g o r st or in g th e b at te rie s, be sur e t o pu t i t i n th e p rov id ed ca se t o p rot ec t
its terminals. Do not carry or store the batteries with any metal objects (such as key
rings).
If this warning is not followed, fire, overheating or electric shock may occur.
• Do not connect the batteries directly to a power outlet or a cigarette lighter of an
automobile.
• Do not insert the batteries with their = and - terminals reversed.
• If a ny liquid from a bat tery gets into yo ur eyes, promptl y wash it off with c lean water
and consult your doctor at once.
• Do not attempt to recharge alkaline, lithium or any other non-rechargeable batteries.
• Never use any batteries with a torn or cracked outer cover.
• Keep batteries out of the reach of children.
• If you no ti ce a ny th ing un us ual wh en u si ng thi s p ro duc t s uc h as ab no rma l n oi se, he at ,
smoke, or a burning odor:
1 remove the batteries immediately while being careful not to burn yourself, and;
2 call your dealer or local Olympus representative for ser vice.
• Do not expose the batteries to water. Do not allow water to contact the terminals.
• Do not remove or damage the batteries insulating sheet.
• Do not use the batteries if you find something wrong with them such as leakage,
color change or deformity.
• Unp lug the charge r if the chargi ng is still inco mplete aft er the specif ied time it sh ould
take.
• Should any batteries liquid get on skin or clothing, promptly wash it off with clean
water.
• Keep batteries away from fire.
16
- -
Page 17

f Caution:
• Do not subject batteries to strong shocks.
• When using rechargeable batteries that have not been used for a while, be sure to
recharge them before use.
• Rechargeable batteries have limited lifetime. When the operating time becomes
short er even if the rec hargeable b attery is f ully charge d under the sp ecified co ndition,
replace it with a new one.
Troubleshooting
Q1: Nothing happens when a button is pressed.
A1: The
The batteries may be depleted.
The batteries may be inserted incorrectly.
Q2: No sound or quiet sound is heard from the speaker while playing back.
A2: The earphone plug may be plugged into the recorder.
The volume may be set to the minimum level.
Q3: Recording is not possible.
A3: By pressing the
• The remaining recording time in the selected folder may have reached
Check if the display shows [
Check if the display shows [
Q4: The playback speed is too fast (slow).
A4: The recorder may be set to fast (slow) Playback.
POWER/HOLD
display shows:
[
00:00
].
switch may be set to [
STOP
( 4) but ton repeated ly while the rec order stops, c heck if the
Memory Full
Folder Full
HOLD
] position.
] by pressing the
] by pressing the
REC
(s ) button.
REC
(s ) button.
Accessories (Optional)
s Stereo microphone: ME51SW
s Compact Zoom Microphone (unidirec-
tional): ME32
s Highly sensitive noisecancellation-
monaural microphone (unidirectional): ME52W
s Tie clip microphone (omnidirec-
tional): ME15
Specifications
General points
4 Recording medium:
Built-in memory
VN-8700PC: 4 GB
VN-8600PC: 2 GB
VN-8500PC: 1 GB
4 Recording format:
MP3* (MPEG-1 Audio Layer3),
WMA (Windows Media Audio)
4 Input level: - 70 dBv
4 Maximum working output:
250 mW (8 Ω speaker)
4 Maximum headphone output:
≤
_
150 mV (according to EN 50332-2)
4 Wide band characteristic headphone
output:
≤
_
75 mV
4 Speaker:
4 MIC jack:
4 EAR jack:
4 Input power requirement:
4 External dimensions:
4 Weight: 66 g (including battery)
4 Operating temperature: 0°C - 42°C
* For VN-8700PC/VN-8600PC only
(according to EN 50332-2)
Built-in ø 28 mm round dynamic
speaker
ø 3.5 mm mini-jack, impedance 2 kΩ
ø 3.5 mm mini-jack, impedance 8 Ω or
more
AAA battery (LR03) or Olympus Ni-MH
rechargeable battery
108 mm × 39 mm × 16.8 mm (without
protrusions)
s Telephone pickup: TP7
s Ni-MH rechargeable battery and
charger set: BC400 (For Europe)
s Ni-MH rechargeable battery: BR401
s Connecting cord: KA333
Overall frequency response
4 During recording or playback mode:
MP3 format
(For VN-8700PC/VN-8600PC only)
Recording mode Overall frequency response
192 kbps 70 Hz to 19 kHz
128 kbps 70 Hz to 17 kHz
48 kbps 70 Hz to 10 kHz
WMA format
Recording mode Overall frequency response
HQ 70 Hz to 13 kHz
SP 70 Hz to 8 kHz
LP 70 Hz to 3 kHz
4 Built-in microphone (During
recording mode):
40 Hz to 14 kHz
• However, the upper limit value of the
frequency response depends on each
recording mode (see above diagram).
--
17
Page 18

About music file
In cases where the recorder is unable to playback music files that have been transferred to it, check to
make sure that th e sampling rate and bit r ate are in the range where p layback is possible. Co mbinations
of sampling rates and bit rates for music files which the recorder can playback are given below.
File format Sampling frequency Bit rate
MPEG1 Layer3:
MP3* format
WMA format
32 kHz, 44.1 kHz, 48 kHz
MPEG2 Laye r3:
16 kHz, 22.05 kHz, 24 kHz
8 kHz, 11 kHz,
16 kHz, 22 kHz, 32 kHz,
44.1 kHz, 48 kHz
From 8 kbps u p to 320
kbps
From 5 kbps u p to 320
kbps
* For VN-8700PC/VN-8600PC only.
• Variable bitrate MP3 files (in which conversion bitrates can vary) may not play properly.
• This recorder is compatible with Microsof t Corporation DRM9, but not with DRM10.
• Even if the file is a compatible format to playback on the recorder, the recorder does not suppor t
every encoder.
Guide to recording times
4 MP3 format: (For VN-8700PC/VN-8600PC only)
Recor ding mode VN-8 600PC (2 GB) VN-8 700PC (4 GB)
192 kbps approx. 22 h. 30 min. approx. 45 h.
128 kbps approx. 34 h. approx. 68 h. 30 min.
48 kbps
4 WMA format:
Recor ding mode VN- 8500PC (1 GB) VN-860 0PC (2 GB) VN-8700 PC (4 GB)
HQ approx. 67 h. approx. 134 h. approx. 268 h.
SP approx. 131 h. approx. 264 h. approx. 529 h.
LP
Notes:
• The above values are strictly rough guides.
• Caution is required, since the di ere nces in the available r ecording time will i ncrease when the bi t rate
is low.
• Available recording time may be shorter if many shor t recordings are made (The displayed available
recording time and recorded time are approximate indications).
approx. 91 h. 30 min. approx. 183 h.
approx. 421 h. approx. 843 h. approx. 1684 h.
Maximum recording time per file
4 MP3 format:
(For VN-8700PC/VN-8600PC only)
192 kbps approx. 49 h. 40 min.
128 kbps approx. 74 h. 30 min.
48 kbps approx. 198 h. 40 min.
4 WMA format:
HQ approx. 26 h. 40 min.
SP approx. 53 h. 40 min.
LP approx. 148 h. 40 min.
Notes:
• The maximum capaci ty for a single le is limited
to approx. 4 GB for WMA and MP3.
• Re gardless of the m emory re maining amou nt, the
longes t sound recordi ng time per le is restricted
to the above value.
Guide to battery life
4 Alkaline battery :
Built-in
Recording mode
microphone
(During recording
mode)
MP3 192 kbps* approx. 32 h. approx. 17 h. approx. 37 h.
WMA LP approx. 51 h. approx. 20 h. approx. 44 h.
4 Ni-MH Rechargeble battery :
Built-in
Recording mode
MP3 192 kbps* approx. 25 h. approx. 14 h. approx. 30 h.
WMA LP approx. 40 h. approx. 16 h. approx. 34 h.
* For VN-8700PC /VN-8600PC only.
microphone
(During recording
mode)
Built-in
speakers
(Durin g playback
mode)
Built-in
speakers
(Durin g playback
mode)
Earphone Playback
Earphone Playback
Notes:
• The above values are strictly rough guides.
• Battery life is measured by Olympus. It varies greatly according to the type of battery used and the
conditions of use.
Specifications and design are subject to change without notice.
18
- -
 Loading...