


 Loading...
DIGITAL CAMERA
Instruction Manual
Table of Contents
Feature Index
1.Preparation
2.Shooting
3.Playback
4.Menu functions
Connecting the camera to a 5. smartphone
Connecting the camera to a 6. computer
7. Cautions
8. Information
9. SAFETY PRECAUTIONS
Model No.: IM021
 Thank you for purchasing an Olympus digital camera. Before you start to use your new camera, please read these instructions carefully to enjoy optimum performance and a longer service life.
 Be sure you have read and understood the contents of “9. SAFETY PRECAUTIONS”, before using this product. Keep these instructions available for future reference.
 We recommend that you take test shots to get accustomed to your camera before taking important photographs.
 The screen and camera illustrations shown in this manual were produced during the development stages and may differ from the actual product.
 If there are additions and/or modifications of functions due to firmware update for the camera, the contents will differ. For the latest information, please visit the Olympus website.

Begin You Before
 Before You Begin
Read and Follow Safety Precautions
To prevent incorrect operation resulting in fire or other damage to property or harm to yourself or to others, read “9. SAFETY PRECAUTIONS” (P. 176) in its entirety before using the camera.
While using the camera, consult this manual to ensure safe and correct operation. Be sure to keep the manual in a safe place once it is read.
Olympus will not be held liable for violations of local regulations arising from use of this product outside the country or region of purchase.
Wireless LAN and Bluetooth®
The camera features built-in wireless LAN and Bluetooth®. Use of these features outside the country or region of purchase may violate local wireless regulations; be sure to check with local authorities before use. Olympus will not be held liable for the user’s failure to comply with local regulations.
Disable wireless LAN and Bluetooth® in areas where their use is prohibited. G “Disabling wireless LAN/Bluetooth®” (P. 150)
User Registration
Visit the OLYMPUS website for information on registering your OLYMPUS products.
Installing PC Software/Apps
Olympus Workspace
This computer application is used to download and view photos and movies recorded with the camera. It can also be used to update the camera firmware. The software can be
downloaded from the website below. Be prepared to provide the camera serial number when downloading the software.
https://support.olympus-imaging.com/owdownload/
OLYMPUS Image Share (OI.Share)
You can load images in the camera to a smartphone.
You can also operate the camera remotely and take pictures from a smartphone.
https://app.olympus-imaging.com/oishare/
2 EN
 Product Manuals
In addition to the “Instruction Manual”, we also offer a “Camera Function Guide”. Consult these manuals when using the product.
DIGITAL CAMERA |
1. |
|
2. |
||
Instruction Manual |
3. |
|
4. |
||
|
||
|
5. |
|
|
6. |
|
|
7. |
|
|
8. |
|
|
9. |
|
|
Model No.: IM021 |
Instruction Manual (this pdf)
A how-to guide to the camera and its features. The Instruction Manual can be downloaded from the OLYMPUS website or directly using the “OLYMPUS Image Share” (OI.Share) smartphone app.
Manuals Product
Camera Function Guide
A function and setting guide that helps you use camera features to the full. It has been
optimized for display on mobile devices and can be viewed using OI.Share. https://cs.olympus-imaging.jp/jp/support/cs/webmanual/index.html 
Indications used in this manual
The following symbols are used throughout this manual.
$ Notes and other supplementary information.
%Tips and other helpful information for using the camera.
G References to other pages in this manual.
EN 3

Contents of Table
4 EN
 Table of Contents
|
|
|
Shooting with touch screen |
|
Before You Begin |
2 |
|
|
|
|
|
|||
|
|
|
operations.................................... |
32 |
|
|
Product Manuals |
3 |
Feature Index |
9 |
Names of parts |
11 |
Preparation |
13 |
Unpacking the box contents...... |
13 |
Attaching the Strap..................... |
14 |
Inserting and Removing the |
|
Battery and Card......................... |
15 |
Removing the battery................ |
16 |
Removing the card.................... |
16 |
Charging the Battery.................. |
17 |
Attaching a lens to the |
|
camera......................................... |
19 |
Removing Lenses....................... |
20 |
Turning the camera on............... |
21 |
Initial setup.................................. |
22 |
Camera displays unreadable/ |
|
not in the selected language...... |
24 |
Shooting |
25 |
Switching between displays...... |
25 |
Information displays while |
|
shooting....................................... |
26 |
Switching the information |
|
display....................................... |
28 |
Choosing a shooting mode and |
|
taking photos.............................. |
29 |
Types of shooting modes.......... |
29 |
Taking high angle and low angle |
|
shots............................................ |
31 |
Switching Displays with the u |
|
(Shortcut) Button........................ |
33 |
Letting the camera choose the |
|
settings (AUTO mode)................ |
34 |
Shooting in scene mode |
|
(SCN mode)................................. |
36 |
Types of scene modes.............. |
36 |
Shooting in advanced photo |
|
mode (Zmode)........................ |
40 |
AP Mode Options...................... |
40 |
[Live Composite]: Live Composite |
|
Photography.............................. |
41 |
[Live Time]: Live Time |
|
Photography.............................. |
42 |
[Multiple Exposure]: Shooting |
|
Multiple Exposures.................... |
43 |
[HDR]: Taking Composite Photos |
|
with HDR................................... |
44 |
[Silent S] Mode....................... |
45 |
Shooting a Panorama............... |
46 |
[Keystone Compensation]......... |
47 |
[AE Bracketing]: Varying Exposure |
|
over a Series of Shots............... |
48 |
[Focus Bracketing]: Varying |
|
Focus Distance over a |
|
Series of Shots.......................... |
49 |
Using art filters (ART mode)...... |
50 |
Types of art filters...................... |
52 |
Adjusting the degree of the art |
|
filter effect (Fine-Tuning)........... |
53 |
Using [Partial Color].................. |
53 |
Letting the camera choose |
|
aperture and shutter speed |
|
(Program mode).......................... |
54 |
Choosing aperture |
|
(Aperture Priority mode)............ |
56 |

Choosing shutter speed |
|
(Shutter Priority mode)............... |
58 |
Choosing aperture and shutter |
|
speed (Manual mode)................. |
60 |
Shooting with long exposure time |
|
(BULB/LIVE TIME)....................... |
61 |
Live composite |
|
photography (dark and light field |
|
composite)................................... |
63 |
Recording movies in photo |
|
shooting modes.......................... |
65 |
Recording movies in movie |
|
mode............................................ |
66 |
Movie Mode Options................. |
67 |
Recording Slow Motion |
|
Movies.......................................... |
68 |
Silencing Camera Sounds While |
|
Shooting Movies......................... |
68 |
Taking Photos in Self-Portrait |
|
Mode............................................. |
69 |
Using various settings............... |
71 |
Controlling exposure |
|
(Exposure F)............................ |
71 |
Digital Zoom |
|
(Digital Tele-converter).............. |
71 |
Selecting the AF target mode |
|
(AF target settings).................... |
72 |
Setting the AF target................. |
72 |
Face priority AF/Eye |
|
priority AF.................................. |
73 |
Changing ISO sensitivity |
|
(ISO).......................................... |
74 |
Using a flash |
|
(Flash photography).................. |
75 |
Performing the sequential/ |
|
self-timer shooting..................... |
77 |
The Electronic Shutter |
|
(Silent S)................................. |
78 |
Calling shooting options............ |
79 |
Processing options |
|
(Picture Mode)........................... |
81 |
Adjusting overall color |
|
(Color Creator).......................... |
82 |
Adjusting color |
|
(WB (white balance))................. |
83 |
Choosing a focus mode |
|
(AF Mode)................................. |
84 |
Setting the image aspect........... |
86 |
Selecting image quality |
|
(Still image quality, KK)....... |
86 |
Selecting image quality |
|
(Movie quality, NK)............... |
87 |
Choosing an Exposure Mode |
|
(N Mode (Movie Exposure |
|
Modes))..................................... |
91 |
Adjusting flash output |
|
(Flash intensity control)............. |
92 |
Reducing camera shake |
|
(Image Stabilizer)...................... |
93 |
Making fine adjustments to white |
|
balance (WB Compensation).... |
94 |
Choosing how the camera |
|
measures brightness |
|
(Metering).................................. |
95 |
Making fine adjustments to |
|
sharpness (Sharpness)............. |
95 |
Making fine adjustments to |
|
contrast (Contrast).................... |
96 |
Making fine adjustments to |
|
saturation (Saturation)............... |
96 |
Making fine adjustments to tone |
|
(Gradation)................................ |
97 |
Applying filter effects to |
|
monochrome pictures |
|
(Color Filter).............................. |
97 |
Adjusting the tone of a |
|
monochrome image |
|
(Monochrome Color)................. |
98 |
Adjusting i-Enhance effects |
|
(Effect)....................................... |
98 |
Setting the color reproduction |
|
format (Color Space)................. |
99 |
Changing the brightness |
|
of highlights and shadows |
|
(Highlight&Shadow Control).... |
100 |
Assigning functions to buttons |
|
(Button Function)..................... |
101 |
Contents of Table
EN 5

Contents of Table
6 EN
Zoom frame AF/Zoom AF |
|
(Super Spot AF)...................... |
103 |
Playback |
105 |
Information display during |
|
playback..................................... |
105 |
Playback image information.... |
105 |
Switching the information |
|
display..................................... |
106 |
Viewing photographs and |
|
movies........................................ |
107 |
Finding Pictures Quickly (Index |
|
and Calendar Playback).......... |
108 |
Zooming In |
|
(Playback Zoom)..................... |
108 |
Rotating Pictures (Rotate)....... |
108 |
Viewing Images as a Slideshow |
|
(L).......................................... |
109 |
Watching movies..................... |
110 |
Protecting Pictures (0)........ |
110 |
Deleting Pictures (Erase)........ |
110 |
Selecting Pictures for Sharing |
|
(Share Order).......................... |
111 |
Cancelling all share orders |
|
(Reset share Order)................ |
111 |
Selecting Multiple Pictures |
|
(0, Erase Selected, Share |
|
Order Selected)....................... |
111 |
Creating a print order |
|
(DPOF).................................... |
112 |
Removing all or selected pictures |
|
from the print order.................. |
113 |
Adding Audio to Pictures |
|
(R)........................................... |
113 |
Audio Playback (Play 7)......... |
113 |
Scrolling Panoramas............... |
114 |
Using the touch screen............ |
115 |
Single-frame playback............. |
115 |
Index/Calendar playback......... |
115 |
Selecting and protecting |
|
images..................................... |
116 |
Viewing pictures in self-portrait |
|
mode....................................... |
116 |
Menu functions |
117 |
Basic menu operations............ |
117 |
Using Shooting Menu 1/ |
|
Shooting Menu 2....................... |
118 |
Returning to default settings |
|
(Reset).................................... |
118 |
Processing options |
|
(Picture Mode)......................... |
119 |
Digital Zoom |
|
(Digital Tele-converter)............ |
119 |
Improving Focus in Dark |
|
Surroundings |
|
(AF Illuminator)........................ |
119 |
Choosing a Zoom Speed |
|
(KElec. Zoom Speed).......... |
120 |
Recording multiple exposures |
|
in a single image |
|
(Multiple Exposure)................. |
120 |
Shooting automatically |
|
with a fixed interval |
|
(Intrvl. Sh./Time Lapse)........... |
122 |
Silent-Mode Options |
|
(Silent S Settings)................. |
123 |
Wireless remote control |
|
flash photography |
|
(#RC Mode).......................... |
124 |
Using the Video Menu.............. |
125 |
Using the Playback Menu......... |
126 |
Automatically Rotating |
|
Portrait-Orientation Pictures for |
|
Playback (R)......................... |
126 |
Retouching Pictures (Edit)...... |
126 |
Combining Pictures |
|
(Image Overlay)...................... |
128 |
Creating Movie Stills |
|
(In-Movie Image Capture)....... |
128 |
Trimming movies |
|
(Movie Trimming).................... |
129 |
Removing Protection from All |
|
Pictures (Reset Protect).......... |
129 |

Using the setup menu.............. |
130 |
Formatting the card |
|
(Card Setup)............................ |
131 |
Deleting all images |
|
(Card Setup)............................ |
131 |
Choosing a language (W).... |
131 |
Using the custom menus......... |
132 |
aAF/MF................................ |
132 |
MButton/Dial......................... |
132 |
NDisp/8/PC ....................... |
133 |
ODisp/8/PC........................ |
133 |
PExp/ISO/BULB................... |
134 |
QExp/ISO/BULB................... |
134 |
b#Custom.......................... |
135 |
WK/WB/Color..................... |
135 |
XRecord............................... |
136 |
cEVF.................................... |
137 |
aKUtility............................ |
137 |
AEL/AFL.................................. |
138 |
Manual Focus Assist |
|
(MF Assist).............................. |
138 |
Adding information displays.... |
139 |
Viewing camera images on TV |
|
(HDMI)..................................... |
140 |
Shutter speeds when the |
|
flash fires |
|
(#X-Sync./#Slow Limit)......... |
141 |
Combinations of JPEG image |
|
sizes and compression rates |
|
(KSet).................................. |
141 |
Connecting the camera to a |
|
smartphone |
142 |
Pairing the Camera and |
|
Smartphone............................... |
143 |
Wireless Connection Standby |
|
Setting for When the Camera Is |
|
On............................................... |
144 |
Wireless Settings for When the |
|
Camera Is Off............................. |
145 |
Transferring images to a |
|
smartphone............................... |
147 |
Automatically uploading images |
|
while the camera is off............. |
147 |
Shooting remotely with a |
|
smartphone (Live View)............ |
148 |
Shooting remotely with a |
|
smartphone |
|
(Remote Shutter)....................... |
148 |
Adding position information to |
|
images........................................ |
149 |
Resetting wireless LAN/ |
|
Bluetooth® settings................... |
149 |
Changing the password........... |
150 |
Disabling wireless LAN/ |
|
Bluetooth® ................................. |
150 |
Connecting the camera to a |
|
computer |
151 |
Copying pictures to a |
|
computer.................................... |
151 |
Installing the PC software........ |
152 |
Cautions |
153 |
Batteries..................................... |
153 |
Using your USB-AC adapter |
|
abroad........................................ |
153 |
Usable cards.............................. |
154 |
Record mode and file size/number |
|
of storable still pictures........... |
154 |
Interchangeable lenses............ |
155 |
MF Clutch Lenses..................... |
156 |
Compatible Flash Units............ |
157 |
Wireless remote control flash |
|
photography............................ |
158 |
Other external flash units......... |
159 |
System chart............................. |
160 |
Contents of Table
EN 7

Contents of Table
Information |
162 |
Cleaning and storing the |
|
camera....................................... |
162 |
Cleaning the camera............... |
162 |
Storage.................................... |
162 |
Cleaning and checking the image |
|
pickup device.......................... |
162 |
Pixel Mapping - Checking the |
|
image processing functions..... |
163 |
Shooting tips and information.164 |
|
Error codes................................ |
167 |
Defaults...................................... |
169 |
Specifications............................ |
173 |
SAFETY PRECAUTIONS |
176 |
SAFETY PRECAUTIONS........... |
176 |
Index |
181 |
8 EN

 Feature Index
|
Feature |
G |
|
|
|
Shooting Mode |
29 |
|
|
|
|
Monitor Display |
28, 106 |
|
|
|
|
Live Controls |
79 |
|
LV Super Control Panel |
80 |
|
|
|
|
W Shooting Menu 1 |
|
|
|
|
|
|
Reset |
118 |
|
Picture Mode |
81, 119 |
|
Digital Tele-converter |
119 |
|
|
|
|
Metering |
95 |
|
AF Illuminator |
119 |
|
|
|
X Shooting Menu 2 |
|
|
|
|
|
|
KImage Stabilizer |
93 |
|
KElec. Zoom Speed |
120 |
|
x |
92 |
|
Multiple Exposure |
120 |
|
|
|
|
Intrvl. Sh./Time Lapse |
122 |
|
|
|
|
Silent S Settings |
123 |
|
|
|
|
#RC Mode |
124 |
|
|
|
N Video Menu |
|
|
|
|
|
|
Movie R |
125 |
|
Recording Volume |
125 |
|
|
|
|
NAF Mode |
125 |
|
|
|
|
N Image Stabilizer |
93 |
|
|
|
|
N Elec. Zoom Speed |
125 |
|
|
|
|
Video Frame Rate |
87, 125 |
|
Video Bit Rate |
87, 125 |
Q Playback Menu |
|
|
|
|
|
|
y |
109 |
|
|
|
|
R |
126 |
|
|
|
|
Edit |
126 |
|
|
|
|
Print Order |
112 |
|
Reset Protect |
129 |
|
|
|
|
Reset share Order |
111 |
|
|
|
|
Device Connection |
143 |
|
|
|
|
|
Feature |
G |
|
|
|
|
GCustom Menu |
|
||
|
|
|
|
|
aAF/MF |
|
|
|
|
|
|
|
|
AEL/AFL |
132, 138 |
|
|
|
|
|
|
AF Targeting Pad |
132 |
|
|
IFace Priority |
73, 132 |
|
|
MF Assist |
132, 138 |
|
|
|
|
|
|
Reset Lens |
132 |
|
MButton/Dial |
|
|
|
|
Button Function |
101, 132 |
|
|
|
|
|
|
QRFunction |
132 |
|
|
|
|
|
|
Dial Function |
132 |
|
NDisp/8/PC |
|
|
|
|
KControl Settings |
80, 133 |
|
|
G/Info Settings |
133, 139 |
|
|
Live View Boost |
133 |
|
|
Flicker Reduction |
133 |
|
|
Displayed Grid |
133 |
|
|
|
|
|
|
Peaking Color |
133 |
|
ODisp/8/PC |
|
|
|
|
|
|
|
|
8 |
133 |
|
|
|
|
|
|
HDMI |
133, 140 |
|
|
|
|
|
|
USB Mode |
133 |
|
|
|
|
|
PExp/ISO/BULB |
|
|
|
|
|
|
|
|
Exposure Shift |
134 |
|
|
|
|
|
|
ISO-Auto Set |
134 |
|
|
|
|
|
|
Noise Filter |
134 |
|
|
|
|
|
|
Noise Reduct. |
62, 134 |
|
|
|
|
|
QExp/ISO/BULB |
|
|
|
|
|
|
|
|
Bulb/Time Timer |
61, 134 |
|
|
|
|
|
|
Live Bulb |
61, 134 |
|
|
|
|
|
|
Live Time |
61, 134 |
|
|
|
|
|
|
Composite Settings |
63, 134 |
Index Feature
EN 9

Index Feature
|
|
Feature |
G |
|
b#Custom |
|
|
|
|
|
|
|
|
#X-Sync. |
135, 141 |
|
|
|
|
|
|
#Slow Limit |
135, 141 |
|
|
|
|
|
|
w+F |
71,92,135 |
|
|
|
|
|
|
#+WB |
135 |
|
|
|
|
|
WK/WB/Color |
|
|
|
|
|
|
|
|
KSet |
135, 141 |
|
|
WB |
83, 135 |
|
|
|
|
|
|
WKeep Warm Color |
135 |
|
|
Color Space |
99, 135 |
|
XRecord |
|
|
|
|
|
|
|
|
File Name |
136 |
|
|
Edit Filename |
136 |
|
|
Copyright Settings |
136 |
|
|
|
|
|
cEVF |
|
|
|
|
|
|
|
|
EVF Auto Switch |
137 |
|
|
|
|
|
|
EVF Adjust |
137 |
|
|
|
|
|
aKUtility |
|
|
|
|
|
|
|
|
Pixel Mapping |
137, 163 |
|
|
|
|
|
|
Level Adjust |
137 |
|
|
Touchscreen Settings |
137 |
|
|
Sleep |
21, 137 |
|
|
|
|
|
|
Certification |
137 |
e Setup Menu |
|
||
|
|
|
|
|
Card Setup |
131 |
|
|
|
|
|
|
X |
23 |
|
|
|
|
|
|
W |
130, 131 |
|
|
|
|
|
|
s |
130 |
|
|
Rec View |
130 |
|
|
Wi-Fi/Bluetooth Settings |
150 |
|
|
|
|
|
|
Firmware |
130 |
|
|
|
|
|
10 EN
 Names of parts
1
2
3
4
5 |
6 |
7 |
8 |
9
0 |
A |
B |
C |
D


 E
E
F
G
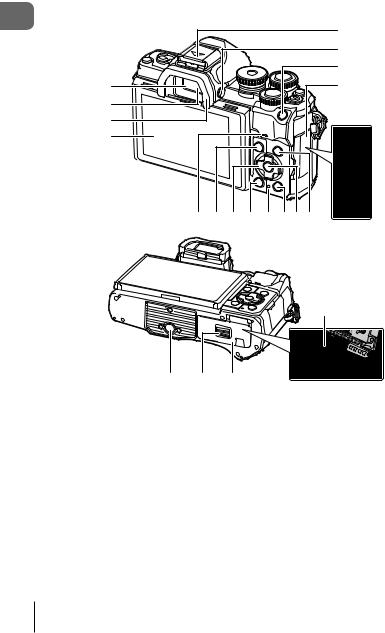
1 Mode dial......................................... |
P. 29 |
2 Rear dial* (o)................... |
P. 54-60, 107 |
3 R(Movie)/hbutton............. |
P. 65/P. 111 |
4b(Digital Tele-converter) button
................................................P. 71, 101
5 Shutter button.................................. |
P. 30 |
|
6 Front dial* (r).............. |
P.54-60,71,75, |
107 |
7 Lens attachment mark..................... |
P. |
19 |
8Mount (Remove the body cap before attaching the lens.)
9 Built-in flash..................................... |
P. 75 |
0 Stereo microphone........ |
P. 113, 125, 127 |
A Diopter adjustment dial.................... |
P. 25 |
B ON/OFF lever................................. |
P. 21 |
C u(Shortcut) button........................ |
P. 33 |
DSelf-timer lamp/AF illuminator
.............................................P. 77/P. 119
E Strap eyelet..................................... |
P. 14 |
F Lens release button......................... |
P. 20 |
G Lens lock pin |
|
*In this manual, the rand oicons represent operations performed using the front dial and rear dial.
parts of Names
EN 11
parts of Names
|
5 |
|
6 |
|
7 |
1 |
8 |
2 3
4

 9
9

 0
0
H G F E D CBA
L |
K J |
1 Viewfinder........................................ |
P. 25 |
2 Eye sensor...................................... |
P. 25 |
3 Eyecup.......................................... |
P. 159 |
4Monitor (Touch screen)
............................P. 26, 32, 79, 105, 115
5 Hot shoe (Hot shoe cover) |
............P. 157 |
|
6 U(LV) button............................... |
|
P. 25 |
7 AEL/AFL button........... |
P. 101, 102, 138 |
|
8 Connector cover |
|
|
9 Micro-USB connector.................... |
|
P. 151 |
0 HDMI micro connector................... |
|
P. 140 |
A INFO button.................... |
P. 28, 106, 139 |
|
B Q button................................. |
|
P. 79, 107 |
I
C Q (Playback) button.................... |
P. 107 |
D CHARGE (battery charge) lamp....P. 17
E D (Erase) button |
...........................P. 110 |
F Arrow pad*.................. |
P. 22, 72 – 77, 107 |
G MENU button............................... |
P. 117 |
H Speaker |
|
I Card slot.......................................... |
P. 16 |
JBattery/card compartment cover
..................................................P. 15, 16
KBattery/card compartment lock
..................................................P. 15, 16
LTripod socket
* In this manual, the FGHIicons represent operations performed using the arrow pad.
12 EN
1 Preparation
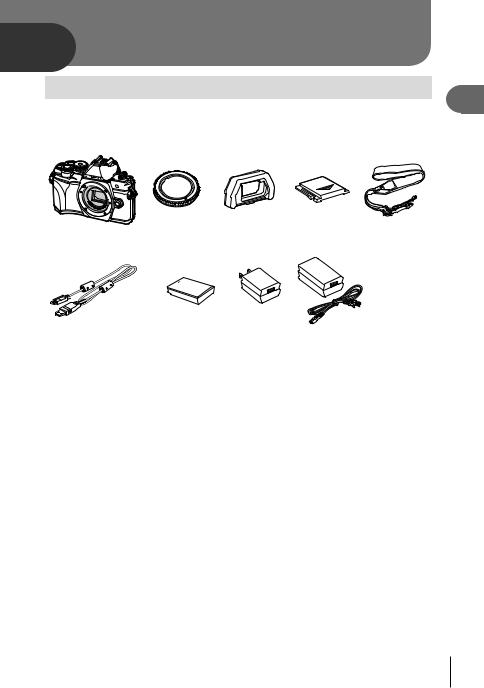
Unpacking the box contents
At purchase, the package contains the camera and the following accessories.
If anything is missing or damaged, contact the dealer from whom you purchased the camera.
Camera |
Body cap * |
EP-15 eyecup * Hot shoe cover * |
Strap |
|
|
|
|
or |
|
USB cable |
Lithium-ion battery |
USB-AC adapter F-5AC |
|
|
CB-USB12 |
BLS-50 |
|
|
|
Basic Manual |
Warranty Card |
|
|
|
* The body cap, eyecup, and hot shoe cover attached to or inserted in the camera.
1
Preparation
EN 13
|
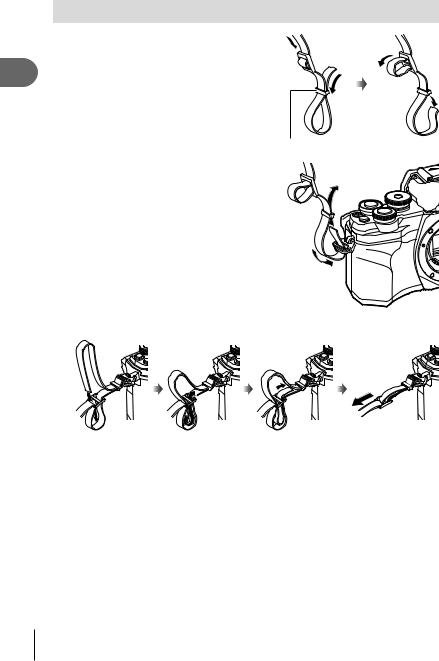
Attaching the Strap |
1 |
Before attaching the strap, remove the end |
|
from the keeper loop and loosen the strap |
1 |
as shown. |
|
|
Preparation |
|
2 |
Pass the end of the strap through the strap |
|
eyelet and back through the keeper loop. |
Keeper loop
3 Pass the end of the strap through the buckle and tighten as shown.
•Attach the other end of the strap to the other eyelet.
•After attaching the strap, pull on it firmly to ensure that it will not come loose.
14 EN
Inserting and Removing the Battery and Card
In this manual, all storage devices are referred to as “cards.”
The camera uses third-party SD, SDHC, or SDXC memory cards conforming to the SD (Secure Digital) standard.
Cards must be formatted with this camera before first use or after being used with other cameras or computers. G “Formatting the card (Card Setup)” (P. 131)
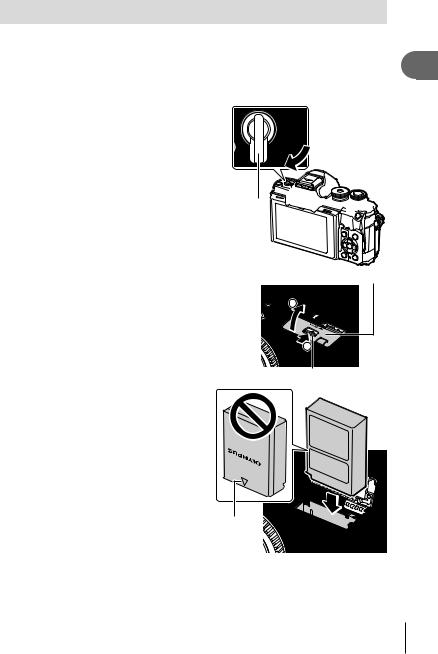
1 |
Confirm that the ON/OFF lever |
|
is in the OFF position. |
ON/OFF lever 


2 |
Opening the battery/card |
Battery/card compartment cover |
|
||
|
compartment cover. |
2 |
|
|
|
|
|
1 |
|
|
Battery/card compartment lock |
3Loading the battery.
•Use only BLS-50 batteries
(P. 13, 175).
Direction indicating mark
1
Preparation
EN 15
1
Preparation
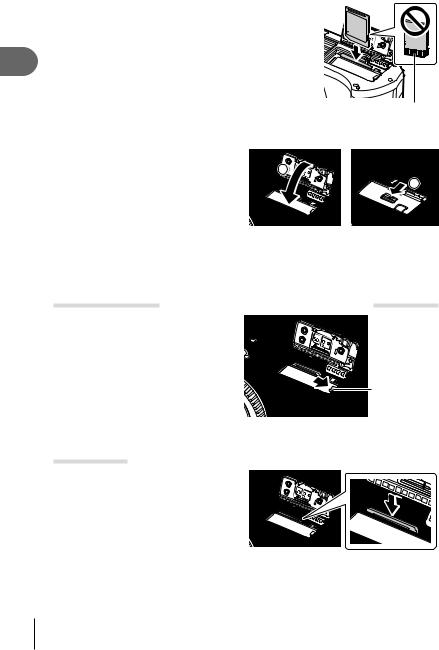
4 Loading the card.
• Slide the card in until it is locked into place. G “Usable cards” (P. 154)
Terminal area
•Do not forcibly insert a damaged or deformed card. Doing so may damage the card slot.
5 |
Closing the battery/card |
|
|
compartment cover. |
1 |
• Be sure the battery/card compartment |
2 |
|
|
||
|
cover is closed before using the camera. |
|
$
•It is recommended to set aside a backup battery for prolonged shooting in case the battery in use drains.
•Also read “Batteries” (P. 153).
Removing the battery
Turn off the camera before opening or closing the battery/card compartment cover.
To remove the battery, first push the battery lock knob in the direction of the arrow and then remove.
• Do not remove the battery while the card
write indicator is displayed (P. 26, |
Battery lock knob |
|
27). |
||
|
• Contact an authorized distributor or service center if you are unable to remove the battery. Do not use force.
Removing the card
Press the inserted card lightly and it will be ejected. Pull out the card.
• Do not remove the card while the card write indicator is displayed (P. 27).
16 EN
Charging the Battery
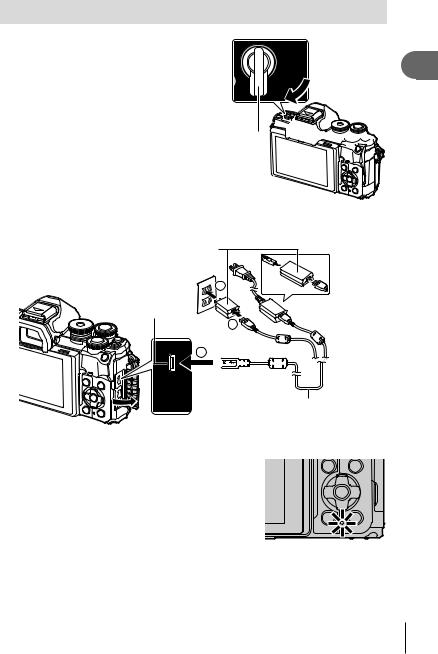
1 |
Confirm that the ON/OFF lever |
|
is in the OFF position. |
ON/OFF lever 


2Check that the battery is in the camera, and connect the USB cable and USB-AC adapter.
USB-AC adapter |
|
(supplied) |
|
AC outlet |
2 |
Micro-USB connector |
or |
|
|
|
1 |
3
USB cable (supplied)
•Never use any cable other than supplied or Olympus-designated USB cable. This may cause smoking or burning.
•The CHARGE lamp light during charging. Charging takes about 4 hours. The lamp goes out as the batteries reach full charge.
•Even if charging is in progress, it stops when the 
 camera is turned on.

•The USB-AC adapter cannot be used to charge the batteries when the camera is on.
•If a charging error occurs, the CHARGE lamp will blink. Disconnect and reconnect the USB cable.
•USB charging is available when the battery temperature is between 0 and 40 °C (32 and 104 °F).
1
Preparation
EN 17

1
Preparation
• A charger (BCS-5: sold separately) can be used to charge the battery.
%
•For safety reasons, charging may take longer, or the battery may not reach full charge, when the battery is charged in a high-temperature environment.
•The batteries will not charge while the camera is off if pictures are being uploaded to a smartphone via Wi-Fi (background auto upload). G “Automatically uploading images while the camera is off” (P. 147)
$ The USB-AC Adapter
•Be sure to unplug the USB-AC adapter for cleaning. Leaving the USB-AC adapter plugged in during cleaning could result in injury or electric shock.
18 EN
Attaching a lens to the camera
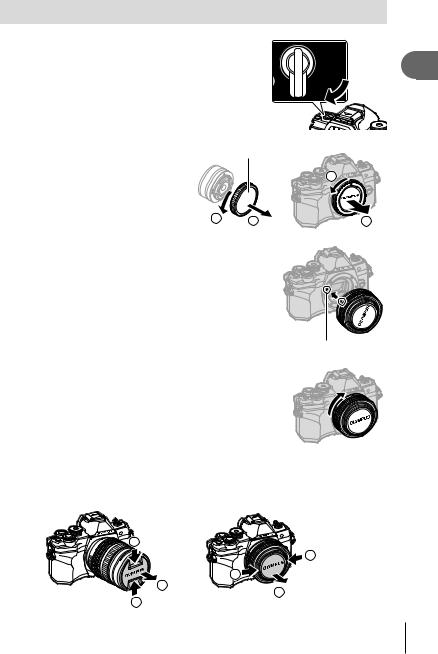
1 |
Confirm that the ON/OFF lever is in the |
|
OFF position. |
2 |
Remove the rear cap of the lens |
Rear cap |
|
|
|
||
|
and the body cap of the camera. |
|
1 |
|
|
|
|
|
1 |
2 |
2 |
3 |
Align the lens attachment mark (red) on |
|
|
|
the camera with the alignment mark (red) |
|
|
|
on the lens, then insert the lens into the |
|
|
|
camera’s body. |
|
|
|
|
|
Lens attachment mark |
4 |
Rotate the lens as shown until it clicks into |
|
|
|
place. |
|
|
1
Preparation
•Do not press the lens release button.
•Do not touch internal portions of the camera.
5 Remove the front lens cap.
1 |
|
|
|
1 |
|
2 |
1 |
|
2 |
||
1 |
||
|
EN 19

|
|
Removing Lenses |
|
1 |
Confirm that the ON/OFF lever is in the |
1 |
|
OFF position. |
|
|
|
Preparation |
2 |
Hold the lens release button and rotate |
|
|
the lens as shown. |
Interchangeable lenses
Read “Interchangeable lenses” (P. 155).
2


 1
1
Lens release button
20 EN
Turning the camera on
1Set the ON/OFF lever to the ON position.
•When the camera is turned on, the monitor will turn on.
•To turn the camera off, return the lever to the OFF position.
ON/OFF lever |
|
Battery level |
|
|
The battery level icon will be displayed. |
|
|
j(green): The camera is ready to shoot. |
|
|
k(green): The battery is not full. |
|
|
l(green): The battery is low. |
|
Monitor |
m(blinks red): Charge the battery. |
|
|
Camera sleep operation
If no operations are performed for a minute, the camera enters “sleep” (stand-by) mode to turn off the monitor and to cancel all actions. Pressing the shutter button reactivates the camera. The camera will turn off automatically if left in sleep mode for 4 hours. Turn the camera on again before use. You can choose how long the camera remains idle before entering sleep mode. G [Sleep] (P. 137)
1
Preparation
EN 21
1
Preparation
Initial setup
After turning the camera on for the first time, perform the initial setup by choosing a language and setting the camera clock.
• Date and time information is recorded on the card together with the images.
•The file name is also included with the date and time information. Be sure to set the correct date and time before using the camera. Some functions cannot be used if the date and time have not been set.
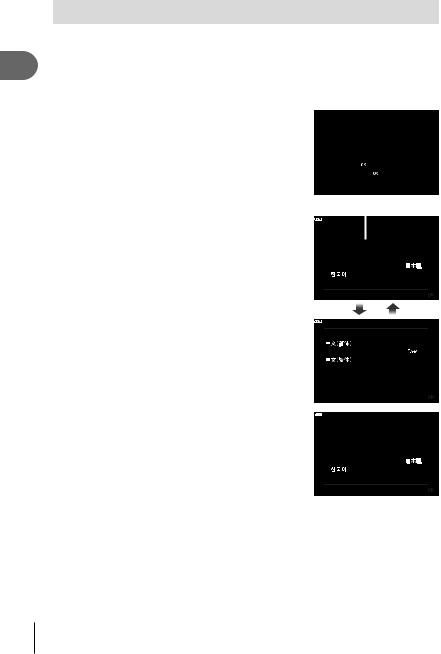
1Press the Q button when the initial setup dialog is displaying prompting you to choose a language.
2Highlight the desired language using the front or rear dial or the FGHIbuttons on the arrow pad.
•The language-selection dialog has two pages of options. Use the front or rear dial or the FGHI buttons on the arrow pad to move the cursor between pages.
3Press the Q button when the desired language is highlighted.
•If you press the shutter button before pressing the Q button, the camera will exit to shooting mode and no language will be selected. You can perform the initial setup by turning the camera off and then on again to display the initial setup dialog and repeating the process from Step 1.
Please select your language. 
Veuillez choisir votre langue. 
Bitte wählen Sie Ihre Sprache. 
Por favor, selecciona tu idioma. 
Cursor
|
|
|
|
|
|
|
|
|
|
W |
|
|
|
|
Hrvatski |
|
Česky |
Български |
||
|
Dansk |
|
English |
Nederlands |
||
|
Eesti |
|
Suomi |
Français |
||
|
Deutsch |
|
Ελληνικά |
Magyar |
||
|
Indonesia |
|
Italiano |
|
|
|
|
|
|
Latviski |
Lietuvių k. |
||
|
Norsk |
|
Polski |
Português(Pt) |
||
|
|
|
|
Set |
|
|
|
|
|
|
|
||
|
|
|
|
|
|
|
|
|
|
W |
|
|
|
|
|
|
|
|
||
|
Romanian |
|
Русский |
Srpski |
||
|
|
Slovensky |
Slovenščina |
|||
|
Español |
|
Svenska |
|
|
|
|
Viet Nam |
|
Türkçe |
Українська |
||
|
||||||
|
|
|
|
|
||
|
|
|
|
|
||
|
|
|
|
Setare |
|
|
|
|
|
|
|
|
|
|
|
|
W |
|
|
|
|
Hrvatski |
|
Česky |
Български |
||
|
Dansk |
|
English |
Nederlands |
||
|
Eesti |
|
Suomi |
Français |
||
|
Deutsch |
|
Ελληνικά |
Magyar |
||
|
|
|||||
|
Indonesia |
|
Italiano |
|
|
|
|
|
|
Latviski |
Lietuvių k. |
||
|
Norsk |
|
Polski |
Português(Pt) |
||
|
|
|
|
|
||
|
|
|
|
Set |
|
|
•The language can be changed at any time from the e setup menu. G “Choosing a language (W)” (P. 131)
22 EN

4Set the date, time, and date format.
•Use the HIbuttons on the arrow pad to highlight items.
•Use the FGbuttons on the arrow pad to change the highlighted item.
•The clock can be adjusted at any time from the e setup menu. G [X] (P. 130)
|
|
|
|
|
|
X |
||||||
Y M D |
|
Time |
||||||||||
|
|
|
|
|
|
|
|
|
|
|
|
|
2020 |
|
|
|
|
|
|
|
|
|
|
|
Y/M/D |
Cancel
The time is displayed using a 24-hour clock.
5 Complete the initial setup.
•Press the Q button to set the clock.
•If the battery is removed from the camera and the camera is left for a while, the date and time may be reset to the factory default setting.
•If you are going to record movies, adjust the frame rate according to the video standard of the country/region. G [Video Frame Rate] (P. 125)
Turning the camera off
To turn the camera off, return the ON/OFF lever to the OFF position. See page 145 for information on how to proceed
if the camera displays the dialog shown in the illustration.
Power-off Standby
Activate Wi-Fi/Bluetooth Power-off Standby so images can be imported while power is off?
Yes
No
Set
Power-off Standby:On
Confirm whether or not to activate Power-off Standby every time power is turned off? This setting can be changed from the menu anytime.
Confirm every time Don't show this screen again
Back |
|
Set |
|
1
Preparation
EN 23
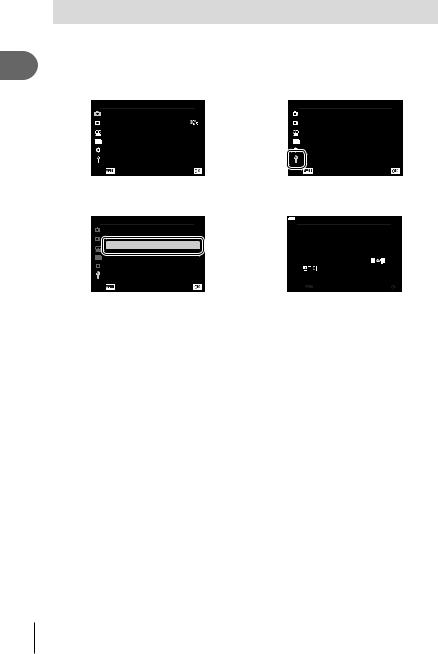
Camera displays unreadable/not in the selected language
If the camera displays are in an unfamiliar language or use characters you are unable to read, you may have accidentally selected the wrong language in the language-
1 |
selection dialog. Follow the steps below to change languages. |
|
Preparation
1 Press the MENU button to display the |
2 Highlight the e tab using FGand press |
||||||||||
menus. |
|
|
|
|
I. |
|
|
|
|
||
|
|
|
|
|
|
|
|
|
|
|
|
|
|
|
1 |
|
|
|
|
|
|
|
|
|
1 |
|
|
|
|
1 |
|
|
|
||
|
2 |
|
|
|
|
2 |
X |
’--.--.-- --:--:-- |
|
||
|
|
|
|
|
|
W |
|
|
|||
|
|
|
p |
|
|
|
s |
j±0 k±0 |
|
||
|
|
AF |
|
|
|
|
|
0.5 |
|
||
|
|
|
|
|
|
|
|
Wi-Fi/Bluetooth |
|
||
|
|
|
|
|
|
|
|
|
|
|
|
|
|
|
|
|
|
|
|
|
|
||
|
|
|
|
|
|
|
|
|
|
|
|
3 Highlight [W] using FGand press I. |
4 Highlight the desired language using |
||||||||||||
|
|
|
|
|
|
FGHIand press the Q button. |
|||||||
|
|
|
|
|
|
|
|
|
|
|
|
|
|
|
|
|
|
|
|
|
|
|
W |
|
|
|
|
|
|
|
|
|
|
|
|
|
|
|
|
|
|
|
1 |
|
|
|
Hrvatski |
Česky |
Български |
|
|||||
|
2 |
X |
’--.--.-- --:--:-- |
|
|
Dansk |
English |
Nederlands |
|
||||
|
|
W |
|
|
|
Eesti |
Suomi |
Français |
|
||||
|
|
s |
j±0 k±0 |
|
|
Deutsch |
Ελληνικά |
Magyar |
|
||||
|
|
|
|
|
|||||||||
|
|
|
0.5 |
|
|
Indonesia |
Italiano |
|
|
|
|||
|
|
Wi-Fi/Bluetooth |
|
|
|
|
|
Latviski |
Lietuvių k. |
|
|||
|
|
|
|
|
|
Norsk |
Polski |
Português(Pt) |
|
||||
|
|
|
|
|
|
Back |
|
|
|
Set |
|
|
|
|
|
|
|
|
|
|
|
|
|||||
24 EN

2 Shooting
Switching between displays
The camera is equipped with an eye sensor, which turns the viewfinder on when you put your eye to the viewfinder. When you take your eye away, the sensor turns the viewfinder off and turns the monitor on.
Put your eye to the viewfinder
Monitor |
Viewfinder |
S-IS ON |
|
|
ISO-A |
|
|
|
|
|
|
|
200 |
|
|
|
L F |
|
|
|
4K |
|
|
|
30p |
P |
250 F5.6 |
0.0 |
1:02:03 |
1023 |
S-IS ON
|
|
ISO-A |
|
|
200 |
|
|
L F |
|
|
4K |
|
|
30p |
P |
250 F5.6 0.0 |
1:02:03 |
1023 |
View through lens shown in monitor |
View through lens shown in viewfinder |
• If the viewfinder is not in focus, put your eye to the viewfinder and focus the display by rotating the diopter adjustment dial.
Diopter adjustment dial
• You can display the EVF Auto Switch setting menu if you press and hold the Ubutton. G [EVF Auto Switch] (P. 137)
• When [Off] is selected for [EVF Auto Switch], you can switch displays by pressing the Ubutton.
Ubutton
$
• Tilting the monitor disables the eye sensor.
2
Shooting
EN 25
2
Shooting
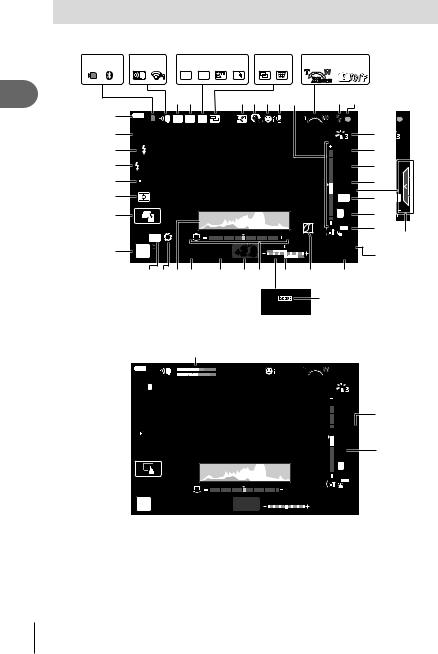
Information displays while shooting
Monitor display during still photography
1 2 |
3 4 7 8 9 0 A B G H |
|||
|
1 HDR |
BKT |
|
28mm |
|
|
|
|
|
|
56 |
|
CDEF V I J |
|
J |
FP RC |
HDR |
off |
28mm |
|
||||
|
|
|
|
|
I |
S-ISON |
|
|
|
|
ISO-A |
K |
-A |
H |
|
|
|
|
|
L |
||
|
|
|
|
|
200 |
0 |
||
G |
-2.0 |
|
|
|
|
WB |
M |
B |
|
|
|
|
AUTO |
TO |
|||
F |
|
|
|
|
|
S-AF |
N AF |
|
E |
|
|
|
|
|
4:3 |
O 3 |
|
D |
|
|
|
|
+2 |
L F |
P |
|
|
|
|
|
|
|
|
|
|
|
|
|
|
-3 |
+7 |
4K |
Q |
|
|
AEL |
|
|
|
|
30p |
|
K |
|
|
|
|
|
1:02:03 |
|
||
C |
P |
250 |
F5.6 +2.0 |
|
|
R |
|
|
|
|
1023 |
|
|||||
|
BAZ Y |
X W V |
U |
T |
S |
|
|
|
L |
Monitor display during movie mode
M
L |
|
R |
28mm |
|
M- IS
IS 1
1
ISO
 AUTO
AUTO
WB |
N |
AUTO |
|
 C-AF
C-AF
P O
|
|
L F |
|
|
4K |
|
|
30p |
N |
0.0 |
1:02:03 |
26 EN

1 Card write indicator......................... |
P. 16 |
2Bluetooth® connection status
.............................................P. 142 – 150
3Wireless LAN connection starting up
.............................................P. 142 – 150
4Wireless LAN connection status
.............................................P. 142 – 150
5 Super FP flash............................... |
P. 157 |
6 RC mode....................................... |
P. 157 |
7 HDR................................................. |
P. 44 |
8 AE Bracketing.................................. |
P. 48 |
Focus Bracketing............................. |
P. 49 |
9 Handheld Starlight........................... |
P. 37 |
0 Multi Focus Shot.............................. |
P. 39 |
A Multiple exposure.................... |
P. 43, 120 |
B Keystone compensation.................. |
P. 47 |
C Digital Tele-converter..................... |
P. 119 |
D Time lapse shooting...................... |
P. 122 |
E Face priority/Eye priority.................. |
P. 73 |
F Movie sound.................................. |
P. 125 |
G Zoom operation direction/Focal length |
|
H Internal temperature warning........ |
P. 167 |
I Flash................................................ |
P. 75 |
(blinks: charging in progress, lights up: |
|
charging completed) |
|
J AF confirmation mark...................... |
P. 30 |
K Picture mode........................... |
P. 81, 119 |
L ISO sensitivity.................................. |
P. 74 |
M White balance.................................. |
P. 83 |
N AF mode.......................................... |
P. 84 |
O Aspect ratio..................................... |
|
|
P. 86 |
P Image quality (still images).............. |
|
|
P. 86 |
Q Record mode (movies).................... |
|
|
P. 87 |
R Available recording time |
|
|
|
S Number of storable still pictures.... |
P. 154 |
||
T Highlight & shadow control............ |
|
|
P. 100 |
U Top: Flash intensity control.............. |
|
|
P. 92 |
Bottom: Exposure compensation.... |
P. 71 |
||
V Level gauge..................................... |
|
|
P. 28 |
W Exposure compensation value........ |
|
P. 71 |
|
X Aperture value.......................... |
|
P. 54 – 60 |
|
Y Shutter speed........................... |
|
P. 54 – 60 |
|
Z Histogram........................................ |
|
|
P. 28 |
A Preview.......................................... |
|
|
P. 102 |
B AE lock.................................. |
P. 102, 138 |
||
C Shooting mode......................... |
|
P. 29 – 68 |
|
D Touch operation............................... |
|
|
P. 32 |
E Metering mode................................ |
|
|
P. 95 |
F Sequential shooting/Self-timer........ |
|
P. 77 |
|
Silent shooting................................. |
|
|
P. 45 |
G Flash intensity control...................... |
|
|
P. 92 |
H Flash mode...................................... |
|
|
P. 75 |
I Image stabilizer............................... |
|
|
P. 93 |
J Battery level..................................... |
|
|
P. 21 |
K Live guide recall.............................. |
|
|
P. 34 |
L Live view boost.............................. |
|
|
P. 133 |
M Recording level meter................... |
|
|
P. 125 |
N Silent shooting tab........................... |
|
|
P. 68 |
O Movie (exposure) mode................... |
|
|
P. 91 |
2
Shooting
EN 27
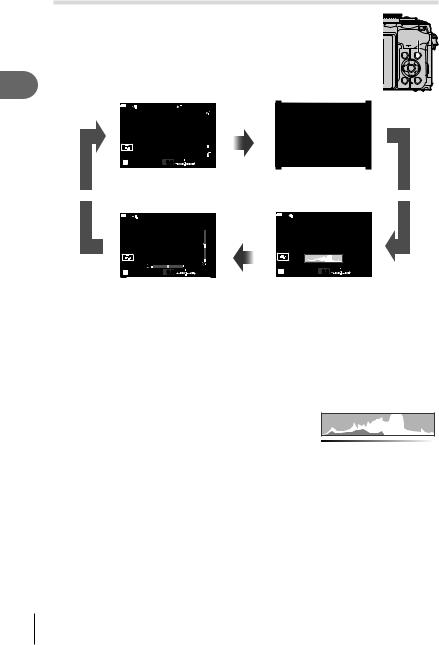
Switching the information display
You can switch the information displayed in the monitor during shooting using the INFO
button. INFO button 
2
Shooting
S-IS ON |
|
|
200 |
INFO |
|
|
|
ISO-A |
|
|
|
|
L F |
|
|
|
|
4K |
|
|
|
|
30p |
|
P |
250 F5.6 |
0.0 |
1:02:03 |
|
1023 |
|
Basic Information* |
Image Only |
INFO |
INFO |
S-IS ON |
|
|
ISO-A |
|
|
|
|
INFO |
|
|
|
|
200 |
|
|
|
|
|
|
P |
250 F5.6 |
0.0 |
1:02:03 |
|
1023 |
|
S-IS ON |
|
|
ISO-A |
|
|
|
|
|
|
|
200 |
P |
250 F5.6 |
0.0 |
1:02:03 |
1023 |
Level Gauge display |
Histogram display |
(Custom2) |
(Custom1) |
*Not displayed in N mode (movie mode) unless recording is in progress.
•You can change Custom1 and Custom2 settings. G [G/Info Settings] > [LV-Info] (P. 133)
•The information display screens can be switched in either direction by rotating the front dial while pressing the INFO button.
Histogram display
A histogram showing the distribution of brightness in the image is displayed. The horizontal axis gives the brightness, the vertical axis the number of pixels of each brightness in the image. During shooting, overexposure is indicated in red, underexposure in blue, and the range metered using spot metering in green.
More |
|
Less |
|
Dark |
Bright |
Level gauge display
The orientation of the camera is indicated. The “tilt” direction is indicated on the vertical bar and the “horizon” direction on the horizontal bar. The camera is level and plumb when the bars turn green.
•Use the indicators on the level gauge as a guide.
•Error in the display can be corrected via calibration (P. 137).
28 EN

Choosing a shooting mode and taking photos
Use the mode dial to select the shooting mode, |
Indicator |
|
|
|
Mode icon |
and then shoot the image. |
|
|
|
|
|
|
|
|
|
|
|
|
|
|
|
|
|
Types of shooting modes
For how to use the various shooting modes, see the following.
Shooting mode |
Description |
G |
|
|
|
|
|
B |
The camera automatically selects the most appropriate shooting |
34 |
|
mode. |
|||
|
|
||
SCN |
The camera automatically optimizes settings for the subject or |
36 |
|
scene. |
|||
|
|
||
Z |
Use for quick access to advanced shooting settings. |
40 |
|
|
|
|
|
ART |
You can shoot with the effect of artistic expression added. |
50 |
|
|
|
|
|
P |
The camera meters subject brightness and automatically adjusts |
54 |
|
shutter speed and aperture for optimal results. |
|||
|
|
||
A |
You choose the aperture and the camera automatically adjusts |
56 |
|
shutter speed for optimal results. |
|||
|
|
||
S |
You choose the shutter speed and the camera automatically |
58 |
|
adjusts aperture for optimal results. |
|||
|
|
||
M |
You choose both the aperture and shutter speed. |
60 |
|
|
|
|
|
N |
Shoot movies of various types. |
66 |
|
|
|
|
Functions that cannot be selected from menus
Some items may not be selectable from the menus when using the arrow pad.
•Items that cannot be set with the current shooting mode.
•Items that cannot be set because of an item that has already been set:
Settings such as picture mode are unavailable when the mode dial is rotated to B.
2
Shooting
EN 29

2
Shooting
1 Rotate the mode dial to choose a mode.
2 Frame the shot.
• Be careful that your fingers or the camera strap do not obstruct the lens or AF illuminator.
Landscape position |
Portrait position |
3Adjust the focus.
•Display the subject in the center of the monitor, and lightly press the shutter button down to the first position (press the shutter button halfway).
The AF confirmation mark (() will be displayed, and a green frame (AF target) will be displayed in the focus location.
Press the shutter button halfway.
AF confirmation mark 
|
|
28mm |
|
|
ISO-A |
|
|
200 |
250 |
F5.6 |
1:02:03 |
1023 |
AF target
• If the AF confirmation mark blinks, the subject is not in focus (P. 164).
4 Release the shutter.
• Press the shutter button all the way
(fully). |
|
• The camera will release the shutter |
|
and take a picture. |
Press the shutter |
• The shot image will be displayed on |
|
the monitor. |
button all the way. |
|
$
•You can focus and take pictures using touch controls. G “Shooting with touch screen operations” (P. 32)
•To exit to shooting mode from menus or playback, press the shutter button halfway.
30 EN
Loading...