

Page 1

LINEAR PCM RECORDER
Linear PCM Recorder
LS-14/LS-12
Linear PCM Recorder
DETAILED
INSTRUCTIONS
Thank you for purchasing an Olympus Digital Voice Recorder. Please read these
instructions for information about using the product correctly and safely. Keep
the instructions handy for future reference. To ensure successful recording, we
recommend that you test the record function and volume before use.
Register your product on www.olympus-consumer.com/register and get additional benefits from Olympus!
EN
Page 2

Introduction
• The contents of this document are subject to change without notice. Contact our Customer Support Center for
the latest information relating to product names and model numbers.
• Illustrations of the screen and the recorder shown in this manual may differ from the actual product. The utmost
care has been taken to ensure the integrity of this document but should you happen to find a questionable item,
error or omission, please contact our Customer Support Center.
• Olympus does not accept any liability for passive damages or damage of any kind incurred due to data loss
resulting from a defect of the product, repair performed by a third party other than Olympus or an Olympus
authorized service station, or for any other reason.
Trademarks and registered trademarks
▌
• IBM and PC/AT are trademarks or registered trademarks of International Business Machines Corporation.
• Microsoft and Windows are registered trademarks of Microsoft Corporation.
• Macintosh is a registered trademark of Apple Inc.
• SD and SDHC are registered trademarks of SD Card Association.
• MPEG Layer-3 audio coding technology is licensed from Fraunhofer IIS and Thomson.
• The tuner and metronome technologies are realized using “CRIWARE” from CRI Middleware Co., Ltd.
Other produc t and brand names mentioned herein are trademarks or registered trademarks of their respective
owners.
EN
2
Page 3

INDEX
▌
Introduction P. 2
Getting started P.10
About recording P.26
About playback P.40
File management P.48
Menu setting P.64
About the tuner P.80
Using the recorder on your PC P.82
Other information P.89
1
2
3
4
5
6
7
8
EN
3
Page 4

Table of contents
Introduction
Safety precautions .................................. 6
1 Getting started
Main features..........................................10
Identification of parts ........................... 12
Display (LCD panel) ..........................................13
Inserting batteries ................................. 15
Turning on/off the power.....................16
HOLD ........................................................ 17
Setting the time and date
[Time & Date] ...................................... 18
Inserting and ejecting an SD card ......20
Inserting an SD card ........................................20
Ejecting an SD card ..........................................21
[Home] screen operations ...................22
Notes on the folders .............................. 24
Selecting folders and files .................... 25
2 About recording
Recording tips for each instrument ...26
Recording ................................................ 28
[QUICK] mode .....................................................28
[SMART] mode ....................................................29
[MANUAL] mode ...............................................30
Dividing a file while recording ..................34
Using the overdubbing function ............35
Using the metronome function ...............36
Recording from an external microphone
or other device ..............................................38
3 About playback
Playback .................................................. 40
Changing the playback speed ..................43
Setting an index mark or
a temp mark ....................................................44
How to begin segment
repeat playback ............................................46
EN
4
Page 5

Table of contents
4 File management
Editing [OPTION]....................................48
Moving/Copying a file
[Move/Copy] ...................................................48
Protecting a file [File Lock] ...........................51
Dividing a file [File Divide] ...........................54
Partially erasing a file [Partial Erase] .......56
Trimming a file [Trimming]
(LS-14 only) ......................................................58
Confirming a file in memory
[Property] ..........................................................60
Erasing ..................................................... 61
Erasing a file ..........................................................61
Erasing multiple files at once .....................62
5 Menu setting
Menu setting method ........................... 64
Rec Menu .........................................................66
,
Play Menu ........................................................70
-
LCD/Sound Menu .......................................71
.
Device Menu .................................................72
/
Guidance [Voice Guide] (LS-14 only) ....74
Changing the time and date
[Time & Date] .................................................75
Changing the USB class
[USB Settings] .................................................76
Formatting the recorder [Format]...........78
6 About the tuner
Using the tuning function.................... 80
7 Using the recorder on your PC
Operating environment ....................... 82
Connecting to your PC .......................... 84
Disconnecting from your PC......................85
Transferring voice files to your PC ...... 86
Usage as external memory
of your PC ............................................ 88
8 Other information
Alarm message list ................................89
Troubleshooting ....................................91
Accessories (optional) ........................... 94
Specifications ......................................... 95
Technical assistance and support....... 99
EN
5
Page 6

Safety precautions
Before using your new recorder, read this manual
carefully to ensure that you know how to operate
it safely and correc tly. Keep this manual in an
easily accessible location for future reference.
• The warning symbols indicate important safety
related information. To protect yourself and others
from personal injury or damage to property, it is
essential that you always read the warnings and
information provided.
f Danger:
If the product is used without obser ving the
information given under this symbol, serious
injury or death may result.
f Warning:
If the product is used without obser ving the
information given under this symbol, injury
or death may result.
f Caution:
If the product is used without obser ving the
information given under this symbol, minor
personal injury, damage to the equipment,
or loss of valuable data may result .
Cautions relating to the operating
environment
• Do not leave the product where it will be subject
to high temperatures and/or humidity such as in a
car parked in direct sunlight or at the seashore in
summer.
• Do not store the product in a humid or dusty place.
• If the product gets wet, immediately wipe water off
with a dry cloth. Especially avoid salt.
• Do not use organic solvent such as alcohol or
thinner for cleaning.
• Do not place the product on or near a television set,
refrigerator, or other electric appliance.
• Ensure that no sand or mud gets on the product.
Sand or mud may cause irreparable damage.
• Do not apply strong vibration or shock to the
product.
•
Do not use the product where it will get wet.
• Do not put a magnetic card (such as bank card)
near the speaker or headphones. Data recorded in
the magnetic card may be damaged.
• When installing a tripod, rotate the screws on the
tripod rather than the recorder.
Notes on data loss
• Data recorded in the memory could be damaged
or erased due to a wrong operation, device failure,
repair or other cause. It is recommended to save
important data in the hard disk of your PC or other
media for backup.
• Olympus bears no liability for any damage or lost
earnings incurred by data loss due to a failure, repair
by a third party not certified by Olympus, or other
reason.
EN
6
Page 7

Safety precautions
Notes on record files
• Olympus bears no liability even if a record file is
erased or becomes unplayable due to a failure of
the recorder or PC.
• Recorded contents can be used for personal use
only. It is prohibited by the Copyright law to use
copyrighted work for other purposes without
permission from the owner.
Handling the recorder
f Warning:
s Do not use the product where there may be
flammable or explosive gas in the air.
Doing so could cause an ignition or explosion.
s Do not use or store the product for a long
time where there is a lot of dust, humidity,
oil, smoke, or steam.
Doing so could cause a fire or electric shock.
s Do not disassemble, repair, or modify the
product.
Doing so could cause an electric shock or injury.
s If the product falls into water or if water,
metal or a flammable foreign object gets
into the product, perform the following
steps:
1 Immediately remove the battery.
2 Contact your dealer or the Olympus Service
Station for service. Continuing to use it could
cause a fire or electric shock.
s Do not insert a card other than SD or SDHC
card into the recorder.
If you accidentally insert such a card, do not try to
forcibly remove it but contact our repair center or
service station.
s Do not operate the product while driving a
vehicle (such as bicycle, motorbike or car).
Doing so could cause a traffic accident.
s Do not leave the product within the reach
of infants or children.
When using the product near them, take extra
care and do not carelessly leave the product
unattended. Children cannot understand warnings
and cautions. In addition, the following accidents
could happen:
– Accidentally wrap the earphone cord around
the neck and suffocate
– Perform a wrong operation, causing injury or
electric shock
s Avoid using the product in an airplane,
hospital, or other place where use of
electric devices is restricted. Or, follow the
instructions given at the site.
s When carrying the recorder by a strap,
ensure that it does not get caught on other
items.
EN
7
Page 8

Safety precautions
f Caution:
s Do not turn the volume up before starting
operation.
Doing so could cause a hearing problem or
hearing loss.
s Stop using the product if you notice an
abnormality such as unusual odor, abnormal
sound, or smoke.
Continuing to use the product could cause a fire
or burn. Immediately remove the battery carefully
not to get burned and contact your dealer, our
repair center or service station (Do not touch the
battery with bare hands when removing it. In
addition, remove the battery outdoors away from
combustible materials).
s Do not leave the product where it will be
subject to high temperatures.
Doing so could cause deterioration of parts or a
fire.
s Do not touch the metal part of the
product for a long time when the ambient
temperature is low.
Doing so could damage your skin. Avoid
touching the product with bare hands if possible
and use gloves or other protective gear at low
temperatures.
Battery handling precautions
f Danger:
s Do not put the battery near fire.
s Do not throw the battery into fire or heat it.
Doing so could cause a fire, blowout or ignition.
s Do not directly solder, deform, modify or
disassemble the battery.
s Do not connect the positive and negative
terminals.
Doing so could cause heat generation, electric
shock or fire.
s When carrying or storing the battery, always
put it into the case to protect the terminals.
Do not carry or store it with a key chain or
other metal item.
Doing so could cause heat generation, electric
shock or fire.
s Do not directly connect the battery to the
power outlet or the slot of car cigarette
lighter.
s Do not use or leave the battery at a place
with high temperatures such as under direct
sunlight, in the car in the hot sun, or near a
heater.
Doing so could cause a fire, burn or injury due
to liquid leak, heat generation, blowout or other
reason.
EN
8
Page 9

Safety precautions
f Warning:
s Do not touch or hold the battery with wet
hands.
Doing so could cause an electric shock or failure.
s Do not use a battery whose package is
scratched or damaged.
Doing so could cause a blowout or heat
generation.
s Do not insert the batteries with the =/-
polarity reversed.
Doing so may cause fluid leakage, heat generation,
fire or bursting.
– Do not use a battery whose outer seal
(insulating cover) is torn.
– Remove the batteries if you are not going to
use the recorder for an extended period of
time.
– When a battery is depleted, cover the contacts
with tape to insulate them and dispose of the
battery as general waste in accordance with
local regulations.
– Remove expended batteries from the unit at
once. Leaving them in the unit may result in
fluid leakage.
s If battery fluid gets into your eyes, flush
your eyes immediately with clean, cold
running water and seek medical attention
immediately.
s Do not leave the battery within the reach of
infants or children.
They could swallow the battery. If this happens,
immediately consult a doctor.
s If you notice an abnormality such as
abnormal sound, abnormally high
temperature, burnt odor or smoke during
use, perform the following steps:
1 Immediately remove the battery carefully.
2 Contact your dealer or the Olympus Service
Station for service. Leaving it could cause a fire
or burn.
s Do not soak the battery in freshwater or
seawater or let the terminals get wet.
s If a battery leaks, becomes discolored or
deformed, or becomes abnormal in any
other way during operation, stop using the
recorder.
s If a battery leaks fluid onto your
clothing or skin, remove the clothing and
flush the affected area with clean, cold
running water immediately. If the fluid
burns your skin, seek medical attention
immediately.
f Caution:
s Do not apply a strong shock to the battery
or throw it.
s Please recycle batteries to help save our
planet’s resources. When disposing of
dead batteries, be sure to cover their
terminals and always observe local laws and
regulations.
EN
9
Page 10

Main features
Getting started
1
Smart mode ([SMART]) for facilitating
▌
Main features
high-quality recording
The [ SMART ] Mode detects the maximum volume
input during a set time interval and automatically
optimizes the recording level. Once the set time
interval has elapsed, recording automatically
starts. This means that even sudden increases in
the volume of the sound source can be recorded
without distortion.
Mode dial for easy setting adjustment to
▌
Tresmic, a triple microphone system that
▌
enables high-quality recording of all
sound frequencies from low to high
(LS-14 only)
This system enables high-quality recording of
the full range of sounds, from bass to treble.
The combination of a high performance stereo
microphone with a center microphone that
enriches the bass enables wideband recording
between 20Hz and 20,000Hz that is closer to the
original sound.
suit your usage
The Mode dial allows you to easily change
the recording setting in accordance with the
conditions of use. Four modes are available:
• [ QUICK ] mode: In this mode the recording level
will be adjusted automatically.
• [ SMART ] mode: In this mode the recording
level will be adjusted automatically to the
optimum level to suit the volume input within
the set time.
• [ MANUAL ] mode: In this mode the recording
level can be adjusted manually.
• Tuning Mode ( v ) to measure the difference
between the source and the reference.
Linear PCM Recording feature with
▌
recording quality at least equal to a CD
This feature is capable of realistically recording
various different sound sources. High resolution
recording at a high sampling frequency and bit
count equivalent or superior to that of a music CD
(Sampling frequency 44.1 kHz, Bit count 16bit) is
possible.
EN
10
Page 11
Main features
A brand-new microphone design with
▌
maximum sound pressure of 130dBspl
The new built-in microphones with acoustic
resistance of 130dBspl are designed to produce
high-quality and immersive recordings without
clipping even when recording live shows and
concerts. The new high-sensitivity and low-noise
stereo microphones faithfully capture the original
sound. Stereo microphones are fixed at a 90° angle
to allow natural and expansive stereo recording.
Metronome function
▌
This feature can be used as a rhythm guide during
recording.
Various other recording functions
▌
In addition to the normal recording modes, two
other functions can be selected: Overdubbing and
Pre-recording. You can select the recording mode
and function according to your use: recording of
musical instrument practice, field recording, and
so on.
File dividing function
▌
You can divide files after recording (PCM, MP3) or
during recording (PCM).
File trimming function (LS-14 only)
▌
You can trim portions of files (PCM) and keep only
the part you want.
Partial erase function
▌
You can erase part of a PCM-format file that has
been recorded with this recorder.
Large high-definition backlit display
▌
1
Main features
Chromatic tuning function
▌
This feature can be used to tune musical
instruments. You can use the recorder as a tuning
meter to tune musical instruments.
EN
11
Page 12

Identification of parts
1
1
Identification of parts
0
!
@
#
$
%
^
&
*
(
)
2
3
4
5
6
7
8
9
w
q
=
-
e
r
t
y
u
1 Built-in stereo microphone
2 Built-in center microphone (LS-14 only)
3 MIC (Microphone) jack
4 LINE IN jack
5 Card cover
6 STOP / w ( 4 ) button
7 REC ( s ) (Record) button,
Recording indicator light (LED)
8 MENU button
9 Mode dial
0 PEAK indicator light (LED)
! LED indicator light
@ Display (LCD panel)
EN
12
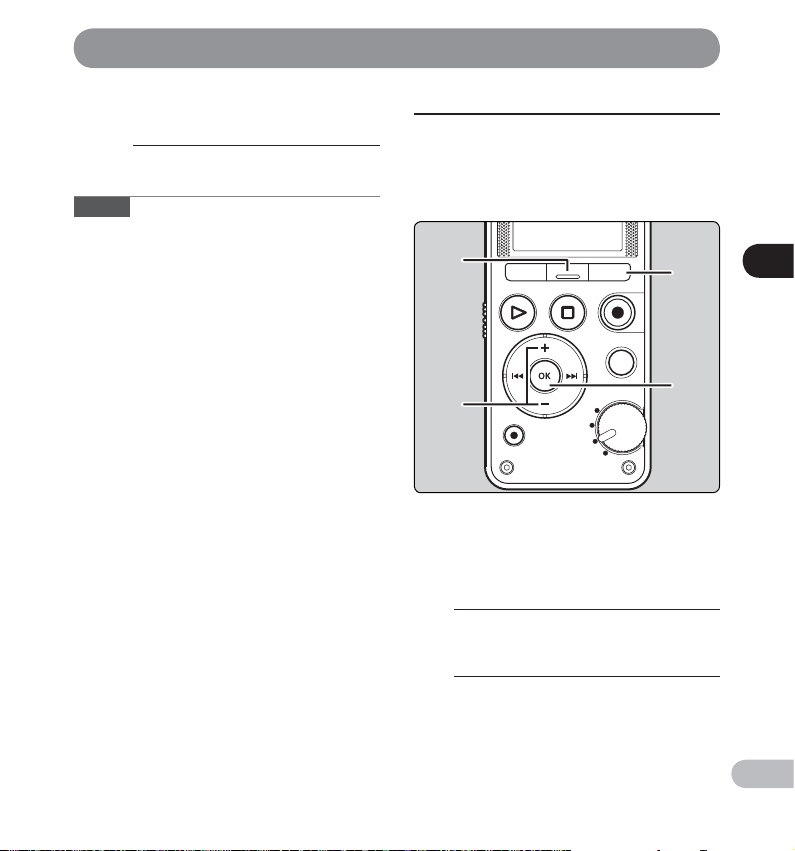
# F1 button, F2 button, F3 button
$ PLAY ( ` ) button
% + button
^ 0 button
& OK button
* ERASE button
( – button
) 9 button
- Battery cover
= Battery cover release button
q Tripod socket
w Built-in speaker
Page 13
Identification of parts
e EAR (Earphone) jack
r REMOTE jack
Connect the receiver of the exclusive remote
control set RS30W (optional). This enables
operation of the start and stop recording functions
through the remote control.
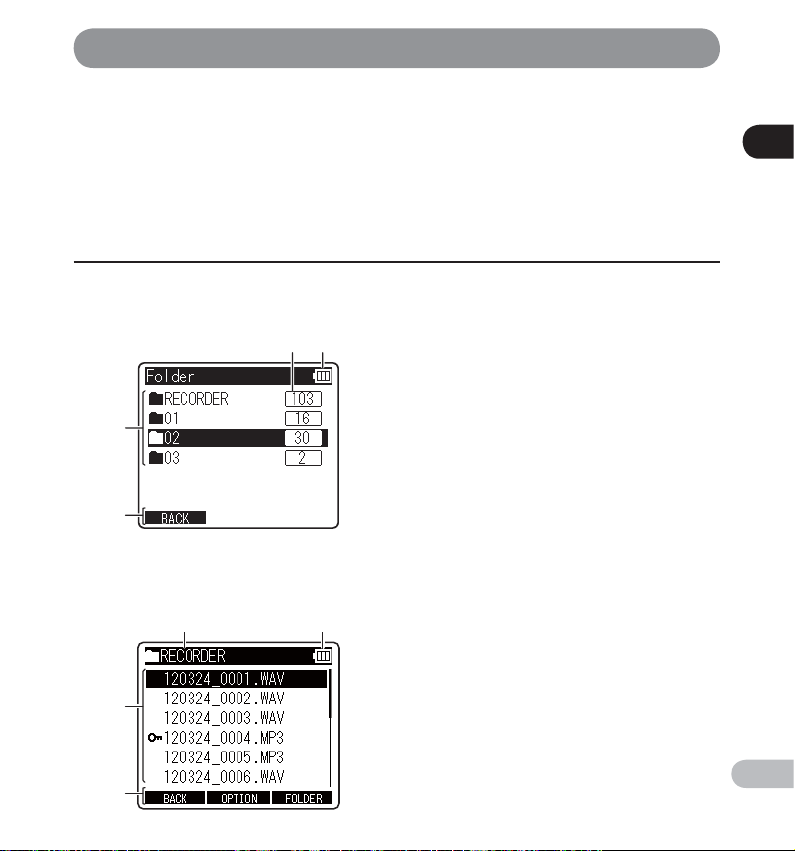
Display (LCD panel)
Folder list screen
▌
12
3
4
File list screen
▌
12
3
t USB connector
y POWER/HOLD switch
u Strap hole
1 Total number of recorded files in the folder
2 Battery indicator
3 Folder name
4 Function guide indicator
1 Current folder name
2 Battery indicator
3 File name
4 Function guide indicator
1
Identification of parts
4
EN
13
Page 14
Identification of parts
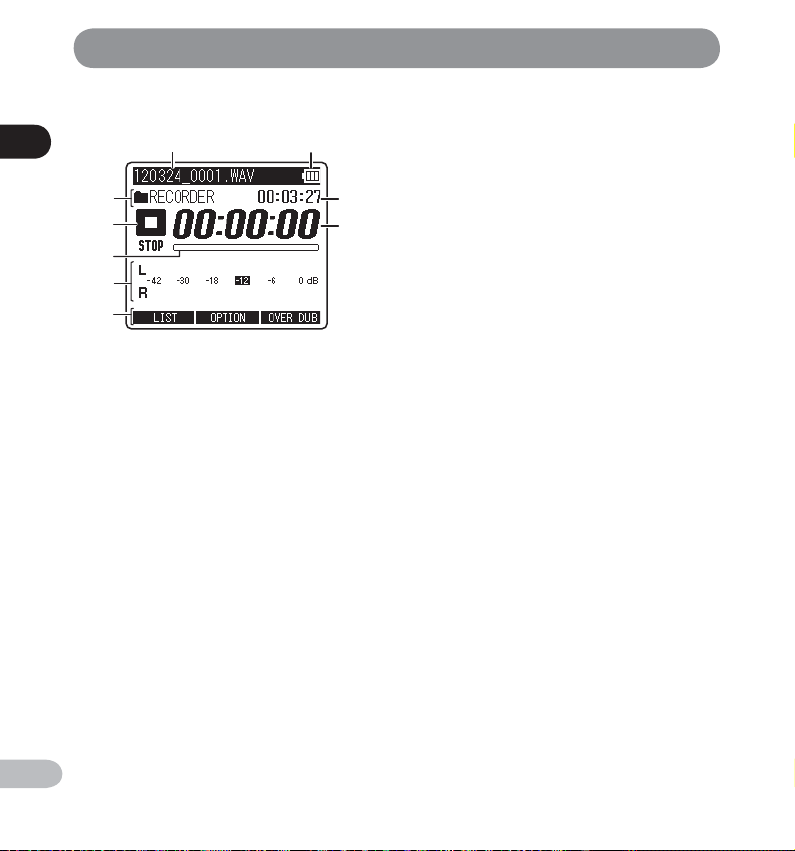
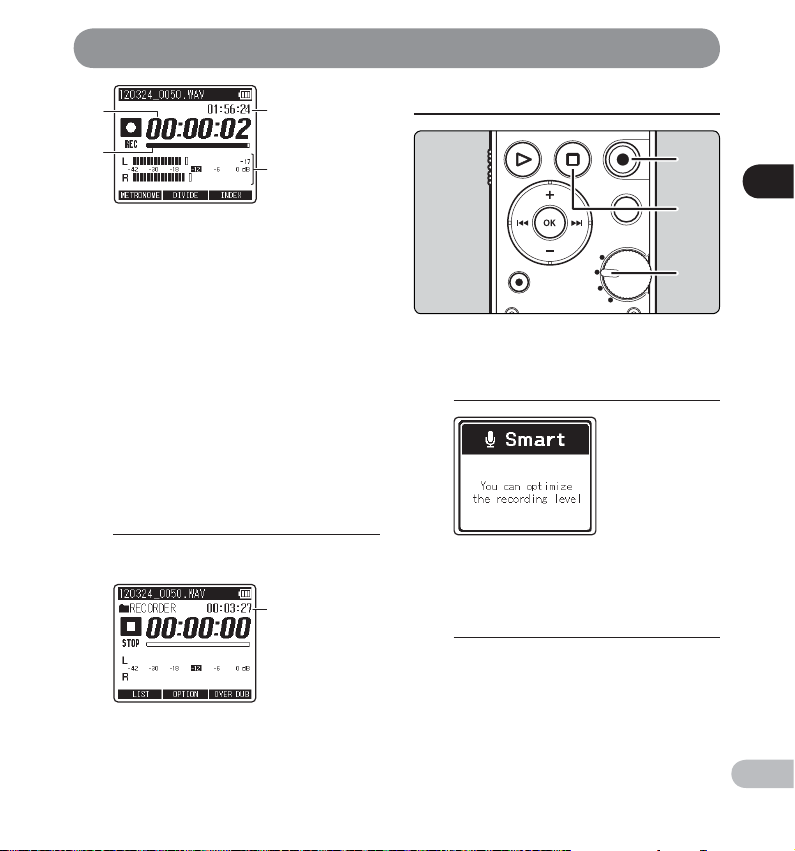
File screen
▌
1
Identification of parts
3
4
5
6
7
12
1 Current file name
8
2 Battery indicator
3 [ OVERdub ] indicator, Metronome
9
4 Recorder status indicator
5 Remaining memory bar indicator,
6 Level meter
7 Function guide indicator
8 Remaining recording time,
9 Elapsed recording time,
indicator, Folder name
[ H REC ]: Record indicator
[ G PAUSE ]: Pause indicator
[ F STOP ]: Stop indicator
[ E PLAY ]: Play indicator
[ I FF ]: Forwarding indicator
[ J REW ]: Rewinding indicator
[ X F.PLAY ]: F. Play indicator
[ Y S.PLAY ]: S. Play indicator
Playback position bar indicator
File length
Elapsed playback time
EN
14
Page 15
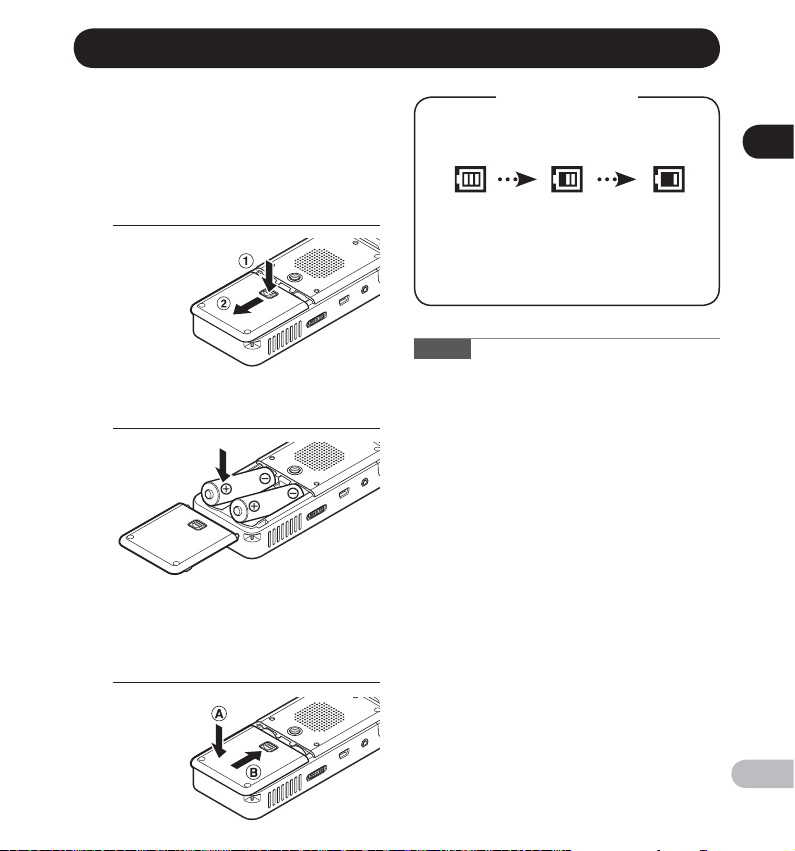
Inserting batteries
This recorder can be used with AA Alkaline Batteries.
Press the battery cover release
1
button, and then slide the battery
cover open while lightly pressing it
down.
Insert the batteries, observing the
2
correct = and - polarities.
Close the battery cover completely
3
by pushing the cover downwards
in direction A while sliding it in
direction B .
Battery indicator
The batter y indicator on the display changes as
the batteries lose power.
• When [ N ] appears on the display, replace
the batteries as soon as possible.
When the batteries are too weak,
[ Battery Low ] will appear on the display and
the recorder will shut down.
Notes
•
Manganese batteries may not be used in this recorder.
Be sure to turn off the recorder before replacing the
•
batteries. Unloading the batteries while the recorder is in
use may cause a malfunction such as corrupting the file,
etc. If you take out the batteries while recording, you will
lose your currently recorded file because the file header
will not be able to close.
• If it takes longer than 15 minutes to replace the
dead batteries or if you take the batteries in and out
repeatedly at short intervals, you may have to
re-enter the battery and time settings.
• Remove the batteries if you are not going to use
the recorder for an extended period of time.
• When you are playing a file from the built-in
speaker, the recorder may turn off depending
on the volume level due to the reduced voltage
output of the batteries even if [ L] is displayed in
the battery indicator. In this case, lower the volume
of the recorder.
1
Inserting batteries
EN
15
Page 16

Turning on/off the power
When the recorder is not being used, turn the power off to reduce battery consumption. Existing data, mode
settings, and clock settings are not lost when the power is turned off.
1
Turning on/off the power
Turning on the power
▌
While the recorder is turned off, slide the
POWER/HOLD switch in the direction of
the arrow.
Turning off the power
▌
Slide the POWER/HOLD switch in the
direction of the arrow, and hold it for
1 second or longer.
• The power turns on.
Power save mode
If the recorder is on but is not used for 10
minutes or longer (default), the display shuts off
and the recorder goes into power save mode
( ☞ P.72).
• To exit power save mode, press any button.
EN
16
• The power turns off.
Page 17
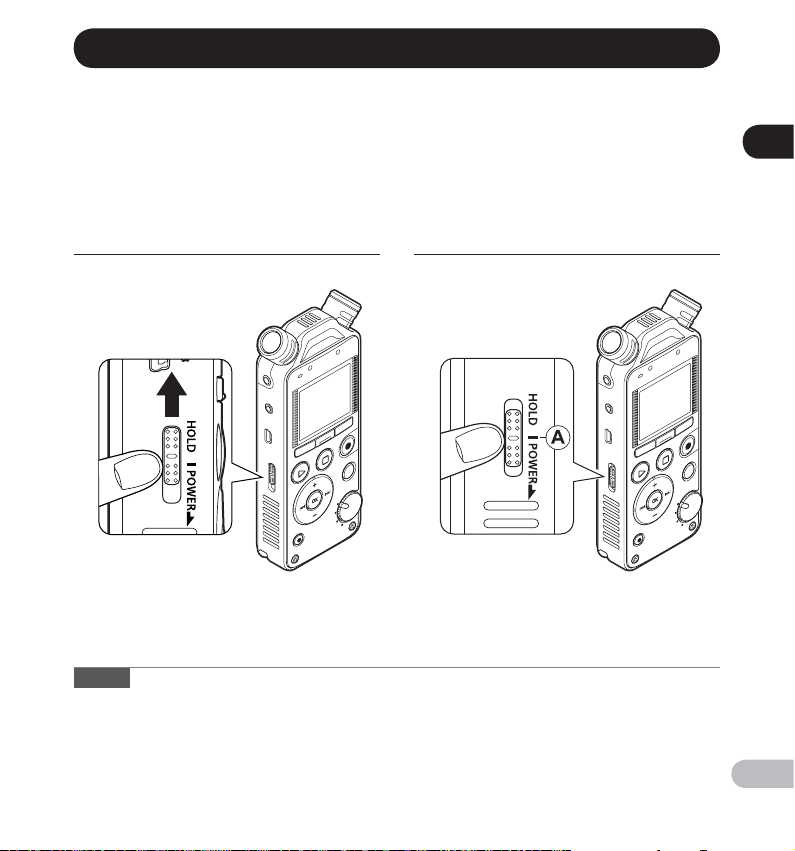
HOLD
If you set the recorder to HOLD mode, the current set tings will be preserved and all buttons will be disabled. This
feature is useful when the recorder has to be carried in a bag or pocket. This mode can also prevent you from
accidentally stopping recording.
Setting the recorder to HOLD mode
▌
Exiting HOLD mode
▌
1
HOLD
Slide the POWER/HOLD switch to the
[ HOLD ] position.
• After [ Hold ] appears on the display, the recorder is
set to HOLD mode.
Notes
• If you press any button while the recorder is in HOLD mode, the clock screen lights for 2 seconds, but the
recorder does not operate.
• If HOLD is applied during playback (recording), operation is disabled with the playback (recording) state
unchanged (When playback has ended or recording has ended due to the remaining memory being used up,
the recorder stops).
• The recorder can be effectively operated via the exclusive remote control set RS30W (optional), even when it is in
HOLD mode.
Slide the POWER/HOLD switch to the A
position.
EN
17
Page 18
1
2
3
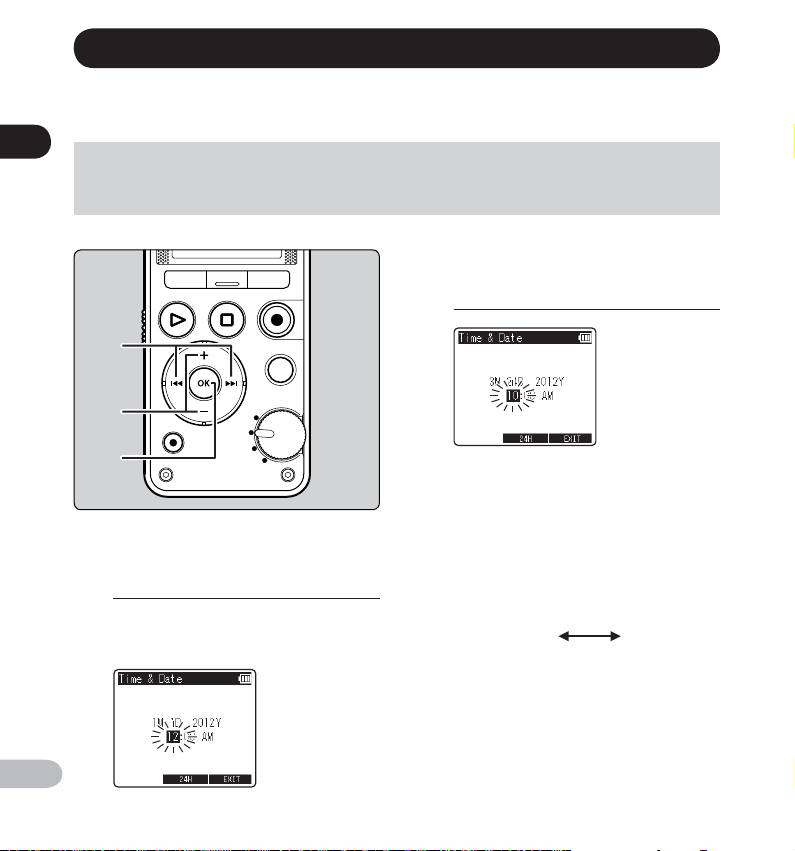
Setting the time and date [ Time & Date ]
If you set the time and date before using the recorder, recording time and date information is automatically stored
for each file. Setting the time and date beforehand enables easier file management.
1
When you use the recorder for the first time, or when the battery is inserted after the recorder has
Setting the time and date [Time & Date]
not been used for a long time, [ Set time & date ] will appear. When “ Hour ” is flashing, conduct setup
from Step 1.
Press the + or − button to change
2
the value.
• Follow the same steps by pressing the 9
or 0 button to select the next item, and
pressing the + or − button to change the
value.
Press the 9 or 0 button to
1
select the item you want to set.
• Select “ Hour ”, “ Minute ”, “ Year ”, “ Month ” or
“ Day ” by moving the flashing position.
• You can select between 12 and 24 hour
display by pressing the F2 button while
setting the hour and minute.
Example: 10:38 P.M
10:38 PM
(Initial setting)
• You can select the order of “ Month ”, “ Day ”
and “ Year ” by pressing the F2 button while
setting these items.
22:38
EN
18
Page 19
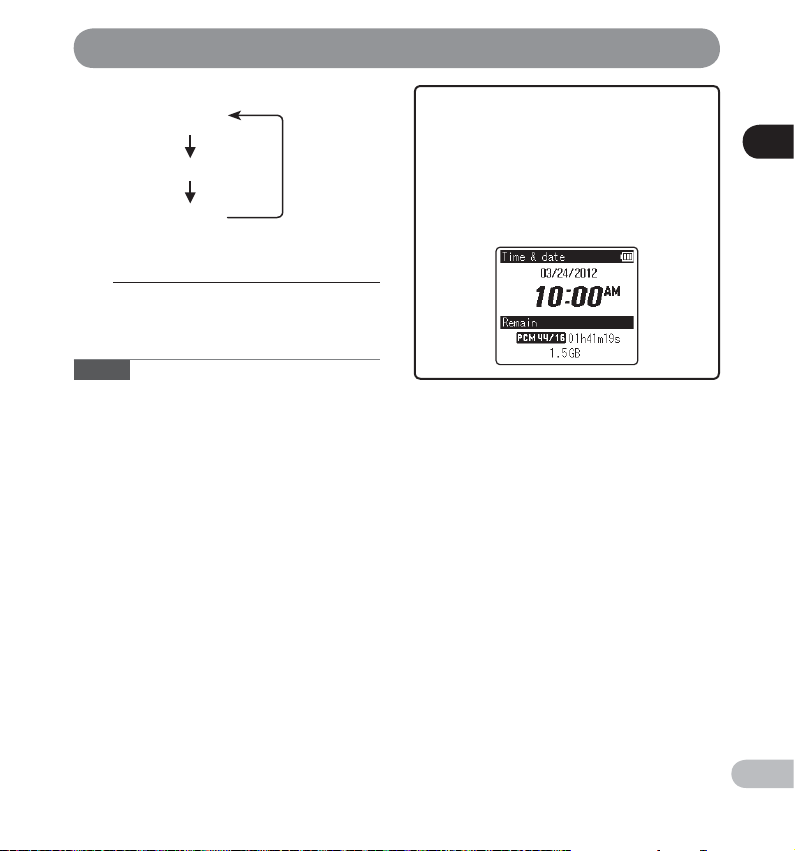
Setting the time and date [Time & Date]
Example: March 24, 2012
3M 24D 2012Y
(Initial setting)
24D 3M 2012Y
2012Y 3M 24D
Press the OK button to complete
3
the setting.
• The clock will start from the set date and
time. Press the OK button when you want
the clock to start.
Notes
• If you press the OK button during the setup
operation, the recorder will save the items that were
set to that point.
• After setup, a message will sound prompting you
to select [ Off ], if voice guidance is not required
and the screen will go into [ Voice Guide ] ( ☞ P.74)
setup. If you don’t want the guidance feature, select
[ Off ] (LS-14 only).
While the recorder is in stop mode at the
[ Home ] screen, press and hold the
STOP / w ( 4 ) button to display [ Time & date ]
and [ Remain ]. If the current time and date are
not correct, set them using the time and date
setting. See “ Changing the time and date
[ Time & Date ] ” ( ☞ P.75).
1
Setting the time and date [Time & Date]
EN
19
Page 20

Inserting and ejecting an SD card
“SD” indicated in the instruction manual refers to
both SD and SDHC. This recorder enables you to store
data not only to the internal memory but also to a
1
commercially available SD card.
Inserting and ejecting an SD card
Inserting an SD card
While the recorder is in stop mode,
1
open the card cover.
With the SD card facing the correct
2
way, insert it into the card slot as
shown in the diagram.
Terminal
EN
surface
• Insert the SD card, keeping it straight.
• Inserting the SD card in the wrong way or at
an angle could damage the contact area or
cause the SD card to jam.
• If the SD card is not inserted all the way,
data may not be recorded on the SD card.
• When you insert the SD card, the recording
media changeover screen will appear.
Close the card cover securely.
3
To record on an SD card, press the +
4
or − button and select [ Yes ].
Press the OK button to complete
5
the setting.
Notes
• It is possible to switch the recording media over to
the internal memory ( ☞ P.72).
• In some cases SD cards that have been formatted
(initialized) by another device, such as a computer,
may not be recognized. Be sure to format SD cards
with this recorder before using them ( ☞ P.78).
• Battery life may be shorter when using an SD card
( ☞ P.98).
20
Page 21

Inserting and ejecting an SD card
Ejecting an SD card
While the recorder is in stop mode,
1
open the card cover.
Push the SD card inward to unlock
2
it, and let it eject partially.
The SD card is visibly out of the slot and can be
removed safely.
• If you eject the SD card when
[ Memory Select ] is set to [ SD card ],
[ Memory Select ] will automatically change
to [ Internal memory selected ].
Close the card cover securely.
3
SD card
When the write protection switch is set to
[ LOCK ], you cannot record or erase files.
Notes
• Quickly moving your finger away after pushing the
SD card inward may cause it to eject forcefully out
of the slot.
• Some SD cards or SDHC cards may not be
recognized correctly depending on the
manufacturer or type of card due to compatibility
issues with this recorder.
• See the Olympus website for a list of SD cards
that have been confirmed to operate with this
recorder in conditions prescribed by Olympus. The
website http://olympus-imaging.jp/ introduces
manufacturers and types of SD cards confirmed
to be compatible. Please note, however, this
is not meant to guarantee that SD cards will
operate. Some SD cards may not be recognized
correctly due to circumstances such as changes in
manufacturer specifications.
• Always read the instructions that come with your
SD card before using it.
• If an SD card is not recognized, remove the SD
card and then insert it again to see if the recorder
recognizes the SD card.
• Processing speed may be slower with some types
of SD cards. Processing performance may also be
reduced due to repeated writing and deleting. If
that happens, reformat the SD card ( ☞ P.78).
1
Inserting and ejecting an SD card
Write protection switch
LOCK
EN
21
Page 22
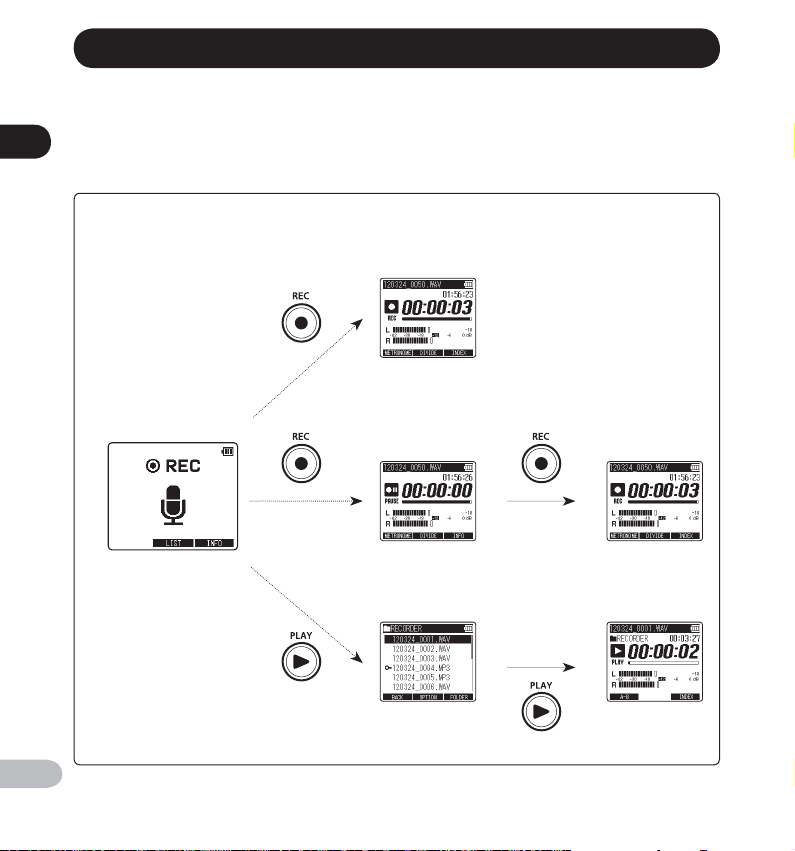
[ Home ] screen operations
When you turn on the recorder, the [ Home ] screen will be displayed. The [ Home ] screen is the main screen used
for accessing each function. In addition, you can also verify the current settings for recording and playback.
1
[Home] screen operations
Switching functions
▌
Press the REC ( s ) button to start
recording.
[QUICK], [SMART] mode ( ☞ P.28, P.29)
Recording starts
A
In [ SMART ] mode, recording starts
automatically when the countdown by the
automatic adjustment function ends.
Press the PLAY ( ` ) button to start
playback.
EN
22
[ Home ] screen
[MANUAL] mode ( ☞ P.30)
Recording pauses Recording starts
File list screen
Playback starts
Page 23

[Home] screen operations
Verifying the current settings
▌
Press and hold the F3 ( INFO ) button on the
[ Home ] screen. You can also check it while
recording is paused.
1
2
3
4
5
6
7
8
The following settings will be displayed.
1 [ Mic Gain ] ( ☞ P.66)
2 [ Rec Format ] ( ☞ P.66)
3 [ Mic Select ] * ( ☞ P.67)
4 [ Play Mode ] ( ☞ P.70)
5 [ Limiter ] ( ☞ P.66)
6 [ Low Cut Filter ] ( ☞ P.67)
7 [ Pre-Recording ] ( ☞ P.68)
8 [ Memory Select ] ( ☞ P.72)
* LS-14 only
1
[Home] screen operations
EN
23
Page 24
001
002
003
004
005
006
007
999
001
002
003
004
005
006
007
999
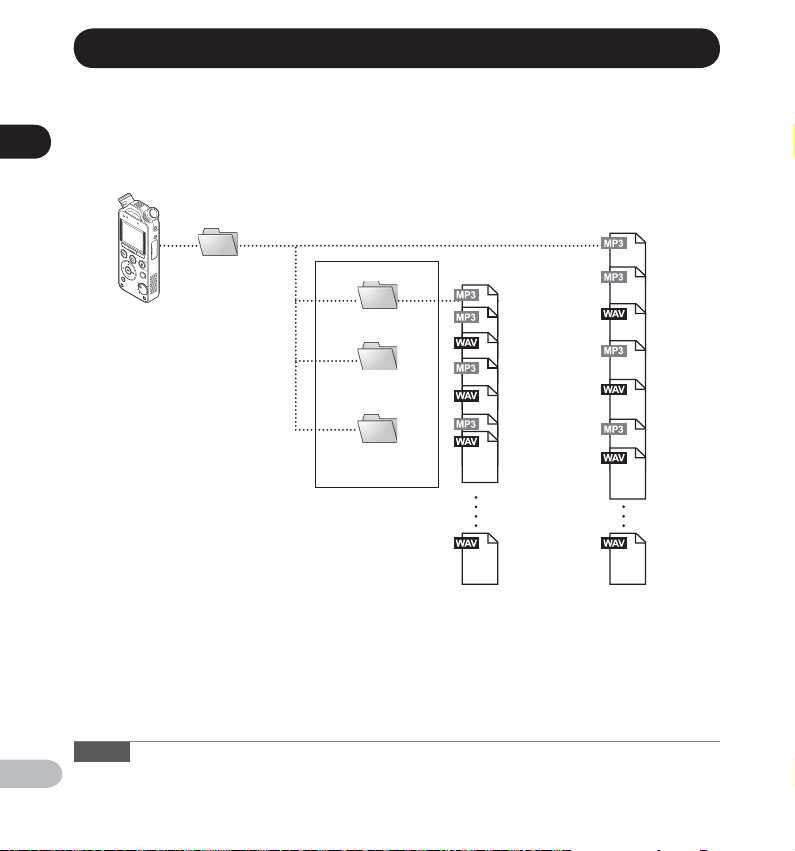
Notes on the folders
The internal memory or an SD card can be used as the recording media. All files recorded with this recorder will be
stored in the[ RECORDER ]folder regardless of the recording media.
1
Notes on the folders
Folder for recorded files:
Recorded files will be saved in the [ RECORDER ] folder.
RECORDER
LS-14
LS-12
01
02
03
Library folder
001
002
003
004
005
006
007
001
002
003
004
005
006
007
Notes on the library folder:
It is possible to divide and store files saved in the [ RECORDER ] folder into
folders [ 01 ] to [ 03 ]. Besides transferring files from a PC, you can also add
new folders by keeping the same hierarchy as folders [ 01 ] to [ 03 ].
You can add up to 200 folders (including the [ 01 ], [ 02 ] and [ 03 ] folders). It’s
not possible to add a folder with a name already in use.
Notes
EN
• Files placed in the same hierarchical level as the [ RECORDER ] folder will not be recognized.
• This recorder will not recognize folders if they are created inside the
[ 01 ], [ 02 ] or [ 03 ] folder.
24
999
Each folder can store up
to 999 files.
999
Page 25
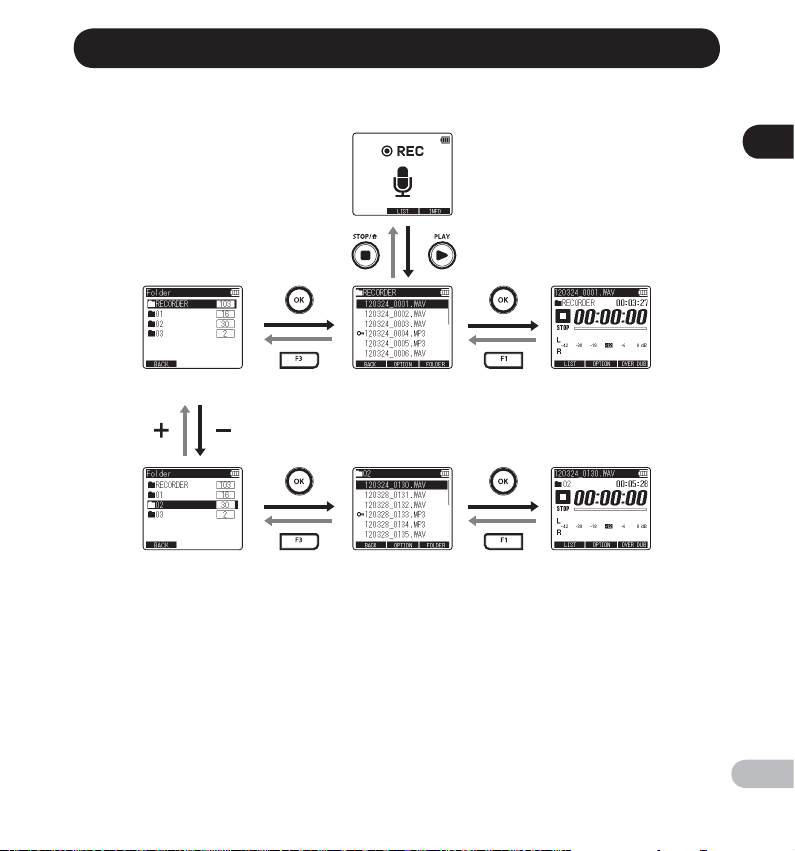
Selecting folders and files
Change folders while the recorder is stopped. For information on the layered structure of the folders, see the
section entitled “ Notes on the folders ” ( ☞ P. 24) .
[ Home ] screen
Folder list screen File list screen File screen
Folder list screen File list screen File screen
Moving through the levels
▌
} Return : F1 ( BACK ) button
Pressing this button takes you back to the previous
screen.
{ Proceed : OK button
Pressing this button opens the folder or file
selected in the list screen.
+ or – button
Selects a folder or file.
F1 ( LIST ) button:
The display changes to the File list screen.
F3 ( FOLDER ) button:
The display changes to the Folder list screen.
List screen:
The folders and files stored in the recorder are
displayed.
File screen:
Information about the selected file is displayed.
The recorder is in playback standby mode.
1
Selecting folders and files
EN
25
Page 26
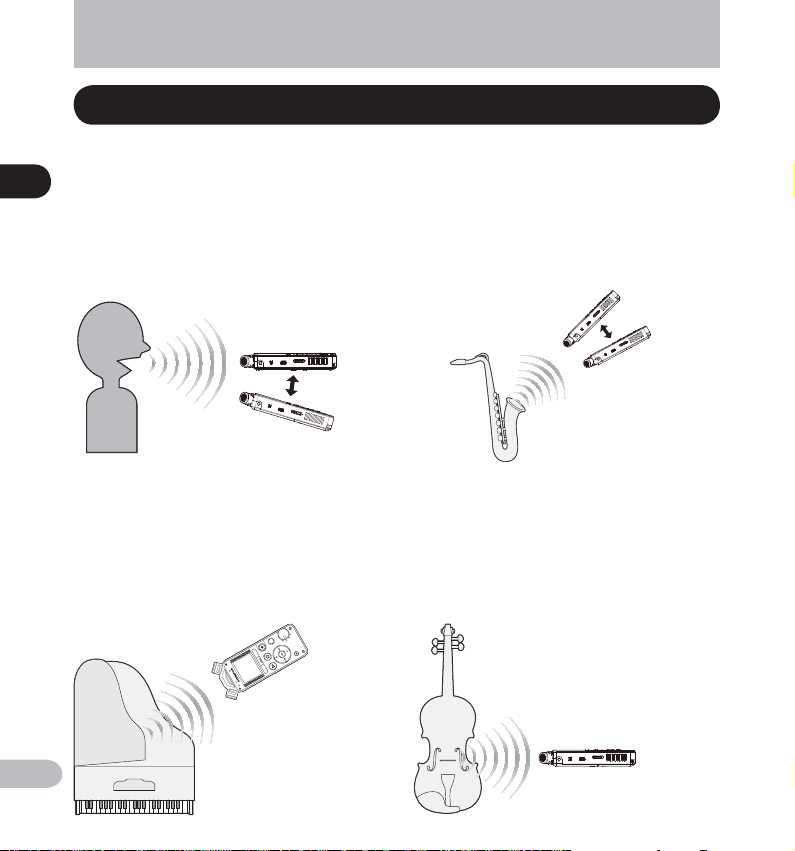
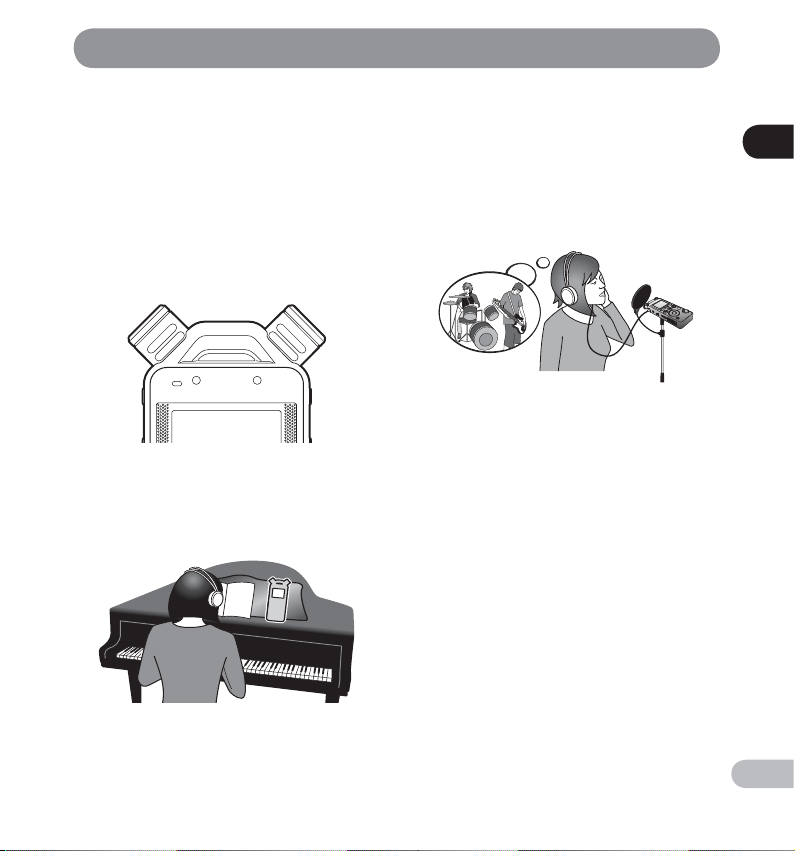
Recording tips for each instrument
Recorder position examples
▌
2
Voice
Recording tips for each instrument
Position the recorder slightly away from the singer's
face. If breathing noises are audible, adjust the
recorder position.
If breathing noises are audible
About recording
Wind instrument
Position the recorder pointing to the center of the so called "bell." If breathing noises are audible, move the
recorder slightly away from the center.
Adjust sound by
moving the recorder
away from the center.
If breathing noises are
audible
Piano
When recording the sound of a grand piano, position
the recorder pointing to the center of the open lid. To
record acousmato as well, move the recorder slightly
away to get a richer sound.
Point to the open lid
EN
26
String instrument
When recording the sound of a string instrument
such as a violin, position the recorder slightly away
from the upper part of the instrument, pointing to the
f-hole of the body.
Point to the f-hole
Page 27
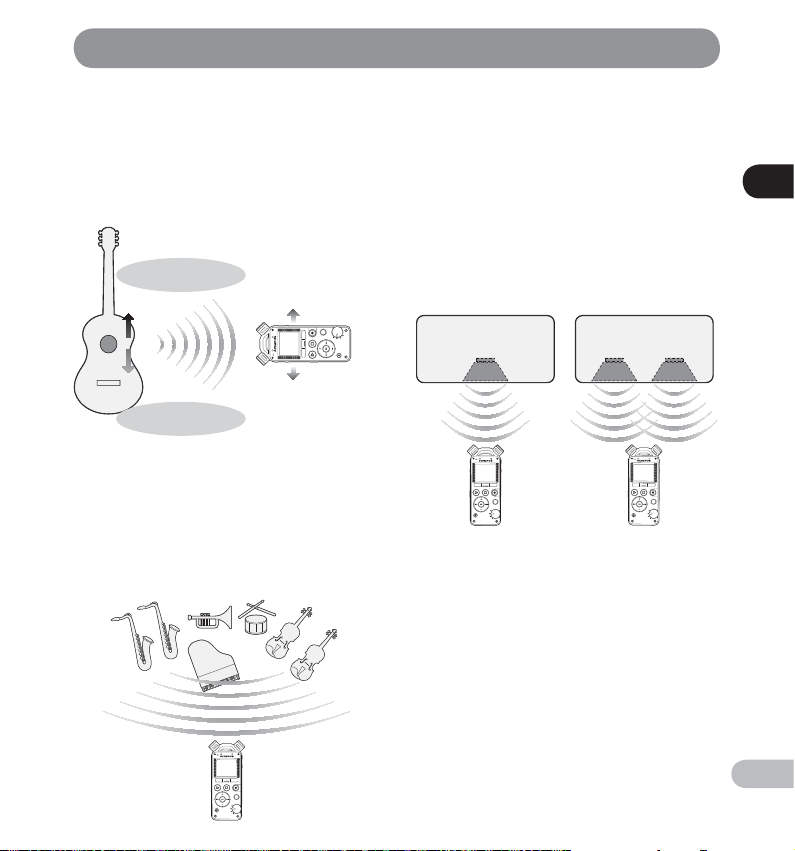
Recording tips for each instrument
Acoustic guitar
Position the recorder pointing to a place slightly away
from the sound hole of the guitar. For a rhythm guitar,
keep a certain distance from the main body of the
guitar. For solo or melody-focused music, keep the
recorder closer to the main body of the guitar during
recording.
Move the recorder
slightly away from the
Hard sharp sound
Round
harmonic sound
sound hole.
Hall
Place the recorder on the center line of the stage, with
players also facing the direc tion of the microphone.
Then, fix the recorder with a tripod or other tool
before starting recording.
Orchestra, big band, choir, etc...
Electric guitar
To record sound directly from the speaker of a guitar
amplifier, position the recorder slightly away from
the speaker and pointing to the center of the speaker
cone paper. To record sound from two speakers in
stereo, position the recorder slightly away from the
center between the lef t and right speakers. To record
sound in mono, position the recorder slightly away
from the center of the speaker cone paper.
Guitar amplifier
Speaker
Guitar amplifier
Speaker
2
Recording tips for each instrument
EN
27
Page 28

1
3
2
Recording
The recorder has three recording modes that can be
selected by using the Mode dial. Use them according
to your needs.
[ QUICK ] mode: In this mode the recording level will
be adjusted automatically. This mode is useful if you
2
want to start recording immediately.
Recording
[ SMART ] mode: In this mode the recording level will
be adjusted automatically to the optimum level to
suit the volume input within the set time. Recording
starts after the recording level is adjusted, so
even sudden loud sounds are recorded without
distortion. This mode allows you to set a time for
detecting the input volume ( ☞ P.29, P.68).
[ MANUAL ] mode: In this mode the recording level can
be adjusted manually ( ☞ P.30).
Notes
• The newly recorded file will be saved last in the
[ RECORDER ] folder.
• Set [ Rec Format ] while the recorder is stopped
( ☞ P.66).
• Set the Mode dial while the recorder is stopped.
[ QUICK ] mode
Switch the Mode dial to the [ QUICK ]
1
position.
Press the REC ( s ) button to start
2
recording.
• The recording indicator light turns on and
[ H ] appears on the display.
EN
28
Page 29
1
3
2
Recording
a
b
a Elapsed recording time
b Remaining memory bar indicator
Remaining recording time
c
Level meter (changes according to the
d
recording level and recording function
settings)
• If the recording level is low, please change
the [ Mic Gain ] setting to [ Hi ] or [ Mid ]
( ☞ P.66).
• This recorder is able to record in high quality
even when the volume of the sound source
changes significantly. However even higher
quality can be realized by adjusting the
recording level manually.
Press the STOP / w ( 4 ) button to
3
stop recording.
• [ F ] appears on the display.
c
d
e
e File length
[ SMART ] mode
Switch the Mode dial to the
1
[ SMART ] position.
Press the REC ( s ) button to start
2
automatic adjustment of the
recording level.
• The countdown of the [ Smart Time ] starts
( ☞ P.68).
• When the countdown of the automatic
adjustment time ends, recording starts with
the adjusted settings.
2
Recording
EN
29
Page 30

1
5
2,4
3
Recording
2
Recording
a
b
a Elapsed recording time
Remaining memory bar indicator
b
Remaining recording time
c
d
Level meter (changes according to the recording
level and recording function settings)
• The recording level will be adjusted
automatically depending on the volume
input within the set time. During recording
level adjustment, [ Setting Rec Level ]
and the remainder of the set time will be
displayed ( ☞ P.68).
• If you want to cancel automatic adjustment,
press the F1 ( CANCEL ) or STOP / w ( 4 )
button. If you want to skip automatic
adjustment and start recording immediately,
press the F3 ( SKIP ) or the REC (
• After automatic adjustment, you can adjust
the recording level manually by using the
9
and
0
Press the STOP / w ( 4 ) button to
3
stop recording.
• [ F ] appears on the display.
c
d
buttons ( ☞ P.31).
e
s
) button.
[ MANUAL ] mode
Switch the Mode dial to the
1
[ MANUAL ] position.
Press the REC ( s ) button to prepare
2
to record.
• The recording indicator light flashes and [
appears on the display.
]
G
EN
30
e File length
Page 31

Recording
a
b
c
a Remaining recording time
b Remaining memory bar indicator
c
Level meter (changes according to the recording
level and recording function settings
Press the 9 or
3
adjust the recording level.
• Distorted sound will be recorded while
[ OVER ] is displayed. Adjust the recording
level so that [ OVER ] is not displayed.
• The level can be adjusted between [ 01 ] and
[ 70 ] * . The higher the number, the higher the
level and the larger the indicator position
on the level meter.
* When recording from the LINE IN jack,
you can adjust the level between [ 01 ] and
[ 30 ].
0
button to
Press the REC ( s ) or PLAY ( ` )
4
button to start recording.
• The recording indicator light turns on and
[ H ] appears on the display.
d
)
d Elapsed recording time
Press the STOP / w ( 4 ) button to
5
stop recording.
• [ F ] appears on the display.
e File length
e
2
Recording
EN
31
Page 32

Recording
Notes
• Inputting a very loud sound may produce noise
even when the Mode dial is set to [ QUICK ] or
[ SMART ].
• To ensure that you do not lose the beginning of the
2
Recording
recording, verify that the recording indicator light or
the mode indicator is lit on the display.
• When the remaining recording time is less than
60 seconds, the LED indicator light starts flashing.
When the remaining recording time drops to 30
and then 10 seconds, the light flashes faster.
• While adjusting the recording level manually, the
sound input may be interrupted.
• [ Folder full ] will appear when recording cannot be
continued. Delete unnecessary files or move them
to another folder before recording ( ☞ P.48, P.61).
• [ Memory full ] will appear when the memory is
full. Delete unnecessary files before recording any
further ( ☞ P.61).
• When an SD card is inserted into the recorder,
be sure to confirm the recording media as either
[ Internal memory ] or [ SD card ] so that there is no
mistake ( ☞ P.23, P.72).
• Processing speed may be slower with some types
of SD cards. Processing performance may also be
reduced due to repeated writing and deleting. If
that happens, reformat the SD card ( ☞ P.78).
• We recommend formatting the recording media in
the recorder before recording.
EN
32
Recording more than 2 GB of data in
▌
linear PCM format
Recording will continue even if the volume of a single
file exceeds 2 GB in linear PCM format recording.
• The data is saved every 2 GB in separate files. It is
treated as multiple files during playback.
• If the 999th file in a folder exceeds 2 GB, recording
stops.
Settings relating to recording
▌
[ Mic Gain ] ( ☞ P.66) Sets the recording sensitivity.
[ Limiter ] ( ☞ P.66)
[ Rec Format ] ( ☞ P.66)
[ Low Cut Filter ] ( ☞ P.67)
[ Plug-in Power ] ( ☞ P.67)
[ Mic Selec t ] * ( ☞ P.67)
[ Pre-Recording ] ( ☞ P.68)
[ Rec Monitor ] ( ☞ P.68)
[ Smart Time ] ( ☞ P.68)
[ Metronome ] ( ☞ P.68)
* LS-14 only
Switches the correction method
according to the sound input
when recording.
Sets the recording rate for each
recording format.
This function can reduce
noise from air conditions and
projectors and other similar
noises.
Selects whether or not to use
the plug-in power function
according to the external
microphone connected to the
MIC jack.
Selects whether or not the
built-in center microphone is to
be turned On or Off.
Pre-recording enables you to
start recording up to 2 seconds
before you press the button for
recording.
Selects whether or not to
output the recording monitor
sound from the EAR jack.
You can set the time for
[ SMART ] mode automatic
adjustment.
You can set the metronome as a
rhythm guide during recording.
Page 33

Recording
Pause
▌
While the recorder is in recording mode,
press the REC ( s ) or PLAY ( ` ) button.
• [ G ] will appear on the display.
• The recorder will stop if left on pause for more than
60 minutes.
Resume Recording
Press the REC ( s ) or PLAY ( ` ) button
again.
• Recording will resume at the point of interruption.
Listening while audio is recorded
▌
If you start recording af ter inserting the earphones
into the EAR jack on the recorder, you can hear the
audio being recorded. The recording monitor volume
can be adjusted by pressing the + or − button.
Connect the earphones to the EAR jack
on the recorder.
• After recording has started, you can hear the audio
being recorded through the earphones.
To EAR jack
Notes
• You cannot control the recording level using the
volume button.
• To avoid hurting your ears, turn down the volume
before inserting the earphones into your ears.
• Do not place earphones near a microphone as this
may cause feedback.
• If an external speaker is connected during
recording, there is a risk that audio feedback will
occur. It is recommended that you use earphones
to monitor recording, or turn [ Rec Monitor ] to [ Off ]
while recording ( ☞ P.68).
2
Recording
EN
33
Page 34

1
2
Recording
Dividing a file while recording
You can also divide files while recording. This is useful,
for example, when you want to have different files for
each movement of a concert.
2
Recording
A
• Please set the [ Rec Format ] to [ PCM ] in advance
( ☞ P.66).
• The maximum number of files that can be stored in
the [ RECORDER ] folder is 999. If there are already
more than 998 files, file division will not be possible.
If you have already reached the limit, calculate the
number of times you will divide the file and delete
the files that you do not need ( ☞ P.61) or move
them to other folders ( ☞ P.48) beforehand to make
space.
• You cannot divide a file while overdubbing is in
progress.
EN
At the position where you want to
1
divide the file, press the
F2
DIVIDE )button.
(
• Recording will continue uninterrupted.
Press the STOP / w ( 4 ) button to
2
stop recording.
34
Page 35

4
7
6
5
Recording
Using the overdubbing function
The overdubbing function enables you to dub sound
over a file while listening to it. The recorded file is
saved under a different name. This is useful when
practicing songwriting and musical instruments.
A
When using the overdubbing function, the following
conditions must be met:
• Select a (.wav) file with the format
[ PCM 44.1kHz/16bit ] as the file to be played
(
P.25, P.60).
☞
• Set [ Rec Format ] to [ PCM 44.1kHz/16bit ]
Switch the Mode dial to the [ QUICK ]
1
or [ MANUAL ] position ( ☞ P.28, P.30).
P.66).
(
☞
Connect earphones to the EAR jack
3
of the recorder.
• The file to be dubbed over will be played
back through the EAR jack.
• Set [ Rec Monitor ] to [ On ] ( ☞ P.68).
While the recorder is in stop mode,
4
press the F3 ( OVER DUB ) button.
• If the Mode dial is set to [ QUICK ], recording
and playback will start simultaneously.
Proceed to Step 7.
• If the Mode dial is set to [ MANUAL ],
playback will start first.
a
To EAR jack
2
Recording
• This function is not enabled when the Mode
dial is set to [ SMART ].
Select a file to dub over ( ☞ P.25).
2
Overdubbing
a
EN
35
Page 36

2
Recording
Press the 9 or
5
adjust the recording level.
2
Recording
EN
• You can adjust the recording level by using
9
the
or
volume level during playback.
Press the REC ( s ) button to start
6
recording.
• Playback will start again from the beginning.
Recording will start at the same time.
Press the STOP / w ( 4 ) button to
7
stop recording.
Notes
• When the original playback file ends, overdubbing
also ends.
• When the [ OVER DUB ] function is used, the
following functions cannot be used.
• [ DIVIDE ] ( ☞ P.34)
• [ Pre-Recording ] ( ☞ P.68)
• [ Metronome ] ( ☞ P.68)
0
0
button depending on the
36
button to
Using the metronome function
The metronome is a useful rhy thm guide and can be
used during recording.
Set the metronome function
1
( ☞ P.68).
• Set [ Rec Monitor ] to [ On ] ( ☞ P.68).
Press the F1 ( METRONOME ) button
2
while recording or pausing.
• Turn the metronome ON or OFF by pressing
the F1 ( METRONOME ) button.
a
a Metronome
• The metronome works with the current
settings. The sound of the metronome will
not be recorded.
• The LED indicator lights on the recorder
light in time with the metronome.
Page 37

Recording
Notes
• The sound of the metronome will be output from
the EAR jack. Connect earphones to hear the
metronome.
• When [ Rec Monitor ] is set to [ Off ], no metronome
sound is output.
File names are automatically created for files
recorded by this recorder.
120324 _00013.WAV
12
1 Time stamp:
2012.03.24
2 File number:
A file number is consecutively assigned
regardless of changes in the selected
recording media.
3 Extension:
This is the file name extension indicating the
recording format used when recording with
this recorder.
• Linear PCM format .WAV
• MP3 format .MP3
2
Recording
EN
37
Page 38

Recording
Recording from an external
microphone or other device
An external microphone or other device can be
connected and audio can be recorded. Connec t as
2
follows according to the device to be used.
Recording
• Do not plug/unplug devices into the recorder’s jack
while it is recording.
Recording with an external microphone
▌
Connect an external microphone to the
MIC jack of the recorder.
• Applicable external microphones (optional) ( ☞ P.94).
Notes
• The built-in microphone becomes inoperable
when an external microphone is plugged into the
recorder’s MIC jack.
• Microphones supported by plug-in power can also
be used.
• When an external monaural microphone is used
while [ Rec Format ] is set to a stereo recording
mode, audio is recorded to the L channel only
( ☞ P.66).
• When an external stereo microphone is used while
[ Rec Format ] is set to a monaural recording mode,
audio is recorded to the L channel only ( ☞ P.66).
• To record using an external microphone, connect
it to the MIC jack. If you connect it to the LINE IN
jack, the recorder will not record sound properly.
• If you use the MIC jack and LINE IN jack at the same
time, input from the LINE IN jack has priority.
To MIC jack
EN
38
Page 39

Recording
Recording audio from another device
▌
with this recorder
Audio can be recorded when you have connected
the audio output terminal (earphone jack) of another
device and the LINE IN jack of the recorder using the
connecting cord KA334 (optional) for dubbing.
To LINE IN jack
To audio output
terminal of other
device
Notes
• If you are unable to produce a clear recording with
this recorder even after adjusting the recording
level ( ☞ P.31), this could potentially be because the
output level for the connected devices is too high
or too low. When external devices are connected,
perform a test recording and then adjust the output
level for the external devices.
• To record sounds from another device, connect to
the LINE IN jack. If you connect to the MIC jack, the
sound will distort and cannot be recorded properly.
Recording audio from this recorder with
▌
another device
Audio from this recorder can be recorded to another
device by connecting the audio input terminal
(microphone jack) of the other device and the EAR
jack of this recorder using the connecting cord K A333
(optional ).
To EAR jack
To audio input
terminal of other
device
2
Recording
EN
39
Page 40

4
2
3
Playback
About playback
The recorder can play back WAV and MP3 format files.
To play back a file recorded with another device, you
need to transfer (copy) it from a computer.
3
Playback
Select the file to be played back
1
from the folder that contains
it ( ☞ P.25).
Press the PLAY ( ` ) button to start
2
playback.
EN
• [ E ] appears on the display.
a
b
c
d
e
a File name, Folder name
b Elapsed playback time
c Playback position bar indicator
d File length
e Level meter
Press the + or − button to adjust
3
the volume.
• The volume can be adjusted within the
range of [ 00 ] to [ 30 ].
Press the STOP / w ( 4 ) button at
4
any point where you want to stop
playback.
• [ F ] appears on the display.
• Pressing this button stops the file being
played.
40
Page 41

Playback
Settings relating to playback
▌
[ Play Mode ] ( ☞ P.70)
[ Skip Space ] ( ☞ P.70) The skip interval can be set.
Playback through the earphones
▌
The earphones can be connected to the EAR jack of
the recorder for listening.
• When the earphones are used, the recorder speaker
is switched off.
To EAR jack
Notes
• To avoid hurting your ears, turn down the volume
before inserting the earphones into your ears.
• When using the earphones, do NOT set the volume
too high. Listening at very high volume may lead to
hearing loss.
You can select the desired
playback range and repeat
playback.
Forwarding
▌
While the recorder is in stop mode in
the File screen, press and hold the 9
button.
• [ I ] appears on the display.
• When you release the 9 button, forwarding
stops. Press the PLAY ( ` ) button to start playback
from where forwarding stopped.
While the recorder is in playback mode,
press and hold the 9 button.
• When you release the 9 button, the recorder
resumes normal playback.
• If there is an index mark or temp mark within the
file, the recorder stops at that location ( ☞ P.44).
• The recorder stops when it reaches the end of the
file. Continue pressing the 9 button to continue
forwarding from the beginning of the next file.
3
Playback
EN
41
Page 42

Playback
Rewinding
▌
3
Playback
While the recorder is in stop mode in
the File screen, press and hold the 0
button.
• [ J ] appears on the display.
• When you release the 0 button, rewinding
stops. Press the PLAY ( ` ) button to start playback
from where rewinding stopped.
While the recorder is in playback mode,
press and hold the 0 button.
• When you release the 0 button, the recorder
resumes normal playback.
• If there is an index mark or temp mark within the
file, the recorder stops at that location ( ☞ P.44).
• The recorder stops when it reaches the beginning
of the file. Continue pressing the 0 button to
continue rewinding from the end of the previous
file.
Locating the beginning of a file
▌
While the recorder is in stop mode or
playback mode, press the 9 button.
• The recorder skips to the beginning of the next file.
While the recorder is in playback mode,
press the 0 button.
• The recorder skips to the beginning of the current
file.
While the recorder is in stop mode, press
the 0 button.
• The recorder skips to the beginning of the previous
file. If the recorder is in the middle of a file, it will
return to the beginning of the file.
While the recorder is in playback mode,
press the 0 button twice.
• The recorder skips to the beginning of the previous
file.
EN
42
Page 43

1,3
2
Playback
Notes
• When you skip to the beginning of the file during
playback, the recorder stops at the position of the
index mark or temp mark. Index marks and temp
marks are skipped when you perform this operation
in stop mode ( ☞ P.44).
• When [ Skip Space ] is set to a setting other than
[ File Skip ], the recorder skips forward/reverse by
the specified time and then starts playback ( ☞ P.70).
About music files
▌
In cases where the recorder is unable to play back
music files that have been transferred to it, check to
make sure that the sampling rate and bit rate are in
the range where playback is possible. Combinations
of sampling rates and bit rates for music files which
the recorder can play back are given below.
File format
WAV format
MP3 format
• Variable bit rate MP3 files (in which conversion bit
rates can vary) may not be played back properly.
• For WAV files, this recorder can only
play back those in the linear PCM format. WAV files
other than these cannot be played back.
• Even if the file format is compatible for playback on
this recorder, the recorder does not support every
encoder.
Sampling
frequency
44.1 kHz, 48.0 kHz 16 bit
88.2 kHz, 96.0 kHz 24 bit
MPEG1 Layer3:
32 kHz, 44.1 kHz,
48 kHz
MPEG2 Layer3:
16 kHz, 22.05 kHz,
24 kHz
Bit rate
From 8 kbps up to
320 kbps
Changing the playback speed
The tone will be automatically adjusted digitally
without changing the voice so it sounds natural.
While the recorder is in playback
1
mode, press the OK button.
Press the + or − button to select
2
playback speed.
3
Playback
EN
43
Page 44

1
Playback
Press the OK button.
3
a
3
Playback
a Playback speed indicator
• Even if playback is stopped, the changed
playback speed will be retained. The next
playback will be at that speed.
Note
• As in normal playback mode, you can stop playback,
cue a file, or insert an index or temp mark in slow
playback and fast playback modes as well.
Setting an index mark or
a temp mark
If index mark s and temp mark s have been placed into
your files, you can quickly find a location you want to
listen to when you are fast forwarding, fast rewinding,
or cuing a file. Index marks can only be placed into
files created by Olympus voice recorders, but temp
marks can be used to temporarily remember desired
locations.
While the recorder is in recording
1
mode or playback mode, press the
F3 ( INDEX ) button.
• A number appears on the display and an
index mark or temp mark is placed into the
file.
EN
44
Page 45

Playback
• Even after an index or temp mark has been
placed into a file, recording or playback will
continue so you can place index or temp
marks in other locations in a similar manner.
Clearing an index mark or a temp mark
▌
Play a file that contains index or
1
temp marks you wish to erase.
Press the 9 or 0 button to
2
select the index or temp mark to be
erased.
While the index or temp number
3
is displayed for approximately 2
seconds on the display, press the
ERASE button.
• The index or temp mark is erased.
• Index or temp numbers after the erased
index or temp number automatically
decrement by 1.
Notes
• Temp marks are temporary markings, so if you
move to another file or connect the recorder to a
PC, the marks will automatically be erased.
• Up to 99 index and temp marks can be set in a file. If
you try to set more than 99 index or temp marks, the
[ No more can be set ] message appears for index
marks and the [ No more can be set ] message appears
for temp marks.
• Index or temp marks cannot be set or erased in a
locked file ( ☞ P.51).
3
Playback
EN
45
Page 46

2,3
Playback
How to begin segment repeat
playback
This function enables repeated playback of part of the
file being played.
3
Playback
Select a file that has a segment you
1
would like to play back repeatedly,
and start playback.
Press the F1 ( A-B ) button at the
2
position where you want to start
segment repeat playback.
• While [ y ] is displayed, you can fast forward,
rewind, or change the playback speed in
the same way as in normal mode to find the
end position ( ☞ P.41, P.43).
• If the recorder reaches the end of the file
while [ y ] is displayed, point [ z ] becomes
the end of the file, and repeat playback
starts.
Press the F1 ( A-B ) button again at
3
the position where you want to end
segment repeat playback.
• The recorder continuously plays back the
segment until segment repeat playback is
canceled.
Note
• As in normal playback mode, the playback speed
can be changed during segment repeat playback as
well ( ☞ P.43). If an index mark or temp mark is set or
cleared during segment repeat playback, segment
repeat playback is canceled and the recorder
returns to normal playback mode ( ☞ P.44).
EN
46
Page 47

Playback
Canceling the segment repeat playback
▌
function
a
b
Pressing any of the following buttons
releases segment repeat playback.
a Press the F1 ( CANCEL ) button
Pressing the F1 ( CANCEL ) button releases
segment repeat playback, and it will return to
normal playback mode.
b Press the STOP / w ( 4 ) button
Pressing the STOP / w ( 4 ) button releases
segment repeat playback and stops playback.
c Press the 9 button
Pressing the 9 button releases segment repeat
playback, and makes the recorder skip to the
beginning of the next file.
d Press the 0 button
Pressing the 0 button releases segment repeat
playback, and makes the recorder skip to the
beginning of the current file.
3
Playback
c
d
EN
47
Page 48

4,6,
8
11
2,10
3,5,
7,9
▌
4
Editing [OPTION]
*1 This function is not available when the File list screen is
*2 LS-14 only
Note
• The recorder stops if you leave it idle for 3 minutes
File management
Editing [ OPTION ]
Recorded files options
[ Move/Copy ]
[ File Lock ] ( ☞ P.51)
[ File Divide ]*1 ( ☞ P.54)
[ Partial Erase ]*1
( ☞ P.56)
[ Trimming ]*1 *2
( ☞ P.58)
[ Property ] ( ☞ P.60)
displayed.
during a menu setup operation and do not set a
selected item.
Files can also be moved or
copied between memory.
Locking a file keeps important
data from being accidentally
erased.
Only files recorded with this
recorder can be divided.
An unwanted part of a file
can be erased. Only a PCM file
recorded with this recorder can
be partially erased.
You can trim a part of a file and
save it as a new file. Only a PCM
file recorded with this recorder
can be trimmed.
[ Name ] (File name), [ Date ]
(Time stamp), [ Size ] (File size),
[ Bit Rate ] (File format),
[ File Lock ] (File protection)
Moving/Copying a file
[ Move/Copy ]
Files saved in the internal memor y or an SD card can
be moved or copied within the memory. Files can also
be moved or copied between memor y.
You can edit a single selected file or multiple files.
First, select the file or the folder
1
that contains the file you want to
copy/move ( ☞ P.25).
EN
48
Page 49

Editing [OPTION]
While the recorder is in stop mode,
2
press the F2 ( OPTION ) button.
• The [ OPTION ] screen appears on the
display.
Press the + or − button to select
3
[ Move/Copy ].
Press the OK button.
4
Press the + or − button to select
5
the location to which you want to
move or copy the file.
[ Move to memory ]: Move a file from the
internal memory or SD card to another
folder within the internal memory.
[ Copy to memory ]: Copy a file from the internal
memory or SD card to another folder within
the internal memory.
[ Move to SD ]: Move a file from the internal
memory or SD card to another folder in the
SD card.
[ Copy to SD ]: Copy a file from the internal
memory or SD card to another folder in the
SD card.
Press the OK button.
6
If you entered the [ OPTION ] screen from
the File scre en:
• Move or copy the selected file.
Proceed to Step 9.
I f you entered the [ OPTIO N ] screen from
the File list screen:
• Move or copy multiple files.
Proceed to Step 7.
Press the + or − button to select the
7
number of files you want to move
or copy.
4
Editing [OPTION]
[ One file ]: Select only the specified file.
[ Selected files ]: Select multiple files.
[ All files ]: Select all files in the folder.
EN
49
Page 50

Editing [OPTION]
Press the OK button to move to the
8
respective setting.
1 Press the + or − button to select the file you
4
Editing [OPTION]
2 Press the OK button to select the file.
1 Press the + or − button to select the file(s)
2 Press the OK button to check the file(s)
3 Repeat steps 1 and 2 until all the files you
EN
50
When you select [ All files ], all the files in the
folder are automatically selected and the
recorder moves to the [ Destination ] screen.
If you selected [ 4One file ]:
want to move or copy.
If you selected [ 4Selected files ]:
you want to move or copy.
selected.
want to move/copy are selected, then press
the F2 ( GO ) button.
If you selected 4[ All files ]:
Press the + or − button to select the
9
folder to which you want to move
or copy the file.
Press the F2 ( GO ) button.
10
• File move or file copy starts if [ Moving! ] or
[ Copying! ] appears on the display. During
the process, the progress status is shown as
a percentage.
• The process is completed when
[ File move completed ] or
[ File copy completed ] is displayed.
Page 51
4,6,
8
2
9
3,5,
7
Editing [OPTION]
Press the F3 ( EXIT ) button to
11
close the [ OPTION ] screen.
Notes
• The recorder cannot copy when the memory
capacity is not sufficient.
• You cannot move or copy files if the number of files
in the move destination folder or copy destination
folder will exceed 999.
• Do not remove the battery during moving or
copying. Doing so may damage the data.
• A file cannot be moved or copied to the same
folder.
• When operation is canceled during moving or
copying, only the files for which the move or copy
process has already been completed are saved
at the new location. The move or copy process is
canceled for all other files.
• Files which are locked remain so even after they are
moved or copied.
Protecting a file [ File Lock ]
Locking a file keeps important data from being
accidentally erased. Locked files are not erased when
you select to erase all files from a folder ( ☞ P.62).
You can edit a single selected file or multiple files.
First, select the file or the folder
1
that contains the file you want to
protect ( ☞ P.25).
While the recorder is in stop mode,
2
press the F2 ( OPTION ) button.
4
Editing [OPTION]
• The [ OPTION ] screen appears on the
display.
EN
51
Page 52

Editing [OPTION]
Press the + or − button to select
3
[ File Lock ].
4
Editing [OPTION]
Press the OK button.
4
If you entered the [ OPTION ] screen from
the File scre en:
• Protect the selected file. Proceed to Step 7.
I f you entered the [ OPTIO N ] screen from
the File list screen:
• Protect multiple files. Proceed to Step 5.
Press the + or − button to select the
5
number of files you want to protect.
[ One file ]: Select only the specified file.
[ Selected files ]: Select multiple files.
[ All files ]: Select all files in the folder.
EN
52
Press the OK button to move to the
6
respective setting.
If you selected [ 4One file ]:
1 Press the + or − button to select the file you
want to protect.
2 Press the OK button to select the file.
If you selected [ 4Selected files ]:
1 Press the + or − button to select the files
you want to protect.
2 Press the OK button to check the files
selected.
3 Repeat steps 1 and 2 until all the files you
want to protect are selected, then press the
F2 ( GO ) button.
If you selected 4[ All files ]:
When you select [ All files ], all the files in the
folder are automatically selected and the
recorder moves to the [ Destination ] screen.
Page 53

Editing [OPTION]
Press the + or − button to select [ On ]
7
or [ Off ].
[ On ]:
Locks the file and prevents it from being
erased.
[ Off ]:
Unlocks the file and allows it to be erased.
Press the OK button to complete
8
the setting.
• Pressing the F1 ( BACK ) button without
pressing the OK button will cancel the
settings and return you to the [ OPTION ]
screen.
Press the F3 ( EXIT ) button to close
9
the [ OPTION ] screen.
File list screen
a
a File Lock
4
Editing [OPTION]
EN
53
Page 54

4,8
2,6
9
3
5
7
Editing [OPTION]
4
Editing [OPTION]
EN
54
Dividing a file [ File Divide ]
Files with large capacities and long recording times
can be divided so that they are easier to manage and
edit.
A
• Only files recorded with this recorder can be
divided .
• This function is not available when the File list
screen is displayed.
Select the file you want to divide.
1
While the recorder is in stop mode,
2
press the F2 ( OPTION ) button.
• The [ OPTION ] screen appears on the
display.
Press the + or − button to select
3
[ File Divide ].
Press the OK button.
4
Press the PLAY ( ` ) button and play
5
the file to the position where you
want to divide it.
• While the recorder is in playback mode,
press and hold the 9 or 0 button to
fast-forward or rewind.
• It is useful to mark the divide position in
advance by setting an index mark.
At the position where you want to
6
divide the file, press the F2 ( DIVIDE )
button.
• Pressing the F1 ( BACK ) button without
pressing the OK button will cancel the
settings and return you to the [ OPTION ]
screen.
Page 55

Editing [OPTION]
Press the + button to select [ Start ].
7
Press the OK button.
8
• [ Dividing! ] appears and file dividing starts.
File dividing is completed when
[ File divide completed ] appears.
Notes
• [ File Divide ] is available only from the File screen.
• The recorder cannot divide files when the number
of files in the folder exceeds 999.
• Locked files cannot be divided ( ☞ P.51).
• After the file is split, the front part of the file is
renamed [ File name_1.mp3 ] and the latter part of
the file is named [ File name_2.mp3 ].
• If a file has an extremely short recording time, it
may not be divided even if it is an MP3 file or PCM
file.
• Do not remove the battery while dividing a file.
Doing so may damage the data.
4
Editing [OPTION]
Press the F3 ( EXIT ) button to close
9
the [ OPTION ] screen.
EN
55
Page 56

4,9
10
2,6,
7
3
5
8
Editing [OPTION]
4
Editing [OPTION]
EN
56
Partially erasing a file
[Partial Erase]
An unwanted part of a file can be erased.
A
• Only a PCM file recorded with this recorder can be
partially erased.
• This function is not available when the File list
screen is displayed.
Select the file you want to partially
1
erase.
While the recorder is in stop mode,
2
press the F2 ( OPTION ) button.
• The [ OPTION ] screen appears on the
display.
Press the + or − button to select
3
[ Partial Erase ].
Press the OK button.
4
Press the PLAY ( ` ) button and play
5
the file to the position where you
want to start partial erase.
• Forward the file to the position where
you want to start partial erase. If the file is
long, use the 9 button to move to the
position you want to delete.
At the position where you want to
6
start partial erase, press the
F2 ( START ) button.
• Playback will continue even after the
F2 ( START ) button is pressed. You can
rewind or fast-forward as usual to quickly
locate the erase end position.
Page 57

Editing [OPTION]
At the position where you want to
7
end partial erase, press the
F2 ( END ) button again.
a
a This is the part that will be erased.
Press the + button to select [ Start ].
8
Press the OK button.
9
• The display will switch to [ Partial erasing ! ]
and start the partial erase.
The deletion is completed when
[ Partial erase completed. ] is displayed.
• The recorder stops the beginning of the
edited file.
Press the F3 ( EXIT ) button to
10
close the [ OPTION ] screen.
4
Editing [OPTION]
EN
57
Page 58

4,9
10
2,6,
7
3
5
8
Editing [OPTION]
4
Editing [OPTION]
EN
58
Trimming a file [Trimming]
(LS-14 only)
A file can be trimmed down to just the required
portion and then re-saved.
A
• Only a PCM file recorded with this recorder can be
trimmed.
• This function is not available when the File list
screen is displayed.
Select the file you want to trim.
1
While the recorder is in stop mode,
2
press the F2 ( OPTION ) button.
• The [ OPTION ] screen appears on the
display.
Press the + or − button to select
3
[ Trim ming ].
Press the OK button.
4
Press the PLAY ( ` ) button and play
5
the file to the position where you
want to start trimming.
•
Forward the file to the position where you want
to start trimming. If the file is long, use the
button to move to the position you want to trim
At the position where you want to
6
start trimming, press the F2 ( START )
button.
• Playback will continue even after
the F2 ( START ) button is pressed. You can
rewind or fast-forward as usual to quickly
locate the trimming end position.
9
.
Page 59

Editing [OPTION]
At the position where you want to
7
end trimming, press the F2 ( END )
button again.
a
a This is the part that will be erased.
Press the + button to select [ Start ].
8
Press the OK button.
9
• The display will switch to [ Trimming ! ] and
start trimming. Trimming is completed
when [ Trimming completed. ] is displayed.
• The recorder stops the beginning of the
edited file.
Press the F3 ( EXIT ) button to
10
close the [ OPTION ] screen.
Note
• If a file has an extremely short recording time, it
may not be trimmed even if it is a PCM file.
4
Editing [OPTION]
EN
59
Page 60

4,5
6
2
3
Editing [OPTION]
Confirming a file in memory
[ Property ]
File information can be confirmed from the menu
screen.
4
Editing [OPTION]
Press the OK button.
4
• The [ Property ] screen appears on the
display.
Select the file for which you want
1
to check information ( ☞ P.25).
While the recorder is in stop mode,
2
press the F2 ( OPTION ) button.
• The [ OPTION ] screen appears on the
display.
Press the + or − button to select
3
EN
[ Property ].
• [ Name ] (File name), [ Date ] (Time stamp),
[ Size ] (File size), [ Bit Rate ] * (File format) and
[ File Lock ] (File protection) appear on the
display.
* When a linear PCM format file has been
selected, the [ Bit Rate ] area displays the
sampling frequency and bit rate.
After checking the information,
5
press the OK button to exit
[ Property ] screen.
Press the F3 ( EXIT ) button to close
6
the [ OPTION ] screen.
60
Page 61

3
2
4
Erasing
Erasing a file
A selected file can be erased from a folder.
Select the file you want to erase
1
( ☞ P.25).
While the recorder is in stop mode
2
in the File screen, press the ERASE
button.
Press the + button to select [ Start ].
3
Press the OK button.
4
• The display changes to [ Erasing! ] and
erasing starts.
• [ Erased ] is displayed when the file is erased.
File numbers are reassigned automatically.
4
Erasing
• If an action is not selected within 8 seconds,
the recorder returns to stop mode.
EN
61
Page 62

4,6,
9
7
2
3,5
8
Erasing
Erasing multiple files at once
4
Erasing
Select the folder where the file you
1
want to erase is saved ( ☞ P.25).
Press the ERASE button in the File
2
list screen.
• If an action is not selected within 8 seconds,
the recorder returns to stop mode.
EN
62
Press the + or − button to select
3
[ Selected files ] or [ All files ].
[ Selected files ]: Erase multiple selected files.
[ All files ]: Erase all files in a folder.
Press the OK button.
4
• If you selected [ All files ], proceed to Step 8.
Press the + or − button to select the
5
file to be erased.
Press the OK button.
6
• Repeat steps 5 and 6 to select the files to be
erased.
Press the F2 ( GO ) button.
7
Page 63

Erasing
Press the + button to select [ Start ].
8
Press the OK button.
9
• The display changes to [ Erasing! ] and
erasing starts.
• [ Erased ] is displayed when the file is erased.
File numbers are reassigned automatically.
Notes
• You cannot recover a file once it has been erased.
Please check carefully before erasing.
• When an SD card is inserted into the recorder,
be sure to confirm the recording media as either
[ Internal memory ] or [ SD card ] so that there is no
mistake ( ☞ P.23, P.72).
• Locked files and files set as read-only cannot be
erased ( ☞ P.51).
• If the SD card is write-protected, [ SD Card Locked ]
will be displayed. If you want to erase a file, please
release the card’s write protection ( ☞ P.21).
• If there is a file that cannot be recognized by the
recorder, the file will not be erased. Please connect
the recorder to your PC to erase the file.
• Replace the battery with a new one in order to
ensure that the battery does not go flat during
erasing. In addition, it may take over 10 seconds to
complete erasing. Never perform operations such
as the following during erasing, as such operations
may damage the data.
1 Disconnect the AC Adapter during erasing.
2 Remove the battery during erasing.
3 Remove the SD card during erasing when
[ SD card ] is selected as the recording media.
• You cannot delete folders with the recorder.
4
Erasing
EN
63
Page 64

2
2,4,6
3,5,7
1
8
Menu setting method
Menu setting
Items in menus are categorized by area, so select an
area first and move to the desired item to set it. You
can set each menu item as follows.
5
Menu setting method
1
EN
While the recorder is in stop mode,
press the MENU button.
• The menu appears on the display.
• Menu items can be set during recording or
playback.
Press the + , − ,
2
to move to the area that contains
the item you want to set.
Press the OK button.
3
Press the + or − button to move to
4
the item you want to set.
Press the OK button.
5
• The display shows the setting of the
selected item.
9
or
0
button
64
Page 65
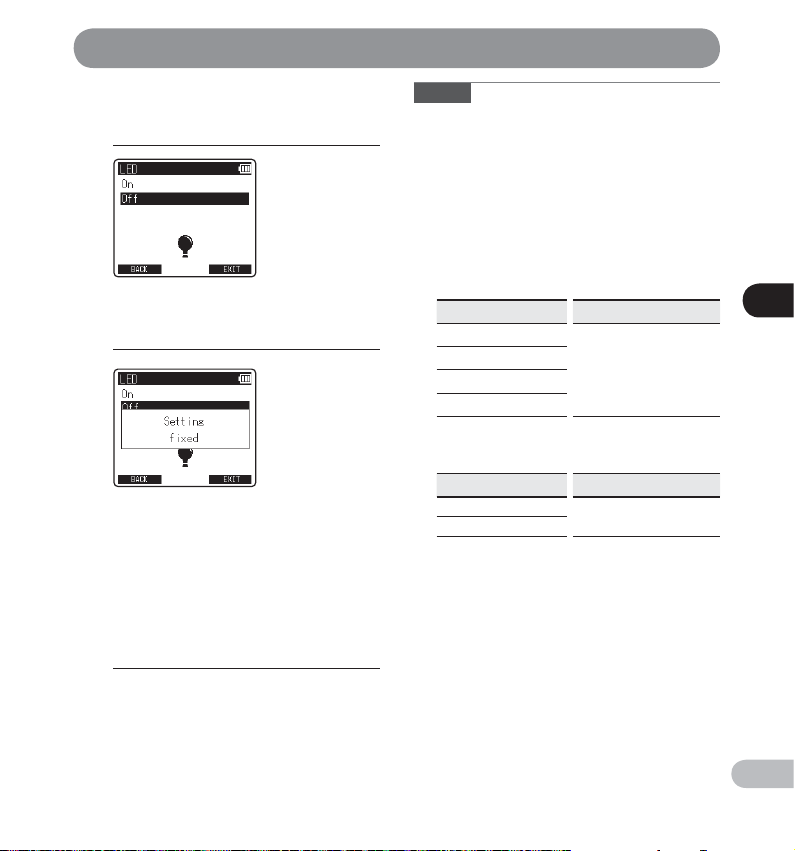
Menu setting method
Press the + or − button to change
6
the setting.
Press the OK button to complete
7
the setting process.
•
A message appears on the screen to inform you
that the setting has been entered.
• Pressing the F1 ( BACK ) button without
pressing the OK button cancels the setting
process and returns you to the previous
screen.
Press the F3 ( EXIT ) button to close
8
the menu screen.
Notes
• The recorder stops if you leave it idle for 3 minutes
during a menu setup operation and do not set a
selected item.
• When menu settings are entered during recording
or playback, the menu settings are canceled if 8
seconds elapse with no buttons being pressed.
Setting menu during recording
▌
Function Setting
[ Mic Gain ]
[ Low Cut Filter ]
[ Plug-in Power ]
[ Rec Monitor ]
Setting menu during playback
▌
Function Setting
[ Play Mode ]
[ Skip Space ]
To menu item options
To menu item options
5
Menu setting method
•
If the menu screen is open during recording or
playback, pressing the
you to return to the recording or playback screen
without interrupting recording or playback
F3 ( EXIT )
button allows
.
EN
65
Page 66

Menu setting method
, Rec Menu
Mic Gain
Recording sensitivity is adjustable to meet recording
needs.
[ Hi ]:
Suitable for recording meetings and seminars with
a small number of people.
[ Mid ]:
Suitable for recording musical performances.
5
[ Lo ]:
Menu setting method
Suitable for recording loud musical performances.
• This function is enabled when the Mode dial
is switched to [ QUICK ]. When the Mode dial is
switched to [ SMART ] * or [ MANUAL ], adjust the
recording level via the correction function (
• To confirm the setting, press and hold the F3 ( INFO )
button at the [ Home ] screen (
* In [ SMART ] mode, you can adjust the recording
level after setting the time for
[ Smart Time ] ( ☞ P.68).
EN
☞
P.23).
66
☞
P.31).
Limiter
Switch to the automatic adjustment function
according to the input level during recording.
[ Music ]:
Select this setting for clarity of sound volume. This
setting is suitable for music recordings.
[ Voice ]
:
Select this setting to equalize the sound volume.
The sound can be recorded at a predetermined
volume to produce equalized recordings. This
setting is suitable for voice recordings.
[ Off ]:
Use this position when adjusting the input levels
without using the correction function.
• This function is enabled when the Mode dial is
switched to [ SMART ] or [ MANUAL ] (
• If the sound input is too loud, noise may occur
even if you set [ Limiter ] to [ Music ] or [ Voice ]. Also,
in certain cases the PEAK indicator light, which
indicates loud input, may not light. To ensure
successful recording, we recommend that you test
the record function and volume before use.
• To confirm the setting, press and hold the F3 ( INFO )
button at the [ Home ] screen (
☞
P.23).
P.29, P.30).
☞
Rec Format
This setting correspo nds to the linear PCM format that
can record soun d at a sound quality that is bet ter than
CDs and to the MP3 format that can record by highly
compressing the file.
Select the recording format.
1
[ PCM ]: This is an uncompressed audio format
which is used for music CDs etc.
[ MP3 ]: This is a common sound compression
mode. File sizes in this format are smaller
than in the PCM format.
Page 67

Menu setting method
Select the recording rate.
2
When [ PCM ] *1 is selected:
[ 96.0 kHz/24 bit ] to [ 44.1 kHz(mono) ] *2
When [ MP3 ] is selected:
[ 320 kbps ] to [ 64 kbps(mono) ] *2
*1 Files saved in the PCM (WAV ) format
correspond to BWF (Broadcast Wave
Format), and the date and time that each
file is recorded is added to the file.
*2 Monaural recording.
• For clear recording of musical performances or
choirs, set [ Rec Format ] to any value other than
[ mono ] before starting recording.
• When an external monaural microphone is used
while [ Rec Format ] is set to a stereo recording
mode, audio is recorded to the L channel only.
• To confirm the setting, press and hold the F3 ( INFO )
button at the [ Home ] screen (
☞
P.23).
Low Cut Filter
The recorder has a Low Cut Filter function to minimize
low-frequency sounds and record voices more clearly.
This function can reduce noise from air conditioners
and projectors and other similar noises.
[ 300Hz ]:
Use this setting when sufficient noise reduction
cannot be obtained with the [ 100Hz ] setting.
[ 100Hz ]:
This setting will reduce the noise generated from air
conditioners and projectors. It is effective for indoor
recording.
[ Off ]:
Disables the Low Cut Filter function.
• To confirm the setting, press and hold the F3 ( INFO )
button at the [ Home ] screen (
☞
P.23).
Plug-in Power
E xternal microphones suppor ted by plug-in power
can also be used. You can configure the recorder
according to whether or not you want to supply
power to external microphones.
[ On ]:
When the plug-in power function is activated,
power will be supplied to any connected external
microphone. Select this option when external
microphones to be supported by plug-in power are
connected (
[ Off ]:
Disables this function. Select this option when
external microphones that you do not want to
support with plug-in power are connected.
• Turn the plug-in power function to [ Off ] when
an external microphone that does not need to
be supported by plug-in power is connected, as
there is a risk that noise may be generated while
recording.
☞
P.94).
Mic Select (LS-14 only)
Select whether or not the built-in center microphone
is to be turned On or Off.
[ Central Mic ON ]:
Recording will be performed in 3-microphone
mode.
[ Central Mic OFF ]:
Recording will be performed using only the built-in
stereo microphones.
• To confirm the setting, press and hold the F3 ( INFO )
button at the [ Home ] screen (
☞
P.23).
5
Menu setting method
EN
67
Page 68

Menu setting method
Pre-Recording
Pre-reco rding enables you to record up to 2 se conds * of so und
before you ac tually press the recording b utton. This funct ion
allows you, for e xample, to start reco rding birdsong up to 2
seconds * be fore the bird starts sin ging even if you press the
recording but ton at the moment the bird starts singing .
[ On ]: For recording sound up to 2 seconds * before the
recording button is pressed.
[ Off ]: For normal recording start.
* Recording start time will vary according to
5
[ Rec Format ] settings.
• To confirm the setting, press and hold the F3 ( INFO )
Menu setting method
button at the [ Home ] screen (
☞
P.23).
Rec Monitor
Select whether or not to output audio while recording
from the earphone jack (EAR).
[ On ]: Enables the recording monitor function. Sound
will be output from the EAR jack.
[ Off ]: Disables this function. Sound will not be output
from the EAR jack.
• If the external speaker is connected while recording,
there is a risk that audio feedback will occur. It is
recommended that you use earphones to monitor
recording, or turn [ Rec Monitor ] to [ Off ] while
recording.
How to enable pre-recording
▌
To enable pre-recording, set [ Pre- Recording ] to [ On ].
A
This function is enabled when the Mode dial is
switched to [ MANUAL ].
While the recorder is in stop
1
mode, press the REC ( s ) button.
• The recorder enters recording pause mode.
However, it constantly records ambient
sound and holds up to 2 seconds of data,
which is refreshed every second.
Press the REC ( s ) button.
2
• The recorded data will include up to 2
seconds of sound recorded before
EN
68
the REC ( s ) button was pressed.
• When the [ Pre-Recording ] function is used, the
following functions cannot be used.
• [ OVER DUB ] ( ☞ P.35)
Smart Time
Set the automatic adjustment time to be used in
[ SMART ] mode.
[ 10 sec. ] [ 30 sec. ] [ 1 min. ]: Set the time for automatic
adjustment.
[ Endless ]: Automatic adjustment will continue until
you skip it.
Metronome
The metronome is a useful rhy thm guide and can
be used during recording. You can also set it while
recording is paused. The metronome sound is not
output from the speaker.
Select the metronome options.
1
[ Tempo ]: Set the metronome’s tempo.
[ Sound ]: Set the metronome’s sound.
[ Beat ]: Set the metronome’s pattern.
[ Volume ]: Set the metronome’s volume.
Page 69

Menu setting method
Change the settings.
2
When [ Tempo ] is selected:
Set a Tempo speed between [ 40 ] and [250].
When [ Volume ] is selected:
Set the volume between [ Volume 1 ] and
[ Volume 5 ].
When [ Sound ] is selected:
Set [ Metronome 1 ] or [ Metronome 2 ] as
the sound type.
When [ Beat ] is selected:
Set a rhythm pattern between [ 0 ] and [ 9 ].
• To use the Metronome function, press the
F1 ( METRONOME ) button during recording or
while recording is paused (
• The sound of the metronome will be output from
the EAR jack. Connect earphones when using the
metronome.
• The sound of the metronome will not be recorded.
• When [ Rec Monitor ] is set to [ Off ], no metronome
sound is output (
☞
P.68).
☞
P.36).
4 Tempo terms and guide to tempo range
LARGO Widely and slowly =40 to 59
LARGHETTO A little more slowly =60 to 65
ADAGIO Slowly
ANDANTE Walking tempo
MODERATO Moderately
ALLEGRO Rapidly
PRESTO Very fast
PRESTISSIMO Very ver y fast
=66 to 75
=76 to 107
=108 to 119
=120 to 167
=168 to 200
=201 to 250
5
Menu setting method
EN
69
Page 70

Menu setting method
- Play Menu
Play Mode
You can select the playback mode that best suits the
type of audio.
Select the desired playback range
▌
• In [ File ] mode, when the recorder comes to the
end of the last file in the folder, [ End ] flashes for two
seconds on the display and the recorder stops at
the start of the last file.
• In [ Folder ] mode, when the recorder comes to the
end of the last file in the folder, [ End ] flashes for two
seconds on the display and the recorder stops at
the start of the first file in the folder.
• To confirm the setting, press and hold the F3 ( INFO )
button at the [ Home ] screen (
☞
P.23).
5
Menu setting method
EN
Select [ Play Area ].
1
Select [ File ] or [ Folder ].
2
[ File ]: Stop after playing back the current file.
[ Folder ]: Continuously play files in the current
folder until the last file and then stop.
Select the desired playback mode
▌
Select [ Repeat ].
1
Select [ On ] or [ Off ].
2
[ On ]: Sets the playback range to be played back
repeatedly.
[ Off ]: Disables the playback mode function.
70
Skip Space
This function enables you to skip (forward) or reverse
skip (rewind) a small portion of the file being played.
This function is convenient for quickly skipping to
another playback position or repeatedly playing back
short phrases.
Select [ Forward Skip ] or
1
[ Reverse Skip ].
Set the skip space.
2
When [ Forward Skip ] is selected:
[ File Skip ] [ 10 sec. ] [ 30 sec. ] [ 1 min. ]
[ 5 min. ] [ 10 min. ]
When [ Reverse Skip ] is selected:
[ File Skip ] [ 5 sec. ] [ 10 sec. ] [ 30 sec. ]
[ 1 min. ] [ 5 min. ]
Page 71

Menu setting method
Forward/Reverse Skip Playback
▌
. LCD/Sound Menu
Press the PLAY ( ` ) button to start
1
playback.
Press the 9 or 0 button.
2
• The recorder skips (forward) or reverse skips
(rewind) a set space and starts playing back.
• If there is an index mark/temp mark or a cue closer
than the skip space, the recorder forward skips/
reverse skips to that position.
Backlight
The display will remain lit for about 10 (Initial set ting)
seconds when a button on the recorder is pressed.
[ 5 sec. ] [ 10 se c. ] [ 30 sec. ] [ 1 min. ]:
Enables the Backlight function.
[ Off ]:
Disables the Backlight function.
5
Menu setting method
Contrast
Display contrast can be adjusted in 12 levels.
• You can adjust the LCD display contrast level from
[ 01 ] to [ 12 ].
LED
You can set the recorder so the LED indicator light
does not turn on.
[ On ]:
Enables the LED light function.
[ Off ]:
Disables the LED light function.
EN
71
Page 72

Menu setting method
Beep
The recorder beeps to aler t you to button operations
or warn you of errors. System sounds may be turned
off.
[ Volume 3 ]:
Increase the volume of beeps.
[ Volume 2 ]:
Set beeps to the normal volume.
[ Volume 1 ]:
Decrease the volume of beeps.
5
[ Off ]:
Disables the Beep function.
Menu setting method
Language(Lang)
You can select the display language for this recorder.
[ English] [Français] [Español]:
• The selectable languages differ depending on the
region.
Voice Guide (LS-14 only)
This feature gives audio announcements of recorder
operating conditions.
See “ Guidance [ Voice Guide ] ” ( ☞ P.74 ) .
/ Device Menu
Memory Select
When an SD card is inser ted, you can select to record
to either the internal memor y or to the SD card
( ☞ P. 2 0 ).
[ Internal memory ]: Internal memory.
[ SD card ]: SD card.
• To confirm the recording media, press and hold the
F3 ( INFO ) button at the [ Home ] screen ( ☞ P. 2 3 ).
Power Save
If the recorder remains in stop mode for over 10
minutes (Initial setting) while the power is turned on,
the recorder enters sleep mode.
[ 5 min. ] [ 10 min. ] [ 30 min. ] [ 1 hr. ]:
Set the length of time that is to elapse before the
recorder enters sleep mode.
[ Off ]: Disables the Power Save function.
• If any button is pressed, the elapsed time count
starts over again.
Time & Date
Setting the time and date beforehand enables easier
file management.
See “ Changing the time and date [ Time & Date ] ”
( ☞ P.75 ) .
EN
72
Page 73

Menu setting method
USB Settings
You can switch the USB class according to your usage.
See “ Changing the USB class [ USB Settings ] ”
( ☞ P.76 ) .
Reset Settings
This function returns all other functions to their initial
settings (factory default).
[ Start ]: Returns the settings to their initial values.
[ Cancel ]: Takes you back to [ Device Menu ].
•
After the settings have been returned to their initial values,
the time settings and file numbers are preserved, without
being returned to their initial settings.
Menu settings after resetting
▌
(initial settings)
, Rec Menu :
[ Mic Gain ] [ Mid ]
[ Limiter ] [ Off ]
[ Rec Format ]
[ PCM ] [ 44.1kHz/16bit ]
[ Low Cut Filter ] [ Off ]
[ Plug-in Power ] [ On ]
[ Mic Select ] * [ Central Mic ON ]
[ Pre-Recording ] [ Off ]
[ Rec Monitor ] [ On ]
[ Smart Time ] [ 30 sec. ]
[ Metronome ]
[ Temp ] [ 120 ]
[ Sound ] [ Metronome 1 ]
[ Beat ] [ 0 ]
[ Volume ] [ Volume 3 ]
- Play Menu :
[ Play Mode ]
[ Play Area ] [ File ]
[ Repeat ] [ Off ]
[ Skip Space ]
[ Forward Skip ] [ File Skip ]
[ Reverse Skip ] [ File Skip ]
. LCD/Sound Menu :
[ Backlight ] [ 10 sec. ]
[ Contrast ] [ Level 06 ]
[ LED ] [ On ]
[ Beep ] [ Volume 2 ]
[ Language(Lang) ] [ English ]
[ Voice Guide ] *
[ On/Off ] [ On ]
[ Speed ] [ Speed 3 ]
[ Volume ] [ Volume 3 ]
/ Device Menu :
[ Memory Select ] [ Internal memory ]
[ Power Save ] [ 10 min. ]
[ USB Settings ]
[ USB Connection ] [ PC ]
[ USB Class ] [ Storage ]
* LS-14 only.
Format
When the recorder is formatted, all the saved data,
including locked files and read-only files, are erased.
See “ Formatting the recorder [ Format ] ” ( ☞ P.78 ) .
Memory Info.
The recordable capacity remaining and overall
capacity of the recording media can be seen from the
menu.
• The recorder uses some of its memory capacity
to maintain a management file. The indicated
remaining capacity is less than the total capacity
of the media due to its characteristic. This is not a
malfunction.
System Info.
You can check information about the recorder on
the menu screen. [ Model ] (Model Name), [ Version ]
(System version) and [ Serial No. ] (Serial Number)
appear on the display.
5
Menu setting method
EN
73
Page 74

Menu setting method
Guidance [ Voice Guide ] (LS-14 only)
This feature gives audio announcements of recorder
operating conditions. Adjust the speed and the
volume of guidance announcements.
Select [ Voice Guide ] from the
1
menu on the [ LCD/Sound Menu ].
• For details on how to enter the menu
5
Menu setting method
EN
settings, see “ Menu setting method ”
( ☞ P.64).
Press the + or − button to select the
2
item you want to set.
• Select items you want to set from among
[ On/Off ], [ Speed ] and [ Volume ].
Press the OK button to move to the
3
respective setting.
[ 4On/Off ] setting:
Press the + or – button to select between
1
[ On ] and [ Off ].
[ On ]: Guidance will be provided.
[ Off ]: Guidance will be canceled.
Press the OK button to exit [ On/Off ]
2
selection.
[ 4Speed ] setting:
Press the + or – button to select from
1
[ Speed 5 ], [ Speed 4 ], [ Speed 3 ], [ Speed 2 ],
and [ Speed 1 ].
Press the OK button to exit [ Speed ]
2
selection.
4
[ Volume ] setting:
Press the + or – button to select from
1
[ Volume 5 ], [ Volume 4 ], [ Volume 3 ],
[ Volume 2 ], and [ Volume 1 ].
Press the OK button to exit [ Volume ]
2
selection.
Press the F3 ( EXIT ) button to close
4
the menu screen.
Notes
• The starting tune/closing tune when the power is
turned On/Off ( ☞ P.16) can be canceled by setting
the guidance to [ Off ].
• Set the volume of the starting tune/closing tune in
the guidance [ Volume ] setting.
• The [ Speed ] setting in the [ Voice Guide ] settings is
disabled during file playback.
74
Page 75

Menu setting method
Changing the time and date
[ Time & Date ]
If the current time and date are not correct, set them
using the procedure below.
Select [ Time & Date ] from the
1
menu on the [ Device Menu ].
Press the + or − button to change
3
the value.
• For details on how to enter the menu
settings, see “ Menu setting method ”
( ☞ P.64).
• “ Hour ” flashes on the display, indicating the
start of the Time and Date setup process.
Press the 9 or 0 button to
2
select the item you want to set.
• Select “ Hour ”, “ Minute ”, “ Year ”, “ Month ” or
“ Day ” by moving the flashing position.
• Follow the same steps by pressing the 9
or 0 button to select the next item, and
pressing the + or − button to change the
value.
Press the OK button to complete
4
the setting.
• The clock will start from the set date and
time. Press the OK button when you want
the clock to start.
Press the F3 ( EXIT ) button to close
5
the menu screen.
5
Menu setting method
EN
75
Page 76

Menu setting method
Changing the USB class
[ USB Settings ]
You can select [ PC ] to connec t the recorder to a PC
to send and receive files, or [ AC adapter ] to connect
it to the AC adapter (A514) (sold separately). It is also
possible to switch the USB class between [ Composite ]
and [ Storage ] to suit your usage.
Select [ USB Settings ] from the
1
5
Menu setting method
menu on the [ Device Menu ].
• For details on how to enter the menu
settings, see “ Menu setting method ”
( ☞ P.64).
Press the + or − button to select
2
[ USB Connection ] or [ USB Class ].
Press the OK button.
3
Press the + or − button to change
4
the setting.
When [ 4USB Connection ] is
selected:
[ PC ]:
Setting for when the recorder is connected
to a PC and used as a storage device or
composite device. Connected as storage or
composite.
[ AC Adapter ]:
This setting is available only when the
recorder receives power from the USB or the
AC adapter (A514) (Sold separately).
[ Optional ]:
Setting to confirm the connection method
each time a USB connection is made.
[ USB Connection ]:
EN
76
Setting for connecting to a PC.
[ USB Class ]:
Setting for USB class.
Page 77

Menu setting method
When [ 4USB Class ] is selected:
[ Storage Class ]:
Recognized by a PC as an external memory
device.
[ Composite ]:
Setting when connected to a PC and used
as an external memory device, USB speaker
or microphone.
Press the OK button to complete
5
the setting.
Press the F3 ( EXIT ) button to close
6
the menu screen.
Notes
• When you first connect the recorder to your PC
as an external storage device, the driver for the
recorder will be automatically installed in your PC.
• The PC cannot recognize that the recorder is
connected to the PC if [ USB Connection ] is set to
[ AC Adapter ].
• If the recorder is not recognized by the PC as an
external storage device, change the [ USB Class ]
setting to [ Storage Class ].
5
Menu setting method
EN
77
Page 78

Menu setting method
Formatting the recorder [ Format ]
If you format the recorder, all files will be erased and
all function settings will return to the defaults except
the date and time settings. Transfer any important
files to a computer before formatting the recorder.
Select [ Format ] from the menu on
1
the [ Device Menu ].
Press the OK button.
3
Press the + button to select [ Start ].
4
5
Menu setting method
EN
78
• For details on how to enter the menu
settings, see “ Menu setting method ”
( ☞ P.64).
Press the + or − button to select the
2
recording media to format.
Press the OK button.
5
• After the [ All data will be erased ] message
displays for two seconds, [ Start ] and
[ Cancel ] appear.
Press the + button again to select
6
[ Start ].
Page 79

Menu setting method
Press the OK button.
7
• Formatting begins and [ Formatting! ]
flashes on the display.
• [ Format done ] appears when formatting
ends.
Notes
• Never format the recorder from a PC.
• When the recorder is formatted, all the saved data,
including locked files and read-only files, is erased.
• To restore the function’s settings to their initial
values, use [ Reset Settings ] ( ☞ P.73).
• If the SD card is write-protected, [ SD Card Locked ]
will be displayed. If you want to format the card,
release the card’s write protection ( ☞ P.21).
• When an SD card is inserted into the recorder,
be sure to confirm the recording media as either
[ Internal memory ] or [ SD card ] so that there is no
mistake ( ☞ P.23, P.72).
• Replace the battery with a new one in order to
ensure that the battery does not go flat during
formatting. In addition, it may take over 10 seconds
to complete formatting. Never perform operations
such as the following during formatting, as such
operations may damage the data.
1 Disconnect the AC Adapter during formatting.
2 Remove the battery during formatting.
3 Remove the SD card during formatting when
[ SD card ] is selected as the recording media.
• Formatting on the recorder is Quick Format. If you
format the SD card, file management information
is refreshed and the data inside the SD card is not
deleted completely. When giving someone or
disposing of the SD card, be careful of data leakage
from the SD card. We recommend that the SD card
be destroyed when you dispose of it.
5
Menu setting method
EN
79
Page 80
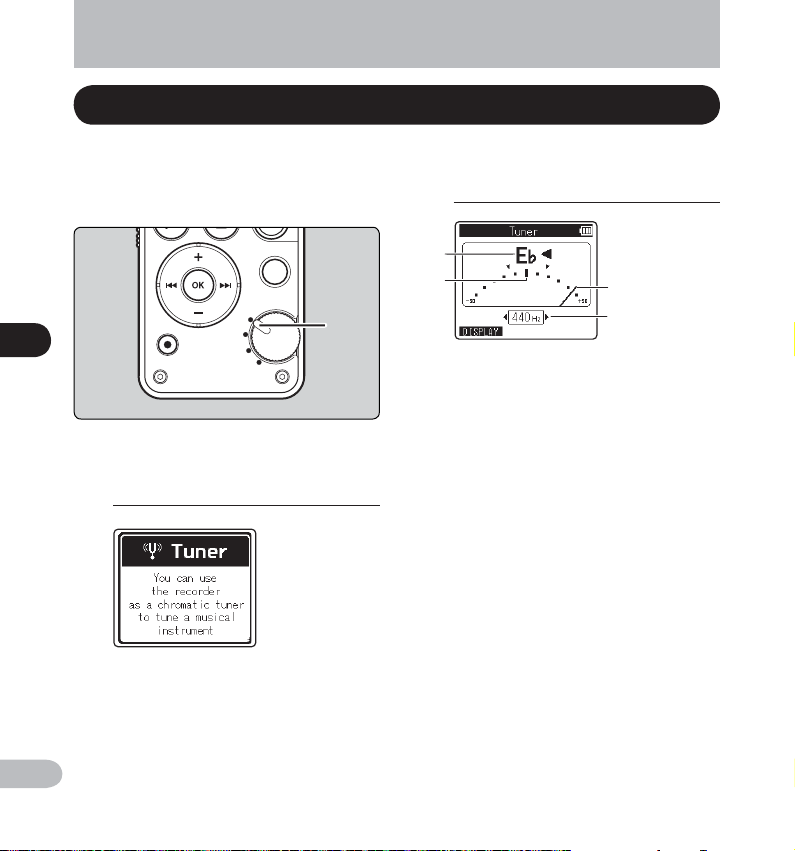
1,4
About the tuner
Using the tuning function
You can use the recorder’s chromatic tuning function
to tune musical instruments. The dif ference between
the reference tone and the input sound is measured
and displayed on screen.
6
Using the tuning function
Switch the Mode dial to the [ v ]
1
position.
Tune the musical instrument by
2
playing a single note.
a
b
a The name of the note closest to the entered
sound
b Target position indicated by the reference
tone
c Tuning meter
d Calibration value
• The name of the note closest to the
recognized sound appears.
• Press the F1 ( DISPLAY ) button to switch the
type of visualization between the waveform
type and the meter type.
• Waveform type is useful for the practice of
wind instruments because it shows the tone
interval visually.
c
d
EN
80
Page 81

Using the tuning function
Adjust while looking at the tuning
3
meter and the indicators.
• Tune accurately with the needle pointing to
the center of the meter.
• The LED indicator lights will turn on as
the instrument becomes tuned. When
the instrument is in tune, the bar will be
at the center of the meter, and the left
and right LED indicator lights will turn on
simultaneously.
The lights enable you to tune an instrument
even when the display is in difficult lighting
conditions.
• To change the calibration reference value,
9
press the
frequency. The frequency of the reference
tone A can be adjusted by 1 Hz increments
in the range of 435 Hz to 445 Hz.
or
button to select the
0
Switch the Mode dial to a position
4
other than [ v ] to exit the tuning
mode.
6
Using the tuning function
EN
81
Page 82

Using the recorder on your PC
When connected to a PC, the recorder enables you to do the following:
• You can transfer files from a computer and play
them back.
• This recorder is compatible with MP3 and WAV files.
• This recorder can also be used as external memory
for a computer by storing data from a computer
and reading it back out ( ☞ P.88).
Operating environment
Windows
▌
7
Operating environment
Operating System:
Microsoft Windows XP/Vista/7/8 (Standard
Installation)
Compatible PC’s:
Windows PC’s equipped with more than one free
USB port
Notes
• This is the operating environment required for saving files recorded by this recorder to your PC via the USB
connection.
• The support service does not cover you if your PC has been updated from Windows 95/98/Me/2000 to Windows
EN
XP/Vista/7/8.
• Any failure on a self-modified PC will not be covered under the operational warranty.
82
Macintosh
▌
Operating System:
Mac OS X 10.4.11 - 10.8 (Standard Installation)
Compatible PC’s:
Apple Macintosh series equipped with more than
one free USB port
Page 83

Operating environment
Precautions on using the recorder connected to a PC
• When you are downloading a file from the recorder or uploading a file to the recorder, do not remove the USB
cable even if the screen is indicating you can. Data is still being transferred while the PEAK indicator light is
blinking. When removing the USB cable, be sure to follow the description in ☞ P.85. If the USB cable is removed
before the drive is stopped, data may not be successfully transferred.
• On a PC, do not format the drive of the recorder. Initialization is not successfully achieved on a PC. For
initialization, follow the instructions in the [ Format ] screen of the recorder ( ☞ P.78).
• If folders or files stored on the recorder are moved or renamed by using a file management tool in Windows or
Macintosh, the order of files may change or files may become unrecognizable.
• Data can be written or uploaded to the recorder even though the attribute of the recorder drive is shown as
Read-only by the operating system of the PC.
• As noise may cause adverse effects on electronics devices near the recorder, unplug the external microphone
and earphones when you connect the recorder to a PC.
7
Operating environment
EN
83
Page 84

Connecting to your PC
7
Connecting to your PC
EN
84
Boot the PC.
1
Connect the USB cable to the USB
2
port of the PC.
While the recorder is in stop mode
3
or turned off, connect the USB
cable to the connecting terminal of
the recorder.
• [ Remote (Storage) ] is displayed on the
recorder if the USB connector is connected.
• The recorder does not establish a
connection with a PC if [ AC Adapter ] is
selected in the USB connection setting.
Select [ PC ] in the USB connection setting
( ☞ P.76).
Windows:
When you connect the recorder to Windows
and open [ My Computer ], it is recognized by
the drive name of the product.
Inserting an SD card will allow you to use it as
[ Removable Disk ].
Macintosh:
When you connect the recorder to
Mac OS, it is recognized by the drive name of
the product on the desktop. If an SD card is
inserted, [ Untitled ] is displayed.
Notes
• Refer to the user’s manual for your PC regarding the
USB port on your PC.
• Be sure to push the cable connector all the way in.
Otherwise, the recorder may not operate properly.
• When the recorder is connected through a USB
hub, operation may become unstable. In such
cases, refrain from using a USB hub.
• Use the dedicated USB cable. If any other
company’s cable is used, it may lead to malfunction
of the recorder. Also, never use this dedicated cable
with any other company’s products.
Page 85
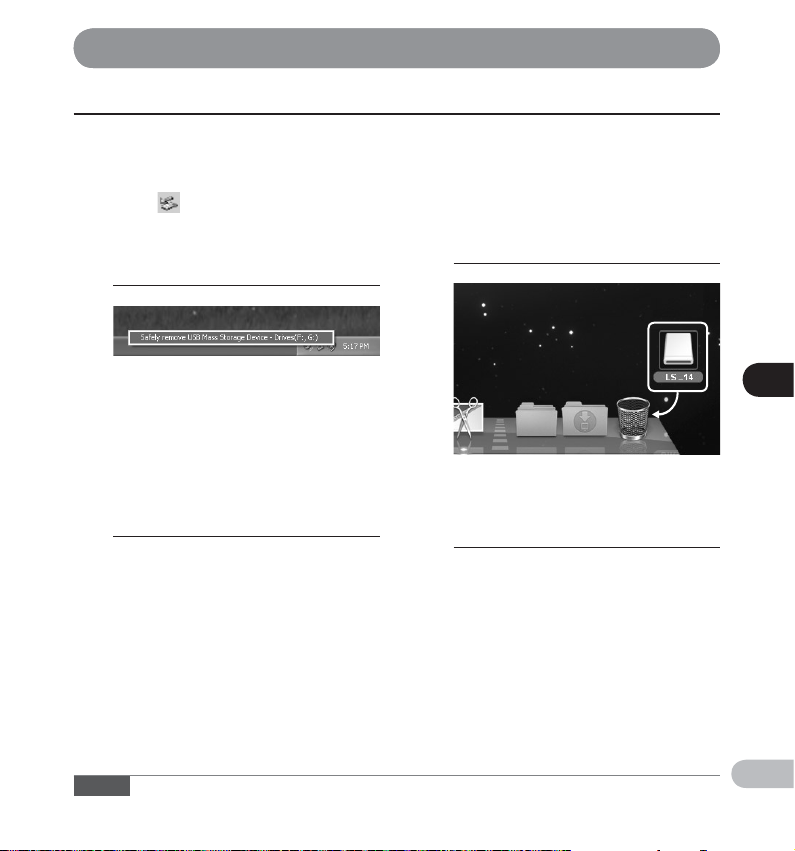
Connecting to your PC
Disconnecting from your PC
Windows
▌
Click [ ] on the task bar located
1
at the lower-right corner of the
screen. Click [ Safely remove USB
Mass Storage Device ].
• The drive letter will differ depending on the
PC being used.
• When the window indicating that it is safe
to remove hardware appears, close the
window.
Confirm that the recorder PEAK
2
indicator light has turned off before
disconnecting the USB cable.
Macintosh
▌
Drag and drop the recorder’s drive
1
icon on the desktop to the Recycle
Bin icon.
Confirm that the recorder PEAK
2
indicator light has turned off before
disconnecting the USB cable.
7
Connecting to your PC
Note
• NEVER disconnect the USB cable while the PEAK indicator light is flashing. If you do, the data may be destroyed.
EN
85
Page 86

Transferring voice files to your PC
The four folders on this recorder will be displayed as [ RECORDER ], [ 01 ], [ 02 ] and [ 03 ] when connecting the
recorder to a PC. Copy them to the folder of your choice on your PC.
7
Transferring voice files to your PC
Windows
▌
Connect the recorder to your PC
1
( ☞ P.84).
Open the Explorer window.
2
• When you connect the recorder to Windows
and open [ My Computer ], it is recognized
by the drive name of the product.
If you insert an SD card, it is recognized as
[ Removable Disk ].
Open the product name folder.
3
Copy the data.
4
Disconnect the recorder from the
5
PC ( ☞ P.85).
Macintosh
▌
Connect the recorder to your PC
1
( ☞ P.84).
• When you connect the recorder to
Mac OS, it is recognized by the drive name
of the product on the desktop. If an SD card
is inserted, [ Untitled ] is displayed.
Double-click the product name
2
icon on the desktop.
Copy the data.
3
Disconnect the recorder from the
4
PC ( ☞ P.85).
Note
EN
• While data is being transmitted, [ Busy ] is displayed and the PEAK indicator light flashes. NEVER disconnect the
USB cable while the PEAK indicator light is flashing. If you do, the data may be destroyed.
86
Page 87
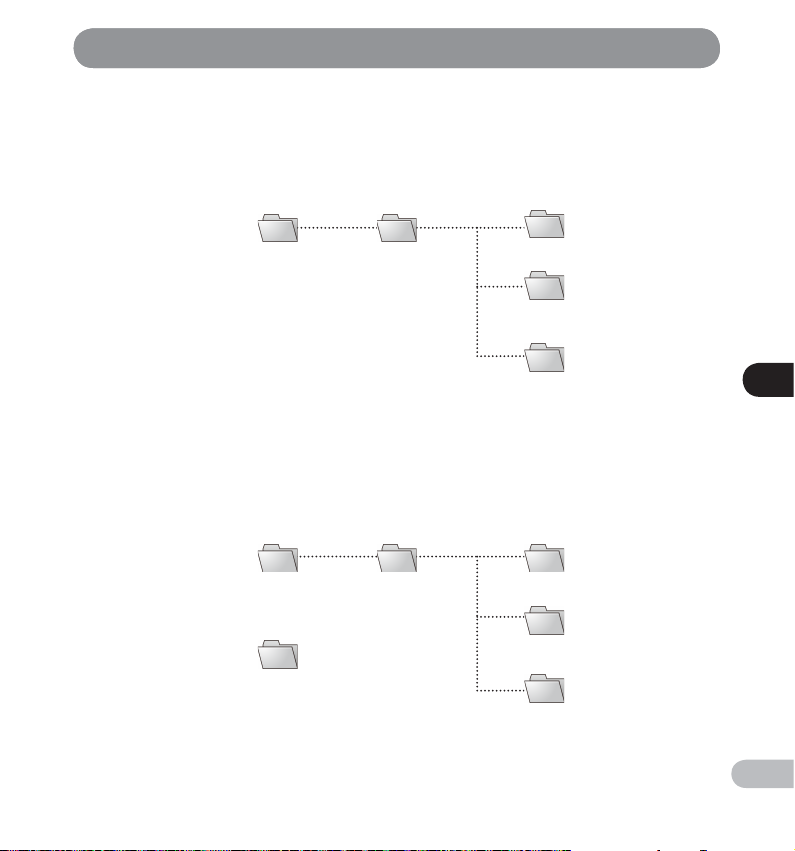
Transferring voice files to your PC
Drive names and folder names when a PC is connected
▌
Internal memory
Drive name Folder name
LS_14
or
LS_12
Recognized by
the drive name of
the product.
SD card
Drive name Folder name
Windows
Removable Disk
Macintosh
Untitled
RECORDER 01
RECORDER
02
03
7
Transferring voice files to your PC
01
02
03
EN
87
Page 88

Usage as external memory of your PC
With the recorder connected to your PC, you can download data from the memor y to your PC and upload data
stored on your PC to the memor y.
7
Usage as external memory of your PC
Windows
▌
Connect the recorder to your PC
1
( ☞ P.84).
Open the Explorer window.
2
• When you open [ My Computer ], the
recorder is recognized by the drive name of
the product.
Open the product name folder.
3
Copy the data.
4
Disconnect the recorder from the
5
PC ( ☞ P.85).
Macintosh
▌
Connect the recorder to your PC
1
( ☞ P.84).
• When you connect the recorder to
Mac OS, it is recognized by the drive name
of the product on the desktop.
Double-click the product name
2
icon on the desktop.
Copy the data.
3
Disconnect the recorder from the
4
PC ( ☞ P.85).
Note
EN
• While data is being transmitted, [ Busy ] is displayed and the PEAK indicator light flashes. NEVER disconnect the
88
USB cable while the PEAK indicator light is flashing. If you do, the data may be destroyed.
Page 89

Other information
Alarm message list
Message Meaning Explanation Action
[ Battery low ] Low battery power. Battery power is getting low. Replace with new batteries ( ☞ P.15).
[ File locked ] Erase-lock ed. Tried to delete a locked file. Unlock the file ( ☞ P.51).
Index full.
[ No more can be set ]
Temp mark full.
[ Folder full ] Folder full.
[ Memory error ] Error in the memory. Error in the memory.
[ Card error ] Error in the memory.
[ Illegally copied file ] Illegally copied file.
[ Memory full ] Zero remaining memory. No remaining memory. Erase unnecessary files ( ☞ P.61).
[ SD Card Locked ] Card Locked.
[ No file ] No file.
[ Format error ] Formatting error.
The file is full of index marks
(maximum of 99 marks).
The file is full of temp marks
(maximum of 99 marks).
The folder is full of files
(maximum of 999 files).
SD card is not recognized
correctly.
———
The SD Card is
write protected.
No files were found in the
folder.
There was an error while
formatting the recorder’s
memory.
Erase unnecessary index marks ( ☞ P.45).
Erase unnecessary temp marks ( ☞ P.45).
Move files to a different folder or delete
unnecessary files (
This is a malfunction, so go to the store
where you purchased the recorder or
an Olympus service station for repair
( ☞ P.99).
Remove the SD card and insert it again
( ☞ P.20).
Erase the file ( ☞ P.61).
Release the SD card’s write protection
and then try again ( ☞ P.21).
Select another folder ( ☞ P.25).
Reformat the memory ( ☞ P.78).
P.48, P.61).
☞
8
Alarm message list
EN
89
Page 90

Alarm message list
Message Meaning Explanation Action
[ Can't create the
system file. Connect
to PC and erase
unnecessary file ]
[ Cannot play this file ] File cannot be played. Incompatible format.
[ Select a file ] Unselected File. File is not selected.
[ Same folder. Can’t be
moved (copied) ]
[ Some files can’t be
moved (copied) ]
The management file cannot
be created.
Folder cannot be moved
(copied).
File cannot be moved
(copied).
8
Alarm message list
[ This file can’t be
divided ]
File cannot be split.
The file for management
cannot be created due to
a shortage of remaining
memory.
Attempting to move (copy)
into the same folder.
Attempting to move (copy)
a file to destination folder in
which a file with the same file
name exists.
Attempting to split a file
other than an MP3 or PCM
file recorded by this recorder.
Connect the recorder to a computer and
delete unnecessary files.
Confirm which files can be played on this
recorder ( ☞ P.43).
Please select a file then carry out the
operation ( ☞ P.25).
Select another folder.
Select another file.
Select another file.
EN
90
Page 91

Troubleshooting
Symptom Probable cause Action
Nothing appears on the display
Won’t start
Unable to record
Unable to record through the
external microphone
No playback sound heard
Recording level too low
The battery is not loaded properly.
Battery power is getting low. Replace with new batteries ( ☞ P.15).
The power is off. Turn the power on ( ☞ P.16).
Battery power is getting low. Replace with new batteries ( ☞ P.15).
The power is off. Turn the power on ( ☞ P.16).
The recorder is in HOLD mode. Release the recorder from HOLD ( ☞ P.17).
Low remaining memory. Erase unnecessary files ( ☞ P.61).
The maximum number of files has been
reached.
An external device is connected to the
LINE IN jack.
An external microphone that must be
supported by plug-in power is connected
but [ Plug-in Power ] is set to [ Off ].
The earphones are connected.
The volume level is set to [ 00 ]. Adjust the volume level ( ☞ P.40).
The recording level has not been adjusted.
The recording sensitivity is too low. Set [ Mic Gain ] to [ Hi ] or [ Mid ] (☞ P.66).
This could potentially be because the
output level for the connected external
devices is too low.
Verify that the battery polarities = and -
are correct ( ☞ P.15).
Move files to a different folder or delete
unnecessary files (
Disconnect the connecting cord from the
recorder.
Set [ Plug-in Power ] to [ On ] when an
external microphone that must be
supported by plug-in power is connected
( ☞ P.67).
Unplug the earphones to use the
built-in speaker.
Adjust the recording level and then try
recording once morel ( ☞ P.31).
Adjust the output level for the
connected devices.
P.48, P.61).
☞
8
Troubleshooting
EN
91
Page 92

Troubleshooting
Symptom Probable cause Action
Recording level too high
Voice files are not recorded in stereo
Cannot find the recorded Voice File Wrong folder.
8
Troubleshooting
Noise heard during playback
Unable to hear any sound from the
earphone through the recording
monitor
Unable to erase the file
The recording level has not been adjusted.
This could potentially be because the
recording level and output level for
connected external devices is too high.
The connected external microphone is
monaural.
[ Rec Format ] is set to a monaural recording
mode.
The recorder was shaken during recording.
The recorder was placed near a cell phone
or fluorescent lamp while recording or
during playback.
The settings of the connected external
microphone do not correspond to those of
the recorder.
[ Rec Monitor ] is set to [ Off ]. Set [ Rec Monitor ] to [ On ] ( ☞ P.68).
The file is locked. Unlock the file ( ☞ P.51).
The file is read-only.
Adjust the recording level and then try
recording once more ( ☞ P.31).
If you cannot record clearly even
after adjusting the recording level,
then adjust the output level for the
connected devices ( ☞ P.31).
When an external monaural microphone
is connected for recording audio, audio is
recorded to the L channel only.
Set [ Rec Format ] to the stereo
recording mode ( ☞ P.66).
Switch to the correct folder
( ☞ P.25).
———
Move the recorder.
When a microphone that does not need
to be supported by the plug-in power
function is connected, turn the
[ Plug-in Power ] setting to [ Off ] ( ☞ P.67).
Unlock the file or cancel the file’s read-only
setting on the PC.
EN
92
Page 93

Troubleshooting
Symptom Probable cause Action
Noise is audible through the
recording monitor
Acoustic feedback is occurring.
If the built-in speaker amps are used to
monitor recording, there is a risk that audio
feedback will occur while recording. It is
recommended that you use earphones to
monitor recording, or turn [ Rec Monitor ] to
[ Off ] before starting recording ( ☞ P.68).
Make adjustments, such as further
distancing the earphones from
the microphones, not pointing the
microphones at the earphones, or lowering
the volume of the recording monitor.
Cannot record using overdubbing
Unable to set index marks, temp
marks
The PC is unable to recognize the
recorder
The chosen playback file is not a
[ PCM 44.1kHz/16bit ] format file.
Rec Format ] is not set to
[
[ PCM 44.1kHz/16bit ].
The maximum number of marks has been
reached.
The file is locked. Unlock the file ( ☞ P.51).
The file is read-only.
[ USB Connection ] is set to [ AC Adapter ]. Set [ USB Connection ] to [ PC ] ( ☞ P.76).
Choose a [ PCM 44.1kHz/16bit ] format file
for playback (
Set [ Rec Format ] to
[ PCM 44.1kHz/16bit ] (
Erase unnecessary marks ( ☞ P.45).
Unlock the file or cancel the file’s read-only
setting on the PC.
P.25, P.60).
☞
☞
P.66).
8
Troubleshooting
EN
93
Page 94

Accessories (optional)
Accessories exclusive to the Olympus voice recorder can be purchased directly from Online Shop on our
company’s website. Availability of accessories differs depending on the country.
s Stereo microphone: ME51S
The built-in large-diameter microphone enables
sensitive stereo recording.
s 2 channel microphone (omni-directional):
ME30W
Two ME30 monaural microphones come in a
set with a miniature tripod and a connection
adapter. These highly sensitive omni-directional
microphones are supported by plug-in power and
are well-suited to recording musical performances.
s Compact Gun Microphone (unidirectional):
ME31
This directional microphone is useful for various
types of recording such as outdoor recording
8
Accessories (optional)
of wild birds singing. The metal body provides
sturdiness and high rigidity.
s Compact zoom microphone
(unidirectional): ME32
This microphone is integrated with a tripod,
making it suitable for recording audio at a
distance, such as from your table at a meeting or
conference.
s Highly sensitive noise-cancellation
monaural microphone (unidirectional):
ME52W
This microphone is used to record audio at a
distance while minimizing surrounding noise.
s Tie clip microphone
(omni-directional): ME15
This small unobtrusive microphone comes with a
tie-clip.
s Telephone pickup microphone: TP8
This earphone-type microphone can be placed
into your ear while you are phoning. The voice
or conversation from the phone can be recorded
clearly.
s USB connecting AC adapter: A514
5VDC AC Adapter for USB connection.
s Connecting cords: KA333
This connecting cord has stereo mini-plugs (ø3.5)
with resistance at both ends. Use it to connect
from the earphone jack output of the recorder
to the microphone input jack when recording.
Converting plug adapters (PA331/PA231) which
convert to the monaural mini plug (ø3.5) or
monaural mini plug (ø2.5) are also included.
s Connecting cords: KA334
This connecting cord has stereo mini-plugs (ø3.5)
without resistance at both ends.
s Exclusive remote control set: RS30W
When the receiver is plugged into the REMOTE
jack, the recorder’s recording and stop functions
can be operated through the remote control.
The receiving position can be adjusted, thereby
allowing you to operate the recorder from various
different angles.
EN
94
Page 95

Specifications
General
▌
4 Recording format:
Linear PCM (Pulse Code Modulation)
MP3 (MPEG-1 Audio Layer3)
4 Input level:
[ Mic Gain ]:
[ Hi ] : − 70 dBv
[ Mid ] : − 50 dBv
[ Lo ] : − 30 dBv
LINE IN jack:
− 6 dBv
4 Sampling frequency:
Linear PCM format
96.0 kHz 24 bit 96.0 kHz
88.2 kHz 24 bit 88.2 kHz
48.0 kHz 16 bit 48.0 kHz
44.1 kHz 16 bit 44.1 kHz
44.1 kHz (mono) 44.1 kHz
MP3 format
320 kbps 44.1 kHz
256 kbps 44.1 kHz
128 kbps 44.1 kHz
64 kbps (mono) 44.1 kHz
4 Maximum working output:
300 mW (8 Ω speaker)
4 Maximum headphone output:
â 150 mV (according to EN 50332-2)
4 Recording media * :
Built-in NAND FLASH memory:
LS-14 : 4 GB
LS-12 : 2 GB
SD card:
2 GB to 32 GB
* The recorder uses some of its memory capacity
to maintain a management file. The indicated
remaining capacity is less than the total
capacity of the media due to its characteristic.
This is not a malfunction.
4 Speaker:
Built-in ø 28 mm round dynamic speaker
4 Built-in microphone with acoustic
resistance:
130 dBspl
4 MIC jack:
ø 3.5 mm mini-jack, impedance 2 kΩ
4 LINE IN jack:
ø 3.5 mm mini-jack, impedance 10 kΩ
4 EAR jack:
ø 3.5 mm mini-jack, impedance 8 Ω or more
4 Input power requirement:
Batteries:
AA batteries (LR6) or
Ni-MH rechargeable batteries
External power supply:
USB connecting AC adapter (A514) 5 V
4 External dimensions:
138.7 mm × 52.5 mm × 23.5 mm
(without protrusions)
4 Weight:
170 g (including batteries)
4 Operating temperature:
0°C - 42°C/ 32°F - 107.6°F
8
Specifications
EN
95
Page 96

Specifications
Frequency response
▌
4 During recording mode ( MIC jack/ LINE IN
jack):
Linear PCM format
96.0 kHz 24 bit 20 Hz to 44 kHz
88.2 kHz 24 bit 20 Hz to 42 kHz
48.0 kHz 16 bit 20 Hz to 23 kHz
44.1 kHz 16 bit 20 Hz to 21 kHz
44.1 kHz (mono) 20 Hz to 21 kHz
MP3 format
320 kbps 20 Hz to 20 kHz
256 kbps 20 Hz to 20 kHz
128 kbps 20 Hz to 17 kHz
64 kbps (mono) 20 Hz to 13 kHz
4 During recording mode
8
Specifications
(Built-in microphones):
LS-14:
20 Hz to 20 kHz ([ Central Mic ON ])
60 Hz to 20 kHz ([ Central Mic OFF ])
LS-12:
60 Hz to 20 kHz
(However, when recording in MP3 format, the
upper limit value of the frequency response
depends on the recording format.)
4 During playback mode:
20 Hz to 20 kHz
( The upper and lower limit values of the frequency
response depends on each recording format.)
Maximum recording time per file
▌
• The maximum capacity for a single file is approx.
4 GB for MP3, and approx. 2 GB for the Linear PCM
format (WAV).
• Regardless of the amount of remaining memory,
the longest sound recording time per file is
restricted to the following value.
4 Linear PCM format:
96.0 kHz 24 bit approx. 1 h.
88.2 kHz 24 bit approx. 1 h.
48.0 kHz 16 bit approx. 3 h.
44.1 kHz 16 bit approx. 3 h. 20 min.
44.1 kHz (mono) approx. 6 h. 40 min.
4 MP3 Format:
320 kbps approx. 29 h. 40 min.
256 kbps approx. 37 h. 10 min.
128 kbps approx. 74 h. 30 min.
64 kbps (mono) approx. 149 h.
EN
96
Page 97
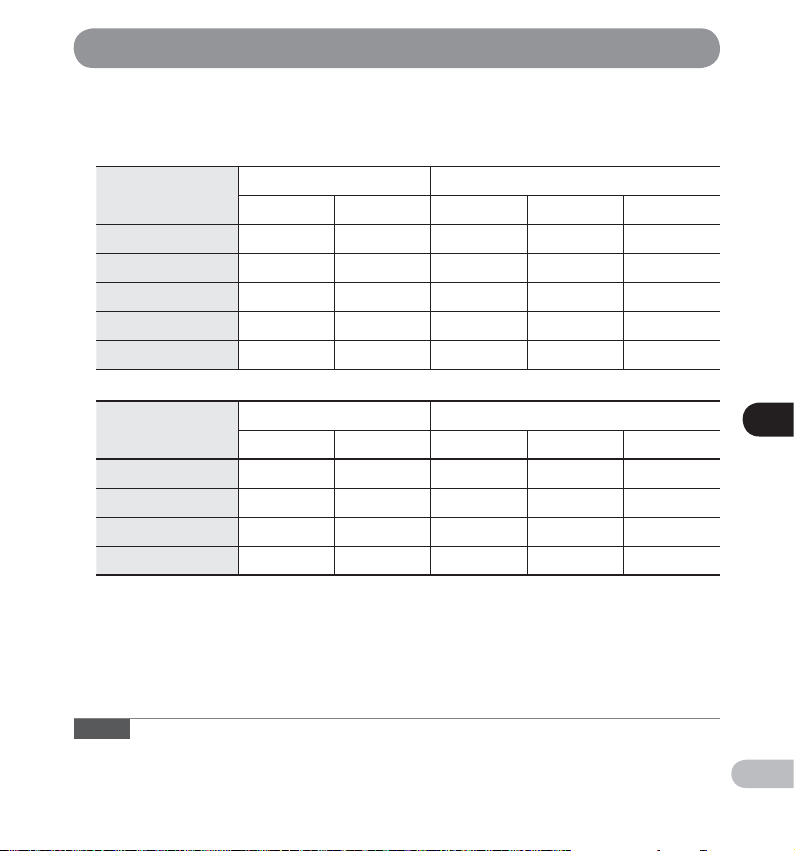
Specifications
Guide to recording times
▌
The following values are stric tly for reference only.
4 Linear PCM format:
Recording format
96.0 kHz 24 bit 1 h. 35 min. 40 min. 14 h. 30 min. 7 h. 15 min. 3 h. 35 min.
88.2 kHz 24 bit 1 h. 45 min. 45 min. 15 h. 45 min. 7 h. 50 min. 3 h. 55 min.
48.0 kHz 16 bit 4 h. 50 min. 2 h. 10 min. 43 h. 35 min. 21 h. 45 min. 10 h. 50 min.
44.1 kHz 16 bit 5 h. 15 min. 2 h. 20 min. 47 h. 25 min. 23 h. 40 min. 11 h. 45 min.
44.1 kHz (mono) 10 h. 35 min. 4 h. 40 min. 94 h. 55 min. 47 h. 20 min. 23 h. 35 min.
4 MP3 format:
Recording format
320 kbps 23 h. 30 min. 10 h. 209 h. 104 h. 52 h.
256 kbps 29 h. 13 h. 261 h. 130 h. 65 h.
128 kbps 58 h. 30 min. 26 h. 523 h. 261 h. 130 h.
64 kbps (mono) 117 h. 52 h. 1,046 h. 522 h. 260 h.
Internal memory SD card
LS-14 (4 GB) LS-12 (2 GB) 32 GB 16 GB 8 GB
Internal memory SD card
LS-14 (
4 GB) LS-12 (2 GB) 32 GB 16 GB 8 GB
8
Specifications
Notes
• Available recording time may be shorter if numerous short recordings are made
(The displayed available recording time and recorded time are approximate indications).
• Variations in the available recording time will arise as there may be differences in the available memory
depending on the SD card.
EN
97
Page 98

Specifications
Guide to battery life
▌
The following values are stric tly for reference only.
4 In recording mode (Internal memory):
Recording format
Linear PCM format 44.1 kHz 16 bit 46 h. 50 h.
MP3 format
* When [ Mic Select ] is set to [ On ] (LS-14 only).
4 In voice file playback mode:
Recording format
8
Specifications
Linear PCM format 44.1 kHz 16 bit 62 h.
MP3 format
Built-in microphones*
Alkaline battery
LS-14 (4 GB) LS -12 (2 GB)
320 kbps 42 h. 46 h.
64 kbps (mono) 43 h. 47 h.
Built-in speaker
Alkaline battery
320 kbps 53 h.
64 kbps (mono) 61 h.
Recording format
Linear PCM format 44.1 kHz 16 bit 86 h.
MP3 format
320 kbps 75 h.
64 kbps (mono) 86 h.
Earphone playback
Alkaline battery
Notes
• Battery life is measured by Olympus. It varies greatly according to the type of battery used and the conditions of
use.
• Battery life may be shorter when using an SD card.
EN
Specifications and design are subject to change
without notice.
98
Page 99

Technical assistance and support
The following contact information relates to technical support for Olympus recorders and software only.
s Technical Hotline Number in the U.S. and Canada
1-888-553-4448
s User Support E-mail address in the U.S. and Canada
distec@olympus.com
Declaration of Conformity:
Model Number: LS-14/LS-12
Trade Name: LINEAR PCM RECORDER
Responsible Party: OLYMPUS IMAGING AMERICA INC.
Address: 3500 Corporate Parkway, P.O. Box 610, Center Valley,
PA 18034-0610, U.S.A.
Telephone Number: 1-888-553-4448
This device Complies with Par t 15 of the FCC Rules. Operation is subject to the following two conditions: (1)
This device may not cause harmful interference, and (2) this device must accept any interference received,
including inter ference that may cause undesired operation.
Tested To Comply
With FCC Standards
FOR HOME OR OFFICE USE
Canadian RFI:
This digital apparatus does not exceed the Class B limits for radio noise emissions from digital apparatus as set out
in the Radio Inter ference Regulations of the Canadian Department of Communications.
Cet appareil numérique ne dépasse pas les limites de la Catégorie B pour les émissions de bruit radio émanant
d’appareils numériques, tel que prévu dans les Règlements sur l’Interférence Radio du Département Canadien des
Communications.
8
Technical assistance and support
EN
99
Page 100

OLYMPUS IMAGING CORP.
2951 Ishikawa-machi, Hachioji-shi, Tokyo 192-8507, Japan.
Tel. +81 (0)42-642-6162
http://www.olympus.com
OLYMPUS IMAGING AMERICA INC.
3500 Corpor ate Parkway, P.O. Box 610, Center Valley, PA 18034-0 610, U.S .A.
Tel. 1-888-553-4448
http://www.olympusamerica.com
EN-BD3652-01 AP1209
 Loading...