

Page 1

LINEAR PCM RECORDER
LS-10S
Linear PCM Recorder
INSTRUCTIONS
EN
Thank you for purchasing an Olympus Digit al Voice Recorder. Please read thes e instructions f or information
about using the product correctly and safely. Keep the instructions handy for future reference.
To ensure successful recordings, we recommend that you test the record function and volume
before use.
Page 2

Introduction
• The contents of this document may be changed in the future without advanced notice. Contact our
Customer Support Center for the latest information relating to product names and model numbers.
• The utmost care has been taken to ensure the integrity of the contents of this document. In the unlikely
event that a questionable item, error, or omission is found, please contact our Customer Support
Center.
• Any liability for passive damages or damage of any kind occurred due to data loss incurred by a defect
of the product, repair performed by the third part y other than Olympus or an Olympus authorized service
station, or any other reason is excluded.
Trademarks and registered trademarks
• IBM and PC/AT are the trademarks or registered trademarks of International Business Machines
Corporation.
• Microsoft, Windows and Windows Media are registered trademarks of Microsoft Corporation.
• Macintosh and iTunes are the trademarks of Apple Inc.
• The SD logo is a trademark.
• The SDHC logo is a trademark.
• MPEG Layer-3 audio coding technology licensed from Fraunhofer IIS and Thomson.
Other product and brand names mentioned herein may be the trademarks or registered trademarks of
their respective owners.
2
Page 3

INDEX
Table of Con tents P.4
Safe an d Proper Usage P.6
Getti ng Started P.8
About Rec ording P.22
About Playback P.32
Menu Set ting P.41
Using th e Recorder on Your P C P.61
Other I nformation P.78
1
2
3
4
5
6
3
Page 4

Table of Contents
Introduction
Table of Contents .....................................................4
Safe and Proper Usage ...........................................6
Getting Started
1
Main Features ..........................................................8
Identification of Parts .............................................9
Display (LCD Panel) .........................................10
Inserting Batteries .................................................11
Using the AC Adapter .......................................12
Power Supply .........................................................13
HOLD .......................................................................13
Setting Time and Date [Time & Date] ..................15
Changing the Time and Date ............................ 16
Inserting and Ejecting a Card ..............................17
Inserting a Card ................................................ 17
Ejecting a Card .................................................18
Notes on the Folders .............................................19
About the Folders for Voice Recordings .......... 19
About the Folder for Music Playback ...............20
Selecting the Folders and Files ...........................21
About Recording
2
Before Recording ...................................................22
Turn the Microphone Toward the Original Sound
Source .......................................................22
Recording ...............................................................23
Listening While Audio is Recorded .................27
Set the Low Cut Filter .......................................27
Microphone Sensitivity .....................................27
Adjusting the voice sync level for recording ....28
Recording from External Microphone or Other
Device s .....................................................30
About Playback
3
Playback ..................................................................32
Playback Through Earphone ...........................35
Setting an index mark or a temp mark
How to begin segment repeat playback ...........36
...........35
Erasin g ....................................................................38
Erasing One File at a Time ...............................38
Erase All Files from a Folder ...........................38
Partially erase a file
Menu Setting
4
.........................................39
Menu Setting Method ............................................41
Formatting the Recorder [Format] .................... 51
Rearranging files [Replace] ............................. 54
Moving Files [File Move]
Splitting Files [File Divide]
Using the Recorder on Your PC
5
.................................. 56
...............................59
Operating Environment.........................................61
Connecting to Your PC ..........................................62
Connecting to Your PC ..................................... 62
Disconnecting from Your PC ............................63
Transfer the Voice Files to Your PC .....................64
Using Windows Media Player ...............................65
Window Names ................................................. 65
Copying Music from CD ....................................66
Transferring Music File to the Recorder ........... 68
Copying Voice File to the CD ........................... 71
Using iTunes ...........................................................73
Window Names ................................................. 73
Copying Music from CD .................................... 74
Transferring Music File to the Recorder ...........
Copying Voice File to the CD ...........................76
75
Using as External Memory of the PC ..................77
4
Page 5

Other Information
6
Alarm Message List ...............................................78
Troubles hooting .....................................................79
Technical Assistance and Support ....................81
Accessories (optional) .........................................82
Specifications ........................................................83
Table of Contents
5
Page 6

Safe and Proper Usage
Before using your new recorder, read
this manual carefully to ensure that
you know how to operate it safely
and correctly. Keep this manual in an
easily accessible location for future
reference.
• The warning symbols indicate important
safety related information. To protect yourself
and others from personal injury or damage to
property, it is essential that you always read
the warnings and information provided.
General Precautions
• Do not leave the recorder in hot,
humid locations such as inside a
closed automobile under direct
sunlight or on the beach in the
summer.
• Do not store the recorder in
places exposed to excessive
moisture or dust.
• Do not use organic solvents such
as alcohol and lacquer thinner to
clean the unit.
• Do not place the recorder on top
of or near electric appliances
such as TVs or refrigerators.
• Avoid recording or playing back
near cellular phones or other
wireless equipment, as they may
cause interference and noise.
If you experience noise, move
to another place, or move the
recorder further away from such
equipment.
• Avoid sand or dirt. These can
cause irreparable damage.
• Avoid strong vibrations or
shocks.
6
• Do not disassemble, repair or
modify the unit yourself.
• Do not operate the unit while
operating a vehicle (such as a
bicycle, motorcycle, or go-cart).
• Keep the unit out of the reach of
children.
• When mounting the recorder to
a tripod, turn the screws on the
tripod side without turning the
recorder itself.
<Warning regarding data loss>
Recorded content in memory may be destroyed or
erased by operating mistakes, unit malfunction,
or during repair work.
It is recommended to back up and save important
content to other media such as a computer hard
disk.
Any liability for passive damages or damage of
any kind occurred due to data loss incurred by a
defect of the product, repair performed by the
third party other than Olympus or an Olympus
authorized service station, or any other reasons
is exclu ded from the Oly mpus’s liability.
Page 7

Safe and Proper Usage
Batteries
Warning
f
• Batteries should never be exposed to flame, heated, shortcircuited or disassembled.
• Do not attempt to recharge
alkaline, lithium or any other
non-rechargeable batteries.
• Never use any battery with a torn
or cracked outer cover.
• Keep batteries out of the reach
of children.
• If you notice anything unusual
when using this product such as
abnormal noise, heat, smoke, or
a burning odor:
1 remove the batteries immediately while
being careful not to burn yourself, and;
2 ca ll yo ur de al er o r loc al Olymp us re pr esen -
tative for service.
AC Adapter
Warning
f
• Do not attempt to disassemble,
repair or modify the AC adapter
in any way.
• Keep foreign objects including
water, metal, or flammable substances from getting inside the
product.
• Do not moisten the AC adapter or
touch it with a wet hand.
• Do not use the AC adapter in the
vicinity of flammable gas (including gasoline, benzine and lacquer
thinner).
In case
• ... the internal parts of the AC
adapter are exposed because it
has been dropped or otherwise
damaged:
• ... the AC adapter is dropped in
water, or if water, metal flammable substances or other foreign
objects get inside it:
• ... you notice anything unusual
when using the AC adapter such
as abnormal noise, heat, smoke,
or a burning odor:
1 do not touch any of the exposed parts;
2 immediately disconnect the power supply
plug from the power outlet, and;
3 call your dealer or local Olympus represen-
tative for servicing. Co ntinued use of the AC
adapter under these circumstances could
result in electric shock, fire or injury.
7
Page 8

Main Features
Getting Started
● Utilizes a high sensitivity, low noise stereo
microphone capable of faithfully capturing
the original sound.
Machined metal components are utilized in
the housing for the built-in stereo microphone,
1
resulting in a design built with special features
Gett ing Start ed
in mind while also achieving a construction
which is resistant to vibration. Furthermore,
by turning the microphone itself 90° outwards
you can produce rec ordings with a natural and
expansive stereo feel to them.
● Equ ipped with a h igh sound qual ity amplif ier
circuit.
Utilizes a low noise amplifier circuit, allowing
you to produce high sound quality recordings
with low noise.
●
Supports the linear PCM format, which is
capabl e of record ing sound qu ality eq uivalent
to or surpassing CD-level.
Capable of realistically recording various
different sound sources. High resolution
recording at a high sampling frequency and bit
count equivalent or superior to that of a music
CD (Sampling frequency 44.1 kHz, Bit count
16bit) is possible (☞ P.41, P. 4 3).
●
Supports a wide range of recording formats.
Can handle the MP3 format (MPE G-1/ MPEG -2
Audio Laye r 3), and the Wind ows Media Audi o
(WMA) for mat.
In supporting the MP3 and WMA formats, this
device can save files in a highly compressed
manner, thereby allowing for extended
recording times (☞ P.41, P. 4 3). In ad d i t i o n ,
when connected to an external device, the
recorder can encode incoming analog audio
signals without a PC (☞ P.30).
●
Supports high capacity recording media.
Starting with its 2 GB built-in flash memory,
ca n a ls o re co rd ont o a n S D Ca rd (co mm er ci al ly
available) (☞ P.17 ).
Check the Olympus website regarding SD
cards which are confirmed operation with this
recorder
(☞ P.81).
.
.
● Equipped with a variety of features that
support audio recording.
With this recorder you can customize a variety
of recording functions such as the recording
level and microphone sensitivity to suit the
recording conditions and personal preferences
(☞ P.41, P.43).
●
Allows for system upgrades through
enhanced options and equipment. Further
enhances the pleasure of recording
(
☞ P. 8 2). .
● Can playback WAV, WMA, and MP3 format
files sent from a computer in addition to
files recorded by the device itself. Can
be enjoyed as a music player at any time.
Can hold approximately
128 kbps/ 4 minutes per song conversion) (☞
P.32, P. 3 3, P.6 5 , P.
● Supports USB 2.0. Hi-Speed, which enables
high-speed data transmission as an external
memor y device for your computer.
By connecting the computer with the USB,
pictures, text data, etc. can be saved, and
utilized to carry data
● You can move o r copy files b etween th e built-i n
memor y and SD card , and within t he folders i n
the memory
●
You can split files (☞ P. 59), or delete a part of
a file (
recorder.
(☞ P. 5 6) .
☞ P. 39) recorded in PCM format in this
2000 music files (WMA
73).
(☞ P.6 4 , P.77).
8
Page 9
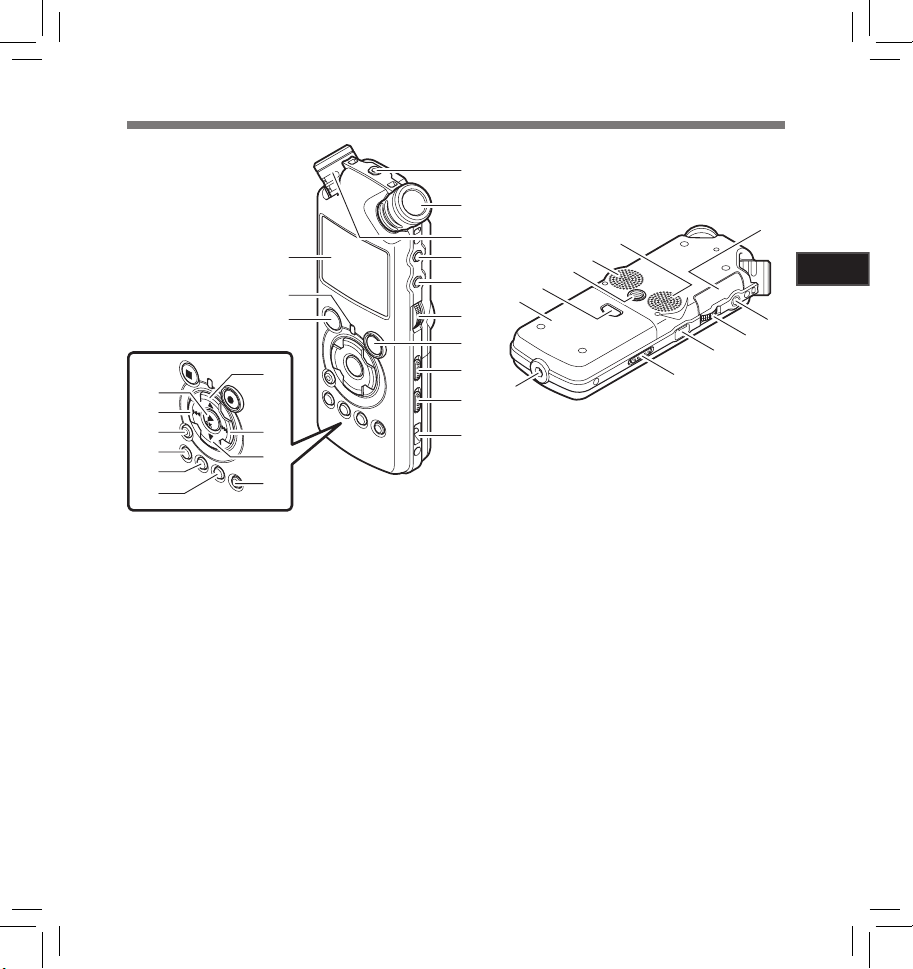
Identification of Parts
1
2
3
!
@
#
$
q
=
)
(
*
1
REMOTE
Connect the receiver for the exclusive remote control
2 Built-in stereo microphone (R)
3 Built-in stereo microphone (L)
4
5
6
7
Recording indicator light (LED)
8
9
0 Strap hole
! Display (LCD panel)
@
#
$ 2 button
% 9 button
jack
set RS30W (optional). This enables operation of the
main unit’s record and stop functions through the
remote control.
LINE IN
jack
MIC
jack
REC LEVEL
REC
s button
MIC SENSE HIG H/LOW
LOW CUT ON/OFF
PEAK
indicator light (LED)
STOP
4 button
%
^
&
dial
switch
switch
4
5
6
7
8
9
0
]
[
p
o
i
u
^ 3 button
&
LIST
button
MENU
button
*
A-B REPEAT
(
) Fn button
ERASE
= 0 button
q `/
w Card cover
EAR
e
VOLUME
r
t
USB
POWER/HOLD
y
u Power jack
i Batt ery cover
o Battery cover release button
p Tri p od s oc ke t
[ Built-in stereo speaker (R)
] Built-in stereo speaker (L)
button
OK
button
jack
dial
terminal
button
switch
y
t
r
w
1
Gett ing Start ed
e
9
Page 10

Display (LCD Panel)
Identification of Parts
File DisplayFolder List Display
1
1
Gett ing Start ed
2
1 Root folder indicator
Folder indicator
Recording media indicator or folder indicator/
Root folder name/ Current file number/ Total
number of recorded files in the folder
2 Folder name
3
Guide indicator
File List Display
1
2
3
1 Folder/ File indicator
Folder name/ Current file nu mber/ Tota l number
of recorded files in the folder
2 File name
3 Guide indicator
1
2
3
4
3
5
6
1 Folder/ File indicator
Folder name/ File name/ File format/ Current
file number/ Total number of recorded files in
the folder
2 Battery indicator
Recording media indicator
[
[
Erase lock indicator
3 Record/ Playback stat us indicator
4 Level meter
5 Playback Mode indicator
6 Recording mode indicator
7 During recording mode:
Remaining recording time
During playback or stop mode:
File length
8 During recording mode:
Elapsed recording time
Durin g playback mode :
Elapsed playback time
Reverb
9 [
0 [
V-Sync. Rec
!
[
LowCutFilter
@ [
Limiter
] Built-in flash memory
] SD card
] indicator
] indicator
] indicator
] indicator
7
8
9
0
!
@
10
Page 11
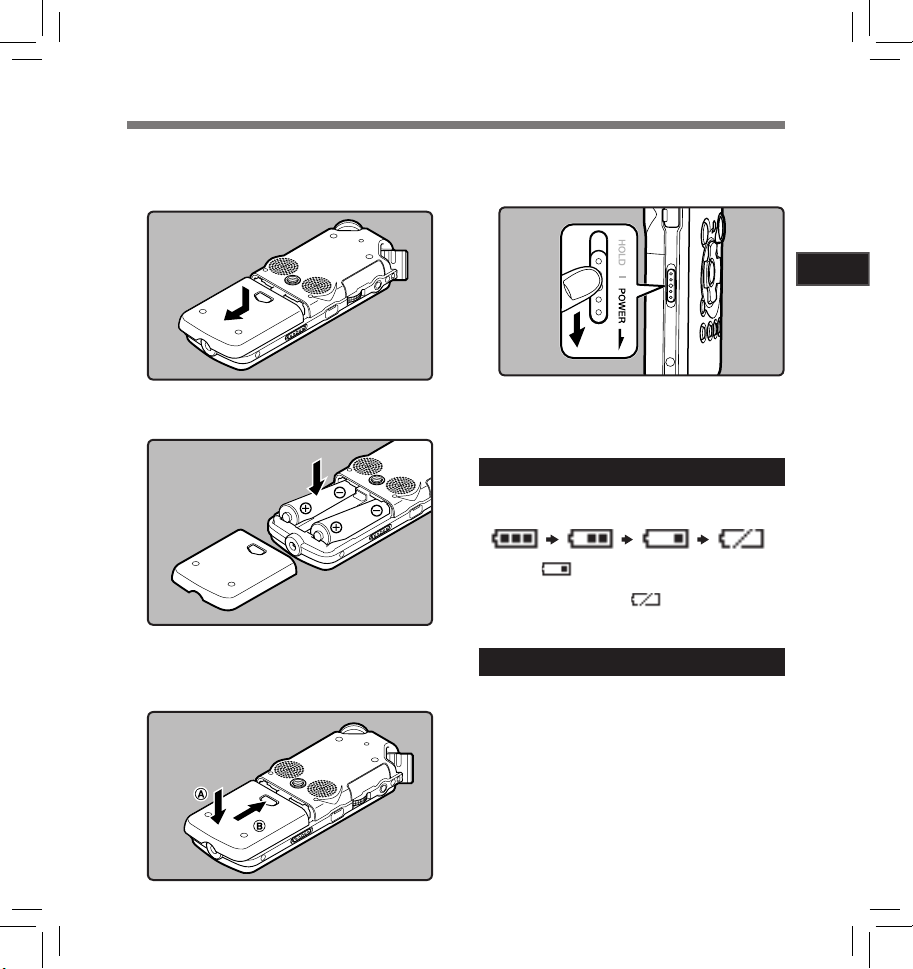
Inserting Batteries
Press the bat tery cover release button,
1
and then slide the battery cover open
while lightly pressing down on it.
Insert two AA batteries with the cor-
2
rect = and - polarities.
Close the battery cover completely
3
by pressing to the direction A, then
sliding to the direction B.
Slide the
4
direction indicated by the arrow, and
turn the power on.
• If the “hour” indicator flashes in the display,
Replacing batteries
The battery indicator on the display changes as
the batteries lose power.
• When [ ] appears on the display, replace
the batteries as soon as possible. When the
battery is too weak, [
appears on the display and the recorder shuts
down.
Ni-MH Rechargeable Battery
Ni-MH rechargeable batteries B- 01 4PE (optional)
from Olympus can be used in the recorder. Use
them with the Olympus Ni-MH Rechargeable
Batter y Charger B-90SU (optional) (For U.S.A.
and Canada) or BU -90SE (optional) (For Europe)
(☞ P.82).
POWER/HOLD
see “Se tting Time an d Date [Time & Dat e]”
(☞ P.15).
switch in the
] and [Battery Low]
1
Gett ing Start ed
11
Page 12
Inserting Batteries
Notes
• This recorder cannot charge rechargeable
batteries.
• Manganese battery may not be used in this
recorder.
Wh en chan gi ng b at teri es , A A alk al ine ba tte ri es
•
or Olympus Ni-MH Rechargeable Batteries are
1
recommended.
Gett ing Start ed
• Be su re to t ur n of f p owe r o f th e rec or der b ef ore
replacing the batteries (☞ P.13 ).
batter ies while the reco rder is in use may cause
a malfunction such as corr upting the file, etc. If
you are recording into a file and the batteries
run out, you will loose your currently recorded
file because the file header will not be able to
close. It is crucial to change the batteries once
you see only one Hash mark in the battery
indicator.
• If it takes longer than 15 minutes to replace the
dead battery or if you take the battery in and
out repeatedly at shor t intervals, you may have
to reset the time when you have loaded a fresh
battery (☞ P.15).
• Remove the batteries if you are not goin g to use
the recorder for an extended period of time.
• When playing a voice/music file, the recorder
may be reset due to the reduc tion of the voltage
output of the battery depending on the volume
level even if [
indicator. In this case, lower the volume of the
recorder.
] is displayed in the battery
Unloading the
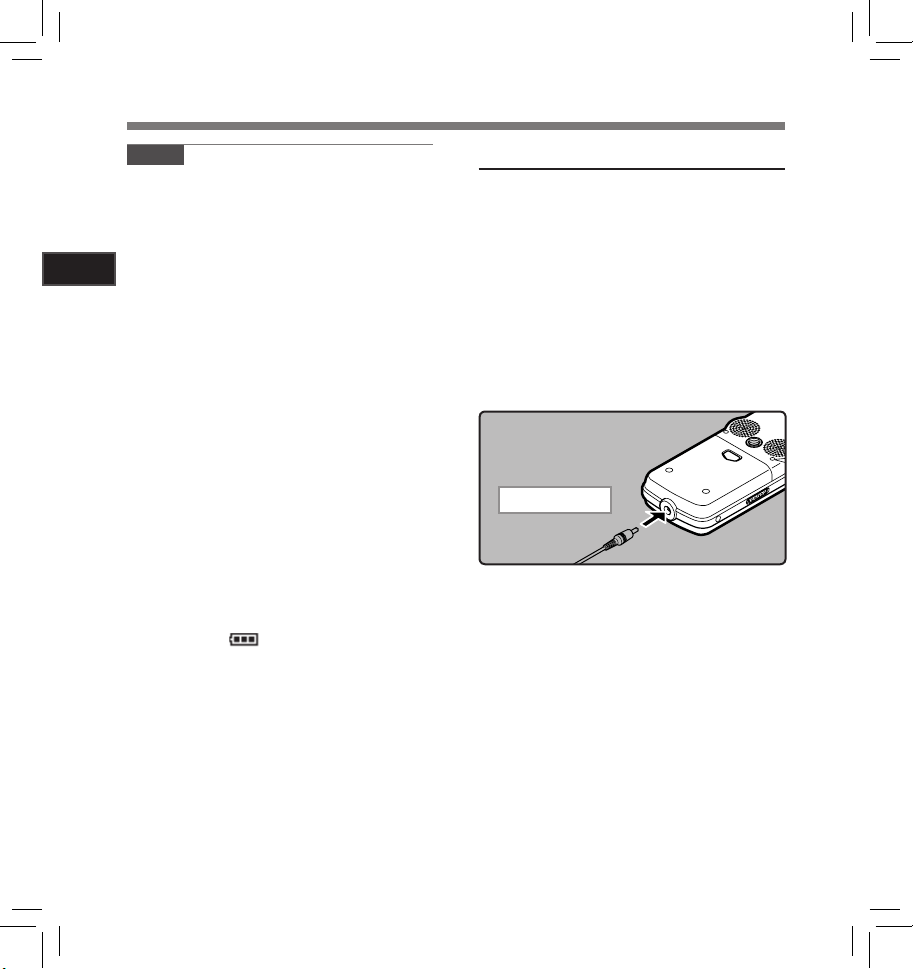
Using the AC Adapter
Plug the AC adapter (optional) into a
household power outlet and connect the
power plug to the recorder’s power connector (D C 5 V) . Alw ay s t ur n th e r ec or de r’s
power off before connecting.
If the AC adapter is plugged in while
recording using batteries, it may not be
possible to play back the voice data being
recorded.
• Check the Olympus website regarding
AC adapters which can be used with this
recorder.
To the po we r j ack
Warning
f
• Always turn the recorder’s power
off before connection or disconnection.
• When the AC adapter is not in use,
disconnect the power supply plug
from the power outlet.
• Use only the correct power sup-
ply voltage as indicated on the
adapter.
• Do not use the AC adapter when
connecting the recorder to the
USB port.
12
Page 13
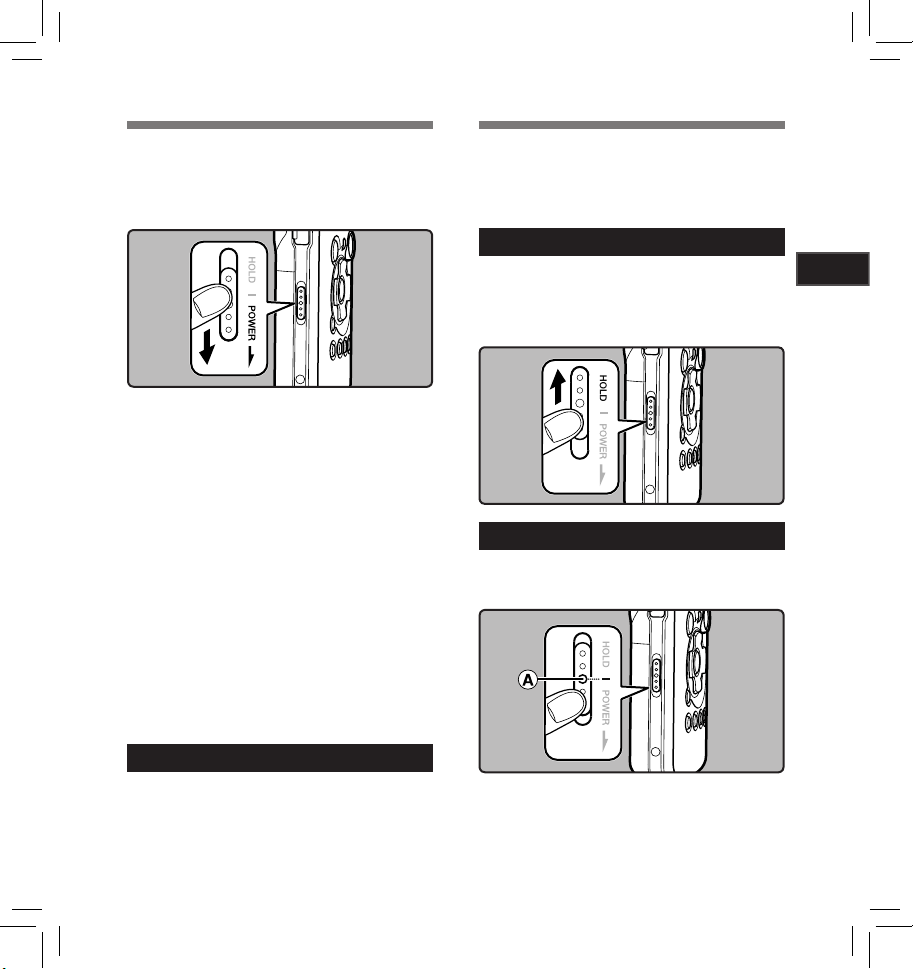
Power Supply
HOLD
When the recorder is not being used, turn the
power off to reduce battery consumption to a
minimum. Eve n if the power is turne d off, existin g
data, mode settings, and clock settings will be
maintained.
Turning On the Power:
While the recorder’s power is off, slide
the
POWER/HOLD
indicated by the arrow.
• The display will turn on, and the power will be
turned on.
• The resume function will bring the recorder
back to the stop position in memory before
power was turned off.
• When the batteries are removed from the
recorder the resume function’s stopped position
will be erased.
switch in the direction
Turning Off the Power:
Slide the
POWER/HOLD
switch in the direc-
tion indicated by the arrow for 1 second
or longer.
• The display shuts off and the power will be
turned off.
• The resume function remembers the stop
position before the power is turned off.
If you bring the recorder is set to HOLD mode,
the current conditions will be preserved, and all
buttons will be disabled. This feature is useful
when the recorder has to be carried in a bag or
pocket.
Set the recorder to HOLD mode
Slide the
position.
• Af ter [Hold] appears on the display, the
POWER/HOLD
recorder is set to HOLD mode.
switch to the [
HOLD
Exit HOLD mode
Slide the
POWER/HOLD
switch to the A
position.
]
1
Gett ing Start ed
Power save mode [AutoPowerOff]
If the recorder is stopped/not used for over 10
minutes (initial setting) while the power is turned
on, the power will be turned off (☞ P.41, P.47).
• If any button is pressed prior to the battery
turning off, the elapsed time count will start
over again until this function takes effect.
13
Page 14

Notes
• If you press any button in HOLD mode, the
clock display flashes for 2 seconds, but it will
not operate the recorder.
• If HOLD is applied during playback (recording), operation is disabled with the playback
(recording) state unchanged (When playback
1
has ended and the recording has ended due
to the remaining memory being used up, it will
Gett ing Start ed
stop).
HOLD
• The recorder can be effectively operated via
its switch and dial, as well as the connected
exclusive remote control set RS3 0W (optional),
even when it is in HOLD mode.
14
Page 15
Setting Time and Date [Time & Date]
If you set the time and date beforehand, the information when the file is recorded is automatically stored
for each file. Setting the time and date beforehand enables easier file management.
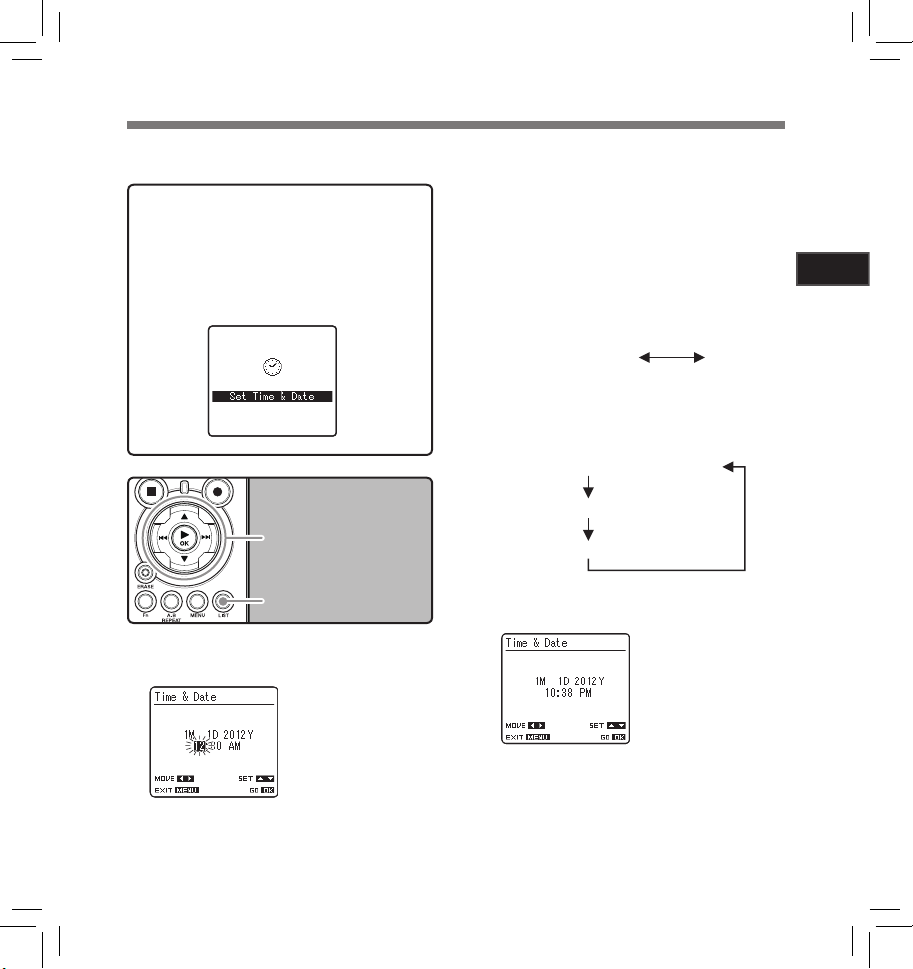
When you u se the recorde r for the first t ime
after purchasing it, or when the batteries
have been inserted without the device having bee n used in a long t ime, the [Set T ime &
Date] will appear. When the “
ing, con duct the setup from Step 1.
Press the 9 or 0 button to select
1
the item to set.
hour
” is flas h-
2 3 button
9 0 button
`/
OK
button
LIST
button
Select the item from the
“hour”, “minute”, “year
“month” and “day” with a
flashing point
Press the 2 or 3 button to set.
2
• Follow the same steps by pressing the 9
or 0 button to select the next item, and
press the 2 or 3 button to set.
• You can select between 12 and 24 hour
display by pressing the LIST button while
setting the hour and minute.
Example: 10:38 P.M
10:38 PM
(Initial setting)
• You can select the order of the “ year”,
“month”, “day” by pressing the LIST button
while setting them.
Example: January 1, 2012
1M 1D 2012Y (Initial setting)
1
D 1M 2012Y
2012Y 1M 1D
Press the `/OK button to complete the
3
setting.
• The clock will start from the set date and
time. Press the `/OK button according to
the time signal.
22:38
1
Gett ing Start ed
15
Page 16
Setting Time and Date [Time & Date]
Note
• If you press the `/OK button during the setup
operation, the recorder will save the items that
were set to that point.
Changing the Time and Date
1
While the recorder is during stop mode, press and
Gett ing Start ed
hold the STOP 4 button to display the Time and
Date, Remaining Memory and File Format.
If the Time and Date is not correct, set it using the
procedure below.
2 3 button
9 0 button
`/
OK
button
MENU
button
LIST
button
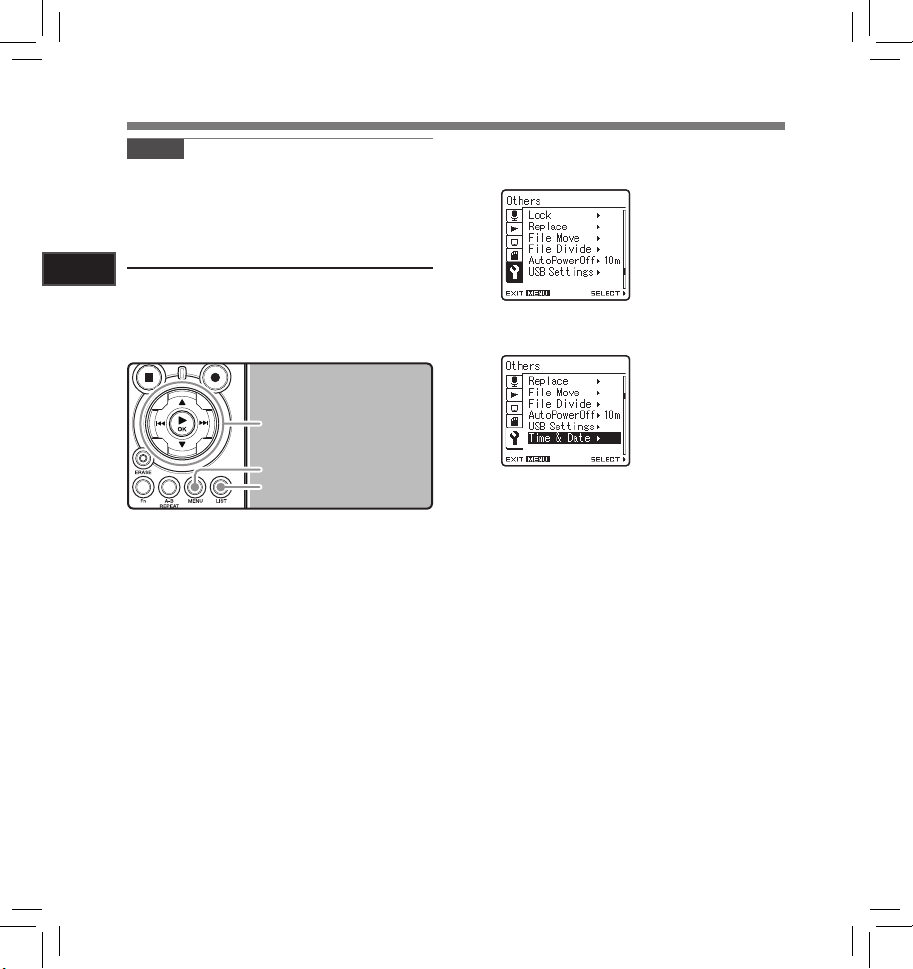
While the recorder is during stop
1
mode, press the
• The menu will appear on the display (☞
P. 41) .
Press the 2 or 3 button to select
2
[
Others
] tab.
• You can change the menu display by moving the settings tab cursor.
MENU
button.
Press the `/OK or 9 button to move
3
the cursor to the item to set.
[Others] will appear on
the display
Press the 2 or 3 button to select [
4
& Date
].
Press the `/OK or 9 button.
5
• The “hour” will flash on the display, indicating the start of the Time and Date setup
process.
The following steps are the same as Step 1
through S tep 3 of “Setting Time and Date [Time
& Date]” (☞ P.15 ) .
Press the
6
menu screen.
MENU
[Time & Date] will appear
on the display
button to close the
Time
16
Page 17
Inserting and Ejecting a Card
This recorder can be used with commercially
available SD Cards as well as the built-in flash
memory.
Inserting a Card
2 3 button
`/
OK
button
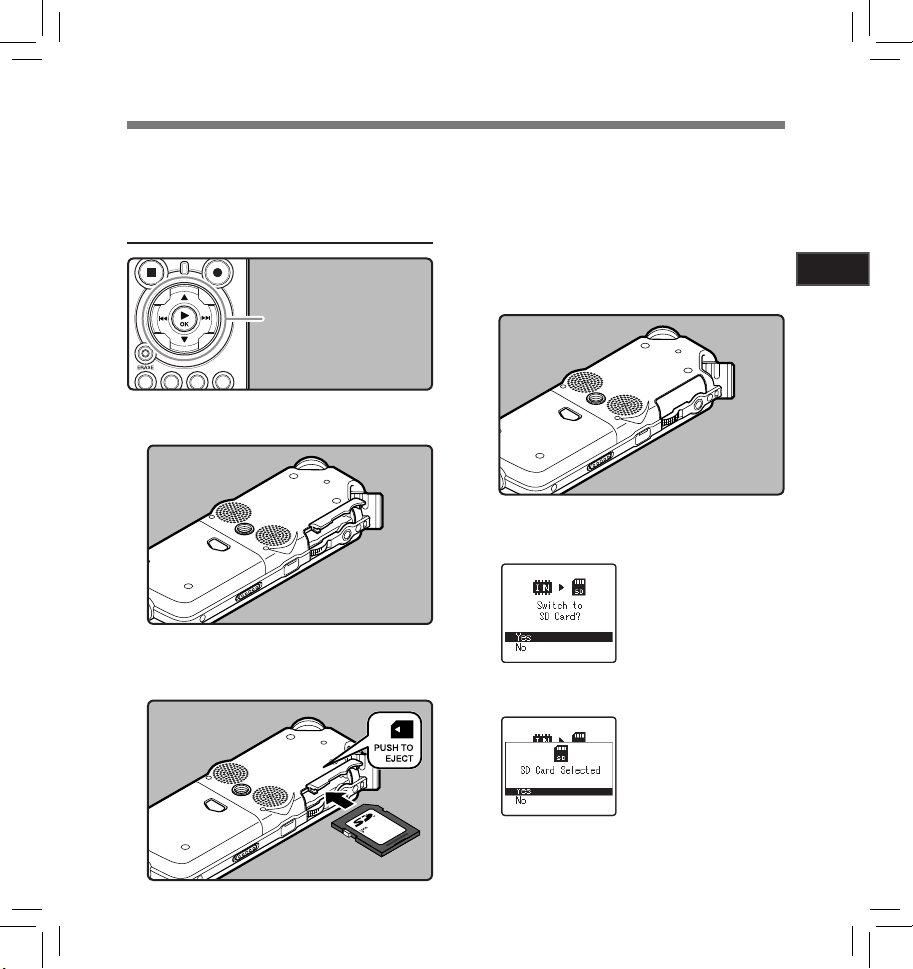
While the recorder is during stop mode,
1
open the card cover.
Face the card the correct way and
2
insert it into the card slot as shown
in the diagram.
• Insert the card keeping it straight.
• The card stops with a click when it is
inserted all the way.
• Inserting the card the wrong way or at an
angle could damage the contact area or
cause the card to jam.
• If the card is not inserted all the way, data
may not be written to the card.
Close the card cover securely.
3
When you are recording to a card,
4
press the 2 or 3 button and select
[
Yes
].
When you insert the
card, the recording
media changeover
display will appear.
Press the `/OK button to complete the
5
setting.
1
Gett ing Start ed
17
Page 18
Inserting and Ejecting a Card
Notes
• It is possible to switch the recording media over
to the built-in flash memory (☞ P.41 , P. 4 6).
• In some cases cards which have been formatted (initialized) by another device, such as a
computer, cannot be recognized. Be sure to
format them with this recorder before using (☞
P. 51) .
1
• Wh en a tt em ptin g t o pe rf or m o per at io ns s uc h as
Gett ing Start ed
rewriting the contents of an SD Card in cases
where the card has been write protected, [SD
Card Locked] will appear. The playback operation can be performed, but the write protection
must first be turned off when overwriting the
contents on the card.
• Cards that are not to SD standards, such as
multimedia cards, may not be used.
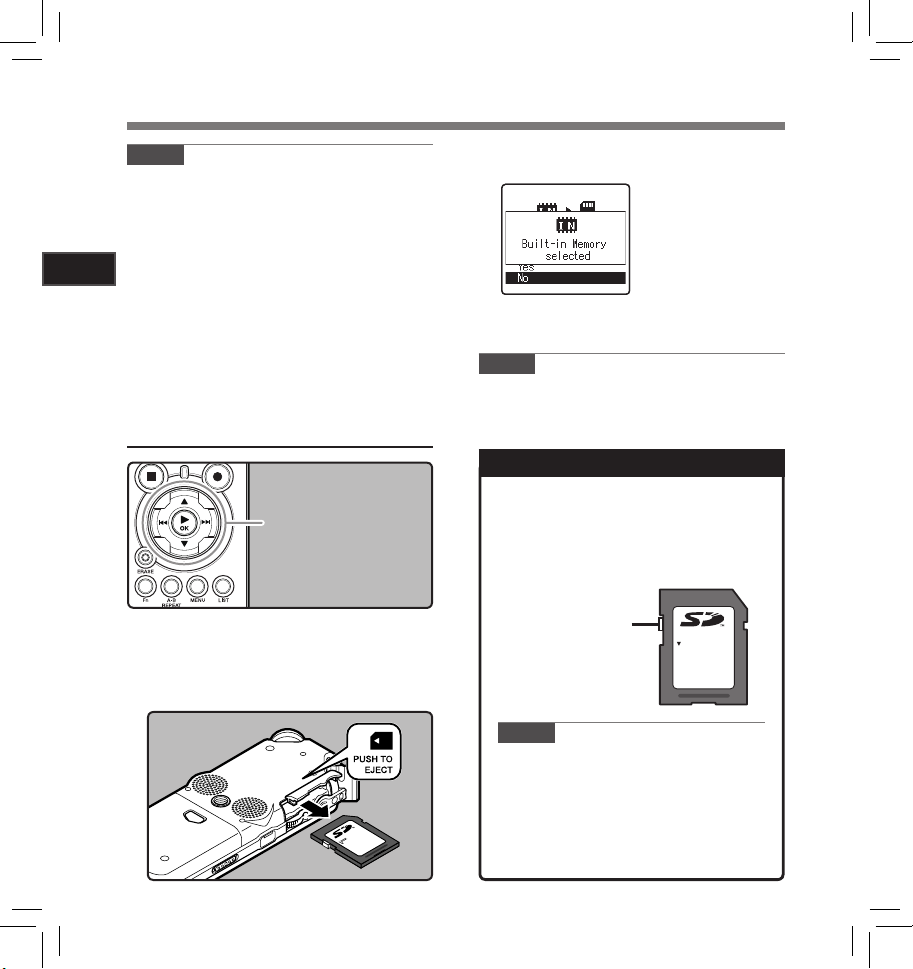
Ejecting a Card
2 3 button
`/
OK
button
While the recorder is during stop mode,
1
open the card cover.
Push the card inward to unlock it, and
2
let it eject partially.
• The card is visibly out of the slot and can
be removed safely.
When [MemorySelect] is
set to [SD Card], [Built-in
Memory selected] will
appear
Close the card cover securely.
3
Note
• Releasing your finger quickly after pushing the
card inward may cause it to eject forcefully out
of the slot.
About the SD Card
When the SD Card is write protec ted, there will
be a display reading [SD Card Locked]. Before
inserting the card, turn off the write protection
function. Check the Olympus website regarding SD cards which are confirmed operation
with this recorder (☞ P.
If the write protection
switch is facing the
[LOCK ] direction,
recording and other
functions cannot be
carried out
81).
LOCK
18
Notes
• The record er may not recognize c orrectly
on s om e SD cards. In this ca se, remove
the card then put it again to see if the
recorder recognizes the card.
• The processing performance reduces in
a SD card when you repeat writing and
delete. In this case, format the SD card
(☞ P.51).
Page 19
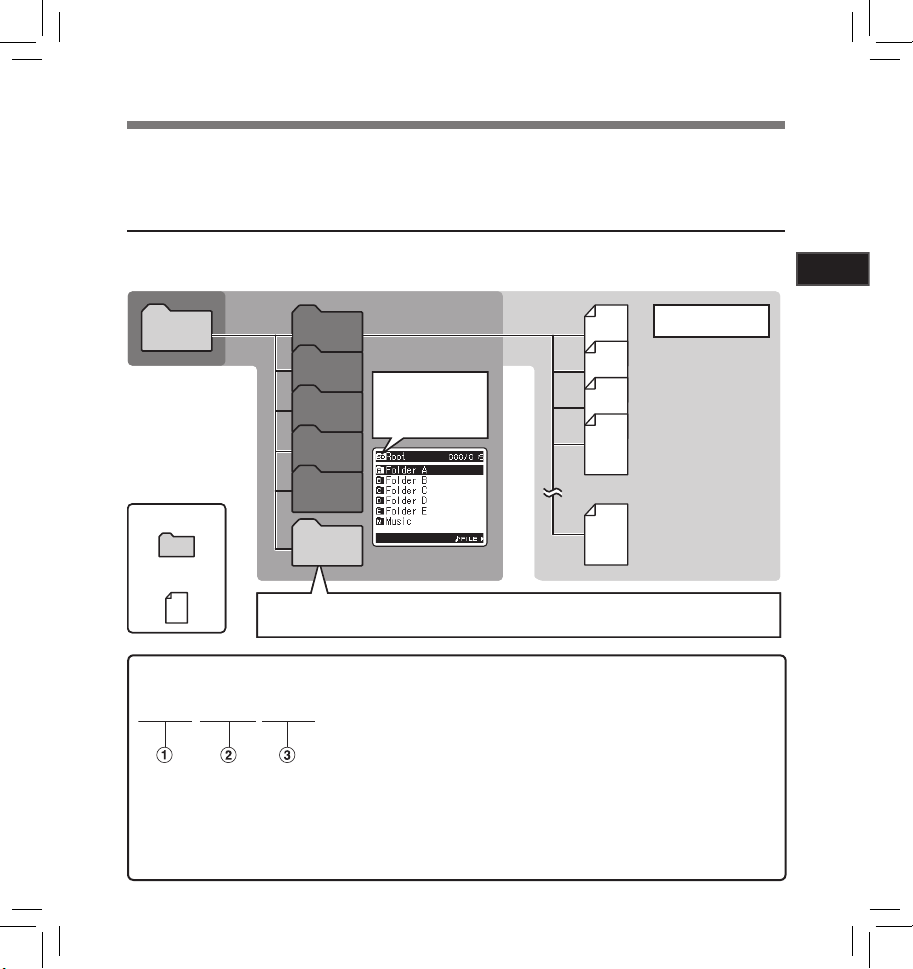
Notes on the Folders
The built- in flash memor y or the SD Card can be used for the recording media. Regardless of the recording
media, voice files and music files are separated into folders for voice recordings and folders for music
playback that are organized in a branching tree-style and saved.
About the Folders for Voice Recordings
[Folder A] - [Folder E] are the folders for voice recordings. When recording with the recorder, select any
one of the five folders and then record.
Save up to 200 files
Root
Root
Folder
Folder
File
File
Folder A
Folder A
Folder B
Folder B
Folder C
Folder C
Folder D
Folder D
Folder E
Folder E
Music
Music
When music files have been transferred to the [Music] folder from a computer, the recorder can be
When music files have been transferred to the [Music] folder from a computer, the recorder can be
used as a music player
used as a music player
Folder list display for
Folder list display for
when the [SD Card]
when the [SD Card]
has been selected as
has been selected as
the recording media
the recording media
(☞ P.32, P.65, P.73)
(☞ P.32, P.65, P.73)
File names will be automatically created for files recorded by this recorder.
LS10 0001 .WAV
1 User ID:
The name that has been set on the Digital Voice Recorder.
2 File number:
A file number is consecutively assigned regardless of the
changes in the recording media.
3 Extension:
T hese are the file na me extensions for the recording form at when
recording with this device.
• Linear PCM format .WAV
• MP3 format .MP3
• WMA format .WMA
001
001
002
002
001
001
003
003
200
200
Save up to 200 files
1
Gett ing Start ed
19
Page 20
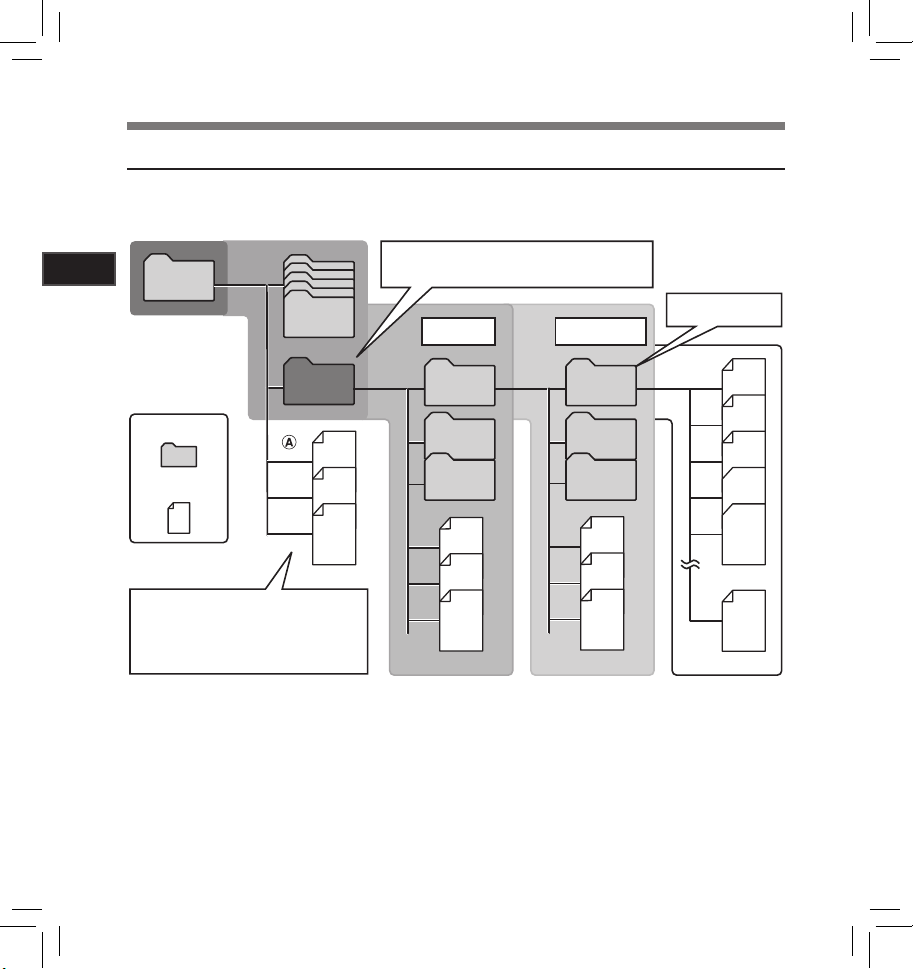
Notes on the Folders
About the Folder for Music Playback
When transferring music files to the device using Windows Media Player, a folder is automatically created
within the music playback folder which has a layered structure as shown in the diagram below. Music files
that are in the same folder can be rearranged in preferential order and replayed (☞ P.5 4).
Up to 128 folders can be created under the
]
[
Music
1
Gett ing Start ed
Root
Folder E
folder, including
First layer Second layer
[
Music
]
Save up to 200 files
Folder
File
Precautions for transferring music files:
When using Windows Media Player, click
[Start Sync] instead of setting the
synchronization options. All the files will be
transferred to the part A above.
20
Music
Artist 01
Artist 02
Artist 03
Album 01
Album 02
Album 03
001
002
003
004
005
200
Page 21
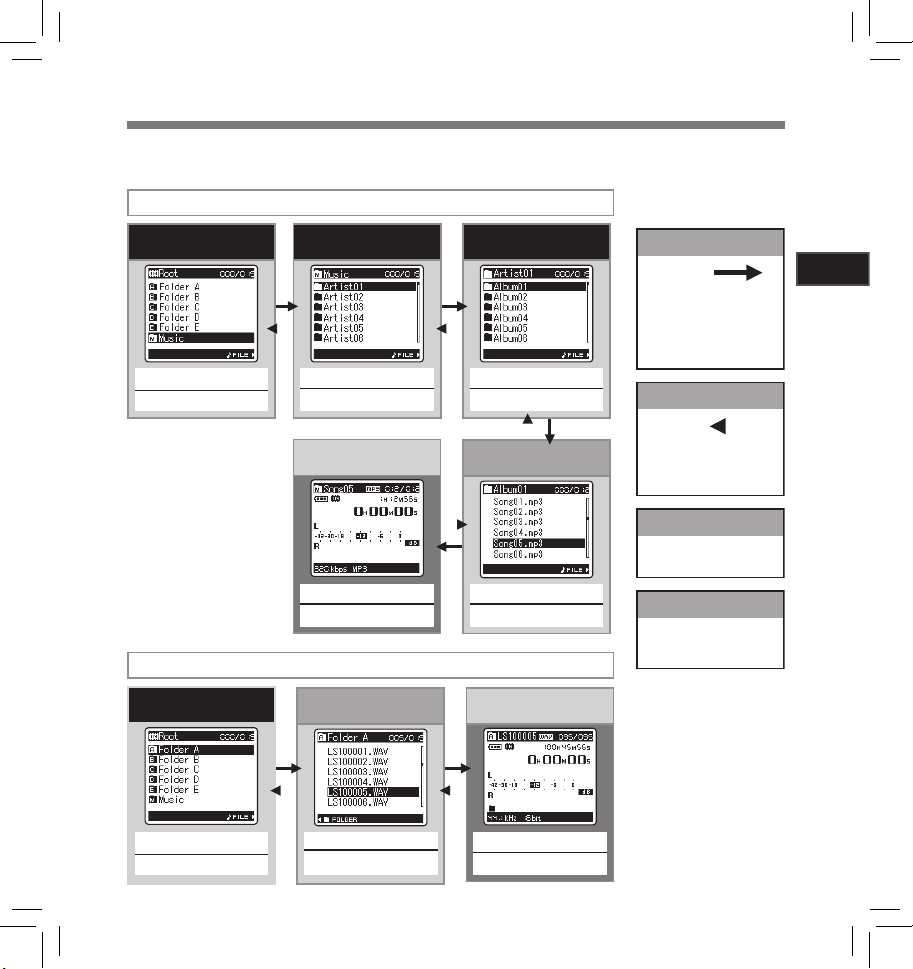
Selecting the Folders and Files
Change folders while the operation is stopped. For information on the layered structure of the folders, see
the section entitled “Notes on the Folders” (☞ P.1 9 , P. 2 0 ) .
Moving through the
4
levels
`/OK button
Proceed
Each time you press this it
opens the folder or file selected
in the list display and proceeds
down one level. The list display
screen can be operated by the
9 button
LIST
button
Return
Each time you press this it
returns up one level. The list
display can be operated by the
0 button
List display
The folders and files recorded
in this recorder are displayed
Folder list display
2 or 3 button
Select the folder
Operation of the folders for music playback
Folder list display
(First layer)
2 or 3 button
Select the artist folder
File display
Folder list display
(Second layer)
2 or 3 button
Select the album folder
File list display
1
Gett ing Start ed
Folder list display
2 or 3 button
Select the folder
`/OK button
Begin playback
Operation of the folders for voice recordings
File list display
2 or 3 button
Select the file
2 or 3 button
Select the file
File display
`/OK button
Begin playback
File display
Information of the selected file
is displayed. Enters in
playback standby mode
21
Page 22
About Recording
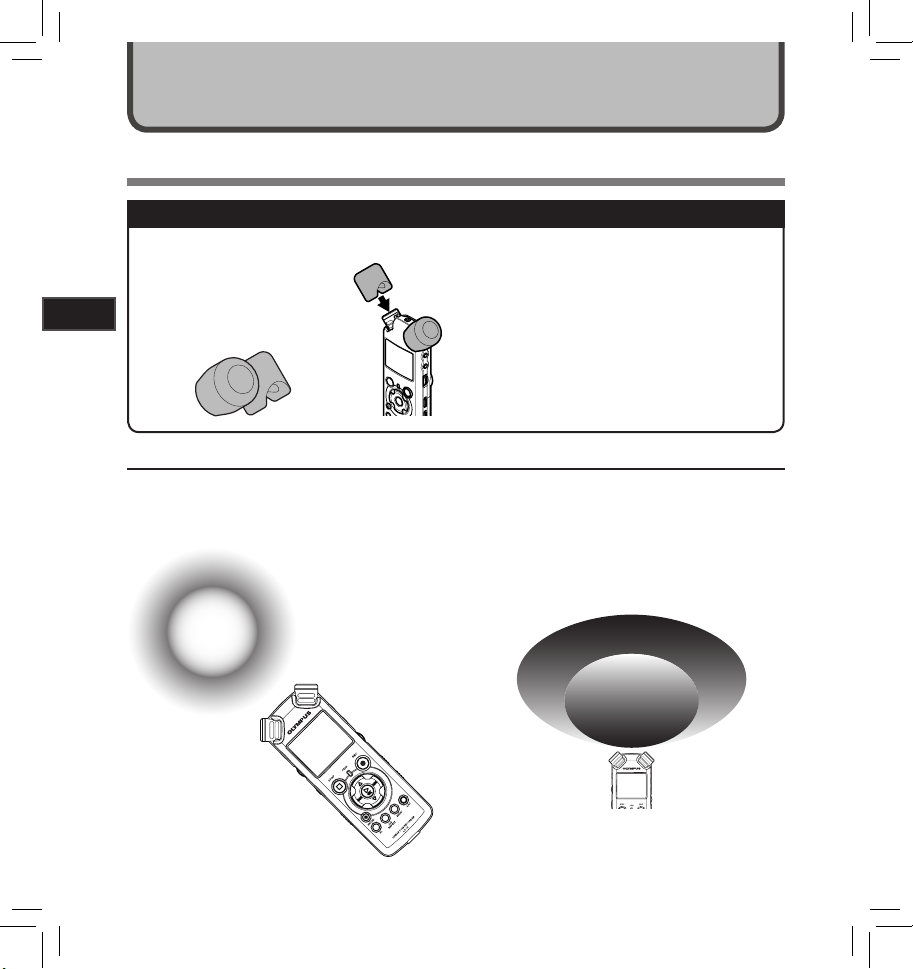
Before Recording
Getting Ready
Affi x the windscreen:
Start recording after attach the
windscreen (optional) to the
microphone. The noise may
occur even if a windscreen is
2
attached when forcing wind
blows against a microphone.
Abou t Recording
Turn the Microphone Toward the Original Sound Source
Turn the built-in stereo microphone in the direction that you would like to record. Placing the built-in stereo
microphone over the display is the proper position for performing stereo recording. If it is below the display
when recording then proper stereo recording cannot be performed because the position of the original
sound will be recorded in reverse phase.
Original
sound
source
Select the media for recording:
The built-in flash memory as well as an SD
Card can be used (☞ P.1 7, P. 41, P. 4 6).
Select the recording format:
Recording can be performed through the
linear PCM format, as well as the WAV, MP3
and WMA formats (☞ P. 41, P. 4 3 ) .
About the built-in stereo microphone:
The direc tion of capturing sound by the microphone
can be changed with the MIC SENSE HIGH/LOW switch
(☞ P. 27).
MIC SENSE HIGH
When recording with the
built-in microphone:
Turn the microphone in the direction
of the source to be recorded.
22
MIC SENSE
LOW
LR
Key map
On mounting:
Accurate adjustments of the microphone’s angle and
the like can be made when the device is affixed to a
commercially available tripod used for cameras.
Page 23
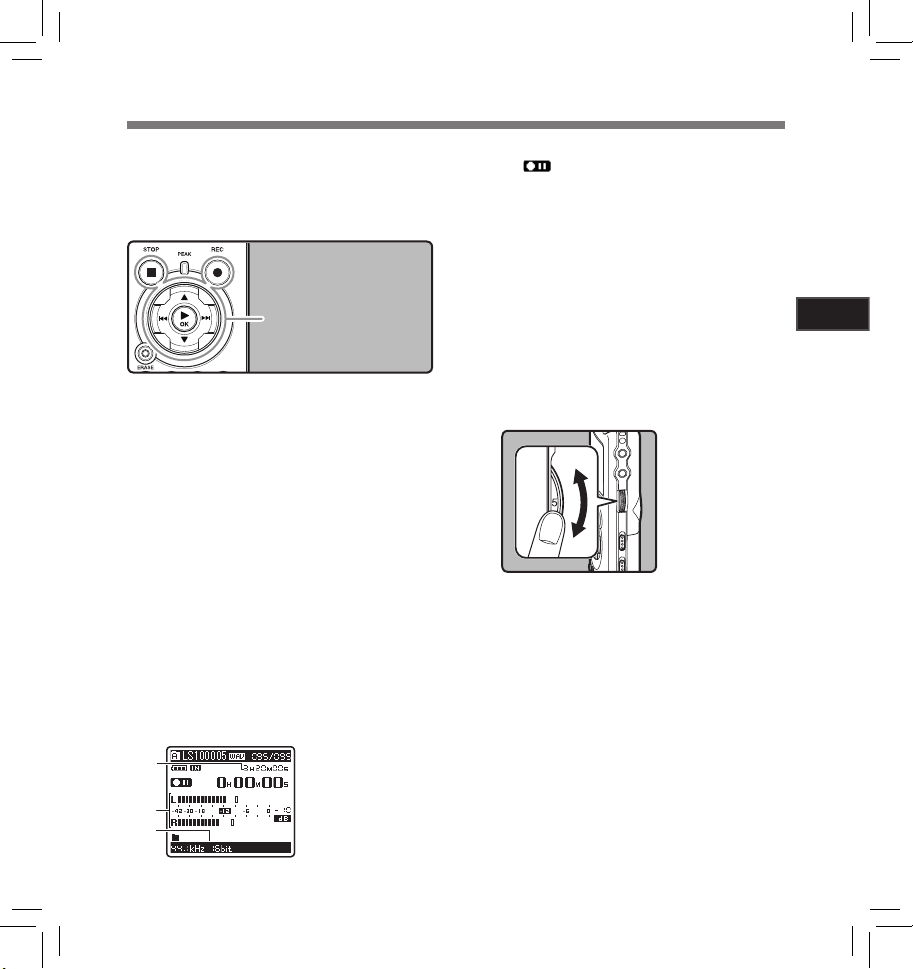
Recording
Before starting recording, select a folder between
[A] to [E]. These five folders can be selectively
used to distinguish the kind of recording; for example, Folder
information, while Folder
to holding business information.
Select the recording folder (☞ P.19 t o
1
P. 21) .
How to change fold ers:
1
Pressing the
2 Pressing button 2 or 3 at the folder list
• Newly recorded audio will be saved as the
Press the
2
record.
• Turn the microphone in the direction of the
a Remaining recording time
b Level meter (change according to the
c Recording mode
a
b
c
[A] might be used to store private
Pressing the LIST button at the file display
while stopped will return you back one layer
above.
bring you to the folder list display.
display will select the folders for voice
recordings.
last file in the selected folder.
REC
source to be recorded.
recording level and recording function
settings)
[B] might be dedicated
REC
s button
STOP
4 button
`/
OK
button
LIST button repeatedly will
s button and prepare to
• The recording indicator light will flash and
[ ] will appear on the display.
• The voice sync level can be set when voice
sync recording is on.
• [Rec Mode] cannot be changed in the
recording standby mode or while recor ding.
Configure this while the recorder is stopped
(☞ P.41, P. 4 3).
• The various functions related to recording
can be configured to suit the recording
conditions (☞ P.41, P.43, P. 4 4).
• The level indicator position of the level
meter will change in accordance with the
switching of the various settings related
to recording. Confirm the recording level
through the level meter after switching the
settings.
Use the
3
recording level.
• This recorder is designed to be able to
• If too big sound is input, the noise may
• When [Rec Level] is set to [Auto] the record-
REC LEVEL
record cleanly and evenly, even in recording conditions such as when the volume
of the source sound changes significantly.
However, even higher sound qualit y recordings can be achieved by adjusting the
recording level manually.
occur even if [Rec Level] is set to [Auto]
or [Limiter On]. Also, in certain cases the
[PEAK] indicator light, which notifies large
input, may not light. To ensure successful
recordings, we recommend that you test the
record function and volume before use.
ing level will be adjusted automatically.
Set [Rec Level] to [Manual] when using the
recording level adjustment function and the
limiter function
dial to adjust the
This can be adjusted
in a range from [0]
to [10]. The larger
the number on the
dial is the higher the
recording level will
be, and the indicator
position of the level
meter will grow
larger as well
(☞ P.41, P.4 3).
2
Abou t Recording
23
Page 24
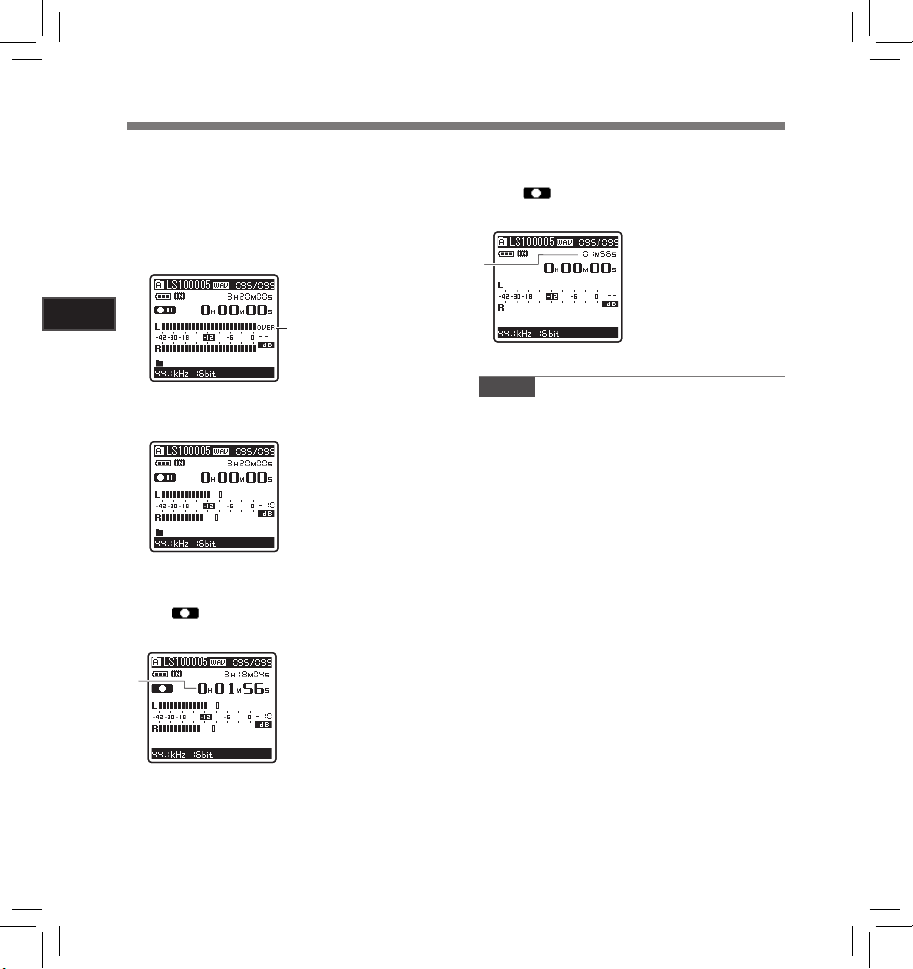
Recording
Actually producing the sound you
would like to record:
• When a loud sound is produced the level
meter will swing all the way over to the right
while recording and the [PEAK ] indicator
light will turn on. When this happens the
sound will be recorded in a distorted manner since the recording level is too high.
When the level meter is
2
Abou t Recording
• When a loud noise is produced, adjust
the recording level so that the level meter
remains in the vicinity of [–6].
Press the
4
begin recording.
• [ ] will appear on the display.
d Elapsed recording time
d
REC
maxed out (the recorded
sounds will be distorted)
Example of conditions
where th e recording leve l
has been l owered and the
excess input has been
adjusted
s button again will
Press the
5
cording.
• [ ] will go out on the display.
e File length
e
Notes
• The recording will continue even if the volume
of a single file exceeds 2 GB in the linear PCM
format recording (☞ P. 43 ).
1 The file is saved every 2 GB in separate
file s. It will be treated as multi ple f iles when
playing back.
2 When the recording exceeds 2 GB, the
number of files in the folder may exceed
200 files. The 201st file and later will not
be recognized by the recorder, so check by
connecting the recorder to a PC.
• When an SD Card is inserted in the recorder,
be sure to co nfirm the reco rding media as either
[Built-in Memory] or [SD Card] so that there is
no mistake (☞ P. 41, P. 4 6 ) .
• When attempting to perform operations such as
rewriting the contents of an SD Card in cases
where the card has been write protected, [SD
Card Locked] will appear. The playback operation can be performed, but the write protection
must first be turned off when overwriting the
contents on the card (☞ P.1 8) .
If you selec t a folder other than [A] through [E]
•
and press the REC s button, an [Can't record
in this folder] message will flash. Select a
folder from [A] through [E] and star t recording
again.
STOP
4 button to stop re-
24
Page 25
Recording
• When remaining recording time is less than
60 seconds, the [PEAK] indicator light star ts
flashing in amber. When the recording time
is decreasing to 30 or 10 seconds, the light
flashes faster.
• [Folder Full] will appear when the folder
capacity is full. Delete any unnecessary files
before recording any further
• [Memory Full] will appear when the memory
is full. Change the recordable media or delete any unnecessary files before recording
any further (☞ P. 3 8 , P.41 , P. 4 6 ) .
• When the recording button of the exclusive
remote control RS30W (optional) is pres sed
once, recording will start immediately.
• Depending on the sound recording mode
and the status of record media, the data
tr an sfer to t he medi a c ann ot be d on e in time
during re cording and the sk ipped sound may
be recorded. In this case, [Data Write Error]
will appear during recording or when the
recording is finished. After transferring the
data to the PC, format the record media.
• We recommend the media to be formatted
before recording.
(☞ P. 38 ).
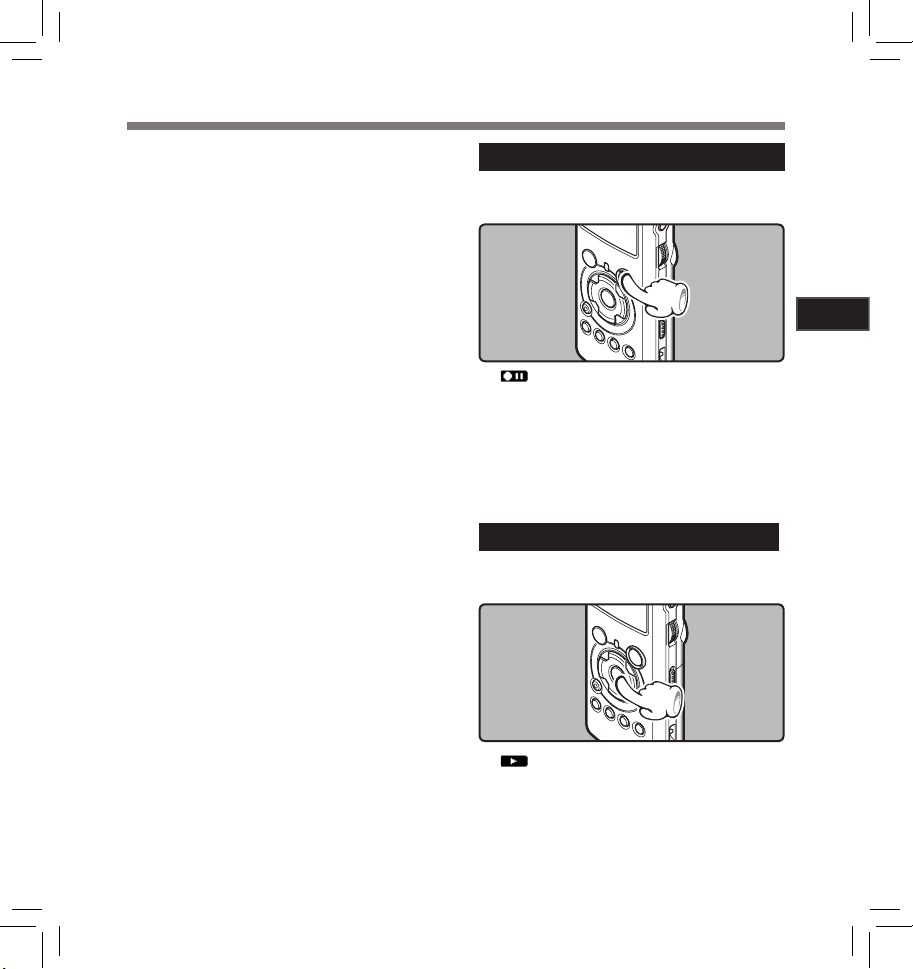
Pause
While the recorder is during recording
mode, press the
• [ ] will appear on the display.
• The recorder will time out after 60 minutes
when left in "Rec Pause".
REC
s button.
Resume Recording:
REC
Press the
• Recording will resume at the point of
interruption.
s button again.
To quickly check on the recorded contents
While the recorder is during recording
mode, press the `/OK button.
2
Abou t Recording
• [ ] will appear on the display.
• Stop recording and the file that was just
recorded will be played back.
25
Page 26
Recording
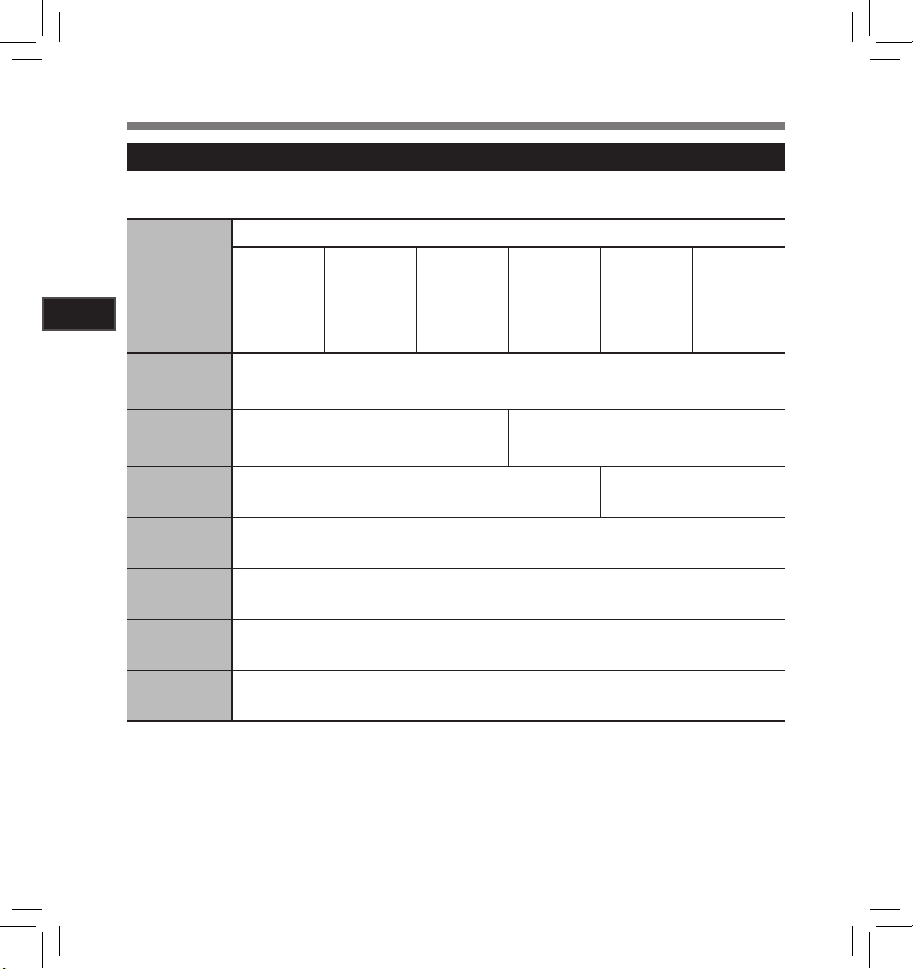
Recommended settings by recording condition
The reco rder is set up so that it can perf orm high quality r ecording equival ent to that of a music CD ri ght away.
The various functions relating to recording can be configured in detail to suit the recording conditions.
Recording condition
Outdoor
2
Abou t Recording
Recording
settings
Recording level*
(☞ P. 23)
Microphone
sensitivity
(☞ P. 27)
Low Cut Filter
(☞ P. 27)
Indoor musical
performance
When the [Rec Level] is set to [Manual] you can adjust the recording level.
Adjust while looking at the level meter
Band
performance
in a practice
studio
[LOW][HIGH]
Performance
in a vast hall,
etc.
[OFF][ON]
environment
sounds like
wild birds
singing,
railroad
noises, etc.
Conferences
with large
crowds in
vast meeting
venues
Conferences
with a few
people
indoors
[Rec Mode]
(☞ P.41, P. 43)
[Rec Level]
(☞ P.41, P. 43)
[Rec Monitor]
(☞ P.41, P. 44)
[Plug-in Power]
(☞ P.41, P. 44)
*
When [Rec Level ] is set to [Auto] the rec or ding l evel will be adjust ed automatica lly. When this happens,
the recording level adjustment function and limiter function will not work (☞ P. 2 3, P.41 , P. 4 3 ) .
The recording level can be adjusted to suit the volume of the original sound
You can configure whether to adjust the recording level automatically or to adjust it manually.
When [Rec Level] is set to [Manual] you can c onfigure the limiter function
Select whether or not to output the rec ording monitor sound from the EAR jack
Select whether or not to use the plug-in power function according to the external microphone
connected to the MIC jack
26
Page 27
Recording
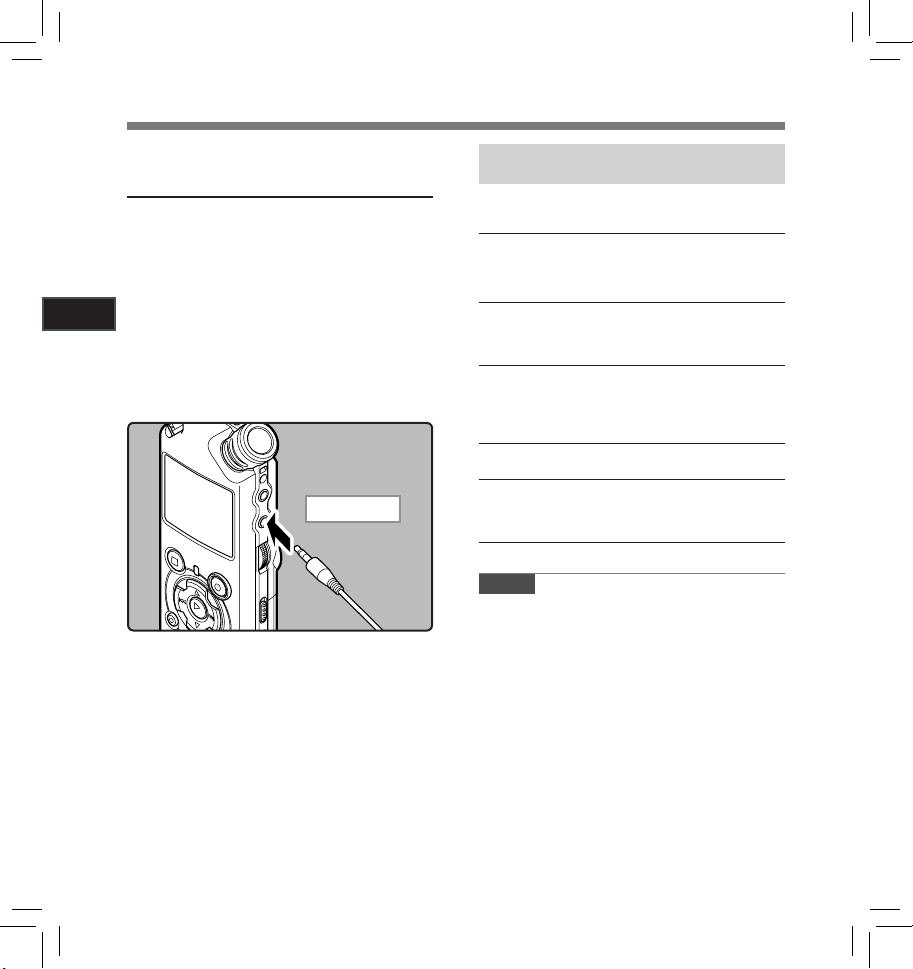
Listening While Audio is Recorded
If you star t recording after inserting the earphone
into the EAR jack on the recorder, you can hear
the sound being recorded. The recording monitor
volume can be adjusted by using the VOLU ME
dial.
Connect the earphone to the
the recorder.
To EAR jack
• After recording has started, you can hear
the sound being recorded through the
earphone. If the earphone is connected,
no sound will come from the speaker.
Notes
• Recording level cannot be controlled using the
volume button.
• When using the earphones, do NOT set the
volume too high. Listening at very high volume
may lead to hearing loss.
• Do not place earphones near a microphone as
this may cause feedback.
• When the external speaker is connected while
recording, there is a risk that audio feedback
will occur. It is recommended that you use
earphones for the recording monitor, or turn
[Rec Mo nitor] to [Off] while recording (☞ P. 41 ,
P. 44 ).
• When [Rec Monitor] is set to [Off
will come out of the earphones while you are
recording (☞ P. 41 , P. 4 4).
EAR
jack on
] no sound
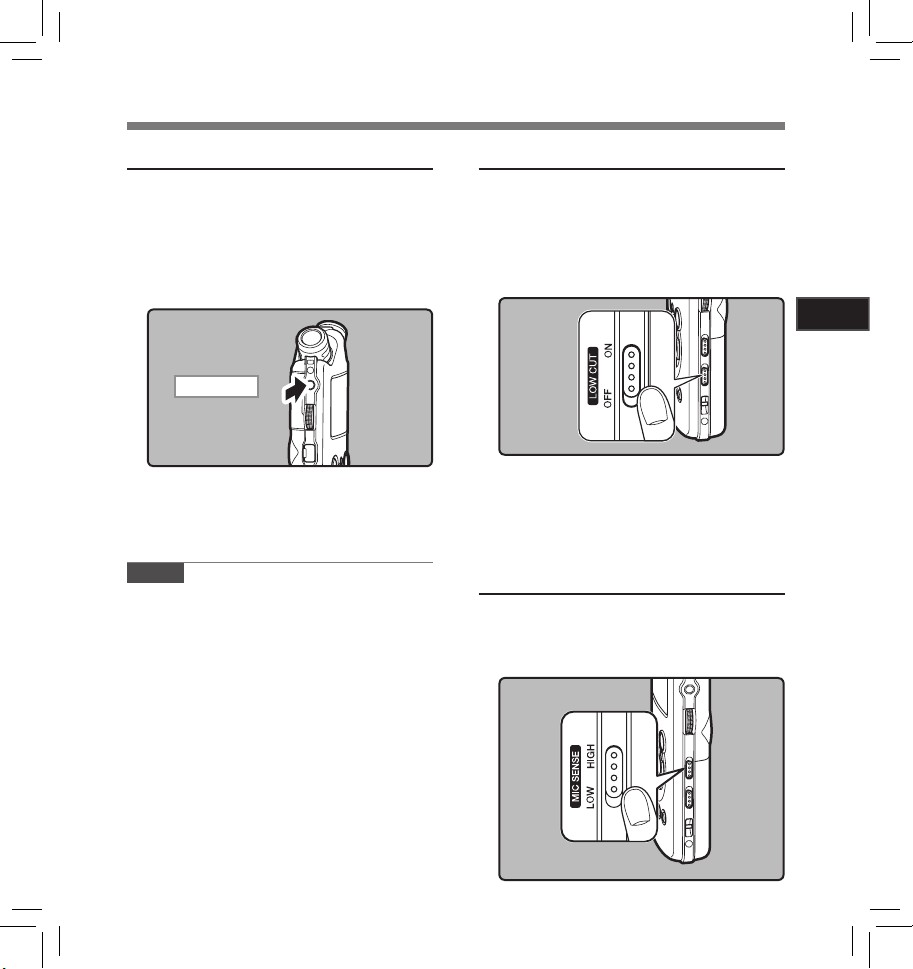
Set the Low Cut Filter
The recorder has a Low Cut Filter function to
minimize low-frequency sounds and record
voices more clearly. This function can reduce
noise from air conditioners, projectors and other
similar noises.
Slide the
[ON] or [
LOW CUT ON/OFF
OFF
].
[ON]:
Enables the Low Cut Filter function.
[OFF
]:
Disables this function.
switch and select
Microphone Sensitivity
Microphone sensitivity is adjustable to meet
recording needs.
Slide the
select [
MIC SENSE HIGH/LOW
HIGH
] or [
LOW
].
switch and
2
Abou t Recording
27
Page 28
Recording
[HIGH]:
This is a highly sensitive mode which can
record surrounding noises.
[LOW]:
This is the standard level of microphone
sensitivity. Select this mode for cases
where the volume of the source sound is
high, such as a band performance.
Note
2
• When you would like to clearly record a
speaker’s voice, set the recorder to [LOW] and
Abou t Recording
hold its built-in stereo microphone close to the
speaker’s mouth (5-10 cm) before recording.
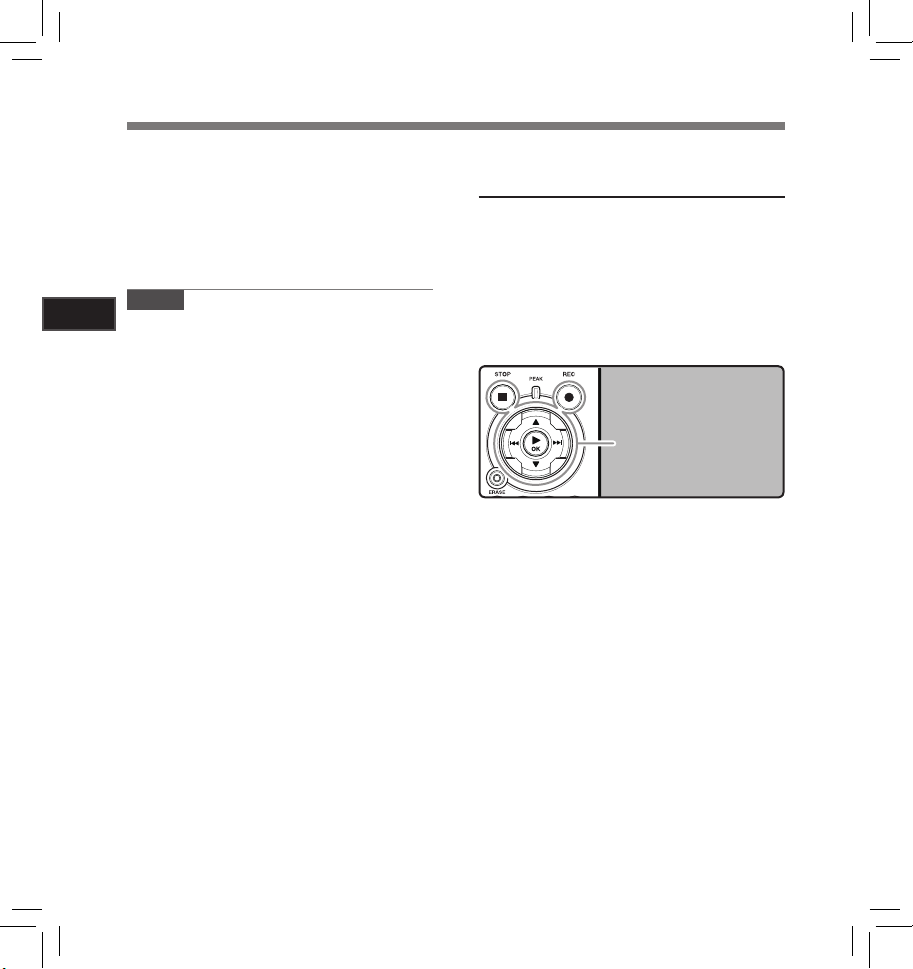
Adjusting the voice sync level for
recording
Voice sync recording allows you to start
recording when voice louder than the
voice sync level (detection level) is detected, and automatically stop recording
when the voice becomes quiet. When
voice sync recording is on (☞P.44) and the
voice is below the voice sync level (detection level) for longer than the specified
detection time, the recorder stops.
REC
s button
STOP
4 button
9 0 button
Select the recording folder (☞ P.19 to
1
P. 21) .
How to change folders:
1 Pressing the LIST button at the file display
while stopped will return you back one layer
above.
Pressing the
bring you to the folder list display.
2 Pressing button 2 or 3 at the folder list
display will select the folders for voice
recordings.
• Newly recorded audio will be saved as the
last file in the selected folder.
LIST button repeatedly will
28
Page 29
Recording
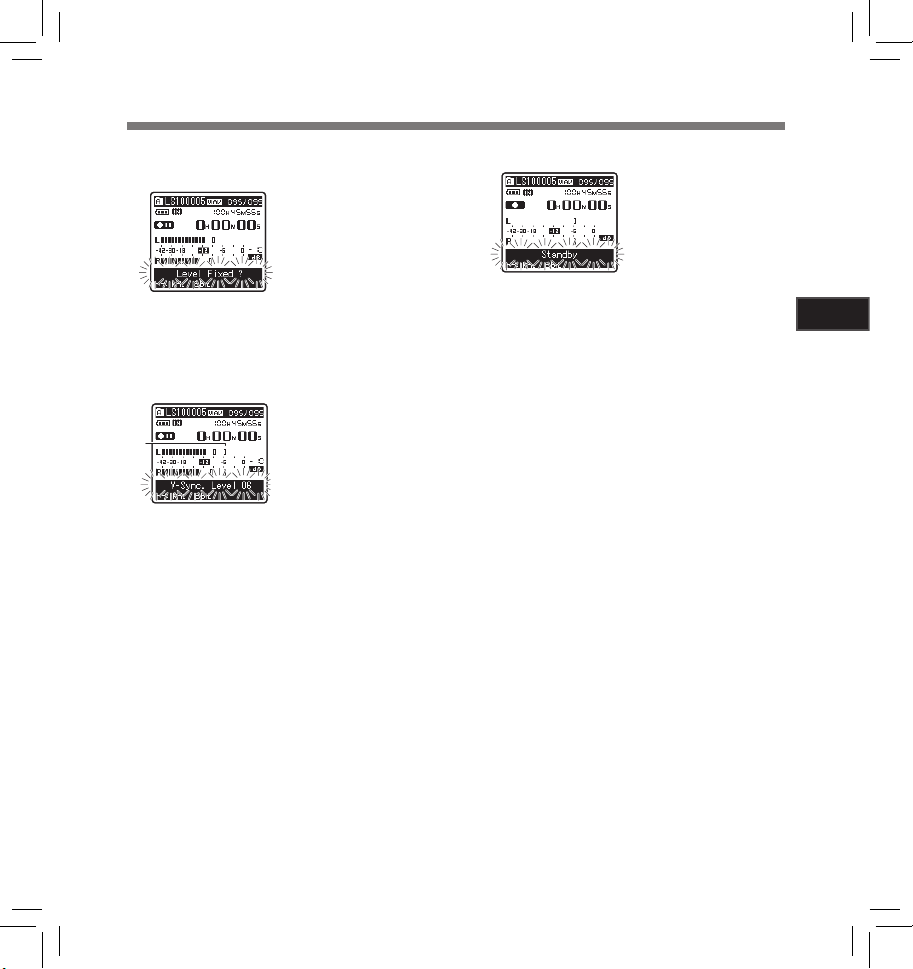
Press the
2
record.
• To use voice sync recording, set [ V-Sync.
Press the 9 or 0 bu tton to ad just
3
the voice sync level.
a
• The higher the value, the more sensitive
a Voice sync level (moves to the right/left
REC
s button and prepare to
[Level Fixed?] will flash
on the display.
Rec
] on and set the detection time (☞
P. 44 ).
Appears the voic e sync
level in 23 steps ([
38]) on the display.
[
the reco rders gets to sounds. At the highest
value, even the faintest sound will activate
recording.
according to the set level)
01] to
Press the
4
• Recording enters standby. [Standby]
If input meets or exceeds the voice sync
Recording stops automatically.
5
• If the volume is equal to or less than voice
• To manually stop recording, press STOP 4
REC
s button again.
flashes on the display and the recording
indicator light flashes.
level, recording starts automatically. At this
time, the recording indicator light glows.
sync level for longer than the specified time,
recording stops automatically. At this time,
the recording indicator light turns off.
button.
2
Abou t Recording
29
Page 30
Recording
Recording from External
Microphone or Other Devices
The external microphone and other devices can
be connected and the sound can be recorded.
Connect as follows by the device to be used.
• Do not plug and unplug devices into the
recorder’s jack while it is recording.
Recording with External Microphone:
2
Connect an external microphone to the
Abou t Recording
MIC
jack of the recorder.
• When recording while an external monaural
microphone is connected, sound will only be
recorded by the L-channel.
To MIC jack
Applicable External Microphones
(optional) (☞ P. 82 )
Stereo microphone: ME51S
The built-in large-diameter microphone enables
sensitive stereo recording.
2 channel microphone (omni-directional): ME30W
These are highly sensitive omni-directional
microphones supported by plug-in power which are
well-suited to recording musical performances.
Highly sensitive noise-cancellation monaural micro-
(unidirectional): ME52W
phone
This microphone is used to record sound at a
distance while minimizing surrounding noise.
Compac t Gun Micro phone (unid irectio nal): ME31
The direct ional microp hones is useful f or recording s
such as outdoor recording of wild bir ds singing. The
metal-cut body provides a sturdiness to the high
rigidity.
Tie clip microphone (omni-directional): ME15
Small concealing microphone with a tie-clip.
Telephon e pickup: TP7
Earphone type microphone can be plugged into your
ear while phoning. The voice or conversation over
the phone can be clearly recorded.
Notes
• Th e bu il t- in m ic roph on e wi ll bec om e i nop er ab le
when an external microphone is plugged into
the recorder’s MIC jack.
• Microphones suppor ted by plug-in power can
also be used. When the plug-in power function
is set to [On] power will be supplied by the
device to the microphone (☞ P. 41, P. 44).
• Turn the plug-in power function to [Off] when
an external microphone not supported by
plug-in power is connected, as there is the risk
that noise may be generated while recording
(☞ P.41, P. 4 4).
• Do not connect the connecting cord to the
LINE IN jack when recording from external
microphone with this recorder.
30
Page 31

Recording
Recording the Sound of Other Devices with
This Recorder:
The sound can be recorded when connecting to
the audio output terminal (earphone jack) of the
other device, and the LI NE IN jack of the recorder
with the connecting cord KA334 (optional) for
dubbing.
To audio output
terminal of other
To LI NE IN
jack
Notes
• If you are unable to produce a clear recording
with this recorder even after adjusting the
recording level (☞ P.23), this could potentially
be because the output level for the connected
devices is too high or too low. When external
devices are connected, perform a test recording and then adjust the output level for the
external devices.
• Do not connect the connecting cord to the MIC
jack when recording sound from other device
with this recorder.
devices
Recording the Sound of This Recorder with
Other Devices:
The sound of this recorder can be recorded to
other devices when connected to the audio input
terminal (line jack) of other devices and the EAR
jack of this recorder, with the connecting cord
KA334 (optional) for dubbing.
To audio input
terminal of
other devices
To EAR
jack
Notes
• When you adjust the various sound quality
settings related to playback on the recorder,
the audio output signal sent out from the EAR
jack will change as well (☞ P.41 , P. 4 5 ) .
• In case of recording on other devices without
a line input, the input may be too large to control when the audio is input to the microphone
jack. In this case, use the connecting cord
KA333 (optional) with attenuation resistance
(☞ P.
82).
2
Abou t Recording
31
Page 32

About Playback
Playback
The recorder can playback WAV, MP3 and WMA
format files. To playback a file recorded with
other machines, you need to transfer (copy) it
from a computer.
STOP
4 button
2 3 button
9 0 button
3
About Playback
Select the folder which contains the
1
files to be played back (☞ P.19 to
P. 21).
How to change fold ers:
1
Pressing the LIST button at the file display
while stopped will return you back one layer
above.
Pressing the
bring you to the folder list display.
2 Pressing button 2 or 3 at the folder list
display will select the folders for voice
recordings and press the 9 button.
In the File list display, press the 2 or 3
2
button to select the file that you want
to playback.
• In the File display, press the 9 or 0
button to select a file.
Press the `/OK button to start play-
3
back.
• [ ] will appear on the display.
a Folder name/ File name/ File format/
Current file number/ Total number of
recorded files in the folder
b File length
c Elapsed playback time
d Level meter
32
`/OK button
LIST button repeatedly will
a
b
c
d
Use the
4
comfortable listening volume.
Press the
5
point you want to stop the playback.
• [ ] will go out on the display.
• This will stop the file being played back
• When the batteries are removed from the
VOLUME
dial to adjust to a
The volume can be
adjusted within a range
from [0] to [10]. The
larger the number on
the dial is the higher the
volume will be
STOP
4 or `/OK button at any
midway. When the resume function is
activated the stopped location will be
registered, even if the power is turned
off. The next time the power is turned
on, playback may be resumed from the
registered stopped location.
recorder the resume function’s stopped
position will be erased.
Page 33

Playback
Settings relating to playback
Segment
repeat
(☞ P.36)
[Play Mode]
(☞ P.41, P.45)
[Reverb]
(☞ P.41, P. 4 5 )
[Replace]
(☞ P.5 4)
[File Move]
(☞ P.5 6)
[File Divide]
(☞ P.5 9)
This allows you to repeatedly playback part of a file
during playback.
[File] [File Rep eat] [Folder]
[Folder Repeat] [All]
[All Repeat]
[Normal] [Studio] [Club]
[Hall] [Dome]
This changes the order
of the files in the selected
folder. It is useful for playing
back files in a preferred order while in normal playback
mode etc.
Selected files can be moved
or copied within or between
memory storages.
PCM files recorded by this
recorder can be divided.
About music file
In cases where the recorder is unable to playback
music files that have been transferred to it, check
to make sure that the sampling rate and bit rate
are in the range where playback is possible.
Combinations of sampling rates and bit rates for
music files which the recorder can playback are
given below.
File
Sampling frequency Bit rate
format
WAV
44.1 kHz, 48 kHz,
format
88.2 kHz, 96 kHz
MPEG1 Layer3:
32 kHz, 44.1 kHz,
48 kHz
MP3
format
MPEG2 Layer3:
16 kHz, 22.05 kHz,
24 kHz
,
22 kHz
16 kHz
WMA
32 kHz, 44.1 kHz
format
48 kHz
• Variable bitrate MP3 files (in which conversion
bitrates can vary) may not play properly.
• For WAV files, this recorder can only play back
those in the linear PCM format. WAV files other
than these cannot be played back.
• This recorder is compatible with Microsoft
Corporation DRM9, but not with DRM10.
• It is possible to playback the WMA files which
are created by the Olympus Digital Voice
Recorder.
,
,
16 bit or 24 bit
From 8 kbps
up to 320 kbps
From 16 kbps
up to 256 kbps
3
About Playback
33
Page 34

Playback
Forwarding
While the recorder is during stop mode
in the file display, press and hold the
9 button.
3
About Playback
• [ ] will appear on the display.
• If you release the 9 button, it will stop. Press
the `/OK button to start playback from where it
was stopped.
While the recorder is during playback
mode, press and hold the 9 button.
• When you release the 9 button the recorder
will resume normal playback.
•
If th er e i s a n in de x m ar k o r te mp ma rk in the mi dd le
of the file, the recorder will stop at that location (☞
P. 35).
• T he recorder sto ps when it reaches t he end of the
file. Co ntinue pressin g the 9 button to proceed
with the cue from the beginning of the next file.
Rewinding
While the recorder is during stop mode
in the file display, press and hold the
0 button.
34
• [ ] will appear on the display.
• If you release the 0 button, it will stop. Press
the `/OK button to start playback from where
it was stopped.
While the recorder is during playback
mode, press and hold the 0 button.
• When you release the 0 button the recorder
will resume normal playback.
•
If th er e i s a n in de x m ar k o r te mp ma rk in the mi dd le
of the file, the recorder will stop at that location (☞
P. 35).
• The recorder stops when it reaches the
beginnin g of the file. Continue pressing the 0
button to proceed with the review from the end
of the previous file.
Locating the Beginning of the File
While the recorder is during stop mode or
playback mode, press the 9 button.
• The recorder skips to the beginning of the next
file.
While the recorder is during playback
mode, press the 0 button.
• The recorder skips to the beginning of the
current file.
While the recorder is during stop mode,
press the 0 button.
• The recorder skips to the beginning of the
previous file. If the recorder stop the midway
of the file, return to the beginning of the file.
While the recorder is during playback
mode, press the 0 button twice.
• The recorder skips to the beginning of the
previous file.
Page 35

Playback
Playback Through Earphone
An earphone can be connected to the EAR jack of
the recorder for listening.
• When the earphone is used, the recorder
speaker will be switched-off.
To EAR
jack
Notes
• When you skip to the beginn ing of the file during
playback, the recorder will stop at the position
of the index mark and temp mark. The index
mar k and temp mark will be skippe d when you
perform the operation in stop mode (☞ P. 3 5).
• To avoid irritation to the ear, insert the earphone
after turning down the volume level.
• When you listen with the earphone during
playback, do not raise the volume too much. It
may cause hearing impairment and decrease in
hearing ability.
Setting an index mark or a temp
mark
If index marks and temp marks are placed, you can
quickly find a location you want to listen to in fast
forward and fast rewind and when cuing a file.
Index and temp marks can be added only during
PCM recording with this recorder or to PCM files
recorded using this recorder. Index marks cannot
be added to WMA files, MP3 files or files made
by recorders other than Olympus IC recorders.
However, temp marks can be added to tempor arily
mark locations to which you wish to listen.
To add index marks, the index function must be
registered to the
Press the Fn button during file re-
1
cording, recording pause, playing, or
playback pause.
• A number appears on the display and an
index mark or temp mark will be placed.
• Ev en a ft er an inde x or te mp m ar k is pla ce d,
recording or playback will continue so you
can place index or temp marks in other
locations in a similar manner.
Fn
button (☞ P.4 8) .
9 0 button
`/
OK
ERASE
Fn
button
button
button
3
About Playback
35
Page 36

Playback
Clearing an index mark or a temp mark:
Locate the index or temp mark you
1
want to clear.
Press the 9 or 0 button to select
2
the index or temp mark to erase.
3
About Playback
While the index or temp number ap-
3
pears for approximately 2 seconds on
the display, Press the
• The index or temp mark is erased.
• Index or temp numbers after the erased index
or temp number will automatically move up.
Notes
• Index marks can be added during PCM rec ord-
ing with this recorder or to PCM files recorded
using this recorder.
ERASE
button.
• Temp marks are temporar y markings, so if you
move to another file, switch to the list screen,
or connect the rec order to a computer, they will
be automatically erased.
• Up to 16 index and temp marks can be set in
a file. If you try to place more than 16 index
or temp marks, the [
appear for index marks, and [
for temp marks.
• Index or temp marks cannot be set or erased
in a locked file (☞ P. 47 ) .
Index Full] message will
Tem p Mar k Ful l]
How to begin segment repeat
playback
This function enables repeated playback of part
of the file being played.
2 3 button
9 0 button
`/
OK
button
A-B REPEAT button
Select a file that has a segment you
1
would like to play back repeatedly (☞
P.19 to P. 2 1) .
In the File list display, press the 2 or
2
3 button to select the file.
• In the File display, press the 9 or 0
button to select a file.
Press the `/OK button to start play-
3
back.
36
Page 37

Playback
Press the
4
point you want to start segment repeat
A-B REPEAT
button at the
playback.
[ ] will flash on the
display
• Fast forwarding and rewinding can be
conducted when [
manner as during normal playback, and
you can quickly proceed as far as the end
position (☞ P.3 4).
• When it reaches to the end of the file while
[
] is flashing, the point will bec ome the end
position, and repeat playback will start.
Press the
5
the position where you want to end
A-B REPEAT
] is flashing in the same
button again at
segment repeat playback.
• The recorder repeatedly plays back the
segment until the segment repe at playback
is cancelled.
Cance l the segment r epeat play back function
Pressing any of the following buttons will
release the segment repeat playback.
a Press the
Pressing the STOP 4 button will release seg-
ment repeat playback, and stop playback.
b Press the `/
Pressing the `/OK button will release segment
repeat playback, and stop playback.
STOP
OK
4 button
button
c Press the 9 button
Pressing the 9 button will release segment
repeat playback, and cue to the beginning of
the next file.
d Press the 0 button
Pressing the 0 button will release segment
repeat playback, and reverse to the beginning
of the current file.
e Press the
Pressing the A-B REPEAT button will release
segment repeat playback, and playback
continues without repeating.
A-B REPEAT
button
3
About Playback
37
Page 38

Erasing
Erasing One File at a Time
A selected file can be erased from a folder.
2 3 button
9 0 button
`/
OK
button
ERASE
button
Select the folder which contains the
3
1
files you want to erase (☞ P.19 t o
About Playback
P. 21) .
In the File list display, press the 2 or
2
3 bu tto n to select t he f ile yo u want to
erase.
• In the File display, press the 9 or 0
button to select a file.
While the recorder is during stop
3
mode, press the
Press the 2 button to select [
4
Erase
].
ERASE
button.
[Cancel] will flash on the
display
File
Press the `/OK button.
5
• The display changes to [File Erase!] and
erasing will start.
• [Erase Done
erased. File numbers will be reassigned
automatically.
] is displayed when the file is
Erase All Files from a Folder
All files in a folder can be erased simultaneously.
The locked files (☞ P.41, P.47) and the files set to
read-only on the PC will not be erased.
2 button
`/
OK
button
ERASE
button
Select the folder that you want to
1
erase (☞ P.19 to P. 2 1).
While the rec order is during stop mode,
2
press the
ERASE
button twice.
[Cancel] will flash on the
display
38
Page 39

Erasing
Press the 2 button to select [
3
Erase
].
Press the `/OK button.
4
• The display changes to [All Erase!] and
erasing will start. [Erase Done
when the files are erased.
] is displayed
All
Partially erase a file
Only a PCM file recorded in the recorder can be
partially erased.
2 button
`/
OK
button
ERASE
button
Select the folder which contains the
1
files you want to partial erase (☞ P.1 9
to P.21).
In the File list display, press the 2 or
2
3 bu tto n to select t he f ile yo u want to
partial erase.
• In the File display, press the 9 or 0
button to select a file.
Play the file you want to partial erase.
3
• Forward a file to the position that shall be
erased. If the file i s long, use the 9 button
to move to the position you want to delete.
At the starting position of the partial
4
erase, press the
ERASE
button.
[Part ial Erase] will flash
on the display.
3
About Playback
• While [Partial Erase] is flashing, the playback continues and r ewind and fast-for ward
are available to locate the erase-end
position quickly.
If it reaches to the file end while this indica-
tion is flashing, the file end will become the
erase end position.
39
Page 40

Erasing
Press the
5
the position you want to end the partial
erase.
• [Partial Erase Start Position] and [Partial
ERASE
button once again at
Erase End Position] on the display flash
alternately.
3
Press the
About Playback
6
partial erase.
• The display will switch to [Pa rtial Erasi ng !]
• Playback will stop at the end location of the
• If the
ERASE
button again to star t the
and start the partial erase. The deletion is
completed when [
is displayed.
partial erase.
ERASE button will not be pressed
within 8 seconds, the partial erase operation will be cancelled and the recorder will
stop.
Parti al erase comp leted]
Notes
• Partial erase is not applicable to files recorded
in the WMA or MP3 formats.
• The File Created Date will not change even if
the file is partially erased.
• An erased file cannot be restored. When an
SD Card is inserted in the recorder, be sure to
confirm the recording media as either [
in Memory
mistake (
• When attempting to perform operations such as
rewriting the contents of an SD Card in cases
where the card has been write protected, [
Card Locked
tion can be performed, but the write protection
must first be turned off when overwriting the
contents on the card (☞ P.1 8) .
• The locked files and files set as read-only
cannot be erased (
• If an action is not selected within 8 seconds,
the recorder will return to stop status.
• Never perform operat ions such as the following
while processing, as they may damage the
data. In addition, replace the batteries with t wo
new ones in order to ensure that the batteries
will not run out while processing.
1 Turning off the power while processing.
2 Removing the batteries while processing.
3 Remove the SD Card during processing
Performing any of these operations may dam-
age the data.
• You cannot delete folders through the recorder.
] or [SD Card] so that there is no
☞ P.41, P.46).
] will appear. The playback opera-
☞ P.41, P.47 ).
when [SD Card] is being used as the recording media.
Built-
SD
40
Page 41

Menu Setting
Menu Setting Method
Items in menus are categorized by tabs, so select
a tab fir st and move to a desired item to quickly set
it. You can set each menu item as follows.
2 3 button
9 0 button
`/
OK
button
MENU
button
While the recorder is during stop
1
mode, press the
• Menu items can be set during a recording
or playback (☞ P. 50 ).
Press the 2 or 3 button to move to the
2
tab that contains the item you want to
set.
MENU
button.
The menu will appear on
the display
Press the `/OK or 9 button to move
3
the cursor to the item to set.
Press the 2 or 3 button to move to
4
the item you want to set.
Press the `/OK or 9 button.
5
• Moves to the setting of the selected item.
4
Menu Setting
• You can change the menu display by
moving the settings tab cursor.
41
Page 42
Menu Setting Method
Press the 2 or 3 bu tt on to c ha nge the
6
setting.
Press the `/OK button to complete the
7
setting.
4
Menu Setting
• You w il l be in form ed th at t he set ti ng s h ave be en
established via the screen.
• Pressing the 0 button without pressing the
`/OK b ut ton will ca ncel th e se tt ings an d re turn
you to the previous screen.
Press the
8
menu screen.
• Whe n in t he me nu sc reen dur ing r ecord ing
or playbac k, pressing the 0 or MENU button will allow you to return to the playback
screen without interrupting recording or
playback.
MENU
button to close the
Notes
• The recorder will stop if you leave it idle for 3
minutes during a menu setup operation, when
a selected item is not applied.
• Wh en e nte ri ng m en u se tt ings duri ng rec or ding
or playbac k, the menu settings will be c ancelled
if 8 seconds elapse with no buttons being
pressed.
42
Page 43

4 Rec Menu
Menu Setting Method
Rec Mode
Rec Level
The recorder can record in the linear PCM format. High resolution recording at a high
sampling rate and high bit rate equivalent or superior to that of a music CD is possible.
Moreover, it also supports the MP3 and WMA formats.
1. Select the recording format.
Setting:
[PCM]:
This is an uncompressed audio format which is used for music CDs and the like.
[MP3]: MPEG is the inte rnational standard est ablished by a working group of the
ISO (International Organization for Standardization).
[WMA]: This is an audio compression encoding method that was developed by
the Microsoft Corporation in the US.
2. Select the recording rate.
Setting:
[PCM]: [96kHz/24bit] to [44.1kHz/mono]
[MP3]: [320kb ps] to [mono]
[WMA]: [16 0kbp s] to [mono]
• When the recording for mat is set to the MP3 o r WMA formats, t he sampling rate will
be encoded and processed at 44.1 kHz.
• When a high recording ra te setting is used the file capaci ty will increase. Make sure
that the amount of memory remaining is suff icient before recording (☞ P. 4 6) .
• When [mono] of [MP3] is selected, the recording rate will be set to 64kbps.
• When [mono] of [WMA] is selected, the recording rate will be set to 32kbps.
You can configure whether to adjust the recording level automatically or to adjust it manually.
1. Select the Recording level setting.
Setting:
[Manual]:
Recording is per formed by manually adjusting the recording level.
[Rec Level] is set to [Manual] you can configure the limiter function.
[Auto]: Recordin g is perform ed by automatic ally adjusting t he recording le vel. This is
useful for when you will be recording right away.
2. Select the Limiter setting.
This recorder is equipped with a limiter function that corrects the recording level
down to an ap propriate ran ge in cases wher e a loud noise is sudd enly picked up.
This prevents distortion c aused by an exc essive recording level.
Setting:
[Limiter On]: Enables the limiter function, thus preventing distortion when recording.
[Limiter Off]: Disables this function.
•
When [Rec Level] is set to [Auto] the reco rding level wil l be adjusted au tomaticall y. Set [Rec Level]
to [Manual] when using the recording level adjustment function and the limiter function.
When
4
Menu Setting
43
Page 44

4 Rec Menu (Continued)
Menu Setting Method
Rec Monitor
Plug-inPower
4
Menu Setting
V-Sync. Rec
Select whether or not to output audio while recording from the earphone jack.
Setting
:
[On]: Enables the recording monitor function. Sound will be output from the
EAR jack.
[Off]: Disables this function. Sound will not be output from the EAR jack.
• When the exter nal speaker is connected while recording, there is a risk that audio
feedback will occur. It is recommended that you use earphones for the recording
monitor, or turn [Rec Monitor] to [Off] while recording (☞ P. 27 ).
• When [Rec Monitor] is set to [Off] no soun d will come out of t he earphone s while you are
recording (☞ P.2 7) .
Exter nal micropho nes which are sup ported by plu g in power can also b e used. Whether
or not to supply power to external microphones c an be configured.
Setting
:
[On]: When the plug-in power function is activated, power will be supplied to
the connected external microphone. Select this when external microphones
suppor ted by plug-in power are connected (☞ P. 30 ).
[Off]: Disables this function. Select this when external microphones not supported
by plug-in power are connected.
• Turn t he plug-in po wer function to [ Off] when an external microphone not supported
by plug- in power is conne cted, as there is t he risk that noi se may be generate d while
recording.
•
Phantom power cannot be supplied, even when the plug in power function is set to [On].
Voice sync recording star ts when a voice louder than the voice sync level (detection
level) is detected. When the voice becomes quiet, recording is automatically stopped.
When voice sync recording is on and the voice is below the voice sync level (detection
level) for longer than the specified detection time, the recorder stops.
Setting:
[
On]: [1 second] [2 seconds] [3 seconds] [4 seconds] [5 seconds] [10 seco nds]:
Sets the detection time. If the input (rec ording level) is equal to or below
the spec ified level fo r longer than th e specifie d detection tim e, the recorde r
stops.
[
Off]: Disables this function.
44
Page 45

4 Play Menu
Menu Setting Method
Play Mode
Reverb
There are six play modes. You can select whether to play by file or folder, or all files
stored in the recorder.
Setting:
[File]: Stop after playing back the current file.
[File Repe at]: Play the current file repeatedly.
[Folder]: Play files continuously in the current folder until the last file and stop.
[Folder Re peat]: Play all files in the current folder continuously.
[All]: Play all files in the selected memor y continuously and stop.
[All Repeat]: Play all files in the selected memory continuously and repeatedly.
• In [File] mode, w hen the recor der comes to t he end of the las t file in the fo lder, [End] flashes
for two seconds on the display and the recorder stops at the start of the last file.
• In [Folder] mode, when the recorder comes to the end of the last file in the folder, [End]
flashes for two seconds on the display and the recorder stops at the start of the f irst file
in the folder.
• In [All] mode, aft er playing the las t file in the fold er, the recorder w ill start play ing from the
first f ile in the next folder. When it comes to the end of the last file in the recorder, [End]
flashes for two seconds on the display and the recorder stops at the start of the f irst file
in the recorder.
You can enjoy th e reverberant so und of various spa ce sizes such as fr om the recordi ng
studio to the dome.
• When playing b ack WAV format file s using these play back results, t he sampling rate
• This function is only available during playback. This recorder cannot perform
• When you adjust the various sound quality settings related to playback on the
:
Setting
[Normal]: Disables the reverb function. Select this when playing back original
sounds as they are.
[Studio] [Club] [Hall] [Dome]: Select the preferred acoustical environment.
and bit rate will be c onver ted downward from 96 kHz to 48 kHz and 24 bit to 16 bit,
respectively.
recording by using the playback results.
recorder, the audio output signal sent out from the EAR jack will change as well.
4
Menu Setting
45
Page 46

4 LCD/Sound Menu
Menu Setting Method
Backlight
Contrast
LED
Language
4
Menu Setting
4 Memory Menu
MemorySelect
Memory Info.
Format
The display will remain lit for about 10 (Initial setting) seconds when a button on the
recorder is pressed.
Display c ontrast can be adjusted in 12 levels.
You can set it so the LED indic ator light does not turn on.
You can select the display language for this recorder.
• The selectable language dif fers depending on the region.
Wh en an S D C ar d is ins er te d yo u c an sel ec t t o re co rd t o e ith er th e bu il t- in f la sh m em or y
or to the SD Card (☞ P.1 7) .
• W hen at te mpt in g to pe rf or m op er at ion s s uc h as re wri ti ng the co nt ent s o f an SD Car d
The recordable c apacity remaining and overall capacity of the recording media can
seen from the menu screen.
• When no SD Card is inserted only information for the built-in flash memory will
• The domain area which uses the administrative f iles which the recorder uses is
:
Setting
[5 secon ds] [10 secon ds] [30 seconds] [60 seconds] [Always on]:
Set the length of time that the backlight will remain lit.
[Off]: Disables this function. The backlight will not light up.
Setting:
You can adjust the LCD display contrast level from [01] to [12].
:
Setting
[On]: LED light will be set.
[Off]: Disables this function. LED light will be cancelled.
Setting
[English] [Franç ais] [Español]
:
Setting
[Built-in Memory]: Built-in flash memory.
[SD Card]: SD Card.
in case s where the card h as been write pr otected, [SD Card Locked] will appea r. The
playback operation can be performed, but the write protection must first be turned
off when overwriting the contents on the c ard (☞ P.1 8) .
seen.
included in the remaining capacity for the recording media. For SD cards in particular,
in addition to this administrative domain the administrative domain area for the SD
card is added in as well. Owing to this, the remaining capacity will be displayed as
less than the card’s specif ied capacity, yet this is not abnormal.
(☞ P.51)
46
Page 47
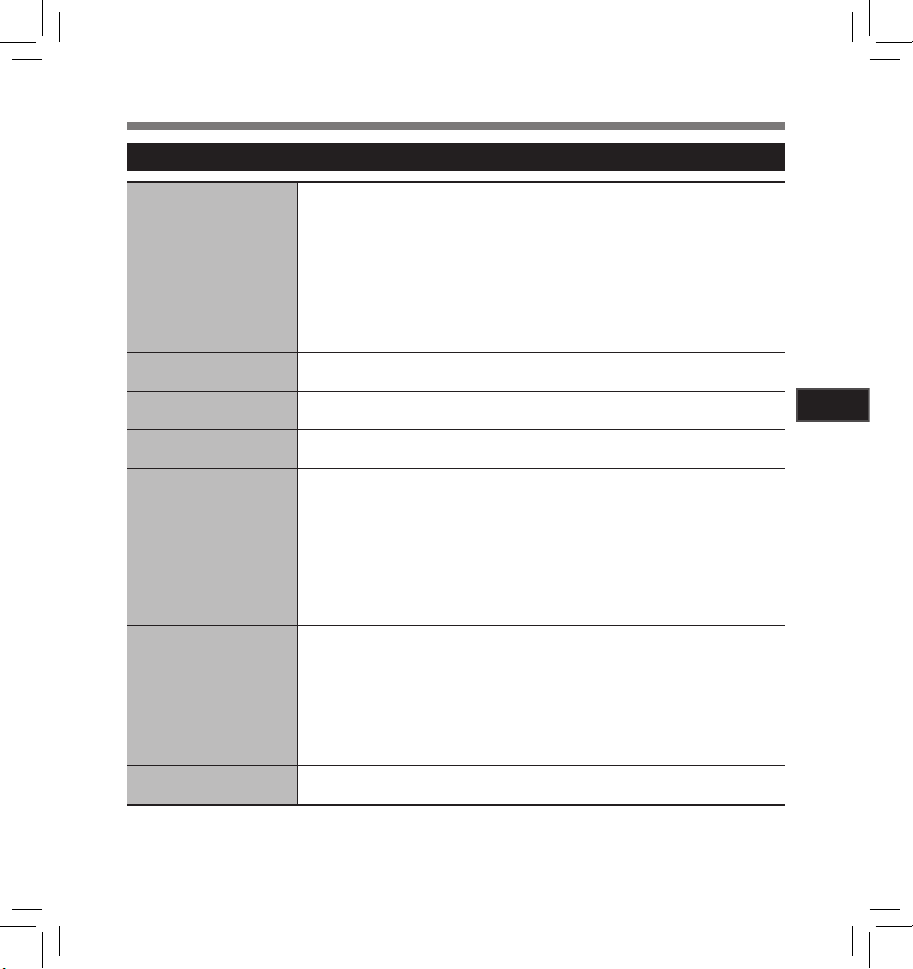
4 Others
Menu Setting Method
Lock
Replace
File Move
File Divide
AutoPowerOff
USBSettings
Locking a file keeps impor tant data from being accidentally erased. Locked files are
not erased when you select to erase all f iles from a folder (☞ P.38) .
• Select the f iles to be locked in advance before operating the menu.
• W hen at te mpt in g to pe rf or m op er at ion s s uc h as re wri ti ng the co nt ent s o f an SD Car d
:
Setting
[On]: Locks the file and prevents it from being erased.
[Off]: Disables this function. Unlocks the file and allows it to be erased.
in case s where the card h as been write pro tected, [SD Card Locked] will appea r. The
playback operation can be performed, but the write protection must first be turned
off when overwriting the contents on the c ard (☞ P.1 8) .
(☞ P.5 4)
(☞ P.5 6)
(☞ P.5 9)
Forgetting to turn the power off can be prevented. If the recorder remains in stop
mode for over 10 minutes (Initial setting) while the power is turned on, the power will
be turned off.
• If any button is pressed, the elapsed time count before the power turns off will star t
There ar e two USB sett ings when conne cting the rec order to a compu ter using the sup plied US B cable. [
device. [
:
Setting
[5 minut es] [10 minu tes] [30 minutes] [60 minutes]: Set the length of time before
the power will be turned off.
[Off]: Disables this function.
over again.
Storage Class] i s us ed wh en u si ng t he rec or de r as an ext er na l st or age
Audio Class] is used when using the recorder as a USB microphone.
Setting:
Storage Class]: The recorder is recognized as an external storage device by
[
the computer.
Audio Class]: Use this setting when connecting the recorder to a computer as
[
a USB microphone.
4
Menu Setting
Time & Date
(☞ P.15)
47
Page 48

4 Others (Continued)
Menu Setting Method
Fn Setting
4
Menu Setting
When functions are registered in the Fn but to n, e ach t im e th e Fn but to n is p re sse d, yo u
can set or change the menu of registered function.
Setting:
[Off]: No functions will be allocated to the button.
[Index] (☞ P.35)
[Rec Level]: (☞ P.4 3)
[Reverb] (☞ P.45)
[Property ] (☞ P.49)
To call up a registered function:
When the Fn button is pressed, menu setting display of registered function
will appear:
[Rec Mode]: [PCM] [MP3] [WMA]: The rec ording rate can be configured
[Rec Level]: [Manual] [Auto]: You can configure whether to adjust the
[Play Mode]: [ File] [File Repeat] [Folder] [Folder Repeat] [All]
[All Repeat]
[Reverb]: [Normal] [Studio] [Club] [Hall] [Dome]
[MemorySelect]: [Built-in Memory] [SD card]
[Property ]: File and folder information can be confir med from the menu
Each ti me the Fn butt on is presse d, the sett ing of regi stered fun ction is ch anged:
[Light]: [On] [Off]: Select backlight on or off by pressing the Fn
If the Fn bu tton is pr essed du ring reco rding or p layback , the regi stered f unctio n
is performed:
[Index]:
• When the registered function is [Rec Mode], [MemorySelect], or [Property], these
will not function if the Fn button is pressed during recording or playback. While the
recorder is during stop mode, press the Fn button.
[Rec Mode] (☞ P.43 )
[Play Mode] (☞ P. 4 5)
[MemorySelect] (☞ P. 46)
[Light] (☞ P. 4 6)
for each file format.
recording level automatically or to adjust it manually. When
the [Rec Level] is set to [Manual] you can co nfigure the l imiter
function.
screen.
button.
With each press of the Fn button, an index mark or temp
mark is added.
48
Page 49

4 Others (Continued)
Menu Setting Method
Menu Reset
System Info.
Property
This returns the functions back to their initial settings (factory default).
Setting
:
[Start]: Returns the set tings to their initial values.
[Cancel]: Takes you back to the [Others].
• After rese tting the set tings, the time s ettings and f ile numbers wi ll be preserve d from
before the reset and will not return to their initial settings.
Menu se ttings aft er settin g reset (initi al setting s):
4 Rec Men u
[Rec Mode]
Recording format [PCM]
Recording rate [44.1kHz/16bit]
[Rec Level]
Recording level [Manual]
Limiter function [Limiter On]
[Rec Monitor] [On]
[Plug-in Power] [On]
[V-Syn c. Rec] [Off]
4 Play Menuu
[Play Mode] [File]
[Reverb] [Normal]
You can check t he recorder ’s information o n the menu scree n. [Model Name], [Versio n]
and [Serial Number] appears on the display.
File and folder information can be confirmed from the menu screen.
When the file is selected: [Name] [Date] [Size] [Length] and [File Format] will
appear on the display.
When th e folder is se lected: [Name] and [Date] will appear on the display.
• Select the files for which you would like to confirm information in advance before
operating the menu.
4 LCD/Sou nd Menu
[Backlight] [10 sec onds]
[Contrast] [06]
[LED] [On]
4 Memory Menu
[MemorySelect] [Built-in Memory]
s
4 Other
[AutoPowerOf f] [10 minu tes]
[USB Settings] [Storage]
[Fn Setting] [Off]
u
u
4
Menu Setting
49
Page 50

Menu Setting Method
hSetting menu during recording hSetting menu during playback
SettingTab Function SettingTab Function
Rec Level
Rec Monitor
Rec
Menu
4
Menu Setting
LCD/
Sound
Menu
Rec Menu Play Menu
Plug-inPower
Backlight
LED
To menu item
options
Play
Menu
LCD/
Sound
Menu
Play Mode
Reverb
Backlight
LED
To menu item
options
50
Page 51

Menu Setting Method
Formatting the Recorder [Format]
If you format the recorder, all files will be removed
and all function settings will return to defaults
except date and time settings. Transfer any
important files to a computer before formatting
the recorder.
2 3 button
9 0 button
`/
OK
button
MENU
button
While the recorder is during stop
1
mode, press the
• The menu will appear on the display (☞
P. 41) .
Press the 2 or 3 button to select
2
[
Memory Menu
• You can change the menu display by
moving the settings tab cursor.
] tab.
MENU
button.
Press the `/OK or 9 button to move
3
the cursor to the item to set.
[Memory Menu] will
appear on the display
Press the 2 or 3 button to select
4
[
Format
].
Press the `/OK or 9 button.
5
Press the 2 or 3 button to select the
6
recording media to format.
• When formatting an SD Card, cancel the
write protection function before inserting
the card into the recorder (☞
[Format] will appear
on the display
P.1 8) .
4
Menu Setting
51
Page 52

Menu Setting Method
Press the `/OK button.
7
Press the 2 button to select [
8
Press the `/OK button.
9
4
Menu Setting
• After the [D ata wi ll be cl eare d] message is
on for two seconds, [Cancel] will turn on.
Press the 2 button again to select
10
[
Start
].
[Cancel] will appear on
the display
Start
].
Press the `/OK button.
11
• Formatting begins and [Format !] flashes
on the display.
• [Format Done] appears when formatting
ends.
Notes
• When an SD Card is inserted in the recorder,
be sure to co nfirm the reco rding media as either
[Built-in Memory] or [SD Card] so that there is
no mistake (☞ P. 41, P. 4 6 ) .
• When attempting to perform operations such as
rewriting the contents of an SD Card in cases
where the card has been write protected, [SD
Card Locked] will appear. The playback operation can be performed, but the write protection
must first be turned off when overwriting the
contents on the card (☞ P.1 8) .
• Never perform operat ions such as the following
while processing, as they may damage the
data. In addition, replace the batteries with t wo
new ones in order to ensure that the batteries
will not run out while processing.
1 Turning off the power while processing.
2 Removing the batteries while processing.
3 Remove the SD Card during processing
when [SD Card] is being used as the recording media.
Performing any of these operations may dam-
age the data.
• Never format the recorder from a PC.
• Once the recorder is formatted, the music files
with DRM may not be transferred to the recorder
again.
52
Page 53

• When the recorder is formatted, all the saved
data, including locked files and read-only f iles,
are erased.
• Af ter formatti ng, recorded audi o file names may
start from [0001].
• When returning the settings for the functions
to their initial settings, use [Menu Reset]
(☞ P.41, P. 4 9).
• Formatting on the recorder will be Quick
Format. If you format the SD card, information
of file management is refreshed and the data
inside the SD card is not deleted completely.
When handing over and disp osing the SD card,
be careful about the data leakage from the
SD card. We recommend the SD card to be
destroyed when you dispose the SD card.
Menu Setting Method
4
Menu Setting
53
Page 54

Menu Setting Method
Rearranging files [Replace]
You can move a file in a folder to change the order
of playback. First select the folder (file) for which
you want to change the playback order.
2 3 button
9 0 button
OK
button
`/
MENU
button
Select the folder for which you would
1
like to rearrange the song order (☞
P.19 to P. 2 1) .
4
Menu Setting
While the recorder is during stop
2
mode, press the
• The menu will appear on the display (☞
P. 41) .
Press the 2 or 3 button to select
3
[
Others
] tab.
• You can change the menu display by moving the settings tab cursor.
MENU
button.
Press the `/OK or 9 button to move
4
the cursor to the item to set.
[Others] will appear on
the display.
Press the 2 or 3 button to select
5
[
Replace
].
Press the `/OK or 9 button.
6
Press the 2 or 3 button to select the
7
file you want to move.
54
Page 55

Menu Setting Method
Press the `/OK or 9 button.
8
• The cursor will flash to confirm that the file
can be moved.
Press the 2 or 3 button to select the
9
location to move it to.
Press the `/OK button to complete the
10
setting.
• If there are more file s to move, repeat Steps
7 through 10.
• Pressing the 0 button without pressing
the `/OK button will cancel the settings and
return you to the previous screen.
Press the
11
menu screen.
MENU
button to close the
Note
• When attempting to perform operations such as
rewriting the contents of an SD Card in cases
where the card has been write protected, [SD
Card Locked] will appear. The playback operation can be performed, but the write protection
must first be turned off when overwriting the
contents on the card (☞ P.1 8) .
4
Menu Setting
55
Page 56

Menu Setting Method]
Moving Files [File Move]
Files saved in the built-in memor y or the SD card
can be moved or copied within the memory. Files
can also be moved or copied between memory.
2 3 button
9 0 button
`/
OK
button
MENU
button
Select the folder where the file you
1
want to move or copy is saved.
4
Menu Setting
In the File list display, press the 2 or
2
3 bu tto n to select t he f ile yo u want to
move or copy.
• In the File display, press the 9 or 0
button to select a file.
While the recorder is during stop
3
mode, press the
• The menu will appear on the display (☞
P. 41) .
MENU
button.
Press the 2 or 3 button to select
4
[
Others
] tab.
• You can change the menu display by moving the settings tab cursor.
Press the `/OK or 9 button to move
5
the cursor to the item to set.
[Others] will appear on
the display
Press the 2 or 3 button to select
6
[
File Move
].
56
Page 57

Menu Setting Method
Press the `/OK or 9 button.
7
Press the 2 or 3 bu tt on to c hoose the
8
position to move or copy the file to.
[Move to Built-in]:
M ov e a f il e i n th e b ui lt- in me mo ry or S D c ar d to
another folder within the built-in memory.
Copy to Built- in]:
[
Copy a file in the built-in memory or SD
card to another folder within the built-in
memory.
Move to SD Car d]:
[
Move a f ile in the built-in memory or SD card
to another folder in the SD card.
Copy to SD Card ]:
[
Co py a fi le i n t he b ui lt- in memo ry or SD c ar d
to another folder in the SD card.
Press the `/OK or 9 button.
9
[File Move] will appear
on the display
A Move or Copy folder
selection screen is
displayed.
Press t he 2 or 3 button to select the
10
folder you want to move or copy the
file to.
Press the `/OK button to complete the
11
setting.
• [Moving!] or [Copying!] will appear on the
display and moving or copying will start.
During the process, the progress status
will be shown in percentage. The process
is completed when [
or [
File copy completed] is displayed.
Press the
12
menu screen.
MENU
File move completed]
button to close the
4
Menu Setting
57
Page 58

Notes
• The recorder cannot copy when the memory
capacity is not sufficient.
• The recorder cannot move or copy when the
number of file exceeds 199.
• Do not remove the batteries during moving or
copying. This may damage the datas.
• A file cannot be moved or copied to the same
folder.
• If there is a file with the same name in the
move/copy destination folder, [Cannot move.
Same name file exists] or [Cannot copy. Same
name file exists] is displayed. The file will not
be overwritten.
• When the operation is cancelled during moving
or copying, the move or copy is cancelled.
• Files which are locked will remain so even after
4
they are moved or copied.
Menu Setting
• If you attempt to rewrite the contents in the SD
card when the SD card is write protected, [SD
Card Locked] will appear. The playback operation can be performed, but the write protection
must first be turned off when overwriting the
contents on the card (☞ P.18) .
• DRM files cannot be moved or copied.
• Files c annot be moved or copied directly under
the [Root] folder.
Menu Setting Method
58
Page 59

Menu Setting Method
Splitting Files [File Divide]
PCM files recorded in this recorder can be split.
Files with large capacities and long recording
times can be split so that they are easier to
manage and edit.
2 3 button
9 0 button
`/
OK
button
MENU
button
Select the PCM file you want to split,
1
play or fast-forward the file and stop
at where you want to split the file.
a
• Files with the recording mode of [96kHz],
[
88.2kHz], [48kHz] or [44.1kHz] are files reco rded
in the PCM format.
a Recording mode
While the recorder is during stop
2
mode, press the
• The menu will appear on the display (☞
P. 41) .
MENU
button.
Press the 2 or 3 button to select
3
[
Others
] tab.
• You can change the menu display by moving the settings tab cursor.
Press the `/OK or 9 button to move
4
the cursor to the item to set.
[Others] will appear on
the display
Press the 2 or 3 button t o sel ect [
5
Divide
].
4
Menu Setting
File
59
Page 60

Menu Setting Method
Press the `/OK or 9 button.
6
Press the 2 or 3 button t o sel ect [
7
Divide
].
4
Menu Setting
Press the `/OK or 9 button.
8
• [Dividing!] will be displayed and f ile splitting
will start. Splitting is completed when [
divide completed
Press the
9
menu screen.
] is displayed.
MENU
button to close the
[File Divi de] will
appear on the display.
File
File
Notes
• The file split cannot be done when the file list
is displayed.
• The r ecorder cannot s plit files when the number
of files in the folder exceeds 199.
• Locked files (☞ P.41, P.47) cannot be split.
• After a file has been split, the original file will
be renamed [File name_1.WAV] and the new
file will be named [File name _2.WAV].
• After a file has been split, the resulting files
retain the same creation date and modification
date as the original file.
• If a file has an extremely short recording time,
it may not be split even if it is a PCM file.
• Do not remove the bat teries during splitting file.
This may damage the data.
60
Page 61

Using the Recorder on Your PC
By bein g connecte d to a PC, the re corder ena bles
you to do the following:
• You can transfer files recorded with this
recorder to a computer, play them back, and
manage them by using Windows Media Player
or iTunes (☞ P.6 5 , P.
• In addition to its uses as an IC recorder and a
music player, this recorder can also be used
as external memory for a computer by storing
data from a computer and reading it back out
(☞ P.6 4 , P.
77).
73).
Operating Environment
Windows
Operating System:
Microsoft Windows
Installation)
Compatible PC’s:
Windows PC’s equipped with more than one
free USB port
Macintosh
Operating System:
Mac OS X 10.4.11 ~ 10.7 (Standard Installation)
Compatible PC’s:
Apple Macintosh series equipped with more
than one free USB port
XP/Vista/7 (Standard
Notes
• This is an operational environment for saving
the files recorded by this recorder to your PC
with USB connection.
•
Even if operational environment is satisfied, we
do not support such as 64-bits OS, the multiboot environment and self-modified PC’s.
• Even if operational environment is satisfied, we
do not suppo rt such as upgraded OS, the multiboot environment and self-modified PC’s.
Precautions on using the recorder
connected to a PC
• When you are downloading a file from the
recorder or uploading a file to the recorder, do
not remove the USB cable even if the screen is
indicating you can. Data is still being transferred
while the [PEAK] indicator light is bl inking. When
removing the USB cable, be sure to follow
the description in ☞ P.63. If the USB cable is
removed before the drive is stopped, data may
not be successfully transferred.
• On a PC, do not format the dri ve of the recorder.
Initialization is not successfully achieved on
a PC. For initialization, follow the instructions in the [Format] screen of the recorder
(☞ P.51).
• Folder (directory) names appeared by file
management tools such as Explorer attached
to Micro soft Windows is di fferent from th e folder
names that can be set with the recorder.
• If folders or files stored on the recorder are
moved or renamed by using a f ile management
tool such as Explorer, the order of files may be
changed or files may become unrecognizable
•
Data can b e written or upl oaded to the rec order even
though the attribute of the recorder drive is shown
as Read-only by the operating system of the PC.
• As the noise may cause adverse ef fects on
electronics devices nearby the recorder, unplug
the earphone when you connect the recorder to
a PC.
5
Using t he Recorder on Your PC
61
Page 62

Operating Environment
Connecting to Your PC
Copyright and Copyright Protection
Feature (DRM)
By the Copyright Act, any voice/music files and
music CDs downloaded from the Internet without
the copyright holder’s permission may not be
reproduced, distributed, publicized/re-publicized
on the Internet, or converted into WMA or MP3
files for the purpose of commercial business
or sale.
A WMA file may be provided with DRM (Digital
Right Management) for copyright protection.
DRM limits the file to copy or distribute music
files that are converted (ripped) from a music CD
or downloaded from music distribution services.
To transfer a WMA file with DRM to the recorder,
you need to use appropriate methods such as
Windows Media Player. Copying the music files
with DRM purchased from online music distribu-
5
tion service to a portable device such as this
Using t he Recorder on Your PC
recorder may be restricted.
Note
• This recorder is compatible with Microsoft
Corporation DRM9, but not with DRM10.
62
Connecting to Your PC
Boot the PC.
1
Connect the USB connecting cable to
2
the USB port of the PC.
Confirm that the recorder has stopped
3
and connect a USB connection cable
to the connection port on the side of
recorder.
Windows:
When you open [My Computer], it w il l b e re co gnized by the dr ive name [LS_10S] (Built-in flash
memory) and [Removable Disk] (SD card).
Macintosh:
When you connect the recorder to a Mac
OS, it will be recognized by the drive name
LS_10S] on the desktop. When an SD card
[
is inserted it will be recognized by the drive
name [Untitled].
Page 63

Connecting to Your PC
[Connec t (Storage)]
is appeared on
recorder if the USB
cable is connected
Note
• Be sure to use the attached dedicated cable
for the USB connection cable. If any other
company’s cable is used, it cause problems.
Also, please do not connect this dedicated
cable to any other company’s product.
Disconnecting from Your PC
Windows
Click [ ] on the task bar located at
1
the lower-right corner of the screen.
Click [
Safely remove USB Mass Storage
Device
].
• The drive letter will differ depending on the
PC being used.
When the safe to remove hardware
2
window appears, click [OK].
Disconnect the USB connection
3
cable.
Macintosh
Move the drive icon for this recorder that
1
is appear on the desktop to the garbage
bin by Drag & Drop it.
• When you connect the recorder to a Mac
OS, it will be recognized by the drive name
[LS_10S] on the desktop. When an SD card
is in ser ted it will b e reco gni zed by th e driv e
name [Untitled].
Disconnect the USB cable.
2
Notes
• NEVER disconnect the USB while the [PEAK]
indicator light is f lashing. If you do, the data will
be destroyed.
• When the recorder is connected to a PC, the
power will be supplied from the USB cable.
• Refer to the user’s manual for your PC regarding the USB port on your PC.
• Be sure that you connect the USB cable either
directly to the USB port on your PC.
• Be sure to push the cable connector all the way
in. Other wise, the recorder may not operate
properly.
• When connecting the recorder through an USB
hub the operation may become unstable. In
such cases, refrain from using a USB hub.
5
Using t he Recorder on Your PC
63
Page 64

Transfer the Voice Files to Your PC
The 5 voice folders of this recorder are appeared
as [DSS_FLDA], [DSS_FLDB], [DSS_FLDC],
[DSS_FLDD] and [DSS_FLDE], and the recorded
voice files are saved in these folders.
Windows
Connecting the recorder to your PC
1
(☞ P.62).
Open the Explorer window.
2
Open the [
3
• When you open [My Computer], it will be
recognized by the drive name [LS_10S]
(Built-in flash memory) and [Removable
Disk] (SD card) (The drive letter will differ
depending on the PC being used).
5
Copy the data.
4
Using t he Recorder on Your PC
Disconnecting the recorder to your PC
5
(☞ P.6 3).
LS_10S
] folder.
Macintosh
Connecting the recorder to your PC
1
(☞ P.62).
• When you connect the recorder to a Mac
OS, it will be recognized by the drive name
[LS_10S] on the desktop.
is in ser ted it will b e reco gni zed by th e driv e
name [Untitled].
Double-click on [
2
desktop.
Copy the data.
3
Disconnecting the recorder to your PC
4
(☞ P.6 3).
Whe n an SD car d
LS_10S
] icon on the
64
4 Drive name and folder name when a
personal computer is connected:
Built-in flash memory
Drive name Folder name
LS_10S
SD card
Drive name
Removable
Disk
Windows
Untitled
Macintosh
Notes
• While transmitting data, [Busy] is appeared,
and the [PEAK] indicator light flashes. NEVER
disconnect the USB while the [PEAK] indicator
light is flashing. If you do, the data will be
destroyed.
• In the Windows operational environment 24 bit
WAV format files cannot be played back.
• When a sound board of your PC does not
support to 24 bit, the recorder cannot play the
software supporting to 24 bit correctly.
• In the Mac OS operational environment, WMA
format files cannot be played back.
DSS_FLDA
DSS_FLDB
DSS_FLDC
DSS_FLDD
DSS_FLDE
Folder name
DSS_FLDA
DSS_FLDB
DSS_FLDC
DSS_FLDD
DSS_FLDE
Folder A
Folder B
Folder C
Folder D
Folder E
Music
Folder A
Folder B
Folder C
Folder D
Folder E
Music
Page 65

Using Windows Media Player
By using Windows Media Player, music files from music CDs or language study CDs can be imported
to your PC (☞P.66) and music files that you have bought from any music distribution sites can be easily
transferred to the recorder to play (☞P.68).The files recorded on the recorder can be transferred to your
PC and can be copied to CD (☞P.71). It suppor ts WAV, MP3, and WMA format music files.
Window Names
Windows Media Player 12
1
4
68 0
32
5
1 Feature s task bar
2 Seek slider
3 Shuffle but ton
4 Repeat but ton
5 Stop button
6 Previous button
7 Play button
8 Next button
9 Mute button
0
Volu me sli der
79
Windows Media Player 11
1
68 04
579
32
1 Feature s task bar
2 Seek slider
3 Shuffle but ton
4 Repeat but ton
5 Stop button
6 Previous button
7 Play button
8 Next button
9 Mute button
0 Volu me sli der
5
Using t he Recorder on Your PC
65
Page 66

Copying Music from CD
Windows Media Player 12
Insert CD into the CD-ROM dr ive, and
1
start Windows Media Player.
From the Features taskbar, click [
2
CD
] menu.
• If Internet connectivity is available, CD
information is searched.
Put a check mark on the music file that
3
you want to copy.
Using Windows Media Player
2
Rip
3
5
Using t he Recorder on Your PC
66
Click [
4
Start Ri p
• Files copied to a PC are stored in WMA
format. Music files copied are categorized
by artist, album, genre, etc. and added to
the play list.
].
4
Page 67
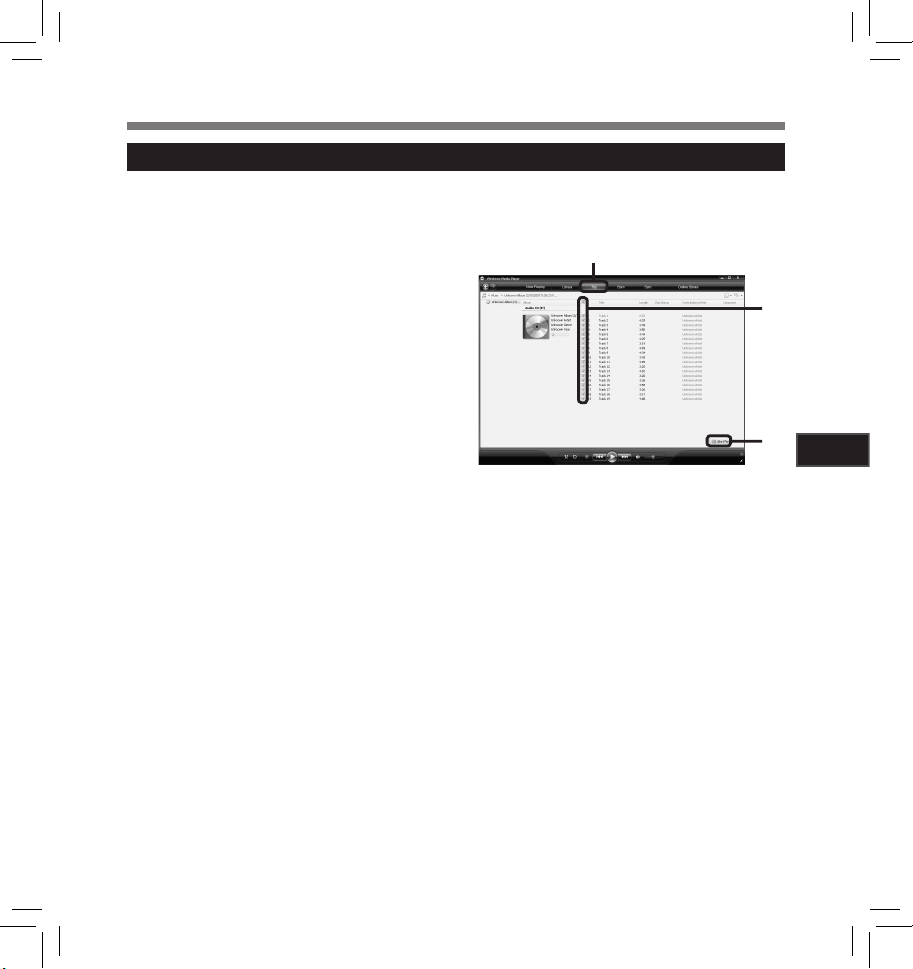
Windows Media Player 11
Insert CD into the CD-ROM dr ive, and
1
start Windows Media Player.
Using Windows Media Player
From the Features taskbar, click [
2
menu.
• Af ter clicking [Rip] menu, click [ View Album
Info] for Windows Media Player 10 as
necessary.
• If Internet connectivity is available, CD
information is searched.
Put a check mark on the music file that
3
you want to copy.
Click [
4
Start Ri p
• For Windows Media Player 10 Click [Rip
Music].
• Files copied to a PC are stored in WMA
format. Music files copied are categorized
by artist, album, genre, etc. and added to
the play list.
].
Rip
]
2
3
4
5
Using t he Recorder on Your PC
67
Page 68

Using Windows Media Player
Transferring Music File to the Recorder
You can transfer the music files saved in your PC to this recorder. For how to copy the music files from
the CD to your PC, see “Copying Music from CD” (☞ P. 66).
Windows Media Player 12
Connect the recorder to a PC, and
1
start Windows Media Player.
From the [
2
[
Options
click the [
5
From the Devices list, select
3
Using t he Recorder on Your PC
[
LS_10S
• Click on the [Create folder hierarc hy on
• The folder with artist name or album
*1 If [Create folder hi erarchy on device] is
*2 After the synchronous transfer to the
Organize
]. At the Options dialog box,
Devices
]. Next, click [
device] to check. *1 *2
name is automatically created. This will
make you find the file you want to listen to
more easily.
checked by default, click to uncheck the
box once, and click it again to check.
recorder, a file named “WMPInfo.xml” is
created. If you delete this file, the *1 may
need to be set again.
] menu, click
] tab.
Properties
].
2
2
3
68
3
Page 69

Select the desired category from
4
[
Library
] on the left, and select music
files or albums to transfer to the
recorder, and Drag & Drop them in
[
Sync Lis t
Click [
5
• The file is transferred to the recorder.
] on the right.
Start Syn c
].
Using Windows Media Player
5
4
Windows Media Player 11
Connect the recorder to a PC, and
1
start Windows Media Player.
From the Features taskbar, click
2
[
Sync
].
Click [
Sync
3
{ [
and set as follows.
• Click on the [Create folder hierarchy on
• The folder with artist name or album name
] m en u ag ai n to s el ect [
Advanced Options
device] to check. *1 *2
is automatically created. This will make
you find the file you want to listen to more
easily.
] { [
DVR
Set Up Sync
5
Using t he Recorder on Your PC
2, 3
]
],
69
Page 70

Using Windows Media Player
*1 If [Create folder hierarchy on device] is
checked by default, click to uncheck the
box once, and click it again to check.
*2 After the synchronous transfer to the
recorder, a file named “WMPInfo.xml” is
created. If you delete this file, the *1 may
need to be set again.
5
Select the desired category from
Using t he Recorder on Your PC
4
[
Library
] on the left, and select music
files or albums to transfer to the
recorder, and Drag & Drop them in
[
Sync Lis t
Click [
5
• The file is transferred to the recorder.
Notes
• Refer to the online help of Windows Media Player for details.
• Copying the music files with DRM purchased online music distribution service to a por table device such
as this recorder may be restricted.
• To transfer the files by using Windows Media Player 9
• If the music files are transferred to the recorder until it reaches to the maximum memory, the message
[Cannot m ake the syste m file. Conne ct to PC and del ete unnece ssary fi le] may appear on this recorder’s
display. In such a case, erase the files to make free space (hundreds of KB to dozens of MB depending
on the music file sizes) for the management file (The more capacity for the management file will be
necessary as the number of the music files increases).
] on the right.
Start Syn c
].
or 10, check the Olympus website.
3
4
5
70
Page 71

Using Windows Media Player
Copying Voice File to the CD
You can transfer the voice files in the recorder to your PC and copy them to CD. For how to copy the voice
files from the recorder to your PC, see “
Windows Media Player 12
Insert the blank CD-R/RW into
the CD-R/RW drive, and start
1
Windows Media Player.
From the Features taskbar, click
the [
2
3
Burn
] menu.
Select the desired category from
[
Library
] on the left, and select
voice files or albums to copy to
the CD-R/RW, and Drag & Drop
them in [
Burn List
] on the right.
Transfer th e Voice Files to Your PC ” (☞ P.6 4 ) .
2
3
54
Click [
Burn
CD or DVD
4
When [
• A file is converted and copied in CD in
order to play it by the audio equipment
which can play CD-R/RW.
When [
• Copying files with the format to be
recorded.
] tab, and select [
] or [
Audio CD
Audio CD
] is selected:
Data CD or DV D
] is selected:
Data
].
5
Using t he Recorder on Your PC
Click [Start Burn].
5
71
Page 72

Windows Media Player 11
Insert the blank CD-R/RW into
the CD-R/RW drive, and start
1
Windows Media Player.
From the Features taskbar, click
the [
2
3
Burn
] menu.
Select the desired category from
[
Library
] on the left, and select
voice files or albums to copy to
the CD-R/RW, and Drag & Drop
them in [
Burn List
] on the right.
5
Using t he Recorder on Your PC
Click [
Burn
] menu again, and select [
4
When [
Audio CD
• A file is converted and copied in
CD-R/RW.
When [
• Copying files with the format to be recorded.
Click [
] is selected:
Data CD
] is selected:
Start Bu rn
].
CD in order to play it by the audio equipment which can play
5
Note
• Refer to the online help of Windows Media Player for details.
Using Windows Media Player
2, 4
Audio CD
] or [
Data CD
].
3
5
72
Page 73

Using iTunes
By using iTunes, music files from music CDs or language study CDs can be imported to your PC (☞P.74) and
music files that you have bought from any music distribution sites can be easily transferred to the recorder to
play (☞P.75). The files recorded on the recorder can be transferred to your PC and can be copied to CD (☞P. 76 ) .
Window Names
1
2
3
5
Using t he Recorder on Your PC
4 5 67
1 Feature s task bar
2 Rewind button/ Playback, Pause button/
Fast Forward button
3 Volu me sli de
4 Playlist addition button
5 Shuffle but ton
6 Repeat but ton
7 Display chang e but ton
8 Disc create button
9
Genius button
0Genius side button
89
0
73
Page 74
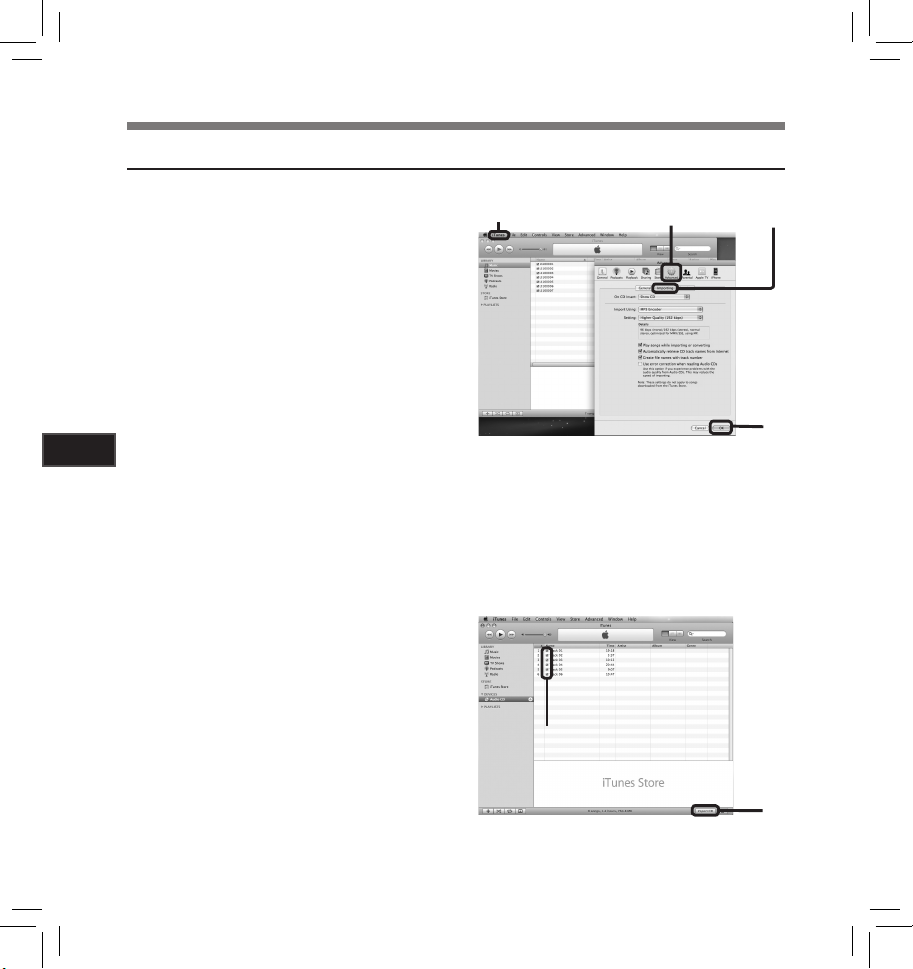
Copying Music from CD
Insert the CD into the CD-ROM
drive, and start iTunes.
1
Click [
iTunes
2
Click [
Advanced
3
Click [
Importing
format and bit rate for copying
4
music files to your PC, and click
[
OK
5
Using t he Recorder on Your PC
5
].
• This recorder is compatible with music files in the MP3 and WAV formats (☞ P.33) .
[Import Using]:
Set the file format for copying music file from a CD. Please select [MP3] or [WAV ].
[Sett ing]:
Set the bit rate for copying music file from
a CD. You can select a bit rate between
128 ], [160] and [192].
[
Put a check mark on the music
files that you want to copy.
Click [
Import CD
6
] { [
Preferences
] tag.
] to set the file
].
Using iTunes
2
].
3 4
4
74
5
6
Page 75

Using iTunes
Transferring Music File to the Recorder
You can transfer the music files saved in your PC to this recorder. For how to copy the music files from
the CD to your PC, see “Copying Music from CD” (☞ P.
Connect the recorder to a PC, and
1
start iTunes.
Se l e c t t h e p l a y l i s t t o be t r an s f er r e d
to the recorder, and put the check
2
marks on the music files that you
want to transfer.
• Th e order of music piec es can be changed
by Dr ag & Dr op o f the mu sic fi le i n t he p la y
list displayed.
Double-click the corresponding
drive with the recorder, and
3
open [
Music
] folder.
• When you connect the recorder to a Mac
OS, it will be recognized by the drive
[LS_10S] on the desktop. When an
name
SD card is inserted it will be recognized
by the drive name [Untitled].
• Copy to [Music] folder of the recorder
when transferring the music file.
• You can create up to 2 hierarchies in
the [Music] folder. And up to 128 folders
can be made including [Music] folder.
• Up to 200 files can be stored in each
folder.
Select the desired files, and Drag & Drop them to [
74).
Music
Drag & Drop
files here
] folder.
2
4
5
Using t he Recorder on Your PC
75
Page 76
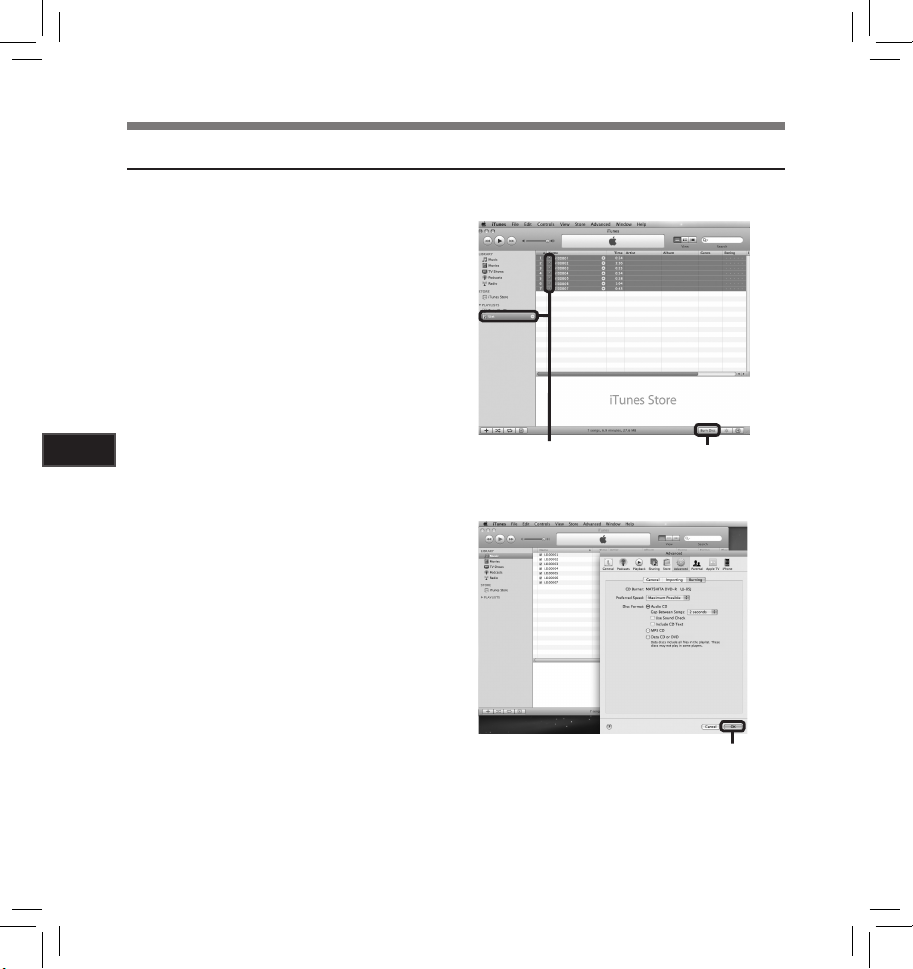
Using iTunes
Copying Voice File to the CD
You can transfer the voice files in the recorder to your PC and copy them to CD. For how to copy the voice
files from the recorder to your PC, see “Transfer t he Voice Files to Your PC” (☞ P.6 4).
Insert the CD-R/RW into the CD-
R/RW drive, and start iTunes.
1
Select the desired playlist, and
put a check mark on the voice
2
files to copy to the CD-R/RW.
Click [
Burn Disc
].
3
5
Using t he Recorder on Your PC
To set the CD format for copying
voice files to CD-R/RW, and click
4
[
OK
].
When [Audio CD] is selected:
• A file is conver ted and copied i n music CD
in order to play it by the audio equipment
which can play CD-R/RW.
When [MP3 CD] is selected:
• Copying in MP3 format.
When [Data CD] is selected:
• Copying files with the format to be
recorded.
2 3
4
76
Page 77

Using as External Memory of the PC
In addition to its uses as an IC recorder and a
music player, this recorder can also be used as
external memory for a computer by storing data
from a computer and reading it back out.
With the recorder connected to your PC, you can
download data from the memory to your PC and
upload data stored on your PC to the memory.
Windows
Connecting the recorder to your PC
1
(☞ P.62).
Open the Explorer window.
2
Open the [
3
• When you open [My Computer], it will be
recognized by the drive name [LS_10S]
(Built-in flash memory) and [Removable
Disk] (SD card) (The drive letter will differ
depending on the PC being used).
Copy the data.
4
Disconnect the USB connection cable
5
(☞ P.63) .
Macintosh
Connecting the recorder to your PC
1
(☞ P.62).
• When you connect the recorder to a Mac
OS, it will be recognized by the drive name
[
is inserted i
name [Untitled].
LS_10S
] folder.
LS_10S
] on the desktop. When an SD card
t will be recognized by the drive
Note
• While transmitting data, [Busy] is displayed,
and the [PEAK] indicator light flashes. NEVER
disconnect the USB while the [PEAK] indicator
light is flashing. If you do, the data will be
destroyed.
5
Using t he Recorder on Your PC
Double-click on [
2
desktop.
Copy the data.
3
Disconnect the USB connection cable
4
(☞ P.63) .
LS_10S
] icon on the
77
Page 78

Alarm Message List
Message Meaning Explanation Action
Battery Low Low battery power.
File Protected Erase-locked. Tried to delete a locked file.
Can't record in this
folder
Folder Full Folder full.
Memory Error Error in the memory.
6
Other Information
License Mismatch Illegally copied file.
Memory Full
No File No file.
SD Card Locked Card Locked.
Format Error Formatting error.
Can’t make the
system f ile. Connect
to PC and delete
unnecessary file
Data Write Error
78
Not an audio-recording
folder.
Zero remaining
memory.
The management file
cannot be created.
The data is not
written correctly in the
memory.
Other Information
Batter y power is getting
low.
Recording has been
attempted with a [Music]
folder.
The folder is full of f iles
(maximum of 200 files).
Error in the memor y.
SD card is not recognized
correctly.
The music files copied
illegally.
No remaining memory.
No files were found in the
folder.
The SD Card is set to write
protection.
There was an error while
formatting the recorder’s
memory.
The file for management
cannot be created due to
a shortage of capacity for
remaining memory.
Data writing to memory
cannot be done in time and
the recorded sound skips.
Replace with new batteries (☞ P.11 ).
Unlock the file (☞ P.4 1, P.47 ).
Select a folder from [A] through to
[E] and try recording again (☞ P.19
to P.21, P.2 3) .
Erase unnecessary files (☞ P. 38) .
This is a malfunction, so go to the
store where you purchased the
recorder or an Olympus service
station for repair (☞ P.
Remove the SD card then put it
again (☞ P.17 to P.18).
Erase the f ile (☞ P. 3 8) .
Erase unnecessary files (☞ P. 38) .
Select another folder (☞ P.19 t o
P. 21) .
Undo the SD Card’s write protection
setting and then try again (☞ P.1 8) .
Reformat the memory (☞ P. 51).
Connect the recorder to a computer
and delete any unnecessary files.
Format the memory (☞ P. 51).
81).
Page 79

Troubleshooting
Symptom Probable cause Action
Verify that the batteries’ polarities = and
- are correct (☞ P.1 1).
Replace with new batteries (☞ P.11 ).
Turn the power on (☞ P.13 ).
Replace with new batteries (☞ P.11 ).
Turn the power on (☞ P.13 ).
Release the recorder from HOLD (☞ P.13 ).
Erase unnecessary files (☞ P. 38) .
Change to the another folder
(☞ P.19 to P.21, P.23).
Undo the SD Card’s write protection setting
and then try again (☞ P.1 8).
Detach all external microphones and
external devices connected to the LINE IN
jack and the MIC jack (☞ P. 30, P. 31) .
Detach the connecting c ord from the
recorder.
Set [Plug-inPower] to [On] when an
external microphone supported by plug-in
power is connected
Unplug the earphones to use the internal
speaker.
Adjust the volume level (☞ P. 32) .
Adjust the recording level and then tr y
recording once more (☞ P. 23).
Set the microphone sensitivity to [HIGH]
mode and try again (☞ P. 27).
If you cannot record clearly even after
adjusting the rec ording level, then adjust the
output level for the c onnected devices
(☞ P. 23) .
Adjust the recording level and then tr y
recording once more (☞ P. 23).
If you cannot record clearly even after
adjusting the rec ording level, then adjust the
output level for the c onnected devices
(☞ P. 23) .
Nothing appears on the
display
Won’t st art
Unable to record
No sound picked up by the
built-in microphone
Unable to record through an
external microphone
No playb ack tone heard
Recor ding level too l ow
Recor ding level too h igh
The batteries are not loaded properly.
Batter y power is getting low.
The power is off.
Batter y power is getting low.
The power is off.
The recorder is in HOLD mode.
Low remaining memory.
The maximum number of files has
been reached.
The SD Card is set to write protection.
An exter nal microphone or external
device is connected.
An exter nal device is connected to the
LINE IN jack.
An exter nal microphone suppor ted by
plug-in power is connected but [Plug-in
Power] is set to [Off].
The earphone is connected.
The volume level is set to [0].
The recording level has not been adjusted.
The microphone sensitivity is too low.
This could potentially be because the
recording level and output level for the
connected external devices are too low.
The recording level has not been adjusted.
This could potentially be because the
recording level and output level for connected ex ternal devices are too high.
6
Other Information
(☞ P.41, P. 44).
79
Page 80

Symptom Probable cause Action
Voice files are not recorded
in stereo
Cannot f ind the recorded
Voice File
Noise h eard during pl ayback
Unable to erase
Unable to hear any sound
6
from the earphone through
Other Information
the rec ording moni tor
Noise is audible through the
recording monitor
The connected external microphone is
monaural.
Wrong rec ording media or folder.
The recorder was shaken during recording.
The recorder was placed near a cell
phone or f luorescen t lamp while rec ording
or during playback.
The settings of the connected external
microphone do not correspond to those
of the recorder.
The file is locked.
The file is read-only.
The [Re c Monitor] is set to [Off].
Acoustic feedback is occurring.
Troubleshooting
When rec ording while an external monaural
microphone is connected, sound will only be
recorded by the L-channel.
Switch to the correct recording media or
folder (☞ P.19 to P.20, P.23, P.41, P.46).
--------
Move the recorder.
When a microphone not supported by the
plug-in power function is connected, turn
the [Plug-inPower] setting to [Off ] (☞ P.41,
P. 44 ).
Unlock the file (☞ P.4 1, P.47 ).
Cancel the read-only setting of the file on
the PC.
Turn the [Rec Monitor] setting to [On]
(☞ P.41, P.4 4) .
When the built-in speaker amps and the
like are connected there is a risk that audio
feedback will occur while recording. It is
recom mended that you us e earphones fo r the
re co rd ing mo nit or, or tur n t he [ Rec Monitor] to
[Off] while recording (☞ P. 41, P. 44).
Conduct adjustments like separating the
earphones from the microphone farther, do
not point the microphone at the earphones,
lower the volume on the recording monitor,
and so on.
80
Page 81

Technical Assistance and Support
The following are contact information for technical support for Olympus recorders only.
s Technical Hotline Number in the U.S. and Canada
1-888-553-4448
s User Support E-mail address in the U.S. and Canada
distec@olympus.com
6
Other Information
81
Page 82

Accessories (optional)
Accessories exclusive to the Olympus IC recorder can be purchased directly from Online Shop on our
company’s website. Sales of accessories are different according to the country.
Stereo microphone: ME51S
The ME51S stereo microphone comes in a set
with an extension cord and a clip. The built-in
large-diameter microphone enables sensitive
stereo recording.
2 channel microphone (omni-directional):
ME30W
Two ME30 monaural microphones come in a
set with a miniature tripod and a connection
adapter. These are highly sensitive omnidirectional microphones suppor ted by plug-in
power which are well-suited to recording
musical performances.
Compact Gun Microphone (unidirectional): ME31
The directional microphones is useful for
recordings such as outdoor recording of wild
birds singing. The metal-cut body provides a
sturdiness to the high rigidity.
Highly sensitive noise-cancellation
6
monaural microphone (unidirectional):
Other Information
ME52W
This microphone is used to record sound at a
distance while minimizing surrounding noise.
Tie clip microphone (omni-directional):
ME15
Small concealing microphone with a tie-clip.
Telephone pickup: TP7
Earphone type microphone can be plugged into
your ear whil e phoning. The voic e or conversatio n
over the phone can be clearly recorded.
Ni-MH rechargeable battery and charger set:
B-90SU (For U.S.A. and Canada)
BU-90SE (For Europe)
B-90SU or BU-90SE comes with an Ni-MH
rechargeable battery charger and 4 Ni-MH
rechargeable batteries B-01 4PE as a pack.
This charger can quick charge Olympus AA or
AAA Ni-MH rechargeable batteries.
Ni-MH rechargeable battery:
B-01 4PE (Europe only)
4 Ni-MH rechargeable batteries B-01 4PE
as a pack. High-efficiency rechargeable long
life batteries.
Connecting cord: KA333
Connecting cord which has stereo mini-plugs
(ø3.5) with resistance at both ends.
It is used to connect the earphone jack output
of the other devices to the microphone input
jack of the recorder when recording.
Converting plug adapters (PA331/PA231)
which convert to the monaural mini plug
(ø3.5) or monaural mini plug (ø2.5) are also
enclosed.
Connecting cord: KA334
Connecting cord with stereo mini-plugs (ø3.5)
at both ends.
It is used to connect the LINE OUT of other
devices to the LINE IN of the recorder when
recording.
Exclusive remote control set: RS30W
When the receiver is plugged into the REMOTE
jack the recorder’s recording and stop functions can be operated through the remote
contro l. The receiving po sition can be adjust ed,
thereby allowing you to operate the recorder
from various different angles.
AC adapter: A515
82
Page 83

Specifications
General points
4 Recording format:
Linear PCM (Pulse Code Modulation)
MP3 (MPEG-1/MPEG-2 Audio Layer3)
WMA (Windows Media Audio)
4 Input level:
MIC SE NSE HIGH/LO W switch is set to [HIGH]:
- 59 dBv
MIC SE NSE HIGH/LO W switch is set to [LOW ]:
- 39 dBv
LINE IN jack input:
- 6 dBv
4 Maximum headphone output:
6.7 mW + 6.7 mW (at load of 16 Ω)
≤
_
150 mV (According to EN 50332-2)
4 Recording medium:
Built-in NAND FLASH memory (2 GB)
SD card (512 MB to 32 GB)
Speaker:
4
Built-in ø 16 mm round dynamic speaker
4 MIC jack:
ø 3.5 mm mini-jack, impedance 2 kΩ
4
LINE IN jack:
ø 3.5 mm mini-jack, impedance 78 kΩ
(approx.)
EAR jack:
4
ø 3.5 mm mini-jack, impedance 8 Ω or more
4 Maximum working output:
200 mW + 200 mW (8 Ω speaker)
4
Input p ower requirement:
Batteries: Two AA batteries (LR6) or Two
External power supply: AC adapter 5 V
4 External dimensions:
131.5 mm × 48 mm × 22.4 mm
(without protrusions)
4 Weight:
165 g (including alkaline batteries)
Ni-MH rechargeable batteries
Overall frequency response
4 LINE IN Jack (During recording or playback
mode):
Linear PCM format
Recording mode Overall frequency response
96 kHz 20 Hz to 44 kHz
88.2 kHz 20 Hz to 42 kHz
48 kHz 20 Hz to 23 kHz
44.1 kHz 20 Hz to 21 kHz
44.1 kHz/mono 20 Hz to 21 kHz
MP3 format
Recording mode Overall frequency response
320 kbps 50 Hz to 20 kHz
256 kbps 50 Hz to 20 kHz
128 kbps 50 Hz to 17 kHz
mono 50 Hz to 13 kHz
WMA format
Recording mode Overall frequency response
160 kbps 50 Hz to 19 kHz
128 kbps 5 0 Hz to 19 kHz
64 kbps 50 Hz to 15 kHz
mono 50 Hz to 13 kHz
4 Built-in stereo microphone (During
recording mode):
60 Hz to 20 kHz
• However, when recording by the MP3
format or the WMA format, the upper
limit value of the frequency response
depends on each recording mode (see
above diagram).
6
Other Information
83
Page 84

Specifications
Guide to recording times
4 Linear PCM format :
Recording
mode
96 kHz 24 bit
96 kHz 16 bit 1 h. 20 min. 20 min. 40 min. 1 h. 20 min. 2 h. 45 min. 5 h. 3 0 min. 11 h. 10 min. 22 h. 20 min.
88.2 kHz 24 bit 1 h. 15 min. 25 min. 55 h. 2 h. 4 h. 8 h. 5 min. 16 h. 10 min.
88.2 kHz 16 bit 1 h. 3 0 min. 20 min. 40 min. 1 h. 25 min. 3 h. 6 h. 12 h. 5 min. 24 h. 20 min.
48 kHz 24 bit 1 h. 50 min. 25 min. 50 min. 1 h. 50 min. 3 h. 40 min. 7 h. 25 min. 14 h. 50 min. 29 h. 50 min.
48 kHz 16 bit 2 h. 45 min. 40 min. 1 h. 20 min. 2 h. 45 min. 5 h. 30 min. 11 h. 5 min. 22 h. 20 min. 44 h. 45 min.
44.1 kHz 24 bit 2 h. 30 min. 55 min. 1 h. 55 min. 4 h. 8 h. 16 h. 10 min. 32 h. 25 min.
44.1 kHz 16 bit 3 h. 45 min. 1 h. 25 min. 2 h. 55 min. 6 h. 12 h. 5 min. 24 h. 15 min. 48 h. 40 min.
44.1 kHz mono 6 h. 1 h. 30 min.
Built- in flash
memory (2 GB)
55 min. 10 min. 25 min. 5 5 min. 1 h. 50 min. 3 h. 40 min. 7 h. 25 min. 14 h. 55 min.
512 MB 1 GB 2 GB 4 GB 8 GB 16 GB 32 GB
2 h. 55 min. 5 h. 55 min. 12 h. 24 h. 10 min. 48 h. 35 min. 97 h. 25 min.
4 MP3 format:
Recording
6
Other Information
mode
320 kbps
256 kbps 16 h. 30 min. 4 h. 8 h. 16 h. 30 min. 33 h. 66 h. 30 min. 134 h. 268 h.
128 kb ps 33 h. 8 h. 15 min. 16 h. 33 h. 66 h.
mono
Built- in flash
memory (2 GB)
13 h. 3 h. 15 min. 6 h. 30 min. 13 h. 26 h. 30 min. 53 h. 107 h. 214 h.
66 h. 30 min. 16 h.
512 MB 1 GB 2 GB 4 GB 8 G B 16 GB
30 min. 32 h. 30 min. 66 h. 132 h.
4 WMA format:
Recording
mode
160 kbp s
128 kb ps 32 h. 30 min. 8 h. 15 h. 30 min. 32 h. 64 h. 30 min. 130 h. 262 h. 525 h.
64 kbps 65 h. 16 h. 31 h. 30 min. 64 h. 30 min. 129 h. 261 h. 523 h. 1049 h.
mono
Built- in flash
memory (2 GB)
26 h. 6 h. 30 min. 12 h. 30 min. 25 h. 30 min. 51 h. 30 min. 104 h. 209 h. 420 h.
130 h. 32 h. 63 h. 129 h. 259 h. 522 h. 1047 h. 2098 h.
512 MB 1 GB 2 GB 4 GB 8 GB 16 GB 32 GB
SD card
SD card
133 h.
267 h.
SD card
32 GB
268 h. 537 h.
536 h. 1074 h.
84
Page 85

Specifications
Notes
• The above values are strictly rough guides.
• Variations in the available recording time will arise as there may be differences in the available memory
depending on the card.
• Caution is required, since the differences in the available recording time will increase when the bit count
and bit rate are low.
• Available recording time may be shorter if many short recordings are made (The displayed available
recording time and recorded time are approximate indications).
• The maximum capacity for a single file is limited to approx. 4 GB for WMA and MP3, and approx. 2 GB
for Linear PCM format (WAV).
• For WMA format files, the file length for a single file is limited to a maximum length of approx. 26 hours
and 40 minutes. For this reason, it will differ from the continuous recording time for a single file.
Guide to battery life
4 Alkaline batteries:
Recording mode
Linear PCM format
Built-in stereo microphone
(During recording mode)
96 kHz 24 bit
44.1 kHz 16 bit 23 h. 52 h.
13 h. 30 min. 29 h.
Built-in stereo speakers
(Durin g playback mod e)
4 Ni-MH Rechargeable batteries:
Recording mode
Linear PCM format
Built-in stereo microphone
(During recording mode)
96 kHz 24 bit
44.1 kHz 16 bit 22 h. 30 min. 42 h.
13 h. 24 h.
Built-in stereo speakers
(Durin g playback mod e)
Notes
• The above values are strictly rough guides.
• Battery life is measured by Olympus. It varies greatly according to the type of batteries used and the
conditions of use.
Specifications and design are subject to
change without notice.
6
Other Information
85
Page 86

MEMO
86
Page 87

LINEAR PCM RECORDER
LS-10S
Enregistreur PCM linéaire
MODE D’EMPLOI
FR
Merci d’avoir porté votre choix sur cet enregistreur vocal numérique. Lisez ce mode d’emploi pour
les informations concernant l’emploi correct et sûr de l’appareil. Conservez le à portée de main pour
toute référence ultérieure.
Nous vous recommand ons de tester le volume et la fonc tion d’enre gistrem ent ava nt l’util is ation po ur
obtenir de bons enregistrements.
Page 88

Introduction
• Le contenu de ce document peut être modifié par la suite sans préavis. Veuillez contacter notre centre
de service après-vente pour obtenir les dernières informations concernant les noms de produits et les
numéros de modèles.
• Le plus grand soin a été pris afin d’assurer l’intégrité du contenu de ce document. Dans le cas peu
probable où vous auriez un doute ou si vous trouvez une erreur ou une omission, veuillez contacter
notre centre de service après-vente.
• Toute responsabilité pour dommages passifs ou dommages de quelque nature que ce soit survenus à
cause d’une perte de données causée par un défaut du produit, réparation ef fectuée par un tiers autre
que Olympus ou un service agréé par Olympus, ou toute autre raison est exclue.
Marques de fabrique et marques de fabrique déposées
• IBM et PC/AT sont des marques de fabrique ou des marques de fabrique déposées par International
Business Machines Corporation.
• Microsoft, Windows et Windows Media des marques de fabrique déposées par Microsoft
Corporation.
• Macintosh et iTunes sont des marques de fabrique d’Apple Inc.
• Le logo SD est une marque de fabrique.
• Le logo SDHC est une marque de fabrique.
• La technologie de codage audio MPEG à 3 couches est incorporée sous licence de Fraunhofer IIS et
Thomson.
Les autres noms de produits et de marques indiqués ici peuvent être des marques de fabrique ou des
marques de fabrique déposées de leurs propriétaires respectifs.
2
Page 89

INDEX
Table des ma tières P.4
Pour un em ploi sûr et cor rect P.6
Préparatifs P.8
A propos d e l’enregistr ement P.22
A Propos d e la lecture P.32
Paramètres du menu P.41
Utilisation de l’enregistreur avec votre PC
Autres informations P.78
P. 6 1
1
2
3
4
5
6
3
Page 90

Table des matières
Introduction
Table des matières...................................................4
Pour un emploi sûr et correct ................................6
Préparatifs
1
Caractéristiques principales ..................................8
Identification des éléments ....................................9
Affichage (panneau LCD) ................................. 10
Insertion des piles ................................................. 11
Utilisation de l’adaptateur secteur .................... 12
Alime ntation ........................................................... 13
Verrouillage clavier [HOLD] ..................................13
Réglage de l’heure et date [Heure&Date] ...........15
Modifier l’heure et date ..................................... 16
Insertion et éjection des cartes ...........................17
Insertion d’une carte ......................................... 17
Ejection de la carte ........................................... 18
Remarques sur les dossiers ................................19
A propos des dossiers pour enregistrements
vocaux ....................................................... 19
A propos du dossier pour la lecture musicale ... 20
Sélection des dossiers et des fichiers ...............21
A propos de l’enregistrement
2
Avant d’enregistrer ................................................22
Dirigez le microphone vers la source sonore
originale .................................................... 22
Enregistrement ......................................................23
Écoute pendant l’enregistrement audio ........... 27
Réglez le filtre Low Cut ..................................... 27
Sensibilité du microphone ................................27
Ajustement du niveau de synchronisation vocale
pour l’enregistrement ................................ 28
Enregistrement à partir d’un microphone externe
ou d’autres dispositifs ...............................30
4
A Propos de la lecture
3
Lectu re ....................................................................32
Utilisation .........................................................35
Réglage d’une marque index ou d’une marque
temp .......................................................... 35
Comment commencer à segmenter la lecture à
répétit ion ...................................................3 6
Effacement .............................................................38
Effacement d’un fichier à la fois .......................38
Effacement de tous les fichiers d’un dossier ...38
Partiellement supprimer un fichier .................... 39
Paramètres du menu
4
Méthode de paramétrage du menu......................41
Formatage de l’enregistreur
Réorganisation des fichiers
Déplacer fichiers [Déplacement] ...................... 56
Fractionnement des fichiers [Partage] ............. 59
Utilisation de l’enregistreur avec
5
[Format] .............. 51
[Remplacer] ..........54
votre PC
Environnement d’exploitation ..............................61
Connecter l’enregistreur à votre PC ....................62
Connecter l’enregistreur à votre PC ................. 62
Déconnecter l’enregistreur de votre PC ...........63
Transférez les fichiers audio à votre PC .............64
Utilisation du Lecteur Windows Media ...............65
Noms des fenêtres ............................................ 65
Copier de la musique à partir d’un CD .............66
Transférer un fichier musical vers
l’enregistr eur .............................................6 8
Copier un fichier vocal sur un CD .................... 71
Utilisation du iTunes..............................................73
Noms des fenêtres ............................................ 73
Copier de la musique à partir d’un CD ............. 74
Transférer un fichier musical vers
l’enregistr eur ............................................. 75
Copier un fichier vocal sur un CD ....................76
Utilisation comme mémoire externe de l’
ordinateur .......................................................77
Page 91

Autres informations
6
Liste des messages d’alarme ...............................78
Dépann ag e .............................................................. 79
Assistance technique et soutien .........................81
Accessoires (options) ..........................................82
Spécifications ........................................................83
Table des matières
5
Page 92

Pour un emploi sûr et correct
Avant d’ utiliser vot re nouvel en registreu r,
lisez attentivement ce manuel pour
savoir comment l’utiliser de manière
sûre et correcte. Conser vez ce manuel
à un endroit facilement accessible pour
toute référence ultérieure.
• Les symboles Avertissement indiquent des
informations importantes liées à la sécurité.
Pour vous protéger vous-même et les autres
contre les blessures ou contre les dégâts
matériels, il est essentiel que vous preniez
toujours en compte les avertissements et
informations fournis.
Précautions générales
• Ne laissez pas le lecteur dans un
endroit chaud, comme dans une
voiture fermée en plein soleil ou
sur une plage en été.
• Ne rangez pas l’enregistreur
dans un endroit trop exposé à
l’humidité ou à la poussière.
• N’utilisez pas de solvant
organique, tel qu’alcool ou diluant pour vernis, pour nettoyer
l’appareil.
• Ne placez pas l’enregistreur
sur ou près d’un autre appareil
électrique tel que téléviseur ou
réfrigérateur.
• Évitez d’effectuer un enregistrement ou une lecture près d’un
téléphone cellulaire ou de tout
autre appareil sans fil, car ils
risquent de provoquer des interférences et des parasites. En
cas de parasites, installez-vous
ailleurs, ou éloignez davantage
l’enregistreur de ces appareils.
• Évitez le sable ou la saleté. Ils
peuvent causer des dommages
irréparables.
• Évitez les vibrations ou chocs
violents.
• Ne démontez pas, ne réparez pas
et ne modifiez pas cet appareil
vous-même.
• N’utilisez pas cet appareil pendant la co n duit e d ’un véh i cule (tel
que bicyclette, motocyclette ou
voiture).
• Con s e r ve z l’ap p a reil ho r s de
portée des enfants.
• L o r s q u e v o u s m o n t e z
l’enregistreur sur un trépied,
tournez les vis du trépied sans
tourner l’enregistreur sur luimême.
<Avertissement relatif aux pertes de
données>
Les données enregistrées dans la mémoire
risquent d’être détruites ou effacées en cas
d’erreur de procédure, d’anomalie de l’appareil,
ou penda nt des travaux de réparation.
Nous vous recommandons d’enregistrer et de
sauveg arder toute s les donnée s importa ntes sur
un autre suppor t, par exemple un disqu e.
Toute responsabilité pour dommages passifs ou
dommages de quelque nature que ce soit survenus à cause d’une perte de données causée par
un défaut du produit, réparation effectuées par
un tiers autre que Olympus ou un service agréé
par Oly mpus, ou toute a utre raison e st exclue de
la responsabilité de Olympus.
6
Page 93

Pour un emploi sûr et correct
Piles
Avertissement
f
• Les piles ne doivent jamais
être exposées à une flamme,
chauffées, court-circuitées ou
démontées.
• N’essayez pas de recharger des
piles alcalines, au lithium ou
autres piles non-rechargeables.
• N’utilisez jamais une pile à couvercle extérieur éventré ou fissuré.
• Conservez les piles hors de portée des enfants.
• Si vous notez quelque chose
d’inhabituel à l’utilisation de ce
produit, par exemple un bruit anormal, de la chaleur, de la fumée
ou une odeur de brûlé:
1 retirez immédiatement les piles en prenant
garde de ne pas vous brûler, et;
2 appelez votre revendeur ou le représentant
Olympus local pour une révision.
Adaptateur secteur
Avertissement
f
•
N’essayez pas de démonter, réparer
ou modifier l’adaptateur secteur de
quelque manière que ce soit.
•
Évitez la pénétration de matières
extérieures, telles qu’eau, métal ou substances inflammables, dans le produit.
• Ne mouil l ez pas l’ad a ptateu r
secteur, ne le touchez pas avec
des mains mouillées.
• N’utilisez pas l’adaptateur secteur
près d’un gaz inflammable (tel
que de l’essence, du benzine ou
d’un diluant pour vernis).
Dans le cas où
• ...les pièces internes de l’adaptateur
secteur sont exposées parce qu’il
est tombé ou a été endommagé
d’une autre manière:
• ...l’adaptateur secteur tombe dans
l’eau, ou si de l’eau, un objet métallique ou une substance inflammable ou d’autres matières extérieures pénètrent à l’intérieur:
...vous notez quelque chose
•
d’inhabituel à l’emploi de l’adaptateur
secteur, tel que bruit anormal, chaleur, fumée ou odeur de brûlé:
1 ne touchez aucune pièce exposée;
2 déconnectez immédiatement la fiche
d’alimentation de la prise, et;
3 appelez votre revendeur ou le représentant
Olympus local pour la révision. Continuer à
utiliser l’adaptateur secteur dans ces con ditions pourrait engendrer une décharge
électrique, un feu ou des blessures.
7
Page 94

Préparatifs
Caractéristiques principales
● Utilise un microphone de haute sensibilité
à faible bruit qui capture fidèlement le son
original.
Des composants métalliques usinés sont
utilisés dans le boîtier du microphone stéréo
1
intégré, ce qui donne une conception aux
Préparatifs
caractéristiques particulières tout en conférant
à l’appareil une construction résistante aux
vibrations. De plus, en tournant le microphone
d e 9 0º ve r s l ’ex t ér ie u r, v ou s p o uv ez pr od ui r e d es
enregistrements stéréo naturels et expansifs.
● Équipé d’un circuit amplificateur avec un son
de haute qualité.
Utilise un circ uit amplificat eur à faible bruit, vou s
permettant de produire des enregistrements
avec un son de haute qualité et peu de bruit.
● Prend en charge le format PCM linéaire, qui
est capable d’enregistrer un son de qualité
équiva lente ou supéri eure à celui d’un CD.
Capable d’enregistrer de façon réaliste
plusieurs sources sonores différentes.
Un enregistrement haute résolution à une
fréquence d’échantillonnage élevée et un
nombre de bits comp arable ou supérie ur à celui
d’un CD musical (fréquence d’échantillonnage:
44,1 KHz, nombre de bits: 16 bits) est possible
(☞ P.41, P.4 3).
● Prend en charg e un grand n ombre de f ormats
d’enregistrement. Peut traiter le format MP3
(MPEG-1/MPEG-2 Audio Layer 3) et le format
Windows M edia Audio (WMA).
En prenant en charge les formats MP3 et
WMA, cet appareil peut enregistrer des fichiers
hautement compressés, et de ce fait permet
des durées d’enregistrement prolongées (☞
P.41, P.43). De plus, quand il est connecté à un
dispositif externe, l’enregistreur peut encoder
les signaux audio analogiques entrants sans
ordinateur (☞ P.3 0).
● Prend en charge des supports d’enregistrement
de haute capacité. Grâce à sa mémoire flash
intégr ée de 2 Go, il pe ut égalem ent enregi strer
sur une ca rte SD (disp onible da ns le commer ce)
(☞ P.17 ).
8
Consultez le site web d’Olympus en ce qui
concerne les cartes SD dont le fonctionnement
dans cet enregistreur est confirmé
● Équipé d’une variété de fonctions qui prennent
en charge les enregistrements audio.
Avec cet enregistreur vous pouvez personnaliser
toute une série de fonctions d’enregistrement
comme le niveau d’enregistrement et la
sensibilité du microphone afin de les adapter
aux conditions d’enregistrement et à vos
préférences personnelles (☞ P.41, P.4 3) .
● Permet des m ises à jour du s ystème à trave rs des
options et de l’équipement amélioré. Accroît
davantage le plaisir d’enregistrer
● Peu t enregist rer des fic hiers aux fo rmats WAV,
WMA et MP3 envoyés depuis un ordinateur
en plus des fichiers enregistrés par l’appareil
lui-même. Peut être utilisé comme lecteur de
musiqu e à tout moment.
Il peut stocker approximativement 2000 fichiers
de musique (conversion de WMA 128 kbps/4
minutes par chanson) (☞ P. 3 2 , P. 33, P.6 5 ,
P.7 3 ).
● Prend en charge l’USB 2.0. Hi-Speed, qui
permet la transmission de données à grande
vitesse comme une mémoire externe pour
votre ord inateur.
En connectant l’ordinateur par l’USB, des
images, du texte, etc. peuvent être enregistrés
dans le but de transpor ter des données
P.6 4 , P.7 7 ) .
● Vous pouvez déplacer ou copier des fichiers
entre la mémoire intégrée et la carte SD, et
dans les d ossiers de la mémoire (☞ P. 56 ).
● Vous pouvez séparer les fichiers (☞ P. 59 ),
ou supprimer une partie d'un fichier
(☞ P. 39) enregistré en format PCM dans cet
enregistreur.
(☞ P.81) .
(
☞ P.8 2) .
(☞
Page 95

Identification des éléments
1
2
3
!
@
#
$
q
=
)
(
*
1 Prise
REMOTE
Permet de connecter le récepteur pour la télécommande
exclusive RS3 0W (options). Ceci per met de commander
les fonctions d’enregistrement et d’arrêt de l’unité
principale à l’aide de la télécommande.
2 Microphone stéréo intégré (R)
3 Microphone stéréo intégré (L)
4 Prise
LINE IN
5 Prise
MIC
6 Molette
7 Tou che
Voyant d’enregistrement (DEL)
8 Commutateur
9 Commutateur
0 Trous de courroie
! Affichage (panneau LCD)
@ Voyan t d e
# Tou c he
$ Tou c he 2
% Tou c he 9
REC LEVEL
REC
STOP
%
^
&
s
MIC SENSE HIG H/LOW
LOW CUT ON/OFF
PEAK
(DEL)
4
4
5
6
7
8
9
0
t
w
r
]
[
p
o
i
u
^ Tou c he 3
& Tou c he
* Tou c he
( Tou c he
) Tou c he
- Tou c he
= Tou c he 0
q Tou c he ` /
w Couvercle du logement de la carte
e Prise
r Molette
t Ter m in a l
y Commutateur
u Prise d ’alimentat ion
i Couvercle du logement de la pile
o Touche de dégagement du couvercle
p Prise du trépied
[ Haut-parleur stéréo intégré (R)
] Haut-parleur stéréo intégré (L)
LIST
MENU
A-B REPEAT
Fn
ERASE
OK
EAR
VOLUME
USB
du logement des piles
y
POWER/HOLD
1
Préparatifs
e
9
Page 96

Affichage (panneau LCD)
Identification des éléments
Affichage de fichiersAffichage de la liste de fichiers
1
1
Préparatifs
2
1 Indicateur de dossier racine
Indicateur de dossier
Indicateur de support d’enregistrement ou
Indicateur de dossier/ Nom de dossier racine/
Numéro du fichier actuel/ Numéro total de
fichiers enregistrés dans le dossier
2 Nom de dossier
3 Indicateur guide
Affichage de la liste de dossiers
1
2
3
1 Indicateur de dossier/fichier
Numéro du fichier actuel/ Numéro total de
fichiers enregistrés dans le dossier
2 Nom de fichier
3 Indicateur guide
1
2
3
4
3
5
6
1 Indicateur de dossier/fichier
Nom de dossier/ Nom de fichier/ Format de
fichier/ Numéro du fichier actuel/ Numéro total
de fichiers enregistrés dans le dossier
2 Indicateur de capacité de pile
Indicateur de support d’enregistrement
[
[
Indicateur de verrouillage
3 Indicateur d’état d’enregistrement/de
lecture
4 Niveau sonomètre
5 Indicateur de mode de lecture
6 Indicateur de mode d’enregistrement
7 En mode d’enregistrement:
Durée d’enregistrement restante
En mode d e lecture ou d’arr êt:
Longueur de fichier
8 En mode d’enregistrement:
Durée d’enregistrement écoulée
En mode de lecture:
Durée de lecture écoulée
9 Indicateur [
0 Indicateur [
! Indicateur [
@ Indicateur [
] Mémoire flash intégrée
] Carte SD
echo
]
V-Sync. Rec
LowCutFilter
Limiteur
]
]
]
7
8
9
0
!
@
10
Page 97

Insertion des piles
Appuyez sur le touche de dégagement
1
du couvercle du logement des piles, puis
faites glisser le couvercle pour l’ouvrir en
appuyant légèrement dessus.
Glissez le commutateur
4
dans la direction indiquée par la
flèche, et allumez-le.
POWER/HOLD
1
Préparatifs
Insérez deux piles AA en respectant
2
les polarités = et -.
Fermez complètement le couvercle du
3
logement des piles en appuyant dans
la direction A puis faites glisser dans
la direction B.
• Si le témoin « heure » clignote à
l’affichage, voir « Réglage de l’heure et
date [Heure&Date] » (☞ P.15).
Remplacement des piles
L’indicateur de capacité des piles sur l’affichage
change avec la perte de capacité des piles.
• Quand [ ] s’affiche, remplacez les piles le
plus tôt pos sible. Lorsque la pile est trop faible,
[
] et [Alim. Faible] s’af fiche et l’enregist reur
s’ éteint.
Batterie Ni-MH rechargeables
Vous pouvez utiliser des batteries Ni-MH rechargeables B-01 4PE (options) Olympus dans
l’ enr eg ist re ur. Uti li sez- le s av ec l e c harg eu r de batteries rechargeables Olympus B-90SU (options)
(pour les États-Unis et le Canada) ou BU-90SE
(options) (pour l’Europe) (☞ P.8 2).
11
Page 98

Insertion des piles
Remarques
• Il est déconseillé d’utiliser une pile manganèse
dans cet enregistreur.
• Cet enregistreur n’accepte pas les batteries
rechargeables.
• Lors du remplacement des piles, des piles
alcalines AA ou des batteries Ni -MH recharge-
1
ables Olympus sont recommandées.
Préparatifs
• Assurez-vous d’arrêter l’enregistreur avant
de remplacer les piles (☞ P.13). Le fait de
décharger les piles lorsque l’enregistreur
fo nc tion ne pe ut cau se r un dysf on ctio nn eme nt ,
corrompre les f ichiers par exemple. Si les piles
sont épuisées pendant que vous enregistrez un
fichier, vous perdrez votre fichier actuel parce
que l’en-tête du fichie r ne pourra pas se fermer.
Il est donc de toute première importance que
vous remplaciez les piles lorsqu’il ne reste plus
qu’un repère dans l’icône des piles.
• Si le remplacement de la pile usée prend plus
15 minutes ou si la pile est retirée puis remise
en place plusieurs fois à intervalles courts,
il vous faudra peut-être remettre l’appareil
à l’heure au chargement d’une nouvelle pile
(☞ P.15) .
• Retirez les piles si l’enregistreur doit rester
inutilisé pendant une période prolongée.
• Lors de la lecture d’un fichier vocal/musical,
l’enregistreur peut se réinitialiser suite à une
réduction de la sortie de tension de la pile
en fonction du niveau de volume même si
] s’affiche dans l’indicateur de capacité
[
de la pile. Dans ce cas, diminuez le volume
de l’enregistreur.
12
Utilisation de l’adaptateur secteur
Branchez le transformateur (options) sur une
prise de courant domestique et branchez la
fich e d’ali mentation s ur la prise d’alim entation
de l’enregistreur (DC 5V). Éteignez toujours
l’enregistreur avant de le brancher.
Si vous branchez le transformateur pendant un enregistrement utilisant les piles,
la lect ure des données audio enregistrées
pourrait s’avérer impossible.
• Consultez le site web d’Olympus en ce qui
concerne les adaptateurs secteur pouvant être
utilisés avec cet enregistreur.
Vers la prise du
trépied
Avertissement
f
• Éteignez toujours l’enregistreur
avant la connexion ou la déconnexion.
• Quand l’enregistreur n’est pas
utilisé, déconnectez toujours
l’adaptateur secteur de la prise
murale. Utilisez uniquement la
tension d’alimentation correcte,
indiquée sur l’adaptateur.
• Arrêtez l’enregistreur avant de déconnecter l’adaptateur secteur.
• N’utilisez pas l’adaptateur
secteur pour le raccordement
de l’enregistreur au port USB.
Page 99

Alimentation
Verrouillage clavier [HOLD]
Lorsque vous n’utilisez pas l’enregistreur,
éteignez-le pour réduire la consommation des
piles au minimum. Même si l’alimentation est
coupée, les données, réglages des modes et de
l’horloge sont conservés.
Allumer l’alimentation:
Lorsque l’enregistreur est éteint, glissez
le commutateur
direction indiquée par la flèche.
• L’écran et l’alimentation s’allument.
• La fonction de reprise remet l’enregistreur à la
position d’arrêt en mémoire avant la mise hors
tension.
• Quand les piles sont enlevée s de l’enregistreur,
la position d’arrêt de la fonction de reprise est
effacée.
POWER/HOLD
dans la
Couper l’alimentation:
Glissez le commutateur
POWER/HOLD
dans
la direction indiquée par la flèche pendant
1 seconde au moins.
• L’écran s’éteint et l’alimentation est coupée.
• La fonction de reprise se souvient de la
position d’arrêt avant la mise hors tension de
l’appareil.
Si vous mettez l’enregistreur en mode HOLD,
les conditions actuelles seront conservées et
toutes les touches seront désactivées. Cette
caractéristique est pratique lorsque vous devez
transporter l’enregistreur dans un sac ou dans
votre poche.
Réglez le mode HOLD de l’enregistreur
Glissez le commutateur
position [
• Lor s q u e [ VERROUILLAGE] s’affiche à
HOLD
].
l’écran, l’enregistreur est réglé en mode HOLD.
POWER/HOLD
en
Sortie du mode HOLD
Glissez le commutateur
POWER/HOLD
en
position A.
1
Préparatifs
Mode économie d’énergie [AutoAlimOff]
Si l’enregistreur est arrêté/inutilisé pendant plus de
10 minutes (réglage initial) alors que l’appareil est
allumé, l’alimentation se coupera (☞ P. 41, P. 47) .
• Si vous appuyez sur une touche avant que
l’alimentation ne soit coupée, le décompte du
temps écoulé redémarre jusqu’à ce que cette
fonction prenne effet.
13
Page 100

Remarques
• Si vous appuyez sur n’importe quelle touche en
mode HOLD, l’affichage de l’horloge clignote
pendant 2 secondes, mais cela n’active pas
l’enregistreur.
• Si HOLD est appliqué pendant la lecture
(l’enregistrement), l’action est annulée tout
1
en laissant l’état de lecture (enregistrement)
inchangé (Lorsque la lecture ou l’enregistrement
Préparatifs
se sont arrêtés parc e que la mémoire disp onible
est saturée, il passe en état d’arrêt).
Verrouillage clavier [HOLD]
• L’enregistreur peut efficacement être commandé par ses commutateurs et molettes, ainsi
que par la télécommande exclusive RS30W
(options), même quand il est en mode HOLD.
14
 Loading...