

Olympus E-10 specifications
English
Automatic Pixel Mapping Feature
The automatic pixel-mapping feature can be used to re-map CCD pixels. The
pixel mapping feature can be turned ON or OFF in the setup menu.
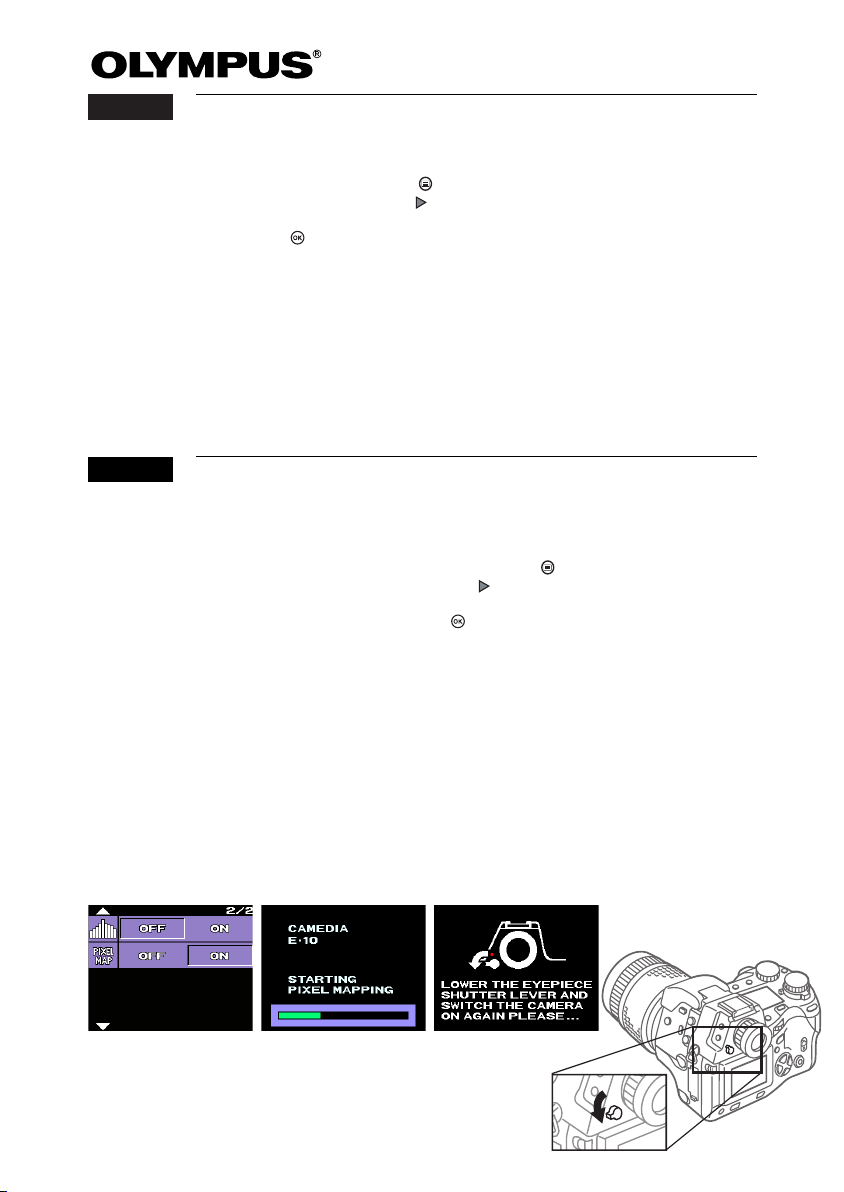
1 With the camera on, turn the mode dial to setup/connection mode, and
then press the menu button .
2 Using the arrow pad, press moving the green highlight to the Pixel Map
feature, and then move the green highlight to ON.
3 Press the button twice and then turn the camera’s power OFF.
4 Remove the camera’s batteries and AC adapter from the camera for three
minutes.
5 Reinstall the batteries, select a mode other than setup, and turn the
camera’s power ON. A pixel check is automatically performed (see figure B).
Pixel mapping requires approximately 10 seconds to complete. Wait for
pixel mapping to finish before using the camera.
If pixel mapping is not completed successfully, a message will prompt you to
correct the problem (see figure C). In this case, lower (close) the eyepiece
shutter lever on the left side of the viewfinder and return to step 4.
Français
Figure A
Ecran A
Fonction Pixel Mapping automatique
La fonction de Pixel Mapping automatique peut être utilisée pour
reprogrammer les pixels CCD. Cette fonction peut être ACTIVEE ou
DESACTIVEE à partir du menu de configuration.
1 L'appareil-photo allumé, réglez le bouton gradué sur mode de configuration/
connexion puis, appuyez sur le bouton menu .
2 A l'aide du mini-clavier, appuyez sur pour déplacer la surbrillance verte
sur la fonction Pixel Map puis, déplacez la surbrillance verte sur ON.
3 Appuyez deux fois sur le bouton puis, éteignez l'appareil-photo.
4 Retirez les piles et l'adaptateur AC de l'appareil-photo pendant trois
minutes.
5 Réinstallez les piles, sélectionnez un mode autre que configuration et
allumez l'appareil-photo. Un contrôle de pixels est exécuté
automatiquement (voir Ecran B). Le Pixel Mapping dure une dizaine de
secondes environ. Attendez que le Pixel Mapping soit terminé avant
d'utiliser l'appareil-photo.
Si le Pixel Mapping ne se termine pas normalement, un message vous convie à
rectifier le problème (voir Ecran C). Dans ce cas, abaissez (fermez) le levier de
l'obturateur de l'oculaire situé à gauche du viseur puis, retournez à l'étape 4.
Figure B
Ecran B
Figure C
Ecran C
VT319601
 Loading...