

Page 1

DSS Player Pro
INSTALLATION GUIDE
Page 2
DSS Player Pro Features
DSS Player Pro is made up of two sections - a Dictation Module and a Transcription Module.
DSS Player Pro can be installed by using a license ID that is supplied with the product.
Functions provided by DSS Player Pro are summarized below:
Dictation Module
- Allows speech recorded on the DS-3000 to be stored and managed as DSS audio
files on a PC.
- Plays audio files.
- Converts DSS files to WAVE files.
- Sends audio files as e-mail attachments.
- Allows DSS files to be recorded directly from the DS-3000 to a PC.
- Allows recorded speech to be converted to text when used in conjunction with
speech recognition software.
Transcription Module
- Plays audio files in the background when another application is running, such as a
word processor.
- Receives audio files sent as e-mail attachments.
- Enables foot switch control of the playback process.
◎Olympus Optical Co., Ltd. holds the copyrights for the DSS Player Pro software and the
instructions (this manual).
◎IBM and ViaVoice are registered trademarks of IBM Corporation.
◎Microsoft and Windows are registered trademarks of Microsoft Corporation.
◎Pentium is a registered trademark of Intel Corporation.
◎Adobe and Acrobat Reader are registered trademarks of Adobe Systems Incorporated.
◎Other company and product names are either registered trademarks or trademarks of
their respective owners.
2
Page 3

Contents
Introduction
System Requirements ............................ 4 Using Online Help......................................5
Using This Book...................................... 5 Using the Online Manual ........................... 6
Getting Ready
Installing DSS Player Pro ....................... 7 Connecting the DS-3000
Uninstalling DSS Player Pro ................. 11 Digital Recorder.................... 12
Let's Get Started
Starting the Dictation Module ............... 13 Connecting the
Starting the Transcription Module ......... 14 RS23/RS24 Foot Switch .................15
Connecting the E102 Headset................. 16
User Support
Technical Assistance And Support ....... 17
3
Page 4
DSS Player Pro INSTALLATION GUIDE
System Requirements
- Operating system Microsoft Windows 95 (Internet Explorer 4.0 or later)/98/Me/
Introduction
- PC IBM PC/AT compatible PC
- CPU Intel Pentium 166MHz or faster, or AMD-K6
- RAM 32MB or more
- Hard drive space 25MB or more (plus space for sound data files)
- Sound card Creative Labs Sound Blaster 16 or 100% compatible sound
- Display 800x600 pixels or more, 256 colors or more
- CD-ROM drive Double-speed CD-ROM
- USB port One free port
- Audio I/O terminals Microphone input and earphone (or speaker) output
Notes
• USB ports are not available on PCs running Windows 95 or that have been
upgraded from Windows 95 to any other OS. An optional PC Card adapter
or floppy disk adapter is needed to download audio files to such PCs.
• Certain functions, such as remote and direct recording, do not work on PCs
that don’t have USB ports.
• One serial port or USB port is required to connect the Foot Switch.
• To use the Send/Receive Mail Function with Windows 98/2000, Microsoft
Outlook must be installed.
NT Workstation (SP4 or later)/2000 Professional (hereafter
called Windows 2000)
card
4
Page 5
Using This Book
This book explains how to install DSS Pla yer Pro and connect the hardware. For more
detailed instructions, view the Online Help or the Online Manual (PDF file) after the
software has been installed.
Using Online Help
To open Online Help, do either of the following:
- Click the “Start” button, point to “Programs,” point to “Olympus DSS Player Pro,” and
click “Transcription Help” or “Dictation Help.”
- If DSS Player Pro is running, choose “Contents” from the “Help” menu.
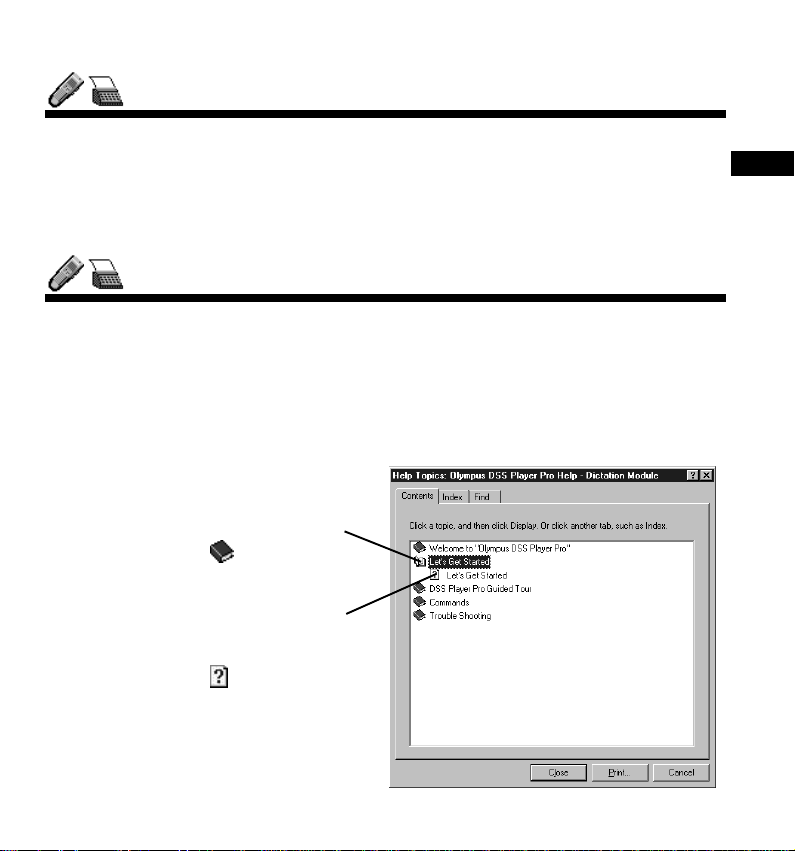
<<Search by contents>>
After opening Online Help
Double-click the you are
1
looking for .
The title of the topic is displayed.
1
2
Introduction
Double-click the you are
2
looking for .
An explanation of the topic is
displayed.
5
Page 6
DSS Player Pro INSTALLATION GUIDE
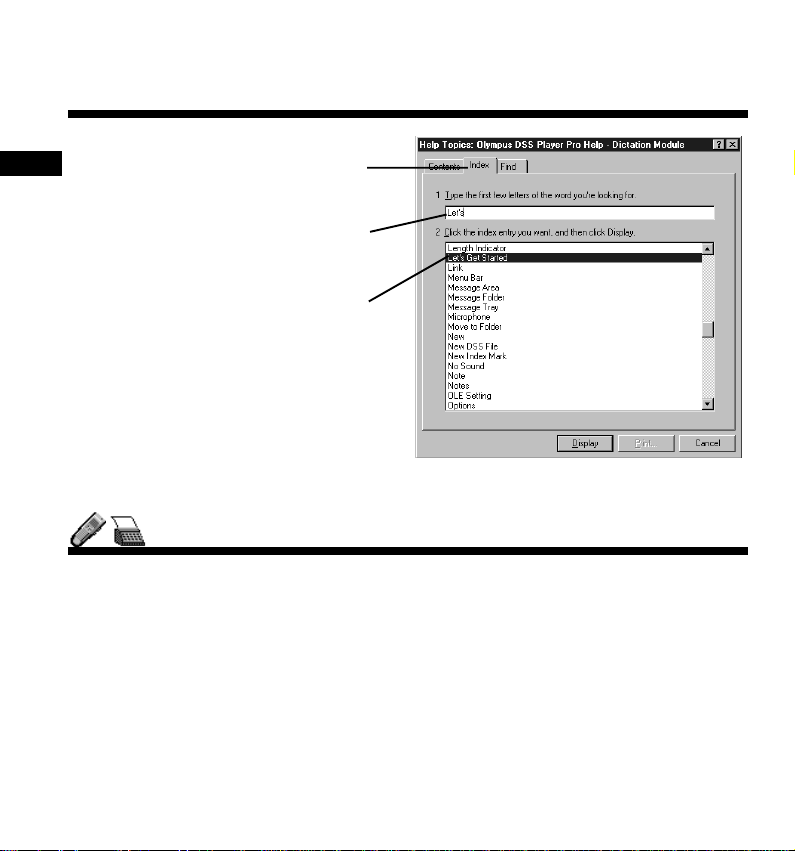
<<Search by keyword>>
Introduction
After opening Online Help
Click the Index tab.
1
A list of keywords by which you
can search is displayed.
1
2
3
Enter text.
2
Matching keywords are located
automatically.
Choose a topic and click
3
“Display.”
An explanation of the topic is displayed.
Using the Online Manual
To open the Online Manual, follow these steps:
- Click the “Start” button, point to “Programs,” point to “Olympus DSS Player Pro,” and
click “Dictation Module Instructions” or “Transcription Module Instructions.”
6
Page 7

Installing DSS Player Pr o
DSS Player Pro is made up of two sections - a Dictation Module and a Transcription
Module.
You need to enter the license ID that is supplied with the product during installation to
run this software.
Notes
• If you intend to use speech recognition software, install it first. For instruction on installing the speech recognition software, refer to the user’s guide
supplied with the speech recognition software.
• If you are running Windows NT or 2000 on a network, you need to log in
as an administrator or use a user name that has administrators rights.
Insert the DSS Player-CD-ROM into the CD-R OM drive.
1
The installer launches automatically.
Note
If the installer does not launch automatically, follow these steps (it is
assumed that the CD-ROM drive is assigned drive letter D:):
(1) Click the “Start” button and choose “Run.”
(2) Type “D:Setup.exe” in the “Open” field and click “OK.”
The installation language selection dialog box opens.
2
Move the mouse or cursor to the desired language, and click to select.
Getting Ready
7
Page 8

DSS Player Pro INSTALLATION GUIDE
Register user information.
3
Register user information. Enter your name, company name, and license ID
number (serial number). The license ID number is printed on the license ID card.
Click “Next.” A confirmation dialog box opens. Click “Yes.”
Getting Ready
Confirm acceptance of License Terms.
4
You must accept the License Terms to install DSS Player Pro. If you accept them,
click “Yes. ”
Select where to install DSS Player Pro.
5
Specify the folder in which to install DSS Player Pro. Click “Browse” to change the
installation folder. To accept the default folder, click “Next.”
Select a program menu folder.
6
You may change the program menu folder to another one, such as “Start Up”. To
accept the default folder, click “Next.”
Confirm the start of file copying.
7
Confirm all “Current Settings.” To accept them, click “Next.”
8
Note
If the installation folder does not exist, a folder creation confirmation dialog
box opens. Click “Yes.”
Page 9

Note
To change the program menu folder or installation folder, click “Back.”
If not currently installed on your PC,
8
Install Acrobat Reader.
When the Acrobat Reader installation
dialog box opens, choose Install Adobe
Acrobat Reader and click “Next.”
Note
Installing Acrobat Reader allows you
to view detailed operating instructions
for DSS Player Pro.
Copy files.
9
Wait until DSS Player Pro is installed on your PC.
Set up Acrobat Reader.
10
When the Acrobat Reader Setup dialog box opens, click “Next.”
Select where to install Acrobat Reader.
11
Specify the folder in which to install Acrobat Reader. To accept the default folder,
click “Next.”
Setup Status.
12
Wait until Acrobat Reader is installed on your PC.
Getting Ready
9
Page 10

DSS Player Pro INSTALLATION GUIDE
Exit Acrobat Reader setup.
13
When the Exit Setup dialog box opens, click “OK.”
Completing setup.
14
Setup is complete. Click “Finish.”
Getting Ready
Note
• You may be requested to restart your PC when setup is complete. If so,
make sure that “Yes, I want to restart my computer now.” is selected before
clicking Finish to restart the PC.
• When you start Windows after DSS Player Pro has been installed, is
displayed on the taskbar.
• If you want to use both the Dictation Module and the Transcription Module
on the same PC, repeat the installation process using option “Modify” in the
Start-up screen.
10
Page 11

Uninstalling DSS Player Pr o
The process of removing software installed on your PC is called uninstalling. Uninstall
DSS Player Pro when it is no longer needed.
Click “Start,” point to “Settings,” and choose “Control Panel.”
1
Double-click “Add/Remo ve Programs. ”
2
A list of applications that have been installed is displayed.
3
Choose “Olympus DSS Player Pro.”
Click “Add/Remove (in Windows 2000, “Change/Remove”).”
4
The “Welcome Modify, Repair, or Remove the program” dialog box opens.
5
Make sure that Remove is selected and then click “Next.”
A file deletion confirmation dialog box opens. Click “Yes”
6
“Now deleting.”
7
DSS Player Pro is being deleted. Please wait.
Note
An additional message may appear . If so, read it carefully and do as instructed.
Getting Ready
Exit uninstall.
8
The program has been uninstalled. Click “Finish.”
11
Page 12

DSS Player Pro INSTALLATION GUIDE
Connecting the DS-3000 Digital Recorder
The DS-3000 works with both the Dictation Module and the Transcription Module.
Notes
• Make sure you finish installing DSS Player Pro before connecting the DS-
3000. If y ou connect the DS-3000 bef ore installing DSS Pla y er Pro , the “Add
Getting Ready
Insert connector A USB cable
1
into the PC’s USB port.
Attach connector B USB cable to
2
the DS-3000.
When the software recognizes the
DS-3000, DSS Player Pro launches automatically.
New Hardware Wizard” dialog box will open. If this happens, click “Cancel”
to exit the wizard and install DSS Player Pro ( P.7).
• Before connecting the USB cable to the DS-3000, make sure that the DS3000 is in the stop mode, with its rear-panel POWER/LOCK s witch ON and
that the HOLD switch is not set to the HOLD position.
A
Notes
• For information about your PC’s USB ports, refer to the user’s guide
supplied with the PC.
• Never remo v e the USB cab le while a communication session is in prog ress.
Data files could be damaged if you do.
B
12
Page 13

Starting the Dictation Module
To start the Dictation Module, follow these steps
Note
It is assumed that the Dictation Module has been installed. For installation instructions, see Installing DSS Player Pro ( P.7).
Start Windows.
1
Connect the DS-3000.
2
For instructions on how to connect the DS-3000, see Connecting the DS-3000
Digital Recorder
automatically, opening its main window.
Notes
• If you plan to use various
SmartMedia adapters, connect
them at this point.
• If the Dictation Module does not
launch automatically, follow these
steps:
(1) Click the “Start” button.
(2) Point to “Programs” and choose
“Olympus DSS Player Pro.”
(3) Click “Dictation Module.”
• To disable automatic launching of the Dictation Module, right-click on
the taskbar and then select “Do not detect automatically.”
( P.7).
The Dictation/Transcription Module will launch
(2) (3)
(1)
Letís Get Started
13
Page 14

DSS Player Pro INSTALLATION GUIDE
Starting the Transcription Module
To start the Transcription Module, follow these steps
Notes
• It is assumed that the Transcription Module has been installed. For installation instructions, see Installing DSS Player Pro ( P.7).
• If you plan to use the foot switch or headset, see Connecting the RS23/
RS24 Foot Switch ( P.15) and Connecting the E102 Headset ( P.16).
Start Windows.
1
Letís Get Started
Follow these steps:
2
(1) Click the “Start” button.
(2) Point to “Programs” and choose
“Olympus DSS Player Pro.”
(3) Click “T ranscription Module.”
A dialog box for selecting the foot
3
switch connection method opens.
Choose USB or Serial and click “OK.”
Notes
• This dialog box opens only when the Transcription Module launches for the first time,
and never appears again.
• The Transcription Module will launch automatically when you attach a DS3000 to the USB port or if you insert a SmartMedia PC Card Adapter into
the PC. To disable automatic launching of the Transcription Module, right-
14
click on the taskbar and then select “Do not detect automatically.”
(2) (3)
(1)
Page 15

Connecting the RS23 / RS24 Foot Switch
The RS23/RS24 foot switch works only with the
Transcription Module.
Connect the foot switch either to a USB port or a
serial port on your PC.
Connecting to a USB Port
Connect the foot switch cable to
1
the USB adapter cable.
Connect the USB adapter cable
2
to the PC’s USB port.
Connecting to a Serial Port
Connect the foot switch cable to
1
the serial adapter cable.
Connect the serial adapter cable
2
to the PC’s serial port.
USB adapter
1
Serial adapter
1
Letís Get Started
2
2
15
Page 16

DSS Player Pro INSTALLATION GUIDE
Connecting the E102 Headset
The E102 is a stereo headset. When playing stereo sound, wear the set properly , observing the L
and R markings.
Letís Get Started
Plug the headset into the PC’s earphone terminal .
Note
If your PC does not hav e a terminal marked , plug
the headset into a terminal marked or .
16
Page 17

T echnical Assistance and Support
DSS Player Pro is part of the Olympus Professional Dictation System. Your dealer is
trained to troubleshoot and fix many common problems that y ou ma y be ha ving with this
system. If you encounter problems with installation or use of DSS Player Pro, We recommend that you contact your Olympus Professional Dealer that sold you the system.
If your dealer cannot fix your problem, please call our technical hotline n umber or send
e-mail.
◎◎
◎ Technical Hotline Number in the U.S. and Canada
◎◎
1-888-553-4448
◎◎
◎ User Support E-mail address in the U.S. and Canada
◎◎
distec@olympus.com
◎◎
◎ Technical Hotline Number in Europe
◎◎
Toll free number
00800 67 10 83 00
available for Austria, Belgium, Denmark, France, Germany, Netherlands, Norway,
Sweden, Switzerland, United Kingdom
Charged numbers
+49 180 5-67 1083
available for Finland, Italy, Luxembourg, Portugal, Spain and Czech Republic
User Support
+49 40 23773 899
available for Greece, Croatia, Hungary and the rest of Europe
17
Page 18

DSS Player Pro INSTALLATION GUIDE
◎◎
◎ User Support E-mail address in Europe
◎◎
dss.support@olympus-europa.com
◎◎
◎ For technical questions and support about IBM ViaVoice.
◎◎
http://www.ibm.com/software/speech/support/faqolympus.html
18
Page 19

Page 20

OLYMPUS OPTICAL CO.,LTD.
San-ei Building, 22-2, Nishi Shinjuku 1-chome, shinjuku-ku, Tokyo, Japan.
Tel. 03-3340-2211
OLYMPUS AMERICA INC.
Two Corporate Center Drive, Melville, NY 11747-3157, U.S.A.
Tel. 1-800-622-6372
OLYMPUS OPTICAL CO (EUROPA) GMBH.
(Premises/Goods delivery) Wendenstrasse 14-18, 20097 Hamburg, Germany.
Tel. 040-237730
(Letters) Postfach 10 49 08. 20034 Hamburg. Germany.
OLYMPUS OPTICAL CO.(U.K.) LTD.
2-8 Honduras Street, London EC1Y OTX, United Kingdom
Tel. 020-7253-2772
http://www.olympus.com/
E2-2751-02
 Loading...