

Page 1

DIGITAL VOICE
RECORDER
DS-2
ONLINE
INSTRUCTIONS
Thank you for purchasing an Olympus
Digital Voice Recorder.
Please read these instructions for information
about using the product correctly and safely.
Keep the instructions handy for future reference.
To ensure successful recordings, we
recommend that you test the record function
and volume before use.
E
N
Page 2

Table of Contents
Table of Contents ...................................... 2
Safe and Proper Usage ............................. 4
General Precautions .................................. 4
1 Getting Started
Main Features............................................ 6
Identification of Parts ................................. 9
Inserting Batteries ................................... 11
Power Supply .......................................... 12
Hold..........................................................13
Setting Time/Date (TIME&DATE)............14
2 Menu Setting
Menu Setting Method .............................. 16
Menu List ................................................. 18
3 About Recording
Recording ................................................ 20
Recording Modes (REC MODE) ............. 22
Using the Variable Control
Voice Actuator (VCVA) ...................... 23
Microphone Sensitivity (MIC SENSE) ..... 25
Recording from External Microphone
or Other Devices ............................... 26
Timer Recording (TIMER REC) .............. 28
Listening While Audio is Recorded
(Recording Monitor) .......................... 32
4 About Playback
Playing ..................................................... 33
Changing the Playback Speed
(PLAY SPEED) ................................... 39
Continuous Playback (ALL PLAY) ........... 41
Repeat Playback ..................................... 42
Auto Backspace Review
(BACK SPACE) ................................. 44
Skip Interval Setting (SKIP SPACE) ....... 45
Noise Cancel Function ............................ 47
Alarm Playback Function (ALARM) ........ 48
5 Other functions
Erasing ..................................................... 51
Locking Files (LOCK) .............................. 55
Index Marks ............................................. 56
LCD Contrast Adjustment
(CONTRAST) .................................... 58
Backlight (BACKLIGHT) .......................... 59
System Sounds (BEEP) .......................... 60
Assigning Folder Names
(FOLDER NAME) .............................. 61
Assigning File Comments
(COMMENT) ..................................... 64
Moving Files Across Folders ................... 65
LCD Display Information ......................... 66
Formatting the Recorder (FORMAT)....... 68
2
Page 3

6 Preparation Before Using
DSS Player
Using DSS Player Software .................... 70
Operating Environment ........................... 71
Installing Software ................................... 72
Uninstalling Software ............................... 75
Using Online Help ................................... 77
Connecting to Your PC ............................ 78
Running DSS Player ............................... 83
Window Names (DSS Player) ................. 85
7 Managing Files on Your PC
Download Voice Files
from the Recorder ............................. 86
Play a Voice File ......................................88
Upload Voice Files to the Recorder ........ 89
Send Voice Files with E-mail................... 91
Changing User ID .................................... 91
Changing a Folder Name ........................ 92
Editing File Comments ............................ 92
Editing a Template................................... 93
USB Microphone/USB Speaker .............. 94
Joining Files ........................................... 106
Splitting Files .......................................... 108
Menu Setting of this Recorder .............. 110
9 Setting of the USB Class
Changing the USB Class
(USB CLASS) .................................. 111
10 Other Practical Use Methods
Using as External Memory
of the Computer .............................. 112
11 Other Information
Alarm Message List ............................... 113
Troubleshooting ..................................... 115
Accessories (optional) ........................... 117
Specifications ........................................ 118
Technical Assistance and Support ........ 119
1
2
3
4
5
6
7
8
9
10
8 DSS Player Expanded
Functions
Upgrade Function .................................... 96
Using Voice Recognition Software .......... 98
11
3
Page 4

Safe and Proper
Usage
Before using your new recorder, read this
manual carefully to ensure that you know
how to operate it safely and correctly.
Keep this manual in an easily accessible
location for future reference.
• The warning symbols indicate important safety
related information. To protect yourself and
others from personal injury or damage to
property, it is essential that you always read the
warnings and information provided.
General Precautions
● Do not leave the recorder in hot,
humid locations such as inside a
closed automobile under direct
sunlight or on the beach in the
summer.
● Do not store the recorder in places
exposed to excessive moisture or
dust.
● Do not use organic solvents such as
alcohol and lacquer thinner to clean
the unit.
● Do not place the recorder on top of
or near electric appliances such as
TVs or refrigerators.
● Avoid recording or playing back near
cellular phones or other wireless
equipment, as they may cause
interference and noise. If you
experience noise, move to another
place, or move the recorder further
away from such equipment.
● Avoid sand or dirt. These can cause
irreparable damage.
● Avoid strong vibrations or shocks.
● Do not disassemble, repair or modify
the unit yourself.
4
Page 5
● Do not operate the unit while
operating a vehicle (such as a
bicycle, motorcycle, or go-cart).
● Keep the unit out of the reach of
children.
<Warning regarding data loss>
Recorded content in memory may be
destroyed or erased by operating
mistakes, unit malfunction, or during
repair work.
It is recommended to back up and save
important content to other media such as
a computer hard disk.
Batteries
Warning
• Batteries should never be exposed to
flame, heated, short-circuited or
disassembled.
• Do not attempt to recharge alkaline,
lithium or any other non-rechargeable
batteries.
• Never use any battery with a torn or
cracked outer cover.
• Keep batteries out of the reach of
children.
• If you notice anything unusual when
using this product such as abnormal
noise, heat, smoke, or a burning odor:
1 remove the batteries immediately
while being careful not to burn
yourself, and;
2 call your dealer or local Olympus
representative for service.
5
Page 6

1 Getting Started
Main Features
1
Main Features
This product is equipped with the following
features.
● Connect the cradle and the USB
connection cable to this recorder, and high
speed data transfer to a computer can be
performed. (☞ P.78)
● This recorder can also be utilized as
external memory of a computer. (☞ P.112)
• By connecting the computer with the USB,
pictures, text data, etc. can be saved, and
utilized to carry data.
● It has a large backlight full-dot display
(LCD display screen). (☞ P.60)
• The screen displays information about
recorded voice files and easily understood
operational messages.
● The recorder stores highly compressed
DSS and WMA format voice messages in
internal flash memory.*
1
● By using the built-in stereo microphone, 2
types of stereo recording modes, which
are Stereo HQ (stereo high quality sound
recording) and Stereo SP (stereo standard
recording) and 3 types of monaural
recording modes, which are HQ (high
quality sound recording), SP (standard
recording), and LP (long-term recording)
can be selected.*1(☞ P.22)
Recording time
STEREO HQ mode : 1 hours 5 minutes
STEREO SP mode : 2 hours 10 minutes
HQ mode : 4 hours 20 minutes
SP mode : 10 hours 25 minutes
LP mode : 22 hours 20 minutes
• Available recording time for one continuous
file. Available recording time may be shorter if
many short recordings are made. (The
displayed available recording time and
recorded time are approximate indications.)
● You may assign your own names to
folders. (☞ P.61)
6
Page 7
● The five folders can hold 199 files each,
for the maximum of 995 recordings.
(☞ P.20)
● It has a built-in Variable Control Voice
Actuator (VCVA) function. (☞ P.23)
● A timer recording function is built-in, which
can record at a set time. (☞ P.28)
● You can input file comments.*2 (☞ P.64)
• You can add comments of up to 100 characters
to each recorded file.
• This recorder has 10 pre-set comment
templates.
● The recorder has a Noise Cancel Function.*
(☞ P.47)
• Ruwisch & Kollegen GmbH Noise Suppression
Technology reduces noise in files and enables
clear sound playback.
● Recorded files may be moved from one
folder to another. (☞ P.65)
● You can insert or delete index marks. *
(☞ P.56)
• If you insert index marks during recording or
playback, you will later be able to quickly find
the recording you want to hear.
● The playback speed can be controlled as
preferred. (☞ P.39)
● Fast forward and rewind are possible at a
set interval. (☞ P.45)
● Comes with DSS Player software. (☞ P.70)
• If you transfer voice files recorded with the
recorder to a PC, you can easily play back,
organize, and edit the files.
• If you connect the recorder to a computer, you
can use it as a USB microphone or USB
speaker. (☞ P.94)
● The “DSS Player” can be upgraded to a
“DSS Player Plus”, which is equipped with
a enhanced functionality (Option). (☞ P.96)
2
2
• If a commercial voice recognition software is
utilized, the recorded voice file can be converted
to characters automatically.*
• In addition to the “DSS Player” functions,
joining and splitting of the files and configuring
the menu settings of this recorder, etc. can be
performed.
The “DSS Player” can be upgraded
Plus
to “DSS Player Plus”, which is
equipped with enhanced functionality
(paid option). (☞P.96)
3
(☞ P.106)
1
Main Features
7
Page 8

Main Features
*1: DSS format in SP and LP mode recording, and
1
WMA format in stereo HQ and stereo SP and
HQ mode recording.
Main Features
*2: For WMA files, these functions are only
available for files recorded with this recorder
or the IC recorders from Olympus.
*3: In a quiet environment, it is necessary to set
this recorder to stereo HQ, stereo SP, HQ mode
or SP mode, and that the person whose voice
is registered in the speech recognition software
speak with the constant tone of voice when
recording.
The voice file recorded under the following
conditions is not suitable for character
conversion, since the software may have
difficulty in recognizing the voice.
— Meetings, discussions where voices of more
than one person can be recorded
— Conferences, lectures where the
surrounding noise can be recorded
IBM, PC/AT, and ViaVoice are the trademarks or
registered trademarks of International Business
Machines Corporation.
Microsoft, Windows and Windows Media are
registered trademarks of Microsoft Corporation.
Apple, Macintosh, iMac, Mac, and PowerMac are
trademarks or registered trademarks of Apple
Computer, Inc.
Intel and Pentium are registered trademarks of Intel
Corporation.
CORTOLOGIC is a registered trademark of
Ruwisch & Kollegen GmbH.
Other product and brand names mentioned herein
may be the trademarks or registered trademarks
of their respective owners.
ScanSoft and Dragon NaturallySpeaking are the
trademarkes or registerd trademarks of ScanSoft, Inc
8
Page 9
Identification of Parts
1
%
$
#
@
!
0
9
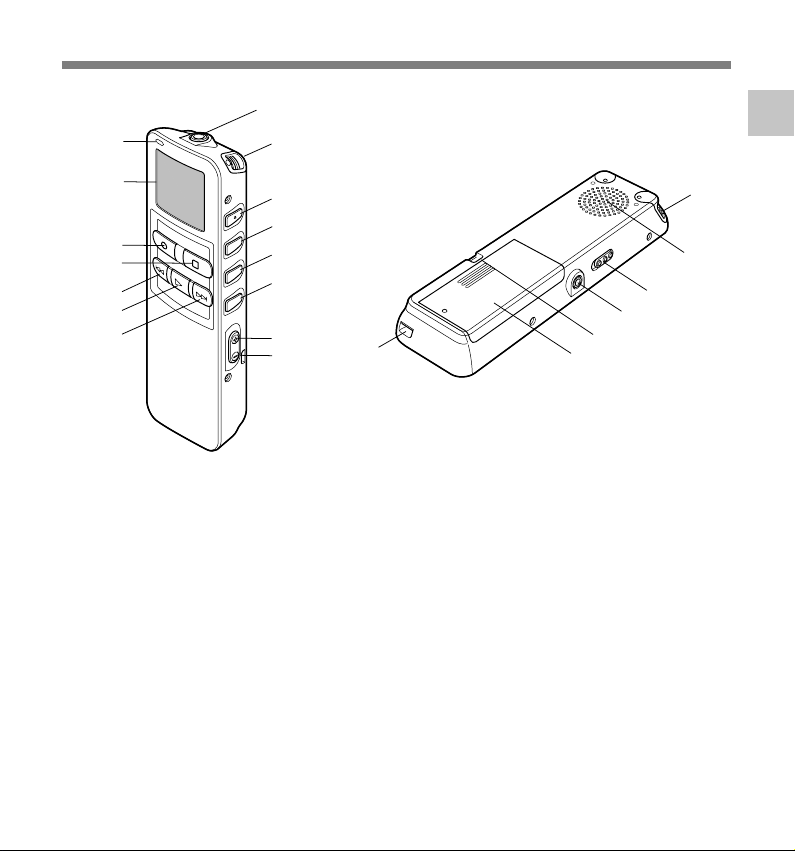
1 MIC (Microphone) jack
2 Built-in stereo microphone
3 INDEX/2 button
4 DISPLAY/MENU/SET button
5 FOLDER/REPEAT/3 button
6 ERASE button
7 VOL (+) button
8 VOL (–) button
9 FF (Fast Forward) button
0 PLAY button
! REW (Rewind) button
2
3
4
5
6
7
8
-
@ STOP button
# REC (Record) button
$ Display (LCD panel)
% Record/Play indicator lamp
^ Built-in speaker
& HOLD switch
* EAR (Earphone) jack
( Strap Hole
) Battery cover
- Cradle attachment point/PC (USB)
terminal
(
)
1
Identification of Parts
2
^
&
*
9
Page 10
Identification of Parts
Display (LCD Panel)
1
Identification of Parts
6 7
5
1
2
3
4
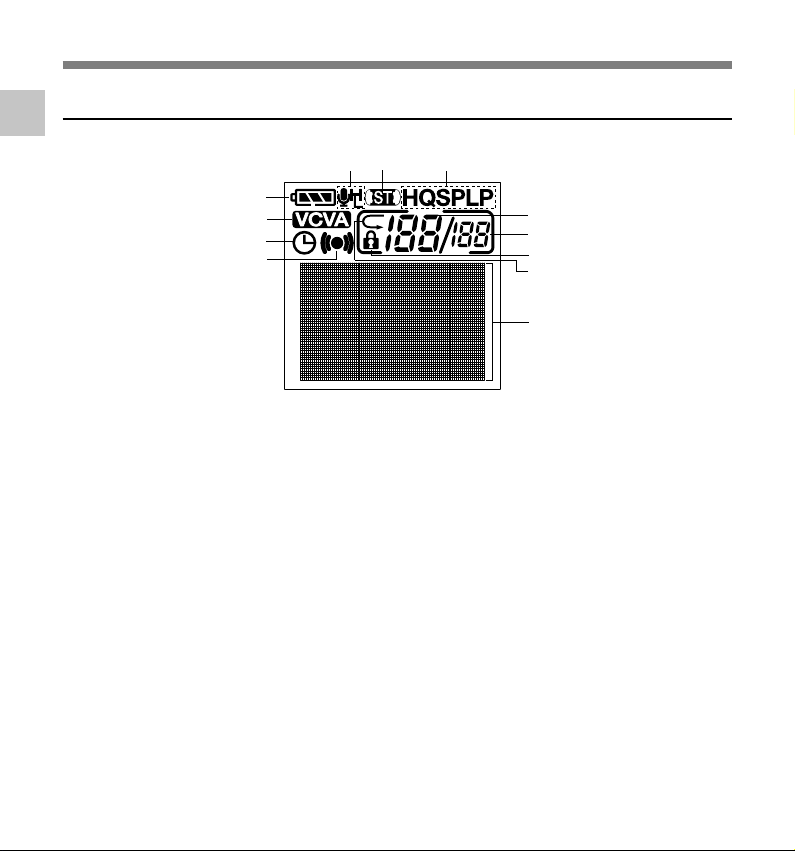
1 Battery indicator
2 VCVA (Variable Control Voice Actuator)
indicator
3 Timer recording display
4 Alarm indicator
5 Microphone sensitivity display
6 Stereo display
7 Record mode indicator
8 Current file number
9 Total number of recorded files in the folder
0 Erase lock indicator
! Repeat play indicator
@ Character Information display
8
9
0
!
@
10
Page 11
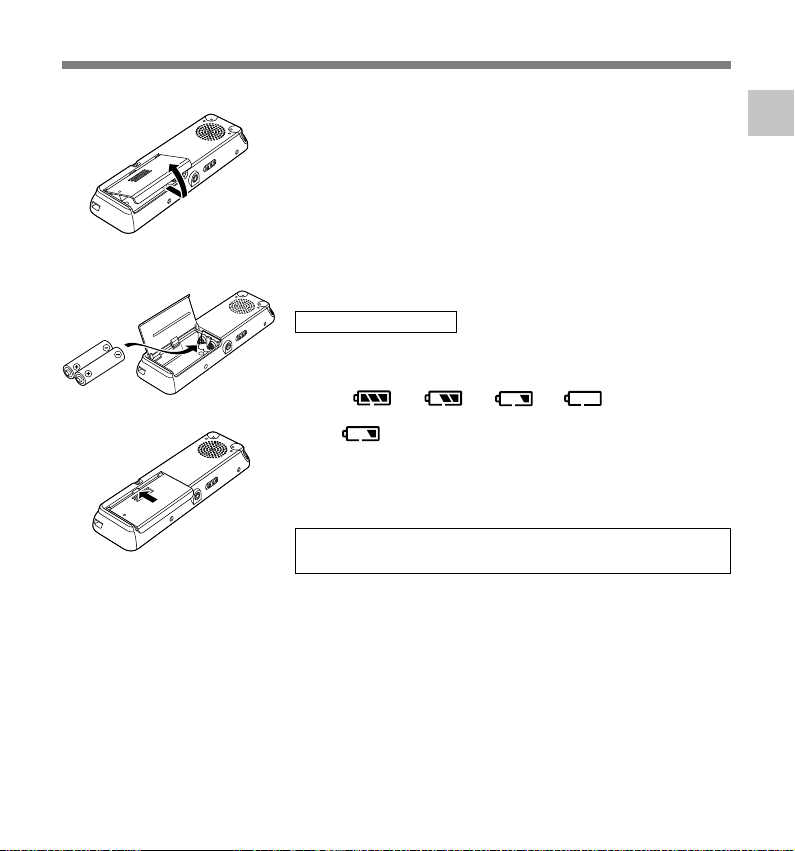
Inserting Batteries
Lightly press down on the arrow and slide the
1
battery cover open.
1
Insert two AAA alkaline batteries, observing the
correct polarity.
2
Close the battery cover completely.
3
2
Replacing batteries
The battery indicator on the display changes as the batteries
lose power.
➜ ➜ ➜
When appears on the display, replace the batteries as
3
....................................................................................................................................................
Notes
• Be sure to stop the recorder before replacing the batteries. Unloading the batteries while the recorder is
in use may corrupt the file. If you are recording into a file and the batteries run out, you will lose your
currently recorded file because the file header will not be able to close. It is crucial to change the batteries
once you see only one Hash mark in the battery icon.
• Be sure to replace both batteries at the same time.
• Never mix old and new batteries, or batteries of different types and/or brands.
• If it takes longer than 1 minute to replace dead batteries, you may have to reset the time when you load
fresh batteries (☞ P.14).
• Remove the batteries if you are not going to use the recorder for an extended period of time.
soon as possible.
When the batteries are too weak, the recorder shuts down
and “BATTERY LOW” appears on the display. AAA alkaline
batteries are recommended.
An optional Ni-MH Rechargeable Battery from Olympus
can be used for the recorder (☞ P.117).
1
Inserting Batteries
11
Page 12

Power Supply
When the recorder is not used, setting it to HOLD turns off the recorder, suppressing the
consumption of the battery to a minimum. Even if the power is turned off, the existing data,
1
settings of each mode, and clock setting will be maintained. To turn the power on, cancel the
Power Supply
hold switch.
Turning Off the Power
Move the HOLD switch to the HOLD
position while the recorder is not in
operation.
After “HOLD” is displayed, flashing for 2
seconds, the display will turn off.
Turning On the Power
Release the HOLD switch of the recorder.
12
Page 13
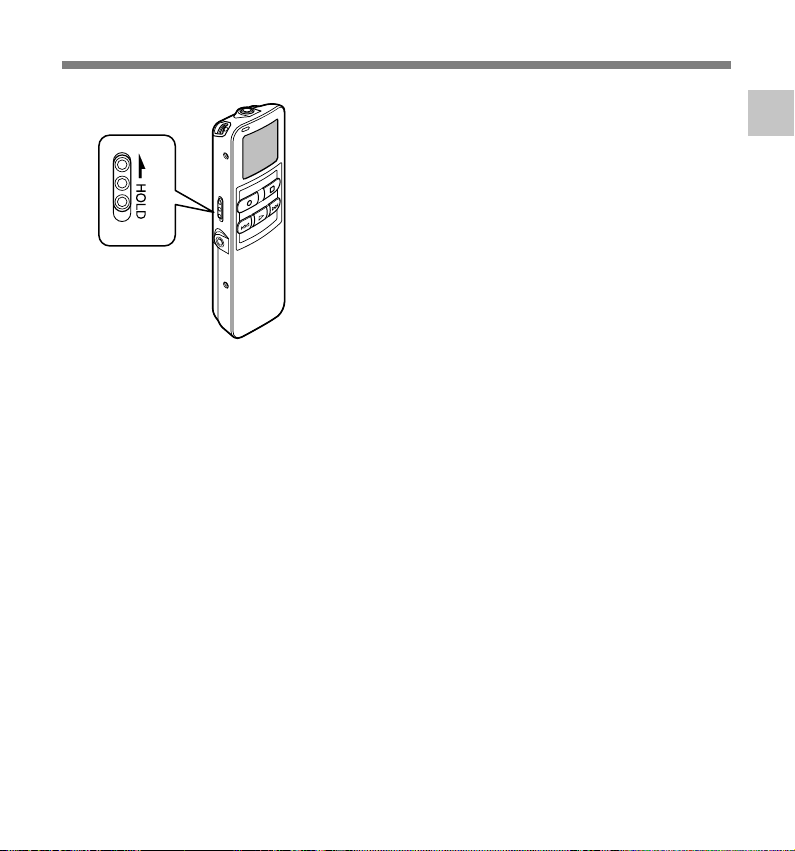
Hold
Setting the HOLD switch to the HOLD position.
If you set the recorder to HOLD status by sliding the
HOLD switch in the direction of the arrow, the current
conditions will be preserved, and all buttons and switches
except the HOLD switch will be disabled. This feature is
useful when the recorder has to be carried in a bag or
pocket.
Remember to reset the HOLD switch when
using the recorder.
....................................................................................................................................................
Notes
• The display will flash if the switch is moved to hold in the stop status. At this time, if any button is pressed
the clock display will flash for about 2 seconds, but will not operate.
• If the switch is moved to hold during playback (or recording), the playback (recording) status will stay and
cannot be operated.
(When playback has ended and the recording has ended due the remaining memory being used up, it will
be in the stop state.)
• The alarm will sound at the scheduled time even if the recorder is set to hold. The recorder begins to play
the file associated with the alarm when you press any button.
• Recording will start when the set time of the timer recording comes even while in hold.
1
Hold
13
Page 14
Setting Time/Date (TIME&DATE)
If you have set the time and date, information as to when an audio file is recorded is stored
automatically with that file. The time and date should be set to ease file management tasks.
1
Also, it is required when performing timer recording (☞ P.28) and alarm playback (☞ P.48).
Setting Time/Date (TIME&DATE)
The hour indicator will flash automatically when you load batteries before using the
recorder for the first time, or after the recorder hasn’t been used for a long time.
Proceed from step 1.
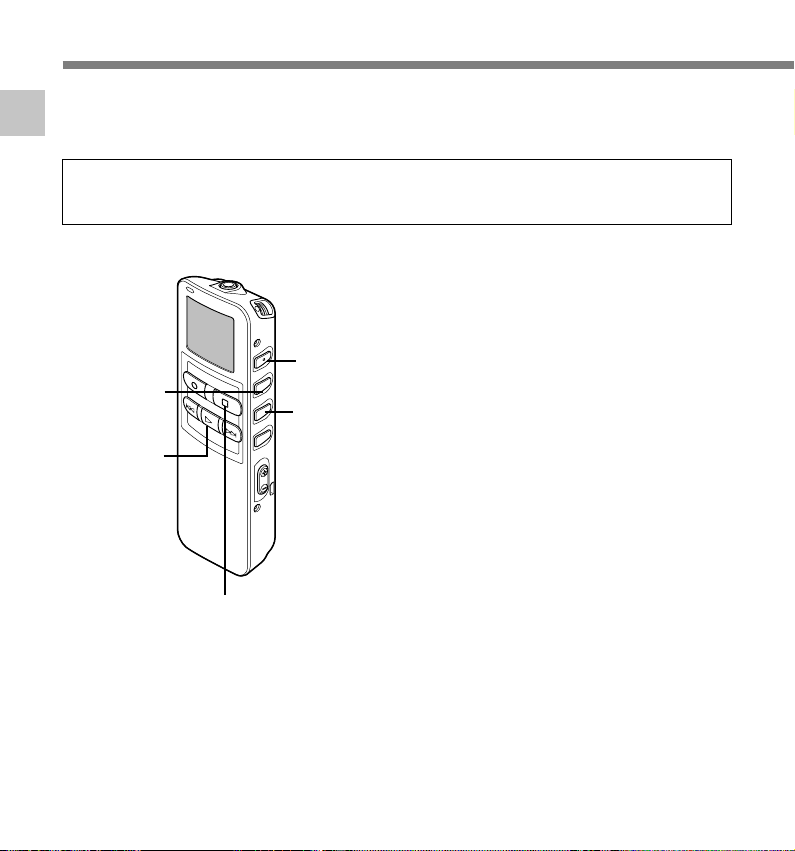
Set the hour.
1 Press the 3 button or 2 button to set
1
the hour.
2 Press the MENU/SET button to accept
MENU/SET
button
(Accepts a choice
and moves on to
the next item)
PLAY button
(Switching the
data displayed.)
2 button
(Alters a choice)
3 button
(Alters a choice)
STOP button
(Exits the menu)
the hour.
• You can choose between 12 and 24 hour
display by pressing the PLAY button while
setting the hour and minute.
Example: 5:45 P.M.
Set the minute.
1 Press the 3 button or 2 button to set
2
the minute.
2 Press the MENU/SET button to accept
the minute.
Set the year.
1 Press the 3 button or 2 button to set
3
the year.
2 Press the MENU/SET button to accept
the year.
• You can choose the order of the year,
month, day by pressing the PLAY button
while setting them.
5:45 PM ←→ 17:45
(Initial setting)
14
Page 15
Example: January 14, 2005
1M 14D 2005Y
(Initial setting)
↓
14D 1M 2005Y
↓
2005Y 1M 14D
Set the month.
1 Press the 3 button or 2 button to set
4
the month.
2 Press the MENU/SET button to accept
the month.
Set the date.
1 Press the 3 button or 2 button to set
5
the date.
2 Press the MENU/SET button to accept
the date.
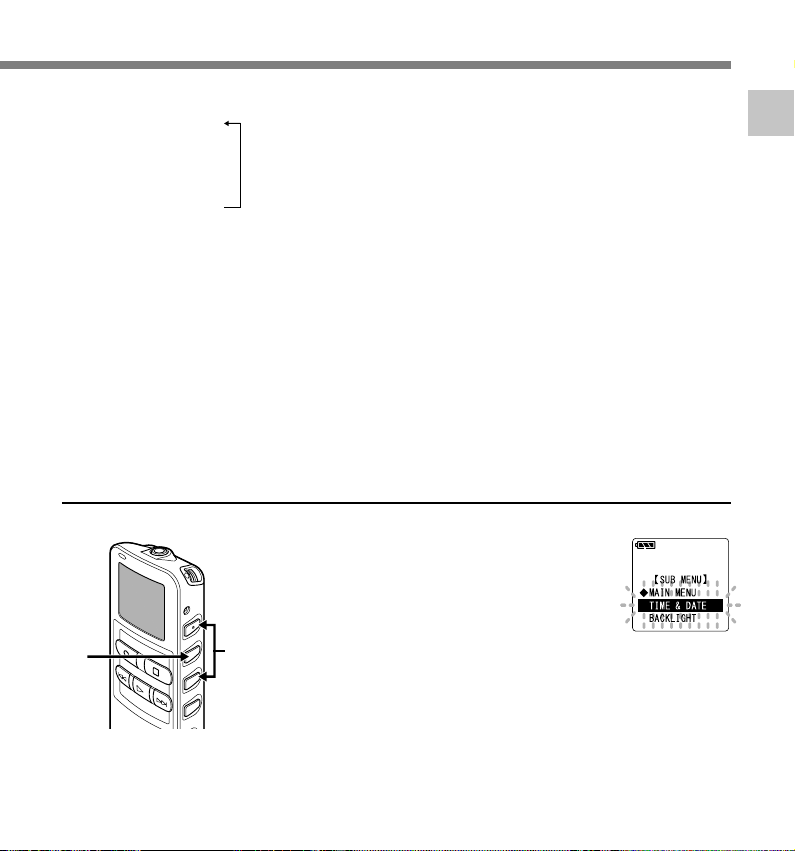
Changing the Time/Date
Press the 3 or 2 button in the sub
menu screen, and select the
1
“TIME&DATE”.
See ☞ P.17 and 19 regarding the sub menu.
Press the MENU/SET button.
Time/Date screen appears. The hour
2
indicator flashes, indicating the start of the
Time/Date setup process.
2
1
Press the STOP button to close the
menu.
6
When the date is confirmed, the recorder’s
clock will start to move. Set the time
according to the time signal and press the
MENU/SET button.
........................................................................
Note
If you press the STOP button during the setup
operation, the recorder will save the items that
were set to that point.
1
Setting Time/Date (TIME&DATE)
Follow the same steps starting at step 1 in “Setting Time/Date”
(☞ P.14).
15
Page 16
2 Menu Setting
Menu Setting Method
Each item of the menu list (☞ P.18, 19) can be set by the following method.
2
Menu Setting Method
1,3,5
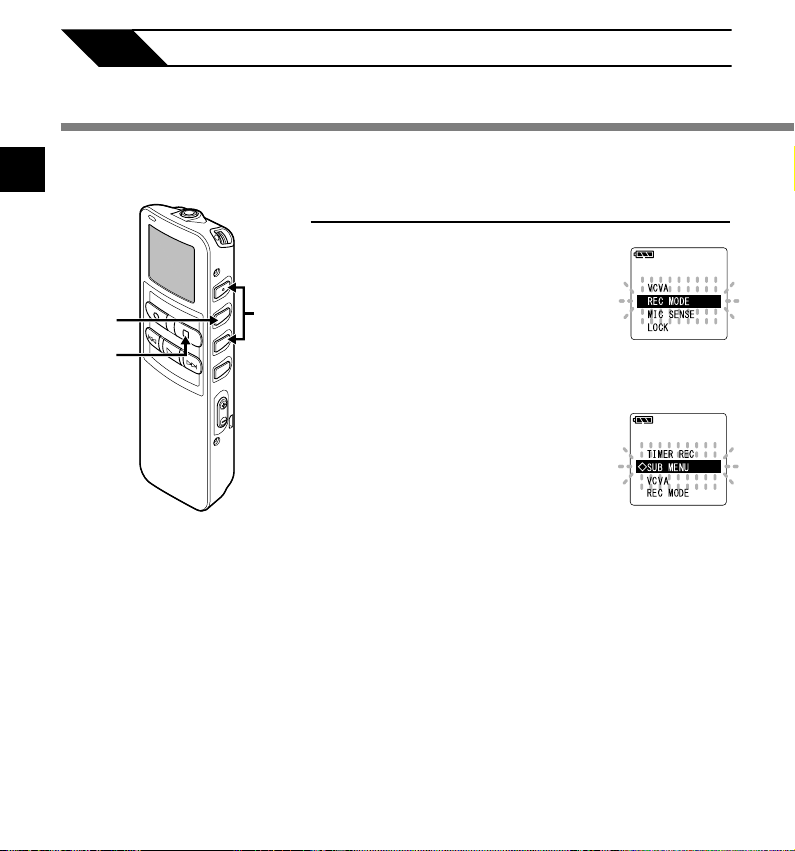
Main Menu Setting
Press and hold the MENU/SET
button for 1 second or longer.
1
The main menu opens.
2,4
16
6
Press the 3 or 2 button to
move to the item to be set.
2
Press the MENU/SET button.
Moves to the setting of the selected
3
item. When ◊SUB MENU is selected,
move to the item of the sub menu.
Press the 3 or 2 button to
change the setting.
4
Press the MENU/SET button to
complete the setup screen.
5
Press the STOP button to close
the main menu.
6
Page 17

1,3,
5,7
8
Sub Menu Setting
Press and hold the MENU/SET
button for 1 second or longer.
1
2,4,
The main menu opens.
6
Press the 3 or 2 button on the
setting screen of the main menu,
2
and select the “
Press the MENU/SET button.
The sub menu opens.
3
Press the 3 or 2 button to move
to the item to be set.
4
Press the MENU/SET button.
Moves to the setting of the selected
5
item. When ◆MAIN MENU is selected,
move to the item of the main menu.
Press the 3 or 2 button to
change the setting.
6
Press the MENU/SET button to
complete the setup screen.
7
Press the STOP button to close
the sub menu.
8
◊
SUB MENU”.
2
Menu Setting Method
17
Page 18
Menu List
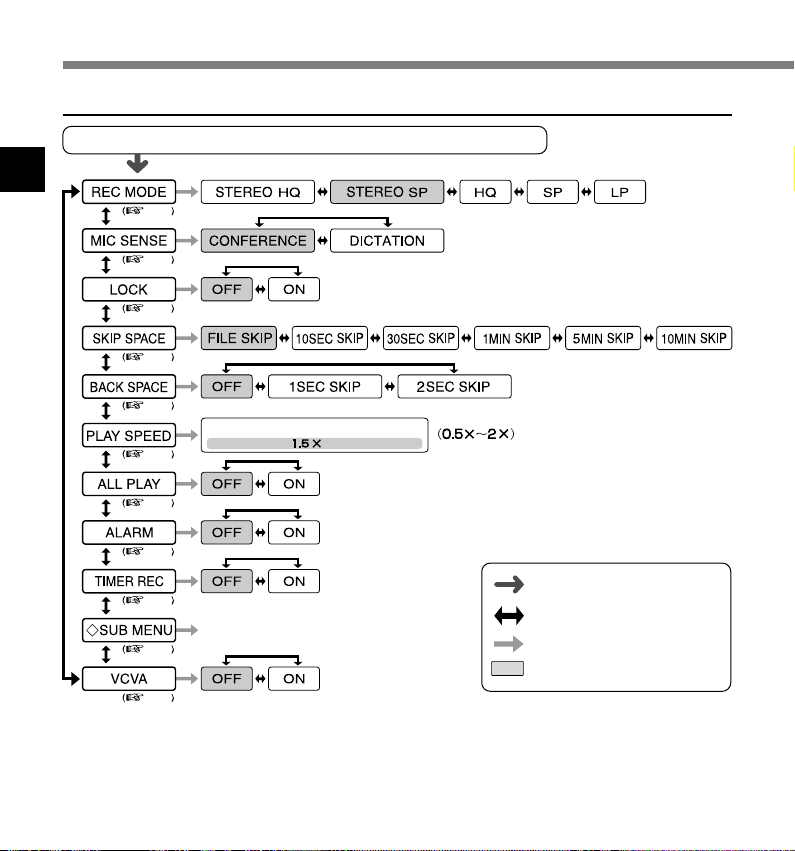
Main Menu
Press and hold the MENU/SET button for 1secomd or longer.
2
Menu List
....................................................................................................................................................
Notes
• If you press the STOP button or the REC button, during a menu setup operation, the recorder will stop and
apply the items that were set to that point. The set contents of the timer recording will be set, and goes to OFF.
• The recorder will stop if you leave it idle for 3 minutes during a menu setup operation, when a selected
item is not applied.
18
P.22
P.25
P.55
P.45
P.44
Playback Speed Setting Screen
P.39
P.41
P.48
P.28
Switches to the sub menu.
P.17
P.23
Press and hold the MENU/SET
button for 1 second or longer.
Press the 3 or 2 button.
Press the MENU/SET button.
Initial setting
Page 19

Sub Menu
Switches to the main menu.
P.16
Time/Date setting.
In order of hour, minute, year, month and day.
P.14
P.59
LCD contrast adjustment
P.58
P.60
Folder naming.
P.61
Assigning file comments.
P.64
P.68
P.
111
....................................................................................................................................................
Notes
• If you press the STOP button or the REC button, during a sub menu setup operation, the recorder will stop
and apply the items that were set to that point.
• The recorder will stop if you leave it idle for 3 minutes during a sub menu setup operation, when a
selected item is not applied.
Press the 3 or 2 button.
Press the MENU/SET button.
Initial setting
2
Menu List
19
Page 20
3 About Recording
Recording
The recorder provides five folders, A, B, C, D and E, and each message recorded in a
folder is saved as a Digital Speech Standard (DSS) file or a Windows Media Audio (WMA) file.
These five folders can be selectively used to distinguish the kind of recording; for example,
Folder A might be used to store private information, while Folder B might be dedicated to
holding business information. Up to 199 messages can be recorded per folder (☞ P.61).
3
Stereo recording is possible, only when set to stereo HQ and stereo SP mode.
Recording
2
3
Built-in stereo
microphone
1
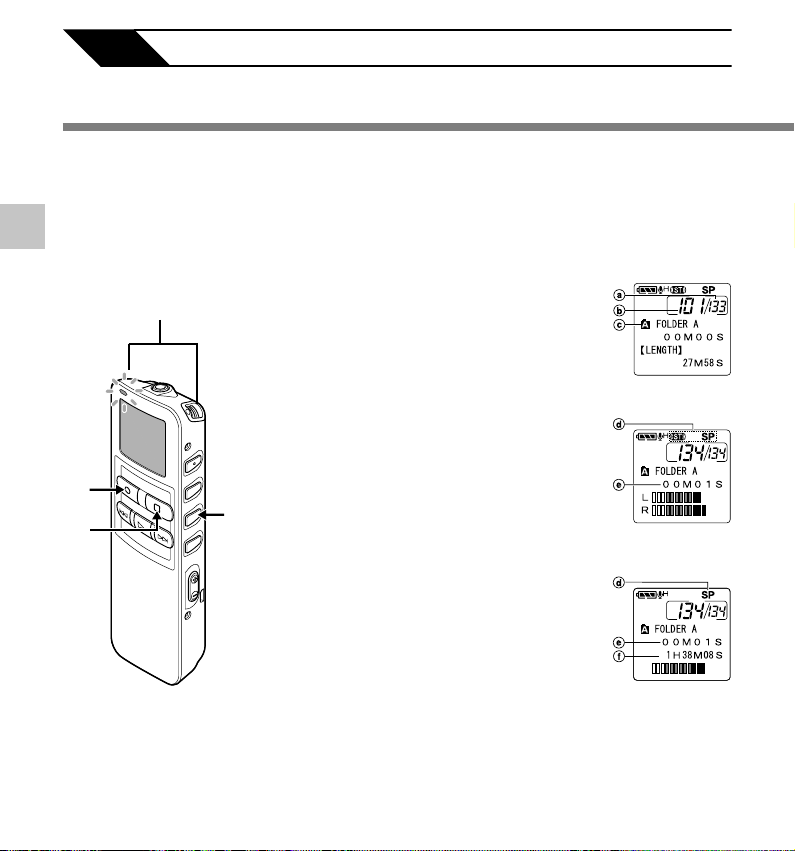
Press the FOLDER button to
choose a folder.
1
The folder name is displayed.
a Total number of recorded files in the
folder
b Current file number
c Current folder
Press the REC button to start
recording.
2
The record/play indicator lamp glows red.
Turn the built-in stereo microphone in the
direction to be recorded. The display
changes depending on the recording
mode (☞ P.22).
d Current recording mode
e Recording time
f Remaining recording time
Display in the
stereo recording
mode
20
Press the STOP button to stop
recording.
3
Display in the
monaural
recording
Page 21

Notes
• To ensure recording from the beginning, start
speaking after you see the red record/play
indicator lamp on.
• A beep will sound when remaining recording time
reaches 60 seconds, 30 seconds, and 10
seconds while recording.
•“MEMORY FULL” or “FOLDER FULL” will be
displayed when the memory or folder capacity is
full. Delete any unnecessary files before
recording any further (☞ P.51) or transfer voice
files to your computer using DSS Player Software
(☞ P.86).
• DSS format in SP and LP mode recording, and
WMA format in stereo HQ and stereo SP and
HQ mode recording.
• While recording, pressing the PLAY button stops
recording and plays back the current file.
Recording functions
Pause
Press the REC button while recording.
“REC PAUSE” will flash on the display.
➥
• The recorder will time out after 2 hours when left
in “REC PAUSE”.
Resume Recording
Press the REC button again.
Recording will resume at the point of
➥
interruption.
3
Recording
21
Page 22
Recording Modes (REC MODE)
The recording mode can be chosen from Stereo HQ (stereo high quality sound recording) and
Stereo SP (stereo standard recording), HQ (high quality sound recording), SP (standard
recording), and LP (long-term recording).
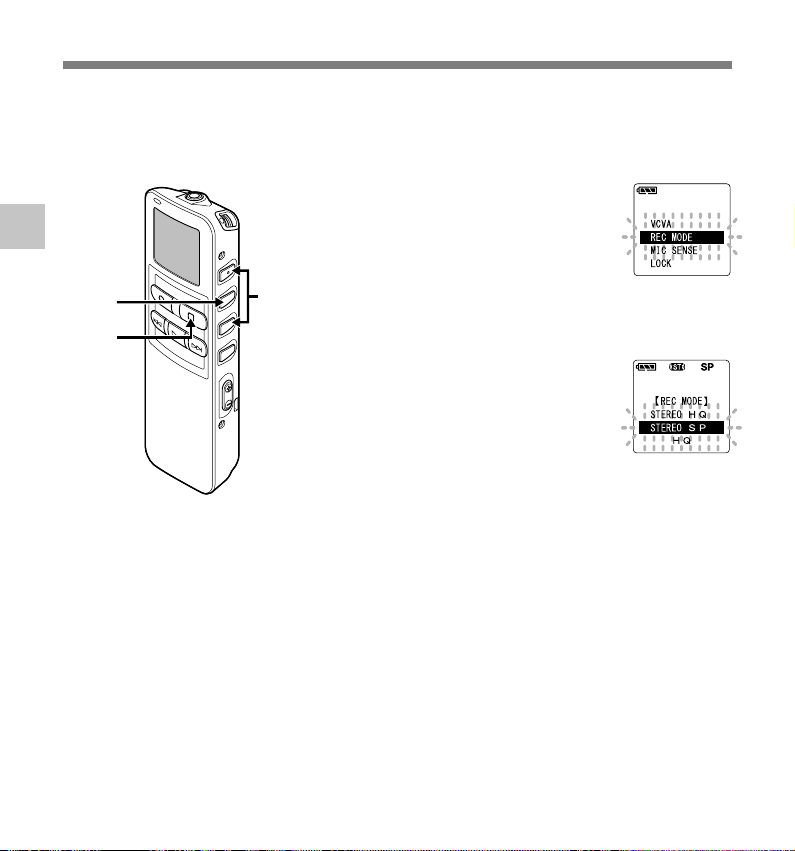
Press and hold the MENU/SET
button for 1 second or longer.
1
3
Recording Modes (REC MODE)
“REC MODE” will be displayed on the
screen (☞ P.16,18).
1,2,4
5
....................................................................................................................................................
Note
When a meeting and lecture is to be recorded clearly, set other than LP mode to record.
22
Press the MENU/SET button.
3
The recording mode setup process
2
begins.
Press the 3 or 2 button to
choose from “STEREO HQ”,
3
“STEREO SP”, “HQ”, “SP” and
“LP”.
Press the MENU/SET button to
complete the setup screen.
4
Press the STOP button to close
the main menu.
5
Page 23
Using the Variable Control Voice Actuator (VCVA)
When the microphone senses that sounds have reached a preset threshold volume level, the
built-in Variable Control Voice Actuator (VCVA) starts recording automatically, and stops when
the volume drops below the threshold level.
The VCVA feature extend recording time and conserve memory by turning off recording during
silent periods. This helps make the playback, with no lulls or dead space, more efficient and
convenient.
1,3,5
6
2,4
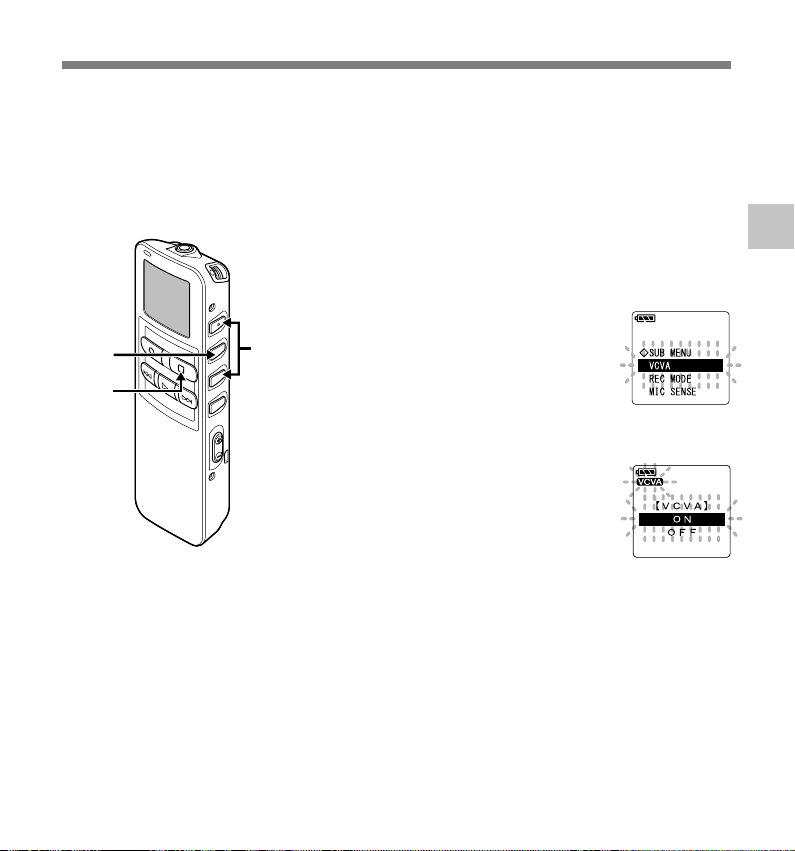
Press and hold the MENU/SET
button for 1 second or longer.
1
The main menu opens (☞ P.16,18).
Press the 3 or 2 button to choose
“VCVA”.
2
Press the MENU/SET button.
The VCVA setup process begins.
3
Press the 3 or 2 button to choose
between “ON” and “OFF”.
4
ON: Will start recording in VCVA
mode.
OFF: Will resume recording in normal
mode.
Press the MENU/SET button to
complete the setup screen.
5
Press the STOP button to close
the main menu.
6
When “ON” is selected, a VCVA
indication will be displayed on the
screen.
3
Using the Variable Control Voice Actuator (VCVA)
23
Page 24
Using the Variable Control Voice Actuator (VCVA)
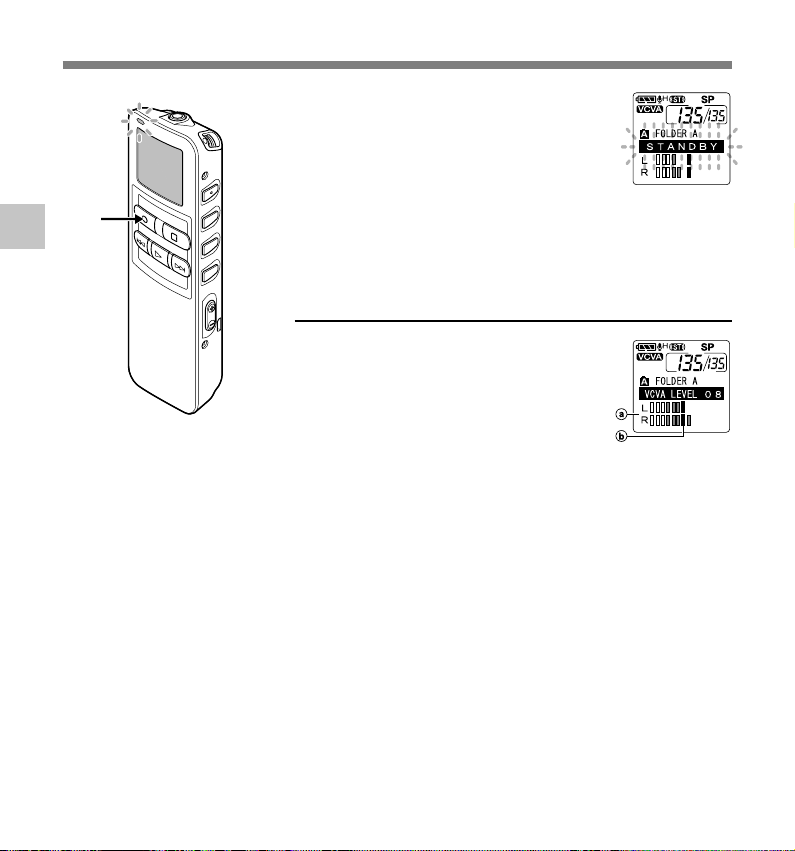
Press the REC button to start
recording.
7
When the sound volume is lower than
the preset threshold sound level,
recording automatically stops after 1
sec approximately, and “STANDBY”
flashes on the display. The record/play
indicator lamp glows when recording
starts and flashes when recording
pauses.
3
7
Using the Variable Control Voice Actuator (VCVA)
Adjust the start/stop actuation level
Press the FF or REW button to
adjust the pause sound level during
recording.
The VCVA level can be set to any of 15
different values. The higher the value, the
more sensitive the recorder to sounds. At
the highest value, even the faintest sound
will activate recording.
The VCVA pause sound level can be
adjusted according to the ambient
(background) noise.
a Level meter (varies according to the
sound volume being recorded)
b Start level (moves to the right/left
according to the set level)
....................................................................................................................................................
Notes
• The start/stop actuation level also varies depending on the selected microphone sensitivity mode (☞ P.25).
• If the starting level is not adjusted within 5 seconds, the display will return to the previous.
• If the surrounding noise is loud, the starting sensitivity of the VCVA can be adjusted according to the
recording situation.
• To ensure successful recordings, prior testing and adjustment of the start/stop actuation level is
recommended.
24
Page 25
Microphone Sensitivity (MIC SENSE)
Microphone sensitivity is adjustable to meet recording needs.
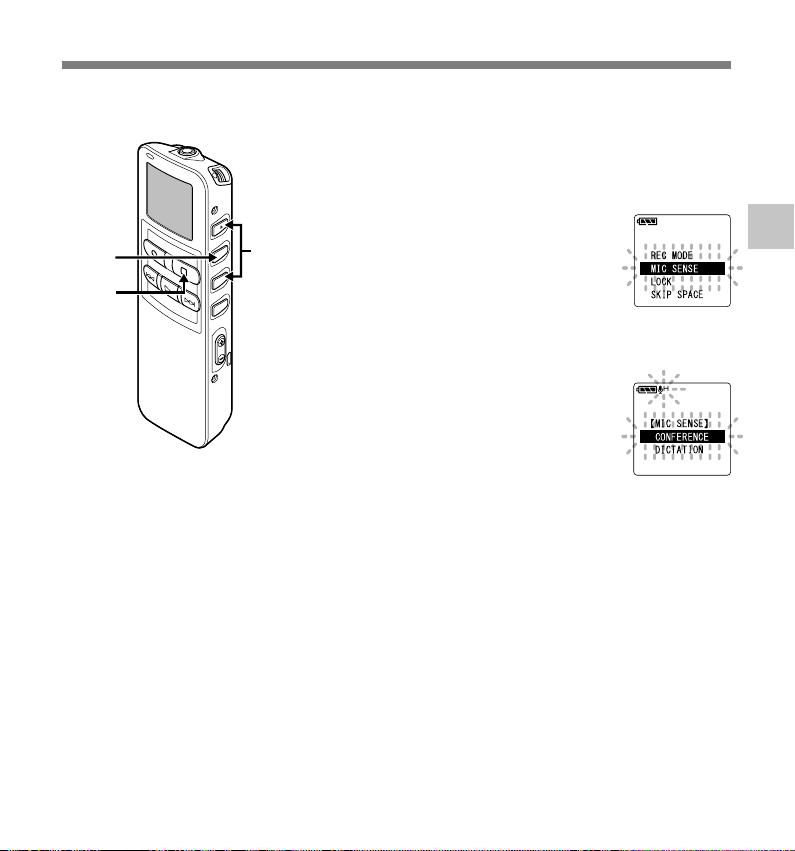
Press and hold the MENU/SET
button for 1 second or longer.
1
The main menu opens (☞ P.16,18).
Press the 3 or 2 button to choose
“MIC SENSE”.
2
1,3,5
2,4
3
Microphone Sensitivity (MIC SENSE)
6
....................................................................................................................................................
Note
When the speakers voice is to be recorded clearly, set to dictation mode and move the built-in stereo
microphone close to the speaker’s mouth (5 to 10 cm) and record.
Press the MENU/SET button.
The microphone sensitivity setup
3
process begins.
Press the 3 or 2 button to choose
between “CONFERENCE” and
4
“DICTATION”.
CONFERENCE:
High-sensitivity mode that
records sounds in all directions.
DICTATION:
Low-sensitivity mode suited for
dictation.
Press the MENU/SET button to
complete the setup screen.
5
Press the STOP button to close
the main menu.
6
25
Page 26
E
EAR
Recording from External Microphone or
Other Devices
The external microphone and other devices can be connected and the sound can be recorded.
Connect as follows by the device to be used.
Recording with External Microphone
3
Recording from External Microphone or Other Devices
To MIC
(microphone) jack
To audio output
terminal of other
devices
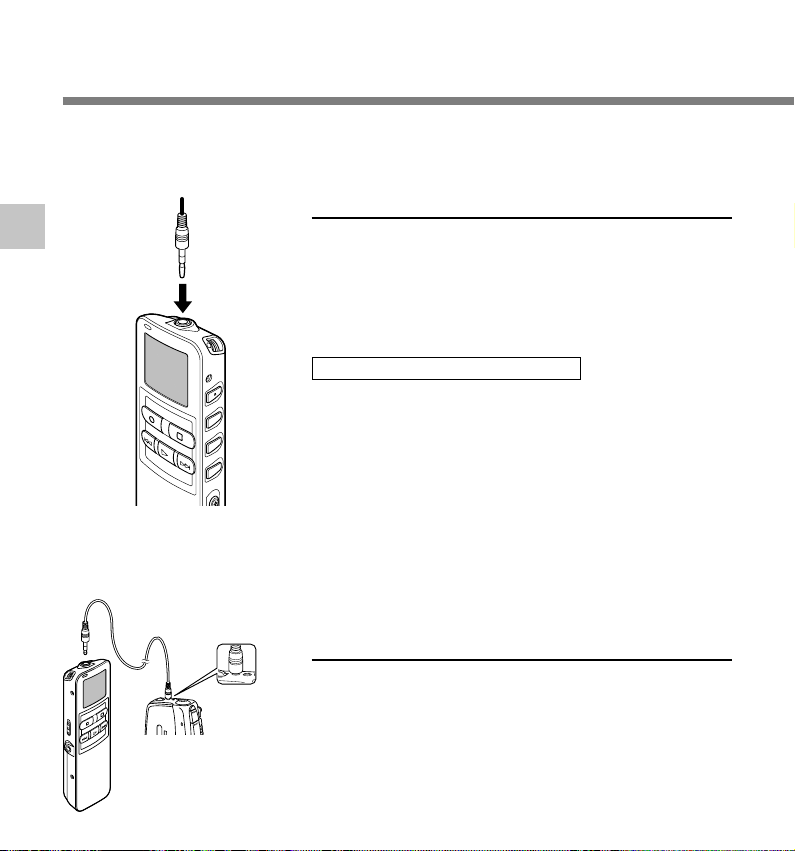
Connect the external microphone to the
microphone jack of the recorder.
When the external microphone is connected to the
microphone jack of the recorder, the built-in microphone will
not operate.
Applicable external microphones
● Noise-Cancellation monaural microphone: ME12
(optional)
(Dictation microphone)
This microphone is used to record your own voice while
minimizing surrounding noise and suits for voice recognition.
● Stereo microphone: ME51S (optional)
The high fidelity of the stereo recording, which only stereo can
perform. Furthermore, clear sound quality with less noise is
obtained with the WMA format. Stereo recording is possible only
when set at Stereo HQ and Stereo SP mode.
Recording the sound of other devices
with this recorder
EAR
V
O
L
U
M
E
The sound can be recorded when connecting to the audio
output terminal (stereo mini plug) of the other device, and
the microphone jack of the recorder with the connecting
cord (optional KA333) for dubbing.
26
Page 27
To audio input
terminal of other
devices
To EAR
(earphone) jack
....................................................................................................................................................
Notes
• The input level cannot be adjusted on this recorder. When you connect the recorder to an external device,
execute a test recording and adjust the output level of the external device.
• A microphone with plug-in power, which receives the power supply from this recorder, can be used.
• Please do not insert/remove the cord to/from the jack of this recorder while recording.
• When the external stereo microphone is inserted while set in HQ, SP, and LP modes, it enables recording
only with the L Channel microphone.
• When the monaural microphone is inserted into the microphone jack in Stereo HQ and Stereo SP mode,
the sound will be recorded only in the L Channel.
Recording the sound of this recorder
with other devices
The sound of this recorder can be recorded to other devices
when connected to the audio input terminal (stereo mini plug)
of other devices and the earphone jack of this recorder, with
the connecting cord (optional KA333) for dubbing.
3
Recording from External Microphone or Other Devices
27
Page 28
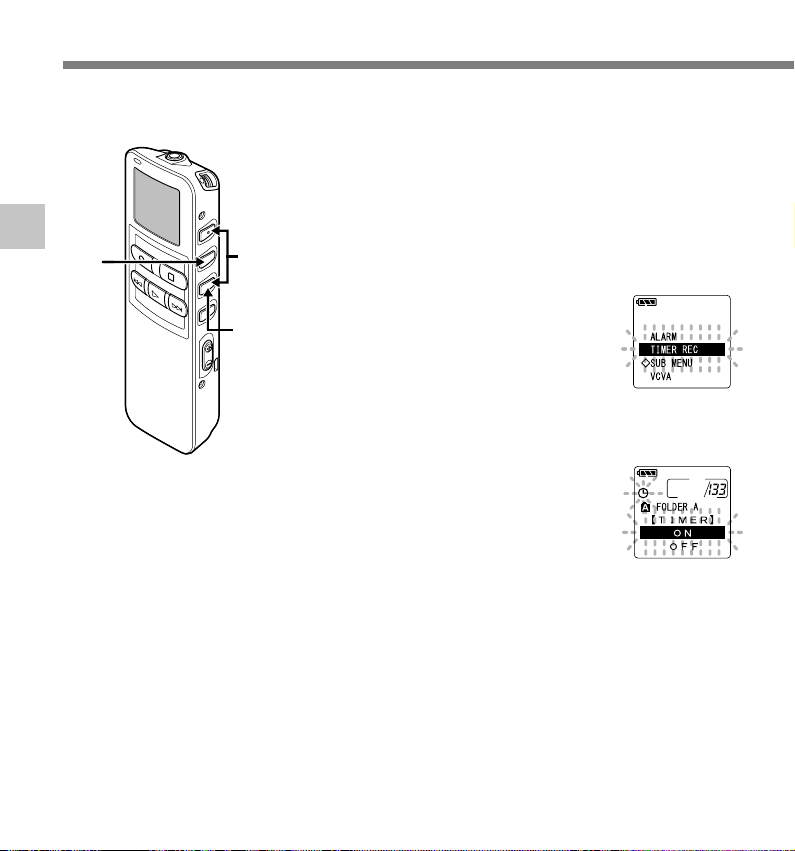
Timer Recording (TIMER REC)
Timer recording is the function to execute a recording at a set time.
Press the FOLDER button to
select the folder in which the
1
recording will be saved.
3
Timer Recording (TIMER REC)
2,4
3,5
1
Press and hold the MENU/SET
button for 1 second or longer.
2
The main menu opens (☞ P.16,18).
Press the 3 or 2 button to choose
“TIMER REC”.
3
Press the MENU/SET button.
The timer recording setup process
4
begins.
Press the 3 or 2 button to choose
“ON”.
5
Press the MENU/SET button to choose
“OFF”, the timer recording will be
canceled and the screen returns to the
main menu.
28
Page 29
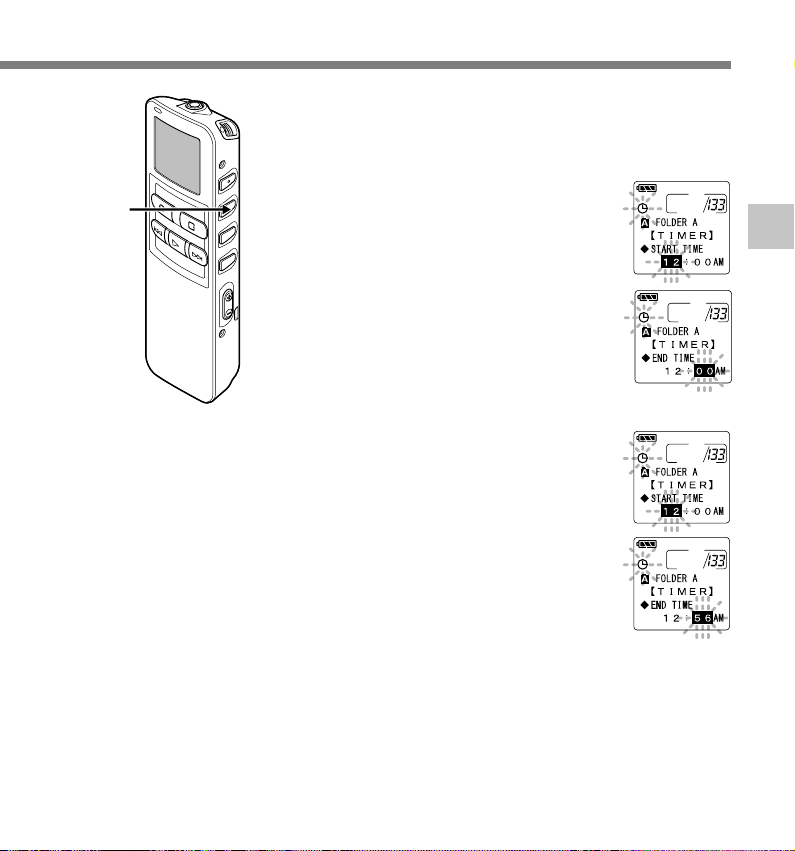
6
Press the MENU/SET button.
Start time setting will begin.
6
Start time setting.
1 Press the 3 button or 2 button to
7
set the hour.
2 Press the MENU/SET button to
accept the hour.
3 Press the 3 button or 2 button to
set the minute.
4 Press the MENU/SET button to
apply the minute setting and it will
move to the end time setting.
Setting end time.
1 Press the 3 button or 2 button to
8
set the hour.
2 Press the MENU/SET button to
accept the hour.
3 Press the 3 button or 2 button to
set the minute.
4 Press the MENU/SET button to
apply the current minute setting and
move to the recording mode.
3
Timer Recording (TIMER REC)
29
Page 30
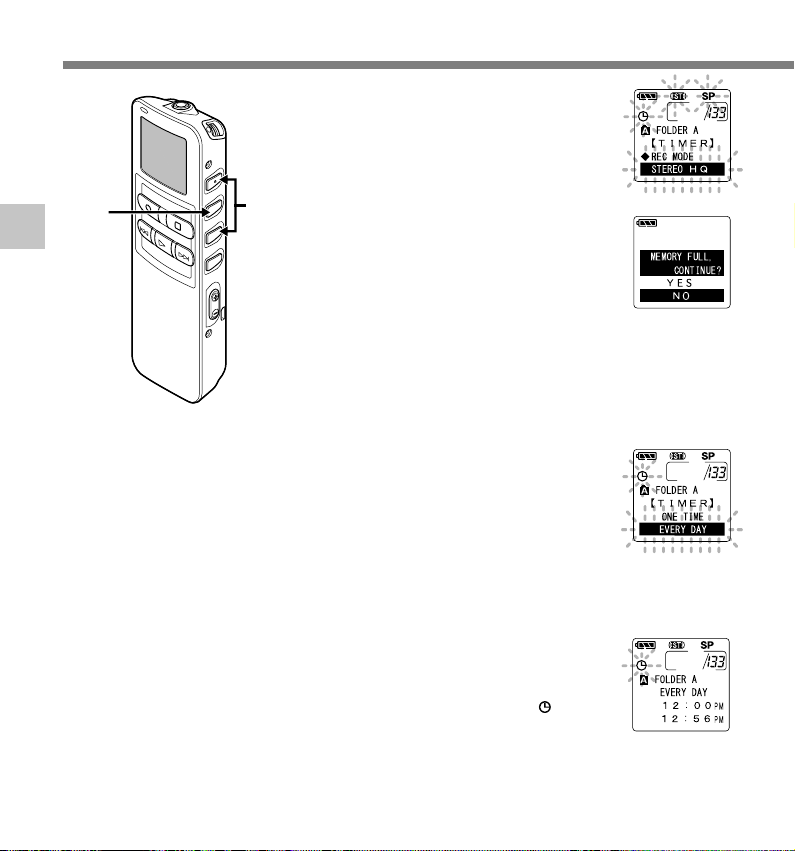
Timer Recording (TIMER REC)
Recording mode setting.
1 Press the 3 button or 2 button to
9
2 Press the MENU/SET button to
set the recording mode.
accept the recording mode.
3
11
Timer Recording (TIMER REC)
10
When accepting the recording mode,
if the remaining memory is insufficient
for the reserved time, “MEMORY
FULL, CONTINUE?” will be displayed.
Press the 3 or 2 button to choose
“YES” or “NO”.
YES: If the setting is continued, the
remaining memory will be used
up while recording in timer, then
the recording will end.
NO: Returns to Procedure 5 (“ON”
flashes on the display).
Press the 3 or 2 button to
choose between “ONE TIME”
10
and “EVERY DAY”.
ONE TIME:
Records only once at the
specified time.
EVERY DAY:
Records every day at the
specified time.
Press the MENU/SET button to
complete the setup screen.
11
The duration, setting time, and timer
display, will be displayed in ( ) for 5
seconds.
30
Page 31

12
Press the STOP button to close the main menu.
12
................................................................................................
Notes
• If the recorder is in use at the preset start time, the timer recording
will start directly after stopping the recorder.
• Timer recording will start even the recorder is put to HOLD.
• Recording will start even though the alarm playback is set at the
time the timer recording was set.
• If start and end time of timer recording are set at the same time, the
recording will not be executed.
• If the batteries run out while recording based on the timer setting,
the recorder will stop recording. Check the battery power before
starting the timer recording.
3
Timer Recording (TIMER REC)
31
Page 32

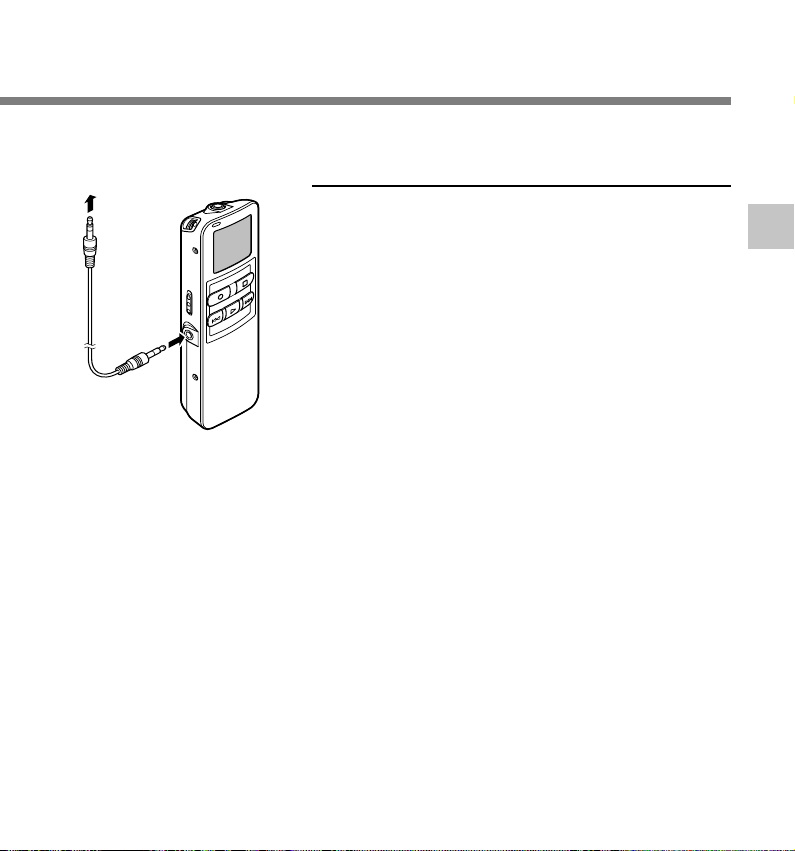
Listening While Audio is Recorded
(Recording Monitor)
If you start recording after inserting the earphone into the EAR jack on the recorder, you can
hear the sound being recorded. The sound volume on the recording monitor can be adjusted
by pressing the VOL (+) or VOL (–) button.
3
Listening While Audio is Recorded (Recording Monitor)
Connect the earphone to the EAR jack on the recorder.
After recording is started, you can hear the sound being recorded
through the earphone.
If the earphone is connected, no sound will come from the speaker.
.......................................................................................................
Notes
• Recording level cannot be controlled using the volume button.
• When using the earphones, do NOT set the volume too high. Listening at
very high volume may lead to hearing loss.
32
Page 33

4 About Playback
Playing
3
2
5
1
4
Press the FOLDER button to
choose folder.
1
Press the FF or REW button to
choose the file that you want to
2
play.
If you keep pressing the FF or REW
button in stop mode, the recorder
continuously skips to the beginnings of
files.
Press the PLAY button to start
playback.
3
The record/play indicator lamp glows
green.
a Current playback time
b Total recording time of the file being
played
Press the VOL (+) or VOL (–)
button to select the proper
4
sound volume.
The display shows the volume level.
You can choose between 0 to 30.
Press the STOP button at any
point you want to stop the
5
playback.
Resume playback by pressing PLAY
button again.
4
Playing
33
Page 34

Playing
Save Function of the Playback End Position
When the STOP button is pressed during playback and it stops in the middle
of the file, the stop position is memorized automatically. Even when it moves
to other files with the FF or REW button, playback can be resumed from the
place which was interrupted previously and returns to the memorized stop
position easily with the FF or REW button. When it returns to the stop position
with the FF or the REW button, “PREVIOUS STOP POINT” will be displayed
in the display.
And the file playback and stopping changes the end position and memorize
the stop position as new end position.
4
Playing
File A Head
Position
File A File B File C
File B Head
Position
▲▲▲▲
Cuing
is
possible
....................................................................................................................................................
Note
The playback ending position will be canceled, if recording, PC connection, changing folders, file deletion
and battery removal are executed.
Cuing
is
possible
End Position
Cuing
is
possible
File C Head
Position
Cuing
is
possible
34
Page 35

Playback
functions
Fast
Playback
Slow
Playback
Cue
(CUE)
Review
Skipping to
beginning
of a file*
Fast
forward*
rewind*6 *
within a set
time
Operation
Press the PLAY button once while playing a file.*
➥ The recorder plays at a set speed. The playback speed can be
set from 0.5 to 2 times (☞ P.39).
Hold the FF button while playing a file.*
2
➥ The recorder stops when it reaches the end of the file. Continue
pressing the FF button to proceed with the cue from the
beginning of the next file.*
3
Hold the REW button while playing a file.*
➥ The recorder stops when it reaches the beginning of the file.
Continue pressing the REW button to proceed with the review
from the end of the previous file.*
3
Press the FF button during playback, fast playback, or slow
playback.
4
➥ The next file is cued and playback starts at the original speed.*
Press the REW button during playback, fast playback, or slow
playback.
➥ The file being played is cued and playback starts at the original
speed.*
5
Press the REW button 2 times during playback, for fast playback or
slow playback.
➥ The previous file is cued, and playback starts at the original
speed.*
5
Press the FF button during playback, fast playback, or slow
6
playback.
7
➥ The file during playback fast forwards for the set time, and
playback starts at the original speed.*
Press the REW button during playback, fast playback, or slow
playback.
➥ The file during playback rewinds for the set time, and playback
starts at the original speed.*8 *
9
1
2
8
How to Cancel
Press the PLAY
button.
➥ Playback
returns to
normal rate.
Release the FF
button.
➥ Replays at the
original speed.
Release the REW
button.
➥ Replays at the
original speed.
5
4
Playing
35
Page 36

Playing
1 The above-mentioned playback functions and the insertion of index mark (☞P.56) are also enabled
*
during fast/slow playback as well as normal playback.
2 When pressing the FF or REW button continuously while stopped, the cue of the file start position and
*
previous file end position(☞ P.34) will be executed continuously (skip/reverse skip).
3
When the index mark is shown in the middle of a file, it will stop temporarily in the position of the index mark.
*
4
When the skip interval is set to file skip in the menu setting (☞ P.45) . It is set to file skip in the initial setting.
*
5 When the index mark is shown in the middle of a file, playback starts at the position of the index mark.
*
6 When the skip interval is set at other than file skip in the menu setting.
*
7 When playback was set to “OFF” previously in the menu setting (☞ P.44).
*
8
When the index mark is shown before the set time the playback will start in the position of the index mark.
*
4
9 If both of the skip interval and the previous playback are set, the time setting for previous playback
*
Playing
overrides the time setting for skip interval.
....................................................................................................................................................
Notes
• When the noise cancel function (☞ P.47) is set to “LOW” or “HIGH”, the playback speed cannot be set.
• When the previous playback is set, the FF button is disabled and will not skip to the cue of the file start
position or the index mark position.
36
Page 37

Last File End
When the following operation is executed and it reaches to the end of the
last file during playback, “END” will be displayed and flashing for 5 seconds
in the display.
• Press the FF button (skip)
• Press the FF button continuously (CUE)
• Playback last file
Operating the FF or REW button while “END” is displayed and flashing, the following operation
can be executed.
Operation
Press the REW button continuously.
➥ Continuously rewind (REVIEW) from the last file end (☞ P.35).
Set other than file skip in the skip interval or, press the REW button when the previous playback is set to
ON.
➥ The nearest of the set time interval or index mark, or only the return time of the previous playback,
will start the playback in reverse skip.
Set the file skip in the skip interval or, press the REW button when the previous playback is set to OFF.
➥ The playback will start in reverse skip; either at the nearest last file start position or the index mark.
Press the FF button.
➥ Skips to the starting position of the head file, and stops.
Press the FF button continuously.
➥ It skips continuously from the starting position of the head file, and it will stop if the REW button is
released.
Note
After “END” is displayed for 5 seconds and flashing, it returns to the start position of the last file and stop.
4
Playing
37
Page 38

Playing
Playback through earphone
4
Playing
An earphone can be connected to the
EAR jack of the recorder for listening.
When the earphone is used, the recorder
speaker will be switched-off.
Notes
• To avoid irritation to the ear, insert the earphone
after turn down the volume level.
• When you listen with the earphone during
playback, do not raise the volume too much. It
may cause hearing impairment and decrease in
hearing ability.
38
Page 39

Changing the Playback Speed (PLAY SPEED)
The playback speed of the file can be changed from within 0.5 to 2 times speed. You have 2
options how to set the playback speed. Either during playback or through the menu.
Changing during playback
Press the PLAY button during
playback.
1
The current playback speed to be
changed will be flashing for 5 seconds.
1,3
Press the FF or REW button while
2
the flashing playback speed is
2
displayed, to change the playback
speed.
Playback speed can be changed by units
within 0.5 to 2 times speed for every 0.125
times. After that, the fast playback/slow
playback will be the set playback speed.
5 seconds after the setting, the playback
speed will be displayed and flashing. Also,
the playback speed in the menu setting will
be changed after the setting.
Press the PLAY button to return
to normal playback.
3
4
Changing the Playback Speed (PLAY SPEED)
....................................................................................................................................................
Notes
• When the noise cancel function (☞ P.47) is set to “LOW” or “HIGH”, the playback speed cannot be set.
• During fast playback/slow playback, it will be played back in monaural even though the file was recorded
in Stereo HQ or Stereo SP mode.
39
Page 40

Changing the Playback Speed (PLAY SPEED)
Changing from the menu
Press and hold the MENU/SET
button for 1 second or longer.
1
The main menu opens (☞ P.16,18).
1,3,5
6
2,4
2
Press the 3 or 2 button to
choose “PLAY SPEED”.
4
Changing the Playback Speed (PLAY SPEED)
Press the MENU/SET button.
The playback speed setup process
3
begins.
Press the 3 or 2 button to set
the playback speed.
4
Playback speed can be changed by
units within 0.5 to 2 times speed for
every 0.125 times.
Press the MENU/SET button
to complete the setup screen.
5
After that, the fast playback/slow
playback will be the set playback
speed.
Press the STOP button to close
the main menu.
6
40
Page 41

Continuous Playback (ALL PLAY)
This function allows you to listen to all your recordings of one folder in one go without any stop
between the files.
Press and hold the MENU/SET
button for 1 second or longer.
1
The main menu opens (☞ P.16,18).
Press the 3 or 2 button to
choose “ALL PLAY”.
2
1,3,5
6
2,4
Press the MENU/SET button.
The continuous playback setup
3
process begins.
Press the 3 or 2 button to
choose between “ON” and
4
“OFF”.
ON: Continuous playback.
OFF: Returns to playback with stop
between single files.
Press the MENU/SET button
to complete the setup screen.
5
Press the STOP button to close
the main menu.
6
4
Continuous Playback (ALL PLAY)
....................................................................................................................................................
Note
After playback of last file in the folder, “END” appears on the screen and playback stops automatically.
41
Page 42

Repeat Playback
This function enables repeated playback of part of the file being played. If the continuous
playback function is used together, two or more files can be repeatedly replayed as long as
they are in the same folder.
Choose the file for Repeat
Playback, and press the PLAY
1
button.
File playback begins.
4
Repeat Playback
2
1
Press the REPEAT button
briefly at the point you want to
2
start Repeat Playback.
“REPEAT END?” flashes until you
designate the end point.
Even while “REPEAT END?” is
flashing, changing the playback
speed (☞ P.39), fast forward, rewind
and cue (☞P.35) can be executed the
same as during normal playback, and
it can be advanced quickly to the end
position. Also, when it reaches to the
end of the file, which will become the
end position, then repeat playback
will start.
42
Page 43

Press the REPEAT button briefly
again at the position you want
3
Repeat Playback to end.
The recorder repeatedly plays back the
section between the start and the end
positions until you cancel Repeat
Playback.
If continuous playback is set to ON
3
....................................................................................................................................................
Note
To use this function, briefly press the REPEAT button. If you hold it 1 second or longer, the Moving Files
screen appears (☞ P.65).
(☞ P.41), the end position can be set
to the extent of the last file in the
folder.
The playback speed, index mark
insertion/removal, and noise cancellation
can be set during continuous playback
as well as normal playback.
Cancel the continuous playback
function.
4
• Pressing the REPEAT button briefly
will return to the normal playback.
• Pressing the STOP button will cancel
the continuous playback function and
stop the playback.
4
Repeat Playback
43
Page 44

Auto Backspace Review (BACK SPACE)
To ease the reviewing of a voice file you can set an auto backspace for either 1 or 2 seconds,
so you will listen to the last phrase repeatedly.
Press and hold the MENU/SET
button for 1 second or longer.
1
The main menu opens (☞ P.16,18).
Press the 3 or 2 button to choose
“BACK SPACE”.
2
1,3,5
4
Auto Backspace Review (BACK SPACE)
7
6
....................................................................................................................................................
Note
If “1 SEC SKIP” or “2 SEC SKIP” is set at the previous playback, and even though the fast forward button is
pressed, it does not reverse skip to the cue or the index mark position. Reverse skip is executed for only the
set time (1 or 2 seconds).
44
2,4
Press the MENU/SET button.
The auto backspace review setup
3
process begins.
Press the 3 or 2 button to choose
from “OFF”, “1 SEC SKIP” and “2
4
SEC SKIP”.
OFF: Continuous playback.
1 SEC SKIP: Start playback from 1
2 SEC SKIP: Start playback from 2
Press the MENU/SET button to
complete the setup screen.
5
Press the STOP button to close
the main menu.
6
Press the REW button while the
file is being replayed.
7
Playback starts at the set point of
seconds before.
second before.
second before.
Page 45

Skip Interval Setting (SKIP SPACE)
This function allows you to define a certain time interval for skipping within a file while playback.
Press and hold the MENU/SET
button for 1 second or longer.
1
The main menu opens (☞ P.16,18).
Press the 3 or 2 button to
choose “SKIP SPACE”.
2
1,3
2,4
Press the MENU/SET button.
The skip interval setup process
3
begins.
Press the 3 or 2 button to set
the skip interval.
4
FILE SKIP:
Skips from file to file.
10SEC, 30SEC, 1MIN, 5MIN, 10MIN:
Skips with the set time interval
and playback will start.
4
Skip Interval Setting (SKIP SPACE)
45
Page 46

Skip Interval Setting (SKIP SPACE)
Press the MENU/SET button to complete the
setup screen.
5
Press the STOP button to close the main menu.
6
6
4
7
Skip Interval Setting (SKIP SPACE)
....................................................................................................................................................
Note
If both skip interval and auto backspace review are set, the previous playback setting will have priority for
the reverse skip when the REW button is pressed.
5
Press the FF or REW button while the file is
being replayed.
7
Skip or reverse skip is executed for the set time and
playback will start.
46
Page 47

Noise Cancel Function
If recorded audio is difficult to understand because of noisy surroundings, adjust the Noise
Cancel setting level. Noise will be reduced in the file when its played back for better sound
quality.
Press and hold the MENU/SET
button for 1 second or longer
1
while the file is playing.
Displays currently set Noise Cancel
level.
1,2
....................................................................................................................................................
Notes
• If you set it to “LOW” or “HIGH”, the display flashes the Noise Cancel level for about 5 seconds when a file
is played back.
• If you set Noise Cancel to “LOW” or “HIGH”, the setting remains valid until it’s set to “OFF”.
• Noise cancel cannot be used during fast playback/slow playback (☞ P.35).
• If the noise cancel is set to the file recorded in Stereo HQ or Stereo SP mode, it will be played back in
monaural.
Press the MENU/SET button
again to choose a noise cancel
2
level.
The levels switch in the following
rotation, “OFF” “LOW” “HIGH”.
If the Noise Cancel level is set to “LOW”
or “HIGH”, the level setting is displayed
for 5 seconds when a file is played back.
To change the Noise Cancel level setting,
press the MENU/SET button while the
level setting is displayed.
4
Noise Cancel Function
47
Page 48

Alarm Playback Function (ALARM)
The alarm playback function can be set to play a selected file at a pre-set time.
Press the FOLDER button to
choose a folder.
1
Press the FF or REW button to
choose the file to be played when
2
3,5
4
Alarm Playback Function (ALARM)
4,6
1
the alarm sounds.
Press and hold the MENU/SET
button for 1 second or longer.
3
The main menu opens (☞ P.16,18).
2
Press the 3 or 2 button to choose
“ALARM”.
4
Press the MENU/SET button.
The alarm playback setup process
5
begins.
Press the 3 or 2 button to choose
between “ON” and “OFF”.
6
ON: Enables alarm playback.
OFF: Disables alarm playback.
48
Page 49

7,9,11
12
Press the MENU/SET button
to complete the setup screen.
7
When you choose ON, the hour
indicator flashes.
When you choose OFF, the alarm
8,10
indicator disappears and finishes
with step 12.
Press the 3 or 2 button to set
the hour.
8
Press the MENU/SET button
to accept the hour.
9
The minute indicator flashes.
Press the 3 or 2 button to set
the minute.
10
Press the MENU/SET button
to accept the minute.
11
Press the STOP button to
close the main menu.
12
An alarm tone will sound at the scheduled
time. Press any button while the alarm
sounds to play the file you associated with
the alarm.
4
Alarm Playback Function (ALARM)
49
Page 50

Alarm Playback Function (ALARM)
To enable alarm sound only
To set an alarm without audio playback, set
the alarm while an empty folder is selected.
• Start setting from step 3 (☞ P.48) of “Alarm
Playback Function”.
• When alarm sound goes at the preset
time, pressing any button stops the sound.
4
Alarm Playback Function (ALARM)
Notes
• The alarm playback function can be set for only
one file at a time.
• The alarm will sound at the scheduled time every
day unless the alarm playback setting is cleared.
• If you wish to change the file for alarm play, first
turn the alarm settings “OFF”, then make any
desired new alarm settings.
• The alarm will sound for 5 minutes and then stop.
• If the recorder is in use at the scheduled time,
the alarm will sound after the operation is
finished.
• The alarm will sound at the scheduled time even
if the recorder is set to hold. The recorder begins
to play the file associated with the alarm when
you press any button.
• The alarm playback setting is cleared if the
selected file is erased.
• When the timer recording is set, the timer
recording setting has priority.
50
Page 51

5 Other functions
Erasing
Erasing One File at a Time
A selected file can be erased from a folder.
Press the FOLDER button to
choose a folder.
1
Press the FF or REW button to
choose the file you want to erase.
2
a File to be erased
1,4
3
2
Press the ERASE button.
“CANCEL” is flashing.
3
Press the 3 button to choose the
“START”.
4
“START” is flashing. When the 2 button
is pressed, it will return to the flashing
display of “CANCEL”.
5
Erasing
51
Page 52

Erasing
Press the MENU/SET button
while “START” flashing.
5
The display changes to “FILE ERASE!”
and erasing will start.
5
“ERASE DONE” is displayed when the file
is erased. File numbers will be reassigned
automatically.
5
Erasing
....................................................................................................................................................
Notes
• An erased file cannot be restored.
• The file set to erase lock will not be erased (☞ P.55).
• If operation is not executed for 8 seconds during the setting, it will return to the stop status.
• Completion of erasing may take 10 seconds. Never do anything during this period because data may be
corrupted. Removing or setting batteries is not permissible, whether or not the batteries are set in the
recorder.
{
52
Page 53

Erase All Files from a Folder
All files in a folder can be erased simultaneously, except for locked files (☞ P.55).
Press the FOLDER button to
choose the folder you want to
1
erase all files.
a Folder from which to erase files
1,3
2
Press the ERASE button for 3
seconds or longer.
2
“CANCEL” is flashing.
Press the 3 button to choose the
“START”.
3
“START” is flashing. When the 2 button
is pressed, it will return to the flashing
display of “CANCEL”.
5
Erasing
53
Page 54

Erasing
Press the MENU/SET button
while “START” flashing.
4
The display changes to “ALL ERASE!”
and erasing will start.
4
“ERASE DONE” is displayed when the files
are erased. Locked files are reassigned file
numbers in ascending order.
5
Erasing
....................................................................................................................................................
Notes
• An erased file cannot be restored.
• The file set to erase lock will not be erased (☞ P.55).
• If operation is not executed for 8 seconds during the setting, it will return to the stop status.
• Completion of erasing may take 10 seconds. Never do anything during this period because data may be
corrupted. Battery removal setting/removal are not permissible, whether or not the battery is set in the
recorder.
{
54
Page 55

Locking Files (LOCK)
Locking a file keeps important data from being accidentally erased.
Locked files are not erased when you choose to erase all files from a folder (☞ P.53).
Press the FOLDER button to
choose a folder.
1
Press the FF or REW button to
choose the file you want to
2
3,5,7
8
2
4,6
1
lock.
Press and hold the MENU/SET
button for 1 second or longer.
3
The main menu opens (☞ P.16,18).
Press the 3 or 2 button to choose
“LOCK”.
4
Press the MENU/SET button.
The file locking setup process begins.
5
Press the 3 or 2 button to
choose between “ON” and
6
“OFF”.
ON: Locks the file and prevents it
from being erased.
OFF: Unlocks the file and allows it to
be erased.
5
Locking Files (LOCK)
Press the MENU/SET button
to complete the setup screen.
7
Press the STOP button to close
the main menu.
8
55
Page 56

Index Marks
Index marks can be placed in a file during recording or playback to provide and quick and easy
way of keeping track of important sections in the file.
Setting an Index Mark
Press the INDEX button during
recording or playback to set an
1
1
index mark.
An index number appears on the
display.
5
Index Marks
56
2
4
Locating an Index Mark
Hold the FF or REW button
while playing a file.
2
The recorder stops for 1 second when
it reaches the index mark.
Clearing an Index Mark
Locate the index mark you
want to clear.
3
Press the ERASE button while
the index number appears for
4
approximately 2 seconds on
the display.
The index mark is erased.
Page 57

Notes
• Up to 16 index marks can be set in a file. Attempting to set more index marks will cause “INDEX FULL” to
appear on the display.
• Index marks cannot be set or cleared in a locked file (☞ P.55).
• In case of WMA files, index marks can only be placed in files recorded with Olympus recorders.
• If the REW button is pressed in the set status of “1 SEC SKIP” or “2 SEC SKIP” in the previous playback,
it will reverse skip for only the set time.
5
Index Marks
57
Page 58

LCD Contrast Adjustment (CONTRAST)
If you find it difficult to read the display information due to lighting, temperature, or other
conditions, you can adjust the contrast using this function to easily see the LCD display (display
contrast).
Display contrast can be adjusted in 12 levels.
Press the 3 or 2 button in the
sub menu screen, and select
1
the “CONTRAST”.
See ☞ P.17 and 19 regarding the sub
menu.
2,4
5
LCD Contrast Adjustment (CONTRAST)
5
1,3
Press the MENU/SET button.
The LCD display contrast setup
2
process begins.
Press the 3 or 2 button to set
the contrast level.
3
You can adjust the LCD display
contrast level from 1 to 12.
(Initial setting ......6)
Press the MENU/SET button
to complete the setup screen.
4
Press the STOP button to close
the sub menu.
5
58
Page 59

Backlight (BACKLIGHT)
The recorder display backlight is ON by default. The display will lit for about 10 seconds when
a button on the recorder is pressed. The backlight feature can be turned off from the menu.
Press the 3 or 2 button in the
sub menu screen, and select
1
the “BACKLIGHT”.
See ☞ P.17 and 19 regarding the sub
menu.
2,4
5
1,3
Press the MENU/SET button.
The backlight setup process begins.
2
Press the 3 or 2 button to
choose between “ON” and
3
“OFF”.
ON: Backlight is enabled.
OFF: Backlight is disabled.
Press the MENU/SET button
to complete the setup screen.
4
Press the STOP button to close
the sub menu.
5
5
Backlight (BACKLIGHT)
59
Page 60

System Sounds (BEEP)
The recorder beeps to alert you to button operations or warn you of errors. System sounds
may be turned off.
Press the 3 or 2 button in the
sub menu screen, and select
1
the “BEEP”.
See ☞ P.17 and 19 regarding the sub
menu.
2,4
1,3
5
5
System Sounds (BEEP)
....................................................................................................................................................
Note
If the alarm playback function has been set, the alarm will sound at the scheduled time even if system
sounds are turned off.
Press the MENU/SET button.
The system sound setup process
2
begins.
Press the 3 or 2 button to
choose between “ON” and
3
“OFF”.
ON: System sounds are enabled.
OFF: System sounds are disabled.
Press the MENU/SET button
to complete the setup screen.
4
Press the STOP button to close
the sub menu.
5
60
Page 61

Assigning Folder Names (FOLDER NAME)
The 5 folders on the recorder (Folder A to Folder E) can be easily renamed. The folder
name is limited to 12 characters each. Frequently used names such as “dictation (DICT.)”,
“meeting (MEETING)”and “(SCHEDULE)” are pre-set in a template.
Press the 3 or 2 button in the
sub menu screen, and select
1
the “FOLDER NAME”.
See ☞ P.17 and 19 regarding the sub
menu.
2,4
1,3
Press the MENU/SET button.
The folder name setup process
2
begins.
Press the 3 or 2 button to
choose the folder you want to
3
name.
Press the MENU/SET button to
accept the chosen folder.
4
a Current character being entered (a
space is highlighted and blinks.)
Press the 3 or 2 button to
choose characters.
5
The recorder assigns the following
buttons to inputting procedures.
5
Assigning Folder Names (FOLDER NAME)
61
Page 62

Assigning Folder Names (FOLDER NAME)
Recorder buttons that are used to input characters
Button
MENU/SET
▲
▼
REW
ERASE
FF
5
Assigning Folder Names (FOLDER NAME)
PLAY
Push
Press once
Press and hold
Press once
Press and hold
Press once
Press and hold
Press once
---------Press once
Press and hold
Press once
Press and hold
Use the two following methods to quickly find characters.
1 When the FF button is pressed, the displayed character group (example: Uppercase,
6
lowercase, template, symbols) will change, and you can then press the 2 or 3 buttons
to select characters.
2 Every time the PLAY button is pressed, it will skip ahead by 5 characters, so you can
quickly move closer to the character you want.
(Currently displayed character) = (Space) = DICT. = TO DO = A = F = K = P = U =
Z = a = f = k = p = u = z = 1 = 6 = , = ( = # = ^ = (Space) = DICT. = TO DO...
If you press the PLAY button while a character other than one of the above appears, you will skip to the
closest forward character in the above cycle.
Pressing the PLAY button again will then cycle through every fifth character as shown above.
example:
If you press the PLAY button while “MEMO” is displayed, “TO DO” will appear.
If you press the PLAY button while “B” is displayed, “F” will appear.
Action
To input the selected character and advance the input position.
Confirms folder name or file comment.
Forward to next character in the character list.
Scroll forward through the character list.
Backward to previous character in the character list.
Scroll backward through the character list.
Returns to previous character.
To delete the flashing character.
Switches between character groups (type).
Quickly cycles through the character groups (types).
Selects character to be input: skips ahead by 5 characters.
Quickly skips ahead in increments of 5 characters.
62
Page 63

Available characters
Type of Characters
Folder name
input
Template
Large caps
Small caps
Numeric
Symbols
When you have finished setting the folder name, press and hold the MENU/
SET button for 1 second or longer.
7
This completes the folder naming procedure.
(If you wish to continue assigning names to folders, press the MENU/SET button and repeat
the procedure from step 3.)
Press the STOP button to close the sub menu.
File comment
input
DICT. = MEETING = MEMO = NOTE = IDEA = TO DO = REMINDER
= LECTURE = SCHEDULE = ARCHIVE
TOP PRIORITY = PRIORITY = IMPORTANT = CONFIDENTIAL =
PRIVATE = DON’T FORGET =THINGS TO DO = MESSAGE =
CONVERSATION = REPORT
A = B = C = D = E = F = G = H = I = J = K = L = M = N = O
= P = Q = R = S = T = U = V = W = X = Y = Z
a = b = c = d = e = f = g = h = i = j = k = l = m = n = o = p =
q = r = s = t = u = v = w = x = y = z
1 = 2 = 3 = 4 = 5 = 6 = 7 = 8 = 9 = 0
, = . = ; = ! = _ = ( = ) = + = – = = = # = $ = % = & = ’ = ^ = @
Action
8
....................................................................................................................................................
Notes
• The folder naming process ends automatically when the twelfth character is set.
• If you input more than 12 characters, “OVER-FLOW” appears on the display.
• You can use a PC to easily change the folder names on the recorder (☞ P.92).
5
Assigning Folder Names (FOLDER NAME)
63
Page 64

Assigning File Comments (COMMENT)
Comments of up to 100 characters can be added to each recorded file. Comments and other
file information such as date and time can help identify recordings without having to playback.
Press the 3 or 2 button in the
sub menu screen, and select
1
the “COMMENT”.
See ☞ P.17 and 19 regarding the sub
menu.
2
5
4
Assigning File Comments (COMMENT)
5
1
Press the MENU/SET button.
The file comment setup process
2
begins.
Input the character.
If you will input characters using the
3
recorder, see step 5 of “Assigning
Folder Names” (☞ P.61).
If you will input characters using a
computer, see “Editing File
Comments” (☞ P.92).
When you have finished
setting the file comments,
4
press and hold the PLAY
button for 1 second or longer.
This completes the file comment input
procedure.
Press the STOP button to close
the sub menu.
5
....................................................................................................................................................
Note
In case of WMA files, file comments can only be added to files recorded with Olympus recorders.
64
Page 65

Moving Files Across Folders
A recorded file can be transferred from one folder to another.
The file is added at the end of existing files in the destination folder.
Choose the file you want to move
and play it.
1
Press and hold the FOLDER
button for 1 second or longer
2
while the file is playing.
“MOVE?” appears on the display.
a File to transfer
b Current folder
c Destination folder
Press the 3 or 2 button to
choose a destination folder.
3
If you choose the current folder as the
destination folder, the selected file will
move to the end of the existing files in it.
Press the MENU/SET button to
accept the chosen destination
4
folder.
The file is moved.
Transfer is complete when “MOVE DONE”
appears.
4
1
3
2
5
Moving Files Across Folders
{
....................................................................................................................................................
Notes
• If the destination folder is full (a maximum of 199 files), “FOLDER FULL” appears on the display and files
cannot be transferred to it.
• The file transfer process is aborted if you press the STOP button or leave the recorder idle for 8 seconds.
65
Page 66

LCD Display Information
The LCD screen on the recorder can display 6 different format of information by pressing the
DISPLAY button. This help review and confirm different recorder settings and file information.
Press the DISPLAY button.
The LCD display views will switch every time the DISPLAY
1
button is pressed.
While in stop or playback mode
When pressing Display, the recorder will cycle through 1 to
1
6. If there is no file, 5 and 6 will display alternately.
5
LCD Display Information
1 File length
Shows how long a file is.
{
6 Current time and date
Shows the current time and
date. (During playback, the
“TIME & DATE” or the
counter appears.)
2 Time stamp
Shows the year, month, and
date that the file was
recorded.
3 Time stamp
Shows the time that the file
was recorded.
66
{
{
{
5 Memory remaining
Shows remaining recording
time.
{
4 File comment*
Shows comment added to
{
* If a comment contains many characters, it will
scroll horizontally to display the complete
comment.
a file. (If there is no
comment, “----” will appear.)
Page 67

While in record mode
Displays 1 and 2 alternately.
While recording in VCVA mode
Displays 1 and 2 alternately.
Display in the
stereo recording
mode
Display in the
monaural
recording
1 Recording level meter
Displays the audio input level
in graphics. The display of the
audio input level is different
depending on stereo recording
or monaural recording.
2
Remaining memory bars
Displays the remaining time
available for recording in bar
mode and count-down mode.
Display in the
stereo recording
mode
Display in the
monaural
recording
1 VCVA recording level
meter
Displays the audio input level
and start level in graphics.
(Displays in “Waiting” if it has
not reached to the VCVA start
level).
The display of the audio input
level is different depending on
stereo recording or monaural
recording.
2
Remaining memory bars
Displays the remaining time
available for recording in bar
mode and count-down mode.
5
LCD Display Information
67
Page 68

Formatting the Recorder (FORMAT)
If you format the recorder, all function settings will return to their defaults*.
All files** stored in the recorder will be deleted.
If you have important files that you want to save, connect the recorder to a computer and
transfer those files from the recorder to the computer before formatting the device.
* Date and time settings will not be cleared, so you won’t need to set them again.
** Locked files will also be deleted.
Press and hold the MENU/SET
button for 1 second or longer.
1
The main menu opens (☞ P.16, 18).
Press the 3 or 2 button to
choose “
2
Press the MENU/SET button.
The sub menu opens (☞ P.17, 19).
3
Press the 3 or 2 button to choose
“FORMAT”.
4
Press the MENU/SET button.
“CANCEL” is flashing.
5
Press the 3 button to choose
“START”.
6
“START” is flashing. When the 2 button
is pressed, it will return to the flashing
display of “CANCEL”.
◊
SUB MENU”.
5
Formatting the Recorder (FORMAT)
1,3,
5,7
2,4
6
68
Press the MENU/SET button.
After “DATA WILL BE CLEARED” turns
7
on for about 2 seconds, “CANCEL” will
flash.
Page 69

Press the 3 button again to
choose “START”.
8
“START” is flashing. When the 2button
is pressed, it will return to the flashing
display of “CANCEL”.
9
8
....................................................................................................................................................
Notes
• Never format the recorder from a PC.
• When the recorder is formatted, all the stored data, including locked files, are erased.
• After formatting, the first file name is 0001.
• While formatting, do not remove the batteries. It may take 10 seconds or more for the erasing to end.
Press the MENU/SET button
again.
9
Formatting begins and an indicator
flashes on the display.
“FORMAT DONE” displays when formatting
ends.
{
5
Formatting the Recorder (FORMAT)
69
Page 70

6 Preparation Before Using DSS Player
Using DSS Player Software
The DSS Player Software can be used to do the following:
• Playback voice files on your PC and on the recorder when connected via USB. Download
files from the recorder to the PC or upload files from the PC to the recorder.
• If an upgrade (Option) to DSS Player Plus is executed, various additional functions can be
utilized (☞P.96).
Precautions on using the recorder connected to a PC
● When you are downloading a file from
the recorder or uploading a file to the
recorder, do not remove the USB cable
even if the screen is indicating you can.
6
Data is still being transferred while the
record/play indicator lamp is blinking.
Using DSS Player Software
When removing the USB cable, be sure
to follow the description in ☞P.79. If the
USB cable is removed before the drive
is stopped, data may not be
successfully transferred.
● On a PC, do not format the drive of the
recorder. Initialization is not successfully
achieved on a PC. For initialization,
follow the instructions in the menu
screen of the recorder (☞ P.17,19).
● Folder (directory) names displayed by
file management tools such as Explorer
attached to Microsoft Windows and
Finder attached to Mac OS are different
from the folder names settable with the
recorder or DSS player.
70
● If folders or files stored on the recorder
are moved or renamed by using a file
management tool such as Explorer or
Finder, the order of files may be
changed or files may become
unrecognizable.
● Data can be written or uploaded to the
recorder even though the attribute of
the recorder drive is shown as Readonly by the operating system of the PC.
● As the noise may cause adverse effects
on electronics devices nearby the
recorder, unplug the earphone when
you connect the recorder to a PC.
Page 71

Operating Environment
Basic Operating Environment of DSS Player
Windows
PC:
Operating
System:
CPU:
RAM:
Hard drive
space:
Drive:
Sound card:
Browser:
Display:
USB port:
Audio I/O
terminals:
Others:
IBM PC/AT compatible PC
Microsoft Windows Me/ 2000
Professional/XP
Professional,Home Edition
Intel Pentium II class 333
MHz processor or more
(If recording to a hard disk
directly with the WMA format,
please use in the range of
500MHz or more)
128MB or more (256MB or
more is recommended)
50MB or more
2x or faster CD-ROM, CD-R,
CD-RW, DVD-ROM drive
Creative Labs Sound Blaster
16 or 100% compatible
sound card
Microsoft Internet Explorer
4.01 SP2 or later
800 x 600 pixels or more, 256
colors or more
One free port
Earphone output or speakers
• The mouse or similar to a
pointing device.
• Environment where the
Internet can be utilized.
Macintosh
PC:
Operating
System:
RAM:
Hard drive
space:
Drive:
Display:
USB port:
Audio I/O
terminals:
Power Mac G3 233 MHz
class processor or faster
iMac/ iBook/ eMac/ Power
Mac/ PowerBook
(The computer must support
a standard USB port)
(If recording to a hard disk
directly with the WMA format,
please use in the range of
500MHz or more)
Mac OS 10.1/10.2/10.3
128MB or more (256MB or
more is recommended)
50 MB or more
2x or faster CD-ROM, CD-R,
CD-RW, DVD-ROM drive
800 x 600 pixels or more, 256
colors or more
One free port
Earphone output or speakers
6
Operating Environment
71
Page 72

Installing Software
Before you connect the recorder to your PC and use it, you must first install the DSS player
software from the included Software CD.
Applications included with “DSS Player”
• DSS Player: Recorded voice files can be downloaded to the PC for complete file management and playback
solution.
• Acrobat Reader is installed on your PC. It is required to view the accompanying manual in PDF format.
Be sure to confirm the following before installation:
• Exit all running applications.
• Eject the floppy disk if you are using one.
• If you are running Windows2000/XP or Mac OS X on the network, you need to log on as an Administrator.
Windows
6
Insert DSS Player into the CDROM drive.
Installing Software
1
The installation program will start
automatically. Once the program starts,
jump to step 4. If it does not, follow the
procedures in steps 2 and 3.
Click the [start] button and select
[Run].
2
Enter “D:\setup.exe” in the [Open]
field and click [OK] .
3
This is assuming the CD-ROM drive is D.
72
The installation Language
Selection dialog box opens.
4
Click the desired language to select it.
Page 73

Installing DSS Player
Register user information.
Enter your name, company name and
5
serial number. For the serial number,
see the label attached to the CD-ROM
package provided with DSS Player.
When entered, click [Next]. When the
confirmation dialog appears, click
[Yes].
Confirm your acceptance of
the terms of the Licensing
6
Agreement.
You must accept the terms of the
Licensing Agreement to install DSS
Player. If you accept them, click [Yes].
Select where to install DSS
Player.
7
This lets you specify the folder in which
to install DSS Player. Click [Browse] to
find the desired installation folder. To
accept the default folder, click [Next].
Note
If the installation folder does not exist, a
confirmation dialog box opens to get your
permission to create a folder for this
purpose. Click [Yes].
Select a program menu folder.
You may change the program menu
8
folder to another one, such as [Start
Up]. To accept the default folder, click
[Next].
Authorizing the start of file
copying.
9
Confirm all “Current Settings”. To accept
them, click [Next].
Note
To change the program menu folder or
installation folder, click [Back].
Copy files.
Wait until DSS Player is installed on
10
your PC, then click [Finish].
The screen returns to the opening
screen automatically.
Installing the Device Driver
Connect the recorder to your
PC, referring to “Connecting to
11
Your PC” (☞ P.78).
When you connect the recorder to your
PC for the first time after installing DSS
Player, the recorder’s driver will be
installed automatically. If the driver is
installed properly, DSS Player will start
automatically.
(For details about operation for DSS
Player see pages from P.83)
6
Installing Software
73
Page 74

Installing Software
Macintosh
Insert DSS Player into the CD-ROM
drive.
1
Double-click CD icon.
Double-click the desired language to
2
select it.
Double-click the following icon.
3
Click [Continue] when the DSS
Player opening screen appears.
4
Confirm your acceptance of the
terms of the Licensing Agreement.
5
6
You must accept the terms of the
Installing Software
Licensing Agreement to install DSS
Player. If you accept them, click [Agree].
Select where to install DSS Player.
This lets you specify the folder in which
6
to install DSS Player. To accept the default
folder, click [Choose].
Installing DSS Player.
Completing setup.
Installation has finished. Click [Quit].
7
Register user information.
To use the DSS Player, it is necessary to
8
register the user information at the time
of initial startup.
Open the [DSS Player] folder created at
installation, and the user’s registration
screen will be displayed, if the is
double clicked. Please input your name,
company name, and serial number.
Please see the seal attached to the CDROM package included with the DSS
Player, for the serial number. After the
input has ended, click [OK] to complete
the registration.
74
Page 75

Uninstalling Software
To uninstall any of the software component of the DSS player software installed on your PC,
follow the steps below.
Windows
Exit DSS Player.
1
Select [Control Panel] from [start] menu.
2
Click [Add/Remove programs] in the control panel window.
3
A list of applications that have been installed is displayed.
Select the software you would like to uninstall/remove.
4
Click [Change/Remove].
5
Confirmation of Deleting the File.
Click the [OK] button to start uninstalling.
6
An additional message may appear, if so, read it carefully and follow the instructions given.
When the [Maintenance Complete] screen is displayed, click [Finish] to
complete uninstalling.
7
....................................................................................................................................................
Note
The voice files you made are stored in the [MESSAGE] folder. If you don’t need them, delete them. You can
confirm the location of the [MESSAGE] folder by clicking [Options] in the [Tools] menu before uninstalling.
6
Uninstalling Software
75
Page 76

Uninstalling Software
Macintosh
Exit DSS Player.
1
Delete the Preferences File.
Delete the [DSS Preference] file in the following location.
2
Macintosh HD : Users : Library : Preferences
Delete the Executable File.
Delete the [DSS Player] file in the location where you installed the file.
3
Delete the Help File.
Delete the [DSS Player Help] file in the following location.
4
System Folder : Help
....................................................................................................................................................
6
Note
Uninstalling Software
The voice files you made are stored in the [MESSAGE] folder. If you don’t need them, delete them. You can
confirm the location of the [MESSAGE] folder by clicking on [Options] in the [Tools] menu before uninstalling.
76
Page 77

Using Online Help
To open Online Help, you have the following options.
(Windows)
• Click the [start] button, select [All Programs], then [Olympus DSS Player], then click [Help].
• While DSS Player is running, choose [Contents] from the [Help] menu.
• While DSS Player is running, press [F1] on the keyboard.
(Macintosh)
• While DSS Player is running, choose [DSS Player Help] from the [Help] menu.
Search by Contents
Once the Online Help screen appears, click
the Contents tab.
1
Double-click the icon of the desired
topic heading.
2
The title of the topic is displayed.
Double-click the icon of the desired topic.
An explanation of the topic is displayed.
3
Search by Key word
Once the Online Help screen appears, click
the Index tab.
1
Enter text.
Matching keywords are located automatically.
2
Choose a topic, then click [Display].
An explanation of the topic is displayed.
3
1
2
3
1
2
6
Using Online Help
....................................................................................................................................................
3
Note
For more information on menus and operations, refer to Online Help. You will be able to use Online Help
after DSS Player is installed.
77
Page 78

Connecting to Your PC
Be sure to finish installing DSS Player before connecting the recorder.
Connecting to your PC using the USB
cable
Release the HOLD switch.
1
Connect the USB connection
cable to the USB port or the
2
USB hub of the PC.
Confirm that the recorder has
stopped, and connect the USB
6
Connecting to Your PC
3
cable to the connection port
on the bottom of the recorder.
Please connect the USB connection
cable mark to match the mark
of the recorder connection port.
“STORAGE REMOTE” is displayed
on recorder if the USB cable is
connected.
Windows
When the recorder is connected and “My Computer” is
opened, a removable disk drive is displayed. If “Add New
Hardware Wizard” appears, cancel the wizard by pressing
the [Cancel] button and then install DSS Player.
78
Macintosh
If the recorder is connected to Mac OS, an icon with a drive
name of “Untitled” appears.
Page 79

Notes
• When connecting this recorder with the PC and utilize DSS Player, in the menu setting of this recorder set
the USB class (☞ P.111) to the “MASS STORAGE” class. If connected by “AUDIO CLASS”, this recorder
will not be recognized as a removable disk drive.
• Be sure to use the attached dedicated cable for the USB connecting cable. If any other company’s cable
is used, it will be the cause trouble. Also, please do not connect this dedicated cable to any other company’s
product.
Disconnecting from Your PC
Windows
Click the on the task bar
located at the lower-right corner
1
of the screen. Click [Safely
Remove Hardware].
It will read [Stop USB Disk-Drive] for
Windows Me. The drive letter will differ
depending on the PC being used.
Disconnect the USB cable.
1
2
Macintosh
Move the icon of the recorder's drive displayed on desktop to trash box by
drag and drop.
1
Disconnect the USB cable.
2
6
Connecting to Your PC
79
Page 80

Connecting to Your PC
Notes
• NEVER disconnect the USB cable while the record/play indicator lamp is flashing. If you do, the data will
be destroyed.
• When the recorder is connected to a PC, the power will be supplied from the USB cable.
• Refer to the user’s manual for your PC regarding the USB port or USB hub on your PC.
• Be sure that you connect the USB cable either directly to the USB port on your PC or the self-power (AC
adapter connection) USB hub.
• Be sure to push the cable connector all the way in. Otherwise, the recorder may not operate properly.
• Release the HOLD switch.
6
Connecting to Your PC
80
Page 81

Connecting to your PC using the cradle
Place the recorder on the cradle
Connect the USB connection
cable to the USB port or the USB
1
hub of the PC.
Connect the USB connection
cable to the cradle.
2
Connect the mark of the USB
connection cable facing up to match the
mark of the cradle connection port.
Make sure that the recorder is in
the Stop mode, and place it in the
3
cradle.
“STORAGE REMOTE” is displayed on
PC I/F
recorder if the USB cable is connected.
6
Connecting to Your PC
81
Page 82

Connecting to Your PC
Remove the recorder from the cradle
Follow step 1 in “Disconnecting from Your PC” (☞ P.79).
To prevent damage or loss of the data, confirm that the
recording/playback indicator lamp of this recorder is not on,
and remove this recorder and USB connection cable from
the cradle.
....................................................................................................................................................
Notes
• When connecting this recorder with the computer and utilize DSS Player, in the menu setting of this
recorder set the USB class (☞ P.111) to the “MASS STORAGE” class. If connected by “AUDIO CLASS”,
6
this recorder will not be recognized as a removable disk drive.
Connecting to Your PC
• Be sure that you connect the USB cable either directly to the USB port on your PC or the self-power (AC
adapter connection) USB hub.
82
Page 83

Running DSS Player
Windows
By connecting the recorder to your PC, you can automatically start the application.
Disabling automatic start
Right click on the of the taskbar on the
lower right of the screen, and select
1
[Setting].
The application which enables setting will be displayed
by dialog.
Click the of the [DSS Player Version 6].
The check mark on [DSS Player Version 6]
2
disappears. For automatic start, select and click DSS
Player to reinstate again.
Manual start
Start Windows.
2
2
3
1
Click the [start] button, select [All
Programs], then [Olympus DSS
2
Player].
Click [Olympus DSS Player].
3
6
Running DSS Player
2
..............................................................................................................................................................
Note
You cannot run more than one DSS Player program or multiple copies of the same program simultaneously.
83
Page 84

Running DSS Player
Macintosh
To start, open the “DSS Player” folder created upon installation and double-click the icon.
When it starts for the first time after installation, user information needs to be registered.
Please see ☞P.74 for details.
6
....................................................................................................................................................
Running DSS Player
Note
The Mac version DSS Player has no automatic start function.
84
Page 85

Window Names (DSS Player)
1
* Main screen displayed when
DSS Player is started
2
3
1
(Windows)
2
3
1 Play Control Bar
Control buttons to play and stop voice files.
2 Dictation Folder Window
Will display the directory structure of the DSS,
WMA, WAVE (Windows only) and AIFF
(Macintosh only)-format files stored on your
PC’s hard disk.
4
(Macintosh)
6
Window Names (DSS Player)
4
3 Device Manager Window
Will display the directory structure of the folders
in the recorder.
4 Voice File List Box
Will display the voice files in the folder selected
in 2 and 3.
85
Page 86

7 Managing Files on Your PC
Download Voice Files from the Recorder
Download Voice Files from the Recorder
There are 3 download options to transfer voice files from the recorder to the PC:
• Download Selected Files
• Download Folders
• Download All
The following is an explanation of “Download Selected Files”. For explanations of “Download
Folders” and “Download All”, refer to Online Help.
Download Selected Files
1
7
2
Download one or several voice files to your PC.
Download all the voice files in one folder.
Click the icon and download all the voice files stored in the recorder to your PC.
Select the folder.
From the Device Manager window, select the folder
that contains the voice file you would like to download.
The illustration shows that Folder A has been
selected.
Select the voice file.
Select the voice file you would like to download from
the Voice File List Box. To select more than one file,
hold either the [Ctrl] or [Shift] key and select files.
The illustration shows that one voice file is selected.
1
86
2
Page 87

Download the voice file.
(Windows)
3
From the [Download] menu, click
[Download Selected Files].
(Macintosh)
From the [Tools] menu, click
[Download Selected Files].
3
Download complete.
Do not disconnect the USB cable while
4
the record/play indicator lamp on the
recorder is flashing. Disconnecting the
USB cable when the recorder lamp is
flashing will result in data loss or
corruption.
..............................................................................................................................................................
Notes
• NEVER disconnect the USB cable while the record/play indicator lamp is flashing. If you do, the data will
be destroyed.
• Depending on the size of the voice file and your PC, it may take some time to download the files.
• The downloaded files will be stored in the download tray folder that corresponds to the folder in the
recorder.
(Example: A voice file downloaded from Folder A will be stored in download tray A on your PC.)
• If a voice file already exists on your PC with the same name, date and time recorded, the new file will not
be downloaded.
Download Voice Files from the Recorder
7
87
Page 88

Play a Voice File
Select the folder.
Select the folder that contains the voice
1
file you would like to play.
Select the voice file.
Select the voice file to play from the Voice
2
File List Box.
Play the voice file.
Click the (play) button of the Play
3
Control Bar.
Play a Voice File
Other playback control such as Rewind, Fast
Forward, Stop, Speed Control, Volume
Control, Time Axis and Index Skip are
available from the Play Control Bar.
7
File name
File names are assigned in the following manner:
DS_2 0001.DSS
Extension
1 2
3
88
File number ....... A serial number automatically assigned by a Digital Voice Recorder.
User ID ....... The name that has been set on the Digital Voice Recorder. The default name on the
Digital Voice Recorder is “DS-2”. The user ID can be modified with DSS Player (☞ P.91).
Page 89

Upload Voice Files to the Recorder
DSS Player has a feature to enable you to upload DSS-format voice files from your PC to the
recorder.
Select the folder.
Select the folder that contains the voice
1
file to upload from the Dictation Folder
window.
Select the voice file.
Select the voice file to upload from the
2
Voice File List Box.
Select the folder to upload.
(Windows)
3
From the [Download] menu select
[Upload Files] or click the Upload icon.
Once the folder list box where the file is
to be uploaded is displayed, select the
folder from which the file is to be
uploaded.
(Macintosh)
From the [Tools] menu, click [Upload
Files]. Once the folder list box where the
file is to be uploaded is displayed, select
the folder from which the file is to be
uploaded.
Upload the voice file.
The voice file is uploaded to the recorder.
4
1
2
Upload Voice Files to the Recorder
7
89
Page 90

Upload Voice Files to the Recorder
Upload complete.
Once the transmission screen closes and the record/play indicator lamp on the recorder is
5
OFF, upload is completed.
Upload Voice Files to the Recorder
You can also drag and drop files from the Voice File List Box to the Device Manager window.
..............................................................................................................................................................
Notes
• NEVER disconnect the USB cable while the record/play indicator lamp is flashing. If you do, the data will
be destroyed.
• If a file with the same name exists in the folder of this recorder, it cannot be transferred.
7
90
Page 91

Send Voice Files with E-mail
Audio files are stored in the Message folder on the hard disk. If you want to send a voice file by
attaching it to E-mail, select the file from the Message folder.
The Message folder location can be found from the [Tools] menu, [Options], and then “Download
folder” tab.
The file can be replayed with DSS Player-Lite even though the recipient does not have DSS
Player. Free DSS Player-Lite can be downloaded from Olympus homepage.
http://www.olympusamerica.com/cpg_section/cpg_downloads.asp
http://olympus-europa.com/consumer/2590_software.cfm
Changing User ID
The user ID is used in file names that are recorded on a Digital Voice Recorder.
Enter the user ID in the [Transfer User ID]
window.
1
(Windows) From the [Download] menu.
(Macintosh) From the [Tools] menu.
Click [Transfer].
The new user ID will be transferred to the Digital Voice
2
Recorder.
21
....................................................................................................................................................
Note
NEVER disconnect the USB cable while the record/play indicator lamp is flashing. If you do, the data will be
destroyed.
Send Voice Files with E-mail/Changing User ID
7
91
Page 92

Changing a Folder Name
Changing a Folder Name/Editing File Comments
Changing a folder name in the Voice Folder window
(Windows)
You can change a folder name using the [Rename Folder] command from the [Edit] menu.
A folder name can be up to 20 characters long and cannot use \ /:*?"<>|.
(Macintosh)
Choose the [Rename Folder] command from the [File] menu.
Changing a folder name in the Device window
(Windows)
Right-click the folder name to change, select the [Rename Folder] and input the new folder
name.
(Macintosh)
Choose the [Rename Folder] from the [File] menu and type a folder name.
The names of the folders on the Digital Voice Recorder is updated with the new folder
names.
Device Window folder names consist of a string of 12 or fewer single-byte alphanumeric
characters.
..............................................................................................................................................................
Note
7
NEVER disconnect the USB cable while the record/play indicator lamp is flashing. If you do, the data will be
destroyed.
Editing File Comments
You can use a PC to create or edit file comments in DSS Player in the [Edit Comments] window,
and transfer them from the PC to the recorder. You can also edit file comments imported from
the recorder to a PC.
Choose the [Edit Comments] command from the [Tools] menu.
Files comments can use up to 100 alphanumerical characters and symbols.
..............................................................................................................................................................
Note
NEVER disconnect the USB cable while the record/play indicator lamp is flashing. If you do, the data will be
destroyed.
92
Page 93

Editing a Template
You can edit folder name and file comment templates in DSS Player in the [Edit and Upload
Template] window and transfer them to the recorder. Templates downloaded from the recorder
can also be edited.
(Windows)
Select [Edit & Upload Templates] from [Download] to open the [Edit and Upload Template]
window.
(Macintosh)
Select [Edit & Upload Templates] from [Tools] to open the [Edit and Upload Template] window.
The maximum number of characters that can be entered is 8 characters for a folder name,
and 20 characters for a comment.
Transfer edited
content to the
recorder
Save edited
content
Read saved
content
Delete edited
content
Editing a Template
7
Load templates
from the recorder
Transfer all comment
and folder information
to the recorder
Delete all changed
content
Close the dialog
box
....................................................................................................................................................
Note
NEVER disconnect the USB cable while the record/play indicator lamp is flashing. If you do, the data will be
destroyed.
93
Page 94

USB Microphone/USB Speaker
The recorder can be used as a USB speaker or microphone when connected to a PC. If you
use the recorder as a USB speaker, you can output voice through the recorder instead of using
the PC speaker. When used as a microphone, you can record voice on your PC using your
favorite application.
Audio set up
USB Microphone/USB Speaker
In order to use this recorder as a USB speaker or a USB microphone in DSS Player, it is
necessary to change to “AUDIO CLASS” after connecting to the computer in the “MASS
STORAGE” class. When changed for the first time, the driver will be installed into the computer.
After connection, execute the following settings.
Windows
Click the icon in the toolbar to change the recorder to Audio device.
1
Macintosh
7
From the [Tools] menu, select [Change to audio device].
1
Uses as a USB Speaker
If this recorder is connected by USB, it
can function as a USB speaker. If the
recorder is used as a USB speaker, audio
output can be done through the recorder,
without audio output from the speaker
attached to the computer.
Select the [Select Audio Output] from the
[Tools] in the menu bar, and change the
output destination.
94
Page 95

Uses as a USB microphone
If this recorder is connected by USB, it can function as a USB microphone. Also, if an upgrade
(☞ P.96) is executed to the DSS Player Plus, voice recognition software or other applications
using this recorder as a microphone, voice can be input to a computer.
Windows 2000, Me
Select [Control Panel] = [(Sound and) Multimedia] = [Audio] tab, and select the [USB Audio
Device] from the recording device.
Windows XP
Select [Control Panel] = [Sound and Audio Device] = [Audio] tab, and select the [Microphone
Control (DVR)] from the recording device.
....................................................................................................................................................
Notes
• If the USB class is set to “AUDIO CLASS” in the menu setting of this recorder, this recorder will not be
displayed as a removable disk drive. Reset to the “MASS STORAGE” class then connect to the computer.
• Changing the USB speaker can be executed from the [Control Panel] as well as the USB microphone.
• When using it as a USB microphone, regardless of the recording mode of this recorder, it becomes the
USB stereo microphone. When connecting this recorder and external microphone, use a stereo microphone.
USB Microphone/USB Speaker
7
95
Page 96

8 DSS Player Expanded Functions
Plus
The “DSS Player” enables upgrades (Options) to the “DSS Player Plus” which is equipped with
more functions. In addition to the DSS Player functions, voice recognition using voice recognition
software, joining of files, sharing of files and the menu setting of this recorder can be utilized.
Upgrade Function
Purchase and Upgrade
To purchase “DSS Player Plus” and upgrading from “DSS Player” is operated in the following
procedures.
Windows
Upgrade Function
Start the DSS Player.
Please see ☞ P.83 for the starting method.
1
Click the button or select [Purchase
a new license for DSS Player Plus] in
2
the [Help] menu.
8
The web browser will start and the purchase
site of the DSS Player Plus will be displayed.
Please operate according to guidance on the
screen.
When the purchase procedure is completed, the
license number will be issued by mail.
Macintosh
2
96
Page 97

Select [Upgrade to DSS Player Plus]
from the [Help] menu.
3
The “Upgrade to DSS Player Plus” dialog will
be displayed.
3
In the [Upgrade to DSS Player Plus]
dialog, enter the license number of your
4
purchase, and click the [OK] button.
When starting the application next time, DSS
Player will be upgraded to DSS Player Plus.
Upgrading to DSS Player Plus
When upgraded, the title of the main menu changes to [DSS Player Plus]. Also, you can confirm
the upgrade by selecting [About DSS Player] from the [Help] menu on the tool bar. In the
[About DSS Player] window, the [DSS Player Plus] should be displayed.
....................................................................................................................................................
Notes
• To purchase the license number, it requires an environment where the Internet can be utilized.
• Please see the details in the website regarding the purchase of the license number.
Upgrade Function
8
97
Page 98

Plus
In conjunction with “ViaVoice” of IBM Corp. or “Dragon NaturallySpeaking” of ScanSoft Inc.
which are on the market, the files recorded in this recorder can be transferred to a computer
and converted to text. Please see the instruction manual for the voice recognition software for
details.
The voice recognition software which is confirmed for use with this recorder is as follows. (As
of September, 2004)
Using Voice Recognition Software
Please inquire to the Olympus Service Center regarding the situation for software to be released
hereafter (☞ P.119).
Also, when you use such software in combination with this recorder, please confirm the software
operation with the user’s computer and the maker.
• Please contact IBM for support information on the voice recognition software, ViaVoice.
• Please contact ScanSoft for support information on ScanSoft Dragon NaturallySpeaking.
....................................................................................................................................................
Note
Voice recognition can only be used with Windows.
8
Using Voice Recognition Software
IBM Corp.
• IBM ViaVoice Pro USB Edition 10
ScanSoft, Inc
• Dragon NaturallySpeaking 8
98
Page 99

Voice Recognition in ViaVoice (Audio set up)
When the DSS Player Plus and IBM’s voice recognition software “ViaVoice” are used together,
execute the setting in the following procedure to record the voice accurately, acquired from the
built-in microphone or speaker.
Connect the recorder to your PC, and start the DSS Player Plus.
1
Change the recorder to [AUDIO CLASS].
Follow the procedure in P.111 to change the recorder to AUDIO CLASS.
2
Click the [start] button, select [All Programs], then select [IBM ViaVoice
VoiceCenter].
3
From the IBM [ViaVoice
VoiceCenter], select [ViaVoice],
4
[Tools], then [Analyze My Voice].
The ViaVoice User Wizard window
appears.
From the [Device] list box, select
[Olympus DSS File] or [Olympus
5
WMA File].
Select [Olympus DSS File] or [Olympus
WMA File] in the [Device] list box, then
click the [Next] button.
Click the [Next] button.
The [Audio Setup Wizard] window
6
appears.
Using Voice Recognition Software
8
99
Page 100

Using Voice Recognition Software
Select a sound card.
When the [Selecting a Sound Card] window
7
appears, select [USB Audio Device] for [Input]
and follow the instructions on screen. (Select
[Microphone Control (DVR)] for Windows XP.)
Proceed with the AUDIO Setup
according to the instruction on screen.
Using Voice Recognition Software
8
During audio setup, enrollment, please input
voice data from the recorder.
It is recommended that you enroll while in your normal surrounding environment settings.
This will help improve the voice recognition by registering your voice characteristics and your
environment.
8
100
 Loading...