

Olympus DR-2000 Executive Kit, DR-1000 Instructions Manual
E
N
DIRECTREC
DR-1000
Executive Kit
Thank you for purchasing an Olympus
DIRECTREC.
Please read these instructions for information
about using the product correctly and safely.
Keep the instructions handy for future reference.
INSTRUCTIONS
EN
INSTRUCTIONS
FR
MODE D’EMPLOI
DE
BEDIENUNGSANLEITUNG
2
Main Features
● New and improved microphone system reduces extraneous sounds such
as wind or machine noise created while recording and thus enabling a
higher quality of sound recording than ever before.
● New design and location of buttons enable single-handed control without
ever having to visually check the placement of function buttons. Directrec
fits easily into your hand providing effortless control coupled with superb
dictation experience (☞P.4).
● The Directrec has 2 programmable (A,B) buttons (☞P.29,30).
● All button functions are easily customized to suit a particular preference
or any recording environment (☞P.29-33).
● USB Audio Device Directrec, can be used as a USB microphone or USB
speaker when connected to a PC. In addition, a powerful built-in speaker
provides hi-fidelity acoustic playback.
● Directrec can be used as a remote-control for the DSS Player Pro (referred
to as DSS Player from now on) not only for direct recording, but also
when editing recorded files on a PC.
● Directrec can save a recording as a file on a PC in DSS (Digital Speech
Standard) format.
● Two recording modes, SP (Standard Playback) mode or LP (Long
Playback) mode (☞P.20).
● Microphone sensitivity can be adjusted to better suit recording
conditions and environment (☞P.20).
This product is equipped with the following features.
• OLYMPUS IMAGING CORPORATION holds the copyrights for DSS Player
Pro software and the instructions (this manual).
• Microsoft and Windows are registered trademarks of Microsoft Corporation.
• Intel and Pentium are registered trademarks of Intel Corporation.
• Other product and brand names mentioned herein may be the trademarks or
registered trademarks of their respective owners.
3
Table of Contents
Identification of Parts ............................ 4
Minimum Requirement ......................... 5
Installing DSS Player Software ............ 6
Uninstalling DSS Player Software ........ 7
Using Online Help ................................. 8
Connection to Your PC ......................... 9
Running DSS Player........................... 10
Window Names ................................... 11
Using the Remote Edit Window ......... 12
Direct Recording ................................. 14
Playback (Playing a Dictation File) .... 17
Save Recording .................................. 19
Microphone Sensitivity ....................... 20
Recording Modes ............................... 20
Index Marks ........................................ 21
System Sounds .................................. 24
Setting Job Data ................................. 25
Directrec Button Function
Customization ..................................... 29
Troubleshooting .................................. 34
Specifications ..................................... 35
Technical Assistance And Support ..... 35
Introduction
Getting Ready
Let’s Get Started
User Support
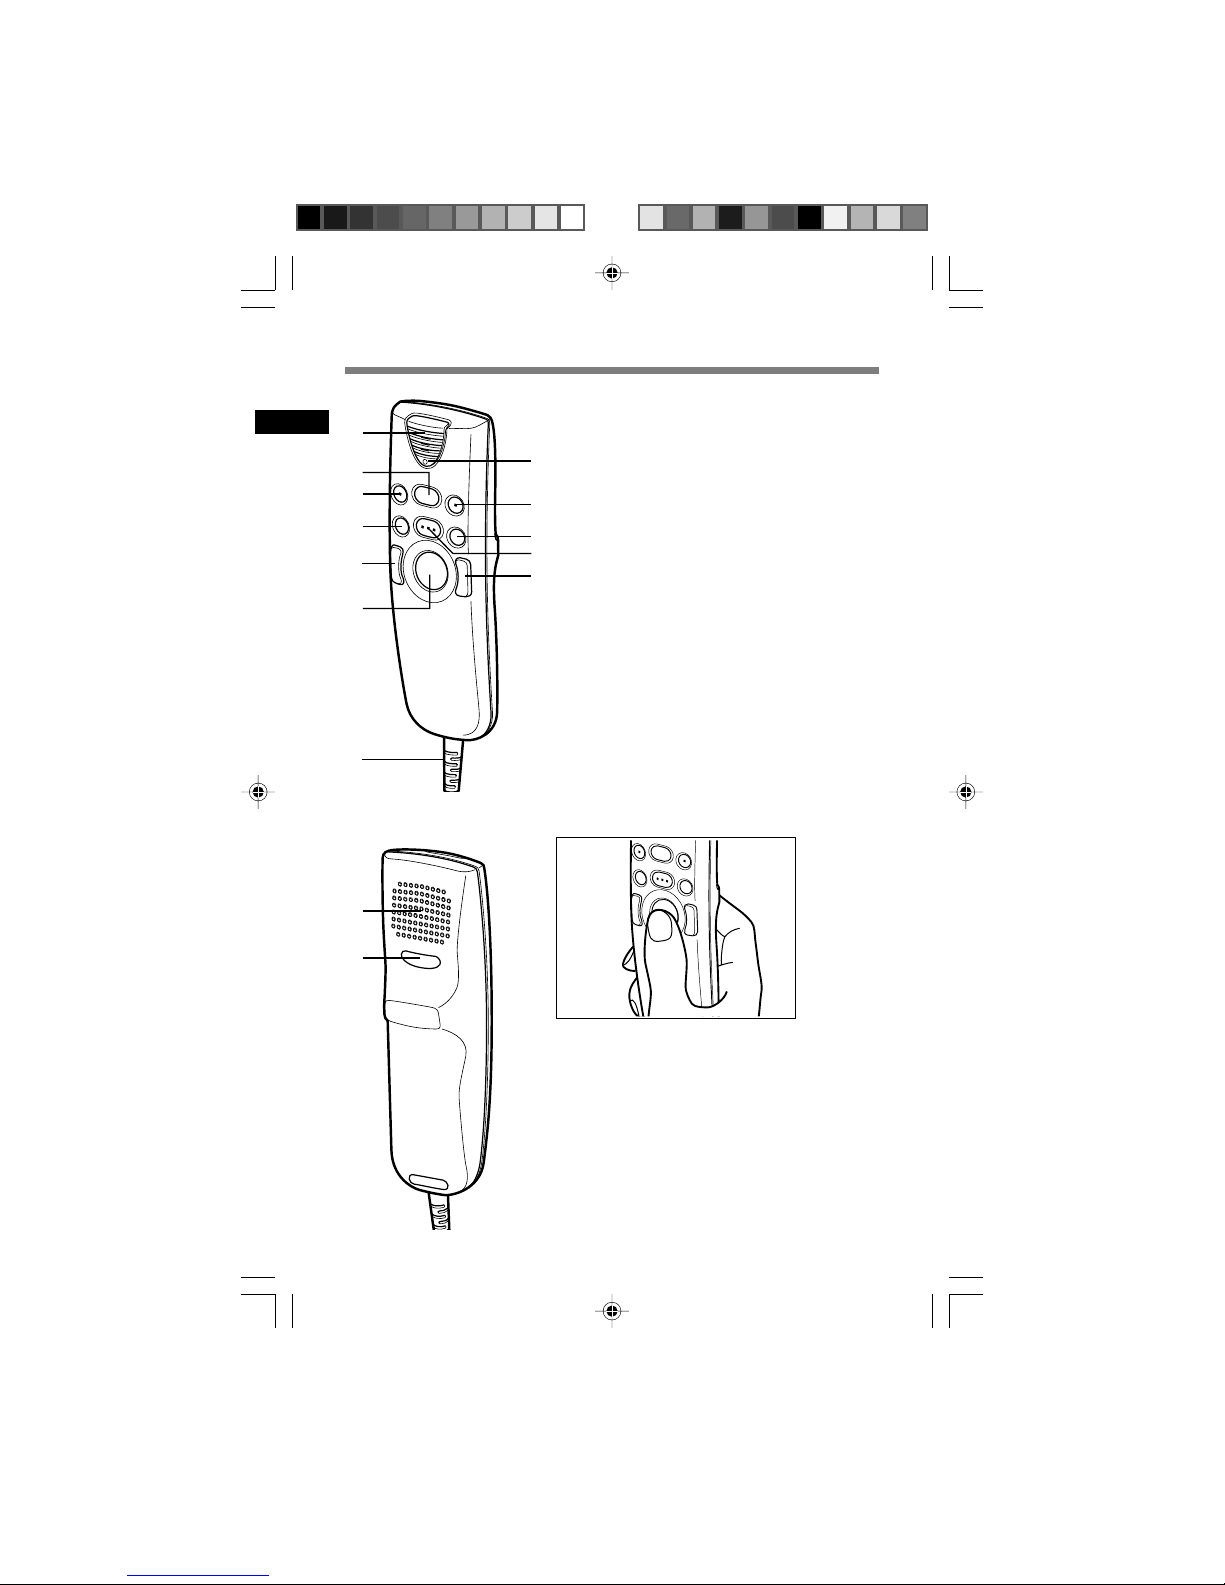
4
1 Built-in microphone
2 Record/Play indicator light
3 PLAY button/STOP function
4 NEW button
5 A (Programmable) button
6 REW (Rewind) button
7 REC (Record)/STOP function
8 FF (Fast Forward) button
9 Left mouse button
0 Pointing device
! Right mouse button
@ Built-in speaker
# B (Programmable) button
$ USB cable
Identification of Parts
How to use the pointing device
Hold Directrec gently and use your thumb to
move the pointer to your desired direction. To
click, use the pointing device right or left button
as your would with a PC mouse. Please do not
press or move the pointing device Forcefully.
@
4
3
6
9
0
1
5
8
!
7
#
2
$
Tip on the pointing device
Holding Directrec gently and using a thumb can
control the pointer like a PC mouse.
5
Minimum Requirement
IBM PC/AT compatible PC
Microsoft Windows Me/ 2000 Professional/
XP Professional,Home Edition
Intel Pentium II class 333 MHz processor or faster
(Processor 500 MHz or faster is recommended)
128 MB or more (256 MB or more is recommended)
50 MB or more
2x or faster CD-ROM, CD-R, CD-RW, DVD-ROM drive
Creative Labs Sound Blaster 16 or 100% compatible
sound card
Microsoft Internet Explorer 4.01 SP2 or later
800 x 600 pixels or more, 256 colors or more
One or more free ports
PC:
Operating System:
CPU:
RAM:
Hard drive space:
Drive:
Sound card:
Browser:
Display:
USB port:
Make sure that your computer meets the Minimum requirements listed
below. Please check with your system administrator or your Olympus
Professional Dealer.
6
Installing DSS Player Software
1
Insert Olympus DSS Player CD into the CD-ROM drive.
The installation program will start automatically.
If the installation program does not start automatically, browse your CD-ROM
drive and execute “setup.exe”.
2
The installation Language Selection dialog box appears.
Select the desired language.
3
Register user information.
Enter your name, company name, and license ID number (serial number).
The license ID number is printed on the license ID card included inside the
recorder package.
Click the [Next] button. When a confirmation dialog box appears, click the [Yes]
button.
4
Proceed with the installation according to the instructions on the
screen.
Before you connect your Directrec to your PC, you must first install the
DSS Player software.
Make sure to exit all running applications, eject the floppy disk if you are
using one, and logon as administrator if you are running Windows 2000/
XP (Professional only) on the network.
7
Uninstalling DSS Player Software
1
Exit DSS Player program.
2
Click the [start] button on the taskbar.
3
Select [Add/Remove programs] from the [Control Panel].
A list of installed applications is displayed.
4
Select [Olympus DSS Player Pro], then click the [Change/Remove]
button.
5
Proceed with the uninstallation according to the instructions
on the screen.
To uninstall any of the software components of the DSS player software
installed on your PC, follow the steps below.
..............................................................................................................................
Note
• Uninstallation does not erase the stored dictation files.
8
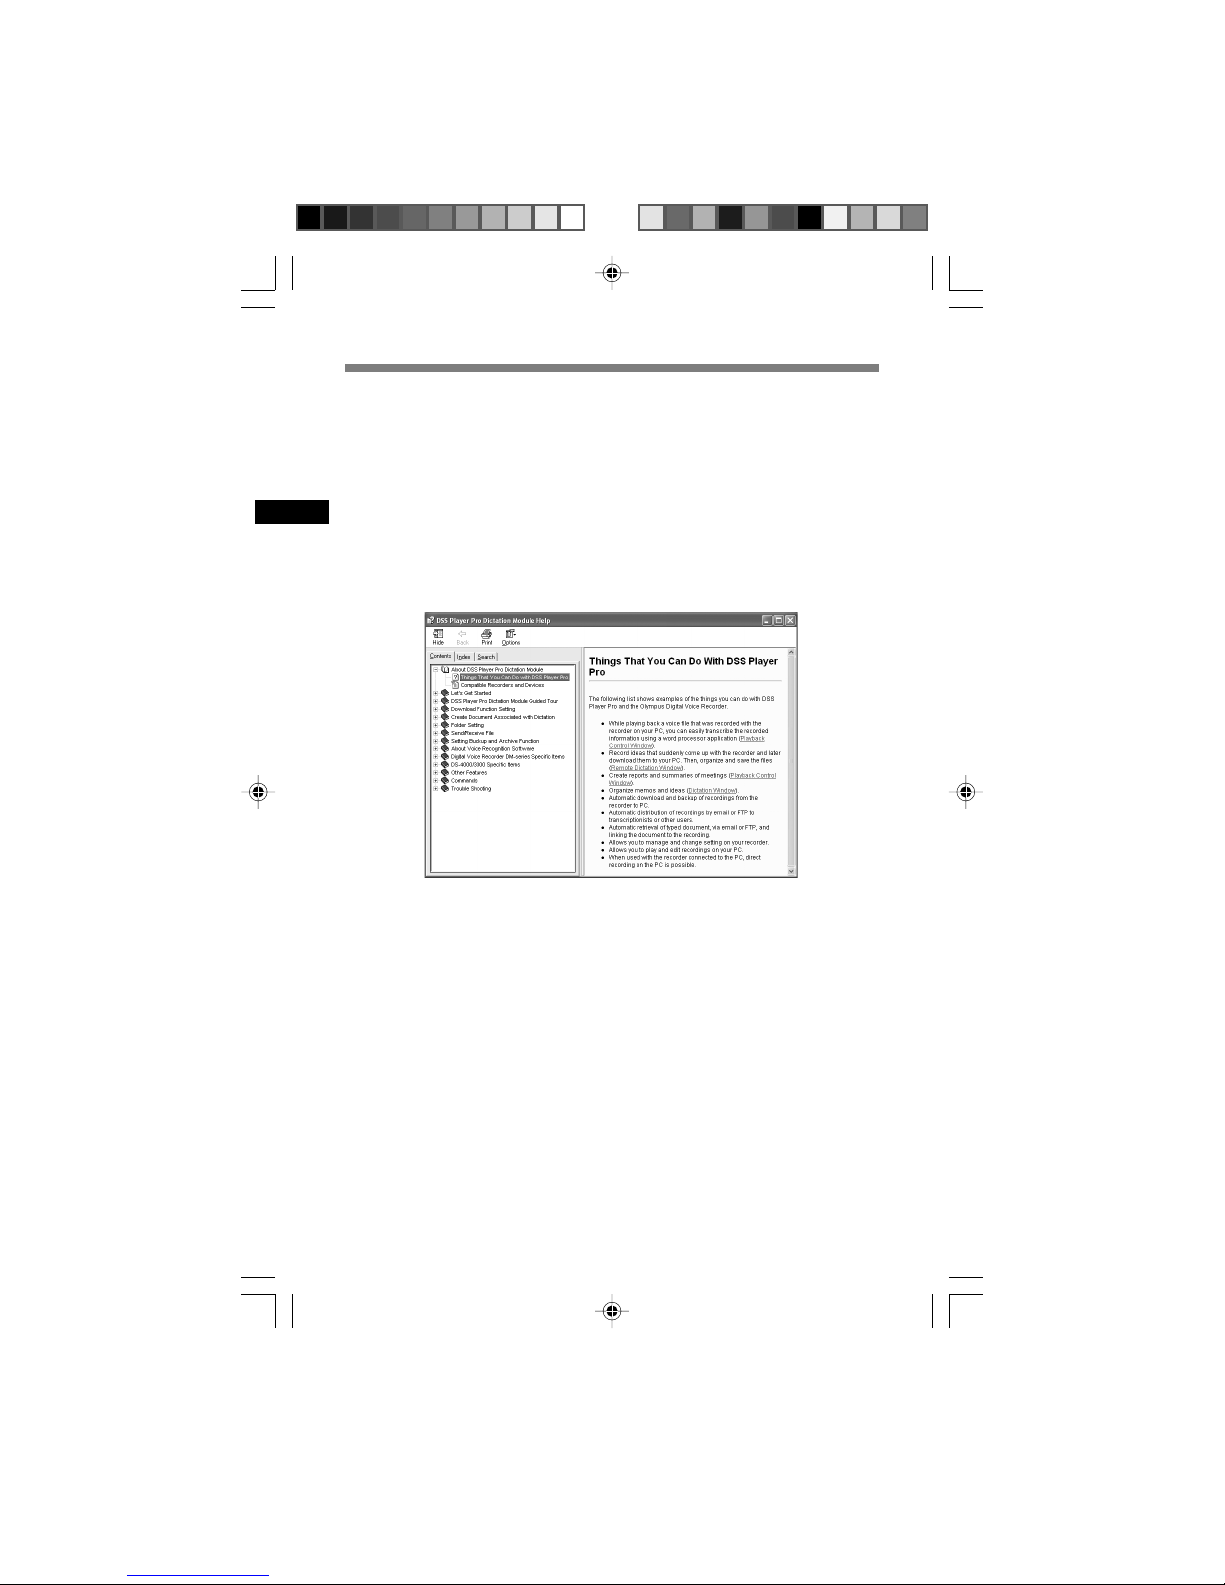
For information on the DSS Player usage and features, refer to the
online Help.
To start online Help:
Using Online Help
• Click the [start] button, then select [All Programs], [Olympus DSS
Player Pro], [Dictation Help].
• While DSS Player is running, select the [Help] menu, [Contents].
• While DSS Player is running, press F1 on the keyboard.
......................................................................................................................................
Note
• For more information on menus and operations, refer to Online Help. Online Help is
available after the DSS Player is installed.
9
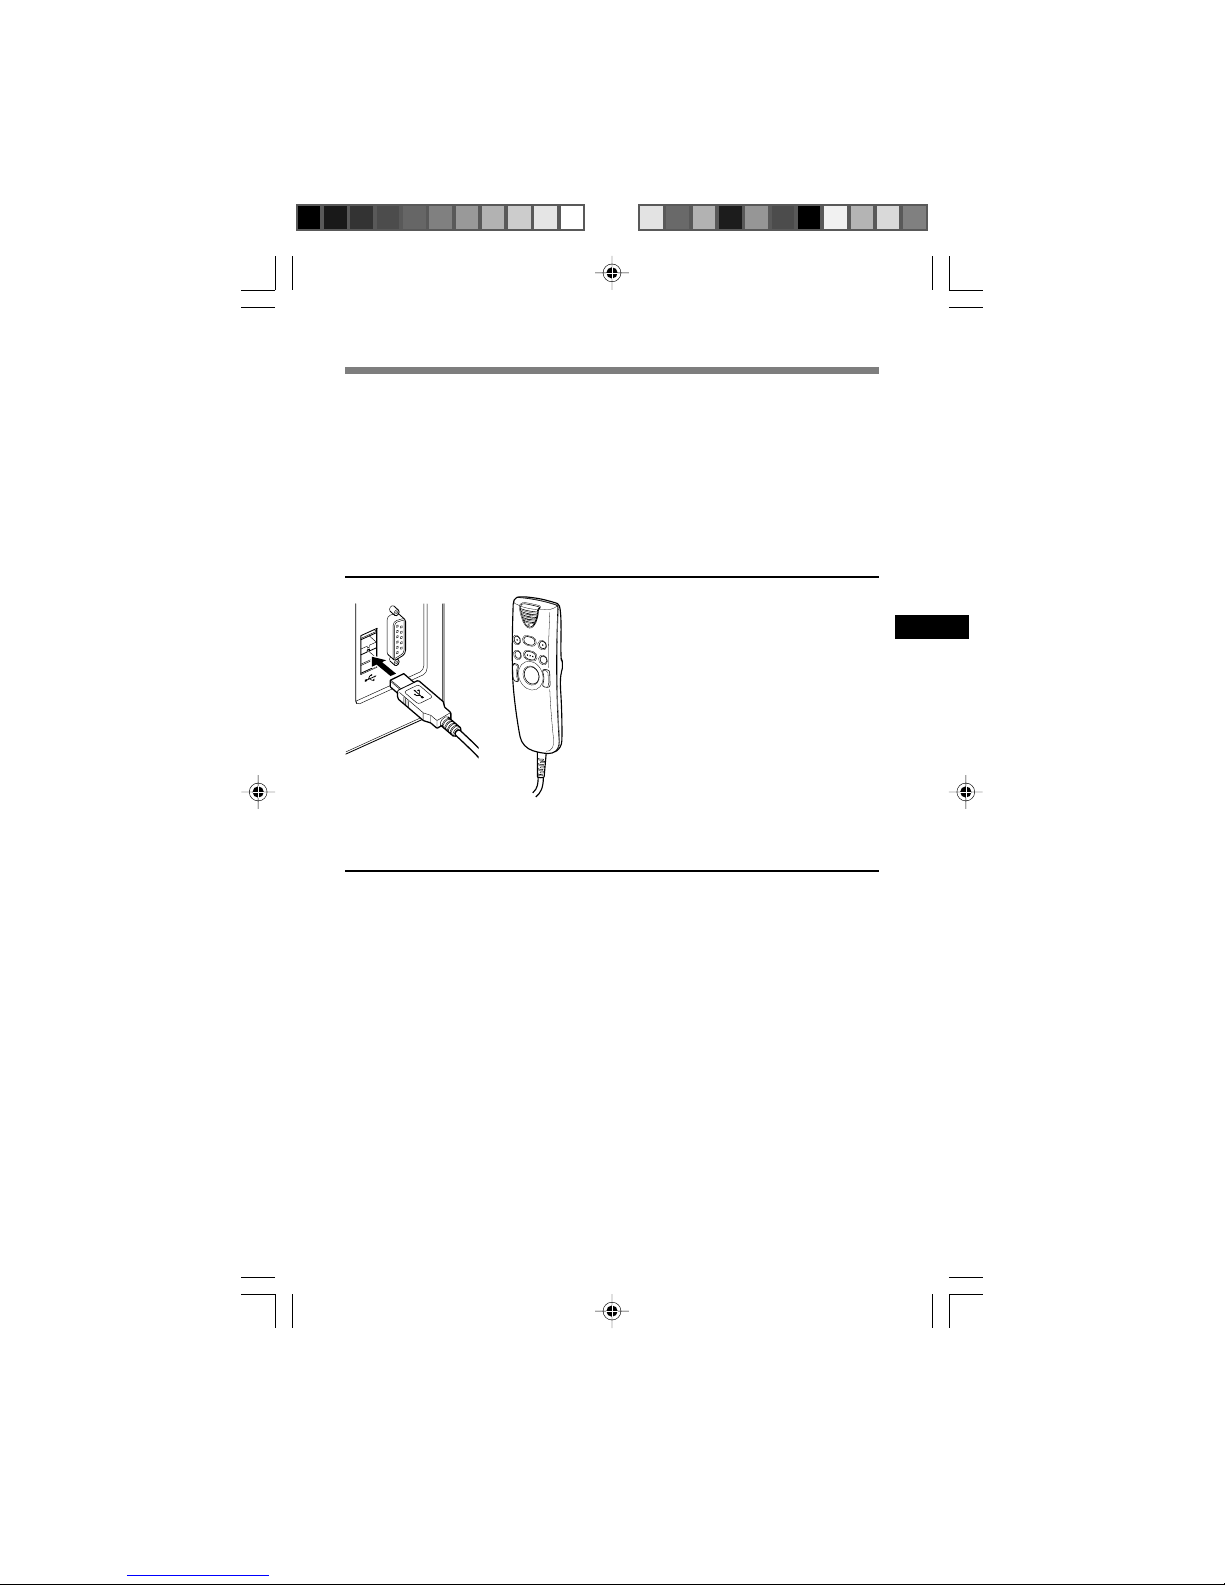
Connection to Your PC
Be sure to install the DSS Player software before connecting the
Directrec to the PC. However, if you do connect the Directrec before or
during the software installation, the “Add New Hardware Wizard” will
appear. In this case, cancel the wizard by pressing the [Cancel] button
in the wizard screen and then install or continue the installation of DSS
Player software.
Disconnecting from Your PC
..............................................................................................................................
Notes
• Some PCs and USB hubs may not supply sufficient power and the Directrec fails to
connect. Refer to your PC User’s Manual regarding the USB port or USB hub on your PC.
• When using a USB hub to connect the Directrec, always use a self-powered (AC adapter)
USB hub.
• Never disconnect the USB code while the record/play indicator light is flashing. If you do,
the data will be destroyed.
Connecting to your PC Using the USB Cable
1
Connect the Directrec USB
cable directly into the USB
port or USB hub of your PC.
1
Disconnect the Directrec USB cable from your PC USB port or
USB hub.
10
Running DSS Player
Disabling automatic start
1
Right-click the Device Detector icon in the System Tray in
the lower right hand corner of the screen, then select “Settings
startup application”.
2
Click [DSS Player Pro].
The check mark on [DSS Player Pro] disappears.
By default, connecting the Directrec to your PC will start the application
automatically.
1
Start Windows.
2
Click the [start] button, then select [All Programs].
All program menus will be displayed.
3
Select [Olympus DSS Player Pro], then click [Dictation Module].
Manual start
......................................................................................................................................
Note
• If you connect the Directrec before installing DSS Player, the “Add New Hardware Wizard”
dialog box will open. If this happens, click [Cancel] to exit the wizard, then install the DSS
Player software.
23
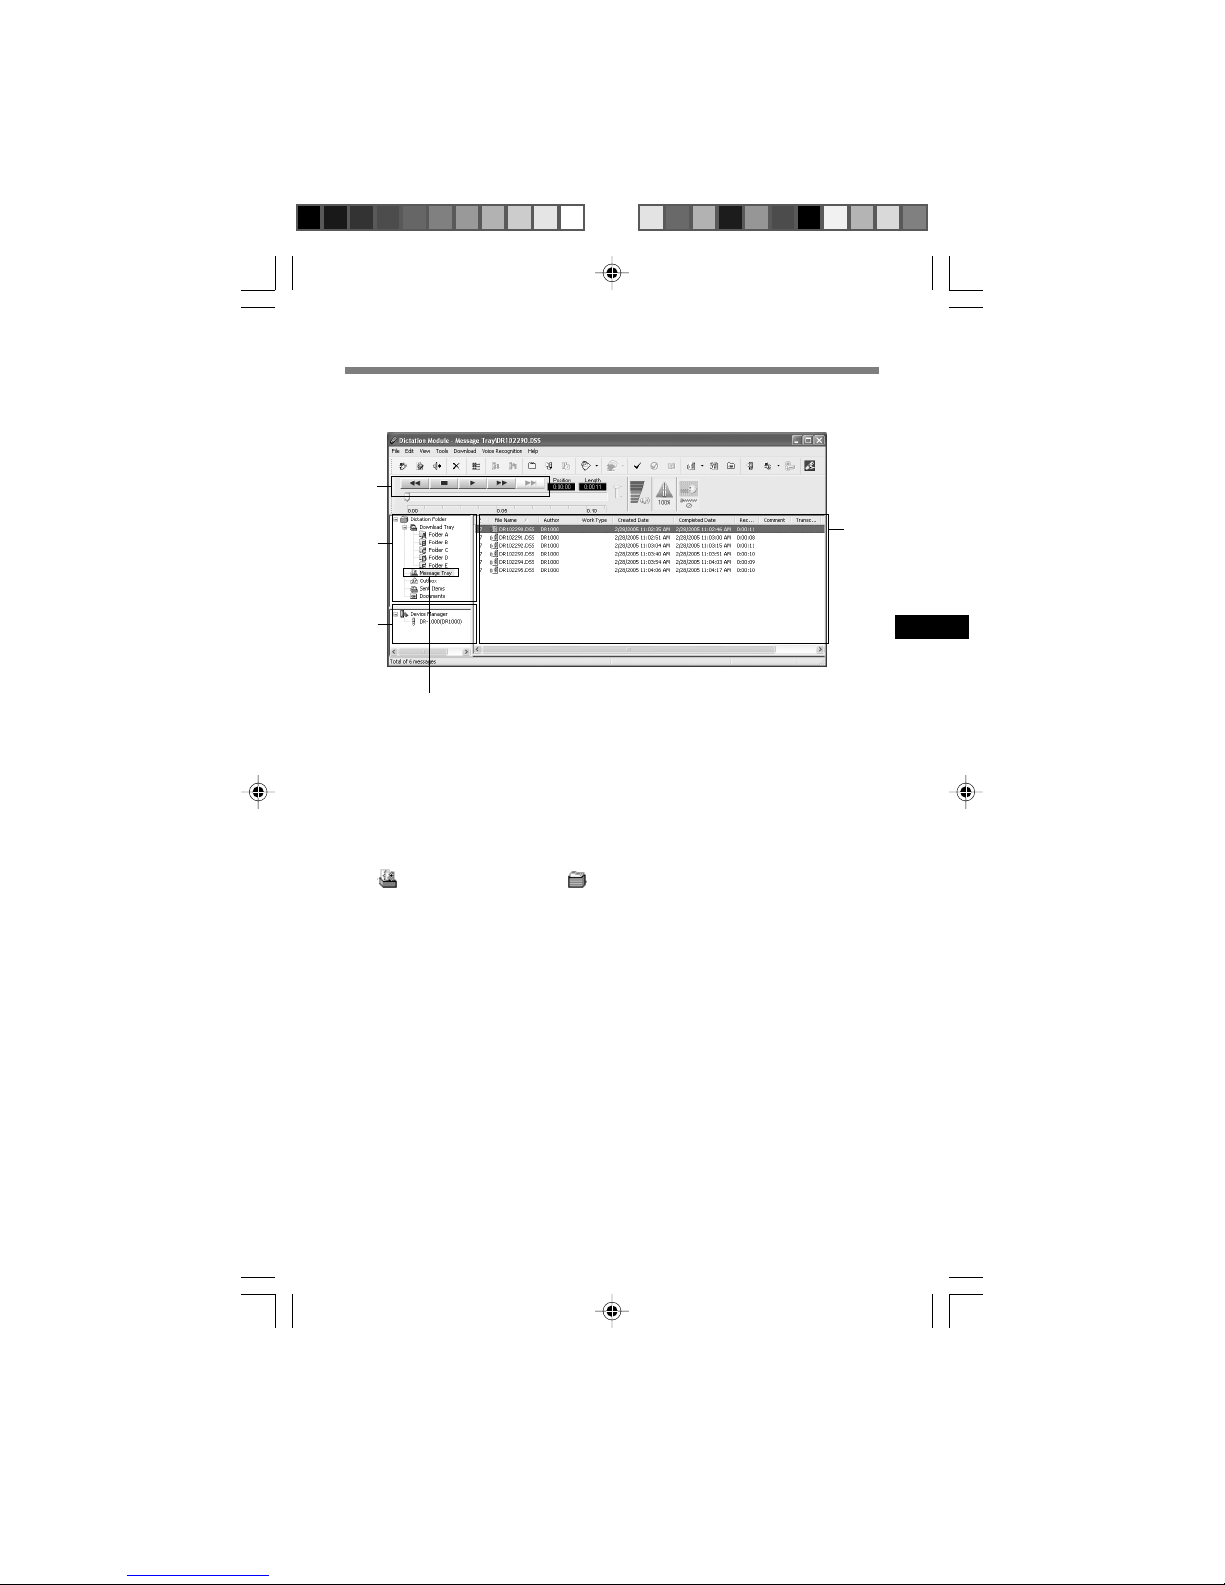
11
Window Names
1 Playback Control Bar
Provides the control buttons to play and stop dictation files.
2 Dictation Tree View
Displays the directory structure of the DSS, WAVE -format files stored on
your PC’s hard disk.
Recordings made using Directrec will be saved as a file in the Message Tray
( ) in the Dictation Folder ( ).
3 Device Tree View
Displays the directory structure of the Directrec.
4 Dictation List View
Displays the dictation files in the folder selected in 2 and 3.
1
4
2
3
Massage Tray
Main Window(Windows XP)
* Main screen is displayed when DSS Player is started
12
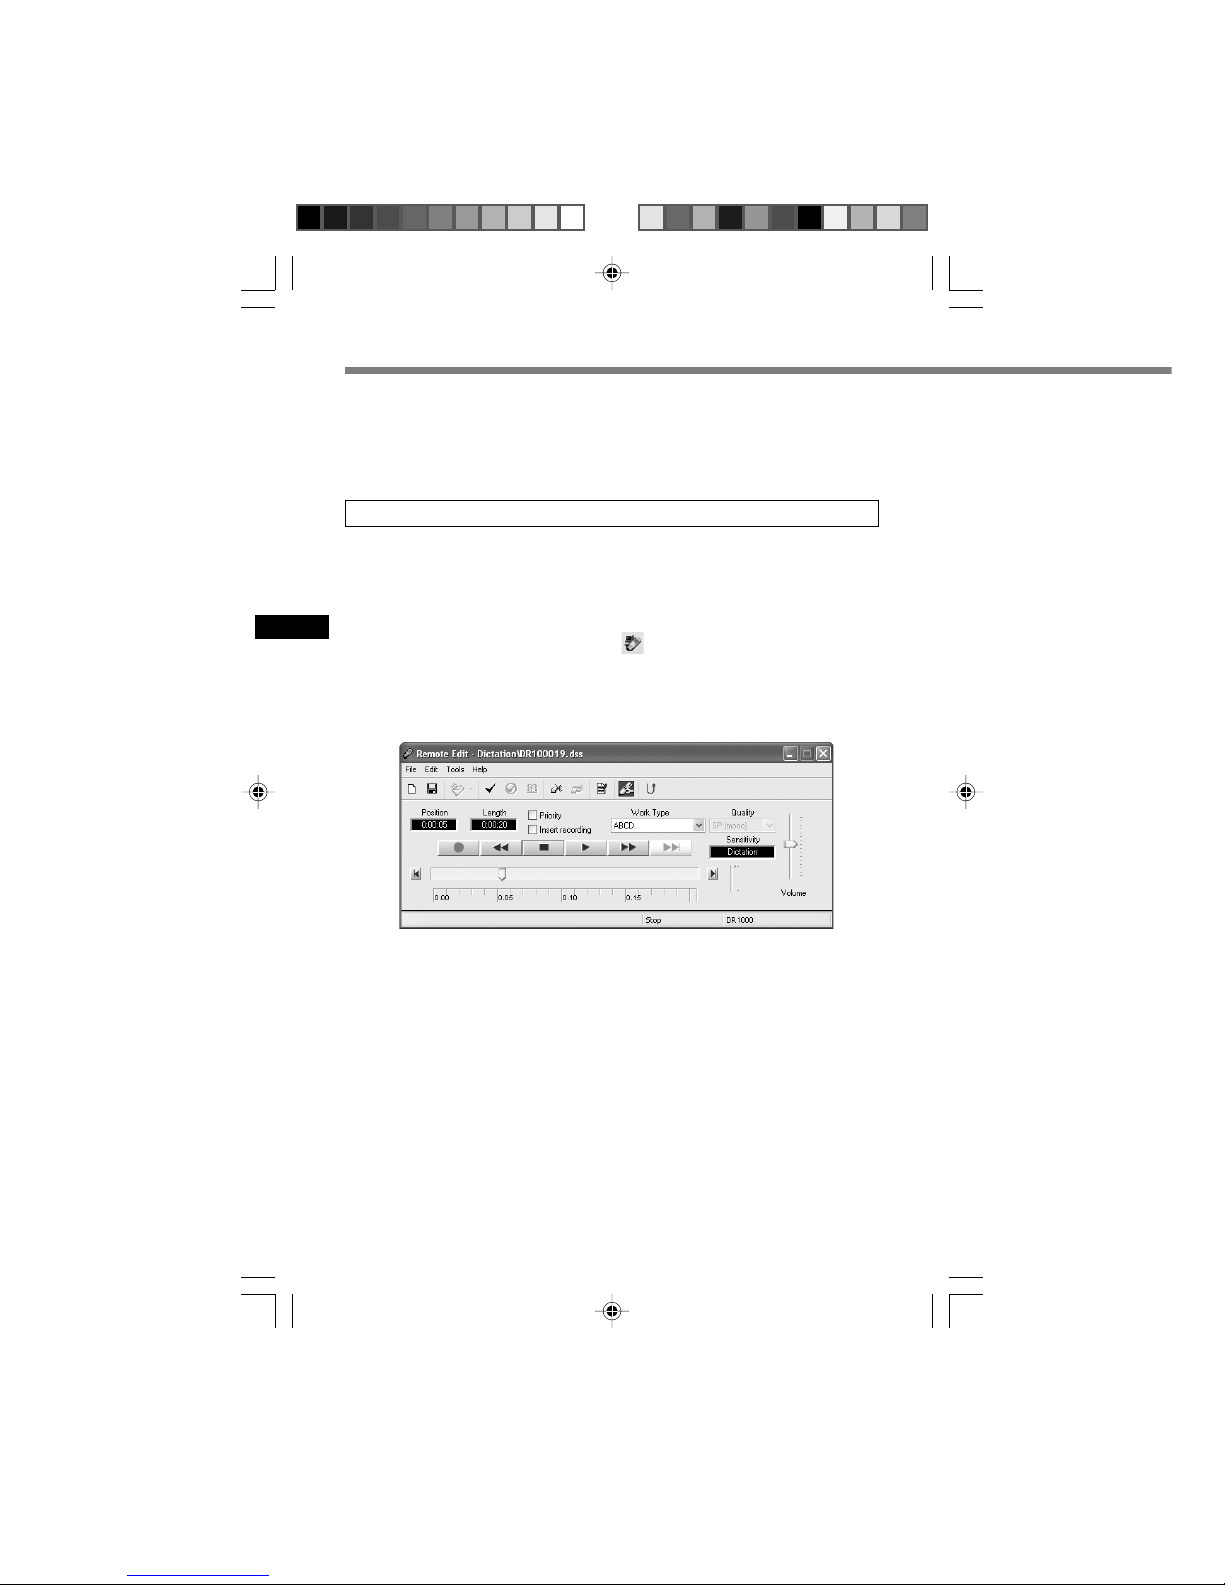
Using the Remote Edit Window
Starting the [Remote Edit] window for the DSS Player main window
1
Ensure Directrec is properly connected to your PC and then start
the DSS Player.
DSS Player main window appears.
2
From the DSS Player main window, click the [File] menu, then
select [New File...], or click the icon.
[Remote Edit] window appears.
3
Directrec button functions are completely supported when the
[Remote Edit] window is open.
......................................................................................................................................
Notes
• Ensure that the [Remote Edit] window is open when you use Directrec, or the remote
control will not function.
• The [Remote Edit] window can also be displayed without opening the main menu when
starting the DSS Player (☞P.13).
For enjoyable recording experience, use Directrec with the DSS Player
software to record to your PC. The DSS Player can be configured to
provide you with complete remote control over your recording session
from the Directrec without the use of the PC mouse.
13
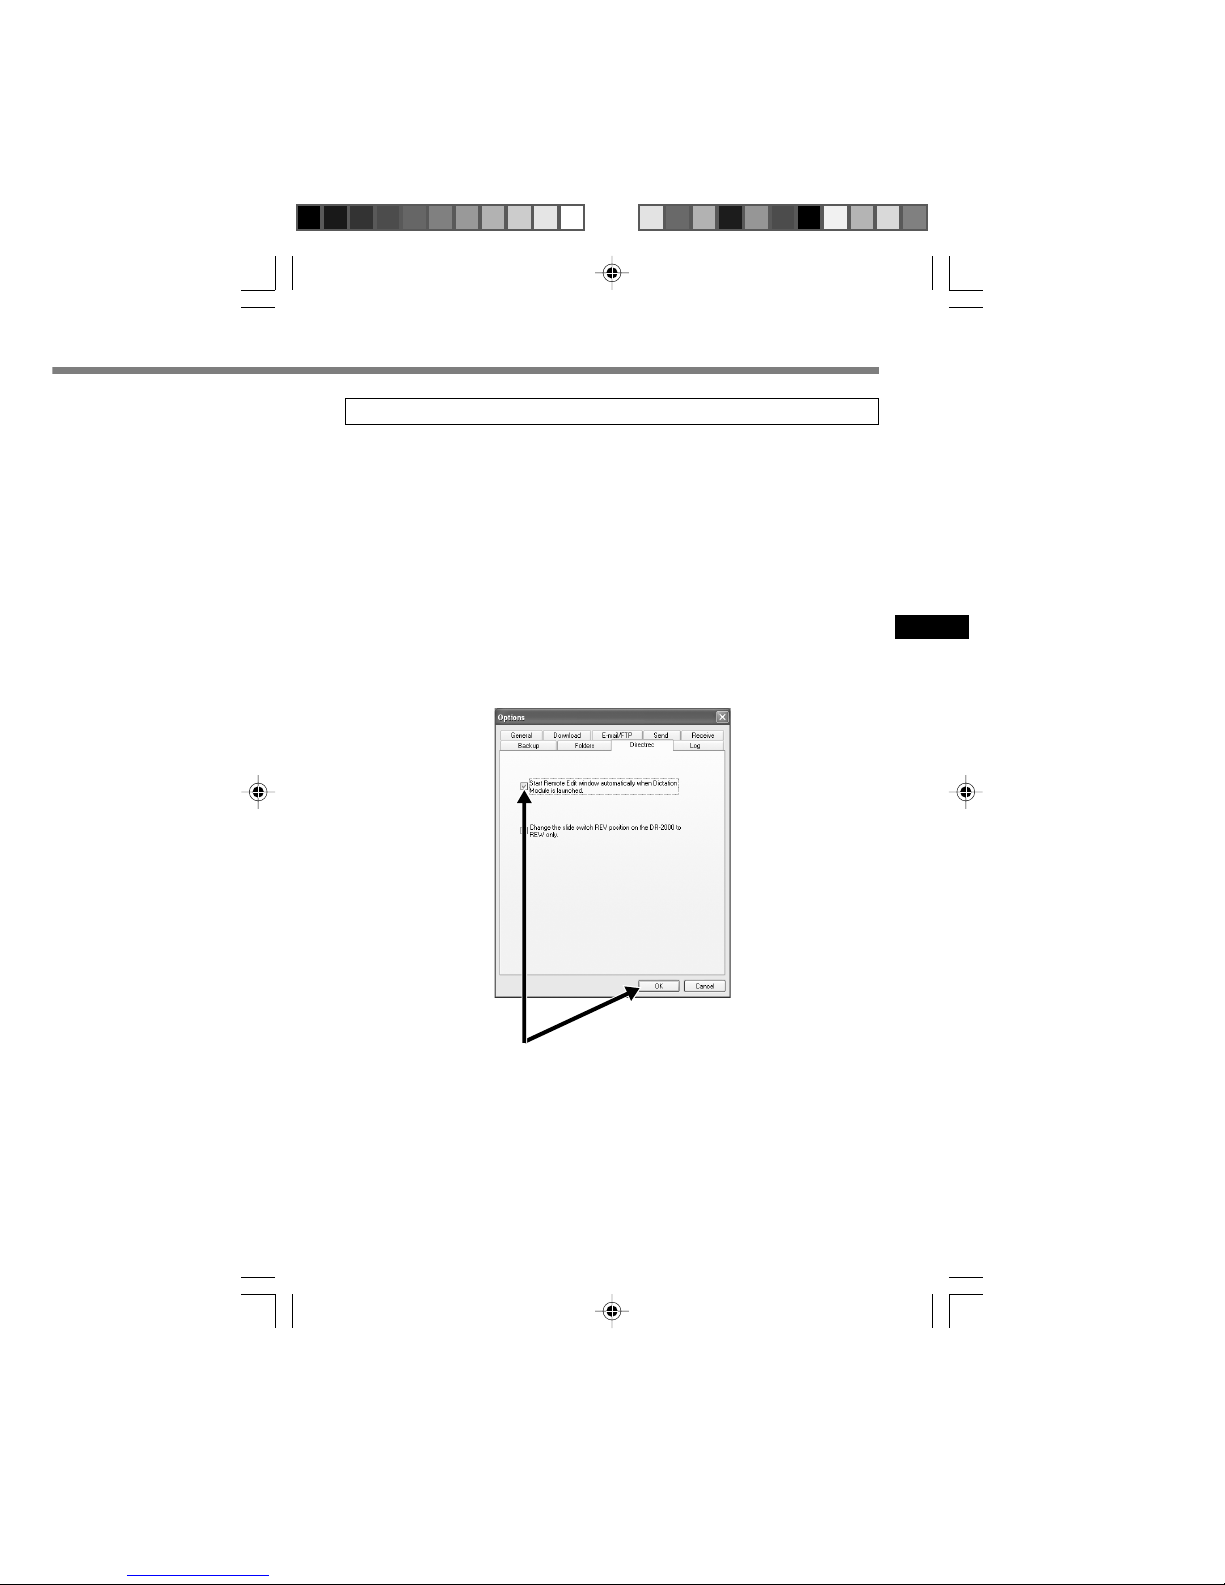
Starting the [Remote Edit] window without opening the DSS Player main window
With a push of a button on the Directrec, you can set your PC to open
the [Remote Edit] window directly without entering the DSS Player main
window.
1
From the DSS Player main window, click the [Tools] menu, select
[Options...], then click the [Direct Dictation] tab.
2
Check [Start Remote Edit window automatically when Dictation
Module is launched] and then click the [OK] button.
The pre-settings are now complete.
When pre-settings are checked, the computer recognizes the Directrec device
connection as the DSS Player starting, and opens the [Remote Edit] window
without opening the main application window (☞P. 11 ) .
2
14
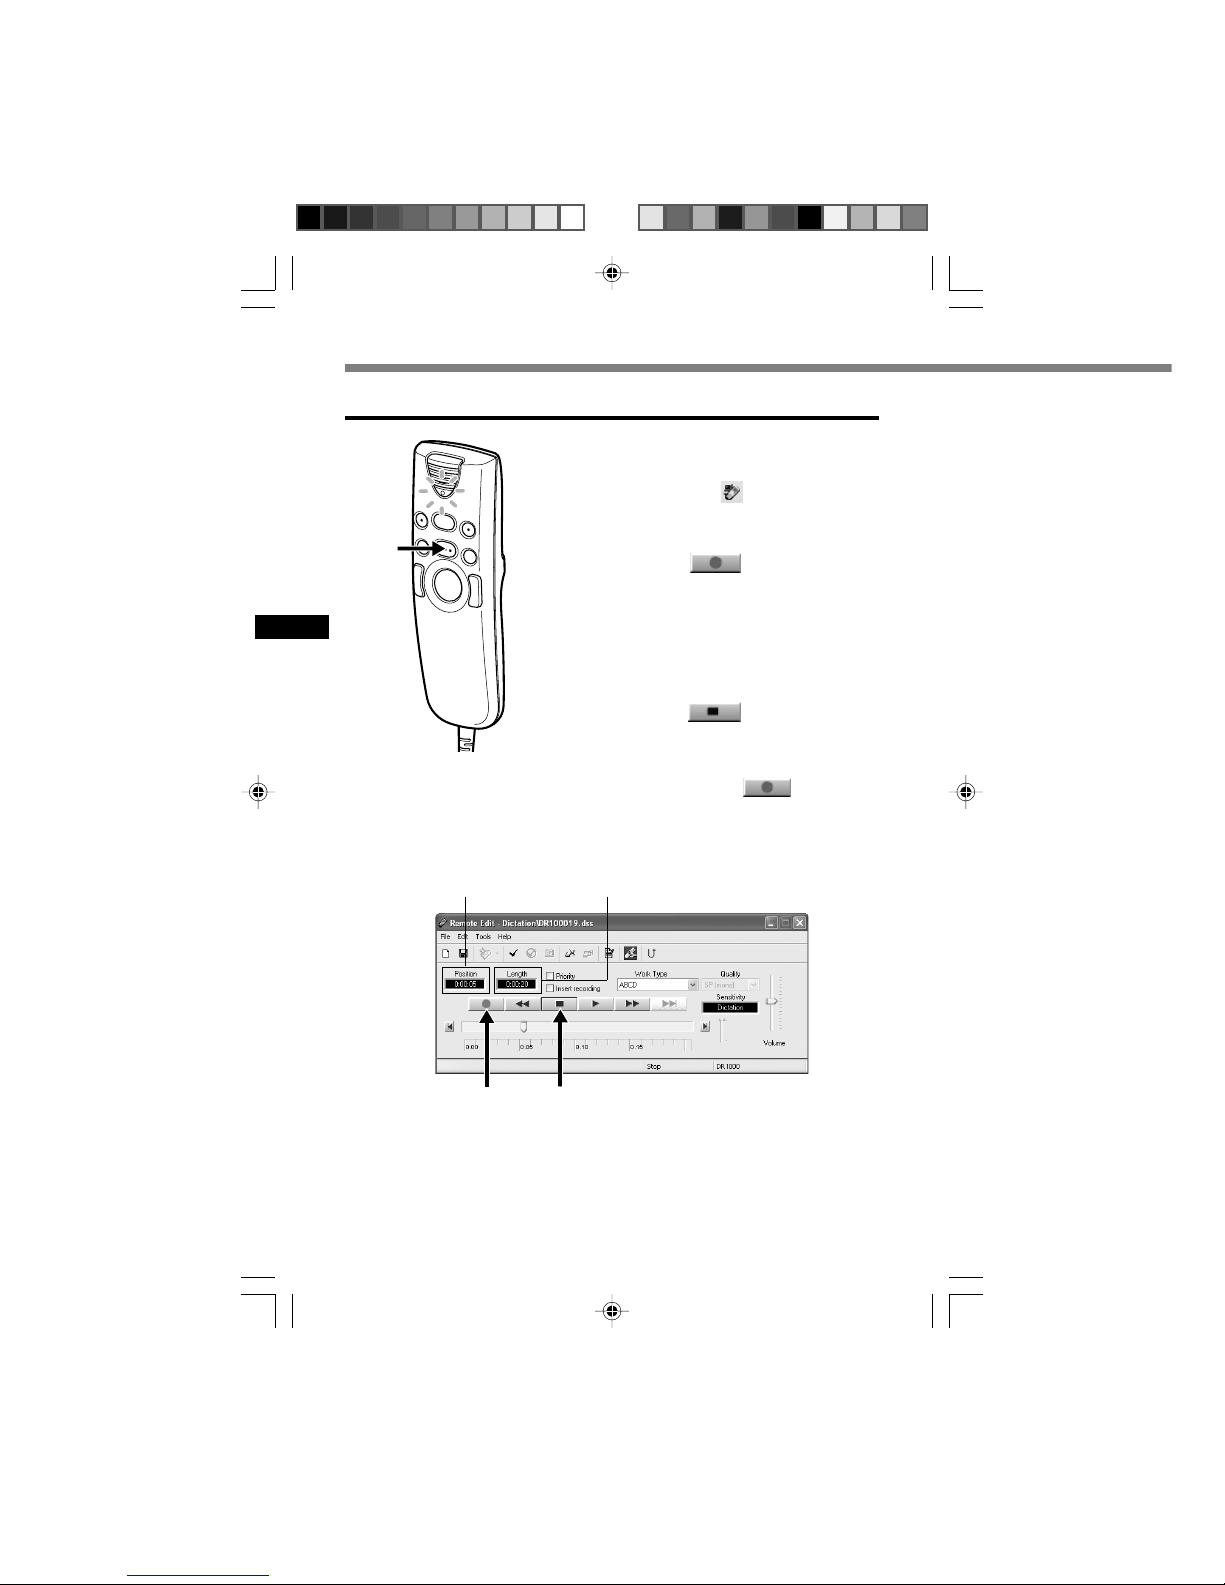
Direct Recording
1
From the DSS Player main window,
click the [File] menu, then select [New
File], or click the icon.
[Remote Edit] window appears.
2
Press the REC button on the Directrec
or press the (Record) button
in the [Remote Edit] window to start
recording.
The red record/play indicator light on
Directrec will become lit. Point the microphone at the sound source.
3
Press the REC button on the Directrec
or press the (Stop) button in
the [Remote Edit] to stop recording.
If you want to append additional recordings
to the same file, Press the REC button on
the Directrec or press the button again.
New Recording
2,3
Current recording
time
Remaining recording
time
2 3
15
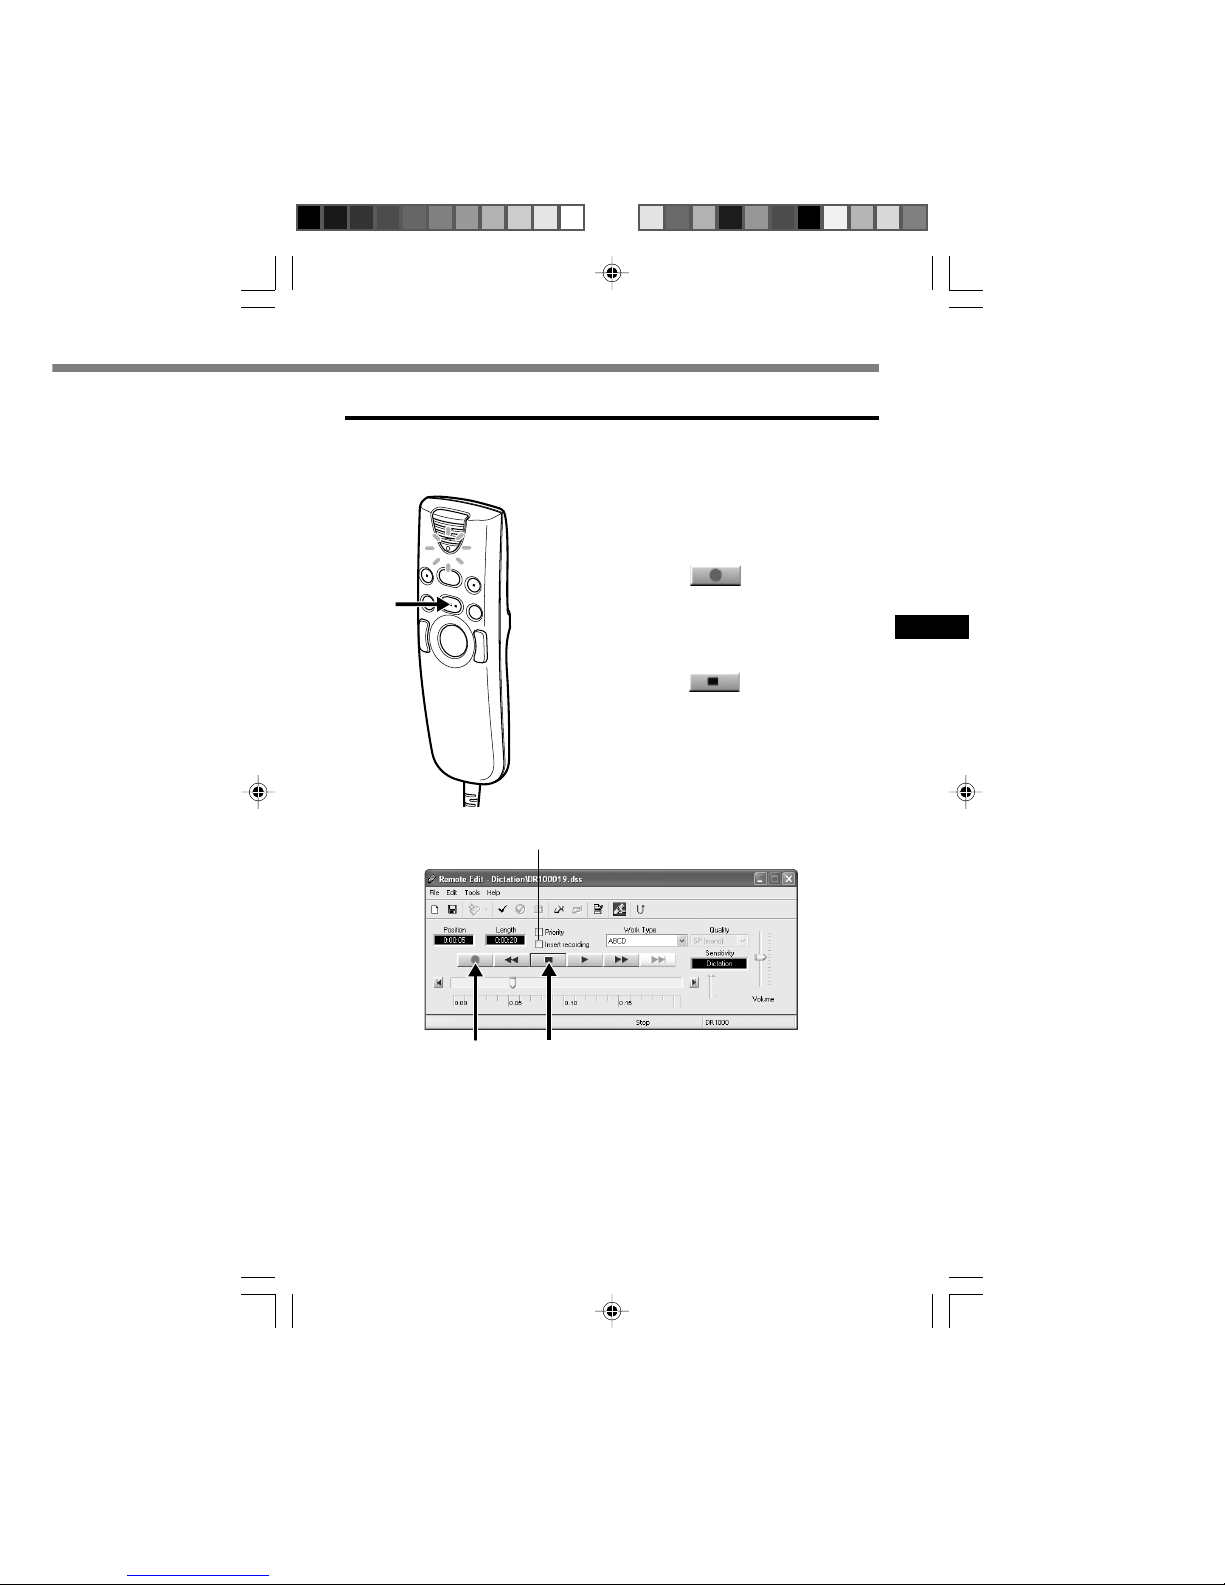
Overwrite Recording
You can overwrite a previous recording from any point within the file.
Note that the overwritten recordings will be premanently erased.
1
Make sure you are at the starting point
of the recording to be overwritten.
2
Press the REC button on the Directrec
or press the
(Record) button
in the [Remote Edit] window.
The record/play indicator light on the Directrec
will light up and Overwrite Recording will start.
3
Press the REC button on the Directrec
or press the (Stop) button in
the [Remote Edit] window to stop
overwriting.
......................................................................................................................................
Notes
• Ensure that the “Insert recording” box (☞P.16) in the [Remote Edit] window is not checked
or the overwrite recording will not proceed.
• You cannot select a different recording mode (SP, LP) than that of the original file before
overwriting a recording.
2,3
2 3
Do not check here.
16
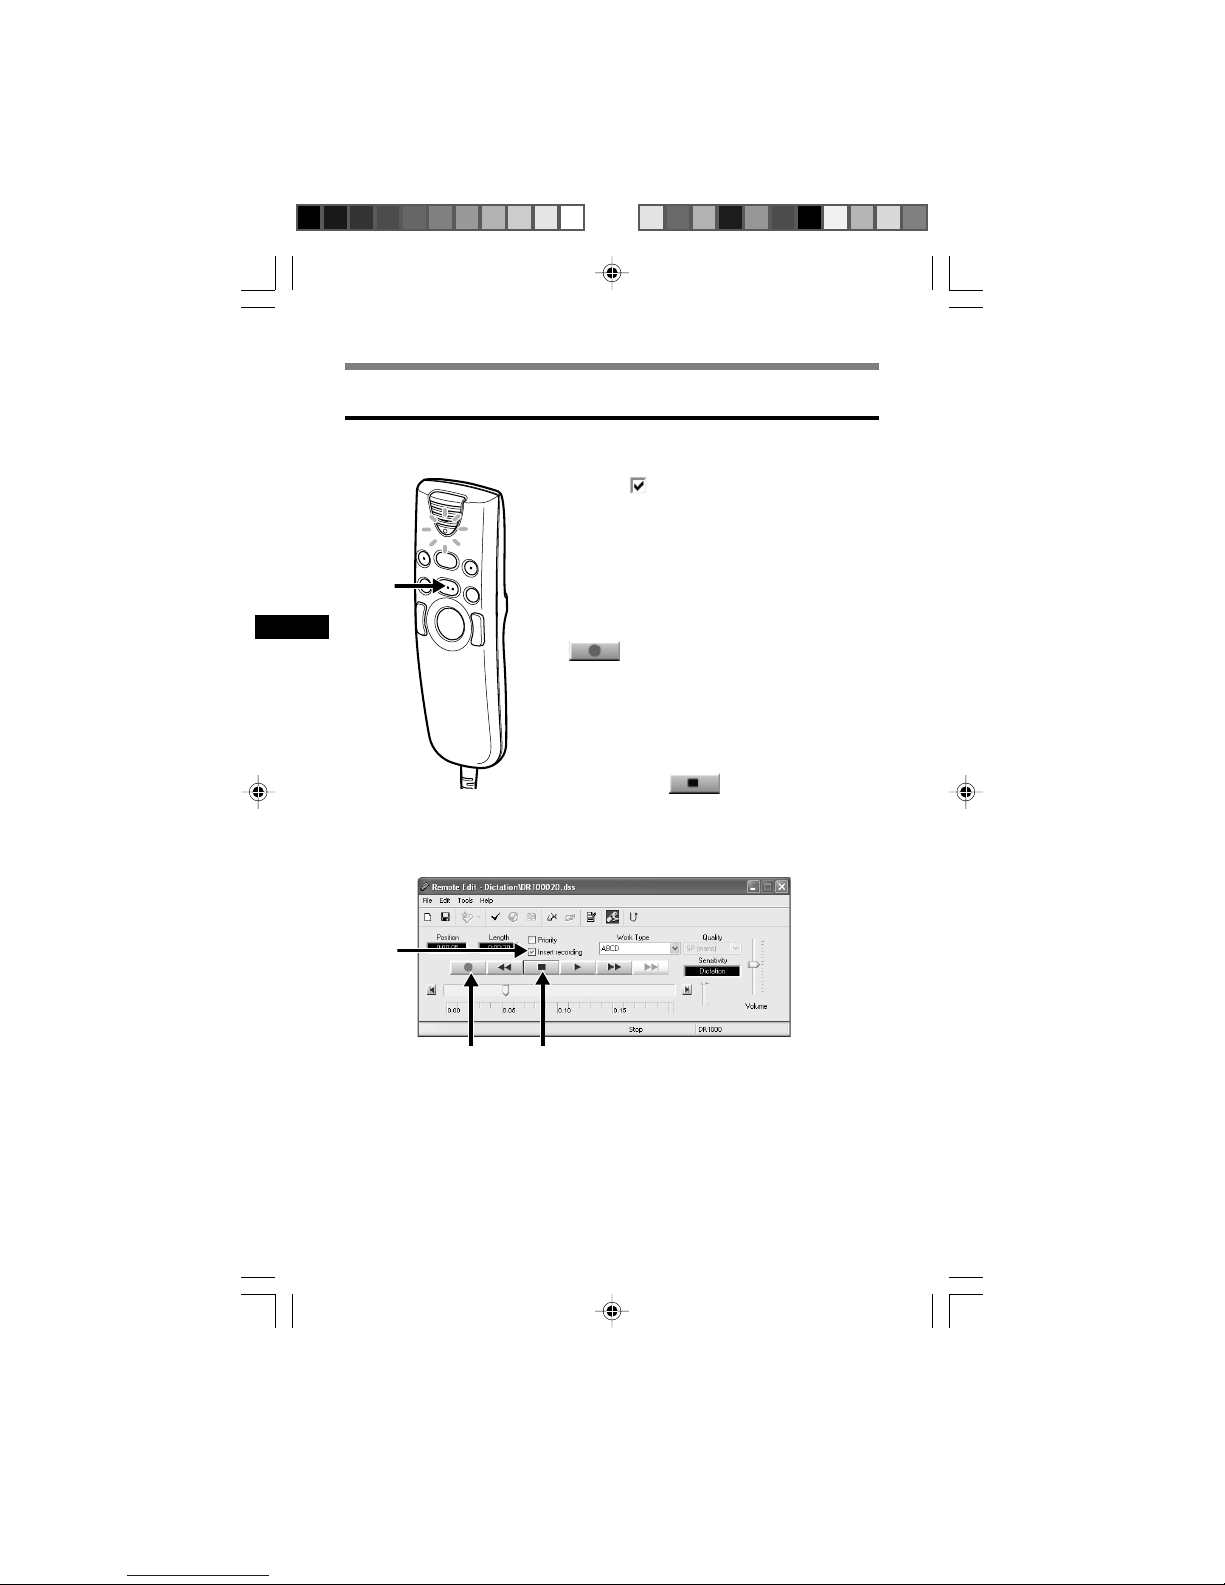
Insert Recording
Additional recording can be inserted into a previously recorded file.
1
Check ( )“Insert recording” box in the
[Remote Edit] window.
2
Make sure you are at the right position
in the file where recording insert
should take place.
3
While playing the file, press the REC
button on the Directrec or press the
(Record) button in the [Remote
Edit] window to start inserting an
additional recording.
The red record/play indicator light on Directrec
will become lit.
4
Press the REC button on the Directrec
or press the (Stop) button in the
[Remote Edit] window to the stop
inserting the additional recording.
3,4
......................................................................................................................................
Notes
• Ensure that the “Insert recording” box in the [Remote Edit] window is checked or the
recording will not be inserted.
• You cannot select a different recording mode (SP, LP) than that of the original file before
overwriting a recording.
Direct Recording
3
4
1
17
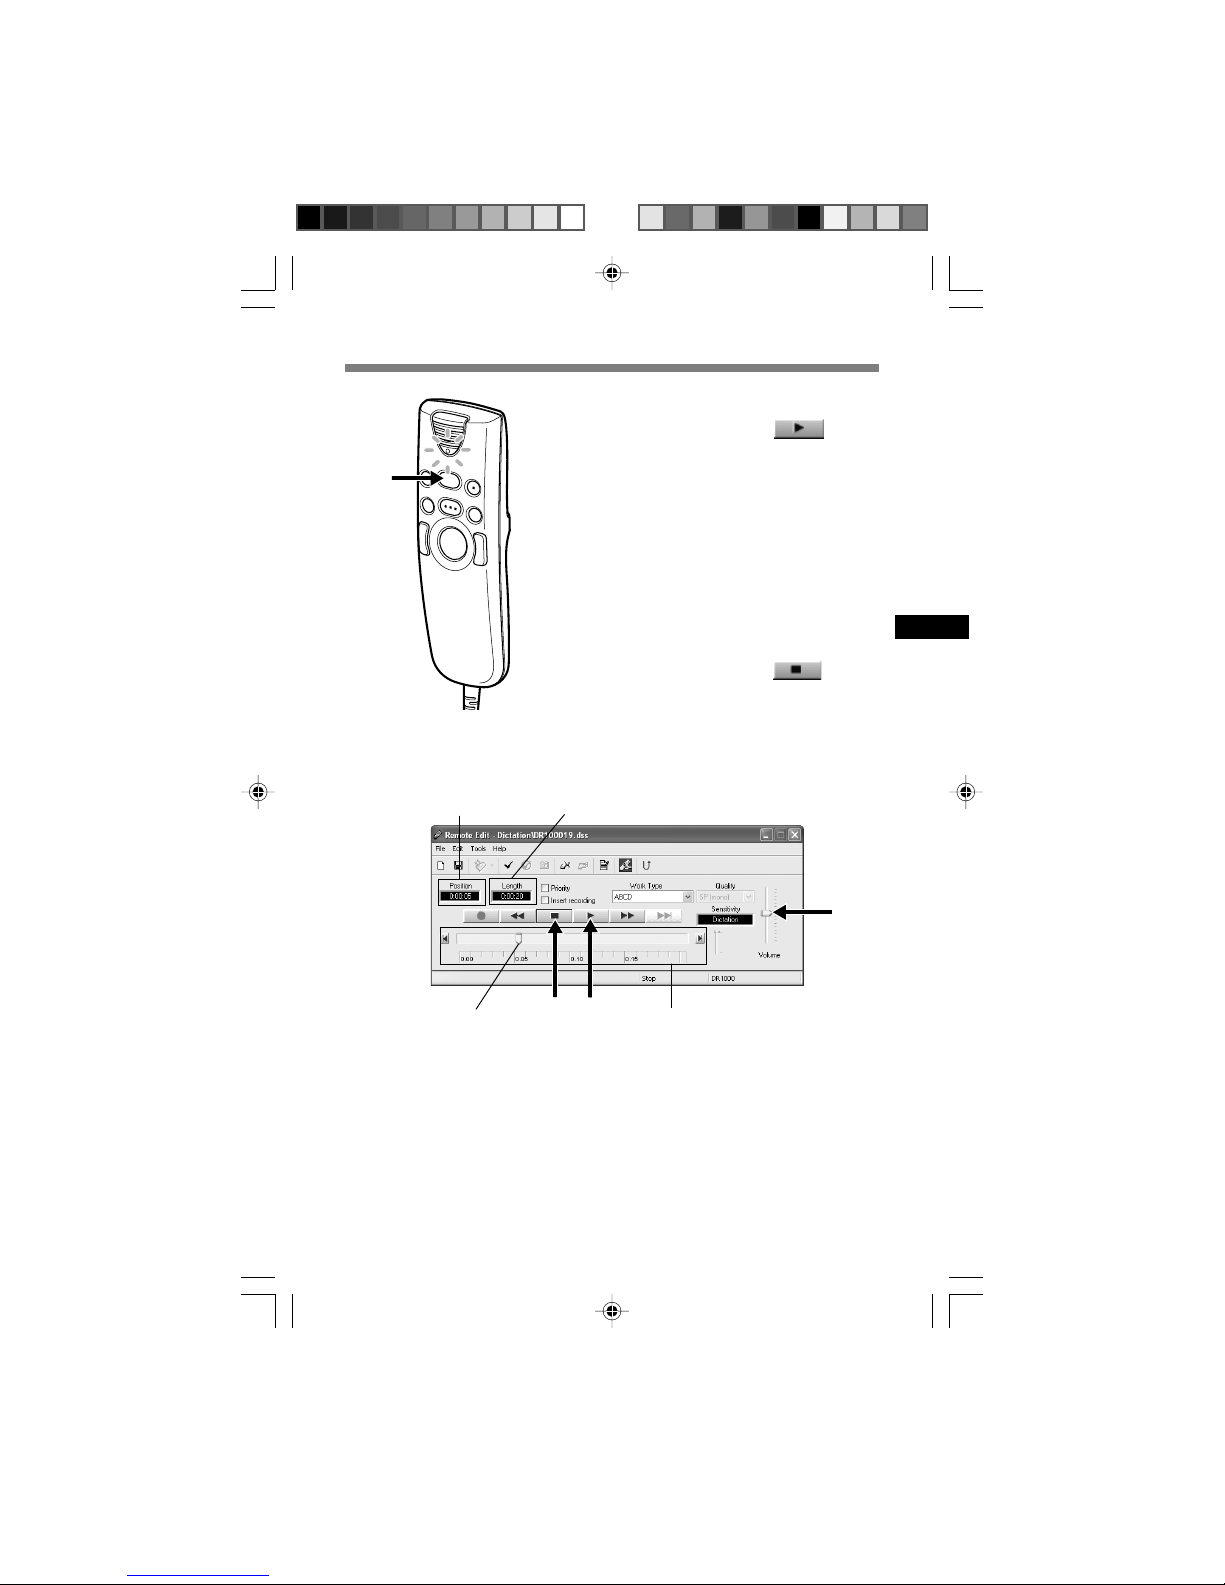
Playback (Playing a Dictation File)
1
Press the PLAY button on the
Directrec or press the (Play)
button in the [Remote Edit] window
to start playback.
The green record/play indicator light on
Directrec will become lit.
2
Adjust the volume slider in the
[Remote Edit] window to the required
level.
The recording will be played through the
Directrec speaker.
3
Press the PLAY button on the
Directrec or press the (Stop)
button in the [Remote Edit] window
at any point you want to stop the
playback.
1,3
2
3 1
Playback slider
Shows the current
playback position
Time axis
Current playback
time
Total recording time of
the file being played
18
Playback functions
Operation
Press the FF button once while
stopped.
Press the REW button once while
stopped.
Hold the FF button while stopped or
playing a file.
Hold the REW button while stopped
or playing a file.
How to Cancel
Press the PLAY button.
➥ The Directrec starts the
operetion of the set position.
Release the FF button.
Release the REW button.
Playback
functions
Fast Forward
(FF)
Rewind (REW)
Cue (CUE)
Review (REV)
• Please refer to our Online Help for further information about Directrec functions and controls
(☞P. 8 ).
Various functions are available with Directrec and the [Remote Edit]
window to playback a recorded file.
Directrec playback functions
Operation
Press the button once while
stopped.
Press the button once while
stopped.
Hold the button while stopped
or playing a file.
Hold the button while stopped
or playing a file.
How to Cancel
Press the button.
➥ Recorded file will play
again.
Release the button.
Release the button.
Playback
functions
Fast Forward
(FF)
Rewind (REW)
Cue (CUE)
Review (REV)
Functions using the [Remote Edit] window
Playing (Playing a Dictation File)
19
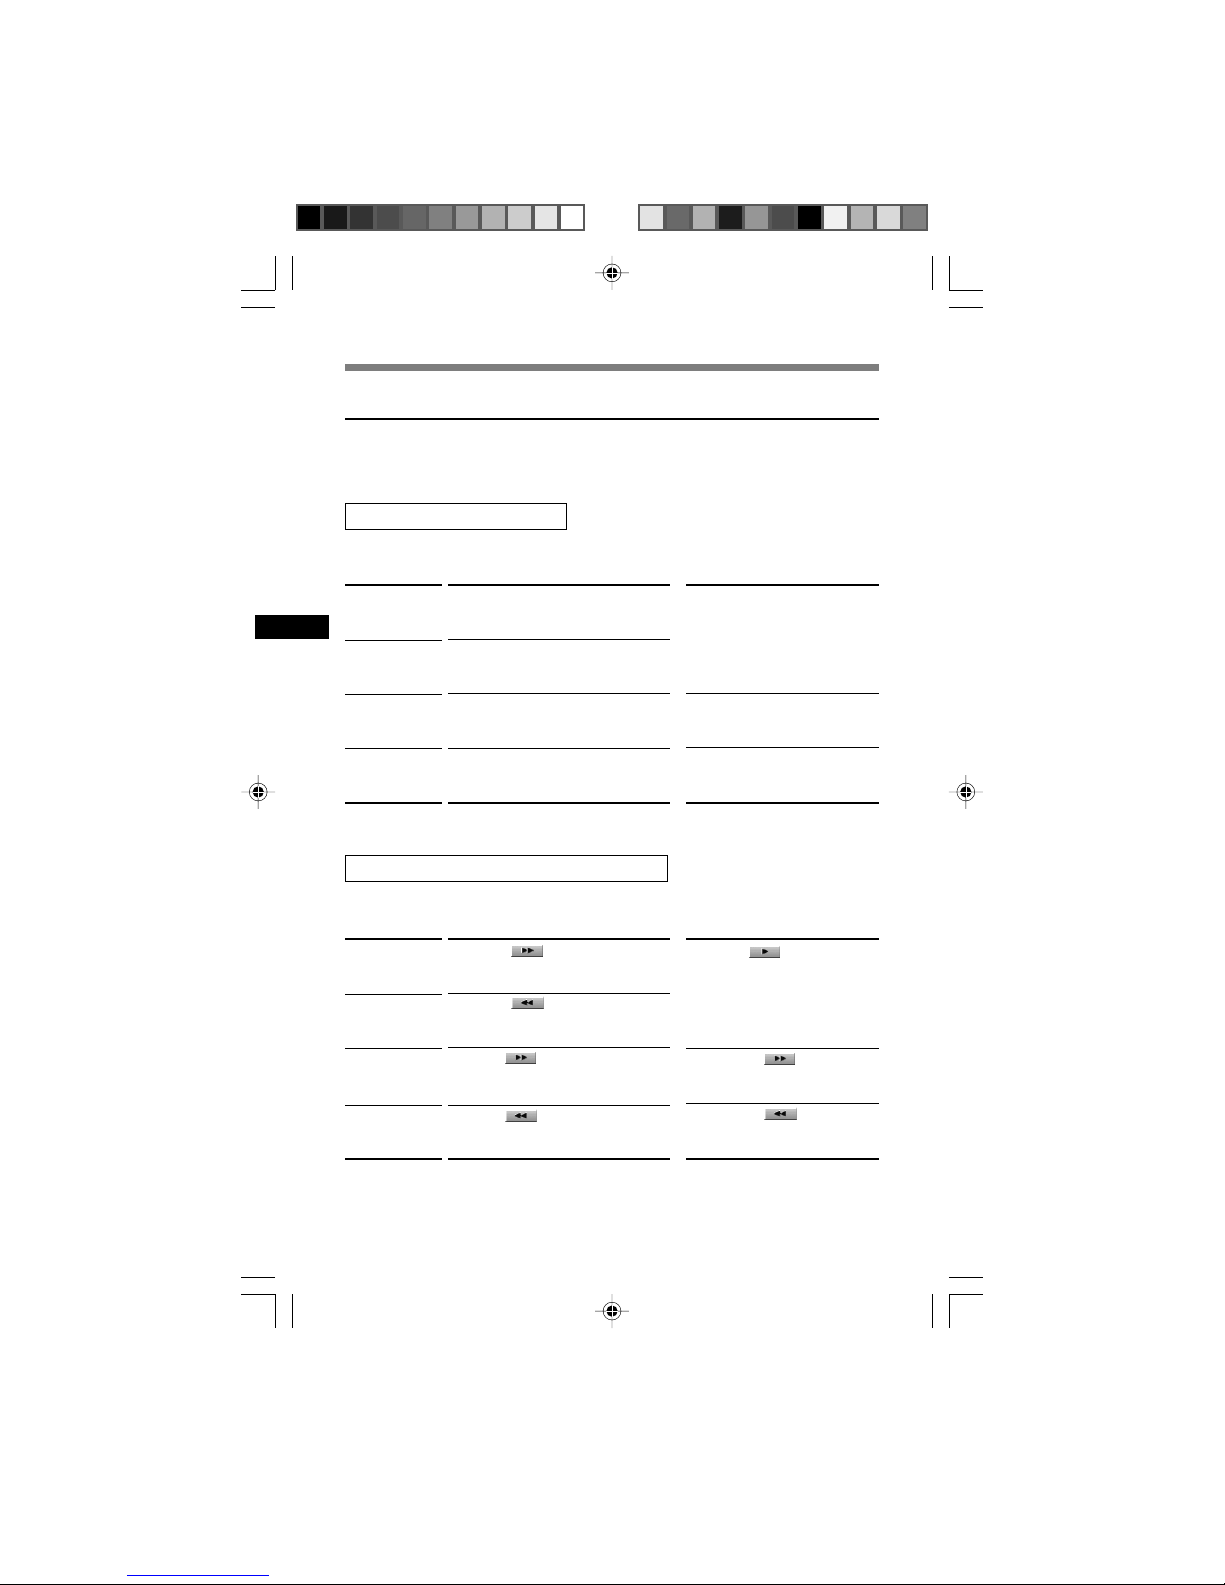
Save Recording
2,3
File number ........ A serial number automatically assigned by the DSS Player.
The ID that has been set on the Directrec. The default name on the Directrec is
“DR_1000”. The user ID can be modified with DSS Player (☞P.25-27).
File names are assigned in the following manner.
File Name Format
DR_1 0001.dss
Extension
1,4
1
To save the current recording, press
the REC button on the Directrec or
press the
(Stop) button in the
[Remote Edit] to stop recording.
2
Either press the NEW button on
Directrec or click the icon on the
toolbar in the [Remote Edit] window.
[File Save] window will appear to save the
data.
3
To save the file, either press the NEW
button on the Directrec or click the
[Save] button on the [Remote Edit]
window.
The recorded data will be saved.
4
The Directrec is now available for
recording on a new file, press the REC
button on the Directrec or press the
(Record) button in the [Remote
Edit] window to start recording.
3
20
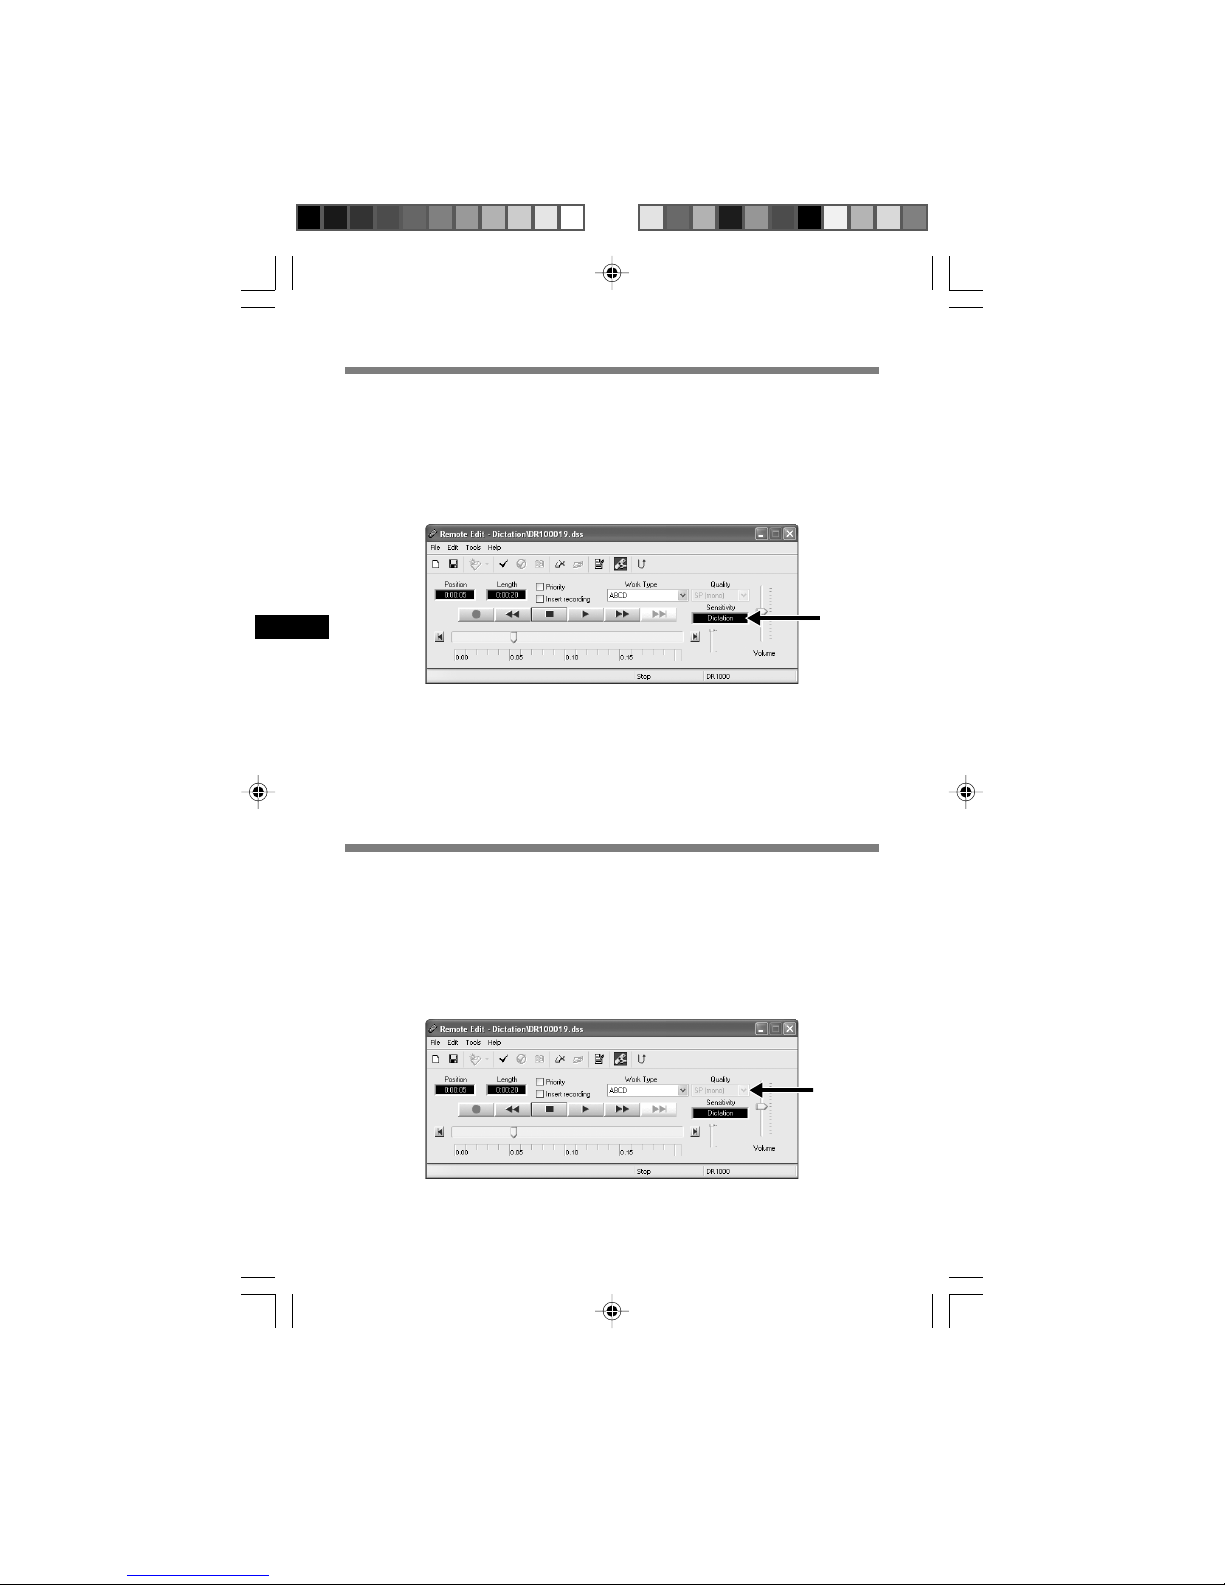
Microphone sensitivity is adjustable to meet recording needs.
Microphone Sensitivity
Two recording modes are available with the Directrec. SP (standard
recording) and LP (long-term recording).
Recording Modes
1
Select from the “Sensitivity” box either “Dictation” or
“Conference” in the [Remote Edit] window.
Conference:
The high-sensitivity mode suitable for recording the ambient sounds.
Dictation: The low-sensitivity mode suitable for recording dictation.
......................................................................................................................................
Note
• If you want to record clear or noise-free dictation, select Dictation mode and place the
microphone 5 to 10 cm (2 to 4 inches) from the source.
1
Select from the “Quality” box either “SP (mono)” or “LP (mono)”
in the [Remote Edit] window.
SP: Default recording mode.
LP:
Can record in a smaller file size with the same recording time as the SP mode.
......................................................................................................................................
Note
• Choose SP mode for recording meetings or lectures with crisp clarity.
1
1
21
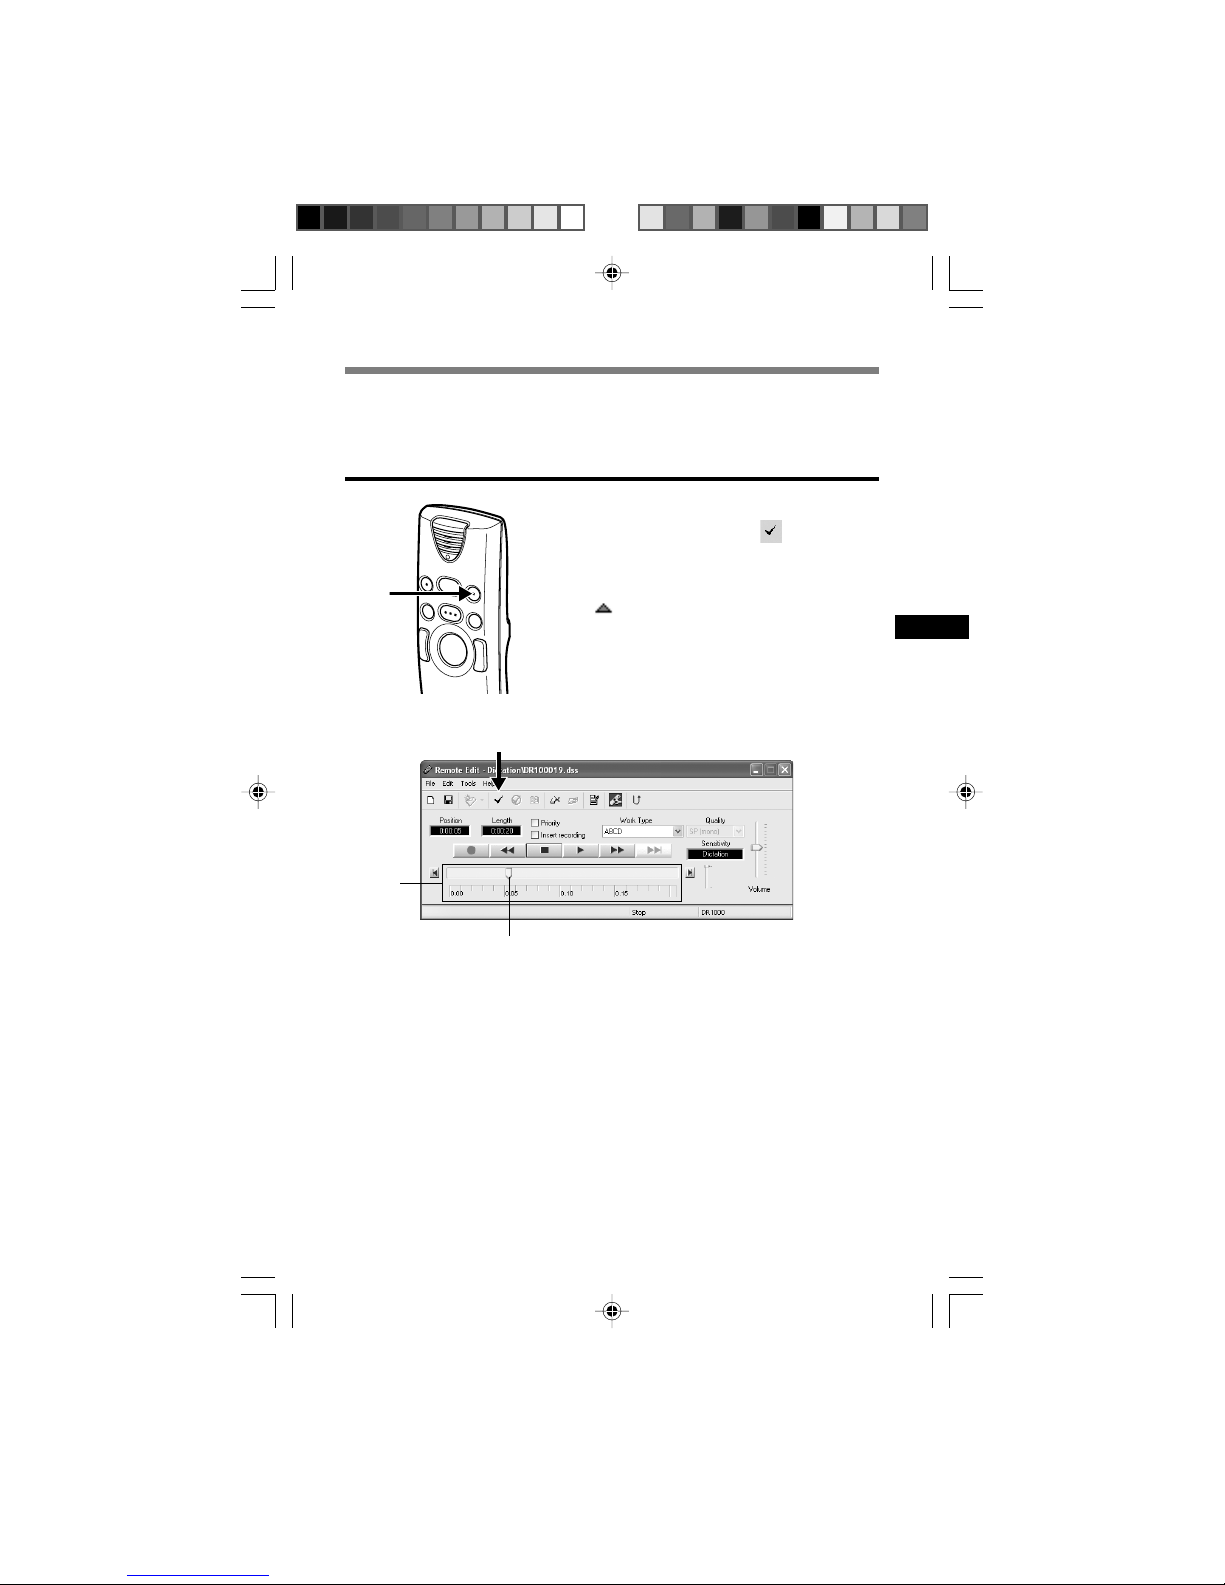
Index marks can be placed in a file during recording or playback to
provide a quick and easy way of identifying important sections in the file.
Index Marks
Setting an Index Mark
......................................................................................................................................
Notes
• Up to 16 index marks can be set in a file.
• Index marks cannot be set or cleared in a locked file. Please see the Online Help for
further details (☞P. 8 ).
1
1
Either press the A button on
Directrec, or click the icon on the
toolbar in the [Remote Edit] window
while recording or playing.
Index Mark will now be set.
A icon will appear on the time axis bar in
the [Remote Edit] window.
The index mark can also be set by selecting
[New Index Mark] in the [Tools] menu.
1
Time axis
Playback slider
Displays the current
position of playback or
recording.
22
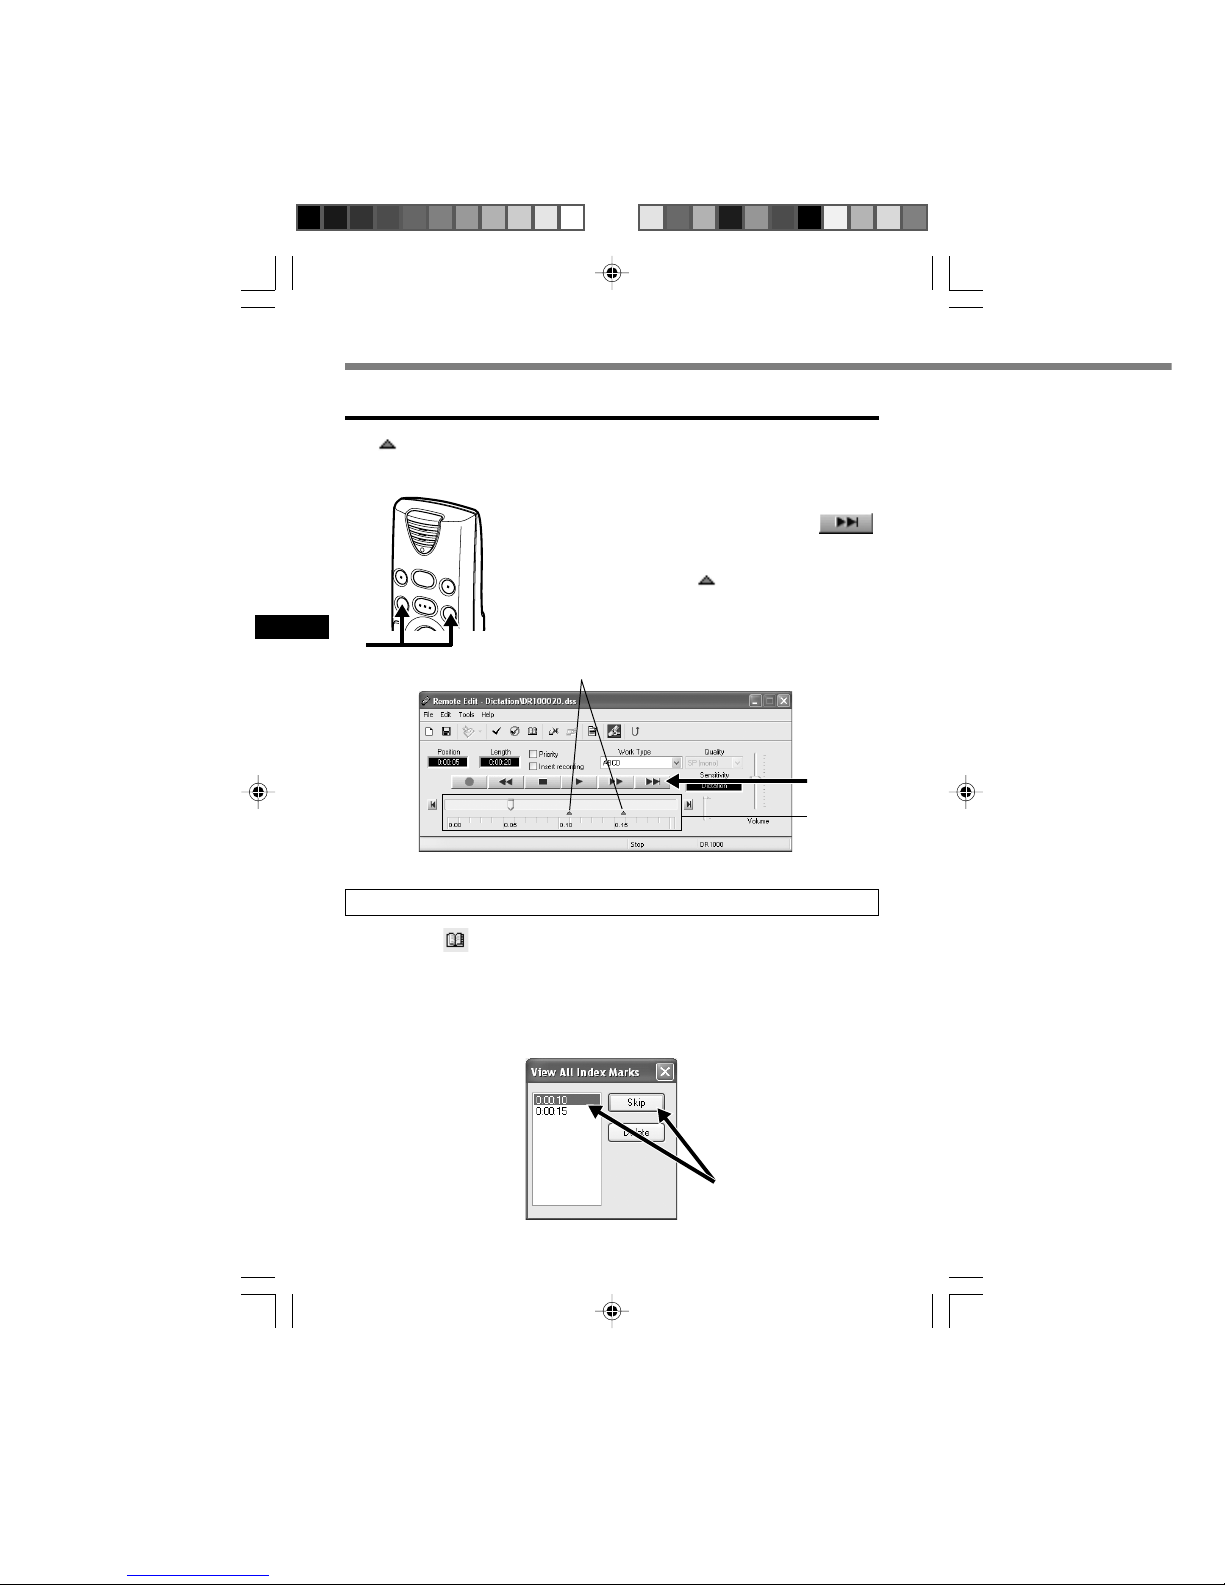
Index Marks
1
1
Either press FF or REW button on
Directrec twice, or click the
button on the [Remote Edit] window.
The Playback slider will automatically jump
to the Index Mark( ) position.
Locating an Index Mark
The icon on the time axis bar in the [Remote Edit] window indicates the
position of the Index Mark. To jump to a marked position follow this procedure.
1
Click the icon on the toolbar in the [Remote Edit] window.
Or, select [View All Index Marks...] in the [Tools] menu.
The [View All Index Marks] window will appear.
2
Select the marked position you want to jump to and click [Skip].
Directrec will jump to the selected Index Mark position.
Using the [View All Index Marks] window to jump to the Index Mark
Position of the Index Mark
1
Time axis
2
23
1
Locate the index mark you want to clear.
2
Click the icon on the toolbar in the [Remote Edit] window.
Or, select the [Delete Index Mark] in the [Tools] menu.
The index mark is erased.
Clearing an Index Mark
......................................................................................................................................
Note
• Index marks cannot be set or cleared in a locked file. Please see the Online Help for
further details (☞P. 8 ).
24
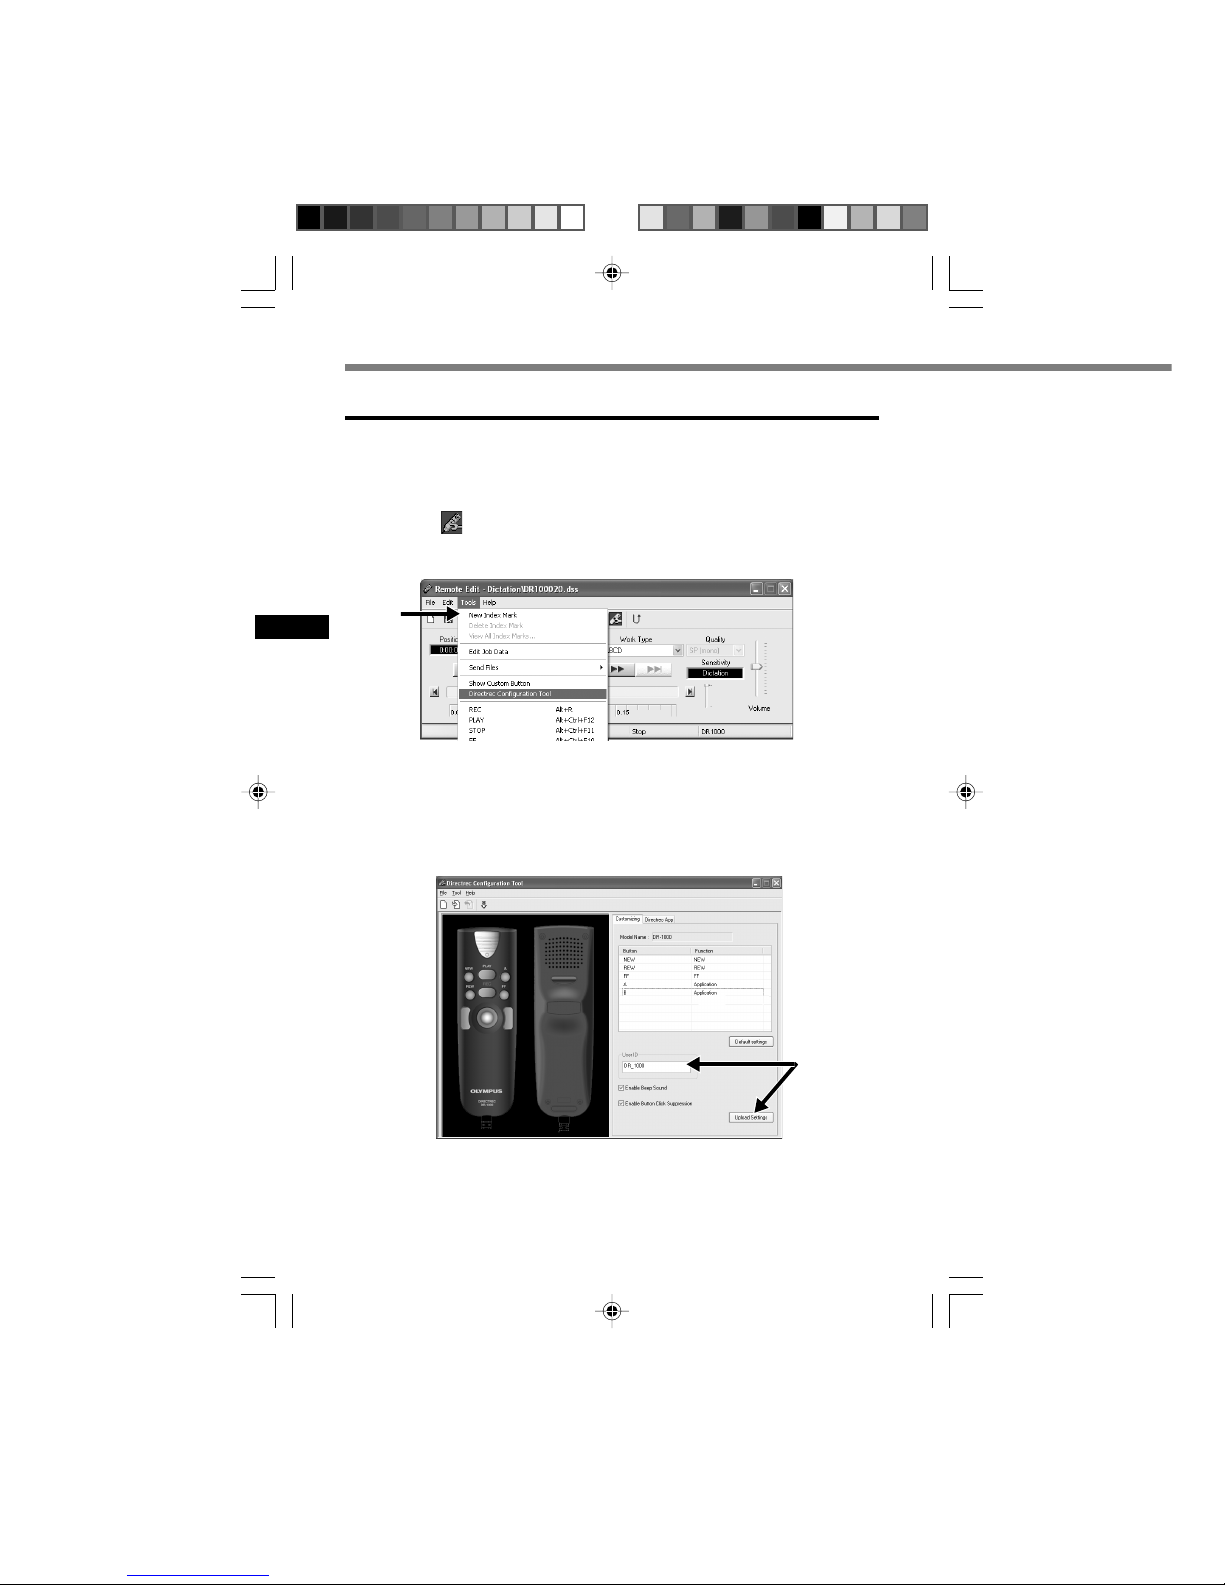
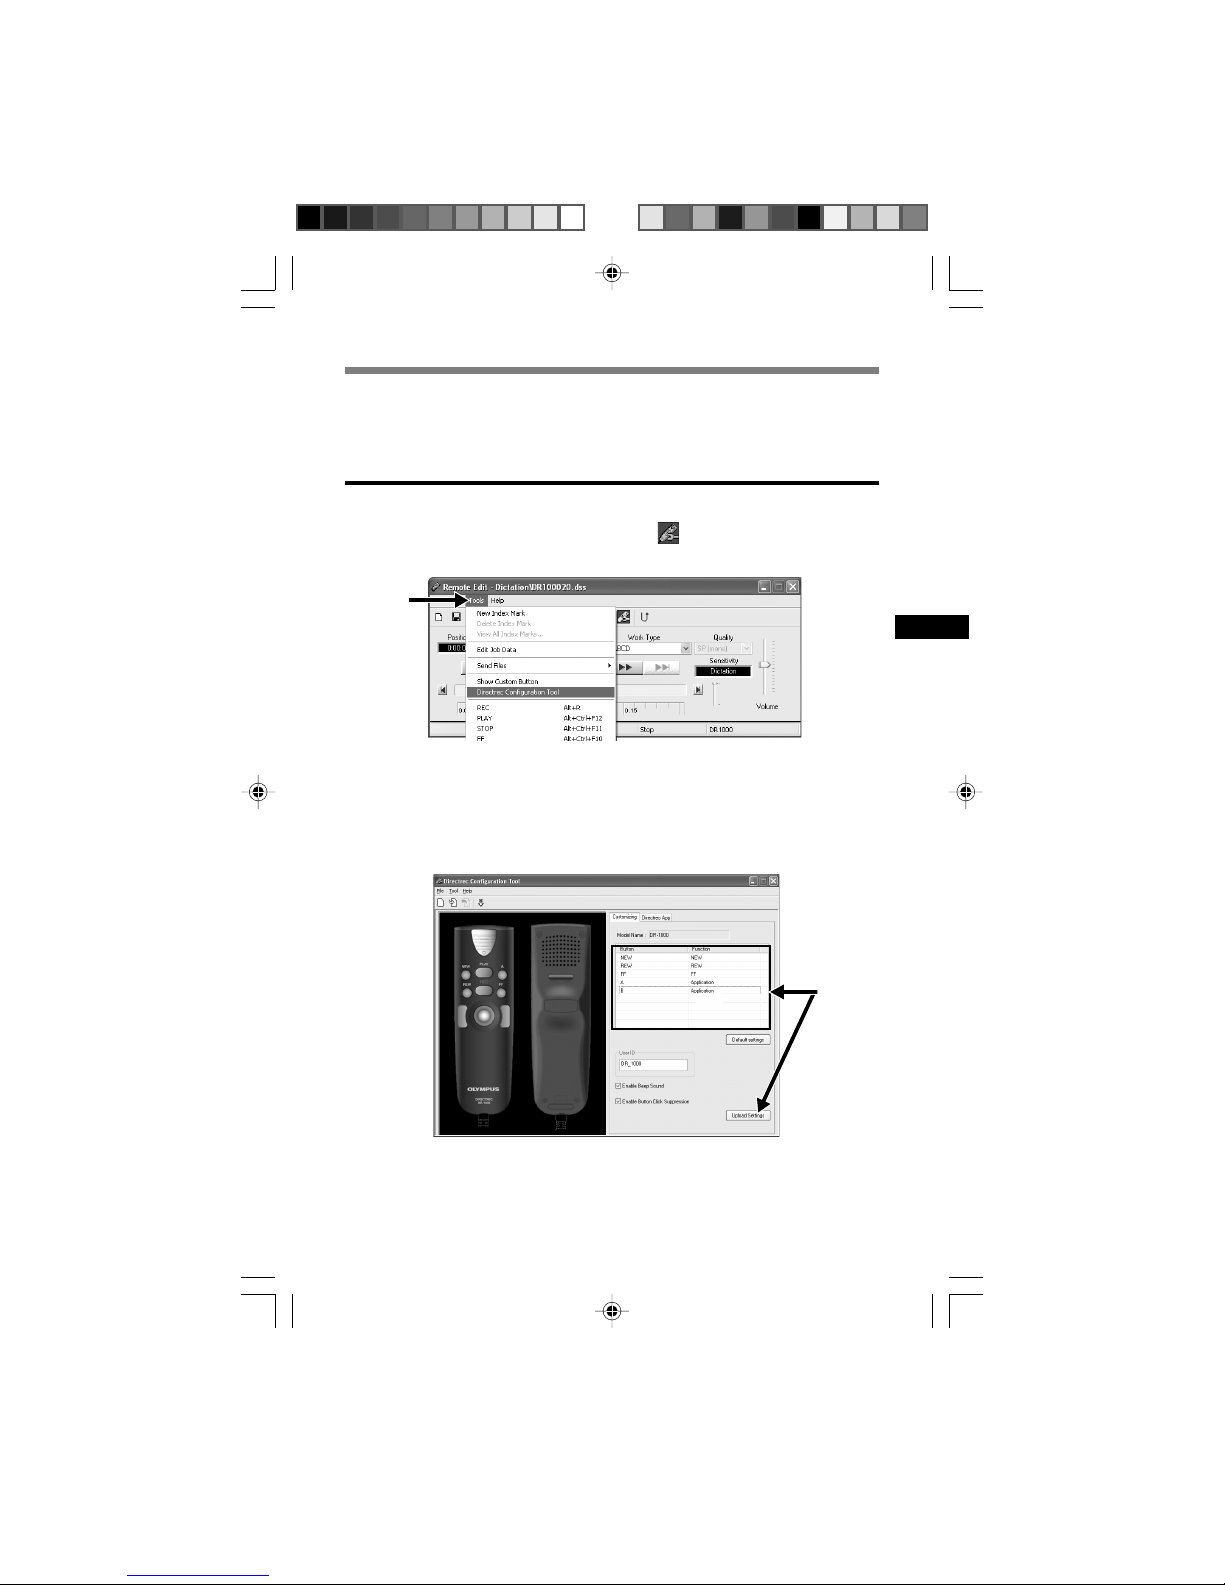
1
Click the icon on the toolbar in the [Remote Edit] window. Or,
select [Directrec Configuration Tool] in the [Tools] menu.
The [Directrec Configuration Tool] dialog box will appear.
2
Select the [Customizing] tab and check the [Enable Beep Sound]
box.
With check: System sound is On.
Without check: System sound is Off.
3
Click [Upload Settings].
The settings are now completed.
System Sounds
The Directrec beeps to alert you to button operations. System sounds
may be turned off.
1
2
3
25
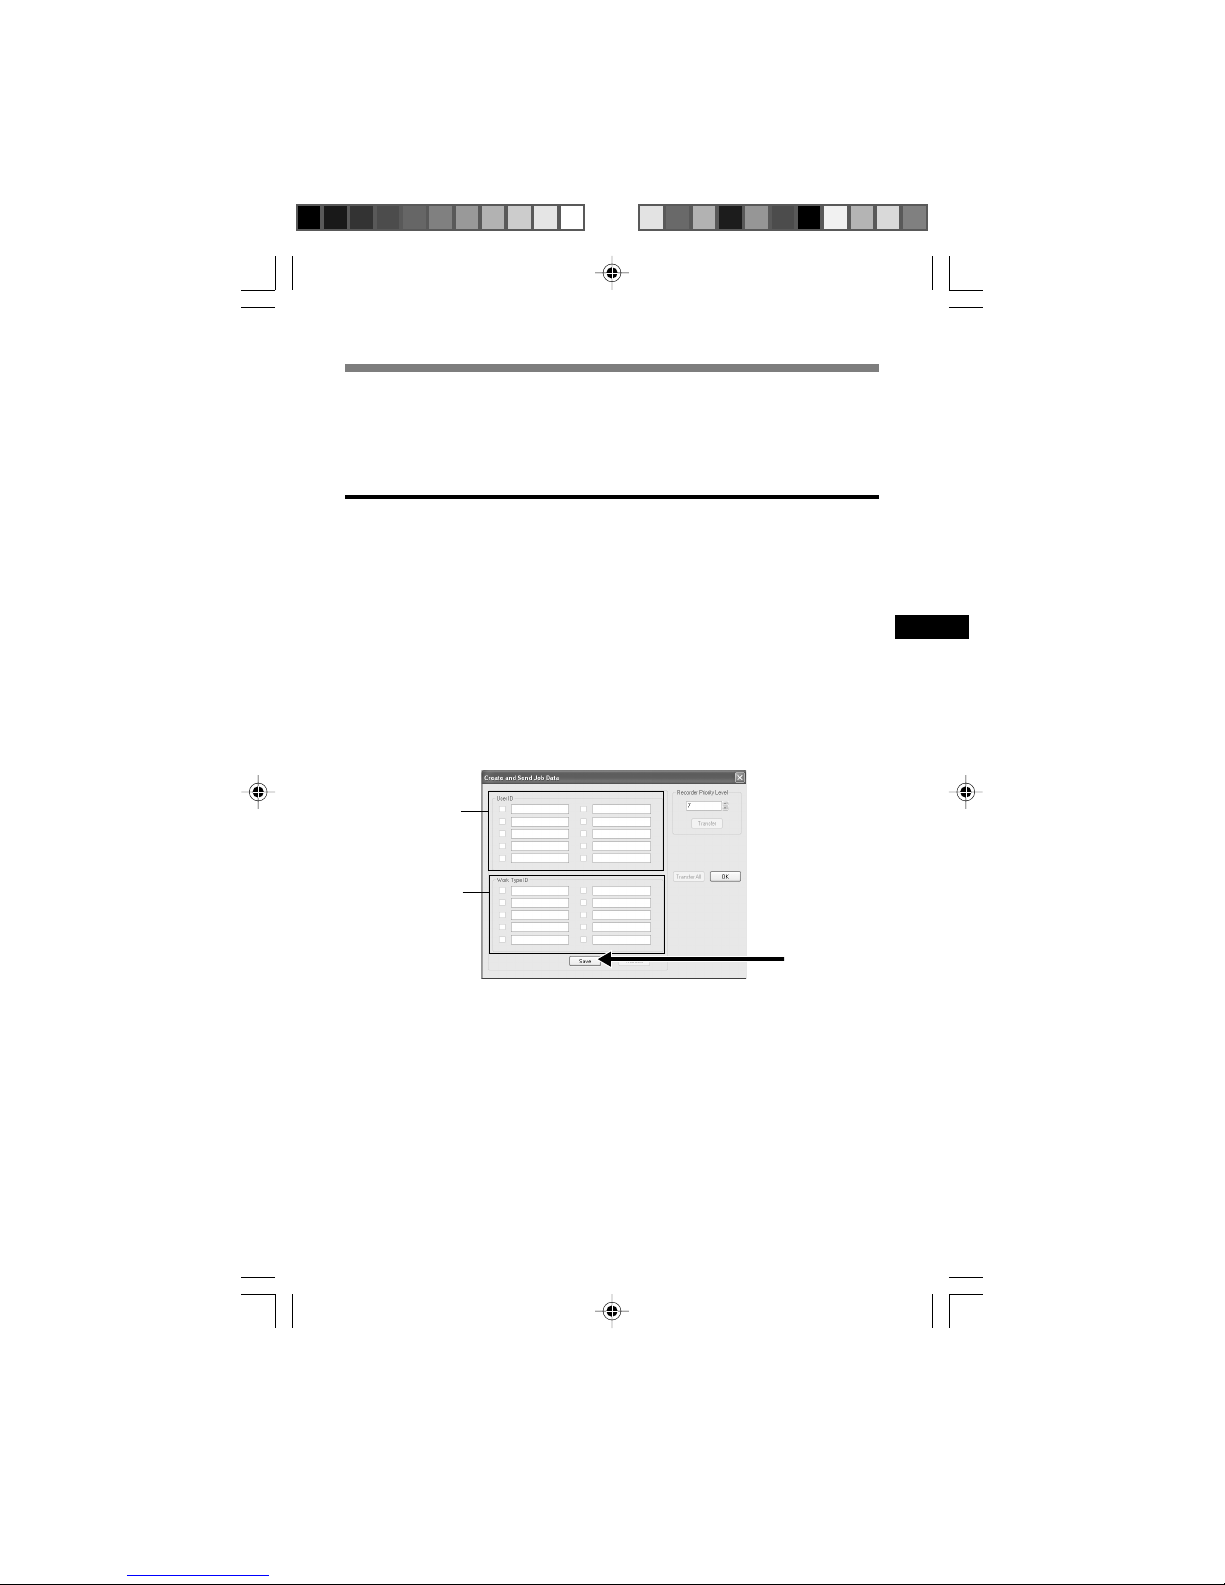
Setting Job Data
The files recorded in your PC by Directrec contain Author ID and Work
Type as header information. The details in header information can be
easily changed by using the DSS Player.
Registering Author ID and Work Type ID in DSS Player
Up to the User ID and ten Work Type ID can be registrered in the DSS
Player.
1
Ensure Directrec is not connected.
2
From the DSS Player main window, click the [Download] menu,
then select [Create & Send Job Data...].
The [Create & Send Job Data] window appears.
Enter your Author ID or Work Type ID in the field indicated by the arrow.
3
Click the [Save] button.
Author ID or Work Type ID registration is now completed.
Author ID
Work Type ID
3
26
Setting Job Data
Directrec Default User ID to Directrec
The Directrec User ID plays an essential part in the file naming process
of new recordings. The default User ID is “DR_1000”. In order to change
the default user ID, follow the procedure below.
1
Click the icon on the toolbar in the [Remote Edit] window. Or,
select the [Directrec Configuration Tool] in the [Tools] menu.
The [Directrec Configuration Tool] dialog box will appear.
2
Input your user ID into the [User ID] box and click [Upload Settings].
The input User ID will be transferred to Directrec. The ID can be any
combination of “A” to “Z”, Numeric and/or “_”, and up to a maximum of 16
letters long.
......................................................................................................................................
Note
• Never disconnect the USB access if the indicator light is flashing red. If you do so, the
data may be destroyed.
1
2

27
1
Click the icon o n the toolbar in the [Remote Edit] window.
The [Set Job Data] window will appear.
2
Select the desired Author ID from the Author ID list box.
3
Click the [OK] button.
All recordings made by the author during the session will include the set ID
as part of the header information.
2
3
Either the Directrec default Author ID or any DSS Player registered Author ID (
☞
P.25) can be set in as header information.
1
......................................................................................................................................
Note
• Directrec’s “DR_1000” is the default User ID.
Setting an Author ID
28
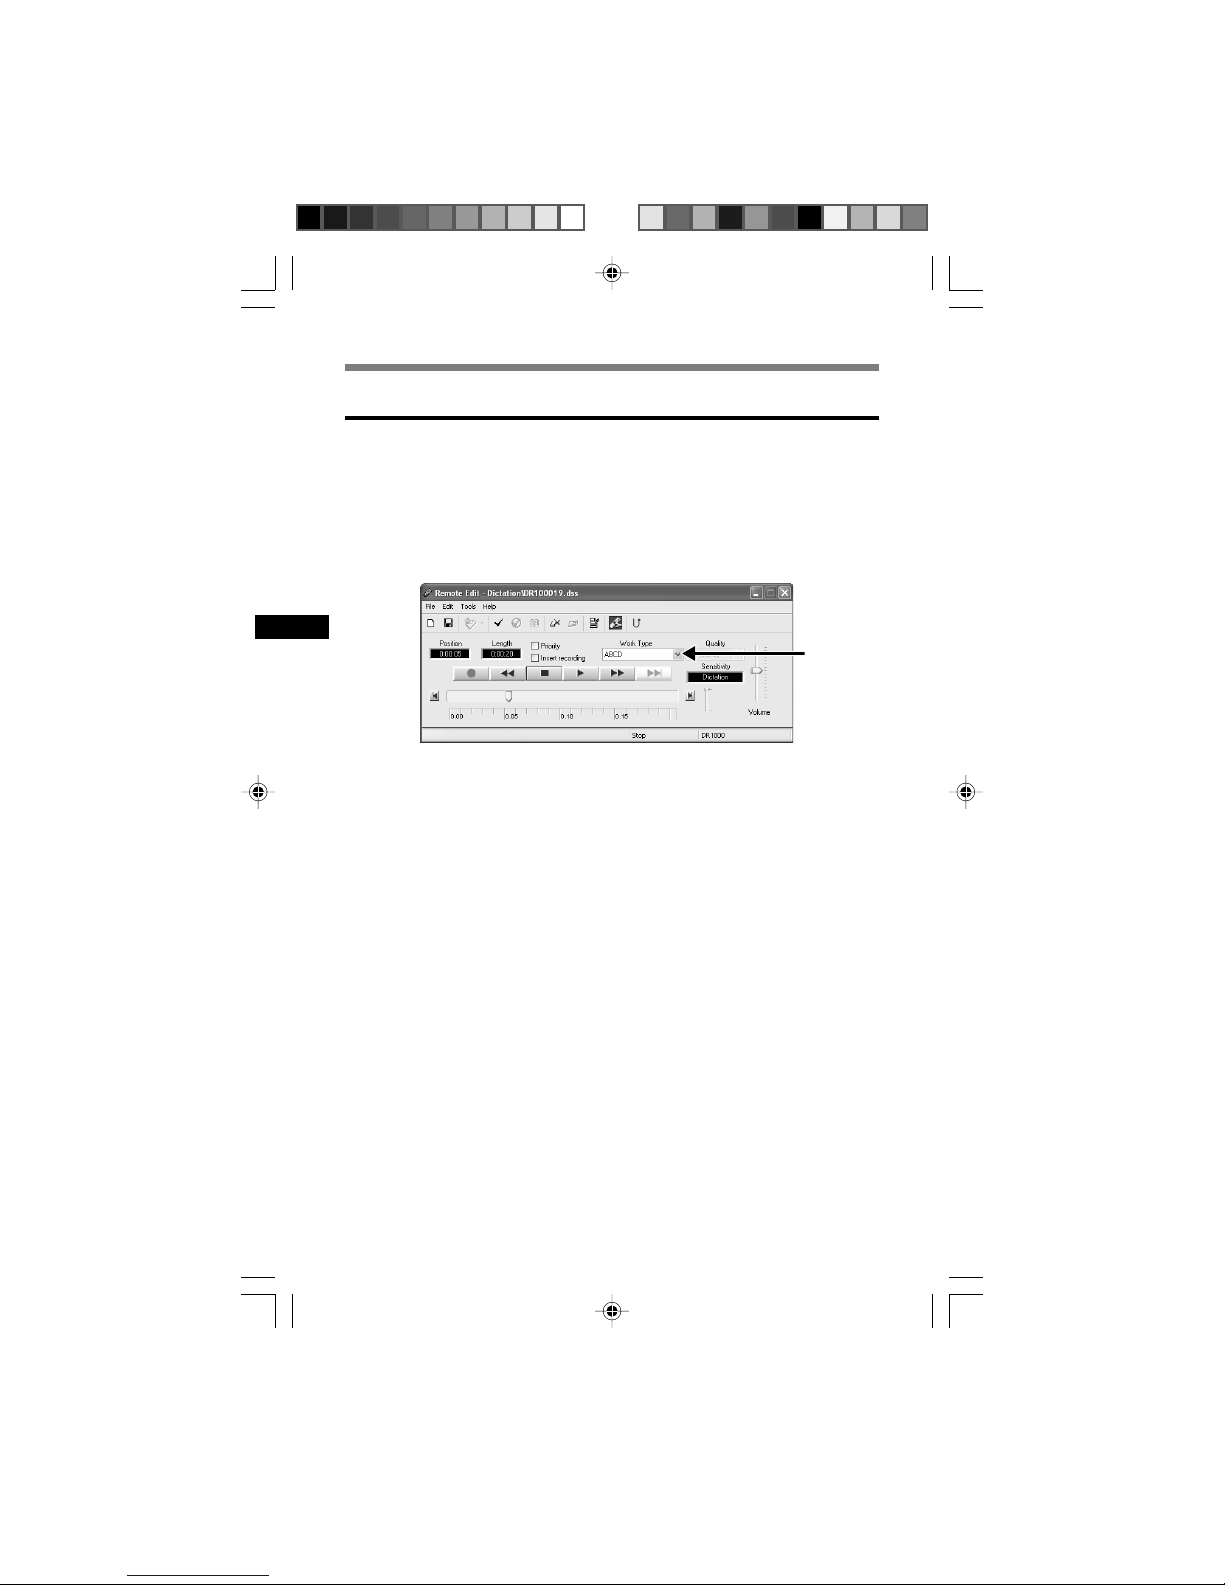
Setting a Work Type
Any Work Type registered (☞P.25) in the DSS Player can be set as
header information.
1
Select the registered Work Type in the Work Type ID setting in the
[Remote Edit] window.
All recordings made with the new Work Type ID will have the new Work Type
as part of the header information.
1
Setting Job Data
29
1
Select [Directrec Configuration Tool] in the [Tools] menu in the
[Remote Edit] window. Or, click the
icon on the toolbar.
The [Directrec Configuration Tool] dialog box will appear.
2
Select the function to be assigned to each button and click
[Upload Settings].
The “Successfully upload setting” alert will appear and complete customization.
If the “Failed to upload setting” alert appears, try the setting procedure once
again.
Directrec Button Function Customization
Using [Directrec Configuration Tool], Directrec button functions can be
easily customized to suit individual user needs.
Customizing Directrec Buttons
1
2

30
Directrec Button Function Customization
List of customizable buttons
REW
PLAY
FF
NEW
REC
A
B
Default settings
REW
PLAY
FF
NEW
REC
Application (INDEX/DSS Player)
Application (EXIT)
Functions available for settings
REW, PLAY, FF, NEW,
INDEX*1, PRIORITY*2,
INSERT/OVERWRITE*3,
DISABLE*4, Application...*
5
*1: [INDEX] button function...To insert an index mark using the [Remote Edit] window.
*2: [PRIORITY] button function...To switch the “Priority” settings in the [Remote Edit] window.
*3: [INSERT/OVERWRITE] button function...To switch the Insert and Overwrite recording modes in the
[Remote Edit] window.
*4: [DISABLE] button function...No function will be assigned.
*5: [Application…] button function...To programme to start a shortcut key for the DSS Player and a
selected application by using the [Directrec APP] tab.
Example: (EXIT) indicates that the shortcut key for the exit command in the [Remote Edit] window is
assigned. Refer to the Online Help for registration.
List of Customizable buttons and Available Functions
Displaying Programmable Buttons
The Directrec Programmable (A,B) buttons can be displayed in the [Remote Edit] window. They are useful as the assigned functions are also
shown.
1
Select and check the [Show Custom Button] box in the [Tools]
menu of the [Remote Edit] window.
The Programmable (A,B) buttons along with their programmed function will
be displayed in the toolbar.
......................................................................................................................................
Note
• The Programmable buttons will not be displayed if the connected device does not include
the same function buttons.
1
 Loading...