

Page 1

DIRECTREC
DR-2000
Executive Kit
INSTRUCTIONS
INSTRUCTIONS
EN
MODE D’EMPLOI
FR
BEDIENUNGSANLEITUNG
DE
Thank you for purchasing an Olympus
DIRECTREC.
Please read these instructions for information
about using the product correctly and safely.
Keep the instructions handy for future reference.
EN
Page 2

Main Features
This product is equipped with the following features.
● New and improved microphone system reduces extraneous sounds such as
wind or machine noise created while recording and thus enabling a higher
quality of sound recording than ever before.
● New design and location of buttons enable single-handed control without
ever having to visually check the placement of function buttons. Directrec
fits easily into your hand providing effortless control coupled with superb
dictation experience (☞ P. 4).
● The Directrec has 3 programmable (A, B, C) buttons (☞ P. 30, 31).
● All button functions are easily customized to suit a particular preference or any
recording environment (☞ P. 30 - 34).
● USB Audio Device Directrec, can be used as a USB microphone or USB speaker
when connected to a PC. In addition, a powerful built-in speaker provides hifidelity acoustic playback.
● Directrec can be used as a remote-control for the DSS Player Pro (referred to as
DSS Player from now on) not only for direct recording, but also when editing
recorded files on a PC.
● Directrec can save a recording as a file on a PC in DSS (Digital Speech Standard)
format.
● Two recording modes, SP (Standard Playback) mode or LP (Long Playback)
mode (☞ P. 20).
● Microphone sensitivity can be adjusted to better suit recording conditions and
environment (☞ P. 20).
● Multi-level priority setting (☞ P. 24).
OLYMPUS IMAGING CORPORATION holds the copyrights for DSS Player Pro software
and the instructions (this manual).
Microsoft and Windows are registered trademarks of Microsoft Corporation.
Intel and Pentium are registered trademarks of Intel Corporation.
Other product and brand names mentioned herein may be the trademarks or registered
trademarks of their respective owners.
2
Page 3

Table of Contents
Introduction
Identification of Parts .......................................................... 4
Minimum Requirement ....................................................... 5
Getting Ready
Installing DSS Player Software .......................................... 6
Uninstalling DSS Player Software ...................................... 7
Using Online Help............................................................... 8
Let’s Get Started
Connection to Your PC ....................................................... 9
Running DSS Player......................................................... 10
Window Names................................................................. 11
Using the Remote Edit Window ....................................... 12
Direct Recording ............................................................... 14
Playback (Playing a Dictation File) .................................. 17
Save Recording ................................................................ 19
Microphone Sensitivity ..................................................... 20
Recording Modes ............................................................. 20
Index Marks ...................................................................... 21
Setting Priority Levels....................................................... 24
System Sounds ................................................................ 25
Setting Job Data ............................................................... 26
Directrec Button Function Customization ........................ 30
Troubleshooting ................................................................ 35
Specifications ................................................................... 36
User Support
Technical Assistance And Support ................................... 36
3
Page 4

Identification of Parts
6
7
8
1
2
3
4
5
9
0
1Built-in microphone
2Record/Play indicator light
3B (Programmable) button
4Slide REC
(Record)
/
STOP/
PLAY/
(Review)
REV
switch
5FF (Fast Forward) button
6NEW button
7A (Programmable) button
8REW (Rewind) button
9Built-in speaker
0C (Programmable) button
!USB Cable
!
4
Page 5

Minimum Requirement
Make sure that your computer meets the Minimum requirements listed below.
Please check with your system administrator or your Olympus Professional
Dealer.
PC: IBM PC/AT compatible PC
Operating System: Microsoft Windows 2000 Professional/XP Professional,
CPU: Windows 2000/XP: Intel Pentium II class 333 MHz
RAM: Windows 2000/XP: 128 MB or more (256MB or more is
Hard drive space: 50 MB or more
Drive: 2x or faster CD-ROM, CD-R, CD-RW, DVD-ROM drive
Sound card: Creative Labs Sound Blaster 16 or 100% compatible
Browser: Microsoft Internet Explorer 4.01 SP2 or later
Display: 800 x 600 pixels or more, 256 colors or more
USB port: One or more free ports
Home Edition/Vista Ultimate, Enterprise, Business, Home
Premium, Home Basic
processor or more (Processor 500 MHz or more is
recommended)
Windows Vista: 800MHz or more
recommended)
Windows Vista: 500 MB or more (1GB or more is
recommended)
sound card
5
Page 6

Installing DSS Player Software
Before you connect your Directrec to your PC, you must first install the DSS
Player software.
Make sure to exit all running applications, eject the floppy disk if you are using
one, and logon as administrator if you are running Windows 2000/XP (Professional only) on the network.
Insert Olympus DSS Player CD into the CD-ROM drive.
The installation program will start automatically.
1
If the installation program does not start automatically, browse your CD-ROM
drive and execute “setup.exe”.
The installation Language Selection dialog box appears.
Select the desired language.
2
Register user information.
Enter your name, company name, and license ID number (serial number).
3
The license ID number is printed on the license ID card included inside the
recorder package.
Click the [Next] button. When a confirmation dialog box appears, click the [Yes]
button.
Proceed with the installation according to the instructions on the
screen.
4
6
Page 7

Uninstalling DSS Player Software
To uninstall any of the software components of the DSS player software installed
on your PC, follow the steps below.
Exit DSS Player program.
1
Click the [start] button on the taskbar.
2
Select [Add/Remove programs] from the [Control Panel].
A list of installed applications is displayed.
3
Select [Olympus DSS Player Pro], then click the [Change/Remove]
button.
4
Proceed with the uninstallation according to the instructions
on the screen.
5
..............................................................................................................................
Note
• Uninstallation does not erase the stored dictation files.
7
Page 8
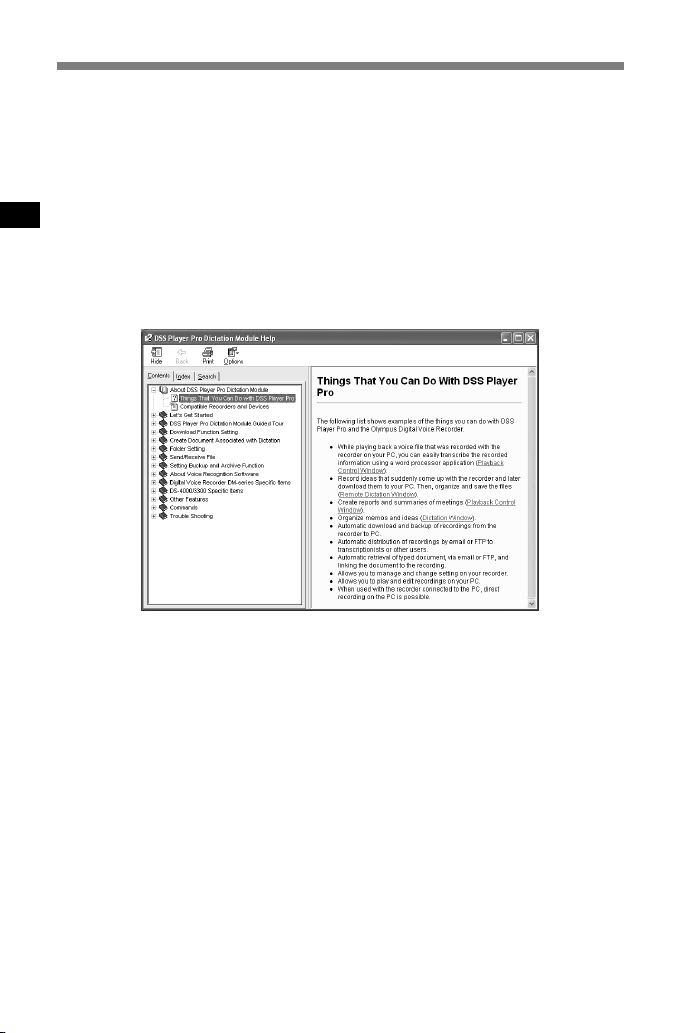
Using Online Help
For information on the DSS Player usage and features, refer to the online Help.
To start online Help:
• Click the [start] button, then select [All Programs], [Olympus DSS
Player Pro], [Dictation Help].
• While DSS Player is running, select the [Help] menu, [Contents].
• While DSS Player is running, press F1 on the keyboard.
......................................................................................................................................
Note
• For more information on menus and operations, refer to Online Help. Online Help is
available after the DSS Player is installed.
8
Page 9
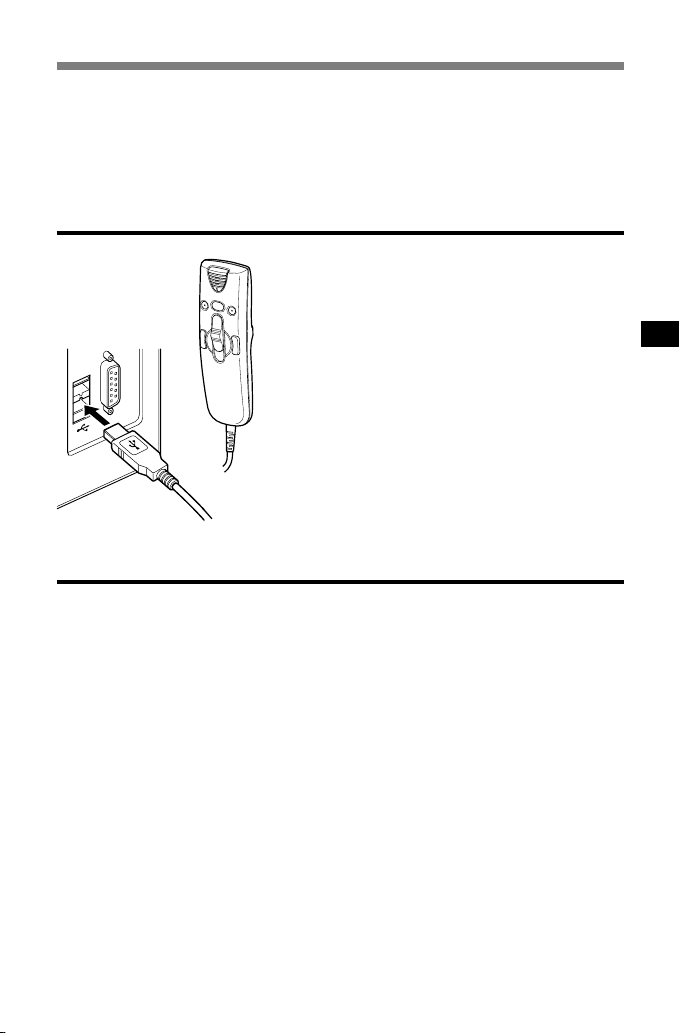
Connection to Your PC
Be sure to install the DSS Player software before connecting the Directrec to the
PC. However, if you do connect the Directrec before or during the software installation, the “Add New Hardware Wizard” will appear. In this case, cancel the wizard
by pressing the [Cancel] button in the wizard screen and then install or continue
the installation of DSS Player software.
Connecting to Your PC Using the USB Cable
Connect the Directrec USB cable
directly into the USB port or USB hub
1
of your PC.
Disconnecting from Your PC
Disconnect the Directrec USB cable from your PC USB port or
USB hub.
1
......................................................................................................................................
Notes
• Some PCs and USB hubs may not supply sufficient power and the Directrec fails to
connect. Refer to your PC User’s Manual regarding the USB port or USB hub on your PC.
• When using a USB hub to connect the Directrec, always use a self-powered (AC adapter)
USB hub.
• Never disconnect the USB cable while the record/play indicator light is flashing. If you do,
the data will be destroyed.
9
Page 10
Running DSS Player
By default, connecting the Directrec to your PC will start the application automatically.
Disabling automatic start
Right-click the Device Detector icon in the System Tray in
the lower right hand corner of the screen, then select “Settings
1
startup application”.
Click [DSS Player Pro].
The check mark on [DSS Player Pro] disappears.
2
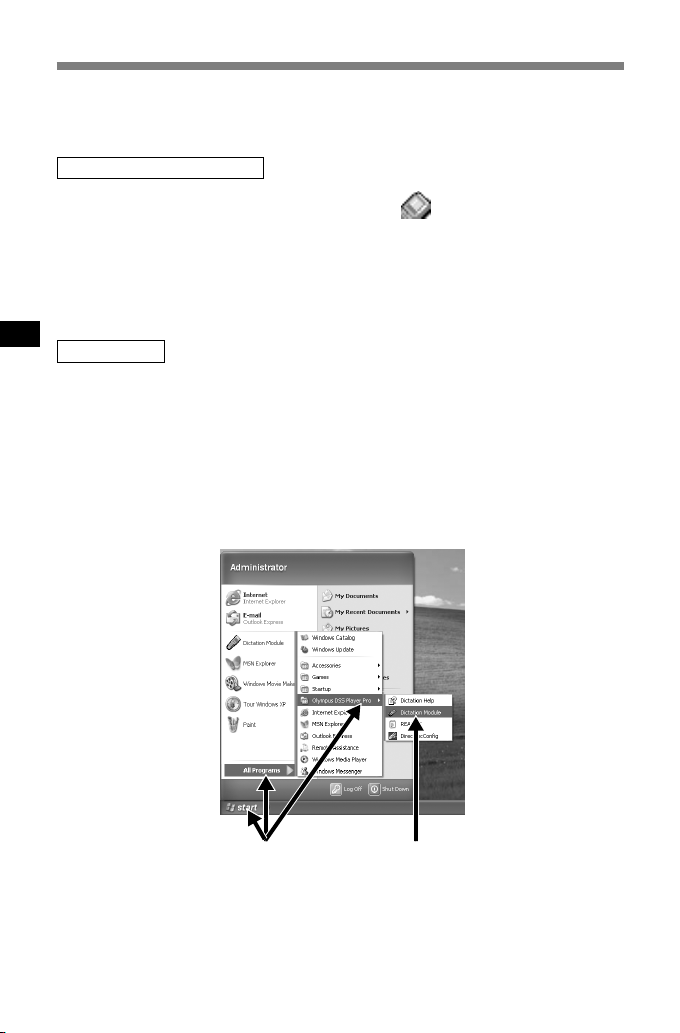
Manual start
Start Windows.
1
Click the [start] button, then select [All Programs].
All program menus will be displayed.
2
Select [Olympus DSS Player Pro], then click [Dictation Module].
3
23
......................................................................................................................................
Note
• If you connect the Directrec before installing DSS Player, the “Add New Hardware Wizard”
dialog box will open. If this happens, click [Cancel] to exit the wizard, then install the DSS
Player software.
10
Page 11
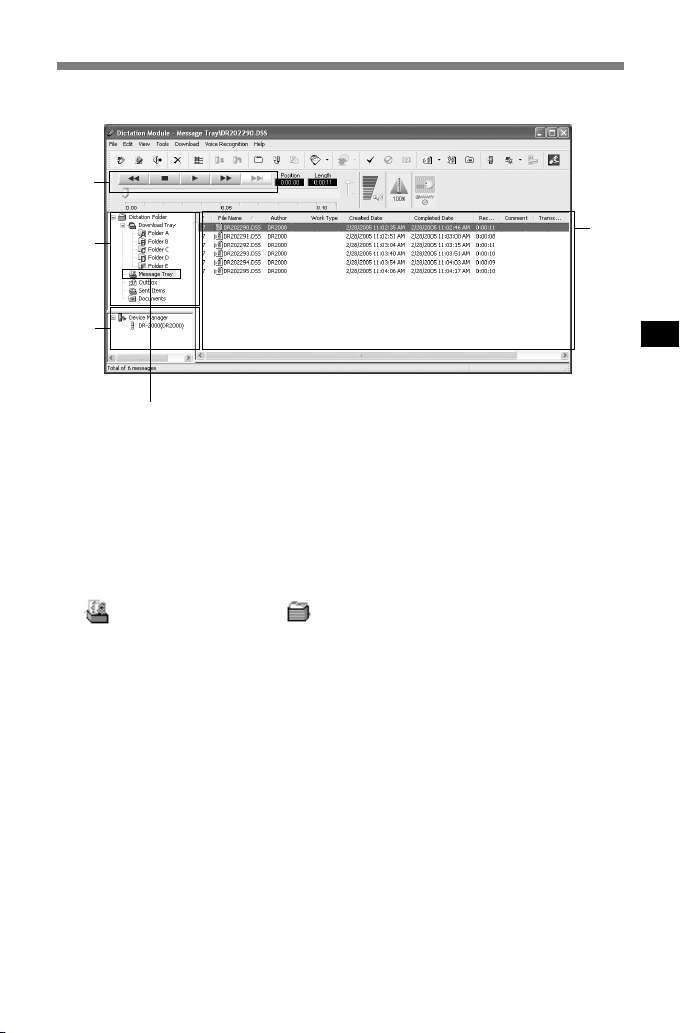
Window Names
1
Main Window (Windows XP)
2
3
* Main screen is displayed when DSS Player is started
Massage Tray
1Playback Control Bar
Provides the control buttons to play and stop dictation files.
2Dictation Tree View
Displays the directory structure of the DSS, WAV-format files stored on your
PC’s hard disk.
Recordings made using Directrec will be saved as a file in the Message Tray
) in the Dictation Folder ( ).
(
3Device Tree View
Displays the directory structure of the Directrec.
4Dictation List View
Displays the dictation files in the folder selected in 2 and 3.
4
11
Page 12

Using the Remote Edit Window
For enjoyable recording experience, use Directrec with the DSS Player software
to record to your PC. The DSS Player can be configured to provide you with
complete remote control over your recording session from the Directrec without
the use of the PC mouse.
Starting the [Remote Edit] window for the DSS Player main window
Ensure Directrec is properly connected to your PC and then start
the DSS Player.
1
DSS Player main window appears.
From the DSS Player main window, click the [File] menu, then
select [New File...], or click the icon.
2
[Remote Edit] window appears.
Directrec button functions are completely supported when the
[Remote Edit] window is open.
3
......................................................................................................................................
Notes
• Ensure that the [Remote Edit] window is open when you use Directrec, or the remote
control will not function.
• The [Remote Edit] window can also be displayed without opening the main menu when
starting the DSS Player (
P. 13).
☞
12
Page 13
Starting the [Remote Edit] window without opening the DSS Player main window
With a push of a button on the Directrec, you can set your PC to open the [Remote Edit] window directly without entering the DSS Player main window.
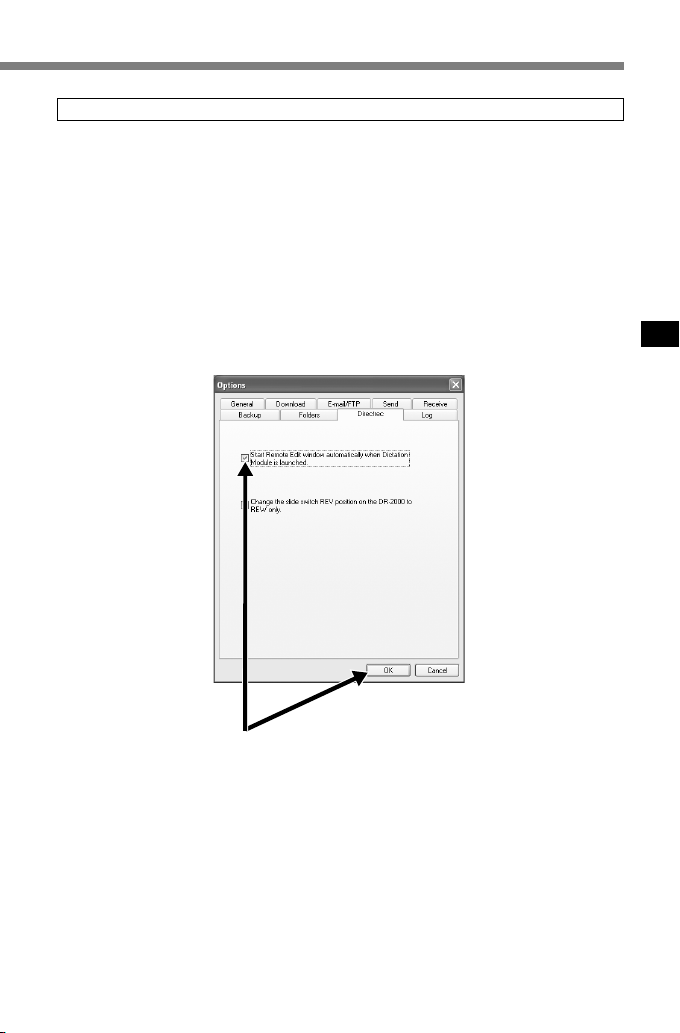
From the DSS Player main window, click the [Tools] menu, select
[Options...], then click the [Directrec] tab.
1
Check [Start Remote Edit window automatically when Dictation
Module is launched] and then click the [OK] button.
2
The pre-settings are now complete.
When pre-settings are checked, the computer recognizes the Directrec device
connection as the DSS player starting, and opens the [Remote Edit] window
without opening the main application window (☞ P. 11).
2
13
Page 14
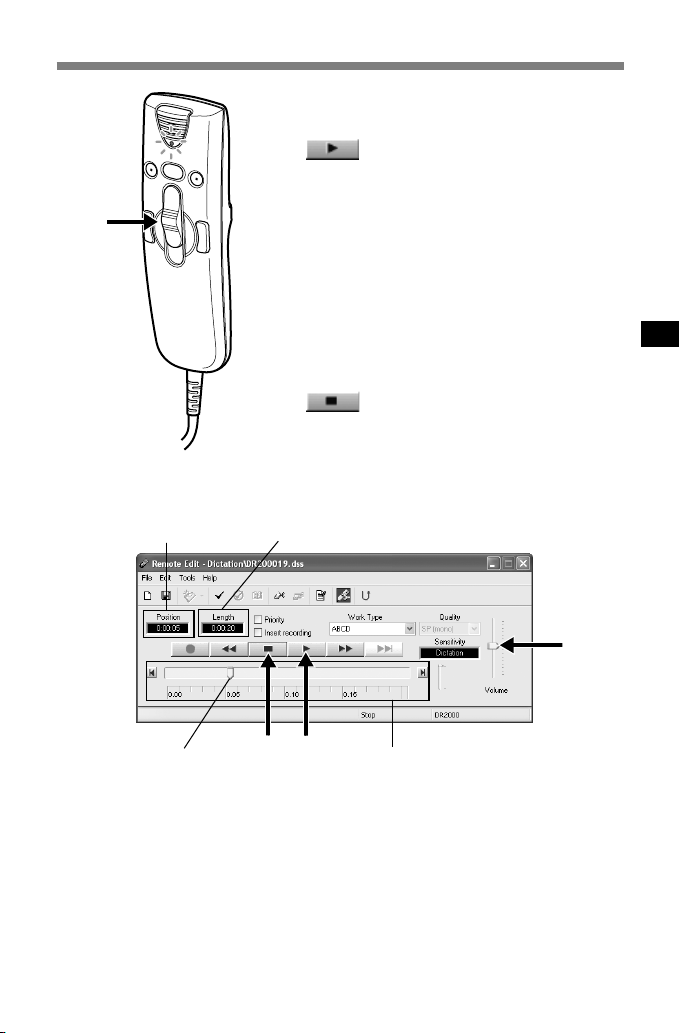
Direct Recording
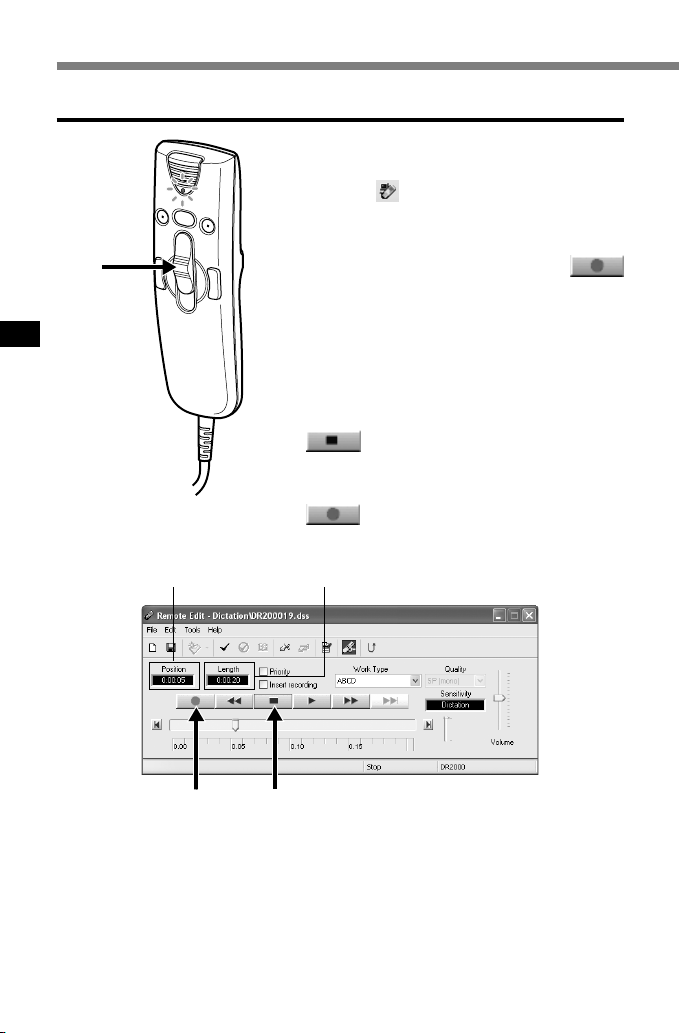
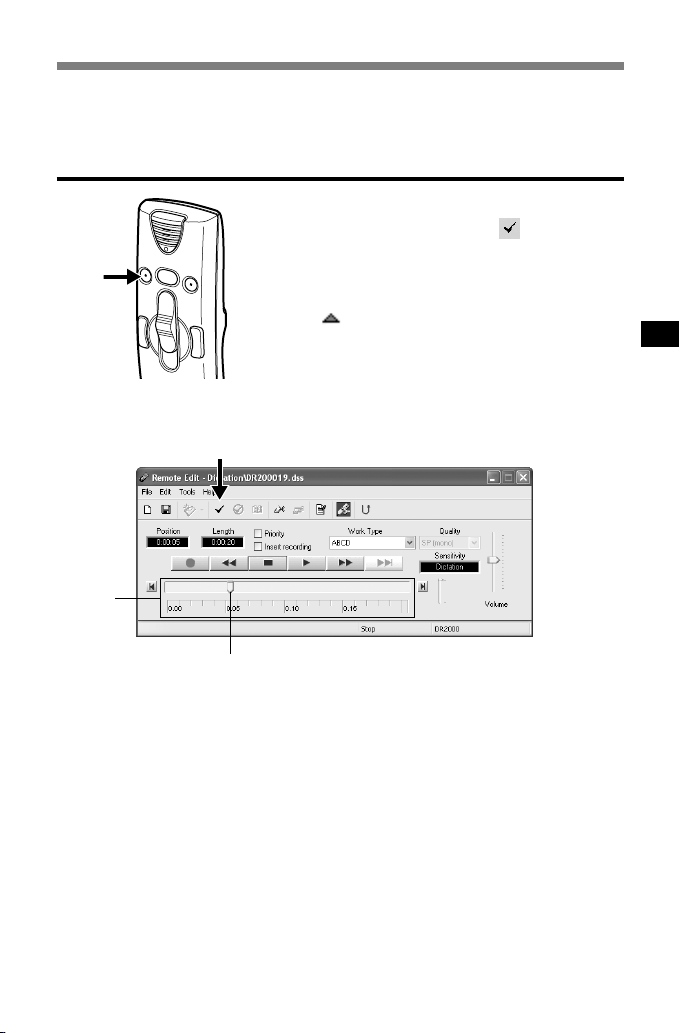
New Recording
From the DSS Player main window, click
the [File] menu, then select [New File], or
1
click the
[Remote Edit] window appears.
Move the slide switch on the Directrec
to the REC position or press the
2,3
Current recording time Remaining recording time
2
(Record) button in the [Remote Edit]
window to start recording.
The red record/play indicator light on
Directrec will become lit. Point the microphone at the sound source.
Move the slide switch on the Directrec
to the STOP position or press the
3
If you want to append additional recordings
to the same file, Move the slide switch on the
Directrec to the REC position or press the
icon.
(Stop) button to stop recording.
button again.
14
2 3
Page 15
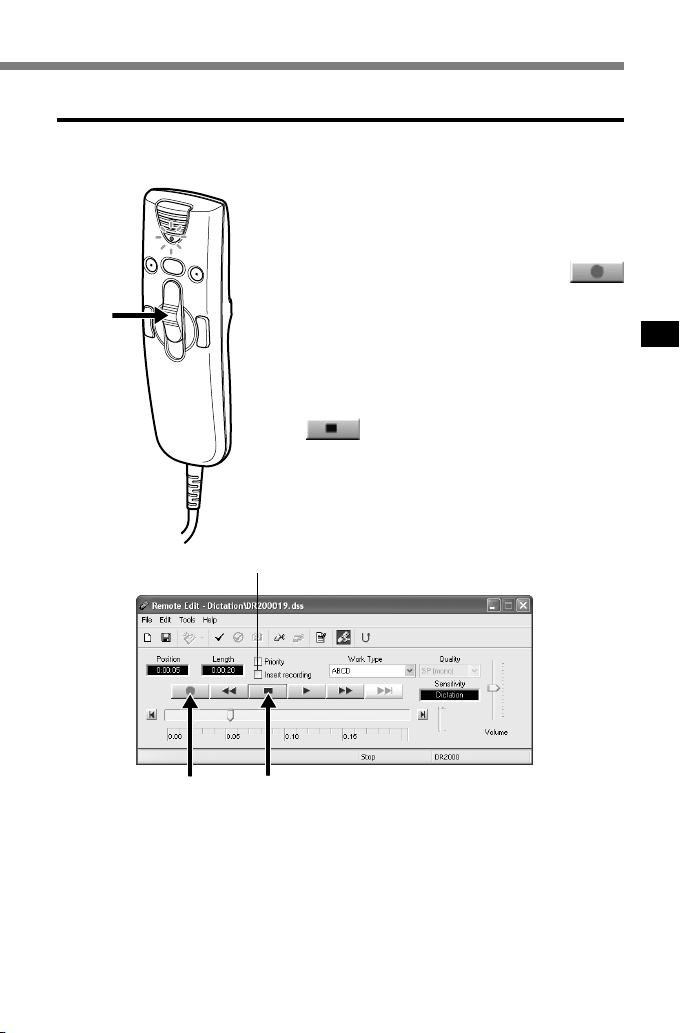
Overwrite Recording
You can overwrite a previous recording from any point within the file.
Note that the overwritten recordings will be premanently erased.
Make sure you are at the starting point
of the recording to be overwritten.
1
Move the slide switch on the Directrec
to the REC position or press the
2
(Record) button in the [Remote Edit]
2,3
Do not check here.
window.
The record/play indicator light on the Directrec
will light up and Overwrite Recording will start.
Move the slide switch on the Directrec
to the STOP position or press the
3
(Stop) button in the [Remote
Edit] window to stop overwriting.
2 3
......................................................................................................................................
Notes
• Ensure that the “Insert recording” box (☞ P. 16) in the [Remote Edit] window is not checked
or the overwrite recording will not proceed.
•You cannot select a different recording mode (SP, LP) than that of the original file before
overwriting a recording.
15
Page 16
Direct Recording
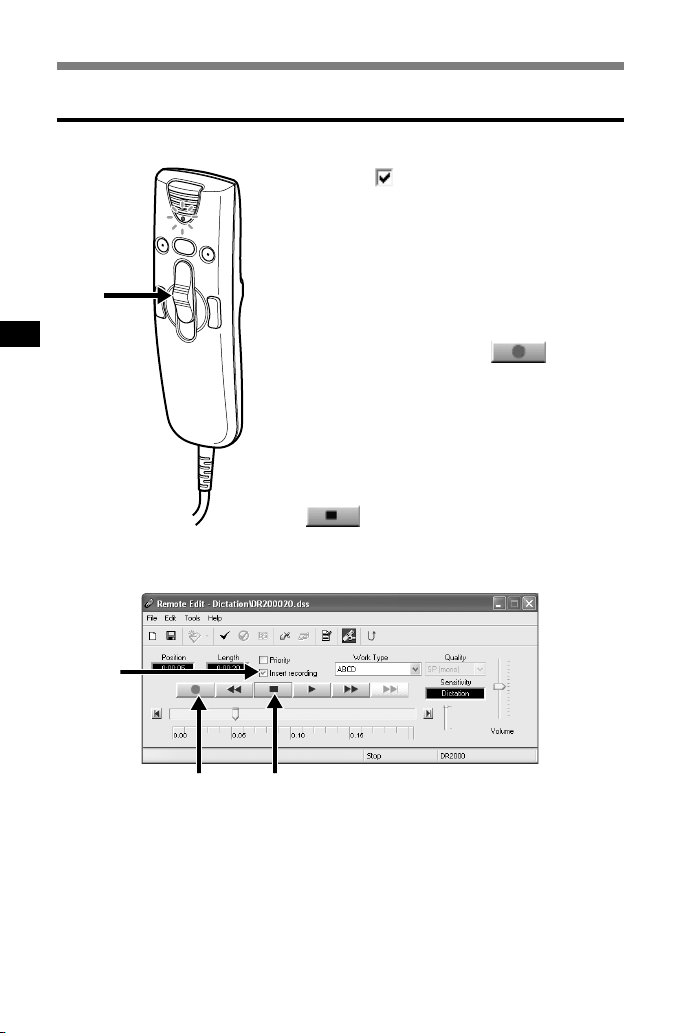
Insert Recording
Additional recording can be inserted into a previously recorded file.
Check ( )“Insert recording” box in
the [Remote Edit] window.
1
Make sure you are at the right position
in the file where recording insert
2
should take place.
3,4
While playing the file, move the slide
switch on the Directrec to the REC
3
position or press the
button in the [Remote Edit] window to
start inserting an additional recording.
The red record/play indicator light on
Directrec will become lit.
Move the slide switch on the Directrec
to the STOP position or press the
4
(Stop) button in the [Remote
Edit] window to the stop inserting the
additional recording.
(Record)
1
3
......................................................................................................................................
Notes
• Ensure that the “Insert recording” box in the [Remote Edit] window is checked or the
recording will not be inserted.
• If you place the slide switch in the STOP position for more than two seconds while moving
the slide switch from the PLAY position to the REC position, the Inserted recording will be
cancelled.
•You cannot select a different recording mode (SP, LP) than that of the original file before
overwriting a recording.
16
4
Page 17
Playback (Playing a Dictation File)
Move the slide switch on the Directrec
to the PLAY position or press the
1
1,3
2
3
(Play) button in the [Remote
Edit] window to start playback.
The green record/play indicator light on
Directrec will become lit.
Adjust the volume slider in the
[Remote Edit] window to the required
level.
The recording will be played through the
Directrec speaker.
Move the slide switch on the Directrec
to the STOP position or press the
(Stop) button in the [Remote
Edit] window at any point you want
to stop the playback.
Current playback
time
Playback slider
Shows the current
playback position
Total recording time of
the file being played
3 1
2
Time axis
17
Page 18
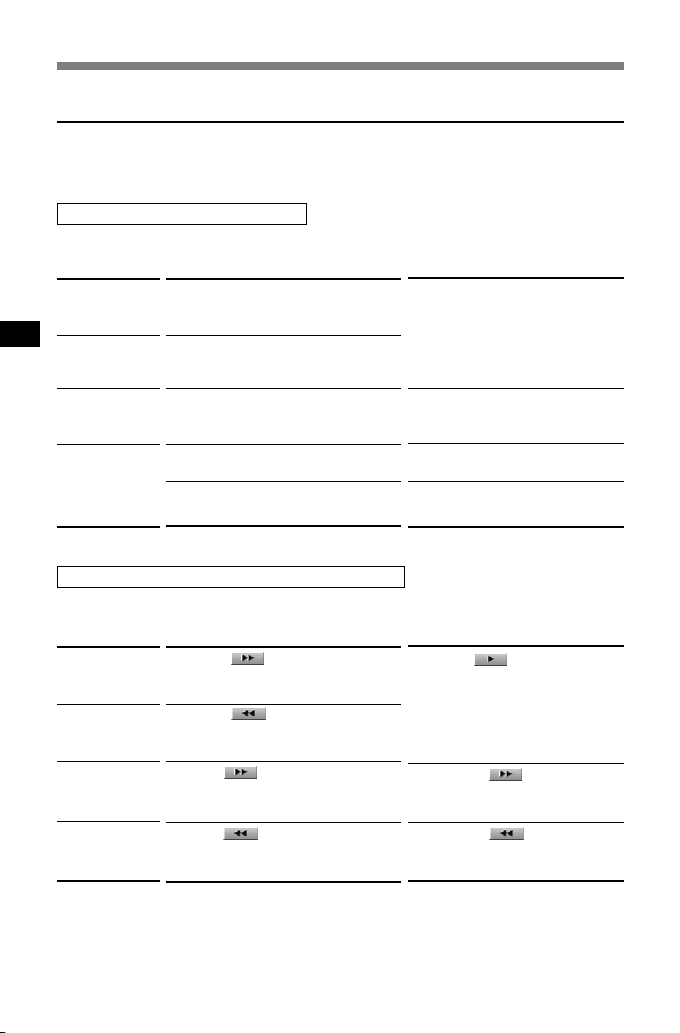
Playing (Playing a Dictation File)
Playback functions
Various functions are available with Directrec and the [Remote Edit] window to
playback a recorded file.
Directrec playback functions
Playback
functions
Fast Forward
(FF)
Rewind (REW)
Operation
Press the FF button once while
stopped.
Press the REW button once while
stopped.
How to Cancel
Move the slide switch to a position
other than the STOP position.
➥ The Directrec starts the
operation of the set position.
Cue (CUE)
Review (REV)
Hold the FF button while stopped or
playing a file.
Hold the REW button while stopped
or playing a file.
Move the slide switch to the REV
position.
Release the button.
Release the button.
Release the slide switch.
Functions using the [Remote Edit] window
Playback
Operation
How to Cancel
functions
Fast Forward
(FF)
Rewind (REW)
Cue (CUE)
Review (REV)
• Please refer to our Online Help for further information about Directrec functions and controls
(
P. 8).
☞
Press the button once while
stopped.
Press the button once while
stopped.
Hold the button while stopped
or playing a file.
Hold the button while stopped
or playing a file.
Press the button.
➥ Recorded file will play again.
Release the button.
Release the button.
18
Page 19
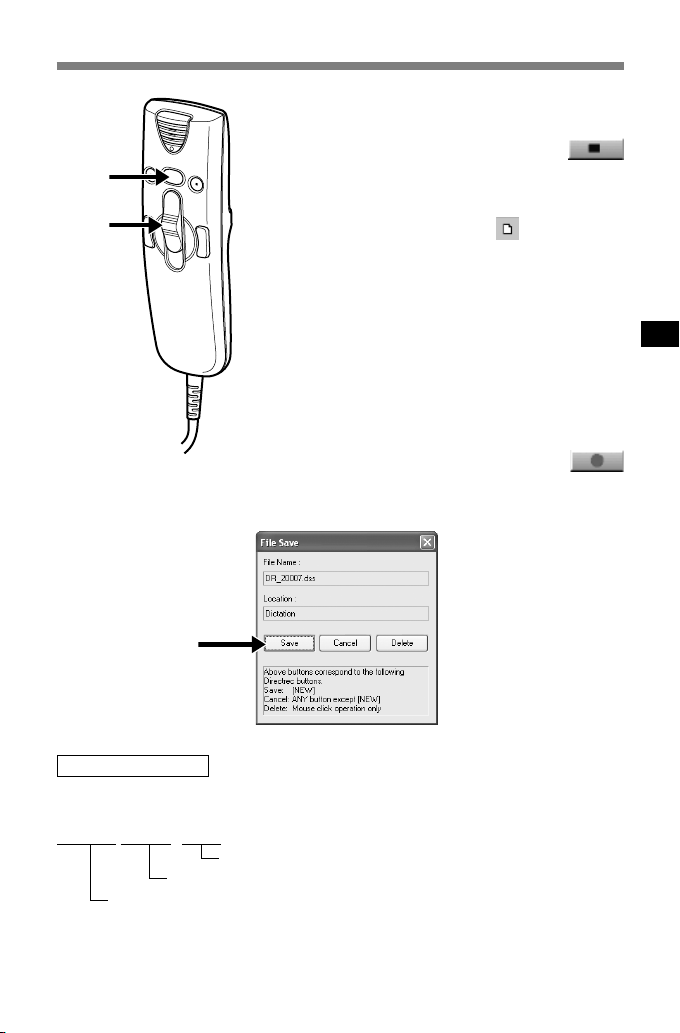
Save Recording
1
2,3
1,4
2
3
4
To save the current recording, move the
slide switch on the Directrec to the
STOP position or press the
(Stop) button to stop recording.
Either press the NEW button on
Directrec or click the
toolbar in the [Remote Edit] window.
[File Save] window will appear to save the data.
To save the file, either press the NEW
button on Directrec or click the [Save]
button on the [Remote Edit] window.
The recorded data will be saved.
The Directrec is now available for
recording on a new file.
Move the slide switch on the Directrec
to the REC position or press the
(Record) button in the [Remote Edit]
window to start recording.
icon on the
3
File Name Format
File names are assigned in the following manner.
DR_2 0001.dss
Extension
File number ....
The ID that has been set on the Directrec. The default ID is “DR_2000”.
The Author ID can be modified with DSS Player (☞ P. 26 - 28).
A serial number automatically assigned by the DSS Player.
19
Page 20
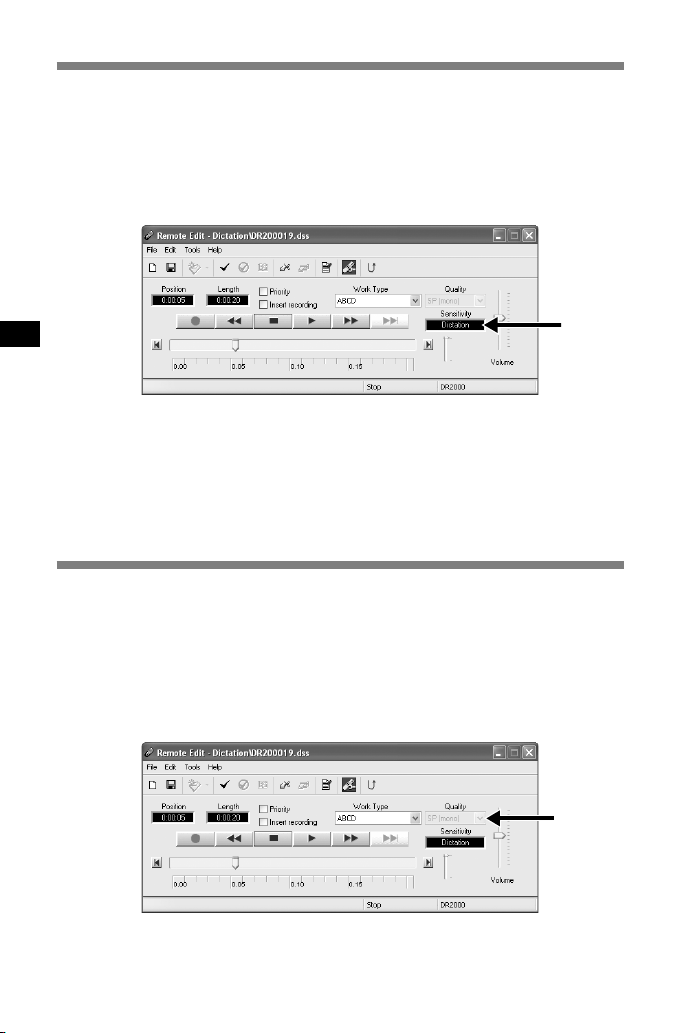
Microphone Sensitivity
Microphone sensitivity is adjustable to meet recording needs.
Select from the “Sensitivity” box either “Dictation” or
“Conference” in the [Remote Edit] window.
1
Conference :The high-sensitivity mode suitable for recording the ambient sounds.
Dictation :The low-sensitivity mode suitable for recording dictation.
1
......................................................................................................................................
Note
• If you want to record clear or noise-free dictation, select Dictation mode and place the
microphone 5 to 10 cm (2 to 4 inches) from the source.
Recording Modes
Two recording modes are available with the Directrec. SP (standard recording)
and LP (long-term recording).
Select from the “Quality” box either “SP (mono)” or “LP (mono)” in the
[Remote Edit] window.
1
SP: Default recording mode.
LP: Can record in a smaller file size with the same recording time as the SP mode.
......................................................................................................................................
Note
• Choose SP mode for recording meetings or lectures with crisp clarity.
20
1
Page 21
Index Marks
Index marks can be placed in a file during recording or playback to provide a
quick and easy way of identifying important sections in the file.
Setting an Index Mark
Either press the A button on
1
Directrec, or click the
1
toolbar in the [Remote Edit] window
while recording or playing.
Index Mark will now be set.
A
icon will appear on the time axis bar in
the [Remote Edit] window. The index mark
can also be set by selecting [New Index Mark]
in the [Tools] menu.
icon on the
1
Time axis
Playback slider
Displays the current
position of playback or
recording.
......................................................................................................................................
Notes
• Up to 16 index marks can be set in a file.
• Index marks cannot be set or cleared in a locked file. Please see the Online Help for
further details (
☞ P. 8).
21
Page 22

Index Marks
Locating an Index Mark
The icon on the time axis bar in the [Remote Edit] window indicates the
position of the Index Mark. To jump to a marked position follow this procedure.
Either press FF or REW button on
Directrec twice, or click the
1
button on the [Remote Edit] window.
The Playback slider will automatically jump
to the Index Mark( ) position.
1
Using the [View All Index Marks] window to jump to the Index Mark
Click the icon on the toolbar in the [Remote Edit] window.
Or, select the [View All Index Marks...] in the [Tools] menu.
1
The [View All Index Marks] window will appear.
Select the marked position you want to jump to and click [Skip].
Directrec will jump to the selected Index Mark position.
2
Position of the Index Mark
Time axis
2
1
22
Page 23

Clearing an Index Mark
Locate the index mark you want to clear.
1
Click the icon on the toolbar in the [Remote Edit] window.
Or, select the [Delete Index Mark] in the [Tools] menu.
2
The index mark is erased.
......................................................................................................................................
Note
• Index marks cannot be set or cleared in a locked file. Please see the Online Help for
further details (
☞ P. 8).
23
Page 24
Setting Priority Levels
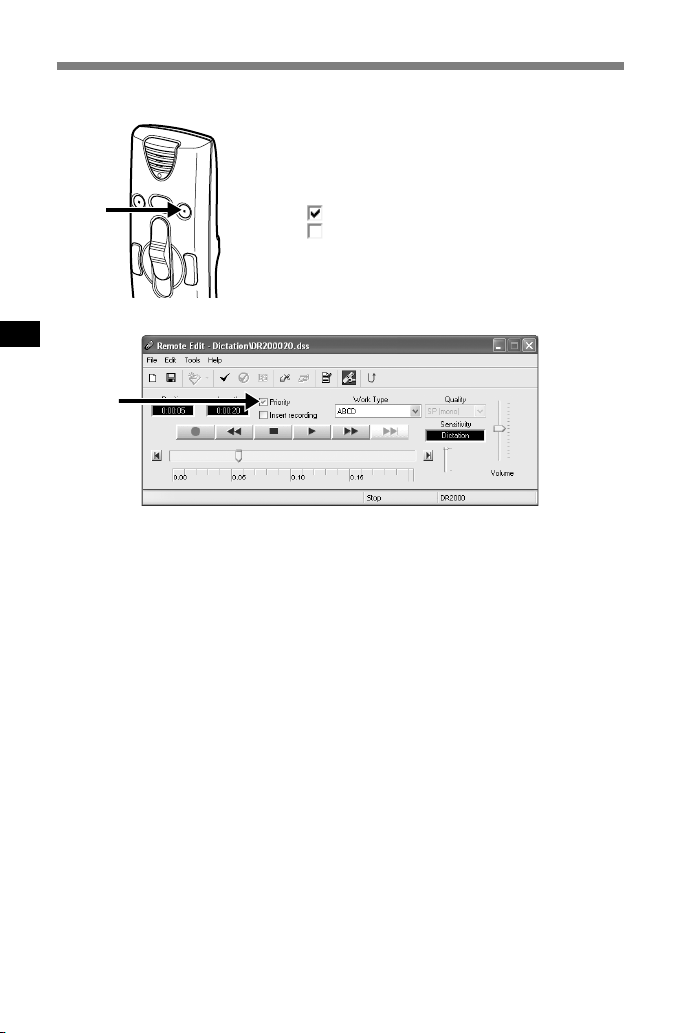
You can set a priority level on each file recorded.
Press the B button on Directrec.
The “Priority” setting box in the [Remote Edit]
1
window will be checked on and off every time
this button is pressed.
1
With check : High level.
Without check : Normal level.
You can also check the priority setting on /off
by using the [Remote Edit] window.
1
24
Page 25
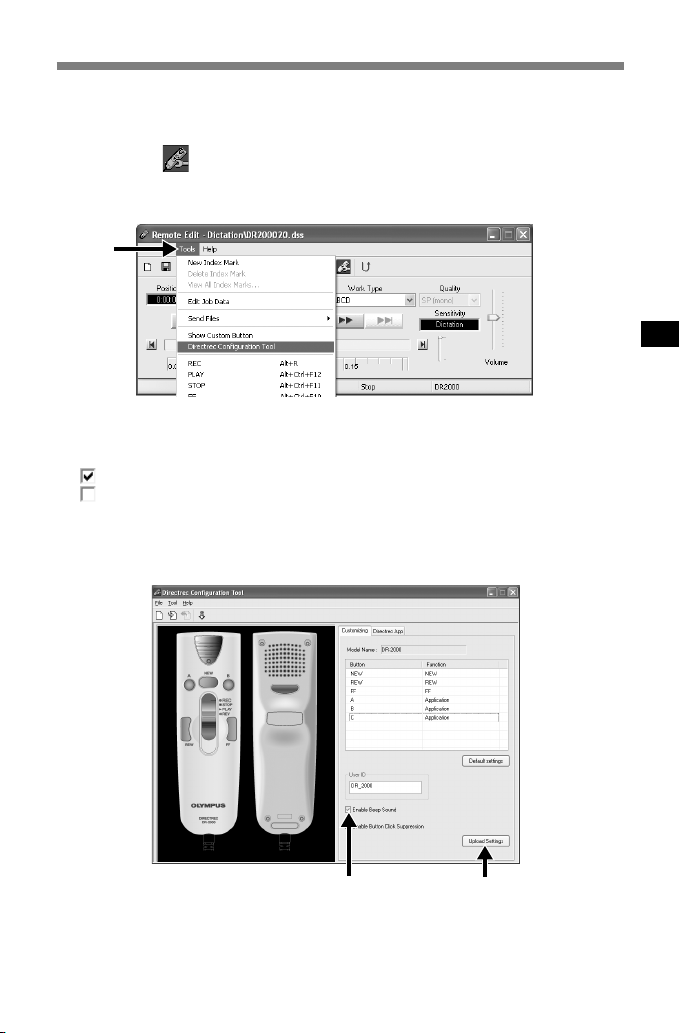
System Sounds
The Directrec beeps to alert you to button operations.
System sounds may be turned off.
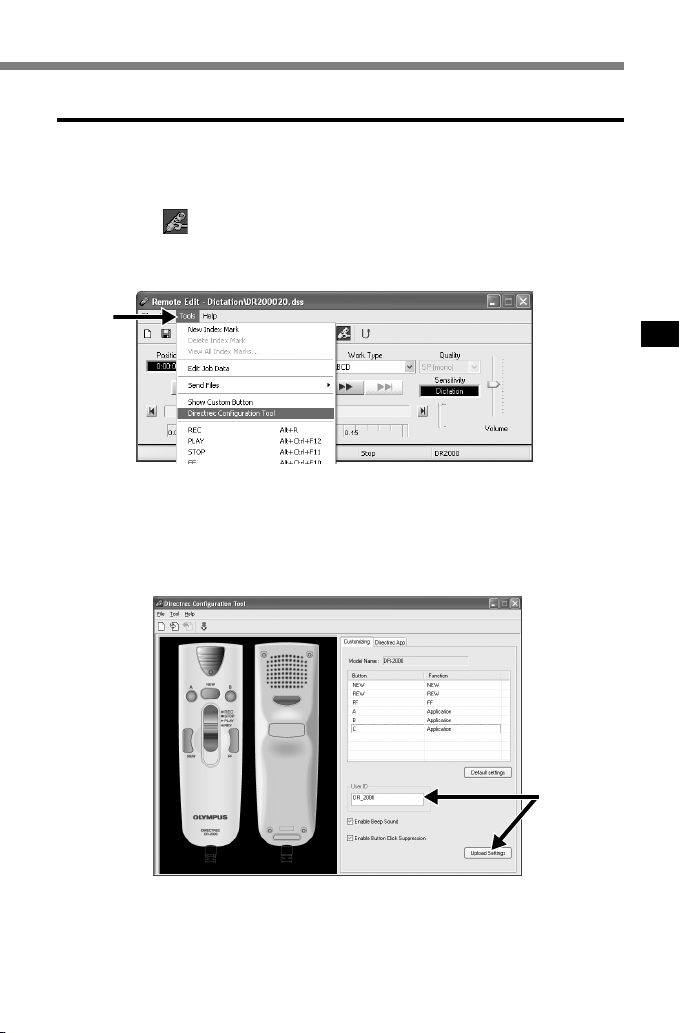
Click the icon on the toolbar in the [Remote Edit] window.
Or, select the [Directrec Configuration Tool] in the [Tools] menu.
1
The [Directrec Configuration Tool] dialog box will appear.
1
Select the [Customizing] tab and check the [Enable Beep Sound]
box.
2
With check: System sound is On.
Without check: System sound is Off.
Click [Upload Settings].
The settings are now completed.
3
2
3
25
Page 26
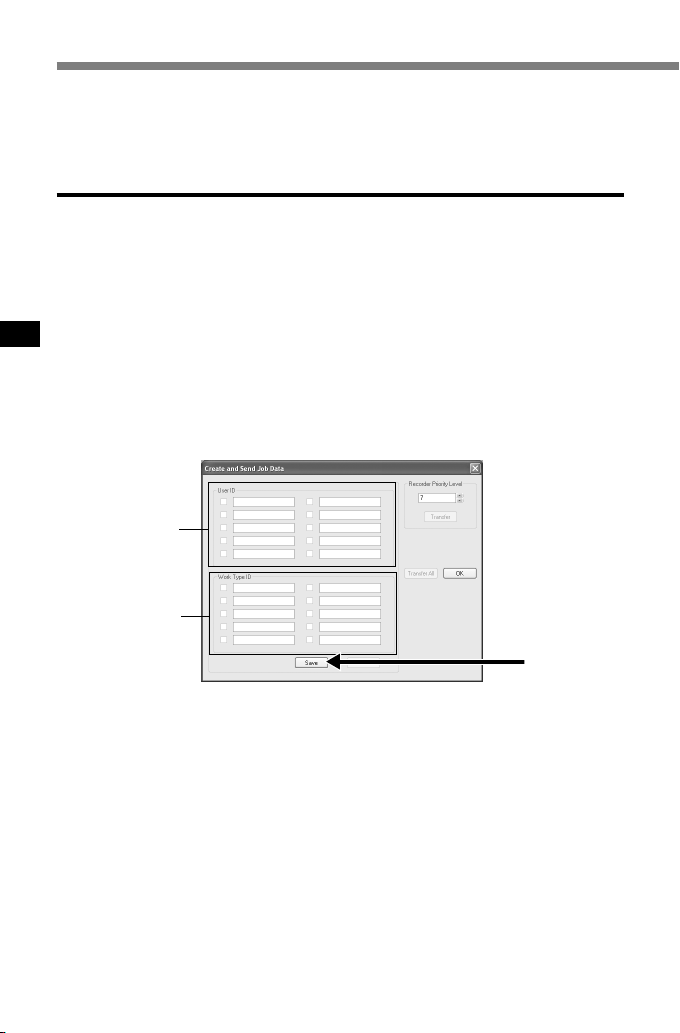
Setting Job Data
The files recorded in your PC by Directrec contain Author ID and Work Type as
header information. The details in header information can be easily changed by
using the DSS Player.
Registering Author ID and Work Type ID in DSS Player
Up to the User ID and ten Work Type ID can be registrered in the DSS Player.
Ensure Directrec is not connected.
1
From the DSS Player main window, click the [Download] menu,
then select [Create & Send Job Data...].
2
The [Create & Send Job Data] window appears.
Enter your Author ID or Work Type ID in the field indicated by the arrow.
Click the [Save] button.
Author ID or Work Type ID registration is now completed.
3
Author ID
Work Type ID
26
3
Page 27
Directrec Default User ID to Directrec
The Directrec User ID plays an essential part in the file naming process of new
recordings. The default User ID is “DR_2000”. In order to change the default
user ID, follow the procedure below.
Click the icon on the toolbar in the [Remote Edit] window.
Or, select the [Directrec Configuration Tool] in the [Tools] menu.
1
The [Directrec Configuration Tool] dialog box will appear.
1
Input your user ID into the [User ID] box and click [Upload Settings].
The input User ID will be transferred to Directrec. The ID can be any
2
combination of “A” to “Z”, Numeric and/or “_”, and up to a maximum of 16
letters long.
2
......................................................................................................................................
Note
• Never disconnect the USB access if the indicator light is flashing red. If you do so, the
data may be destroyed.
27
Page 28
Setting Job Data
Setting an Author ID
Either the Directrec default Author ID or any DSS Player registered Author ID
(☞ P. 26) can be set in as header information.
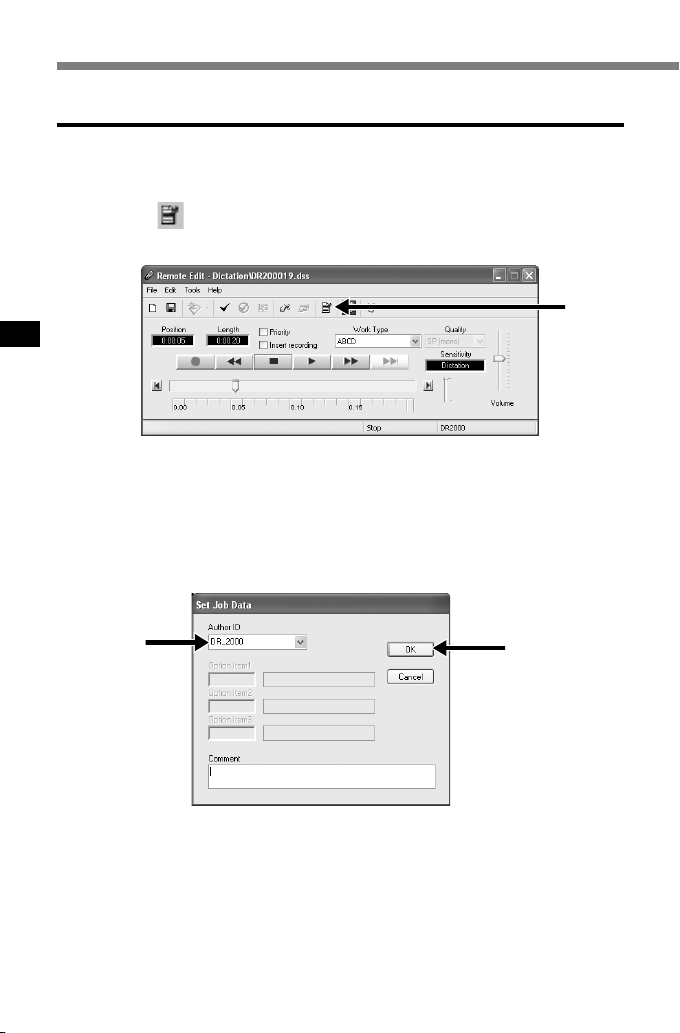
Click the icon on the toolbar in the [Remote Edit] window.
The [Set Job Data] window will appear.
1
1
Select the desired Author ID from the Author ID list box.
2
Click the [OK] button.
All recordings made by the author during the session will include the set ID
3
as part of the header information.
2
......................................................................................................................................
Note
• Directrec’s “DR_2000” is the default User ID.
28
3
Page 29

Setting a Work Type
Any Work Type registered (☞ P. 26) in the DSS Player can be set as header
information.
Select the registered Work Type in the Work Type ID setting in the
[Remote Edit] window.
1
All recordings made with the new Work Type ID will have the new Work Type
as part of the header information.
1
29
Page 30
Directrec Button Function Customization
Using [Directrec Configuration Tool], Directrec button functions can be easily
customized to suit individual user needs.
Customizing Directrec Buttons
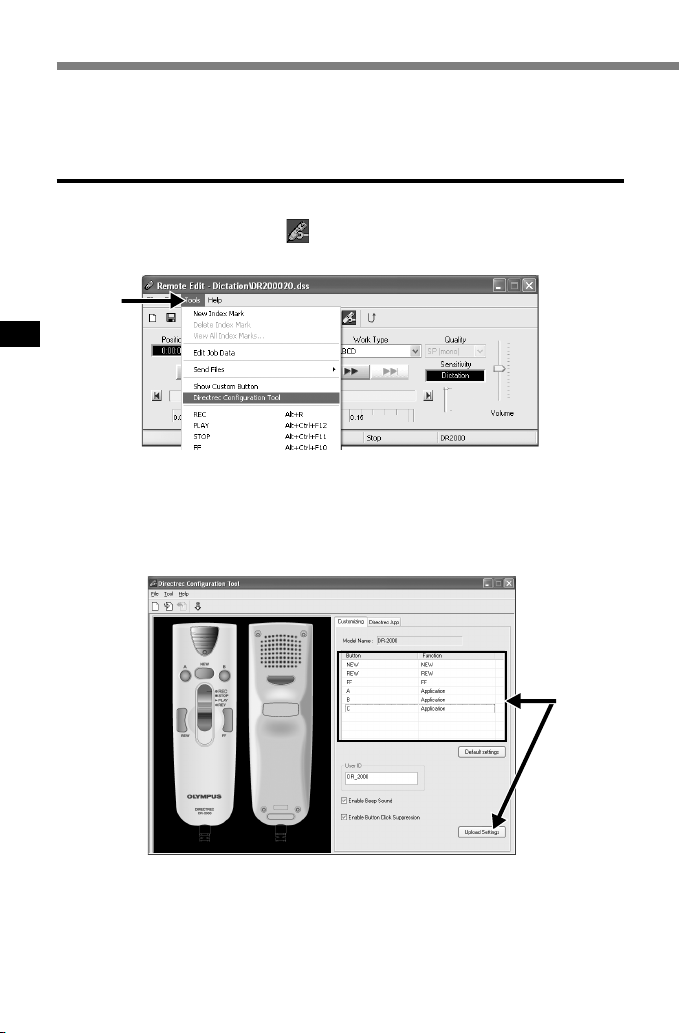
Select [Directrec Configuration Tool] in the [Tools] menu in the [Remote
Edit] window. Or, click the
1
The [Directrec Configuration Tool] dialog box will appear.
icon on the toolbar.
1
Select the function to be assigned to each button and click
[Upload Settings].
2
The “Successfully upload setting” alert will appear and complete customization.
If the “Failed to upload setting” alert appears, try the setting procedure once again.
30
2
Page 31

List of Customizable buttons and Available Functions
List of customizable buttons
NEW
REW
FF
A
B
C
*1: [INDEX] button function ....To insert an index mark using the [Remote Edit] window.
*2: [PRIORITY] button function....To switch the “Priority” settings in the [Remote Edit] window.
*3: [INSERT/OVERWRITE] button function....To switch the Insert and Overwrite recording modes in the
[Remote Edit] window.
*4: [DISABLE] button function..... No function will be assigned.
*5: [Application…] button function....
To programme to start a shortcut key for the DSS Player and a selected application by using the [Directrec APP] tab.
Example: (EXIT) indicates that the shortcut key for the exit command in the [Remote Edit] window is assigned.
Refer to the online Help for registration.
Default settings
NEW
REW
Application
FF
(INDEX/DSS Player)
Application (PRIORITY)
Application (EXIT)
Functions available for settings
NEW, REW, FF, INDEX*1,
PRIORITY*2, INSERT/
OVERWRITE*3, DISABLE*4,
Application*
5
Displaying Programmable Buttons
The Directrec Programmable (A, B, C) buttons can be displayed in the [Remote
Edit] window. They are useful as the assigned functions are also shown.
Select and check the [Show Custom Button] box in the [Tools]
menu of the [Remote Edit] window.
1
The Programmable (A, B, C) buttons along with their programmed function
will be displayed in the toolbar.
1
......................................................................................................................................
Note
• The Programmable buttons will not be displayed if the connected device does not include
the same function buttons.
31
Page 32

Directrec Button Function Customization
Programming Shortcut Keys (Registration)
You can customize the functions of other applications to the Directrec buttons. This
enables you to use the other application software easily while dictating with Directrec.
The selected application shortcut keys can be programmed to Directrec Programmable (A, B, C) buttons by using [Directrec Configuration Tool]. By doing so, the
Directrec buttons can be used to start the applications and command the functions.
The icon will be displayed in the task tray as a regular application in [Directrec
Configuration Tool].
Programming [Remote Edit] Function (Default)
The shortcut keys in the DSS Player [Remote Edit] window are programmed as
default.
Click the icon on the toolbar in the [Remote Edit] window. Or,
select [Directrec Configuration Tool] in the [Tools] menu.
1
The [Directrec Configuration Tool] dialog box will appear.
1
Select the [Directrec App] tab in the [Directrec Configuration
Tool] dialog box.
2
The shortcut keys for the [Remote Edit] window programmed to each button on the
Directrec as well as each start-up application are displayed.
2
32
Page 33

The default programmed shortcut keys are shown below.
Button
A
B
C
Shift+FF
Shift+A
Shift+B
Shift+NEW
Only the programmable (A, B, C) buttons can be programmed. Programming of the
NEW, REW or FF button is not possible. However, the combination with Shift key or
Ctrl key of the PC will enable programming.
Programming shortcut keys to your desired application
Directrec programmable (A, B, C) buttons as well as the [Remote Edit] window
can be used to control and navigate through applications when they are individually programmed as application shortcuts.
The shortcuts to applications can be saved individually as templates.
As the template can be switched automatically when the application becomes
active, the various applications can be operated by remote control when required.
Click the icon on the toolbar in the [Remote Edit] window. Or,
select [Directrec Configuration Tool] in the [Tools] menu.
1
The [Directrec Configuration Tool] dialog box will appear.
Click the icon on the toolbar in [Directrec Configuration Tool].
Or, select [New Template] in the [File] menu.
2
The [Open] dialog box will appear.
Application (To insert an index mark/Running DSS Player)
Application (To assign the “Priority” settings)
Application (Exit the Remote Edit window or Main window)
Assigned command
Jump to the index mark
To turn up the volume
To turn down the volume
Switching Insert/Overwrite Recording
2
33
Page 34

Directrec Button Function Customization
Browse and Select the application executable and click [Open].
The application shortcut is now set.
3
For example, if you select Microsoft Word “winword.exe” executable file,
“winword” will be added to the [Directrec Configuration Tool] dialog box.
3
Select the tab added to the [Directrec Configuration Tool] dialog box
and program the shortcut key to Directrec Programmable (A, B, C)
4
buttons.
The registered contents will be automatically saved as a template.
Programming to the buttons other than Programmable (A, B, C) buttons is
possible with the combination with Shift key or Ctrl key of the PC.
Refer to the online Help (
shortcut keys.
A: The [Button] column shows Directrec buttons. Shift+XXX and Ctrl+XXX indicates
the combination of Shift key or Ctrl key on the keyboard and Directrec buttons.
B: The [Assign] column shows the currently programmed shortcut keys or
the start-up application status.
P. 8) for further information on programming
☞
34
AB
Page 35

Troubleshooting
For the latest information not included in the user manual, please refer to the
Online Help (
☞
P. 8).
Symptom
Unable to use
Directrec controls
No playback tone
heard
Noise heard
during playback
Recording level
too low
Unable to set
index marks
Cannot connect
to PC
Unable to use
Directrec USB
microphone/
speaker.
Probable cause
DSS Player (included in the
package) is not installed.
The [Remote Edit] window in
the DSS Player (included in
the package) is not open.
The sound volume in the
[Remote Edit] window is
set to 0.
The sound volume of your
computer is set to 0.
The Directrec was shaken
during recording.
The Directrec was placed
near a cell phone or
fluorescent lamp while
recording or during playback.
The microphone sensitivity is
too low.
The maximum number of
index marks (16) has been
reached.
Sometimes a connection
cannot be made with some
PCs running Windows XP.
USB Audio Device is not
selected in the device settings
of your PC.
Action
Install the DSS Player
(☞ P. 6).
Open the [Remote Edit]
window first and then use
Directrec.
Adjust the volume level.
Move the Directrec.
Set the microphone sensitivity to
Conference mode and try again
(☞ P. 20).
Erase unnecessary index
marks (☞ P. 23).
You need to change the PC’s
USB settings. See DSS Player
Online Help for details (☞ P. 8).
Go to the Windows [start] menu,
=[Control Panel] and then select
[Sounds and Multimedia].
Open the [Audio] tab and select
USB Audio Device as the setting
for “Sound Playback” and
“Sound Recording”.
35
Page 36

Specifications
Recording format: DSS (Digital Speech Standard)
Input level: –70 dBv
Overall frequency response: 100 to 15,000 Hz
Maximum working output (5 V DC): 300 mW or more (8 Ω speaker)
External dimensions: 157 x 49 x 27 mm (without protrusions)
Weight: 200 g
Cable length: 2.5 m
Plug shape: USB connector A type
Technical Assistance And Support
DR-2000 is part of the Olympus Professional Dictation System. Your dealer is
trained to troubleshoot and fix many common problems that you may be having
with this system. If you encounter problems using your DR-2000, we recommend that you contact your Olympus Professional Dealer that sold you the system. If your dealer cannot fix your problem, please call our technical hotline
number or send an E-mail.
◆For customers in the U.S. and Canada
Phone: 1-888-553-4448
E-mail: distec@olympus.com
◆For customers in Europe
E-mail : dss.support@olympus-europa.com
36
Page 37

DIRECTREC
DR-2000
Executive Kit
MODE D’EMPLOI
Merci d’avoir porté votre choix sur un Olympus
DIRECTREC.
Lisez ce mode d’emploi pour les informations
concernant l’emploi correct et sûr de l’appareil.
Conservez-le à portée de la main pour toute
référence ultérieure.
FR
Page 38

Caractéristiques principales
Ce produits possède les caractéristiques suivantes.
● Un nouveau système amélioré de microphone réduit les sons parasites (vent,
bruit de machine produit) lors de l’enregistrement, et par conséquent permet
une qualité sonore d’enregistrement supérieure, jamais atteinte auparavant.
● Un nouveau design et un nouvel emplacement des touches permettent un
contrôle d’une seule main, sans même avoir à vérifier visuellement la position
des touches de fonction. Directrec s’adapte facilement à votre main, pour un
maniement sans effort (☞ P. 4).
● Le Directrec dispose de 3 touches programmables (A, B et C) (☞ P. 30, 31).
● Toutes les fonctions de touche sont facilement personnalisables pour s’adapter
à vos préférences particulières ou à n’importe quel environnement
d’enregistrement (☞ P. 30 - 34).
● Périphérique audio USB, le Directrec peut être utilisé comme microphone USB
ou haut-parleur USB une fois connecté à un ordinateur. De plus, un puissant
haut-parleur intégré diffuse un son de qualité hi-fi.
● Le Directrec peut être utilisé comme commande à distance pour le DSS Player
Pro (ci-après dénommé DSS Player) non seulement pour l’enregistrement direct,
mais aussi lors de l’édition des fichiers enregistrés sur un ordinateur.
● Le Directrec peut sauvegarder un fichier d’enregistrement sur un ordinateur au
format DSS (norme vocale numérique).
● Deux modes d’enregistrement, mode SP (Lecture Standard) ou mode LP (Lecture
Longue Durée) (☞ P. 20).
● La qualité du capteur du microphone peut être modifiée pour mieux s’adapter
aux conditions et à l’environnement d’enregistrement (☞ P. 20).
● Réglage de priorité à niveaux multiples (☞ P. 24).
OLYMPUS IMAGING CORPORATION détient les droits du logiciel DSS Player Pro et
des instructions (ce manuel).
Microsoft et Windows sont des marques déposées ou marque de Microsoft Corporation.
Intel et Pentium sont des marques de fabrique déposées par Intel Corporation.
Les autres noms de produits et de marques indiqués ici peuvent être des marques de
fabrique ou des marques de fabrique déposées de leurs propriétaires respectifs.
2
Page 39

Table des matières
Introduction
Identification des éléments................................................. 4
Configuration minimale....................................................... 5
Préparation
Installation du logiciel DSS Player ..................................... 6
Désinstaller un logiciel DSS Player.................................... 7
Utiliser l’aide en ligne ......................................................... 8
Commençons
Connexion à votre PC ........................................................ 9
Commande du DSS Player .............................................. 10
Noms des fenêtres ........................................................... 11
Utilisation de la fenêtre Editer à distance ........................ 12
Enregistrement direct ....................................................... 14
Lecture (Lecture d’un fichier de dictée) ........................... 17
Sauvegarder l’enregistrement .......................................... 19
Sensibilité du microphone ................................................ 20
Modes d’enregistrement ................................................... 20
Marques index .................................................................. 21
Réglage des niveaux de priorité....................................... 24
Système son ..................................................................... 25
Réglage de job Data ......................................................... 26
Personnalisation des fonctions des touches Directrec .... 30
Dépannage ....................................................................... 35
Spécifications ................................................................... 36
Support pour l’utilisateur
Assistance technique et soutien....................................... 36
3
Page 40

Identification des éléments
6
7
8
1
2
3
4
5
9
0
1Microphone intégré
2Voyant d’enregistrement/
lecture
3Touche B (Programmable)
4Commande commutateur
REC (Enregistrer)/
STOP (Arrêt)/
PLAY (Lire)/
REV (Revue
)
5Touche FF (Avance rapide)
6Touche NEW (Nouveau
)
7Touche A (Programmable)
8Touche REW (Retour)
9Haut-parleur intégré
0Touche C (Programmable)
!Câble USB
!
4
Page 41

Configuration minimale
Assurez-vous que votre ordinateur dispose de la configuration minimale détaillée
ci-dessous. Veuillez vous renseigner auprès de votre administrateur système
ou de votre revendeur professionnel Olympus.
PC: IBM PC/AT compatible PC
Système d’exploitation:
CPU: Windows 2000/XP: Processeur de classe Intel Pentium II
RAM: Windows 2000/XP: 128 Mo ou plus (256 Mo ou plus
Espace disque dur: 50 Mo ou plus
Lecteur: Lecteur de CD-ROM, CD-R, CD-RW, DVD-ROM 2x ou
Carte son: Creative Labs Sound Blaster 16 ou 100% compatible
Navigateur: Microsoft Internet Explorer 4.01 SP2 plus récent
Affichage: 800 x 600 pixels ou plus, 256 couleurs ou plus
USB port: un port libre ou plus
Microsoft Windows 2000 Professionnel/XP
Professionnel, Edition Familiale/Vista Édition Intégrale,
Entreprise, Professionnel, Édition Familiale Premium,
Édition Familiale Basique
333 MHz ou supérieur (Processeur 500 MHz ou supérieur
recommandé)
Windows Vista: 800MHz ou supérieur
recommandé)
Windows Vista: 500 Mo ou plus (1Go ou plus
recommandé)
plus rapide
Carte son
5
Page 42

Installation du logiciel DSS Player
Avant de connecter le Directrec à votre ordinateur, vous devez d’abord installer
le logiciel DSS Player.
Assurez-vous de quitter toutes les applications, éjectez la disquette si vous en
utilisez une, et connectez-vous en tant qu’administrateur si vous utilisez Windows 2000/XP (Professionnel seulement) sur le réseau.
Insérez le logiciel Olympus DSS Player dans le lecteur de CDROM.
1
Le programme d’installation démarre automatiquement.
Si le programme d’installation ne démarre pas automatiquement, parcourez
votre lecteur de CD-ROM et exécutez «setup.exe».
La boîte de dialogue permettant de sélectionner la langue à utiliser
pour l’installation apparaît.
2
Sélectionnez la langue souhaitée.
Enregistrez les informations de l’utilisateur.
Enregistrez les informations utilisateur. Entrez votre nom, le nom de votre
3
société, et le no.d’identification (ID) de licence (le numéro de série).
Le numéro d’identification de licence figure sur la carte d’identification de licence fournie avec l’enregistreur.
Cliquez sur le bouton [SUIVANT]. Une boîte de dialogue de confirmation
s’affiche; cliquez sur le bouton [OUI].
Effectuez l’installation en suivant les instructions qui s’affichent
à l’écran.
4
6
Page 43

Désinstaller un logiciel DSS Player
Pour désinstaller tout composant logiciel du logiciel DSS Player installé sur votre
PC, suivez les étapes ci-dessous.
Quittez le programme DSS player.
1
Cliquez sur le bouton [démarrer] dans la barre de tâches.
2
Sélectionnez [Ajouter ou Supprimer des programmes] à partir
du [Panneau de configuration].
3
La liste des applications installées est affichée.
Sélectionnez [Olympus DSS Player Pro], puis cliquez sur le bouton [Modifier ou Supprimer].
4
Effectuez la désinstallation en suivant les instructions qui
s’affichent à l’écran.
5
..............................................................................................................................
Remarque
• La désinstallation n’efface pas les fichiers de dictée enregistrés.
7
Page 44

Utiliser l’aide en ligne
Pour en savoir plus sur les menus et les opérations, consultez l’aide en ligne.
Pour lancer l’aide en ligne:
• Cliquez sur le bouton [Démarrer] et sélectionnez [Tous les
programmes], puis [Olympus DSS Player Pro], puis [Aide de
Dictée].
• Lorsque le DSS Player est en marche, sélectionnez le menu
[Contenu] dans le menu [Aide].
• Lorsque le DSS Player est en marche, appuyez sur la touche F1
du clavier.
......................................................................................................................................
Remarque
• Pour plus d’informations concernant l’utilisation du DSS Player et ses fonctions, reportez-
vous à l’aide en ligne. L’aide en ligne est accessible après l’installation du DSS Player.
8
Page 45

Connexion à votre PC
Assurez-vous d’installer le logiciel DSS Player avant de connecter le Directrec à
l’ordinateur. Cependant, si vous connectez le Directrec avant ou pendant
l’installation du logiciel, l’assistant «Assistant Mise à jour du matériel» s’affiche.
Dans ce cas, annulez l’assistant en cliquant sur le bouton [Annuler] dans la fenêtre
de l’assistant, puis installez ou continuez l’installation du logiciel DSS Player.
Connexion à votre PC avec le câble de connexion USB
Branchez le câble USB du Directrec
directement dans le port USB de votre
1
ordinateur ou dans un concentrateur USB.
Déconnecter l’enregistreur de votre PC
Débranchez le câble USB du Directrec du port USB de votre
ordinateur ou du concentrateur USB.
1
......................................................................................................................................
Remarques
• Certains ordinateurs et concentrateurs USB peuvent ne pas fournir une alimentation
suffisante et empêcher la connexion du Directrec. Consultez le manuel d’utilisation de
votre ordinateur pour en savoir plus sur le port USB de votre ordinateur ou sur le
concentrateur USB.
• Si vous utilisez un concentrateur USB pour connecter le Directrec, utilisez toujours un
concentrateur USB auto-alimenté (adaptateur secteur).
• Ne débranchez jamais le câble USB tant que les voyants d’enregistrement/lecture
clignotent. Sinon, les données seront détruites.
9
Page 46

Commande du DSS Player
Par défaut, la connexion du Directrec à votre ordinateur lancera automatiquement
l’application.
Désactivation du démarrage automatique
Effectuez un clic droit de la souris sur l’icône Détection de la
barre des tâches, dans le coin inférieur droit de l’écran, puis
1
cliquez sur «Paramètres l’application de démarrage».
Cliquez sur [DSS Player Pro].
La marque de sélection de [DSS Player Pro] disparaît.
2
Démarrage manuel
Démarrez Windows.
1
Cliquez sur [démarrer], puis sélectionnez [Tous les programmes].
Tout le menu du programme s’affichera.
2
Sélectionnez [Olympus DSS Player Pro], puis cliquez sur le
[Dictation Module].
3
......................................................................................................................................
Remarque
•Si vous connectez le Directrec avant d’installer DSS Player, la boîte de dialogue de
l’assistant «Assistant Mise à jour du matériel» s’ouvre. Dans ce cas, cliquez sur [Annuler]
pour quitter l’assistant, puis installez le logiciel DSS Player.
10
23
Page 47

Noms des fenêtres
1
Fenêtre principale (Windows XP)
2
3
* Ecran principal est affiché lorsque DSS Player a
Plateau Messages
démarré.
1Barre de commande lecture
Boutons de commande pour la lecture et l’arrêt des fichiers de dictée.
2Visionner l’arbre des dictées
Affiche l’arborescence des dossiers concernant les fichiers au format DSS,
WAV enregistrés sur le disque dur de votre PC.
Les enregistrement effectués à l’aide du Directrec seront sauvegardés comme
fichiers dans la Plateau Messages (
) dans le Dossier Dictées ( ).
3Visionner l’arbre des dispositifs
Affiche l’arborescence des dossiers du Directrec.
4Visionner la liste des dictées
Affiche les fichiers de dictée du dossier sélectionné sous 2 et 3.
4
11
Page 48

Utilisation de la fenêtre Editer à distance
Le Directrec peut être utilisé à la fois comme microphone USB et haut-parleur USB
lorsqu’il est connecté à votre ordinateur. De plus, en ouvrant la fenêtre [Editer à
distance] dans DSS Player, vous pouvez enregistrer directement (☞ P. 14 - 16) ou
éditer des fichiers à l’aide de la commande à distance.
Ouverture de la fenêtre [Editer à distance]
Assurez-vous que le Directrec est correctement connecté à votre
ordinateur, puis démarrez DSS Player.
1
La fenêtre principale DSS Player s’affiche.
Dans la fenêtre principale du DSS Player, cliquez sur le menu
[Fichier], puis sélectionnez [Nouveau fichier] ou cliquez sur
2
l’icône .
L’écran [Editer à distance] apparaît.
Utilisez le Directrec ou la fenêtre [Editer à distance] à votre
convenance.
3
......................................................................................................................................
Remarques
• Assurez-vous que la fenêtre [Editer à distance] est ouverte lors de l’utilisation du Directrec,
sinon la commande à distance ne fonctionnera pas.
• La fenêtre [Editer à distance] peut aussi s’afficher sans ouvrir le menu principal lors du
lancement de DSS Player (☞ P. 13).
12
Page 49

Affichage de la fenêtre [Editer à distance] sans ouvrir le menu principal
Vous pouvez configurer votre ordinateur pour que la fenêtre [Editer à distance]
s’ouvre directement au lancement de DSS Player, sans ouvrir la fenêtre principale.
Dans la fenêtre principale du DSS Player, cliquez sur le menu
[Outils], puis sélectionnez [Options...], puis cliquez sur l’onglet
1
[Directrec].
Cochez la case [Commencez la fenêtre de Editor a distance
automatiquement quand le Dictation Modle est lancé] et cliquez
2
ensuite sur le bouton [OK].
Les préréglages sont maintenant terminés.
Lorsque les préréglages décochés ont été cochés, l’ordinateur reconnaît la
connexion du périphérique Directrec au lancement de DSS Player et ouvre
la fenêtre [Editer à distance] sans ouvrir la fenêtre principale de l’application
P. 11).
(
☞
2
13
Page 50

Enregistrement direct
Nouvel enregistrement
Dans la fenêtre principale du DSS Player,
cliquez sur le menu [Fichier], puis
1
sélectionnez [Nouveau fichier...] ou
cliquez sur l’icône
L’écran [Editer à distance] apparaît.
2,3
Temps d’enregistrement actuel Temps d’enregistrement restant
Déplacez le commutateur du Directrec sur
la position REC ou cliquez sur la touche
2
3
(Enregistrer) dans la fenêtre [Editer
à distance] pour démarrer l’enregistrement.
Le voyant rouge d’enregistrement/lecture sur
le Directrec s’allume. Dirigez le microphone
vers la source sonore.
Déplacez le commutateur du
Directrec sur la position STOP ou
cliquez sur la touche
pour arrêter l’enregistrement.
Si vous souhaitez ajouter des enregistrements
supplémentaires au même fichier, déplacez de
nouveau le commutateur du Directrec sur la
position REC ou cliquez de nouveau sur la
touche .
.
(Arrêt)
14
2 3
Page 51

Ecrasement d’enregistrement
Vous pouvez écraser un enregistrement antérieur à partir de n’importe quel point
du fichier. Notez que les enregistrements écrasés seront effacés.
Assurez-vous de vous placer au point de
départ de l’enregistrement à écraser.
1
Déplacez le commutateur du Directrec sur
la position REC ou cliquez sur la touche
2
2,3
3
Ne cochez pas cette case
(Enregistrer) dans la fenêtre
[Editer à distance].
Le voyant d’enregistrement/lecture sur le Directrec
s’allume et l’écrasement d’enregistrement
démarre.
Déplacez le commutateur du Directrec sur
la position STOP ou cliquez sur la touche
(Arrêt) dans la fenêtre [Editer à
distance] pour arrêter l’écrasement.
2 3
......................................................................................................................................
Remarques
• Assurez-vous que la case «Insérer enregistrem» (☞ P. 16) dans la fenêtre [Editer à distance]
n’est pas cochée, sinon l’écrasement d’enregistrement ne s’effectuera pas.
•Vous ne pouvez pas sélectionner un autre mode d’enregistrement (SP, LP) que celui du
fichier d’origine avant d'enregistrer un écrasement.
15
Page 52

Enregistrement direct
Enregistrement d'insertion
Des informations complémentaires peuvent être insérées dans des fichiers
précédemment enregistrés.
Cochez la case ( ) «Insérer enregistrem»
dans la fenêtre [Editer à distance].
1
Assurez-vous de vous placer à la
position exacte dans le fichier où doit
2
commencer l’enregistrement à inséret.
3,4
Lors de la lecture du fichier, déplacez le
commutateur du Directrec sur la position
3
REC ou cliquez sur la touche
(Enregistrer) dans la fenêtre [Editer à
distance] pour commencer l’insertion
d’un enregistrement supplémentaire.
Le voyant rouge d’enregistrement/lecture sur
le Directrec s’allume.
Déplacez le commutateur du Directrec sur
la position STOP ou cliquez sur la touche
4
(Arrêt) dans la fenêtre [Editer à
distance] pour arrêter l’insertion de
l’enregistrement supplémentaire.
1
......................................................................................................................................
Remarques
• Assurez-vous que la case «Insérer enregistrem» dans la fenêtre [Editer à distance] est
cochée, sinon l’enregistrement ne s’insèrera pas.
•
Si vous mettez le commutateur en position STOP pendant plus de deux secondes en le
déplaçant de la position PLAY à la position REC, l’insertion d’enregistrement sera désactivée.
•Vous ne pouvez pas sélectionner un autre mode d’enregistrement (SP, LP) que celui du
fichier d’origine avant d'enregistrer un écrasement.
16
3
4
Page 53

Lecture (Lecture d’un fichier de dictée)
Déplacez le commutateur du
Directrec sur la position PLAY ou
1
1,3
cliquez sur la touche
dans la fenêtre [Editer à distance]
pour commencer la lecture.
Le voyant vert d’enregistrement/lecture sur
le Directrec s’allume.
Réglez le curseur de volume dans la
fenêtre [Editer à distance] sur le
2
niveau requis.
L’enregistrement sera lu et diffusé à travers
le haut-parleur du Directrec.
Déplacez le commutateur du
Directrec sur la touche STOP ou
3
cliquez sur la touche
dans la fenêtre [Editer à distance] là
où vous souhaitez arrêter la lecture.
(Lire)
(Arrêt)
Temps de lecture
actuel
Curseur de lecture
Montre la position de
lecture actuelle
Temps d’enregistrement total du
fichier en cours de lecture
Axe du temps
31
2
17
Page 54

Lecture (Lecture d’un fichier de dictée)
Fonctions de lecture
Diverses fonctions sont disponibles dans le Directrec et la fenêtre [Editer à distance] pour lire un fichier d’enregistrement.
Fonctions de lecture du Directrec
Fonctions de
lecture
Avance rapide
(FF)
Retour (REW)
Opération
Appuyez une fois sur la touche FF
pendant l’arrêt.
Appuyez une fois sur la touche
REW pendant l’arrêt.
Comment annuler
Mettez le commuteur sur une
autre position que STOP.
➥ Déplacer le curseur sur une
autre position que Arrêt.
Repérage (CUE)
Revue (REV)
Maintenez la touche FF pressée
pendant l’arrêt ou la lecture d’un
fichier.
Maintenez la touche REW pressée
pendant l’arrêt ou la lecture d’un
fichier.
Mettez le commutateur en position
REV.
Relâchez la touche FF.
Relâchez la touche REW.
Relâchez la Commande.
Fonctions de la fenêtre [Editer à distance]
Fonctions de
Opération
Comment annuler
lecture
Avance rapide
(FF)
Retour (REW)
Repérage(CUE)
Revue (REV)
•Veuillez consulter notre aide en ligne pour en savoir plus sur les fonctions et les
commandes du Directrec (
Appuyez une fois sur la touche
pendant l’arrêt.
Appuyez une fois sur la touche
pendant l’arrêt.
Maintenez la touche pressée
pendant l’arrêt ou la lecture d’un fichier.
Maintenez la touche pressée
pendant l’arrêt ou la lecture d’un fichier.
P. 8).
☞
Appuyez sur la touche .
➥ Le fichier d’enregistrement
sera de nouveau lu.
Relâchez la touche .
Relâchez la touche .
18
Page 55

Sauvegarder l’enregistrement
Pour sauvegarder l’enregistrement
actuel, déplacez le commutateur du
1
Directrec sur la position STOP ou cliquez
2,3
1,4
sur la touche
l’enregistrement.
Appuyez sur la touche NEW du Directrec
ou bien cliquez sur l’icône
2
d’outils de la fenêtre [Editer à distance].
La fenêtre [Enregistrement du fichier] s’affiche
pour sauvegarder les données.
Pour sauvegarder le fichier, appuyez sur
la touche NEW du Directrec ou cliquez
3
sur la touche [Enregistrer] dans la
fenêtre [Editer à distance].
Les données enregistrées sont sauvegardées.
Le Directrec est maintenant disponible
pour enregistrer dans un nouveau fichier.
4
Déplacez le commutateur du Directrec sur
la position REC ou cliquez sur la touche
(Enregistrer) dans la fenêtre [Editer
à distance] pour démarrer l’enregistrement.
(Arrêt) pour arrêter
dans la barre
3
Format de nom de fichier
Les noms de fichier sont nommés de la façon suivante.
DR_2 0001.dss
Extension
Numéro de fichier...Un numéro de série est automatiquement
assigné par le Directrec.
Le nom qui a été réglé par le Directrec. Le nom par défaut de le Directrec est
«DR_2000». Vous pouvez modifier l’ID auteur avec le DSS Player (☞ P. 26 - 28).
19
Page 56

Sensibilité du microphone
La sensibilité du microphone est ajustable en fonction des besoins
d’enregistrement.
Sélectionnez dans le champ «Sensibilité» soit «Dictée» ou
«Conférence» dans la fenêtre [Editer à distance].
1
Conférence:
Dictée: Mode basse sensibilité adapté à l’enregistrement de dictée.
Mode haute sensibilité adapté à l’enregistrement des ambiances sonores.
1
......................................................................................................................................
Remarque
• Si vous souhaitez enregistrer une dictée claire et intelligible, passez au mode Dictée et
rapprochez (5 ou 10 cm) le microphone interne du haut-parleur.
Modes d’enregistrement
Deux modes d’enregistrement sont disponibles avec le Directrec. SP
(enregistrement normal) et LP (enregistrement longue durée).
Sélectionnez dans le champ «Qualité» soit «SP (mono)» ou «LP
(mono)» dans la fenêtre [Editer à distance].
1
SP: Mode d’enregistrement par défaut.
LP:
Peut enregistrer dans un fichier de plus petite taille le même enregistrement qu’en mode SP.
......................................................................................................................................
Remarque
•
Choisissez le mode SP pour enregistrer des réunions ou conférences avec une grande netteté.
20
1
Page 57

Marques index
Des marques d’index peuvent être placées dans un fichier pendant
l’enregistrement ou la lecture afin de fournir un moyen simple et rapide d’identifier
les sections importantes du fichier.
Réglage d’une marque index
Appuyez sur la touche A du Directrec
1
ou bien cliquez sur l’icône
1
barre d’outils de la fenêtre [Editer à
distance].
La marque d’index est maintenant définie.
Une icône s’affiche sur la barre de l’axe
temporel dans la fenêtre [Editer à distance].
La marque d’index peut aussi être définie en
sélectionnant [Nouvelle marque d’index] dans
le menu [Outils].
dans la
1
Axe du
temps
Curseur de lecture
Affiche la position actuelle
de lecture ou
d’enregistrement.
......................................................................................................................................
Remarques
• Jusqu’à 16 marques index peuvent être posées dans un fichier.
• Des marques index ne peuvent pas être posées ou effacées dans un fichier verrouillé.
Veuillez consulter l’aide en ligne pour en savoir plus (
☞ P. 8).
21
Page 58

Marques index
Repérage d’une marque index
L’icône sur la barre de l’axe temporel dans la fenêtre [Editer à distance] indique la
position de la marque d’index. Pour sauter à une position marquée, suivez cette procédure.
Appuyez deux fois sur la touche FF
ou REW du Directrec ou bien cliquez
1
sur le bouton
[Editer à distance].
Le curseur de lecture saute automatiquement
à la position de la marque d’index ( ).
dans la fenêtre
1
Utilisation de la fenêtre [Liste des marques d’index] pour sauter à la marque d’index
Cliquez sur l’icône dans la barre d’outils de la fenêtre [Editer à distance].
Ou sélectionnez [Afficher toute les marques d’index...] dans le menu [Outils].
1
La fenêtre [Liste des marques d’index] s’affiche.
Sélectionnez la position marquée sur laquelle vous souhaitez
sauter et cliquez sur [Sauter].
2
Le Directrec saute à la position de la marque d’index.
Position de la marque d’index
1
Axe du
temps
2
22
Page 59

Effacement d’une marque index
Repérez la marque index que vous souhaitez effacer.
1
Cliquez sur l’icône dans la barre d’outils de la fenêtre [Editer
à distance]. Ou sélectionnez [Effacer une marque d’index] dans
2
le menu [Outils].
La marque index est effacée.
......................................................................................................................................
Remarque
• Des marques index ne peuvent pas être posées ou effacées dans un fichier verrouillé.
Veuillez consulter l’aide en ligne pour en savoir plus (
☞ P. 8).
23
Page 60

Réglage des niveaux de priorité
Vous pouvez régler un niveau de priorité pour chaque fichier enregistré.
Appuyez sur la touche B du Directrec.
La case à cocher «Priorité» dans la fenêtre
1
[Editer à distance] sera cochée et décochée
à chaque appui sur cette touche.
Cochée : Niveau haut.
Décochée : Niveau normal.
1
Vous pouvez aussi cocher et décocher le
paramètre Priorité à l’aide la fenêtre [Editer
à distance].
1
24
Page 61

Système son
Le Directrec émet des bips pour vous signaler le fonctionnement des touches.
Les avertissements sonores peuvent être désactivés.
Cliquez sur l’icône dans la barre d’outils de la fenêtre [Editer à distance].
Ou sélectionnez [Directrec Configuration Tool] dans le menu [Outils].
1
La boîte de dialogue [Directrec Configuration Tool] s’affiche.
1
Sélectionnez l’onglet [Personnalisation] et cochez la case
[Activer le bip].
2
Cochée: Les avertissements sonores sont activés.
Décochée: Les avertissements sonores sont désactivés.
Cliquez sur [Exporter les réglages].
Les réglages sont maintenant terminés.
3
2 3
25
Page 62

Réglage de Job Data
Les fichiers enregistrés dans votre ordinateur par le Directrec contiennent un ID auteur et
un ID de type de travail comme en-tête d’information. Les détails contenus dans l’en-tête
d’information peuvent être facilement modifiés à l’aide du DSS Player.
Enregistrement d’un ID auteur et d’un ID de type
de travail dans DSS Player
Jusqu’à dix ID utilisateur et ID de type de travail peuvent être enregistrés dans DSS Player.
Assurez-vous que le Directrec n’est pas connecté.
1
Dans la fenêtre principale du DSS Player, cliquez sur le menu
[Télécharger] , puis sélectionnez [Créer et envoyer les données
2
du travail...].
L’écran [Créer et envoyer les données du travail] apparaît.
Entrez votre ID auteur ou ID de type de travail dans le champ indiqué par la flèche.
Cliquez sur [Enregistrer].
L’enregistrement de l’ID auteur ou de l’ID de type de travail est maintenant terminé.
3
ID auteur
Type de travail
26
3
Page 63

ID utilisateur du Directrec par défaut
L’ID utilisateur du Directrec joue un rôle essentiel dans le processus pour nommer
les nouveaux fichiers d’enregistrements. L’ID utilisateur par défaut est «DR_2000».
Pour modifier l’ID utilisateur par défaut, suivez la procédure ci-dessous.
Cliquez sur l’icône dans la barre d’outils de la fenêtre [Editer
à distance]. Ou sélectionnez [Directrec Configuration Tool] dans
1
le menu [Outils].
La boîte de dialogue [Directrec Configuration Tool] s’affiche.
1
Entrez votre ID utilisateur dans le champ [Identité de I’auteur] et cliquez
sur [Exporter les réglages].
2
L’ID utilisateur entré est transféré dans le Directrec. L’ID peut être n’importe
quelle combinaison de «A» à «Z», de nombres et/ou de «_», pour une longueur
maximale de 16 caractères.
2
......................................................................................................................................
Remarque
• Ne déconnectez jamais l’accès USB si le voyant clignote en rouge. Sinon, les données
pourraient se perdre.
27
Page 64

Réglage de Job Data
Réglage d’un ID auteur
L’ID auteur par défaut du Directrec ou tout ID auteur enregistré dans DSS Player
(☞ P. 26) peut être défini comme information d’en-tête.
Cliquez sur l’icône dans la barre d’outils de la fenêtre [Editer à
distance] .
1
La fenêtre [Régler les données du travail] s’affiche.
1
Sélectionnez l’ID auteur souhaité dans la liste déroulante ID auteur.
2
Cliquez sur [OK].
Tous les enregistrements faits par l’auteur pendant la session verront leur ID
3
faire partie de l’information de l’en-tête.
2
......................................................................................................................................
Remarque
• «DR_2000» du Directrec est l’ID utilisateur par défaut.
28
3
Page 65

Réglage d’un type de travail
Tout type de travail enregistré dans DSS Player (☞ P. 26) peut être défini comme
information d’en-tête.
Sélectionnez le type de travail enregistré dans le paramètre ID de type
de travail dans la fenêtre [Editer à distance].
1
Tous les enregistrements effectués avec le nouveau ID de type de travail
verront celui-ci faire partie de l’information de l’en-tête.
1
29
Page 66

Personnalisation des fonctions
des touches Directrec
A l’aide de [Directrec Configuration Tool], les fonctions des touches du Directrec
peuvent être facilement personnalisées pour s’adapter aux besoins de l’utilisateur.
Personnalisation des touches du Directrec
Sélectionnez [Directrec Configuration Tool] dans le menu [Outils] de
la fenêtre [Editer à distance]. Ou cliquez sur l’icône dans la barre
1
d’outils.
La boîte de dialogue [Directrec Configuration Tool] s’affiche.
1
Sélectionnez la fonction à personnaliser pour chaque touche et
cliquez sur [Exporter les réglages].
2
L’alerte «Réglages exportés avec succès» s’affichera et terminera la
personnalisation.
Si l’alerte «Echec de l’exportation des réglages» s’affiche, renouvelez la
procédure de configuration.
30
2
Page 67

Liste des touches personnalisables et des fonctions disponibles
Liste des touches personnalisables
NEW
REW
FF
A
B
C
*1: [INDEX] fonction de touche...Pour insérer une marque d’index à l’aide de la fenêtre [Editer à distance].
*2: [PRIORITY] fonction de touche...Pour modifier le paramètre «Priorité» dans la fenêtre [Editer à distance].
*3: [INSERT/OVERWRITE] fonction de touche...Pour modifier les modes d’enregistrement Insertion et
Ecrasement dans la fenêtre [Editer à distance].
*4: [DISABLE] touche de fonction...Aucune fonction ne sera affectée.
*5: [Application…] touche de fonction...
Pour programmer une touche de raccourci pour lancer DSS Player et une application sélectionnée à l’aide de
l’onglet [Directrec APP].
Exemple: (EXIT) indique que la touche de raccourci pour la commande de sortie dans la fenêtre [Editer
àdistance] est affectée. Consultez l’aide en ligne pour l’enregistrement.
Réglages par défaut
NEW
REW
Application
FF
(INDEX/DSS player)
Application (PRIORITY)
Application (EXIT)
Fonctions disponibles pour la personnalisation
NEW, REW, FF, INDEX*1,
PRIORITY*2, INSERT/OVERWRITE*3,
DISABLE*4, Application*
5
Affichage des touches programmables
Les touches programmables (A, B et C) du Directrec peuvent être affichées
dans la fenêtre [Editer à distance]. Elles sont utiles car les fonctions programmées
sont aussi affichées.
Sélectionnez et cochez la case [Afficher bouton Personnaliser]
dans le menu [Outils] de la fenêtre [Editer à distance].
1
Les touches programmables (A, B et C) avec leurs fonctions programmées
s’afficheront dans la barre d’outils.
1
......................................................................................................................................
Remarque
• Les touches programmables ne s’afficheront pas si le périphérique connecté ne possède
pas les mêmes touches de fonction.
31
Page 68

Personnalisation des fonctions des touches Directrec
Programmation des touches de raccourci (enregistrement)
Les touches de raccourci de l’application sélectionnée peuvent être programmées
dans les touches programmables (A, B et C) du Directrec à l’aide de [Directrec
Configuration Tool]. Dans ce cas, les touches du Directrec peuvent être utilisées
pour lancer des applications et exécuter des fonctions.
L’icône
dans [Directrec Configuration Tool].
Programmation de la fonction [Editer à distance] (défaut)
Les touches de raccourci dans la fenêtre [Editer à distance] dans DSS Player
sont programmées par défaut.
1
s’affichera dans la barre de tâches comme une application normale
Cliquez sur l’icône dans la barre d’outils de la fenêtre [Editer
à distance] dans le menu. Ou sélectionnez [Directrec
Configuration Tool] dans le menu [Outils].
La boîte de dialogue [Directrec Configuration Tool] s’affiche.
1
Sélectionnez l’onglet [Directrec App] dans la boîte de dialogue
[Directrec Configuration Tool].
2
Les touches de raccourci pour la fenêtre [Editer a distance] et programmées dans
chaque touche du Directrec, ainsi que chaque application de lancement, sont affichées.
32
2
Page 69

Les touches de raccourci programmées par défaut sont indiquées ci-dessous.
Touche
A
B
C
Shift+FF
Shift+A
Shift+B
Shift+NEW
Seules les touches (A, B et C) peuvent être programmées. La programmation des
touches NEW, REW ou FF est impossible. Cependant, la combinaison avec les
touches Majuscule ou Ctrl de l’ordinateur permettra la programmation.
Programmation des touches de raccourci pour votre application souhaitée
Les touches programmables (A, B et C) du Directrec, ainsi que la fenêtre [Editer
à distance] peuvent être utilisées pour contrôler et naviguer à travers des applications lorsqu’elles sont individuellement programmées comme raccourcis
d’application.
Les raccourcis d’application peuvent être sauvegardés individuellement comme
modèles.
Puisque le modèle peut être activé automatiquement lorsque l’application est
lancée, les différentes applications peuvent être pilotées par la commande à
distance si nécessaire.
Cliquez sur l’icône dans la barre d’outils de la fenêtre [Editer
à distance]. Ou sélectionnez [Directrec Configuration Tool] dans
1
le menu [Outils].
La boîte de dialogue [Directrec Configuration Tool] s’affiche.
Cliquez sur l’icône dans la barre d’outils de la fenêtre
[Directrec Configuration Tools]. Ou sélectionnez [Nouveau
2
modèle] dans le menu [Fichier].
La boîte de dialogue [Ouvrir] s’affiche.
Application (Pour insérer une marque d'index/Commande du DSS Player)
Application (Pour attribuer les paramètres «Priorité»)
Application (Quitte la fenêtre [Editer à distance] ou Fenêtre principale)
Bascule l’enregistrement d’insertion/écrasement
Commande affectée
Saute à la marque d’index
Pour monter le volume
Pour baisser le volume
2
33
Page 70

Personnalisation des fonctions des touches Directrec
Parcourez le disque dur, sélectionnez l’exécutable de
l’application et cliquez sur [Ouvrir].
3
Le raccourci de l’application est maintenant défini.
Par exemple, si vous sélectionnez le fichier exécutable de Microsoft Word
«winword.exe», «WinWord» sera ajouté à la boîte de dialogue [Directrec
Configuration Tool].
3
Sélectionnez l’onglet ajouté à la boîte de dialogue [Directrec
Configuration Tool] et programmez la touche de raccourci dans les
4
touches programmables (A, B et C) du Directrec.
Le contenu enregistré sera automatiquement sauvegardé comme modèle.
La programmation dans des touches autres que les touches programmables
(A, B et C) est possible avec la combinaison des touches Shift et Ctrl de
l’ordinateur.
Consultez l’aide en ligne (☞ P. 8) pour en savoir plus sur la programmation
des touches de raccourci.
A: La colonne [Bouton] indique les touches du Directrec. Shift+XXX et Ctrl+XXX
indique la combinaison entre les touches Shift et Ctrl du clavier et les touches du
Directrec.
B: La colonne [Attribuer] indique les touches de raccourci actuellement
programmées ou l’état de l’application de lancement.
34
A
B
Page 71

Dépannage
Pour des informations complémentaires non inclus dans le manuel
d'utilisation merci de vous référer à l’aide en ligne (
☞
P. 9).
Symptôme
Impossible
d’utiliser les
commandes du
Directrec
Pas de tonalité
de lecture
Bruit audible
pendant la
lecture
Niveau
d’enregistrement
faible
Pose de marques
index impossible
Impossible de se
connecter au PC
Impossible d’utiliser
le microphone/
haut-parleur USB
du Directrec
Cause probable
DSS Player (inclus dans le
lot) n’est pas installé.
La fenêtre [Editer à distance]
dans DSS Player (inclus dans
le lot) n’est pas ouverte.
Le volume sonore dans la
fenêtre [Editer à distance] est
réglé sur 0.
Le volume sonore de votre
ordinateur est réglé sur 0.
Le Directrec a été secoué
pendant l’enregistrement.
Le Directrec a été placé à
proximité d’un téléphone
cellulaire ou d’une lampe
fluorescente pendant
l’enregistrement ou la lecture.
La sensibilité du microphone
est trop faible.
Le nombre max. de marques
index (16) a été atteint.
Les PC fonctionnant sous
Windows XP ne permettent
pas tous la connexion.
Le périphérique audio USB
n’est pas sélectionné dans les
paramètres audio de votre
ordinateur.
Mesure
Installez DSS Player
(☞ P. 6).
Ouvrez d’abord la fenêtre
[Editer à distance] et utilisez
ensuite le Directrec.
Ajustez la volume.
Déplacez le Directrec.
Réglez le en mode Conference
et essayez à nouveau (☞ P. 20).
Effacez les marques inutiles
(☞ P. 23).
Vous devrez modifier les
réglages USB du PC. Pour les
détails, voyez l’aide en ligne du
DSS Player (☞ P. 8).
Allez dans le menu [start], →
[Panneau de configuration] et
sélectionnez ensuite [Son et
Multimédia]. Ouvrez l’onglet
[Audio] et sélectionnez
Périphérique audio USB dans les
paramètres «Lecture audio» et
«Enregistrement audio».
35
Page 72

Spécifications
Format d’enregistrement: DSS (Digital Speech Standard)
Niveau d’entrée: –70 dBv
Réponse en fréquence générale: 100 à 15.000 Hz
Puissance de travail max. (5 V c.c.): 300 mW ou plus (haut-parleur 8 Ω)
Dimensions extérieures: 157 x 49 x 27 mm (sans protubérance)
Poids: 200 g
Longueur de câble: 2,5 m
Type de prise : connecteur USB de type A
Assistance technique et soutien
Le DR-2000 fait partie du système de dictée professionnel Olympus. Votre
revendeur est formé au dépistage des pannes et pourra régler beaucoup des
problèmes ordinaires que vous pourriez avoir avec ce système. En cas de
problème à l’utilisation du DR-2000, nous vous recommandons de contacter le
revendeur Olympus qui vous a vendu le système. Si votre revendeur ne peut
pas résoudre le problème, appelez notre numéro de téléphone de ligne directe
technique ou envoyez-nous un message par courrier électronique.
◆Pour les clients résidant aux Etats-Unis et au Canada
Téléphone: 1-888-553-4448
Courriel: distec@olympus.com
◆Pour les clients résidant en Europe
Courriel : dss.support@olympus-europa.com
36
Page 73

DIRECTREC
DR-2000
Executive Kit
BEDIENUNGSANLEITUNG
Vielen Dank für das Vertrauen in Olympus-
Produkte, das Sie uns mit dem Kauf des Olympus
Machen Sie sich bitte gründlich mit dem Inhalt
dieser Bedienungsanleitung vertraut, damit stets
DIRECTREC erwiesen haben.
ein einwandfreier und sicherer Betrieb des
Produkts gewährleistet ist.
Bewahren Sie außerdem die
Bedienungsanleitung stets griffbereit für
späteres Nachschlagen auf.
Page 74

Hauptmerkmale
Dieses Produkt ist mit folgenden Funktionen ausgestattet.
● Das neue und verbesserte Mikrophonsystem reduziert Fremdgeräusche wie
Wind oder Maschinenlärm, die während der Aufnahme entstehen. Somit sind
qualitativ hochwertigere Tonaufnahmen möglich, als jemals zuvor.
● Das neue Design und die neue Platzierung der Tasten ermöglichen eine
Einhandbedienung, ohne dass es nötig ist, die Anbringung der
Bedienungstasten mit dem Auge zu überprüfen. Der Directrec liegt sehr gut
in der Hand und bietet eine mühelose Bedienung zusammen mit einem
großartigen Diktiererlebnis (☞ S. 4).
● Der Directrec verfügt über 3 progammierbare (A,B,C) Tasten (☞ S. 30, 31).
● Alle Tastenfunktionen wurden angepasst, um einer bestimmten Präferenz oder
jedem Aufnahmeumfeld gerecht zu werden (☞ S. 30 - 34).
● Das USB Audio Gerät der Directrec, kann als USB-Mikrofon oder USB-
Lautsprecher verwendet werden, wenn das Gerät an einen PC angeschlossen
wird. Außerdem bietet ein leistungsstarker, eingebauter Lautsprecher eine
akustische Hi-Fi-Wiedergabe.
● Der Directrec kann als Fernbedienung für den DSS Player Pro (im Folgenden
DSS Player genannt) verwendet werden - nicht nur für die direkte Aufnahme,
sonder auch zur Bearbeitung von Dateien auf einem PC.
● Der Directrec kann eine Aufnahme als Datei auf einem PC im DSS Format (Digital
Speech Standard) speichern.
● Zwei Aufnahmemodi, SP (Standardwiedergabe) Modus oder LP (Langzeit-
Wiedergabe) Modus (☞ S. 20).
●
Die Qualität des Mikrofonsensors kann für eine bessere Anpassung an die
Aufnahmebedingungen und an das Aufnahmeumfeld abgeändert werden (☞ S. 20).
● Verschiedene Prioritätseinstellungen (☞ S. 24).
Die OLYMPUS IMAGING CORPORATION besitzt die Urheberrechte für die DSS Player
Pro-Software und die Bedienungsanleitung (diese Anleitung).
Microsoft und Windows sind eingetragene Warenzeichen von Microsoft Corporation.
Intel und Pentium sind eingetragene Warenzeichen von Intel Corporation.
Andere hier genannte Produkt- und Markennamen sind u.U. Warenzeichen oder
eingetragene Warenzeichen der jeweiligen Urheberrechtsinhaber.
2
Page 75

Inhaltsverzeichnis
Einleitung
Bezeichnung der Teile ........................................................ 4
Minimale Anforderungen .................................................... 5
Einfuhrung
Installieren der DSS Player-Software ................................ 6
Deinstallieren der DSS Player-Software ............................ 7
Verwenden der Online-Hilfe ............................................... 8
Beginnen Wir
Anschluss des Directrec an Ihren PC ................................ 9
Bedienung des DSS Players ............................................ 10
Fensterbezeichnungen ..................................................... 11
Gebrauch des Fernbearbeitungsfensters ........................ 12
Direktes Aufnehmen ......................................................... 14
Wiedergabe (Abspielen einer Diktatdatei) ....................... 17
Aufnahme speichern......................................................... 19
Mikrofonempfindlichkeit .................................................... 20
Aufnahmearten ................................................................. 20
Indexmarken ..................................................................... 21
Einstellung von Prioritäten ............................................... 24
Systemton ......................................................................... 25
Eingabe von zusätzlichen Benutzerinformationen........... 26
Funktionsanpassung einer Taste des Directrec ............... 30
Fehlersuche ...................................................................... 35
Technische Daten ............................................................. 36
Anwender-Unterstützung
Technische Hilfe und Support .......................................... 36
3
Page 76

Bezeichnung der Teile
6
7
8
1
2
3
4
5
9
0
1Integriertes Mikrofon
2Aufnahme/Wiedergabe-
Kontrollleuchte
3B-Taste (Programmierbar)
4Schiebeschalter
(Aufnahme)
REC
STOP
PLAY
REV
(Stopp)
(Wiedergabe)
(Schnell-abhörkontrolle)
/
/
/
5FF-Taste (Schnellvorlauf)
6NEW-Taste (Neue
)
7A-Taste (Programmierbar)
8REW-Taste (Rücklauf)
9Integrierter Lautsprecher
0C-Taste (Programmierbar)
!USB-Kabel
!
4
Page 77

Minimale Anforderungen
Vergewissern Sie sich, dass Ihr Computer die unten angegebenen
Systemanforderungen erfüllt. Prüfen Sie dies mit Ihrem System Administrator
oder Ihrem Olympus-Fachhändler.
PC: IBM-PC/AT-kompatibler PC
Betriebs-system: Microsoft Windows 2000 Professional/XP Professional,
CPU: Windows 2000/XP: Intel-Mikroprozessor Pentium II 333
RAM: Windows 2000/XP: 128 MB oder mehr (256 MB oder
Festplatten-speicher
Laufwerk: 2x oder schneller CD-ROM, CD-R, CD-RW, DVD-ROM
Soundkarte: Creative Labs Sound Blaster 16 oder 100% kompatible
Browser: Microsoft Internet Explorer 4.01 SP2 oder später
Anzeige: Mindestens 800 x 600 Pixel, mindestens 256 Farben
USB-Anschluss: Ein freier Anschluss
Home Edition/Vista Ultimate, Enterprise, Business, Home
Premium, Home Basic
MHz oder besser (Processor 500 MHz oder besser wird
empfohlen)
Windows Vista: 800MHz oder besser
mehr wird empfohlen)
Windows Vista: 500 MB oder mehr (1GB oder mehr wird
empfohlen)
: 50 MB oder mehr
Laufwerk
Soundkarte
5
Page 78

Installieren der DSS Player-Software
Bevor Sie Ihren Directrec an Ihren PC anschließen, müssen Sie zuvor die DSS
Player-Software.
Achten Sie darauf, daß Sie alle laufenden Anwendungen beenden. Entfernen
Sie die Diskette aus dem Laufwerk, falls Sie eine benutzen.
Wenn Sie Windows2000/XP (nur Professional) im Netzwerk betreiben, müssen
Sie sich als Administrator anmelden.
Legen Sie die DSS Player-Software CD von Olympus in das CDROM-Laufwerk ein.
1
Das Installationsprogramm startet automatisch.
Falls das Installationsprogramm nicht automatisch startet, durchsuchen Sie
Ihr CD-ROM Laufwerk und führen Sie „setup.exe“ durch.
Das Dialogfenster zur Auswahl der Installationssprache erscheint.
Wählen Sie die gewünschte Sprache aus.
2
Registrieren Sie die Benutzerdaten.
Geben Sie hierzu Ihren Namen, den Namen Ihrer Firma und Ihre Lizenznummer
3
(Seriennummer) ein.
Die Lizenz ID-Nummer ist auf der Lizenz ID-Karte aufgedruckt, die zum
Lieferumfang des Recorders gehört.
Klicken Sie auf das Feld [Weiter]. Ein Bestätigungs-Dialogfenster erscheint,
klicken Sie auf [Ja].
Fahren Sie mit der Installation entsprechend den Anweisungen
auf dem Bildschirm fort.
4
6
Page 79

Deinstallieren der DSS Player-Software
Folgen Sie den nachstehenden Schritten, wenn Sie eine der
Softwarekomponenten der auf Ihrem PC installierten DSS Player Software zu
deinstallieren.
Beenden Sie das DSS Player Programm.
1
Klicken Sie auf [Start] in der Task-Leiste.
2
Wählen Sie [Programm Hinzufügen/Entfernen] aus der
[Systemsteuerung].
3
Eine Liste der installierten Anwendungen wird angezeigt.
Wählen Sie [Olympus DSS Player Pro], und klicken Sie auf
[Ändern/Entfernen].
4
Fahren Sie mit der Installation entsprechend den Anweisungen
auf dem Bildschirm fort.
5
..............................................................................................................................
Hinweis
• Bei Deinstallation werden keine gespeicherten Diktatdateien gelöscht.
7
Page 80

Verwenden der Online-Hilfe
Näheres zum Gebrauch und den Funktionen des DSS Players finden Sie in der
Online-Hilfe.
Zum Starten der Online-Hilfe:
• Klicken Sie auf [Start], wählen Sie dann [Alle Programme],
[Olympus DSS Player Pro], [Diktat-Hilfe].
• Während der DSS Player läuft, wählen Sie das [Hilfe]-Menü,
[Inhalt].
• Während der DSS Player läuft, drücken Sie F1 auf der Tastatur.
......................................................................................................................................
Hinweis
• Für Informationen über den Gebrauch und den Funktionen des DSS Players beziehen
Sie sich bitte auf die Online Hilfe. Sie können die Online-Hilfe nach der Installation des
DSS Players verwenden.
8
Page 81

Anschluss des Directrec an Ihren PC
Vor dem Anschließen des Directrec an den PC sollte die DSS Player- Software
installiert sein. Falls Sie jedoch den Directrec vor oder während der Installation
der Software anschließen, erscheint der „Hardwareupdate-Assistent“ Beenden
Sie den Assistenten, indem Sie die Taste [Abbrechen] im Assistenten-Bildschirm
drücken, und installieren Sie dann den DSS Player oder fahren Sie mit seiner
Installation fort.
Anschluss an den PC über USB-Kabel
Schließen Sie das USB-Kabel des
Directrec direkt an den USB-Port oder
1
USB-Hub Ihres PCs an.
Trennen der Verbindung zum PC
Ziehen Sie das USB-Kabel des Directrec aus dem USB-Port oder
USB-Hub Ihres PCs.
1
......................................................................................................................................
Hinweise
• Manche PCs und USB-Hubs liefern u.U. nicht genug Leistung, sodass der Directrec nicht
anspricht. Informationen zum USB-Anschluss oder USB-Hub Ihres PCs entnehmen Sie
bitte dem Benutzerhandbuch für Ihren PC.
•Wenn Sie einen USB-Hub verwenden, um den Directrec anzuschließen, verwenden Sie
stets einen USB-Hub mit seperater Stromversorgung (Netzadapter).
• Bei blinkender Aufnahme/Wiedergabe-Kontrollleuchte darf das USB nicht abgezogen
werden. Andernfalls werden die Daten zerstört.
9
Page 82

Bedienung des DSS Players
Durch werkseitige Einstellung wird beim Anschluss des Directrec an Ihren PC
die Anwendung automatisch gestartet.
Deaktivieren des automatischen Start
Klicken Sie mit der rechten Maustaste auf das Device Detector
Symbol im System Tray rechts unten im Bildschirm, und
1
klicken Sie auf „Auswahl Autostart-Anwendung“.
Klicken Sie [DSS Player Pro].
Die Kontrollmarkierung bei [DSS Player Pro] verschwindet.
2
Manueller Start
Starten Sie Windows.
1
Klicken Sie in Windows auf [Start], zeigen Sie auf [Alle
Programme].
2
Das Menü Alle Programme wird angezeigt.
Wählen Sie [Olympus DSS Player Pro], und klicken Sie auf [Dictation Module].
3
......................................................................................................................................
23
Hinweis
•Wenn Sie den Directrec vor der Installation des DSS Players anschließen, öffnet sich das
Dialogfenster „Hardwareupdate-Assistent“. Klicken Sie in diesem Fall auf [Abbrechen], um den
Hardware-Assistenten zu beenden, und installieren Sie dann die mitgelieferte DSS Player-Software.
10
Page 83

Fensterbezeichnungen
Hauptfenster (Windows XP)
1
2
3
* Die Hauptseite wird angezeigt, wenn der DSS Player
Nachrichten-Ablage
gestartet ist.
1Wiedergabekontrolleiste
Steuerungstasten mit Wiedergabe- und Stoppfunktionen für Diktatdateien.
2Diktat-Baumansicht
Zeigt die Verzeichnisstruktur der Dateien im Format DSS, WAV bzw.
Aufnahmen, die mit dem Directrec erstellt wurden, werden als Datei in der
Nachrichten-Ablage (
) im Diktat-Ordner ( ) gespeichert.
3Geräte-Baumansicht
Zeigt die Verzeichnisstruktur des Directrec an.
4Diktat-Listenansicht
Zeigt die Diktatdateien im Ordner an, die bei 2 und 3 ausgewählt wurden.
4
11
Page 84

Gebrauch des Fernbearbeitungsfensters
Der Directrec kann sowohl als USB-Mikrofon als auch als ein USB-Lautsprecher
verwendet werden, wenn er an Ihren PC angeschlossen wurde. Außerdem können
Sie, wenn Sie das Fenster [Fernbearbeitung] im DSS Player öffnen, direktes
Aufnehmen (☞ S. 14 - 16) oder Dateibearbeitungen mittels der Fernbedienung
ausführen.
Öffnen des Fensters [Fernbearbeitung]
Stellen Sie sicher, dass der Directrec ordnungsgemäß an Ihren
PC angeschlossen ist und starten Sie den DSS Player.
1
Das Hauptfenster des DSS Players erscheint.
Wählen Sie aus dem DSS Player Hauptfenster das [Datei] Menü,
wählen Sie dann [Neue Datei...] oder klicken Sie auf das
2
Symbol.
Das Fenster [Fernbearbeitung] erscheint.
Verwenden Sie für den gewünschten Bedienungsschritt den
Directrec oder das Fenster [Fernbearbeitung].
3
......................................................................................................................................
Hinweise
•Vergewissern Sie sich, dass das Fenster [Fernbearbeitung] geöffnet ist, wenn Sie den
Directrec verwenden. Andernfalls funktioniert die Fernbedienung nicht.
• Das Fenster [Fernbearbeitung] kann auch geöffnet werden, ohne das Hauptmenü zu
öffnen, wenn der DSS Player (☞ S. 13) gestartet wird.
12
Page 85

Anzeige des Fensters [Fernbearbeitung], ohne das Hauptmenü zu öffnen
Sie können Ihren PC so einstellen, dass Sie das Fenster [Fernbearbeitung]
direkt öffnen können, ohne in das Hauptfenster zu gehen, wenn Sie den DSS
Player starten.
Wählen Sie aus dem DSS Player Hauptfenster das [Extras] Menü,
wählen Sie dann [Optionen...], und klicken Sie auf Register
1
[Directrec].
Setzen Sie bei [Beginnen Sie Fernbearbeitung Fenster
automatisch, wenn Dicttation Module ausgestoßen wird] und
2
klicken Sie dann auf [OK].
Die Voreinstellungen sind nun abgeschlossen.
Wenn die unmarkierten Voreinstellungen markiert werden, erkennt der
Computer die Directrec-Geräte-Verbindung als den Start eines DSS Players
und öffnet deshalb das Fenster [Fernbearbeitung], ohne das
Hauptanwendungsfenster zu öffnen (
☞
S. 11).
2
13
Page 86

Direktes Aufnehmen
Neuaufnahme
Wählen Sie aus dem DSS Player
Hauptfenster das [Datei] Menü,
1
wählen Sie dann [Neue Datei...] oder
klicken Sie auf das
Das Fenster [Fernbearbeitung] erscheint.
2,3
Aktuelle
Aufnahmezeit
Stellen Sie den Schiebeschalter auf dem
Directrec auf die Position REC oder klicken
2
Sie auf die Taste
Fenster [Fernbearbeitung], um mit der
Aufnahme zu beginnen.
Die rote Aufnahme/Wiedergabe-Kontrollleuchte
leuchtet am Directrec auf. Richten Sie das Mikrofon
auf die Klangquelle.
Stellen Sie den Schiebeschalter auf dem
Directrec auf die Position STOP oder
3
klicken Sie auf die Taste
um die Aufnahme zu stoppen.
Sollen zusätzliche Aufzeichnungen an die
gleiche Datei angehängt werden, so stellen
Sie den Schiebeschalter auf dem Directrec
auf die Position REC oder drücken Sie die
Taste erneut.
Restliche Aufnahmezeit
Symbol.
(Aufnahme) im
(Stopp),
14
2 3
Page 87

Überschreiben von Aufnahmen
Sie können den Inhalt einer früheren Aufzeichnung von jedem Punkt auf der Datei aus
überschreiben. Beachten Sie, dass die überschriebene Aufnahmen gelöscht wird.
Vergewissern Sie sich, dass Sie am
Anfangspunkt der zu überschreibenden
1
Aufnahme sind.
Stellen Sie den Schiebeschalter auf dem
Directrec auf die Position REC oder klicken
2
2,3
Sie auf die Taste
Fenster [Fernbearbeitung].
Die Aufnahme/Wiedergabe-Kontrollleuchte
auf dem Directrec leuchtet auf und es wird
mit dem Überschreiben von Aufnahmen
begonnen.
Stellen Sie den Schiebeschalter auf dem
Directrec auf die Position STOP oder
3
klicken Sie auf die Taste
im Fenster [Fernbearbeitung], um das
Überschreiben zu stoppen.
Hier nicht markieren
(Aufnahme) im
(Stopp)
......................................................................................................................................
2 3
Hinweise
• Stellen Sie sicher, dass die Box „Aufnahme einfügen“ (☞ S. 16) im Fenster [Fernbearbeitung] nicht
markiert ist, da sonst die das Überschreiben von Aufnahmen nicht weitergeführt wird.
• Beim Überschreiben von Daten müssen Sie unbedingt die Aufnahmeart (SP, LP) für die
ursprüngliche Datei beibehalten.
15
Page 88

Direktes Aufnehmen
Einfügen von Anfnahmen
Das Einfügen einer zusätzlichen Aufnahme in bereits aufgezeichnete Dateien ist möglich.
Markieren Sie ( ) die Box „Aufnahme
einfügen“ im Fenster [Fernbearbeitung].
1
Vergewissern Sie sich, dass Sie sich
an der rechten Position in der Datei
2
befinden, wo das Einfügen der
3,4
Aufnahme stattfinden soll.
Stellen Sie beim Abspielen der Datei den
Schiebeschalter auf dem Directrec auf
3
die Position REC oder klicken Sie auf die
Taste
[Fernbearbeitung], um mit dem Einfügen
einer weiteren Aufnahme zu beginnen.
Die rote Aufnahme/Wiedergabe-Kontrollleuchte
leuchtet am Directrec auf.
Stellen Sie den Schiebschalter auf dem
Directrec auf die Position STOP oder klicken
4
Sie auf die Taste (Stopp) im Fenster
[Fernbearbeitung], um das Einfügen
weiterer Aufzeichnungen zu stoppen.
(Aufnahme) im Fenster
1
......................................................................................................................................
Hinweise
•Vergewissern Sie sich, dass das Kästchen „Aufnahme einfügen“ im Fenster
[Fernbearbeitung] markiert ist, da ansonsten die Aufnahme nicht eingefügt wird.
•Wenn Sie den Schiebeschalter für mehr als zwei Sekunden auf STOP stehen lassen,
während Sie ihn von PLAY auf REC stellen, wird die Aufnahmeeinfügung deaktiviert.
• Beim Überschreiben von Daten müssen Sie unbedingt die Aufnahmeart (SP, LP) für die
ursprüngliche Datei beibehalten.
16
3
4
Page 89

Wiedergabe (Abspielen einer Diktatdatei)
Stellen Sie den Schiebeschalter auf dem
Directrec auf die Position PLAY oder
1
klicken Sie auf die Taste
(Wiedergabe) im Fenster [Fernbearbeitung],
um die Wiedergabe zu starten.
1,3
Die grüne Aufnahme/Wiedergabe-Kontrollleuchte
auf dem Directrec leuchtet auf.
Stellen Sie den Lautstärkeregler im
Fenster [Fernbearbeitung] auf die
2
gewünschte Lautstärke ein.
Die Aufnahme wird über den Lautsprecher
des Directrec abgespielt.
Stellen Sie den Schiebeschalter auf dem
Directrec auf die Position STOP oder
3
klicken Sie auf die Taste
im Fenster [Fernbearbeitung] an dem
Punkt, an dem Sie die Wiedergabe
stoppen möchten.
(Stopp)
Bisherige
Wiedergabezeit
Wiedergabe
Schieber
Der Wiedergabe
Slider zeigt die
gegenwärtige
Wiedergabeposition
Gesamtaufnahmezeit der aktuell
wiedergegebenen Datei
Zeitachse
3 1
2
17
Page 90

Wiedergabe (Abspielen einer Diktatdatei)
Wiedergabefunktionen
Mit dem Directrec und dem Fenster [Fernbearbeitung] sind verschiedene
Funktionen verfügbar, um eine aufgenommene Datei abzuspielen.
Wiedergabefunktionen des Directrec
Wiedergabefunktionen
Schnellvorlauf
(FF)
Rücklauf
(REW)
Bedienvorgang
Drücken Sie die FF-Taste einmal
bei Betriebsstopp.
Drücken Sie die REW -Taste einmal
bei Betriebsstopp.
Annullierung
Stellen Sie den Schiebeschalter
auf einer andere Position als
STOP.
➥ Der Directrec beginnt den
Betrieb an der eingestellten
Position.
CUEFunktion(CUE)
Schnellabhörkontrolle
(REV)
Halten Sie FF-Taste bei
Betriebsstopp oder Wiedergabe
einer Datei gedrückt.
Halten Sie REW-Taste bei
Betriebsstopp oder Wiedergabe
einer Datei gedrückt.
Stellen Sie den Schiebeschalter auf
REV.
Lassen Sie die FF-Taste los.
Lassen Sie die REW-Taste los.
Lassen Sie den Schiebeschalter los.
Funktionen, die das Fenster [Fernbedienung] verwenden
Wiedergabe-
Bedienvorgang
Annullierung
funktionen
Schnellvorlauf
(FF)
Rücklauf
(REW)
CUE-Funktion
(CUE)
Schnellabhörkontrolle
(REV)
• Bitte beziehen Sie sich hinsichtlich weiterer Informationen zu den Funktionen und zum
Betrieb des Directrec auf unsere Online-Hilfe (
Drücken Sie die Taste einmal
bei Betriebsstopp.
Drücken Sie die Taste einmal
bei Betriebsstopp.
Halten Sie Taste bei
Betriebsstopp oder Wiedergabe
einer Datei gedrückt.
Halten Sie
Betriebsstopp oder
Wiedergabe einer Datei gedrückt.
Taste bei
☞
Drücken Sie die Taste.
➥ Die aufgezeichnete Datei wird
erneut wiedergegeben.
Lassen Sie die Taste los.
Lassen Sie die Taste los.
S. 8).
18
Page 91

Aufnahme speichern
Um die aktuelle Aufnahme zu speichern, stellen
Sie den Schiebeschalter auf dem Directrec auf
1
die Position STOP oder klicken Sie auf die Taste
(Stopp), um die Aufnahme zu stoppen.
2,3
Drücken Sie entweder die Taste NEW auf dem
Directrec oder klicken Sie auf das Symbol
1,4
2
der Symbolleiste im Fenster [Fernbearbeitung].
Das Fenster [Datei sichern] erscheint, um die Daten
zu speichern.
Um die Daten zu speichern, drücken Sie
entweder die Taste NEW auf dem Directrec
3
oder klicken Sie auf die Taste [Speichern] im
Fenster [Fernbearbeitung].
Die aufgenommenen Daten werden gespeichert.
Der Directrec ist nun bereit auf einer neuen
Datei eine Aufzeichnung zu beginnen.
4
Stellen Sie den Schiebeschalter auf dem
Directrec auf die Position REC oder klicken
Sie auf die Taste
Fenster [Fernbearbeitung], um mit der
Aufnahme zu beginnen.
auf
(Aufnahme) im
3
Dateinamenformat
Dateinamen werden folgendermaßen zugewiesen.
DR_2 0001.dss
Erweiterung
Dateinummer...
Die am Directrec eingegebene Kennung. Die werkseitige Vorgabe ist „DR_2000“.
Die Autorenkennung lässt sich mittels DSS Player ändern (☞ S. 26 - 28).
Eine vom Directrec zugewiesene laufende Nummer.
19
Page 92

Mikrofonempfindlichkeit
Die Mikrofonempfindlichkeit ist auf die Aufnahmeerfordernisse einstellbar.
Wählen Sie aus dem Kästchen „Empfindlichkeit“ entweder
„Diktat“ oder „Konferenz“ im Fenster [Fernbearbeitung].
1
Konferenz : Der hochempfindliche Modus, der geeignet ist, um Außengeräusche aufzunehmen.
Diktat : Der weniger empfindliche Modus, der zur Aufnahme von Diktaten geeignet ist.
1
......................................................................................................................................
Hinweis
• Für besonders klare Aufzeichnungen von Diktaten schalten Sie auf Diktat-Modus um
und platzieren das interne Mikrofon nahe (5 bis 10 cm) beim Diktierenden.
Aufnahmearten
Es stehen mit dem Directrec zwei Aufnahmemodi zur Verfügung: SP (StandardWiedergabe) und LP (Longspiel-Wiedergabe).
Wählen Sie aus dem Kästchen „Hohe“ entweder „SP(mono)“ oder
„LP(mono)“ im Fenster [Fernbearbeitung].
1
SP: Voreingestellter Aufnahmemodus.
LP: Kann in der gleichen Zeit wie im SP-Modus in einer kleineren Dateiengröße
aufnehmen.
......................................................................................................................................
Hinweis
• Wählen Sie den SP-Betrieb zur Aufzeichnung des Inhalts von Konferenzen oder Vorträgen.
20
1
Page 93

Indexmarken
In einer Datei lassen sich während der Aufnahme oder Wiedergabe Indexmarken setzen,
um das schnelle und einfache Auffinden von wichtigen Passagen in der Datei zu erleichtern.
Setzen einer Indexmarke
Drücken Sie entweder die Taste A auf
dem Directrec oder klicken Sie während
1
der Aufnahme oder Wiedergabe auf das
1
Symbol
Fenster [Fernbearbeitung].
Eine Indexmarke wird nun gesetzt.
Das Symbol erscheint auf der
Zeitachsenanzeige im Fenster [Fernbearbeitung].
Die Indexmarke kann ebenfalls durch die Auswahl
von [Neue Indexmarkierung] im Menü [Extras].
auf der Menüleiste im
1
Zeitachse
Wiedergabe Schieber
Zeigt die aktuelle
Position der Wiedergabe
oder Aufnahme an.
......................................................................................................................................
Hinweise
• Bis zu 16 Indexmarken lassen sich in einer Datei setzen.
• In einer gesperrten Datei lassen sich Indexmarken weder setzen noch löschen. Bitte
beziehen Sie sich zu weiteren Einzelheiten auf die Online-Hilfe (
☞ S. 8).
21
Page 94

Indexmarken
Auffinden einer Indexmarke
Das Symbol auf der Zeitachsenanzeige im Fenster [Fernbearbeitung] zeigt die Position
der Indexmarke an. Um zu einer markierten Position zu springen, folgen Sie diesem Ablauf.
Drücken Sie entweder zweimal die Taste FF
oder REW auf dem Directrec oder klicken
1
Sie auf die Taste
[Fernbearbeitung].
Der Schieberegler „Abspielposition“ springt
automatisch auf die Position der Indexmarke
( ).
im Fenster
1
Position der Indexmarke
1
Zeitachse
Verwenden Sie das Fenster [Indexmarkierungen aufli...], um auf die Indexmarke zu springen
Klicken Sie auf das Symbol in der Menüleiste im Fenster
[Fernbearbeitung]. Oder wählen Sie [Alle Indexmarkierungen
1
anzeigen...] im Menü [Extras].
Das Fenster [Indexmarkierungen aufli...] erscheint.
Wählen Sie die markierte Position, auf die Sie springen möchten
und klicken Sie auf [Überspringen].
2
Der Directrec springt auf die gewählte Position der Indexmarke.
2
22
Page 95

Löschen von Indexmarken
Wählen Sie die zu löschende Indexmarke.
1
Klicken Sie auf das Symbol in der Menüleiste im Fenster
[Fernbearbeitung]. Oder wählen Sie [Indexmarkierung löschen] im
2
Menü [Extras].
Daraufhin wird die Indexmarke gelöscht.
......................................................................................................................................
Hinweis
• In einer gesperrten Datei lassen sich Indexmarken weder setzen noch löschen. Bitte
beziehen Sie sich zu weiteren Einzelheiten auf die Online-Hilfe (
☞ S. 8).
23
Page 96

Einstellung von Prioritäten
Jeder aufgenommenen Datei lassen sich Prioritäten zuordnen.
Drücken Sie die Taste B auf dem
Directrec.
1
Bei jedem Drücken dieser Taste wird eine
Markierung auf die Einstellungsbox “Priortät”
im Fenster [Fernbearbeitung] gelegt oder
1
davon wieder entfernt.
Mit Markierung : Hohe Stufe.
Ohne Markierung : Normale Stufe.
Sie können auf die Prioritäts-Einstellungen
ebenfalls über das Fenster [Fernbearbeitung] eine
Markierung legen oder wieder davon entfernen.
1
24
Page 97

Systemton
Durch einen Ton bestätigt der Directrec die Betätigung von Bedienelementen.
Die Systemtonwiedergabe lässt sich ausschalten.
Klicken Sie auf das Symbol in der Menüleiste im Fenster
[Fernbearbeitung]. Oder wählen Sie [Directrec Configuration
1
Tool] im Menü [Extras].
Das Dialogfenster [Directrec Configuration Tool] erscheint.
1
Wählen Sie das Register [Benutzerorientiert] und markieren das
Kästchen [Piepton aktivieren].
2
Mir Markierung : Der Systemton ist ein.
Ohne Markierung : Der Systemton ist aus.
Klicken Sie auf [Einstellungen hochladen].
Die Einstellungen sind nun abgeschlossen.
3
2
3
25
Page 98

Eingabe von zusätzlichen Benutzerinformationen
Die durch den Directrec auf Ihrem PC aufgenommenen Dateien beinhalten die
Autorenkennung und die Themakennung als Kopfdaten. Die Einzelheiten in den
Kopfdaten können mittels des DSS Players leicht geändert werden.
Registrierung der Autorenkennung und der
Themakennung im DSS Player
Es können auf dem DSS Player bis zu zehn Benutzerkennungen und zehn
Themakennungen registriert werden.
Vergewissern Sie sich, dass der Directrec nicht angeschlossen ist.
1
Wählen Sie aus dem DSS Player Hauptfenster das [Download]
Menü, wählen Sie dann [Job-Daten erstellen und senden].
2
Das Fenster [Job-Daten erstellen und senden] erscheint.
Geben Sie Ihre Autorenkennung oder Themakennung in dem durch den Pfeil
angezeigten Feld ein.
Klicken Sie die Taste [Speichern].
Die Registrierung der Autorenkennung und Themakennung ist nun
3
abgeschlossen.
Autorenkennung
Themakennung
26
3
Page 99

Voreingestellte Benutzerkennung auf dem Directrec
Die Benutzerkennung des Directrec spielt eine wichtige Rolle im
Dateibenennungs-Verfahren neuer Aufnahmen. Die voreingestellte
Benutzerkennung ist „DR_2000“. Um die voreingestellte Benutzerkennung zu
ändern, halten Sie sich an den unten beschriebenen Ablauf.
Klicken Sie auf das Symbol in der Menüleiste im Fenster
[Fernbearbeitung]. Oder wählen Sie [Directrec Configuration
1
Tool] im Menü [Extras].
Das Dialogfenster [Directrec Configuration Tool] erscheint.
1
Geben Sie Ihre Benutzerkennung in der [Benutzername] -Box
ein und klicken Sie auf [Einstellungen hochladen].
2
Die eingegebene Benutzerkennung wird auf den Directrec übermittelt. Bei
der Kennung kann es sich um eine beliebige Kombination aus „A“ bis „Z“,
Nummern und/oder „_“ handeln, die bis zu 16 Buchstaben lang sein kann.
2
......................................................................................................................................
Hinweis
•Trennen Sie niemals den USB-Anschluss, wenn die Anzeigeleuchte rot aufblinkt.
Andernfalls können die Daten zerstört werden.
27
Page 100

Eingabe von zusätzlichen Benutzerinformationen
Eingabe einer Autorenkennung
Es können entweder die voreingestellte Autorenkennung auf dem Directrec oder
jede auf einem DSS Player registrierte Autorenkennung (☞ S. 26) als Kopfdaten
eingestellt werden.
Klicken Sie auf das Symbol in der Menüleiste im Fenster
[Fernbearbeitung].
1
Das Fenster [Job-Daten bestimmen] erscheint.
1
Wählen Sie die gewünschte Autorenkennung aus der Box mit
der Autoren-ID aus.
2
Klicken Sie die Taste [OK].
Alle Aufnahmen, die von einem Autor während einer Sitzung gemacht wurden,
3
enthalten die eingestellte Kennung als Teil der Kopfzeile.
2
......................................................................................................................................
Hinweis
• Die voreingestellte Benutzerkennung des Directrec ist „DR_2000“.
28
3
 Loading...