

Olympus CAEDIA C-350ZOOM, CAEDIA D-560ZOOM, CAMEDIA X-200, CAMEDIA D-560 ZOOM, CAMEDIA C-350 ZOOM Reference Manual
OLYMPUS
(AM DIA
DIGITAL CAMERA
D-560ZOOM
C-350ZOOM
X-200
REFERENCE MANUAL
<Click Here>
Explanation of digital camera functions and operating instructions.
Explanation of how to download images between your digital camera and PC.
OLYMPUS
(AM(DIA
DIGITAL CAMERA
D-560ZOOM
C-350ZOOM
X-200
REFERENCE MANUAL
• Thank you for purchasing an Olympus digital camera. Before you
start to use your new camera, please read these instructions care-
fully to enjoy optimum performance and a longer service life. Keep
this manual in a safe place for future reference.
• We recommend that you take test shots to get accustomed to your
camera before taking important photographs.
• Screen and camera illustrations shown in this manual may differ
from those of the actual product.

For customers in North and South America
For customers in USA
Declaration of Conformity
Model Number : D-560ZOOM/C-350ZOOM/X-206
Trade Name : OLYMPUS
Responsible Party :Olympus America Inc.
Address : 2 Corporate Center Drive, Melville, New York
11747-3157 U.S.A.
Telephone Number :631-844-5000
Tested To Comply With FCC Standards
FOR HOME OR OFFICE USE
This device complies with Part 15 of the FCC rules. Operation is subject to
the following two conditions:
(1) This device may not cause harmful interference.
(2) This device must accept any interference received, including
interference that may cause undesired operation.
For customers in Canada
This Class B digital apparatus meets all requirements of time Canadian
Interference-Causing Equipment Regulations.
For customers in Europe
"DE*' mark indicates that this product complies with timeEuropean
requirements for safety, health, environment and customer protection
"CE" mark cameras are intended for sales in Europe.
Trademarks
• IBM is a registered trademark of International Business Machines Corporation.
• Microsoft and Windows are registered trademarks of Microsoft Corporation.
• Macintosh is a trademark of Apple Computer Inc.
• All other company and product names are registered trademarks and/or
trademarks of their respective owners.
• The standards for camera file systems referred to in this manual are the "Design
Rule for Camera File System/DCF" standards stipulated by the Japan Electronics
and Information Technology Industries Association (JEITA).
2

Contents P4
: Specifications P131
Glossary of terms P 133
Index P135
3_
Contents .......................................... 4
1 Getting started 8
Names of parts ..................................... 8
Camera ........................................ 8
Monitor indications .............................. 10
How to use this manual .............................. !3
Attaching the strap .................................. 14
Loading the batteries ................................ !5
Selecting optional batteries or an AC adapter .......... !7
Inserting a card .................................... !9
Card basics .................................... 19
Removing the card .............................. 21
Power on/off ...................................... 22
If the card is not recognized (card check) ............. 25
Selecting a language _._ .......................... 26
Setting the date and time Q ......................... 28
Holding the camera ................................. 30
2 About the menus 31
Types of menus .................................... 31
How to use the menus ............................... 32
Shortcut menus .................................... 34
Shooting mode ................................. 34
Playback mode ................................. 35
Mode Menus ...................................... 36
Shooting mode ................................. 36
Playback mode ................................. 38
4
Contents
3 Shooting basics 40
Shooting mode .................................... 40
Taking still pictures OPHOT0 .......................... 43
Taking still pictures using the viewfinder .............. 43
Taking still pictures using the monitor ................ 45
Comparison of the viewfinder & monitor .............. 47
If correct focus cannot be obtained ..................... 48
Determine the position of the subject after focusing
(Focus Lock) .................... 48
Subjects that are difficult to focus on ................ 50
Night scene mode [] ............................... 51
Recording movies [] ............................... 53
Zoom ............................................ 55
Using the optical zoom ........................... 55
Using the digital zoom ............................ 56
Using the flash ,_ ................................... 58
4 Advanced shooting 61
Macro mode shooting _,_ ............................. 61
Self-timer shooting _ .............................. 63
Selecting the metering area _ ....................... 64
Sequential shooting _ ............................. 65
PANORAMA ...................................... 66
Taking two-in-one pictures 2 IN 1 ...................... 68
Selecting a record mode _" ........................... 70
Varying the image brightness (Exposure compensation) [].. 74
Adjusting the white balance WB ...................... 76
,j
Contents
5 Playback 78
Viewing still pictures [] ............................. 78
QUICK VIEW ................................... 79
Close-up playback Q. ........................... 80
Index display [] ................................... 81
Selecting the number of pictures .................... 82
Slideshow _ ..................................... 83
Playback on a TV .................................. 84
Picture rotation _ ............................... 85
MOVIE PLAY- Viewing movies [] ..................... 86
Protecting pictures o_ ............................... 88
Erasing pictures/_> ................................. 89
Single-frame erase .............................. 89
All-frame erase ................................. 90
Editing still pictures ................................. 91
Creating black and white pictures ................... 92
Creating sepia-toned pictures ...................... 92
Resizing _ ................................... 93
INDEX - Creating an index ........................... 94
6 Useful functions 96
MODE RESET - Reset the settings you changed .......... 96
ALL RESET - Saving the camera's settings .............. 97
CARD SETUP - Formatting cards_] ................... 99
Displaying shooting information INFO ................. 101
Adjusting the monitor brightness [..c_,_.................. 102
REC VIEW ....................................... 103
Turning the beep sound off m))) ...................... 104
FILE NAME ...................................... 105
PIXEL MAPPING .................................. 106
VIDEO OUT - Video output selection .................. 107
6

Contents
7 Print setting 108
How to print pictures,I], ............................ 108
All-frame reservation ,[_ ........................... 110
Single-frame reservation _ ......................... 112
Resetting print reservation data ,_ .................... 115
8 Miscellaneous 117
Error codes ...................................... 117
Troubleshooting ................................... 118
The camera does not work ....................... 118
The image quality is poor ........................ 122
List d menus ..................................... 124
List of factory default settings ........................ 128
List d items by shooting mode ....................... 129
Camera maintenance .............................. 130
Specifications .................................... 131
Glossary of terms ................................. 133
Index ........................................... 135
,j
in
_2.
0_
¢D
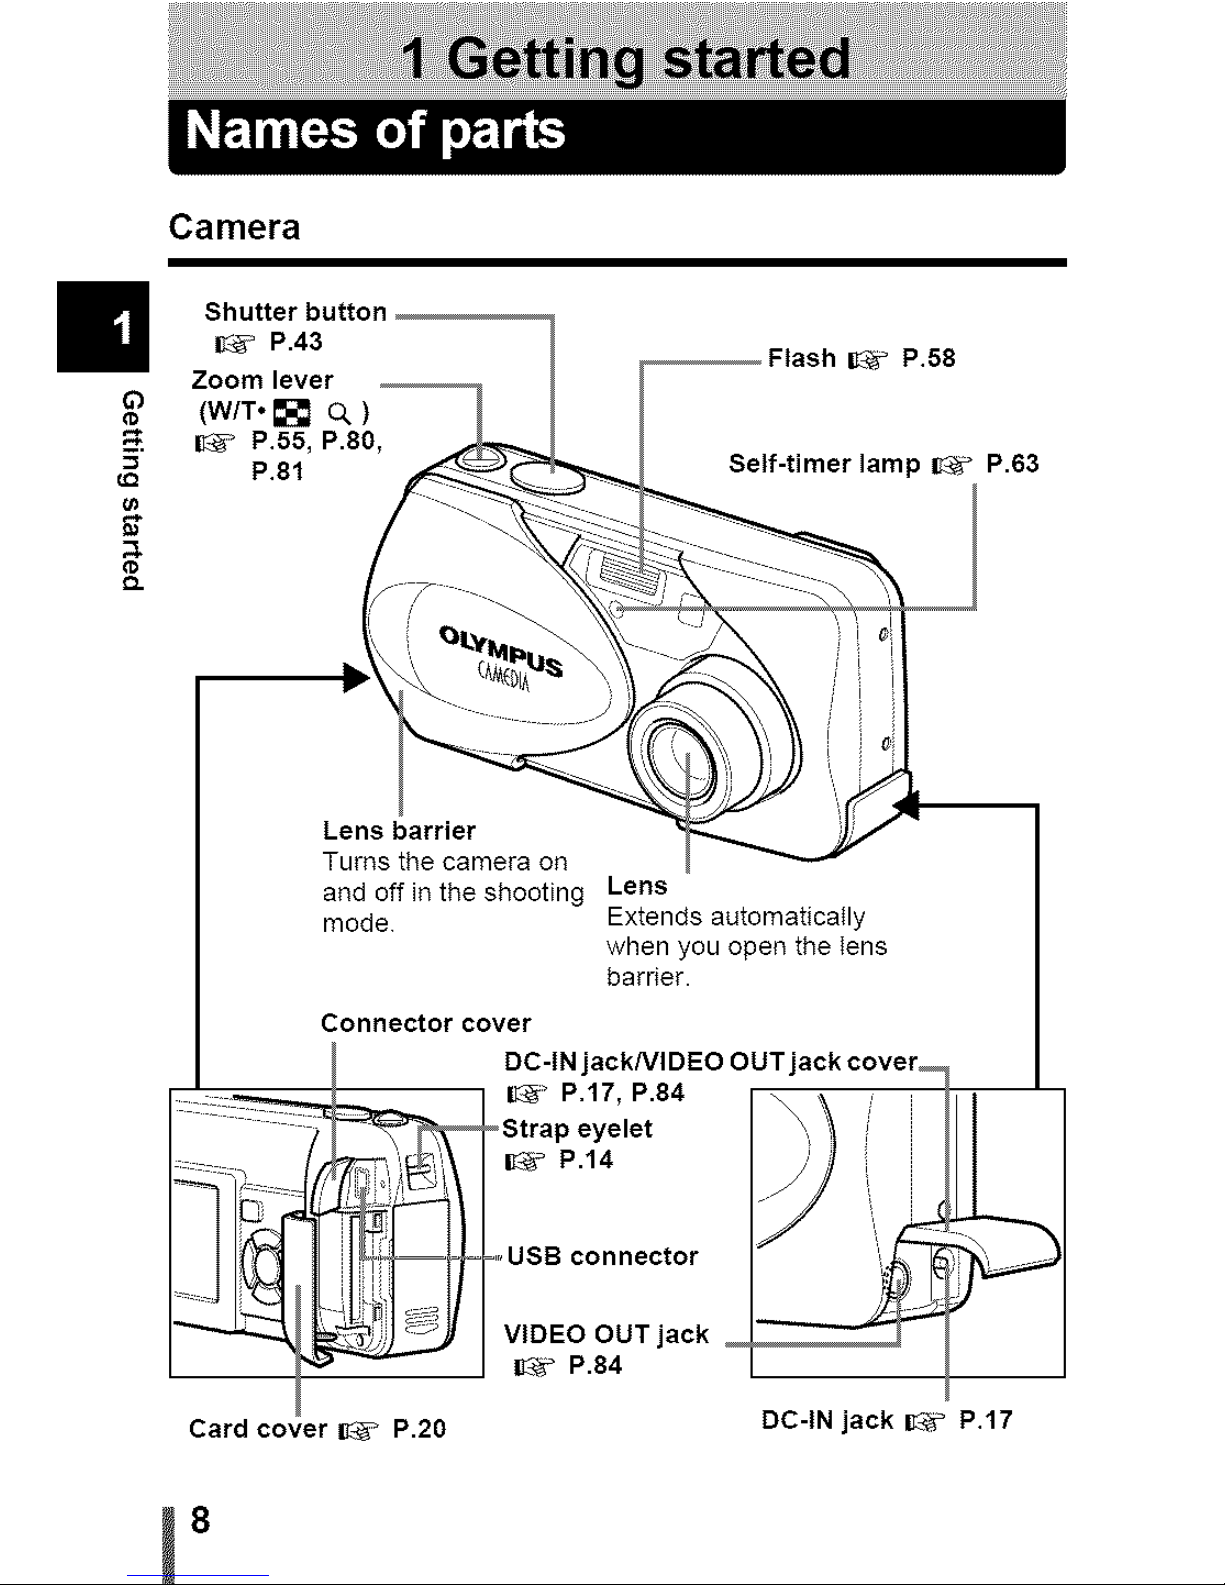
Camera
Shutter button
ITS" P.43
Zoom lever
(WIT. [] Q. )
I_' P.55, P.80,
P.81
P.58
Self-timer lamp _ P.63
Lens barrier
Turns the camera on
and off in the shooting Lens
mode Extends automatically
when you open the Iens
barrier.
Connector cover
DC-IN jackNIDEO OUTj
I_ _ P.17, P.84
_Strap eyelet
[C_ P.14
Card cover I_ P.20
.... USB connector
VIDEO OUT jack
I_ P.84
DC-IN jack I1_ P.17
8
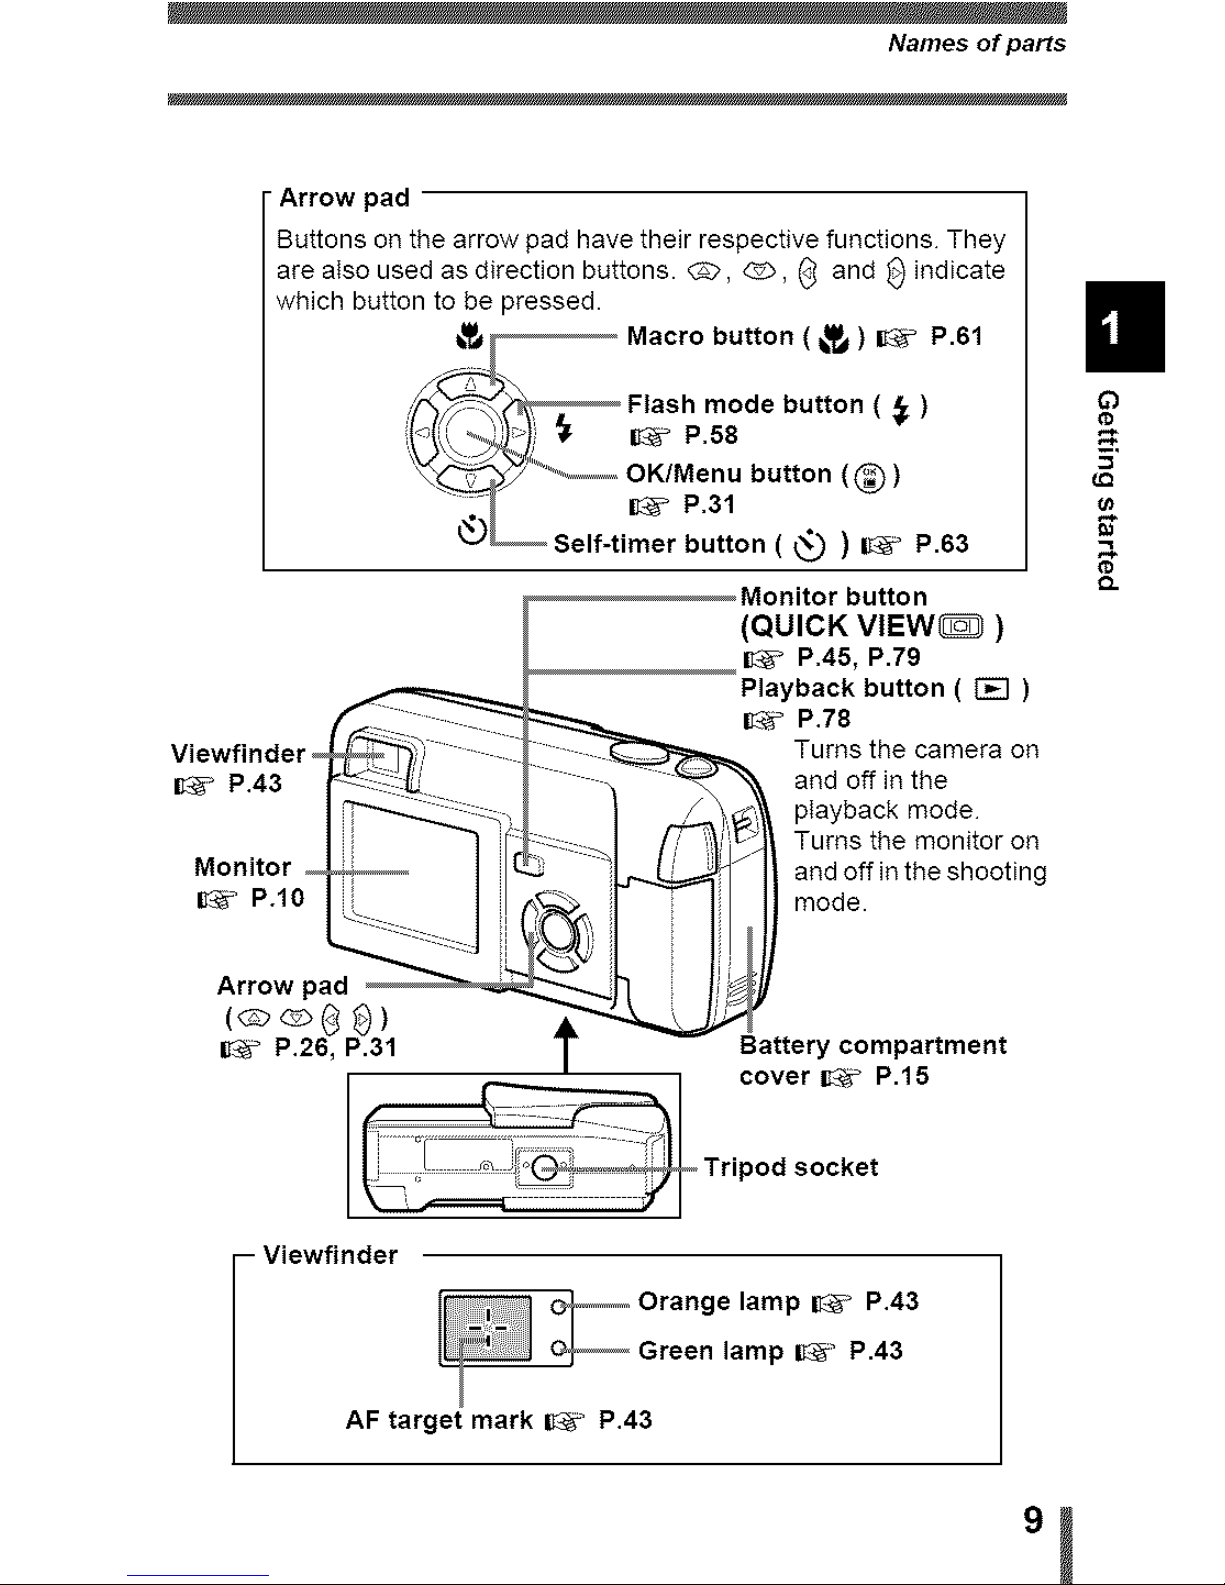
Names of parts
Arrow pad
Buttons on the arrow pad have their respective functions They
are aIso used as direction buttons. _, @>, (_ and _) indicate
which button to be pressed.
Viewfinder o , _
I_" P.43
Monitor
IY@'P.10
Arrow pad
(_@8)
[_ P.26, P.31
S_ Macro button ( _ ) I_ P.61
%;0ebutton
'_'_°_ OK/Menu button (@)
_._ ..... I_ P.31
v_ Self-timer button ( _ ) I}_' P,63
Monitor button
(QUICK VIEW_ )
I_%_P.45, P.79
Playback button ( _ )
IS_ P.78
Turns the camera on
and off in the
pIayback mode
Turns the monitor on
and off in the shooting
mode.
t Battery compartment
cover _-*_ P.15
I Tripod socket
- Viewfinder
co
¢Q
¢0
_J
AF target mark I!i_' P.43
,j
Names of parts
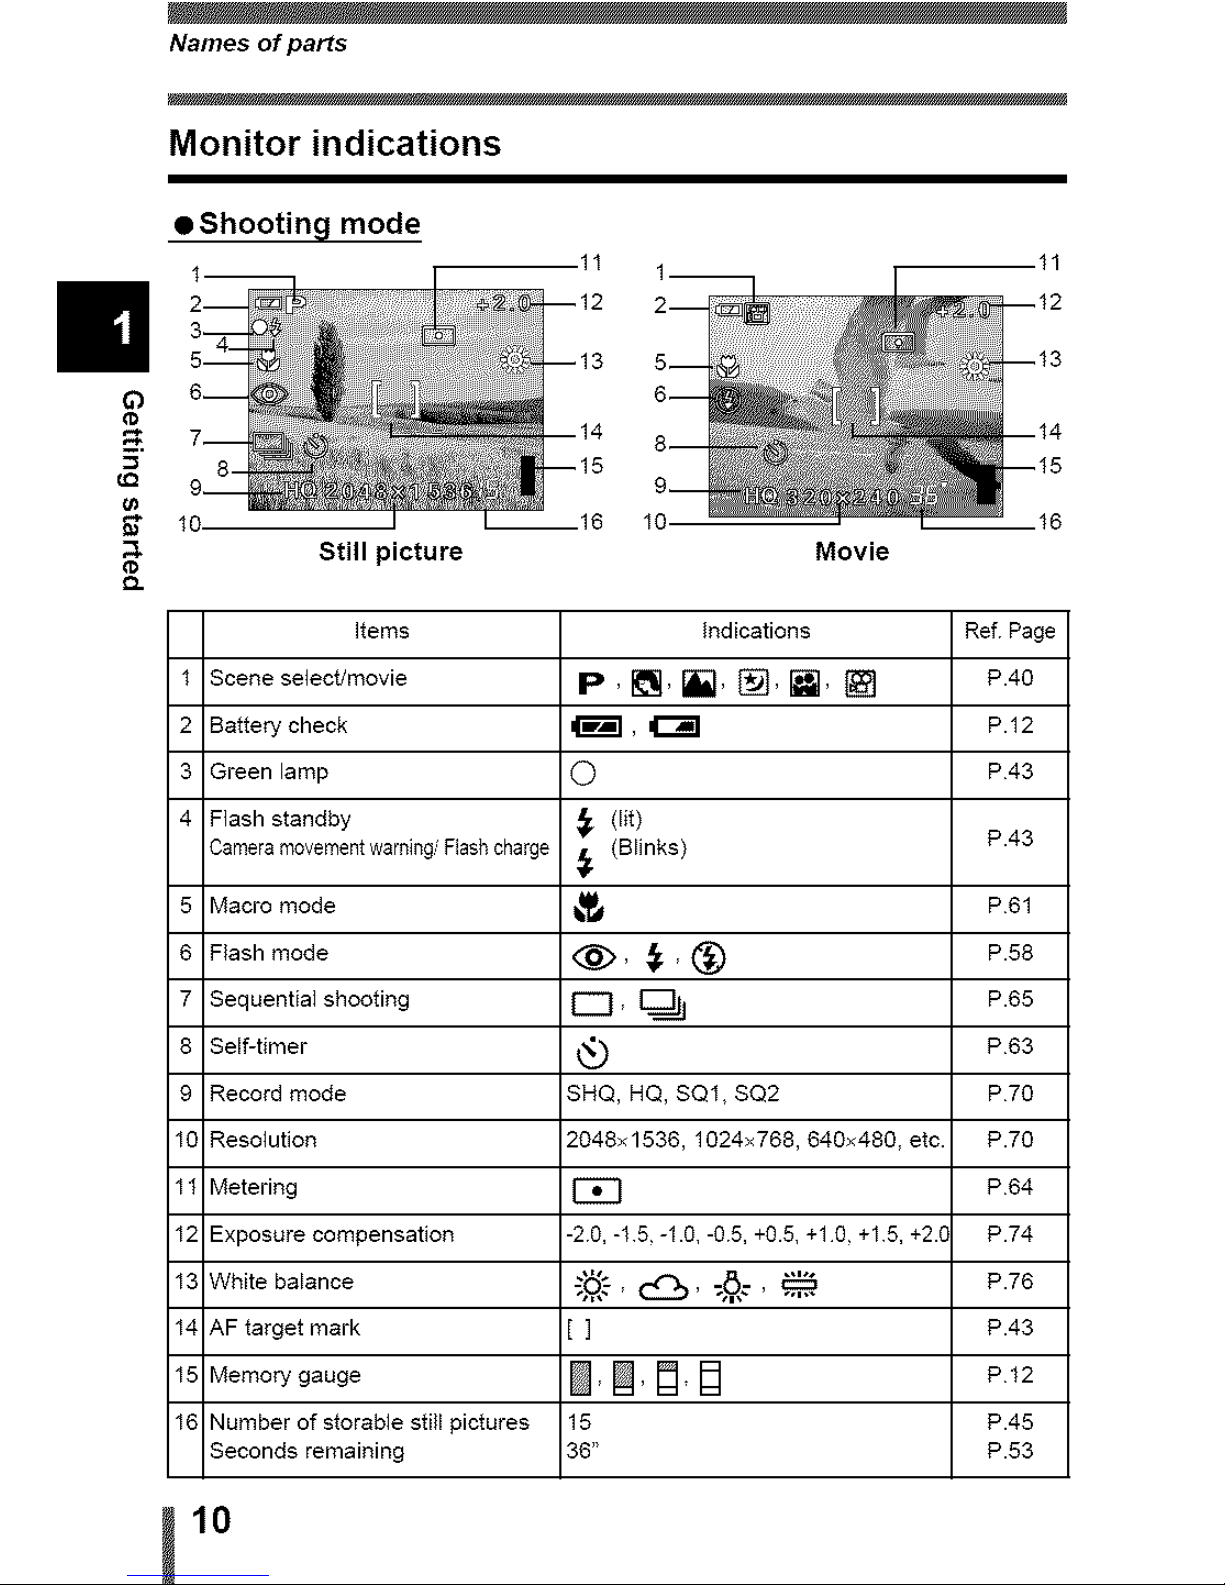
Monitor indications
• Shooting mode
Still picture Movie
Items
Scene select/movie
Battery check
Green lamp
Flash standby
Cameramovementwarning/Flash charge
Macro mode
Flash mode
Sequential shooting
Self-timer
Record mode
Resolution
Metering
Exposure compensation
White balance
AF target mark
Memory gauge
Number of storable still pictures
Seconds remaining
Indications Ref Page
P, I_, [], I_, I_, [] P4o
_, _ P.12
0 P43
_ dit)
(Blinks) P.43
P61
@, ,_, @ P58
r-q, _ p.6s
@ P63
SHQ, HQ, SQI, SQ2 P70
2048×1536, 1024×768,640x480, etc. P.70
P64
-20, -15, -1.0, -05, +0.5, +1 g, +15, +2.[ P.74
] P.43
I ,N,D,D P12
15 P.45
36" P.53
lO
Names of parts
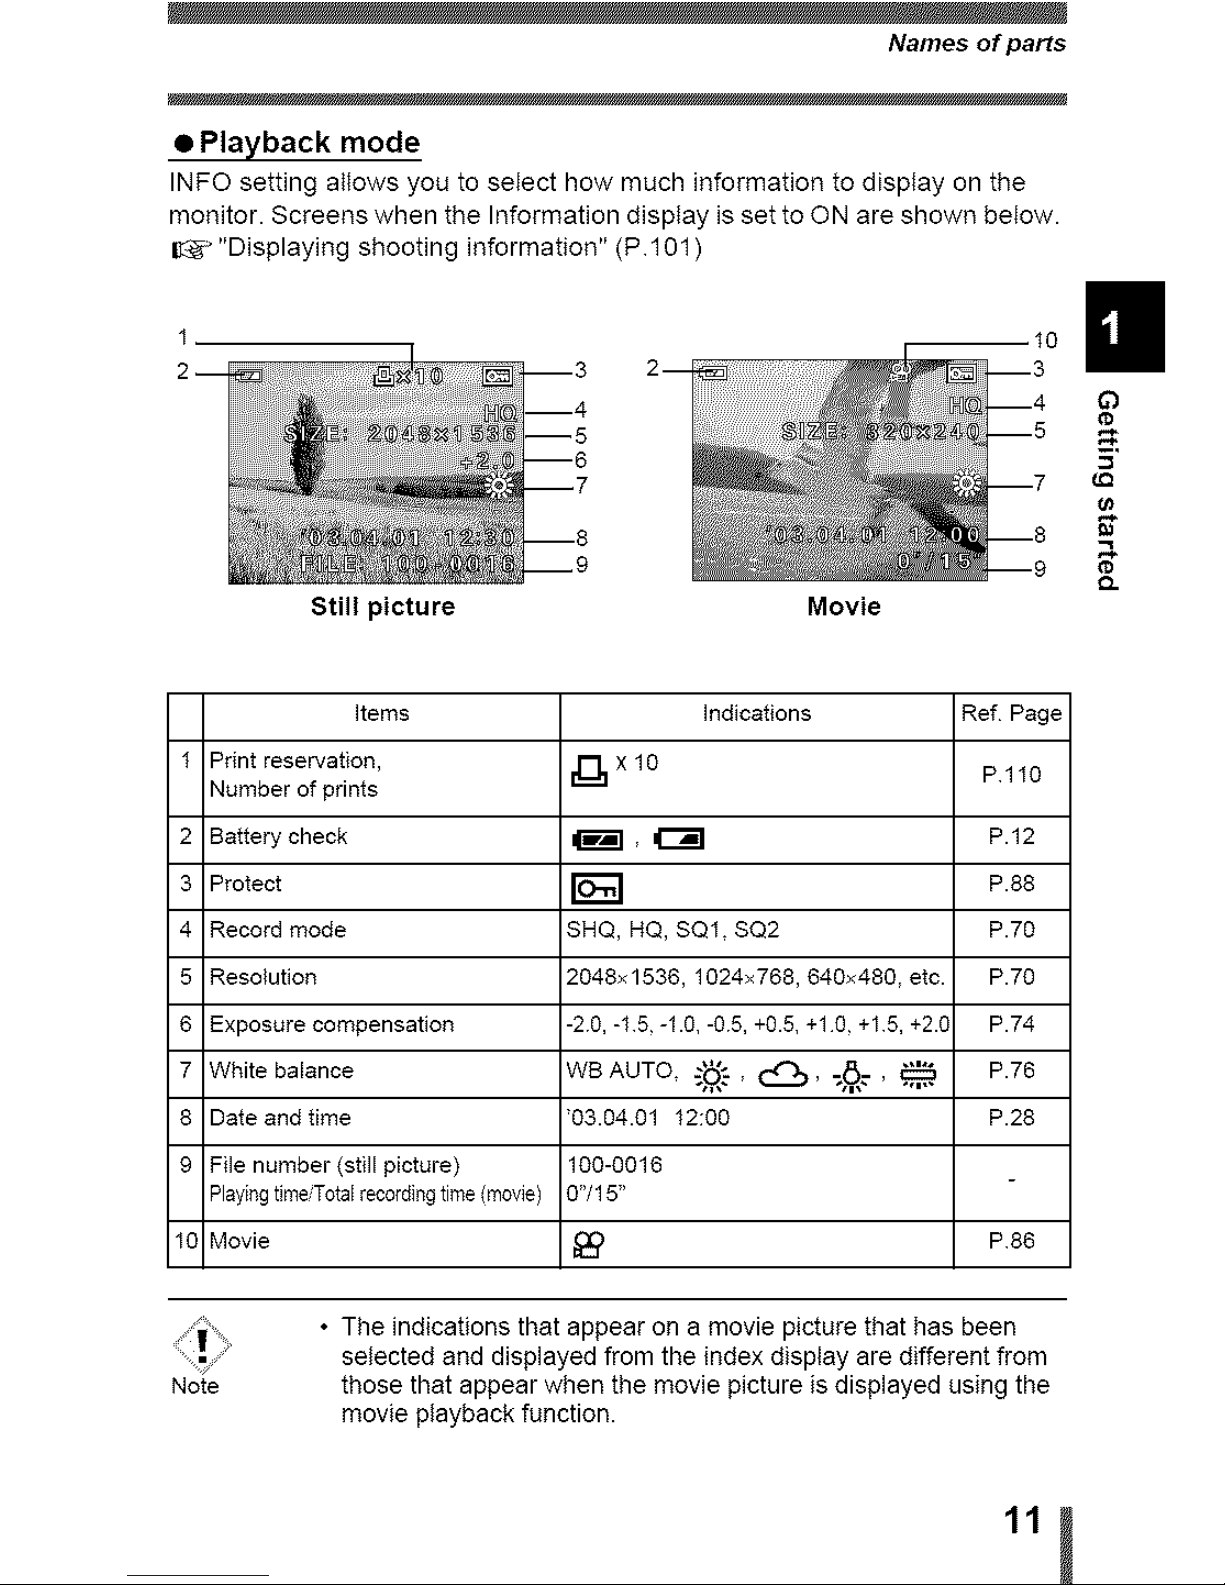
• Playback mode
INFO setting allows you to select how much information to display on the
monitor. Screens when the Information disptay is set to ON are shown below.
Ir_" "Displaying shooting information" (P 101 )
Still picture Movie
G3
(o
_=,
_Q
O)
&
items indications Ref Page
1 Print reservation, j-L x 10
PlI0
Number of prints
2 Battery check ir_l, _ P.12
3 Protect r_ P.88
4 Record mode SHQ, HQ, SQI, SQ2 P.70
5 Resolution 2048x1536, 1024×768,640x480, etc. P.70
6 Exposure compensation -20, -15, -1.0, -05, +0.5, +10, +15, +2.C P.74
7 White bal .... WB AUTO.._"., C_:), _, _ P.76
8 Date and time '03.04.01 12:00 P.28
File number (still picture) 100-0016
/ IPlayingtimeTotalrecordingtime (movie) 0"/15"
t-- I
LOl Movie _) P86
Note
• The indications that appear on e movie picture that has been
selected and displayed from the index display ere different from
those that appear when the movie picture is displayed using the
movie playback function.
In
Names of parts
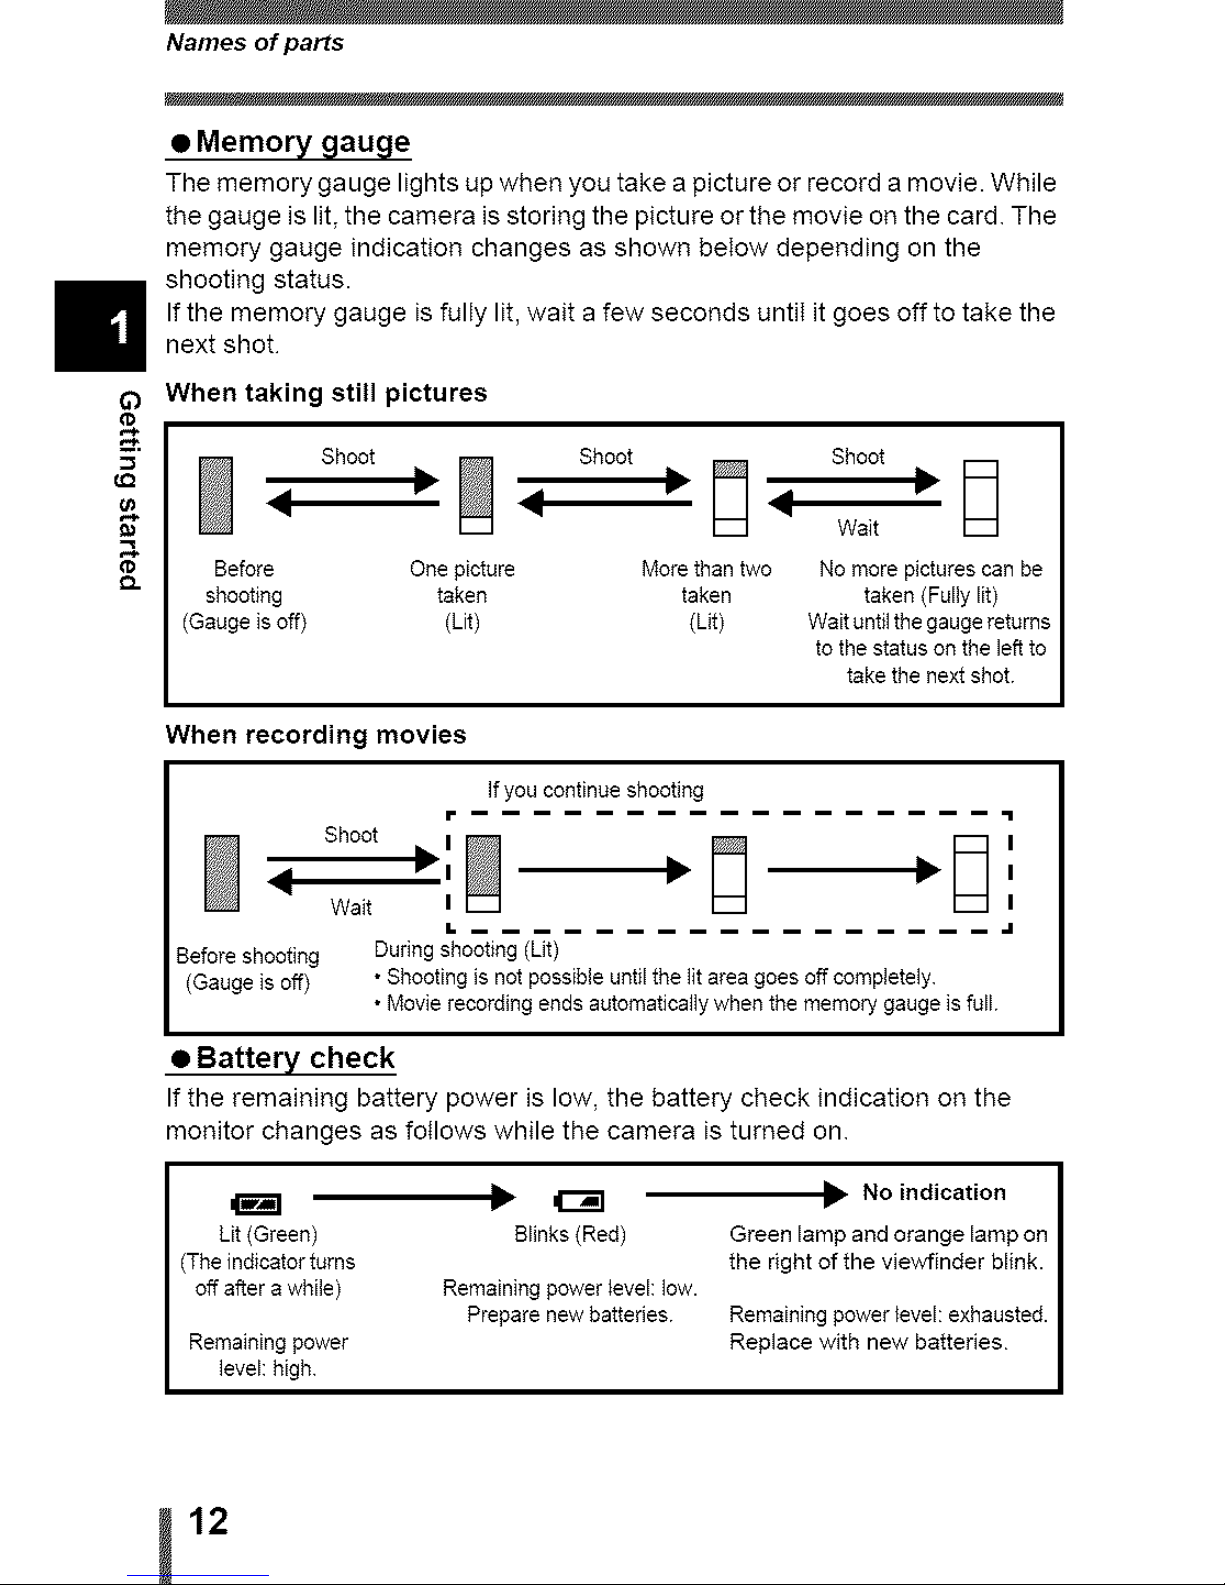
• Memory gauge
The memory gauge lights up when you take a picture or record a movie. While
the gauge is lit, the camera isstoring the picture orthe movie on the card The
memory gauge indication changes as shown beIow depending on the
shooting status.
If the memory gauge isfully lit, wait a few seconds untiI itgoes off to take the
next shot
When taking still pictures
Before One picture
shooting taken
(Gauge is off) (Lit)
Shoot Shoot Shoot
Wait
More than two No more pictures can be
taken taken (Fully lit)
(Lit) Wait until the gauge returns
to the status on the leftto
take the next shot
When recording movies
ftyou continue shooting
-- ,i
Shoot ;D
Wait I
Before shooting During s_looting (Lit)
n
n
,,I
(Gauge is off) • Shooting is not possible untilthe lit area goes off completely
• Movie recording ends automatically when the memory gauge is full
• Battery check
If the remaining battery power is low, the battery check indication on the
monitor changes as fotlows while the camera is turned on
b,=
Ill _ _ No indication
Lit (Green) Blinks (Red) Green lamp and orange lamp on
The indicator turns the right of the vJewfinder blink.
off after a while) Remaining power level: low.
Prepare new batteries Remaining power }evek exhausted.
Remaining power Replace with new batteries
level: high
12
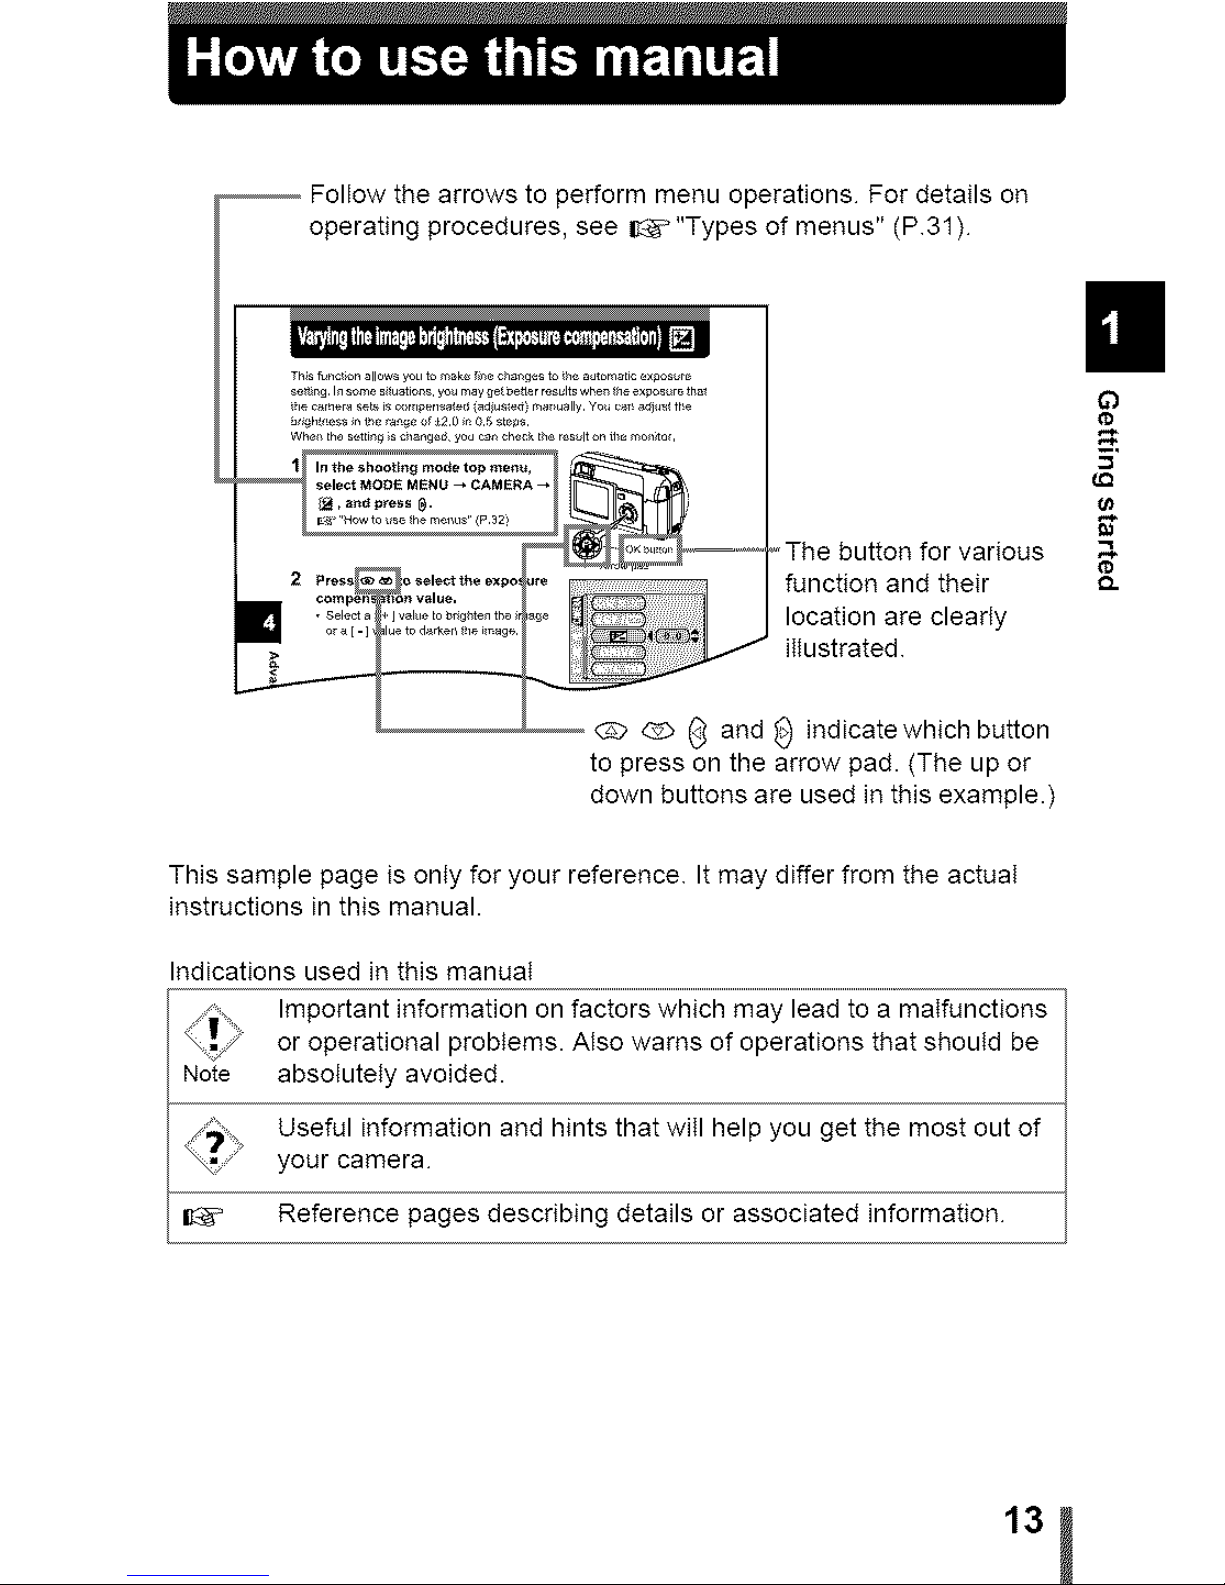
-- Follow the arrows to perform menu operations For details on
operating procedures, see _"Types of menus" (P31)
s_l_ct_0_ MENU_ CAMERA_ _
-- _The button for various
2 P,o_o_o_po fanct on and the r
ocat on are c earyo,o[.] lutoda¢_er_I_i_ag_
i;Iustrated
_) indicafewhich button
to press on the arrow pad. (The up or
down buttons are used in this example.)
This sample page is onty for your reference It may differ from the actual
instructions in this manual.
Indications used in this manual
Important information on factors which may lead to a malfunctions
i
_/}_ or operational problems. Also warns of operations that should be
Note absolutely avoided.
_?_ yourUSefUlcamerainf°rmati°nand hints that will help you get the most out of
_._ Reference pages describing details or associated information
,3j
I!
_=.
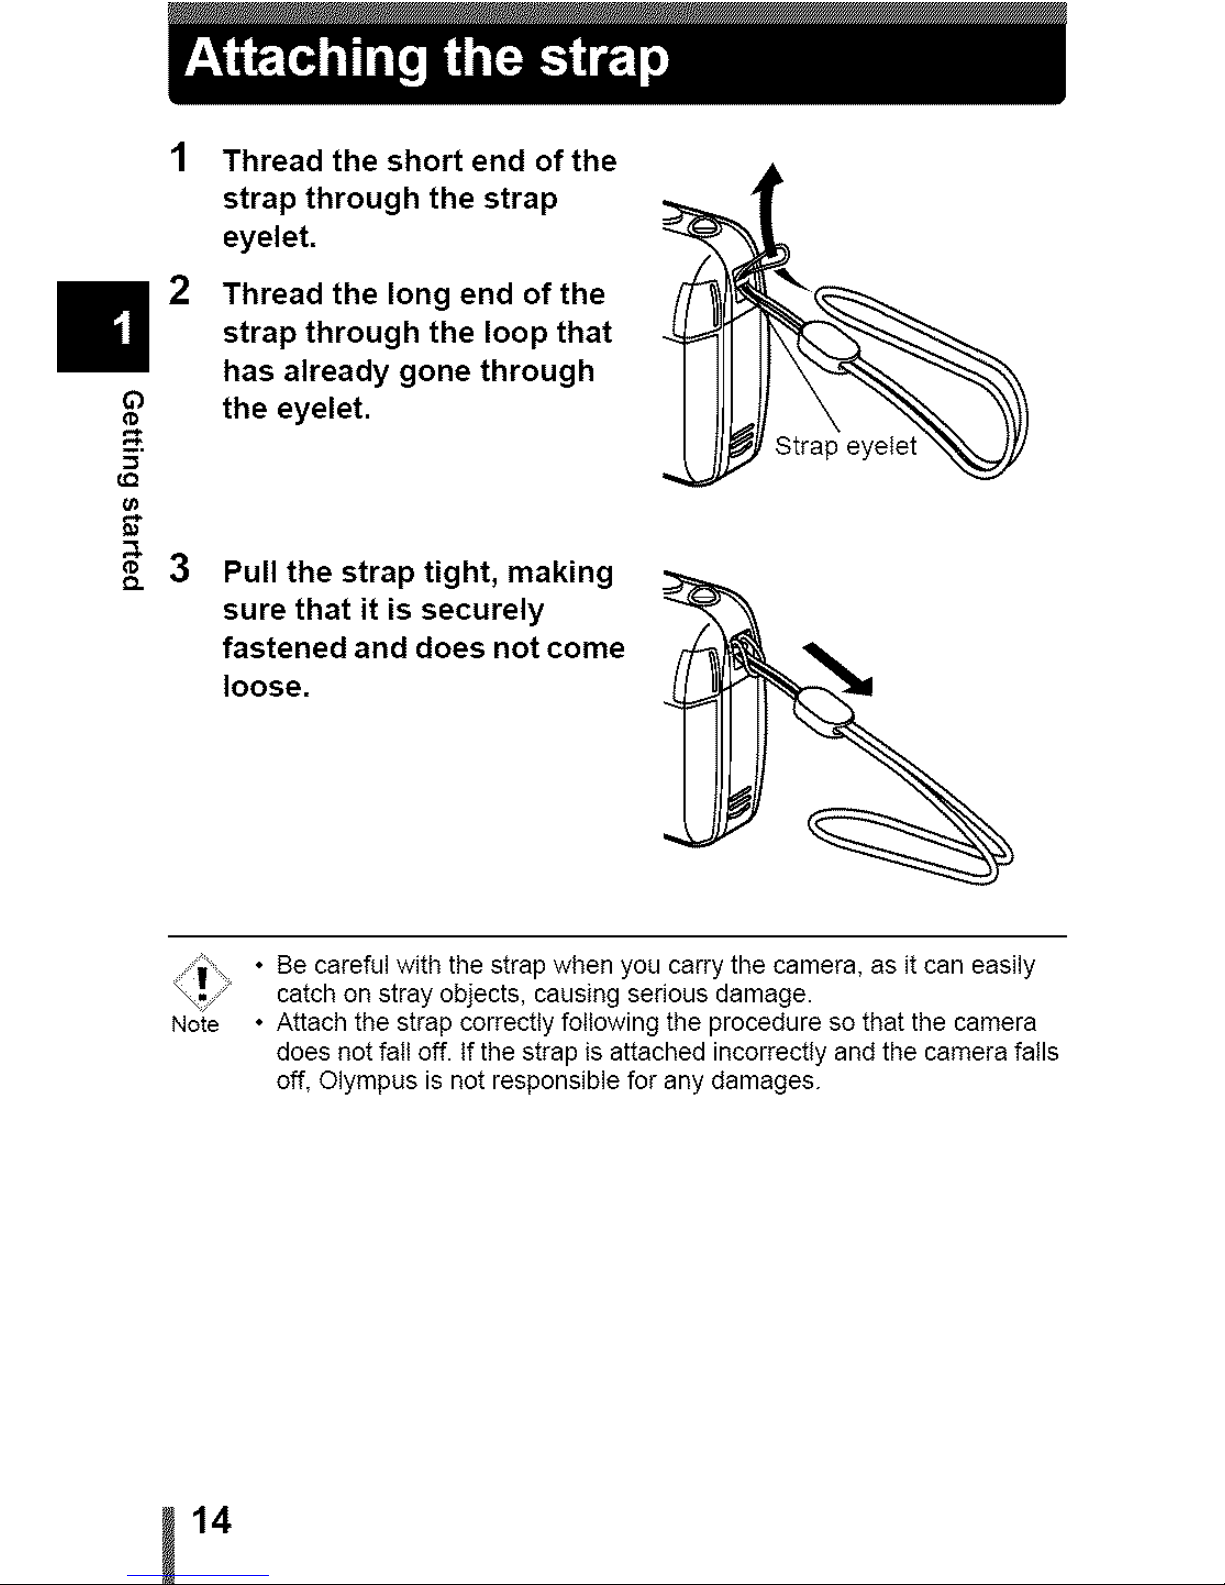
Thread the short end of the
strap through the strap
eyelet.
Thread the long end of the
strap through the loop that
has already gone through
the eyelet.
_3
Pull the strap tight, making
sure that it is securely
fastened and does not come
loose.
• Be careful with the strap when you carry the camera, as it can easily
catch on stray objects, causing serious damage.
Note • Attach the strap correctly following the procedure so that the camera
does not fall off. tf the strap is attached incorrectly and the camera falls
off, Olympus is not responsible for any damages.
14
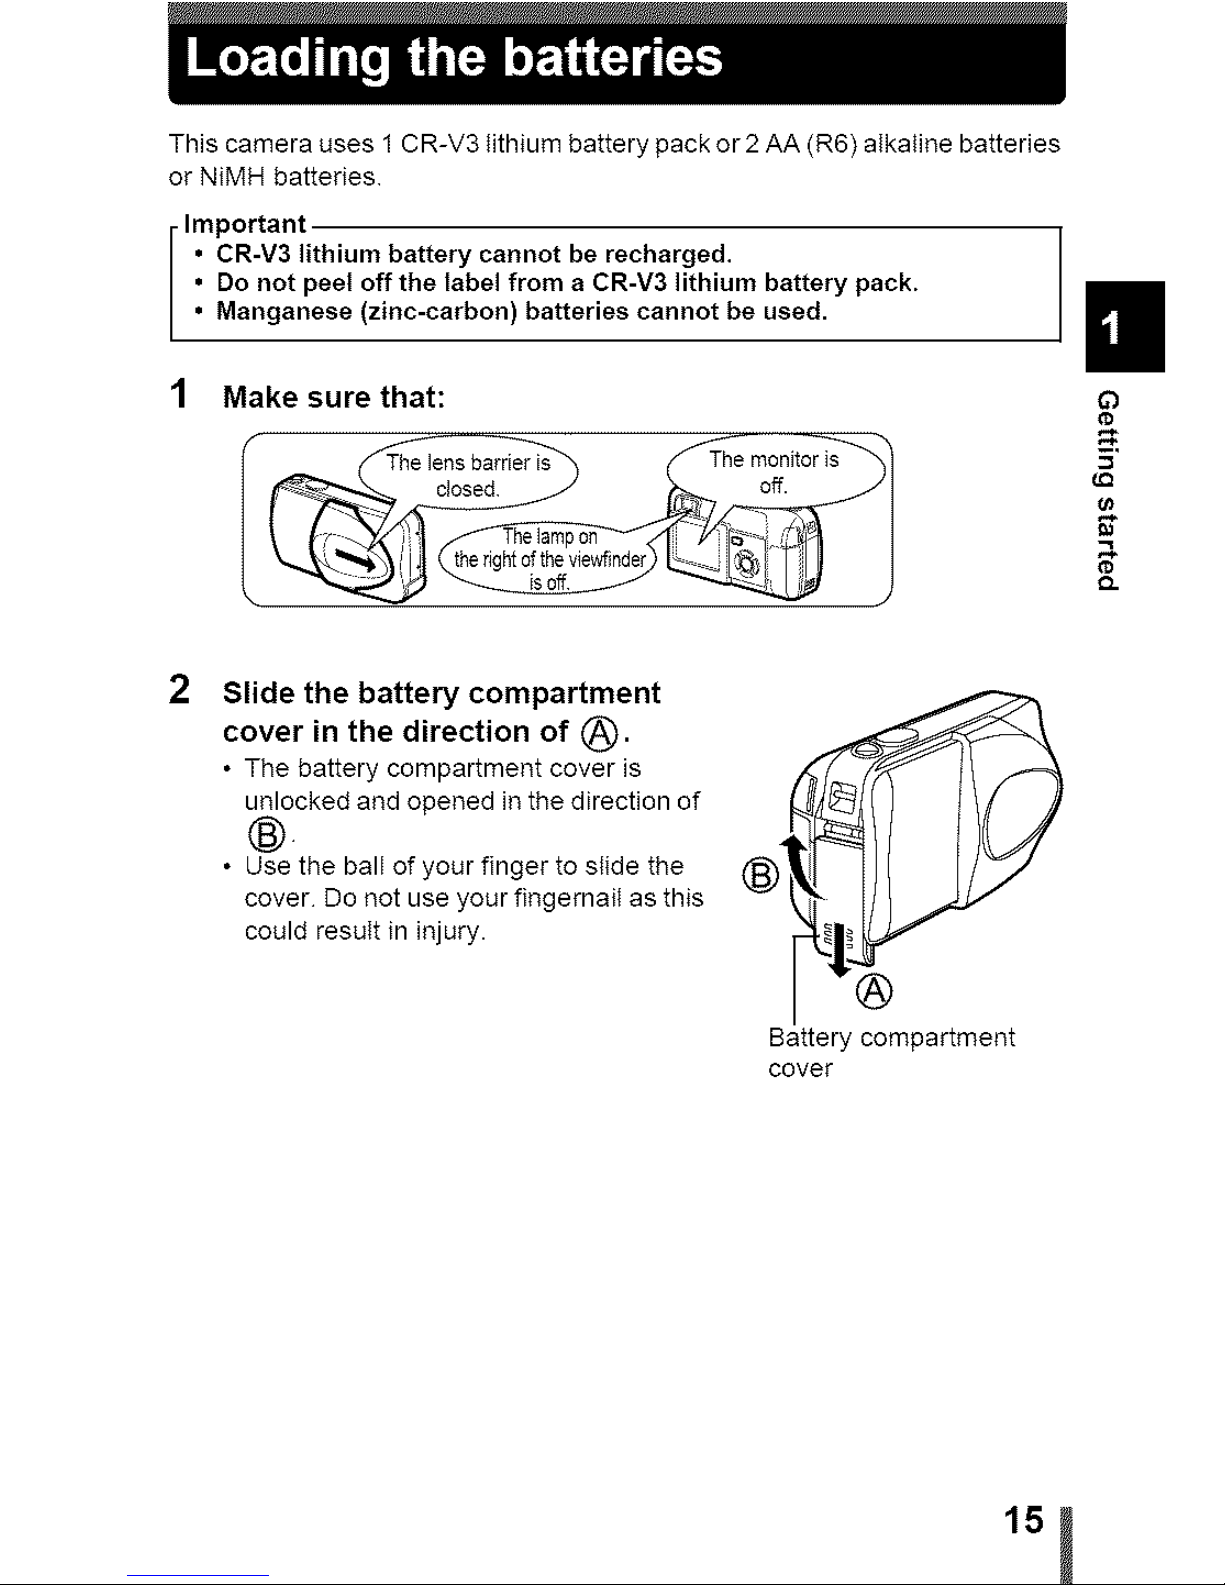
This camera uses 1 CR-V3 tithium battery pack or 2 AA (R6) alkaline batteries
or NiMH batteries
Important
• CR-V3 lithium battery cannot be recharged.
• Do not peel off the label from a CR-V3 lithium battery pack.
• Manganese (zinc-carbon) batteries cannot be used.
1 Make sure that:
,%
Q.
Slide the battery compartment
cover in the direction of (_.
• The battery compartment cover is
unlockedandopened in thedirection of
®
• Use the ball of your finger to elide the
cover Donot use your fingernail as this
could reeuIt in injury.
Battery compartment
cover
ii!
0
8.
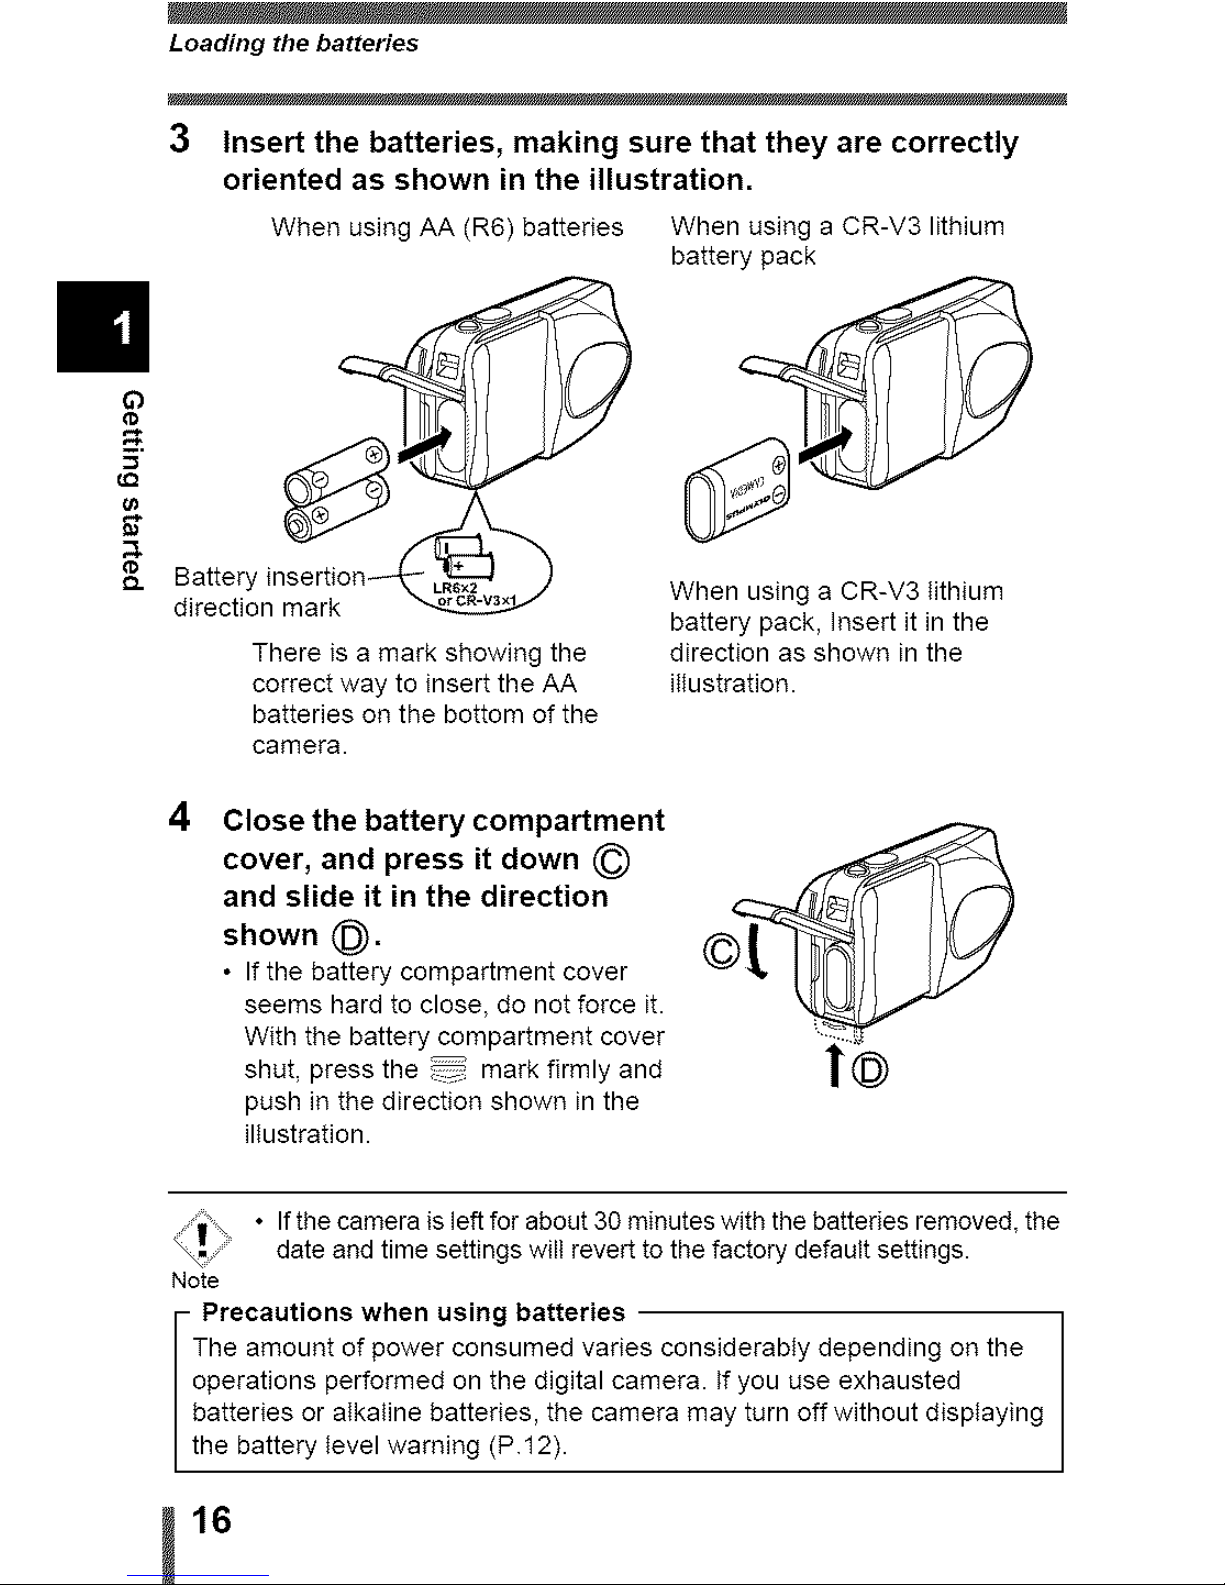
Loading the batteries
3 Insert the batteries, making sure that they are correctly
oriented as shown in the illustration,
When using AA (R6) batteries When using aCR-V3 lithium
battery pack
Batter! When using a CR-V3 tithium
direction mark
battery pack, Insert it in the
There is a mark showing the direction as shown in the
correct way to insert the AA illustration.
batteries on the bottom of the
camera.
4
Close the battery compartment
and press it down (_cover,
and slide it in the direction
shown (i_).
• If the battery compartment cover
seems hard to close, do not force it.
With the battery compartment cover
shut, press the mark firmly and
push in the direction shown in the
illustration.
• Ifthe camera is left for about 30 minutes with the batteries removed, the
date and time settings will revert to the factory default settings.
Note
- Precautions when using batteries
The amount of power consumed varies considerabIy depending on the
operations performed on the digital camera. If you use exhausted
batteries or aIkaline batteries, the camera may turn off without displaying
the battery tevel warning (P 12).
16
Loading the batteries
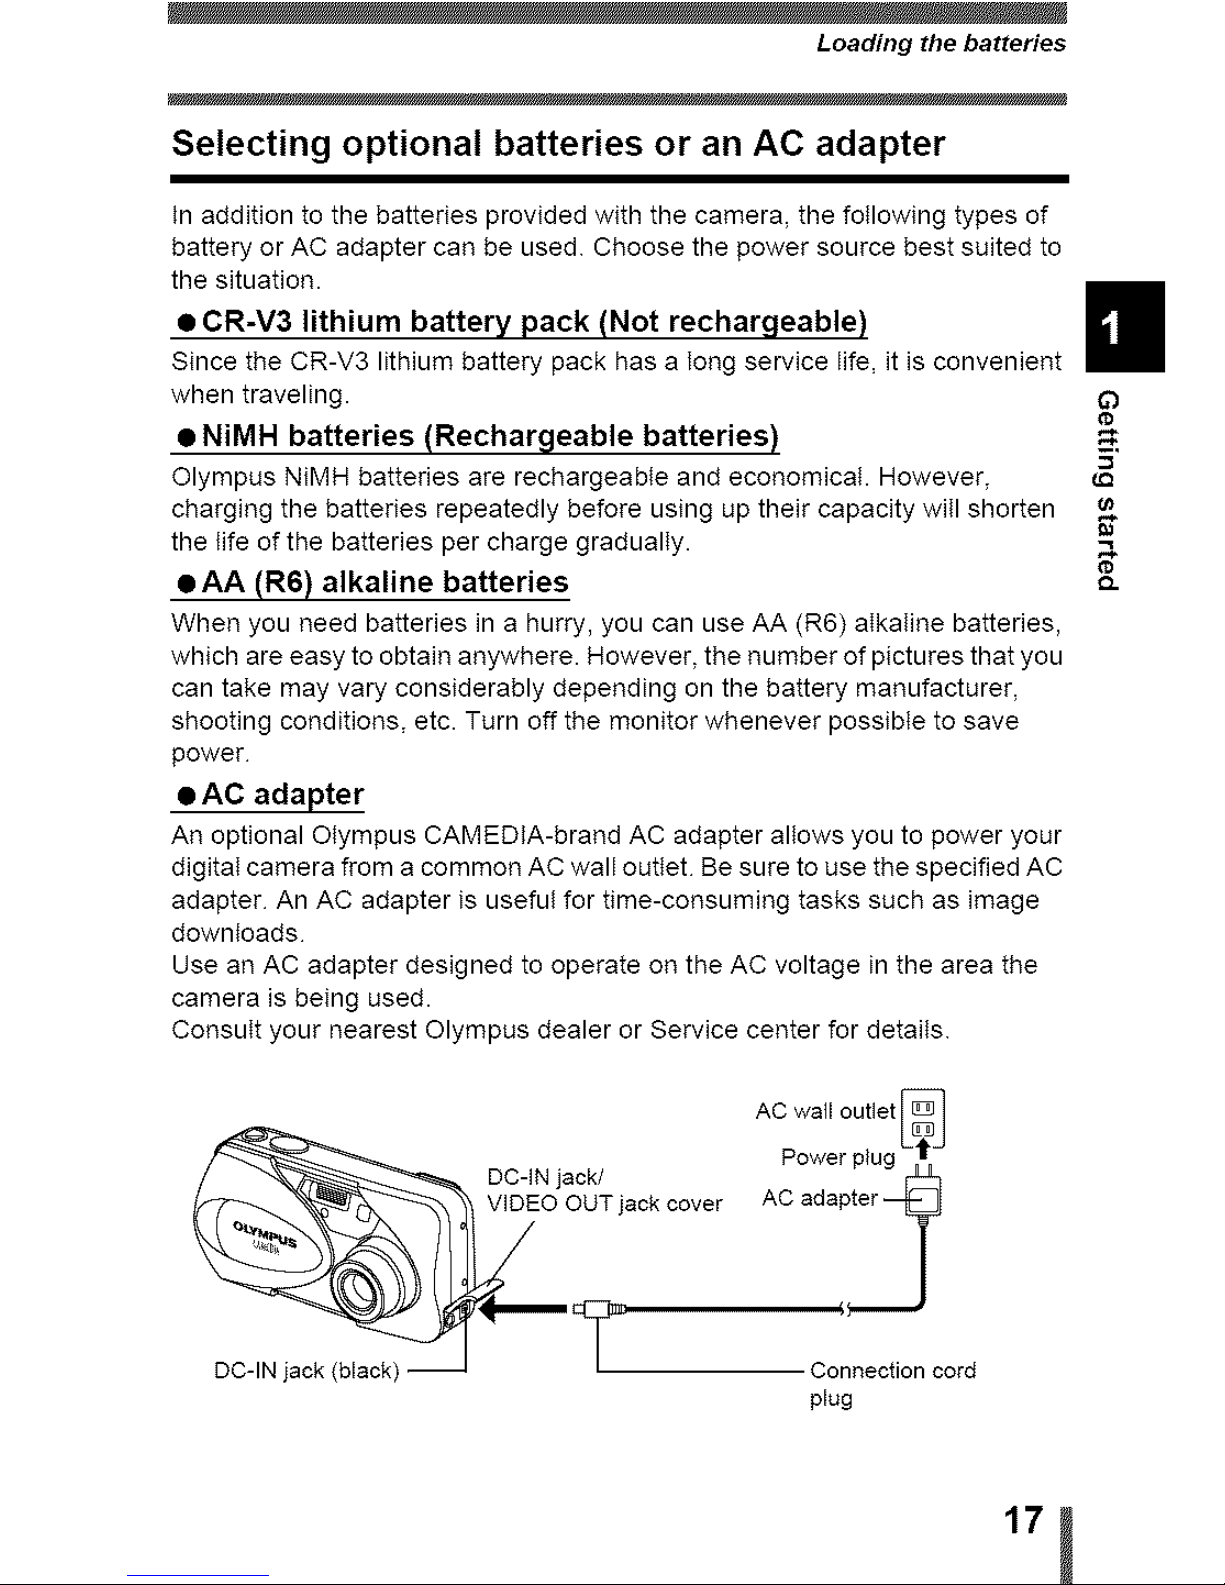
Selecting optional batteries or an AC adapter
In addition to the batteries provided with the camera, the following types of
battery or AC adapter can be used Choose the power source best suited to
the situation.
• CR-V3 lithium battery pack (Not rechargeable)
Since the CR-V3 lithium battery pack has a long service life, it is convenient
when traveling.
• NiMH batteries (Rechargeable batteries)
Olympus NiMH batteries are rechargeable and economical. However,
charging the batteries repeatedly before using up their capacity will shorten
the life of the batteries per charge gradualIy.
• AA (R6) alkaline batteries
When you need batteries in a hurry, you can use AA (R6) aIkaline batteries,
which are easy to obtain anywhere. However, the number of pictures that you
can take may vary considerably depending on the battery manufacturer,
shooting conditions, etc. Turn off the monitor whenever possible to save
power
• AC adapter
An optional Olympus CAMEDIA-brand AC adapter altows you to power your
digitaI camera from a common AC wall outtet Be sure to use the specified AC
adapter An AC adapter is useful for time-consuming tasks such as image
downloads
Use an AC adapter designed to operate on the AC voltage in the area the
camera is being used.
Consult your nearest Olympus dealer or Service center for detaits
AC wall outlet
VIDEO OUT jack cover A
- Connection cord
plug
C)
_=,
O.
1,j
in
Loading the batteries
S% •
Note
Manganese (zinc-carbon) batteries cannot be used.
Ifthe battery power runs out while the camera is connected to a PC, the
image data may be lost or damaged. You are recommended to use the
AC adapter when transferring images to a PC. Do not connect or
disconnect the AC adapter while the camera is communicating with the
PC.
• Do not remove or load the batteries or connect or disconnect the AC
adapter while the camera is turned on. Doing so could affect the
camera's internal settings or functions.
• The life of battery packs may vary according to the type of battery,
manufacturer, shooting conditions, etc.
• Power is consumed continuously during the conditions below. This
could shorten the life of the batteries.
• When the monitor is in the playback mode for an extended period
of time.
• Repeated zoom adjustments.
• Repeated auto-focus by depressing the shutter button halfway.
• When the camera is connected to a PC.
• Carefully read the AC adapter's instructions before use.
• When using an AC adapter, the AC adapter supplies power to the
camera even if batteries are loaded inthe camera. The AC adapter does
not charge batteries in the camera.
18
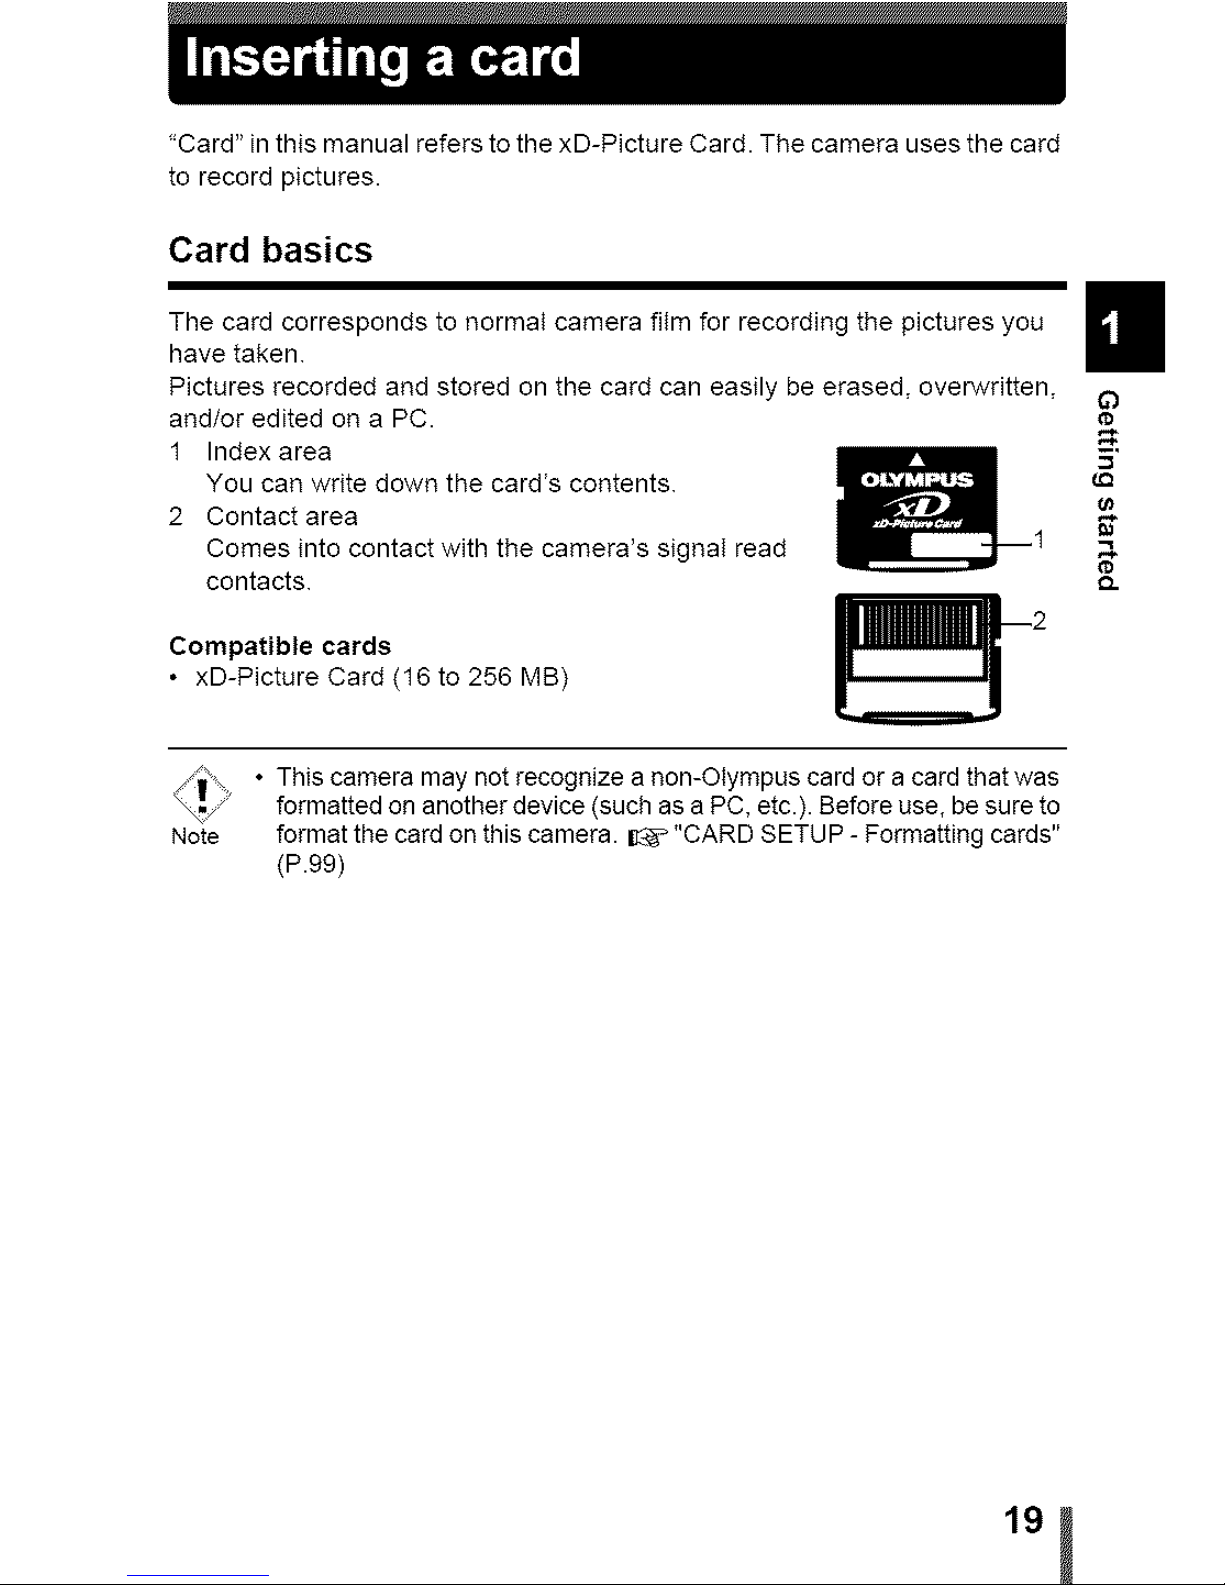
"Card" in this manual refers to the xD-Picture Card. The camera uses the card
to record pictures.
Card basics
The card corresponds to normal camera film for recording the pictures you
have taken
Pictures recorded and stored on the card can easily be erased, overwritten,
and/or edited on a PC.
1 Index area
You can write down the card's contents
2 Contact area
Comes into contact with the camera's signal read
contacts
Compatible cards
• xD-Picture Card (16 to 256 MB)
J%
| • This camera may not recognize a non-Olympus card or a card that was
_' formatted on another device (such as e PC, etc.). Before use, be sure to
Note format the card on this camera. _ "CARD SETUP - Formatting cards"
(P.99)
_=,
,gj
m
_2
3
Inserting a card
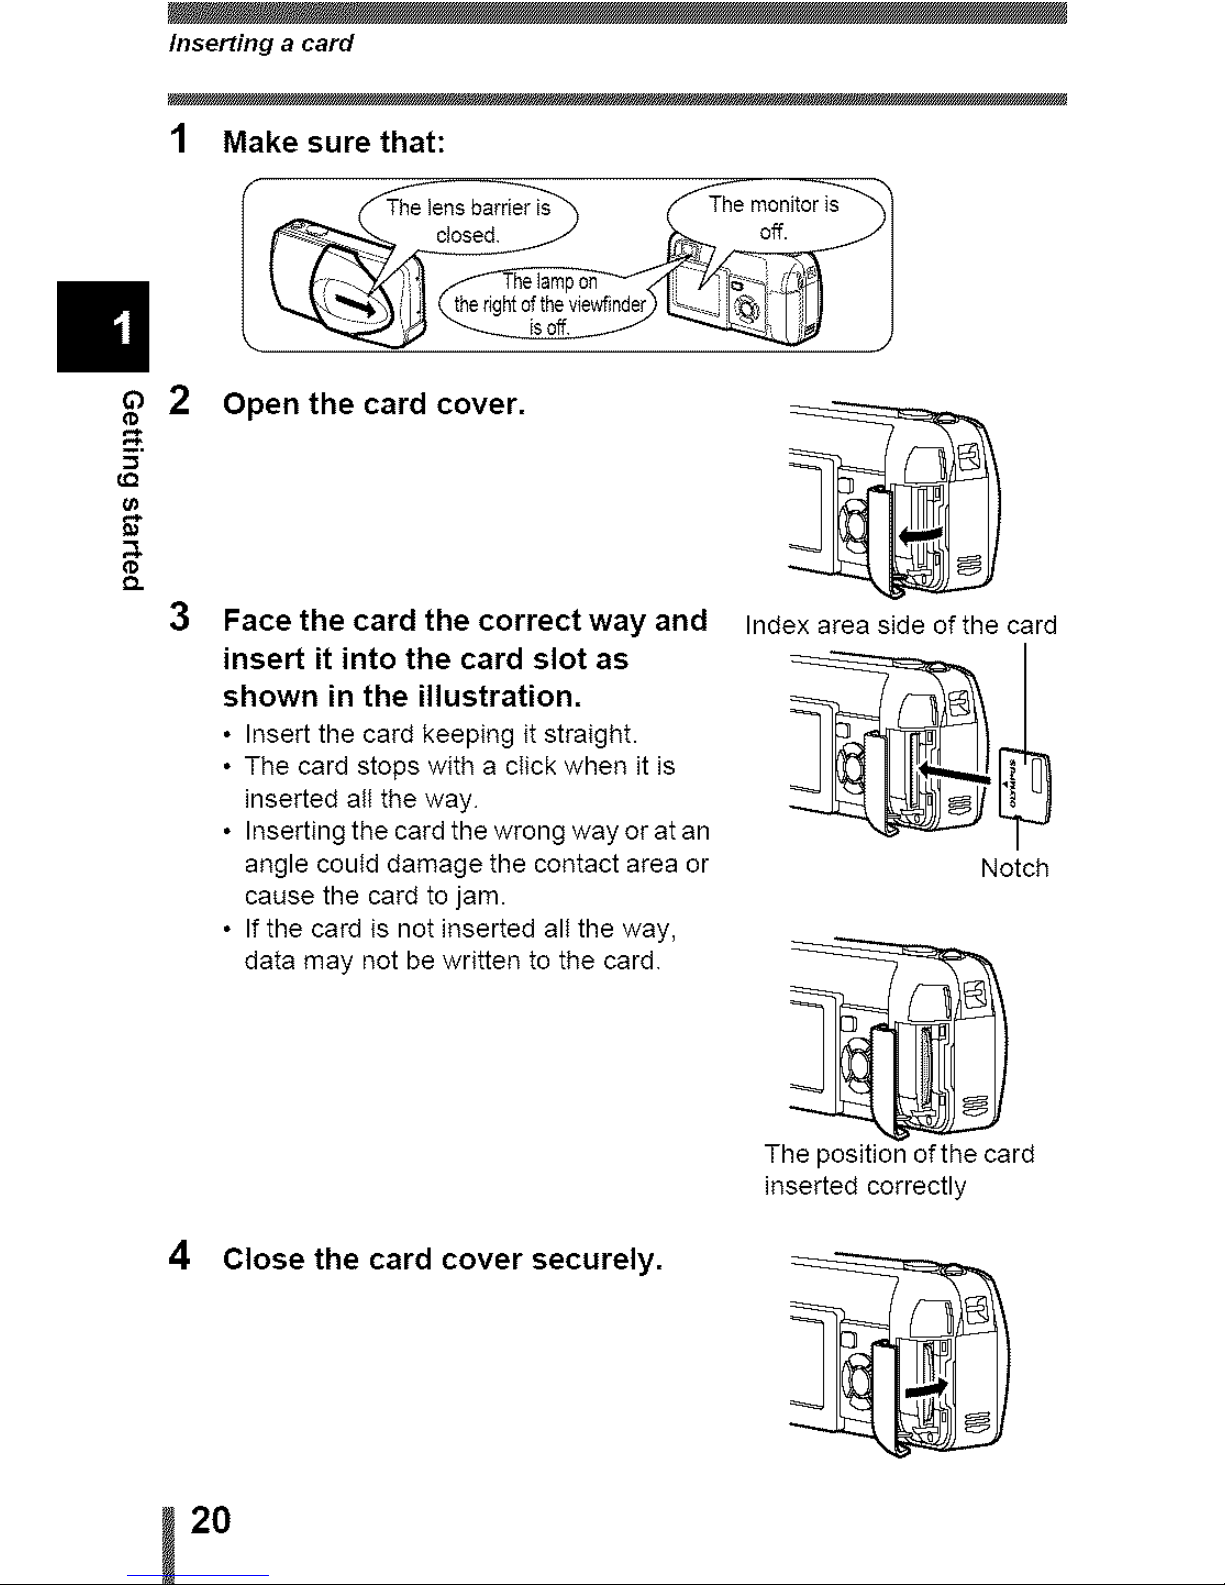
1 Make sure that:
Open the card cover.
Face the card the correct way and
insert it into the card slot as
shown in the illustration,
• Insert the card keeping it straight.
• The card stops with a cIick when it is
inserted all the way
• Inserting the card the wrong way or at an
angle coutd damage the contact area or
cause the card to jam.
• If the card is not inserted alt the way,
data may not be written to the card
Index area side of the card
Notch
4 Close the card cover securely.
The position of the card
inserted correctly
20
Inserting a card
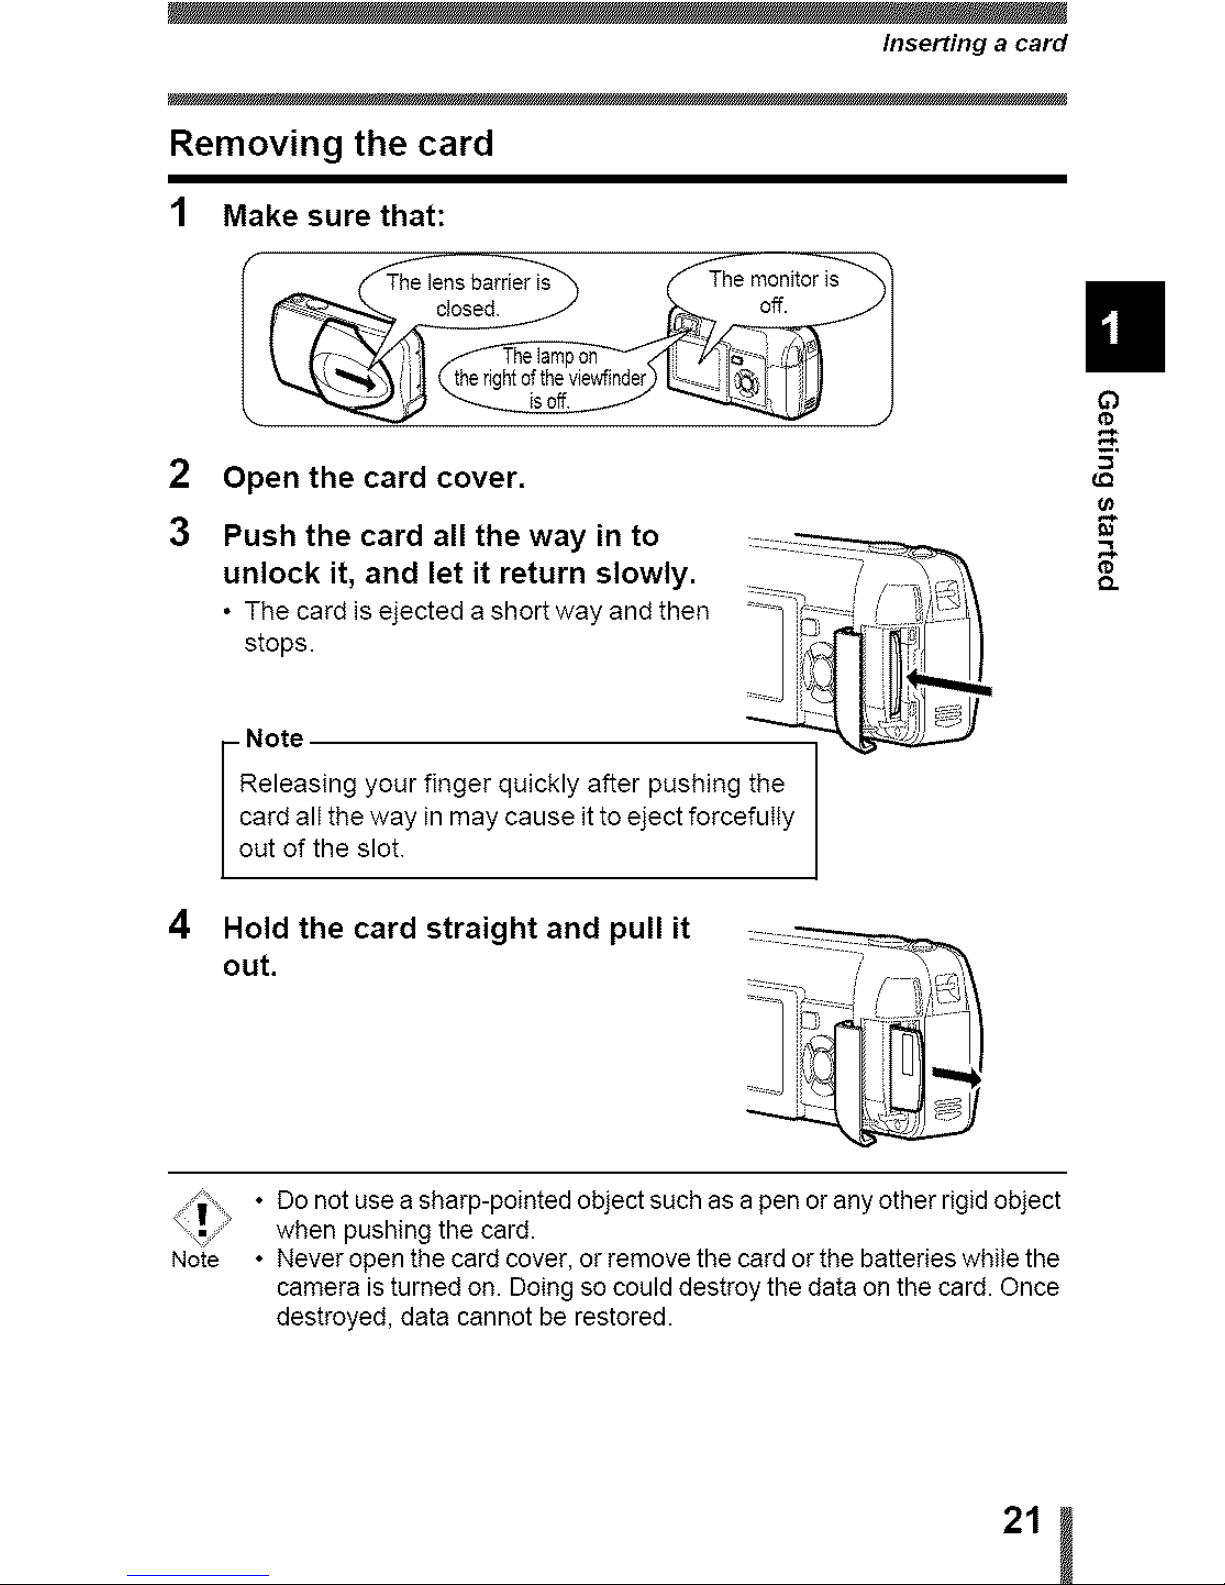
Removing the card
1 Make sure that:
2 Open the card cover.
3
Push the card all the way in to 1 _
unlock it, and let it return slowly. 7
• Thecardisejectedaehortwayandthen / '/=_1
etops i_
i Note
Releasing your finger quickly after pushing the
card all the way in may cause it to eject forcefully
out of the slot
4 Hold the card straight and pull it
out.
C)
c0
_=,
_Q
_J
• Do not usea sharp-pointed object such as a pen or any other rigid object
when pushing the card.
Note ° Never open the card cover, or remove the card or the batteries while the
camera is turned on. Doing so could destroy the data on the card. Once
destroyed, data cannot be restored.
21j

eWhen shooting pictures (Shooting mode)
Power on:
in
G)
_2.
o_
0.
Power off:
Open the lens barrier fully.
The camera turns on in the shooting mode and the lens
extends.
If the lens does not extend when the lens barrier is opened,
there is a possibitity that the barrier is not fully open Open
the lens barrier fully until you feet it clicks.
-J i
Close the tens barrier slightly until it almost touches
the lens barrel.
The lens barrier stops just before ittouches the tens and the
lens retracts Wait until the lens is fully retracted before
closing the tens barrier completely
The camera turns off
22
Power on/off
TIPS ---------=---------------=------
• To save battery power, the camera automatically enters the sleep mode
and stops operating if not used for 3 minutes. If the monitor is on, it will
automatically turn off. The lens retracts automatically 5 minutes after
that. The camera activates again as soon as you lightly press the shutter
button or zoom lever. Whenever possible, turn the camera off when you
do not intend to take any pictures for a while.
• Do not push the lens barrier forcefully against the lens as this may
,__ damage the lens or cause it to malfunction.
Note
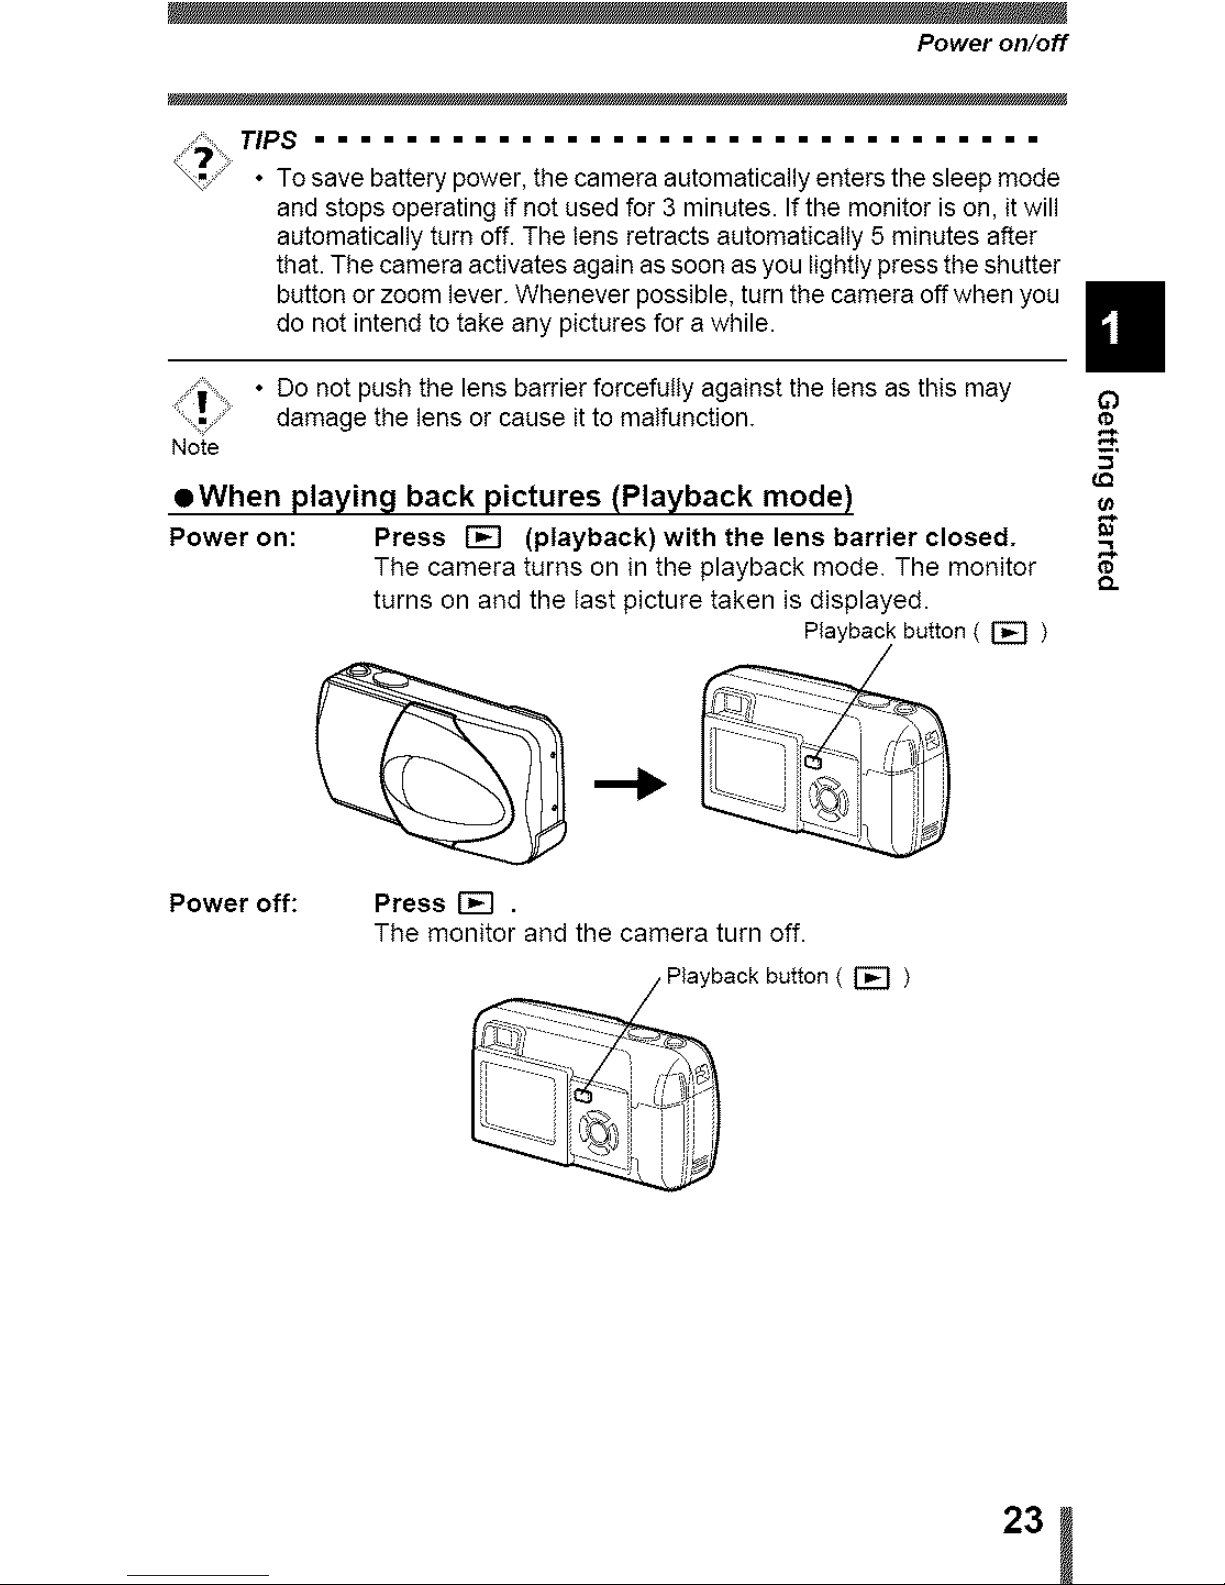
eWhen playing back pictures (Playback mode)
Power on: Press r-_ (playback) with the lens barrier closed.
The camera turns on in the playback mode The monitor
turns on and the last picture taken is displayed.
Playback button ( I_ )
Power off: Press [E} .
The monitor and the camera turn off.
ack button ( _ )
,.%
23j
Power on/off
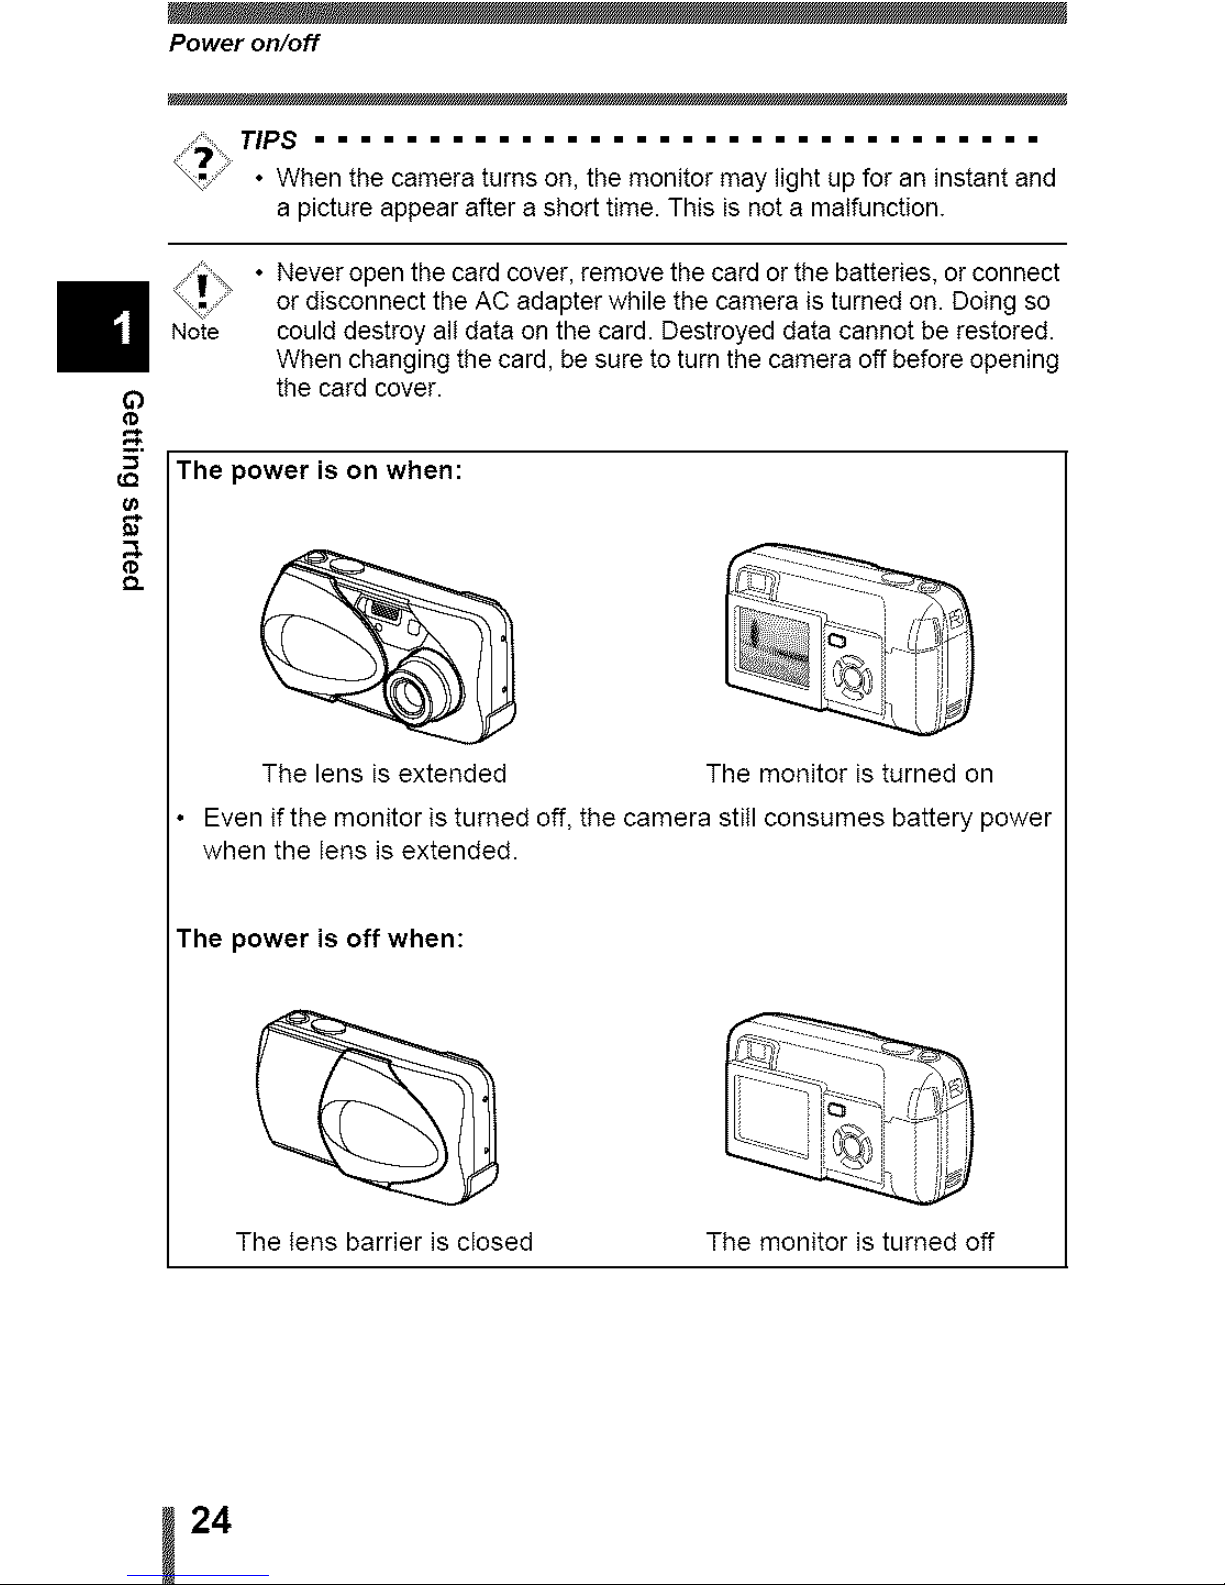
TIPS ================================
• When the camera turns on, the monitor may light up for an instant and
a picture appear after a short time. This is not a malfunction.
Note
Never open the card cover, remove the card or the batteries, or connect
or disconnect the AC adapter while the camera is turned on. Doing so
could destroy all data on the card. Destroyed data cannot be restored.
When changing the card, be sure to turn the camera off before opening
the card cover.
The power is on when:
The lens is extended The monitor is turned on
• Even if the monitor is turned off, the camera stitl consumes battery power
when the lens is extended.
The power is off when:
The lens barrier is closed The monitor is turned off
24

Power on/off
If the card is not recognized (card check)
When the power is turned on, the camera checks the card automatically
If there is no card in the camera or a card that is not supported by this camera
is inserted, the foIIowing screen is displayed.
• All data stored on the card is erased when the card is formatted.
Note
Monitor
Corrective action '_
indication
Q.
NO CARD
There is no card in the camera or the card is not
inserted properly
_,Insert a card. If a card is already inserted, remove it
and insert it again correctly
The card cannot record, play back or erase pictures.
Replace with a new card, or format the card.
>Press _ _ to setect POWER OFF, and press
@. Replace it with a new one.
_,Format the card
Press @ _ to select [_ FORMAT, and press
to display the confirmation screen. SeIect YES and
press (_).
Formatting starts If the card was successfully
formatted, the camera is ready to take pictures
2,j
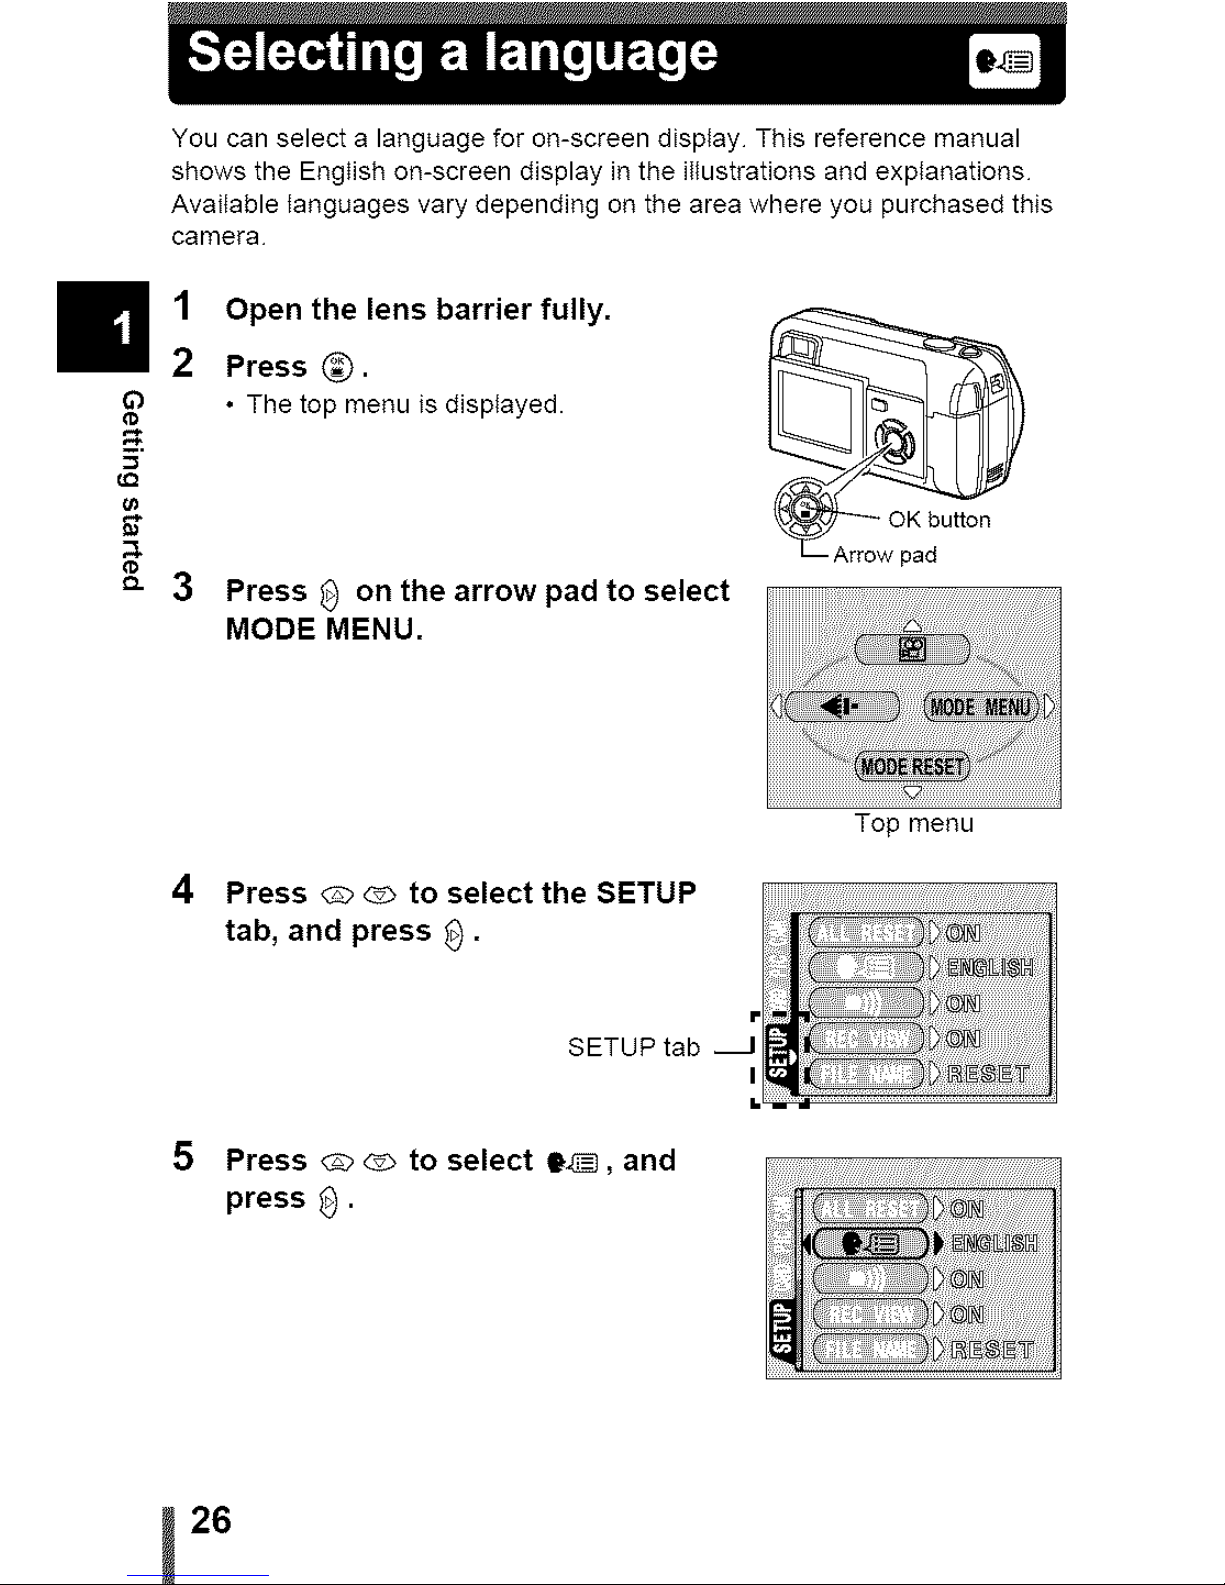
You can select a language for on-screen display This reference manual
shows the English on-screen display in the illustrations and explanations
Available languages vary depending on the area where you purchased this
camera
1
In2
_=.
3
Open the lens barrier fully.
Press _),
• The top menu isdisplayed.
Press _ on the arrow pad to select
MODE MENU.
iiiiiiiii!!i! ililil
i!i!!i!ii!ii!ii ii i!il
Top menu
4 Press_to selectthe SETUP
tab, and press _.
SETUP
Press_to select O_,and
press _.
26
Selecting a language
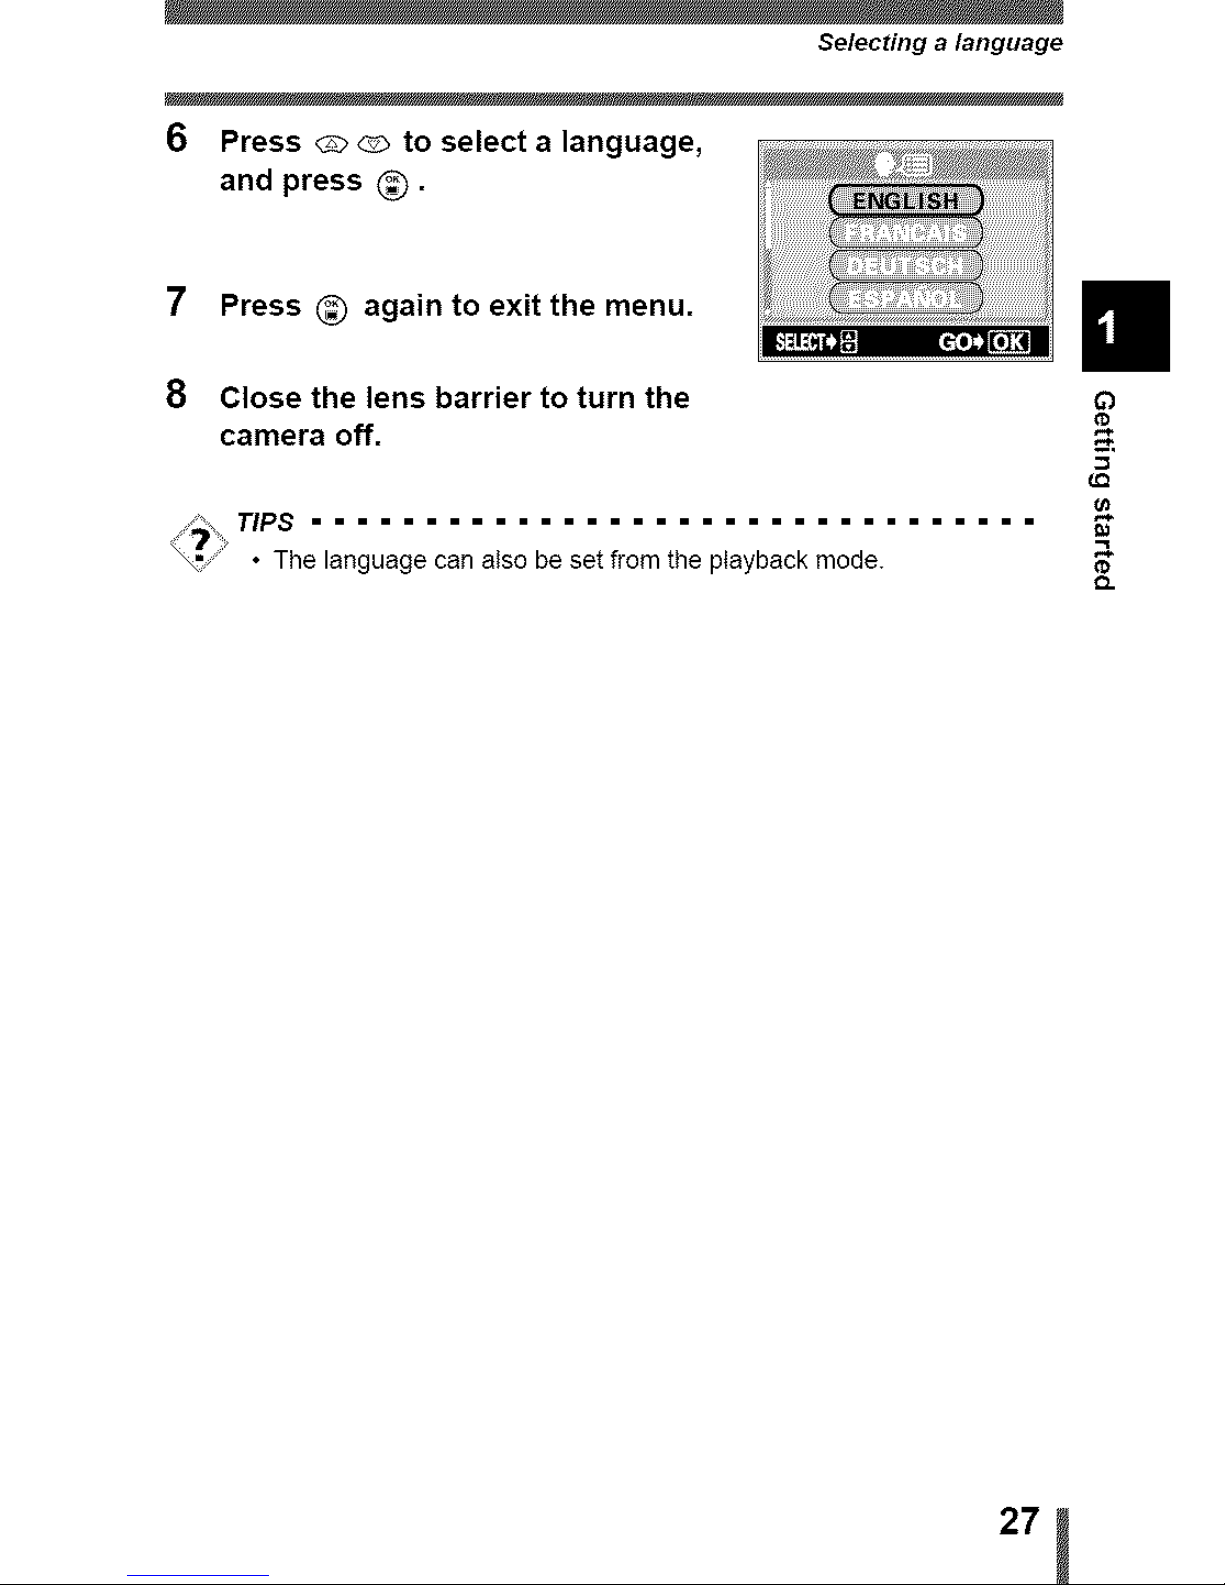
6 Press _ _ to select a language,
and press @.
7
8
Press _ again to exit the menu.
Close the lens barrier to turn the C)
camera off.
TIPS ................................ '_
• The languagecan alsobeset fromthe playbackmode. e
2,j
O.
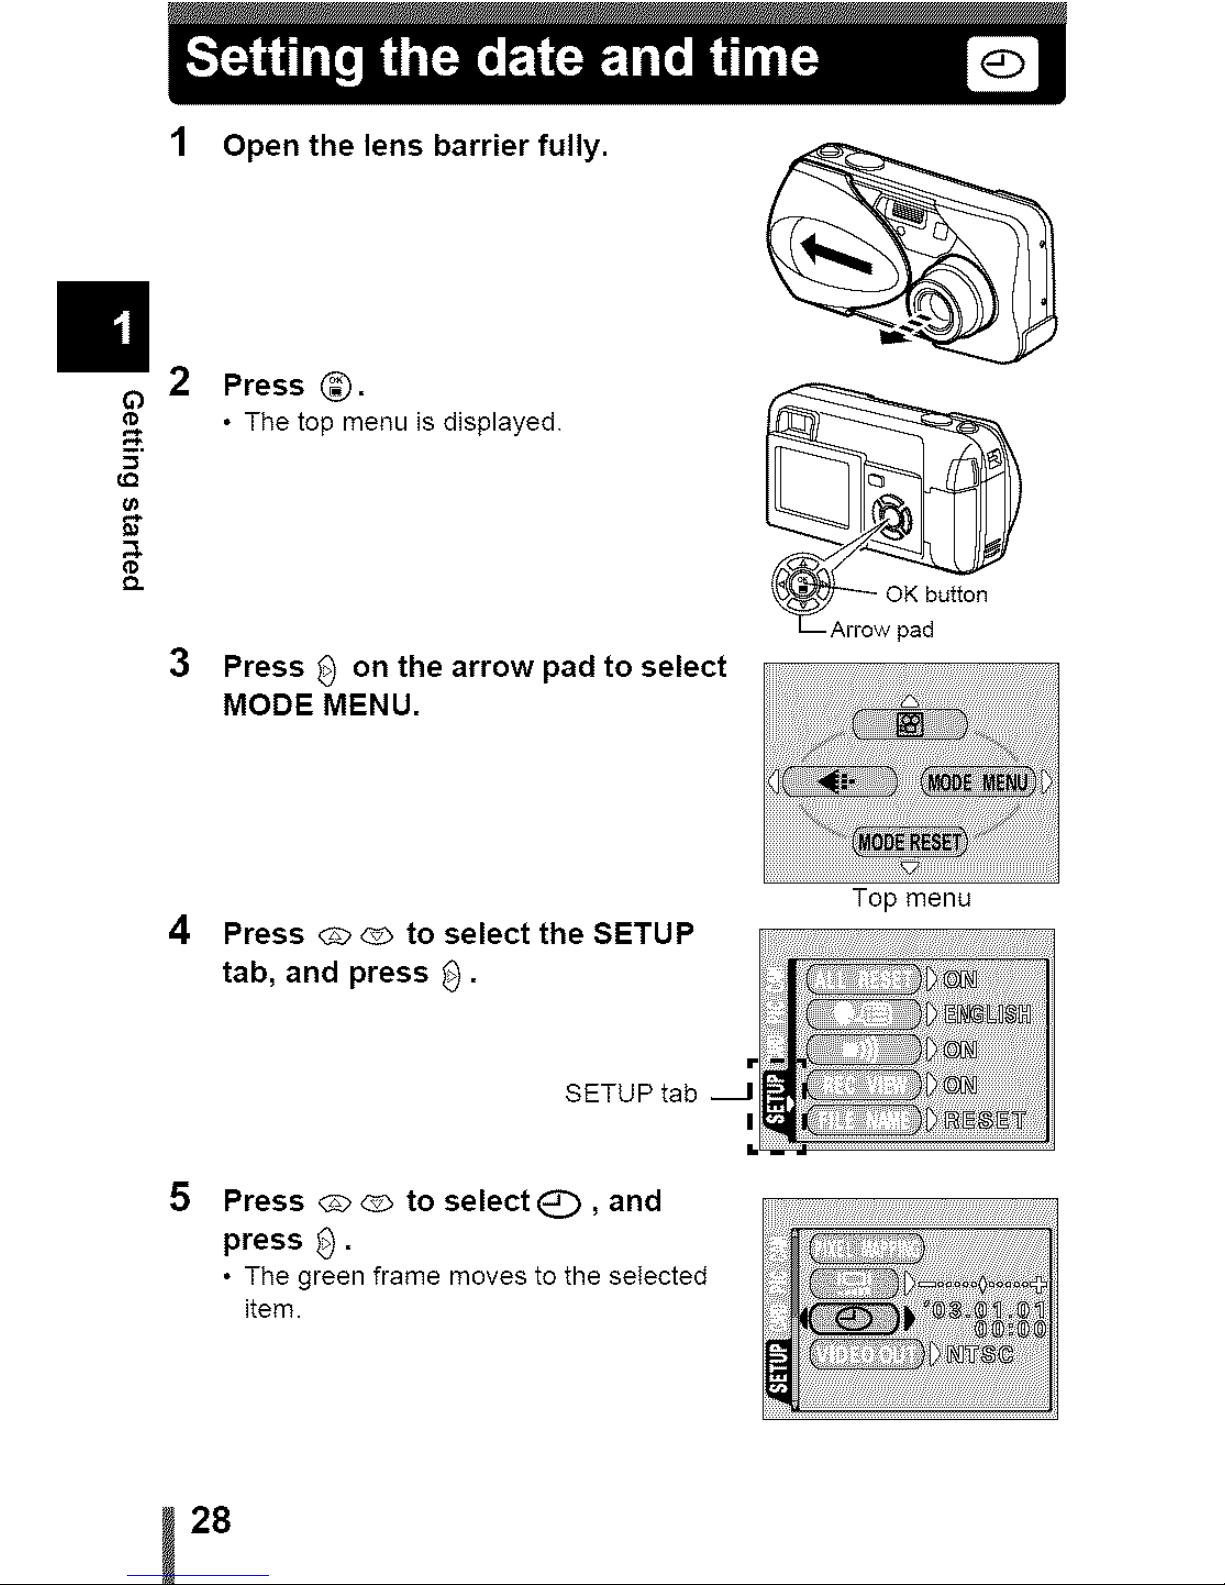
1 Open the lens barrier fully.
Press _,
• The topmenu isdisplayed
Press _ on the arrow pad to select
MODE MENU.
OK button
4 Press _ _ to select the SETUP
tab, and press _.
SETUPtab
5
Press _ to select Q, and
press _.
• The greenframe moves to the seIected
item.
28
Top menu
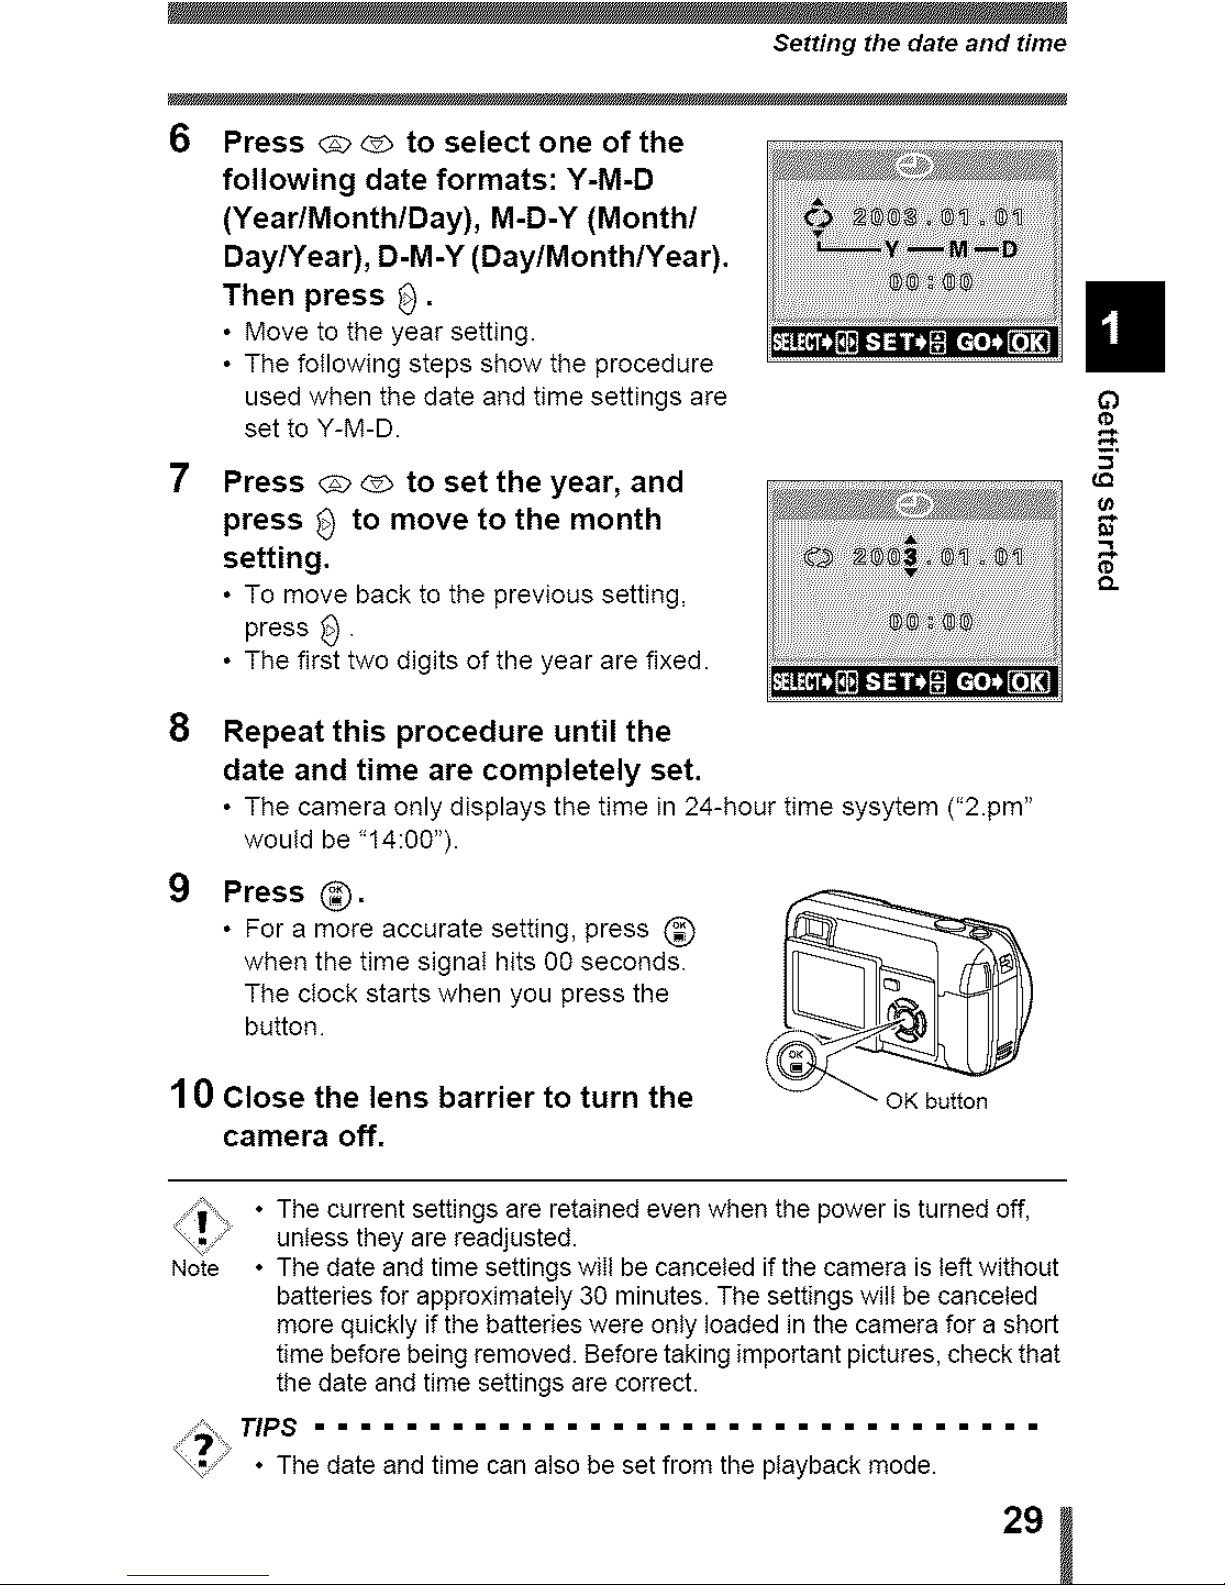
Setting the date and time
6 Press _ _ to select one of the
following date formats: Y-M-D
(Year/Month/Day), M-D-Y (Month/
Day/Year), D-M-Y (Day/Month/Year).
Then press _.
• Move to the year setting.
• The following steps show tile procedure
used when the date andtime settings are
set to Y-M-D.
7 Press _ _ to set the year, and
press _ to move to the month
setting.
• To move back tothe previous setting,
press
• The first two digits of the year are fixed.
C)
co
_=,
_Q
Repeat this procedure until the
date and time are completely set.
• The camera only displays thetime in24-hour time sysytem ("2.pro"
would be "14:00").
Press _,
• For a more accurate setting, press
when the time signaI hits go seconds
The ctock starts when you press the
button
10 Close the lens barrier to turn the
camera off.
• The current settings are retained even when the power is turned off,
unless they are readjusted.
Note • The date and time settings will be canceled if the camera is left without
batteries for approximately 30 minutes. The settings wilt be canceled
more quickly if the batteries were only loaded in the camera for a short
time before being removed. Before taking important pictures, check that
the date and time settings are correct.
TIPS ================================
• The date and time can also be set from the playback mode.
29j
 Loading...