

Page 1

Network FAX
Operation Guide
Click here
to view the Table of Contents
Page 2
PUBLICATION ISSUED BY:
Olivetti S.p.A.
Gruppo Telecom Italia
Via Jervis, 77 - 10015 Ivrea (ITALY)
www.olivetti.com
Copyright © 2009, Olivetti
All rights reserved
The mark affixed to the product certifies that the
product satisfies the basic quality requirements.
The manufacturer reserves the right to carry out modifications to the product described in this manual at any time
and without any notice.
ENERGY STAR is a U.S. registered mark.
The ENERGY STAR program is an energy reduction plan introduced by theUnited States Environmental Protection
Agency in response to environmental issues and for the purpose of advancing the development and utilization of
more energy efficient office equipment.
Your attention is drawn to the following actions which could compromise the conformity attested to above, as well as
the characteristics of the product:
• incorrect electrical power supply;
• incorrect installation, incorrect or improper use or use not in compliance with the warnings provided in the
User’s Manual supplied with the product;
• replacement of original components or accessories with others of a type not approved by the manufacturer, or
performed by unauthorised personnel.
All rights reserved. No part of this material may be reproduced or transmitted in any form or by any means,
electronic or mechanical, including photocopying, recording or by any information storage and retrieval
system, without permission in writing from the Publisher.
Page 3

About this On-Line Manual
This On-Line Manual explains the setting procedures required in order to use the Network FAX functions when the Scanner
Kit and Fax Kit are installed in your machine. It is recommended that you also read the corresponding Operation Guide as
well.
This on-line manual is prepared as a PDF (Portable Document Format) file.
IMPORTANT!
The use of Adobe Acrobat Reader implies agreement to the terms of use as stipulated by Adobe Systems Incorporated.
Trademark Information
• Microsoft, Windows, and Internet Explorer are registered trademarks of Microsoft Corporation of the United States and
other countries.
• Windows Server and Windows XP are trademarks of Microsoft Corporation.
• Ethernet is a registered trademark of Xerox Corporation.
• IBM and IBM PC-AT are trademarks of International Business Machines Corporation.
• Adobe and Acrobat are registered trademarks of Adobe Systems Incorporated.
All other company and product names contained in this On-Line Manual are trademarks or registered trademarks of their
respective companies. The designations ™ and ® will not be used in this manual.
Operating Environment
The Network FAX functions are compatible for use under the following operating environments:
• Hardware ... IBM PC-AT compatible computer
• Interface ... 10BASE-T or 100BASE-TX
• Operating system ... Windows 2000 (Professional, Server, Advanced Server),
Windows XP, Windows Server 2003 and Windows Vista.
The screen shots used in this On-Line Manual are compiled from Windows XP. The actual displays on your computer may
differ depending upon your particular operating system.
i
Page 4
Included Utilities
The following utilities are contained on the provided CD-ROM. In order to use the related Network FAX functions, it is
necessary to follow the appropriate procedure and install the corresponding utility on your computer.
Network FAX Driver
This software allows you to send documents created on your computer to the Scanner Kit in this machine, which converts
them to the appropriate format, transfers them to Fax Kit which then transmits them to the other fax machine. The Network
FAX Driver must be installed on the computer from which you want to send the documents.
Address Book for Network FAX
This utility is the address book that needs to be installed on the computer from which you want to send documents. The
Address Book for Network FAX allows you to create and use your own personal fax destination list for sending documents
directly from your computer. It is also possible to import CSV-formatted address data that has been created with other
applications.
Scanner File Utility
Documents sent from the other fax machine can be received by the Fax Kit in this machine and, once the Scanner Kit is
installed, the received documents will be converted to an image file and can be sent to and saved in a folder that is
designated in the Scanner File Utility. Because the Scanner File Utility must be running in order to receive the incoming
data, it is recommended that you install it on a computer that is generally up and running on the network (referred to as the
“Server Computer” in this manual).
You can select the type of installation to be performed based upon whether you are using Windows 2000, Windows Server
2003, Windows XP or Windows Vista, as well as whether you are using the Scanner File Utility on an individual basis or it is
being shared. (See page 1-8.)
Address Editor for FAX
This utility is an editor that uses your computer to register and change the self-station and dialing information which is stored
in the fax machine itself. The Address Editor for FAX allows you to easily and conveniently register the information that will
be used by the fax machine directly from your computer.
8
ii
Page 5

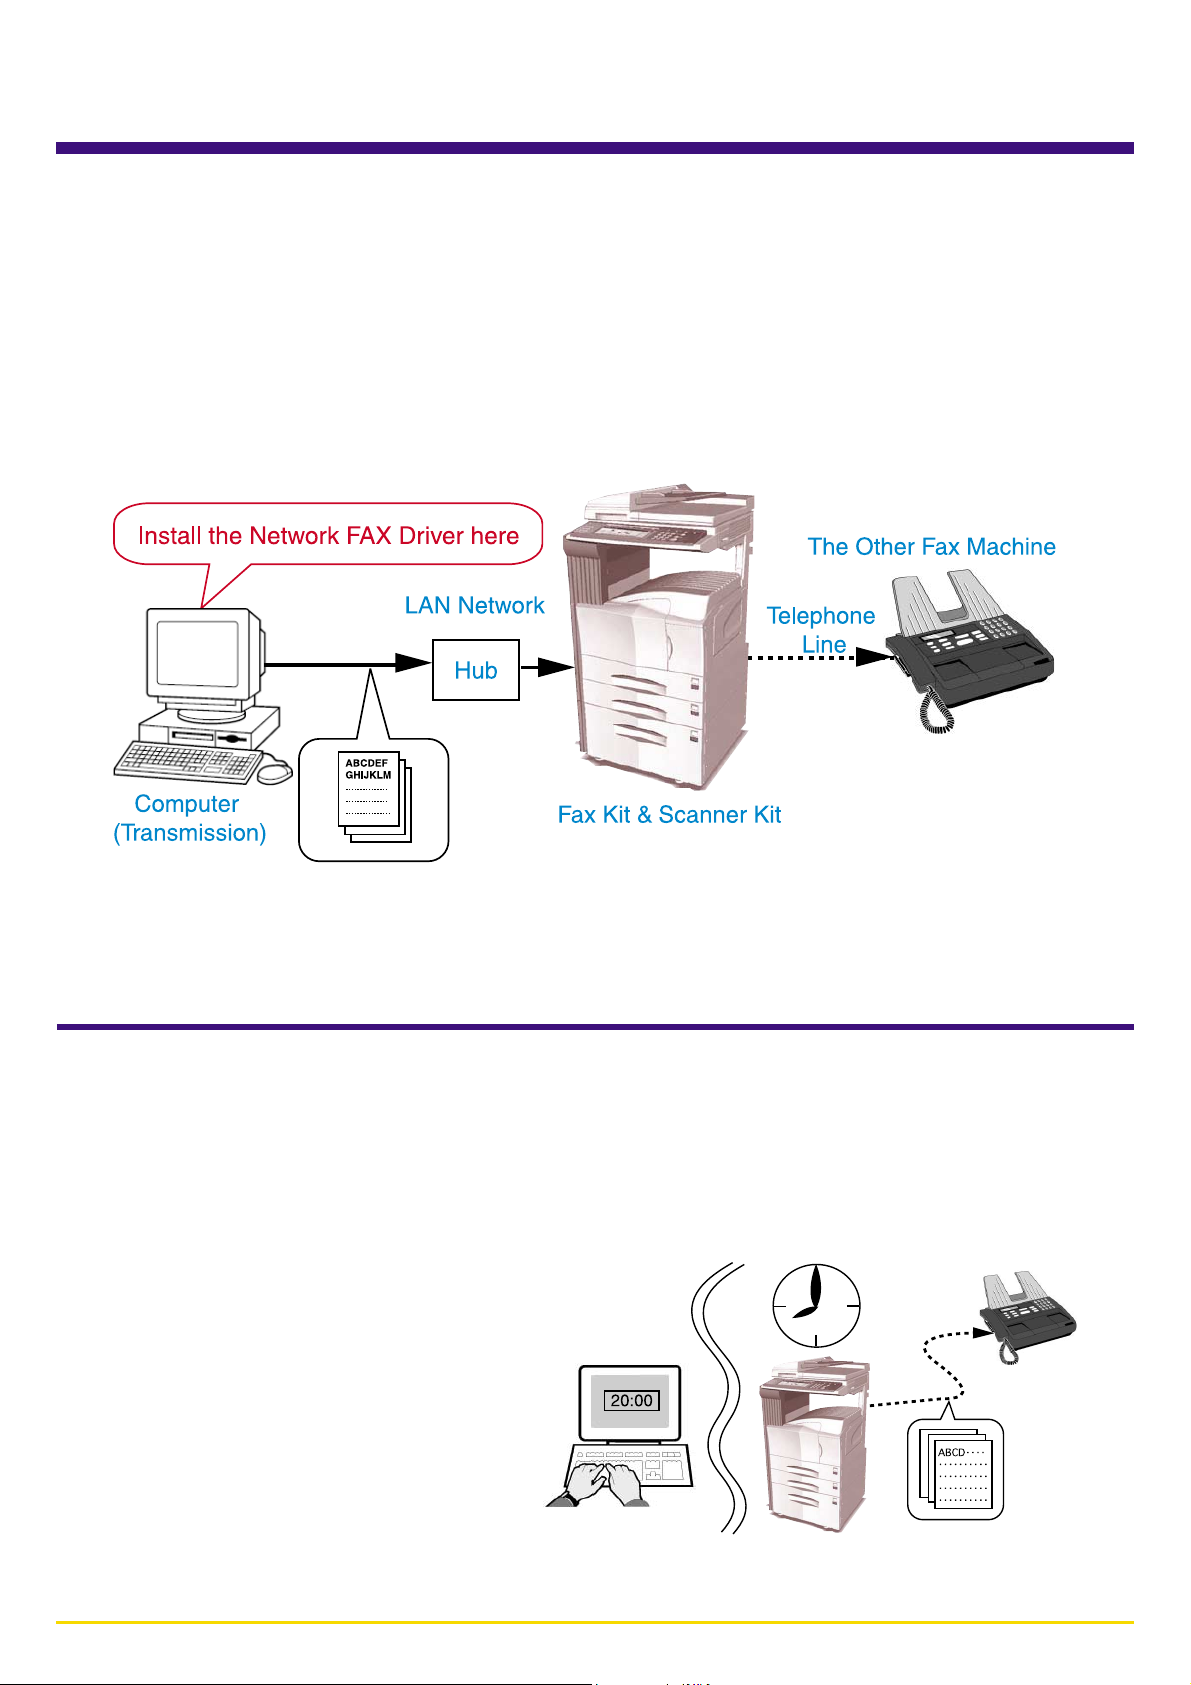
Outline of the Network FAX Functions
The Network FAX functions allow you to send and receive fax documents between computers on your LAN network and the
other fax machines. In addition, if you use the Address Book, you can register individual destinations, or multiple destinations
as an individual group, in advance.
● Transmission function
1. Documents are sent as image data from a network computer over the LAN network to this fax machine.
2. Those documents are sent over the telephone line as a
fax transmission from this fax machine to the other fax
machine.
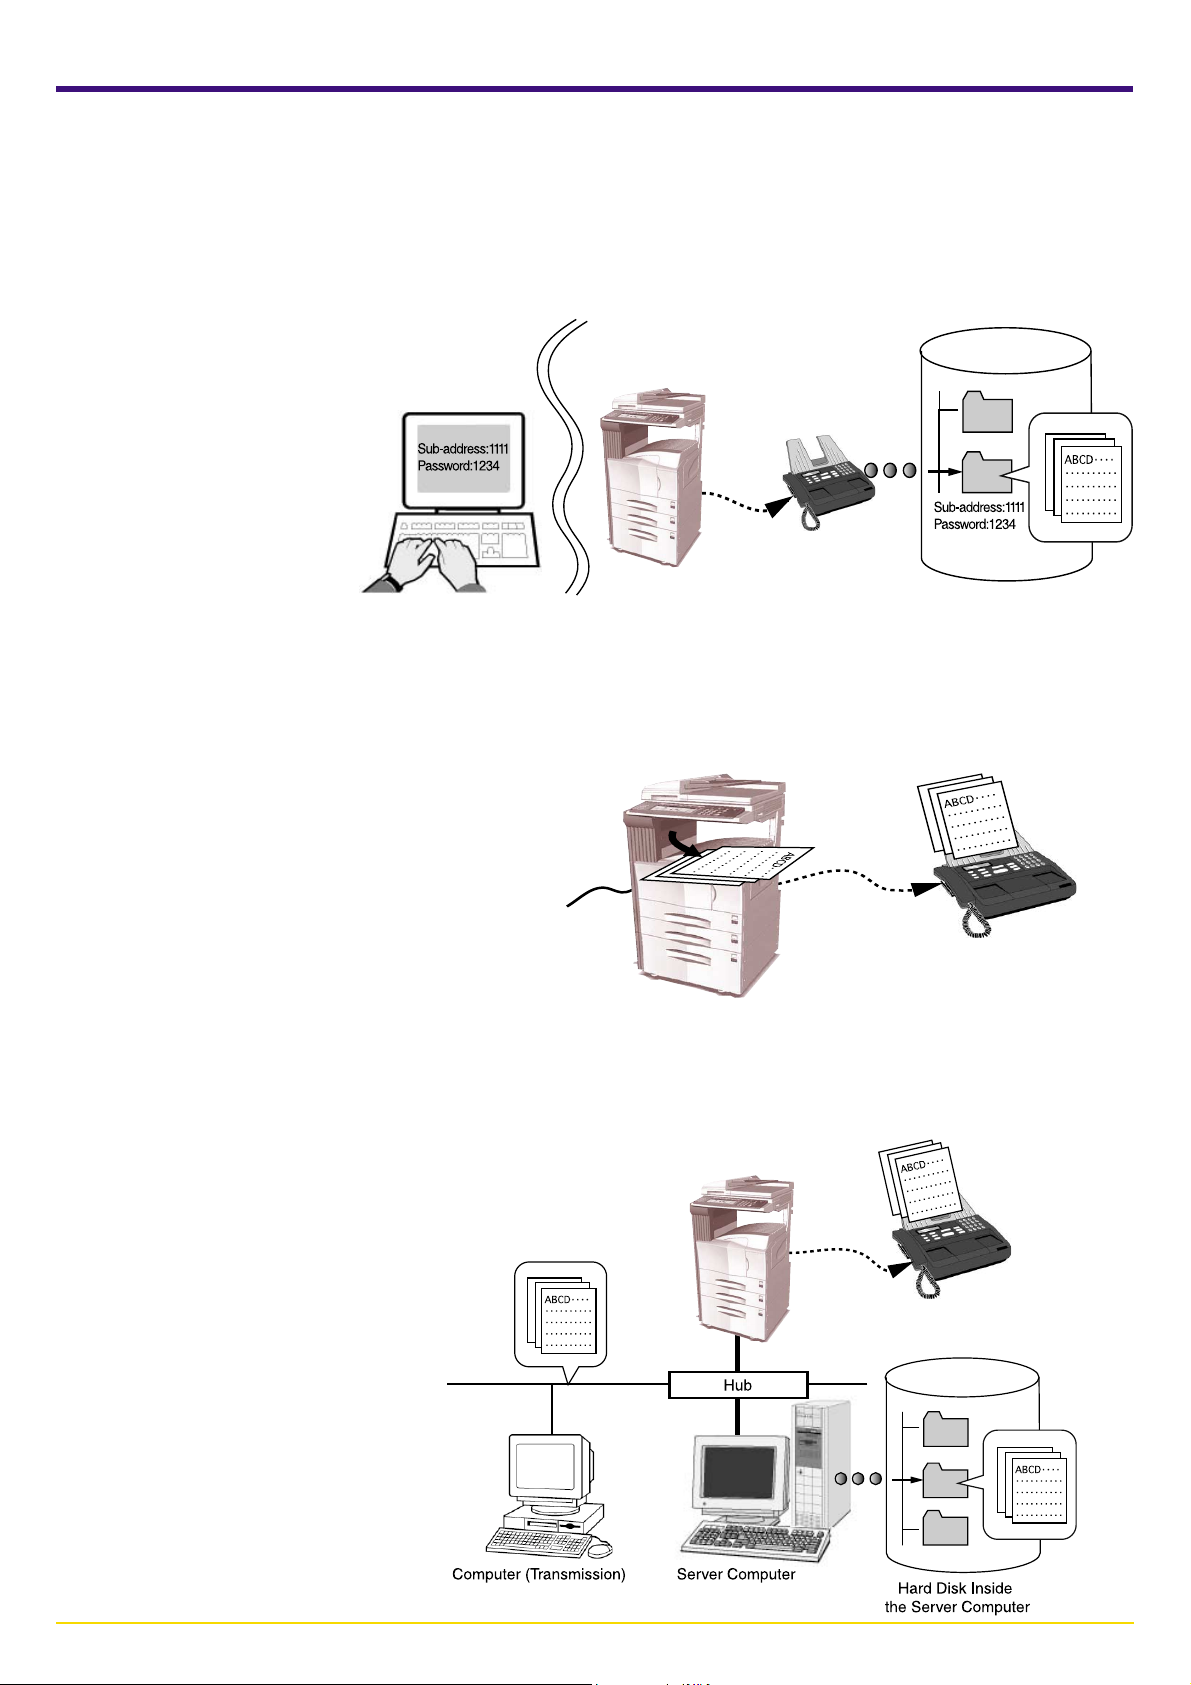
● Reception function
1. Documents are sent over the telephone line as a fax transmission from the other fax machine to this fax machine where
they are converted into PDF or TIFF file data.
2. That data is sent from this fax machine over the LAN network to the Server Computer.
3. The file is saved on the Server Computer.
iii
Page 6
Outline of the Network FAX Functions
● Address Book
1. Information for individual destinations (or a group of destinations) is registered in the Address Book software on the
computer from which you want to send documents.
2. The destination for sending documents using the Network FAX function is selected from this Address Book.
3. The documents are then sent as image data from a network computer over the LAN network to this fax machine.
4. Those documents are sent over the telephone line as a fax transmission from this fax machine to the other fax machine
based on the selected destination information. If multiple destinations are registered as a group, the documents will be
broadcast to all of those destinations.
iv
Page 7
Outline of the Network FAX Functions
● Address Editor for FAX
1. Use your computer to read and edit the self-station and/or dialing information of the fax machine itself, and then register
the revised data back into the fax machine.
2. Import CSV-formatted address data or FDT-formatted address books that have been created with another application
and register it in the fax machine.
3. Save registered dialing information as FED-formatted data (the data format for Address Editor for FAX).
v
Page 8

Contents
About this On-Line Manual
Trademark Information
Operating Environment
Included Utilities
...............................................................................................................
Outline of the Network FAX Functions
................................................................................................
......................................................................................................
.....................................................................................................
..............................................................................
iii
Section 1 Installing the Corresponding Software...Page 1-1
1-1 Installing the Network FAX Driver and Utilities
Registering the Machine’s IP Address
Uninstalling the Network FAX and Utilities
1-2 Installing the Scanner File Utility
.......................................................................
.................................................................
....................................................................
...............................................
Page 1-1
1-5
1-7
Page 1-8
Section 2 Sending a Fax ........................................Page 2-1
2-1 Main Transmission Functions
(1) Delayed Transmission..................................................................................................... 2-1
........................................................................
Page 2-1
i
i
i
ii
(2) F-Code Based Communication ...................................................................................... 2-2
(3) Concurrent Print .............................................................................................................. 2-2
(4) Save Transmitted Original............................................................................................... 2-2
(5) Attached a Cover Page.................................................................................................... 2-3
(6) Restricted Access ........................................................................................................... 2-3
2-2 Basic Transmission
2-3 FAX Setting Tab
2-4 Default Setting Dialog Box
(1) Sending Options Tab ....................................................................................................... 2-7
(2) Cover Page Tab ............................................................................................................... 2-8
(3) Sender Information Tab ................................................................................................. 2-10
(4) Machine Setting Tab ...................................................................................................... 2-11
(5) Restricted access Tab .................................................................................................. 2-12
2-5 Various Settings in TX Setting Dialog Box
(1) Selecting a Destination from the Address Book ............................................................ 2-13
......................................................................................
............................................................................................
............................................................................
..................................................
Page 2-4
Page 2-6
Page 2-7
Page 2-13
(2) F-Code Based Communication .................................................................................... 2-16
(3) Registering the Destination Information to be Addedto the Cover Page ........................ 2-17
(4) Optional Settings ........................................................................................................... 2-20
(5) Transmitting Terminal Information Data ......................................................................... 2-21
(6) Machine Settings ........................................................................................................... 2-22
2-6 Transmission Control
2-7 Creating New Cover Page Templates
..................................................................................
.........................................................
vi
Page 2-23
Page 2-24
Page 9

Contents
Section 3 Receiving a Fax ......................................Page 3-1
3-1 Summary of Delivery Settings
3-2 Starting the Scanner File Utility
3-3 Setup Dialog Box
3-4 Folder Setting Dialog Box
3-5 Delivery Setting List Dialog Box
3-6 Delivery Setting Dialog Box
3-7 Determing the Destination Folder
3-8 When a notice of fax reception is sent
3-9 Checking a Reception Notification Error
3-10 Opening Received Faxes
3-11 Deleting Received FAxes
........................................................................................
......................................................................
....................................................................
............................................................................
...................................................................
.......................................................................
..............................................................
........................................................
....................................................
........................................................................
........................................................................
Page 3-2
Page 3-4
Page 3-5
Page 3-6
Page 3-7
Page 3-10
Page 3-13
Page 3-13
Page 3-14
Page 3-15
Page 3-16
Section 4 The Address Book ...................................Page 4-1
4-1 Registering Destination Information
.............................................................
Page 4-2
4-2 Registering Multiple Destination as a Group
4-3 Address/Group Copy
4-4 Editing Indivisual and Group Destination Information
(1) Editing Information for an Indivisual or Group Destination ............................................... 4-7
(2) Editing Information for More than One Indivisual or Group Destination ........................... 4-8
(3) Search/Replace the Contents of a Paticular Entry Item .................................................. 4-9
4-5 Deleting Indivisual and Group Destination Information
4-6 Importing Address Data
(1) Importing FDT Files ....................................................................................................... 4-10
(2) Importing CSV Files ...................................................................................................... 4-11
(3) Importing FED Files ...................................................................................................... 4-13
4-7 Exporting Address Data
...................................................................................
.............................................................................
.............................................................................
...............................................
....................................
................................
Page 4-4
Page 4-6
Page 4-7
Page 4-10
Page 4-10
Page 4-14
vii
Page 10

Contents
Section 5 Address Editor for FAX ...........................Page 5-1
5-1 Registering Self-Station Information
5-2 Setting the Network FAX functions
5-3 Registering Dialing Information
(1) Registering one-touch dial information ............................................................................ 5-9
(2) Registering chain dial information ................................................................................. 5-12
(3) Registering group dial information ................................................................................. 5-14
(4) Registering program dial information ............................................................................ 5-18
(5) Editing registered dialing information ............................................................................. 5-22
(6) Deleting dialing information ........................................................................................... 5-28
(7) Registering abbreviated dialing information ................................................................... 5-29
5-4 Registering Box Information
(1) F-Code Based Confidential box .................................................................................... 5-30
(2) Encryption box............................................................................................................... 5-31
(3) F-Code Based Relay boxes .......................................................................................... 5-33
.......................................................................
.............................................................
...............................................................
....................................................................
Page 5-2
Page 5-8
Page 5-9
Page 5-30
(4) Deleting registered boxes.............................................................................................. 5-36
5-5 Importing Data
5-6 Saving Data as an FED-formatted File
...........................................................................................
......................................................
Page 5-37
Page 5-41
Section 6 Specifications .........................................Page 6-1
viii
Page 11
Section 1 Installing the Corresponding Software
1-1 Installing FAX Driver and Utilities
This section explains how to install the FAX driver and utilities in Windows Vista.
* To install the printer driver, you must log on with administrator privilege.
1. Insert the provided CD-ROM into the CD-ROM drive of the computer in which you want to install the Network FAX Driver.
The set-up screen will appear automatically. If the Autoplay screen is displayed, click on Run setup.exe.
If the set-up screen does not appear, start the appropriate software manually from the CD-ROM.
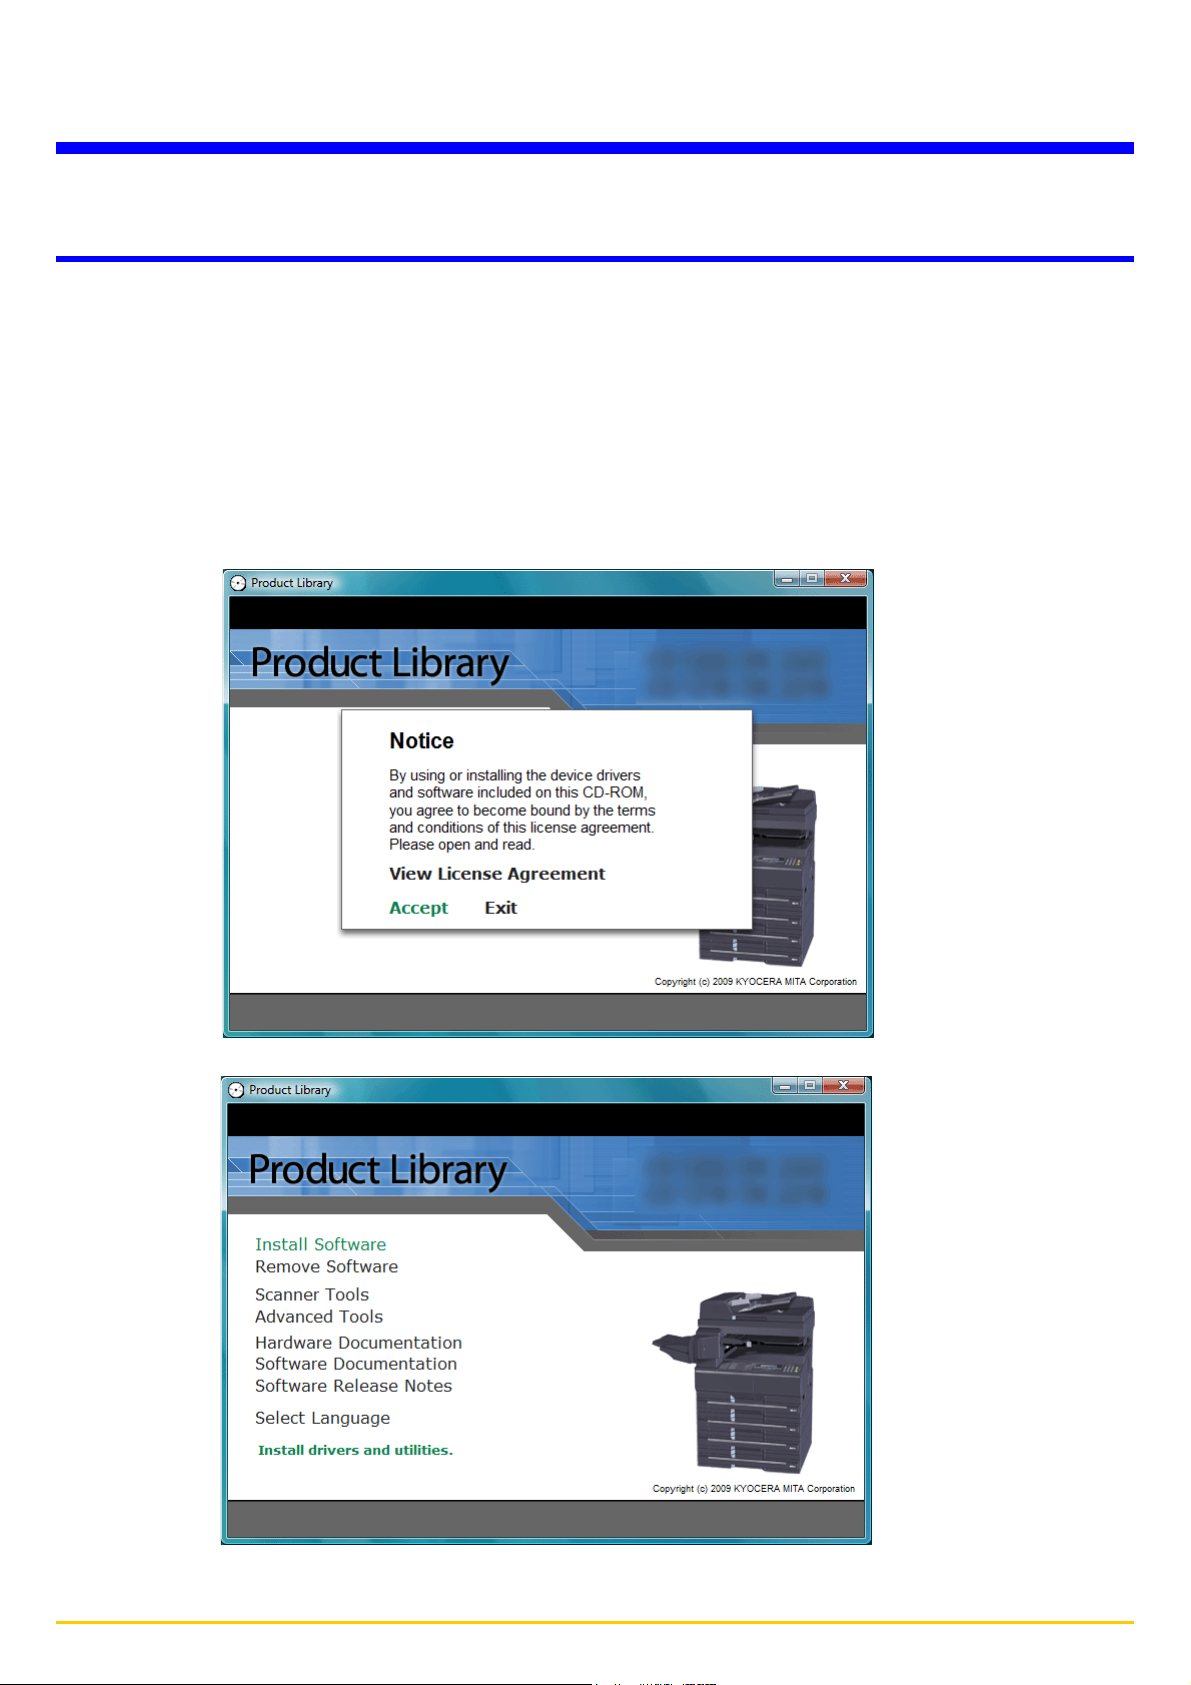
2. Select View License Agreement to read the information and select Accept to proceed.
3. Click Install Software. Installation Method screen appears.
Page 1-1
Page 12
1-1 Installing FAX Driver and Utilities
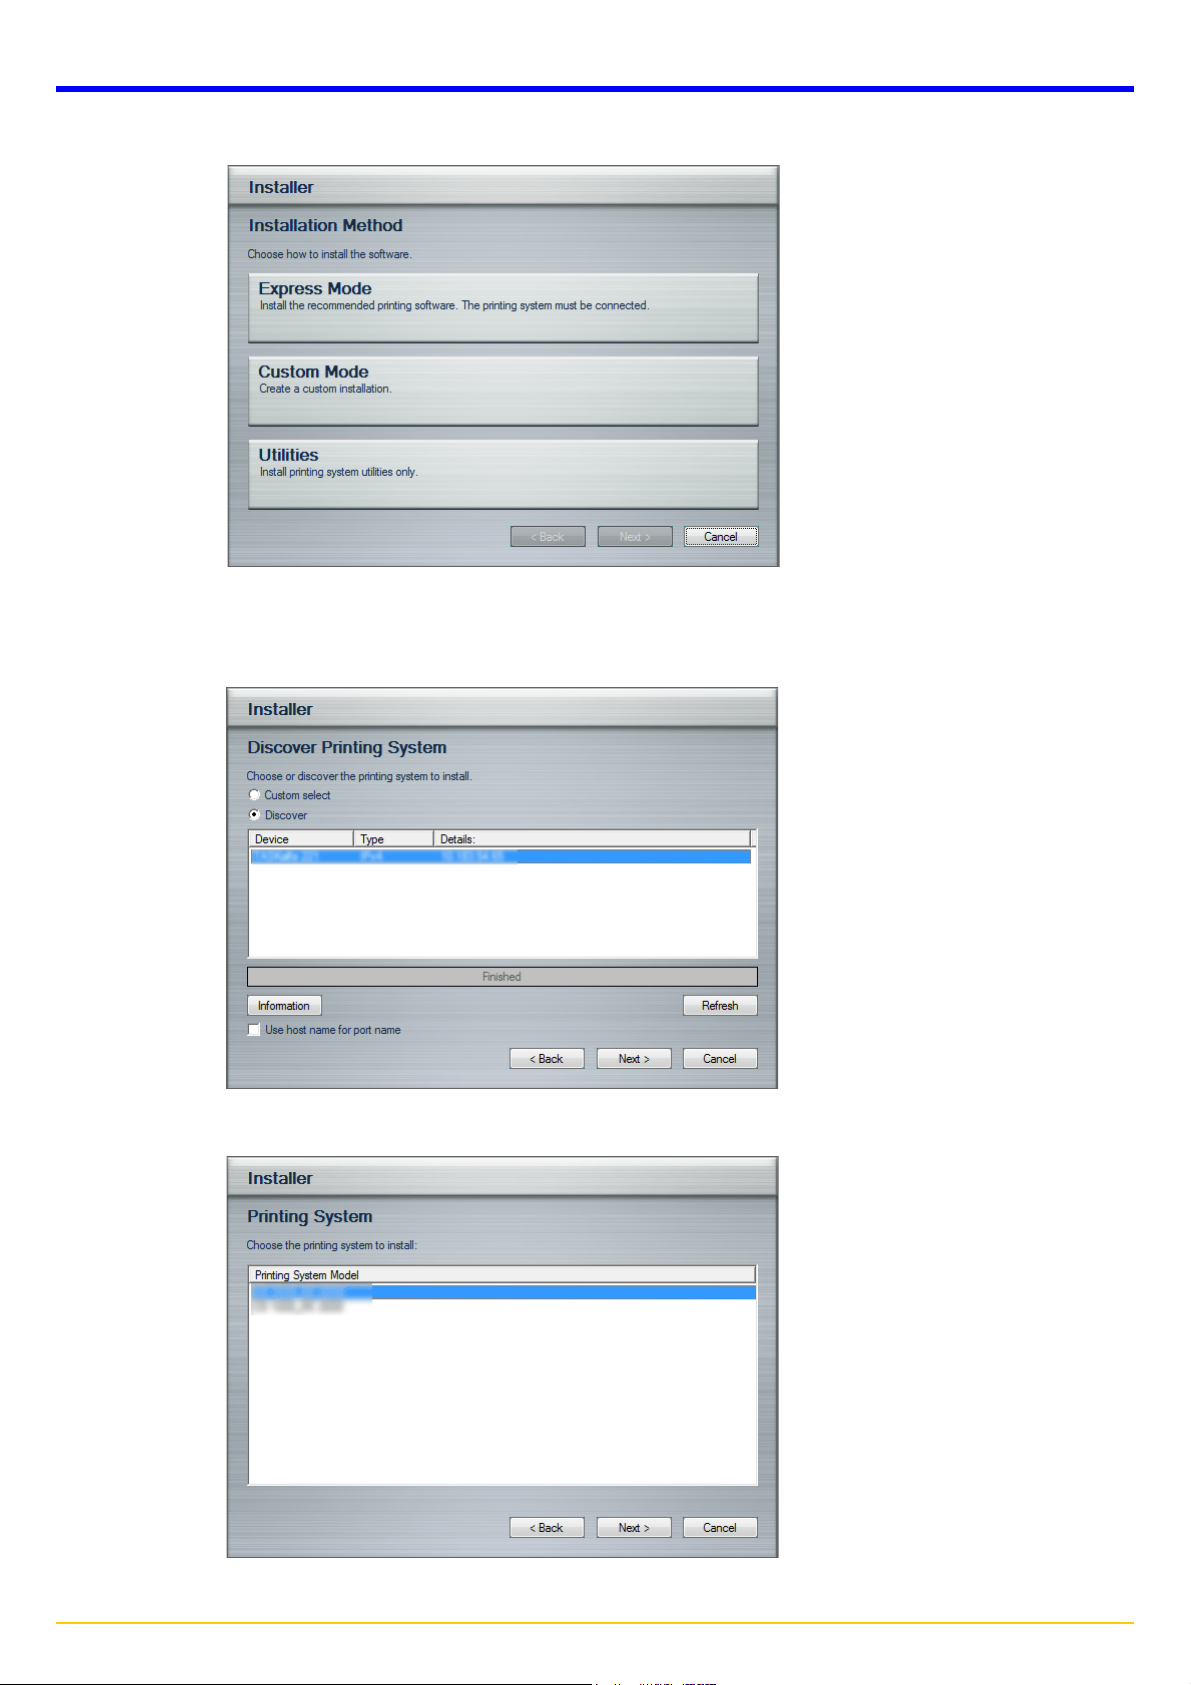
4. Click Custom Mode. The installer searches the printers connected to the network on Discover Printing System screen.
5. Select the printer you want to install, and click Next. Proceed to the step 8.
If no printer is found, an error message appears. Select Custom select, and click Next. Printing System screen
appears. Proceed to the step 6.
6. Select the printer you want to install, and click Next.
Page 1-2
Page 13
1-1 Installing FAX Driver and Utilities
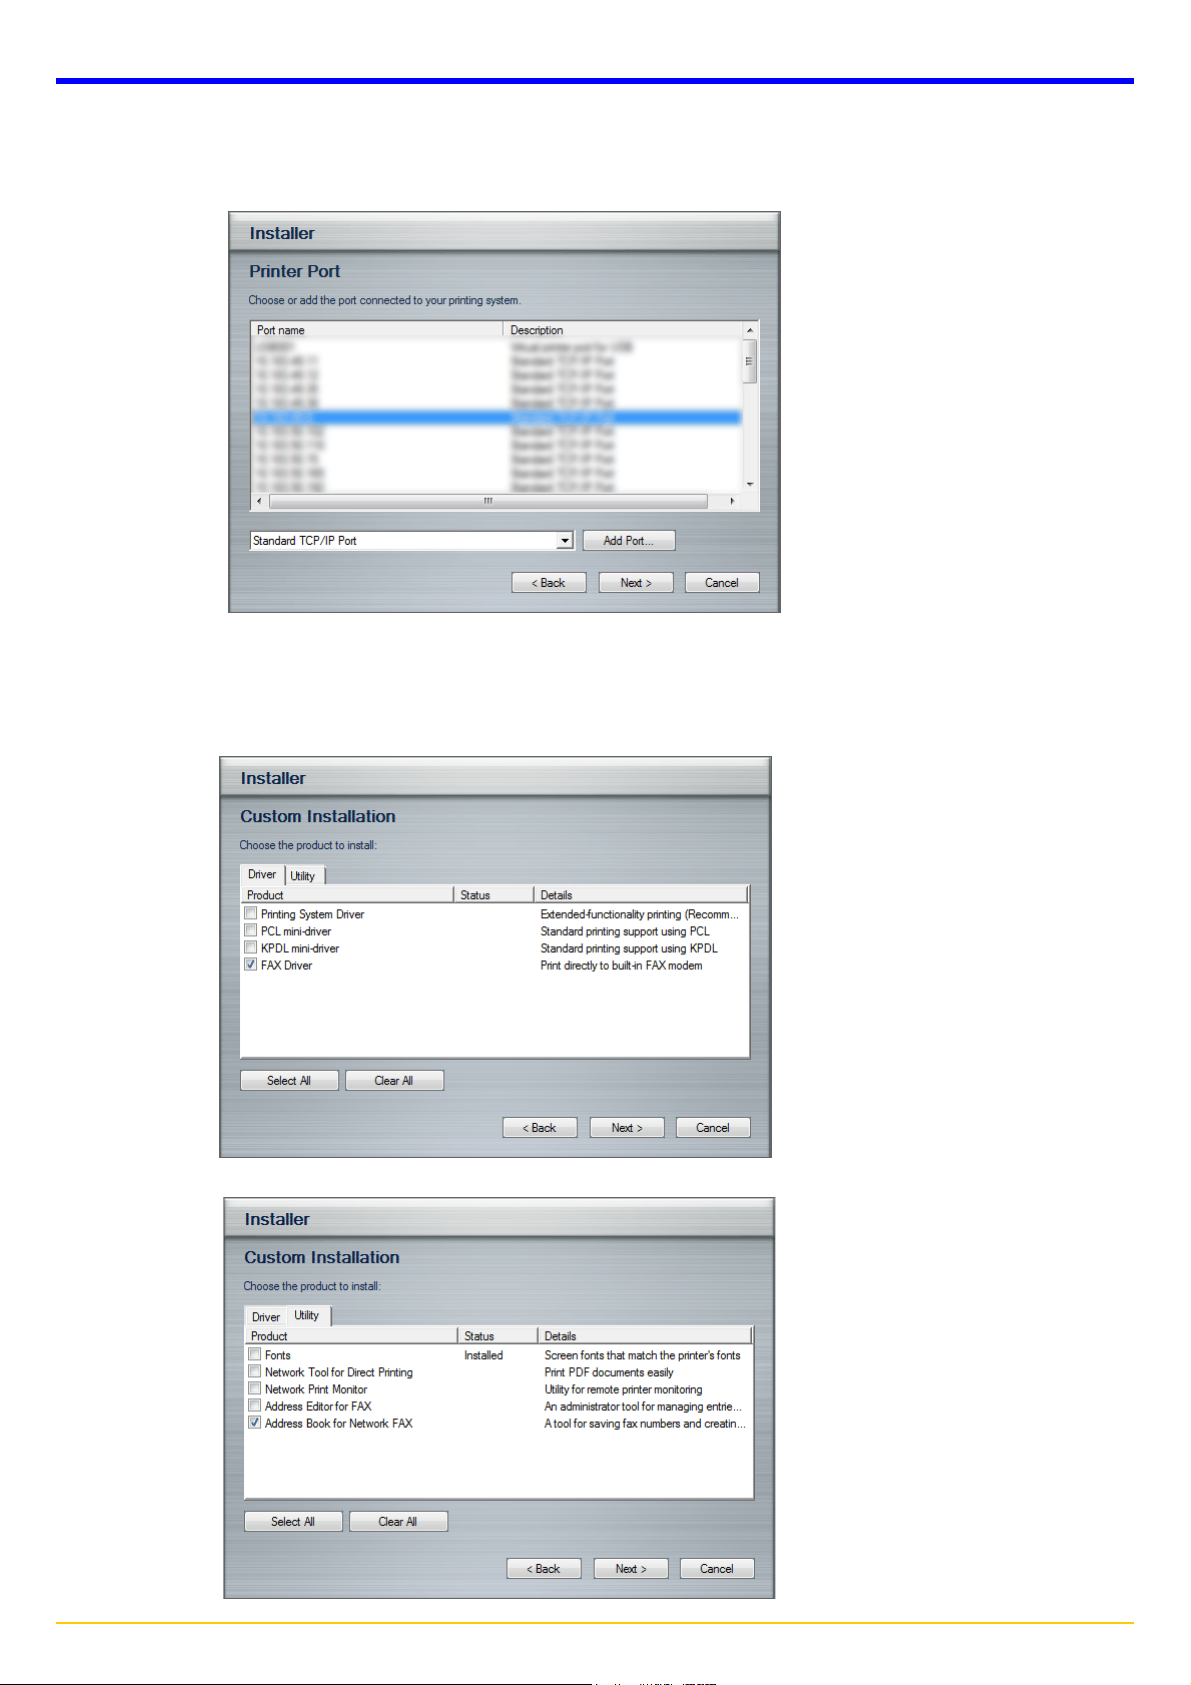
7. Select the printer port to use, and click Next.
* If no printer port is found in the port list, select Add Port. Add Standard TCP/IP Printer Port Wizard appears. Follow
the steps in the wizard to add or edit the port.
8. On Driver tab and Utility tab of the Custom Installation screen, select the FAX driver and utilities (Address Book for
Network and Address Editor for FAX) you want to install, and click Next.
* Utilities can be installed using the Product Library after installing the FAX Driver.
Page 1-3
Page 14
1-1 Installing FAX Driver and Utilities
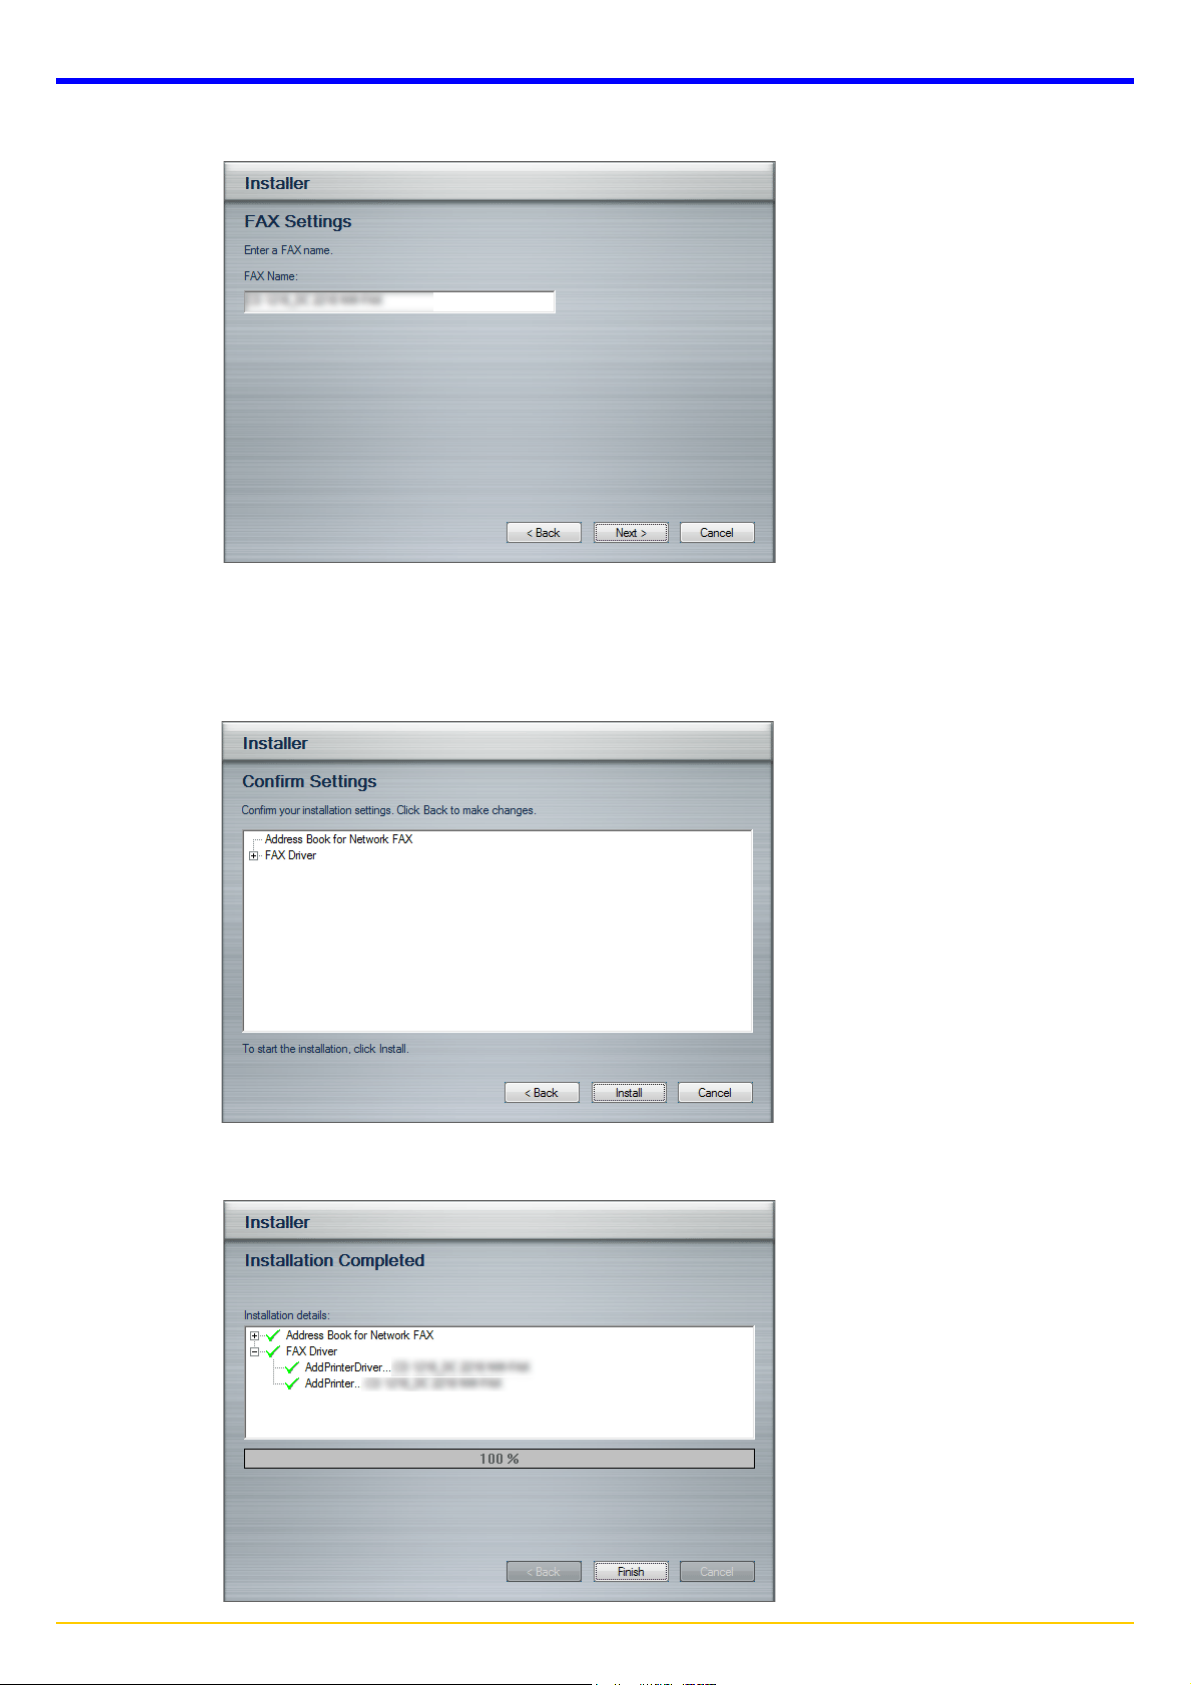
9. Enter a FAX name on the FAX Settings screen, and click Next.
10. Confirm the settings and click Install. Installation of the FAX driver and utilities starts.
* During any point in the installation process, if the Windows Security warning dialog box appears, click Install this driver
software anyway. If the Hardware Installation screen appears in Windows XP, click Continue Anyway.
11. Installation Completed screen appears. Click Finish to return to the main menu.
Page 1-4
Page 15
1-1 Installing FAX Driver and Utilities
Q Registering the Machine's IP address
Once you have installed the Network FAX Driver, perform the following procedure to register the IP address of the
machine that you want to use as the Network FAX.
1. Click on Start in the Task Bar and then select Control Panel, Printer and other Hardware and then Printers and
Faxes in that order from the successive menus in order to access the Printers and Faxes dialogue box.
2. Right-click on the name of the machine that you want to use as the Network FAX and select Printing Preferences...
from the resulting dropdown menu. The Printing Preferences dialogue box will appear.
Page 1-5
Page 16
1-1 Installing FAX Driver and Utilities
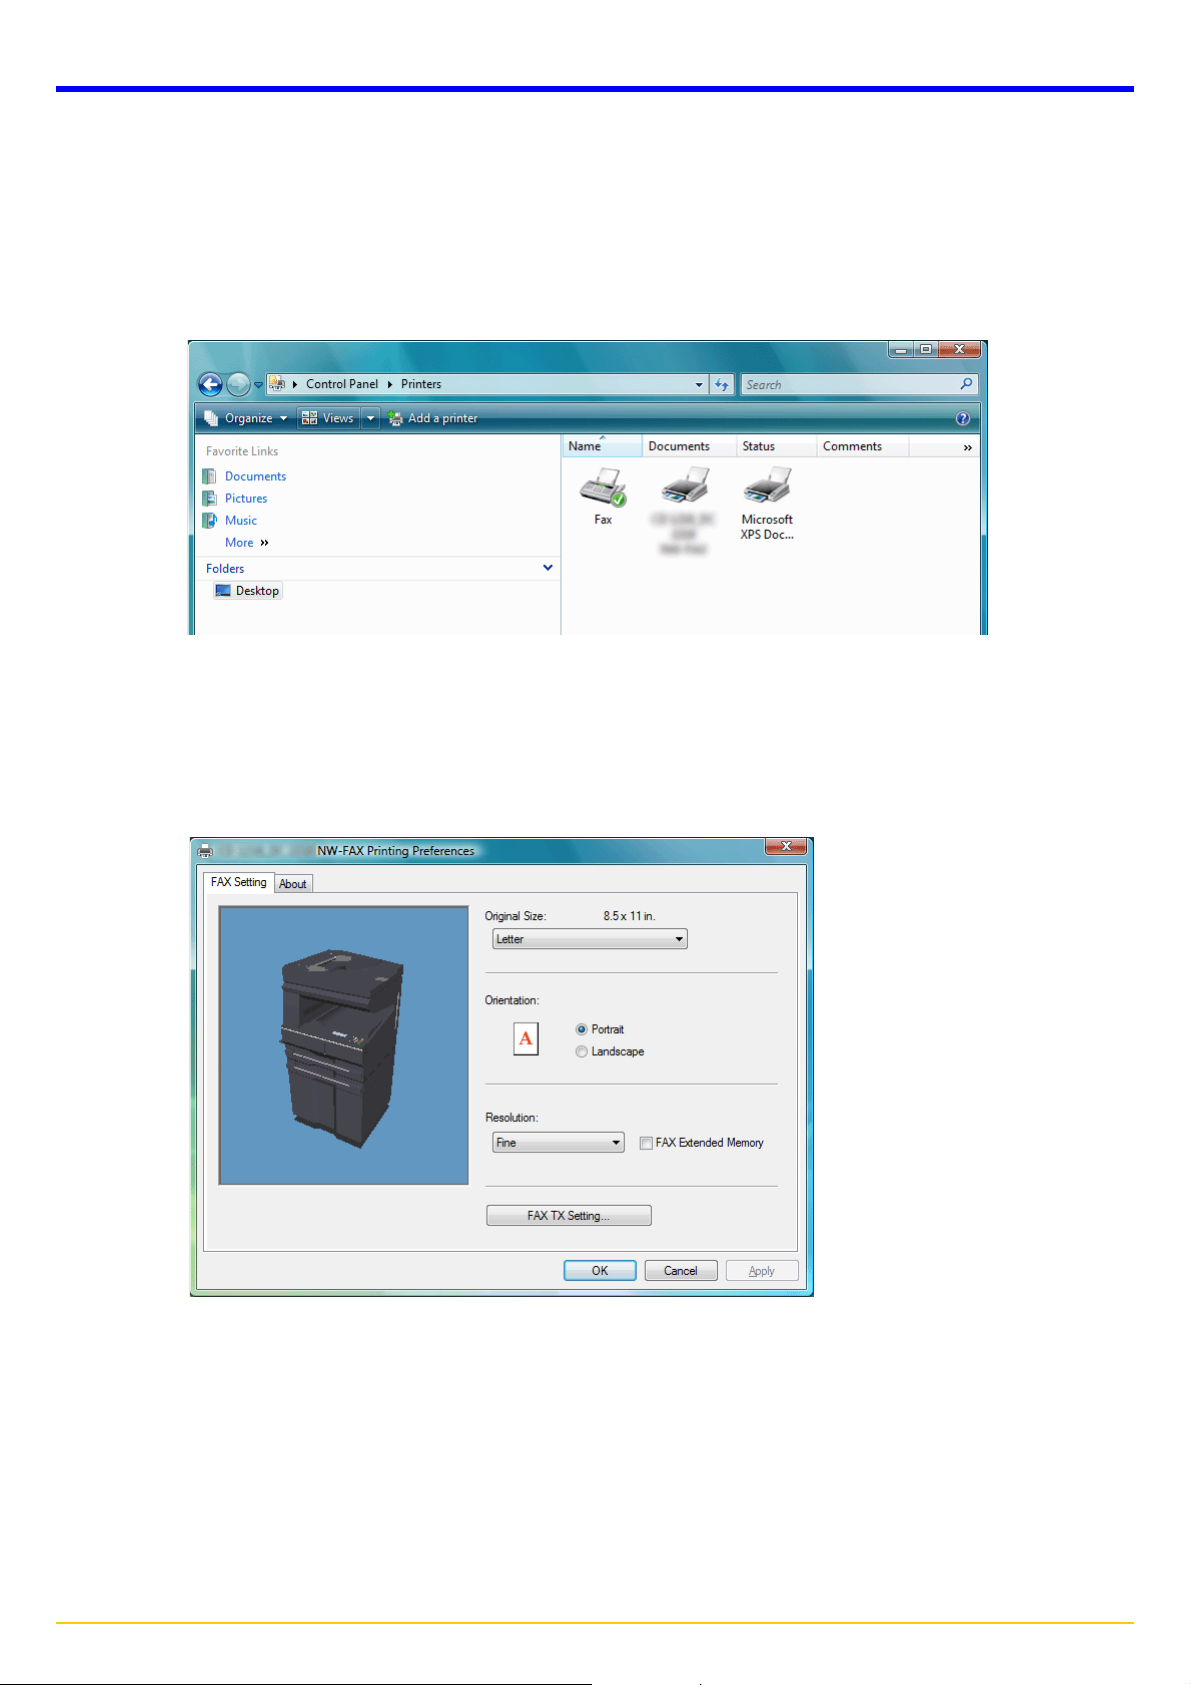
3. Click on the FAX TX Setting... button in order to access the Default Setting dialogue box.
4. Click on the Machine Setting tab in order to display its contents.
5. In the Network FAX Address area, enter the IP address, or host name, of the machine that you want to use as the
Network FAX.
* The IP address/host name that you enter here must be the same as that registered in the scanner default settings
of the machine itself.
Refer to Chapter 2 of the Scan System(F)B Operation Guide Function Edition.
Sample screen-shot of the scanner default setting window
Scan Default:
IP Address
Subnet
Gateway
6. Click OK button.
10. 181. 15. 11
:
255. 255.255. 0:
: 10. 181. 12. 11
Page 1-6
Page 17
1-1 Installing FAX Driver and Utilities
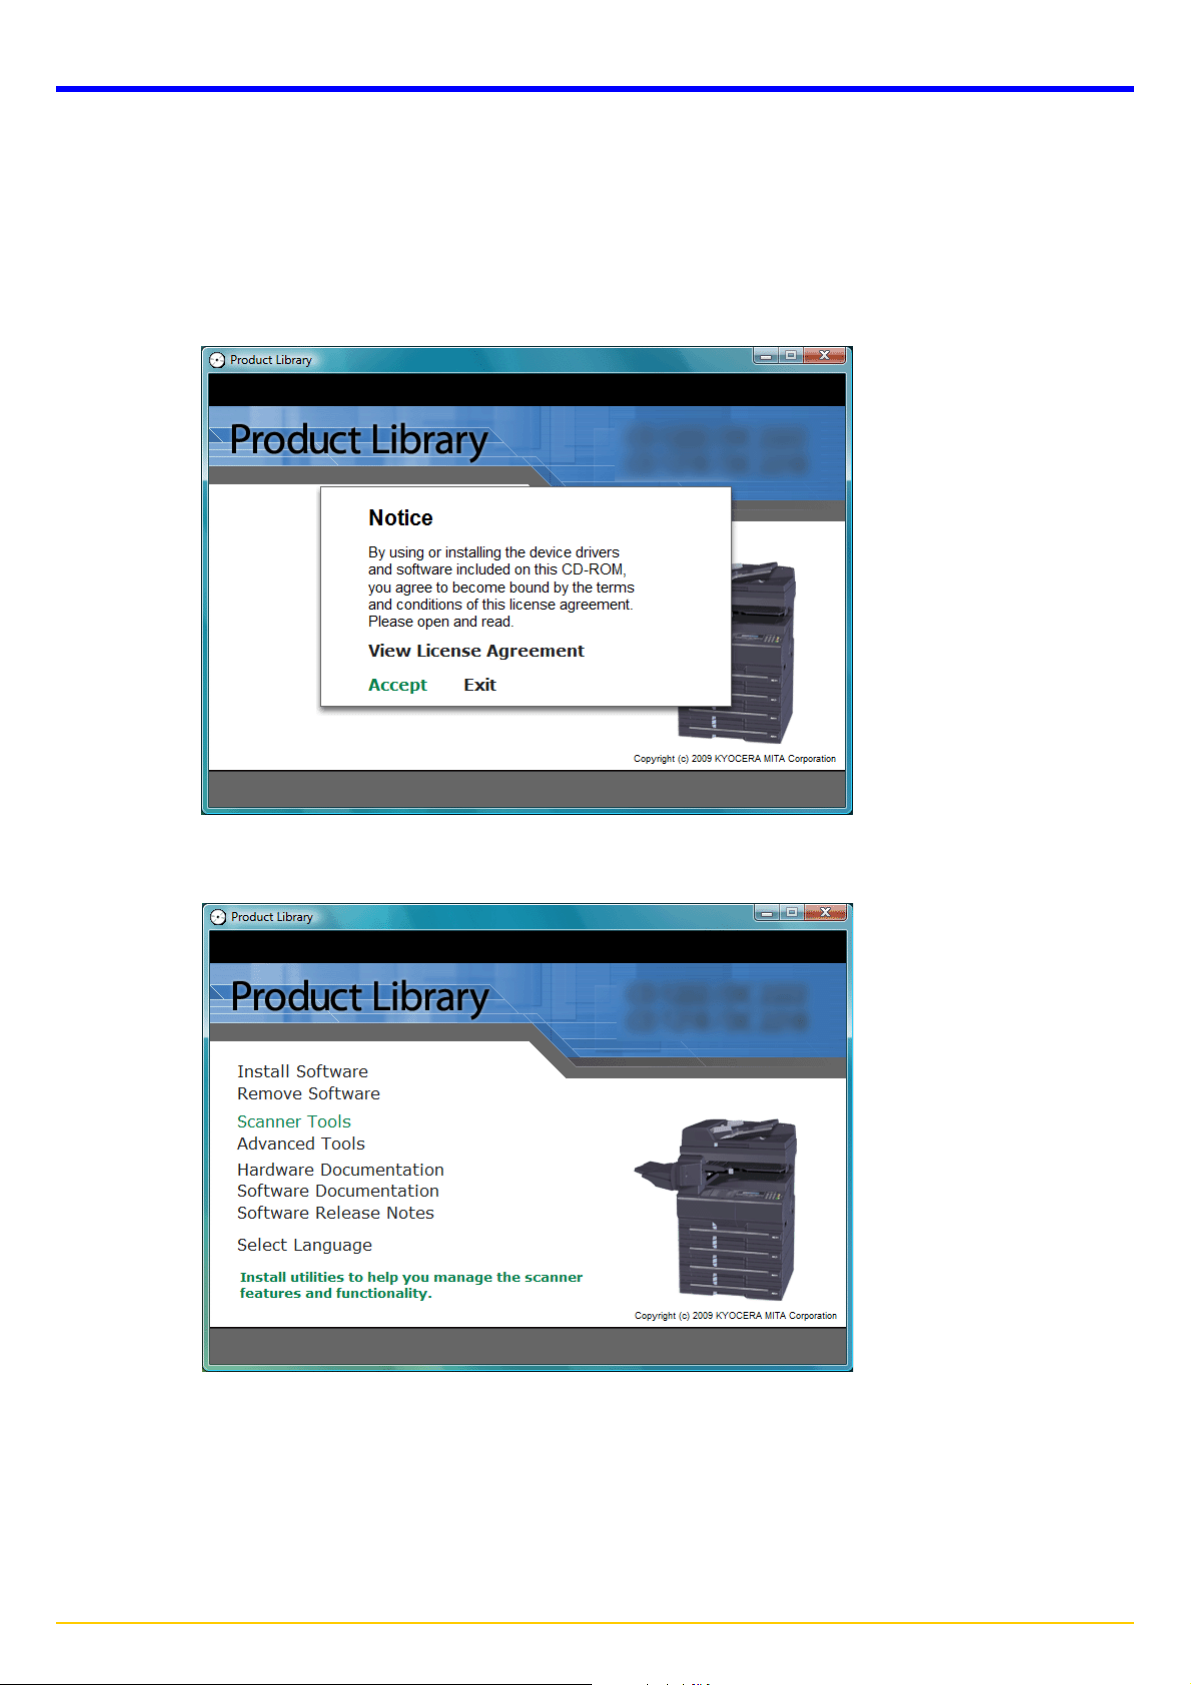
QUninstalling the Network FAX Driver and Utilities
Perform the following procedure when you want to delete the Network FAX Driver and utilities from your computer.
1. Click on the Start button in the Windows Task Bar and then select the uninstall tool for Product Library in that order
from the successive menus.
2. Place a check in the check box of FAX Driver or utilities and click Uninstall button.
3. Click Finish button.
If restart of the system is displayed, follow the instructions on the screen to restart the computer.
Page 1-7
Page 18
1-2 Installing the Scanner File Utility
This section explains how to install the Scanner File Utility in Windows Vista.
* To install the printer driver, you must log on with administrator privilege.
1. Insert the provided CD-ROM into the CD-ROM drive of the computer in which you want to install the Network FAX Driver.
The set-up screen will appear automatically. If the Autoplay screen is displayed, click on Run setup.exe.
If the set-up screen does not appear, start the appropriate software manually from the CD-ROM.
2. Select View License Agreement to read the information and select Accept to proceed.
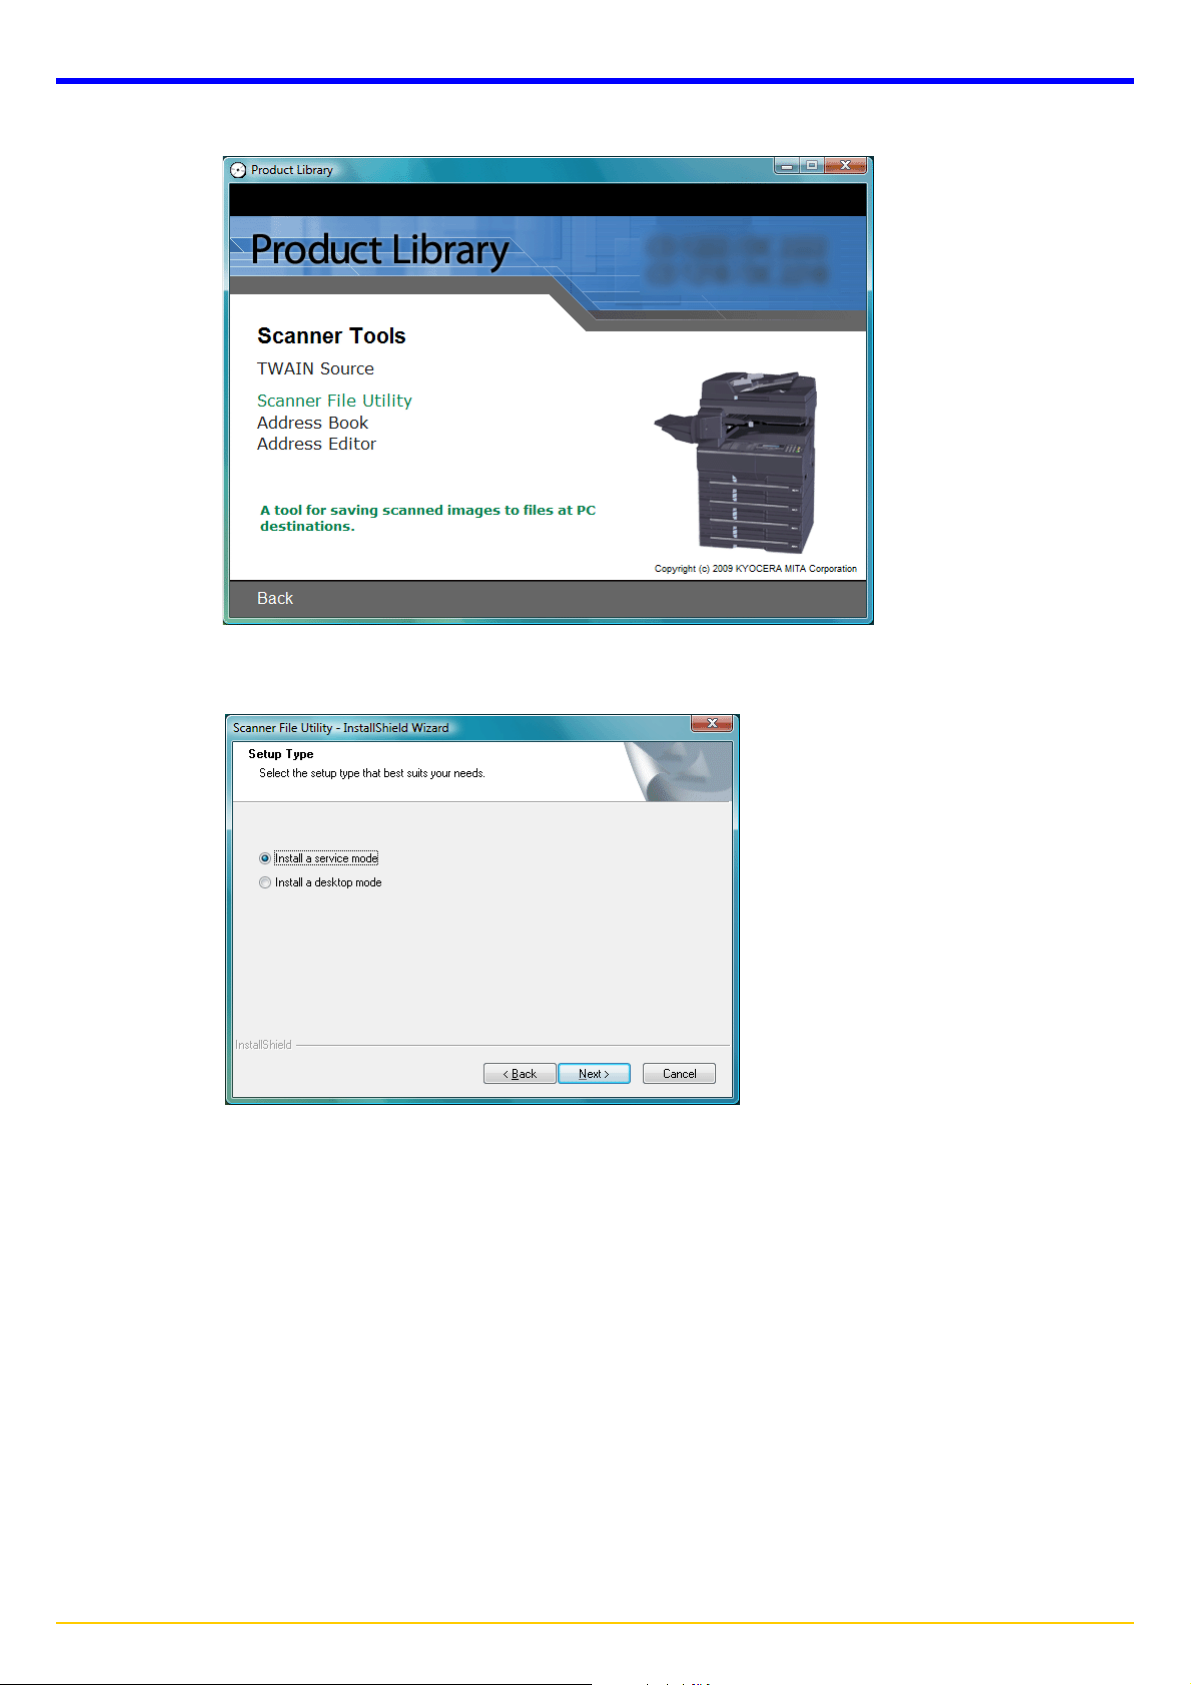
3. Click Scanner Tools on the Main menu screen.
Page 1-8
Page 19
1-2 Installing Scanner File Utility
4. Click Scanner File Utility.
5. Follow the instructions in the installation wizard to continue the installation procedure.
* Select one of the following setup types on the Setup Type selection screen, and then proceed to the next step.
Install a service mode:
Select this type of setup in order to share the Scanner File Utility on a File Server, etc. (In this case, the Scanner File
Utility will be usable even when you are logged off of your computer.)
For details, refer to page 3-4.
Install a desktop mode:
Select this type of setup in order to use the Scanner File Utility independently from others. (In this case, the Scanner
File Utility will be usable once you are logged on to your computer.)
* Once the Scanner File Utility has been installed, you can change the type of setup from the desktop mode to the
service mode by selecting Repair in the Windows Add/Remove Programs control panel.
Page 1-9
Page 20

1-2 Installing Scanner File Utility
* If the Select Components screen appears, click on the box next to Network FAX Receive Handler in order to put a
check mark in that box. The content of the other checkboxes is as follows:
- PDF Keyword Embedder: Adds file information as keywords to scanned image data files. When searching keyword
using Paper Port, select this component.
- DataBase Link Handler(Sample): Creates a csv file that includes the registered file information to go with the
scanned image data files.
Page 1-10
Page 21
Section 2 Sending a Fax
This section contains explanations on how to use the Network FAX Driver to send documents created on a network computer
directly from that computer to the other fax machine.
IMPORTANT!
The Network FAX Driver must be installed on the computer from which you want to send the documents. Refer to 1-1
Installing FAX Driver and Utilities on page 1-1 for the procedure to install that software.
2-1 Main Transmission Functions
(1) Delayed Transmission <see page 2-7 for setting procedures>
This function enables you to have documents transmitted at a designated time. Delayed transmission can be carried out at
any time within 24 hours from the time that is actually set in the fax itself.
Page 2-1
Page 22
2-1 Main Transmission Functions
(2) F-Code Based Communication <see page 2-16 for setting procedures>
This function enables you to send documents to an F-Code Box that is registered in a destination fax machine. Because
F-Code Boxes include a sub-address and password, highly confidential communication is ensured. It will be necessary
for you to enter the corresponding sub-address and password of the destination F-Code Box (if they have been
designated for that box) whenever you perform an F-Code Based Transmission procedure.
* For more information on F-Code based
communication, refer to the Operation
Guide for the Fax Kit.
of the other Fax Machine
Memory
(3) Concurrent print <see page 2-7 for setting procedures>
This function enables you to print out the documents at the same time as you send them by fax.
(4) Save Transmitted Original <see page 2-7 for setting procedures>
This function enables you to save transmitted documents in the folder that corresponds to the folder number which was
registered under the Network FAX Registration settings in the fax machine . Those documents will be saved as a PDF or
TIFF file according to the default File Type Setting in the fax
machine itself.
* For more information on registering folder numbers
and on file formats, refer to the Operation Guide
for the Fax Kit.
Page 2-2
Page 23
2-1 Main Transmission Functions
(5) Attaching a Cover Page <see page 2-8 for setting procedures>
This function enables you to add a cover page to your transmission that includes such TTI (Transmitting Terminal Information)
data as your company name, department name, your own name, your telephone or fax number, in addition to whatever
comment you’d like to send. You can easily create Cover Pages using one of the several templates provided.
(6) Restricted Access <see page 2-12 for setting procedures>
When Restricted Access is turned ON
in the copy (or fax) machine itself, this
function enables you to control Network
FAX Transmissions under Restricted
Access as well, only allowing
transmission when a viable access
code that is registered in the copy (or
fax) machine is entered.
* For more information on Restricted
Access, refer to the Operation Guide
for the Fax Kit.
Page 2-3
Page 24
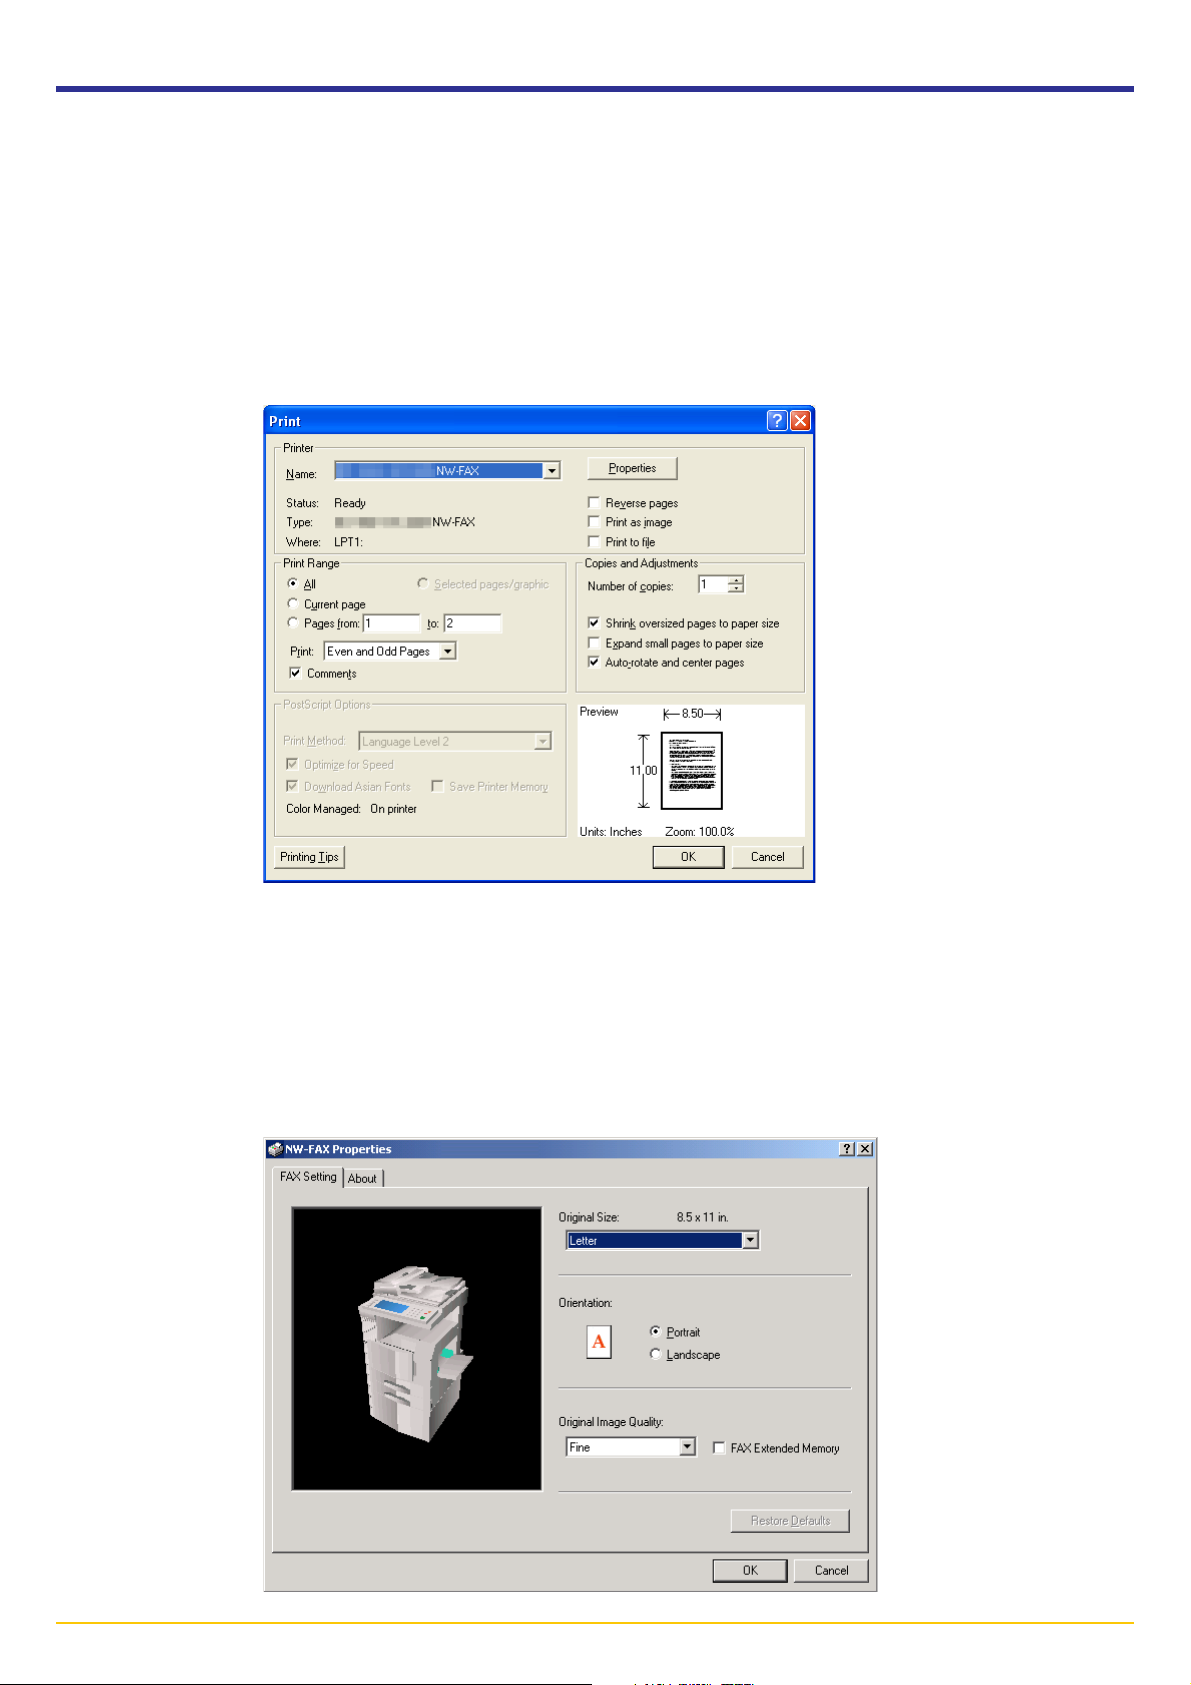
2-2 Basic Transmission
1. Use an application on your computer to create the documents that you want to send.
2. Select Print from the File menu.
3. Use the dropdown menu in the Name field to select the name of the machine that you want to use as the Network FAX.
The print dialogue box for the application that you are using will appear.
NOTE: The following screen shot is just an example and the actual dialogue box displayed on your computer may differ
depending to the application that you are using.
4. Enter the page numbers, etc., that you want to fax.
NOTE: Make sure that the number of copies is set to 1.
5. Click on the Properties button in order to access the Properties window.
Page 2-4
Page 25
2-2 Basic Transmission
6. Perform all of the desired settings under the FAX Setting tab, such as the original size setting, and then click on the OK
button.
* Refer to 2-3 FAX Setting Tab on page 2-6 for more detailed information on the settings in that tab.
7. The print dialogue box for the application that you are using will be displayed once again. Click on the OK button. The TX
Setting dialogue box will appear.
* Refer to 2-5 Various Settings in the TX Setting Dialogue Box on page 2-13 for more detailed information on the
settings in that dialogue box.
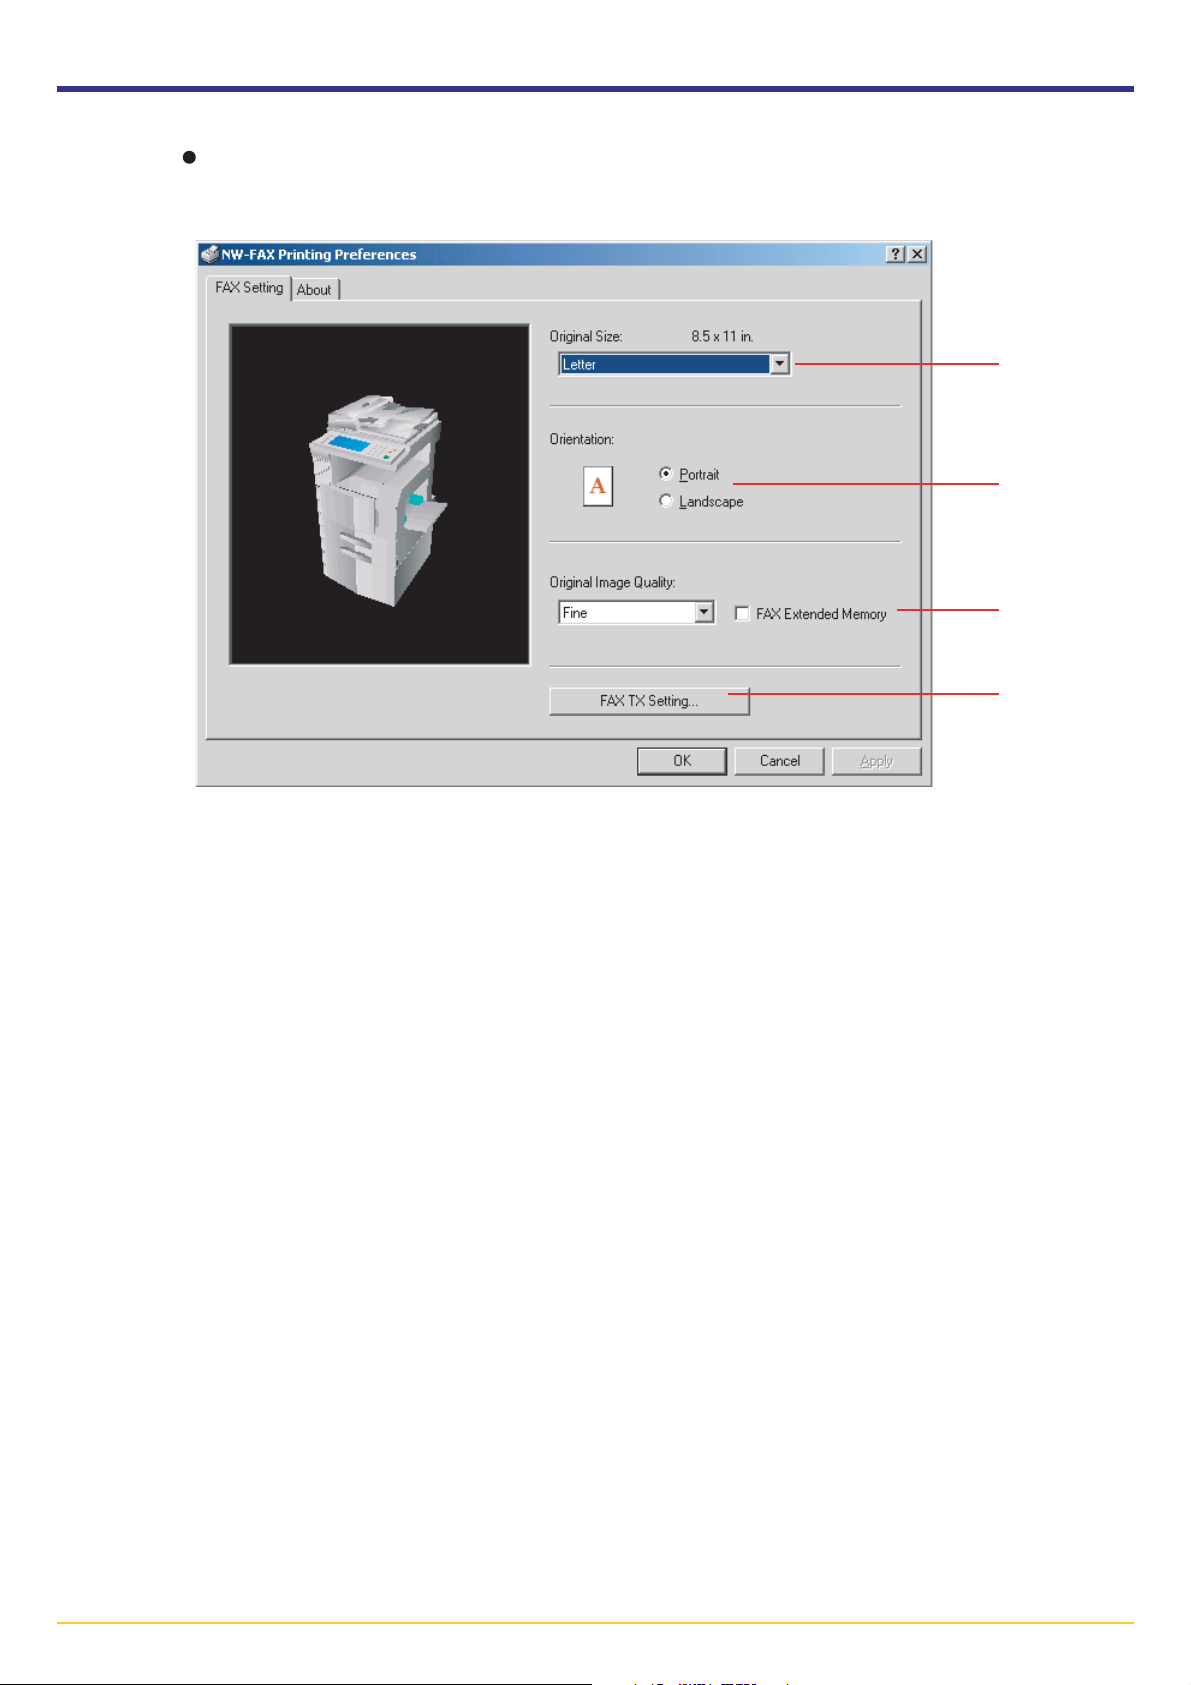
8. Use the keyboard to enter the phone number of the destination fax in the FAX Number field. If you want to use the
Address Book to enter this information, refer to (1) Selecting a Destination from the Address Book on page 2-13.
• Maximum number of characters that can be entered: 32
• Characters that can be entered: 0 – 9, #, *, -, and a space (a hyphen or space can NOT be entered as the first character)
9. If you are using a cover page, refer to (3) Registering the Destination Information to be Added to the Cover Page on
page 2-17.
10. Click on the Add to Destination List button. The entered destination information will be displayed under the Destination
List area.
If you want to send the same documents to more than one destination, repeat steps 8 and 9 as required. (Up to 80
destinations can be registered.)
* If you want to delete a destination from the Destination List area, select that destination and then click on the Delete
from list button. If you want to delete all of the currently registered destinations, click on the Delete All button.
11. Click on the Send button to initiate the fax transmission operation.
Page 2-5
Page 26
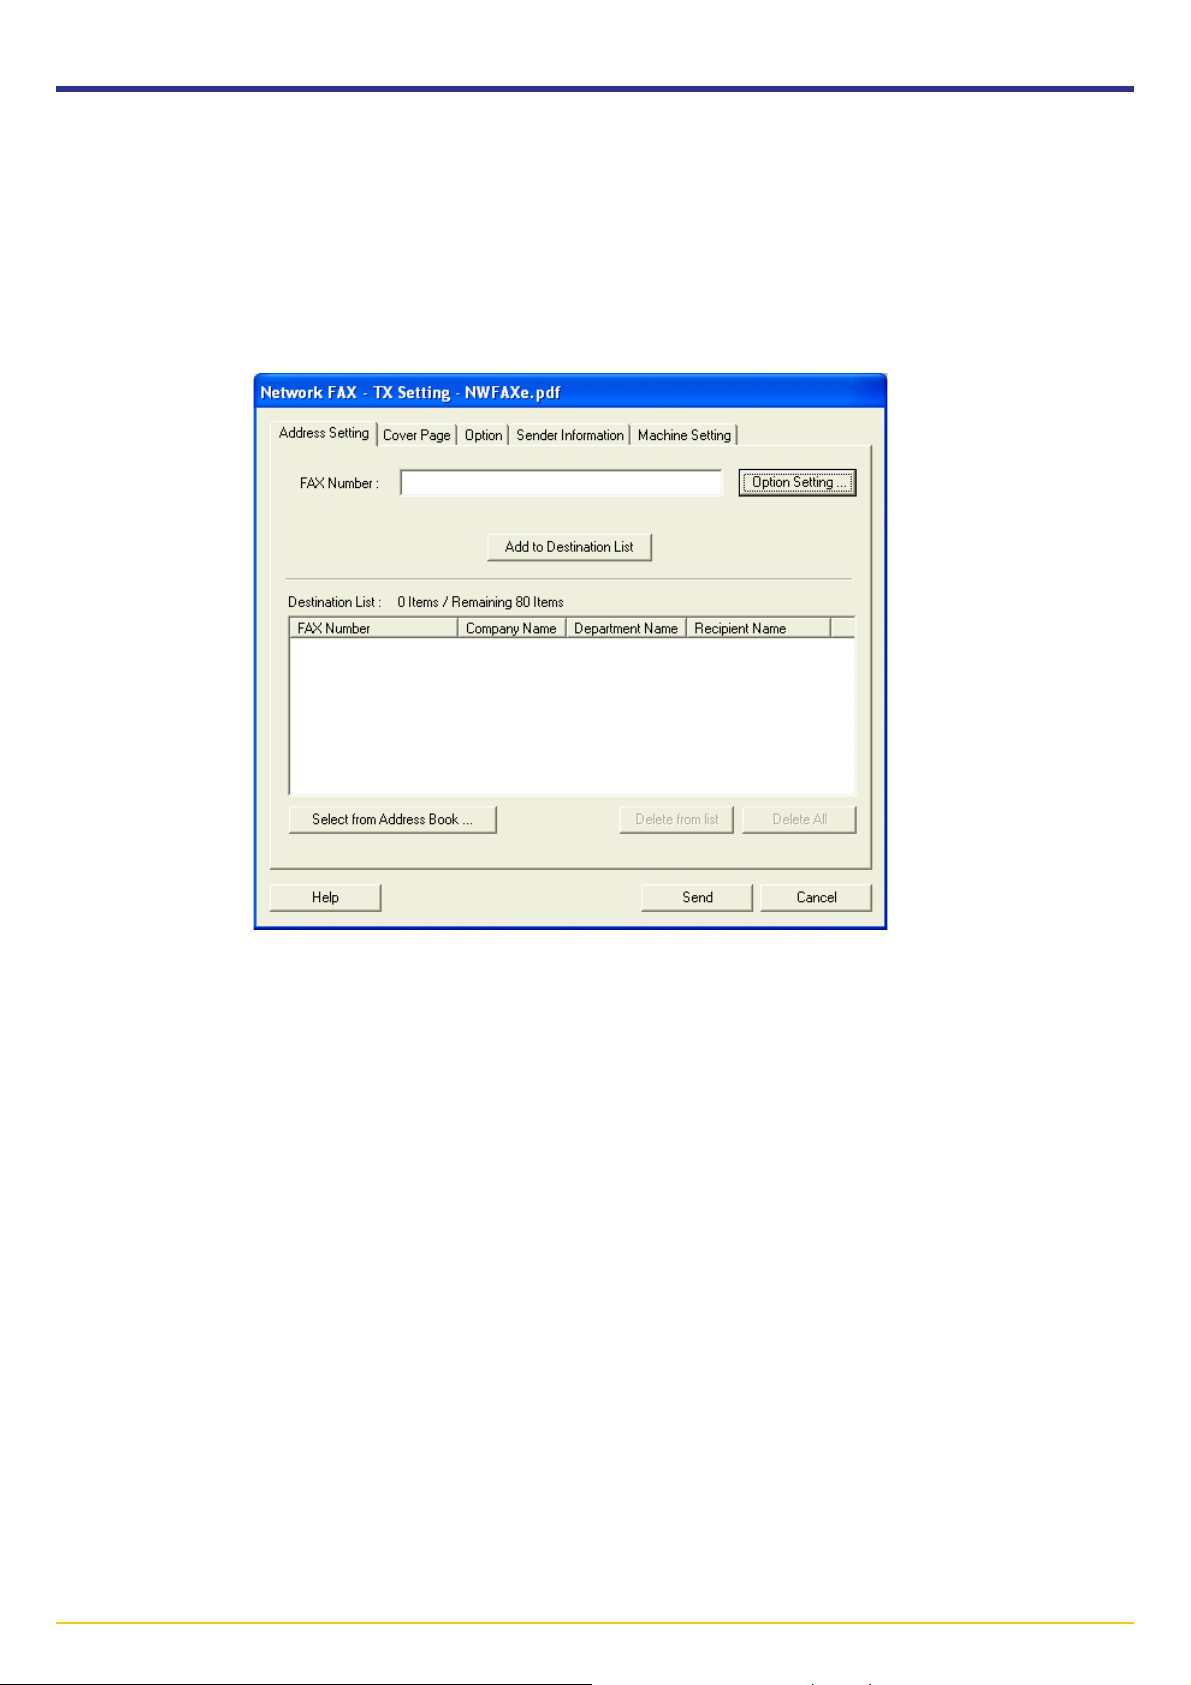
2-3 FAX Setting Tab
Use the contents of this tab to set certain transmission conditions, such as the size of the original being sent.
Refer to
Registering the Machine’s IP address on page 1-5 to open this tab.
1
2
3
1 Original Size field
Use the dropdown menu in this field to select the size of the original being transmitted.
* The size of the documents created in the application will be changed to the size selected here for transmission
purposes.
Available settings: Letter, Legal, Ledger, Statement, A3, A4, A5, Folio, B4 and B5
2 Orientation radio buttons
Make sure the radio button for the desired orientation, either Portrait or Landscape, is selected.
3 Original Image Quality field
Use the dropdown menu in this field to select the resolution quality of the original being transmitted.
Available settings: Normal, Fine, Ultra fine
* When you need to send documents that contain minute text and detailed lines at the best possible quality, select
the Ultra fine setting. The Ultra fine setting will only be available when there is a check mark in the FAX Extended
Memory check box.
* In order to actually send documents at the Ultra fine setting, it is necessary to add additional memory to your fax
machine. (Refer to the Operation Guide for your fax machine.)
4
4 FAX TX Setting button
Click this button in order to access the Default Setting dialogue box if you want to change the default settings for
fax transmission.
* Refer to 2-4 Default Setting Dialogue Box on page 2-7 for more detailed information on the settings in that
dialogue box.
Page 2-6
Page 27

2-4 Default Setting Dialogue Box
By setting the transmission conditions that you use most in this dialogue box, you can minimize the need to change the
settings each time.
* The Default Setting dialogue box can be accessed using the following procedure:
Click on Start in the Windows Task Bar and then select Control Panel, Printer and other Hardware and then Printers
and Faxes in that order from the successive menus in order to access the Printers and Faxes dialogue box.
Then, right-click on the name of the machine that you want to use as the network fax and select Printing Preferences
from the resulting dropdown menu. Click on the Fax TX Settings button in the Printing Preferences window. (With systems
such as Windows 98 and Windows Me, click on Start in the Task Bar and then selecting Settings and then Printers in that
order from the successive menus in order to access the Printers dialogue box. Right-click on the name of the machine that
you want to use as the network fax and select Properties from the resulting dropdown menu. Then, click on the Fax TX
Settings button in the Properties window.)
(1) Sending Options Tab
1
2
3
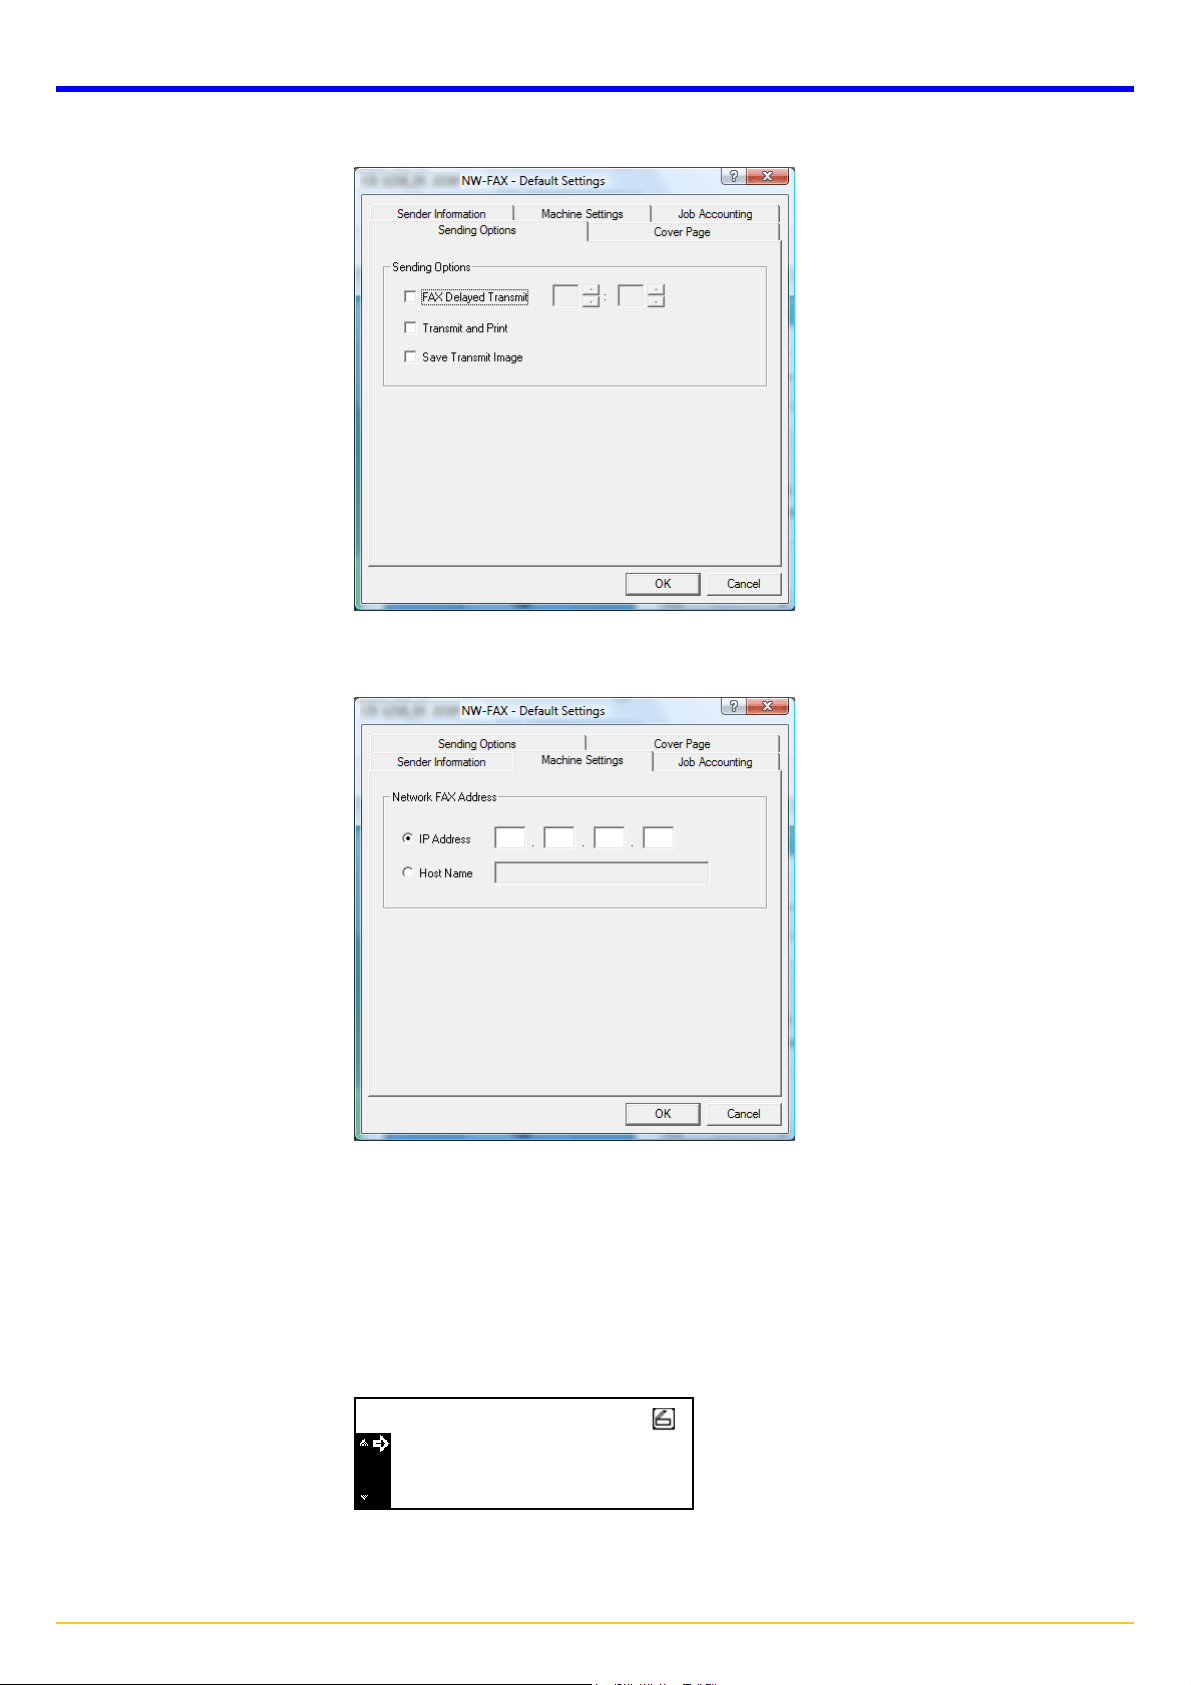
1 Delayed TX checkbox
Put a check mark in this checkbox in order to make the time fields to the right of the checkbox active whenever you want
to set the time that your documents will be transmitted. The desired time setting can be entered directly with the keyboard
or by clicking on the ▲ and ▼ arrows. Enter the time on a 24-hour time basis (00:00 - 23:59).
NOTE: If you designate a time that is earlier in the day than the time that is actually displayed in the fax machine itself, the
transmission operation will be carried out the following day at that time. Be sure to check the time setting in the fax
machine itself before making this setting.
2 Concurrent print checkbox
Put a check mark in this checkbox when you want to print out the documents at the fax machine same time as you send
them by fax.
3 Save TX Original checkbox
Put a check mark in this checkbox when you want to save documents in the computer that was registered under the
Network FAX Registration settings in the fax machine.
* For more information on saving the data for transmitted fax documents, refer to the Operation Guide for the Fax Kit.
* For the procedure to save the data for transmitted fax documents, refer to
3-1 Summary of Delivery Settings on page 3-2 of this manual.
Page 2-7
Page 28
2-4 Default Setting Dialogue Box
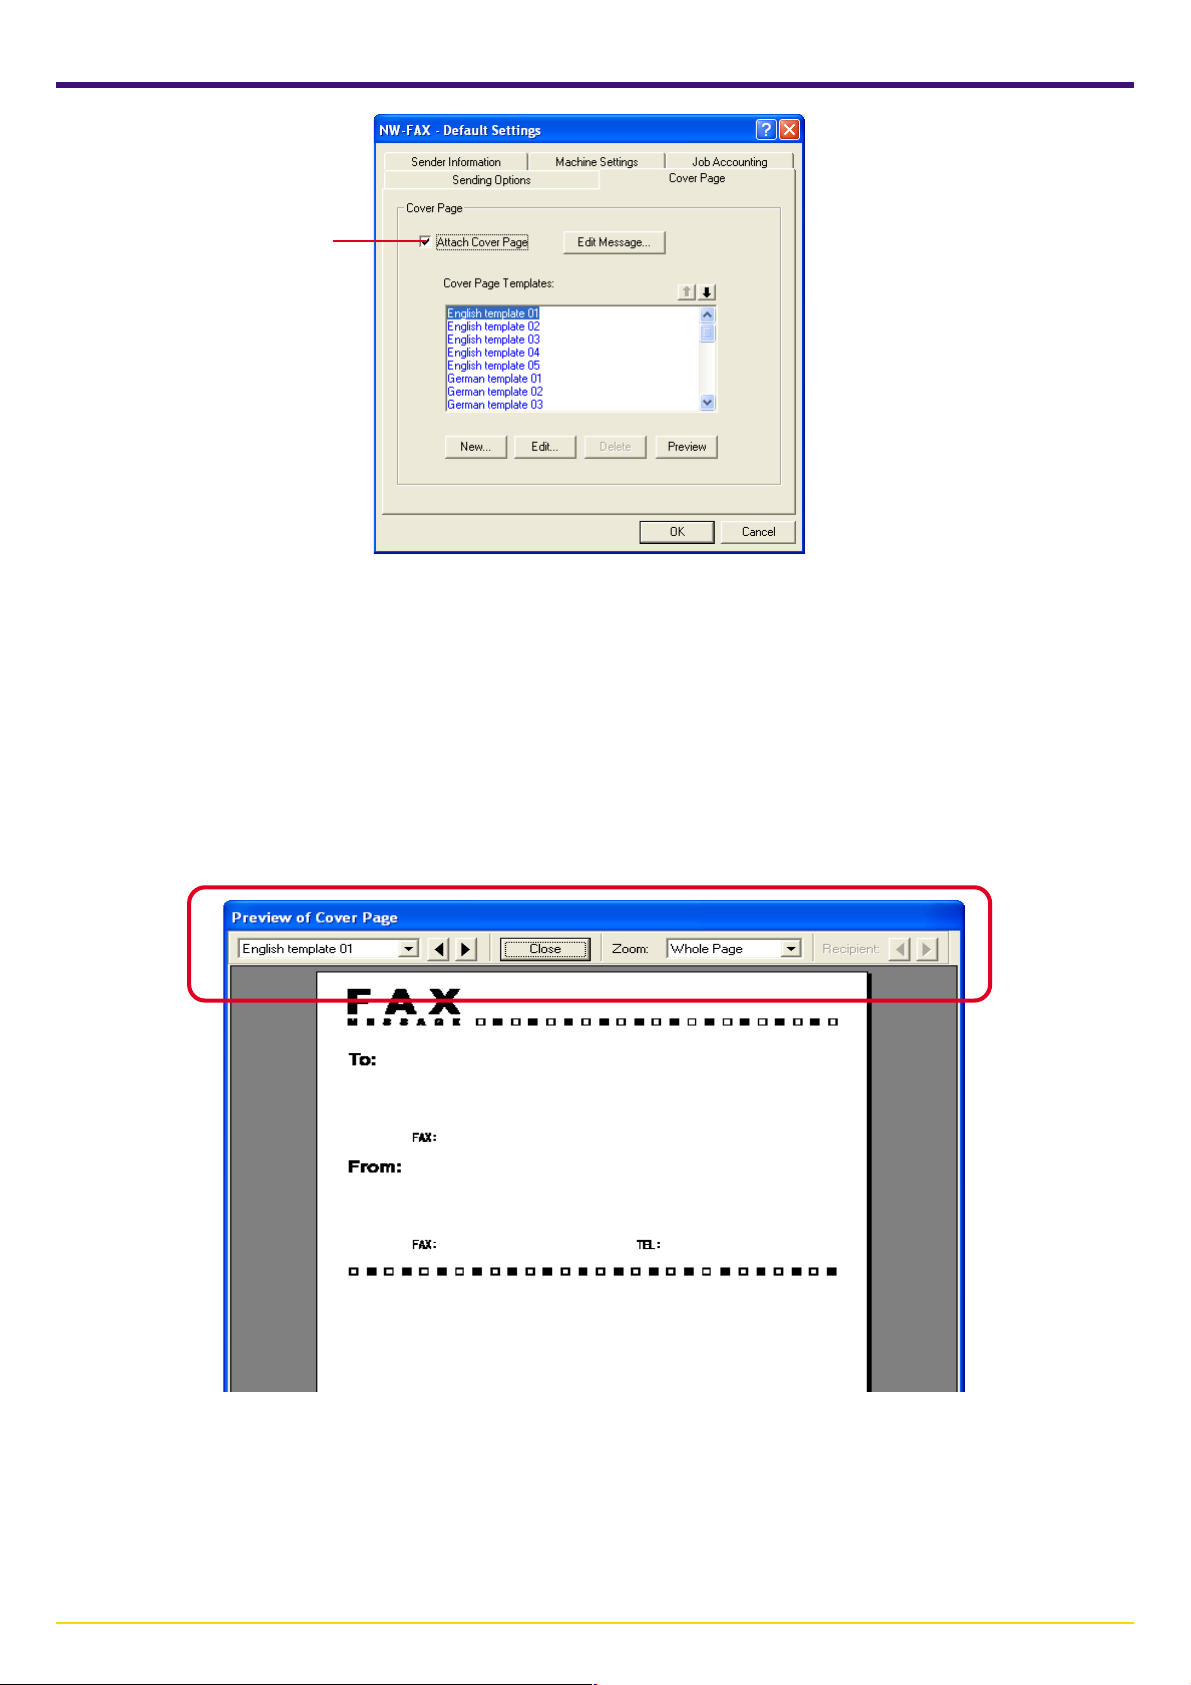
(2) Cover Page Tab
1
1 Attach Cover Page checkbox
Put a check mark in this checkbox when you want to add a cover page to your transmission.
Perform the following procedure to select the settings for the cover page.
1) Select the desired template for the cover page from the Cover Page Templates list.
* Original Cover Page templates can be created. Refer to 2-7 Creating New Cover Page Templates on page 2-24.
2) To check the format of the template, click on the Preview button.
The format for the currently selected template will be displayed.
To change the type of template, use the dropdown menu or click on the O or P on the upper portion of the dialogue box.
The display ratio for the template can also be changed to between 25% and 250% using the dropdown menu. If some
destinations have been registered, the format for each destination can be displayed. Click on the O or P next to the
Recipient to change the format. (Refer to (3) Registering the Destination Information to be Added to the Cover Page
on page 2-17 for more information on registering destinations.) After you are finished previewing the format, click on the
Close button.
Page 2-8
Page 29
2-4 Default Setting Dialogue Box
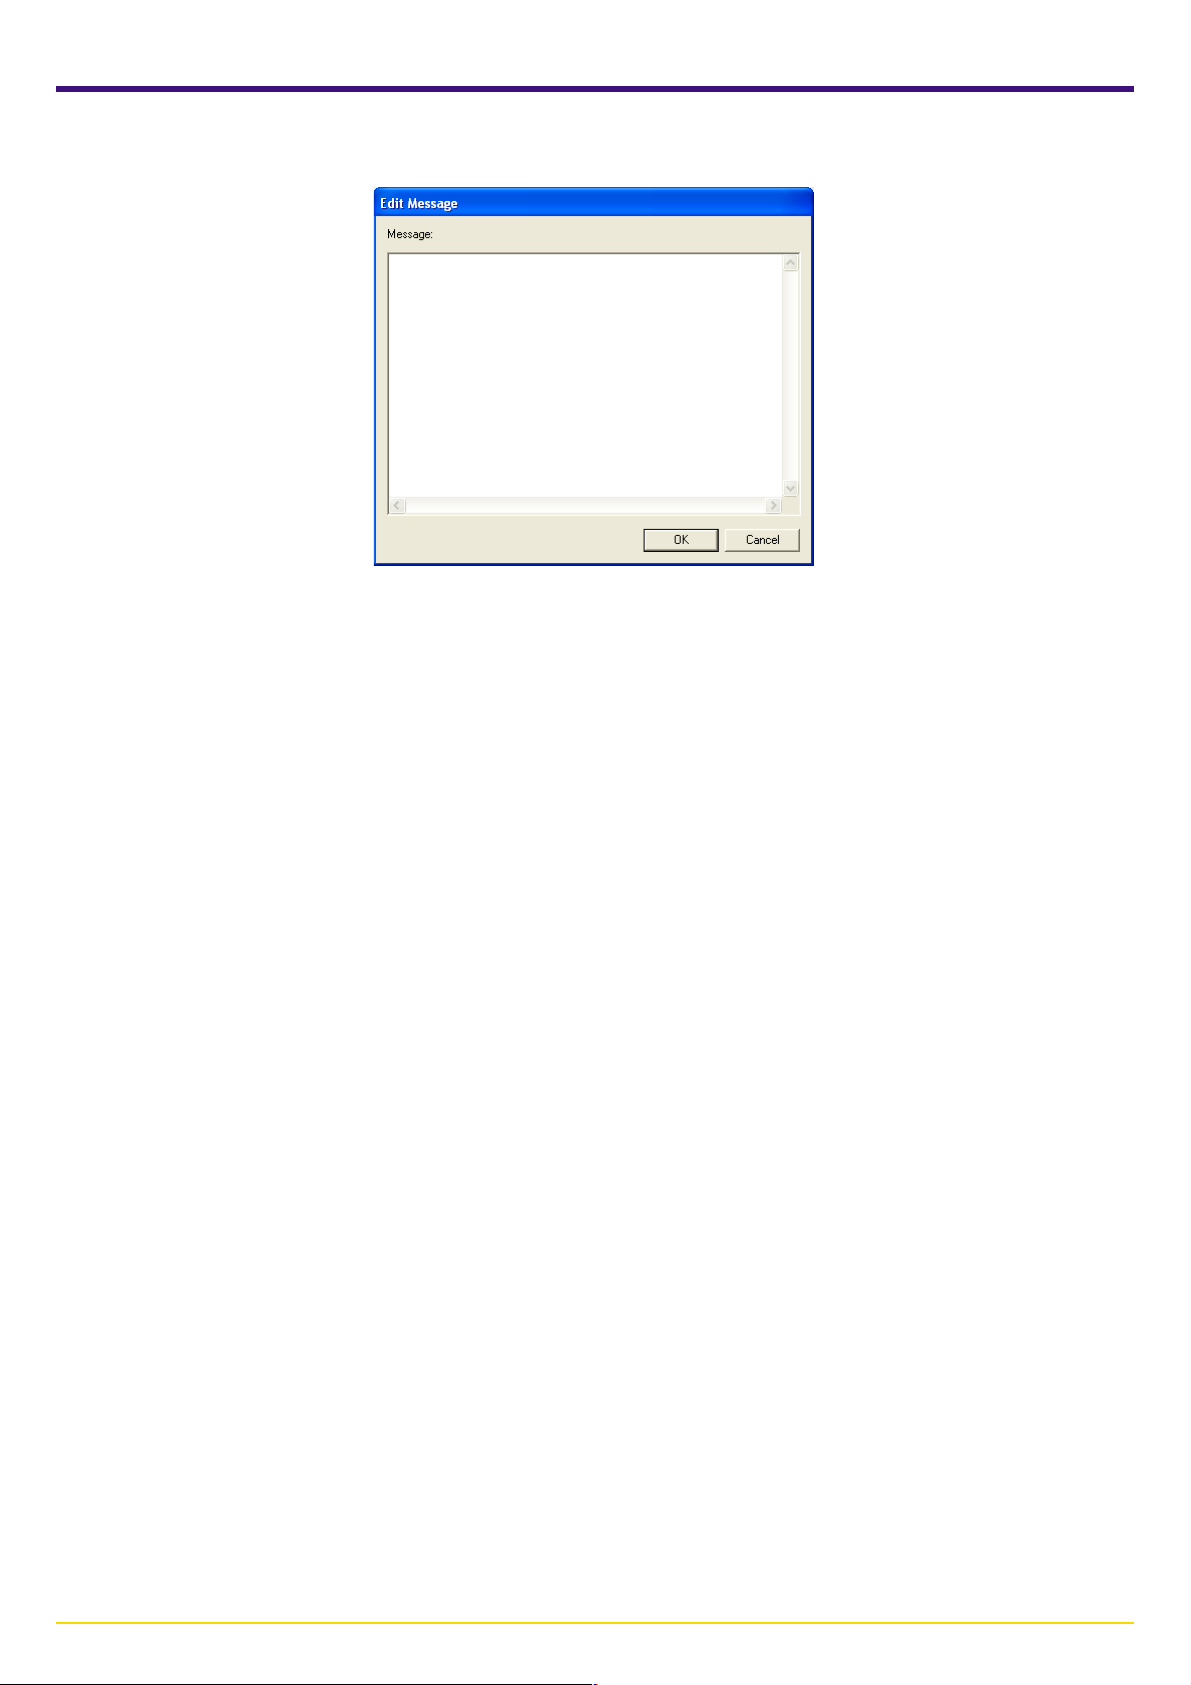
3) To add your message to the cover page, click on the Edit Message button.
The Edit message dialogue box will be displayed.
Enter the message to be displayed on the cover page and click on the OK button. The message can be up to 1000
characters long.
Page 2-9
Page 30
2-4 Default Setting Dialogue Box
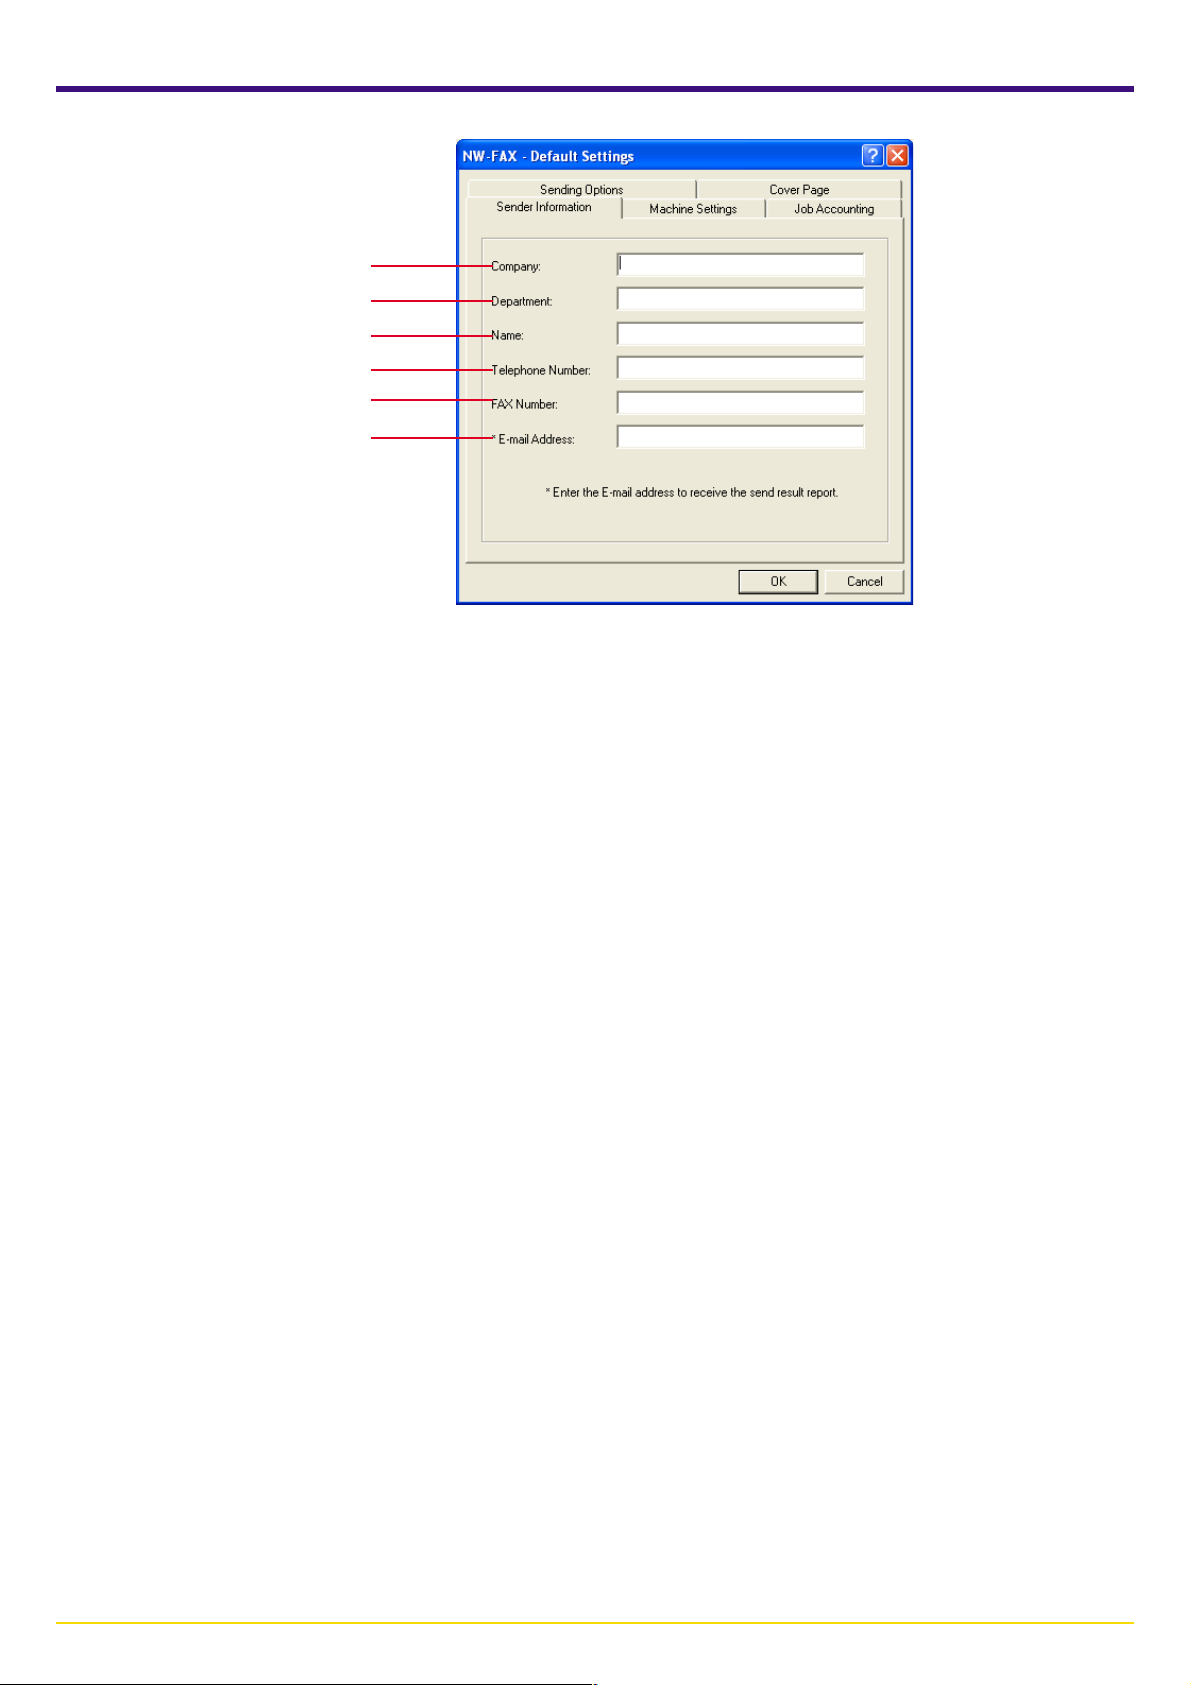
(3) Sender Information Tab
1
2
3
4
5
6
Enter your own information into fields 1 – 5 explained below when you want to send a cover page with your faxes.
1 Company Name: Your company name can be up to 64 characters long.
2 Department Name: Your department name can be up to 64 characters long.
3 Name (user name, etc.): Your name can be up to 16 characters long.
4 Telephone Number: Your telephone number can be up to 20 characters long. [Available characters: 0 - 9, #, *, -, (, ),
&, +, and a blank space]
5 FAX Number: Your fax number can be up to 20 characters long. [Available characters: 0 - 9, #, *, -, (, ), &, +, and a blank
space]
6 E-Mail Address: Your e-mail address can be up to 64 characters long.
[Available characters: Symbols ( !, #, $, %, &, ’, *, +, -, ., /, =, @, [, ], ˆ, _, ‘, {, } )
Alphanumerics (0 – 9, A – Z and a – z)]
* If you register your e-mail address, you will be able to select to have a Network FAX Transmission Report sent to you
as an e-mail attachment.
NOTE: In order to have the Network FAX Transmission Report sent to you by e-mail, it is necessary to turn ON the
corresponding report printout setting (or have it set to Output on condition) in the fax default settings and
register the administration's e-mail address in the network fax registration, and carry out the SMTP setting in the
scanner default settings.
* It is possible to register the administration's e-mail address in the scanner default settings instead of registering
it in the network fax registration.
Page 2-10
Page 31

2-4 Default Setting Dialogue Box
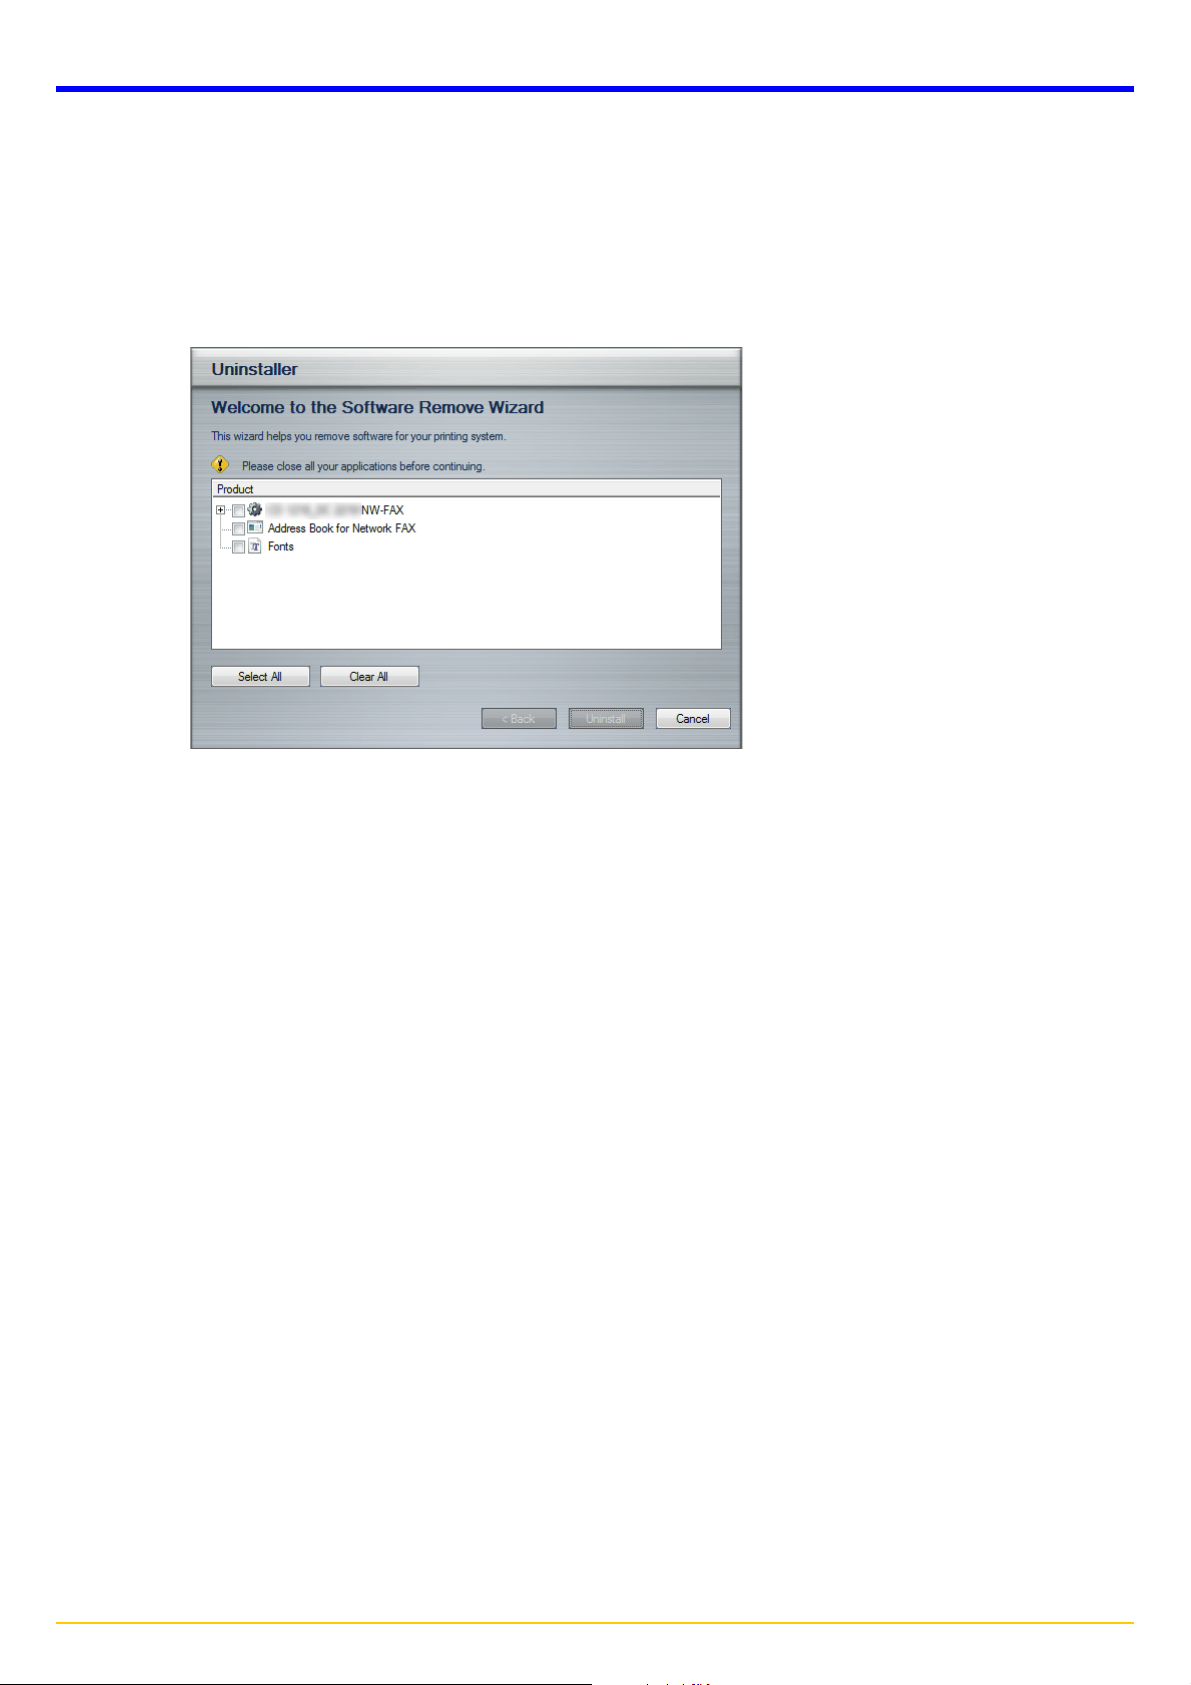
(4) Machine Setting Tab
When you want to use a different machine as a fax, use this tab to change the IP address, or the host name, to the
information that is registered in scanner default settings of the desired machine. (Refer to 2. Set-up in the Operation Guide
for your Network Scanner. For color machines, refer to 2. Preparation for Usage in the Operation Guide.)
Sample screen-shot of the
scanner default setting window
If you use the host name, your computer must be under a network environment
controlled by a WINS server or a DNS server.
The host name can be up to 32 one-byte characters in length and made up of any of the
following characters: 0 – 9, A – Z, a – z, - (hyphen/dash) and . (period/dot)
Page 2-11
Page 32

2-4 Default Setting Dialogue Box
(5) Restricted access Tab
When Restricted Access is turned ON in the copy (or fax) machine itself, transmission will only be allowed when a viable
access code is entered.
If your access code has not been registered under this tab, Non-registration will be displayed in the Department code
field, and Registration completion will be displayed in that field if it has been registered.
* In order to use the Restricted Access function, it is necessary to turn Restricted Access ON in the fax machine itself. For
more information on access codes, refer to the Operation Guide for the Fax Kit.
● Registering your access code
1. If you have not registered your access code under the Restricted access tab, click on the Registration button in order
to access the Department Code Registration dialogue box.
2. Enter your access code (1-8digits) and then click on the OK button. The Restricted access tab will be displayed once
again.
● Deleting your access code
1. Click on the Reset button. The registered access code will be deleted from the Restricted access tab and Non-registration will
be displayed once again in the Department code field.
Page 2-12
Page 33

2-5 Various Settings in the TX Setting Dialogue Box
(1) Selecting a Destination from the Address Book
NOTE
In order to use the Address Book, it is necessary to install it and register the corresponding destinations in advance. Refer
to 4-1 Registering Destination Information on page 4-2 for more detailed information on destination registration procedures.
1. Click on the Select from Address Book button in order to access the Select Address dialogue box.
Page 2-13
Page 34

2-5 Various Settings in the TX Setting Dialogue Box
2. The registered destinations will be displayed in the list in the upper portion of the dialogue box.
If you want to search for a particular destination, perform procedures 1) and 2) below. If you do NOT need to search for
a destination, go directly to step 3.
1) Make sure that the desired Search target radio button, either Registration Name or Company Name, is selected.
2) Enter the text to be searched for in the Search Item field. The text can be up to 64 characters long.
The search operation will begin as soon as the first character is entered. Only those entries that start with exactly the
same character(s) as the search criteria will be displayed in the list. If there are no entries that match the search criteria
in this way, nothing will be displayed in the list.
* To display all of the entries registered in the Address Book once again, click on the Display all button.
3. To add a destination from the list of destinations in the Address Book (upper list) to the Destination List (lower list), click
on the desired destination to select it and then click on the Add to Destination List button.
* When you select an entry which multiple destinations have been registered as a group, the Detail button appears on
the top of the dialogue box.
* If you select an entry registered as a group and click on the Detail button, a Confirm members in selected group
dialogue box will appear so that you can verify all of the destinations in that group.
Once you are finished verifying the information, click on the OK button to return to the Select Address dialogue box.
Page 2-14
Page 35

2-5 Various Settings in the TX Setting Dialogue Box
4. Only those destinations selected from the Address Book will be displayed the Destination List.
* If you want to delete any of the destinations from the Destination List, select that destination and then click on the
Delete from list button. If you want to delete all of the destinations from the Destination List, click on the Delete All
button.
5. Click on the OK button. The Select Address dialogue box will close and the destinations that were registered in the
Destination List will be displayed in the TX Setting dialogue box.
Page 2-15
Page 36

2-5 Various Settings in the TX Setting Dialogue Box
(2) F-Code Based Communication
1. Click on the Option Setting button in the Address Setting tab of the TX Setting dialogue box.
The Option Setting dialogue box will be displayed.
2. Enter the sub-address and password as it is registered in the destination fax.
• Maximum number of characters that can be entered: 20
• Characters that can be entered: 0 – 9, #, *, and a space (a space can NOT be entered as the first character)
3. Click on the OK button. The TX Setting dialogue box will be displayed once again.
Page 2-16
Page 37

2-5 Various Settings in the TX Setting Dialogue Box
(3) Registering the Destination Information to be Added to the Cover Page
The type of cover page can be selected from among different templates. Destination information such as that shown below can be added
on the cover page.
Sample of English template 01
1 Recipient Name
2 Destination Company Name
3 Destination Department Name
1
2
3
4
5
6
7
8
9
4 Destination Fax Number
5 Sender Name
6 Sender Company Name
7 Sender Department Name
8 Sender Fax Number
9 Sender Telephone Number
10 Message
10
1. Enter the destination fax number in the Address Setting tab. (Refer to step 8 on page 2-5.)
Page 2-17
Page 38

2-5 Various Settings in the TX Setting Dialogue Box
2. Click on the Option Setting button and enter the recipient information.
1 Company Name: The name of the destination company can be up
to 64 characters long.
1
2
3
3. Click on the OK button. The display will return to the TX Setting dialogue box.
2 Department Name: The name of the destination department can
be up to 64 characters long.
3 Recipient Name: The name of the person to whom you are sending
the fax can be up to 20 characters long.
4. Click on the Add to Destination List to add the entered information to the destination list.
5. If the sender information is not registered in the Default Setting dialogue box, click on the Sender Information button to
register the sender information. Refer to (3) Sender Information Tab on page 2-10.
6. Click on the Cover Page tab and place a check in the Attach Cover Page checkbox.
7. Select a Cover Page template from the Cover Page Templates list.
* If the Cover Page is registered in the Default Settings, then the action of selecting the Cover Page for each transmission
can be omitted. Refer to 2-4 Default Setting Dialogue Box on page 2-7.
Original Cover Page templates can be created. Refer to 2-7 Creating New Cover Page Templates on page 2-24.
Page 2-18
Page 39

2-5 Various Settings in the TX Setting Dialogue Box
8. Click on the Preview button. A preview of the currently selected template will be displayed.
To display a different template, use the drop-down menu at the top of the dialog box or click on the O or P button. The
template display magnification can also be changed within the range of 25 to 250% from the drop-down menu.
NOTE
Before transmitting the fax, be sure to use the Preview screen to check all of the displayed information including the
recipient name and company name. If there is a large number of characters for information that is automatically entered,
they might not completely fit in the field and the characters might not print correctly. If the characters are not displayed
correctly, reduce the number of characters in the recipient information or sender information or edit the template being
used.
9. Click on the Close button.
10. Click on the Edit Message button.
11. Enter the message to be added to the Cover Page and click on the OK button. A maximum of 1,000 characters can be
entered.
Page 2-19
Page 40

2-5 Various Settings in the TX Setting Dialogue Box
(4) Optional Settings
1. If you want to temporarily change the settings (the present settings will be displayed) from those which are currently
designated in the (1) Sending Options Tab or the (5) Restricted access Tab under 2-4 Default Setting Dialogue Box
on pages 2-7 and 2-12, click on the Option tab in order to access the Option tab.
NOTE: The changes made here will only apply to the present transmission and the corresponding settings will return to
those previously made in the Default Setting dialogue box once that transmission is completed.
2. Refer to (1) Sending Options Tab on page 2-7 and (5) Restricted access Tab on page 2-12 for more detailed information
on the corresponding settings in those tabs.
3. To start the fax transmission, click on the Send button.
To continue the settings for other tabs, click on another tab.
Page 2-20
Page 41

2-5 Various Settings in the TX Setting Dialogue Box
(5) Transmitting Terminal Information Data
1. If you want to temporarily change the settings (the present settings will be displayed) from those which are currently
designated in the (3) Sender Information Tab under 2-4 Default Setting Dialogue Box on page 2-10, click on the
Sender Information tab in order to access the Sender Information tab.
NOTE: The changes made here will only apply to the present transmission and the corresponding settings will return to
those previously made in the Default Setting dialogue box once that transmission is completed.
2. Refer to (3) Sender Information Tab on page 2-10 for more detailed information on the corresponding settings in that
tab.
3. To start the fax transmission, click on the Send button.
To continue the settings for other tabs, click on another tab.
Page 2-21
Page 42

2-5 Various Settings in the TX Setting Dialogue Box
(6) Machine Settings
1. If you want to temporarily change the Network FAX address (IP address or host name registered in the scanner default
settings of the machine itself) from that which is currently made in the (4) Machine Setting Tab under 2-4 Default
Setting Dialogue Box on page 2-11, click on the Machine Setting tab in order to access the Machine Setting tab.
NOTE: The changes made here will only apply to the present transmission and the corresponding settings will return to
those previously made in the Default Setting dialogue box once that transmission is completed.
2. Use the keyboard to enter the Network FAX IP address (IP address registered in the scanner default settings) or the
Network FAX host name (host name registered in the scanner default settings).
3. To start the fax transmission, click on the Send button.
To continue the settings for other tabs, click on another tab.
Page 2-22
Page 43

2-6 Transmission Control
Perform the following procedure when you want to use your computer to verify the status of a fax transmission currently
being processed, or to actually terminate that transmission.
1. Once a fax transmission begins being processed, a Transmission Control icon will be displayed in the Windows Task Bar.
2. Double-click on that icon in order to access the Sending Control window which indicates the status of all transmissions
being processed.
3. If you want to terminate any transmission, select that transmission and then select Cancel from the Document menu.
INFORMATION
If you right-click on the Transmission Control icon, the menu shown below will appear.
Select Exit to quit Transmission Control and delete the icon from the Task Bar.
Page 2-23
Page 44

2-7 Creating New Cover Page Templates
Perform the following procedure to create an original Cover Page template.
1. Perform the 2-4 Default Setting Dialogue Box procedure shown on page 2-7, open the Default Settings dialog box,
and click on the Cover Page tab.
2. Place a check in the Attach Cover Page checkbox and click on the New... button. The Edit Cover Page screen will be
displayed.
3. Enter the characters.
From the Menu bar, click on Insert and then Textbox and then position the textbox and enter the characters.
Page 2-24
Page 45

2-7 Creating New Cover Page Templates
4. Position the field box.
From the Menu bar’s Insert menu, select the field box to be positioned.
NOTE
If there are too many characters in the entered information, such as recipient name or company name, the information will
not fit in the field box and some of the characters could be cut off. When positioning the field box, make it large enough and
adjust the font point size so that the inserted information will fit in the field box.
* When a fax is transmitted, the information entered in the Default Settings and Destination Settings will automatically be
entered in the fields.
The following field boxes can be used. Use them as required.
Template DisplayMenu Item Inserted Information
Destination
Sender
Company
Department
Name
Address
Company
Department
Name
Recipient - Company
Recipient - Department
Recipient - Name
Recipient - Address
Sender - Company
Sender - Department
Sender - Name
Recipient information company name
Recipient information department name
Recipient information recipient name
Recipient FAX number
Sender information company name
Sender information department name
Sender information sender name
Comment
FAX Number
Telephone Number
Sender - FAX Number
Sender - Telephone Number
Comment
Page 2-25
Sender information FAX number
Sender information telephone number
Message entered in the Cover Page tab
Page 46

2-7 Creating New Cover Page Templates
5. Position the figures, textboxes, etc., to create a Cover Page.
* For information regarding the operation method, refer to Help.
6. From the Menu bar click on File and then Save as, enter the file name, and click on the Save button.
7. Close the Edit Cover Page screen.
8. The new template will be registered at the top of the list and can now be selected.
Page 2-26
Page 47

Section 3 Receiving a Fax
If Network FAX Reception is turned ON as the default setting in the fax machine itself, incoming faxes will be converted into
PDF or TIFF files and saved into the designated folder on the Server Computer (the computer on which the Scanner File
Utility has been installed). In addition, you can select to have the result of the reception sent by e-mail to a designated
computer. Notice of the reception of a fax can be sent to other computers by standard e-mail as an attached image. In
addition, it is possible to send a notice of fax reception to any other computer on the network that has the Scanner File Utility
installed.
NOTE
In order to enable fax reception, be sure to perform the required settings in both your computer and the fax machine itself.
Settings in Your Computer
• Install the Scanner File Utility in the computer in which you want to receive the fax data. Refer to “1-2 Installing the
Scanner File Utility” on page 1-8 for more detailed information on installing that utility.
Settings in the Fax Machine Itself
• Turn Network FAX Reception ON and select whether or not to have received faxes printed out at the fax machine itself.
• Under “IP address / Host Name” in the “Network FAX Registration” settings, register the IP address or host name of the
computer in which you want to receive the fax data (Server Computer).
* For more information on settings in the fax machine itself, refer to the Operation Guide for the Fax Kit.
NOTE
In order to enable fax reception, be sure that the Scanner File Utility is running. When the Scanner File Utility is running, an
icon that indicates that the utility is running will appear in the Windows Task Bar.
Page 3-1
Page 48

3-1 Summary of Delivery Settings
The following describes the procedure for setting the folder in which documents received by the Network FAX will be stored.
Refer to the procedures starting from "3-2 Starting the Scanner File Utility" for more detailed information on each setting .
The folder that is used for the storage of transmitted documents can also be set using this procedure.
1 Starting up the Scanner File Utility
Use the Start button to start up the Scanner File Utility and double-click
on the icon in the Windows Task Bar in order to access the Scanner File
Utility dialogue box.
-> Refer to page 3-4
2 Setup Dialogue Box
This dialogue box is used to select the management settings for the
destination folder, such as the settings for the capacity of the hard disk, for
the display of the fax reception notification window, etc.
-> Refer to page 3-5
3 Folder Setting Dialogue Box
This dialogue box is used to set the number or the address of the folder in
which received documents will be stored.
-> Refer to page 3-6
Page 3-2
Page 49

3-1 Summary of Delivery Settings
4 Delivery Setting List Dialogue Box
Delivery conditions can be selected from among the
Subaddress, Sender Fax Number, Destination Fax Number
and Other settings. In addition, you can select whether sending
a notice of fax reception by e-mail or by using the Scanner
File Utility and perform the related settings for that in the
Configuration dialogue box.
-> Refer to page 3-7
5 Delivery Setting Dialogue Box
This dialogue box is used to select the folder where documents
will be stored, the e-mail address to which the notice of fax
reception will be sent, etc.
-> Refer to page 3-10
Page 3-3
Page 50

3-2 Starting the Scanner File Utility
1. Click on Start button in the Windows Task Bar and then select All Programs > Scanner User Software > Scanner File
Utility in that order. The Scanner File Utility will start up and an icon that indicates that the utility is now running will
appear in the Windows Task Bar.
2. Double-click on that icon in order to access the Scanner File Utility dialogue box.
3. To continue making delivery settings, click on the Setup button and proceed to the following procedure, “3-3 Setup
Dialogue Box”.
The service mode (only available on Windows 2000, Windows Server 2003, Windows XP and
Windows Vista)
The following functions are additionally available when you select the
• Distribution of received files is possible with the Scanner File Utility even when you are logged off of your computer.
• To change the setting in the Scanner File Utility, select that utility’s “Stop” command. In order to enable the distribution of
received files once again, select the “Start” command in the Scanner File Utility.
• This setting is initially set to “Stop” if the service mode is selected during installation.
To “Stop” the Scanner File Utility...
Right-click on the Scanner File Utility’s icon in the Windows Task Bar to display the drop-down list and select the “Stop”
command. A “prohibited” mark will appear over the icon and distribution of received files will not be possible.
To “Start” the Scanner File Utility ...
Right-click on the Scanner File Utility’s icon in the Windows Task Bar to display the drop-down list and select the “Start”
command. The “prohibited” mark will disappear from over the icon and distribution of received files will once again be
possible.
Stopping the Scanner File Utility
service
mode during installation of the Scanner File Utility.
Starting the Scanner File Utility
Page 3-4
Page 51

3-3 Setup Dialogue Box
1
3
1. Perform the various settings as appropriate.
2
4
1 Hard Disk Warning (%) field
If the volume of data on the hard disk reaches the percentage registered here during saving of received fax data to
disk, a warning message will be displayed.
The desired setting can be entered directly with the keyboard or by clicking on the ▲ and ▼ arrows.
2 Maximum of Received File List field
This setting determines the maximum number of files that will be displayed under the Received File List in the
Scanner File Utility dialogue box. (Available setting: between 10 and 100)
Once the limit designated here is reached, the oldest data will be replaced (overwritten) by any newly received fax
data.
The desired setting can be entered directly with the keyboard or by clicking on the ▲ and ▼ arrows.
3 Reception Notice checkbox
Put a check mark in this checkbox if you want to have a reception notification window appear on your computer monitor
screen anytime new fax data is received. Click on the Open button in the displayed window in order to access the
Scanner File Utility dialogue box, or on the OK button to close the window.
4 Permit File Overwrite checkbox
Put a check mark in this checkbox if you want to have the corresponding old data overwritten anytime a new fax data
file is received with the same file name. If this box is not selected, a different name will be assigned to the new data file
and that file will be saved with the new name.
2. To continue making delivery settings, click on the New button and proceed to the following procedure, “3-4 Folder
Setting Dialogue Box”.
Page 3-5
Page 52

3-4 Folder Setting Dialogue Box
1
2
3
4
5
1. Perform the various settings as appropriate.
1 No. field
Enter in this field the designated number of the folder in which you want to receive the fax data.
* The folder number you enter here should be the same as the folder number which was registered under the “Network
FAX Registration” settings in the fax machine.
* If you need to verify a registered folder number, refer to the Operation Guide for the Fax Kit.
2 Folder field
Enter in this field the location of the destination folder. You can also browse for the folder location by clicking on the ...
button to the right of the field.
3 Password Setting button
This button is only available for use with the scanner function. It is not used under the Network FAX functions and
nothing will happen even if you click on it and enter a password.
4 Comment field
Enter in this field any comments that you’d like to have appear in the Setup dialogue box.
5 System Connection Program field
Click on the ▼ arrow to the right of this field and select Network FAX Receive Handler from the resulting dropdown
menu. The Further Settings button will be made active.
2. To continue making delivery settings, click on the Further Settings button and proceed to the following procedure, “3-5
Delivery Setting List Dialogue Box”.
Page 3-6
Page 53

3-5 Delivery Setting List Dialogue Box
1. Select the desired method of data delivery from the Delivery Method list. Available settings: Subaddress, Sender Fax
number, Destination Fax number, and Other.
* For the procedure to determine delivery conditions, refer to “3-7 Determining the Destination Folder” on page 3-13 of
this manual.
Note
For more details on the Error Log button, refer to “3-9 Checking a Reception Notification Error” on page 3-14.
2. Click on the Configuration button. The Configuration dialogue box will be displayed.
Page 3-7
Page 54

3-5 Delivery Setting List Dialogue Box
1
2
3
4
5
3. Select the transmission method for the notice of fax reception.
To have the notice of fax reception sent by e-mail, put a check mark in the Send reception notification E-mail checkbox.
To have the notice of fax reception sent to any other computer on the network that has the Scanner File Utility installed,
put a check mark in the Send reception notification to Scanner File Utility of other PC check box. The settings
related to the respective check marks will then be available.
1 SMTP Server Name edit box
Enter the IP address or host name of the SMTP server address to be used when sending the notice of fax reception.
The server name can be up to up to 32 characters long.
* This setting is shared for all folders, so any changes made here will affect the settings for all other folders as well.
2 SMTP Port number edit box
Enter the port number of the SMTP server to be used when sending the notice of fax reception. (Available setting:
between 1 and 32767, default setting: 25).
* This setting is shared for all folders, so any changes made here will affect the settings for all other folders as well.
3 Attach file to reception notification E-mail check box
Put a check mark in this checkbox when you want to attach the image file of the received fax to the reception
notification mail.
4 Data size edit box
Select the maximum size for files attached to the reception notification mail.
You can choose from among “Low”, “Mid.”, “High” and “Non-restricted”. Files which exceed the size limit will not be
attached.
* The approximate size limits for each setting is as follows, but this should not be taken as an exact representation of
actual performance ability.
“Low”: 0.5 MB, “Mid.”: 1.0 MB, “High”: 2.0 MB
5 Retention period of reception notification edit box
Set the number of days, between 0 and 31, that retransmission of the notice will be attempted in case the computer
set to receive the notice of fax reception is not turned on.
4. Click on the OK button. The display will return to the Delivery Setting List dialogue box.
5. To continue making delivery settings, click on the New button and proceed to the following procedure, “3-6 Delivery
Setting Dialogue Box”.
Page 3-8
Page 55

3-5 Delivery Setting List Dialogue Box
Sample of the notice of fax reception
Page 3-9
Page 56

3-6 Delivery Setting Dialogue Box
Note: The following screen will be displayed after you select the subaddress.
1
2
3
1. Set the various delivery conditions that were selected in the Delivery Setting List dialogue box.
1 Subaddress, Sender FAX number, Destination FAX number and Other edit boxes
• Enter the subaddress: Enter between 4 and 20 digits. Be sure to enter the same 4 digits as the subaddress of the F-
code box as registered in the fax unit.
• Enter the sender fax number and the destination fax number: The fax numbers can be up to 20 digits long. Spaces, and
characters such as + (only for the Sender fax number) or *, can also be entered.
Note: Entry using the (*) wild card symbol
If, for example, you enter *123-4567, all destination fax numbers ending with 123-4567 will be stored in the same folder.
Conversely, if you enter 06-123*, all destination fax numbers starting with 06-123 will be stored in the same folder.
If you enter *123*, all destination fax numbers that include 123 will be stored in the same folder.
• For the Other setting: Fax transmission Document or Reception Fax will be displayed in the edit box.
* For more details about the subaddress, refer to the Operation Guide for the Fax Kit.
2 Destination Folder box
Displays the name of the folder where received files are to be stored. Select a name in the folder list that is displayed
under the box. A maximum of 256 characters will be displayed.
* New folders other than those displayed under the box can be set as well.
3 Destination Folder List
Displays a list of the sub-folders within that folder that is set as storage folder.
Folders contained within the sub-folders can also be displayed. The following settings can also be made by clicking on a
sub-folder with the right mouse button.
• “New”: To create a new folder within the folder on which you clicked.
• “Rename”: To change the name of the folder on which you clicked.
• “Properties”: A dialogue box of the shared settings for the folder on which you clicked will be displayed.
Page 3-10
Page 57

3-6 Delivery Setting Dialogue Box
4
5
6
7
4 Reception Notification E-mail Address (Reception Notification PC Address) list
The notice of fax reception can be sent to computers on the network through e-mail or using the Scanner File Utility. Up
to 10 e-mail addresses or computer addresses can be entered. Perform the following procedure to enter the desired email addresses or computer addresses. (To select the transmission method for the notice of fax reception, refer to the
setting explained under “3-5 Delivery Setting List Dialogue Box” on page 3-7.)
Note: To send the notice of fax reception to a computer on the network using the Scanner File Utility, the Scanner File
Utility must be installed on the destination computer. In addition, the delivery folder must also be set so that it is shared
on the network.
1) Click on the New button. The edit box will be displayed over the list.
2) Enter the mail address (max. 64 characters). In the case of a computer address, you can only enter a maximum of 32
characters.
Example of mail address registration Example of computer address registration
5 Edit button
Click on this button to edit the e-mail address or computer address that you selected in the list.
6 Delete button
Click on this button to delete the e-mail address or computer address that you selected in the list.
7 ... button
Click on this button to add an e-mail address or a computer address. When registering e-mail addresses, the E-Mail
Address dialogue box will be displayed. (Refer to “● Adding an e-mail address” on page 3-12.) When sending the notice
of fax reception to a computer on the network, the Browse for Computer dialogue box will be displayed. (Refer to
“● Adding a computer address” on page 3-12.)
Page 3-11
Page 58

3-6 Delivery Setting Dialogue Box
● Adding an e-mail address
To add an e-mail address that was previously registered in other delivery settings, click on the ... button. The E-Mail
Address dialogue box will be displayed. Select an e-mail address from list and click on the Add button. When you are
through adding addresses, click on the OK button. The display will return to the Delivery Setting dialogue box.
● Adding a computer address
To see the computers on the network under the Entire Network directory and then register the address of the computer(s)
to which the notice of fax reception will be sent, click on the ... button. The Browse for Computer dialogue box will be
displayed. Select a computer in the tree and click on the OK button. The display will return to the Delivery Setting
dialogue box.
2. Click on the OK button. When creating a new folder, the confirmation box for the creation of a new folder will be displayed.
Click on the OK button one more time. The display will return to the Delivery Setting List dialogue box.
The settings for the storage folders are now completed.
Page 3-12
Page 59

3-7 Determining the Destination Folder
The destination folder for delivery of the received fax data will be determined based on the settings made under “3-5
Delivery Setting List Dialogue Box” on page 3-7.
The priority of delivery conditions is as follows:
1. Subaddress
2. Sender’s fax number
3. Other
1. Any subaddress sent from the transmitting fax machine will be checked to see if it matches any of the subadresses
registered in the delivery method settings of each destination folder. If it does, the received fax data will be sent to that
folder.
2. If a subaddress was not sent, or the subaddress does not match any folder settings, the fax phone number of the
transmitting fax will be checked to see if it matches the Sender Fax Number information registered under any of the
destination folders.
3. Lastly, delivery priority will check the Other settings in order to delivered the data to a destination folder.
* Only 4-digit subadresses sent from transmitting fax machines will be checked. If a subaddress of 5 digits or longer is
received, even if the last 4 digits match, the documents will not be delivered into the designated folder.
3-8 When a notice of fax reception is sent
When a notice of fax reception is sent from the server computer, the following screen will be displayed on the computer
receiving the notice.
Note: The Scanner File Utility must be running on the computer that will receive the notice of fax reception. In addition, be
sure that there is a check mark in the Reception Notice checkbox in the Setup dialogue box. (Refer to the settings
explained under “3-3 Setup Dialogue Box” on page 3-5.)
● To see the documents that were received by fax
1. Click on the Open button in the reception notice window shown above. Then, double-click on the Scanner File Utility icon
on the Windows Task Bar. The Scanner File Utility dialogue box will be displayed.
* When a notice of fax reception is received, the icon will appear in the Receive File List.
2. Refer to “3-10 Opening Received Faxes” on page 3-15 and open the received documents.
Page 3-13
Page 60

3-9 Checking a Reception Notification Error
When a notice of fax reception is sent from the server computer to a computer on which the Scanner File Utility is installed
but the notice could be delivered because the receiving computer is not turned on, or there is some other error, the status of
the error can be checked on a list.
Reception notices that were successfully retransmitted will be deleted from the list. For more details on the setting for the number
*
of days that retransmission will be attempted, refer to step 3 of “3-5 Delivery Setting List Dialogue Box” on page 3-8.
1. Click on the Error Log button in the Delivery Setting List dialogue box. The Error Log dialogue box will be displayed.
1 2 3 4
The following items are displayed in the list.
1 Date & Time
The date and time the documents were received by the fax unit.
2 Receiving notice point PC Address
The address of the computer to which the notice of fax reception was sent.
3 Status
Shows the cause of the error. The types of error are as follows.
“connection error”: The computer to which the notice of fax reception was sent is not running or the address of the
computer to which the notice of fax reception was sent is wrong.
“version error”: The installed Scanner File Utility is older than “Version 3.7”.
4 File Name
File name of the received documents.
Page 3-14
Page 61

3-10 Opening Received Faxes
Received fax data will be displayed in the Received File List within the Scanner File Utility dialogue box.
1. If the Scanner File Utility dialogue box is not open, double-click on the Scanner File Utility icon in the Windows Task
Bar.
2. Select in the Received File List the file that you want to open.
* Files listed in red (or indicated with an asterisk “*” next to the date) indicate those files which have not been opened yet.
Once a file is opened, the file is listed in black.
3. Click on the Open File button to open the selected file.
* You can also open any file by double-clicking on its name. However, if the file is a PDF file, Adobe Reader will be
required in order to read it.
REFERENCE
If you want to search for the folder where a specific received fax file is saved, select a file name from the list and click on the
Open Folder button. The location of that folder will be displayed.
Page 3-15
Page 62

3-11 Deleting Received Faxes
Is it recommended that you delete received fax data periodically and as necessary.
1. If the Scanner File Utility dialogue box is not open, double-click on the Scanner File Utility icon in the Windows Task
Bar.
2. Select the file that you want to delete.
3. Click on the Delete button to delete the selected file from the Received File List.
* In order to actually delete the file data from your computer, you will need to delete it directly from the folder in which it
is saved.
Page 3-16
Page 63

Section 4 The Address Book
The Address Book allows you to register information about individual destinations, or groups of destinations for Broadcast
Transmission, in advance. It is also possible to import CSV-formatted address data that have been created with other
applications and FED formatted data created with Address Editor for FAX to register destinations.
NOTE
It is necessary to have Address Book for Network FAX installed in each computer which will be used for fax transmission in
order to use the Address Book. Refer to “1-1 Installing FAX Driver and Utilities” on page 1-1 for more detailed
information on installing that software.
Page 4-1
Page 64

4-1 Registering Destination Information
You will need to register destination information in advance if you want to select a destination from the Address Book when
sending a fax.
1. Click on Start button in the Windows Task Bar and then select All Programs > FAX User Software > Address Book for
Network FAX in that order from the successive menus in order to access the Address Book for Network FAX dialogue
box.
2. Select New under the Edit menu and then select New Address from the successive submenu (or click on the
Address button). The Registering a New Address dialogue box will appear.
New
Page 4-2
Page 65

4-1 Registering Destination Information
3. Perform the various settings as appropriate.
1
2
3
4
5
6
7
1 Registration Name field: The destination name can be up to 16 characters long.
* You can not register a name that has already been registered.
2 Fax Number field: The destination fax number can be up to 32 characters long. [Available characters: 0 – 9, #, *, -
and a space (a space can NOT be entered as the first character)]
3 Subaddress field: The sub-address can be up to 20 characters long. [Available characters: 0 – 9, #, * and a space
(a space can NOT be entered as the first character)]
4 Password field: The password can be up to 20 characters long. [Available characters: 0 – 9, #, * and a space (a space
can NOT be entered as the first character)]
5 Company Name field: The company name can be up to 64 characters long.
6 Department Name field: The department name can be up to 64 characters long.
7 Recipient Name field: The name of the recipient can be up to 20 characters long.
4. Click on the OK button.
The entered information will be displayed in the address list area of the Address Book for Network FAX dialogue box.
5. In order to actually register the new information in the Address Book, select Apply from the File menu (or click on the
Apply button).
Page 4-3
Page 66

4-2 Registering Multiple Destinations as a Group
Perform the following procedure if you want to register information for multiple destinations as a single group.
1. Select New under the Edit menu of the Address Book for Network FAX dialogue box and then select New Group from
the successive submenu (or click on the
appear.
New Group button). The Registering a New group dialogue box will
2. Click on the Add button in order to access the Add New Address dialogue box.
3. Select from the Names that can be added list the destination that you want to add to the group. It is possible to select
multiple destinations at one time.
4. Click on the Add>> button.
The selected destinations will be moved to the Address to be added list. (Up to 80 destinations can be registered to
each group.)
* If you want to delete a destination from the Address to be added list, select that destination in that list and then click on
the <<Delete button.
5. Click on the OK button to return to the Registering a New group dialogue box.
The names you selected Add New Address dialogue box will be added to the group.
* If you want to delete a destination from the group, select that destination and then click on the Delete button.
Page 4-4
Page 67

4-2 Registering Multiple Destinations as a Group
6. Enter in the Registration Name field a name for the group of destinations. The group name can be up to 16 characters
long.
7. Click on the OK button.
The entered group information will be displayed in the address list area of the Address Book for Network FA X dialogue
box.
8. In order to actually register the new group information in the Address Book, select Apply from the File menu (or click on
the Apply button).
Page 4-5
Page 68

4-3 Address/Group Copy
It is possible to copy a registered address or group and partly edit the contents for registration as a new address or group.
This is convenient for cases when the contents you want to register are close or similar to already registered information.
1. With the Address Book for Network FAX dialogue box open, select the address or group that you want to copy.
2. Under the Edit menu, click on Copy and then on Paste. The Registering a New Address dialogue box or the Registering
a New Group dialogue box, as appropriate, will be displayed.
3. Edit the registered information.
To edit an address, refer to “4-1 Registering Destination Information” on page 4-2.
To edit a group, refer to “4-2 Registering Multiple Destinations as a Group” on page 4-4.
4. Click on the OK button.
5. In order to actually register the edited information in the Address Book, select Apply from the File menu (or click on the
Apply button).
Page 4-6
Page 69

4-4 Editing Individual and Group Destination Information
(1) Editing Information for an Individual or Group Destination
Perform the following procedure to edit information for an individual or group destination.
1. With the Address Book for Network FAX dialogue box open, select the individual or group destination entry that
contains the information that you want to edit.
An icon will appear above the list to indicate whether it is an individual (
) or group destination ( ).
2. Click on the Edit button (or double-click on the entry you want to edit).
3. Edit the registered information.
To edit information for an individual destination, refer to “4-1 Registering Destination Information” on page 4-2.
To edit information for a group of destinations, refer to “4-2 Registering Multiple Destinations as a Group” on page 4-4.
4. Click on the OK button.
5. In order to actually register the edited information in the Address Book, select Apply from the File menu (or click on the
Apply button).
Page 4-7
Page 70

4-4 Editing Individual and Group Destination Information
(2) Editing Information for More than One Individual or Group Destinations
It is possible to edit the information for multiple registered destinations at the same time. This is convenient when, for
example, you want to change the company name for different registered departments of the same company.
1. With the Address Book for Network FAX dialogue box open, select the multiple destinations that you want to edit.
2. Click on the Edit button. The Multiple Address Edit dialogue
box will be displayed.
3. Put a check mark in the checkbox of the common item that you want
to edit (“Registration Name”, “FAX Number”, “Subaddress”,
“Password”, “Company Name”, “Department Name”, “Recipient
Name” for an individual destination, and “Registration Name” for
Group Destinations), and then enter the new information.
4. Click on the OK button. The display will return to the Address Book for Network FAX dialogue box and the edited
information will be displayed.
5. In order to actually register the edited information in the Address Book, select Apply from the File menu (or click on the
Apply button).
Page 4-8
Page 71

4-4 Editing Individual and Group Destination Information
(3) Search/Replace the Contents of a Particular Entry Item
It is possible to search for and replace data for any entry item for multiple registered individual or group destinations. For example,
if a change is made to a city's area code, you can select multiple destinations and change the area code for their fax number with
the new one all in one batch.
1. With the Address Book for Network
FAX dialogue box open, select the
multiple individual or group
destinations that you want to edit.
2. Point at Replace under the Edit menu, or click on the
Replace button. The Replace text dialogue box will be
displayed.
3. Put a check mark in the checkbox of the common item that you want to edit (“Registration Name”, “FAX Number”,
“Subaddress”, “Password”, “Company Name”, “Department Name”, and “Recipient Name” for an individual destination
and “Registration Name” for Group Destinations).
4. Enter the information that you want to change in the Find text
field (left column) for the corresponding item.
Enter the new information in the edit box of the Replace text
field (right column).
Note: For fax numbers, the left most sequence that matches
the entered information will be replaced. (Example) With fax
number “555-33-1555”, if you enter “555” in the Find text field
and “111” in the Replace text field, the fax number will be
changed to “111-33-1555”. For other items, all matching
sequences will be replaced.
5. Click on the OK button. The display will return to the Address
Book for Network FAX dialogue box and the edited
information will be displayed.
6. In order to actually register the edited information in the Address
Book, select Apply from the File menu (or click on the
Apply button).
Page 4-9
Page 72

4-5 Deleting Individual and Group Destination Information
1. With the Address Book for Network FAX dialogue box open, select the individual or group destination entry that you
want to delete.
An icon will appear above the list to indicate whether it is an individual (
) or group destination ( ).
2. Click on the
The selected entry will be deleted from the list.
3. In order to actually delete the selected entry from the Address Book, select Apply from the File menu (or click on the
Apply button).
Delete button.
4-6 Importing Address Data
(1) Importing FDT Files
You can import and use FDT formatted address lists (file name: xxxx.fdt) previously made with this Address Book software.
1. With the Address Book for Network FAX dialogue box open, select Import under the File menu and then select
Address Book from the successive submenu. The Open dialogue box will appear.
2. Access the folder that contains the desired FDT file.
3. Select the desired FDT file and then click on the Open button.
Page 4-10
Page 73

4-6 Importing Address Data
(2) Importing CSV Files
You can import and use CSV-formatted address lists created with other software.
1. With the Address Book for Network FAX dialogue box open, select Import under the File menu and then select CSV
file from the successive submenu. The Open dialogue box will appear.
2. Access the folder that contains the desired CSV file.
3. Select the desired CSV file and then click on the Open button. The Import dialogue box will appear.
4. Use the dropdown menus to select the fields in the CSV file that correspond to the various fields (Registration Name, Fax
Number, etc.) in this Address Book.
5. Click on the OK button in order to access the Confirm imported contents dialogue box.
Page 4-11
Page 74

4-6 Importing Address Data
6. Check the imported addresses and select those entries that you want to add to this Address Book. The number of entries
that you select will be displayed in the Number of selected addresses field. Click on the Add To Address Book button
and the total number of entries that will be added to this Address Book will be displayed in the Number of added
addresses field. (The addresses you add will be deleted from the list.)
NOTE
If either of the following symbols appears in the list, that address can NOT be added to this Address Book as is.
?: That name is already registered in this Address Book, or the number of characters in the name exceed the acceptable
limit.
!: This information may include data which can not be handled by this Address Book.
In either of the above cases, click on the Edit button and refer to the character limits for each field under “4-1 Registering
Destination Information” on page 4-3 and correct the data as appropriate.
7. Once you are finished with the importing procedure, click on the OK button.
Page 4-12
Page 75

4-6 Importing Address Data
(3) Importing FED Files
You can import and use FED formatted editor list (file name: xxxx.fed) previously made with the Address Editor for FAX utility.
Refer to page 5-1 “Section 5 Address Editor for FAX” for more details.
NOTE
The fields imported from FED formatted editor list (files name: xxxx.fed) previously made with the Address Editor for FAX utility are
“Destination”, “FAX Number”, “Subaddress” and “Password” of the registered One-Touch Dial or Abbreviated Dial.
“Destination” will be imported into the “Registration Name” field of the Address Book for Network FAX.
1. With the Address Editor for FAX dialogue box open, select Import under the File menu and then select Address Editor
from the successive submenu. The Open dialogue box will appear.
2. Access the folder that contains the desired FED file.
3. Select the desired FED file and then click on the Open button.
Page 4-13
Page 76

4-7 Exporting Address Data
You can save the data created using this Address Book software as a FDT file.
1. With the Address Book for Network FAX dialogue box open, select Save as under the File menu. The Save as
dialogue box will appear.
2. Select the location in which you want to save the data.
3. Enter the desired file name and then click on the Save button.
Page 4-14
Page 77

Section 5 Address Editor for FAX
The Address Editor for FAX utility allows you to use your computer to register and change the self-station and dialing
information which is stored in the fax machine itself. It is also possible to import CSV-formatted address data that has been
created with other applications and use that data as dialing information.
If you are using more than one fax machine that is compatible with Address Editor for FAX, it is easy to register the same
dialing information in each of those machines.
NOTE
It is necessary to install Address Editor for FAX in each of the computers that will be used to implement the corresponding
functions and procedures of this utility. Refer to “1-1 Installing FAX Driver and Utilities” on page 1-1.
Page 5-1
Page 78

5-1 Registering Self-Station Information
You can use the Address Editor for FAX to register and change the self-station information that is stored in the fax machine
itself.
Perform the following procedure when you want to register or change the fax’s self-station information.
1. Click on the Start button in the Windows Task Bar and then select All Programs > (Brand Name) > Address Editor
for FAX in that order from the successive menus.
The Address Editor for FAX window will appear.
2. Select the desired method of connection to the fax machine.
To connect to a fax machine and continue the operation on-line, go to the next step.
To continue the operation off-line (without connecting to the fax machine), go directly to step 6.
Page 5-2
Page 79

5-1 Registering Self-Station Information
3. Connect to the fax machine.
Select from among the following 3 methods of connecting to the fax machine.
Connect to the fax machine by entering the fax’s IP address or host name
1 Enter the fax’s IP address or host name in the NW-FAX Address field.
2 Click on the Start Editing button. Connection to that fax machine will begin.
1
2
Connect to a fax machine that you have connected to before
1 Use the dropdown menu for the NW-FAX Address field to select the fax’s IP address or host name.
* Up to the last 10 fax machines that you have connected to will be displayed.
2 Click on the Start Editing button. Connection to that fax machine will begin.
1
2
Connect to the fax machine by searching over the network without entering the fax’s IP address
1 Click on the Search... button. The Search dialogue box will appear.
2 Click on the Start Searching button. A search will begin for all fax machines connected to the network and the NW-
FAX List will appear.
3 Select from the NW-FAX List the fax that you want to connect to and then click on the Start Editing button. Connection
to that fax machine will begin.
1
2
3
Page 5-3
Page 80

5-1 Registering Self-Station Information
4. Enter the password and then click on the OK button.
It is necessary to enter the Administrator Password in order to connect to the fax machine and edit registered data.
* For more detailed information on the Administrator Password, refer to the Scanner Edition of your Operation Guide.
(For color machines, refer to the machine’s Advanced Operation Guide.)
5. Reading of the data registered in the fax machine will begin. Go to step 7.
6. Open the type of information data that you want to edit off-line.
Create completely new information data
1 Select the New Data radio button under Offline Edit.
2 Click on the Start Editing button. New information data will be created.
* If you create new information data and send it to the fax machine, the full data file, including unregistered dial
numbers, will be written to the fax machine on top of the data that is currently registered there. It is not possible to
send only newly entered data as an addition to the current data.
1
2
Use saved data (FED file) and edit the current information data
1 Select the Saved File radio button under Offline Edit and then click on the ... button. The Open dialogue box will
appear.
2 Select the file (FED file) with the saved data and then click on the Open button.
1
2
Page 5-4
Page 81

5-1 Registering Self-Station Information
7. Point to the Own Info. command under the Setting menu. The Own Information window will appear.
8. Enter the various information as appropriate.
1
2
3
1 Own Name field: Enter the self-station name of the fax machine (up to 32 characters)
2 Own Tel field: Enter the self-station telephone number of the fax machine (up to 20 digits)
3 Own ID field: Enter the self-station ID number of the fax machine (4 digits)
* Refer to the Fax Edition of your Operation Guide for more detailed information on the self-station ID number.
Page 5-5
Page 82

5-1 Registering Self-Station Information
9. Transmit the edited data to the fax machine.
Select from among the following 2 methods of transmitting data.
* If you are editing the data off-line, the Set the destination dialogue box will appear when you perform the transmission
operation. Since it is necessary to connect to the fax machine in order to transmit the data, you will need to perform the
following procedure.
Transmit all of the edited data
Point to the Send all data command under the File menu (or click on the
self-station and dialing information, etc., will be written over all corresponding data in the fax machine.
Send all data button). All of the registered
Transmit only the type of edited data that is currently displayed
Point to the Send data command under the File menu (or click on the
is related to the type of data currently displayed in the window will be written over all corresponding data in the fax
machine.
<Changing your connection to another fax machine>
Point to the Change connection command under the File menu (or click on the
Change the destination connection in the resulting Change connection dialogue box.
Send data button). Only the information that
Change connection button).
Page 5-6
Page 83

5-1 Registering Self-Station Information
10. Connect to the fax machine and transmit the edited data.
Select from among the following 3 methods of connecting to the fax machine.
Connect to the fax machine by entering the fax’s IP address or host name
1 Enter the fax’s IP address or host name in the NW-FAX Address field.
2 Click on the Send Data button. The Administrator Password dialogue box will appear.
3 Enter the password* and then click on the OK button. The connection will be made to that fax machine and transmission
of the data will begin.
1
2
Connect to a fax machine that you have connected to before
1 Use the dropdown menu for the NW-FAX Address field to select the fax’s IP address or host name.
* Up to the last 10 fax machines that you have connected to will be displayed.
2 Click on the Send Data button. The Administrator Password dialogue box will appear.
3 Enter the password* and then click on the OK button. The connection will be made to that fax machine and transmission
of the data will begin.
3
1
2
Connect to the fax machine by searching over the network without entering the fax’s IP address
1 Click on the Start Searching button. A search will begin for all fax machines connected to the network and the NW-
FAX List will appear.
2 Select from the NW-FAX List the fax that you want to connect to and then click on the Send Data button. The
Administrator Password dialogue box will appear.
3 Enter the password* and then click on the OK button. The connection will be made to that fax machine and transmission
of the data will begin.
1
2
3
3
* It is necessary to enter the Administrator Password in order to connect to the fax machine and edit registered data.
For more detailed information on the Administrator Password, refer to the Scanner Edition of your Operation Guide.
(For color machines, refer to the machine’s Advanced Operation Guide.)
Page 5-7
Page 84

5-2 Setting the Network FAX functions
You can use the Address Editor for FAX utility to make settings for the Network FAX functions.
Perform the following procedure when you want to make settings for the Network FAX functions.
1. Follow steps 1 through 6 under “5-1 Registering Self-Station Information” on page 5-2 and open the Address Editor for
FAX window. Then select the desired method of connection to the fax machine.
2. Point to the NW-FAX command under the Setting menu. The NW-FAX Setting window will appear.
3. Perform the various settings as appropriate.
* Refer to the Fax Edition of your Operation Guide for more detailed information on the function of each setting.
1
2
3
4
5
6
7
8
9
10
1 NW-FAX RX radio buttons: Turns Network FAX reception ON or OFF.
2 Print Here radio buttons: Turns printout at the fax machine ON or OFF during Network FAX reception.
3 File name field: Enter the default file name for data received during Network FAX reception. (monochrome machines:
up to 13 characters; color machines: up to 5 characters)
4 Save Folder No. field: Enter the save folder number for data received during Network FAX reception.
(between 001 and 100)
5 File name field: Enter the default file name to be used when the “Turning the Save transmitted Documents Function
ON” setting is selected. (monochrome machines: up to 13 characters; color machines: up to 5 characters)
6 Save Folder No. field: Enter the save folder number to be used when the “Turning the Save transmitted Documents
Function ON” setting is selected. (between 001 and 100)
7 IP Address or Host Name field: Enter the IP address or host name of the Server Computer (the computer where the
Scanner File Utility is installed) in which the Network FAX files will be saved.
(up to 32 characters)
8 Admin’s E-mail Address field: Enter the email address of the Network FAX administrator. (up to 64 characters)
9 SMTP Authentication Account field: Enter the SMTP authorization account for the Network FAX administrator’s
email address. (up to 64 characters)
10 SMTP Authentication Password field: Enter the SMTP authorization password* for the Network FAX administrator’s
email address. (up to 31 characters)
* An asterisk (“*”) will be displayed in place of each character when you enter
the SMTP authorization password.
4. Transmit the edited data to the fax machine. Refer to steps 9 and 10 under “5-1 Registering Self-Station Information” on
page 5-2 to transmit the edited data to the fax machine.
Page 5-8
Page 85

5-3 Registering Dialing Information
You can use the Address Editor for FAX to register and change the dialing information that is stored in the fax machine itself.
Perform the following procedure when you want to register or change the fax’s dialing information.
(1) Registering one-touch dial information
Perform the following procedure when you want to register information for one-touch dialing.
1. Follow steps 1 through 6 under “5-1 Registering Self-Station Information” on page 5-2 and open the Address Editor for
FAX window. Then select the desired method of connection to the fax machine.
2. Point to the Dial command under the Registration menu. The Dial Registration window will appear.
3. Click on the New button. The New Dial Registration dialogue box will appear.
Page 5-9
Page 86

5-3 Registering Dialing Information
4. Select One-Touch Dial and then click on the OK button. The One-Touch Dial Registration dialogue box will appear.
5. Register the one-touch dial information. Enter the following registration information.
1
2
3
4
5
1 Dial No. field: Enter the corresponding one-touch dial number. (
and 0600; 16, 18, 20, 22 and 25 cpm* monochrome machines: between 0001 and 0032; color machines: between 0001 and 1000)
2 Destination field: Enter a name for that one-touch dial number. (up to 20 characters. Available characters: 0 – 9, #,
*, - and a space (a space can NOT be entered as the first character))
3 Fax No. field: Enter the telephone number of the fax machine that you want to dial using that one-touch dial number.
(up to 32 digits)
4 TX Start Speed field: Enter the communication speed that you want to use with that one-touch dial number. (HIGH/
MEDIUM/LOW)
5 Detailed setting button: Lets you make more detailed settings. Refer to the procedure from the following step.
6. Click on the Detailed setting button. The Detailed setting dialogue box will appear.
7. Enter the following registration information.
30, 40 and 50 cpm* monochrome machines: between 0001
1
2
3
4
5
6
7
8
1 Normal TX radio button: Select this setting for standard fax transmission.
2 Encryption TX radio button: Select this setting when performing Encryption Communication.
3 Encryption Code field: When the Encryption TX setting is selected, enter the ID number that corresponds to the
Encryption key to be used. (between 01 and 20)
4 ... button: Lets you register Encryption keys. Refer to the procedure from the following step.
5 Encryption Box No. field: When the Encryption TX setting is selected, enter the Encryption box number of the
receiving station. (4 digits)
6 Subaddress TX radio button: Select this setting when performing F-Code Based Communication.
7 Subaddress field: Enter the corresponding subaddress when the Subaddress TX setting is selected. (up to 20 characters.
Available characters: 0 – 9, #, * and a space (a space can NOT be entered as the first character))
8 Password field: Enter the corresponding password when the Subaddress TX setting is selected. (up to 20 characters.
Available characters: 0 – 9, #, * and a space (a space can NOT be entered as the first character))
Page 5-10
Page 87

5-3 Registering Dialing Information
8. To register an Encryption key, go to the next step.
To continue without registering an Encryption key, go directly to step 14.
9. Click on the ... button for the Encryption Code field. The Encryption Key Selection dialogue box will appear.
10. Select the Encryption key ID number that you want to register and then click on the Edit button. The Encryption key
Registration dialogue box will appear.
11. Use numerals (0 to 9) and/or the English alphabet (A to F) to enter the desired 16-digit Encryption key.
12. Click on the OK button. The registered information will appear in the Encryption Key Selection dialogue box.
13. Click on the OK button. The Detailed setting dialogue box will appear once again.
14. Click on the OK button. The One-Touch Dial Registration dialogue box will appear once again.
15. Make sure that the registered information is correct and then click on the OK button.
16. Transmit the edited data to the fax machine. Refer to steps 9 and 10 under “5-1 Registering Self-Station Information” on
page 5-2 to transmit the edited data to the fax machine.
Page 5-11
Page 88

5-3 Registering Dialing Information
(2) Registering chain dial information
Perform the following procedure when you want to register information for chain dialing.
1. Follow steps 1 through 6 under “5-1 Registering Self-Station Information” on page 5-2 and open the Address Editor for
FAX window. Then select the desired method of connection to the fax machine.
2. Point to the Dial command under the Registration menu. The Dial Registration window will appear.
3. Click on the New button. The New Dial Registration dialogue box will appear.
Page 5-12
Page 89

5-3 Registering Dialing Information
4. Select Chain Dial and then click on the OK button. The Chain Dial Registration dialogue box will appear.
5. Register the chain dial information. Enter the following registration information.
1
2
3
1 Dial No. field: Enter the corresponding chain dial number. (
0600; 16, 18, 20, 22 and 25 cpm* monochrome machines: between 0001 and 0032; color machines: between 0001 and 1000)
2 Chain Name field: Enter a name for that chain dial number. (up to 20 characters)
3 Chain No. field: Enter the chain number that you want to dial using that chain dial number. (up to 32 digits)
6. Make sure that the registered information is correct and then click on the OK button.
7. Transmit the edited data to the fax machine. Refer to steps 9 and 10 under “5-1 Registering Self-Station Information” on
page 5-2 to transmit the edited data to the fax machine.
30, 40 and 50 cpm* monochrome machines: between 0001 and
Page 5-13
Page 90

5-3 Registering Dialing Information
(3) Registering group dial information
Perform the following procedure when you want to register information for group dialing.
1. Follow steps 1 through 6 under “5-1 Registering Self-Station Information” on page 5-2 and open the Address Editor for
FAX window. Then select the desired method of connection to the fax machine.
2. Point to the Dial command under the Registration menu. The Dial Registration window will appear.
3. Click on the New button. The New Dial Registration dialogue box will appear.
Page 5-14
Page 91

5-3 Registering Dialing Information
4. Select Group Dial and then click on the OK button. The Group Dial Registration dialogue box will appear.
5. Register the group dial information. Enter the following registration information.
1
2
3
4
5
1 Dial No. field: Enter the corresponding group dial number. (
0600; 16, 18, 20, 22 and 25 cpm* monochrome machines: between 0001 and 0032; color machines: between 0001 and 1000)
2 Group Name field: Enter a name for that group dial number. (up to 20 characters)
3 Add button: Lets you add destinations to the group. Refer to the procedure from the following step.
4 Delete button: Lets you delete destinations from the destination list for that group.
5 Chain Deletion button: Deletes any chain number that is registered for a selected destination.
6. Click on the Add button. The Add new destination dialogue box will appear.
30, 40 and 50 cpm* monochrome machines: between 0001 and
Page 5-15
Page 92

5-3 Registering Dialing Information
7. Add a new destination to the group.
Select from among the following 3 methods of adding destinations to a group.
Add a destination that is registered under one-touch dialing to the group
1 Click on the 1-Tch tab above the list at left and select the one-touch information that you want to add to the group.
* If your machine possesses abbreviated dialing capabilities, it is also possible to add destinations that are registered
under abbreviated dial numbers.
2 Click on the Add>> button. The selected information will be added to the list at right.
1
2
Enter a destination fax number to be added to the group
1 Click on the New Fax No. button. The Input Fax No. dialogue box will appear.
2 Enter the destination fax number in the Fax No. field.
3 When performing F-Code Based Communication, select the Subaddress setting and then enter the corresponding
subaddress and password.
4 Click on the OK button. The Add new destination dialogue box will appear once again and the registered information
will be added to the list at right.
2
3
1
4
Page 5-16
Page 93

5-3 Registering Dialing Information
Adding a chain dial number
1 Click on the Chain tab above the list at left and select the chain dial information that you want to use.
2 Click on the Add>> button. The selected information will be added to the list at right.
3 Register the destination that you want to add to the group. Perform either steps 1 and 2 of “Add a destination that is
registered under one-touch dialing to the group” or steps 1 to 4 of “Enter a destination fax number to be added to the
group” above.
4 The added destination will be registered in the list at right under the number that corresponds to the designated chain
dial information.
1
2
8. Make sure that the registered information is correct and then click on the OK button.
9. Transmit the edited data to the fax machine. Refer to steps 9 and 10 under “5-1 Registering Self-Station Information” on page
5-2 to transmit the edited data to the fax machine.
Page 5-17
Page 94

5-3 Registering Dialing Information
(4) Registering program dial information
Send transmission and polling reception procedures can be registered under program dialing.
Perform the following procedure when you want to register information for program dialing.
1. Follow steps 1 through 6 under “5-1 Registering Self-Station Information” on page 5-2 and open the Address Editor for
FAX window. Then select the desired method of connection to the fax machine.
2. Point to the Dial command under the Registration menu. The Dial Registration window will appear.
3. Click on the New button. The New Dial Registration dialogue box will appear.
Page 5-18
Page 95

5-3 Registering Dialing Information
4. Select Send (Program Dial) or Polling RX (Program Dial) as desired and then click on the OK button. The Send
(Program Dial) or Polling RX (Program Dial) dialogue box, as appropriate, will appear.
5. Register the program dial information. Enter the following registration information.
1
2
3
4
5
6
1 Dial No. field: Enter the corresponding program dial number. (
and 0600; 16, 18, 20, 22 and 25 cpm* monochrome machines: between 0001 and 0032; color machines: between 0001 and 1000)
2 Program Name field: Enter a name for that program dial number. (up to 20 characters)
3 Add button: Lets you add destinations to the program. Refer to the procedure from the following step.
4 Delete button: Lets you delete destinations from the destination list for that program.
5 Chain Deletion button: Deletes any chain number that is registered for a selected destination.
6 Set Time radio buttons: Select the ON setting when performing a Timer-Controlled Communication and then enter
the start time for the programmed communication in the field below.
6. Click on the Add button. The Add new destination dialogue box will appear.
30, 40 and 50 cpm* monochrome machines: between 0001
Page 5-19
Page 96

5-3 Registering Dialing Information
7. Add a new destination to the program.
Select from among the following 3 methods of adding destinations to a program.
Add a destination that is registered under one-touch dialing to the program
1 Click on the 1-Tch tab above the list at left and select the one-touch information that you want to add to the program.
* If your machine possesses abbreviated dialing capabilities, it is also possible to add destinations that are registered
under abbreviated dial numbers.
2 Click on the Add>> button. The selected information will be added to the list at right.
1
2
Enter a destination fax number that to be added to the program
1 Click on the New Fax No. button. The Input Fax No. dialogue box will appear.
2 Enter the destination fax number in the Fax No. field.
3 When performing F-Code Based Communication, select the Subaddress setting and then enter the corresponding
subaddress and password.
4 Click on the OK button. The Add new destination dialogue box will appear once again and the registered information
will be added to the list at right.
2
3
1
4
Page 5-20
Page 97

5-3 Registering Dialing Information
Adding a chain dial number
1 Click on the Chain tab above the list at left and select the chain dial information that you want to use.
2 Click on the Add>> button. The selected information will be added to the list at right.
3 Register the destination that you want to add to the program. Perform either steps 1 and 2 of “Add a destination that is
registered under one-touch dialing to the program” or steps 1 to 4 of “Enter a destination fax number to be added to the
program” above.
4 The added destination will be registered in the list at right under the number that corresponds to the designated chain
dial information.
1
2
8. Make sure that the registered information is correct and then click on the OK button.
9. Transmit the edited data to the fax machine. Refer to steps 9 and 10 under “5-1 Registering Self-Station Information” on
page 5-2 to transmit the edited data to the fax machine.
Page 5-21
Page 98

5-3 Registering Dialing Information
(5) Editing registered dialing information
It is possible to edit registered dialing information. It is also possible to select multiple destinations and simultaneously
change their corresponding information.
● Edit registered information (individual data)
Perform the following procedure when you want to edit registered dialing information.
1. Follow steps 1 through 6 under “5-1 Registering Self-Station Information” on page 5-2 and open the Address Editor for
FAX window. Then select the desired method of connection to the fax machine.
2. Point to the Dial command under the Registration menu. The Dial Registration window will appear.
* If the information is registered under an abbreviated dial number, point to the Abbreviated Dial command. The
Abbreviated Dial Registration window will appear.
3. Select the dialing information that you want to edit and then click on the Edit button.
4. Edit the registered information as desired.
To edit one-touch dial information, refer to “(1) Registering one-touch dial information” on page 5-9.
To edit chain dial information, refer to “(2) Registering chain dial information” on page 5-12.
To edit group dial information, refer to “(3) Registering group dial information” on page 5-14.
To edit program dial information, refer to “(4) Registering program dial information” on page 5-18.
To edit abbreviated dial information, refer to the procedure for editing one-touch dial information.
5. Make sure that the edited information is correct and then click on the OK button.
6. Transmit the edited data to the fax machine. Refer to steps 9 and 10 under “5-1 Registering Self-Station Information” on
page 5-2 to transmit the edited data to the fax machine.
Page 5-22
Page 99

5-3 Registering Dialing Information
● Edit registered information (multiple data)
It is possible to simultaneously change the destination name and fax telephone number, etc., for multiple destinations so
that they all have the same information in common.
Perform the following procedure when you want to edit registered dialing information for multiple destinations simultaneously.
1. Follow steps 1 through 6 under “5-1 Registering Self-Station Information” on page 5-2 and open the Address Editor for
FAX window. Then select the desired method of connection to the fax machine.
2. Point to the Dial command under the Registration menu. The Dial Registration window will appear.
* If the information is registered under an abbreviated dial number, point to the Abbreviated Dial command. The
Abbreviated Dial Registration window will appear.
3. Select multiple dialing entries that you want to edit and then click on the Edit button. The Edit multiple Dials dialogue
box will appear.
4. Select which type of information will be changed for all of the selected entries and then enter the corresponding information
that they will have in common.
One-touch dial: Destination / Fax No. / TX Start Speed / Dial Mode
Chain dial: Destination / Fax No.
Group dial: Destination
Program dial: Destination
Abbreviated dial: Destination / Fax No. / TX Start Speed / Dial Mode
5. Make sure that the edited information is correct and then click on the OK button. The selected information will be edited.
6. Transmit the edited data to the fax machine. Refer to steps 9 and 10 under “5-1 Registering Self-Station Information” on
page 5-2 to transmit the edited data to the fax machine.
Page 5-23
Page 100

5-3 Registering Dialing Information
● Copying dialing information
It is possible to copy registered dialing information and then change a portion of that information for registration as a new
dialing entry.
Perform the following procedure when you want to copy registered dialing information.
1. Follow steps 1 through 6 under “5-1 Registering Self-Station Information” on page 5-2 and open the Address Editor for
FAX window. Then select the desired method of connection to the fax machine.
* If the information is registered under an abbreviated dial number, point to the Abbreviated Dial command. The
Abbreviated Dial Registration window will appear.
2. Point to the Dial command under the Registration menu. The Dial Registration window will appear.
3. Select the dialing information that you want to copy and then click on the Copy button. The Select No. dialogue box will
appear.
4. Designate the new dialing information number that you want to use for the copied data. Enter the desired number in the
Dial No. field or use the dropdown menu to select that number.
5. Click on the OK button. The copied dialing information will be copied to the selected number.
6. Refer to “● Edit registered information (individual data)” on page 5-22 or “● Edit registered information (multiple data)”
on page 5-23, as appropriate, and edit the copied dialing information.
7. Transmit the edited data to the fax machine. Refer to steps 9 and 10 under “5-1 Registering Self-Station Information” on
page 5-2 to transmit the edited data to the fax machine.
Page 5-24
 Loading...