

Page 1

PROGRAMMING USING SET
CASH REGISTER
NETTUN@3000
int'l
Page 2

Publication issued by:
Olivetti S.p.A.
Telecom Italia Group
Via Jervis, 77 - 10015 Ivrea (TO)
Copyright © 2012, by Olivetti
All rights reserved.
This manual describes the CRF3000 cash register sold with the name
NETTUN@3000
int’l
.
The manufacturer reserves the right to carry out modifications to the product
described in this manual at any time without any notice.
The quality requirements of this product are attested
through display of
marking on the product.
Your attention is drawn to the following actions which could compromise the
conformity attested to above and also product characteristics:
• incorrect power supply;
• incorrect installation, incorrect or improper use or use not in compliance with
the warnings provided in the User’s Manual furnished with the product;
• replacement of original components or accessories with others of a type not
approved by the manufacturer, or performed by unauthorised personnel
User Safety
Connect the machine to a nearby and readily accessible current outlet.
Access the print unit area only to replace accessories. Do not use the machine
above or close to sources of heat (e.g. radiators) or very close to water (e.g.
swimming-pools or showers).
To effectively disconnect the appliance, remove the plug of the power cord from the
current outlet. To clean the machine, disconnect it from the current outlet, use a
damp cloth. Do NOT not use corrosive liquids.
Page 3

iii
CONTENTS
PROGRAMMING USING SET
ERROR MESSAGES..............................................................................................2
PROGRAMMING LIST ...........................................................................................2
SET 101 – RESTORE FACTORY DEFAULT ......................................................... 3
SET 102 – FORMAT MEMORY.............................................................................. 3
SET 150 - DISPLAY TILL TOTAL AMOUNT ..........................................................8
SET 151 – SET MACHINE DATE AND TIME......................................................... 9
SET 152 – CHANGE AUTOMAT. DATE & TIME.................................................. 10
SET 154 – RESET REGISTER GT....................................................................... 10
SET 155 - ACTIVATE OBLIGATORY INVOICE HEADING FOR INVOICE.......... 10
SET 160 - LANGUAGE SELECTION ...................................................................11
SET 162 – ROUNDING TYPE SELECTION......................................................... 12
SET 170 – TRAINING MODE ...............................................................................12
SET 200 - PRINT SERIES 200 OPTIONS LIST ................................................... 12
SET 201 - SET UP MERCHANDISE ICONS........................................................13
SET 203 - SET UP POINT ICONS .......................................................................14
SET 206 - SET UP PUBLIC HOLIDAY ICONS..................................................... 14
SET 297 - PRINT LIST OF ICON-PHRASE COMBINATIONS
SET 298 - PRINT LIST OF MERCHANDISE PHRASES
SET 299 - PRINT LIST OF MERCHANDISE ICONS............................................ 16
SET 300 - PRINT SERIES 300 OPTION LIST...................................................... 16
SET 301 - SET MACHINE CODE......................................................................... 16
SET 302 - SET UP HEADING LINES ................................................................... 17
SET 303 - SET UP COURTESY PHRASES......................................................... 18
SET 304 - SET PAYMENT MODE PARAMETERS .............................................. 19
SET 305 - SET GROUP DESCRIPTORS............................................................. 21
SET 306 - ENABLE OBLIGATORY EXECUTION OF DAILY REPORT ............... 21
SET 307 - SET UP DISCOUNT TABLE................................................................ 22
SET 308 - SET VAT RATES................................................................................. 23
SET 309 - SET PERCENT MARKUP PARAMETERS.......................................... 24
SET 310 - SET MONEY ORDER DESCRIPTOR ................................................. 25
SET 311 - SET HALO VALUE FOR CHANGE .....................................................25
SET 314 - PRINT MACHINE CONFIGURATION .................................................26
SET 315 – X MODE AUTOMATIC REPORT MANAGEMENT
SET 316 - Z MODE AUTOMATIC REPORT MANAGEMENT .............................. 27
SET 318 - ENABLE OBLIG. CALCULATION OF CHANGE .................................. 28
SET 320 - SELECT COURTESY MESSAGE TYPE............................................. 28
SET 321 - ENABLE ZERO PRICE........................................................................ 29
SET 322 - SELECT MACHINE FONT...................................................................29
SET 324 - SELECT VAT DETAILS....................................................................... 30
SET 328 - SELECT RAPID UPDATE MODE........................................................ 31
SET 329 - ENABLE SINGLE ITEM SALES ..........................................................31
Page 4

iv
SET 338 - SET HEADER LINES FOR INVOICE ..................................................31
SET 339 - SET SIMPLIFIED INVOICE PARAMETERS........................................32
SET 340 - SET WEEE GENERIC MESSAGE DESCRIPTORS ...........................32
SET 341 - SET WEEE MESSAGE VALUE DESCRIPTORS................................32
SET 342 - SET PROFORMA RECEIPT MESSAGE............................................. 33
SET 345 – SAVE DATABASE DATA AND DEF. SETTINGS ............................... 34
SET 346 – RESTORE DATABASE DATA AND DEF. SETTINGS .......................36
SET 347 - RESET BCR PLU DATA...................................................................... 37
SET 348 - SAVING THE USER CONFIGURATION (DATABASE)
OF THE CASH REGISTER..................................................................38
SET 349 - RESTORING THE USER CONFIGURATION (DATABASE)
OF THE CASH REGISTER...................................................................39
SET 350 - MAKING A SECURITY (BACKUP) COPY
OF THE CASH REGISTER ON A USB PEN ....................................... 40
SET 351 - RESTORE USER DATA...................................................................... 41
SET 352 - SELECT ADD MODE TYPE ................................................................ 42
SET 355 - ENABLE CUTTER ............................................................................... 42
SET 356 - ENABLE ACOUSTIC WARNING FOR BARCODE READER.............. 43
SET 358 - ENABLE REPORT SAVING ON EJ..................................................... 43
SET 359 - ENABLE BCR PRINTING.................................................................... 43
SET 360 - ENABLE PASSWORD MANAGEMENT .............................................. 44
SET 361 - SET SUPERVISOR PASSWORD .......................................................44
SET 362 - SET CASHIER PASSWORD............................................................... 45
SET 363 - SELECT NO. TICKETS ON EJ TO PRINT .......................................... 45
SET 364 - SELECT TYPE AND THRSHLD. VALUE FOR EJ END ...................... 45
SET 365 - SAVE ALL TICKETS ON EJ ................................................................ 46
SET 366 - ENABLE MULTIPLE TICKETS............................................................47
SET 367 - ENABLE PRINTING OF ARTICLES SOLD ......................................... 47
SET 368 - ENABLE TILL TOTAL DISPLAY.......................................................... 48
SET 370 - ENABLE OPERATORS ....................................................................... 48
SET 371 - ENABLE CUSTOMER ACCOUNTS .................................................... 48
SET 372 - SET OFFER VALUES .........................................................................49
SET 375 - PRINT TICKET INFORMATION .......................................................... 49
SET 380 - WAIT FOR DISPLAY SWTCH-OFF..................................................... 49
SET 389 - ENABLE CHIPCARD MANAGEMENT ................................................
50
SET 390 - PRINT SERIES 390 OPTIONS LIST ................................................... 50
SET 391 - CHIPCARD FORMATTING MANAGEMENT....................................... 50
SET 392 - CHIPCARD PROGRAMMING INFORMATION ................................... 51
SET 393 - CHIPCARD DELETION ....................................................................... 53
SET 394 - CHIPCARD DUPLICATION................................................................. 53
SET 395 - CHIPCARD CODE MANAGEMENT .................................................... 54
SET 396 - DEALER CHIPCARD CODE MANAGEMENT..................................... 54
SET 397 - WALLET CHIPCARD CODE MANAGEMENT..................................... 55
SET 398 - CHIPCARD PNTS MANAGEMENT..................................................... 55
SET 400 - PRINT SERIES 400 OPTIONS LIST ................................................... 55
SET 401 - SET INFORMATION FOR EACH DEPARTMENT............................... 56
SET 451 - PRINT INFORMATION OF ALL EJ USED BY MACHINE ................... 58
Page 5

v
SET 452 - PRINT TICKET SELECTED BY NUMBER.......................................... 58
SET 453 - PRINT TICKETS OF A GIVEN DATE.................................................. 58
SET 454 - PRINT TICKETS COMPRISED BETWEEN TWO NUMBERS ............ 59
SET 455 - PRINT TICKETS COMPRISED BETWEEN TWO DATES .................. 59
SET 458 - FULL PRINTING OF EJ....................................................................... 60
SET 459 - EJ DELETION ..................................................................................... 60
SET 460 - PRINT CURRENT EJ INFORMATION ................................................ 60
SET 461 - EJ FREE SPACE MANAGEMENT...................................................... 60
SET 510 - PRINT SERIES 510 OPTIONS LIST ................................................... 60
SET 600 - PRINT SERIES 600 OPTIONS LIST ................................................... 61
SET 601 - SET INFORMATION FOR EACH OPERATOR ................................... 61
SET 650 - PRINT SERIES 650 OPTIONS LIST ................................................... 62
SET 651 - SET INFORMATION FOR EACH ACCOUNT ..................................... 62
SET 652 - DELETE CUSTOMER ACCOUNT INFORMATION ............................ 62
SET 653 - DELETE INFORMATION OF MORE THAN ONE ACCOUNT............. 63
SET 654 - DELETE ALL CUSTOMER ACCOUNTS............................................. 63
SET 800 - PRINT BCR PLU INFORMATION READ AS CODE ........................... 64
SET 801 - FORMAT BCR PLU AREA .................................................................. 68
SET 802 - INSERT NEW BCR PLU ..................................................................... 69
SET 803 - DELETE BCR PLU.............................................................................. 70
SET 804 - MODIFY BCR PLU .............................................................................. 71
SET 900 - PRINT SERIES 900 OPTIONS LIST ................................................... 72
SET 901 - SET SERIAL CHANNEL 1 INFORMATION
SET 903 - SET SERIAL CHANNEL 2 INFORMATION......................................... 73
SET 902 - LOADING SERIAL CHANNEL 1 DEVICE
SET 904 - LOADING SERIAL CHANNEL 2 DEFAULT ........................................ 74
SET 905 - SERIAL DEVICE CONFIGURE ........................................................... 74
SET 906 - ENABLE USB CONNECTION ............................................................. 74
SET 919 - ENABLE NETWORK SERVICES (OPTIONAL SETTINGS)................ 75
SET 920 - ETH ACTIVATION PARAMETERS (OPTIONAL SETTINGS)............. 75
SET 921 - CHANNEL 1 ETH SETTINGS
SET 922 – CHANNEL 2 WLAN SETTINGS
SET 923 – PPP SETTINGS
SET 924 – WIFI SETTINGS
SET 925 – ADSL SETTINGS
SET 926 – FTP SETTINGS
SET 927 – SNMP SETTINGS
SET 928 – HSDPA SETTINGS
SET 929 – VPN SETTINGS
SET 930 - ETH ADVANCED SETTINGS (OPTIONAL SETTINGS) ................... 76
SET 931 - SELECT FW UPDATE MODE (OPTIONAL SETTINGS) .................... 76
SET 932 - SELECT DB UPDATE MODE (OPTIONAL SETTINGS) ..................... 77
SET 950 – SET SLIP PRINTER INFORMATION
SET 951 - CALIBRATE SLIP PRINTER MODULE............................................... 78
APPENDIX
ICON CLASSIFICATIONS AND LIST OF PROMOTIONAL PHRASES A-1
SET 933 - TEST NETWORK (OPTIONAL SETTINGS) ...........
............................. 77
Page 6

Page 7

1
1. PROGRAMMING USING SET
The cash register can be programmed from the Programming environment accessible from the
main Sales screen by selecting [F] (Functions)> GENERAL FUNCTIONS environment
followed by the [Config] > [Set setup] key.
F
03.03.2012 18.10 Till No.: 1
Vch: ON Pr.list 1 Operator: Disabled
To:
perform programming
set the related parameter as described in the
following pages.
confirm the setting made and pass to the
next parameter
press X.
skip programming and pass directly to the
next parameter
press X.
cancel the setting press C.
exit from the programming environment
without saving the programming changes
press
without confirming with .X.
confirm the settings made and return to
the start of the SET mode
press . Total .
cancel an error message press .C.
when programming a department field,
skip to the next department to program the
same field
Press .Subtotal.
SETTING SET UP
Page 8
2
When programming sales prices, the decimal separator is inserted automatically when you
enter amounts consisting of whole figures. On the other hand, the decimal separator must be
entered manually for amounts with decimal figures.
ERROR MESSAGES
The error messages listed here are those that appear most frequently when using
Programming mode.
MESSAGE MEANING
EXCEEDED CAPACITY
The values set exceed the number of figures allowed.
OVER MAX. LIM.
The value set is not included among the permitted values.
SEQUENCE ERROR
The key pressed is not allowed.
NOT ALLOWED
The operation requested is not allowed.
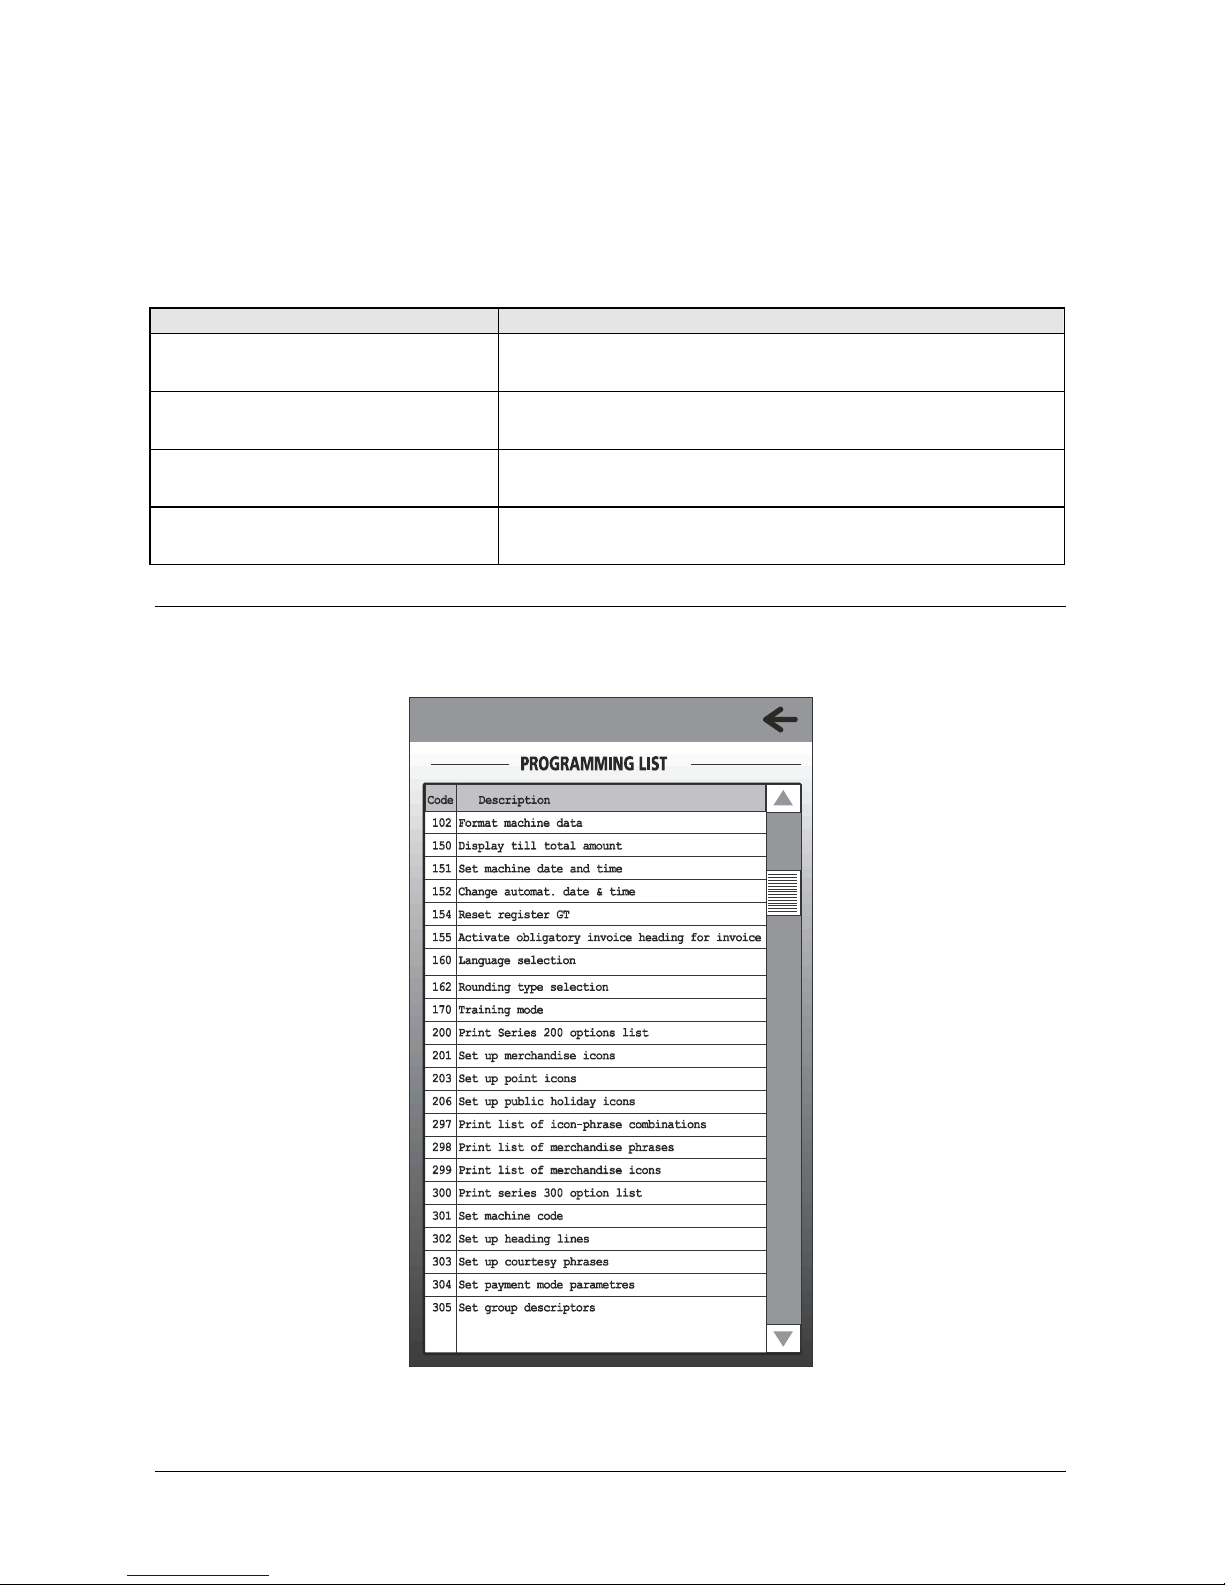
PROGRAMMING LIST
With the [Sets List] key, you can display a list of all the functions available on the register for
programming, and the code to use for enabling the function.
F
03.03.2012 18.10 Till No.: 1
V
ch: ON Pr.list 1 Operator: Disabled
Note: The programming functions that can be used by the user are listed below.
This section indicates the procedures and codes to be used for configuring the cash register.
Page 9

3
SET 101 – RESTORE FACTORY DEFAULT
This can be used to zero all the data present on the machine, restoring the default values
(factory settings).
Operating procedure
1.
.1. .0. 1. .X.
2.
LOAD DEFAULT
CONFIRM?
Confirm with .X. to proceed with the operation to format the existing
data and load the machine with the default values.
SET 102 – FORMAT MEMORY
Formatting the memory
Using Code 102 you can format the memory of the cash register. This means that in
programming mode the memory can be divided into logical areas of size and number to meet
the needs of the user. In particular, you can configure the basic number of parameters required
for carrying out sales activities (number of merchandise categories, departments, PLUs,
operators, etc.) and choose the lengths of each of their descriptors.
For each of these entities you can also decide whether or not to enable a series of options
available on the machine. For example, you can choose whether or not to set a maximum or
minimum sales amount for all departments (other codes described in the following pages allow
you to program maximum or minimum amounts specifically for each department).
The total capacity of the memory available, however, is not sufficient to support contemporarily
programming of the maximum values for all parameters. Therefore, while programming with
Code 102, from time to time, configuration of certain parameter values may result in warnings of
memory capacity exceeded.
Code 102 General Guidelines
Key [X] : confirms parameter programming and allows you to scroll sequentially through all the
information.
Key [TOTAL] : exits from the option without saving the parameter settings and without
formatting the databases, maintaining the previous configuration.
Key [SUBTOTAL] : memorises the parameters modified and, from any position, switches to
DB formatting that the user can choose whether or not to perform.
Procedure entry: confirmation may be requested before proceeding.
Before formatting is performed, the user is requested for final confirmation.
Operating procedure
1.
.1. .0. .2. .X.
Formats the memory of the cash register. In
programming mode, you can divide the memory into
logical areas of varying sizes and number according to
your specific needs. The position for entering the first
character is highlighted on the operator display.
2.
[PROGRAM DEPARTMENTS]
3.
[NUMERIC CHARACTERS] To program the number of departments from 1 to 250.
4.
.X.
To confirm the data entered and continue to set the next
parameter.
5.
[NUMERIC CHARACTERS] To program the number of price lists from 1 to 4.
6.
.X.
To confirm the data entered and continue to set the next
parameter.
7.
[NUMERIC CHARACTERS] To program the length of the descriptor from 0 to 29.
Page 10

4
8.
.X.
To confirm the data inserted and continue to set the
next parameter
9.
[NUMERIC CHARACTERS] To program link to GROUP to 1/0.
10.
.X.
To confirm the data entered and continue to set the next
parameter.
11.
[NUMERIC CHARACTERS] To program a HALO to 1/0.
12.
.X.
To confirm the data entered and continue to set the next
parameter.
13.
[NUMERIC CHARACTERS] To program a LALO to 1/0.
14.
.X.
To confirm the data entered and continue to set the next
parameter.
15.
[NUMERIC CHARACTERS] To program OFFER link to 1/0.
16.
.X.
To confirm the data entered and continue to set the next
parameter.
17.
[NUMERIC CHARACTERS] To program periodic 2 to 1/0.
18.
.X.
To confirm the data entered and continue to set the next
parameter.
19.
[PROGRAM INTERNAL PLUs]
20.
[NUMERIC CHARACTERS] To program the number of PLUs from 0 to 250.
21.
.X.
To confirm the data entered and continue to set the next
parameter.
22.
[NUMERIC CHARACTERS] To program the length of the descriptor from 0 to 29.
23.
.X.
To confirm the data entered and continue to set the next
parameter.
24.
[NUMERIC CHARACTERS] To program the KEYPAD DIM., NUMBER OF KEYS
(250), DESCR LENGTH (24).
25.
.X.
To confirm the data entered and continue to set the next
parameter.
26.
[PROGRAM PAYMENT FORMS]
27.
[NUMERIC CHARACTERS] To program the length of the DESCRIPTOR from 0 to 29.
28.
.X.
To confirm the data entered and continue to set the next
parameter.
29.
[NUMERIC CHARACTERS] To program the number of CURRENCIES from 0 to 10.
30.
.X.
To confirm the data entered and continue to set the next
parameter.
31.
[NUMERIC CHARACTERS] To program the number of CREDIT CARDS from 0 to 10.
32.
.X.
To confirm the data entered and continue to set the next
parameter.
33.
[NUMERIC CHARACTERS] To program the number of VOUCHERS from 0 to 15.
34.
.X.
To confirm the data entered and continue to set the next
parameter.
35.
[NUMERIC CHARACTERS] To program the number of CUTS from 0 to 15.
36.
.X.
To confirm the data entered and continue to set the next
parameter.
37.
[NUMERIC CHARACTERS] To program periodic 2 to 1/0.
38.
.X.
To confirm the data entered and continue to set the next
parameter.
Page 11

5
39.
[PROGRAM OPERATORS]
40.
[NUMERIC CHARACTERS] To program the number of OPERATORS from 0 to 10.
41.
.X.
To confirm the data entered and continue to set the next
parameter.
42.
[NUMERIC CHARACTERS] To program the descriptor length from 0 to 16.
43.
.X.
To confirm the data entered and continue to set the next
parameter.
44.
[NUMERIC CHARACTERS] To program the length of the personal code from 0 to 4.
45.
.X.
To confirm the data entered and continue to set the next
parameter.
46.
[NUMERIC CHARACTERS] To program periodic 2 to 1/0.
47.
.X.
To confirm the data entered and continue to set the next
parameter.
48.
[PROGRAM OFFERS]
49.
[NUMERIC CHARACTERS] To program the number of OFFERS from 0 to 9.
50.
.X.
To confirm the data entered and continue to set the next
parameter.
51.
[NUMERIC CHARACTERS] To program the descriptor length from 0 to 29.
52.
.X.
To confirm the data entered and continue to set the next
parameter.
53.
[NUMERIC CHARACTERS] To program periodic 2 to 1/0.
54.
.X.
To confirm the data entered and continue to set the next
parameter.
55.
[PROGRAM DISCOUNTS AND MARKUPS]
56.
[NUMERIC CHARACTERS] To program the number of percent discounts from 0 to 9.
57.
.X.
To confirm the data entered and continue to set the next
parameter.
58.
[NUMERIC CHARACTERS] To program number of absolute discounts from 0 to 9.
59.
.X.
To confirm the data entered and continue to set the next
parameter.
60.
[NUMERIC CHARACTERS] To program the number of percent markups from 0 to 9.
61.
.X.
To confirm the data entered and continue to set the next
parameter.
62.
[NUMERIC CHARACTERS] To program the number of absolute markups.
The number of markups can vary from 0 to 9.
63.
.X.
To confirm the data entered and continue to set the next
parameter.
64.
[NUMERIC CHARACTERS] To program the descriptor length from 0 to 15.
65.
.X.
To confirm the data entered and continue to set the next
parameter.
Page 12

6
66.
[NUMERIC CHARACTERS] To program periodic 2 to 1/0.
67.
.X.
To confirm the data entered and continue to set the next
parameter.
68.
[PROGRAM GROUPS]
69.
[NUMERIC CHARACTERS] To program the number of groups from 0 to 30.
70.
.X.
To confirm the data entered and continue to set the next
parameter.
71.
[NUMERIC CHARACTERS] To program the descriptor length from 0 to 29.
72.
.X.
To confirm the data entered and continue to set the next
parameter.
73.
[NUMERIC CHARACTERS] To program periodic 2 to 1/0.
74.
.X.
To confirm the data entered and continue to set the next
parameter.
75.
[PROGRAM VAT RATES]
76.
[NUMERIC CHARACTERS] To program the descriptor length from 0 to 29.
77.
.X.
To confirm the data entered and continue to set the next
parameter.
78.
[NUMERIC CHARACTERS] To program CUSTOMER DIM., NO. CUSTOMERS
(200), DESCR. LENGTH (29), PERIOD. 2 REG. (1)
79.
.X.
To confirm the data entered and continue to set the next
parameter.
80.
[NUMERIC CHARACTERS] To program the WEEE eco-contribution to 1/0.
81.
.X.
To confirm the data entered and terminate programming
with SET 102.
Note: on terminating programming using option 102 - after you have performed successfully the selection and memory
formatting procedures - a ticket is automatically printed containing a list of all the settings (the same as can printed
using option 314), so that you can retain a trace of the settings made.
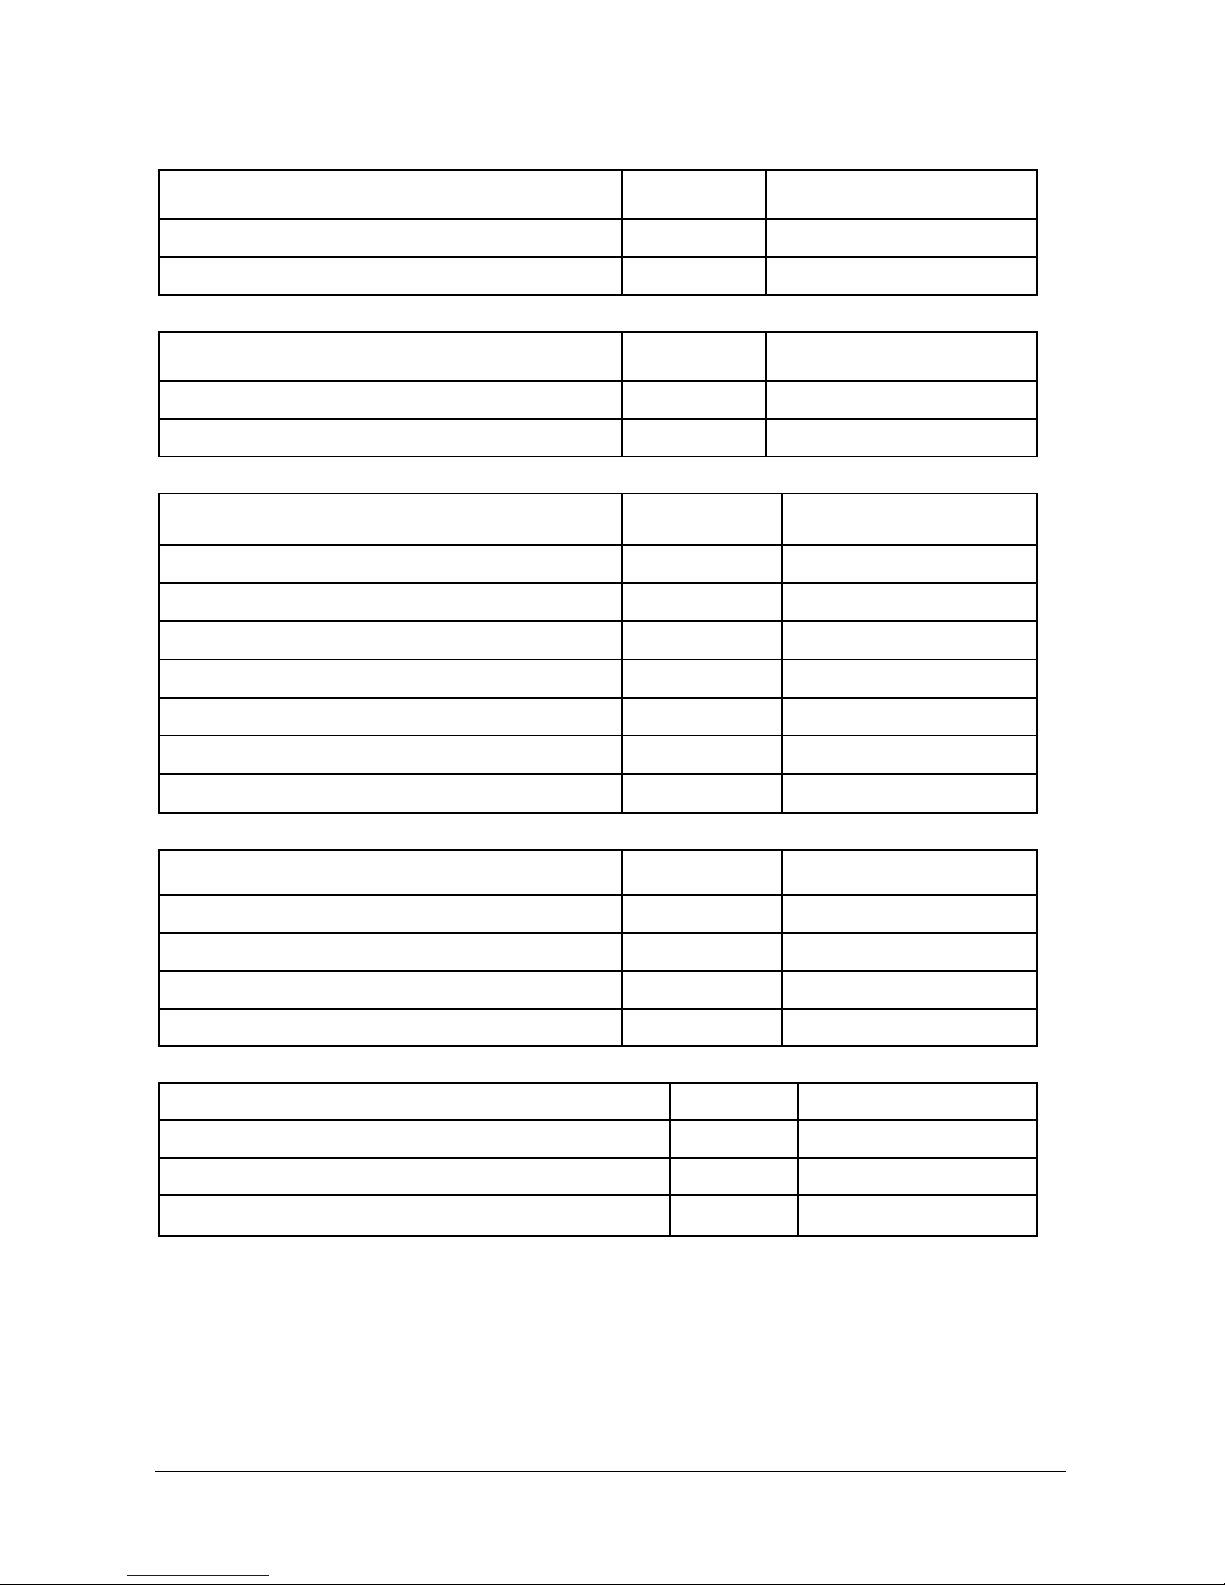
Factory Settings Table
Programmable parameters - DEPTS Range Factory setting
Number of departments
1-250 250
Number of price lists
1-4 4
Descriptor length 0-29
24
GROUP link
1/0 1
HALO
1/0 1
LALO
1/0 1
OFFER link
1/0 0
Periodic 2
1/0 1
Page 13
7
Programmable parameters – INT. PLUs
Range
Factory setting
Number of PLUs 0-250
250
Number of price lists 0-29
24
Keypad
Range
Factory setting
Number of keys 0-250
250
Descriptor 1-24
24
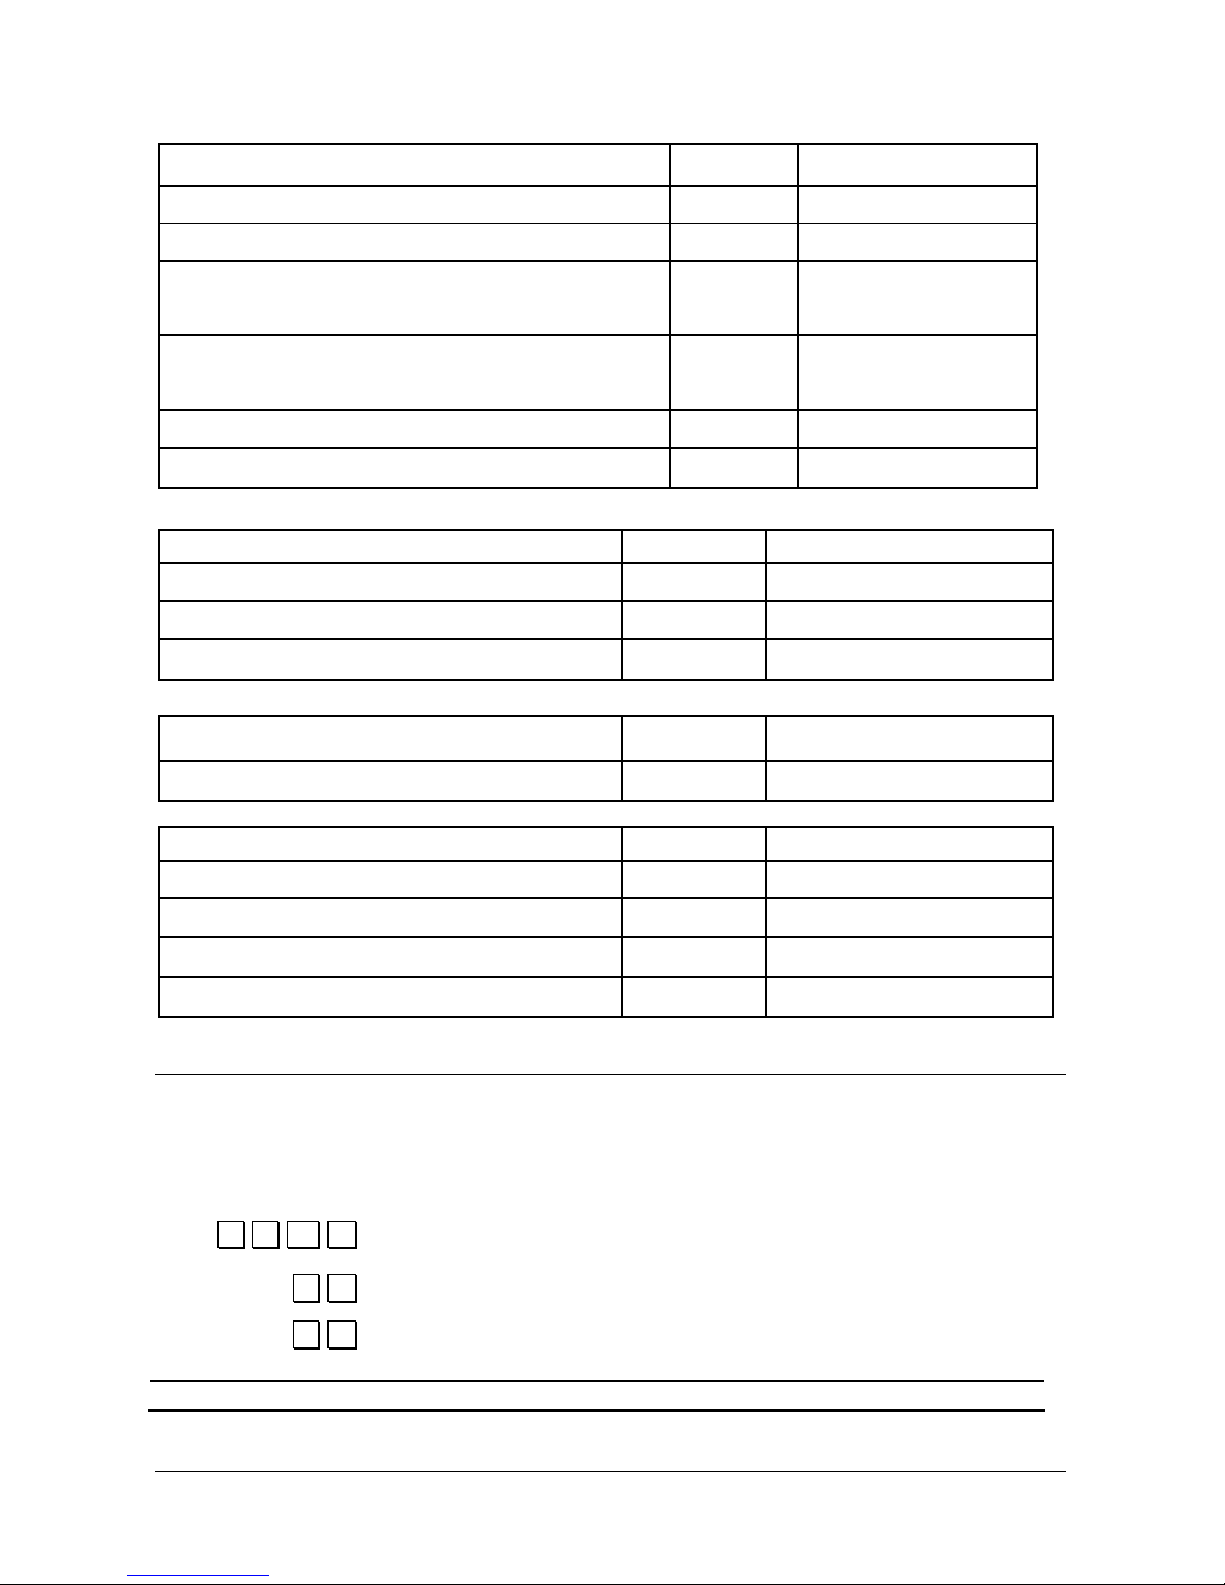
Programmable parameters - PAYMENT
FORMS
Range Factory setting
Descriptor length 0-29
24
Number of currencies 0-10
5
Number of credit cards 0-10
5
Number of vouchers 0-20
15
Number of companies 0-99
15
Number of cuts 0-999 15
Periodic 2 1/0
1
Programmable parameters - OPERATORS Range Factory setting
Number of operators 0
10
Descriptor length 0-29
16
Personal code length
0-4 4
Periodic 2
1/0 1
Programmable parameters - OFFERS Range Factory setting
Number of offers 0-9
5
Descriptor length 0-29
24
Periodic 2
1/0 1
Page 14
8
Programmable parameters - DISCNTS & MRKUPS Range Factory setting
Number of percent discounts 0-9
6
Number of absolute value discounts 0-9
6
Number of percent markups
0 - 9 6
Number of absolute value markups
0-9 6
Descriptor length
0-29 15
Periodic 2
1/0 1
Programmable parameters - GROUPS Range Factory setting
Number of groups
0 -30 30
Descriptor length
0-29 24
Periodic 2
1/0 1
Programmable parameters - VAT RATES Range Factory setting
Descriptor length 0-29
24
CUSTOMER Dimension Range Factory setting
Number of customer accounts
0 -200 200
Descriptor length
0-29 29
Periodic 2
1/0 1
WEEE Contribution 1/0
0
SET 150 - DISPLAY TILL TOTAL AMOUNT
The cash register date is updated automatically at midnight of every day. If obligatory report
execution is programmed, after the date is changed new sales tickets cannot be issued until
the report is run.
Operating procedure
1.
.1. .5. 0. .X.
2.
.0. .X.
To disable obligatory report execution after the date change.
.1. .X.
To enable obligatory report execution after the date change.
Factory setting
Page 15

9
SET 151 – SET MACHINE DATE AND TIME
To set the date and time, proceed as follows:
1. Select [F] > GENERAL FUNCTIONS environment, by pressing [Config] > [Set
setup] keys.
The following screen appears:
F
03.03.2012 18.10 Till No.: 1
Vch: ON Pr.list 1 Operator: Disabled
2. Using the numeric keypad, enter the code
.1. .5. .1. followed by .X.
3. The default format for displaying the date is
DD/MM/YY and corresponds to selection 0.
Select 1 to display the date in the format MM/DD/YY
Select 2 to display the date in the format YY/MM/DD.
4. press .X. to confirm.
5. The default format for displaying the time is
24H, and corresponds to selection 1.
Select 0 to display the time in 12H format.
6. Press .X. to confirm.
7. Enter the date and press .X. to confirm the date entered.
8. The time stored in the cash register is displayed.
9. Enter the time in the format: hh-mm-sec.
10. Press .X. to confirm the time entered.
Note:
• Changing the date/time is not permitted unless the Z10 report has been run.
Example:
.1. .5. .1. followed by .X.
DD/MM/YY followed by .X.
24H followed by .X.
01-01-2012 followed by .X.
01:19:43 followed by .X.
Page 16

10
SET 152 – CHANGE AUTOMAT. DATE & TIME
With SET 152 you can program the register to update the time automatically
(Daylight Saving Time to Standard time, and vice versa).
Operating procedure
1.
.1. .5. .2. .X.
2.
.0. .X.
To set manual updating (factory default).
.1. .X.
To set automatic updating
SET 154 – RESET REGISTER GT
Reset the register’s Grand Total.
Operating procedure
1.
.1. .5. .4. .X.
2.
CONFIRM?
.X.
SET 155 - ACTIVATE OBLIGATORY INVOICE HEADING FOR INVOICE
You can specify if the details of the invoicee must be completed immediately, at the
moment the invoice is issued, or whether these details can be added at a later time.
Operating procedure
1.
.1. .5. .5. .X.
2.
.1. .X.
The details of the customer who is the invoicee
can be completed at a later time. (Enable)
.0. .X.
The details of the customer who is the invoicee
must be entered at the cash register keypad
before issuing the invoice. (Disabled)
Page 17

11
SET 160 - LANGUAGE SELECTION
To select the language for the interface, proceed as follows:
1. Select [F] > GENERAL FUNCTIONS environment, by pressing [Config] > [Set
setup].
The following screen appears:
F
03.03.2012 18.10 Till No.: 1
Vch: ON Pr.list 1 Operator: Disabled
2. Using the numeric keypad, enter the code .1. .6. .0. followed by .X. .
WARNING: if you need to change the language after having already used the
cash register, it may be necessary to print the reports (Z10). If this is the case,
consult the manual for how to print a report.
3. The cash register asks you to confirm that you want to change the language.
4. Press .X. to confirm.
5. The current language (for example, 0=english) appears on the screen.
6. Select the language you want to set from :
0=English
1=Italian
2=French
3=German
4=Spanish .
7. After you have selected the language, the cash register prints an information
ticket and automatically restarts.
After restarting, the cash register displays the interface in the new language
selected, loading the default parameters and zeroing the management data.
Page 18

12
SET 162 – ROUNDING TYPE SELECTION
This is used to set the type of rounding to apply to the total.
Operating procedure
1.
.1. .6. 2. .X.
2.
.0. .X.
No rounding *
.1. .X.
SWISS FRANC
.2. .X.
DANISH KRONE
.3. .X.
EURO
Factory setting
SET 170 – TRAINING MODE
The option SET170 is used to select the Training environment (that can be run at any
time, without requiring any particular set-up).
In Training mode, all normal operations can be performed as during normal use of
the cash register.
Sales tickets and invoices are differentiated from those issued during normal
operation by the character “#”printed before the “Ticket Number” caption.
Operations performed in Training mode are not saved in the EJ.
On exiting from Training mode, the register is reset with all the values and settings
that were in effect before entering Training Mode.
To set up Training mode:
Select the option SET 170 followed by the key .X.
0 followed by .X. = to disable
1 followed by .X. = to enable
SET 200 - PRINT SERIES 200 OPTIONS LIST
Thi
s function allows you to print the settings for the icons and promotional messages.
Operating procedure
1.
.2. .0. .0. .X.
2.
Starts printing.
Page 19

13
SET 201 - SET UP MERCHANDISE ICONS
A graphical image (or icon) can also be printed on a ticket, together with a predefined
promotional message. Icons are sub-divided as follows:
• merchandise categories
• public holidays and special occasions
• lucky tickets with programmed amount
The message can be substituted with one of those provided on the cash register, or by entering
a 4-row customised message, each 15 characters in length. For each row, you can choose one
of the three printing attributes: normal, double-height, double-width.
Code SET 201 is used to program the icon to print on tickets and the associated promotional
phrase.
Operating procedure
1.
.2. .0. .1. .X.
2.
.1. .X. / .0. .X.
To enable / disable the function
3.
[NUMERIC CHARS] .X.
To set the number of the icon to print (1 to 120).
4.
.0. .X.
To associate a custom phrase with the icon selected.
.1. .X.
To select the phrase to associate with the icon (default
phrase)
.2. .X.
To select one of the phrases provided by the cash register
5.
[ALPHANUMERIC
CHARACTERS]
.X.
If “custom phrase” mode is chosen, enter the characters
for the descriptor to assign to the current row.
Confirm to continue to program the attribute for the
character.
6. .0. .X.
To select the attribute normal
.1. .X.
To select the attribute double-height
.2. .X.
To select the attribute double-width
Repeat the procedure for all (4) rows to be programmed.
7.
.X.
If “icon-associated phrase” mode is chosen (factory-set
phrase):
confirm. The cash register returns to the beginning of SET
mode.
otherwise
[NUMERIC CHARS]
.X.
If “select cash register phrase” mode is chosen :
enter the number of the phrase:
Confirm ; the cash register returns to the beginning of
SET mode.
Page 20

14
SET 203 - SET UP POINT ICONS
At the bottom of the sales ticket, the icon related to reward points can be printed
automatically. The number of points is calculated on the basis of a threshold value
programmed with option 203.
Operating procedure
1.
2 0 3 X
2.
1 X / 0 X
To enable / disable the function
3. [ICON No. 118] X
4. [NUMERIC CHARACTERS] X
To set the reference value for calculating reward
points.
SET 206 - SET UP PUBLIC HOLIDAY ICONS
The icons in this group, relating to religious holidays or special occasions occurring annually,
can be activated during pre-defined periods using the programming code SET 206.
The icon replaces the merchandise icon (if set) during the pre-defined period exclusively.
NO. HOL./OCCASION
ICON
NO.
PROMOTIONAL PHRASE PERIOD
1
Christmas
108
HAPPY CHRISTMAS
from 15/12
to 27/12
2
New Year
109
HAPPY NEW YEAR
from 28/12
to 02/01
3
St. Valentine’s Day
110
A DAY TO REMEMBER
from 10/02
to 14/02
4
Carnival (*)
111
HAVE A HAPPY CARNIVAL
from 25/02
to 1/03
5
Women’s Day (*)
112
A DAY WORTH REMEMBERING
from 05/03
to 08/03
6
Father’s Day
113
FATHER’S DAY - BEST WISHES
from 15/03
to 19/03
7
Easter (*)
114
HAPPY EASTER
from 10/04
to 16/04
8
Mother’s Day
115
MOTHER’S DAY - BEST WISHES
from 06/05
to 14/05
9
Good Holiday (*)
116
HAVE A GOOD HOLIDAY
from 10/07
to 30/07
(*) the periods shown are purely examples
Page 21

15
Operating procedure
1.
.2. .0. .6. .X.
2.
[NUMERIC CHARACTERS] .X.
Set the number of the HOLIDAY/OCCASION ( 1 − 9 )
you want to program.
3. .1. .X. / .0. .X.
To enable / disable the function
4.
[NUMERIC CHARACTERS] .X.
The number of the default icon associated with the
selected HOLIDAY/OCCASION is displayed on the
screen. To replace this icon with another, enter the
number of the icon you require (108-116).
5.
.0. .X.
To associate a custom phrase with the icon selected
.1. .X.
To select the phrase to associate with the icon (default
phrase)
.2. .X.
To select one of the phrases available on the cash
register
6.
[ALPHANUMERIC CHARACTERS]
.X.
If the mode “custom phrase” has been selected, enter
the characters for the descriptor to assign to the
current row.
Confirm to continue to program the attribute for the
character.
7.
.0. .X.
To set the attribute normal
.1. .X.
To set the attribute double-height
.2. .X.
To set the attribute double-width
Repeat this procedure for all (4) rows to be programmed. After programming the last row, you
can proceed to program the period.
8.
.X.
or
If the mode “icon-associated phrase” is selected
(default phrase):
confirm to proceed to program the period.
[NUMERIC CHARACTERS]
.X.
If the mode “select cash register phrase” is selected :
Enter the number of the phrase.
Confirm to proceed to program the period.
The start period date is displayed on the screen
9. [NUMERIC CHARACTERS]
.X.
Set the new date, overwriting the previous one.
Confirm the default start period date or the one
programmed.
The end period date is displayed on the screen
10 .X.
Press to confirm the default end period date;
otherwise repeat the programming procedure
described above.
Page 22

16
SET 297 - PRINT LIST OF ICON-PHRASE COMBINATIONS
SET 298 - PRINT LIST OF MERCHANDISE PHRASES
SET 299 - PRINT LIST OF MERCHANDISE ICONS
Operating procedure
Cash register in SET operation mode.
PRINT ALL THE MERCHANDISE CATEGORY ICONS (DSGNS & PHRASES)
(FACTORY DEFAULTS)
.2. .9. .7.
.X.
Confirm printing *
PRINT MERCHANDISE, HOLIDAYS and OCCASION PHRASES
.2. .9 .8.
.X.
Confirm printing *
PRINT MERCHANDISE, HOLIDAYS and OCCASION ICONS (DSGNS & PHRASES)
.2. .9. .9.
.X.
Confirm printing *
*Printing can be interrupted by pressing the key .C. or the change mode key
SET 300 - PRINT SERIES 300 OPTION LIST
This function allows you to print how all the functionalities associated with the Series 300
programming codes are programmed.
Operating procedure
1.
.3. .0. 0.
2.
.X.
Start printing
SET 301 - SET MACHINE CODE
Operating procedure
1.
.3. .0. .1. .X.
2.
[ALPHANUMERIC CHARS] .X
.
Customisation of TILL CODE .
(Up to 10 alphanumerical characters)
Factory setting: "01"
Page 23

17
SET 302 - SET UP HEADING LINES
For the ticket header 7 rows are provided, printed centred on the ticket. The header can contain
the precise company details, including the address and VAT number/Tax Code.
The VAT Number can be programmed exclusively during the EJ initialisation procedure
(see CHAP.8 “The E.J.”) after running the Z10 daily closure report.
Operating procedure
PROGRAMMING ROWS FROM 1 TO 7
3.
.3. .0. .2. .X.
4.
[NUMERIC CHARACTERS] .X.
To select the logo to be inserted in the first row
of the header.
5.
.0. .X.
To position the logo on the left
.1. .X.
To position the logo at the centre.
.2. .X.
To position the logo on the right.
6.
[ALPHANUMERIC CHARS] .X.
Customise descriptor. Customisation is only
possible if “0” has been chosen as the logo
number.
7.
.0. .X.
To define the character attribute “NORMAL”.
.1. .X.
To define the character attribute “DOUBLE
HEIGHT”.
8.
.0. .X.
To define a character font with 24 chars / row
.1. .X.
To define a character font with 29 chars / row
Factory setting
Factory
setting: "blank line"
Factory
setting: "0"
To program the descriptor length, use code 322 (SELECT MACHINE FONT).
When you complete programming the sixth row, the cash register returns to the beginning of
configuration mode.
Page 24

18
SET 303 - SET UP COURTESY PHRASES
Operating procedure
Programming code 320 set to 2 (enable courtesy
message that is then customised using code 303).
1.
.3. .0. .3. .X.
2.
[NUMERIC CHARACTERS] .X.
To select the logo you want to insert in the first row
of the courtesy message.
3.
.0. .X.
To position the logo on the left
.1. .X.
To position the logo at the centre.
.2. .X.
To position the logo on the right.
4.
[ALPHANUMERIC CHARS] .X.
Customise the descriptor. Customisation is possible
only if “0” has been chosen as the number of the
logo.
5.
.0. .X.
To set the character attribute “NORMAL”.
.1. .X.
To set the character attribute “DOUBLE-HEIGHT”.
6.
.0. .X.
To set the font character with 24 chars / row
.1. .X.
To set the font character with 29 chars / row
7. Program the other rows
Factory setting
Page 25

19
SET 304 - SET PAYMENT MODE PARAMETERS
This function is used to program forms of payment.
Payment forms are programmed according to the categories listed in the table. The various
categories and their respective parameters are defined by entering the alphanumerical
characters required and then confirming with the key .X. .
FUNCTION (PAYMENT FORM)
CASH 1 (CASH)
DESCRIPTOR
CASH FROM 2 TO 6 (CURRENCIES)
DESCRIPTOR
CHEQUES
DECIMALS
ROUNDING
CHECKS 1 (CHECKS)
DESCRIPTOR
CREDIT 1 (CREDIT)
DESCRIPTOR
CREDIT 2 (CUSTOMER ACCOUNT)
DESCRIPTOR
CREDIT 3 (CHIPCARD)
DESCRIPTOR
CREDIT CARDS FROM 1 TO 5 (CREDIT CARDS = CASHPNT)
DESCRIPTOR
LUNCHEON VOUCHER
PROGRAMMING LUNCHEON VOUCHERS
This function is used to program luncheon vouchers for up to 15 companies, a maximum of 15
different values or denominations being available for each company.
FUNCTION PROGRAMMABLE FIELDS FACTORY
SETTINGS
Company description Up to 24 alphanumerical chars. (PYMT.N.)LUNCH_11
Denomination
description
Denomination value
Up to 24 alphanumerical chars.
Up to 6 numeric chars.
Denom.
0,00
Page 26

20
Operating procedure
1.
[ALPHANUMERIC
CHARACTERS]
.X
.
to enter the company description
(max. 24 chars)
to confirm the description and continue to program the
voucher denominations
2.
[ALPHANUMERIC
CHARACTERS]
.X
.
to enter the denomination description (max. 24 chars)
to confirm and continue to program the denomination
value
3.
Subtotal
to select the next COMPANY
5.
Total
to return to the beginning of configuration mode.
PROGRAMMING CURRENCIES
This code is used to define a descriptor for each of the currencies in use, its related exchange
rate, a rounding value and the number of decimals.
FUNCTION PROGRAMMABLE FIELDS FACTORY SETTINGS
CURRENCY (1–5)
EXCHANGE RATE
DECIMALS
ROUNDING
Up to 29 alphanumeric characters
Up to 6 numerics (4+2 dec.)
Up to 1 numeric (from 0 to 9)
0 = rounding to 0
1 = rounding to 4
2 = rounding to 5
3 = rounding to 9
CURRENCY 1 (1-5)
0,00
2
5
Page 27
21
SET 305 - SET GROUP DESCRIPTORS
This code is used to program the groups by which items of different origins but of the same
general type can be categorised. The number of the groups available is 30 (unless set to a
different number using option 102), for each of which a description can be programmed, a
maximum of 29 alphanumerical characters in length.
Operating procedure
1.
.3. .0. .5. .X.
2.
.X.
To position on the first group to program.
3.
[ALPHANUMERIC CHARS] .X.
To customise the descriptor for the merchandise
category.
4. Proceed as described for steps 2 and 3 for the other merchandise categories.
SET 306 - ENABLE OBLIGATORY EXECUTION OF DAILY REPORT
The cash register date is updated automatically at midnight of each day. If execution of the daily
report is programmed as obligatory, it is not possible to issue a new sales ticket after the date
change until this report is run.
Operating procedure
3.
.3. .0. 6. .X.
4.
.0. .X.
To disable obligatory execution of the report on date change.
.1. .X.
To enable obligatory execution of the report on date change.
Factory setting
Page 28
22
SET 307 - SET UP DISCOUNT TABLE
This function allows you to program up to 6 percentage value discounts and 9 absolute value
discounts.
PROGRAMMABLE PARAMETERS
FUNCTION PROGRAMMABLE FIELDS FACTORY
SETTING
Percentage value discount
DESCRIPTION Up to 15 alphanumerical characters DISCNT PERC._1
Percentage discount Up to 4 figures (2+2 dec.) 0,00
Absolute value discount
DESCRIPTION Up to 15 alphanumerical characters DISCNT VALUE_1
Discount value
(as absolute value)
Max. 8 figures for discount as an
absolute value (6+2 dec.)
0,00
The maximum number (=9) of discounts and the maximum length of the description depend on
the value set with option 102.
Operating procedure
Programming percent discounts
1.
.3. .0. .7. .X.
2.
[ALPHANUMERIC CHARS] .X
.
or
.X
.
Customise descriptor
confirm descriptor and continue to program the
discount
3. [NUMERIC CHARACTERS] .X
. Set the percent discount
4. .X
. continue to the next percent discount
Programming absolute value discounts
5.
[ALPHANUMERIC CHARS] .X
.
or
.X
.
Customise descriptor
confirm descriptor and continue to program the
discount
6. [NUMERIC CHARACTERS] .X
.
Set absolute value for discount (max. 8
characters, 6+2 dec.)
7. .X
.
continue to the next absolute value discount
• To delete the percentage value programmed, enter .0
.
Page 29

23
SET 308 - SET VAT RATES
PROGRAMMABLE PARAMETERS
A number of parameters can be programmed for each VAT rate, as indicated in the following
table:
FUNCTION PROGRAMMABLE FIELDS FACTORY SETTING
Rate description Max. 29 characters, alphanumeric VAT_1
Rate value (as
percentage)
4 figures max. (from 0,01 to 99,98) NO TAX
As a prerequisite to programming, you must have run a Z10 Report, a Z20 Tax Extraction
Report, and any other reports that are requested before starting to program.
In the [Reports] environment, the key [Mandatory reports for Vat Variation] can be used to
execute automatically all the reports required.
Operating Procedure
1.
.3. .0. .8. .X.
On the lower row of the operator display, a
descriptor is proposed for the first VAT rate.
2.
[MANAGEMENT TYPE]
0 followed by .X. for SPIN.OFF TAX
1 followed by .X. for ADD ON
3.
[ALPHANUMERIC CHARACTERS]
.X.
Customise the descriptor.
4.
[NUMERIC CHARACTERS] .X.
Set the VAT rate as a percentage.
5.
Repeat steps 3 and 4 for any other VAT rates
you want to add (up to a maximum of 7).
• if the tax extraction reports have not been run, the message appears “RUN
REPORTS”.
• To cancel the percentage programmed, enter .0.
Page 30
24
SET 309 - SET PERCENT MARKUP PARAMETERS
This function is used to program up to 9 percentage value markups and 9 absolute value
markups (set to 6 by default).
PROGRAMMABLE PARAMETERS
FUNCTION PROGRAMMABLE FIELDS FACTORY SETTING
Percentage value markups
DESCRIPTION Up to 10 alphanumerical characters MRKUP PERC._1
Percentage discount Up to 4 numerics (2+2 dec.) 0,00
Absolute value markups
DESCRIPTION Up to 15 alphanumerical characters MRKUP VALUE_2
Value discount
(absolute value)
Up to 8 numerics for the absolute value
for the markup (6+2 dec.)
0,00
The maximum number of markups (max 9) and the maximum length of the description depend
on the value set with option 102.
Operating procedure
Programming percentage discounts
1.
.3. .0. .9. .X.
2.
[ALPHANUMERIC CHARS] .X
.
or
.X
.
Customise descriptor
confirm descriptor and continue to program
markups.
3. [NUMERIC CHARACTERS] .X
. Set percentage for markup
4. .X
. continue to next percentage markup
Programming absolute value discounts
5.
[ALPHANUMERIC CHARS] .X
.
or
.X
.
Customise descriptor
confirm descriptor and continue to program markup
6. [NUMERIC CHARACTERS] .X
. Set absolute value for markup (max. 8 characters,
6+2 dec.)
7. .X
. continue to next absolute value markup
• If you want to delete the percentage programmed, enter .0.
Page 31

25
SET 310 - SET MONEY ORDER DESCRIPTOR
This function is used to program a descriptor to associate with the RETURN function.
Operating procedure
1.
.3. .1. .0. .X.
2.
[ALPHANUMERIC CHARACTERS]
.X.
Customise descriptor.
(Up to 29 alphanumerical characters)
Factory setting: "M.ORDER"
SET 311 - SET HALO VALUE FOR CHANGE
You can define a maximum amount that can be returned to the customer as change for
payment of a sale. If during operation mode the amount that must be returned exceeds this
limit, an error is signalled.
The maximum amount that can be set for change is between 0 and 999999 inclusive (6 figures
+ 2 decimals).
Operating procedure
1.
.3. .1. .1. .X.
2.
[NUMERIC CHARS] .X.
Set the maximum amount
Page 32

26
SET 314 - PRINT MACHINE CONFIGURATION
This function allows you to print the current configuration of the cash register at any time. This
operation is useful to obtain a paper copy of how the cash register has been configured for the
option SET 102, and relates mainly to these entities:
• WEEE CONTRIB.
• NO. OF DEPTS
• NO. PRICE LISTS
• DESCRIPTOR
• ENABLE GROUP LINK
• MAX. PRICE (HALO)
• MIN. PRICE (LALO)
• OFFER LINK
• REG PERIODIC 2
• NO. PLUs
• NO. OF KEYS
• NO. PAYMNT FORMS
• NO. OPERATORS
• NO. OFFERS N X M
• NO. DISCOUNTS (VALUE AND PERCENT)
• NO. OF MARKUPS (VALUE AND PERCENT))
• NO. OF MARKUP VALUE
• DESCRIPTOR
• PERIODIC 2 REG
• NO. GROUPS
• NO. VAT RATES
• NO. CUSTOMER ACCOUNTS
• PLU (BARCODES)
All the data set can be modified using option 102 or 801 PLU (Barcodes).
For each entity the maximum length allowed for the descriptor is specified.
Operating procedure
1.
.3. .1. 4.
2.
.X.
Start printing
Page 33

27
SET 315 – X MODE AUTOMATIC REPORT MANAGEMENT
SET 316 - Z MODE AUTOMATIC REPORT MANAGEMENT
This function is used to program automatic printing of a number of reports. This means that with
a single operation you can print all the reports programmed at the same time.
• SET 315: allows you to program sequential printing in X mode of a maximum of 22 reports
(daily + periodic).
• SET 316: allows you to program sequential printing in Z mode of a maximum of 21 reports
(daily only).
The configuration of this function depends on how SET 328 is set. If DISABLED ( .0. ) the
function is set for daily/periodic, if it is ENABLED ( .1. ) the function is set for periodic 1/periodic
2.
The following table indicates the reports that can be printed automatically and their execution
code:
REPORT Execution codes
in X MODE (SET315)
Execution codes
in Z MODE (SET316)
SET 328 = 0 Daily Periodic Daily Periodic
SET 328 = 1
Reports
screen key
Periodic1 Periodic2 Periodic1 Periodic2
Departments Depts. 1 11 1 11
Management Management 4 14 4 14
Till operations Till operations 5 15 5 15
Hourly sales Sales per hour 6 6
Tax report Tax extraction 20 20
Currencies Currencies 7 17 7 17
Report Z10 Report (Z10) 10 10 10 10
Barcode reader-
accessed PLUs
BCR PLUs 9 19 9 19
Invoices
Slip printer
Documents
18 28 18 28
Operators Operators 21 31 21 31
Luncheon voucher Lunch vcr 25 35 25 35
Customer account
Cust.
accounts
26 36 26 36
Customer account
movements
Cust. Accs w
movements
29 39
Operating procedure
1.
.3. .1. .5. / .3. .1. .6. .X.
2.
.0. .X.
To disable printing of the report indicated on the operator
display
.1. .X.
To enable printing of the report indicated on the operator
display
3. Proceed with the remaining reports
Page 34

28
SET 318 - ENABLE OBLIG. CALCULATION OF CHANGE
You can program the cash register so it must obligatorily calculate the change due to the
customer on registering payment for a sales transaction. In this case, the operator must enter
the amount received from the customer before finalising the ticket.
Operating procedure
1.
.3. .1. 8. .X.
2.
.0. .X.
To disable the function for obligatory calculation of the change due
.1. .X.
To enable the function for obligatory calculation of the change due
Factory setting
SET 320 - SELECT COURTESY MESSAGE TYPE
Operating procedure
1.
.3. .2. .0. .X.
2.
.0. .X.
To disable the courtesy message.
.1. .X.
To enable the courtesy message programmed in the factory.
(THANK YOU AND SEE YOU SOON)
3.
.2. .X.
Enable the message customised by the user using code 303
Factory setting
Page 35

29
SET 321 - ENABLE ZERO PRICE
To register a transaction involving a free gift it must be possible to register a zero price on the
ticket for the item. This function allows you to enable or disable the possibility of registering zero
prices for items.
Operating procedure
1.
.3. .2. 1. .X.
2.
.0. .X.
To disable the sales function for zero price items.
.1. .X.
To enable the sales function for zero price items.
Factory setting
SET 322 - SELECT MACHINE FONT
With this code you can select the character font to be used when printing tickets.
Operating procedure
1.
.3. .2. .2. .X.
2.
.0. .X.
Selects font type 1 to print up to 24 characters per row
.1. .X.
Selects font type 2 to print up to 29 characters per row
Factory setting:
Page 36

30
SET 324 - SELECT VAT DETAILS
This can be used to select the type of details to be printed for tax extraction at the bottom of the ticket.
Operating procedure
1.
.3. .2. 4. .X.
2.
.0. .X.
NO VAT CALC.
.1. .X.
PRINT VAT INFO
.2. .X.
ON TOTAL AMOUNT *
.3. .X.
DETAILS SALE
Factory settings
0 (No VAT CALC) 2 (ON TOTAL AMOUNT) Default setting
1
(PRINT VAT INFO) 3 (DETAILS SLE)
Page 37

31
SET 328 - SELECT RAPID UPDATE MODE
This function is used to select how to update the reports.
Operating procedure
.3. .2. 8. .X.
.0. .X.
To disable rapid update mode (DAILY/PERIODIC)
.1. .X.
To enable rapid update mode* (PERIOD 1-2)
Factory setting
SET 329 - ENABLE SINGLE ITEM SALES
This function allow you to print the “quantity 1” (1x 10,00 Rep1).
Operating procedure
1.
.3. .2. 9. .X.
2.
.0. .X.
To disable the print of “quantity 1”
3.
.1. .X.
To enable the print of “quantity 1”
Factory setting
SET 338 - SET HEADER LINES FOR INVOICE
INCREASING HEADER ROWS FOR TICKETS/INVOICES
On the cash register 8 additional rows can be programmed using code 338. These 8
rows are in addition to the ticket header rows that can be programmed using code
302.
Code 338 provides 8 additional rows that are “free”, that is, not restricted to entry of
any particular type of field.
Operating procedure
PROGRAMMING ROWS FROM 1 TO 8
1.
.3. .3. .8. .X.
2.
[ALPHANUMERIC CHARS] .X.
Enter characters for the type of attribute
3.
[ALPHANUMERIC CHARS] .X.
Continue with the other rows you want to
program
Note: programming the other rows is the same as for programming for the
ticket header (code 302).
Page 38

32
SET 339 - SET SIMPLIFIED INVOICE PARAMETERS
Sets the Invoice series for the specific cash register, and the initial number to use for numbering
the invoices.
Operating procedure
1.
.3. .3. .9. .X.
2.
[AL
PHANUMERIC CHARS] .X.
Set invoice series, maximum 3 alphanumerical
characters (default=A)
3.
[NUMERIC CHARS] .X.
Program the invoice number, maximum 5
numeric characters (default=1)
.
SET 340 - SET WEEE GENERIC MESSAGE DESCRIPTORS
Using code 340 you can program a customisation message relative to the WEEE ecocontribution, composed of 3 rows (of 24/29 characters). Only the descriptor is set, not the
attribute.
This is printed at the end of the ticket if WEEE with specific amount mode is enabled for the
ticket.
Operating procedure
1.
.3. .4. .0. .X.
To customise the descriptive message for the
eco-contribution
2.
[ALPHANUMERIC CHARS] .X.
Customise the first row of the message.
3. Program the remaining rows
SET 341 - SET WEEE MESSAGE VALUE DESCRIPTORS
Using code 341 you can program a customisation message related to the WEEE ecocontribution composed of 3 rows each of a maximum of 29 characters (24/29 characters). Only
the descriptor is set, not the attribute.
The descriptor is printed at the bottom of the ticket if WEEE with generic amount mode is
enabled for the ticket.
Operating procedure
1.
.3. .4. .1. .X.
Customise the descriptive message for the ecocontribution
2.
[ALPHANUMERIC CHARACTERS
]
.X.
Customise the first row of the message.
3. Program the remaining rows
Page 39

33
SET 342 - SET PROFORMA RECEIPT MESSAGE
Set the proforma message consisting of a maximum of 2 rows.
Operating procedure
1.
.3. .4. .2. .X.
2.
LINE 1 .X.
Line 1 of the message that can be edited using
alphanumerical characters
3. NORMAL ATTRIBUTE
.0. .X.
To use a character with a normal height for the
message
.1. .X.
To use a character of double height for the
message (ATTR.D.HGT.).
4. 24 CHARS/ROW
.0. .X.
To use a character for the message with
24CHARS/ROW
.1. .X.
To use a character for the message with
29CHARS/ROW
5.
LINE 2 .X.
Line 2 of the message that can be edited with
alphanumerical characters
Repeat steps 3 and 4 of the procedure.
Page 40

34
SET 345 – SAVE DATABASE DATA AND DEF. SETTINGS
Code 345 can be used to save the following types of data on the pen: all cash register
programming data (configuration set-up), the database descriptive part, accounting data used
by the cash register for generating Management reports.
Operating Procedure
1.
Insert the USB pen into the cash register.
Note: If you try to save the data without first inserting the pen, an error
is displayed: “STICK NOT INSERTED”.
2.
Select configuration (CONFIG) mode for the register.
3.
.3. .4. .5. .X.
On the display the message appears: “345-WRITING DATA/WAIT” and
writing the data starts.
a. If the data is written successfully, the message is displayed:
“WRITING EXECUTED/REMOVE STICK”
b. If during writing errors are encountered, a warning is displayed:
“ERROR WRITING/REMOVE STICK”.
Note: Try repeating the procedure, making sure that the pen is
inserted correctly. If the error re-occurs, contact Technical
Services.
4.
Remove the pen. The machine automatically enters SET (configuration)
mode when the pen is removed.
Checking the data saved
Insert the USB pen into a USB port on the computer to check the data saved, and that the
following files are present in the “presetting_files” folder:
• Datapresetfile.csv: saves the current date
• DBxxxxxDesc.csv: DB descriptive part
• DBxxxxxField.csv: DB periodic 1 and periodic 2
• DBxxxxxStruct.txt: DB formatting string in binary format
• DescriptorsPresetFile: Descriptor-type variables (presetting)
• FlagsPresetFile: Flag-type variables (presetting)
• KbdFile: Keypad programming
• NumbersPresetFile: Number-type variables (presetting)
• PermissionLevelFile: Permission levels associated with keypad functions
• RegistersPresetFile: Register-type variables (presetting)
• presetting: the presence of this empty file (size 0) confirms that the files have been
saved)
• ASNTfile: these are two files named asntdescriptorspresetfile.csv and
asntnumberspresetfile.csv
• LOGOfile: infodescxxxx.txt and logofile.txt.
xxxxx represents the name of each database. For each type of database, three files are present
in the folder.
Page 41

35
The files present on the pen, organised as described above (DBxxxxxDesc.csv,
DBxxxxxField.csv, DBxxxxxStruct.txt) have the following structure:
Note: if the files present on the pen do not correspond with those described in the table, or if
the space they occupy is 0 bytes, try repeating the procedure on another USB pen
making sure first that it is functional and inserted correctly.
File name Description
Department Department database
DiscountMarkUp Discount and markup tables
Group Merchandise groups
Hourly Hourly sales
InternalClientAccount Customer accounts
InternalPlu
PLUs accessed by number (1-
250)
Operator Operators
OperatorPayment
Payment types related to the
operators
Payment Payment types
Plu
PLUs accessible using barcode
reader
Promotions Sales offers
Vat (Invoice, Ticket with
information of type Desc and Field,
and a unique file for the Struct
type.)
VAT table (VAT for invoices, VAT
for tickets).
Page 42

36
SET 346 – RESTORE DATABASE DATA AND DEF. SETTINGS
The SET 346 option restores the following types of information to the cash register:
• descriptive part (all data saved by the user excluding accounting data) of all the databases
present on the cash register
• all the cash register preset parameters, excluding logos.
Operating Procedure
1.
Insert the USB pen into the cash register.
Note: If you try restoring the data without first inserting the pen, an
error is displayed: “STICK NOT INSERTED”.
Note: Before proceeding you may have to print the management
reports indicated by the cash register. You will not be allowed to
proceed with the restore operation until you do so.
2.
Select SET mode for the register.
3.
.3. .4. .6. .X.
On the display the message appears:
“DESTRUCTIVE OPER. PROCEED?”
Press the X key to continue.
You are asked if you want to format or not:
“FORMAT? ENABLED: 1, DISABLED: 0.
If you choose 1 the data in the cash register is deleted, if you choose 0
the data is maintained.
At the end, a message is shown on the screen:
“346-READING DATA/WAIT” and reading of the data starts.
a. If the data on the pen is read successfully, the message is displayed:
“READ EXECUTED/REMOVE STICK”
b. If, however, errors have occurred during reading, the warning
appears “READ ERROR/REMOVE STICK”.
Note: Try repeating the procedure, making sure that the pen is
inserted correctly. If the error re-occurs, contact Technical
Services.
4.
The procedure has completed. The register prints a ticket (ECR
CONFIGURATION) that shows the current configuration of the cash
register. The ticket is saved in the EJ.
5.
Remove the pen. When the USB pen is removed, the machine
automatically enters SET mode.
Page 43

37
SET 347 - RESET BCR PLU DATA
Code 347 restores the cash register with the data relative to the PLUs accessed via the
barcode reader and set up by the user. The data is read from a USB pen (the data restored is
that saved using code 345).
Note: when the data of PLUs accessible via barcode reader is restored, the previous PLU
data on the cash register is lost without possibility of retrieval.
Operating procedure
1.
Insert the USB key into the cash register.
Note: if you try to restore the data without having inserted the pen,
an error is displayed “STICK NOT INSERTED”.
Note: before proceeding it may be necessary to print the
Management reports indicated by the cash register. If the
reports are not executed it will not be possible to proceed
with the restore.
2.
Set the register to configuration mode.
3.
.3. .4. .7. .X.
On the screen, the message appears:
“347-READING DATA/WAIT” and reading of the data starts.
During this phase, the following conditions could occur:
c. If reading of the data on the pen completes successfully, the
message is displayed:
“READING EXECUTED/REMOVE STICK”.
d. If, during reading, errors are encountered, the following error is
displayed:
“READ ERROR/REMOVE STICK”.
Note: Try repeating the procedure, making sure that the pen is
inserted correctly. If the error re-occurs, contact Technical
Services.
4.
When the procedure terminates, the register prints a ticket with the
header “347- DATA READING”.
The ticket is saved in the EJ.
5.
Remove the pen.
When the USB pen is removed, the register positions automatically
at the beginning of configuration mode, displaying the message
“SET/0”.
Page 44

38
SET 348 - SAVING THE USER CONFIGURATION (DATABASE) OF THE CASH REGISTER
Code 348 saves the user configuration (DATABASE) of the cash register.
Operating Procedure
1.
Insert the USB pen into the cash register.
Note: If you try to save the data without first inserting the pen, an
error is displayed: “STICK NOT INSERTED”.
2.
Select SET (CONFIG) mode for the register.
3.
.3. .4. .8. .X.
On the display the message appears: “348-WRITING DATA/WAIT”
and writing of the data starts.
a. If the data is written to the pen successfully, a message is
displayed “WRITING EXECUTED/REMOVE STICK”
b. If, however, errors are encountered during writing, an error is
displayed: “WRITE ERROR/REMOVE STICK”.
Note: Try repeating the procedure, making sure that the pen is
inserted correctly. If the error re-occurs, contact Technical
Services.
Remove the pen.
On removal of the USB pen, the machine automatically enters SET
mode.
Page 45

39
SET 349 - RESTORING THE USER CONFIGURATION (DATABASE) OF THE CASH REGISTER
Option SET 349 restores the user configuration (DATABASE) of the cash register.
Preliminary Operations
Data archival on the USB pen performed using the option SET 348 saves the data in a file
“<cashregisterid>-database.tar” archived in the folder [crf7100\database].
To be able to restore the data again using the SET 349 command, you must rename the file
from “<cashregisterid>-database.tar” to database.tar using a PC.
Operating Procedure
1.
Insert the USB pen into the cash register.
Note: If you try to restore the data without first inserting the pen, an
error is displayed: “STICK NOT INSERTED”.
Note: Before proceeding, it may be necessary to print the Management
reports indicated by the cash register (ACTIVE ACCOUNT). You
will not be allowed to proceed with the restore operation until you do
so.
2.
Select SET mode for the register.
3.
.3. .4. .9. .X.
On the display the warning appears:
“DESTRUCTIVE OPER. PROCEED?”
Press the X key to continue.
You are asked if you want to format or not:
“FORMAT? ENABLED: 1, DISABLED: 0.
If you choose 1, the data in the cash register is deleted, if you choose 0 the
data is maintained.
At the end, a message is shown on the screen:
“346-READING DATA/WAIT” and reading of the data starts.
a. If the data on the pen is read successfully, the message is displayed:
“READ EXECUTED/REMOVE STICK”
b. If, however, errors have occurred during reading, the warning appears
“READ ERROR/REMOVE STICK”.
Note: Try repeating the procedure, making sure that the pen is inserted
correctly. If the error re-occurs, contact Technical Services.
4.
The procedure has completed. The register prints a ticket (ECR
CONFIGURATION) that shows the current configuration of the cash
register. The ticket is saved in the EJ.
5.
Remove the pen. When the USB pen is removed, the machine
automatically enters SET mode.
Page 46

40
SET 350 - MAKING A SECURITY (BACKUP) COPY OF THE CASH REGISTER ON A USB PEN
Code 350 makes a security, backup, copy of the cash register.
Operating Procedure
1.
Insert the USB pen into the cash register.
Note: If you try saving the data without first inserting the pen, an error
is displayed: “STICK NOT INSERTED”.
2.
Select configuration mode (CONFIG) for the register.
3.
.3. .5. .0. .X.
On the display the message appears: “350-WRITING DATA/WAIT”
and writing of the data starts.
a. If the data is written to the pen successfully, the message is
displayed: “WRITING EXECUTED/REMOVE STICK”
b. If, however, errors have occurred during writing, the warning
appears: “WRITE ERROR/REMOVE STICK”.
Note: Try repeating the procedure, making sure that the pen is
inserted correctly. If the error re-occurs, contact Technical
Services.
Remove the pen.
W
hen the USB pen is removed, the machine automatically enters SET
mode.
Page 47

41
SET 351 - RESTORE USER DATA
Code 351 restores a backup copy of the cash register that was previously saved.
Preliminary Operations
Data archival on the USB pen executed with the option SET 350 is saved in a file
“<daymonthyear-cashregisterid>-backup.tar” archived in the folder [crf7100\backup].
To be able to restore it using the SET 351 command, you must rename it from:
“<daymonthyear >-backup.tar” to backup.tar on a PC.
Note: More than one backup copy could be present. Choose the most appropriate one using as
a reference the archival date.
Operating Procedure
1.
Insert the USB pen into the cash register.
Note: If you try to restore the data without first inserting the pen, an
error is displayed: “STICK NOT INSERTED”.
Note: Before proceeding, you may be required to print the Management
reports indicated by the cash register (ACTIVE ACCOUNT). You
will not be allowed to proceed with the restore operation until you do
so.
2.
Select SET mode for the register.
3.
.3. .5. .1. .X.
On the display the message appears:
“DESTRUCTIVE OPER. PROCEED?”.
Press the X key to continue.
On the display you are asked if you want to format or not:
“FORMAT? ENABLED: 1, DISABLED: 0.
If you choose 1 the data in the cash register is deleted, if you choose 0 the
data is maintained
At the end, a message is shown on the display:
“346-READING DATA/WAIT” and reading of the data starts.
a. If the data on the pen is read successfully, the message is displayed:
“READ EXECUTED/REMOVE STICK”
b. If, however, errors have occurred during reading, the warning appears
“READ ERROR/REMOVE STICK”.
Note: Try repeating the procedure, making sure that the pen is inserted
correctly. If the error re-occurs, contact Technical Services
4.
The procedure has completed. The register prints a ticket (ECR
CONFIGURATION) that shows the current configuration of the cash
register. The ticket is saved in the EJ.
5.
Remove the pen. When the USB pen is removed, the machine
automatically enters SET mode.
Page 48

42
SET 352 - SELECT ADD MODE TYPE
The cash register is programmed in the factory so that the decimal point is inserted
automatically only when prices consisting of whole numbers are entered (e.g. Euro 12,00).
Therefore, when entering a price containing cents (e.g. Euro 12,35), you must enter the
decimal point after the whole number (12).
Operating procedure
1.
.3. .5. .2. .X.
2.
.0. .X.
Disables the automatic decimal point function
.1. .X.
Enables the automatic decimal point function.
.2. .X.
Enables the function for sales amounts only, not for quantities
Factory setting
SET 355 - ENABLE CUTTER
This function allows you to enable or disable the automatic cutting by the cutter.
Operating procedure
1.
.3. .5. .5. .X.
2.
.0. .X.
To disable automatic cutting
.1. .X.
To enable automatic cutting
Page 49

43
SET 356 - ENABLE ACOUSTIC WARNING FOR BARCODE READER
This function allows you to enable or disable the acoustic signal that, during use of the barcode
reader, indicates when the item’s barcode has been read.
Operating procedure
1.
.3. .5. 6. .X.
2.
.0. .X.
To disable management of the acoustic signal.
.1. .X.
To enable management of the acoustic signal.
Factory setting
SET 358 - ENABLE REPORT SAVING ON EJ
This function allows you to enable or disable registration of Management reports in “X” - "Z"
mode on EJ.
Operating procedure
1.
.3. .5. 8. .X.
2.
.0. .X.
To disable registration of management tickets in “X” - "Z" mode on EJ.
.1. .X.
To enable registration of management tickets in “X” - "Z" mode on EJ.
Factory setting
SET 359 - ENABLE BCR PRINTING
This function allows you to enable or disable printing on the sales ticket of the barcode read by
the barcode reader, in addition to the description of the item sold.
Operating procedure
1.
.3. .5. 9. .X.
2.
.0. .X.
To disable printing of the barcode.
.1. .X.
To enable printing of the barcode.
Factory setting
Page 50

44
SET 360 - ENABLE PASSWORD MANAGEMENT
The cash register is supplied with access code management disabled and with the following
values for the predefined codes :
VALUE DESCRIPTION
111111 Supervisor code
222222 Cashier code
Operati
ng procedure
1.
.3. .6. .0. .X.
2.
.0. .X.
To disable access code management.
.1. .X.
To enable access code management
Factory setting:
SET 361 - SET SUPERVISOR PASSWORD
PROGRAMMABLE PARAMETERS
FUNCTION PROGRAMMABLE FIELDS FACTORY SETTING
CODE Up to 6 numeric characters 111111
Operati
ng procedure
1.
.3. .6. .1. .X.
2.
[NUMERIC CHARACTERS] .X.
Input (Type), predefinited code (111111), if already
m
odified, the actual supervisor code.
3.
[NUMERIC CHARACTERS] .X.
Set the new code
4.
.X.
Confirm the new code
.C.
Cancel the new code
Page 51

45
SET 362 - SET CASHIER PASSWORD
PROGRAMMABLE PARAMETERS
FUNCTION PROGRAMMABLE FIELDS FACTORY SETTINGS
CODE Up to 6 numeric characters 222222
Operati
ng procedure
1.
.3. .6. .2. .X.
2.
[NUMERIC CHARACTERS] .X.
Input the predefined cashier code (222222) or, if
already modified, one of the two codes set.
3.
[NUMERIC CHARACTERS] .X.
Set the new code
4.
.X.
Confirm the new code
.C.
Cancel the new code
SET 363 - SELECT NO. TICKETS ON EJ TO PRINT
This function allows you to select the number of tickets on the EJ to print.
Operating procedure
3.
.3. .6. 3. .X.
4.
NUM
BER Enter the number of tickets on EJ to print.
Factory setting is 10
SET 364 - SELECT TYPE AND THRSHLD. VALUE FOR EJ END
This function allows you to program a threshold value for the amount of space still left on the
EJ.
When the threshold value is reached it is signalled via a message printed as an appendix to the
closure report, and repeated for each closure until the EJ in use is replaced.
Operating procedure
1.
.3. .6. .4. .X.
2.
.0. .X.
To set a threshold expressed in days.
.1. .X.
To set a threshold expressed as a percentage.
.2. .X.
To set a threshold expressed in MB.
3.
[NUMERIC CHARS] .X.
Threshold value expressed in days (2 chars max.)
[NUM
ERIC CHARS] .X.
Threshold value expressed as a percentage.
(3 chars
max.)
[NUMERIC CHARS] .X.
Threshold value expressed in MB (3 chars max.)
Factory setting: "1"
Factory setting: "5"
Page 52

46
SET 365 - SAVE ALL TICKETS ON EJ
This function is used to enable or disable registration of management tickets in “REG” mode.
Operating procedure
1.
.3. .6. 5. .X.
2.
.0. .X.
To disable the function for registering management tickets in “REG”
mode on the EJ.
.1. .X.
To enable the function for registering management tickets in “REG”
mode on the EJ.
Factory setting
Page 53

47
SET 366 - ENABLE MULTIPLE TICKETS
For multiple tickets, allows you to program whether sales items are grouped according to
merchandise categories or departments.
Operating procedure
1.
.3. .6. .6. .X.
2.
.0. .X.
To disable the function
.1. .X.
To enable the function
3.
.0. .X.
Selects grouping by department
.1. .X.
Selects grouping by merchandise category
4.
.0. .X.
Manual
.1. .X.
Automatic
SET 367 - ENABLE PRINTING OF ARTICLES SOLD
Enables printing of the number of transactions or items sold on the sales ticket.
In SET mode, code 367 can be programmed to enable printing on the sales ticket of the number
of transactions or items sold.
On entering code 367 for SET, the following is displayed :
• PRICE = 0
• ITEM = 1
Pressing the key X after choosing either PRICE or ITEM, you are requested to enable or
disable whether it is printed on the ticket:
• DISABLED = 0
• ENABLED = 1
Press the key X to end programming.
Page 54

48
SET 368 - ENABLE TILL TOTAL DISPLAY
Using this function you can enable/disable printing of the till total on the deposit/withdrawal
ticket, and for function SET 150.
Enter the access code of the supervisor, by default 111111, or check the access code
setting using option SET361.
Operating procedure
1.
.3. .6. 8. .X.
2.
.0. .X.
To disable displaying/printing of the till total on the
deposit/withdrawal ticket and for function SET150.
.1. .X.
To enable displaying/printing of the till total on the
deposit/withdrawal ticket and for function SET150
SET 370 - ENABLE OPERATORS
Operating procedure
1.
.3. .7. 0. .X.
2.
.0. .X.
To disable operator management
.1. .X.
To enable casher
.2. .X.
To enable waiters
.3. .X.
To enable casher/waiter
[ALPHANUM.
CHARACTERS]
Enter the access code of the supervisor, by default 111111, or check
the access code set using the option SET361.
3.
.0. .X.
To disable printing of the till total on the operator report
.1. .X.
To enable printing of the till total on the operator report
SET 371 - ENABLE CUSTOMER ACCOUNTS
Operating procedure
1.
.3. .7. 1. .X.
2.
.0. .X.
To disable customer account management
.1. .X.
To enable customer account management
3.
.0. .X.
To copy the disabled account
.1. .X.
To copy the enabled account
Page 55

49
SET 372 - SET OFFER VALUES
This function allows you to program up to 5 offers; for each offer you can program a 4-row
descriptor.
FUNCTION PROGRAMMABLE FIELDS FACTORY
SETTINGS
Offer description 4 rows, each max. 24 chars LINE_1
Offer Value “N” and value “M” 0
The length of the programmable fields depend on the value set using option 102.
Operating procedure
1.
.3. .7. .2. .X.
2.
[ALPHANUMERIC CHARS] .X
.
or
.X.
or
.Subtotal
to customise the first row of the descriptor for the first
offer and continue to the next row
to confirm the descriptor row and continue to the next row
to select the next offer
3.
[NUMERIC CHARACTERS] .X
.
to set the number "N"
4.
[NUMERIC CHARACTERS] .X
.
to set a number "M" less than "N", but not equal to 0
5.
.X
. to continue to program the next offer
SET 375 - PRINT TICKET INFORMATION
This function allows you to print the programming of the ticket executed with code 304.
Operating procedure
1.
.3. .7 55 .X
.
Prints the programming
SET 380 - WAIT FOR DISPLAY SWTCH-OFF
Operating procedure
1.
.3. .8. .0. .X.
2.
[ from 0 to
255]
Time value expressed in minutes (from 0 to 255) to set for the time
delay before the touch screen is switched off
Page 56

50
SET 389 - ENABLE CHIPCARD MANAGEMENT
Operating procedure
1.
.3. .8. .9. .X.
2.
.0. .X.
.1. .X.
DISABLED (default setting
ENABLED).
SET 390 - PRINT SERIES 390 OPTIONS LIST
Operating procedure
1.
.3. .9. .0. .X.
Start printing. If the chipcard is not inserted, when it is
subsequently inserted, printing starts automatically.
SET 391 - CHIPCARD FORMATTING MANAGEMENT
This procedure can be used to format the chipcard with the dealer information. If the chipcard
has already been used, any data present on it must first be deleted.
The programmable parameters are the following:
FUNCTION PROGRAMMABLE PARAMETERS
Unique Card
If the chipcard is not configured as unique, its
use is permitted without entering the dealer’s
secret code set using code 396.
However, if the chipcard is configured as unique,
it can only be used after entering the dealer’s
secret code set using code 396.
(0=no 1=yes)
Dealer VAT No. Optional parameter
Operating procedure
3.
.3. .9. .1. .X.
4.
.0. .X.
.1. .X.
Unique card = no
Unique card = yes
3.
[Numeric characters ] .X.
To enter the VAT No. of the dealer
(optional parameter)
Page 57

51
SET 392 - CHIPCARD PROGRAMMING INFORMATION
This procedure is used to initialise the chipcard with the information necessary for its use, and
for identifying the customer.
This programming can be performed only when the net balance between deposits, withdrawals
and payments using the chipcard is = 0.
FUNCTION PROGRAMMABLE PARAMETERS
Card Identifier
- Public circuit or private card (1=circ. 0=private)
- Fidelity card (0=No 1=Yes)
- Electronic wallet card (0=No 1= Yes)
- Credit limit (loan) (max. 8 digits)
- Chain store code (max. 2 alphanumerical chars.)
- Shop code (max. 2 alphanumerical chars.)
- Expiry date (dd-mm-yyyy)
Customer Identifier
Customer code (alphanumeric, max. 4 chars.)
Name and surname (alphanumeric, max. 22 chars.)
T.C. or VAT No. (16 chars for T.C., 11 chars for VAT No.)
Address (alphanumeric, max. 22 chars.)
Town and Postcode (alphanumeric, max. 22 chars.)
Date of birth (dd-mm-yyyy)
Public circuit
card
A card programmed as public circuit can be used without the need to
enter a secret code defined using code 395.
Private card
A card programmed as private can only be used together with the card’s
secret code defined using code 395.
Fidelity card
Card programmed for calculating reward points or stamps.
Electronic wallet
card
Card that can be programmed to permit deposit and withdrawal
operations. To use the electronic wallet, a specific secret code must be
set for it using code 397.
Expiry date On expiry, the card can no longer be programmed but only read.
Page 58
52
Operating procedure
1.
.3. .9. .2. .X.
3.
.1. .X. / .0. .X.
Public Circuit card = 1 / Private card = 0
(1)
4.
.1. .X. / .0. .X.
Fidelity card = 1 / Fidelity card = 0
5.
.1. .X. / .0. .X.
Electronic wallet = 1
(2) /
Electronic wallet = 0
6. [Numeric characters ] .X
.
To program the maximum credit limit 999 999,99
(3)
7. [Alphanumeric chars ] .X
.
Chain store code - not supported
8. [Alphanumeric chars ] .X
.
Shop code - not supported
9. [dd-mm-yyyy] .X
.
.X.
.C.
To enter the expiry date for the card
(4) ()
The message "Reactivate card?" appears when the
card has expired or a new card is inserted
confirm
cancel
10. [Alphanumeric chars ] .X
.
Customer code - not supported
11. [Alphanumeric chars ] .X
.
Enter customer Name and Surname (max. 22 chars)
()
12. [Alphanumeric chars ] .X
.
Enter Tax Code or Vat Number (16 or 11 chars max.)
()
13. [Alphanumeric chars ] .X
.
Enter customer’s address (22 chars max.)
()
14. [Alphanumeric chars ] .X
.
Enter customer’s town and postcode (22 chars max.)
15. [Numeric characters ] .X
.
Enter the customer’s date of birth (22 chars max.)
()
()
Obligatory parameter
(1)
If the card is programmed as private without a secret code having been programmed for it
(using code 395), the machine assumes the default value (0000)
(2)
If you want to control use of the wallet by means of a secret code, remember to program the
secret code before enabling the wallet.
(3)
This parameter is requested only if the electronic wallet is enabled.
(4)
A date preceding the card registration date on the cash register is not allowed.
In the case of “card expired” the card can be read only.
In the case of “card expired”, you can reactivate the card by modifying this parameter.
Page 59

53
SET 393 - CHIPCARD DELETION
The contents of the chipcard programmed using code 392 can be completely deleted using
code 393.
This deletion operation however does not delete the configuration performed by formatting
(using code 391), but it makes it possible again.
The Chipcard must be inserted into the cash register.
The net balance between deposits, withdrawals and payments must be = 0
Operating procedure
1.
.3. .9. .3. .X.
2.
.0. .X.
.1. .X.
- Card extraction -
Cancel
Starts deletion procedure
3.
.0. .X.
Return to the beginning of configuration mode.
.1. .X.
Restart the delete procedure for another card
SET 394 - CHIPCARD DUPLICATION
Makes a full copy of a chipcard to another chipcard of the data registered using code 392.
The chipcard to which to copy data must have been formatted previously using code 391.
Operating procedure
1.
.3. .9. .4. .X.
or
.3. .9. .4. .X.
Message for insertion of chipcard if the card to be
copied is not inserted.
Message for extraction of the chipcard if the card to be
copied is inserted. The contents of the card are read
and saved in memory.
Message to insert the card to which you want to copy
the data.
2.
- Card insertion - The copied data is written to the new chipcard.
Card extraction message. The card has been copied.
3.
- Card extraction -
4.
.0. .X. Returns to the beginning of configuration mode
.1. .X.
Starts the procedure again to copy another card
Page 60

54
SET 395 - CHIPCARD CODE MANAGEMENT
You can configure the card with its own secret code. Programming the chipcard as “PRIVATE”
using code 392, the cash register recognises only chipcards responding to the secret code
PSWCARD.
The PSWCARD is composed of a maximum of 4 alphanumerical chars. and must be entered
before programming the card as “PRIVATE”.
When programming the password, the chipcard must not be inserted in the cash register.
Operating procedure
1.
.3. .9. .5. .X.
2.
[Alphanumeric chars ] .X
. To enter the secret code
SET 396 - DEALER CHIPCARD CODE MANAGEMENT
If you intend to control use of the card by means of a secret code, you must first enter the
secret code PSWCONC and then configure the card as unique card.
PSWCONC is composed of max. 4 alphanumerical chars.
When programming the password, the chipcard must not be inserted in the cash register.
Operating procedure
1.
.3. .9. .6. .X.
2.
[Alphanumeric chars ] .X
. To enter the secret code
Page 61

55
SET 397 - WALLET CHIPCARD CODE MANAGEMENT
Use of the card as an electronic wallet can be protected by a secret code, PSWBORS.
PSWBORS is composed of max. 4 alphanumerical chars.
When programming the secret code, the chipcard must not be inserted in the cash register.
Operating procedure
1.
.3. .9. .7. .X.
2.
[Alphanumeric chars ] .X.
To enter the secret code
SET 398 - CHIPCARD PNTS MANAGEMENT
When the chipcard is ENABLED as a Fidelity card, you can add or subtract points from the total
number recorded on it.
Operating procedure
1.
.3. .9. .8. .X.
Message for insertion of the chipcard if the card is not
already inserted
2.
.X
.
The current number of points appears.
3.
.0. .X.
Starts the procedure for subtracting points
.1. .X.
Starts the procedure for adding points
4.
[Alphanumeric chars ] .X.
Number of points to add or subtract
SET 400 - PRINT SERIES 400 OPTIONS LIST
This function allows you to print the department programming: the departments printed are only
those for which a field is programmed.
Operating procedure
1.
.4. .0. 0.
2.
.X.
Start printing
Programming printing can be interrupted by pressing the key .C.
Page 62

56
SET 401 - SET INFORMATION FOR EACH DEPARTMENT
Programmable Parameters
For each department a number of parameters can be programmed, as indicated below:
FUNCTION PROGRAMMABLE FIELDS FAC. SET.
1. Department description Max. 29 characters, alphanumeric DEPT_nn
2. Sale Price for Price list 1 Max. 8 figures (6+2 dec.) 0,00
3. Sale Price for Price list 2 Max. 8 figures (6+2 dec.) 0,00
4. Sale Price for Price list 3 Max. 8 figures (6+2 dec.) 0,00
5. Sale Price for Price list 4 Max. 8 figures (6+2 dec.) 0,00
6. Eco-contribution amount* Max. 6 figures (4+2 dec.) 0,00
7. Maximum Price (HALO) Max. 8 figures (6+2 dec.) 0,00
8. Minimum Price (LALO) Max. 8 figures (6+2 dec.) 0,00
9. VAT Rate reference Max. from 0 to 8 NO TAX
10. Merchandise Group reference Max. 2 figures (max. 30) 0
11. Enable Return (order) 0 = disabled / 1 = enabled 1
12. Enable Discount 0 = disabled / 1 = enabled 1
13. Enable Goods Refund 0 = disabled / 1 = enabled 1
14. Enable Single item 0 = disabled / 1 = enabled 1
15. Enable Bypass saved price 0 = disabled / 1 = enabled 1
16. Offer reference*
Max. 1 figure (depends on the max. value
set)
0
• To reprogram “NO TAX”, enter .8. (note that TAX 8 cannot be modified and corresponds to the TAX
EXEMPT setting.
The following table shows the result obtained during the sales phase from programming the various functions:
FUNCTION RESULT
Department description The department description is printed on the ticket
Sale Price for Price List 1
Sale price will be printed when the department key is pressed
(with key “List 1”)
Sale Price for Price List 2
Sale price will be printed when the department key is pressed
(with key “List 2”)
Sale Price for Price List 3
Sale price will be printed when the department key is pressed
(with key “List 3”)
Sale Price for Price List 4
Sale price will be printed when the department key is pressed
(with key “List 4”)
Eco-contribution reference* Value printed on the sales ticket corresponding to the product sold
Maximum Price (HALO)
An item sale will not be permitted if the price entered at the keypad
is higher than that programmed here.
Minimum Price (LALO)
An item sale will not be permitted if the price entered at the keypad
is lower than that programmed here.
VAT Rate reference
Reference to programmed VAT rate (from 0 to 8) that allows
calculation of the tax related to the sale by department
Merchandise Group
reference
Sales will be assigned to the programmed merchandise group, and
included in the final reports
Enable Return If enabled, return operations can be performed for the department
* If programmed for option SET102.
Page 63

57
FUNCTION RESULT
Enable Discount If enabled, discount operations can be performed for the department
Enable Goods Refund
If enabled, goods refund operations can be performed for the
department
Enable Single item
If enabled, the sales ticket can be closed by pressing a department
key (if it is the first operation for the ticket).
Enable Bypass saved
price
If enabled, the price saved for the department can be overridden by
one entered using the keypad.
Offer references
A sales offer can be applied to the department during a sales
operation.
No. in stock The number of items in stock.
Operating Procedure
1.
.4. .0. .1. .X.
[department number 1-250] .X.
or
.X.
Enter Department programming.
Select the department.
Enter the programming procedure
Dept 1
2.
[ALPHANUM CHARS] .X.
Customise descriptor
3.
[NUMERIC CHARACTERS] .X.
Set price for Price List 1.
4.
[NUMERIC CHARACTERS] .X.
Set price for Price List 2.
5.
[NUMERIC CHARACTERS] .X.
Set price for Price List 3.
6.
[NUMERIC CHARACTERS] .X.
Set price for Price List 4.
7.
[NUMERIC CHARACTERS] .X.
Set eco-contribution amount (if programmed for
option SET102).
8.
[NUMERIC CHARACTERS] .X.
Set maximum (HALO) price.
9.
[NUMERIC CHARACTERS] .X.
Set minimum (LALO) price.
10.
[NUMERIC CHARACTERS] .X.
Set VAT rate reference.
11.
[NUMERIC CHARACTERS] .X.
Define the number of the merchandise group to
link to the department.
.0. - .1.
To disable - enable returns.
.0. - .1.
To disable - enable discounts.
.0. - .1.
To disable - enable goods refunds.
.0. - .1.
To disable - enable single item sales.
.0. - .1.
To disable - enable sales with price bypass.
[NUMERIC CHARACTERS] .X.
Offer reference (from 1 to 5) (if programmed for
option SET102).
.Total
Press this key to interrupt programming the
selected parameter, that nevertheless remains
programmed, and switch the register to the start
of configuration mode.
.Subtotal
Press this key to interrupt programming the
selected parameter, that nevertheless remains
programmed, and switch the register to the
same parameter for the next department.
• It is not recommended to program the sales reference for both departments and PLUs.
Page 64

58
SET 451 - PRINT INFORMATION OF ALL EJ USED BY MACHINE
This function is not supported by the cash register.
SET 452 - PRINT TICKET SELECTED BY NUMBER
This function is used to print a selected ticket. Follow the steps described in the procedure
below.
Operating procedure
1.
.4. .5. .2. .X.
2.
[TICKET TYPE ] Select the type of ticket from:
.1. fisca
.2. non fiscal
.3. all types
.4. invoice
.5. receipt
and press .X.
3.
[TICKET NUMBER ] Enter the number of the ticket and press .X.
4.
[TICKET DATE ] Enter the ticket date in the format DD-MM-YYYY and
press .X.
Note: if the ticket selected is not present, a message is displayed: TICKET MISSING.
Note: printing can be interrupted by pressing the key C.
SET 453 - PRINT TICKETS OF A GIVEN DATE
This function can be used to print the tickets issued on a certain date. Follow the steps
described in the procedure.
Operating procedure
1.
.4. .5. .3. .X.
2.
[TICKET TYPE ] Select the type of ticket from:
.1. fisca
.2. non fiscal
.3. all types
.4. invoice
.5. receipt
and press .X.
3.
[TICKET DATE ] Enter the ticket date in the format DD-MM-YYYY and
press .X.
Note: if the ticket selected is not found, a message is printed: TICKET MISSING.
Note: printing can be interrupted by pressing the key C.
Page 65

59
SET 454 - PRINT TICKETS COMPRISED BETWEEN TWO NUMBERS
This function allows you to print the tickets comprised between two numbers following the steps
described in the procedure.
Operating procedure
1.
.4. .5. .4. .X.
2.
[TICKET TYPE ] Select the ticket type from:
.1. fisca
.2. non fiscal
.3. all types
.4. invoice
.5. receipt
and press .X.
3.
[TICKET NUMBER ]
Enter the number of the first ticket and press .X.
4.
[TICKET DATE ] Enter the date of the first ticket in the format DD-MM-
YYYY and press .X.
5.
[TICKET NUMBER ]
Enter the number of the second ticket and press .X.
6.
[TICKET DATE ] Enter the date of the second ticket in the format DD-
MM-YYYY and press .X.
Note: if the selected ticket is not found, a message is displayed: TICKET MISSING.
Note: printing can be interrupted by pressing the key C.
SET 455 - PRINT TICKETS COMPRISED BETWEEN TWO DATES
This function allows you to print the tickets comprised between two dates. Follow the steps
described in the procedure below.
Operating procedure
1.
.4. .5. .5. .X.
2.
[TICKET TYPE ] Select the ticket type from:
.1. fisca
.2. non fiscal
.3. all types
.4. invoice
.5. receipt
and press .X.
3.
[FROM DATE ] Enter the date of the first ticket in the format DD-MM-
YYYY and press .X.
4.
[TO DATE ] Enter the date of the second ticket in the format DD-MM-
YYYY and press .X.
Note: if the selected ticket is not found, a message is displayed: TICKET MISSING.
Note: printing can be interrupted by pressing the key C.
Page 66
60
SET 458 - FULL PRINTING OF EJ
This function allows you to print the entire contents of the Electronic Journal.
Operating procedure
1.
.4. .5. .8. .X.
Starts printing directly
Note: printing can be interrupted by pressing the key C.
SET 459 - EJ DELETION
This function allows you to delete the entire contents of the Electronic Journal.
Note: before the EJ is deleted you are requested to print the report Z10 and when the deleted
is terminated, will be request to open the hatch.
SET 460 - PRINT CURRENT EJ INFORMATION
This function allows you to print the information relative to the EJ currently in use.
Operating procedure
1.
.4. .6. .0. .X.
Starts printing directly
[PRINT EJ INFO
CONFIRM? ]
Press .X. to confirm and start printing.
Note: printing can be interrupted by pressing the key C.
SET 461 - EJ FREE SPACE MANAGEMENT
This function allows you to display the information related to the free space on the EJ currently
in use.
Operating procedure
1.
.4. .6. .1. .X.
Displays the percentage still available on the screen
SET 510 - PRINT SERIES 510 OPTIONS LIST
SET 510 is used to print the programming of PLUs in “direct mode”. For each PLU, the following
parameters are provided on the printout:
• PLU description
• Numerical position of the key related to the PLU
• Page number
• Short code to select the PLU during the sales operation
• PLU barcode.
Page 67

61
SET 600 - PRINT SERIES 600 OPTIONS LIST
This function is used to print the personal details of the operators programmed.
Operating procedure
1.
.6. .0. 0.
2.
.X.
Start printing
SET 601 - SET INFORMATION FOR EACH OPERATOR
FUNCTION PROGRAMMABLE FIELDS FACTORY SETTINGS
Personal code Up to 4 numerical chars. each
(starting from 0)
Description
Enable Permission
level
Up to 29 alphanumerical chars.
0=Supervisor, 1=Cashier, 2=Waiter
0 = disabled / 1 = enabled
OPERATOR_1
0
The sizes of the programming fields depend on the value set with the option 102.
Operating procedure
1.
.6. .0. .1. .X.
2.
[operator number 1 to 20] .X
. To select the operator
3.
.X
.
or
[new personal code] .X
.
or
[old personal code] .X
.
[new personal code] .X.
To confirm the CODE and continue to the
description field
to enter and confirm the personal code
to modify the code already programmed
4.
.X
.
or
[ALPHANUMERIC CHARS]
.X
.
[ALPHANUMERIC CHARS]
.X
.
to confirm the description programmed
to set the new description (max. 29 chars)
to confirm the new description
to set the permission levels (0,1 or 2)
to confirm the new description
5.
.0. .X.
to disable the operator
.1. .X.
to enable the operator
Page 68

62
SET 650 - PRINT SERIES 650 OPTIONS LIST
This function allows you to print the options relative to programming the personal details for the
customer accounts.
Operating procedure
1.
.6. .5. .0. .X.
Starts printing
No
te: printing can be interrupted by pressing the key C.
SET 651 - SET INFORMATION FOR EACH ACCOUNT
This function is used to program the personal details of each customer account.
Operating procedure
1.
.6. .5. .1. .X.
2.
[ACCOUNT ] Enter the number of customer accounts desired (factory
setting 1) and press .X.
3.
[ACCOUNT 2 ] Set the details for account 1
press .X.
4.
[descriptor 2 ] Enter the description for account 1 and press .X.
5.
[descriptor 3 ] Enter the description for account 1 and press .X.
6.
[VAT NO./TAX CODE ] Enter the VAT NO./TAX CODE for account 1 and press
.X.
[L
OAN] Enter the maximum credit limit and press .X.
SET 652 - DELETE CUSTOMER ACCOUNT INFORMATION
This function is used to delete the personal details programmed for a selected customer
account.
Operating procedure
1.
.6. .5. .2. .X.
2.
[ACCOUNT ] Enter the number of the customer account required
3.
and press .X.
[ACTIVE ACCOUNT ] Set the attributes for account 1
press .X.
No
te: if the account is active, it cannot be deleted.
Page 69

63
SET 653 - DELETE INFORMATION OF MORE THAN ONE ACCOUNT
This function allows you to delete the personal details programmed for multiple customer
accounts.
Operating procedure
1.
.6. .5. .3. .X.
2.
[FROM ACCOUNT ] Enter the number of customer account from which to
start deletion
and press .X.
3.
[TO ACCOUNT] Enter the number of final customer account
and press .X.
Note: if an account is active it cannot be deleted.
SET 654 - DELETE ALL CUSTOMER ACCOUNTS
This function allows you to delete all personal details programmed for customer accounts.
Operating procedure
1.
.6. .5. .4. .X.
[DELETE ALL
CONFIRM? ]
Press .X. to confirm
Page 70

64
SET 800 - PRINT BCR PLU INFORMATION READ AS CODE
Prints the PLU programming information.
Operating procedure
1.
.8. .0. 0. .X.
2.
When using a barcode reader, pass
the optical reader over the item’s
barcode so that it is read. The code is
displayed on the operator display and
an acoustic signal emitted to indicate
that reading has terminated.
To manually enter a barcode, select
the type of barcode then press the
[alphanumerical keys]
corresponding to the code to save in
memory. Press the key .X. to
confirm and proceed to the next
programmable function.
The PLU selected is printed
3.
.0. .X.
To print the single PLU
.1. .X.
To print all items with the EAN-13 code
.2. .X.
To print all items with the EAN-8 code
.3. .X.
To print all items with the UPC-A code
.4. .X.
To print all items with the UPC-E code
.5. .X.
To print all items with the Pharmacy code
.6. .X.
To print all items with the C39 code
.7. .X.
To print all items with the Balance code
.8. .X.
To print all items
4. Continue with other PLUs
.Total
.
Press this key to exit from the printing procedure
and return to the beginning of SET mode.
Page 71

65
SELLING ITEMS BY DEPARTMENT
For sales by department, the department key (DEPT_XX) is programmed and linked
to an item, and can be used directly for performing sales operations.
The maximum number of items that can be programmed for this mode is 250.
Operating Procedure
1.
SET VAT RATE
(Set setup environment)
For the VAT rate, you can program a description and the
related value (for more information refer to the chapter
related to setting the VAT rate – SET308).
Note: if sales operations have been performed, report
printing is requested.
2.
PROGRAM DEPARTMENTS
(Set setup environment)
Program the departments using the SET 401 command
(in the example in the window below CAFETERIA is
programmed).
For each DEPT, as described in chapter “Programming
Departments - Code 401” – to which you should refer to
more details – a price and other optional parameters can
be entered. For more information, refer to the chapter
related to department programming – SET401.
3.
03.03.2012 18.10 Till No.: 1
F
TOTAL 7,50
2,50
4,00
1,00
PAS T RY
SANDWICH
COFFEE
Vch: ON Pr.list 1 Operator: Disabled
DEPARTMENT
Page 72

66
SELLING ITEMS BELONGING TO A DEPARTMENT
For sales of an item belonging to a department, an item (PLU) must be linked to the
department. The item can then be accessed after selecting first the department.
Note: If more than 15 PLUs are programmed, the remainder are displayed in the
following pages viewable using the keys: [Previous] and [Next].
Operating Procedure
1.
SET VAT RATE
(Set setup environment)
For the VAT rate, you can program a description and the
related value (for more information refer to the chapter
related to setting the VAT rate – SET308).
2.
PROGRAM DEPARTMENTS
(Set setup environment)
Program the departments using the SET 401 command
(in the example below CAFETERIA is programmed).
03.03.2012 18.10 Till No.: 1
F
TOTAL 7,50
2,50
4,00
1,00
PAS T RY
SANDWICH
COFFEE
Vch: ON Pr.list 1 Operator: Disabled
3.
PROGRAM ITEMS (PLU)
(Set setup environment)
Program the items (PLU) using the SET 802 command
(in the example below COFFEE, TEA, CAPPUCCINO,
are programmed). For each ITEM/PLU enter the price,
other optional parameters and the DEPT to which it
belongs. For more information, refer to the chapter
related to item programming – SET802.
DEPARTMENT
Page 73

67
4.
LINK PROGRAMMING TO KEY Program the link of the Departments (PLU) to a key on
the Sales keyboard.
- Select the “PLU Management”
- Select the department you require by touching it in
the “Dept List” (such as CAFETERIA).
- Select the PLU you require by touching it in the
“Item List” (such as COFFEE).
- Select the key in the window to which you want to
create the link by touching it or select “Assign to
free position”.
In this way, the CAFETERIA key is created on the Sales
keyboard that, if selected, displays a second Sales
window where the COFFEE key is present).
t
h
e
a
l
l
i
m
o
n
e
5.
03.03.2012 18.10 Till No.: 1
F
TOTAL 7,50
2,50
4,00
1,00
PAS T RY
SANDWICH
COFFEE
Vch: ON Pr.list 1 Operator: Disabled
DEPARTMENT
ITEM (PLU)
Page 74

68
SET 801 - FORMAT BCR PLU AREA
You can use the programming code SET 801 to restore the programmable parameters of the
PLUs to their factory values.
Operating procedure
1.
.8. .0. 1. .X.
2.
.X.
To confirm. A message appears on the operator display asking you to
confirm execution of the formatting function.
.C.
Cancel command. The cash register returns to the beginning of SET
mode.
During the procedure you are requested for all the parameters you want to set during
formatting:
• number of price lists
• descriptor length
• offer link
• WEEE contrib..
• periodic 2.
• Number in stock.
Page 75

69
SET 802 - INSERT NEW BCR PLU
Operating procedure
1.
.8. .0. 2. .X.
2.
[READ BARCODE]
.X.
When using a barcode reader, pass the optical reader
over the barcode of the item so that it is read. The code
is displayed on the operator display and an acoustic
signal emitted to indicate that reading has terminated.
To manually enter the barcode:
- Select the type of barcode: EAN-UPC, C39.
- Enter the alphanumerical code of the item to save
using the keypad.
Press the .X. key to confirm and proceed to the next
programmable function.
3.
[INSERTIO
N
EAN/UPC BARCOD
E
or C-39 CODE
]
.X.
To save items without the assistance of a barcode, select
the C39 type that allows descriptive strings to be entered
for an item or for generic PLUs (such as Coffee).
For example:
- When you select C39, on the screen appears:
INSERTION
PLU CODE C-39
- Enter the descriptive string you want (as in the
previous example, coffee) and press .X.
- You are then requested to enter the PLU CODE.
Enter the description of the item inserted (as in the
previous example, coffee).
The description inserted in this field will be printed on
the ticket and shown in the ticket on the touch screen.
4.
[EAN/UPC or C-39 CODE
]
[PR1, PR2,PR3,PR4,DEPT.0
]
Next enter the parameters for the item (prices 1,2,3,4,
department linked etc.) to associate a key to the item.
5.
.Total
.
Press this key to interrupt programming the selected
parameter, that nevertheless remains configured, and
return the cash register to the beginning of SET mode.
6.
.Subtotal
.
Press this key to interrupt programming the parameter
selected, that nevertheless remains configured, and skip
to program the same parameter for the next department.
• If you want to change the number of the department to which a PLU is linked, you must
first run the (Z10) report in Z operation mode.
Page 76

70
SET 803 - DELETE BCR PLU
Operati
ng procedure
1.
.8. .0. 3. .X.
2.
If you want to use the barcode reader, pass the
optical reader over the item’s barcode so that it
is read. The code is displayed on the operator
screen and an acoustic signal emitted to
indicate that reading has terminated.
If, on the other hand, you want to enter the
barcode manually, first select the type of code,
then press the [alphanumerical keys]
corresponding to the code to save. Press the
key .X. to confirm and continue to the next
programmable function.
A message is printed to indicate that
the PLU has been deleted.
Page 77

71
SET 804 - MODIFY BCR PLU
Operating procedure
.8. .0. 4. .X.
1.
2.
[READ BARCODE]
.X.
When using a barcode reader, pass the optical reader
over the barcode of the item so that it is read. The code
is displayed on the operator display and an acoustic
signal emitted to indicate that reading has terminated.
To manually enter the barcode:
- Select the type of barcode: EAN-UPC, C39.
- Enter the alphanumerical code of the item to save
using the keypad.
Press the .X. key to confirm and proceed to the next
programmable function.
3.
[INSERTIO
N
EAN/UPC BARCOD
E
or C-39 CODE
]
.X.
To save items without the assistance of a barcode, select
the C39 type that allows descriptive strings to be entered
for an item or for generic PLUs (such as Coffee).
For example:
- When you select C39, on the screen appears:
INSERTION
PLU CODE C-39
- Enter the descriptive string you want (as in the
previous example, coffee) and press .X.
- You are then requested to enter the PLU CODE.
Enter the description of the item inserted (as in the
previous example, coffee).
The description inserted in this field will be printed on
the ticket and shown in the ticket on the touch screen.
4.
[EAN/UPC or C-39 CODE
]
[PR1, PR2,PR3,PR4,DEPT.0
]
Next enter the parameters for the item (prices 1,2,3,4,
department linked etc.) to associate a key to the item.
5.
.Total
.
Press this key to interrupt programming the selected
parameter, that nevertheless remains configured, and
return the cash register to the beginning of SET mode.
6.
.Subtotal
.
Press this key to interrupt programming the parameter
selected, that nevertheless remains configured, and skip
to program the same parameter for the next department.
• If you want to change the number of the department to which a PLU is linked, you must
first run the (Z10) report in Z operation mode.
Page 78

72
PROGRAMMING THE SERIAL INTERFACES
The devices that can be connected to the cash register via the serial interfaces are the personal
computer, barcode reader and the slip printer.
Code 905 allows you to configure the connection of the devices to the two serial interfaces.
The parameters for serial interfaces 1 and 2 can be configured, respectively, with code 901 and
code 903.
To reset the parameter values to their factory settings, use code 902 for interface 1 and code
904 for interface 2.
Before connecting the PC, BARCODE READER and SLIP PRINTER to the cash register, follow
the instructions below in the order indicated :
In SET mode, using programming code 905, select the types of devices to be
connected to serial interfaces 1 and 2.
If you need to modify the parameters of either serial interface, in SET mode use the
appropriate programming code - code 901 for serial interface 1 and code 903 for
serial interface 2.
Switch off the cash register and the devices to be connected
Connect the devices to the cash register
Switch on the cash register and then the devices connected to it
To disconnect the devices from the cash register, follow the instructions below in the order
given :
Switch off first the cash register, then all the devices connected to it
Disconnect the devices from the cash register
Switch on the cash register.
SET 900 - PRINT SERIES 900 OPTIONS LIST
Operating procedure
1.
.9. .0. 0.
2.
.X.
Start printing
Page 79

73
SET 901 - SET SERIAL CHANNEL 1 INFORMATION
SET903 - SET SERIAL CHANNEL 2 INFORMATION
The values set automatically are the defaults. You can subsequently modify these values using
code 901 (for serial 1) and code 903 (for serial 2).
Programmable parameters
DESCRIPTION
Factory settings for
connection of a PC
Factory settings for connection of
BARCODE READER
Power supply DISABLED ENABLED
Modem signals Disabled Disabled
Baud rate 9600 9600
Data bits 8 7
Stop bits 1 1
Parity No Even
ACK/NACK time-out 3000 0
Session time-out 0 0
Number of retries 2 0
The values set automatically are the defaults or those set by the user.
Operating procedure
1.
9. .0. .1. .X. or .9. .0. .3. .X.
2.
.0. .X.
.1. .X.
To disable the 5V power supply to the connector output.
To enable the 5V power supply to the connector output.
3.
.0. .X.
.1. .X.
To disable the modem signals.
To enable the modem signals.
4.
.0. .X.
.1. .X.
.2. .X.
.3. .X.
.4. .X.
.5. .X.
.6. .X.
.7. .X.
.8. .X.
.9. .X.
To select the baud rate:
300
600
1200
2400
4800
9600
19200
38400
57600
115200
5.
.0. .X.
.1. .X.
To program the data bits as 7
To program the data bits as 8
6.
.0. .X.
.1. .X.
To program the number of stop bits as 1
To program the number of stop bits as 2
7.
.0. .X.
.1. .X.
.2. .X.
To program “no parity”
To program “odd parity”
To program “even parity”
8.
[Numeric Chars] .X.
To program ACK/NACK time-out (between 0 and 30,000 ms).
9.
[Numeric Chars] .X.
To program the session time-out (between 0 and 30,000 ms).
10.
[Numeric Chars] .X.
To program the number of retries (from 0 to 250).
Page 80

74
SET 902 - LOADING SERIAL CHANNEL 1 DEVICE
SET904 - LOADING SERIAL CHANNEL 2 DEFAULT
Programming codes SET 902 and 904 can be used to reset the serial interface 1 and
serial interface 2 parameters to their default values.
Operating procedure
1.
.9. .0. .2. .X.
or .9. .0. .4. .X.
2.
.X.
.C.
To confirm loading of the factory-set parameter values.
Cancel command.
The cash register returns to the beginning of SET mode.
SET 905 - SERIAL DEVICE CONFIGURE
Operating procedure
1.
9 0 5 X
2.
Serial 1 Device Serial 2 Device
3.
0 X
1 X
2 X
3 X
Barcode reader
Personal Computer
Barcode reader
Personal Computer
Personal Computer
Barcode reader
Slip printer
Slip printer
Factory setting:
SET 906 - ENABLE USB CONNECTION
Operating procedure
1.
.9. .0. .6. .X.
2.
.0. .X.
To disable the USB interface
1 .X.
To enable the USB interface
When the USB interface is enabled, the serial interface on which
the personal computer is configured is deactivated.
Page 81

75
SET 919 - ENABLE NETWORK SERVICES (OPTIONAL SETTINGS)
This is used to enable network services.
Operating procedure
1.
.9. .1. .9. .X.
2.
DISABLED = 0
ENABLED = 1.
SET 920 - ETH ACTIVATION PARAMETERS (OPTIONAL SETTINGS)
This is used to enable a network port of Ethernet type.
Operating procedure
1.
.9. .2. .0. .X.
2.
DISABLED = 0
ENABLED = 1.
3.
[FRIENDLY NAME] Name for identifying the device on the network. The system
proposes the factory setting: Nettuna3000
To change this name, enter the name you want on the keypad.
Page 82

76
SET 921 - CHANNEL 1 ETH SETTINGS
SET 922 – CHANNEL 2 WLAN SETTINGS
SET 923 – PPP SETTINGS
SET 924 – WIFI SETTINGS
SET 925 – ADSL SETTINGS
SET 926 – FTP SETTINGS
SET 927 – SNMP SETTINGS
SET 928 – HSDPA SETTINGS
SET 929 – VPN SETTINGS
SET930 - ETH ADVANCED SETTINGS (OPTIONAL SETTINGS)
The cash register is able to connect to different types of network, but principally: Ethernet,
wireless (Wlan), ppp protocol, adsl, ftp, HSDPA, VPN. As for any other device on the
market using these technologies, specific configuration parameters must be set for each
of these modes. In the following an example is given of how the various interfaces can be
configured.
Configuration
parameters
Active
connections
Page 83

77
SET 931 - SELECT FW UPDATE MODE (OPTIONAL SETTINGS)
This command enables or disables firmware updating mode.
Operating procedure
1.
.9. .3. .1. .X.
2.
.0. .X.
WITH CONFIRM ; if you choose to update the firmware, confirmation is
required
1 .X.
AUTOMATIC; the firmware is updated automatically
(default setting).
SET 932 - SELECT DB UPDATE MODE (OPTIONAL SETTINGS)
This command enables or disables the internal database updating mode of the cash
register.
Operating procedure
1.
.9. .3. .2. .X.
2.
.0. .X.
WITH CONFIRM ; if you choose to update the database, confirmation is
required
1 .X.
AUTOMATIC; the database is updated automatically
(default setting).
SET 933 – TEST NETWORK (OPTIONAL SETTINGS)
This command print the information about the network connection.
Operating procedure
1.
.9. .3. .3. .X.
Print information network connection.
Page 84
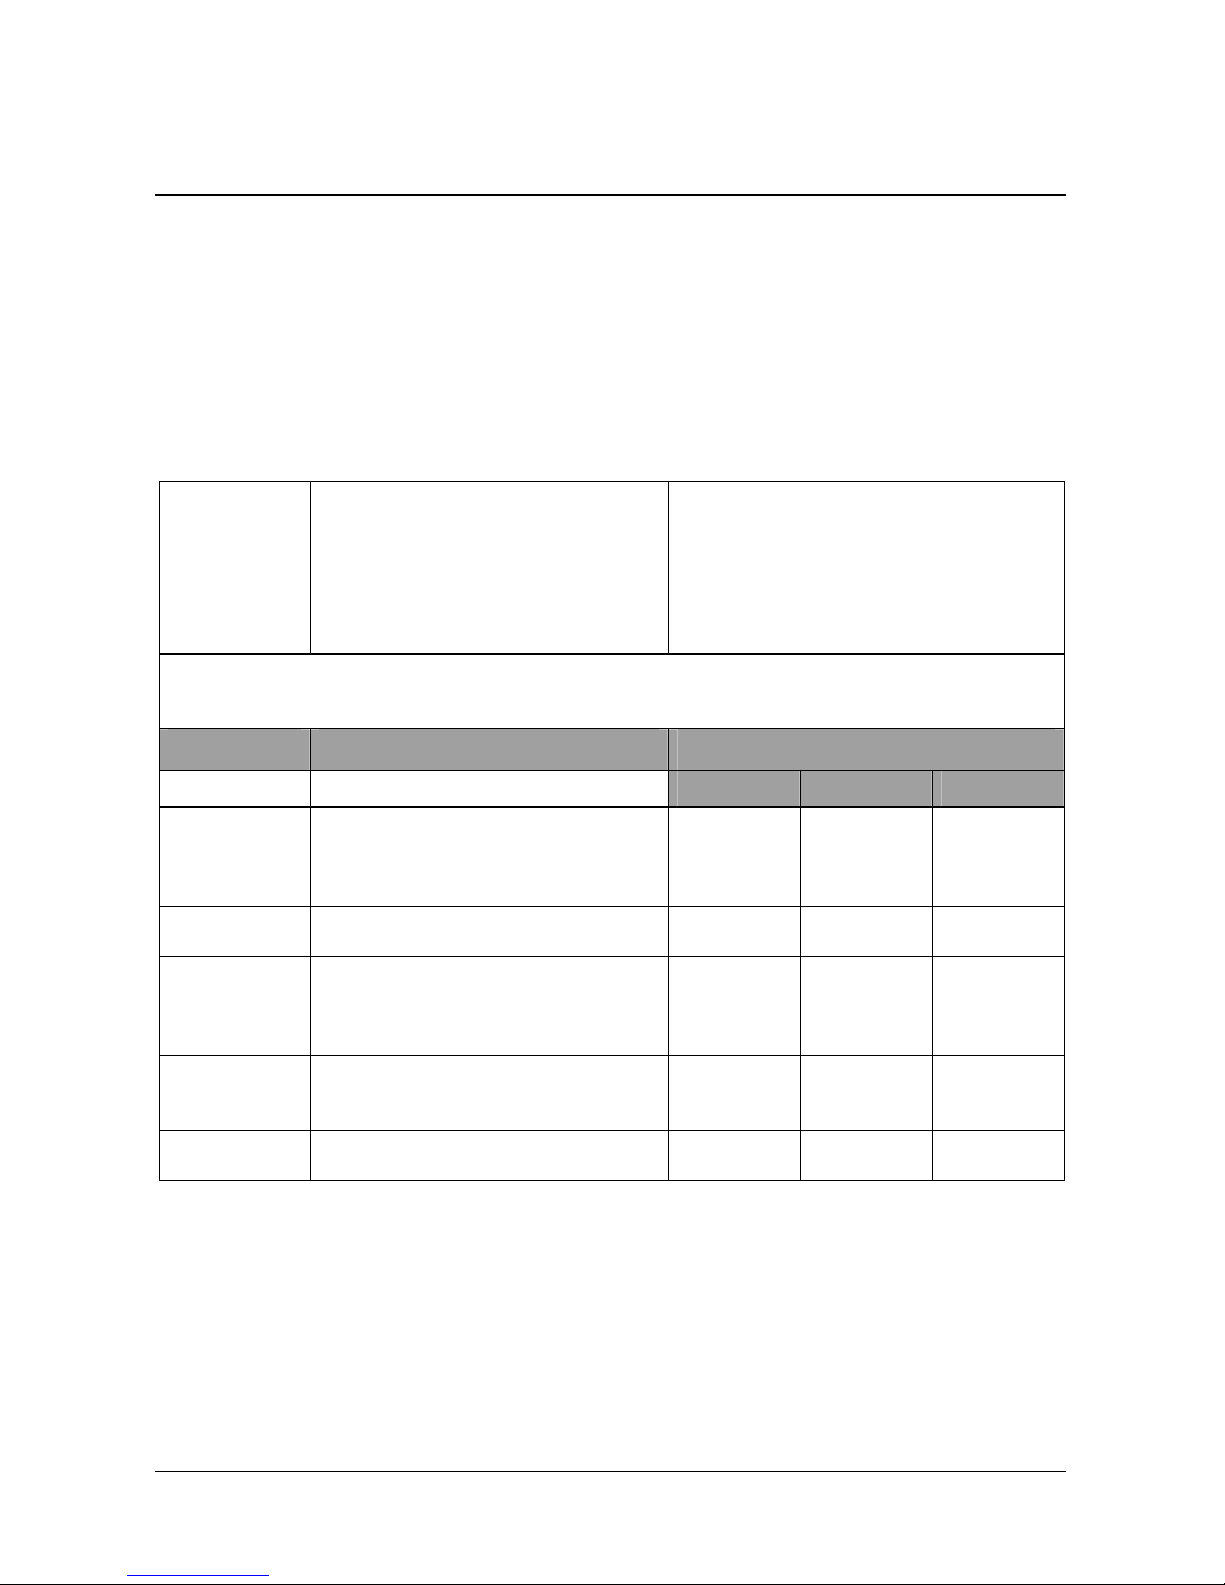
78
SET 950 – SET SLIP PRINTER INFORMATION
SET 951 - CALIBRATE SLIP PRINTER MODULE
PROGRAMMING DOCUMENT MANAGEMENT ON THE EXTERNAL PRINTER
After connecting the printer or slip printer, and selecting and programming the required
parameters, you must program document management for Invoices.
The programming code is SET 950.
PRINTER PROGRAMMABLE PARAMETERS: OLIVETTI PR4 SL, EPSON TM 290, EPSON TM 295, STAR
SP 298
Select printer
1 = Selects Olivetti PR4 SL
2 = Selects Epson TM 290
3 = Selects Epson TM 295
4 = Selects STAR SP 298
5 = Selects PRT100Marker
Programmable parameters
PARAMETER FUNCTION PROGRAMMING VALUES
minimum maximum factory
1
Width of the header area
corresponding to the pre-printed
area of the document.
0 20 0
2
Body text area of document.
10 200 35
3
Enables or disables the same
header printed on tickets to be used
also on invoices / receipts.
1
enabled
0
disabled
0
disabled
4
Invoice Series identifiable with
alphanumerical characters
1 3 A
5
Starting value for (progressively)
numbering receipts
1 99999 1
Page 85

79
PARAMETER FUNCTION PROGRAMMABLE VALUES
minimum maximum factory
6
Starting value for (progressively).
numbering invoices
1 99999 1
7
Compact document (type of form).
You can specify whether the body
text area must be completed
automatically with interlines, so that
the invoice / receipt total and
following text appear under the text
area. In the opposite case,
interlines are not inserted, and the
invoice / receipt total and following
text are printed immediately after the
sales items.
1
enabled
0
disabled
1
enabled
8
Enable / disable copying to EJ of
tickets not COPY INVOICE or
RECEIPT.
1
enabled
0
disabled
1
enabled
9
Enable / disable definition of unit
price
1
enabled
0
disabled
0
disabled
PROGRAMMABLE PARAMETERS FOR PRT 100 MARKER PRINTER
Selects printer
5 = Selects PRT100Marker
Programmable parameters
PARAMETER FUNCTION PROGRAMMABLE VALUES
minimum maximum factory
1
Module length expressed in
printing lines
10 90 52
2
In the case of a pre-printed form,
number of pre-printed lines at the
top
0 20 0
Page 86

80
PARAMETER FUNCTION
PROGRAMMABLE VALUES
minimum maximum factory
3
In the case of a pre-printed form,
number of pre-printed rows at the
end.
0 30 0
4
Enables / disables the same
header printed on tickets to be
printed also on invoices and
receipts.
1
enabled
0
disabled
0
disabled
5
Invoice Series identified by
alphanumerical characters
1 3 A
6
Starting value for numbering
receipts (progressively).
1 99999 1
7
Starting value for numbering
invoices (progressively).
1 99999 1
8
Compact document (type of form).
You can specify whether the body
text must be completed
automatically with interlines so that
the invoice / receipt total and
following text are positioned under
the text area. In the opposite case,
interlines are not inserted, and the
invoice / receipt total and following
text appear immediately after the
sales items.
1
enabled
0
disabled
1
enabled
9
Enables / disables copying to EJ of
tickets not COPY/INVOICE/
RECEIPT.
1
enabled
0
disabled
1
enabled
10
Enables / disables definition of
single unit price
1
enabled
0
disabled
0
disabled
Page 87

81
LAYOUT OF THE DOCUMENT FOR INVOICE OR RECEIPT
In the following figure is illustrated the layout of the document for the Invoice or Receipt, with
indications of how the various fields are ordered.
Width of top area
CODE 950 Parameter 1
Optional Header
CODE 950 Parameter 7
Body text
CODE 950 Parameter 2
Composed of :
- one row for “Customer TAX CODE / VAT NO.”
- one row for descriptor
“QUANTITY DESCRIPTION TOTAL VAT AMOUNT”
- one row for “EURO” descriptor
- one row for each sales item
Width of bottom area.
Composed of :
- one row for the “TOTAL AMOUNT (EURO)”
- one row for “PAID (EURO)”
- one row for “NOT PAID (EURO)”
- one row for the descriptor
“% VAT TAXABLE AMT TAX AMT”
- one row for each VAT rate used
- one row for the date
- one row for the
“INVOICE or RECEIPT NUMBER”
Page 88

82
Operating procedure
1.
.9. .5. 0. .X.
2.
[ALPHANUMERICAL CHARS] .X.
Set all the parameters that are requested,
referring to the tables for slip printer printing.
DEFINE THE BODY TEXT LINES FOR THE SLIP PRINTER – SET 951
To print on an external printer of slip printer type, you must know the number of body text lines
that can be printed by the slip printer for the invoice/ticket.
The number of body text lines must be specified for the option SET950.
1.
.9. .5. 1. .X.
The ticket is printed on the slip printer with the following indications:
2.
.X.
Wait until the slip printer finishes printing, then read the value
calculated on the last line.
3.
Using SET 950, enter the value obtained for the parameter “Body text”; in the
example above 57.
Page 89

A-1
A. ICON CLASSIFICATIONS AND LIST OF PROMOTIONAL
PHRASES
ICON GENERAL CLASSIFICATIONS – MERCHANDISE CATEGORIES
FOOD
• Wine shop
• Grocery shop
• Fruit - Vegetables
• Gastronomy
• Butcher’s shop
• Equine butcher’s
• Bakery
• Pastry shop
• Pasta shop
• Fishmonger’s
• Poulterer
• Delicatessen - Cheeses
• Frozen food
Page 90

A-2
THE
WHOLE
WORLD IN A
BOTTLE
THE
WHOLE
WORLD IN A
BOTTLE
EQUINE BUTCHER’S
FRESH, GENUINE
MEAT PRODUCTS
FOR YOUR
TABLE
FRESH, GENUINE
MEAT PRODUCTS
FOR YOUR
TABLE
A
VAST
SELECTION
OF PRODUCTS
FOR YOUR
HOME
THE PERFUME
AND TASTE OF
HOME-MADE
PASTA
THE PERFUME
AND TASTE OF
HOME-MADE
PASTA
A
VEGETABLE
GARDEN AND AN
ORCHARD AT
YOUR DOOR
A
VEGETABLE
GARDEN AND
ORCHARD AT
YOUR DOOR
DESSERTS,
CAKES,
PASTRIES
AND
FANTASY
DESSERTS,
CAKES,
PASTRIES
AND
FANTASY
THE PLEASURE
FROM
SAVOURING
GOOD THINGS
T
HE PLEASURE
FROM
SAVOURING
GOOD THINGS
THE PERFUME
AND TASTE
OF HOME-MADE
PASTA
THE PERFUME
AND TASTE
OF HOME-MADE
PASTA
FRESH,
GENUINE MEAT
PRODUCTS
FOR YOUR
TABLE
FRESH,
GENUINE MEAT
PRODUCTS
FOR YOUR
TABLE
A
GUARANTEE
OF ONLY THE
FRESHEST
FISH
A
GUARANTEE
OF ONLY THE
FRESHEST
FISH
A
LL THE SCENTS,
ALL THE
ESSENCES CHOSEN
JUST FOR YOU
BUTCHER’S SHOP FISHMONGER’S
BAKERY
GASTRONOMY
FRUIT - VEGETABLES
PASTRY SHOP
GROCERY SHOP
WINE SHOP
BAKERY
Page 91

A-3
DELICATESSEN - CHEESES
FROZEN FOOD
POLLERIA
CHICKEN, MEAT
AND SALAMI
LIKE
HOME-RAISED
THE COLD
FRIEND OF
FRESH
PRODUCE
CHICKEN, MEAT
AND SALAMI
LIKE
HOME-RAISED
THE COLD
FRIEND OF
FRESH
PRODUCE
THE BEST
CHEESES
CARRY OUR
NAME
THE BEST
CHEESES
CARRY OUR
NAME
POULTERER
Page 92

A-4
CLOTHES
• Kids • Lingerie
• Shoes • Leather goods
• Shirts • Textiles
• Hats • Sportswear
• Ladieswear • Menswear
LINGE
RIE
LINGE
RIE
THE WORLD
OF THE
YOUNG
THE WORLD
OF THE
YOUNG
WALKING
TOGETHER
WALKING
TOGETHER
LEATHER BAGS
REAL LEATHER
TRAVEL
ARTIC LES
GUARANTEED
LEATHER BAGS
REAL LEATHER
TRAVEL
ARTIC LES
GUARANTEED
THE SHIRT
THAT SETS
YOU
APART
THE SHIRT
THAT SETS
YOU APART
FABRICS
LATEST
IDEAS
CLASSIC
FABRICS
LATEST
IDEAS
CLASSIC
YOU HAVE
MADE A
WISE
CHOICE
SPORT
AND HEALTH
GO HAND IN
HAND
YOU HAVE
MADE A
WISE
CHOICE
SPORT
AND HEALTH
GO HAND IN
HAND
JUST
FOR
WOMEN
JUST
FOR
WOMEN
EXCLUSIVE
MENSWEAR
EXCLUSIVE
MENSWEAR
LADIESWEAR
MENSWEAR
SPORT SWEAR
HATS
SHOES LEATHER GOODS
TEXTILES
SHIRT S
LINGERIE KIDS
Page 93

A-5
CATERING
• Bar - Café
• Public House
• Ice-cream Parlour
• Sandwich Bar
• Pizza Restaurant
• Pasta House
• Snack Bar
ENJOY A
RELAXED
TIME IN
GOOD
COMPANY
THE
FIVE
STAR
ICE-CREAM
THE
FIVE
STAR
ICE-CREAM
ENJOY A
RELAXED
TIME IN
GOOD
COMPA
N
Y
ENJOY A
RELAXED
TIME IN
GOOD
COMPANY
AT YOUR
SERVICE
OUR QUALITY
AND COURTESY
AT YOUR
SERVICE
OUR QUALITY
AND COURTESY
YOUR
MEETING
PLACE
YOUR
MEETING
PLACE
A CONTINUOUS
THREAD
OF PASTA &
FANTASY
A CONTINUOUS
THREAD
OF PASTA &
FANTASY
ENJOY A
RELAXED
TIME IN
GOOD
COMPANY
AT YOUR
SERVICE
OUR QUALITY
AND
COURTESY
AT YOUR
SERVICE
OUR
QUALITY
AND
COURTESY
PUBLIC HOUSE
SNACK BAR
PASTA HOUSE BAR - CAFE
SANDWICH BAR
ICE-CREAM PARLOUR
PIZZA RESTAURANT
Page 94

A-6
V
ALUABLE GOODS
• Jewellery
• Antiques
• Goldsmith
• Clocks and watches
BUILDING –PAINT
SUPPLIERS
• Paints
• Bricks - Cement
• Marble - Tiles
• Upholstery - Carpets
• Sanitaryware –
Bathroom Furnishings
BUILDING
SAFELY
PRECIOUS AND
EXCLUSIVE FOR
EXCEPTIONAL
PERSONS
THE
FORECAST
JUST
FOR YOU
ELEGANT
MATERIALS
FOR
FURNISHINGS
PRECIOUS AND
EXCLUSIVE FOR
EXCEPTIONAL
PERSONS
ABSOLUTELY
EVERYTHING
FOR A WORLD
OF COLOUR
THE SURE
CHARM OF
ALL ANTIQUE
OBJECTS
THE SURE
CHOICE FOR
TASTEFUL
FURNISHINGS
THE SURE
CHOICE FOR
TASTEFUL
FURNISHINGS
MARBLE - TILES
GOLDSMITH
UPHOLSTERY - CARPETS
SANITARYWARE – BATHROOM FURNISHINGS
BRICKS - CEMENT
GOLDSMITH
ANTIQUES
PAINTS
JEWELLERY
Page 95

A-7
ELECTRONICS
• HF radio accessories
• VHS cassettes
• Computers and
accessories
• Music cassettes - Disks
• Household goods
• Radio - Televisions
• Musical instruments
A
HIGH
FIDELITY
SHOP
A
HIGH
FIDELITY
SHOP
THE SHOP
THAT PROVIDES
YOU HELP AND
ADVICE
A
HIGH
FIDELITY
SHOP
YOUR
MUSIC
IN
HARMONY
HOUSEHOLD GOODS
MUSICAL INSTRUMENTS
RADIO - TELEVISIONS
CDs -DISKS
VHS CASSETTES
HF RADIO ACCESSORIES
COMPUTERS AND ACCESSORIES
A
HIGH
FIDELITY
SHOP
THE SHOP
THAT PROVIDES
YOU
HELP AND
ADVICE
Page 96

A-8
STATIONERY - TOYS
• School & office stationery
• Stationery
• Toys
• Books
COSMETICS
• Fashion jewellery
• Herbal products
• Cosmetics
• Perfumes
NEW,
EXCLUSIVE
UNUSUAL
CREATIONS
EVERYTHI
NG
FOR THE HOME,
OFFICE AND
SCHOOL
NATURE, ITS
HERBS AND
NATURAL
PRODUCTS
EVERYTHI
NG
FOR THE
HOME,
OFFICE AND
SCHOOL
A SPACE
FOR BEAUTY
AND BODY
CARE
A FABULOUS
WORLD FOR THE
YOUNG AND
NOT SO YOUNG
A BOOK
FOR A
FRIEND
A SPAC
E
FOR BEAUTY
AND BODY
CARE
BOOKS PERFUMES
COSMETICS TOYS
HERBAL PRODUCTS
STATIONERY
FASHION JEWELLERY
OFFICE & SCHOOL STATIONERY
Page 97

A-9
ANIMALS
• Animal supplies
• Pets
• Fish and acquariums
GARDENING
• Gardening supplies
• Equipment and fertilizers
• Flowers and plants
AUTOMOTIVE - MOTOBIKE BICYCLE
• Car accessories and spare parts
• Motorbike/bicycle accessories
and spare parts
PHOTOGRAPHY - OPTICS
• Video - photo - optical equipment
•
Scientific instruments
VIDEO PHOTO OPTICAL EQUIPMENT
CULTIVATE,
CARE
FOR AND
CREATE
IN HARMONY
WITH NATURE
ALL
ACCESSORIES
AND SPARE
PARTS
ITEM BY
ITEM
EVERYT
HING
FOR OUR
FRIENDS
CULTIVATE,
CARE FOR AND
CREATE
IN HARMONY
WITH NATURE
CULTIVATE, CARE
FOR AND CREATE
IN HARMONY
WITH
NATURE
EVERYTHING
FOR THE
UNDERWATER
WORLD
EVERYTHING
FOR
TWO WHEELS
ALL
ACCESSORIES
AND SPARE
PARTS
ITEM BY ITEM
EVERYTHING
FOR
OUR
FRIENDS
CAR ACCESSORIES
AND SPAR E PARTS
MOTORBIKE
ACCESSORIES AND
SPARE PART S
FLOWERS AND PLANTS
BIKES
PETS
EQUIPMENT AND FERTILIZERS
GARDENING SUPPLIES
ANIMAL SUPPLIES
GIVE YOUR
PICTURES
THEIR JUST
WORTH
A VAST
RANGE
OF PRODUCTS
FOR YOU
SCIENTIFIC INSTRUMENTS
FISH AND ACQUARIUMS
Page 98

A-10
HARDWARE ITEMS
• Household goods
• Plumbing materials
• Heating systems
• Ironmongery
• Electrical materials
• Industrial metal products
WOOD - FURNITURE
• Frames - Pictures Prints
• Wood Carpentry
• Home - office
furnishings
GLASSWARE CERAMICS
• Light fixtures
• Porcellane - Pottery
• Glassware
EVERYTHING
FOR
ALL TYPES OF
INSTALLATION
HOUSEHOLD GOODS
EVERYTHING
FOR AN
ELEGANT
WELCOMING
HOME
PLUMBING MATERIALS
HEATING SYSTEMS
TIMELESS
JEWELS
EVERYTHING
FOR ALL
TYPES OF
INSTALLATION
FROM A
BOLT
TO A
CRANE
THE ART
OF
WOOD
GLASSWARE
EVERYTHING
FOR
ALL TYPES OF
INSTALLATION
WE WILL PUT
YOU RIGHT
GLASS
IN ALL
ITS FORMS
THE ART
OF LIGHT
LIGHT FIXTURES
FRAMES – PICTURES - PRINTS
IRONMONGERY
A
CHOICE
OF
STYLE
HOME –OFFICE FURNITURE
ELECTRICAL MATERIALS
A VAST
SELECTION
OF PRODUCTS
FOR YOU
PORCELLANE - POTTERY
WOOD - CARPENTRY
INDUSTRIAL METAL
PRODUCTS
Page 99

A-11
HOLIDAYS
AND SPECIAL
OCCASIONS
• Christmas
• New Year
• St Valentine’s Day
• Carnival
• Women’s Day
• Father’s Day
• Easter
• Mother’s Day
• Vacation
HAPPY
EASTER
A DAY
WORTH
REMEMBERING
FATHER’S
DAY -
BEST
WISHES
HAVE
A GOOD
HOLIDAY
HAVE
A
HAPPY
CARNIVAL
HAPPY
NEW
YEAR
N
EW YEAR
CARNIVAL
VACATION
A
DAY
TO
REMEMBER
MOTHER’S
DAY -
BEST WISHES
HAPPY
CHRISTMAS
MOTHER’S DAY ST. VALENTINE’S DAY CHRISTMAS
FATHER’S DAY
EASTER
WOMEN’S DAY
Page 100

A-12
LIST OF PROMOTIONAL PHRASES
PHRASES No.
AT YOUR SERVICE QUALITY AND COURTESY
25
TECHNICAL ARTICLES
91
YOU HAVE MADE A WISE CHOICE
15
ENJOY YOUR MEAL
78
HAPPY CHRISTMAS
59
HAPPY EASTER
65
HAVE A GOOD HOLIDAY
67
WALKING TOGETHER
13
FRESH, GENUINE MEAT PRODUCTS FOR YOUR TABLE
5
HE WHO LOVES NATURE LOVES LIFE
85
HE WHO FINDS A FRIEND FINDS A TREASURE
82
ASK FOR A HOME DELIVERY
70
CULTIVATE, CARE FOR AND CREATE IN HARMONY WITH NATURE
45
BUILDING SAFELY
31
NEW, EXCLUSIVE, UNUSUAL CREATIONS
42
FROM A BOLT TO A CRANE
53
GIVE YOUR PICTURES THEIR JUST WORTH
48
JUST FOR WOMEN
16
DESSERTS, CAKES, PASTRIES AND FANTASY
6
EXCLUSIVE MENSWEAR
21
HAPPY NEW YEAR
60
FATHER’S DAY – BEST WISHES -
64
MOTHER’S DAY – BEST WISHES
66
HAVE A HAPPY CARNIVAL
62
YOU HAVE WON A PRIZE
69
IDEAS AND FANTASY FOR THE HOME
106
FLOWERS FIND THE BEST WORDS FOR EVERY OCCASION
86
THE BEST CHEESES CARRY OUR NAME
10
ELEGANT MATERIALS FOR FURNISHINGS
32
FABRICS, LASTEST IDEAS, CLASSIC
19
THE SURE CHARM OF ALL ANTIQUES OBJECTS
28
THE COLD FRIEND OF FRESH PRODUCE
11
THE FIVE-STAR ICE-CREAM
24
THE BEST FOR YOUR TABLE
72
THE WORLD OF THE YOUNG
12
 Loading...