


Option Copier
SERVICE MANUAL
Code Y104371-8
DF-650
MT-1(A)
BF1(A)
PH-4A/PH-4C

PUBLICATION ISSUED BY:
Olivetti S.p.A.
77, Via Jervis - 10015 Ivrea (TO)
Italy
Copyright © 2008, Olivetti
All rights reserved

This page is intentionally left blank.

Safety precautions
This booklet provides safety warnings and precautions for our service personnel to ensure the safety of
their customers, their machines as well as themselves during maintenance activities. Service personnel
are advised to read this booklet carefully to familiarize themselves with the warnings and precautions
described here before engaging in maintenance activities.

Safety warnings and precautions
Various symbols are used to protect our service personnel and customers from physical danger and
to prevent damage to their property. These symbols are described below:
DANGER: High risk of serious bodily injury or death may result from insufficient attention to or incorrect
compliance with warning messages using this symbol.
WARNING: Serious bodily injury or death may result from insufficient attention to or incorrect compliance
with warning messages using this symbol.
CAUTION: Bodily injury or damage to property may result from insufficient attention to or incorrect
compliance with warning messages using this symbol.
Symbols
The triangle ( ) symbol indicates a warning including danger and caution. The specific point
of attention is shown inside the symbol.
General warning.
Warning of risk of electric shock.
Warning of high temperature.
indicates a prohibited action. The specific prohibition is shown inside the symbol.
General prohibited action.
Disassembly prohibited.
indicates that action is required. The specific action required is shown inside the symbol.
General action required.
Remove the power plug from the wall outlet.
Always ground the copier.

1.Installation Precautions
WARNING
• Do not use a power supply with a voltage other than that specified. Avoid multiple connections to
one outlet: they may cause fire or electric shock. When using an extension cable, always check
that it is adequate for the rated current. .............................................................................................
• Connect the ground wire to a suitable grounding point. Not grounding the copier may cause fire or
electric shock. Connecting the earth wire to an object not approved for the purpose may cause
explosion or electric shock. Never connect the ground cable to any of the following: gas pipes,
lightning rods, ground cables for telephone lines and water pipes or faucets not approved by the
proper authorities. ............................................................................................................................
CAUTION:
• Do not place the copier on an infirm or angled surface: the copier may tip over, causing injury. .......
• Do not install the copier in a humid or dusty place. This may cause fire or electric shock. ................
• Do not install the copier near a radiator, heater, other heat source or near flammable material.
This may cause fire. .........................................................................................................................
• Allow sufficient space around the copier to allow the ventilation grills to keep the machine as cool
as possible. Insufficient ventilation may cause heat buildup and poor copying performance. ...........
• Always handle the machine by the correct locations when moving it. ...............................................
• Always use anti-toppling and locking devices on copiers so equipped. Failure to do this may cause
the copier to move unexpectedly or topple, leading to injury. ...........................................................
• Avoid inhaling toner or developer excessively. Protect the eyes. If toner or developer is accidentally ingested, drink a lot of water to dilute it in the stomach and obtain medical attention immediately. If it gets into the eyes, rinse immediately with copious amounts of water and obtain medical
attention. ......................................................................................................................................
• Advice customers that they must always follow the safety warnings and precautions in the copier’s
instruction handbook. .....................................................................................................................

2.Precautions for Maintenance
WARNING
• Always remove the power plug from the wall outlet before starting machine disassembly. ...............
• Always follow the procedures for maintenance described in the service manual and other related
brochures. .......................................................................................................................................
• Under no circumstances attempt to bypass or disable safety features including safety mechanisms
and protective circuits. .....................................................................................................................
• Always use parts having the correct specifications. ..........................................................................
• Always use the thermostat or thermal fuse specified in the service manual or other related brochure when replacing them. Using a piece of wire, for example, could lead to fire or other serious
accident. ..........................................................................................................................................
• When the service manual or other serious brochure specifies a distance or gap for installation of a
part, always use the correct scale and measure carefully. ................................................................
• Always check that the copier is correctly connected to an outlet with a ground connection. .............
• Check that the power cable covering is free of damage. Check that the power plug is dust-free. If it
is dirty, clean it to remove the risk of fire or electric shock. ..............................................................
• Never attempt to disassemble the optical unit in machines using lasers. Leaking laser light may
damage eyesight. ...........................................................................................................................
• Handle the charger sections with care. They are charged to high potentials and may cause electric
shock if handled improperly. ............................................................................................................
CAUTION
• Wear safe clothing. If wearing loose clothing or accessories such as ties, make sure they are
safely secured so they will not be caught in rotating sections. ..........................................................
• Use utmost caution when working on a powered machine. Keep away from chains and belts. ........
• Handle the fixing section with care to avoid burns as it can be extremely hot. ..................................
• Check that the fixing unit thermistor, heat and press rollers are clean. Dirt on them can cause
abnormally high temperatures. ........................................................................................................

• Do not remove the ozone filter, if any, from the copier except for routine replacement. ....................
• Do not pull on the AC power cord or connector wires on high-voltage components when removing
them; always hold the plug itself. .....................................................................................................
• Do not route the power cable where it may be stood on or trapped. If necessary, protect it with a
cable cover or other appropriate item. .............................................................................................
• Treat the ends of the wire carefully when installing a new charger wire to avoid electric leaks. ........
• Remove toner completely from electronic components. ...................................................................
• Run wire harnesses carefully so that wires will not be trapped or damaged. ....................................
• After maintenance, always check that all the parts, screws, connectors and wires that were
removed, have been refitted correctly. Special attention should be paid to any forgotten connector,
trapped wire and missing screws. ...................................................................................................
• Check that all the caution labels that should be present on the machine according to the instruction
handbook are clean and not peeling. Replace with new ones if necessary. ......................................
• Handle greases and solvents with care by following the instructions below: .....................................
· Use only a small amount of solvent at a time, being careful not to spill. Wipe spills off completely.
· Ventilate the room well while using grease or solvents.
· Allow applied solvents to evaporate completely before refitting the covers or turning the power
switch on.
· Always wash hands afterwards.
• Never dispose of toner or toner bottles in fire. Toner may cause sparks when exposed directly to
fire in a furnace, etc. .......................................................................................................................
• Should smoke be seen coming from the copier, remove the power plug from the wall outlet imme-
diately. ............................................................................................................................................
3.Miscellaneous
WARNING
• Never attempt to heat the drum or expose it to any organic solvents such as alcohol, other than the
specified refiner; it may generate toxic gas. .....................................................................................

This page is intentionally left blank.

3H3-2.0
CONTENTS
1-1 Specifications
1-1-1 Specifications..........................................................................................................................................1-1-1
1-1-2 Parts names............................................................................................................................................1-1-2
1-1-3 Machine cross sectional view .................................................................................................................1-1-3
1-1-4 Machine drive system .............................................................................................................................1-1-4
(1) Finisher (paper feed and conveying section) ....................................................................................1-1-4
(2) Finisher (main tray driving section) ...................................................................................................1-1-5
(3) Multi job tray ......................................................................................................................................1-1-6
(4) Centerfold unit...................................................................................................................................1-1-7
(5) Punch unit .........................................................................................................................................1-1-7
1-2 Installation
1-2-1 Unpacking and installation......................................................................................................................1-2-1
1-2-2 Installing the centerfold unit (option) .......................................................................................................1-2-3
1-2-3 Installing the multi job tray (option) .......................................................................................................1-2-11
1-2-4 Installing the punch unit (option) ...........................................................................................................1-2-17
1-2-5 Installing the stopper guide (option)......................................................................................................1-2-21
(1) Installing the stopper guide (To the finisher without the multi job tray) ...........................................1-2-21
(2) Installing the stopper guide (To the finisher with the multi job tray) ................................................1-2-22
1-3 Maintenance Mode
1-3-1 Maintenance mode .................................................................................................................................1-3-1
(1) Executing a maintenance item ..........................................................................................................1-3-1
(2) Contents of the maintenance mode items.........................................................................................1-3-2
1-4 Troubleshooting
1-4-1 Paper misfeed detection .........................................................................................................................1-4-1
(1) Paper misfeed indication ...................................................................................................................1-4-1
(2) Paper misfeed detection conditions ..................................................................................................1-4-2
(3) Paper misfeeds .................................................................................................................................1-4-3
1-4-2 Self-diagnosis .........................................................................................................................................1-4-6
(1) Self-diagnostic function .....................................................................................................................1-4-6
(2) Self diagnostic codes ........................................................................................................................1-4-7
1-4-3 Electric problems ..................................................................................................................................1-4-14
1-4-4 Mechanical problems............................................................................................................................1-4-22
1-5 Assembly and Disassembly
1-5-1 Finisher ...................................................................................................................................................1-5-1
(1) Correcting paper curling ....................................................................................................................1-5-1
(2) Correcting centerfold-stapling ...........................................................................................................1-5-3
(3) Adjusting the stapler unit mounting position......................................................................................1-5-4
(4) Centering stapling position ................................................................................................................1-5-7
1-5-2 Centerfold unit.........................................................................................................................................1-5-9
(1) Detaching and refitting the centerfold blade......................................................................................1-5-9
(2) Adjusting the paper folding position ................................................................................................1-5-11
1-5-3 Punch unit.............................................................................................................................................1-5-12
(1) Centering punch-holes ....................................................................................................................1-5-12
(2) Setting margin from the leading edge to punch holes .....................................................................1-5-13
1-6 Requirements on PWB Replacement
1-6-1 Upgrading the version of the firmware of the finisher main PWB ...........................................................1-6-1
1-6-2 Requirements on finisher main PWB replacement .................................................................................1-6-2

3H3-2.0
2-1 Mechanical construction
2-1-1 Finisher ...................................................................................................................................................2-1-1
(1) Paper insertion section......................................................................................................................2-1-1
(2) Feedshift section ...............................................................................................................................2-1-2
(3) Intermediate tray section ...................................................................................................................2-1-5
(4) Paper eject section..........................................................................................................................2-1-13
2-1-2 Multi job tray..........................................................................................................................................2-1-15
2-1-3 Centerfold unit.......................................................................................................................................2-1-17
2-1-4 Punch unit.............................................................................................................................................2-1-20
2-2 Electrical Parts Layout
2-2-1 Electrical parts layout..............................................................................................................................2-2-1
(1) PWBs (finisher) .................................................................................................................................2-2-1
(2) Switches and sensors (finisher) ........................................................................................................2-2-2
(3) Clutches and solenoids (finisher) ......................................................................................................2-2-4
(4) Motors and others (finisher) ..............................................................................................................2-2-5
(5) Stapler ...............................................................................................................................................2-2-6
(6) PWBs (optional centerfold unit).........................................................................................................2-2-7
(7) Switches and sensors (optional centerfold unit)................................................................................2-2-8
(8) Motors and solenoids (optional centerfold unit).................................................................................2-2-9
(9) Switches and motors (optional multi job tray)..................................................................................2-2-10
(10) Switches and motors (optional punch unit) .....................................................................................2-2-11
2-3 Operation of the PWBs
2-3-1 Finisher main PWB .................................................................................................................................2-3-1
2-3-2 Finisher drive PWB ...............................................................................................................................2-3-10
2-3-3 Centerfold unit main PWB.....................................................................................................................2-3-14
2-4 Appendixes
Timing chart No.1....................................................................................................................................2-4-1
Timing chart No.2....................................................................................................................................2-4-2
Timing chart No.3....................................................................................................................................2-4-3
Timing chart No.4....................................................................................................................................2-4-4
Maintenance parts list.............................................................................................................................2-4-5
Periodic maintenance procedures ..........................................................................................................2-4-7
Optional devices supplied parts list.......................................................................................................2-4-11
Centerfold unit wiring diagram ..............................................................................................................2-4-13
General wiring diagram No.1 ................................................................................................................2-4-14
General wiring diagram No.2 ................................................................................................................2-4-15
General wiring diagram No.3 ................................................................................................................2-4-16
General wiring diagram No.4 ................................................................................................................2-4-17
General wiring diagram No.5 ................................................................................................................2-4-18
General wiring diagram No.6 ................................................................................................................2-4-19
General wiring diagram No.7 ................................................................................................................2-4-20

3H3
1-1-1
1-1 Specifications
1-1-1 Specifications
Finisher
Type................................................ Floor type
Number of trays ..............................2 trays
Tray capacity ................................... Main tray (80 g/m2 weight paper)
A3, B4 (257 x 364 mm), 11" x 17", 8
1/2
" x 14": 1500 sheets
A4 - A6R, Folio, 8
1/2
" x 11", 11" x 8
1/2
", 5
1/2
" x 8
1/2
": 3000 sheets
Sub tray (80 g/m2 weight paper)
A3 - A6R, Folio, 11" x 17", 8 1/2" x 14", 8 1/2" x 11", 11" x 8 1/2", 5 1/2" x 8 1/2": 200
sheets
Stapling capacity ............................. A3, B4 (257 x 364 mm), 11" x 17", 8
1/2" x 14": 30 sheets
A4, A4R, B5, 8 1/2" x 11", 11" x 8 1/2": 50 sheets
Storage capacity.............................A3, B4 (257 x 364 mm), 11" x 17", 8
1/2" x 14"
Stapling 2 - 4 sheets: 150 sets
Stapling 5 - 10 sheets: 100 sets
Stapling 11 - 30 sheets: 50 sets
A4, A4R, 8
1/2" x 11", 11" x 8 1/2", 5 1/2" x 8 1/2"
Stapling 2 - 4 sheets: 150 sets
Stapling 5 - 10 sheets: 100 sets
Stapling 11 - 30 sheets: 50 sets
Stapling 31 - 50 sheets: 3000 sheets
Power source..................................Supplied via machine
Dimensions (W x D x H) ................ 796 x 640 x 1070 mm
31
5/16" x 25 3/16" x 42 1/8"
Weight.............................................Approx. 73 kg/160.6 lbs.
Multi job tray (option)
Number of trays ..............................Job tray: 5
Paper size.......................................A3, B4 (257 x 364 mm), A4, A4R, A5R, B6R, Folio, 11" x 17", 8
1/2" x 14", 8 1/2" x 11",
11" x 8 1/2", 5 1/2" x 8 1/2"
Tray capacity................................... A3, B4 (257 x 364 mm), 11" x 17", 8
1/2" x 14": 100 sheets (80 g/m
2
weight paper)
A4 - B6R, Folio, 8
1/2" x 11", 11" x 8 1/2", 5 1/2" x 8 1/2": 150 sheets (80 g/m
2
weight
paper)
Dimensions (W x D x H) .................368 x 392 x 573 mm
14
1/2" x 15 7/16" x 22 9/16"
Weight ............................................Approx.15 kg/33 lbs.
Centerfold unit (option)
Foldable sizes.................................A3, B4 (257 x 364 mm), A4R, 11" x 17", 8
1/2" x 11"
Foldable number of sheets .............1 - 16 (no stapling for 1 sheet)
Maximum number for storage......... 5 or less copies in a set: 30 sets
6 - 10 copies in a set: 20 sets
11 - 16 copies in a set: 10 sets
Paper thickness ..............................60 - 200 g/m2 (only one cover for 81 g/m2 or more)
Punch unit (option)
Available sizes................................A3, B4 (257 x 364 mm), A4, A4R, B5, B5R, A5R, Folio, 11" x 17", 8
1/2" x 14",
8
1/2" x 11", 11" x 8 1/2", 5 1/2" x 8 1/2"
Y104371-8 Service Manual

3H3
1-1-2
1-1-2 Parts names
Figure 1-1-1
9
5
2
1
3
4
7
6
24
22
21
23
20
8
17
19
18
10
16
1312
15
14
11
Finisher
1. Main tray (Tray A)
2. Sub tray (Tray B)
3. Front cover
4. Front cover handle
5. Upper cover
6. Intermediate tray
7. Intermediate tray handle
8. Intermediate tray release lever
9. Lower lever
10. Conveyor knob
11. Coupling section lower guide lever
12. Stapler cartridge A
13. Stapler cartridge B
14. Coupling section upper guide lever
Punch unit (option)
15. Punch unit
16. Punch unit adjustment dial
17. Punch waste box
Centerfold unit (option)
18. Unit release lever
19. Unit transport handle
20. Unit release handle
21. Centerfold unit installation button
22. Conveyor guide lever
23. Storage tray
Multi job tray (option)
24. Job trays No.1 - 5
Service Manual Y104371-8

3H3
1-1-3
1-1-3 Machine cross sectional view
Figure 1-1-2
Paper path
1. Paper insertion section
2. Feedshift section
3. Intermediate tray section
4. Paper ejection section
5. Multi job tray (option)
6. Centerfold unit (option)
7. Punch unit (option)
Y104371-8 Service Manual

3H3
1-1-4
1-1-4 Machine drive system
(1) Finisher (paper feed and conveying section)
Figure 1-1-3
Viewed from the machine rea
r
1. Paper conveying motor
gear
2. Paper conveying gear Z54/
P50
3. Paper conveying drive belt
4. Paper conveying gear Z48/
P31
5. Drive tension pulley
6. Paper conveying roller pulley 31
7. Intermediate tray drive gear
Z40/P30
8. Drive tension pulley
9. Paper entry motor gear
10. Paper entry gear 25
11. Paddle gear 22
12. Paddle gear 22
13. Siding drum motor gear
14. Drum gear Z50/Z20
15. Drum drive gear 53
16. Drum drive gear 46
17. Movable guide motor gear
18. Idle gear
19. Idle cam gear 75
20. Intermediate tray joint gear
34
21. Drive pulley 20
22. Pulley 16
23. Feed pulley belt
24. Forwarding roller gear
25. Feed pulley drive belt
26. Pulley 16
27. Drive pulley 20
28. Feed pulley belt
29. Forwarding roller gear
30. Paper conveying pulley belt
31. Paper conveying drive pulley 27
32. Upper paper conveying belt
motor gear
33. Intermediate tray drive belt
34. Eject pulley 20
35. Pulley 20
36. Intermediate tray conveying belt
37. Pulley 20
38. Eject pulley 20
39. Intermediate tray drive belt
40. Lower paper conveying belt
motor gear
41. Lower intermediate tray belt
42. Pulley 20
43. Timing belt pulley
44. Pulley 20
45. Eject motor gear
46. Eject gear Z60/Z32
47. Intermediate drive gear 40
48. Intermediate drive gear 40
49. Gear 16T
Service Manual Y104371-8

3H3
1-1-5
(2) Finisher (main tray driving section)
Figure 1-1-4
1. Main tray elevation motor pulley
2. Feed belt
3. Pulley 34
4. Worm gear
5. Gear 50
6. Gear 18
7. Gear 51
8. Pulley 20S
9. Tray drive belt
10. Pulley 20S
11. Gear 26
Y104371-8 Service Manual

3H3
1-1-6
(3) Multi job tray
1. Multi job tray elevation motor pulley
2. Feed belt
3. Pulley 34
4. Worm gear
5. Gear 50
6. Gear 18
7. Gear 51
8. Pulley 20S
9. Tray drive belt
10. Pulley 20S
11. Gear 26
Service Manual Y104371-8

3H3
1-1-7
(4) Centerfold unit
Figure 1-1-5
(5) Punch unit
Figure 1-1-6
1. Main motor pulley
2. Belt 118P2M6
3. Gear 22/40
4. Gear 33/15
5. Gear 51
6. Manual roller gear
(conveyor guide knob)
7. Gear 22
8. Gear 51
9. Gear 19
10. Gear 50/15
11. Gear 16/25
12. Gear 16/25
13. Bypass pulley gear
14. Gear 58
15. Pulley 28
16. Paper drive belt
17. Pulley 28
18. Idle pulley 15
19. Centering plate motor pulley
20. Belt 124
21. Pulley 22
22. Pulley 20
23. Paper conveying belt
24. Pulley 20
25. Blade motor pulley
26. Belt 126P2M6
27. Gear 22/40
28. Gear 33/15
29. Gear 40
30. Gear 22
31. Gear 50
32. Manual roller gear
1. Punch motor gear
2. Idle gear 16/51
3. Drive cum gear 40
Y104371-8 Service Manual

3H3
1-2-1
1-2Installation
1-2-1 Unpacking and installation
Figure 1-2-1 Unpacking (Finisher)
1. Finisher
2. Main tray
3. Sub tray
4. Connecting plate
5. Sponge
6. Pins
7. Nuts
8. M4 x 20 TP tap tight S screws
9. Stapler cartridges
10. Outer case
11. Barcode labels
12. Inner frame
13. Skid
14. Hinge joint
15. Accessory case
16. Bottom cushion sheet
17. Front lower left pad
18. Rear lower left pad
19. Front lower right pad
20. Rear lower right pad
21. Upper pad
22. Machine cover
23. Air cap bag
24. Air cap bag
25. Air cap bag
26. Plastic bag
27. Plastic bag
28. Operation guide
29. Installation guide
30. Spacer
31. Spacer
32. Plastic sheet
33. Clamp
34. M3 x 14 tap tight S screws
35. M4 x 8 tap tight S screws
36. M3 x 10 tap tight S screw
37. Grounding plates A
38. Grounding plates B
Y104371-8 Service Manual

3H3
1-2-2
Removing tapes and spacers
Procedure
1. Remove the plastic sheet.
2. Remove two tapes and spacer.
Figure 1-2-2
3. Remove eight tapes.
Figure 1-2-3
4. Remove four tapes and two spacers.
Figure 1-2-4
Plastic sheet
Ta pe
Ta pe
Spacer
Ta pe
Ta pe s
Ta pe s
Ta pe
Ta pe
Ta pe
Ta pe
Ta pe
Spacers
Service Manual Y104371-8

3H3-2.0
1-2-3
1-2-2 Installing the centerfold unit (option)
• When installing the centerfold unit and multi job tray as a set, first install the centerfold unit and then the multi job
tray.
• Before installing the centerfold unit, press the Power key on the operation panel to off. Make sure that the Power
lamp is off before turning off the main power switch. And then unplug the power cable from the wall outlet.
Turning off the main power switch before pressing the Power key to off may cause damage to the equipped hard
disk.
Procedure
* When unpacking or installing, hold the cen-
terfold unit by a indicated in the illustration.
Do not hold it by b at the center of the unit.
Figure 1-2-5
1. Remove the four screws locking down the
guide plate followed by the plate.
2. Remove the left lower shaft from the finisher
side plate.
Figure 1-2-6
3. Open the front cover. Remove the screw
locking down the retainer followed by the
retainer.
4. While keeping the front cover perpendicular,
detach the cover by raising it vertically in the
direction of the arrow.
Figure 1-2-7
a
a
b
Left lower shaft
Screws
Screws
Guide plate
Front cover
Retaine
r
Screw
Y104371-8 Service Manual

3H3
1-2-4
5. Hook the backstop onto the hook on the
inside of the finisher plate, and install the
two pins from the outside.
6. Attach one end of the small spring to the
backstop and hang the other end over the
hook inside the machine.
Figure 1-2-8
7. Insert the release lever actuating plate from
the front side of the machine into the hole
and fit with two pins. Then, make sure that
the release lever actuating plate slides leftward and rightward.
Figure 1-2-9
8. Attach one end of the small spring to the
release lever actuating plate and hang the
other end over the hook on the side plate.
9. Apply the release lever actuating plate with
TEMP1 or the similar grease in the indicated
area A.
Figure 1-2-10
Backstop
Backstop
Hook
Pins
Small spring
Hook
Hook
Release lever
actuating plate
Release lever
actuating plate
Release lever
actuating plate
Hole
Pin
Pin
Small spring
Hook
Release lever
actuating plate
A
Service Manual Y104371-8

3H3
1-2-5
10. Insert one end of the release pole assembly
into the square bypass hole and the other
end into the hole with the projection, with the
D-cut of the release pole assembly aligned
with the projection.
11. Insert the end of the release pole assembly
already inserted through the square bypass
hole into the mounting hole.
Figure 1-2-11
12. Fit the medium stop ring onto the release
pole assembly. Then, make sure the release
pole assembly can rotate slightly.
Figure 1-2-12
13. Attach the release handle to the release
pole assembly at the machine front side with
the M4 x 10 TP screw.
Figure 1-2-13
Square
bypass hole
Square
bypass hole
Hole with
the projection
Release pole
assembly
D-cut
Mounting hole
Mounting hole
Medium stop ring
Release pole
assembly
M4 x 10 TP screw
Release handle
Y104371-8 Service Manual

3H3
1-2-6
14. Place the slider on the projections on the finisher rear side-plate and lock down with
three M4 x 8 S tight bind screws.
Insert the M4 x 8 S tight bind screws from
the round holes on the eject side of the finisher.
15. Place the slider on the projections on the finisher front side-plate and lock down with
three M4 x 8 S tight bind screws.
Insert the M4 x 8 S tight bind screws from
the round holes on the eject side of the finisher.
Figure 1-2-14
16. Pull out the intermediate tray of the finisher.
17. Fit the large stop ring onto the unit lock rod.
18. Attach the unit lock hook to the lower guide
stay with the unit lock rod.
Figure 1-2-15
M4 x 8 S tight
bind screws
M4 x 8 S tight
bind screws
Slider
Slider
Projections
Projections
Unit lock rod
Large stop ring
Guide stay
Guide stay
Unit lock hook
Unit lock hook
Intermediate tray
Guide stay
Service Manual Y104371-8

3H3
1-2-7
19. Fit the large stop ring onto the lower part of
the unit lock rod.
20. Hang one end of the large spring over the
hook on the unit lock hook and the other end
over the hook on the guide stay.
21. Insert the intermediate tray of the finisher
and return it to its original position.
Figure 1-2-16
22. Remove the tapes and the cushioning materials provided on the centerfold unit.
Figure 1-2-17
23. Pull the left and right sliders out until they
stop. Attach the centerfold unit on the pins of
the sliders.
Hold the centerfold unit by a indicated in the
illustration. Do not hold it by b at the center
of the unit.
Figure 1-2-18
Large stop ring
Unit lock hook
Hook
Hook
Unit lock rod
Guide stay
Large
spring
Ta pe
Ta pe
Ta pe
Ta pe s
Cushioning
material
a
Centerfold unit
a
b
Slider
Slider
Pin
Pin
Y104371-8 Service Manual

3H3
1-2-8
24. Slide the centerfold unit in the direction of
the arrow.
25. Loosen the two screws and push the
retainer in the direction of the arrow and
retighten the screws.
Figure 1-2-19
26. Fit the left cover and right cover into the
rectangular holes on either side of the center fold unit, and secure each one with the
M4 x 6 TP screw.
Figure 1-2-20
27. Attach the eject tray to the centerfold unit by
inserting the projection of the tray into the
hole inside the unit.
Figure 1-2-21
Centerfold
unit
Screw
Screw
Retainer
Retainer
M4 x 6
TP screw
M4 x 6
TP screw
Left cover
Right cover
Centerfold unit
Projection
Hole
Eject tray
Service Manual Y104371-8

3H3
1-2-9
28. Engage the projection of the douser detecting PI with the cutout on the centerfold unit's
rear side plate, and secure them with a M4 x
8 S tight bind screw.
When inserting the centerfold unit, make
sure that the douser detecting PI does not
come into contact with the finisher's folding
unit sensor.
Figure 1-2-22
29. Push the release lever actuating plate.
30. Push in the centerfold unit until it stops.
Figure 1-2-23
31. Attach the unit transport handle with the M4
x 8 S tight bind screw.
Figure 1-2-24
Douser
detecting PI
M4 x 8 S tight
bind screw
Release lever
actuating plate
Centerfold unit
M4 x 8 S tight
bind screw
Unit transport handle
Y104371-8 Service Manual

3H3
1-2-10
32. After cleaning each area with alcohol, affix
the following labels from label sheet at the
locations shown in the illustration: (C)-1
(G7), (C)-2.
Figure 1-2-25
33. Plug the power cable into a wall outlet and
turn the machine on from the main power
switch.
34. Make a test copy to check that the centerfold unit operates correctly.
35. Adjust the paper folding position (see page
1-5-11.)
20 mm
C -1
C -2
Service Manual Y104371-8

3H3-2.0
1-2-11
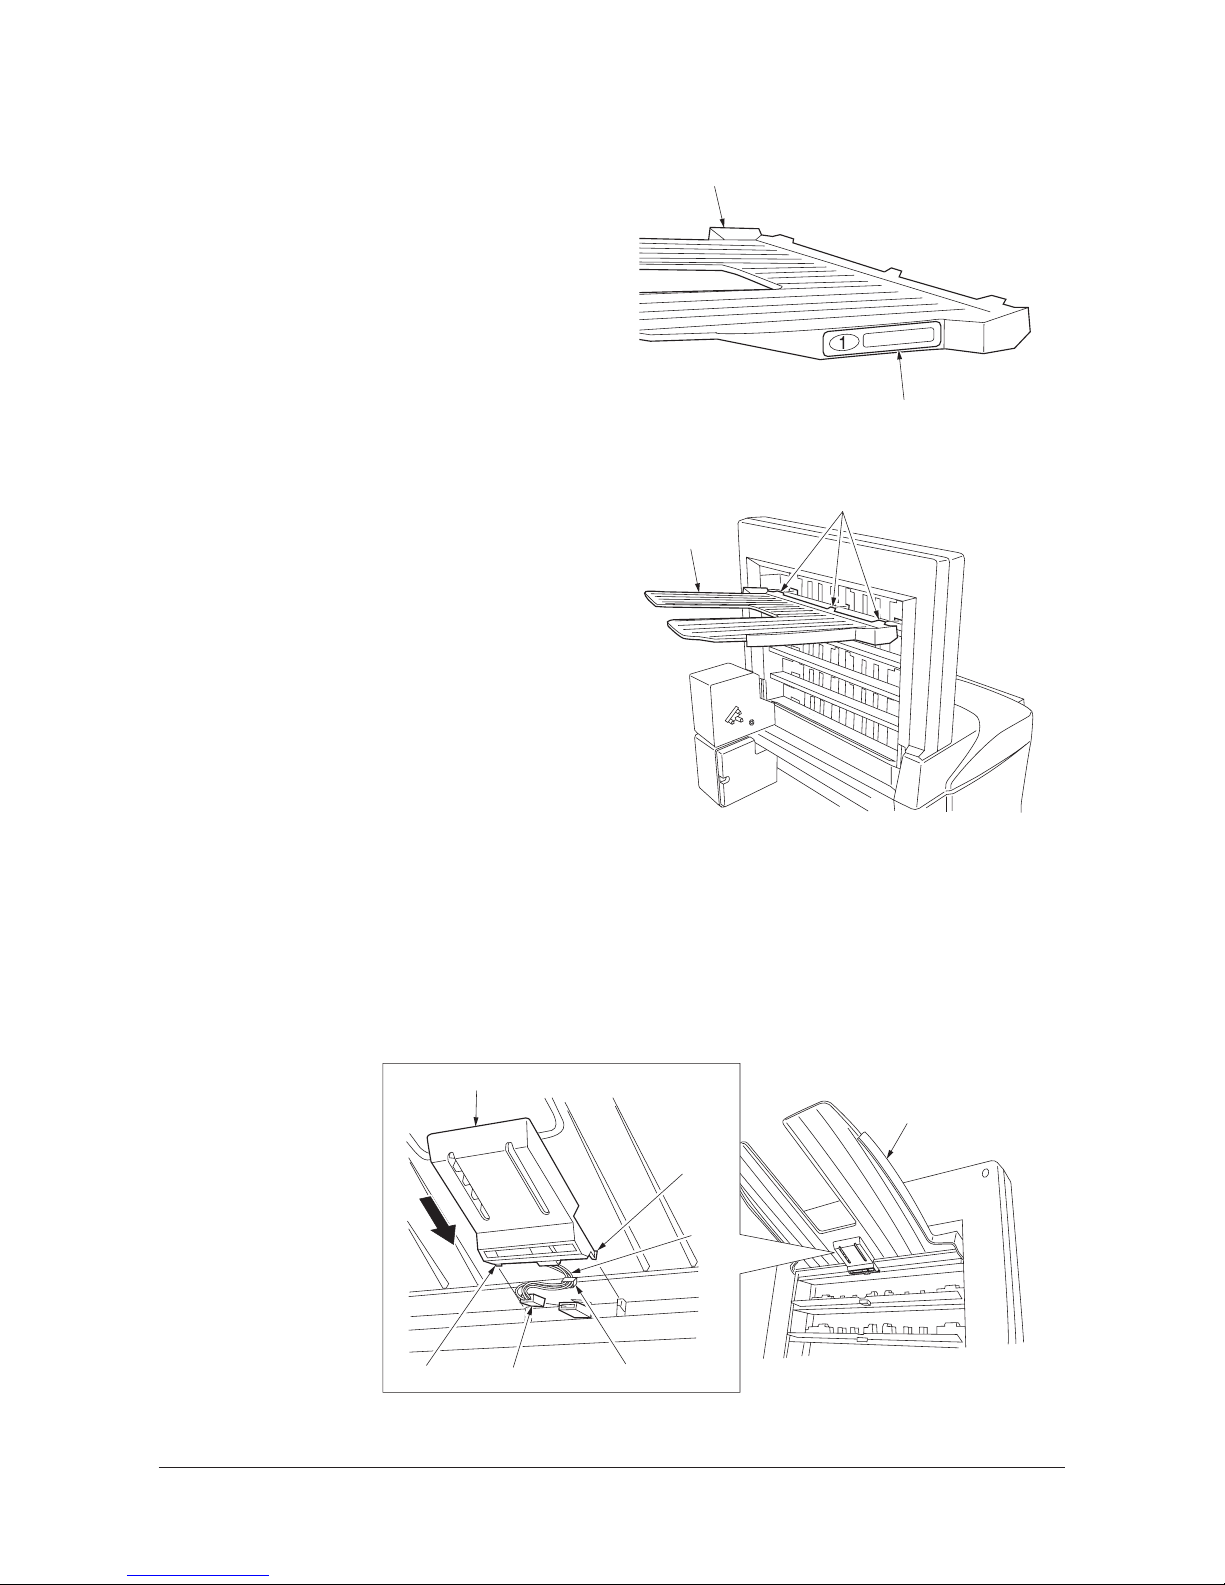
1-2-3 Installing the multi job tray (option)
• Hold the frame at the front and back when removing the multi job tray from the box. Supporting the multi job tray
from the bottom can cause deformation of the film affixed to it.
• Before installing the multi job tray, press the Power key on the operation panel to off. Make sure that the Power lamp
is off before turning off the main power switch. And then unplug the power cable from the wall outlet.
Turning off the main power switch before pressing the Power key to off may cause damage to the equipped hard
disk.
• When installing the multi job tray and centerfold unit as a set, first install the centerfold unit and then the multi job
tray.
• Installation should be carried out with the finisher's rear cover removed.
Procedure
1. Remove the two screws locking down the
top cover lid followed by the lid.
2. Open the upper cover and remove the nine
screws locking down the top cover followed
by the top cover.
Figure 1-2-26
3. Remove the four screws locking down the
top cover lid guide followed by the guide.
Figure 1-2-27
Screws
Screws
Screws
Top cover
Upper cover
Top cover lid
Screws
Screws
Top cover lid guide
Y104371-8 Service Manual

3H3
1-2-12
4. Attach the two size detection switches to the
eject stay by inserting the tabs, and lock in
place with one M3 x 5 binding screw each.
5. Connect the 3-pin connector of the size
detection switch to the connector of the finisher.
Figure 1-2-28
6. Attach the bin front guide plate and bin rear
guide plate to the finisher by inserting the
claws on plates into the finisher frame and
lock in place with three M4 x 6 binding
screws each.
Figure 1-2-29
7. Attach the multi job tray to the bin front
guide plate and bin rear guide plate by
inserting the six pulleys at the tray front and
rear into the plates.
Make sure that the shading plate at the rear
of the multi job tray does not make contact
with the sensor.
Figure 1-2-30
M3 x 5
binding screw
Ta b
3-pin connector
Eject stay
Size detection
switch
Bin rear
guide plate
Bin front
guide plate
M4 x 6
binding
screws
M4 x 6
binding screws
Multi job tray
Pulley
Pulleys
Pulleys
Bin front
guide plate
Bin rear
guide plate
Shading
plate
Sensor
Service Manual Y104371-8

3H3
1-2-13
8. Measure the height a against the scale to
make sure that the multi job tray is positioned properly to stay level from front to
rear.
If the height a is not the same at the front
and rear, the multi job tray may not be positioned on a level plane. Install the tray again.
Figure 1-2-31
9. Loosen the two screws.
10. With the retainer slid upward, push in the
gear shaft while holding the bottom of the
multi job tray. Then, lower the multi job tray
by about 30 mm.
Figure 1-2-32
11. Pull out the gear shaft, slide the retainer to
its original position and retighten the two
screws.
Make sure the gear shaft is positioned so
that the retainer will be engaged in groove
on the shaft.
Figure 1-2-33
Bin front
guide plate
Bin rear
guide plate
Multi job tray
a
a
Multi job tray
Screws
Retainer
Gear shaft
Screws
Retainer
Groove
Gear shaft
Y104371-8 Service Manual

3H3
1-2-14
12. Attach the bin guide plate retainer with two
M4 x 6 binding screws.
13. Reattach the top cover with the nine screws
removed in step 2, keeping the upper cover
open halfway to enable proper attaching.
Figure 1-2-34
14. Attach the right cover with four M4 x 8 TP
screws.
Figure 1-2-35
15. Attach the left cover by inserting the two
pegs into the square holes, and lock in place
with two M4 x 8 TP screws.
Figure 1-2-36
Bin guide
plate retainer
M4 x 6
binding screw
M4 x 6
binding screw
M4 x 8
TP screws
M4 x 8
TP screws
Right cover
Left cover
Peg
Peg
M4 x 8
TP screw
M4 x 8
TP screw
Service Manual Y104371-8
3H3
1-2-15
16. Affix a bin No. label to each of the five eject
bins.
Figure 1-2-37
17. Attach the eject bin with the label No.1
affixed at the uppermost shelf of the multi
job tray by inserting the three claws into the
square holes.
Figure 1-2-38
18. Connect the 3-pin connector at the back side of the eject bin.
19. Fit the cable of the 3-pin connector to the inside of the eject bin and lock down with the cable
retainer.
20. Slide the eject bin lid into position and lock in place by inserting the two pegs into the square holes.
Make sure that the cable is tidily fitted and not caught in the eject bin lid.
21. Repeat steps 17 to 20 to attach the other four eject bins.
Attach the eject bins in the order of the bin No. labels so that the bin with the label No.1 is at the
uppermost shelf, No.2 at the second and so forth.
Figure 1-2-39
Eject bin
Bin No. label
Claws
Eject bin
Eject bin
3-pin connector
Cable retainer
Peg
Peg
Cable
Eject bin lid
Y104371-8 Service Manual
3H3
1-2-16
22. Insert the two lugs of the motor front cover
into the rectangular holes, and secure them
with the M4 x 8 TP screw.
Figure 1-2-40
23. Connect the signal cable of the multi job tray
to the finisher connector.
24. Plug the power cable into a wall outlet and
turn the machine on from the main power
switch.
25. Make a test copy and check the multi job
tray performs properly.
Figure 1-2-41
Motor front cover
Lugs
M4 x 8 TP screw
Signal cable
Service Manual Y104371-8

3H3-2.0
1-2-17
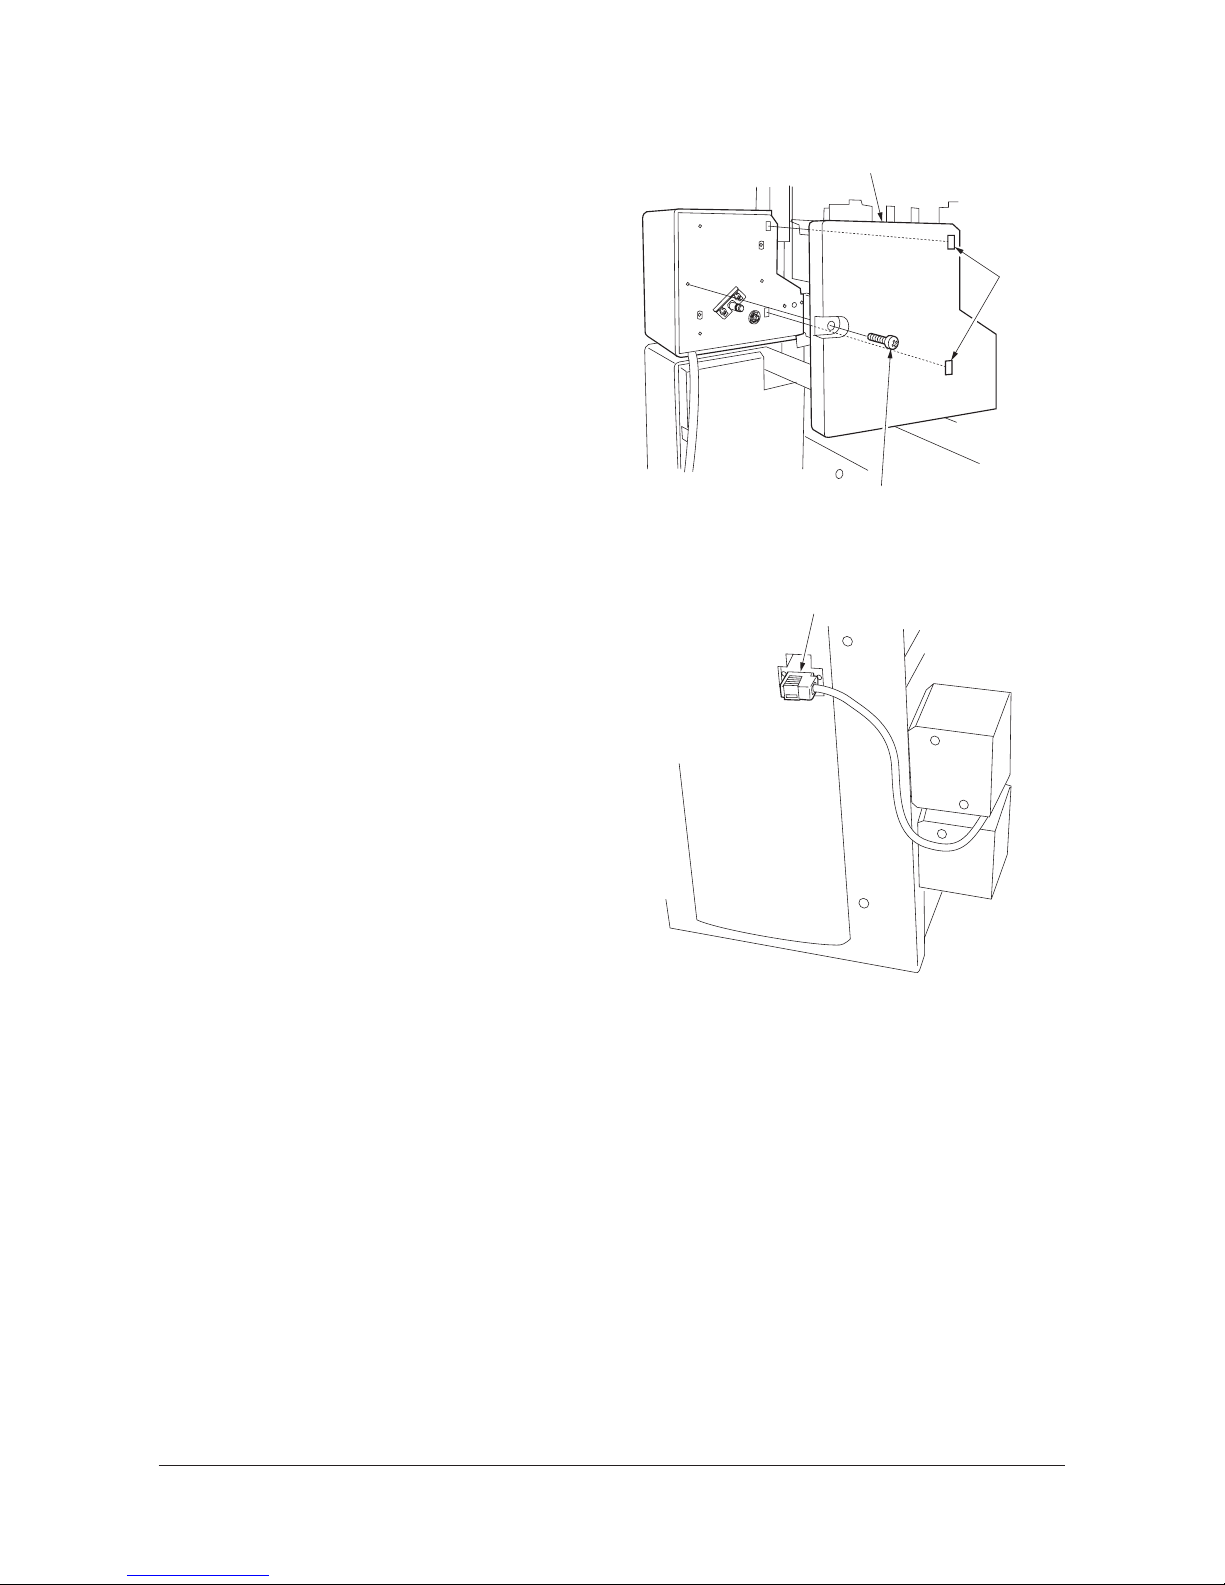
1-2-4 Installing the punch unit (option)
• Before installing the punch unit, press the Power key on the operation panel to off. Make sure that the Power lamp is
off before turning off the main power switch. And then unplug the power cable from the wall outlet.
Turning off the main power switch before pressing the Power key to off may cause damage to the equipped hard
disk.
Procedure
1. Remove the five screws, disconnect the
connector, and then remove the rear cover.
2. Open the upper cover.
Figure 1-2-42
3. Remove the two screws, and then remove
the guide plate.
Figure 1-2-43
4. Making sure that frame of the punch unit is in contact with lever of the finisher, insert the punch
unit as far as it will go between the rails that held the guide plate that was removed in step 3.
Figure 1-2-44
Screw
Screw
Screws
Screw
Connector
Rear cover
Screw
Guide plate
Screw
Lever
Punch unit
Frame
Y104371-8 Service Manual

3H3
1-2-18
5. Secure the punch unit with two M4 x 10 tap
tight S screws. Make sure the center of the
right long hole is aligned with the center
guideline.
Figure 1-2-45
6. Connect the 3-pin connector of the solenoid
to the 3-pin connector on the front of the finisher.
7. Close the top cover and open the front
cover.
Figure 1-2-46
8. Slide the guide along the rails on the bottom
of the punch unit so it hooks on the tabs.
9. Pull out the intermediate tray of the finisher.
Figure 1-2-47
Punch unit
M4 x 10 tap
tight S screws
3-pin connector
Guide
Service Manual Y104371-8

3H3
1-2-19
10. Insert the assembly tank holder into the
holes in the side of the finisher, and then
press it downwards to secure it. Next,
secure it further with the screw that was
removed in step 3. Install the screw from the
outside.
11. Connect the 3-pin connector to the 3-pin
connector inside the finisher.
12. Anchor the wires to the frame with a supplied wire saddle.
Figure 1-2-48
13. Insert the intermediate tray of the finisher so
it is back to its original position, and then
install the punch waste box.
14. Close the front cover.
Figure 1-2-49
15. Insert the tab of the punch PWB into the
hole on the back of the finisher, and secure
it with the screw that was removed in step 3.
Figure 1-2-50
Tank holder
Screw
Supplied
wire saddle
3-pin connector
Punch waste box
Intermediate tray
Punch PWB
Screw
Y104371-8 Service Manual

3H3
1-2-20
16. Make the following seven connections.
Top: 2-pin power connector and 2-pin motor connector; 6-pin power connector and 6-pin sensor connector
Center: 4-pin power connector and YC1 of punch PWB; 6-pin power connector and YC3 of punch PWB;
9-pin power connector and YC2 of punch PWB
Bottom: 2-pin power connector and 2-pin finisher power connector; 9-pin power connector and 9-pin finisher
power connector
17. Secure wires at one location with wire saddle.
18. Secure wires with clamp and fix with M4 x 8 tap Tight S screw.
19. Fasten the snap-on band on core A to the hole on the finisher frame.
20. Fasten the snap-on band on core B to the hole on the finisher frame.
21. Refit the rear cover.
Figure 1-2-51
22. Plug the power cable into a wall outlet and
turn the machine on from the main power
switch.
23. Adjust the centering punch-holes (see page
1-5-12).
24. Set margin from the leading edge to punch
holes (see page 1-5-13).
Clamp
M4 x 8 tap
Tight S screw
Wire
saddle
Core A
Core B
6-pin
connector
2-pin
connector
YC1
YC3
YC1
9-pin
connector
2-pin
connector
Service Manual Y104371-8

3H3-2.0
1-2-21
1-2-5 Installing the stopper guide (option)
• Before installing the stopper guide, press the Power key on the operation panel to off. Make sure that the Power
lamp is off before turning off the main power switch. And then unplug the power cable from the wall outlet.
Turning off the main power switch before pressing the Power key to off may cause damage to the equipped hard
disk.
(1) Installing the stopper guide (To the finisher without the multi job tray)
Procedure
1. Secure the stopper assembly to the finisher
sub tray with three screws (M3 × 8 tap tight
P screw).
* The installation position varies from the inch
specification and metric specification. Make
sure to adjust the position for the inch specification to the mark of (I) and the position for
the metric specification to the mark of (C).
Figure 1-2-52
2. After cleaning with rubbing alcohol, affix the
appropriate operation label (Inch or metric)
to the finisher as indicated.
Figure 1-2-53
Stopper assembly
M3 x 8 tap tight P screw
Mark
Installation position
Sub tray
(Metric) (Inch)
5 to 10 mm
5 to 10 mm
Operation label
Y104371-8 Service Manual

3H3-2.0
1-2-22
(2) Installing the stopper guide (To the finisher with the multi job tray)
Procedure
1. Install the stopper to the stopper mount
using stop ring 3.
* Be careful. The stopper hole on the stopper
mount varies from the inch specification and
metric specification.
Figure 1-2-54
2. Push down the main tray of the finisher. (For
the details, refer to step 10 on page 6 of
multi job tray Installation guide.)
3. Hook the guide assembled in step 1 to the
finisher as indicated. Secure it with two M4 ×
8 tap tight S screws. Make sure that the
stopper guide is dropped as indicated.
Figure 1-2-55
Stopper
Stopper mount
Stop ring 3
Stopper hole
(Metric)
Stopper hole
(Inch)
Stopper mount
Stopper guide
M4 x 8 tap tight S screw
Service Manual Y104371-8

3H3-2.0
1-2-23
4. Hold the stopper guide as indicated.
5. Replace the cover removed in step 2.
Figure 1-2-56
6. After cleaning with rubbing alcohol, affix the
appropriate operation label to the finisher as
indicated.
Figure 1-2-57
Stopper guide
5 to 10 mm
5 to 10 mm
Operation label
Y104371-8 Service Manual

3H3
1-3-1
1-3 Maintenance Mode
1-3-1 Maintenance mode
(1) Executing a maintenance item
Enter 10871087 using
the numeric keys.
Enter 001 using the cursor
up/down keys or numeric keys
and press the start key.
Enter the maintenance item
number using the cursor up/down keys
or numeric keys.
The selected maintenance item is run.
Press the stop/clear key.
Press the start key.
Start
End
Maintenance mode is entered.
The maintenance item is
selected.
Maintenance mode is exited.
Repeat the same
maintenance item?
Run another maintenance
item?
No
No
Yes
Yes
Y104371-8 Service Manual
3H3
1-3-2
(2) Contents of the maintenance mode items
Maintenance
item No.
Description
U018
Displaying the ROM checksum
Description
Displays the checksum of ROM.
Purpose
To check the checksum.
Method
Press the start key. The ROM checksum is displayed.
Completion
Press the stop/clear key. The screen for selecting a maintenance item No. is displayed.
U019
Displaying the ROM version
Description
Displays the part number for the ROM fitted to each PWB.
Purpose
To check the part number or to decide, based on the last digit of the number, if the newest version of ROM is
installed.
Method
1. Press the start key. The ROM version (the last 6 digits of the part number) is displayed.
2. Change the screen using the * or # keys.
*For the machine.
Completion
Press the stop/clear key. The screen for selecting a maintenance item No. is displayed.
Display Description
MAIN* Main PWB ROM checksum
ENGINE* Engine PWB ROM checksum
SCANNER* Network scanner ROM checksum
LANGUAGE(Stand.)* Standard language ROM checksum
LANGUAGE(Option)* Optional language ROM checksum
DP* DP main PWB ROM checksum
FINISHER Document finisher ROM checksum
*For the machine.
Display Description
MAIN* Main PWB ROM IC
ENGINE* Engine PWB ROM IC
SCANNER* Scanner PWB ROM IC
LANGUAGE (Stand.)* Standard language ROM IC
LANGUAGE(Option)* Optional language ROM IC
MAIN BOOT* Main PWB booting
PRINTER* Printer board booting
NETWORK SCANNER* Network scanner ROM IC
DP* DP ROM IC
FINISHER Document finisher main PWB ROM IC
ENGINE BOOT* Engine PWB booting
CASSETTE1* Deck PWB ROM IC
CASSETTE2* Cassette PWB ROM IC
DUPLEX* Duplex PWB ROM IC
SIDE FEEDER* Side feeder main PWB ROM IC
Service Manual Y104371-8
3H3
1-3-3
U234
Setting punch destination
Description
Sets the destination of optional punch unit of document finisher.
Purpose
To be set when installing the optional punch unit.
Method
Press the start key. The screen for selecting an item is displayed.
Setting
1. Select the destination.
Initial setting: NOTHING
2. Press the start key. The setting is set.
Completion
Press the stop/clear key. The screen for selecting a maintenance item No. is displayed.
U235
Setting output tray initialize mode
Description
Sets whether or not initialization (shift of eject position to main tray) is performed when auto clear is triggered
if a multi-job tray is installed to an optional finisher.
Purpose
To be set as required according to the user.
Method
Press the start key. The screen for selecting an item is displayed.
Setting
1. Select the item to be set. The selected item is displayed in reverse.
Initial setting: HP ON
2. Press the start key. The setting is set, and the screen for selecting a maintenance item No. is displayed.
Completion
Press the stop/clear key at the screen for selecting an item.
The screen for selecting a maintenance item No. is displayed.
Maintenance
item No.
Description
Display Description
NOTHING Automatic recognization
JAPAN METRIC Metric (Japan) specifications
INCH Inch (North America) specifications
EUROPE METRIC Metric (Europe) specifications
SWEDEN METRIC Metric (North Europe) specifications
Display Description
HP ON Job tray initialization is performed.
HP OFF Job tray initialization is not performed.
Y104371-8 Service Manual

3H3
1-3-4
U237
Adjusting finisher stack quantity
Description
Sets the number of sheets of stack on the main tray in the document finisher.
Purpose
To change the setting when a stack malfunction has occurred.
Method
Press the start key. The screen for selecting an item is displayed.
Setting
1. Change the setting using the cursor up/down keys.
Initial setting: 0
If the preset value is changed to 1, the number of sheets of a stack is limited to 1,500 in modes other
than the staple mode.
2. Press the start key. The setting is set.
Completion
Press the stop/clear key. The screen for selecting a maintenance item No. is displayed.
Maintenance
item No.
Description
Setting Description
0 Stack quantity: 3000 sheets
1 Stack quantity: 1500 sheets
Service Manual Y104371-8

3H3
1-3-5
U240
Checking the operation of the finisher
Description
Turns each motor and solenoid of the document finisher ON.
Purpose
To check the operation of each motor and solenoid of the document finisher.
Method
1. Press the start key. The screen for selecting an item is displayed.
2. Select the item to be checked.
Method: Checking the motor and solenoid of the document finisher
1. Select FINISHER on the screen for selecting an item.
2. Select the item to be operated.
Maintenance
item No.
Description
Display Description
FINISHER Motors and solenoids of document finisher
SADDLE Motors and solenoids of centerfold unit
Display Motors and solenoids
FD_IN_MT_H Paper entry motor (PEM) is turned on high speed
FD_IN_MT_M Paper entry motor (PEM) is turned on middle speed
FD_IN_MT_L Paper entry motor (PEM) is turned on low speed
CNV_MT_H Paper conveying motor (PCM) is turned on high speed
CNV_MT_M Paper conveying motor (PCM) is turned on middle speed
CNV_MT_L Paper conveying motor (PCM) is turned on low speed
UP_MT Upper paper conveying belt motor (PCBM-U) is turned on
DOWN_MT Lower paper conveying belt motor (PCBM-L) is turned on
LGR_TEST Front/rear upper side registration guide motor (SRGM-FU/RU) test
operation for 11” x 17” size
A3_TEST Front/rear upper side registration guide motor (SRGM-FU/RU) test
operation for A3 size
WDTH_MT_L Lower side registration guide motor (SRGM-L) is turned on
SLAP_MT_INI Movable guide motor (MGM) is turned on initial driving
SLAP_MT_MOV Movable guide motor (MGM) is turned on
DRM_MT_H Siding drum motor (SDM) is turned high speed
DRM_MT_M Siding drum motor (SDM) is turned middle speed
DRM_MT_L Siding drum motor (SDM) is turned low speed
EJECT_MT_H Eject motor (EJM) is turned on high speed
EJECT_MT_M Eject motor (EJM) is turned on middle speed
EJECT_MT_L Eject motor (EJM) is turned on low speed
MTRAY_MT Main tray elevation motor (MTEM) is turned on
JTRAY_MT Multi job tray elevation motor (MJTEM) is turned on
SOL_A Feedshift solenoid A (FSSOLA) is turned on
SOL_B Feedshift solenoid B (FSSOLB) is turned on
SOL_C Feedshift solenoid C (FSSOLC) is turned on
COLO_SOL Paper forwarding pulley solenoid (PFPSOL) is turned on
LOCK_SOL Lock solenoid (LSOL) is turned on
P_PUT_SOL Paper holder solenoid (PHSOL) is turned on
EJECT_SOL Eject guide solenoid (EGSOL) is turned on
PUNCH_MT Punch motor (PUNM) is turned on
PUNCH_SOL Punch solenoid (PUNSOL) is turned on
Y104371-8 Service Manual

3H3
1-3-6
U240 3. To turn ON a solenoid with the motor driving, press the interrupt key before selecting the solenoid.
The driving motor will start operation, and the selected clutch or the solenoid will remain ON until the
interrupt key is pressed again.
4. To stop motor driving, press the interrupt key again.
5. To return to the screen for selecting an item, press the stop/clear key with the motor stopped.
Method: Checking the motor and solenoid of the centerfold unit
1. Select SADDLE on the screen for selecting an item.
2. Select the item to be operated.
3. To turn ON a solenoid with the motor driving, press the interrupt key before selecting the solenoid.
The driving motor will start operation, and the selected clutch or the solenoid will remain ON until the
interrupt key is pressed again.
4. To stop motor driving, press the interrupt key again.
5. To return to the screen for selecting an item, press the stop/clear key with the motor stopped.
Completion
Press the stop/clear key with the operation stopped. The screen for selecting a maintenance item No. is displayed.
U241
Checking the operation of the switches of the finisher
Description
Displays the status of each switch of the document finisher.
Purpose
To check the operation of each switch of the document finisher.
Method
1. Press the start key. The screen for selecting an item is displayed.
2. Turn each switch ON manually.
When a switch is detected to be in the ON position, the display for that switch will be highlighted.
3. Change the screen using the * or # keys.
Maintenance
item No.
Description
Display Motors and solenoids
SDL_MT_H Main motor (MM) is turned ON high speed
SDL_MT_L Main motor (MM) is turned ON low speed
SDL_BLD_MT Centerfold blade motor (CBLM) is turned ON
SDL_CTR_MT Centering plate motor (CPM) is turned ON
SDL_WDTH_MT Side registration guide motor (SRGM) is turned ON
SDL_SOL Pressure release solenoid (PRSOL) is turned ON
Display Switches
FD_IN_SW Paper entry sensor (PES)
EJT_SW Paper ejection sensor (PEJS)
DRM_SW Sub tray paper ejection sensor (STPES)
M_TRAY_FD_SW Intermediate tray paper conveying sensor (ITPCS)
P_DET_U_SW Upper paper conveying belt home position sensor (PCBHPS-U)
P_DET_D_SW Lower paper conveying belt home position sensor (PCBHPS-L)
PCH_BOX_SW Punch waste box sensor (PWBS)
SLAP_HP_SW Movable guide home position sensor (MGHPS)
P_PUT_SW Paper holder detection sensor (PHDS)
STP_FPIN_SW Front stapler empty sensor (STES-F)
STP_RPIN_SW Rear stapler empty sensor (STES-R)
STP_F_CT_SW Front stapler cartridge sensor (STCS-F)
STP_R_CT_SW Rear stapler cartridge sensor (STCS-R)
STP_F_HP_SW Front stapler home position sensor (STHPS-F)
STP_R_HP_SW Rear stapler home position sensor (STHPS-R)
CRT_F_HP_SW Front clincher home position sensor (CLNHPS-F)
Service Manual Y104371-8

3H3
1-3-7
U241
Completion
Press the stop/clear key. The screen for selecting a maintenance item No. is displayed.
Maintenance
item No.
Description
Display Switches
CRT_R_HP_SW Rear clincher home position sensor (CLNHPS-R)
T_OPEN_SW Upper cover switch (UCSW)
F_OPEN_SW Front cover switch (FCSW)
JTRAY_DT_SW Multi job tray position sensor (MJTPS)
JTRAY_P_SW1 Paper detection switch 1 (PDSW1)
JTRAY_P_SW2 Paper detection switch 2 (PDSW2)
JTRAY_P_SW3 Paper detection switch 3 (PDSW3)
JTRAY_P_SW4 Paper detection switch 4 (PDSW4)
JTRAY_P_SW5 Paper detection switch 5 (PDSW5)
JTRAY_ULT_SW Multi job tray upper limit detection sensor (MJTULDS)
JTRAY_P_SW Multi job tray front/rear switches (MJTSW-F/MJTSW-R)
JTRAY_U_SW Multi job tray paper upper surface detection light emitting/intercept-
ing sensors (MJTPUSDLES/MJTPUSDLIS)
MTRAY_U_SW Main tray paper upper surface detection light emitting/intercepting
sensors (MTPUSDLES/MTPUSDLIS)
MTRAY_LM_SW Main tray upper limit detection sensor (MTULDS)
1000_SW Main tray load 1000 detection sensor (MTLDS-10)
1500_SW Main tray load 1500 detection sensor (MTLDS-15)
JTRAY_LLT_SW Multi job tray lower limit detection sensor (MJTLLDS)
3000_SW Main tray load 3000 detection sensors (MTLDS-30)
MTRAY_LLT_SW Main tray lower limit detection sensor (MTLLDS)
N_STP_HP_SW N_STP_CT_SW W_UF_HP_SW Front upper side registration guide home position sensor
(SRGHPS-FU)
W_UR_HP_SW Rear upper side registration guide home position sensor
(SRGHPS-RU)
W_L_HP_SW Lower side registration guide home position sensor (SRGHPS-L)
UP_HP_SW Upper paper sensor (PS-U)
DWN_HP_SW Lower paper sensor (PS-L)
SDL_SET_SW Centerfold unit set switch (CUSSW)
SDL_DET_SW Eject tray detection switch (ETDSW)
SDL_W_HP_SW Side Registration guide home position sensor (SRGHPS)
SDL_S_HP_SW Centering plate home position sensor (CPHPS)
SDL_B_HP_SW Centerfold blade home position sensor (CBLHPS)
SDL_FD_SW Centerfold unit paper entry sensor (CUPES)
SDL_P_SW Eject tray paper detection switch (ETPDSW)
SDL_E_SW Folded edge detection sensor (FEDS)
SDL_T_SW Inside tray detection sensor (ITDS)
Y104371-8 Service Manual

3H3
1-3-8
U248
Setting the paper ejection device
Description
Adjusts the paper stop timing in the punch mode, the booklet stapling position, and the center folding position
for the machine with the document finisher installed. Also, displays and clears the punch-hole scrap count.
Purpose
Adjustment or registration stop timing in punch mode
Adjust if skewed paper conveying occurs or if the copy paper is Z-folded in punch mode.
Adjustment of paper stop timing in the punch mode
To adjust this item when the position of a punch hole is different from the specified one.
Punch-hole scrap count display (clearing)
Used to manually clear the punch-hole scrap count if a message requiring collection of punch-hole scrap is
shown on the touch panel after collection.
Adjustment of booklet stapling position
Adjusts the booklet stapling position in the stitching mode if the position is not proper.
Adjustment of center folding position
Adjusts the center folding position in the stitching mode if the position is not proper.
Setting the punch limit
Sets the maximum number of punches possible in order to be informed of the timing for disposing of waste
punch. Decrease the value when using thick paper frequently.
Start
Press the start key. The screen for selecting an item is displayed.
Setting the registration stop timing in punch mode
1. Select PUNCH REGIST ADJUST on the screen for selecting an item.
2. Change the value using the cursor up/down keys.
If skewed paper conveying occurs (sample 1), increase the preset value. If the copy paper is Z-folded
(sample 2), decrease the preset value.
3. Press the start key. The value is set.
4. To return to the screen for selecting an item, press the stop/clear key.
Maintenance
item No.
Description
Display Description
PUNCH REGIST ADJUST Adjustment of registration stop timing in punch mode
PUNCH POSITION ADJUST Adjustment of the paper stop timing in punch mode
PUNCH COUNT Punch-hole scrap count display
SADDLE STAPLE ADJUST Booklet stapling position adjustment
SADDLE ADJUST Adjustment of center folding position
PUNCH PRESET Punch limit
Description Setting range Default setting
Adjustment of registration stop timing in punch mode -5 to 5 0
Sample 1 Sample 2
Service Manual Y104371-8

3H3
1-3-9
U248
Setting the paper stop timing
1. Select PUNCH POSITION ADJUST on the screen for selecting an item.
2. Change the value using the cursor up/down keys.
If the distance of the position of a punch hole is smaller than the specified value A, increase the preset
value. If the distance is larger than the value A, decrease the preset value.
Changing the value by 1 changes by 1.0 mm.
3. Press the start key. The value is set.
4. To return to the screen for selecting an item, press the stop/clear key.
Displaying the punch-hole scrap count
1. Select PUNCH COUNT on the screen for selecting an item.
2. Change the value using the cursor up/down keys.
Press the reset key to clear the count.
3. Press the start key. The value is set.
4. To return to the screen for selecting an item, press the stop/clear key.
Setting the booklet stapling position
1. Select SADDLE STAPLE ADJUST on the screen for selecting an item.
2. Select the size to be set.
3. Change the setting using the cursor up/down keys.
If the staple position is displaced toward the ejection side (copy sample 1), decrease the preset value.
If the staple position is displaced toward the feeding side (copy sample 2), increase the preset value.
Maintenance
item No.
Description
Description Setting
range
Default
setting
Change in value
per step
Adjustment of the paper stop timing in punch mode -10 to 10 0 0.24 mm
A
Preset value A: 5.5 2mm (inch)
9.5 2mm (metric)
+
-
+
-
Description Setting range Default setting
Punch-hole scrap count
(current number of punching times)
0 to 9999999 -
Display Description Setting
range
Default
setting
Change in value
per step
A4R/8.5 x 11 Adjustment of booklet stapling position for
A4R/8.5 x 11 size
-10 to 10 0 0.55 mm
B4R/8.5 x 14Adjustment of booklet stapling position for
B4R/8.5 x 14 size
-10 to 10 0 0.55 mm
A3R/11 x 17 Adjustment of booklet stapling position for
A3R/11 x 17 size
-10 to 10 0 0.55 mm
Y104371-8 Service Manual

3H3
1-3-10
U248
4. Press the start key. The value is set.
5. To return to the screen for selecting an item, press the stop/clear key.
Setting the center folding position
1. Select SADDLE ADJUST on the screen for selecting an item.
2. Select the size to be set.
3. Change the setting using the cursor up/down keys.
4. Press the start key. The value is set.
5. To return to the screen for selecting an item, press the stop/clear key.
Maintenance
item No.
Description
Copy sample 1 Copy sample 2
Display Description Setting
range
Default
setting
Change
in value
A4R/8.5 x 11 Adjustment of center folding position for
A4R/8.5 x 11 size
-10 to 10 0 0.55 mm
B4R/8.5 x 14 Adjustment of center folding position for
B4R/8.5 x 14 size
-10 to 10 0 0.55 mm
A3R/11 x 17 Adjustment of center folding position for
A3R/11 x 17 size
-10 to 10 0 0.55 mm
Left stapling
Upper side is longer.
Right stapling
Lower side is longer.
Lower side is longer. Upper side is longer.
Adjustment method
Proper
Decrease the
preset value.
Increase the
preset value.
Service Manual Y104371-8

3H3
1-3-11
U248
Setting the punch limit
1. Select PUNCH PRESET on the screen for selecting an item.
2. Change the value using the * or # keys.
The punch limit can be set to any value in increments of 1000.
3. Press the start key. The value is set.
4. To return to the screen for selecting an item, press the stop/clear key.
Completion
To exit this maintenance item without changing the current setting, press the stop/clear key.
The screen for selecting a maintenance item No. is displayed.
U330
Setting the number of sheets to enter stacking mode during sort operation
Description
Sets the number of copies at which copy ejection will be switched from the optional document finisher's sub
tray to its main tray when sorting is turned ON in the setting for the output mode under user simulation.
Purpose
To be set as required according to the number of copies the user makes.
Method
Press the start key. The current setting is displayed.
Setting
1. Change the setting using the cursor up/down keys.
2. Press the start key. The value is set, and the screen for selecting a maintenance item No. is displayed.
Initial setting: 201 (sheets)
Completion
To exit this maintenance item without changing the current setting, press the stop/clear key.
The screen for selecting a maintenance item No. is displayed.
Maintenance
item No.
Description
Description Setting range Default setting
Punch limit (max. number of punches) 0 to 999000 100000
Y104371-8 Service Manual

3H3
1-3-12
U905
Checking/clearing counts by optional devices
Description
Displays or clears the counts of the DP or optional finisher.
Purpose
To check the use of the DP and optional finisher. Also to clear the counts after replacing consumable parts.
Method
1. Press the start key. The screen for selecting an item is displayed.
2. Select the device, the count of which is to be checked. The count of the selected device is displayed.
DP
Finisher
Clearing
1. Select the item to be cleared. The selected item is displayed in reverse.
Select the counts for all, press the reset key.
2. Press the start key. The count is cleared.
To return to the screen for selecting an item, press the stop/clear key.
Completion
Press the stop/clear key at the screen for selecting an item.
The screen for selecting a maintenance item No. is displayed.
Maintenance
item No.
Description
Display Description
ADP Number of single-sided originals that has passed through the DP
RADP Number of double-sided originals that has passed through the DP
Display Description
CP CNT Number of copies that has passed
STAPLE Frequency the stapler has been activated
PUNCH Frequency the punch has been activated
STACK Frequency the stacker has been activated
SADDLE Frequency the center holding has been activated
Service Manual Y104371-8

3H3
1-4-1
1-4 Troubleshooting
1-4-1 Paper misfeed detection
(1) Paper misfeed indication
When a paper jam occurs, the machine immediately stops copying and the operation panel shows a paper misfeed message.
Paper jam counts sorted by the detecting conditions can be checked by maintenance item U903.
To remove paper, open the front cover or upper cover.
To reset the paper misfeed detection, open and close the front cover or upper cover to turn the front cover switch or upper
cover switch off and on, respectively.
Figure 1-4-1
STPES
PES
ITPCS
ITDS
FEDS
PS-L
PEJS
CUPES
Y104371-8 Service Manual

3H3
1-4-2
(2) Paper misfeed detection conditions
Section Jam code Description Conditions
Document
finisher
80 Jam between the finisher
and copier
Paper ejection is not output from the copier to the document
finisher within 15 s of the face-up exit sensor (FUES) turning
off.
81 Paper jam during paper
insertion to the finisher
When the paper entry sensor (PES) does not turn on within
1950 ms of the face-up exit sensor (FUES) of the copier turning off.
82 Paper jam during paper
insertion to the finisher
and paper ejection to the
sub tray
When the sub tray paper ejection sensor (STPES) does not
turn on within 2000 ms of the paper entry sensor (PES) turning
on.
When the paper entry sensor (PES) does not turn off within
1500 ms of its turning on.
83 Paper jam at the siding
drum
When the sub tray paper ejection sensor (STPES) does not
turn off within 1000 ms of its turning on.
84 Paper jam during paper
insertion to the intermediate tray
When the intermediate tray paper conveying sensor (ITPCS)
does not turn on within 1200 ms of the paper entry sensor
(PES) turning on.
When the paper entry sensor (PES) does not turn off within
1500 ms of its turning on.
When the intermediate tray paper conveying sensor (ITPCS)
does not turn on within 2000 ms of the sub tray paper ejection
sensor (STPES) turning on.
85 Paper jam during ejection
of stack of paper
When the intermediate tray paper conveying sensor (ITPCS)
does not turn off within 1000 ms of its turning on.
86 Jam in eject section of
main tray
When straight ejection is performed, the paper ejection sensor
(PEJS) is not turned on even if 2600 ms elapse after the paper
entry sensor (PES) is turned on.
87 Jam in eject section (mid-
dle tray) of main tray
The paper ejection sensor (PEJS) is not turned on even if
2600 ms elapse after bundled ejection from the intermediate
tray starts.
88 Jam in eject section of
main tray
When the paper ejection sensor (PEJS) does not turn off
within 2600 ms of its turning on.
89 Jam in cover open During operation, any of safety switches (upper cover switch
(UCSW), front cover switch (FCSW), and centerfold unit set
switch (CUSSW) is turned off.
90 Jam in stapler The front/rear stapler home position sensor (STHPS-F/R) or
front/rear clincher home position sensor (CLNHPS-F/R) cannot detect normally the home position.
91 Jam in saddle paper entry
section
The lower paper sensor (PS-L) is not turned on even if 3000
ms elapse after bundled ejection to the centerfold unit starts.
92 Jam in saddle paper entry
section
The centerfold unit paper entry sensor (CUPES) is not turned
on even if 2000 ms elapse after sorter ejection notification
(serial communication data from the finisher main body to the
centerfold unit).
93 Jam in saddle tray section When the inside tray detection sensor (ITDS) does not turn on
within 5000 ms of the centerfold unit paper entry sensor
(CUPES) turning on.
94 Jam in saddle eject sec-
tion
The folded edge detection sensor (FEDS) is not turned on
even if 5000 ms elapse after centerfold operation starts.
95 Jam in saddle eject sec-
tion
When the folded edge detection sensor (FEDS) does not turn
off within 6000 ms of its turning on.
Service Manual Y104371-8

3H3
1-4-3
(3) Paper misfeeds
Problem
Causes/check procedures
Corrective measures
(1)
Paper jam during
paper insertion to the
finisher
Jam code 81
The paper entry roller is
dirty with paper powder.
Check and, if it is dirty, clean it.
The paper entry roller is
deformed or worn.
Check and, if it is deformed or worn, fix or replace it.
Defective paper entry sensor.
Run maintenance item U241 and turn the paper entry sensor on
and off manually. Replace the paper entry sensor if indication of
the corresponding sensor on the touch panel is not displayed in
reverse.
(2)
Paper jam during
paper insertion to the
finisher and paper
ejection to the sub
tray
Jam code 82
The sub feed roller is dirty
with paper powder.
Check and, if it is dirty, clean it.
The sub feed roller is
deformed or worn.
Check and, if it is deformed or worn, fix or replace it.
Defective paper entry sensor.
Run maintenance item U241 and turn the paper entry sensor on
and off manually. Replace the paper entry sensor if indication of
the corresponding sensor on the touch panel is not displayed in
reverse.
Defective sub tray paper
ejection sensor.
Run maintenance item U241 and turn the sub tray paper ejection
sensor on and off manually. Replace the sub tray paper ejection
sensor if indication of the corresponding sensor on the touch
panel is not displayed in reverse.
(3)
Paper jam at the siding drum
Jam code 83
The siding drum is dirty with
paper powder.
Check and, if it is dirty, clean it.
The siding drum is
deformed or worn.
Check and, if it is deformed or worn, fix or replace it.
Defective intermediate tray
paper conveying sensor.
Run maintenance item U241 and turn the intermediate tray paper
conveying sensor on and off manually. Replace the intermediate
tray paper conveying sensor if indication of the corresponding
sensor on the touch panel is not displayed in reverse.
(4)
Paper jam during
paper insertion to the
intermediate tray
Jam code 84
The intermediate tray paper
entry roller is dirty with
paper powder.
Check and, if it is dirty, clean it.
The intermediate tray paper
entry roller is deformed or
worn.
Check and, if it is deformed or worn, fix or replace it.
Defective intermediate tray
paper conveying sensor.
Run maintenance item U241 and turn the intermediate tray paper
conveying sensor on and off manually. Replace the intermediate
tray paper conveying sensor if indication of the corresponding
sensor on the touch panel is not displayed in reverse.
(5)
Paper jam during
ejection of stack of
paper
Jam code 85
The eject roller is dirty with
paper powder.
Check and, if it is dirty, clean it.
The eject roller is deformed
or worn.
Check and, if it is deformed or worn, fix or replace it.
Defective paper eject sensor.
Run maintenance item U241 and turn the paper eject sensor on
and off manually. Replace the paper eject sensor if indication of
the corresponding sensor on the touch panel is not displayed in
reverse.
Y104371-8 Service Manual

3H3
1-4-4
(6)
Jam in eject section
of main tray
Jam code 86
The eject roller is dirty with
paper powder.
Check and, if it is dirty, clean it.
The eject roller is deformed
or worn.
Check and, if it is deformed or worn, fix or replace it.
Defective paper eject sensor.
Run maintenance item U241 and turn the paper eject sensor on
and off manually. Replace the paper eject sensor if indication of
the corresponding sensor on the touch panel is not displayed in
reverse.
(7)
Jam in eject section
(intermediate tray) of
main tray
Jam code 87
The eject roller is dirty with
paper powder.
Check and, if it is dirty, clean it.
The eject roller is deformed
or worn.
Check and, if it is deformed or worn, fix or replace it.
Defective paper eject sensor.
Run maintenance item U241 and turn the paper eject sensor on
and off manually. Replace the paper eject sensor if indication of
the corresponding sensor on the touch panel is not displayed in
reverse.
(8)
Jam in eject section
of main tray
Jam code 88
The eject roller is dirty with
paper powder.
Check and, if it is dirty, clean it.
The eject roller is deformed
or worn.
Check and, if it is deformed or worn, fix or replace it.
Defective paper eject sensor.
Run maintenance item U241 and turn the paper eject sensor on
and off manually. Replace the paper eject sensor if indication of
the corresponding sensor on the touch panel is not displayed in
reverse.
(9)
Jam in cover open
Jam code 89
Defective upper cover
switch.
If the voltage at CN3-3 on the finisher main PWB remains the
same when the upper cover switch is turned on and off, replace
the switch.
Defective front cover
switch.
If the voltage at CN3-4 on the finisher main PWB remains the
same when the front cover switch is turned on and off, replace the
switch.
Defective centerfold unit set
switch.
If the voltage at CN14-2 on the finisher main PWB remains the
same when the centerfold unit set switch is turned on and off,
replace the switch.
(10)
Jam in stapler
Jam code 90
Defective front/rear stapler
home position sensor.
If the voltage at CN6-14B and CN6-10B on the finisher main PWB
remain the same when the front/rear stapler home position sensor
is turned on and off, replace the front/rear stapler driver.
Defective front/rear clincher
home position sensor.
If the voltage at CN6-22A and CN6-23A on the finisher main PWB
remain the same when the front/rear clincher home position sensor is turned on and off, replace the front/rear stapler clincher.
(11)
Jam in saddle paper
entry section
Jam code 91
The intermediate tray upper
or lower sliding plate is
deformed or worn.
Check and, if it is deformed or worn, fix or replace it.
Defective lower paper sensor.
Run maintenance item U241 and turn the lower paper sensor on
and off manually. Replace the lower paper sensor if indication of
the corresponding sensor on the touch panel is not displayed in
reverse.
Problem
Causes/check procedures
Corrective measures
Service Manual Y104371-8

3H3
1-4-5
(12)
Jam in saddle paper
entry section
Jam code 92
The paper forwarding pulley, upper or lower forwarding roller is dirty with paper
powder.
Check and, if it is dirty, clean it.
The paper forwarding pulley, upper or lower forwarding roller is deformed or
worn.
Check and, if it is deformed or worn, fix or replace it.
Defective centerfold unit
paper entry sensor.
Run maintenance item U241 and turn the centerfold unit paper
entry sensor on and off manually. Replace the centerfold unit
paper entry sensor if indication of the corresponding sensor on the
touch panel is not displayed in reverse.
(13)
Jam in saddle tray
section
Jam code 93
The paper entry roller is
dirty with paper powder.
Check and, if it is dirty, clean it.
The paper entry roller is
deformed or worn.
Check and, if it is deformed or worn, fix or replace it.
Defective inside tray detection sensor.
Run maintenance item U241 and turn the inside tray detection
sensor on and off manually. Replace the inside tray detection sensor if indication of the corresponding sensor on the touch panel is
not displayed in reverse.
(14)
Jam in saddle eject
section
Jam code 94
The right or left centerfold
roller is dirty with paper
powder.
Check and, if it is dirty, clean it.
The right or left centerfold
roller is deformed or worn.
Check and, if it is deformed or worn, fix or replace it.
Defective folded edge
detection sensor.
Run maintenance item U241 and turn the folded edge detection
sensor on and off manually. Replace the folded edge detection
sensor if indication of the corresponding sensor on the touch
panel is not displayed in reverse.
(15)
Jam in saddle eject
section
Jam code 95
The eject roller is dirty with
paper powder.
Check and, if it is dirty, clean it.
The eject roller is deformed
or worn.
Check and, if it is deformed or worn, fix or replace it.
Defective folded edge
detection sensor.
Run maintenance item U241 and turn the folded edge detection
sensor on and off manually. Replace the folded edge detection
sensor if indication of the corresponding sensor on the touch
panel is not displayed in reverse.
Problem
Causes/check procedures
Corrective measures
Y104371-8 Service Manual

3H3
1-4-6
1-4-2 Self-diagnosis
(1) Self-diagnostic function
This unit is equipped with a self-diagnostic function. When a problem is detected, copying is disabled and the problem displayed as a code consisting of C followed by a number between 8010 and 8330, indicating the nature of the problem. A
message is also displayed requesting the user to call for service.
After removing the problem, the self-diagnostic function can be reset by turning front cover/upper cover switch off and
back on.
Service Manual Y104371-8

3H3
1-4-7
(2) Self diagnostic codes
*The option equipment.
Code Contents
Remarks
Causes Check procedures/corrective measures
C8010 Paper conveying motor problem
• The LOCK signal of the paper conveying motor is detected for more than
500 ms while the paper conveying
motor is operating.
However, the first 1 s after the paper
conveying motor is turned on is
excluded from detection.
Loose connection
of the paper conveying motor connector.
Reinsert the connector. Also check for continuity within the connector cable. If none,
remedy or replace the cable.
Defective paper
conveying motor.
Replace the paper conveying motor and
check for correct operation.
Defective finisher
main PWB.
Replace the finisher main PWB and check
for correct operation.
C8020 Punch motor* problem
• The LOCK signal of the punch motor is
detected for more than 500 ms while
the punch motor is operating.
However, the first 1 s after the punch
motor is turned on is excluded from
detection.
Loose connection
of the punch motor
connector.
Reinsert the connector. Also check for continuity within the connector cable. If none,
remedy or replace the cable.
Defective punch
motor.
Replace the punch motor and check for correct operation.
Defective finisher
main PWB.
Replace the finisher main PWB and check
for correct operation.
C8030 Upper paper conveying belt problem
• During initialization, the intermediate
tray upper sliding plate is not detected
in the home position within 3 s after
the belt returns to the home position.
JAM87 is indicated the first time this
problem occurs. If the problem reoccurs after initialization when the front
cover is opened and closed, the problem is in the upper paper conveying
belt.
• When the intermediate tray upper sliding plate is operated from the home
position, the upper paper conveying
belt home position sensor does not
turn off within 1 s.
Phase shift of the
upper paper conveying belt.
Correct the phase of the upper paper conveying belt and check for correct operation.
Malfunction of the
upper paper conveying belt motor.
Replace the upper paper conveying belt
motor and check for correct operation.
Malfunction of the
upper paper conveying belt home
position sensor.
Replace the upper paper conveying belt
home position sensor and check for correct
operation.
Loose connection
of the upper paper
conveying belt
home position sensor connector.
Reinsert the connector. Also check for continuity within the connector cable. If none,
remedy or replace the cable.
Incorrect insertion
of the intermediate
tray.
Check whether the intermediate tray
catches are damaged.
Defective finisher
main PWB.
Replace the finisher main PWB and check
for correct operation.
Y104371-8 Service Manual

3H3
1-4-8
C8040 Lower paper conveying belt problem
• During initialization, the intermediate
tray lower sliding plate is not detected
in the home position within 3 s after
the belt returns to the home position.
JAM87 is indicated the first time this
problem occurs. If the problem reoccurs after initialization when the front
cover is opened and closed, the problem is in the lower paper conveying
belt.
• When the intermediate tray lower sliding plate is operated from the home
position, the lower paper conveying
belt home position sensor does not
turn off within 1 s.
Phase shift of the
lower paper conveying belt.
Correct the phase of the lower paper conveying belt and check for correct operation.
Malfunction of the
lower paper conveying belt motor.
Replace the lower paper conveying belt
motor and check for correct operation.
Malfunction of the
lower paper conveying belt home
position sensor.
Replace the lower paper conveying belt
home position sensor and check for correct
operation.
Loose connection
of the lower paper
conveying belt
home position sensor connector.
Reinsert the connector. Also check for continuity within the connector cable. If none,
remedy or replace the cable.
Incorrect insertion
of the intermediate
tray.
Check whether the intermediate tray
catches are damaged.
Defective finisher
main PWB.
Replace the finisher main PWB and check
for correct operation.
C8140 Main tray problem
• When the main tray is not detected by
the main tray upper limit detection sensor or the main tray load detection
sensor within 20 s from the moment it
starts ascending.
• During main tray descent, the main
tray upper limit detection sensor or the
main tray load detection sensor does
not turn off within 500 ms after it turns
on.
• During main tray ascent, the main tray
upper limit detection sensor or the
main tray load detection sensor stays
on for more than 2 s.
Loose connection
of the main tray
elevation motor
connector.
Reinsert the connector. Also check for continuity within the connector cable. If none,
remedy or replace the cable.
Malfunction of the
main tray elevation motor.
Replace the main tray elevation motor and
check for correct operation.
Malfunction of the
main tray upper
limit detection sensor.
Replace the main tray upper limit detection
sensor and check for correct operation.
Loose connection
of the main tray
upper limit detection sensor connector.
Reinsert the connector. Also check for continuity within the connector cable. If none,
remedy or replace the cable.
Malfunction of the
main tray load
detection sensor.
Replace the main tray load detection sensor
and check for correct operation.
Loose connection
of the main tray
load detection sensor connector.
Reinsert the connector. Also check for continuity within the connector cable. If none,
remedy or replace the cable.
Defective finisher
main PWB.
Replace the finisher main PWB and check
for correct operation.
Code Contents
Remarks
Causes Check procedures/corrective measures
Service Manual Y104371-8

3H3
1-4-9
C8150 Multi job tray* problem
• When the multi job tray is not detected
by the multi job tray upper limit detection sensor within 15 s from the
moment it starts ascending.
• During multi job tray descent, the multi
job tray upper limit detection sensor
does not turn off within 500 ms after it
turns on.
Loose connection
of the multi job tray
elevation motor
connector.
Reinsert the connector. Also check for continuity within the connector cable. If none,
remedy or replace the cable.
Malfunction of the
multi job tray elevation motor.
Replace the multi job tray elevation motor
and check for correct operation.
Malfunction of the
multi job tray upper
limit detection sensor.
Replace the multi job tray upper limit detection sensor and check for correct operation.
Loose connection
of the multi job tray
upper limit detection sensor connector.
Reinsert the connector. Also check for continuity within the connector cable. If none,
remedy or replace the cable.
Defective finisher
main PWB.
Replace the finisher main PWB and check
for correct operation.
C8170 Front upper side registration guide
problem
• During initialization, the front upper
side registration guide is not detected
in the home position within 1.5 s after
the guide returns to the home position.
JAM87 is indicated the first time this
problem occurs. If the problem occurs
after initialization when the front cover
is opened and closed, the problem is
in the front upper side registration
guide.
• When the front upper side registration
guide is operated from the home position, the front upper side registration
home position sensor does not turn off
within 500 ms.
Loose connection
of the front upper
side registration
guide motor connector.
Reinsert the connector. Also check for continuity within the connector cable. If none,
remedy or replace the cable.
Malfunction of the
front upper side
registration guide
motor.
Replace the front upper side registration
guide motor and check for correct operation.
Malfunction of the
front upper side
registration guide
home position sensor.
Replace the front upper side registration
guide home position sensor and check for
correct operation.
Loose connection
of the front upper
side registration
guide home position sensor connector.
Reinsert the connector. Also check for continuity within the connector cable. If none,
remedy or replace the cable.
Defective finisher
main PWB.
Replace the finisher main PWB and check
for correct operation.
Code Contents
Remarks
Causes Check procedures/corrective measures
Y104371-8 Service Manual

3H3
1-4-10
C8180 Rear upper side registration guide
problem
• During initialization, the rear upper
side registration guide is not detected
in the home position within 1.5 s after
the guide returns to the home position.
JAM87 is indicated the first time this
problem occurs. If the problem occurs
after initialization when the front cover
is opened and closed, the problem is
in the rear upper side registration
guide.
• When the rear upper side registration
guide is operated from the home position, the rear upper side registration
home position sensor does not turn off
within 500 ms.
Loose connection
of the rear upper
side registration
guide motor connector.
Reinsert the connector. Also check for continuity within the connector cable. If none,
remedy or replace the cable.
Malfunction of the
rear upper side
registration guide
motor.
Replace the rear upper side registration
guide motor and check for correct operation.
Malfunction of the
rear upper side
registration guide
home position sensor.
Replace the rear upper side registration
guide home position sensor and check for
correct operation.
Loose connection
of the rear upper
side registration
guide home position sensor connector.
Reinsert the connector. Also check for continuity within the connector cable. If none,
remedy or replace the cable.
Defective finisher
main PWB.
Replace the finisher main PWB and check
for correct operation.
C8190 Lower side registration guide prob-
lem
• During initialization, the front/rear
lower side registration guides are not
detected in the home position within
1.5 s after the guide returns to the
home position.JAM87 is indicated the
first time this problem occurs. If the
problem occurs after initialization
when the front cover is opened and
closed, the problem is in the lower side
registration guide.
• When the lower side registration guide
is operated from the home position,
the lower side registration home position sensor does not turn off within 500
ms.
Loose connection
of the lower side
registration guide
motor connector.
Reinsert the connector. Also check for continuity within the connector cable. If none,
remedy or replace the cable.
Malfunction of the
lower side registration guide motor.
Replace the lower side registration guide
motor and check for correct operation.
Malfunction of the
lower side registration guide home
position sensor.
Replace the lower side registration guide
home position sensor and check for correct
operation.
Loose connection
of the lower side
registration guide
home position sensor connector.
Reinsert the connector. Also check for continuity within the connector cable. If none,
remedy or replace the cable.
Defective finisher
main PWB.
Replace the finisher main PWB and check
for correct operation.
Code Contents
Remarks
Causes Check procedures/corrective measures
Service Manual Y104371-8

3H3
1-4-11
C8210 Front stapler problem
• During initialization, the front stapler is
not detected in the home position
within 500 ms after the front stapler
returns to the home position. JAM90 is
indicated the first time this problem
occurs. If the problem occurs after initialization when the front cover is
opened and closed, the problem is in
the front stapler.
• When the front stapler is operated
from the home position, the front stapler home position sensor does not
turn off within 500 ms.
Loose connection
of the front stapler
motor connector.
Reinsert the connector. Also check for continuity within the connector cable. If none,
remedy or replace the cable.
Malfunction of the
front stapler motor.
Replace the front stapler motor and check
for correct operation.
Malfunction of the
front stapler home
position sensor.
Replace the front stapler home position sensor and check for correct operation.
Loose connection
of the front stapler
home position sensor connector.
Reinsert the connector. Also check for continuity within the connector cable. If none,
remedy or replace the cable.
Defective finisher
main PWB.
Replace the finisher main PWB and check
for correct operation.
C8220 Front clincher problem
• During initialization, the front clincher
is not detected in the home position
within 500 ms after the front clincher
returns to the home position. JAM90 is
indicated the first time this problem
occurs. If the problem occurs after initialization when the front cover is
opened and closed, the problem is in
the front clincher.
• When the front clincher is operated
from the home position, the front
clincher home position sensor does
not turn off within 500 ms.
Loose connection
of the front clincher
motor connector.
Reinsert the connector. Also check for continuity within the connector cable. If none,
remedy or replace the cable.
Malfunction of the
front clincher
motor.
Replace the front clincher motor and check
for correct operation.
Malfunction of the
front clincher home
position sensor.
Replace the front clincher home position
sensor and check for correct operation.
Loose connection
of the front clincher
home position sensor connector.
Reinsert the connector. Also check for continuity within the connector cable. If none,
remedy or replace the cable.
Defective finisher
main PWB.
Replace the finisher main PWB and check
for correct operation.
C8230 Rear stapler problem
• During initialization, the rear stapler is
not detected in the home position
within 500 ms after the rear stapler
returns to the home position. JAM90 is
indicated the first time this problem
occurs. If the problem occurs after initialization when the front cover is
opened and closed, the problem is in
the rear stapler.
• When the rear stapler is operated from
the home position, the rear stapler
home position sensor does not turn off
within 500 ms.
Loose connection
of the rear stapler
motor connector.
Reinsert the connector. Also check for continuity within the connector cable. If none,
remedy or replace the cable.
Malfunction of the
rear stapler motor.
Replace the rear stapler motor and check for
correct operation.
Malfunction of the
rear stapler home
position sensor.
Replace the rear stapler home position sensor and check for correct operation.
Loose connection
of the rear stapler
home position sensor connector.
Reinsert the connector. Also check for continuity within the connector cable. If none,
remedy or replace the cable.
Defective finisher
main PWB.
Replace the finisher main PWB and check
for correct operation.
Code Contents
Remarks
Causes Check procedures/corrective measures
Y104371-8 Service Manual

3H3
1-4-12
C8240 Rear clincher problem
• During initialization, the rear clincher is
not detected in the home position
within 500 ms after the rear clincher
returns to the home position. JAM90 is
indicated the first time this problem
occurs. If the problem occurs after initialization when the front cover is
opened and closed, the problem is in
the rear clincher.
• When the rear clincher is operated
from the home position, the rear
clincher home position sensor does
not turn off within 500 ms.
Loose connection
of the rear clincher
motor connector.
Reinsert the connector. Also check for continuity within the connector cable. If none,
remedy or replace the cable.
Malfunction of the
rear clincher motor.
Replace the rear clincher motor and check
for correct operation.
Malfunction of the
rear clincher home
position sensor.
Replace the rear clincher home position
sensor and check for correct operation.
Loose connection
of the rear clincher
home position sensor connector.
Reinsert the connector. Also check for continuity within the connector cable. If none,
remedy or replace the cable.
Defective finisher
main PWB.
Replace the finisher main PWB and check
for correct operation.
C8300 Centerfold unit* communication prob-
lem
• Communication with the centerfold
unit is not possible although the connection is detected.
Loose connection
of the centerfold
unit set switch connector.
Reinsert the connector. Also check for continuity within the connector cable. If none,
remedy or replace the cable.
Defective centerfold unit set switch.
Replace the centerfold unit set switch and
check for correct operation.
Defective centerfold unit main
PWB.
Replace the centerfold unit main PWB and
check for correct operation.
Defective finisher
main PWB.
Replace the finisher main PWB and check
for correct operation.
C8310 Centerfold unit* side registration
guide problem
• During initialization, the front/rear side
registration guides are not detected in
the home position within 600 ms after
the guide returns to the home position.
• When the side registration guide is
operated from the home position, the
side registration guide home position
sensor does not turn off within 100 ms.
Loose connection
of the side registration guide motor
connector.
Reinsert the connector. Also check for continuity within the connector cable. If none,
remedy or replace the cable.
Malfunction of the
side registration
guide motor.
Replace the side registration guide motor
and check for correct operation.
Malfunction of the
side registration
guide home position sensor.
Replace the side registration guide home
position sensor and check for correct operation.
Loose connection
of the side registration guide home
position sensor
connector.
Reinsert the connector. Also check for continuity within the connector cable. If none,
remedy or replace the cable.
Defective centerfold unit main
PWB.
Replace the centerfold unit main PWB and
check for correct operation.
Code Contents
Remarks
Causes Check procedures/corrective measures
Service Manual Y104371-8

3H3
1-4-13
C8320 Centerfold unit centering plate prob-
lem
• During initialization, the centering plate
is not detected in the home position
when the centering plate returns to the
home position.
Loose connection
of the centering
plate motor connector.
Reinsert the connector. Also check for continuity within the connector cable. If none,
remedy or replace the cable.
Malfunction of the
centering plate
motor.
Replace the centering plate motor and
check for correct operation.
Malfunction of the
centering plate
home position sensor.
Replace the centering plate home position
sensor and check for correct operation.
Loose connection
of the centering
plate home position sensor connector.
Reinsert the connector. Also check for continuity within the connector cable. If none,
remedy or replace the cable.
Defective centerfold unit main
PWB.
Replace the centerfold unit main PWB and
check for correct operation.
C8330 Centerfold blade* problem
• During initialization, the centerfold
blade is not detected in the home position within a specified period of time.
Loose connection
of the centerfold
blade motor connector.
Reinsert the connector. Also check for continuity within the connector cable. If none,
remedy or replace the cable.
Malfunction of the
centerfold blade
motor.
Replace the centerfold blade motor and
check for correct operation.
Malfunction of the
centerfold blade
home position sensor.
Replace the centerfold blade home position
sensor and check for correct operation.
Loose connection
of the centerfold
blade home position sensor connector.
Reinsert the connector. Also check for continuity within the connector cable. If none,
remedy or replace the cable.
Defective centerfold unit main
PWB.
Replace the centerfold unit main PWB and
check for correct operation.
Code Contents
Remarks
Causes Check procedures/corrective measures
Y104371-8 Service Manual

3H3
1-4-14
1-4-3 Electric problems
Finisher
Problem Causes Check procedures/corrective measures
(1)
The paper conveying motor does not
operate.
Poor contact in the paper
conveying motor connector
terminals.
Reinsert the connector. Also check for continuity within the connector cable. If none, remedy or replace the cable.
Broken paper conveying
motor gear.
Check visually and replace the paper conveying motor gear if necessary.
Defective paper conveying
motor.
Run maintenance item U240 and check if the paper conveying
motor operates when YC14-3 on the finisher main PWB goes low.
If not, replace the paper conveying motor.
Defective finisher main
PWB.
Run maintenance item U240 and check if YC14-3 on the finisher
main PWB goes low. If not, replace the finisher main PWB.
(2)
The upper paper
conveying belt motor
does not operate.
Poor contact in the upper
paper conveying belt motor
connector terminals.
Reinsert the connector. Also check for continuity within the connector cable. If none, remedy or replace the cable.
Broken upper paper conveying belt motor gear.
Check visually and replace the upper paper conveying belt motor
gear if necessary.
Defective upper paper conveying belt motor.
Run maintenance item U240 and check if the upper paper conveying belt motor operates when YC24-A1, YC24-A3, YC24-B28
and YC-B30 on the finisher main PWB go low. If not, replace the
upper paper conveying belt motor.
Defective finisher main
PWB.
Run maintenance item U240 and check if YC24-A1, YC24-A3,
YC24-B28 and YC-B30 on the finisher main PWB go low. If not,
replace the finisher main PWB.
(3)
The lower paper conveying belt motor
does not operate.
Poor contact in the lower
paper conveying belt motor
connector terminals.
Reinsert the connector. Also check for continuity within the connector cable. If none, remedy or replace the cable.
Broken lower paper conveying belt motor gear.
Check visually and replace the lower paper conveying belt motor
gear if necessary.
Defective lower paper conveying belt motor.
Run maintenance item U240 and check if the lower paper conveying belt motor operates when YC24-A4, YC24-A6, YC24-B25 and
YC-B27 on the finisher main PWB go low. If not, replace the lower
paper conveying belt motor.
Defective finisher main
PWB.
Run maintenance item U240 and check if YC24-A4, YC24-A6,
YC24-B25 and YC-B27 on the finisher main PWB go low. If not,
replace the finisher main PWB.
(4)
The front upper side
registration guide
motor does not operate.
Poor contact in the front
upper side registration
guide motor connector terminals.
Reinsert the connector. Also check for continuity within the connector cable. If none, remedy or replace the cable.
Broken front upper side registration guide motor gear.
Check visually and replace the front upper side registration guide
motor gear if necessary.
Defective front upper side
registration guide motor.
Run maintenance item U240 and check if the front upper side registration guide motor operates when YC24-A7, YC24-A9, YC24B22 and YC-B24 on the finisher main PWB go low. If not, replace
the front upper side registration guide motor.
Defective finisher main
PWB.
Run maintenance item U240 and check if YC24-A7, YC24-A9,
YC24-B22 and YC-B24 on the finisher main PWB go low. If not,
replace the finisher main PWB.
Service Manual Y104371-8

3H3
1-4-15
(5)
The rear upper side
registration guide
motor does not operate.
Poor contact in the rear
upper side registration
guide motor connector terminals.
Reinsert the connector. Also check for continuity within the connector cable. If none, remedy or replace the cable.
Broken rear upper side registration guide motor gear.
Check visually and replace the rear upper side registration guide
motor gear if necessary.
Defective front upper side
registration guide motor.
Run maintenance item U240 and check if the rear upper side registration guide motor operates when YC24-A10, YC24-A12,
YC24-B19 and YC-B21 on the finisher main PWB go low. If not,
replace the rear upper side registration guide motor.
Defective finisher main
PWB.
Run maintenance item U240 and check if YC24-A10, YC24-A12,
YC24-B19 and YC-B21 on the finisher main PWB go low. If not,
replace the finisher main PWB.
(6)
The lower side registration guide motor
does not operate.
Poor contact in the lower
side registration guide
motor connector terminals.
Reinsert the connector. Also check for continuity within the connector cable. If none, remedy or replace the cable.
Broken lower side registration guide motor gear.
Check visually and replace the lower side registration guide motor
gear if necessary.
Defective lower side registration guide motor.
Run maintenance item U240 and check if the lower side registration guide motor operates when YC24-A13, YC24-A15, YC24-B16
and YC-B18 on the finisher main PWB go low. If not, replace the
lower side registration guide motor.
Defective finisher main
PWB.
Run maintenance item U240 and check if YC24-A13, YC24-A15,
YC24-B16 and YC-B18 on the finisher main PWB go low. If not,
replace the finisher main PWB.
(7)
The main tray elevation motor does not
operate.
Poor contact in the main
tray elevation motor connector terminals.
Reinsert the connector. Also check for continuity within the connector cable. If none, remedy or replace the cable.
Broken main tray elevation
motor gear.
Check visually and replace the main tray elevation motor gear if
necessary.
Defective main tray elevation motor.
Run maintenance item U240 and check if the main tray elevation
motor operates when YC9-1 and YC9-2 on the finisher drive PWB
go low. If not, replace the main tray elevation motor.
Defective finisher drive
PWB.
Run maintenance item U240 and check if YC9-1 and YC9-2 on
the finisher drive PWB go low. If not, replace the finisher drive
PWB.
Defective finisher main
PWB.
Run maintenance item U240 and check if YC12-17 on the finisher
main PWB goes low. If not, replace the finisher main PWB.
(8)
The front stapler
motor does not operate.
Poor contact in the front
stapler motor connector terminals.
Reinsert the connector. Also check for continuity within the connector cable. If none, remedy or replace the cable.
Broken front stapler motor
gear.
Check visually and replace the front stapler motor gear if necessary.
Defective front stapler
motor.
If the front stapler motor dose not operate when 5 V DC is output
to YC18-A13 on the finisher main PWB, replace the front stapler
motor.
Defective finisher main
PWB.
If 5 V DC is not output from YC18-A13 on the finisher main PWB,
replace the finisher main PWB.
Problem Causes Check procedures/corrective measures
Y104371-8 Service Manual

3H3
1-4-16
(9)
The rear stapler
motor does not operate.
Poor contact in the rear stapler motor connector terminals.
Reinsert the connector. Also check for continuity within the connector cable. If none, remedy or replace the cable.
Broken rear stapler motor
gear.
Check visually and replace the rear stapler motor gear if necessary.
Defective rear stapler
motor.
If the rear stapler motor dose not operate when 5 V DC is output
to YC18-A17 on the finisher main PWB, replace the rear stapler
motor.
Defective finisher main
PWB.
If 5 V DC is not output from YC18-A17 on the finisher main PWB,
replace the finisher main PWB.
(10)
The front clincher
motor does not operate.
Poor contact in the front
clincher motor connector
terminals.
Reinsert the connector. Also check for continuity within the connector cable. If none, remedy or replace the cable.
Broken front clincher motor
gear.
Check visually and replace the front clincher motor gear if necessary.
Defective front clincher
motor.
If the front clincher motor dose not operate when 5 V DC is output
to YC18-B2 on the finisher main PWB, replace the front clincher
motor.
Defective finisher main
PWB.
If 5 V DC is not output from YC18-B2 on the finisher main PWB,
replace the finisher main PWB.
(11)
The rear clincher
motor does not operate.
Poor contact in the rear
clincher motor connector
terminals.
Reinsert the connector. Also check for continuity within the connector cable. If none, remedy or replace the cable.
Broken rear clincher motor
gear.
Check visually and replace the rear clincher motor gear if necessary.
Defective rear clincher
motor.
If the rear clincher motor dose not operate when 5 V DC is output
to YC18-A25 on the finisher main PWB, replace the rear clincher
motor.
Defective finisher main
PWB.
If 5 V DC is not output from YC18-A25 on the finisher main PWB,
replace the finisher main PWB.
(12)
The paper entry
motor does not operate.
Poor contact in the paper
entry motor connector terminals.
Reinsert the connector. Also check for continuity within the connector cable. If none, remedy or replace the cable.
Broken paper entry motor
gear.
Check visually and replace the paper entry motor gear if necessary.
Defective paper entry
motor.
Run maintenance item U240 and check if the paper entry motor
operates when YC12-1, YC12-3, YC12-4 and YC12-6 on the finisher drive PWB go low. If not, replace the paper entry motor.
Defective finisher drive
PWB.
Run maintenance item U240 and check if YC12-1, YC12-3, YC124 and YC12-6 on the finisher drive PWB go low. If not, replace the
finisher drive PWB.
Defective finisher main
PWB.
Run maintenance item U240 and check if YC25-12 on the finisher
main PWB goes low. If not, replace the finisher main PWB.
Problem Causes Check procedures/corrective measures
Service Manual Y104371-8

3H3
1-4-17
(13)
The siding drum
motor does not operate.
Poor contact in the siding
drum motor connector terminals.
Reinsert the connector. Also check for continuity within the connector cable. If none, remedy or replace the cable.
Broken siding drum motor
gear.
Check visually and replace the siding drum motor gear if necessary.
Defective siding drum
motor.
Run maintenance item U240 and check if the siding drum motor
operates when YC11-1, YC11-3, YC11-4 and YC11-6 on the finisher drive PWB go low. If not, replace the siding drum motor.
Defective finisher drive
PWB.
Run maintenance item U240 and check if YC11-1, YC11-3, YC114 and YC11-6 on the finisher drive PWB go low. If not, replace the
finisher drive PWB.
Defective finisher main
PWB.
Run maintenance item U240 and check if YC25-9 on the finisher
main PWB goes low. If not, replace the finisher main PWB.
(14)
The movable guide
motor does not operate.
Poor contact in the movable
guide motor connector terminals.
Reinsert the connector. Also check for continuity within the connector cable. If none, remedy or replace the cable.
Broken movable guide
motor gear.
Check visually and replace the movable guide motor gear if necessary.
Defective movable guide
motor.
Run maintenance item U240 and check if the movable guide
motor operates when YC16-1, YC16-3, YC16-4 and YC16-6 on
the finisher main PWB go low. If not, replace the movable guide
motor.
Defective finisher main
PWB.
Run maintenance item U240 and check if YC16-1, YC16-3, YC164 and YC16-6 on the finisher main PWB go low. If not, replace the
finisher main PWB.
(15)
The eject motor does
not operate.
Poor contact in the eject
motor connector terminals.
Reinsert the connector. Also check for continuity within the connector cable. If none, remedy or replace the cable.
Broken eject motor gear. Check visually and replace the eject motor gear if necessary.
Defective eject motor. Run maintenance item U240 and check if the eject motor operates
when YC11-7, YC11-9, YC11-10 and YC11-12 on the finisher
drive PWB go low. If not, replace the eject motor.
Defective finisher drive
PWB.
Run maintenance item U240 and check if YC11-7, YC11-9, YC1110 and YC11-12 on the finisher drive PWB go low. If not, replace
the finisher drive PWB.
Defective finisher main
PWB.
Run maintenance item U240 and check if YC25-6 on the finisher
main PWB goes low. If not, replace the finisher main PWB.
(16)
The cooling fan
motor does not operate.
Broken cooling fan motor
coil.
Check for continuity across the coil. If none, replace the cooling
fan motor.
Poor contact in the cooling
fan motor connector terminals.
Reinsert the connector. Also check for continuity within the connector cable. If none, remedy or replace the cable.
Defective finisher main
PWB.
Check if YC26-1 on the finisher main PWB goes low. If not,
replace the finisher main PWB.
(17)
The eject guide solenoid does not operate.
Broken eject guide solenoid
coil.
Check for continuity across the coil. If none, replace the eject
guide solenoid.
Poor contact in the eject
guide solenoid connector
terminals.
Reinsert the connector. Also check for continuity within the connector cable. If none, remedy or replace the cable.
Defective finisher main
PWB.
Run maintenance item U240 and check if YC15-2 on the finisher
main PWB goes low. If not, replace the finisher main PWB.
Problem Causes Check procedures/corrective measures
Y104371-8 Service Manual

3H3
1-4-18
(18)
The paper holder
solenoid does not
operate.
Broken paper holder solenoid coil.
Check for continuity across the coil. If none, replace the paper
holder solenoid.
Poor contact in the paper
holder solenoid connector
terminals.
Reinsert the connector. Also check for continuity within the connector cable. If none, remedy or replace the cable.
Defective finisher drive
PWB.
Run maintenance item U240 and check if YC10-2 and YC10-3 on
the finisher drive PWB go low. If not, replace the finisher drive
PWB.
Defective finisher main
PWB.
Run maintenance item U240 and check if YC25-1 and YC25-2 on
the finisher main PWB go low. If not, replace the finisher main
PWB.
(19)
The paper forwarding
pulley solenoid does
not operate.
Broken paper forwarding
pulley solenoid coil.
Check for continuity across the coil. If none, replace the paper forwarding pulley solenoid.
Poor contact in the paper
forwarding pulley solenoid
connector terminals.
Reinsert the connector. Also check for continuity within the connector cable. If none, remedy or replace the cable.
Defective finisher main
PWB.
Run maintenance item U240 and check if YC24-B15 on the finisher main PWB goes low. If not, replace the finisher main PWB.
(20)
The feedshift solenoid A does not operate.
Broken feedshift solenoid A
coil.
Check for continuity across the coil. If none, replace the feedshift
solenoid A.
Poor contact in the feedshift
solenoid A connector terminals.
Reinsert the connector. Also check for continuity within the connector cable. If none, remedy or replace the cable.
Defective finisher main
PWB.
Run maintenance item U240 and check if YC15-4 and YC15-5 on
the finisher main PWB go low. If not, replace the finisher main
PWB.
(21)
The feedshift solenoid B does not operate.
Broken feedshift solenoid B
coil.
Check for continuity across the coil. If none, replace the feedshift
solenoid B.
Poor contact in the feedshift
solenoid B connector terminals.
Reinsert the connector. Also check for continuity within the connector cable. If none, remedy or replace the cable.
Defective finisher drive
PWB.
Run maintenance item U240 and check if YC5-2 and YC5-3 on
the finisher drive PWB go low. If not, replace the finisher drive
PWB.
Defective finisher main
PWB.
Run maintenance item U240 and check if YC25-3 and YC25-4 on
the finisher main PWB go low. If not, replace the finisher main
PWB.
(22)
The feedshift solenoid C does not operate.
Broken feedshift solenoid C
coil.
Check for continuity across the coil. If none, replace the feedshift
solenoid C.
Poor contact in the feedshift
solenoid C connector terminals.
Reinsert the connector. Also check for continuity within the connector cable. If none, remedy or replace the cable.
Defective finisher main
PWB.
Run maintenance item U240 and check if YC15-10 and YC15-11
on the finisher main PWB go low. If not, replace the finisher main
PWB.
Problem Causes Check procedures/corrective measures
Service Manual Y104371-8

3H3
1-4-19
(23)
The lock solenoid
does not operate.
Broken lock solenoid coil. Check for continuity across the coil. If none, replace the lock sole-
noid.
Poor contact in the lock
solenoid connector terminals.
Reinsert the connector. Also check for continuity within the connector cable. If none, remedy or replace the cable.
Defective finisher main
PWB.
Run maintenance item U240 and check if YC17-2 and YC17-3 on
the finisher main PWB go low. If not, replace the finisher main
PWB.
Problem Causes Check procedures/corrective measures
Y104371-8 Service Manual

3H3
1-4-20
Centerfold unit
Problem Causes Check procedures/corrective measures
(1)
The main motor does
not operate.
Poor contact in the main
motor connector terminals.
Reinsert the connector. Also check for continuity within the connector cable. If none, remedy or replace the cable.
Broken main motor gear. Check visually and replace the main motor if necessary.
Defective main motor. Run maintenance item U240 and check if the main motor oper-
ates when CN3-1 and CN3-2 on the centerfold unit main PWB go
low. If not, replace the main motor.
Defective centerfold unit
main PWB.
Run maintenance item U240 and check if CN3-1 and CN3-2 on
the centerfold unit main PWB go low. If not, replace the centerfold
unit main PWB.
(2)
The centerfold blade
motor does not operate.
Poor contact in the centerfold blade motor connector
terminals.
Reinsert the connector. Also check for continuity within the connector cable. If none, remedy or replace the cable.
Broken centerfold blade
motor gear.
Check visually and replace the centerfold blade motor if necessary.
Defective centerfold blade
motor.
Run maintenance item U240 and check if the centerfold blade
motor operates when CN3-3 and CN3-4 on the centerfold unit
main PWB go low. If not, replace the centerfold blade motor.
Defective centerfold unit
main PWB.
Run maintenance item U240 and check if CN3-3 and CN3-4 on
the centerfold unit main PWB go low. If not, replace the centerfold
unit main PWB.
(3)
The side registration
guide motor does not
operate.
Poor contact in the side registration guide motor connector terminals.
Reinsert the connector. Also check for continuity within the connector cable. If none, remedy or replace the cable.
Broken side registration
guide motor gear.
Check visually and replace the side registration guide motor if
necessary.
Defective side registration
guide motor.
Run maintenance item U240 and check if the side registration
guide motor operates when CN4-1, CN4-2, CN4-3 and CN4-4 on
the centerfold unit main PWB go low. If not, replace the side registration guide motor.
Defective centerfold unit
main PWB.
Run maintenance item U240 and check if CN4-1, CN4-2, CN4-3
and CN4-4 on the centerfold unit main PWB go low. If not, replace
the centerfold unit main PWB.
(4)
The centering plate
motor does not operate.
Poor contact in the centering plate motor connector
terminals.
Reinsert the connector. Also check for continuity within the connector cable. If none, remedy or replace the cable.
Broken centering plate
motor gear.
Check visually and replace the centering plate motor if necessary.
Defective centering plate
motor.
Run maintenance item U240 and check if the centering plate
motor operates when CN5-7A, CN5-9A, CN5-22B and CN5-24B
on the centerfold unit main PWB go low. If not, replace the centering plate motor.
Defective centerfold unit
main PWB.
Run maintenance item U240 and check if CN4-7, CN4-8, CN4-9
and CN4-10 on the centerfold unit main PWB go low. If not,
replace the centerfold unit main PWB.
Service Manual Y104371-8

3H3
1-4-21
Multi job tray
Punch unit
(5)
The pressures
release solenoid
does not operate.
Broken pressures release
solenoid coil.
Check for continuity across the coil. If none, replace the pressures
release solenoid.
Poor contact in the pressures release solenoid connector terminals.
Reinsert the connector. Also check for continuity within the connector cable. If none, remedy or replace the cable.
Defective centerfold unit
main PWB.
Run maintenance item U240 and check if CN6-27 and CN6-28 on
the centerfold unit main PWB go low. If not, replace the centerfold
unit main PWB.
Problem Causes Check procedures/corrective measures
(1)
The multi job tray elevation motor does
not operate.
Poor contact in the multi job
tray elevation motor connector terminals.
Reinsert the connector. Also check for continuity within the connector cable. If none, remedy or replace the cable.
Broken multi job tray elevation motor gear.
Check visually and replace the multi job tray elevation motor if
necessary.
Defective multi job tray elevation motor.
Run maintenance item U240 and check if the multi job tray elevation motor operates when YC8-7 and YC8-8 on the finisher drive
PWB go low. If not, replace the multi job tray elevation motor.
Defective finisher drive
PWB.
Run maintenance item U240 and check if YC8-7 and YC8-8 on
the finisher drive PWB go low. If not, replace the finisher drive
PWB.
Defective finisher main
PWB.
Run maintenance item U240 and check if YC12-14 on the finisher
main PWB goes low. If not, replace the finisher main PWB.
Problem Causes Check procedures/corrective measures
(1)
The punch motor
does not operate.
Poor contact in the punch
motor connector terminals.
Reinsert the connector. Also check for continuity within the connector cable. If none, remedy or replace the cable.
Broken punch motor gear. Check visually and replace the punch motor if necessary.
Defective punch motor. Run maintenance item U240 and check if the punch motor oper-
ates when YC3-3 and YC3-4 on the punch PWB go low. If not,
replace the punch motor.
Defective punch PWB. Run maintenance item U240 and check if YC3-3 and YC3-4 on
the punch PWB go low. If not, replace the punch PWB.
(2)
The punch solenoid
does not operate.
Broken punch solenoid coil. Check for continuity across the coil. If none, replace the punch
solenoid.
Poor contact in the punch
solenoid connector terminals.
Reinsert the connector. Also check for continuity within the connector cable. If none, remedy or replace the cable.
Defective finisher main
PWB.
Run maintenance item U240 and check if YC15-7 and YC15-8 on
the finisher main PWB go low. If not, replace the finisher main
PWB.
Problem Causes Check procedures/corrective measures
Y104371-8 Service Manual

3H3
1-4-22
1-4-4 Mechanical problems
Finisher
Centerfold unit
Multi job tray
Problem Causes/check procedures Corrective measures
(1)
Paper jam.
Check if the paper entry pulley correctly contacts paper entry roller.
If not, fix as necessary.
Check if the intermediate tray paper entry
roller correctly contacts the intermediate tray
paper entry pulley.
If not, fix as necessary.
(2)
Abnormal noise.
Check if all the rollers and gears rotate
smoothly.
If there is a problem, grease the bearings
and gears.
Problem Causes/check procedures Corrective measures
(1)
Paper jam.
Check if the paper entry pulley, paper entry
roller, eject pulley and eject roller are
deformed.
If they are, replace.
(2)
Abnormal noise.
Check if all the rollers and gears rotate
smoothly.
If there is a problem, grease the bearings
and gears.
Problem Causes/check procedures Corrective measures
(1)
Paper jam.
Check if the finisher’s eject pulley and eject
roller are deformed.
If they are, replace.
(2)
Abnormal noise.
Check if all the rollers and gears rotate
smoothly.
If there is a problem, grease the bearings
and gears.
Service Manual Y104371-8
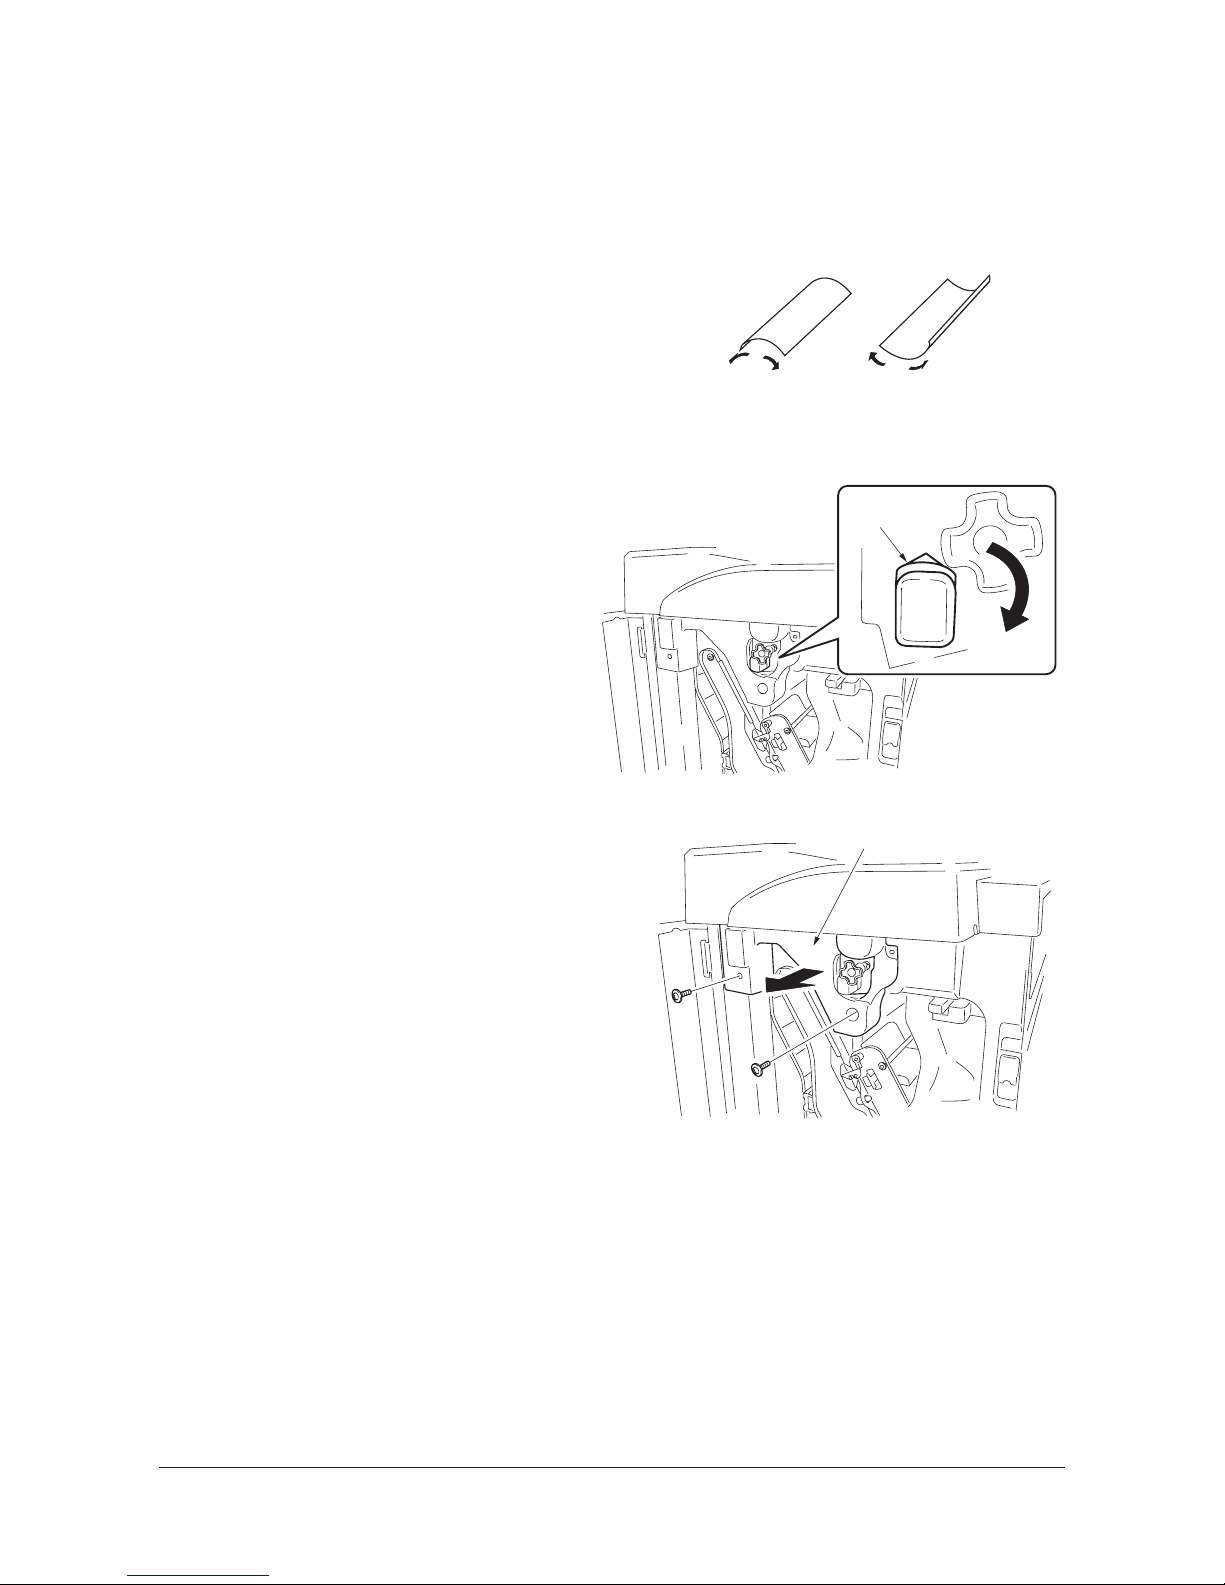
3H3
1-5-1
1-5 Assembly and Disassem bly
1-5-1 Finisher
(1) Correcting paper curling
Follow the below procedure if paper ejected from the finisher is curled.
<Procedure>
1. Set the machine to the non-sort mode and
run paper through the machine to make a
test copy.
2. Check if the paper that is ejected from the
finisher is curled. If it is, make the following
adjustment.
Figure 1-5-1
If the paper curls downward (a in figure 1-5-1)
1. Open the front cover.
2. Rotate the lower lever by one mark in the
direction of the higher numbers.
There are five marks.
3. Close the front cover.
4. Run paper through the machine and check if
it is still curled downward.
5. Repeat steps 1 to 4 until the ejected paper
does not curl downward anymore.
Figure 1-5-2
If the paper curls upward (b in figure 1-5-1)
1. Open the front cover.
2. Remove the two screws and then the inner
left cover.
Figure 1-5-3
ab
1
Lower lever
2
3
4
5
Inner left cover
Y104371-8 Service Manual

3H3
1-5-2
3. Rotate the upper lever by one mark in the
direction of the higher numbers.
There are five marks.
4. Close the front cover.
5. Run paper through the machine and check if
it is still curled upward.
6. Repeat steps 1 to 5 until the ejected paper
does not curl upward anymore.
7. When the correction is completed, reattach
the inner left cover.
Figure 1-5-4
Upper cover
1
2
3
4
5
Service Manual Y104371-8
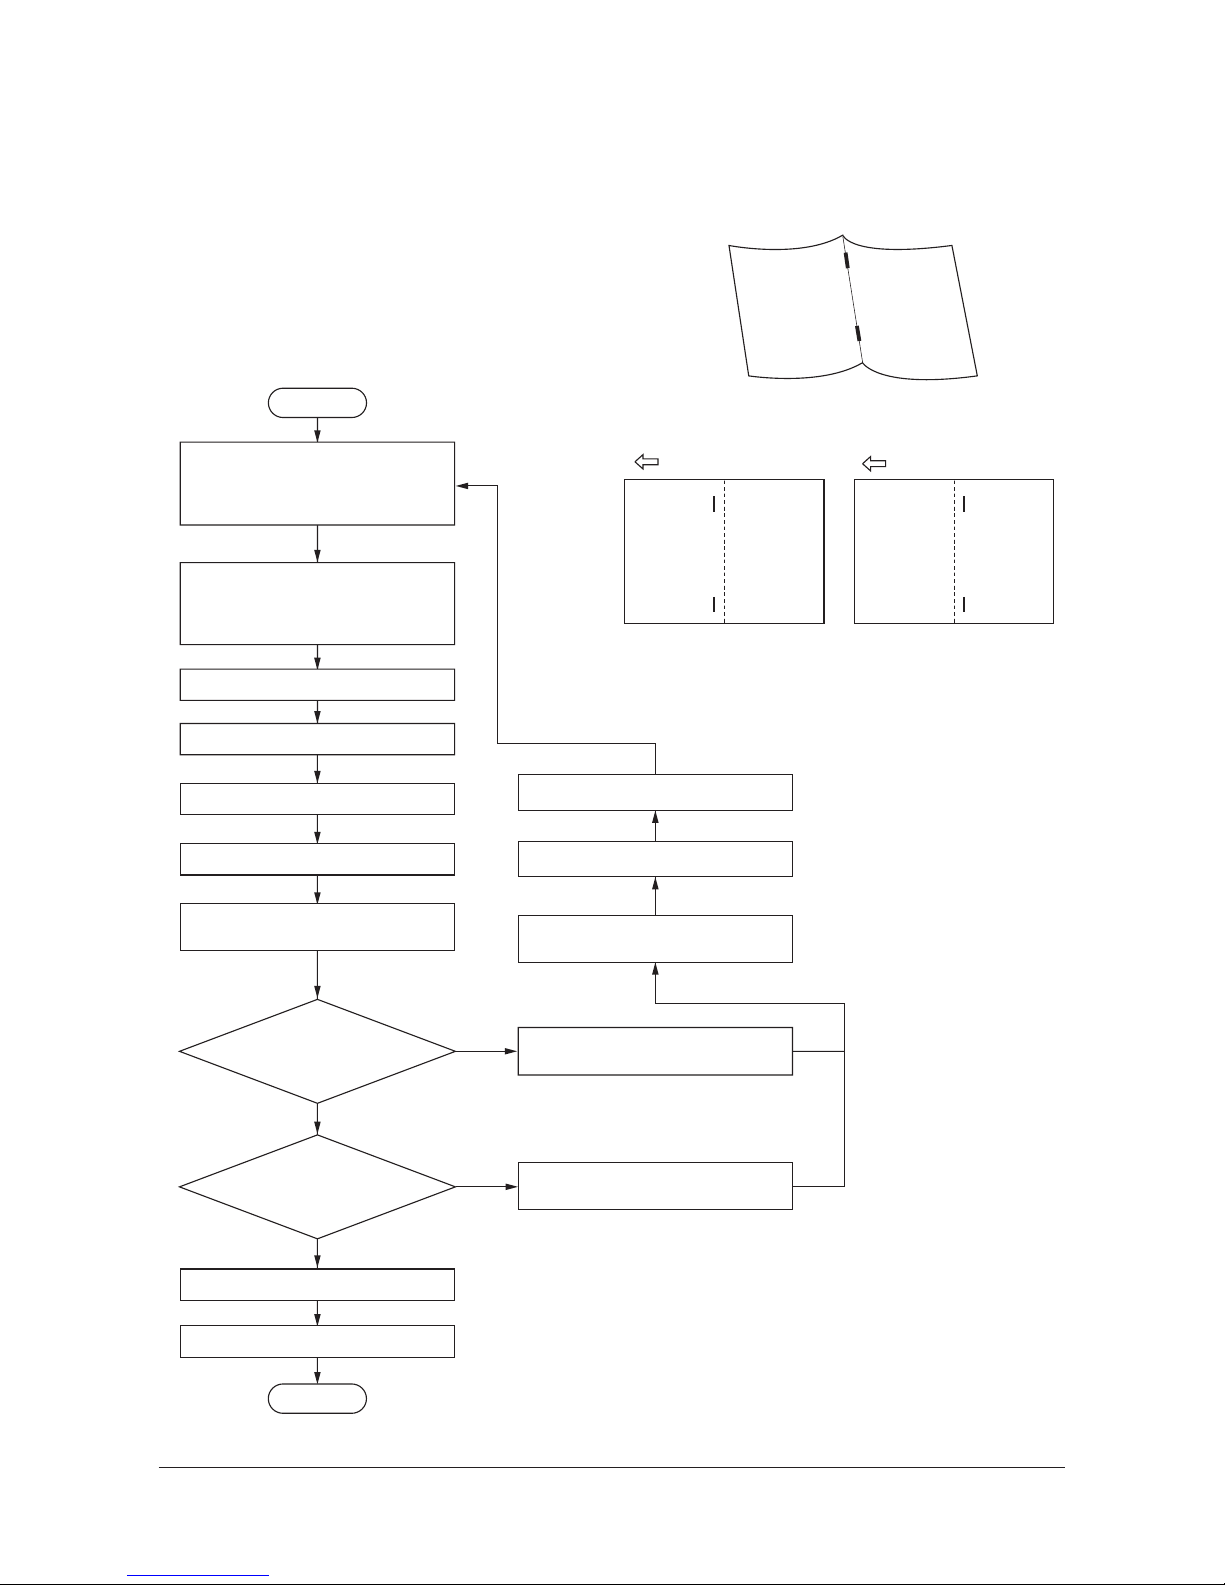
3H3
1-5-3
Enter 248 using the numeric keys.
Press the start key.
Select SADDLE STAPLE ADJUST.
Press the stop/clear key.
Exit the maintenance mode.
Press the cursor down key
to decrease the setting value.
Press the cursor up key
to increase the setting value.
No
No
Yes
Yes
Start
End
Staples are off
toward the paper eject side
(sample 1).
Staples are off
toward the paper feed side
(sample 2).
Press the start key to store
the setting value.
Exit the maintenance mode.
Press the stop/clear key.
Set the machine to the stitching copy
mode and make a test copy. Use
paper of below sizes.
A4R, B4R, A3R, 8
1
/2" x 11", 11" x 17"
Unfold the copied paper that has been
center-stapled, with the inside faced
down as shown in figure 1-5-5. Check
that the paper is stapled at the center.
Select paper size.
A4R, B4R, A3R, 8
1
/2" x 11", 11" x 17"
Enter the maintenance mode.
Initial value: 0
Setting range: -10 to +10
Changing the value by 1 changes the position of the
stapling by approximately 0.6 mm (reference value).
Increasing the setting value moves the stapling
position toward the paper eject side. Decreasing it
moves the stapling position toward the paper feed
side.
(2) Correcting centerfold-stapling
Follow the below procedure when the stapling position is off from the center when the machine is in the stitching copy
mode.
Procedure
Figure 1-5-5
Figure 1-5-6
Sample 1 Sample 2
Y104371-8 Service Manual

3H3-3
1-5-4
(3) Adjusting the stapler unit mounting position
Perform this operation when replacing a stapler unit or when a stapling malfunction occurs.
Since the front stapler and the rear stapler in the finisher have the same construction, only the procedure for the front stapler is described below. Use similar procedure for adjusting the rear stapler.
Tool required for adjustment
Stapler adjustment tool (P/N 3B868010)
Cartridge adjustment tool (P/N 303H368040)
Procedure
1. Pull out the intermediate tray and remove
the stapler cartridge from the stapler.
Figure 1-5-7
2. Remove the stapler adjustment metal from
the stapler adjustment tool (P/N 3B868010).
Figure 1-5-8
3. Open the staple cover of the cartridge
adjustment tool (P/N 303H368040).
4. Attach the stapler adjustment metal to the
cartridge adjustment tool and close the staple cover.
Attach the stapler adjustment metal by
inserting its projections into the grooves of
the cartridge adjustment tool.
5. Install the cartridge adjustment tool into the
stapler.
Figure 1-5-9
Stapler cartridge
Stapler adjustment tool
Stapler adjustment metal
Staple cover
Grooves
Projections
Stapler adjustment
metal
Cartridge adjustment tool
Service Manual Y104371-8

3H3-3
1-5-5
6. Open the intermediate tray and attach the
stapler adjustment tool to the stapler.
Attach the stapler adjustment tool by inserting its projections into the stapler holes. In
addition, be careful not to get the film caught
when attaching the tool.
Figure 1-5-10
7. Close the intermediate tray.
Do not carry out step 8 with the intermediate
tray open because the stapler may be damaged.
8. Turn the gear manually to push the stapler
into the inner part and ensure that the stapler adjustment metal is inserted smoothly
into the adjustment hole of the stapler
adjustment tool.
Figure 1-5-11
Figure 1-5-12
Projections
Stapler adjustment tool
Stapler
Holes
Film
Gear
Stapler
Stapler adjustment metal
Stapler adjustment tool
Adjustment hole
Y104371-8 Service Manual

3H3-3
1-5-6
9. If the stapler adjustment metal is not
inserted into the adjustment hole, loosen the
four adjustment screws on the intermediate
tray and adjust the stapler unit mounting
position so that the metal is inserted into the
hole.
At this time, turn the gear manually furthermore and ensure that the stapler is securely
pushed into the inner part.
10. Tighten the adjustment screws in the order
shown below.
1) Tighten the upper two screws loosely.
2) Tighten the lower two screws loosely.
3) Finally tighten the upper two screws.
4) Finally tighten the lower two screws.
Figure 1-5-13
11. Turn the gear manually to pull back the stapler to its original position and then remove
the cartridge adjustment tool.
12. Remove the stapler adjustment metal and
the stapler adjustment tool.
13. With the stapler cartridge removed, return
the intermediate tray to its original position
and mount the finisher to the machine. Turn
the machine main power switch on (to
detect the noncartridge status).
14. Pull out the intermediate tray again and
attach the stapler cartridge. Mount the finisher to the machine and turn the main
power switch on.
15. Select the staple mode (mode specifying the
stapler that has been adjusted) and carry
out this mode.
After the staples in the cartridge are automatically fed in test stapling, the staple
mode will be carried out.
16. Check the shape of the staples on the rear
side that have been used in the test stapling
and the staple mode above.
If the shape is defective, perform the adjustment again.
Adjustment screws
Intermediate tray
Adjustment screws
Normal Defective
Shape of staples on the rear side
a
a 0.5mm
a 0.5mm
a
Service Manual Y104371-8

3H3
1-5-7
Make a test copy in the two-point
stapling mode using A3/
11" x 17"
size.
Enter 240 using the numeric keys.
Press the start key.
Select A3 TEST and
press the start key.
Open the front cover and
pull out the intermediate tray.
Tighten the screws and
refit the intermediate tray.
Close the front cover.
Exit the maintenance mode.
Start
Enter the maintenance mode.
Yes
No
End
Are staple positions
off the centering
position?
Loosen each screw of front/rear side resistration
home position sensor and move the position.
Insert A3/11" x 17" paper to the upper side registration
guide and confirm that the space between the front
and back guides and the paper edge is + or - 0.5 mm.
If not so, adjust the position of the front or back sensor.
When staple positions are off toward the front side of
the machine (sample 1), slide the sensors toward
the side of the machine (to the direction of ).
When staple positions are off toward the rear side of
the machine (sample 2), slide the sensors toward
the side of the machine (to the direction of ).
(4) Centering stapling position
Follow the below procedure if the positioning of stapling are off the centerline of paper when the machine is in the twopoint stapling mode.
Caution
Before making the following adjustment, ensure that the center position of each cassette in the machine is correct.
When the adjustment distance of the upper side registration guide is too large, follow through on page 1-5-8 to adjust the
position of the lower side registration guide.
Procedure
• Position adjustment of upper side registration guide
Figure 1-5-14
Figure 1-5-15
Sample 1 Sample 2
0.5mm
Upper side
registration guide
Front upper side registration guide
home position sensor
Rear upper side registration guide
home position sensor
0.5mm
Y104371-8 Service Manual

3H3
1-5-8
Enter 240 using the numeric keys.
Press the start key.
Select A3 TEST and
press the start key.
Open the front cover and
pull out the intermediate tray.
Insert A3/11" x 17" paper to the upper
side registration guide. Pull the paper
directly down to verify that the paper
enters the lower side registration guide.
Exit the maintenance mode.
Loosen the screw of lower side
resistration home position sensor
and slide the position of the sensor.
No
Yes
Yes
No
Start
End
Position of lower
side resistration
guide is off?
Is the space between
the front/back guides
and the paper edge
+ or - 0.5 mm?
Tighten the screw(s) and refit the
intermediate tray.
Close the front cover.
Enter the maintenance mode.
Tighten the screws and
refit the intermediate tray.
Close the front cover.
Loosen the two screws of lower side
resistration motor and slide the position
to move the lower side registration
guide.
• Position adjustment of lower side registration guide
Figure 1-5-16
Figure 1-5-17
Lower side resistration guide
Upper side resistration guide
Lower side registration
guide motor
0.5mm
0.5mm
Lower side
registration guide
home position senso
r
Service Manual Y104371-8

3H3
1-5-9
1-5-2 Centerfold unit
(1) Detaching and refitting the centerfold blade
Follow the below procedure to clean or replace the centerfold blade.
Procedure
1. Pull out the centerfold unit from the finisher.
2. Loosen the two screws, slide the retainers in
the direction of the arrow, and remove the
centerfold unit from the finisher.
Figure 1-5-18
3. Stand the centerfold unit with its left side facing down.
4. Remove the six screws locking down the left
base followed by the base.
Figure 1-5-19
5. Disconnect the 2-pin connector of the blade
motor.
6. Remove the two screws and then remove
the blade motor.
Figure 1-5-20
Centerfold unit
Retainer
Screw
Screw
Retainer
Centerfold unit
Left base
2-pin connector
Blade drive belt
Blade motor
Y104371-8 Service Manual

3H3
1-5-10
7. Remove the two springs form the blade
retainer.
8. Remove the five screws locking down the
blade retainer followed by the retainer.
9. Remove the centerfold blade.
10. Clean or replace the centerfold blade.
11. Refit all the removed parts.
When attaching the centerfold blade to the
blade support plate, fit the two holes in the
blade over the two projections on the blade
support plate.
Figure 1-5-21
Projections
Spring
Centerfold
blade
Blade support
plate
Blade retainer
Spring
Service Manual Y104371-8

3H3
1-5-11
Make a test copy in the centerfold
mode using paper of each of the
below sizes.
A4R, B4R, A3R, 8
1
/2" x 11", 11" x 17"
Check that the paper is folded at the
center.
Enter 248 using the numeric keys.
Press the start key.
Select SADDLE ADJUST.
Select the paper size that the
correction should be made for.
A4R, B4R, A3R, 8
1
/2" x 11",
11" x 17"
Press the stop/clear key.
Exit the maintenance mode.
Press the cursor up key to increase
the setting value.
No
No
Yes
Yes
Start
End
The upper half of the
folded paper is too long.
(Sample 1)
The upper half of the
folded paper is too short.
(Sample 2)
Press the start key to store the
setting value.
Exit the maintenance mode.
Press the stop/clear key.
Press the cursor down key to
decrease the setting value.
Enter the maintenance mode.
Setting range: -10 to +10
Initial value: 0
Increasing the value makes the upper half of
folded paper shorter while decreasing it makes
the upper half longer.
Changing the value by 1 moves the folding
position by approximately 0.55 mm (reference
value).
(2) Adjusting the paper folding position
Follow the below procedure when the folding position is not correct in the centerfold mode.
Procedure
Figure 1-5-22
Sample 1 Sample 2
Y104371-8 Service Manual

3H3
1-5-12
Yes
No
Start
End
Are punch holes
off the centering
position?
Loosen the two screws of the punch unit.
Tighten the two screws in the punch unit.
Set the machine to the punch mode
and make a test copy with paper fed
from the bypass table.
Check for any off-centering of the
punch holes.
Adjust the position of the punch unit.
When punch holes are off toward the front side of
the copier (sample 1), slide the punch unit toward
the rear side of the copier (to the direction of ).
When punch holes are off toward the rear side of
the copier (sample 2), slide the punch unit toward
the front side of the copier (to the direction of ).
Open the upper cover.
1-5-3 Punch unit
(1) Centering punch-holes
Follow the below procedure if the positioning of punch holes are off the centerline of paper when the machine is in the
punch mode.
Caution:
Before making the following adjustment, ensure that the center position of each cassette in the machine is correct.
Procedure
Figure 1-5-23
Figure 1-5-24
Sample 1 Sample 2
Punch unit
Screw
Screw
Service Manual Y104371-8

3H3
1-5-13
Check the margin from the paper
edge to the punch holes.
Enter 248 by using numeric keys.
Press the start key.
Select PUNCH POSITION
ADJUST.
Press the stop/clear key.
Exit the maintenance mode.
No
No
Start
End
Is the margin
a from the paper edge
to punch holes within the
reference value?
Press the start key to store the
setting value.
Set the machine to the punch mode
and make a test copy with paper fed
from the bypass table.
Press the cursor up/down keys to change the setting
value.
If the margin a is shorter than the reference value,
press the cursor up key to increase the setting
value.
If the margin a is longer than the reference value
and the paper leading edge is curled, press the
cursor down key to decrease the setting value.
Setting range: -10 to +10
Initial value: 0
Changing the value by 1 moves the position of punch
holes by approximately 0.25 mm (reference value).
Enter the maintenance mode.
(2) Setting margin from the leading edge to punch holes
Follow the below procedure if the margin from the paper edge to punch holes is off the reference value.
Procedure
Figure 1-5-25
Reference value of a:
Metric: 9.5 2 mm
Inch: 5.5 2 mm
+
-
+
-
Y104371-8 Service Manual

3H3
1-6-1
1-6 Requirements on PWB R eplacement
1-6-1 Upgrading the version of the firmware of the finisher main PWB
Firmware upgrading requires the following tools:
Compact Flash (Products manufactured by SANDISK are recommended.)
NOTE
When writing data to a new Compact Flash from a computer, be sure to format it in advance.
Procedure
1. Enter the maintenance mode.
2. Run maintenance item U019 (Displaying the
ROM version) to check the current version
of the ROM.
3. Exit the maintenance mode.
4. Turn the machine off from the main power
switch and unplug the power cable from the
wall outlet.
5. Release three inserted parts and then
remove the CF cover.
Figure 1-6-1
6. Insert the CompactFlash card in the CF slot
on the finisher main PWB.
* Be sure to face the front side of the Com-
pactFlash card to the machine rear and
insert it straight until it stops. If the main
power switch is turned on when the CompactFlash card is not properly inserted, the
PWB may be damaged.
7. Plug the power cable into a wall outlet and
turn the machine on from the main power
switch.
* During upgrading the firmware, LED on
PWB will be blinking. (Version up takes
about 20 to 25 sec.)
Caution:
Never turn the main power switch off during
upgrading.
The status of version up will not be shown
on the operation panel and do not wrongly
press any operation keys.
8. After completion of the version up, LED on
PWB stops to blink and lights up.
Figure 1-6-2
9. Turn the machine off from the main power
switch and unplug the power cable from the
wall outlet.
10. Remove the CompactFlash card from the
CF slot on the finisher main PWB.
11. Refit the CF cover.
12. Plug the power cable into a wall outlet and
turn the machine on from the main power
switch.
CF cover
Inserted parts
Inserted part
CompactFlash
CF slot
During upgrading
LED: blinking
Finisher main PWB
LED
Completion
LED: lights up
Y104371-8 Service Manual
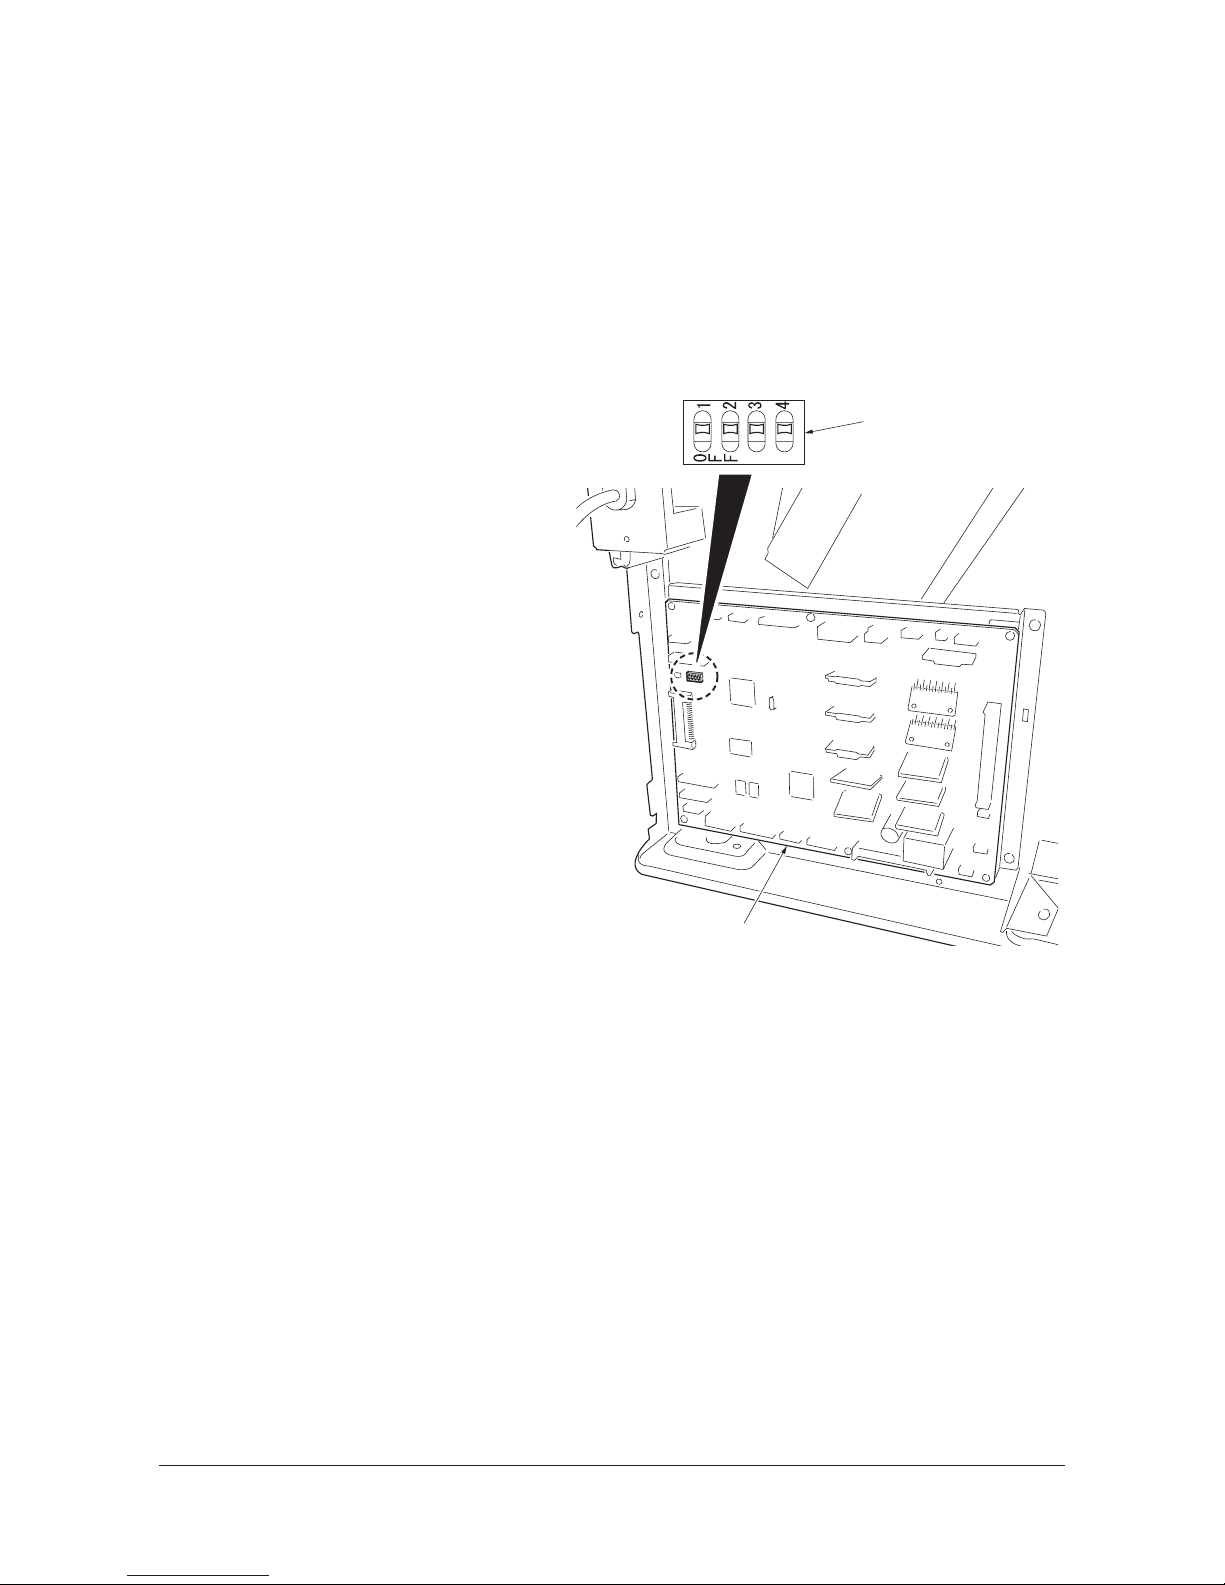
3H3-2.0
1-6-2
13. Enter the maintenance mode.
14. Run maintenance item U019 (Displaying the
ROM version) to check ROM version
upgrading was successful.
15. Exit the maintenance mode.
1-6-2 Requirements on finisher main PWB replacement
NOTE
When replacing the finisher main PWB, be sure to conform DIPSW setting of the replaced PWB to that of the removed
PWB.
Figure 1-6-3
DIP switch
Finisher main PWB
Service Manual Y104371-8

3H3
2-1-1
2-1 Mechanical construction
2-1-1 Finisher
(1) Paper insertion section
The paper insertion section inserts paper from the machine into the finisher and then conveys it to the feedshift section.
The paper is fed out to the finisher. The paper entry motor (PEM) will be activated in a certain period of time after the paper
entry motor (PEM) is turned on to convey the paper to the feedshift section. Attaching the paper to the paper entry roller
for a certain period of time prevents skewed feeding.
Pressure rollers A and B correct upward paper curling and pressure rollers C and D correct downward paper curling.
Figure 2-1-1 Paper insertion section
Figure 2-1-2 Block diagram of the paper insertion section
(1) Upper paper entry guide plate
(2) Lower paper entry guide plate
(3) Paper entry guide
(4) Upper paper entry roller
(5) Lower paper entry roller
(6) Paper conveying guide
(7) Pressure roller A
(8) Pressure roller B
(9) Pressure roller C
(10) Pressure roller D
(11) Paper entry sensor (PES)
PES
PEM
FMPWB
FDPWB
YC1-2
YC25-12
YC12-1,3,4,6
YC23-2
Y104371-8 Service Manual
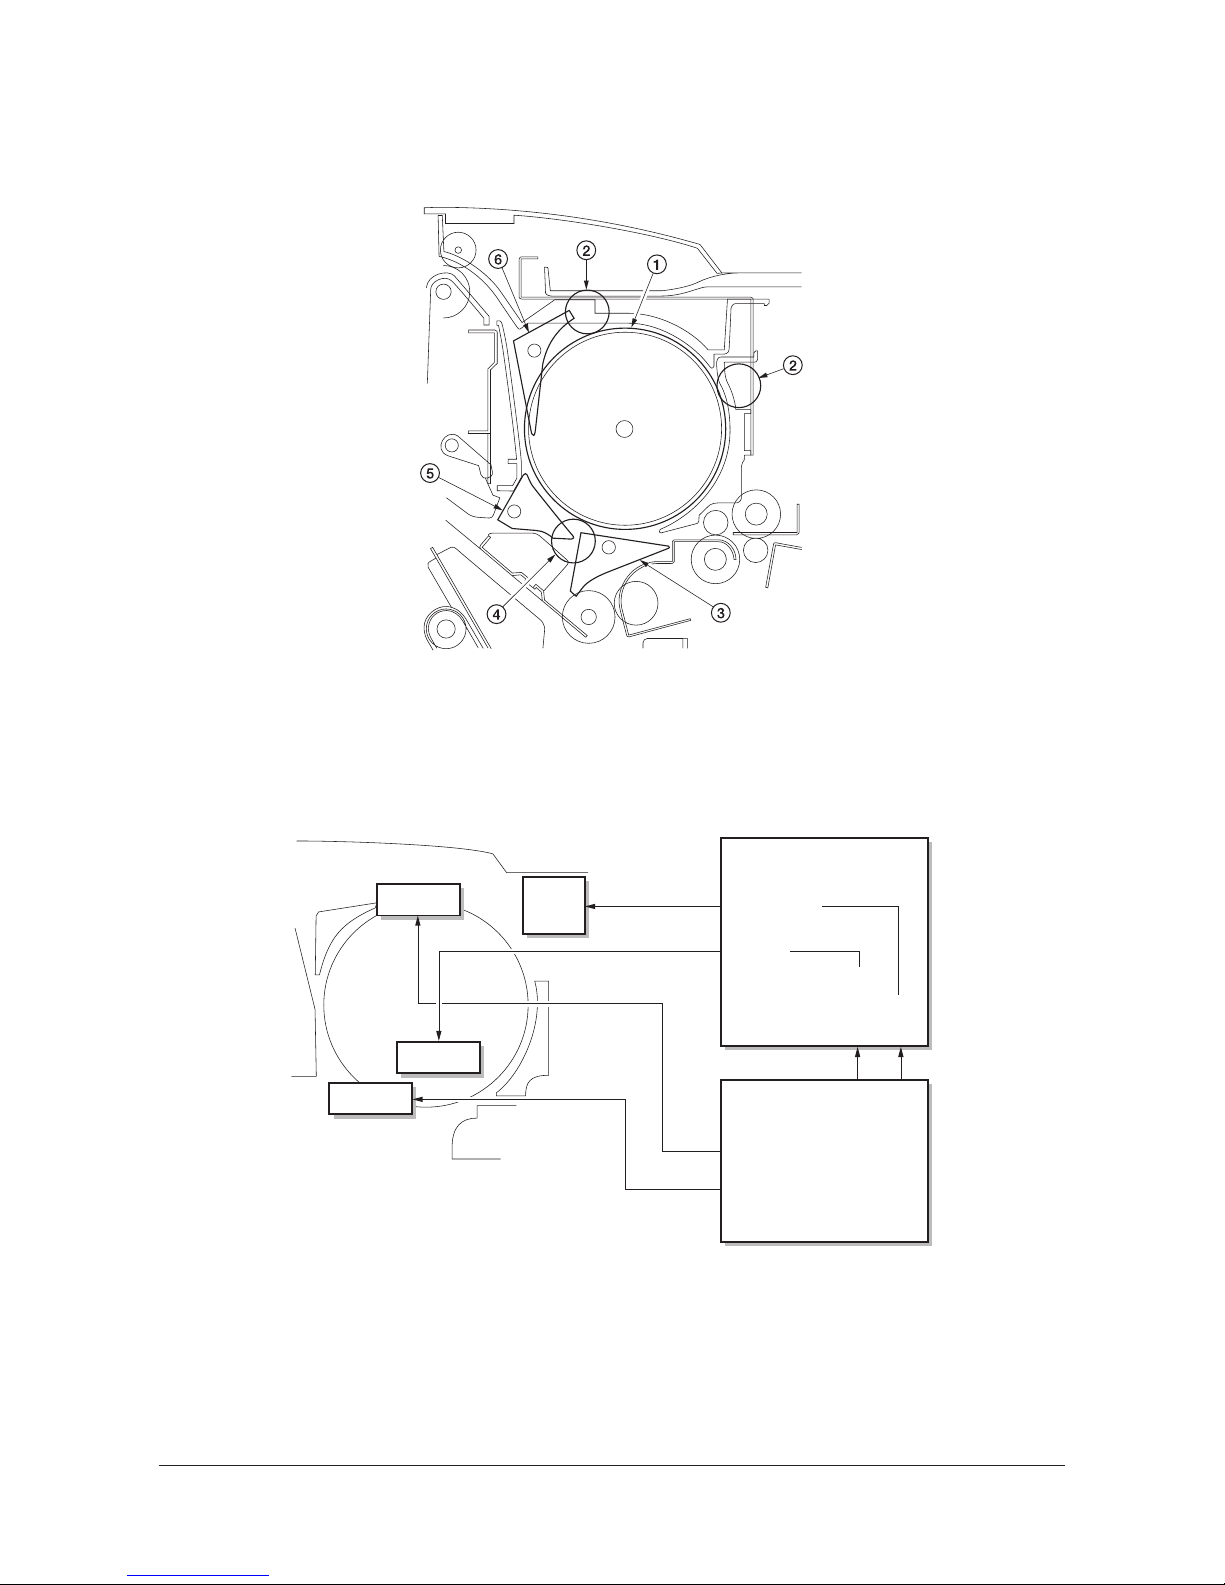
3H3
2-1-2
(2) Feedshift section
The feedshift section switches the path of the paper conveyed from the paper insertion section so as to convey the paper
to the intermediate tray, main tray or sub tray.
Figure 2-1-3 Feedshift section
Figure 2-1-4 Block diagram of the feedshift section
(1) Siding drum
(2) Siding pulleys
(3) Main eject feedshift guide
(4) Sub feed roller
(5) Left eject feedshift guide
(6) Sub eject feedshift guide
FSSOLA
FSSOLB
FDPWB
FMPWB
YC15-10,11
YC11-1,3,4,6
FSSOLC
YC5-2,3
YC1-10,11
YC1-5
YC25-3,4
YC25-9
YC15-4,5
SDM
Service Manual Y104371-8

3H3
2-1-3
Paper path switching
The paper path is switched by the operation of the main eject feedshift guide, left eject feedshift guide or sub eject feedshift guide.
There are four paper paths in the feedshift section as shown below.
The guide corresponding to the path to the selected tray operates to switch the paper path appropriately.
Figure 2-1-5
Main eject
feedshift guide
Left feedshift guide
Sub eject feedshift roller
(1) Paper path to the main tray
(2) Paper path to the intermediate tray
(3) Paper path to the sub tray
(4) Paper path to the siding drum
Y104371-8 Service Manual

3H3
2-1-4
Siding drum operation
When A4/11" x 8 1/2" size paper is processed in the intermediate tray for eventual multiple sets of copies, to ensure the
time for paper processing, the first and second page of the next copy set are wounded around the siding drum. The
wounded paper are sided there until the third page is conveyed.
1. While paper is processed in the intermediate
tray, feedshift solenoid A (FSSOLA) turns on
so that the sub eject feedshift guide operates.
Figure 2-1-6
2. The siding drum motor (SDM) turns on so
that the siding drum rotates and winds the
fist page of the next copy set around the
drum.
Feedshift solenoid C (FSSOLC) turns on so
that the main eject feedshift guide operates.
3. When paper processing has been completed in the intermediate tray, the sided first
and second pages of the next copy set is
conveyed to the intermediate tray together
with the third page.
Figure 2-1-7
Sub eject feedshift guide
First page of
next copy set
Siding drum
Third page o
f
next copy set
First and
second pages
Main eject
feedshift guide
Service Manual Y104371-8

3H3
2-1-5
(3) Intermediate tray section
The intermediate tray section performs side identifying, eject position shifting and stapling of paper that is stacked in the
tray. It then conveys paper to the main tray and centerfold unit.
Figure 2-1-8 Intermediate tray section
(1) Intermediate tray paper entry roller
(2) Intermediate tray paper entry pulley
(3) Movable guide
(4) Intermediate tray upper sliding plate
(5) Upper paper conveying belt
(6) Front upper side registration guide
(7) Rear upper side registration guide
(8) Paper forwarding pulley
(9) Intermediate tray pulley
(10) Intermediate tray lower sliding plate
(11) Lower paper conveying belt
(12) Upper forwarding roller
(13) Lower forwarding roller
(14) Upper paper conveying belt home position sensor
(PCBHPS-U)
(15) Lower paper conveying belt home position sensor
(PCBHPS-L)
(16) Front upper side registration guide home position
sensor (SRGHPS-FU)
(17) Rear upper side registration guide home position
sensor (SRGHPS-RU)
(18) Lower side registration guide home position sen-
sor (SRGHPS-L)
(19) Intermediate tray paper conveying sensor
(ITPCS)
(20) Front stapler driver (STD-F)
(21) Rear stapler driver (STD-R)
(22) Front stapler clincher (STCLN-F)
(23) Rear stapler clincher (STCLN-R)
Y104371-8 Service Manual
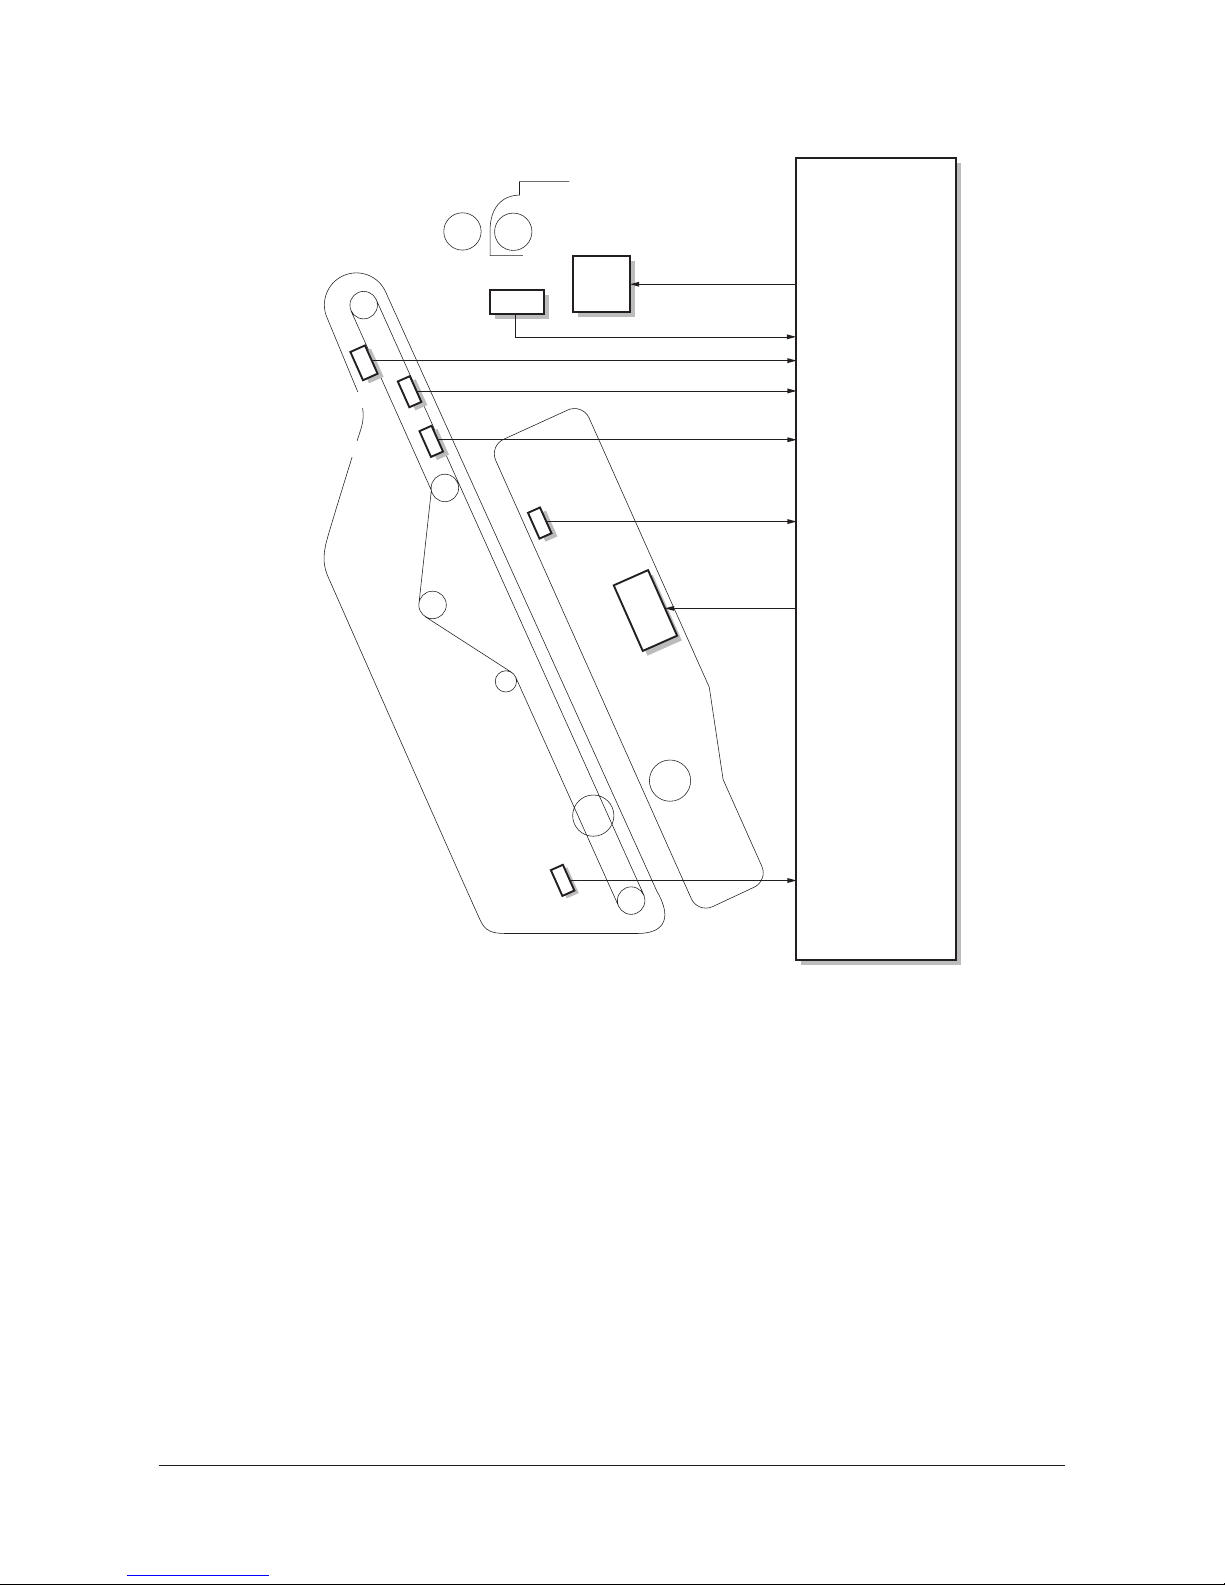
3H3
2-1-6
Figure 2-1-9 Block diagram of the intermediate tray section
FMPWB
YC-16-1,3,4,6
YC21-5
YC18-B25
YC18-B22
YC18-B21
YC18-A24
CN24-B15
YC18-B20
MGM
ITPCS
PCBHPS-L
PFPSOL
SRGHPS-L
PCBHPS-U
SRGHPS-FU
SRGHPS-RU
Service Manual Y104371-8

3H3
2-1-7
Paper inserting operation to the intermediate tray
Each time a sheet of paper is inserted, the below operation takes place.
1. The front/rear upper/lower side registration
guides move to the paper receiving positions that are slightly outside the actual
paper width according to the paper size.
* The front/rear lower side registration guides
stay at their home positions when paper of
the below sizes is used.
A4, B5, 11" x 8 1/2"
Figure 2-1-10
2. The upper paper conveying belt motor
(PCBMU) rotates forward so that the intermediate tray upper sliding plate moves to
the paper receiving position.
3. When paper is inserted into the intermediate
tray, the movable guide motor (MGM turns
on so that the movable guide lowers and
holds the paper to keep it from curling.
4. The upper paper conveying belt motor
(PCBM-U) rotates backward so that the
intermediate tray upper sliding plate moves
to the paper holding position.
Figure 2-1-11
5. The front/rear upper/lower side registration
guides move to and return from the paper
size position to identify the sides of the
paper.
When the last sheet of paper is inserted,
each guide stops at the paper size position.
* The front/rear lower side registration guides
do not operate when paper of the below
sizes is used.
A4, B5, A4R, folio, 11" x 8 1/2", 8 1/2" x 11"
Figure 2-1-12
Front upper
side registration guide
Front lower
side registration guide
Rear upper
side registration guide
Rear lower
side registration guide
Intermediate tray upper sliding plate
Movable guide
Upper paper
conveying belt
Paper
Y104371-8 Service Manual

3H3
2-1-8
Stapling operation
There are four types of stapling. Paper is stapled with the selected stapling type and then moved to the shifted eject position.
Figure 2-1-13
One-point stapling at the back/two-point stapling/one-point stapling at the front
1. The eject guide solenoid (EGSOL) turns on
so that the eject guide rises and prevents
the paper leading edge from contacting the
eject roller when paper is stapled.
Figure 2-1-14
2. The front/rear upper side registration guides
and the front/rear lower side registration
guides (for large size paper only) move to
the positions that are slightly outside the
actual paper width.
3. The lower paper conveying belt motor
(PCBM-L) rotates forward so that the intermediate tray lower sliding plate moves
upward and moves paper to the stapling
travel height.
4. The front/rear lower side registration guides
return to their home positions.
5. The lower paper conveying belt motor
(PCBM-L) rotates backward so that the
intermediate tray lower sliding plate moves
downward and moves paper to the stapling
height.
* The operations described in step 1 to 5
above are not performed when A4/11" x 8 1/
2" paper is used.
Figure 2-1-15
Two-point staplingOne-point stapling
at the back
One-point stapling
at the front
Centerfold stapling
Eject guide
Eject roller
Front upper
side-registration guide
Front lower
side-registration guide
Rear upper
side-registration guide
Rear lower
side-registration guide
Intermediate tray lower
sliding plate
Stapling height
Stapling travel height
Service Manual Y104371-8

3H3
2-1-9
6. The front/rear upper side registration guides
move toward the machine front or rear to
move paper to the stapling position.
7. The stapler performs stapling.
8. The front/rear upper side registration guides
move toward the machine front or rear to
shift paper forward or backward.
Figure 2-1-16
Centerfold stapling
1. The eject guide solenoid (EGSOL) turns on
so that the eject guide rises and prevents
the paper leading edge from contacting the
eject roller when paper is stapled.
Figure 2-1-17
2. The front/rear upper side registration guides
and front/rear lower side registration guides
(for large size paper only) move to the positions that are slightly outside the actual
paper width.
3. The upper/lower paper conveying belt
motors (PCBM-U/L) rotate forward so that
the intermediate tray upper/lower sliding
plates move upward and move paper to the
centerfold stapling height.
4. The front/rear lower side registration guides
move to the paper size position and identify
the sides of the paper.
5. The front/rear staplers perform two-point
stapling.
Figure 2-1-18
Front upper
side-registration guide
Stapling position (one-point
stapling at the front)
Rear upper
side-registration guide
Eject guide
Eject roller
Front upper
side-registration guide
Intermediate tray
upper sliding plate
Intermediate tray
lower sliding plate
Front lower
side-registration guide
Rear upper
side-registration guide
Rear lower
side-registration guide
Centerfold
stapling height
Y104371-8 Service Manual

3H3
2-1-10
Stapling operation
The stapler is comprised of the front stapler driver, front stapler clincher, rear stapler driver and rear stapler clincher.
The stapler cam that is connected to the stapler driving gear of the stapler driver rotates to drive in staples and then the
stapler clincher clinches the staples.
Figure 2-1-19
Stapler clincher
Stapler cam
Stapler cam
Stapler driving gear
Stapler motor
Stapler drive
r
Service Manual Y104371-8
 Loading...