

Oliver 777-N Parts List

Grand Rapids, Michigan, U.S.A. 49504-5298
USER’S OPERATING AND INSTRUCTION MANUAL
MODEL 777-N
VARIETY SLICER
0777S20000-CV3

INDEX
Section Description
Document No. Page No.
SAFETY INSTRUCTIONS ------------------------------- 0777S20008 --------------------- 1-1
DESCRIPTION/SPECIFICATIONS ------------------- - 0777S20009------------- --------- 2-1
Description -------------------------------------------------------------------------------------- 2-1
Specifications----------------------------------------------------------------------------------- 2-1
INSTALLATION INSTRUCTIONS --------------------- 0777S20010 --------------------- 3-1
Removing the Slicer from the Shipping Platform ------------------------------------- 3-1
Installing the Rubber Feet ------------------------------------------------------------------ 3-2
Installing Optional Casters ----------------------------------------------------------------- 3-2
OPERATING INSTRUCTIONS ------------------------- 0777S20011 --------------------- 4-1
TROUBLESHOOTING ------------------------------------ 0777S20012 --------------------- 5-1
The Slicer Will Not Start (Motor is Not Humming) ------------------------------------ 5-1
The Slicer Will Not Start (Motor is Humming) ------------------------------------------ 5-2
The Slicer Starts Without Pulling the Knob --------------------------------------------- 5-2
The Slicer Does Not Stop When Slicing is Complete -------------------------------- 5-2
The Slicer Stops Before Slicing Starts or is Complete ------------------------------- 5-2
Bread Slices Vary in Thickness ----------------------------------------------------------- 5-2
The Blade Frames are Knocking ---------------------------------------------------------- 5-3
MAINTENANCE -------------------------------------------- 0777S20013 --------------------- 6-1
Cleaning ----------------------------------------------------------------------------------------- 6-1
Lubrication -------------------------------------------------------------------------------------- 6-1
Removing the Blade Frames --------------------------------------------------------------- 6-1
Replacing the Blade Frames --------------------------------------------------------------- 6-4
Changing the Blades ------------------------------------------------------------------------- 6-5
Tightening the Belt ---------------------------------------------------------------------------- 6-7
Replacing the Belt ---------------------------------------------------------------------------- 6-8
Adjusting the Blade Frames When Slices Vary in Thickness ---------------------- 6-9
Adjusting the Clearance Between the Blade Frames -------------------------------- 6-9
RECOMMENDED SPARE PARTS -------------------- 0777S20014 --------------------- 7-1
REPLACEMENT PARTS SECTION
ASSEMBLY DRAWING (MECHANICAL PARTS) ------------0777S20015 ----------- 8-1
REPLACEMENT PARTS (MECHANICAL) ------------0777S20016 -------------------- 9-1
Continued
0777S20019 0-1

INDEX (Continued)
Section Description
Document No. Page No.
ELECTRICAL SINGLE PHASE ------------------------ 0777S20017 -------------------- 10-1
Wiring Diagram (Single Phase) ---------------------------------------------------------- 10-1
Assembly Drawing (Single Phase) ------------------------------------------------------ 10-1
Parts List 1/2 HP, 115 VAC, 60 Hertz, 1 Phase -------------------------------------- 10-2
Parts List 1/2 HP, 230 VAC, 60 Hertz, 1 Phase -------------------------------------- 10-2
Parts List 1/2 HP, 220 VAC, 50 Hertz, 1 Phase -------------------------------------- 10-2
WARRANTY ----------------------------------------------------------------------------- GEN 040225
WARRANTY PROCEDURE --------------------------------------------------------- GEN 040226
RETURNED PARTS POLICY ------------------------------------------------------- GEN 040227
REV. 3/1/04
0777S20019 0-2

SAFETY INSTRUCTIONS
WARNING
VARIOUS SAFETY DEVICES AND METHODS OF GUARDING HAVE BEEN
PROVIDED ON THIS MACHINE. IT IS ESSENTIAL HOWEVER THAT THE MACHINE
OPERATORS AND MAINTENANCE PERSONNEL OBSERVE THE FOLLOWING
SAFETY PRECAUTIONS. IMPROPER INSTALLATION, MAINTENANCE, OR
OPERATION OF THIS EQUIPMENT COULD CAUSE SERIOUS INJURY OR DEATH.
1. Read this manual before attempting to operate your machine. Never allow an
untrained person to operate or service this machine.
2. Connect the machine to a properly grounded electrical supply that matches the
requirements shown on the electrical specification plate and follow all specifications
of local electrical codes.
3. Disconnect and lock-out the machine from the power supply before cleaning or
servicing.
4. Check and secure all guards before starting the machine.
5. Observe all caution and warning labels affixed to the machine.
6. Use only proper replacement parts.
7. Do not wear loose fitting clothing or loose hair when working near this machine.
Shirt tails should be tucked in.
8. Wear proper, personal, protective, safety equipment.
9. Keep Hands away form the moving parts of this machine while it is in operation.
10. In addition to these general safety instructions, also follow the more specific safety
instructions given for the different areas of the machine operating instruction manual.
WARNING
DO NOT USE FOR OTHER THAN ORIGINALLY INTENDED PURPOSE.
0777S20008 1-1
DESCRIPTION/SPECIFICATIONS
Description
The Oliver Variety Slicer is a compact, sturdy, time tested design, which has been used
in bakeries world wide for many years. It is easy to operate and allows the slicing of
virtually all varieties of bread, quickly and cleanly, with a spring fed pusher that gently
moves the product through the knives followed by a automatic shut off. Its design will
provide years of efficient, trouble-free operation requiring a minimum of maintenance.
The Variety Slicer is of stainless steel, plated, and painted construction for easy cleaning
and maintenance. The knives can be replaced, by most operators, without the need of a
service call.
The Variety Slicer is backed by Oliver Products Company, who has a reputation of
serving the Baking Industry for well over 60 years.
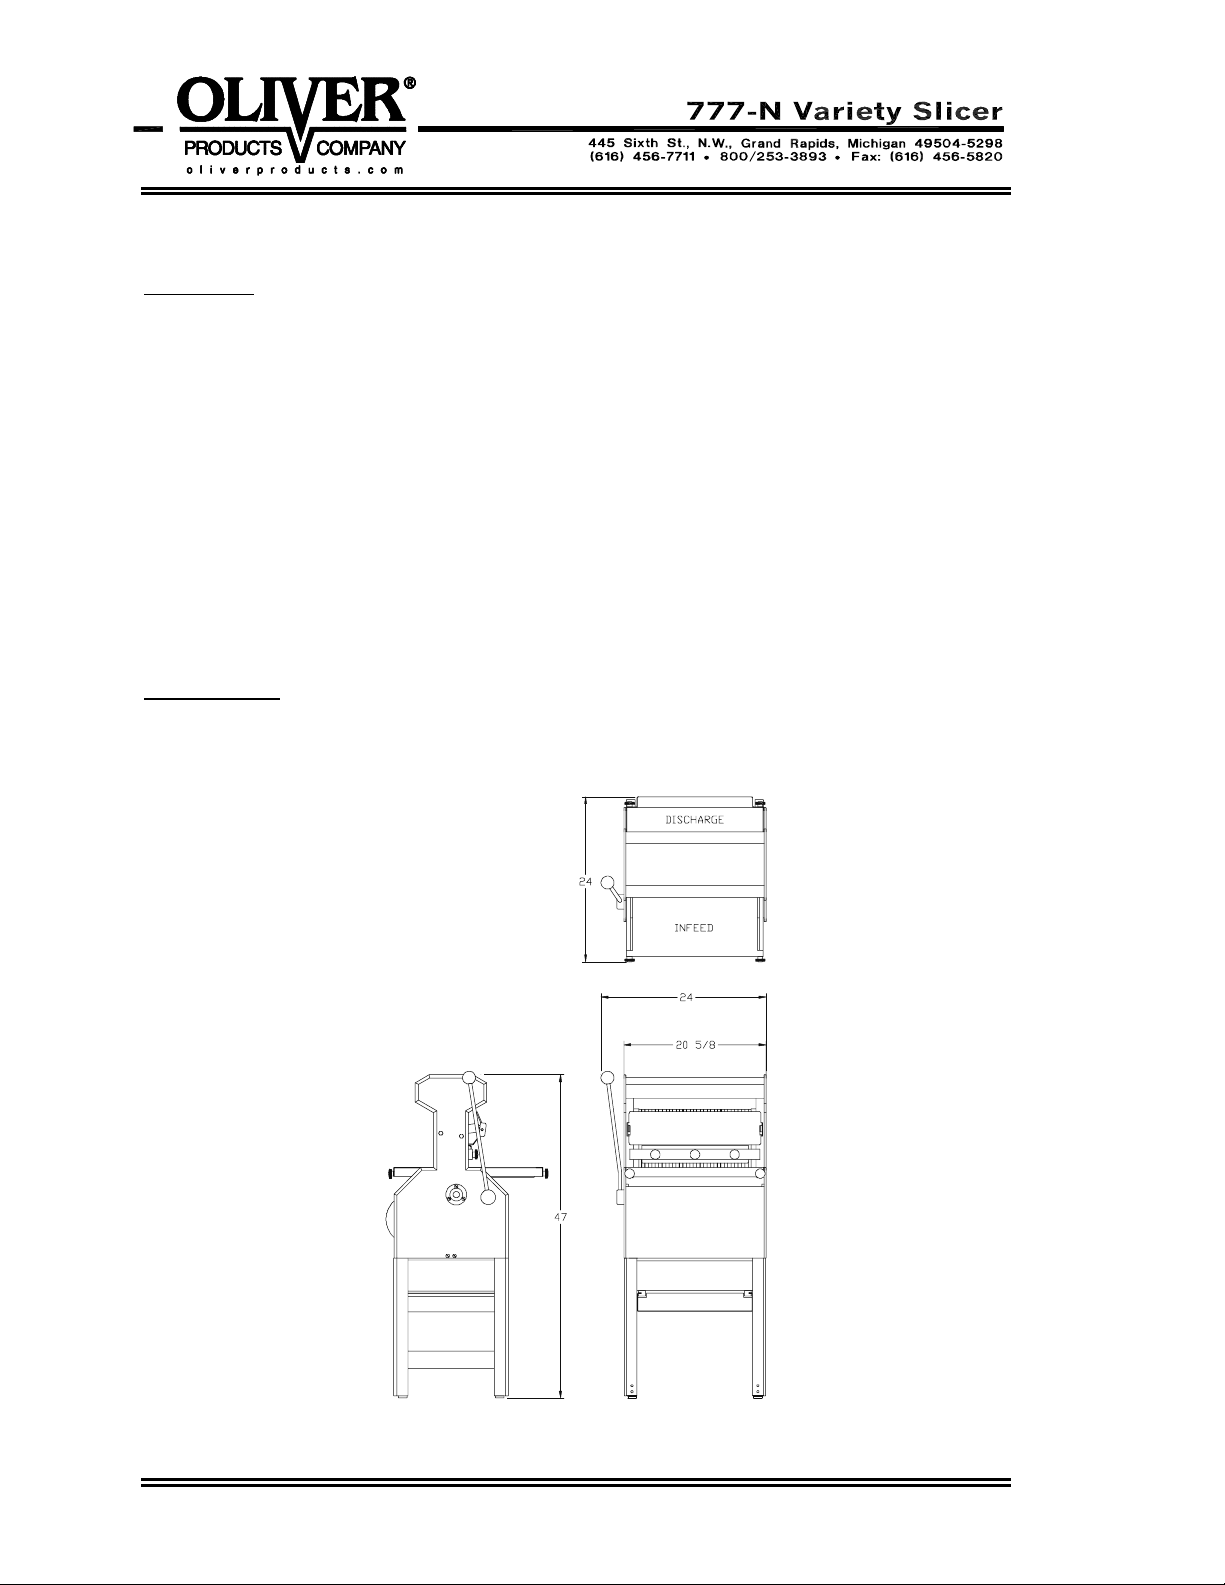
Specifications
Space Requirements: (All Dimensions are Approximate)
0777S20009 2-1

Product Capacities:
Up to 16” long, 10-1/2” wide and from 3-1/2 to 6” high.
Electrical Options Available:
1 phase, 60 hz, 115VAC, 7 Amps.
1 phase, 60 hz, 230VAC, 3.5 Amps.
Others Available consult factory.
Standard Slice Spacings
7/16, 1/2, 9/16
Optional Slice Spacings (At additional cost)
1/4, 5/16, 3/8, 5/8, 3/4, 7/8, 1”
Others Available consult factory.
Shipping Weight
250 lbs. (Floor Model)
0777S20009 2-2
INSTALLATION INSTRUCTIONS
CAUTION
THE SLICER IS HEAVY, USE PROPER TECHNIQUE WHEN LIFTING.
KEEP BACK STRAIGHT, KNEES BENT, AND LIFT WITH LEGS.
USE GLOVES TO PROTECT HANDS.
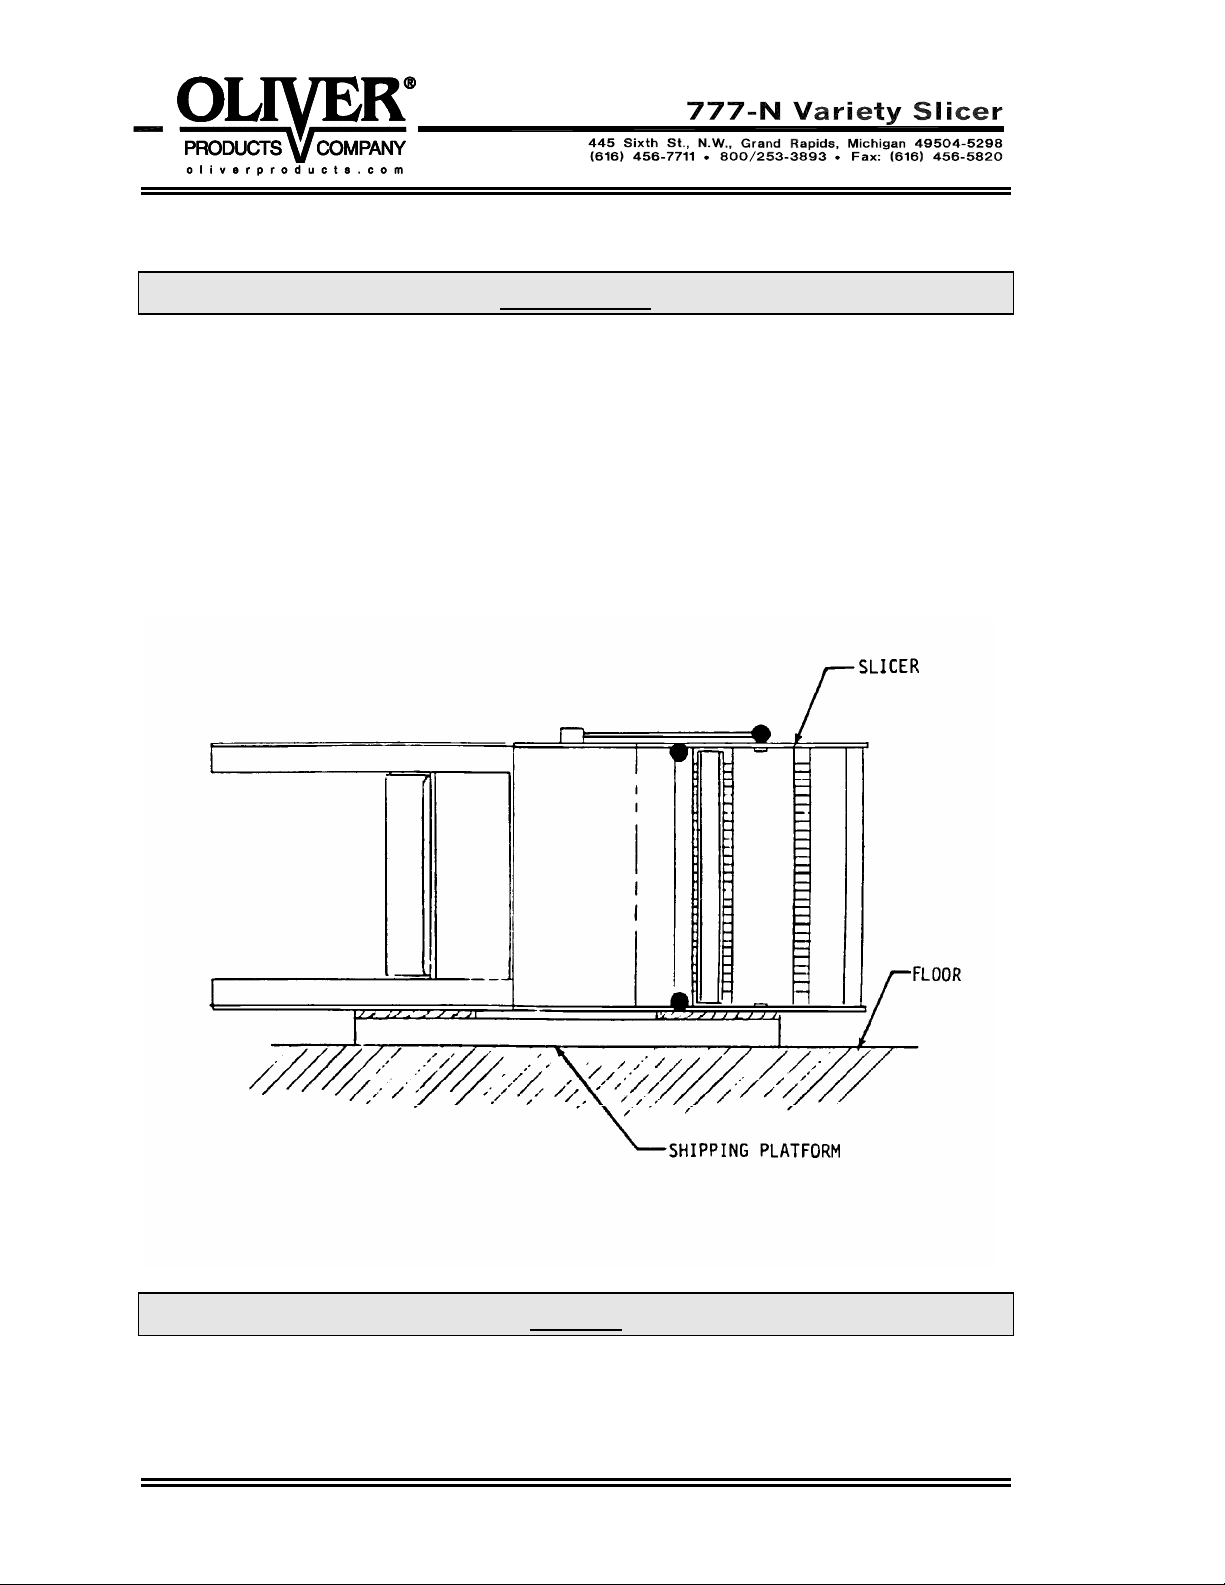
Removing the Slicer from the Shipping Platform
Lift the slicer off the shipping platform with one person on each side of the slicer. Set the
slicer down on a level floor.
Using the shipping platform or other blocks, carefully lower the slicer to its side as shown
below.
NOTE
PERFORM THE FOLLOWING DEPENDING ON WHICH OPTIONS
HAVE BEEN ORDERED WITH THE MACHINE.
0777S20010 3-1
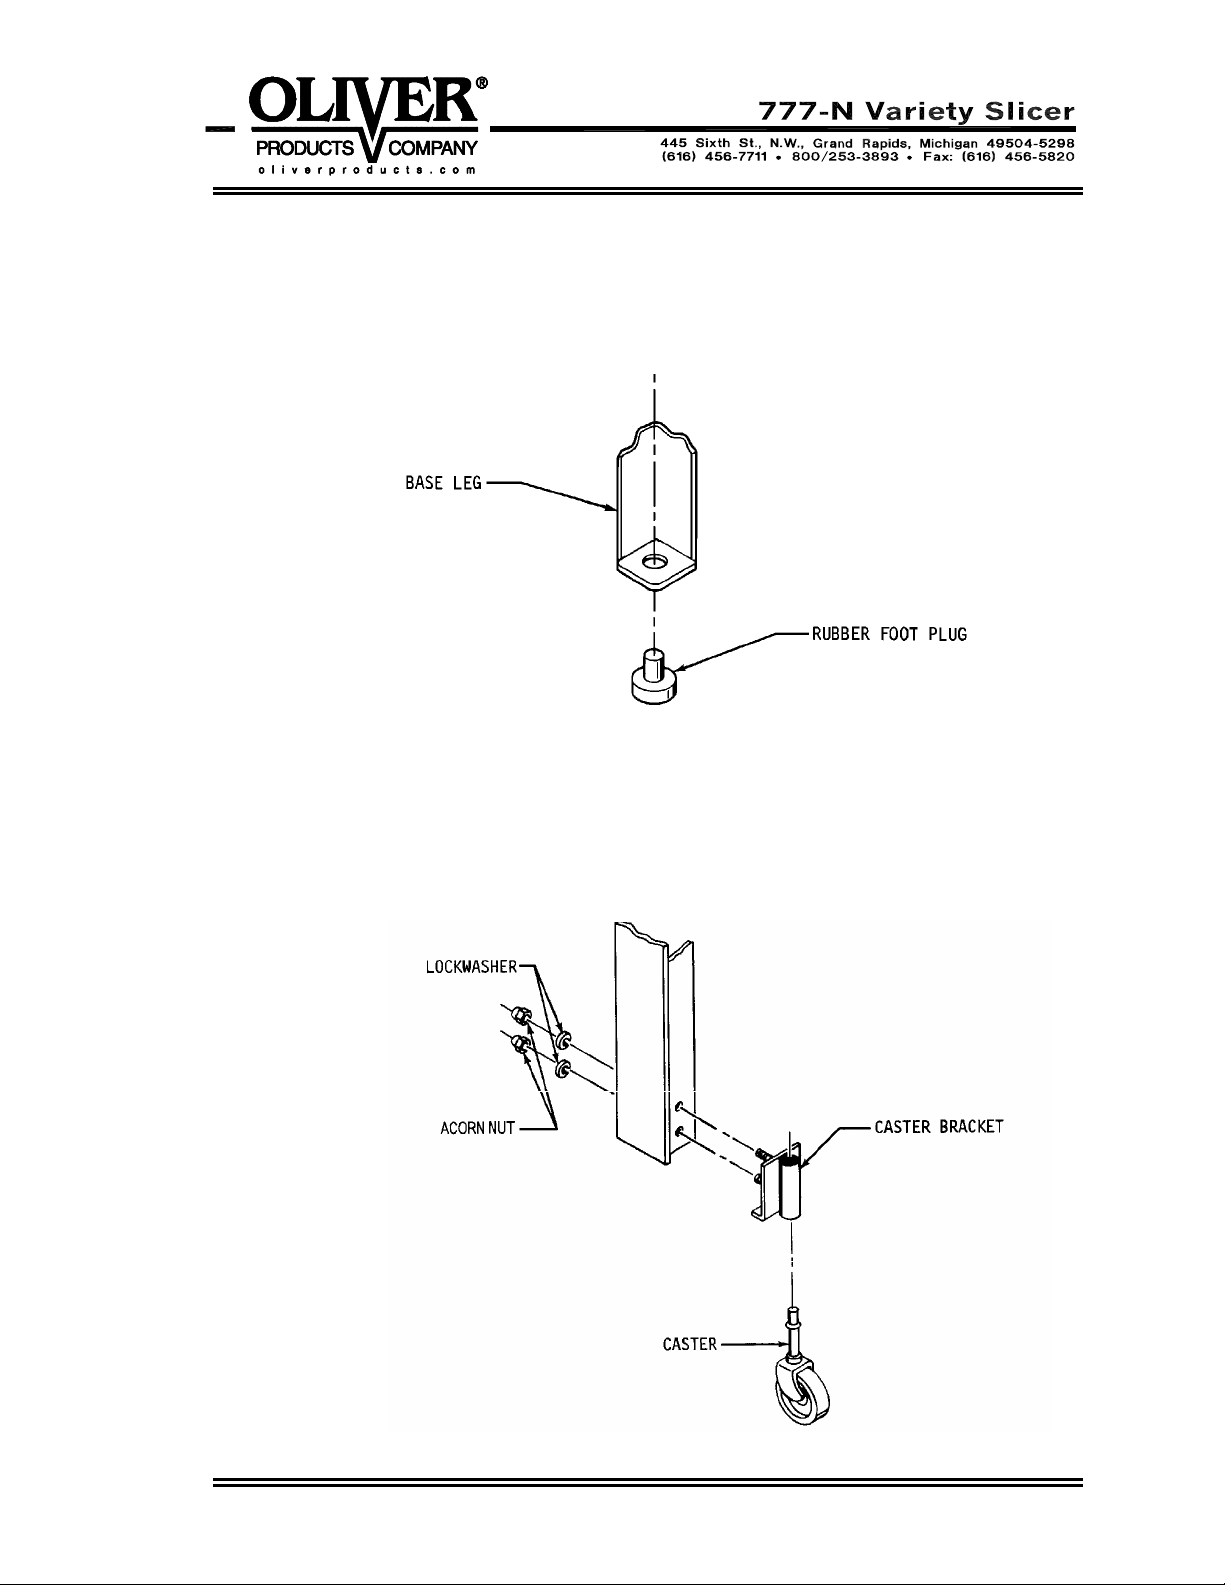
Installing the Rubber Feet
Remove the rubber feet from the accessory package and insert the plugs into the
holes in the leg bottoms, see below. Carefully restore the machine to the upright
position.
Installing Optional Casters
Remove the casters, caster brackets and hardware from the accessory package.
Insert the studs of the brackets, see figure below, through the holes provided on
the base of the slicer. Secure the brackets with the lock washers and hex acorn
nuts. Press fit the casters into the brackets as shown below. Carefully restore
the machine to the upright position.
0777S20010 3-2
OPERATING INSTRUCTIONS
CAUTION
ALWAYS USE CARE WHENEVER WORKING NEAR THE CUTTING KNIVES.
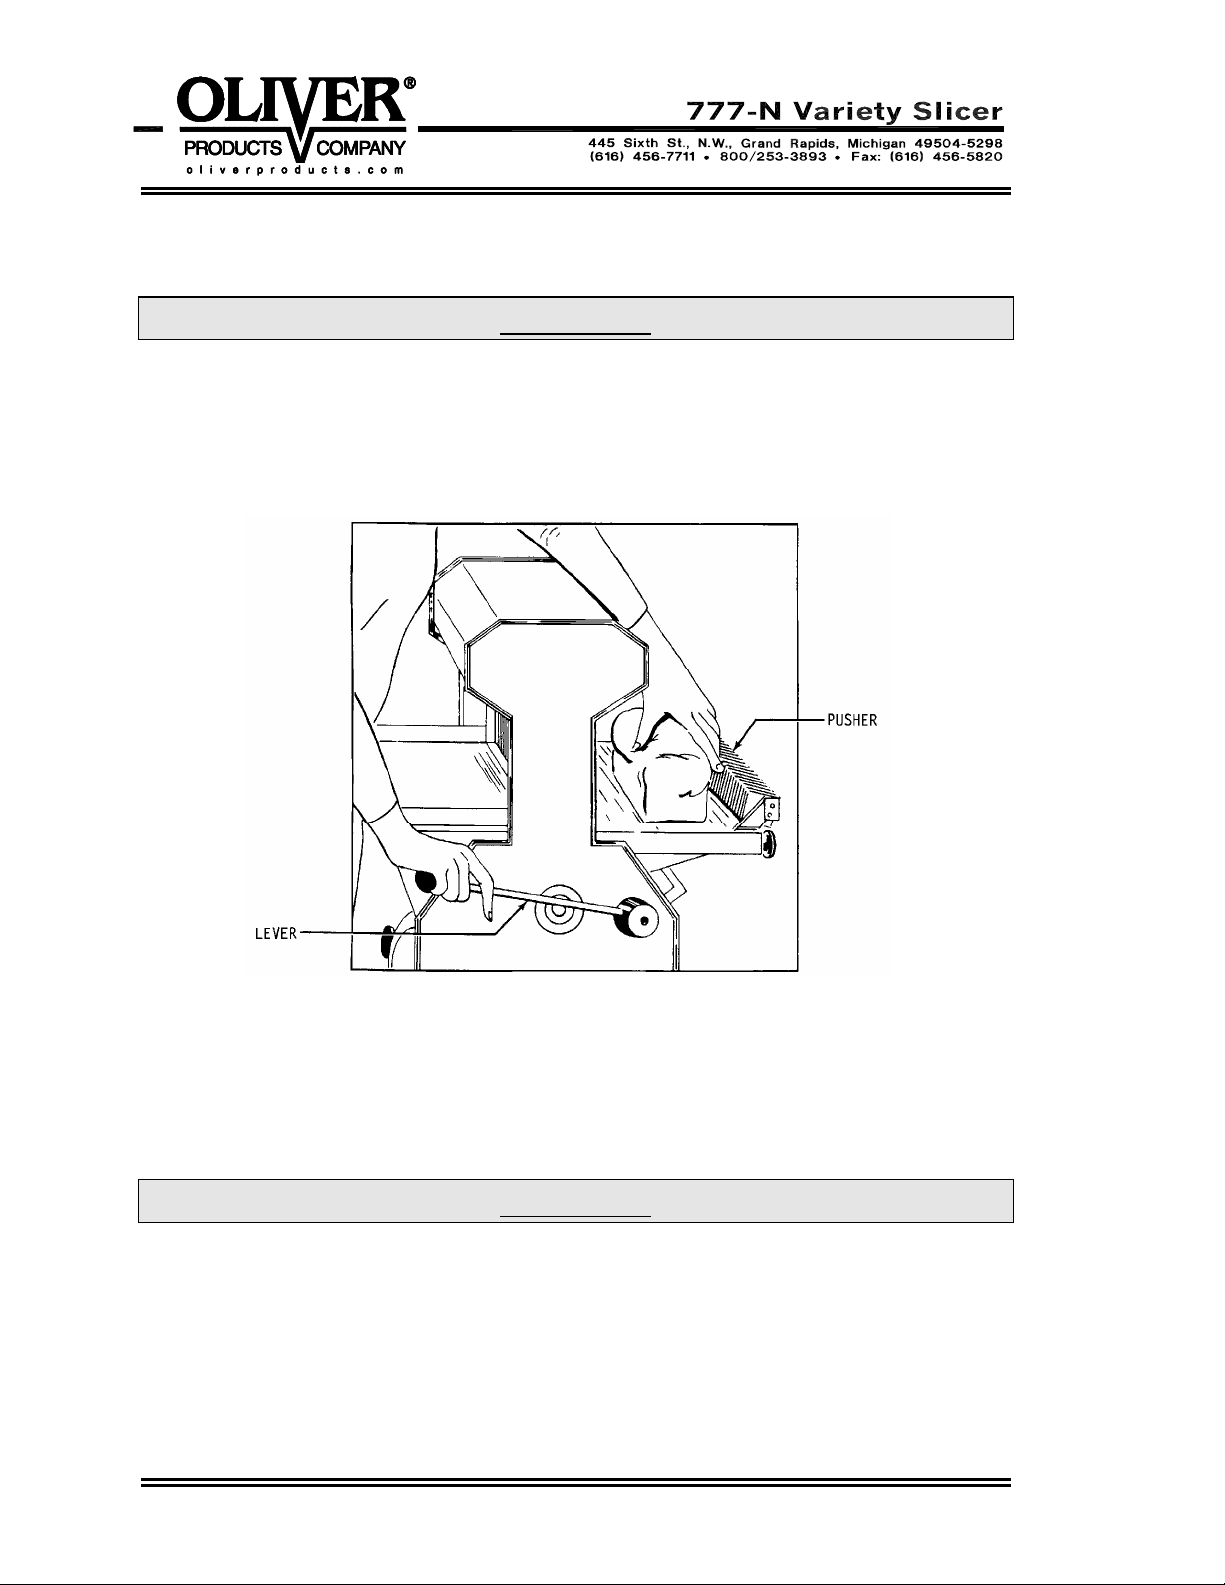
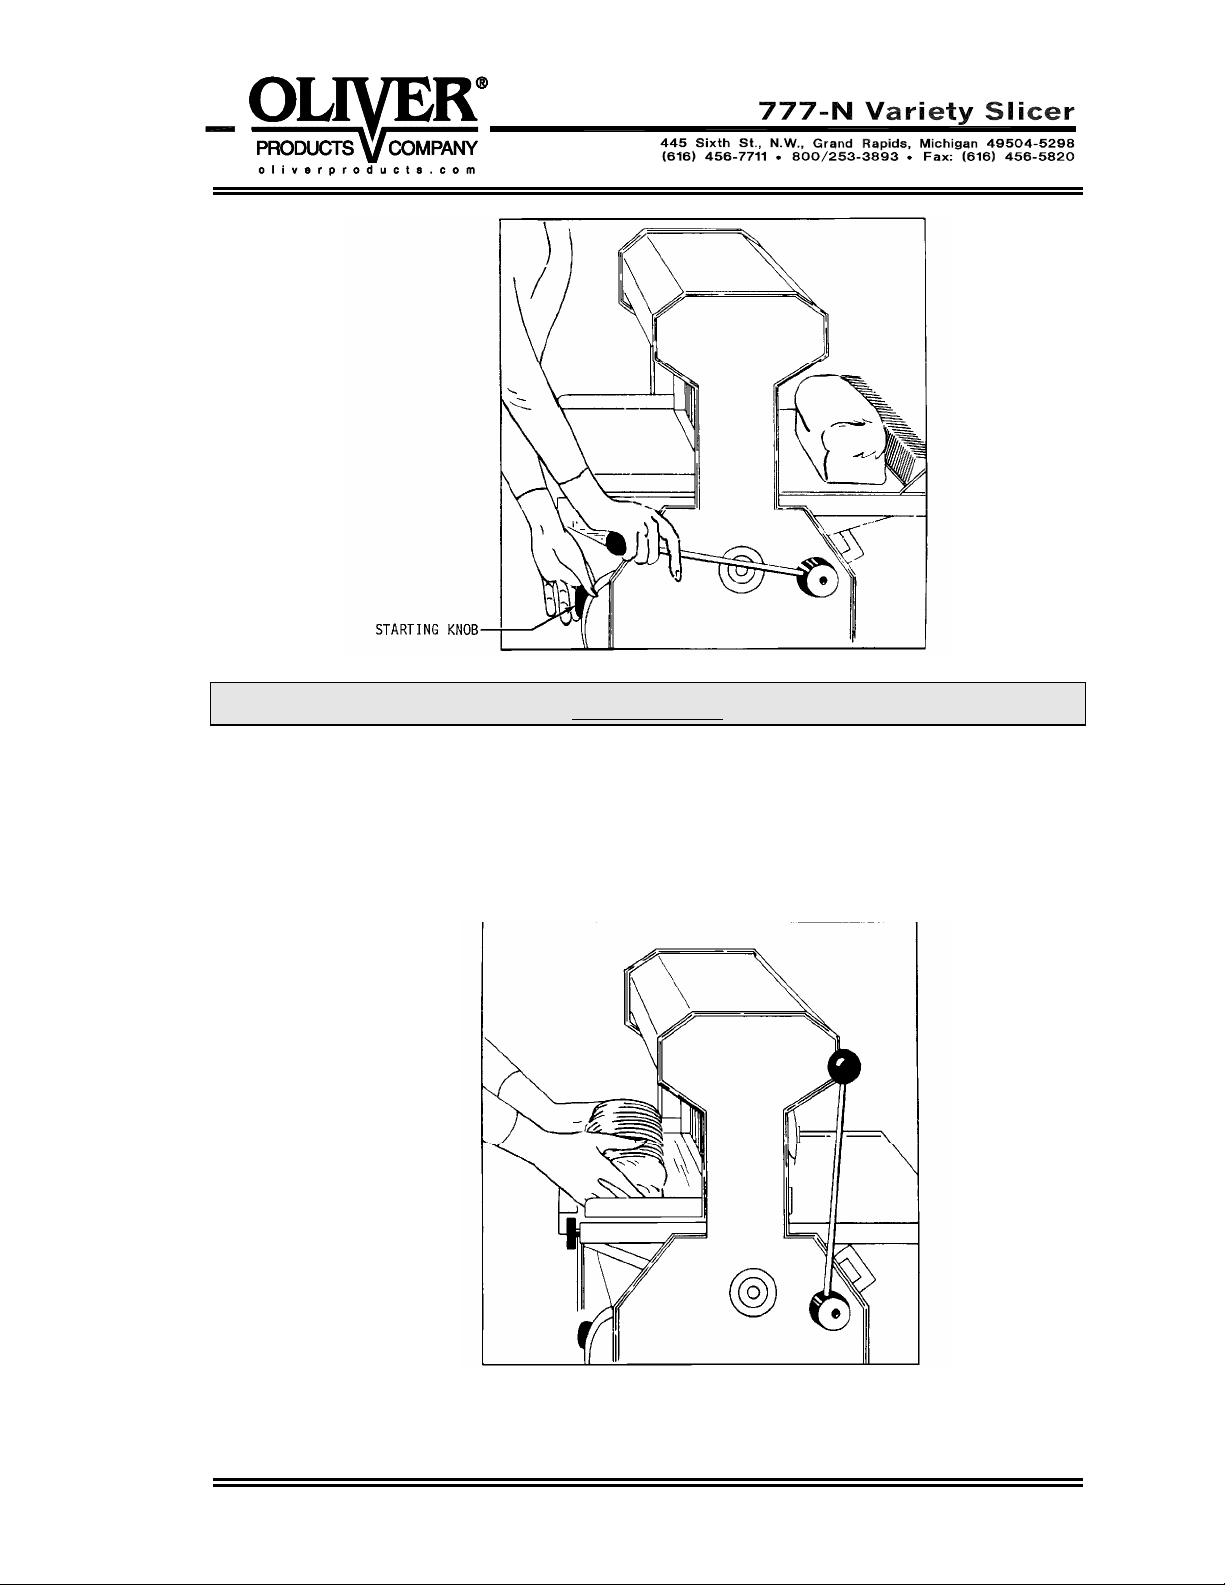
To operate the slicer, stand on the discharge side, grasp the lever with the right hand,
see below, pull it down as far as it will go and hold it there. With the left hand place the
loaf of bread in front of the pusher.
While continuing to hold the lever down with the right hand move the left hand to the
discharge side of the machine and pull the motor starting knob, see next illustration.
Allow the right hand to raise slowly with the lever until the loaf contacts the slicer blades.
After the knives have pierced the crust remove your right hand from the lever allowing
the pusher to move the loaf through the knives.
CAUTION
NEVER PUSH THE HAND LEVER.
DOING SO MAY RESULT IN DAMAGE TO THE MACHINE’S COMPONENTS.
0777S20011 4-1
CAUTION
THE KNIVES ARE EXTREMELY SHARP.
DO NOT TOUCH MOVING OR STATIONARY KNIVES.
The motor and slicer knives will stop automatically when the pusher comes to its full
forward position. Remove the loaf from the table and bag or wrap the product. Use the
same procedure for each loaf.
0777S20011 4-2
TROUBLESHOOTING
WARNING
ALWAYS DISCONNECT THE SLICER FROM THE POWER SUPPLY BEFORE
ATTEMPTING ANY TYPE OF MAINTENANCE TASK, INCLUDING
TROUBLESHOOTING.
The Slicer Will Not Start (Motor Is Not Humming)
• The machine is not plugged in.
• There is no power at the outlet. (Check by plugging in a small working appliance,
like a lamp. Check to see if a circuit breaker has tripped. If the circuit breaker has
not tripped and the circuit is still not working have a qualified electrician check the
circuit.)
• The motor switch overload has tripped. (To reset push firmly in the direction shown
on the switch nameplate.)
• There are bread crumbs in the motor starting switch. (Have a qualified electrician
disassemble the switch and clean it.)
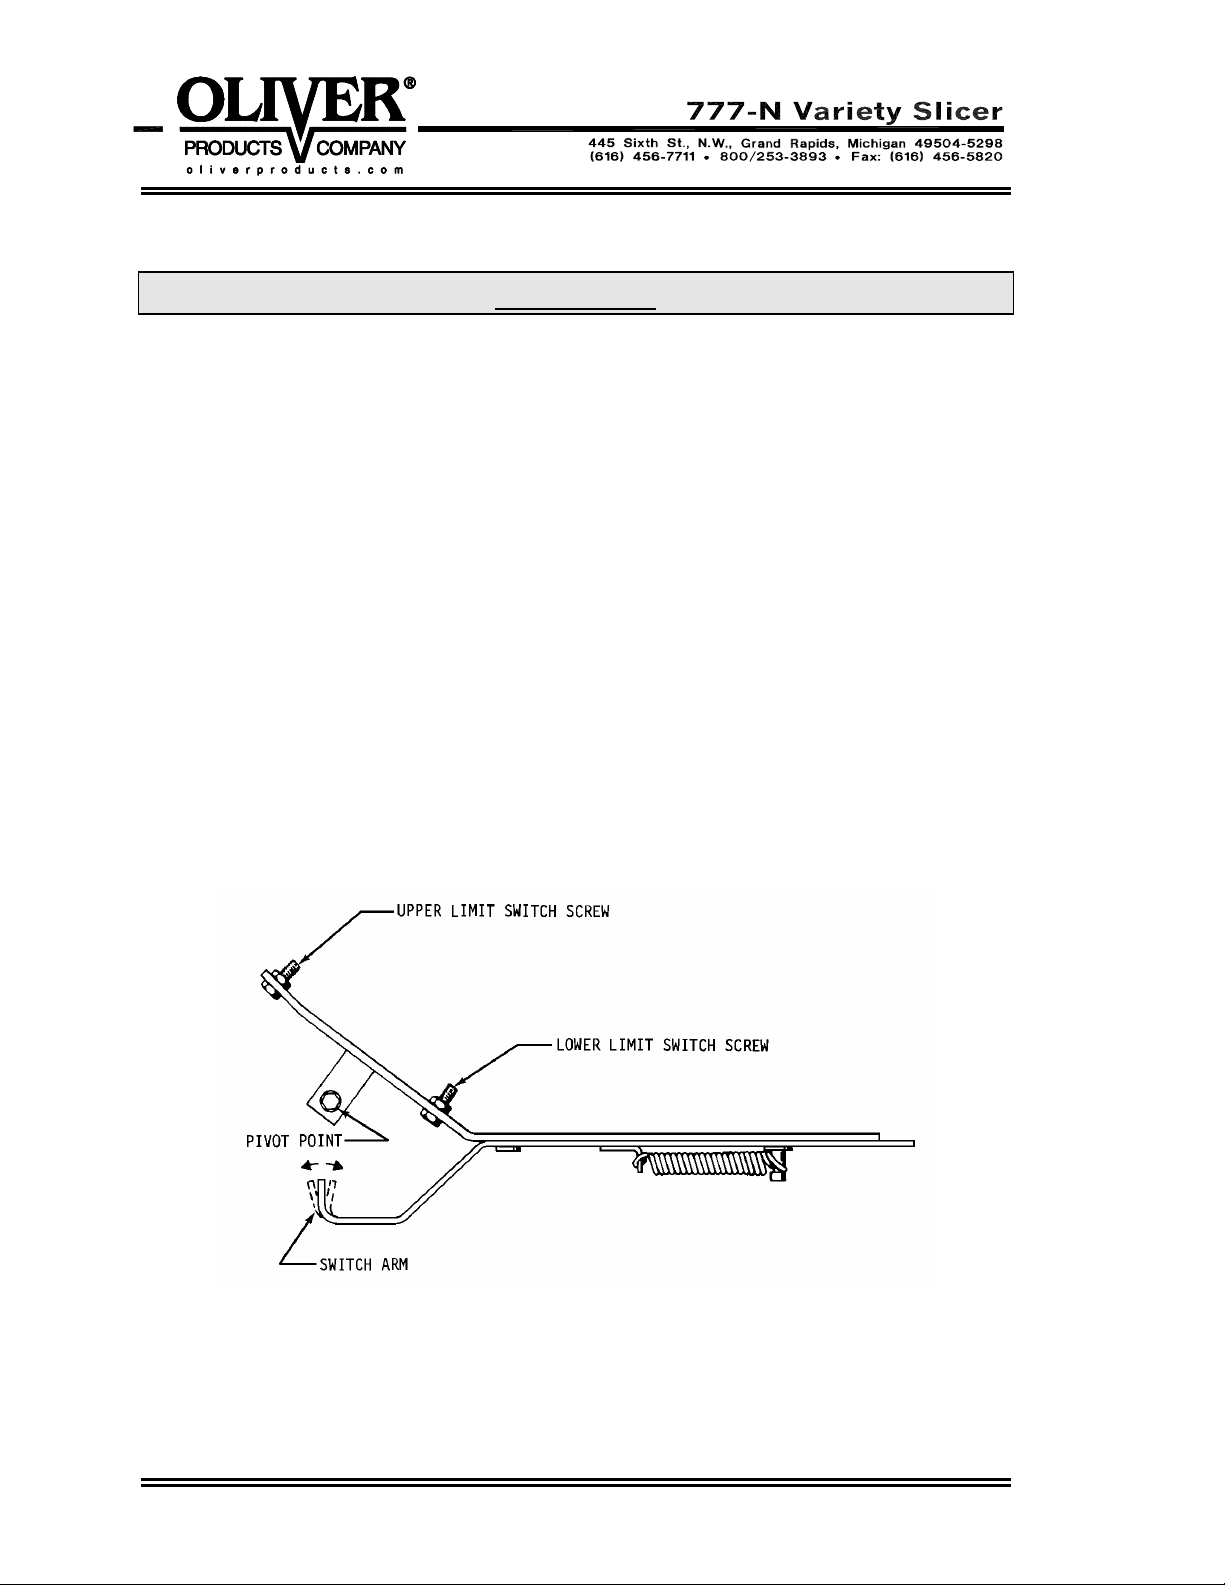
• The switch arm on the Switch Trip Mechanism is bent. (A qualified service agent can
bend the arm to correct the problem, see the illustration below.)
• The switch trip mechanism is binding. (Clean the mechanism and lubricate its pivot
point, see above illustration.)
• The upper limit switch is not being made. (Adjust the limit switch screws as required
to correct the problem, see above illustration.)
0777S20012 5-1

The Slicer Will Not Start (Motor Is Humming)
CAUTION
DO NOT ALLOW THE MOTOR TO HUM WITHOUT STARTING.
THE MOTOR CAN BE PERMANENTLY DAMAGED BY OVERHEATING.
• The motor has failed. (Have it checked by a qualified electrician.)
NOTE
A SPECIAL NON-VENTILATED MOTOR MUST BE USED WITH THIS SLICER.
• The drive system is binding. (Have a qualified service agent check for defective
bearings or other restrictions to free movement.)
• There is mechanical interference between other parts of the slicer. (Have a qualified
service agent evaluate the machine for adjustment or replacement of defective
parts.)
The Slicer Starts Without Pulling the Knob
• The switch arm on the Switch Trip Mechanism is bent. (A qualified service agent can
bend the arm to correct the problem, see the illustration in the “The Slicer Will Not
Start” section above.)
The Slicer Does Not Stop When Slicing is Complete
• Either one or both of the upper and lower limit switch screws on the limit switch trip
mechanism are out of adjustment. (Adjust the limit switch screws as required to
correct the problem, see the illustration in the “The Slicer Will Not Start”, section
above.)
The Slicer Stops Before Slicing Starts or is Complete
• The lower limit switch screw on the limit switch trip mechanism is out of adjustment.
(Adjust the screw as required to correct the problem, see the illustration in the “The
Slicer Will Not Start”, section above.)
• The switch trip mechanism is binding. (Clean the mechanism and lubricate its pivot
point, see the illustration in the “The Slicer Will Not Start”, section above.)
Bread Slices Vary in Thickness
• The blade frames are out of adjustment. (See the “Maintenance” section of this
manual under “Adjusting the Blade Frames When Slices Vary in Thickness” on how
to perform this adjustment.)
0777S20012 5-2
 Loading...