

Oliver 738-V Installation Manual

Walker, Michigan, U.S.A. 49534
USER’S OPERATING AND INSTRUCTION MANUAL
MODEL 738-V
MINI CHIP SLICER
0738S20000-CV

INDEX
Section Description
Document No. Page No.
SAFETY INSTRUCTIONS -------------------------------------- 0738S20002 --------------------------- 1-1
DESCRIPTION/SPECIFICATIONS --------------------------- 0738S20025---------------------------- 2-1
INSTALLATION INSTRUCTIONS ---------------------------- 0738S20004 --------------------------- 3-1
OPERATING INSTRUCTIONS -------------------------------- 0738S20026 --------------------------- 4-1
TROUBLESHOOTING ------------------------------------------- 0758S20006 --------------------------- 5-1
CLEANING AND MAINTENANCE -----------------------------0758S20031 --------------------------- 6-1
Removing the Blade Frames --------------------------------------------------------------------------- 6-4
Cleaning ---------------------------------------------------------------------------------------------------- 6-5
Replacing the Blade Frames --------------------------------------------------------------------------- 6-5
Changing the Blades ------------------------------------------------------------------------------------- 6-6
Lubrication --------------------------------------------------------------------------------------------------- 6-9
General Cleaning ------------------------------------------------------------------------------------------ 6-9
REPLACEMENT PARTS SECTION
MAIN FRAME ------------------------------------------------------ 0758S20034 --------------------------- 7-1
Drawing ------------------------------------------------------------------------------------------------- 7-2
ELECTRICAL--------------------------------------------------------0758S20020 --------------------------- 8-1
Drawing ------------------------------------------------------------------------------------------------- 8-1
Parts List ------------------------------------------------------------------------------------------------8-2
DRIVE COMPONENTS-------------------------------------------0758S20021 --------------------------- 9-1
SLICE PARTS/COVERS -----------------------------------------0758S20028---------------------------10-1
Drawing ----------------------------------------------------------------------------------------------- 10-1
Parts List ---------------------------------------------------------------------------------------------- 10-2
WIRING DIAGRAM 1-60-120----------------------------------- 0738S20013 -------------------------- 12-1
WARRANTY ------------------------------------------------------- GEN 040225
WARRANTY PROCEDURE------------------------------------ GEN 040226
RETURNED PARTS POLICY --------------------------------- GEN 040227
0738S20024 0-1

THIS PAGE WAS INTENTIONALLY
LEFT BLANK.
GEN020319

SAFETY INSTRUCTIONS
WARNING
VARIOUS SAFETY DEVICES AND METHODS OF GUARDING HAVE BEEN
PROVIDED ON THIS MACHINE. IT IS ESSENTIAL HOWEVER THAT THE MACHINE
OPERATORS AND MAINTENANCE PERSONNEL OBSERVE THE FOLLOWING
SAFETY PRECAUTIONS. IMPROPER INSTALLATION, MAINTENANCE, OR
OPERATION OF THIS EQUIPMENT COULD CAUSE SERIOUS INJURY OR DEATH.
1. Read this manual before attempting to operate your machine. Never allow an
untrained person to operate or service this machine.
2. Connect the machine to a properly grounded electrical supply that matches the
requirements shown on the electrical specification plate and follow all specifications
of local electrical codes.
3. Disconnect and lock-out the machine from the power supply before cleaning or
servicing.
4. Check and secure all guards before starting the machine.
5. Observe all caution and warning labels affixed to the machine.
6. Use only proper replacement parts.
7. Do not wear loose fitting clothing or loose hair when working near this machine.
Shirt tails should be tucked in.
8. Wear proper, personal, protective, safety equipment.
9. Keep Hands away from the moving parts of this machine while it is in operation.
10. In addition to these general safety instructions, please follow the more specific safety
instructions as specified in the operating instruction manual.
11. The on/off switch is marked with international symbols for on and off. See below.
ON OFF
0738S20002 1-1
DESCRIPTION/SPECIFICATIONS
Description
The Model 738-V Mini Chip Slicer is a compact, countertop slicer designed to reprocess
shrink - specifically bagels and baguettes - into a marketable bakery/foodservice
product. Designed with reciprocating blade technology, the Mini Chip Slicer easily slices
through day-old bagels and baguettes.
The Model 738-V Mini Chip Slicer is constructed of stainless and painted steel. Easy to
clean, the Mini Chip Slicer food contact surfaces - infeed cover, pusher, handle, and
blade cartridge - can be removed without the use of tools for cleaning and sanitizing in a
dishwasher. Blade changes are simple: simply remove the blade cartridge, replacing it
with an OEM cartridge. No tools or service company required.
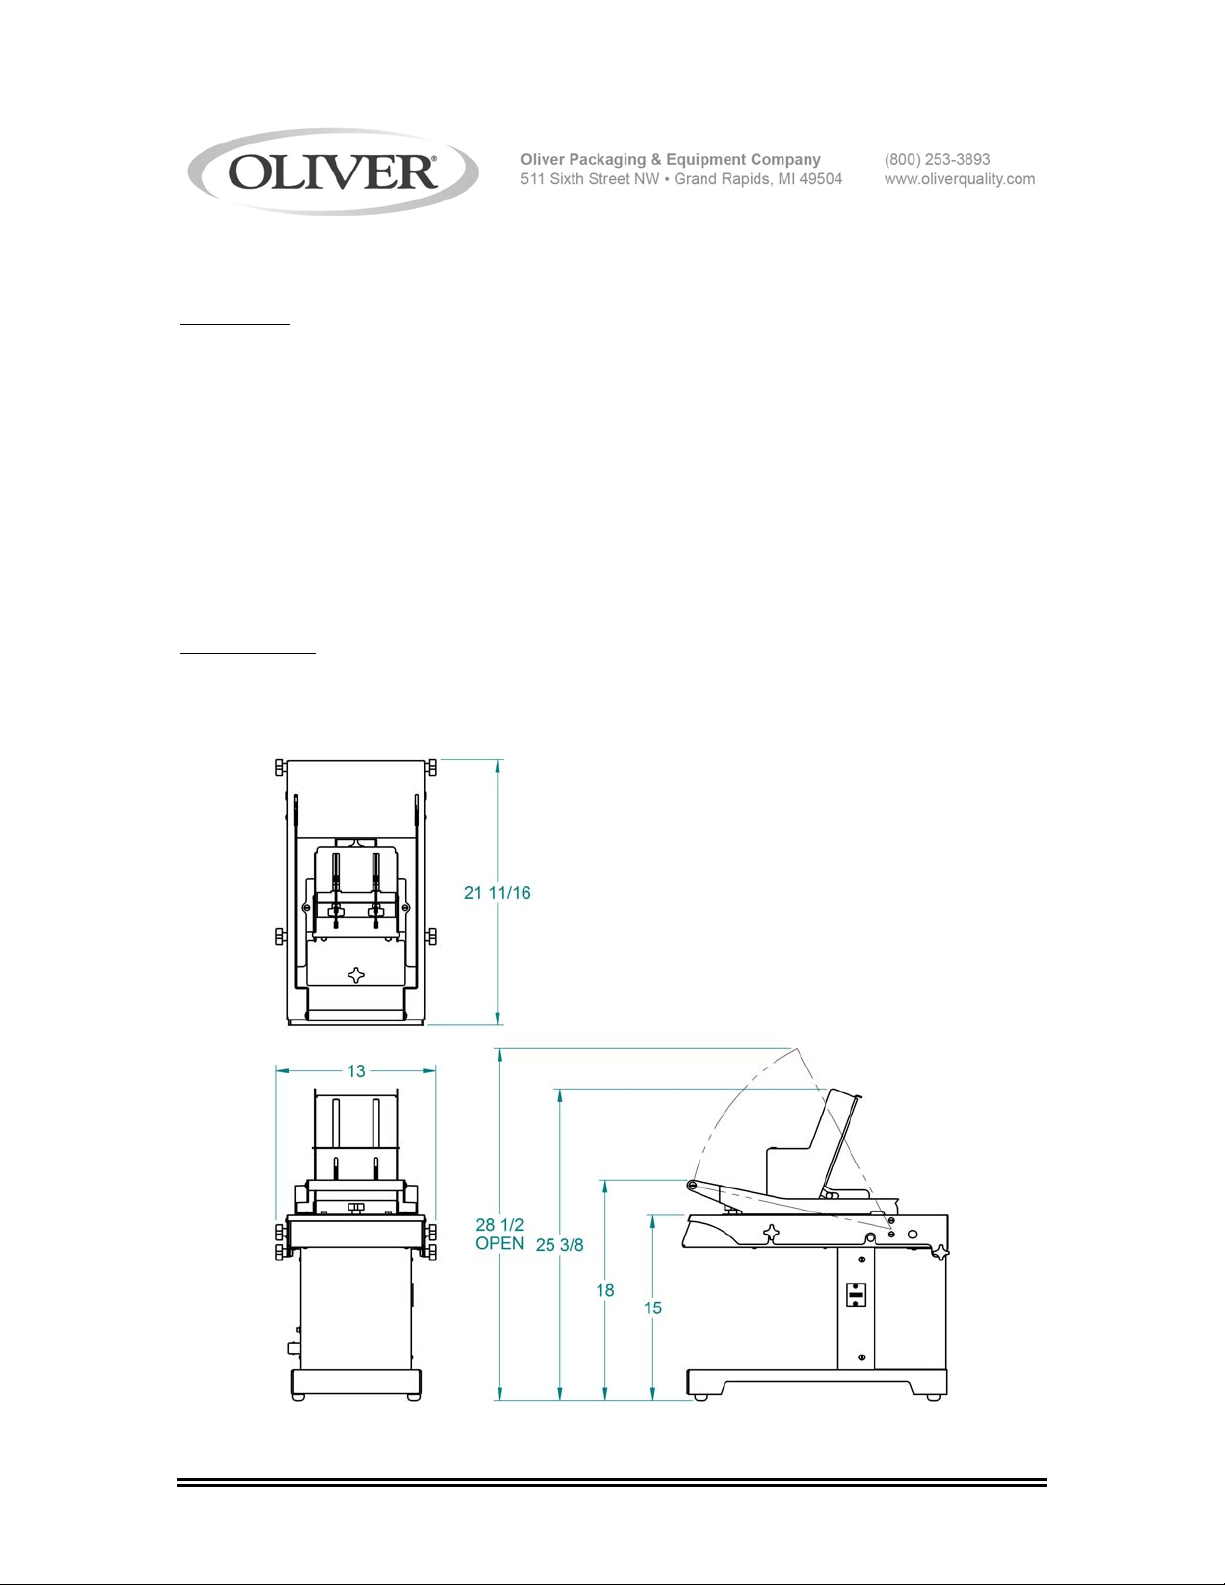
Specifications
Space Requirements:
Model 738-V (All Dimensions are Approximate)
0738S20025 2-1

Product Capacities:
Length 6 inches
Width 6 inches
Height 2 inches
Standard Electrical Options: (Others consult factory)
1 phase, 60 Hz, 120VAC, 2 Amps.
Shipping Weight:
100 lbs. (approximate)
Net Weight:
80 lbs. (approximate)
0738S20025 2-2

INSTALLATION INSTRUCTIONS
Before starting the Installation process make sure you observe the following caution
notes.
CAUTION
THE SLICER IS HEAVY, USE PROPER TECHNIQUE WHEN LIFTING OR MOVING.
Select a location for your slicer which has a substantial mounting surface and which has
electrical service compatible with the load the machine will place on it as indicated on
the electrical data plate of the machine. Position the machine while it is still in its
packaging as close as possible to the desired end location.
0738S20004 3-1
OPERATING INSTRUCTIONS
WARNING
ALWAYS USE CARE WHENEVER WORKING NEAR THE CUTTING KNIVES.
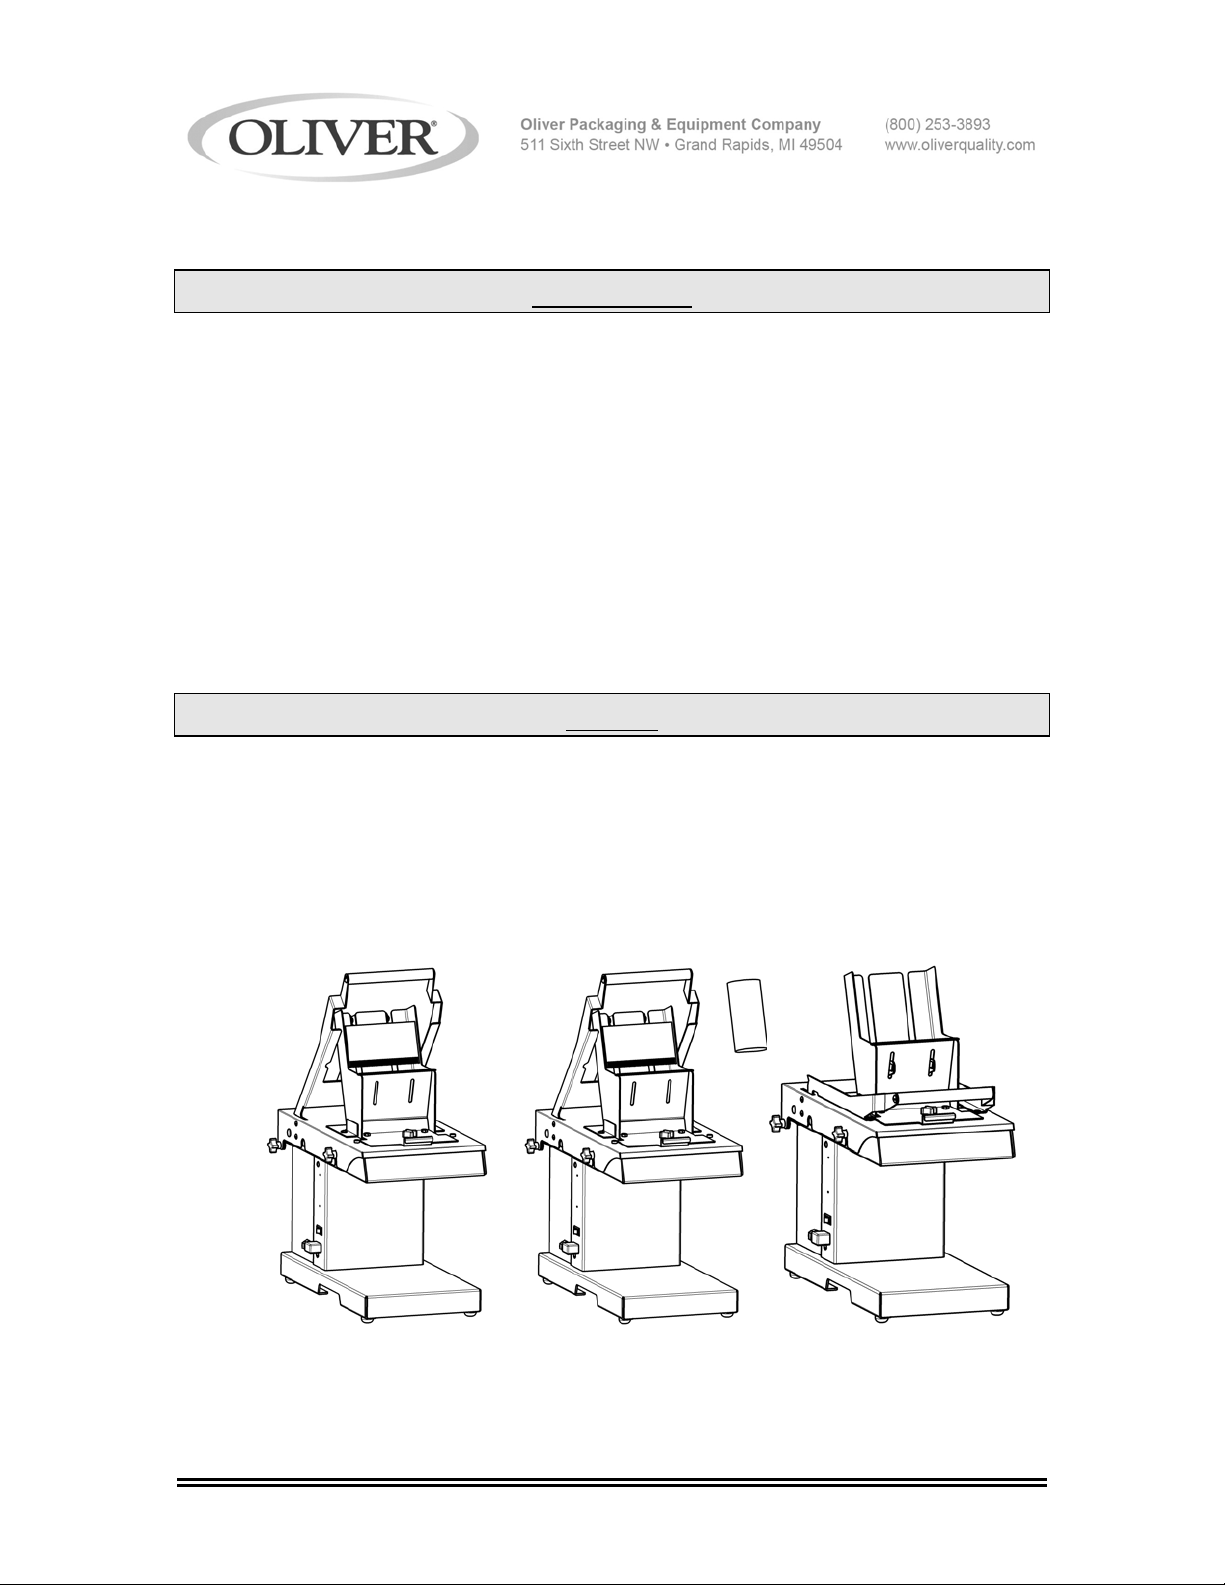
To operate the slicer, follow these simple steps:
1. Power unit on and lift the handle. The unit will automatically shut off.
2. Place the product atop the blades and so that the product is resting against the
back of the chute.
3. Using the handle, apply slight pressure in a downward motion until the handle
comes to a stop. Repeat steps 1-3.
4. When finished, power the unit off.
NOTE
THE UNIT WILL CONTIUE TO RUN UNLESS THE HANDLE IS LIFTED TO THE
STARTING POSITION. PLEASE REMEMBER TO POWER OFF THE UNIT WHEN
SLICING IS COMPLETE.
STEP 1 STEP 2 STEP 3
0738S20026 4-1

THIS PAGE WAS INTENTIONALLY
LEFT BLANK.
GEN020319

TROUBLE SHOOTING
WARNING
ALWAYS DISCONNECT THE SLICER FROM THE POWER SUPPLY BEFORE
ATTEMPTING ANY TYPE OF MAINTENANCE TASK, INCLUDING
TROUBLESHOOTING.
Slicer will not start
• The machine is not plugged in.
• There is no power at the outlet.
• The cover is not on correctly. The cover has an interlocking mechanism that
allows the unit to operate only if the cover is on.
• Broken wire or disconnected terminals.
• The switch actuator cam is not contacting the switch. Lift the cover and adjust
the screw with a flat head screw driver.
Pusher interference when slicing product
• Loosen pusher and adjust side to side to make sure there is no interference.
• Blade frame is not correctly placed on slide blocks.
• Pusher blades are bent or damaged. Contact dealer or factory.
Extreme effort needed to slice product
• Blades are dull. Contact dealer or factory for replacements.
• Product is too stale or old. The slicer is designed to be most efficient with slicing
fresh or day old product.
0738S20006 5-1
 Loading...