

Oliver 709 Parts List

Grand Rapids, Michigan, U.S.A. 49504-5298
USER’S OPERATING AND INSTRUCTION MANUAL
MODEL 709
MINI SUPREME
BREAD SLICER
0709S20000-CV

MODEL 709 MINI SUPREME BREAD SLICER
INDEX
SAFETY INSTRUCTIONS.......................................................................... 0709S20025
DEFINITIONS ........................................................................................... GEN 931118
INSTALLATION INSTRUCTIONS ............................................................. 0709S20026
SPECIFICATIONS .................................................................................... 0709S20027
OPERATING INSTRUCTIONS.................................................................. 0709S20028
ADJUSTMENTS........................................................................................ 0709S20029
Slices Vary In Thickness .............................................................. 0709S20029-1/3
Limit Switch and Actuating Flag Adjustment.................................. 0709S20029-2/3
MAINTENANCE .........................................................................................0709S20030
Removing Blade Frames ............................................................... 0709S20030-1/4
Replacing Blade Frames ............................................................... 0709S20030-2/4
Changing Blades ........................................................................... 0709S20030-3/4
Lubrication........... ..........................................................................0709S20030-4/4
Cleaning...... .................................................................................. 0709S20030-4/4
TROUBLE SHOOTING ............................................................................. 0709S20031
The Slicer Will Not Start ................................................................ 0709S20031-1/2
Motor Runs But Blade Frames Do Not Move ................................ 0709S20031-1/2
The Slicer Will Not Stop ................................................................ 0709S20031-1/2
The Slicer Starts But Stops Too Soon ...........................................0709S20031-2/2
Bread Slices Vary In Thickness ..................................................... 0709S20031-2/2
WIRING DIAGRAMS ................................................................................ 0709S20032
1 Phase, 60 Hertz, 115 VAC ......................................................... 0709S20032-1/2
1 Phase, 60 Hertz, 230 VAC ......................................................... 0709S20032-2/2
1 Phase, 50 Hertz, 220 VAC ......................................................... 0709S20032-2/2
RECOMMENDED SPARE PARTS ............................................................0709S20033
REPLACEMENT PARTS LIST .................................................................. 0709S20034
ASSEMBLY DRAWINGS .......................................................................... 0709S20035
Side View ...................................................................................... 0709S20035-1/3
Front View .................................................................................... 0709S20035-2/3
Sectional View .............................................................................. 0709S20035-3/3
WARRANTY.............................................................................................. GEN 040225
WARRANTY PROCEDURE.................................................................... GEN 040226
RETURN PARTS POLICY...................................................................... GEN 040227
REV. 2/27/04
0709S20024

MODEL 709 MINI SUPREME BREAD SLICER
SAFETY INSTRUCTIONS
Every effort has been made by Oliver Products Company to provide you with a safe
machine. However, it is essential that machine operators and maintenance personnel
observe the following safety precautions.
1. Read this manual before attempting to operate your slicer. Never allow an
untrained person to operate this machine.
2. Make sure that the machine is only connected to a properly grounded electrical
supply source of sufficient capacity for the load the slicer will put on it. Always
unplug the machine when it is not in use.
3. Always make sure the machine has been disconnected from the power supply
before cleaning or servicing.
4. Always keep your hands away from the moving parts of the machine while it is in
operation
5. All guards must be in place before starting the machine.
6. Do not wear loose fitting clothing while operating the machine. Shirt tails should be
tucked in.
7. To prevent injury handle knife blades with care and never touch moving knives.
8. Use only proper replacement parts.
In addition to these general safety instructions, also follow the more specific safety
instructions given for the different areas of the machine in the operating instructions.
0709S20025

General Document
DEFINITIONS
The use of the words WARNING, CAUTION, and NOTE in this manual should be
guided by the following.
WARNING
AN OPERATING PROCEDURE, TECHNIQUE, ETC., WHICH MAY
RESULT IN PERSONAL INJURY IF NOT CAREFULLY FOLLOWED.
CAUTION
AN OPERATING PROCEDURE, TECHNIQUE, ETC., WHICH MAY
RESULT IN DAMAGE TO EQUIPMENT IF NOT CAREFULLY FOLLOWED.
NOTE
AN OPERATING PROCEDURE, TECHNIQUE, ETC., WHICH IS CONSIDERED
ESSENTIAL TO EMPHASIZE.
GEN931118

MODEL 709 MINI SUPREME BREAD SLICER
INSTALLATION INSTRUCTIONS
WARNING
THE SLICER IS HEAVY. USE PROPER LIFTING TECHNIQUES, KEEP
BACK STRAIGHT, KNEES BENT, AND LIFT WITH YOUR LEGS. USE
GLOVES TO PROTECT YOUR HANDS.
Lift the slicer from its resting surface with one person standing on each end of the
slicer, (front and back), set the slicer onto the counter or table as close as possible to
its desired location.
CAUTION
BEFORE PLACING THE SLICER ON A TABLE OR COUNTER, MAKE SURE
THE TABLE OR COUNTER CAN SUPPORT THE SLICER’S WEIGHT WHICH
IS APPROXIMATELY 115 POUNDS.
Should the machine not be in its desired location, carefully slide the machine to its final
location.
The machine may now be connected to a properly grounded power supply of the same
voltage and of sufficient capacity for the load which the slicer will put on it. See the
electrical requirements on the “Oliver Nameplate” on the rear of the machine. DO NOT
USE EXTENSION CORDS.
WARNING
BEFORE ATTEMPTING TO SLICE BREAD READ THE “OPERATION”
SECTION OF THIS MANUAL.
0709S20026
MODEL 709 MINI SUPREME BREAD SLICER
SPECIFICATIONS
• Weight:
(Approximate) ----------------------------------------------------------- (115) pounds
• Slice Spacings:
Standard ---------------------------------------------------------------------------------------- 1/2”
Available at extra cost ------------------------------------ 3/8” (min.), 7/16”, 5/8”, 3/4”, 1”
Others --------------------------------------------------------------------------- Consult Factory
• Standard Electrical Service:
-------------------- 1/5 HP, 1-60-115 Volts AC, 2 Amps.
• Optional Electrical Services
: --------------------------------------------------- Consult factory
• Product Capacities
:
Length -------------------------------------------------------------------------------------- 14-5/8”
*Width --------------------------------------------------------------------------------------- 5-1/4”
*Height -------------------------------------------------------------------------------------- 5-1/4”
NOTE
*WIDTH AND HEIGHT DIMENSIONS ARE FOR A SQUARE PRODUCT.
LOWER AND WIDER PRODUCTS MAY ALSO BE SLICED BY TAKING
CARE IN LOADING THE PRODUCT. INDIVIDUAL DETERMINATIONS
WOULD HAVE TO BE MADE.
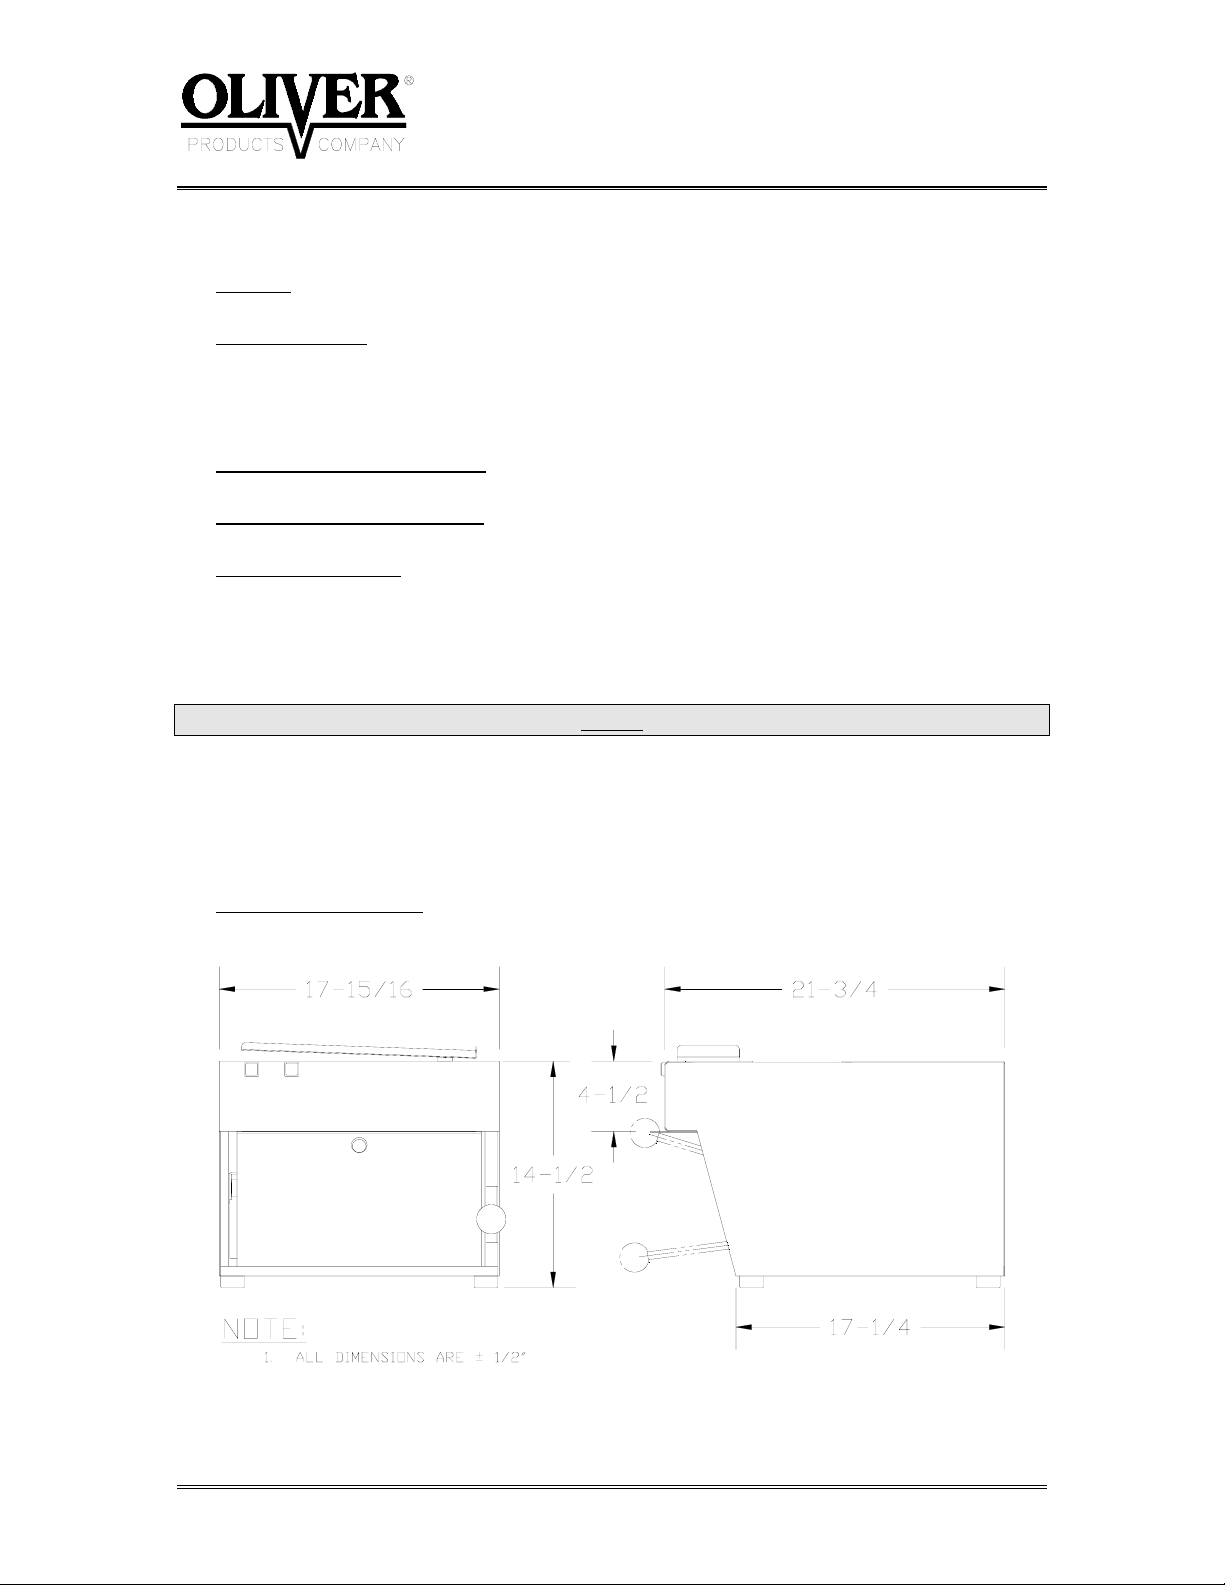
• Machine dimensions:
Revised 6-14-07
0709S20027

MODEL 709 MINI SUPREME BREAD SLICER
OPERATING INSTRUCTIONS
WARNING
ALWAYS USE CARE WHENEVER WORKING NEAR THE CUTTING KNIVES.
To operate the machine, stand in front of the machine and grasp the lever with your
right hand. Pull the lever from its lowest position to the upper limit of its travel. Using
your left hand, load the product into the machine.
WARNING
NEVER
START THE MACHINE BEFORE LOADING THE PRODUCT.
Make sure that the product does not hang over either edge of the cradle. While holding
the lever in the upper-most position, (the machine will not start unless this is done),
push the START button with your left hand.
NOTE
ONCE THE MACHINE HAS BEEN STARTED, THE MACHINE CAN BE
STOPPED BY PUSHING THE “STOP”
BUTTON.
After starting, move the lever downward slowly until the product contacts the knives.
Once the product has contacted the knives move the handle down using moderate
force to slice the bread.
CAUTION
EXCESSIVE DOWNWARD FORCE SHOULD NOT BE USED AS DAMAGE
TO THE MACHINE OR PRODUCT MAY RESULT.
When the slicing operation is complete, and the handle is at its lowest position, the
machine will automatically stop. The cradle will stay in the upper most position so that
both hands can be used to grasp the sliced product and remove it from the top of the
cradle. The product can then be moved to the bagging scoop mounted on the front of
the machine which will ease packaging of your product.
0709S20028

MODEL 709 MINI SUPREME BREAD SLICER
ADJUSTMENTS
WARNING
ALWAYS
UNPLUG THE SLICER WHEN ADJUSTING OR SERVICING.
• Slices Vary In Thickness:
NOTE
IN ONLY THREE SITUATIONS SHOULD IT BECOME NECESSARY TO
ADJUST THE BLADE FRAMES FOR A VARIANCE IN SLICE THICKNESS.
1. IF THE BLADE FRAME GUIDE BARS BECOME LOOSE ALLOWING
THE FRAME TO MOVE.
2. IF THE BLADE FRAMES WERE REMOVED FROM THE MACHINE
AND REPLACED IN OPPOSITE POSITIONS.
3. THE BLADE FRAMES ARE BEING REPLACED WITH A DIFFERENT
SET OF BLADE FRAMES, SUCH AS IN A CONVERSION TO A
DIFFERENT SLICE WIDTH.
To correct the variance in slice thickness, remove the front and top covers which are
each held in place with four screws.
NOTE
A TABLE LIP IS ATTACHED BETWEEN THE TOP COVER AND THE
INFEED TABLE BY FRICTION, A SLIGHT PULL MAY BE REQUIRED
TO DISLODGE IT.
Next remove the lower screw from the holddown pivot block on each side of the
machine, also loosen the upper screw of the pivot block, but, do not remove it. When
this has been done you will be able to pivot the holddown out of the knives to allow
removal of the blade frames. Next remove the shoulder screw from the foot of the top
blade
frame, (the blade frame is connected to the rocker through a pivoting link on the
foot of the blade frame). Once disconnected the top blade frame can be removed by
sliding the frame forward out of the tracks.
WARNING
ALWAYS USE CARE WHENEVER WORKING NEAR THE CUTTING KNIVES.
0709S20029-1

MODEL 709 MINI SUPREME BREAD SLICER
• Slices Vary In Thickness: (Cont’d.):
At this point check the side to side movement of the lower blade frame: it should be at
the minimum which still allows free travel in the tracks. If the side to side movement
seems satisfactory check the centering of the frame. The distance from the side of the
blade frame to the machine’s side should be as close as possible to the same distance
on each side.
Should either of the above two situations need correction loosen
the four nuts, two on
each side, which secure the lower blade frame guide bars, (they are accessible from
the underside of the blade frame). Once loosened, the blade frame can be centered in
the machine, making sure that the guide bars are as far into the tracks as they will go,
thus limiting side to side movement. When the bars are as far into the tracks as
reasonably possible and the blade frame is centered in the machine, re-tighten the
nuts. Re-check the blade frame for proper centering, side to side movement and ease
of travel.
When the lower blade frame has been found to be in its proper position, or, corrected
to the proper position, (if that was required), as described previously, re-install the
upper blade frame. Replace the shoulder screw and link at the foot of the blade frame,
replacing and tightening the nut and lock washer which secure the shoulder screw.
Check the distance between any three adjacent blades using a 12 inch or shorter ruler.
the outside blades should be the same distance from the center blade. If this is the
case the slices will be the same thickness, if the distance varies then the upper blade
frame must be adjusted side to side until the measured distances are equal.
To adjust the upper blade frame loosen
the four nuts, (two on each side), which secure
the blade frame guide bars. Once loosened the blade frame can be adjusted by
moving it slightly either right or left in the machine until the distances as measured
above are equal. Make sure the guide bars are as far into the tracks as they will go to
limit side to side movement. When the bars are as far into the tracks as possible and
the blade spacing is equal, re-tighten the nuts. Re-check the blade frame for proper
spacing, side to side movement and ease of travel.
Rotate the holddown back into the knives. Replace and secure the four mounting
screws of the pivot blocks and replace the front and top covers securing each with the
four screws which were previously removed.
• Limit Switch and Actuating Flag Adjustment:
After disconnecting the slicer from the power supply, remove the rear cover from the
machine allowing access to the limit switch area.
0709S20029-2
 Loading...