

Oliver 501 Installation Manual

Grand Rapids, Michigan, U.S.A. 49504-5298
USER’S OPERATING AND INSTRUCTION MANUAL
MODELS 501, 501-N, 502, & 502-N
PANINI GRILLS
0502S20000

501_502
INDEX
Section Description
SAFETY INSTRUCTIONS -------------------------------------- 0502S20002 --------------------------- 1-1
DESCRIPTION/SPECIFICATIONS --------------------------- 0502S20003---------------------------- 2-1
Description -------------------------------------------------------------------------------------------------- 2-1
Specifications----------------------------------------------------------------------------------------------- 2-1
INSTALLATION INSTRUCTIONS ---------------------------- 0502S20004 --------------------------- 3-1
Container Inspection ------------------------------------------------------------------------------------- 3-1
Location Selection & Electrical Hook-up ------------------------------------------------------------ 3-1
Ventilation and Clearances --------------- ------------------------------ ------------------------------ -- 3-1
Initial Set-up ------------------------------------------------------------------------------------------------ 3-2
Upper Platen Assist Spring Adjustment ------------------------------------------------------------- 3-2
Seasoning of the Cooking Surface ------------------------------------------------------------------- 3-2
OPERATING INSTRUCTIONS -------------------------------- 0502S20005 --------------------------- 4-1
Preheating -------------------------------------------------------------------------------------------------- 4-1
Temperature Selection ----------------------------------------------------------------------------------- 4-1
Setting the “Optional” Timer ---------------------------------------------------------------------------- 4-1
Operating Hints -------------------------------------------------------------------------------------------- 4-2
TROUBLESHOOTING ------------------------------------------- 0502S20006 --------------------------- 5-1
The Grille is not Heating (Indicator Light Is Not
The Grille is not Heating (Indicator Light Is
Product is Either Burning or Under Cooking ------------------------------------------------------- 5-2
The Upper Platen Falls If not Held ------------------------------------------------------------------- 5-2
The Optional Timer Does Not Turn On (The Rest of the Units is Working) ---------------- 5-2
MAINTENANCE --------------------------------------------------- 0502S20007 --------------------------- 6-1
Upper Platen Assist Spring Adjustment ------------------------------------------------------------- 6-1
Cleaning ----------------------------------------------------------------------------------------------------- 6-1
RECOMMENDED SPARE PARTS -------------------------- 0502S20008 --------------------------- 7-1
REPLACEMENT PARTS SECTION
MODEL 501 PANINI GRILLES ------------------------------- 0501S20000 --------------------------- 8-1
Drawing ------------------------------------------------------------------------------------------------- 8-1
Parts List ----------------------------------------------------------------------------------------------- 8-2
MODEL 502 PANINI GRILLES ------------------------------- 0502S20009 --------------------------- 9-1
Drawing ------------------------------------------------------------------------------------------------ 9-1
Parts List ----------------------------------------------------------------------------------------------- 9-2
Continued
Document No. Page No.
On) --------------------------------------------- 5-1
On) --------------------------------------------------- 5-1
0502S20001 0-1

501_502
INDEX (Continued)
Section Description
MODEL 501 PANINI GRILLE WIRING DIAGRAMS ----- 0501S20001 ------------------------- 10-1
1-50/60-208/220/240 With Timer --------------------------------------------------------------- 10-1
1-50/60-208/220/240 Without Timer ---------------------------------------------------------- 10-1
1-50/60-110/115 With Timer -------------------------------------------------------------------- 10-2
1-50/60-110/115 Without Timer ---------------------------------------------------------------- 10-2
MODEL 502 PANINI GRILLE WIRING DIAGRAMS ----- 0502S20010 -------------------------- 11-1
1-50/60-208/220/240 With Timers --------------------------------------------------------------11-1
1-50/60-208/220/240 Without Timers --------------------------------------------------------- 11-2
WARRANTY ---------------------------------------------------- --- GEN 050816
WARRANTY PROCEDURE------------------------------------ GEN 050817
RETURNED PARTS POLICY --------------------------------- GEN 050818
Document No. Page No.
0502S20001 0-2

501_502
GENERAL SAFETY INSTRUCTIONS
WARNING
IT IS ESSENTIAL THAT ALL GRILLE OPERATORS AND MAINTENANCE
PERSONNEL OBSERVE THE FOLLOWING SAFETY PRECAUTIONS. IMPROPER
INSTALLATION, MAINTENANCE, OR OPERATION OF THIS EQUIPME NT COULD
CAUSE SERIOUS INJURY OR DEATH.
1. Read this manual before attempting to operate your grille. Never allow an untrained
person to operate or service this appliance.
2. Connect the grille to a properly grounded electrical supply that matches the
requirements shown on the grille’s electrical specification plate. Follow all local
building and electrical codes.
3. Do not install this appliance on or near flammable surfaces or materials including
curtains, draperies, walls etc.
4. Do not “Wash Down” or Immerse this appliance in water or other liquids.
5. Disconnect and lock-out the grille from the power supply before cleaning or servicing.
6. Observe all caution and warning labels affixed to the grille.
7. Use only proper replacement parts.
8. Wear proper, personal, protective, safety equipment.
9. Keep Hands away from the heated parts of this appliance until it has been allowed to
cool.
10. In addition to these general safety instructions, please follow the more specific safety
instructions in the rest of this operating and instruction manual.
WARNING
DO NOT USE FOR OTHER THAN ORIGINALLY INTENDED PURPOSE.
0502S20002 1-1
501_502
DESCRIPTION/SPECIFICATIONS
Description
The Oliver Models 501 & 501-N, (Single Top Platen), and Models 502 & 502-N Double
Top Platen Grilles are constructed of stainless steel with cast iron cooking surfaces. The
floating, (self leveling), top platen will remain roughly parallel to the bottom platen to a
height of approximately four inches.
The heated surfaces are thermostatically controlled with separate selection of either
heated bottom platen only or heating of both top and bottom platens. An optional timer
is also available.
The Oliver Panini Grilles, depending on the options you have selected, can be used to
prepare Quesadillas, “Panini” or gourmet sandwiches. They can grille meats,
vegetables, breakfast items like, eggs, pancakes, or French toast. They can also toast
bagels and breads or be used in many other applications.
Oliver Products Company, has served the Food Machinery Industry for over 70 years,
and we stand behind these grilles.
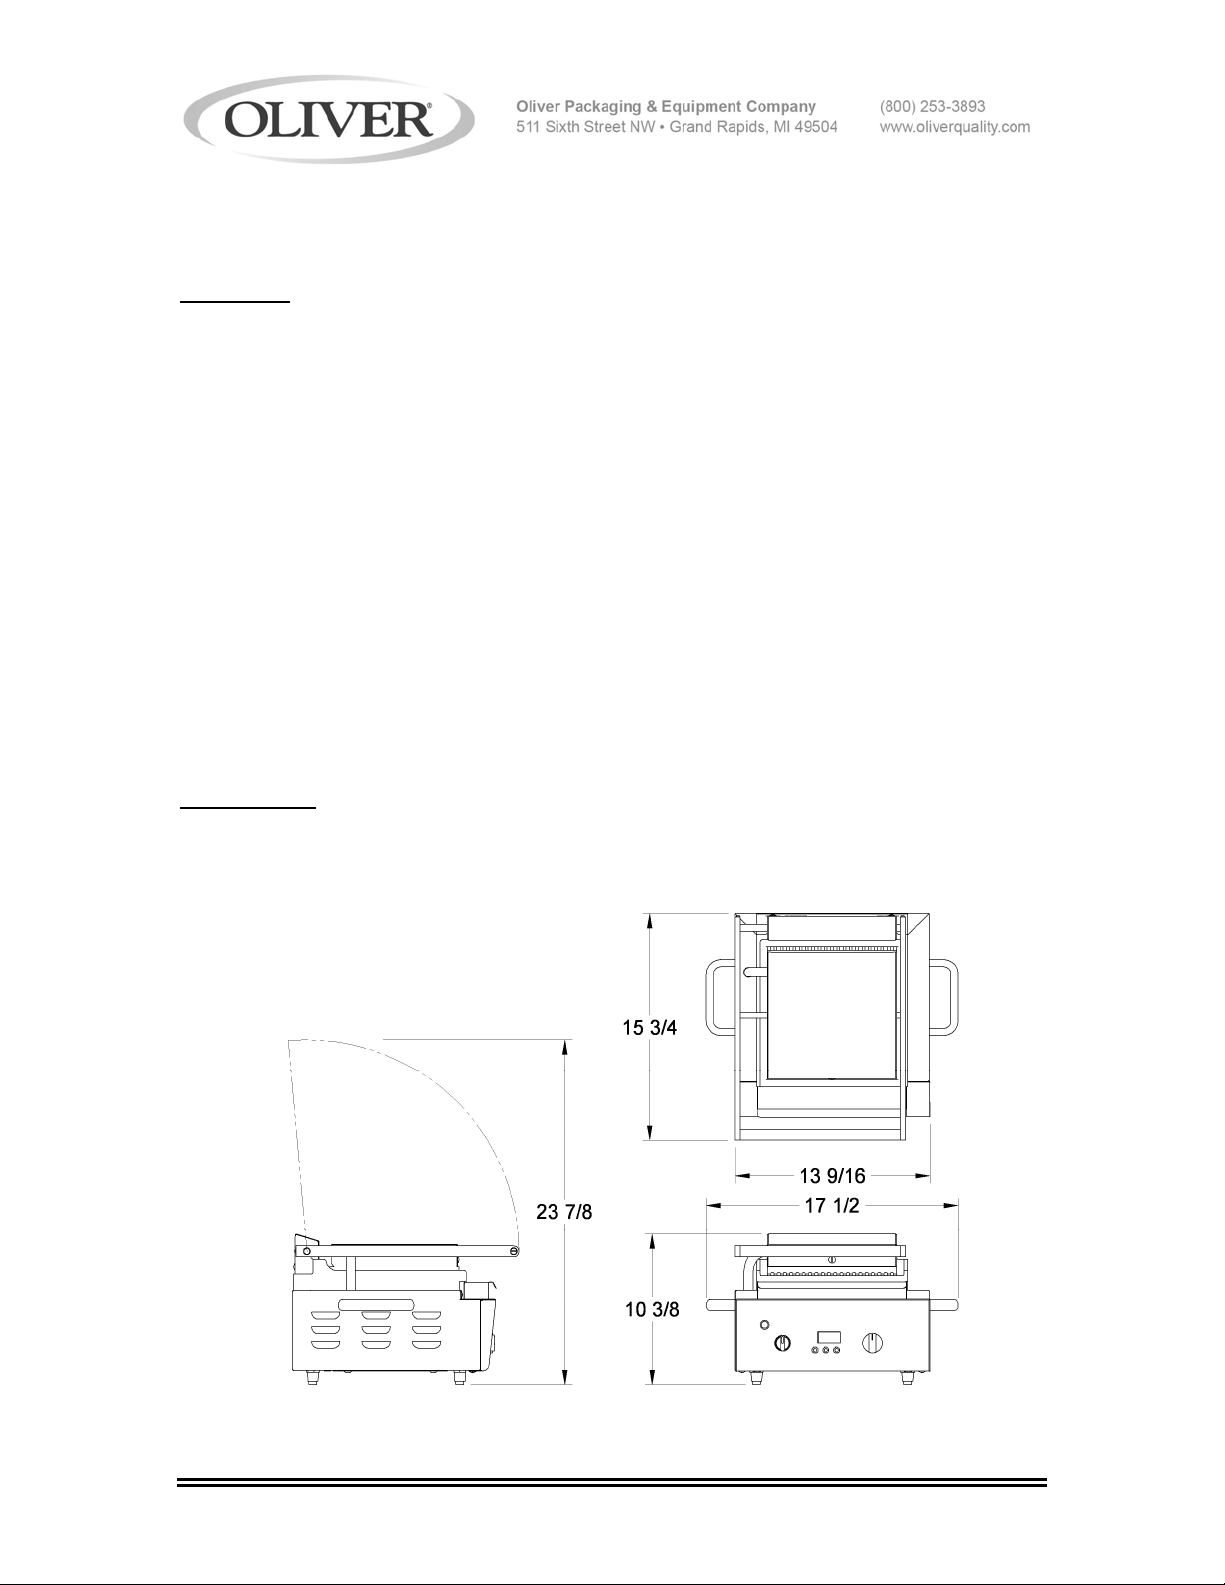
Specifications
Space Requirements, (Shown with Standard Options):
Model 501 & 501-N (All Dimensions are Approximate)
0502S20003 2-1

501_502
Space Requirements, (Shown with Standard Options):
Model 502 & 502-N (All Dimensions are Approximate)
Standard Electrical Options: (Others consult factory).
WARNING
THIS UNIT MUST BE CONNECTED TO A DEDICATED
COMPATIBLE WITH THE LOAD THE GRILLE WILL PLACE ON IT.
Model 501/501-N Single Upper Platen Panini Grille
1 phase, 60 hz, 115VAC, 18 Amps, 1800 Watts.
1 phase, 60 hz, 208/240VAC, 10 Amps, 1685/2250 Watts.
1 phase, 50 hz, 220VAC, 9 Amps, 1890 Watts.
Model 502/502-N Double Upper Platen Panini Grille
1 phase, 60 hz, 208/240VAC, 20 Amps, 3375/4500 Watts.
1 phase, 50 hz, 220VAC, 18 Amps, 3775 Watts
ELECTRICAL CIRCUIT
0502S20003 2-2

501_502
Options (All options are not available on All models):
Smooth Top and Bottom Platens
With or Without Electronic Timers
1 inch Legs (leveling)
2-1/2 inch Flanged Legs (leveling)
2-1/2 inch Suction Cupped Legs (leveling)
4 inch Flanged Legs (leveling)
4 inch Suction Cupped Legs (leveling)
Table Stops
Net Weight
Model 501 = 55 lbs. (approximate)
Model 502 = 105 lbs. (approximate)
Shipping Weight
Model 501 = 70 lbs. (approximate)
Model 502 = 120 lbs. (approximate)
0502S20003 2-3
501_502
INSTALLATION INSTRUCTIONS
Container Inspection
Inspect the container for visible and/or concealed damage, if the equipment or container
seems to be damaged make a note on the shipping documents such as “Damaged” or
“Open” and notify the freight company asking for an inspection. Remember, the receiver
is responsible for filing damage claims. In such a situation you must retain all the
packaging until the inspection is complete to verify the damage and thus lessen the
chances that your claim will be denied.
Location Selection & Electrical Hook-up
DANGER
THIS UNIT MUST BE ELECTRICALLY GROUNDED. FAILURE TO DO SO COULD
RESULT IN SERIOUS INJURY OR DEATH.
WARNING
THIS UNIT MUST BE CONNECTED TO A DEDICATED
COMPATIBLE WITH THE LOAD THE GRILLE WILL PLACE ON IT.
ELECTRICAL CIRCUIT
CAUTION
ANY STAND, COUNTER OR OTHER MOUNTING SURFACE MUST BE
CAPABLE OF SUPPORTING THE GRILLE’S WEIGHT.
Select a location for your grille which has a substantial mounting surface, such as a
countertop, table or stand, see “Caution” statement above, and which is near a
dedicated electrical service
on the electrical data plate on the rear of the grille. Always conform to all local and
national electrical codes.
Ventilation and Clearances
The use of a vent, hood, grease extractor and/or fire extinguishing system will be
dictated and must conform to the applicable national and/or local building codes.
The following are suggested minimum clearances from combustible surfaces unless
those directed by local building codes are greater.
1 inch from each side of the unit
4 inches from the back of the unit
compatible with the load the grille will place on it as indicated
0502S20004 3-1
501_502
Initial Set-up
Before the first use of the grille, use the height adjustable legs provided on each unit, to
level it right to left. In addition, the rear of the unit should be set slightly higher than the
front of the unit to allow the normal cooking fluids to more easily travel to the front
grease tray.
Top Platen Assist Spring Adjustment
To allow adjustability in the amount of force required to raise or lower the top platen a
drag block has been added to each top platen hinge pin. Using a screw driver a screw
can be turned to increase or decrease the drag on the hinge pin. Increasing the drag,
(turning the screw clockwise), will restrict the movement of the upper platen’s handle.
Rotating the screw counter clockwise will free the movement of the platen allowing it to
drop from higher positions but pop up when at the lowest position. If you wish you may
make the adjustments to fit your needs. The screw is accessible from the rear of the
machine through the spring cover. Periodic adjustment of this screw may be necessary.
Seasoning of the Cooking Surfaces
NOTE
DURING INITIAL OPERATION OF YOUR GRILLE YOU MAY NOTICE A
SMALL AMOUNT OF SMOKE COMING OFF THE GRILLING SURFACES,
AND A FAINT ODOR FROM THE SMOKE. THIS IS NORMAL FOR A NEW
GRILL AND WILL DISAPPEAR AFTER THE FIRST FEW HOURS OF USE.
CAUTION
COOKING SURFACES ARE HOT
Before the first use of the grill the cooking surfaces must be seasoned to minimize
product sticking. This can be accomplished by first wiping the excess oil from all
cooking surfaces. Then turn the unit on by heating both top and bottom platens to a
temperature of between 250 – 300°F for approximately 30-40 minutes. Do not be
alarmed, but during the first few hours of operation the grille may smoke as oils
associated with the manufacturing process are evaporated. After heating the grille for
30-40 minutes, (see above), spray all cooking surfaces with a non-salted vegetable oil
such as Pam ®. Allow the unit to stand at the temperature until the cooking surfaces
look dry, (about 30 minutes). Spray all surfaces a second time with Pam ® and then
heat the unit to 400°F, which will take about 10 minutes, after which the unit should be
turned off. Repeat the above procedure if necessary.
0502S20004 3-2
USE CARE WHENEVER WORKING NEAR THEM.

501_502
OPERATING INSTRUCTIONS
CAUTION
COOKING SURFACES ARE HOT
Preheating
The unit should be allowed to preheat approximately 10-20 minutes before loading it with
product. Failure to preheat will likely cause unsatisfactory cooking of the first load.
Using the selector switch on the front of the unit, turn the switch from the “Off” position,
to either the bottom only heat selection, or to the bottom and top position. Set the unit to
the desired temperature, (see “Temperature Selection” below). If heating both top and
bottom platens it is best to do so with the top platen lowered to contact the bottom
platen. Dual units will have separate controls for each side of the grille.
When you select either the bottom or both top and bottom platen position on the selector
switch the “Power On” indicator light and the optional timer, (when present), should
come on, however the platen will not begin heating until a temperature above 120º F has
been selected.
Temperature Selection
Each top and bottom platen is controlled by a single thermostat. Dual grilles will have a
separate thermostat for each side of the unit. When the line on the knob is pointing
straight up the heaters will be off. Rotating the knob clockwise will turn the heaters on
starting at an approximate temperature of 120º F and if you continue to rotate the knob
in the clockwise direction they will reach a maximum temperature setting of
approximately 570º F. The approximate setting can be noted from the position of the
line on the knob relative to the numbers printed on the front panel’s legend plate.
Setting the “Optional” Digital Timer
Grilles with the optional digital timers can be set to give an audible sound at a user
specified time setting from 1 second to a maximum of 9 minutes 59 seconds. Dual units
with this option will have a timer for each side of the unit.
In addition to the display, each timer will have three buttons. From the left to the right
the buttons will be labeled “+”, “-“, and “Start/Stop”. The timer can be used without
heating the platens by turning the selector switch to either bottom or both top and bottom
platen heating, but leaving the thermostat, (temperature selection knob), set to “Off”.
USE CARE WHENEVER WORKING NEAR THEM.
0502S20005 4-1
 Loading...