


OKIPAGE 8z Product Update
To Set Up your OKIPAGE 8z using Windows XP with USB or Parallel Connection:
Follow steps 1 through 6 in the Quick Setup guide. Then follow the instructions below.
Start with both the printer and the computer off.
Turn on the computer.
When Windows has started, turn on the printer.
When you see “Welcome to the Found New Printer Wizard,” put the Oki Windows XP Driver CD in your CD drive.
Note: Windows XP may recognize a picture file on the disk and open a dialog listing things it can automatically do. If
this happens, click Cancel.
If you see a “Hardware Installation” warning message, click Continue Anyway. The driver you are installing will not
damage your system.
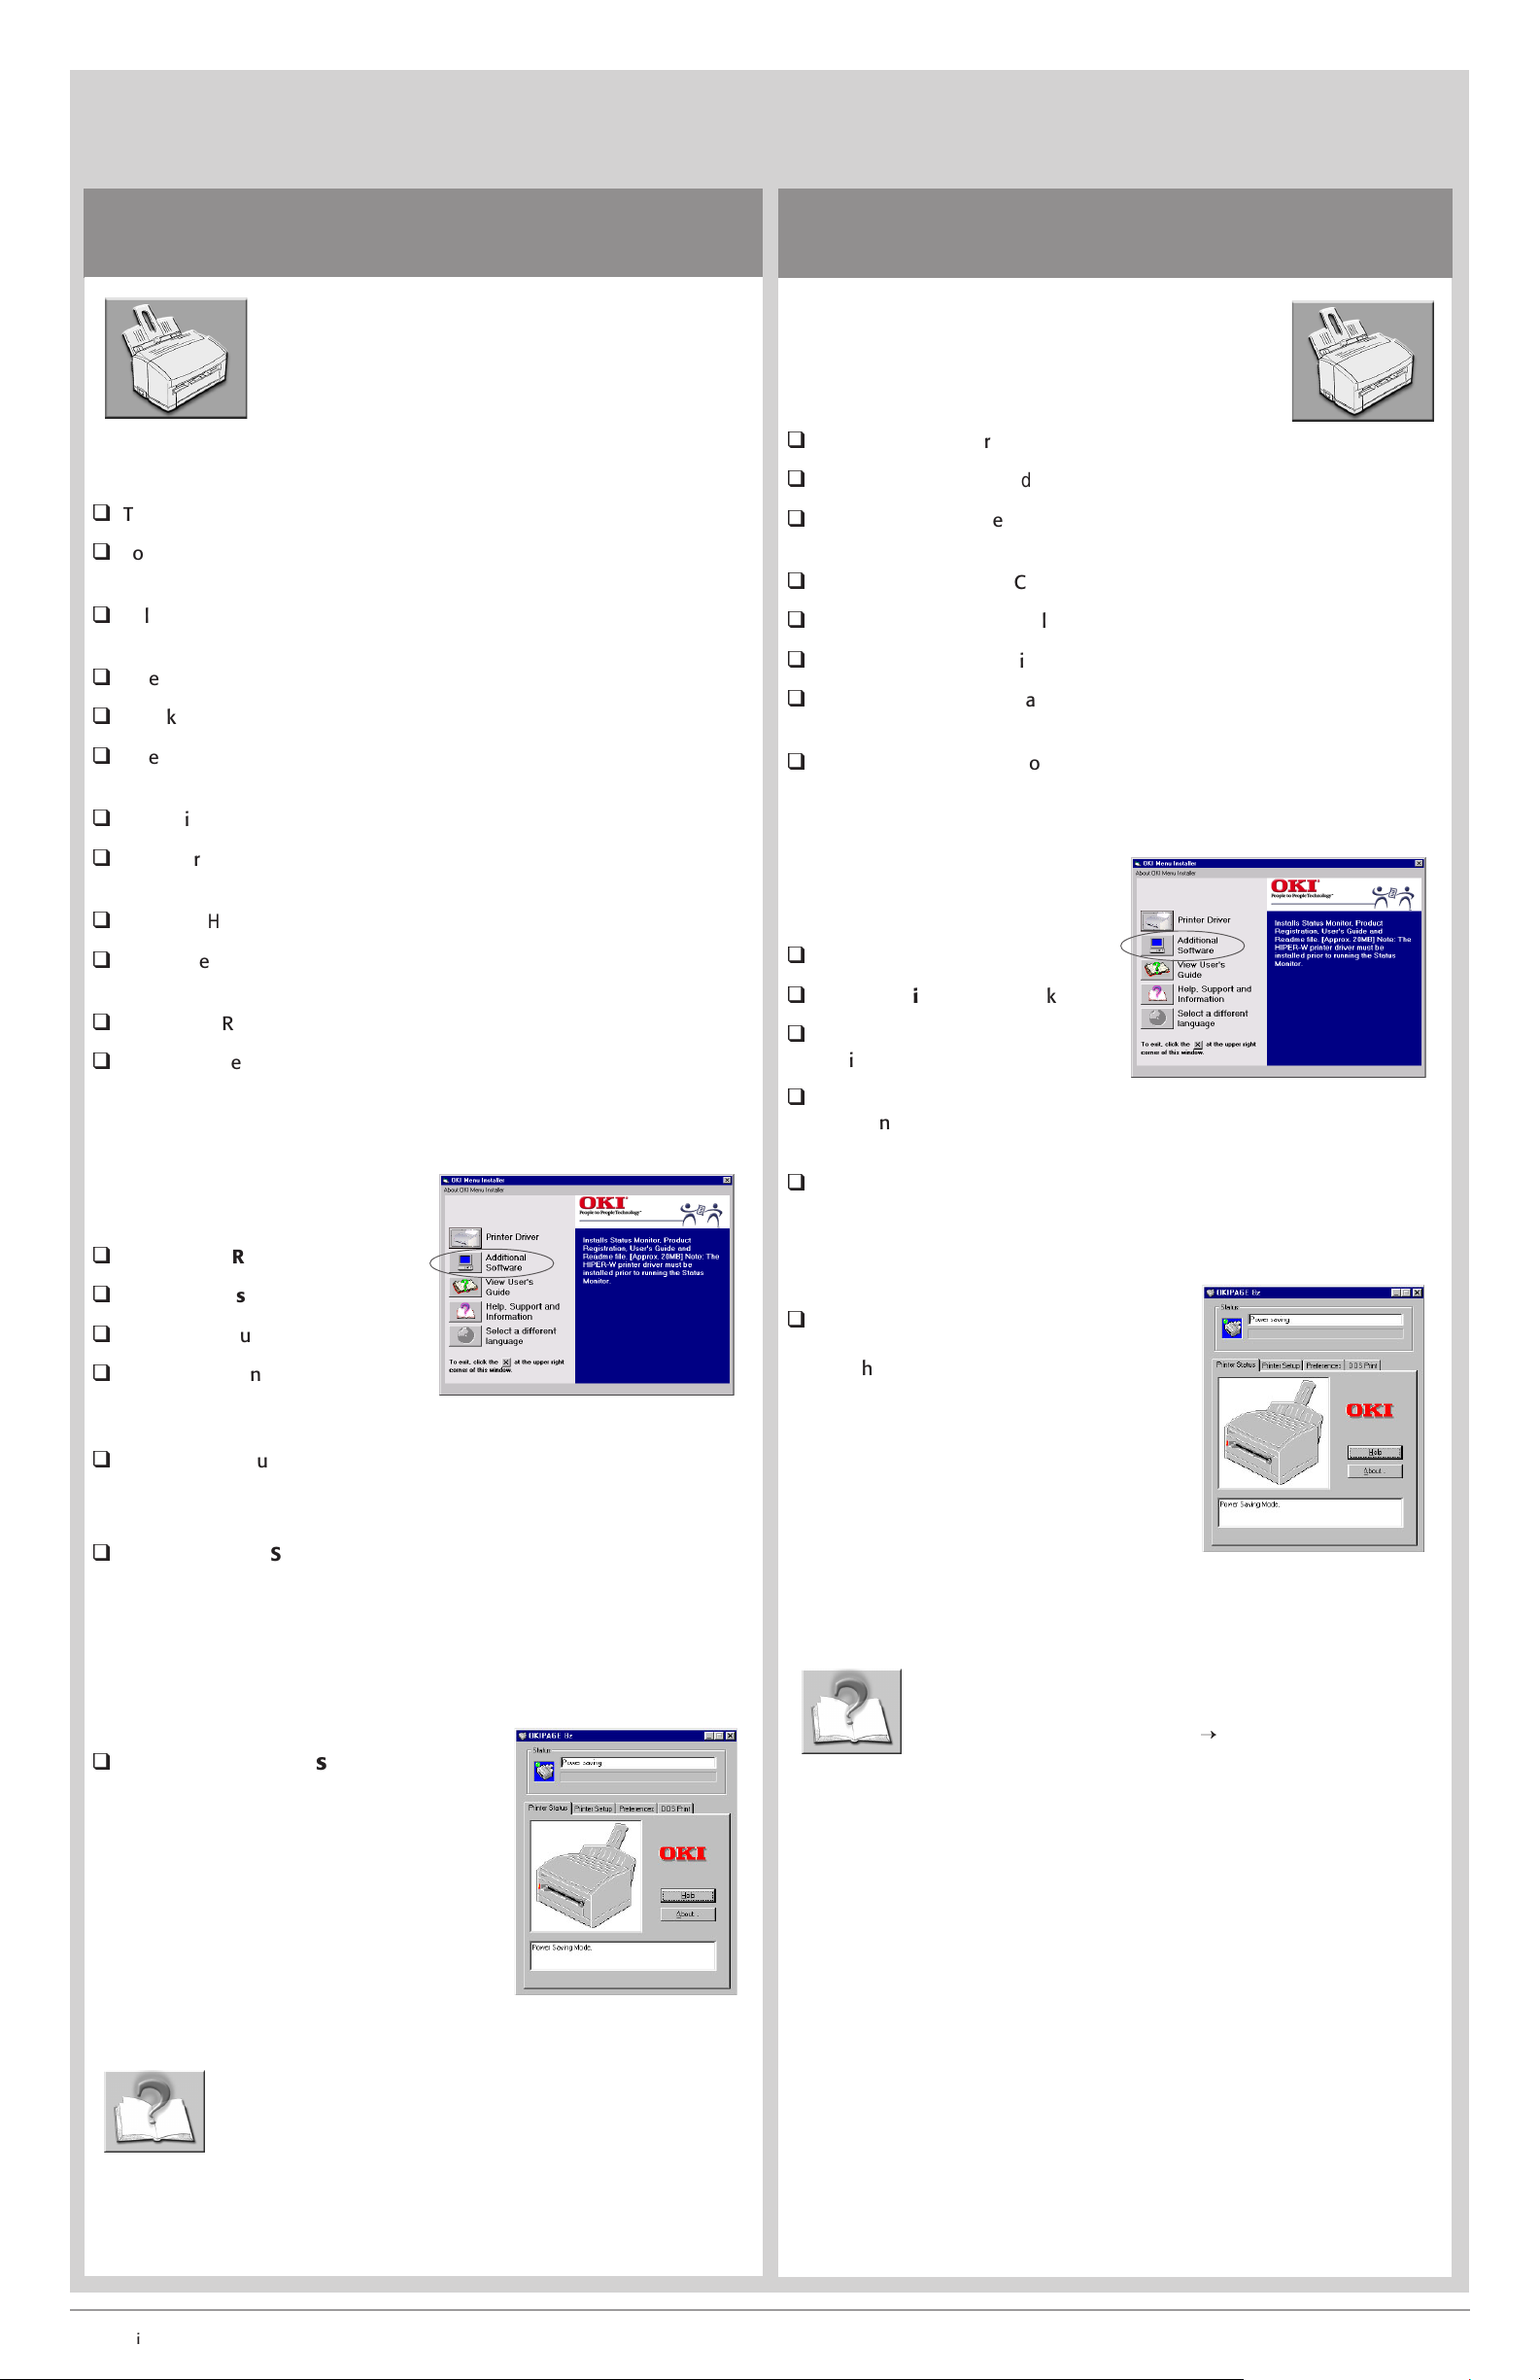
Install Additional Software
With the OKIPAGE 8z Software CD—not the Oki Windows XP CD--in your CD-ROM drive:
Click Start
Type in D:\install.exe, where “D” is the letter of your CD-ROM drive. Click OK.
Click the language of your choice.
Click the button beside Additional Software. The User’s Guide, Status Monitor, Product Registration and Readme file
will install.
Follow the instructions on your screen to complete the installation and restart your computer.
®Run.
Activate the Status Monitor
Use the on-screen Status Monitor to monitor print jobs, check printer status, and set certain printer features.
From the Taskbar, click Start
®Programs®OKIPAGE 8z®OKIPAGE 8z Status Monitor.
To view the User’s Guide
From the Taskbar, click Start®Programs®OKIPAGE 8z®OKIPAGE 8z User’s Guide.
Oki Data Americas, Inc. 2000 Bishops Gate Blvd., Mt.Laurel, NJ 08054-4620
1-800-OKI-DATA (1-800-654-3282) Fax: 856-222-5247 www.okidata.com
58360201
7
Install Printer Software for Windows
Windows 98 with USB Connection
These instructions assume “D” is your CD-ROM drive.
Have your original Microsoft Windows 98 CD
handy. You may be prompted for it during the
installation.
Check Windows Device Manager to verify that the
USB port on your PC is enabled. If it is not, check
your system’s documentation for information.
q
Turn on your computer, then turn on your printer.
q
Found a USB Device appears. The wizard searches for a driver for the
USB device. Click Next.
q
Select “Search for the best driver for your device (Recommended).” Click
Next.
q
Insert the OKIPAGE 8z CD into your CD-ROM drive.
q
Check “CD-ROM drive.” Click Next.
q
A search for the OKI USB device begins. Device is detected and OKI USB
Driver displays. Click Next to continue.
Windows 98 with Parallel Connection
These instructions assume “D” is your CD-ROM
!
drive.
Have your original Microsoft Windows 98 CD
handy. You may be prompted for it during the
installation.
q
Turn on your printer, then turn on your computer.
q
When the Add New Hardware Wizard appears, click Next.
q
Select “Search for the best driver for your device, (recommended).” Click
Next.
q
Insert the OKIPAGE 8z CD into your CD-ROM drive.
q
Check “CD-ROM drive.” Click Next.
q
Confirm that the driver is ready to be installed. Click Next.
q
Verify the printer name, and select Next to specify OKIPAGE 8z as the
default printer. Click Finish.
q
In the Print Test dialog box, select Yes , click Finish. The files are copied.
q
The Oki USB driver files are then copied to the system. Select Finish.
q
The operating system detects the printer, the Add New Hardware Wizard
appears. Click Next.
q
Add New Hardware Wizard appears with OKIPAGE 8z listed. Click Next.
q
Select “Search for the best driver for your device (recommended).” Click
Next.
q
Check “CD-ROM Drive.” Click Next.
q
Complete the installation following the instructions on your screen.
Install Additional Software
With the CD in your CD-ROM drive:
q
Click Start®Run.
q
Type in D:\install.exe. Click OK.
q
Click the language of your choice.
q
Click the button beside
Additional Software. The User’s
Guide, Status Monitor, Product Registration and Readme file will install..
Install Additional Software
With the CD in your CD-ROM drive:
q
Click Start®Run.
q
Type in D:\install.exe. Click OK.
q
Click the language of your
choice.
q
Click the button beside
Additional Software. The User’s Guide, Status Monitor, Product
Registration and Readme file will install..
q
Follow the instructions on your screen to complete the installation and
restsart your computer.
q
Activate the Status Monitor
Use the on-screen Status Monitor to
monitor print jobs, check printer status,
and set certain printer features.
q
Follow the instructions on your screen to complete the installation and
restsart your computer.
q
Verify that the USB port is active:
From the Taskbar, click Start®Settings®Printers. Right-click the
OKIPAGE 8z icon, then click Properties\Ports. Make sure USB001 is
checked, click OK.
q
Activate the Status Monitor
Use the on-screen Status Monitor to
monitor print jobs, check printer status,
and set certain printer features. From the
Taskbar, click From the Taskbar, click
Start®Programs®OKIPAGE
8z®OKIPAGE 8z Status Monitor.
From the Taskbar, click
Start®Programs®OKIPAGE8z®
OKIPAGE 8z Status Monitor.
To view the User’s Guide
From the Taskbar, click From the Taskbar, click
Start®Programs®OKIPAGE 8zÕOKIPAGE 8z Status
Monitor.
To view the User’s Guide
From the Taskbar, click Start®Programs®OKPAGE 8z®
OKIPAGE 8z User’s Guide.
©
2000 Oki Data Americas, Inc. 2000 Bishops Gate Blvd., Mt. Laurel, NJ 08054-4620 1-800-OKI-DATA (1-800-654-3282) Fax: 856-222-5247 http://www.okidata.com 58341901

Install Printer Software for Windows
7
Windows 2000 with USB Connection Windows 2000 with Parallel Connection
These instructions assume “D” is your CD-ROM drive.
!
Have your original Microsoft Windows 2000 CD
handy. You may be prompted for it during the
installation.
q
Turn on your computer. Then turn on your printer. Found New Hardware
“USB device ” displays.
q
The Found New Hardware wizard displays, click Next.
q
Select “Search for a suitable driver for my device (recommended).” click
Next.
q
Insert the OKIPAGE 8z CD into your CD-ROM drive.
q
“Where do you want to Search” displays, Check CD-ROM. Click Next.
q
OKIPAGE 8z driver is found. Click Next.
q
In the Digital Signature Not Found box, click Yes. The printer driver is
installed.
q
Click Finish to complete the installation.
Install Additional Software
With the CD in your CD-ROM drive:
q
Click Start®Run.
q
Type in D:\install.exe. Click OK.
q
Click the language of your choice.
These instructions assume “D” is your CD-ROM
!
drive.
Have your original Microsoft Windows 2000 CD
handy. You may be prompted for it during the
installation.
q
Turn on your computer and then turn on your printer.
q
The Found New Hardware wizard displays, click Next.
q
Select “Search for a suitable driver for my device (recommended).”
Click Next.
q
Insert the Okipage 8z CD into your CD-ROM drive.
q
Check CD-ROM drive. Click Next.
q
The wizard searches for the driver files. Click Next.
q
In the Digital Signature Not Found box, click Yes. The printer driver is
installed.
q
Click Finish.
Install Additional Software
With the CD in your CD-ROM drive:
q
Click Start®Run.
q
Type in D:\install.exe. Click OK.
q
Click the language of your
choice.
q
Click the button beside Additional
Software. The User’s Guide,
Status Monitor, Product Registration and Readme file will install..
q
Follow the instructions on your screen to complete the installation and
restsart your computer.
q
Verify that the USB port is active:
From the Taskbar, click Start®Settings®Printers. Right-click the
OKIPAGE 8z icon, then click Properties\Ports. Make sure USB001 is
checked, click OK.
q
Activate the Status Monitor
Use the on-screen Status Monitor to
monitor print jobs, check printer status,
and set certain printer features.
From the Taskbar, click
Start®Programs®OKIPAGE 8z®OKIPAGE
8z Status Monitor.
q
Click the button beside
Additional Software. The User’s
Guide, Status Monitor, Product Registration and Readme file will
install.
q
Follow the instructions on your screen to complete the installation
and restsart your computer.
q
Activate the Status Monitor
Use the on-screen Status Monitor to
monitor print jobs, check printer status,
and set certain printer features.
From the Taskbar, click From the Taskbar,
click Start®Programs®OKIPAGE
8z®OKIPAGE 8z Status Monitor.
To view the User’s Guide
From the Taskbar, click Start®Programs®OKIPAGE8z®
OKIPAGE 8z User’s Guide
To view the User’s Guide
From the Taskbar, click Start®Programs®OKIPAGE8z®
OKIPAGE 8z User’s Guide.

7
Install Printer Software for Windows
Windows NT 4.0 with Parallel ConnectionWindows 95 with Parallel Connection
These instructions assume “D” is your CD-ROM
!
drive.
Have your original Microsoft Windows 95 CD
handy. You may be prompted for it during the
installation.
Before you can install the printer software, you need to determine the
version of Windows installed on your computer. To do this:
q
Turn on your computer.
q
Click Start®Settings®Control Panel. Double-click System.
q
On the General tab, look under System. Beneath “Microsoft Windows
95” a version number appears, for example 4.00.950. If that number is
followed by the letter “B” you have type 2, if not, you have type 1.
Windows 95 (type 1)
q
Turn on your printer.
q
Click “Driver from disk provided by hardware manufacturer.” Click OK.
q
Insert the OKIPAGE 8z CD into your CD-ROM drive.
q
In the copy manufacaturer’s files field, click Browse, then locate
d:\oemsetup. Click OK.
q
In the Install From Disk dialog box, click OK.
q
The Select Name for your printer dialog box appears. Click Next.
q
In the Print Test Dialog box, select Yes . Click Finish.
q
Continue with instructions below to Install Additional Software.
These instructions assume “D” is your CD-ROM
!
drive.
Have your original Microsoft Windows NT 4.0 CD
handy. You may be prompted for it during the
installation.
q
Turn on your computer, then your printer.
q
Insert the OKIPAGE 8z CD into your CD-ROM drive.
q
From the Taskbar, click Start®Run.
q
Type in D:\install.exe. Click OK.
q
Click the language of your choice.
q
The OKIPAGE 8z Menu Installer appears. Click the Printer Driver button.
q
The Add Printer Wizard dialog box appears. Select “My Computer,”
click Next.
q
From Available ports, select LPT1:Local Port. Click Next.
q
The Manufacturer and Model box appears. Click Have Disk.
Windows 95 (type 2)
q
Turn on your printer.
q
Insert the OKIPAGE 8z CD into your CD-ROM drive.
q
When the Update Device Driver Wizard appears, click Finish.
q
The Select Name for Your Printer dialog box appears. Click Next.
q
In the Please insert the disk labeled Oki Driver Disk 1 message box,
click OK.
q
In the Copying Files dialog box, click Browse, then locate
D:\OP8WPGDI.DAT. Click OK.
q
In the Copying Files dialog box, click OK.
q
In the Print Test dialog box, select Yes. the files are copied.
q
Continue with instructions below to Install Additional Software.
Install Additional Software
With the CD in your CD-ROM drive:
q
Click Start®Run.
q
Type in D:\install.exe. Click OK.
q
Click the language of your
choice.
q
Click the button beside
Additional Software. The User’s Guide, Status Monitor, Product
Registration and Readme file will install..
q
Follow the instructions on your screen to complete the installation and
restsart your computer.
q
The Install from Disk window pops up. Click Browse, then locate
D:\WinNT40\English. Click Open. Click OK.
q
OKIPAGE 8z appears. Click Next.
q
The Printer Name dialog box appears. Click Next.
q
Select “Not shared” and click Next.
q
In the Print Test dialog box,
select Yes , click Finish. The files
are copied.
q
In the OKIPAGE 8z Menu
Installer, click the button beside
Additional Software. Follow the
instructions on your screen.
The User’s Guide, Status Monitor,
Product Registration and
Readme file install.
q
Follow the instructions on your
screen to complete the
installation and restsart your computer.
q
Activate the Status Monitor
Use the on-screen Status Monitor to
monitor print jobs, check printer status,
and set certain printer features.
From the Windows Taskbar, click From the
Taskbar, click
Start®Programs®OKIPAGE 8z®
OKIPAGE 8z Status Monitor.
To view the User’s Guide
Click Start®Programs®OKIPAGE 8z®OKIPAGE 8z User’s
Guide.
q
Activate the Status Monitor
Use the on-screen Status Monitor to
monitor print jobs, check printer status,
and set certain printer features.
From the Windows Taskbar, click From
the Taskbar, click
Start®Programs®OKIPAGE
8z®OKIPAGE 8z Status Monitor.
To view the User’s Guide
Click Start®Programs®OKIPAGE 8z®OKIPAGE 8z User’s
Guide.
58341901

7
Install Printer Software
for Macintosh with USB Port
The OKIPAGE 8z driver supports Mac OS 8.1 or
!
higher.
q
Make sure the OKIPAGE 8z is OFF.
q
Turn ON your computer.
q
Insert the OKIPAGE 8z CD into your CD-ROM Drive.
q
Double-click the OKIPAGE 8z CD-ROM icon that appears on the
desktop.
q
Double-click the Mac folder.
q
Double-click the Installer icon.
q
Click Install on the Printer Driver Installer screen. Installation
begins.
q
When “Installation is complete” appears, click Quit.
q
Turn on the OKIPAGE 8z power.
For Support or Service
• See our multilingual web site:
http://www.okidata.com
• Consult the store where you
purchased your printer.
• In the U.S. and Canada, call:
– 1-800-OKI-DATA (1-800-654-3282)
24 hours a day, 7 days a week.
• In Latin America, call:
– Oki Data de Mexico, S.A. de C.V., (525)
263-8780
– Oki Data do Brasil, Ltda., 5511-5011-1518
q
Activate the Chooser from the Apple menu.
q
Click the OKIPAGE 8z icon. Close the window.
q
Verify that you have changed the current printer. Click OK.
Installation is complete.
Install the On-line User’s Guide
Requirements
• Microsoft Internet Explorer version 4.0 or higher
• Netscape Communicator version 4.7 or higher
In order to open the User’s Guide, you must have your Macintosh
!
set to run .htm extension files under your browser.
q
Create a folder in which to store the User's Guide.
q
Place the OKIPAGE 8z CD in your CD-ROM drive.
Product Registration
To register your printer use any of the following
options:
• Go to our web site http://www.okidata.com and
click Product Registration.
• Fill out the enclosed registration form and mail it or
fax it in.
• PCs only: Register via modem using the Product
Registration program (click
Start®Programs®OKIPAGE 8z®Product
Registration, then follow the on-screen prompts to
register your printer).
q
Copy the folder Manual\Html\English to the folder you created.
To View the User’s Guide
To use the on-line User's Guide, go to the folder where you placed it
and double-click the start_e.htm file.
-
Windows® and Windows NT are registered trademarks of Microsoft Corporation in the U.S. and other countries. Macintosh is a registered trademark of Apple Computer, Inc.
 Loading...