

Page 1

OkiLAN 6020e® Pocket Print Server
User’s Guide
High Performance 10/100 Base-T Ethernet
Network Print Server
Page 2

Copyright and Trademark Information
Every effort has been made to ensure that the information
in this document is complete, accurate, and up-to-date.
Oki Data assumes no responsibility for the results of
errors beyond its control. Oki Data also cannot guarantee
that changes in products made by other manufacturers
and referred to in this handbook will not affect the
applicability of the information in it. This handbook is
subject to change without notification.
© 2000 by Oki Data. All rights reserved.
Oki Data, OKIPAGE, OkiVIEW, OkiLAN Reg. T.M.,
M.D.,., and OKICOLOR T.M., OKI Electric Industry Co.,
Ltd.; Windows, MS-DOS Reg. T.M., Microsoft Corp.; HP
LaserJet, PCL, Reg. T.M. Hewlett Packard Company;
Centronics Reg. T.M., Centronics Data Computer Corp.;
Energy Star, Reg. T.M., U.S. EPA; Ethernet Reg. T.M.
Digital Equipment Corp.; Adobe Reg. T.M., PostScript
T.M., Adobe Systems Inc.; Macintosh EtherTalk,
LocalTalk, TrueType Reg. T.M. , Apple Computer Inc.;
Novell, NetWare, Unix, YES NetWare Tested and
Approved logo, Reg. T.M. Novell Corp.; ProPrinter, OS/2
Reg. T.M. TokenRing, T.M., International Business
Machines Corp.
ii
OKI OkiLAN 6020e User’ s Guide
Page 3

Organization and Contents
Organization
This manual has been divided into eight sections. Section
I contains and installation instructions for the OkiLAN
6020e print server.
Section II contains information about management
features, an extremely valuable set of OkiLAN 6020e
management tools for network administrators.
The Network Operating System (NOS) and protocol
sections are found in Sections III through VI.
Section VII contains information and instruction on
Windows printing options. With the exception of the
Advanced Management Features section, each section in
this manual has been designed to be independent of one
another.
Contents
Section I: Hardware Installation..............................I-1
Section II: Advanced Management Features ........II-1
Chapter 1: SNMP......................................................... II-3
Chapter 2: HP JetAdmin Support................................. II-6
Chapter 3: HP Web JetAdmin Support ......................... II-8
Chapter 4: OkiLAN 6020e W eb Configuration .......... II-10
Chapter 5: Additional Management Features .............. II-18
Section III: Novell NetWare....................................III-1
Chapter 1: Introduction................................................ III-4
Chapter 2: OkiNet for NetW are ...................................III-6
Chapter 3: OkiNet for NDS ......................................III-24
Chapter 4: Using the OkiLAN 6020e in NDPS
(NetW are 4.x and 5.1) ...............................................III-33
OKI OkiLAN 6020e User’ s Guide
iii
Page 4

Organization and Contents
Section IV: TCP/IP.................................................. IV-1
Chapter 1: Introduction................................................ IV -5
Chapter 2: Configuring the OkiLAN 6020e ................ IV-7
Chapter 3: TCP/IP Configuration and Printing.......... IV -14
Chapter 4: OkiNet for TCP/IP................................... IV-23
Chapter 5: W eb Configuration ................................... IV-42
Chapter 6: T elnet Configuration.................................IV-43
Appendix A: Troubleshooting ................................... IV -49
Appendix B: Application Considerations .................. IV-56
Appendix C: Internet Printing Protocol (IPP) ...........IV-81
Section V: LAN Manager/LAN Server................... V-1
Chapter 1: Introduction................................................. V-3
Chapter 2: Installation................................................... V-5
Chapter 3: Printing in the OS/2 Environment ............. V-11
Chapter 4: Additional Utility Features ........................ V -13
Chapter 5: Using Help................................................ V-16
Appendix A: Troubleshooting .................................... V-17
Section VI: EtherT alk............................................. VI-1
Chapter 1: Introduction............................................... VI-3
Chapter 2: The OkiLAN 6020e Utility ....................... VI-4
Appendix A: Troubleshooting .................................... VI-8
Appendix B: Selecting Y our Printer ......................... VI-13
Appendix C: Capturing With a Spooler.................... VI-14
Section VII: Windows Printing............................. VII-1
Chapter 1: OkiLAN 6020e Set Up
for Windows NT 4.0/2000 ........................................ VII-3
Chapter 2: OkiLAN 6020e Set Up
for Windows 95/98 ................................................. VII-10
Section VIII: OkiView 32...................................... VIII-1
Chapter 1: Introduction............................................. VIII-3
Chapter 2: OkiView 32 Printer Panel ....................... VIII-4
Section IX: Regulatory Information ..................... IX-1
Index
iv
OKI OkiLAN 6020e User’ s Guide
Page 5

Network Operating Systems
Network Operating Systems
Overview
OkiLAN 6020e simultaneously supports several network
protocols in various combinations. Below is a list of
supported network protocols accompanied with NOS/OS
requirements.
TCP/IP and Windows NT
TCP/IP, FTP and Remote LPD protocols. Simple Network
Management Protocol (SNMP) and Windows NT are
supported in this environment. HTTP and a built-in Web
server are standard for the 6020e.
Novell NetWare
Novell NetWare versions 3.x, 4.1, 5.x and higher.
EtherTalk
Macintosh® System 6.x or later and LaserWriter® Driver
version 8.x.
LAN Manager/LAN Server
OS/2 version 1.3 with LAN Manager version 2.x and OS/
2 version 1.3 or higher with LAN Server version 2.x and
higher.
OKI OkiLAN 6020e User’ s Guide
v
Page 6

Technical Support
Service Information
Note: This information is valid for the United States and
Canada only.
Oki Data On Line
Visit the OKI DATA Web Site at http://www.okidata.com for
the latest information on:
• Software drivers
• Product guides
• Customer support
• Corporate information
• Dealers
• Documentation
Y our Dealer
Consult the store where you purchased your OkiLAN
6020e, or call 1-800-OKI-DATA (1-800-654-3282) for
the location of the nearest authorized Oki Data service
dealer. Have your ZIP code ready.
• Proof of purchase is required for warranty work. Be
sure to retain your purchase documents.
• Prices and minimum charges may vary.
The Oki Data Customer Support Center
For customer support, call 1-800-OKI-DATA (800-654-
3282). The Oki Data Information System Automated
Attendant is available 24 hours a day, 7 days a week. The
system can provide immediate assistance with:
• Basic operating procedures
• Sales and service referrals
• Parts and consumable referrals
• Product information
vi
OKI OkiLAN 6020e User’ s Guide
Page 7

Technical Support
Oki Data Customer Support Representatives
Agents are available 24 hours a day, 7 days a week at
1-800-OKI-DATA (1-800-654-3282). Please be sure that
you are calling from a telephone close to your printer, so
you can describe your problem accurately. Our customer
service representatives are trained on all current Oki Data
products They can answer your questions regarding:
• Installation
• Determination of printer issues that require service
• Consumer relations
• Interface information
• Availability and installation of printer drivers and
support for the latest network operating systems.
(Customer service representatives are not trained to
provide assistance with the use of commercial software
packages. Please consult your software user’s manual
for times and availability of their support).
Oki Data Service Centers
Oki Data has over 2,000 local Authorized Service
Providers in North and South America.
For the most comprehensive, up-to-date listing of Oki
Data authorized Service Centers:
- Consult our web site at www.okidata.com
- In the U.S. and Canada, call 1-800-654-3282 (1-800-
OKI-DATA) English and French only.
- In Latin America, contact the Latin America Service
Coordinator at Oki Data’s Corporate
Headquarters at 856-235-2600 (Spanish only).
United States
Oki Data Americas, Inc.
Tel: 1-800-OKI-DATA (800-654-3282)
Fax: 1-856-222-5247
Canada
Oki Data Americas, Inc.
Tel: 1-800-OKI-DATA (800-654-3282)
Fax: 905-238-4427
OKI OkiLAN 6020e User’ s Guide
vii
Page 8

Technical Support
Brazil
Oki Data do Brasil, Ltda.
Tel: 0800-11-5577
Fax: 55-11-5012-0267
Mexico
Oki Data de Mexico, S.A. de C.V.
Tel: 525-263-8780
Fax: 525-250-3501
viii
OKI OkiLAN 6020e User’ s Guide
Page 9

Technical Support
When you call Technical Support, the following
information will help us answer your questions more
quickly and accurately. Please be able to identify the
following:
• OkiLAN model number
• Serial number
• Configuration sheet settings
• Type of network cable connected to the OkiLAN 6020e
• Printer(s) make and model numbers
• Computer and network adapter card make and model
numbers
• Network Operating System and version number
Please write these numbers down in the space provided
below for future reference.
Model #: ___________________
S/N: ___ ___ ___ ___ ___ ___ ___
Ethernet ADDR: 00:40:68: ___ : ___ : ___
OKI OkiLAN 6020e User’ s Guide
ix
Page 10

Technical Support
x
OKI OkiLAN 6020e User’ s Guide
Page 11

Section I:
Hardware
Installation
Hardware Installation
Page 12

Section I - Hardware Installation
I - 2
OKI OkiLAN 6020e User’ s Guide
Page 13

Section I - Hardware Installation
In This Section
Powering On the OkiLAN 6020e................ I-7
Printing a Configuration Sheet ..................... I-8
Hardware Installation
OKI OkiLAN 6020e User’ s Guide
I - 3
Page 14

Section I - Hardware Installation
I - 4
OKI OkiLAN 6020e User’ s Guide
Page 15

Section I - Hardware Installation
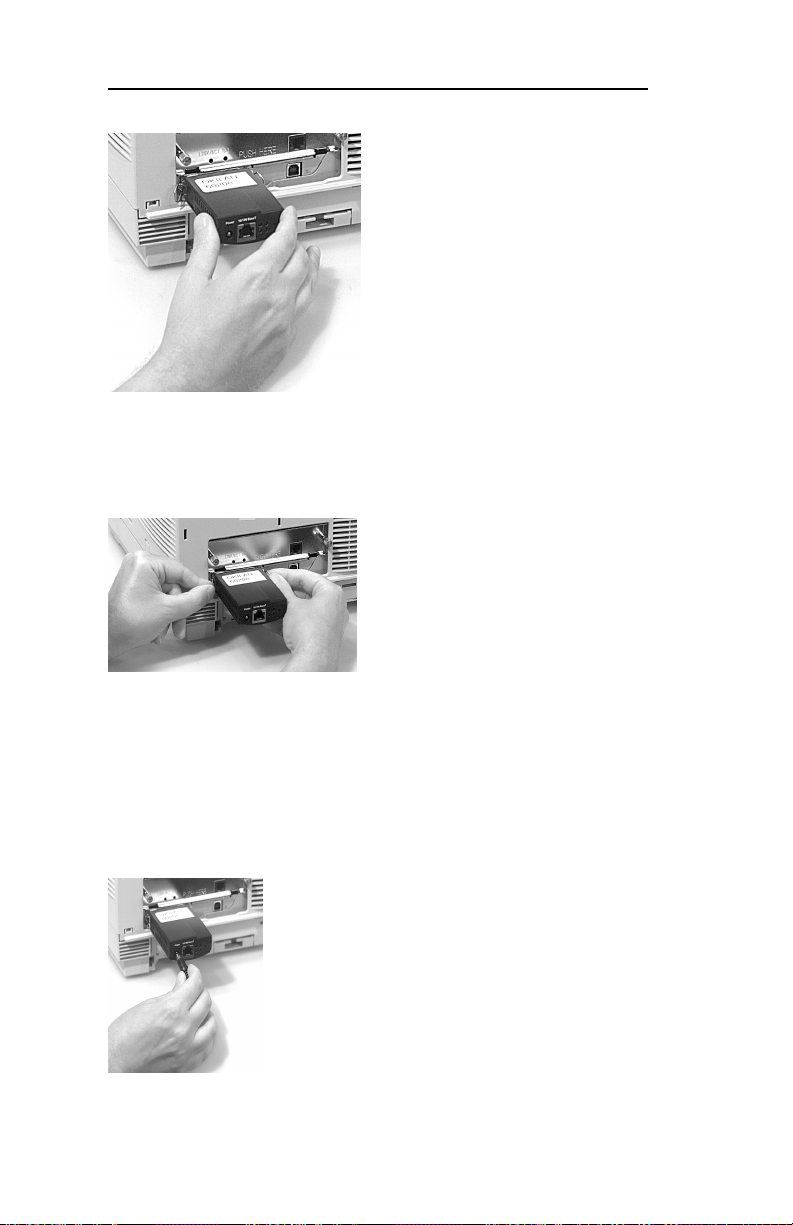
The OkiLAN 6020e Pocket Print Server enables
Ethernet network users to connect to a printer with a
bidirectional parallel port. The OkiLAN 6020e can be
made to work with any Centronics or IEEE-1284 parallel interface printer that includes a resident emulation
such as PCL versions 4 through 6, Adobe PostScriptâ,
IBM ProPrinterâ or Epsonâ emulations.
The OkiLAN 6020e supports 10/100-megabit networks
and most popular network operating systems and printers, except for the OKIPAGE 8z and other GDI-based
printers.
The OkiLAN 6020e kit includes the following:
· OkiLAN 6020e hardware
· Power adapter with line cord
· Installation User’s Guide
· Utilities CD
· Product registration card
Hardware Installation
Installing the OkiLAN 6020e
1. Turn off printer power .
2. Attach the OkiLAN 6020e to the centronics connec-
tor on your printer .
Parallel
connector
OKI OkiLAN 6020e User’ s Guide
I - 5
Page 16
Section I - Hardware Installation
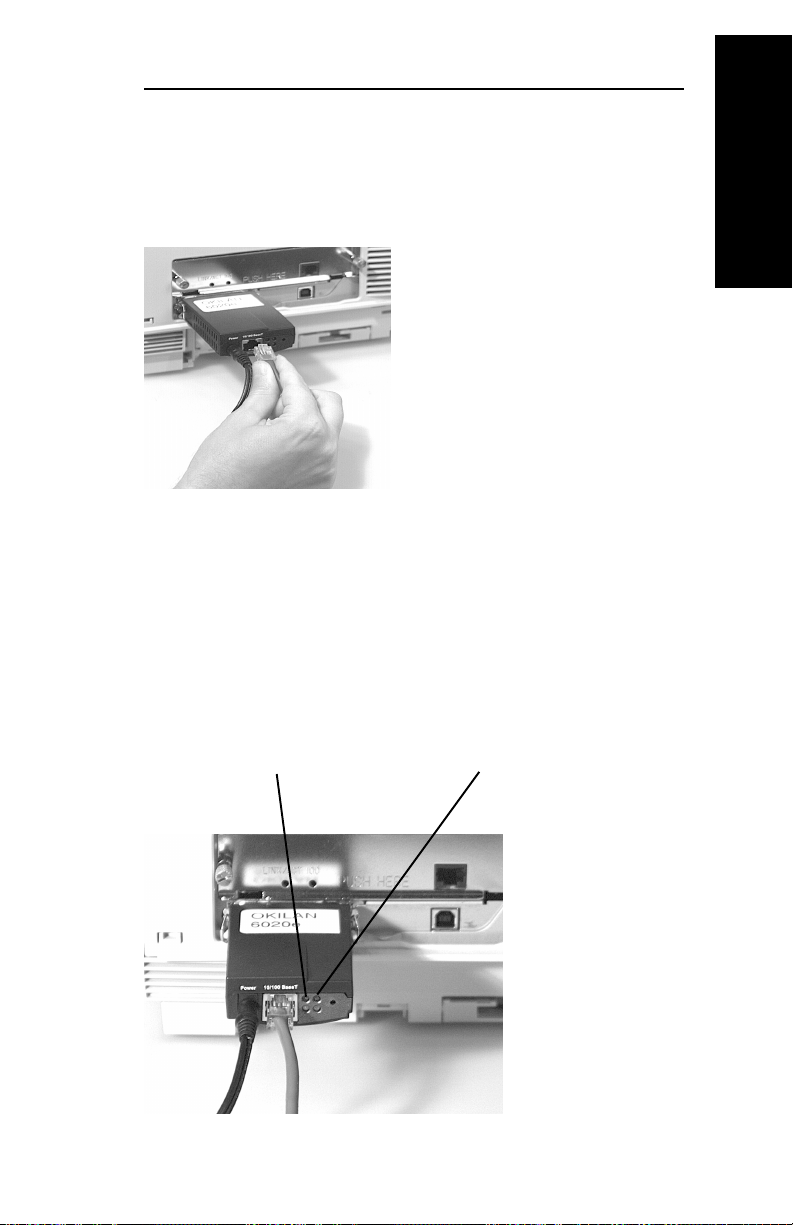
3. Secure the OkiLAN 6020e with the wire clips on the
printer’s connector .
4. Plug the power adapter wire into the power jack on
the OkiLAN 6020e. Then plug the power adapter
into a 120 VAC wall outlet.
Please note that some countries may requir e a
different adapter for local voltages, such as 240
V AC.
I - 6
OKI OkiLAN 6020e User’ s Guide
Page 17
Section I - Hardware Installation
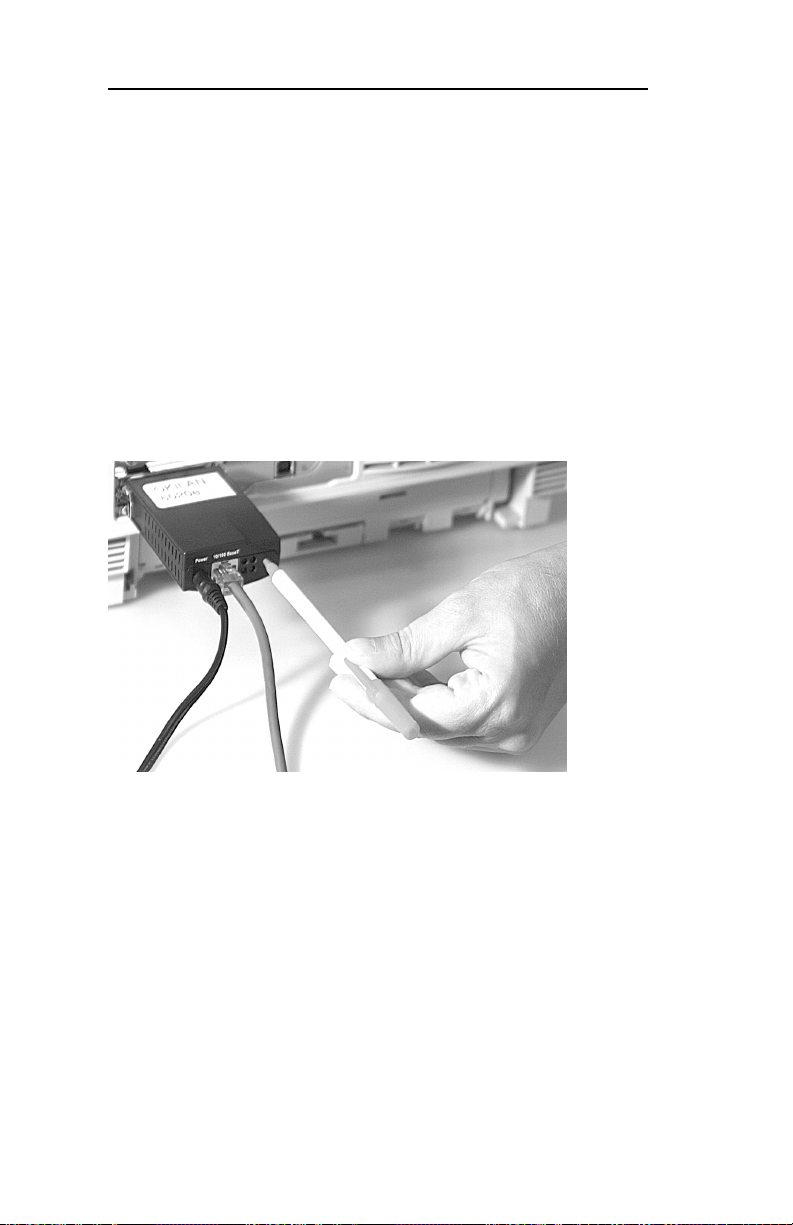
5. Attach the 10/100Base-T UTP cable to the recep-
tacle on the back of the OkiLAN 6020e.
Attach the other end of the cable to the Network.
Powering On the OkiLAN 6020e
Turn printer power on. The red and green indicators on
the OkiLAN 6020e will blink during self-test. When
self-test completes successfully , the red indicator will go
off and the green indicator will stay on.
Hardware Installation
Green indicator Red indicator
OKI OkiLAN 6020e User’ s Guide
I - 7
Page 18
Section I - Hardware Installation
Note: If the red and green indicators do not display as
indicated above, see Hardware T roubleshooting at the
end of this section.
Printing a Configuration Sheet
T o print configuration information, press the T est button
on the front of the OkiLAN 6020e. You can also print
configuration information using the utility program
provided on the CD.
Note: By default, the configuration sheet prints in
ASCII text. If you want the configuration sheet to print
in PostScript or PCL, select this option (if the emulation
is supported in the printer) when you run the network
configuration utility program. The selected language
must match the printer’s configured language to print
correctly .
The content of the configuration sheet will vary depending on your printer and system setup.
I - 8
OKI OkiLAN 6020e User’ s Guide
Page 19

Section I - Hardware Installation
Installing the OkiLAN 6020e
Software Utilities
Introduction
Your OkiLAN 6020e Pocket Print Server comes with
two types of software utilities: OkiV iew 32 and OkiNet
Utilities.
OkiView 32
OkiV iew 32 is a general purpose utility for configuring
and montioring printers on NetW are and W indows NT/
2000 servers. It includes a GUI for the Win32
(Windows) environment. For more information on using
OkiV iew 32, see section VIII.
OkiNet Utilities
The OkiNet utilities are specialty utilities used in different operating systems such as Unix, Mac and Win32.
A custom port monitor utility is also provided for the
Win32 environment which supports peer -to-peer
printing, also known as serverless printing. TCP/IP, DLC
and IPX-direct protocols are supported in this serverless
network environment. See Section VII, W indows Printing, for details.
Hardware Installation
OKI OkiLAN 6020e User’ s Guide
I - 9
Page 20

Section I - Hardware Installation
Installing the OkiLAN Utilities
Software in Windows
1. Insert the OkiLAN CD into your CD-ROM drive.
2. The Setup screen appears automatically (if it doesn’t,
click Start®Run, then enter D:\setup, if “D” is your
CD-ROM drive).
3. Select the utility group for the network environment
you have, then click Next.
4. Select the specific utility you want to install and the
proper location for installation, then click Install.
Windows Utility Groups:
NetWare Management Utilities
OkiNet Utility for NetW are
OkiNet Utility for NDS (W orkstation and Server)
OkiNet Utility for NDS (W orkstation)
OkiNet Connect Windows Printing
OkiNet Connect for TCP/IP (Windows 95/98)
OkiNet Connect for TCP/IP (Windows NT)
OkiNet Connect for IPX/SPX (Windows 95/98)
OkiNet Connect for IPX/SPX Windows NT)
OkiNet Connect DLC (Windows 95/98)
OkiNet Connect DLC (Windows NT)
TCP/IP Management Utilities
OkiNet Utilities for TCP/IP
OkiNet Alert for TCP/IP
Okidata MIB
BootP Server
I - 10
OKI OkiLAN 6020e User’ s Guide
Page 21

Section I - Hardware Installation
Apple® MacIntosh® Utility Groups:
OkiNet for the Apple® MacIntosh®
Utility
Note: The OkiLAN Utilities CD is designed for more
than one type of OkiLAN print server and includes
features that do not apply to the OkiLAN 6020e. Specifically , Apple EtherTalk is supported by other OKI print
servers but not by the OkiLAN 6020e.
Installing OkiView 32
Note: Novell’ s Client for W indows 95/98, NT or 2000 is
required for OkiV iew 32. Microsoft Client is required
only for configuring Novell using a Microsoft network.
Insert the OkiV iew 32 CD into your CD-ROM drive and
run Setup.exe.
Hardware Installation
OKI OkiLAN 6020e User’ s Guide
I - 11
Page 22

Section I - Hardware Installation
Hardware T roubleshooting
Status Indicator
The LED status indicators display the general operating
state of the OkiLAN 6020e. During normal operation,
the red LED is off and the green LED is on, indicating
that the OkiLAN 6020e is functioning properly and the
presence of the network is detected.
The following list describes LED displays that indicate
problems, as well as possible solutions:
LED Display
Green indicatior flashing very rapidly
Problem
The OkiLAN 6020e has not detected the presence of a
network cable.
Solution
a) Unplug the OkiLAN 6020e power adapter from the
wall outlet. Remove the network cable. Plug the
network cable back in until you hear a positive click.
Check the other end of the cable in the same manner .
Plug the OkiLAN 6020e back in. If it does not detect
a cable, continue below .
b) Verify the cable is a 10/100 Base-T cable and it has
an RJ-45 end. The network cable must have a cat-3
or higher rating. Silver Satin or flat ribbon cable is
not adequate.
c) Connect to a network that a currently working PC or
print server is using. If the OkiLAN 6020e is still
unable to detect the network cable, contact T echnical
Support for assistance.
I - 12
OKI OkiLAN 6020e User’ s Guide
Page 23

Section I - Hardware Installation
LED Display
Green indicator is flashing slowly (1 timer/sec);
the OkiLAN 6020e is trying to print a job.
Problem
The printer is malfunctioning or does not have sufficient
paper or toner.
Solution
Verify that the printer is not showing any errors and has
sufficient paper and toner .
LED Display
Red indicator is stays red for more than 30 seconds
Problem
The printer server has failed the Power On Self T est.
Solution
The OkiLAN 6020e will try to print a configuration
sheet on the printer with more information.
Failing the self test can be caused by any of the following:
a) The printer is malfunctioning. Unplug the OkiLAN
6020e from the printer and unplug the power adapter.
Reconnect the OkiLAN 6020e and the power
adapter. If the OkiLAN 6020e still fails the self test,
continue below .
b) The OkiLAN 6020e power supply has failed or there
is a hardware problem. Contact Okidata Customer
Support for replacement information.
Hardware Installation
OKI OkiLAN 6020e User’ s Guide
I - 13
Page 24

Section I - Hardware Installation
LED Display
The red and green indicators are alternately flashing for
longer than two minutes.
Problem
The OkiLAN 6020e is in firmware download mode.
This means it is waiting for new firmware to be sent
before it will continue functioning normally .
Solution
If the OkiLAN 6020e was purposely put into firmware
download mode, finish the download with the proper
update utility . Contact our web site at
http://www .okidata.com to download the utility .
I - 14
OKI OkiLAN 6020e User’ s Guide
Page 25

Section II:
Advanced
Management
Features
Advanced Management
Page 26

Section 2 - Advanced Management Features
In This Section
Chapter 1 SNMP ......................................................II-3
Overview ....................................................... II-3
Private MIB ................................................... II-3
Traps .............................................................. II-4
Security .......................................................... II-5
Chapter 2 HP JetAdmin Support............................II-6
Overview ....................................................... II-6
Configuring the OkiLAN 6020e
Using JetAdmin........................................... II-6
Chapter 3 HP Web JetAdmin Support ...................II-8
Overview ....................................................... II-8
Configuring the OkiLAN 6020e Using
Web JetAdmin ............................................. II-8
Installing a Windows NT Printer for the
OkiLAN 6020e ............................................ II-8
Obtaining Diagnostic Information from
the OkiLAN 6020e ...................................... II-9
Chapter 4 OkiLAN 6020e Web Configuration .....II-10
Overview ..................................................... II-10
Connecting to the OkiLAN 6020e............... II-10
Configuration............................................... II-12
Status............................................................ II-15
Print Job Log ............................................... II-15
Support......................................................... II-15
Reset ............................................................ II-16
OkiLAN 6020e Server Discovery ............... II-16
Troubleshooting........................................... II-17
Chapter 5 Additional Management Features ......II-18
OkiNet Alert................................................. II-18
Enhanced Printer Status............................... II-18
OkiNet for NDS ........................................... II-19
OkiNet for TCP/IP (Creating Custom
Views)........................................................II-19
NetWare Load Balancing............................. II-19
Windows Printing ........................................ II-19
Printer Security for TCP/IP Printing............ II-19
II - 2
OKI OkiLAN 6020e User’s Guide
Page 27

Section 2 - Chapter 1 - SNMP
Chapter 1
Simple Network Management
Protocol (SNMP)
Overview
Simple Network Management Protocol (SNMP)
provides network administrators with the ability to
communicate management functions between an SNMP
manager and an SNMP agent. An SNMP manager is a
user program the network administrator can use to
manage SNMP agents. The manager can retrieve Get
information from the agent or alter Set information on
the agent. An agent can also send an unsolicited
message Trap to a manager when it encounters an
unusual condition.
The OkiLAN 6020e is a fully functional SNMP agent
and supports any standard SNMP management
platform, including:
• HP OpenView
• Novell NMS
• Sun SunNet Manager
• IBM NetView
Advanced Management
Private MIB
OkiLAN 6020e SNMP support has been enhanced with
a private MIB. It is accessible via SNMP over TCP/IP
and IPX. This private MIB contains over 150
configuration and status variables for the network
protocols, printer ports, network interfaceprinter
settings, and the overall OkiLAN 6020e status. Printer
status traps such as on-line, off-line, detached printer
and printer error are also provided.
The setting of certain variables causes an immediate
firmware reset. These variables are listed in the private
MIB under cmdReset.
OKI OkiLAN 6020e User’s Guide
II - 3
Page 28

Section 2 - Chapter 1 - SNMP
Note: If you attempt a reset while a job is printing, the job
may not print successfully .
Certain variables are critical, that is, they change a
fundamental operating parameter of the OkiLAN
6020e. These variables are saved by the OkiLAN
6020e but are not actually used until it is power cycled
or is reset. When any one of these variables is changed
the variable genConfigDirty is automatically set to yes
by the print server. This signifies a reset is required for
all configuration changes to be made active. We
recommend checking the genConfigDirty variable after
using a MIB browser to make any configuration
changes to the OkiLAN 6020e. If genConfigDirty is set
to yes, then the cmdReset variable should also be set to
yes. This will cause the OkiLAN 6020e to reset, make
all configuration changes active on the OkiLAN 6020e
and set both the cmdReset and genConfigDirty
variables to no. These critical variables are listed in the
private MIB under genConfigDirty.
T raps
Traps are unsolicited information from the SNMP
agent. The OkiLAN 6020e uses a ColdStart trap to
inform the manager it has been powered on or reset. An
authentication failure trap is sent when the OkiLAN
6020e receives an SNMP trap GET or SET request with
an incorrect community name.
The OkiLAN 6020e sends printer traps when there is a
change in the status of the printer. If the Printer goes
off-line, runs out of paper or is detached, the
administrator will be notified via the OkiLAN 6020e
traps over both UDP and IPX. Additionally, the
OkiLAN 6020e can send traps on toner low, paper jam,
and printer cover open, depending on the printer’s
capabilities. The traps may be configured for specific
destination addresses and can be configured for a
particular printer port and/or printer trap.
II - 4
OKI OkiLAN 6020e User’s Guide
Page 29

Section 2 - Chapter 1 - SNMP
In order to receive OkiNet Alert traps, the OkiLAN
6020e must have bi-directional status enabled (it is
disabled by default). Extended Status can be enabled
through the OkiLAN 6020e Configuration utility
(telnet) from the Configure Port option. You can also
enable OkiNet Alert through OkiNet for TCP/IP or IPX
from the Output Port file tab.
Security
SNMP implements a simple security system known as
community names. Each SNMP message has a
community name associated with the command in the
message. SNMP allows for a Set community name, Get
community name and a Trap community name. When
the SNMP Agent receives a command, it checks the
community name of the message with the community
name of the device. If the community names do not
match, the Agent discards the message and sends an
authentication failure trap.
Both the OkiNet for TCP/IP and the IPX, and the
OkiLAN 6020e Configuration utility (telnet) allow you
to specify the community names and a trap destination
IP address.
Advanced Management
OKI OkiLAN 6020e User’s Guide
II - 5
Page 30

Section 2 - Chapter 2 - HP JetAdmin Support
Chapter 2
HP JetAdmin Support
Overview
This section contains instructions and information on
how to configure and obtain diagnostic information
from your OkiLAN 6020e using the Hewlett-Packard
JetAdmin software.
Software Requirements
• JetAdmin 2.4, 2.5, or 3.02
• Windows 95/98 or Windows NT/2000
Note: For more information on installing and using
HP JetAdmin, refer to the HP JetAdmin
documentation.
Configuring the OkiLAN 6020e Using
JetAdmin
NetWare Configuration
1. From the main JetAdmin screen, select the OkiLAN
6020e port you wish to configure.
2. Select Modify from the Device menu.
3. On the Configuration screen, select the General tab
and enter the print server name and description.
4. Select the NetWare tab and click on the Operating
Mode icon from the left column. Set the print server
operating mode from the given options on the right.
5. If you are running a NetWare 4.x network, click the
NetWare Directory Services icon from the left
column. Select NDS T ree Name from the pull-down
menu and enter the Print Server Context.
6. Click the Queues icon from the left column to bring
up the Queues screen and then click the Change
button.
II - 6
OKI OkiLAN 6020e User’s Guide
Page 31

Section 2 - Chapter 2 - HP JetAdmin Support
7. Select the desired queues from the list of Available
Queues to be added into service. Click the Service
button to move the selection to the Serviced Queues
column. When all queues have been added, click
OK.
8. Click OK again to return to the main screen.
WARNING: Do not use both OkiNet and JetAdmin to
change NetWare configuration settings as unexpected
results may occur.
TCP/IP Configuration
1. From the main JetAdmin screen, select the OkiLAN
6020e port you wish to configure.
2. Select Modify from the Device menu.
3. On the Configuration screen, select the General tab
and enter the print server name and description.
4. Select the TCP/IP tab and set the print server IP
configuration.
AppleT alk Configuration
1. From the main JetAdmin screen, select the OkiLAN
6020e port you wish to configure.
2. Select Modify from the Device menu.
3. Under the Optional tab, select Mac.
4. Enter the Apple T alk name and click OK.
Advanced Management
Obtaining Diagnostic Information Using JetAdmin
1. From the main JetAdmin screen, select the OkiLAN
6020e port on which you wish to view diagnostic
information.
2. Select Properties from the Device menu.
3. From the Properties screen, select the appropriate
tab to view the desired diagnostic information.
Note: For JetAdmin to function correctly with the
OkiLAN 6020e, the SNMP Get community
name in JetAdmin must be set to public.
OKI OkiLAN 6020e User’s Guide
II - 7
Page 32

Section 2 - Chapter 3 - HP Web JetAdmin Support
Chapter 3
HP Web JetAdmin Support
Overview
This section contains instructions and information on
how to configure, install, and obtain diagnostic
information from your OkiLAN 6020e using the
Hewlett-Packard Web JetAdmin software.
Software Requirements
• Web JetAdmin 1.x, 2.x, 3.x, or 4.x
Note: For more information on installing and using
HP Web JetAdmin, refer to the HP Web
JetAdmin documentation.
Configuring the OkiLAN 6020e Using
Web JetAdmin
1. From the main Web JetAdmin page, select the
OkiLAN 6020e port you wish to configure.
2. On the Properties page, click the Config button.
3. Make any necessary changes to the options listed
and click the corresponding Apply button.
Installing a Windows NT Printer for
the OkiLAN 6020e
1. From the main Web JetAdmin page, select the
OkiLAN 6020e port you wish to install.
2. On the Properties page, click the Install Printer
button.
3. In the Specify the device address… field, enter the
print server IP address, followed by a comma and
then the output port number. For example, to install a
printer for output port 2 of an OkiLAN 6020e with
an IP address of 10.10.10.2, enter “10.10.10.2,2”.
II - 8
OKI OkiLAN 6020e User’s Guide
Page 33

Section 2 - Chapter 3 - HP Web JetAdmin Support
4. On the Install Printer Page 1 page, select an NT
domain from the pull-down menu. Enter the user
name and password of a domain user with sufficient
rights to create a printer and click the Continue
button.
5. On the Install Printer Page 2 page, select the
Windows NT machine from the pull-down menu on
which you want to create the shared printer and click
the Continue button.
6. On the Install Printer Page 3 page, select a printer
driver from the pull-down menu and click the
Continue button.
7. On the Install Printer Page 4 page, enter a name for
the printer in the Select Printer Name field and click
the Install Printer button.
8. Users in the domain can now print to the new printer.
Obtaining Diagnostic Information
from the OkiLAN 6020e
1. From the main Web JetAdmin page, select the
OkiLAN 6020e port on which you wish to view
diagnostic information.
2. Click the Diagnose button.
3. From the Properties page, select the appropriate
diagnostic category name to view information.
Advanced Management
OKI OkiLAN 6020e User’s Guide
II - 9
Page 34

Section 2 - Chapter 4 - OkiLAN 6020e Web Configuration
Chapter 4
OkiLAN 6020e Web
Configuration
Overview
This section contains instructions and information on
how to configure and manage your OkiLAN 6020e
using a standard Web browser.
Software Requirements
TCP/IP Protocol
Netscape Navigator 2.0 or greater and Microsoft
Explorer 3.0 or greater (Other browsers may work).
Note: If you experience difficulties connecting to the
server, refer to Appendix A, T r oubleshooting.
Connecting to the OkiLAN 6020e
1. Enter http://<HTTP Address> in the browser
address prompt.
The HTTP address can be the IP address, the System
Name if the print server has been configured to use
WINS, or the DNS name if registered with a DNS
server.
II - 10
Note: It is not currently possible to discover all
OkiLAN 6020e products from a Web browser.
If you need to create a list of all available
OkiLAN 6020e products and their addresses,
refer to the OkiLAN 6020e Product Discovery
section for instruction.
OKI OkiLAN 6020e User’s Guide
Page 35

Section 2 - Chapter 4 - OkiLAN 6020e Web Configuration
Note: As a layer of security, the TCP port number
that the device uses to communicate with
browsers, called the HTTP port, can be
modified from a default of 80. If the port is
modified, the HTTP address put in the browser
must include the port number, for example,
http://vpn.company.com:99/ would be entered
for port 99. Refer to the Web Admin
Configuration section for details.
2. A successful connection will display the print server
home page.
Advanced Management
Note: By default, only Status and Support
information can be viewed. To configure the
print server, see the Configuration section.
The print server pages are normally displayed in a
frame with two panes. The left pane shows all the top
level menus along with links to the pages under each
menu. The right pane displays the currently selected
page. If your browser does not support frames, or you
select the No Frames link at the bottom of the left pane,
a single page will be displayed. In this case, the menu
items normally shown in the left pane can be accessed
by using the menu links that appear at the bottom of the
page.
OKI OkiLAN 6020e User’s Guide
II - 11
Page 36

Section 2 - Chapter 5 - Additional Management Features
Configuration
1. Select the Login as Admin link under the
Configuration menu.
2. On the Enter Network Password screen, enter the
User name and Password.
The default administrator User name is admin. The
default administrator Password is OkiLAN—note
that the password is case sensitive. We suggest that
the print server administrator change the default
administrator User name and Password. New User
name and Password entries can contain up to 24
characters.
3. Select the appropriate link under the Configuration
menu and modify the desired values on the page that
appears.
Note: All values (except as noted on the following
pages*) are configured exactly the same as in
the OkiNet utility . Please refer to the OkiLAN
6020e User’s Guide Section IV - TCP/IP,
Chapter 4 - OkiNet for TCP/IP for instructions
on configuration.
4. Select the Submit Changes button at the bottom of
the page to send the new values to the print server.
WARNING: Changes will not be saved if the Submit
Changes button is not selected before continuing to
another page.
II - 12
OKI OkiLAN 6020e User’s Guide
Page 37

Section 2 - Chapter 4 - OkiLAN 6020e Web Configuration
5. A Request Results page will appear indicating one of
the following:
• Configuration Successfully Set: The values have
been successfully saved to the print server. Go to
another page to continue configuration or exit the
browser.
• Invalid Input: Some or all input fields contain
invalid information. None of the values have been
saved to the print server. The Request Results
page will list all fields that contain errors along
with a description of the problem. Selecting the
Back button on your browser will generally
redisplay the page you just submitted and allow
the values to be edited. Selecting the Reload link
on the Request Results page will produce a new
entry page from the server so you can start over.
• Configuration Successfully Set. Reset
Required: The values have been successfully
saved, but the print server must be reset for the
desired values to take effect. Reset the server
immediately or wait until all configuration is
complete before resetting. If you do not reset
immediately, a link will appear at the top of all
subsequent configuration pages reminding you to
reset the server.
Advanced Management
OKI OkiLAN 6020e User’s Guide
II - 13
Page 38

Section 2 - Chapter 5 - Additional Management Features
* The following values are currently only
configurable through the Web browser
interface:
Web Admin Configuration
Under the Configuration menu, select the Admin(Web)
link.
• Admin Name - The name used to access full
configuration privileges. The default Admin
Name is admin.
• Admin Password - This field is used to specify
the Admin Password used to access full
configuration privileges. This field will
accommodate up to 24 characters. The default
Admin Password is OkiLAN-note that the
password is case sensitive.
Note: The Admin Password is also used as the Telnet
password.
• Confirm Admin Password - This field is used to
confirm the Admin Password entry by entering a
second time.
• HTTP Port - This field is used to specify the TCP
port that the HTTP protocol will listen on. The
default HTTP port is 80, but can be changed to
provide added security.
• FAQ URL - By default points to the FAQ page on
the OKI Web Server. Maximum URL length is 63
characters.
• Updates URL - By default points to the firmware
update site on the OKI FTP Server. Maximum
URL length is 63 characters.
• Custom Link Title - This field is useful for
setting up a link to an internal help desk. If
configured, it will appear under the Support
menu. Will accommodate up to 24 characters.
• Custom Link URL - This field is useful for
setting up a link to an internal help desk. Can
contain any URL up to 63 characters.
II - 14
OKI OkiLAN 6020e User’s Guide
Page 39

Section 2 - Chapter 4 - OkiLAN 6020e Web Configuration
Status
The home page for the print server shows general status
information including the status of all printers currently
attached. For more detailed status information, select
the View Cnfg Sheet link under the Status menu. This
will show information similar to what is printed on the
print servers configuration sheet.
Print Job Log
The Print Job Log page provides information on print
jobs, system up time and total jobs printed.
Support
There are up to four links listed under the Support
menu.
Contact
This page provides the necessary addresses and phone
numbers for contacting Oki Data Customer Support.
FAQ
By default this link will connect you to the FAQ page
on the OKI Web Server. This link can be configured to
point to other locations by selecting the Admin(Web)
link under the Configuration menu.
Updates
By default this link will connect you to the firmware
update location on the OKI FTP Server. This link can
be configured to point to other locations by selecting
the Admin(Web) link under the Configuration menu.
Custom Link
This link will only appear if it has been configured by
selecting the Admin(Web) link under the
Configuration menu. This link can be used to access
internal help desk sites.
Advanced Management
OKI OkiLAN 6020e User’s Guide
II - 15
Page 40

Section 2 - Chapter 5 - Additional Management Features
Reset
Reset
Reset the print server by selecting the Reset link under
the Reset menu. A message will appear asking you to
confirm the reset.
Restore
Select Restore Defaults under the Reset menu to
restore selected protocols to factory defaults. Select the
individual protocols to be restored and then select the
Restore Selected Protocols button. All protocols can
be restored simultaneously by selecting the Restore All
Protocols button.
OkiLAN 6020e Server Discovery
An HTML file containing links to all OkiLAN 6020e
print servers on the network can be created using the
OkiNet utility for TCP/IP. Complete the following steps
to create the HTML file:
1. Install and run the OkiNet for TCP/IP utility. The
utility will discover and display all OkiLAN 6020e
printservers on the local network.
2. Create a custom view, if desired, to control which
devices are displayed. See Creating Customized
Views in the OkiLAN 6020e Users Guide, Section
IV.
3. Select Save V iew to HTML under the File menu.
4. Enter a name and save the file.
5. From the Web browser, select Open under the File
menu and enter the path and name of the file saved
in step 4.
6. You can now create a bookmark or add the file to
your list of favorites.
II - 16
Note: This file does not update automatically. The
OkiNet utility must be run again to obtain
current information.
OKI OkiLAN 6020e User’s Guide
Page 41

Section 2 - Chapter 4 - OkiLAN 6020e Web Configuration
Troubleshooting
Server Connection
• The print server only supports two simultaneous
HTTP connections. If your browser fails to connect
to the print server, the browser may be trying to open
more than two connections. Please refer to your
browser’s Help files for information on changing the
connection settings. Both Netscape Navigator and
Microsoft Explorer for the Macintosh and Power PC
will sometimes display a failure to connect message
after being configured for only two connections.
Should this occur, select OK to bypass the error
message. The menu page will still be displayed and
configuration can be completed.
• Quickly refreshing a page within some browsers can
cause the browser to leave active connections open
with the server called a hung connection. This will
use up one of the HTTP connections, can cause
problems connecting to the server and will slow
down Web response time. If TCP timeout checking
is enabled under TCP/IP configuration, the hung
connection will timeout after the timeout period has
expired.
Advanced Management
Login
• If you forget the administrator password, restoring
the TCP/IP protocol to factory defaults from any
other configuration utility restores the Web admin
name and password to default values.
Configuration
• Web browsers will generally cache previously
viewed Web pages on the local machine. To view the
most current print server information, it is a good
idea to select the Reload or Refresh button on your
browser instead of using the Back button.
OKI OkiLAN 6020e User’s Guide
II - 17
Page 42

Section 2 - Chapter 5 - Additional Management Features
Chapter 5
Additional Management
Features
OkiNet Alert
OKI OkiNet Alert enterprise management utility allows
administrators to proactively manage printers by being
immediately alerted to printing problems before they
are encountered by users. This remote management
utility can be configured to monitor all SNMP traps
from a list of printers chosen by the administrator,
without requiring HP OpenView. It runs in the
background on any Windows-based PC and alerts the
user with a sound or a screen flash when an error has
occurred, and OkiNet Alert can be configured to
respond only to the specific error conditions that are of
concern to you. You can also launch batch files on
given error conditions. OKI OkiNet Alert can be used
in IPX and IP environments. Additionally, multiple
traps can be sent to multiple destinations on the
network.
Enhanced Printer Status
The OkiLAN 6020e communicates with the printer to
monitor the current condition on the printer. This
information can be observed in real time via the utilities
or can be interpreted by the OkiLAN 6020e to generate
traps to your SNMP management utility of choice: HP
OpenView or the OKI OkiNet Alert utility.
For bi-directional capable printer the OkiLAN 6020e
can retrieve the printer information, such as front panel
message, and display it through the OkiNet utilities.
II - 18
OKI OkiLAN 6020e User’s Guide
Page 43

Section 2 - Chapter 5 - Additional Management Features
OkiNet for NDS
OkiNet for NDS allows administrators to create and
manage OKI print server objects in the NDS tree.
OkiNet for NDS integrates into Novell’s NetWare
Administrator, NetWareAdmin. For more information,
see OkiNet for NDS under NetWare in this manual.
OkiNet for TCP/IP
(Creating Custom Views)
OkiNet for TCP/IP allows discovery on a pure
TCP/IP Windows environment. To assign a TCP/IP
address assignment, simply select Discover
Unconfigured Device and double-click. To create
multiple views and customize the viewing environment,
specify devices and define Filters, Sorts, Columns,
Search Information and Refresh rates. For more
information about OkiNet for TCP/IP, see Creating
Custom Views under the TCP/IP section of this manual.
NetWare Load Balancing
Using this feature, administrators can distribute the
print load among several print servers. Simply assign
the queue to the desired print ports on the selected print
servers.
Advanced Management
Windows Printing
From a W indows operating system, using TCP/IP or
DLC protocols, the OkiNet Connect utility routes the
print job to the appropriate printer without passing
through a file server or print queue. This cuts down on
network printing traffic. For more information, see the
Windows Printing section of this manual.
Printer Security for TCP/IP Printing
The OkiLAN 6020e print server has a Printer Security
for TCP/IP Printing feature which allows the printers
to only be accessed from a specified list of IP
addresses. This feature is accessed via TELNET option
#9, TCP Connection Configuration.
OKI OkiLAN 6020e User’s Guide
II - 19
Page 44

Section 2 - Chapter 5 - Additional Management Features
II - 20
OKI OkiLAN 6020e User’s Guide
Page 45

Section III:
NetWare
NetWare
Page 46

Section 3 - NetWare
In This Section
Chapter 1 Introduction ...........................................III-4
Overview ...................................................... III-4
Before You Start ........................................... III-4
Selecting PServer or RPrinter/NPrinter
Mode........................................................... III-5
Chapter 2 OkiNet for NetWare...............................III-6
Overview ...................................................... III-6
Running OkiNet for NetWare .......................III-7
Configuring the OkiLAN 6020e Using OkiNet
for NetWare ................................................ III-7
NetWare Configuration Options ................... III-8
NetWare Queues Configuration Options ...... III-9
NetWare Port Configuration Options ......... III-10
TCP/IP Configuration Options ................... III-10
EtherTalk Configuration Options ............... III-11
Output Port Configuration Options ............ III-11
SNMP Configuration Options .................... III-13
SNMP Traps Configuration ........................ III-15
Saving the Configuration ............................ III-16
Enabling/Disabling Protocols ..................... III-17
Displaying OkiLAN 6020e Diagnostic
Information ............................................... III-17
Printing a Configuration Sheet ................... III-17
Resetting the OkiLAN 6020e ..................... III-17
Restoring Factory Default Settings ............. III-18
Creating Customized Views ....................... III-19
Modifying View Settings ............................ III-20
Permanently Defining SNMP Access
Information ............................................... III-22
III - 2
OKI OkiLAN 6020e User’s Guide
Page 47

Section 3 - NetWare
Chapter 3 OkiNet for NDS .................................... III-24
Overview .................................................... III-24
Installing OkiNet for NDS for Novell
NetWare 4.1 .............................................. III-25
Installing OkiNet for NDS for Novell
NetWare 4.x, NetWare 5.x,
and Windows 3.x ...................................... III-26
Installing OkiNet for NDS for Novell
NetWare 4.x, NetWare 5.x, Windows 95/98
and Windows NT/2000 ............................ III-27
Creating a New OkiLAN 6020e Object ..... III-28
Printing with an OkiLAN 6020e Print
Server ....................................................... III-29
Configuring the OkiLAN 6020e Using
OkiNet for NDS ....................................... III-31
Adding or Removing the OKI Print
Server Class .............................................. III-31
Chapter 4 Using the OkiLAN 6020e
in NDPS (NetWare 4.x and 5.1) ............................ III-33
Introduction ................................................ III-33
Adding the Oki Printer Driver Using NDPS
Broker ....................................................... III-33
Setting Up the OkiLAN 6020e Through
NWAdmin32 ............................................ III-35
Setting Up the OkiLAN 6020e for
Public Access Printers
At the File Server Console ....................... III-37
NetWare
OKI OkiLAN 6020e User’s Guide
III - 3
Page 48

Section 3 - Chapter 1 - Introduction
Chapter 1: Introduction
Overview
This section contains instructions and information on
how to configure your OkiLAN 6020e in the NetWare
environment.
There are three environments in which to configure the
OkiLAN 6020e:
• Bindery (NetWare 3.x)
• NetWare Directory Services (NDS)-for NetWare
versions 4.1 and later
• NDPS for NetWare 4.x and 5.x.
Before You Start
• You should be familiar with network administration
as well as the physical setup and operation of your
network.
• Write down the serial number and the Ethernet or
Token-Ring address of your OkiLAN 6020e. You
will find these numbers on the OkiLAN 6020e
enclosure.
• Install the OkiLAN 6020e hardware and connect the
cabling-see Section I. Instructions for hardware
installation are found in Section I of this manual.
• Install the OkiNet Utility for NetWare--see Section I.
III - 4
OKI OkiLAN 6020e User’s Guide
Page 49

Section 3 - Chapter 1 - Introduction
Selecting PServer or
RPrinter/NPrinter Mode
Your OkiLAN 6020e supports both PServer and
NPrinter mode. There are several factors to consider
when choosing which mode to use.
In PServer mode, the OkiLAN 6020e operates as the
print server. It services specified queues on the
network. In RPrinter mode, the NetWare Print Server
NLM or EXE is in control.
Feature PServer Mode RPrinter/NPrinter Mode
User
Connection
Performance High performance. Good performance.
Installation Easier to set up.
Print Server Separate print server
Status
Reporting
Security Without supervisor
Requires one NetWare
user connection per
OkiLAN 6020e.
Requires fewer steps.
node, print server
functions, and NetWare
print server software
not required.
Printer status is
reported via messages
sent to client nodes. Job
status is available via
job notification. Printer
status available via
OkiNet utilities.
intervention, other
printers cannot access
data sent to the queues.
Data can be password
protected from the file
server to the printer.
Requires no user
connection.
More steps to set up, but
works well with existing
utilities.
Requires NetWare print
server software. Integrates
with NetWare print utilities.
Printer status is reported via
PCONSOLE, PSC, and
print server screen. Job
status is reported via the
print server screen, PSC,
job notification.
Data can be password
protected from the file
server to the printer.
NetWare
OKI OkiLAN 6020e User’s Guide
III - 5
Page 50

Section 3 - Chapter 2 - OkiNet for NetWare
Chapter 2
OkiNet for NetWare
Overview
This chapter contains information about how to
configure the OkiLAN 6020e in Bindery and NDS
environments using the OkiNet for NetWare utility.
Note: OkiNet for NetWare contains minimal NDS
configuration support. For more extensive
configuration options, use the OkiNet for NDS
utility described in Chapter 3.
OkiNet for NetWare allows you to:
• Configure the OkiLAN 6020e for all Supported
Protocols
• Display OkiLAN 6020e Diagnostic Information
• Print a Configuration Sheet
• Reset the OkiLAN 6020e
• Restore Factory Default Settings
• Create Customized Views
• Modify View Settings
• Permanently Define SNMP Access Information
III - 6
OKI OkiLAN 6020e User’s Guide
Page 51

Section 3 - Chapter 2 - OkiNet for NetWare
Running OkiNet for NetWare
To run the utility, double-click on the OkiNet icon. The
main OkiNet for NetWare screen will display.
By default, the All Print Servers view is selected and all
print servers attached to the network from which the
OkiNet utility is running are listed.
Configuring the OkiLAN 6020e Using
OkiNet for NetWare
The following steps outline how to configure an
OkiLAN 6020e.
1. Select the OkiLAN 6020e you wish to configure.
2. Select Configuration from the Print Server menu or
select the Configuration icon on the toolbar.
3. Set the appropriate configuration by choosing the
applicable file folder tabs.
The following settings are configurable based on the
capabilities of the OkiLAN 6020e:
• NetWare • Output Port
• NetWare Queues • SNMP
• NetWare Port • VINES *
• TCP/IP • EtherTalk
• Protocols • SNMP Traps
* May apply to other OkiLAN print server models.
NetWare
OKI OkiLAN 6020e User’s Guide
III - 7
Page 52

Section 3 - Chapter 2 - OkiNet for NetWare
NetWare Configuration Options
To configure options specific to the NetWare protocol,
select the NetWare file tab. The following screen will
display:
PServer or RPrinter Mode
Several factors should be considered when choosing
between PServer or RPrinter mode. For more detailed
information regarding these modes, see page III-5.
Bindery Settings
• Default File Server - The default file server can be
selected from any file server listed in the Default
File Server scroll menu. The default file server must
be active at power up for the OkiLAN 6020e to
recognize other servers.
• Print Server Name - Enter the print server name of
your choice.
III - 8
OKI OkiLAN 6020e User’s Guide
Page 53

Section 3 - Chapter 2 - OkiNet for NetWare
NDS Settings
NDS settings need to first be created and setup using
the NWAdmin or PConsole utility. Create an NDS print
server object. Then, create one NDS printer object per
output port. For example, Printer 1 goes to Port 1,
Printer 2 goes to port 2. Attach NDS print queues to the
NDS printer objects. Once you have created NDS
objects and queues, use the OkiNet for NetWare utility
to configure the following fields:
• Preferred File Server - This is the file server on
which the print server object was created.
• Preferred Tree - This is the NDS tree on which the
NDS print server object was created.
• Print Server Name - The fully qualified (canonical)
name of the NDS print server object that was
created. The Print Server Name is case sensitive.
Example:
cn=marketinglj.ou=marketing.o=companyname
where cn is the Common Name of the leaf object, ou is
the Organizational Unit name, and o is the
Organizational name.
NetWare
Note: After any change to the servicing of queues for
the OkiLAN 6020e from NWAdmin or
PConsole, the OkiLAN 6020e must be reset via
OkiNet for NetWare.
NetWare Queues Configuration
Options
The NetWare Queues option allows you to add bindery
print queues to be serviced by first selecting each
desired queue and then selecting the
To have a queue print to an output port other than the
currently selected port, select the Output Port button
and then select the desired port.
OKI OkiLAN 6020e User’s Guide
→→
→ button.
→→
III - 9
Page 54

Section 3 - Chapter 2 - OkiNet for NetWare
NetWare Queue Load Balancing
Print jobs can be distributed to multiple printers on
selected queues by selecting the same queue multiple
times and selecting a different output port for each
queue entry.
NetWare Port Configuration Options
To modify the NetWare port settings to fit your
NetWare printing environment, select the NetWare
Port file tab.
TCP/IP Configuration Options
To modify configuration settings specific to the TCP/IP
protocol such as IP address, subnet mask and default
gateway. For specific information on TCP/IP
configuration options, see Section IV,
TCP/IP, or select the HELP button on the bottom right
of the screen.
III - 10
OKI OkiLAN 6020e User’s Guide
Page 55

Section 3 - Chapter 2 - OkiNet for NetWare
EtherTalk Configuration Options
To modify configuration settings specific to the
EtherTalk protocol such as the name and zone. For
specific information on other EtherTalk options, see
Section VII, EtherTalk, or select the HELP button on
the bottom right of the screen.
Output Port Configuration Options
To configure the OkiLAN 6020e output port, select the
Output Port file tab. The following screen will
display:
NetWare
Port Number
Select the port you wish to configure.
Name Field
Enter a descriptive name to identify the port.
Language Switching
Each output port can be configured to perform the
following language switching options: OFF, PCL,
PostScript or Automatic. Unless OFF is selected, a
language switching character string will be inserted
before each print job. The Printer Type selection is
used to determine the actual characters required to
switch the language of the printer.
• OFF - Print data stream will be sent directly to the
output port without alteration.
• PCL - Inserts the appropriate character string in
front of each print job to switch the printer to the
PCL print language.
OKI OkiLAN 6020e User’s Guide
III - 11
Page 56

Section 3 - Chapter 2 - OkiNet for NetWare
• PostScript - Inserts the appropriate character string
in front of each print job to switch the printer to the
PostScript printer language.
• Automatic - Enables the auto language sensing
function. This function examines the print job data
stream and determines the required print language
and inserts the appropriate character string in front
of each print job to switch the printer to the
appropriate printer language.
Note: If you are not switching languages or the
printer can switch languages automatically, this
option should be set to OFF.
Printer Type
The Printer Type selection is used to determine the
actual character string required for your printer. If your
printer type is not listed, select Other and enter the
character string for switching the printer to PCL or
PostScript mode.
To enter nonprintable characters, enclose the ASCII
value of the character in angle brackets. For example,
to enter the ESC character type: <27>.
PCL Switch Sequence
Enter the character string to switch the printer to the
PCL print language.
PostScript Switch Sequence
Enter the character string to switch the printer to the
PostScript print language.
Configuration Page Language
Select the appropriate printer language for printing
configuration pages on your printer.
Note: Do not set the Configuration Page Language to
OFF for all ports of your OkiLAN 6020e. If a
configuration sheet cannot be printed,
troubleshooting abilities are limited.
III - 12
OKI OkiLAN 6020e User’s Guide
Page 57

Section 3 - Chapter 2 - OkiNet for NetWare
Bidirectional Printer Status Support
Enable this option for enhanced status from
bi-directional printers that support PJL.
Output Type
Select the desired level of support for 1284
communications. The following settings are available:
- Compatibility (no bidi)
- 1284 (Std Nibble Mode) (default)
- 1284 (ECP or Fast Nibble Mode)
SNMP Configuration Options
SNMP options specify which information is necessary
for an SNMP manager to access the OkiLAN 6020e.
The system variables are for user convenience and are
optional.
SNMP community names are used as passwords to
GET and SET information on the OkiLAN 6020e. The
values should be changed for enhanced security.
To configure SNMP specific information, select the
SNMP file tab. The following screen will display:
NetWare
Note: SNMP options need to be configured only if
you are managing OkiLAN 6020e products or
getting system information using SNMP.
OKI OkiLAN 6020e User’s Guide
III - 13
Page 58

Section 3 - Chapter 2 - OkiNet for NetWare
Fill in the following information:
System Name
Enter the name of your choice. This name will identify
the OkiLAN 6020e in your SNMP-based management
program.
System Contact
Enter any information useful to a user if problems with
the OkiLAN 6020e arise.
System Location
Enter a description of the OkiLAN 6020e location.
Get Community Name
This field is used to set the community name required
to Get information from the print server. The default
community name is public.
Note: To use the JetAdmin utility with the OkiLAN
6020e, the Get and Set Community Names
must be set to public.
Set Community Name
This field sets the community name required to Set
information on the OkiLAN 6020e. The default
community name is public.
Note: The OkiLAN 6020e cannot be configured
without the correct Set community name. To
secure the configuration of the OkiLAN 6020e,
change the community name from the default
setting.
III - 14
OKI OkiLAN 6020e User’s Guide
Page 59

Section 3 - Chapter 2 - OkiNet for NetWare
Trap Community Name
Enter the community name which will be used when
traps are sent from the OkiLAN 6020e. This setting
allows trap utilities to only accept traps from devices
with appropriate community names.
The Trap community name field is used by the OKI
OkiNet Alert and other monitoring utilities for grouping
or filtering OkiLAN 6020e devices. OkiNet Alert
assists in managing network printers by immediately
alerting you of printer problems.
SNMP Traps Configuration
The SNMP Trap option allows configuration of traps.
Traps are unsolicited information concerning the
OkiLAN 6020e. Traps can be sent to an SNMP
manager or be broadcast to all hosts on the local
segment.
To configure SNMP traps, select the SNMP Traps file
tab. The following screen will display:
NetWare
Fill in the following information:
Protocol
Select the protocol for which you wish to configure
trap information.
OKI OkiLAN 6020e User’s Guide
III - 15
Page 60

Section 3 - Chapter 2 - OkiNet for NetWare
Trap Destination
• NetWare Protocol - Enter the network number and
hardware address, respectively, to which traps will
be sent. To broadcast traps to all addresses on all
networks, enter FFFFFFFF (8 characters) in the first
field and FFFFFFFFFFFF (12 characters) in the
second field. To broadcast traps to all addresses on a
specific network, enter the network number in the
first field and then FFFFFFFFFFFF (12 characters)
in the second field.
• TCP/IP Protocol - Enter the IP address to which
traps will be sent. The IP address must follow the
format XXX.XXX.XXX.XXX, where each XXX is
a number from 0 to 255. To broadcast traps to all
hosts on the local subnet, enter 255.255.255.255.
Ports to Trap
Select the output ports on which you wish traps to be
active.
Printer Traps
Select the printer traps to be activated. The following
printer conditions may cause a printer trap to occur if
the OKI printer model supports the features:
• On-line
• Off-line
• No Printer Attached
• Paper Out
• Toner Low
• Paper Jam
• Door Open
• Printer Error
Note: Toner Low, Paper Jam and Door Open require
the printer to be set in PCL or Auto mode.
Saving the Configuration
Once all settings have been defined, select OK. The
settings will be saved and you will be returned to the
main OkiNet for NetWare screen.
III - 16
OKI OkiLAN 6020e User’s Guide
Page 61

Section 3 - Chapter 2 - OkiNet for NetWare
Enabling/Disabling Protocols
To enable or disable protocols on the OkiLAN 6020e,
select the Protocols file tab. Select each protocol you
wish to enable. If you disable a protocol, the OkiLAN
6020e will no longer communicate using that protocol.
To reduce unnecessary network traffic, disable unused
protocols.
Displaying OkiLAN 6020e Diagnostic
Information
To view OkiLAN 6020e diagnostic information, select
Diagnostics from the Print Server pull-down menu on
the main NetWare Print Manager screen. Diagnostic
information is available for the following topics:
• Printer
• Print Server
• Protocols
• Network
• Statistics
• Technical Support
• System
NetWare
Printing a Configuration Sheet
The configuration sheet provides current network, print
server and printer information. To print a configuration
sheet, select the OkiLAN 6020e from the list of
available print servers. Select Print Configuration
Sheet from the Print Server menu bar.
Resetting the OkiLAN 6020e
To reset the OkiLAN 6020e, select the OkiLAN 6020e
from the list of available print servers. From the Print
Server menu bar, select Reset.
OKI OkiLAN 6020e User’s Guide
III - 17
Page 62

Section 3 - Chapter 2 - OkiNet for NetWare
CAUTION: Make sure there are no print jobs active
when you reset the OkiLAN 6020e. All protocols will
be restarted. If you attempt a reset while a job is
printing, the job may not print successfully.
Restoring Factory Default Settings
To restore the OkiLAN 6020e to factory default
settings, select the OkiLAN 6020e from the list of
available print servers. From the Print Server menu bar,
select the Reset option. Choose one or more of the
following options:
Output Ports
Restores settings related to output ports such as port
name and output type.
TCP/IP
Restores settings specific to the TCP/IP protocol
configuration such as the IP address and subnet mask.
NetWare
Restores settings specific to the NetWare protocol
configuration such as the mode and default file server.
EtherTalk
Restores settings specific to the EtherTalk protocol
configuration such as the name and zone.
Once you have chosen the desired options, select
Restore. To completely restore the print server to
factory default settings, select all items in the list.
III - 18
OKI OkiLAN 6020e User’s Guide
Page 63

Section 3 - Chapter 2 - OkiNet for NetWare
CAUTION: Make sure there are no active print jobs
when you select Restore Factory Defaults. If you reset
the OkiLAN 6020e while a job is printing, the job may
not print successfully.
Creating Customized Views
OkiNet for NetWare allows users to create multiple
customized views for the list of OkiLAN 6020e
products. By creating different views, the user can
narrow the information displayed to that which is of
highest priority. These views can be saved and selected
as needed.
OkiNet has two predefined views. The All Print Servers
view displays all the print servers available on your
local network. The Unconfigured Print Servers View
displays only the print servers on the local network that
have not been configured.
Creating a New Customized View
To create a new view, select the New option from the
View menu. Enter a name for the new customized view.
Define Filters, Sorts, Column, Search information and
Refresh rates (see the Modifying View Settings sections
for more detail). Select OK to save this view.
Selecting an Existing View
To select an existing view, choose Select from the View
menu. Highlight the view you wish to open and select
OK. The OkiLAN 6020e list in the utility will be
displayed as described by the view selected.
Searching for a Specific OkiLAN 6020e
To search for a specific OkiLAN 6020e, select Search
from the tools menu. Choose the Search List option to
search for OkiLAN 6020e products already listed. For
OkiLAN 6020e products which cannot be found in the
list, select the Search Network by Address option. For
more information about this option, select HELP.
OKI OkiLAN 6020e User’s Guide
III - 19
NetWare
Page 64

Section 3 - Chapter 2 - OkiNet for NetWare
Modifying View Settings
Before modifying the settings, select the name of the
view you wish to edit from the Name field.
Display Filter
The filter option displays only those print servers
matching specific criteria. The print server list can be
filtered by any of the following:
Filter By Enter for the Filter Value
<No Filter> No value
DateCode Four digits followed by a letter (e.g. 9502B)
H/W Address 12 hexadecimal digits for the hardware
address
Name NetWare print server name
Product # Select from the list of product number(s)
Product Type Select from the list of product types
Status Select from the list of status conditions
Default File Server The default NetWare file server
Mode The NetWare mode the print server is
running
Network # The IPX network number
Search Filter
The Search option defines the criteria for locating
OkiLAN 6020e products on the network.
• Search Local Network - This method searches the
bindery to locate all OkiLAN 6020e products on the
network. All OkiLAN 6020e print servers that
respond are placed in the list. If you have a large
number of OkiLAN 6020e print servers on your
network and do not wish to view all of them, do not
select this option.
III - 20
OKI OkiLAN 6020e User’s Guide
Page 65

Section 3 - Chapter 2 - OkiNet for NetWare
• Specify Devices/Networks - This method adds
specific print servers (or groups of print servers) to
the list. This can be useful when only a subset of the
list of OkiLAN 6020e products is desired.
To select all desired print servers, select Add.
Sort
The Sort option displays the OkiLAN 6020e list in a
specific order. The list can also be sorted by clicking on
the column by which you wish to sort. A sort order can
only be defined on columns displayed on the main
OkiNet for NetWare screen.
Columns
Column information for each print server can be
modified. To define the location of a new column,
select the location in the Columns Displayed field
where you wish the new column to be inserted, then
select Add. If no location is selected, the new column
will be added to the end of the list and the column will
be displayed to the right of the last column on the
screen. For example, if you currently have three
columns displayed and you wish to add a fourth
column to the far left of the screen, follow these steps:
1. Select the first column in the Columns Displayed
field.
2. Select the column to be added from the Columns
Available field.
3. Select Add.
Columns may also be removed by selecting Remove
from the Columns Available field.
NetWare
OKI OkiLAN 6020e User’s Guide
III - 21
Page 66

Section 3 - Chapter 2 - OkiNet for NetWare
Refresh
The refresh rate defines how often the OkiNet for
NetWare utility updates the main print server list. To
define a refresh rate, select the Automatic Refresh box
and then enter the refresh rate in the field provided.
Decide how frequently to refresh the screen based on
factors such as network traffic and desire for most
recent information. For example, if traffic is not an
issue on your network and the most current information
is desired, set the refresh rate to 1 so the screen is
updated every minute. If network traffic is an issue,
you may wish to set the refresh rate to 10. This would
update the screen every ten minutes and minimize
network traffic.
Permanently Defining SNMP Access
Information
Access to OkiLAN 6020e configuration and diagnostic
information is determined by using community names.
The Special Options window is used to permanently
define access information so it does not need to be
entered each time the OkiLAN 6020e is accessed. To
Get and/or Set information on the OkiLAN 6020e
through OkiNet for NetWare, community names used
by the utility must match the community names
assigned to the OkiLAN 6020e.
To configure the OkiNet for NetWare utility to use the
correct community names, select Special Options from
the File menu.
Serial/Network Numbers
This field displays the serial number of each OkiLAN
6020e or the network number for a network of OkiLAN
6020e products for which the OkiNet utility has defined
access. To add a new serial number or network number
to this list, select the Add button.
Get Community Name
Enter the Get Community Name necessary to access
the OkiLAN 6020e or group of OkiLAN 6020e
products selected.
III - 22
OKI OkiLAN 6020e User’s Guide
Page 67

Section 3 - Chapter 2 - OkiNet for NetWare
Set Community Name
Enter the Set Community Name necessary to access the
OkiLAN 6020e or group of OkiLAN 6020e products
selected.
Add
Select the Add button to define access to a new
OkiLAN 6020e or a group of OkiLAN 6020e products.
Enter a serial number or a network number followed by
a dash (-). Use an asterisk (*) as a wildcard to match
multiple devices. As examples, to add a single OkiLAN
6020e, enter 1500001, or to add a whole network, enter
D4-.
Delete
The Delete button deletes an OkiLAN 6020e access
entry in the Serial/Network Number list.
NetWare
OKI OkiLAN 6020e User’s Guide
III - 23
Page 68

Section 3 - Chapter 3 - OkiNet for NDS
Chapter 3
OkiNet for NDS
Overview
OkiNet for NDS is a Dynamic Link Library (DLL)
which allows users to create and manage OKI print
server objects in the NDS tree. OkiNet for NDS
integrates into Novell’s NetWare Administrator, a
Windows-based utility that allows users to view and
manage their NetWare 4.x NDS tree. Once OkiNet for
NDS is integrated into NetWare Administrator, users
can manage OKI devices with the same utility used to
manage other network objects such as printers and
queues.
The OkiLAN 6020e supports NetWare NDS using
Novell Embedded Systems Technology, also known as
NEST.
OkiNet for NDS can be installed to support Novell
NetWare version 4.1 or 4.11 and for operating systems
running Windows 3.x, Windows 95/98, and Windows
NT/2000. If you have multiple versions of Windows
operating systems to service, you can install OkiNet for
NDS for each.
OkiNet for NDS supports four different versions of
NWAdmin.
• OkiNet for NDS installation for NetWare version 4.1
(one version of NWAdmin) requires a single
installation which will work for all platforms
including Windows 3.x. Windows 95/98, and
Windows NT/2000.
• The OkiNet for NDS installation for NetWare
version 4.11 requires a separate installation for each
of the three platforms: Windows 3.x, Windows 95/
98, and Windows NT/2000 (three separate versions
of NWAdmin).
III - 24
OKI OkiLAN 6020e User’s Guide
Page 69

Section 3 - Chapter 3 - OkiNet for NDS
Refer to the following table to determine which method
to use to install OkiNet for NDS:
NetWare
Version
NetWare 4.1
NetWare 4.11
and NetWare 5
Windows 3.x Windows 95/98
See Installing OkiNet for NDS for Novell
NetWare 4.1
See Installing
OkiNet for NDS
for Novell NetWare
4.11 and Windows
3.x
Client Operating System
Windows NT/2000
See Installing OkiNet
for NDS for Novell
NetWare 4.11 and
Windows 95/98 and
Windows NT/2000
Installing OkiNet for NDS for
Novell NetWare 4.1
A single installation is required to service
Windows 3.x and Windows 95/98 operating
systems with OkiNet for NDS for Novell NetWare
4.1. OkiNet for NDS must be installed in the same
location you have installed NetWare
Administrator. This may be located on the file
server or on an independent workstation. In most
cases NetWare Administrator can be found in the
SYS:\PUBLIC directory. To install OkiNet for
NDS for Novell NetWare 4.1 and Windows 3.x
and/or Windows 95/98:
1. Login to the directory tree as a user with
Admin rights at the root of the directory tree.
2. Run the installation program provided. Select
the option to install OkiNet for NDS. Follow
the instructions on the screen.
Tip for Advanced Administrators
When installing OkiNet for NDS, the install
utility copies the OkiNet for NDS files to the
destination directory, adds the OKI print
server class to the NDS schema and modifies
the user’s NWADMIN.INI file.
NetWare
OKI OkiLAN 6020e User’s Guide
III - 25
Page 70

Section 3 - Chapter 3 - OkiNet for NDS
Installing OkiNet for NDS for Novell
NetWare 4.x, NetWare 5.x, and
Windows 3.x
OkiNet for NDS must be installed in the same location
you have installed NetWare Administrator. This may be
located on the file server or on an independent
workstation. In most cases NetWare Administrator can
be found in the SYS:\PUBLIC directory. To install
OkiNet for NDS for Novell NetWare version 4.11 and
Windows 3.x:
1. Login to the directory tree as a user with Admin
rights at the root of the directory tree.
2. Install OkiNet for NDS.-see Section I.
Tip for Advanced Administrators
When installing OkiNet for NDS, the install utility
copies the OkiNet for NDS files to the destination
directory, adds the OKI print server class to the
NDS schema and modifies the user’s
NWADMIN3X.INI file.
III - 26
OKI OkiLAN 6020e User’s Guide
Page 71

Section 3 - Chapter 3 - OkiNet for NDS
Installing OkiNet for NDS for Novell
NetWare 4.x, NetWare 5.x,
Windows 95/98 and Windows NT/2000
OkiNet for NDS must be installed in the same location
you have installed NetWare Administrator. This may be
located on the file server or on an independent
workstation. In most cases NetWare Administrator can
be found in the SYS:\PUBLIC\Win95 or
SYS:\PUBLIC\WinNT directory. To install OkiNet for
NDS for Novell NetWare version 4.11 and Windows
95/98 and Windows NT/2000:
1. Login to the directory tree as a user with Admin
rights at the root of the directory tree.
2. Install--see Section I.
Tip for Advanced Administrators
When installing OkiNet for NDS, the install utility
copies the OkiNet for NDS files to the destination
directory, adds the OKI print server class to the
NDS schema and modifies the user’s registry.
NetWare
OKI OkiLAN 6020e User’s Guide
III - 27
Page 72

Section 3 - Chapter 3 - OkiNet for NDS
Creating a New OkiLAN 6020e Object
To create a new OkiLAN 6020e object from Novell’s
NetWare Administrator, perform the following steps:
1. Select the container (also known as organizational
unit) in which you want the object created. For
example, to create an object that is within the sales
organizational unit, select SALES.
2. From the Object menu, select Create. If the Create
option is grayed, you do not have sufficient rights or
you have selected a leaf object.
3. From the Class of New Object list box, select OKI
Print Server. If the OKI Print Server is not listed,
check the following:
• The OkiNet for NDS utility has been installed.
• The OKI Printing Device has not been removed
from the schema. See Adding or Removing the
OKI Print Server section for more information.
4. Click OK.
5. Define filter and sort criteria for displaying a list of
Extended Systems devices from which to choose.
6. Click OK. The following screen will display:
III - 28
OKI OkiLAN 6020e User’s Guide
Page 73

Section 3 - Chapter 3 - OkiNet for NDS
Note: If the Device list box is still empty, select Find
Device. This will allow you to locate the
specific device you are trying to define. You
will be prompted for the Ethernet address and
network number of the device. A mismatch in
the OKI device frame format may cause the
device not to show up in the Device list box.
7. From the list of OKI devices, select a device to
assign to the object.
8. Enter a name for the new OKI Print Server object.
9. Select Create.
The new OKI Print Server object should now appear in
the directory tree.
Printing with an OkiLAN 6020e Print
Server
To configure the NetWare environment for printing to
an OkiLAN 6020e print server, follow these steps:
1. Install the OkiLAN 6020e hardware and connect the
cabling. Instructions for hardware installation are
found in Section I of this manual.
2. Create an OKI Print Server object. If you are
unfamiliar with how to do this, see the previous
section.
3. Open the OKI Print Server object’s Details dialog.
This may be done by double-clicking on the OKI
print server icon in the NDS tree or by selecting
Details from the File menu.
4. If your OkiLAN 6020e supports both PServer and
NPrinter mode, there are several factors to consider
when choosing which mode to use. See page III-5
for more information. From the Identification page,
select either PServer or NPrinter mode. If you select
NPrinter mode, skip to Step 11.
5. From the Assignments page, choose the Port #
associated with the printer to which the queue will
print.
NetWare
OKI OkiLAN 6020e User’s Guide
III - 29
Page 74

Section 3 - Chapter 3 - OkiNet for NDS
6. Select Assign.
7. Select or create a NetWare Printer object from the
Printer/Queue Assignments dialog.
8. Select or create a NetWare Print Queue object from
the Printer/Queue Assignments dialog.
9. Select OK to save your printer and queue selections.
Note: To load balance print queue jobs, repeat steps 5
through 9 for another port. Create a new printer
object for the OkiLAN 6020e port and then
select the same print queue object. This will
allow multiple printers to service a single print
queue.
10. From the Assignments page, select OK to save
changes. If you have selected PServer mode, you
have completed all necessary steps. Continue to
Configuring the OkiLAN 6020e Using OkiNet for
NDS.
11. Select or create a NetWare Print Server object
from the Assignments page.
12. Select a port to configure from the Assignments
page, then select Assign.
13. Select or create a NetWare Printer object from the
Printer/Queue Assignments dialog.
14. Select or create a NetWare Print Queue object
from the Printer/Queue Assignments dialog.
15. Select OK to save your printer and queue
selections.
16. From the Assignments page, select OK to save
changes.
17. From the file server, restart the PSERVER.nlm.
III - 30
OKI OkiLAN 6020e User’s Guide
Page 75

Section 3 - Chapter 3 - OkiNet for NDS
Configuring the OkiLAN 6020e Using
OkiNet for NDS
The following steps outline how to configure an
OkiLAN 6020e.
1. From the NWAdmin screen, select (double-click) the
OkiLAN 6020e you wish to configure.
2. Set the appropriate configuration by choosing the
applicable detail pages.
The following settings are configurable:
• Identification • Network Protocols
• Assignments • Port Configuration
• Network Configuration • Status
For specific information about these detail pages, select
the HELP button.
Adding or Removing the OKI Print
Server Class
The OKI print server class is added to Novell’s
NetWare Administrator by the installation utility. This
class must exist in order to create an OKI Print Server
object for use in printing to the device.
NetWare
Removing the OKI Print Server Class
1. Run Novell’s NetWare Administrator.
2. Verify all OKI print server objects have been
removed from the directory tree.
3. From the Tools menu, choose Remove OKI
Printing Device Class. The OKI print server class
will no longer show up in the Create New Object
dialog. If the Remove OKI Printing Device Class
option is grayed, the class has already been removed.
If the option does not exist, OkiNet for NDS is not
installed.
OKI OkiLAN 6020e User’s Guide
III - 31
Page 76

Section 3 - Chapter 3 - OkiNet for NDS
The install utility on the installation diskette can also be
used to remove the OKI print server class. This utility
removes the class from Novell’s NetWare
Administrator and removes all the associated files that
were copied during the installation process.
Note: Be sure to remove all OKI Print Server objects
from the directory tree before uninstalling
OkiNet for NDS.
Adding the OKI Print Server Class
The OKI print server class is initially added to Novell’s
NetWare Administrator when the Install utility is run
from the diskette. If the OKI print server class has been
removed through Novell’s NetWare Administrator’s
Tools menu, you will need to add the class again.
From the Tools menu in Novell’s NetWare
Administrator, choose Define OKI Printing Device
Class. If this option is grayed, the class has already
been added. If the option does not exist, you will need
to run the install utility from the diskette to install
OkiNet for NDS.
The OKI print server class will now appear in the
Create New Object dialog.
III - 32
OKI OkiLAN 6020e User’s Guide
Page 77

Section 3 - Chapter 4 - Using the OkiLAN 6020e in NDPS
Chapter 4
Using the OkiLAN 6020e in NDPS
(NetWare 4.x and 5.1)
Introduction
Novell Distributed Print Services (NDPS) is Novell’s new
printing architecture for use with NetWare versions 4.x and 5.1. To
use the OkiLAN 6020e in NDPS, you must add the OKI printer
driver(s) to the NDPS Broker.
Requirements:
• IP Address on the file server
• IP address on the print server (NetWare-only print servers will
not work)
• The client must also run the most current version of the
NetWare client to get the NDPS objects.
Note: The client printing to the printer does not need an IP address.
Adding the OKI Printer Driver Using the NDPS
Broker
Printer drivers cannot be installed to the Resource Management
Service from multiple floppy disks. If a printer driver is shipped on
more than one disk, copy the files to a directory on a hard drive or
network drive and install the driver from there. Any problems in
adding the driver should be addressed to the OKI Customer Service
Center.
1. In NetWare Administrator, double-click the Broker object.
2. Click the Resource Management Service (RMS) tab.
3. Make sure the Resource Management Service is enabled.
4. Click Add Resources to display the Manage Resources
dialog box.
5. Select the icon for the type of printer driver that you want
to add under the Resource Types window.
A complete list of currently loaded printer drivers of that
type appears in the Current Resources window.
6. To add a driver to the list, click Add to display the Add
Resources dialog box.
NetWare
OKI OkiLAN 6020e User’s Guide
III - 33
Page 78

Section 3 - Chapter 4 - Using the OkiLAN 6020e in NDPS
7. Click Browse to display the Select Printer Driver dialog
box. Locate the appropriate printer driver .INF file.
8. Select the .INF file and click OK. The .INF file and path
is selected in the Resource location box. The printer
drivers are in the Resources To Be Added box.
9. Click OK on the Add Resources Window.
10. Click OK on the Manage Resources window.
11. Note: When the Manage Resources window re-appears,
the printer driver(s) have been added to the NDPS Broker.
12. Click Cancel on the NDPS Broker window to EXIT the
NDPS Broker.
III - 34
OKI OkiLAN 6020e User’s Guide
Page 79

Section 3 - Chapter 4 - Using the OkiLAN 6020e in NDPS
Setting Up the OkiLAN 6020e Through
NWAdmin32
There are two types of printers available with NDPS. One is Public
Access, which anyone on the tree can get to. The other is Private
Access, which requires rights to the object. For Public Access
printers, the NDPS Printer can be created at the file server console
or through Novell’s NetWare Administrator (NWAdmin32). The
File Server Console approach offers less flexibility in
configuration. Both approaches are described in this and the
following subsection.
Setting Up the OkiLAN 6020e for Public Access Printers
1. Create NDPS Manager.
2. Double click NDPS Manager.
3. Go to Printer Agent List
4. Click New. Enter a name for the Agent.
5. Select NDPS Manager Name.
6. Select Novell Printer Gateway as the Gateway type and
click OK.
7. Select NONE as your Printer Type, select Novell Port
Handler as the Port Handler Type and click OK.
8. Select Remote (LPR on IP) and click Next.
9. From the OkiLAN 6020e Configuration Sheet, get the
print server’s IP address and use it for the Host Address
Box of the Novell Gateway Utility. Then, enter the print
server’s IP address. Also from the Configuration sheet, get
the output port of the print server. Then, enter the output
port as the Printer Name. Click Finish.
10. If the “Loading Printer Agent” screen stays on for more
than 60 seconds, click “Stop Waiting.”
11. Ignore the error message, “The Printer Agent Just Created
Needs Attention.”
12. Choose the printer drivers and click Continue.
13. The Status should show Idle.
NetWare
OKI OkiLAN 6020e User’s Guide
III - 35
Page 80

Section 3 - Chapter 4 - Using the OkiLAN 6020e in NDPS
Private Access Printers: these can only be created
through NWAdmin32
1. Create NDPS Manager in NWAdmin32.
2. Go to the Context in which the Private Printer is to reside.
3. Select Create. The New Object screen appears.
4. Click NDPS Printer, then click OK. Click the Define
Additional Properties box, and click Create.
5. Give the Agent a name, assign it to a NDPS Manager (use
the gray browse button marked “…”), then choose Novell
Printer Gateway.
6. Select NONE as your Printer Type, select Novell Port
Handler as the Port Handler Type and click OK.
7. Select Remote (LPR on IP) and click Next.
8. From the OkiLAN 6020e Configuration Sheet, get the
print server’s IP address and use it for the Host Address
Box of the Novell Gateway Utility. Then, enter the print
server’s IP address. Also from the Configuration sheet, get
the output port of the print server. Then, enter the output
port as the Printer Name. Click Finish.
9. If the “Loading Printer Agent” screen stays on for more
than a minute, click “Stop Waiting.”
10. Ignore the error message, “The Printer Agent Just Created
Needs Attention.”
11. Choose the printer drivers and click Continue.
III - 36
OKI OkiLAN 6020e User’s Guide
Page 81

Section 3 - Chapter 4 - Using the OkiLAN 6020e in NDPS
Setting Up the OkiLAN 6020e for Public Access
Printers At the File Server Console
1. Create NDPS Manager in NWAdmin32.
2. Load the NDPS Manager on the file server.
3. Select Insert New Printer Agent.
4. Give the Agent a Name.
5. Go to Configuration Utilities.
6. Select Novell Printer Gateway.
7. Select Appropriate Printer.
8. Select Novell Port Handler.
9. Select Remote Printer: LPR/TCPIP.
10. From the OkiLAN 6020e Configuration Sheet, get the
print server’s IP address. Click <Enter> at IP Host, then
enter IP address of print server.
11. The LPR Printer Name is the output port of the print
server.
12. Click Accept and Exit, then use Escape key to save.
NetWare
OKI OkiLAN 6020e User’s Guide
III - 37
Page 82

Section 3 - Chapter 4 - Using the OkiLAN 6020e in NDPS
III - 38
OKI OkiLAN 6020e User’s Guide
Page 83

Section IV:
TCP/IP
TCP/IP
Page 84

Section 4 - TCP/IP
In This Section
Chapter 1Introduction ........................................... IV-5
Overview ................................................................................... IV-5
Software Requirements ............................................................. IV-5
Network Preparation .................................................................. IV-6
Before You Start ........................................................................ IV-6
Overview of TCP/IP Configuration ........................................... IV-6
Chapter 2 Configuring the OkiLAN 6020e ........... IV-7
Choosing an IP Address ............................................................. IV-7
Configuring the OkiLAN 6020e ............................................... IV-8
Assigning the IP Address ........................................................... IV-8
Other Utilities .......................................................................... IV-12
Verifying Access to the OkiLAN 6020e .................................. IV-13
Chapter 3 TCP/IP Configuration and Printing ... IV-14
Overview ................................................................................. IV-14
Configuring for TCP/IP Network Printing ..............................IV-15
Remote Print Queue Name ...................................................... IV-15
Configuring a BSD-Style Print Queue .................................... IV-17
Remote LPD Printing .............................................................. IV-18
FTP Printing ............................................................................ IV-19
Timeout Checking ................................................................... IV-21
Raw Port Printing .................................................................... IV-22
Chapter 4 OkiNet for TCP/IP ............................... IV-23
Overview ................................................................................. IV-23
System Requirements .............................................................. IV-23
Running OkiNet for TCP/IP .................................................... IV-24
Configuring the OkiLAN 6020e Using OkiNet for TCP/IP.... IV-24
Configuring TCP/IP Options ................................................... IV-25
EtherTalk Configuration Options ............................................ IV-28
Output Port Configuration Options ......................................... IV-28
SNMP Configuration Options ................................................. IV-30
Enabling/Disabling Protocols ..................................................IV-32
SNMP Trap Configuration ...................................................... IV-32
IV - 2
OKI OkiLAN 6020e User’s Guide
Page 85

Section 4 - TCP/IP
Saving the Configuration ........................................................ IV-34
Displaying OkiLAN 6020e Diagnostic Information ............... IV-34
Printing a Configuration Sheet ................................................ IV-34
Resetting the OkiLAN 6020e .................................................. IV-34
Restoring Factory Default Settings ......................................... IV-35
Creating Customized Views .................................................... IV-36
Modifying View Settings ......................................................... IV-37
Permanently Defining SNMP Access Information.................. IV-39
Configuring the Discovery UDP Port Number ....................... IV-41
Starting a Telnet Session.......................................................... IV-41
Starting the BOOTP Server ..................................................... IV-41
Chapter 5 Web Configuration ............................ IV-42
Chapter 6 Telnet Configuration.......................... IV-43
Overview ................................................................................. IV-43
Running a Telnet Session ........................................................ IV-43
Appendix A Troubleshooting ............................. IV-49
Main Status Indicator .............................................................. IV-49
Restoring the OkiLAN 6020e to Factory Defaults .................. IV-49
Unable to Assign IP Address ................................................... IV-50
Hardware Error Messages ....................................................... IV-53
Printing a Configuration Page ................................................. IV-54
Unable to Print ......................................................................... IV-54
Appendix B Application Considerations ........... IV-56
Overview ................................................................................. IV-56
Assigning the OkiLAN 6020e IP Address
with BOOTP ..................................................................... IV-57
Configuring the OkiLAN 6020e IP
Address with RARP ......................................................... IV-60
Configuring HP-UX v8.07 for Printing
with the OkiLAN 6020e ................................................... IV-63
Configuring HP-UX v9.xx for Printing
with the OkiLAN 6020e ................................................... IV-66
Configuring HP-UX v10.xx for Printing
with the OkiLAN 6020e ................................................... IV-69
OKI OkiLAN 6020e User’s Guide
IV - 3
TCP/IP
Page 86

Section 4 - TCP/IP
Configuring SCO UNIX for Printing
with the OkiLAN 6020e ................................................... IV-73
IBM’s AIX ver. 3.x for Printing
with the OkiLAN 6020e ................................................... IV-75
Configuring Solaris 2.x for Printing
with the OkiLAN 6020e ................................................... IV-77
Configuring Sun-OS v4.1.x or Ultrix v4.2 for Printing
with the OkiLAN 6020e ................................................... IV-79
Appendix C Internet Printing Protocol (IPP) ..... IV-81
IV - 4
OKI OkiLAN 6020e User’s Guide
Page 87

Section 4 - Chapter 1 - Introduction
Chapter 1
Introduction
Overview
This section contains instructions and information on
how to configure your OkiLAN 6020e. You will also be
instructed on how to set up your host computers to print
to the OkiLAN 6020e using the TCP/IP protocol.
OkiLAN 6020e supports TCP/IP methods for printing:
• Remote Line Printer Daemon (LPD)
• File Transfer Protocol (FTP)
• Printing directly through a TCP port (Raw Port
Printing)
Additionally, if the DHCP protocol is enabled as a
default, the print server may be accessed through an
ordinary Internet Web browser, such as Netscape
Navigator, or by using TELNET. See Chapters 5 and 6
in this section.
Software Requirements
The OkiLAN 6020e may be configured for TCP/IP
using the OkiNet for TCP/IP utility, or from a computer
supporting the OkiNet for NetWare utility, Banyan
VINES OkiNet for VINES utility (may apply to other
OkiLAN print server models), OR telnet and one of the
following:
• Manual arp table entry and ping
• Static route entry using route add command
• DHCP
• RARP
• BOOTP
OKI OkiLAN 6020e User’s Guide
TCP/IP
IV - 5
Page 88

Section 4 - Chapter 1 - Introduction
Network Preparation
• You should be familiar with network administration
as well as the physical setup and operation of your
network.
• Advise users of possible disruption during
installation.
• Make sure the serial number and Ethernet address of
your OkiLAN 6020e are available.
• Assign an IP address and a hostname (alias) to the
OkiLAN 6020e.
Use the network name service or the “/etc/hosts” file
to add the OkiLAN 6020e to the network.
Before You Start
Before running OkiNet for TCP/IP, you must do the
following:
• Install the OkiLAN 6020e hardware and connect the
cabling. Instructions for hardware installation are
found in Section I of this manual.
• Write down the serial number and Ethernet address
of your OkiLAN 6020e. (These numbers are located
on the OkiLAN 6020e unit.)
• Install OkiNet for TCP/IP-see Section I.
Overview of TCP/IP Configuration
• Assign an IP address for the OkiLAN 6020e
• Configure the OkiLAN 6020e network information
• Configure hosts for printing to the OkiLAN 6020e
• Test print (optional)
IV - 6
OKI OkiLAN 6020e User’s Guide
Page 89

Section 4 - Chapter 2 - Configuring the OkiLAN 6020e
Chapter 2
Configuring the OkiLAN 6020e
Choosing an IP Address
Every TCP/IP network device is required to have a
unique IP address. The IP address can be permanently
stored using one of the following:
• OKI OkiNet management utilities for TCP/IP, Novell
NetWare or Banyan VINES (may apply to other
OkiLAN print server models)
• OkiLAN 6020e Configuration utility via telnet.
Note: The OkiNet utilities are the easiest way to
assign an IP address.
Using factory default settings, the OkiLAN 6020e first
attempts to determine its IP address (flashing rapid
green) using DHCP, RARP, BOOTP or Gleaning. If the
OkiLAN 6020e has not resolved its IP address after 2
minutes, it defaults to 198.102.102.254. (This IP
address should be used only temporarily for
configuration purposes.)
To choose an IP address:
1. Select an IP address and hostname for the OkiLAN
6020e.
Example: 192.168.42.50 OkiLAN 6020e_name
2. Add the name and IP address to the “/etc/hosts” file
of each host that will access the OkiLAN 6020e. Or,
if your network uses a name service, add the host
name and IP address to the name server.
Most TCP/IP networks use the Network Information
Service (NIS), Domain Name Service (DNS) or the “/
etc/hosts” database. See your network documentation
for instructions.
TCP/IP
OKI OkiLAN 6020e User’s Guide
IV - 7
Page 90

Section 4 - Chapter 2 - Configuring the OkiLAN 6020e
Configuring the OkiLAN 6020e
There are four utilities available to configure the
OkiLAN 6020e for TCP/IP printing. You may use
whichever utility is best suited for your needs.
• OkiNet for TCP/IP - Windows TCP/IP print
manager utility. See Chapter 3 of this section for
more information.
• OkiLAN 6020e Configuration Utility - This utility is
accessed via telnet. See Chapter 6 of this section for
more information.
In order to configure the OkiLAN 6020e via telnet,
you must first assign an IP address to the OkiLAN
6020e and verify communication by pinging the
device.
• OkiNet for NetWare - This windows utility must be
run from a Novell NetWare client. See Section III of
this manual for specific information.
• OkiNet for VINES (VPMAN) Utility - This
Windows utility must be run from a Banyan VINES
client (may apply to other OkiLAN print server
models).
Assigning the IP Address
There are eight different methods for assigning an IP
address to the OkiLAN 6020e: Gleaning, Static Route
Entry, DHCP, RARP, BOOTP and using the OkiNet or
OkiNet for VINES utilities. Gleaning, Static Route
Entry and RARP require the OkiLAN 6020e and the
host to be on the same subnet. DHCP and BOOTP also
have this restriction unless the network routers are
configured to pass these requests. The OkiNet and
OkiNet for VINES utilities (may apply to other
OkiLAN print server models) do not have this
restriction.
IV - 8
OKI OkiLAN 6020e User’s Guide
Page 91

Section 4 - Chapter 2 - Configuring the OkiLAN 6020e
Gleaning
If an IP address has not been permanently assigned
when the OkiLAN 6020e is powered on or reset, it will
look for a ping packet on the network. If the OkiLAN
6020e receives a ping packet within two minutes, it will
accept the IP address in the ping packet as its own
address.
To use Gleaning, you must have Windows 95/98,
Windows NT/2000, or super-user privileges on a UNIX
system.
1. Add an entry in the ARP table that assigns an IP
address to the hardware address of the OkiLAN
6020e. To do this, use the arp command.
arp -s <ip_address><hardware_address> temp
UNIX Example:
arp -s 192.168.42.24 00:02:16:00:00:01 temp
Windows 95/98, Windows NT/2000 Example:
arp -s 192.168.42.24 00-02-16-00-00-01
2. Start a continuous ping to the OkiLAN 6020e.
ping <ip_address>
Example: ping 192.168.42.24
On some systems, this may require an additional
parameter. Some implementations of ping only send
out one ping packet which could get lost in transit.
Check your system documentation for more
information.
3. Connect power to the OkiLAN 6020e.
The OkiLAN 6020e will glean its IP address from
the ping packet. This IP address will remain in effect
until the OkiLAN 6020e is powered off or reset.
Therefore, a permanent IP address should be
assigned by running the OkiNet for TCP/IP utility or
via telnet.
TCP/IP
Note: Gleaning does not work with Windows NT
Workstation 3.5.
OKI OkiLAN 6020e User’s Guide
IV - 9
Page 92

Section 4 - Chapter 2 - Configuring the OkiLAN 6020e
DHCP
The Dynamic Host Configuration Protocol (DHCP)
provides a framework for passing configuration
information to hosts on a TCP/IP network in a client/
server fashion. DHCP is based on the Bootstrap
Protocol (BOOTP), adding the capability of automatic
allocation of reusable network addresses and additional
configuration options. DHCP uses the same packet
structure as BOOTP so current BOOTP relay agents
will also interact with DHCP messages.
DHCP offers dynamic IP address allocation. When a
client receives an IP address, it also receives a lease (an
amount of time the host may use the address). The
lease times vary from 1 hour to 100 years, or may be
infinite. When the lease expires, the host must stop
using the address. DHCP may also be used like
BOOTP, with a certain IP address always assigned to a
certain device. Depending on the server, both methods
may be used at the same time.
If the OkiLAN 6020e does not find a DHCP server
after two minutes, it will timeout and assume a default
address of 198.102.102.254. This follows current
BOOTP and RARP behavior.
If the OkiLAN 6020e receives multiple responses, it
will choose the first one.
When the OkiLAN 6020e receives an address, it sends
an ARP message once every second for five seconds on
the offered address to determine if another device is
using it. If the OkiLAN 6020e finds another device is
using the address, it will refuse the address and start
looking for a new address.
IV - 10
OKI OkiLAN 6020e User’s Guide
Page 93

Section 4 - Chapter 2 - Configuring the OkiLAN 6020e
Static Route Entry
When the OkiLAN 6020e is powered on or reset and
no permanent IP address has been assigned, it will
attempt to obtain an IP address through Gleaning,
RARP, BOOTP or DHCP. If the OkiLAN 6020e has not
determined its IP address after two minutes, the IP
address will default to 198.102.102.254. This IP
address should only be used temporarily to configure a
new, permanent IP address. To change to a permanent
IP address, the route add command is used to place the
OkiLAN 6020e product’s default IP address into the
workstation’s network routing table. To use the route
command, you must have Windows 95/98, Windows
NT/2000 or super-user privileges under UNIX. The
syntax for this command is:
route add 198.102.102.254 “IP address of the
workstation” 0
Note: The zero (0) placed at the end of the route add
command shown above is optional.
The Static Route method only works if the host from
which you are telneting is on the same subnet as the
OkiLAN 6020e. Once the route add command has been
issued, telnet will allow you to change and/or make the
IP address permanent. After changing the IP address to
its permanent address, the routing table entry should be
deleted using route delete.
For more information, consult your system
documentation for the route command.
RARP or BOOTP
If an IP address has not been permanently assigned, the
OkiLAN 6020e will use Reverse Address Resolution
Protocol (RARP) or Bootstrap Protocol (BOOTP). The
OkiLAN 6020e will broadcast requests for its IP
address to both RARP and BOOTP servers. A RARP or
BOOTP server will respond by searching a
configuration file that maps the Ethernet hardware
addresses of devices on the network to their respective
IP addresses. If a match is found, the server’s response
will include the IP address of the device.
OKI OkiLAN 6020e User’s Guide
IV - 11
TCP/IP
Page 94

Section 4 - Chapter 2 - Configuring the OkiLAN 6020e
Most UNIX operating systems support either the RARP
or BOOTP protocol. To find out which protocol your
operating system supports, request the manual page for
the protocol’s daemon (e.g. man bootpd or man rarpd),
or see your network manuals. Both protocols require
that you add the product’s network hardware address
and IP address to a configuration file. See your network
documentation for instructions or refer to Appendix B,
Application Considerations.
Note: An IP address received from a RARP or
BOOTP server is not permanently programmed
into the OkiLAN 6020e. Therefore, if you
choose this method of assigning the IP address,
the RARP or BOOTP server must be available
every time the OkiLAN 6020e is powered on
or reset. The IP address can be stored
permanently using telnet, OkiNet for TCP/IP,
OkiNet for NetWare or the OkiNet for VINES
utility (may apply to other OkiLAN print server
models).
A Winsock compliant BOOTP server is located on the
OkiNet for TCP/IP diskette. This has been provided for
users who do not have UNIX machines.
Other Utilities
The IP address can also be set from Novell NetWare
using the OkiNet for NetWare utility or through the
Banyan VINES OkiNet for VINES utility (may apply
to other OkiLAN print server models).
Note: The OkiNet for NetWare and OkiNet for
VINES utilities can only be used if Novell
NetWare or Banyan VINES are installed on
your network respectively (may apply to other
OkiLAN print server models).
IV - 12
OKI OkiLAN 6020e User’s Guide
Page 95

Section 4 - Chapter 2 - Configuring the OkiLAN 6020e
Verifying Access to the OkiLAN 6020e
Use the ping utility to verify access to the OkiLAN
6020e.
ping <IP address of OkiLAN 6020e>
If the OkiLAN 6020e does not respond, your network
or the device is not configured correctly.
• Verify the IP address, default gateway and subnet
mask are set to the proper values on the OkiLAN
6020e by printing a configuration sheet. This can be
done using either the print configuration sheet
button, through the OkiNet or OkiNet for VINES
utilities (may apply to other OkiLAN print server
models) or via telnet.
• If the settings appear to be correct, try repeating the
installation steps. If problems persist, call Oki Data
Customer Support at 1-800-OKI-DATA (1-800-654-
3282).
OKI OkiLAN 6020e User’s Guide
TCP/IP
IV - 13
Page 96

Section 4 - Chapter 3 - TCP/IP Configuration and Printing
Chapter 3
TCP/IP Configuration and
Printing
Overview
The OkiLAN 6020e supports printing from computers
using TCP/IP and any of the following printing
protocols:
• Line Printer Redirect/Line Printer Daemon (lpr/lpd)
• File Transfer Protocol (FTP)
• Printing directly through a TCP port (Raw Port
Printing)
This chapter presents basic instructions on how to
configure your computer to print using Remote LPD
and FTP. Specific instructions for several popular
computer systems have been documented in Appendix
B, Application Considerations. If your specific system
is not addressed in this appendix, follow the
instructions outlined below. You should also refer to
your operating system or computer manual for
information about configuring remote network printing.
If you are still unable to configure your computer
system to print to the OkiLAN 6020e, contact Oki Data
Customer Support at 1-800-OKI-DATA
(1-800-654-3282).
IV - 14
OKI OkiLAN 6020e User’s Guide
Page 97

Section 4 - Chapter 3 - TCP/IP Configuration and Printing
Configuring for TCP/IP Network
Printing
Most computers that support TCP/IP network printing
use the Remote Line Printer Daemon (LPD) protocol.
This protocol was originally part of the Berkeley
Software Distribution (BSD) version of the UNIX
operating system. Remote LPD was quickly adopted as
a de facto standard. As a result, Remote LPD is now
supported by most versions of the UNIX operating
system and by many TCP/IP packages available for
other operating systems. Configuration of Remote LPD
printing varies among vendors who supply TCP/IP.
You may also use the File Transfer Protocol (FTP) for
printing. Typically FTP is used to transfer files between
computers on a TCP/IP network. The OkiLAN 6020e
simply prints the files it receives from FTP.
Remote Print Queue Name
The Remote Print Queue Name determines which
printer port will service the print job. The Remote Print
Queue Name may also be used to specify ASCII print
jobs. Both Remote LPD and FTP have provisions for
specifying a Remote Print Queue Name.
The OkiLAN 6020e looks at the last character of the
Remote Print Queue Name to determine which printer
port will service the print job. All Remote Print Queue
Names should end with the number 1, 2, 3 or 4. If a
number is not specified, the OkiLAN 6020e will use
printer port 1.
The OkiLAN 6020e is designed to handle many
different types of printers and print data. Typically you
will select the printer type for your printer in telnet
under the Configure Port option. However, if you are
connecting to an ASCII printer, you may wish to use
the OkiLAN 6020e to format the print data for your
printer.
TCP/IP
OKI OkiLAN 6020e User’s Guide
IV - 15
Page 98

Section 4 - Chapter 3 - TCP/IP Configuration and Printing
The OkiLAN 6020e will parse the remote queue name
and search for certain characters at the end which tell
how to convert an ASCII print job. The print server
uses FF, LF and NF as ASCII conversion specifiers and
uses the last number as an output port. The FF, LF and
NF specifiers must be the last letters in the queue name.
Example: LaserWriterFF, SalesColorLaserNF,
ChemDeptLF2
FF Use the FF suffix at the end of the Remote Print
Queue Name, before the port number.
Example: queueFF2
If the last character in the print job is not a form
feed, the OkiLAN 6020e appends a form feed.
This form feed prompts the printer to print any
partial page at the end of the job.
LF Use the LF suffix at the end of the Remote Print
Queue Name, before the port number.
Example: queueLF2
In addition to the form feed described above,
the OkiLAN 6020e inserts a carriage-return
character into the print job immediately before
each line-feed character. This feature is useful
for printing UNIX text files.
NF Use the NF suffix at the end of the Remote Print
Queue Name, before the port number.
Example: queueNF2
The OkiLAN 6020e inserts a carriage-return
character into the print job immediately before
each line-feed character. This feature is useful
for printing UNIX text files.
This option differs from LF in that form feed is
not added to the end of jobs.
IV - 16
OKI OkiLAN 6020e User’s Guide
Page 99

Section 4 - Chapter 3 - TCP/IP Configuration and Printing
Configuring a BSD-Style Print Queue
For remote BSD-Style LPD printing, add the OkiLAN
6020e as a remote printer in the “/etc/printcap”
database to each host printing to the OkiLAN 6020e.
You can add PRINTCAP options as needed. If you are
unfamiliar with PRINTCAP, consult your local
documentation.
The entry should be similar to the following:
local_print_queue_name|[printer_model_and_
manufacturer]:\:lp=:mx#0:rm=OkiLAN
6020e_name:\:rp=remote_print_queue_name:\
:sd=path_to_spool_directory:lf=just
log_file_name
local_print_queue_name
The local_print_queue_name defines the name of the
printcap entry. It is used by the lpr/lpd utilities to
specify which printcap entry is being referenced.
Additional printcap entries can be added as needed for
different queue types. Each entry must have a unique
local_print_queue_name and a different spool directory
to work properly. When you are ready to print, use the
local_print_queue_name that matches the data type of
the file to be printed.
OkiLAN 6020e_name
This is the name (alias) of the OkiLAN 6020e. This
must be the same name as entered in the /etc/hosts file
or your NIS or DNS system. An IP address may also be
used here.
remote_print_queue_name
The remote_print_queue_name entry determines the
OkiLAN 6020e port where the print job will be printed
and optionally specifies ASCII printing.
path_to_spool_directory
This is the path to a directory where the print jobs will
be spooled for this queue. You must create a unique
spool directory for each printcap entry.
OKI OkiLAN 6020e User’s Guide
IV - 17
TCP/IP
Page 100

Section 4 - Chapter 3 - TCP/IP Configuration and Printing
log_file_name
This is the path to a file where error information from
the lpd will be logged.
Example: If you are printing to an ASCII printer that
requires a carriage return/line feed, you may need two
separate printcap entries: one entry for print jobs which
terminate lines with a carriage return/line feed, and
another entry for print jobs which terminate lines with a
line feed only. Your printcap entries might look like the
following:
ascii_files|form.feed.Queue_on_Port_2:\
:lp=:mx#0:rm=pserver1:rp=MYQUEUEFF2:\
:sd=/usr/spool/myqueueff2:\
:lf=/usr/spool/myqueueff2/queue.log
asciilf_files|line.feed.Queue_on_Port_2:\
:lp=:mx#0:rm=pserver1:rp=MYQUEUELF2:\
:sd=/usr/spool/myqueuelf2:\
:lf=/usr/spool/myqueuelf2/queue.log
Note: Each printcap entry must have a different spool
directory to work properly.
Remote LPD Printing
The way print jobs are queued to a Remote LPD system
varies among the vendors that support TCP/IP. UNIX
systems that are BSD-based typically use the lpr
program to submit print jobs. Other UNIX systems may
use the lp program to submit print jobs. PC-based TCP/
IP packages often provide a command line lpr program
and a utility to redirect the output of an LPT port to a
Remote LPD system.
Consult your system administrator or software vendor
for assistance troubleshooting LPD.
IV - 18
OKI OkiLAN 6020e User’s Guide
 Loading...