

Page 1
English
English
User’s Guide
User’s Guide i
Page 2

Note to customers
Every effort has been made to ensure that the information
in this document is complete, accurate, and up-to-date.
The manufacturer assumes no responsibility for the
results of errors beyond its control. The manufacturer
also cannot guarantee that changes in software and
equipmen t made by other manufacturers and referred to
in this guide will not affect the applicability of the
information in it. Mention of software products
manufactured by other companies does not necessarily
constitute endorsement by the manufacturer.
First edition June 1999.
© Oki Europe Limited 1999.
Oki is a registered trademark of Oki Electric Industry
Company, Ltd.
Energy Star is a trademark of the United States
Environmental Protection Agency
Other product names and brand names are registered
trademarks or trademarks of their proprietors.
This product complies with the requirements of the Council Directives 89/336/
EEC and 73/23/EEC amended by 93/68/
EEC on the approximation of the laws of
the member states relating to electromagnetic compatibility and low voltage.
Energy Star
As an Energy Star Partner, the
manufacturer has determined that this
product meets the Energy Star guide-lines
for energy efficiency.
ii OKIFAX 250
Page 3

Contents
Note to customers. . . . . . . . . . . . . . . . . . . . . . . . . . . . . ii
Safety Instructions . . . . . . . . . . . . . . . . . . . . . . . . . . . . .v
Notes, Cautions and Warnings. . . . . . . . . . . . . . . . . . vii
Cleaning and maintenance . . . . . . . . . . . . . . . . . . . . . vii
Features. . . . . . . . . . . . . . . . . . . . . . . . . . . . . . . . . . . . . .1
Checking Package Contents. . . . . . . . . . . . . . . . . . . . . .2
Installation . . . . . . . . . . . . . . . . . . . . . . . . . . . . . . . . . . .3
Installing the handset . . . . . . . . . . . . . . . . . . . . . . . .3
Connecting the telephone line cable. . . . . . . . . . . . .3
Connecti ng a second t elephone or
answering machine . . . . . . . . . . . . . . . . . . . . . . .4
Connecting the power supply adaptor . . . . . . . . . . .4
Installing the thermal transfer ribbon . . . . . . . . . . . .5
Loading recording paper. . . . . . . . . . . . . . . . . . . . . .7
Installing the leading paper tray . . . . . . . . . . . . . . . .8
Setting reception reduction. . . . . . . . . . . . . . . . . . . .8
Control Panel . . . . . . . . . . . . . . . . . . . . . . . . . . . . . . . . .9
Keypanel. . . . . . . . . . . . . . . . . . . . . . . . . . . . . . . . . .9
Audible Alarm identification . . . . . . . . . . . . . . . . .10
Initial Programming . . . . . . . . . . . . . . . . . . . . . . . . . . .11
Functions. . . . . . . . . . . . . . . . . . . . . . . . . . . . . . . . .11
Inputting Characters . . . . . . . . . . . . . . . . . . . . . . . .13
Setting the Date and Time . . . . . . . . . . . . . . . . . . .13
Setting Sender ID . . . . . . . . . . . . . . . . . . . . . . . . . .14
Entering your name . . . . . . . . . . . . . . . . . . . . . 14
Entering your fax number. . . . . . . . . . . . . . . . . 14
Storing one touch numbers. . . . . . . . . . . . . . . . . . .15
Storing speed dial directory numbers. . . . . . . . . . .15
To modify a directory entry . . . . . . . . . . . . . . . 16
To delete a directory entry . . . . . . . . . . . . . . . . 16
Basic Operations. . . . . . . . . . . . . . . . . . . . . . . . . . . . . .17
Loading documents. . . . . . . . . . . . . . . . . . . . . . . . .17
Document dimensions:. . . . . . . . . . . . . . . . . . . 17
Document insertion . . . . . . . . . . . . . . . . . . . . . 17
Sending documents. . . . . . . . . . . . . . . . . . . . . . . . .18
Keypad dialling . . . . . . . . . . . . . . . . . . . . . . . . 18
One-touch dialling . . . . . . . . . . . . . . . . . . . . . . 19
Directory dialling . . . . . . . . . . . . . . . . . . . . . . . 19
Manual redial . . . . . . . . . . . . . . . . . . . . . . . . . . 20
Low speed transmission . . . . . . . . . . . . . . . . . . 20
Cancelling transmission . . . . . . . . . . . . . . . . . . 20
Adding pages while sending. . . . . . . . . . . . . . . 20
Copying documents . . . . . . . . . . . . . . . . . . . . . . . .21
English
User’s Guide iii
Page 4

Receiving documents. . . . . . . . . . . . . . . . . . . . . . .21
TEL mode . . . . . . . . . . . . . . . . . . . . . . . . . . . . .21
FAX mode . . . . . . . . . . . . . . . . . . . . . . . . . . . . .22
TAD mode . . . . . . . . . . . . . . . . . . . . . . . . . . . . .2 3
Memory reception . . . . . . . . . . . . . . . . . . . . . . .24
Setting user preferences. . . . . . . . . . . . . . . . . . . . . . . .25
Setting alarm . . . . . . . . . . . . . . . . . . . . . . . . . . . . .25
TEL/FAX switchover. . . . . . . . . . . . . . . . . . . . . . .25
Ring count . . . . . . . . . . . . . . . . . . . . . . . . . . . . . . .26
Tone/ Pulse dial mode (not in UK) . . . . . . . . . . . .26
Silence detection . . . . . . . . . . . . . . . . . . . . . . . . . .27
Message confirmation report . . . . . . . . . . . . . . . . .28
Remote control. . . . . . . . . . . . . . . . . . . . . . . . . . . . 28
Redial times . . . . . . . . . . . . . . . . . . . . . . . . . . . . . .29
Redial interval . . . . . . . . . . . . . . . . . . . . . . . . . . . .29
Language . . . . . . . . . . . . . . . . . . . . . . . . . . . . . . . .30
Special functions . . . . . . . . . . . . . . . . . . . . . . . . . .30
Reception timer . . . . . . . . . . . . . . . . . . . . . . . . .30
Reception restriction . . . . . . . . . . . . . . . . . . . . .31
R key . . . . . . . . . . . . . . . . . . . . . . . . . . . . . . . . .31
Distinctive ring . . . . . . . . . . . . . . . . . . . . . . . . .32
Speaker volume . . . . . . . . . . . . . . . . . . . . . . . . . . .32
Printing Reports. . . . . . . . . . . . . . . . . . . . . . . . . . . . . .33
Journal report. . . . . . . . . . . . . . . . . . . . . . . . . . . . .33
Phone book. . . . . . . . . . . . . . . . . . . . . . . . . . . . . . .34
Timer report . . . . . . . . . . . . . . . . . . . . . . . . . . . . . .35
Help List. . . . . . . . . . . . . . . . . . . . . . . . . . . . . . . . .35
Special Features. . . . . . . . . . . . . . . . . . . . . . . . . . . . . .36
Delayed transmission. . . . . . . . . . . . . . . . . . . . . . . 36
Document delayed transmission . . . . . . . . . . . .36
Memory delayed transmission. . . . . . . . . . . . . .37
Polling transmission. . . . . . . . . . . . . . . . . . . . . . . .38
Polling reception . . . . . . . . . . . . . . . . . . . . . . . . . . 39
Instant polling reception . . . . . . . . . . . . . . . . . .39
Maintenance. . . . . . . . . . . . . . . . . . . . . . . . . . . . . . . . . 40
Clearing a recording paper jam . . . . . . . . . . . . . . .40
Clearing a document jam . . . . . . . . . . . . . . . . . . . . 41
Error codes. . . . . . . . . . . . . . . . . . . . . . . . . . . . . . .41
Cleaning . . . . . . . . . . . . . . . . . . . . . . . . . . . . . . . . . 42
Scanner . . . . . . . . . . . . . . . . . . . . . . . . . . . . . . .42
Printer . . . . . . . . . . . . . . . . . . . . . . . . . . . . . . . .43
Troubleshooting. . . . . . . . . . . . . . . . . . . . . . . . . . . . . . 44
Specifications. . . . . . . . . . . . . . . . . . . . . . . . . . . . . . . . 46
Index . . . . . . . . . . . . . . . . . . . . . . . . . . . . . . . . . . . . . .49
iv OKIFAX 250
Page 5

Safety Instructions
This product has been carefully designed to give you
years of safe, reliable performance. As with all electrical
equipment, however, there are a few basic precautions
you should take to avoid hurting yourself or damagi ng the
product:
• Read the setup instructions in this manual carefully.
Be sure to save it for future reference.
• Read and follow all warning and instruction labels on
the product itself.
• Unplug the machine before you clean it. Use only a
damp cloth; do not use liquid or aerosol cleaners.
• Place the machine on a firm, solid s ur f ace. I f y ou pu t
it on something unsteady, it may fall and be
damaged; if you place it on a soft surface, such as a
rug, sofa, or bed, the vents may become blocked,
causing the machine to overheat.
• Install the machine away from other electronic
devices to avoid interference. Make sure that the
machine does not share a power outlet with any other
equipment.
• To protect the machine from overheating, make sure
no openings are blocked. Do not put the machine on
or near a heat source, such as a radiator. Keep it out
of direct sunlight. Allow enough room around the
machine for adequate ventilation and easy access.
• Do not use the machine near water, or spill liquid of
any kind into it.
• Be certain that your power source matches the rating
listed on the back of the machine. If you are not sure,
check with your supplier or with your local power
provider.
• This machine has an earthed, 3-pin plug as a safety
feature, and it will only fit into an earthed outlet. If
you can not plug it in, you probably have an older,
non-earthed outlet; contact an electrician to have the
outlet replaced. Do not use an adapter to defeat the
earthing.
• To avoid damaging the power cable, do not put
anything on it or place it where it will be walked on.
If the cable becomes damaged or frayed, replace it
immediately.
English
User’s Guide v
Page 6

• If you are using an extensi on cable or p ower st rip
with the machine, make sure that the total current
(amperes) required by all the equipment on the
extension is less than the extension's rating. The total
ratings of all equipment plugged into the outlet
should not exceed 15 amperes.
If anything happens which indicates the machine is not
working properly or has been damaged, unplug it
immediately and contact your supplier.
These are some of the things to look for:
• The power cable or plug is frayed or damaged.
• The power outlet into which you plug your machine
must remain accessible at all times.
• It is recommended that the machine be switched off
prior to op ening or removing covers.
• Lifting the top cover may expose hot surfaces. Hot
surfaces are clearly labelled. Do NOT touch them.
• Liquid has been spilled into the machine, or it has
been exposed to water.
• The machine has been dropped, or the cabinet is
damaged.
• The machine does not function normally when you
are following the operating instructions.
• Do not poke anything into any ventilation slots; you
could receive an electrical shock or cause a fire.
• Apart from the routine maintenance described in the
accompanying documentation, do not try to service
the machine yourself; opening or removing covers
may expose you to shocks or other hazards.
• Do not make any a djustments other than those
outlined in the manual as you may cause damage
requiring extensive repair work.
vi OKIFAX 250
Page 7

Notes, Cautions and W arnings
Cleaning and maintenance
Note:
A note appears in this manual like this. A
note provides additional information to
supplement the main text which may help
you to use and understand the product.
Caution:
A caution appears in this manual like
this. A caution provides additional
information which, if ignored, may result
in equipment malfunction or damage.
ARNING
W
WARNING APPEARS IN THIS MANUAL
A
LIKE THIS
ADDITIONAL INFORMATION WHICH, IF
IGNORED, MAY RESULT IN A RISK OF
PERSONAL INJURY
:
WARNING PROVIDES
. A
.
Before cleaning disconnect the machine from the
1
power supply. Use a soft damp cloth to wipe over the
operation panel and main body of the machine.
DO NOT USE ALCOHOL OR ANY OTHER
STRONG CLEANING SOLUTION
Always unplug the machine before trying to remove
2
.
any objects that may have fallen into it.
Never lubricate parts yourself, always contact your dealer
first.
English
User’s Guide vii
Page 8

Note for user’s in New Zealand only:
The operation of this equipment on the same line
as telephones or other equipment with audible
warning devices or automatic ring detectors will
give rise to bell tinkle or noise and may cause
false tripping of the detector. Should such
problems occur, the user i s not to contact Telecom
Faults Service.
Not all standard telephones will respond to
incoming ringing when conn ected to an extensio n
socket.
viii OKIFAX 250
Page 9

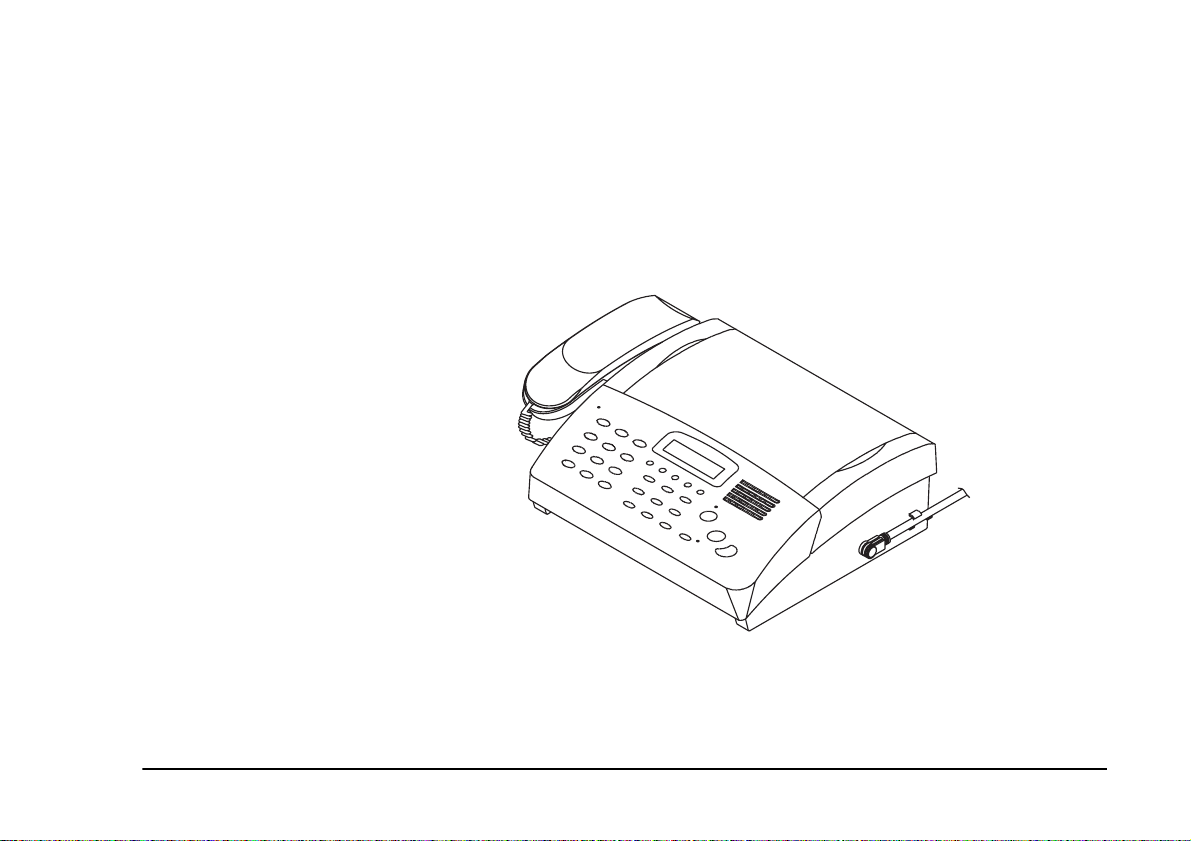
Features
Your new fax machine brings you the latest advances in
communication technology, offering a range of features
designed to make your telephone communications both
easy and efficient.
• Compact design requires minimal space in the home
or small office.
• Built-in telephone offers conventional voice
operation with telephone handset.
• 5 one touch memory locations for storage of your
most frequently used telephone and fax numbers.
• 50 memory locations for storage of other telephone
and fax numbers, together with their names.
• Automatic answering of incoming calls, including
automatic detection of voice and fax.
• Delayed fax transmission for se nding messages
during off-peak charging periods.
• Transmit and receive polling functions for automatic
distribution and collection of fax messages.
• Printed reports confirming successful (or
unsuccessful) transmission and reception, listing
directory entries and configuration settings.
• Simple programming of all f eatures via con trol panel
buttons and LCD display panel.
English
User’s Guide 1
Page 10

Checking Package Contents
Your package should contain the following items:
Facsimile machine
1
This User’s Guide.
2
Telephone line cable
3
Thermal transfer ribbon
4
Leading paper tray
5
Extension paper tray
6
Handset cradle
7
Two handset screws
8
Telephone handset
9
Power supply adaptor
10
AC power cable
11
One-touch key label for affixing to handset
12
Adaptor (UK only)
13
2
1
11
10
12
2
3
4
5
1
9
8
3
7
Note:
If any item appears to be missing or damaged,
please contact your supplier without delay.
4
5
6
2 OKIFAX 250
Page 11
Installation
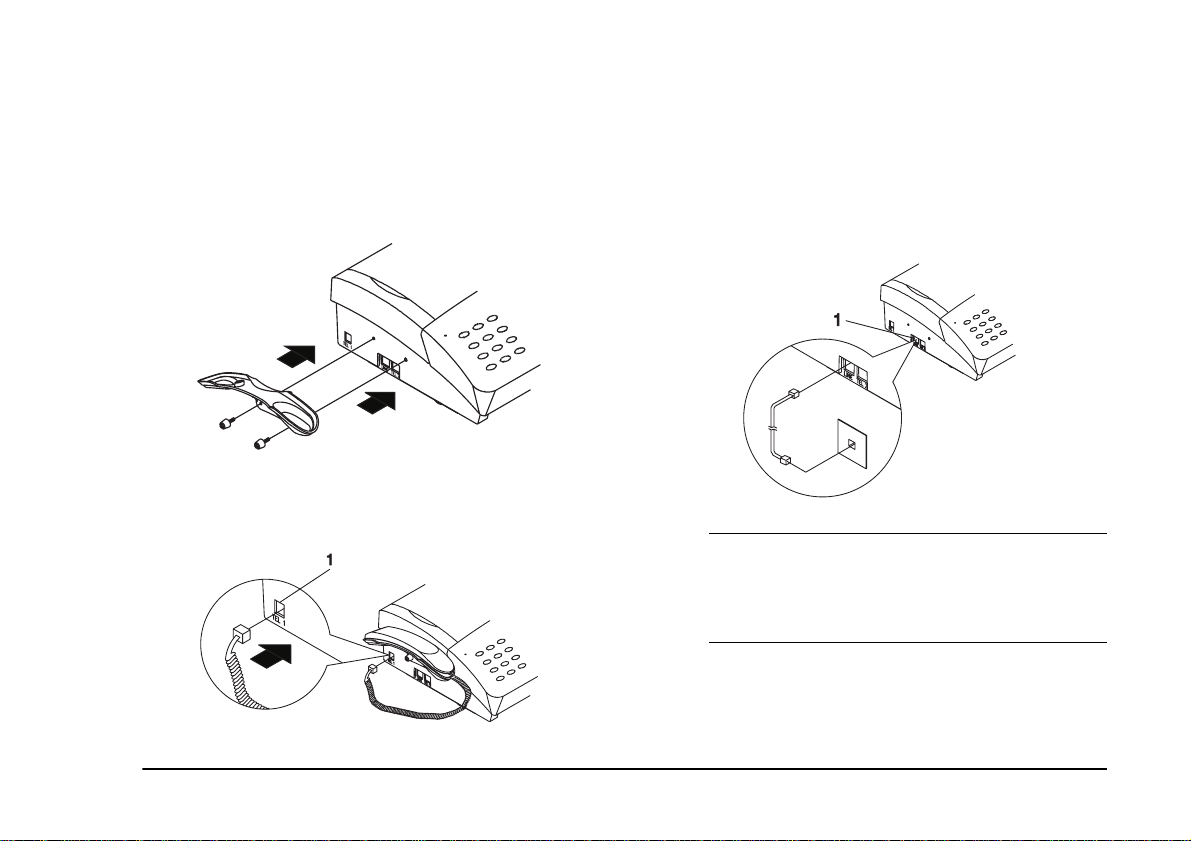
Installing the handset
Install the handset cradle using the two screws
1
provided.
Connect one end of the coil cord to the TEL 1 jack (1)
2
on the left-hand side of machine.
Connecting the telephone line cable
Connect one end of the telephone line cable to the
1
Line jack (1) on the machine, and the other en d to the
wall socket.
ARNING
W
NSURE THAT THE POWER CORD IS UNPLUGGED
E
BEFORE CONNECTING THE FAX MACHINE TO THE
TELEPHONE LINE
:
.
English
User’s Guide 3
Page 12
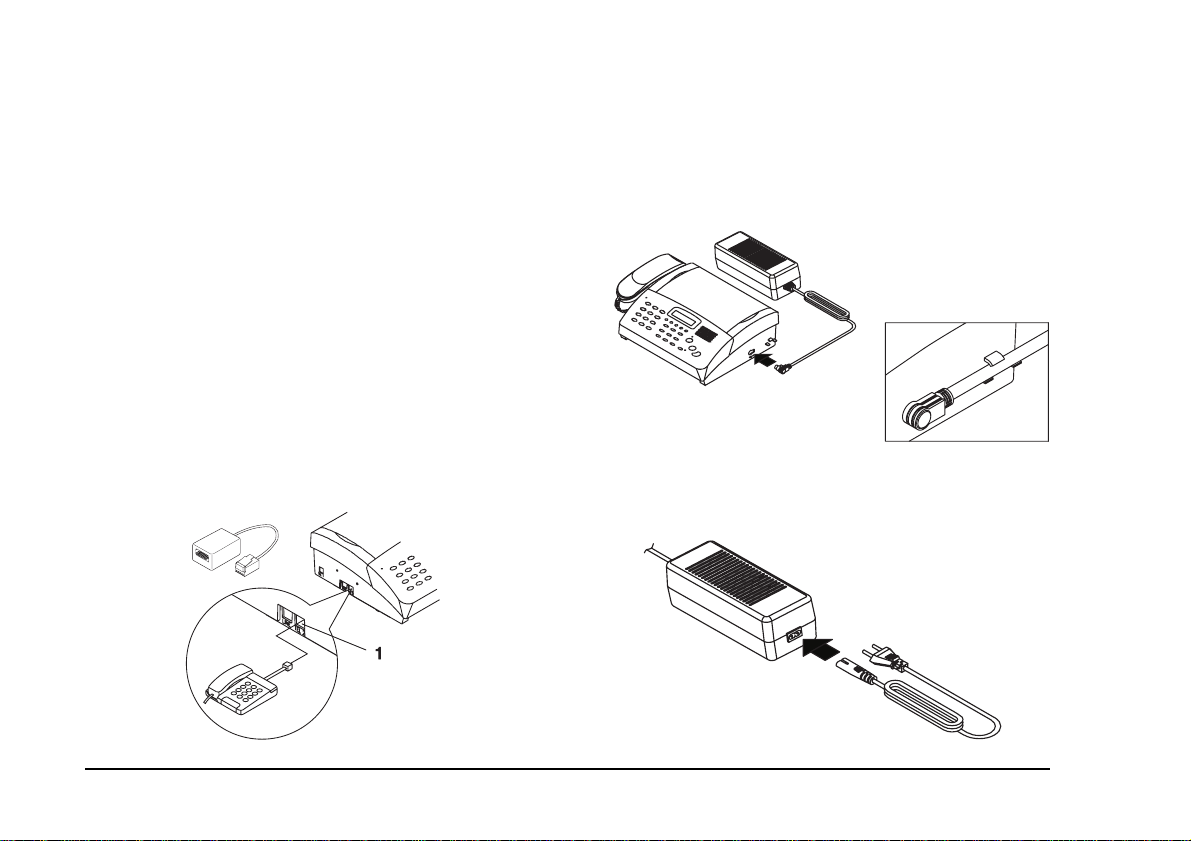
Connecting a second telephone or answering machine
Connect your extension telephone or an answering
1
machine to the TEL 2 jack of the machine (1). To
accommodate either of these options it may be
necessary to use the adaptor (2) supplied in certain
countries with the fax machine.
Note:
When connecting an answer machine ensure that
its ring response is set to lower than that of the fax
machine e.g., if the fax machine is set to 5 rings,
the answer machine should be set to 3 rings (see
“Ring count” on page 26).
Connecting the power supply adaptor
Plug the power supply adaptor cable into the socket
1
on the right-hand side of the fax machine and insert
the cord into the retainers on the side of the machine
as shown below.
This connection may not be permitted in certain
countries.
2
4 OKIFAX 250
Connect one end of the power cable to the a daptor and
2
plug the other end of the power cable into a suitable
wall power outlet located nearby.
Page 13
Note :
There is no power switch on this fax machine. The
power is on as long as the fax machine is plugged
in.
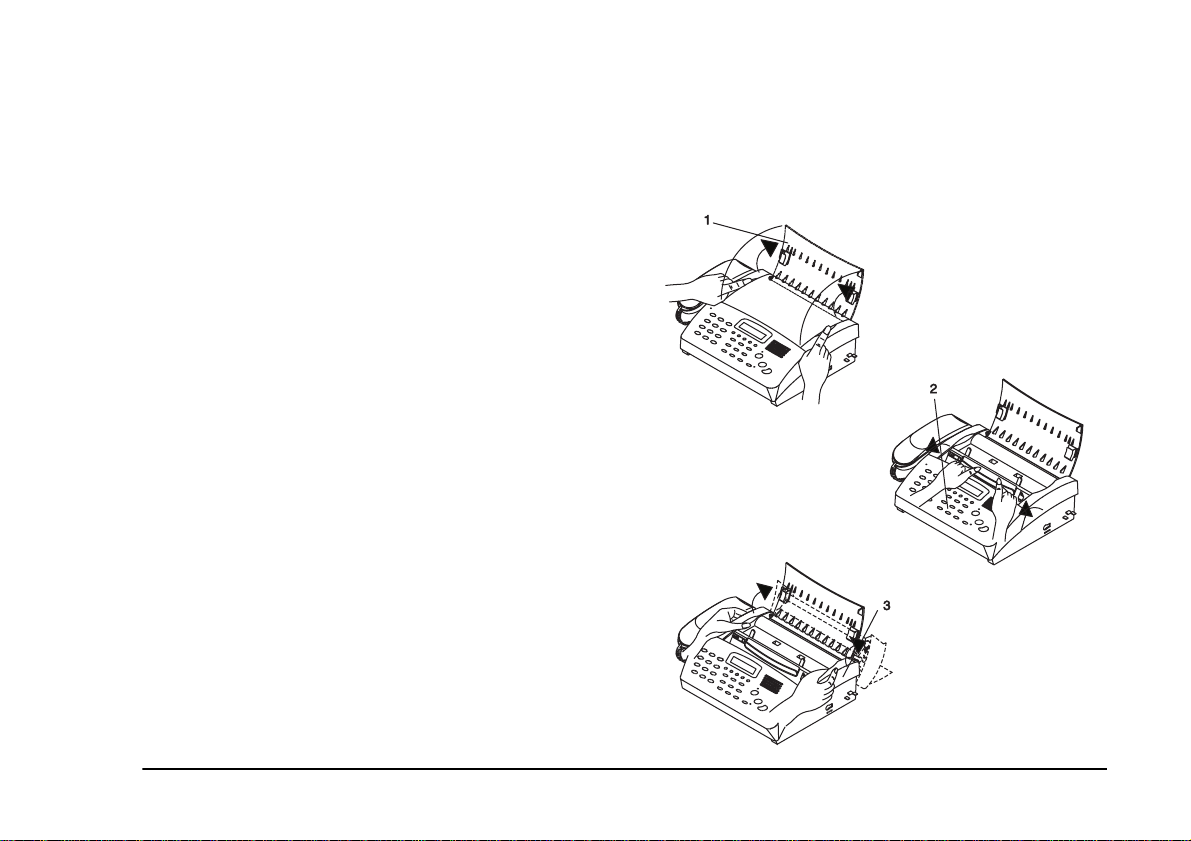
Installing the thermal transfer ribbon
The thermal transfer ribbon prints your documents and
must be installed before receiving or copy ing documents.
Use the ribbon roll recommended by your Oki dealer to
avoid poor quality printing.
• Ribbon roll dimensions:
width: 210 mm ± 1 mm
length: 30m/100m
core: 12.7mm ± 1 mm.
The ribbon is near to its end and must be replaced when
the display shows CHECK RIBBO N.
Note:
Always store ribbons in a dry, cool place and
avoid exposure to extremes of temperature.
If you are replacing an old ribbon please make
sure you clean the thermal print head (see
“Cleaning” on page 42).
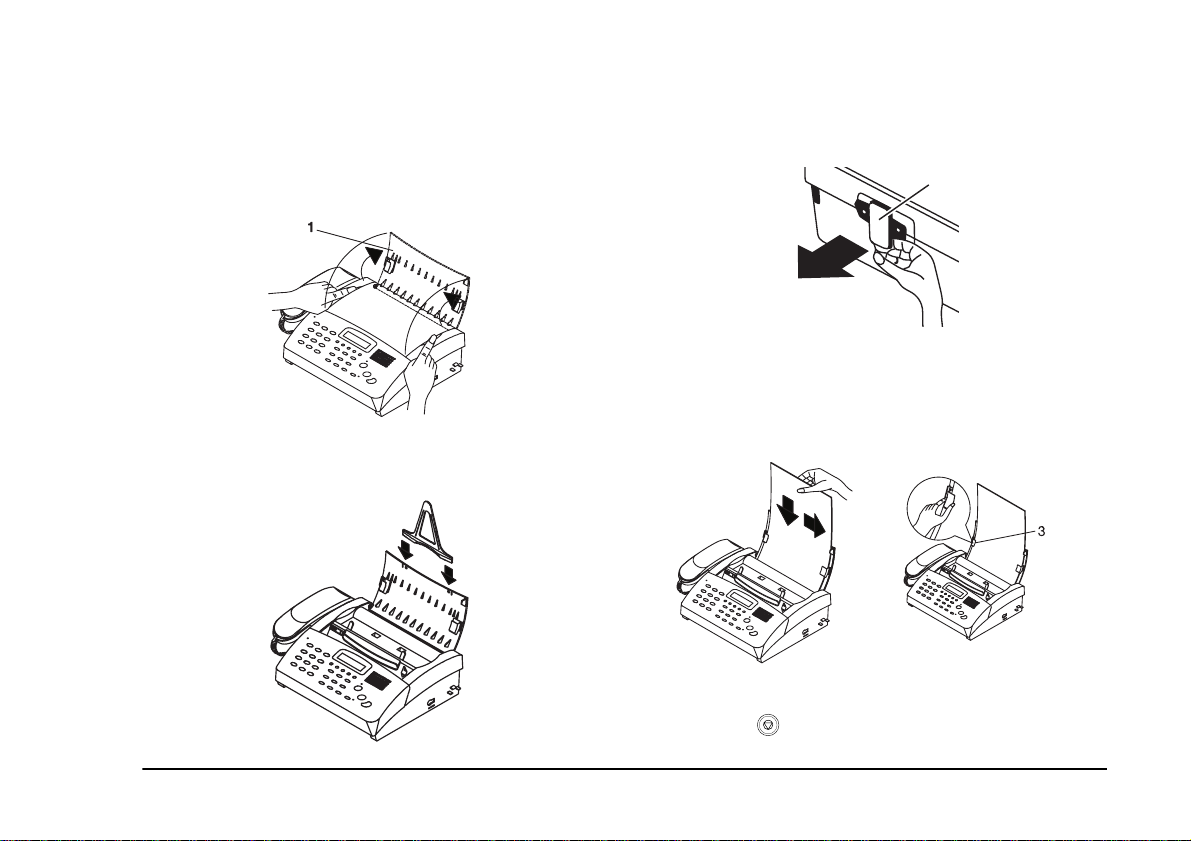
To install a new ribbon:
Unplug the power cable from the power outlet.
1
Open the paper tray (1) and keypanel (2) then open
2
the top cover (3) as shown below.
English
User’s Guide 5
Page 14

Insert the larger thermal transfer ribbon roll (1) into
3
the back ribbon bay (2) by placing one end of the
ribbon holder into the right side of the bay and
pushing against the spring to inser t the left han d si de
of the ribbon roll. Make sure that the ribbon roll sits
properly in place in the ribbon bay.
Place the smaller front ribbon roll (1) in the front ribbon
4
bay (2) by locating the hole on the left hand side of the
ribbon onto the spindle on the left of the ribbon bay and
dropping the right hand cog (3) into place.
Make sure the ribbon’s surface is s mo oth and taut by
5
rolling the cog on the front spool towards the
keypanel to take up any slack..
Close all the open parts firmly.
6
Note :
Whenever the machine is moved, please check to
make certain the thermal transfer ribbon roll is
still taut and firmly in place.
Dispose of used ribbons carefully, because an
imprint of the contents of your fax messages will
be left on the used ribbons.
6 OKIFAX 250
Page 15
Loading recording paper
2
Your fax machine prints onto plain paper and will hold up
to 40 sheets of 80g/m² A4 paper (210 x 297mm).
Open the paper tray (1).
1
Clip the extension tray onto the paper tray as shown
2
below.
Lift the paper release lever on the back of the machine
3
(2) to release the paper tray, and insert a stack of
paper.
Line up the right edge of the stack of paper against
4
the right edge of the paper tray and slide the
adjustable paper guide (3) until it touches the left edge
of the stack of paper.
English
User’s Guide 7
Push the paper release lever back down again and
5
press the button to feed the first sheet through.
Page 16
Note:
Paper can only be ins erted when the pape r tray is
empty.
To empty the paper tray: remove all paper apart
from the sheet that is currrently fed into the
machine, and then press the
final sheet.
For best print quality, follow the directions on the
paper packet.
button to eject the
Installing the leading paper tray
Attach the leading paper tray as shown below.
Setting reception reduction
You can set your machine to reduce the size of incoming
faxes to a fixed percentage, regardless of the size of paper
in your machine.
To change the the level of reception reduction:
Press the
1
appears in the display then press the button.
When RX REDUCTION appears in the display, press
2
the button.
The display will show 1
3
the
reduction you want.
Press the button to confirm your choice and move
4
to the next setting.
Make changes to the next setting or press the
5
button to return to the Standby Mode.
FUNCTION
</RESOL. / CONTRAST/>
button until PRINTING
00% / 93% / 87% / 70% . Us e
buttons to select the
8 OKIFAX 250
Page 17
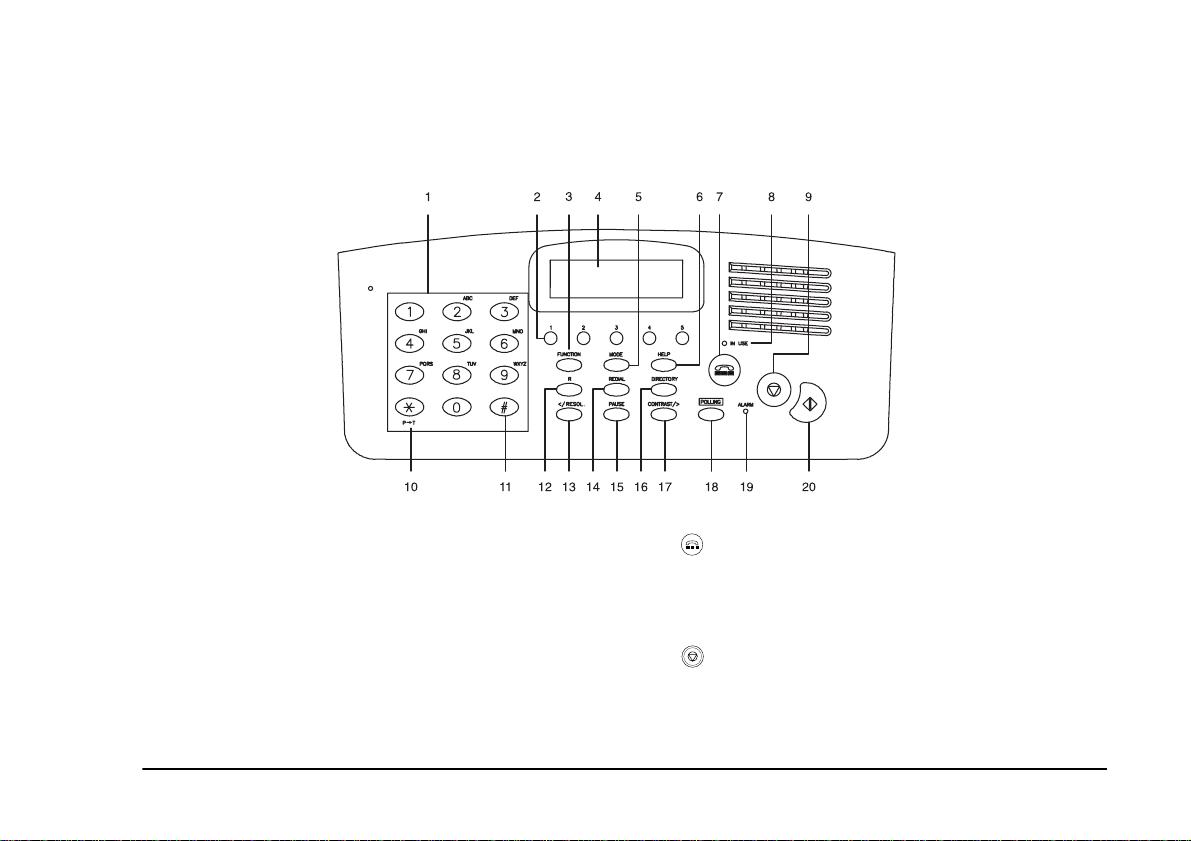
Control Panel
Keypanel
Numeric (0~9): Use to dial numbers and programme
1
machine functions and directories.
One-touch (1~5): Use to store and dial your 5 most
2
frequently used telephone and fax numbers.
3 FUNCTION
scroll forward through functions.
Display: Shows operating status, time, telephone and
4
fax numbers.
5MODE
: Press to select function mode and to
: Press to select receiving mode.
6HELP
7
8
9
10 */P→→→→T
: Prints out a quick reference Help List.
: Press to connect to telephone line when machine
is in Standby mode (hands free dialing).
“IN USE” LED: Lights to indicate the telephone line
is engaged.
: Press to terminate operations or alarms.
:Press to change the current dialling mode from
PULSE to TONE.
English
User’s Guide 9
Page 18

: Use to enter unique characters when programming
11 #
Sender ID or one-touch and directory entries.
: Use to enter a “>” (Flash/Prefix) when dialling or
12 R
for “TEL/FAX No.” editing and to insert a “+”
(international access code) when editing “YOUR
FAX No.”.
13 </RESOL.
: Use to select resolution of transmitted
fax or copy, to move the LCD cursor to the left when
programming and to reduce speaker volume.
14 REDIAL
: Press to automatically redial last number
dialled.
15 PAUSE
:Use to insert a “-” (pause) when dialling or
when programming fax/telephone numbers.
16 DIRECTORY
: Use to access Phone Book and change
character case between upper/lower case and digit in
Sender ID setting.
17 CONTRAST/>
: Use to select contrast of transmitted
fax or copy, to move the LCD cursor to the right when
programming and to increase speaker volume.
18 POLLING
: Press this button to poll faxes from
remote fax machines.
“ALARM” LED: ON to indicate a fault.
19
: Press to start transmission or copying and
20
confirm options during function set up.
Audible Alarm identification
An audible tone will be generated to alert you to check
the status of the machine. A description of the tones and
their significance is given below.
Tone Description
Tone for 1 second • Power on normally
• Transmission or reception is successfully completed
Intermittent tone for
3~5 seconds
Intermittent tone for
18/30 seconds
Intermittent tone • Handset is off-hook after commu-
1 beep • Place a document in the ADF
• Communication trouble.
• Document jam.
• No paper.
• Paper jam.
• Top cover is opened.
• Thermal Printer Head has overheated.
• No ribbon.
• Local alarm. to alert you to pick up
the handset to answer a call if the
machine is in F AX recepti on mode
and the FAX/T EL switch over feature (voice call alert) is activated
nication has been completed.
10 OKIFAX 250
Page 19
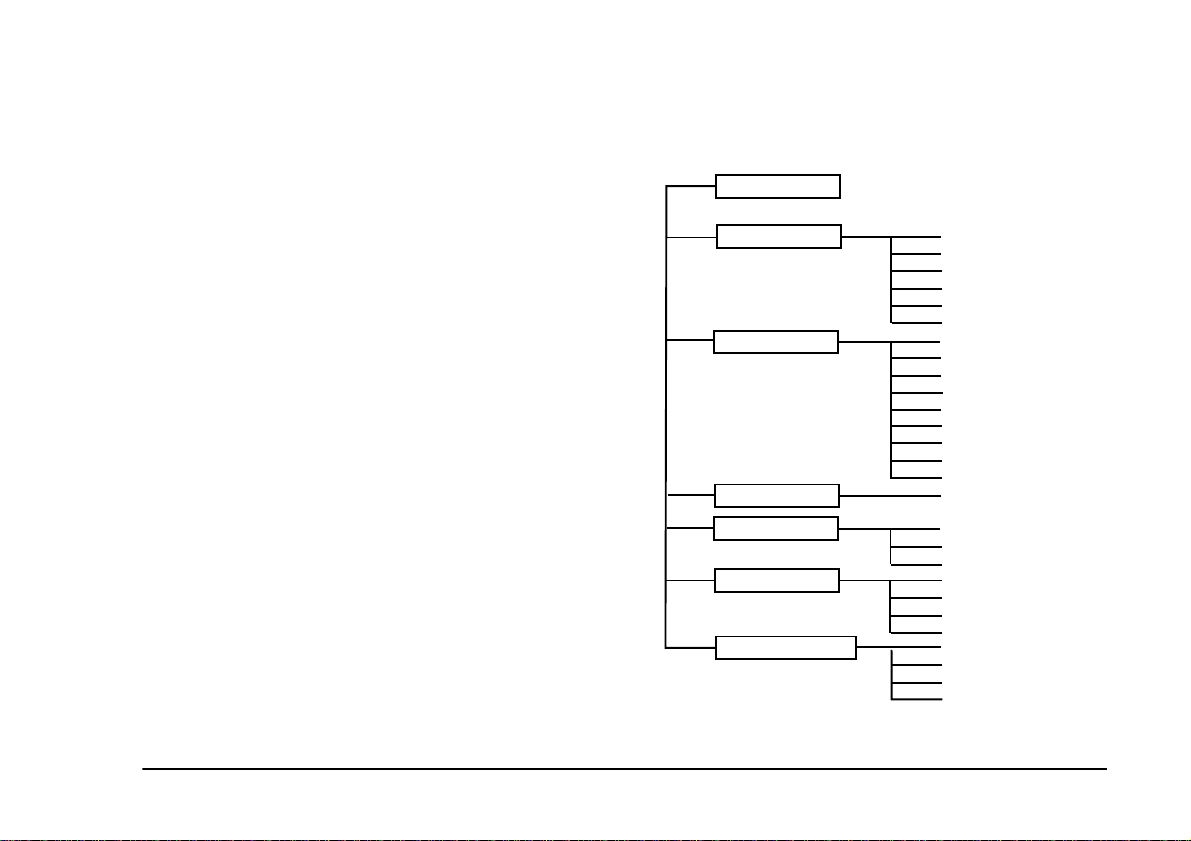
Initial Programm ing
Setting date/time
Setting your name
Editing one touch speed dial
Setting your FAX number
Setting ring count
Setting TEL/FAX switchover
Setting alarm
Editing directory dial numbers
Setting redial interval
Setting redial times
Setting remote control
Printing transmission report
Setting silence detection
Setting dial mode
Setting reception reduction
Setting language
FUNCTION NO: XX
SETTINGS
CONFIGURATION
PRINTING
REPORT
COMMUNICATION
SPECIAL FUNCTION
Setting low speed
Setting polling reception
Setting polling transmission
Setting delay transmission
Printing timer report
Printing TEL number list
Printing journal report
Setting R key
Setting reception restrict
Setting reception timer
Setting distinctive ring
Functions
Your machine allows you to program and store a series of
settings and functions. You can change the default
settings of your fax machine to accommodate your
specific preferences. The Function Chart opposite shows
you all the functions available via the FUNCTION
button.
User’s Guide 11
Note:
Due to differences in local telephone
regulations not al l functi ons are ava ilabl e in
every country. To see which functions are
present for your country, print out a Help List
by pressing the HELP button.
English
Page 20

Use the following keys t o n avigat e t h rou gh the Function
Menu and programme the options you require.
Use this key To
FUNCTION
CONTRAST/>
</RESOL.
DIRECTORY
*/#
MODE
HELP
PAUSE
R
• Enter Function Menu
• Scroll forwards through function
options
• Move the cursor to the right or toggle between setting options
• Move the cursor to the lef t or toggl e
between setting options
• Switch between upper and lower
case characters and digits
• Scroll forwards/backwards when
editing special characters
• Clear the display when programming/editing
• To confirm selected options
• Quit the function/editing mode,
and return to standby mode at any
time.
• Print out a Help List gi ving detail s of
functions and quick access codes
• Add a pause when programming
numbers
• Add flash/prefix entry (‘>’) when
programming numbers
Note:
If there is no activity for more than 60 seconds
when you are setting any function, the machine
will return to Standby Mode.
You can access functions quickly by pressing the
FUNCTION
key + function number + , but you will
need to consult the following pages for details of these
functions.
The function numbers are shown in the Help List which
can be printed out by pressing the
HELP
key.
12 OKIFAX 250
Page 21

Inputting Characters
To enter a letter or number, press the appropriate key
repeatedly until the desired letter or number appears in
the display. The cursor will automatically move to the
next position when you press the next key, however if
you need to repeat the same letter twice or use another
letter on the same key, yo u must use t he
key to move the cursor to the next position first.
CONTRAST/>
Note:
If you make a mistake when entering characters,
pressing the MODE button will clear the display.
English
Setting the Date and Time
The display shows the date and time when yo ur machine
is in standby mode. This data is also printed at the top of
each fax you send. To alter the date and time:
Use the
case and lower case characters, and digits. (The prompt
at the right hand side of t he display will change to
indicate which case the display is currently in).
To enter special characters, press the # key repeatedly to
find the character you want from the list below.
User’s Guide 13
DIRECTORY
!“#$%
&‘()*
+,-./
: ;<=>
?@[\]
^_‘
button to switch between upper
SPACE
Press the
1
in the display window and press .
When the message DATE/TIME appears in the
2
display, press .
Use the numeric keypad to enter the month-day-year
3
and enter the time in 24-hour format e.g., 07:30 =
7:30 am and 17:05 = 5:05 pm. Use the < and > keys
to move the cursor backwards or forwards and press
the button to confirm and move to the next setting.
Continue to programme the next setting or press to
4
return to standby mode.
FUNCTION
Note:
If data is entered incorrectly ERROR will appear
on the display and the machine will return to
editing mode for re-entry.
key until SETTINGS appears
Page 22

Setting Sender ID
Your name/company name and fax number (known as
your Sender ID) can be printed out for fax corresp ondents
at the top of each transmitted page. It may also display on
remote fax machines during transmission. Programme
your Sender ID as follows:
Note:
Some countries do not permit user adjustment of
this setting. If so, this function may not appear in
the list of available functions.
Entering your name
You can enter up to 20 characters ( including spaces) in a
name.
Press the
1
in your display window.
Press the button, then press the
2
until YOUR NAME appears in the display.
FUNCTION
key until SETTINGS appears
FUNCTION
key
Entering your fax number
You can enter up to 20 digits in your fax number.
Press
1
2
3
4
5
FUNCTION
display window
Press the button, then press the
until YOUR FAX NO appears in the display.
Press the button to enter or edit your number
pages 12 and 13).
Note:
Use the R key to insert the ‘+’ sign for
international dialling.
After editing, press the button to confirm and move to the next setting.
Continue to programme the next setting or press to return to standby mode.
until SETTINGS appears in your
FUNCTION
key
(see
Press the button to enter or edit your name
3
pages 12 and 13)
After editing, press the button to confirm and
4
move to the next setting.
Continue to programme the next setting or press
5
to return to standby mode.
14 OKIFAX 250
.
(see
Page 23

Storing one touch numbers
You can store your five most frequently used fax and
telephone numbers together with their associated names
in the one touch locations on your machine.
Note:
The five one touch buttons are located directly
beneath the di splay screen.
Press
1
2
3
4
5
6
7
FUNCTION
display window
Press the button, then press the
until EDIT ONE TOUCH appears in the display.
Press the button and then press the one touch key
you wish to programme or edit.
Input the desired fax number
You can enter up to 50 digits including spaces for
pauses.
Press the button to enter the number and REMOTE NAME will appear in the display.
You can enter up to 14 charact ers as the n ame to ide ntify
the number. Then press the button to confirm.
To store another one touch number press the
button and select another one touch key. To return to
standby mode press the button. To move to the
until SETTINGS appears in your
FUNCTION
(see pages 12 and 13)
key
next setting use the < or > keys to select ‘NO’ and
press the button.
Note:
It is useful to keep a reminder of the names you
have stored in the one touch key s on the one touch
key label that can be affixed to the handset.
English
Storing speed dial directory numbers
You can store up to 50 speed dial names and their
associated telephone and fax numbers, in alphabetical
order, which can be recalled to the display for dialling.
To store an entry:
Press
1
.
2
3
FUNCTION
display and press the button.
Press
FUNCTION
in the display and press the button.
You can enter up to 14 characters in the name you
insert
(see pages 12 and 13)
Note:
If a duplicate name is entered, the display will
show NAME EXISTS.If empty data is entered, the
display will show ERROR, an alarm will sound
and and the machine will return to editing mode
for re-entry.
until SETTINGS appears in the
until EDIT TEL DIR NO appears
.
User’s Guide 15
Page 24

Press the button to enter the associated
4
number.You can enter up to 50 digits including
spaces for pauses.
To store another directory number press the
5
button. To return to standby mode press the
button. To move to the next setting, use the < or >
keys to select ‘NO’ and press the button.
Note:
When the 50 speed dial locations are all full, the
display will show MEMORY FULL and the
machine will move to the next function setting.
To modify a directory entry
Note:
Before you delete or modify directory numbers, it
is useful to print out the TELEPHONE REPORT
to see your current settings (see “ Phone book” on
page 34).
Press the
1
DIRECTORY
button until USE INDEX
appears in the display.
Modify the name as desired.
4
Press the button to confirm and move to editing
5
the fax number.
Modify the fax number and press the button to
6
confirm and return to Standby mode.
To delete a directory entry
Press the
1
DIRECTORY
button until USE INDEX
appears in the display.
2
Press
</RESOL. or CONTRAST/>
to choose the
name you want to delete and press the R button.
When M
3
the
D
When DEL.RECORD? Y
4
ODIFY/DELETE appears in the display use
</RESOL. or CONTRAST/>
keys to sele c t
ELETE and then press the button to confirm.
/N appears in the display,
press the button to confirm and return to Standby
mode.
2
Press
</RESOL. or CONTRAST/>
to choose the
name you want to modify and press the R button.
When MODIFY/ D
3
the
</RESOL. or CONTRAST/>
M
ODIFY and then press the button to confirm.
16 OKIFAX 250
ELETE appears in the display use
keys to select
Page 25

Basic Operations
Loading documents
Caution:
• Only use documents which are in good
condition. Do not try to feed torn, badly
curled or damp documents.
• Ensure documents to be sent have no
wet ink or correcting fluid on them.
• Remove any hard objects, such as paper
clips or staples.
• If your document original is unsuitable,
use a photoco py.
Document dimensions:
Your machine can accept the following document
sizes:
Letter 216mm - 280mm
Legal 216mm - 356mm
A4 210mm - 297mm
Thickness 0.0762mm - 0.127mm
Note:
Documents of different widths should be
transmitted separately.
If a docume nt is too long, divide it into two o r
more sheets.
Document insertion
Note:
Fan documents before insertion to prevent them
sticking.
Extend the paper tray arm to suppor t the documents in
1
the automatic document feeder (1).
Insert the documents face down and against the right
2
hand side of the document feeder with the top of the
page first .
English
User’s Guide 17
Page 26

Note:
You can stack up to 10 sheets in the feeder. The
machine automatically feeds the pages one by one
from the bottom.
Adjust the document guide (2) to the width of the
3
document.
: Select DARK if your original documents are
Dark
too light and you wish to transmit/copy them
darker.
: Select LIGHT if your original documents are
Light
too dark and you need to transmit/copy them
lighter.
Caution:
Do not put the handset cord in front of the
machine or it will block the document exit (3)
and cause a document jam.
If necessary, change the document resolution by
4
pressing the
through the following options:
Standard
: For documents with small print or other
Fine
Halftone
If necessary change the document contrast by
5
pressing the
through the following options:
Normal
18 OKIFAX 250
</RESOL.
:For normal text documents. This is the
factory default setting.
fine detail.
: For documents with graphics or
photographs.
CONTRAST/>
: For normal text documents. This is the
factory default setting.
key repeatedly to cycle
key repeatedly to cycle
Note:
Both resolution and contrast settings will return
to their default setting after trans m ission.
Dial to transmit your documents as indicated in
6
‘Sending documents’ below.
Sending documents
Keypad dialling
Place the document in the document feeder as
1
indicated above and the messages FEED
DOCUMENT and STANDARD NORMAL will
appear in the display.
Select the resolution and contrast you require by
2
using the
as indicated above
Dial the number using the numeric keypad.
3
</RESOL.
key and the
.
CONTRAST/>
key
Page 27

Press the button to transmit your document. The
4
message TRANSMISSION will appear on the
display.
Note:
Alternatively, you can lift the handset or press the
key before dialling, but you must press the
button and hang up the handset before the
machine will send your document.
One-touch dialling
Place the document in the document feeder as
1
indicated above and the messages FEED
DOCUMENT and STANDARD NORMAL will
appear in the display.
Note:
Alternatively, you can lift the handset or press the
key before dialling, but you must press the
button and hang up the handset before the
machine will send your document.
Directory dialling
Place the document in the document feeder as
1
indicated above and the messages FEED
DOCUMENT and STANDARD NORMAL will
appear in the display.
Select the resolution and contrast you require by
2
using the
key.
</RESOL.
key and the
CONTRAST/>
English
Select the resolution and contrast you require by
2
using the
as indicated above
Press the desired one-touch key and the name of the
3
selected remote location will appear in the display.
Press the button to transmit your document. The
4
display will show the remote party’s number, then
TRANSMISSION will appear on the display and the
document will be transmitted.
User’s Guide 19
</RESOL.
key and the
.
CONTRAST/>
key
Press the
3
INDEX will show on the display.
Press the
4
search for the name you require then press the
button to transmit your document. The display will
show the remote party’s number, TRANSMISSION
will appear on the display and the document will be
transmitted.
DIRECTORY
</RESOL.
key and the message USE
and
CONTRAST/>
keys to
Page 28

Manual redial
To redial a number you have already dialled using any of
the above methods, simply press the
REDIAL
key.
Low speed transmission
If you are having difficulties with transmitting due to
excessive noise on the line, you can reduce the
transmission speed from 9600 bps to 4800bps.
To set up low speed transmission:
Place the document in the document feeder as
1
indicated above and the messages FEED
DOCUMENT and STANDARD NORMAL will
appear in the display.
Select the resolution and contrast you require by
2
using the
key
Press the
3
</RESOL.
.
FUNCTION
key and the
button until
CONTRAST/>
COMMUNICATION appears in the display and
press the button.
Press the
4
FUNCTION
shows in the display, then press the
button until DELAY TX
FUNCTION
button until SEND LOW SPEED appears and press
the button.
Change the setting from O
5
cursor using the
</RESOL.
FF to ON by mo ving the
key and pressing the
button to enter.
Dial the destination number in the usual way and
6
press the button to transmit.
Note:
The transmission speed will return to 9600bps
automatically after the low speed transmission is
completed.
Cancelling transmission
You can stop transmission at any po int by pressing the
key. In this case the document will stop immediately and
the call will be terminated. A further press of the key
will eject the document. Once you have pressed the
key a transmission report will be printed automatically.
Adding pages while sending
If you want to add pages while the fax machine is sending
a document, wait until the last page of your transmission
is being fed through and insert the first new page so that
it overlaps the last page by about 2.5 cm.
20 OKIFAX 250
Page 29

Copying documents
You can use your machine to make photocopies.
Caution:
Ensure that the handset is on the cradle a before
attempting to make copies.
To copy a document:
Place the document in the document feeder as
1
indicated in the ‘Document Insertion’ section and the
messages FEED DOCUMENT and STANDARD
NORMAL will appear in the display.
Select the resolution and contrast you require by
2
using the
as indicated above and then press the button to
confirm
The display will show REDUCTION RATE and then
3
1
00% / 93% / 87% / 70%. Use the
the
require and press the button to confirm
</RESOL.
.
Note:
For copying, choose only fine or halftone
resolution. If you choose standard, the machine
will automatically switch to fine mode while
copying.
CONTRAST/>
key and the
key to select the setting you
CONTRAST/>
</RESOL.
.
key
key and
For 1 copy, press the button, the machine will
4
produce your copy. For multiple copies, enter the
number of copies you require (for quantities less than
10 prefix the digit with a zero, for example to print
three copies type ‘03’) then press the button.
Note:
You can change the resolution and/ or contrast for
each separate page by using the
and the
Press the key to stop copying at any point. A
5
further press of the key will eject the document.
Caution:
Do not pull on the paper while copying is in
progress.
CONTRAST/>
key.
</RESOL.
key
Receiving documents
Your fax machine has three answering modes, which can
be selected by repeatedly pressing the
TEL mode
This is a manual receiving mode. Your fax machine will
not answer incoming calls automatically, but will emit a
ringing sound and wait for you to answer. Lift the
handset, press the button and then hang up to begin
reception.
MODE
key.
English
User’s Guide 21
Page 30

This is most useful when you are in attendance and use
the same telephone line for incoming v oice an d f ax calls.
fax receiving mode. If there is no calling fax machine the
call will be terminated.
Note:
If your machine is connected to an extension
telephone and you answer it by means of the
extension handset, you need to press # * 7 to
begin reception.
FAX mode
This is an automatic answering mode.
If the FAX/TEL switchover feature is set to OFF
“TEL/FAX switchover” on page 25)
, the machine will
(see
automatically enter fax reception mode whenever a call is
received. In this mode your machine will send an audible
tone to the caller, designed to be d etected by a remote fax
machine. Incoming fax messages are received, and the
call is terminated automatically on completion.
This mode is most useful when you h ave a dedicated fax
line.
If the FAX/TEL switchover feature is set to 18 sec. or 30
sec., when it receives a voice call, your fax machine will
emit a ringing sound (for t he time perio d you hav e set) to
attract your attention. If you do not answer the call within
the set time, your machine will automatically switch to
Note:
After your fax machine answers the call, any
additional phones on the same line will not ring.
If the call is from a remote fax machine your machine will
automatically switch to fax receiving mode and receive
the incoming transmission.
This mode is most useful if you are in attendance and
wish to manually answer incoming voice calls and
automatically answer incoming fax calls on the same
line.
Note:
Some older fax machines do not send the initial
audible tones necessary to enable automatic
detection. In this case your fax machine will ring
as for a voice call. If you pick up the handset and
hear nothing, press the button and hang up the
handset to begin reception.
Reception can be cancelled by pressing the
key.
22 OKIFAX 250
Page 31

TAD mode
This is an automatic answering mode. It is most useful if
you are not in attendance and wish to automatically
receive incoming voice and fax calls on the same line.
A separate answering machine may be connected to your
machine, via the TEL 2 jack on the side of the machine
(see “Connecting a second telephone or answering
machine” on page 4),
In this case the answering machine will answer all
incoming calls.
You will need to record an Outgoing Message (OGM) on
your answer machine which should no t be longer than 15
seconds and should contain the following information:
'Please leave a message or press the #,* and 7 buttons on
your phone for fax tran smissi on a fter t he b eep. Pres s the
START button on your fax machine to begin transmission
after hearing the fax tone'.
Note:
If the existing remote control code (#*7) con flicts
with your TAD control code, you can change the
last digit (see “Remote control” on page 28).
If the incoming call is a voice call, your answering
machine will record a message for you to hear later.
to take incoming voice messages.
If the call is from a remote fax machine, your fax machine
will automatically take over and receive the fax message.
Note:
If the answering machine fails to answer within
the number of rings set under RING COUNT in
the Function Menu, for example when its memory
is full, your fax machine will answer the call in
case the caller wishes to send you a fax message.
Some older fax machines do not send the initial
audible tones necessary to enable automatic
detection. In this case your fax machine can be set
to wait for 5 seconds after the outgoing message
for the caller to speak, and if nothing is heard
switch to fax receiving mode and receive the
incoming transmission from the older machine
(see “Silence detection” on page 27).
English
User’s Guide 23
Page 32

Memory reception
If your fax machine is not immediately able to print a
received document due to an error such as a printer fault,
paper jam, no recording paper or if the printer ribbon has run
out, then the message will be received in memory and will
be printed out when the fault is rectified (see table below)
Note:
The machine can receive up to 20 pages in
memory (ITU test chart 1).
Display
Message
CHECK PAPER There is a prob-
PAPER JAM A paper jam has
CHECK RIBBON The printer rib-
Cause Action
lem with the
recording paper
occurred
bon has run out
Reload paper
into the paper
tray and press
the
∇
Clear the
jammed paper
(see “Clearing a
recording paper
jam” on
page 40)
Change the
printer ribbon
(see “Installing
the thermal
transfer ribbon”
on page 5)
key
Display
Message
TOP COVER OPEN The top cover is
PLEASE WAIT The thermal
Cause Action
open
print head is too
hot
Note:
Once it has printed the pages in memory, the
machine erases the message from its memory.
Close the top
cover
Wait for a few
moments
24 OKIFAX 250
Page 33

Setting user preferences
Setting alarm
This function allows y ou to set an al arm to remind you of
a meeting or to make calls, etc. You can set up to 2 alarms
(A and B).
To set an alarm:
Press
1
2
3
4
5
6
FUNCTION
display, then press the button to confirm.
Press
FUNCTION
appears in the display, then press the button to
confirm.
When A/B appears in the display press the button
and A:O
Press the
A:OFF / O
Change the alarm time to the time you want the alarm
to sound (enter the time in 24-hour format e.g., 07:30
= 7:30 am and 17:05 = 5:05 pm) and press the
button to confirm, then enter a description as a
reminder if you want to, e.g., MEETING A and
press the button to confirm your setting.
Press the key to return to Standby mode.
FF / ON 12:00 will appear.
CONTRAST/>
N 12:00 and press the button to confirm.
until SETTINGS appears in the
until ALARM SETTINGS
key to change the selection to
When the alarm goes off it will ring for about 20 seconds.
Press the key to stop the alarm.
TEL/FAX switchover
This function regulates how your machine deals with
incoming calls.
When this function is set to OFF, the machine will
automatically enter fax reception mode, without emitting
any ringing sound, whenever a call is received.
When this function is set to 18 sec. or 30 seconds, on
receiving a voice call your fax machine will emit a
ringing sound (for the time pe riod you have s et) to attract
your attention. If you do not answer the call within the set
time, your machine will automatically switch to fax
receiving mode.
To change this setting:
Press
1
2
FUNCTION
appears in the display, then press the button to
confirm.
Press
FUNCTION
appears in the display, then press the button to
confirm.
until CONFIGURATION
until TEL/FAX AUTO SW.
English
User’s Guide 25
Page 34

The message OFF/1
3
display (18 second s is the factory defaul t setting). Use
the
</RESOL. / CONTRAST/>
setting you want.
Press the button to confirm this setting and move
4
to the next setting.
Continue to programme the next setting or press the
5
button to return to the Standby Mode.
8SEC/30SEC will appear in the
buttons to select the
Ring count
In FAX reception mode, this feature determines how
many rings are required before the fax machine
automatically answers an incoming call.
To change this setting:
Press
1
2
3
FUNCTION
appears in the display, then press the button to
confirm.
Press
FUNCTION
the display, then press the button to confirm.
The message RING COUNT: 2
display (2 rings is the factory default setting). Use the
numeric keypad to select from 2 to 5 rings.
until CONFIGURATION
until RING COUNT appears in
2-5 will appear in the
Press the button to confirm this setting and move
4
to the next setting.
Continue to programme the next setting or press the
5
button to return to the Standby Mode.
Tone/ Pulse dial mode
Some telephone systems use pulse (sometimes called
‘loop disconnect’) dialling and others use tone
(sometimes called ‘DTMF’ or ‘MF’) dialling. Pulse
dialling systems usually produce a feint clicking noise
during dialling; tone systems usually produce feint but
audible tones during dialling. If in doubt, consult your
telephone service provider.
This setting controls how the fax machine and telephone
handset dials outgoing calls.
To change this setting:
Press
1
2
3
FUNCTION
appears in the display, then press the button to
confirm.
Press
FUNCTION
display, then press the button to confirm.
The message P
display. Use the
to select the setting you want.
until CONFIGURATION
until DIAL MODE appears in the
ULSE/TONE will appear in the
</RESOL. / CONTRAST/>
buttons
26 OKIFAX 250
Page 35

Press the button to confirm this setting and move
4
to the next setting.
Continue to programme the next setting or press the
5
button to return to the Standby Mode.
To change this setting:
Press
1
FUNCTION
appears in the display, then press the button to
confirm.
until CONFIGURATION
English
Note:
Some countries do not permit user adjustment of
this setting. If so this function will not appear in
the list of available functions.
Silence detection
In TAD mode, if this function is set to ON your machine
will automatically answer an incoming call with your
outgoing voice message. It will then listen for speech. If
no speech is detected within 5 seconds, your machine will
automatically switch to fax receive mode. This is known
as silence detection.
Note:
This is useful for some older fax machines which
do not send the initial audible tones necessary to
enable automatic detection. In this case, your fax
machine can wait for 5 seconds after the outg oing
message for the caller to speak, and then switch to
fax receiving mode and receive the incoming
transmission.
User’s Guide 27
Press
2
3
4
5
FUNCTION
the display, then press the button to confirm.
The message O
the
</RESOL. / CONTRAST/>
setting you want.
Press the button to confirm this setting and move
to the next setting.
Continue to programme the next setting or press the
button to return to the Standby Mode.
until SILENCE DET. appears in
N/OFF will appear in the display. Use
buttons to select the
Page 36

Message confirmation report
Remote control
At the end of each fax transmission (TX) the result is
displayed on the control panel for a few seconds. If
required, the machine can automatically print a single
line report after each transmission.
You can set your machine to automatically print message
confirmation reports either for ALL messages, for messages
that have failed for some reason (ERROR) or you can switch
this option OFF and no report will be printed.
To change this setting:
Press
1
2
3
4
5
FUNCTION
appears in the display, then press the button to
confirm.
Press
FUNCTION
appears in the display, then press the button to
confirm.
The message ALL/E
display. Use the
to select the setting you want.
Press the button to confirm this setting and move to the next setting.
Continue to programme the next setting or press the
button to return to the Standby Mode.
until CONFIGURATION
until PRINT TX REPORT
RROR/OFF will appear in the
</RESOL. / CONTRAST/>
buttons
The remote control is a button code sequence (factory
default is #,*,7) that you pres s on an extens ion teleph one
to instruct the machine to go into reception mode to
receive a fax message.
Note:
This function is on ly p oss i bl e when using a touch
tone phone connected to the TEL 2 jack of the fax
machine (see “Connecting a second telephone or
answering machine” on page 4).
To change the code:
Press
1
2
3
4
FUNCTION
appears in the display, then press the button to
confirm.
Press
FUNCTION
appears in the display, then press the button to
confirm.
The message ACT.NO #*7
display. Use the numeric keypad to change the final
number of the code (it can be set between 0 and 9).
Press the button to confirm this setting and move to the next.
until CONFIGURATION
until REMOTE CONTROL
0-9 will appear in the
28 OKIFAX 250
Page 37

Continue to programme the next setting or press the
5
button to return to the Standby Mode.
Press the button to confirm this setting and move
4
to the next.
Note:
This feature can al so be used b y remote m achines
(see “TAD mode” on page 23).
Redial times
Your machine can be set to automatically redial a busy
number from 1 to 8 times. The factory default is set to 3
redials.
Note:
Some countries do not permit user adjustment of
this setting. If so, this function will not appear in
the list of available functions.
To change this setting:
Press
1
2
3
FUNCTION
appears in the display, then press the button to
confirm.
Press
FUNCTION
the display, then press the button to confirm.
The message TIMES: 3
display. Use the numeric keypad to enter the number
you require.
until CONFIGURATION
until REDIAL TIMES appears in
1-8 will appear in the
Continue to programme the next setting or press the
5
button to return to the Standby Mode.
Redial interval
The interval between redial attempts on your machine
can be set from 1 to 8 minutes. The factory def aul t is set
to 2 minute intervals between redial attempts.
Note:
Some countries do not permit user adjustment of
this setting. If so, this function will not appear in
the list of available functions.
To change this setting:
Press
1
2
3
FUNCTION
appears in the display, then press the button to
confirm.
Press
FUNCTION
appears in the display, then press the button to
confirm.
The message MINUTES: 2
display. Use the numeric keypad to enter the interval
time in minutes that you require.
until CONFIGURATION
until REDIAL INTERVAL
1-8 will appear in the
English
User’s Guide 29
Page 38

Press the button to confirm this setting and move
4
to the next.
Continue to programme the next setting or press the
5
button to return to the Standby Mode.
Language
The messages and reports on your machine can be set to
display in one of three languages.
To change the language:
Press
1
2
3
4
5
FUNCTION
appears in the display, then press the button to
confirm.
Press
FUNCTION
appears in the display, then press the button to
confirm.
The message ENGLISH <</>> will appear in the
display. Use the
to select the language you want.
Press the button to confirm this setting and move to the next.
Continue to programme the next setting or press the
button to return to the Standby Mode.
until CONFIGURATION
until SELECT LANGUAGE
</RESOL. / CONTRAST/>
buttons
Special functions
Reception timer
This feature allows you to override the normal reception
setting of your machine for a preset time period during
which it will receive fax messages only .
To set up the reception timer:
Press
1
2
3
4
5
6
FUNCTION
appears in the display, then press the button to
confirm.
Press
FUNCTION
appears in the display, then press the button to
confirm.
Use the
and press the button to confirm.
The message START TIME 0
display. Use the numeric keypad to enter the start time
then press the button to confirm your setting.
The message END TIME 1
display. Use the numeri c keypad to enter the end t ime
then press the button to confirm your setting and
move to the next.
Continue to programme the next setting or press the
</RESOL.
button to return to the Standby Mode.
until SPECIAL FUNCTION
until RECEPTION TIMER
button to move the cursor to O
8:00 will appear on the
7:00 will appear on the
N
30 OKIFAX 250
Page 39

Reception restriction
To prevent reception of faxes from certain sources, you
can set your machine to reject messages from up to 5
remote loc ations.
To set up your list of 5 restricted locations:
Press
1
2
3
4
5
FUNCTION
appears in the display, then press the button to
confirm.
Press
FUNCTION
the display, then press the button to confirm.
Use the
and press the button to confirm.
The message RESTRICT RX: #1 will appear on the
display. Press the button to enter the first number
in your set of restricted locations.
Press the button and the message EDIT
ANOTHER Y
the relevant keypad button (2~5) to enter further
numbers or press the button to return to the
Standby Mode.
</RESOL.
until SPECIAL FUNCTION
until RX RESTRICT appears in
button to move the cursor to O
/N will appear. Press the button and
N
Note:
To edit existing entries, repeat steps 1) to 3). When
the message RESTRICT RX: #1 appears, enter
the number of the entry you want to edit on the
keypad and press the button.
R key
If your fax machine is connected to a private branch
exchange (PABX) rather than directly to the public
telephone network, you can select one of two types of line
transfer: FLASH or PREFIX. Contact your PABX
supplier to find out which is applicable for your PABX.
To select the type of line transfer:
Press
1
2
3
4
FUNCTION
appears in the display, then press the button to
confirm.
Press
FUNCTION
display, then press the button to confirm.
Use the
FLASH or PREFIX.
Press the button to confirm this setting and move
to the next.
</RESOL. / CONTRAST/>
until SPECIAL FUNCTION
until R KEY appears in the
buttons to select
English
Continue to programme the next setting or press the
5
button to return to the Standby Mode.
User’s Guide 31
Page 40

Distinctive ring
If you subscribe to a distinctive ring service you can have
two telephone numbers, each with its own distinctive ring
tone, on a single line. This featu re allows you t o set yo ur
machine to respond to each ring differently.
The first number will always be the normal ring to which
your machine will respond according to which reception
mode is set i.e., FAX, TEL or TAD and the second
number will always be the distinctive ring to which your
fax will always respond with FAX reception mode.
Note:
Some countries do not permit user adjustment of
this setting. If so, this function will not appear in
the list of available functions.
To activate distinctive ring:
Continue to programme the next setting or press the
4
button to return to the Standby Mode.
Speaker volume
Your machine’s speaker volume can be set lower or
higher by pressing the key to hear the current level
and using the
adjust.
</RESOL. / CONTRAST/>
buttons to
Press
1
2
3
32 OKIFAX 250
FUNCTION
appears in the display, then press the button to
confirm.
Press
FUNCTION
appears in the display, then press the button to
confirm.
Use the
and press the button to confirm.
</RESOL.
until SPECIAL FUNCTION
until DISTINCTIVE RING
button to move the cursor to O
N
Page 41

Printing Reports
Journal report.
JOURNAL REPORT
01-01-199 16:26:05
(4)
MODE
TX 01-01-1999 10:10:00 03’23” 7644321 04 GOOD
RX 01-01-1999 10:24:00 01’17” 8765432 01 GOOD
POLL-TX 01-01-1999 11:48:00 01’43” 9876543 02 GOOD
POLL-RX 01-01-1999 12:30:00 00’50” 1234567 01 GOOD
(1) Date and time of report printing.
(2) Your fax number.
(3) Your company name.
(4) Mode. TX Transmission.
RX Reception.
POLL-TX Polling transmission.
POLL-RX Polling reception.
(5) Total TX/RX transaction.
DATE STA RT TIME DURATION REMOTE ID PAGES RESULT
(1)
FAX ID: 321-5431
(2)
COMPANY NAME: ABC Co.
TX:0001 RX:0001
(3)
(5)
Your fax machine stores details of the last 40 fax
transactions, including number called, date, time, call
duration, number of pages, and result (OK or
communication error). Your machine automatically
prints this report after every 40 transactions.
To print a journal report manually:
1
Press
FUNCTION
until REPORT appears in the
display, then press the button to confirm.
English
User’s Guide 33
Page 42

2
Press
FUNCTION
until JOURNAL appears in the
display, then press the button to confirm.
The report will print.
3
Note:
If no transactions have taken place, the message
EMPTY will appear in the display
Phone book
This report lists all the telephone and fax numbers which have
been stored in your machine’s one-touch key and directory
dial memories. If you have many numbers stored, it may be
useful to keep a print-out of this list close to the machine.
To print out the Phone Book:
1
Press
FUNCTION
until REPORT appears in the
display, then press the button to confirm.
2
Press
FUNCTION
until TEL NO LIST appears in the
display, then press the button to confirm.
The report will print.
3
TELEPHONE REPORT
01-01-1999 16:26:05 FAX ID:321-5431 COMPANY NAME: ABC Co.
ONE TOUCH NO
ID NAME TEL NO
01 OEL 1234567
02
TEL DIRECTORY NO
NAME TEL NO
OKI 1234567
RX RESTRICT NO
ID NAME TEL NO
01
34 OKIFAX 250
Page 43

Timer report
Help List
This report gives details of all programmed delayed
transmission and polling reception transactions. Your
machine automatically prints this report whenever a
delayed transmission or polling reception transaction is
programmed.
To print a Timer Report manually:
Press
1
2
3
FUNCTION
display, then press the button to confirm.
Press
FUNCTION
the display, then press the button to confirm.
The report will print.
Note:
If no transactions have been programmed, the
message EMPTY will appear in the display.
ENGAGE TIME MODE FAX NO.
20:30 DOCUMENT DELAY-TX 1234556
15:00 POLLING RX 5432167
until REPORT appears in the
until TIMER REPORT appears in
Press the Help key to obtain a print out of all the quick
codes for the functions, plus simple instru ctions for basi c
operations.
English
User’s Guide 35
Page 44

Special Features
Delayed transmission
This feature allows you to take advantage of off peak
telephone charges, by preparing a document for
unattended later transmission. Documents may be
prepared up to 24 hours in advance.
Note:
Delayed transmission will only f un ctio n pr oper l y
if the date and time have been set correctly.
It is not possible to transmit while the fax machine
is in POLLING STANDBY mode or AUTO
REDIAL mode.
Document delayed transmission
This allows you to place documents in the ADF for later
transmission.
To set up a document for delayed transmission:
Place the documents face down on the ADF and let
1
them drop down as far as they will go.
Select the desired resolution/contrast setting by
2
pressing the
buttons repeatedly as necessary.
</RESOL.
and/or
CONTRAST/>
Press the
3
COMMUNICATION appears in the display, then
press the button to confirm.
Press the
4
appears in the display, then press the button to
confirm.
Move the cursor to D
5
button and press the button to confirm.
At the prompt enter the destination fax number and
6
press the button.
The message HH:MM 1
7
for you to enter the time you want the fax to be sent.
Enter the time in 24-hour fo rmat e.g., 07:30 = 7:30 am
and 17:05 = 5:05 pm, and press the button to enter.
A delayed transmission report
8
page 35)
information on the transmission and the machine will
go into delay transmission standby mode.
FUNCTION
FUNCTION
will be automatically printed out giving the
Note:
To cancel the delayed transmission simply remove
the document by pressing the
button until
button until DELAY TX
OC by pressing the
0:02 will appear on the screen
(see “Timer report” on
key.
</RESOL.
36 OKIFAX 250
Page 45

Memory delayed transmission
This allows you to scan yo ur documents int o memory for
sending at a later time.
Note:
This function is dependent on sufficient memory
being availabile.
To set up a document for memory delayed transmission:
Place the documents face down on the ADF and let
1
them drop down as far as they will go.
Select the desired resolution/contrast settin g by
2
pressing the
buttons repeatedly as necessary.
Press the
3
COMMUNICATION appears in the display, then
press the button to confirm.
Press the
4
appears in the display, then press the button to
confirm.
Move the cursor to M
5
RESOL.
and press the button to confirm.
</RESOL.
FUNCTION
FUNCTION
and/or
CONTRAST/>
and/or
button until
button until DELAY TX
EM TX by pressing the
CONTRAST/>
buttons as necessary
</
Move the cursor to A
6
or
CONTRAST/>
button to confirm.
When the message JOB NO:1
7
button to confirm and an indication of how much
memory is available will briefly appear.
At the prompt enter the destination fax number and
8
press the button.
The message HH:MM 1
9
for you to enter the time you want the fax to be sent.
Enter the time in 24-ho ur format e.g., 07:30 = 7:30 am
and 17:05 = 5:05 pm, and pr ess the button to enter.
The machine will scan the documents into memory.
10
Note:
While one page of the docu ment is being sc anned,
you can set the resolution/contrast for the next
page to be scanned by p ressing the
CONTRAST/>
When the machine has finished scanning, a delayed
11
transmission report
will be automatically printed out giving the
information on the transmission and the machine will
go into delay transmission standby mode.
DD by pressing the
buttons as necessary and press the
appears press the
0:02 will appear on the screen
buttons.
(see “Timer report” on pag e 35)
</RESOL.
</RESOL.
or
English
User’s Guide 37
Page 46

Note:
If the memory becomes full while your document
is being scanned MEMORY FULL will appear on
the display and the machine will return to Standby
mode.
To cancel a delayed memory transmission, repeat
12
steps 3) to 6) above.
Move the cursor to R
13
CONTRAST/>
confirm.
When the message JOB NO:1
14
number of the job you wish to remove and JOB
REMOVED will appear on the screen.
EMOVE by pressing the
button and press the button to
1~3 appears, input the
Polling transmission
This feature allows your machine to transmit a prepared
document, on demand from a remote fax machine.
Note:
Polling transmissio n may not fu ncti on with ot her
brands and models of fax machine.
Your fax machine must be in automatic answer
mode when a polling transmission is
programmed. The reception of other
transmissions is not affected by this setting.
To set up documents for polling transmission:
Place the documents face down on the ADF and let
1
them drop down as far as they will go.
Select the desired resolution/contrast setting by
2
pressing the
buttons repeatedly as necessary.
Press the
3
COMMUNICATION appears in the display, then
press the button to confirm.
Press the
4
appears in the display, then press the button to
confirm.
The message POLLING STANDBY will appear in
5
the display and machine will wait to be polled by the
remote machine.
Note:
If at any time you want to cancel the polling
transmission, press the
</RESOL.
FUNCTION
FUNCTION
and/or
button until
button until POLLING TX
CONTRAST/>
key.
38 OKIFAX 250
Page 47

Polling reception
This feature allows your machine to retrieve a prepared
document from one remote fax machine which has been
set for polling transmission. It is the remote end of the
previous feature.
Polling reception allows you to take advantage of off
peak telephone charges, by preparing your machine to
receive documents at a later time when unattended.
Polling time may be set up to 24 hours in advance.
Note:
This function cannot be set if there is no paper in
the machine, if there is a paper jam or if the top
cover is open.
Note:
Choose CANCEL to cancel any previously
programmed polling reception.
At the prompt enter the destination fax number and
4
press the button.
The message HH:MM 1
5
for you to enter the time you want your machine to
poll the remote fax. Enter the time in 24-hour format
e.g., 07:30 = 7:30 am and 17:05 = 5:05 pm, and press
the button to enter.
A delayed transmission report will be automatically
6
printed out giving the information on the transmission
(see “Timer report” on page 35)
0:02 will appear on the screen
.
English
To set polling reception:
Press the
1
COMMUNICATION appears in the display, then
press the button to confirm.
Press the
2
appears in the display, then press the button to
confirm.
Move the cursor to S
3
RESOL.
and press the button to confirm.
User’s Guide 39
FUNCTION
FUNCTION
and/or
button until
button until POLLING RX
ET by pressing the the
CONTRAST/>
buttons as necessary
</
Instant polling reception
You can use the
straight away from a remote machine that has been
previously set for polling transmiss ion.
To do this, simply dial the number of the remote machine
then press the
POLLING
POLLING
key to retrieve documents
key.
Page 48

Maintenance
Clearing a recording paper jam
If your recording paper wil not feed or becomes skewed
or jammed in the machine the display will show: PAPER
JAM.
To remove jammed paper open the keypanel and paper
tray and try to pull the jammed paper out towards the
back of the machine.
If the paper remains jammed, pull it out slowly towards
the front of the machine.
Caution:
Do not try to pull paper upwards out of the paper
feeder.
40 OKIFAX 250
Page 49

Clearing a document jam
Error codes
If a document jams in the ADF, open the keypanel and
remove the document by pulling it out from the bottom.
Then close the keypanel again.
Caution:
Do not try to pull the document out while the
keypanel is closed.
When an error in transmission occurs, a transmission
report with an error code will be printed out
automatically. These codes also appear on the daily
journal report.
Error
Code
1. GENERAL FAULT
1.01 TOP COVER OPEN Close the top cover
1-02 DOCUMENT JAM Clear the document jam
1-03 PAPER JAM Clear the recording paper
1-04 PAPER END (REPLACE
1-05 PRINT SYSTEM OVER-
1-07 LINE CONDITION BREAK
1-08 STOP BY USER INTER-
1-10 RIBBON END Install new ribbon
2. FAULT DURING DIALLING
2-01 BUSY TONE DETECTED Wait and retransmit
2-02 T0 TIMEOUT (no answer
Meaning Solution
PAPER
HEAT
(LOOP BREAK)
RUPT
from remote or not a fax)
Replace recording paper
Wait for 5 minutes for the
machine to cool down and
then retransmit your message
Check line condition
Retransmit
Wait and retransmit. If still
no response, contact
remote party.
English
User’s Guide 41
Page 50

Error
Code
2-03 DIAL ATTEMPT FAIL Retry
3. FAULT IN PROTOCOL
3-01
to
3-23
3-24 RECEPTION FAILURE Ask remote party to
3-25 ANTIJUNK (RX
3-26 RX ONE PAGE TIME OUT Ask remote party to
4. FAULT IN PICTURE RECEPTION
4-01
to
4-04
4-05 MEMORY FULL ERROR Dump memory and ask
Meaning Solution
TRANSMISSION FAILURE Retransmit. See note below.
retransmit
RESTRICT)
retransmit
PICTURE FAILURE See note below
remote party to retransmit
Note:
If the error code you receive means ‘transmission’
or ‘picture’ failure, retransmit using the low
speed transmission feature (see “Low speed
transmission” on page 20).
Cleaning
Caution:
Always turn power off by unpl ug gi n g the pow er
cable from the wall outlet before carrying out
cleaning procedures.
Scanner
Open the paper tray (1) and keypanel (2) and remove
1
the ribbon roll.
Gently wipe the internal parts with a soft damp cloth.
2
Caution:
Apply the solution to the cloth away from the
machine to avoid spilling liquid into it.
42 OKIFAX 250
Page 51

Printer
Open the paper tray (1) and keypanel (2) and top
1
cover (3).
Gently wipe the internal parts with a soft damp cloth.
2
Note:
The thermal printhead (4) should be cleaned
every time you change the thermal transf er ribbon
(see “Installing the thermal transfer ribbon” on
page 5).
English
User’s Guide 43
Page 52

Troubleshooting
If you are having problems with operations failures,
check the display or read the transmission report which
will indicate what is happening with the machine.
Before calling your supplier, please refer to the table
below to attempt to resolve the problem yourself:
Status Cause Remedy
Machine does
not respond
Documents
are feeding
skewed
• Power has been
disconnected
• Document
guides are not
correctly
adjusted
• Documents with
different widths
are loaded
• Document feed
mechanism is
dirty
• Document is too
thin
• Check power
connection
• Clear the jammed
document, adjust
the document
guide to the correct paper size
and retransmit
• Transmit each
document separately
• Clean feed mech-
• Make photocopy
see
anism (
“Cleaning” on
page 42
)
of original and
retransmit
Status Cause Remedy
Machine will
not transmit
Automatic
reception does
not work
Reception and
copying do not
work
• Document jam • Clear documen t
• Failure at
remote machine
• The lin e i s b u s y • Wait for dial tone
• You have dialled
the wrong
number
• Machine is set
to manual
reception
• T elephone line
cables are not
properly connected
• Incorrect paper
size
• No paper • Load plain paper
jam and retransmit
• Check transmission report and
ask remote party
to check their
machine
and retransmit or
press REDIALkey
• Check fax
number and
redial
• Change the
reception mode to
FAX by pressing
the MODE button
repeatedly
• Check that all line
cables are
inserted into the
correct jacks
• Use only recommended paper
sizes
44 OKIFAX 250
Page 53

Status Cause Remedy
• Paper jam • Clear the jammed
paper
Blank output
on copies
• Copy • Ribbon has
ended
• Documents are
incorrectly
loaded
• Recep tion • Documents
loaded incorrectly on remote
fax
• Check ribbon
installation
• Insert documents
printed side down
• Advise remote
party
If you are still unable to resolve the problem, please
contact your supplier.
English
User’s Guide 45
Page 54

Specifications
Applicable lines: Public Switched Telephon e Network
(PSTN)Private branch exchange (PBX)
Automatic dial
functions: One-touch speed dialing registration for
5 phone or fax numbers
Directory dialing registration for 50
phone or fax numbers
Dimensions: W x D x H (machine only) = 274 x 241 x
98.2 mm (10.8 x 9.5 x 3.9 inches)
W x D X H (machine + handset + tray) =
341.2 x 241 x 318.4 mm (13.4 x 9.5 x 12.5
inches)
Effective image width: 210 mm (8.26")
Humidity: 20% ~ 80% relative humidity
Operating temperature: 5 ~ 35°C(41 ~ 95°F)
Power consumption: Approx. 10W in standby
Approx. 30W during 30% of black
transmission
Approx. 35W during 30% of black
reception
Approx. 50W during 30% of black copy
Approx. 110W during 100% of black
copy
Power source: External adaptor AC 180-265V, 47-63
Hz
Recording method Thermal printing
Scanning line density: Horizontal 8.00 dots/mm
Vertical standard 3.85 lines/mm
Fine 7.70 lines/mm
Scanning method: Solid state electonic scanning by contact
image sensor
Sheet size: Max. w i dt h 216mm, Min. width 128mm
Transmission time: A4 size, G3 MH standard mode = appox.
20 sec. (based on CCITT number 1 chart
using standard mode
Weight: Machine only 2.8 kgs
Machine an d ha ndset3.0 kgs
Backup battery: Lithium
Backup contents: Dial registratio n data, user data, date a nd
time
Battery life: Approx. 1.5 years
Caution:
Use only batteries that are recommended by the
manufacturer. There is a risk of explosion if an
unsuitable battery is used.
Dispose of used batteries in accordance with the
manufacturer’s instructions.
46 OKIFAX 250
Page 55

The equipment has been approved in accordance with
Council Decision 98/482/EC for pan-European single
terminal connection to the public switched telephone
network (PSTN). However, due to differences between
the individual PSTNs provided in di fferent countries, the
approval does not, of itself, give an unconditional
assurance of successful operation on every PSTN
network termination point.
In the event of problems, you should contact your
equipment supplier in the first instance.
Declaration to Council Decision 98482/EC from 20th
July 1998 (Article 3/Annex III) (network
compatibility declaration);
Equipment is
PSTN
Germany ✔
Greece ✔
Portugal ✔
Spain ✔
Switzerland ✔
Norway ✔
Austria ✔
Belgium ✔
Denmark ✔
Finland ✔
France ✔
Iceland ✔
Ireland ✔
Italy ✔
Luxembourg ✔
Netherlands ✔
United Kingdom ✔
Sweden ✔
designed to
work with
Equipment
may have
interworking
difficulties with
English
User’s Guide 47
Page 56

48 OKIFAX 250
Page 57

Index
A
Alarm . . . . . . . . . . . . . . . . . . . . . . . . . . . . . . . . . . . . . 25
answer machine . . . . . . . . . . . . . . . . . . . . . . . . . . . . . . 4
Audible Alarms . . . . . . . . . . . . . . . . . . . . . . . . . . . . . 10
C
Characters
inputting . . . . . . . . . . . . . . . . . . . . . . . . . . . . . . . 13
special . . . . . . . . . . . . . . . . . . . . . . . . . . . . . . . . . 13
Cleaning
external panels. . . . . . . . . . . . . . . . . . . . . . . . . . . vii
printer . . . . . . . . . . . . . . . . . . . . . . . . . . . . . . . . . 43
scanner. . . . . . . . . . . . . . . . . . . . . . . . . . . . . . . . . 42
Contrast. . . . . . . . . . . . . . . . . . . . . . . . . . . . . . . . . . . . 18
Control Panel
keys . . . . . . . . . . . . . . . . . . . . . . . . . . . . . . . . . . . . 9
Copying . . . . . . . . . . . . . . . . . . . . . . . . . . . . . . . . . . . 21
D
Date and time . . . . . . . . . . . . . . . . . . . . . . . . . . . . . . . 13
Delayed transmission . . . . . . . . . . . . . . . . . . . . . . . . . 36
document. . . . . . . . . . . . . . . . . . . . . . . . . . . . . . . 36
memory . . . . . . . . . . . . . . . . . . . . . . . . . . . . . . . . 37
Dialling
directory numbers . . . . . . . . . . . . . . . . . . . . . . . . 19
keypad . . . . . . . . . . . . . . . . . . . . . . . . . . . . . . . . . 18
manual redial. . . . . . . . . . . . . . . . . . . . . . . . . . . . 20
one-touch. . . . . . . . . . . . . . . . . . . . . . . . . . . . . . . 19
Directory numbers
deleting . . . . . . . . . . . . . . . . . . . . . . . . . . . . . . . . 16
dialling. . . . . . . . . . . . . . . . . . . . . . . . . . . . . . . . . 19
modifying . . . . . . . . . . . . . . . . . . . . . . . . . . . . . . 16
storing . . . . . . . . . . . . . . . . . . . . . . . . . . . . . . . . . 15
Distinctive ring. . . . . . . . . . . . . . . . . . . . . . . . . . . . . . 32
Document jams
clearing . . . . . . . . . . . . . . . . . . . . . . . . . . . . . . . . 41
Documents
contrast . . . . . . . . . . . . . . . . . . . . . . . . . . . . . . . . 18
copying . . . . . . . . . . . . . . . . . . . . . . . . . . . . . . . . 21
dimensions. . . . . . . . . . . . . . . . . . . . . . . . . . . . . . 17
insertion. . . . . . . . . . . . . . . . . . . . . . . . . . . . . . . . 17
loading. . . . . . . . . . . . . . . . . . . . . . . . . . . . . . . . . 17
receiving . . . . . . . . . . . . . . . . . . . . . . . . . . . . . . . 21
resolution. . . . . . . . . . . . . . . . . . . . . . . . . . . . . . . 18
sending . . . . . . . . . . . . . . . . . . . . . . . . . . . . . . . . 18
English
User’s Guide 49
Page 58

E
Error codes. . . . . . . . . . . . . . . . . . . . . . . . . . . . . . . . . 41
Extension tray . . . . . . . . . . . . . . . . . . . . . . . . . . . . . . . 7
H
Handset . . . . . . . . . . . . . . . . . . . . . . . . . . . . . . . . . . . . 3
Help list . . . . . . . . . . . . . . . . . . . . . . . . . . . . . . . . . . . 35
F
FAX mode . . . . . . . . . . . . . . . . . . . . . . . . . . . . . . . . . 22
Features . . . . . . . . . . . . . . . . . . . . . . . . . . . . . . . . . . . . 1
Function chart . . . . . . . . . . . . . . . . . . . . . . . . . . . . . . 11
Functions
alarm. . . . . . . . . . . . . . . . . . . . . . . . . . . . . . . . . . 25
chart . . . . . . . . . . . . . . . . . . . . . . . . . . . . . . . . . . 11
date and time. . . . . . . . . . . . . . . . . . . . . . . . . . . . 13
distinctive ring . . . . . . . . . . . . . . . . . . . . . . . . . . 32
language . . . . . . . . . . . . . . . . . . . . . . . . . . . . . . . 30
low speed transmission. . . . . . . . . . . . . . . . . . . . 20
message confirmation report. . . . . . . . . . . . . . . . 28
R key. . . . . . . . . . . . . . . . . . . . . . . . . . . . . . . . . . 31
reception reduction. . . . . . . . . . . . . . . . . . . . . . . . 8
reception restriction . . . . . . . . . . . . . . . . . . . . . . 31
reception timer . . . . . . . . . . . . . . . . . . . . . . . . . . 30
redial interval . . . . . . . . . . . . . . . . . . . . . . . . . . . 29
redial times . . . . . . . . . . . . . . . . . . . . . . . . . . . . . 29
remote control. . . . . . . . . . . . . . . . . . . . . . . . . . . 28
ring count . . . . . . . . . . . . . . . . . . . . . . . . . . . . . . 26
Sender ID . . . . . . . . . . . . . . . . . . . . . . . . . . . . . . 14
silence detection . . . . . . . . . . . . . . . . . . . . . . . . . 27
TEL/FAX switchover. . . . . . . . . . . . . . . . . . . . . 25
tone/pulse dial mode. . . . . . . . . . . . . . . . . . . . . . 26
I
Installation
answer machine . . . . . . . . . . . . . . . . . . . . . . . . . . 4
extension tray . . . . . . . . . . . . . . . . . . . . . . . . . . . . 7
handset . . . . . . . . . . . . . . . . . . . . . . . . . . . . . . . . . 3
leading paper tray. . . . . . . . . . . . . . . . . . . . . . . . . 8
power supply adaptor . . . . . . . . . . . . . . . . . . . . . . 4
ribbon . . . . . . . . . . . . . . . . . . . . . . . . . . . . . . . . . . 5
second telephone. . . . . . . . . . . . . . . . . . . . . . . . . . 4
telephone line cable . . . . . . . . . . . . . . . . . . . . . . . 3
J
Journal report. . . . . . . . . . . . . . . . . . . . . . . . . . . . . . . 33
L
Language . . . . . . . . . . . . . . . . . . . . . . . . . . . . . . . . . . 30
Leading paper tray. . . . . . . . . . . . . . . . . . . . . . . . . . . . 8
Low speed transmission. . . . . . . . . . . . . . . . . . . . . . . 20
M
Memory reception . . . . . . . . . . . . . . . . . . . . . . . . . . . 24
Message confirmation report. . . . . . . . . . . . . . . . . . . 28
50 OKIFAX 250
Page 59

O
One-touch key
dialling. . . . . . . . . . . . . . . . . . . . . . . . . . . . . . . . . 19
One-touch numbers
storing . . . . . . . . . . . . . . . . . . . . . . . . . . . . . . . . . 15
P
Package contents . . . . . . . . . . . . . . . . . . . . . . . . . . . . . 2
Paper jams
clearing . . . . . . . . . . . . . . . . . . . . . . . . . . . . . . . . 40
Phone book. . . . . . . . . . . . . . . . . . . . . . . . . . . . . . . . . 34
Polling
POLLING key. . . . . . . . . . . . . . . . . . . . . . . . . . . 39
reception . . . . . . . . . . . . . . . . . . . . . . . . . . . . 38, 39
transmission. . . . . . . . . . . . . . . . . . . . . . . . . . . . . 38
Power supply adaptor. . . . . . . . . . . . . . . . . . . . . . . . . . 4
Print ribbon
specifications. . . . . . . . . . . . . . . . . . . . . . . . . . . . . 5
R
R key. . . . . . . . . . . . . . . . . . . . . . . . . . . . . . . . . . . . . . 31
Receiving documents
FAX mode. . . . . . . . . . . . . . . . . . . . . . . . . . . . . . 22
in memory . . . . . . . . . . . . . . . . . . . . . . . . . . . . . . 24
TAD mode. . . . . . . . . . . . . . . . . . . . . . . . . . . . . . 23
TEL mode . . . . . . . . . . . . . . . . . . . . . . . . . . . . . . 21
Reception reduction . . . . . . . . . . . . . . . . . . . . . . . . . . . 8
Reception restriction. . . . . . . . . . . . . . . . . . . . . . . . . . 31
Reception timer . . . . . . . . . . . . . . . . . . . . . . . . . . . . . 30
Recording paper
loading. . . . . . . . . . . . . . . . . . . . . . . . . . . . . . . . . . 7
Redial interval . . . . . . . . . . . . . . . . . . . . . . . . . . . . . . 29
Redial key. . . . . . . . . . . . . . . . . . . . . . . . . . . . . . . . . . 20
Redial times . . . . . . . . . . . . . . . . . . . . . . . . . . . . . . . . 29
Remote control. . . . . . . . . . . . . . . . . . . . . . . . . . . . . . 28
Reports
Help list. . . . . . . . . . . . . . . . . . . . . . . . . . . . . . . . 35
journal report. . . . . . . . . . . . . . . . . . . . . . . . . . . . 33
message confirmation . . . . . . . . . . . . . . . . . . . . . 28
printing . . . . . . . . . . . . . . . . . . . . . . . . . . . . . . . . 33
timer report . . . . . . . . . . . . . . . . . . . . . . . . . . . . . 35
Resolution. . . . . . . . . . . . . . . . . . . . . . . . . . . . . . . . . . 18
Ribbon . . . . . . . . . . . . . . . . . . . . . . . . . . . . . . . . . . . . . 5
Ring count . . . . . . . . . . . . . . . . . . . . . . . . . . . . . . . . . 26
S
Second telephone . . . . . . . . . . . . . . . . . . . . . . . . . . . . . 4
Sender ID . . . . . . . . . . . . . . . . . . . . . . . . . . . . . . . . . . 14
name . . . . . . . . . . . . . . . . . . . . . . . . . . . . . . . . . . 14
number. . . . . . . . . . . . . . . . . . . . . . . . . . . . . . . . . 14
Silence detection. . . . . . . . . . . . . . . . . . . . . . . . . . . . . 27
Speaker volume . . . . . . . . . . . . . . . . . . . . . . . . . . . . . 32
Special characters. . . . . . . . . . . . . . . . . . . . . . . . . . . . 13
Specifications . . . . . . . . . . . . . . . . . . . . . . . . . . . . . . . 46
English
User’s Guide 51
Page 60

T
TAD mode . . . . . . . . . . . . . . . . . . . . . . . . . . . . . . . . . 23
TEL mode . . . . . . . . . . . . . . . . . . . . . . . . . . . . . . . . . 21
TEL/FAX switchover . . . . . . . . . . . . . . . . . . . . . . . . 25
Telephone line cable . . . . . . . . . . . . . . . . . . . . . . . . . . 3
Timer report. . . . . . . . . . . . . . . . . . . . . . . . . . . . . . . . 35
Tone/pulse dial mode. . . . . . . . . . . . . . . . . . . . . . . . . 26
Troubleshooting. . . . . . . . . . . . . . . . . . . . . . . . . . . . . 44
52 OKIFAX 250
Page 61

OKI Systems Companies
Oki Systems (UK) Limited
550 Dundee Road
Slough Trading Estate
Slough
Berks SL1 4LE
Tel: 44 (0) 1753 819819
Fax: 44 (0) 1753 819899
http://www.oki.co.uk
Oki Systems (Ireland) Limited
The Square Industrial Complex
Tallaght
Dublin 24
Tel: (01) 4598666
Fax: (01) 459884 0
http://www.oki.ie
Oki Systems (Ireland) Limited
Hawthorn Business Centre
Adelaide Industrial Estate
Falcon Road
Belfast BT12 6HP
Tel: (01232) 572355
Fax: (01232) 572350
http://www.oki.ie
Oki Data Corporation
4-11-22, Shibaura,
Minato-ku,
Tokyo 108-8551, Japan
Tel: +81 3 5445 6125
Fax: +81 3 5445 6182
Oki Data (Singapore) Pte., Ltd
78 Shenton Way, #09-01,
Singapore 079120
Tel: +65 221 3722
Fax: +65 421 1688
Oki Systems (Thailand) Ltd.
956 Udomvidhya Building 6th Floor,
Rama IV Rd., Silom, Bangrak,
Bangkok 10500, Thailand
Tel: +662 636 2535
Fax: +662 636 2536
Oki Data (Hong Kong) Ltd.
Suite 1901-9, Tower 3, China Hong Kong City,
33 Canton Road, Tsim Sha Tsui,
Kowloon, Hong Kong
Tel: +81 3 5445 6125
Fax: +81 3 5445 6182
English
User’s Guide 53
Page 62

54 OKIFAX 250
 Loading...