

Page 1
Chapter 0
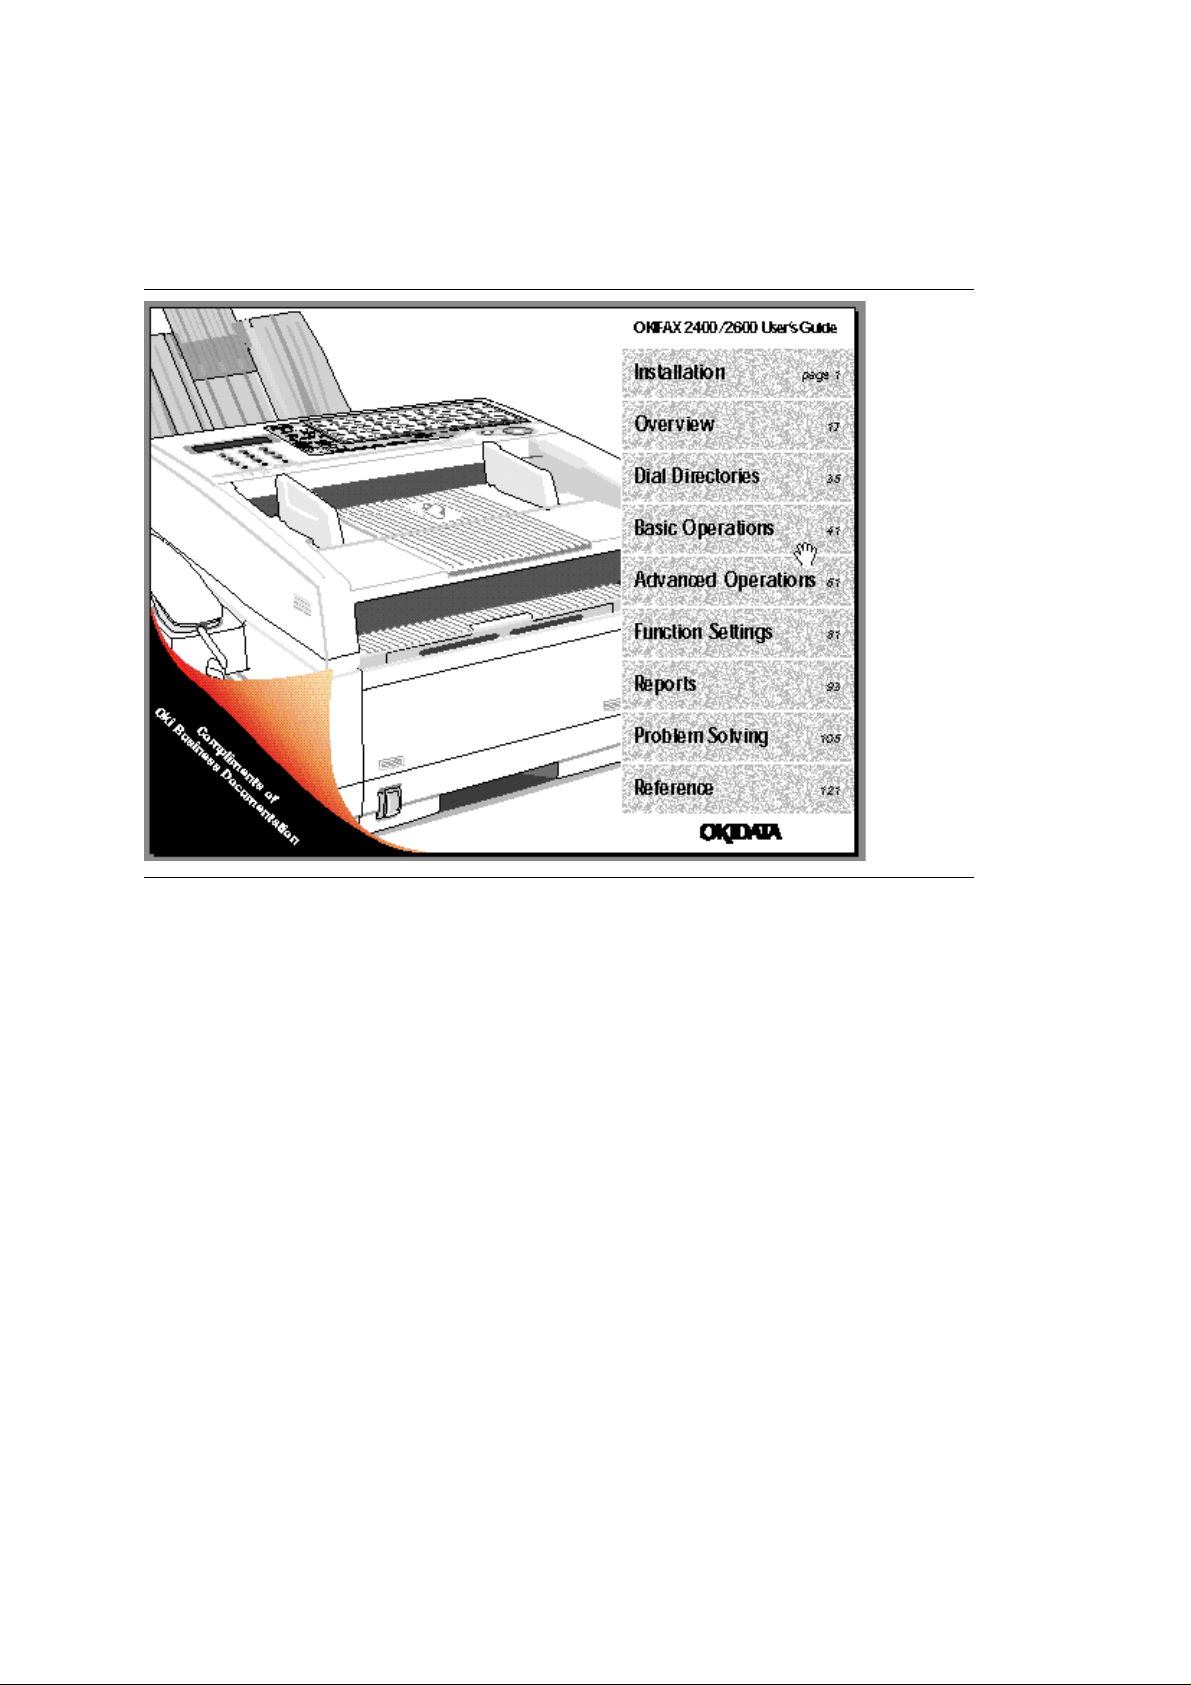
Manual Front Cover
OF2400/2600 ( 96-02-07 )
Page 2

Chapter 1
Installing Your OKIFAX 2400/2600
Installing Your OKIFAX 2400/2600
Start Here
To install your new fax machine, read through and follow the instructions from Unpacking (page 3) to
Setting the Fax Identification (page 11). You must complete all of these steps for your fax machine to
operate properly.
Where to Install Your OKIFAX 2400/2600
Here are a few things to consider when selecting a location for your new fax machine:
- Install your fax machine in a dust-free location away from direct sunlight.
- Be sure to allow several inches on each side of the fax machine to ensure ade-quate ventilation. Make sure that both power and tele-phone outlets are available nearby.
- Choose an area where the humidity is between 20% and 80%, and where the temperature is
between 10°C/50°F and 32°C/90°F.
E Warnings
- Your fax machine is intended to be electrically grounded and is equipped with a three-wire
grounded power cord. This plug will only fit into a grounded AC outlet. For your safety, do not
attempt to defeat your power cords grounding plug.
- Do not plug your fax machine into a power outlet which is shared by equipment which produces a
lot of electrical noise (e.g., air conditioners and photocopiers).
- The LINE terminal connects your fax machine to a standard telephone line. To avoid dam-age to
your telephone system or fax machine, do not plug your fax machine into anything other than a
standard RJ-11C jack.
- Aside from the installation instructions specifically men-tioned in this section and in the Problem
Solving Section (see page 106), your fax machine is not user serviceable. Do not attempt to
service the machine or lubricate moving parts by yourself.E Memory Cards If you have purchased
optional memory cards for your OKIFAX 2400/2600, refer to Installing Memory Cards on page 14.
Changing Languages
If you choose, you can change the language your fax machine uses on the display and when answering
voice telephone calls. See Setting Languages on page 13.
Unusual Installations
If your fax machine is to be con-nected to a PBX, or if you intend to use leased or private lines, some of
your fax machines settings will have to be changed. Refer to the informa- tion contained in Installation
Options, starting on page 16.
What to Read After You Finish Installation
Once you have completed your installation, read through the Overview (starting on page 17) to learn
more about your fax machines components and features, then con-tinue on to Basic Operations (starting on page 41) to begin using your fax machine.
OF2400/2600 ( 96-02-07 )
Page 3
%Unpacking
Unpacking
Is Something Missing?
If any items are missing, notify your OKIFAX authorized dealer immedi-ately for a replacement.
It is always a good idea to keep the packing materials and carton in case you ever need to ship or
transport the machine.
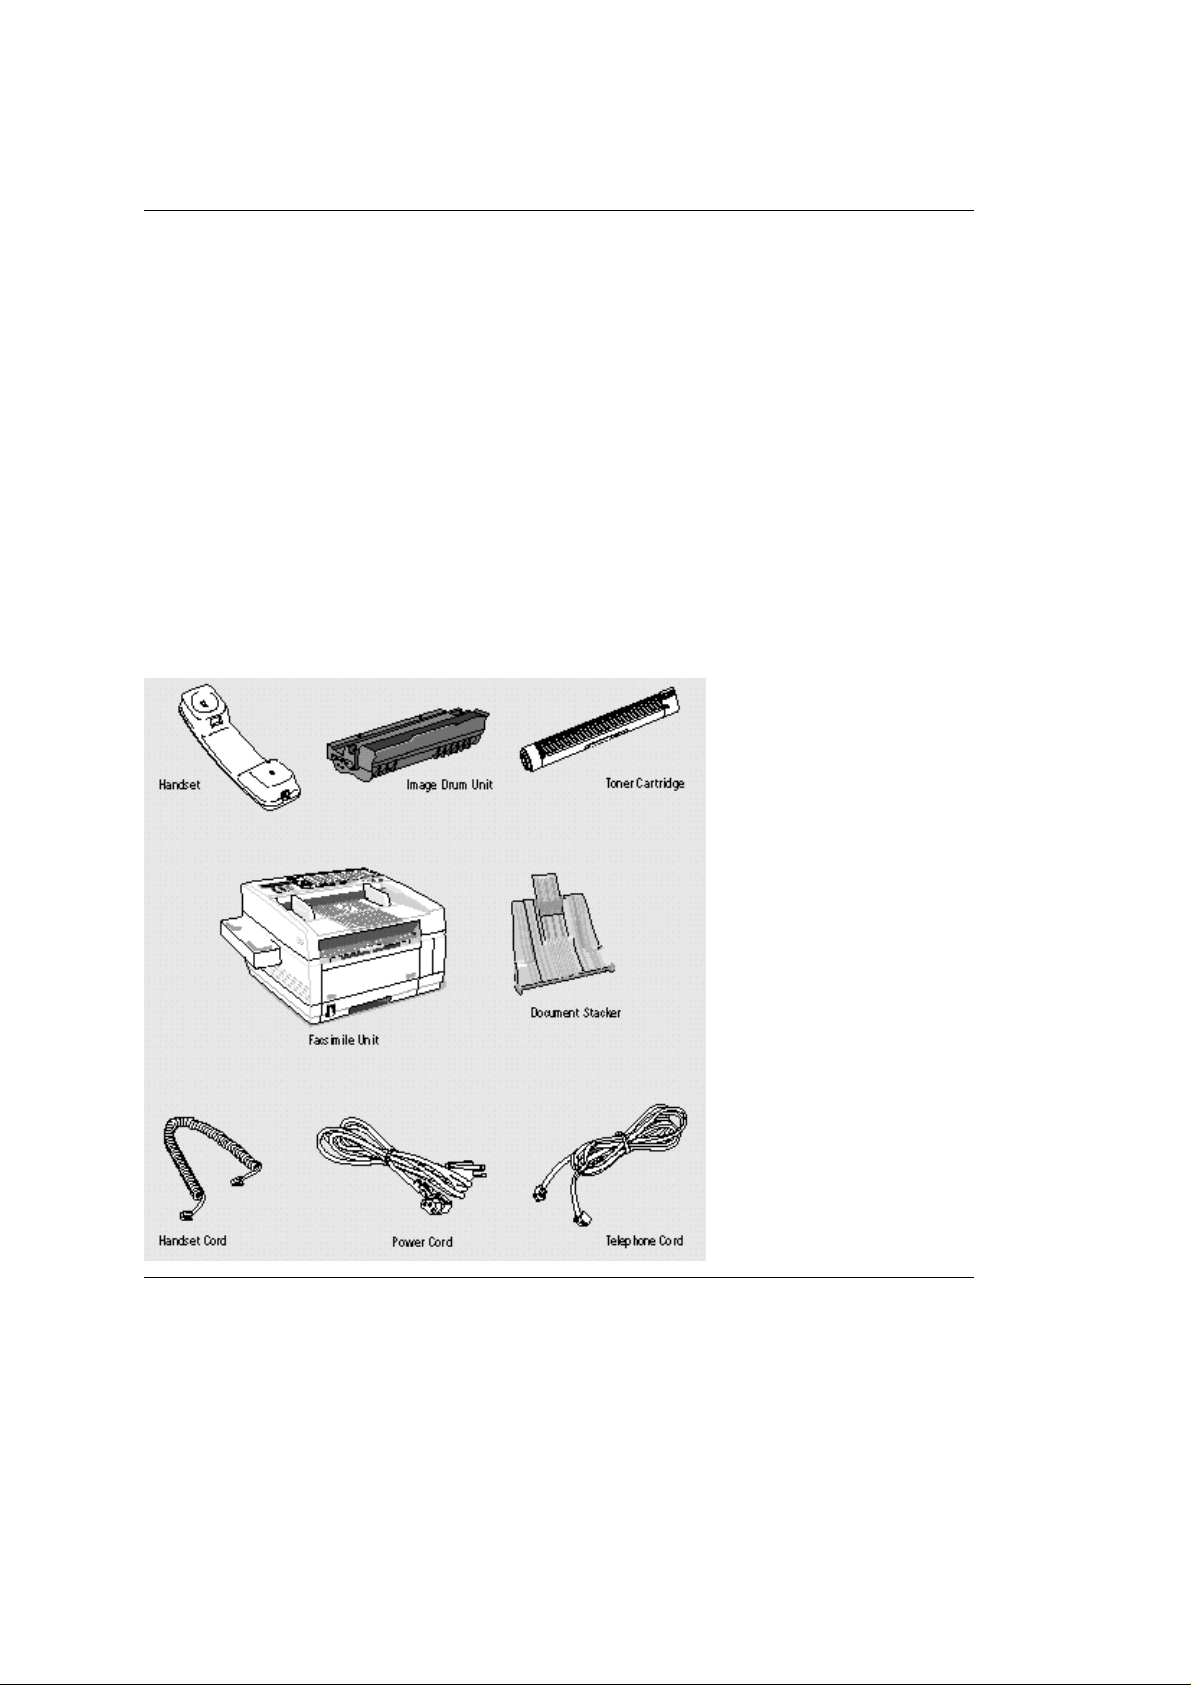
Before you begin, be sure that all the items listed below are included in your package. Remove the
contents from the carton and place them on a sturdy surface.
- Facsimile Unit
- Handset
- Handset Cord
- Toner Cartridge
- Image Drum Unit (inside facsimile unit)
- Power Cord
- Telephone Cord
- Document Stacker
- OKIFAX 2400/2600 documentation kit (not pictured here) Facsimile Unit Handset
OF2400/2600 ( 96-02-07 )
Page 4
%Setting Up Your OKIFAX 2400/2600
Setting Up Your OKIFAX 2400/2600
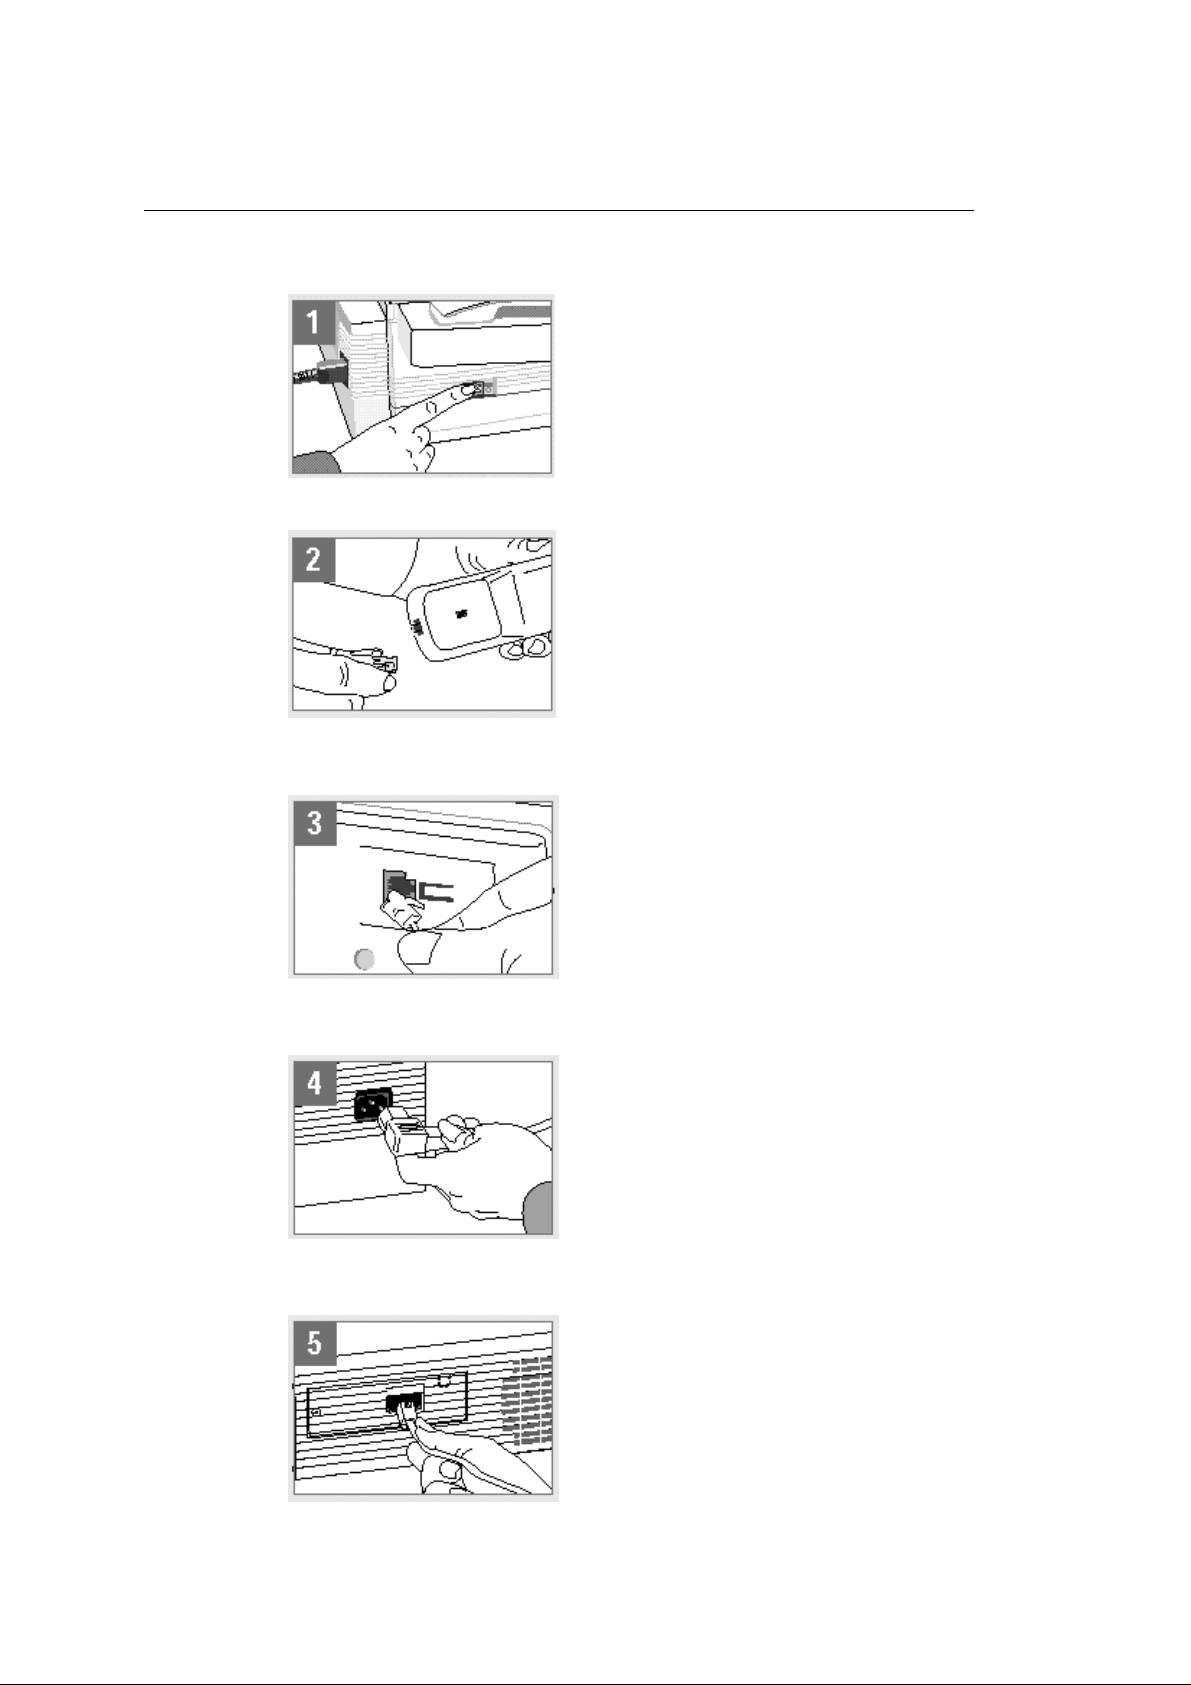
1) Ensure that the power switch is OFF (the O should be pressed down).
2) Plug one end of the handset cord into the handset.
3) Plug the other end of the handset cord into the jack located on the bottom of the cradle. Place the
handset in the cradle.
4) Plug the power cord into the power inlet located on the back of the unit. Then plug the unattached end
of the power cord into a grounded AC power outlet.
5) Insert one end of the telephone cord into the LINE terminal located on the back of the unit. Then insert
the unattached end of the telephone cord into your wall telephone jack.
OF2400/2600 ( 96-02-07 )
Page 5
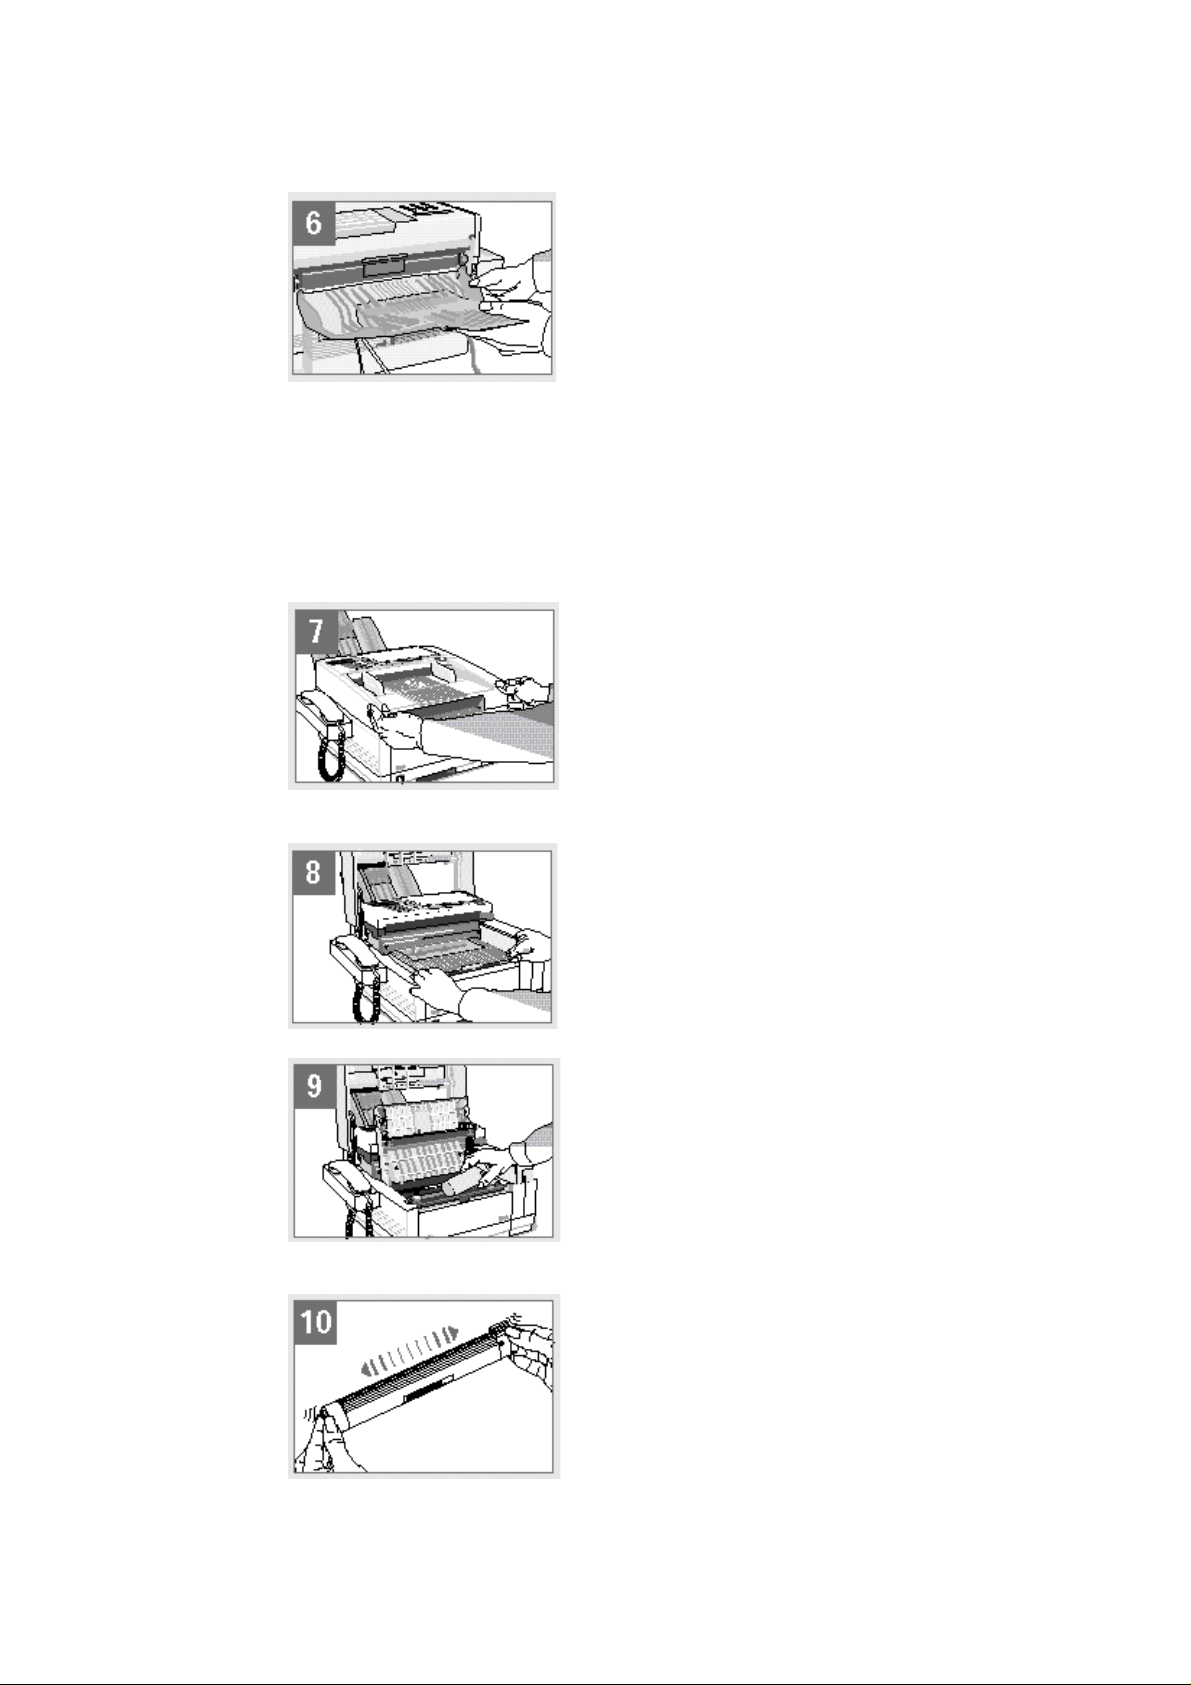
6) Attach the document stacker to the rear of the unit, above the LINE and TEL jacks. Slip the document
stacker indents over the tabs on the unit. You should feel the document stacker lock into place.
Warning: Toner Cartridge Handling Be careful when handling the toner cartridge. Toner is the black
powder which acts as your fax machines ink. Do not let toner spill onto your clothing or other porous
materials. If you do spill toner, small amounts can be removed from skin or clothing with soap and cold
water. Never try to remove toner with hot water, as this may cause the toner to bond to clothing or skin. If
toner is ingested, inhaled or gets in the eyes, refer to the Emergency First Aid instructions on page ii and
the Material Safety Data Sheet at the back of this users guide.
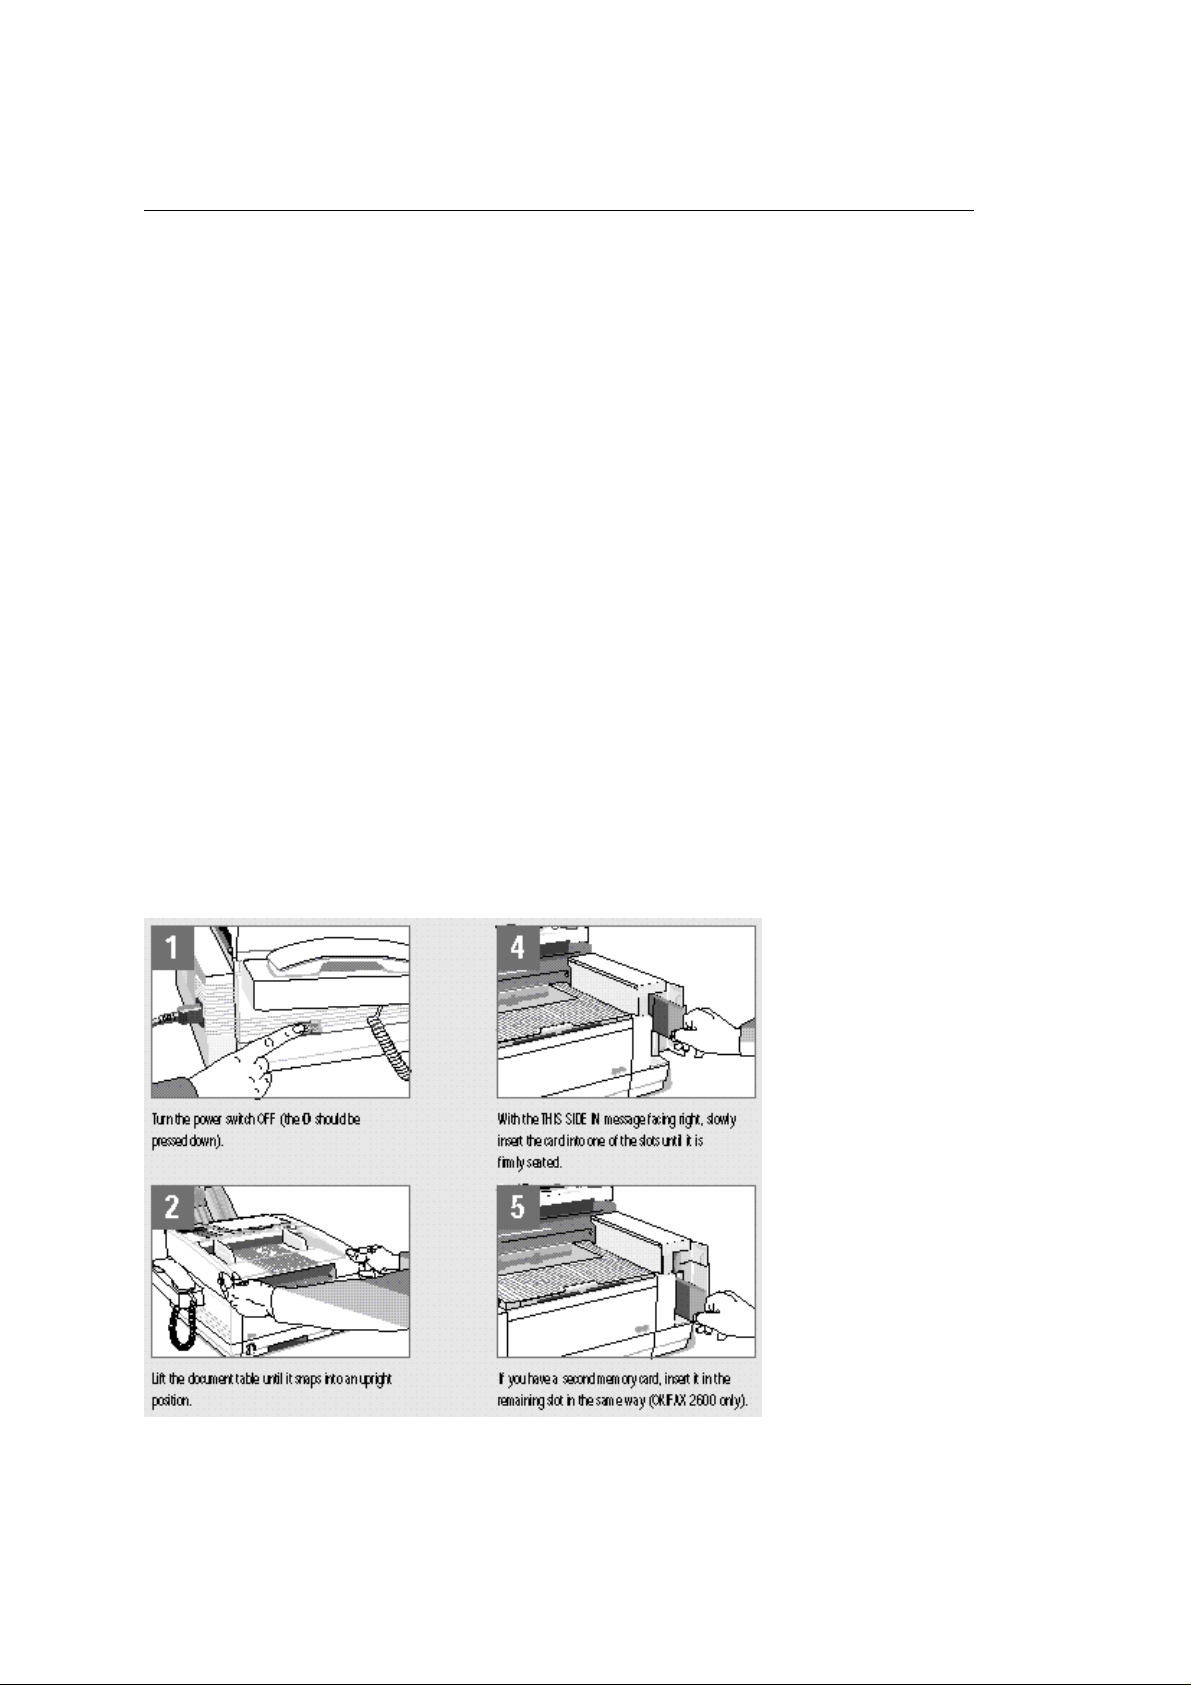
7) Lift the document table until it snaps into an upright position.
8) Using your index fingers, push in the cover release buttons on the side of the copy stacker until you
hear a click. Then lift the copy stacker.
9) Remove the protective foam cylinder from the toner well in the image drum unit.
10) Remove the toner cartridge from its sealed pack and gently shake it from side to side to ensure even
distribution of the toner. Then carefully peel the white plastic tape from the bottom of the toner cartridge.
11) With the ridged side facing up and the blue lever on your right, insert the toner cartridge into the
OF2400/2600 ( 96-02-07 )
Page 6
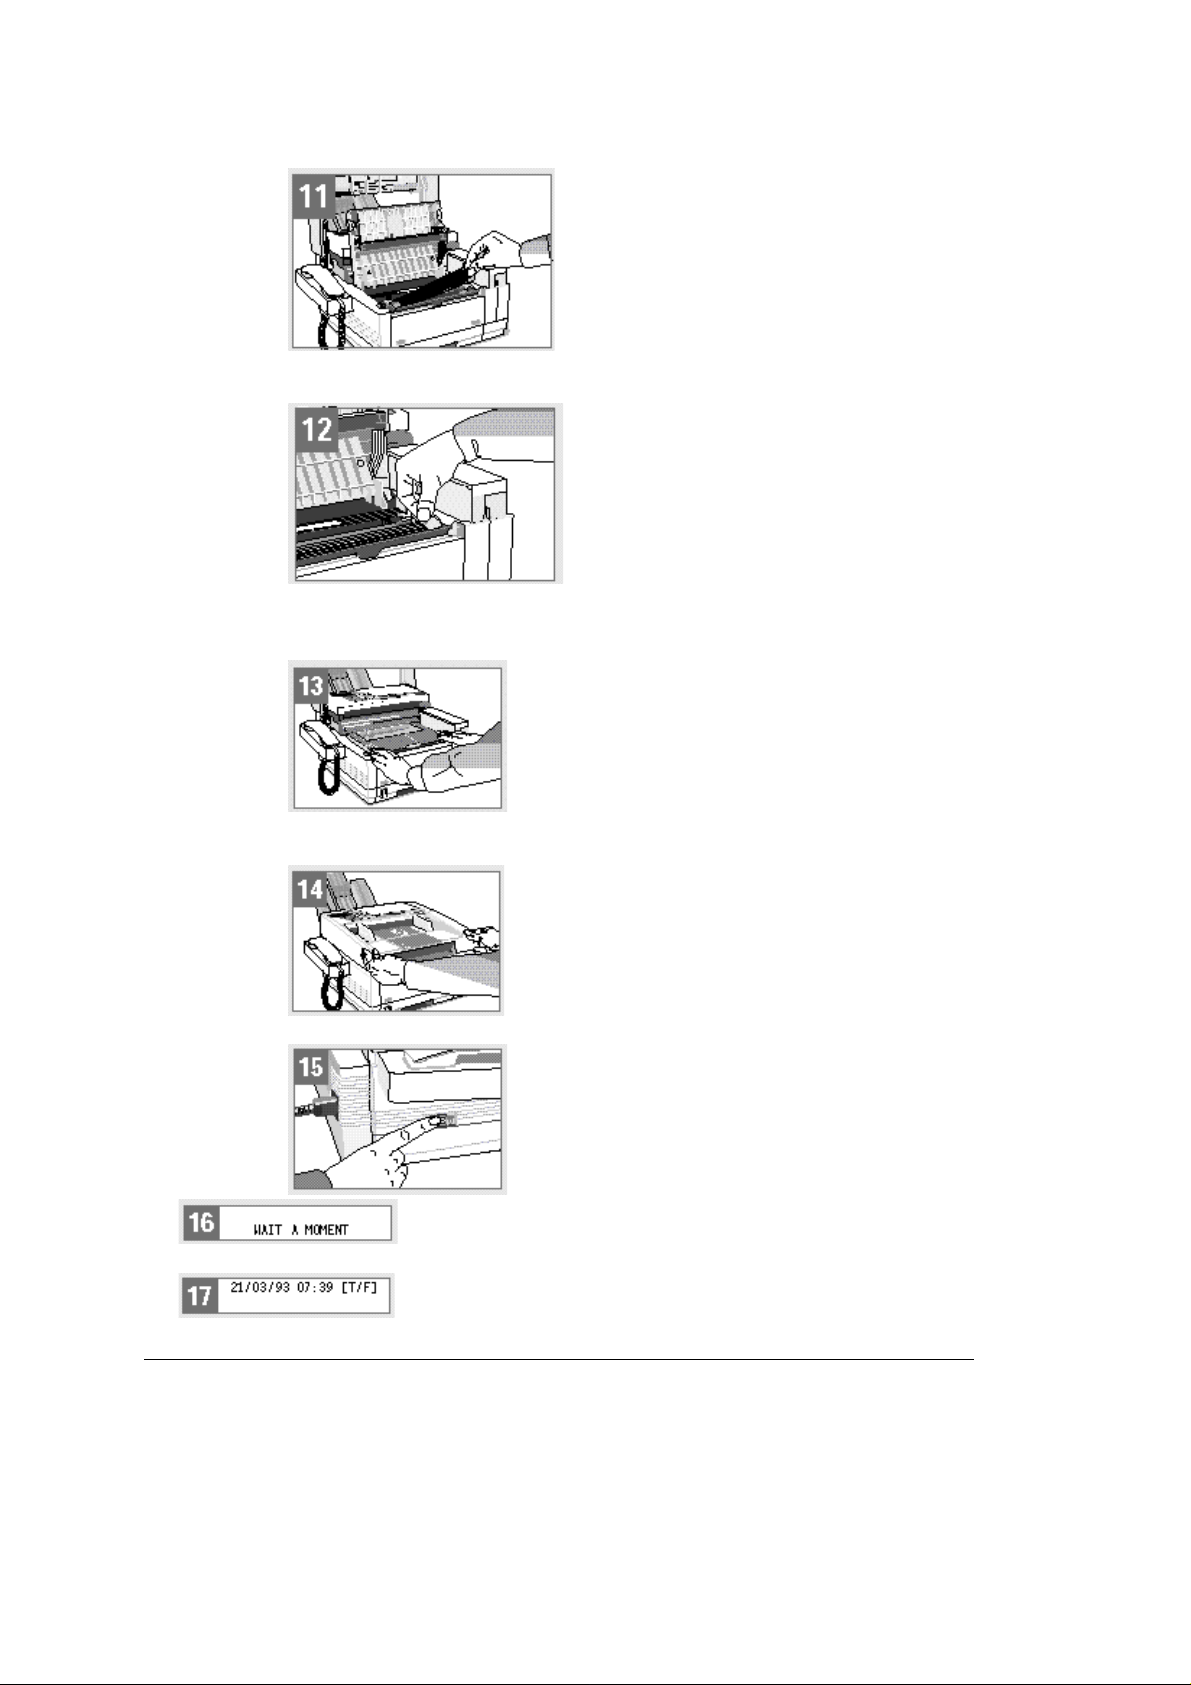
image drum unit. Slide the left end of the cartridge in first, then lower the right end into place.
12) Once the toner cartridge is in place, push the blue knob lever all the way forward to secure it and
release the toner. To continue, go to step 13 on the next page.
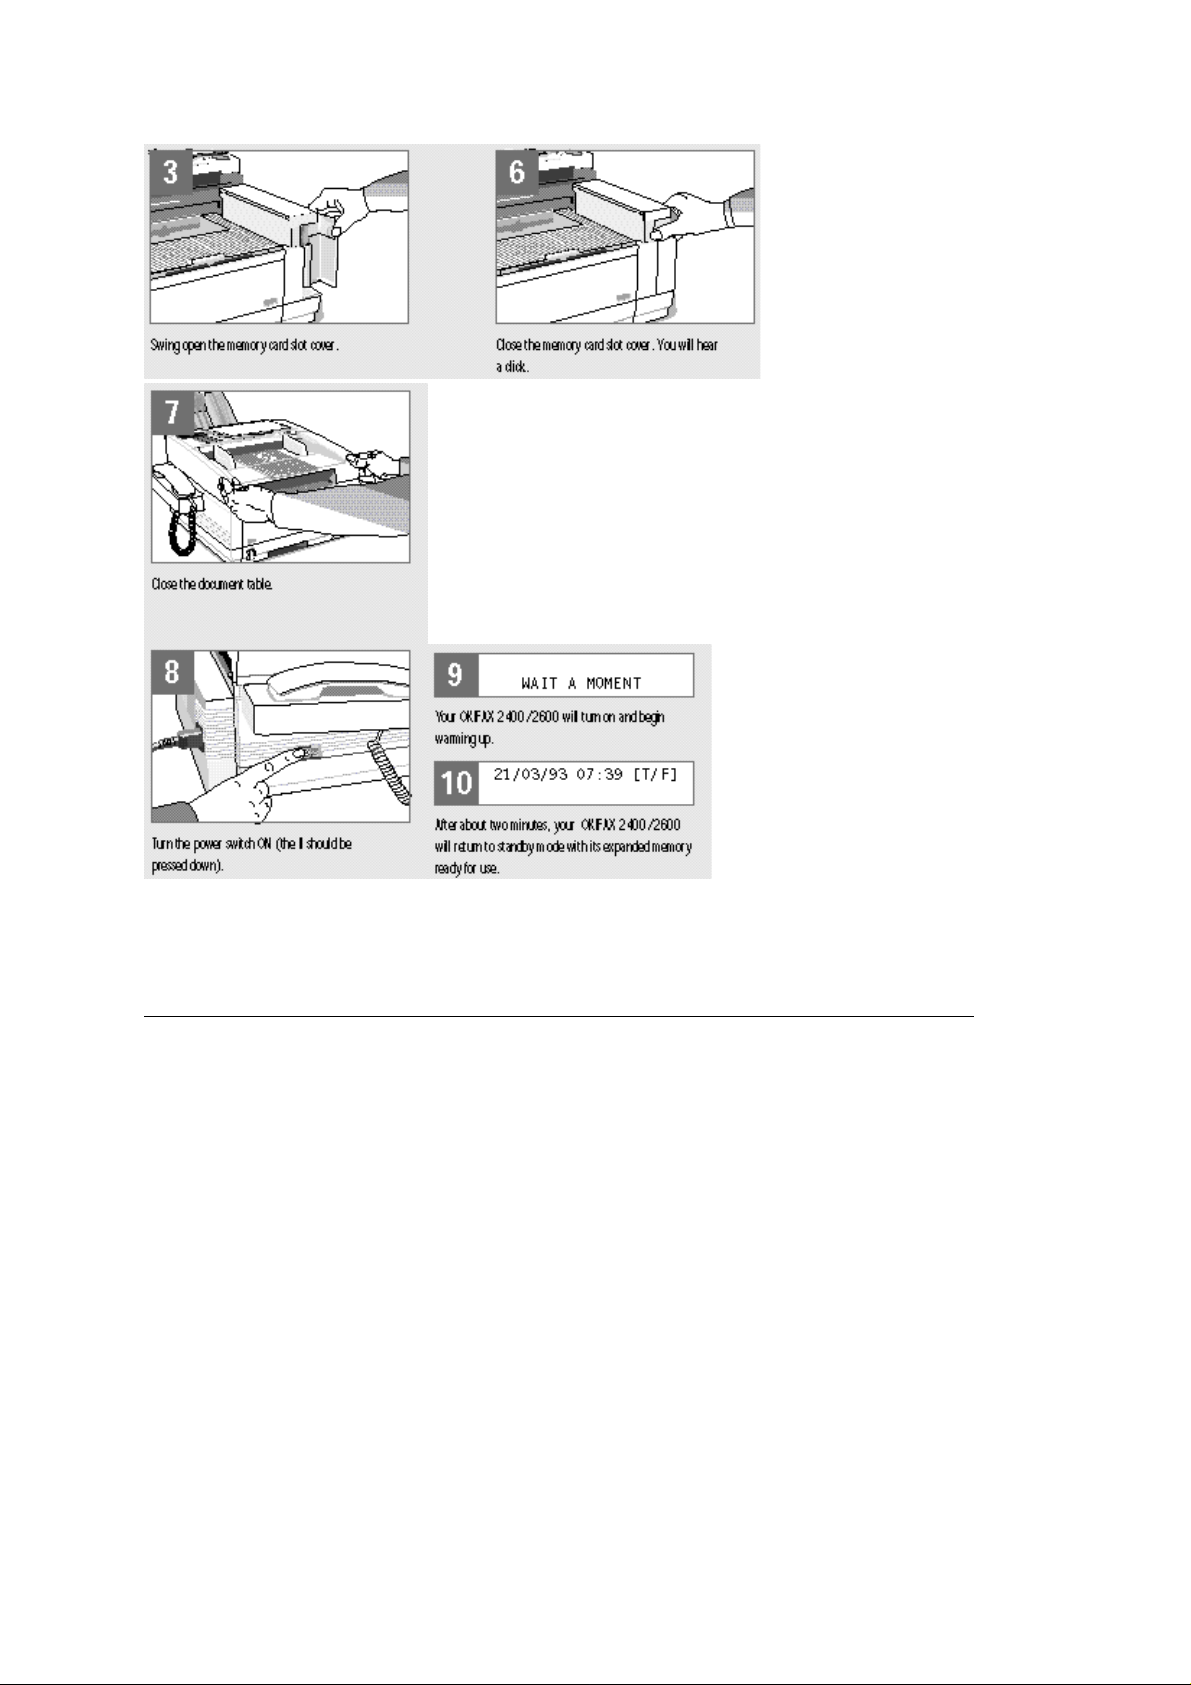
13) Close the copy stacker and push down until you hear the copy stacker click into place. Be sure that
the cover latches on both sides.
14Close the document table.
15Turn the power switch back ON (the I should be pressed down).
16) Your OKIFAX 2400/2600 will turn on and begin warming up.
17)
mode and be ready for operation.
After about two minutes, your OKIFAX 2400/2600 will return to standby
OF2400/2600 ( 96-02-07 )
Page 7
%Connecting an External Telephone
Connecting an External Telephone
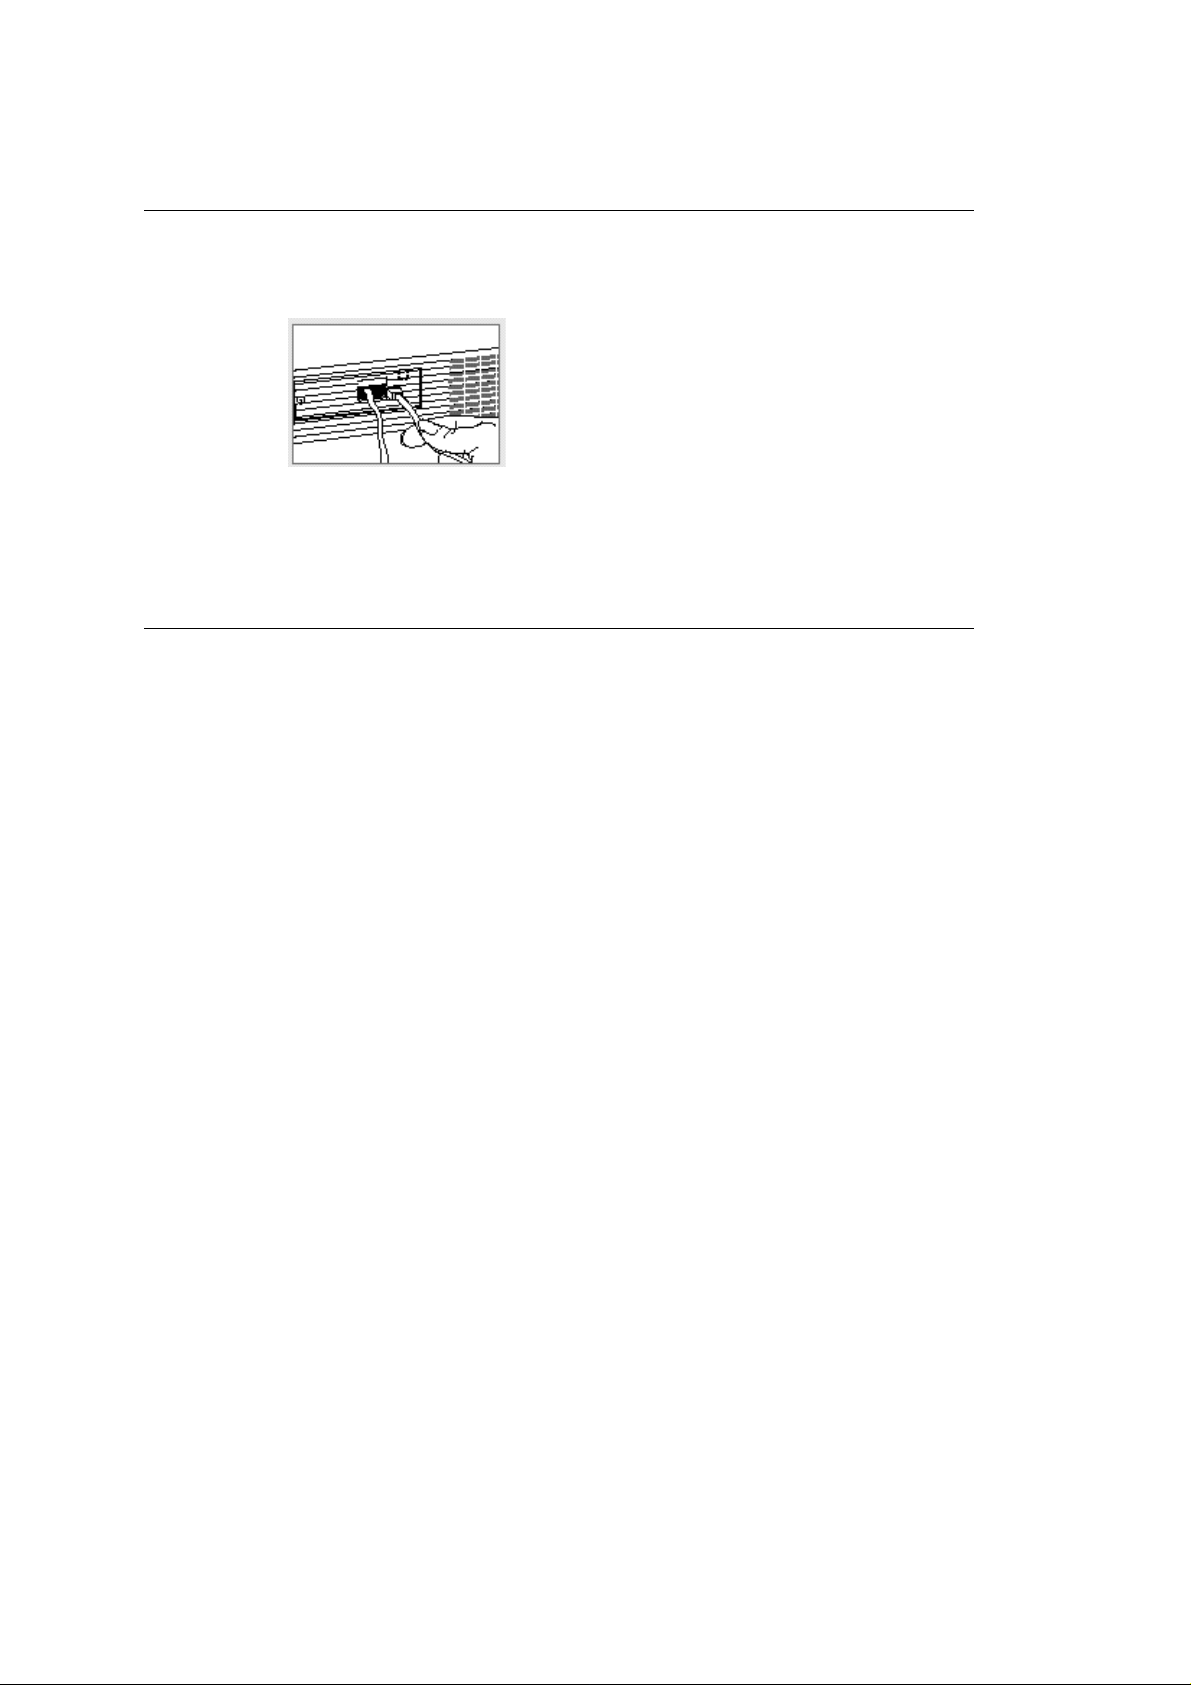
Your fax machine comes with a handset which can used like a tele-phone. However you can also attach
an external telephone to your fax machine. Follow this instruction.
If you are using an external tele- phone, you should read Setting the Answering Mode on page 9.
Insert one end of the telephone cord into the TEL terminal on the back of your fax machine. Insert the
other end of the cord into the jack in your external telephone.
OF2400/2600 ( 96-02-07 )
Page 8

%Replacing Toner Cartridges and Image Drum Units
Replacing Toner Cartridges and Image Drum Units
Normally your toner cartridge will yield up to 2,500 pages (CCITT #1 Test Chart); the image drum unit up
to 20,000 pages. Then they will need to be replaced. When installing the first toner cartridge in a new
image drum unit, the toner low condition may occur between 500 and 1,500 pages. It is highly
recommended that you purchase a toner cartridge soon after initial installation to ensure that you have
one on hand when toner low occurs.
See Replacing the Toner Cartridge on page 110, and Replacing the Image Drum Unit on page 112 for
replacement instructions.
OF2400/2600 ( 96-02-07 )
Page 9
%Loading Paper
Loading Paper
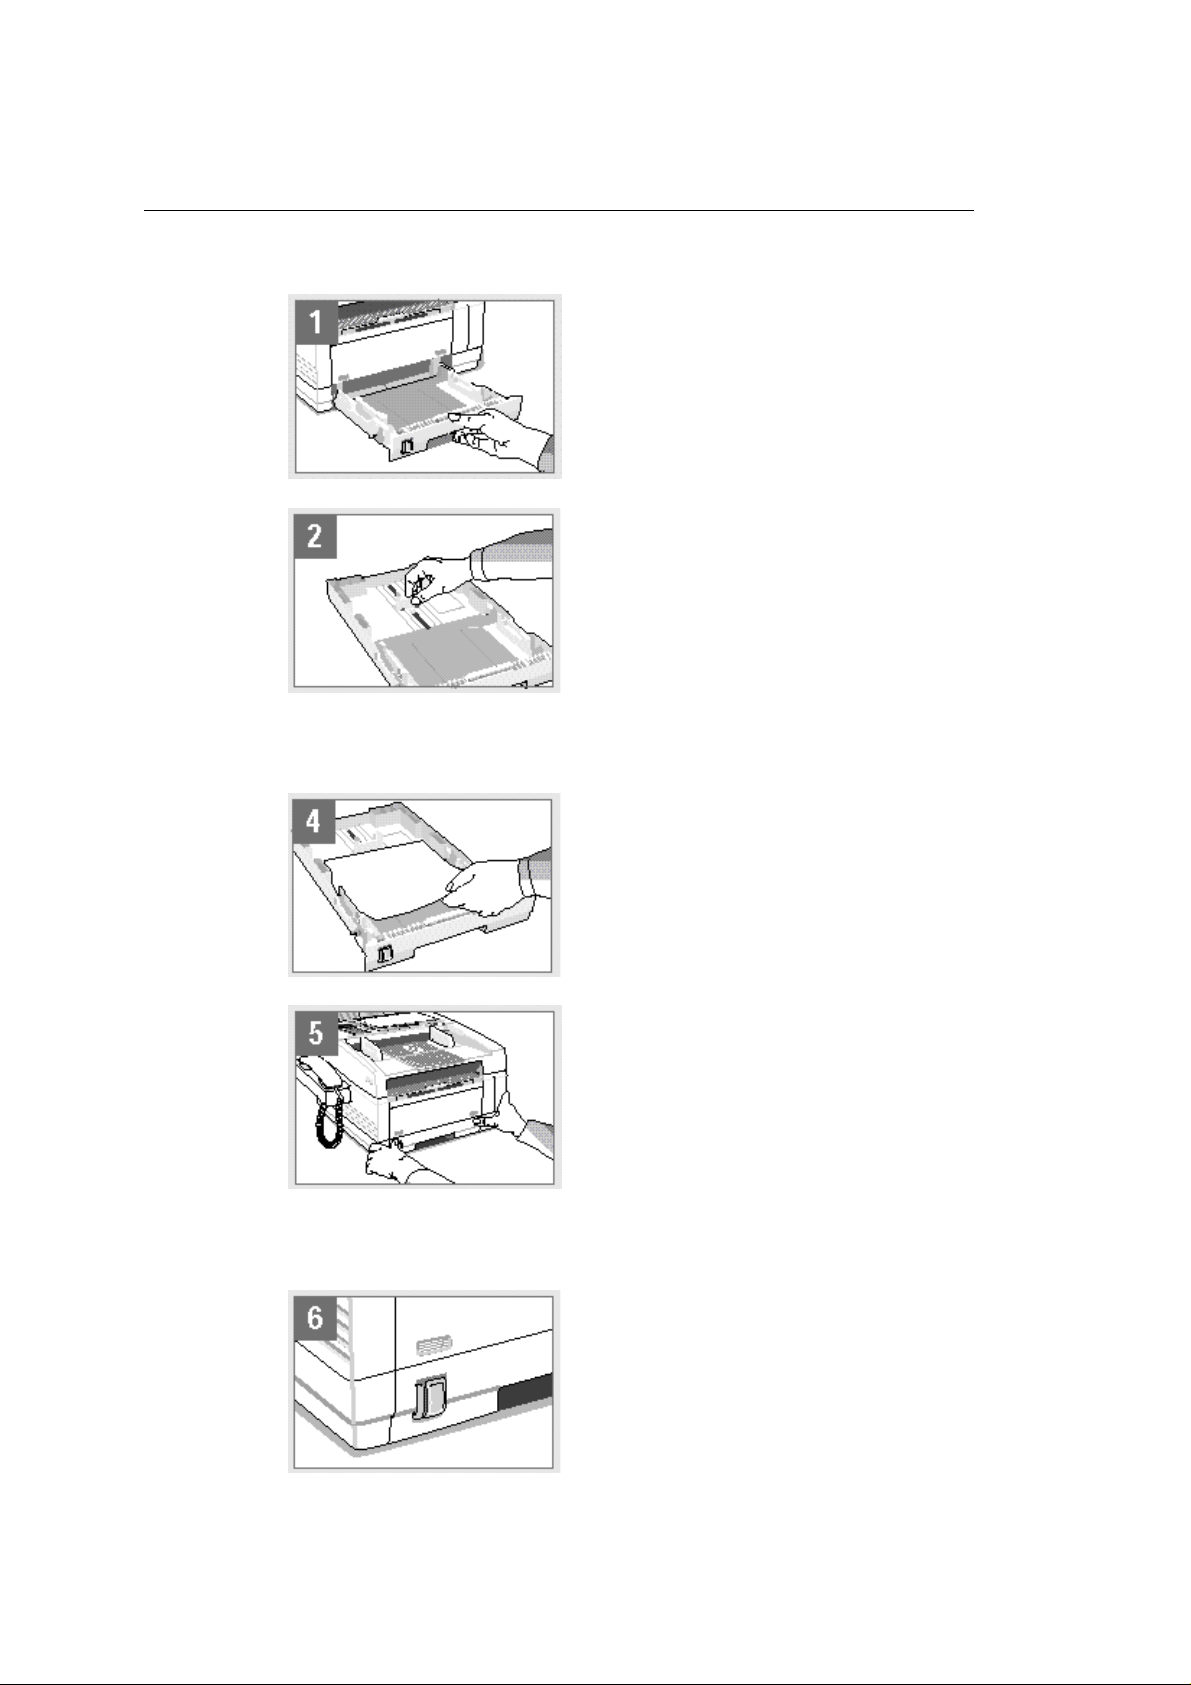
1) Pull the paper cassette completely out of the fax machine.
2) If needed, lift the top paper adjuster, while sliding it up or down, to adjust the paper length.
3) If necessary, move the side adjusters back and forth to adjust the paper width.
4) Place the paper in the cassette. Do not fill past the spring clip on the end of the cassette. Push the
paper under the plastic tabs on the paper width adjusters.
5) Slide the paper cassette all the way back into your fax machine.
6) The red indicator on your paper cassette will always indicate how much paper you have remaining.
Your fax machine will beep and display a message when it is out of paper. Your paper cassette can hold
up to 250 sheets of standard weight (20 lb.) paper. For best results, use paper specially made for laser
printers or photocopiers.
OF2400/2600 ( 96-02-07 )
Page 10

Paper Handling Options
- An optional 500 sheet second paper cassette is available. Contact your OKIFAX sales office for
information about this option.
- Your fax machine is set to assume you are using letter size paper. If you wish to use a differ- ent
size of paper, see 1ST TRAY PAPER on page 86.
- Your fax machine is set to auto-matically receive faxes in mem-ory when it runs out of paper
(these messages are automatic-ally printed out when new paper is loaded). If you do not want
your fax machine to do this, you can turn this feature OFF. See NO PAPER RX on page 86.
OF2400/2600 ( 96-02-07 )
Page 11
%Setting the Clock
Setting the Clock
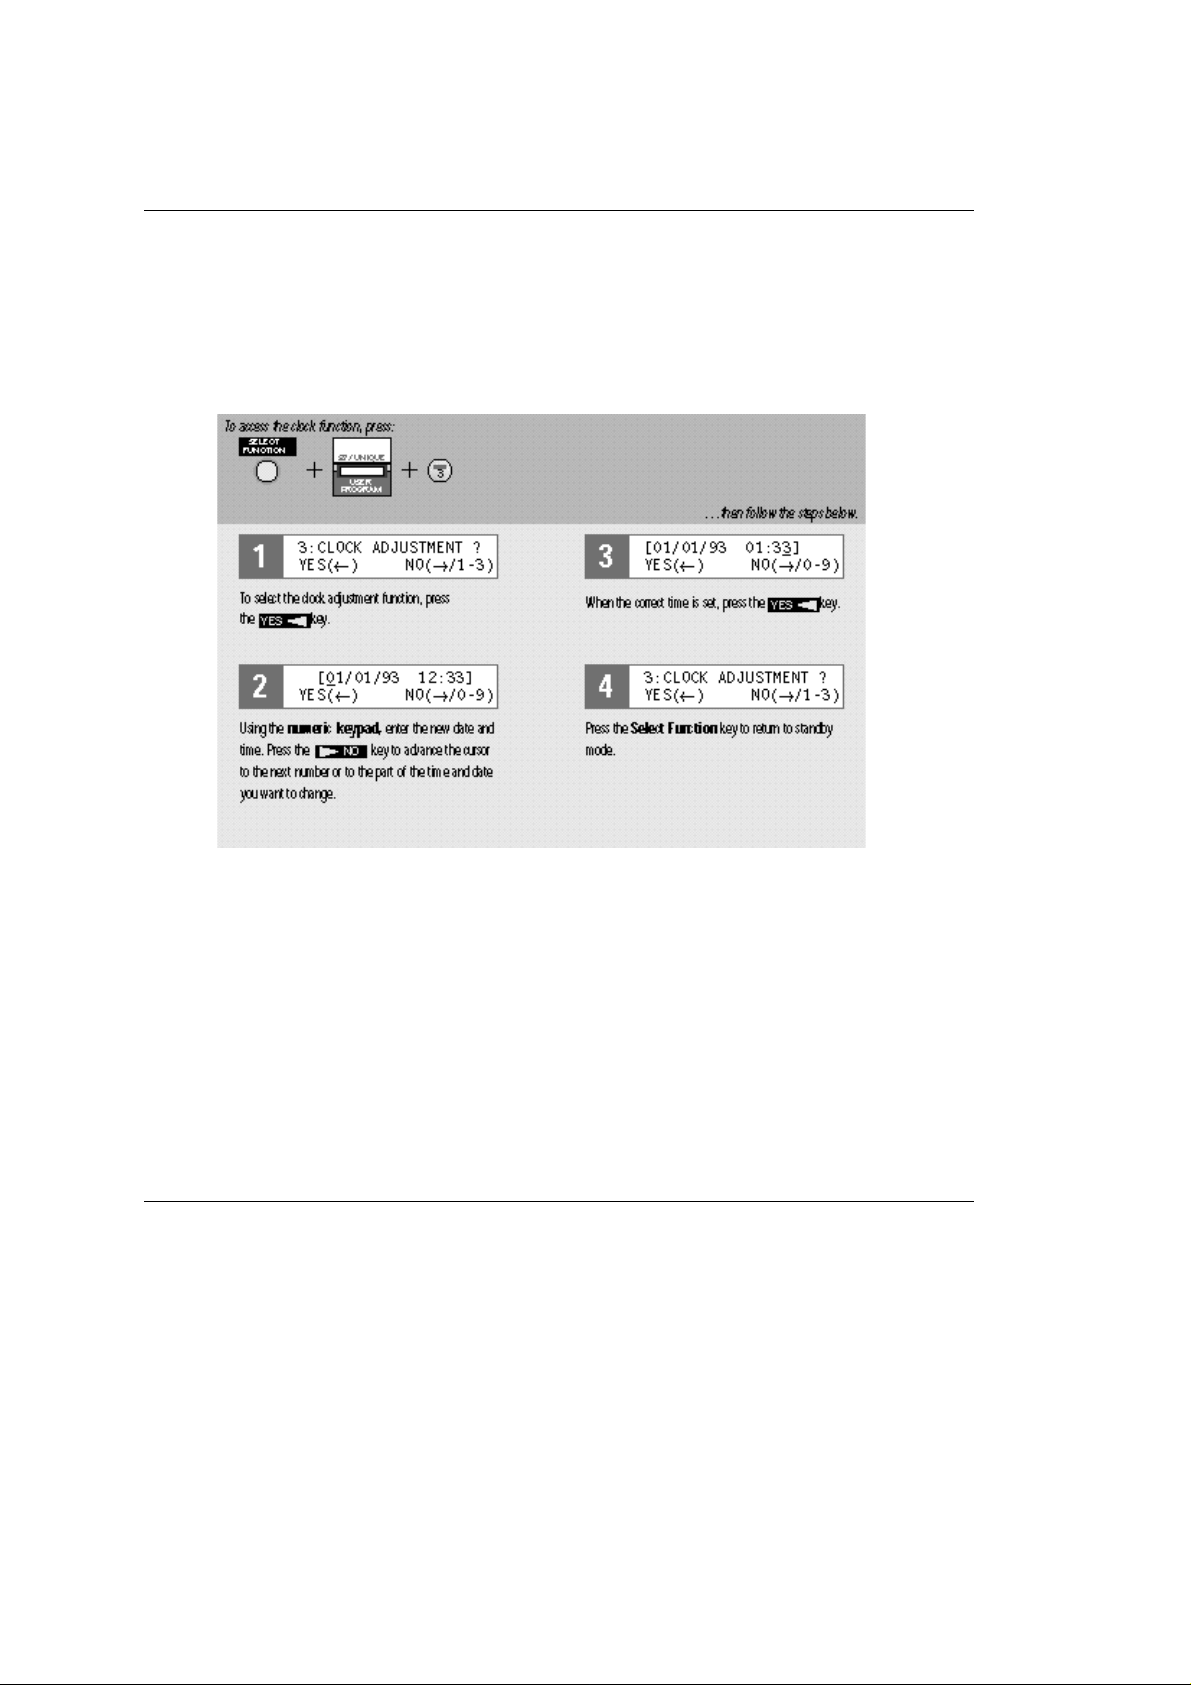
Your fax machine uses its clock to keep track of the date and time. While your fax machine is not in use
or is preparing infor-mation in memory, the time and date appear on the display. The time and date of
your fax communications are recorded and appear on report printouts, at the top of every fax you send
and at the top of every fax you receive. The correct time and date are also essential when you want to
send a delayed fax (see page 50) or when you are using delayed mail boxes (see page 64). Note: setting
the date and time in your machine is an FCC requirement (see page iii).then follow the steps below.
Time and Date Format
You can change the way your fax machine shows the time and date on the display. Three settings
are possible: Day/Month/Year (DMY), Month/Day/Year (MDY) and Year/Month/Day (YMD). For
information about changing your fax machines current setting, see CALENDAR FORMAT on
page 89.
Time and Date Printing
You can control how your fax machine places the time and date on outgoing faxes. The time and
date can either be OFF (not printed on any page), or ON (printed at top of every page you send).
For information about changing your fax machines current setting, see TIME/DATE PRINT on
page 87.
OF2400/2600 ( 96-02-07 )
Page 12

%Setting the Answering Mode
Setting the Answering Mode
Your fax machines answering mode deter-mines how your fax machine handles incom-ing telephone
calls (both fax and voice calls). The reception mode which makes the most sense for you will vary
depending on how you use your machine. Your fax machine has three answering mode options. Read
through the answering mode options listed here, then refer to the instruction bar to the right.
OF2400/2600 ( 96-02-07 )
Page 13

%Manual Receive Mode (TEL)
Manual Receive Mode (TEL)
If you use the same line for both fax and telephone calls and the majority of your incoming calls are
telephone calls, then the TEL reception mode is your best choice. Each time someone calls, your fax
machine will ring like a telephone. You can answer either from your machines handset or from an
external telephone connected to your fax machine (see page 6 to learn how to con-nect an external
telephone). If you pick up the handset and hear fax machine tones, press the Start key to receive the fax.
If you do not answer the phone and someone tries to send you a fax message, your machine will not
accept it. When in this mode, TEL appears on your fax machines display.
OF2400/2600 ( 96-02-07 )
Page 14

%Auto Receive Mode (FAX)
Auto Receive Mode (FAX)
If your fax machine is connected to a tele-phone line reserved only for fax communica-tions, the Auto
Receive mode is your best choice. Your fax machine will assume all incoming calls are fax messages and
will attempt to set up fax communications each time someone calls. When in this mode, FAX appears on
the display.
OF2400/2600 ( 96-02-07 )
Page 15

%Telephone/Fax Mode (T/F)
Telephone/Fax Mode (T/F)
When incoming calls are a mixture of fax and telephone calls, your best choice is the Telephone/Fax or
T/F mode. In this mode, your fax machine detects whether the incom-ing call is a fax or a voice call and
responds accordingly. When the call is from another fax machine, your machine will switch to fax mode
and automatically receive the fax mes-sage. If a voice call comes in, your machine will ring just like a
telephone and the calling party will hear the following voice message, One moment please, your call is
being connected. When your fax machine rings, pick up the handset and speak to the other party. If you
do not answer an incoming voice call, the calling party will hear the following message, Sorry, theres no
answer . . . please try later. If you are sending a fax, begin transmission after the tone. After a preset
time, your fax machine will automatic-ally switch back to fax mode. This allows the calling party to
manually send a fax. While in this mode, T/F appears on the display.
OF2400/2600 ( 96-02-07 )
Page 16
%Changing Your Answering Mode
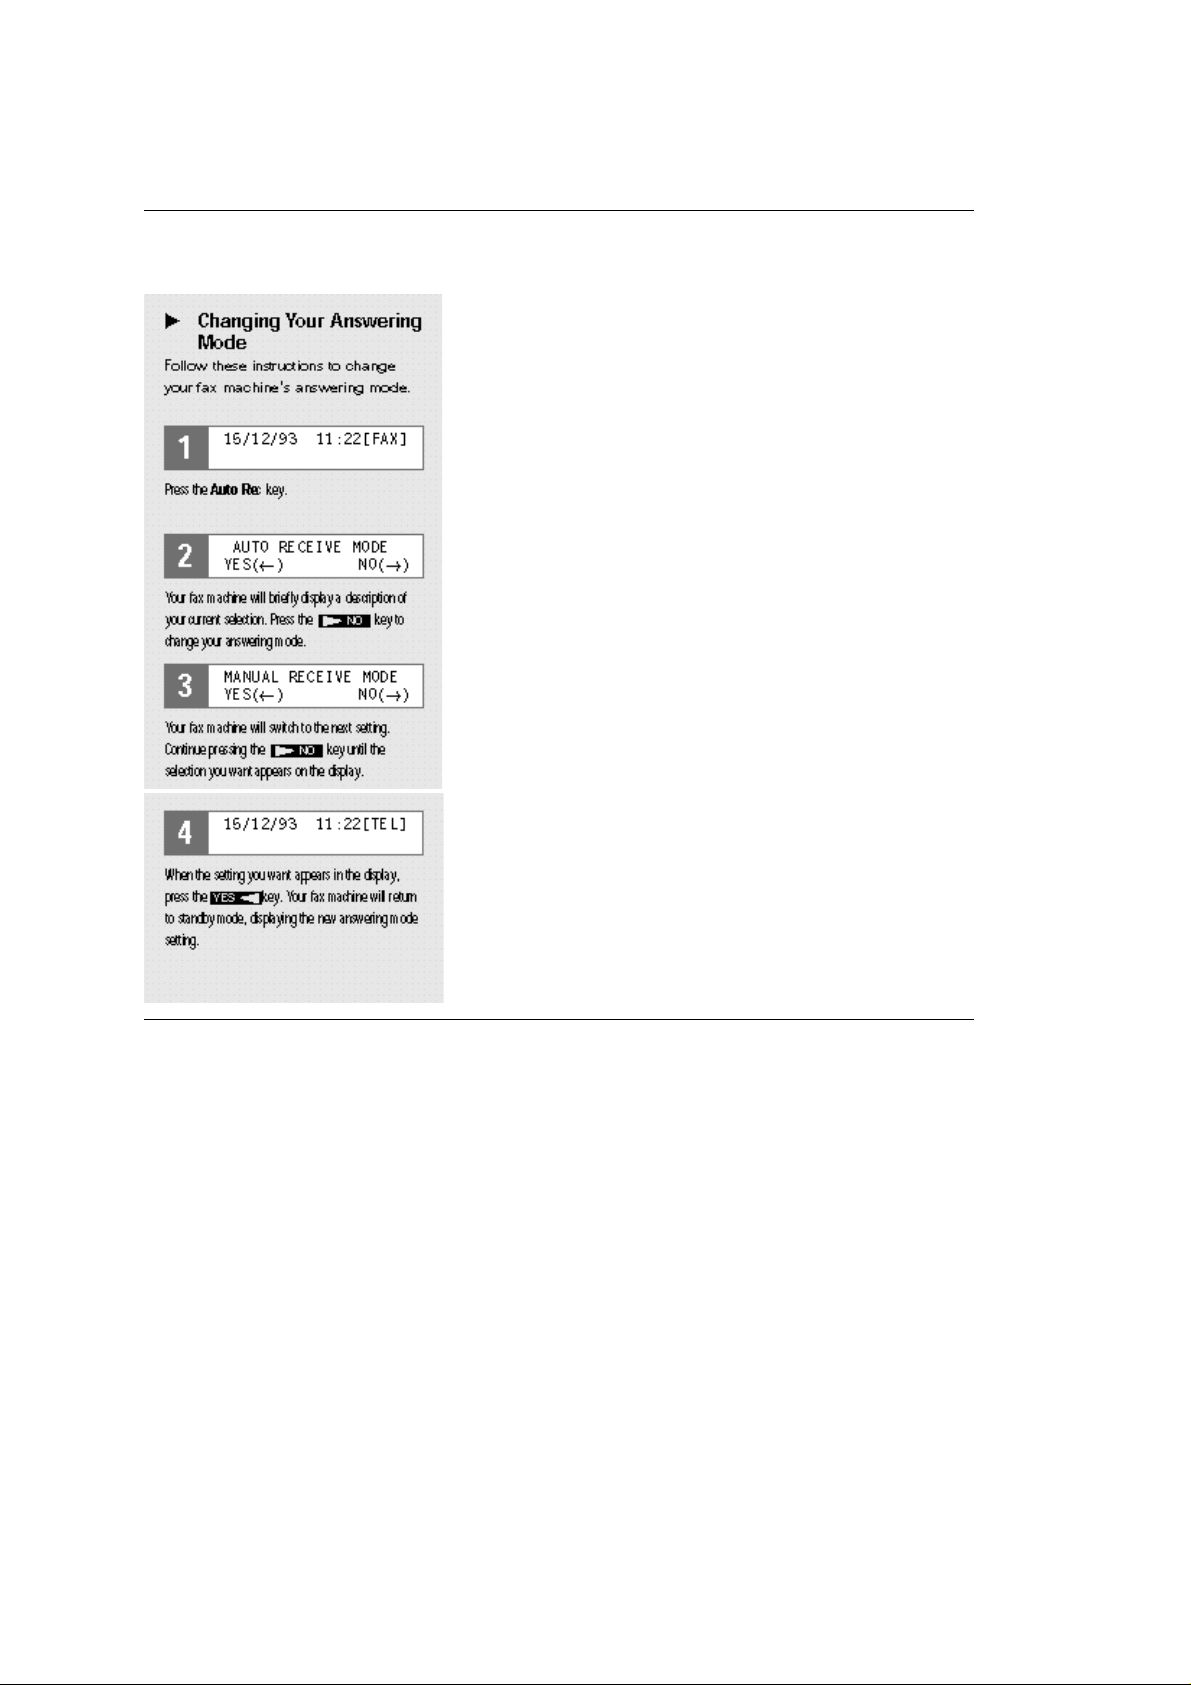
Changing Your Answering Mode
Follow these instructions to change your fax machines answering mode.
OF2400/2600 ( 96-02-07 )
Page 17

%Answering Mode Function Settings
Answering Mode Function Settings
Some options are available to allow you to control how your fax machine operates in the different
answering modes.
- In both Auto Receive and Telephone/Fax modes, your fax machine is set to answer incoming
telephone calls immediately after the first ring. However, if you are using an external telephone,
you may want your fax machine to wait longer before answeringto give you more time to answer
the call on your external tele-phone. In this case, you can set your fax machine to wait between 5
and 30 seconds before answering. For informa-tion on how to increase the time your fax machine
waits before answering, see RING RESPONSE on page 90. Note that this function requires a
ser-viceman to change it and may not be available in all countries.
- Occasionally, someone may telephone your fax machine and then manually send a fax (see page
45). If your fax machine is set to Auto Receive mode, all the other party has to do is press the
Start key on his fax machine. How-ever, if your fax machine is set to Telephone/Fax mode, it will
answer the incoming call as a voice telephone call. If no one answers after 35 sec-onds, your fax
machine will provide the following voice message to the calling party: Sorry, theres no answer . . .
please try later. If you are sending a fax, begin transmission after the tone. At this point, your fax
machine automat-ically switches back to fax mode to receive a manually sent fax. Your fax
machine can be set either to never switch back to fax mode, or to wait for 20 or 35 seconds
before switching back to fax mode. For information on changing this setting, see TEL/FAX timer
on page 90.
- In Telephone/Fax mode, your fax machine uses voice messages to inform the calling party of what
it is doing when the incoming call is a voice telephone call (see Telephone/Fax Mode on page 9).
Your fax machine can provide voice messages in nine different languages: English, German,
Dutch, Italian, French, Swedish, Norwegian, Danish and American English. For information on
how to change the language your fax machine uses for voice messages, or if you want to turn the
voice message function off, see Setting Languages on page 13.
OF2400/2600 ( 96-02-07 )
Page 18

%Setting the Fax Identification
Setting the Fax Identification
Changing the Position of Your Sender ID
The Sender ID normally prints at the top of each page sent, slightly out-side the original area of the page.
This way, the Sender ID never inter-feres with the original information on the page. However, this makes
each page slightly longer than the origi-nal. If you prefer, you can set the Sender ID to print slightly inside
the original information on the page. For information on how to change this setting, see Sender ID on
page 84.
Caution: Important Note
Setting the Sender ID is an FCC requirement (see page iii).Fax machines use fax identification
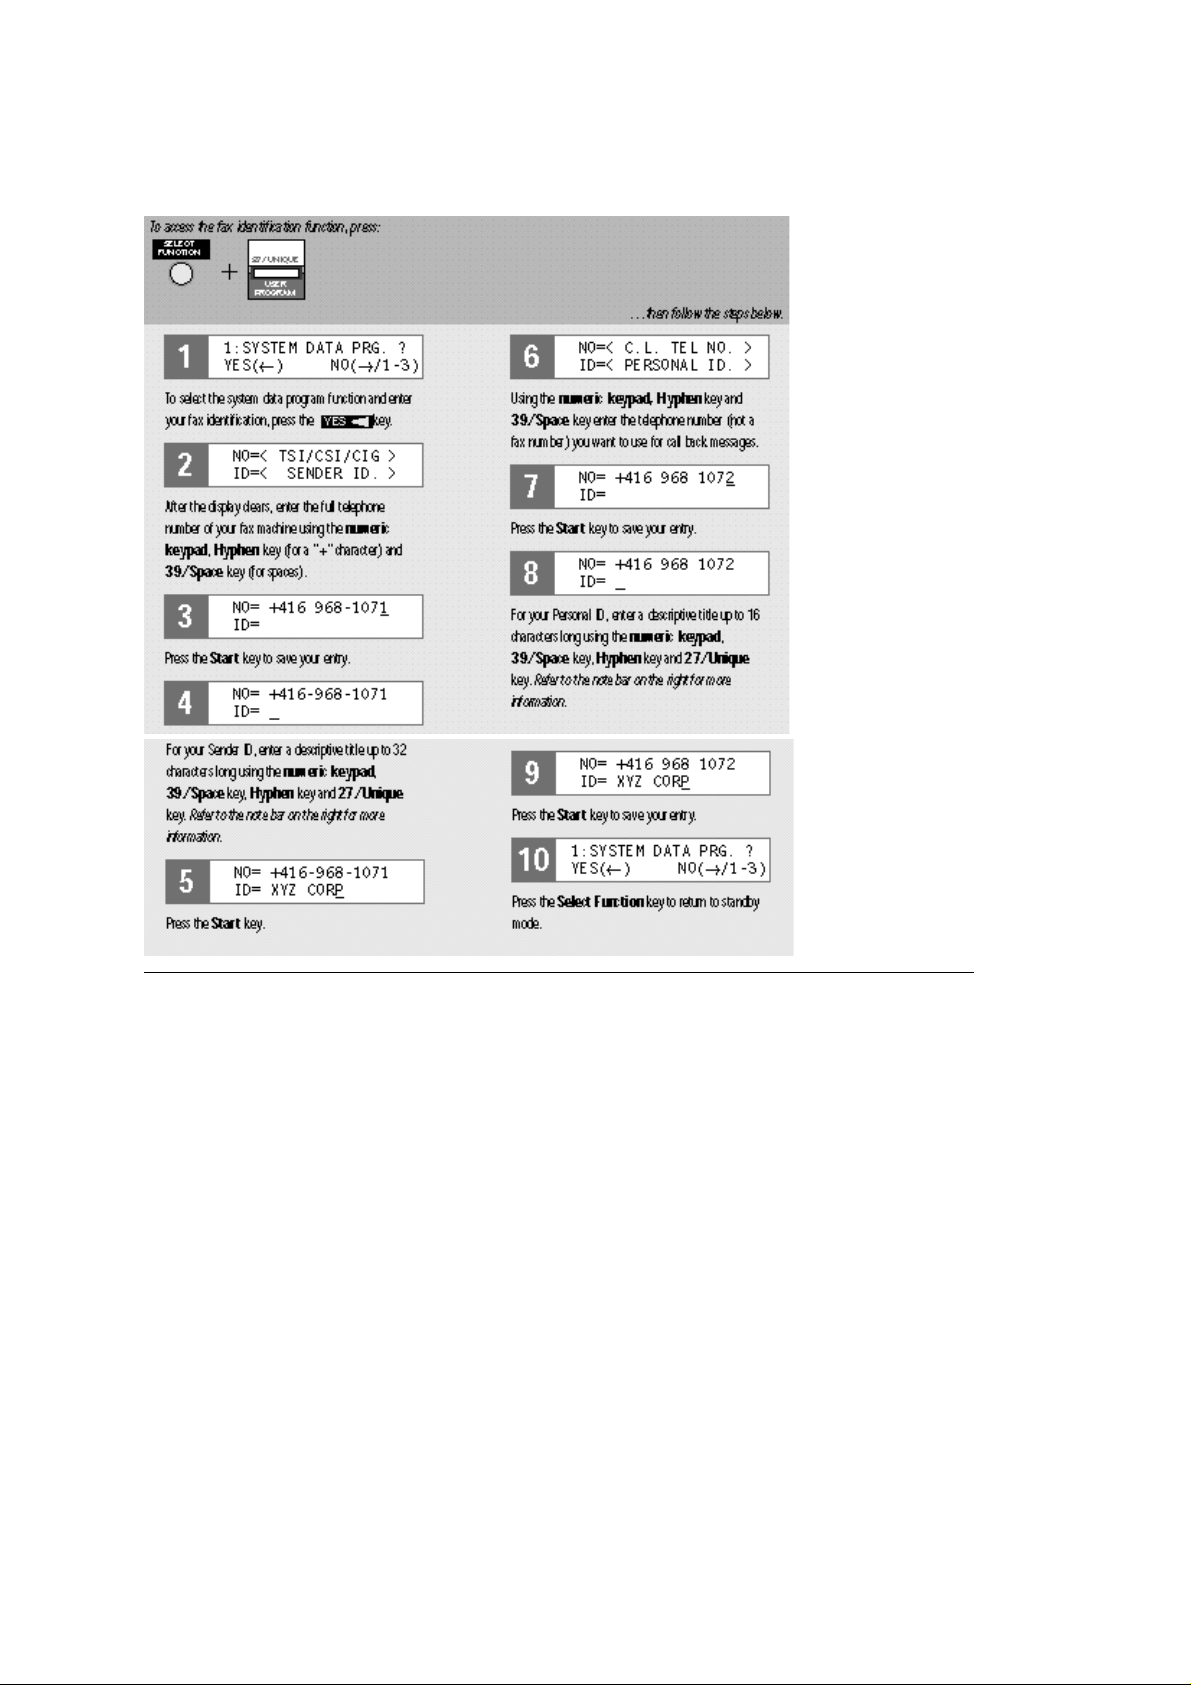
informa-tion listed here to identify themselves during communications. After you have read the
descriptions here, follow the instructions on the next page to enter your fax identification.
TSI/CSI/CIG
This is the telephone number of your fax machine. This number appears at the top of every fax you send
and sometimes appears in displays during fax communications. In addition to numbers, you can also
enter spaces and + characters in the telephone number, for example: +416 968-1071. In this case, the +
character has been added to show that an international access code must be added before dialing this
number. The space and hyphen have been added to make reading the number easier. See the note bar
on page 12 to learn how to enter these characters.
Sender ID
This is a descriptive title (usually the location of your fax machine or the name of your company or office).
Along with the time and date, page number, and your fax machines telephone number, this description
will be printed at the top of every fax you send. You can enter up to 32 characters. The first 16 characters
of your Sender ID will also be used as your Personal ID and will appear on the displays of other fax
machines you are communicating with. Setting the Sender ID is an FCC requirement ( see page iii).
Call Back Number
If you use the voice request function (see page 60 for a description)while communicat-ing with another
fax machine and no one is there to answer, your fax machine will auto-matically send a cover letter with a
call back message . The call back message is printed on a separate sheet of paper with the mes-sage
Please call back and a telephone number where you can be reached. You can also add a call back
message cover letter any time you send a fax (see page 83). The call back number entered here is the
tele-phone number that appears on the call back message. This tells the remote party the voice
telephone number (not a fax number) they should use when calling you back.
Personal ID
The Personal ID is another, shorter descriptive title for your fax machine (location, office or company)
which appears on the displays of other fax machines you are communicating with. The Personal ID
consists of up to 16 characters. It will only appear in the display of another OKI product.
Entering Information
- Use the numeric keypad to enter numbers.
- To enter letters, use the alpha-bet on the One Touch keypad. One Touch key 1 is A, One Touch key 2
is B, etc.
- To add a space, press 39/Space on the One Touch keypad.
- To add a hyphen for a short pause (or a + character in the case of the TSI/CSI/CIG), press the Hyphen
key.
- Twenty-seven additional charac-ters are available. To enter one, press the 27/Unique key on the One
Touch keypad until the desired character appears on The characters available are: ! # & ( ) * + . / : ; = ?
· ä ß ñ ö ü AE Å Ø ae å ø
- To enter two characters using the same key, press the key to move to the next character.
OF2400/2600 ( 96-02-07 )
Page 19
- To go back and change some-thing you have already entered, press the key. YES NO then follow the
steps below.
OF2400/2600 ( 96-02-07 )
Page 20
%Setting Languages
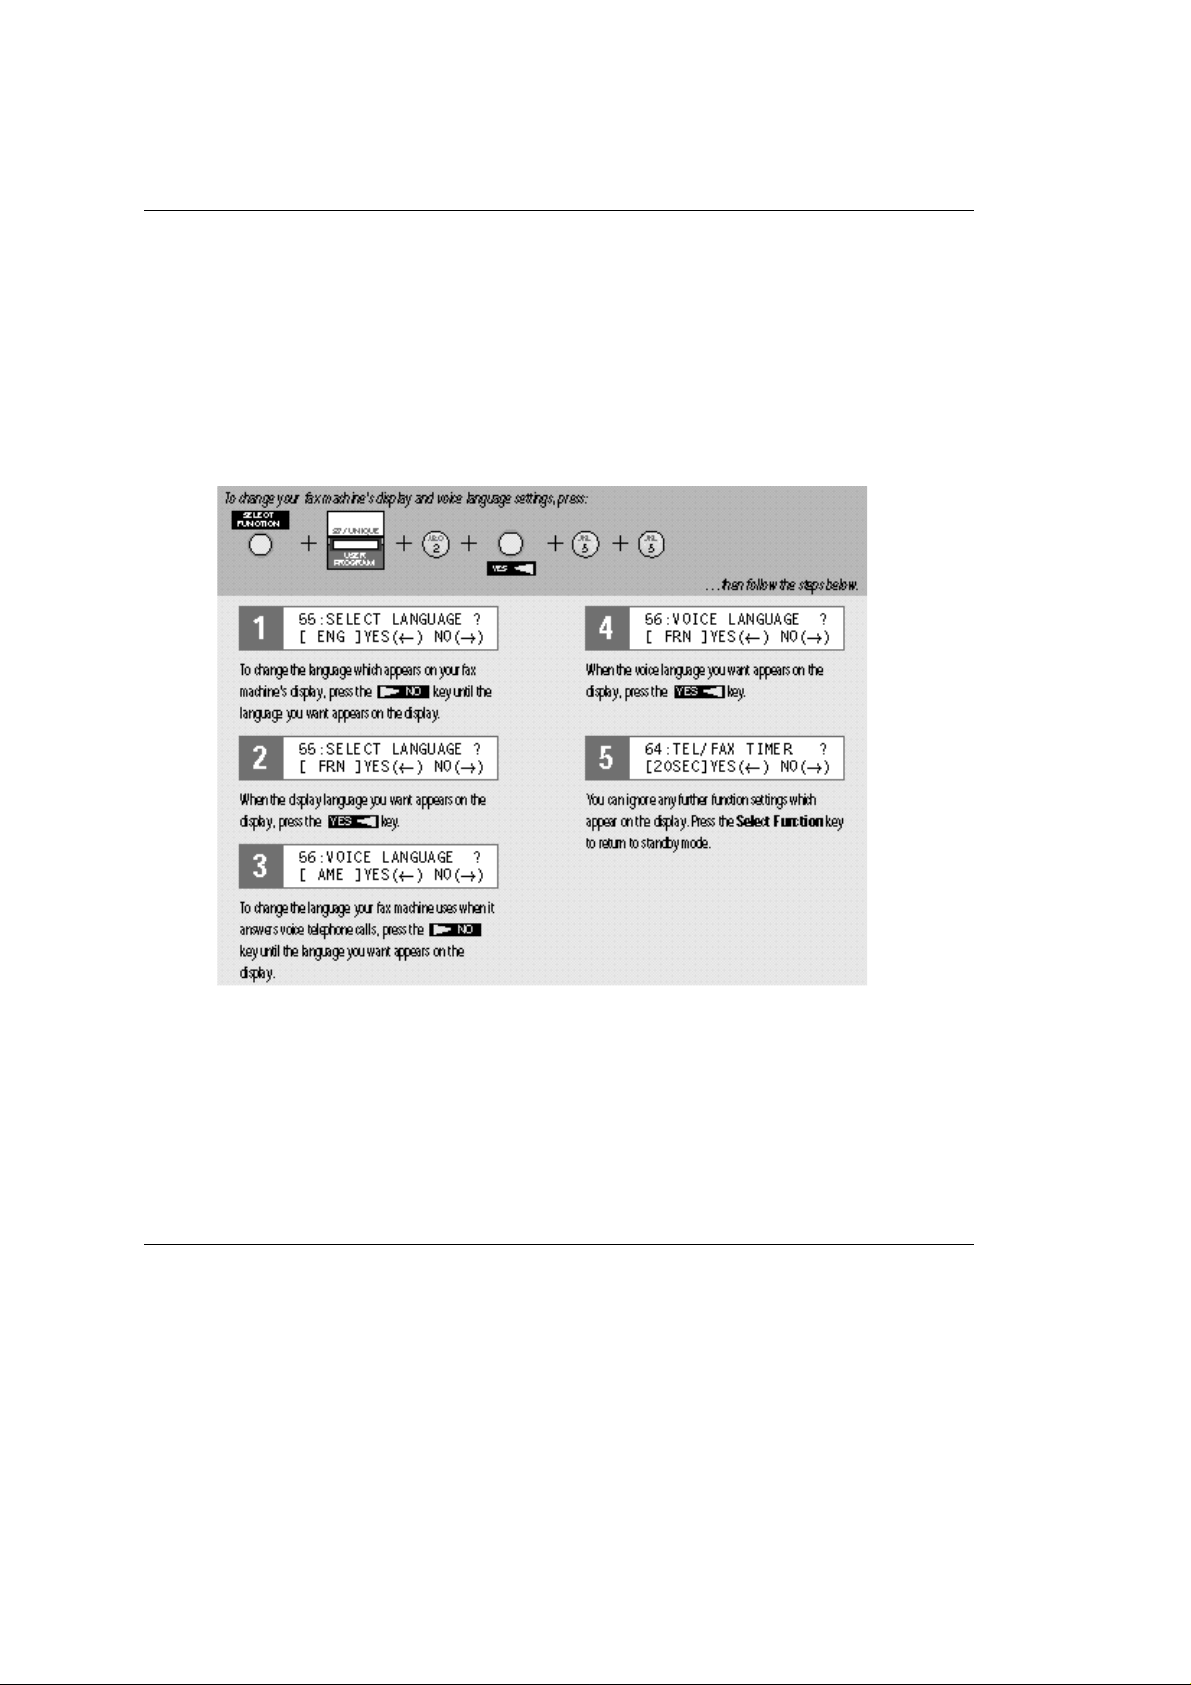
Setting Languages
Your fax machine uses language in two different ways: the language it uses on the display, and the
language it uses when answering voice telephone calls in Telephone/Fax mode (see page 9). The display
and voice languages can be set independently of each other.
The display and voice languages can be set to any of the following European languages: ENG (English),
GER (German), DU (Dutch), ITA (Italian), FRN (French), SWE (Swedish), NOR (Norwegian), DANE
(Danish). In addition, the voice language can be set to AME (American English), and the voice language
function can also be turned OFF completely.
Changing the Display Language Back
If the fax machine is set to a language which you cant read, follow the exact same steps shown in the
access bar until 55: appears on the display. You will still be able to read the codes signifying each
language. Continue to follow the steps to change the display language to your preference.
Listening to the Voice Language
If you want to listen to your fax machines voice messages and understand more about how your fax
machine handles incoming voice calls, set your fax machine to Telephone/Fax mode (see page 9), and
then use another telephone to call your fax machines number.
OF2400/2600 ( 96-02-07 )
Page 21
%Installing Optional Memory Cards
Installing Optional Memory Cards
The OKIFAX 2400 comes equipped with 512 kilobytes of onboard memory. Depending on your fax
machines settings and the type of faxes you normally send and receive, this is enough memory to hold
up to 29 (CCITT #1) pages of standard office faxes in memory. The OKIFAX 2600 is equipped with 1
megabyte of onboard memory enough to hold up to 64 (CCITT #1) pages of standard office faxes in
memory. Many of your OKIFAX 2400/2600s advanced fea-tures depend on memory, including:
- Transmitting detailed faxes from memory in the FINE, EX.FINE or PHOTO transmission modes
(see page 84)
- Sending multiple faxes once daily to a single location using the delayed mail box feature (see
page 64)
- Using personal mail boxes for confiden-tial message reception and message forwarding (page 66)
- Broadcasting large and complex docu-ments from memory to multiple locations (see page 72)
- Initiating relay broadcasts of large and complex documentsor, if you have an OKIFAX 2600, using
the fax
Warnings Read these warnings before you remove your memory card options from their packages or
attempt to install them.
- NEVER insert or remove a memo-ry card while your fax machines power is on. If you try to insert
or remove the card while the power is on, you could permanently damage the card.
- Memory cards are delicate electronic devices. NEVER bend, put pressure on or drop them.
- NEVER put any labels, tape or other sticky substances on mem-ory cards.
- Avoid keeping memory cards in dirty or dusty locations. If you do not plan to install your memory
cards right away, leave them in their packages.
- Keep memory cards away from heat, direct sunlight, liquids or grease. machine as a relay
broadcast key station (see page 74)
- Using the memory reception mode for high-speed fax reception
If your office makes heavy use of your OKIFAX 2400/2600s advanced memory-based features, or if
you are seeing memory overflow error messages, you may require more extensive memory.
OF2400/2600 ( 96-02-07 )
Page 22
The OKIFAX 2400 has one memory expan-sion slot, and the OKIFAX 2600 has two expansion slots.
Memory cards are available in 1 MB, 2 MB or 4 MB versions, allowing you to increase your fax machines
memory up to a maximum of 4.5 MB for the OKIFAX 2400 and 9 MB for the OKIFAX 2600.
Contact your OKIFAX authorized dealer for information about ordering memory card options.
OF2400/2600 ( 96-02-07 )
Page 23

%Installation Options
Installation Options
This page lists optional ways that your fax machine can be installed for specific types of uses, and the
function settings which may have to be changed in order for your fax machine to work in these
installations.
PBX Installations
A PBX, or Private Branch Exchange, is a private telephone system which companies and other
organizations use to route internal calls and control costs. If you have to dial an access number to get an
outside line, then your telephone is connected to a PBX. Fax machines are normally connected direct-ly
to outside lines; however, if your fax machine is to be connected to your PBX, the following settings of
your fax machine may have to be changed:
PBX MODE
Turning this function on tells your fax machine that it is connected to a PBX. Once turned on, your fax
machine will be able to discriminate your PBXs outside line access digits in the num-bers that you
program or dial in your fax machine. After it dials the access digits, your fax machine will automati-cally
wait until it sees that the outside line is available before dialing the rest of the number. See PBX MODE
on page 89.
J ACCESS DIGIT This function allows you to enter the access digit(s) your PBX uses to access an
outside line, so that your fax machine can recognize it. See ACCESS DIGIT on page 90.
If your fax machine is connected to a PBX, keep in mind that all of the outside tele-phone numbers you
program into your fax machines dialing directories will have to begin with your PBXs access digits.
Leased Line Installations
Leased lines are fixed connections between two fax machines. The connected fax machines can only
communicate with each other. The telephone line connecting the two fax machines is leased from the
telephone company, and the two machines are typically in different locations. In this situa-tion, the
LEASED LINE function (page 90) must be turned on, and the PIS/CNG CHANGE function (page 90) may
have to be changed.
Service Assistance Required
All of the installation options listed on this page require the assistance of a qualified fax service
technician. In addition, you may require addi-tional training and support, as these installations
fundamentally change the operation of your fax machine. Please contact your OKIFAX authorized dealer.
OF2400/2600 ( 96-02-07 )
Page 24

Chapter 2
%An Overview of Your OKIFAX 2400/2600
An Overview of Your OKIFAX 2400/2600
Your OKIFAX 2400/2600 is a sophist-icated piece of communications equipment with features and
options available for almost any conceivable facsimile use. The Overview section of this users guide
pro-vides you with an overview of your fax machines components, features and options. Read or skim
through this section to familiarize yourself with how your fax machine works and what it can do for you.
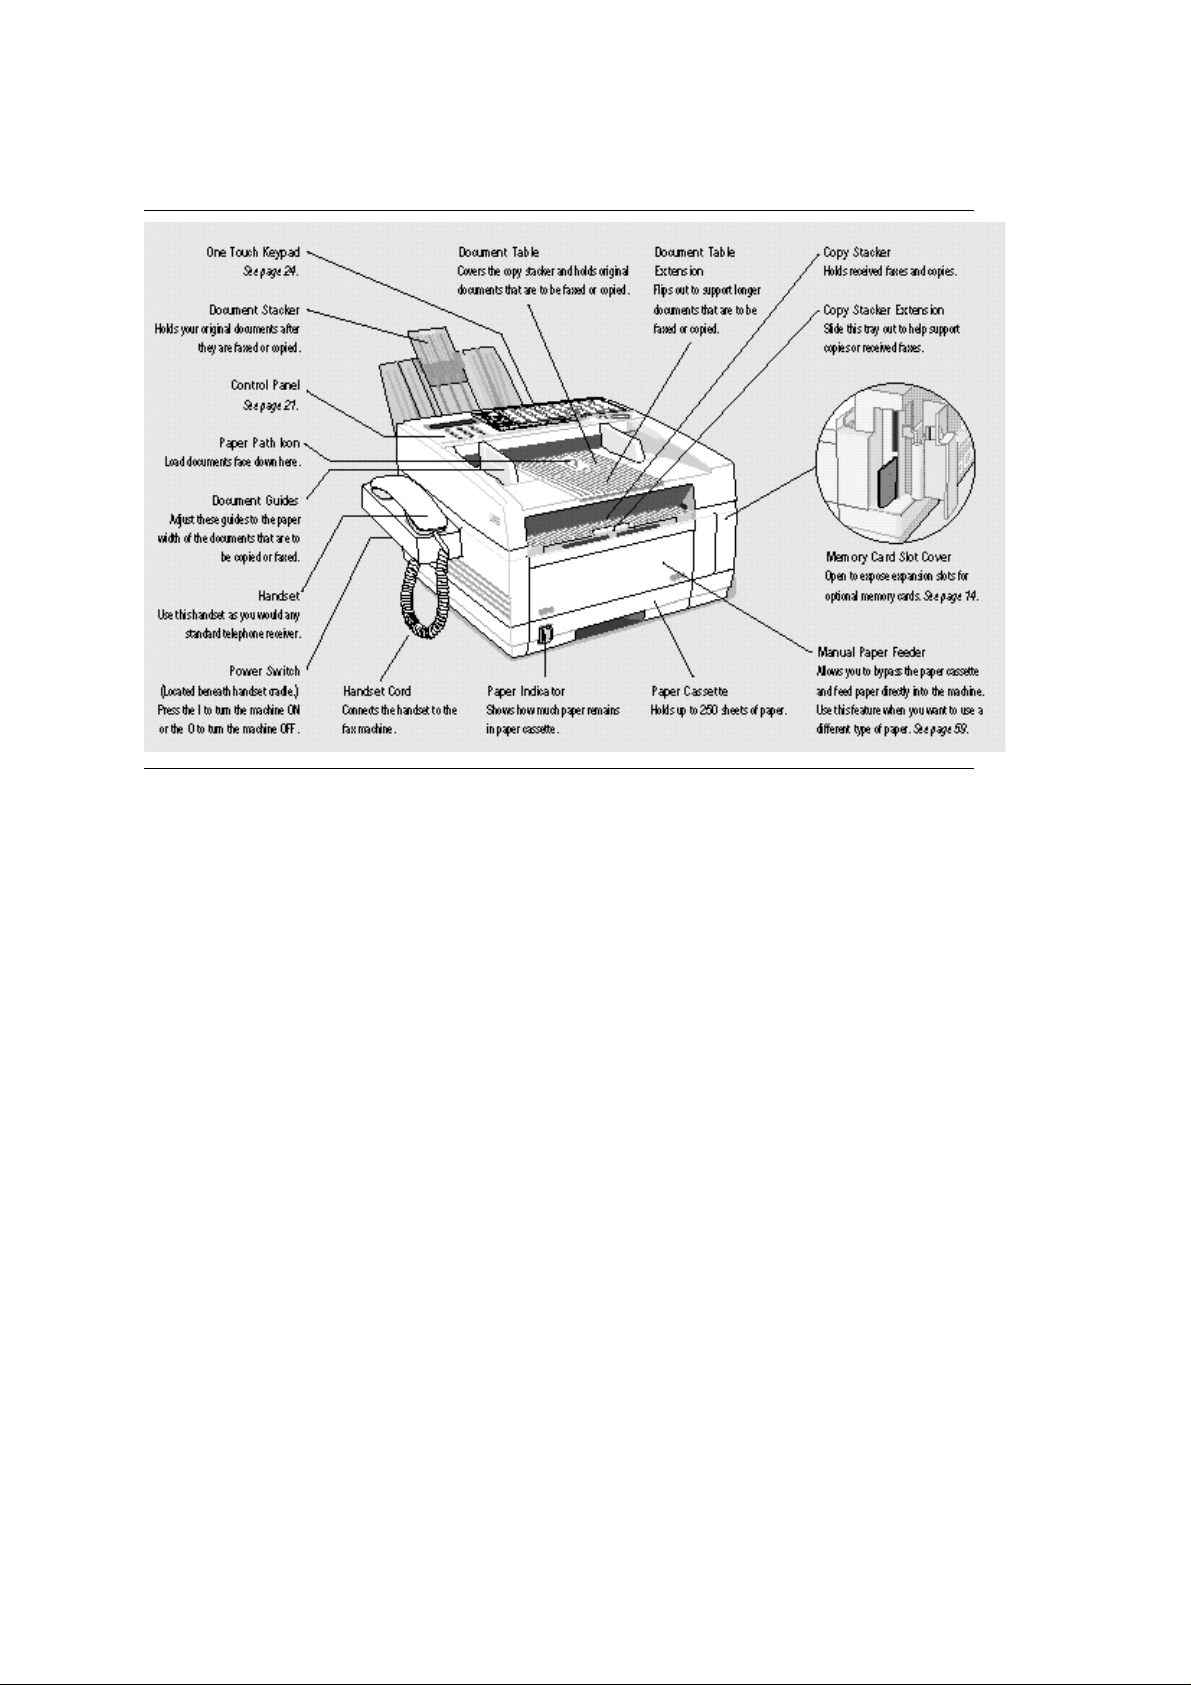
Components, on the next page, introduces you to your new fax machine and to the location of all of
its parts and controls.
The Control Panel, on page 21, provides a list of descriptions of the purpose and opera-tion of
everything on your fax machines control panel, as well as hints for using the function and
references to more detailed instructions elsewhere.
The One Touch Keypad, on page 24, introduces you to the many purposes and functions of your
fax machines One Touch keypad. Read through the descriptions listed here to learn how you will
use your One Touch keys for dialing, with mail boxes, for entering alphabet and other characters
on the display, and for almost all of your fax machines programming operations.
Signal Tones, on page 32, introduces you to the various sounds your fax machine makes during the
course of its operation.
Dual Access, on page 33, provides you with an overview of one of your fax machines major
productivity features. With dual access, you can continue to use your fax machine for one
function while it is already performing another function of a different kind.
Product Options, on page 34, describes the various options which are available for your fax
machine.
OF2400/2600 ( 96-02-07 )
Page 25
Product Overview - External Diagram
OF2400/2600 ( 96-02-07 )
Page 26
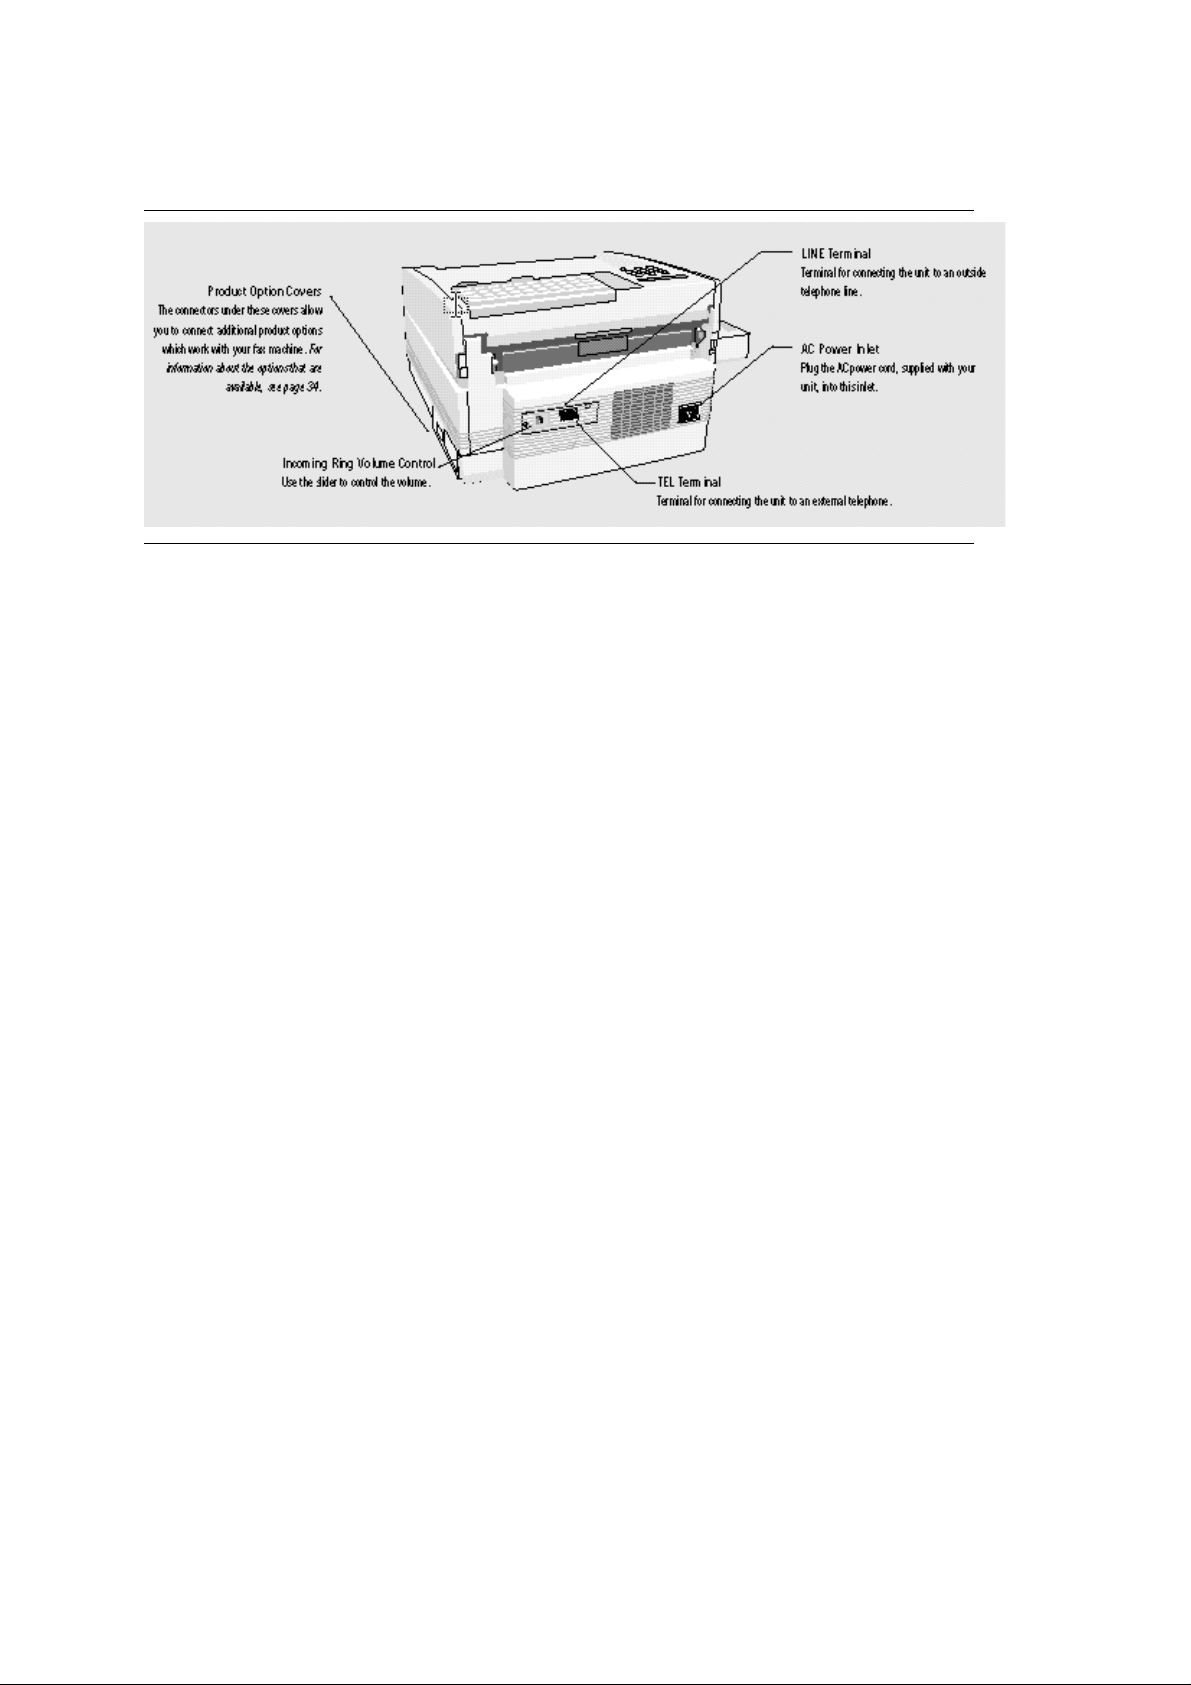
Product Overview - Rear Diagram
OF2400/2600 ( 96-02-07 )
Page 27
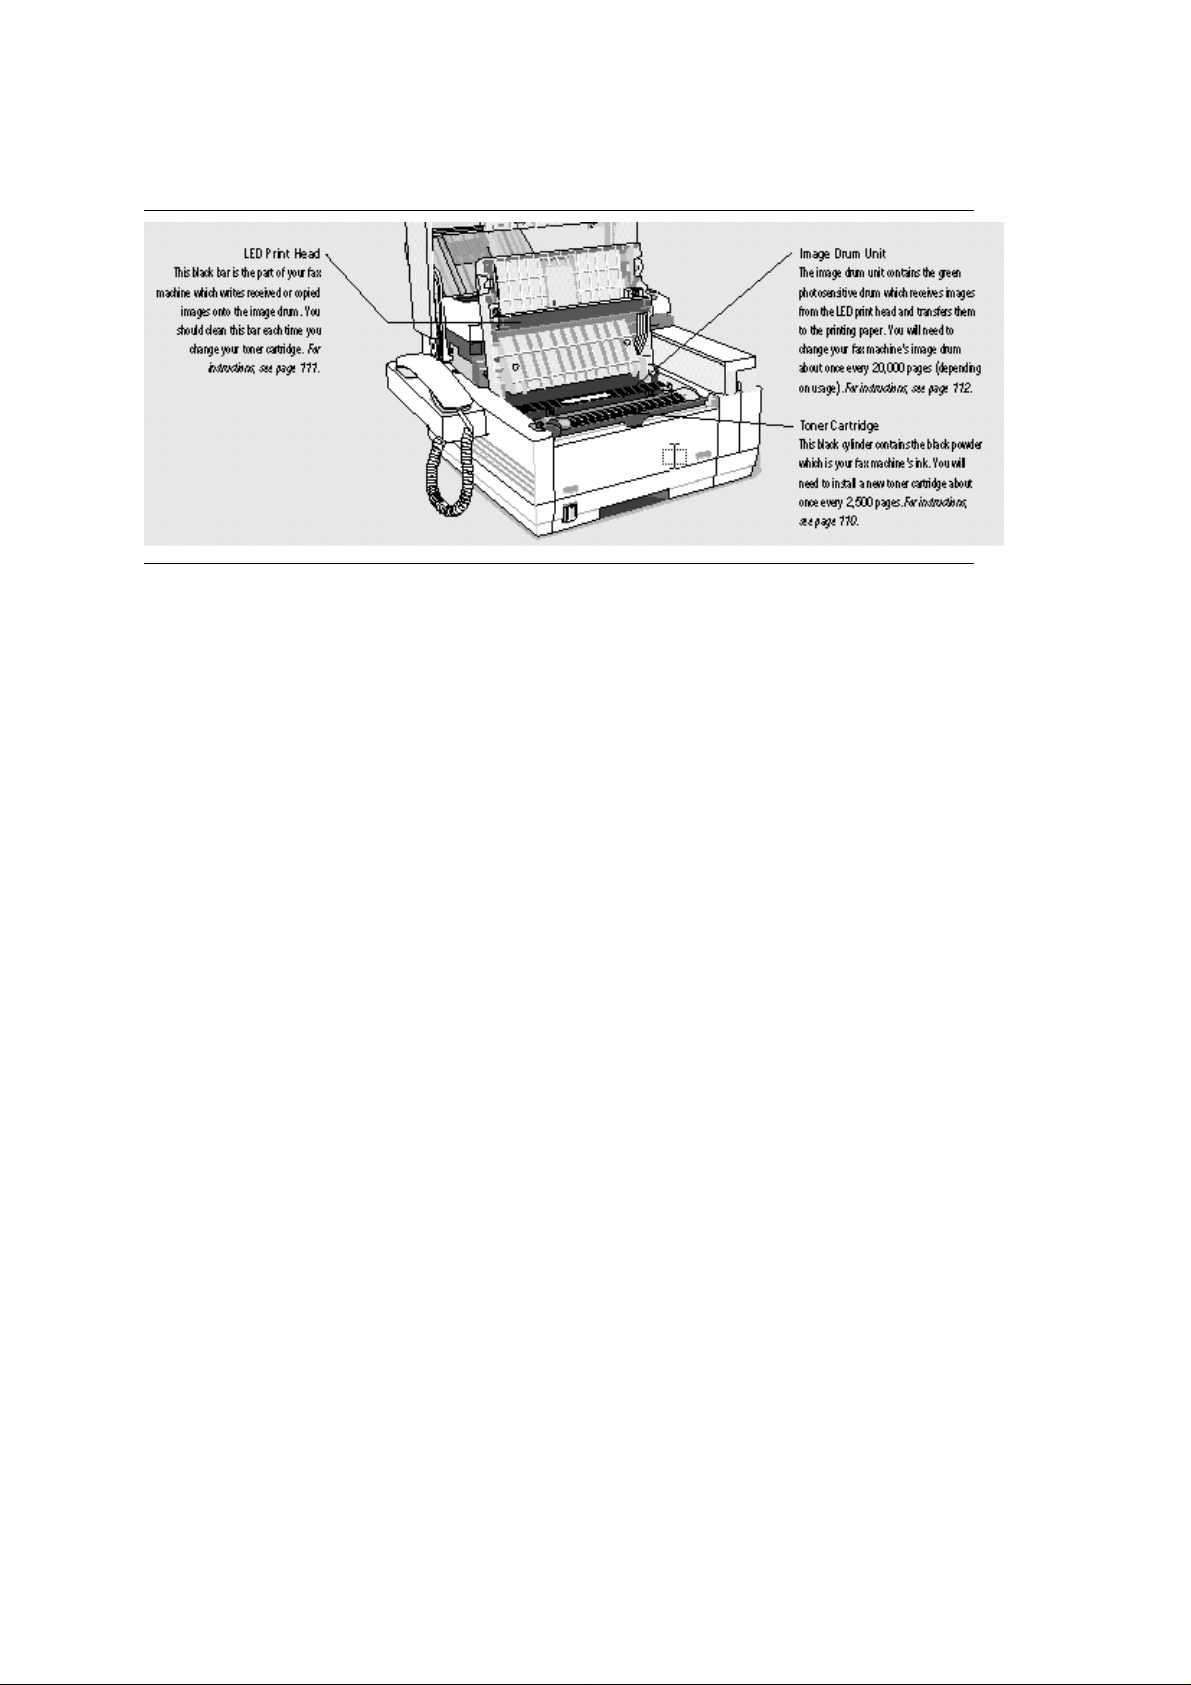
Product Overview - Image Drum Area Diagram
OF2400/2600 ( 96-02-07 )
Page 28
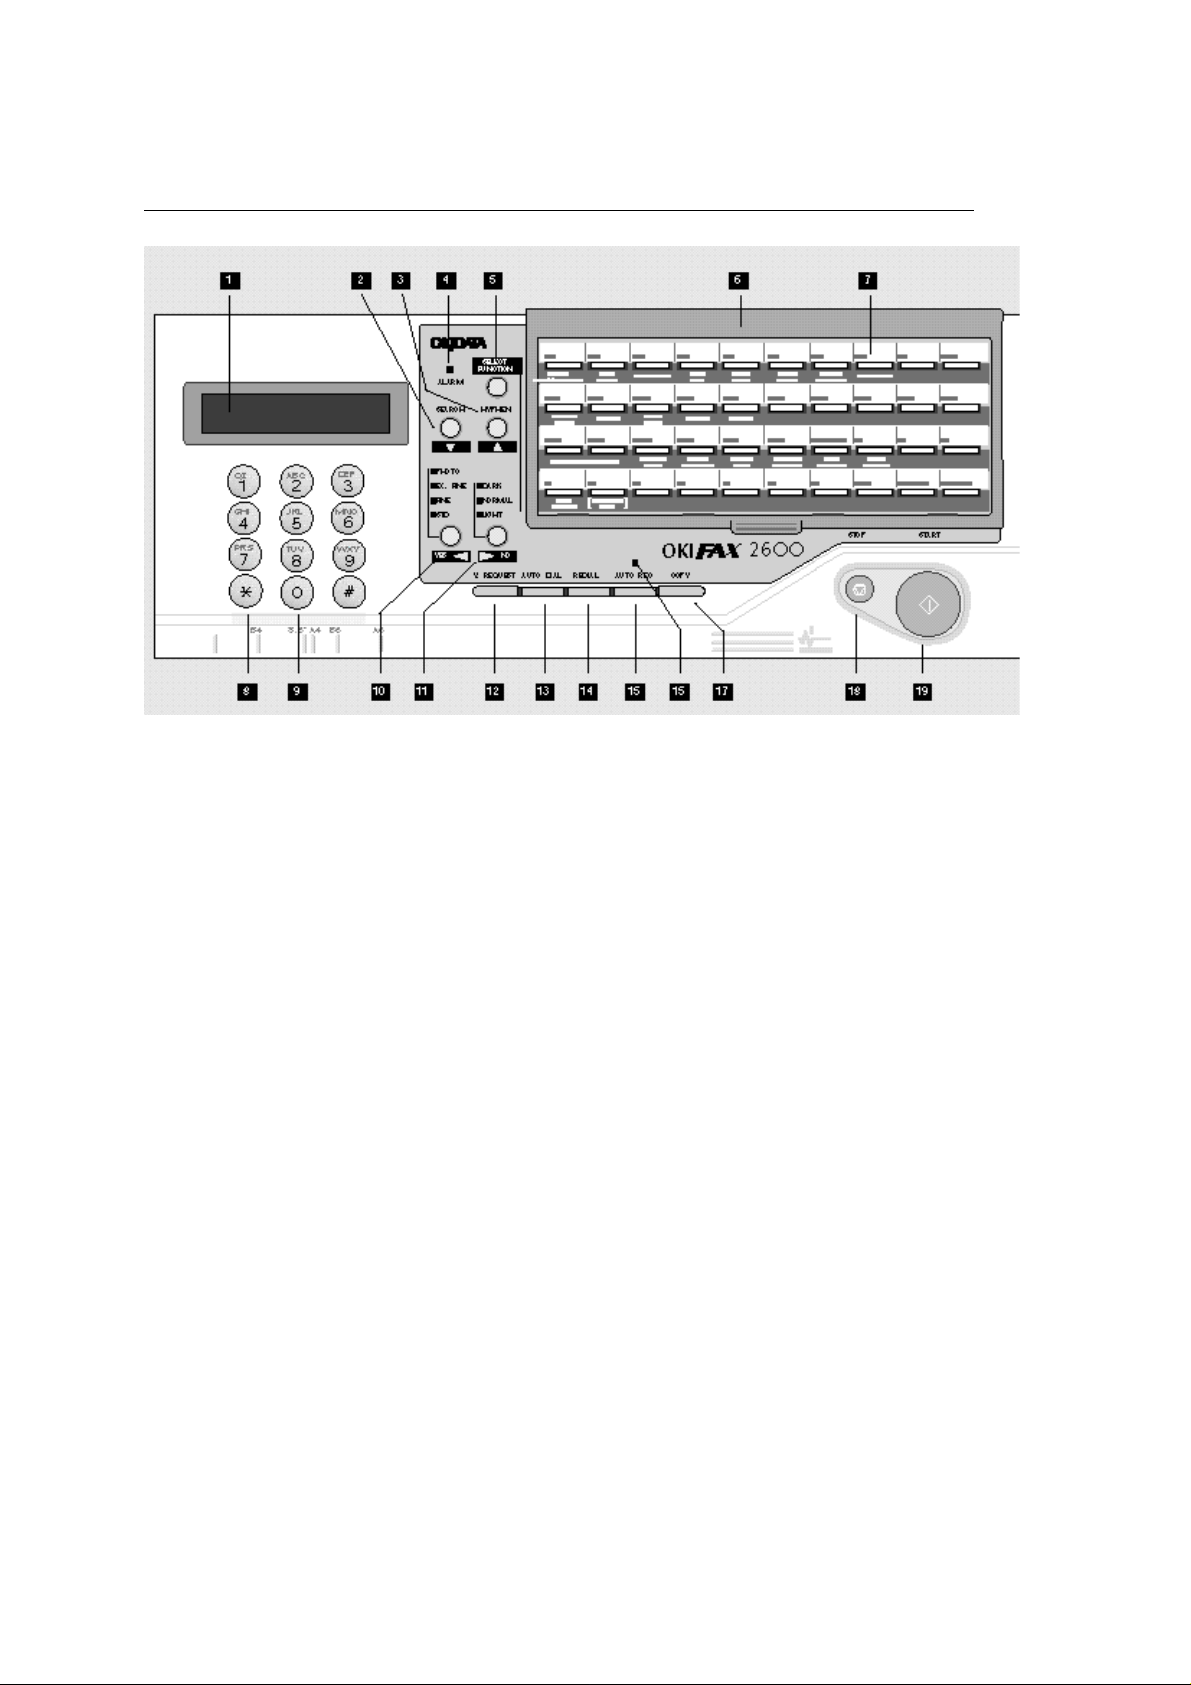
%The Control Panel
The Control Panel
1) LCD Display Panel
The liquid crystal display (LCD) panel gives instructions and information. Refer to the display while your
fax machine is perform-ing operations or while you are program-ming the machine.
2) Search Key
The One Touch keys and the Auto Dial numbers can be programmed to have a name (Location ID)
associated with their telephone numbers. When selecting loca-tions, if you are not sure which One Touch
key or Auto Dial code the location you want has been programmed into, press the Search key to turn on
the search function. You can use this function in three ways:
- Repeatedly pressing the Search key will display in alphabetic sequence all of your fax machines
programmed loca-tions from A to Z.
- Repeatedly pressing the Hyphen key will allow you to move backward up through the list of
locations from Z to A.
- Pressing an alphabet letter on your fax machines One Touch keys will take you to the first location
ID beginning 2 1 with that letter. You can then use the Search and Hyphen keys to move through
the list from that point.
See page 47 for detailed instructions on how to use the Search key.
3) Hyphen Key
This key can be used to enter a short pause (marked with the - or hyphen character) when you are
dialing and while program-ming One Touch and Auto Dial telephone numbers. Only the first hyphen is
seen as a short pause.
After the location search function has been turned on by pressing the Search key, the Hyphen key is also
used to allow you to search backward through the alphabet from Z to A.
4) Alarm Indicator
This indicator will glow red and an alarm will sound to notify you of any problem that occurs. To turn the
alarm indicator off, press Stop and correct the problem.
5) Select Function Key
Press this key to activate your fax machines function mode. You will use this key for accessing almost all
of your fax machines transmission and reception options, as well as the first step in all programming you
perform on your fax machine. To select a function, press the Select Function key, then 5 4 3 choose a
function from the list of functions in the dark gray stripes on the One Touch keypad (see page 24 for a list
OF2400/2600 ( 96-02-07 )
Page 29

of descrip-tions of the functions on the One Touch keypad). Press the associated One Touch key to
access that function.
While you are in the middle of program-ming or selecting other functions, pressing the Select Function
key a second time takes you directly back to your fax machines standby mode. This is the fastest way to
get back to where you started if you change your mind, or once you have finished with your selections.
While your fax machine is communicating with another fax machine, pressing Select Function switches
your display between one showing communication information and one showing the session number of
the current communication.
6) One Touch Keypad
For a description of all of the functions of your One Touch keypad, see page 24.
7) One Touch Key Labels
After programming a One Touch key , write the name associated with it on the white space on the One
Touch label above that key. Lift off the plastic cover above the One Touch label, use a pencil to write in
the name, then replace the cover.
8) * /Tone Key This key allows you to switch the dialing operation of your fax machine from pulse to tone
dialing during your current call (see MF/DP on page 88). This can be useful, for example, if you need to
use pulse dialing inside a PBX to get an outside line, and then use tone dialing for the rest of the call. You
can also use this key while programming to create numbers with mixed pulse-then-tone operation.
9) Numeric Keypad
When dialing, these 12 keys work just like the keypad on a telephone. You will also use the keypad to
enter numbers during programming.
10) Transmit Resolution/ Key
Use this key to change the resolution used for transmitting documents (how sharp the transmission will
be). Use STD for standard originals, FINE and EX.FINE for detailed or YES 10 9 small print originals, and
PHOTO for origi-nals that include colors or many shades of gray. Your selection will appear on the LEDs
above the key. Note that documents in FINE, EX.FINE or PHOTO modes take longer to transmit. (See
page 84 for more information on setting the Transmit Resolution.) You will also use this key as the key
when making selections or moving your cursor while programming.
11) Type of Original/ Key
Use this key to select the document reading density after you load a document for trans-mission. Use
LIGHT for originals that are too light, NORMAL for originals with good con-trast, and DARK for originals
that are too dark. Your selection will appear on the LEDs above the key. (See page 43 for more
infor-mation on setting the Type of Original.) You will also use this key as the key when making selections
or moving the cursor while programming.
12) Voice Request Key
During a fax communication, press this key to tell the operator at the remote machine that you want to
talk to him or her at the end of the communication. To answer a voice request, press this key after lifting
your hand-set. See page 60.
13) Auto Dial Key
Auto Dial numbers are abbreviated numbers for rapid dialing. Instead of dialing the entire telephone
number, you can enter a 3- digit Auto Dial code instead. You can also use the Location IDs (names)
associated with each Auto Dial number to search for these numbers by name using the Search key (page
47). Auto Dial numbers are also used to create groups (page 38) for broadcasting (page 72) and
multiple-location polling (page 69). The OKIFAX 2400 can store up to 120 auto dial numbers (001120),
and the OKIFAX 2600 can store up to 200 auto dial num-bers (001200). When you want to dial or select
an Auto Dial number, press the Auto Dial key, enter the 3-digit Auto Dial code, then press Start. See
page 39 to learn how to program Auto Dial codes, and page 46 to learn how to use them in dialing.
OF2400/2600 ( 96-02-07 )
Page 30

14) Redial Key
Press this key to manually redial the last number dialed on your fax machine. See the note bar on page
47 for information about automatic redialing options.
15) Auto Rec Key
The Auto Receive key allows you to control how your fax machine answers incoming calls. To switch
among the Auto Receive [FAX], Manual Receive [TEL], and Telephone/Fax [T/F] answering modes,
press Auto Receive, then press until the mode you want appears on the display. Press the key to select
that answer-ing mode. The upper right corner of your fax machines display always indicates your fax
machines current answering mode. See pages 9 and 53 for more information.
16) Auto Rec Indicator
This indicator tells you whether your fax machine is currently set to receive faxes auto-matically. When
your fax machine is set to 16 YES NO 15 14 either of the Auto Receive [FAX] or Telephone/Fax [T/F]
modes, this indicator will be ON (your fax machine is set to receive faxes automatically). When your
machine is in Manual Receive [TEL] mode, this indicator will be OFF. See page 9 for more information
about your fax machines answering modes.
17) Copy Key
When an original document is loaded into your fax machines document feeder, press this key to make a
copy (see page 57). If no original documents are loaded in the document feeder, press the Copy key to
obtain a Message Confirmation Report about your last transmission. The report will either appear on the
display or be printed. For more information on the Message Confirmation Report, see page 100.
18) Stop Key
This key cancels the operation currently in progress or turns off the Alarm indicator.
While you are programming, pressing Stop takes you back step-by-step through the programming
functions you have already selected.
19) Start Key
Press Start to initiate the operation indicated on the display or to confirm information you have entered
into the display.
OF2400/2600 ( 96-02-07 )
Page 31

%The One Touch Keypad
The One Touch Keypad
The One Touch keys are your fax machines most important tool. You will use them for quick dialing to
one or multiple locations, for entering alphabet and special characters in Sender IDs and Location IDs, for
delayed and personal mail boxes and for rapid access to the majority of your fax machines functions and
programming options.
The OKIFAX 2400 is equipped with 40 One Touch keys, numbered from 1/A to 40/PAUSE on the One
Touch keypad. The OKIFAX 2600 is equipped with 80 One Touch keys, numbered from 1/A to 80. The
first 40 One Touch keys are numbered and labeled in exactly the same way on both the OKIFAX 2400
and the OKIFAX 2600.
The OKIFAX 2600 has an additional 40 One Touch keys located directly under the main One Touch
panel. To access One Touch keys 41-80, grasp the One Touch keypad latch and swing the main One
Touch panel up and out of the way. You can then select from One Touch keys 41-80. When you are
finished, close the One Touch panel to continue with other options and programming.
OF2400/2600 ( 96-02-07 )
Page 32

%One Touch Keys 41-80 (OKIFAX 2600 only):
One Touch Keys 41-80 (OKIFAX 2600 only):
On the OKIFAX 2600, One Touch keys 41-80 are located directly beneath the main One Touch panel.
To access these keys when dialing or programming, grasp the One Touch keypad latch and swing the
main One Touch panel up and out of the way. One Touch keys 41-80 are now active. When you are
finished, close the panel.
OF2400/2600 ( 96-02-07 )
Page 33

%One Touch Key Dialing
One Touch Key Dialing
You can use your One Touch keys to select and automatically dial preprogrammed telephone
numbers when selecting locations.
Each One Touch key can be programmed in a number of ways:
- Single Location Dialing You can program any One Touch key to automatically dial a single location
to either send a fax or receive docu-ments from another fax machine (this is called pollingsee
page 69).
For each key you may program a name (Location ID) associated with the location, and a primary
telephone number which your fax machine will always call first.
For One Touch keys 0140, you can also program an alternate telephone number which your fax
machine will automatically dial if the first number is busy or if there is no answer.
For information on dialing using One Touch keys, refer to page 46. For information on programming
One Touch keys for a single location, see page 37. - Multiple Location Dialing You can also
program any One Touch key for automatic multiple-location (or group) dialing. Groups are used
for broadcasting (see page 38) and for multiple-location polling (see page 69). On the OKIFAX
2600, groups can also be used when your fax machine acts as a relay key station (see page 74).
Groups are programmed by selecting as many of the Auto Dial codes as you have programmed
into your fax machine and adding them to your One Touch keys group.
On the OKIFAX 2400 and on the OKIFAX 2600, each of 40 groups can contain up to 120 dialing
locations each. This means that on the OKIFAX 2600 for example, you can automatic-ally send a
fax to up to 120 locations with the touch of a single key.
Before you can program groups into your One Touch keys, you must first have programmed
numbers into your fax machines Auto Dial codes.
Refer to page 39 for information on programming Auto Dial codes. For information on programming
multiple-location groups into your One Touch keys, see page 38.
OF2400/2600 ( 96-02-07 )
Page 34

%Delayed and Personal Box Programming and Operation
Delayed and Personal Box Programming and Operation
One Touch keys 0140 can also be used for box programming and operation. Each box represents a
space in your fax machines memory where information for transmission or reception can be stored.
There are two types of boxes: delayed mail boxes and personal mail boxes. You can create a total of
40 delayed and personal mail boxes.
- Delayed Mail Boxes Delayed mail box transmissions (batch file transmissions) allow you to send all
documents which will go to a single location (or multiple if a One Touch key is programmed as a
group) just one time each dayregardless of the num-ber of documents which are loaded into your fax
machine. This is a memory transmission, and the number of docu-ments which can be sent depends
on the amount of memory available.
For example, you might program a delayed mail box to send all faxes to an overseas location after 11
p.m. each night, when the international telephone rates are lower. People can enter docu-ments to be
faxed to that location at any time during the day by loading their document and pressing the delayed
mail boxs One Touch key (see page 64 for loading and dialing information).
Your fax machine will store the mes-sages in memory and then send all of the documents at the same time
when the time you have set arrives. Delayed mail boxes can also be used to send confidential documents.
To create a delayed mail box, you must first pro-gram a One Touch key for the single location to which the
delayed mail box faxes will be sent (see page 37 for information on programming single-location One
Touch keys). You can then program that One Touch key as a delayed mail box.
For information about programming and using delayed mail boxes, see page 64.
- Personal Mail Boxes The boxes associated with the One Touch keys can also be used to create personal
mail boxes. The personal mail boxes are a reception function which allows you to assign mail boxes to
specific people or departments. This allows each person a great deal of control regarding how their
messages are received, and also allows different people to control what happens to the faxes they receive
in different ways.
If messages are normal office communi-cations, the person can choose to have the fax machine print the
messages as soon as they are received. If the mes-sages are normally confidential, the person can
choose to have the fax machine receive and store their mes-sages in memory until they are ready to
retrieve them using a confidential pass-word (the fax machine will even print a report to tell them they have
received a confidential message). If the person goes on vacation or plans to work from another location for
period of time, the fax machine can be automatically set to forward their messages to another fax machine
at a distant location.
In the case of delayed mail boxes, each delayed mail box is directly associated with the single location or
group you have programmed in that mail boxs One Touch key, and all documents will automatically be
sent to those locations. In the case of personal mail boxes, a personal mail box is not associated with the
location and telephone numbers you have programmed into the same One Touch key. You can program
either a single location or a group into that One Touch key for use in sending faxes, and still program a
personal mail box using the same One Touch key for receiving and retrieving stored fax messages.
For information about creating and using personal mail boxes, refer to page 67.
OF2400/2600 ( 96-02-07 )
Page 35

%Entering Alphabet and Special Characters
Entering Alphabet and Special Characters
When you are programming your sender ID , One Touch and Auto Dial locations and other types of information,
you will also use your One Touch keys to enter the alphabetic and other special characters. To do this when
the display prompts you to enter infor-mation, just press the One Touch key associ-ated with the information
you want to enter.
- One Touch Keys 1/A26/Z Use these keys to enter the letters of the alphabet in Sender and Location IDs.
- One Touch Key 27/UNIQUE You can use this key to enter a variety of unique characters. Thirty-five unique
characters are available:
! # & ( ) * + . / : ; = ? · ä ß ñ ö ü AE Å Ø ae å ø
To select one of these unique characters while programming, repeatedly press the 27/Unique key until the
character you want appears on the display.
- One Touch Key 39/SPACE Use this key to enter spaces while pro-gramming. Unlike the 40/Pause key, spaces
are used for easier reading pur-poses only and have no effect on dialing.
If you want to change your fax machines default transmission method from memory to feeder transmis-sion,
see MEM./FEED SWITCH on page 84.
- 2/Verification Stamp Key Your fax machine is preset at the fac-tory with the verification stamp function
turned OFF. The 2/Verification Stamp key allows you to turn on the verifica-tion stamp for your next
transmission only. When turned ON, the verification stamp automatically places a stamp on the face of
each page as it is fed through the document feeder and suc-cessfully transmitted.
The verification stamp function can only be used during a feeder transmission (not during memory
transmissions).
For instructions on turning the verification stamp function ON or OFF using this key, see page 49. If you want
to change your fax machines default for the verification stamp from OFF to ON, see VERIF. STAMP on
page 85.
- 3/No Reduction Key Your fax machine can scan and transmit documents which are wider than most fax
machines can print. Your fax machine is preset at the factory to automatically - 1/Feeder « Memory Key
The 1/Feeder « Memory key allows you to select a transmission method different from your fax machines
default setting. Your fax machine is preset at the factory to always use memory transmission. However,
you can specify a feeder transmission instead for your next transmission only using this key.
During memory transmission, all of the pages of your document are fed into the fax machines memory before
trans-mission begins. This is faster than feeder transmission and frees up your document table for
scanning the next document to be transmitted or for copy-ing. It is usually your best choice. During feeder
transmission, the docu-ments are scanned into your fax machine and transmitted to the receiv-ing fax
machine page-by-page. Feeder transmission is slower than memory transmission, but may occasionally be
useful for very long or very detailed faxes for which you may not have enough memory. Feeder
transmission is also necessary in cases where you want to make use of the verification stamp (see the
next column).
For instructions on selecting memory or feeder transmission using this key, see - One Touch Key 40/PAUSE
This key is used to enter automatic 3-sec-ond pauses in dialing when program-ming telephone numbers.
For example, you may use this key to tell your machine to wait for an outside or international line to open.
Pauses in telephone numbers are marked by a P symbol.
- Entering Numbers and Editing Information in Displays When you want to program numbers into Sender IDs,
Location IDs and tele-phone numbers, use the numeric key-pad. To edit information, you can also use the
and keys to move your cursor while programming (for example, to go back and change something you
have already entered).
OF2400/2600 ( 96-02-07 )
Page 36

%One Touch Keypad for Selecting Options and Programming
Using the One Touch Keypad for Selecting Options and Programming
You will also use your One Touch keypad for selecting transmission, reception and copying options,
and for function program-ming. These options and functions are the dark gray bars beneath each
One Touch key. To select an option or function from the One Touch keypad, press the Select
Function key first, then press the correspond-ing One Touch key. The options and func-tions
available on the One Touch keypad are listed on the next several pages:
- 1/Feeder « Memory Key
The 1/Feeder « Memory key allows you to select a transmission method different from your fax
machines default setting. Your fax machine is preset at the factory to always use memory
transmission. However, you can specify a feeder transmission instead for your next transmission
only using this key.
During memory transmission, all of the pages of your document are fed into the fax machines
memory before trans-mission begins. This is faster than feeder transmission and frees up your
document table for scanning the next document to be transmitted or for copy-ing. It is usually
your best choice. During feeder transmission, the docu-ments are scanned into your fax machine
and transmitted to the receiv-ing fax machine page-by-page. Feeder transmission is slower than
memory transmission, but may occasionally be useful for very long or very detailed faxes for
which you may not have enough memory. Feeder transmission is also necessary in cases where
you want to make use of the verification stamp (see the next column).
- 2/Verification Stamp Key
Your fax machine is preset at the fac-tory with the verification stamp function turned OFF. The
2/Verification Stamp key allows you to turn on the verifica-tion stamp for your next transmission
only. When turned ON, the verification stamp automatically places a stamp on the face of each
page as it is fed through the document feeder and suc-cessfully transmitted.
The verification stamp function can only be used during a feeder transmission (not during memory
transmissions).
For instructions on turning the verification stamp function ON or OFF using this key, see page 49. If
you want to change your fax machines default for the verification stamp from OFF to ON, see
VERIF. STAMP on page 85.
- 3/No Reduction Key
Your fax machine can scan and transmit documents which are wider than most fax machines can
print. Your fax machine is preset at the factory to automatically reduce the document image to fit
on the paper available on the receiving machine, or on the paper in your own fax machine if you
are copying (the no reduction function default setting is OFF).
The 3/No Reduction key allows you to turn the no reduction function ON for the next transmission or
copying opera-tion only. In this case, only the center portion of the documents image which can fit
on the printing paper will be transmitted or copied.
For instructions on turning the no reduc-tion function ON or OFF using this key, see page 49. If you
want to change your fax machines default for the no reduction function from OFF to ON (so that it
will not automatically reduce documents you send or copy), see NO REDUCTION on page 85.
- 4/Long Document Key Your fax machine is preset at the fac-tory not to transmit documents which
are longer than 500 mm (19.7"). However, if you have a need to trans-mit a document which is
longer than this, you can use the 4/Long Document key to turn the long docu-ment function ON
for your next trans-mission only. When the long document function is ON, your fax machine will
transmit a document of almost any length.
For instructions on turning the long docu-ment function ON or OFF using this key, see page 49. If
you want to change your fax machines default for the long document function from OFF to ON,
see LONG DOC. TX on page 85.
- 5/Total Pages Key While setting up a transmission opera-tion, use the 5/Total Pages key to tell
OF2400/2600 ( 96-02-07 )
Page 37

your fax machine the number of pages you will be transmitting (up to 999 pages). During
transmission, the page number and the total number of pages will be printed on each page (i.e.,
Page 1 of 50). See page 50 for more infor-mation about selecting this function.
- 6/Cover Letter Key Your fax machine is preset at the fac-tory with the cover letter function turned
OFF. The Cover Letter key allows you to add a cover letter for your next transmission only. Your
fax machine will automatically send a cover letter which will be printed on top of the document
you are transmitting.
The cover letter includes the date and time the message was transmitted, the Location ID
(identifying name or number of the location you are transmitting to), your fax machines Sender
ID, and the total number of pages in the document (if you have set the total pages func-tion). You
can select a cover letter with no message, or one which says URGENT, CONFIDENTIAL or
PLEASE CALL BACK. In the case of the call back cover letter, a voice tele-phone number where
the receiving party can reach you is also added to the message.
For instructions on adding a cover letter to your transmission using this key, see page 50. If you
want to change your fax machines default setting for the cover letter function from OFF to one of
the cover letters listed above, see COVER LETTER on page 83.
- 7/Closed Network Key The closed network function allows you to tell your fax machine to reject
any incoming faxes from fax machines whose telephone numbers are not pro-grammed into your
One Touch keys or Auto Dial codes. In this way, your fax machine will automatically reject
unwanted faxes such as unsolicited advertising.
Your fax machine is preset at the factory with the closed network function turned When your fax
machine transmits the confidential document, the receiving fax machine will store the fax in
memory until the person who has that mail box retrieves and prints the fax by entering a
confidential password.
For instructions on using this key to send a confidential fax, see page 51. For detailed information
about personal OFF (anyone can transmit messages to your fax machine). If you are receiving
unwanted fax messages and want to turn the closed network function ON, refer to CLOSED
NETWORK on page 85.
Once the closed network function default setting has been turned ON, you may still occasionally
want to receive faxes from a location which is not programmed into your fax machine. Using the
Closed Network key, you can turn the closed network function OFF for the next reception only.
For instructions on turning the closed network function off using this key, see page 54.
- 8/[RS-232C] Key This key is used to control the operation of the RS-232C option that is available
for your fax machine. For more informa-tion about this option, see page 34. For information about
operation of the RS-232C option, refer to the documenta-tion you received in the option package.
- 11/Delayed TX/RX Key While setting up a memory transmission (see page 48) or a polling
reception operation (see page 70), you can use this key to select a specific date and time for the
transmission or reception to occur. In the case of transmission, the message will be scanned into
memory and will remain there until the date and time you have set arrives (up to one year). In the
case of polling reception, the fax machine will wait until the date and time you have set (up to one
year), and then automatically begin the polling operation.
For instructions on setting the delay time and date using this function, see page 50.
- 12/Confidential TX Key While setting up a transmission opera-tion, you can use this key to select
the confidential transmission function. Your fax machine will prompt you to enter the number of a
personal mail box in the receiving fax machine (numbered between 01 and 64). You should get
this number from the person you intend to send the confidential document to. mail boxes and
confidential reception, see page 66.
- 13/Relay Initiate TX Key While setting up a transmission opera-tion, you can use this key to select
the relay initiate transmission function, which allows your fax machine to send a document to a
second fax machine, which then broadcasts the message to a number of other fax machines.
This is useful, for example, if you often send faxes internationally and wish to save money by
broadcasting from a distant location. Your fax machine will prompt you to enter a relay initiate
OF2400/2600 ( 96-02-07 )
Page 38

password and the relay group number you want to use for the transmission.
For detailed information on using the relay initiate transmission function, or for instructions on how
to set up an OKIFAX 2600 as a relay key station, see Relay Broadcasting, beginning on page 74.
- 14/Poll TX Key Use this key to set up a polling transmis-sion operation. Using this function, you
can load a document into your fax machines memory. Once the document is loaded into memory,
instead of trans-mitting the fax, your fax machine will wait to be called by another fax machine,
which will ask for the fax to be sent (this is called polling). You can enter a polling number to
ensure that only people who know that number can ask your fax machine to send the document.
You can also set your fax machine so that the document can be polled only once, or make it a
bulletin which can be polled any number of times.
For detailed information on using the polling transmission function, see Polling, beginning on page
69.
- 15/Poll RX Key Use the 15/Polling Reception key to set up a polling reception operation. Using this
function, you can tell your fax machine to call another fax machine and ask it to transmit
documents loaded there to your machine (this is called polling the other machine). You can set
your fax machine to poll either one or multiple fax machines at the same time. You will need to
enter a polling pass-word which matches the polling number programmed into the other fax
machine.
For detailed information on using the polling reception function, see Polling, beginning on page 69.
- 21/RX Mode Key The 21/Reception Mode key allows you to select how your fax machine receives
fax messages. In the print mode, your fax machine will automati-cally print messages as it
receives them.
In the memory reception mode, your fax machine will receive messages into memory and not print
them until you tell the fax machine to print them . Your fax machine will automatically print all
messages stored in your fax machines memory when you use the Reception Mode key again to
switch the fax machine back to print mode.
In the forwarding mode, you can set your fax machine to automatically for-ward all fax messages it
receives to another fax machine at a distant loca-tion. Your fax machine will ask you to enter the
telephone number for forward-ing when you turn this mode on.
For detailed information about setting your reception modes see Reception Options, beginning on
page 53.
- 22/Cancel Key The Cancel key allows you to cancel and either erase messages which are stored
in memory and waiting to be transmitted (such as delayed transmissions and polling
transmissions), or messages which have been received in memory but which have not yet been
printed (such as mes-sages received while your fax machine is in memory reception mode or
confiden-tial messages received in personal mail boxes). For all cases involving pass-words, you
will have to enter the correct password before you are allowed to cancel the message.
For detailed information about using the cancel function, see page 56.
- 23/Box Message Print Key Use this key to retrieve confidential mes-sages from your personal mail
box. After pressing the 23/Box Message Print key, your fax machine will ask you to enter the
number of your personal mail box, and the password for your personal mail box. All of the
messages you have received in that mail box will then be printed.
For detailed information about using personal mail boxes to receive confiden-tial faxes, see page
68.
- 24/Substitute Message Print Key Your fax machine is set to receive messages into memory and
not print them when it runs low on toner (see NO TONER MEM. RX on page 86). However, you
can override no toner reception and force messages to print using the 24/Substitute Message
Print key. Messages received into memory
will be printed, although the print quality may be poor because of lack of suffi-cient toner.
- 25/Report Print Key Use this key to manually print reports from your fax machine. For detailed
OF2400/2600 ( 96-02-07 )
Page 39

information on your fax machines reports, see Reports, starting on page 93. For instructions on
using the Report Print key to print reports, see Manually Printing Reports on page 103.
- 26/Location Program Key Use this key to program your fax machines One Touch keys, groups,
and auto dial codes. Use also to set up delayed and personal mail boxes.
For information on programming One Touch keys for single locations, see page 37. To program
One Touch keys as groups, see page 38. To program Auto Dial codes, see page 39. To learn
about and program delayed mail boxes, see Delayed Mail Boxes, beginning on page 64. To learn
about and program personal mail boxes see Personal Mail Boxes, beginning page 66.
- 27/User Program Key Use this key for programming your fax machines identification information,
for changing your fax machines function settings, and for setting your fax machines clock. This
feature is not active when any documents are stored in memory for transmission.
For instructions on setting your fax machines identification, see page 12. To change your fax
machines function settings see Function Settings, starting on page 83. To set your fax machines
clock, see page 8.
- 28/Print Counters Key Your fax machine keeps track of the number of pages it has printed in
sever-al ways. This feature is not active when any documents are stored in memory ready for
transmission.
The 28/Print Counters key allows you to check each of your fax machines print counters (print,
fuser, image drum and toner) and reset them if necessary. You will need to reset the toner
counter each time you replace your fax machines toner cartridge (see page 110), and reset the
drum counter each time you replace your fax machines image drum unit (see page 112). You
should never reset either the print or fuser counters without the advice of a qualified fax
technician, but you may be asked to check these numbers if you are experiencing problems.
- 31/Copy Sorting Key Your fax machines copy function (which you access with the Copy key)
allows you to make multiple copies, but the copies are not sorted (all copies of the first page are
printed, then all copies of the second, etc.). The 31/Copy Sorting key allows you to make multiple
sets of sorted, properly ordered copies on your fax machine.
For instructions on using the copy sorting function, see page 58.
- 32/[2nd Tray Copy] Key When setting up a copy operation, this key allows you to tell your fax
machine to make copies using paper from your fax machines optional second paper tray, if you
have this option installed.
For more information about the second paper tray option, see page 34. For information about
copying from the optional second paper tray, refer to the documentation you received with that
option.
OF2400/2600 ( 96-02-07 )
Page 40

%Signal Tones
Signal Tones
Incoming Ring Signal
Adust the volume of this by sliding the switch on the rear of the unit (see page 20).
Key Select Tone
This is a short beep that occurs each time you press a key on your fax machines control panel or
One Touch keypad.
Ready-to-Receive Tone
When you are communicating with a remote fax machine, this 3-second beep from your handset or
speaker will tell you that the remote fax machine is ready to receive your transmission.
Error Tones
If you press a wrong or inappropriate key on your control panel or One Touch keypad, your fax
machine will emit three short beeps.
If your fax machine experiences a problem during a transmitting or receiving session, your fax
machine will emit three long beeps to alert you to a problem. Press the Stop key to turn error tone
off, then print a message confirmation report to check the source of the problem (see page 100).
E Voice Request Tone During a fax session, either you or the per-son at the remote fax machine
may initiate a voice request (a message asking for a voice conversation between yourself and the
remote operator). When the person at the remote fax machine either initiates or answers your
voice request, your fax machine will emit a repetitive warbling sound. For more information about
using the voice request function, see page 60. E End of Session Tone At the end of every
successful transmitting or receiving session, your fax machine will emit a short beep to inform you
that there were no errors or problems in the communication.
Off-Hook Alarm Tone
If your handset is left off the hook, your fax machine will emit an intermittent warbling sound. To turn
off the sound, hang up your handset or press the Stop key.
Signal Tone Options
Three function settings are available to allow you to control the volume of the signal tones your fax
machine makes (the Incoming Ring signal can be changed by adjust-ing the slide switch on the
rear of the unit):
- Key Touch Response The key touch response function allows you to turn the key select tone ON
or OFF (it is set at the factory to ON). If you turn the key select tone OFF, you will not hear
anything when you press the keys. See KEY TOUCH RESP. on page 84.
- Buzzer Volume The buzzer volume function allows you to set the volume of your fax machines
error and voice request tones. You can set the volume to LOW or HIGH (the factory default
setting is LOW). See BUZZER VOLUME on page 84.
- Monitor Volume The monitor volume function allows you to set the volume of the rings and other
tones your fax machine makes during a communication (such as the ready-to-receive tone). You
can set the volume to OFF, LOW or HIGH (the factory default setting is LOW). See MONITOR
VOLUME on page 84.
OF2400/2600 ( 96-02-07 )
Page 41

%Dual Access
Dual Access
Your fax machine has three major functional units: the memory, the scanner and the printer.
When you send a fax, it is usually first placed on the document table and scanned into memory, and
then is transmitted from memory. So the scanner unit is used first, and then the memory is used.
While the transmission is taking place, the scanner unit is not being used. When you receive a
fax, it is first received into memory, and then printed. In this case, the memory is used first, and
then the printer unit is used. The scanner unit is not used at all. When you make normal
page-by-page copies, the memory is not used very much, but heavy use is made first of the
scanner unit and then of the printer unit.
Your fax machines dual access feature allows you to use the parts of your machine which are not
busy while your fax machine performs other operations. This greatly increases the amount of
productive time you can spend using your fax machine, and reduces your waiting time. A number
of your dual access options are listed here.
What You Can Do While Sending a Fax
While your fax machine is either scanning or transmitting a fax from memory, you can do the
following:
- Load another fax After the document has been scanned into memory, you can load another
document right away and prepare it for transmission (see page 44). The docu-ment will be
scanned into memory while your first document is still being transmitted. You can continue to do
this for as many documents as you have memory available. When your first transmission is
completed, your second document will be automatically sent.
- Make copies After the document has been scanned into memory, you can load a document and
make normal copies (not sorted copies) while your fax machine is still transmitting the first
document from memory (see page 58).
- Receive faxes While your fax machine is scanning a document into memory (but has not yet
begun dialing), your fax machine will still receive and print incoming fax messages (the printing
will pause until the scanning is complete).
What You Can Do While Receiving a Fax
While your fax machine is receiving a fax, you can do the following:
- Load a fax While your fax machine is receiving a fax, you can load a document, prepare it for
transmission and scan it into mem-ory (see page 44). If your fax machine is already printing the
received fax, printing will temporarily pause while the document is being scanned. After the
document is scanned into memory, the received fax will resume printing. You can continue to do
this for as many documents as you have memory avail-able. When your fax machine is fin-ished
receiving the fax message and the telephone line is free, it will auto-matically begin sending the
documents you have loaded.
- Make copies While your fax machine is receiving a fax into memory (but not yet printing), you can
load a document and make either normal or sorted copies (see pages 57 and 58). Once the
received fax is ready for printing, your fax machine will stop copying and print the fax. To resume
copying after the received fax is printed, press the Copy key again.
OF2400/2600 ( 96-02-07 )
Page 42

%Product Options
Product Options
Three major option packages are available to enhance your fax machines operations:
Memory Card Options
The OKIFAX 2400 comes equipped with 512 kilobytes of onboard memory, the OKIFAX 2600 with 1 MB
of onboard memory. This is enough memory for most general uses. However, if your office makes heavy
use of your OKIFAX 2400/2600s advanced memory-based features, or if you are seeing memory
overflow error messages, you may require more extensive memory.
The OKIFAX 2400 has one memory expan-sion slot, and the OKIFAX 2600 has two expansion slots.
Memory cards are avail-able in 1 MB (up to 64 pages), 2 MB (up to 128 pages), or 4 MB (up to 256
pages) versions (CCITT #1 ratings), allowing you to increase your fax machines memory up to a
maximum of 4.5 MB for the OKIFAX 2400 and 9 MB for the OKIFAX 2600.
If you have already purchased memory cards and want to install them, or for more detailed information
about when you may need memory cards, see page 14.
Second Paper Cassette Option
Your fax machines paper cassette is capable of holding 250 pages of standard-weight (20 lb.) paper
(such as the paper normally used in laser printers and photo-copiers). If your fax machine is constantly
receiving multi-page documents, or if it is constantly used for copying and is always running out of paper,
you may need the second paper cassette option.
The second paper cassette option is capable of holding letter-size or legal-size paper, and can hold up to
500 sheets of standard-weight (20 lb.) paper. Once the second paper cassette option is installed, if your
fax machine runs out of paper in the main paper cassette, it will automatically switch to using the second
paper cassetteproviding a total paper supply of 700 pages for your fax machine. Another benefit of the
second paper tray is the choice of using a second size of paper.
For information on installing and configuring your second paper cassette option, refer to the
documentation you receive with that option.
RS-232C Connector Option
The RS-232C connector option allows your fax machine to be interconnected with other equipment for
specialized data communica-tions applications such as multiplexing,encryption for enhanced
communications security, dumping fax image data from the fax machine to a computer for archiving or
other applications, and other functions.
For information about installing and configur-ing this option, refer to the documentation you receive with
the option.
Contact Your Dealer For information about purchasing any of the product options listed on this page,
contact your OKIFAX authorized dealer.
OF2400/2600 ( 96-02-07 )
Page 43

Chapter 3
Planning Your Dial Directories
Planning Your Dial Directories
When used for dialing, your fax machines One Touch keys allow you to send a fax to one or many
locations with the touch of a single key. Your fax machines Auto Dial codes are abbreviated telephone
numbers which allow you to enter a 3--digit code instead of dialing the entire number.
The OKIFAX 2400 has a total of 40 One Touch keys and 120 Auto Dial codes. The OKIFAX 2600 has a
total of 80 One Touch keys and 200 Auto Dial codes.
Make a List of Numbers
To start your planning, make a list of all of the locations that people using your fax machine
routinely transmit faxes to. Ask other people, and make the list as compre-hensive as you can.
Then reorganize your list or locations in the following ways:
- Make a list of frequently-used interna-tional or long distance locations.
- Arrange the remaining locations in order of how frequently they are used.
- If you routinely transmit certain types of documents to more than one location, make lists of the
different groups of locations that you normally transmit documents to. Make as many different
groups with different combinations of locations as you like to fit the way that your office works.
Program Your One Touch Keys
Program your list of international locations, and all of your most frequently used loca-tions into your
One Touch keys. Be sure to enter not only the fax number for each loca-tion, but also its name.
You will need these Location IDs to make use of your fax machines search function. If you have
made some lists of groups, leave enough One Touch keys unprogrammed to accommodate
those groups. See page 37 for instructions on how to program your One Touch keys for single
locations.
Program Your Auto Dial Codes
If you do not have enough One Touch keys to program all of the locations you have listed, program
the less frequently used locations as Auto Dial codes. See page 39 to learn how to do this.
If you have made lists of groups of locations you commonly transmit the same documents to, you
should also program all of those locations as Auto Dial codes as well. You should do this even if
the numbers are com-monly used and you have already pro-grammed them as One Touch keys.
You will need these locations in your Auto Dial direc-tory in order to create your groups.
Program Your Groups
Program the groups you have listed into your remaining One Touch keys. Each group can have up
to 120 locations programmed using Auto Dial Codes. See page 38 to learn how to do this.
Set Up Delayed Mail Boxes
For the One Touch keys you have programmed with international or long dis-tance locations, you
may want to consider setting them up as delayed mail boxes (batch file transmissions). With a
delayed mail box, all of the faxes to a location are stored in memory and transmitted only once
each day at a time which you set. To save money on long distance or international telephone
charges, you can set a time for transmission when the rates are lower. See Delayed Mail Boxes
on page 64 for more information.
Label Your One Touch Keys
Be sure to write the names of the locations you have programmed on the labels on your One Touch
keypad to allow people to find them quickly.
Print Your Dial Directories
Print reports of your One Touch directory (page 101) and Auto Dial directory (page 96) and leave
OF2400/2600 ( 96-02-07 )
Page 44

them near your fax machine.
OF2400/2600 ( 96-02-07 )
Page 45

%Programming Your One Touch Keys
Programming Your One Touch Keys
You can store up to two fax numbers with 32 digits for each One Touch key. The first number you enter
will be the main number and the second number will be the alternate number. If the main number is busy
or does not answer, your fax machine will automati-cally dial the alternate number. You will also enter a
16 character Location ID (name) for each fax number using letters, numbers, or symbols.
Entering Fax Numbers
Use the 39/Space key to make your fax numbers more readable. Use the Hyphen key to add hyphens for
readability. Use the 40/Pause key to add a pause during dialing (e.g., to wait for long distance or outside
lines). If your fax machine is set to pulse dialing (see MF/DP on page 88) press the x/TONE key to switch
to tone dialing for part of the call.
PBX Users
Be sure to enter your access digit before entering the number of your location. See page 89 for more
infor- mation about using your fax machine with a PBX.
Auto Start
Your fax machine is set to begin dial-ing as soon as you press a One Touch key or select an Auto Dial
location. You do not have to press Start. If you do not want your fax machine to do this, see AUTO
START on page 90.
OF2400/2600 ( 96-02-07 )
Page 46

%Programming One Touch Keys as Groups
Programming One Touch Keys as Groups
Follow these instructions to program a One Touch key for group dialing. Enter up to 120 locations in each
group. (The OKIFAX 2400 uses Auto Dial codes 001120; the OKIFAX 2600 can use 120 locationsAuto
Dial codes 001 200.) Groups use memory transmission to broadcast to multiple locations.
Removing Locations
To remove locations from a group, follow the steps in the instruction bar. At step 7, enter the Auto Dial
code of the location you want to delete, then press the key. Your fax machine will ask if you want to
delete that Auto Dial code from the group (GROUP NUMBER DELETE ?). Press the key again to remove
the location.
Deleting a Group
If you want to delete a group you have previously programmed from a One Touch key, follow the
informa-tion above to remove all locations from the group.
OF2400/2600 ( 96-02-07 )
Page 47

%Programming Your Auto Dial Numbers
Programming Your Auto Dial Numbers
For each Auto Dial code, you can enter a fax number up to 32 digits long and a Location ID (name) up
to16 digits long.
On an OKIFAX 2400, 120 Auto Dial codes are available for programming (numbered 001-120).
On an OKIFAX 2600, 200 Auto Dial codes are available for programming (numbered 001-200).
PBX Users
Be sure to enter your access digit before entering the number of your location. See page 89 for more
infor- mation about using your fax machine with a PBX.
Auto Start
Your fax machine is set to begin dial-ing as soon as you press a One Touch key or select an Auto Dial
location. You do not have to press Start. If you do not want your fax machine to do this, see AUTO
START on page 90.
Entering Fax Numbers
Use the 39/Space key to make your fax numbers more readable. Use the Hyphen key to add hyphens for
readability. Use the 40/Pause key to add a pause during dialing (i.e., to wait for long distance or outside
lines). If your fax machine is set to pulse dialing (see MF/DP on page 88) press the x/TONE key to switch
to tone dialing for part of the call.
OF2400/2600 ( 96-02-07 )
Page 48

%One Touch and Auto Dial Parameters
One Touch and Auto Dial Parameters
You will probably never have to change these settings. However, if you communicate with a location
having a great deal of tele-phone line interference or other poor quality conditions, try changing these
parameters for that location.
Changing the H/Modem rate to 4800 bps can lower the initial transmit speed to com-pensate for
consistently poor phone line conditions (try this last). When turned ON, Ignore First DIS allows time for
phone line noise or echoes to settle by ignoring the first response of the called machine. When turned
ON, the Tone for Echo setting helps suppress phone line echoes which sometimes occur during
international calls. When turned ON, the MH Only setting forces the use of Modified Huffman error
correction, which is more tolerant to phone line noise, but will slow transmission speed slightly. Be sure to
change only one setting at a time. In all cases, if using a particular parameter does not help, set it back to
its original mode. If none of these parameter changes improve communications with a remote location,
service may be required.
Resetting Parameters
Even if you change the fax number assigned to a One Touch key or Auto Dial code, these dialing
parameters remain in effect. Be sure to use this procedure again to reset these dialing parameters back
to their original settings.
OF2400/2600 ( 96-02-07 )
Page 49

Chapter 4
%Learning to Use Your OKIFAX 2400/2600 for Basic
Operations
Learning to Use Your OKIFAX 2400/2600 for Basic Operations
The Basic Operations section of this Users Guide provides you with the information you will need to use
most of the standard facsim-ile features of your machine. You will learn how to prepare and send
documents, to receive faxes, to make copies and use the voice request function.
Your fax machine has a wide array of options and features which allow you to choose exactly how a
document will be transmitted, how a fax will be received, or how a document will be copied. Because you
can select what you want and do not want to use, your fax machine can send or receive faxes and make
copies in many different ways.
Sending Faxes
To learn how to send a fax, read Preparing Your Faxes and Loading Your Documents (pages 43-44).
Then select the dialing method you want to use (page 45). Skim through your fax machine's transmission
options to help you decide how you want your fax machine to send your document (page 48), but in most
cases you wont need to change anything to send your fax.
Receiving Faxes
As long as the Auto Receive indicator is lit on your control panel (this is directly above the Auto Receive
key), you dont really have to do anything because your fax machine will automatically receive all incoming
faxes.
If your Auto Receive indicator is not lit, then your fax machine is set to manual receive mode. If you have
not already done so, you should turn to Setting the Answering Mode on page 9 of the Installation section
to learn about your fax machines available answer-ing modes.
Read through Reception (page 52) to learn how to manually receive a fax if you later have to, and skim
through Reception Options (page 53) to learn about the vari-ous ways your fax machine can be set to
handle incoming fax messages.
Working with Memory
Your fax machine uses memory for many transmission and reception functions. To learn how to print
messages in memory, how to find out what is stored in your fax machines memory now, and how to
cancel messages in memory, see Working with Memory (page 55).
Making Copies
To learn how to make copies using your fax machine, turn to Making Copies (page 57), then flip through
Copying Options (page 58) to learn about your fax machines other copying-related features.
Voice Request
Turn to Voice Request (page 60) to learn how to use your fax machine to initiate a voice conversation
with the operator of a remote fax machine that you are communi-cating with.
OF2400/2600 ( 96-02-07 )
Page 50

%Preparing Your Documents
Preparing Your Documents
Try to use good quality documents for your transmissions. Documents that are typed or created in felt-tip
black ink on white or light colored paper work best. Do not send documents which are not rectangular in
shape. Never use documents that have wet or sticky surfaces, wrinkles, staples, or paper clips. However,
your fax machine can trans-mit documents which have been subject to normal wear, such as documents
with staple holes, letter folds, and minor corner folds.
Checking Document Quality
If you are not sure how a document will fax, try making a copy first on your fax machine (see page 57). If
your documents are extremely bent, creased or torn, make a copy on an office photocopier and send the
copy instead. You can also use a photocopier to enlarge or reduce documents before sending, or to
com-bine many small documents onto one page.
Document Size
All documents must have a minimum width of 5.8" (148 mm) and a minimum length of 5" (128 mm). The
OKIFAX 2400 can scan and fax documents up to 10" (257 mm) wide, and the OKIFAX 2600 can scan
and fax documents up to 11.7" (297 mm) wide. Your documents should not normally be longer than 19.7"
(500 mm) long, but you can send longer documents if you need to (see 4/Long Document Key on page
49).
Loading Multiple Documents
You can load up to 50 sheets of standard (20 lb.) weight paper (like photocopier paper) at the same time.
If you use a heavier weight of paper, you can load up to 25 sheets. For very heavy paper, you should
load and send the documents sheet-by-sheet. Do not try to load paper that is thicker than 0.006" (0.15
mm). You should make a photocopy and send the photocopy instead.
Pay Attention to the Type of Document
You Are Sending Your fax machine can send documents with different resolutions and contrasts. Use the
Transmit Resolution key to set the resolution and the Type of Original key to set the con-trast. The
Transmit Resolution setting tells the fax machine the amount and type of detail in your document. For
normal office documents, use STANDARD. For documents with small type or other fine details, use FINE
or EXTRA FINE. For documents that contain photos or many shades of gray, use PHOTO. Using a
higher quality setting slows the speed of transmission, however. The Type of Original setting tells the
machine the amount of con-trast in your document. For documents with E Changing the Default
Transmission Mode For each document you send, you can set the transmission resolution (STANDARD,
FINE, EXTRA FINE and PHOTO) and the type of original (LIGHT, NORMAL and DARK). This feature
allows you to set your fax machine to the specific needs of each document. In most cases, your fax
machines default settings of STANDARD resolution and NOR-MAL original are sufficient.
However, if you are continually sending documents with special needs (for example, documents which
contain small type, complex illustrations or photos, or documents which are either too light or too dark),
you can change the default transmission setting to better suit your needs. See TX MODE DEFAULT on
page 84.normal contrast, use NORMAL. For docu-ments which are too light, use LIGHT. For documents
which are too dark, use DARK.
Refer to Loading Your Documents on the next page to learn how to use these settings.
OF2400/2600 ( 96-02-07 )
Page 51

%Loading Your Documents
Loading Your Documents
Take care in loading your documents to prevent paper jams and problems during scanning. Neatly stack
your documents, aligning their edges, before you place them face down in the document feeder.
When loading documents, the fax machine grips one sheet at a time and feeds each sheet through the
scanner. To allow the machine to grip the sheets of paper, the leading edges of the documents must be
aligned at the inserted end.
Loading a Fax While Sending or Receiving
You can load a fax and prepare for sending while your fax machine is still in the middle of receiving a fax
or sending a fax from memory. As long as the document feeder is empty, you do not have to wait until the
current operation is over to load your docu-Your ments. Simply load your documents as described on this
page, then select your locations (see Dialing Options on page 45).
OF2400/2600 ( 96-02-07 )
Page 52

%Dialing Options
Dialing Options
Dialing From The Numeric Keypad
Dial from the numeric keypad just as you would from a normal telephone keypad. If you make a mistake,
press the key to go back and re-enter the number.
OF2400/2600 ( 96-02-07 )
Page 53

%Entering Fax Numbers on the Numeric Keypad
Entering Fax Numbers on the Numeric Keypad
When entering numbers on the numeric keypad, a number of fea-tures are available to help make your
dialing successful:
- If your fax machine is connect-ed to a PBX, be sure to enter an access digit for an outside line
before dialing the number. You may also want to press the 40/Pause key after a PBX access digit
to tell your fax machine to wait for the outside line before proceeding with dialing. See PBX
Installations on page 16 for more information.
- Pressing the Hyphen key once adds a short pause. Subsequent hyphens make the number more
readable, but do not add more pauses.
- If your fax machine is set to pulse dialing (see MF/DP on page 88) and if you need to switch to
tone dialing for part of your telephone number, press the * /Tone key at the point where you need
the dialing mode to switch.
OF2400/2600 ( 96-02-07 )
Page 54

%Dialing From an External Telephone
Dialing From an External Telephone
OF2400/2600 ( 96-02-07 )
Page 55

%Auto Dial Code Dialing
Auto Dial Code Dialing
OF2400/2600 ( 96-02-07 )
Page 56

%One Touch Key Dialing
One Touch Key Dialing
One Touch keys allow you to send a fax to one or many locations by press-ing a single key. If you prefer
to con-trol when dialing begins, see page 88 to set Auto Start to OFF.
The OKIFAX 2400 and OKIFAX 2600 differ slightly in how the One Touch keys are accessed for dialing.
When dialing with the OKIFAX 2400, 40 One Touch keys are available. These are numbered from 1/A to
40/Pause on the One Touch keypad. To dial a location after loading your documents, just press the key
for the location.
When dialing with the OKIFAX 2600, 80 One Touch keys are available. One Touch keys 1/A to 40/Pause
are numbered in and accessed in exactly the same way as for the OKIFAX 2400. One Touch keys 41 to
80 are located directly under your first 40 One Touch keys. To access One Touch keys 41-80, you will
first need to lift the One Touch panel.
OF2400/2600 ( 96-02-07 )
Page 57

%Search Key Dialing
Search Key Dialing
The One Touch keys and the Auto Dial codes can be programmed to have a name (Location ID)
associated with their telephone numbers. If you are not sure which One Touch key or Auto Dial code the
location you want has been programmed into, press the Search key to turn on your fax machines search
function.
Your Dial Directories
Before you can dial with One Touch keys, Auto Dial codes, or the Search key, the locations must be
entered into your fax machines dial directo-ries. To do this, see pages 3639.
Stopping a Transmission To cancel a transmission at any time, press Stop, then press the key. Press
Stop two more times to turn off the alarm.
Confirming Results After transmission, press Copy once with no documents loaded to display a report
confirming your transmission. Press Copy twice to print the results (see page 100). You can set your fax
machine to print an error report each time there is a problem. See ERROR REPORT (MCF) on page 83.
Redialing If the line is busy or if there is no answer, your machine will automati-cally redial three times
before quitting. It will wait 3 minutes between each redial attempt. To change these set- tings, see
REDIAL TIMES and REDIAL INTERVAL on page 88. You can also redial manually with the Redial key.
OF2400/2600 ( 96-02-07 )
Page 58

%Transmission Options
Transmission Options
The information in Dialing Options shows you how to perform a simple fax transmis-sion with different
dialing methods. In many cases, this is all you will really need to do.
However, before you begin dialing, you can choose from a variety of transmission options which change
the way your fax machine sends your document. Most of your transmission options are listed here. A few
options are described in special chapters of their own in the Advanced Operations section (beginning on
page 61).
Your fax machines transmission options are available on your One Touch keypad, in the dark gray bars
under each row of One Touch keys. To access a transmission option, press the Select Function key, then
press the One Touch key for the option you want to use. With a few exceptions, you can select as many
transmission options as you need for each document you send.
For a detailed overview of all of the transmis-sion options and other functions available on your One
Touch keypad, see The One Touch Keypad, beginning on page 24.
OF2400/2600 ( 96-02-07 )
Page 59

%1/Feeder « Memory Key
E 1/Feeder « Memory Key
Using this key, you can switch your document from memory to feeder transmission.
During feeder transmission, your document will be scanned into your fax machine and transmitted
page-by-page. Feeder transmission is slower, but may occasionally be useful for very long or detailed
faxes for which you may not have enough memory. You will also need to select feeder transmission if you
want to use the verification stamp option.
During memory transmission, all of the pages in your document are fed into the fax machines memory
before transmission begins. This is faster than feeder transmission and frees up your document table for
loading the next document to be faxed or copied. It is usually your best choice.
Your fax machine is preset at the factory to use memory transmission unless you select otherwise using
this key. However, you can change the default setting if you want, so that your fax machine will normally
use feeder To change your fax machines default transmission setting from memory to feeder
transmission, see MEM./FEED SWITCH on page 84.
When using memory transmission, your fax machine will always tell you the amount of memory you have
remaining as a percentage. If you find that you are often running short on memory or if you are
experiencing memory overflow errors, you can purchase optional memory cards to expand your fax
machines memory. Read about memory card options on page 14.
OF2400/2600 ( 96-02-07 )
Page 60

%2/Verification Stamp Key
2/Verification Stamp Key
When the verification stamp is turned on, your fax machine will stamp the face of each page as it is
successfully trans-mitted. The verification stamp can only be used during a feeder transmission.
Your fax machine is preset at the factory with the verification stamp function turned off unless you select
otherwise using this key. However, you can change the default setting if you want, so that your fax
machine will normally stamp pages as they are successfully transmitted. To do this, see VERIF.STAMP
on page 85.
OF2400/2600 ( 96-02-07 )
Page 61

%3/No Reduction Key
3/No Reduction Key
When the no reduction option is turned ON, your document will be transmitted at actual size without
reduction. If the image size is too large to fit on the receiving fax machines paper, only a portion of the
document will be printed.
Your fax machine is preset at the factory to automatically reduce your document to fit on the paper
available on the receiving machine unless you select otherwise using this key. To change this default
setting, see NO REDUCTION on page 85.
OF2400/2600 ( 96-02-07 )
Page 62

%4/Long Document Key
4/Long Document Key
When the long document option is turned ON, your fax machine will allow you to send pages which are
longer than 19.7" (500 mm).
Your fax machine is preset at the factory with the long document option turned off. This means that your
fax machine will normally not allow you to send documents which are longer than 19.7" (500 mm) unless
you select otherwise using this key (it will assume such pages are feeder errors). To change this default
setting, see LONG DOC. TX on page 85.
OF2400/2600 ( 96-02-07 )
Page 63

%5/Total Pages Key
5/Total Pages Key
Use this key to tell your fax machine the number of pages you will be transmitting (up to 999 pages).
During transmission, the page number and the total number of pages will be printed on each page (for
example, Page 1 of 50).
OF2400/2600 ( 96-02-07 )
Page 64

%6/Cover Letter Key
6/Cover Letter Key
When the Cover Letter option is turned ON, your fax machine prints a cover letter on top of the document
you are transmitting. Four are available: no message, URGENT, CONFIDEN-TIAL or PLEASE CALL
BACK. The call back message includes your call back number (see page 11).
The cover letter option is always off unless you select otherwise using this key. To change this default
setting, see COVER LETTER on page 83.
OF2400/2600 ( 96-02-07 )
Page 65

%11/Delayed TX Key
11/Delayed TX Key
When you load a document into your fax machine, it is normally transmitted right away. However,
occasionally you may want to load a fax into your fax machine for transmission later.
When the Delayed TX option is turned on you can tell your fax machine at exactly what date and time you
want your message to be transmitted. Your document will be scanned into memo-ry and will remain there
until the date and time you have set arrives (you can program a transmission date and time up to one
year in the future). When the date and time you have programmed arrives, your fax machine will
automatically begin dialing and transmit the message.
For your delayed TX option to work properly, it is important that you have programmed the correct date
and time into your fax machines clock. To set your fax machines clock, see page 8.
The delayed TX option is always OFF unless you enter a delayed transmis-sion date and time using this
key.
OF2400/2600 ( 96-02-07 )
Page 66

%12/Confidential TX Key
12/Confidential TX Key
Fax machines are often placed in public areas where everyone can look through the received faxes. This
can make it difficult to send a docu-ment confidentially. To avoid this problem, send the document as a
confidential fax.
When the confidential transmission option is turned on using this key, your fax machine will transmit your
document to a personal mail box on the receiving fax machine. The receiv-ing fax machine will store the
fax in memory until the person who has that mail box retrieves and prints the fax by entering a
confidential password.
For confidential transmission to work, the receiving fax machine must be programmed with personal mail
boxes which have been set up for confidential reception.
Before you can transmit a confiden-tial document, you must know in advance the number of the mail box
you will be sending the message to. Ask the person who will be receiving the fax to tell you the number of
their personal mail box. To set up a personal mail box for confi-dential reception on your own fax
machine, and learn how to receive and print confidential faxes, see Personal Mail Boxes, beginning on
page 66.
OF2400/2600 ( 96-02-07 )
Page 67

%Title of Section
Reception
As long as your fax machine is set to one of the automatic answering modes, you do not really have to do
anything for your fax machine to receive faxes. You can see which reception mode your fax machine is
currently in by looking at your machines standby display. If your fax machine is in either FAX mode or T/F
mode, it will auto-matically receive your faxes without assis-tance. See page 9 for more information about
your fax machines answering modes.
If your fax machine is in TEL (Manual Receive) mode, follow the instructions on this page to receive a
fax.
OF2400/2600 ( 96-02-07 )
Page 68

%Reception Settings
Reception Settings
Your fax machine has many function settings which control the way it receives faxes.
- If a communication error occurs, a RECEIVE STOP message will be printed at the bottom of the last
page received. See STOP MSG. PRINT on page 87.
- If a fax is too long to print on one sheet, it will be reduced to fit. See RX REDUCTION on page 87. - If
the fax is too long to be reduced, it will be split across two pages (see RX SPLIT PRINT on page 87)
and a small portion of the image will be repeated at the top of the second page (see REPEAT PRINT
on page 87).
- The telephone number (TSI/CSI/CIG) of the calling fax machine is printed at the top of each received
page. See TSI PRINT on page 87.
- The date and time of reception can also be printed on each page if you want. See TIME/DATE PRINT
on page 87.
OF2400/2600 ( 96-02-07 )
Page 69

%Manual Reception
Manual Reception
Follow these instructions to manually receive faxes from your handset or from an external telephone.
OF2400/2600 ( 96-02-07 )
Page 70

%No Toner/No Paper Memory Reception
No Toner/No Paper Memory Reception
If your fax machine is out of paper or toner, it will automatically receive faxes in memory. As soon as the
paper or toner is replaced, the mes-sages stored in memory will be print-ed. To turn these function
settings OFF, see NO TONER MEM. RX on page 86, and NO PAPER RX on page 86.
OF2400/2600 ( 96-02-07 )
Page 71

%Reception Options
Reception Options
Your fax machines reception options let you choose how incoming fax messages are handled once they
are received. Three reception modes are available:
OF2400/2600 ( 96-02-07 )
Page 72

%Print Mode
Print Mode
In print mode, your fax machine will auto-matically print fax messages as soon as it receives them. Your
fax machine is preset to print mode at the factory.
If your fax machine runs out of paper or toner while in print mode, your incoming fax messages will be
stored in memory. As soon as the paper or toner is replaced, your fax machine will print the stored
messages and resume printing fax messages as soon as it receives them. If you would prefer that your
fax machine not automatically receive fax messages in memory when it runs out or paper or toner, you
can turn these functions OFF. See NO PAPER RX on page 86 and NO TONER MEM. RX on page 86.
OF2400/2600 ( 96-02-07 )
Page 73

%Memory Reception Mode
Memory Reception Mode
In memory reception mode, your fax machine will receive messages into memory and not print them until
you tell your fax machine to do so. All fax messages received in memory up to that point will then be
printed when you switch the reception mode back to print mode using the 21/Reception Mode key.
If your fax machine receives so many mes-sages that its memory becomes full, it will be unable to
receive any further messages until you print out the messages already stored.
If you receive many faxes and intend to make heavy use of your fax machines memory reception mode,
you may need to purchase more memory for your fax machine. See Memory Card Options on page 14.
OF2400/2600 ( 96-02-07 )
Page 74

%Forwarding Mode
Forwarding Mode
In forwarding mode, your fax machine will automatically forward all fax messages it receives to another
fax machine at a distant location. As soon as your fax machine receives a fax message, it will
automatically dial and re-send the fax message to another fax machine.
Ordinarily your fax machine does not print the messages it has received and then for-warded. If you
would prefer your fax machine to print locally the messages it receives, and then forward the message,
see PRINT FORWD. MSG. on page 86.
OF2400/2600 ( 96-02-07 )
Page 75

%21/Reception Mode Key
21/Reception Mode Key
Follow these instructions to change your fax machines reception mode.
If you have selected the forwarding mode, your fax machine will ask you to enter the telephone number of
the fax machine you want messages forwarded to. Enter the number using the numeric keypad. Be sure
to enter an access code if needed. Then press Start. For information on entering telephone numbers into
your fax machine, see the note bar on page 45. Press the Select Function key to return to standby.
OF2400/2600 ( 96-02-07 )
Page 76

%Closed Network Reception
Closed Network Reception
The closed network reception option allows you to tell your fax machine to reject any incoming faxes from
fax machines whose telephone numbers are not programmed into your One Touch keys or Auto Dial
codes. In this way, your fax machine will automatic-ally reject unwanted fax transmissions such as
unsolicited advertising.
Your fax machine is preset at the factory with the closed network option turned OFF. To turn it ON, see
the instructions in the next column.
Once the closed network option has been turned ON, you may still occasionally want to receive faxes
from a location which is not programmed into your fax machine. You will need to receive faxes like this
manually. See the 7/Closed Network Key instruction bar to learn how to do this.
Warning
Be sure that all reception location numbers are stored in One Touch or Auto Dial locations so that they will not be
excluded from the closed network.
To Turn the Closed Network Option On
7/Closed Network Key To temporarily disable the closed network option once it has been turned on,
follow the instructions below.
OF2400/2600 ( 96-02-07 )
Page 77

OF2400/2600 ( 96-02-07 )
Page 78

%Working with Memory
Working with Memory
If you have set your fax machines reception mode to memory reception, all messages will be stored in
memory until you turn off memory reception (see page 53).
For instructions on how to print a report show-ing all of the messages currently stored in your fax
machines memory, refer to Printing an Active Memory Files Report on the next page.
For instructions on how to erase specific messages which are stored in your fax machines memory, refer
to Canceling a Message in Memory on the next page.
OF2400/2600 ( 96-02-07 )
Page 79

%Printing Messages Stored in Memory
Printing Messages Stored in Memory
Your fax machine has been set to store messages in memory when it is low on toner. You can force the
machine to print the messages anyway, but the quality will not be high because of the low toner condition.
Follow these instruc-tions to tell your fax machine to print the messages .
Printing Confidential Messages
For instructions on printing a confi- dential message which has been received into a personal mail box,
see Printing Confidential Messages, on page 68.
OF2400/2600 ( 96-02-07 )
Page 80

%Messages Left in Memory
Messages Left in Memory
The following settings control how your fax machine handles messages left in memory for a long time:
- Message Save Days Your fax machine is set to store messages in memory for 20 days. This can
be changed to 10 days, 30 days, or turned OFF. If this function is turned OFF, your fax machine
will store messages forever. To change this setting, see MSG. SAVE DAYS on page 88.
- Time Out Message If a message has remained in memory for longer than the message save days
setting above, your fax machine will automatically erase the mes-sage. If you would prefer your
fax machine to print the mes- sage instead, see TIME OUT MSG. on page 88.
- Memory Cancel Report If your fax machine is set to erase messges after the message save time
has elapsed, it will print a memory clear report to tell you what messages were erased. See page
97.
OF2400/2600 ( 96-02-07 )
Page 81

%Printing an Active Memory Files Report
Printing an Active Memory Files Report
To print a report listing all of the mes-sages which are currently stored in your fax machines memory,
follow the instructions below.
For an example and a description of the information contained in the Active Memory Files Report, see
page 95.
OF2400/2600 ( 96-02-07 )
Page 82

%Canceling Messages Stored in Memory
Canceling Messages Stored in Memory
Occasionally, you may cancel (erase) a message which has been stored in your fax machines memory.
For example, you may program a document for delayed transmission and then decide not to send it. To
erase a message stored in your fax machines memory, you will need to print an active memory files
report, find the session number of the mes-sage you want to delete, and then use the 22/Cancel key to
erase the stored message .
After you have printed an active memory files report and found the session number of the message you
want to erase, follow the instructions below:
OF2400/2600 ( 96-02-07 )
Page 83

%Making Copies
Making Copies
Your fax machine can also be set so that it will not reduce documents which are too wide to print (the
parts of the document which do not fit will not be printed). See NO REDUCTION on page 85.
Making Unsorted Copies
To make local unsorted copies of a document, follow these instructions:
Copying Settings
- If you copy a document wider than the paper in your fax machine, the image will auto-matically be
reduced to fit on the printing paper. Your fax machine can also be set so that it will not reduce
documents which are too wide to print (the parts of the document which do not fit will not be
printed). See NO REDUCTION on page 85.
- If you copy a document longer than the paper in your fax machine, the image will automat-ically be
split across two pages. A small part of the image will be repeated at the top of the second page to
help in aligning the pages. Your fax machine can also be set not to split pages (the portion which
is too long will not be printed), or not to repeat a part of the image. See COPY SPLIT PRINT on
page 86 and REPEAT PRINT on page 87.
- Pressing 2nd TRAY COPY on the Control Panel forces copies to be made using the 2nd paper
tray.Your fax machine can also be used to make copies. When you place your document in the
document feeder, your fax machine scans it in the same way it scans a docu-ment for
transmission. It then prints the copy in the same way it would print a fax mes-sage that it has
received.
If you have the second paper tray option installed, you can use the 2nd Tray Copy key on the
control panel to make copies from it.
OF2400/2600 ( 96-02-07 )
Page 84

%%Copying Options
Copying Options
Making Sorted Copies
To make copies of a multi-page document which are sorted into correctly numbered sets, follow the
instructions below:
If You Often Use the Sorted Copy Feature
Your fax machines sorted copy feature is preset at the factory to be normally OFF unless you select
otherwise using the 31/Copy Sorting key. However, it is also possi-ble for your fax machine to be set so
that the sorted copy feature is normally ON (you would then need to use the 31/Copy Sorting key to
make unsorted copies).
For information about changing this setting, see SORT COPY on page 87. Use the instructions on this
page to make sorted copies and to use the manual paper feeder feature.
Copying and Dual Access
After your fax machine has scanned a docu-ment for transmission, you can make copies right away, but
you cannot use the sorted copy option.
Your fax machine will also receive faxes while you make copies (either sorted or unsorted). However,
once the received fax is ready for printing, your fax machine will stop copying to print a received fax
mes-sage (reception is given priority over copy-ing). After the received fax is printed, you will need to
reprogram your copy operation to continue copying. To read about other dual access features, see page
33.
Your fax machine can also be set so as to not receive faxes while you are making copies. See PRIORITY
COPY on page 89.
OF2400/2600 ( 96-02-07 )
Page 85

%Making Copies with the Manual Paper Feeder
Making Copies with the Manual Paper Feeder
Your fax machines manual paper feeder allows you to make copies on a different type of paper than what
you normally keep in the paper cas-sette. For example, if you normally keep letter-size paper in your
paper cassette, but wish to make copies of a document which is on legal size paper, you can open the
manual paper feeder and feed in legal-size paper manually to make your copy. You can also use the
manual paper feeder if you want to make a copy onto letterhead, etc.
Your fax machine is set to assume that you will load legal-size paper into your manual paper feeder. If
you intend to use a different size of paper, you will need to change the paper size setting. See MANUAL
TRAY PAPER on page 86.
OF2400/2600 ( 96-02-07 )
Page 86

%Using Voice Request
Using Voice Request
The voice request feature allows you to have a conversation with a person on another fax machine during
a fax communication. Either the person sending or receiving the fax can initiate a voice request.
You will know if the person on the other fax machine has issued a voice request when you hear a
warbling tone. If you do not respond in approximately six seconds, the voice request is automatically
canceled.
To Initiate a Voice Request
To initiate a voice request during a fax communication, follow these instructions:
To Answer a Voice Request To answer a voice request during a fax communication, follow the
instruc-tion below:
Call Back Messages
If you press your Voice Request key to initiate a voice request but no one is there to answer, your fax
machine will automatically print a cover letter with the message PLEASE CALL BACK at the remote site.
This mes-sage includes the telephone number where you can be reached.
To program your call back telephone number, see page 50. For informa- tion about how to manually add
cover letters to your fax communica- tions, see page 83.
OF2400/2600 ( 96-02-07 )
Page 87

Chapter 5
%Summary of Your Fax Machines Advanced
Features
A Summary of Your Fax Machines Advanced Features
Read this page to find out which of your fax machines advanced features might be useful to you.
Department ID
The Department ID feature is a password which allows you to control access to your fax machine. It also
gives you information about who is using your fax machine.
Once this feature is turned on, people will only be able to use the fax machine after they enter a 4-digit
Department ID number. This ID number will appear on reports.
Delayed Mail Boxes
Delayed mail boxes (batch file transmissions) are a transmission feature which allows you to ensure that
all documents sent to a single location are automatically transmitted together at one specific time each
day.
Since you do not have to be present when the delayed mail box transmits its docu-ments, you can set a
time late at night, when international or long distance tele-phone rates are lower, to help save money in
telephone line charges.
Personal Mail Boxes
Personal mail boxes are a reception feature which allows individuals in your office to control for
themselves how their own mes-sages are received.
They can choose to receive confidential fax messages which will only print after a pass-word is entered,
or they can choose to have their fax messages print normally. They can also have their fax messages
automatically forwarded to another fax machine at a distant location if they plan to be away from the
office.
Polling
The polling feature allows you to dial another fax machine to receive documents instead of transmit them.
Once a person loads a document to be polled on their fax machine, they are fin-ished, and the person
who wants the docu-ment can dial in at any time to receive it. It is also possible to program your fax
machine to automatically dial up and receive documents from many different fax machines at the same
time.
Broadcasting Broadcasting is a transmission feature which allows you to fax a single document to many
different locations as a series of sequential transmissions.
You may find this feature useful if you are constantly sending the same information to many different
places.
Relay Broadcasting
Relay broadcasting is a transmission feature which allows one fax machine to tell a second fax machine
to make a broadcast.
The first fax machine sends a document to the second fax machine. As soon as the second fax machine
receives the message, it automatically begins dialing and re-send-ing the message to many other
locations. Relay broadcasting is another way to help you save money on long distance and international
telephone charges.
Touch Tone Operations
The Touch Tone feature allows you to control your fax machine from any Touch Tone telephone.
OF2400/2600 ( 96-02-07 )
Page 88

%Department ID
Department ID
The Department ID feature lets you monitor who is using your fax machine, and restrict access if you choose.
If you turn on the Department ID feature but leave restricted access off, the user must enter any 4-digit number
before they will be able to use the fax machine. The number entered will appear on reports and help you keep track
of who is using the fax machine.
If you also turn restricted access on, access to your fax machine will be limited to peo-ple who know specific 4-digit
passwords which you have programmed. You can program up to a total of 24 passwords.
Restricted Access
- Print a configuration report to see a list of the passwords you have programmed (page 97). - In restricted
access mode, restricted access numbers 0124 appear on MCF and Activity reports. With Department ID
on, and restricted access off, the department code will appear.
OF2400/2600 ( 96-02-07 )
Page 89

%Delayed Mail Boxes
Delayed Mail Boxes
To use a delayed mail box, load the document and press the One Touch key for the location as you
would normally (see page 46). Documents can be loaded at any time. Your fax machine will store them
until the transmis-sion time you have set. It will then send all of your faxes at the same time. Delayed mail
boxes can help you save money in long dis-tance and international telephone charges, since you can set
the transmission to occur when rates are lower and as a single transmis-sion to save more expensive first
minute fees.
Delayed mail boxes can be set up to transmit either to a single location, or to many loca-tions
sequentially, depending on how you have programmed the One Touch key. They can also be set for
confidential transmission.
You can create a total of 40 delayed and personal mail boxes in any combination on One Touch keys
01-40 (for information about personal mail boxes, see page 66).
Program Your One Touch Keys First
Before creating a delayed or per-sonal mail box, you must first pro-gram the One Touch key you intend
to use for a single location or a group (single locations only for personal mail boxes). See pages 37
and 38.
Mail Box Reports
- Your fax machine can print a list of all of your delayed and personal mail boxes . See Box List on page
96. - To view a list of all documents which have been loaded into a delayed mail box but not yet sent,
or received into a personal mail box but not yet printed, print an active memory files report. See page
95.
OF2400/2600 ( 96-02-07 )
Page 90

Canceling Messages
To cancel (erase) a document from a delayed or personal mail box before it is sent or printed, start by
printing an active memory files report to determine the session and message numbers of the
message you want to erase. Then use your fax machines 22/Cancel key to erase the mes-sage. See
page 56 for instructions.
OF2400/2600 ( 96-02-07 )
Page 91

%Programming a Delayed Mail Box for Confidential Transmission
Programming a Delayed Mail Box for Confidential Transmission
If you want to set up your delayed mail box to send confidential docu-ments to a personal mail box in the
receiving fax machine, first follow the instructions on the previous page. When you reach step 9, follow
the instructions below.
OF2400/2600 ( 96-02-07 )
Page 92

%Closing a Delayed Mail Box
Closing a Delayed Mail Box
Follow the instructions below to close a delayed mail box which you no longer need.
OF2400/2600 ( 96-02-07 )
Page 93

%Personal Mail Boxes
Personal Mail Boxes
Personal mail boxes are a reception feature which allows each individual user to decide for themselves
how they will receive faxes.
Each personal mail box corresponds to a One Touch key on your One Touch keypad. You can create a
total of 40 personal and delayed mail boxes using One Touch keys 0140. Personal and delayed mail
boxes cannot share the same One Touch key (see page 64 for delayed mail box information).
Once a personal mail box has been creat-ed, the user can use their password either to print messages or
to switch the operation of the mail box to any of the following modes.
Confidential Reception Mode
When set to confidential reception mode, your fax machine will receive messages sent to that mail box in
memory and will keep them in memory until the user retrieves them using a 4-digit password (see page
68 for instructions on how to print confidential messages). Your fax machine will print a Personal Box
Reception Report to inform you each time a confidential message is received (see page 102 for an
example of this report). If you would prefer that your fax machine not print a Personal Box Reception
Report each time a confidential message is received, you can turn this function off. See PERS. BOX
REPORT on page 83.
Forwarding Mode
When set to forwarding mode, your fax machine will first receive a fax message sent to that mail box in
memory. It will then auto-matically begin dialing and re-send the fax to the location programmed into the
personal mail boxs One Touch key. The fax will not be printed locally on your fax machine. If you would
prefer that your fax machine print these messages locally as well as forward them, you can change this
setting. See PRINT FORWD. MSG. on page 86.
If you plan to make use of forwarding mode, you should begin by programming a One Touch key with the
location of another fax machine that you would want the mes-sages forwarded to (see page 53), and then
program that One Touch key as a personal mail box using the instructions here. You cannot use the
forwarding mode for One Touch keys which have been pro-grammed with groups.
Print Mode
OF2400/2600 ( 96-02-07 )
Page 94

When set to print mode, your fax machine will receive and immediately print fax mes-sages sent to that
mail box in the normal way. E Unprinted Messages If your personal mail box is set to confidential
reception, messages received into that box will remain there until you enter your password and tell the fax
machine to print them. The following settings let you control what your fax machine does with messages
which it receives but which are never printed:
- Message Save Days Your fax machine is set to hold unprinted messages in memory for 20 days. It can
also be set to 10 days, 30 days or to hold them forever. See MSG. SAVE DAYS on page 88. - Time Out
Message Once the message save days time has expired, your fax machine will automatically erase the
message. If you would prefer that your fax machine print the messages instead, see TIME OUT MSG. on
page 88.
E Other Options Refer to pages 7879 for other important information which applies to personal mail
boxes.
OF2400/2600 ( 96-02-07 )
Page 95

%Closing a Personal Mail Box or Changing Modes Later
Closing a Personal Mail Box or Changing Modes Later
Follow these instructions to close a personal mail box or to change its mode later.
OF2400/2600 ( 96-02-07 )
Page 96

%Printing Confidential Messages
Printing Confidential Messages
Follow these instructions to retrieve messages when in confidential mode:
OF2400/2600 ( 96-02-07 )
Page 97

%Polling
Polling
Normally, you dial other fax machines to send documents to them. Using your fax machines polling
feature, you can dial other fax machines to tell them to send documents to your fax machine.
Polling is especially useful for the routine collection of documents from one or many locations, since the
party sending the docu-ments only has to load their documents for transmission. Once their documents
are loaded they do not have to be present, and the remote party can call in and poll their fax machine to
receive the documents from it at any time.
Polling has two aspects: polling reception and polling transmission.
Polling Transmission
Loading a document into your fax machines memory so that another machine can call in and receive
documents from it is called polling transmission.
You can program your fax machine so that the document you load can be polled only once by a single
remote fax machine, or you can load a document so that it can be polled many times by many different
fax machines (this is called a bulletin).
To add security, you can also enter a spe-cial 4-digit polling number when you load your documents. This
ensures that only peo-ple who know this polling number can call your fax machine to receive the
documents you have loaded. If you set your polling number to 0000, your fax machine can be polled by
anyone, including fax machines that do not have this security feature.
Polling Reception
Calling another fax machine to receive documents from it is called polling reception (or just polling).
You can set your fax machine to poll docu-ments from just one fax machine, or from many fax machines
at the same time. To poll many fax machines at the same time, however, you must ensure that all of
those fax machines have been programmed with the same polling number. Multiple-reception polling will
also work if the polling numbers of the transmitting fax machines have been set to 0000.
You can also set your polling reception operation to occur at any time up to one year in the future using
your fax machines delayed TX/RX feature (see page 50).
Report Options for Polling
The following reports are available to help you manage your polling operations:
- To obtain a report confirming the results of a single-location polling reception, press Copy. To see an
example report, see Message Confirmation Report on page 100. - To obtain a report confirming the
results of a multiple-location polling reception, see Multiple Location Message Confirmation report on
page 101.
Continuous Polling
Normally when you set up a recep-tion polling for multiple locations, your fax machine polls all of the
locations in your list of selections from the beginning to the end. Once it reaches the end of the list, your
fax machine stops polling. If you need to constantly poll a group of fax machines for documents, your fax
machine can be set to continu-ously poll all of the fax machines in your list of selections in an endless
loop until you press the Stop key. See CONT. POLL RX on page 89.
OF2400/2600 ( 96-02-07 )
Page 98

%Setting Your Fax Machine for Polling Reception
Setting Your Fax Machine for Polling Reception
Follow these instructions to poll other fax machines for documents.
OF2400/2600 ( 96-02-07 )
Page 99

%Setting Your Fax Machine for Polling Transmission
Setting Your Fax Machine for Polling Transmission
Follow these instructions to load a document for polling by other fax machines.
OF2400/2600 ( 96-02-07 )
Page 100

%Polling Passwords and Polling Numbers
Polling Passwords and Polling Numbers
Polling numbers are a security mea-sure entered when a person loads a document for polling
transmission. This ensures that only people who know that number will be able to poll for documents.
Usually, you will enter this number only once, then leave it the same for later polling transmissions.
Polling passwords are the matching number which a person enters while setting up a polling reception.
Since this number must match the receiving partys polling number, you will usually have to enter a
different polling password each time.
If you plan to routinely poll and be polled by a number of other fax machine, arrange to have all the fax
machines use the same polling num-ber. If the polling numbers are the same (or if they are 0000), you
can poll them all at the same time.
Note that polling numbers are a feature of OKI fax machines only. To poll or be polled by other fax
machines, set the number to 0000.
OF2400/2600 ( 96-02-07 )
 Loading...