

Page 1
Page 2

C
OPYRIGHT INFORMATION
Copyright © 2010 by Oki Data. All Rights Reserved
D
OCUMENT INFORMATION
MC560 Plus User’s Guide
P/N 59101101
Revision 1.0
April, 2010
D
ISCLAIMER
Every effort has been made to ensure that the information in this document
is complete, accurate, and up-to-date. The manufacturer assumes no
responsibility for the results of errors beyond its control. The manufacturer
also cannot guarantee that changes in software and equipment made by
other manufacturers and referred to in this guide will not affect the
applicability of the information in it. Mention of software products
manufactured by other companies does not necessarily constitute
endorsement by the manufacturer .
While all reasonable efforts have been made to make this document as
accurate and helpful as possible, we make no warranty of any kind,
expressed or implied, as to the accuracy or completeness of the
information contained herein.
The most up-to-date drivers and manuals are available from the web site
http://www.okiprintingsolutions.com
T
RADEMARK INFORMATION
Oki and Oki Data are trademarks of Oki Electric Industry Company Ltd.
Apple, Macintosh and Mac OS are registered trademarks of Apple
Computers Inc.
Hewlett-Packard, HP, and LaserJet are registered trademarks of Hewlett-
Packard Company.
Microsoft, MS-DOS and Windows are either registered trademarks or
trademarks of Microsoft Corporation in the United States and/or other
countries.
Other product names and brand names are registered trademarks or
trademarks of their proprietors.
Copyright Information > 2
Page 3

C
ONTENTS
Copyright Information . . . . . . . . . . . . . . . . . . . . . . . . 2
Document Information . . . . . . . . . . . . . . . . . . . . . . . 2
Disclaimer . . . . . . . . . . . . . . . . . . . . . . . . . . . . . . . . 2
Trademark Information . . . . . . . . . . . . . . . . . . . . . . . 2
Contents . . . . . . . . . . . . . . . . . . . . . . . . . . . . . . . . . . . 3
Emergency first aid . . . . . . . . . . . . . . . . . . . . . . . . . . . 6
Notes, cautions and warnings. . . . . . . . . . . . . . . . . . . 7
Introduction . . . . . . . . . . . . . . . . . . . . . . . . . . . . . . . . 8
About this guide . . . . . . . . . . . . . . . . . . . . . . . . . . . 10
MFP Overview . . . . . . . . . . . . . . . . . . . . . . . . . . . . . . 13
Front view . . . . . . . . . . . . . . . . . . . . . . . . . . . . . . . 13
Rear view . . . . . . . . . . . . . . . . . . . . . . . . . . . . . . . 14
The control panel . . . . . . . . . . . . . . . . . . . . . . . . . . 15
Changing the display language . . . . . . . . . . . . . . . . . 17
Getting started . . . . . . . . . . . . . . . . . . . . . . . . . . . . . 18
Installing MFP drivers and utilities. . . . . . . . . . . . . . . 18
Paper recommendations . . . . . . . . . . . . . . . . . . . . . 20
Cassette tray . . . . . . . . . . . . . . . . . . . . . . . . . . . . . 22
Multi purpose tray . . . . . . . . . . . . . . . . . . . . . . . . . 23
Face down stacker . . . . . . . . . . . . . . . . . . . . . . . . . 23
Face up stacker . . . . . . . . . . . . . . . . . . . . . . . . . . . 23
Loading paper . . . . . . . . . . . . . . . . . . . . . . . . . . . . . . 24
Cassette tray . . . . . . . . . . . . . . . . . . . . . . . . . . . . . 24
Multi purpose tray . . . . . . . . . . . . . . . . . . . . . . . . . 27
Configuring your machine. . . . . . . . . . . . . . . . . . . . . 29
Minimum configuration requirements . . . . . . . . . . . . 29
Pre-configuration information. . . . . . . . . . . . . . . . . . 29
Configuration . . . . . . . . . . . . . . . . . . . . . . . . . . . . . 34
Explanation of filing protocols . . . . . . . . . . . . . . . . . 61
Setting the fax facility . . . . . . . . . . . . . . . . . . . . . . . 64
Print settings and security . . . . . . . . . . . . . . . . . . . . 73
PCL or postscript?. . . . . . . . . . . . . . . . . . . . . . . . . . 73
Printing preferences in windows applications . . . . . . . 73
Store to hard disk/Job Spooling . . . . . . . . . . . . . . . . 75
Operation . . . . . . . . . . . . . . . . . . . . . . . . . . . . . . . . . 80
Loading document(s) for copying . . . . . . . . . . . . . . . 80
Placing document(s) in the ADF . . . . . . . . . . . . . . . . 80
Placing document(s) on the glass . . . . . . . . . . . . . . . 82
Sending document(s) via e-mail. . . . . . . . . . . . . . . . 82
Sending document(s) to a file server . . . . . . . . . . . . 86
Copying. . . . . . . . . . . . . . . . . . . . . . . . . . . . . . . . . 87
Contents > 3
Page 4

Faxing. . . . . . . . . . . . . . . . . . . . . . . . . . . . . . . . . . 93
Scanning . . . . . . . . . . . . . . . . . . . . . . . . . . . . . . . .102
Maintenance . . . . . . . . . . . . . . . . . . . . . . . . . . . . . . 114
Part Numbers. . . . . . . . . . . . . . . . . . . . . . . . . . . . .114
Toner cartridge replacement . . . . . . . . . . . . . . . . . .115
Image drum replacement . . . . . . . . . . . . . . . . . . . .121
Transfer belt replacement . . . . . . . . . . . . . . . . . . . .127
Clean the ADF . . . . . . . . . . . . . . . . . . . . . . . . . . . .134
Clean the document glass . . . . . . . . . . . . . . . . . . . .135
Clean the LED head . . . . . . . . . . . . . . . . . . . . . . . .136
Installing upgrades. . . . . . . . . . . . . . . . . . . . . . . . . 139
Part Numbers. . . . . . . . . . . . . . . . . . . . . . . . . . . . .139
Duplex unit . . . . . . . . . . . . . . . . . . . . . . . . . . . . . .139
Memory upgrade . . . . . . . . . . . . . . . . . . . . . . . . . .141
Hard disk drive. . . . . . . . . . . . . . . . . . . . . . . . . . . .143
Additional paper tray. . . . . . . . . . . . . . . . . . . . . . . .146
Storage cabinet . . . . . . . . . . . . . . . . . . . . . . . . . . .147
Adjusting windows printer drivers. . . . . . . . . . . . . . .147
Troubleshooting . . . . . . . . . . . . . . . . . . . . . . . . . . . 149
Clearing paper jams . . . . . . . . . . . . . . . . . . . . . . . .149
Fax problem checklist . . . . . . . . . . . . . . . . . . . . . . .160
LCD message list . . . . . . . . . . . . . . . . . . . . . . . . . .163
A guide to printing . . . . . . . . . . . . . . . . . . . . . . . . . 182
How to access the driver screens . . . . . . . . . . . . . . .182
Changing the driver defaults . . . . . . . . . . . . . . . . . .183
Changing the application’s driver settings . . . . . . . . .183
PCL saved driver settings . . . . . . . . . . . . . . . . . . . .183
Setting the driver device options . . . . . . . . . . . . . . .184
Blacks and grays (black overprint) . . . . . . . . . . . . . .185
Black printing (black generation) . . . . . . . . . . . . . . .186
Fine lines enhancement. . . . . . . . . . . . . . . . . . . . . .188
Grayscale printing. . . . . . . . . . . . . . . . . . . . . . . . . .189
Color matching. . . . . . . . . . . . . . . . . . . . . . . . . . . .191
Printer color management . . . . . . . . . . . . . . . . . . . .193
Office color . . . . . . . . . . . . . . . . . . . . . . . . . . . . . .195
Office color - RGB options . . . . . . . . . . . . . . . . . . . .195
Customising RGB office color
with the color correct utility . . . . . . . . . . . . . . . .197
Graphic pro . . . . . . . . . . . . . . . . . . . . . . . . . . . . . .197
Types of ICC profile supported . . . . . . . . . . . . . . . . .199
Graphic pro workflow – overview . . . . . . . . . . . . . . .199
Matching the color of a monitor, scanner or camera . .202
Simulating another printer - RGB source data . . . . . .204
Contents > 4
Page 5

CMYK ink simulations - CMYK source data . . . . . . . . .206
Rendering intents . . . . . . . . . . . . . . . . . . . . . . . . . .209
Pure black text / graphics . . . . . . . . . . . . . . . . . . . .210
Color match precision . . . . . . . . . . . . . . . . . . . . . . .210
Printer driver settings for ICC profile creation or no color
matching . . . . . . . . . . . . . . . . . . . . . . . . . . . . .210
Finishing options . . . . . . . . . . . . . . . . . . . . . . . . . .211
Specifications . . . . . . . . . . . . . . . . . . . . . . . . . . . . . 233
Contents > 5
Page 6

E
MERGENCY FIRST AID
diagline_symbol.eps
Take care with toner powder:
If swallowed, induce vomiting and seek medical
attention. Never attempt to induce vomiting if person is
unconscious.
If inhaled, move the person to an open area for fresh
air. Seek medical attention.
If it gets into the eyes, flush with large amounts of
water for at least 15 minutes keeping eyelids open. Seek
medical attention.
Spillages should be treated with cold water and soap to
help reduce risk of staining skin or clothing.
Emergency first aid > 6
Page 7
N
OTES, CAUTIONS AND WARNINGS
Note
A note provides additional information to supplement
the main text.
CAUTION!
A caution provides additional information which, if
ignored, may result in equipment malfunction or
damage.
WARNING!
A warning provides additional information which, if
ignored, may result in a risk of personal injury.
For the protection of your product, and in order to ensure that
you benefit from its full functionality, this model has been
designed to operate only with genuine Oki Printing Solutions
toner cartridges. These can be identified by the Oki Printing
Solutions trademark. Any other toner cartridge may not operate
at all, even if it is described as “compatible”, and if it does work,
your product's performance and print quality may be degraded.
Specifications subject to change without notice. All trademarks
acknowledged.
Notes, cautions and warnings > 7
Page 8

I
NTRODUCTION
Congratulations on choosing this Oki Printing Solutions Multi
Function Product (MFP). It is designed with advanced features, to
give you clear, vibrant color prints and crisp black and white
pages at high speed on a range of office print media.
With this MFP, you can instantly scan paper-based documents
and deliver the electronic image to various destinations including
e-mail addresses, printers, ftp servers or someone else's
computer on the network. This MFP also has a “walk-up” fax
facility allowing you to send your documents to a destination fax
number instantly.
Your MFP includes these features:
> Multi-level technology produces subtler tones and
smoother gradations of color to lend photographic quality
to your documents.
> Up to 20 pages per minute in full color for fast printing of
high impact color presentations and other documents.
Up to 10 copies per minute (at 300 dpi) in full color for fast
copying.
> Up to 32 pages per minute in black and white for fast and
efficient printing of all general purpose documents not
requiring color.
Up to 16 copies per minute (at 300 dpi) in black and white
for fast and efficient copying of all general purpose
documents not requiring color.
> 1200 x 600dpi (dots per inch) print resolution for high
quality image production showing the finest detail.
> 600 x 600dpi (dots per inch) copy resolution.
> Single Pass Color Digital LED technology for high speed
processing of your printed pages.
> New Profile Assistant utility allows you to download ICC
profiles to the hard disk (Hard Disk Drive required).
> Photo Enhance mode to improve printouts of photographic
images (Windows PCL driver only).
> High speed USB 2.0 interface.
Introduction > 8
Page 9

> Scan to E-mail - Connected to an Ethernet network and a
SMTP server, this MFP allows you to transmit document(s)
over the internet via e-mail. With a touch of the e-mail
key and the selection of your recipients' e-mail addresses,
the document(s) is/are first scanned and converted into
an image file, and then transmitted to remote recipients
within minutes.
> Scan to FTP - Allows you to send scanned documents to a
server or a personal computer's file folder over an intranet
with FTP (File Transfer Protocol), HTTP (Hypertext Transfer
Protocol), CIFS (Common Internet File System) protocol.
The scan to filing feature removes the need for the mail
server to handle large attachments.
> LDAP - Allows the end-user to access the corporate email
address book securely, plus outbound emails
automatically have the user's name in the "sent" field,
therby eliminating outbound anonymous emails for
security reasons.
> Multi-tasking - Supports scanning one job while printing
another to ensure greater productivity.
> Digital Copying - An intuitive control panel, makes digital
copying fast and easy.
> Network/PC Printing - When connected to a network, the
MFP is able to perform network or PC printing (available in
“Scan-to Mode”).
> Multiple Pages Sending - With the Auto Document Feeder
(ADF), the MFP allows a stack of up to 50 page
document(s) to be continuously scanned.
> Faxing - An intuitive control panel, makes direct faxing
fast and easy.
> Advanced fax transmission and reception, including
delayed transmissions, sending to multiple locations,
confidential transmission and reception, and polling.
> Address Book/Phone Book/Profiles Managing - This
provides a convenient way to manage all the e-mail
addresses, fax numbers and profiles (filing destinations).
Simply typing the machine's IP address in the URL field of
your browser will prompt the MFP web page. This web
page allows you to create up to 300 e-mail addresses, 200
Introduction > 9
Page 10

fax numbers and several filing destinations to manage
your document.
The following optional features are available:
> Internal hard disk drive for storage of overlays, macros
and downloadable fonts, and automatic collation of
multiple copies of multi page documents.
> Additional memory, to allow printing of more complex
pages.
> Additional paper tray for loading a further 530 sheets to
minimise operator intervention, or different paper stocks
for letterhead stationery, alternative paper sizes or other
print media.
> Automatic two-sided (duplex) printing for economical use
of paper and compact printing of larger documents.
> Storage cabinet.
A
BOUT THIS GUIDE
Note
Images used in this manual may include optional
features that your MFP does not have installed.
This manual is your user’s guide (check the web site,
www.okiprintingsolutions.com, for the most up-to-date version)
for your MFP and forms part of the overall user support listed
below:
> Safety, Warranty, and Regulatory Information: to
provide information for safe use of the MFP.
This is a paper document that is packaged with the MFP
and should be read before setting up your MFP.
> Set-up Guide: to describe how to unpack, connect and
turn on your MFP.
This is a paper document that is packaged with the MFP.
> This User’s Guide: to help you to become familiar with
your MFP and make the best use of its many features.
Introduction > 10
Page 11

Also included are guidelines for troubleshooting and
maintenance to ensure that it performs at its best.
Additionally, information is provided for adding optional
accessories as your printing needs evolve.
This is an electronic document stored on CD 1.
> Installation Guides: accompany consumable items and
optional accessories to describe how to install them.
These are paper documents that are packaged with the
consumables and optional accessories.
> On-line Help: on-line information accessible from the
printer driver and utility software.
ON-
LINE USER GUIDE
This guide is intended to be read on screen using an Adobe
Reader. Use the navigation and viewing tools provided in Adobe
Reader.
You can access specific information in two ways:
> In the list of bookmarks down the left hand side of your
screen, click on the topic of interest to jump to the
required topic. (If the bookmarks are not available, see
“Contents” on page 3).
> In the list of bookmarks, click on Index to jump to the
Index. (If the bookmarks are not available, use the see
“Contents” on page 3). Find the term of interest in the
alphabetically arranged index and click on the associated
page number to jump to the page containing the term.
P
RINTING PAGES
The whole manual, individual pages, or sections may be printed.
The procedure is:
1. From the toolbar, select File > Print (or press the
Ctrl + P keys).
Introduction > 11
Page 12

2. Choose which pages you wish to print:
(a) [All pages], (1), for the entire manual.
(b) [Current page], (2), for the page at which you are
looking.
acroprint1.eps
1
2
3
(c) [Pages from] and [to], (3), for the range of pages
you specify by entering their page numbers.
3. Click OK.
Introduction > 12
Page 13
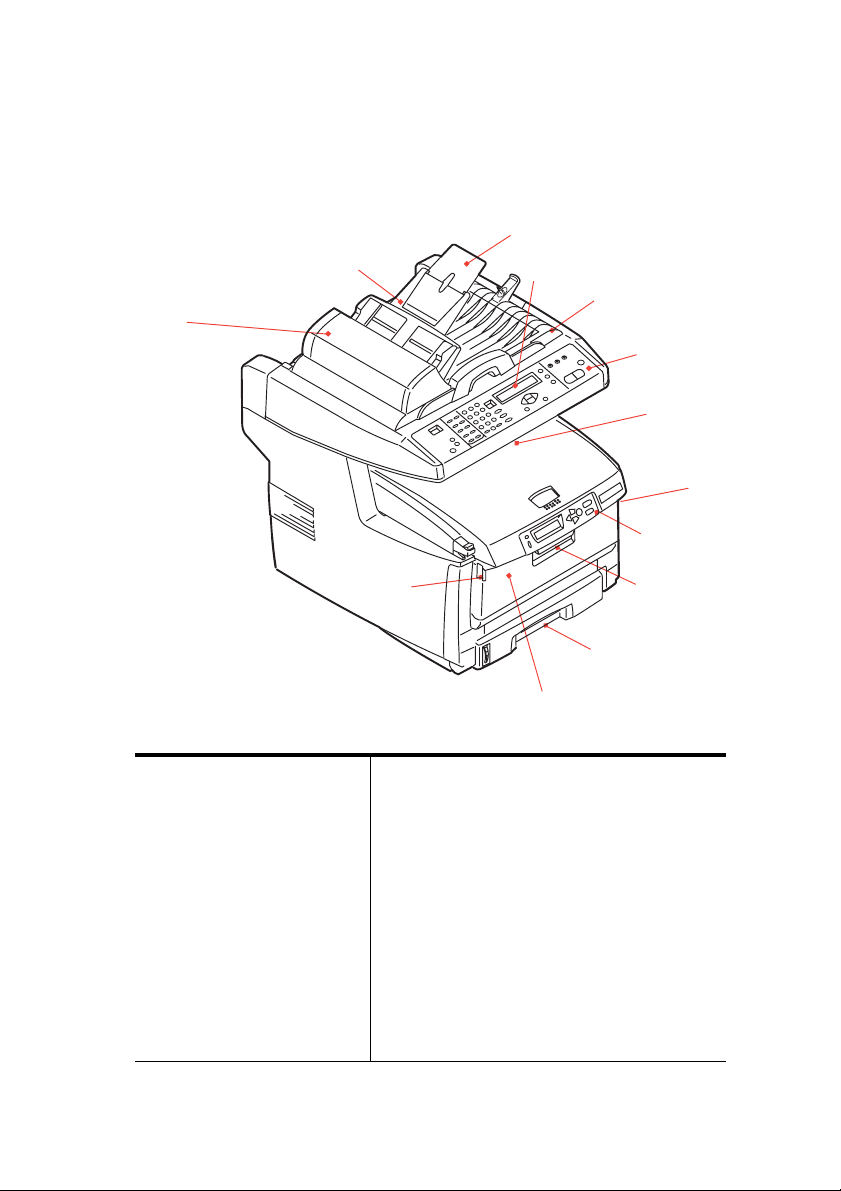
MFP O
F
RONT VIEW
VERVIEW
MFP front.eps
7
10
9
8
11
12
1
2
3
1. Output stacker, face
down. Standard printed
copy delivery point. Holds
up to 250 sheets at 20 lb.
(80g/m²).
2. Multi purpose tray release
buttons (press).
3. Operator Panel with LCD
display. Status LEDs and
operator buttons.
4. Front Cover release (lift).
5. Paper tray.
Standard blank paper
tray. Holds up to 300
sheets of 20 lb. (80g/m²)
paper.
MFP Overview > 13
2
6
6. Multi purpose feeder (shown closed). Used
for feeding heavier paper stocks,
envelopes and other special media. Also
for manual feeding of single sheets when
required.
7. Automatic Document Feeder (ADF) Unit.
8. LCD Display.
9. ADF Paper Tray.
10. ADF Paper Support.
11. Document Cover.
12. Control Panel.
4
5
Page 14
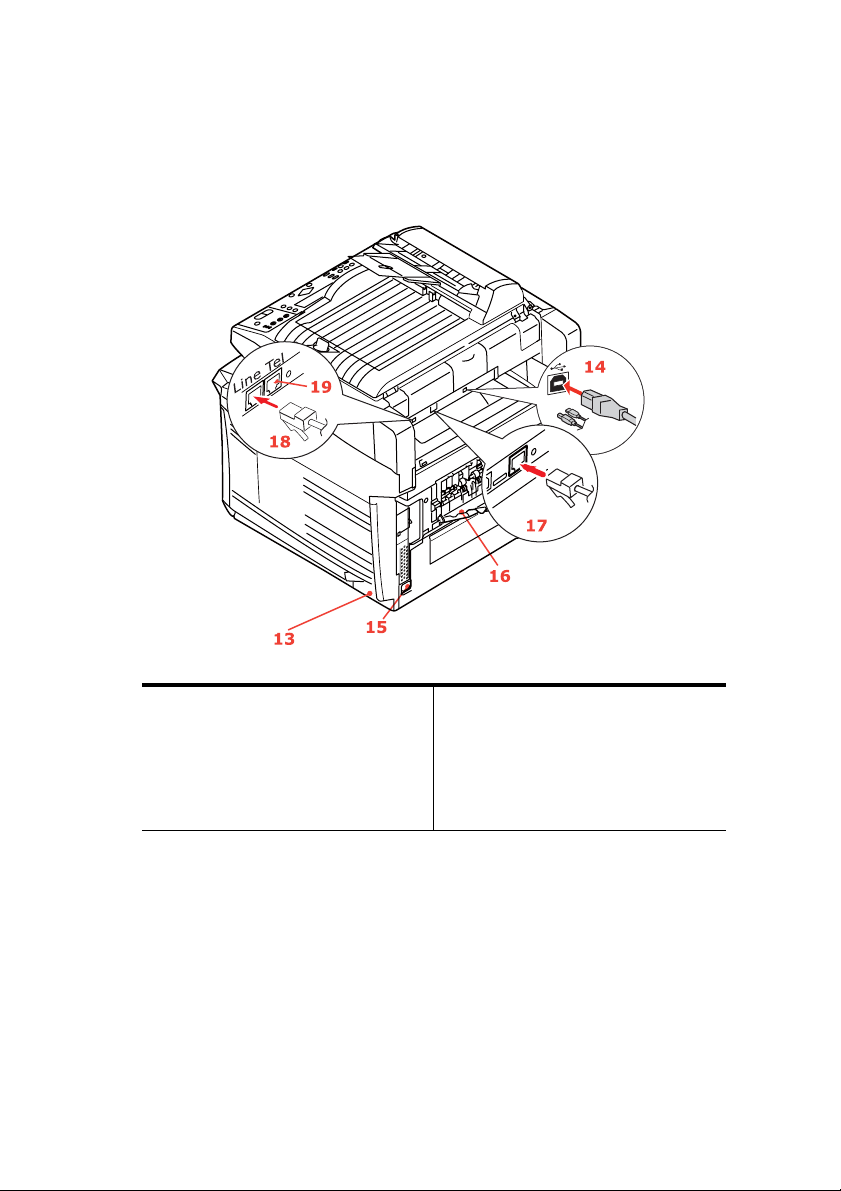
R
EAR VIEW
This view shows the connection panel and the rear output
stacker. MFP rear.eps
13. ON/OFF Power switch.
14. USB interface.
15. AC power socket.
16. Rear, face up, 100 sheet stacker.
17. Network Connector.
18. Line connection. Socket for
connecting the fax machine to the
telephone line.
19. Tel connection. Socket for
connecting a telephone handset
(if required).
When the rear paper stacker is folded down, paper exits through
the rear of the MFP and is stacked here face up. This is mainly
used for heavy print media. When used in conjunction with the
multi purpose feed tray, the paper path through the MFP is
essentially straight. This avoids bending the paper around curves
in the paper path and enables feeding of up to 54 lb. (203g/m²)
media.
MFP Overview > 14
Page 15
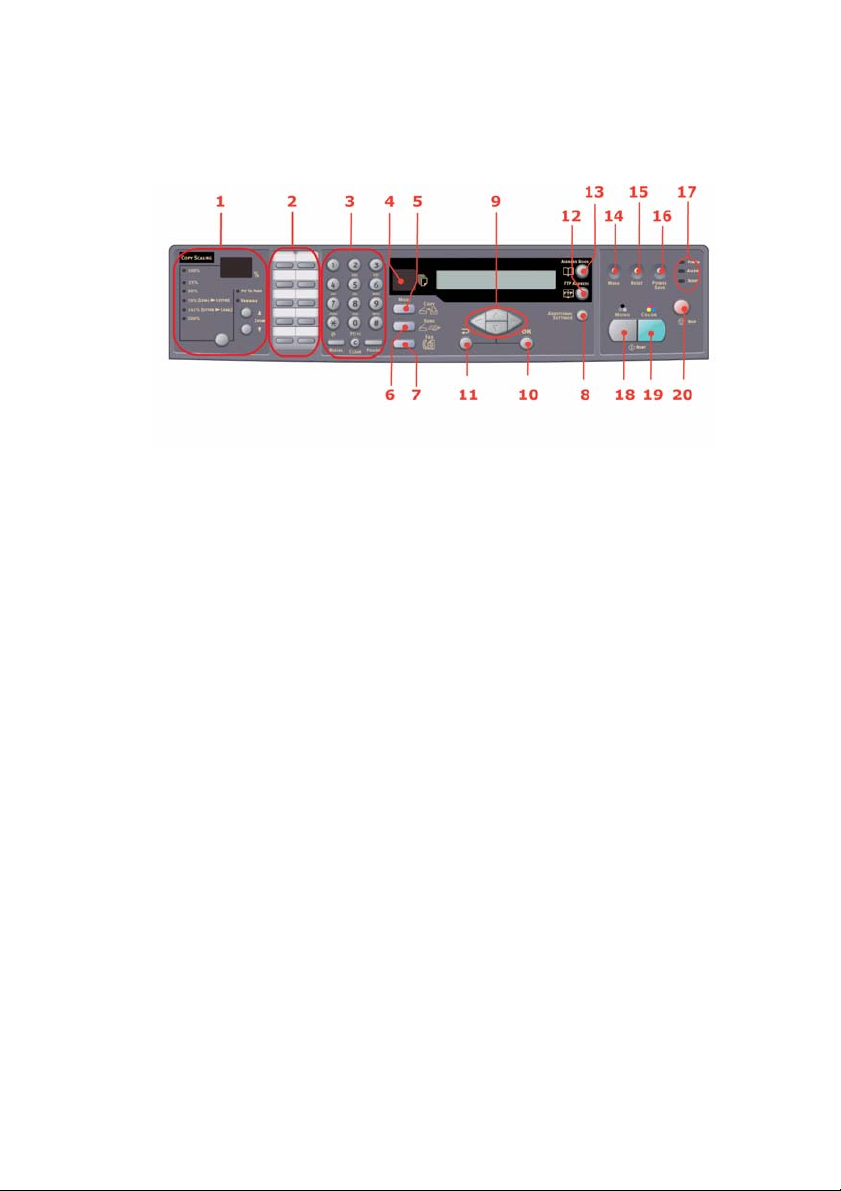
THE
CONTROL PANEL
Control panel_oda.jpg
C
OPY AND DIALING AREA
1. Zoom Used to increase or decrease scaling in 1% increments
2. One-touch keypad Provides one-touch dialing of your most often used or
3. Keypad Alpha/numerical keys: used to enter copy quantity,
up to 400% and down to -25%.
A further choice of scaling can be made from preset
percentages.
favorite fax numbers.
fax number or e-mail address.
Redial key: used to manually resend a fax.
Clear key: used to delete entry from the LCD panel.
Pause key: used to insert a “-” within a fax number if
dialing an extension.
MFP Overview > 15
Page 16

Control panel_oda.jpg
LCD
AND FUNCTION AREA
4. Copy Count Indicates the number of copies selected.
5. Copy Mode Used to select Copy mode (also the default working
6. Send Mode Used to select Send mode.
7. Fax Mode Used to select Fax mode.
8. Additional Settings Used to execute additional settings of “Copy” and
9. Up/Down/Left/Right
Keys
10. OK Used to select and confirm current setting selections.
11. Return Used to cancel selections and go back to the top level of
12. FTP Address Used to indicate the stored FTP address for the “Send”
13. Address book Used to indicate the stored E-mail addresses for the
mode).
“Send” modes. (The settings are available only for three
minutes. After three minutes, the settings will
automatically return to the default value).
Used to move the cursor in the LCD up/down/left/right.
The up/down keys are used to switch function
indication.
the setting. The key is also used to cancel any previous
input.
function. This key is only available in the “Send” mode.
Send function.
Also used to indicate the stored Fax numbers for the fax
function. Press once to view speed dial numbers, press
twice to view group dial numbers.
MFP Overview > 16
Page 17

Control panel_oda.jpg
S
TART AND OTHER KEYS
14. Menu Select to access the menu to set up the MFP.
15. Reset Select to change the scanner to the factory default
16. Power save Press once to go to “sleep” mode (continuous press is
17. Power LEDs
Power
Alarm
Sleep
18. Mono Select to send or copy document(s) in monochrome.
19. Color Select to send or copy in color.
20. Stop Select to stop all operation (LCD indication shifts to
settings.
invalid).
Illuminates to indicate “power on and ready”.
Illuminates to indicate error condition.
Illuminates to indicate power save mode.
stand-by screen for each function). Does not effect
settings.
C
HANGING THE DISPLAY LANGUAGE
The default language used by your MFP for display messages and
for report printing is English. If required, this can be changed
using the MFP Network Setup Tool or web page, refer to
“Configuration” on page 34.
MFP Overview > 17
Page 18
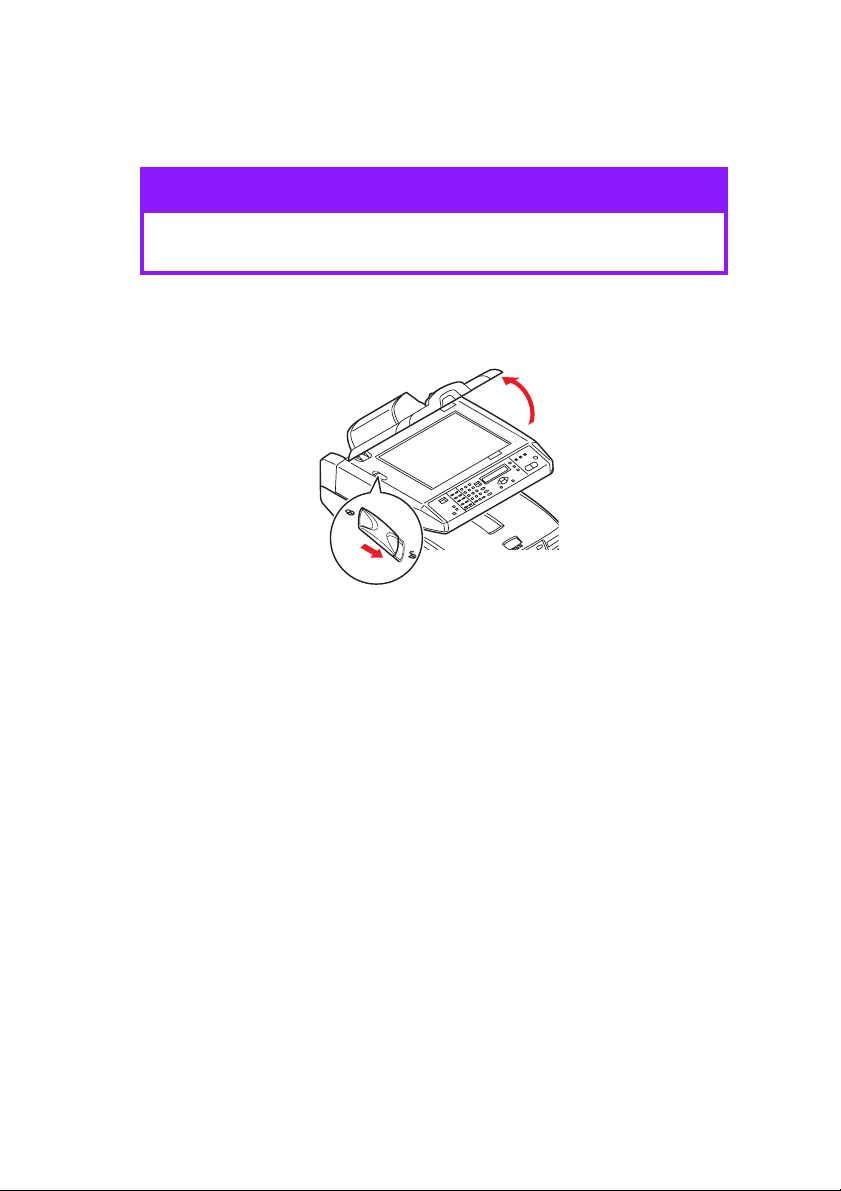
G
ETTING STARTED
CAUTION!
Make sure the scanner is in the UNLOCKED position
before operating.
1. Open the document cover.
2. Move scan lock lever to UNLOCKED position.
I
NSTALLING
T
WAIN AND PRINTER DRIVERS
1. Start Microsoft Windows.
2. Insert the CD-ROM supplied into your CD ROM drive.
MFP
DRIVERS AND UTILITIES
Scanner
3. The CD-ROM will auto launch on most systems. However,
if your system does not support auto launching CD-ROMs,
press the Start button, choose RUN, type d:\setup.exe (d:
the CD-ROM drive in use), and then click OK.
4. Follow the on-screen instructions to complete the driver
installation.
MFP
NETWORK SETUP TOOL
The MFP network setup utility can be found on the CD 1 in the
Network Software menu. Follow the on-screen instructions to
complete the setup tool installation.
Getting started > 18
Page 19
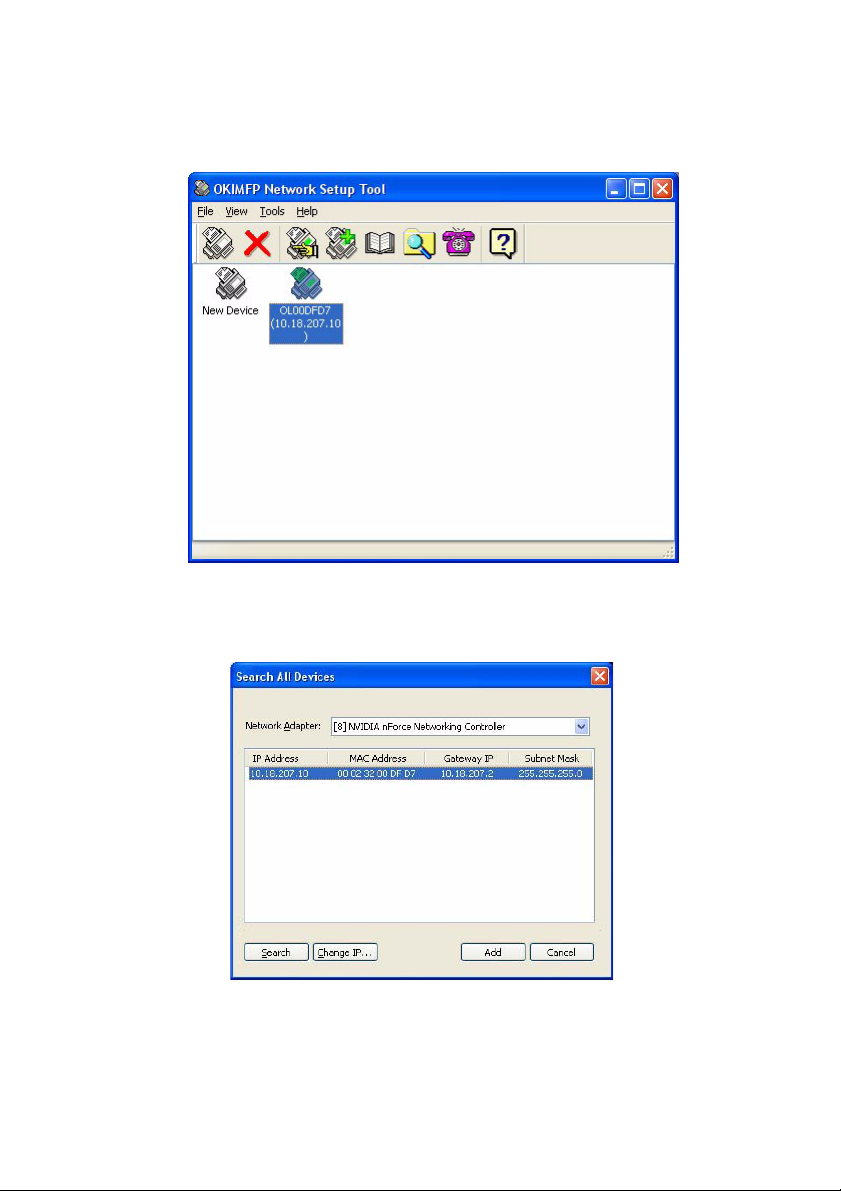
The MFP network setup tool can discover the devices over
network connections. MFP setup.jpg
1. To search and install, select File > Search All Devices...
2. Click Search.
MFP setup search.jpg
3. Highlight the required search result and click Add.
Getting started > 19
Page 20

The MFP network setup tool allows you to configure your MFP.
Refer to “Pre-configuration information” on page 29 for detailed
instructions.
P
APER RECOMMENDATIONS
Your MFP will handle a variety of print media, including a range
of paper weights and sizes, transparencies and envelopes. This
section provides general advice on choice of media, and explains
how to use each type.
The best performance will be obtained when using standard 20
~24 lb. (75~90g/m²) paper designed for use in copiers and laser
printers. A suitable types are
®
> Hammermill
(90 g/m
Laser Printer Radiant White, 24 lb. US Bond
²
)
> Xerox® 4024, 20 lb. US Bond 20 lb. (75 g/m²)
> Oki
®
52206101 Bright White Proofing Paper, 32 lb. US
Bond (120 g/m
2
)
Use of heavily embossed or very rough textured paper is not
recommended.
Pre-printed stationery can be used, but the ink must not offset
when exposed to the high fuser temperatures used in the printing
process.
Envelopes should be free from twist, curl or other deformations.
They should also be of the rectangular flap type, with glue that
remains intact when subjected to hot roll pressure fusing used in
this type of MFP. Window envelopes are not suitable.
®
> Oki
Premium Envelopes (size #10)
52206301 (100 count)
and
52206302 (500 count)
Transparencies should be of the type designed for use in copiers
and laser printers. We strongly recommend Oki transparencies
(Order No. 52205701). In particular, avoid office transparencies
designed for use by hand with marker pens. These will melt in the
fuser and cause damage.
Getting started > 20
Page 21

Labels should also be of the type recommended for use in copiers
and laser printers, in which the base carrier page is entirely
covered by labels. Other types of label stock may damage the
printer due to the labels peeling off during the printing process.
Suitable types are:
> Avery 5161 White Laser Label (Letter size)
> Avery 7162, 7664, 7666 White Laser Labels (size A4).
Banner Paper
®
> Oki
52206002 (100 count)
8.5 x 35.4 inches (215.90 x 899.16 mm)
Oki® SynFlexTM Paper
> Oki
®
52205901
> 8.5 x 11 inches (215.90 x 279.40 mm)
> Waterproof and Tear-resistant
Getting started > 21
Page 22
C
ASSETTE TRAY
The cassette tray can handle paper weights of 17 lb. to 32 lb
(64g/m² to 120g/m²). The cassette tray is ideal for printing
A4/Letter documents of more than 1 page in length.
SIZE DIMENSIONS WEIGHT (G/M²)
A6 4.1339 x 5.8268 inches
105 x 148mm
A5 5.8268 x 8.2677 inches
148 x 210mm
B5 7.1653 x 10.1181 inches
182 x 257mm
Executive 7.252 x 10.5 inches
184.2 x 266.7mm
A4 8.2677 x 11.6929 inches
210 x 297mm
Letter 8.5 x 11 inches
215.9 x 279.4mm
Legal 13in. 8.5 x 13 inches
216 x 330mm
Legal 13.5in. 8.5 x 13.5 inches
216 x 343mm
Legal 14in. 8.5 x 14 inches
216 x 356mm
Light
17 - 20 lb
64-74g/m²
Medium
20 - 28 lb.
75-104g/m²
Heavy
28 - 32 lb.
105-120g/m²
If you have identical paper stock loaded in the multi purpose tray,
you can have the MFP automatically switch to the other tray when
the current tray runs out of paper. When printing from Windows
applications, this function is enabled in the driver settings. When
printing from other systems, this function is enabled in the Print
Menu.
Getting started > 22
Page 23

M
ULTI PURPOSE TRAY
The multi purpose tray can handle the same media sizes as the
cassette trays but in weights of 20 - 54 lb (75g/m² to 203g/m²).
For very heavy paper stock, use the face up (rear) paper stacker.
This ensures that the paper path through the MFP is almost
straight.
The multi purpose tray can feed paper widths as small as 4.1339
inches (105mm) and lengths up to 47.244 inches (1200mm)
(banner printing).
For paper lengths exceeding 14 inches (356mm) (Legal 14in.)
use paper stock between 24 lb and 34 lb. (90g/m² and 128g/m²)
and the face up (rear) paper stacker.
Use the multi purpose tray for printing on envelopes and
transparencies. Up to 50 sheets of transparencies or 10
envelopes can be loaded at one time, subject to a maximum
stacking depth of 0.3937 inches (10mm).
Watermarked or headed paper should be loaded print side up and
top edge into the MFP.
F
ACE DOWN STACKER
The face down stacker on the top of the MFP can hold up to 250
sheets of 20 lb (80g/m²) standard paper and can handle paper
stocks up to 32 lb. (120g/m²). Pages printed in reading order
(page 1 first) will be sorted in reading order (last page on top,
facing down).
F
ACE UP STACKER
The face up stacker at the rear of the MFP should be opened and
the tray extension pulled out when required for use. In this
condition paper will exit via this path, regardless of driver
settings.
The face up stacker can hold up to 100 sheets of 20 lb (80g/m²)
standard paper, and can handle stocks up to 54 lb (203g/m²).
Always use this stacker and the multi purpose feeder for paper
stocks heavier than 32 lb. (120g/m²).
Getting started > 23
Page 24
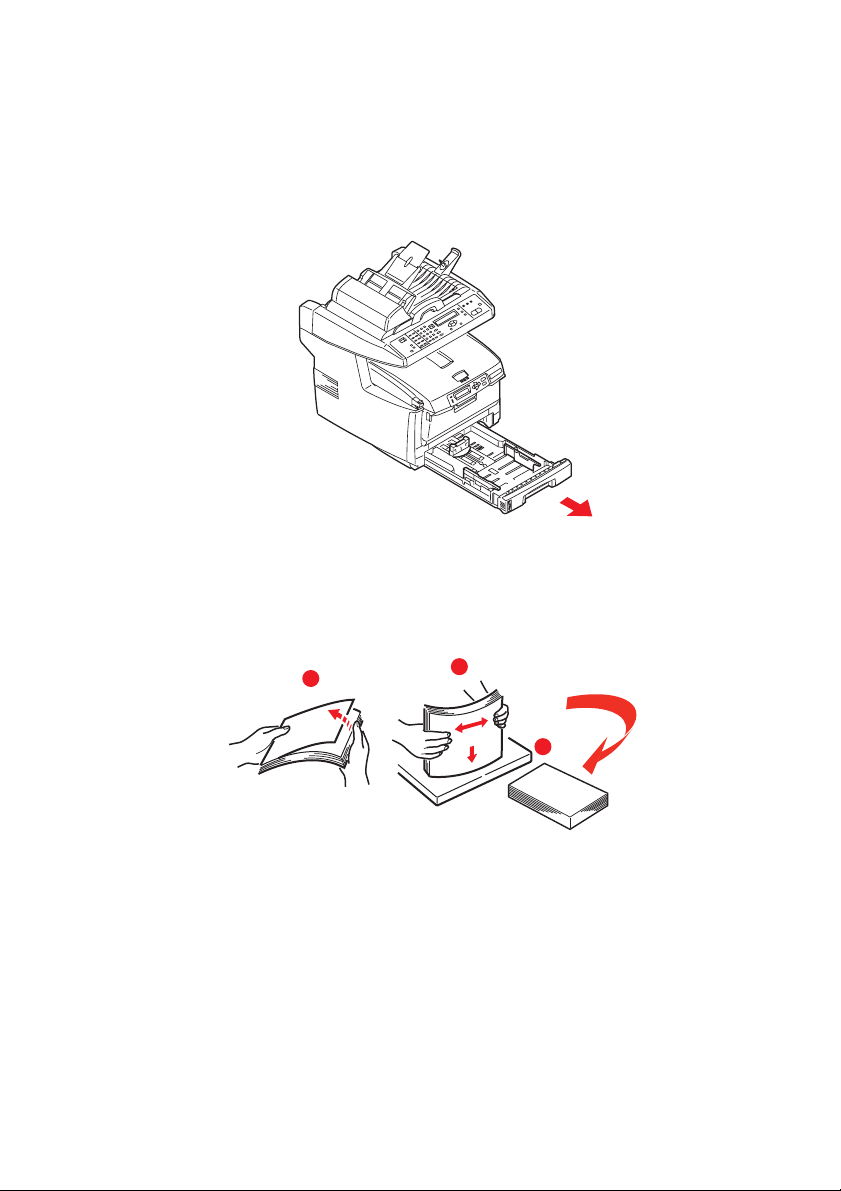
L
OADING PAPER
C
ASSETTE TRAY
1. Remove the paper tray from the MFP. Pull out paper
2. Fan the paper to be loaded at the edges (1) and in the
middle (2) to ensure that all sheets are properly
separated, then tap the edges of the stack on a flat
surface to make it flush again (3).
Fan Paper.eps
1
Loading paper > 24
2
3
Page 25
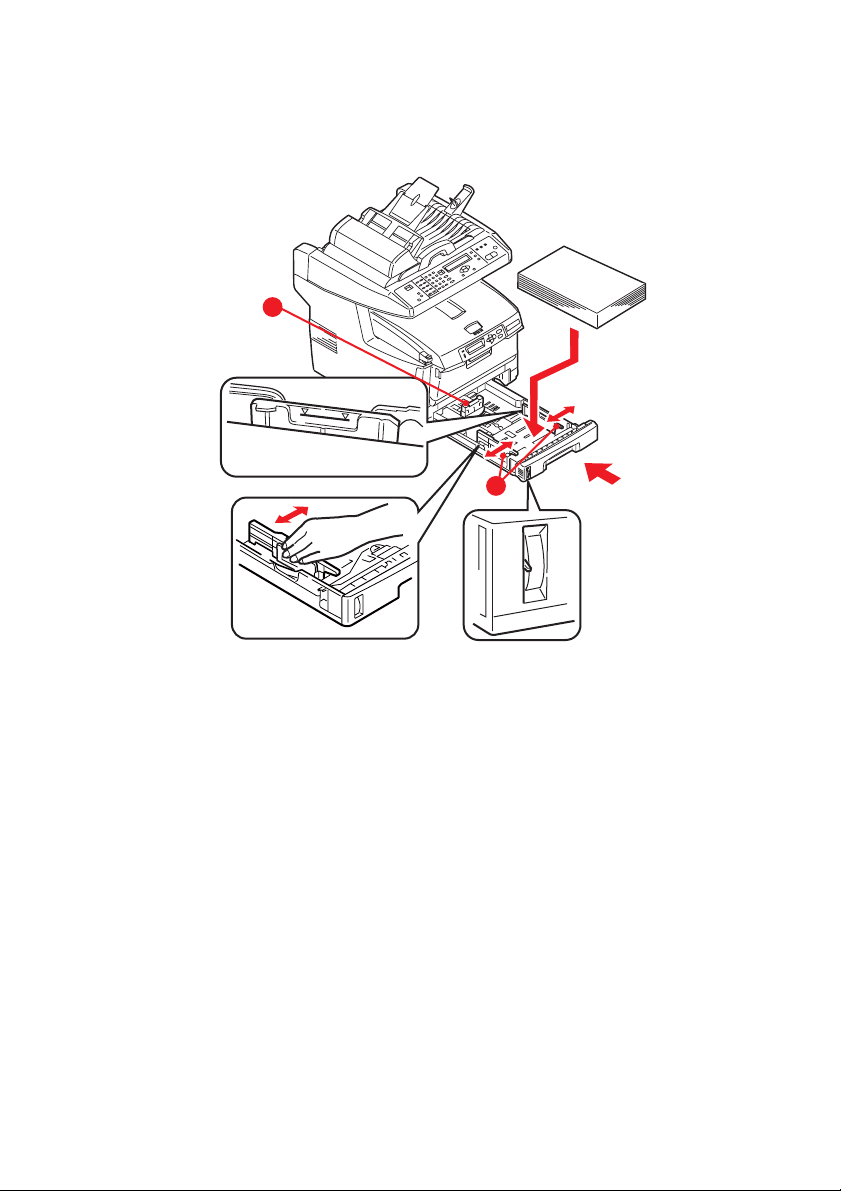
3. Load the paper (for letter headed paper load face down
with top edge towards the front of the MFP). Paper
1
2
load.eps
4. Adjust the rear stopper (1) and paper guides (2) to the
size of paper being used.
To prevent paper jams:
> Do not leave space between the paper and the guides
and rear stopper.
> Do not overfill the paper tray. Capacity depends on the
type of paper stock.
> Do not load damaged paper.
> Do not load paper of different sizes or types at the
same time.
> Do not pull the paper tray out during printing.
Loading paper > 25
Page 26
> Close the paper tray gently.
CAUTION!
Do not open or close the rear paper exit while printing
as it may result in a paper jam.
Face up stacker open.eps
3
4
5. For face down printing, make sure the face up (rear)
stacker (3) is closed (the paper exits from the top of the
MFP). Stacking capacity is approximately 250 sheets,
depending on paper weight.
6. For face up printing, make sure the face up (rear)
stacker (3) is open and the paper support (4) is extended.
Paper is stacked in reverse order and tray capacity is
approximately 100 sheets, depending on paper weight.
7. Always use the face up (rear) stacker for heavy paper
(card stock, etc.).
Loading paper > 26
Page 27
M
1
2
3
ULTI PURPOSE TRAY
1. Open the multi purpose tray and press gently down on the
paper platform (1) to ensure it is latched down.
2. Load the paper and adjust the paper guides (2) to the size
of paper being used.
> When printing on headed paper load the paper into the
multi purpose tray with pre-printed side up and top
edge into the MFP.
> Envelopes should be loaded face up with top edge to
the left and short edge into the MFP.
> Do not exceed the paper capacity of about 50 sheets or
10 envelopes. Maximum stacking depth is 0.3937
inches (10mm).
3. Press the tray latch button (3) inwards to release the
paper platform, so that the paper is lifted and gripped in
place.
Note
Before closing the multi purpose tray, paper platform
(1) must be latched down.
4. Set the correct paper size for the multi purpose tray in
either the Media Menu (printer menu settings) or Print
Menu (scanner menu settings). See “Configuration” on
page 34 for details.
Loading paper > 27
Page 28

Note
You only need to update one menu; the scanner and
printer menus automatically synchronise to ensure the
information is consistent.
Loading paper > 28
Page 29

C
ONFIGURING YOUR MACHINE
M
INIMUM CONFIGURATION REQUIREMENTS
To make the best of this MFP, the following configuration is
required:
To send faxes:
A PSTN telephone line connection.
To send e-mails:
> TCP/IP network.
> A SMTP and an optional POP3 server.
To file document(s) via intranet
> FTP, HTTP, or CIFS Protocol environment.
> Windows 2000, Windows XP, HTTP or FTP server.
PRE-
CONFIGURATION INFORMATION
G
ENERAL
There are no factory default PIN or passwords, these should be
set initially by the system administrator.
FAX
SET UP
Your MFP has to be set up properly to allow faxing from the
machine. The following parameters must be set before using the
fax function:
> Date and time
> Country code
> Station ID and number
See “Initial set up” on page 64. for details.
Configuring your machine > 29
Page 30

N
ETWORK SET UP
The MFP must also be set up properly on your network to perform
scan to e-mail and scan to FTP functions. In order for other
network devices to find the MFP on the network, the following
network parameters have to be set.
1. DHCP enable:
2. IP Address: . . .
3. Subnet mask:. . .
4. Gateway IP:. . .
5. DNS server:. . .
6. SMTP server:. . .
7. SMTP port:25
8. POP3 server: . . .
9. POP3 Port:110
Explanation:
1. DHCP Enable:
Choose Yes to obtain IP/subnet/gateway addresses
automatically from DHCP server. After changing setting
from Disable to Enable, switch scanner module power OFF
then ON.
2. IP Address:
The Internet Protocol (IP) address assigned to your
machine by your network administrator.
3. Subnet Mask:
The net mask address assigned by your network
administrator.
4. Gateway IP:
The gateway IP address assigned by your network
administrator.
Configuring your machine > 30
Page 31

5. SMTP Server:
The IP address of your SMTP Mail Server assigned by your
network administrator.
6. SMTP Port:
The port number of your SMTP Mail Server.
7. DNS server:
The IP address of DNS Server assigned by your network
administrator.
8. POP3 Server:
The IP address of your POP3 server.
9. POP3 Port
The port number of your POP3 Server.
Enter the DNS name, or IP and port number of your POP3
server if your mail server requires POP3 authentication,
before sending e-mails from the machine.
note
You must also set up the “Define from” details to allow
e-mail sending.
Configuring your machine > 31
Page 32

Note
1. DHCP server: With DHCP (Dynamic Host Configuration
Protocol), a host can automatically be given a unique IP
address each time it connects to a network-making IP
address management an easier task for network
administrators. If the DHCP server is available from your
network, you do not need to enter TCP/IP, subnet mask,
gateway, and DNS information. Instead, this information
will be automatically given for the MFP.
2. IP Address: An IP (Internet Protocol) address uniquely
identifies a host connection to an IP network. System
administrator or network designer assigns the IP
address. The IP address consists of two parts, one
identifying the network and the one identifying your
node. The IP address is usually written as four numbers
separated by periods. Each number can be zero to 255.
For example, 10.1.30.186 could be an IP address.
3. SMTP: (Simple Mail Transfer Protocol) is the main
communication protocol used to send and receive e-mail
on the Internet.
4. DNS: (Domain Name System). The DNS server identifies
hosts via names instead of IP addresses. If the DNS
server is available on your network, you can enter the
domain name instead of digits for your SMTP or POP3
servers, such as Pegasus.com.tw instead of 120.3.2.23.
5. POP3: POP3 is the latest Post Office Protocol 3, this is a
service that stores and serves e-mails for various client
machines that are not connected to the Internet 24 hours
a day. E-mails are held in POP3 until you log on.
I
NTERNET COMMUNICATION FEATURES
Scan to e-mail
The MFP allows you to deliver your scanned document to
e-mail addresses on the network. The document is first
scanned and converted to a standard PDF, JPEG, TIFF, or
MTIF (Multi-page TIFF) file format and then transmitted to
remote recipients simultaneously as an e-mail attachment.
When you send an e-mail to someone using this MFP it
uses Simple Mail Transfer Protocol (SMTP) to transfer your
Configuring your machine > 32
Page 33

outgoing e-mails to your SMTP mail server, and then send
these e-mails to your recipients through the internet.
Scan to FTP
Via the intranet with FTP (File Transfer Protocol), HTTP
(Hypertext Transfer Protocol), or CIFS (Common Internet
File System). The MFP allows you to save scanned
documents directly to a designated server or a personal
computer on the network in a standard PDF, JPEG, TIFF, or
MTIFF file format.
CIFS is the sharing system of Microsoft Windows. What is
unique about this filing function is that it allows all
corporate users to share one machine to send documents
to each file folder on a designated server or individual
computer.
The following settings or destinations must be defined by the
system administrator before the MFP can be used to distribute
any scanned document(s) on the network.
> Network and E-mail parameters: Defines the parameters
for TCP/IP, SMTP, and POP3 protocols to send your
scanned document to e-mail addresses.
> Filing destinations: Defines the protocols and destinations
to send your scanned document to FTP servers, web, or
any personal computers on the network.
For more information on filing protocols refer to
“Explanation of filing protocols” on page 61.
Note
1. If the system administrator has chosen DHCP, then the
IP address of TCP/IP, gateway, subnet mask, and DNS
server will be automatically given.
2. When installing the MFP for the first time, it is
recommended that the Administrator retain the default
system settings. The settings can be customized at a
later date, once you are familiar with the operation and
functionality.
Configuring your machine > 33
Page 34

C
ONFIGURATION
There are a number of configuration options available which allow
you to change the scanner, fax and printer settings to suit your
own needs. There are three methods of configuring your MFP:
1. From the MFP's web page.
2. From the MFP’s Management Utility (please refer to the
user's manual of the Network Setup Tool on the CD-ROM
supplied).
note
In order to maintain data integrity and ensure the MFP
configuration is consistent, when you access a menu
item via the MFP Network Setup Tool you are directed
to the corresponding section of the MFP web page.
3. From the MFP scanner control panel.
For illustration purposes only, the configuration menu options
shown are as accessed via the scanner control panel.
Configuring your machine > 34
Page 35

FROM THE WEB PAGE
Type the IP address of the MFP in the URL field of your browser
and then press Enter. The MFP web page appears. For example:
http://192.168.1.41
webpage.jpg
Note
The Administrative Settings are blocked by a
password. It is recommended that the system
administrator creates a new one since the machine is
shipped without a specific password.
Configuring your machine > 35
Page 36

F
ROM THE MANAGEMENT UTILITY
If you have not already done so, install the MFP Network Setup
Tool as described in “MFP network setup tool” on page 18.
MFP
note
The Administrative Settings are blocked by a
password. It is recommended that the system
administrator creates a new one since the machine is
shipped without a specific password.
Configuring your machine > 36
Page 37

FROM THE SCANNER CONTROL PANEL
Press Menu (1) on the scanner control panel. Use the UP and
DOWN arrow keys (2) to navigate, OK (3) to select, and Return
(4) to cancel the selection or exit the menu item.
Control
panel_oda.jpg
Configuring your machine > 37
Page 38

Information menu
ITEM DESCRIPTION OR CHOICE
Model Displays the model name.
Device name Displays the device name.
Scanner MAC address Displays the scanner MAC address.
Printer Serial No. Displays serial number.
F/W version Displays firmware versions:
1.Printer CU version
2.Printer PU version
3.System F/W version
4.Scanner F/W version
5.Web page version
6.Resource file version
Configuring your machine > 38
Page 39

Printer menu
ITEM DESCRIPTION OR CHOICE
Tray 1 Paper Size A4, A5, A6, B5, Legal, Legal 135, Legal 13, Letter,
Tray 2 Paper Size A4, A5, B5, Legal, Legal 135, Legal 13, Letter,
MP Paper Size A4, A5, A6, B5, Legal, Legal 135, Legal 13, Letter,
Tray 1 Media Weight Light, Medium, Heavy.
Tray 2 Media Weight Light, Medium, Heavy.
MP Media Weight Medium, Heavy, Ultra Heavy.
Tray 1 Media Type Plain, LTRhead, Bond, Recycled, Rough.
Tray 2 Media Type Plain, LTRhead, Transparency, Bond, Recycled,
MP Media Type Plain, Letterhead, Transparency, Labels, Bond,
Density Control Auto/Manual.
Adjust Density* Select to perform Density Adjustment.
Adjust Registration* Select to perform Auto Color Registration.
* Menu options only available on the scanner control panel.
Executive, Custom.
Executive, Custom.
Executive, Custom, COM9, COM10, Monarch, DL,
C5.
CardStock, Rough.
Recycled, CardStock, Rough.
Network settings
ITEM DESCRIPTION OR CHOICE
IP Address The IP address of the MFP.
Subnet Mask The IP address of your subnet mask.
Gateway IP The IP address of your gateway.
DNS Server The IP address of your DNS server.
DHCP Enable ON/OFF. Select ON if you wish to enable DHCP.
Device Name Displays the device name.
Mail server
Configuring your machine > 39
Page 40

ITEM DESCRIPTION OR CHOICE
SMTP Server The IP address of your SMTP server.
SMTP Port The port number of your SMPT server.
POP3 Server The IP address of your POP3 server.
POP3 Port The port number of your POP3 server.
Authentification
Method
Login Name User’s choice.
Password User’s choice.
No, SMTP, POP3.
Def. Subject Default text for the Subject field in e-mail messages from
Def. From Default From field in e-mail and fax messages from the
Scan Size Limit The limitation for the attachment to be sent from the MFP.
the MFP. Up to 64 characters are allowed. The default
subject is used only when users did not enter anything in
the Subject field in e-mail message from the MFP.
MFP. Up to 64 characters are allowed.
Choice: 1MB, 3MB, 5MB, 10MB, 30MB, No limit.
Configuring your machine > 40
Page 41

Fax settings
ITEM DESCRIPTION OR CHOICE
Phone Book Edit speed dial!
Edit group dial!
Delete speed dial!
Delete group dial!
Delete All!
Append phone #: OFF/On
REPORTS:
Activity Report
Tra n sm ission Report
Tra n sm ission Report
Broadcast Report
Select to print activity report.
Select to print transmission report.
Yes / Error Only / No.
Select to print broadcast report.
Cancel Fax Jobs Select to cancel fax jobs stored in the MFP’s
memory.
SET UP FAX:
Station ID
Fit to page
Detect dial tone*
Detect busy tone*
Re-dial*
Redial interval*
Ring response
Dial prefix
Manual receive
ECM mode
Speaker volume
* Country code dependant.
Id #: Enter MFP ID number.
Station #: Enter MFP telephone number.
Enable / Disable.
Enable / Disable.
Enable / Disable.
0, 1, 2, 3, 4, 5, 6, 7, 8, 9, 10.
0, 1min, 2min, 3min, 4min, 5min, 6min.
1 ring, 5secs, 10secs, 15secs, 20secs.
If connecting via a PBX line, enter the access
number to obtain an external line.
Enable / Disable.
Enable / Disable.
0, 1, 2, 3.
Configuring your machine > 41
Page 42

Report print
ITEM DESCRIPTION OR CHOICE
Menu Map Select to print menu map.
Printer Demo Page Select to print a sample page.
MFP Usage report Select to print usage information.
Supplies Status Report Select to print information on the consumables
remaining.
Management
Note
1. The Management selection is blocked by a password.
Since the machine is shipped without a specific
password, it is recommended that the administrator
create a new password to ensure security.
2. Security settings by default are set to “Off”. You can
enable the following security settings:
> Copy: restricts the use of the copy function only.
> Copy+Scan to: restricts the use of the copy and scan
functions.
> Fax: restricts the use of the fax function only.
> Fax+Copy: restricts the use of the fax and copy
functions.
> Fax+Copy+Scan to: restricts the use of the fax, copy
and scan functions.
It is recommended that the administrator create a new
4 to 6 digit PIN. When the security feature is enabled
the user will be prompted to enter the PIN.
ITEM DESCRIPTION OR CHOICE
Date/Time Enter the current date and time.
Password Enter new password if the administrator wishes to change
the password. (Up to 8 alphabetical or numerical digits
are allowed to be entered in this field. When entering
alphabetical digits, note that they are case-sensitive.)
Configuring your machine > 42
Page 43

ITEM DESCRIPTION OR CHOICE
Add “To” Address If “On” is selected, when finishing sending an e-mail,
Pin Setting Choice: Off, Copy, Copy + Scan to, Fax, Fax+Copy,
Power Save Enable / Disable.
Power Save Time Select to enter power saving mode after the machine has
Default Mode Scan to, Copy, Fax.
Stand-by Timer 20, 40, 30, 60, 120, 180 seconds.
Country Code* Select the country in which the MFP is situated.
Language Default set to English.
Scan to Log
Report
* Additional country code options available from the web page and MFP
Network Setup Tool.
there will be a dialog box inquiring whether the user
wishes to add the new e-mail address to the machine’s
address book.
Choice: On, Off.
Fax+Copy+Scan to.
Note: The PIN ID input screen is indicated at the time of
“PIN Setting=Enable”.
Enter four to six digits for your pin ID. A PIN ID under four
digits will be denied.
stopped using for a specific period.
Choice: 5, 15, 30, 60, 240 minutes.
Choice: United States/Japan/International/Denmark/
Austria/Italian/Latin America/Great Britain/Germany/
Belgium/Greece/Mexico/Ireland/Hungary/Holland/
Australia/China/Norway/Czech Republic/France/New
Zealand/Russia/Sweden/Poland/Portugal/Singapore/
Tai wa n /.
Language setting can be changed from the web page and
MFP Network Setup Tool.
Select to print all the “Scan to” jobs.
S
PECIFYING THE ADMINISTRATIVE SETTINGS
Configuring your machine > 43
Page 44

Note
The settings can only be done through the web page
or the Network Setup Tool. It can not be set up on the
Control Panel.
The Administrative settings are blocked by a password.
Since the machine is shipped without a specific
password, it is recommended that the administrator
create a new password to ensure security.
ITEM DESCRIPTION OR CHOICE
Address Book
Manager
Profile Manager Create profiles of the filing destinations in which the
Phone Book
Manager
PIN registration Create and delete PIN registrations assigning access
Set up a list of e-mail addresses and groups to which to
send your scanned images.
scanned image can be placed.
Set up a list of fax numbers and groups to which to send
your fax messages.
Note: Phone Book Manager can also be accessed from the
scanner control panel.
rights for users.
Configuring your machine > 44
Page 45

C
ONTENTS OF EACH PRINTER MENU
The printer control panel offers some additional menu options.
Note
The scanner retrieves the latest information from the
printer, ensuring both menu sets are always
synchronised.
Press Enter (1) on the printer control panel. Use the + and - keys
(2) to navigate, Enter (1) to select, and Back (3) to cancel the
selection or exit the menu item.
Op menu1.eps
23
1
READY
ATTENTION
BACK
MENU
ENTER
ON LINE
CANCEL
Informationmenu
ITEM ACTION DESCRIPTION
Print Menu Map Execute Prints complete menu listing with current MFP
Print File List Execute Prints a list of overlays, macros, fonts and
Print PCL Font Execute Prints complete list of all internal PCL fonts
Print PSE Font Execute Prints complete list of all internal PostScript
Print PPR Font Execute Prints complete list of all internal IBM
Print FX Font Execute Prints complete list of all internal Epson FX
settings shown.
other files stored on the MFP’s hard disk drive
(if installed).
plus those stored in ROM (slot 0), flash
memory and in hard disk (if installed).
emulation fonts.
ProPrinter III XL emulation fonts, including
any downloaded to flash memory or hard disk.
emulation fonts, including any downloaded to
flash memory or hard disk.
Configuring your machine > 45
Page 46

ITEM ACTION DESCRIPTION
Demo 1 Execute Prints demonstration page containing graphics
Print Error Log Execute Prints a list of errors encountered by the MFP.
Color Prof List Execute Prints a list of the resident color profiles.
and text in color and monochrome.
Shutdown menu
This menu only appears if the hard disk drive is installed.
Note
This item should always be selected before switching
the printer off, to ensure that no hard disk data is lost.
ITEM ACTION DESCRIPTION
Shutdown Start Execute Performs controlled shutdown of the MFP,
ensuring that all files on the internal hard disk
are closed before power is turned off. Only
power the MFP off when the display indicates
that shutdown is complete.
Configuring your machine > 46
Page 47

Print menu
ITEM CHOICE DESCRIPTION
Copies 1-999 Enter the number of copies of a
Duplex ON/OFF Turns the duplex (2-sided) printing
Paper Feed TRAY1
Auto Tray Switch ON/OFF If two trays contain identical paper, the
Tra y S e que nce DOWN
MP Tray Usage DO NOT USE
Media Check ENABLE
Resolution 600x1200DPI
Toner Save Mode OFF/ON Reduces the amount of toner used for
TRAY 2
MP TRAY
UP
PAPER FEED
TRAY
WHEN
MISMATCH
DISABLE
600DPI MLevel
600DPI
document to be printed from 1 to 999.
function on or off if this feature is
installed.
Selects the default tray for paper feed,
Tray 1 (upper), Tray 2 (lower, if
installed) or MP Tray (multi purpose
tray).
MFP can switch to an alternative source
when the current tray runs out in the
middle of a print job.
Determines tray sequence order when
automatically switching.
If a document to be printed demands a
paper size not installed in the selected
tray, the MFP can automatically feed
from the multi purpose tray instead. If
this function is not enabled, the MFP will
stop and request the correct size of
paper to be loaded.
Determines whether the MFP check the
size of paper loaded matches that
required for the document sent to print.
Sets the default resolution for printing
(dots per inch). 600x1200DPI uses
more memory and requires more time
to process, but prints at a higher
quality.
imaging. Toner saving gives lighter
prints but is more economical.
Configuring your machine > 47
Page 48

ITEM CHOICE DESCRIPTION
Mono-Print
Speed
Orientation PORTRAIT
Lines Per Page 5-64-128 Sets the number of lines of text per
AUTO SPEED
MONO 32PPM
COLOR SPEED
MIXED SPEED
LANDSCAPE
If the first page of a print job is black
and white, the MFP runs at 32ppm
(pages per minute). When a color page
is detected the MFP slows down to
20ppm for the rest of that job.
This setting operates in the same way
as AUTO SPEED, except that the MFP
runs at 32ppm until a color page is
detected. To achieve this speed the MFP
requires an additional 10 – 20 seconds
to warm up and 30 –60 seconds to cool
down when switching to 20ppm for
color pages. This setting is therefore
most appropriate when the majority of
print jobs are entirely black and white.
The MFP runs at 20ppm for all print
jobs. This setting is most appropriate
when the majority of print jobs are in
color.
The MFP automatically switches
between 20ppm for each color page and
32ppm for each black and white page.
When black and white pages are
printed, the 3 color drums are
automatically lifted to maximize their
working life. This operation imposes
delay each time the MFP switches
between color and black and white
printing. However, the 30 –60 second
cool down delay described for MONO
32ppm is avoided by limiting mono
speed to 20ppm. This setting may be
preferred for mostly black and white
printing with some color pages, or
where most print jobs are entirely color
or entirely black and white.
Selects default page orientation
between portrait (tall) and landscape
(wide).
page when raw text is received from
systems other than Windows. The
default for A4 portrait is 65, and for
Letter is 60.
Configuring your machine > 48
Page 49

ITEM CHOICE DESCRIPTION
Edit Size CASSETTE
SIZE
LETTER
EXECUTIVE
LEGAL14
LEGAL13.5
LEGAL13
A4 / A5 / A6 /
B5
CUSTOM
COM-9
ENVELOPE
COM-10
ENVELOPE
MONARCH ENV
DL ENVELOPE
C5 ENVELOPE
Sets the size of the printable page area
to match the size of paper in use. This
is not the same as the physical paper
size, which is always slightly larger. For
dimensions of physical page sizes. See
“Paper recommendations” on page 20..
Media menu
ITEM CHOICE DESCRIPTION
Tra y1
Papersize
Tra y1
Mediatype
/ A5 / A6 / B5
A4
LEGAL14
LEGAL13.5
LEGAL13
LETTER
EXECUTIVE
CUSTOM
PLAIN
LETTERHEAD
BOND
RECYCLED
ROUGH
Selects the size of paper loaded in Tray
1 (upper tray if both trays installed).
For CUSTOM setting see X-DIMENSION
and Y-DIMENSION later in this table.
Selects the type of media loaded in this
tray. This will help the MFP to adjust its
internal operating parameters, such as
engine speed and fusing temperature,
to better accommodate the media to be
fed. For example, letterhead may
benefit from a slightly lower fusing
temperature to ensure that its ink does
not offset.
Configuring your machine > 49
Page 50

ITEM CHOICE DESCRIPTION
Tra y1
Mediaweight
Tra y2
Papersize
Tra y2
Mediatype
Tra y2
Mediaweight
Light
17-20 lb
64-74g/m²
Medium
20 - 28 lb.
75-104g/m²
Heavy
28 - 32 lb.
105-120g/m²
A4 / A5 / B5 /
LEGAL14
LEGAL13.5
LEGAL13
LETTER
EXECUTIVE
CUSTOM
PLAIN
LETTERHEAD
TRANSPARENCY
BOND
RECYCLED
CARDSTOCK
ROUGH
Light
17-20 lb
64-74g/m²
Adjusts the MFP for the weight of paper
stock loaded in this tray.
Selects the size of paper loaded in Tray
2 (lower) if installed. For CUSTOM
setting see X-DIMENSION and YDIMENSION later in this table.
Selects the type of media loaded in this
tray (if installed).
Adjusts the MFP for the weight of paper
stock loaded in this tray (if installed).
Medium
20 - 24 lb.
75-90g/m²
Heavy
24 - 47 lb.
91-176g/m²
Configuring your machine > 50
Page 51

ITEM CHOICE DESCRIPTION
MPT
Papersize
MPT
Mediatype
MPT
Mediaweight
Unit Of
Measure
A4 / A5 / A6 / B5
LEGAL14
LEGAL13.5
LEGAL13
LETTER
EXECUTIVE
CUSTOM
COM-9 ENVELOPE
COM-10
ENVELOPE
MONARCH ENV
DL ENVELOPE
C5 ENVELOPE
PLAIN
LETTERHEAD
TRANSPARENCY
LABELS
BOND
RECYCLED
CARD STOCK
ROUGH
Medium
20 - 24 lb.
75-90g/m²
Heavy
24 - 32 lb.
91-120g/m²
ULTRA HEAVY
32 - 54 lb.
121-203g/m²
MILLIMETER
INCH
Selects the size of paper to be fed from
the multi purpose tray. For CUSTOM
setting see X-DIMENSION and YDIMENSION later in this table.
Selects the type of media to be fed from
the multi purpose tray so that the MFP
can adjust its internal parameters to
better accommodate the selected type
of media.
Selects the media weight to be fed from
the multi purpose tray.
Selects the unit of measure for the next
two items.
X-Dimension 3.937 - 8.2677 -
Y-Dimension 5.8268 - 11.6929
8.5039 inches
100-210-216
MILLIMETER
- 47.244 inches
148-297-1200
MILLIMETER
Configuring your machine > 51
Selects the width of paper defined by
the “CUSTOM” settings referred to in
the foregoing PAPER SIZE settings.
Selects the length of paper defined by
the “Custom” settings referred to in the
foregoing PAPER SIZE settings. Note
that media of up to 1200mm in length
can be fed from the multi purpose tray
for banner printing.
Page 52

Color menu
ITEM CHOICE DESCRIPTION
ColorDensity
Control
Adjust Density EXECUTE Selecting this will perform the auto
Color Tuning PRINT PATTERN Selecting this item prints the color
C Highlight
C Mid-Tone
C Dark
M Highlight
M Mid-Tone
M Dark
Y Highlight
Y Mid-Tone
Y Dark
K Highlight
K Mid-Tone
K Dark
AUTO
MANUAL
-3~0~+3
-3~0~+3
-3~0~+3
-3~0~+3
-3~0~+3
-3~0~+3
-3~0~+3
-3~0~+3
-3~0~+3
-3~0~+3
-3~0~+3
-3~0~+3
If set to AUTO, image density will be
automatically adjusted at power on,
when a new image drum or toner
cartridge is installed, and at intervals of
100, 300 and 500 drum counts. If a 500
drum count interval occurs during a
print job it will occur at the end of that
job, and will take up to 55 seconds. If
set to manual, this adjustment will only
be performed when initiated by the next
menu item.
density set up immediately.
tuning pattern to help you adjust the
color balance.
Adjusts image density for each color
component (cyan, magenta, yellow and
black). Normal setting is 0.
C Darkness
M Darkness
Y Darkness
K Darkness
Ajst Registration EXECUTE Performs automatic color registration
C Reg Fine Ajst
M Reg Fine Ajst
Y Reg Fine Ajst
-3~0~+3
-3~0~+3
-3~0~+3
-3~0~+3
-3~0~+3
-3~0~+3
~+3
-3~0
Adjusts darkness of each color
component (cyan, magenta, yellow and
black). Normal setting is 0.
adjustment. Normally this is done on
power on and when the top cover is
opened and then closed. This process
accurately aligns the cyan, magenta
and yellow images to the black image.
Performs fine adjustment of image
timing in relation to the black image
component.
Configuring your machine > 52
Page 53

ITEM CHOICE DESCRIPTION
Ink Simulation OFF
UCR LOW
CMY 100%
Density
CMYK
Conversion
SWOP
EUROSCALE
JAPAN
MEDIUM
HIGH
DISABLE
ENABLE
ON/OFF
Selects from a range of industry
standard color swatches.
When enabled, black areas are
produced using 100% C, M, and Y
instead of black. This results in a
glossier finish.
Configuring your machine > 53
Page 54

System configuration menu
ITEM CHOICE DESCRIPTION
Pow Save Time 5
Personality AUTO
USB PS Protocol RAW
Clrable Warning ONLINE
Auto Continue ON/OFF Determines whether or not the MFP will
Manual Timeout OFF
Wait Timeout 5~40~300
15
30
60
240
EMULATION
PCL
IBM PPR III XL
EPSON FX
PS3
EMULATION
ASCII
JOB
30 sec
60 sec
OFF
Adjusts the idling time before the
printer automatically switches into
power saving mode. In this mode
power consumption is reduced to a low
level required to just keep the printer
operating and ready to receive data.
When a job is sent the MFP will require
a warm-up time of up to 1 minute
before printing can begin.
This item selects which industry
standard emulation your MFP should
use. When set to AUTO, incoming data
is examined and the correct emulation
is automatically selected each time a
print job is received.
Selects PostScript data format for USB
port.
When ONLINE, non-critical warnings,
such as requests for a different paper
size, can be cleared by pressing the ON
LINE button. When set to JOB, they are
cleared when the print job resumes.
automatically recover from a memory
overflow condition.
Specifies how many seconds the MFP
will wait for paper to be fed before
cancelling the job.
Specifies how many seconds the MFP
will wait when received data pauses
before forcing a page eject. In
PostScript Emulation mode the job will
be cancelled if timeout occurs.
Low Toner CONTINUE
Jam Recovery ON/OFF Specifies whether the MFP should
STOP
Specifies whether the MFP should
continue printing even after a low toner
condition is detected.
perform jam recovery after a paper jam
has occurred. If ON, the MFP will
attempt to print again any pages lost
due to a paper jam once the jam has
been cleared.
Configuring your machine > 54
Page 55

ITEM CHOICE DESCRIPTION
Error Report ON/OFF If ON, the MFP will print error details
when a PostScript Emulation error
occurs.
PCL emulation
ITEM CHOICE DESCRIPTION
Font Source RESIDENT /
Font No. I0~I89 Sets the current default font number
Font Pitch 0.44 CPI~10.00
Symbol Set PC-8 PCL symbol set. If the font source and
A4 Print
Width
RESIDENT 2
CPI~99.99 CPI
78 COLUMN
80 COLUMN
Specifies the location of the PCL
default font. Normally this will be
INTERNAL unless additional fonts are
installed in the expansion ROM slot or
additional fonts have been
downloaded to RAM as permanent
fonts.
from the currently selected source,
which could be internal (I), ROM slot
(C) or downloaded (S).
Point size of selected default font.
number are changed to one which
does not support the selected symbol
set, this must be changed to an
available symbol set for that font.
Sets the number of columns subject
to Auto LF with A4 paper in PCL. This
is the value when Auto CR/LF Mode is
set to OFF with the 10CPI character.
White Page
Skip
CR Function CR / CR+LF Selects whether a received carriage
LF Function LF / LF+CR Selects whether a received line feed
Print Margin NORMAL
OFF/ON Selects whether blank pages are
1/5 INCH (5.08 mm)
1/6 INCH (4.24 mm)
printed or not.
return character (0Dh) also causes a
line feed.
character (0Ah) also causes a
carriage return.
Sets the non-printable page area.
NORMAL is PCL compatible.
Configuring your machine > 55
Page 56

ITEM CHOICE DESCRIPTION
True Bla c k OFF/ON Selects whether black image data is
Pen Width
Adjust
Tra y I D #
MP Tray
ON/OFF
1~4~59
printed using black toner (ON) or
100% CMY (OFF). (Valid in PCL
emulation mode only.)
PPR emulation
ITEM CHOICE DESCRIPTION
Character
Pitch
Font
Condense
Character Set SET 1; SET 2 Specifies a character set.
Symbol Set IBM 437 Specifies a symbol set.
Letter 0 Style DISABLE
Zero
Character
Line Pitch 6 LPI; 8 LPI Specifies the line spacing.
White Page
Skip
CR Function CR / CR+LF Selects whether a received carriage
LF Function LF / LF+CR Selects whether a received line feed
Line Length 80 COLUMN / 136
10 CPI; 12 CPI; 17
CPI; 20 CPI;
PROPORTIONAL
12CPI - 20CPI;
12CPI - 12CPI
ENABLE
NORMAL
SLASHED
OFF/ON Selects whether blank pages are
COLUMN
Specifies character pitch in IBM PPR
emulation.
Specifies 12CPI pitch for Condense
Mode.
Specifies the style that replaces 9BH
with letter o and 9DH with a zero
Sets the zero to be slashed or
unslashed.
printed or not.
return character (0Dh) also causes a
line feed.
character (0Ah) also causes a
carriage return.
Specifies the number of characters
per line.
Configuring your machine > 56
Page 57

ITEM CHOICE DESCRIPTION
Form Leng th 11 Inch / 11.7 Inch
TOF Position 0.0 Inch - 1.0 Inch
Left Margin 0.0 Inch - 1.0 Inch
Fit To Letter DISABLE
Tex t H e i g h t SAME / DIFF Sets the height of a character.
/ 12 Inch
279.40 / 297.18 /
204.80 millimeters
(0 - 25.4 mm)
(0 - 25.4 mm)
ENABLE
Specifies the length of paper.
Specifies the distance of print from
the top edge of the paper.
Specifies the distance of print from
the left hand edge of the paper.
Sets the printing mode that can fit
print data, equivalent to 11 inches
(66 lines/279.40 millimeters), in the
LETTER-size printable area.
SAME: Regardless of CPI, same
height
DIFF: As CPI, character heights vary.
FX emulation
ITEM CHOICE DESCRIPTION
Character
Pitch
Character Set SET 1 / SET 2 Specifies a character set.
10 CPI; 12 CPI; 17
CPI; 20 CPI;
PROPORTIONAL
Specifies character pitch in this
emulation.
Symbol Set IBM 437 Specifies a symbol set.
Letter 0 Style DISABLE
Zero
Character
Line Pitch 6 LPI / 8 LPI Specifies the line spacing.
White Page
Skip
CR Function CR / CR+LF Selects whether a received carriage
ENABLE
NORMAL
SLASHED
OFF/ON Selects whether blank pages are
Specifies the style that replaces 9BH
with letter o and 9DH with a zero
Sets the zero to be slashed or
unslashed.
printed or not.
return character (0Dh) also causes a
line feed.
Configuring your machine > 57
Page 58

ITEM CHOICE DESCRIPTION
Line Length 80 COLUMN / 136
Form Length 11 inch / 11.7 inch
TOF Position 0.0 inch - 1.0 inch
Left Margin 0.0 inch - 1.0 inch
Fit To Letter DISABLE
Tex t H e i g h t SAME / DIFF Sets the height of a character.
COLUMN
/ 12 inch
279.40 / 297l18 /
204.80 mm
0 - 25.4 mm
0 - 25.4 mm
ENABLE
Specifies the number of characters
per line.
Specifies the length of paper.
Specifies the distance of print from
the top edge of the paper.
Specifies the distance of print from
the left hand edge of the paper.
Sets the printing mode that can fit
print data, equivalent to 11 inches
(66 lines), in the LETTER-size
printable area.
SAME: Regardless of CPI, same
height.
DIFF: As CPI, character heights vary.
Configuring your machine > 58
Page 59

USB menu
ITEM CHOICE DESCRIPTION
Soft Reset ENABLE
Speed 12 / 480 Mbps Selects the interface speed
Offline Receive ENABLE
Serial Number ENABLE
DISABLE
DISABLE
DISABLE
Enables or disables the SOFT RESET
command.
Maintenance menu
ITEM CHOICE DESCRIPTION
Menu Reset EXECUTE Resets menus to default settings.
Save Menu EXECUTE Saves current menu settings as default
Power Save ENABLE
Paper Black
Setting
Paper Color
Setting
DISABLE
–2~0~+2 Used for small adjustment when you
–2~0~+2 As above, but for color printing.
values. At confirmation prompt, press
ENTER to confirm save, or CANCEL to
cancel.
Enables or disables automatic power
save mode. Delay before entering this
mode is set in the system configuration
menu.
experience faded print or light specks /
streaking in monochrome printing on
white paper. Select a higher value to
reduce fading, or a lower value to
reduce specks or streaking in high
density print areas.
Transpr Black
Setting
Transpr Color
Setting
SMR Setting –3~0~+3
BG Setting –3~0~+3
–2~0~+2 As above but for mono printing on
–2~0~+2 As above but for color printing on
Configuring your machine > 59
transparencies.
transparencies.
Page 60

Usage menu
ITEM DESCRIPTION
Tra y n Page Count The total number of pages fed from tray n.
MPT Page Count The total number of pages fed from the multi purpose
Color Page Count The total number of pages printed in color.
Mono Page Count The total number of pages printed in monochrome.
tray.
K Drum Life
Remaining
C Drum Life
Remaining
M Drum Life
Remaining
Y Drum Life
Remaining
Belt Life Remaining Percentage of belt life remaining.
Fuser Life Remaining Percentage of fuser life remaining.
K Toner
C Toner
M Toner
Y Toner
Percentage of life remaining in these consumable
items.
Cartridge size and current toner level.
Job log menu
Note
Access to this menu is password restricted.
ITEM CHOICE DESCRIPTION
Job Log ENABLE
DISABLE
Prints a list of jobs carried out on
this MFP.
Configuring your machine > 60
Page 61

E
XPLANATION OF FILING PROTOCOLS
FTP
FTP stands for “File Transfer Protocol.” It is a common method of
transferring files via the Internet from one computer to another.
FTP use RFC 959[FTP] as their protocol. Therefore, ensure you
have a legal FTP account with the privilege of writing under the
directory to save the files and password before using FTP to save
documents. To add a sub-directory from the MFP, you need to
have the privilege of adding a new directory.
HTTP
HTTP use RFC 2616[HTTP 1.1] as their protocol, and the default
Port is usually 80. If you are not using the HTTP port to save files,
you must change the MFP HTTP Port to the port for the Web
Server.
Generally speaking, a Hyper Text Transfer Protocol (HTTP) Web
Server will use an anonymous account for authentication, so that
the user can link directly to the web page without entering the
user name and password first. Therefore, if the HTTP Server does
use an anonymous account for authentication when you use this
MFP to save files, there is no need for setting any text in the field
of Login name and Password for the MFP.
On the other hand, if the HTTP server does not allow an
anonymous account for authentication of connection to the web
page, the user will be prompted to enter a user name and
password first when connecting to the web site. In this mode, the
file saving feature is available only when entering the user name
and password permitted by the server in the Login name and
Password field for the MFP.
Therefore, make sure of the mode that your Web Server allows
before using HTTP for file saving. If anonymous access mode is
not allowed, you must have a legal HTTP account and password.
Since this MFP will check whether the directory for file saving
really exists before proceeding to file saving and writing after
scanning to the specified directory, you have to set the directory
for files saving as “browse” and allow for writing in the Web
Server; otherwise the MFP will not be able to write the file into
the directory.
Configuring your machine > 61
Page 62

If you wish to use the MFP to save files, in addition to making
some settings in Web Server, you will have to confirm that the
account has writing privilege for connecting to the Web Server. If
not, the MFP will not be able to “write” the scanned file in the file
system.
Setting IIS anonymous access:
1. Start Internet service manager in “Control Panel”.
2. Select Default Web site and right click
C:\Inetpub\wwwroot\X cabinet.
3. Select Properties. IIS anon1.jpg
4. In the X cabinet dialog box, select the Directory security
tab, and click Edit for "Anonymous Access and
Authentication Control". Make sure " Anonymous Access"
is selected in the "Authentication Methods" dialog box.
5. Click Edit to open “Account for anonymous access”.
Note
Make sure that the account stored in your computer
system, in the “username” file, has sufficient privilege
to access the file system.
Configuring your machine > 62
Page 63

Setting IIS privileged access:
1. As in “Setting IIS anonymous access”, start “Internet
service manager” and select Default Web site. Right click
C:\Inetpub\wwwroot\X cabinet, and select Properties.
2. Select the Directory tab on the Properties page. Ensure
the privileges for “Read”, “Write” and “Directory Browsing”
are selected.
Note
If the file management system on your server is NTFS,
in order to allow IIS to use an anonymous account to
access the files in the directory of
C:\Inetpub\wwwroot\X cabinet\Files, you have to
make sure the anonymous account has the correct
privileges. You should make the following settings:
1. Select C:\Inetpub\wwwroot\X cabinet\Files directory in
Windows Explorer, and right click to select Properties.
2. Select the Security tab in the File dialog box, and then
Everyone.
3. Select the privileges for Read and Execute, Folder
Properties List, Read and Write.
After that every user has the privilege to manage all files in the
directory for saving files.
Note
1. For security of the scanned files, “Everyone” should not
be allowed to have full privileges of the file directory.
Therefore, when setting the access privilege for your file
system, it is recommended that you set the privilege of
the directory for saving files to IIS anonymous account,
or users and groups that can use that directory only.
2. Please note that HTTP cannot add a server sub-directory
from this MFP.
Configuring your machine > 63
Page 64

When using Apache as HTTP server, according to their
documentation, it must have SCRIPT to run the HTTP PUT
method. Although the document is attached with a Perl example,
you will need to modify it before applying it, since this MFP uses
Transfer-encoding of Chunked. In addition, the Apache will have
to be set to accept this MFP. For more information refer to the
relevant Apache documentation.
CIFS
CIFS (Windows Network Share) is a file saving protocol generally
used for “resource sharing” of a network in Microsoft Windows
systems. Set up the “shared directory” as per the network
settings for sharing in MS Windows. Under the User level mode
of Windows 2000, use the account and password with the
privilege of “write” as the login name and Password for the MFP
folder.
S
ETTING THE FAX FACILITY
I
NITIAL SET UP
The following parameters must be set before using the fax
function on your MFP:
> Date and time
> Country code
> Station ID and number
There are other parameters that can be adjusted to suit your
personal preferences later if required, refer to fax set up table for
details (See “Fax settings” on page 41.).
To set fax parameters:
1. Press the Menu button to prompt the menu settings
screen.
2. Using the UP arrow key, navigate to Management and
press OK.
3. When prompted, enter the password and press OK.
4. Press OK to select Date/Time.
Configuring your machine > 64
Page 65

5. Enter today’s date and the correct time, then press OK to
confirm.
6. Using the UP arrow key, navigate to Country Code and
press OK.
7. Select the country in which the MFP is situated and press
OK.
8. Press Return to go back to the main menu settings
screen.
9. Using the UP arrow key, navigate to Fax Settings and
press OK.
10. Using the UP arrow key, navigate to Setup Fax and press
OK.
11. Press OK to select Station ID.
12. Enter the ID number and telephone number, then press
OK to confirm.
13. Press Return to update selections and exit the menu.
Note
If connecting the machine through a private branch
exchange (PBX) line, you must also specify a dial prefix
to allow the machine to obtain an external line before
dialling. Refer to “Connecting to a PBX” on page 68.
A
DVANCED SET UP
Your machine offers a multitude of features which reduce the
time required for manual operation and make fax
communications more efficient.
Adding a speed dial entry to the phone book
The machine can hold up to 200 numbers in the phone book, the
first 10 numbers will be assigned as “one-touch” speed dial
entries. To add a new speed dial number to the phone book:
1. Press the Menu button on the control panel.
2. Using the UP arrow key, navigate to Fax Settings and
press OK.
Configuring your machine > 65
Page 66

3. Press OK to select Phone Book.
4. Press OK to select Edit Speed Dial!, then press OK.
5. Using the UP/DOWN arrow keys, navigate to the desired
speed dial entry location (index number), then press OK.
6. Press OK, enter the name of the fax recipient using the
alpha/numeric keypad, and press OK.
7. Using the DOWN arrow key, navigate to the number field
then press OK.
8. Enter the new destination fax number and press OK.
Note
1. The maximum length of name is 32 characters.
The maximum length of number is 32 digits.
2. If the destination fax number has an “extension number”,
press the Pause button to input a “-” between numbers.
The machine will insert a one second pause when
dialling.
Adding a group dial entry to the phone book
The machine can hold up to 20 group dial settings, each group
can have up to 50 entries. To add a new group dial number to the
phone book:
1. Press the Menu button on the control panel.
2. Using the UP arrow key, navigate to Fax Settings and
press OK.
3. Press OK to select Phone Book.
4. Using the DOWN arrow key, navigate to Edit Group Dial!
then press OK.
5. Using the UP/DOWN arrow keys, navigate to the desired
group dial entry location (index number), then press OK.
6. Press OK, enter the new group name using the alpha/
numeric keypad, and press OK.
Note
The maximum length of name is 32 characters.
Configuring your machine > 66
Page 67

7. If multiple numbers are required, repeat step 6 to add
other entries to the group.
Note
Each group can have a maximum of 50 entries.
Deleting a speed dial entry from the phone book
To delete a speed dial number from the phone book:
1. Press the Menu button on the control panel.
2. Using the UP arrow key, navigate to Fax Settings and
press OK.
3. Press OK to select Phone Book.
4. Using the DOWN arrow key, navigate to Delete Speed
Dial! then press OK.
5. Using the UP/DOWN arrows keys, scroll through the
speed dial entries and press OK to select the required fax
number.
This can be repeated if multiple deletions are required. The
selected row(s) will be marked with an “*”.
6. Press Return to finish selecting and return to the previous
screen. The LCD display will confirm the quantity of fax
numbers selected.
7. Press OK to confirm deletion, or press Stop to cancel the
deletions.
Deleting a group dial entry from the phone book
To delete a group dial entry from the phone book:
1. Press the Menu button on the control panel.
2. Using the UP arrow key, navigate to Fax Settings and
press OK.
3. Press OK to select Phone Book.
4. Using the DOWN arrow key, navigate to Delete Group
Dial! then press OK.
Configuring your machine > 67
Page 68

5. Using the UP/DOWN arrows keys, scroll through the
group dial entries and press OK to select the required
group ID.
This can be repeated if multiple deletions are required. The
selected row(s) will be marked with an “*”.
6. Press Return to finish selecting and return to the previous
screen. The LCD display will confirm the quantity of group
entries selected.
7. Press OK to confirm deletion, or press Stop to cancel the
deletions.
Deleting all phone book entries
To delete the entire contents of the phone book:
1. Press the Menu button on the control panel.
2. Using the UP arrow key, navigate to Fax Settings and
press OK.
3. Press OK to select Phone Book.
4. Using the DOWN arrow key, navigate to Delete All! then
press OK.
5. At the prompt, select “Yes” to confirm deletions or “No” to
cancel the operation.
Connecting to a PBX
Private Branch Exchanges (PBXs) are private telephone systems
used to route calls internally, for example, in a company. When
dialling a telephone number, if a prefix (access) number is
required to open an outside line, the line is connected to a PBX.
If this MFP is going to be connected to a PBX, please make the
following changes to enable it to recognise the prefix digits in the
telephone numbers used to obtain access to the outside line.
After dialling the prefix digits, the MFP will wait until the outside
line is available (secondary dial tone detected) before dialling the
rest of the number.
1. Press the Menu button on the control panel.
2. Using the UP arrow key, navigate to Fax Settings and
press OK.
Configuring your machine > 68
Page 69

3. Using the UP arrow key, navigate to Setup Fax and press
OK.
4. Using the UP arrow key, navigate to dial prefix and press
OK.
5. Enter your dialling prefix, then press OK to confirm.
6. Press Return to go back to the main menu settings
screen.
Automatic redial
You can set the fax to automatically redial if the initial fax
transmission fails. The machine will redial on:
> Line busy
> No answer
> Communication error
To set auto-redial:
1. Press the Menu button to prompt the menu settings
screen.
2. Using the UP arrow key, navigate to Fax Settings and
press OK.
3. Using the UP arrow key, navigate to Setup Fax and press
OK.
4. Using the DOWN arrow key, navigate to Re-dial and press
OK.
5. Select the required number of redial attempts (between 0
and 10), then press OK.
6. Using the DOWN arrow key, navigate to Redial Interval
and press OK.
7. Select the required redial interval (between 1 and 6
minutes), then press OK.
8. Press Return to store the new configuration settings and
exit the menu.
Configuring your machine > 69
Page 70

Manual receive
Upon receiving an incoming call, the MFP will ring until you press
the Start button to receive the fax.
To enable the manual receive option:
1. Press the Menu button to prompt the menu settings
screen.
2. Using the UP arrow key, navigate to Fax Settings and
press OK.
3. Using the UP arrow key, navigate to Setup Fax and press
OK.
4. Using the DOWN arrow key, navigate to Manual Receive
and press OK.
5. Press Return to store the new configuration settings and
exit the menu.
Distinctive Ring Detection (DRD)
When using Distinctive Ring Detection (DRD), your phone
company assigns a second phone number to the same physical
line. The additional number has a ring pattern which is different
from the original number.
1. Press Menu to prompt the menu settings screen.
2. Using the Down arrow key, navigate to Fax Settings and
press OK.
3. Using the UP arrow key, navigate to Setup Fax and press
OK.
4. Using the DOWN arrow key, navigate to DRD Mode and
press OK.
5. Select Enable and press OK.
6. Using the DOWN arrow key, navigate to DRD Pattern and
press OK.
Configuring your machine > 70
Page 71

7. Select the appropriate Ring Pattern (Pattern1, Pattern2,
Pattern3, Pattern4) and press OK.
Note
When programming the DRD Ring Pattern, some trial
and error may be required in order to choose the
correct pattern for the additional number. Start by
selecting Pattern1 to see if the MFP answers the correct
phone number for the fax line. f not, select
incrementing patterns (Pattern2, 3, etc..) until the MFP
answers the correct ring.
8. Press Return to update the selections and exit the menu.
Configuring your machine > 71
Page 72

Adding a telephone handset
If you want to add a telephone handset to your MFP, connect the
line to the Tel socket (in certain countries it may be necessary to
use a telephone plug adaptor).
Note
Loop the telephone line round the ferrite once as shown
Tel line core.eps
.
You will also need to set the ring response:
1. Press the Menu button on the control panel.
2. Using the UP arrow key, navigate to Fax Settings and
press OK.
3. Using the UP arrow key, navigate to Setup Fax then press
OK.
4. Using the UP/DOWN arrows keys, navigate to Ring
Response and press OK.
5. Select the required response setting and press OK.
6. Press Return to store the new configuration setting and
exit the menu.
Note
Manual receive must also be activated. See “Manual
receive” on page 70.
Configuring your machine > 72
Page 73

P
RINT SETTINGS AND SECURITY
Your MFP’s operator panel menus provide access to many
options. The Windows printer driver also contains settings for
many of these items. Where items in the printer driver are the
same as those in the operator panel menus, and you print
documents from Windows, the settings in the Windows printer
driver will override those items in the operator panel menus.
The illustrations in this chapter show Windows XP. Other
Windows versions may appear slightly different, but the
principles are the same.
PCL OR
P
RINTING PREFERENCES IN WINDOWS APPLICATIONS
POSTSCRIPT
Three printer drivers are supplied with your MFP: one for PCL5c
emulation, one for PCL6 emulation, and the other for PostScript 3
emulation. If you print mainly from general “Office” applications
choose one of the PCL drivers. For faster printing of PDF
documents, choose PostScript. If you print mainly from
professional DTP and graphics applications, choose PostScript.
Print Props Button.eps
When you choose to print your
document from a Windows
application program a print dialog
box appears. This dialog usually
specifies the name of the machine
on which you will print your
document. Next to the printer
name is a Properties button.
When you click Properties a new
window opens which contains a
short list of the printer settings
available in the driver, which you
can choose for this document.
The window which opens when you click Properties depends on
which printer driver has been installed. The PostScript driver
offers different choices to the PCL driver.
?
Print settings and security > 73
Page 74

P
OSTSCRIPT EMULATION
PS Layout Tab.eps
1. Page orientation sets
portrait (tall) or
landscape (wide) page
orientation. The
“rotated” rotates the
paper through 90
degrees anti-clockwise.
1
2
3
4
2. When printing double
sided pages (duplex
unit required). You can
flip the paper either on
its long edge or short
edge.
3. Pages can be printed in forward or reverse order. If using
the face down (top) paper stacker, forward order is
usually appropriate to ensure that pages are stacked in
numerical order. If using the face up (rear) paper stacker,
reverse order would normally stack your pages in
numerical order.
4. You can specify how many pages to print on a sheet.
Pages will be scaled to fit the number you choose. If you
choose booklet printing (requires duplex unit) two pages
will automatically be set, and pages will be printed with
the correct pages opposite one another so that folding the
stacked printout produces a booklet.
5. Advanced options are also available, such as how to
download TrueType fonts, and whether advanced options
such as booklet printing are available.
5
The printer driver contains extensive on-line help for these items
to help you make the most appropriate choices.
PCL
EMULATION
When you click the Properties button from your application’s
Print dialog, the driver window opens to allow you to specify your
printing preferences for this document.
Print settings and security > 74
Page 75

5550 Setup Tab_oda.jpg
1.
Paper size should be the same
as the page size of your
document (unless you wish to
scale the printout to fit
another size), and should also
be the same as the size of
paper you will feed into the
MFP.You can choose the
source of the paper to feed,
which may be Tray 1 (the
standard paper tray), Tray 2
(if you have the optional 2nd
paper tray installed) or the multi purpose feeder. You can
also click on the appropriate part of the screen graphic to
select your preferred tray.
2. The setting for paper weight should match the type of
paper on which you intend to print.
3. A variety of document finishing options can be selected,
such as normal one page per sheet, or N-up (where N can
be any number up to 16) for printing scaled down pages
at more than one page per sheet. Booklet printing prints
two pages per sheet on each side of the paper so that
when folded they make up a booklet. Booklet printing
requires the duplex unit to be installed in your MFP.
Poster printing will print large pages as tiles spread over
multiple sheets.
4. For two-sided printing, you can choose to flip the page by
the long edge or the short edge. Of course, this requires
that a duplex unit be installed in your MFP.
5. If you have changed some printing preferences before and
saved them as a set, you can recall them to avoid having
to set them individually each time you need them.
6. A single on-screen button restores the default settings.
S
TORE TO HARD DISK/JOB SPOOLING
The Hard Disk is an option.
Print settings and security > 75
Page 76

This feature allows print jobs to be created on the PC and stored
on the MFP’s hard disk for printing on demand. This is good for
forms, generic memos, letterhead, stationery, etc.
If you use this feature for standard forms, for example, you can
walk up to the MFP at any time and print off your forms without
having to re-send them from the PC.
The document is not automatically deleted from the MFP’s hard
disk after printing. It remains there for future use until you delete
it from the printer control panel or from your PC with the Storage
Device Manager utility.
Note
If this choice does not appear in the driver screens, or
if it is gra yed out, c heck to e nsure th a t the ha rd disk i s
enabled in the printer driver. (See “Adjusting windows
printer drivers” on page 147.)
There are three parts in job spooling:
1. Sending the document. See “Sending the document” on
page 76.
2. Printing the document. See “Printing the document” on
page 78.
3. Deleting a stored document. See “Deleting a stored
document” on page 79.
S
ENDING THE DOCUMENT
1. If using the PCL driver, in the [Setup] tab choose any
saved driver settings you wish to use. See “Recalling
saved driver settings” on page 184.
2. In the driver’s [Job Options] tab, click [Store to HDD].
Print settings and security > 76
Page 77

3. The Job PIN (Personal Identification Number) window
opens. PS Store to HDD1_oda.jpg
4. If the PIN window does not open, click the [PIN] button.
5. In the Job PIN window, enter a [name] for this print job:
The name may be up to 16 alpha-numeric characters. If
you have more than one print job stored on the MFP when
you come to print, you will need a distinctive name to
distinguish between each of your print jobs.
6. If you would like a prompt at the MFP for the job name,
click the [Request…] checkbox below the name entry.
7. Enter a number from 0000 to 9999 in the [PIN] box.
8. Your PIN must be unique on this MFP. Each user should be
allocated a PIN by the system administrator.
9. Click [OK] to accept your changes.
10. Click [OK] to close the Printer Properties window.
11. Print your document.
12. The print job will be sent to the MFP, but will not print at
this time.
Print settings and security > 77
Page 78

P
RINTING THE DOCUMENT
Your print job is printed using the printer control panel on the
front of the MFP.
READY
ATTENTION
BACK
MENU
ENTER
ON LINE
CANCEL
1. When the MFP is idle (“ONLINE” indicated in the display),
use the +/- buttons to select the PRINT JOB menu, then
press [ENTER].
2. Select “ENCRYPTED/STORED JOB”.
3. Use the +/- buttons to input your PIN. Press [ENTER]
after each digit.
If you have more than one stored document, a list appears
in the display.
4. Use the +/- buttons to select the name of the print job
you wish to print, and press [ENTER] to select it.
5. If necessary, use the +/- buttons to highlight the PRINT
option.
6. Press [ENTER] to confirm you wish to print the document.
7. Use the +/- buttons to select the number of collated
copies you require.
8. Press [ENTER] to print your document.
The document will not be deleted from the hard disk after it has
been printed.
Note
It is also possible to print and delete stored documents
remotely from your PC using the Storage Device
Manager utility.
Print settings and security > 78
Page 79

D
ELETING A STORED DOCUMENT
Any other documents stored on the printer’s hard disk can also
be deleted remotely from the PC using the Storage Device
Manager utility
If you change your mind about printing a stored document, you
can delete it from the MFP’s hard disk without printing it first.
1. Follow Steps 1 to 4 in the above procedure for printing the
document.
2. Use the +/- buttons to highlight the DELETE option and
press [ENTER].
3. If necessary, use the +/- buttons to highlight the YES
choice, and press [ENTER] to confirm the deletion.
Your document is deleted from the MFP’s hard disk without
printing.
Print settings and security > 79
Page 80

O
PERATION
With its intuitive control panel, this Multi Function Product (MFP)
is designed to be easy to use. After the machine has been
configured, operating is quite straight forward.
Note
If PIN restriction has been enabled for any or all of the
MFP functions, you will first have to enter your PIN.
The following sections describe how to make a copy of your
scanned document, how to distribute your document on the
internet, and how to send it via fax.
L
OADING DOCUMENT(S) FOR COPYING
This MFP can scan/copy/send/fax document(s) either in the ADF
(Automatic Document Feeder) or on the glass. If you need to
send multiple pages, load your papers in the ADF. The ADF can
hold up to 50 pages at one time.
If you need to scan/copy/send/fax pages from books, newspaper
clippings, or paper with wrinkles or curls, place them on the
glass.
P
LACING DOCUMENT(S) IN THE
Before using the ADF, please make sure that your paper meets
the following specifications:
> Document(s) can range in size from 4.5 x 5.5 inches
(114.3 x 139.7mm) to 8.5 x 14 inches (215.9 x
355.6mm).
> Document(s) can range in weight from 16 to 28 lbs [60 to
105 g/m
> Document(s) should be square or rectangular and in good
condition (not fragile or worn).
2
(0.002" to 0.006" [0.05 to 0.15 mm]).
ADF
> Document(s) should be free of curl, wrinkle, tears, wet
ink, or punch holes.
> Document(s) should be free of staples, paper clips, paper
sticky notes.
Operation > 80
Page 81

> Keep the glass clean and without any documents left on it.
Note
To transmit irregular types of document(s), place the
document(s) on the glass or make a copy first and then
transmit the copy instead.
1. If you have multiple pages, fan the pages to avoid paper
jams. The ADF holds up to 50 pages at one time.
1
2
3
2. Place the document with the text face UP in the ADF and
make sure that the top of each page is fed in first.
3. Adjust the Paper Guides (1) to center the document in the
ADF.
Operation > 81
Page 82

P
LACING DOCUMENT(S) ON THE GLASS
1. Open the document cover.
2. Place your document with the text face DOWN on the
glass and align it to the upper-left corner.
3. Close the document cover.
S
ENDING DOCUMENT(S) VIA E-MAIL
B
ASIC OPERATION
Control menu sending_oda.jpg
1. Place your document(s) with text face UP in the ADF or
face DOWN on the glass (as described above).
2. Press Send Mode (1) on the control panel. The e-mail
screen will appear.
3. In the “To” field, enter the destination e-mail address from
the Address Book by pressing Address Book (2). Use the
UP and DOWN arrows (3) to select multiple e-mail
Operation > 82
Page 83

addresses and press the OK button (4). Or for a fast
operation, you may simply type the initial letter of the email address using the keypad (8). Press Return (5) to
return to the e-mail main screen.
4. Enter the subject of your e-mail. If not entered, “Default
Subj.” will be displayed.
5. Enter or select CC and BCC address(es), if necessary.
6. Press the Mono button (6) to send your document(s) in
black and white, or the Color button (7) to send your
document(s) in color.
A
DVANCED OPERATION
If you are not satisfied with the scanned image, you can use the
advanced features to enhance it.
note
For illustration purposes only, the advanced features
shown are as accessed from the scanner control panel,
they can also be accessed from the web page and the
MFP Network Setup Tool.
To use the advanced features, press the Send Mode button (1)
on the control panel and then the Additional Settings button
(2) to prompt the Additional settings screen.
Operation > 83
Page 84

Refer to the following table to modify the scanner settings.
MENU ITEM DESCRIPTION
Attachment The file name of the scanned document. Up to 64
From Enter your “From” address. If an e-mail can not be
Reply To Address Enter a “Reply To Address” address if you wish to
Color output format Choose the output format for the document to be
B&W output format Turn the multi-level B&W - Gray On or Off.
Resolution Choose the scanning resolution for the scanned
Manual Feed Multi-batch document scanning can be enabled. Enable
characters can be entered in this field.
sent, notification is returned to this address.
This is also the “From” address in your e-mail when you
receive an e-mail from the MFP. Up to 64 characters
can be entered in this field.
specify a reply address which is different from the
“From” address. Up to 64 characters can be entered in
the field.
scanned in colors from PDF, TIF, JPEG, and MTIF.
Also select the compression rate from Low, Medium,
High.
Choose the output format for the document to be
scanned in B&W from PDF, TIF, and MTIF.
Also select the compression rate from Low, Medium,
High.
document from a selection of 75, 100, 150, 200, 300,
400, 600 dpi. A higher resolution reproduces the image
with greater detail, but requires more disk space.
Manual Feed when loading more than 50 pages on the
ADF or more than one page on the flatbed.
Document Size A4, Letter, Legal
Density -2, -1, 0, 1, 2
Operation > 84
Page 85

Note
> If you make a mistake during the process, press Stop (3)
on the control panel to cancel the operation.
> If you stop typing in the From, Subject, To, CC, or BCC
fields for three minutes, the LCD-display automatically
clears what you have typed.
> This machine allows you to send scanned document(s) to
multiple e-mail addresses. Simply add a comma between
each address.
> Up to 64 characters can be entered in the “Attachment”,
“To”, “From”, “CC”, “BCC”, and the “Def. Subject” field.
> If you wish to scan a multi-page document and convert it
to a single image file, choose your output file format to
be MTIF or PDF.
> If the administrator has set the SMTP or POP3
authentication, after sending your scanned document to
e-mail addresses, and if no more transmission is
required, press Return on the control panel to log out of
the system. This is to prevent misuse of the user's e-mail
account for sending e-mails. If there is no other
operation within 3 minutes, the system will log out
automatically.
Operation > 85
Page 86

S
ENDING DOCUMENT(S) TO A FILE SERVER
Before sending your document to a file server, profiles should be
set up first to speed up the process. A profile contains a list of
filing parameters such as your filing protocol, directory, file name
and other scanning parameters. Add a new profile by either
entering the machine's web page or installing and starting the
Network Setup Tool on the CD-ROM supplied.
1. Place your document(s) with text face UP in the ADF or
face DOWN on the glass.
2. Press Send Mode (1) and FTP Address (2) buttons on
the control panel. The LCD-display prompts the Filing
screen. For example,
Profile 1
Profile 2
3. Choose the required profile (filing destination) and press
OK (3).
4. Press Mono (4) to send your document(s) in black and
white, or Color (5) to send your document(s) in color.
Note
You can create up to 40 filing profiles from the
machine's web site or from the Network Setup Tool.
Operation > 86
Page 87

C
OPYING
B
ASIC OPERATION
1. Place your document(s) with text face UP in the ADF or
face DOWN on the glass.
2. If required, press the Copy Mode button (1) on the
control panel to prompt the Copy screen.
Note
Factory default setting is Copy mode.
3. Press Mono (2) to copy your document(s) in black and
white, or Color (3) to copy your document(s) in color.
Note
If you wish to cancel the copy process, press Stop (4)
to abort the operation.
Operation > 87
Page 88

A
DVANCED OPERATION
Set up the Printer Options and Media Type (See “Contents of each
printer menu” on page 45., and the instructions following).
Accessing additional settings
note
For illustration purposes only, the advanced features
shown are as accessed from the scanner control panel,
they can also be accessed from the web page and the
MFP Network Setup Tool.
To use the advanced features, press the Copy Mode button (1)
on the control panel and then the Additional Settings button
(2) to prompt the Additional settings screen.
Below iare the factory defaults for the “Additional Settings”.
FUNCTION DEFAULT SETTING
Density 0
Quality Speed
Collate OFF
Duplex (optional) OFF
N-up 1in1
Edge erase 0
Margin shift (R) 0
Margin shift (B) 0
Paper supply A4/Letter
Input tray Auto
Operation > 88
Page 89

Quality
> Speed
> Tex t
> Photo
Density
> -2, -1, 0, 1, 2
Collation:
> ON - The collate function is always enabled
> OFF - The collate function is always disabled.
Note
When “Collate” is set, the items “N-Up” and “Duplex”
are not displayed.
Duplex (Optional):
> Off
> Short Edge
> Long Edge
Note
Long edge and Short edge are only available when
“Scaling = 100%” and “Quality = Speed”.
N-Up (Paper Save)
> 1 in 1
> 4 in 1 (Horizontal)
> 4 in 1 (Vertical)
Note
When “N-Up” is set to other than “1 in 1", the “Collate”
item is not displayed.
Edge Erase
Operation > 89
Page 90

> 0/6/13/19/25 (mm)
0 / 0.2362 / 0.5118 / 0.748 / 0.9843 inches
Margin Shift
> Right 0/6/13/19/25 (mm)
0 / 0.2362 / 0.5118 / 0.748 / 0.9843 inches
> Bottom 0/6/13/19/25 (mm)
0 / 0.2362 / 0.5118 / 0.748 / 0.9843 inches
Paper Supply
> Legal
> Letter
> A4
> A5
Input Tray
> Auto
> Tray 1
> Tray 2 (Optional)
> MP
Changing scaling
The machine is preset to 100% scaling. If you wish to reduce or
enlarge your original, you can apply this feature to enlarge up to
400% or reduce down to 25%.
Operation > 90
Page 91

To reduce or enlarge the original document:
1
2
3
4
1. Press Copy Mode (1) on the Control panel to prompt the
Copy screen.
2. Press the Select (4) button to choose a preset value from
100%, 25%, 50%, 70%, 141%, 200% and 98% (fit to
page).
3. Alternatively, continue to press the Select (4) button until
the 25%-> 400% LED is illuminated, then press the %+
(2) or %- (3) button to enlarge or reduce your document
in 1% increments.
Note
1. Press and hold the %+ or %- button to enlarge or
reduce your document in 10% increments.
2. After you have completed copying the machine will
automatically return to the preset scale.
Improving copy quality
The machine is preset to “Speed”. If required, you can change to
“Text” or “Photo” to improve the copy quality.
To change copy quality:
1. Press the Copy Mode button on the control panel to
prompt the Copy screen.
Operation > 91
Page 92

2. Press the Additional Settings button.
3. Using the UP arrow, navigate to the Quality setting and
press OK.
4. Select “Text” or “Photo” and press OK.
Note
After you have completed your copying, the machine
will automatically return to the preset document
quality.
Adjusting density
The machine is preset to the “Normal” level of density. If your
original document comes with a lighter or darker contrast, you
can improve the quality by using the Adjusting Density feature.
To change density:
1. Press the Copy Mode button on the panel to prompt the
Copy screen.
2. Press the Additional Settings button.
3. Using the UP arrow, navigate to the Density setting and
press OK.
4. Select the required density and press OK.
Note
After you have completed your copying, the machine
will automatically return to the preset value.
Increasing copy count
The machine is preset to a copy count of 1. If you wish to increase
the number of copies, select the number of copies with the
numeric keypad.
To increase the copy count:
1. Press the Copy Mode button on the control panel to
prompt the Copy screen.
Operation > 92
Page 93

2. Enter number of copies required with the numeric keypad.
The LCD display will confirm the copy count selected.
F
AXING
B
ASIC OPERATION
Sending a fax to a single location
1. Place your document(s) with text face UP in the ADF or
face DOWN on the glass.
2. Press the Fax Mode button (1) on the control panel to
prompt the Fax screen.
3. Enter the destination fax number by either:
> typing in the number using the numeric keypad (4)
> pressing the required speed dial button (5))
Note
If the destination fax number has an “extension
number”, press the Pause button (6) to input a “-”
between numbers. The machine will insert a 1 second
pause when dialling.
4. If required, press Return to go back to the fax screen.
Operation > 93
Page 94

5. Press the Mono button (7) to send your document(s).
Note
1. Fax transmissions are sent in black and white only.
2. If you make a mistake during the transmission process,
press the STOP button (8) to cancel the operation.
Manual redial
Press the Redial button (9) on the control panel to display the
fax number of the last transmission (successful or not), then
press the Mono button (6) to send a fax to this number.
Receiving a Fax
Your MFP is set to receive faxes automatically, if you wish to
change this to manual receive refer to“Manual receive” on
page 70 for details.
note
If the MFP is in use, i.e. sending a fax or scanning, then
any incoming faxes will be rejected.
During other functional operations, for example
copying, filing, e-mailing, etc., then any incoming
faxes will be stored and printed out when the MFP is
available.
Operation > 94
Page 95

A
DVANCED OPERATION
Accessing additional settings
note
For illustration purposes only, the advanced features
shown are as accessed from the scanner control panel,
they can also be accessed from the web page and the
MFP Network Setup Tool.
To use the advanced features, press the Fax Mode button (1) on
the control panel and then the Additional Settings button (2)
to prompt the Additional settings screen.
Below is the menu for the “Additional Settings”. If there are any
changes made, the settings will return to the these factory
default settings when you press the Reset button (3).
FUNCTION DEFAULT SETTINGS
Quality Fine
Density 0
Doc size A4/Letter
Delayed time Real time
Manual feed Off
Poll to receive Off
Overseas Mode Off
Operation > 95
Page 96

Changing fax quality
The machine is preset to “Fine”. If required, you can select
“ExtraFine” or “Photo” to improve the fax quality or you can
reduce the fax quality by selecting “Standard”.
To change fax quality:
1. Press the Fax Mode button on the control panel to prompt
the fax screen.
2. Press the Additional Settings button and press OK.
3. Select the appropriate quality setting and press OK.
4. Press Return to exit the menu and return to the fax
screen.
Note
After you have completed your fax operation, the
machine will automatically return to the preset quality.
Adjusting density
The machine is preset to the “Normal” level of density. If your
original document comes with a lighter or darker contrast, you
can improve the quality by using the Adjusting Density feature.
To change density:
1. Press the Fax Mode button on the control panel to prompt
the Fax screen.
2. Press the Additional Settings button.
3. Using the DOWN arrow key, navigate to the Density
setting and press OK.
4. Select the required density and press OK.
5. Press Return to exit the menu and return to the fax
screen.
Note
After you have completed your fax operation, the
machine will automatically return to the preset value.
Operation > 96
Page 97

Document size
The machine is preset to “A4/Letter” size.
To change document size:
1. Press the Fax Mode button on the control panel to prompt
the Fax screen.
2. Press the Additional Settings button.
3. Using the DOWN arrow key, navigate to the Doc Size
setting and press OK.
4. Select the required size setting and press OK.
5. Press Return to exit the menu and return to the fax
screen.
Note
After you have completed your fax operation, the
machine will automatically return to the preset value.
Delayed send
The delayed send function allows you to fax documents at a
specific date and time.
To set the fax to delay send:
1. Place your document(s) with text face UP in the ADF or
face DOWN on the glass.
2. Press the Fax Mode button on the control panel to prompt
the Fax screen.
3. Press the Additional Settings button.
4. Using the DOWN arrow key, navigate to the Delayed
Send setting and press OK.
5. Enter the required send date and time and press OK.
6. Press Return to exit the menu and return to the fax
screen.
7. Press Mono to scan and store your document ready for
sending at the specified time.
Operation > 97
Page 98

Manual feed
If you need to send multiple sets of documents from the ADF or
flatbed, enable the “Manual Feed” option.
To set the fax to manual feed:
1. Place your document(s) with text face UP in the ADF or
face DOWN on the glass.
2. Press the Fax Mode button on the control panel to prompt
the Fax screen.
3. Press the Additional Settings button.
4. Using the DOWN arrow key, navigate to the Manual Feed
setting and press OK.
5. Select “ON” and press OK.
6. Press Return to exit the menu and return to the fax
screen.
7. Press Mono to start scanning the first document.
Once the current scanning operation is complete, the LCD
will display “To scan another page press select/OK”. If you
have further documents to scan press OK to continue
scanning or press Mono to continue sending the fax.
Fax Forwarding
1. Press Menu to prompt the menu settings screen.
2. Using the UP arrow key, navigate to Management and
press OK.
3. When prompted, enter the password and press OK.
4. Using the UP arrow key, navigate to Fax Forwarding and
press OK.
5. Select ei ther Fax To Fax or Fax To Email and press OK.
(a) If Fax To Fax is selected, enter the destination Fax
number and press OK.
(b) If Fax To Email is selected, enter the forwarding
Email address and press OK.
6. Press Return to update selections and exit the menu.
Operation > 98
Page 99

Polling receive
Polling is a process in which documents are loaded into a
machine, and the machine is then set to wait for a call from a
remote location before faxing. If the remote machine is set to
hold data in memory for transmission to a local machine when
contacted, the procedure is called “polling receive”.
To set the fax to poll receive:
1. Press the Fax Mode button on the control panel to prompt
the Fax screen.
2. Press the Additional Settings button.
3. Using the DOWN arrow key, navigate to the Polling
Receive setting and press OK.
4. Select “ON” and press OK.
5. Press Return to exit the menu and return to the fax
screen.
6. Enter the desired location using the Speed Dial keys or
the numeric keypad.
7. Press Mono to begin polling.
Overseas mode
To avoid transmission problems when faxing overseas, set the
fax to overseas mode:
1. Place your document(s) with text face UP in the ADF or
face DOWN on the glass.
2. Press the Fax Mode button on the control panel to prompt
the Fax screen.
3. Press the Additional Settings button.
4. Using the DOWN arrow key, navigate to the Overseas
Mode setting and press OK.
5. Select “ON” and press OK.
6. Press Return to exit the menu and return to the fax
screen.
Operation > 99
Page 100

7. Press Mono to start sending the document(s).
Note
After you have completed your fax operation, the
machine will automatically return to the preset value.
Broadcasting
You can send a fax to multiple locations at the same time:
1. Place your document(s) with text face UP in the ADF or
face DOWN on the glass.
2. Press the Fax Mode button on the control panel to prompt
the Fax screen.
3. Enter the destination fax numbers by either:
> typing in the number using the numeric keypad
> pressing the required speed and/or group dial buttons
Press OK after entering each fax number.
Note
You can send to a maximum 100 different locations.
If a destination fax number has an “extension
number”, press the Pause button to input a “-”
between numbers. The machine will insert a 1 second
pause when dialling.
4. Press Return to exit the menu and return to the fax
screen.
5. Press Mono to start sending the document(s).
Note
If you make a mistake during the transmission
process, press the STOP button to cancel the
operation.
Operation > 100
 Loading...