

Page 1
MC361dn/MC561dn
User’s Manual
Advanced
This manual supports the following models:
MC361dn
MC561dn
Page 2

Contents
About This Manual . . . . . . . . . . . . . . . . . . . . . . . . . . . . . . . . . . . . . . . . . 13
Terms in this document . . . . . . . . . . . . . . . . . . . . . . . . . . . . . . . . . . . . . . . . . . . . . . 13
Symbols in this document . . . . . . . . . . . . . . . . . . . . . . . . . . . . . . . . . . . . . . . . . . . . 13
Legends used in this manual. . . . . . . . . . . . . . . . . . . . . . . . . . . . . . . . . . . . . . . . . . . 14
1 Copying. . . . . . . . . . . . . . . . . . . . . . . . . . . . . . . . . . . . . . . . 15
Useful Functions. . . . . . . . . . . . . . . . . . . . . . . . . . . . . . . . . . . . . . . . . . . 15
Sorting Copies (Sorft) . . . . . . . . . . . . . . . . . . . . . . . . . . . . . . . . . . . . . . . . . . . . . . . 15
Combining Multiple Pages Onto One Sheet of Paper (N-in-1) . . . . . . . . . . . . . . . . . . . . 15
Making Multiple Copies Onto One Sheet of Paper (Repeat) . . . . . . . . . . . . . . . . . . . . . . 16
Copying ID Cards (ID Card Copy) . . . . . . . . . . . . . . . . . . . . . . . . . . . . . . . . . . . . . . . 17
Erasing Edge Shadows (Edge Eras) . . . . . . . . . . . . . . . . . . . . . . . . . . . . . . . . . . . . . . 17
Setting Margins (Margin) . . . . . . . . . . . . . . . . . . . . . . . . . . . . . . . . . . . . . . . . . . . . . 17
Copying Different Size Documents (Mixed Size) . . . . . . . . . . . . . . . . . . . . . . . . . . . . . 19
Note for Using Multiple Functions . . . . . . . . . . . . . . . . . . . . . . . . . . . . . . . . . . . . . . . 19
Functions That Cannot Be Used Simultaneously . . . . . . . . . . . . . . . . . . . . . . . . . . . . . . . . . . . 19
Disabling a Function . . . . . . . . . . . . . . . . . . . . . . . . . . . . . . . . . . . . . . . . . . . . . . . . . . . . . . 19
2 Faxing . . . . . . . . . . . . . . . . . . . . . . . . . . . . . . . . . . . . . . . . . 20
Useful Operations for Transmission . . . . . . . . . . . . . . . . . . . . . . . . . . . . . 20
Transmitting Duplex Documents (DuplexScan) . . . . . . . . . . . . . . . . . . . . . . . . . . . . . . 20
Changing Where Documents Are Loaded . . . . . . . . . . . . . . . . . . . . . . . . . . . . . . . . . . 20
Changing the Sender Name . . . . . . . . . . . . . . . . . . . . . . . . . . . . . . . . . . . . . . . . . . . 21
Setting Prefix (PreFix) . . . . . . . . . . . . . . . . . . . . . . . . . . . . . . . . . . . . . . . . . . . . . . . 22
Registering a Prefix . . . . . . . . . . . . . . . . . . . . . . . . . . . . . . . . . . . . . . . . . . . . . . . . . . . . . . 22
Using a Prefix When Transmitting Faxes . . . . . . . . . . . . . . . . . . . . . . . . . . . . . . . . . . . . . . . . 22
Using a Prefix When Registering a Number to Speed Dial . . . . . . . . . . . . . . . . . . . . . . . . . . . . 22
Various Functions for Transmission. . . . . . . . . . . . . . . . . . . . . . . . . . . . . . 23
Redialing . . . . . . . . . . . . . . . . . . . . . . . . . . . . . . . . . . . . . . . . . . . . . . . . . . . . . . . . 23
Automatic Redialing . . . . . . . . . . . . . . . . . . . . . . . . . . . . . . . . . . . . . . . . . . . . . . . . . . . . . . 23
Manual Redialing . . . . . . . . . . . . . . . . . . . . . . . . . . . . . . . . . . . . . . . . . . . . . . . . . . . . . . . . 23
Transmission in Real Time . . . . . . . . . . . . . . . . . . . . . . . . . . . . . . . . . . . . . . . . . . . . 23
Manual Transmission . . . . . . . . . . . . . . . . . . . . . . . . . . . . . . . . . . . . . . . . . . . . . . . . 24
Transmission to Multiple Destinations (Broadcast) . . . . . . . . . . . . . . . . . . . . . . . . . . . . 24
Transmission at a Specified Time (Set Tx time). . . . . . . . . . . . . . . . . . . . . . . . . . . . . . 25
Fcode Transmission . . . . . . . . . . . . . . . . . . . . . . . . . . . . . . . . . . . . . . . . . . . . . . . . . 25
Registering Fcode Boxes . . . . . . . . . . . . . . . . . . . . . . . . . . . . . . . . . . . . . . . . . . . . . . . . . . . 25
Transmission Using a Sub Address (Fcode Transmission) . . . . . . . . . . . . . . . . . . . . . . . . . . . . 27
Reception Using a Sub Address (Fcode Polling) . . . . . . . . . . . . . . . . . . . . . . . . . . . . . . . . . . . 27
Storing Documents in a Bulletin Box . . . . . . . . . . . . . . . . . . . . . . . . . . . . . . . . . . . . . . . . . . . 27
Printing Stored Documents . . . . . . . . . . . . . . . . . . . . . . . . . . . . . . . . . . . . . . . . . . . . . . . . . 28
Deleting Stored Bulletin Documents . . . . . . . . . . . . . . . . . . . . . . . . . . . . . . . . . . . . . . . . . . . 28
Deleting Fcode Boxes . . . . . . . . . . . . . . . . . . . . . . . . . . . . . . . . . . . . . . . . . . . . . . . . . . . . . 28
- 2 -
Page 3

Contents
Security Functions . . . . . . . . . . . . . . . . . . . . . . . . . . . . . . . . . . . . . . . . . 29
Security Functions at Transmission . . . . . . . . . . . . . . . . . . . . . . . . . . . . . . . . . . . . . . 29
ID Check Transmission . . . . . . . . . . . . . . . . . . . . . . . . . . . . . . . . . . . . . . . . . . . . . . . . . . . . 29
Checking Broadcast Destination . . . . . . . . . . . . . . . . . . . . . . . . . . . . . . . . . . . . . . . . . . . . . . 29
Pressing Dial Twice (Confirm Dial) . . . . . . . . . . . . . . . . . . . . . . . . . . . . . . . . . . . . . . . . . . . . 30
Various Settings for Fax Reception . . . . . . . . . . . . . . . . . . . . . . . . . . . . . . 31
When Received Image is Larger Than Paper Size . . . . . . . . . . . . . . . . . . . . . . . . . . . . 31
Specifying a Reduction Rate. . . . . . . . . . . . . . . . . . . . . . . . . . . . . . . . . . . . . . . . . . . . . . . . . 31
Specifying a Reduction Margin . . . . . . . . . . . . . . . . . . . . . . . . . . . . . . . . . . . . . . . . . . . . . . . 31
Changing Buzzer Volume . . . . . . . . . . . . . . . . . . . . . . . . . . . . . . . . . . . . . . . . . . . . . 31
Forwarding Received Faxes As Fax Documents . . . . . . . . . . . . . . . . . . . . . . . . . . . . . . 32
Registering a Forwarding Destination . . . . . . . . . . . . . . . . . . . . . . . . . . . . . . . . . . . . . . . . . . 32
Setting waiting time for a response . . . . . . . . . . . . . . . . . . . . . . . . . . . . . . . . . . . . . . 32
Faxing From a Computer. . . . . . . . . . . . . . . . . . . . . . . . . . . . . . . . . . . . . 33
Sending a Fax From a Computer . . . . . . . . . . . . . . . . . . . . . . . . . . . . . . . . . . . . . . . . 33
Adding a Fax Number to the Phone Book . . . . . . . . . . . . . . . . . . . . . . . . . . . . . . . . . . 33
Grouping Entries . . . . . . . . . . . . . . . . . . . . . . . . . . . . . . . . . . . . . . . . . . . . . . . . . . . 34
Sending a Fax to a Group. . . . . . . . . . . . . . . . . . . . . . . . . . . . . . . . . . . . . . . . . . . . . 34
Attaching a Cover Sheet. . . . . . . . . . . . . . . . . . . . . . . . . . . . . . . . . . . . . . . . . . . . . . 34
Canceling a Fax Job From a Computer . . . . . . . . . . . . . . . . . . . . . . . . . . . . . . . . . . . . 35
Exporting and Importing Phone Book Data . . . . . . . . . . . . . . . . . . . . . . . . . . . . . . . . . 35
Associating New Definition With Phone Book Format. . . . . . . . . . . . . . . . . . . . . . . . . . . . . . . . 35
3 Scanning . . . . . . . . . . . . . . . . . . . . . . . . . . . . . . . . . . . . . . . 36
Advanced Operations for Scanning to E-mail . . . . . . . . . . . . . . . . . . . . . . . 36
Setting Sender and Reply to Addresses (From/Reply to) . . . . . . . . . . . . . . . . . . . . . . . 36
Creating Templates . . . . . . . . . . . . . . . . . . . . . . . . . . . . . . . . . . . . . . . . . . . . . . . . . 36
Registering a Subject . . . . . . . . . . . . . . . . . . . . . . . . . . . . . . . . . . . . . . . . . . . . . . . . . . . . . 36
Registering Body Text . . . . . . . . . . . . . . . . . . . . . . . . . . . . . . . . . . . . . . . . . . . . . . . . . . . . . 37
Using a Template . . . . . . . . . . . . . . . . . . . . . . . . . . . . . . . . . . . . . . . . . . . . . . . . . . 37
Advanced Operations for Scanning and Internet Faxing . . . . . . . . . . . . . . . 38
Specifying the File Name . . . . . . . . . . . . . . . . . . . . . . . . . . . . . . . . . . . . . . . . . . . . . 38
Changing the Scan Size (Scan Size) . . . . . . . . . . . . . . . . . . . . . . . . . . . . . . . . . . . . . 38
Changing the Resolution (Document Type) . . . . . . . . . . . . . . . . . . . . . . . . . . . . . . . . . 38
Adjusting the Density (Density) . . . . . . . . . . . . . . . . . . . . . . . . . . . . . . . . . . . . . . . . 38
Specifying the File Format . . . . . . . . . . . . . . . . . . . . . . . . . . . . . . . . . . . . . . . . . . . . 39
Encrypting PDF . . . . . . . . . . . . . . . . . . . . . . . . . . . . . . . . . . . . . . . . . . . . . . . . . . . . 39
Setting a password for opening a document and authentication password . . . . . . . . . . . . . . . . . 39
Use the default password . . . . . . . . . . . . . . . . . . . . . . . . . . . . . . . . . . . . . . . . . . . . . . . . . . 40
Setting the Compression Level . . . . . . . . . . . . . . . . . . . . . . . . . . . . . . . . . . . . . . . . . 41
Setting the Grayscale . . . . . . . . . . . . . . . . . . . . . . . . . . . . . . . . . . . . . . . . . . . . . . . 41
Using Drivers and Software . . . . . . . . . . . . . . . . . . . . . . . . . . . . . . . . . . . 42
Using TWAIN Driver. . . . . . . . . . . . . . . . . . . . . . . . . . . . . . . . . . . . . . . . . . . . . . . . . 42
- 3 -
Page 4

Contents
Starting a Scan Job (for Windows) . . . . . . . . . . . . . . . . . . . . . . . . . . . . . . . . . . . . . . . . . . . . 42
Changing Settings . . . . . . . . . . . . . . . . . . . . . . . . . . . . . . . . . . . . . . . . . . . . . . . . . . . . . . . 42
Starting a Scan Job (for Mac OS X). . . . . . . . . . . . . . . . . . . . . . . . . . . . . . . . . . . . . . . . . . . . 43
Changing Settings (for Macintosh) . . . . . . . . . . . . . . . . . . . . . . . . . . . . . . . . . . . . . . . . . . . . 43
Using WIA Driver. . . . . . . . . . . . . . . . . . . . . . . . . . . . . . . . . . . . . . . . . . . . . . . . . . . 44
Starting a Scan Job . . . . . . . . . . . . . . . . . . . . . . . . . . . . . . . . . . . . . . . . . . . . . . . . . . . . . . 44
Using Windows FAX and Scan . . . . . . . . . . . . . . . . . . . . . . . . . . . . . . . . . . . . . . . . . . . . . . . 44
Using ActKey Software. . . . . . . . . . . . . . . . . . . . . . . . . . . . . . . . . . . . . . . . . . . . . . . 45
Installing the Software . . . . . . . . . . . . . . . . . . . . . . . . . . . . . . . . . . . . . . . . . . . . . . . . . . . . 45
Starting the Software . . . . . . . . . . . . . . . . . . . . . . . . . . . . . . . . . . . . . . . . . . . . . . . . . . . . . 45
Starting ActKey when Scanning to a Local PC . . . . . . . . . . . . . . . . . . . . . . . . . . . . . . . . . . . . 45
Fax Transmission of Scanned Documents . . . . . . . . . . . . . . . . . . . . . . . . . . . . . . . . . . . . . . . 45
Setting the Scan Button . . . . . . . . . . . . . . . . . . . . . . . . . . . . . . . . . . . . . . . . . . . . . . . . . . . 45
Using Network Configuration . . . . . . . . . . . . . . . . . . . . . . . . . . . . . . . . . . . . . . . . . . . . . . . . 46
Useful Functions for Internet Faxing and Scan To E-mail. . . . . . . . . . . . . . . 47
Enabling MDN and DSN Requests . . . . . . . . . . . . . . . . . . . . . . . . . . . . . . . . . . . . . . . 47
Enabling MDN Response. . . . . . . . . . . . . . . . . . . . . . . . . . . . . . . . . . . . . . . . . . . . . . 47
Useful Functions for Scanning to Local and Remote PCs . . . . . . . . . . . . . . . 48
Setting PC Scan Mode . . . . . . . . . . . . . . . . . . . . . . . . . . . . . . . . . . . . . . . . . . . . . . . 48
Enabling the Network TWAIN Settings . . . . . . . . . . . . . . . . . . . . . . . . . . . . . . . . . . . . 48
4 Printing. . . . . . . . . . . . . . . . . . . . . . . . . . . . . . . . . . . . . . . . 49
Useful Operations for Printing From a Computer . . . . . . . . . . . . . . . . . . . . 49
Manual Printing . . . . . . . . . . . . . . . . . . . . . . . . . . . . . . . . . . . . . . . . . . . . . . . . . . . . 49
For Windows PCL/PCL XPS Printer Driver . . . . . . . . . . . . . . . . . . . . . . . . . . . . . . . . . . . . . . . . 49
For Windows PS Printer Driver . . . . . . . . . . . . . . . . . . . . . . . . . . . . . . . . . . . . . . . . . . . . . . . 49
For Mac OS X Printer Driver . . . . . . . . . . . . . . . . . . . . . . . . . . . . . . . . . . . . . . . . . . . . . . . . . 49
Printing on Envelopes . . . . . . . . . . . . . . . . . . . . . . . . . . . . . . . . . . . . . . . . . . . . . . . 50
For Windows PCL/PCL XPS Printer Driver . . . . . . . . . . . . . . . . . . . . . . . . . . . . . . . . . . . . . . . . 50
For Windows PS Printer Driver . . . . . . . . . . . . . . . . . . . . . . . . . . . . . . . . . . . . . . . . . . . . . . . 51
For Mac OS X Printer Driver . . . . . . . . . . . . . . . . . . . . . . . . . . . . . . . . . . . . . . . . . . . . . . . . . 51
Printing on Labels . . . . . . . . . . . . . . . . . . . . . . . . . . . . . . . . . . . . . . . . . . . . . . . . . . 51
For Windows PCL/PCL XPS Printer Driver . . . . . . . . . . . . . . . . . . . . . . . . . . . . . . . . . . . . . . . . 52
For Windows PS Printer Driver . . . . . . . . . . . . . . . . . . . . . . . . . . . . . . . . . . . . . . . . . . . . . . . 52
For Mac OS X PS Printer Driver . . . . . . . . . . . . . . . . . . . . . . . . . . . . . . . . . . . . . . . . . . . . . . 52
Printing on Custom Size Paper . . . . . . . . . . . . . . . . . . . . . . . . . . . . . . . . . . . . . . . . . 52
For Windows PCL Printer Driver . . . . . . . . . . . . . . . . . . . . . . . . . . . . . . . . . . . . . . . . . . . . . . 52
For Windows PS Printer Driver . . . . . . . . . . . . . . . . . . . . . . . . . . . . . . . . . . . . . . . . . . . . . . . 53
For Windows PCL XPS Printer Driver . . . . . . . . . . . . . . . . . . . . . . . . . . . . . . . . . . . . . . . . . . . 53
For Mac OS X PS Printer Driver . . . . . . . . . . . . . . . . . . . . . . . . . . . . . . . . . . . . . . . . . . . . . . 53
Combining Multiple Pages Onto One Sheet of Paper. . . . . . . . . . . . . . . . . . . . . . . . . . . 54
For Windows PCL/PCL XPS Printer Driver . . . . . . . . . . . . . . . . . . . . . . . . . . . . . . . . . . . . . . . . 54
For Windows PS Printer Driver . . . . . . . . . . . . . . . . . . . . . . . . . . . . . . . . . . . . . . . . . . . . . . . 54
For Mac OS X PS Printer Driver . . . . . . . . . . . . . . . . . . . . . . . . . . . . . . . . . . . . . . . . . . . . . . 54
Making Duplex Prints . . . . . . . . . . . . . . . . . . . . . . . . . . . . . . . . . . . . . . . . . . . . . . . . 54
For Windows PCL/PCL XPS Printer Driver . . . . . . . . . . . . . . . . . . . . . . . . . . . . . . . . . . . . . . . . 55
For Windows PS Printer Driver . . . . . . . . . . . . . . . . . . . . . . . . . . . . . . . . . . . . . . . . . . . . . . . 55
For Mac OS X PS Printer Driver . . . . . . . . . . . . . . . . . . . . . . . . . . . . . . . . . . . . . . . . . . . . . . 55
- 4 -
Page 5

Contents
Scaling to Pages . . . . . . . . . . . . . . . . . . . . . . . . . . . . . . . . . . . . . . . . . . . . . . . . . . . 55
For Windows PCL/PCL XPS Printer Driver . . . . . . . . . . . . . . . . . . . . . . . . . . . . . . . . . . . . . . . . 55
For Mac OS X PS Printer Driver . . . . . . . . . . . . . . . . . . . . . . . . . . . . . . . . . . . . . . . . . . . . . . 55
Collating Pages . . . . . . . . . . . . . . . . . . . . . . . . . . . . . . . . . . . . . . . . . . . . . . . . . . . . 56
For Windows Printer Driver . . . . . . . . . . . . . . . . . . . . . . . . . . . . . . . . . . . . . . . . . . . . . . . . . 56
For Mac OS X PS Printer Driver . . . . . . . . . . . . . . . . . . . . . . . . . . . . . . . . . . . . . . . . . . . . . . 56
Setting the Page Order . . . . . . . . . . . . . . . . . . . . . . . . . . . . . . . . . . . . . . . . . . . . . . 56
For Windows PS Printer Driver . . . . . . . . . . . . . . . . . . . . . . . . . . . . . . . . . . . . . . . . . . . . . . . 56
For Mac OS X PS Printer Driver . . . . . . . . . . . . . . . . . . . . . . . . . . . . . . . . . . . . . . . . . . . . . . 56
Booklet Printing . . . . . . . . . . . . . . . . . . . . . . . . . . . . . . . . . . . . . . . . . . . . . . . . . . . 57
For Windows PCL/PCL XPS Printer Driver . . . . . . . . . . . . . . . . . . . . . . . . . . . . . . . . . . . . . . . . 57
For Windows PS Printer Driver . . . . . . . . . . . . . . . . . . . . . . . . . . . . . . . . . . . . . . . . . . . . . . . 57
Cover Printing . . . . . . . . . . . . . . . . . . . . . . . . . . . . . . . . . . . . . . . . . . . . . . . . . . . . . 57
For Windows PCL/PCL XPS Printer Driver . . . . . . . . . . . . . . . . . . . . . . . . . . . . . . . . . . . . . . . . 57
For Mac OS X PS Printer Driver . . . . . . . . . . . . . . . . . . . . . . . . . . . . . . . . . . . . . . . . . . . . . . 57
Poster Printing . . . . . . . . . . . . . . . . . . . . . . . . . . . . . . . . . . . . . . . . . . . . . . . . . . . . 58
For Windows PCL/PCL XPS Printer Driver . . . . . . . . . . . . . . . . . . . . . . . . . . . . . . . . . . . . . . . . 58
Changing Print Quality . . . . . . . . . . . . . . . . . . . . . . . . . . . . . . . . . . . . . . . . . . . . . . . 58
For Windows Printer Driver . . . . . . . . . . . . . . . . . . . . . . . . . . . . . . . . . . . . . . . . . . . . . . . . . 58
For Mac OS X PS Printer Driver . . . . . . . . . . . . . . . . . . . . . . . . . . . . . . . . . . . . . . . . . . . . . . 58
Enhancing Photos . . . . . . . . . . . . . . . . . . . . . . . . . . . . . . . . . . . . . . . . . . . . . . . . . . 59
For Windows PCL/PCL XPS Printer Driver . . . . . . . . . . . . . . . . . . . . . . . . . . . . . . . . . . . . . . . . 59
Emphasizing Fine Lines . . . . . . . . . . . . . . . . . . . . . . . . . . . . . . . . . . . . . . . . . . . . . . 59
For Windows Printer Driver . . . . . . . . . . . . . . . . . . . . . . . . . . . . . . . . . . . . . . . . . . . . . . . . . 59
For Mac OS X PS Printer Driver . . . . . . . . . . . . . . . . . . . . . . . . . . . . . . . . . . . . . . . . . . . . . . 59
Auto Tray Selection . . . . . . . . . . . . . . . . . . . . . . . . . . . . . . . . . . . . . . . . . . . . . . . . . 59
For Windows PCL/PCL XPS Printer Driver . . . . . . . . . . . . . . . . . . . . . . . . . . . . . . . . . . . . . . . . 60
For Windows PS Printer Driver . . . . . . . . . . . . . . . . . . . . . . . . . . . . . . . . . . . . . . . . . . . . . . . 60
For Mac OS X PS Printer Driver . . . . . . . . . . . . . . . . . . . . . . . . . . . . . . . . . . . . . . . . . . . . . . 60
Auto Tray Switching . . . . . . . . . . . . . . . . . . . . . . . . . . . . . . . . . . . . . . . . . . . . . . . . 60
For Windows PCL/PCL XPS Printer Driver . . . . . . . . . . . . . . . . . . . . . . . . . . . . . . . . . . . . . . . . 61
For Windows PS Printer Driver . . . . . . . . . . . . . . . . . . . . . . . . . . . . . . . . . . . . . . . . . . . . . . . 61
For Mac OS X PS Printer Driver . . . . . . . . . . . . . . . . . . . . . . . . . . . . . . . . . . . . . . . . . . . . . . 61
Saving Toner . . . . . . . . . . . . . . . . . . . . . . . . . . . . . . . . . . . . . . . . . . . . . . . . . . . . . 61
For Windows PCL/PS Printer Driver . . . . . . . . . . . . . . . . . . . . . . . . . . . . . . . . . . . . . . . . . . . . 61
For Windows PCL X PS Printer Driver . . . . . . . . . . . . . . . . . . . . . . . . . . . . . . . . . . . . . . . . . . 61
For Mac OS X PS Printer Driver . . . . . . . . . . . . . . . . . . . . . . . . . . . . . . . . . . . . . . . . . . . . . . 62
Secure Printing (for MC561dn Only) . . . . . . . . . . . . . . . . . . . . . . . . . . . . . . . . . . . . . 62
For Windows PCL/PS Printer Driver . . . . . . . . . . . . . . . . . . . . . . . . . . . . . . . . . . . . . . . . . . . . 62
Encrypted Secure Printing (for MC561dn Only) . . . . . . . . . . . . . . . . . . . . . . . . . . . . . . 63
For Windows PCL/PS Printer Driver . . . . . . . . . . . . . . . . . . . . . . . . . . . . . . . . . . . . . . . . . . . . 63
Watermark Printing . . . . . . . . . . . . . . . . . . . . . . . . . . . . . . . . . . . . . . . . . . . . . . . . . 63
For Windows Printer Driver . . . . . . . . . . . . . . . . . . . . . . . . . . . . . . . . . . . . . . . . . . . . . . . . . 63
Overlay Printing (for MC561dn Only) . . . . . . . . . . . . . . . . . . . . . . . . . . . . . . . . . . . . . 64
For Windows PCL Printer Driver . . . . . . . . . . . . . . . . . . . . . . . . . . . . . . . . . . . . . . . . . . . . . . 64
For Windows PS Printer Driver . . . . . . . . . . . . . . . . . . . . . . . . . . . . . . . . . . . . . . . . . . . . . . . 64
Storing Print Data (for MC561dn Only). . . . . . . . . . . . . . . . . . . . . . . . . . . . . . . . . . . . 65
For Windows PCL/PS Printer Driver . . . . . . . . . . . . . . . . . . . . . . . . . . . . . . . . . . . . . . . . . . . . 65
Saving the Driver Settings . . . . . . . . . . . . . . . . . . . . . . . . . . . . . . . . . . . . . . . . . . . . 65
For Windows PCL/PCL XPS Printer Driver . . . . . . . . . . . . . . . . . . . . . . . . . . . . . . . . . . . . . . . . 65
- 5 -
Page 6

Contents
Changing the Driver's Default Settings. . . . . . . . . . . . . . . . . . . . . . . . . . . . . . . . . . . . 66
For Windows Printer Driver . . . . . . . . . . . . . . . . . . . . . . . . . . . . . . . . . . . . . . . . . . . . . . . . . 66
For Mac OS X PS Printer Driver . . . . . . . . . . . . . . . . . . . . . . . . . . . . . . . . . . . . . . . . . . . . . . 66
Using Printer Fonts . . . . . . . . . . . . . . . . . . . . . . . . . . . . . . . . . . . . . . . . . . . . . . . . . 66
For Windows PCL Printer Driver . . . . . . . . . . . . . . . . . . . . . . . . . . . . . . . . . . . . . . . . . . . . . . 66
For Windows PS Printer Driver . . . . . . . . . . . . . . . . . . . . . . . . . . . . . . . . . . . . . . . . . . . . . . . 66
Using Computer Fonts . . . . . . . . . . . . . . . . . . . . . . . . . . . . . . . . . . . . . . . . . . . . . . . 67
For Windows PCL Printer Driver . . . . . . . . . . . . . . . . . . . . . . . . . . . . . . . . . . . . . . . . . . . . . . 67
For Windows PS Printer Driver . . . . . . . . . . . . . . . . . . . . . . . . . . . . . . . . . . . . . . . . . . . . . . . 67
Using a Print Buffer (MC561dn Only) . . . . . . . . . . . . . . . . . . . . . . . . . . . . . . . . . . . . . 67
For Windows PCL/PS Printer Driver . . . . . . . . . . . . . . . . . . . . . . . . . . . . . . . . . . . . . . . . . . . . 67
Changing the Mono-Print Speed Settings . . . . . . . . . . . . . . . . . . . . . . . . . . . . . . . . . . 67
Printing to File . . . . . . . . . . . . . . . . . . . . . . . . . . . . . . . . . . . . . . . . . . . . . . . . . . . . 68
For Windows Printer Driver . . . . . . . . . . . . . . . . . . . . . . . . . . . . . . . . . . . . . . . . . . . . . . . . . 68
For Mac OS X PS Printer Driver . . . . . . . . . . . . . . . . . . . . . . . . . . . . . . . . . . . . . . . . . . . . . . 68
Printing E-mail Attached Files . . . . . . . . . . . . . . . . . . . . . . . . . . . . . . . . . . . . . . . . . . 68
Downloading PS Files . . . . . . . . . . . . . . . . . . . . . . . . . . . . . . . . . . . . . . . . . . . . . . . . 68
For OKI LPR Utility . . . . . . . . . . . . . . . . . . . . . . . . . . . . . . . . . . . . . . . . . . . . . . . . . . . . . . . 68
Printing Out PS Errors . . . . . . . . . . . . . . . . . . . . . . . . . . . . . . . . . . . . . . . . . . . . . . . 69
For Windows PS Printer Driver . . . . . . . . . . . . . . . . . . . . . . . . . . . . . . . . . . . . . . . . . . . . . . . 69
For Mac OS X PS Printer Driver . . . . . . . . . . . . . . . . . . . . . . . . . . . . . . . . . . . . . . . . . . . . . . 69
Changing Emulation Mode . . . . . . . . . . . . . . . . . . . . . . . . . . . . . . . . . . . . . . . . . . . . 69
5 Job Macro (for MC561dn Only). . . . . . . . . . . . . . . . . . . . . . 70
JOB MACRO . . . . . . . . . . . . . . . . . . . . . . . . . . . . . . . . . . . . . . . . . . . . . . 70
Creating a Macro . . . . . . . . . . . . . . . . . . . . . . . . . . . . . . . . . . . . . . . . . . . . . . . . . . . 70
Using Macros . . . . . . . . . . . . . . . . . . . . . . . . . . . . . . . . . . . . . . . . . . . . . . . . . . . . . 71
Editing the Title. . . . . . . . . . . . . . . . . . . . . . . . . . . . . . . . . . . . . . . . . . . . . . . . . . . . 71
Deleting a Macro . . . . . . . . . . . . . . . . . . . . . . . . . . . . . . . . . . . . . . . . . . . . . . . . . . . 71
6 Configuring at the Operator Panel . . . . . . . . . . . . . . . . . . . 72
Changing the Equipment Settings . . . . . . . . . . . . . . . . . . . . . . . . . . . . . . 72
Admin Setup or Easy Setup . . . . . . . . . . . . . . . . . . . . . . . . . . . . . . . . . . . . . . . . . . . 72
Other Menus . . . . . . . . . . . . . . . . . . . . . . . . . . . . . . . . . . . . . . . . . . . . . . . . . . . . . . 72
Checking the Current Settings . . . . . . . . . . . . . . . . . . . . . . . . . . . . . . . . . 73
Printing Reports . . . . . . . . . . . . . . . . . . . . . . . . . . . . . . . . . . . . . . . . . . . . . . . . . . . 73
List of the Device Setting Menu Items. . . . . . . . . . . . . . . . . . . . . . . . . . . . 74
Device Setting Menu . . . . . . . . . . . . . . . . . . . . . . . . . . . . . . . . . . . . . . . . . . . . . . . . 74
List of Each Setup Menu . . . . . . . . . . . . . . . . . . . . . . . . . . . . . . . . . . . . . . . . . . . . . . 74
Reports . . . . . . . . . . . . . . . . . . . . . . . . . . . . . . . . . . . . . . . . . . . . . . . . . . . . . . . . . . . . . . . 74
Paper Setup. . . . . . . . . . . . . . . . . . . . . . . . . . . . . . . . . . . . . . . . . . . . . . . . . . . . . . . . . . . . 75
Address Book . . . . . . . . . . . . . . . . . . . . . . . . . . . . . . . . . . . . . . . . . . . . . . . . . . . . . . . . . . . 76
Phone Book . . . . . . . . . . . . . . . . . . . . . . . . . . . . . . . . . . . . . . . . . . . . . . . . . . . . . . . . . . . . 76
Profile . . . . . . . . . . . . . . . . . . . . . . . . . . . . . . . . . . . . . . . . . . . . . . . . . . . . . . . . . . . . . . . . 77
Network Scan Destination . . . . . . . . . . . . . . . . . . . . . . . . . . . . . . . . . . . . . . . . . . . . . . . . . . 79
- 6 -
Page 7

Contents
Store Document Settings. . . . . . . . . . . . . . . . . . . . . . . . . . . . . . . . . . . . . . . . . . . . . . . . . . . 80
View Information . . . . . . . . . . . . . . . . . . . . . . . . . . . . . . . . . . . . . . . . . . . . . . . . . . . . . . . . 80
Shutdown . . . . . . . . . . . . . . . . . . . . . . . . . . . . . . . . . . . . . . . . . . . . . . . . . . . . . . . . . . . . . 80
Easy Setup . . . . . . . . . . . . . . . . . . . . . . . . . . . . . . . . . . . . . . . . . . . . . . . . . . . . . . . . . . . . 81
Admin Setup . . . . . . . . . . . . . . . . . . . . . . . . . . . . . . . . . . . . . . . . . . . . . . . . . . . . . . . . . . . 82
7 Useful Software . . . . . . . . . . . . . . . . . . . . . . . . . . . . . . . . 100
List of Utilities . . . . . . . . . . . . . . . . . . . . . . . . . . . . . . . . . . . . . . . . . . . 100
Utilities common to Windows/Mac OS X . . . . . . . . . . . . . . . . . . . . . . . . . . . . . . . . . . . . . . . 100
Windows Utilities . . . . . . . . . . . . . . . . . . . . . . . . . . . . . . . . . . . . . . . . . . . . . . . . . . . . . . . 100
Mac OS X Utilities . . . . . . . . . . . . . . . . . . . . . . . . . . . . . . . . . . . . . . . . . . . . . . . . . . . . . . . 102
Installing Utilities . . . . . . . . . . . . . . . . . . . . . . . . . . . . . . . . . . . . . . . . . 102
Installing from the Software CD-ROM . . . . . . . . . . . . . . . . . . . . . . . . . . . . . . . . . . . .102
For Windows . . . . . . . . . . . . . . . . . . . . . . . . . . . . . . . . . . . . . . . . . . . . . . . . . . . . . . . . . . 102
For Mac OS X . . . . . . . . . . . . . . . . . . . . . . . . . . . . . . . . . . . . . . . . . . . . . . . . . . . . . . . . . . 102
Download from the Okidata website and install. . . . . . . . . . . . . . . . . . . . . . . . . . . . . .102
Utilities common to Windows/Mac OS X . . . . . . . . . . . . . . . . . . . . . . . . . . . . . . . . . . . . . . . 102
Utilities common to Windows/Mac OS X . . . . . . . . . . . . . . . . . . . . . . . . . 103
Webpage . . . . . . . . . . . . . . . . . . . . . . . . . . . . . . . . . . . . . . . . . . . . . . . . . . . . . . . .103
Access the machine webpage. . . . . . . . . . . . . . . . . . . . . . . . . . . . . . . . . . . . . . . . . . . . . . . 103
Log in as the administrator. . . . . . . . . . . . . . . . . . . . . . . . . . . . . . . . . . . . . . . . . . . . . . . . . 103
Changing the Administrator's password. . . . . . . . . . . . . . . . . . . . . . . . . . . . . . . . . . . . . . . . 104
Checking Machine Status. . . . . . . . . . . . . . . . . . . . . . . . . . . . . . . . . . . . . . . . . . . . . . . . . . 104
Changing Machine Settings . . . . . . . . . . . . . . . . . . . . . . . . . . . . . . . . . . . . . . . . . . . . . . . . 104
Get the Date and Time Automatically . . . . . . . . . . . . . . . . . . . . . . . . . . . . . . . . . . . . . . . . . 104
Windows Utilities . . . . . . . . . . . . . . . . . . . . . . . . . . . . . . . . . . . . . . . . . 105
Configuration Tool . . . . . . . . . . . . . . . . . . . . . . . . . . . . . . . . . . . . . . . . . . . . . . . . . .105
Setup . . . . . . . . . . . . . . . . . . . . . . . . . . . . . . . . . . . . . . . . . . . . . . . . . . . . . . . . . . . . . . . 105
Registering the Machine . . . . . . . . . . . . . . . . . . . . . . . . . . . . . . . . . . . . . . . . . . . . . . . . . . 105
Removing a Machine . . . . . . . . . . . . . . . . . . . . . . . . . . . . . . . . . . . . . . . . . . . . . . . . . . . . . 106
Check the Status of the Machine. . . . . . . . . . . . . . . . . . . . . . . . . . . . . . . . . . . . . . . . . . . . . 106
Set the Email Address . . . . . . . . . . . . . . . . . . . . . . . . . . . . . . . . . . . . . . . . . . . . . . . . . . . . 106
Set Speed Dials . . . . . . . . . . . . . . . . . . . . . . . . . . . . . . . . . . . . . . . . . . . . . . . . . . . . . . . . 107
Setting Profiles. . . . . . . . . . . . . . . . . . . . . . . . . . . . . . . . . . . . . . . . . . . . . . . . . . . . . . . . . 107
Setting a PIN . . . . . . . . . . . . . . . . . . . . . . . . . . . . . . . . . . . . . . . . . . . . . . . . . . . . . . . . . . 108
Set a network scan . . . . . . . . . . . . . . . . . . . . . . . . . . . . . . . . . . . . . . . . . . . . . . . . . . . . . . 110
Device Setting Plugin . . . . . . . . . . . . . . . . . . . . . . . . . . . . . . . . . . . . . . . . . . . . . . . . . . . . 110
Alert Info Plugin . . . . . . . . . . . . . . . . . . . . . . . . . . . . . . . . . . . . . . . . . . . . . . . . . . . . . . . . 111
Network Setting Plugin . . . . . . . . . . . . . . . . . . . . . . . . . . . . . . . . . . . . . . . . . . . . . . . . . . . 111
Cloning Settings . . . . . . . . . . . . . . . . . . . . . . . . . . . . . . . . . . . . . . . . . . . . . . . . . . . . . . . . 112
Storage Device Manager . . . . . . . . . . . . . . . . . . . . . . . . . . . . . . . . . . . . . . . . . . . . .112
Install . . . . . . . . . . . . . . . . . . . . . . . . . . . . . . . . . . . . . . . . . . . . . . . . . . . . . . . . . . . . . . . 112
Start Up . . . . . . . . . . . . . . . . . . . . . . . . . . . . . . . . . . . . . . . . . . . . . . . . . . . . . . . . . . . . . 113
Register Forms (Form Overlay) . . . . . . . . . . . . . . . . . . . . . . . . . . . . . . . . . . . . . . . . . . . . . 113
Check the Free Space in SD Memory Cards or Flash Memory. . . . . . . . . . . . . . . . . . . . . . . . . 113
Delete Unwanted Jobs from an SD Memory Card . . . . . . . . . . . . . . . . . . . . . . . . . . . . . . . . . 114
PDF Print Direct . . . . . . . . . . . . . . . . . . . . . . . . . . . . . . . . . . . . . . . . . . . . . . . . . . .114
Print a PDF file. . . . . . . . . . . . . . . . . . . . . . . . . . . . . . . . . . . . . . . . . . . . . . . . . . . . . . . . . 114
Print Control Client . . . . . . . . . . . . . . . . . . . . . . . . . . . . . . . . . . . . . . . . . . . . . . . . .114
- 7 -
Page 8

Contents
Setting the user name and job account ID. . . . . . . . . . . . . . . . . . . . . . . . . . . . . . . . . . . . . . 114
Setting Pop-Up Mode . . . . . . . . . . . . . . . . . . . . . . . . . . . . . . . . . . . . . . . . . . . . . . . . . . . . 115
Set a job account ID for each user in Hide mode. . . . . . . . . . . . . . . . . . . . . . . . . . . . . . . . . . 115
Allocates the same ID to all users in hide mode. . . . . . . . . . . . . . . . . . . . . . . . . . . . . . . . . . 116
Do not Distinguish Between Users . . . . . . . . . . . . . . . . . . . . . . . . . . . . . . . . . . . . . . . . . . . 116
Operator Panel Language Setup . . . . . . . . . . . . . . . . . . . . . . . . . . . . . . . . . . . . . . . .116
Starting Up . . . . . . . . . . . . . . . . . . . . . . . . . . . . . . . . . . . . . . . . . . . . . . . . . . . . . . . . . . . 116
Network Card Setup . . . . . . . . . . . . . . . . . . . . . . . . . . . . . . . . . . . . . . . . . . . . . . . .117
Launching the Utility . . . . . . . . . . . . . . . . . . . . . . . . . . . . . . . . . . . . . . . . . . . . . . . . . . . . . 117
Configuring Network Settings. . . . . . . . . . . . . . . . . . . . . . . . . . . . . . . . . . . . . . . . . . . . . . . 117
Set Web settings . . . . . . . . . . . . . . . . . . . . . . . . . . . . . . . . . . . . . . . . . . . . . . . . . . . . . . . 117
Changing the Password. . . . . . . . . . . . . . . . . . . . . . . . . . . . . . . . . . . . . . . . . . . . . . . . . . . 118
Change the Environment. . . . . . . . . . . . . . . . . . . . . . . . . . . . . . . . . . . . . . . . . . . . . . . . . . 118
OKI LPR Utility . . . . . . . . . . . . . . . . . . . . . . . . . . . . . . . . . . . . . . . . . . . . . . . . . . . .118
Launching the Utility . . . . . . . . . . . . . . . . . . . . . . . . . . . . . . . . . . . . . . . . . . . . . . . . . . . . . 118
Adding a Printer . . . . . . . . . . . . . . . . . . . . . . . . . . . . . . . . . . . . . . . . . . . . . . . . . . . . . . . . 118
Downloading Files. . . . . . . . . . . . . . . . . . . . . . . . . . . . . . . . . . . . . . . . . . . . . . . . . . . . . . . 119
Displaying the Machine Status . . . . . . . . . . . . . . . . . . . . . . . . . . . . . . . . . . . . . . . . . . . . . . 119
Checking/Deleting/Forwarding Jobs . . . . . . . . . . . . . . . . . . . . . . . . . . . . . . . . . . . . . . . . . . 119
Forwarding Jobs Automatically . . . . . . . . . . . . . . . . . . . . . . . . . . . . . . . . . . . . . . . . . . . . . . 119
Print with Multiple Printers. . . . . . . . . . . . . . . . . . . . . . . . . . . . . . . . . . . . . . . . . . . . . . . . . 119
Open a Webpage . . . . . . . . . . . . . . . . . . . . . . . . . . . . . . . . . . . . . . . . . . . . . . . . . . . . . . . 120
Adding Comments to Printers. . . . . . . . . . . . . . . . . . . . . . . . . . . . . . . . . . . . . . . . . . . . . . . 120
Automatically Configuring the IP Address . . . . . . . . . . . . . . . . . . . . . . . . . . . . . . . . . . . . . . 120
Uninstall the OKI LPR Utility. . . . . . . . . . . . . . . . . . . . . . . . . . . . . . . . . . . . . . . . . . . . . . . . 120
Network Extension . . . . . . . . . . . . . . . . . . . . . . . . . . . . . . . . . . . . . . . . . . . . . . . . .120
Launch the Utility . . . . . . . . . . . . . . . . . . . . . . . . . . . . . . . . . . . . . . . . . . . . . . . . . . . . . . . 121
Check Machine Settings . . . . . . . . . . . . . . . . . . . . . . . . . . . . . . . . . . . . . . . . . . . . . . . . . . 121
Set Options Automatically . . . . . . . . . . . . . . . . . . . . . . . . . . . . . . . . . . . . . . . . . . . . . . . . . 121
Uninstall the Utility . . . . . . . . . . . . . . . . . . . . . . . . . . . . . . . . . . . . . . . . . . . . . . . . . . . . . . 121
TELNET . . . . . . . . . . . . . . . . . . . . . . . . . . . . . . . . . . . . . . . . . . . . . . . . . . . . . . . . .121
Mac OS X Utilities. . . . . . . . . . . . . . . . . . . . . . . . . . . . . . . . . . . . . . . . . 123
Panel Language Setup . . . . . . . . . . . . . . . . . . . . . . . . . . . . . . . . . . . . . . . . . . . . . . .123
Print Control Client . . . . . . . . . . . . . . . . . . . . . . . . . . . . . . . . . . . . . . . . . . . . . . . . .123
Registering a User ID . . . . . . . . . . . . . . . . . . . . . . . . . . . . . . . . . . . . . . . . . . . . . . . . . . . . 123
Register Multiple Users at the Same Time . . . . . . . . . . . . . . . . . . . . . . . . . . . . . . . . . . . . . . 123
Changing User ID and Username.. . . . . . . . . . . . . . . . . . . . . . . . . . . . . . . . . . . . . . . . . . . . 124
Deleting User IDs and Usernames . . . . . . . . . . . . . . . . . . . . . . . . . . . . . . . . . . . . . . . . . . . 124
Network Card Setup . . . . . . . . . . . . . . . . . . . . . . . . . . . . . . . . . . . . . . . . . . . . . . . .124
Configure the IP Address . . . . . . . . . . . . . . . . . . . . . . . . . . . . . . . . . . . . . . . . . . . . . . . . . . 124
Configure Web settings . . . . . . . . . . . . . . . . . . . . . . . . . . . . . . . . . . . . . . . . . . . . . . . . . . . 124
Quit Network Card Setup. . . . . . . . . . . . . . . . . . . . . . . . . . . . . . . . . . . . . . . . . . . . . . . . . . 125
Network Scanner Setup Tool. . . . . . . . . . . . . . . . . . . . . . . . . . . . . . . . . . . . . . . . . . .125
Carry out a network scan for the first time. . . . . . . . . . . . . . . . . . . . . . . . . . . . . . . . . . . . . . 125
8 Adjusting Color . . . . . . . . . . . . . . . . . . . . . . . . . . . . . . . . . 126
Adjusting Color on the Control Panel . . . . . . . . . . . . . . . . . . . . . . . . . . . 126
Adjusting Color Registration . . . . . . . . . . . . . . . . . . . . . . . . . . . . . . . . . . . . . . . . . . .126
Adjusting the Density . . . . . . . . . . . . . . . . . . . . . . . . . . . . . . . . . . . . . . . . . . . . . . . 126
- 8 -
Page 9

Contents
Fine Adjustment of Color Registration . . . . . . . . . . . . . . . . . . . . . . . . . . . . . . . . . . . . 127
Adjusting the Color Balance (Density) . . . . . . . . . . . . . . . . . . . . . . . . . . . . . . . . . . . .127
Printing Color Swatch . . . . . . . . . . . . . . . . . . . . . . . . . . . . . . . . . . . . . . . . . . . . . . . . . . . . 127
Adjusting the Color. . . . . . . . . . . . . . . . . . . . . . . . . . . . . . . . . . . . . . . . . . . . . . . . . . . . . . 127
Color Adjustment for Copying and Scanning . . . . . . . . . . . . . . . . . . . . . . 128
Adjusting Contrast. . . . . . . . . . . . . . . . . . . . . . . . . . . . . . . . . . . . . . . . . . . . . . . . . .128
Adjusting the Hue . . . . . . . . . . . . . . . . . . . . . . . . . . . . . . . . . . . . . . . . . . . . . . . . . .128
Adjusting Saturation . . . . . . . . . . . . . . . . . . . . . . . . . . . . . . . . . . . . . . . . . . . . . . . .128
Adjusting RGB Color . . . . . . . . . . . . . . . . . . . . . . . . . . . . . . . . . . . . . . . . . . . . . . . .128
Color Adjustment for Printing. . . . . . . . . . . . . . . . . . . . . . . . . . . . . . . . . 129
About ColorMatching. . . . . . . . . . . . . . . . . . . . . . . . . . . . . . . . . . . . . . . . . . . . . . . .129
Color Matching (Office Color) . . . . . . . . . . . . . . . . . . . . . . . . . . . . . . . . . . . . . . . . . .129
If you are Using a Windows PCL/PS Printer Driver . . . . . . . . . . . . . . . . . . . . . . . . . . . . . . . . 129
If you are Using a Windows PCL XPS Printer Driver. . . . . . . . . . . . . . . . . . . . . . . . . . . . . . . . 129
For Mac OS X PS Printer Driver . . . . . . . . . . . . . . . . . . . . . . . . . . . . . . . . . . . . . . . . . . . . . 129
Black Finish . . . . . . . . . . . . . . . . . . . . . . . . . . . . . . . . . . . . . . . . . . . . . . . . . . . . . .129
For Windows PCL/PS Printer Driver . . . . . . . . . . . . . . . . . . . . . . . . . . . . . . . . . . . . . . . . . . . 129
If you are Using a Windows PCL XPS Printer Driver. . . . . . . . . . . . . . . . . . . . . . . . . . . . . . . . 130
For Mac OS X PS Printer Driver . . . . . . . . . . . . . . . . . . . . . . . . . . . . . . . . . . . . . . . . . . . . . 130
Printing in Grayscale . . . . . . . . . . . . . . . . . . . . . . . . . . . . . . . . . . . . . . . . . . . . . . . .130
For Windows . . . . . . . . . . . . . . . . . . . . . . . . . . . . . . . . . . . . . . . . . . . . . . . . . . . . . . . . . . 130
For Mac OS X . . . . . . . . . . . . . . . . . . . . . . . . . . . . . . . . . . . . . . . . . . . . . . . . . . . . . . . . . . 130
Overprinting Black (Overprinting black) . . . . . . . . . . . . . . . . . . . . . . . . . . . . . . . . . . .130
For Windows PCL/PCL XPS Printer Drivers . . . . . . . . . . . . . . . . . . . . . . . . . . . . . . . . . . . . . . 130
For Windows PS Drivers . . . . . . . . . . . . . . . . . . . . . . . . . . . . . . . . . . . . . . . . . . . . . . . . . . 130
For Mac OS X Printer Driver . . . . . . . . . . . . . . . . . . . . . . . . . . . . . . . . . . . . . . . . . . . . . . . . 131
Simulating Printing Results in Ink . . . . . . . . . . . . . . . . . . . . . . . . . . . . . . . . . . . . . . .131
For Windows PCL/PS Printer Driver . . . . . . . . . . . . . . . . . . . . . . . . . . . . . . . . . . . . . . . . . . . 131
For Mac OS X PS Printer Driver . . . . . . . . . . . . . . . . . . . . . . . . . . . . . . . . . . . . . . . . . . . . . 131
Color Separation Printing . . . . . . . . . . . . . . . . . . . . . . . . . . . . . . . . . . . . . . . . . . . . .131
For Windows PS Drivers . . . . . . . . . . . . . . . . . . . . . . . . . . . . . . . . . . . . . . . . . . . . . . . . . . 131
For Mac OS X PS Printer Driver . . . . . . . . . . . . . . . . . . . . . . . . . . . . . . . . . . . . . . . . . . . . . 131
Using ColorSync (Mac OS X Only) . . . . . . . . . . . . . . . . . . . . . . . . . . . . . . . . . . . . . . .132
Profile Assistant . . . . . . . . . . . . . . . . . . . . . . . . . . . . . . . . . . . . . . . . . . 133
Registering ICC Profile . . . . . . . . . . . . . . . . . . . . . . . . . . . . . . . . . . . . . . . . . . . . . . .133
For Windows . . . . . . . . . . . . . . . . . . . . . . . . . . . . . . . . . . . . . . . . . . . . . . . . . . . . . . . . . . 133
For Mac OS X . . . . . . . . . . . . . . . . . . . . . . . . . . . . . . . . . . . . . . . . . . . . . . . . . . . . . . . . . . 133
Color Matching Using ICC Profile (Graphic Pro) . . . . . . . . . . . . . . . . . . . . . . . . . . . . . .134
For Windows . . . . . . . . . . . . . . . . . . . . . . . . . . . . . . . . . . . . . . . . . . . . . . . . . . . . . . . . . . 134
For Mac OS X . . . . . . . . . . . . . . . . . . . . . . . . . . . . . . . . . . . . . . . . . . . . . . . . . . . . . . . . . . 134
Color Correct Utility . . . . . . . . . . . . . . . . . . . . . . . . . . . . . . . . . . . . . . . 135
Changing Palette Color. . . . . . . . . . . . . . . . . . . . . . . . . . . . . . . . . . . . . . . . . . . . . . .135
For Windows . . . . . . . . . . . . . . . . . . . . . . . . . . . . . . . . . . . . . . . . . . . . . . . . . . . . . . . . . . 135
For Mac OS X . . . . . . . . . . . . . . . . . . . . . . . . . . . . . . . . . . . . . . . . . . . . . . . . . . . . . . . . . . 135
Changing Gamma Value or Hue . . . . . . . . . . . . . . . . . . . . . . . . . . . . . . . . . . . . . . . .136
For Windows . . . . . . . . . . . . . . . . . . . . . . . . . . . . . . . . . . . . . . . . . . . . . . . . . . . . . . . . . . 136
- 9 -
Page 10

Contents
For Mac OS X . . . . . . . . . . . . . . . . . . . . . . . . . . . . . . . . . . . . . . . . . . . . . . . . . . . . . . . . . . 136
Printing in Adjusted Color Settings . . . . . . . . . . . . . . . . . . . . . . . . . . . . . . . . . . . . . .137
For Windows PCL/PS Printer Driver . . . . . . . . . . . . . . . . . . . . . . . . . . . . . . . . . . . . . . . . . . . 137
If you are Using a Windows PCL XPS Printer Driver. . . . . . . . . . . . . . . . . . . . . . . . . . . . . . . . 137
For Mac OS X PS Printer Driver . . . . . . . . . . . . . . . . . . . . . . . . . . . . . . . . . . . . . . . . . . . . . 137
Saving Color Correction Settings . . . . . . . . . . . . . . . . . . . . . . . . . . . . . . . . . . . . . . . .137
For Windows . . . . . . . . . . . . . . . . . . . . . . . . . . . . . . . . . . . . . . . . . . . . . . . . . . . . . . . . . . 137
For Mac OS X . . . . . . . . . . . . . . . . . . . . . . . . . . . . . . . . . . . . . . . . . . . . . . . . . . . . . . . . . . 138
Importing Color Correction Settings. . . . . . . . . . . . . . . . . . . . . . . . . . . . . . . . . . . . . . 138
For Windows . . . . . . . . . . . . . . . . . . . . . . . . . . . . . . . . . . . . . . . . . . . . . . . . . . . . . . . . . . 138
For Mac OS X . . . . . . . . . . . . . . . . . . . . . . . . . . . . . . . . . . . . . . . . . . . . . . . . . . . . . . . . . . 138
Deleting Color Correction Settings . . . . . . . . . . . . . . . . . . . . . . . . . . . . . . . . . . . . . . .138
For Windows . . . . . . . . . . . . . . . . . . . . . . . . . . . . . . . . . . . . . . . . . . . . . . . . . . . . . . . . . . 138
For Mac OS X . . . . . . . . . . . . . . . . . . . . . . . . . . . . . . . . . . . . . . . . . . . . . . . . . . . . . . . . . . 139
Color Swatch Utility . . . . . . . . . . . . . . . . . . . . . . . . . . . . . . . . . . . . . . . 140
Printing Color Swatch . . . . . . . . . . . . . . . . . . . . . . . . . . . . . . . . . . . . . . . . . . . . . . .140
Customizing the Color Sample . . . . . . . . . . . . . . . . . . . . . . . . . . . . . . . . . . . . . . . . . . . . . . 140
Printing a File With the Color You Want . . . . . . . . . . . . . . . . . . . . . . . . . . . . . . . . . . .140
PS Gamma Adjuster Utility . . . . . . . . . . . . . . . . . . . . . . . . . . . . . . . . . . 141
Registering Halftone . . . . . . . . . . . . . . . . . . . . . . . . . . . . . . . . . . . . . . . . . . . . . . . .141
For Windows PS Drivers . . . . . . . . . . . . . . . . . . . . . . . . . . . . . . . . . . . . . . . . . . . . . . . . . . 141
For Mac OS X PS Printer Driver . . . . . . . . . . . . . . . . . . . . . . . . . . . . . . . . . . . . . . . . . . . . . 141
Printing a File With the Adjusted Gamma Curve . . . . . . . . . . . . . . . . . . . . . . . . . . . . .142
For Windows PS Drivers . . . . . . . . . . . . . . . . . . . . . . . . . . . . . . . . . . . . . . . . . . . . . . . . . . 142
For Mac OS X PS Printer Driver . . . . . . . . . . . . . . . . . . . . . . . . . . . . . . . . . . . . . . . . . . . . . 142
9 Network Settings . . . . . . . . . . . . . . . . . . . . . . . . . . . . . . . 143
Network Setting Items . . . . . . . . . . . . . . . . . . . . . . . . . . . . . . . . . . . . . 143
Changing Network Settings From the Web Page. . . . . . . . . . . . . . . . . . . . 162
Encrypting Communication by SSL/TLS . . . . . . . . . . . . . . . . . . . . . . . . . . . . . . . . . . .162
Creating a Certificate . . . . . . . . . . . . . . . . . . . . . . . . . . . . . . . . . . . . . . . . . . . . . . . . . . . . 162
Enabling Encryption . . . . . . . . . . . . . . . . . . . . . . . . . . . . . . . . . . . . . . . . . . . . . . . . . . . . . 162
Opening the Web Page . . . . . . . . . . . . . . . . . . . . . . . . . . . . . . . . . . . . . . . . . . . . . . . . . . . 163
IPP Printing . . . . . . . . . . . . . . . . . . . . . . . . . . . . . . . . . . . . . . . . . . . . . . . . . . . . . . . . . . . 163
Encrypting Communication by IPSec . . . . . . . . . . . . . . . . . . . . . . . . . . . . . . . . . . . . .164
Configuring Your Machine . . . . . . . . . . . . . . . . . . . . . . . . . . . . . . . . . . . . . . . . . . . . . . . . . 164
Configuring Your Computer . . . . . . . . . . . . . . . . . . . . . . . . . . . . . . . . . . . . . . . . . . . . . . . . 164
Controlling Access Using IP Address (IP Filtering) . . . . . . . . . . . . . . . . . . . . . . . . . . . .166
Control Access Using MAC Address (MAC Address Filtering) . . . . . . . . . . . . . . . . . . . . .166
Error Notification by E-mail (E-mail Alert) . . . . . . . . . . . . . . . . . . . . . . . . . . . . . . . . .167
Configuring Your Machine . . . . . . . . . . . . . . . . . . . . . . . . . . . . . . . . . . . . . . . . . . . . . . . . . 167
Regular Alert . . . . . . . . . . . . . . . . . . . . . . . . . . . . . . . . . . . . . . . . . . . . . . . . . . . . . . . . . . 167
Alert At Time of Error Occurrence . . . . . . . . . . . . . . . . . . . . . . . . . . . . . . . . . . . . . . . . . . . . 167
Using SNMPv3 . . . . . . . . . . . . . . . . . . . . . . . . . . . . . . . . . . . . . . . . . . . . . . . . . . . .168
Using IPv6 . . . . . . . . . . . . . . . . . . . . . . . . . . . . . . . . . . . . . . . . . . . . . . . . . . . . . . .168
Enabling IPv6. . . . . . . . . . . . . . . . . . . . . . . . . . . . . . . . . . . . . . . . . . . . . . . . . . . . . . . . . . 168
Checking IPv6 Address . . . . . . . . . . . . . . . . . . . . . . . . . . . . . . . . . . . . . . . . . . . . . . . . . . . 169
- 10 -
Page 11

Contents
Using IEEE802.1X . . . . . . . . . . . . . . . . . . . . . . . . . . . . . . . . . . . . . . . . . . . . . . . . . .169
Configuring Your Machine for IEEE802.1X . . . . . . . . . . . . . . . . . . . . . . . . . . . . . . . . . . . . . . 169
Connecting Your Machine to Authentication Switch . . . . . . . . . . . . . . . . . . . . . . . . . . . . . . . . 170
Configuring LDAP Server . . . . . . . . . . . . . . . . . . . . . . . . . . . . . . . . . . . . . . . . . . . . .170
Configuring Secure Protocols . . . . . . . . . . . . . . . . . . . . . . . . . . . . . . . . . . . . . . . . . .170
Printing Without Printer Driver (Direct Print) . . . . . . . . . . . . . . . . . . . . . . . . . . . . . . . .171
Printing PDF Files . . . . . . . . . . . . . . . . . . . . . . . . . . . . . . . . . . . . . . . . . . . . . . . . . . . . . . . 171
Configuring Server to Print Files Attached to E-mails . . . . . . . . . . . . . . . . . . . . . . . . . . . . . . 171
Changing Settings on EtherTalk (for Mac OS only) . . . . . . . . . . . . . . . . . . . . . . . . . . .171
Changing EtherTalk Machine Name. . . . . . . . . . . . . . . . . . . . . . . . . . . . . . . . . . . . . . . . . . . 171
Changing EtherTalk Zone . . . . . . . . . . . . . . . . . . . . . . . . . . . . . . . . . . . . . . . . . . . . . . . . . 172
Other Operations . . . . . . . . . . . . . . . . . . . . . . . . . . . . . . . . . . . . . . . . . 173
Initializing Network Settings . . . . . . . . . . . . . . . . . . . . . . . . . . . . . . . . . . . . . . . . . . .173
Using DHCP . . . . . . . . . . . . . . . . . . . . . . . . . . . . . . . . . . . . . . . . . . . . . . . . . . . . . .173
Configuring DHCP Server. . . . . . . . . . . . . . . . . . . . . . . . . . . . . . . . . . . . . . . . . . . . . . . . . . 173
Configuring Your Machine . . . . . . . . . . . . . . . . . . . . . . . . . . . . . . . . . . . . . . . . . . . . . . . . . 174
10 Settings for Auto Delivery and Transmission Data Save
Functions (for MC561dn Only) . . . . . . . . . . . . . . . . . . . . . 175
Forwarding Received Faxes As Digital Data (Auto Delivery) . . . . . . . . . . . . 175
Configuration for the Auto Delivery Function. . . . . . . . . . . . . . . . . . . . . . . . . . . . . . . .175
Saving Transmission and Reception Data (Transmission Data Save). . . . . . 178
Configuration for the Transmission Data Save Function . . . . . . . . . . . . . . . . . . . . . . . .178
11 Troubleshooting . . . . . . . . . . . . . . . . . . . . . . . . . . . . . . . . 180
Initializing . . . . . . . . . . . . . . . . . . . . . . . . . . . . . . . . . . . . . . . . . . . . . . 180
Initializing an SD memory card (for MC561dn Only) . . . . . . . . . . . . . . . . . . . . . . . . . .180
Formatting the Entire Area . . . . . . . . . . . . . . . . . . . . . . . . . . . . . . . . . . . . . . . . . . . . . . . . 180
Formatting a particular partition. . . . . . . . . . . . . . . . . . . . . . . . . . . . . . . . . . . . . . . . . . . . . 180
Initializing Flash Memory . . . . . . . . . . . . . . . . . . . . . . . . . . . . . . . . . . . . . . . . . . . . .181
Resetting the Machine Settings . . . . . . . . . . . . . . . . . . . . . . . . . . . . . . . . . . . . . . . . .181
Deleting or Updating the Drivers . . . . . . . . . . . . . . . . . . . . . . . . . . . . . . 182
Deleting a Printer or Fax Driver. . . . . . . . . . . . . . . . . . . . . . . . . . . . . . . . . . . . . . . . .182
For Windows . . . . . . . . . . . . . . . . . . . . . . . . . . . . . . . . . . . . . . . . . . . . . . . . . . . . . . . . . . 182
For Mac OS X . . . . . . . . . . . . . . . . . . . . . . . . . . . . . . . . . . . . . . . . . . . . . . . . . . . . . . . . . . 182
Updating a Printer or Fax Driver . . . . . . . . . . . . . . . . . . . . . . . . . . . . . . . . . . . . . . . .183
For Windows . . . . . . . . . . . . . . . . . . . . . . . . . . . . . . . . . . . . . . . . . . . . . . . . . . . . . . . . . . 183
For Mac OS X . . . . . . . . . . . . . . . . . . . . . . . . . . . . . . . . . . . . . . . . . . . . . . . . . . . . . . . . . . 183
Deleting a Scanner Driver . . . . . . . . . . . . . . . . . . . . . . . . . . . . . . . . . . . . . . . . . . . .183
For Windows . . . . . . . . . . . . . . . . . . . . . . . . . . . . . . . . . . . . . . . . . . . . . . . . . . . . . . . . . . 183
For Mac OS X . . . . . . . . . . . . . . . . . . . . . . . . . . . . . . . . . . . . . . . . . . . . . . . . . . . . . . . . . . 183
Updating a Scanner Driver . . . . . . . . . . . . . . . . . . . . . . . . . . . . . . . . . . . . . . . . . . . .184
For Windows . . . . . . . . . . . . . . . . . . . . . . . . . . . . . . . . . . . . . . . . . . . . . . . . . . . . . . . . . . 184
For Mac OS X . . . . . . . . . . . . . . . . . . . . . . . . . . . . . . . . . . . . . . . . . . . . . . . . . . . . . . . . . . 184
- 11 -
Page 12

Contents
Limit Items on When in Sleep Mode . . . . . . . . . . . . . . . . . . . . . . . . . . . . 185
Printer Driver Utility Constraints . . . . . . . . . . . . . . . . . . . . . . . . . . . . . . . . . . . . . . . .185
Network Function Constraints . . . . . . . . . . . . . . . . . . . . . . . . . . . . . . . . . . . . . . . . . .185
Cannot go into sleep mode. . . . . . . . . . . . . . . . . . . . . . . . . . . . . . . . . . . . . . . . . . . . . . . . . 185
Cannot Print . . . . . . . . . . . . . . . . . . . . . . . . . . . . . . . . . . . . . . . . . . . . . . . . . . . . . . . . . . 185
Cannot Search/Change Settings . . . . . . . . . . . . . . . . . . . . . . . . . . . . . . . . . . . . . . . . . . . . . 186
Protocols with the client function do not work. . . . . . . . . . . . . . . . . . . . . . . . . . . . . . . . . . . . 186
Protocols that need to have sleep mode deactivated to be used. . . . . . . . . . . . . . . . . . . . . . . 186
12 Appendix. . . . . . . . . . . . . . . . . . . . . . . . . . . . . . . . . . . . . . 187
About Using Print Control . . . . . . . . . . . . . . . . . . . . . . . . . . . . . . . . . . . 187
Number of Job Account IDs and logs that can be used. . . . . . . . . . . . . . . . . . . . . . . . .187
Index . . . . . . . . . . . . . . . . . . . . . . . . . . . . . . . . . . . . . . . . . . . 188
- 12 -
Page 13
About This Manual
Note
Memo
Reference
Terms in this document
The following terms are used in this manual:
Indicates important information on operations. Make sure to read them.
Indicates additional information on operations. You are recommended to read them.
Indicates where to look when you want to know more detailed or related information.
WARNING
Indicates additional information which, if ignored or failed to follow the guidelines, may result in personal fatal
injury or death.
CAUTION
Indicates additional information which, if ignored, may result in personal injury.
Symbols in this document
The following symbols are used in this guide:
Symbols Description
[ ] Indicates menu names on the display screen.
Indicates menu, window, dialog names on the computer.
" " Indicates messages and enter text on the display screen.
Indicates file names on the computer.
Indicates reference titles.
< > key Indicates a hardware key on the operator panel or a key on
the keyboard of the computer.
> Indicates how to get to the menu you want on the menu of
the machine or the computer.
- 13 -
Page 14

Legends used in this manual
In this document, it may have written as follows.
PostScript3 Emulation PSE, POSTSCRIPT3 Emulation, POSTSCRIPT3 EMULATION
®
Microsoft
Microsoft
Microsoft
Microsoft
Microsoft
Microsoft
Microsoft
Microsoft
Microsoft
Microsoft
Microsoft
Microsoft
Generic name for Windows 7, Windows Vista, Windows Server 2008, Windows XP, Windows Server 2003, and
Windows 2000 Windows
Windows® 7 64-bit Edition operating system Windows 7 (64bit version)
®
Windows Vista® 64-bit Edition operating system Windows Vista (64bit version) ※
®
Windows Server® 2008 R2 64-bit Edition operating system Windows Server 2008 R2 ※
®
Windows Server® 2008 64-bit Edition operating system Windows Server 2008 (64bit version) ※
®
Windows® XP x64 Edition operating system Windows XP (x64 version) ※
®
Windows Server® 2003 x64 Edition operating system Windows Server 2003 (x64 version) ※
®
Windows® 7 operating system Windows 7 ※
®
Windows Vista® operating system Windows Vista ※
®
Windows Server® 2008 operating system Windows Server 2008 ※
®
Windows® XP operating system Windows XP ※
®
Windows Server® 2003 operating system Windows Server 2003 ※
®
Windows® 2000 operating system Windows 2000
※
If there is no special description, 64bit version is i
ncluded in Windows 7, Windows Vista, Windows
Server 2008, Windows XP, and Windows Server 2003. (64bit version and Windows Server 2008 R2 is
luded in Windows Server 2008.)
inc
If there is no special description, Windows 7 is used as Windows, Mac OS X 10.6 is used as Mac OS X,
and
MC561dn is used as the machine for examples in this document.
Depending on your OS or model, the descriptio
n on this document may be different.
- 14 -
Page 15
1. Copying
Memo
Reference
MONO
R
The direction to inserting a document
The direction to inserting a documentt
The direction to inserting a document
This chapter explains your machine's various copy functions.
Useful Functions
This section explains your machine's useful copy functions. The functions explained below are enabled
from the [Change settings] menu of the copy start screen.
The following procedures are explained under the assumption that [Continue Scan] is disabled. For the basic procedures when
[Continue Scan] is enabled, refer to the User's Manual Basic.
Sorting Copies (Sorft)
When the sort function is enabled, data is
outputted by making one copy according to page
number. Since the machine collates copies, this
function saves you the effort of sorting copies
manually. In the factory default, the sort function
is not enabled.
1 Press the <COPY> key.
2 Place your document with text face up in
the ADF or face down on the document
glass.
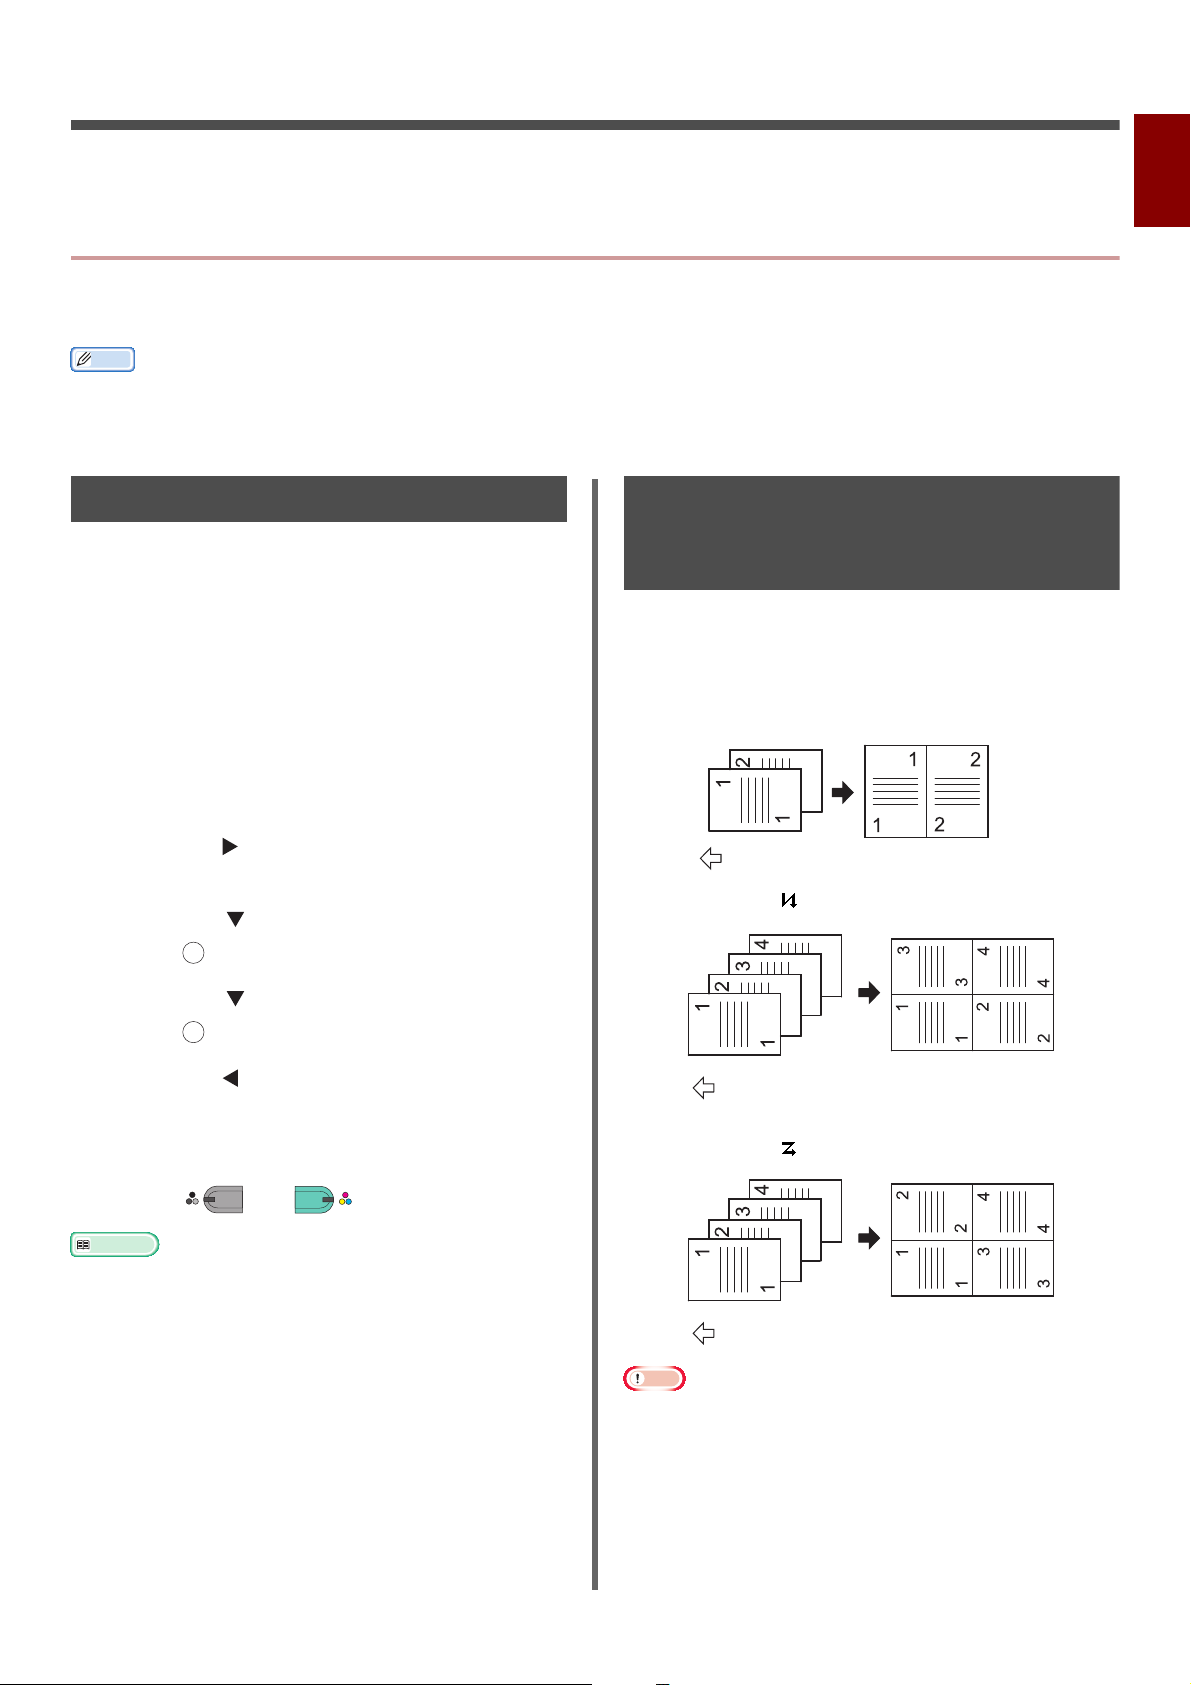
Combining Multiple Pages
Onto One Sheet of Paper (Nin-1)
This function allows you to copy multiple pages
of documents onto one side of a single sheet of
paper. Two or four pages can be printed onto one
side.
Tw o pa g es
1
Copying
3 Press the to enter the [Change
settings] m
enu.
4 Press the to select [Sort] and then
press .
OK
5 Press the to select [ON] and then
press .
OK
6 Press the until the copy standby screen
appears.
7 Enter the number of copies required.
8 Press or .
The continuous scan mode allows you to copy multiple
documents at once. You can use both the ADF and
document glass for a single job if you use the continuous
scan mode. For details, refer to the User's Manual Basic.
COLO
Four pages Vertical setting
Four pages Horizontal setting
Note
Place your document so that the top is scanned in first.
Specify the appropriate orientation of the image in
[Direction] to get the copy result you want.
[Zoom] is automatically set to [Auto] when [N-in-1] is
enabled. To specify the desired zoom ratio, set [N-in-1]
first and then set [Zoom].
- 15 -
Page 16
Useful Functions
Reference
Memo
Reference
MONO
R
R
A part of the document image may be missing on the copy
depending on paper, document, and zoom ratio.
The paper tray is automatically selected when [
enabled.
For details on how to load your document, refer to the
User's Manual Basic.
N-in-1
] is
1 Press the <COPY> key.
2 Place your document with text face up in
the ADF or face down on the document
glass.
3 Press the to enter the [Change
settings] m
enu.
4 Press the to select [N-in-1] and then
press .
OK
5 Press the to select a value and then
press .
OK
6 Press the until the copy standby
screen appears.
7 Enter the number of copies required.
8 Press or .
When you use the document glass, the continuous scan
mode is automatically enabled. Follow the instructions
displayed on the display screen.
COLO
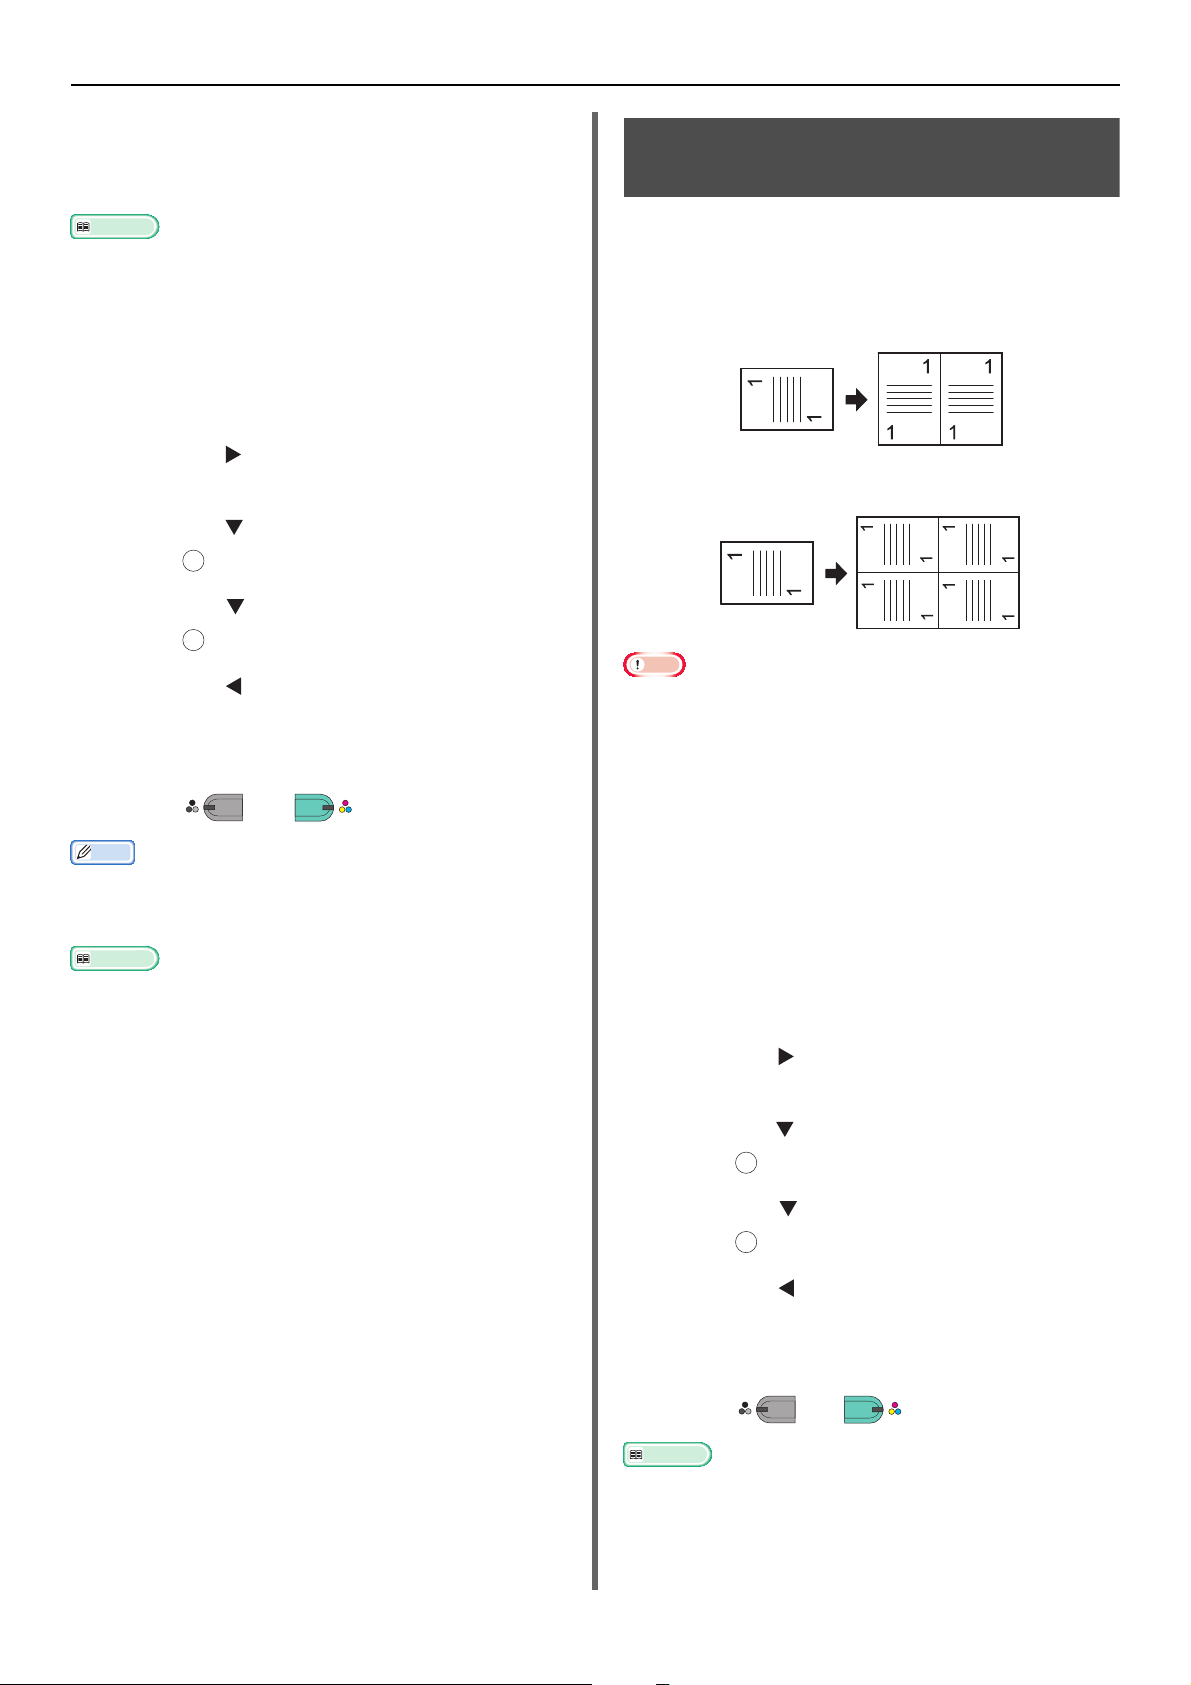
Making Multiple Copies Onto One Sheet of Paper (Repeat)
This function allows you to repeatedly copy the
image on a document onto one side of a single
sheet of paper. Images can be repeated two or
four times.
Tw o re p eat
Four repeat
Note
[Zoom] is automatically set to [Auto] when [Repeat] is
enabled. To specify the desired zoom ratio, set [Repeat]
first and then set [Zoom].
Specify the appropriate orientation of the image in
[Direction] to get the copy result you want.
A part of the document image may be missing on the copy
depending on paper, document, and zoom ratio.
The paper tray is automatically set when this function is
enabled.
1 Press the <COPY> key.
The continuous scan mode allows you to copy multiple
documents at once. You can use both the ADF and
document glass for a single job if you use the continuous
scan mode. For details, refer to the User's Manual Basic.
2 Place your document with text face up in
the ADF or face down on the document
glass.
3 Press the to enter the [Change
settings] me
nu.
4 Press the to select [Repeat] and then
press .
OK
5 Press the to select a value and then
press .
OK
6 Press the until the copy standby
screen appears.
7 Enter the number of copies required.
8 Press or .
Reference
The continuous scan mode allows you to copy multiple
documents at once. You can use both the ADF and
document glass for a single job if you use the continuous
scan mode. For details, refer to the User's Manual Basic.
MONO COLO
- 16 -
Page 17
Useful Functions
Note
Reference
MONO
R
R
Copying ID Cards (ID Card Copy)
This function allows you to copy both sides
of an ID card, such as a driver's license,
onto one side of a piece of paper.
You cannot use the ADF for this ID Card Copy function.
The area of 2mm from the edge of the document glass is
the scan margin.
The machine scans an area half the size of the specified
paper. If the document is more than half the size of the
paper size, the excess part is discarded.
1 Press the <COPY> key.
2 Press the to enter the [Change
settings] m
3 Press the to select [ID Card Copy]
and then press .
4 Press the to select [ON] and then
press .
OK
enu.
OK
2 Place your document with text face up in
the ADF or face down on the document
glass.
3 Press the to enter the [Change
settings] me
nu.
4 Press the to select [Edge Erase] and
then press .
OK
5 Press the to select [ON] and then
press .
OK
6 Enter a value for width using the ten-key
pad and then press .
OK
7 Press the until the copy standby
screen appears.
8 Enter the number of copies.
9 Press or .
MONO COLO
Setting Margins (Margin)
1
Copying
5 Press the until the copy start screen
appears.
6 Place your card with the front side face
down on the document glass.
7 Enter the number of copies.
8 Press or .
COLO
9 When the [Please set back side of
document.] screen is displayed, place
your card with the back side face down
on the document glass.
10 Check that [Start Scan] is selected and
then press .
OK
Erasing Edge Shadows (Edge Eras)
When you copy a document with the document
cover open or when you copy a book, the edges
may be printed as black shadows.
This function allows you to erase such shadows.
This margin function allows you to set the
margins. This is useful when you staple or punch
holes in copies. You can set the top, right,
bottom, or left margin by specifying the [Top]
and [Left] values.
Note
A part of the document image may be missing on the copy.
The specified margin values stay the same even when you
change the zoom ratio.
Specify the appropriate orientation of the image in
[Direction] to get the copy result you want.
Reference
You can set [Margin] as a default so that you do not have
to perform the following procedure every time you make
copies. For details, refer to "View Information" P. 80.
When Making Simplex Copies
1 Press the <COPY> key.
2 Place your document with text face up in
the ADF or face down on the document
glass.
3 Press the to enter the [Change
settings] me
nu.
You can set [Edge Erase] as a default so that you do not
have to perform the following procedure every time you
make copies. For details, refer to "View Information" P. 80.
1 Press the <COPY> key.
- 17 -
4 Press the to select [Margin] and then
press .
OK
5 Press the to select [ON] and then
press .
OK
Page 18
Useful Functions
Memo
MONO
R
R
6 Press the or to specify the [Top]
margin for [Fr
- To create a margin at the top of the output,
specify a positive value.
- To create a margin at the bottom of the output,
specify a negative value.
ont] and then press the .
7 Press or to specify the [Left]
margin for [Fr
- To create a margin on the left side of the output,
specify a positive value.
- To create a margin on the right side of the output,
specify a negative value.
Memo
You do not have to specify the [Back] margin when
copying on a single side.
ont] and then press .
OK
8 Press the until the copy start screen
appears.
9 Enter the number of copies.
10 Press or .
[Margin] is disabled when all the values are set to [0].
COLO
When Making Duplex Copies
When you make duplex copies with [Margin]
enabled, you must specify the [Back] margin.
1 Press the <COPY> key.
8 Press or to specify the [Left]
margin for [Fr
the .
- To create a margin on the left side of the output,
specify a positive value.
- To create a margin on the right side of the output,
specify a negative value.
ont] and then press
9 Press or to specify the [Top]
margin for [Ba
- To create a margin at the top of the output,
specify a negative value.
- To create a margin at the bottom of the output,
specify a positive value.
Memo
Specify the same absolute value set in the [Top]
margin for both the [Front] and [Back] margins.
ck] and then press the .
10 Press the or to specify the [Left]
margin for [Ba
- To create a margin on the left side of the output,
specify a negative value.
- To create a margin on the right side of the output,
specify a positive value.
Memo
Specify the same absolute value set in the [Left]
margin for both the [Front] and [Back] margins.
ck] and then press .
OK
11 Press the until the copy standby
screen appears.
2 Place your document with text face up in
the ADF or face down on the document
glass.
3 Specify [Duplex Copy] as you want.
Reference
For details, refer to the User's Manual Basic.
4 Press the to enter the [Change
settings] m
enu.
5 Press the to select [Margin] and then
press .
OK
6 Press the to select [ON] and then
press .
OK
7 Press the or to specify the [Top]
margin for [Fr
- To create a margin at the top of the output,
specify a positive value.
- To create a margin at the bottom of the output,
specify a negative value.
ont] and then press the .
12 Enter the number of copies.
13 Press or .
Memo
The position of margin is according to [Direction] of the
document.
If [Direction] of the document image is [Portrait], the
short edges are located in top and bottom edges, and long
edges are located in the right and left edges. If
[Direction] of the document image is [Landscape], the
long edges are located in right and left edges and the short
edges are located in the top and bottom edges.
When you use the document glass, the continuous scan
mode is automatically enabled. Follow the instructions
displayed on the display screen.
[Margin] is disabled when all the values are set to [0].
MONO COLO
- 18 -
Page 19
Useful Functions
Note
Memo
OK
OK
R
When selecting [Margin]
you cannot specify [N-in-1]/
[Repeat].
Copying Different Size Documents (Mixed Size)
When you use the ADF, you can copy multiple
documents having the same width but different
lengths at the same time onto their respective
paper sizes.
You can use this function only when the document is a
combination of letter and legal 13.5 or of letter and legal
14.
When Enabling [Mixed Size], [Paper Feed] is set to
[Auto], a paper tray corresponding to a document is fed
and [Paper Feed] can not be selected.
[Mixed Size] is available only when [Zoom] is set to [Fit
to page(98%)] or [100%].
You cannot set [Edge Erase] and [Mixed Size] at the
same time.
Enable more than one paper tray by pressing the
<SETTING> key and then selecting [Paper Setup]>
[Select Tray]>[Copy] to use this function.
When you use the MP tray, load paper in the MP tray first
and then enter the [Mixed Size] menu.
You can use only standard paper for this function.
In this section Tray1 and MP tray are used, and Legal 14 is
loaded in Tray1 and Letter is loaded in MP tray as an
example.
1 Load Legal 14 in Tray1 and Letter in MP
tray.
2 Press the <SETTING> key.
3 Press the to select [Paper] and then
press .
4 Select [Legal 14] for [Paper Size] of
Tray1 and [Letter] for [Paper Size] of
MP tray.
OK
13 Enter the number of copies.
14 Press or .
MONO COLO
Note for Using Multiple Functions
Functions That Cannot Be Used Simultaneously
Some functions cannot be used in combination
with other functions. If you try to select
incompatible functions, a message indicating that
you cannot select the function appears.
For example, when you have specified [Mar
you cannot specify [N-in-1] and [Repeat].
Of functions displayed in the message, disable
unnecessary functions and then try to set a
function you want to use again.
Memo
Some functions cannot be used with others.
Disabling a Function
To disable one of the functions, return the
function's setting to the default.
gin],
1
Copying
5 Press until the top screen appears.
6 Press the <COPY> key.
7 Place your documents with mixing Letter
and Legal 14 sizes in the ADF.
8 Press the to enter the [Change
settings] m
enu.
9 Press the to select [Mixed Size] and
then press .
10 Press the to select [ON] and then
press .
11 Press the until the copy standby
screen appears.
12 Check that the following settings are
displayed on the start screen.
[Mixed Size]: ON
[Paper Feed]: Auto
[Zoom]: 100%
[Scan size]: Legal 14
- 19 -
1 Press the <COPY> key.
2 Press the to enter the [Change
settings] me
nu.
3 Press the to select the function you
want to disable and then press .
OK
4 Press the to select the default value
and then press .
OK
5 Press the until the copy standby
screen appears.
Memo
When the default setting has been changed from the
factory default, select the default setting after changing
should be selected.
Reference
For the default value of each function, refer to "View
Information" P. 80.
Page 20
2. Faxing
Memo
Reference
Note
MONO
This chapter explains your machine's useful fax functions and operations.
Useful Operations for Transmission
This section explains useful operations for fax transmission.
To enter the [Admin Setup] menu, the administrator password is necessary. The default password is "aaaaaa".
For details on how to specify a destination, refer to the User's Manual Basic.
For details on how to load your documents in the ADF or on the document glass, refer to the User's Manual Basic.
Transmitting Duplex Documents (DuplexScan)
You can transmit duplex documents by using the
ADF.
You cannot use the document glass for this procedure.
1 Place your document in the ADF.
2 Press the <FAX> key.
3 Make sure that [Fax] is selected and
then press to open the fax start
screen.
OK
Changing Where Documents Are Loaded
You can use both the ADF and the document
glass when scanning documents for a fax job.
This allows you to send both a document and a
part of a book as one fax.
1 Press the <FAX> key.
2 Make sure that [Fax] is selected and
then press to open the fax start
screen.
3 Press the to select [Fax Functions]
and then press .
OK
OK
4 Press the to select [Fax Functions]
and then press .
OK
4 Press the to select [Continue Scan]
and then press .
OK
5 Press the to select [Duplex Scan]
and then press .
OK
5 Press the to select [ON] and then
press .
OK
6 Press the to select a scanning method
and then press .
You can specify [Long edge bind] or [Short
edge bind].
OK
7 Press the until the fax standby screen
appears.
8 Specify a destination.
6 Press the until the fax standby screen
appears.
7 Place your document with text face up in
the ADF or face down on the document
glass.
8 Specify a destination.
2
Faxing
9 Press to start transmission.
9 Press .
10 When the [Start Scan] screen appears,
11 Make sure [Start Scan] is selected and
-20-
MONO
place the next document with text face
up in the ADF or face down on the
document glass.
then press .
OK
Page 21
Useful Operations for Transmission
Reference
Reference
Memo
12 Repeat steps 10 and 11 as necessary for
each document you want to fax.
13 When all the documents are scanned,
press the to select [Scan
and then press .
For details on how to stop scanning and to cancel
transmission, refer to the User's Manual Basic.
OK
Complete]
Changing the Sender Name
You can specify the sender name to be printed on
faxes you send. You must register a Sender
name in advance.
Make sure that [Sender name] is enabled before using
the following functions. For details, refer to the User's
Manual Basic.
Registering a Sender Name
You can register up to three sender names.
Changing the Sender Name Printed
on a Fax
By default, the standard sender name is printed
on faxes when you enable [Sender Name]. To
use a sender name other than the standard
sender name, perform the following procedure.
1 Press the <FAX> key.
2 Make sure that [Fax] is selected and
then press to open the fax start
screen.
OK
3 Press the to select [Fax Functions]
and then press .
OK
4 Press the to select [TTI Select] and
then press .
OK
5 Press the to select a sender name you
wan to use and then press .
OK
6 Press the until the fax standby screen
appears.
In the initial fax settings described in the User's Manual
Basic, you specify [Sender ID], which is automatically
registered to [Sender name 1].
1 Press the <SETTING> key.
2 Press the to select [Admin Setup]
and then press .
OK
3 Enter the administrator password.
4 Select [Enter] and then press .
OK
5 Press the to select [User Install] and
then press .
OK
6 Press the to select [TTI Register/
Edit] and the
n press .
OK
7 Press the to select a sender's number
and then press .
OK
8 Enter a name up to 22 characters.
9 Select [Enter] and then press .
OK
Changing the Standard Sender
Name
If you use a sender name frequently, we
recommend to specify it as the standard sender
name.
Memo
In the initial fax settings described in the User's Manual
Basic, you specify [Sender ID]. By default, this value is
used as the standard sender name.
1 Press the <SETTING> key.
2 Press the to select [Admin Setup]
and then press .
OK
3 Enter the administrator password.
4 Select [Enter] and then press .
OK
5 Press the to select [User Install] and
then press .
OK
6 Press the to select [Standard TTI]
and then press .
OK
10 Press the until the start screen appears.
- 21 -
7 Press the to select a name you want
to use and then press .
OK
8 Press the until the start screen
appears.
Page 22
Useful Operations for Transmission
Reference
Memo
OK
Setting Prefix (PreFix)
You can add a prefix to a destination number. You
can also attach a prefix when registering a number
to speed dial.
Registering a Prefix
You must register the prefix to [PreFix] in
advance. You can register up to 40 digits.
1 Press the <SETTING> key.
2 Press the to select [Admin Setup]
and then press .
3 Enter the administrator password.
4 Select [Enter] and then press .
5 Press the to select [Fax Setup] and
then press .
OK
OK
OK
Using a Prefix When Registering a Number to Speed Dial
You can attach a prefix to a speed dial number.
Perform the following procedures to register a
number to speed dial.
Reference
For details on how to register a number to speed dial, refer
to the User's Manual Basic.
1 On the fax number entry screen to
register a number to speed dial, press
the and to select [PreFix:N] and
then press .
The area code is displayed as "N".
OK
2 Enter a fax number.
3 Select [Enter] and then press .
OK
2
Faxing
6 Press the to select [Other Settings]
and then press .
OK
7 Press the to select [Prefix] and then
press .
OK
8 Enter a prefix.
9 Select [Enter] and then press .
OK
10 Press the until the top screen appears.
You can use symbols such as # and *. For details, refer to
the User's Manual Basic.
Using a Prefix When Transmitting Faxes
You can attach a prefix only when you enter a
destination number using the ten-key pad.
Perform the following procedures when
specifying a destination using the ten-key pad.
1 On the destination entry screen, press
the and to select [PreFix:N] and
then press .
The area code is displayed as "N".
2 Enter a destination number.
3 Select [Enter] and then press .
You cannot enter a prefix and then use speed dial.
OK
- 22 -
Page 23
Various Functions for Transmission
Memo
Reference
Memo
Various Functions for Transmission
This section explains various functions for fax transmission.
To enter the [Admin Setup] menu, the administrator password is necessary. The default password is "aaaaaa".
For details on how to specify a destination, refer to the User's Manual Basic.
Redialing
Automatic Redialing
The machine automatically redials if the first fax
transmission fails. Redial is automatically done
when the recipient machine is busy or does not
answer, or when a communication error happens.
To set the number of redial attempts and their
erval, perform the following procedures.
int
When the transmission failed though the machine tried
redials for the specified times, the document stored in
memory is erased and an error message is printed out.
1 Press the <SETTING> key.
2 Press the to select [Admin Setup]
and then press .
3 Enter the administrator password.
4 Select [Enter] and then press.
5 Press the to select [Fax Setup] and
then press .
6 Press the to select [Other Settings]
and then press .
7 Make sure that [Redial Tries] is
selected and then press .
OK
OK
OK
OK
Manual Redialing
To redial manually, specify the desired
destination from the transmission history.
Reference
For details on the transmission history, refer to the User's
Manual Basic.
Transmission in Real Time
The scanned fax data is stored in memory before
the machine starts transmission. This is called
memory transmission. The fax data is
transmitted while it is scanned. This is called real
time transmission.
Real time transmission
The real time transmission is a method to
transmit data to a destination party without
storing document data in memory. In this mode,
transmission starts right after the transmission
operation, and this allows you to check that the
fax is transmitted to its destination.
Memory transmission
The memory transmission is a method to
transmit after storing document data in memory.
In this mode, you do not have to wait for the
achine to finish transmission.
m
The factory default is set to the memory
ransmission.
t
To enable the real time transmission, perform the
ollowing operation.
f
8 Press to specify the desired number of
redial attempts and then press .
9 Press the to select [Redial Interval]
and then press .
OK
10 Specify the desired redial interval using
the ten-key pad and then press .
11 Press the until the top screen appears.
Note
OK
You can scan only a single page when using the document
glass for real time transmission.
While you send a fax by using real time transmission, other
jobs using the ADF and document glass cannot be done.
1 Press the <FAX> key.
OK
2 Make sure that [Fax] is selected and
press to open the fax start screen.
OK
3 Press the to select [Fax Functions]
and then press .
OK
- 23 -
Page 24
Various Functions for Transmission
Note
Memo
Memo
MONO
4 Press the to select [Memory Tx] and
then press .
OK
5 Press the to select [OFF] and then
press .
OK
6 Press the until the fax standby screen
appears.
7 Place your document with text face up in the
ADF or face down on the document glass.
8 Specify a destination.
9 Press .
Manual Transmission
You can transmit faxes manually when the
recipient uses manual reception mode or when
you want to send a fax after talking on the phone.
You can scan only a single page when using the document
glass for manual transmission.
You need to connect an external telephone to the machine
to send faxes manually.
The following functions are unavailable in manual
transmission:
- broadcast
- transmission at the specified time
- Fcode transmission
- ID check transmission
- check broadcast destinations
- (Pressing Dial Twice confirm dial)
You do not have to disable memory transmission.
Even if the start screen other than the fax functions is
displayed in the machine, you can perform manual
transmission by lifting the handset.
1 Pick up the handset.
2 Dial a number.
3 Place your document with text face up in the
ADF or face down on the document glass.
4 Configure the fax functions if necessary.
5 When you hear a Fax tone, press
to start transmission.
You can put down the handset.
MONO
Transmission to Multiple Destinations (Broadcast)
This function allows you to transmit faxes to
multiple destinations at the same time. You can
specify up to 100 destinations using the ten-key
pad, speed dial, and group lists of destinations.
1 Place your document with text face up in
the ADF or face down on the document
glass.
2 Press the <FAX> key.
3 Make sure that [Fax] is selected and
press to open the fax start screen.
4 Make sure that [Add Destination] is
selected and then press .
5 Specify a destination.
6 Repeat steps 4 to 5 to enter all the
destinations.
7 When you have specified all the
destinations, press .
8 [Please press Start key to begin
transmission. To delete, select address
and press Delete.] appears.
9 If specified all the destination appears,
press .
Memo
Press the <RESET/LOG OUT> key to cancel the
operation.
Reference
When [Broadcast Destination] is enabled, the
destination numbers are displayed before transmission.
For details, refer to "Checking Broadcast Destination" P. 29.
For details on how to cancel transmission, refer to the
User's Manual Basic.
Using From the Group List
The group list is useful for broadcast
transmission. Register destination group lists in
advance.
Reference
For details on transmission using the group list, refer to
the User's Manual Basic.
OK
OK
MONO
MONO
2
Faxing
When putting down the handset, after the transmission is
complete, the display screen of the machine returns to the
screen displayed before the manual transmission.
If you keep picking the handset, you can talk to your
destination.
- 24 -
Page 25

Various Functions for Transmission
Memo
Reference
OK
OK
Transmission at a Specified Time (Set Tx time)
This function allows you to instruct the machine
to transmit faxes at a specified time. When you
set a fax job to be sent later, the fax data is
stored in memory and automatically sent at the
specified time.
Up to 20 jobs can be scheduled up to one month
in adv
1 Place your document with text face up in
2 Press the <FAX> key.
3 Make sure that [Fax] is selected and
4 Press the to select [Fax Functions]
5 Press the to select [Delayed Tx] and
6 Press the to select [ON] and then
7 Press the or to select the desired
8 Press the until the start screen
9 Press the to select [
10 Specify a destination.
11 Press .
When you want to change the specified time of a
You can make reservations for other fax jobs while the
For details on how to cancel a fax job, refer to the User's
ance.
the ADF or face down on the document
glass.
press to open the fax start screen.
and then press .
OK
then press .
press .
date and time and then press .
- To move to the next box, press the .
- Dates are displayed as [Date/Month].
OK
OK
appears.
Add Destination
and then press .
MONO
reservation, cancel the reservation and make another one.
machine is transmitting.
Manual Basic.
OK
]
Fcode Transmission
Fcode transmission uses sub addresses for
communication in accordance with the standard
of ITU-T. By creating and registering Fcode
you can perform confidential communication
bulletin board communication.
You can register up to 20 Fcode boxes.
When registering an Fcode box, be sure to
re
gister a sub address, that is used to identify
the Fcode box.
Fcode Confidential Communication
When an Fcode confidential box is set in the
recipient fax machine, you can perform confidential
communication by specifying the sub address of
the box.
Received data cannot be printed unless the
spe
cified ID code is entered. Therefore, this
function is useful when transmitting data that
needs security protection.
Reference
To transmit faxes using Fcode confidential communication,
refer to "Transmission Using a Sub Address (Fcode
Tran s m i ss i on)" P. 2 7 .
To print the received faxes using Fcode confidential
communication, refer to "Printing Stored Documents" P. 28.
Fcode Bulletin Board Communica-
tion
When an Fcode bulletin box is set in the recipient
machine, you can transmit to and remove data
from a bulletin box by specifying its sub address.
Reference
To transmit faxes to a bulletin box of the recipient's
machine, refer to "Transmission Using a Sub Address
(Fcode Transmission)" P. 27.
To receive data stored in the bulletin box of the recipient
machine, refer to "Reception Using a Sub Address (Fcode
Polling)" P. 27.
To store data in a bulletin box of your machine, refer to
"Storing Documents in a Bulletin Box" P. 27.
Registering Fcode Boxes
To perform Fcode communication, register an
Fcode box. Be sure to register a sub address and
an PIN number on each Fcode box. (Only Fcode
confidential communication)
Memo
Maximum number of characters is as follows:
- Box Name: A maximum of 16 characters.
- Sub-Address: A maximum of 20 digits including # and *.
-PIN number: 4 digits.
boxes,
and
Reference
For details on how to enter text, refer to the User's Manual
Basic.
- 25 -
Page 26
Various Functions for Transmission
For Fcode Confidential Communi-
cation
1 Press the <SETTING> key.
2 Press the to select [Admin Setup]
and then press .
OK
3 Enter the administrator password.
4 Select [Enter] and then press .
OK
5 Press the to select [Fax Setup] and
then press .
OK
6 Press the to select [Fcode Box] and
then press .
OK
7 Press the to select a box number and
then press .
OK
8 Make sure that [Register] is selected
and then press .
To edit the registered Fcode Confidential Box,
enter the PIN number and select [Edit].
OK
b) Enter a value between 0 and 31 (days),
and then press
Memo
When [00] (day) is set, data is retained for an
indefinite period.
19 Press .
OK
OK
.
For Fcode Bulletin Board Commu-
nication
1 Press the <SETTING> key.
2 Press the to select [Admin Setup]
and then press .
OK
3 Enter the administrator password.
4 Select [Enter] and then press .
OK
5 Press the to select [Fax Setup] and
then press .
OK
6 Press the to select [Fcode Box] and
then press .
OK
2
Faxing
9 Make sure that [Confidential Box] is
selected and then press .
OK
10 Make sure that [Box Name] is selected
and then press .
11 Enter a box name.
12 Select [Enter] and then press .
OK
13 Press the to select [Sub-Address]
and then press the .
14 Enter a sub address.
15 Select [Enter] and then press .
OK
16 Press the to select [I.D. code] and
then press the .
17 Enter a PIN number and then press .
Note
The entered PIN number is not displayed. Be sure to
write it down and keep it safe.
OK
7 Press the to select a box number and
then press .
OK
8 Make sure that [Register] is selected
and then press .
To edit the registered Fcode Confidential Box,
select [Edit].
OK
9 Press the to select [Bulletin Box]
and then press .
OK
10 Make sure that [Box Name] is selected
and then press the .
11 Enter a box name.
12 Select [Enter] and then press .
OK
13 Press the to select [Sub-Address]
and then press .
14 Enter a sub address.
15 Select [Enter] and then press .
OK
18 If necessary, specify [Hold time] to set
a period to retain data.
a) Press the to select [Hold time] and
then press .
- 26 -
16 Press .
OK
Page 27
Various Functions for Transmission
Memo
Note
OK
MONO
Transmission Using a Sub Address (Fcode Transmission)
By entering a sub address, Fcode confidential
transmission and Fcode bulletin board
transmission can be done.
Be sure to check a destination sub address.
1 Place your document with text face up in
the ADF or face down on the document
glass.
2 Press the <FAX> key.
3 Make sure that [Fax] is selected and
press to open the fax start screen.
OK
4 Press the to select [Fax Functions]
and then press .
OK
5 Press the select [Fcode Tx] and then
press .
2 Make sure that [Fax] is selected and
press to open the fax standby screen.
OK
3 Press the to select [Fax Functions]
and then press .
OK
4 Press the to select [Fcode Polling]
and then press .
OK
5 Press the to select [ON] and then
press .
OK
6 Enter the sub address of the bulletin box
registered in the sender machine.
7 Select [Enter] and then press .
OK
8 Press the until the start screen appears.
9 Press the to select [Add Destination]
and then press .
OK
10 Specify a destination.
6 Press the to select [ON] and then
press .
OK
7 Enter the sub address of the box
registered in the recipient machine.
8 Select [Enter] and then press .
OK
9 Press the until the start screen
appears.
10 Press the to select [Add
Destination] and the
n press .
OK
11 Specify a destination.
12 Press .
Reception Using a Sub Address (Fcode Polling)
You can perform Fcode polling by entering the
sub address of a sender machine's bulletin box.
This function makes a remote fax machine
tr
ansmit a fax in response to instructions from
your machine.
11 Press .
Memo
Received data is automatically printed.
MONO
Storing Documents in a Bulletin Box
You can store only one document in a bulletin
box of your machine.
Reference
You must register a bulletin box in advance. For details on
how to register a bulletin box, refer to "Registering Fcode
Boxes" P. 25.
1 Place your document with text face up in
the ADF or face down on the document
glass.
2 Press the <SETTING> key.
3 Press the to select [Store Document
Settings]
and then press .
OK
4 Make sure that [Store] is selected and
then press .
OK
5 Make sure that [Fcode Bulletin board]
is selected and then press .
OK
You cannot receive data if the sender has a password on
the bulletin box.
1 Press the <FAX> key.
- 27 -
6 Press the to select a box number and
then press .
OK
Page 28
Various Functions for Transmission
Memo
Memo
Memo
OK
7 Make sure that [Over Write] is selected
and then press .
[Over Write] replaces documents in the box.
OK
8 Press the or to select [Yes] and
then press .
The data stored in an Fcode bulletin box is not deleted
when the recipient gets it.
OK
Printing Stored Documents
You can print confidential received documents.
When a document is received at an Fcode box,
ode reception notice is printed. Check the
an Fc
Fcode box number and print the stored
document.
1 Press the <SETTING> key.
2 Press the to select [Store Document
Settings] and
then press .
OK
3 Press the to select [Print] and then
press .
2 Press the to select [Store Document
Settings]
and then press .
OK
3 Press the to select [Delete] and then
press .
OK
4 Make sure that [Fcode Bulletin board]
is selected and then press .
OK
5 Press the to select the box number of
a document you want to delete and then
OK
ss two times.
pre
6 Press the or to select [Yes] on the
confirmation screen and then press .
OK
Deleting Fcode Boxes
You can delete an unnecessary Fcode
Confidential box and Fcode bulletin box.
1 Press the <SETTING> key.
2 Press the to select [Admin Setup]
and then press .
OK
3 Enter the administrator password.
2
Faxing
4 Make sure that [Fcode Box] is selected
and then press .
OK
5 Press the to select the desired box
number and then press .
OK
6 If necessary, enter the PIN number and
then press .
OK
7 Press the to select the file number
you want to print and then press .
OK
8 Press the or to select [Yes] on the
confirmation screen and then press .
Confidential received documents are automatically deleted
after printing.
OK
Deleting Stored Bulletin Documents
You can delete documents stored in a bulletin
box.
4 Select [Enter] and then press .
OK
5 Press the to select [Fax Setup] and
then press .
OK
6 Press the to select [Fcode Box] and
then press .
OK
7 Press the to select the box number
you want to delete and then press .
8
Enter the PIN number if necessary and then
OK
.
press
To delete Fcode bulletin box, PIN number is not
necessary.
OK
9 Press the to select [Delete] and then
press .
OK
10 Press the or to select [Yes] on the
confirmation screen and then press .
OK
The data stored in an Fcode confidential box is
automatically deleted when you print the data.
The data stored in an Fcode bulletin box is not deleted
when the recipient gets it.
1 Press the <SETTING> key.
- 28 -
Page 29
Security Functions
Memo
Reference
Memo
OK
Security Functions
This section explains the security functions at fax transmission.
To enter the [Admin Setup] menu, the administrator password is necessary. The default password is "aaaaaa".
For details on how to specify a destination, refer to the User's Manual Basic.
Security Functions at Transmission
The machine has the following three security
functions:
D check transmission
I
Checking broadcast destination
Pressing dial twice
These functions prevent you from transmitting
faxes to the wrong destination.
ID Check Transmission
This function checks and matches the last four
digits of the destination numbers with those
registered in the destination machine. If this
function is enabled, the machine will transmit
faxes only when they match.
If the destination machine has no registered fax number,
the machine does not transmit the fax.
ID check transmission is unavailable when you transmit
faxes manually.
9 Press the until the top screen appears.
Operation
1 Place your document with text face up in
the ADF or face down on the document
glass.
2 Press the <FAX> key.
3 Make sure that [Fax] is selected and
press to open the fax start screen.
OK
4 Make sure that [Add Destination] is
selected and then press .
OK
5 Specify a destination.
6 Press .
MONO
Checking Broadcast Destination
When this function is enabled, a fax number
confirmation screen is displayed before
transmission starts. By factory default, this
function is enabled.
Configuration
1 Press the <SETTING> key.
2 Press the to select [Admin Setup]
and then press .
OK
3 Enter the administrator password.
4 Select [Enter] and then press .
OK
5 Press the to select [Fax Setup] and
then press .
OK
6 Press the to select [Security
Function] and the
n press .
OK
7 Make sure that [ID Check Tx] is
selected and then press .
OK
8 Press the to select [ON] and then
press .
Memo
Broadcast destination check function is available only
when multiple destinations are specified.
When [Confirm Dial] is also enabled, it is done first.
Broadcast destination check function is unavailable by
manual transmission.
Configuration
1 Press the <SETTING> key.
2 Press the to select [Admin Setup]
and then press .
OK
3 Enter the administrator password.
4 Select [Enter] and then press .
OK
5 Press the to select [Fax Setup] and
then press .
OK
6 Press the to select [Security
Function]
and then press .
OK
- 29 -
Page 30
Security Functions
Memo
MONO
MONO
MONO
7 Press the to select [Broadcast
Destination] and the
n press .
OK
8 Press the to select [ON] and then
press .
OK
9 Press the until the top screen appears.
Operation
1 Place your document with text face up in
the ADF or face down on the document
glass.
2 Press the <FAX> key.
3 Make sure that [Fax] is selected and
press to open the fax start screen.
OK
4 Make sure that [Add Destination] is
selected and then press .
OK
5 Specify all the destinations.
6 Press .
A fax number confirmation screen is displayed.
7 [Please press Start key to begin
transmission. To delete, select address
and press Delete.] appears.
8 If specified all the destination appears,
press .
If necessary, press to select the destination
you want to delete and then press the . Select
[Delete The Address] and then press .
OK
OK
9 Press to start transmission.
Memo
The confirm dial function is unavailable when you specify
the destination using speed dial.
If you use symbols in the destination number, re-enter the
symbols also.
The confirm dial function is done first when [Check
broadcast dest.] is also enabled.
You cannot use the dial double-press function with manual
sending.
Configuration
1 Press the <SETTING> key.
2 Press the to select [Admin Setup]
and then press .
OK
3 Enter the administrator password.
4 Select [Enter] and then press .
OK
5 Press the to select [Fax Setup] and
then press .
OK
6 Press the to select [Security
Function]
and then press .
OK
7 Press the to select [Confirm Dial]
and then press .
OK
8 Press the to select [ON] and then
press .
OK
9 Press the until the top screen appears.
Operation
Place your document with text face up in
1
the ADF or face down on the document
glass.
2
Faxing
If the destination number entered with the ten-key pad is
wrong, delete it and re-specify the correct one.
When many destinations are specified, you may not be
able to check all of them at one time. To check all the
destinations, press the to scroll the screen.
Pressing Dial Twice (Confirm Dial)
This function requires you to re-enter the
destination number when you enter a destination
using the ten-key pad. The fax is sent only if the
two numbers match.
- 30 -
2 Press the <FAX> key.
3 Enter a destination number using the
ten-key pad.
4 Select [Enter] and then press .
A screen that requires you to re-enter the
destination number appears.
OK
5 Enter the destination number again using
the ten-key pad.
6 Select [Enter] and then press .
The fax start screen appears.
7 Press to start transmission.
MONO
OK
Page 31

Various Settings for Fax Reception
Memo
Various Settings for Fax Reception
This section explains various settings for fax reception.
To enter the [Admin Setup] menu, the administrator password is necessary. The default password is "aaaaaa".
Specifying a Reduction Margin
When Received Image is Larger Than Paper Size
Parts of images that do not fit in the printable
area of the specified paper may be reduced,
discarded, or printed on the next sheet of paper.
For example, if a fax that is longer than A4 size is
received while the specified paper is A4 size, the
bottom of the image is printed on a subsequent
piece of paper.
You can avoid this situation by specifying a
duction rate and margin.
re
Specifying a Reduction Rate
The reduction rate determines whether or not the
machine automatically reduces the received
image to the specified paper size. [Auto] reduces
the image automatically and [100%] prints the
image without reduction. By factory default, [Rx
Reduc. Rate] is set to [Auto].
1 Press the <SETTING> key.
2 Press the to select [Admin Setup]
and then press .
3 Enter the administrator password.
4 Select [Enter] and then press .
5 Press the to select [Fax Setup] and
then press .
6 Press the to select [Other Settings]
and then press .
OK
OK
OK
OK
The reduction margin is the threshold level which
determines when to print part of the received
image on the next page.
1 Press the <SETTING> key.
2 Press the to select [Admin Setup]
and then press .
OK
3 Enter the administrator password.
4 Select [Enter] and then press .
5 Press the to select [Fax Functions]
and then press .
OK
6 Press the to select [Other Settings]
and then press .
OK
7 Press the to select [Reduc. Margin]
and then press .
OK
8 Enter a value between 0 and 100 (mm)
and then press .
OK
9 Press the until the top screen appears.
Memo
When the excess part is larger than the specified reduction
margin, the excess part is printed on the next page.
When the excess part is smaller than the specified
reduction margin, the received image is reduced onto a
single page.
When you set [Rx Reduc. Rate] to [100%] and the excess
part is smaller than the specified reduction margin, the
excess part is discarded.
OK
7 Press the to select [Rx Reduc. Rate]
and then press .
OK
8 Press the to select [Auto] or [100%]
and then press .
OK
9 Press the until the top screen appears.
- 31 -
Changing Buzzer Volume
You can change the buzzer volume, which sounds
when there is an incoming fax or call.
1 Press the <SETTING> key.
2 Press the to select [Admin Setup]
and then press .
3 Enter the administrator password.
OK
Page 32

Various Settings for Fax Reception
Memo
Memo
4 Select [Enter] and then press .
OK
5 Press the to select [Management]
and then press .
OK
6 Press the to select [Sound Control]
and then press .
OK
7 Press the to select [Fax Buzzer
Volume] and t
hen press .
OK
8 Press the to select a volume and then
press .
OK
9 Press the until the top screen appears.
The buzzer volume setting is available only when
[Reception Mode] is set to [Tel/Fax Ready Mode].
Forwarding Received Faxes As Fax Documents
You can set the machine to forward the received
faxes automatically to a specified destination as fax
documents if [Forwarding Setting] is enabled.
When [Forwarding Setting] is enabled, received faxes are
not printed by the machine.
The forwarding function is disabled when [Reception Mode]
is set to [Tel Ready Mode].
10 Select [Enter] and then press .
OK
11 Press the until the top screen appears.
Setting waiting time for a response
With this function, you can set a waiting time to
respond to an incoming call and start receiving a
fax in the machine.
1 Press the <SETTING> key.
2 Press the to select [Admin Setup]
and then press .
3 Enter the administrator password.
4 Select [Enter] and then press .
5 Press the to select [Fax Setup] and
then press .
6 Press the to select [Other Settings]
and then press .
7 Press the to select [Ring response]
and then press .
8 Press the to select a time and then
press .
OK
OK
OK
OK
OK
OK
2
Faxing
Registering a Forwarding Destination
Press the <SETTING> key.
1
2 Press the to select [Admin Setup]
and then press .
OK
3 Enter the administrator password.
4 Select [Enter] and then press .
OK
5 Press the to select [Fax Setup] and
then press .
OK
6 Press the to select [Fax Setting] and
then press .
OK
7 Press the to select [Forwarding
Setting] and the
n press .
OK
8 Press the to select [ON] and then
press .
OK
9 Press the until the top screen appears.
Memo
When the machine is connected to a line supporting
Number Display function and a phone supporting the
number display function is connected to the machine, set
[Waiting time for a response] to any of [10 sec.],
[15 sec.], and [20 sec.].
9 Enter a forwarding number.
- 32 -
Page 33

Faxing From a Computer
Reference
Memo
Faxing From a Computer
This section explains how to send a fax from a computer and how to edit data of the phone book. The
fax driver allows you to send faxes directly from your computer to a destination via the machine without
printing the document.
This function is available only on the following Windows operating systems:
Windows 7/Windows Vista/Windows Server 2008 R2/Windows Server 2008/Windows XP/Windows Server 2003/
Windows 2000
Be sure to install the fax driver for MC361dn or MC561dn before performing the following procedures.
For details on how to install the fax driver, refer to the User's Manual Basic.
The following procedures uses MC561dn, NotePad as an example. The procedures and menus may differ depending on the OS
and application you use.
Sending a Fax From a Computer
1 Open the file you want to fax.
2 From the [File] menu, select [Print].
3 From [Select Printer], select [OKI
MC561 (FAX)] and then click [Print].
4 On the [Specifying numbers] tab of
the [Select Recipients] dialog box,
enter the destination name in [Name].
5 Enter the destination fax number in [FAX
number].
6 Click [Add<-].
7 If necessary, add a destination from the
phone book.
a) Select the [Phone book] tab.
b) Select a destination and then click [Add<-].
8 Repeat steps 4 to 7 to specify all the
destinations.
Adding a Fax Number to the Phone Book
Note
You cannot register two identical names. The same fax
numbers can be registered if the names are different.
Memo
You can register up to 1000 destinations.
1 Click [Start] and select [Devices and
Printers]
2 Right-click the OKI MC561 icon and
select [Printing preferences]>[OKI
MC561 (FAX)].
3 On the [Setup] tab, click [Phone book].
4 From the [FAX number] menu, select
[New (FAX number)].
5 On the [New (FAX number)] dialog
box, enter a destination name in [Name].
6 Enter a destination fax number in [FAX
number].
7
Enter comments in [
Comments
] if necessary.
9 Click [OK] to start transmitting.
8 Click [OK].
9 From the [FAX number] menu, select
[Save].
10 Click [OK] on the confirmation window.
11 From the [FAX number] menu, select
[Exit].
Memo
The name and fax number entered in this procedure are
printed on the cover sheet.
-33-
Page 34

Faxing From a Computer
Grouping Entries
By grouping the registered destinations, you can
send faxes to multiple destinations at the same
time.
1 Click [Start] and select [Devices and
Printers].
2 Right-click the OKI MC561 icon and
select [Printing preferences]>[OKI
MC561 (FAX)].
3 On the [Setup] tab, click [Phone book].
4 From the [FAX number] menu, select
[New (Group)].
5 On the [New (Group)] dialog box, enter
[Group name].
6 Enter comments in [Comments] if
necessary.
7 Select an entry to register in a group and
then click [Add->].
8 If necessary, register a fax number
directly.
a) Click [New (FAX number)].
b) Perform steps 5 to 8 in "Adding a Fax
Number to the Phone Book" P. 33.
c) Select an entry and then click [Add->].
9 Click [OK] to save.
On the left col umn of the [Phone book] di alog box,
a new group is added. When you select a group,
the fax numbers registered in the group are
shown on the right column of the dialog box.
10 Select [Save] from the [FAX Number]
menu.
4 On the [Select Recipients] dialog box,
select the [Phone book] tab.
5 Select a group from the right column and
then click [Add<-].
6 Click [OK] to start transmission.
Attaching a Cover Sheet
1 Open the file you want to fax.
2 From the [File] menu, select [Print].
3 From [Select Printer], select [OKI
MC561 (FAX)].
4 Click [Preferences].
5 Select the [Cover Sheet] tab.
6 Select the [Print all recipients'
information on each cover sheet] or
[Print only one recipient's
information on each cover sheet].
7 From the format list, select the desired
format.
- You can view an enlarged image of each format
by clicking [Zoom].
- Selecting the [Add the recipient's FAX
number] check box prints the recipient fax
number on the cover sheet.
- Selecting the [Add the recipient's comments]
check box prints comments registered in the
phone book on the cover sheet.
- You can add a custom cover sheet design by
clicking [Custom cover sheet].
8 If necessary, enter the sender name, fax
number, and comment on the [Sender]
tab to be printed on the cover sheet.
2
Faxing
11 Click [OK] on the confirmation window.
12 Select [Exit] from the [FAX Number]
menu.
Sending a Fax to a Group
By using a group, you can specify multiple
destinations in one operation.
1 Open the file you want to fax.
2 From the [File] menu, select [Print].
3 From [Select Printer], select [OKI
MC561 (FAX)] and then click [Print].
9 Click [OK].
10 Perform steps 3 to 9 in "Sending a Fax
From a Computer" P. 33.
Note
When selecting [Print all recipients' information on
each cover sheet] and transmitting to multiple
destinations (broadcasting), all destinations' names,
destinations' fax numbers (only when they are set), and
comments in the phone book (only when they are set) are
described on the same cover sheet and transmitted to all
destinations. Caution is required when broadcasting to
multiple outside destinations.
-34-
Page 35

Faxing From a Computer
Reference
Note
Canceling a Fax Job From a Computer
You can cancel a job while the data is being
transmitted to the machine.
1 Double-click the printer icon in the
toolbar.
2 Select the job to cancel in the print
queue.
3 From the [Document] menu, select
[Cancel].
Once the data is stored in the machine, you cannot cancel
the job from your computer. For details on how to cancel a
fax job stored in the machine memory, refer to the User's
Manual Basic.
Exporting and Importing Phone Book Data
The export and import functions allow you to
manage the fax numbers in a phone book
created on another computer. The following
procedure explains how to export the phone
book data from your computer and to import it to
another computer.
9 Repeat steps 1 to 3 on the computer to
launch the phone book.
10 From the [Tools] menu, select [Import].
11 On the [Import Phone Book] dialog
box, specify the file you have copied.
12 Click [Next].
13 Select [Save] from the [FAX Number]
menu.
14 Click [OK] on the confirmation window.
15 Select [Exit] from the [FAX Number]
menu.
Associating New Definition With Phone Book Format
If you want to import a CSV file with the format
different from that of the phone book, select a
CSV definition file and associate the definition
with that of the phone book.
1 Repeat steps 1 to 3 in "Exporting and
Importing Phone Book Data" on the
computer to launch the phone book.
2 From the [Tools] menu, select [Import].
You cannot export groups. However, each entry in a group
is exported.
Entries that are already registered are not imported.
1 Click [Start] and select [Devices and
Printers].
2 Right-click the OKI MC561 icon and
select [Printing preferences]>[OKI
MC561 (FAX)].
3 On the [Setup] tab, click [Phone book].
4 From the [Tools] menu, select [Export].
5 On the [Export to file] dialog box,
specify where to save the file.
6 Enter a name for the file in [File name]
and then click [Save].
The data of the phone book is exported as a CSV
file in which entries are put in display order, being
separated with a comma. The name comes first,
followed by the fax number and comment.
7 Close the phone book.
3 On the [Import Phone Book] dialog
box, specify the CSV file to import in
[Choose a CSV File].
4 Select the [Setup relationship
between the fields imported and
phone book.] check box and specify a
CSV definition file if necessary.
Select [Comma (,)] from [Field Delimiter].
Memo
The operation can be continued if a definition file is not
specified. If the definition file is not specified, select
whether to save a new definition file on the dialog box
displayed in the step 6.
5 Click [Next].
6 Associate the definition you are
importing with that of the phone book
and then click [OK].
7
Select [Save] from the [FAX Number]
menu.
8 Click [OK] on the confirmation window.
8 Copy the created file to another
computer.
9 Select [Exit] from the [FAX Number]
menu.
- 35 -
Page 36

3. Scanning
Memo
This chapter explains your machine's useful Scan functions.
Advanced Operations for Scanning to E-mail
This section explains useful operations for scanning to e-mail.
The following procedures are explained under the assumption that [Continue Scan] is disabled. For the basic procedures when
[Continue Scan] is enabled, refer to the User's Manual Basic.
To enter the [Admin Setup] menu, the administrator password is necessary. The default password is "aaaaaa".
3
Scanning
Setting Sender and Reply to Addresses (From/Reply to)
You can set the e-mail address from which emails are sent and the address to which
responses are sent.
1 Press the <SETTING> key.
2 Press the to select the [Admin
Setup] and the
n press .
3 Enter the administrator password.
4 Select [Enter] and then press .
5 Press the to select [Scanner Setup]
and then press .
OK
6 Press the to select [E-mail Setup]
and then press .
OK
7 Press the to select [From/Reply to]
and then press .
OK
8 Press the to select [From] or [Reply
to] and the
n press .
9 Enter e-mail addresses.
When [Reply to] is selected in the step 8, select a
method to enter a destination and specify a
destination. Proceed to the step 11.
10 Select [Enter] and then press .
11 Press the until the top screen appears.
Memo
Select an e-mail address from the address book.
OK
OK
OK
OK
Creating Templates
You can record up to five templates with various
subject lines and body text.
Registering a Subject
1 Press the <SETTING> key.
2 Press the to select the [Admin
Setup] and the
n press .
3 Enter the administrator password.
4 Select [Enter] and then press .
5 Press the to select [Scanner Setup]
and then press .
OK
6 Press the to select [E-mail Setup]
and then press .
OK
7 Press the to select [Template] and
then press .
OK
8 Make sure that [Edit Subject] is
selected and then press .
9 Press the to select a number and then
press .
OK
10 Enter the subject up to 80 characters.
11 Select [Enter] and then press .
12 Press the until the top screen appears.
OK
OK
OK
OK
- 36 -
Page 37

Advanced Operations for Scanning to E-mail
OK
OK
OK
OK
R
Registering Body Text
1 Perform steps 1 to 7 in "Registering a
Subject" P. 36.
2 Press the to select [Edit Body] and
then press .
3 Press the to select a number and then
press .
4 Enter the body text up to 256 characters.
5 Select [Enter] and then press .
OK
6 Press the until the top screen appears.
Using a Template
You can use the templates recorded in "Creating
Tem pl at e s" P. 36 or standardized e-mails.
1 Place your document with text face up in
the ADF or face down on the document
glass.
2 Press the <SCAN> key.
3 Make sure that [E-mail] is selected and
then press .
4 Press the to select [Scan setting]
and then press .
5
Press the to select [
then press .
OK
Edit E-mail] and
6 Press the to select [Subject] or
[E
mail body] and then press .
7
Make sure that [
Select Subject
Text] is selected and then press .
OK
] or [
Select
OK
8 Press the to select a subject or text
and then press .
OK
9 Press the to select [Add Destination]
and then press .
OK
10 Press the to select an entry method
and then press .
11 Specify a destination and then press .
12 Press or .
MONO COLO
OK
OK
- 37 -
Page 38

Advanced Operations for Scanning and Internet Faxing
Memo
Reference
Memo
OK
OK
Advanced Operations for Scanning and Internet
Faxing
This section explains useful operations for scanning and internet faxing. You can configure the scan and
internet fax functions to alter the output to suit your needs. The scan to local PC and the scan to remote
PC cannot be used for the following functions.
In this section, the procedures are explained from scan menu as an example. If you use the internet fax
f
unction, each setting can be configured from the [Scan Setting] menu on the [Internet FAX
Standby] screen.
To enter the [Admin Setup] menu, the administrator password is necessary. The default password is "aaaaaa".
For details on how to start a scan job, refer to the User's Manual Basic.
Specifying the File Name
You can specify the file name of scanned
documents.
1 On the [Scan Menu] screen, select the
scan mode you want and then press .
If you select [USB memory], go to step 3.
2 Press the to select [Scan setting]
and then press .
OK
3 Press the to select [File Name] and
then press .
4 Enter a file name up to 64 characters.
5 Select [Enter] and then press .
If you do not specify the file name, the name specified by
the factory default settings is used.
OK
OK
Changing the Resolution (Document Type)
You can change to the appropriate resolution to
scan your document to get optimum image
quality.
1 On the [Scan Menu] screen, select the
scan mode you want and then press .
If you select [USB memory], go to step 3.
2 Press the to select [Scan setting]
and then press .
3 Press the to select [Image Settings]
and then press .
For the internet fax, select [Resolution] and
proceed to the step 5 after pressing .
4 Press the to select [Document Type]
and then press .
OK
OK
OK
Changing the Scan Size (Scan Size)
You can specify the appropriate scan size for your
document.
1 On the [Scan Menu] screen, select the
scan mode you want and then press .
If you select [USB memory], go to step 3.
2 Make sure that [Scan setting] is
selected and then press .
OK
OK
5 Press the to select a type and then
press .
Scanning takes longer in [Photo] mode.
OK
Memo
Adjusting the Density (Density)
You can adjust the density to seven levels.
3
Scanning
OK
OK
3 Make sure that [Scan Size] is selected
and then press .
OK
4 Press the to select a value and then
press .
- 38 -
1 On the [Scan Menu] screen, select the
scan mode you want and then press .
If you select [USB memory], go to step 3.
OK
2 Press the to select [Scan setting]
and then press .
OK
Page 39

Advanced Operations for Scanning and Internet Faxing
Memo
Note
OK
OK
3 Press the to select [Image Settings]
and then press .
For the internet fax, select [Density] and proceed
to the step 5 after pressing .
OK
OK
4 Make sure that [Density] is selected and
then press
OK
.
5 Press the or to select a density
value and then press .
[0] is the standard value. To darken the document image,
select [+1], [+2] or [+3] (most dense). Conversely, to
lighten the document image, select [-1], [-2] or [-3]
(least dense).
OK
Specifying the File Format
You can specify the file format of scanned
documents. You can select a file format from
PDF, TIFF, JPEG or XPS.
This function is only for scanning. Internet FAX cannot be
used.
1 On the [Scan Menu] screen, select the
scan mode you want and then press .
If you select [USB memory], go to step 3.
OK
Encrypting PDF
You can encrypt a scanned document. You can
set the encryption level, a password for opening
documents, an authentication password, and
permission for created PDF files with this
function.
A password for opening a document is password
open an encrypted PDF. It cannot be the same
to
with the authentication password. The password
should be up to 32 1-byte characters.
Authentication password is a password to control
rations including printing, extracting and
ope
editing encrypted PDF. It can not be the same
with the password to open a document. The
password should be up to 32 1-byte characters.
Note
This function is only for scanning. You cannot use this
function for internet faxing.
[Encrypted PDF] is displayed only when [PDF] is set to
any of [Color], [Mono (Grayscale)] and [Mono
(Binary)] of [File Format].
To encrypt P DF, it is necessary to set a passw ord to op en a
document or authentication password.
Setting a password for opening a document and authentication password
2 Press the to select [Scan setting]
and then press .
OK
3 Press the to select [File Format] and
then press .
4 Press the to select the type of color
from [Col
ono (Binary)] and then press .
[M
or], [Mono (Grayscale)], or
OK
5 Press the to select a file format and
then press .
Memo
If you selected [Mono (Binary)] in step 4, [JPEG]
cannot be selected.
Memo
This section uses both a password to open a document and
authentication password for setting as an example.
1 On the [Scan Menu] screen, select the
scan mode you want and then press .
OK
2 Press the to select [Scan setting]
and then press .
OK
3 Press the to select [Encrypted PDF]
and then press .
OK
4 Press the to select [Encrypt] from
encrypt] and [Encrypt] and then
[Not
press .
OK
5 Press the to Select the encryption
level from [Lo
and then press .
w], [Medium] and [High]
OK
6 Press the to select [Enable] from
[Disabl
Default Password] and then press .
Set a password for opening the document.
e], [Enable] and [Apply
OK
7 Press the to enter the password.
- 39 -
Page 40

Advanced Operations for Scanning and Internet Faxing
Note
OK
8 Select [Enter] and then press .
OK
9 Re-enter the password.
10 Select [Enter] and then press .
OK
11 Press the to select [Enable] from
sable], [Enable] and [Apply
[Di
Default Password] and then press .
Set the authentication password.
OK
12 Press the and then enter the password.
13 Select [Enter] and then press .
OK
14 Re-enter the password.
15 Select [Enter] and then press .
OK
16 Select the permission to print the
document and then press .
- When the encryption level is set to [Low] in the
step 5, you can select [Not Allowed] or [High
resolution].
- When the encryption level is set to [Middle] or
[High] in the step 5, you can select [
[low resolution (150dpi)] or [High resolution].
OK
Not Allowed]
Use the default password
When [Use the default password] is selected
in the step 6 or 11 in "Setting a password for
opening a document and authentication
password" P. 39, you can use the default
password registered in advance.
Use the procedures below to register the initial
sword.
pas
1 Press the <SETTING> key.
2 Press the to select the [Admin
Setup] and the
n press .
OK
3 Enter the administrator password.
4 Select [Enter] and then press .
OK
5 Press the to select [Scanner Setup]
and then press .
OK
6 Press the to select [Default
Settings]
and then press .
OK
7 Press the to select [Encrypted PDF
Setting] and t
hen press .
OK
3
Scanning
17 Select the permission to copy the text
and object and then press .
OK
18 Select the permission to change the PDF
file and then press .
- When the encryption level is set to [Low] in the
step 5, you can select [Not Allowed], [Allow To
Make A Comment], [Allow To Swap Page], or
[Allow all op. except pg extract.]
- When the encryption level is set to [Medium] or
[
High
] in the step 5, you can select [
[Allow To Make A Comment], [Allow Ins., Del.
or Rotate Page.], or [Allow all op. except pg
extract.]
OK
Not Allowed
],
19 Check the security settings and then
press .
The settings of each authentication in the steps 16 to 18
are displayed only when [Permissions Password] is set
for [Enable] or [Apply Default Password]
8 Press the to select [Document Open
Password]/
and then press .
[Permissions Password]
OK
9 Enter a password up to 32 characters.
10 Select [Enter] and then press .
OK
11 Press the until the top screen is
displayed.
- 40 -
Page 41

Advanced Operations for Scanning and Internet Faxing
Memo
Note
OK
Setting the Compression Level
You can specify the appropriate compression
level.
1 On the [Scan Menu] screen, select the
scan mode you want and then press .
If you select [USB memory], go to step 3.
2 Press the to select [Scan setting]
and then press .
OK
3 Press the to select the [Compression
Rate] a
If you use the internet fax function, go to step 5.
nd then press .
OK
4 Press the to select the color type
(Color, Mono etc.) and then press .
5 Press the to select the compression
level from [Hi
and then press .
gh], [Medium] or [Low]
OK
OK
OK
If you select [Mono (Binary)], you can select a
compression level from [High], [Medium] or [Raw].
Setting the Grayscale
When Grayscale is enabled, data scanned by
MONO
grayscale (255 tones).
This function is only for scanning. Internet FAX cannot be
1 On the [Scan Menu] screen, select the
2 Press the to select [Scan setting]
3 Press the to select the [Grayscale]
is not black-and-white (binary) but
used.
scan mode you want and then press .
If you select [USB memory], go to step 3.
and then press .
and then press .
OK
OK
OK
4 Press the to select [ON] and then
press .
- 41 -
Page 42

Using Drivers and Software
Memo
Note
Reference
OK
Using Drivers and Software
This section explains how to use the scanner driver and utilities. They allow you to scan documents and
change settings easily on your computer.
Using TWAIN Driver
The explanations in this section use PaperPort in Windows
and Adobe Photoshop CS3 in Mac OS X as an example.
In this section, procedures using Scan To Remote PC with
USB connection are described. For how to connect to the
network and start to scan by Scan To Local PC, refer to the
User's Manual Basic.
To use this function, applications supporting TWAIN
(PaperPort or Adobe Photoshop CS3, etc.) should be
installed in your computer.
For details on how to start a scan job, refer to the User's
Manual Basic.
For details on how to install PaperPort, refer to "Installing
Utilities" P. 102.
Starting a Scan Job (for Windows)
1 Place your document with text face up in
the ADF or face down on the document
glass.
2 Press the <SCAN> key.
7 Click the scan buttons.
The scan job starts.
3
Scanning
8 Click [Quit].
9 When there is no continued page or the
back side is not scanned, click [Quit].
Memo
The following five buttons are registered as default
settings.
Scan Photograph
Scan Magazine
Scan for OCR
Scan for Internet
Customize
3 Press the to select [Remote PC] and
then press .
4 Start PaperPort on your computer.
5 Click [Select] and then select the
scanner driver of the machine.
A window appears.
6 Click the [Scan].
Changing Settings
You can adjust how the document is scanned by
changing the driver setting.
The following explains the setting items.
Simple Mode
You can change the settings of five registered
buttons.
1 Follow the procedure for "Starting a Scan
Job (for Windows)" through step 6.
2 Select [Simple] from [Mode].
- 42 -
Page 43

Using Drivers and Software
Reference
OK
3 Click [Settings].
A window appears.
4 Click the scan button to change the
settings.
5 Click [OK].
6 If you start a scan job, click the scan
button.
If you want to finish the setting, click [Quit].
Advanced Mode
You can adjust in detail how a document is
scanned.
5 Select [Import] from [File] and then
select [OKI MC351_361_561 Twain]
or [OKI MC351_361_561 Twain
Network].
- When [OKI MC351_361_561 Twain] is selected,
proceed to the step 9.
- When [OKI MC351_361_561 Twain Network] is
selected, the network scan is the second or later
time, proceed to the step 9.
6 For the first network scan, the dialog box
indicating that the tool for selecting a
connection destination is started is
displayed. Then, click [OK].
7 On the dialog box of [Scan Settings],
select a connection destination to
register host information if necessary,
and then click [OK].
8 Select [Import] from [File] of Adobe
Photoshop CS3 and select [OKI
MC351_361_561 Twain Network].
The windows appears.
9 Click the scan button.
Scanning starts.
1 Follow the procedure for "Starting a Scan
Job (for Windows)" P. 42 through step 6.
2 Select [Advanced] from [Mode].
3 Change the settings if necessary.
4 Click [Scan] to start scanning.
If you want to finish the setting, click [Quit].
For details on how to change each setting, refer to the
online help.
Starting a Scan Job (for Mac OS X)
1 Press the <SCAN> key on the operator
panel.
2 Place your document with text face up in
the ADF or face down on the document
glass.
3 Press the to select [Remote PC] and
then press .
10 Select [Quit Photoshop] from
[Photoshop].
Changing Settings (for Macintosh)
You can adjust how the document is scanned by
changing the driver setting.
The following explains the setting items.
Simple Mode
You can change the settings of five registered
buttons.
1 Follow the procedure for "Starting a Scan
Job (for Mac OS X)" through step 8.
2 Select [Simple] from [Mode].
3 Click [Settings].
A window appears.
4 Click the scan button to change the
settings.
5 Click [OK].
4 Start Adobe Photoshop CS3 on your
computer.
6 If you start a scan job, click the scan
button.
If you want to finish the setting, click [Quit].
- 43 -
Page 44

Using Drivers and Software
Memo
OK
Advanced Mode
You can adjust in detail how a document is
scanned.
1 Follow the procedure for "Starting a Scan
Job (for Mac OS X)" P. 43 through step 8.
2 Select [Advanced] from [Mode].
3 Change the settings if necessary.
4 Click [Scan] to start scanning.
If you want to finish the setting, click [Quit].
Using WIA Driver
The WIA driver does not support the network
scan function. Connect the machine with the
coumber via USB.
The WIA driver does not support Mac OS X.
The WIA 2.0 driver supports Windows 7/
Windo
The WIA 1.0 driver supports Windows Vista/
Windo
Server 2003.
ws Server 2008 R2.
ws Server 2008/ Windows XP/ Windows
12 When there is no continued page or the
back side is not scanned, click [Finish].
The scanned image is displayed in PaperPort.
Using Windows FAX and Scan
"Windows FAX and Scan" is a function used in
Windows 7.
1 Place your document with text face up in
the ADF or face down on the document
glass.
2 Press the <SCAN> key.
3 Press the to select [Remote PC] and
then press .
OK
4 Click [Start] on your computer, and
select [All Programs]> [Windows FAX
and Scan].
5 Click [New Scan].
6 Select [MC351/361/561] and click
[OK].
3
Scanning
Starting a Scan Job
The explanations in this section use PaperPort as an
example, and may differ from the description depending
on your application.
1 Place your document with text face up in
the ADF or face down on the document
glass.
2 Press the <SCAN> key.
3 Press the to select [Remote PC] and
then press .
4 Start PaperPort on your computer.
5 Click [Select] and then click
[WIA:MC351/361/561].
6 Click [Scan].
7 Select a paper feeding method.
7 Make additional setting if necessary.
8 Click [Scan].
9 Exit [Windows FAX and Scan].
8 Select a document type.
9 Specify the area to be scanned.
10 Click [Scan].
11 Click [Cancel] when scanning is finished.
- 44 -
Page 45

Using Drivers and Software
Memo
Reference
Using ActKey Software
Using the ActKey, you can start a scan job in
specified settings with a click a button.
ActKey does not support Mac OS X.
When ActKey is installed, Network Configuration is also
installed simultaneously. For Network Configuration, refer
to "Using Network Configuration" P. 46.
For details on how to start a scan job, refer to the User's
Manual Basic.
Installing the Software
1 Insert the "Software CD-ROM" into your
computer.
A window opens.
2 Select [ActKey] from [Optional
Software].
3 Install the software as instructed.
4 Click [Finish].
8 Repeat steps 6 and 7 so that [ActKey] is
set to all events.
9 Click [OK].
Fax Transmission of Scanned Documents
Using the fax service of the Windows component,
you can send a scanned document.
Note
The direction to load the paper can not be changed after
scanning the documents.
This function uses the fax service of the Windows
component.
Memo
For PC-FAX function, the resolution is fixed to 200dpi and
the color mode is fixed to black and white.
1 Start ActKey on your computer.
2 Press the <SCAN> key on the operator
panel of the machine.
3 Press the to select [Remote PC] and
then press .
OK
Starting the Software
1 Click [Start] to select [All Programs] >
[Okidata] > [ActKey] > [ActKey].
Starting ActKey when Scanning to a Local PC
You can set ActKey to start when you select
[Local PC] on the
machine.
1 Click [Start] to select [Control Panel].
2 Enter [View scanners and cameras] in
[Search for Operator panel].
3 Click the [View scanners and cameras]
under [Devices and Printers].
4 Select [MC351/361/561] and click
[Properties].
If the [User Account Control] dialog box
appears, click [Yes].
4 Place your document with text face up in
the ADF or face down on the document
glass.
5 Click [PC-Fax] on your computer.
The [Fax Setup] starts.
6 Follow the on-screen instructions to send
a fax.
Setting the Scan Button
You can change the settings of four scan buttons.
1 Start ActKey.
2 Select [Button settings] from
[Options] menu.
3 Click a button you want to set.
4 Change the settings if necessary.
5 Click [OK].
5 Click the [Events] tab.
6 Select an event for [Select an event].
7 Select the [Start this program] check
box and then select [ActKey].
- 45 -
Page 46

Using Drivers and Software
Using Network Configuration
Network Configuration is a tool to set in advance
when executing Scan To Local PC. In addition, if
the information including the device and IP
address of the computer, etc. is changed when
performing network scan, the setting value can
be changed by this tool.
When installing ActKey, Network Configuration is
als
o installed simultaneously.
Network Configuration will be automatically
attac
hed to the taskbar when you restart your
computer.
When starting Network Configuration, the scanner
dr
iver installed in the computer is displayed.
Method to change a scanner driver
name
When a scanner driver name has been changed,
select [Edit Driver Name] from the [Scanner]
menu and then change the scanner driver name.
Method to set Scan To Local PC
To execute Scan To Local PC, you need to register
the computer name, IP address and port number
in the machine.
After installing the scanner driver, start Network
Configu
Then, select [Properties] form the [Scanner]
menu and select the [Register] tab. As the
computer information, the computer name, IP
address and port number are displayed. The
computer name does not have to be set since the
computer's host name is automatically acquired.
Although the setting value of the computer is
auto
multiple network cards are installed in the
computer, multiple IP addresses are displayed.
Select the IP address of the network card
currently used. Further more, for the port
number, the current setting is displayed. If you
need to change, change the setting.
After all settings are complete. Click [Re
button to register the setting in the machine.
If the machine is tuned off and cannot be
co
After registering, if the computer's name, IP
address or port number is changed, you need to
register again with the above procedure.
ration and select the driver to be used.
matically displayed for the IP address, if
gister]
nnected, an error occurs when registering.
3
Scanning
Method to change the setting
information of the machine
When the IP address of the machine and port
number of the machine have been changed, start
Network Configuration and then select [Edit
Scanner] from the [Scanner] menu.
The setting value set in the current computer is
displayed, and then change the IP address and
port number of the machine.
- 46 -
Page 47

Useful Functions for Internet Faxing and Scan To E-mail
Memo
Note
Reference
OK
OK
Useful Functions for Internet Faxing and Scan To
E-mail
This section explains useful functions for the internet fax and scan to e-mail function.
MDN is a message to notify the sender about the status after the recipient has received the document.
DSN is a message to notify the sender about the de
livery status if the transmitted document has
reached the recipient.
If the machine receives a DSN request, it will not send a response.
To en t e r [ Admin Setup] menu, a password is necessary. The default password is "aaaaaa".
To receive response from MDN or DSN, enable the setting of MDN and DSN requests, and make email reception settings in
advance.
For the reception setting of emails, refer to "Configuring Server to Print Files Attached to E-mails" P. 171.
Enabling MDN and DSN Requests
Do the following procedure to request MDN and
DSN when you transmit internet faxes and
emails.
1 Press the <SETTING> key.
2 Press the to select [Admin Setup]
and then press .
3 Enter the administrator password.
4 Select [Enter] and then press .
5 Press the to select [Scanner Setup]
and then press .
6 Press the to select [E-mail Setup]
and then press .
7 Press the to select [MCF Report] and
then press .
8 Press the to select [ON] and then
press .
OK
OK
OK
OK
Enabling MDN Response
Do the following operation to transmit the MDN
response when the machine receives MDN
requests.
1 Press the <SETTING> key.
2 Press the to select [Admin Setup] and
then press .
3 Enter the administrator password.
4 Select [Enter] and then press .
5 Press the to select [Scanner Setup]
and then press .
6 Press the to select [E-mail Setup]
and then press .
7 Press the to select [MDN Response]
and then press .
8 Press the to select [ON] and then
press .
9 Press the until the top screen appears.
OK
OK
OK
OK
OK
OK
9 Press the until the top screen appears.
- 47 -
Page 48

Useful Functions for Scanning to Local and Remote PCs
Memo
OK
Useful Functions for Scanning to Local and
Remote PCs
This section explains useful functions for scanning to local and remote PCs.
To enter the [Admin Setup] menu, a password is necessary. The default password is "aaaaaa".
Setting PC Scan Mode
You can select either simple scan mode or secure
scan mode for scanning to local PC function.
1 Press the <SETTING> key.
2 Press the to select [Admin Setup]
and then press .
3 Enter the administrator password.
4 Select [Enter] and then press .
5 Press the to select [Scanner Setup]
and then press .
6 Press the to select [TWAIN Setup]
and then press .
7 Press the to select [PC Scan Mode]
and then press .
8 Press the to select a mode and then
press .
9 Press the until the top screen appears.
OK
OK
OK
OK
OK
Enabling the Network TWAIN Settings
Do the following procedure to use scan to the
local PC and scan to remote PC functions
connecting to network.
Note
If you select [Disable] on this function, you cannot use
scan to local PC and scan to remote PC via network.
1 Press the <SETTING> key.
2 Press the to select [Admin Setup]
and then press .
3 Enter the administrator password.
4 Select [Enter] and then press .
5 Press the to select [Scanner Setup]
and then press .
6 Press the to select [TWAIN Setup]
and then press .
7 Make sure that [Network TWAIN] is
selected and then press .
OK
OK
OK
OK
OK
3
Scanning
- 48 -
8 Press the to select [ON] and then
press .
OK
9 Press the until the top screen appears.
Page 49

4. Printing
Memo
Reference
This chapter explains advanced printing operations.
Useful Operations for Printing From a Computer
This section explains useful operations when you print a document from a computer.
The display and procedure may differ according to the operating system, the applications, and the version of the printer driver
you are using. This section uses Wordpad and TextEdit in Windows and Mac OS X as examples.
For additional information on the setting items on the printer driver, refer to its online help.
Manual Printing
You can print a document feeding paper
manually on the MP tray. The machine prints on a
sheet of paper at a time. Every time a page is
printed, a message appears requesting to load
paper on the MP tray. Select [
on the message to continue to print.
1 Load paper on the MP tray.
2 Open the file you want to print.
3 Configure the print settings on the
printer driver and start printing.
For Windows PCL/PCL XPS Printer Driver
From the [File] menu, select [Print].
1
2 Click [Preferences].
3 On the [Setup] tab, select [Multi
Purpose Tray] from [Source].
4 Click [Paper Feed Options].
5 Select the [Use MP tray as manual
feed] check box and then click [OK].
Restart printing]
For Windows PS Printer Driver
1 From the [File] menu, select [Print].
2 Click [Preferences].
3 Select the [Paper/Quality] tab.
4 Select [Multi-Purpose Tray] from
[Paper Source].
5 Click [Advanced].
6 Click [Multipurpose tray is handled as
manual feed] and select [Yes] from the
drop-down list.
7 Click [OK].
8 Configure other settings if necessary and
then start printing on the print dialog.
9 If a request message appears on the
operator panel for loading paper on the
MP tray, press or to select [Restart
printing] and then press .
If you print a document of multiple pages, every
time a page is printed the same message appears.
OK
For Mac OS X Printer Driver
6 Configure other settings if necessary and
then start printing.
7 When a request message appears on the
operator panel for loading paper on the
MP tray, press the or to select
[Restart printing] and then press .
If you print a document of multiple pages, every
time a page is printed the same message appears.
1 From the [File] menu, select [Print].
2 Select [Paper Feed] from the panel
menu.
3 Select [All] and then select [Multi-
OK
Purpose Tray].
4 Select [Printer Features] from the
panel menu.
- 49 -
Page 50

Useful Operations for Printing From a Computer
Memo
Note
Memo
Reference
5 Select [Paper Feeding Option] from
[Feature Sets].
6 Select [Multipurpose tray is treated
as manual feed] check box.
7 Configure other settings if necessary and
then start printing.
8 When a request message appears on the
operator panel for loading paper on the MP
tray, press the or to select [Re
printing] a
If you print a document of multiple pages, every
time a page is printed the same message appears.
If the print dialog contains only two menus and does not
contain the options you expect to see on the Mac OS X
10.5 and 10.6, click the disclosure triangle beside the
[Printer] menu.
nd then press .
OK
start
Printing on Envelopes
You can print on envelopes by changing the
paper size setting, and using the MP tray and the
face up stacker.
Set the paper size of MP tray on the operator
l, and then make print settings including
pane
paper size and paper tray with the printer driver.
6 Make sure [Paper Size] is selected and
then press .
OK
7 Press the to select any of
[En
velope*] and then press .
*Select a type of envelope.
OK
8 Press the until the top screen
appears.
9 Open the file you want to print on the
computer.
10 Configure the paper size, paper source
and orientation on the printer driver and
then start printing.
For Windows PCL/PCL XPS Printer
4
Printing
Driver
1 From the [File] menu, select [Print].
2 Click [Preferences].
3 On the [Setup] tab, select any of
[Envelope*] from [Size].
* Select a type of envelope.
4 Select [Multi Purpose Tray] from
[Source].
Warp or creasing may appear after printing. Make sure
that there is no problem by test printing.
Envelopes should be loaded with the address side up.
- You envelopes (Monarch, Com-9, Com-10, DL, C5)
should be loaded so that the flap is on the right side to
the feeding direction.
Do not select duplex printing on envelopes.
For available envelopes refer to the User's Manual Basic.
Manual printing is also available for printing on envelopes.
For details on manual printing, refer to "Manual Printing" P. 49.
1 Load paper on the MP tray and then
press the set button.
2 Open the face up stacker at the rear of
the machine.
3 Press the <SETTING> key on the
operator panel.
4 Press the to select [Paper] and then
press .
OK
5 Select the [Job Options] tab.
6 Select orientation at [Orientation].
- Select [Portrait] for Chou envelopes.
- Select [Landscape] for You envelopes.
7 Configure other settings if necessary and
then start printing.
5 Press the to select [MP tray] and
OK
then press .
- 50 -
Page 51

Useful Operations for Printing From a Computer
Memo
For Windows PS Printer Driver
1 From the [File] menu, select [Print].
2 Click [Preferences].
3 On the [Layout] tab, select orientation
from [Orientation].
- Select [Portrait] for Chou envelopes.
- Select [Landscape] for You envelopes. Click
[Preferences] and select [Rotation] for [180°]
on the advanced option screen.
4 Select the [Paper/Quality] tab.
5 Select [Multi-Purpose Tray] from
[Source].
6 Click [Advanced].
7 Click [Paper Size] and select any of
[Envelope*] from the drop-down list.
* Select a type of envelope.
8 Click [OK].
9 Configure other settings if necessary and
then start printing.
For Mac OS X Printer Driver
1 From the [File] menu, select [Page
Setup].
2 Select any of [Envelope*] from [Paper
Size].
* Select a type of envelope.
3 Select orientation from [Orientation]
and then click [OK].
- Select [Portrait] for Chou envelopes, and check
the checkbox of [180°] in the [Job Options]
function set on the [Printer Features] panel.
- Select [Landscape] for You envelopes.
4 From the [File] menu, select [Print].
5 Select [Paper Feed] from the panel
menu.
6 Select [All] and then select [Multi-
Purpose Tray].
7 Configure other settings if necessary and
then start printing.
Printing on Labels
You can print on labels by changing the media
type setting, and using the MP tray and the faceup stacker.
Set the paper size and type for MP tray on the
rator panel. Then, make print settings
ope
including paper size and paper tray with the
printer driver.
Memo
Do not select duplex printing on labels.
Reference
For available labels, refer to the User's Manual Basic.
Manual printing is also available for printing on labels. For
details on manual printing, refer to "Manual Printing" P. 49.
1 Load paper on the MP tray and then
press the set button.
2 Open the face up stacker at the rear of
the machine.
3 Press the <SETTING> key on the
operator panel.
4 Press the to select [Paper] and then
press .
5 Press the to select [MP tray] and
then press .
6 Make sure [Media Type] is selected and
then press .
7 Press the to select [A4] or [Letter]
and then press .
8 Press the to select [Paper Type] and
then press .
9 Press the to select the [Labels] and
then press .
10 Press the until the top screen
appears.
11 Open the file you want to print on the
computer.
12 Configure the paper size and tray on the
printer driver.
OK
OK
OK
OK
OK
OK
If the print dialog contains only two menus and does not
contain the options you expect to see on the Mac OS X
10.5 or 10.6, click the disclosure triangle beside the
[Printer] menu.
- 51 -
Page 52

Useful Operations for Printing From a Computer
Memo
For Windows PCL/PCL XPS Printer Driver
1 From the [File] menu, select [Print].
2 Click [Preferences].
3 Select [A4] or [Letter] from [Size] on
the [Setup] tab.
4 Select [Multi Purpose Tray] from
[Source].
5 Configure other settings if necessary and
then start printing.
For Windows PS Printer Driver
1 From the [File] menu, select [Print].
2 Click [Preferences].
3 Select [Paper/Quality] tab.
4 Select [Multi-Purpose Tray] from
[Paper Feed Source].
5 Click [Advanced].
6 Click [Paper Size] and then select [A4]
or [Letter] from the drop-down list.
7 Click [OK].
8 Configure other settings if necessary and
then start printing.
For Mac OS X PS Printer Driver
1
From the [File] menu, select [Page
Setup].
2 Select [A4] or [Letter] from [Paper
Size].
3 Select [Print] from [File] menu.
Printing on Custom Size Paper
You can register a customized paper size on the
printer driver so you can print on nonstandard
paper such as banners.
Settable custom size range
Width: 64 to 215.9mm
Length: 127 to 1320.8mm
Paper size that can be fed is different depending
on a tray.
Note
Register a paper size and load paper in portrait
orientation.
For banner media that is over 356 mm long, use the face
up stacker.
This function may not be available in some applications.
If paper length exceeds 356mm, we do not guarantee
print quality.
If paper is so long that it exceeds the paper supports of
the MP tray, support it by hand.
When using tray 1 or tray 2, select the <SETTING> key
on the operator panel>[Paper]>[Tray 1] or [Tray 2]>
[Paper Size]>[Custom] before doing the following
procedure.
When image is not correctly printed on large size paper in
the PS printer driver, by selecting [Standard
(600x600dpi)] for [Print Quality], image may be
correctly printed.
It is not recommended to use paper whose with is less
than 100mm since it may cause paper jams.
Reference
For details on the paper sizes that can be fed on each tray,
that can be used for duplex printing, or that can be
registered for custom paper sizes, refer to the User's
Manual Basic.
The [Auto Tray Change] check box is selected by default.
When the tray runs out of paper during printing, the
machine automatically locates another tray and begins
feeding paper from that tray. If you want to feed custom
paper only from a particular tray, clear the [Auto Tray
Change] check box. For auto tray change, refer to "Auto
Tray Switching" P. 60.
For Windows PCL Printer Driver
4
Printing
4 Select [Feed Paper] from the panel menu.
5 Select [All] and then select [Multi-
Purpose Tray].
6 Configure other settings if necessary and
then start printing.
If the print dialog contains only two menus and does not
contain the options you expect to see on the Mac OS X
10.5 or 10.6, click the disclosure triangle beside the
[Printer] menu.
1 Click [Start] and select [Devices and
Printers].
2 Right-click the OKI MC561 icon and
select [Printing preferences]>[OKI
MC561(PCL)].
3 On the [Setup] tab, click [Paper Feed
Options].
4 Click [Custom Size].
- 52 -
Page 53

Useful Operations for Printing From a Computer
Reference
Reference
5 Enter a name and the dimensions.
a) Enter a name for the new size in the
[
Name] box.
b) Enter its dimensions in the [
[
Length] boxes.
Width] and
6 Click [Add] to save the custom paper
size to the list and then click [OK].
You can save up to 32 custom sizes.
7 Press [OK] until the [Printing
Preferences] dialog box is closed.
8 Open the file you want to print.
9 Select the registered paper size and start
printing on the print dialog.
For how to specify paper in the printer driver, refer to
User's Manual Basic.
For Windows PS Printer Driver
2 Click a printer icon in [Printers and
Faxes] and then click [Print server
properties] on the top bar.
3 Select the [Forms] tab.
4 Select the [Create a new form] check
box.
5 Enter the values in the [Form name],
[Paper size], and [Printer area
margins]. Click [Save Form].
6 Click [Close].
7 Open the file you want to print from the
application.
8 Select the registered paper size and start
printing on the printer driver.
Reference
For how to specify paper in the printer driver, refer to
User's Manual Basic.
1 Click [Start] and select [Devices and
Printers].
2 Right-click the OKI MC561 icon and
select [Printing preferences]>[OKI
MC561(PS)].
3 On the [Layout] tab, click [Advanced].
4 Click [Paper Size] and select
[PostScript Custom Page Size] from
the drop-down list.
5 Enter the dimensions in the [Width] and
[Height] boxes, and press [OK].
Note
[Offset for Paper Feeder Size] is not available.
6 Press [OK] until the [Print Setup]
dialog box is closed.
7 Open the file you want to print from the
application.
8 Select [PostScript Custom Page Size]
for a paper size and start printing on the
printer driver.
For Mac OS X PS Printer Driver
Note
In the Mac OS X PS printer driver, paper size out of the
available range can be set, however, image is not correctly
printed. set paper size within available range.
1 Open the file you want to print.
2 From the [File] menu, select [Page
Setup].
3 Select [Manage Custom Sizes] from
[Paper Size]
4 Click [+] to add an item to the list of
custom paper sizes.
5 Double-click [Untitled] and enter a
name for the custom paper size.
6 Enter the dimensions in the [Width] and
[Height] boxes.
7 Click [OK].
8 Click [OK].
9 From the [File] menu, select [Print].
For how to specify paper in the printer driver, refer to
User's Manual Basic.
For Windows PCL XPS Printer Driver
1 Click [Start] and select [Devices and
Printers].
10 Configure other settings if necessary and
then start printing.
Memo
If the print dialog contains only two menus and does not
contain the options you expect to see on the Mac OS X
10.5 or 10.6, click the disclosure triangle beside the
[Printer] menu.
- 53 -
Page 54

Useful Operations for Printing From a Computer
Note
Combining Multiple Pages Onto One Sheet of Paper
You can print multiple pages of a document onto
a single side of a sheet of paper.
This function scales down the page size of your document
for printing. The center of the printed image may not be in
the center of the paper.
This function may not be available in some applications.
For Windows PCL/PCL XPS Printer Driver
1 Open the file you want to print.
2 From the [File] menu, select [Print].
3 Click [Preferences].
4 On the [Setup] tab, select the number of
pages to print on each sheet at
[Finishing Mode].
5 Click [Options].
6 Specify each setting at [Page Borders],
[Page layout], and [Bind Margin], and
then click [OK].
7 Configure other settings if necessary and
then start printing.
For Mac OS X PS Printer Driver
1 Open the file you want to print.
2 From the [File] menu, select [Print].
3 Select [Layout] from the panel menu.
4 Select the number of pages to print on
each sheet from [Pages per Sheet]
5 Specify each setting at [Border] and
[Layout Direction].
6 Configure other settings if necessary and
then start printing.
Memo
If the print dialog contains only two menus and does not
contain the options you expect to see on the Mac OS X
10.5 or 10.6, click the disclosure triangle beside the
[Printer] menu.
Making Duplex Prints
You can print on both sides of a sheet of paper.
Paper size that can be used for duplex printing
A4, A5, B5, Letter, Legal13, Legal 13.5, Legal 14,
Executive, 16K (197x273mm, 195x270mm,
184x260mm) Custom size
A6 can not be used for duplex printing.
Media weight that can be used for duplex printing
64~176g/m
2
4
Printing
For Windows PS Printer Driver
Open the file you want to print.
1
2 From the [File] menu, select [Print].
3 Click [Preferences].
4 On the [Layout] tab, select the number
of pages to print on each sheet from
[Pages per Sheet].
5 Specify the following settings.
- Select the [Draw Borders]
check box to draw borders between pages on each
sheet.
- Select [Advanced]>[Page per Sheet Layout]
to set the layout of pages on each sheet.
Note
[Draw Borders] and [Page per Sheet Layout] are
not available with Windows Server 2003, Windows XP,
and Windows 2000.
Using media weight other than the above causes
paper jams, therefore do not use.
Note
When performing duplex printing with the face-up stacker
opened, the message indicating that the face-up stacker
should be closed on the display of the operator panel.
At this moment, by closing the face-up stacker, you can
restart printing.
This function may not be available in some applications.
Memo
The width and length of custom size that can be used for
duplex printing are as follows.
- Width: 148 to 216mm (5.8 to 8.5 inch)
- Length: 210 to 356mm (8.3 to 14.0 inch)
1 Check that the face-up stacker on the
rear size of the machine is closed.
2 Make print settings for duplex printing
with the printer driver of the computer
and then start printing.
6 Configure other settings if necessary and
then start printing.
- 54 -
Page 55

Useful Operations for Printing From a Computer
Memo
For Windows PCL/PCL XPS Printer Driver
1 Open the file you want to print.
2 From the [File] menu, select [Print].
3 Click [Preferences].
4 On the [Setup] tab, select [Long Edge]
or [Short Edge] from [2-Sided
Printing].
5 Configure other settings if necessary and
then start printing.
For Windows PS Printer Driver
1 Open the file you want to print.
2 From the [File] menu, select [Print].
3 Click [Preferences].
4 On the [Layout] tab, select [Flip on
Long Edge] or [Flip on Short Edge]
from [Print on Both Sides].
5 Configure other settings if necessary and
then start printing.
For Mac OS X PS Printer Driver
Scaling to Pages
You can print data formatted for one size page
onto a different size page without modifying the
print data.
Note
This function may not be available in some applications.
This function is not available with the Windows PS printer
driver.
For Windows PCL/PCL XPS Printer Driver
1 Open the file you want to print.
2 From the [File] menu, select [Print].
3 Click [Preferences].
4 On the [Setup] tab, click [Paper Feed
Options].
5 Select the [Resize document to fit
printer page] check box in [Fit to
Page].
6 Select a scaling value from
[Conversion] and click [OK].
7 Configure other settings if necessary and
then start printing.
1 Open the file you want to print.
2 From the [File] menu, select [Print].
3 Select [Layout] from the panel menu.
4 Select [Long-Edge binding] or [Short-
Edge binding] from [Two-Sided] on
the [Layout] panel.
5 Configure other settings if necessary and
then start printing.
If the print dialog contains only two menus and does not
contain the options you expect to see on the Mac OS X
10.5 or 10.6, click the disclosure triangle beside the
[Printer] menu.
For Mac OS X PS Printer Driver
Open the file you want to print.
1
2 From the [File] menu, select [Print].
3 Select [Paper Handling] from the panel
menu.
4 Select the [Scale to fit paper size]
check box.
5 Select the paper size you want to use
from [Output Paper Size].
6 Configure other settings if necessary and
then start printing.
Memo
If the print dialog contains only two menus and does not
contain the options you expect to see on the Mac OS X
10.5 or 10.6, click the disclosure triangle beside the
[Printer] menu.
- 55 -
Page 56

Useful Operations for Printing From a Computer
Note
Memo
Collating Pages
You can print copies of multiple sets of a
multipage document.
This function may not be available in some applications.
Turn off the page collating mode in the application when
you use this function with the Windows PS printer driver.
For Windows Printer Driver
1 Open the file you want to print.
2 From the [File] menu, select [Print].
3 Click [Preferences].
4 Select the [Job Options] tab.
5 Select a number of copies to print from
the [Copies] scrolling list and select
the[Collate] check box.
6 Configure other settings if necessary and
then start printing.
Setting the Page Order
You can set whether pages are printed in forward
or reverse order to suit your needs.
If you want pages to be stacked in numeric order,
orward order is usually appropriate with the face
f
down stacker, and reverse order with the face up
stacker.
If using a face-up stacker, set the printing to run
reverse order to stack the paper in the
in the
order of the pages.
Note
Reverse order is not available with the Windows PCL/PCL
XPS printer driver.
If the face up stacker is not opened, pages are output on
the face down stacker.
For Windows PS Printer Driver
1 Open the file you want to print.
2 From the [File] menu, select [Print].
3 Click [Preferences].
4
Printing
For Mac OS X PS Printer Driver
1 Open the file you want to print.
2 From the [File] menu, select [Print].
3 Uncheck the checkbox of [Collate] and
enter a number of copies to print in
[Copies].
For Mac OS X 10.3.9 to 10.4.11, uncheck the
checkbox of [Collate] on the [Number of
printed copies and printed pages] and enter a
number of printed copies in [Copies].
4 Select [Printer Features] from the
panel menu.
5 Select [Job Options] from [Feature
Set].
6 Check the checkbox of [Collate].
7 Configure other settings if necessary and
then start printing.
4 On the [Layout] tab, select [Front to
Back] or [Back to Front] from [Page
Order].
5 Configure other settings if necessary and
then start printing.
Memo
If [Page Order] does not appear, click [Start]>[Devices
and Printers]> right-click the OKI MC561 icon > select
[Printer properties]>[OKI MC561(PS)]>[Advanced]
>[Enable advanced printing features].
For Mac OS X PS Printer Driver
1 Open the file you want to print.
2 From the [File] menu, select [Print].
3 Select [Paper Handling] from the panel
menu.
4 Select [Normal] or [Reverse] from
[Page Order] on the [Paper Handling]
panel.
If the print dialog contains only two menus and does not
contain the options you expect to see on the Mac OS X
10.5 or 10.6, click the disclosure triangle beside the
[Printer] menu.
Check the [Collate] box to print without using the printer
memory.
5 Configure other settings if necessary and
then start printing.
Memo
If the print dialog contains only two menus and does not
contain the options you expect to see on the Mac OS X
10.5 or 10.6, click the disclosure triangle beside the
[Printer] menu.
- 56 -
Page 57

Useful Operations for Printing From a Computer
Note
Memo
Booklet Printing
You can print multipage documents with their
pages ordered and arranged so that the final
printed output can be folded into a booklet.
This function may not be available in some applications.
This function is not available with Mac OS X printer driver.
Watermarks are not printed properly with this function.
This function is not available when executing encrypted
authentication printing from the client computer that
shares the machine in the network by the print server.
For Windows PCL/PCL XPS Printer Driver
1 Open the file you want to print.
2 From the [File] menu, select [Print].
3 Click [Preferences].
4 On the [Setup] tab, select [Booklet] at
[Finishing Mode].
5 Click [Options] and then set the booklet
print options if necessary.
-[Signature]: Specify the number of pages per
side of each sheet of paper.
-[Right to Left] Print the booklet to be opened
toward the right hand.
5 Configure other settings if necessary and
then start printing.
Memo
When you want to make an A5 booklet using A4 sheets,
select [A4] for the paper size.
When making a booklet whose right side is bound (The
right side is bound when the first page is the front), click
[Advanced] on the [Layout] tab and select [Right edge]
for [Booklet binding].
[Booklet binding] can not be used in Windows XP/
Windows Server 2003/ Windows 2000.
If you cannot use this function, click [Start]>[Devices
and Printers]> right-click the OKI MC561 icon > select
[Printer properties]>[OKI MC561(PS)]>[Advanced]>
select the [Enable advanced printing features] check
box.
Cover Printing
You can feed the first page of a print job from
one tray and the remaining pages from another
tray. This function is useful when you want to use
a kind of paper for a cover and another for body
pages.
Note
This function is not available with the Windows PS printer
driver.
For Windows PCL/PCL XPS Printer Driver
1 Open the file you want to print.
6 Click [OK].
7 Configure other settings if necessary and
then start printing.
When you want to make an A5 booklet using A4 sheets,
select [A4] for the paper size.
When you cannot select this function, click [Start]>
[Devices and Printers]> right-click the OKI MC561 icon
> select [Printer properties]>[OKI MC561 (PCL)]>
[Advanced]>[Print Processor]>[OPLAPP3]>[OK].
For Windows PS Printer Driver
1 Open the file you want to print.
2 From the [File] menu, select [Print].
3 Click [Preferences].
4 On the [Layout] tab, select [Booklet] at
[Page Format].
If you want to print boarder lines, select the
[Draw Borders] check box to draw borders.
2 From the [File] menu, select [Print].
3 Click [Preferences].
4 On the [Setup] tab, click [Paper Feed
Options].
5 Select the [Use different source for
first page] check box.
6 Select a source tray from [Source] and
click [OK].
If necessary, select a paper weight from the
[Weight] drop-down list.
7 Configure other settings if necessary and
then start printing.
For Mac OS X PS Printer Driver
1 Open the file you want to print.
2 From the [File] menu, select [Print].
3 Select [Paper Feed] from the panel
menu.
- 57 -
Page 58

Useful Operations for Printing From a Computer
Memo
Note
Memo
4 Select [First Page From] and select
source trays for the first page and the
remaining pages.
5 Configure other settings if necessary and
then start printing.
If the print dialog contains only two menus and does not
contain the options you expect to see on the Mac OS X
10.5 or 10.6, click the disclosure triangle beside the
[Printer] menu.
Poster Printing
You can print a poster by dividing a single
document into parts and printing it onto multiple
sheets of paper. Each part is enlarged and
printed on separate sheets of paper. You can then
combine the separate sheets to create a poster.
This function is not available with the Windows PS printer
driver and the Mac OS X PS printer driver.
This function is not available when you use a NetBEUI or
IPP network.
This function is invalid when you use the encrypted secure
printing mode from a client computer sharing the machine
with a print server.
Changing Print Quality
You can change the print quality to suit your
needs.
Memo
[Normal (600X600)] may produce better results for
printing on a larger size of paper with the PS printer driver.
For Windows Printer Driver
1 Open the file you want to print.
2 From the [File] menu, select [Print].
3 Click [Preferences].
4 Select the [Job Options] tab.
5 Select a print quality level at [Quality].
6 Configure other settings if necessary and
then start printing.
For Mac OS X PS Printer Driver
1 Open the file you want to print.
4
Printing
For Windows PCL/PCL XPS Printer Driver
1 Open the file you want to print.
2 From the [File] menu, select [Print].
3 Click [Preferences].
4 On the [Setup] tab, select
[PosterPrint] at [Finishing Mode].
5 Click [Options].
6 Set values for [Enlarge], [Add
Registration Marks], or [Add
Overlap] if necessary and press [OK].
7 Configure other settings if necessary and
then start printing.
When making a poster of A3 size using two A4 sheets,
select [A4] for paper size and select [2] for [Enlarge].
If you cannot select this function, click [Start]>[Devices
and Printers]> right-click the OKI MC561 icon > select
[Printer properties] > [OKI MC561(PCL)]>
[Advanced]>[Print Processor]>[OPLAPP3]>[OK].
2 From the [File] menu, select [Print].
3 Select [Printer Features] from the
panel menu.
4 Select [Job Options] from [Feature
Sets].
5 Select a print quality level from [Print
Quality].
6 Configure other settings if necessary and
then start printing.
Memo
If the print dialog contains only two menus and does not
contain the options you expect to see on the Mac OS X
10.5 or 10.6, click the disclosure triangle beside the
[Printer] menu.
- 58 -
Page 59

Useful Operations for Printing From a Computer
Note
Memo
Enhancing Photos
You can print photographs more vividly.
This function is not available with the Windows PS printer
driver and the Mac OS X PS printer driver.
This function is not available when [File]>[Print]>[OKI
MC561 (PCL)]>[Preferences]>[Color] tab >[Office
Document] check box is selected with the Windows PCL
printer driver.
For Windows PCL/PCL XPS Printer Driver
1 Open the file you want to print.
2 From the [File] menu, select [Print].
3 Click [Preferences].
4 Select the [Job Options] tab.
5 Select the [Photo enhance] check box.
6 Configure other settings if necessary and
then start printing.
Emphasizing Fine Lines
You can print fine lines and small characters
clearer.
This function is turned on by default.
With some applications, if this function is turned on, the
spaces in bar codes may become too narrow. If this
happens, turn off this function.
For Windows Printer Driver
1
Open the file you want to print.
For Mac OS X PS Printer Driver
1 Open the file you want to print.
2 From the [File] menu, select [Print].
3 Select [Printer Features] from the
panel menu.
4 Select [Image Option] from [Feature
Sets].
5 Select the [Adjust ultra fine lines]
check box.
6 Configure other settings if necessary and
then start printing.
Memo
If the print dialog contains only two menus and does not
contain the options you expect to see on the Mac OS X
10.5 or 10.6, click the disclosure triangle beside the
[Printer] menu.
Auto Tray Selection
You can switch paper feed trays with the same
size of paper configured on the printer driver
automatically.
First, set MP tray to be a target tray for auto
election on the operator panel. Then, set the
s
auto selection of the tray with the printer driver.
Note
Make sure to set a paper size for Tray1, Tray2 (optional)
and MP tray. Available paper size differs depending on
each tray. For details, refer to the User's Manual Basic.
Memo
In the default settings, the [MP tray Usage] is [Not
Used]. In such a case, MP tray is not supported by the
auto tray switching function.
To enter the [Admin Setup] menu, an administrator
password is necessary. The default password is "aaaaaa".
2 From the [File] menu, select [Print].
3 Click [Preferences].
4 Select the [Job Options] tab.
5 Click the [Advanced].
6 Select the [Adjust ultra fine lines]
check box and then click [OK].
7 Configure other settings if necessary and
then start printing.
- 59 -
1 Press the <SETTING> key on the
operator panel.
2 Press the to select [Admin Setup]
and then press .
OK
3 Enter the administrator password.
4 Select [Enter] and then press .
OK
5 Press the to select [Printer
Functions]
and then press .
OK
6 Make sure that [Print menu] is selected
and then press .
OK
Page 60

Useful Operations for Printing From a Computer
7 Make sure that [Tray Configuration] is
selected and then press .
OK
8 Press the to select [MP Tray Usage]
and then press .
OK
9 Press the to select [When
Mismatching]
and then press .
OK
10 Press the until the top screen appears.
11 Specify a paper tray on the printer driver
and start printing.
For Windows PCL/PCL XPS Printer Driver
1 Open the file you want to print.
2 From the [File] menu, select [Print].
3 Click [Preferences].
4 On the [Setup] tab, select
[Automatically Select] from [Source].
5 Configure other settings if necessary and
then start printing.
For Windows PS Printer Driver
Memo
If the print dialog contains only two menus and does not
contain the options you expect to see on the Mac OS X
10.5 or 10.6, click the disclosure triangle beside the
[Printer] menu.
Auto Tray Switching
You can switch paper feed trays automatically.
When the tray runs out of paper while printing,
he machine locates another tray with the same
t
size of paper configured on the printer driver and
begins feeding paper from that tray.
This function is effective for large print jobs.
First, set MP tray to be a target tray for auto
witching on the operator panel. Then, set the
s
auto switching of the tray with the printer driver.
Note
Make sure to set the same values (paper size, media type,
media weight) for each tray used for auto tray switching.
Available paper size differs depending on each tray. For
details, refer to the User's Manual Basic.
Memo
In the default settings, the [MP tray Usage] is [Not
Used]. In such a case, MP tray is not supported by the
auto tray switching function.
To enter the [Admin Setup] menu, an administrator
password is necessary. The default password is "aaaaaa".
1 Press the <SETTING> key.
4
Printing
1 Open the file you want to print.
2 From the [File] menu, select [Print].
3 Click [Preferences].
4 Select the [Paper/Quality] tab.
5 Select [Automatically Select] from
[Paper Feed Source].
6 Configure other settings if necessary and
then start printing.
For Mac OS X PS Printer Driver
1 Open the file you want to print.
2 From the [File] menu, select [Print].
3 Select [Paper Feed] from the panel menu.
4 Select [All pages] and select [Auto Select].
5 Configure other settings if necessary and
then start printing.
2 Press the to select [Admin Setup]
and then press .
OK
3 Enter the administrator password.
4 Select [Enter] and then press .
OK
5 Press the to select [Print Setup] and
then press .
OK
6 Make sure that [Print menu] is selected
and then press .
OK
7 Make sure that [Tray Configuration] is
selected and then press .
OK
8 Press the to select [MP Tray Usage]
and then press .
OK
9 Press the to select [When
Mismatching] a
nd then press .
OK
10 Press the until the top screen appears.
11 Configure the paper source setting on
the print dialog.
- 60 -
Page 61

Useful Operations for Printing From a Computer
For Windows PCL/PCL XPS Printer Driver
1 Open the file you want to print.
2 From the [File] menu, select [Print].
3 Click [Preferences].
4 Click [Paper Feed Options] on the
[Setup] tab.
5 Check the [Auto Tray Change] box and
then click [OK].
6 Configure other settings if necessary and
then start printing.
For Windows PS Printer Driver
1 Open the file you want to print.
2 From the [File] menu, select [Print].
3 Click [Preferences].
4 Click [Advanced] on the [Layout] tab.
5 Click [Auto Tray Switch] under [Auto
Tray Switch] and select [Auto Tray
Switch] from the drop-down list.
6 Click [OK].
7 Configure other settings if necessary and
then start printing.
3 Select [Error handling] from the panel
menu.
4 Select [Switch to another cassette
with the same paper size].
5 Configure other settings if necessary and
then start printing.
Saving Toner
You can print your documents using less toner.
This function control the amount of toner by
htening up the whole page image except the
brig
areas that have 100% black.
Note
This function is invalid for 100% black.
This function is disabled when you use the grayscale
mode.
This function is disabled in the following cases:
- configuring the CMYK colors in the PostScript
application.
- setting the grayscale mode in the PostScript application.
- using the application or operating system of CIE color.
Memo
The density of the printed images with this function may
vary in degree, depending on the document being printed.
For Windows PCL/PS Printer Driver
1 Open the file you want to print.
2 From the [File] menu, select [Print].
For Mac OS X PS Printer Driver
For Mac OS X 10.5 to 10.6
1
Open the file you want to print.
2 From the [File] menu, select [Print].
3 Select [Printer Functions] from the
panel menu.
4 Select [Paper Feed Options] from
[Function sets].
5 Check the [Auto Tray Switching] box.
6 Configure other settings if necessary and
then start printing.
For Mac OS X 10.3.9 to 10.4.11
1 Open the file you want to print.
2 From the [File] menu, select [Print].
3 Click [Preferences].
4 Select the [Color] tab.
5 Select the [Toner Save] check box.
6 Configure other settings if necessary and
then start printing.
For Windows PCL X PS Printer Driver
1 Open the file you want to print.
2 From the [File] menu, select [Print].
3 Click [Preferences].
4 Select the [Job Options] tab.
5 Select the [Toner Save] check box.
- 61 -
Page 62

Useful Operations for Printing From a Computer
Memo
Memo
Note
6 Configure other settings if necessary and
then start printing.
In the Windows PCL printer driver and the Windows PCL
XPS printer driver, you can select [Office Document] on
the [Color] tab which also controls the amount of toner as
well. The color density of the output image becomes lower
by using both of the toner save mode and the office
document mode.
For Mac OS X PS Printer Driver
1 Open the file you want to print.
2 From the [File] menu, select [Print].
3 Select [Color] from the panel menu.
4 Select [Toner Saving] check box.
5 Configure other settings if necessary and
then start printing.
If the print dialog contains only two menus and does not
contain the options you expect to see on the Mac OS X
10.5 or 10.6, click the disclosure triangle beside the
[Printer] menu.
Secure Printing (for MC561dn Only)
You can assign a password to a print job so it can
only be printed if the password is input at the
operator panel.
In order to use this function, the machine must
uipped with an SD memory card.
be eq
If there is not enough space on the SD memory card for
the spooled data, a message indicating the file system is
full appears and the print job does not start.
This function is not available with the Windows PCL XPS
printer driver and the Mac OS X printer driver.
For Windows PCL/PS Printer Driver
6 Enter a job name in the [Job Name] box
and a password in the [Job Password]
x.
bo
If you select the [Request Job Name for each
print job] check box, a prompt for the job name
appears when you send the print job to the
machine.
7 Click [OK].
8 Configure other settings if necessary and
then start printing.
The print job is sent to the machine, but is not
printed.
9 Press the <PRINT> key on the operator
panel.
10 Press the to select [Print Job] and
then press .
OK
11 Press the to select [Stored Job] and
then press .
OK
12 Enter your password set in the step 6 in
the [Password] box and then press
to start a job searching.
- Press the <CLEAR> key if you enter a wrong
number.
- Press the <STOP> key if you want to stop the job
search.
13 Make sure [Print] is selected and press .
If you select [Delete], you can cancel the print
job.
OK
OK
14 Enter the number of copies and then
press .
Note
If you forget your password set for a job and do not print
the job transmitted to the machine, the job remains in the
SD memory card.
For how to delete the job stored in the SD memory card,
refer to "Delete Unwanted Jobs from an SD Memory Card"
P. 1 1 4 .
OK
4
Printing
1 Open the file you want to print.
2 From the [File] menu, select [Print].
3 Click [Preferences].
4 Select the [Job Options] tab.
5 Select [Secure Print] at [Job Type].
- 62 -
Page 63

Useful Operations for Printing From a Computer
Note
Encrypted Secure Printing (for MC561dn Only)
You can encrypt your documents before sending
them from a computer to the machine.
Therefore, you can prevent unauthorized access
to confidential information.
The document is unprinted and stored in an
crypted format on the SD memory card in the
en
machine until you enter the registered password
at the operator panel.
The print job stored on the SD memory card is
matically deleted after printing or if it is not
auto
printed for more than a certain period of time. If
an error occurs when the data is sent or if an
unauthorized person is detected trying to access
the job, it is automatically deleted.
If there is not enough space on the SD memory card for
the spooled data, a message indicating the file system is
full appears and the print job does not start.
This function is not available with printer drivers for the
64-bit editions of Windows 7, Windows Vista, Windows
Server 2008 R2, Windows Server 2008,Windows Server
2003, and Windows XP.
This function is not available with the Windows PCL XPS
printer driver and the Mac OS X printer driver.
You cannot use this function with the poster printing mode
and the booklet mode with the Windows PCL printer driver
if you share the machine with a print server.
When you use this function, clear the [Give Priority to
the host release] check box. For details, refer to "Using a
Print Buffer (MC561dn Only)" P. 67.
[Start] > [Devices and Printers] > the OKI MC561 icon
> [Printer properties] > [OKI MC561(PS)] > [Device
Settings] > [Print only Encrypted print data] can not
be enabled with Windows 7 and Windows Server 2008 R2.
[Start] > [Operator panel] > [Printers] > the OKI
MC561 icon > [Properties] > [OKI MC561(PS)] >
[Device Settings] > [Print only Encrypted print data]
can not be enabled with Windows Server 2008 and
Windows Vista.
For Windows PCL/PS Printer Driver
7 Click [OK].
8 Configure other settings if necessary and
then start printing.
The print job is sent to the machine, but is not printed.
9 Press the <PRINT> key on the operator
panel.
10 Press the to select [Print Job] and
then press .
OK
11 Press the to select [Encrypted Job]
and then press .
12
Enter the password you set in step 6 in the
[
Password
start a job searching.
- Press the <CLEAR> key if you enter a wrong
number.
- Press the <STOP> key if you want to stop the job
search.
13 Make sure [Print] is selected and press .
If you select [Delete], you can delete the print
job, and all of the encrypted jobs with the same
password are deleted as well.
OK
] box and then press
OK
to
OK
Watermark Printing
You can print pages with a watermark or text.
Note
This function is not available with the Mac OS X printer driver.
Watermarks are not printed properly for booklet printing.
For Windows Printer Driver
1 Open the file you want to print.
2
From the [
3 Click [Preferences].
4 Select [Job Options] tab.
File
] menu, select [
Print
].
1 Open the file you want to print.
2 From the [File] menu, select [Print].
3 Click [Preferences].
4 Select the [Job Options] tab.
5 Select [Encrypted Secure Print].
6 Enter a password in the [Password] box
and configure other options if necessary.
Reference
For details on the options, refer to the on-screen
explanations of the driver.
5 Click [Watermark].
6 Click [New].
7 Specify text, a size and an angle for the
watermark and then click [OK].
8 Click [OK].
9 Configure other settings if necessary and
then start printing.
Note
Watermarks are printed over the text or images of
documents in the default settings with the Windows PS.
- 63 -
Page 64

Useful Operations for Printing From a Computer
Note
Reference
Memo
printer driver. To print in the background of documents,
check the [In Background] box in the [Watermark]
window.
When the [Background] is checked on the [Watermark]
window, depending on an application you use, the
watermark may not be printed. In such a case, uncheck
[Background].
Overlay Printing (for MC561dn Only)
You can print overlays such as logos or forms on
documents.
The machine must be equipped with an SD
memory card for this function.
This function is not available with the Windows PCL XPS
printer driver and the Mac OS X printer driver.
To use this function on a Windows PS printer driver, you
need to log into your computer as an administrator.
For details of the Storage Device Manager and on how to
install an SD memory card, refer to "Storage Device
Manager" P. 112.
1 Create an overlay with the storage
device manger and register it on the
machine.
Reference
"Register Forms (Form Overlay)" P. 113.
2 Define the overlay on the printer driver
and start printing.
For Windows PCL Printer Driver
9 Enter the ID of the form you registered
in the Storage Device Manager in the
[ID].
10 Select the pages of the document on
which to print the overlay from the
[Print on Pages] drop-down list.
11 Click [Add].
12 Click [Close].
13 Select the overlay to use from the
[Defined Overlays] and click [Add].
14 Click [OK].
15 Configure other settings if necessary and
then start printing.
For Windows PS Printer Driver
Memo
An overlay is a form group. You can register three forms
with one overlay.
1 Click [Start] and select [Devices and
Printers].
2 Right-click the OKI MC561 icon and
select [Printing preferences]>[OKI
MC561(PS)].
3 Select the [Job Options] tab.
4 Click [Overlay].
5 Select [Use Overlay] from the
dropdown list and click [New].
4
Printing
Overlay is a group of forms. Three forms can be registered
in an overlay.
The forms are printed over in a registered order. The form
registered last is printed at the top.
1 Open the file you want to print.
2 From the [File] menu, select [Print].
3 Click [Preferences].
4 Select the [Job Options] tab.
5 Click [Overlay].
6 Select the [Print Using Active
Overlays] check box.
7 Click [Define Overlays].
8 Enter a name for the overlay in the
[Overlay Name] box.
6 Enter the exact name of the overlay you
registered in the Storage Device
Manager in the [Form Name] box and
click [Add].
7 Enter a name for the overlay in the
[Overlay Name] box
8 Select the page of the document on
which to print the overlay from the
[Print on Pages] drop-down list.
9 Click [OK].
10 Select the overlay to use from the
[Defined Overlay] list and then click
[Add].
11 Click [OK].
-64-
Page 65

Useful Operations for Printing From a Computer
Note
12 Click [OK] to close the print setup dialog
box.
13 Open the file you want to print.
14 Start printing on the print dialog.
Storing Print Data (for MC561dn Only)
You can store print data on the SD memory card
installed on the machine and print it as needed
from the operator panel by entering a password.
If there is not enough space on the SD memory card for
the spooled data, a message indicating the file system is
full appears and the print job does not start.
This function is not available with the Windows PCL XPS
printer driver and the Mac OS X printer driver
For Windows PCL/PS Printer Driver
1 Open the file you want to print.
- Press the <CLEAR> key if you enter a wrong
number.
- Press the <STOP> key if you want to stop the job
search.
13 Make sure [Print] is selected and then
press .
If you select [Delete], you can delete the print
job.
OK
14 Enter the number of copies and then
press .
Reference
You can delete stored print data with the Storage Device
Manager. For details, refer to "Delete Unwanted Jobs from
an SD Memory Card" P. 114.
OK
Saving the Driver Settings
You can save the printer driver settings.
Note
This function is not available with the Windows PS printer
driver, the Mac OS X printer driver and the Fax driver.
2 From the [File] menu, select [Print].
3 Click [Preferences].
4 Select the [Job Options] tab.
5 Check [Store to SD].
6 Enter a job name in the [Job Name] box
and a password in the [Job Password]
box.
If you check the [Request Job Name for each
print job] box, a prompt for the job name
appears when you send the job to the machine.
7 Click [OK].
8 Configure other settings if necessary and
then start printing.
The print job is sent to the machine, but is not
printed.
9 Press the <PRINT> key on the operator
panel.
10 Press the to select [Print Job] and
then press .
OK
For Windows PCL/PCL XPS Printer Driver
Saving the Settings
1 Click [Start] and select [Devices and
Printers].
2 Right-click the OKI MC561 icon and then
select [Printing preferences]>[OKI
MC561(*)].
*Select the type of driver you want to use.
3 Configure the print settings to save.
4 On the [Setup] tab, click [Add] at
[Driver Settings].
5 Specify a name for the setting to save
and then click [OK].
If you select the [Keep form information.]
check box, the paper configuration on the [Setup]
tab is also saved.
6 Click [OK] to close the print setup dialog
box.
11 Press the to select [Stored Job] and
then press .
OK
12 Enter the password you set in step 6 in
the [Password] box and then press
to start a job searching.
OK
- 65 -
Memo
Up to 14 forms can be stored.
Using the Saved Settings
1 Open the file you want to print.
2 From the [File] menu, select [Print].
Page 66

Useful Operations for Printing From a Computer
Note
3 Click [Preferences].
4 On the [Setup] tab, select a setting you
want to use from [Driver Settings].
5 Start printing.
Changing the Driver's Default Settings
You can use print settings often used as the
printer driver's default settings.
For Windows Printer Driver
1 Click [Start] and select [Devices and
Printers].
2 Right-click the OKI MC561 icon and then
select [Printing preferences]>[OKI
61(*)].
MC5
*Select the type of driver you want to use.
3 Configure the print settings to use as the
driver's default setting.
Using Printer Fonts
You can print your documents using pre-installed
printer fonts by substituting them for TrueType
fonts in the computer.
Note
The printer fonts do not exactly duplicate the appearance
of the TrueType fonts seen on screen.
This function is not available with the Windows PCL XPS
printer driver and the Mac OS X printer driver.
To use this function with the Windows PS printer driver you
must be logged on your computer as an administrator.
This function is not available in some applications.
For Windows PCL Printer Driver
1 Open the file you want to print.
2 From the [File] menu, select [Print].
3 Click [Preferences].
4 Select the [Job Options] tab.
5 Click [Font].
4
Printing
4 Click [OK].
For Mac OS X PS Printer Driver
1 Open a file.
2 From the [File] menu, select [Print].
3 Configure the print settings to use as the
driver's default settings.
4 Select [Save As] from [Presets].
5 Enter a name for the settings and click
[OK].
6 Click [Cancel].
To use the saved settings, select the name from [Presets]
in the print dialog.
6 Select the [Font Substitution] check
box.
7 Specify which printer font you substitute
for each TrueType font in the [Font
titution Table].
Subs
8 Click [OK].
9 Configure other settings if necessary and
then start printing.
For Windows PS Printer Driver
1 Click [Start] and select [Devices and
Printers].
2 Right-click the OKI MC561 icon and then
select [Printer properties]>[OKI
C561(PS)].
M
3 Select the [Device Settings] tab.
4 Substitute a printer font for each TrueType
font in the [Font Substitution Table].
To specify the font substitution, click each
TrueType font and select a printer font to
substitute from the pull-down menu.
5 Click [OK].
6 Open the file you want to print.
7 From the [File] menu, select [Print].
- 66 -
Page 67

Useful Operations for Printing From a Computer
Note
8 Click [Preferences].
9 On the [Layout] tab, click [Advanced].
10 Select [Substitute Device Font] at
[TrueType Font] and then click [OK].
11 Configure other settings if necessary and
then start printing.
Using Computer Fonts
You can print your documents using TrueType
fonts in the computer to retain the font
appearance on screen.
This function is not available with the Windows PCL XPS
printer driver and the Mac OS X PS printer driver.
For Windows PCL Printer Driver
1 Open the file you want to print.
Using a Print Buffer (MC561dn Only)
You can spool a print job in the SD memory card
installed in the machine. This function frees
memory on your computer so it can handle other
tasks faster while the machine is running in the
background.
Note
If there is not enough space on the SD memory card for
the spooled data, a message indicating the file system is
full appears and the print job does not start.
This function is not available with the Windows PCL XPS
printer driver and the Mac OS X printer driver.
For Windows PCL/PS Printer Driver
1 Open the file you want to print.
2 From the [File] menu, select [Print].
3 Click [Preferences].
2 From the [File] menu, select [Print].
3 Click [Preferences].
4 Select the [Job Options] tab.
5 Click [Font].
6 Clear the [Font Substitution] check box
and then click [OK].
-[Download as Outline Font]
Font images are created by the printer.
-[Download as Bitmap Font]
Font images are created by the printer driver
7 Configure other settings if necessary and
then start printing.
For Windows PS Printer Driver
1 Open the file you want to print.
2 From the [File] menu, select [Print].
4 Select the [Job Options] tab.
5 Click [Advanced].
6 Select the [Priority is given to AP
collation] check box and click [OK].
7 Start printing on the print dialog.
Changing the Mono-Print Speed Settings
You can adjust the speed that documents are
printed.
Memo
To enter the [Admin Setup] menu, an administrator
password is necessary. The default password is "aaaaaa".
1 Press the <SETTING> key on the
operator panel.
2 Press the to select [Admin Setup]
and then press .
OK
3 Click [Preferences].
4 On the [Layout] tab, click [Advanced].
5 Click [TrueType Font] and select
[Download as Softfont] from the
dropdown list.
6 Click [OK].
7 Configure other settings if necessary and
then start printing.
- 67 -
3 Enter the administrator password.
4 Select [Enter] and then press .
OK
5 Press the to select [Print Setup] and
then press .
OK
6 Make sure [Print menu] is selected and
then press .
OK
Page 68

Useful Operations for Printing From a Computer
Note
7 Press the to select [Print Setup] and
then press .
OK
8 Press the to select [Mono-Print
Speed] and the
n press .
9 Select a speed mode and then press .
-[Auto]:
The default setting. This mode suffices for general
usage.
-[Color Print Speed]:
Effective for a large color print job.
-[Normal Print Speed]:
Effective for a large print job with color and blackand- white pages mixed.
OK
OK
10 Press the until the top screen
appears.
Printing to File
You can print a document to a file, without
printing it out on paper.
Printing E-mail Attached Files
The machine can print the attached files
automatically when it receives an e-mail. To use
this function you have to configure the email
reception setting.
Note
The following file formats are supported:
- PDF (v1.7), JPEG, TIFF (V6 Baseline).
They differ depending on the file page size and the file
format what size of paper an attached file is printed on and
whether to enable the fitting function. For the other
printing settings for the number of copies or whether to do
duplex printing, the current settings configured on the
[Admin Setup] menu are applied.
Memo
Up to 10 files and a maximum of 8 MB for each file can be
printed.
Reference
For details on how to configure the settings to print e-mail
attached files, refer to "Configuring Server to Print Files
Attached to E-mails" P. 171 or the User's Manual Basic.
4
Printing
You must be logged on your computer as an administrator.
For Windows Printer Driver
1 Click [Start] and select [Devices and
Printers].
2 Right-click the OKI MC561 icon and then
select [Printer properties]>[OKI
MC561(*)].
*Select the type of driver you want to use.
3 Select the [Ports] tab.
4 Select [FILE:] from the port list and click
[OK].
5 Start printing on the print dialog.
6 Enter the name of a file and then click
[OK].
For Mac OS X PS Printer Driver
Downloading PS Files
You can download PostScript files to the machine
and print them.
Note
This function is available only when you are using a TCP/IP
network.
For OKI LPR Utility
1 Launch the OKI LPR Utility.
2 Select [Download] from the [Remote
Print] menu.
3 Select the file to download and click
[Open].
After finishing the download, the PostScript file is
printed.
1 Open the file you want to print.
2 From the [File] menu, select [Print].
3 Click [PDF] on the print dialog and select
a file format.
4 Enter the name of a file and select where
to save it in and click [Save].
- 68 -
Page 69

Useful Operations for Printing From a Computer
Note
Note
Memo
Printing Out PS Errors
You can print out a PostScript error when it
occurs.
This function is not available with the Windows PCL printer
driver and the Windows PCL XPS printer driver.
For Windows PS Printer Driver
1 Open the file you want to print.
2 From the [File] menu, select [Print].
3 Click [Preferences].
4 On the [Layout] tab, click [Advanced].
5 Click [Send PostScript Error Handler]
under [PostScript Options] and select
s] from the drop-down list.
[Ye
6 Click [OK] until the print setup dialog
box is closed.
4 Select [Enter] and then press .
OK
5 Press the to select [Printer
Functions]
and then press .
OK
6 Press the to select [System
Configuration Menu] an
d then press .
OK
7 Make sure [Personality] is selected and
then press .
OK
8 Press the to select an emulation
mode and then press .
OK
9 Press the until the top screen
appears.
For Mac OS X PS Printer Driver
This function is not available with the Mac OS X 10.5 or
10.6.
1 Open the file you want to print.
2 From the [File] menu, select [Print].
3 Select [Error Handling] from the panel
menu.
4 Select [Print detailed report] at
[PostScript Errors].
5 Click [Print].
Changing Emulation Mode
You can select the emulation mode.
To enter the [Admin Setup] menu, an administrator
password is necessary. The default password is "aaaaaa".
1 Press the <SETTING> key on the
operator panel.
2 Press the to select [Admin Setup]
and then press .
OK
3 Enter the administrator password.
- 69 -
Page 70

5. Job Macro (for MC561dn Only)
Note
Memo
This chapter explains the job macro function.
JOB MACRO
This section explains how to make macros for jobs that you do frequently.
You can register macros for frequently used function settings for copying, scanning, faxing, internet
f
axing, and printing in the machine and create shortcuts. This "Job Macro" allows you to perform
operations more simply and quickly.
You can create a macro for settings on the following functions:
Copying (Color/Mono) Printing from USB Memory Scanning to e-mail
Scanning to network PC Scanning to USB Memory Fax Sending
Internet Fax Sending
5
If the user authentication is enabled, log into the machine before following the procedures below.
You can register up to 10 macros.
Overwriting
Creating a Macro
You can create a macros for settings frequently
used.
Registering a new macro
1 Specify the settings you want to register
at the operator panel.
2 Press the <JOB MACRO> key to open
the job macro menu.
3 Press the to select a registered
number and then press .
4 Check the settings and then press .
Press the to scroll the setting list on the
screen.
OK
OK
5 Enter a title for the new macro.
6 Select [Enter] and then press .
OK
7 On the confirmation screen, press the
or to select [Yes]
and then press .
OK
1 Specify the settings you want to register
at the operator panel.
2 Press the <JOB MACRO> key to open
the job macro menu.
3 Press the to select an entry number
for a new macro and then press .
4 Press the to select [Register] and
then press .
OK
5 Check the settings and then press .
Press the to scroll the setting list on the
screen.
6 On the confirmation screen,Press the
or to select [Ye
7 Enter a title for the new macro.
8 Select [Enter] and then press .
OK
OK
s] and then press .
OK
OK
Job Macro (for MC561dn Only)
- 70 -
Page 71

JOB MACRO
Using Macros
You can use macros by reading out the macros.
1 Press the <JOB MACRO> key to open
the job macro menu.
2 Press the to select the macro you
want to use and then press .
3 Select [Readout] and then press .
4 Check the settings and then press .
Press the to scroll the setting list on the
screen.
5 Press the or to select [Yes] on the
confirmation message .
If the access control is enabled on the functions
you want to use, a message appears indicating
that you are not permitted to use them and the
screen returns to the confirmation message.
OK
6 Start a job.
OK
OK
OK
Deleting a Macro
You can delete macros.
1 Press the <JOB MACRO> key to open
the job macro menu.
2 Press the to select the macro you
want to delete and then press .
3 Press the to select [Delete] and then
press .
OK
4 Check the settings and then press .
Press the to scroll the setting list on the
screen.
5 Press the or to select on the
confirmation screen.
OK
OK
OK
Editing the Title
You can edit the title of your macro.
1 Press the <JOB MACRO> key to open
the job macro menu.
2 Press the to select the macro whose
title you want to edit and then press .
3 Press the to select [Title Edit] and
then press .
OK
4 Check the settings and then press .
Press the to scroll the setting list on the
screen.
5 Enter a new title.
6 Select [Enter] and then press .
OK
OK
OK
- 71 -
Page 72

6. Configuring at the Operator Panel
Reference
Memo
Memo
Memo
This chapter explains how to configure the equipment settings from the <SETTING> key on the
operator panel.
Changing the Equipment Settings
This section explains the basic procedure to change the equipment settings.
For details on the menu structure of the equipment settings, refer to "Device Setting Menu" P. 74.
An item which cannot be re-set is indicated as [---].
Admin Setup or Easy Setup
To e nt er t he [Admin Setup] menu or the [Easy
Setup] menu, an administrator password is
necessary.
The default password is "aaaaaa".
1 Press the <SETTING> key to open the
equipment setting menu.
2 Press the to select [Admin Setup] or
[Ea
sy Setup] and then press .
3 Enter the administrator password.
4 Select [Enter] and then press .
5 Press the to select the setup menu on
which you want to change a setting and
hen press .
t
6 Change the setting and then press
For [Easy Setup], repeat the step 6 until the
message indicating the setting completion is
displayed.
OK
OK
OK
Other Menus
1 Press the <SETTING> key to open the
equipment setting menu.
2 Press the to select the setup menu on
which you want to change a setting and
en press .
th
3 Change the setting and then press .
4 Press the until the top screen
appears.
OK
OK
6
Configuring at the Operator Panel
7 For [Admin Setup], press the until
the top screen appears.
For [Eas
y Setup], press to complete
the setup.
If you want to cancel the setup of [Easy Setup], press
<RESET/LOG OUT> key.
OK
- 72 -
Page 73

Checking the Current Settings
Reference
Note
Checking the Current Settings
This section explains the basic operational procedure for report printing. With report printing, you can
check the current settings of the machine.
Printing Reports
You can print and check the configuration or
the job logs of the machine.
For details on the reports you can print and the structure
of the [Reports] menu, refer to "Reports" P. 74.
1 Press the <SETTING> key.
2 Make sure [Reports] is selected and
then press .
If you want to print the [Menu Map], follow
procedure 4.
OK
3 Press the to select the category to
which the report you want to print
longs and then press .
be
OK
4 Press to select the report you want to
print and then press .
If the entry screen for the admin
passwo
rd, enter the admin password and
select [Enter], and then, press .
OK
OK
5 Press the or to select [Yes] on the
confirmation message and then press .
When [Admin Setup]>[Management]>[System
Setup]>[Allow All Reports To Print] is [Disable], the
admin password is required for printing the following
reports.
-Scan To Log
- Speed Dial List
- Address Group List
- Communication Management Report (Fax)
- Communication Management Report (Email / Internet
Fax)
- Email Address List
OK
- 73 -
Page 74

List of the Device Setting Menu Items
List of the Device Setting Menu Items
This section explains the configuration of the equipment setting menu.
Device Setting Menu
Items Description Reference
Reports Prints reports. page 74
Paper Setup Performs the paper settings of trays. page 75
Address book Creates or edits an address book. page 76
Phone book Creates or edits a phone book. page 76
Profile Creates or edits a profile. page 77
Network Scan Destination Sets a destination of the network scan. page 79
Store Document Settings Performs the storing setting of scanned document data. page 80
View Information Checks the machine information. page 80
Shutdown Performs shutdown. page 80
Easy Setup Performs Easy Setup. To enter this menu, the admin password is
required.
Admin Setup Performs Admin Setup. To enter this menu, the admin password is
required.
page 81
page 82
6
List of Each Setup Menu
Reports
Item Description
Configuration Prints the configuration details of the machine.
System File List Prints a job file list.
Demo Page Prints a demo page.
Error Log Prints an error log.
Scan To Log Prints the results of the jobs of Scan to E-mail, Scan to
etwork PC, or Scan to USB Memory. Display condition:
N
[Ad
min Setup]>[Device Management]>[Job Log
Setup]>[Save Job Log] is set to [Enable].
MFP Usage Copies Prints the total of the job logs. Specifies the number of
pages to print in the [Copies] screen.
Network Information Prints general information on the network.
Fax Speed Dial List Prints the list of the fax numbers registered for speed
di
als.
Group List Prints the list of the fax numbers registered under groups.
Fax Tx/Rx Log Prints the list of the communication results of the latest
0 fax jobs received or sent.
5
Fcode Box List Prints the list of Fcode boxes.
Email/
In
ternet
FAX
Journal Report Prints the results of the latest 50 Internet Fax jobs.
Address Book Prints the registered address list.
Configuring at the Operator Panel
- 74 -
Page 75

List of the Device Setting Menu Items
Item Description
Printer PCL Font List Prints the list of PCL font samples.
PSE Font List Prints the list of PostScript font samples.
PPR Font List Prints a font list of IBMPPR.
FX Font List Prints a font list of EPSON FX.
Color Tuning Pattern Prints a color tuning pattern for adjusting gradation char-
acteristics.
ColorProfile List Prints the list of color profiles.
Paper Setup
Item
Tray1 Paper size A4 Selects a paper size.
Custom Width 210 mm
Length 297mm
Media Type Plain Selects a paper type.
Media Weight Medium Selects a paper weight.
Tray2 Paper size A4 Selects a paper size.
Custom Width 210 mm
Length 297mm
Media Type Plain Selects a paper type.
Media Weight Medium Selects a paper weight.
MP Tray Paper size A4 Selects a paper size.
Custom Width 210 mm
Length 297mm
Media Type Plain Selects a paper type.
Media Weight Medium Selects a paper weight.
Select
Tra y
Fax Tray1 ON Selects a tray to use for received docu-
Tra y2 ON
MP Tray OFF
Factory
Default
(8.3 inch)
(11.7 inch)
(8.3 inch)
(11.7 inch)
(8.3 inch)
(11.7 inch)
Description
Sets width and length for a custom paper
size.
Display condition: [Custom] is selected
as a paper size.
Available range:
Width:100 to 216 mm (3.9 to 8.5 inches)
Length: 148 to 356 mm (5.8 to 14.0 inches)
Display condition: the second tray unit is
installed.
Sets width and length for a custom paper
size.
Display condition: [Custom] is selected
as a paper size and the second tray unit is
installed.
Available range:
Width:148 to 216 mm (5.8 to 8.5 inches)
Length: 210 to 356 mm (8.3 to 14.0 inches)
Display condition: The second tray unit is
installed.
Display condition: The second tray unit is
installed.
Sets width and length for a custom paper
size.
Display condition: [Custom] is selected
as a paper size.
Available range:
Width:64 to 216 mm (2.5 to 8.5 inches)
Length: 127 to 1321 mm (5.0 to 52.0 inches)
ments.
Display condition for [Tray 2]: the second
tray unit is installed.
- 75 -
Page 76

List of the Device Setting Menu Items
Item
Copy Tray1 ON (Prior) Specifies a tray to use when a tray is auto-
Tra y2 ON
MP Tray OFF
Duplex Last Page Skip Blank
* This function may not be usable by some applications.
Factory
Default
Page
Description
matically selected.
Display condition for [Tray 2]: the second
tray unit is installed.
If [Skip Blank Page] is selected, when odd
pages are printed in the double-sided print
mode, the final page is printed on only
one side. (*)
If [Always Print] is selected, both sides are
printed even for odd page job in the double-sided print mode.
Address Book
Item Description
E-mail Address Edit/Register Name Sets a name of a destination. Maximum16
characters.
E-mail Address Sets an e-mail address. Maximum 80
characters.
Group No. Selects a group.
Delete Deletes the registered address.
Sort By Name Sorts email addresses by name.
Sort By Number Sorts email addresses into registered
numerical order.
E-mail Group Edit/Register Name Sets a group name. Maximum 16 characters.
Address No. Selects address numbers. Maximum 100
addresses to be registered for a group.
Delete Deletes the registered group.
Sort By Name Sorts groups by name.
Sort By Number Sorts groups into registered numerical
order.
6
Configuring at the Operator Panel
Phone Book
Item Description
Speed Dial Edit/Register Name Sets the name of a destination. Maximum
24 characters.
Fax Number Sets a fax number. Maximum 40 digits.
Group No. Selects a group.
Delete Deletes the registered speed dial.
Sort By Name Sorts speed dials by name.
Sort By Number Sorts speed dials into registered numerical
order.
Group No. Edit/Register Name Sets a group name. Maximum 16 characters.
Speed Dial Sets a speed dial. Maximum 100
addresses to be registered for a group.
Delete Deletes the registered group.
Sort By Name Sorts groups by name.
Sort By Number Sorts groups into registered numerical order.
- 76 -
Page 77

List of the Device Setting Menu Items
Profile
Register/ Edit
Item
Profile Name (NULL) Sets a profile name. Maximum 16 charac-
Protocol CIFS Selects a protocol to use for storing files.
Target URL (NULL) Sets a server address and a directory to
Port No. 445 Sets a port number.
PASV Mode OFF Sets whether to use the FTP Passive
User Name (NULL) Sets a user name to use for logging onto
Password (NULL) Sets a password to use when logging.
CIFS Character Set UTF-16 Sets a character set to use in CIFS.
Encode Communication None Selects an encryption method for commu-
Scan Size A4 Selects a scan size.
Image Settings Density 0 Sets the density of images.
Document Type Text/Photo Sets the image quality of documents.
Background Removal 3 Sets the default setup of the background
Resolution 200 dpi Selects a resolution for scanning.
Contrast 0 Sets the contrast of documents.
Hue 0 Sets the red-green color balance.
Saturation 0 Sets the color saturation of documents.
RGB 0 Sets the RGB contrast.
File name (NULL) Sets a file name. Maximum 64 characters.
Grayscale OFF Sets whether to scan a monochrome job
Factory
Default
Factory Default
ters.
store the scanned data. Maximum
Available range: 1 to 65535.
mode.
Display condition: FTP is set as a protocol.
the server. Maximum 32 characters.
Maximum 32 characters.
Display condition: CIFS is set as a proto-
col.
nication. Not available when using CIFS
protocol. Choices are different depending
on the protocol being selected.
removal of documents.
The following options can be set as the
default file name:
#n: adding a serial number from 00000 to
99999
#d: adding the date of a file creation
(yymmddhhmmss)
in grayscale (ON) or in black and white
(OFF).
*1
- 77 -
Page 78

List of the Device Setting Menu Items
Item
Edit/
Register
Delete Deletes profiles.
Sort By Name Sorts profiles by name.
Sort By Number Sorts profiles into registered numerical
File Format Color PDF Sets a file format for scanning.
Mono(Grayscale) PDF
Mono (Binary) PDF
Encrypted PDF Not Encrypt Sets whether to enable PDF encryption.
Encryption level Medium Sets the encryption level.
Document open password Disable Sets a password to open an encrypted PDF. A
Permissions Password Disable Sets a password to control printing or
Permission Permission
toPrint
Permission to
Extract Text/
Graphics
Permission to
Edit
CompressionRate
Edge Erase Setting OFF Sets whether to erase the edge shadow
Color Low Sets a compression rate for scanning.
Mono (Grayscale) Low
Mono (Binary) High
Width 5 mm
Factory
Default
document open password cannot be the
same as an authority password.Maximum 32
characters.
editing on an encrypted PDF. An authority
password cannot be the same as a docu-
ment open password. Maximum 32 char-
acters.
Not Allowed Sets the permission settings on encrypted
PDF.
Not Allo wed Display Condition: An authority password is
set.
Not Allowed
created in the surrounding of 2-page
spread documents.
Sets an erasing width.
(0.2 inch)
Available range: 5 to 50 mm (0.2 to 2.0
inches).
order.
Factory Default
6
Configuring at the Operator Panel
- 78 -
Page 79

List of the Device Setting Menu Items
Note
*1 In profiles, "#n" or #d" can be specified for [File Name].
When specifying "#n": 5-digit serial number between 00000 to 99999
When specifying "#d": Date and time when a file is created. 12 digits of yymmddhhmmss.
yy: Year created (the last 2 digits of
hh: Hours created (00 to 23)
the Christian Era)
mm: Month created (01 to 12) mm: Minute created (00 to 59)
dd: Date created (01 to 31) ss: Second created (00 to 59)
*A date and time when a file is created are values of the timer of MC561dn.
Example of file name specification (when the file format is PDF)
When specifying "Data#n": Saved as file names such as "Data0000.pdf" and
"Data00001.pdf",etc.
When specifying "File#d": saved as file names "File090715185045.pdf", etc.
When specifying "Scan": "Scan.pdf" is created first, and then, data is saved with the name
of"Scan#d.pdf".
For "#d", refer to the above.
When nothing is specified: "Image.pdf" is created first and then, data is saved with the name of
"Image#d.pdf".
For "#d", refer to the above.
File names registered in profiles, are applied when executing Scan To Network PC.
When performing Auto Deliver using profiles with these file names, the above names are not applied.
The file name at Auto Delive is fixed to "yymmddhhmmss_xxxxxxxx.pdf". The part of "yymmddhhmmss" is date and time when
a file is created for the above "#d", and the part of "_xxxxxxxx" is additional 8 numeric values (meaningless value) so as not to
duplicate other files.
Network Scan Destination
Factory
Default
Description
characters.
Edit/
Register
Item
Destination (NULL) Sets a destination name. Maximum 16
Destination Address (NULL) Sets a destination address. Maximum 64
characters.
Port No. 9968 Sets a port number.
Available range: 1 to 65535.
Delete Deletes a destination.
Sort By Name Sorts destinations by name.
Sort By Number Sorts destinations into registered numeri-
cal order.
- 79 -
Page 80

Store Document Settings
Item Description
List of the Device Setting Menu Items
Store Fcode Bulletin
board
Delete Fcode Bulletin board Deletes accumulated documents.
Print Fcode Box Prints accumulated documents.
Over Write Stores documents in a bulletin box.
View Information
Item Description
System information
Network IPv4 address Indicates the IPv4 address of the machine.
Serial No. Indicates the serial number of the machine.
Asset No. Indicates the asset number of the machine.
Lot No. Indicates the production lot number of the machine.
CU Version Indicates the version number of the control unit firmware.
PU Version Indicates the version number of the print unit firmware.
Scanner Version Indicates the version number of the scanner firmware.
Total Memory Indicates the total capacity of all RAMs installed.
Flash Memory Indicates the total capacities of all flash memories.
SD Memory Card Indicates the size of the SD memory card and the version of the file sys-
tem.In MC361dn, [Not Installed] is displayed.
Display condition: [Admin Setup]>[Network Menu]>[Network
Setup]>[TCP/IP] is set to [Enable] and [IP Version] is not set to
[IPv6].
Subnet Mask Indicates the subnet mask of the machine.
Display condition: [Admin Setup]>[Network Menu]>[Network
Setup]>[TCP/IP] is set to [Enable] and [IP Version] is not set to
[IPv6].
Gateway Address Indicates the gateway address of the machine.
Display condition: [Admin Setup]>[Network Menu]>[Network
Setup]>[TCP/IP] is set to [Enable] and [IP Version] is not set to
[IPv6].
MAC Address Indicates the MAC address of the machine.
NIC Program Version
IPv6 Address
(Local)
IPv6 Address
(Global)
Indicates the version number of the network firmware.
Indicates the IPv6 address of the machine.
Display condition: [Admin Setup]>[Network Menu]>[Network
Setup]>[TCP/IP] is set to [Enable] and [IP Version] is not set to
[IPv4].
Indicates the IPv6 address of the machine.
Display condition: [Admin Setup]>[Network Menu]>[Network
Setup]>[TCP/IP] is set to [Enable] and [IP Version] is not set to
[IPv4].
6
Configuring at the Operator Panel
Shutdown
Item Description
Shutdown Does a controlled shutdown of the machine.
- 80 -
Page 81

List of the Device Setting Menu Items
Memo
Easy Setup
To enter the [Easy Setup] menu, an administrator password is necessary. The default password is "aaaaaa".
Item Description
Date/
Time
Setting
Fax Setting
Network
Setting
E-mail
Setting
Time Zone Sets the time zone in relation to GMT.
Daylight Saving Time Maximum 20 characters can be entered. "+","-" symbol
also allowed to input.
Manual Date Sets the current date and time manually.
Time
Server SNTP Server (Primary) Sets the SNTP server to use for setting the current date
SNTP Server (Secondary)
FAX Number Sets the fax number for the machine.Maximum 20 char-
Sender ID Sets a sender ID. Maximum 22 characters.
Manual setting IP Address Sets the IP address. Maximum 15 characters. (You can
Subnet Mask Sets the subnet mask. Maximum 15 characters. (You can
Default Gateway Sets the default gateway address. Maximum15 charac-
DNS Server (Primary) Sets the IP address for a Primary DNS server. Maximum
DNS Server (Secondary) Sets the IP address for a Secondary DNS server. Maxi-
WIN Server (Primary) Sets the name or the IP address for theWINS server.
WIN Server (Secondary) Sets the name or the IP address for theWINS server.
Auto setting Obtains an IP address automatically.
Mail Server Address Sets the IP address or host name for the SMTP server.
Set Sender's Address (from) Sets an e-mail address for the machine.
Authentication method
SMTP Auth User Name Sets the user ID for the SMTP authentication. Maximum
Password Sets the password for the SMTP authentication. Maxi-
POP before
SMTP
POP3 Server Sets the IP address or the host name for the POP3 server.
User Name Sets a user ID for the POP authentication. Maximum 64
Password Sets a password for the POP3 authentication. Maximum
and time. Maximum 64 characters.
acters.
enter a value between 000.000.000.000 and
255.255.255.255)
enter a value between 000.000.000.000 and
255.255.255.255)
ters. (You can enter a value between 000.000.000.000
and 255.255.255.255)
15 characters. (You can enter a value between
000.000.000.000 and 255.255.255.255)
mum 15 characters. (You can enter a value between
000.000.000.000 and 255.255.255.255)
Maximum 15 characters. (You can enter a value between
000.000.000.000 and 255.255.255.255)
Maximum 15 characters. (You can enter a value between
000.000.000.000 and 255.255.255.255)
Maximum 64 characters.
Sets the authentication method.
64 characters.
mum 64 characters.
Maximum 64 characters.
characters.
16 characters.
- 81 -
Page 82

List of the Device Setting Menu Items
Memo
Admin Setup
In the following menu, you can change the settings that need the administrator authority.
"Copy Setup" "Fax Setup" "Internet Fax Setup"
"Scanner Setup" "Print From USB Memory Setup" "Print Setup"
"Network Menu" "Management" "User Install"
To enter the [Admin Setup] menu, an administrator password is necessary. The default password is "aaaaaa".
If you change the default setting from the [Admin Setup] menu, and want to reflect the changed default on the start screen
immediately, press <RESET/LOG OUT> key or press the function switch key which is any of <Copy>, <Scan>, <Print> and
<Fax>.
Copy Setup
Default
Settings
Item
Scan Size A4 Sets the default scan size.
Duplex Copy OFF (Do not
Zoom 100% Sets the default zoom ratio.
Sort ON Sets whether to collate copied documents
Image Settings Density 0 Sets the default density of images.
Document Type Text/Photo Sets the default print quality when scan-
Resolution For Color Normal Sets the default setting of resolution.
Background Removal 3 Sets the default setup of the background
Contrast 0 Sets the default setting of contrast.
Hue 0 Sets the default red-green color balance.
Saturation 0 Sets the default saturation setting.
RGB 0 Sets the default RGB contrast.
Direction Portrait Selects the default page orientation of
ID Card Copy OFF Sets whether to use the ID card copy
Continue Scan OFF Sets whether to use the continuous scan
Mixed Size OFF Sets whether different sized documents
Margin Margin OFF Sets the default settings of margins.
Factory
Default
do both
sides)
Description
Sets the duplex (2-sided) function off or
on.
by default.
ning documents.
removal.
documents.
mode by default.
mode.
are copied on each size paper as the
default.
6
Configuring at the Operator Panel
- 82 -
Page 83

List of the Device Setting Menu Items
Default
Settings
Margin Front Left 0
Edge Erase Setting ON Sets whether to erase the shade created
Fax Setup
Default
Settings
Fcode
Box
Security
Function
Resolution Normal Sets the default setting of image quality.
Density 0 Sets the default density of images.
Scan Size A4 Sets the default scan size.
Continue Scan OFF Sets whether to use the continue scan
TTI ON Sets whether to add the sender's name to
Transmit Confirmation Report OFF Sets whether to print the result of the
Memory Tx ON Sets whether to use memory transmission
Edit/Register Confidential
Delete Deletes an Fcode box.
ID Check Tx OFF Sets whether to use the ID check trans-
Broadcast Destination ON Sets whether to indicate the destination
Confirm Dial OFF Sets whether to reenter the destination
Item
Top
Back Left
Top
Width 2 mm
Item
Box Name (NULL) Sets the name of confidential boxes. Maxi-
Box
Sub-Address (NULL) Sets the sub-address for your confidential
Hold Time 0 Sets the hold time for your confidential
I.D.Code (NULL) Sets the password for your confidential
Bulletin Box Box Name (NULL) Sets a bulletin box name. Maximum 16
Sub-Address (NULL) Sets a sub-address for your bulletin box.
Factory
Default
(0.1 inch)
Factory
Default
Description
Available rage: 0 to ±25 mm
(0.0 to 1.0inches) (1 mm/ increment)
in the surrounding of 2-page spread documents as the default.
Sets an erasing width.
Available range:2 to 50 mm
(0.1 to 2.0 inches).
Description
mode.
the header of the transmitted fax.
transmission automatically.
(ON) or real-time transmission (OFF).
mum 16 characters.
box. Maximum 20 characters.
box. Available range: 00 to 31 days.
document box. Four characters from 0 to
9 (numbers only).
characters.
Maximum 20 characters.
mission.
number before starting broadcast transmission.
fax number before sending a fax.
- 83 -
Page 84

List of the Device Setting Menu Items
Other
settings
Fax Setting
Item
Redial Tries 2 times Sets the number of redial attempts.
Redial Interval 1 minute Sets the time between redial attempts.
Ring Response 1 ring Sets the number of rings required before
Dialing Pause Duration 2 seconds Sets the dial pause time.
Rx Reduc. Rate Auto Sets the reception reduction rate.
Reduc. Margin 1.7 inch Sets the threshold level of reception
ECM Mode ON Sets whether to use the error correction
PreFix NULL Sets the dialing prefix. Maximum 40 dig-
Received Time Stamp OFF Sets whether the time stamp is printed on
Print Check Message ON Sets whether the error content is reported
Service Bit OFF If set OFF, some menu items are not dis-
Country Code Australia
A/R Full Print ON It only shows, when ServiceBit = ON.
Tone For Echo (For Transmission) Disable It only shows, when ServiceBit = ON.
Tone For Echo (For Reception) Disable It only shows, when ServiceBit = ON.
H/Modem Rate(For Tx) 33.6 Kbps Sets the default value of the modem
H/Modem Rate(For Rx) 33.6 Kbps Sets the default value of the modem
Attenuator
MF Attenuator 8 dB, Range :
Pulse Make Ratio
Pulse Dial Type N, Range : N,
MF(Tone) Duration
Calling Timer 60 seconds,
PBX Line OFF When connecting to PBX (internal
Factory
Default
(Singapore)
10 dB, Range :
0-15 dB
0-15 dB
40 %, Range :
33, 39, 40%
10-N, N+1
100 mseconds,
Range : 75,
85, 100
mseconds
Range : 1255 seconds
Description
Available range: 0 to 9 times.
Available range: 1 to 5 minutes.
receiving an incoming fax.
Available range: 0 to 10 seconds.
reduction.
Available range: 0 to 100 mm
(0 to 3.9 inches).
mode.
its.
incoming faxes.
when a transmission error occurs.
played on the panel.
Sets the country code.
transmission speed while the machine is
sending a fax.
transmission speed while the machine is
receiving a fax.
Enter Attenuator.It only shows, when Service Bit = ON.
Enter MF(Tone) Attenuator.It only shows,
when Service Bit = ON.
Sets the make rate of DP (10 pps) during
call.It only shows, when Servic Bit = ON
and Tone/Pulse setting = PULSE.
Sets the make rate of DP (10 pps) during
call.It only shows, when Servic Bit = ON
and Tone/Pulse setting = PULSE.
Enter MF(Tone) Duration.It only shows,
when Service Bit = ON and Tone/Pulse
setting = TONE.
It only shows, when Service Bit = ON.
exchange), put it to [ON].
6
Configuring at the Operator Panel
- 84 -
Page 85

List of the Device Setting Menu Items
Fax Setting
Item
Forwarding
Setting
TAD Mode Type 3 Sets an action type at the answering
Tel Priority Mode OFF Sets a timing of phone rings for extension
CNG Detection OFF Sets whether to judge that the party is
T/F Timer Programming 35 seconds Sets a time to start the auto reception of
Soft Ringer Volume High Sets a phone ring volume at the phone /
Remote Receive Number OFF Sets a remote switch number.
Forwarding Setting OFF Sets whether to enable or not the fax for-
Forwarding Number (NULL) Sets a fax number used for the fax for-
Factory
Default
Description
warding mode.
warding mode.
machine/ fax standby mode.
[Type 3]: a fax signal is detected in 15
seconds from incoming calls.
[Type 1]: A fax signal is detected right
after incoming calls and reception is performed. By setting to this type, if there is
anything wrong with fax reception, it may
be improved.
[Type 2]: A fax signal is detected right
after incoming calls. Set to this type if you
use as a phone mostly.
phone and this machine at the phone/ fax
standby mode.
[ON]: assumes that the party is making a
phone call.
Phone rings are made early.
[OFF] assumes that the part is sending a
fax. If it is judged that the party is not
sending a fax, phone rings are made.
sending a fax during the off the hook condition at the phone / Fax standby mode.
fax when not answering the phone after
incoming calls at the phone / fax standby
mode or answering machine / fax standby
mode.
fax standby mode.
Internet Fax Setup
Item
Default
Settings
Scan Size A4 Sets the default scan size.
Density 0 Sets the default density of images.
Resolution Normal Sets the default setting of resolution.
Background Removal 3 Sets the default setup of the background
Continue Scan OFF Sets whether to use the continue scan
Compression Rate Low Selects the default compression level.
Factory
Default
- 85 -
Description
removal.
mode by default.
Page 86

Scanner Setup
List of the Device Setting Menu Items
Default
Settings
Item
Scan Size A4 Sets the default scan size.
Image Settings Density 0 Sets the default density of images.
Document Type Text/Photo Sets the image quality of the documents.
Background Removal 3 Sets the default setup of the background
Resolution 200 dpi Sets the default resolution setting.
Contrast 0 Sets the default contrast setting.
Hue 0 Sets the default red-green color balance.
Saturation 0 Sets the default saturation setting.
RGB 0 Sets the default RGB contrast.
Continue Scan OFF Sets whether to perform continuous scan
Grayscale OFF Sets whether to scan a monochrome job
File Format Color PDF Selects the default file format. [Color] /
Mono (Grayscale) PDF
Mono (Binary) PDF
Encrypted PDF
Setting
Compression
Rate
Edge Erase Setting OFF Sets whether to erase the edge shadow
Document open password (NULL) Sets the default password to open an
Permissions password (NULL) Sets a default password to control printing
Display Default Password Disable Sets whether the registered password is
Color Low Selects a default compression level.
Mono (Grayscale) Low
Mono (Binary) High
Width 5 mm
Factory
Default
(0.2 inch)
Description
removal.
as the default.
in grayscale or in black and white.
[Mono (Grayscale)] can be selected
from PDF, TIFF, JPEG, and XPS. [Mono
(Binary)] can be selected from PDF, TIFF,
and XPS.
encrypted PDF.
The same password with the authentication password can not be used. Maximum
32 characters.
or editing on an encrypted PDF. The same
password with the Document open password can not be used. Maximum 32
characters.
displayed or not displayed on the password selection screen for the document
open password or authentication password.
[Disable]: Displays the registered default
password using * instead of each character.
[Enable]: Displays the registered default
password as it is.
created in the surrounding of 2-page
spread document.
Sets an erasing width. Available range: 5
to 50 mm (0.2 to 2.0 inches).
6
Configuring at the Operator Panel
- 86 -
Page 87

List of the Device Setting Menu Items
E-mail
Setup
USB
Memory
Setup
Twain
Setup
Scanner
Calibration
Item
File Name (NULL) Sets a file name of scanned images. Maxi-
Template Edit Subject (NULL) Registers or edits standard e-mail subject
Edit Body (NULL) Registers or edits standard e-mail body
From / Reply ToFrom (NULL) Sets the e-mail address which is given to
Reply to (NULL) Sets the e-mail address which is given to
Broadcast Destination ON Sets whether an e-mail address confirma-
MDN Response OFF Sets whether to request the MDN (mes-
A/R Full Print ON Sets whether to print the transmission and
MCF Report ON Sets whether to print a fax confirmation
Timeout of MCF Report 15 minutes Sets the timeout for printing a fax confir-
Print Check Message ON Sets whether the error content is reported
File Name (NULL) Sets the default setup for file names. Max-
Network TWAIN ON Sets whether to use the Network TWAIN.
Port No.
PC Scan Mode Simple Scan
Timeout Setting 5 minutes Sets the timeout duration.
Execute Starts a scanner calibration.
*2
Factory
Default
mum 64 characters.
The following options can be set as the
default file name
#n: adding a serial number from 00000 to
99999
#d: adding the date of a file creation
(yymmddhhmmss)
text. Maximum 80 characters.
text. Maximum 256 characters.
the [From] column. Maximum 80 characters.
the [Reply to] column. Maximum 80
characters.
tion screen is displayed before sending the
e-mail.
sage disposition notification) response.
reception history reports automatically.
after transmission.
mation after transmission. If the setting
period of time is exceeded, the report is
automatically printed without the MDN
response.
when a transmission error occurs.
imum 64 characters The following options
can be set as the default file name
#n: adding a serial number from 00000 to
99999
#d: adding the date of a file creation
(yymmddhhmmss).
9967 Sets the port number. Available range: 1
to 65535.
Selects the default PC scan mode.
Mode
Available range: 1 to 30 minutes.
Description
*1
:
*1
:
- 87 -
Page 88

List of the Device Setting Menu Items
*1 "#n" or "#d" can be specified for [File Name].
When specifying "#n": 5-digit serial number between 00000 to 99999
When specifying "#d": Date and time when a file is created. 12 digits of yymmddhhmmss.
yy: Year created (the last 2 digits of
the Christian Era)
mm: Month created (01 to 12) mm: Minute created (00 to 59)
dd: Date created (01 to 31) ss: Second created (00 to 59)
*A date and time when a file is created are values of the timer of MC561dn.
hh: Hours created (00 to 23)
Example of file name specification (when the file format is PDF)
When specifying "Data#n": Saved as file names such as "Data0000.pdf" and "Data00001.pdf",
etc.
When specifying "File#d": saved as file names "File090715185045.pdf", etc.
When specifying "Scan": "Scan.pdf" is created first, and then, data is saved with the name of
"Scan#d.pdf".For "#d", refer to the above.
When nothing is specified: "Image.pdf" is created first and then, data is saved with the name of
"Image#d.pdf". For "#d", refer to the above.
*2 To enable the changed setting, the network card must be restarted. Follow the instructions on
the confirmation screen displayed when changing the settings, and restart the network card.
Print From USB Memory Setup
Default
Settings
Paper Feed Tray 1 (A4) Sets the default feed tray.
Copies 1 Sets the number of copies.
Duplex OFF Sets whether to use the duplex function
Binding Long edge
Fit ON Sets whether to scale the page size of
Print Setup
Print
Menu
Tray Configuration
Item
Item
Paper Feed Tray 1 Selects the default feed tray.
Auto Tray Switch ON Sets whether to enable the automatic tray
Tray Sequence Down Sets the selection order priority for auto-
MP Tray Usage Do Not Use [When Mismatching]: If a paper size or
Media Check Enable Sets whether to check the un-matching
Factory
Default
bind
Factory
Default
Description
by default.
Sets the default binding position for
duplex printing.
documents to fit the paper size.
Description
switch function.
matic tray selection and automatic tray
switching.
type in a tray is not matched to that of the
print data, uses paper from the MP tray
instead of the specified tray.
[Do Not Use]: makes the MP tray
unavailable in auto tray selection or
switching.
between the paper size and the page size
of documents.
6
Configuring at the Operator Panel
- 88 -
Page 89

List of the Device Setting Menu Items
Print
Menu
Item
Print Setup Copies 1 Sets the number of copies of a document
Duplex OFF Sets whether to use the duplex function
Binding Long edge
Resolution 600dpi Sets the resolution.
Toner Save Mode OFF Sets whether to use the toner save mode.
Mono-Print Speed Auto Selects a printing speed to suit your docu-
Orientation Portrait Selects the page orientation.
Lines Per Page 64 lines Sets the number of lines of text per page (for
Edit Size Cassette size Sets the size of the printable page area to
Width 210 mm
Length 297 mm
Printer Adjust Manual Timeout 60 seconds Sets how many seconds the machine will wait
Wait Timeout 40 seconds Sets how many seconds the machine will
Print Mode without Color
Toner
Jam Recovery Enable Sets whether the machine will attempt to
Paper Black Setting 0 Sets values to make a fine adjustment to
Paper Color Setting 0 Sets values to make a fine adjustment to
SMR Setting 0 Corrects variations in print results caused
Factory
Default
to be printed. For local printing, this setting is invalid except for demo data. Available range: 1 to 999.
by default.
Sets the default binding position for
bind
(8.3 inch)
(11.7 inch)
Alarm • Alarm: When a color document is
duplex printing.
ment type.
PCL only). The default number of lines for A4
portrait is 64. The number differs depending
on the size of paper on the feed tray.
match the size of the paper when there is
no specification by the command of paper
edit size specification from the computer.
It is unavailable in PS.
Sets the default width of the custom size
paper. Available range: 64 to 216 mm (2.5
to 8.5 inches).
Selects the default length of the custom
size paper. Available range: 127 to 1321
mm (5.0 to 52.0 inches).
for paper to be fed before cancelling a job.
wait when received data pauses before
forcing a page eject. A PS job is canceled
if timeout occurs.
received, the alarm is displayed and the
printer is set off line.
• Cancel: When a color document is
received, color printing is canceled and
the printer is kept on line.
re-print any pages lost due to a paper jam
once the jam has been cleared.
very visible faded print results or light
specks (or streaks) results in plain paper
black setting.
very visible faded print results or light
specks (or streaks) results in plain paper
color setting.
by temperature and humidity conditions
and differences in print density and frequency. Change the setting if the print
quality is uneven.
Description
- 89 -
Page 90

List of the Device Setting Menu Items
Color
Menu
Item
BG Setting 0 Corrects variations in print results caused
Print Position
Adjust
Drum Cleaning OFF Sets whether to do cleaning of a drum
Hex Dump OFF Prints out the data received from the host
Density Control Auto Selects whether image density is auto-
Adjust Density Execute Starts the auto density setup.
Color Tuning /
Print Pattern
Cyan Highlight 0 Adjusts color tone density for each color.
Cyan Mid-Tone 0
Cyan Dark 0
Magenta Highlight 0
Magenta Mid-Tone 0
Magenta Dark 0
Yellow Highlight 0
Yellow Mid-Tone 0 Adjusts color tone density for each color.
Yel low Dark 0
Black Highlight 0
Black Mid-Tone 0
Black Dark 0
Cyan Darkness 0 Adjusts the density of each color (cyan,
Magenta Darkness 0
Yel low Dark n ess 0
Black Darkness 0
Adjust Registration
Front X Adjust 0.00 mm Adjusts the position of the whole printing
Front Y Adjust 0.00 mm Adjusts the position of the whole printing
Back X Adjust 0.00 mm Adjusts the position of the image on the
Back Y Adjust 0.00 mm Adjusts the position of the image on the
Execute Prints the color tuning pattern. Used for
Execute Does an automatic color registration
Factory
Default
Description
by temperature and humidity conditions
and difference in print density and frequency. Change the setting if the background is dark.
image perpendicular to the direction of
paper movement. Available range: ±2.00
mm (0.25 increments).
image parallel to the direction of paper
movement. Available range: ±2.00 mm
(0.25 increments).
reverse side of a duplex print perpendicular to the direction of paper movement.
Available range:
ments).
reverse size of a duplex print parallel to
the direction of paper movement. Available range:
before printing. It may have an effect for
improvement of image quality.
computer in hexidecimal code. To finish
printing, turn off the power.
matically or manually adjusted.
adjusting the color balance.
The normal setting is 0.
The normal setting is 0.
magenta, yellow and black).
The normal setting is 0.
adjustment.
±2.00 mm (0.25 incre-
±2.00 mm (0.25 increments).
6
Configuring at the Operator Panel
- 90 -
Page 91

List of the Device Setting Menu Items
System
Configuration
Menu
PCL
Setup
Item
Cyan Reg Fine Adj 0 Does a fine adjustment to the image posi-
Magenta Reg Fine Adj 0
Yel low Re g Fine Ad j 0
Ink Simulation OFF Sets the ink simulation. Valid only for the
UCR Low Selects the amount of black used during
CMY100% Density Disable Selects whether black areas are produced
CMYK Conversion ON When [OFF] is selected, the machine sim-
Personality Auto Emula-
Alarm Release Manual When [Manual] is selected, non-critical
Auto Continue OFF Sets whether the machine automatically
Error Report OFF Sets whether to print error details when
Font Source Resident Selects the location of the font to use.
Font No. I0 Selects the number of the font to use.
Font Pitch 10.00 CPI Sets the width of the PCL default font.
Font Height 12.00 point Sets the height of the PCL default font.
Symbol Set PC-8 Selects a PCL symbol set.
A4 Print Width 78 Column Sets a number of digits for automatic line
White Page Skip OFF Selects whether to print blank pages.
CR Function CR Sets the machine operation when receiv-
LF Function LF Sets the machine operation when receiv-
Print Margin Normal Sets the area of the page that is nonprint-
True Black OFF Selects whether black image data is
Factory
Default
tion
Description
tion error of each color.
PS print job.
color printing.
using 100% C, M and Y, or black. 100%C,
M, and Y results in a glossier finish.
plifies the conversion process of CMYK
data, which reduces processing time.
However, the color tone of print results is
changed. When using the ink simulation
function, this menu setting is disabled.
Selects the emulation mode. When set to
auto, the correct emulation is automatically
selected each time a print job is received.
warnings, such as requests for a different
paper size, can be cleared by pressing the
<RESET/LOG OUT> key. When [Auto] is
selected, they are cleared when the print
job resumes.
recovers from a memory overflow.
PostScript errors occur.
Available range: I0 to I90 when [Resi-
dent] is set.
Available range: 0.44 to 99.99 CPI
(0.01CPI increments).
Available range: 4.00 to 999.75 point.
(0.25 point increments)
feed on A4 paper.
ing CR code.
ing LF code.
able.
printed by using black toner only or mixing CMYK.
- 91 -
Page 92

List of the Device Setting Menu Items
Item
Pen Width Adjust ON Sets whether the thinnest line width is
Tray ID# Tray2 5 Sets a number to tray 2 and the MP tray
MP Tray 4
PS Setup L1 Tray TYPE 1 Sets a type of tray numbering in Post-
SIDM
Setup
IBM PPR
Setup
EPSON
FX Setup
SIDM Manual ID# 2
SIDM Manual2 ID# 3
SIDM MP Tray ID# 4
SIDM Tray1 ID# 1
SIDM Tray2 ID# 5
Character Pitch 10 CPI Specifies character pitch in IBM PPR emu-
Font Condense 12CPI to
Character Set SET-2 Specifies a character set.
Symbol Set IBM-437 Specifies a symbol set.
Letter O Style Disable Specifies the style that replaces 9BH with
Zero Character Normal Sets the zero to be slashed or unslashed.
Line Pitch 6LPI Specifies the line spacing.
White Page Skip OFF Selects whether blank pages are printed
CR Function CR Selects whether a received carriage return
LF Function LF Selects whether a received line feed char-
Line Length 80 Column Specifies the number of characters per
Form Length 11.7 inch Specifies the length of paper.
TOF Position 0.0inch Specifies the distance of print from the top
Left Margin 0.0inch Specifies the distance of print from the left
Fit to Letter Disable Sets the printing mode that can fit print
Text Height Same Sets the height of a character.
Character Pitch 10CPI Specifies character pitch in this emulation.
Character Set SET-2 Specifies a character set.
Factory
Default
20CPI
Description
emphasized to look wider.
for the paper feed destination command
inPCL emulation.
Available range: 1 to 59. Display condition
for [Tray 2]: the second tray unit is
installed.
Script print job.
When [TYPE1] is selected: the tray numbering starts from 0.
When [TYPE2] is selected: the tray numbering starts from 1.
Sets a number to SIDM Manual, MP and
Tray ID.
lation.
Specifies 12CPI pitch for Condense Mode.
letter o and 9DH with a zero.
or not.
character (0Dh) also causes a line feed.
acter (0Ah) also causes a carriage return.
line.
edge of the paper.
hand edge of the paper.
data, equivalent to 11 inches (66 lines), in
the LETTER-size printable area.
SAME: Regardless of CPI, same height
DIFF: As CPI, character heights vary.
6
Configuring at the Operator Panel
- 92 -
Page 93

List of the Device Setting Menu Items
Memo
Item
Symbol Set IBM-437 Specifies a symbol set.
Letter O Style Disable Specifies the style that replaces 9BH with
Zero Character Normal Sets the zero to be slashed or unslashed.
Line Pitch 6LPI Specifies the line spacing.
White Page Skip OFF Selects whether blank pages are printed
CR Function CR Selects whether a received carriage return
Line Length 80 Column Specifies the number of characters per
Form Length 11.7 inch Specifies the length of paper.
TOF Position 0.0 inch Specifies the distance of print from the top
Left Margin 0.0 inch Specifies the distance of print from the left
Fit to Letter Disable Sets the printing mode that can fit print
Text Height Same Sets the height of a character.
Factory
Default
Description
letter o and 9DH with a zero.
or not.
character (0Dh) also causes a line feed.
line.
edge of the paper.
hand edge of the paper.
data, equivalent to 11 inches (66 lines), in
the LETTER-size printable area.
SAME: Regardless of CPI, same height
DIFF: As CPI, character heights vary.
Network Menu
To enable the settings changed in the [Network Control] menu, the network card must be restarted. Follow the instructions on
the confirmation screen displayed when changing the settings, and restart the network card.
Factory
Default
Description
IPv6 can be selected only by Telnet. When
IPv6 is selected by Telnet, the screen
before selecting items, [IPv6] is displayed, and on the screen after selecting
items, nothing is selected.
Display condition:TCP/IP protocol is
enabled.
Display condition: TCP/IP protocol is
enabled and the IP version is not set to
IPv6.
Display condition:Netware is enabled.
Display condition: TCP/IP protocol is
enabled and the IP version is not set to
IPv6.
Network
Setup
Item
TCP/IP Enable Sets whether to enable TCP/IP.
IP Version IPv4 Selects the IP version.
NetBEUI Disable Sets whether to enable NetBEUI.
NetBIOS over TCP Enable Sets whether to enable NetBIOS over TCP.
NetWare Disable Sets whether to enable NetWare.
EtherTalk Disable Sets whether to enable EtherTalk.
Frame Type Auto Selects a frame type.
IP Address Set Auto Sets the method of setting up IP address.
- 93 -
Page 94

List of the Device Setting Menu Items
Item
IPv4 Address 192.168.100.
Subnet Mask 255.255.255.0.Sets a subnet mask.
Gateway Address 0.0.0.0 Sets a gateway address.
DNS Server (Primary) 0.0.0.0 Sets an IP address for primary DNS
DNS Server (Secondary) 0.0.0.0 Sets an IP address for secondary DNS
WINS Server (Primary) 0.0.0.0 Sets a name or an IP address for the
WINS Server (Secondary) 0.0.0.0 Sets a name or an IP address for the
Web Enable Sets whether to enable access from a web
Telnet Disable Sets whether to enable access from the
FTP Disable Sets whether to enable access from FTP.
IPSec Disable This item is displayed and it can be dis-
SNMP Enable Sets whether to enable access from SNMP.
Network Scale Normal When [Normal] is set: the machine works
Factory
Default
100
Description
Sets an IP address.
Display condition: TCP/IP protocol is
enabled and the IP version is not set to
IPv6.
Display condition: TCP/IP protocol is
enabled and the IP version is not set to
IPv6.
Display condition: TCP/IP protocol is
enabled and the IP version is not set to
IPv6.
server. Display condition: TCP/IP protocol
is enabled and the IP version is not set to
IPv6.
server. Display condition: TCP/IP protocol
is enabled and the IP version is not set to
IPv6.
WINS server.
Display condition: TCP/IP protocol is
enabled and the IP version is not set to
IPv6.
WINS server.
Display condition: TCP/IP protocol is
enabled and the IP version is not set to
IPv6.
browser.
Display condition: TCP/IP protocol is
enabled.
Tel n et.
Display condition: TCP/IP protocol is
enabled.
Display condition: TCP/IP protocol is
enabled.
abled only when IPSec is set to valid.
Display condition: Netware is enabled and
TCP/IP is enabled.
effectively even when connected to a HUB
that has a spanning tree feature. However,
printer start up time gets longer when
computers are connected to two or three
small LANs.
When [Small] is set: computers can cover
from two or three small LANs to a largeLAN, but it may not work effectively when
it is connected to a HUB with a spanning
tree feature.
6
Configuring at the Operator Panel
- 94 -
Page 95

List of the Device Setting Menu Items
Mail
Server
Setup
Item
HUB Link Setting Auto Sets the hub linking method. Usually,
Network PS-Protocol RAW Sets a PS-protocol.
Factory
Defaults
SMTP Server (NULL) Sets the IP address or host name for the
SMTP Port 25 Sets the port number. Usually, the default
SMTP Encryption None Selects an encryption method in the SMTP
POP3 Server (NULL) Sets the IP address or host name for the
POP3 Port 110 Sets the port number prepared by the
POP Encryption None Selects an encryption method or e-mail
Authentication method None Sets the certification for e-mail transmis-
SMTP User ID (NULL) Sets a log-in name used for SMTP certifi-
SMTP Password (NULL) Sets a log-in password used for SMTP cer-
POP User ID (NULL) Sets a log-in name onto the server used
POP Password (NULL) Sets a lo-in password onto the server used
Execute
Factory
Default
Description
select [Auto].
The settings of the network, mail server, LDAP
server, and secure protocol server are returned
to the default settings.
SMTP server.
is used.
Available range: 1 to 65535
communication.
POP3 server.
POP3 on the POP3 server.
Available range: 1 to 65535.
transmission.
sion.
cation.
tification.
for POP certification or for printing
attached files of received e-mails.
for POP certification or for printing
attached files of received e-mails.
- 95 -
Page 96

List of the Device Setting Menu Items
LDAP
Server
Setting
Secure
Print
Server
Setting
Item
Server Setting LDAP Server (NULL)
Port No. 389 Sets a port number.
Timeout 30 seconds Sets the timeout value for the search
Max. Entries 100
Search Root (NULL) Specifies a position to start searching the
Attribute Name1 cn Specifies an attribute used for searching.
Name2 sn
Name3 givenName
E-mail Address mail
Additional Filter (NULL)
Authentication Method Anonymous Sets the certification method.
User ID (NULL) Sets a user ID for certification of the LDAP
Password (NULL) Sets a certification password for the LDAP
Encryption None Sets the encryption of communication
Domain (NULL) Sets a realm name for the Kelberos certifi-
Factory
Default
Description
Sets an IP address or host name for the
LDAP server.
Available range: 1 to 65535.
response from the LDAP server.
Available range: 10 to 120 seconds.
Sets the maximum number of search results
from the LDAP server.
LDAP directory.
For Digest-MD5, the DNS server must be
set. For Secure Protocol, the secure protocol server must be set.
server. Maximum 80 characters.
Display condition: the authentication
method for LDAP is not set to [Anony-
mous].
server. Maximum 32 characters.
Display condition: the authentication
method for LDAP is not set to [Anony-
mous].
with the LDAP server.
cation.
Maximum 64 characters.
6
Configuring at the Operator Panel
- 96 -
Page 97

List of the Device Setting Menu Items
Management
Item
Default Mode Copy Sets the default mode of the machine.
Operation
Clear
Sound
Control
LocalInte
rface
System
Setup
Operation Timeout 3 Sets time of automatic reset. Available
Clear After Job OFF Sets whether to reset after any job is
Key Touch Tone Volume Middle Sets the volume of the key-touch tone.
FAX Buzzer Volume Middle
USB Menu Soft Reset Disable Sets whether to enable the soft reset
*1
Speed 480 Mbps Selects the maximum transfer speed of
USB PS-Protocol RAW Selects a USB PS-protocol.
Offline Receive Disable Sets whether to receive data in offline
Serial Number Enable Sets whether to use a USB serial number.
Access Control Disable Sets access control.
Factory
Default
Description
range: 1 to 10 minutes.
completed.
Sets the volume for transmission complete
acknowledgment.
command.
USB interface.
state or in recoverable error state.
Power
Save
User Authentication Method Local Display condition: [Access Control] is set
to [User] or [Password].
Unit of Measure millimeter Selects a displayed unit (millimeter / inch)
of measure.
Date Format dd/mm/yyyy
Allow All Reports To Print Disable Sets whether to allow printing reports with
personal information.
Near Life LED Enable Sets whether to light an LED when a near
life warning occurs.
Status in Near Life Enable Sets whether a message is displayed when
a near life warning occurs.
Address Information Lock Time Out 3 minutes Sets time until a lock is released by the
machine when address book, telephone
book, or profile is kept locked by the utilities. Available range: 1 to 10 minutes.
USB Memory Interface Enable When [Disable] is set. the scan to USB
and the print from USB memory functions
cannot be used.
Panel Contrast 0 Sets the LCD panel contrast. Available
range:
Power Save Time 30 minutes Sets a time to enter the power save mode.
Sleep Time 10 minutes Sets a time to enter the sleep mode.
±10 (1 increments).
Silent Mode ON Sets whether to enable the silent mode.
ECO Mode
*1
ON When [ON] is set: the machine starts a
small print job before the temperature of
the fixing device reaches the regulation
degree.
When [OFF] is set: the machine starts a
print job after the temperature of the fixing device reaches the regulation degree.
- 97 -
Page 98

List of the Device Setting Menu Items
Item
Memory
Setup
Flash
Memory
Setup
SD Memory Card
Setup
Storage
Maintenance
Setup
Encryption
Setup
Language
Maint
Setup
Admin Password aaaaaa Changes an administrator password. 6 to
Reset Settings
Job Log
Setup
Print
Statistics
Receive Buffer Size Auto Sets the reception buffer size that local
Resource Save OFF Sets the resource save area.
Initialize Execute Initializes flash memory.Display condi-
*1
Initialize Execute Initializes an SD memory card. This item
*1
Format
Partition
Check File
System
Erase SD Memory Card
Initial Lock Enable Sets whether to give permission to the
Job Limitation Disable When [Encrypted Job only] is selected,
Initialize
Save Job Log
Clear Job Log*3
Supplies Report Disable Sets whether to print the consumable
Reset Main
Counter
Reset Supplies
Counter
*1
*2
PCL Formats a partition in an SD memory
Common
PS
Execute Resolves the un-match between the actual
Execute Deletes the data in an SD memory card.
Execute Deletes downloaded message files.
Execute Deletes job macros, fax send/receive
*1
Execute Clears the saved job logs. Display condi-
Execute Resets the main counter.
Execute Resets the consumable counter.
Factory
Default
interface secures.
tion:[Limit for Initialization] is set to
[Disable].
is displayed in MC561dn only.
Display condition: [Limit for Initializa-
tion] is set to [Disable].
card.This item is displayed in MC561dn only.
Display condition: [Limit for Initializa-
tion] is set to [Disable].
free space and displayed free space of file
system and recovers the control data.
This item is displayed in MC561dn only.
setup change accompanied by initialization of flash memory or an SD memory
card.
all requests for print except encrypted
authentication printing are ignored. This
item is displayed in MC561dn only.
12 characters are available.
data, and the history information and
returns the settings to the default.
Disable Sets whether to save job logs.
tion:[Save Job Log] is set to [Enable].
counters' report.
Display conditions: Setting [Consumable
Counter] to [Active]
Description
6
Configuring at the Operator Panel
*1 A message appears confirming you that making changes automatically restarts the system.
Select [Yes] to continue. Select [No] to cancel.
*2 A message appears confirming you that execution automatically restarts the system. Select
[Yes] to continue. Select [No] to cancel.
*3 A message appears confirming you that execution deleted all job logs. Select [Yes] to con-
tinue. Select [No] to cancel.
- 98 -
Page 99

List of the Device Setting Menu Items
Note
User Install
Item
Time
Setup
Time Zone 0:00 Sets your time zone in relation to GMT.
Set Daylight Saving ON Sets whether to enable the Daylight
Power
Save
High Humid Mode OFF Sets whether to enable the humidity
MF(Tone)/DP(Pulse) Tone Selects a dialing method.
Reception Mode Fax Ready
DRD Type Type1 Sets the DRD Type.
Dial Tone Detection OFF Sets whether to detect a dial tone.
Busy Tone Detection OFF Sets whether to detect a busy tone.
Monitor Control OFF Select any one from three choices: Not
Monitor Volume Middle Sets the Monitor Volume.
TTI Register/Edit
Standard TTI TTI 1 Selects the default sender's name from
TTI Number (NULL) Registers your fax number.
TTI Calendar Type dd/mm/yyyy Sets the calendar date format of sender's
Super G3 ON Sets whether to use Super G3 (ultra high-
Erase Privacy Data
Auto Setup SNTP Server (Primary) Manual Setup Sets the SNTP server to use for setting the
SNTP Server (Secondary)
Manual Setup Sets the current date and time manually.
Power Save Enable ON Sets whether to enable the power save
Sleep ON Sets whether to enable the sleep mode.
TTI 1 (NULL) Registers or changes the transmission ter-
TTI 2
TTI 3
*1
Execute Deletes the registered privacy data.
Factory
Default
Mode
Description
current date and time. Maximum 64 characters.
Available range: -12:00 to + 13:00. (15
minutes / increment)
Saving mode.
mode.
mode.
Sets the reception mode.
to monitor. Monitor up to DIS. Execute
monitoring during communication.
minal identification (the name of a
sender). Maximum 22 characters.
the registered list.
information.
speed communication mode).
Display condition: Job Accounting is disabled.
*1 A message appears confirming you that continuing deletes all settings and registered data.
Select [Yes] to continue. Select [No] to cancel.
If you use the machine for a long time when [Power Save] is [OFF], it may affect the lifetime of electronic components.
- 99 -
Page 100

7. Useful Software
This chapter explains useful software functions for using your machine.
List of Utilities
The following is a list of utilities that you can use for your machine. For details on how to use these
utilities, refer to each section.
Utilities common to Windows/Mac OS X
Item
Color Correct Utility Printing Adjusts color matching It can
Profile Assistant
PS Gamma Adjuster Utility Printing You can adjust the density of
Print Control client/Print
Control
Network Card Setup Machine
Operator Panel language
setup/Panel language setup
*1
Function
Scope
adjust the tone of palette
color output. Also, you can
adjust the hue and change the
overall shade of the color output.
Printing Registers and manages the
ICC profile on the machine's
hard disk. The registered ICC
profile uses custom match on
the printer drivers' [Graphic
Pro
pictures by adjusting the
CMYK color and halftone
density of each color.
Managing
the
machine
settings
Machine
settings
Sets the user name and job
account ID to the print driver.
You can configure settings for
the network
You can change the operating
panel or menu display language
Details
] mode
System
Requirements
Windows 7/Windows
Vista/Windows Server
2008 R2/Windows
Server 2008/Windows
XP/Windows Server
2003/Windows 2000
Mac OS X 10.3.9-10.6
Refer to
page 135
page 133
page 141
page 114
page 123
page 117
page 124
page 116
page 123
7
Useful Software
Windows Utilities
Item
Configuration Tool Machine
Function
Scope
settings
Details
You can change the access
control settings and menu on
the machine, and register email addresses, speed dial
numbers, profiles, PIN
numbers, auto delivery
settings and network scan
settings.
- 100 -
System
Requirements
Windows 7/Windows
Vista/Windows Server
2008 R2/Windows Server
2008/Windows XP/
Windows Server 2003/
Windows 2000
Windows 2000 requires
the following to be installed
Service Pack 4
Internet Explorer 5.5
SP1 or a higher version
KB891861 (http://
support.microsoft.com/
?kbid=891861)
Refer to
page 105
 Loading...