

Page 1
Electronic user's guide released subject to "Nokia User's Guides Terms and Conditions, 7th June, 1998"
User’s Guide
Issue 1
Page 2

DECLARATION OF CONFORMITY
We, NOKIA MOBILE PHONES Ltd declare under our sole responsibility that the product NHM-6NX is in conformity
with the provisions of the following Council Directive: 1999/5/EC.
A copy of the Declaration of Conformity can be found at http://www.nokia.com/phones/
declaration_of_conformity/.
Copyright © Nokia Mobile Phones 2001. All rights reserved.
Reproduction, transfer, distribution or storage of part or all of the contents in this document in any form without the prior written
permission of Nokia is prohibited.
US Patent No 5818437 and other pending patents. T9 text input software Copyright (C) 1997-2001. Tegic Communications, Inc. All
rights reserved.
Nokia is a registered trademark of Nokia Corporation. Other product and company names mentioned herein may be trademarks or
tradenames of their respective owners.
Navi and Nokia Xpress-on are trademarks of Nokia Mobile Phones. Nokia tune is a trademark of Nokia Corporation.
Nokia operates a policy of continuous development. Nokia reserves the right to make changes and improvements to any of the
products described in this document without prior notice.
Under no circumstances shall Nokia be responsible for any loss of data or income or any special, incidental, consequential or indirect
damages howsoever caused.
The contents of this document are provided "as is". Except as required by applicable law, no warranties of any kind, either express or
implied, including, but not limited to, the implied warranties of merchantability and fitness for a particular purpose, are made in
relation to the accuracy, reliability or contents of this document. Nokia reserves the right to revise this document or withdraw it at
any time without prior notice
The availability of particular accessories may vary by region. Please check with the Nokia dealer nearest to you.
Copyright © 2004 Nokia. All rights reserved.
Page 3
Quick and easy
Thank you for choosing this Nokia phone! These pages give some tips on using your phone. More
detailed information is given throughout this user’s guide.
■ Before using your phone
1. Insert a SIM card in the phone. See Inserting a SIM card on page 24.
2. Install and charge the battery. See Inserting a SIM card on page 24 and Charging the battery on
page 27.
3. Switch on your phone by pressing and holding (see page 28).
See also Display indicators on page 21.
■ Call functions
Making a call
Key in the area code and phone number, and press (Call).
Ending a call
Press (End).
Answering a call
Press (Answer).
Redialling a phone number
Press in standby mode, scroll to the desired number with or , and press (Call).
Copyright © 2004 Nokia. All rights reserved.
Quick and easy
Page 4

Adjusting the earpiece volume
Press or during a call.
Calling your voice mailbox
Press and hold in standby mode. See also Voice mailbox number (Menu 2-9) on page 64.
Making a call by voice dialling
Add a voice tag to the desired phone number (see page 53). Press and hold in standby mode,
Quick and easy
and say the voice tag to make a call.
■ Phone book functions
Quick save
Key in the phone number and press or to change the text above to Save. Press
(Save).
Key in the name and press (OK).
Quick find
Press in standby mode, (key in the first letter of the name) and scroll with or to the
desired name. Press and hold to view the related phone number.
■ Entering or exiting a menu function
Entering
Press (Menu). Scroll with or to the desired menu function and press (Select).
Repeat this for submenus and setting options.
Copyright © 2004 Nokia. All rights reserved.
Page 5

Exiting
Press to return to the previous menu level. Press and hold to return to standby mode.
■ Other essential functions
Locking or unlocking the keypad
In standby mode, press and then quickly.
Setting the phone tones for different environments
Press quickly, use or to scroll to the desired option, and press (OK).
Copyright © 2004 Nokia. All rights reserved.
Quick and easy
Page 6

Table of contents
Quick and easy................................................................................................................................... 3
Table of contents ............................................................................................................................... 6
For your safety................................................................................................................................. 15
Table of contents
General information ........................................................................................................................ 17
Stickers on the sales package ...................................................................................................................................................... 17
Security code .................................................................................................................................................................................... 17
Network services.............................................................................................................................................................................. 17
Accessories and batteries.............................................................................................................................................................. 18
1. Your phone.................................................................................................................................. 19
Using the keys .................................................................................................................................................................................. 19
Power key ....................................................................................................................................................................................... 19
Number keys.................................................................................................................................................................................. 19
Navi key .......................................................................................................................................................................................... 20
Scroll keys....................................................................................................................................................................................... 20
C key ................................................................................................................................................................................................ 20
Display indicators ............................................................................................................................................................................ 21
Standby mode ............................................................................................................................................................................... 21
Essential indicators related to menu functions................................................................................................................... 22
2. Getting started ........................................................................................................................... 24
Inserting a SIM card ....................................................................................................................................................................... 24
Using the SIM card ...................................................................................................................................................................... 24
Inserting the SIM card in the phone ...................................................................................................................................... 24
6
Copyright © 2004 Nokia. All rights reserved.
Page 7

Charging the battery....................................................................................................................................................................... 27
Switching the phone on or off..................................................................................................................................................... 28
Switching on.................................................................................................................................................................................. 28
If the phone requests a PIN code or security code: ........................................................................................................ 28
Switching off ................................................................................................................................................................................. 29
Changing the Nokia Xpress-on™ covers................................................................................................................................. 29
3. Basic functions ........................................................................................................................... 31
Making a call..................................................................................................................................................................................... 31
Switching to handsfree mode................................................................................................................................................... 31
International calls ........................................................................................................................................................................ 31
Adjusting the earpiece volume................................................................................................................................................. 32
Muting the microphone.............................................................................................................................................................. 32
Redialling a last dialled number............................................................................................................................................... 32
Making a call using the phone book....................................................................................................................................... 32
Speed dialling a phone number................................................................................................................................................ 33
Making a new call during a call............................................................................................................................................... 34
Voice dialling ................................................................................................................................................................................. 34
Making a conference call........................................................................................................................................................... 34
Answering a call............................................................................................................................................................................... 35
Diverting or rejecting a call....................................................................................................................................................... 35
Answering a new call during a call ......................................................................................................................................... 36
Listening to voice messages.......................................................................................................................................................... 36
Locking the keypad.......................................................................................................................................................................... 37
Selecting a ringing tone (Menu 5-1).......................................................................................................................................... 38
Adjusting all the phone tones by a single setting.................................................................................................................. 38
Storing a phone number with a name....................................................................................................................................... 38
Table of contents
Copyright © 2004 Nokia. All rights reserved.
7
Page 8

Writing text....................................................................................................................................................................................... 39
By pressing a key once for each character (predictive text input) ................................................................................ 40
Writing compound words....................................................................................................................................................... 42
Selecting a dictionary for predictive text input............................................................................................................... 42
Turning predictive text input off.......................................................................................................................................... 42
By pressing a key one or more times for each character (traditional text input) ..................................................... 42
4. Using the menus......................................................................................................................... 44
Accessing a menu function........................................................................................................................................................... 44
Table of contents
By scrolling..................................................................................................................................................................................... 44
By a shortcut ................................................................................................................................................................................. 45
Exiting a menu function................................................................................................................................................................ 45
List of menu functions ................................................................................................................................................................... 46
5. Phone book (Menu 01) .............................................................................................................. 49
Recalling a name and phone number (Menu 01-1) .............................................................................................................. 49
Calling a service number (Menu 01-2)...................................................................................................................................... 49
Storing a name and phone number (Menu 01-3).................................................................................................................. 50
Erasing a name and phone number (Menu 01-4).................................................................................................................. 50
Editing a name and phone number (Menu 01-5)................................................................................................................... 50
Copying or moving a name and phone number (Menu 01-6)............................................................................................ 50
Assigning a ringing tone to a phone number (Menu 01-7) ................................................................................................ 50
Sending and receiving a name and phone number (Menu 01-8)...................................................................................... 51
Receiving a name and phone number.................................................................................................................................... 51
Options (Menu 01-9): Memory in use, Type of view, and Memory status...................................................................... 51
Selecting the memory for names and phone numbers (Memory in use) ..................................................................... 51
Selecting the way the saved names and phone numbers are shown (Type of view)................................................ 52
Checking the amount of free space in the phone book (Memory status) ................................................................... 52
Assigning a phone number to a speed dial key (Menu 01-10) .......................................................................................... 52
Using the speed dialling keys ................................................................................................................................................... 53
8
Copyright © 2004 Nokia. All rights reserved.
Page 9

Voice dialling (Menu 01-11)......................................................................................................................................................... 53
Adding a voice tag to a name and phone number.............................................................................................................. 54
Making a call by saying a voice tag........................................................................................................................................ 54
Listening to a voice tag .............................................................................................................................................................. 55
Changing a voice tag................................................................................................................................................................... 55
Erasing a voice tag....................................................................................................................................................................... 55
6. Messages (Menu 2).................................................................................................................... 56
Writing and sending a text message (Menu 2-1)................................................................................................................... 56
Writing a message........................................................................................................................................................................ 56
Reading a text message (Inbox - Menu 2-2)........................................................................................................................... 58
Viewing a message you have saved (Outbox - Menu 2-3) .................................................................................................. 59
Picture messages (Menu 2-4)....................................................................................................................................................... 59
When you receive a picture message ..................................................................................................................................... 59
When you view the message in this menu ........................................................................................................................... 60
Sending a picture message........................................................................................................................................................ 60
Templates (Menu 2-5) .................................................................................................................................................................... 60
Smileys (Menu 2-6)......................................................................................................................................................................... 61
Message settings (Menu 2-7)....................................................................................................................................................... 61
Set 1 (Menu 2-7-1) .................................................................................................................................................................... 61
Message centre number.......................................................................................................................................................... 62
Messages sent as....................................................................................................................................................................... 62
Message validity........................................................................................................................................................................ 62
Common (Menu 2-7-2) ............................................................................................................................................................. 62
Delivery reports.......................................................................................................................................................................... 62
Reply via same centre.............................................................................................................................................................. 63
Character support ..................................................................................................................................................................... 63
Info service (Menu 2-8) ................................................................................................................................................................. 63
Table of contents
Copyright © 2004 Nokia. All rights reserved.
9
Page 10

Voice mailbox number (Menu 2-9) ............................................................................................................................................ 64
Service command editor (Menu 2-10) ...................................................................................................................................... 64
7. Chat (Menu 3) ............................................................................................................................ 65
Starting a chat ................................................................................................................................................................................. 65
8. Call register (Menu 4)................................................................................................................ 67
Missed calls (Menu 4-1)................................................................................................................................................................ 68
Received calls (Menu 4-2) ............................................................................................................................................................ 68
Table of contents
Dialled numbers (Menu 4-3) ........................................................................................................................................................ 68
Erase recent call lists (Menu 4-4)............................................................................................................................................... 68
Show call duration (Menu 4-5)................................................................................................................................................... 68
Show call costs (Menu 4-6).......................................................................................................................................................... 69
Call cost settings (Menu 4-7) ...................................................................................................................................................... 69
Call cost limit ................................................................................................................................................................................ 69
Show costs in ................................................................................................................................................................................ 70
Prepaid credit (Menu 4-8)............................................................................................................................................................. 70
9. Tones (Menu 5) ......................................................................................................................... 71
Ringing tone (Menu 5-1)............................................................................................................................................................... 71
Ringing volume (Menu 5-2) ......................................................................................................................................................... 71
Incoming call alert (Menu 5-3) ................................................................................................................................................... 71
Composer (Menu 5-4) .................................................................................................................................................................... 72
Creating a new ringing tone..................................................................................................................................................... 72
Receiving a ringing tone ............................................................................................................................................................ 74
Message alert tone (Menu 5-5)................................................................................................................................................... 74
Keypad tones (Menu 5-6).............................................................................................................................................................. 74
Warning tones (Menu 5-7)........................................................................................................................................................... 74
Vibrating alert (Menu 5-8) ........................................................................................................................................................... 74
Screen saver (Menu 5-9)............................................................................................................................................................... 75
10
Copyright © 2004 Nokia. All rights reserved.
Page 11

10. Settings (Menu 6)..................................................................................................................... 76
Call settings (Menu 6-1)................................................................................................................................................................ 76
Automatic redial ........................................................................................................................................................................... 76
Speed dialling ................................................................................................................................................................................ 76
Call waiting options..................................................................................................................................................................... 77
Own number sending .................................................................................................................................................................. 77
Phone line in use .......................................................................................................................................................................... 77
Automatic answer ........................................................................................................................................................................ 78
Phone settings (Menu 6-2) ........................................................................................................................................................... 78
Language......................................................................................................................................................................................... 78
Cell info display............................................................................................................................................................................. 78
Welcome note................................................................................................................................................................................ 79
Network selection......................................................................................................................................................................... 79
Lights................................................................................................................................................................................................ 79
Confirm SIM service actions...................................................................................................................................................... 79
Security settings (Menu 6-3)........................................................................................................................................................ 79
PIN code request........................................................................................................................................................................... 80
Call barring service....................................................................................................................................................................... 80
Fixed dialling.................................................................................................................................................................................. 81
Closed user group......................................................................................................................................................................... 81
Security level.................................................................................................................................................................................. 82
Change access codes ................................................................................................................................................................... 82
Restore factory settings (Menu 6-4).......................................................................................................................................... 83
11. Call divert (Menu 7) ................................................................................................................. 84
Selecting a divert mode ................................................................................................................................................................. 84
Table of contents
Copyright © 2004 Nokia. All rights reserved.
11
Page 12

12. Games (Menu 8) ....................................................................................................................... 86
Adjusting the settings for all the games .................................................................................................................................. 86
Playing a game................................................................................................................................................................................. 86
Making a connection to the WAP service of Club Nokia..................................................................................................... 87
13. Calculator (Menu 9) ................................................................................................................. 88
Making a calculation...................................................................................................................................................................... 88
Making a currency conversion..................................................................................................................................................... 89
Currency conversion in standby mode ...................................................................................................................................... 89
Table of contents
14. Reminders (Menu 10)............................................................................................................... 90
Adding a reminder........................................................................................................................................................................... 90
Viewing the reminders ................................................................................................................................................................... 91
Erasing a reminder .......................................................................................................................................................................... 91
When the reminder time is reached........................................................................................................................................... 91
15. Clock (Menu 11) ....................................................................................................................... 92
Alarm clock (Menu 11-1) .............................................................................................................................................................. 92
Clock settings (Menu 11-2).......................................................................................................................................................... 93
Date setting (Menu 11-3) ............................................................................................................................................................. 93
Stopwatch (Menu 11-4)................................................................................................................................................................ 93
Countdown timer (Menu 11-5)................................................................................................................................................... 94
Auto update of date and time (Menu 11-6)............................................................................................................................ 94
16.Profiles (Menu 12)..................................................................................................................... 95
Selecting a profile for use............................................................................................................................................................. 95
Changing the settings of a profile.............................................................................................................................................. 95
12
Copyright © 2004 Nokia. All rights reserved.
Page 13

Settings available in a profile....................................................................................................................................................... 96
Ringing tone................................................................................................................................................................................... 96
Ringing volume ............................................................................................................................................................................. 96
Incoming call alert ....................................................................................................................................................................... 97
Message alert tone....................................................................................................................................................................... 97
Keypad tones.................................................................................................................................................................................. 97
Warning tones............................................................................................................................................................................... 97
Vibrating alert................................................................................................................................................................................ 97
Screen saver ................................................................................................................................................................................... 97
Rename............................................................................................................................................................................................ 98
Receiving a profile (profile name, ringing tone, and screen saver) ................................................................................... 98
17.WAP services (Services - Menu 13) ......................................................................................... 99
Basic steps for accessing and using a WAP service ............................................................................................................... 99
Setting up the phone for a WAP service ................................................................................................................................. 100
Saving the settings received as a text message ................................................................................................................ 100
Keying in the connection settings manually ...................................................................................................................... 101
Making a connection to a WAP service................................................................................................................................... 102
Browsing the pages of a WAP service...................................................................................................................................... 103
General guidelines for using the keys................................................................................................................................... 104
Ending a WAP connection........................................................................................................................................................... 105
Adjusting the appearance settings of WAP pages................................................................................................................ 105
Saving and managing bookmarks.............................................................................................................................................. 106
When no WAP connection is in progress............................................................................................................................. 106
When a WAP connection is in progress............................................................................................................................... 107
Emptying the cache memory...................................................................................................................................................... 107
Security certificates ...................................................................................................................................................................... 107
18. SIM services (Menu 14) ......................................................................................................... 109
Table of contents
Copyright © 2004 Nokia. All rights reserved.
13
Page 14

19. Reference information............................................................................................................ 110
Sending DTMF tones..................................................................................................................................................................... 110
Access codes ................................................................................................................................................................................... 110
Security code............................................................................................................................................................................... 110
PIN code........................................................................................................................................................................................ 111
PIN2 code ..................................................................................................................................................................................... 111
PUK code....................................................................................................................................................................................... 111
PUK2 code .................................................................................................................................................................................... 111
Barring password........................................................................................................................................................................ 112
Table of contents
Battery information ...................................................................................................................................................................... 112
Charging and discharging the battery ................................................................................................................................. 112
Using the batteries .................................................................................................................................................................... 113
Care and maintenance................................................................................................................... 114
Important safety information....................................................................................................... 115
Index ............................................................................................................................................... 119
14
Copyright © 2004 Nokia. All rights reserved.
Page 15

For your safety
Read these simple guidelines. Breaking the rules may be dangerous or illegal. Further detailed
information is given in this manual.
ROAD SAFETY COMES FIRST
Don’t use a hand-held phone while driving; park the vehicle first.
INTERFERENCE
All wireless phones may get interference which could affect performance.
SWITCH OFF IN HOSPITALS
Follow any regulations or rules. Switch phone off near medical equipment.
SWITCH OFF IN AIRCRAFT
Wireless phones can cause interference. Using them on aircraft is illegal.
SWITCH OFF WHEN REFUELING
Don’t use phone at a refuelling point. Don’t use near fuel or chemicals.
SWITCH OFF NEAR BLASTING
Don’t use phone where blasting is in progress. Observe restrictions, and follow any regulations or rules.
USE SENSIBLY
Use only in normal position (to ear). Don’t cover the antenna unnecessarily.
USE QUALIFIED SERVICE
Only qualified service personnel must install or repair equipment.
For your safety
Copyright © 2004 Nokia. All rights reserved.
15
Page 16
ACCESSORIES AND BATTERIES
Use only approved accessories and batteries. Do not connect incompatible products.
CONNECTING TO OTHER DEVICES
When connecting to any other device, read its user guide for detailed safety instructions. Do not connect
incompatible products.
For your safety
16
MAKING CALLS
Ensure the phone is switched on and in service. Enter the phone number, including the area code, then
press (Call). To end a call press (End). To answer a call press (Answer).
EMERGENCY CALLS
Ensure the phone is switched on and in service. Press and hold twice for several seconds to clear the
display. Enter the emergency number, then press (Call). Give your location. Do not end the call until
told to do so.
Copyright © 2004 Nokia. All rights reserved.
Page 17

General information
■ Stickers on the sales package
The stickers contain important information for service and customer support purposes. Keep these
stickers in a safe and secure place.
■ Security code
The security code protects your phone against unauthorised use. This code is supplied with the phone.
The preset code is 12345. Change the code (see Change access codes on page 82) and set the phone to
request it (see Security level on page 82). Keep the new code secret and in a safe place, separate from
the phone.
■ Network services
The wireless phone described in this guide is approved for use on the EGSM 900 and GSM 1800
networks.
Note that dual band functionality is a network dependent feature. Check with your local operator if
you can subscribe to and use this functionality.
A number of features included in this guide are called Network Services. They are special services
provided by wireless service providers. Before you can take advantage of any of these Network
Services, you must subscribe to these service(s) from your home service provider and obtain
instructions for their use.
Copyright © 2004 Nokia. All rights reserved.
17
General information
Page 18

■ Accessories and batteries
This apparatus is intended for use when supplied with power from ACP-7, ACP-8, LCH-9, and DCV-10.
Other usage will invalidate any approval given to this apparatus and may be dangerous.
Warning! Use only batteries, chargers and accessories approved by the phone manufacturer
for use with this particular phone model. The use of any other types will invalidate any
approval or warranty applying to the phone, and may be dangerous.
For availability of approved accessories, please check with your dealer.
General information
When you disconnect the power cord of any accessory, grasp and pull the plug, not the cord.
18
Copyright © 2004 Nokia. All rights reserved.
Page 19
1. Your phone
This chapter introduces you to the keys and display indicators of the phone. More details are given
throughout this user’s guide.
■ Using the keys
Power key
Pressing and holding the key switches the phone on or off.
In standby mode, pressing this key briefly shows the list of profiles which
allow you to set the phone tones for different environments.
In a menu function, pressing this key briefly turns on the lights for 15
seconds.
Number keys
to allow you to key in numbers and letters.
and are used for various purposes in different functions.
Your phone
Copyright © 2004 Nokia. All rights reserved.
19
Page 20
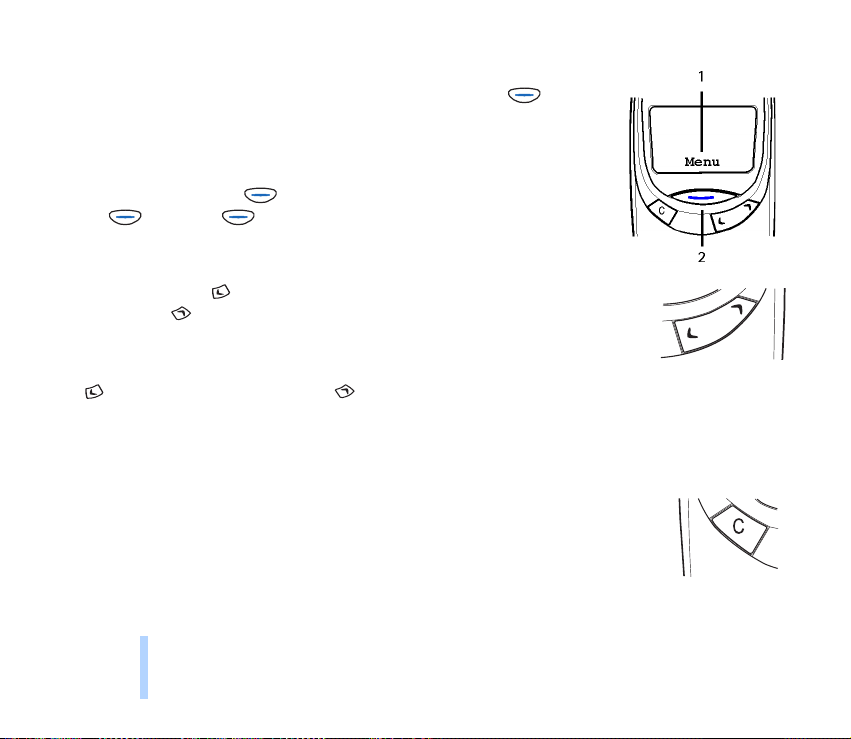
Navi key
The use of the phone is largely based on the Nokia Navi™ key ( ) below
the display (2).
The function of this key varies according to the guiding text (1) shown
Your phone
above it.
In this user’s guide, the symbol is followed by the related guiding text,
e.g. (Menu) or (Select).
Scroll keys
In standby mode: shows the names and phone numbers saved in the
phone book. shows the list of last dialled numbers.
In the menu: These keys browse through menus and settings.
When keying in a name or number or writing a text message:
moves the cursor to the left and to the right.
During a call: These keys adjust the earpiece volume.
C key
When keying in a name or number: This key deletes the character to the left.
When pressed and held, it deletes all characters from the display.
In a menu function: This key returns to the previous menu level. Press and hold this
key to exit the menu.
When you receive a call: Pressing this key rejects the call.
20
Copyright © 2004 Nokia. All rights reserved.
Page 21
■ Display indicators
Display indicators inform you of the current operation of the phone.
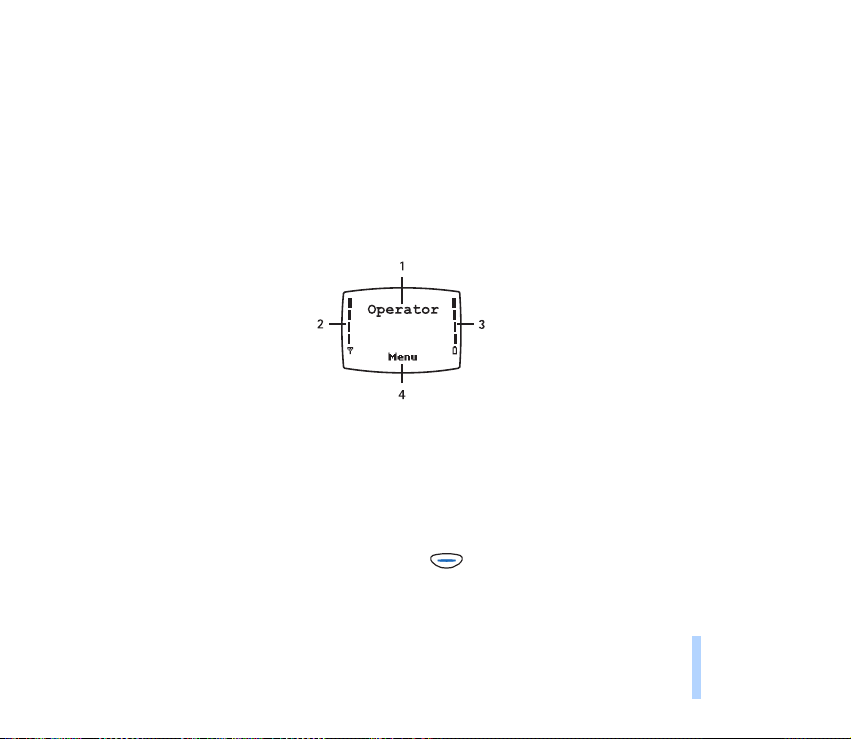
Standby mode
The indicators described below are shown when the phone is ready for use, with no characters keyed in
by the user. When this screen is shown, the phone is in ‘standby mode’.
1. Indicates in which cellular network the phone is currently used.
2. Shows the signal strength of the cellular network at your current location. The higher the bar, the
stronger the signal.
3. Shows the battery charge level. The higher the bar, the more power left in the battery.
4. Shows the current function of the Nokia Navi™ key ( ).
Copyright © 2004 Nokia. All rights reserved.
21
Your phone
Page 22

Essential indicators related to menu functions
One or more of the following indicators may be shown when the phone is in standby mode:
Indicates that you have a call in progress.
Your phone
See Making a call on page 31 and Making a connection to a WAP service on page 102.
Indicates that you have received a text or picture message.
See Reading a text message (Inbox - Menu 2-2) on page 58 and Picture messages (Menu 2-4)
on page 59.
Indicates that the phone does not ring or beep when you receive a call since the "Incoming call
alert" setting is set to Off.
See Tones (Menu 5) on page 71 and Profiles (Menu 12) on page 95.
Indicates that the phone’s keypad is locked. See Locking the keypad on page 37.
Indicates that the alarm clock is on. See Alarm clock (Menu 11-1) on page 92.
Indicates that all your calls are diverted. See Call divert (Menu 7) on page 84.
Indicates that your calls are limited to a closed user group (network service). See Closed user
group on page 81.
2 Indicates that you can make calls using phone line 2 only (network service). See Phone line in
use on page 77.
Indicates that stopwatch timing is proceeding in the background. See Stopwatch (Menu 11-4)
on page 93.
22
Copyright © 2004 Nokia. All rights reserved.
Page 23

Indicates that the countdown timer is running in the background. See Countdown timer
(Menu 11-5) on page 93.
Indicates that the name or phone number you have selected in the phone book is saved in the
SIM card. See Recalling a name and phone number (Menu 01-1) on page 49.
Your phone
Copyright © 2004 Nokia. All rights reserved.
23
Page 24

2. Getting started
Before you can use your phone, you need to insert a SIM card in it, and then install and charge the
battery.
Getting started
■ Inserting a SIM card
The phone can only be used with a valid miniature plug-in SIM card. You can obtain the card from your
network operator or service provider.
Using the SIM card
• Keep all miniature SIM cards out of small children’s reach.
• The SIM card and its contacts can easily be damaged by scratches or bending, so be careful when
handling, inserting or removing the card.
Inserting the SIM card in the phone
• Before installing the SIM card, always make sure that the phone is switched off and then remove
the battery.
24
Copyright © 2004 Nokia. All rights reserved.
Page 25
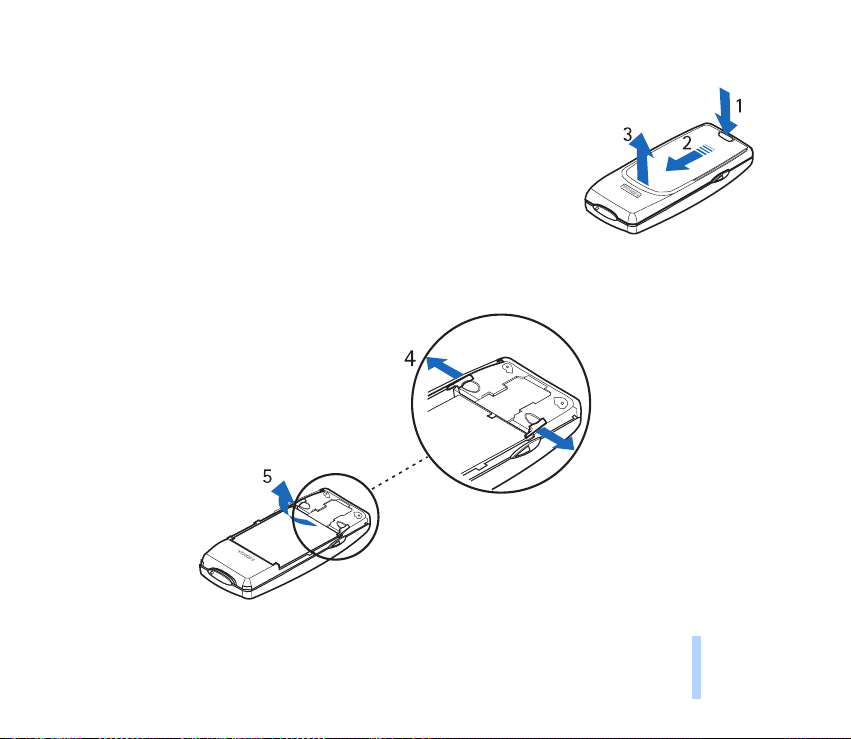
1. Remove the back cover:
Press the locking catch (1), slide the cover (2), and lift the cover off (3).
2. Remove the battery: Push the two release catches in the opposite directions (4) and remove the
battery (5).
Getting started
Copyright © 2004 Nokia. All rights reserved.
25
Page 26
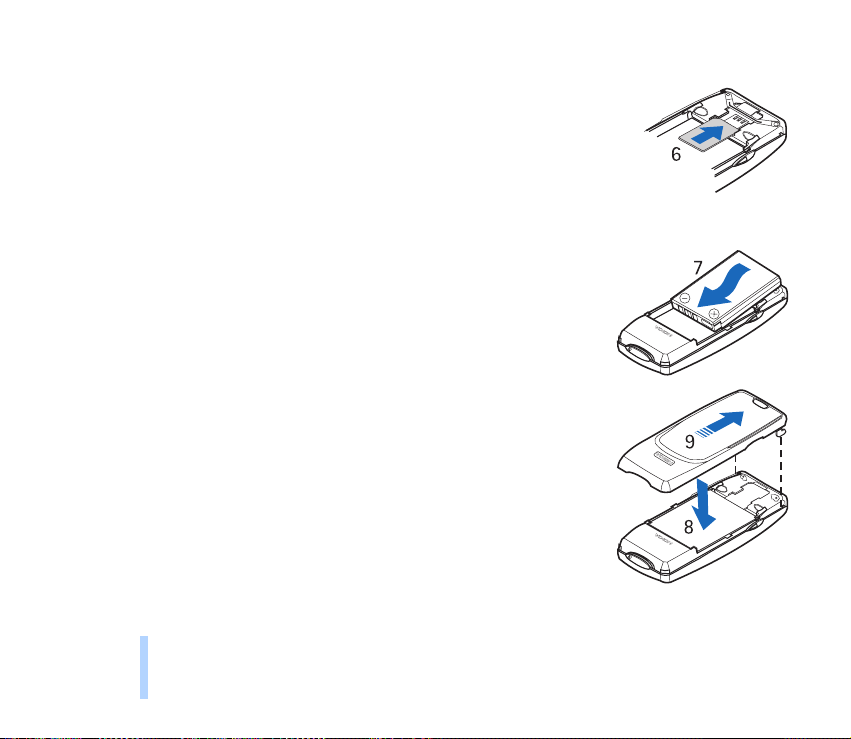
3. Insert the SIM card:
Slide the SIM card carefully into the SIM card slot (6).
Make sure that the golden connectors on the card are facing downwards
and that the bevelled corner is on the left.
Getting started
4. Install the battery:
Align the golden connectors on the battery with the corresponding
connectors on the phone, and push the opposite end of the battery until
it snaps into place (7).
5. Replace the back cover:
Insert the two catches of the back cover in the corresponding slots in
the phone (8), and slide the cover towards the bottom of the phone
until it locks into place (9).
26
Copyright © 2004 Nokia. All rights reserved.
Page 27
■ Charging the battery
• Do not charge the battery when either of the phone covers is removed. See also Battery information
on page 11 2 .
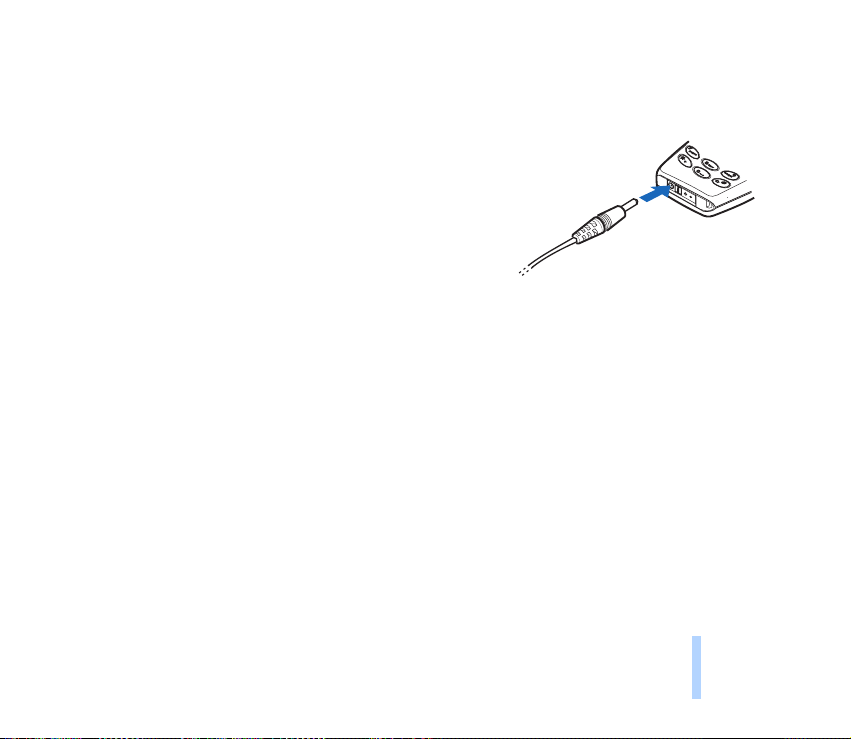
1. Connect the lead from the charger to the base of the phone.
2. Connect the charger to an AC wall outlet. The battery
indicator bar starts scrolling.
• The phone can be used while charging if it is switched on.
• If the battery is totally run down, it may take up to a few
minutes before the charging indicator is shown.
• The charging time depends on the charger and battery
used and on how much power there is left in the battery. For example, charging the battery
supplied with the phone may take up to six hours when using the ACP-7 charger.
•If Not charging is displayed, charging is suspended. Wait for a while, disconnect the charger,
plug it in again, and retry. If charging still fails, contact your dealer.
3. When the battery is fully charged, the bar stops scrolling. Disconnect the charger from the AC
outlet and the phone.
Getting started
Copyright © 2004 Nokia. All rights reserved.
27
Page 28
■ Switching the phone on or off
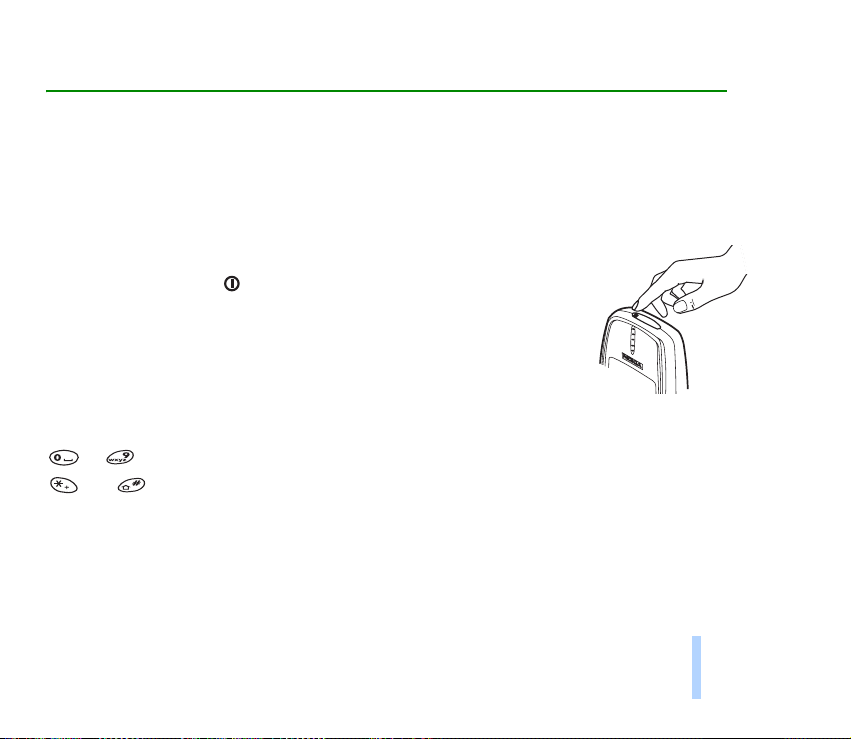
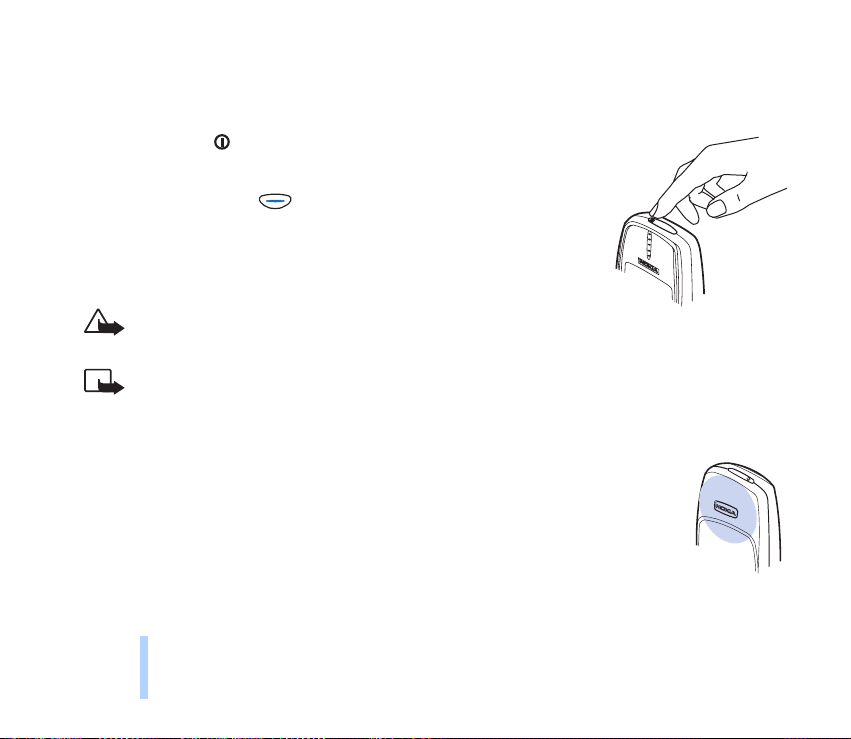
Switching on
Press and hold the key for a second.
If the phone requests a PIN code or security code:
Getting started
Key in the code and press (OK).
See also PIN code request on page 80, Security level on page 82, and
Access codes on page 110 .
Warning! Do not switch on the phone when wireless phone use is
prohibited or when it may cause interference or danger.
Note:
• Use the phone only with both covers mounted.
• Normal position: Hold the phone as you would any other telephone.
• Your phone has a built-in antenna (grey area in picture). As with any other radiotransmitting device, do not touch the antenna unnecessarily when the phone is
switched on. Contact with the antenna affects call quality and may cause the
phone to operate at a higher power level than otherwise needed. Not touching the
antenna area during a call optimizes the antenna performance and the talk-time of
your phone.
28
Copyright © 2004 Nokia. All rights reserved.
Page 29
Switching off
Press and hold the key for a second.
Tip: Alternatively, press quickly in standby mode, scroll with or to Switch off!, and
press (OK).
■ Changing the Nokia Xpress-on™ covers
• Before changing the Nokia Xpress-on™ covers, always switch off the phone and disconnect it from
the charger or any other device.
• Always store the phone with the covers attached. Read carefully Care and maintenance on page
11 4 .
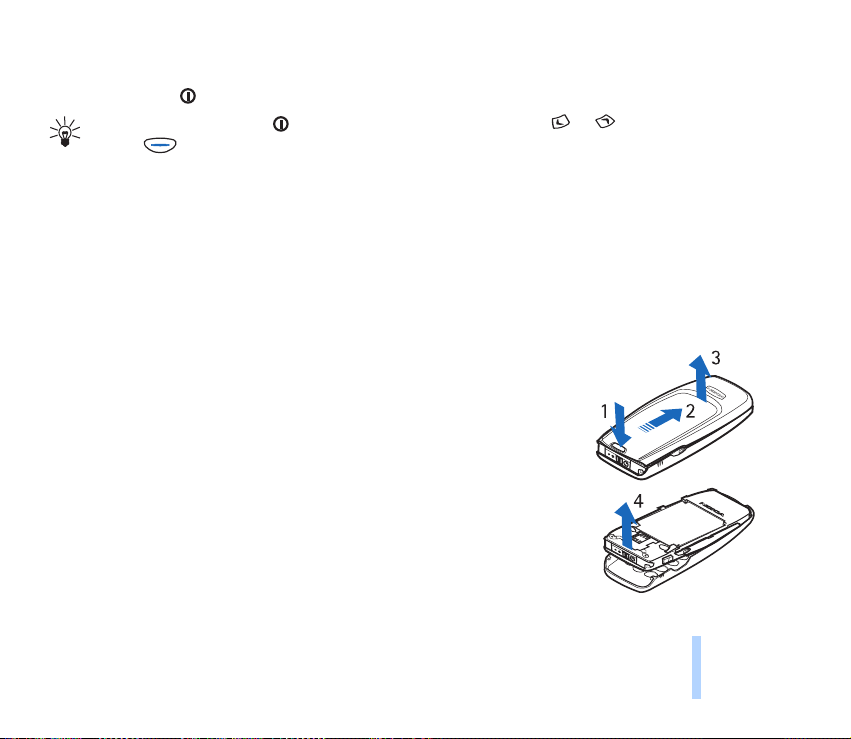
1. Remove the back cover: Press the locking catch (1), slide the cover (2),
and lift it off the phone (3).
2. Remove the front cover: Gently pull the cover off the phone starting
from the bottom of the phone (4).
Copyright © 2004 Nokia. All rights reserved.
29
Getting started
Page 30
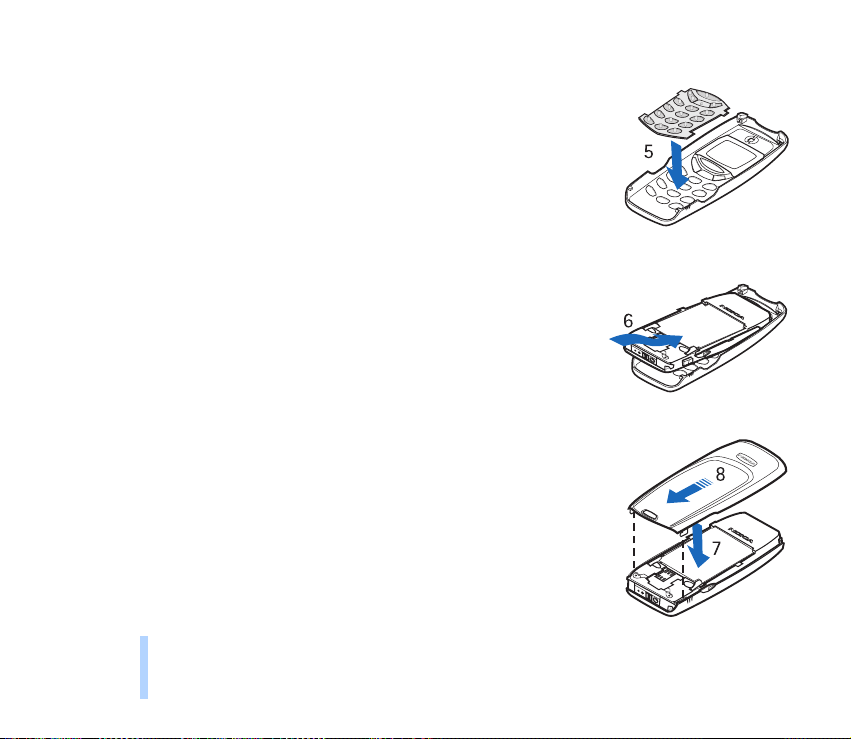
3. Insert the keypad: Insert the keypad mat in the front cover (5).
Getting started
4. Replace the front cover: Align the top of the phone with the top of
the front cover, and push the phone towards the cover until it locks
into place (6).
5. Replace the back cover: Insert the two catches of the back cover in the
corresponding slots in the phone (7), and slide the cover until it locks
into place (8).
30
Copyright © 2004 Nokia. All rights reserved.
Page 31

3. Basic functions
■ Making a call
1. In standby mode, key in the phone number including the area code using the
keys to . The text Menu changes to Call.
If you make a mistake, press to delete the character to the left.
2. Press (Call) and wait for the answer. The text Call changes to End.
3. Press (End) to finish the call (or to cancel the call attempt).
Switching to handsfree mode
When you are using the phone with the PPH-1 handsfree car kit, you can switch
from handsfree mode to privacy mode by disconnecting the PPH-1 from the phone.
To switch back to handsfree mode, plug the PPH-1 into the phone.
International calls
1. In standby mode, press twice quickly for the + character which replaces the international
access code.
2. Enter the country code, area code (delete the leading 0 if necessary) and phone number.
3. Press (Call) to call the number.
Basic functions
Copyright © 2004 Nokia. All rights reserved.
31
Page 32

Adjusting the earpiece volume
You can adjust the earpiece volume during a call. Press to increase and to
decrease the volume level.
Muting the microphone
To turn off the phone’s microphone during a call: Press and then
Basic functions
(Options), scroll to Mute, and press (Select).
To turn on the microphone: Press and then (Options), scroll to Unmute, and press
(Select).
Redialling a last dialled number
You can redial any of the last 20 phone numbers that you have called or attempted to call. See also
Dialled numbers (Menu 4-3) on page 68.
To redial one of these last dialled numbers:
1. In standby mode, press once to view the list of dialled numbers.
2. Use or to scroll to the desired phone number or name.
3. Press (Call) to call the number.
Making a call using the phone book
If you have saved a phone number in the phone book, you can dial it using the related name.
See page 50 for storing a phone number with a name.
1. Press (Menu) in standby mode.
32
Copyright © 2004 Nokia. All rights reserved.
Page 33

2. Press (Select) (when Phone book is displayed).
3. Press (Select) (when Search is selected).
4. Key in the first letter of the name (using the keys to ) and press (OK). For example,
to view the first name starting with the letter “S”, press quickly four times.
You can skip this step if you like.
5. Scroll with or to the desired name. You can check the related phone number by pressing and
holding .
6. Press (Call).
Quick find: Press in standby mode. The first name (and/or phone number) in the phone
book is displayed. Find the desired name by first keying in its first letter and pressing or
.
Speed dialling a phone number
If you have assigned a phone number to one of the speed dialling keys to , you can call this
phone number in one of the following ways (in standby mode):
• Press the corresponding speed dialling key and then (Call).
•If the Speed dialling function is on (see page 76): Press and hold the speed dialling key until the call
is started.
Note that pressing and holding calls your voice mailbox.
See also Assigning a phone number to a speed dial key (Menu 01-10) on page 52 and Speed dialling on
page 76.
Basic functions
Copyright © 2004 Nokia. All rights reserved.
33
Page 34

Making a new call during a call
You can have two calls in progress at the same time (network service).
1. During a call, press to change the text above from End to Options.
2. Press (Options), scroll to New call, press (Select), key in the phone number or recall it
from the phone book, and press (Call).
Basic functions
The existing call is put on hold. The active call is indicated by and the held call by .
3. To switch between the two calls: Press (Options), scroll to Swap, press (Select).
4. To end the active call: Press (Options), scroll to End active call, press (Select). The held
call becomes active.
To end both calls: Press (Options), scroll to End all calls, press (Select).
Voice dialling
You can dial a phone number by saying one or more words attached to it.
See Voice dialling (Menu 01-11) on page 53.
Making a conference call
Up to six persons can take part in a conference call (network service).
1. Make a call to the first participant.
2. During the call, press and then (Options). Scroll to New call and press (Select) to
make a call to the second participant. The first call is put on hold.
3. To join the first participant in the conference call, press (Options), scroll to Conference and
press (Select).
34
Copyright © 2004 Nokia. All rights reserved.
Page 35

4. To add a new person to the call, repeat steps 2 and 3.
5. To have a private conversation with one of the participants:
• Press (Options), scroll to Private and press (Select). Scroll to the desired participant
and press (OK).
Once you have finished the private conversation, return to the conference call as described in
step 3.
6. Press (Options) and select End all calls.
■ Answering a call
When somebody is calling you, the phone rings (if the Incoming call alert setting is not set to Off) and
flashes its lights, and a related text is displayed.
If the network could not identify the caller, Call is displayed.
If the caller could be identified, the caller's phone number (or name if saved in the phone book) and
calling are displayed.
1. To answer the call, press (Answer).
If the call was diverted from some other phone number, the > sign may be shown after Call or
calling (network service).
2. Press (End) to finish the call.
Diverting or rejecting a call
If you do not want to answer the call, press . The caller will hear a “line busy” tone. If the Divert
when busy function is activated (see page 84), the call is diverted e.g. to your voice mailbox.
Basic functions
Copyright © 2004 Nokia. All rights reserved.
35
Page 36

Answering a new call during a call
When the Call waiting options function is on (see page 77), the phone beeps and displays a related
text when you receive a new call. In a call list, a waiting call is indicated by .
1. Press to change the text above from End to Options.
2. Press (Options), scroll to Answer and press (Select). The other call is put on hold.
Basic functions
If you do not want to answer the call, select Reject.
3. To switch between the two calls: Press (Options), scroll to Swap, and press (Select).
4. To end the active call: Press (Options), scroll to End active call, and press (Select). The
held call then becomes active.
To end both calls: Press (Options), scroll to End all calls, press (Select).
■ Listening to voice messages
1. In standby mode, press and hold for a second to call your voice
mailbox. You can obtain the voice mailbox number from your service
provider.
2. If the phone asks for the number of the voice mailbox, key it in and
press (OK). See also Voice mailbox number (Menu 2-9) on page
64 and Call divert (Menu 7) on page 84.
3. Listen to the message(s) that you have received.
4. End the call by pressing (End).
Tip: If the text Listen is shown above the key, you can call your voice mailbox by pressing
this key.
36
Copyright © 2004 Nokia. All rights reserved.
Page 37

■ Locking the keypad
The keypad lock prevents keys from being accidentally pressed when, for example, the phone is in your
pocket or handbag.
To turn the lock on:
In standby mode, press (Menu) and then quickly.
To turn the lock off:
Press (Unlock) and then quickly.
When the keypad is locked:
• The indicator is shown
• You can answer, end or reject a call in the normal way.
During a call, you can operate the phone as usual.
• The HDC-5 headset can be used as usual.
Note: When the keypad is locked, calls may be possible to the emergency number programmed
into your phone (112).
The number is displayed only when all the digits have been keyed in.
Basic functions
Copyright © 2004 Nokia. All rights reserved.
37
Page 38

■ Selecting a ringing tone (Menu 5-1)
1. In standby mode, press (Menu).
2. Scroll with or to Tones and press (Select).
3. Scroll to Ringing tone and press (Select).
4. Scroll to the desired ringing tone (a sample is sounded) and press (OK) to select it.
Basic functions
5. Press and hold to return to standby mode.
See also Ringing tone (Menu 5-1) on page 71.
■ Adjusting all the phone tones by a single setting
You can set the phone tones (e.g. ringing tone) and screen saver to function in the desired manner by
selecting a setting group (’profile’).
This makes it easy to adjust the tones for different environments and events (e.g. outdoor activities).
For more information, see Tones (Menu 5) on page 71 and Profiles (Menu 12) on page 95.
1. In standby mode, press the power key ( ) quickly.
2. Scroll with or to the desired profile (e.g. to Silent to turn off the ringing tones).
3. Press (OK) to confirm the setting.
■ Storing a phone number with a name
To save a new name and phone number in the phone book:
1. In standby mode, press (Menu) (Phone book is displayed) and then (Select).
2. Scroll with to Add name, and press (Select).
38
Copyright © 2004 Nokia. All rights reserved.
Page 39

3. With the Name: text on the display, key in the desired name (see Writing text on page 39).
4. After you have written the name, press (OK).
5. When Phone number: is displayed, key in the area code and the phone number that you want to
save with the name.
If you make a mistake, press to delete the digit to the left.
Tip: If you want to use the phone number when abroad, press twice quickly for the +
character and key in the country code, area code (delete the leading 0 if necessary) and
phone number.
6. After you have written the phone number, press (OK).
The name and phone number are saved in the phone book.
7. If you want to add a voice tag to the name and phone number, see Voice dialling (Menu 01-11) on
page 53.
Quick save: In standby mode, key in the phone number. Press or to change the text
above to Save. Press (Save). Key in the name and press (OK).
■ Writing text
You can key in characters in two ways: by pressing a letter key once for each character (predictive text
input) or by pressing a letter key one or more times for each character.
To exit from text input to standby mode at any time, press and hold twice. Alternatively: Press
(Options), scroll to Exit, and press (OK).
Basic functions
Copyright © 2004 Nokia. All rights reserved.
39
Page 40

By pressing a key once for each character (predictive text input)
Predictive text input is an easy way to write for example text messages (see page 56) and reminder
notes (see page 90). In this input method, you only need to press a key once for each character.
According to your keypresses, the phone tries to find the correct word from the currently selected
dictionary. (For selecting a dictionary, see page 42.)
When you want to use predictive text input, check that is shown at the top of the display.
Basic functions
You can switch between predictive and traditional text input by pressing twice.
1. Write the desired word by pressing each key once for one letter.
For example, to write ‘Nokia’, press:
As you can see in the illustration above, the word changes after each keypress. Therefore, you do
not need to pay much attention to what happens on the display before you have keyed in the whole
word.
• To delete a character to the left, press . To clear the screen, press and hold this key.
• To switch between letter cases, press repeatedly and check the indicator at the top of the
display. For example, abc is shown when lower case is in use.
• To insert a punctuation mark, press and then repeatedly until the desired punctuation
mark is shown.
40
Copyright © 2004 Nokia. All rights reserved.
Page 41

• To insert a special character: Press and hold , scroll to the desired character, and press
(Use).
• To insert a number, press and hold the desired number key.
To insert several numbers, press and hold and key in the numbers. For an alternative
method, see step 3.
2. When you have finished writing the word, check that the word is correct.
If the word is correct: Press or and write the next word.
If the word is not correct: Press repeatedly until the desired word appears. For an alternative
method, see step 3.
If the ? character is shown after the word: There are no further words in the dictionary that
correspond to your keypresses. To add a word into the dictionary: Press (Spell), key in the word
using traditional text input, and press (OK).
If you want to change the previous word: Press to highlight the word and edit it.
3. If the text Options is shown above , you can access the following options by pressing this key:
Matches: Shows a list of words that correspond to your keypresses. Scroll to the desired word and
press (Use).
Insert word: You can add a word to the dictionary manually. Write the word using traditional text
input and press (OK).
Insert number: You can key in numbers by pressing each number key once.
Insert symbol: You can select a special character from a list. Scroll to the desired character (such as
%) and press (Use).
Basic functions
Copyright © 2004 Nokia. All rights reserved.
41
Page 42

Writing compound words
Write the first half of the word, press , and then write the second half.
Selecting a dictionary for predictive text input
1. In the Write messages menu (Menu 2-1), press (Options).
2. Scroll to Dictionary and press (OK).
Basic functions
3. Scroll to the desired language and press (OK).
Turning predictive text input off
1. In the Write messages menu (Menu 2-1), press (Options).
2. Scroll to Dictionary and press (OK).
3. Scroll to Dictionary off and press (OK).
By pressing a key one or more times for each character (traditional text input)
Traditional text input is commonly used in mobile phones. In this input method, you press a key
repeatedly until the desired character appears.
When you want to use traditional text input, check that is shown at the top of the display.
1. When writing text, press a number key ( to ) marked with the desired character one or
more times until the character appears.
The available characters depend on the language selected for display texts (see Language on page 78).
Note that all available characters are not printed on the keys.
42
Copyright © 2004 Nokia. All rights reserved.
Page 43

2. You can use the following functions to edit the text:
• To add a space, press .
• To add a punctuation mark or special character, press repeatedly. Alternatively: Press ,
scroll to the desired character, and press (Use).
• To move the cursor left or right, press or , respectively.
• To delete the character to the left, press . To clear the screen, press and hold this key.
• To switch between upper and lower case, press quickly.
• To add a number, press and hold the key labelled with the desired number. To switch between
letters and numbers, press and hold . 123 is shown when numbers can be entered.
• To key in a character which is under the same key as the previous one, press or (or wait
for one second) and key in the new character.
Basic functions
Copyright © 2004 Nokia. All rights reserved.
43
Page 44

4. Using the menus
The phone offers a range of functions that allow you to tailor it to your needs.
These functions are arranged in menus and submenus which can be accessed by scrolling or using the
appropriate shortcut.
Using the menus
■ Accessing a menu function
By scrolling
1. Press (Menu) in standby mode.
2. Press or to scroll to the desired main menu, e.g. Settings, and press (Select) to enter it.
3. If the main menu contains submenus, scroll to the desired one (e.g. Call settings) and press
(Select) to enter it.
4. Scroll to the desired function (e.g. Speed dialling) and press (Select) to enter it.
5. Scroll to the desired setting (e.g. Off) and press (OK) to confirm it.
If you do not want to change the setting, press .
44
Copyright © 2004 Nokia. All rights reserved.
Page 45

By a shortcut
The menus, submenus and setting options are numbered and can be accessed by their
shortcut number. The shortcut number is shown on the top right of the display.
1. Press (Menu).
2. Key in quickly (within three seconds) the number of the menu you want to access.
Repeat this step for a submenu.
3. Within three seconds, key in the number of the desired function and setting option.
■ Exiting a menu function
You can return to the previous menu level by pressing or exit the menu by pressing and holding
.
Using the menus
Copyright © 2004 Nokia. All rights reserved.
45
Page 46

■ List of menu functions
1. Phone book
1. Search
2. Service Nos.
1
3. Add name
4. Erase
Using the menus
5. Edit
6. Copy
7. Assign tone
8. Send b’card
9. Options
1. Memory in use
2. Type of view
3. Memory status
10. Speed dials
11. Voice tags
2. Messages
1. Write messages
2. Inbox
1. Shown only if supported by the SIM card.
2. The amount and names of sets may vary. Each set appears in its own submenu.
3. The shortcut number of this menu depends on the amount of sets available.
4. May not be shown if the voice mailbox number has been saved on the SIM card by your network operator or service
provider.
46
Copyright © 2004 Nokia. All rights reserved.
3. Outbox
4. Picture messages
5. Templates
6. Smileys
7. Message settings
1. Set 1
2
1. Message centre number
2. Messages sent as
3. Message validity
2. Common
3
1. Delivery reports
2. Reply via same centre
3. Character support
8. Info service
9. Voice mailbox number
10. Service command editor
3. Chat
4. Call register
1. Missed calls
4
Page 47

2. Received calls
3. Dialled numbers
4. Erase recent call lists
5. Show call duration
1. Last call duration
2. All calls’ duration
3. Received calls’ duration
4. Dialled calls’ duration
5. Clear timers
6. Show call costs
1. Last call cost
2. All calls’ cost
3. Clear counters
7. Call cost settings
1. Call cost limit
2. Show costs in
8. Prepaid credit
5. Tones
1. Ringing tone
2. Ringing volume
3. Incoming call alert
4. Composer
5. Message alert tone
1. Shown only when the phone is connected to the PPH-1 handsfree car kit or the HDC-5 headset.
2. Shown only when the phone is connected to the PPH-1 handsfree car kit.
6. Keypad tones
7. Warning tones
8. Vibrating alert
9. Screen saver
6. Settings
1. Call settings
1. Automatic redial
2. Speed dialling
3. Call waiting options
4. Own number sending
5. Phone line in use
6. Automatic answer
2. Phone settings
1. Language
2. Cell info display
3. Welcome note
4. Network selection
5. Lights
2
6. Confirm SIM service actions
3. Security settings
1. PIN code request
2. Call barring service
3. Fixed dialling
4. Closed user group
Copyright © 2004 Nokia. All rights reserved.
Using the menus
1
47
Page 48

5. Security level
6. Change access codes
4. Restore factory settings
7. Call divert
1
1. Divert all voice calls without ringing
2. Divert when busy
3. Divert if not answered
Using the menus
4. Divert when phone off or no coverage
5. Divert when off, no answer, or no coverage
6. Cancel all diverts
8. Games
9. Calculator
1. The divert options that are not supported by your network operator may not be shown.
2. The availability, name and contents depend on the SIM card used.
48
Copyright © 2004 Nokia. All rights reserved.
10. Reminders
11. Clock
1. Alarm clock
2. Clock settings
3. Date setting
4. Stopwatch
5. Countdown timer
6. Auto update of date and time
12. Profiles
13. Services
14. SIM services
2
Page 49

5. Phone book (Menu 01)
Within the Phone book menu you can
• save phone numbers and their related names in your phone and the SIM card
• manage the saved names and phone numbers
To access this menu: In standby mode, press (Menu) and then (Select).
To enter the phone book during a call, press to change the text above to Options, press
(Options), and select Phone book.
■ Recalling a name and phone number (Menu 01-1)
With the Search function you can recall the desired name and phone number from the phone book to
the display e.g. for calling. See also Making a call using the phone book on page 32.
When you browse through the names and phone numbers, is shown on the top right if the
currently selected name or phone number is saved in the SIM card.
■ Calling a service number (Menu 01-2)
With the Service Nos. function you can easily call the service numbers of your service provider. This
menu is shown only if there are service numbers saved on your SIM card.
Select the desired service number and press (Call) to call it.
Phone book (Menu 01)
Copyright © 2004 Nokia. All rights reserved.
49
Page 50

■ Storing a name and phone number (Menu 01-3)
With the Add name function you can add names and phone numbers in the phone book. For more
information, see page 38.
The phone supports SIM cards which can save up to 250 phone numbers and names. However, it
depends on the SIM card how many numbers and names can be saved in it.
■ Erasing a name and phone number (Menu 01-4)
With the Erase function you can delete phone numbers and names from the phone book one by one
(select One by one) or all at once (Erase all).
Phone book (Menu 01)
■ Editing a name and phone number (Menu 01-5)
With the Edit function you can modify the names and phone numbers saved in the phone book. Scroll
to the desired name or phone number and press (Edit). Edit the name and press (OK). Edit
the phone number and press (OK). For keying in a name, see Writing text on page 39.
■ Copying or moving a name and phone number (Menu 01-6)
With the Copy function you can copy or move names and phone numbers from the phone to the SIM
card (or vice versa) one by one or all at once.
■ Assigning a ringing tone to a phone number (Menu 01-7)
With the Assign tone function you can set the phone to play a specific ringing tone when you receive a
call from a particular phone number.
50
Copyright © 2004 Nokia. All rights reserved.
Page 51

Scroll to a name or phone number in the phone book and press (Assign).
Scroll to the desired ringing tone (Default is the tone selected for the current profile in Menu 12) and
press (OK).
■ Sending and receiving a name and phone number (Menu 01-8)
With the Send b’card function you can send a name and phone number (“business card”) from your
phone book as a text message to another phone.
Select Send b’card, scroll to the name and phone number you want to send, and press (Send).
Enter the recipient’s phone number or recall it from the phone book, and press (OK).
Receiving a name and phone number
When somebody sends you a phone number and related name, you will hear a message tone and the
text Business card received is displayed.
To view, save, or erase the number and name, press (Options), scroll to the desired function, and
press (OK).
■ Options (Menu 01-9):
Memory in use, Type of view, and Memory status
Selecting the memory for names and phone numbers (Memory in use)
You can select whether the names and phone numbers are saved in your phone (option Phone) or the
SIM card (SIM card). Note that when you change the SIM card, the SIM card option is automatically
selected.
Phone book (Menu 01)
Copyright © 2004 Nokia. All rights reserved.
51
Page 52

Selecting the way the saved names and phone numbers are shown (Type of view)
You can define how the saved phone numbers and names are shown. The options are:
Name list: Shows three names at a time.
Name, number: Shows one name and phone number at a time.
Large font: Shows one name at a time in large font.
Checking the amount of free space in the phone book (Memory status)
You can check how many names and phone numbers can still be saved and are currently saved in the
phone book.
Phone book (Menu 01)
■ Assigning a phone number to a speed dial key (Menu 01-10)
You can set any of the number keys to to work as a speed dialling key.
With the Speed dials function you can assign the desired phone number to one of these keys.
1. Scroll to the desired key and press (Assign).
Assign is also shown when the phone has automatically assigned a phone number to a speed
dialling key.
2. Search for the desired name and/or phone number from the phone book, and press (Select) to
select it.
You can view, change, or delete any assignments that you have made by first pressing (Options)
and then selecting the desired function.
52
Copyright © 2004 Nokia. All rights reserved.
Page 53

Using the speed dialling keys
Either: In standby mode, press the desired speed dialling key and press (Call).
Or if Speed dialling is on (see page 76): In standby mode, press and hold the desired speed dialling key
until the call is started.
■ Voice dialling (Menu 01-11)
You can dial a phone number by saying one or several words (’voice tag’) attached to it. The voice tag
can be any spoken word, for example a name.
Before using voice dialling, note the following:
• Voice tags are stored in the phone and removed when you insert another SIM card into the phone.
• When recording a voice tag or making a call by saying a voice tag, hold the phone in the normal
position near your ear. The phone must be in a service area with adequate cellular signal strength.
• Voice tags are not language dependent. They are dependent on the speaker’s voice.
• Voice tags are sensitive to the background noise; record voice tags in a quiet environment.
• Very short names are not accepted; use long names and avoid similar names for different numbers.
• Eight phone numbers can have a voice tag attached at a time.
Note that the phone must be in a service area with adequate cellular signal strength. Also, you must
say the name exactly as you said it when you recorded it. This may be difficult in, for example, a noisy
environment or during an emergency, so you should not rely solely upon voice dialling in all
circumstances.
Phone book (Menu 01)
Copyright © 2004 Nokia. All rights reserved.
53
Page 54

Adding a voice tag to a name and phone number
1. In the Voice tags menu, select Add voice tag and then the name and phone number to which you
want to add a voice tag.
Press Start, then speak after tone is displayed.
2. Press (Start). The phone sounds a tone and Please speak now is briefly displayed.
3. Hold the phone near your ear and say clearly the word(s) you want to record as a voice tag.
4. After recording, the phone plays the recorded voice tag and saves it.
Phone book (Menu 01)
Making a call by saying a voice tag
1. In standby mode, press and hold (Menu). The phone sounds a tone and Please speak now is
displayed.
2. Say the desired voice tag clearly while you hold the phone in the normal position near your ear.
3. The phone plays the voice tag and dials the related phone number.
• If no match for the voice tag is found or recognised, the phone will ask you to try again. Press
(Yes) to say the voice tag again, or to return to standby mode.
When you use the HDC-5 headset
1. Press and hold the headset button until you hear a short tone.
2. Say the voice tag clearly.
3. The phone plays the voice tag and automatically dials the related phone number.
54
Copyright © 2004 Nokia. All rights reserved.
Page 55

Listening to a voice tag
1. In the Voice tags menu, select Playback.
2. Scroll to the name or phone number whose voice tag you want to hear, and press (Select).
Changing a voice tag
1. In the Voice tags menu, select Change.
2. Scroll to the name (or phone number) whose voice tag you want to change, and press (Select).
3. Press (Start) to start the recording. The phone sounds a tone and Please speak now is
displayed.
4. Say the word(s) you want to record as a new voice tag. The phone plays the new voice tag and
confirms that it has been saved.
If you press (Quit) while the phone plays the voice tag or if the phone doesn’t accept the word,
for example if the word is too short, the original voice tag is deleted.
Erasing a voice tag
1. In the Voice tags menu, select Erase.
2. Scroll to the name (or phone number) whose voice tag you want to erase, and press (Erase).
Erase voice tag? is displayed.
3. Press (OK) to erase the voice tag.
Phone book (Menu 01)
Copyright © 2004 Nokia. All rights reserved.
55
Page 56

6. Messages (Menu 2)
Within the Messages menu you can use various message functions related to voice,
text and picture messages.
To access this menu: In standby mode, press (Menu), scroll to Messages, and
press (Select).
Messages (Menu 2)
■ Writing and sending a text message (Menu 2-1)
You can write and send multi-part text messages of almost three ordinary text messages in length
(network service). Invoicing is based upon how many ordinary messages are needed for any multi-part
message.
Before sending a message, make sure that the phone number of your message centre is saved in the
phone (see Message centre number on page 62). You can obtain this number from your service
provider.
To exit from this menu at any time to standby mode, press and hold twice. Alternatively: Press
(Options), scroll to Exit, and press (OK).
Writing a message
1. In the Messages menu, scroll with or to Write messages and press (Select).
2. Write a message using predictive or traditional text input (see Writing text on page 39).
56
Copyright © 2004 Nokia. All rights reserved.
Page 57

The number of available characters and the current part number are shown on the top right of the
display. For example, 233/2 means that there are 233 characters left in total and that you are
writing the second part of the message.
Tip: You can switch between the predictive and traditional text inputs by pressing
twice.
3. While writing the message, you can access a further set of functions by pressing (Options).
Scroll to the desired function and press (OK).
Send: You can send the message to the desired recipient. Key in the recipient’s phone number (or
recall it from the phone book) and press (OK). The message is sent using the set 1 in Message
settings (see page 61).
Send to many: You can send the message to several recipients one after another. Scroll to the first
recipient and press (Send). Repeat this for each recipient. You can return to the message by
pressing .
Template: You can use a preset message as a basis for your message.
Insert smiley: You can add a smiley character such as ":-)" to the message. Scroll to the desired
smiley and press (Select).
Dictionary: You can switch to traditional text input (select Dictionary off) or to predictive text
input (select the desired language).
Send by set: You can select some other set of message settings than the set 1 (see page 61).
Save: Saves the message in Outbox (Menu 2-3).
Erase: Deletes all the characters from the message.
Exit: You can return to standby mode at any time.
Messages (Menu 2)
Copyright © 2004 Nokia. All rights reserved.
57
Page 58

■ Reading a text message (Inbox - Menu 2-2)
When you receive a new text message, you hear a message alert tone selected for the current profile,
and the number of new messages as well as are shown (in standby mode).
When flashes, there is no more space for new messages. Use the Erase function in the Inbox
menu (Menu 2-2) to free some space.
1. Press (Read) to view the messages right away. To view the messages later, press and enter
the Inbox menu (Menu 2-2) when you want to do so.
Messages (Menu 2)
2. Scroll with or to the desired message and press (Read). Unread messages are indicated
by .
3. Use or to browse through the message.
4. While reading the message, you can use the functions below. Press (Options), scroll to the
desired function, and press (OK). The functions available are:
Erase: Deletes the message.
Reply: You can send a reply to the sender of the message. See Writing and sending a text message
(Menu 2-1) on page 56.
Chat: You can have a conversation based on text messages with another party. Key in the nickname
that you want to use in the chat, and press (OK). Write the chat message and press
(Options) and select Send to send it. For more information, see Chat (Menu 3) on page 65.
Edit: You can modify the message. See Writing text on page 39.
Use number: Extracts a phone number from the message for calling or saving.
Forward: You can edit and forward the message to the desired phone number.
58
Copyright © 2004 Nokia. All rights reserved.
Page 59

Details: Shows the sender’s name and phone number, the message centre used for sending as well
as the reception date and time.
■ Viewing a message you have saved (Outbox - Menu 2-3)
You can view the messages that you have saved in Write messages (Menu 2-1). Pressing
(Options) allows access to the same functions as in Inbox (Menu 2-2), except for Reply, Chat, and
Details.
■ Picture messages (Menu 2-4)
With your phone, you can receive and send text messages that contain pictures. These messages are
called picture messages. There are several preset picture messages available in the phone.
This function can be used only if it is supported by your network operator or service provider.
Note that:
• Each picture message is made up of several text messages. Therefore, sending one picture message
may cost more than one text message.
• Since picture messages are saved in the phone, you cannot view them if you use the SIM card with
another phone.
• Only phones that offer the picture message feature can receive and display picture messages.
When you receive a picture message
• To view the message immediately, press (View). You can save the message by pressing
(Save) or delete it by pressing twice.
• To view the message later in this menu: Press and then (OK) to save the message.
Copyright © 2004 Nokia. All rights reserved.
59
Messages (Menu 2)
Page 60

When you view the message in this menu
Pressing (Options) allows access to the same functions as in Inbox (Menu 2-2), except for Reply
and Chat.
With the Edit text function you can modify the text part of the message and send it further; see
Writing and sending a text message (Menu 2-1) on page 56.
Sending a picture message
Messages (Menu 2)
1. In the Picture messages menu, scroll to a picture message and press (View).
2. If the displayed picture is the one you want, press (Options), scroll to Edit text and press
(Select).
If the displayed picture is not the one you want, press and repeat step 1.
3. Write the message.
To view the whole message before sending it, press (Options), scroll to Preview, and press
(OK).
4. Press (Options), scroll to Send, and press (OK).
■ Templates (Menu 2-5)
Your phone offers some preset messages (’templates’) that you can use when writing a message.
Within this menu you can view, edit, and erase the templates.
Scroll to the desired template and press (Read).
When the template is displayed, press (Options) and then select whether you want to edit or
erase the template.
60
Copyright © 2004 Nokia. All rights reserved.
Page 61

While editing a template, pressing (Options) allows access to a further set of functions, including
Send and Save.
You can create a template from scratch by selecting one of the empty templates at the end of the
template list.
■ Smileys (Menu 2-6)
With this function you can create smiley characters such as ":-)" that you can use when writing or
replying to a message. Scroll to the desired smiley and press (Read). The smiley can be any
sequence of characters. Press (Options) and select Edit. Change the smiley to your liking (press
and hold for special characters) and press (OK). For editing, see Writing and sending a text
message (Menu 2-1) on page 56.
■ Message settings (Menu 2-7)
The phone offers two kinds of message settings: settings specific to each settings group or ’set’, and
settings common to all text messages.
Messages (Menu 2)
Set 1 (Menu 2-7-1)
A set is a collection of settings needed for sending text and picture messages.
You can, for example, send a text message as a fax, if supported by your service provider, by simply
selecting the set in which you have earlier defined the proper settings for fax transmissions.
Each set has its own submenu where you can change the settings described below.
1. The total number of sets depends on how many sets your SIM card offers.
1
Copyright © 2004 Nokia. All rights reserved.
61
Page 62

Message centre number
You can save the phone number of the message centre used for sending text and picture messages. You
obtain this number from your service provider.
Key in the phone number or recall it from the phone book, or edit the existing number, and press
(OK).
Messages sent as
You can request the network to convert your Text messages into E-mail, Fax or Paging format (network
service).
Messages (Menu 2)
In order to receive a converted message, the recipient must have the appropriate equipment, e.g. a fax
machine.
Message validity
You can set the length of time that your text messages are stored at the message centre (network
service).
Common (Menu 2-7-2)
The settings in this submenu apply to all text messages that you send, irrespective of the chosen set.
1
Delivery reports
You can request the network to send delivery reports on your text messages (network service).
1. The shortcut number of this menu depends on the number of sets available. Here it is assumed that only one set is
available.
62
Copyright © 2004 Nokia. All rights reserved.
Page 63

Reply via same centre
When this function is on, the recipient of your text message can send you a reply via the same message
centre as your original message (network service).
Character support
When the Unicode option is selected, you can send messages using special characters (such as ñ) in
Romance and Slavic languages or Russian characters to a compatible phone, if supported by your
network.
■ Info service (Menu 2-8)
With this network service you can receive messages on various topics (such as weather or traffic
conditions) from your service provider.
For available topics and related topic numbers, contact your service provider.
If you select On, you will receive messages on the active topics. Topic index sets the phone to receive a
list of available topics from the network.
If you select Topics, you can mark the topics as active or inactive, add a new topic to the topic list, or
edit or erase the existing topics on the list.
If you select Language, you can select the language for the messages. Only messages in the selected
language will be shown.
Messages (Menu 2)
Copyright © 2004 Nokia. All rights reserved.
63
Page 64

■ Voice mailbox number (Menu 2-9)
In a voice mailbox, callers can leave messages that you can listen to later (network service).
Within this menu you can save the phone number of your voice mailbox. Key in the number (obtained
from the service provider) and press (OK).
Note that this menu may not be shown if the voice mailbox number has been saved in the SIM card by
your network operator or service provider.
Each phone line may have its own voice mailbox number (see Phone line in use on page 77).
Messages (Menu 2)
For listening to voice messages, see page 36.
For diverting incoming calls to your voice mailbox, see page 84.
■ Service command editor (Menu 2-10)
You can send service requests to your service provider. Key in the desired characters. Press and hold
to switch between letters and numbers. Press (Send) to send the request.
64
Copyright © 2004 Nokia. All rights reserved.
Page 65

7. Chat (Menu 3)
With the Chat function you can have a conversation with other people using text
messages.
To access this menu: In standby mode, press (Menu), scroll to Chat, and press
(Select).
■ Starting a chat
You can start a chat either within this menu or by selecting the Chat option that you can access by
pressing (Options) while reading a received text message.
1. If you start a chat within this menu, key in the other person’s phone number or recall it from the
phone book (see Making a call using the phone book on page 32), and press (OK).
If you have previously had a chat with the same person, the last 500 characters of this chat are
shown.
2. Key in a nickname (see Writing text on page 39) that you want to use in the chat, and press
(OK).
3. Write your chat message as you would a normal text message, press (Options), and select
Send to send the message.
Pressing (Options) allows access to the same functions as when writing a text message
except for Save and Send to many. In addition, Chat history shows all the messages sent (indicated
by "<" and your nickname) and received (indicated by ">" and the other person’s nickname) during
the current chat, and Chat name allows you to edit your nickname.
Chat (Menu 3)
Copyright © 2004 Nokia. All rights reserved.
65
Page 66

4. When you receive a reply from the other party, the reply message is shown above the message that
you sent. Press (OK) to clear the display, write your reply, and send it by pressing
(Options) and selecting Send. Repeat this for each chat message.
Note that the messages received during a chat are not saved in the Inbox menu.
Chat (Menu 3)
66
Copyright © 2004 Nokia. All rights reserved.
Page 67

8. Call register (Menu 4)
Within the Call register menu you can access the phone numbers registered
automatically by the phone.
You can also view the approximate duration and cost of your calls, and manage the
credit units in your prepaid SIM card.
To access this menu: In standby mode, press (Menu), scroll to Call register, and press
(Select).
Options within Menus 4-1 to 4-3
With the options that you access by pressing (Options) you can
• edit, view or call a registered phone number
• view the time of the call
• save the number in the phone book
• erase the number from the call list (not from the phone book)
• send a text message to the caller (Send SMS)
About missed and received calls
The phone registers missed and received calls if:
• the network allows showing the caller’s phone number to the call recipient
• the phone is switched on and within the network’s service area
Call register (Menu 4)
Copyright © 2004 Nokia. All rights reserved.
67
Page 68

■ Missed calls (Menu 4-1)
This function shows you the last 10 phone numbers from which somebody has tried to call you with no
success (network service).
Tip: You can also view these phone numbers by pressing (List) when a note about missed
calls is displayed. The previously registered phone numbers are also shown.
■ Received calls (Menu 4-2)
This function shows the last 10 phone numbers from which you have accepted a call (network service).
Call register (Menu 4)
■ Dialled numbers (Menu 4-3)
This function shows the last 20 phone numbers that you have called or attempted to call.
■ Erase recent call lists (Menu 4-4)
With this function you can delete all the phone numbers and names from Menus 4-1 to 4-3.
These phone numbers are also erased in the following cases:
• When you switch on the phone with a SIM card which is not one of the five cards used most
recently with the phone.
• When you change the Security level setting (see page 82).
■ Show call duration (Menu 4-5)
With this function you can view the approximate duration of your outgoing and incoming calls.
68
Copyright © 2004 Nokia. All rights reserved.
Page 69

You can reset these so-called call timers using the Clear timers function (Menu 4-5-5). For this you
need the security code (see Access codes on page 11 0). Changing the SIM card does not clear the call
timers.
Note: The actual time invoiced for calls by your service provider may vary, depending upon
network features, rounding-off for billing, and so forth.
■ Show call costs (Menu 4-6)
With this network service you can view the approximate cost of your last call or all calls.
The costs are shown in terms of units specified within the Show costs in function (Menu 4-7-2).
Call costs are shown separately for each SIM card.
Note: The actual invoice for calls and services from your service provider may vary, depending
upon network features, rounding-off for billing, taxes and so forth.
■ Call cost settings (Menu 4-7)
Call cost limit
You can limit the costs of calls to a certain amount of charging units or units of currency (network
service).
You can make and receive charged calls as long as the specified cost limit is not exceeded. The number
of remaining units is shown in standby mode.
To set the limit you may need the PIN2 code (see Access codes on page 110 ).
Call register (Menu 4)
Copyright © 2004 Nokia. All rights reserved.
69
Page 70

Note that when no more charging or currency units are left, only calls to the emergency number 112
may be possible.
Show costs in
The phone can show the remaining talk-time in terms of charging units or the desired currency.
Contact your service provider for charging unit prices.
For this function you may need the PIN2 code (see Access codes on page 110 ).
If you selected Currency, key in the charging unit price, press (OK), key in the currency name, and
press (OK).
Call register (Menu 4)
■ Prepaid credit (Menu 4-8)
Within this menu you can view and change settings related to prepaid SIM cards (network service).
When using a prepaid SIM card, you can make calls only when there are enough credit units on the SIM
card.
With the Credit info display function you can set the phone to show the amount of remaining credit
units when the phone is in standby mode.
Credit available shows the amount of remaining credit units.
Last event costs shows information about previous calls.
Recharge status shows the time and date when credit units were last recharged. Pressing (More)
shows the expiry date of credit units.
70
Copyright © 2004 Nokia. All rights reserved.
Page 71

9. Tones (Menu 5)
Within the Tones menu you can adjust the settings of the selected profile. You can
also create ringing tones of your own using the Composer function.
See also Profiles (Menu 12) on page 95 and Adjusting all the phone tones by a single
setting on page 38.
To access this menu: In standby mode, press (Menu), scroll to Tones, and press (Select).
■ Ringing tone (Menu 5-1)
Sets the ringing tone for voice calls. Scroll to the desired tone and press (OK). The tones that you
have received from somebody or that you have composed yourself can be found at the end of the tone
list.
■ Ringing volume (Menu 5-2)
Sets the volume level for the ringing and message alert tones. Scroll to the desired level and
press (OK).
■ Incoming call alert (Menu 5-3)
Defines how the phone notifies you of incoming voice calls. The options are: Ringing, Ascending, Ring
once, Beep Once, and Off.
When Off is selected, all phone tones are mute and is displayed.
Tones (Menu 5)
Copyright © 2004 Nokia. All rights reserved.
71
Page 72

■ Composer (Menu 5-4)
You can compose a ringing tone of your own. The composed tones are shown last in the tone list.
Note: Your phone must be switched on to use this function. Do not switch on the phone when
wireless phone use is prohibited or when it may cause interference or danger.
Creating a new ringing tone
Tones (Menu 5)
1. Scroll to the tone that you want to edit and press (Select).
2. Enter the desired notes. For example, press for note f (shown as f). The
phone plays each note after it is entered (unless the phone tones are off).
3. To adjust the characteristics of the note:
• Note duration: shortens (-) and lengthens (+) the duration of
the note or rest. The default duration is 1/4. The duration is shown in
front of the note, e.g. 16d denotes a note d with duration 1/16.
Pressing and holding a note key lengthens the note by half, indicated by a dot after the duration,
e.g. 8.a.
• Rest: inserts a rest (i.e. pause) of the same duration as the previous note. The default
duration of a rest is one quarter note (1/4). The rest is indicated by the - character.
• Octave: sets the octave for new notes. The octave is shown as a number after the note (e.g.
e1).
• Pitch: makes the note sharp (indicated by # in front of the note), e.g. #f. The pitch
selection is not available for notes e and b.
72
Copyright © 2004 Nokia. All rights reserved.
Page 73

4. To edit the notes:
• and move the cursor right or left, respectively.
• deletes a note or a rest to the left.
5. After you have completed the tone, press (Options), scroll to one of the functions below, and
press (OK).
Play: Plays back the notes.
Save: You can name the tone and add it to the end of ringing tone list.
Tempo: You can select the desired tempo for the tone (in beats per minute).
Send: You can send the tone that you created to a compatible phone.
Clear screen: Deletes all the notes from the display.
Exit: You can exit the Composer menu.
Example: Here is an example of a ringing tone. Enter the notes and play them as described above.
Change the different aspects of the tone (notes, octave, duration, etc.) and consider how these
changes affect the tone.
16.a2 16d2 16#f2 16a1 16d2 16#f2 8a2 1- 8-
16.b2 16d2 16#f2 16a1 16d2 16#f2 8a2 1- 8-
16.a2 16e2 16g2 16a1 16e2 16g2 8a2 1- 8-
16.e3 16#f2 16a2 16d2 16#f2 16a2 8d3 1- 8-
Tones (Menu 5)
Copyright © 2004 Nokia. All rights reserved.
73
Page 74

Receiving a ringing tone
When somebody sends you a ringing tone, you hear a message tone and the related text is displayed.
To play, save, or erase the tone, press (Options), scroll to the desired function, and press
(OK).
■ Message alert tone (Menu 5-5)
Tones (Menu 5)
Sets the alert tone for text messages. Scroll to the desired tone and press (OK).
■ Keypad tones (Menu 5-6)
Sets the volume level for keypad tones. Scroll to the desired level and press (OK).
■ Warning tones (Menu 5-7)
Sets the phone to sound a warning tone, for example when the battery is running out of power. This
setting has no effect on the tones that are related to network services.
■ Vibrating alert (Menu 5-8)
Sets the phone to vibrate when you receive a voice call or a text message. You can also set the phone to
first vibrate and then ring.
The vibrating alert is disabled when the phone is connected to a charger or a desktop stand.
74
Copyright © 2004 Nokia. All rights reserved.
Page 75

■ Screen saver (Menu 5-9)
Sets the picture that is displayed in standby mode after a selected period of time (called ’timeout’). You
can also use animated pictures as screen savers.
Select Off, On (previously selected screen saver is shown), Timeout, or Screen saver, and press
(OK).
If you selected Screen saver, the currently selected screen saver picture is shown. To change it, scroll to
the desired picture and press (Use). If you selected Timeout, scroll to the desired time and press
(OK).
The use of an animated picture as a screensaver uses power so it reduces the operation time of your
phone. For downloading animated pictures, see the View picture function in Browsing the pages of a
WAP service on page 103.
Tones (Menu 5)
Copyright © 2004 Nokia. All rights reserved.
75
Page 76

10. Settings (Menu 6)
Within the Settings menu you can adjust
• call settings (Menu 6-1)
• general phone settings (Menu 6-2)
• security settings (Menu 6-3)
Settings (Menu 6)
You can reset the menu settings to their original values using the Restore factory settings function
(Menu 6-4).
To access this menu: In standby mode, press (Menu), scroll to Settings, and press (Select).
■ Call settings (Menu 6-1)
Automatic redial
When this function is on, your phone will make up to ten attempts to connect the call after an
unsuccessful call attempt.
Speed dialling
When this function is on, you can dial the names and phone numbers assigned to the speed dial keys
to by pressing and holding the corresponding key.
Pressing and holding dials your voice mailbox number.
76
Copyright © 2004 Nokia. All rights reserved.
Page 77

Call waiting options
When this network service is activated, the network notifies you of a new incoming call while you have
a call in progress. See Answering a new call during a call on page 36.
Own number sending
With this network service you can set your phone number to be displayed (On) or hidden (Off) from the
person you are calling. When you select Set by network, the setting agreed with your service provider
is used.
Phone line in use
The phone may be used with a SIM card which supports two subscriber numbers, i.e. phone lines. This is
a network service.
Within this menu you can select the desired phone line (1 or 2) for making calls or prevent line
selection. Calls on both lines can be answered irrespective of the selected line.
You will not be able to make calls if you select line 2 and you have not subscribed to this network
service. When line 2 is selected, 2 is shown on the top left of the display in standby mode.
To allow or prevent the line selection you need the PIN2 code.
Tip: In standby mode, you can switch between the lines by pressing and holding .
Settings (Menu 6)
Copyright © 2004 Nokia. All rights reserved.
77
Page 78

Automatic answer
You can set the phone to answer an incoming call after one ring.
This function can be used when the phone is connected to the PPH-1 handsfree car kit or the HDC-5
headset. When using the car kit, note that some cigarette charger plugs do not provide power when
the ignition is off.
This function does not work when the phone tones are set to Off .
Settings (Menu 6)
■ Phone settings (Menu 6-2)
Language
You can select in which language the display texts are shown.
When Automatic is selected, the phone selects the language according to the information on the SIM
card.
This setting also determines which characters are available when you write text, for example a name or
text message.
Cell info display
With this network service you can set the phone to indicate when it is used in a cellular network based
on Micro Cellular Network (MCN) technology. In such a network, local calls may cost less than
otherwise.
78
Copyright © 2004 Nokia. All rights reserved.
Page 79

Welcome note
You can write a message which is shown briefly when the phone is switched on.
Network selection
You can set the phone to automatically select one of the cellular networks available in your area
(default setting), or you may select the desired network manually from a list of networks.
When selecting a network manually, the selected network must have a roaming agreement with your
home network (i.e. the operator whose SIM card is in your phone). Otherwise the text No access is
shown.
The phone will stay in manual mode until you select automatic mode or insert another SIM card in the
phone.
Lights
You can set the display and keypad lights to be on or off. This setting is available when the phone is
connected to the PPH-1 handsfree car kit.
Confirm SIM service actions
You can set the phone to show (Asked) or hide (Not asked) confirmation messages when you are using
the SIM card services. See also SIM services (Menu 14) on page 109.
■ Security settings (Menu 6-3)
Your phone is equipped with a versatile security system to prevent unauthorised use of the phone and
the SIM card.
Copyright © 2004 Nokia. All rights reserved.
79
Settings (Menu 6)
Page 80

PIN code request
You can set the phone to request the PIN code of your SIM card every time the phone is switched on.
For this function you need the PIN code. See also Access codes on page 110 .
Some SIM cards do not allow turning off the PIN code request.
Call barring service
With this network service you can restrict the making and receiving of calls with your phone. For this
Settings (Menu 6)
function you need the barring password that you obtain from your service provider.
1. Select one of the following call restrictions:
Outgoing calls: Calls cannot be made.
International calls: Calls cannot be made to foreign countries when in the home country.
International except to home country: When abroad, international calls cannot be made except
for calls to the home country.
Incoming calls: Calls cannot be received.
Incoming calls when abroad: Calls cannot be received when abroad.
Cancel all barrings: Calls can be made and received with no restrictions. If you select this option,
the following step will not be available.
2. Set the call restriction on (Activate) or off (Cancel), or check which types of calls are barred
(Status).
Note: When calls are barred, calls may be possible to certain emergency numbers in some
networks (e.g. 112 or other official emergency number).
80
Copyright © 2004 Nokia. All rights reserved.
Page 81

Fixed dialling
You can restrict your outgoing calls to selected phone numbers, if allowed by your SIM card. For this
function you need the PIN2 code (see Access codes on page 11 0).
When this function is on, you can only call phone numbers that are included in the fixed dialling list or
that begin with the same digit(s) as a phone number on the list.
Within the Numbers function you can check the phone numbers (Search) and add new numbers to the
list (Add name) as well as clear the list (Erase all).
Within the Search function you can edit, erase, or call the displayed phone number by first pressing
(Options) and then selecting the desired option.
Note: When fixed dialling is set on, calls may be possible to certain emergency numbers in
some networks (e.g. 112 or other official emergency number).
Closed user group
With this network service you can specify a group of people whom you can call and who can call you.
Default resets the phone to use the group that the SIM card owner has agreed upon with the service
provider.
To set this function on, you need to know the index number of the desired group. Contact your service
provider.
When you have selected a closed user group, the indicator and the index number of the given group
are shown in standby mode.
Note: When calls are limited to closed user groups, calls may be possible to certain emergency
numbers in some networks (e.g. 112 or other official emergency number).
Settings (Menu 6)
Copyright © 2004 Nokia. All rights reserved.
81
Page 82

Security level
You can set the phone to ask for the security code when a new SIM card is inserted in the phone
(option Phone) or when you select the internal phone book (Memory).
(“A new SIM card” means here a card that is not one of the five cards used most recently with the
phone.)
For this function you need the security code (see Access codes on page 110 ).
Note that when you change this setting, all the recent calls lists in Menus 4-1 to 4-3 are cleared.
Settings (Menu 6)
See also Security code on page 17, Switching the phone on or off on page 28, Selecting the memory for
names and phone numbers (Memory in use) on page 51, and Access codes on page 11 0.
Change access codes
You can change the following access codes: security code, PIN code, PIN2 code, barring password.
These codes can include the numbers 0 to 9 only.
The phone asks first for the current code and then for the new code twice.
Note: Avoid using access codes similar to the emergency numbers, such as 112, to prevent
accidental dialling of the emergency number.
82
Copyright © 2004 Nokia. All rights reserved.
Page 83

■ Restore factory settings (Menu 6-4)
You can reset the menu settings to their original values. For this you need the security code.
This function has no effect e.g. on the following functions:
• the names and phone numbers saved in the phone book
• text and picture messages
• phone numbers listed in the Call register menu
• call divert
Settings (Menu 6)
Copyright © 2004 Nokia. All rights reserved.
83
Page 84

11. Call divert (Menu 7)
Within the Call divert menu you can direct your incoming calls to your voice
mailbox or some other phone number (network service).
To access this menu: In standby mode, press (Menu), scroll to Call divert, and
press (Select).
Call divert (Menu 7)
■ Selecting a divert mode
1. Scroll to one of the following divert options and press (Select):
Divert all voice calls without ringing
Divert when busy: The call is diverted when you have a call in progress or when you reject the call.
Divert if not answered: The call is diverted when you do not answer it.
Divert when phone off or no coverage: The call is diverted when your phone is switched off or
outside of the network service area.
Divert when off, no answer, or no coverage: The call is diverted when you do not answer it, or your
phone is busy, switched off, or outside of the network service area.
Cancel all diverts: Sets all divert options off. If you select this option, the steps below will not be
available.
2. Set the selected option on (Activate) or off (Cancel), check whether the divert option is activated
(Status), or specify a delay for it (not available for all divert options).
1. The divert options that are not supported by your network operator may not be shown.
84
Copyright © 2004 Nokia. All rights reserved.
1
Page 85

3. If you selected Activate, select where the incoming calls are to be diverted to (voice mailbox or
another phone number).
If you selected Status, pressing (Number) shows the phone number to which the calls are
diverted.
Pressing (Detail), if available, and then selecting Delay shows the time after which calls are
diverted.
Several divert options may be active at the same time.
When all calls are diverted, is shown in standby mode.
Each phone line may have its own divert settings. See also Phone line in use on page 77.
Tip: When you receive a call, pressing diverts the call if Divert when busy is activated.
Copyright © 2004 Nokia. All rights reserved.
Call divert (Menu 7)
85
Page 86

12. Games (Menu 8)
The phone offers you the following games to play: Snake II, Space impact, Bantumi,
Pairs II, Bumper
To access this menu: In standby mode, press (Menu), scroll to Games, and
press (Select).
Games (Menu 8)
Note: Your phone must be switched on to use this function. Do not switch on the phone when
wireless phone use is prohibited or when it may cause interference or danger.
■ Adjusting the settings for all the games
1. In the Games menu, scroll to Settings and press (Select).
2. Scroll to the desired setting and press (Select).
You can set the sounds, lights, and vibrator (Shakes), and save the Club Nokia membership number.
You need the membership number to use Club Nokia services, for example to send your high score.
For more information on Club Nokia and the game services, visit www.club.nokia.com.
Note that when the Vibrating alert function is set off, the phone does not vibrate even if the
Shakes function is on.
■ Playing a game
1. In the Games menu, scroll to Select game and press (Select).
2. Scroll to the game that you want to play, and press (Select).
86
Copyright © 2004 Nokia. All rights reserved.
Page 87

3. Scroll to one of the following options and press (Select). All the options may not available for
the selected game.
• New game: Starts a new game session.
• High scores: Shows the highest scores so far. To send your score to the scoreboard on Club
Nokia’s Web site, scroll to the desired score and press (Submit). The score is sent to Club
Nokia via WAP connection.
• Instructions: Shows a help text on how to play the game. You can scroll through the text with
or .
• Continue: Resumes a game that you paused by pressing or . Start the game by pressing
any key except for , , or .
• Options: You can adjust the settings (e.g. difficulty level) of the selected game.
■ Making a connection to the WAP service of Club Nokia
In the Games menu, scroll to Game services and press (Select).
Your phone tries to connect to the WAP pages of Club Nokia by using the currently active set of
connection settings.
If the connection fails and an error message (such as Check service settings) is displayed, you may not
be able to access Club Nokia from the WAP service whose connection settings are currently active. In
this case, enter the Services menu, activate some other set of connection settings (see Making a
connection to a WAP service on page 102) and try to connect to Club Nokia again by using this Game
services function.
For the availability of different WAP services, pricing and tariffs, contact your network operator and/or
the WAP service provider.
Games (Menu 8)
Copyright © 2004 Nokia. All rights reserved.
87
Page 88

13. Calculator (Menu 9)
The phone is provided with a basic four function calculator which can also be used for
rough currency conversions.
The calculator has a limited accuracy and rounding errors may occur, especially in long
divisions.
To access this menu: In standby mode, press (Menu), scroll to Calculator, and press
Calculator (Menu 9)
(Select).
Note: Your phone must be switched on to use this function. Do not switch on the phone when
wireless phone use is prohibited or when it may cause interference or danger.
■ Making a calculation
You can use the following keys for keying in a calculation:
• - : Inserts a digit. To change the sign, press (Options) and select Change sign.
• : Inserts a decimal point.
• : Deletes the digit to the left.
• : Press once (for + ) to add, twice (for - ) to subtract, three times (for * ) to multiply and four
times (for / ) to divide. Alternatively, you can press (Options) and select the desired function.
• For a total, press (Options) and select Equals. Press and hold to clear the display for a new
calculation.
88
Copyright © 2004 Nokia. All rights reserved.
Page 89

■ Making a currency conversion
1. To set the exchange rate:
• Press (Options) and select Exchange rate.
• Select either of the displayed exchange options and press (OK).
For example, if you live in the UK and want to convert pounds sterling to French francs, select
Domestic unit expressed in foreign units.
• Key in the exchange rate and press (OK). inserts a decimal point.
2. To make the conversion:
• Key in the currency amount to be converted.
• Press (Options).
• Scroll to In domestic or In foreign, and press (OK). In the example above, you would select
In foreign since you want to convert your domestic currency (pounds sterling) to a foreign
currency (francs).
■ Currency conversion in standby mode
You can make currency conversions in standby mode. To use this function you need to first set the
exchange rate in the Calculator menu.
1. Key in the amount that you want to convert to the domestic or foreign currency. Press for a
decimal point (an asterisk appears).
2. Press or twice. The text above changes from Call to Convert and the asterisk changes
to a decimal point.
3. Press (Convert).
You can return to standby mode by pressing (OK).
Calculator (Menu 9)
Copyright © 2004 Nokia. All rights reserved.
89
Page 90

14. Reminders (Menu 10)
With this memory aid you can save short text notes with an alarm. The phone starts
alarming when the set date and time is reached.
To access this menu: In standby mode, press (Menu), scroll to Reminders, and
press (Select).
Note: Your phone must be switched on to use this function. Do not switch on the phone when
Reminders (Menu 10)
wireless phone use is prohibited or when it may cause interference or danger.
■ Adding a reminder
1. Scroll to Add new and press (Select).
2. Write a note (see Writing text on page 39).
3. When the note is ready, press (OK) for the options below. Scroll to the desired option and press
(OK).
• Alarm on: Sets an alarm for the note. Key in the date and press (OK), and then key in the
time and press (OK).
• Alarm off : No alarm is set for the note.
90
Copyright © 2004 Nokia. All rights reserved.
Page 91

■ Viewing the reminders
1. Scroll to View all and press (Select).
2. Scroll to the desired note. You can press (Options) for the following:
• Erase: Deletes the note.
• Edit: You can modify the note and the alarm date and time.
• Send: You can send the note without alarm as a text message (SMS) to a compatible phone.
■ Erasing a reminder
1. Scroll to Erase and press (Select).
2. Scroll to one of the following options and press (OK):
• One by one: Deletes the reminders one at a time. Select the reminder that you want to delete,
and press (Erase).
• All: Deletes all the reminders. Press (Yes) to confirm the removal.
■ When the reminder time is reached
If the phone is switched on, it sounds an alarm and flashes its lights and the reminder text. You can
stop the alarm by pressing . If you press (Snooze), the alarm stops for a few minutes.
If the phone is switched off, the reminder is displayed when you switch on the phone again.
Copyright © 2004 Nokia. All rights reserved.
91
Reminders (Menu 10)
Page 92

15. Clock (Menu 11)
The phone is provided with a clock which can also be used as an alarm clock.
This menu also contains time settings, a stopwatch and a countdown timer.
To access this menu: In standby mode, press (Menu), scroll to Clock, and press (Select).
Clock (Menu 11)
■ Alarm clock (Menu 11-1)
The phone can be set to alarm at the desired time.
If the alarm was off when you entered this function, key in the desired alarm time in hours and
minutes, and press (OK).
If the alarm was on when you entered this function, select On to change the alarm time or Off to turn
off the alarm.
When the alarm time is reached
The phone sounds an alert tone at the volume selected within the Ringing volume function (see page
71), and flashes its lights and the text Alarm!. You can stop the alarm by pressing any key.
If you let the phone alarm for one minute or press (Snooze), the alarm stops for a few minutes
and then resumes.
If the alarm time is reached while the phone is switched off, the phone starts alarming. If you press any
other key but (Snooze), the phone asks whether you want to activate the phone for calls. Press
(Yes) to switch on the phone or to keep the phone switched off.
92
Copyright © 2004 Nokia. All rights reserved.
Page 93

Note: Do not switch on the phone when wireless phone use is prohibited or when it may cause
interference or danger.
■ Clock settings (Menu 11-2)
You can set the time display on or off, adjust the time, or select the 12-hour or 24-hour time format.
When the time display is on, the time is shown in standby mode.
If the battery is removed from the phone, you may need to reset the time.
■ Date setting (Menu 11-3)
You can set the correct date for the built-in clock.
■ Stopwatch (Menu 11-4)
The stopwatch can be used for time measurement, for example in different sports.
The precision of the stopwatch is one hundredth of a second. The total measurement time is 10 hours
at maximum.
Note that using the stopwatch consumes the battery and the phone’s operating time will be reduced.
Be careful not to let it run in the background when performing other operations with your phone.
Note: Your phone must be switched on to use this function. Do not switch on the phone when
wireless phone use is prohibited or when it may cause interference or danger.
1. In this menu, press (Start) to start timing.
2. To take the time, press (Stop). When the timing is stopped, you can press (Options) for
the following functions. Scroll to the desired function and press (Select).
Clock (Menu 11)
Copyright © 2004 Nokia. All rights reserved.
93
Page 94

Start: Restarts the timing from the previous stop time.
Reset: Stops the current timing and sets the time to zero.
Exit: Exits to standby mode. To continue the timing, enter this menu.
To set the timing to continue in the background, press twice. While the time is running, flashes
in standby mode.
■ Countdown timer (Menu 11-5)
Clock (Menu 11)
With the countdown timer you can set the phone to alarm after a certain time.
Note: Your phone must be switched on to use this function. Do not switch on the phone when
wireless phone use is prohibited or when it may cause interference or danger.
To set the alarm time, key in the time in hours and minutes. Press (Start) to start the timer.
To stop the timer or edit the time, enter this menu, select the desired function, and press (OK).
When the timer is running, is shown in standby mode.
If the alarm time is reached when the phone is in standby mode, the phone sounds a tone and flashes
the related text. You can stop the alarm by pressing any key. If no key is pressed in 30 seconds, the
alarm stops automatically.
■ Auto update of date and time (Menu 11-6)
This network service updates the clock in your phone in accordance with the current time zone.
If you select On, the time and date are updated automatically.
If you select Confirm first, the phone asks for a confirmation before the update.
If you select Off , the time and date are not updated.
94
Copyright © 2004 Nokia. All rights reserved.
Page 95

16. Profiles (Menu 12)
You can set the phone tones and screen saver to function in the desired manner by
selecting the desired setting group or ’profile’.
This makes it easy to adjust the phone for different events and environments.
To access this menu: In standby mode, press (Menu), scroll to Profiles, and press (Select).
Note that you can easily adjust the settings of the selected profile in the Tones menu (see page 71).
■ Selecting a profile for use
To change the profile that your phone is using, do either of the following:
• In standby mode or during a call: Press the key quickly. Scroll to the desired profile and press
(OK).
•In the Profiles menu, scroll to the desired profile, press (Select), scroll to Activate, and press
(OK).
Tip: To activate a profile quickly in standby mode, press and the number key corresponding
to the desired profile. For example, to activate the Silent profile, press and . To change
back to the General profile, press and .
■ Changing the settings of a profile
1. In the Profiles menu, scroll to the profile whose settings you want to edit and press (Select).
You can select from the following profiles:
Profiles (Menu 12)
Copyright © 2004 Nokia. All rights reserved.
95
Page 96

• General: This is the default setting.
• Silent: Mutes all the phone tones. When the tones are off, is shown in standby mode.
• Discreet: Sets the phone tones to be quiet.
• Loud: Sets the phone tones to be loud.
• (empty): You can replace this profile with a profile that you have received e.g. from your service
provider. For availability and other information, contact your service provider or other profile
Profiles (Menu 12)
provider.
2. Scroll to Personalise and press (OK).
3. Scroll to the desired setting (see below) and press (Select).
4. Scroll to the setting option and press (OK).
■ Settings available in a profile
Ringing tone
Sets the ringing tone for voice calls. Scroll to the desired tone and press (OK). The tones that you
have received from somebody or that you have composed yourself can be found at the end of the tone
list.
Ringing volume
Sets the volume level for the ringing and message alert tones. Scroll to the desired level and press
(OK).
96
Copyright © 2004 Nokia. All rights reserved.
Page 97

Incoming call alert
Defines how the phone notifies you of incoming voice calls. The options are: Ringing, Ascending, Ring
once, Beep Once, and Off.
When Off is selected, all phone tones are mute and is displayed.
Message alert tone
Sets the call alert for text messages. Scroll to the desired tone and press (OK).
Keypad tones
Sets the volume level for keypad tones. Scroll to the desired level and press (OK).
Warning tones
Sets the phone to sound a warning tone, for example when the battery is running out of power. This
setting has no effect on the tones that are related to network services.
Vibrating alert
Sets the phone to vibrate when you receive a voice call or a text message. You can also set the phone to
first vibrate and then ring.
The vibrating alert is disabled when the phone is connected to a charger or a desktop stand.
Screen saver
Sets the picture that is displayed in standby mode after a selected period of time (called ’timeout’). You
can select from the same pictures as in the Picture messages menu.
Profiles (Menu 12)
Copyright © 2004 Nokia. All rights reserved.
97
Page 98

Scroll to Off, On (previously selected screen saver is shown), Timeout, or Screen saver, and press
(OK).
If you selected Screen saver, the currently selected screen saver picture is shown. To change it, scroll to
the desired picture, and press (Use). If you selected Timeout, scroll to the desired time and press
(OK).
The use of an animated picture as a screensaver uses power so it reduces the operation time of your
phone.
Profiles (Menu 12)
Rename
You can change the name of the profile. This function is not available for the General profile.
Key in the new name (see Writing text on page 39) and press (OK).
■ Receiving a profile (profile name, ringing tone, and screen saver)
When you receive a profile sent, for example, from a Web site, you hear a message tone and the related
text is displayed. For availability and other information, contact your service provider or other profile
provider.
1. Press (Options) and select Details (to view the profile details), Save (to add the profile to the
profile list), or Discard (to erase the profile).
2. If you selected Details, scroll to the desired setting (profile name, ringing tone or screen saver) and
press to view or hear it.
If you selected Save, scroll to the profile that you want to replace with the new one, and press
(OK).
98
Copyright © 2004 Nokia. All rights reserved.
Page 99

17. WAP services (Services - Menu 13)
In this menu you can access various WAP (Wireless Application Protocol) services such
as banking, online games, and entertainment. These services are specifically designed
for mobile phones and they are maintained by WAP service providers.
To access this menu: In standby mode, press (Menu), scroll to Services, and press (Select).
Note: Your phone must be switched on to use this function. Do not switch on the phone when
the use of a wireless phone is prohibited or when it may cause interference or danger.
Check the availability of WAP services, pricing and tariffs with your network operator and/or the WAP
service provider whose service you want to use. Service providers will also give you instructions on how
to use their services.
Note that WAP services use Wireless Mark-up Language (WML) on their WAP pages. Web pages using
the Hyper-Text Mark-up Language (HTML) cannot be viewed on your phone.
■ Basic steps for accessing and using a WAP service
1. Obtain the connection settings that are needed to access a WAP service that you want to use.
See Setting up the phone for a WAP service.
2. Save the connection settings.
See Setting up the phone for a WAP service. See also Adjusting the appearance settings of WAP
pages on page 105.
WAP services (Services - Menu 13)
Copyright © 2004 Nokia. All rights reserved.
99
Page 100

3. Make a call, i.e. connection, to the given WAP service. See Making a connection to a WAP service on
page 102.
4. Start browsing the pages of the WAP service. See Browsing the pages of a WAP service on page 103.
5. Once you are done with browsing, end the connection to the WAP service. See Ending a WAP
connection on page 105.
■ Setting up the phone for a WAP service
You may obtain the connection settings as a text message from the network operator or service
provider that offers the WAP service that you want to use. For more information, contact your network
operator or service provider, or visit Club Nokia’s Web site (www.club.nokia.com).
If this is not the case, you can key in the settings manually. For appropriate settings, contact your
network operator or service provider. The WAP settings may be available for example on the Web site
of the network operator or service provider.
WAP services (Services - Menu 13)
Saving the settings received as a text message
When you receive the connection settings as a text message, Service settings received is displayed.
• To save the received settings: Press (Options), scroll to Save, and press (Select).
• If you want to view the settings before saving them: Press (Options), scroll to View, and press
(Select).
Press (Save) to save the settings or to return to the option list.
100
Copyright © 2004 Nokia. All rights reserved.
 Loading...