

Page 1

Nokia Customer Care
6-T roubleshooting
Instructions
ISSUE 1 09/2004 Copyright © 2004 Nokia Corporation. All rights reserved
Page 2

RH-59/60
Nokia Customer Care 6-Troubleshooting Instructions
[This page left intentionally blank]
2 COMPANY CONFIDENTIAL ISSUE 1 09/2004
Copyright © 2004 Nokia. All Rights Reserved.
Page 3
RH-59/60
Nokia Customer Care
Table of Contents
Page No
Baseband troubleshooting................................................................................. 7
Baseband test points ......................................................................................... 7
Troubleshooting diagrams ................................................................................. 7
Phone is dead.................................................................................................... 8
Flash programming do not work ........................................................................ 9
Power does not stay on or phone is jammed................................................... 10
Display information : "Contact Service"............................................................ 11
The phone do not register to the network, or the phone cannot make a call... 12
SIM related faults............................................................................................. 13
Insert SIM card fault ....................................................................................... 13
SIM-Card rejected .......................................................................................... 14
Audio related faults 1: Earpiece and microphone ............................................ 15
Audio related faults 2: Headset........................................................................ 16
Charging failure troubleshooting...................................................................... 17
Charging troubleshooting 2.............................................................................. 18
General RF Troubleshooting............................................................................ 19
RF key component placement ......................................................................... 20
RH-60 Receiver Troubleshooting .................................................................... 23
General instructions for GSM850 RX troubleshooting..................................... 23
Troubleshooting diagram for GSM850 Receiver ........................................... 24
General instructions for RH-60 GSM1900 RX troubleshooting........................ 26
Phoenix commands .......................................................................................26
Troubleshooting diagram for GSM1900Receiver ........................................... 27
Measurement points in the receiver ...............................................................29
RH-60 transmitter troubleshooting................................................................... 31
Measurement points for the transmitter .........................................................31
General instructions for RH-60 GSM TX troubleshooting................................ 32
GSM850 TX output power .............................................................................33
General instructions for RH-60 GSM1900 TX troubleshooting........................ 34
Phoenix commands .......................................................................................34
GSM1900 TX output power ........................................................................... 34
Troubleshooting diagram for GSM1900 TX..................................................... 35
General Instructions for RH-59 GSM900 RX Troubleshooting...................... 37
Troubleshooting chart for GSM900 receiver .................................................. 38
General instructions for GSM1800 RX troubleshooting................................... 40
Troubleshooting Chart for GSM1800Receiver ............................................... 41
Measurement points in the receiver ...............................................................42
RH-59 Transmitter troubleshooting.................................................................. 44
Measurement points for the transmitter .........................................................44
General instructions for RH-59 GSM TX troubleshooting................................ 45
ISSUE 1 09/2004 COMPANY CONFIDENTIAL 3
Copyright © 2004 Nokia. All Rights Reserved.
Page 4
RH-59/60
Nokia Customer Care
PCN Transmitter general instructions for PCN TX troubleshooting................. 47
Synthesizer...................................................................................................... 48
26 MHz Reference Oscillator ( VCXO ) ......................................................... 48
VCO ...............................................................................................................48
Troubleshooting diagram for PLL Synthesizer ...............................................49
Phone fails after power on ............................................................................. 50
Measurement points at the VCXO ................................................................. 50
Measurement points at the PLL/VCO ............................................................51
List of Figures
Page No
Fig 1 Phone is dead troubleshooting..................................................................... 6
Fig 2 Flash programming fault .............................................................................. 7
Fig 3 Phone jammed troubleshooting ................................................................... 8
Fig 4 Troubleshooting when Contact Service message seen............................... 9
Fig 5 No call troubleshooting................................................................................. 10
Fig 6 SIM troubleshooting..................................................................................... 11
Fig 7 Signal diagram............................................................................................. 11
Fig 8 Signal diagram............................................................................................. 12
Fig 9 Top: Earpiece troubleshooting, bottom: Microphone troubleshooting.......... 13
Fig 10 Headset troubleshooting............................................................................ 14
Fig 11 Charging troubleshooting 1........................................................................15
Fig 12 Charging troubleshooting 2........................................................................16
Fig 13 RF key components ................................................................................... 18
Fig 14 Supply points at UEM (D200).................................................................... 19
Fig 15 Supply point at Mjoelner (N600)................................................................. 19
Fig 16 GSM850 RF controls window..................................................................... 21
Fig 17 GSM850 Receiver troubleshootingt ...........................................................22
Fig 18 RX850 I/Q signal waveform ....................................................................... 23
Fig 19 GSM1900 RF controls ............................................................................... 24
Fig 20 GSM1900 receiver troubleshooting diagram.............................................. 25
Fig 21 RX1900 I/Q signal waveform .................................................................... 26
Fig 22 RX measurements point at the RX/TX Switch - Z700................................ 27
Fig 23 Measurements points at the RX-Filters – Z601/Z602 ................................ 27
Fig 24 RX I/Q signals, baseband shielding can UEM (D200) ............................... 28
Fig 25 TX measurement points in the PA ( N700 ) shielding can ........................ 29
Fig 26 TX measurement point in Mjolner (N600) shielding can............................ 29
Fig 27 :GSM850 RF controls window....................................................................30
Fig 28 VPCTRL_G & TXC..................................................................................... 31
Fig 29 GSM1900 RF controls screen shot............................................................32
Fig 30 GSM1900 TX troubleshooting.................................................................... 33
Fig 31 GSM900 RF controls window..................................................................... 35
Fig 32 EGSM receiver troubleshooting chart........................................................ 36
Fig 33 RX900 I/Q signal waveform ....................................................................... 37
Fig 34 GSM1800 RF control window ...................................................................38
Fig 35 GSM1800 receiver Troubleshooting chart ................................................. 39
Fig 36 RX1800 I/Q signal waveform ..................................................................... 40
4 COMPANY CONFIDENTIAL ISSUE 1 09/2004
Copyright © 2004 Nokia. All Rights Reserved.
Page 5

RH-59/60
Nokia Customer Care
Fig 37 RX measurements point at the RX/TX Switch - Z700................................ 40
Fig 38 Measurements points at the RX-Filters – Z601/Z602 ................................ 41
Fig 39 RX I/Q Signals, baseband shielding can UEM (D200)............................... 41
Fig 40 TX measuremnet points in the PA ( N700 ) shielding can ........................ 42
Fig 41 TX measurement point in Mjolner (N600) shielding can............................ 42
Fig 42 GSM900 RF controls window ....................................................................43
Fig 43 VPCTRL_G and TXC signal ...................................................................... 44
Fig 44 RF controls window ...................................................................................45
Fig 45 VCXO 26 MHz waveform..........................................................................46
Fig 46 PLL Troubleshooting diagram....................................................................47
Fig 47 Figure 22: Measurement point for VCXO supply ....................................... 48
Fig 48 Figure 23: Measurement point for VCXO output........................................48
Fig 49 Measurement point for PLL........................................................................ 49
ISSUE 1 09/2004 COMPANY CONFIDENTIAL 5
Copyright © 2004 Nokia. All Rights Reserved.
Page 6

Nokia Customer Care
RH-59/60
[This page left intentionally blank]
6 COMPANY CONFIDENTIAL ISSUE 1 09/2004
Copyright © 2004 Nokia. All Rights Reserved.
Page 7
RH-59/60
Nokia Customer Care
Baseband Troubleshooting
■ Baseband test points
This document contains the Nokia 2600 troubleshooting diagrams.
Test points are described and listed in the A3 schematic diagrams.
■ Tr oubleshooting diagrams
In this section, Troubleshooting diagrams is prov ided for the most common problems of the Nokia 2600
NOTE : Since both D200 (UEM) and D400(UPP) are underfilled, they can not be replaced. If
either D200 or D400 is defective, the whole PWB has be discarded.
ISSUE 1 09/2004 COMPANY CONFIDENTIAL 7
Copyright © 2004 Nokia. All Rights Reserved.
Page 8
RH-59/60
Nokia Customer Care
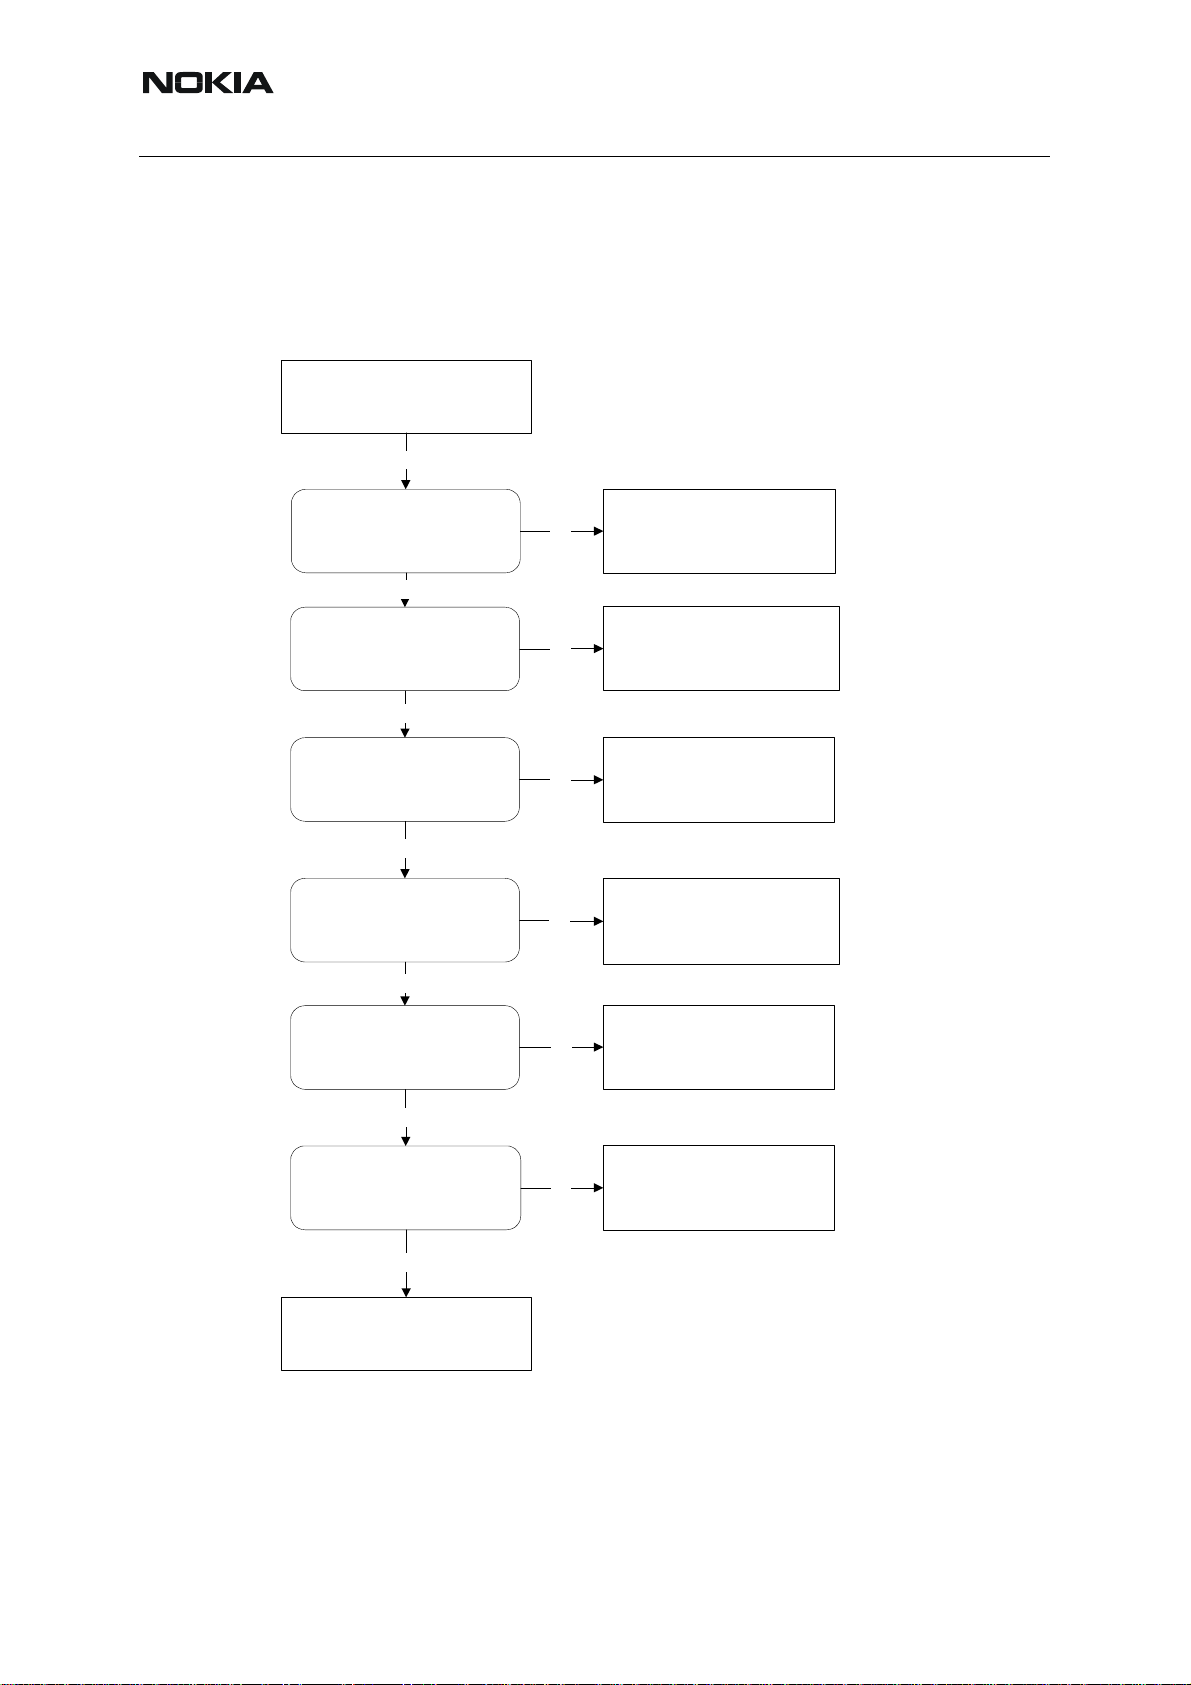
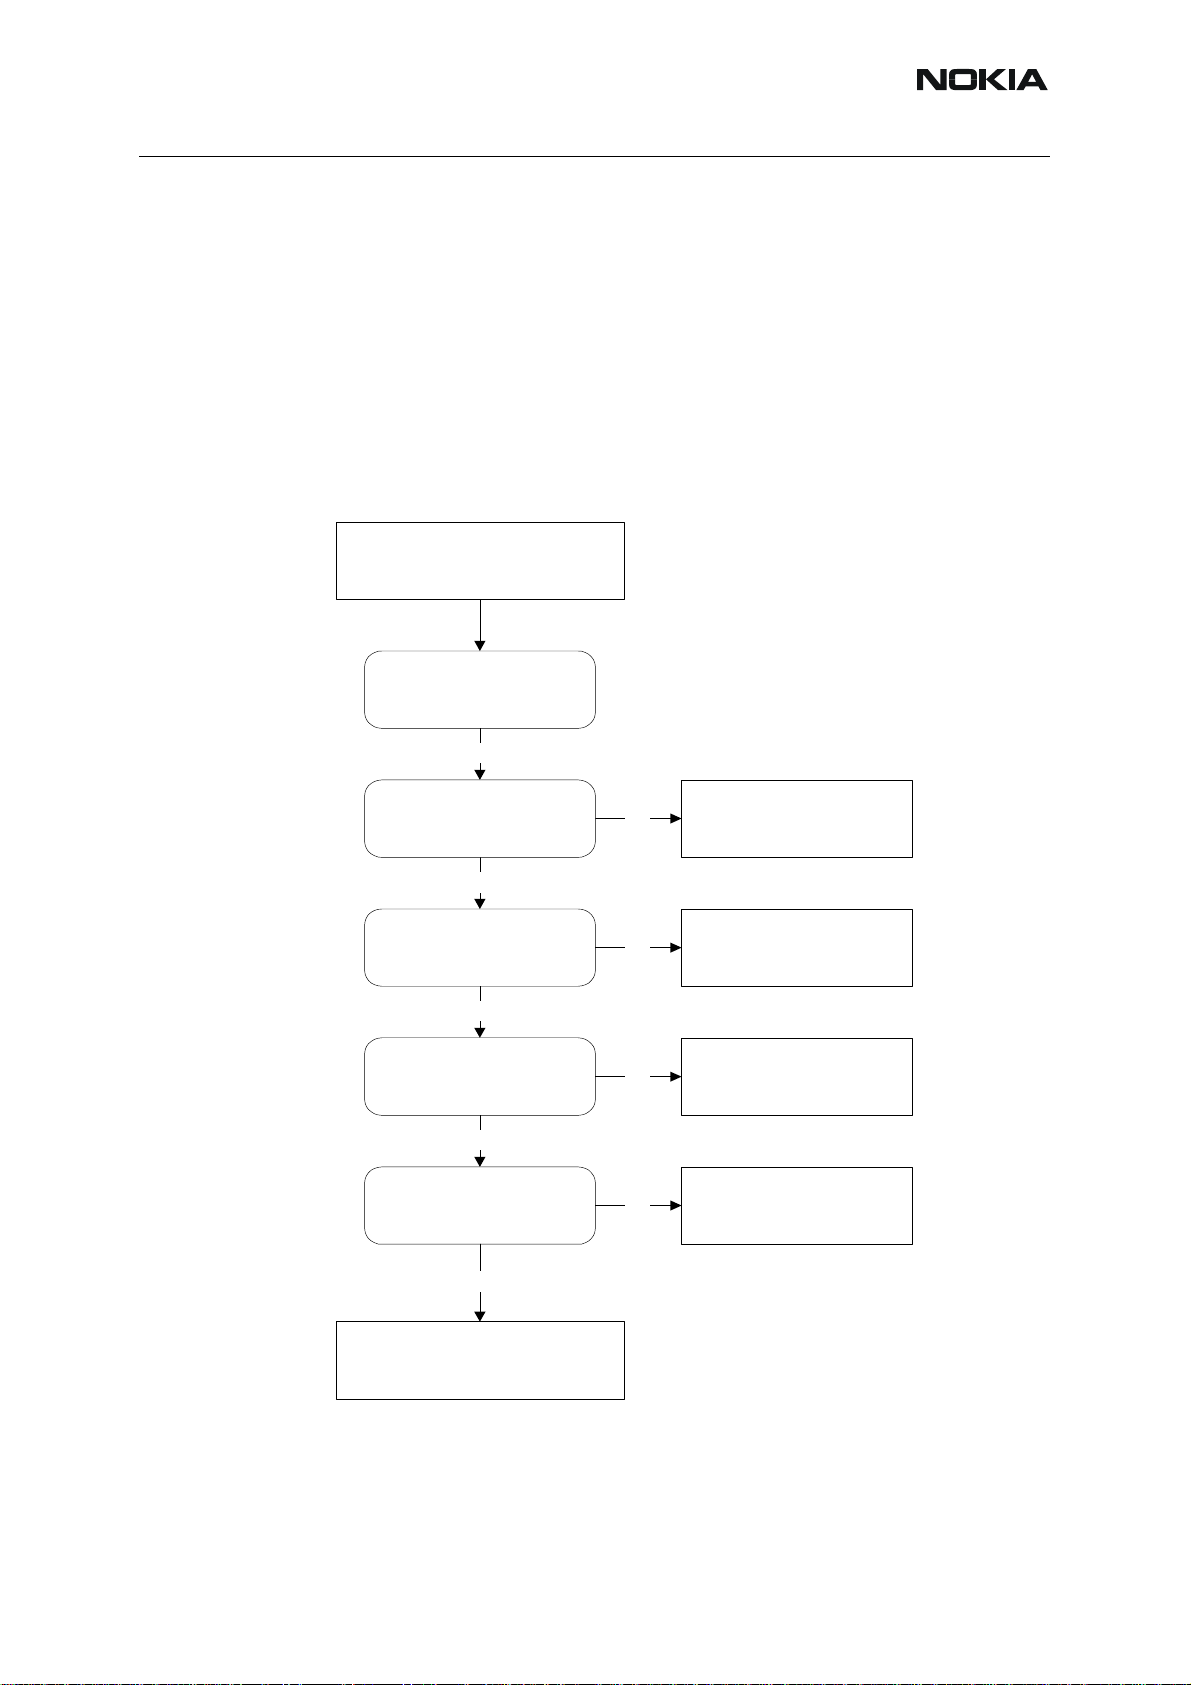
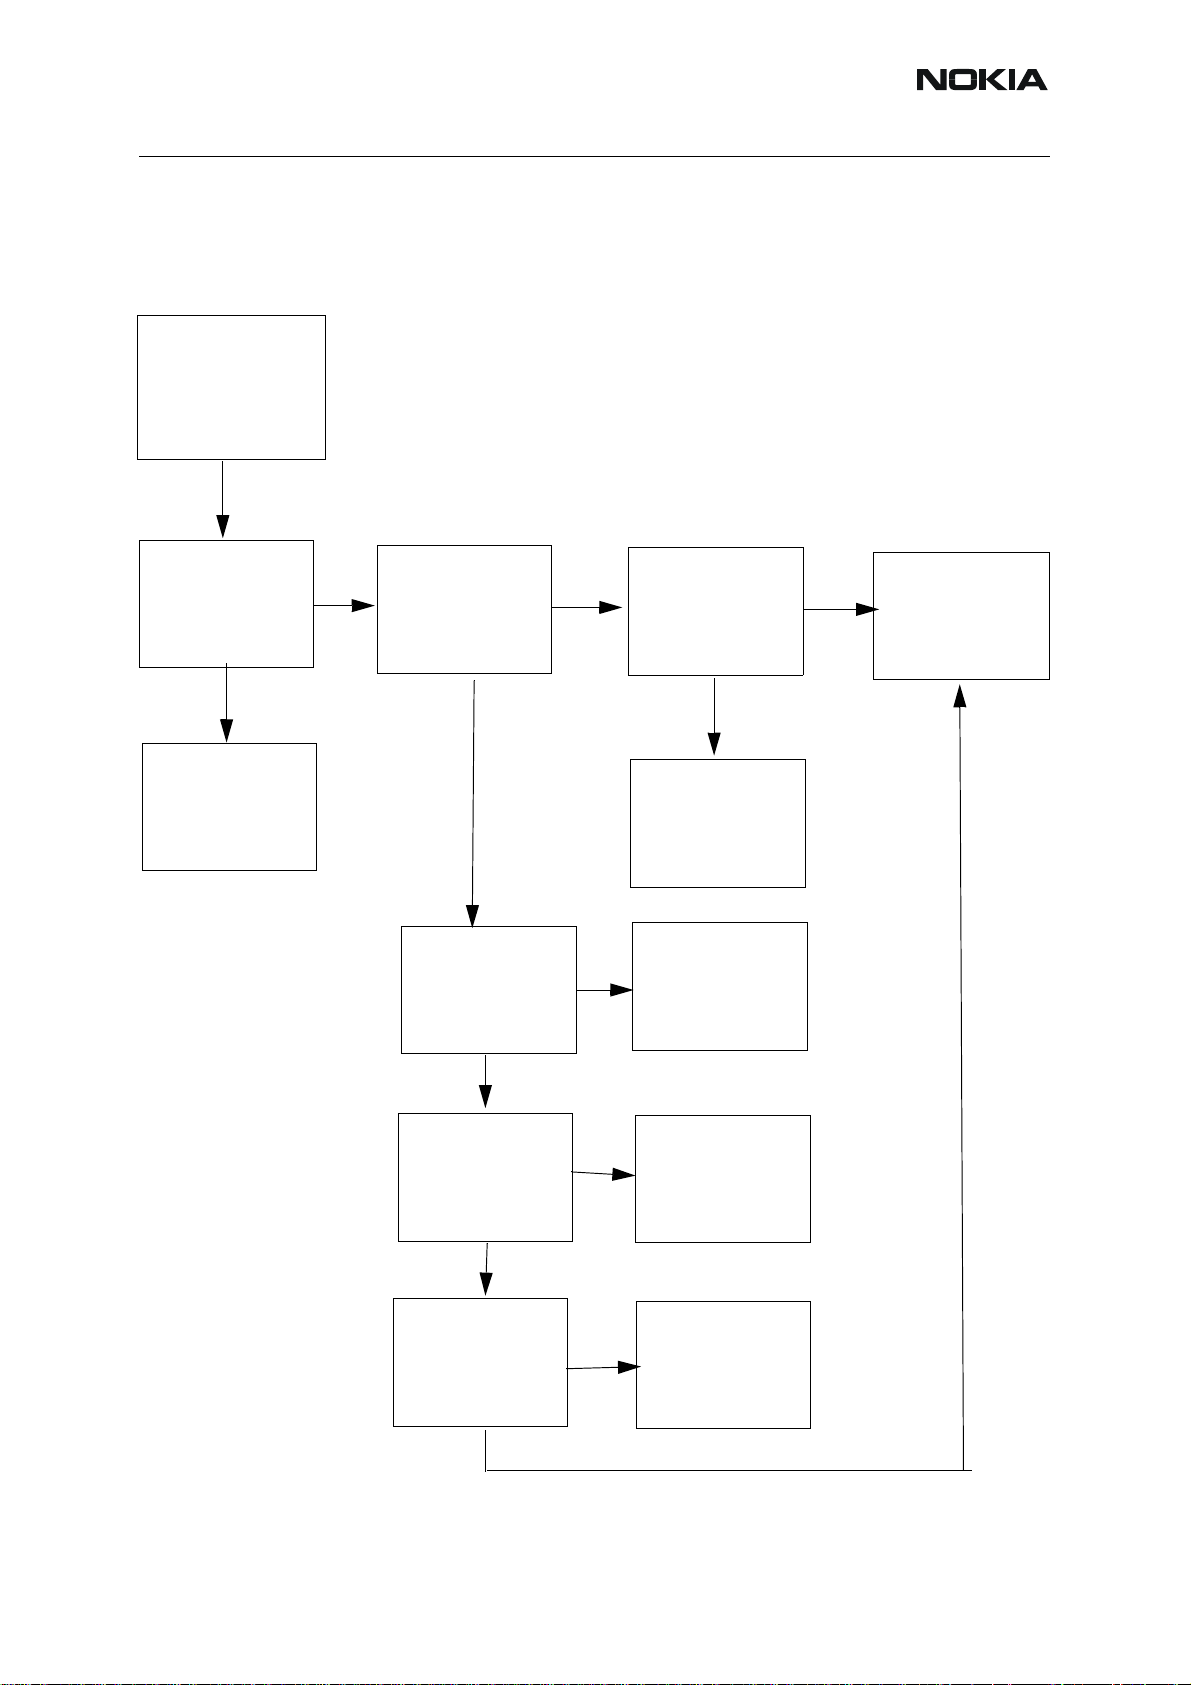
■ Phone is dead
This means that the phone do not draw any current at all when supply is connected and/or
powerkey is pressed.
It is assumed that the voltage supplied is 3.6 VDC. The UEM will pre vent any functionality what
so ever at battery/supply levels below 2.9 VDC.
Phone is dead
Yes
X105
VBAT = 3,6VDC
Yes
L260,L261,L262,L263,L264,L265
C260,C261,C262,C263,C264,C265
Voltage = 3,6VDC
Yes
J404
Sleep-clock is
32.768 kHz, 1,8Vpp
Yes
J402
PURX = 1,8VDC,
1 sec. after power-key
is pressed
Yes
C227
VR3 = 2,78VDC
No
No
No
No
No
Check :
X105
Check :
L260,L261,L262,L263,L264,L265
C260,C261,C262,C263,C264,C265
Check :
B200, C209, C210, PW B. Else
defective D200*
Check :
PWB.
Else defective D200*
Check :
C227, PWB.
Else defective D200*
Yes
26 MHz clock min. 300mVACpp,
R426
probe Cin=10-13 pF/10M
Yes
No
Check :
C227, PWB.
Else defective D200*
Check :
D450 (Flash).
Else defective D200*
Figure 1:Phone is dead troubleshooting
8 COMPANY CONFIDENTIAL ISSUE 1 09/2004
Copyright © 2004 Nokia. All Rights Reserved.
Page 9
RH-59/60
Nokia Customer Care
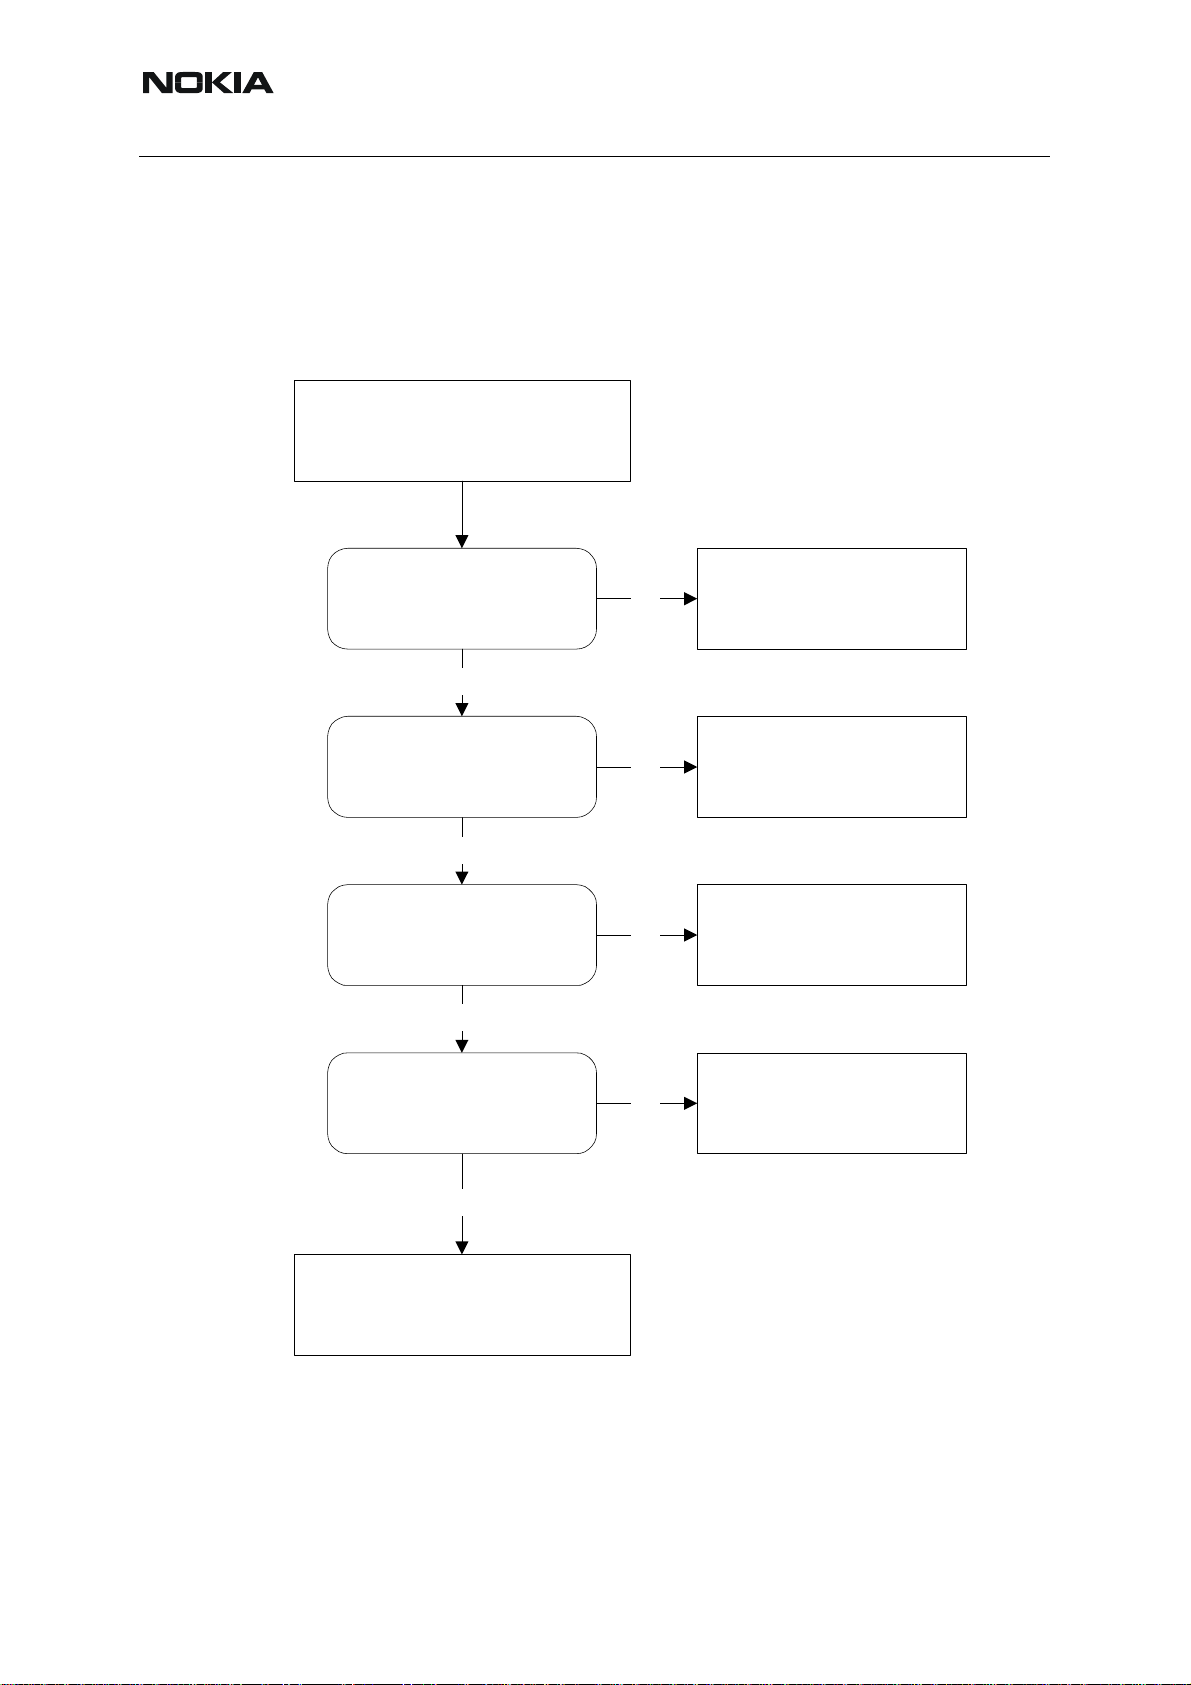
■ Flash programming do not work
The flash programming can only be done via the pads on the PWB (J396).
In case of Flash failure in FLALI station, problem is most likely related to SMD problems. Pos-
sible failures could be short-circuit of balls under µBGAs (UEM, UPP, FLASH). Missing or misaligned components.
In flash programming error cases the flash prommer can give some information about a fault.
The fault information messages could be:
- Phone doesn't set FBUS_TX line low
Because of the use of uBGA components it is not possible to verify if there is a short circu it in
control- and address lines of MCU (UPP) and memory (flash).
Flash prgramming
do not work
Error fro m p ro mmer:
"Phone doesn't set
FBUS_T X line low"
Yes
J396, R108
Check connection between
pad 1,2 & 3 on J396
and R108
Yes
J409, J410, J411, J412
Voltage level at 1,8VDC
Yes
Try re a d in g MCU ID
with Phoenix.
Reading OK?
Yes
Try reading Flash ID
with Phoenix.
Reading OK?
No
No
No
No
Check :
R108, PW B
Check :
PWB.
Else defective D200*
Check :
PWB.
Else defictive D400*
Check :
Replace D450
Yes
Reflash phone
Figure 2:Flash programming fault
ISSUE 1 09/2004 COMPANY CONFIDENTIAL 9
Copyright © 2004 Nokia. All Rights Reserved.
Page 10
RH-59/60
Nokia Customer Care
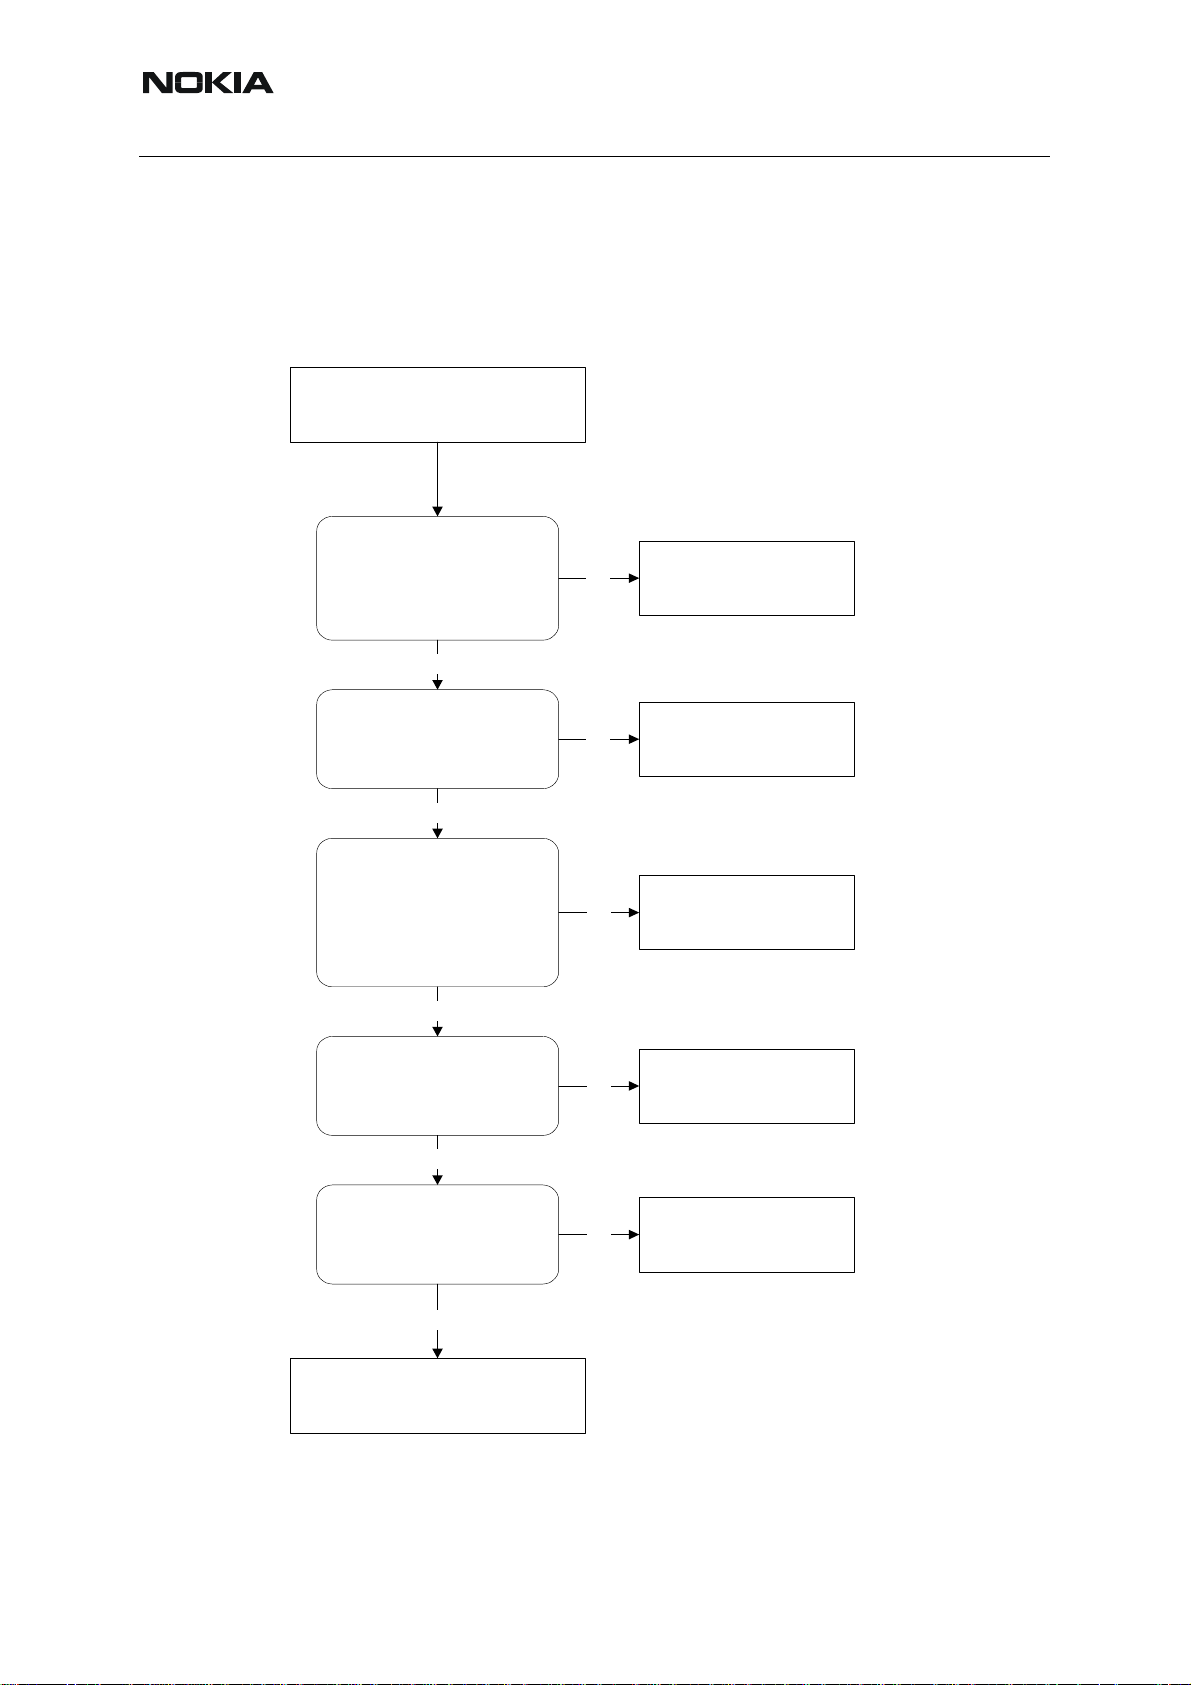
■ Power does not stay on or phone is jammed
If this kind of failure is presenting itself immediately after FLALI, it is most likely caused by
ASICs missing contact with PWB.
If for some reason the MCU does not service the watchdog register within the UEM, the operations watchdog will run out after approximately 32 seconds. Unfortunately , the service routine
can not be measured.
Power doesn't stay on,
or phone is jammed
J404
Sleep clock = 32.768 kHz,
1.8Vpp
Yes
J402
PURX = 1,8VDC,
1 sec. after power-key i s
pressed
Yes
UI functionality,
and keys react
to pressure?
Yes
R426
26 MHz clock min.
300mVACpp,
probe Cin=10-13 pF/10M
No
No
No
No
Check :
B200, C209, C210, PW B.
Else defective D200*
Check :
PWB.
Else defictive D200*
Check :
D450, Keymat,
Lightguide, PWB .
Else defective D400*
Check :
C420, C426, R420,
R426, N600(Mjoelner)
Yes
Reflash phone
Figure 3:Phone jammed troubleshooting
10 COMPANY CONFIDENTIAL ISSUE 1 09/2004
Copyright © 2004 Nokia. All Rights Reserved.
Page 11
RH-59/60
Nokia Customer Care
■ Display information : "Contact Service"
This error can only happen at power up where several self-tests is run. If any of these test cases
fails the display will show the message: "Contact Service".
It's individual test cases so the below lineup of error hunting's has no chronological order . Use
common sense and experience to decide which test case to start error hunting at.
Display shows
"Contact Service"
Yes
EarDa & MicDa
between
UPP and UEM?
MBUS interface
between
UPP and UEM?
AuxDa & UEMInt
between
UPP and UEM?
SleepX & SleepClk
between UPP & UEM?
TXI/QD & RXI/QD?
SIM interface between
UPP & UEM
No
Check :
PWB.
Else defecti v e D20 0*
or D400*
Key is stucked
Flash checksum
y ASIC version vs. compilation flag, PMM checksum
y PMM validity
y Warrenty Information State
y SIM-Lock
Check :
A-cover, Keymat, Lightguide,
PWB.
Reflash phone
Check :
PWB.
Else defective D450 (FL A S H)
Figure 4:Troubleshooting when Contact Service message seen
ISSUE 1 09/2004 COMPANY CONFIDENTIAL 11
Copyright © 2004 Nokia. All Rights Reserved.
Page 12
RH-59/60
Nokia Customer Care
■ The phone do not register to the network, or the phone cannot make a call
If the phone doesn't register to the network, the fault can be in either BB or RF . Only few signals
can be tested since several signals is 'burried' in one or more of the inner layers of the PWB.
First of all check that SIM LOCK is not causing the error by using a Test-SIM card and connect
the phone to a tester.
Phone do not register to
network
or phone cannot make a call
C222, C223, C224, C225,
C226, C227
Voltage = ~2,78VDC
All during GSM frame-
call mode.
Use TXP on C646 as trigger
Yes
C230, C231
Voltage = ~1,35VDC
All during GSM frame (call mode)
Use TXP on C646 as trigger
Yes
J421, J422, J423
Check RF serial bus during
GSM-frame :
Logic HIGH = 1,8VDC
Logic LOW = 0V DC
RFBUSC LK (J421),
RFBUSD A (J422),
RFBUSEN1X (J423)
Yes
R601, R603
Check analog signals during
GSM-frame (RX slot):
RXIP/N (R601) = 0-1,45VDC
RXQP/N (R603) = 0-1,45VDC
Check :
No
C222,C223, C224, C225,
C226, C 227 , P WB .
Else defective D200 or D400*
Check :
No
C230, C 231 , P WB .
Else defective
D200* or D400*
Check :
No
Else defective D200*
Check :
No
Else defective D200*
PWB.
or D400*
PWB.
or D400*
Yes
R610, R611
Check analog signals during
GSM-frame (TX slot):
TXIP/N (R610) = 1-1,75VDC
TXQP/N (R611) = 1-1,75VDC
Yes
No
Check :
R610, R 611 ,P WB .
Else defective D200*
or D400*
Check RF
Figure 5:No call troubleshooting
12 COMPANY CONFIDENTIAL ISSUE 1 09/2004
Copyright © 2004 Nokia. All Rights Reserved.
Page 13
RH-59/60
Nokia Customer Care
■ SIM related faults
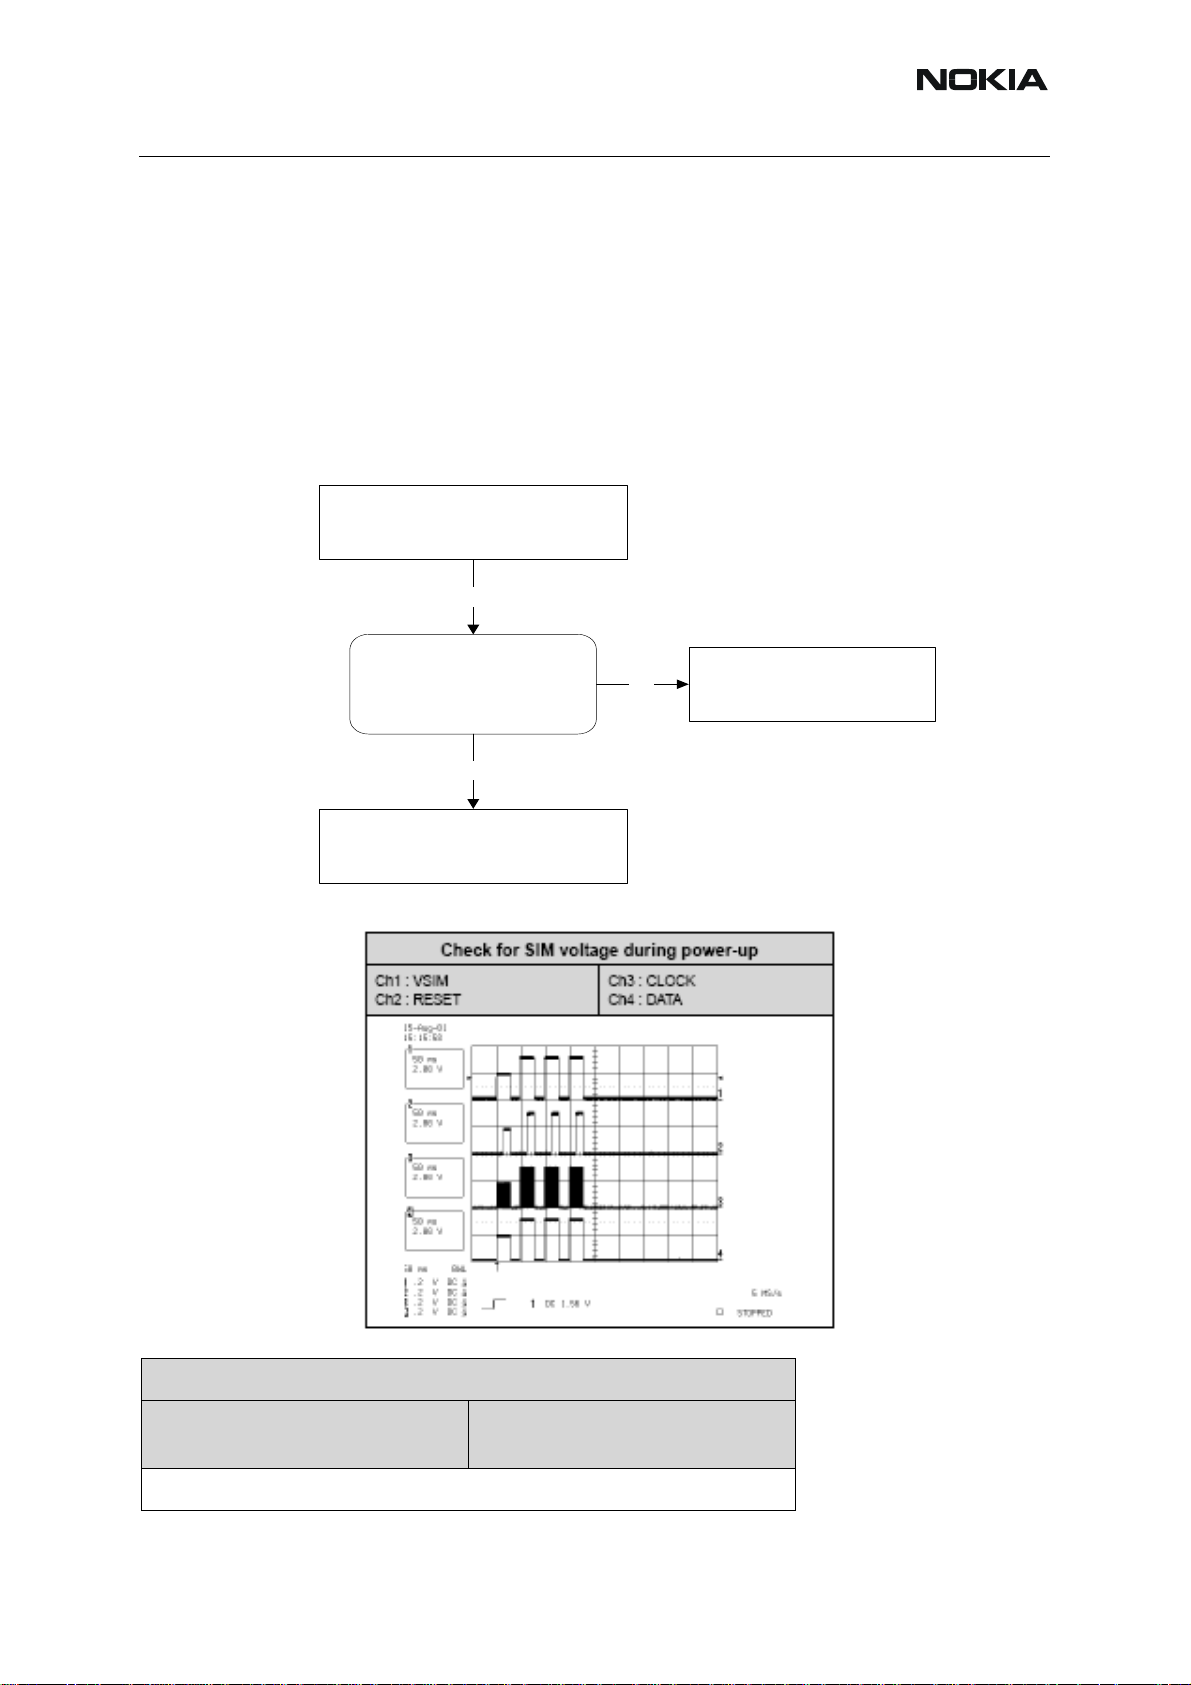
Insert SIM card fault
The hardware of the SIM interface from UEM (D200) to the SIM connector (X387) can be tested
without a SIM card. When the power is switched on the phone first check for a 1,8V SIM card
and then a 3V SIM card. The phone will try this four times, whereaf ter it will display ”Insert SIM
card”.
Figure 6:SIM troubleshooting
Display shows :
"Insert SIM Card"
Yes
Verify that phone checks for
X387
1,8V-SIM, and then 3V-SIM
during power-up.
(See illustration below)
Yes
SIM Interface OK
Figure 7:Signal diagram
No
Check :
X387, R386, PWB.
Else defective D200*
Check for SIM voltage during power-up
Ch1 : VSIM
Ch2 : RESET
ISSUE 1 09/2004 COMPANY CONFIDENTIAL 13
Copyright © 2004 Nokia. All Rights Reserved.
Ch3 : CLOCK
Ch4 : DATA
Page 14
RH-59/60
Nokia Customer Care
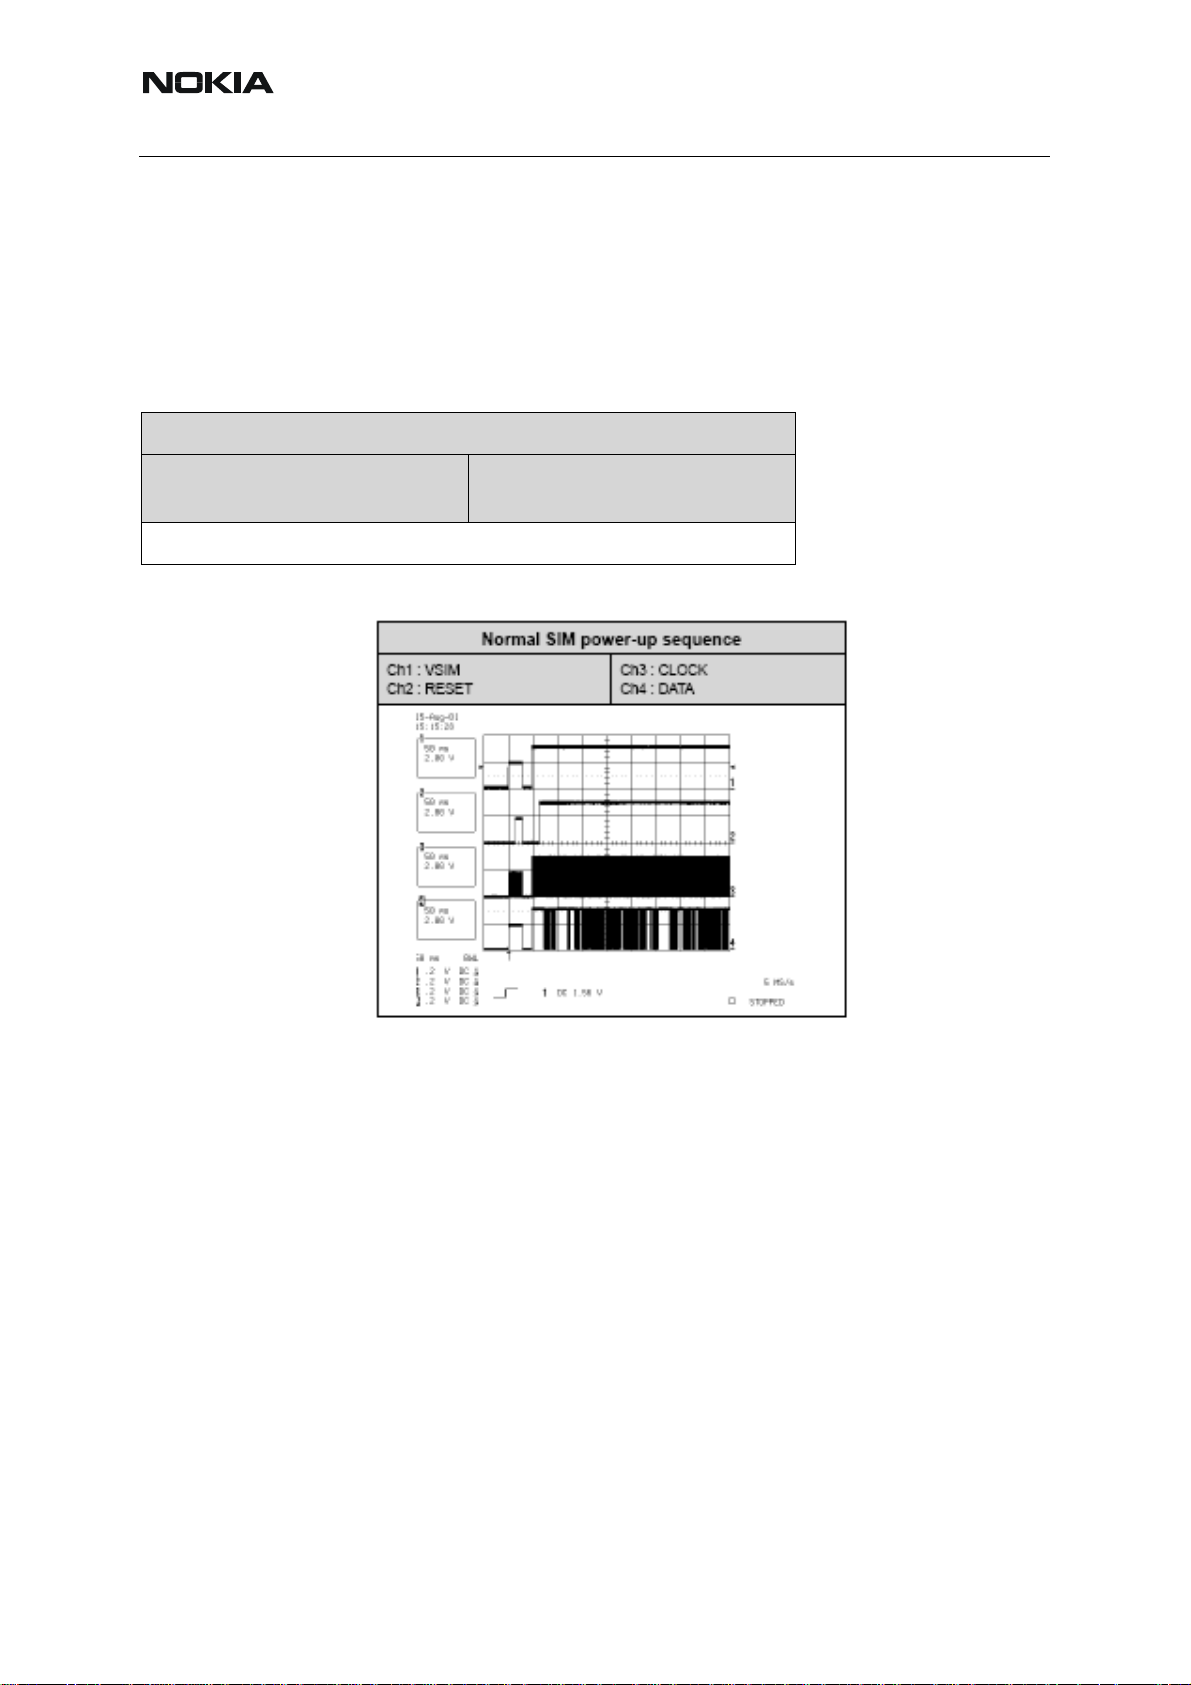
SIM-Card rejected
The error ”SIM card rejected” means that the A TR message received from SIM card is corrupted, e.g. data signal levels are wrong. The first data is always ATR and it is sent from card to
phone.
For reference a picture with normal SIM power-up is shown below.
Normal SIM power-up sequence
Ch1 : VSIM
Ch2 : RESET
Ch3 : CLOCK
Ch4 : DATA
Figure 8:Signal diagram
14 COMPANY CONFIDENTIAL ISSUE 1 09/2004
Copyright © 2004 Nokia. All Rights Reserved.
Page 15
RH-59/60
Nokia Customer Care
■ Audio related faults 1: Earpiece and microphone
Figure 9:Top: Earpiece troubleshooting, bottom: Microphone troubleshooting
Earpiece do not work
Replace :
Earpiece
Error still present
Z150, R161
Check Z150, R161 is
working correctly
(no short/open-circuit)
Yes
Defective D200*
Microphone do not work and
the isn't any mechanical
problem
Z100
Check Z100 is
working correctly
(no short/open-circuit)
Replace :
System Connoctor
No
No
Check :
R386, PWB.
Else defective D200*
Replace :
Z100
Error still present
R165
Check voltage level on
R165 towards UEM (bias)
= 2,1V
Yes
R153
Check voltage level on
R153 towards mic-lines (bias)
= 1,0V - 1,4V
No
No
Check :
R165, C168, PWB.
Else defctive D200*
Check :
R153, R157,C151, C152,
C153, C154, PWB.
ISSUE 1 09/2004 COMPANY CONFIDENTIAL 15
Copyright © 2004 Nokia. All Rights Reserved.
Page 16
Nokia Customer Care
■ Audio related faults 2: Headset
Figure 10:Headset troubleshooting
Headset earpiece do not
work and the isn't any
mechanical problem
RH-59/60
R183, Z102
Check R183, Z102 is
working correctly
(no open-circuit)
Defective D200*
Headset microphone do not
work and the isn't any
mechanical problem
R166
Check voltage level on R166
towards UEM (bias) = 2,1V
Yes
R151
Check voltage level on R151
towards UEM (bias)
= 1,0V - 1,4V
Yes
No
No
No
Replace :
C183 and/or Z102
Replace :
C183 and/or Z102
Check :
R166, R151, C171
R152, R165, R168,
C172, C170, C173,
C174, Z101
Check XMIC line to UEM
(D200)
Error still present
No
Replace :
Defective component
Defective D200*
16 COMPANY CONFIDENTIAL ISSUE 1 09/2004
Copyright © 2004 Nokia. All Rights Reserved.
Page 17

RH-59/60
■ Charging failure troubleshooting
Figure 11:Charging troubleshooting 1
Phone is OFF - battery is
completely empty
(<=3,1VDC)
and no current from
charger when connected
Nokia Customer Care
L100
VCHAR > 2,1VDC
Yes
Defective D200*
No
Check :
F100, L100, V100, C100,
R200, System-c onnector.
Phone is ON or OFF - battery
nominal voltage (~3,6VDC)
and no current from
charger when connected
L100
VCHAR > 3,6VDC
No
Check :
F100, L100, V100, C100,
R200, System-c onnector.
Yes
Defective
D200 or D400*
ISSUE 1 09/2004 COMPANY CONFIDENTIAL 17
Copyright © 2004 Nokia. All Rights Reserved.
Page 18

Nokia Customer Care
■ Charging troubleshooting 2
Figure 12:Charging troubleshooting 2
Display info when
charger is connected :
"Not charging"
RH-59/60
Voltage on R206 towards
R206
D200 is ~0,8VDC
when power is connected.
(BSI must be 75K)
Yes
R207
Voltage (use scope) on R207
towards D200 is ~0,9VDC at
peak.
(BSI must be 47K)
Yes
R200
Voltage on R200 towards
D200 same as VBAT voltage
Yes
R200
Voltage rises slowly on
R200 towards D200 when
charger is connected.
Yes
No
No
No
No
Check :
X105, R202, R206, C240.
Check :
X105, R202, R207, C220.
Check :
R200, PWB.
Else defective D200*v
Check :
PWB.
Else defective D200*
Check :
PWB
18 COMPANY CONFIDENTIAL ISSUE 1 09/2004
Copyright © 2004 Nokia. All Rights Reserved.
Page 19

RH-59/60
Nokia Customer Care
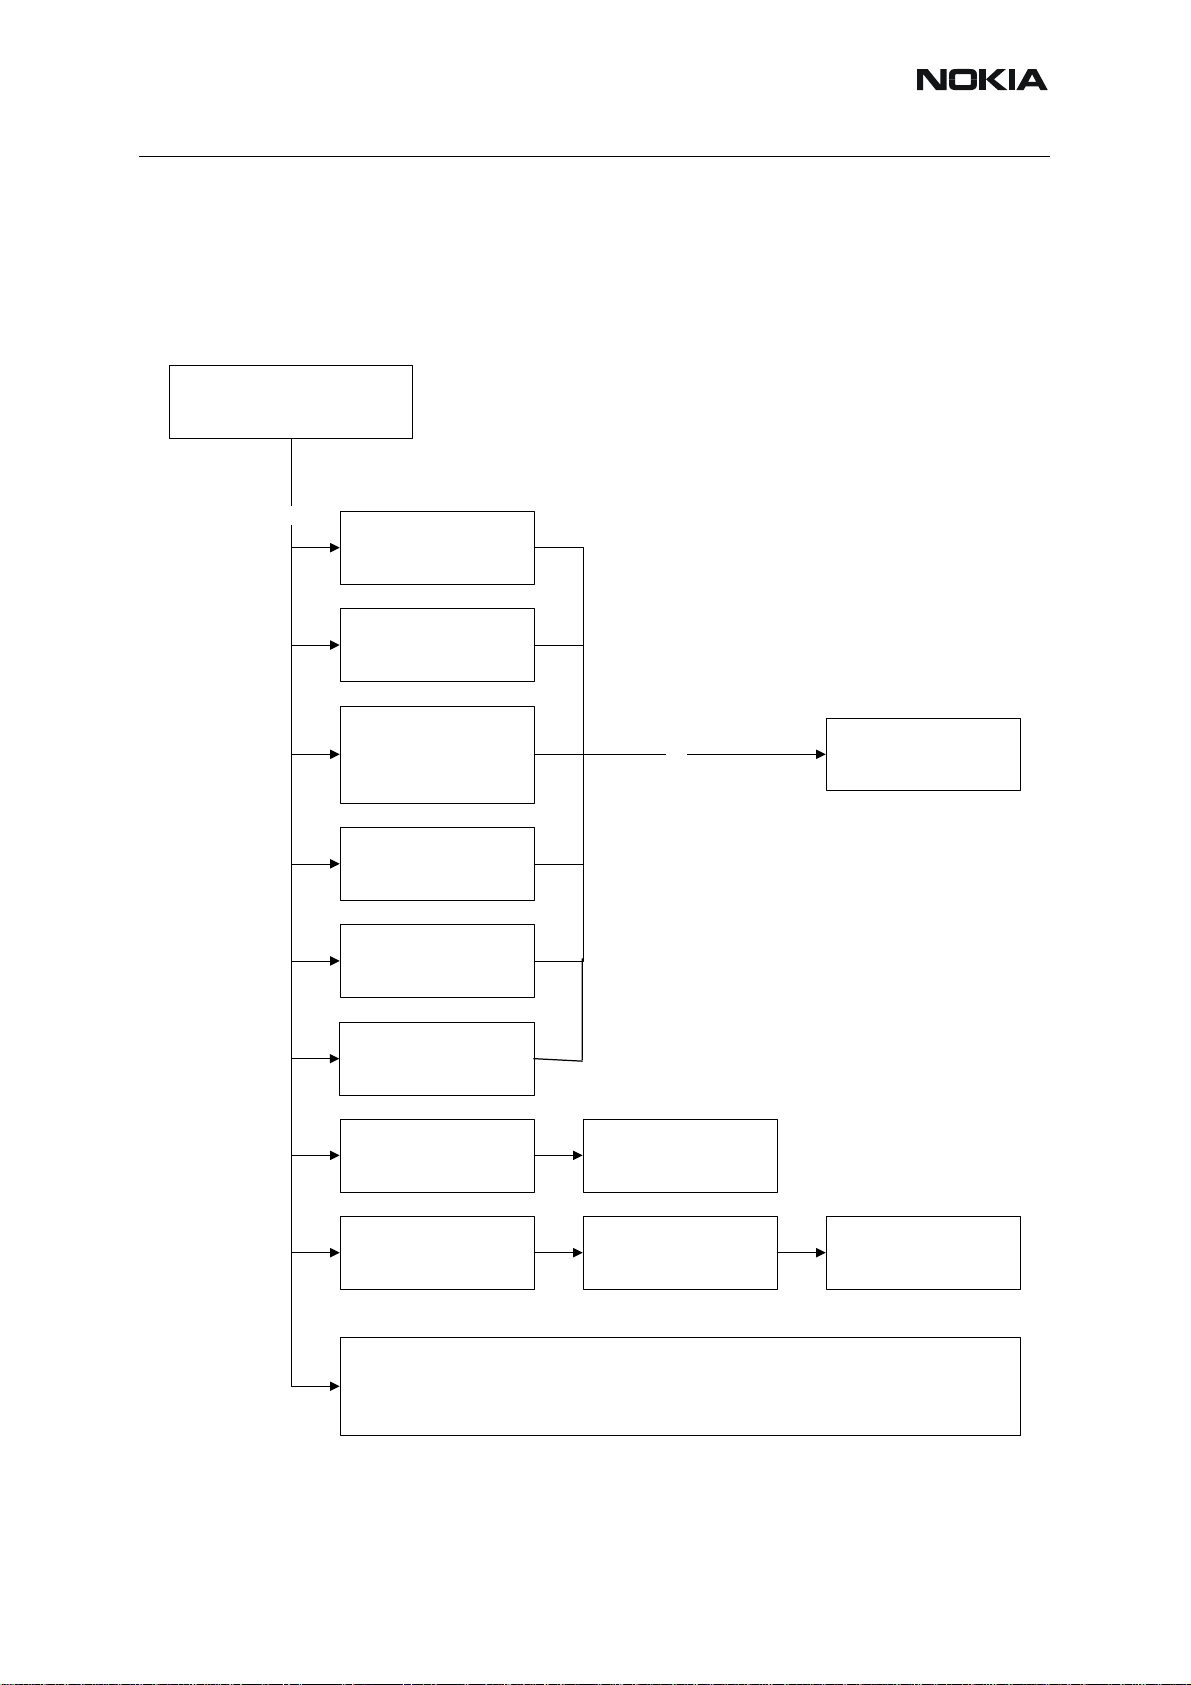
General RF Troubleshooting
Two types of measurements are used in the following. It will be specified if the measurement
type is "RF" or "LF".
• • RF measurements are done with a Spectrum Analyser and a high-frequency 500
ohm passive probe, for example HP54006A. (Note that when measuring with the
500 ohm probe the signal will be around 20 dB attenuated. The values in the following will have these 20 dB subtracted and represent the real value seen on the spectrum analyser).
Note that the testjig have some losses which must be taken into consideration wh en calibrating
the test system.
• • LF (Low frequency) and DC measurements should be done with a 10:1 probe
and an oscilloscope. The probe used in the following is 10MW/8pF passive probe.
If using another probe then bear in mind that the voltages displayed may be sligh tly
different.
Always make sure the measurement set-up is calibrated when measuring RF parameters on
the antenna pad. Remember to include the loss in the module repair jig when realigning the
phone.
Most RF semiconductors are static discharge sensitive.
plied during repair (ground straps and ESD soldering irons). Mjoelner and Bifrost is moisture
sensitive so parts must be pre-baked prior to soldering.
Apart from key-components described in this document there are a lot of discrete components
(resistors, inductors and capacitors) for which troubleshooting is done by checking if soldering
of the component is done properly and checking if the component is missing from PWB. Capacitors can be checked for short-circuiting and resistors for value by means of an ohmmeter,
but be aware in-circuit measurements should be evaluated carefully.
In the following both the name EGSM and GSM850 will be used for the lower band and both
PCN and GSM1900 will be used for the upper band.
So ESD protection must be ap-
ISSUE 1 09/2004 COMPANY CONFIDENTIAL 19
Copyright © 2004 Nokia. All Rights Reserved.
Page 20

Nokia Customer Care
■ RF key component placement
Figure 13:RF key components
RH-59/60
Table 1: RF component placement
N600 Mjoelner RF IC
Z601 PCN RX SAW
Z602 EGSM RX SAW
Z603 EGSM TX SAW
B600 26 MHz crystal
G600 VCO ( 4.0 GHz UHF VCO )
N700 Power Amplifier (PA)
Z700 RX/TX switch
20 COMPANY CONFIDENTIAL ISSUE 1 09/2004
Copyright © 2004 Nokia. All Rights Reserved.
Page 21

RH-59/60
Refer to the picture below for measuring points at the UEM (D200).
Figure 14:Supply points at UEM (D200)
Nokia Customer Care
Figure 15:Supply point at Mjoelner (N600)
ISSUE 1 09/2004 COMPANY CONFIDENTIAL 21
Copyright © 2004 Nokia. All Rights Reserved.
Page 22

Nokia Customer Care
RH-59/60
[This page left intentionally blank]
22 COMPANY CONFIDENTIAL ISSUE 1 09/2004
Copyright © 2004 Nokia. All Rights Reserved.
Page 23

RH-59/60
RH-60 Receiver Troubleshooting
■ General instructions for GSM850 RX troubleshooting
Connect the phone to a PC with the module repair jig.
Start Phoenix and establish connection to the phone
Phoenix commands
RF Controls .Band GSM 850 RX .Continuous mode
Channel 190 .AGC 8 FEG ON + 46 dB
The setup should now look like this:
Nokia Customer Care
Figure 16:GSM850 RF controls window
ISSUE 1 09/2004 COMPANY CONFIDENTIAL 23
Copyright © 2004 Nokia. All Rights Reserved.
Page 24

Nokia Customer Care
Troubleshooting diagram for GSM850 receiver
Figure 17:GSM850 receiver troubleshootingt
Apply -55dBm
881.6 MHz
offset 67.71kHz
from generator
to
antenna conn
YES
RH-59/60
Oscilloscope
at RX i/Q
signal 588mVpp
DC offset 1.35V
Freq.67.71kHz
YES
GSM850
chain
OK
Check RX/TX
switch at
RX850
Z700
-56dBm
YES
Spectrum analyzer
GSM850 SAW filter
Z602
output
-65dBm
YES
Spectrum analyzer
check signal after
inductors
L602 and L603
-65DbM
NO NO
NO
Oscilloscope
check
VC1 and VC2
at Z700
Signal = 0V
NO
YES
Check
RX/TX
switch
Check
SAW filter
Z602
Check
Inductor
L603, L602
Check Mjoelner
YES
YES
Oscilloscope
VRX 2.7V
Check Mjoelner
serial
interface
NO
Check
Baseband
24 COMPANY CONFIDENTIAL ISSUE 1 09/2004
Copyright © 2004 Nokia. All Rights Reserved.
Page 25

RH-59/60
Nokia Customer Care
By measuring with an oscilloscope at RXIP or RXQP on a working GSM 850 receiver this picture should be seen.
Signal amplitude peak-peak 789 mV
DC offset 1.2 V
Figure 18:RX850 I/Q signal waveform
ISSUE 1 09/2004 COMPANY CONFIDENTIAL 25
Copyright © 2004 Nokia. All Rights Reserved.
Page 26

Nokia Customer Care
■ General instructions for RH-60 GSM1900 RX troubleshooting
Connect the phone to a PC with the module repair jig.
Start Phoenix and establish connection to the phone
Phoenix commands
RF Controls .Band GSM 1900 RX .Continuous mode
Channel 661 .AGC 8 FEG ON + 46 dB
The setup should now look like this:
Figure 19:GSM1900 RF controls
RH-59/60
26 COMPANY CONFIDENTIAL ISSUE 1 09/2004
Copyright © 2004 Nokia. All Rights Reserved.
Page 27
RH-59/60
Troubleshooting diagram for GSM1900 receiver
Figure 20:GSM1900 receiver troubleshooting diagram
Apply -55dBm
1960.0 MHz
offset 67.71kHz
from generator
to
antenna conn
YES
Nokia Customer Care
Oscilloscope
at RX i/Q
signal 588mVpp
DC offset 1.35V
Freq.67.71kHz
YES
GSM850
chain
OK
Check RX/TX
switch at
RX1900
Z700
-56dBm
YES
Spectrum analyzer
PCN SAW filter
Z602
output
-65dBm
YES
Spectrum analyzer
check signal after
inductors
L601 and L611
-65DbM
NO NO
NO
Oscilloscope
check
VC1 and VC2
at Z700
Signal = 0V
NO
YES
Check
RX/TX
switch
Check
SAW filter
Z601
Check
Inductor
L601, L611
Check Mjoelner
YES
YES
Oscilloscope
VRX 2.7V
Check Mjoelner
serial
interface
NO
Check
Baseband
ISSUE 1 09/2004 COMPANY CONFIDENTIAL 27
Copyright © 2004 Nokia. All Rights Reserved.
Page 28

RH-59/60
Nokia Customer Care
By measuring with an oscilloscope at RXIP or RXQP on a working GSM 1900 receiver this picture should be seen.
Signal amplitude peak-peak 460 mV
DC offset 1.2 V
Figure 21: RX1900 I/Q signal waveform
28 COMPANY CONFIDENTIAL ISSUE 1 09/2004
Copyright © 2004 Nokia. All Rights Reserved.
Page 29

RH-59/60
Measurement points in the receiver
Figure 22:RX measurements point at the RX/TX Switch - Z700
Nokia Customer Care
Figure 23:Measurements points at the RX-Filters – Z601/Z602
ISSUE 1 09/2004 COMPANY CONFIDENTIAL 29
Copyright © 2004 Nokia. All Rights Reserved.
Page 30

Nokia Customer Care
Figure 24:RX I/Q signals, baseband shielding can UEM (D200)
RH-59/60
30 COMPANY CONFIDENTIAL ISSUE 1 09/2004
Copyright © 2004 Nokia. All Rights Reserved.
Page 31

RH-59/60
■ RH-60 transmitter troubleshooting
Measurement points for the transmitter
Figure 25: TX measurement points in the PA ( N700 ) shielding can
Nokia Customer Care
Power amp.
Figure 26:TX measurement point in Mjolner (N600) shielding can
ISSUE 1 09/2004 COMPANY CONFIDENTIAL 31
Copyright © 2004 Nokia. All Rights Reserved.
Page 32

RH-59/60
Nokia Customer Care
■ General instructions for RH-60 GSM TX troubleshooting
Apply a RF-cable to the RF-connector to allow the transmitted signal act as normal. RF-cable
should be connected to measurement equipment or to at least a 10-dB attenuator, otherwise
the PA may be damaged.
Start Phoenix-Service-Software and establish a connection to the phone e.g. FBUS.
Select File and Product: Gemini
Select: Maintenance, Testing and RF Controls
Band:GSM 850
Active Unit:TX
Tx Power Level:5
Tx Data Type:Random
Your screen should look like:
Figure 27::GSM850 RF controls window
32 COMPANY CONFIDENTIAL ISSUE 1 09/2004
Copyright © 2004 Nokia. All Rights Reserved.
Page 33

RH-59/60
Nokia Customer Care
GSM850 TX output power
Measure the output power of the phone; it should be around 32.1 dBm.
Remember the loss in the jig; around 0.3 dB.
Figure 28:VPCTRL_G & TXC
ISSUE 1 09/2004 COMPANY CONFIDENTIAL 33
Copyright © 2004 Nokia. All Rights Reserved.
Page 34

RH-59/60
Nokia Customer Care
■ General instructions for RH-60 GSM1900 TX troubleshooting
Apply a RF-cable to the RF-connector to allow the transmitted signal act as normal. RF-cable
should be connected to measurement equipment or to at least a 10-dB attenuator, otherwise
the PA may be damaged.
Start Phoenix-Service-Software and establish a connection to the phone e.g. FBUS.
Phoenix commands
RF Controls .Band GSM 1900 RX .Continuous mode
Channel 661
Your screen should look like:
Figure 29:GSM1900 RF controls screen shot
GSM1900 TX output power
Measure the output power of the phone.
It should be around 29.7 dBm.
Remember the loss in the jig; around 0.7 dB.
34 COMPANY CONFIDENTIAL ISSUE 1 09/2004
Copyright © 2004 Nokia. All Rights Reserved.
Page 35

RH-59/60
■ Tr oubleshooting diagram for GSM1900 TX
Figure 30:GSM1900 TX troubleshooting
Nokia Customer Care
ISSUE 1 09/2004 COMPANY CONFIDENTIAL 35
Copyright © 2004 Nokia. All Rights Reserved.
Page 36

Nokia Customer Care
RH-59/60
[This page left intentionally blank]
36 COMPANY CONFIDENTIAL ISSUE 1 09/2004
Copyright © 2004 Nokia. All Rights Reserved.
Page 37

RH-59/60
Nokia Customer Care
General Instructions for RH-59 GSM900 RX Troubleshooting
Connect the phone to a PC with the module repair jig.
Start Phoenix and establish connection to the phone
Phoenix commands
RF Controls .Band GSM 900 RX .Continuous mode
Channel 37. AGC 8 FEG ON + 46 dB
The setup should now look like this:
Figure 31:GSM900 RF controls window
ISSUE 1 09/2004 COMPANY CONFIDENTIAL 37
Copyright © 2004 Nokia. All Rights Reserved.
Page 38

Nokia Customer Care
Troubleshooting chart for GSM900 receiver
Figure 32:EGSM receiver troubleshooting chart
Apply -55dBm
942.4 MHz
offset 67.71kHz
from generator
to
antenna conn
YES
RH-59/60
Oscilloscope
at RX i/Q
signal 588mVpp
DC offset 1.35V
Freq.67.71kHz
YES
EGSM
chain
OK
Check RX/TX
switch at
RX900
Z700
-56dBm
YES
Spectrum analyzer
EGSM SAW filter
Z602
output
-65dBm
YES
Spectrum analyzer
check signal after
inductors
L602 and L603
-65DbM
NO NO
NO
Oscilloscope
check
VC1 and VC2
at Z700
Signal = 0V
NO
YES
Check
RX/TX
switch
Check
SAW filter
Z602
Check
Inductor
L603, L602
Check Mjoelner
YES
YES
Oscilloscope
VRX 2.7V
Check Mjoelner
serial
interface
NO
Check
Baseband
38 COMPANY CONFIDENTIAL ISSUE 1 09/2004
Copyright © 2004 Nokia. All Rights Reserved.
Page 39

RH-59/60
Nokia Customer Care
By measuring with an oscilloscope at RXIP or RXQP on a working GSM 900 receiver this picture should be seen.
Signal amplitude peak-peak 789 mV
DC offset 1.2 V
Figure 33:RX900 I/Q signal waveform
ISSUE 1 09/2004 COMPANY CONFIDENTIAL 39
Copyright © 2004 Nokia. All Rights Reserved.
Page 40

Nokia Customer Care
■ General instructions for GSM1800 RX troubleshooting
Connect the phone to a PC with the module repair jig.
Start Phoenix and establish connection to the phone
Phoenix commands
RF Controls .Band GSM 1800 RX .Continuous mode
Channel 700 .AGC 8 FEG ON + 46 dB
The setup should now look like this:
Figure 34:GSM1800 RF control window
RH-59/60
40 COMPANY CONFIDENTIAL ISSUE 1 09/2004
Copyright © 2004 Nokia. All Rights Reserved.
Page 41

RH-59/60
Troubleshooting chart for GSM1800 receiver
Figure 35:GSM1800 receiver troubleshooting chart
Apply -55dBm
1842.8 MHz
offset 67.71kHz
from generator
to
antenna conn
YES
Nokia Customer Care
Oscilloscope
at RX i/Q
signal 588mVpp
DC offset 1.35V
Freq.67.71kHz
YES
EGSM
chain
OK
Check RX/TX
switch at
RX1800
Z700
-56dBm
YES
Spectrum analyzer
EGSM SAW filter
Z601
output
-65dBm
YES
Spectrum analyzer
check signal after
inductors
L601 and L611
-65DbM
NO NO
NO
Oscilloscope
check
VC1 and VC2
at Z700
Signal = 0V
NO
YES
Check
RX/TX
switch
Check
SAW filter
Z602
Check
Inductor
L603, L602
Check Mjoelner
YES
YES
Oscilloscope
VRX 2.7V
Check Mjoelner
serial
interface
NO
Check
Baseband
ISSUE 1 09/2004 COMPANY CONFIDENTIAL 41
Copyright © 2004 Nokia. All Rights Reserved.
Page 42

Nokia Customer Care
XIP or RXQP on a working GSM 1800 receiver this picture should be seen.
Signal amplitude peak-peak 460 mV
DC offset 1.2 V
Figure 36:RX1800 I/Q signal waveform
RH-59/60
Measurement points in the receiver
Figure 37:RX measurements point for the RX/TX Switch - Z700
42 COMPANY CONFIDENTIAL ISSUE 1 09/2004
Copyright © 2004 Nokia. All Rights Reserved.
Page 43

RH-59/60
Nokia Customer Care
Figure 38:Measurements points for the RX-Filters – Z601/Z602
Figure 39:RX I/Q Signals, baseband shielding can UEM (D200)
ISSUE 1 09/2004 COMPANY CONFIDENTIAL 43
Copyright © 2004 Nokia. All Rights Reserved.
Page 44

Nokia Customer Care
■ RH-59 Transmitter troubleshooting
Measurement points for the transmitter
Figure 40: TX measuremnet points for the PA ( N700 ) shielding can
RH-59/60
Figure 41:TX measurement point for Mjolner (N600) shielding can
44 COMPANY CONFIDENTIAL ISSUE 1 09/2004
Copyright © 2004 Nokia. All Rights Reserved.
Page 45

RH-59/60
Nokia Customer Care
■ General instructions for RH-59 GSM TX troubleshooting
Apply a RF-cable to the RF-connector to allow the transmitted signal act as normal. RF-cable
should be connected to measurement equipment or to at least a 10-dB attenuator, otherwise
the PA may be damaged.
Start Phoenix-Service-Software and establish a connection to the phone e.g. FBUS.
Select File and Product: RH-59
Select: Maintenance, Testing and RF Controls
Band: GSM 900
Active Unit: TX
Tx Power Level: 19
Tx Data Type: All 1
Your screen should look like:
Figure 42:GSM900 RF controls window
Measure the output power of the phone; it should be around 32.1 dBm.
Remember the loss in the jig; around 0.3 dB.
ISSUE 1 09/2004 COMPANY CONFIDENTIAL 45
Copyright © 2004 Nokia. All Rights Reserved.
Page 46

Nokia Customer Care
RH-59/60
Figure 43:VPCTRL_G and TXC signal
46 COMPANY CONFIDENTIAL ISSUE 1 09/2004
Copyright © 2004 Nokia. All Rights Reserved.
Page 47

RH-59/60
Nokia Customer Care
■ PCN Transmitter general instructions for PCN TX troubleshooting
Apply a RF-cable to the RF-connector to allow the transmitted signal act as normal. RF-cable
should be connected to measurement equipment or to at least a 10-dB attenuator, otherwise
the PA may be damaged.
Start Phoenix-Service-Software and establish a connection to the phone e.g. FBUS.
Phoenix commands
RF Controls .Band GSM 1800 RX .Continuous mode
Channel 700 .AGC 14 FEG ON + 24 dB
Your screen should look like:
Figure 44:RF controls window
Measure the output power of the phone; it should be around 29.5 dBm. Remember the loss in
the jig; around 0.7 dB.
Troubleshooting chart for PCN transmitter: refer to Figure 30 “GSM 1900 transmitter troubleshooting diagram on page 33.
Note! The word PCS in “start” block should be PCN if this block is used for RH59 troubleshooting.
ISSUE 1 09/2004 COMPANY CONFIDENTIAL 47
Copyright © 2004 Nokia. All Rights Reserved.
Page 48

RH-59/60
Nokia Customer Care
■ Synthesizer
There is only one PLL synthesizer generating Local Oscillator frequencies for both RX and TX
in both bands ( PCN and EGSM). The VCO frequency is divided by 2 for PCN operation or by
4 for EGSM operation inside the Mjoelner IC.
26 MHz reference oscillator ( VCXO )
The 26 MHz oscillator is located in the Mjoelner IC (N600). The coarse frequency for this oscillator is set by an external crystal (B600). The reference oscillator is used as a reference frequency for the PLL synthesizer and as the system clock for BaseBand. The 26MHz signal is
divided by 2 to achieve 13MHz inside the UPP IC (D400).
The 26 MHz signal from the VCXO can be measured by probing R425 (must be measured on
the UPP side of R425 i.e. the end not
700mVpp. Frequency of this oscillator is adjusted by changing the AFC-register inside the
Mjoelner IC. This is done via the Mjoelner serial interface.
Example Signal Measured at VCXO output (R425)
Figure 45: VCXO 26 MHz waveform
connected to C425). The level at this point is approx.
VCO
The VCO is an ASIC with all the frequency determining parts inside.
In order to reduce the requirements of the tuning voltage and coverage of the VCO, the VCO
core is composed of four VCOs in parallel. This VCO circuit enables a very wide tun-ing range
of 3.4 - 4.0 GHz .
48 COMPANY CONFIDENTIAL ISSUE 1 09/2004
Copyright © 2004 Nokia. All Rights Reserved.
Page 49

RH-59/60
Troubleshooting diagram for PLL Synthesizer
Figure 46:PLL Troubleshooting diagram
Nokia Customer Care
ISSUE 1 09/2004 COMPANY CONFIDENTIAL 49
Copyright © 2004 Nokia. All Rights Reserved.
Page 50

RH-59/60
Nokia Customer Care
Phone fails after power on
If the phone stops working a short time after the power is turned ON, a possible reason for this
could be that the 26MHz system clock signal is not getting to the UPP clock-input in BaseBand.
In this case check the following:
1Turn on the phone and check
2VCXO Power supply (C620) = 2.7V
3VCXO output (R425 – end not
If this is not the case check the reference crystal (B600) and Mjolner (N600) as well as R425,
R426, C425, C426.
connected to C425) is 26MHz and approx. 700mVpp
Measurement points for the VCXO
Figure 47:Figure 22: Measurement point for VCXO supply
Figure 48:Figure 23: Measurement point for VCXO output
50 COMPANY CONFIDENTIAL ISSUE 1 09/2004
Copyright © 2004 Nokia. All Rights Reserved.
Page 51

RH-59/60
Measurement points at the PLL/VCO
Figure 49:Measurement point for PLL
Nokia Customer Care
ISSUE 1 09/2004 COMPANY CONFIDENTIAL 51
Copyright © 2004 Nokia. All Rights Reserved.
Page 52

Nokia Customer Care
RH-59/60
[This page left intentionally blank]
52 COMPANY CONFIDENTIAL ISSUE 1 09/2004
Copyright © 2004 Nokia. All Rights Reserved.
 Loading...