

Page 1
En
Instruction Manual
Autofocus Speedlight
SB-80DX
SB-80DX
(
En
)
Page 2

2
Foreword
Thank you for purchasing the Nikon Speedlight SB-80DX.
To get the most out of your Speedlight, please read this instruction
manual thoroughly before use.
n (p. xx) indicates the reference page.
Main features and functions of the SB-80DX
• The SB-80DX is a high-performance Speedlight having a guide number of
38/125 (at the 35mm zoom-head position, ISO 100, m/ft., 20°C/68°F).
According to the camera/lens combination used with the SB-80DX, you can
perform various types of TTL auto flash (p. 35), Non-TTL auto flash (p. 40)‚
and Manual flash (p. 44). When used with Nikon Digital SLRs cameras, D-TTL
auto flash (p. 35) and AA (Auto Aperture) flash (p. 42) can be performed.
• Automatic power zoom changes the zoom-head position continuously to
match the lens focal length (incompatible with some cameras and lenses,
see p. 24). The built-in wide-flash adapter increases the angle of coverage to
match a 14mm/17mm lens (p. 25).
• Flash head tilts up to 90° or down to –7°, and rotates horizontally 180° to the
left and 90° to the right, enabling bounce flash (p. 66) or close-up
photography (p. 70).
• Use of the provided Nikon Diffusion Dome in combination with the built-in
wide-flash adapter (p. 69) in bounce flash (p.66) or close-up photography
(p.70) diffuses the light from the flash to soften shadows and creates wellbalanced, more natural-looking pictures.
• Wireless multiple flash photography (p. 82) is also possible.
• For operation in dim light, an illuminator for the LCD panel is provided (p. 10).
• Custom settings are provided to set values, or activate or cancel functions
that are not necessary to set each time (p. 12).
Note
• The Nikon N90s, N90, N70, N60, N55, N50, N8008‚ N8008s, PRONEA 6i, N6006, N6000,
N5005, N4004‚ and N4004s are sold exclusively in the U.S.A.
• The Nikon N80-Series, N65-Series are sold exclusively in the U.S.A. and Central and
South America.
• The Nikon N2020 and N2000 are sold exclusively in the U.S.A and Canada.
Page 3
3
Preparation
Take trial shots
Take trial shots before shooting at important occasions like weddings or
graduations.
Have Nikon spot-check your Speedlight regularly
Nikon recommends that you have your Speedlight serviced by an authorized
dealer or service center at least once every two years.
Using your Speedlight correctly
The Nikon Speedlight SB-80DX’s performance has been optimized for use with
Nikon brand cameras/accessories including lenses.
Camera/accessories made by other manufacturers may not meet Nikon’s
criteria for specifications, and nonconforming cameras/accessories could
damage the SB-80DX’s components. Nikon cannot guarantee the SB-80DX’s
performance when used with non-Nikon products.
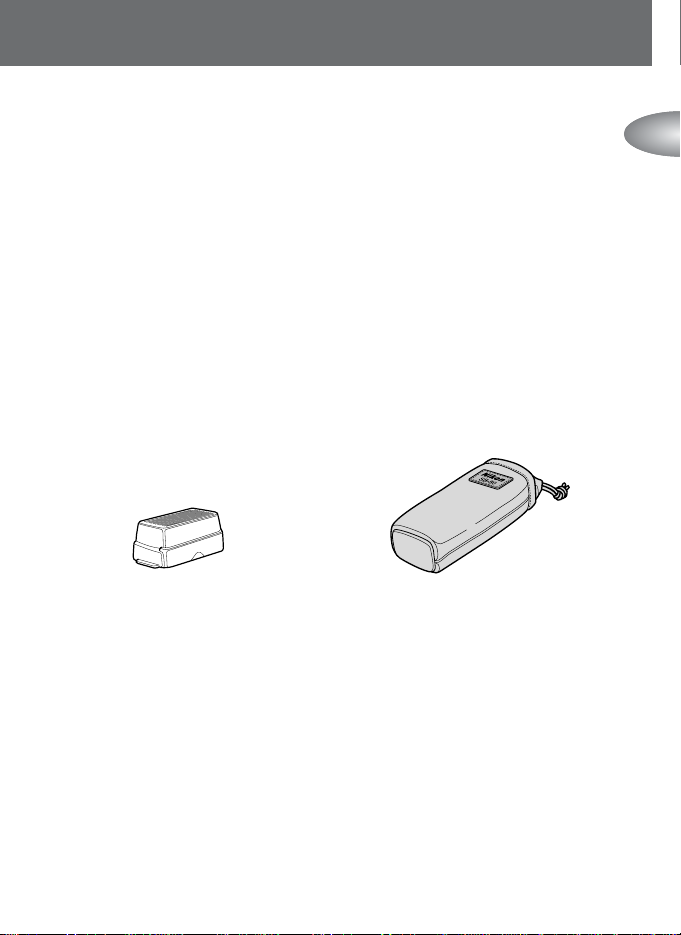
Supplied accessories
Tips on using the Speedlight
Nikon Diffusion Dome
SW-10H (p. 69)
Soft Case SS-80
Page 4
4
Camera groups and available flash modes
In this manual, Nikon SLR cameras are divided into eight groups (I to VII, and Digital
SLRs) unless otherwise noted. First consult the camera group table to see which
group your camera belongs to. Then as you read the manual, you will find specific
information on how to use the SB-80DX with your particular camera.
I
F5, F100, F90X/ N90s, F90-Series/ N90,
F80-Series/ N80-Series, F70-Series/ N70
–
II
F4-Series, F65-Series/N65-Series, F-801s/
N8008s, F-801/N8008, Pronea 600i/6i
––
∗1
III
F-601/N6006, F-601
M/N6000
––
IV
F60-Series/N60, F50-Series/N50,
–––
F-401x/N5005
V
F-501/N2020, F-401s/N4004s,
F-401/N4004, F-301/N2000
–––
∗2
VI
FM3A, FA, FE2, FG, Nikonos V,
F3-Series (with the AS-17)
––– –
VII
New FM2, FM10, FE10, F3-Series, F55/N55
––– ––
Digital
D1-Series, D100
SLRs
––– – –
∗1 Center-Weighted Fill-Flash/Spot Fill-Flash is not possible with the Pronea 600i/6i.
∗2 Programmed TTL Auto Flash is set.
∗3 TTL auto flash mode for Nikon Digital SLRs.
∗4 Possible only when a non-CPU lens is attached.
∗5 Repeating Flash is not possible with the F3-Series (using the AS-17).
∗6 FP High-Speed Flash sync is not possible with F80-Series/N80-Series and F70-Series/N70 cameras.
Group
Camera name
TTL auto flash (p. 35)
3D
Multi-Sensor
Balanced
Fill-Flash
Multi-
Sensor
Balanced
Fill-Flash
Matrix
Balanced
Fill-Flash
Center-
Weighted
Fill-Flash/Spot
Fill-Flash
Standard
TTL flash
Page 5
5
The SB-80DX’s available flash modes vary, depending on the cameras and lenses in use or the
camera’s exposure mode and metering system. Refer to “Detailed operation” (p. 33) and your
camera’s instruction manual.
: Available
–:Not available
3D
Multi-Sensor
Balanced
Fill-Flash for
Digital SLRs
Multi-Sensor
Balanced
Fill-Flash for
Digital SLRs
– ––– – ∗6I
– ––– – – II
– ––– – – III
– ––– – – IV
– ––– – –
V
– ––– – ∗5– VI
– ––– – – VII
Digital
∗4
SLRs
D-TTL auto flash∗3(p. 35)
Manual mode
Group
Center-
Weighted
Fill-Flash for
Digital SLRs
Standard
TTL flash
for
Digital SLRs
Non-TTL
Auto Flash
(p. 40)
Auto
Aperture
Flash
(p. 42)
Manual
Flash
(p. 46)
Repeating
Flash
(p. 48)
FP
High-Speed
Flash sync
(p. 51)
Page 6

6
Contents
Preparation
Foreword........................................................................2
Tips on using the Speedlight .........................................3
Camera groups and available flash modes ...................4
Speedlight parts.............................................................8
LCD panel....................................................................10
Control buttons ...........................................................11
Custom settings...........................................................12
Lenses.........................................................................14
Basic operation
1 Installing batteries.....................................................16
2 Test firing..................................................................18
3 Attach the SB-80DX to the camera and adjust
the flash head...........................................................20
4 Setting the ISO sensitivity.........................................22
5 Adjusting the zoom-head position............................24
6 Setting the camera’s exposure mode and
metering system.......................................................26
7 Setting the SB-80DX’s flash mode...........................28
8 Compose the picture and shoot with flash.....................30
Using the SB-80DX with the COOLPIX.......................32
Detailed operation
SB-80DX available flash modes..................................34
TTL/D-TTL auto flash mode.........................................35
Usable cameras compatible with the TTL/D-TTL
auto flash mode........................................................36
Non-TTL auto flash mode............................................40
Auto Aperture flash mode............................................42
Manual mode...............................................................44
Notes on continuous flash shooting.............................53
Checking the correct exposure before shooting..........54
Page 7
7
Advanced operation
Exposure compensation and flash output
level compensation...................................................56
The flash shooting distance range with zoom
lenses having a variable aperture
..............................59
Slow-sync flash mode/Red-eye reduction control........60
Rear-curtain sync and Modeling illumination ..............61
Autofocus flash operation in dim light..........................62
Technical operation/
Effective Speedlight placement
Bounce flash operation ...............................................66
Close-up flash operation..............................................70
Multiple flash operation................................................74
Multiple flash shooting using cords..............................76
System chart for TTL multiple flash.............................80
Wireless multiple flash shooting ..................................82
Reference information
Optional accessories ...................................................92
Tips on Speedlight care...............................................95
Notes on batteries........................................................96
Troubleshooting...........................................................97
Specifications.............................................................100
Index..........................................................................104
Preparation
This section provides
preliminary information on
using the SB-80DX.
Basic operation
Basic procedures to take
simple, well-balanced
flash photographs in the
TTL/D-TTL auto flash
mode.
Detailed operation
A variety of flash modes
available with the SB-80DX
are provided.
Advanced operation
Advanced information on
each function of the SB-80DX
is provided.
Technical operation/Effective
Speedlight placement
Bounce, close-up, multiple
flash, and their recommended
positions are described.
Reference information
Troubleshooting,
Speedlight care, etc. are
described in this section.
Page 8
8
Speedlight parts
1 Control button quick reference (p. 12)
Easy reference chart for two-button operations
and custom settings
2Flash head (p. 68)
Can be tilted up to 90° or down to –7°, and
rotated horizontally 180° to the left and 90° to
the right.
3 Flash head tilting/rotating lock
release button (p. 20)
4 Battery chamber lid (p. 16)
5 Built-in bounce card (p. 69)
Creates a highlight in the subject’s eyes in
bounce flash photography.
6 Built-in wide-flash adapter (p. 72)
Increases the angle of coverage to match a
14mm or 17mm lens.
7 Red-eye reduction lamp (p. 60)
Lights up to prevent red-eye from occurring.
8 AF-assist illuminator (p. 62)
Automatically turns on for autofocus
operation when the light is dim.
9 External power source
terminal (p. 94)
Allows connection of a power cord to the
SB-80DX’s external power source terminal
(supplied with a cover).
10 Light sensor window for
Non-TTL auto flash (p. 40)
Senses reflected light from the subject in
Non-TTL auto or Auto Aperture flash mode.
11 Light sensor window for wireless
slave flash (p. 82)
Senses light from the master flash unit in
wireless multiple flash operation.
12 Mount pin
For cameras featuring a safety lock system.
13 Hot-shoe contacts
14 Mounting foot
1
2
3
4
5
6
7
8
9
10
11
12
13
14
Page 9
9
Preparation
15
15 Flash head tilting angle scale (p. 68)
16 Modeling illuminator button (p. 61)
Press to fire flash repeatedly to check the
illumination and the shadows cast on the
subject before taking pictures.
Wireless slave flash cancel
button (p. 85)
The SB-80DX will not fire, while this button
is pressed.
17 Flash head rotating angle
scale (p. 68)
18 Terminal cover
19 TTL multiple flash terminal (p. 78)
Connects the SB-80DX to the slave flash
unit(s) in TTL multiple flash operation.
20 Sync terminal (p. 79)
Connects the SB-80DX to the sync terminal
of the slave flash unit(s) in other than TTL
multiple flash operations.
21 LCD panel (p. 10)
22 Control buttons (p. 11)
23 Ready-light
Lights up when the SB-80DX is fully
recycled and ready to fire. Blinks after the
SB-80DX fires at its maximum output in
various auto flash modes, indicating that
the light may be insufficient.
24 Mounting foot lock lever (p. 20)
16
17
18
19
20
21
22
23
24
Page 10
10
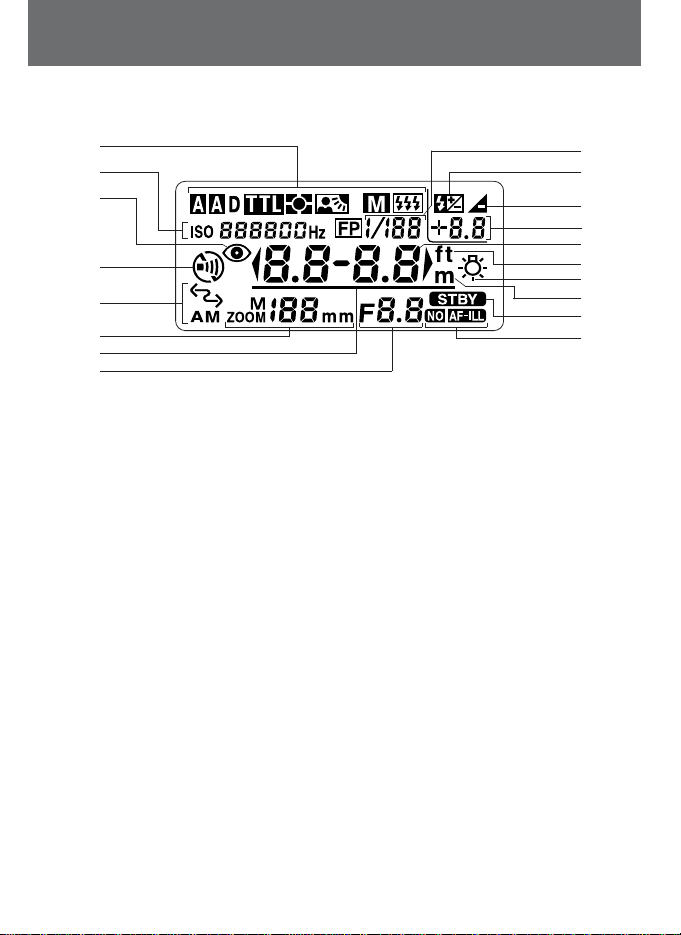
For reference, all indications are displayed in the illustration.
LCD panel
2
3
4
5
6
7
8
1
9
10
11
12
13
14
15
16
17
18
About the LCD panel
• Because of the directional characteristics of the liquid crystal, the LCD is difficult to read when
viewed diagonally from above; however, the display can be seen clearly from a somewhat
lower angle.
• The LCD panel display tends to be darker at high temperatures (approx. 60°C/140°F). When
the temperature returns to normal (20°C/68°F), the display also returns to normal.
• The LCD’s response time tends to slow down at low temperatures (approx. 5°C/41°F and below).
When the temperature returns to normal (20°C/68°F), response time also returns to normal.
Using the SB-80DX in dim light
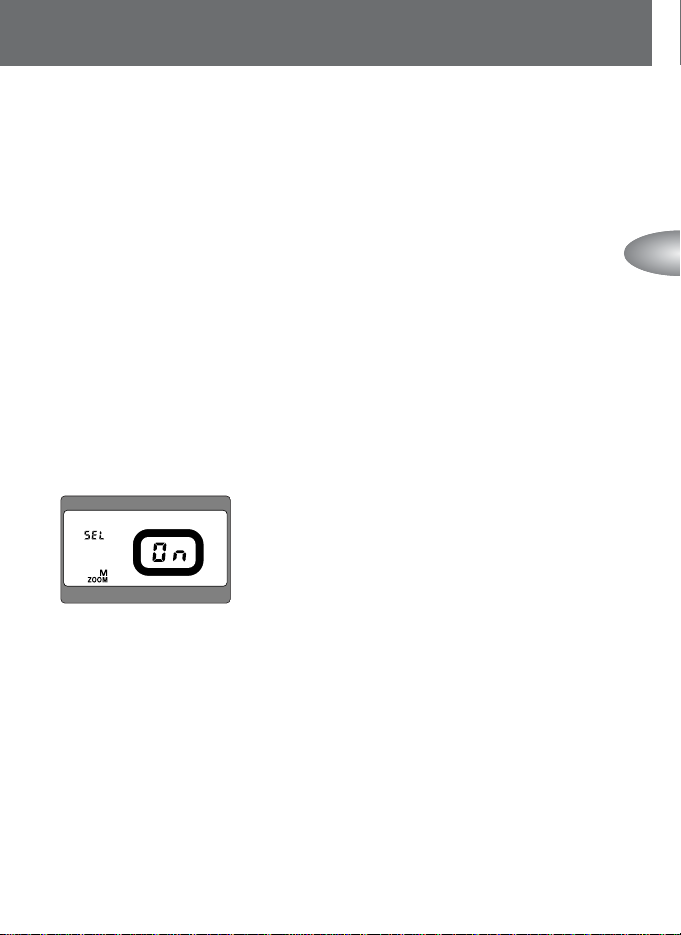
Press any button on the SB-80DX to turn the illuminator on (when the SB-80DX power is on), and it will
stay on for approx. 16 seconds. To cancel the LCD panel illuminator, go to the Custom settings mode
and set it to OFF (p. 13).
1 Flash mode (pp. 34-51)
DE Automatic Balanced Fill-Flash with TTL
Multi Sensor
CDE Automatic Balanced Fill-Flash with TTL
Multi Sensor for Digital SLRs
DF Matrix Balanced Fill-Flash, Center-Weighted
Fill-Flash/Spot Fill-Flash
CDF Center-Weighted Fill-Flash for Digital SLRs
D Standard TTL Flash, Matrix Balanced Fill-Flash,
Center-Weighted Fill-Flash/Spot Fill-Flash
CD Standard TTL Flash for Digital SLRs
A Non-TTL Auto Flash
B Auto Aperture Flash
G Manual Flash
GH Repeating Flash
GK FP High-Speed Flash sync
2 ISO sensitivity (p. 22), No. of repeating
flashes/Frequency (p. 48)
3 Red-eye reduction (p. 60)
4 Sound monitor (p. 89)
5 Wireless flash (p. 84)
6 Zoom-head position (p. 24)
7 Underbar (p. 21)
8 Aperture (p. 40)
9 Flash output level (p. 46)
10 Exposure compensation (p. 58)
11 Underexposure (p. 31)
12 Flash output level compensation value
(p. 58)/Underexposure value (p. 31)
13 Flash shooting distance range (p. 28)
14 ft (feet) (p. 13)
15 LCD panel illuminator (p. 13)
16 m (meters) (p. 13)
17 Standby function (p. 19)
18 AF-assist illuminator (p. 62)
Page 11

11
Preparation
Press the MODE and SEL buttons simultaneously
To recall the underexposure value in the TTL/D-TTL auto flash
mode
(p. 31)
.
Press the MODE and ON/OFF buttons simultaneously
for approx. 2 sec.
To reset all settings, including custom settings, to their
default settings (except the distance unit selected in m/ft).
Control buttons
2
3
4
5
6
1
1 h button
Press to test fire the flash (p. 18).
2 a button
Press to set the flash mode (p. 28).
3 g button
• Press to select these functions:
Flash output level compensation,
aperture, number of repeating
flashes per frame, frequency, and
flash output level. The selected
item blinks and can be set using
the e and f buttons.
• Press for approx. 2 sec. to display
the Custom settings mode (p. 12).
4 e button/f button
Press to increase or decrease values.
5 c button (wide)/
d button (tele)
Press to change the zoom-head
position (p. 24).
6 b button
Press for approx. 0.5 sec. to turn
the power on and off.
+
+
Page 12
12
Item Setting (Bold: default)
Wireless flash mode*1(p. 84) OFF (canceled) ON (activated)
Sound monitor*2in the wireless L (sound on) M (sound off)
flash mode (p. 89)
AF-assist illuminator (p. 62) AF ILL (activated) NO AF ILL (canceled)
Standby function (p. 19)
Selecting the distance unit (m, ft) (p. 13)
m (meters) ft (feet)
Canceling the power zoom function (p. 25) OFF (activated) ON (canceled)
Emergency mode*3(p. 98) OFF (not possible) ON (possible)
LCD panel illuminator (p.13) ON (turn on) OFF (turn off)
40 (sec.) 80 (sec.) 160 (sec.) 300 (sec.)
- - - - (The standby
function canceled)
Custom settings
The SB-80DX can easily set, activate, or cancel various operations using the
Custom settings function as shown below.
Control button quick
reference
Procedures for Custom
settings, recalling the
underexposure value in the
TTL auto flash mode, and
resetting all settings to their
default settings are shown
in the Control button quick
reference chart on the back
of the built-in bounce card.
*1No display appears when the SB-80DX is attached to Digital SLRs cameras.
*
2
The display appears when the wireless flash mode is set to ON.
*
3
No display appears when the built-in wide-flash adapter is not used.
AUTO (the SB-80DX turns off
when the camera’s exposure
meter turns off.)
Page 13
13
Preparation
lSetting the LCD panel illuminator using Custom settings
1
Press the g button for approx. 2 sec. to display the Custom settings mode.
2
Press the e or f button to choose the Q LCD panel illuminator setting.
3
Press the c or d button to turn the LCD panel illuminator on or off.
4
To get out of the custom settings mode, press the g button for approx. 2 sec.
or press the b button.
nEven if the LCD panel illuminator is set to OFF, the SB-80DX’s LCD panel illuminator
turns on when the camera’s LCD panel illuminator is turned on. The LCD panel
illuminator also lights up when the Custom settings mode is displayed.
lSelecting the distance unit (m or ft) using Custom settings
Set the distance unit on the LCD panel to either meters “m” or feet “ft”.
nThe SB-80DX is preset to meters when the SB-80DX is shipped from the factory.
1
Press the g button for more than 2 sec. to display the Custom settings mode.
2
Press the e or f button to choose “Selecting the distance unit (m, ft).”
3
Press the c or d button to set the preferred distance unit.
4
Press the g button for more than 2 sec. or press the bbutton to return to
the normal setting mode.
ON (turn on) OFF (turn off)
m (meters) display
ft (feet) display
Page 14
14
In this manual, Nikkor lenses are divided into two types: CPU Nikkor lenses and
non-CPU Nikkor lenses.
Lenses
CPU Nikkor lenses
G-type Nikkor‚ D-type Nikkor‚ Non-G/D-type AF Nikkor
(except for AF Nikkor for the F3AF)‚ AI-P Nikkor
Non-CPU Nikkor lenses AI-S Nikkor, AI Nikkor‚ Series E
CPU lenses
CPU lenses have CPU contacts.
G-type Nikkor lenses
G-type Nikkor lenses send distance information to the
camera body, but do not have an aperture ring. Therefore,
set the aperture on the camera body. With some cameras,
the usable exposure mode is limited. For more details,
refer to the lens instruction manual.
D-type Nikkor lenses
D-type Nikkor lenses send distance information to the
camera body. Set the aperture either on the lens aperture
ring or on the camera body. For more details, refer to the
lens instruction manual.
Page 15
Basic operation
Basic operation
In this section, basic procedures are
clearly illustrated so that you can easily
perform flash photography in the TTL/
D-TTL auto flash mode.
For more details on other flash modes, refer to
“Detailed operation” (p. 33).
Page 16
16
lUsable batteries
m Install four AA-type penlight batteries (1.5V or lower) of any of these types:
(1) Alkaline-manganese (1.5V)
(2) Lithium (1.5V)
(3) NiCd (rechargeable, 1.2V)
(4) Ni-MH (Nickel Metal Hydride) (rechargeable, 1.2V)
n When replacing batteries, use fresh batteries of the same brand.
n High-power manganese batteries are not recommended for use
with the SB-80DX.
n Always carry extra batteries when traveling.
n Refer to “Notes on batteries” on page 96.
CAUTION!
n Do not use batteries not specified in this instruction manual, as this may
cause them to explode, leak corrosive liquids, or catch on fire.
n Do not mix battery brands or types, or use old with new batteries. Otherwise
the batteries may explode, leak corrosive liquids, or catch on fire.
n Do not recharge non-rechargeable batteries in a battery charger.
Otherwise the batteries may leak corrosive liquids, or generate heat.
1
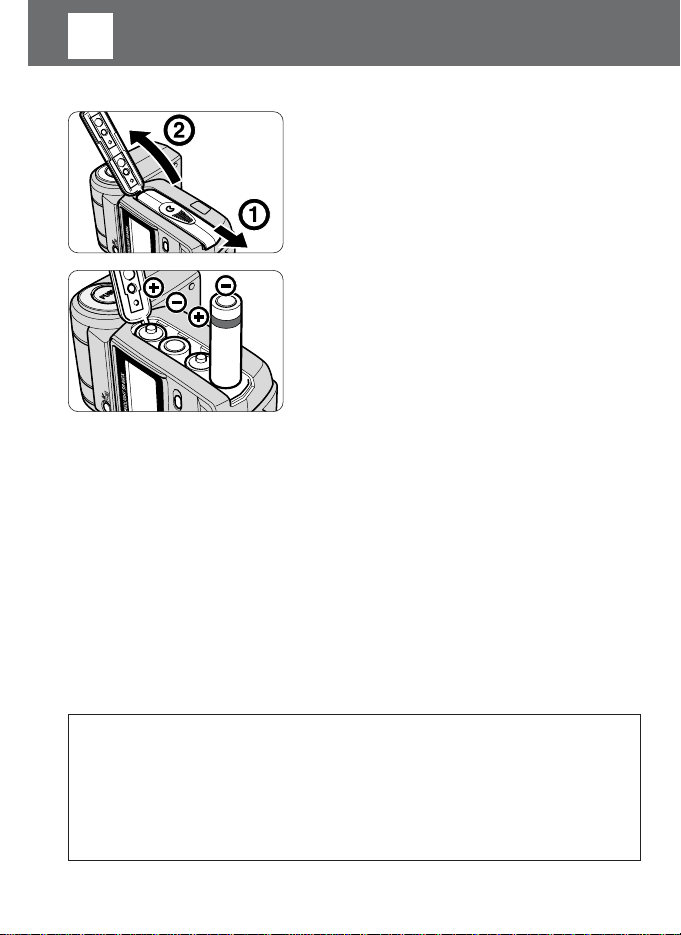
Installing batteries
1
Open the battery chamber lid as indicated
by the arrows.
2
Install the batteries following the i and
j marks as shown. Then close the
battery chamber lid by sliding it into place
while pressing down.
Page 17
17
Basic operation
nMinimum recycling time is for operation using fresh batteries.
nThe data was measured without using AF-assist illuminator, zoom-head position
adjustment, or LCD panel illumination.
nThe above data may vary due to variations in battery performance.
lReplacing / recharging the batteries
m Refer to the following table to determine when to replace or recharge your
batteries‚ if the ready-light takes a long time to light up.
Minimum number of flashes and recycling times
m When using four fresh batteries of the same type, after the Speedlight fires at
M1/1 output.
Batteries Min. recycling time Min. number of flashes/
(approx.) recycling time
Alkaline-manganese 6.0 sec. 150 / 6 – 30 sec.
Lithium 7.5 sec. 190 / 7.5 – 30 sec.
NiCd (1000 mAh) 4.0 sec. 90 / 4 – 30 sec.
Ni-MH (1600 mA) 4.0 sec. 110 / 4 –30 sec.
Type of battery Recycling time Remedy
Alkaline-manganese More than 30 seconds
Replace
Lithium More than 10 seconds
Ni-Cd (rechargeable)
More than 10 seconds Recharge
Ni-MH(rechargeable)
lExternal power sources
m Using an external power source increases the number of flash firings and
provides faster recycling times (p. 94).
nIf extremely exhausted batteries are used, a strange sound can be heard caused by
the flash head zooming back and forth even when the SB-80DX is turned off. In this
case, replace the SB-80DX’s batteries even if an external battery source is used.
Page 18
18
2
Test firing (confirming exposure)
lTest firing
CAUTION!
When test firing the Speedlight, never position your eyes close to the flash
head.
m The SB-80DX fires at specified output in the Manual flash mode or at approx.
1/16 output in the TTL/D-TTL auto flash mode.
m In the Non-TTL auto flash/Auto Aperture flash modes, the SB-80DX fires at a
flash output controlled by the ISO sensitivity, aperture, and zoom-head position.
m In the Non-TTL auto/Auto Aperture flash mode, you can check the amount of
insufficient flash output by pressing the h button before taking the actual
picture (p. 54).
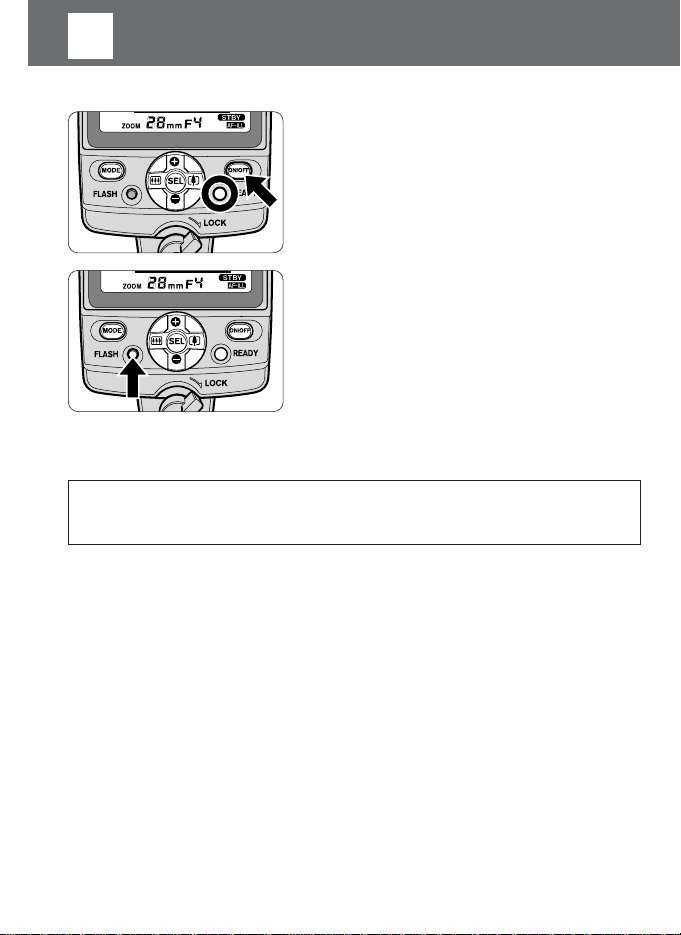
lb button
m Pressing the b button for approx. 0.5 sec. turns the SB-80DX on and
the indications appear on the LCD panel. Pressing the button again turns the
SB-80DX off and the indications disappear.
1
Press the
b
button for approx. 0.5
sec. to turn on the SB-80DX. Make sure
the ready-light comes on.
2
Press the h button to test fire the
flash.
Page 19
19
Basic operation
lStandby function to conserve battery power
m If the SB-80DX and the camera are not used for approx. 40 seconds, the
standby function activates and automatically turns the SB-80DX off to
conserve battery power (standby-off state).
nOnly the R indicator appears on the LCD panel in the standby-off state.
nThe SB-80DX in the standby-off state returns to on again when the SB-80DX’s b or
h button is pressed, or the shutter release button is lightly pressed (when using a
camera body that is compatible with TTL/D-TTL auto flash) (p. 36).
nIn the Wireless Flash mode (p. 84), the standby function activates in approx. 40 seconds
when the Speedlight is attached to the camera body. However, the standby function does
not work regardless of the SB-80DX’s setting when the Speedlight is used as a slave
flash unit.
nIf the ready-light does not come on in approx. 60 seconds after turning the power on, the
SB-80DX goes into standby-off state and the R indicator appears.
nTo avoid accidental firing or a malfunction when carrying the SB-80DX in your camera
bag, press the b button to turn the flash unit off and make sure the R indicator
disappears.
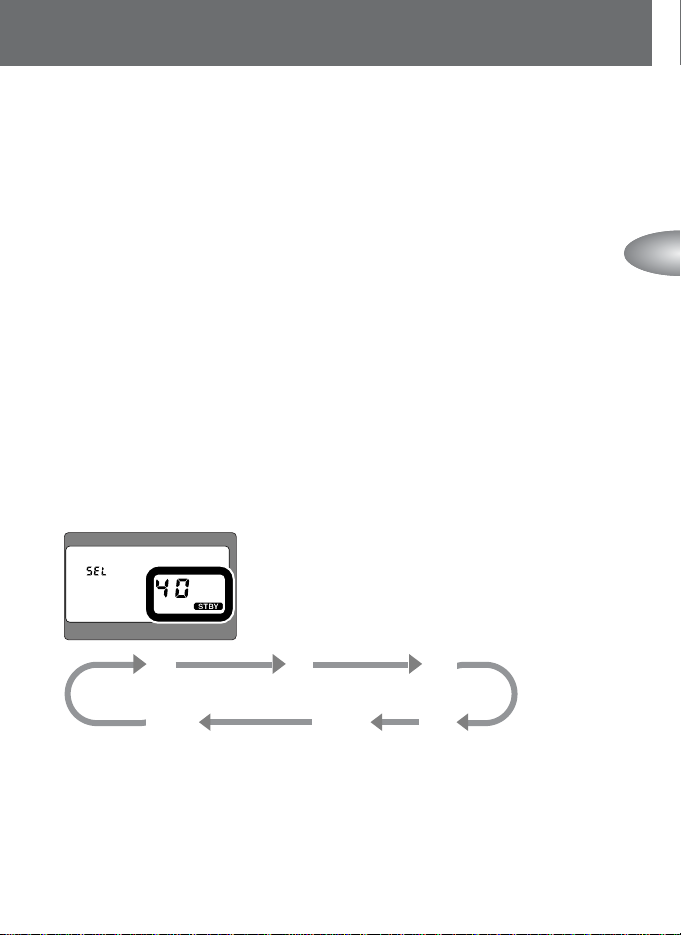
Adjusting standby duration/canceling standby function using
Custom settings
1
Press the g button for more than 2 sec. to display the Custom settings mode.
2
Press the e or f button to choose “Standby function.”
3
Press the c or d button to set the appropriate standby duration.
80
(80 sec.)
160
(160 sec.)
300
(300 sec.)
– – – –
Standby
function
canceled
AUTO
With a camera body that is
compatible with TTL/D-TTL
auto flash (p. 36), the
SB-80DX automatically turns
off when the camera’s
exposure meter turns off and
turns back on when the
exposure meter is turned on.
4
Press the g button for more than 2 sec. or press the b button to return
to the normal setting mode.
40
(40 sec.)
(factory setting)
Page 20
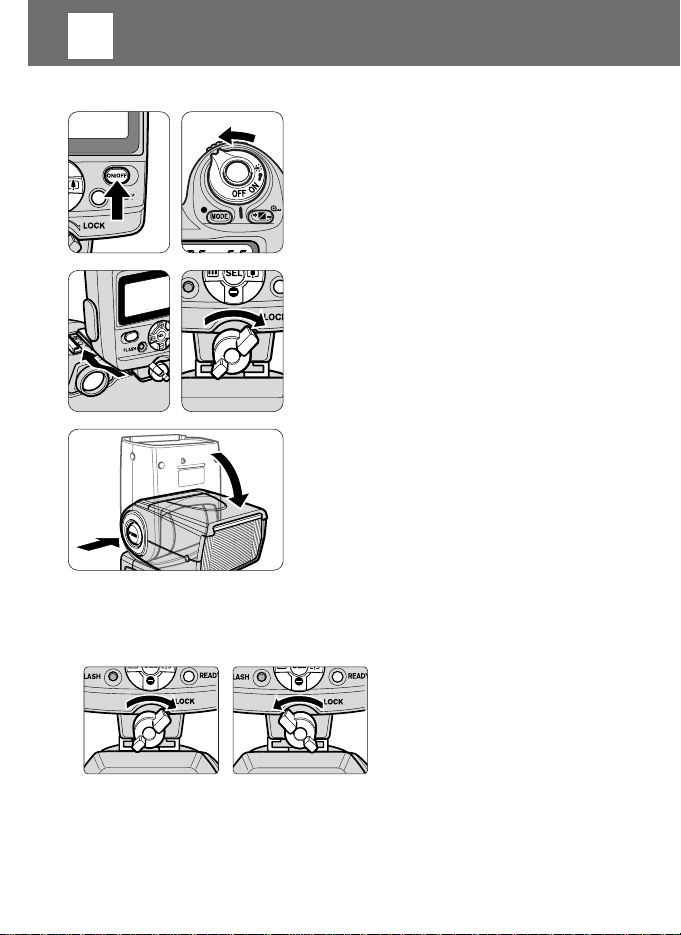
20
3
Attach the SB-80DX to the camera and
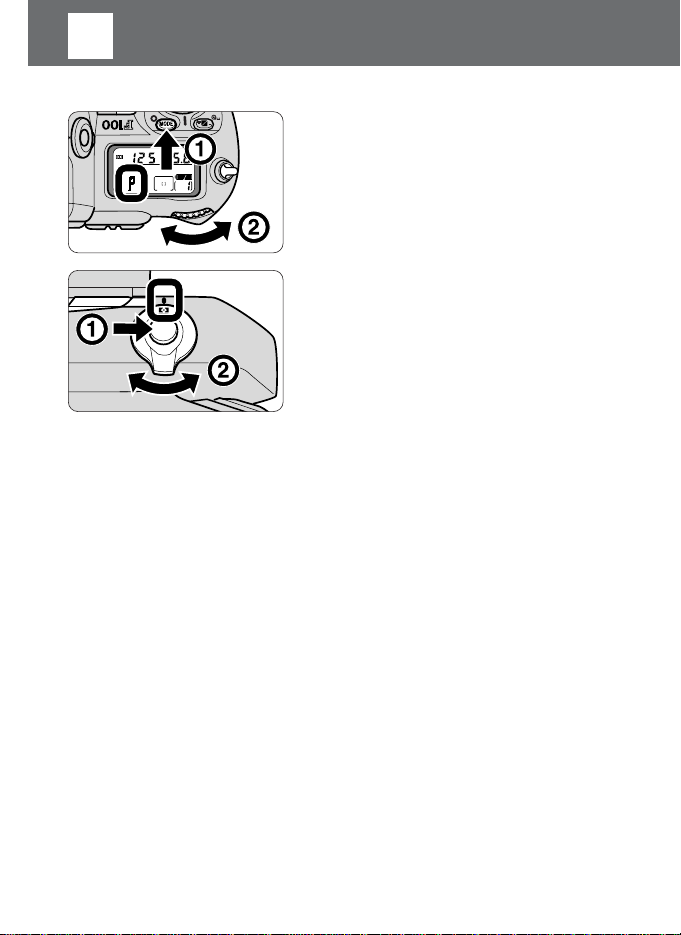
lTurn the mounting foot lock lever securely until it stops.
m To lock the Speedlight in place, turn the lock lever approx. 90° clockwise until
it stops. To unlock, turn the lever counterclockwise until it stops.
Lock
Unlock
1
Make sure the SB-80DX and the camera
body are turned off.
2
Rotate the mounting foot lock lever to the
left, slide the SB-80DX’s mounting foot
into the camera’s accessory shoe and turn
the lock lever to the right.
3
Hold down the flash head tilting/rotating
lock release button to adjust the flash
head to the horizontal/front position.
Page 21
21
Basic operation
The underbar blinks when the flash head
is tilted down –7°.
The flash shooting distance range disappears
if the flash head is adjusted to other than
the horizontal/front or down –7° position.
lWarning indication
m If the flash head is not adjusted to the horizontal/front position, when the
power is turned on, this warning appears on the LCD panel. See page 68 for
the flash head’s rotating angles.
lThe ready-light only inside the camera’s viewfinder blinks
after the power is turned on:
Camera group/camera name Possible cause
Cameras in Groups I to VI In the TTL auto flash mode, the SB-80DX is not properly
(except F70-Series/N70) attached to the camera body.
Cameras in Groups V and VI In the TTL auto flash mode, the ISO film speed set on
the camera is higher than the available range of the
Speedlight.
nThe ISO film speed set on the camera is higher or
lower than the available range for the FA camera only.
Cameras in Group VI In the TTL auto flash mode, the shutter speed is set to
M90, M250, or B (bulb).
FM3A, New FM2 The shutter speed set is faster than the flash sync
speed.
New FM2, F55/N55 The SB-80DX’s flash mode is set to TTL auto flash.
adjust the flash head
Page 22
22
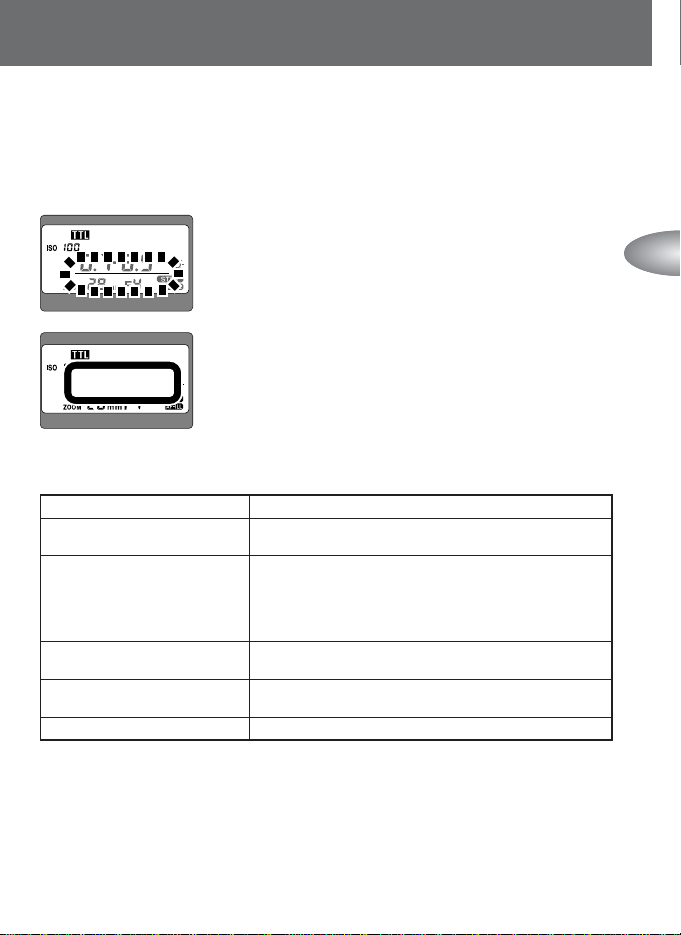
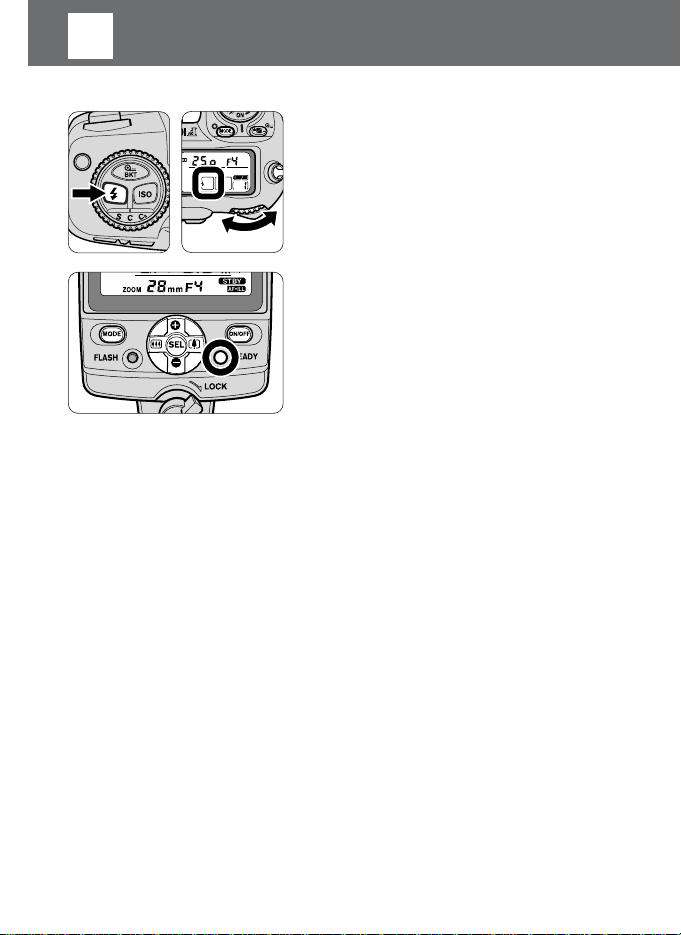
4
Setting the ISO sensitivity
Digital data communication with the SB-80DX
When the SB-80DX is used with cameras in Groups I and II, and Nikon
Digital SLRs cameras, digital data communication is performed. The
camera automatically sends the ISO sensitivity to the SB-80DX. With a CPU
lens, the aperture and focal length are automatically set on the SB-80DX.
In this manual, the film speed for film-based cameras and the sensitivity for
Digital SLRs cameras are generally referred to as ISO sensitivity.
m For cameras in Groups I and II, and Digital SLRs cameras, the ISO sensitivity
is automatically set and appears on the LCD panel.
m For other camera bodies, set the ISO sensitivity using the following procedure.
1
Turn the SB-80DX off once, then turn it
back on. After that, turn on the camera
body.
2
The ISO sensitivity starts blinking on the
LCD panel.
nNo setting is possible if the g button is
pressed to stop the ISO sensitivity from
blinking. In this case, return to step 1 above.
3
Press the e or f button to increase or
decrease the ISO sensitivity.
4
Press the g button to stop the ISO
sensitivity from blinking.
Page 23

23
Basic operation
lAvailable ISO sensitivity in TTL/D-TTL auto flash operation
m The maximum ISO sensitivity range usable in the TTL/D-TTL auto flash mode
is ISO 25 to 1000.
nThe ISO sensitivity range may become narrower, depending on the cameras in use. For
details, see your camera instruction manual.
nThe flash shooting distance range on the SB-80DX’s LCD panel varies, depending on the
ISO sensitivity. Therefore, be sure to set the ISO sensitivity correctly.
Notes on setting the Speedlight’s ISO sensitivity
In the TTL/D-TTL auto flash mode and Manual flash mode, there is no
direct connection between setting the ISO sensitivity on the Speedlight
and controlling the flash output level. Setting the ISO sensitivity is for
correctly displaying the flash shooting distance range or the shooting
distance indication on the Speedlight’s LCD panel.
In the Non-TTL auto flash mode and Auto Aperture flash mode, the correct
exposure can be obtained by setting the camera’s ISO sensitivity on the
Speedlight, because the Speedlight controls the flash output. In the Auto
Aperture flash mode, the ISO sensitivity is automatically transferred from
the camera to the Speedlight.
Page 24
24
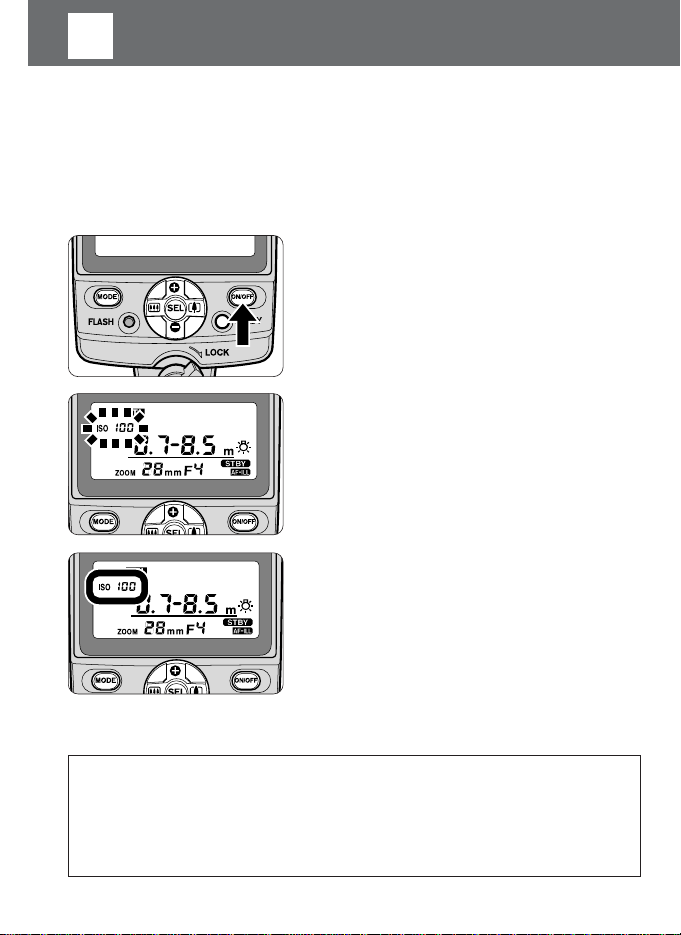
5
Adjust the zoom-head position
lThe power zoom function
m When the SB-80DX is used with cameras in Groups I, II, or Nikon Digital SLRs,
in combination with a CPU lens, the power zoom function activates and the
zoom head is automatically adjusted.
nThe zoom-head position is automatically adjusted within the range of 24mm, 28mm,
35mm to 105mm in increments of 5mm between 35mm and 105mm when the power
zoom function is activated.
nWhen the lens focal length is not one of those indicated above, the zoom head adjusts to
the closest wideangle setting of the lens in use. For example, if the zoom setting of a CPU
lens is between 36mm and 39mm, the zoom-head position is adjusted to 35mm.
nIf a small M does not appear above the “ZOOM” indication on the LCD panel, the zoom-
head position will be automatically adjusted. If a small M appears, press the c or d
button several times until it disappears.
Power zoom activated Power zoom canceled
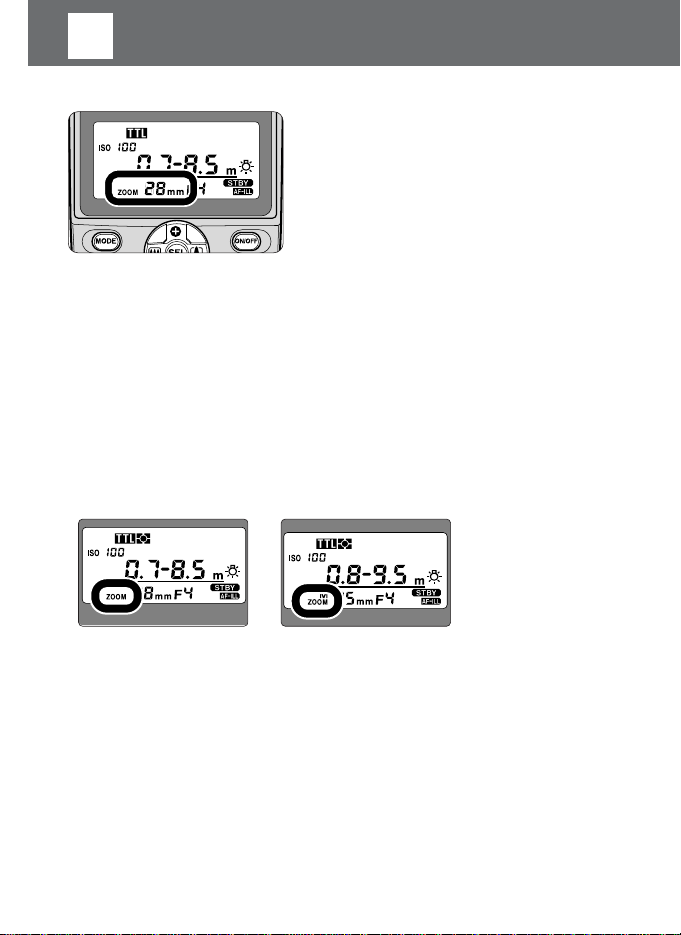
lSetting the zoom-head position manually
m When the SB-80DX is used with cameras in Groups III to VII in combination
with a non-CPU lens, or you want to change the zoom-head position to one
that does not match the focal length, you should adjust the zoom-head
position manually.
nPress the c button to move toward a wideangle setting and the d button to move
toward a telephoto setting.
nWhen the camera/lens combination is compatible with the power zoom function, the
zoom-head position changes as follows, when a 35mm lens is attached:
M24mm↔M28mm↔35mm↔M50mm↔M70mm↔M85mm↔M105mm
1
The zoom-head position is indicated on
the LCD panel.
nThe zoom-head position is automatically
adjusted by the power zoom function or it can
be manually adjusted.
nThe guide number indicating flash output level
varies according to the zoom-head position
(p. 45).
Page 25
25
Basic operation
nA small M above the “ZOOM” indication appears on the LCD panel while manually setting
the zoom-head position.
nGenerally, set the zoom-head position to the focal length of the lens in use or to the
closest wideangle setting.
For example, select the 50mm setting when using a 60mm lens.
lCanceling the power zoom function using Custom settings
m When the power zoom function is canceled in the Custom settings mode
(p. 12), the small M blinks and the zoom-head position indicator does not
change even if the lens is zoomed, a lens is changed, or the b button is
pressed.
m The zoom head can manually be adjusted to 24mm, 28mm, 35mm, 50mm,
70mm, 85mm, or 105mm by pressing the c or d button.
nPress the c button to move toward a wideangle setting and the d button to move
toward a telephoto setting. The zoom-head position changes as follows:
24mm↔28mm↔35mm↔50mm↔70mm↔85mm↔105mm
1
Press the g button for more than 2 sec. to display the Custom settings mode.
2
Press the e or f button to choose “Canceling the power zoom function.”
3
Press the c or d button to select “ON.”
4
Press the g button for more than 2 sec. or press the b button to return
to the normal setting mode.
lUsing the built-in wide-flash adapter/
Nikon Diffusion Dome
m Use the built-in wide-flash adapter when a 14mm to 23mm lens is mounted (p. 72).
nThe power zoom function becomes inactive when using the wide-flash adapter. Press the
c or d button to adjust the zoom-head position to 14mm or 17mm.
nThe zoom-head position is automatically set at 14mm when the Nikon Diffusion Dome is
attached.
nWhen using a 14mm or 17mm lens or the Nikon Diffusion Dome, the distance between
the camera and subject becomes increasingly pronounced from the center of the frame
to the periphery, so the peripheral area might not be sufficiently lit in some cases.
Page 26
26
6
Setting the camera’s exposure mode and
lExposure mode and metering system
m The camera’s available exposure mode and metering system vary, depending
on the cameras and lenses in use or the SB-80DX’s flash modes. For details,
refer to “Detailed operation” (p. 33) and your camera’s instruction manual.
m In Programmed Auto (P) mode, the shutter speed is automatically set to the
highest flash sync shutter speed.
1
Set the camera’s exposure mode to
Programmed Auto (P).
nIf Programmed Auto (P) cannot be set, refer to
page 27 to select another exposure mode.
2
Set the camera’s metering system to
Matrix Metering Y.
nIf Matrix Metering Y cannot be set, select
Center-Weighted Metering W.
Page 27

27
Basic operation
metering system
lExposure modes other than Programmed Auto exposure (P)
In Shutter-Priority Auto exposure (S) mode
m By selecting a slower shutter speed, the proper exposure for the background
can be achieved.
nThe camera selects the correct aperture. Set the shutter speed on the camera after
confirming that the automatically controlled aperture will provide an appropriate shooting
distance range for your subject. Refer to “Flash shooting distance range in the TTL/D-TTL
auto flash modes” (p. 29).
nIf you set a shutter speed faster than the flash sync speed, the camera automatically
shifts to its fastest sync speed when the SB-80DX is turned on.
In Aperture-Priority Auto exposure (A) mode
m By selecting the aperture, you can control depth of field and the flash
shooting distance range.
nThe camera selects the correct shutter speed. For detains, see your camera’s instruction
manual.
nTo determine the aperture, refer to the guide number (p. 45) and the “Flash shooting
distance range in the TTL/D-TTL auto flash modes” (p. 29).
In Manual exposure (M) mode
m By selecting the shutter speed and aperture, you can control the exposure of
the background, the depth of field, and flash shooting distance range.
nIf you set a shutter speed faster than the flash sync speed, the camera automatically
shifts to its fastest sync speed when the SB-80DX is turned on. This is true of all cameras,
except mechanical shutter cameras.
nTo determine the aperture, refer to the “Guide number” (p. 45) and the “Flash shooting
distance range in the TTL/D-TTL auto flash modes” (p. 29).
Page 28
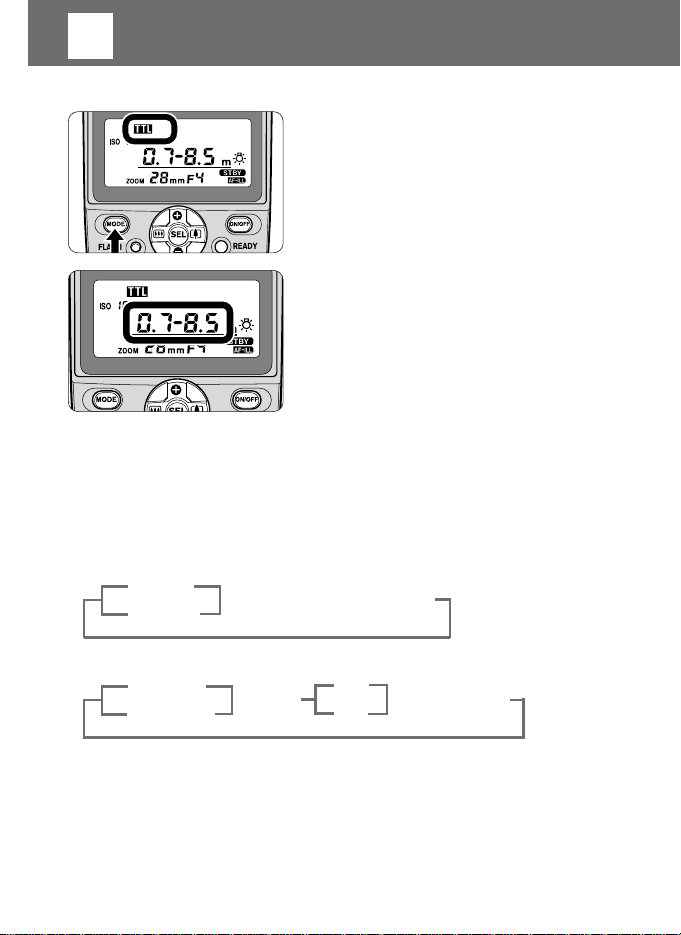
lTTL/D-TTL auto flash mode (p. 35)
m Every time you press the MODE button, the flash mode changes. In the TTL
auto flash mode, the D indicator appears on the LCD panel.
m When using Nikon Digital SLRs cameras, D-TTL auto flash is activated and
CD appears on the LCD panel.
nNote that the usable flash modes only appear and vary, and the unavailable TTL/D-TTL
auto flash modes will be skipped and do not appear, when pressing the MODE button.
nThe SB-80DX’s available flash modes vary, depending on the cameras and lenses in use
or the camera’s exposure mode and metering system. Refer to “Detailed operation”
(p. 33) and your camera’s instruction manual.
28
7
Setting the SB-80DX’s flash mode
➔DE
➔DF
➔ D ➔ A ➔ G ➔GH
For film-based cameras
For Digital SLRs cameras
➔B
➔ A
➔CDE
➔CDF
➔ CD
➔ G ➔ GH
1
Press the a button to set the flash
mode to TTL/D-TTL auto flash.
2
Confirm that the main subject is within the
flash shooting distance range.
Page 29
29
Basic operation
Aperture
Flash shooting distance range (m/ft.)
ISO sensitivity Zoom-head position (mm)
Flash shooting distance range in the TTL/D-TTL auto flash modes
∗1With the Nikon Diffusion Dome attached and the wide-flash adapter in place
∗2 With the Nikon Diffusion Dome attached
∗3With the wide-flash adapter in place
∗4 TTL/D-TTL auto flash operation is not possible at this ISO sensitivity.
For ISO 1000, use an aperture 2/3 of an f/stop smaller than the aperture for ISO 1600,
or 1/3 larger than the aperture for ISO 800.
∗5Programmed TTL Auto Flash with the F-501/N2020, F-401s/N4004s, F-401/N4004,
and F-301/N2000. (ISO 25 to ISO 400 for the F-401s/N4004s and F-401/N4004.)
lAbout the flash shooting distance range
nThe SB-80DX’s flash shooting distance range is 0.6m to 20m (2 to 66 ft.) and varies,
depending on the ISO sensitivity, zoom-head position and lens aperture in use.
1600
800 400 200 100
50 25
∗1 ∗2
14 17 24 28 35 50 70 85 105
∗4
2.8 2 1.4
4 2.8 2 1.4
5.6 4 2.8 2 1.4
8 5.6 4 2.8 2 1.4
11 8 5.6 4 2.8 2 1.4
16
11 8 5.6 4 2.8 2
22 16 11 8 5.6 4 2.8
32 22 16 11 8 5.6 4
32 22 16 11 8 5.6
32 22 16 11 8
32 22 16 11
32 22 16
0.8-9.0/ 1.0-11/ 1.1-12/ 1.2-13/ 2.0-20/ 2.1-20/ 2.4-20/ 2.8-20/ 3.0-20/ 3.4-20/ 3.6-20/
2.6-29 3.3-37 3.5-39 3.9-44 6.6-66 7.0-66 7.8-66 9.3-66 10-66 11-66 12-66
0.6-6.3/ 0.7-8.0/ 0.7-8.5/ 0.8-9.5/ 1.4-16/ 1.5-17/ 1.7-19/ 2.0-20/ 2.2-20/ 2.4-20/ 2.5-20/
2.0-21 2.3-26 2.5-28 2.8-31 4.6-52 4.9-56 5.5-62 6.6-66 7.4-66 7.8-66 8.3-66
0.6-4.5/ 0.6-5.7/ 0.6-6.0/ 0.6-6.7/ 1.0-11/ 1.1-12/ 1.2-13/ 1.4-16/ 1.6-18/ 1.7-19/ 1.8-20/
2.0-15 2.0-19 2.0-20 2.0-22 3.3-37 3.5-39 3.9-44 4.6-52 5.2-59 5.5-62 5.8-66
0.6-3.2/ 0.6-4.0/ 0.6-4.2/ 0.6-4.8/ 0.7-8.0/ 0.7-8.5/ 0.8-9.5/ 1.0-11/ 1.1-13/ 1.2-13/ 1.3-14/
2.0-10 2.0-13 2.0-14 2.0-16 2.3-26 2.5-28 2.8-31 3.3-37 3.7-42 3.9-44 4.1-47
0.6-2.2/ 0.6-2.8/ 0.6-3.0/ 0.6-3.4/ 0.6-5.7/ 0.6-6.0/ 0.6-6.7/ 0.7-7.6/ 0.8-9.0/ 0.8-9.5/ 0.9-10/
2.0-7.4 2.0-9.3 2.0-10 2.0-11 2.0-19 2.0-20 2.0-22 2.3-26 2.6-29 2.8-31 2.9-33
0.6-1.6/ 0.6-2.0/ 0.6-2.1/ 0.6-2.4/ 0.6-4.0/ 0.6-4.2/ 0.6-4.8/ 0.6-5.3/ 0.6-6.3/ 0.6-6.7/ 0.6-7.1/
2.0-5.2 2.0-6.6 2.0-7.0 2.0-7.8 2.0-13 2.0-14 2.0-16 2.0-19 2.0-21 2.0-22 2.1-23
0.6-1.1/ 0.6-1.4/ 0.6-1.5/ 0.6-1.7/ 0.6-2.8/ 0.6-3.0/ 0.6-3.4/ 0.6-4.0/ 0.6-4.5/ 0.6-4.8/ 0.6-5.0/
2.0-3.7 2.0-4.6 2.0-4.9 2.0-5.5 2.0-9.3 2.0-10 2.0-11 2.0-13 2.0-15 2.0-16 2.0-17
0.6-0.8/ 0.6-1.0/ 0.6-1.1/ 0.6-1.2/ 0.6-2.0/ 0.6-2.1/ 0.6-2.4/ 0.6-2.8/ 0.6-3.2/ 0.6-3.4/ 0.6-3.6/
2.0-2.6 2.0-3.3 2.0-3.5 2.0-3.9 2.0-6.6 2.0-7.0 2.0-7.8 2.0-9.3 2.0-10 2.0-11 2.0-12
_
0.6-0.7/ 0.6-0.7/ 0.6-0.8/ 0.6-1.4/ 0.6-1.5/ 0.6-1.7/ 0.6-2.0/ 0.6-2.2/ 0.6-2.4/ 0.6-2.5/
2.0-2.3 2.0-2.5 2.0-2.8 2.0-4.6 2.0-4.9 2.0-5.5 2.0-6.6 2.0-7.4 2.0-7.8 2.0-8.3
____
0.6-1.0/ 0.6-1.1/ 0.6-1.2/ 0.6-1.4/ 0.6-1.6/ 0.6-1.7/ 0.6-1.8/
2.0-3.3 2.0-3.5 2.0-3.9 2.0-4.6 2.0-5.2 2.0-5.5 2.0-5.8
∗
3
∗
3
∗
5
Page 30
30
8
Compose the picture and shoot with flash
lSet the camera’s flash sync mode to Front-curtain sync.
m Set the camera’s flash sync mode to Front-curtain sync with cameras
featuring a Rear-curtain sync flash mode.
nFor other flash sync modes, refer to “Slow-sync flash mode” (p. 60), “Red-eye reduction
with slow-sync flash mode” (p. 60), or “Rear-curtain sync flash” (p. 61).
nRefer to the camera’s instruction manual for details on the flash sync mode.
1
Set the camera’s sync mode.
nIn normal flash photography, set the camera’s
flash sync mode to Front-curtain sync.
2
Compose the picture, confirm that the readylight on the SB-80DX’s LCD panel or in the
camera’s viewfinder is on, then shoot.
Page 31

31
Basic operation
lIf the ready-light blinks after shooting, the light might
be insufficient.
m In various auto flash modes, when the flash has fired at its maximum output
and underexposure may have occurred, the ready-lights on the SB-80DX and
in the camera’s viewfinder blink for approx. 3 sec. Depending on the camera
in use, the ready-light on the SB-80DX or in the camera’s viewfinder lights up.
To compensate, use a wider aperture or move closer to the subject and
reshoot.
Display of the amount of underexposure
m With cameras in Group I and Nikon Digital SLRs cameras in the TTL/D-TTL
auto flash mode, the amount of underexposure (0 to –3.0 EV) appears for
approx. 3 sec on the SB-80DX’s LCD panel; at the same time the ready-lights
blink.
nPressing the a and g buttons simultaneously recalls this display.
Page 32

32
COOLPIX 900 series (COOLPIX 995, etc.) and COOLPIX 5000
digital cameras have a built-in compact flash unit. When more
powerful illumination is required, or when performing multiple
flash, connecting the SB-80DX or another Nikon Speedlight to
the COOLPIX using cords is recommended as an external
flash unit.
Auto flash operation is possible by setting the SB-80DX’s flash
mode to the TTL auto flash mode. The flash output level is
controlled by detecting signals from the camera to determine
when to start and stop firing in sync with the built-in flash,
which is controlled by the camera’s Non-TTL auto flash
operation.
nUse the dedicated Multi-Flash Bracket Unit SK-E900 (optional) and
Multi-Flash Adapter AS-E900 (optional) for connection with all the
COOLPIX 900 series cameras except the COOLPIX 900 itself.
nFor connection to the COOLPIX 5000, attach the Speedlight directly
to the accessory shoe.
Using the SB-80DX with the COOLPIX
Please note that wireless multiple flash using the COOLPIX’s
built-in flash as a master flash unit and the SB-80DX as a
slave flash unit cannot be performed.
Page 33

33
Detailed operation
This section provides a variety of flash
modes available with the SB-80DX.
Be sure to refer to your camera’s instruction
manual for specific information on camera
settings and functions.
Detailed operation
Page 34

34
SB-80DX available flash modes
∗1 Monitor Preflashes are fired.
∗2 3D Multi-Sensor Balanced Fill-Flash and Multi-Sensor Balanced Fill-Flash are generally
referred to as Automatic Balanced Fill-Flash with TTL Multi Sensor (Automatic Balanced
Fill-Flash with TTL Multi-Sensor for Digital SLRs in D-TTL auto flash).
∗3 The TTL auto flash mode for Nikon Digital SLRs is called the D-TTL auto flash mode.
∗4 In the D-TTL auto flash mode, Monitor Preflashes are fired at all times.
The SB-80DX’s available flash modes vary, depending on the cameras
and lenses in use or the camera’s exposure mode.
TTL auto flash mode (p. 35)
D-TTL auto flash mode (p. 35
)
∗3∗
4
ANon-TTL auto flash mode (p. 40
)
BAuto Aperture flash mode (p. 42)
Manual mode
DE 3D Multi-Sensor Balanced
Fill-Flash
∗1 ∗2
DE Multi-Sensor Balanced
Fill-Flash
∗1 ∗2
DF
Matrix Balanced Fill-Flash
DF Center-Weighted
Fill-Flash/Spot Fill-Flash
D Standard TTL Flash
G Manual Flash (p. 46)
H Repeating Flash (p. 48)
K FP High-Speed Flash Sync
(p. 51)
CDE 3D Multi-Sensor Balanced
Fill-Flash for Digital SLRs
∗1 ∗2
CDE Multi-Sensor Balanced
Fill-Flash for Digital SLRs
∗1 ∗2
CDF Center-Weighted FillFlash for Di
gital SLRs
∗
1
CD Standard TTL Flash for
Digital SLRs
∗1
(for film-based SLRs cameras)
(for Digital SLRs cameras)
Page 35

35
Detailed operation
TTL/D-TTL auto flash mode
The SB-80DX’s TTL/D-TTL auto flash mode varies, depending on the cameras
and lenses in use or the camera’s exposure mode and metering system. For
details, refer to “Usable cameras compatible with the TTL/D-TTL auto flash
mode” (p. 36) and your camera’s instruction manual.
DE3D Multi-Sensor Balanced Fill-Flash/
CDE3D Multi-Sensor Balanced Fill-Flash for Digital SLRs
Information obtained by the Monitor Preflashes, exposure control information,
and distance information from a D- or G-type lens are integrated to
automatically adjust the flash output level to obtain a well-balanced exposure of
the main subject and background.
DE Multi-Sensor Balanced Fill-Flash/
CDE Multi-Sensor Balanced Fill-Flash for Digital SLRs
Information obtained by the Monitor Preflashes and exposure control
information is integrated to automatically adjust the flash output level for a
well-balanced exposure of the main subject and background.
DF Matrix Balanced Fill-Flash
Exposure control information obtained by the camera’s Matrix meter is used to
automatically adjust the flash output level for a well-balanced exposure of
the main subject and background.
DF Center-Weighted Fill-Flash/Spot Fill-Flash
Exposure control information with Center-Weighted or Spot Metering is used to
adjust the flash output for a natural fill-flash effect.
CDF Center-Weighted Fill-Flash for Digital SLRs
Exposure control information with Center-Weighted Metering is used to adjust
the flash output for a natural fill-flash effect.
D Standard TTL Flash/
C
D Standard TTL Flash for Digital SLRs
The main subject is correctly exposed regardless of the background
brightness. Useful when you want to highlight the main subject.
lBalancing the exposure for the main subject and background
m The degree of exposure balance for the main subject and the background varies as the type of TTL auto
flash mode changes. The most well-balanced TTL auto flash exposure is obtained when using 3D
Multi-Sensor Balanced Fill-Flash and decreases through Multi-Sensor Balanced Fill-Flash, Matrix
Balanced Fill-Flash, Center-Weighted/Spot Fill-Flash, down to Standard TTL Flash in that order.
m The above description is applicable to the D-TTL auto flash mode.
lMonitor Preflashes
m Monitor Preflashes are available in Automatic Balanced Fill-Flash with TTL Multi-Sensor and all flash
modes in D-TTL auto flash to determine the condition of the subject. After you press the shutter release
button and just before the shutter opens, the SB-80DX fires a series of imperceptible preflashes that are
detected by the camera’s TTL Multi-Sensor and analyzed for brightness and contrast. (Please note that
Monitor Preflashes are fired instantaneously and cannot be differentiated from the main flash.)
m To cancel Monitor Preflashes, see page 74.
Page 36

36
Usable cameras compatible with the TTL/D-TTL
Exposure mode
P : Programmed Auto
S : Shutter-Priority Auto
A : Aperture-Priority Auto
M: Manual
Metering system
Y : Matrix
W : Center-Weighted
X : Spot
The available types of TTL/D-TTL auto flash vary, depending on the
camera/lens/exposure mode/metering system being used. For details,
see the tables on the following pages.
n Refer to your camera’s instruction manual for specific information on camera
settings and functions.
Cameras compatible with the TTL/D-TTL auto flash mode
Camera TTL/D-TTL Exposure Metering Lens
auto flash mode mode system
F5
DE
∗2
P/S/A/M
YW
CPU lens (D/G-type)
F100
DE
∗3
P/S/A/M
YW
CPU lens (except for D/G-type)
DF
A/M
W
Non-CPU lens
D
P/S/A/M
YWX
CPU lens
D
A/M
WX
Non-CPU lens
F90X/N90s
DE
∗2
P/S/A/M
YWX
CPU lens (D/G-type)
∗1
F90-Series/
DE
∗3
P/S/A/M
YWX
CPU lens (except for D/G-type)
N90
DF
A/M
WX
Non-CPU lens
F70-Series/
D
P/S/A/M
YWX
CPU lens
∗1
N70
D
A/M
WX
Non-CPU lens
∗
1: The A and M exposure modes cannot be used with a G-type lens.
∗
2: 3D Multi-Sensor Balanced Fill-Flash is set. ∗3: Multi-Sensor Balanced Fill-Flash is set.
F80-Series/
DE
∗2
P/S/A/M
YW
CPU lens (D/G-type)
N80-Series
DE
∗3
P/S/A/M
YW
CPU lens(Non-D/G-type AF)
D
P/S/A/M
YWX
CPU lens
D
M
WX
Non-CPU lens
∗1
∗1: The camera’s exposure meter cannot be used. Set the aperture using the lens aperture ring.
∗2: 3D Multi-Sensor Balanced Fill-Flash is set. ∗3: Multi-Sensor Balanced Fill-Flash is set.
I
Camera
Group
TTL/D-TTL auto flash mode
DE : Automatic Balanced Fill-Flash with
TTL Multi Sensor
DF : Matrix Balanced Fill-Flash, Center-
Weighted Fill-Flash/Spot Fill-Flash
D : Standard TTL Flash
CDE : Automatic Balanced Fill-Flash with
TTL Multi Sensor for Digital SLRs
CDF: Center-Weighted Fill-Flash for Digital
SLRs
CD :Standard TTL Flash for Digital SLRs
Page 37

37
Detailed operation
auto flash mode
Camera TTL/D-TTL Exposure Metering Lens
auto flash mode mode system
F4-Series
DF
P/S/A/M
Y
CPU lens
∗1
DF
A/M
Y
Non-CPU lens
∗2
DF
∗3
P/S/A/M
W
CPU lens
∗1
DF
∗3
A/M
Y
Non-CPU lens
D
P/S/A/M
YWX
CPU lens
∗1
D
A/M
YWX
Non-CPU lens
∗
1: The A and M exposure modes cannot be used with a G-type lens.
∗
2: AI-S, AI, Series E lens only usable. ∗3: Center-Weighted Fill-Flash is set.
F65-Series/
DF
P/S/A
Y
CPU lens
N65-Series
D
P/S/A/M
YW
CPU lens
∗1
D
M
W
Non-CPU lens
∗2
∗
1: Center-Weighted Metering is automatically set when the exposure mode is set to M.
∗
2:
The camera’s exposure meter cannot be used. Set the aperture using the lens aperture ring.
F-801s/
DF
P/S/A/M
Y
CPU lens
∗1
N8008s
DF
∗3
P/S/A/M
WX
CPU lens
∗1/∗2
F-801/
DF
∗3
A/M
WX
Non-CPU lens
∗2
N8008
D
P/S/A/M
YWX
CPU lens
∗1/∗2
D
A/M
WX
Non-CPU lens
∗2
∗
1: The A and M exposure modes cannot be used with a G-type lens.
∗
2:
Spot Metering is not possible with the F-801/N8008.
∗
3:
Center-Weighted Fill-Flash/Spot Fill-Flash is set.
Pronea
DF
P/S/A
Y
CPU lens
600i/6i
D
P/S/A/M
YWX
CPU lens
D
M
WX
Non-CPU lens
∗1
∗1: The camera’s exposure meter cannot be used. Set the aperture using the lens aperture ring.
F-601/
D
P/S/A/M
Y
CPU lens (except for G-type)
∗1
N6006
D
P/S/A/M
WX
CPU lens (except for G-type)
∗1
D
A/M
WX
Non-CPU lens
∗1
D
P/S/A/M
YWX
CPU lens (except for G-type)
∗2
D
A/M
WX
Non-CPU lens
∗2
∗
1: Only D appears on the SB-80DX’s LCD panel. Matrix Balanced Fill-Flash or Center-
Weighted Fill-Flash/Spot Fill-Flash is selected when F appears on thecamera’s LCD panel.
∗
2:
Center-Weighted Metering is automatically set when the exposure mode is set to M.
II
III
Camera
Group
Page 38

38
Usable cameras compatible with the TTL/D-TTL auto flash mode
Camera TTL/D-TTL Exposure Metering Lens
auto flash mode mode system
F-601M/
D
P/S
Y
CPU lens
∗1
N6000
D
P/S
W
CPU lens
∗1
D
A/M
W
Non-CPU lens
∗1
D
P/S
YW
CPU lens
D
A/M
W
Non-CPU lens
∗
1: Only D appears on the SB-80DX’s LCD panel. Matrix Balanced Fill-Flash or Center-
Weighted Fill-Flash/Spot Fill-Flash is selected when
F
appears on the camera’s LCD panel.
F60-Series/N60
D
∗1
P/S/A
Y
CPU lens
F50-Series/N50
D
∗2
M
W
CPU/non-CPU lens
F-401x/N5005
F-501/N2020
D
∗3
P
W
CPU∗4/non-CPU lens
∗5
F-301/N2000
D
A/M
W
CPU∗4/non-CPU lens
∗
1: Matrix Balanced Fill-Flash is set. ∗2: Center-Weighted Fill-Flash/Spot Fill-Flash is set.
∗
3: Programmed TTL Auto Flash is set. ∗4: G-type Nikkor lenses cannot be used. Nikkor lenses
for F3AF usable.
∗
5: AI-S, AI, Series E lenses only usable.
F-401s/N4004s
D
∗2
P/S
Y
CPU lens
F-401/N4004
D
A/M
YW
CPU lens
∗1
D
M
W
Non-CPU lens
∗
1: Center-Weighted Metering is automatically set when the exposure mode is set to M.
∗
2: Programmed TTL Auto Flash is set.
FM3A
D
A/M
W
CPU (except G-type)/non-CPU lens
FA
D
P/A/M
YW
CPU (except G-type)/non-CPU lens
∗1
FE2
D
A/M
W
CPU (except G-type)/non-CPU lens
∗1
FG
D
P/A/M
W
CPU (except G-type)/non-CPU lens
∗1
Nikonos V
D
A/M
W
CPU (except G-type)/non-CPU lens
∗1/∗2
F3-Series
D
A/M
W
CPU (except G-type)/non-CPU lens
∗3
∗
1: Standard TTL Flash is not possible if the shutter speed is set to M250 or B (bulb)
for the FA, FE2, and M90 for the FG and Nikonos V cameras.
∗
2: An optional sync cord for land use is required.
∗
3: Optional TTL Unit Coupler AS-17 is required.
VI
IV
V
III
Camera
Group
Digital data communication with the SB-80DX
When the SB-80DX is used with cameras in Groups I and II, and Nikon Digital
SLRs cameras listed in the table above, digital data communication is
performed. (p. 22)
Page 39

39
Detailed operation
Camera TTL/D-TTL Exposure Metering Lens
auto flash mode mode system
D1-Series
CDE
∗1
P/S/A/M
YW
CPU lens (D/G-type)
D100
CDE
∗2
P/S/A/M
YW
CPU lens (except for D/G-type)
CDF
A/M
W
Non-CPU lens
CD
P/S/A/M
YWX
CPU lens
CD
A/M
WX
Non-CPU lens
∗
1: 3D Multi-Sensor Balanced Fill-Flash for Digital SLRs is set
∗
2: Multi-Sensor Balanced Fill-Flash for Digital SLRs is set
lFlash shooting distance range in the 1/300 TTL
High-Speed Flash sync mode (F5 only)
m The farthest flash shooting distance cannot be read on the SB-80DX’s LCD
panel. In this case, use the guide number table and equation for calculating
this distance, according to each zoom-head position.
D (farthest flash shooting distance) = Guide number ÷ f/stop (aperture)
Guide number (m/ft.) in the 1/300 TTL High-Speed Flash sync mode
∗
1 With the Nikon Diffusion Dome attached and the wide-flash adapter in place
∗
2 With the Nikon Diffusion Dome attached
∗
3 With the wide-flash adapter in place
nFor example, when shooting with an ISO sensitivity of 100, at a 35mm zoom-head position
and an aperture of f/5.6:
D = 14 ÷ 5.6 (f/stop) = 2.5 (in meters) (farthest flash shooting distance)
D = 46 ÷ 5.6 (f/stop) = 8.2 (in feet) (farthest flash shooting distance)
Digital
SLRs
ISO
Zoom-head position (mm)
sensitivity
∗1∗
2 14
∗
3
17
∗
3
24 28 35 50 70 85 105
25
2.5/8 3/10 3.5/11 3.5/11 5.5/18 6/20 7/23 8/26 9/30 9.5/31 10/33
50
3.6/12 4.3/14 5/16 5/16 7.8/26 8.5/28 9.9/32 11.4/37 12.8/42 13.5/44 14.2/47
100
5/16 6/20 7/23 7/23 11/36 12/39 14/46 16/52 18/59 19/62 20/66
200
7/23 8.4/28 9.8/32 9.8/32 15.4/51 16.8/55 19.6/64 22.4/73 25.2/83 26.6/87 28/92
400
10/33 12/39 14/46 14/46 22/72 24/79 28/92 32/105 36/118 38/125 40/131
800
14/46 16.8/55 19.6/64 19.6/64 30.8/101 33.6/110 39.2/129 44.8/147 50.4/165 53.2/174 56/184
Camera
Group
Page 40

40
Any camera and lens combination. (For Digital SLRs, it is
possible only when a non-CPU lens is mounted.)
Non-TTL auto flash A mode
Usable cameras
and lenses
The SB-80DX’s built-in sensor measures the flash illumination reflected back
from the subject, automatically controlling the SB-80DX’s light output to give the
correct exposure. This allows you to make exposure compensation (p. 56)
easily by varying the aperture set on the camera or lens.
3
Press the e or f button to change the
aperture, bringing the subject within the flash
shooting distance range.
1
Set the camera’s exposure mode to AperturePriority Auto (A) or Manual (M).
4
Set the aperture that appears on the SB-80DX’s
LCD panel on the lens or camera.
5
Set the camera to its highest flash sync shutter
speed.
n For details, see the camera’s instruction manual.
2
Press the a button until “A”appears on the
LCD panel.
Page 41

41
Detailed operation
6
Compose the picture, make sure the ready-light
is on, then shoot.
nWhen the flash has fired at its maximum output and
underexposure may have occurred, the ready-light
on the SB-80DX blinks for approx. 3 sec. To
compensate, use a wider aperture or move closer to
the subject and reshoot.
Aperture
Flash shooting distance range (m/ft)
ISO sensitivity Zoom-head position (mm)
Usable flash shooting distance ranges in Non-TTL auto flash and Auto
Aperture flash mode
lSetting the aperture in the Non-TTL auto flash A mode
m Set the aperture within the available range as shown in the table below.
nFor example, for an ISO sensitivity of 100, with the zoom-head position adjusted to 35mm,
and the subject at a distance of 5m (16.4 ft.), selecting apertures from f/2 to f/5.6 from the
table will give the correct exposure.
nTo set the aperture on Zoom-Nikkor lenses having variable maximum apertures, refer to
“The flash shooting distance range with zoom lenses having a variable aperture” (p. 59).
∗
1 With the Nikon Diffusion Dome attached and the wide-flash adapter in place
∗
2 With the Nikon Diffusion Dome attached
∗
3 With the wide-flash adapter in place
1600 800 400 200 100 50 25
∗1∗
2
14 17 24 28 35 50 70 85 105
85.642.8 2 1.4
0.6-6.3/ 0.7-8.0/ 0.7-8.5/ 0.8-9.5/ 1.4-16/ 1.5-17/ 1.7-19/ 2.0-20/ 2.2-20/ 2.4-20/ 2.5-20/
2.0-21 2.3-26 2.5-28 2.8-31 4.6-52 4.9-56 5.5-62 6.6-66 7.4-66 7.8-66 8.3-66
11 8 5.6 4 2.8 2 1.4
0.6-4.5/ 0.6-5.7/ 0.6-6.0/ 0.6-6.7/ 1.0-11/ 1.1-12/ 1.2-13/ 1.4-16/ 1.6-18/ 1.7-19/ 1.8-20/
2.0-15 2.0-19 2.0-20 2.0-22 3.3-37 3.5-39 3.9-44 4.6-52 5.2-59 5.5-62 5.8-66
16 11 8 5.6 4 2.8 2
0.6-3.2/ 0.6-4.0/ 0.6-4.2/ 0.6-4.8/ 0.7-8.0/ 0.7-8.5/ 0.8-9.5/ 1.0-11/ 1.1-13/ 1.2-13/ 1.3-14/
2.0-10 2.0-13 2.0-14 2.0-16 2.3-26 2.5-28 2.8-31 3.3-37 3.7-42 3.9-44 4.1-47
22 16 11 8 5.6 4 2.8
0.6-2.2/ 0.6-2.8/ 0.6-3.0/ 0.6-3.4/ 0.6-5.7/ 0.6-6.0/ 0.6-6.7/ 0.7-7.6/ 0.8-9.0/ 0.8-9.5/ 0.9-10/
2.0-7.4 2.0-9.3 2.0-10 2.0-11 2.0-19 2.0-20 2.0-22 2.3-26 2.6-29 2.8-31 2.9-33
32 22 16 11 8 5.6 4
0.6-1.6/ 0.6-2.0/ 0.6-2.1/ 0.6-2.4/ 0.6-4.0/ 0.6-4.2/ 0.6-4.8/ 0.6-5.3/ 0.6-6.3/ 0.6-6.7/ 0.6-7.1/
2.0-5.2 2.0-6.6 2.0-7.0 2.0-7.8 2.0-13 2.0-14 2.0-16 2.0-19 2.0-21 2.0-22 2.1-23
45 32 22 16 11 8 5.6
0.6-1.1/ 0.6-1.4/ 0.6-1.5/ 0.6-1.7/ 0.6-2.8/ 0.6-3.0/ 0.6-3.4/ 0.6-4.0/ 0.6-4.5/ 0.6-4.8/ 0.6-5.0/
2.0-3.7 2.0-4.6 2.0-4.9 2.0-5.5 2.0-9.3 2.0-10 2.0-11 2.0-13 2.0-15 2.0-16 2.0-17
64 45 32 22 16 11 8
0.6-0.8/ 0.6-1.0/ 0.6-1.1/ 0.6-1.2/ 0.6-2.0/ 0.6-2.1/ 0.6-2.4/ 0.6-2.8/ 0.6-3.2/ 0.6-3.4/ 0.6-3.6/
2.0-2.6 2.0-3.3 2.0-3.5 2.0-3.9 2.0-6.6 2.0-7.0 2.0-7.8 2.0-9.3 2.0-10 2.0-11 2.0-12
∗
3
∗
3
Page 42

42
Digital SLRs + CPU lenses
Auto Aperture AA flash mode
In addition to Non-TTL auto flash (p. 40), the SB-80DX’s built-in sensor correctly
controls the flash output in combination with data automatically transmitted from
the camera and lens to the SB-80DX, including the ISO sensitivity value,
aperture, focal length, and exposure compensation value.
nThe Non-TTL auto flash mode is automatically set when a non-CPU lens is mounted on
Digital SLRs.
Usable cameras and lenses
1
Set the camera’s exposure mode to Programmed
Auto (P) or Aperture-Priority Auto (A).
2
Lock the CPU lens aperture at its minimum.
n Not necessary with a G-type lens.
3
Press the a button to select the AA (Auto
Aperture flash) mode.
4
While looking at the flash shooting distance
range on the SB-80DX’s LCD panel, set the
aperture on the camera.
Page 43

43
Detailed operation
5
Compose the picture, confirm that the ready-light
is on, then shoot.
n When the flash has fired at its maximum output and
underexposure may have occurred, the ready-light
on the SB-80DX blinks for approx. 3 sec. To
compensate, use a wider aperture or move closer to
the subject and reshoot.
lSetting the aperture in Auto Aperture AA flash mode
m Set the aperture on the camera or lens within the available range as shown in
the table below.
Usable flash shooting distance ranges in the Non-TTL auto flash and
Auto Aperture flash mode
nFor example, for an ISO sensitivity of 100, with the zoom-head position adjusted to 35mm,
and subject at a distance of 5m (16.4 ft.), selecting an aperture of f/2 to f/5.6 from the
table gives the correct exposure.
Aperture
ISO sensitivity Zoom-head position (mm)
∗
1 With the Nikon Diffusion Dome attached and the wide-flash adapter in place
∗
2 With the Nikon Diffusion Dome attached
∗
3 With the wide-flash adapter in place
1600 800 400 200 100 50 25
∗1∗
2
14 17 24 28 35 50 70 85 105
85.642.8 2 1.4
0.6-6.3/ 0.7-8.0/ 0.7-8.5/ 0.8-9.5/ 1.4-16/ 1.5-17/ 1.7-19/ 2.0-20/ 2.2-20/ 2.4-20/ 2.5-20/
2.0-21 2.3-26 2.5-28 2.8-31 4.6-52 4.9-56 5.5-62 6.6-66 7.4-66 7.8-66 8.3-66
11 8 5.6 4 2.8 2 1.4
0.6-4.5/ 0.6-5.7/ 0.6-6.0/ 0.6-6.7/ 1.0-11/ 1.1-12/ 1.2-13/ 1.4-16/ 1.6-18/ 1.7-19/ 1.8-20/
2.0-15 2.0-19 2.0-20 2.0-22 3.3-37 3.5-39 3.9-44 4.6-52 5.2-59 5.5-62 5.8-66
16 11 8 5.6 4 2.8 2
0.6-3.2/ 0.6-4.0/ 0.6-4.2/ 0.6-4.8/ 0.7-8.0/ 0.7-8.5/ 0.8-9.5/ 1.0-11/ 1.1-13/ 1.2-13/ 1.3-14/
2.0-10 2.0-13 2.0-14 2.0-16 2.3-26 2.5-28 2.8-31 3.3-37 3.7-42 3.9-44 4.1-47
22 16 11 8 5.6 4 2.8
0.6-2.2/ 0.6-2.8/ 0.6-3.0/ 0.6-3.4/ 0.6-5.7/ 0.6-6.0/ 0.6-6.7/ 0.7-7.6/ 0.8-9.0/ 0.8-9.5/ 0.9-10/
2.0-7.4 2.0-9.3 2.0-10 2.0-11 2.0-19 2.0-20 2.0-22 2.3-26 2.6-29 2.8-31 2.9-33
32 22 16 11 8 5.6 4
0.6-1.6/ 0.6-2.0/ 0.6-2.1/ 0.6-2.4/ 0.6-4.0/ 0.6-4.2/ 0.6-4.8/ 0.6-5.3/ 0.6-6.3/ 0.6-6.7/ 0.6-7.1/
2.0-5.2 2.0-6.6 2.0-7.0 2.0-7.8 2.0-13 2.0-14 2.0-16 2.0-19 2.0-21 2.0-22 2.1-23
45 32 22 16 11 8 5.6
0.6-1.1/ 0.6-1.4/ 0.6-1.5/ 0.6-1.7/ 0.6-2.8/ 0.6-3.0/ 0.6-3.4/ 0.6-4.0/ 0.6-4.5/ 0.6-4.8/ 0.6-5.0/
2.0-3.7 2.0-4.6 2.0-4.9 2.0-5.5 2.0-9.3 2.0-10 2.0-11 2.0-13 2.0-15 2.0-16 2.0-17
64 45 32 22 16 11 8
0.6-0.8/ 0.6-1.0/ 0.6-1.1/ 0.6-1.2/ 0.6-2.0/ 0.6-2.1/ 0.6-2.4/ 0.6-2.8/ 0.6-3.2/ 0.6-3.4/ 0.6-3.6/
2.0-2.6 2.0-3.3 2.0-3.5 2.0-3.9 2.0-6.6 2.0-7.0 2.0-7.8 2.0-9.3 2.0-10 2.0-11 2.0-12
∗
3
∗
3
Flash shooting distance range (m/ft)
Page 44

44
Manual ÉG mode
In this mode, the flash always fires at a specified output. The SB-80DX
features three types of manual modes.
Types Usable camera
Manual flash No limitation
Repeating flash No limitation
FP High-Speed Flash sync
F5, F100, F90X/N90s, F90-Series/N90, D1-Series
m You can calculate the correct aperture by using the guide number table and
the shooting distance. Then set the same aperture manually on the lens.
In this case, set the camera’s exposure mode to Aperture-Priority Auto (A) or
Manual (M).
nRefer to your camera’s instruction manual for details on camera and lens aperture
settings.
nIf the camera’s exposure mode is set to other than Aperture-Priority (A) or Manual (M)
mode, the shutter may not be released, depending on the cameras in use. For details,
refer to your camera’s instruction manual.
nIn the Manual mode, no warning ready-light blinks to indicate that the light may have
been insufficient for correct exposure after shooting.
lDetermining the aperture and flash output level in the
Manual mode
m In the Manual mode, use the guide number table and the following equation
to calculate the aperture, flash output level, and shooting distance to obtain
the correct exposure.
nThe guide number (GN at ISO 100; m/ft) indicates the amount of light generated by the
flash. The larger the number, the greater the flash output.
Page 45

45
Detailed operation
ISO 25 50 100 200 400 800 1600
Factors x0.5 x0.71 x1 x1.4 x2 x2.8 x4
To calculate the correct aperture
n Calculate the correct aperture by using this equation and the guide number
table, according to the ISO sensitivity and flash output level that are set:
f/stop (aperture) = Guide number (GN) x ISO sensitivity factor ÷ Shooting distance (m/ft)
n Set the same aperture on both the SB-80DX and the camera or lens.
To calculate the guide number
n Calculate the guide number by using this equation, according to the shooting
distance and aperture required.
Guide number (GN) = Shooting distance (m/ft) x Aperture x ISO sensitivity factor
n Referring to the guide number table, determine an appropriate flash output
level corresponding to the guide number obtained above, then set the same
value on the SB-80DX.
ISO sensitivity factors
n For sensitivity other than ISO 100, multiply the guide number at an ISO
sensitivity of 100 by the factors shown in the guide number table.
*1With the Diffusion Dome attached and the built-in wide-flash adapter in place
*
2
With the Diffusion Dome attached
*
3
With the built-in wide-flash adapter in place
Zoom-head position (mm)
∗1 ∗2 14
∗3
17∗324 28 35 50 70 85 105
M1/1 12.5/41 16/52 17/56 19/62 32/105 34/112 38/125 44/144 50/164 53/174 56/184
M1/2 8.8/29 11.3/37 12/39 13.4/44 22.6/74 24/79 26.8/88 31/102 35/115 37.5/123 40/131
M1/4 6.3/21 8.0/26 8.5/28 9.5/31 16/52 17/56 19/62 22/72 25/82 26.5/87 28/92
M1/8 4.4/14 5.6/18 6.0/20 6.7/22 11.3/37 12/39 13.4/44 15.5/51 17.7/58 18.7/61 19.8/65
M1/16 3.1/10 4.0/13 4.3/14 4.8/16 8.0/26 8.5/28 9.5/31 11/36 12.5/41 13.3/44 14/46
M1/32 2.2/7 2.8/9 3.0/10 3.4/11 5.6/18 6.0/20 6.7/22 7.8/26 8.8/29 9.4/31 9.9/32
M1/64 1.6/5 2.0/7 2.1/7 2.4/8 4.0/13 4.3/14 4.8/16 5.5/18 6.3/21 6.6/22 7.0/23
M1/128 1.1/4 1.4/5 1.5/5 1.7/6 2.8/9 3.0/10 3.4/11 3.9/13 4.4/14 4.7/15 4.9/16
FP
-- - -
10.7 /35 11.3/37 12.7/42 14.7/48 16.7/55 17.7/58 18.7/61
Guide number (ISO 100, m/ft)
Flash
output
level
Page 46

46
Manual G mode
lManual flash operation
m In Manual flash photography, you select the aperture and flash output level. In
this way, you can control the exposure and flash shooting distance when
shooting subjects where the correct exposure is difficult to obtain in the TTL
or Non-TTL auto flash mode. In Manual flash operation, the flash output level
can be set from M1/1 to M1/128 to match your creative preferences.
1
Set the camera’s exposure mode to AperturePriority Auto (A) or Manual (M).
2
Press the a button until “G” appears on the
LCD panel.
3
Determine the flash output level and aperture to
match the flash shooting distance. Then set the
flash output level and the aperture on the
SB-80DX.
nFor details on determining the flash output level and
the aperture, refer to “Determining the aperture and
flash output level in the Manual mode” (p. 44).
nFor setting the flash output level, refer to “Setting the
flash output level” (p. 47).
nIf the ISO sensitivity is correctly set, the flash shooting
distance appears on the LCD panel, matching the
flash output level and aperture as set.
4
Set the same aperture on your camera or lens
that is set on the SB-80DX.
nFor cameras in Groups I and II, and Digital SLRs
cameras with CPU lenses, set the SB-80DX’s
aperture on the camera (p. 4).
Page 47

47
Detailed operation
▲
1/1 (0.0) ➔ 1/2 (0.0) ➔ 1/2 (0.3) ➔ 1/2 (0.7) ➔ 1/4(0.0)
FP ➔ 1/128 (0.0)
1/4 (0.7) ➔ 1/4 (0.3)
1/128 (0.0) ➔ 1/128 (0.3) ➔ 1/128 (0.7) ➔ 1/64(0.0)
FP ➔ 1/1 (0.0) ➔ 1/2 (0.0)
1/64 (0.7) ➔ 1/64 (0.3)
5
Confirm that the ready-light is on,
then shoot.
▲
▲
➔➔
Setting the flash output level
m The flash output level changes every time you press the f or e button as
shown below.
When you press the f button:
When you press the e button:
nThe numbers in parentheses represent the adjustable flash output level in ±1/3 steps
except between 1/1 and 1/2. Therefore, 1/32 (–0.3) and 1/64 (+0.7) represent the same
flash output level.
nK indicates FP High-Speed Flash sync (p. 51). This indicator appears only when the
SB-80DX is used in combination with cameras compatible with FP High-Speed Flash sync.
nTo extend the flash shooting distance, choose a flash output level close to M1/1.
➔➔➔
▲
Page 48

48
Manual G mode
lRepeating flash mode
m In the Repeating Flash mode, the SB-80DX fires repeatedly during a single
exposure, creating stroboscopic multiple-exposure effects. This mode is
useful when shooting fast-moving subjects.
nIn the Repeating flash mode, use fresh or fully charged batteries. Also allow enough time
for the flash to recycle between each repeating flash.
nIn the Repeating flash mode, use a tripod to prevent camera/flash shake, because slower
shutter speeds are used.
Setting the flash output level, the frequency (Hz), and the number of
repeating flashes per frame
m Frequency (Hz) represents the number of times the flash fires per second.
nThe actual number of repeating flashes per frame becomes lower than the one set as the
shutter speed increases or the number of flashes per second decreases, because the
Speedlight fires during a single exposure.
m Referring to the table below, set the flash output level, the frequency, and the
number of repeating flashes separately for each picture.
Maximum number of repeating flashes per frame
* Frequency (Hz) represents the number of flashes per second.
Frequency*
Flash output level
1/8 1/16 1/32 1/64 1/128
1-2 Hz 14 30 60 90 90
3 Hz 12 30 60 90 90
4 Hz 10 20 50 80 80
5 Hz 8 20 40 70 70
6 Hz 6 20 32 56 56
7 Hz 6 20 28 44 44
8 Hz 5 10 24 36 36
9 Hz 5 10 22 32 32
10 Hz 4 8 20 28 28
20-100 Hz 4 8 12 24 24
Page 49

49
Detailed operation
1
Set the camera’s exposure mode to Manual (M).
2
Press the a button to set the flash mode to
the H Repeating Flash mode.
3
Press the g button and the flash output level
starts blinking. Press the e or f button to
increase or decrease the values.
nThe flash output level blinks during adjustment and
stops after 8 seconds unless an adjustment is made.
The last blinking number is the one automatically set.
4
Press the g button and the flash output level
stops blinking.
nAfter that, the frequency starts blinking.
5
Repeat the procedures above to set the
frequency and the number of repeating flashes
per frame.
Frequency (Hz)
Number of repeating flashes per frame
Page 50

50
8
Set the shutter speed.
nUse the equation to determine the shutter speed and
set that shutter speed or one slower.
Shutter speed = Number of flashes per frame ÷
Frequency of flashes (Hz)
nFor example, if the number of flashes per frame is 10
and frequency is 5 Hz, divide 10 by 5 to get a shutter
speed of 2 sec. or slower.
nOr you can set the shutter speed to B (bulb) to
accommodate any number of repeating flashes.
Manual G mode
7
Set the same aperture on the camera or lens that
is set on the SB-80DX.
nFor cameras in Groups I and II, and Digital SLRs
cameras with CPU lenses, set the SB-80DX’s
aperture on the camera (p. 4).
9
Confirm that the ready-light is on, then
shoot.
Making sure the flash fires correctly before shooting
m Press the h button to make sure the flash fires correctly as set.
6
Determine the guide number according to the
flash output level and zoom-head position set,
then calculate the correct aperture from the
guide number and the shooting distance. Finally
set this aperture on the SB-80DX.
nRefer to “Guide number table” (p. 45) and
“Determining the aperture and flash output level in
the Manual mode” (p. 44).
nIf the ISO sensitivity is set correctly, the flash shooting
distance appears on the LCD panel to match to the
flash output level and aperture as set.
Page 51

51
Detailed operation
lFP High-Speed Flash sync K mode
m High-speed flash synchronization at shutter speeds between 1/250 and
1/4000 sec. (1/500 and 1/16000 sec. for the D1-Series) is possible, allowing
you to use a wider aperture to achieve shallow depth of field and blur the
background.
nDo not use the built-in wide-flash adapter (p. 72) or Nikon Diffusion Dome (p. 69).
When the wide-flash adapter is used, the zoom-head position and K indicator
blink on the LCD panel as a warning.
nWhen you remove the SB-80DX from the camera, be sure to cancel FP flash
operation so that K disappears. If the flash unit is removed with the FP setting, K
blinks as a warning.
1
Set the camera’s exposure mode to Manual (M).
2
Press the a button until “G” appears on the
LCD panel.
3
Press the e or f button until “K” appears on
the LCD panel.
F5, F100, F90X / N90s, F90-Series / N90, D1-Series
Usable cameras
Exposure compensation in the Repeating flash mode
m The flash shooting distance calculated in step number 6 is the correct
exposure for the first flash in the sequence. Therefore, repeating flash at this
flash output level will result in overexposure of any overlapping images. To
prevent this, set a smaller aperture on the camera.
Page 52

52
Manual G mode
5
Set the same aperture on your camera or lens
that is set on the SB-80DX.
6
Set the shutter speed between 1/250 and
1/4000 sec. (between 1/500 and 1/16000 sec. for
the D1-Series).
nSetting a shutter speed slower than 1/250 sec. is not
recommended.
nThe faster the shutter speed, the smaller the
flashoutput (guide number).
7
Confirm that the ready-light is on, then shoot.
4
Determine the aperture and flash output level to
match the main subject’s shooting distance. Set
the same aperture and flash output level on the
SB-80DX.
nFor details on calculating the flash output level and
aperture, refer to “Determining the aperture and flash
output level in the Manual mode” on page p. 44 and
“Guide number table ” on p. 45.
nFor setting the flash output level, refer to “Setting the
flash output level” on page 47.
nFor cameras in Groups I and II, and Digital SLRs
cameras with CPU lenses, set the SB-80DX’s
aperture on the camera (p. 4).
nIf ISO sensitivity is correctly set, the flash shooting
distance appears on the LCD panel to match to the
flash output level and aperture as set.
Page 53

53
Detailed operation
Notes on continuous flash shooting
lMaximum number of continuous firings
m It is recommended to allow the SB-80DX to cool off for at least 10 minutes
after the maximum number of continuous firings as shown in this table:
Max. no. of continuous firings
lSynchronization during continuous flash shooting
m It is possible to take up to the number of frames during continuous shooting
as shown in the table below. However, if the continuous firings exceed the
maximum numbers as shown in the table above, you should allow
the SB-80DX to cool off for at least 10 minutes.
Flash mode
Max. no. of continuous
firings (at 6 frames/sec.)
TTL/D-TTL auto flash
Non-TTL auto flash/Auto Aperture flash
15
Manual flash (
Flash output level: M1/1, M1/2
)
Manual flash (Flash output level: M1/4 to M1/128) 40
nWith fresh batteries of the same type in both the SB-80DX and optional Nikon SD-8A or
Power Bracket Unit SK-6A.
nRefer to table “Maximum number of repeating flashes per frame” on page 48 when
performing Repeating flash.
Maximum number of frames during continuous flash shooting
(at six frames per sec.)
1/8 1/16 1/32 1/64 1/128
Up to 4
Up to 8 Up to 16 Up to 30
Up to 40
SD-7
Alkaline-manganese
Alkaline-manganese
Lithium
NiCd
Ni-MH
Alkaline-manganese
Lithium
NiCd
Ni-MH
Up to 6 Up to 10 Up to 40 Up to 40 Up to 40
SD-8A
Up to 5 Up to 10
Up to 20
Up to 30
Up to 40 Up to 40
Up to 5 Up to 10 Up to 40 Up to 40
Up to 30
SK-6A
Up to 5 Up to 10 Up to 20
Up to 40 Up to 40
Up to 5 Up to 10 Up to 30 Up to 40
Up to 40
Batteries inside
SB-80DX
Flash output level
SB-80DX
only
All types
Optional
power
source
Page 54

54
Checking the correct exposure before shooting
You can determine whether the subject will receive the correct exposure by test
firing the SB-80DX before actually taking the picture.
lTTL auto flash mode
m Press the SB-80DX’s MODE button until “A” (Non-TTL auto flash) appears on
the LCD panel. Set the same aperture on the SB-80DX as set in the TTL auto
flash mode. Press the h button to fire the flash. If the ready-light blinks
after firing, this indicates the light may have been insufficient for correct
exposure. In this case, set a wider aperture on the camera or lens, or move
closer to the subject.
lD-TTL auto flash mode
m Press the SB-80DX’s MODE button until “B” (Auto Aperture flash) appears
on the LCD panel. Set the same aperture on the SB-80DX as set in the D-TTL
auto flash mode. Press the h button to fire the flash. If the ready-light
blinks after firing, this indicates the light may have been insufficient for correct
exposure. In this case, set a wider aperture on the camera or lens, or move
closer to the subject.
lNon-TTL auto flash mode
m Make the necessary settings on the SB-80DX and camera, and press the
h button. If the ready-light blinks after firing, this indicates the light may
have been insufficient for correct exposure. In this case, set a wider aperture
on the camera or lens, or move closer to the subject.
lAuto Aperture flash mode
m Make the necessary settings on the SB-80DX and camera, and press the
shutter release button slightly, then press the h button. If the ready-light
blinks after firing, this indicates the light may have been insufficient for correct
exposure. In this case, set a wider aperture on the camera or lens, or move
closer to the subject.
lManual flash mode
m In manual flash mode, checking the correct exposure cannot be performed
by test firing. Calculate the correct flash output level, aperture, and flash
shooting distance by referring to “Determining the aperture and flash output
level in the Manual mode” (p. 44).
Page 55

Advanced operation
Advanced operation
In this section advanced information on each
function of the SB-80DX’s is provided.
Advanced operation
Page 56

56
Exposure compensation allows you to take well-balanced pictures by
intentionally modifying the correct exposure when a subject of extremely high
or low reflectivity is included in a picture or when you want to create flash
photographs to match your creative preferences.
nSome plus compensation may be necessary when the background includes a mirror,
white wall, or other highly reflective surface. Likewise, some minus compensation may be
required when the background is dark or includes subjects of low reflectivity.
nMaking exposure compensation for both the main subject and background or the main
subject without affecting the background are possible, depending on the flash shooting
situations.
Exposure compensation on the SB-80DX can be performed in the following ways:
Exposure compensation and flash output level
Exposure compensation
Making exposure compensation
for both the main subject and
background
Making exposure compensation
for the main subject only
Making exposure compensation
for the background only
Available flash mode
All flash modes
TTL/D-TTL auto flash and Auto
Aperture flash
Manual flash mode
Flash shooting at slow shutter
speeds
Usable camera
Cameras in all groups
Cameras in groups I to III, and
Digital SLRs
Cameras in all groups
Cameras in all groups
lMaking exposure compensation for both the main subject
and background
In TTL/D-TTL auto flash and Auto Aperture flash
m Use the camera’s exposure compensation function to modify both the
SB-80DX’s flash output level and the background exposure. For details,
see your camera’s instruction manual.
m The exposure compensation value set on the camera is not displayed on the
SB-80DX’s LCD panel.
m Exposure compensation beyond the usable ISO sensitivity range cannot be
performed (p. 23). For example, with an ISO sensitivity of 100, if you try to
make an exposure compensation of +3 steps on the camera (equivalent to
ISO 12), which is out of the usable ISO sensitivity range (ISO 25-1000) of the
SB-80DX. However, exposure compensation up to +2 steps (equivalent to
ISO 25) is possible.
Page 57

57
Advanced operation
compensation
Making exposure compensation in the Non-TTL auto flash and
Manual flash mode
m Exposure compensation is performed by intentionally modifying the correct
aperture.
m In the Non-TTL auto flash mode, the correct exposure can be obtained when
the same aperture is set on the camera as that set on the SB-80DX.
Therefore, to make exposure compensation, vary the aperture set on the
camera while retaining the aperture set on the SB-80DX or vice versa.
m In the Manual flash mode, calculate the proper aperture for the correct
exposure from the guide number and the shooting distance (p. 45).
Then referring to this aperture, modify the aperture on the camera to make
exposure compensation.
m As a basic guide, set a wider aperture on the camera or lens to make the
subject brighter or a smaller aperture to make it darker.
lMaking exposure compensation for the main subject only
In TTL/D-TTL auto flash and Auto Aperture flash
m Making exposure compensation for a flash illuminated subject without
affecting the background exposure is called flash output level compensation
(p. 58).
m This compensation is performed with cameras in Groups I to III and Digital
SLRs cameras.
In Manual flash mode
m Making exposure compensation for only the flash illuminated subject by
intentionally modifying the SB-80DX’s flash output level (M1/1 to M1/128).
For cameras in all groups.
lMaking exposure compensation for the background only
m Set the camera’s exposure mode to Shutter-Priority Auto (S) or Manual (M),
and set the shutter speed to one slower than its flash sync shutter speed.
m With cameras providing slow-sync, set the camera’s flash sync mode to Slow-
sync (p. 60) to bring out background details in low-light situations.
nFor details, see your camera’s instruction manual.
Page 58

58
Usable cameras For cameras in Groups I to III, and Digital SLRs cameras
Exposure compensation and flash output level compensation
lFlash output level compensation
m Make exposure compensation for a flash illuminated subject without affecting
the background exposure by modifying the SB-80DX’s flash output level.
m Available in the TTL/D-TTL auto flash and Auto Aperture flash modes.
m With cameras in Group III, make flash output level compensation on the
camera. Flash output level compensation cannot be made on the SB-80DX.
The amount of compensation set on the camera does not appear on the
SB-80DX’s LCD panel. For details, see your camera’s instruction manual.
1
Press the g button, or the e or f button, to
display the Exposure compensation indicator,
and the Flash output level compensation value
starts blinking.
2
Press the e or f button to increase or
decrease the compensation in 1/3 steps (or
in 1/6 steps with Digital SLRs) from –3.0 to
+3.0 EV.
3
Press the g button and the flash output level
compensation value stops blinking.
nThe flash output level blinks during adjustment
and stops after 8 seconds unless an adjustment is
made. The last blinking number is the one
automatically set.
nWith F80-Series/N80-Series, F70-Series/N70, and Pronea 600i/6i cameras having an
exposure compensation function, you can compensate the flash output level on either the
camera or SB-80DX. For details, see your camera’s instruction manual. If you use both
controls, the exposure is modified by the sum total of both compensation values. In this
case, the SB-80DX’s LCD panel shows only the compensation value set on the
SB-80DX.
Canceling flash output level compensation
The flash output level compensation cannot be canceled by turning the
SB-80DX off. To cancel, press the e or f button to set the compensation
value back to 0.0 and make sure the exposure compensation indicator
disappears.
Page 59

59
Advanced operation
The flash shooting distance range with zoom lenses having a variable aperture
With zoom lenses having a variable aperture, take note of the following before
setting the aperture on the SB-80DX and confirming the flash shooting distance
range.
Lenses having a variable aperture
m There are two maximum aperture values indicated in the lens model name.
For example with the AF Zoom-Nikkor 28-105mm f/3.5-4.5D IF, the maximum
aperture at 28mm is f/3.5, but decreases to f/4.5 at 105mm.
lReading the aperture on the camera’s LCD panel or in
the viewfinder
m After composing the picture by zooming in or out, read the aperture on the
camera’s LCD panel or in the viewfinder. Then set the same aperture on the
SB-80DX’s LCD panel and confirm the flash shooting distance range.
nAperture values are automatically compensated by the camera and appear on the
camera’s LCD panel or in the viewfinder. The aperture value displayed in the aperturedirect-readout scale as seen in the viewfinder of the Nikon F5 or other cameras is fixed
and not automatically compensated.
lReading the aperture using the scale on the lens
m After zooming in or out to select the appropriate composition, read the
aperture using the aperture scale on the lens. Then set the same aperture on
the SB-80DX’s LCD panel and confirm the flash shooting distance range.
At wideangle zoom settings, read the aperture value at the green index (or line).
At telephoto settings, read the aperture value at the yellow index (or dot).
At intermediate settings, read the aperture value between the two indexes.
lReading the aperture using the camera’s aperture dial
F-401x/N5005, F-401s/N4004s, F-401/N4004 camera + CPU lens
m After zooming in/out to select the desired composition, read the aperture
using the camera’s aperture dial. Then set the same aperture on the
SB-80DX’s LCD panel and confirm the flash shooting distance range.
nSet the camera’s exposure mode to Aperture-Priority Auto (A) or Manual (M). The
aperture value set on the lens cannot be confirmed in the Programmed Auto (P) or
Shutter-Priority Auto (S) exposure mode.
nFor cameras having TTL metering, the aperture on zoom lenses is automatically
compensated by the camera.
nIn case of setting a larger or smaller value than the lens aperture on the camera’s aperture
dial, set the lens’ maximum or minimum aperture on the SB-80DX.
Page 60

60
lSlow-sync flash
m The flash is controlled at a slow shutter speed to obtain the correct exposure
for both the main subject and background in low-light situations or at night.
m Available with cameras providing slow-sync. You cannot set the slow-sync
function on the SB-80DX directly. Set it on the camera. For more information,
refer to your camera’s instruction manual.
nSince slow shutter speeds are usually used, use a tripod to prevent camera shake.
lRed-eye reduction
m To prevent the center of your subject’s eyes from appearing red in color
pictures, the SB-80DX’s red-eye reduction lamp lights up for approx. 1 sec.
before the picture is taken.
m Available with cameras having red-eye reduction control. You cannot set red-
eye reduction on the SB-80DX directly. Set it on the camera. For more
information, refer to your camera’s instruction manual.
nAfter setting your camera to red-eye reduction, make sure that “N” appears on the
SB-80DX’s LCD panel.
Slow-sync flash mode/Red-eye reduction control
lRed-eye reduction with slow-sync flash mode
m In this mode, red-eye reduction is combined with slow sync.
m Available with cameras having red-eye reduction with slow-sync. You cannot
set this mode on the SB-80DX directly. Set it on the camera. For more
information, refer to your camera’s instruction manual.
nAfter setting your camera to red-eye reduction with slow sync, make sure that “N”
appears on the SB-80DX’s LCD panel.
nSince slow shutter speeds are usually used, use a tripod to prevent camera shake.
Page 61

Usable cameras All cameras
61
Advanced operation
Rear-curtain sync and Modeling illumination
Rear-curtain sync Front-curtain sync
Shooting data
nCamera: F100 (2 seconds, f/4 + 1/2)
nFocal length: 70mm
nSpeedlight: SB-80DX (Manual, flash output level: M1/1)
m In normal flash synchronization, when shooting fast-moving subjects at slow
shutter speeds, this usually results in unnatural-looking pictures where the
subject frozen by the flash appears behind or within the blurred movement.
Rear-curtain flash sync creates a picture in which the blur of a moving subject
(for example, the taillights of a car) appears behind the subject and not in front.
m Available with cameras providing rear-curtain sync. You cannot set this mode
on the SB-80DX directly. Set it on the camera. For details, see your camera’s
instruction manual.
nSince slow shutter speeds are usually used, use a tripod to prevent camera shake.
nThis function does not operate in either the FP High-Speed flash sync or Repeating flash mode.
nIn multiple flash, the master flash unit can be set to either front-curtain or rear-curtain
sync flash. The slave units cannot be set to rear-curtain sync flash (p. 74).
lModeling illumination
m Press the Modeling illuminator button and the modeling illuminator lights up
(or the flash fires) repeatedly at a reduced flash output level. This is useful for
checking the illumination and the shadows cast on the subject before actually
taking the picture.
nThe modeling illuminator lights up for a maximum of
approx. 3 sec. while the modeling illuminator button is
pressed.
nThe modeling illuminator can be set to operate only after
the ready-light comes on.
nThe modeling illuminator will not light up in the wireless
slave flash mode (p. 84).
lRear-curtain sync
Page 62

62
Autofocus flash operation in dim light
Usable cameras and lenses Cameras with autofocus function + autofocus lens
When the light is too dim for normal autofocus operation, the SB-80DX’s
AF-Assist Illuminator enables you to perform autofocus flash photography
in dim light.
In dim light, the AF-assist illuminator turns on automatically when the camera’s
shutter release button is lightly pressed if an AF lens is mounted and the
camera’s focus mode is set to S (Single Servo AF with focus priority), AF, or A.
nThe effective shooting distance with the AF-assist illuminator is approx. 1m to 10m with a
50mm f/1.8 lens or shorter, depending on the lens in use.
nUsable lens focal length: 24mm to 105mm (35 to 105mm for F-501/N2020 cameras)
nThe AF-Assist Illuminator is activated when U appears on the LCD panel.
The AF-Assist Illuminator is canceled when S appears on the LCD panel.
nThe AF-Assist Illuminator is set to activate when shipped from the factory.
nIf the focus indicator does not appear in the camera’s viewfinder even through the
AF-Assist Illuminator turns on, focus manually.
nRefer to your camera’s instruction manual.
The AF-Assist Illuminator will not light up, if:
nThe autofocus is locked or the ready-light does not come on.
nThe camera’s center focus area is not selected with cameras having Focus Area
selection. For details, refer to your camera’s instruction manual.
Page 63

63
Advanced operation
lActivating and canceling the AF-Assist illuminator using
Custom settings
1
Press the g button for more than 2 sec. to
display the Custom settings mode.
2
Press the e or f button to choose
“AF-Assist illuminator.”
3
Press the c or d button to activate or cancel
the AF-Assist Illuminator:
U: Activate
S: Cancel
4
Press the g button for more than 2 sec. or
press the b button to return to the normal
setting mode.
nWhen the AF-Assist Illuminator is canceled, autofocus operation may not be performed
in dim light.
lFor cameras having a built-in Speedlight
nEven when the camera’s AF-Assist Illuminator is set to activate, the SB-80DX’s AF-Assist
Illuminator is given priority and the camera’s AF-Assist illuminator does not light up. (The
camera’s AF-Assist Illuminator lights up when the SB-80DX’s AF-Assist Illuminator is
canceled.)
nWith F60-Series/N60 cameras, the AF-Assist Illuminator lights up while shooting at full-
output manual.
nWith F80-Series/N80-Series, and F65-Series/N65-Series cameras, the camera’s AF-Assist
Illuminator lights up when the SB-80DX’s AF-Assist illuminator is canceled. To cancel the
camera’s AF-Assist Illuminator, cancel it on the camera. For details, refer to your
camera’s instruction manual.
Page 64

Page 65

In this section, information on a variety
of photographic techniques such as
bounce and close-up flash is provided,
explaining how to create flash pictures
with softer shadows.
We also present the recommended
position of Speedlights in wireless
multiple flash photography or when
attached with cords.
Technical operation/
Effective Speedlight
placement
Technical operation/
Effective Speedlight
placement
Page 66

66
Bounce flash Normal flash
Bounce flash operation (For taking pictures without
Tilt or rotate the flash head to bounce the light off the ceiling or walls to
soften shadows and create more natural-looking portraits indoors.
Even softer shadows are possible when using the Nikon Diffusion
Dome.
90¡
50¡
Tilting the flash head
m Tilt the flash head up at least 50° to
bounce light off the ceiling for
effective bounce flash. Make sure
that the light from the flash head
does not directly illuminate the
subject.
nOptimum results are obtained when the
flash head is positioned 1 to 2m (3.3 to
6.6 ft.) away from the reflecting surface.
Shooting data:
nCamera: F100
nFocal length: 70mm
nSpeedlight: SB-80DX set to
Standard TTL flash
nAperture: f/5.6 +1/3
nShooting distance: 3m (9.8 ft.)
Shooting data:
nCamera: F100
nFocal length: 70mm
nSpeedlight: SB-80DX set to
Standard TTL flash
nAperture: f/11 +1/3
nShooting distance: 3m (9.8 ft.)
Page 67

67
Technical operation/Effective Speedlight placement
unattractive shadows)
1
Set the camera’s exposure mode to AperturePriority Auto (A) or Manual (M).
2
Set the camera’s metering system to Matrix
Metering Y or Center-Weighted Metering W.
3
Set the flash mode to TTL/D-TTL auto flash,
or Non-TTL auto/Auto Aperture flash.
5
Adjust the flash head.
4
Set the camera’s aperture.
nRefer to page 68 for setting the aperture.
6
Make sure that the ready-light is on,
then shoot.
nWhen the flash has fired at its maximum
output and underexposure may have
occurred, the ready-light on the SB-80DX
blinks for approx. 3 sec. To compensate, use
a wider aperture or move closer to the
subject and reshoot.
Page 68

68
lSetting the aperture
m With bounce flash, there is a light loss when compared with normal flash with
the flash head adjusted to the horizontal/front position. You should use an
aperture that is 2 to 3 stops wider.
m The flash shooting distance range indicator disappears, if the flash head is
adjusted to other than the horizontal/front position. First, confirm the flash
shooting distance range and aperture at the horizontal/front position, then set
the aperture on the camera.
nIn the Non-TTL auto flash mode, set the same aperture on the SB-80DX.
lSetting the flash head
m The SB-80DX’s flash head tilts or rotates by holding down the flash head
tilting/rotating lock release button as shown in the illustrations. Adjust the flash
head, depending on the shooing environment or your creative preferences.
0°
7°
90°
75°
60°
45°
0
°
30
°
60
°
90
°
120
°
150
°
180
°
90
°
60
°
30
°
Flash head tilting and rotating angles
m The SB-80DX’s flash head tilts up 90° and rotates
horizontally 180° to the left and 90° to the right.
nSet the flash head at a click stop at the angles shown.
nWhen taking close-up pictures with flash, tilt the flash
head down to the –7° position (p. 70).
Choosing the reflecting surface
m In color photography, select white or highly
reflective surfaces to bounce the light off of.
Otherwise, your pictures will come out with an
unnatural color cast similar to that of the
reflecting surface.
Bounce flash operation
Page 69

69
Technical operation/Effective Speedlight placement
lUsing the built-in bounce card
m In bounce flash photography, use the SB-80DX’s built-in bounce card to
create a highlight in the subject’s eyes, making the eyes look more vibrant.
nAs shown in the illustrations below, pull out the wide-flash adapter. While holding the
bounce card, slide the wide-flash adapter back into place inside the flash head.
nTilt the flash head up 90° to use this function most effectively.
90¡
50¡
lShooting with the Nikon Diffusion Dome
m Use of the provided Nikon Diffusion Dome diffuses the light from the flash
much more than with normal bounce flash, allowing you to soften the light
from the flash and eliminate shadows. With the camera in the vertical position,
the Nikon Diffusion Dome provides the same effect.
nGood results are generally obtained when the flash head is tilted up 60°.
nUse of the built-in wide-flash adapter in conjunction with the the Nikon Diffusion Dome
results in much more diffused light (p. 72).
m Attach the Nikon Diffusion Dome
as shown in the illustration.
m The zoom-head position is
automatically set at 14mm.
Nikon Diffusion Dome attached Nikon Diffusion Dome not attached
Page 70

70
Close-up flash operation
With the built-in wide-flash adapter attached to the SB-80DX, close-up flash
shooting can be performed. The built-in wide-flash adapter diffuses the light
from the flash to soften shadows. When the SB-80DX is used off-camera, you
can take more natural-looking close-up pictures.
nBe sure to use the wide-flash adapter when taking close-up flash photographs.
nTake care that light from the flash is not obstructed by the lens barrel when a long lens
is used.
nVignetting due to the lighting situation, lens in use, focal length, etc. may occur in close-
up flash shooting. It is strongly recommended to make test shots before taking the final
pictures.
Shooting data:
nCamera: F100
nFocal length: 105mm
nSpeedlight: Two SB-80DX units set to
Standard TTL flash
nAperture: f/22 + 2/3
nShooting distance: 50cm (20 in.)
nISO sensitivity: 100
Shooting data:
nCamera: F100
nFocal length: 105mm
nSpeedlight: Single SB-80DX unit set to
Standard TTL flash
nAperture: f/16
nShooting distance: 50cm (20 in.)
nISO sensitivity: 100
Flash shooting with one flash unitFlash shooting with two flash units
An example of close-up shooting
with two flash units
The subject is illuminated from behind
by flash unit to emphasize the small
subject’s contours, while flash unit
is used off-camera to illuminate the
subject from the side, softening the
shadows.
SC-18
or
SC-19
SC-17
Page 71

71
Technical operation/Effective Speedlight placement
1
Set the camera’s exposure mode to AperturePriority Auto (A) or Manual (M).
2
Set the camera’s metering system to Matrix
Metering Y or Center-Weighted Metering W.
3
Set the SB-80DX’s flash mode to TTL or D-TTL
auto flash.
4
Position the built-in wide-flash adapter over the
flash head. Press the c or d button to adjust
the zoom-head position to 14mm or 17mm.
5
Tilt the flash head down to –7°.
nThis position is recommended to illuminate the lower
portion of the subject sufficiently in close-up
photography when the SB-80DX is attached to the
camera and used as the only flash unit.
nThe underbar blinks when the flash head is tilted
down to this position.
7°
6
Confirm that the ready-light is on, then shoot.
nWhen the flash has fired at its maximum output and
underexposure may have occurred, the ready-light
on the SB-80DX blinks for approx. 3 sec. To
compensate, use a wider aperture or move closer to
the subject and reshoot.
Page 72

72
lSetting the aperture
m Calculate the aperture by using this equation and table. Setting a smaller
aperture than the one obtained from the equation is recommended.
f/stop
≥ Coefficient ÷ Flash-to-subject distance
m For example, with a subject 0.5m (1.6 ft) away using an ISO sensitivity of 100
and with the wide-flash adapter in place, the suggested aperture is:
f/stop
≥ 2 ÷ 0.5 = 4 (in meters)
f/stop
≥ 6.6 ÷ 1.6 = approx. 4 (in feet)
Therefore, you should use at least f/4 or an even smaller aperture, such as
f/5.6 or f/8.
lSetting the built-in wide-flash adapter and adjusting the
zoom-head position
1
Slowly pull out the wide-flash adapter all the way,
and position it over the flash head. Then slide
the bounce card back into place inside the flash
head.
2
Press the c or d button to adjust the zoomhead position to 14mm or 17mm.
nWhen the wide-flash adapter is set on the flash head,
the power zoom function becomes inactive and the
zoom-head position is adjusted to 14mm or 17mm.
nTo slide the wide-flash adapter back into place, raise
it and push it into the flash head as far as it will go.
ISO sensitivity 25 50 100 200 400 800 1000
Coefficient (m/ft) 1.4/4.6 2/6.6 2/6.6 4/13 4/13 5.6/18 5.6/18
Close-up flash operation
Page 73

73
Technical operation/Effective Speedlight placement
lWhen shooting subjects closer than 0.6m (2 ft)
m With the SB-80DX attached to the camera, sufficient illumination of the subject
cannot be obtained. In this case, use the SB-80DX off-camera by attaching
the optional TTL Remote Cord as shown below.
SC-17
A
B
nFor cameras in Group I in 3D Multi-Sensor Balanced Fill-Flash and Digital SLRs cameras
in 3D Multi-Sensor Balanced Fill-Flash for Digital SLRs, you may not be able to obtain
correct exposure, because distance information from the lens is used. In this case,
position the camera (A) and the SB-80DX (B) at equal distances from the subject.
nFor F5 cameras with the High-Magnification Finder DW-30 or DW-31, or F4 cameras with
the High-Magnification Finder DW-20 or DW-21, use the optional TTL Remote Cord SC-24
instead of the SC-17.
Page 74

74
Multiple flash operation (Creating various flash
Multiple flash photography allows you to create more natural-looking pictures by
using several flash units to eliminate the shadows cast by the subject or to
emphasize the subject’s shape. Multiple flash operation can be performed in
two ways: (1) By using cords or (2) Wireless operation.
lNotes on performing multiple flash (common to both
operations)
m Be sure to read the instruction manuals of your camera and the Speedlight(s)
in use.
Master flash unit and slave flash unit(s)
m In this manual, the flash unit mounted on the camera or the one directly
connected to the camera using a remote cord is called the master flash unit.
All other flash units are called slave flash units.
Canceling Monitor Preflashes in multiple flash operation
m Cancel the Monitor preflashes of the master flash unit following either one of the
methods described below, since Monitor Preflashes cause incorrect exposure.
Multiple flash with Nikon Digital SLRs cameras
m Because Monitor Preflashes are fired at all times in the D-TTL auto flash
mode, Digital SLRs cameras cannot be used for multiple flash shooting in this
mode.
m With Digital SLRs cameras, only manual multiple flash operation is possible in
multiple flash shooting using cords. In wireless multiple flash shooting, set the
master flash unit’s flash mode to the Auto Aperture (AA) or Non-TTL auto flash
(A) mode.
Manual multiple flash mode
m FP High-Speed Flash sync and Repeating flash are not possible.
SB-80DX/SB-50DX
1 Set to the wireless flash mode.
2 Set the flash mode to Standard TTL flash.
3 Tilt the flash head up.
4 Use a non-CPU lens.
SB-28/28DX, SB-27,
1 Set the flash mode to Standard TTL flash.
SB-26, SB-25
2 Tilt the flash head up.
3 Use a non-CPU lens.
Built-in Speedlight
Set the exposure mode to Manual.
(F80-Series/N80-Series,
F70-Series/N70)
Page 75

75
Technical operation/Effective Speedlight placement
effects by using more than one Speedlight)
Canceling the power standby function
m When using a Speedlight having a standby function as a slave flash unit,
make sure that the standby function is set to off, or select a standby duration
that is long enough, using the Custom settings mode.
m The SB-80DX’s standby function is canceled while the SB-50DX’s standby
duration is prolonged to approx. one hour when they are set to the wireless
slave flash mode.
Turn off the power
m Turn off the camera and all the flash units before mounting the master flash
unit on the camera or connecting the master flash unit to the slave flash units.
Setting the angle of coverage of the slave flash units
m Set the angle of coverage of the slave flash units wider than the picture angle,
so that the subject will receive sufficient illumination even when the angle of
the flash head is off axis from the subject. Remember, the closer the subject,
the wider the angle of coverage required.
Compound guide number
m You can calculate the compound guide number (GN) by using the following
equation when more than one Speedlight is used in Manual multiple flash
operation.
GN =
√
(GN of Speedlight A)
2
+ (GN of Speedlight B)2+ . . .
Balancing the illumination when using more than one Speedlight
m The brightness of the flash illumination is inversely proportional to the square
of the distance between the flash unit and the subject. For example, if the
distance between Speedlight A and the subject is 1m (3.3 ft.), and Speedlight
B is 2m (6.6 ft.), the combined brightness of the two Speedlights will be:
A : B = 1
2
: 22= 1 : 4 (in meters) or 3.32: 6.62= approx. 11 : 44 (in feet)
Therefore, the illumination provided by Speedlight A is four times (or two
steps) brighter than that provided by Speedlight B.
Making test shots
m Making test shots before shooting is recommended.
Page 76

76
The master flash unit used off-camera
illuminates the subject from the side to
create a more natural-looking picture,
and slave flash units and illuminate
the subject from the top and the rear to
eliminate shadows, helping to give a
better rendition of the subject.
Shooting data
nCamera: F100 (1/250 sec. f/11)
nFocal length: 70mm
nMaster flash unit
: SB-80DX set to
Standard TTL flash
nSalve flash units
, : Two SB-80DX units
set to Standard TTL
flash
Multiple flash shooting (using 3 flash units) Single flash shooting (on-camera flash unit)
Sample photographs and the positions of the Speedlights
lAvailable flash modes for multiple flash shooting
using cords
m Multiple flash shooting using cords can be performed in two ways:
(1) TTL multiple flash and (2) Manual multiple flash.
nPerforming multiple flash shooting in the Manual mode is not recommended, since it is
difficult to obtain the correct exposure. Use the TTL auto flash mode with cameras
compatible with TTL auto flash.
nManual flash is possible with all Nikon cameras, including Digital SLRs cameras.
nUse of the SB-50DX and SB-23 as slave flash units is not recommended, because the
standby function cannot be canceled.
nEven when a master flash unit is used off-camera, the shutter speed is automatically set
through the optional TTL Remote Cord SC-17 in the TTL auto flash mode.
Multiple flash shooting using cords
From the top
SC-18
or
SC-19
SC-18
or
SC-19
SC-17
Page 77

77
Technical operation/Effective Speedlight placement
lConnecting the master and slave flash units
m Refer to “System chart for TTL multiple flash” (p. 80). Also see the instruction
manuals of your cameras, Speedlights, and accessories.
nUse the optional TTL Remote Cords SC-18 or SC-19 to connect the SB-80DX to more
than one slave flash unit.
nUse the optional Multi-Flash Adapter AS-10, if the slave flash units are not equipped with
multiple flash terminals.
nUse optional Multi-Flash Adapter AS-10 to attach the slave flash unit(s) to a tripod.
lThe maximum number of flash units to be connected
using cords
m Up to five units including the master flash unit can be used for multiple flash
photography at a total cable length of 10m (33 ft.).
nMake sure the combined total of the coefficients in the table below for all flash units used
together does not exceed 20 at 20°C (68°F) or 13 at 40°C (104°F).
nIf it exceeds these figures, you may not be able to take a second shot after the first one.
In this case, turn off the power of all flash units and reduce the total number of flash units
connected.
Speedlight Coefficient
SB-80DX, SB-50DX, SB-30, SB-29, SB-29s, SB-28, SB-28DX,
SB-27, SB-26, SB-25, SB-24, SB-22s, SB-14, SB-11, SB-140
1
SB-23, SB-21, SB-17, SB-16, SB-15 4
SB-22 6
SB-20 9
Page 78

78
lTTL multiple flash
1
Set the camera’s exposure mode to AperturePriority Auto (A) or Manual (M).
2
Attach the master flash unit to the camera,
turn the power on, and set the flash mode to
TTL auto flash.
nAvailable TTL auto flash modes are Matrix Balanced
Fill-Flash, Center-Weighted Fill-Flash/Spot Fill-Flash,
and Standard TTL flash.
For the usable camera/lens/exposure mode/metering
system combination, see page 36.
n3D Multi-Sensor Balanced Fill-Flash and Multi-Sensor
Balanced Fill-Flash cannot be used, because monitor
preflashes are fired.
nD-TTL multiple flash shooting using cords is not
possible with digital SLRs cameras.
3
Turn off all the flash units before connecting the
master flash unit to the slave flash units using
optional TTL Remote Cords SC-18 or SC-19.
4
Turn on all slave flash units and set the flash
mode on all slave flash unit to TTL auto flash.
5
Confirm the aperture and flash shooting distance
range as in normal TTL auto flash shooting, then
shoot.
nSee page 28 about the TTL auto flash mode.
nWhen the flash has fired at its maximum output and
underexposure may have occurred, the ready-light
on the SB-80DX blinks for approx. 3 sec. To
compensate, use a wider aperture or move closer to
the subject and reshoot.
Multiple flash shooting using cords
Page 79

79
Technical operation/Effective Speedlight placement
lManual multiple flash
1
Set the camera’s exposure mode to AperturePriority Auto (A) or Manual (M).
2
Turn off the power and attach the master flash
unit to the camera.
3
Connect the sync terminal on the master flash
unit to the slave flash unit using optional Sync
Cords SC-11 or SC-15.
4
Turn on the power of all flash units and set the
flash mode on all units to Manual flash.
nThe flash output level can be adjusted on the SB-80DX,
SB-28, etc., if necessary (p. 45).
nFP High-Speed Flash sync and Repeating flash are
not possible.
5
Confirm the aperture and flash shooting distance
as in normal Manual flash shooting, then shoot.
nSee page 46 about the Manual flash mode.
Page 80

80
System chart for TTL multiple flash
SC-24
SB-21B
SB-21A
SB-16A SB-17
SC-14
SB-11
SC-23
SB-14
SB-140
SB-16B
SB-15
SB-25 SB-26SB-24
Master flash unit
SC-17
V-type Sync Cord
SB-27
AS-17
SB-29/29s
Items marked on page 80 are
connected to item on page 81.
SB-28/28DX
SB-22 SB-22sSB-20 SB-23 SB-30 SB-50DX
SB-80DX
Group I
Group V
F-501/N2020,
F-401
s/N4004s,
F-401/N4004
F-301/N2000
Group III
F-601/N6006, F-601M/N6000
Group II
F4-Series
(with DW-20/DW-21)
F4-Series
(with DA-20/DP-20)
F65-Series/N65-Series
F-801s/N8008s
F-801/N8008
Pronea 600i/6i
Group VII
F3-Series
Group IV
F60-Series/N60
F50-Series/N50
F-401
X/N5005
Group VI
FM3A, FA, FE2, FG
Nikonos V
F5 (with DA-30/DP-30)
F100
F90X/N90s
F90-Series/N90
F80-Series/N80-Series
F70-Series/N70
F5 (with DW-30/DW-31)
nSpeedlights SB-11, SB-14, SB-140, and SB-21B cannot be used with the F-401/N4004 or
F-401s/N4004s as either master or slave flash units.
Page 81

81
Technical operation/Effective Speedlight placement
Slave flash unit
SC-18
(1.5m)
SC-19
(3m)
SB-16B
AS-10
SB-15
AS-10
SC-23
SB-16A
AS-11
SB-25 SB-26 SB-28/28DX
SB-24
AS-10
SB-11
SB-21B
SB-16B
SB-24
SB-17
AS-11
SB-14
SB-140
SB-22SB-20
SB-25 SB-26
SB-21A
SB-22s
AS-11
SB-27
SB-28/28DX
SB-29/29s
SB-30
SB-80DX
SC-18
SC-19
SB-29/29s
SB-80DX
SC-18
SC-19
Using SC-18 or SC-19,
up to five flash units can
be used for multiple
flash photography at a
total cable length of 10m
(33 ft.).
Page 82

82
Wireless multiple flash can be operated in two ways: (1) In the A (auto) mode, in
which the wireless slave flash units start and stop firing in sync with the master
Speedlight, and (2) in the M (manual) mode, in which the wireless slave flash
units only fire in sync with the master Speedlight.
nIn wireless multiple flash, the master flash unit triggers and controls the flash duration of
the slave flash unit(s).
nThe camera’s built-in Speedlight can also be used as a master flash unit.
nSpeedlights compatible with TTL auto flash, but having no wireless multiple flash function,
can be used as the master flash unit. The optional Wireless Slave Flash Controller SU-4
allows you to use any Speedlight as a slave flash unit.
Wireless multiple flash (two flash units) Single flash (off-camera flash unit)
The master flash unit used off-camera
illuminates the subject from the side to
create a more natural-looking picture, and
the slave flash unit softens the shadows
cast by the subject.
Shooting data
nCamera: F100 (1/250 sec., f/8)
nFocal length: 50mm
nMaster flash unit
: SB-80DX set to
Standard TTL flash
nSlave flash unit
: SB-80DX set to Auto
wireless slave flash
mode
Wireless multiple flash shooting
Wireless multiple flash shooting and examples of effective Speedlight placement
SC-17
Page 83

83
Technical operation/Effective Speedlight placement
Three slave flash units are used. Slave flash unit
is used to eliminate the shadow caused by
the master flash unit
, while slave flash units
and brightly illuminate the subject from
behind as well as the background to create a
more natural-looking picture.
Shooting data
nCamera: F100 (1/125 sec, f/5.6 + 1/2)
nFocal length: 40mm
nMaster flash unit
: SB-80DX set to
Standard TTL flash
nSlave flash units
,,: Three SB-80DX
units set to Auto
wireless slave flash
Wireless multiple flash (four flash units) Single flash (on-camera flash unit)
Notes on setting the slave flash units.
m Position the slave flash unit (usually closer to the subject than the camera), so
that light from the master flash unit can reach the light sensor of the slave
flash unit. Particularly when taking pictures while holding a slave flash unit in
your hand, make sure the slave flash unit is in front of the camera, so that light
can reach the light sensor of the slave flash unit.
m Take care not to let light from the slave flash unit enter the camera lens
directly or indirectly (in TTL auto flash mode) and prevent light from entering
the master flash unit’s light sensor for Non-TTL auto flash (in Non-TTL auto
flash mode). Otherwise, the correct exposure cannot be obtained.
m There is no limit to the number of slave flash units that can be used together.
However, if too much light from other slave flash units enters the light sensor
of the master flash unit, correct operation may not be possible. Practically, the
number of slave flash units should be limited to three.
Page 84

84
m When the SB-80DX is attached to the camera after activating the Wireless
flash mode, the O indicator appears on the LCD panel, showing that the
SB-80DX can be used as a wireless master flash unit. When the flash unit is
detached as it is, the indicator automatically changes to P or P and you
can use the SB-80DX as a wireless slave flash unit.
m With the SB-80DX attached to Digital SLRs cameras, the wireless flash mode is
canceled and no wireless flash indicator appears on the LCD panel when the
flash mode is set to D-TTL auto flash. Therefore, be sure to set the flash mode to
other than D-TTL auto flash.
1
Press the g button for more than 2 sec. to
display the Custom settings mode.
2
Press the e or f button to choose the
“Wireless flash mode.”
3
Press the c or d button to select “ON.”
4
Press the g button for more than 2 sec. or
press the b button to return to the normal
setting mode.
5
Detach the SB-80DX from the camera.
6
Press the a button until the wireless flash
indicator appears on the LCD panel.
P (Auto mode) ⇔ P (Manual mode)
lActivating and canceling the wireless flash mode using
Custom settings
Wireless multiple flash shooting
A
M
A
M
Page 85

85
Technical operation/Effective Speedlight placement
lWireless master flash unit
m The SB-80DX, when set as a wireless master flash unit, can be used as a
normal flash unit, but Monitor Preflashes will not fire even if Automatic
Balanced Fill-Flash with TTL Multi-Sensor is selected.
m Use of a wireless master flash unit set to the TTL auto flash mode is
recommended. With Nikon Digital SLRs cameras, use a wireless master flash
unit set to the Auto Aperture or Non-TTL auto flash mode.
lWireless slave flash unit
m When the flash unit is used off-camera, the wireless slave flash mode is
activated and the indication toggles between P (auto) and P (manual)
mode every time you press the a button.
A (auto) mode:
m The wireless slave flash unit starts and stops firing in sync with the master
Speedlight.
m The maximum shooting distance of the SB-80DX’s light sensor is approx.
7m (23 ft.).
M (manual) mode:
m The wireless slave flash unit only fires in sync with the master Speedlight.
m The maximum shooting distance of the SB-80DX’s light sensor is approx.
40m (131 ft.).
m The flash output level can be set from M1/1 to M1/128.
Note
nDo not leave the power of the wireless slave flash unit on—this includes Speedlights
mounted on the SU-4. Otherwise, ambient electric noise due to a discharge of static
electricity, etc. may accidentally trigger the flash.
How to prevent accidental flash firing
m Press the Modeling illuminator button on the SB-80DX to avoid accidental
firing in sync with other Speedlights. The SB-80DX will not fire, while this
button is pressed.
M
A
Page 86

86
lWireless multiple flash shooting in A (auto) mode
Wireless multiple flash shooting
1
Set the camera’s exposure mode to Aperture-
Priority Auto (A) or Manual (M).
2
Set up all Speedlights as master and slave
flash units.
3
Set all SB-80DX units (used as the master and
slave flash units) to the Wireless flash mode.
4
Press the a button on the slave flash unit to
activate the A (auto) mode.
5
Set the flash mode of the master Speedlight to
the TTL auto flash mode.
nWith Nikon Digital SLRs cameras, wireless flash
cannot be set, if the flash mode is set to D-TTL auto
flash. In this case, set the flash mode to Auto
Aperture or Non-TTL auto flash.
6
Confirm the aperture and flash shooting distance
range as in normal TTL auto flash shooting, then
shoot.
nSee page 28 about the TTL auto flash mode.
nSee pages 42, 40 about the Auto Aperture or Non-
TTL auto flash mode with Digital SLRs cameras.
nFlash operation can be confirmed by the ready-light
or the beeping sound (p. 89).
Page 87

87
Technical operation/Effective Speedlight placement
lWireless multiple flash shooting in M (manual) mode
1
Set the camera’s exposure mode to AperturePriority Auto (A) or Manual (M).
2
Set up all Speedlights as the master and slave
flash units.
3
Set all SB-80DX units (used as the master and
slave flash units) to the Wireless flash mode.
4
Press the a button on the slave flash unit
to activate the M (manual) mode.
5
Set the flash mode of the master Speedlight to
the Manual flash mode.
nThe Non-TTL auto flash (A) mode can also be
selected on the wireless slave flash unit. In this case,
the flash unit controls the flash output based on the
aperture and ISO sensitivity which are set on the
slave flash unit, and automatically stops firing in sync
with the master flash unit (p. 40).
6
Confirm the aperture and flash shooting distance
as in normal Manual flash shooting, then shoot.
nSee page 45 about Setting the flash output level.
nSee page 46 about the Manual flash mode.
Page 88

88
Adjusting the flash output level in M (manual) mode
Adjusting the slave flash unit’s flash output level manually
m Use the following equation to determine the proper manual flash output level
of the slave flash unit, depending on your creative preferences.
GN = F x D
where GN is the guide number of the slave flash unit (in meters/feet), F is the
lens aperture in use, and D is the distance between the slave flash unit and
the subject (in meters/feet).
For example, when using an ISO sensitivity of 100 and shooting a subject at a
distance of 2m (6.6 ft.) with the SB-80DX’s zoom-head position adjusted to
28mm, and a lens aperture of f/4,
GN = 4 x 2 = 8 (in meters)
GN = 4 x 6.6 = approx. 26 (in feet)
Therefore, to get the correct exposure, refer to the Guide Number table (p. 45)
and adjust the flash output level to M1/16.
nRefer to “Determining the aperture and flash output level in the Manual mode” (p. 44).
Adjusting the slave flash unit’s flash output level in the Non-TTL auto
flash (A) mode
m Determine the flash output level by setting the aperture on the slave flash unit
and camera.
1
Set the same ISO sensitivity on the slave flash unit as set on your camera.
2
Set the same aperture on both the lens and the slave flash unit to obtain the
correct exposure.
nDepending on your creative preferences, you can intentionally overexpose or
underexpose the picture by modifying the aperture.
nThe above setting is applicable only when both the master and slave flash units are
pointed in the same directions. Not applicable, if the directions differ.
nRefer to “Setting apertures in the non-TTL auto flash mode” (p. 41) for more details.
Wireless multiple flash shooting
Page 89

89
Technical operation/Effective Speedlight placement
lConfirming flash operation using the ready-light or
the beeping sound
m You can confirm flash operation by checking the ready-light on the Speedlight
or the beeping sound during and after shooting.
Activating and canceling the SB-80DX’s beeping sound using Custom
settings
m When the SB-80DX is used as a wireless slave flash unit, you can monitor its
operation by listening to the beeping sound (p. 90). This function can be
activated or canceled using the Custom settings.
1
Detach the SB-80DX from the camera.
2
Press the g button for more than 2 sec. to
display the Custom settings mode.
3
Press e or f button to choose “Sound monitor
in the wireless flash mode.”
4
Press the c or d button to select:
L : Sound on
M : Sound off
5
Press g button for more than 2 sec. or
press the b button to return to the normal
setting mode.
Page 90

90
Lights up or
does not
come on
(not blinking)
Lights up or
does not
come on
(not blinking)
Two beeps
Fired properly
Blinks for
approx. 3
sec.
Blinks for
approx. 3
sec.
Beeps for
approx. 3
sec.
Both the master and slave flash units have
fired at full output and light may have been
insufficient for correct exposure. Use a
wider aperture and reshoot.
Lights up or
does not
come on
(not blinking)
Blinks for
approx. 3
sec.
Beeps for
approx. 3
sec.
The slave flash unit has fired at full output
and light may have been insufficient for
correct exposure. The light sensor could
not detect when to stop firing in sync with
the master flash unit, because a strong
reflection from the slave flash unit itself or
light from another slave flash unit may have
entered the light sensor window. Change
the direction or position of the slave flash
unit and reshoot.
Lights up
Lights up
One beep Ready to fire
Wireless multiple flash shooting
Confirming flash operation using the ready-light or beeping sound
Master flash Slave flash unit
unit
Speedlight condition
Ready-light Ready-light Beeping
sound
Page 91

Reference
information
Reference
information
Information on optional accessories and
tips on Speedlight care are presented
here. Following that are notes on
batteries, troubleshooting, and the
SB-80DX’s specifications.
Page 92

92
Optional accessories
lAccessories for multiple flash
TTL Multi-Flash Sync Cord SC-18 (approx. 1.5 m or 4.9 ft)
TTL Multi-Flash Sync Cord SC-19 (approx. 3 m or 9.8 ft)
Multi-Flash Sync Cords SC-18/SC-19 are useful for
connecting the SB-80DX to the multiple flash terminal
of the SC-17 or AS-10 for TTL multiple flash operation.
TTL Multi-Flash Adapter AS-10
Use the Multi-Flash Adapter AS-10 when connecting
more than three flash units together for TTL multiple
flash operation, or if the slave flash units are not
equipped with multiple flash terminals. The AS-10
comes with one tripod socket and three TTL multiple
flash terminals.
Sync Terminal Adapter AS-15
The Sync Terminal Adapter AS-15 is necessary when
connecting the SB-80DX to cameras not having a
sync terminal.
Sync Cord SC-11 (approx. 25 cm or 9.8 in. )
Sync Cord SC-15 (approx. 1 m or 3.3 ft)
Sync Cords SC-11 and SC-15 are handy when you
want to use the SB-80DX off-camera or for use with
cameras not having accessory shoes. These cords
also allow you to perform multiple flash operation in
the Manual mode.
TTL Remote Cord SC-17 (approx. 1.5m or 4.9 ft)
TTL Remote Cord SC-24 (approx. 1.5m or 4.9 ft)
TTL Remote Cords SC-17/SC-24 provide TTL auto
flash operation when the SB-80DX is used off-camera.
Their flash shoes come with one tripod socket and
two TTL multiple flash terminals. The TTL Remote
Cord SC-24 is for use with F5 cameras mounted with
a High-Magnification Finder DW-30 or DW-31, or F4
cameras having a High-Magnification Finder DW-20
or DW-21.
Page 93

93
Reference information
Multi-Flash Bracket Unit SK-E900
(One AS-E900 Multi-Flash Adapter is included with the
SK-E900)
Multi-Flash Adapter AS-E900
The SB-80DX can be used as a multiple flash unit
with Nikon COOLPIX 900 series digital cameras by
attaching the COOLPIX to Multi-Flash Bracket unit
SK-E900 and connecting the SB-80DX to the multiflash terminal of the COOLPIX using the Multi-Flash
Adapter AS-E900 (p. 32).
Wireless Slave Flash Controller SU-4
Useful for multiple flash photography, the SU-4
features a built-in, movable light sensor and an
accessory shoe for attachment of a slave flash unit.
The SU-4’s light sensor not only triggers the slave unit
to fire in sync with the master unit, but controls the
flash duration of the slave unit to provide wireless
TTL, Non-TTL, or Manual operation.
TTL Flash Unit Coupler AS-17 for F3-Series cameras
Dedicated adapter for F3-Series cameras providing
TTL flash operation with Nikon Speedlights such as
SB-80DX featuring an ISO-type mounting foot (not
designed for the F3).
Bracket SK-7
A metal plate with attachment screws allowing the
camera and Speedlight to be positioned side by side.
Use the optional TTL Multi-Flash Adapter AS-10 to
attach the SB-80DX on Bracket SK-7.
Page 94

94
Connecting to an external power source
m To use an external power source, remove the cover
and connect its power cord to the SB-80DX’s
external power source terminal.
m Using external power sources made by another
manufacturer is not recommended.
Nikon DC Unit
SD-7
Nikon High-Performance
Battery Pack
SD-8A
Power Bracket Unit
SK-6A
∗1 With AA-type alkaline-manganese batteries in the SB-80DX.
∗2With the same type of batteries in both the external power source and the SB-80DX.
∗3 When fired at an interval of 120 seconds.
nThe above data may vary due to variations in performance or whether fresh or old
batteries are used.
nIn rare cases, when firing the modeling illuminator with the SD-8A or SK-6A attached, the
SB-80DX may be powered by its own batteries, and the external power source does not
operate. This is not a malfunction.
lUsing external power sources
Optional accessories
External power
source
DC Unit SD-7
∗1
HighPerformance
Battery Pack
SD-8A
∗2
Power Bracket
Unit SK-6A
∗1
C-type alkaline-manganese (x 6)
AA-type alkaline-manganese (x 6)
AA-type NiCd (1000mAh) (x 6)
AA-type Ni-MH (x 6)
AA-type lithium (x 6)
∗3
AA-type alkaline-manganese (x 4)
AA-type NiCd (1000mAh) (x 4)
AA-type Ni-MH (x 4)
AA-type lithium (x 4)
∗3
2.5 sec.
2.5 sec.
2 sec.
2 sec.
2 sec.
3 sec.
2.5 sec.
2.5 sec.
3.5 sec.
430 times/2.5-30 sec.
400 times/2.5-30 sec.
190 times/2-30 sec.
300 times/2-30 sec.
300 times/2-30 sec.
300 times/3-30 sec.
150 times/2.5-30 sec.
250 times/2.5-30 sec.
330 times/3.5-30 sec.
Battery type required
Min. recycling
time (approx.)
Min. number of
flashes/recycling
time (approx.)
Specifications
Page 95

95
Reference information
lCleaning
m Use a blower brush to remove dirt and dust from the SB-80DX and clean it
with a soft, clean cloth. After using the SB-80DX near saltwater, wipe the
SB-80DX with a soft, clean cloth slightly moistened with plain water to remove
salt, and then dry it using a dry cloth.
m On rare occasions, the LCD may turn on or turn dark, due to static electricity.
This is not a malfunction. The display will soon return to normal.
m Do not drop the SB-80DX or hit it against a hard surface, as this may damage
its precision mechanisms. Do not apply strong pressure to the LCD panel.
lStorage
m Store the SB-80DX in a cool, dry place to prevent malfunctions due to high
humidity, as well as the growth of mold or mildew.
m Keep the SB-80DX away from chemicals such as camphor or naphthalene.
Avoid exposing the SB-80DX to magnetic waves from TVs or radios.
m Do not use or leave the SB-80DX in locations subject to high temperatures
such as those encountered near a heater or stove, as this may cause
damage.
m When not using the SB-80DX for more than two weeks, be sure to remove the
batteries before storage to prevent malfunctions due to battery leakage.
m Take the SB-80DX out about once a month, insert the batteries and fire the
unit several times to reform the capacitor.
m Change the desiccant occasionally since it does not absorb moisture
effectively after a while.
lOperating location
m An extreme temperature change can cause condensation inside the
SB-80DX. When taking the SB-80DX to a very hot place from a very cold
place or vice versa, place it inside an airtight container such as plastic bag.
Leave it inside for a while, then expose the SB-80DX gradually to the outside
temperature.
m Avoid exposing the SB-80DX to strong magnetism or radio waves from TVs or
high-voltage power transmission towers, as this may cause it to malfunction.
WARNING
Never use thinner, benzene, or other active agents for cleaning the
Speedlight, as this may damage the Speedlight, cause it to catch on
fire, or harm your health.
Tips on Speedlight care
Page 96

96
Notes on batteries
Warning
m Batteries shall not be exposed to excessive heat such as sunshine, fire or the like.
m Dry batteries shall not be subjected to charging.
m Do not expose the SB-80DX to water as this may result in electric shock or
cause the unit to catch on fire.
lUsable batteries
m Use four AA-type batteries (1.5V or lower) of any of the following types.
nHigh-power manganese batteries are not recommended.
nUsing an external power source (p. 94) increases the number of flashes and provides
faster recycling times.
Alkaline-manganese (1.5V) battery
m Non-rechargeable batteries. They should not be charged in a battery charger.
Otherwise, they may explode.
Lithium (1.5V) battery
m Non-rechargeable batteries. They should not be charged in a battery charger.
Otherwise, they may explode.
nDepending on battery specifications, when the battery becomes hot, the safety circuits
are activated, cutting off power. This often occurs when the flash unit is operated in the
repeating flash mode. Battery power will recover when the temperature returns to normal.
NiCd battery (rechargeable, 1.2V) / Ni-MH (rechargeable, 1.2V)
m Rechargeable batteries. Before recharging the batteries, be sure to read the
instruction manuals for your batteries and battery charger for detailed
information on how to handle and charge the batteries.
lNotes on handling batteries
m Because flash consumes a large amount of battery power, rechargeable
batteries may not operate properly before reaching the end of their stated lifespan or the number of charging/discharging as specified by the battery
manufacturer.
m When replacing batteries, replace all four batteries at the same time. Do not
mix battery types or brands or use old with new batteries.
m When installing batteries, turn the power of the Speedlight off, and never
reverse the polarity of the batteries.
mWhen the battery terminals become soiled, remove the dirt and smudges
before use, as this may cause a malfunction.
m Battery power tends to weaken as the temperature drops. It also gradually
decreases when batteries are not used for a long period of time and recovers
after a short break following intensive use. Be sure to check battery power
and replace the batteries with fresh ones, if you notice any delays in recycling
time.
m Do not store batteries in locations subject to high temperatures and high humidity.
Page 97

97
Reference information
Problem
The power cannot be turned on.
The ready-light does not light up.
The power turns off automatically.
A strange sound can be heard caused
by the flash head zooming back and
forth even when the SB-80DX is
turned off.
The flash shooting distance range
does not appear.
No
D, DE, or
DF
indicator
appears in TTL auto flash mode.
The zoom-head position cannot be
adjusted to other than 14mm or 17mm.
Cause
The batteries are not correctly installed.
nBattery power is weak.
nThe standby function is activated
and operating.
The batteries are extremely exhausted.
The batteries are extremely exhausted.
The flash head is adjusted to other than
the horizontal/front or down -7˚ position.
The camera’s exposure mode or
metering system is not correctly set or a
non-CPU lens is mounted.
The built-in wide-flash adapter is in use or
the Nikon Diffusion Dome is attached.
Ref.
page
p. 16
p. 17
p. 19
p. 17
p. 17
p. 21
p. 36
p. 69
p. 72
If a warning indication appears on the SB-80DX’s LCD panel or inside the
camera’s viewfinder, use the following chart to determine the cause of the
problem before you take your Speedlight to a Nikon service center for repair.
Problems with the SB-80DX
Troubleshooting
Problem
The ready-light blinks for 3 sec. after firing.
The underexposure indicator blinks and
the amount of underexposure is
displayed, depending on the camera in
use.
The underbar blinks.
The zoom-head position indication
blinks.
A small M above the “ZOOM” indication
blinks.
The
GK
indicators and the zoom-
head position blink.
K
blinks.
The aperture indicator displays
“
FEE”and the shutter cannot be released.
Cause
Underexposure may have occurred.
The flash head is tilted down –7°.
“Emergency mode” is set to ON.
“Canceling the power zoom function” is
set to ON.
The built-in wide-flash adapter is used
in the FP High-Speed Flash sync mode.
The SB-80DX is removed from the
camera while the
K
setting is ON.
The aperture on the lens is not set at its
minimum.
Ref.
page
p. 31
p. 21
p. 98
p. 25
p. 51
p. 51
—
Warning indicators in the SB-80DX
Page 98

98
Problem
In the Auto Aperture AA flash mode, the
aperture and the flash output level
compensation value blink and the flash
shooting distance range disappears.
The zoom-head position displays
“- - mm” and blinks.
Three beeps sound during wireless
multiple flash shooting.
Cause
The aperture or flash output level
compensation value set is out of the usable
flash shooting distance range.
In rare cases, this happens but is not a
malfunction. Turn off the power and
then turn it back on.
The flash has fired at its maximum
output and underexposure may have
occurred.
Ref.
page
p. 42
—
p. 90
1
Press the g button for more than 2 sec. to
display the Custom settings mode.
2
Press the e or f button to choose “Emergency
mode.”
3
Press the c or d button to set it to “ON.”
4
Press the g button for more than 2 sec. or
press the ON/OFF button to return to the normal
setting mode. The zoom-head position indicator
blinks, making it possible to adjust the zoomhead automatically or manually.
If the built-in wide-flash adapter is broken off accidentally
m The wide-flash adapter may be broken off, if it receives a strong impact while
set on the flash head. If it becomes broken, visit your nearest authorized
Nikon service center for repair.
Setting the zoom-head position when the wide-flash adapter is
broken off using Custom settings
m It is no longer possible to set the zoom-head position to other than 14mm or
17mm. In this case:
Troubleshooting
Page 99

99
Reference information
Cameras in Groups I (except for F70-Series/N70) to VI and Digital SLRs cameras
Note
The SB-80DX incorporates a microcomputer to control flash operations. In rare cases, the
SB-80DX may not work properly even after fresh batteries are properly installed. If this
happens, replace the batteries while the SB-80DX’s power is turned on.
Problem
The ready-light blinks when pressing
the shutter release button slightly in the
TTL auto flash mode.
Cameras in Groups V and VI
The ready-light blinks when the power
is turned on in TTL auto flash mode.
The ready-light blinks in the TTL auto
flash mode.
The ready-light blinks.
The ready-light blinks when the flash
mode is set to TTL auto flash.
Cause
The SB-80DX is not correctly attached
to the camera.
The ISO sensitivity set on the camera is
higher than the available range of the
Speedlight.
The ISO sensitivity set on the camera is
higher or lower than the available range
for the FA camera.
The shutter speed is set to M90, M250,
or B (bulb).
The shutter speed set is faster than the
flash sync speed.
The SB-80DX’s flash mode is set to TTL
auto flash.
Ref.
page
p. 20
p. 38
p. 38
—
p. 21
Ready-light warning inside the camera’s viewfinder
Cameras in Group VI
FM3A, New FM2 cameras
New FM2, F55/N55 cameras.
Page 100

100
Electronic Automatic Insulated Gate Bipolar Transistor (IGBT)
construction and series circuitry
Flash Selected by pressing a button.
exposure
control
Settings on camera
* Appears on the SB-80DX’s LCD panel
Indicator Available flash operation
D+E 3D Multi-Sensor Balanced Fill-Flash/
Multi-Sensor Balanced Fill-Flash
C+D+E 3D Multi-Sensor Balanced Fill-Flash/Multi-Sensor
Balanced Fill-Flash for Digital SLRs
D+F Matrix Balanced Fill-Flash or Center-Weighted Fill-
Flash/Spot Fill-Flash
C+D+F Center-Weighted Fill-Flash for Digital SLRs
D Standard TTL Flash, Matrix Balanced
Fill-Flash, Center-Weighted Fill-Flash/Spot
Fill-Flash
C+D Standard TTL Flash for Digital SLRs
A Non-TTL Auto Flash
B Auto Aperture Flash
G Manual Flash
G+H Repeating Flash
G+%K FP High-Speed Flash sync
Specifications
Indicator Available flash operation
N* Red-eye reduction
\ Rear-curtain sync
[ Slow-sync
^ Red-eye reduction in slow-sync
 Loading...