

Nikon COOLPIX SQ Quick Start Guide
Shoot / Review / Transfer
Quick Start Guide

Contents
Taking pictures
1. Unpack the camera
2. Charge the battery
3. Insert the Memory Card
4. Take pictures
5. View pictures
Transfer Pictures to Your Computer
P.12 – P.22
1. Installing Nikon View
For Windows
For Macintosh
P.23 – P.29
2. Connecting to a Computer
1. Connect the camera and
COOL-STATION to the computer
2.
Transfer pictures to your computer
3. Disconnect the camera
P.3 – P.11
P.12 – P.31
P.14
P.19
P.30 – P.31
3. Nikon View
2
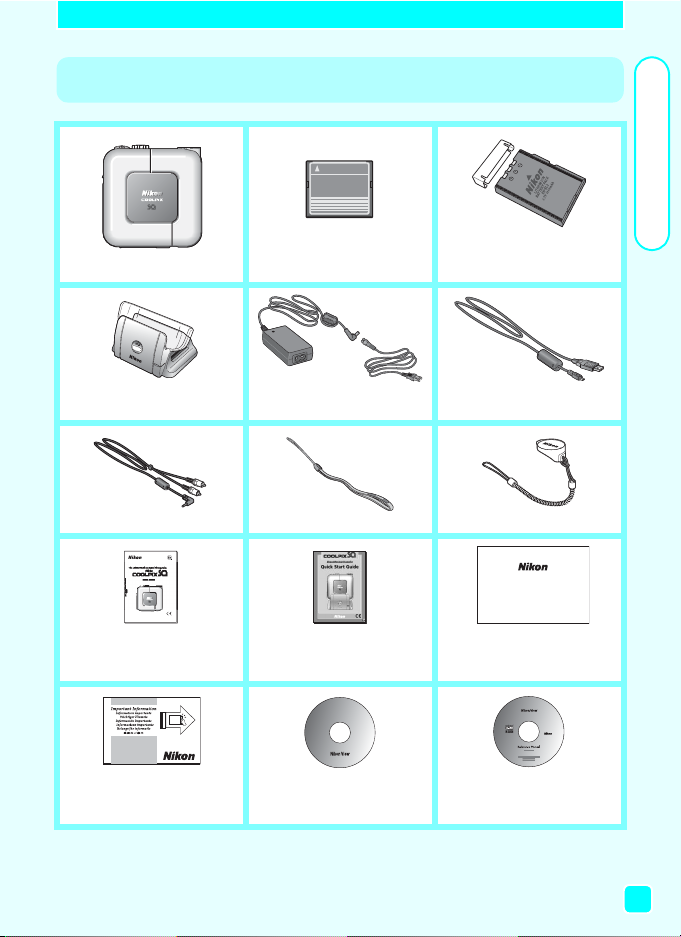
Step 1 Unpack the camera
CF CARD
3 Rechargeable
1 COOLPIX SQ
2 CompactFlash™
memory card
EN-EL2 battery with
terminal cover
Taking pictures
4 COOL-STATION
MV-10
5 EH-61 AC adapter
(with power cable)
6 USB Interface Cable
7 Audio/Video cable 8 Camera strap 9 Lens cap with cord
Warranty
10 Guide to Digital
Photography with
the COOLPIX SQ
13
“Important
Information” envelop
* Please see page 19 of the Nikon Guide to Digital Photography with the COOLPIX SQ for
attaching the camera strap and the lens cap.
* CD-ROMs included with product vary with country or region of purchase.
11 Quick Start Guide
(this guide)
14 Nikon View
CD-ROM
12 Warranty
15 Nikon View
Reference Manual
CD-ROM
3
Taking pictures
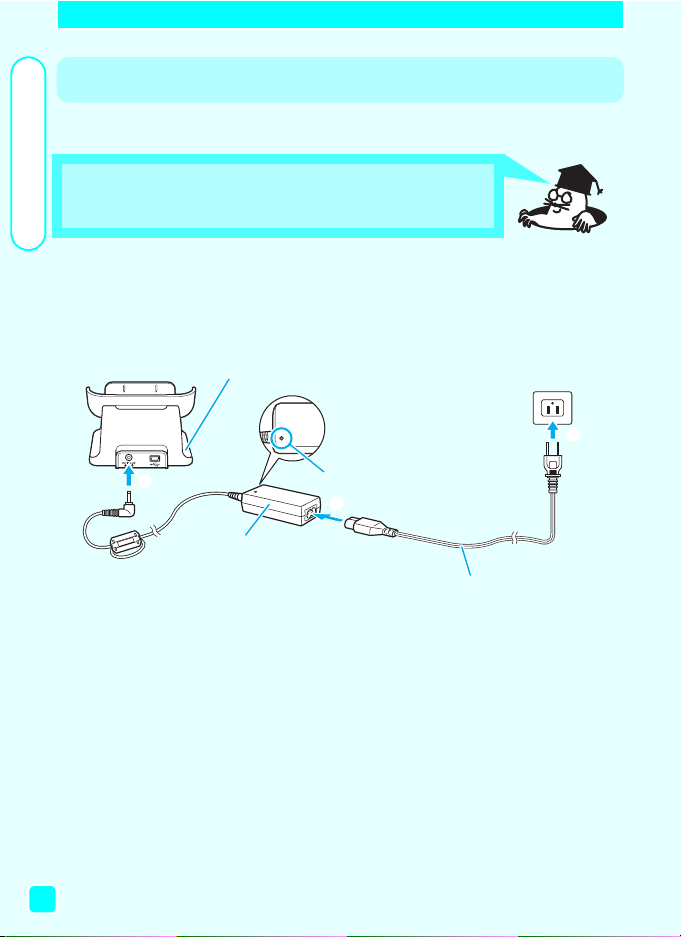
Step 2 Charge the Battery
Charging time: approximately 2 hours for full charge
Charge the battery while it is in the camera by placing it on the COOLSTATION MV-10
1 Connect the EH-61 AC adapter to the
COOL-STATION.
• The Power lamp will glow showing the EH-61 is plugged in.
COOL-STATION
p
o
Power lamp
n
EH-61 AC adapter
Power cable
4

2 Insert the battery.
Open the battery-chamber/
1
memory card slot cover.
Slide.
Flip open.
Insert the battery.
2
Press the orange latch to side.
Insert the battery.
The orange latch locks battery in place.
Close the battery-chamber/
3
memory card slot cover.
Flip shut.
Slide back into place.
Taking pictures
n
o
n
p
o
o
n
5

Taking pictures
3 Place the camera on the COOL-STATION.
1
Power-on
lamp
2
Check that the camera is turned off.
1
If the camera is on (the power-on lamp is green), the battery will not be
charged.
Open the COOL-STATION connector cover on the camera.
2
Place the camera on the COOL-STATION.
3
• Insert the camera into the COOL-STATION as far as it will go, matching the
position of the connector and tripod socket on the camera with the connector and camera catch on the COOL-STATION.
The power-on lamp on the camera blinks red and charging
4
4
starts.
Power-on lamp Meaning
Blinks (red) The battery is charging.
Lights (red) Charging is complete.
Lights (green) The camera is on. Turn the camera off.
• Camera is not positioned correctly.
Blinks rapidly (red)
off
Remove and insert again.
• The battery has malfunctioned and cannot be charged.
Replace it with a new battery.
• Camera is not positioned correctly.
Remove and insert again.
• The battery is not inserted. Insert the battery.
3
Camera catchConnector
6

Step 3 Insert the Memory Card
Confirm that the camera is off.
1
• The power-on lamp should be off.
2 Open the battery-chamber/
memory card slot cover.
Slide.
Flip open.
3 Insert the memory card.
Check label for correct orientation.
The memory card is fully inserted when the
eject button protrudes slightly.
Rear label
Direction of
insertion
n
Taking pictures
o
n
o
Terminals
4 Close the battery-chamber/
memory card slot cover.
Flip shut.
Slide.
o
n
7

Taking pictures
Step 4 Take pictures
1 Set the mode dial to .
Turn the camera on.
• Rotate the power switch until it stops,
then gently release the switch.
• The power-on lamp will light and the
monitor will display a welcome screen.
The first time you use the camera, the date and time will not be set,
and (“date not set”) icon will blink in the top right corner of the
monitor.
For more information, see the Guide to Digital Photography, page 28.
2 Check indicators in the monitor.
Battery level indicator
Display Meaning
No icon Battery fully charged.
(Lights) Low battery. Charge or ready spare batteries.
Warning!
Battery exhausted
8
Number of exposures
remaining
Battery exhausted. Charge or replace with a fully
charged battery.

3 Adjust the lens angle.
• From a position parallel to the camera
body, the lens section can be rotated 120°
forward or 90° back toward the monitor.
Forward Back (toward monitor)
: Range of rotation
Hold the camera steadily in
both hands.
4 Frame your subject.
• Use the zoom buttons.
Taking pictures
Press the W button to
zoom out.
TeleWide
Press the T button to
zoom in.
9
Taking pictures
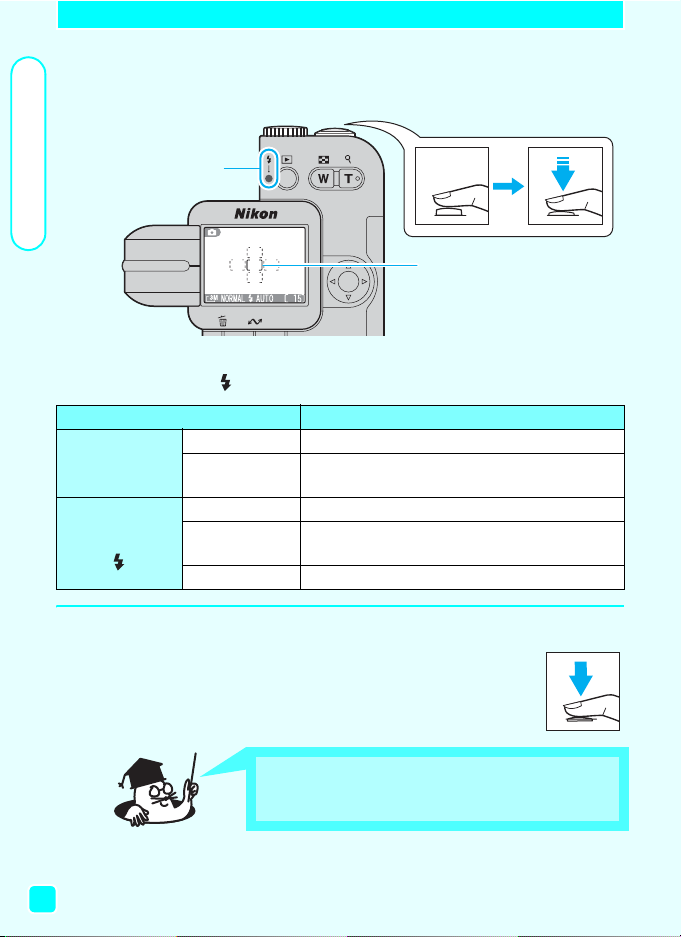
5 Focus.
Focus area
indicator
Flash-ready
6 Shoot.
• Press the shutter-release button halfway to set focus and exposure.
Flash-ready lamp
Focus area indicator
• With the shutter-release button pressed halfway, check the focus area
indicator and (flash-ready) lamp.
Status Meaning
Lights (green) Subject in focus.
[ ]
lamp
• Press the shutter release button the rest of the way down to
take the picture.
Flashes (red)
On Flash will fire when picture is taken.
Blinks
Off Flash is off or not required.
Camera unable to focus on subject.
Recompose the picture and try again.
Flash charging. Remove finger briefly from
shutter-release button, then try again.
10
Focus and exposure will lock while the shutter-release button is pressed halfway. Press the shutter release button the
rest of the way down to take the picture.
 Loading...