

Nikon COOLPIX S1100pj User Manual
DIGITAL CAMERA
User’s Manual
En

Trademark Information
• Microsoft, PowerPoint, Windows and Windows Vista are either registered trademarks
or trademarks of Microsoft Corporation in the United States and/or other countries.
• Macintosh, Mac OS, and QuickTime are trademarks of Apple Inc.
• Adobe and Acrobat are registered trademarks of Adobe Systems Inc.
• SDXC, SDHC, and SD Logos are trademarks of SD-3C, LLC.
• PictBridge is a trademark.
• ACCESS and NetFront are registered trademarks or trademarks of ACCESS Co., LTD in
Japan, the United States and/or other countries.
• All other trade names mentioned in this manual or the other documentation
provided with your Nikon product are trademarks or registered trademarks of their
respective holders.
AVC Patent Portfolio License
This product is licensed under the AVC Patent Portfolio License for the personal and
non-commercial use of a consumer to (i) encode video in compliance with the AVC
standard (“AVC video”) and/or (ii) decode AVC video that was encoded by a consumer
engaged in a personal and non-commercial activity and/or was obtained from a video
provider licensed to provide AVC video. No license is granted or shall be implied for any
other use. Additional information may be obtained from MPEG LA, L.L.C.
See http://www.mpegla.com.

Introduction
First Steps
Basic Photography and Playback: G (Easy Auto) Mode
More on Shooting
More on Playback
Editing Pictures
Movie Recording and Playback
Connecting to Televisions, Computers and Printers
Basic Camera Setup
Using the projector
Caring for the Camera
Technical Notes and Index
i

For Your Safety
To prevent damage to your Nikon product or injury to yourself or to others, read
the following safety precautions in their entirety before using this equipment.
Keep these safety instructions where all those who use the product will read them.
The consequences that could result from failure to observe the precautions listed
in this section are indicated by the following symbol:
This icon marks warnings, information that should be read before using this Nikon
product, to prevent possible injury.
WARNINGS
Turn off in the event of
malfunction
Should you notice smoke or an
unusual smell coming from the
camera or AC adapter, unplug the AC
adapter and remove the battery
immediately, taking care to avoid
burns. Continued operation could
result in injury. After removing or
disconnecting the power source, take
the equipment to a Nikon-authorized
service representative for inspection.
Do not disassemble
Touching the internal parts of the
camera or AC adapter could result in
injury. Repairs should be performed
only by qualified technicians. Should
the camera or AC adapter break open
as the result of a fall or other accident,
take the product to a Nikon-authorized
service representative for inspection,
after unplugging the product and/or
removing the battery.
ii
Do not use the camera or AC
adapter in the presence of
flammable gas
Do not use electronic equipment in
the presence of flammable gas, as this
could result in explosion or fire.
Handle the camera strap with
care
Never place the strap around the neck
of an infant or child.
Keep out of reach of children
Particular care should be taken to
prevent infants from putting the
battery or other small parts into their
mouths.

For Your Safety
Observe caution when
handling the battery
The battery may leak or explode if
improperly handled. Observe the
following precautions when handling
the battery for use in this product:
• Before replacing the battery, turn
the product off. If you are using the
AC adapter (available separately), be
sure to unplug the AC adapter from
an electrical power outlet.
• Use only a Rechargeable Li-ion
Battery EN-EL12 (supplied). Charge
the battery by inserting it in a
Battery Charger MH-65 (supplied).
• When inserting the battery, do not
attempt to insert it upside down or
backwards.
• Do not short or disassemble the
battery or attempt to remove or
break the battery insulation or
casing.
• Do not expose the battery to flame
or to excessive heat.
• Do not immerse in or expose to
water.
• Replace the terminal cover when
transporting the battery. Do not
transport or store with metal objects
such as necklaces or hairpins.
• The battery is prone to leakage
when fully discharged. To avoid
damage to the product, be sure to
remove the battery when no charge
remains.
• Discontinue use immediately should
you notice any change in the
battery, such as discoloration or
deformation.
• If liquid from the damaged battery
comes in contact with clothing or
skin, rinse immediately with plenty
of water.
Observe the following
precautions when handling
the battery charger
• Keep dry. Failure to observe this
precaution could result in fire or
electric shock.
• Dust on or near the metal parts of
the plug should be removed with a
dry cloth. Continued use could
result in fire.
• Do not handle the power cable or
go near the battery charger during
lightning storms. Failure to observe
this precaution could result in
electric shock.
• Do not damage, modify, forcibly tug
or bend the power cable, place it
under heavy objects, or expose it to
heat or flames. Should the insulation
be damaged and the wires become
exposed, take it to a Nikonauthorized service representative for
inspection. Failure to observe these
precautions could result in fire or
electric shock.
• Do not handle the plug or battery
charger with wet hands. Failure to
observe this precaution could result
in electric shock.
• Do not use with travel converters or
adapters designed to convert from
one voltage to another or with DCto-AC inverters. Failure to observe
this precaution could damage the
product or cause overheating or fire.
iii

For Your Safety
Use appropriate cables
When connecting cables to the input
and output jacks, use only the cables
provided or sold by Nikon for the
purpose, to maintain compliance with
product regulations.
Handle moving parts with
care
Be careful that your fingers or other
objects are not pinched by the lens
cover or other moving parts.
CD-ROMs
The CD-ROMs supplied with this
device should not be played back on
audio CD equipment. Playing CDROMs on an audio CD player could
cause hearing loss or damage the
equipment.
Observe caution when using
the flash
Using the flash close to your subject’s
eyes could cause temporary visual
impairment. Particular care should be
observed if photographing infants,
when the flash should be no less than
one meter (3 ft. 4 in.) from the subject.
Do not operate the flash with
the flash window touching a
person or object
Failure to observe this precaution
could result in burns or fire.
Avoid contact with liquid
crystal
Should the monitor break, care should
be taken to avoid injury caused by
broken glass and to prevent liquid
crystal from the monitor touching the
skin or entering the eyes or mouth.
Turn the power off when
using inside an airplane or the
hospital
Turn the power off while inside the
airplane during take off or landing.
Follow the instructions of the hospital
when using while in a hospital. The
electromagnetic waves given out by
this camera may disrupt the electronic
systems of the airplane or the
instruments of the hospital.
Observe caution when using
the projector or movie light
• Do not look directly into the
projector window or project images
or shine the movie light in or near
human eyes. This could damage the
eyes or result in visual impairment.
• Do not project images or shine the
movie light towards the driver of a
motor vehicle. Doing so may result
in an automobile accident.
iv

Notices
Notice for Customers in the U.S.A.
Federal Communications
Commission (FCC) Radio
Frequency Interference Statement
This equipment has been tested and
found to comply with the limits for a
Class B digital device, pursuant to Part
15 of the FCC rules. These limits are
designed to provide reasonable
protection against harmful
interference in a residential installation.
This equipment generates, uses, and
can radiate radio frequency energy
and, if not installed and used in
accordance with the instructions, may
cause harmful interference to radio
communications. However, there is no
guarantee that interference will not
occur in a particular installation. If this
equipment does cause harmful
interference to radio or television
reception, which can be determined
by turning the equipment off and on,
the user is encouraged to try to correct
the interference by one or more of the
following measures:
• Reorient or relocate the receiving
antenna.
• Increase the separation between the
equipment and receiver.
• Connect the equipment into an
outlet on a circuit different from that
to which the receiver is connected.
• Consult the dealer or an
experienced radio/television
technician for help.
CAUTIONS
Modifications
The FCC requires the user to be
notified that any changes or
modifications made to this device that
are not expressly approved by Nikon
Corporation may void the user’s
authority to operate the equipment.
Interface Cables
Use the interface cables sold or
provided by Nikon for your equipment.
Using other interface cables may
exceed the limits of Class B Part 15 of
the FCC rules.
Notice for customers in the State of
California
WARNING
Handling the cord on this product will
expose you to lead, a chemical known
to the State of California to cause birth
defects or other reproductive harm.
Wash hands after handling.
Nikon Inc.,
1300 Walt Whitman Road
Melville, New York 11747-3064
USA
Tel: 631-547-4200
v

Notices
Notice for customers in Canada
CAUTION
This Class B digital apparatus complies
with Canadian ICES-003.
ATTENTION
Cet appareil numérique de la classe B
est conforme à la norme NMB-003 du
Canada.
s for customers in Europe
Notice
CAUTION
RISK OF EXPLOSION IF BATTERY IS
REPLACED BY AN INCORRECT
TYPE.
DISPOSE OF USED BATTERIES
ACCORDING TO THE
INSTRUCTIONS.
This symbol indicates that
this product is to be
collected separately.
The following apply only to
users in European countries:
• This product is designated for
separate collection at an
appropriate collection point. Do not
dispose of as household waste.
• For more information, contact the
retailer or the local authorities in
charge of waste management.
This symbol on the battery
indicates that the battery is
to be collected separately.
The following apply only to
users in European countries:
• All batteries, whether marked with
this symbol or not, are designated
for separate collection at an
vi
appropriate collection point. Do not
dispose of as household waste.
• For more information, contact the
retailer or the local authorities in
charge of waste management.

Table of Contents
For Your Safety......................................................................................................................................ii
WARNINGS..................................................................................................................................................................ii
Notices ....................................................................................................................................................... v
Introduction ...........................................................................................................................................1
About This Manual ................................................................................................................................ 1
Information and Precautions............................................................................................................. 2
Parts of the Camera............................................................................................................................... 4
The Camera Body ...................................................................................................................................................4
Remote Control ML-L5........................................................................................................................................6
Attaching the Camera Strap............................................................................................................................7
Basic Operations..................................................................................................................................... 8
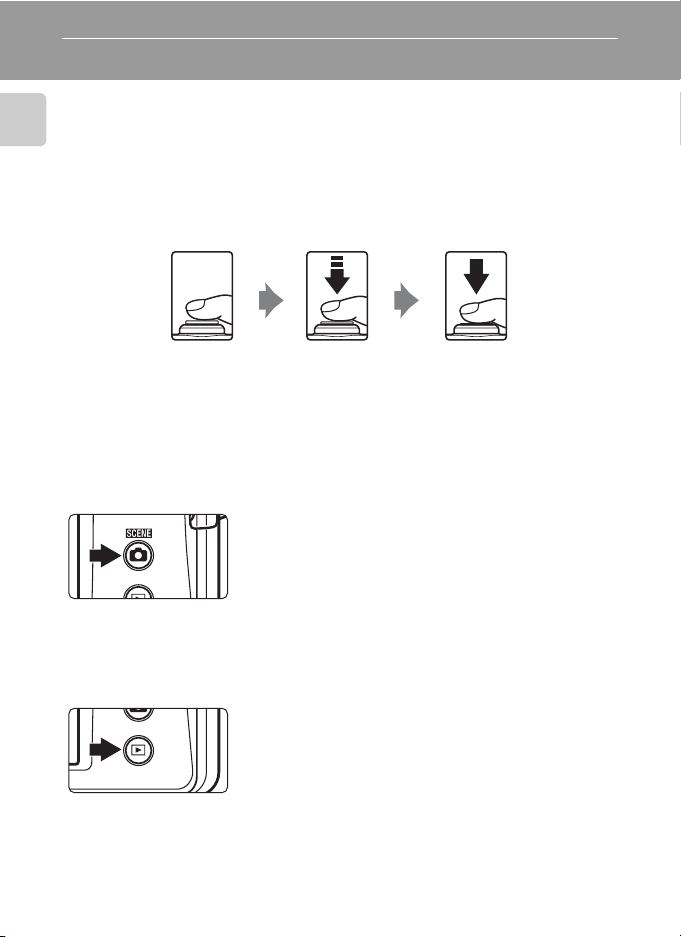
Shutter-release Button........................................................................................................................................8
The A (Shooting Mode) Button...................................................................................................................8
The c (Playback) Button..................................................................................................................................8
The b (Movie-record) Button........................................................................................................................9
The P (Projector) Button................................................................................................................................9
Operating the Touch Panel ..............................................................................................................10
Tapping......................................................................................................................................................................10
Dragging...................................................................................................................................................................10
Dragging and Dropping..................................................................................................................................10
Using the Stylus....................................................................................................................................................11
Main Display of the Monitor/Touch Panel and Basic Operations.......................................12
Shooting (Information Display)...................................................................................................................12
Shooting (Operation Controls)....................................................................................................................13
Playback (Information Display)....................................................................................................................14
Playback (Operation Controls).....................................................................................................................15
Operating the Tabs.............................................................................................................................................16
First Steps............................................................................................................................................. 18
Charging the Battery ..........................................................................................................................18
Inserting the Battery ...........................................................................................................................20
Removing the Battery.......................................................................................................................................21
Turning On and Off the Camera.................................................................................................................21
Setting Display Language, Date and Time .................................................................................22
Inserting Memory Cards....................................................................................................................24
Removing Memory Cards...............................................................................................................................24
vii

Table of Contents
Basic Photography and Playback: G (Easy Auto) Mode..................................................... 26
Step 1 Turn the Camera On and Select G (Easy Auto) Mode.............................................26
Indicators Displayed in G (Easy Auto) Mode....................................................................................27
Step 2 Frame a Picture .......................................................................................................................28
Using the Zoom....................................................................................................................................................29
Step 3 Focus and Shoot.....................................................................................................................30
Step 4 Playing Back and Deleting Pictures.................................................................................32
Playing Back Pictures (Playback Mode)..................................................................................................32
Deleting Unwanted Pictures........................................................................................................................33
Using the Basic Shooting Functions .............................................................................................34
m Flash Mode ........................................................................................................................................................34
n Taking Pictures with the Self-timer ...................................................................................................37
A Image Mode (Image Quality/Image Size) .....................................................................................39
q Tapping the Monitor to Release the Shutter (Touch Shutter)..........................................41
r Tapping the Monitor to Focus (Touch AF/AE)..........................................................................44
o Changing the Brightness Using Exposure Compensation.................................................47
Taking Pictures with the Remote Control...................................................................................48
More on Shooting ............................................................................................................................. 49
Selecting a Shooting Mode..............................................................................................................49
G Easy Auto Mode .............................................................................................................................50
Shooting in A (Auto) Mode ............................................................................................................52
Adjusting the A (Auto) Mode setting.........................................................................................53
p Macro Mode ....................................................................................................................................................54
s Subject Tracking (Focusing on a Moving Subject).................................................................55
E ISO Sensitivity.................................................................................................................................................57
C Continuous ......................................................................................................................................................58
w White Balance (Adjusting Hue)...........................................................................................................59
Shooting Suited to Scenes (Scene Mode)...................................................................................61
Selecting a Scene Mode..................................................................................................................................61
Selecting a Scene Mode to Take Pictures (Features).....................................................................64
Shooting for a Panorama................................................................................................................................71
Shooting Smiling Faces (Smart Portrait Mode).........................................................................73
Changing the Smart Portrait Mode Settings......................................................................................75
Camera Settings that Cannot Be Applied Simultaneously ...................................................77
viii

Table of Contents
More on Playback..............................................................................................................................79
Operations in Full-frame Playback Mode....................................................................................79
Viewing Multiple Pictures: Thumbnail Playback ......................................................................80
Taking a Closer Look: Playback Zoom..........................................................................................82
Selecting Playback Mode..................................................................................................................83
Sorting Favorite Pictures (Favorite Pictures Mode).................................................................84
Adding Pictures to Albums ...........................................................................................................................84
Viewing Pictures in an Album......................................................................................................................86
Removing Pictures from Albums...............................................................................................................87
Operations in Favorite Pictures Mode....................................................................................................88
Changing Icons Assigned to Albums......................................................................................................89
Image Searching in Auto Sort Mode.............................................................................................91
Viewing Pictures in Auto Sort Mode........................................................................................................91
Operations in Auto Sort Mode....................................................................................................................93
Selecting Pictures Taken on a Specific Day (List by Date Mode)........................................94
Selecting a Date in List by Date Mode...................................................................................................94
Operations in List by Date Mode...............................................................................................................95
Playback Options .................................................................................................................................96
Setting the Picture Rating.................................................................................................................97
Playing Back Pictures by Rating..................................................................................................................97
b Enjoying Slide Show.....................................................................................................................98
d Protecting Important Pictures (Protect)...............................................................................99
Protecting One Picture.....................................................................................................................................99
Protecting Multiple Pictures......................................................................................................................100
Removing Protection from Pictures......................................................................................................100
a Creating a DPOF Print Order: Print Set................................................................................101
Creating a Print Order for One Picture ................................................................................................101
Creating a Print Order for Multiple Pictures.....................................................................................103
Canceling Print Order.....................................................................................................................................104
f Rotate Image ................................................................................................................................105
E Voice Memos: Recording and Playback ............................................................................... 106
Recording Voice Memos.............................................................................................................................. 106
Playing Voice Memos..................................................................................................................................... 107
Deleting Voice Memos.................................................................................................................................. 107
ix

Table of Contents
Editing Pictures ................................................................................................................................108
Editing Functions..............................................................................................................................108
Picture Editing.................................................................................................................................... 110
U Paint...................................................................................................................................................................110
k Quick Retouch: Enhancing Contrast and Saturation..........................................................113
I D-Lighting: Enhancing Brightness and Contrast...................................................................114
P Stretch: Stretching Pictures.................................................................................................................115
O Perspective Control: Adjusting a Sense of Perspective.....................................................116
i Filter Effects (Digital Filter)....................................................................................................................117
j Glamour Retouch.......................................................................................................................................119
g Small Picture: Making Smaller Pictures........................................................................................ 121
o Crop: Creating a Cropped Copy........................................................................................................122
Movie Recording and Playback..................................................................................................123
Recording Movies .............................................................................................................................123
Changing the Movie Recording Settings..........................................................................................125
D Movie Options............................................................................................................................................. 125
m Movie Light .................................................................................................................................................126
n Movie AF Mode........................................................................................................................................ 127
Movie Playback..................................................................................................................................128
Connecting to Televisions, Computers and Printers..........................................................129
Connecting to a TV...........................................................................................................................129
Connecting to a Computer............................................................................................................ 131
Before Connecting the Camera...............................................................................................................131
Transferring Images from a Camera to a Computer...................................................................132
Connecting to a Printer................................................................................................................... 136
Connecting the Camera to a Printer..................................................................................................... 137
Printing Pictures One at a Time............................................................................................................... 138
Printing Multiple Pictures............................................................................................................................139
x

Table of Contents
Basic Camera Setup........................................................................................................................142
Setup Menu......................................................................................................................................... 142
c Welcome Screen........................................................................................................................................ 144
d Date....................................................................................................................................................................145
e Monitor Settings.......................................................................................................................................148
f Date Imprint (Imprinting Date and Time)..................................................................................149
g Vibration Reduction................................................................................................................................150
h AF Assist ........................................................................................................................................................151
u Digital Zoom................................................................................................................................................152
i Sound Settings ..........................................................................................................................................152
k Auto Off...........................................................................................................................................................153
l/m Format Memory/Format Card...................................................................................................154
n Language ........................................................................................................................................................155
J Interface .........................................................................................................................................................155
d Blink Warning...............................................................................................................................................156
p Reset All........................................................................................................................................................... 158
h Copy (Copy Between Internal Memory and Memory Card).......................................... 161
r Firmware Version ....................................................................................................................................162
Using the projector.........................................................................................................................163
Displaying Pictures with the Projector (Projector Mode)...................................................163
Projecting Pictures........................................................................................................................................... 163
Using Projector Mode.................................................................................................................................... 166
Projecting Movies.............................................................................................................................................167
Changing the Projecting Settings...............................................................................................168
b Projector Slide Show............................................................................................................................... 169
Changing the Projector Settings (Projector Settings Menu).............................................172
Operating the Projector Settings Menu............................................................................................. 172
z Power Saving ..............................................................................................................................................172
k Auto Off...........................................................................................................................................................173
Tone Compensation ...................................................................................................................................... 173
Tips: Projecting PowerPoint Presentations with the Camera Alone .............................. 174
xi

Table of Contents
Caring for the Camera....................................................................................................................175
Maximizing Camera Life and Performance.............................................................................. 175
Cleaning .................................................................................................................................................................177
Storage....................................................................................................................................................................177
Technical Notes and Index...........................................................................................................178
Optional Accessories .......................................................................................................................178
Approved Memory Cards............................................................................................................................179
Image/Sound File and Folder Names ........................................................................................180
Error Messages...................................................................................................................................181
Troubleshooting................................................................................................................................ 186
Specifications .....................................................................................................................................193
Supported Standards.....................................................................................................................................197
Index......................................................................................................................................................198
xii

Introduction
About This Manual
Thank you for your purchase of a Nikon COOLPIX S1100pj digital camera. This
manual was written to help you enjoy taking pictures with your Nikon digital
camera. Read this manual thoroughly before use, and keep it where all those who
use the product will read it.
Symbols and Conventions
To make it easier to find the information you need, the following symbols and
conventions are used:
This icon marks cautions,
information that should be read
B
before use, to prevent damage to
the camera.
This icon marks tips, additional
information that may be helpful
D
when using the camera.
Introduction
This icon marks notes, information
that should be read before using
C
the camera.
This icon indicates that more
information is available elsewhere
A
in this manual.
Notations
• Secure Digital (SD) memory card, SDHC memory card, and SDXC memory card
are referred to as “memory card.”
• The setting at the time of purchase is referred to as the “default setting.”
• The names of menu items displayed in the camera monitor, and the names of
buttons or messages displayed on a computer monitor appear in bold.
Screen Samples
In this manual, images are sometimes omitted from monitor display samples so
that monitor indicators can be more clearly shown.
Illustrations and Screen Display
Illustrations and text displays shown in this manual may differ from actual display.
C Internal Memory and Memory Cards
Pictures taken with this camera can be stored in the camera’s internal memory or on removable
memory cards. If a memory card is inserted, all new pictures will be stored on the memory card and
delete, playback and format operations will apply only to the pictures on the memory card. The
memory card must be removed before the internal memory can be formatted or accessed for
picture storage, deletion, or viewing.
1

Information and Precautions
Life-Long Learning
As part of Nikon’s “Life-Long Learning” commitment to ongoing product support and education,
continually updated information is available online at the following sites:
Introduction
• For users in the U.S.A.: http://www.nikonusa.com/
• For users in Europe and Africa: http://www.europe-nikon.com/support/
• For users in Asia, Oceania, and the Middle East: http://www.nikon-asia.co m/
Visit these sites to keep up-to-date with the latest product information, tips, answers to frequently
asked questions (FAQs), and general advice on digital imaging and photography. Additional
information may be available from the Nikon representative in your area. Visit the site below for
contact information:
http://imaging.nikon.com/
Use Only Nikon Brand Electronic Accessories
Nikon COOLPIX cameras are designed to the highest standards and include complex electronic
circuitry. Only Nikon brand electronic accessories (including battery chargers, batteries, and AC
adapters) certified by Nikon specifically for use with this Nikon digital camera are engineered and
proven to operate within the operational and safety requirements of this electronic circuitry.
THE USE OF NON-NIKON ELECTRONIC ACCESSORIES COULD DAMAGE THE CAMERA AND MAY
VOID YOUR
The use of third-party rechargeable Li-ion batteries not bearing the
Nikon holographic seal could interfere with normal operation of the
camera or result in the batteries overheating, igniting, rupturing, or
leaking.
For more information about Nikon brand accessories, contact a local
authorized Nikon dealer.
Before Taking Important Pictures
Before taking pictures on important occasions (such as at weddings or before taking the camera on
a trip), take a test shot to ensure that the camera is functioning normally. Nikon will not be held liable
for damages or lost profits that may result from product malfunction.
About the Manuals
• No part of the manuals included with this product may be reproduced, transmitted, transcribed,
• Nikon reserves the right to change the specifications of the hardware and software described in
• Nikon will not be held liable for any damages resulting from the use of this product.
• While every effort was made to ensure that the information in these manuals is accurate and
NIKON WARRANTY.
Holographic seal:
Identifies this device as an
authentic Nikon product.
stored in a retrieval system, or translated into any language in any form, by any means, without
Nikon’s prior written permission.
these manuals at any time and without prior notice.
complete, we would appreciate it were you to bring any errors or omissions to the attention of the
Nikon representative in your area (address provided separately).
2

Information and Precautions
Notice Concerning Prohibition of Copying or Reproduction
Note that simply being in possession of material that was digitally copied or reproduced by means
of a scanner, digital camera or other device may be punishable by law.
• Items prohibited by law from being copied or reproduced
Do not copy or reproduce paper money, coins, securities, government bonds or local government
bonds, even if such copies or reproductions are stamped “Sample.” The copying or reproduction
of paper money, coins, or securities which are circulated in a foreign country is prohibited. Unless
the prior permission of the government was obtained, the copying or reproduction of unused
postage stamps or post cards issued by the government is prohibited. The copying or
reproduction of stamps issued by the government and of certified documents stipulated by law is
prohibited.
• Cautions on certain copies and reproductions
The government has issued cautions on copies or reproductions of securities issued by private
companies (shares, bills, checks, gift certificates, etc.), commuter passes or coupon tickets, except
when a minimum of necessary copies are to be provided for business use by a company. Also, do
not copy or reproduce passports issued by the government, licenses issued by public agencies
and private groups, ID cards and tickets, such as passes and meal coupons.
• Comply with copyright notices
The copying or reproduction of copyrighted creative works such as books, music, paintings,
woodcut prints, maps, drawings, movies and photographs is governed by national and
international copyright laws. Do not use this product for the purpose of making i llegal cop ies or to
infringe copyright laws.
Disposing of Data Storage Devices
Please note that deleting images or formatting data storage devices such as memory cards or builtin camera memory does not completely erase the original image data. Deleted files can sometimes
be recovered from discarded storage devices using commercially available software, potentially
resulting in the malicious use of personal image data. Ensuring the privacy of such data is the user’s
responsibility.
Before discarding a data storage device or transferring ownership to another person, erase all data
using commercial deletion software, or format the device and then completely refill it with images
containing no private information (for example, pictures of empty sky). Be sure to also replace any
pictures selected for the welcome screen (A 144). Care should be taken to avoid injury or damage
to property when physically destroying data storage devices.
Introduction
3
Parts of the Camera
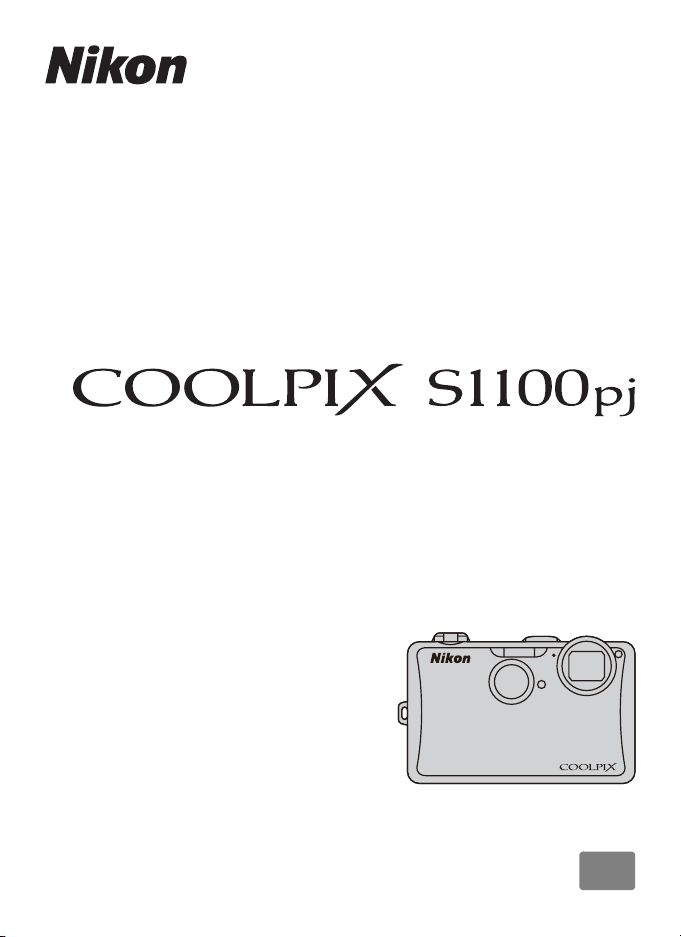
The Camera Body
Introduction
Under the
connector cover
15
14
13
1 Shutter-release button..............................30
Zoom control..................................................29
f: wide .........................................................29
2
g: tele ..............................................................29
h: thumbnail playback......................80
i: playback zoom....................................82
Power switch/power-on lamp
3
.......................................................................26, 153
4 Flash......................................................................34
5 P (projector) button.......................9, 163
6 Projector focus dial...................................163
7 Built-in microphone...................... 106, 123
123 5647
Lens cover closed
Self-timer lamp...............................................37
8
AF-assist illuminator.................................151
Movie light.....................................................126
9 Lens .........................................................177, 193
10 Infrared receiver (front)..................48, 164
11 Projector window......................................163
12 Lens cover......................................................175
13 Eyelet for camera strap................................7
14 Connector cover...................129, 132, 137
USB/audio/video output connector
15
......................................................... 129, 132, 137
8
9
10
11
12
4
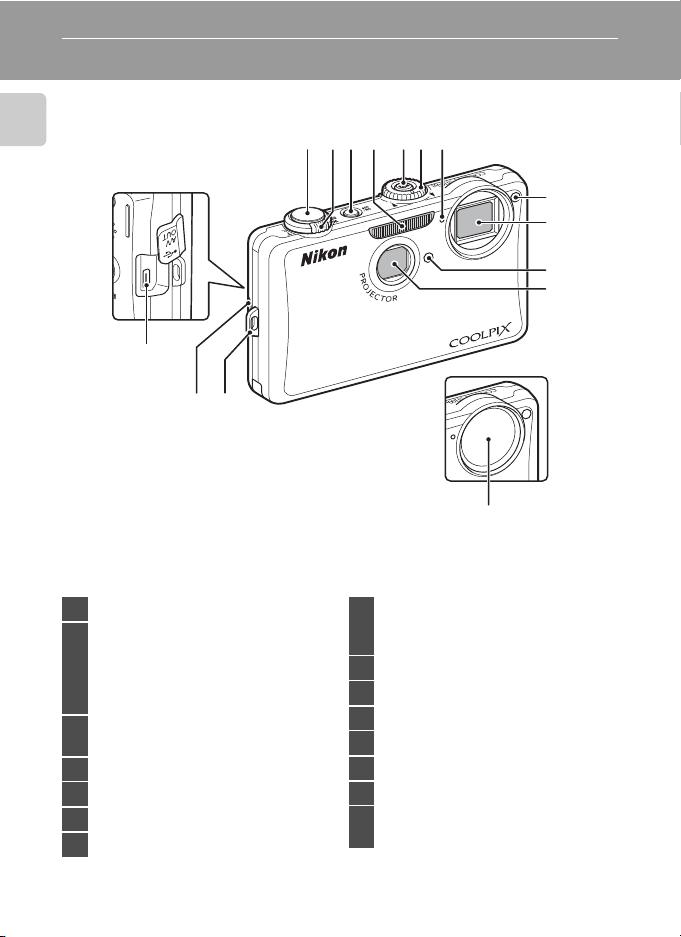
Parts of the Camera
16 1415
1 Flash lamp......................................................... 35
2 Infrared receiver (rear).................... 48, 164
3 Speaker..................................................107, 128
4 b (movie-record) button............... 9, 123
5 A (shooting mode) button.............8, 49
6 c (playback) button...................8, 32, 83
7 Monitor/touch panel................................. 12
8 Cover latch ...............................................20, 24
Battery-chamber/
9
memory card slot cover................... 20, 24
1
2
3
4
5
6
7
8
9
10
1213 11
Power connector cover (for
10
connection with available separately
AC Adapter)................................................... 178
11 Battery latch.............................................20, 21
12 Battery chamber............................................20
13 Memory card slot..........................................24
14 Projector stand............................................ 165
15 Projector stand latch...............................165
16 Tripod socket
Introduction
5
Parts of the Camera
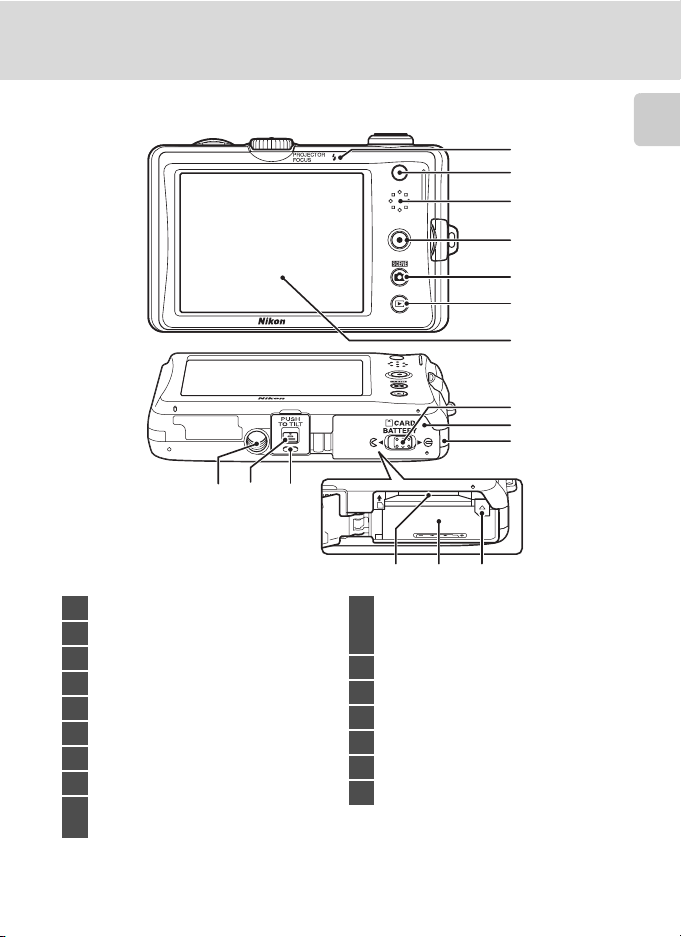
Remote Control ML-L5
The supplied remote control can be used for shooting (A 48). In projector mode
(A 163), the remote control can be used to change the projected still pictures
Introduction
and to play back movies.
Before using the remote control for the first time, remove
the insulating sheet by pulling it in the direction indicated.
1 Infrared emitter
12
3
4
5
6
See the following pages for details of the operation of the remote control.
• Shooting mode: “Taking Pictures with the Remote Control” (A 48)
• Projector mode: “Displaying Pictures with the Projector (Projector Mode)”
(A 163), “b Projector Slide Show” (A 169)
Zoom button (shooting mode)
f: wide
g: tele
Zoom button (projector mode)
2
h: thumbnail playback
i: playback zoom
–: decrease volume
+: increase volume
H, I, J, or K (up, down, left, or right
3
selection) button
4 Apply selection button
5 P (projector) button
6 b (slide show) button
B Notes on the Remote Control Battery
• When changing the remote control battery, be sure that the battery’s positive (+) and negative (–)
terminals are oriented correctly.
• Be sure to read and follow the warnings for the battery on page iii and the section, “The Battery”
(A 176).
6

Replacing the Remote Control Battery
Parts of the Camera
123
Push the tab in the
direction indicated
above.
45
Place a new 3V CR2025
lithium battery in the
battery holder. Be sure
that the “+” mark is
facing up.
While holding the tab in,
grasp the edge of the
battery holder with your
fingernail and pull it
straight out.
Insert the battery holder
into the remote control.
Remove the used 3V
CR2025 lithium battery.
Attaching the Camera Strap
Introduction
7
Basic Operations
Shutter-release Button
The camera features a two-stage shutter-release button. To set focus and
exposure, press the shutter-release button halfway, stopping when you feel
Introduction
resistance. Focus and exposure lock while the shutter-release button is held in this
position. To release the shutter and take a picture, press the shutter-release button
the rest of the way down. Do not use force when pressing the shutter-release
button, as this may result in camera shake and blurred pictures.
Press the
shutter-release
button halfway
to set focus and
exposure
The A (Shooting Mode) Button
• Press the A button in playback mode or
projector mode to enter shooting mode.
• Press the A button in shooting mode to display
the shooting-mode selection menu and switch
shooting modes (A 49).
The c (Playback) Button
• Press the c button in shooting mode to enter
playback mode.
• Press the c button in playback mode or
projector mode to display the playback-mode
selection menu and switch playback modes
(A 83).
• If the camera is turned off, hold down the c
button to turn the camera on in playback mode.
8
Press the
shutter-release
button the rest
of the way down
to take picture
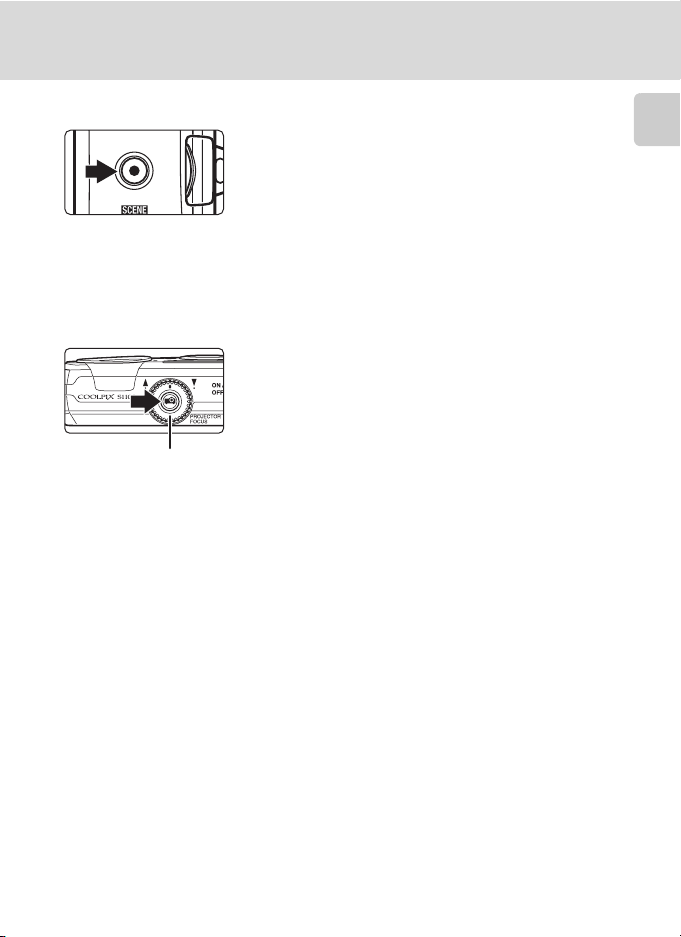
The b (Movie-record) Button
• Press the b (movie-record) button in shooting
mode to start movie recording (A 123). Press the
b (movie-record) button again to stop movie
recording.
• Press the b (movie-record) button in playback
mode to enter shooting mode.
The P (Projector) Button
• Press the P button in shooting mode or playback
mode to switch to projector mode.
• Press the P button again to end projector mode.
Projector focus dial
(A 163)
Basic Operations
Introduction
9
Operating the Touch Panel
The monitor on the COOLPIX S1100pj is a touch panel display. Use a finger or the
supplied stylus to operate the touch panel.
Introduction
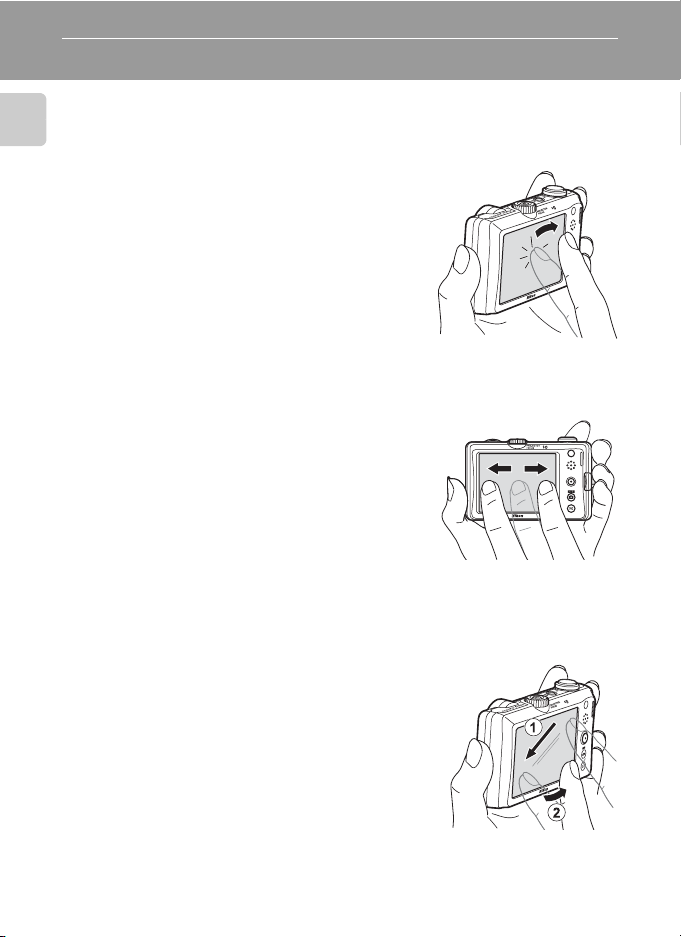
Tapping
Tap the touch panel.
Use this operation to:
Select icons or other controls
Select pictures in thumbnail playback mode (A 80)
Perform touch shutter (A 41), touch AF/AE (A 44),
or subject tracking (A 55) operations
Drag the tab to display the setting controls during
shooting or playback (A 16)
Dragging
Drag your finger across the touch panel and
remove it from the touch panel.
Use this operation to:
Scroll through pictures in full-frame playback mode
(A 32)
Move the visible portion of a picture enlarged with
playback zoom (A 82)
Use sliders to adjust exposure compensation (A 47) or other settings
Dragging and Dropping
Place your finger on the touch panel, drag it to
the desired location (1), and remove it from
the touch panel (2).
Use this operation to:
Apply the rating setting (A 97)
Select a picture to view with slide show in projector
mode (A 170)
10

Operating the Touch Panel
Using the Stylus
Use the stylus for operations, such as when using
the paint option (A 110), that require more
precision than using a finger.
Attaching the Stylus
Attach the stylus to the strap as shown.
B Notes on the Touch Panel
• Do not press on the touch panel with pointed objects other than the supplied stylus.
• Do not apply unnecessary pressure to the touch panel.
Introduction
B Notes on Tapping/Dragging
• The camera may not respond if your finger is left in one place too long.
• The camera may not respond if the followings are made.
- Bounce your finger off the display
- Drag your finger over too short a distance
- Stroke the display too lightly
- Move your finger too quickly
B Notes on the Touch Panel
• Keep the stylus out of reach of small children.
• Do not carry the camera by the stylus. The stylus may slip off the strap and the camera may fall.
11
Main Display of the Monitor/Touch Panel and Basic Operations
23
00
1
1
00
F3.9
250
23
50
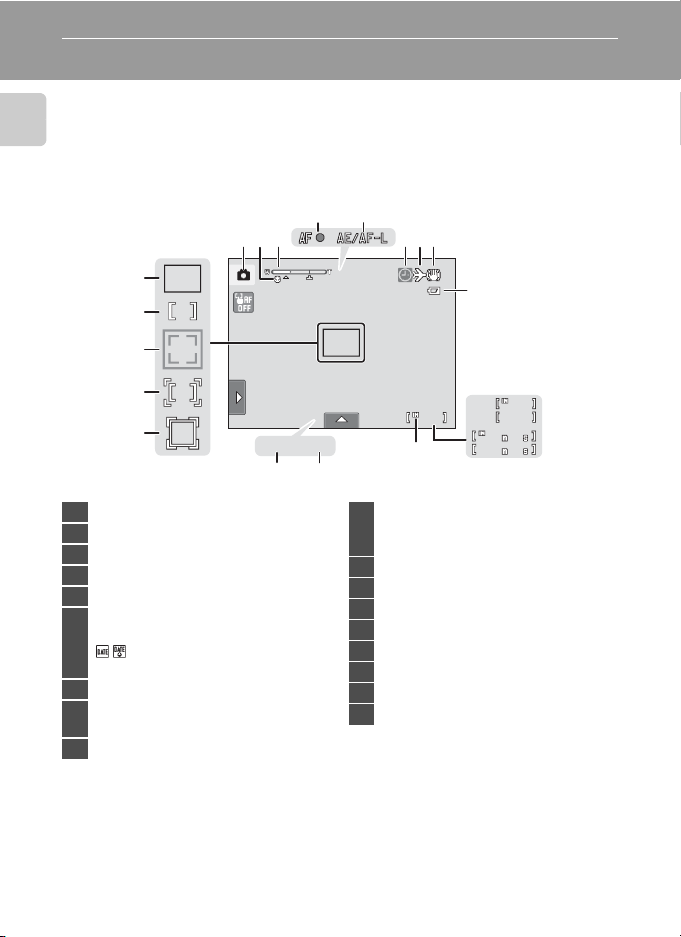
Shooting (Information Display)
Displayed information on the monitor varies depending on the camera settings or
status.
Introduction
54
213 67 8
18
17
16
15
14
1/1/1/ F3.9
F3.9250
250
1213
1 Shooting mode1....................26, 52, 61, 73
2 Macro mode....................................................54
3 Zoom indicator......................................29, 54
4 Focus indicator.............................................. 30
5 AE/AF-L indicator .........................................72
O
“Date not set” indicator..................... 181
6
Date imprint indicator ....................... 149
7 Travel destination icon ..........................145
Oq
8
Vibration reduction icon...................150
9 Battery level indicator................................26
1
Indicators displayed vary with current shooting mode.
2
Indicator is displayed when there are 50 or fewer exposures remaining.
12
a Number of exposures remaining
10
(still pictures)2.............................................26
b Movie length............................................123
11 Internal memory indicator......................27
12 Aperture.............................................................30
13 Shutter speed.................................................30
14 Focus area (
15 Focus area (touch AF/AE)........................44
16 Focus area (face detection)............30, 73
17 Focus area (center)
18 Focus area (auto)..........................................50
9
10
23
23
11
subject tracking mode
23
23
a
50
50
00
1
b
00
1
).... 55
Main Display of the Monitor/Touch Panel and Basic Operations
OFF
AUTO
0.0
AUTO
OFF
AUTO
0.0
AUTO
OFF
AUTO
0.0
AUTO
Shooting (Operation Controls)
Tap the following controls to change settings.
• Tap the tab to display the setting controls and shooting settings can be
changed (A 16).
• The controls available and indicators displayed vary with shooting mode and
the current camera settings.
1
Introduction
OFF
OFF
AUTO
AUTO
4
2
AUTO
AUTO
0.0
1 Touch AF/AE cancellation.......................44
2 Tab......................................................................... 16
0.0
3 Setting controls.............................................17
4 Scene effect adjustment slider ............63
3
C Monitor Display in Portrait (“Tall”) Orientation
When the camera is held in portrait (“tall”) orientation, the controls and indicators are also displayed
in portrait (“tall”) orientation. Controls and indicators may not be appropriately rotated when the
camera is pointing up or down.
AUTO
AUTO
0.0
OFF
OFF
AUTO
AUTO
AUTO
AUTO
0.0
0.0
0.0
AUTO
AUTO
OFF
OFF
13
Main Display of the Monitor/Touch Panel and Basic Operations
4
4
0004.
JPG
15/11/2010 15 :
3030
999 9
999 9
/
/
444
00
00
1
1
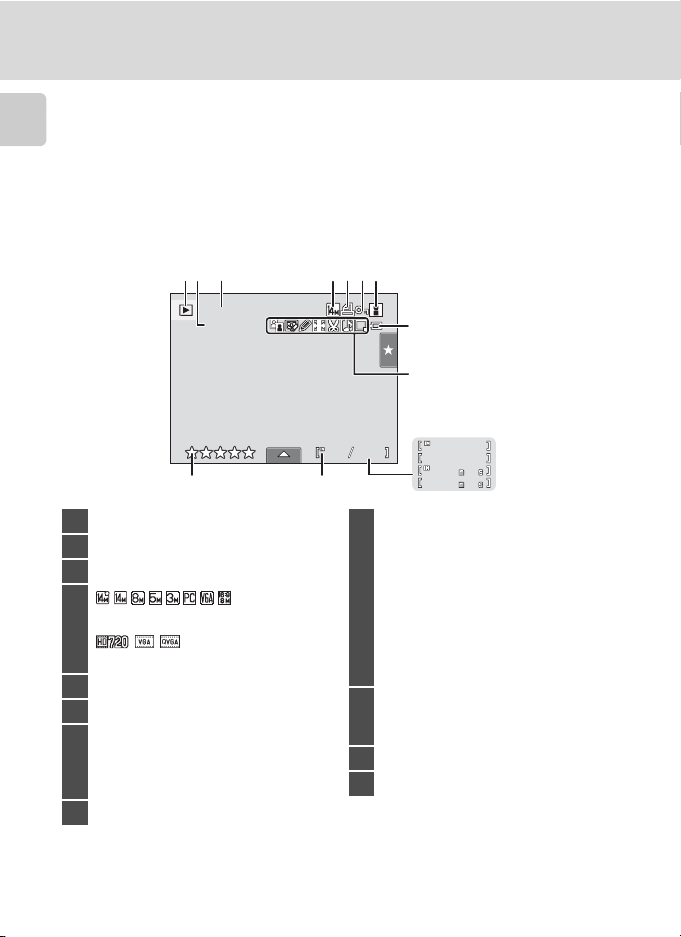
Playback (Information Display)
The following monitor display shows information for the picture currently
displayed and camera status.
Introduction
• The displayed information vary depending on the picture played back and the
current camera status.
• Indicators below are displayed when turning on the camera or operating the
camera, and turn off after a few seconds elapse (A 148).
213 4567
15/11/2010 15
15/11/2010 15 : 30
JPG
JPG
0004.
0004.
12
4
11
8
9
10
/
4
4
9999
/
9999
1
1
a
00
b
00
1 Playback mode1.....................32, 84, 91, 94
2 File number and type............................. 180
3 Date/time of recording............................. 22
4
Image mode
2
............................................. 39
Movie options2.......................................125
5 Print-order icon ..........................................101
6 Protect icon...................................................... 99
Album icon in
favorite pictures mode
7
Category icon in
auto sort mode
3
3
............................................ 91
...........................86
a Quick retouch icon ..........................113
c D-Lighting icon ..................................114
j Glamour retouch icon...................119
i Filter effects icon...............................117
d Paint icon...............................................110
9
r Stretch icon ..........................................115
q Perspective control icon...............116
a Crop icon ............................................... 122
p Voice memo icon..............................107
C Small picture icon.............................121
a Current frame number/
10
total number of frames ........................32
b Movie length............................................128
11 Internal memory indicator......................27
12 Rating indicator.............................................97
8 Battery level indicator................................26
1
Indicators displayed vary with current playback mode.
2
Indicators displayed vary depending on the setting for shooting.
3
The icon for the selected album or category in auto sort mode currently selected in
playback mode is displayed.
14
Main Display of the Monitor/Touch Panel and Basic Operations
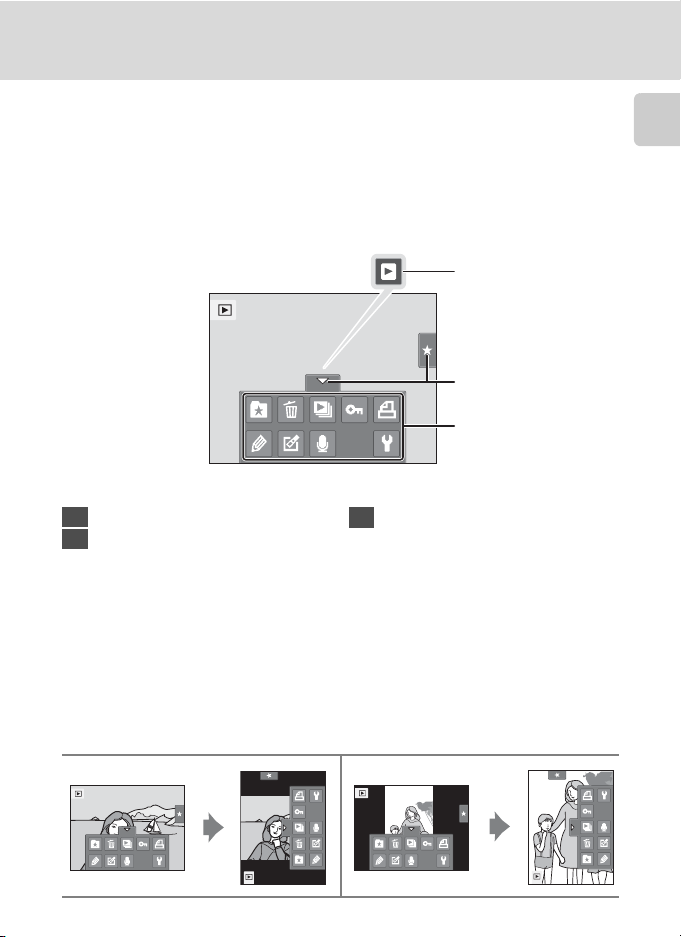
Playback (Operation Controls)
Tap the following controls to change settings.
• Tap the tab to display the setting controls and deleting or editing can be
available (A 16).
• The controls available and indicators displayed vary with the picture played
back and the current camera settings.
1
2
3
Introduction
1 Movie playback........................................... 128
2 Tab......................................................................... 16
3 Setting controls.............................................17
C Picture Display
When the camera is rotated, the picture and controls displayed are also rotated as indicated below.
Pictures and controls may not be appropriately rotated when the camera is pointing up or down.
15

Main Display of the Monitor/Touch Panel and Basic Operations
OFF
0.0
23
Operating the Tabs
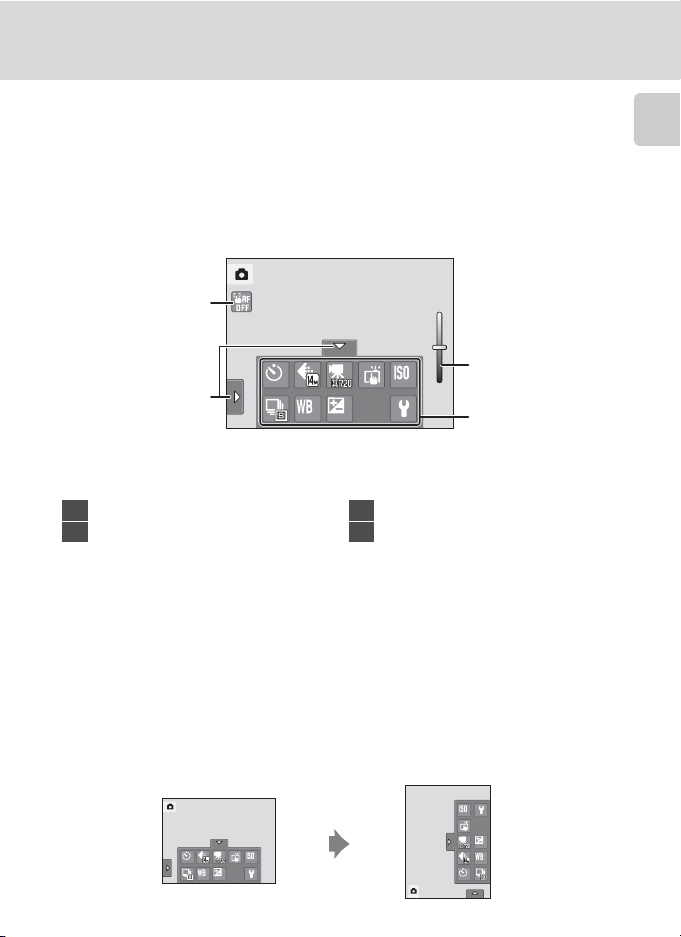
When in shooting or playback mode, use the setting controls to make shooting or
playback settings. Display the controls by tapping the tab at the bottom, left and
Introduction
right sides of the monitor.
• Tap the icon of the desired item to display the setting screen for that item.
• Tap z (setup) in the setting controls to make the basic camera settings.
• When H or J is displayed on the setting screen, tap H to exit the setting
screen. Tap J to return to the previous screen.
• Tap the tab again to hide the setting controls.
Tap the tab to display the
icons of settings that can
be changed in the
current mode.
23
23
Tap an icon to display the
setting screen of that
Tap an icon to apply the
setting of that item.
16
Tap the tab again to hide
the setting controls.
item.
OFF
OFF
0.0
0.0
Tap z to display the setup
menu.
Image mode
4320×3240
Return to the previous
screen.
 Loading...