

Nikon COOLPIX AWIOO, COOLPIX AW1OO Quick Start Manual
Nikon
Quick
Take
First Steps
Shooting
Using
Other
the
Camera
and
ViewNX
Functions
Start
Out
Playback 9
2 12
of
the
Guide
Box 3
4
16
COOLPIX
COOL
PIX
AWIOO

Thank you
for
purchasing a Nikon
COOLPI
X
AWl
00 digital camera. This
guide
introduces
For
more
located
Re
ference
Be
sure
GPS/digital
Should
the
detailed
on
the
Manual,
to
read
compass"
you need
Internet
Pl
ease
visit the Nikon support home page, wh
•
Search
•
Use
•
Download the latest
r
ece
For
cus
For customers
For
cu
Nikon's continu
"As
k
Nikon a
ive
e-mail notification for software
tomers
st
omers
in
in
in
procedures necessary for first
information,
included
see
"Viewing
11
<Important>
technical
ous
Qu
est
ion"
vers
ions
the Unit
Canada:
Mexico:
ed
State
help.nikon.ca
nikon.com.mx/soporte
CO-ROM.
in
the
ly updated Knowledge Database for the latest technical supp o
to
re
of
s:
please
the
refer
For
information
Reference
Shockproof,
Reference
support,
ce
i
ve
Ni
ko
n softw
www.nikontechusa.com
we
ere
yo
a prompt reply from a Nikon professional advi
are
or
firmware updates.
(Eng
li
sh),
nikoncanada-fr.custhelp.com
time
to
Manual
the
use
of
digital
on
viewing
CO"
this camera.
Reference
described
waterproof, dustproof,
Manual before
offer a
u
can
or firmw
number
:
are
updat
using
of
options.
es
for your product,
the
this
(F
ranc,:ai
Manual,
camera's
which
digital
below.
condensation,
camera.
rt
informati
sor
to your e-ma
or
register to
s)
is
on.
il
.
Telephone
Please
he
For
For
For
1CIJ1
1
2
3
ca
ll
for technical support and other product
lp
with your digital
customers
customers
cus
tomers
in
the United
in
Ca
nada:
in
Mexico:
Viewing the
Turn
on
the computer and insert the
Double-click the
Windows 7 and Windows
Windows
Mac
Double-click the
OS
XP
X
Users:
U
CO-
sers:
De
INOE
cam
era
need
s.
Sta
te
s:
1-800-N/KON-UX
1-877-534-9910
001-888-565-5452
Reference
RO
M
icon.
Vista
My
Co
mput
sktop____.
X.p
df
Manual
Users:
er
COOLPIX
icon and then click
CD
CO-ROM
Computer____.
--+
COO
LPI
AWl
00
assistance.
(1-800-645-6689)
into the comp ut
COOLPIX
X
AW
l
00
icon
icon
Reference
O
ur
professional advi
er's
CO-ROM
AWl
00
icon
Manual.
drive.
sers
are
standi
ng
by to
In
the
'
N/kon
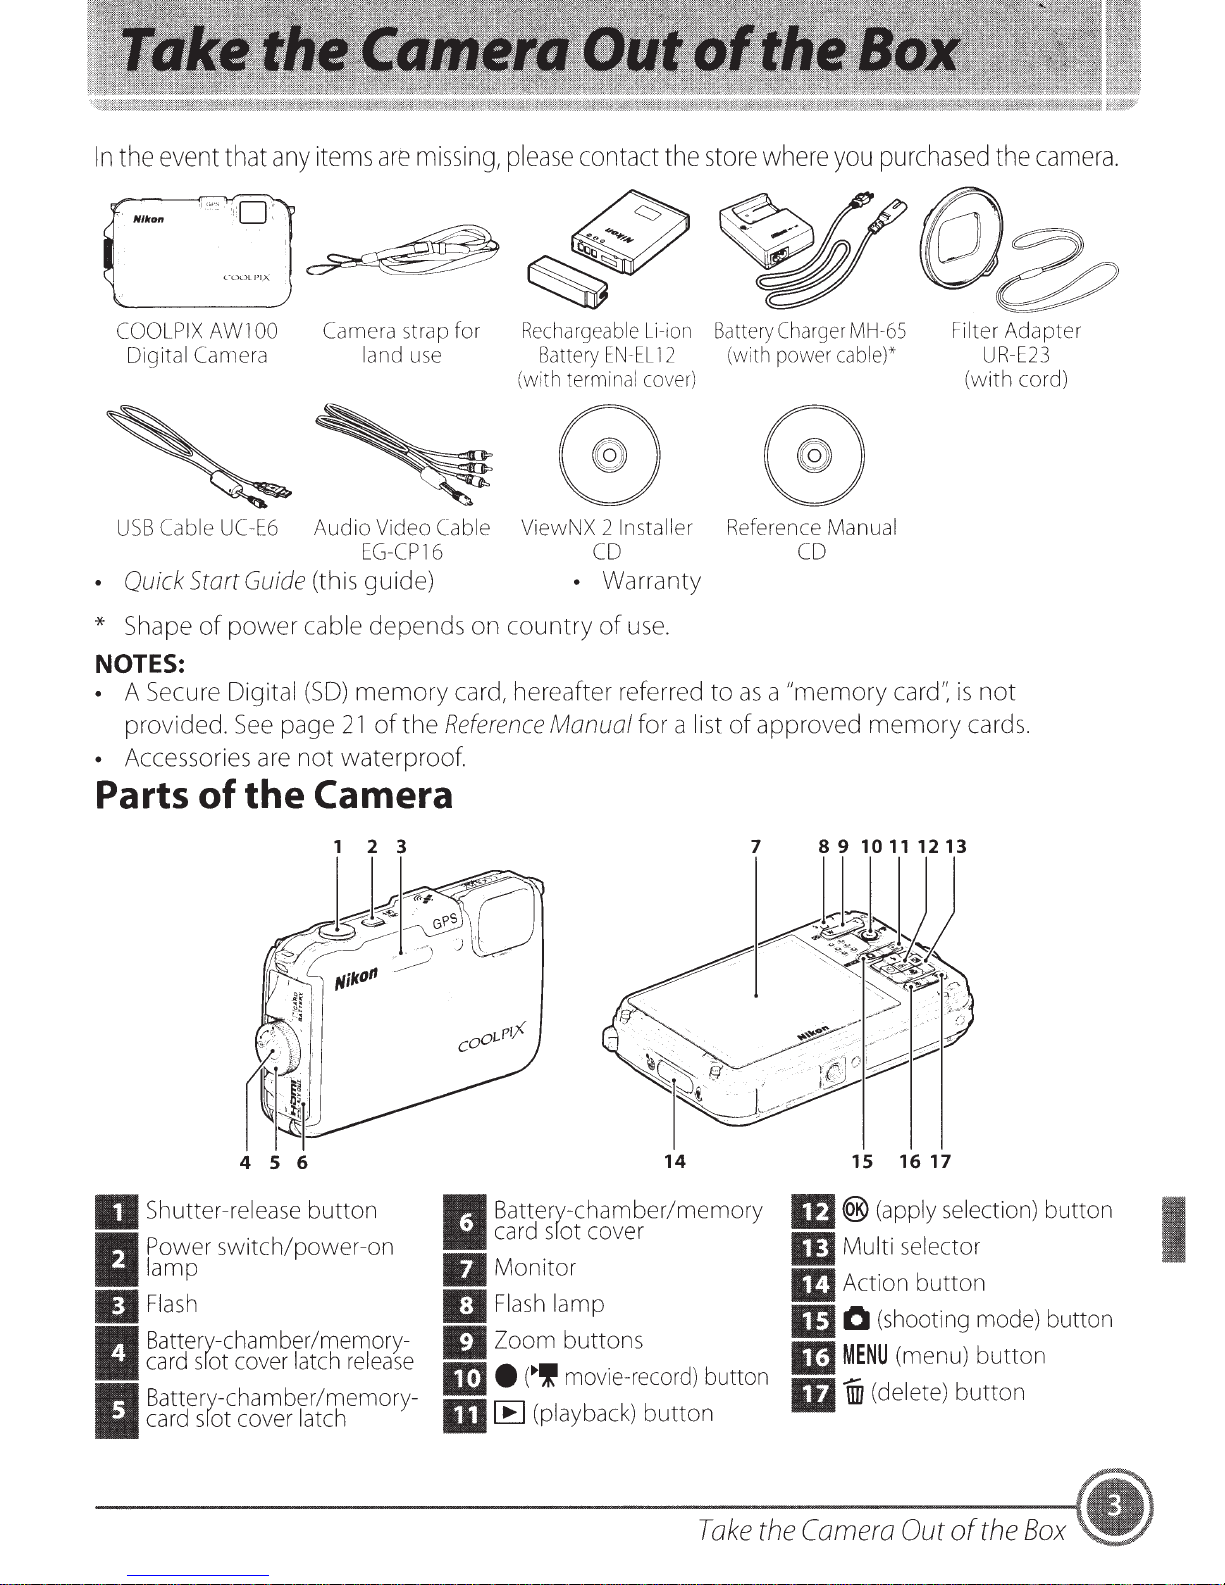
event
that
any
items
are
missing,
please
contact
the
store
where
you
purchased
the
camera.
COOLPIX
Digital Camera
USB
• Quick Start
* Shape
NOTES:
• A Secure Digital
provided.
• Accessories
Parts
Cable
of
of
AWl
00
UC-E6
Guide
power cable depends on country
See
page
are
the
Camera
Audio Video Cable ViewNX 2 Installer Reference Manual
(this guide) • Warranty
(SO)
21
not waterproof.
strap for
use
land
EG-CP
16
memory card, hereafter referred to
of
the
Reference
Rechargeable
Battery
(with
terminal
Manual for a list
EN-EL
CD
of
Li-ion
cover)
use.
Battery
12
Charger
(with
power
as
a "memory card':
of
approved memory
MH-65
cable)*
CD
Camera
1 2 3
Filter Adapter
UR-E23
(with cord)
is
not
cards.
4 5 6
IJ
Shutter-release button
Power
lamp
II
IJ
Flash
Battery-chamber/memory-
card
I
Battery-chamber/memory-
card
I
switch/power-on
sfot
cover
latch
sfot
cover
latch
release
Battery-chamber/memory
card
srot
II
II
Monitor
IJ
Flash
IJ
Zoom buttons
m •
m
(~,
IE
cover
lamp
movie-record)
(playback)
button
14
button
Take
m ®
II]
BJ
m 0
1m
ID
the
Camera
15
16
17
(apply
Multi selector
Action button
(shooting
MENU
selection)
mode)
(menu) button
i (delete) button
Out
of
the
button
I
button
Box
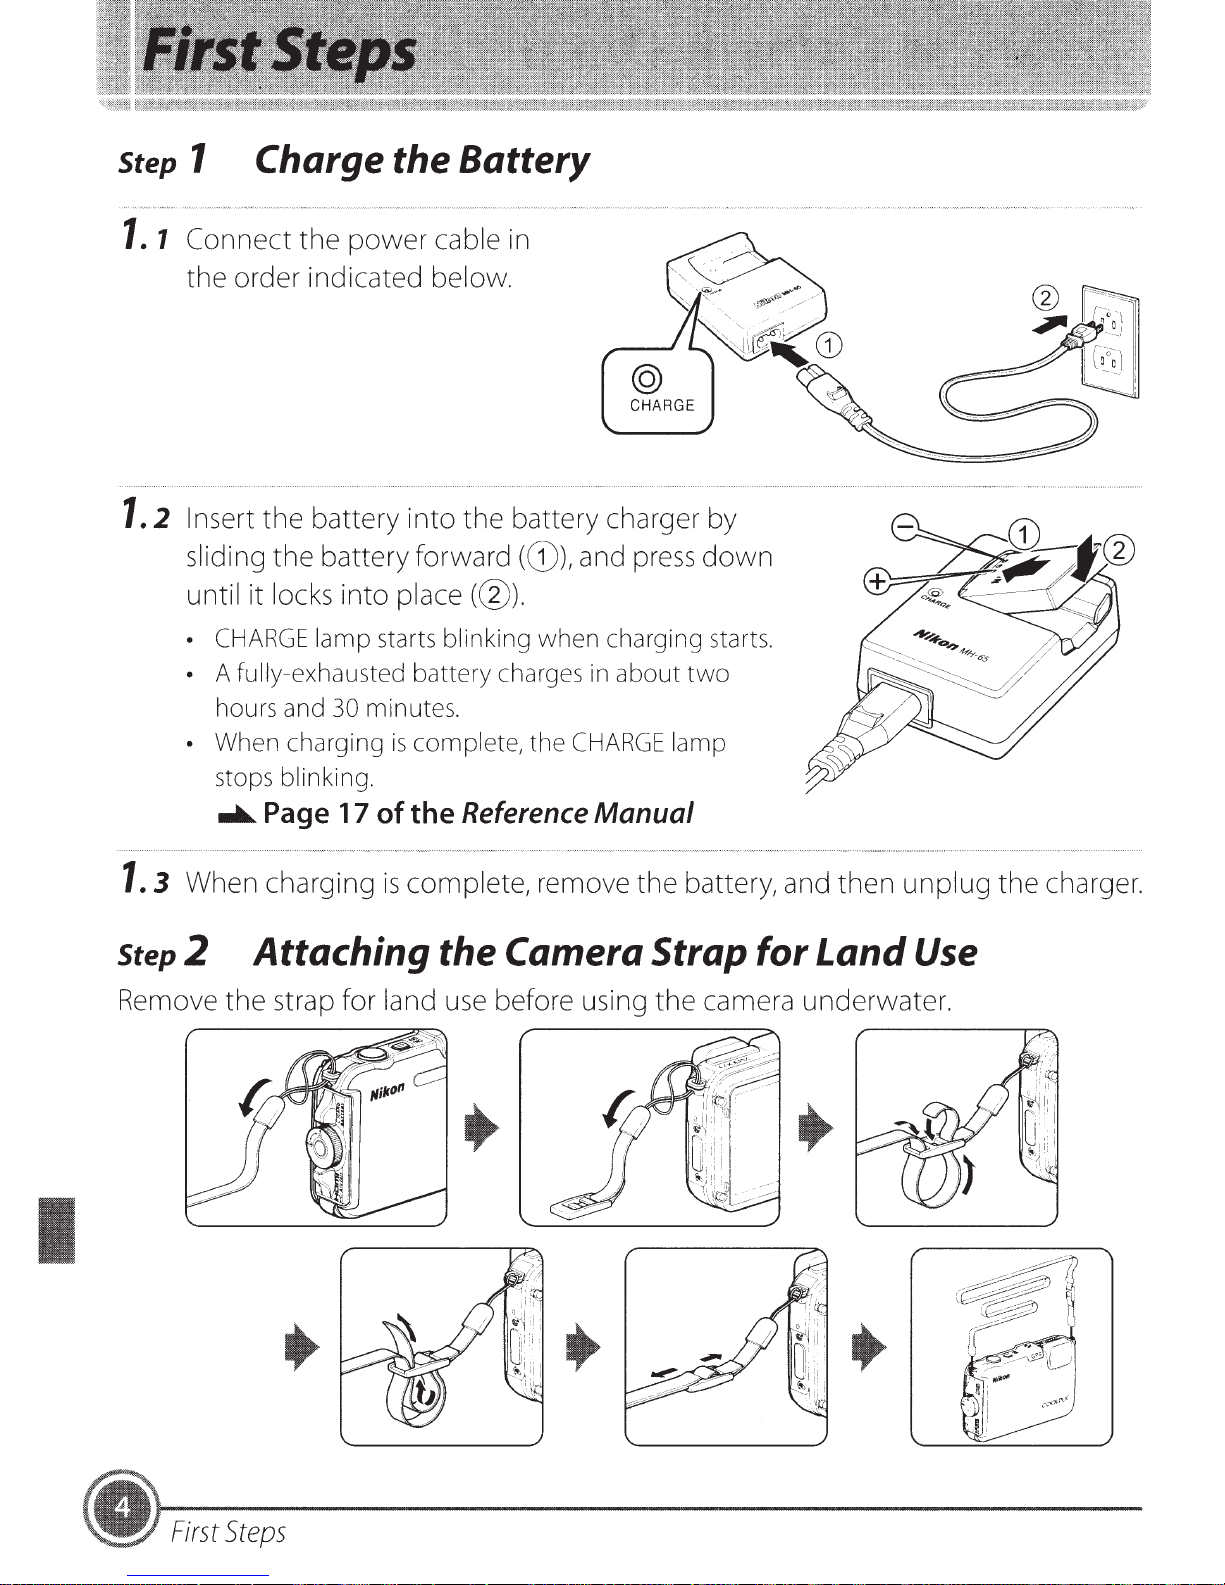
step 1 Charge the Battery
1.
1
1.
2 Insert
Connect
the
order indicated below.
the
the
power
battery
cable
into
in
the
battery charger by
@
CHARGE
sliding
until it locks
•
• A fully-exhausted battery charges
• When charging
1.
3 When charging
the
battery forward (G)), and press
into
CHARGE
hours and
stops blinking .
....._
lamp starts blinking when charging
30
Page 17
place(@).
minutes.
is
complete, the
of
the Reference
is
complete, remove
in
about
CHARGE
Manual
the
down
starts.
two
lamp
battery, and
step 2 Attaching the Camera Strap for
Remove
the
strap for land use before using
the
camera underwater.
then
Land
unplug
Use
the
charger.
First
Steps

Step 3 Insert the Battery
If a
memory
card
is
inserted, images are saved
and
the
on
Memory
the
memory
Card
card
when
you take
pictures. If a
memory
3.1
(approximately 83MB).
Press
latch release
memory-card
(@).
3.2
Insert
•
Use
latch in
insert
• When
latch locks it in pla'ce.
memory
the
battery-chamber/memory-card
the
battery.
the
battery
the
the
the
card
(G)) and rotate
slot cover latch
direction shown (G)), and fully
battery(@).
battery
is
not
to
push
the
is
fully inserted,
inserted, images are saved in
the
(@)to
orange battery
slot cover
battery-chamber/
the
open
battery
the
cover
the
camera's internal
Battery latch
~
Inserting the Battery Correctly
Inserting
to
confirm
3.3
~
Inserting
the
Insert
• Slide
Inserting the Memory Card Correctly
memory
the
that
the
place.
the
battery upside down or backwards could damage the camera.
the
battery
memory
the
memory
memory
card.
Be
is
in
the correct orientation.
card.
card
in
until it clicks
card upside down or backwards could damage
sure
to
confirm that the memory card
into
Memory
is
in
card slot
the correct orientation. I
the
Be
sure
camera or
First
Steps

3.4
Push
to
the
the
battery
camera
chamber/memory
(G))
and
rotate
the
card
battery
slot-cover
chamber/
memory
locked
• Rotate
latch until it clicks
~
Note on Closing
If the strap or filter adapter's cord gets caught
when it
card slot cover, make sure
~
Do
environment or
water may seep inside the camera or the camera may become damaged.
• If foreign particles
or brush.
• If liquid such
and dry cloth.
is
closed,
Opening/Closing
not
open and close the battery
card
((?)).
the
with
as
slot-cover
battery-chamber/memory-card slot cover
into
the
Cover
the
cover could be damaged. Before closing the battery-chamber/memory
that
the
wet
hands. If the cover
get
inside the cover or camera, immediately remove
water gets inside the cover or camera, immediately
latch
place.
without
the strap or cord does
until
Getting
the
in
the
cover
is
the
Strap or Cord Caught
battery-chamber/memory
not
get
Battery Chamber/Memory Card Slot-Cover
chamber/memory
is
closed
card slot-cover
without
caught
removing foreign particles,
in
it.
in
a sandy or dusty
wipe
card slot cover
them
with a blower
it
off
with a soft
Removing
Before
confirm
•
Removing
Removing
•
...._
opening
that
The
camera,
camera.
To
eject the battery, open the battery-chamber/memory
cover
(G)),
Press
partially eject it, and then pull it
the
and
and
the
the
Observe
memory
Pages 19 to
the
the
the
power-on
battery
Battery
slide the orange battery latch
then remove the battery straight((?)).
Memory
Battery and Memory Card
battery-chamber/memory
caution
card
21
of
lamp
and
Card
in
lightly with your
the
and
the
memory
when
out
card
removing
straight(@)
Reference
monitor
in
the direction shown
Manual
card slot cover,
are off.
may
fin~r
be
the
(G))
.
hot
battery
card
to
turn
the
immediately
or
memory
slot
camera
after
using
card.
off
and
the
First
Steps
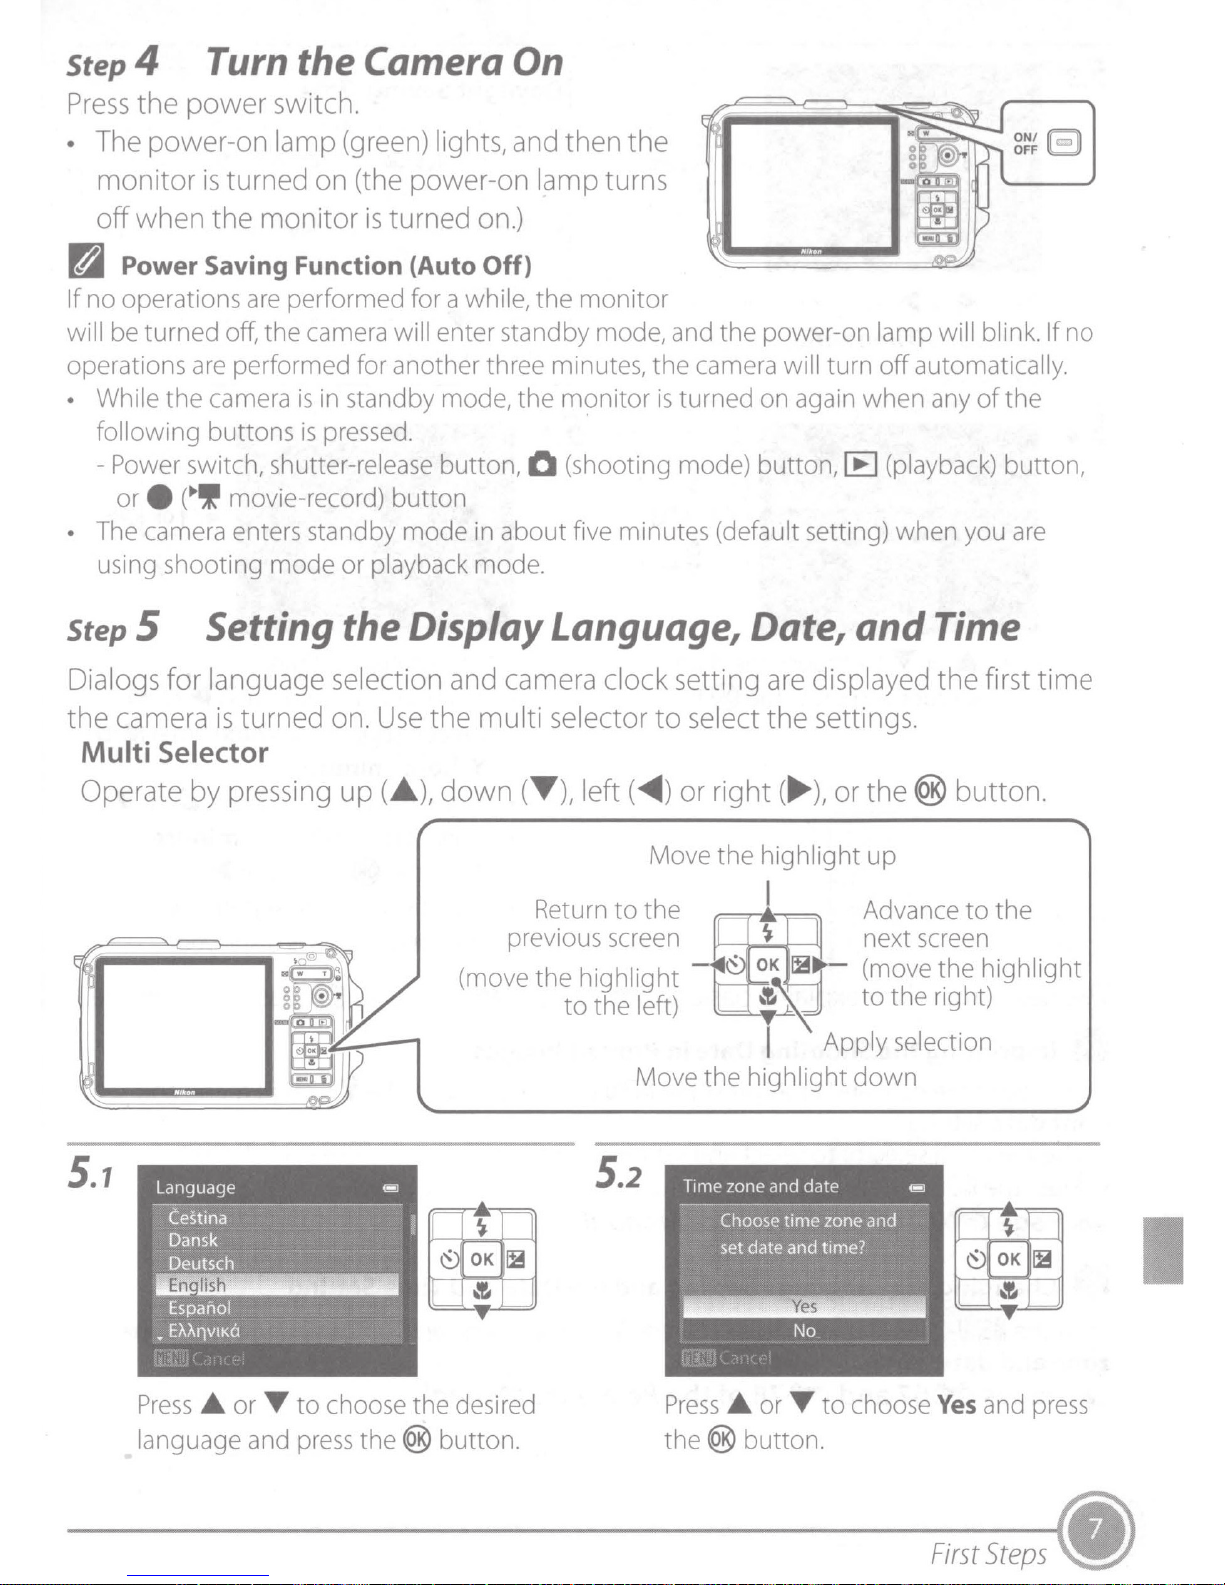
Step 4
Turn
the Camera
On
Press
• The power-on lamp (green) lights, and then
~
If
will be turned
operations are performed for another three minutes,
• While
• The camera enters standby
the
power
monitor
off
when
Power Saving Function (Auto
no operations
following buttons
-Power
or
using shooting mode
is
the
the
camera
switch, shutter-release button, 0 (shooting mode) button, IE (playback) button,
e
(
~~~
switch.
turned on (the power-on lamp turns
monitor
are
performed for a while, the
of(
the camera will enter standby mode, and the power-on lamp will blink. If
is
is
movie-record)
is
turned on.)
in standby mode, the msmitor
pressed.
button
or
playback mode.
mode
Off}
in
about
the
monitor
the
camera will turn
is
turned on again when any
five minutes (default setting) when you
off
automatically.
of
the
step 5 Setting the Display Language, Date, and Time
Dialogs for language selection and camera clock setting are displayed
the
first
ON/18
OFF
l=:J
no
are
time
the
camera
is
Multi Selector
Operate
5.1
by
Language
--
c'::estina
Dansk
Deutsch
En
fish
Espariol
•
EMtlVIKO
pressing
turned on.
up
Use
the
(
.A.
),
down
(move
••
1111!1
••
multi
selector
(~),left(
Return
previous screen
the
to
~
to
the
highlight
the left)
5.2
to
select
)
or
Move the highlight
right(
the
.....,
settings.
),
or
I
the
®
up
Advance
button.
to
the
"'
r
OK
~
~
~
"'
Press
language and
.A.
or
T
to
choose the desired
press
the ® button.
Press
the
® button.
.A.
or
T
to
choose
Yes
and press
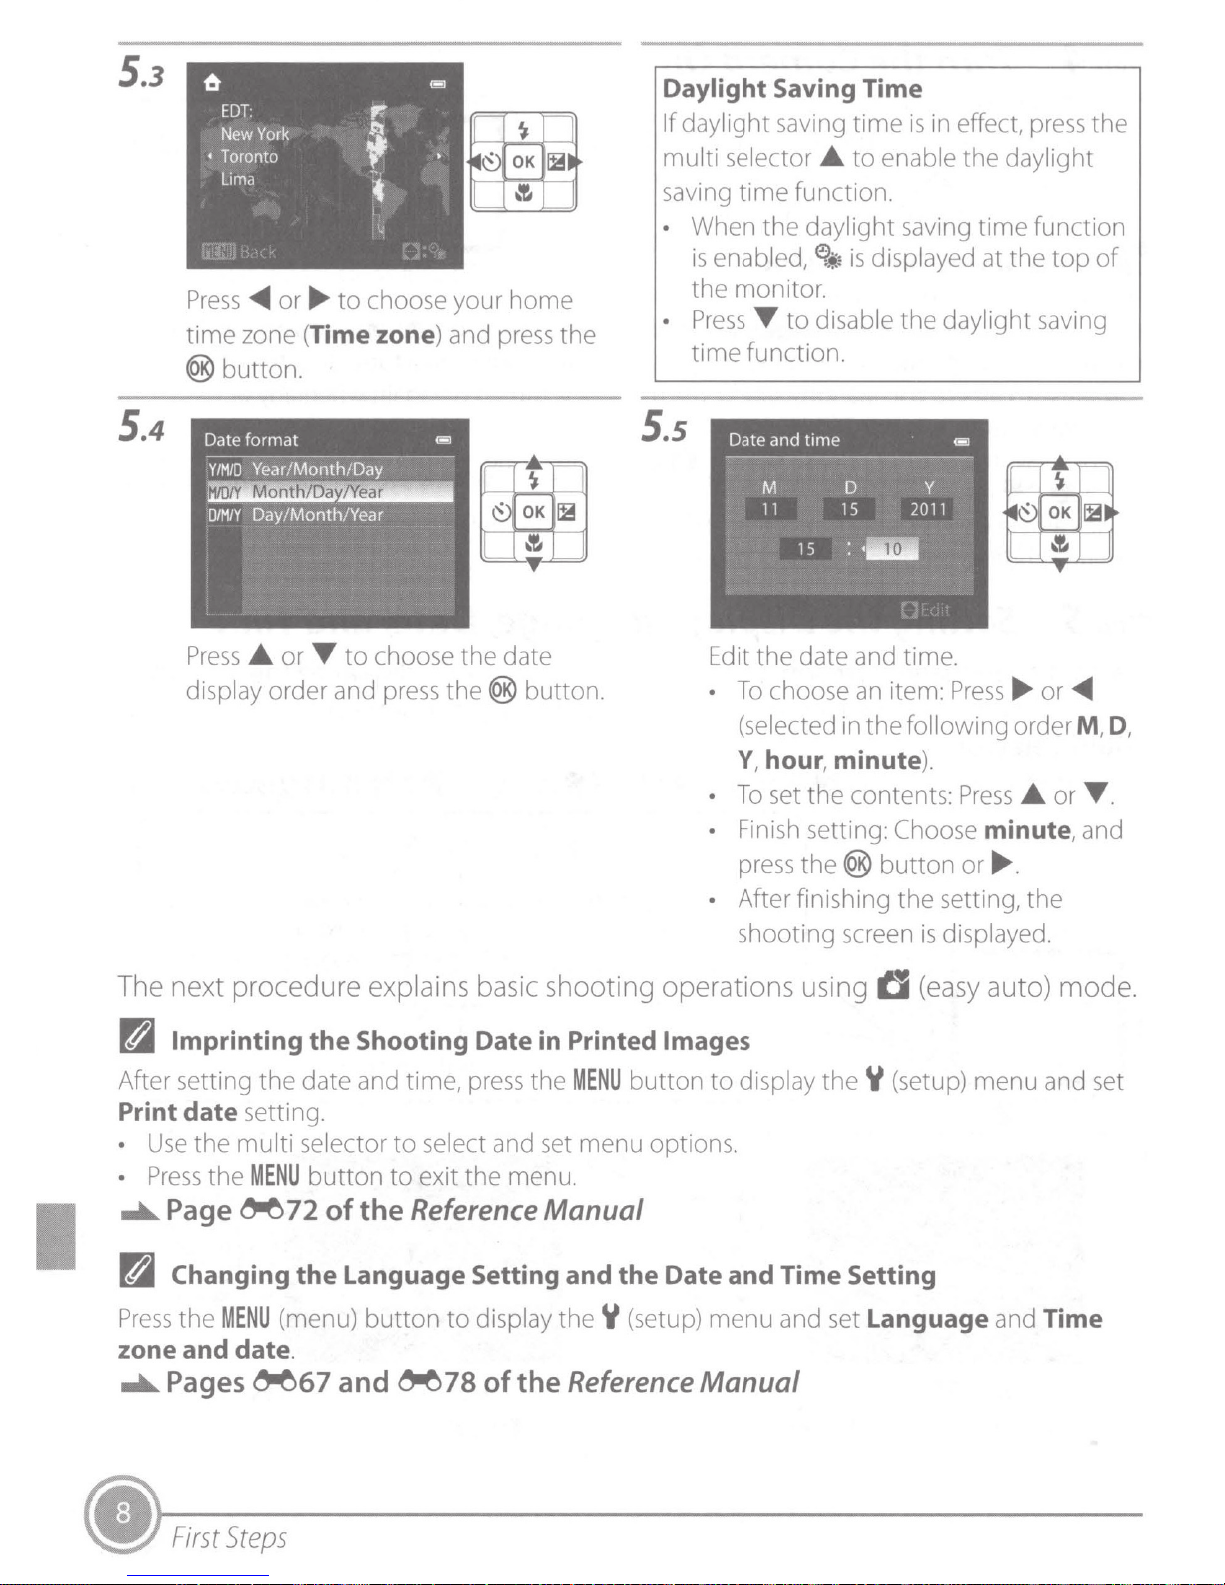
5.3
6
EDT:
New
York
• Toronto
Lima
p"!
~
f
~
~
~
OK
~~
~
12.
Daylight Saving Time
If daylight saving
multi selector
saving
time
time
A
to
enable the daylight
function.
is
in effect, press the
5.4
Press
time
®
-1111111
or
....
to
choose your
zone (Time zone) and
button
Date format
Y/M/0
0/MIY
.
Year/Month/Day
Mont
IDa
ear
Day/Month/Year
1 -1
--~
•a•
Press
display order and press the ®
A
or
'Y
to
choose the date
home
press
button
the
.
• When
is
enabled,
the monitor.
•
Press
time function.
S.s
Edit
•
•
the
daylight saving
~
is
displayed at the
'Y
to
disable the daylight saving
the
date and time.
To
choose
(selected in
Y, hour, minute
To
set the contents:
an
the
item:
time
function
top
of
Press
....
or
-1111111
following order M, D,
).
Press
A
or
'Y
.
The next procedure explai
D Imprinting
After setting
Print
•
•
...._
Pal
Press
zone and
...._
date
Use
the
Press
the
Page
Changing
the
MENU
date
Pages
setting .
multi
~
the
the
date and time,
selector
MENU
button
72
of
the
Language Setting and
(menu)
.
~67
and
Shooting Date in Printed Images
to
select and set menu options.
to
exit the menu .
the
Reference
button
~
• Finish setting: Choose minute, and
press the ®
• After finishing
shooting screen
ns
basic shooting operations using
press
the
MENU
button
to
display
Manual
the
Date and Time Setting
to
displ
ay
the
Y (setup) menu and set Language and Time
78
of
the
Reference
Manual
button
the
tJ
the
Y (setup) menu and set
or
....
.
setting,
is
displayed.
(easy auto) mode.
the
•
First
Steps
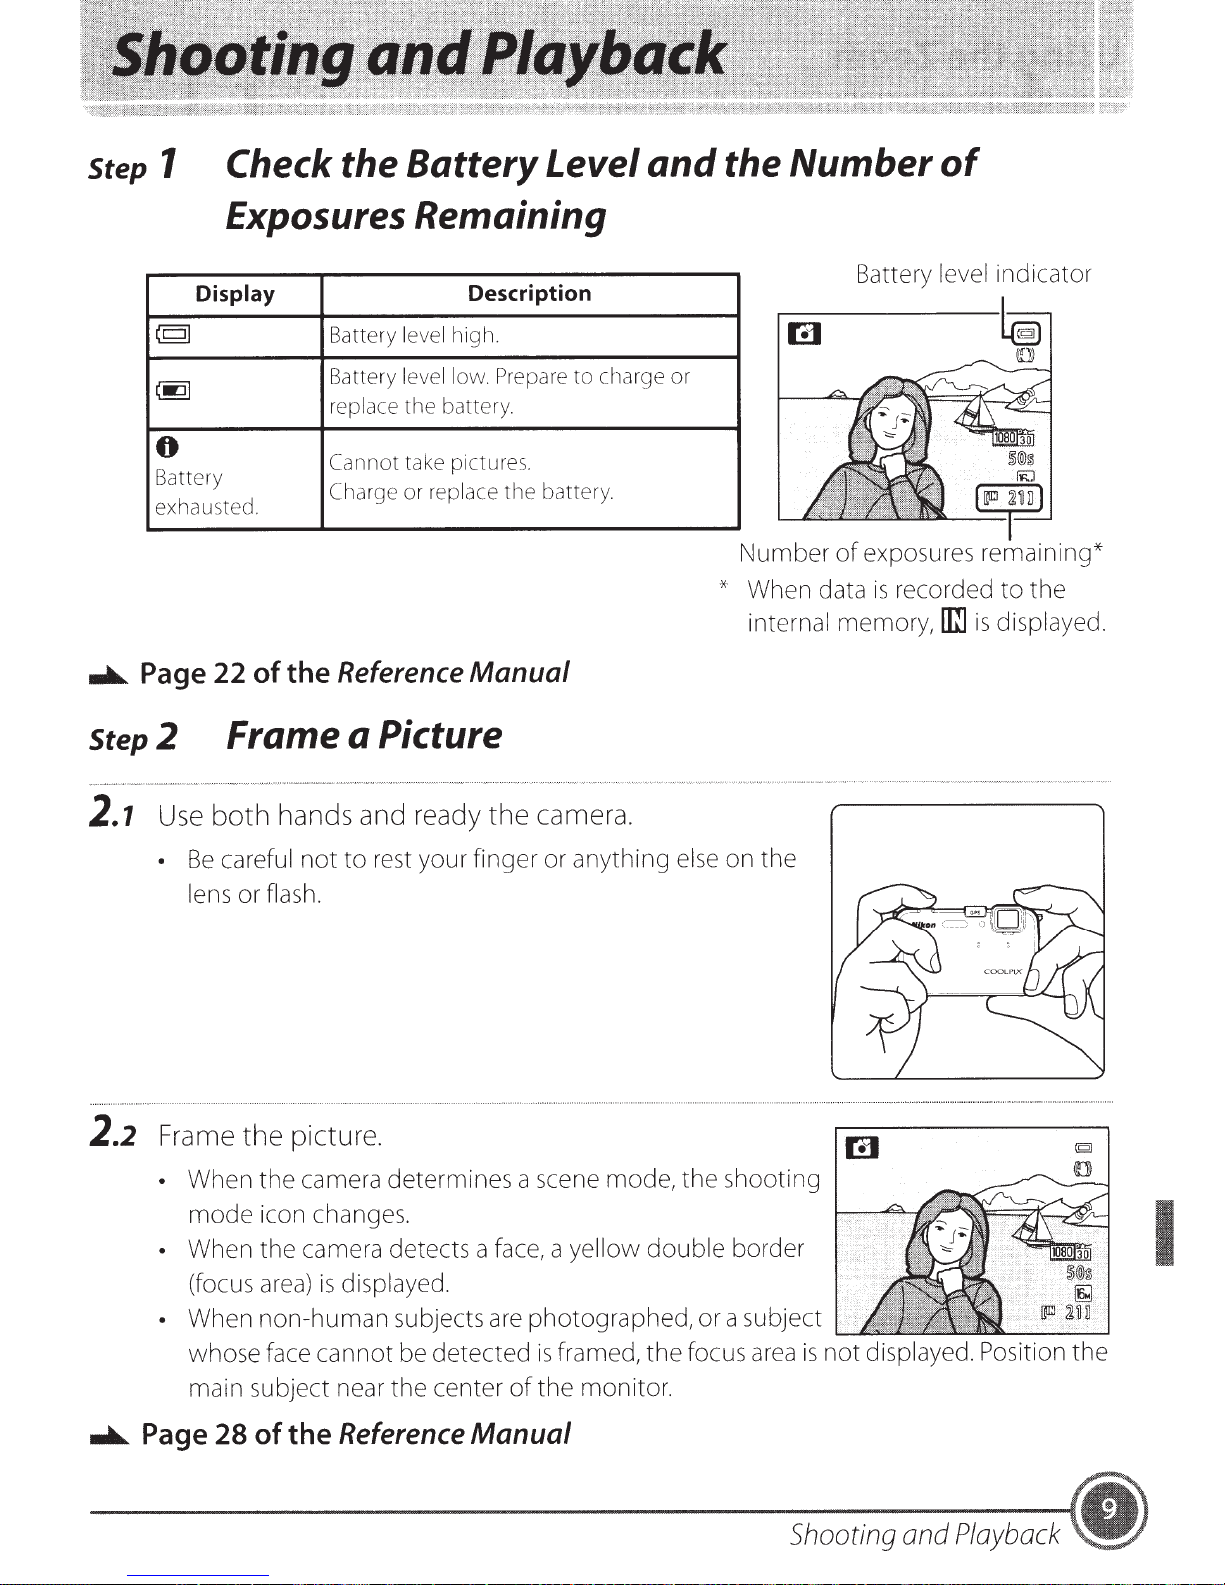
Step
1
Check the
Battery
Level
and
the
Number
of
(c:JI
(.:Jl
6
Battery
ex
Page 22
..1111..
Step2
Exposures
Display
sted.
hau
the
of
Frame
Remaining
Description
g
hi
el
v
ttery
nnot
le
level
take
repla
or
low. Pr
ct
pi
ce
Manual
Battery
Ba
replace the batte
Ca
Charge
Reference
a Picture
h.
ry.
ure
the ba
re to charge or
epa
s.
ery.
tt
indicator
Battery le
Number of exposures remaining*
recorded to the
is
When
*
internal memory,
data
vel
is
lTil
displayed
.
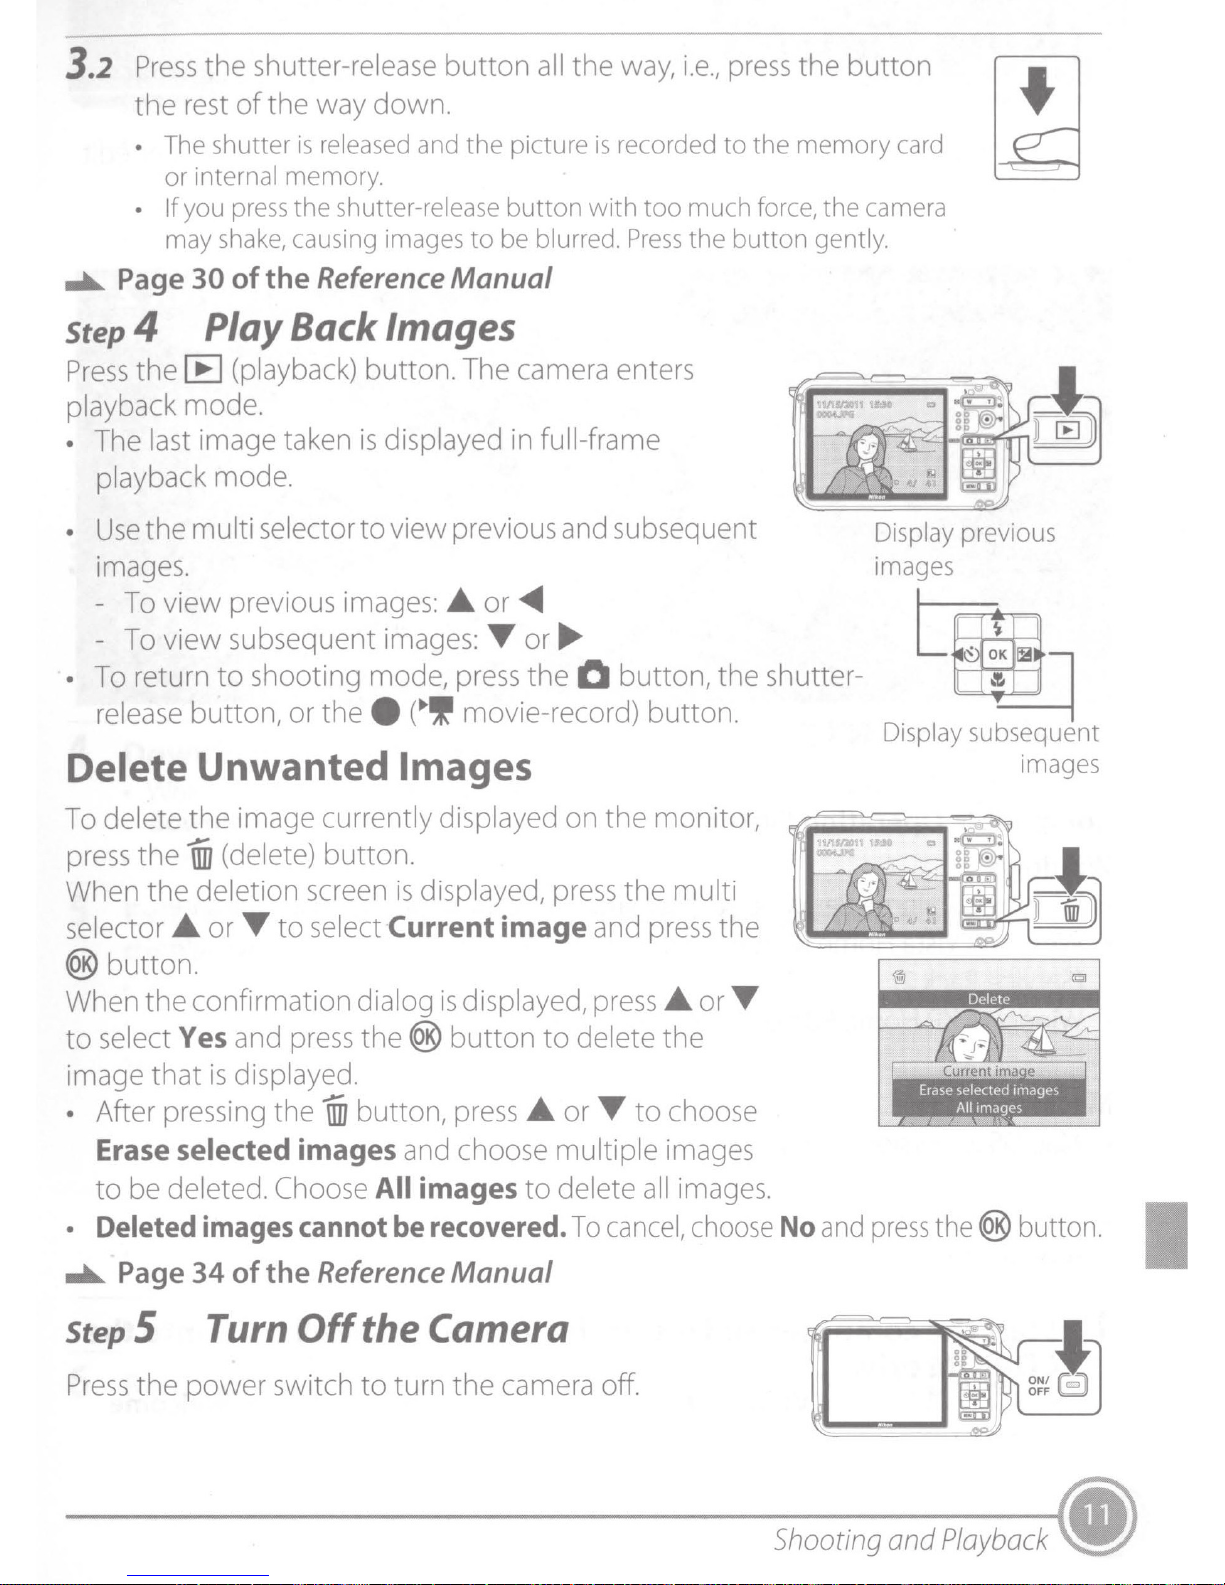
2.1
2.2
ready
both hands
Use
careful
Be
•
flash.
or
lens
Frame
• When the
• When the
• When non-human subjects
the picture.
mode icon
(focus
whose
main subject
area)
face
and
not to
camera
changes.
camera
displayed.
is
cannot
near
your finger
rest
determines a
detects a
detected
be
the center of the monitor .
camera.
the
on
anything
or
scene
face,
photographed, or a subject
are
is
mode, the shooting
yellow double border
a
framed, the focus
else
the
area
not displayed.
is
Position
I
the
Page 28
..1111..
of
Reference
the
Manual
Shooting
and
Playback

Using
the
Zoom
Press
• The
the
zoom
subject
buttons
to
activate
fills a larger area
• The area visible increases in
the
• When
wide-angle
..a....
Page
Step3
3.1
Press
slightly
•
When
The camera focuses
double
subject
green.
When
•
The camera
more
subject closest
subject
focus (up
•
When
halfway and
focus. Change
Flash
power
position
29
of
Focus
the
until
a face
border
is
a face
of
is
the
lamp
is
turned
.
the
Reference
and
Shoot
shutter-release
you
feel resistance.
is
detected
on
in
the
focus
in focus,
automatically
the
nine focus areas
in focus,
to
nine areas)
shutter-release
the
the
double
is
not
detected:
to
the
camera. When
the
focus areas
focus area or focus indicator
the
composition
the
optical
of
the
frame:
the
frame:
on,
the
zoom
Manual
button
in step
the
face framed by a
area.
selects one
light
button
halfway,
2:
When
border
containing
that
in
green.
is
and press
Press T (zoom
Press
is
at
the
lights in
or
the
the
are in
pressed
zoom.
W (zoom out).
the
maximum
i.e.,
press
Shutter speed
may
the
shutter-release
the
blink
Focus area
red,
in).
button
Aperture value
the
camera
button
-
-
•
Flash
is
halfway again.
lamp
unable
to
The flash
button
On
Blinking
Off
*When
Shooting
lamp
halfway.
the
and
Playback
indicates
Flash
Flash
Flash
battery
the
status
fires
when the shutter button
charging.*
does not
level
is
fire.
low,
of
the
the
flash
monitor
when
is
pressed.
is
turned
you press
off
during
the
shutter-release
charging
of
the
flash.
3.2
....._
step 4 Play Back Images
Press
the
• The shutter
•
Page
the shutter-release button
rest
of
the way down.
is
released and
or
internal memory.
If
you
press
may shake, causing images
30
of
the
the
Reference
shutter-release
the
button
to
be blurred.
Manual
all
the
picture
way,
is
recorded
with
too
Press
i.e.,
press
to
much
the
button
the button
the
memory
force,
the
gently
card
camera
.
•
Press
playback mode .
•
•
•
the
[E
(playback)
The
last image
playback mode.
Use
the
mu
images
-
To
-
To
To
release
.
view previous
view subsequent
return to shooting mode,
button, or the e (
taken
lti selector to view previous
images:
button.
is
displayed
images:
•If
The
camera
in
full-frame
A
or
<1111111
T
or
press
movie-record) button.
the 0 button, the shutter-
enters
and
subsequent
.,...
Delete Unwanted Images
To
delete the image currently displayed on the monitor,
press
When the deletion
selector
the
1iiJ
(delete) button.
screen
A
or
T to select Current
is
displayed,
press
image
the multi
and
press
Display previous
images
~
Display subsequent
images
the
(@
button.
When the confirmation dialog
to select Yes and
image that
• After
Erase selected images
to
be
• Deleted
....._
Page
step 5 Turn
Press
the power switch to turn the
is
pressing
deleted.
images
34
press
displayed.
the
1iiJ
Choose
cannot
of
the
Reference
Off
the
(@
button,
and
All images
be
the Camera
is
displayed,
button to delete the
press
choose multiple
recovered
Manual
A
to
camera
press
or
T to choose
delete
.
To
all
cancel,
off.
A
or
T
images
images.
choose
No
and
press
Shooting
the
and
(@
button .
ON/
OFF
Playback
I
fF.;il
~
.)
ViewNX 2 is
and
share
images.
an
ail-in-one software package which enables you to transfer, view, edit
Install ViewNX 2 using the ViewNX 2 Installer
Installing ViewNX 2
•
An
internet connection
is
required.
CD.
Compatible
Windows
Operating
Systems
• Windows 7 Home Basic/Home Premium/Professional/Enterprise/Ultimate
• Windows
(Service
Pack
• Windows
Macintosh
•
Mac
OS
X (version 1
Refer
to the Nikon website for the latest information on operating
Vista
XP
Home Basic/Home Premium/Business/Enterprise/Ultimate
2)
Home Edition/Professional
(Service
Pack
3)
0.5.8, 1 0.6.7)
system
compatibility.
1 Start
the
computer and insert
the
ViewNX 2 Installer
CD
into the
CD-ROM drive.
• Mac
ICOn.
OS:
When
the
ViewNX 2
window
is
displayed,
double-click
the
Welcome
Using
ViewNX
2
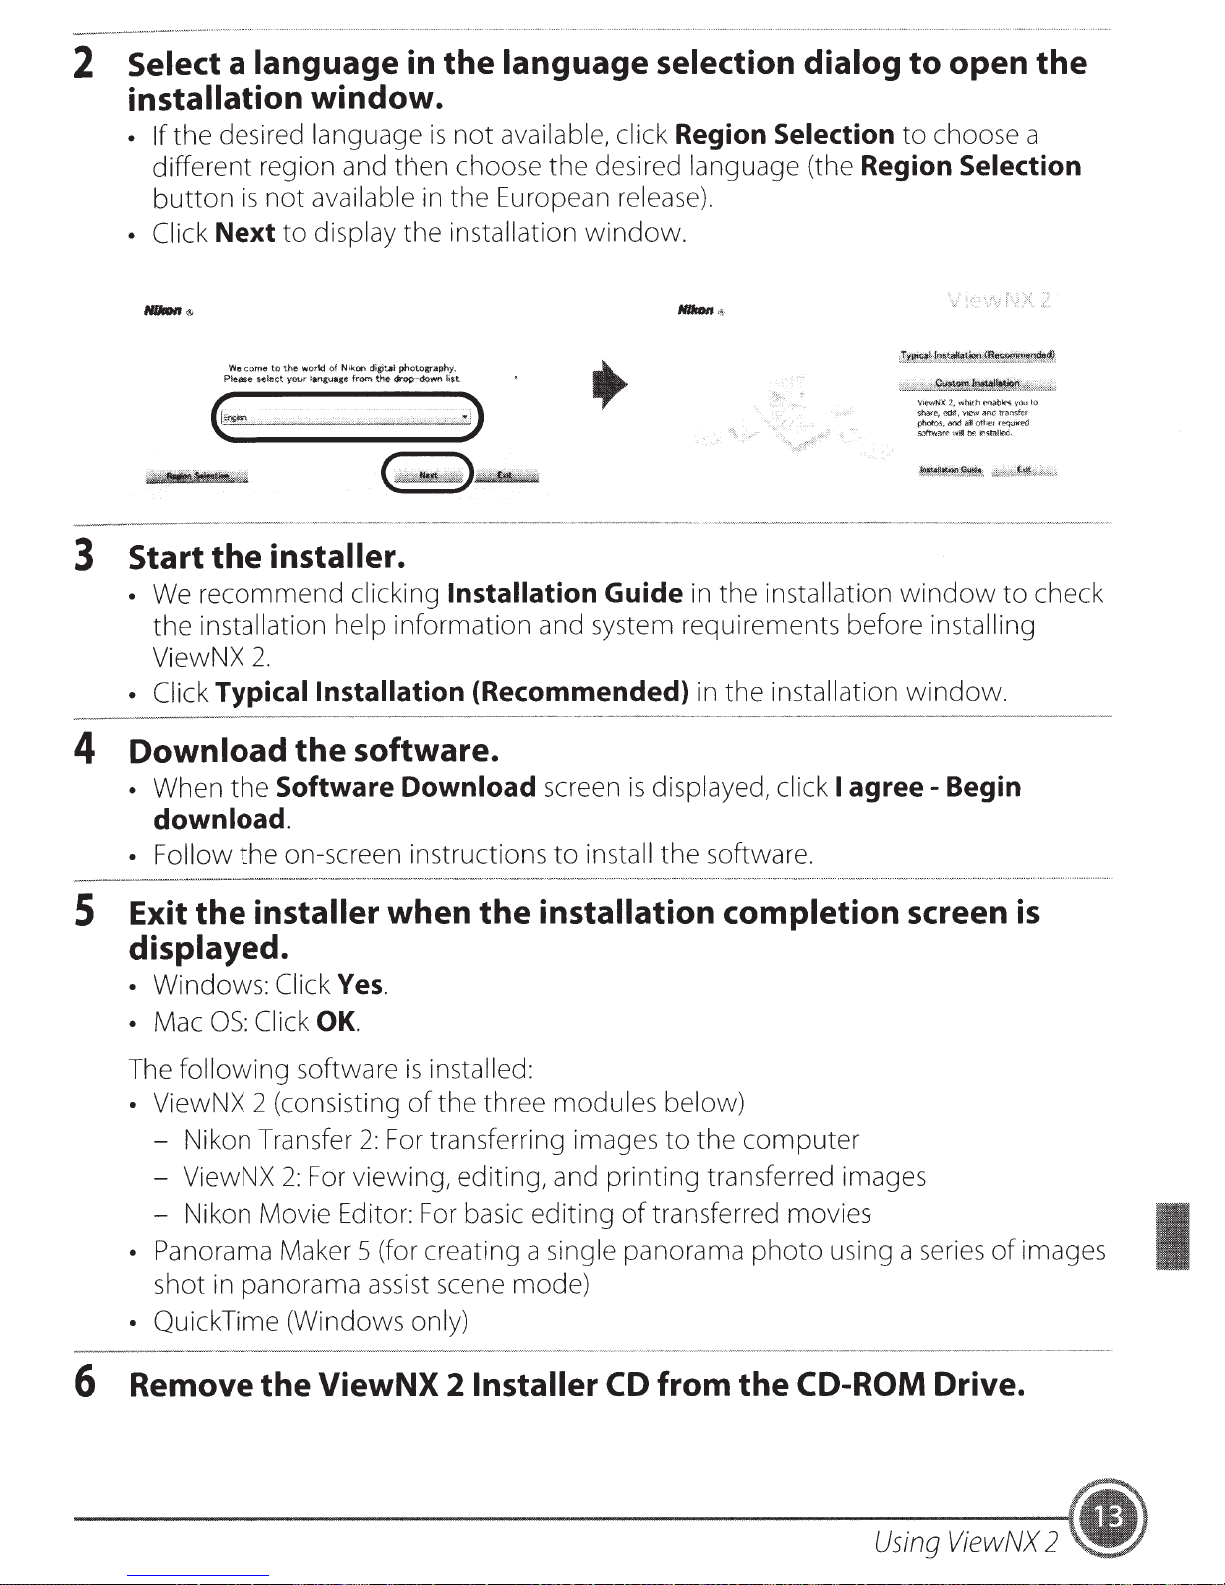
2 Select a language in
installation window .
• If
the
desired language
different
button
region and
is
not
available in
then
the
is
not
choose
the
language selection dialog
available, click Region Selection
the
desired language (the Region Selection
European release) .
to
open the
to
choose a
• Click
Next
Welcome
Pf.e.Bse
$elect
to
to
the
your
display
world
of
N~kon
~an.gua.ce
from
digJt-.1
the
the
installation
photography.
c:Jr'Qp-down
1i$t
)
3 Start
• We
the
ViewNX 2 .
• Click
4 Download the software .
•
When
the
installer .
recommend
installation help
Typical Installation (Recommended) in
the
Software Download screen
download.
clicking Installation Guide in
information
window.
ViewNX
1,
Whit:h
('t)~b~E's
'tli?'l\f
anc:
transkr
au
<>tht:r
re-q<.~if~
if1<;tal~.
y;}u
to
the
installation
shan'!,~.
ph¢t0s,
.:'lod
SL"::ftw.:;:re'u'*O:~
window
and system requirements before installing
the
installation
is
displayed, click I
window.
agree-
Begin
l.o
check
•
Follow
5 Exit
the
on-screen instructions
the
installer when
the
to
install
installation completion screen
displayed.
• Windows: Click
• Mac
The
OS:
Click
following
• ViewNX 2 (consisting
- Nikon Transfer
- ViewNX
- Nikon Movie Editor: For basic
• Panorama Maker 5 (for creating a single panorama
shot in panorama assist scene
• Quick Time (Windows only)
6 Remove the ViewNX 2 Installer
Yes.
OK.
software
2:
For viewing, editing, and
is
installed:
of
the
three
2:
For transferring images
editing
mode)
modules
printing
of
CD
the
software.
below)
to
the
computer
transferred images
transferred movies
photo
using a series
of
from the CD-ROM Drive.
is
images
Using
ViewNX
2
Transferring
Choose how images
1
Choose
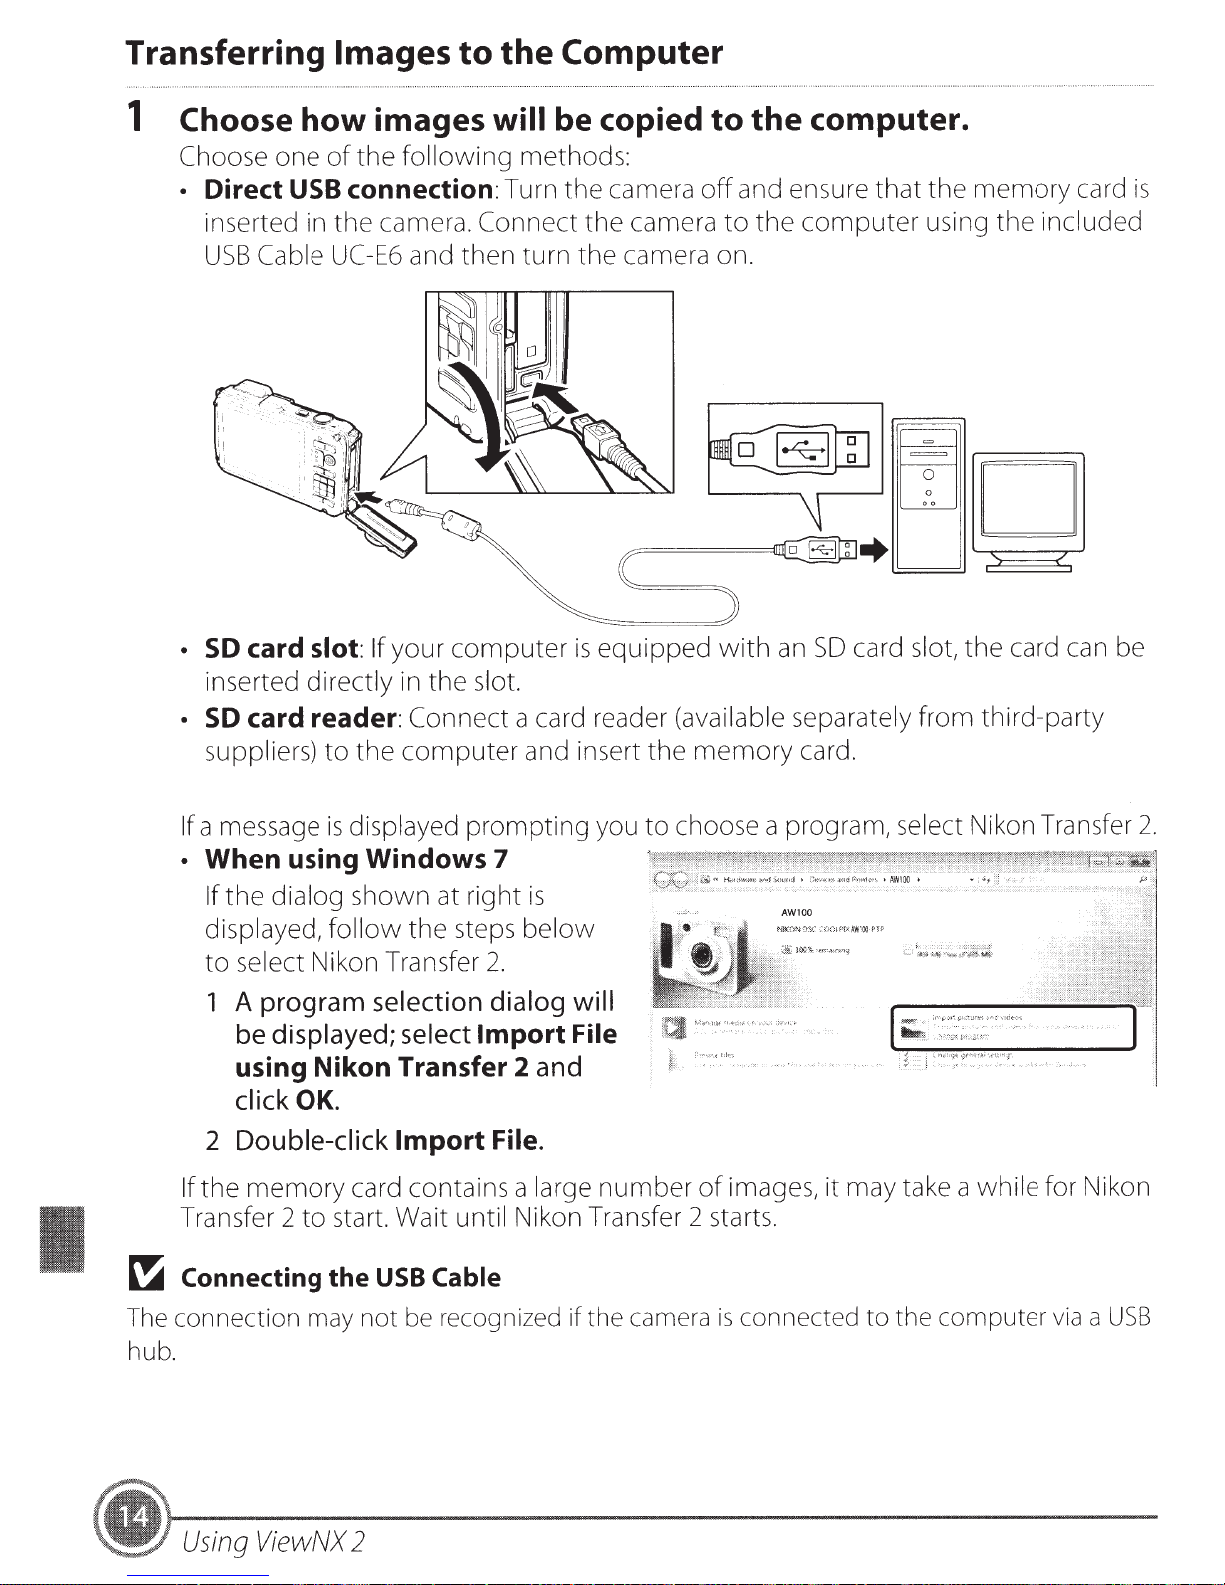
• Direct
inserted in
USB
one
Cable
Images
the
of
connection:
USB
the
UC-E6
to
following
camera.
and
the
Computer
will be copied
methods:
camera
the
Turn
camera
Connect
turn
then
the
the
camera
the
to
and ensure
off
the
to
.
on
computer.
the
that
computer
using
memory
included
the
card is
your
card
SO
•
inserted
card reader:
SO
•
suppliers)
If a message
When
•
the
If
displayed,
select Nikon Transfer
to
slot:
directly
using Windows 7
dialog
1 A program
displayed;
be
If
the
to
displayed
is
shown
follow
selection
in
computer
the
select
using Nikon Transfer 2
click
Double-click
2
the
If
Transfer
OK.
memory
start. Wait until Nikon Transfer
to
2
Import
card contains a large
computer
slot.
the
Connect
prompting
right
at
steps
2.
dialog
Import
File.
equipped
is
a card reader (available separately
you
the
to
and insert
is
below
with
memory
choose a program, select Nikon Transfer
card.
card slot,
SO
an
will
File
and
take a
may
number
images,
of
starts.
2
it
from
card can be
the
third-party
while
for Nikon
2.
USB
Connecting
~
connection may not
The
hub.
Using
ViewNX
the
be
2
Cable
recognized if the camera is connected
the computer
to
via
USB
a
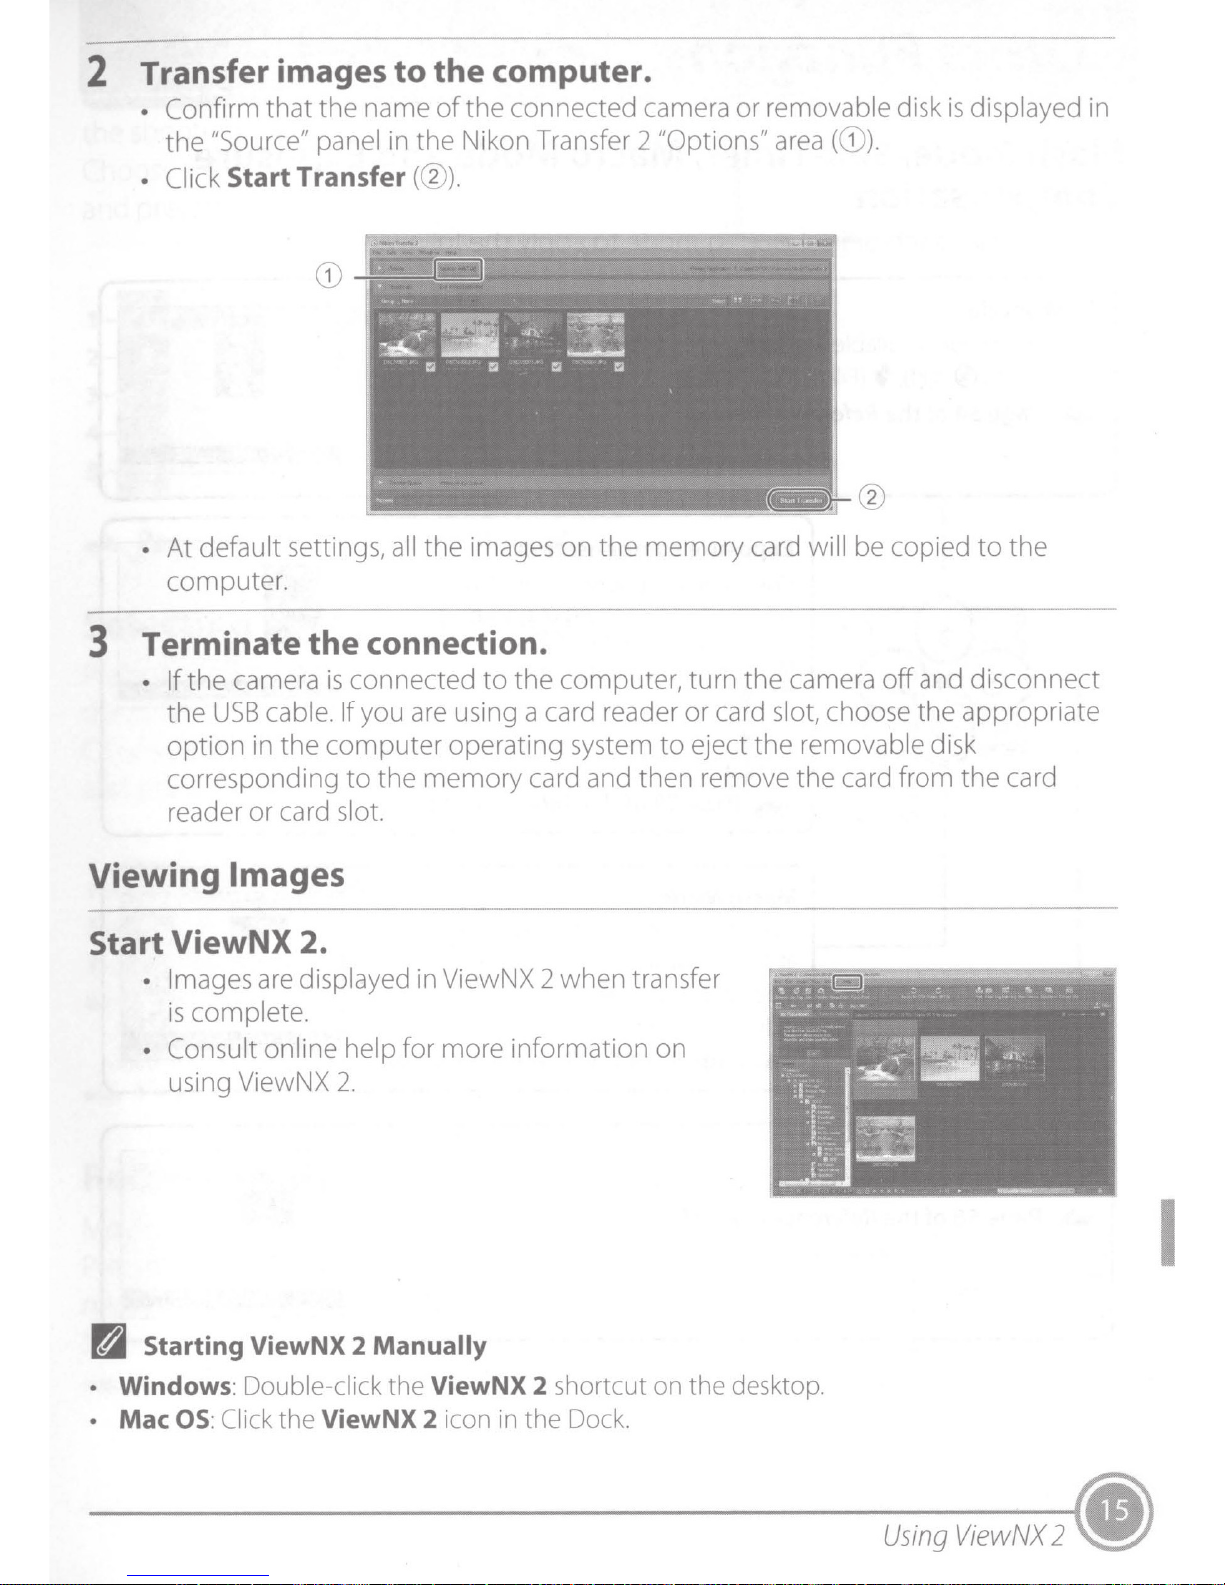
2 Transfer images
to
the
computer .
• Confirm
the
• Click
•
At
default settings, all
computer.
that
"Source" panel in
Start
3 Terminate
• If
the
camera
the
USB
cable. If you are using a card reader
option
corresponding
reader
in
the
or
card slot.
the
name
Transfer
the
connection .
is
connected
computer
to
the
of
the
connected camera
the
Nikon Transfer 2 "Options" area
(@).
the
images
to
operating system
memory
on
the
computer,
card and
the
then
memory
turn
or
to
eject
remove
or
removable disk
(G))
.
@
card will be copied
the
camera
card slot, choose
the
removable disk
the
card
off
from
is
displayed in
to
the
and disconnect
the
appropriate
the
card
Viewing Images
Start ViewNX 2.
• Images
is
complete.
• Consult online help for
using ViewNX
are
displayed in ViewNX 2
more
2.
N Starting ViewNX 2 Manually
• Windows:
• Mac OS: Click the ViewNX 2 icon
Double-click the ViewNX 2 shortcut on the desktop.
when
information
in
the Dock.
transfer
on
I
Using
ViewNX
2 •
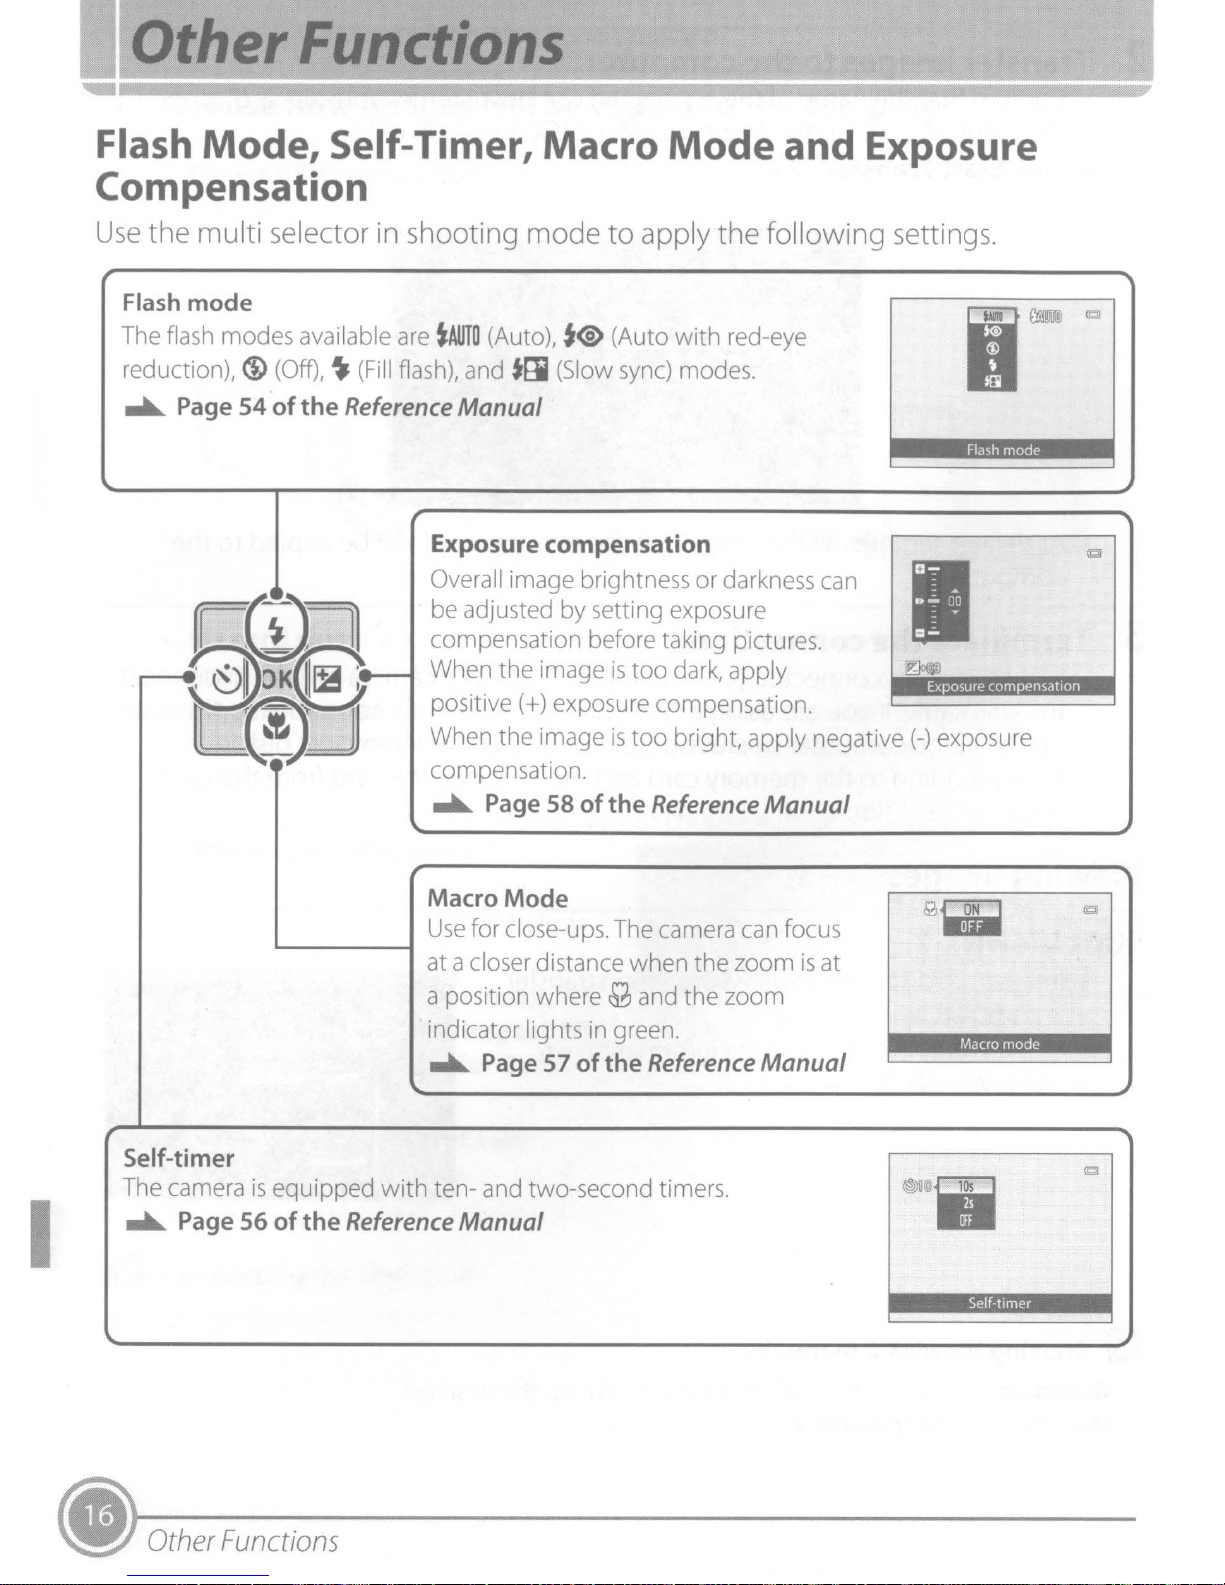
Flash
Mode,
Self-Timer, Macro
Compensation
Use
the multi selector in shooting mode
to
Mode
apply
the
and Exposure
following
settings.
Flash
The
reduction), ®
....._
mode
flash
Page
modes
54
available
(Off),
~
(Fill
of
the
Reference
are
~AUTO
(Auto),
flash), and
Manual
Exposure compensation
Overall
be adjusted by setting exposure
compensation before taking pictures.
When
positive(+) exposure compensation.
When
compensation .
....._
the
the
Page 58
t®
(Auto
tti
(Slow
image brightness or darkness can
image
image
of
is
is
the
with
red-eye
sync) modes .
too
dark,
apply
too
bright, apply
Reference
1
-·
~
negative(-) exposure
Manual
Flash
mode
Exposure compensation
I
Self-
timer
The camera
....._
Page
L.....--------1
is
equipped
56
of
the
Reference
Macro
Use
at a
a position where
indicator
....._
with
ten- and two-second timers.
Mode
for
close-ups.
closer
Manual
distance when
lights
Page
57
of
M
in green.
the
The camera can focus
the
and
the
zoom
Reference
zoom
is
at
Manual
Macro
Self-timer
mode
~-
Other
Functions
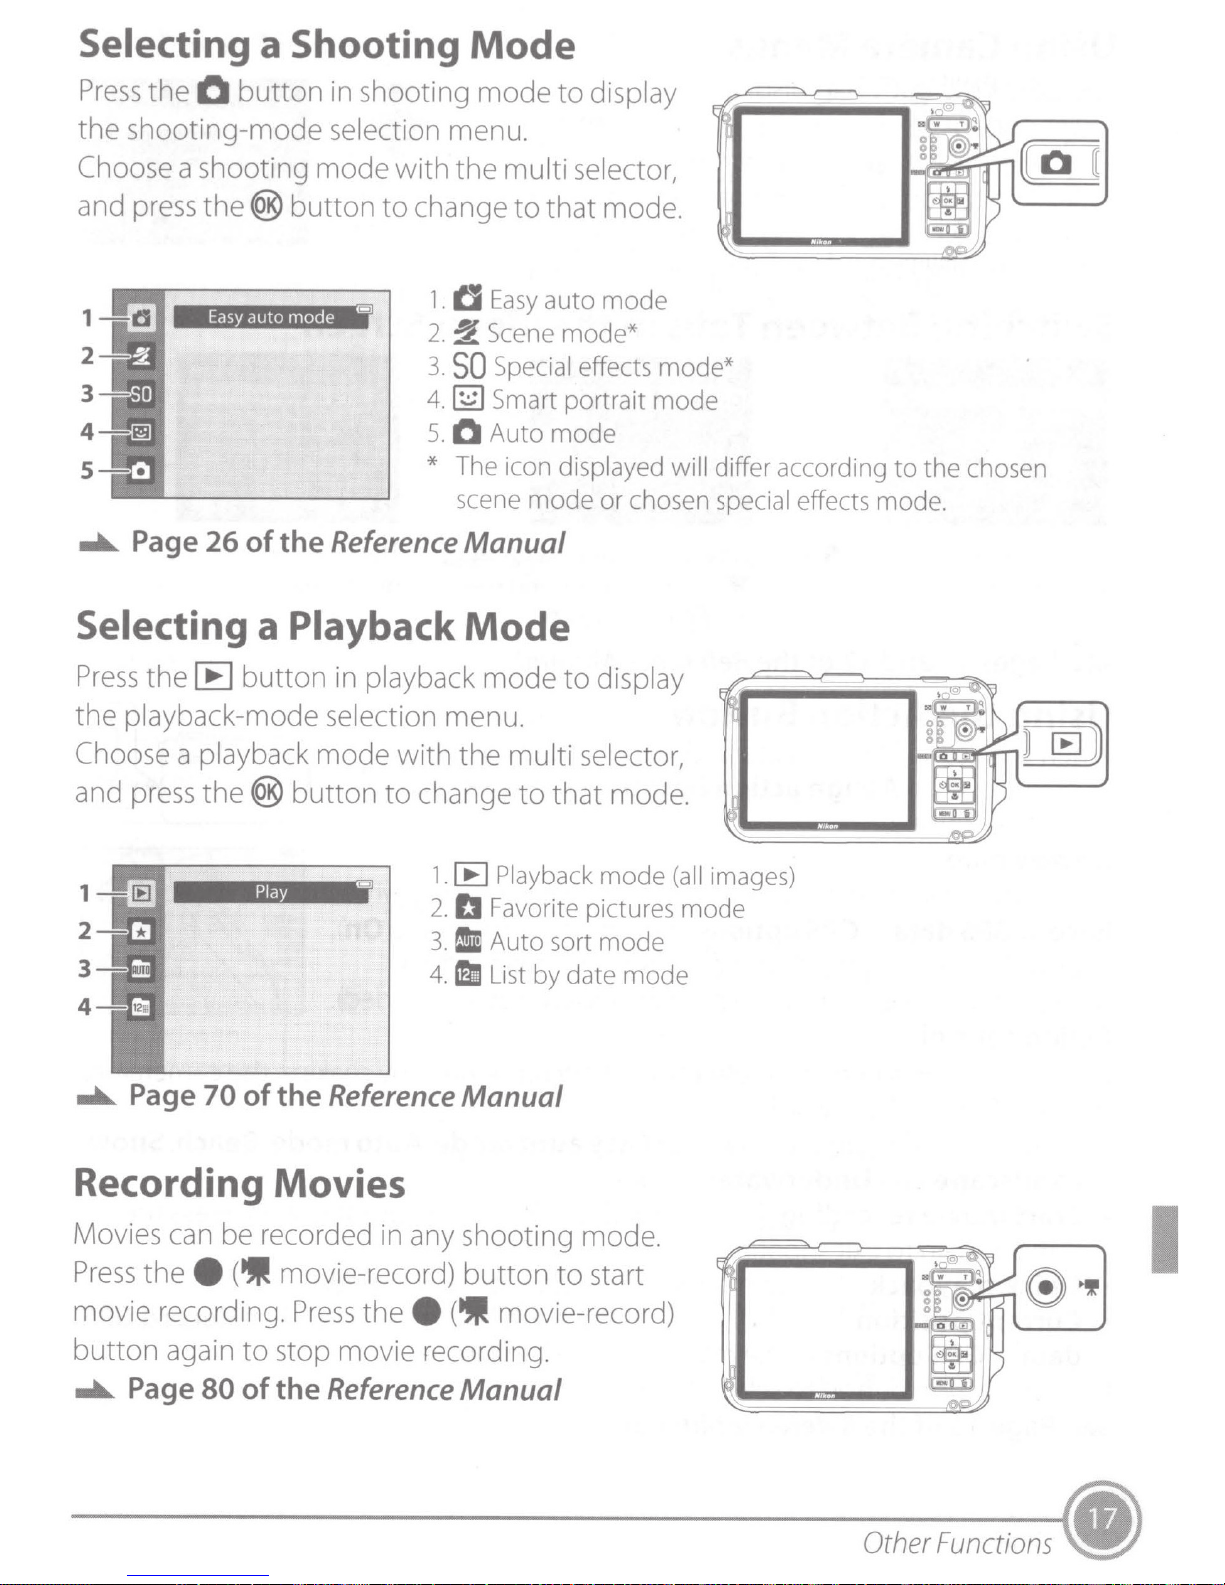
Selecting a Shooting
Mode
Press
the
Choose
and press
1
2
3
4
5
..._ Page
the
0
button
shooting-mode selection menu.
a shooting mode with
the
(@
Easy
auto mode
26
of
in shooting
button
EJ
the
Reference
to
change
1.
2.
3.
4.
5.
* The icon displayed will differ according
Selecting a Playback
mode
the
tJ
Easy
~
Scene
SO
Special effects
~
Smart
0
Auto
scene
to
mu
lti
to
that mode.
auto
mode
mode
Manual
Mode
display
se
lector,
mode
mode*
portrait
or
chosen special effects
mode*
mode
to
the
mode
chosen
.
Press
the
Choose
and press
1
2
3
4
..._ Page
the
[E
button
playback-mode selection menu.
a playback mode with the multi selector,
the
(@
Play
70
of
in
button
the
Reference
playback
to
change
El
1.
2.
3.
4.
mode
[E
Playback
b
Favorite pictures
1m
Auto
b List
to
to
that mode.
sort
by
date
Manual
display
mode
mode
mode
Recording Movies
Movies can be recorded in any shooting mode.
Press
the
e
(
ttl'
movie-record)
button
to
start
(all
images)
mode
I
movie recording.
button
..._ Page
again
80
Press
to
stop movie recording .
of
the
the
e
Reference
(
ttl'
movie-record)
Manual
Other
Functions
(.
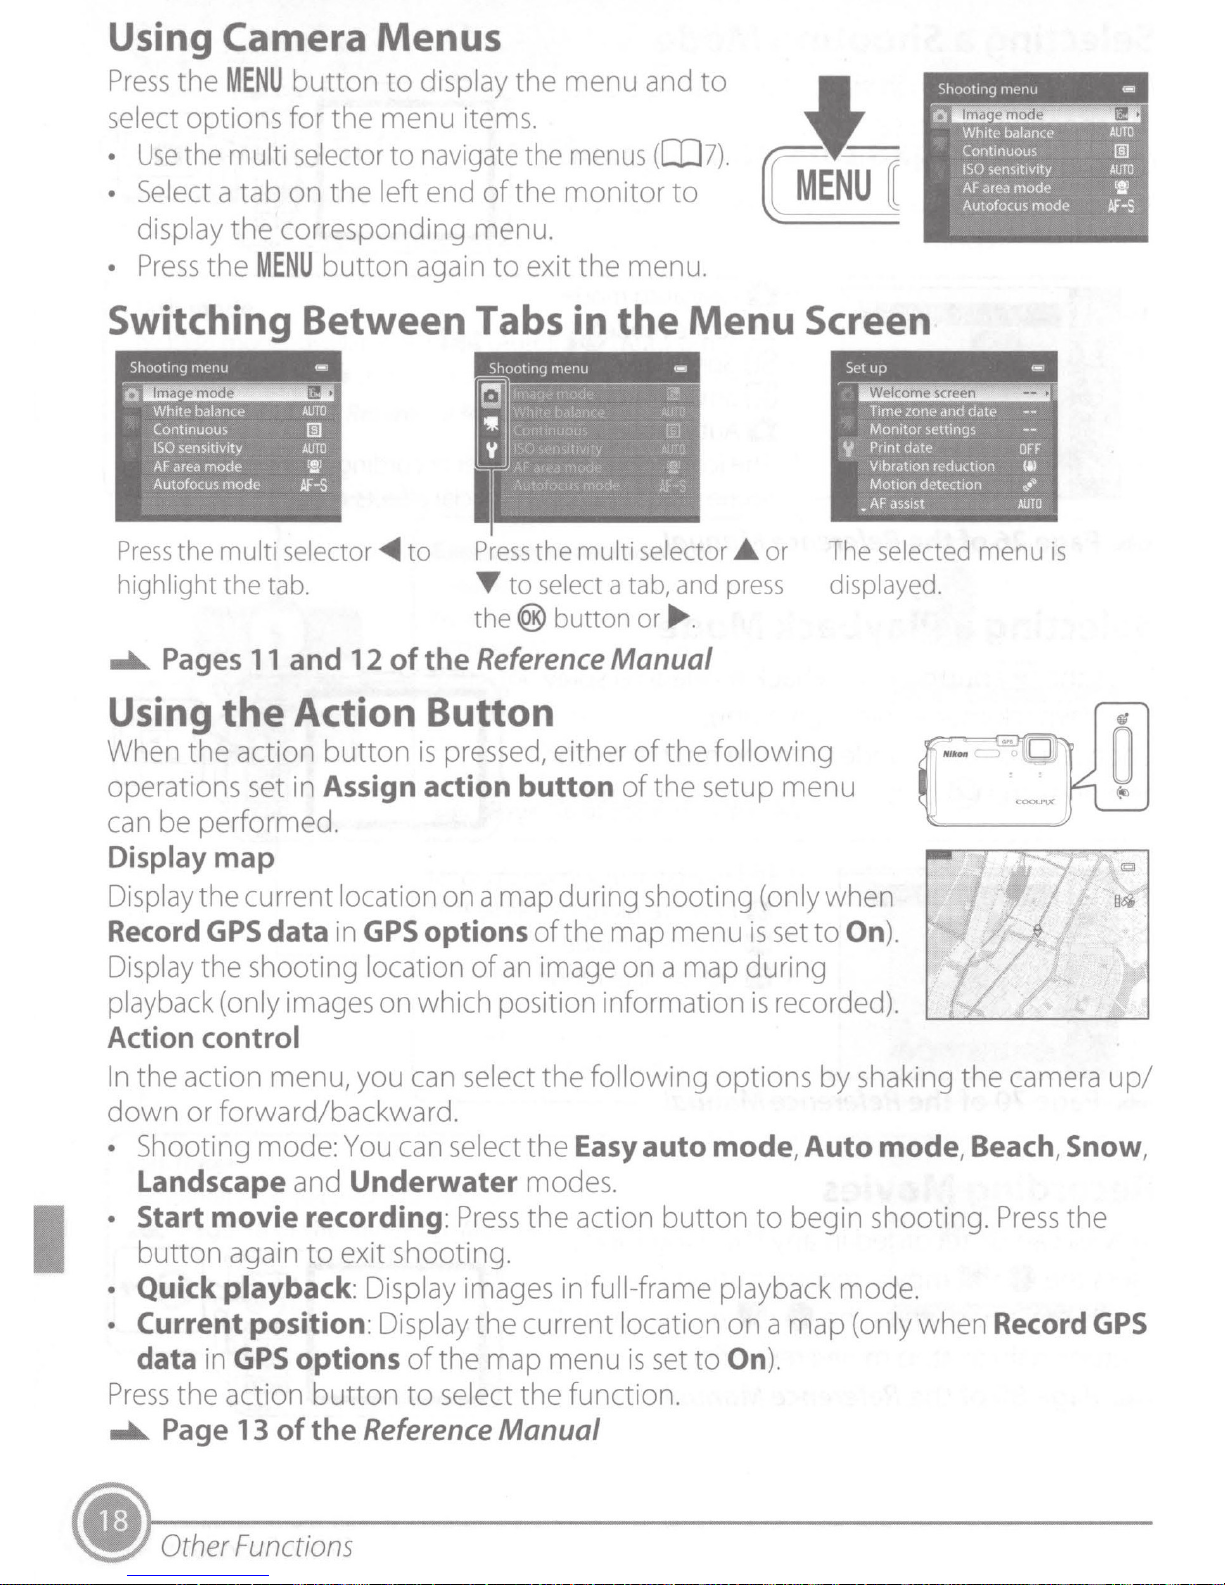
Using Camera Menus
Press
select options
•
• Select a
•
the
MENU
Use
the multi selector
tab
display
Press
the
the
corresponding menu.
MENU
button
for
the
on
the
button
to
display
menu
to
items.
navigate the
left end
again
of
to
the
menu and
menus
the
monitor
exit
the
Switching Between Tabs in
Shootmg
0
Press
highlight
....._
menu
lma
emode
White balance
Continuous
ISO
sensitivity
AFarea
mode
Autofocus
the
mode
multi
the
Pages
-
• Welcome screen
AUTO
1!1
AUTO
l!J
Af-S
selector
tab. T
11
and
12
~
to
of
the
Press
the
multi
to
select a tab, and press
the
®
button
Reference
to
([I]7).
to
menu.
the
Menu
selector •
or
....
.
Manual
~
·
~
~
Screen
Set
y
•
or
The selected menu
displayed .
Shoottng
lma
0
White balance
Continuous
ISO
AF
area
Autofocus
up
Time
zone
Monitor
Print date
Vibration reduction
Motion
AF
and date
settings
detection
assist
nwnu
emode
sensitivity
mode
mode
--
OFF
~
...
~
AUTO
•
is
-
•
AUTO
1!1
AUTO
lll
M"-s
I
Using
When
operations set in Assign action
the
the
Action Button
action
button
is
pressed, either
button
of
of
the
the
following
setup
menu
can be performed.
Display map
Display the current location on a map during shooting (only when
Record
Display the shooting location
playback (only images on which position information
GPS
data
in
GPS
options
of
an
of
the map menu
is
set
image on a map during
is
recorded).
to
On
).
Action control
In
the
action menu, you can select
down
or
forward/backward.
• Shooting mode: You can select
and
Landscape
· Start
movie
button
• Quick
again
playback
Underwater
recording :
to
exit shooting.
Press
: Display images in full-frame playback mode.
the
following options
the
Easy
modes.
the
action
auto
button
by
shaking
mode, Auto
to
begin shooting.
mode
the
camera
up/
, Beach, Snow,
Press
the
• Current position: Display
data
Press
....._
• Other
in
the
Page
GPS
action
13
of
options
button
the
Functions
of
to
Reference
the
current location on a
the map menu
select
the
function .
Manual
is
set
to
On
map
).
(only when Record
GPS
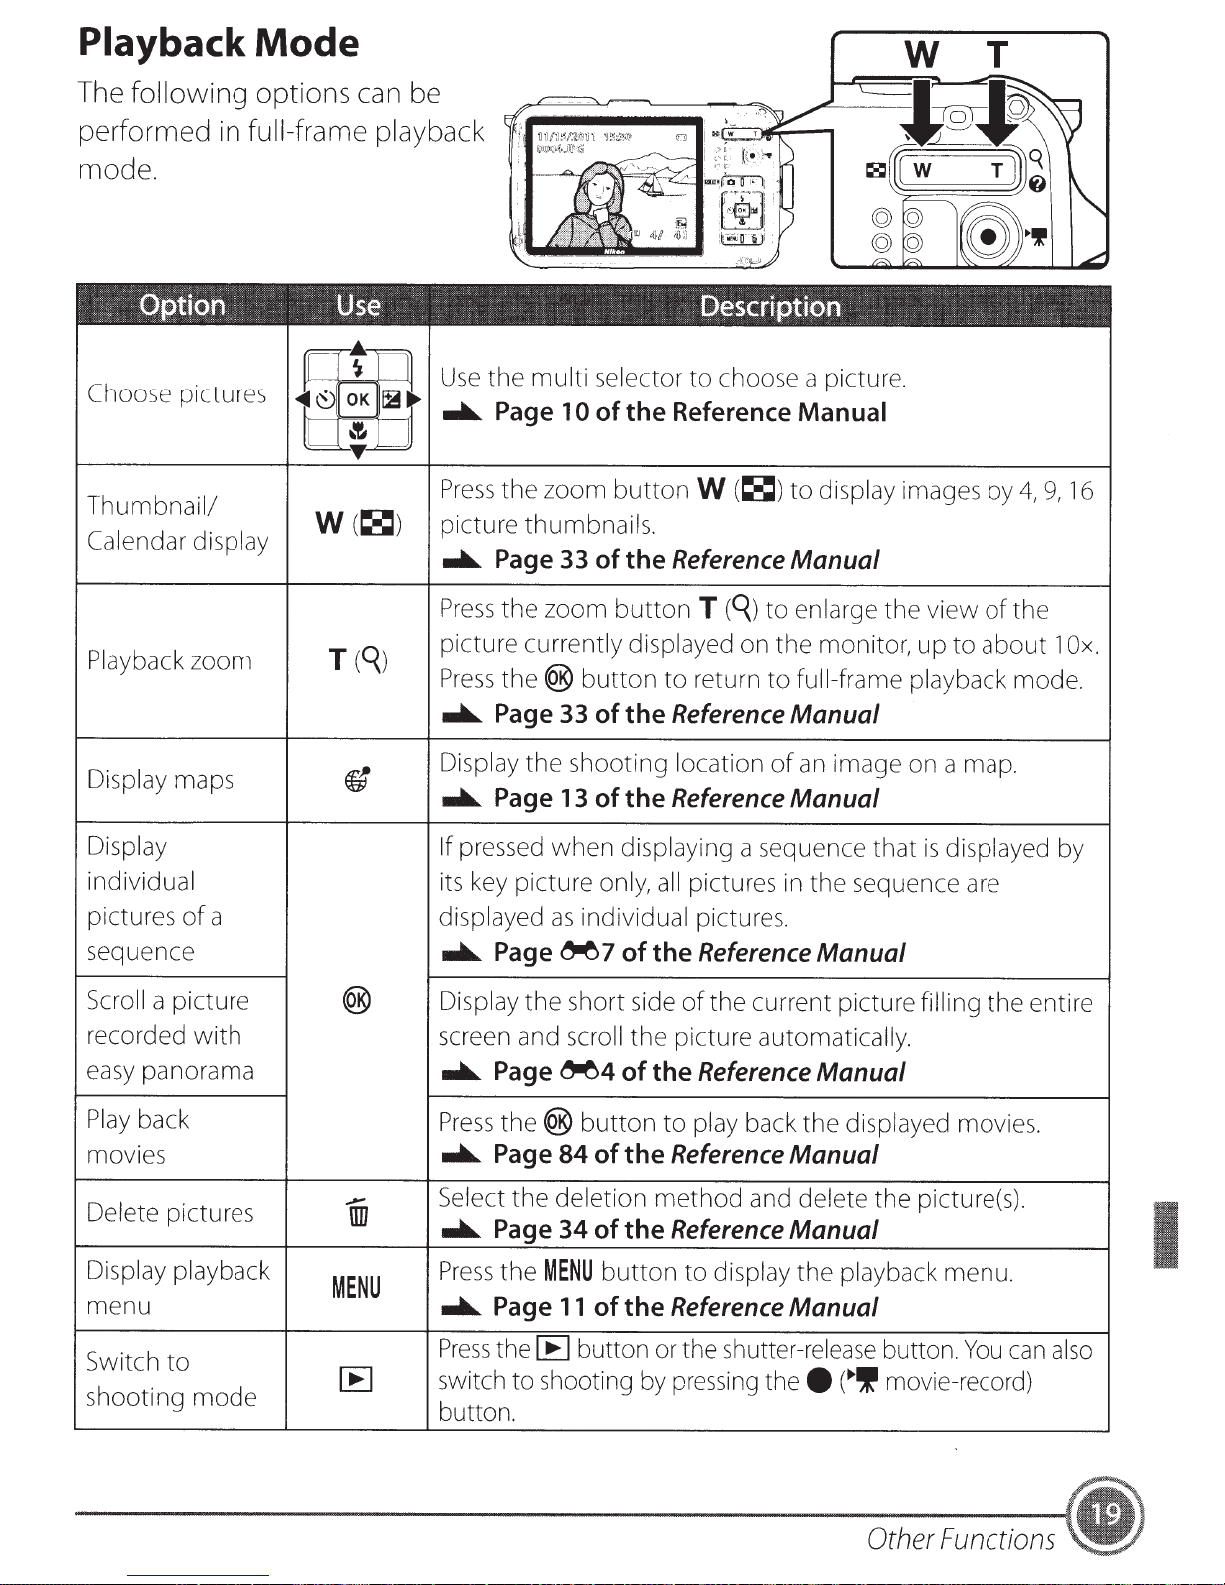
Playback
The
following
Mode
options can be
performed in full-frame playback
mode.
W T
O~?'ti<>n
Choose
Thumbnail/
Calendar
Playback
Display
Display
individual
pictures
sequence
pictures
display
zoom
maps
of
a displayed
Use
r='tn
~~
~
r
Use
~~
1
......._
L._~_U
Press
W(~)
T
(q)
ft
picture thumbnails.
......._
Press
picture currently displayed
Press
......._
Display the shooting location
......._
If
pressed
its
......._
Oescriptien
the multi selector to choose a picture.
Page 10
the zoom button
Page 33 of the
the zoom button
the(@
Page 33 of
Page 13
key
picture only,
Page
of
the Reference
W
(~)to
Reference
T
(q)
button to return to full-frame playback mode .
the
Reference
of
the
Reference
when displaying a sequence that
all
pictures
as
individual pictures.
~
7
of
the
Reference
Manual
display images by
Manual
to enlarge the view
on
the monitor, up to about 1
Manual
of
an
image
Manual
in
the sequence
Manual
on
a
map.
is
displayed
of
are
4,
the
9,
16
Ox.
by
Scroll
recorded with
easy
Play
movies
a picture
panorama
back
(@
.....
Delete pictures
Display playback
m1
MENU
menu
Switch to
shooting mode
[E
Display the short
screen
......._
Press
......._
Select
......._
Press
......._
Press
switch
button.
and
scroll
Page
Page
Page
Page
the
~4
the(@
the deletion method
the
to shooting
button to
84
of
34
of
MENU
11
of
[E)
button
button to display the playback menu.
side
of
the current picture filling the entire
the picture automatically .
of
the
the
Reference
the
Reference
the
Reference
or
by
pressing
Reference
play
back
and
the
shutter-release
Manual
the displayed movies.
Manual
delete the picture(s) .
Manual
Manual
button.
thee
("'If
movie-record)
Other
You
can
Functions
I
also

~
Other
Shooting
Various
tJ
Easy
By
simply
for
simpler
~
Scene
Camera settings are
SO
Special effects
Effects can be
~
Smart portrait mode
The camera
press
skin tones softer.
the
Mode
shooting
auto
framing
shooting.
mode
shutter-release
modes
mode
applied
detects
Features
can be chosen.
a picture,
automatically
mode
to
smiling faces and
the
camera
pictures
button
(smile timer). The skin
of
the
automatically
optimized
during
shooting.
automatically
COOLPIX
...a...
for
Page
...a...
...a...
the
...a...
Six
...a...
26
Page 38 of
selects
Page
selected scene.
Page 47
different
Page
releases
softening
AW100
of
the Reference
the
Reference
the
optimum
39
of
the
of
the
effects are available.
49
of
the
the
shutter
function
scene
Reference
Reference
Reference
even
makes facial
Manual
Manual
mode
Manual
Manual
Manual
if
you
don't
0 Auto mode
Basic
shooting operations
shooting menu according
capture.
Movie recording
Movies can be recorded in
Using GPS/Display Maps
Record
and
the
image
position
shooting
Picture Editing
Various effects can be
can
to
the shooting conditions and the kind
slow
information
location
added
be
performed.
motion
on
the
on
the
screen using
to
pictures taken .
Also,
...a...
or in fast
...a...
image
using
...a...
Page
...a...
Page
change the settings for the options
Page
motion.
Page
GPS
the
camera's internal
~
51
of
the
of
images you want to
80
of
the Reference
86
of
the Reference
and display
15
of
the Reference
Reference
the
current
map
information.
Manual
in
the
Manual
Manual
position
Manual
Print pictures
by
connecting
NIKON CORPORATION
©
2011
Nikon Corporation
the
camera
...a...
Page
directly
~24
to a PictBridge-compatible
of
the Reference
6MM16311-02
Manual
printer.
FX1
G02(11)

Nikon
r
Dear Nikon Customer,
Thank you for choosing Nikon. Included in this package you will find a
languages. This
The enclosed CD-ROM contains a detailed User's Manual (in
that
this environmentally-friendly solution also meets
Your Nikon camera will provide you years
Nikon Tech
Cher client Nikon,
Nous vous remercions d'avoir choisi un appareil
multilingue
rapide
commencer
Le
CD-ROM inclus
PDF.
Nous avons estime
nos clients de disposer
Votre appareil
avez besoin d'assistance, n'hesitez
guide
support
rapidement
in your country. Thank you!
sous
contient
photo
Nikon vous fera profiter des plaisirs
contains basic
forme
a utiliser votre appareil
un Manuel d'utilisation detaille (dans plusieurs langues) enregistre sous
que
cette solution respectueuse de
d'une
documentation
information
imprimee.
pas a contacter
so
of
photographic
photo
Ce
guide
photo
multilingue.
votre
you can quickly start using
multiple
the
multiple
enjoyment.
Nikon. Vous trouverez dans
contient
des informations
Nikon.
l'environnement
de
Ia
support
printed
languages) saved
language needs
If you require assistance, please
photographie
technique
Quick Start Guide in
your
Nikon camera.
as a PDF
of
our
customers.
Ia
bolte
un Guide
de
base
qui
vous
repondait
pendant
Nikon local. Merci I
egalement
de
longues annees.
multiple
file.
We
have
contact
de
demarrage
permettront
forme
de fichier
aux besoins
Si
found
de
de
vous
Prezado cliente Nikon:
Obrigado
Esse
0 CD-ROM incluso
Constatamos
clientes em idiomas variados.
Sua
assistencia, entre em
por
escolher a Nikon. Neste pacote, voce encontrara
guia
contem
camera Nikon proporcionara a voce varios anos de
informa<;:6es basicas para
que
contem
essa
solu<;:ao
contato
um
Manual
ecologicamente
com o suporte
NIKON CORPORATION
©
2011
Nikon Corporation
do
que
voce possa
Usuario
correta
tecnico
detalhado
tambem
aprecia<;:ao
Nikon
no
um
Guia
de
inlcio rapido impresso
come<;:ar
(em varios idiomas), salvo
rapidamente a usar a
vai ao
encontro
do
mundo
seu
pals.
Obrigado'
das necessidades dos nossos
da fotografia.
sua
camera Nikon.
como
arquivo
Se
precisar de
Printed
6MM
em
varios idiomas.
PDF.
1
AG6P1
in
Indonesia
FX1
1634N-O
P6392--
G01(4N)
1
En
Reference Manual
DIGITAL CAMERA

Trademark Information
• Microsoft, Windows and Windows Vista are either registered trademarks or
trademarks of Microsoft Corporation in the United States and/or other countries.
• Macintosh, Mac OS, and QuickTime are trademarks of Apple Inc., registered in the
U.S. and other countries. The iFrame logo and the iFrame symbol are trademarks
of Apple Inc.
• Adobe and Acrobat are registered trademarks of Adobe Systems Inc.
• SDXC, SDHC and SD Logos are trademarks of SD-3C, LLC.
• PictBridge is a trademark.
• HDMI, logo and High-Definition Multimedia Interface are
trademarks or registered trademarks of HDMI Licensing LLC.
• All other trade names mentioned in this manual or the other documentation
provided with your Nikon product are trademarks or registered trademarks of
their respective holders.
AVC Patent Portfolio License
This product is licensed under the AVC Patent Portfolio License for the personal and
non-commercial use of a consumer to (i) encode video in compliance with the AVC
standard (“AVC video”) and/or (ii) decode AVC video that was encoded by a
consumer engaged in a personal and non-commercial activity and/or was
obtained from a video provider licensed to provide AVC video. No license is granted
or shall be implied for any other use. Additional information may be obtained from
MPEG LA, L.L.C.
See http://www.mpegla.com.

i
Introduction
Parts of the Camera and Basic Operations
The Basics of Shooting and Playback
Shooting Features
Playback Features
Recording and Playing Back Movies
Using GPS/Displaying Maps
General Camera Setup
Reference Section
Technical Notes and Index
ii
Introduction
Introduction
Read This First
Thank you for purchasing the Nikon COOLPIX AW100 digital camera.
Before using the camera, please read the information in “For Your Safety” (Avi) and
“<Important> Shockproof, waterproof, dustproof, condensation, GPS/digital
compass“ (Axi), and familiarize yourself with the information provided in this
manual. After reading, please keep this manual handy and refer to it to enhance
your enjoyment of your new camera.
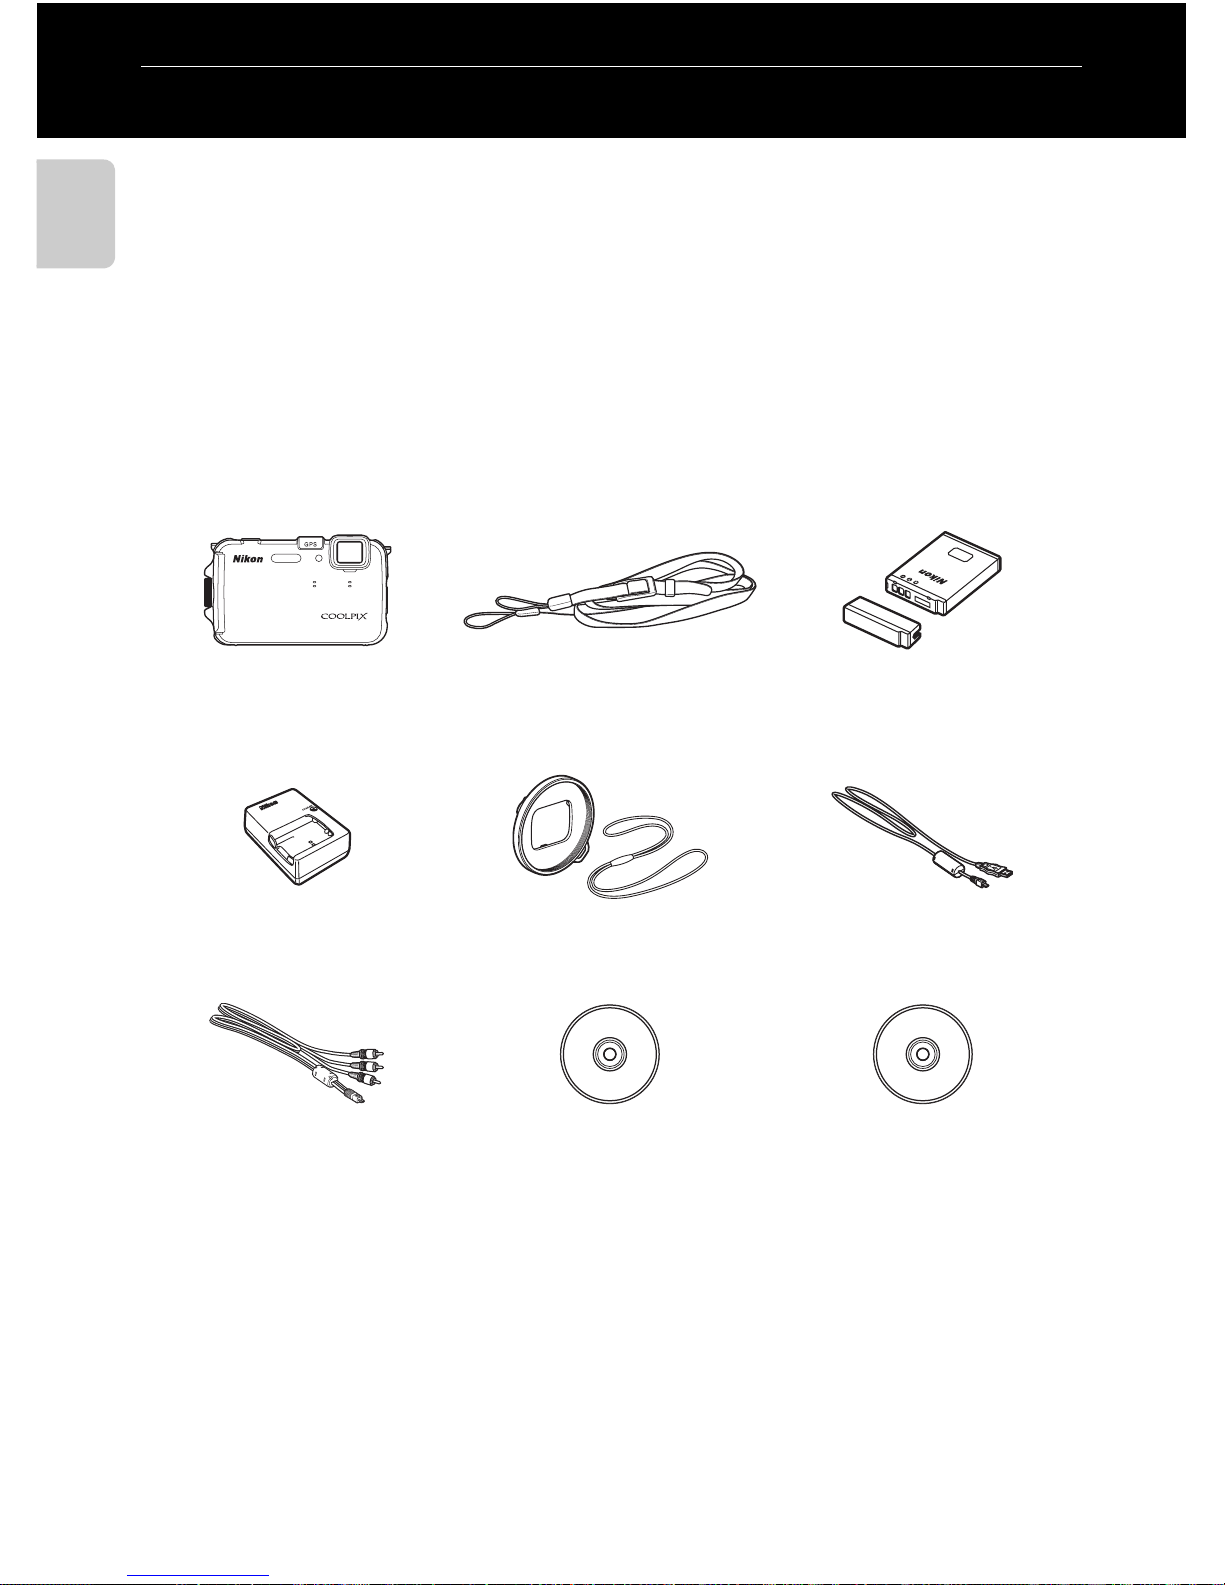
Confirming the Package Contents
In the event that any items are missing, please contact the store where you
purchased the camera.
* Shape of power cable depends on country of use.
NOTES:
• Accessories are not waterproof.
• A memory card is not included with the camera.
COOLPIX AW100
Digital Camera
Camera strap for land use Rechargeable Li-ion Battery
EN-EL12
(with terminal cover)
Battery Charger MH-65
(with power cable)*
Filter Adapter UR-E23
(with cord)
USB Cable UC-E6
Audio Video Cable EG-CP16 ViewNX 2 Installer CD Reference Manual CD
• Warranty

iii
Read This First
Introduction
About This Manual
If you want to start using the camera right away, see “The Basics of Shooting and
Playback” (A15).
To learn about the parts of the camera and basic operations, see “Parts of the
Camera and Basic Operations” (A1).
Other Information
• Symbols and Conventions
To make it easier to find the information you need, the following symbols and
conventions are used in this manual:
•
SD, SDHC and SDXC memory cards are referred to as “memory cards” in this manual.
• The setting at the time of purchase is referred to as the “default setting.”
• The names of menu items displayed in the camera monitor, and the names of
buttons or messages displayed on a computer monitor appear in bold.
• In this manual, images are sometimes omitted from monitor display samples so
that monitor indicators can be more clearly shown.
• Illustrations and monitor content shown in this manual may differ from the
actual product.
Icon Description
B
This icon indicates cautions and information that should be read before
using the camera.
C
This icon marks notes, information that should be read before using the
camera.
A/E/F
These icons indicate other pages containing relevant information;
E: “Reference Section”, F: “Technical Notes and Index.”

iv
Read This First
Introduction
Information and Precautions
Life-Long Learning
As part of Nikon’s “Life-Long Learning” commitment to ongoing product support and education,
continually updated information is available online at the following sites:
• For users in the U.S.A.: http://www.nikonusa.com/
• For users in Europe and Africa: http://www.europe-nikon.com/support/
• For users in Asia, Oceania, and the Middle East: http://www.nikon-asia.co m/
Visit these sites to keep up-to-date with the latest product information, tips, answers to frequently
asked questions (FAQs), and general advice on digital imaging and photography. Additional
information may be available from the Nikon representative in your area. Visit the site below for
contact information:
http://imaging.nikon.com/
Use Only Nikon Brand Electronic Accessories
Nikon COOLPIX cameras are designed to the highest standards and include complex electronic
circuitry. Only Nikon brand electronic accessories (including battery chargers, batteries, and AC
adapters) certified by Nikon specifically for use with this Nikon digital camera are engineered and
proven to operate within the operational and safety requirements of this electronic circuitry.
THE USE OF NON-NIKON ELECTRONIC ACCESSORIES COULD DAMAGE THE CAMERA AND MAY
VOID YOUR
NIKON WARRANTY.
The use of third-party rechargeable Li-ion batteries not bearing the Nikon holographic seal could
interfere with normal operation of the camera or result in the batteries overheating, igniting,
rupturing, or leaking.
For more information about Nikon brand accessories, contact a local authorized Nikon dealer.
Before Taking Important Pictures
Before taking pictures on important occasions (such as at weddings or before taking the camera on
a trip), take a test shot to ensure that the camera is functioning normally. Nikon will not be held liable
for damages or lost profits that may result from product malfunction.
About the Manuals
• No part of the documentation included with this product may be reproduced, transmitted,
transcribed, stored in a retrieval system, or translated into any language in any form, by any means,
without Nikon’s prior written permission.
• Nikon will not be held liable for any damages resulting from the use of this product.
• Nikon reserves the right to change the specifications of the hardware and software described in
the documentation at any time and without prior notice.
• While every effort was made to ensure that the information in the documentation is accurate and
complete, we would appreciate it were you to bring any errors or omissions to the attention of the
Nikon representative in your area (address provided separately).
Holographic seal: Identifies this
device as an authentic Nikon product.

v
Read This First
Introduction
Notice Concerning Prohibition of Copying or Reproduction
Note that simply being in possession of material that was digitally copied or reproduced by means
of a scanner, digital camera or other device may be punishable by law.
• Items prohibited by law from being copied or reproduced
Do not copy or reproduce paper money, coins, securities, government bonds or local government
bonds, even if such copies or reproductions are stamped “Sample.” The copying or reproduction of
paper money, coins, or securities which are circulated in a foreign country is prohibited. Unless the
prior permission of the government was obtained, the copying or reproduction of unused postage
stamps or post cards issued by the government is prohibited.
The copying or reproduction of stamps issued by the government and of certified documents
stipulated by law is prohibited.
• Cautions on certain copies and reproductions
The government has issued cautions on copies or reproductions of securities issued by private
companies (shares, bills, checks, gift certificates, etc.), commuter passes, or coupon tickets, except
when a minimum of necessary copies are to be provided for business use by a company. Also, do
not copy or reproduce passports issued by the government, licenses issued by public agencies and
private groups, ID cards and tickets, such as passes and meal coupons.
• Comply with copyright notices
The copying or reproduction of copyrighted creative works such as books, music, paintings,
woodcut prints, maps, drawings, movies, and photographs is governed by national and international
copyright laws. Do not use this product for the purpose of making illegal copies or to infringe
copyright laws.
Disposing of Data Storage Devices
Please note that deleting images or formatting data storage devices such as memory cards or
built-in camera memory does not completely erase the original image data. Deleted files can
sometimes be recovered from discarded storage devices using commercially available software,
potentially resulting in the malicious use of personal image data. Ensuring the privacy of such data is
the user’s responsibility.
Before discarding a data storage device or transferring ownership to another person, erase all data
using commercial deletion software, or format the device and then completely refill it with images
containing no private information (for example, pictures of empty sky). Be sure to also replace any
pictures selected for the Select an image option in the Welcome screen setting (A94). Care
should be taken to avoid injury or damage to property when physically destroying data storage
devices.

vi
Introduction
For Your Safety
To prevent damage to your Nikon product or injury to yourself or to others, read
the following safety precautions in their entirety before using this equipment.
Keep these safety instructions where all those who use the product will read them.
WARNINGS
Turn off in the event of
malfunction
Should you notice smoke or an unusual
smell coming from the camera or
Battery Charger, unplug the AC adapter
and remove the battery immediately,
taking care to avoid burns. Continued
operation could result in injury. After
removing or disconnecting the power
source, take the equipment to a Nikonauthorized service representative for
inspection.
Do not disassemble
Touching the internal parts of the
camera or Battery Charger could result
in injury. Repairs should be performed
only by qualified technicians. Should
the camera or Battery Charger break
open as the result of a fall or other
accident, take the product to a Nikonauthorized service representative for
inspection, after unplugging the
product and/or removing the battery.
Do not use the camera or
Battery Charger in the
presence of flammable gas
Using the camera in the presence of
flammable gases such as propane and
gasoline, as well as flammable sprays or
dust could result in explosion or fire.
Remove the strap when using
the camera underwater
Twisting the camera strap around the
neck may cause suffocation.
Handle the camera strap with
care
Never place the strap around the neck
of an infant or child.
Keep out of reach of children
Do not keep the products within reach
of children. Doing so may cause injury.
Particular care should be taken to
prevent infants from putting the
battery or other small parts into their
mouths.
Do not remain in contact with
the camera, battery charger,
or AC adapter for extended
periods while the devices are
on or in use.
Parts of the devices become hot.
Leaving the devices in direct contact
with the skin for extended periods may
result in low-temperature burns.
This icon marks warnings, information that should be read before using this Nikon
product, to prevent possible injury.

vii
For Your Safety
Introduction
Observe caution when
handling the battery
The battery may leak, overheat, or
explode if improperly handled.
Observe the following precautions
when handling the battery for use in
this product:
• Before replacing the battery, turn the
product off. If you are using the
Battery Charger/AC adapter, be sure
it is unplugged.
• Use only a Rechargeable Li-ion
Battery EN-EL12 (included). Charge
the battery by inserting it in a Battery
Charger MH-65 (included).
• When inserting the battery, do not
attempt to insert it upside down or
backwards.
• Do not short or disassemble the
battery or attempt to remove or
break the battery insulation or casing.
• Do not expose the battery to flame
or to excessive heat.
• Do not immerse in or expose to water.
• Replace the terminal cover when
transporting the battery. Do not
transport or store with metal objects
such as necklaces or hairpins.
• The battery is prone to leakage when
fully discharged. To avoid damage to
the product, be sure to remove the
battery when no charge remains.
• Discontinue use immediately should
you notice any change in the battery,
such as discoloration or deformation.
• If liquid from the damaged battery
comes in contact with clothing or
skin, rinse immediately with plenty
of water.
Observe the following
precautions when handling
the Battery Charger
• Keep dry. Failure to observe this
precaution could result in fire or
electric shock.
• Dust on or near the metal parts of
the plug should be removed with a
dry cloth. Continued use could result
in fire.
• Do not handle the power cable or go
near the Battery Charger during
lightning storms. Failure to observe
this precaution could result in
electric shock.
• Do not damage, modify, forcibly tug
or bend the power cable, place it
under heavy objects, or expose it to
heat or flames. Should the insulation
be damaged and the wires become
exposed, take it to a Nikonauthorized service representative for
inspection. Failure to observe these
precautions could result in fire or
electric shock.
• Do not handle the plug or Battery
Charger with wet hands. Failure to
observe this precaution could result
in electric shock.
• Do not use with travel converters or
adapters designed to convert from
one voltage to another or with DCto-AC inverters. Failure to observe
this precaution could damage the
product or cause overheating or fire.
 Loading...