

Nikon COOLPIX AW1100 Quick Start Manual
Nikon
Quick
Take
First Steps
Shooting
Using
Other
the
Camera
and
ViewNX
Functions
Start
Out
Playback
2
of
the
Guide
Box
12
17
21
3
5
For
Your
Safety
Nlkon
c
__
__,
-
-
COOL
28
-
PIX
Thank you for purchasing the Nikon
COOLPIX
introduces the procedures necessary for first
please
ensure proper
To
provided in
more detailed information,
For
"For Your Safety"
located on the
Reference
sure
Be
Manual,
read
to
use,
included
see
11
<Important>
CD-ROM.
"Viewing
Condensation, GPS" and
Reference
Should
you need technical support,
Manual
before using this camera.
read and
([028)
please
the Reference Manual
Shockproof, Waterproof, Dustproof,
"Wi-Fi
thoroughly
before using the camera.
refer
information on viewing
For
to
{Wireless
offer a
we
Internet
Please
• Search Nikon's
•
• Download
For customers in
For customers in Canada:
For customers in Mexico:
For
visit the Nikon support
continuously updated
Nikon a Question"
"Ask
Use
latest
the
receive
customers in
e-mail
notification for
the
Brazil:
United
http://nikon.com.br
home
versions
States:
help.nikon.ca
nikon.com.mx/soporte
page, where you can:
Knowledge Database for
receive a
to
Nikon software or firmware updates for your product, or register
of
software or firmware updates.
prompt
reply
www.nikontechusa.com
(English),
nikoncanada-fr.custhelp.com
AWll
time
0 digital
use
understand the information
the digital
LAN
Network) Function" in
number
the
from a Nikon
camera.
this camera.
of
Reference
the
described
CD"
options.
of
latest technical
professional
guide
This
Manual, which
camera's digital
below.
the
support information.
e-mail.
your
advisor
(Franc;ais)
to
is
to
Telephone
for
Please
help
For customers in
For
For customers in Mexico:
For customers in
W
The
website.
1
2
3
I
call
your
with
customers
Viewing the
Reference
computer
the
Start
Double-click
desktop (Mac
Double-click the
language
a
Click
Important
An
Nikon
COOLPIX
complex electronic circuitry. Only
adapters
AC
and
engineered
are
cameras.
our
of
USE
THE
YOUR
NIKON
Genuine Nikon
technical
digital
in
camera needs.
United States:
the
Canada:
:
Brazil
"Reference
Manual
can be viewed using Adobe
CD
the
.
OS)
INDEX.pdf
and
digital camera
and
NON-NIKON
OF
WARRANTY.
accessories
support and other product assistance. Our professional
1-800-N/KON-UX (1-800-645-6689)
1-877-534-9910
001-888-565-5452
0800-886-4566 (0800-88 NIKON)
Manual
"Reference
and insert
(COOLPIX AW110)
follow
Notice
the
icon
links
the
about
to
is
certified by Nikon specifically for your Nikon
are
tested to operate within the requirements
ACCESSORIES
available
are
CD"
icon in
display
view
to
Reader,
Manual
Computer
language selection
the
Reference
the
available
CD':
Manual.
or
for free
Computer
My
screen.
Accessories
designed to the highest standards and
battery chargers, batteries,
as
Nikon
accessories,
DAMAGE
MAY
through your Nikon-authorized dealer.
such
YOUR
of
CAMERA
advisers are standing by
download
from the Adobe
(Windows) or on the
includes
COOLPIX
camera
and
the electronic circuitry
VOID
WILL
AND
to
·-------
In
the
event
that
any items are missing,
please
contact
the
store where you
purchased
COOLPIX
Digital
Battery
(with
power
the
COOLPI)(
AWllO
Camera
Charger
MH-65
camera.
j
cable)
1
Camera strap for land use
Filter Adapter
(with
dedicated cord)
UR-E25
Rechargeable Li-ion
Battery
(with terminal cover)
EN-EL
USB
Cable
UC-El6
12
Audio
•
Quick
•
Warranty
1
Shape
2
The brush
Video
EG-CP16
Start
of
power
NOTES:
•
A Secure Digital
•
Accessories
Cable
Guide
is
used for cleaning
(this guide)
cable depends
(SO)
memory
are
not
waterproof.
\
2
Brush
on
country
the
waterproof
card, hereafter referred
of
ViewNX 2
use.
packing.
to
CD
as
a
"memory
Reference
card':
Manual
is
not
CO
provided.
I
Cil:
This icon indicates
that
more information
is
available elsewhere in this guide.
Take
the
Camera
Out
of
the
Box
•
Parts
of
the
Camera
s
4
Shutter-release button
II
Power switch/power-on lamp
II
Flash
II
Battery-chamber/memory card slot cover
release
latch
I
Battery-chamber/memory card slot cover
latch
I
13
II
D
D
II:J
ID
lfJ
ID
m
W
1m
m
14
Monitor
Zoom control
Wide
W:
Tele
T:
~:Thumbnail
Playback zoom
:
q
@:Help
Flash
e
[E
®
Multi selector
fl
~
0
MENU
1iD
lamp
movie-record) button
(~If
(playback) button
(apply selection) button
(map) button
(action) button
(shooting mode) button
(menu) button
(delete) button
playback
15
16
17
I
Camera
•
Take
the
Out
of
the
Box

step
1 Charge
the
Battery
1.1
1.2
Connect the power
@
CHARGE
Insert
ion Battery
by sliding
down
the
included
the
until
EN-EL
it
12)
battery forward
locks into
cable
---
battery
into
the
place(@).
in
the
order indicated below.
--------····--··----··---
(Rechargeable
battery charger
(G)),
and
Li-
press
1.3
•
CHARGE
starts.
•
A
fully-exhausted
hours and
•
When charging
stops flashing.
When charging
lamp
30
starts
minutes.
flashing
battery charges in
is
complete,
--
is
complete,
when
the
·
remove the battery, and then
CHARGE
-·
--
charging
about
··-·---··
2
lamp
-·---
--
-··--·
--
.
·----
-----·
unplug
·
--
the charger.
I
First
Steps
(.

step
Remove
2
Attaching the Camera Strap for
before using the camera underwater.
strap for land
the
use
Land
Use
I
Steps
.)
First
Step
If
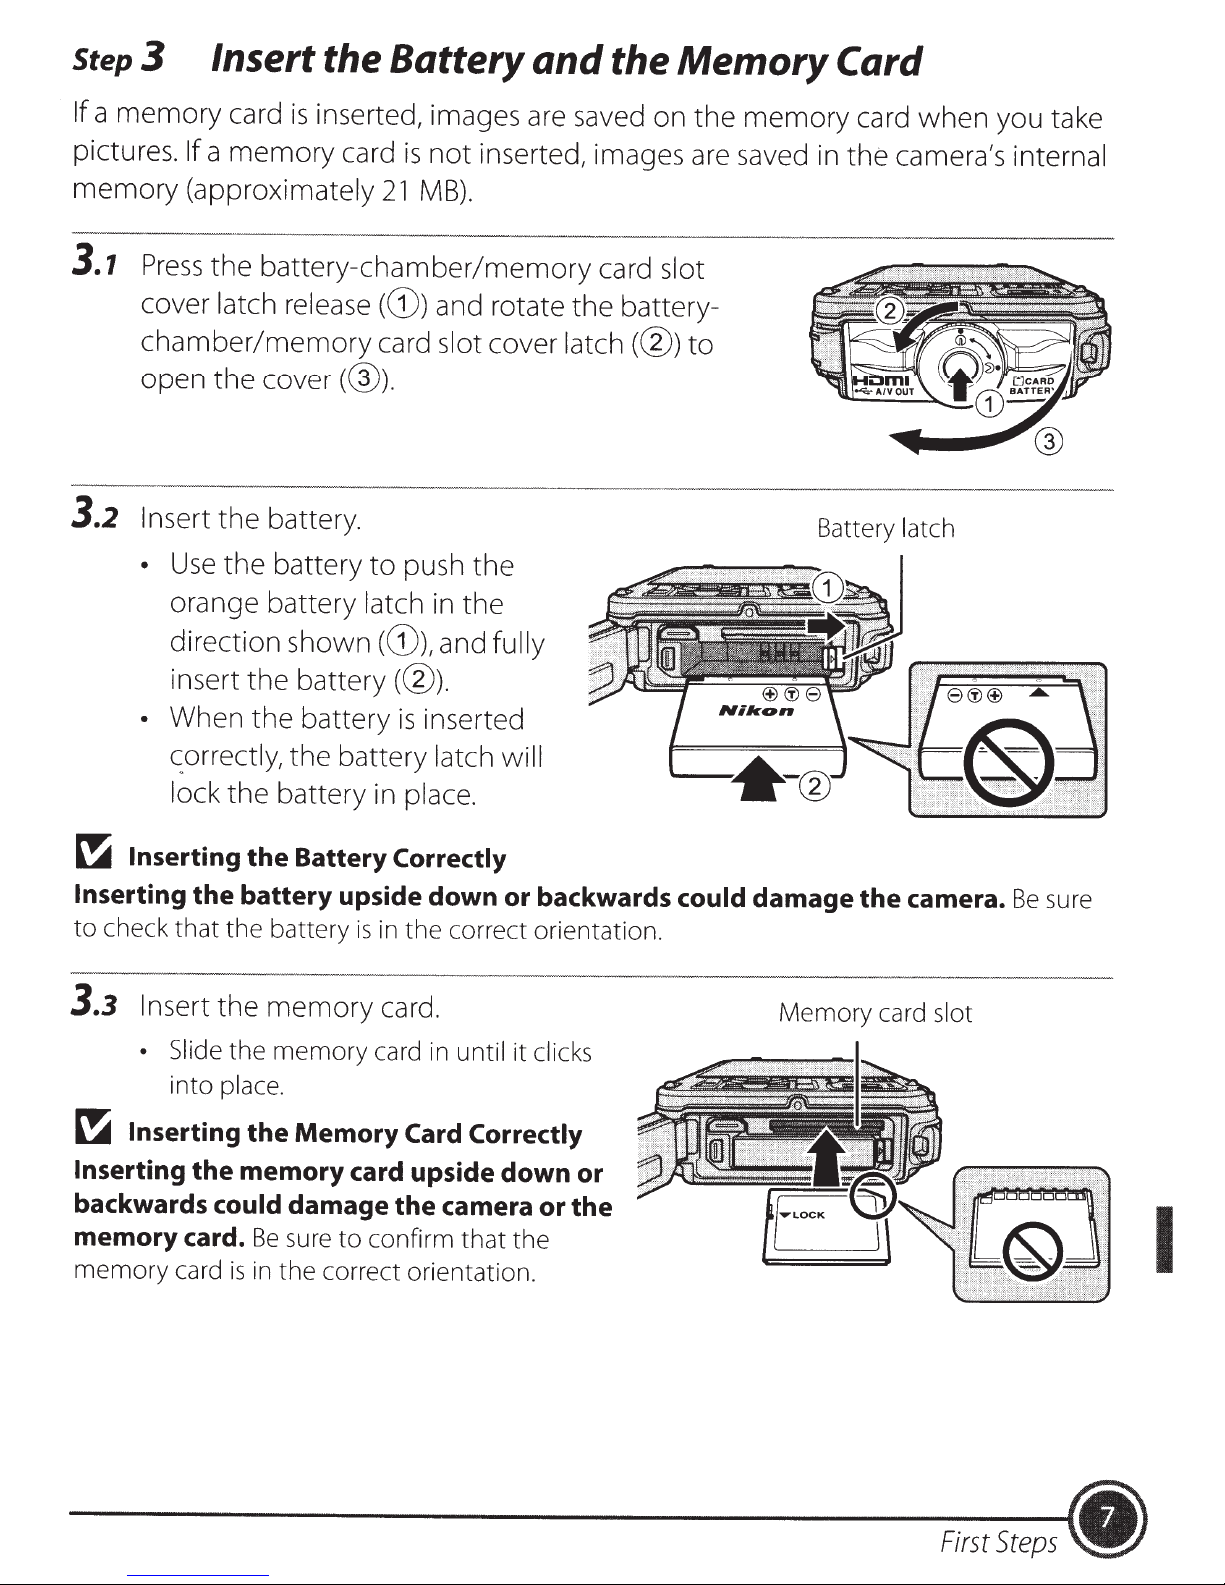
pictures.
memory
3 Insert the Battery
a
memory
card
If
a
memory
(approximately
is
inserted, images are saved on
card
21
is
not
MB).
and
inserted, images are saved in
the Memory Card
the
memory
card
the
when
camera's internal
you take
3.1
3.2
Press
cover latch release
chamber/memory
open
Insert
•
• When
the
battery-chamber/memory
(G))
card slot cover latch
the
cover
the
battery.
Use
the
battery
orange battery latch in
direction shown
insert
\Orrectly,
lock
the
the
the
battery in place.
(@).
to
(G)),
battery
battery
the
battery latch will
and rotate
push
((l)).
is
the
the
and
inserted
fully
card slot
the
battery-
((l))
to
Battery
latch
~
Inserting
Inserting
to
check
3.3
~
Inserting
Inserting
backwards
memory card.
memory
the
that
Insert
• Slide
into
the
card
the
the
place.
could
the
Battery
battery upside down or backwards
battery
memory
the
memory
the
Memory
memory card upside down or
damage the camera or
Be
sure
is
in
the
correct orientation.
is
in
card.
card in
to
confirm
Correctly
the
correct orientation.
until
it
clicks
Card Correctly
that
the
the
could
damage
Memory
the
card
camera.
slot
Be
sure
I
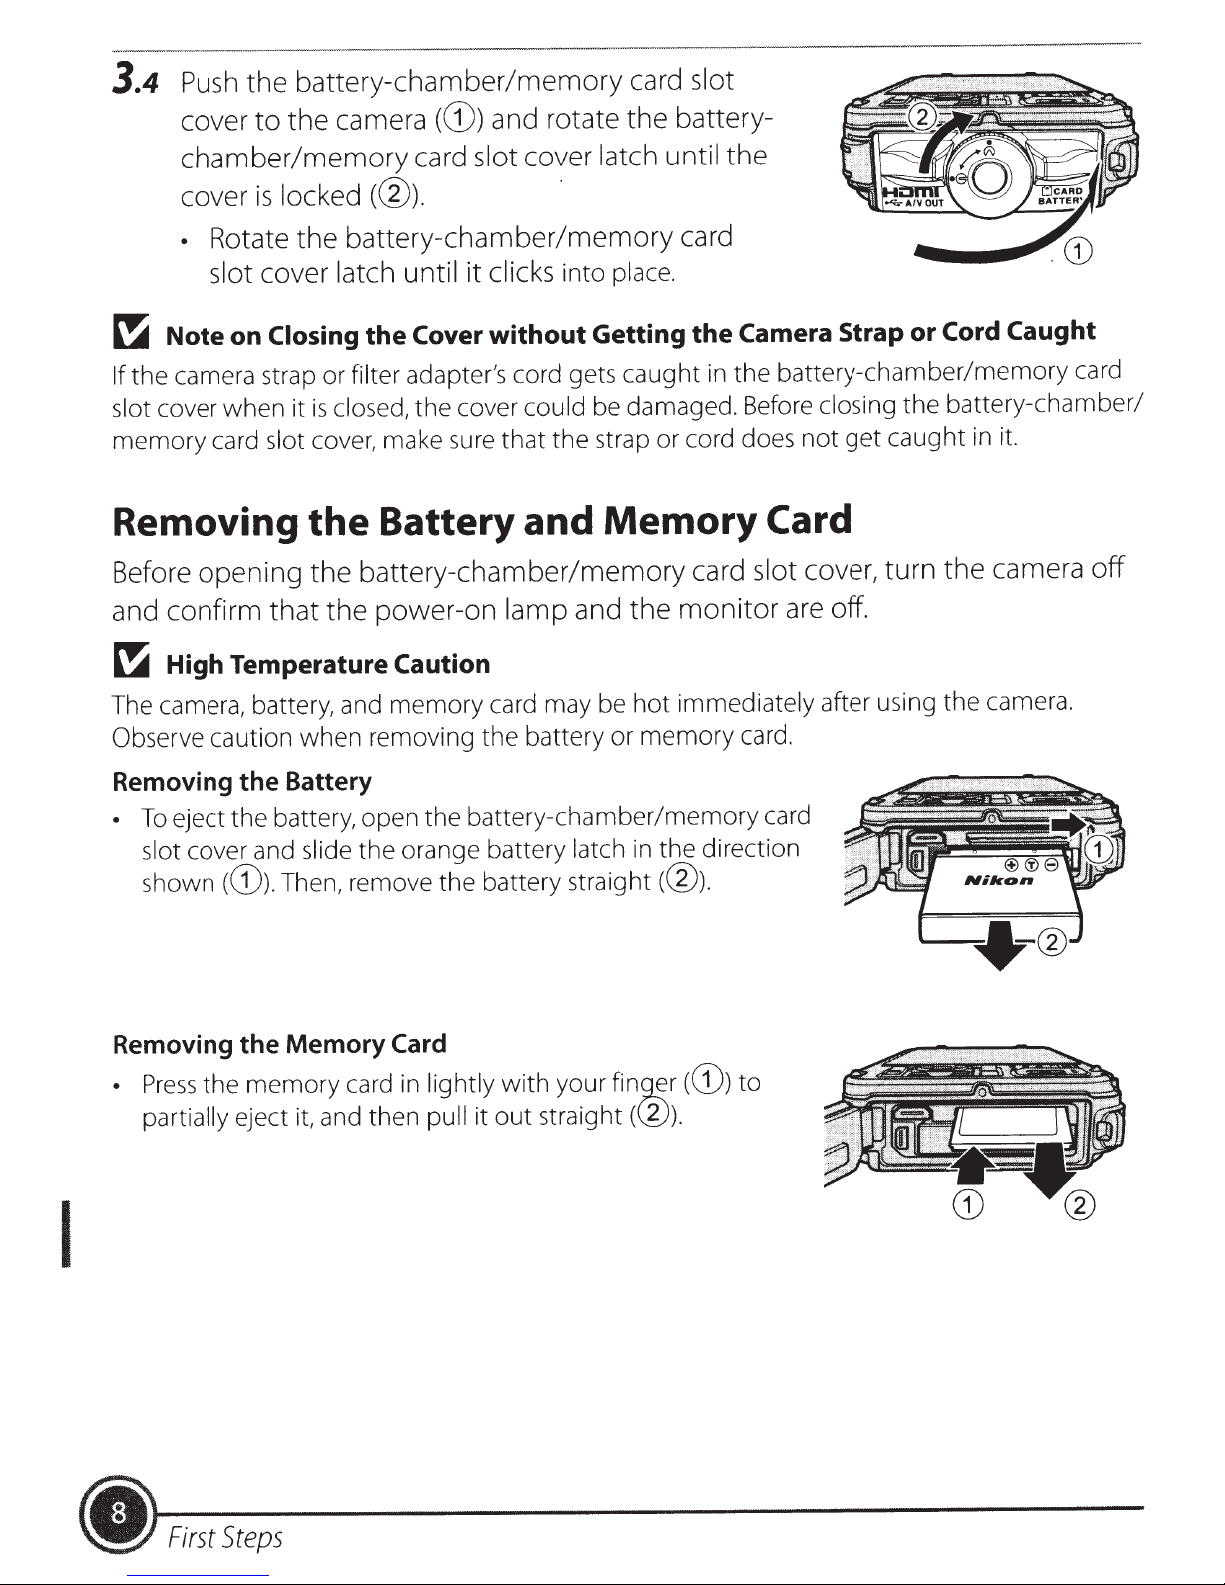
3.4
battery-chamber/memory
Push
cover
chamber/memory
the
to
the
camera
(G))
card
and
slot
rotate
cover
card
the
latch
slot
battery-
until
the
locked
cover
•
Note
~
the camera strap or filter adapter's cord gets caught
If
slot cover when it
memory card slot cover, make
is
Rotate
cover
slot
Closing
on
the
Removing the Battery and
Before
and
~
The camera, battery, and memory card may be hot immediately after using the camera.
Observe caution when removing the battery or memory
opening
confirm
High Temperature
that
(@). ·
the
card
Cord Caught
Camera
the
the battery-chamber/memory card
in
Strap
get caught
not
or
in
it.
Card
camera
the
card
monitor
slot
card.
cover,
are off.
turn
battery-chamber/memory
clicks
latch
closed, the cover could be damaged. Before closing the battery-chamber/
is
until
the
it
Cover
sure
without
that the strap or cord does
into place.
Getting
Memory
battery-chamber/memory
the
power-on
the
lamp
Caution
and
off
Removing
•
Removing
•
I
Battery
the
eject the battery, open the battery-chamber/memory
To
the direction
slot cover and slide the orange battery latch
shown
Press
partially eject
(G)).
the
the memory card
Then, remove the battery
Memory
and then
it,
Card
lightly with your
in
it out straight
pull
straight(@).
in
fin~r
(G))
((l)).
card
to
Steps
(.
First
step
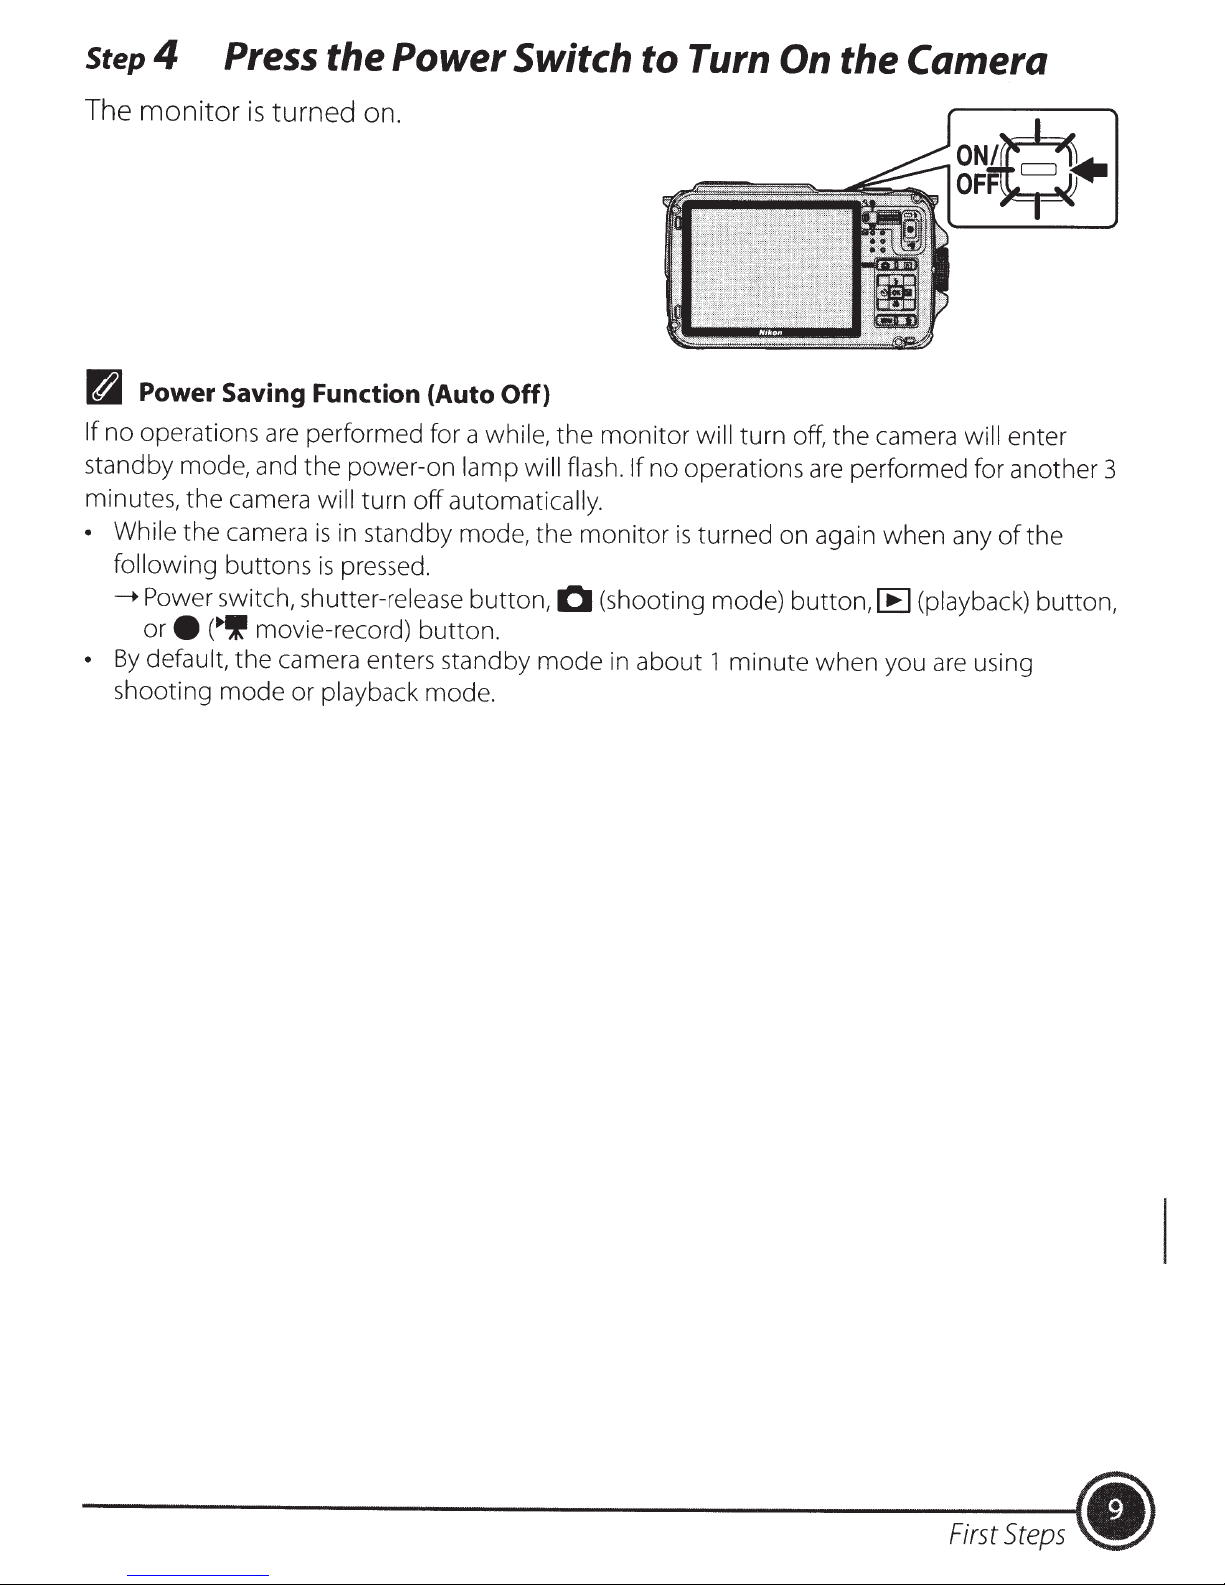
4
Press
the Power Switch to Turn On
the Camera
The monitor
R
Power Saving Function (Auto
If
no operations
standby mode, and the power-on
minutes, the camera
• While the camera
following buttons
---+Power
ore
•
By
default,
shoot ing mode or playback
is
turned on.
are
performed for a
will
turn
off
is
in
standby mode, the
is
pressed.
switch, shutter-release button,
("'If
movie-record) button.
the camera enters standby mode in about
mode.
Off)
while,
lamp will flash. If
automatically.
the monitor will
monitor
C (shooting mode) button,
turn
off,
the camera
no operations
is
turned on again when any
1
minute when you
are
performed for another 3
[E)
OFF
0~>
will
enter
of
the
(playback)
are
using
button,
First
Steps
•
step
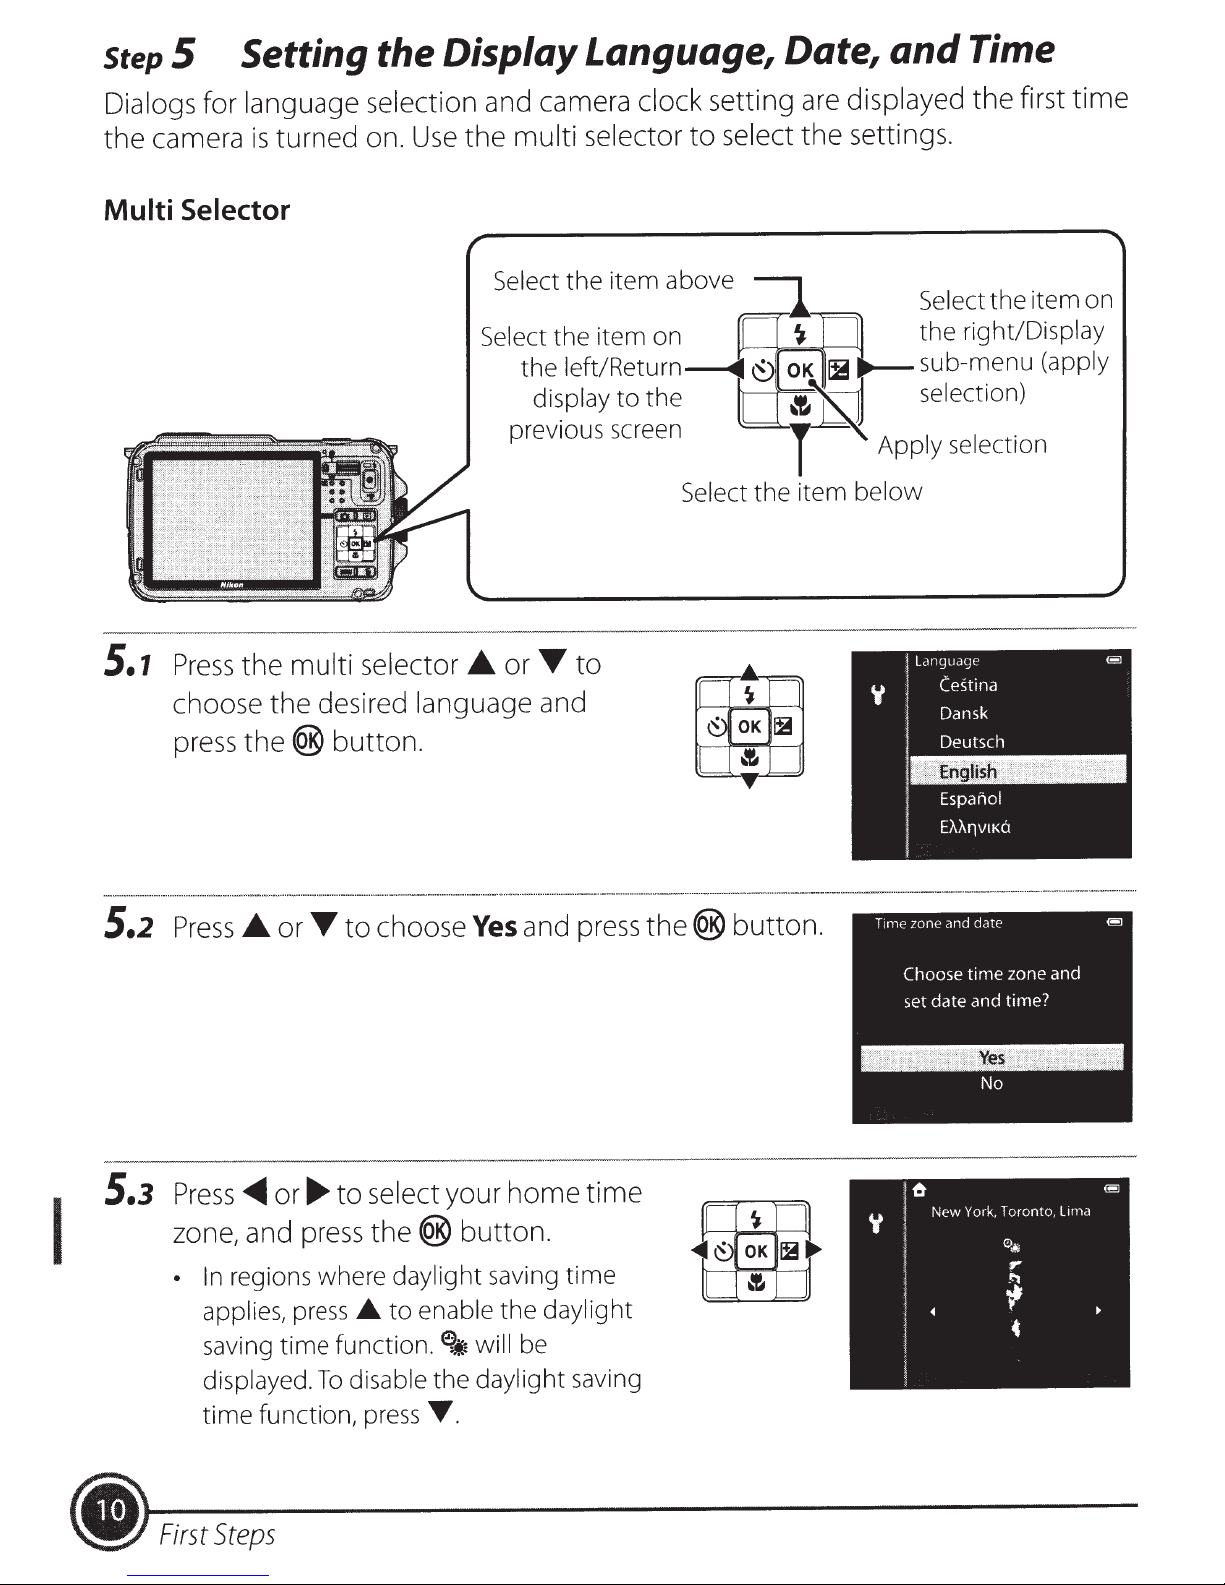
Dialogs for language selection and camera clock setting are displayed
the
5
camera
Setting the Display Language, Date,
turned on.
is
Use
multi selector
the
to
select
the
and
settings.
Time
first
the
time
Multi
5.1
Selector
multi
Press
choose the desired language and
press
the
® button.
the
selector •
or~
to
Select
the
item on
I
5.2
5.3
choose
Press£.
Press~
zone, and
In
•
applies, press •
saving
displayed.
time
or~
or~
regions where
time
function, press
to
to
press
function.
disable
To
select your
the®
button.
daylight
enable
to
6
~
the
T .
and
Yes
home
saving
daylight
the
be
will
daylight
press
time
time
saving
the®
button
.
(!!!]
lima
y
l 6
I
1
I
l
l
1
New York,
Toronto,
e>~
r
~
.,
•
I
Steps
•
First
5.4
Press_.
or
T
to
choose the date
display
order and
5.s
5.6
press
the®
Press_.,
the®
• Choose
order:
minute).
•
Set
• Confirm
the(@
Press_.
button.
M
the
or
button
T,
~or~
an
item:
(month)--.
contents:
the settings: Select
button
T
or
to
or~.
to
set date and time, and
Press~
D
(day)
Press
....
.._
.
choose
or
<11111111
or
the
Yes
(selected
--.
Y
(year)
T.
minute
and
press
in
the
-t
hour
field
the®
press
following
-t
and press
button.
•
After finishing
displayed.
The next procedure explains
R
Imprinting
After setting the date and time, press the
Print date
•
Use
•
Press
R
Changing
Press
date
the
([JJ23).
setting ([JJ23).
the
multi
the
MENU
the
selector
MENU
button
the
button
the
setting,
the
shooting screen
basic shooting operations using
Date on
to
to
Current Date, Time, or Language
to
display
Images
select and set menu options.
exit the menu.
theY
While Taking Pictures
(setup) menu and set
MENU
button
is
to
display
tJ
the
Y
(setup) menu and set
Language
(easy
or
auto) mode.
Time zone and
I
First
Steps
•
Step
1
Check the Battery Level
Exposures Remaining
and
the
Number
Battery
of
level
indicator
step
2.1
Display
(CJI
(.::~1
6
Battery
exhausted.
Battery
Battery
or replace
Cannot
Charge
2 Frame a
camera.
Ready
•
•
the
Keep your fingers, hair, strap and
illuminator and microphone.
"tall" orientation,
shoot in
To
the
Description
high
level
level low. Prepare
the
take pictures.
replace
or
Picture
.
battery.
the
to
battery.
other
the
hold
charge
* When data
internal
objects away from
that
camera
so
Number
remaining*
is
memory,
lens, flash,
the
flash
the
of
recorded
is
[m
above
is
exposures
the
to
displayed.
AF-assist
lens.
the
picture.
2.2
I
•
Frame
• Point the camera at
•
Shooting
the
When the camera determines a scene mode, the
shooting
and
mode
icon changes .
Playback
the
subject.
Using
To zoom
•
of
T
To zoom
•
in
W
the
the frame, operate the zoom control toward
(telephoto zoom position).
the frame, operate
(wideangle position).
Zoom
so
in
so
out
the subject fills a larger
that
visible increases
area
the
that
zoom control toward
the
area
T
Zoom
in
W Zoom out
Using
Record position information (latitude and longitude) on
camera's internal
To enable recording
(GPS
GPS
when a picture
GPS
position information,
of
options) menu icon
([D23),
taken.
is
and set
press
Record
the
GPS
MENU
the
data
image using the
button, select the
GPS options
in
•~
On.
to
Shooting and
Playback
I
(.
Step3
3.
7
Press
adjust
Focus
the
shutter-release
the
and Shoot
focus.
button
halfway
to
-
-
~
• "Pressing halfway"
shutter-release
resistance and
• When the subject
focus indicator lights
or focus indicator flashes in
out
of
focus.
halfway again.
•
In
tJ
(easy
shooting scene
- When a face
Focuses on
(focus
on
that
Press
auto) mode,
area)
face,
is
button
then
is
the
that
is
detected: Focus
the
face around which a
is
displayed. When
the
double
the
action
slightly until you feel
holding in
in focus,
in
green.
shutter-release
the
is
automatically determined by
of
that
the
If
red,
the
areas
the
border
pressing
position.
focus
the
focus
subject
to
be used for focusing
camera
will
turn green.
the
area
area
button
double
or
is
border
has
the
focused
will
change
camera.
depending
area
on
I
- When a face
The camera automatically selects
the
subject closest
When
focus
When
than the
focuses on
the
light
the
is
not
detected:
to
the
camera
subject
in green.
camera determines a scene
rill
the
is
in focus,
or
Ell
shooting
subject at the center
the
mode
the
out
focus
icon,
of
areas
of
9 focus
areas
mode
the
containing
areas.
that
are
other
the
camera
frame.
in
Shutter
speed
D
Aperture
value
D
(fij)
Shooting
and
Playback
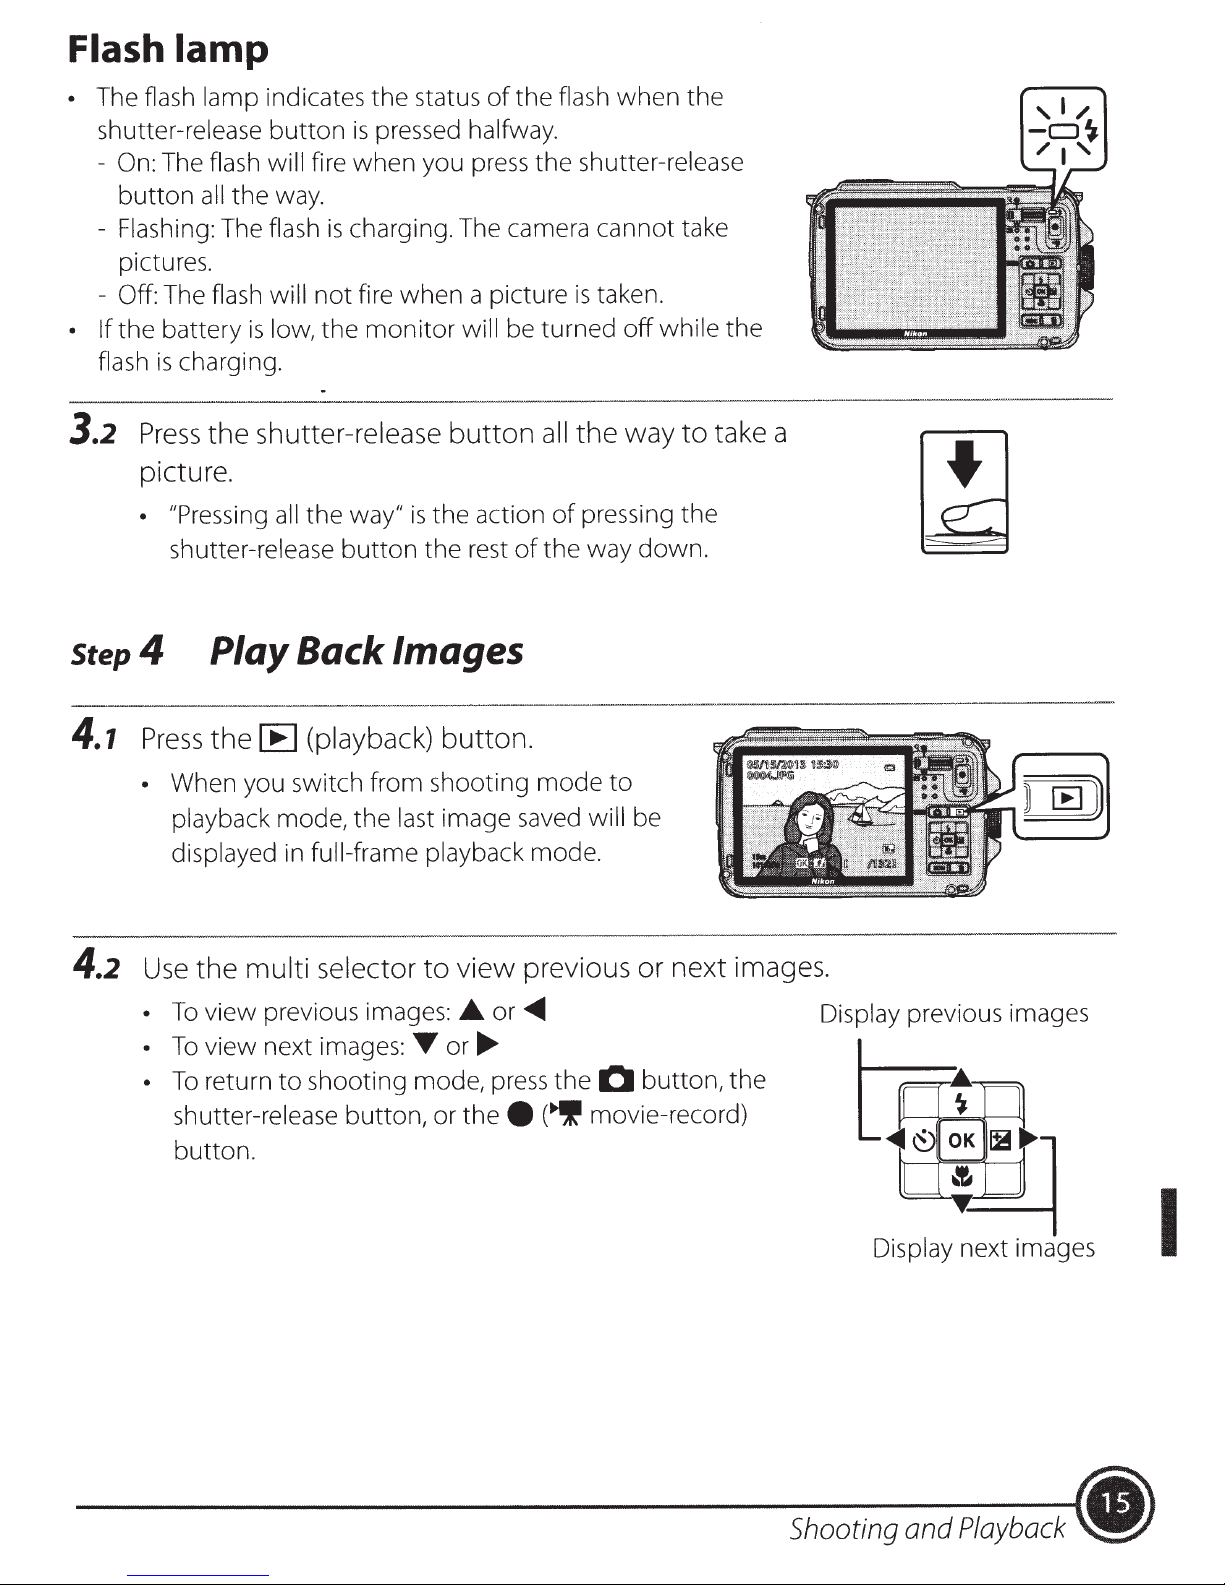
Flash
lamp
The flash lamp indicates
•
shutter-release
- On:
-
-
• If
flash
3.2
Step
The flash will fire
button
Flashing: The flash
pictures.
Off: The flash will
the
Press
picture.
• "Pressing
all
battery
charging.
is
the
shutter-release
4 Play Back Images
button
way.
the
low, the
is
shutter-release
all
status
the
pressed halfway.
is
when
charging. The camera cannot take
is
fire when a picture
not
way"
the
button
you press
monitor
is
the
of
the
will be turned
of
all
the
button
action
the
rest
shutter-release
taken.
is
off
way
the
pressing
of
way down.
when
flash
the
the
while the
take a
to
the
,I/
-CJ~
/I'
•
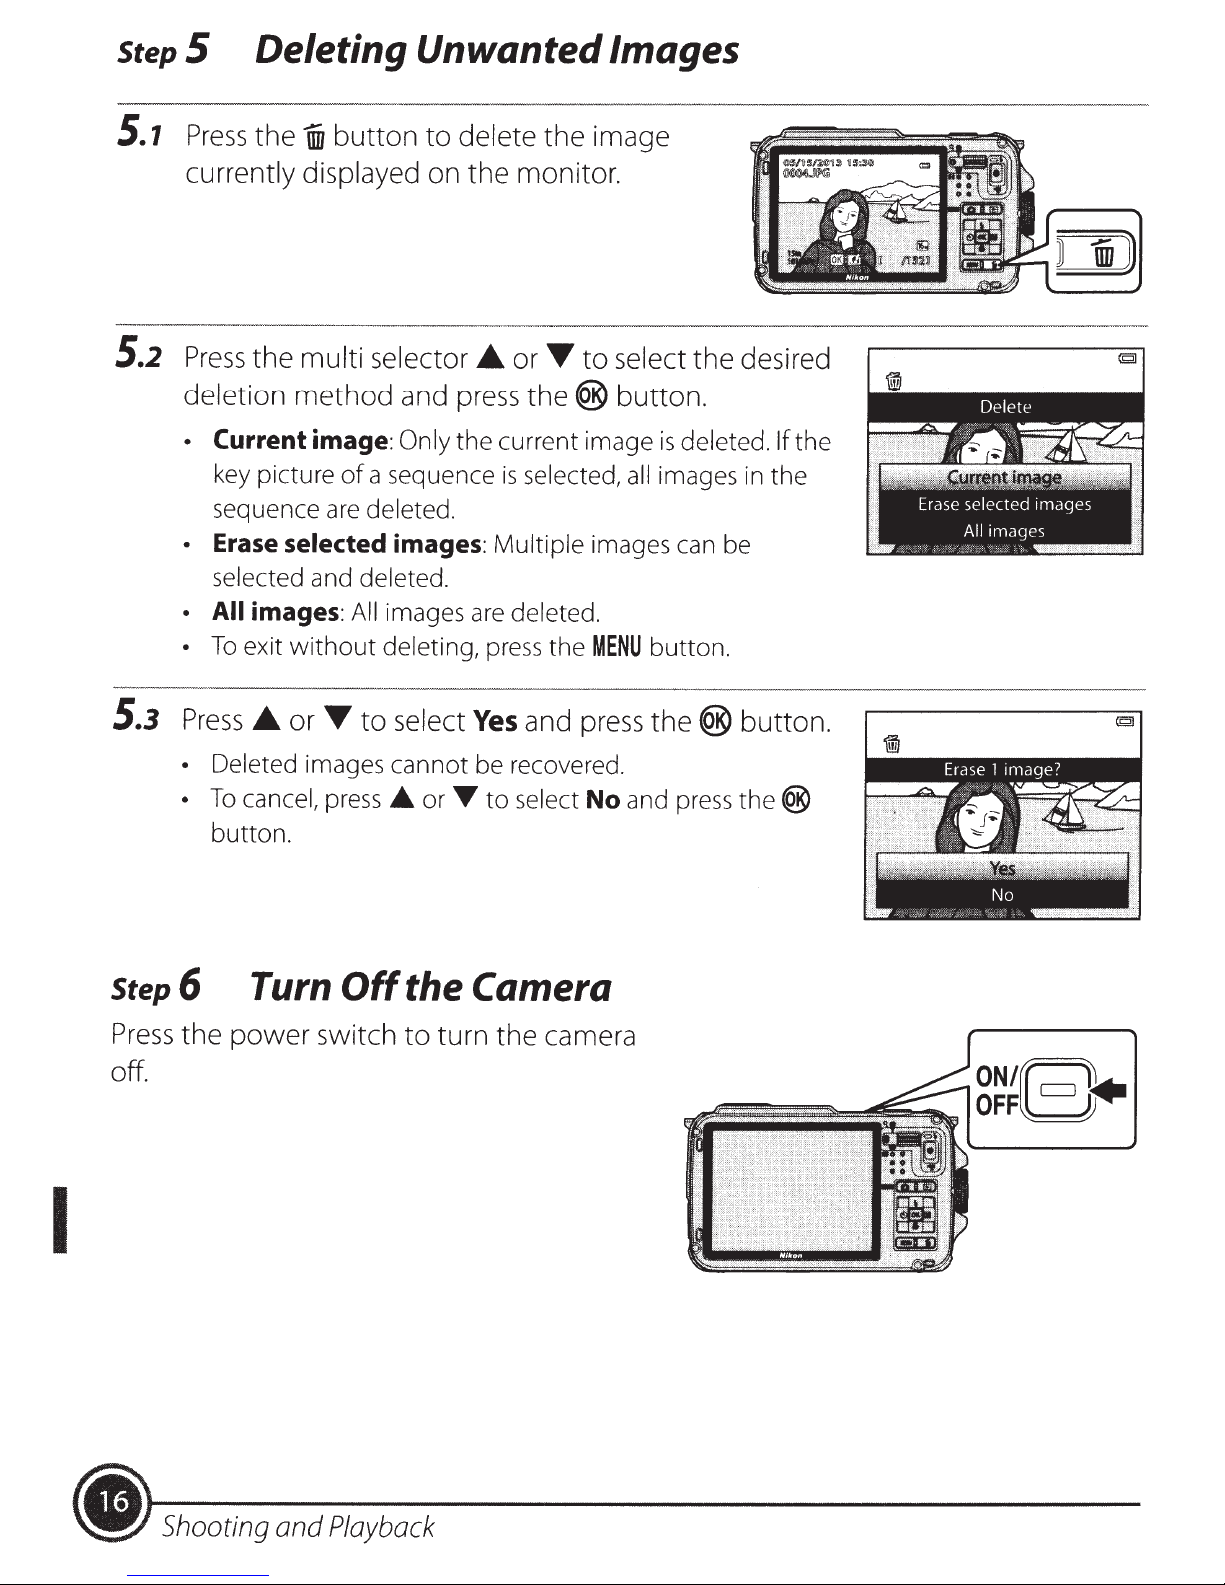
4.1
4.2
Press
•
Use
•
•
•
the
When you switch from shooting
playback mode,
displayed in full-frame playback mode.
multi
the
view previous images:
To
view next images:
To
return
To
shutter-release
button.
to
the
selector
shooting mode, press
button,
(playback)
[E1
button.
last image saved will be
view
to
A
Tor~
thee
or
previous or
<01111111
or
mode
(.,'I
to
0
the
movie-record)
next
button, the
images.
I
Shooting and
Playback
.)
step
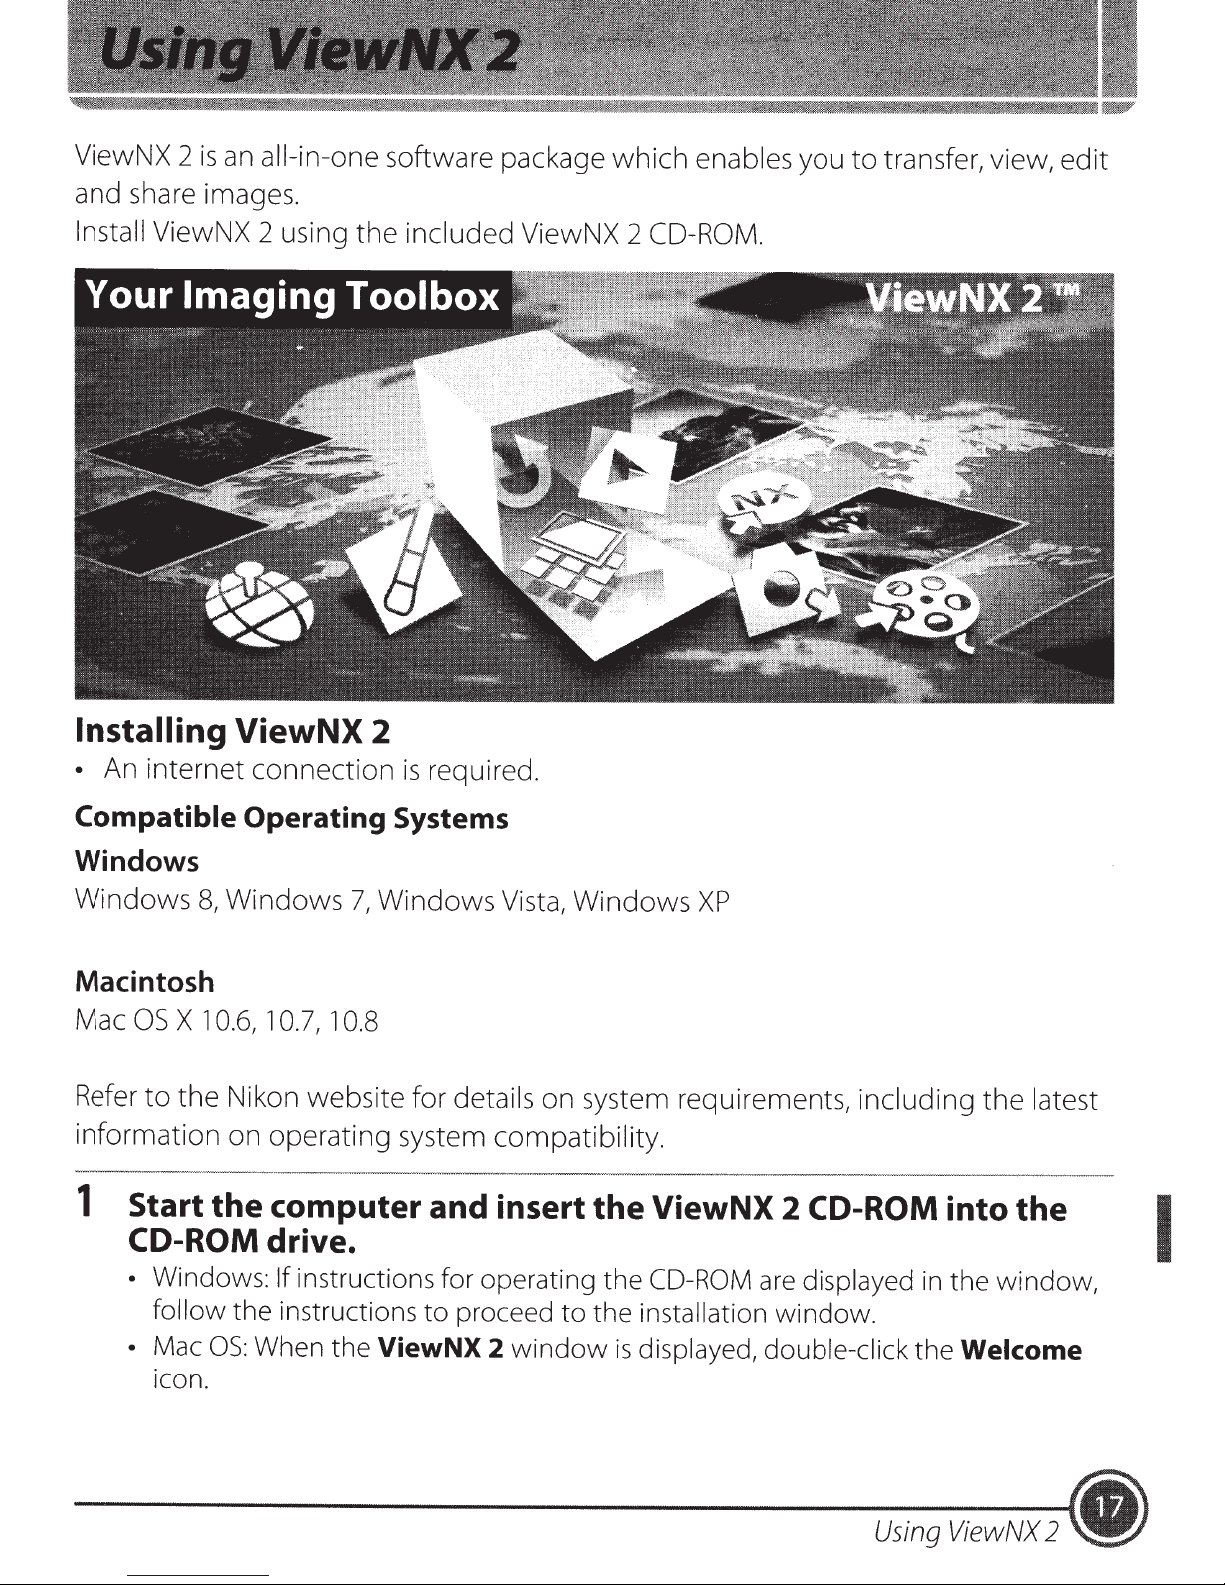
5
Deleting Unwanted Images
5.1
5.2
Press
currently displayed on
Press
deletion
•
•
• All
•
the
WI
button
the
multi selector
method
Current image:
key picture
sequence
Erase
selected and deleted.
images:
To
exit
of
are
selected
All
without
to
and
Only
a sequence
deleted.
images:
images
deleting,
delete the image
the
monitor.
•
or~
press
the current image
is
Multiple
are
deleted.
press
to
the®
selected,
images can be
the
MENU
select the desired
button.
all
button.
is
deleted.
images
in
If the
the
I
5.3
Press
• Deleted images cannot be recovered.
•
Step6
Press
the
off.
•
To
cancel,
button.
Turn
power
or~
to
press_.
Off
switch
select
the Camera
to
Yes
and
press
or
T
to
select
turn the camera
No
the®
and
press
button.
the®
ON/[~~
OFFL=J
• Shooting and
Playback
ViewNX 2
and share images.
is
an
all-in-one software package
which
enables
you
to
transfer, view,
edit
Install ViewNX 2 using
Installing
•
An internet
ViewNX
connection
the
included ViewNX 2
2
is
required.
CD-ROM.
Compatible
Windows
Windows
Macintosh
Mac
OS
X 1
Refer
information
1
to
the
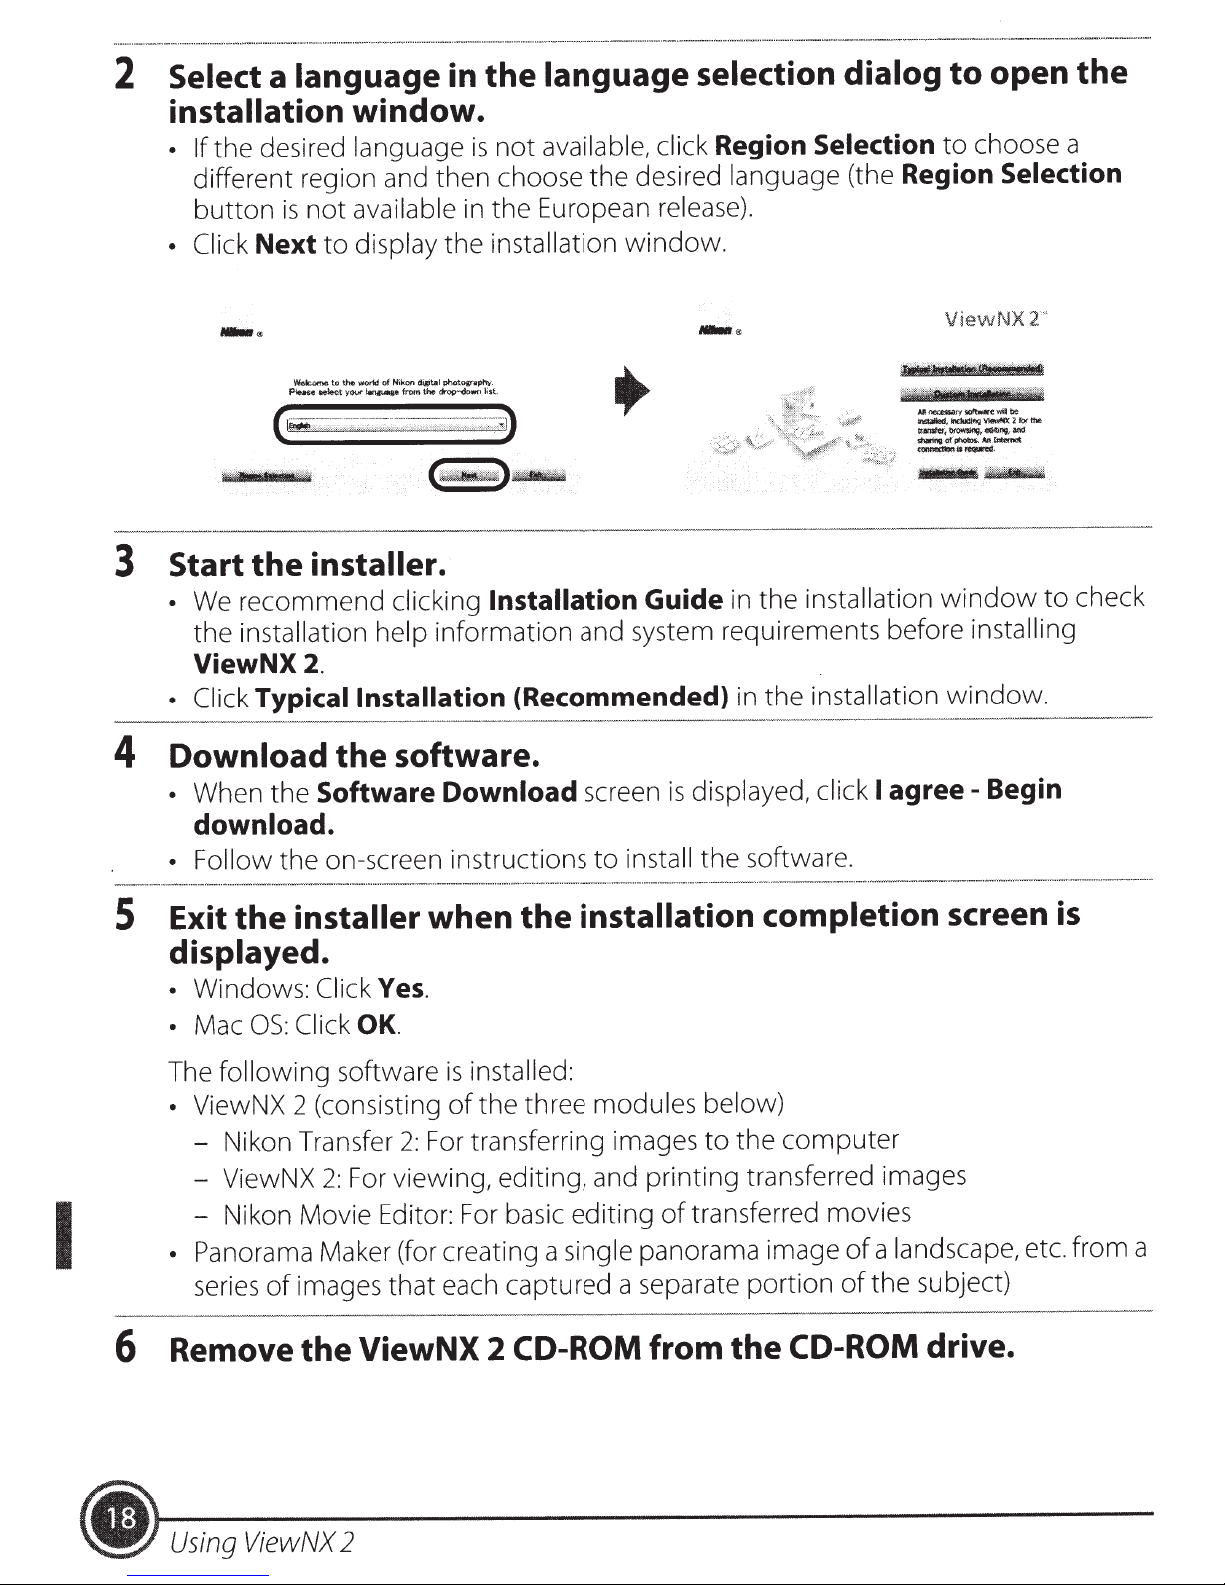
Start the computer and insert the ViewNX
CD-ROM
• Windows: If instructions for operating the
follow
•
Mac
icon.
Operating
8,
Windows
0.6,
1
0.7,
10.8
Nikon website for
on operating system compatibility.
Systems
7,
Windows
Vista,
details
Windows
on system requirements, including
drive.
the instructions
OS:
When the
to
proceed
ViewNX
2
window
to
the installation
CD-ROM
is
displayed, double-click the
XP
2
CD-ROM
are
displayed
window.
the
latest
into the
in
the window,
Welcome
I
Using
ViewNX
2
•
Select
2
installation
the
• If
different region and then choose
button
• Click
language
a
window.
desired
not
is
Next
to
in the
language
available
display
the
language selection dialog
available, click
not
is
European release).
the
in
installation
the
window
desired
Region
language
.
Selection
Region
(the
open
to
choose a
to
Selection
the
Start
3
We
•
the
ViewNX
• Click
- -
Download
4
When
•
download.
• Follow
Wok:omcs
Pluce
the
recommend
installation help
~
your
telect
installer.
drop-down
the
from
clicking
information and system requirements before
OfVll
phat
Qt.al
koo
Ni
of
worid
the
to
2.
Typical Installation
software.
the
Software
the
on-screen instructions
the
Download
phv.
t..
lis
Installation
Guide
(Recommended)
screen
install
to
.,
,...
in the
in the
displayed,
is
software.
the
Mnet'.tiSiat
- -
_of_
tf.1Sfl$1Cffbf~,«<ibJlg:,Md
.....,..,it-.
installation
installation
agree-
I
click
ViewNX2
~mi!be:
'(
-i"'V!I!wNl<2fo<llw>
_
..
window
installing
window.
Begin
"
to
check
I
5
Exit
the
installer
displayed.
Windows: Click
•
Click
OS:
Mac
•
following
The
ViewNX 2 (consisting
•
- Nikon Transfer
- ViewNX
- Nikon Movie Editor: For basic editing
• Panorama
series
6
Remove the ViewNX 2
Maker (for creating a
images
of
Yes.
OK.
software
For viewing, editing, and printing transferred images
2:
installation completion
when
is
of
For transferring images
2:
each captured a separate portion
that
the
installed:
three modules below)
the
of
single
CD-ROM
panorama image
from the
to
transferred movies
computer
the
CD-ROM
screen
a landscape, etc. from a
of
subject)
the
of
is
drive .
•
Using
ViewNX
2
Transferring
1
Choose
Choose
•
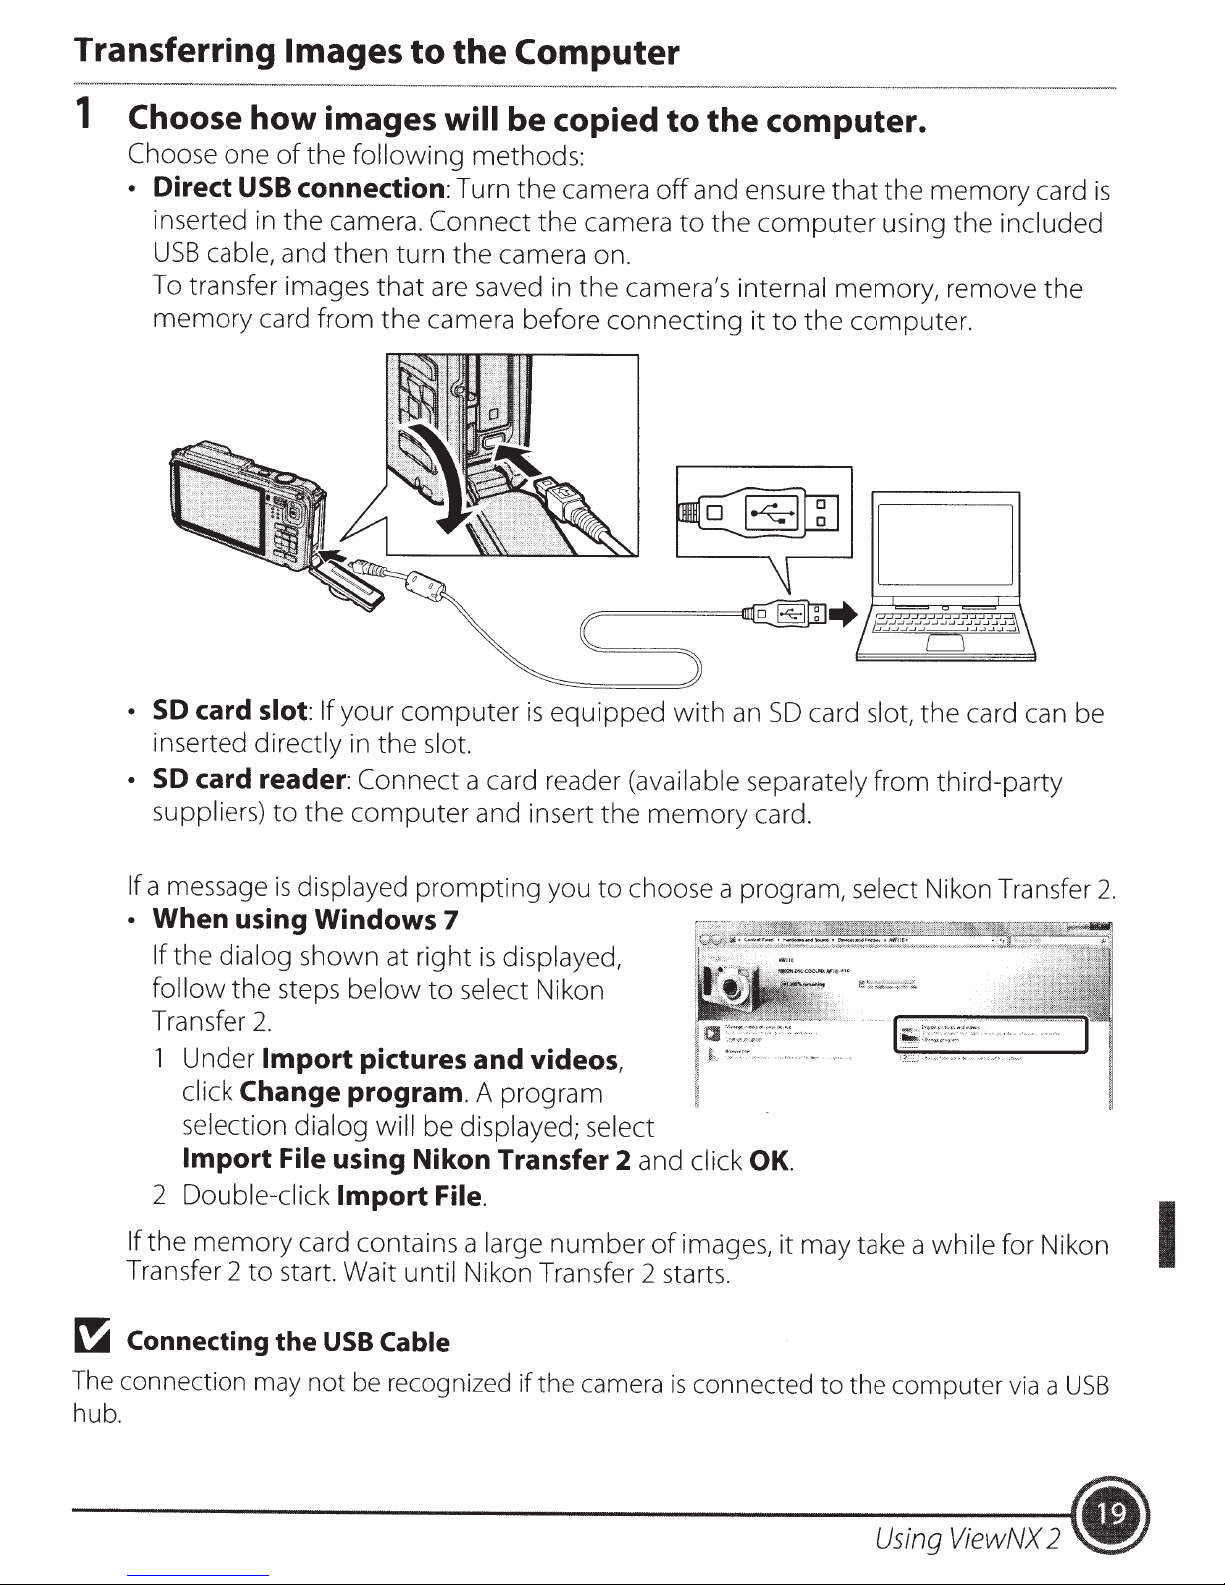
Direct
inserted
USB
To transfer images
memory
how
one
USB
in
cable,
card from
Images
to
images
of
the
following
connection:
the
camera.
and then turn
that
the
the
will
Connect
the
are saved in
camera before connecting
Computer
be copied
methods:
Turn
the
the
camera on.
camera
camera
the
camera's internal
to
the
off
and ensure
to
the
computer.
that
the
computer
it
to
the
using
memory, remove
computer.
memory
the
included
card
the
is
•
SO
card slot:
inserted
•
SD
suppliers)
If a message
•
When using Windows
If
the
follow
Transfer
1
Under
click
selection dialog will be displayed; select
Import
2
Double-click
If
the
memory
Transfer
directly
card reader:
dialog
the steps
2.
Change program.
2
to
If
your
to
the
is
displayed
computer
in
the
slot.
Connect a card reader
computer
prompting
is
and insert
7
shown at right
below
Import
File using Nikon Transfer 2
card contains a
start. Wait
pictures and videos,
Import
until
is
displayed,
to
select
A
program
File.
large
Nikon Transfer
equipped
(available separately from third-party
the
you
to
choose a program,
Nikon
number
with
an
memory
and click
of
images,
2
starts.
SO
card
slot,
card.
select
OK.
it
may take a while
the
card can be
Nikon Transfer
for Nikon
2.
I
~
Connecting
The
connection
hub.
the
may
USB
not
Cable
be
recognized if the
camera
is
connected to the computer
Using
ViewNX
via
a
USB
2
~)
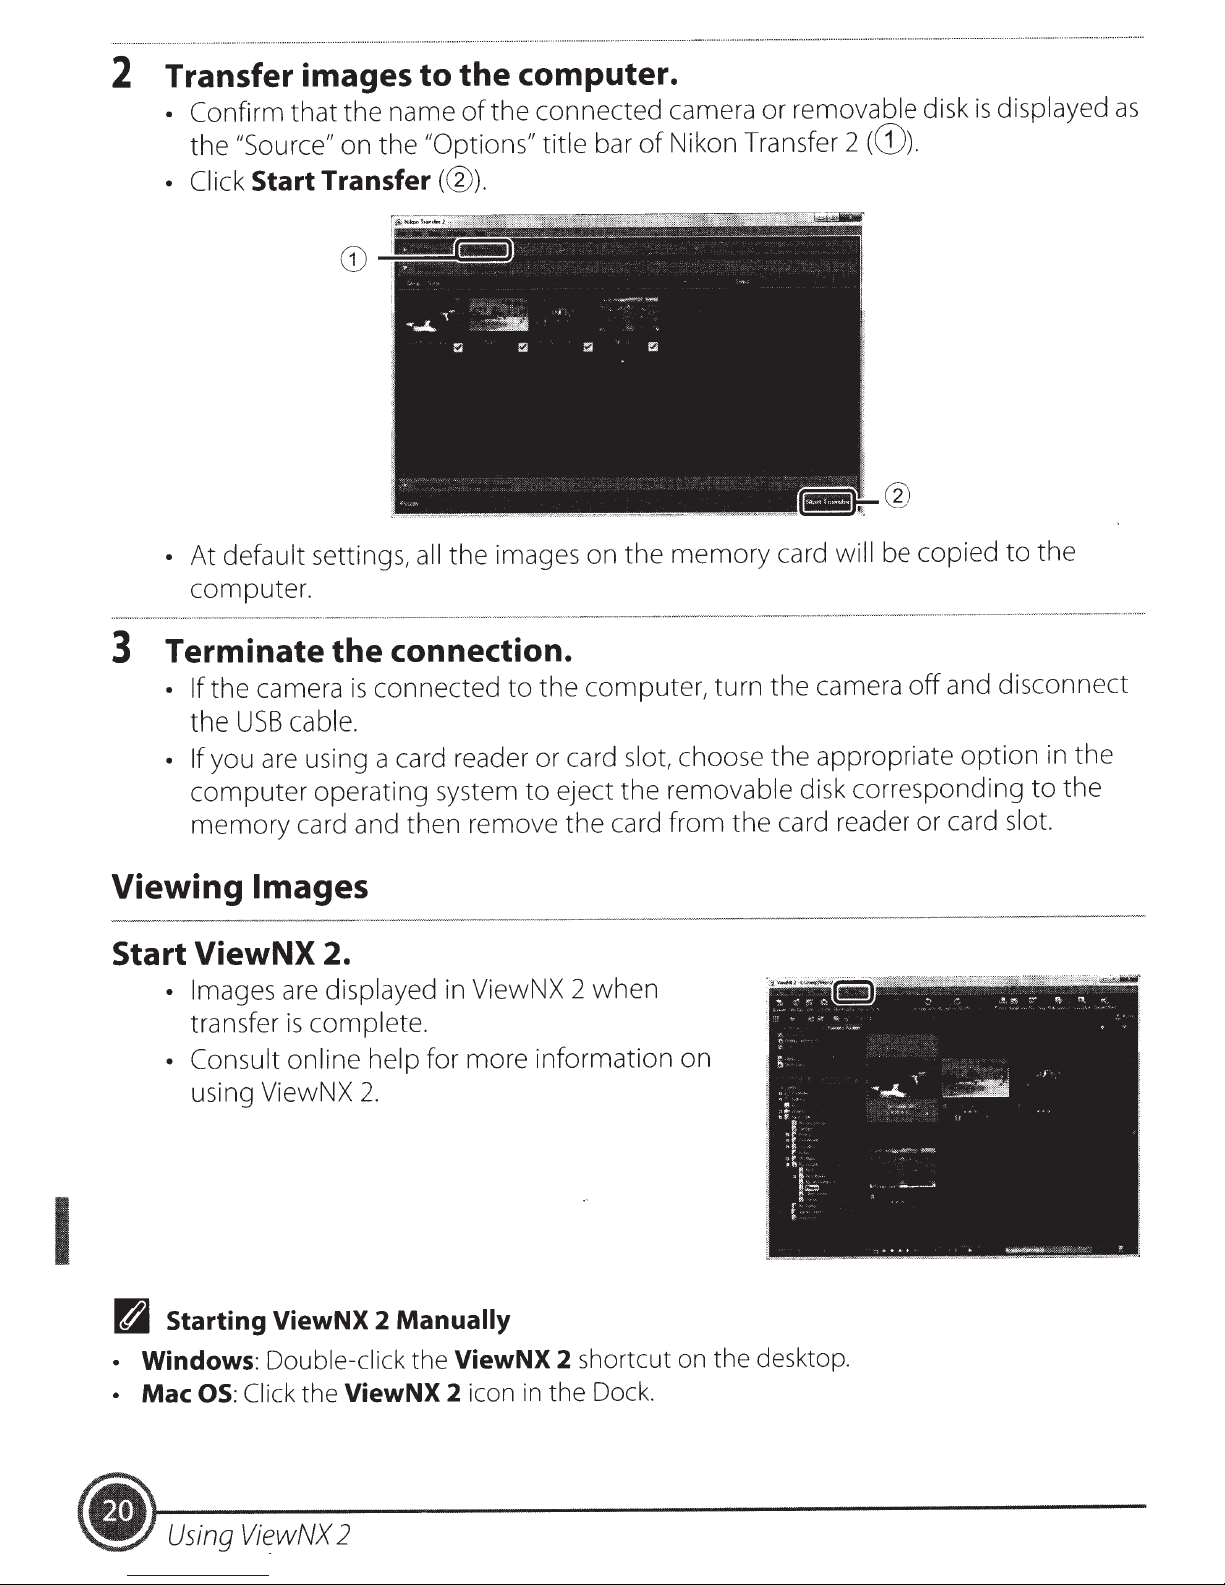
Transfer images
2
• Confirm
the
that
"Source"
the
on
the
to
name
the
of
"Options" title
computer.
the connected camera
Nikon Transfer 2
of
bar
removable
or
(G)).
disk
displayed
is
as
• Click
At
•
computer.
Terminate the connection.
3
• If
the
• If
computer
memory
Start
default
the camera
USB
you are using a card reader or card
Transfer((?)).
the images on
settings,
is
all
connected
cable.
operating system
card and then remove
to
the
to
memory
the
computer, turn
choose
slot,
removable
eject
the
card from
the
be copied
will
card
and disconnect
camera
the
appropriate
the
disk corresponding
card reader or card slot.
the
off
to
option
the
in
to
the
the
I
Viewing Images
Start
n
•
•
ViewNX
• Images
transfer
• Consult online help
using ViewNX
Starting
Windows:
Click
OS:
Mac
2.
displayed
are
complete.
is
2.
ViewNX 2
Double-click
ViewNX
the
in ViewNX 2
for more
Manually
ViewNX
the
icon
2
when
information
shortcut
2
the Dock.
in
on
the desktop.
on
(.
Using
ViewNX
2
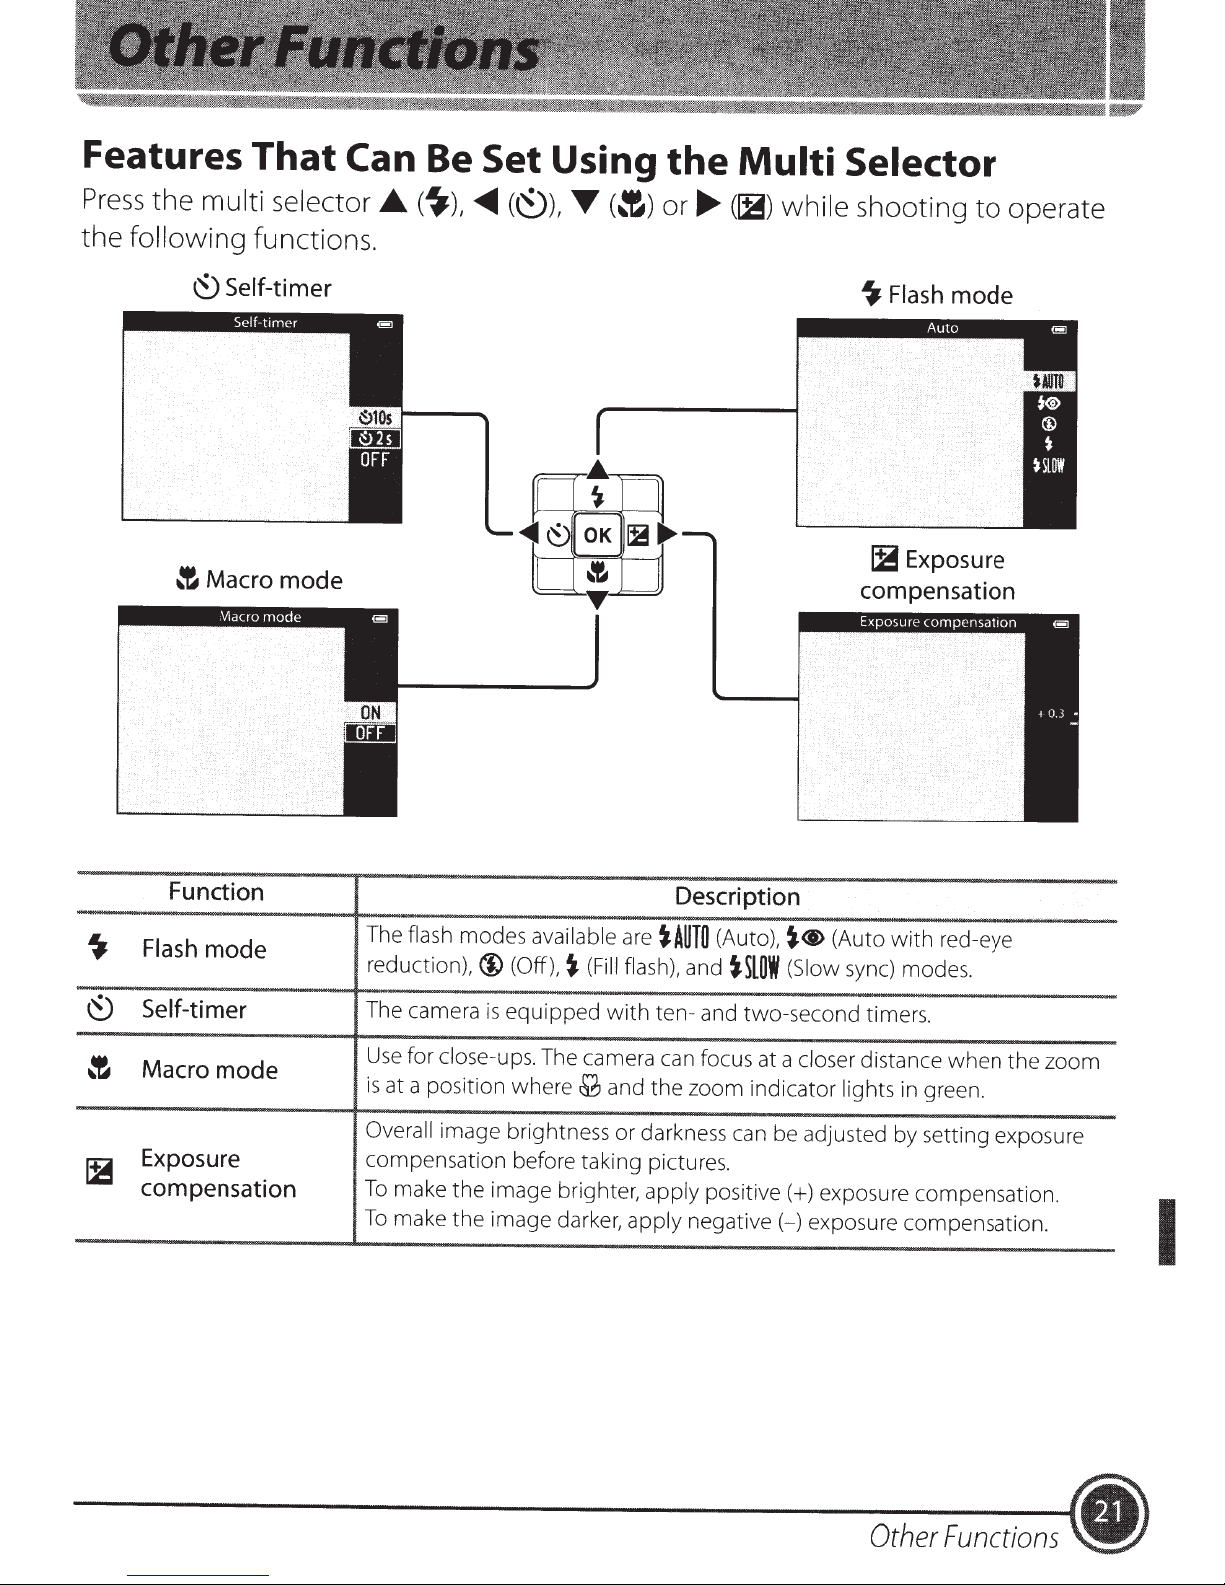
Features
Press
the
the
multi
following
That
Can
selector_.
functions.
Be
Set Using
(~),
~
(~),
T
(:t)
the
or_.....
Multi
(!B)
while
Selector
shooting
to
operate
~Self-timer
:t
Macro
mode
~Flash
~Exposure
compensation
mode
Function
~
Flash
~
Self-timer
:t
Macro
~
Exposure
compensation
mode
mode
Description
The flash modes available
reduction),@
The camera
Use
for close-ups. The camera can focus at a closer distance when the zoom
is
at a position
Overall image brightness or darkness can be adjusted by setting exposure
compensation before taking pictures.
To
make the image brighter, apply positive(+) exposure compensation.
To
make the image darker, apply
(Off),~
is
equipped
where£
are
~AUTO
(Auto),
(Fill
flash), and
with
ten- and two-second timers.
and the zoom indicator lights in green.
negative(-)
~<t>
(Auto
~SlOW
(Slow
exposure compensation.
with
sync) modes.
red-eye
I
Other
Functions
•
Selecting a Shooting
shooting
Press
the
0
button
in
Mode
mode
display
to
the shooting-mode
Choose
and
1
a shooting mode
press
the®
2
3
4
5
selection menu.
with
change
button
to
1.
2.
3.
4.1~1
5.
*The
scene
Selecting a Playback
playback
Press
the
Choose
and
the
playback-mode selection
playback
a
press
the®
button
[E]
in
mode
button
with
change
to
menu.
multi selector,
the
that mode.
to
auto mode
Easy
tJ
Scene
2
Special effects
SO
Smart portrait mode
Auto
0
icon
mode
mode*
mode
displayed will
or chosen special
Mode
display
mode
the
to
multi selector,
mode.
that
to
mode*
differ according
effects
to
mode
the chosen
.
I
1
2
3
4
[E]
1.
b
2.
3.11
f1
4.
images)
Playback
Favorite pictures mode
Auto sort
List by date mode
mode
mode
(all
• Other
Functions
Basic
Menu
Operations
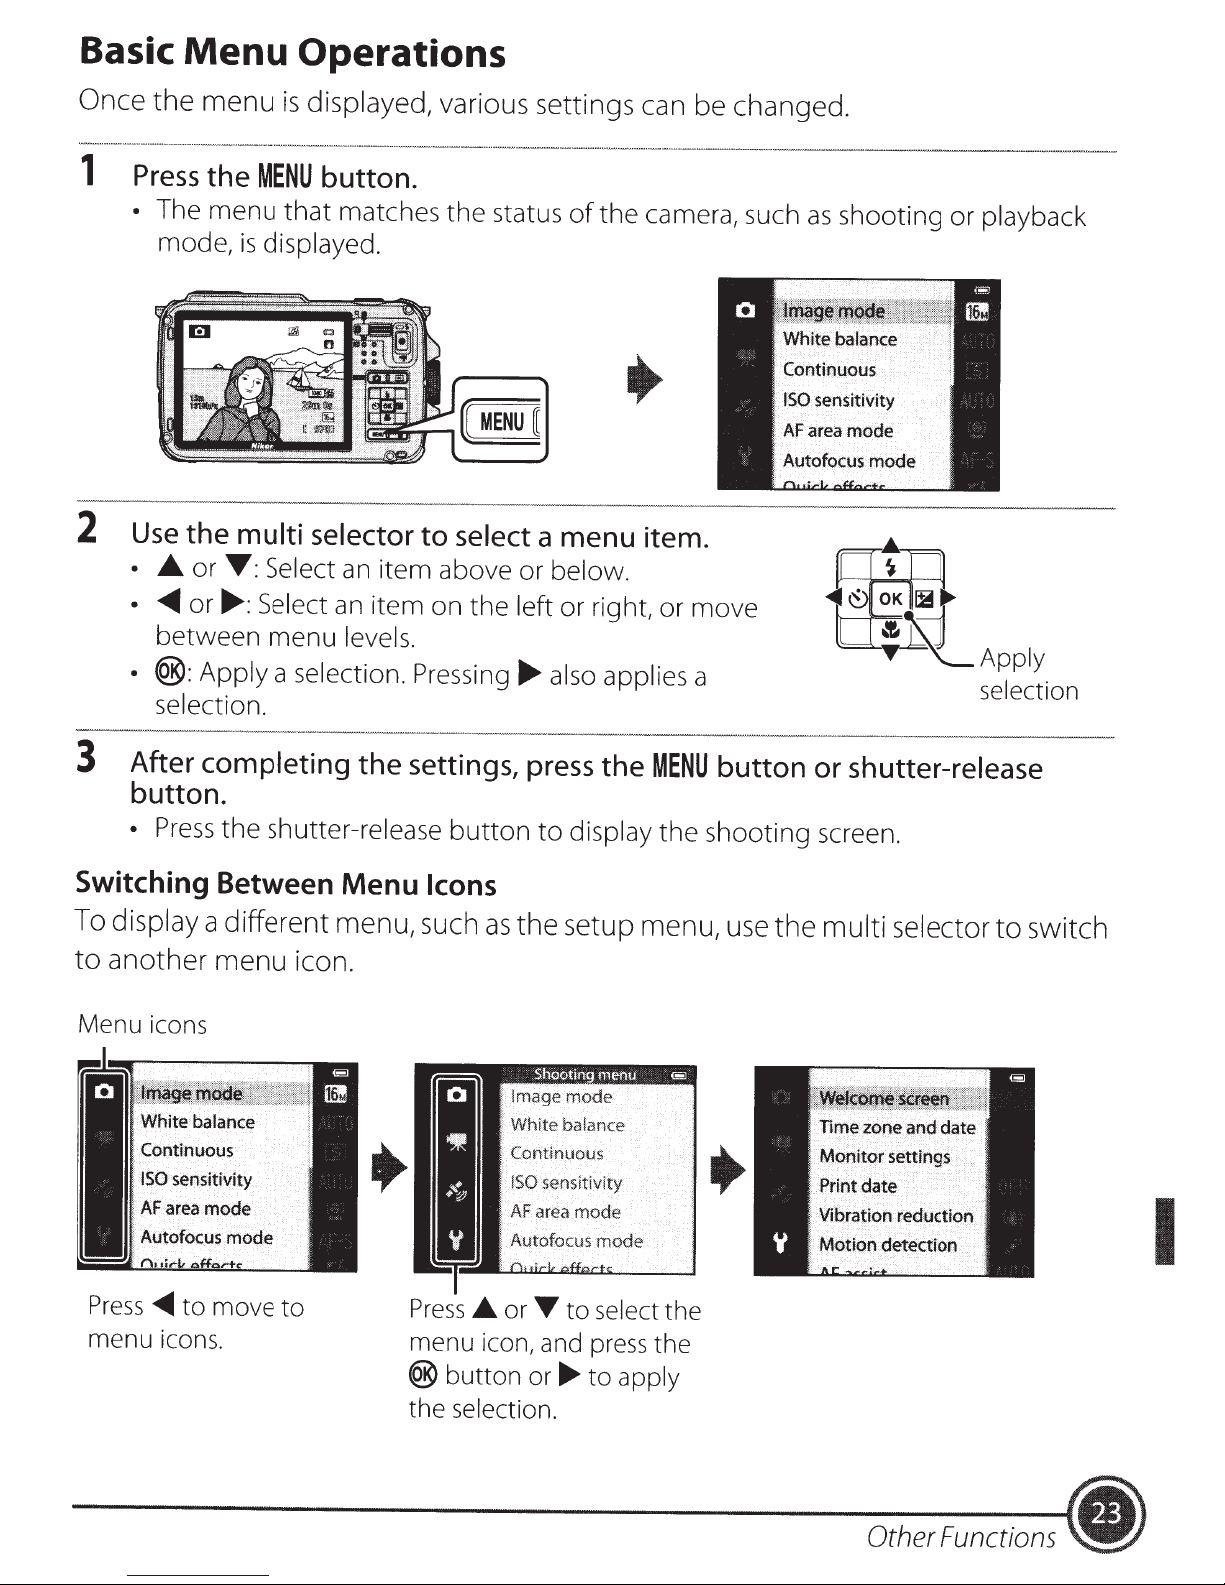
Once
1
2
· A
•
•
the
menu
Press
•
Use
the
The
menu
mode,
the
or
~or
between
®:Apply
selection.
is
displayed, various settings can be changed.
MENU
is
multi selector
T:
....
: Select
button.
that
matches
displayed.
Select
menu
a
an
an
levels.
selection.
item
to select
item
on
Pressing
the
status
above
the
of
the
camera, such
a menu item.
or
below.
left
or
right,
....
also applies
or
move
a
as
shooting
or
playback
OK~
~~~Apply
selection
3
After completing
button.
•
Press
the
shutter-release
Switching Between
To
display
to
another menu icon.
Menu icons
Press
menu icons.
a different menu, such
...._
to
move
to
the
settings,
Menu
Press
menu icon, and
®
the
button
Icons
as
A
button or
selection.
press
to
display
the
setup menu,
or
'Y
to
press
...
to
the
select
apply
MENU
the
the
shooting
the
button or
use
shutter-release
screen.
the
multi selector
to
switch
I
Other
Functions
•
Menu
Types
0
~menu
•~
of
menu icon:
Displays available
shooting mode. Depending on the current
shooting mode, the menu icon that
displayed will
icon:
Displays
recording.
menu icon:
Displays
the settings that
the
Icons
Shooting
For
settings
be different.
options menu items.
GPS
in
deal
the current
with
is
movie
~menu
Displays
playback
icon:
the settings
~'@
mode.
Playback
For
Pia
retouch
•
I
. Glamour retouch
ta imprin t
Da
•
order
nt
ri
· P
•
·-
available
for the
I
menu icon:
Y
Displays the setup menu, where you can change
general
settings.
•
Other
Functions
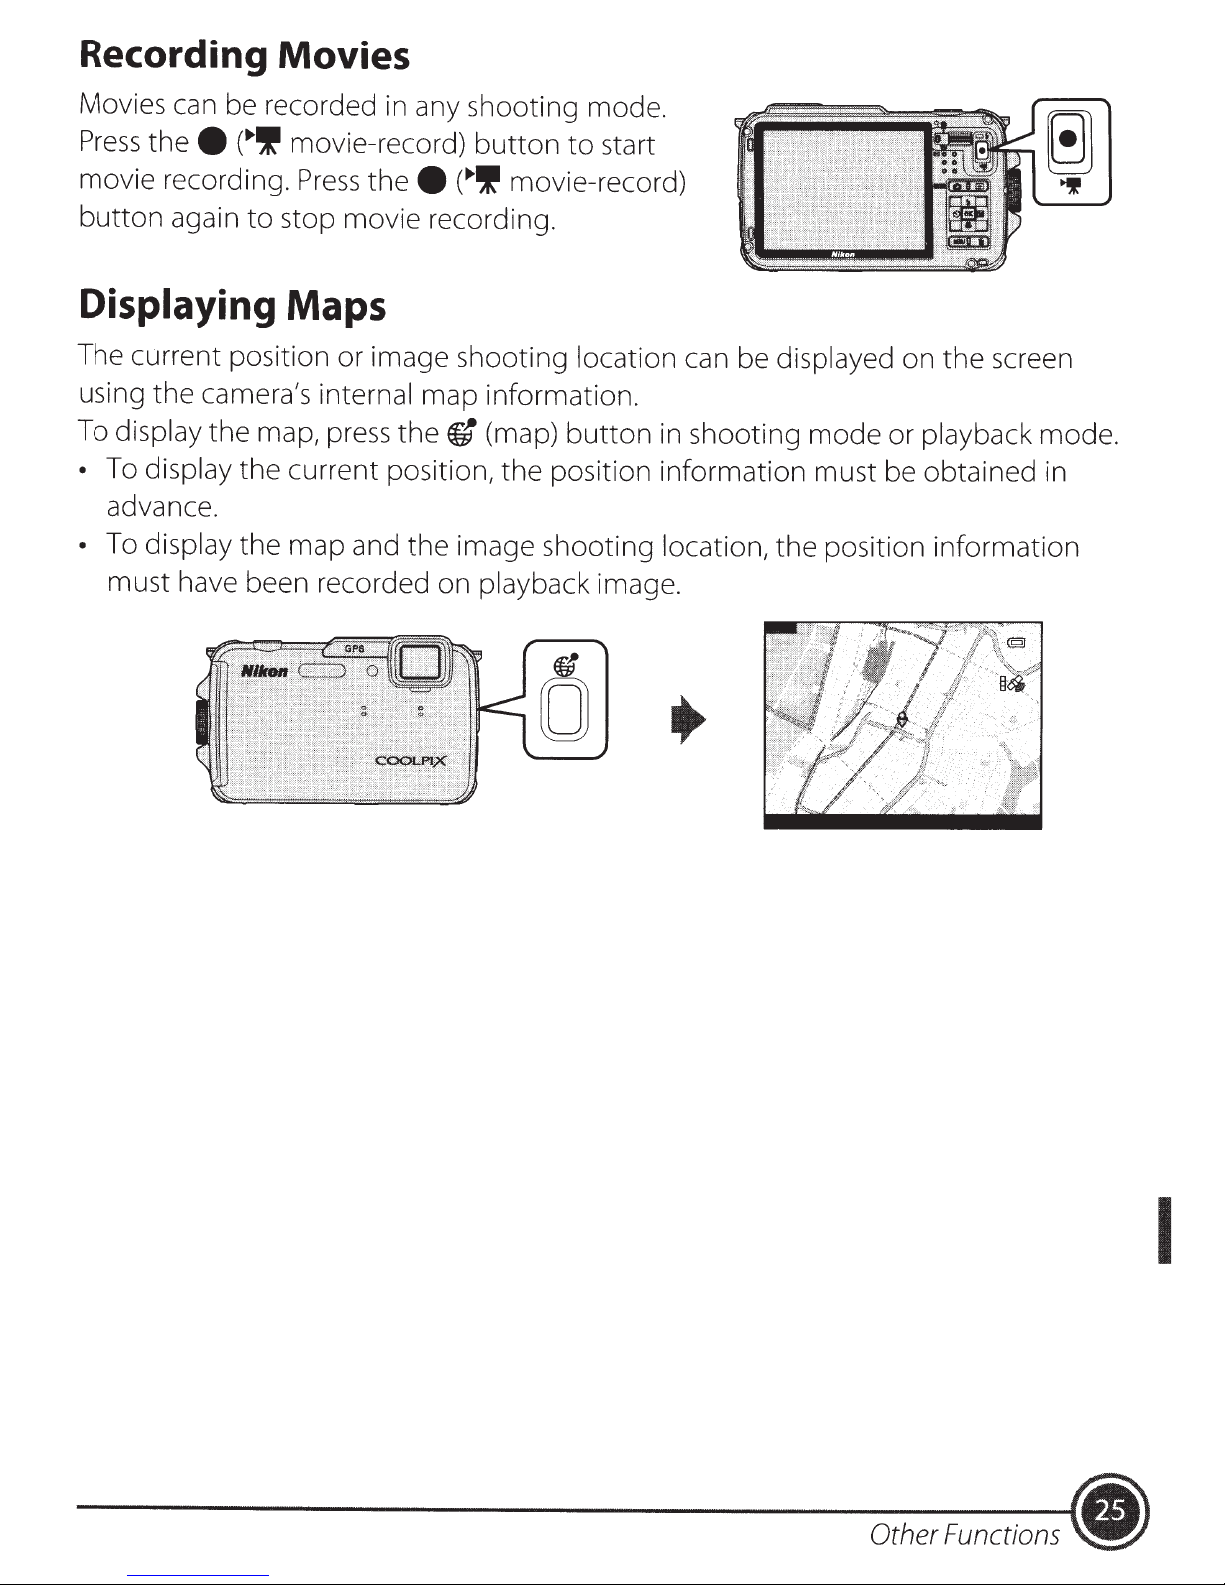
Recording Movies
Movies
Press
movie recording.
button
can
thee
again
be recorded
(..,If
movie-record)
Press
to
stop movie recording.
in
any shooting mode.
thee
button
(..,If
to
movie-record)
start
Displaying Maps
The current position or image shooting location can be displayed on
using the camera's internal map information.
To display
•
To
display the current position,
advance.
•
To
display the map and the image shooting location,
must have been recorded on playback image.
the
map,
press
the
fJ
(map)
the
button
position information must be obtained in
in
shooting
mode
the
position information
or playback mode.
the
screen
Other
Functions
I
.)
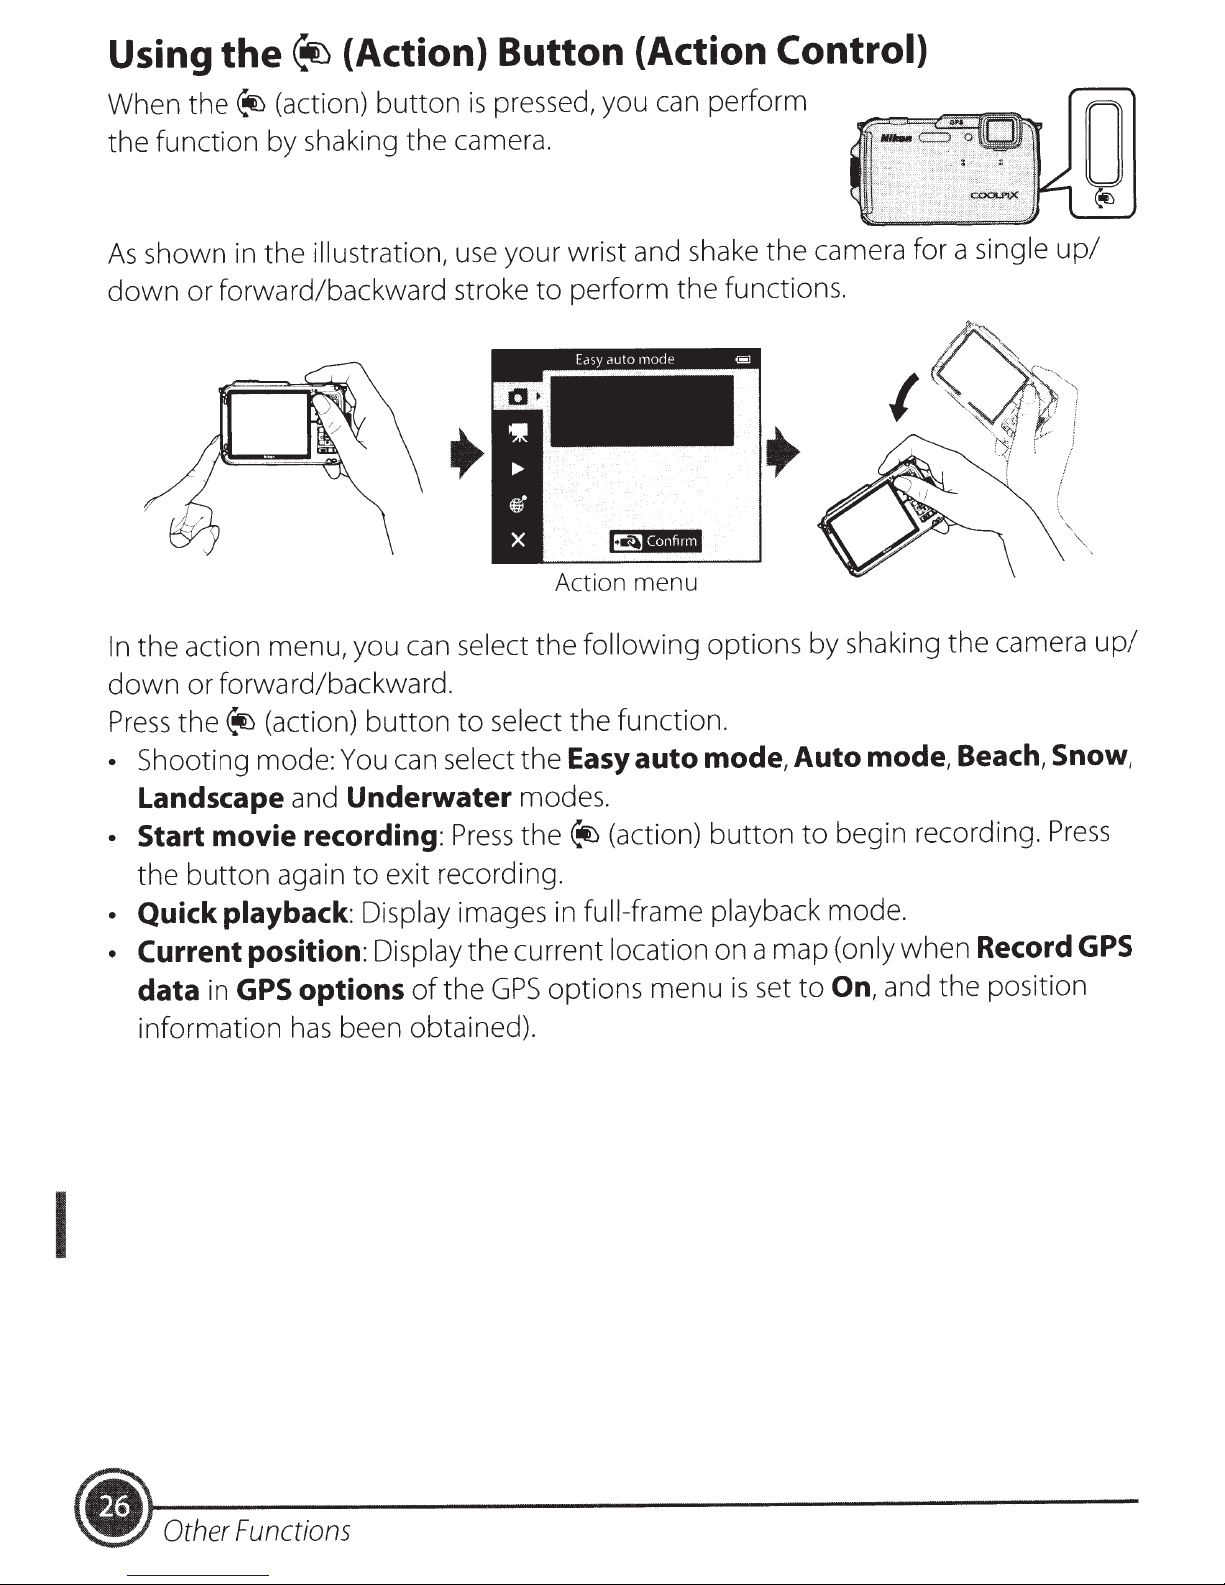
Using
When
function by shaking
the
the
the
(action)
~
(Action) Button (Action
@iJ
pressed, you can perform
button
the
is
camera.
Control)
••
1~0
•·:
..
,2;:,
,
~
shown
As
down
the action menu, you can select
In
down
Press
Shooting mode: You can
•
Landscape
Start
•
in
or forward/backward stroke
or forward/backward.
the~
(action)
movie
and
recording:
button
Underwater
illustration,
the
use
to
select
Press
your wrist and shake the camera for a single
perform the functions.
to
Action menu
the
select
the
Easy
the
modes.
the~
following
function.
auto
(action)
options by shaking the camera
mode,
button
Auto
to
mode, Beach, Snow,
begin recording.
up/
up/
Press
button
the
Quick playback:
•
• Current position:
GPS
data
information
in
I
again
has
to
options
been obtained).
exit recording.
Display
Display
images in
the
the
of
GPS
full-frame
current location on a map
options menu
playback mode.
to
set
is
(only
On,
when
and the position
Record
GPS
•
Other
Functions
Playback
The
following options
Mode
can
be
performed in full-frame playback mode.
Control
Name
Playback
button
Zoom control
Multi selector
Apply
selection
button
Main
Function
•
When the camera
button
• Change the playback
selection
• Enlarge the image when operated toward
image thumbnail
toward
•
Adjust the
• While
Change the
(<IIIII),
• While the setting screen
Select
• While the enlarged image
Move the
• Display individual
• Scroll
•
Play
• Apply effects
•
Switch from image
to
• While
selection.
to
turn the camera on
screen).
W
(~).
volume
the playback
displayed
down(~)
an
item by pressing
display position.
an
image recorded
back movies.
full-frame playback
the setting screen
is
turned off,
mode
or the
for voice
and
images
to
pictures using quick effects.
calendar
screen
image by pressing
right(
is
with
thumbnail
mode.
is
press
in
(display
memo
is
displayed:
....
).
displayed:
.&.,
~,
is
displayed:
of
a sequence in
Easy
or zoomed image display
displayed, apply the
and
playback mode.
the
when operated
and movie playback.
<IIIII
or
panorama.
playback-mode
.....
hold
this
T (
);
display
up
(A),
full-frame.
left
MENU
(menu)
button
Delete
ft
button
~(action)
button
button
(map)
Display
Delete
Display
Operate the function when
and hide the menu.
images.
the location
of
a picture taken on a map.
the
camera
Other
is
shaken.
Functions
I
(.
To prevent damage
following
safety precautions
your Nikon
to
others, read the
yourself or
product
their entirety before using this equipment. Keep these
in
or injury
to
to
safety instructions where
all
those
who
use
WARNINGS
Turn
A
malfunction
Should you notice smoke or
smell
charger,
remove the battery immediately, taking
to
care
could result in injury. After removing or
disconnecting the power source, take the
equipment
representative for inspection.
off
coming from the camera or battery
unplug
avoid burns.
the battery charger and
Continued
a Nikon-authorized service
to
event
the
in
of
unusual.
an
operation
product
the
gasoline,
dust could result
A
Twisting
neck may cause suffocation.
A
Never place the strap around the neck
infant or child.
an
will read them.
flammable sprays or
as
well
as
explosion or fire.
in
strap when using
Remove
the camera underwater
the
Handle
care
the
camera strap around the
camera strap with
the
of
disassemble
A Do
Touching the internal parts
or battery charger could result in injury.
Repairs
qualified technicians. Should the camera
or battery charger break open
a fall
of
a Nikon-authorized service
to
representative for inspection, after
unplugging
the
A
I
Using the camera
flammable gases such
not
of
should be performed only by
or other accident, take the
product
the
battery.
the
use
not
Do
charger in the presence
flammable
gas
in
and/or
camera
the presence
propane and
as
the camera
as
the result
product
removing
battery
or
of
of
children
reach
Keep out
A
keep the products
not
Do
children. Doing
Particular care should be taken
infants from
small
A
Parts
the devices
for extended periods may result
temperature burns.
parts
not
Do
camera, battery charger, or
the
adapter for extended periods
AC
while
use.
the devices become hot. Leaving
of
of
may cause injury.
so
putting
their mouths.
into
remain in contact with
devices are on
the
direct contact
in
of
within
the battery or other
with
reach
prevent
to
in
or
the
low-
in
of
skin
(.
For
Safety
Your
~
Observe caution when handling
the
battery
~
Observe
the
following
precautions when handling
the
The battery may leak, overheat, or explode
if
improperly handled. Observe the
following precautions when handling the
battery for
• Before replacing the battery, turn
product
charger/
unplugged.
•
Use
Battery
battery by inserting it in the Battery
Charger MH-65 (included).
• When inserting the battery,
attempt
backwards.
• Do
attempt
insulation or casing.
• Do
excessive heat.
• Do
• Replace the terminal cover
transporting the battery. Do
transport or store
such
• The battery
fully discharged.
the product, be sure
battery
• Discontinue
you notice any change in the battery,
use
in this product:
off. If you
AC
adapter, be sure it
only the Rechargeable Li-ion
EN-EL
to
insert it upside
not
disassemble the battery or
to
remove or break the battery
not
expose the battery
not
immerse
as
necklaces or hairpins.
is
when
use
are
using the battery
12
(included). Charge the
do
down
to
flame or
in
or expose
with
prone
To
no charge remains.
immediately should
metal objects
to
leakage
avoid damage
to
remove the
to
when
not
the
is
not
or
to
water.
when
to
battery charger
• Keep dry. Failure
precaution could result in fire or electric
shock.
• Dust on or near the metal parts
plug should be removed
cloth. Continued
not
• Do
battery charger during lightning
storms. Failure
precaution could result in electric
shock.
• Do
bend the
heavy objects, or expose it
flames. Should the insulation be
damaged and the wires become
exposed, take it
service representative for inspection.
Failure
could result in fire or electric shock.
• Do
charger
observe this precaution could result in
electric shock.
• Do
adapters designed
voltage
inverters. Failure
precaution could damage the
or cause overheating or fire.
handle the plug or
not
damage, modify, forcibly
USB
to
observe these precautions
not
handle the plug or battery
with
not
use
with
to
another or
to
observe this
of
with
a dry
use
could result
go
near the
to
observe this
cable, place it under
to
heat or
to
a Nikon-authorized
wet
hands. Failure
travel converters or
to
convert from one
with
to
observe this
DC
-to-AC
product
to
tug
the
in
fire.
or
as
such
• If liquid from the damaged battery
comes in contact
rinse immediately
discoloration or deformation.
with
clothing or skin,
with
plenty
of
water.
~
Use
appropriate cables
When connecting cables
output
or sold by Nikon for the purpose,
maintain compliance
regulations.
jacks,
use
only the cables provided
to
with
For
the
input
product
Your
Safety.
to
and
I
Handle
.Lt
careful
Be
objects
other
or
.Lt
The
should
equipment.
CD
damage
.Lt
Using
are
CO-ROMs
CO-ROMs included
not
player could cause hearing
Observe caution when using
flash
the
moving parts with care
your fingers
that
pinched by
not
moving
be played back on audio
the
flash close
parts.
with
Playing CO-ROMs
equipment.
your subject's
to
other
or
lens cover
the
this device
an
on
or
loss
CD
audio
the
eyes
camera
.Lt
result in injury
.Lt
This could cause a traffic accident.
.Lt
Do
This could damage
visual impairment.
Do
time
long
(32°F)
skin
the
If
Drivers
camera
Observe caution when using
movie light
not
or
contacts
look directly
touch
not
the
temperatures
low
in
lower
metal parts etc.,
skin. Wear gloves etc.
the
to
should
while driving.
not
into
eyes or result
the
directly
operate
movie light.
the
for
ooc
of
may
it
the
the
in
a
could cause temporary visual impairment.
Particular care should be observed
photographing
should be no
subject.
the
not
Do
.Lt
flash
or object
observe this precaution could
Failure
result in burns
.Lt
Turn
airplane
before boarding
tracking information recording function
OFF.
instructions
to
Turn
inside an
the
End
the
power
during
recording
infants,
than
less
operate
window
fire.
or
power
airplane
off
take
an
the
of
when
m
1
the
touching a person
off
while inside the
or landing. Also,
off
airplane, set
logs. Follow
all
of
hospital
the
(3ft
flash
when using
the
or
when
if
flash
.) from
in
4
with
hospital
the
the
GPS
the
using
to
Images
30
.Lt
continuously view
not
Do
this device for extended
whether
display.
use and
to
use
with
on a television, monitor,
In
follow
should any
the
of
recorded
periods,
other
or
whose visual systems
consult a pediatrician
prior
Prolonged viewing
cause eye strain, nausea,
Cease
occur and consult a physician
30
of
case
still maturing,
are
ophthalmologist
or
their
30
of
instructions.
images may
discomfort.
or
these symptoms
images
children
necessary.
if
hospital.
a
while
waves
I
the
the
Remove
cause
inserted in
•
in
emitted
electronic systems
instruments
Eye-Fi
the
the disruption, beforehand
of
the
Safety
Your
For
The electromagnetic
by this camera may disrupt
the
of
hospital.
the
of
card, which can be
camera .
airplane
if
or
the
 Loading...