

Nikon COOLPIX 990 Owner Manual

1
Contents
The Guide to Digital Photography
with the
COOLPIX 990
DIGITAL CAMERA
Electronic Edition
Product Documentation
First Steps
Basic Photography
Advanced Photography
Playback
Camera Setup
Connections
Technical Notes
Click
to go

Product Documentation
Thank you for your purchase of a COOLPIX 990 digital camera. The documentation for this product includes the manuals
listed below. Please be sure to read all instructions thoroughly
to get the most from your camera.
Fast Track Guide/For Your Safety
In addition to taking first time users step-by-step through
the process of setting up and using the camera, the printed
Fast Track Guide gives a quick overview of camera settings.
For Your Safety, printed on the reverse of the Fast Track Guide,
lists warnings and cautions that should be observed when
using and storing your camera, together with legal information. Please keep this document where all those who use
the camera will read it.
Menu Guide
This printed guide provides an overview of the camera’s
menus.
Guide to Digital Photography
The Guide to Digital Photography (this manual, available in both
electronic and printed formats) provides detailed information about your camera. The electronic edition features
clickable links not available in the printed guide; otherwise
the contents of the two manuals are identical. Both are
divided into the following chapters:
First Steps
Guides you step-by-step through the process of setting up
your camera and taking your first photograph
Basic Photography
Introduces the shooting options available in A-REC mode, a
“point-and-shoot” mode that gives you control over flash,
focus, and image quality settings, while the camera automatically adjusts other settings for the best results
Advanced Photography
Details the shooting options available in M-REC mode, an
advanced shooting mode that gives you complete control
over camera settings
Playback
Explains how to view and delete the photographs stored in
the camera’s memory
Camera Setup
Details the options available in the SET-UP menus
Connections
Describes how to connect your camera to a television or
computer
Technical Notes
Provides information on caring for your camera, camera
accessories, specifications, and troubleshooting
2
Product Documentation

To make it easier to find the information you need, the following symbols and conventions are used:
A table of contents appears on the first page of the
About
electronic Guide to Digital Photography. In addition,
each chapter begins with an outline of the topics
covered. Click on the heading to open the guide
to the indicated chapter or section.
Click the icon at the bottom right corner of
each page for an explanation of the symbols and
conventions used in this manual.
This icon marks cautions, information that you
should read before use to prevent damage to your
camera.
This icon marks notes, information that you should
read before using your camera.
This icon marks tips, additional information you may
find helpful when using your camera.
This icon marks references to other documentation or to another part of this manual.
3
Product Documentation
Click the icon at the bottom of each page for
an explanation of how to use the camera menus.
Click the icon at the bottom of each page for
a quick overview of camera menus.
Click the icon at the bottom of each page to
view an illustration identifying camera parts.
Blue text indicates a link to another part of the
Guide to Digital Photography. To follow the link, click
the blue text.
Printing this manual
While this guide is also available in printed format, you may find it convenient to print portions of the electronic edition for ease of reference. The
desired pages can be printed using the Print… command in the Adobe
Acrobat Reader File menu.
This icon is used throughout these manuals to mark
cross references to the Fast Track Guide.
This icon is used throughout these manuals to mark
cross references to For Your Safety.
This icon is used throughout these manuals to mark
cross references to the Guide to Digital Photography.
Life-Long Learning
As part of Nikon’s “Life-Long Learning” commitment to providing ongoing
product support and education, a continuing set of new and updated information is always available on-line at www.nikon-euro.com. Please visit this
site to keep up-to-date with the latest in product information, tips, FAQs,
and general advice on the subjects of Digital Imaging and Photography.

First Steps
4
This chapter:
• Introduces you to the parts of the COOLPIX 990 and the
camera menus
• Takes you step-by-step through the process of setting up
your camera
• Outlines the steps involved in taking photographs and playing them back
First Steps
Getting to Know the COOLPIX 990
Putting Batteries in the Camera
Inserting the Memory Card
Choosing a Language
Setting the Time and Date
Taking a Photograph
Playback and Deletion
Click
to go
Getting to Know the COOLPIX 990
Take a few moments to familiarize yourself with camera controls, displays, and menus.
The lens section is attached to the camera body by a hinge that permits
the lens to be rotated through 270°. For more information, see:
“First Steps: Taking a Picture”
5
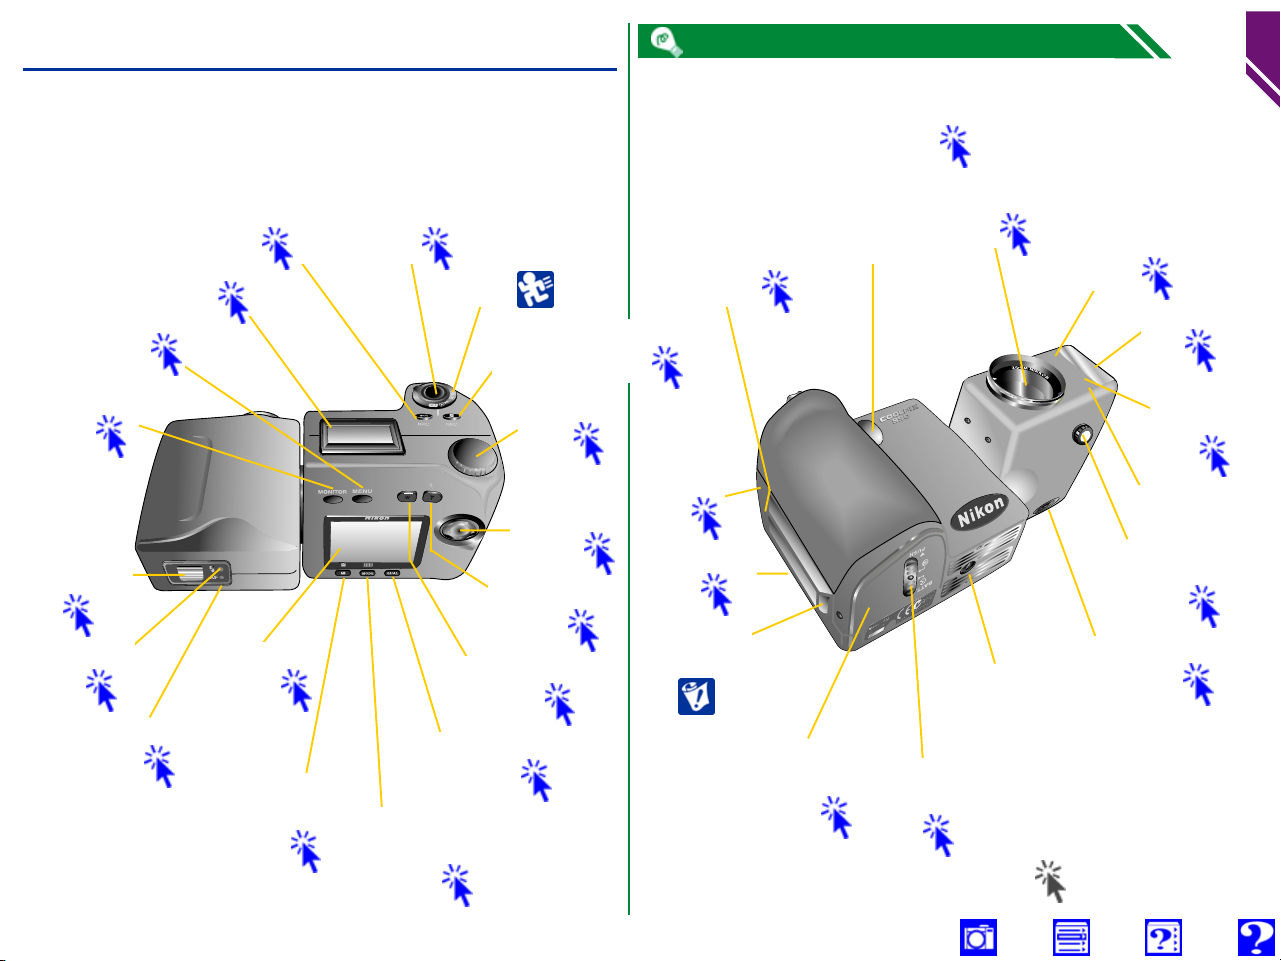
First Steps: Getting to Know the COOLPIX 990
Control panel
MENU button
MONITOR
button
Viewfinder
eyepiece
Flash-ready
lamp
Autofocus
lamp
MODE (FUNC 1)
button
LCD
Monitor
Focus mode
(Delete)
button
Shutter-release
button
Mode dial
Image-quality/
Size button
Flash/Sensitivity
(Thumbnail)
button
Exposure compensation
(FUNC 2) button
Command
dial
Multi
selector
Zoom-in (Tele)
button
Zoom-out (Wide)
button
USB/serial
connector
VIDEO
OUT
Memory-card
slot
Eyelet for
camera strap
Battery-
chamber
cover
DC-IN
connector
chamber latch
Battery-
Lens
Tripod
socket
Viewfinder
Built-in
flash
Red-eye
reduction
lamp
Photocell
Connector
for external
flash
Diopter-adjust-
ment dial
Click
for more information
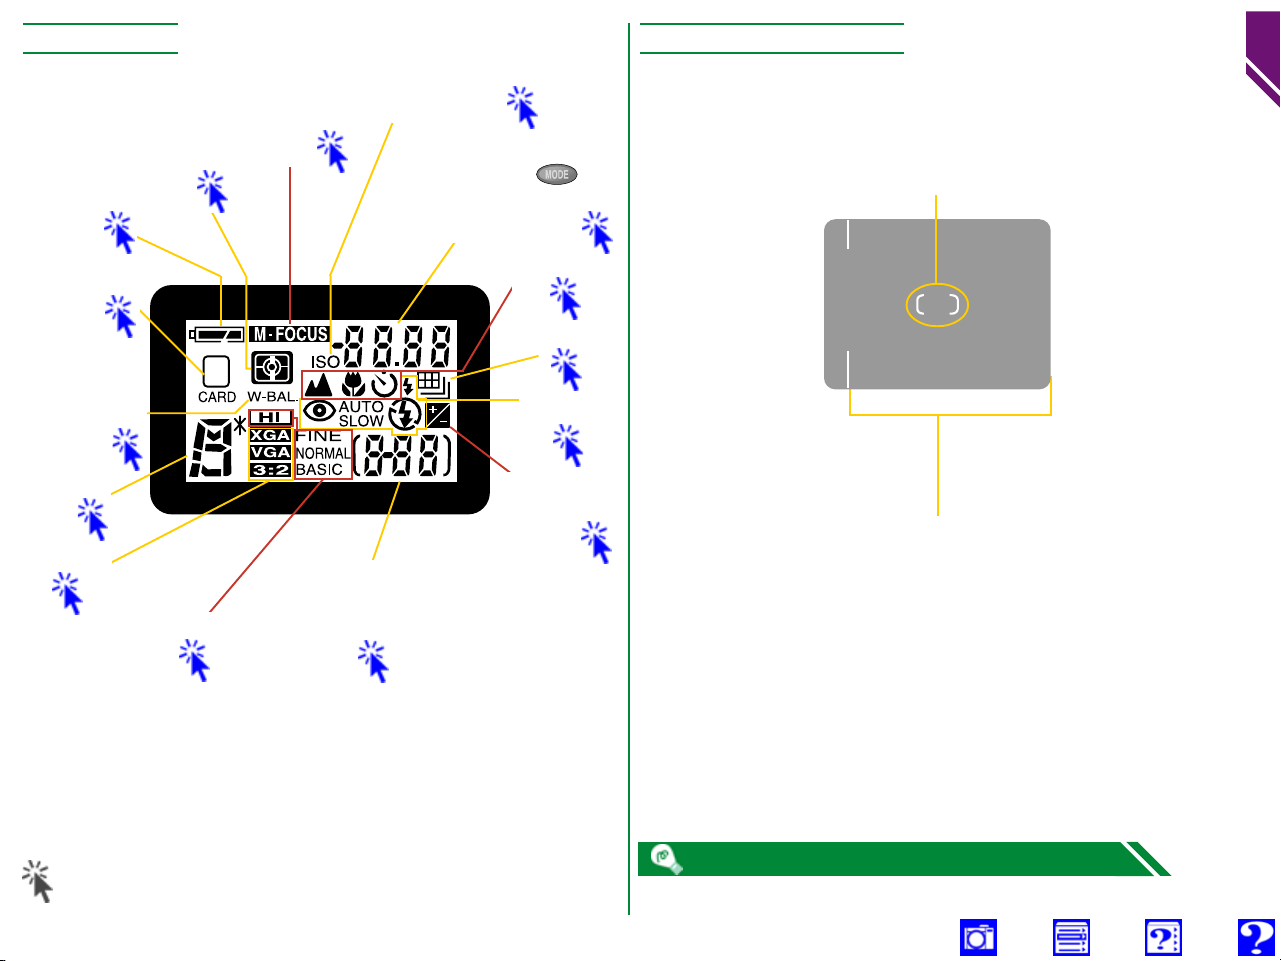
Control Panel Through the Viewfinder
Sensitivity (ISO equivalency)
Battery
indicator
Metering
mode
Manual focus
indicator
indicator
Shutter-speed/aperture
display (press to
switch between shutter-
speed and aperture)
automatic AF area selection (M-REC)
Focus target (A-REC)/
Center focus area for manual or
6
First Steps: Getting to Know the COOLPIX 990
Memory-card
indicator
White-balance
indicator
(FUNC. 1/
FUNC. 2)
Exposure
mode
Image size
Image quality
Exposure count display
(shows number of
exposures remaining)
Focus mode
Continuous
Flash mode
Exposure
compensation
indicator
Use this area to frame
photographs at ranges of
less than 90 cm (1 yd)
Click
for more information
Use the diopter-adjustment dial to adjust viewfinder focus.

LCD Monitor
FINE
GA
ISO
1 2 354
27
+0.7
24
22
20
26
25
23
21
NONOV
BSS
WB-L
AE-L
19
1/60F2.7
P
18
1 Zoom indicator
2 Digital zoom
3 Focus mode/manual focus dis-
tance
4 External flash indicator
5 Flash mode (built-in flash)
6 Battery indicator
7 Image sharpening
8 White-balance program
9 Sensitivity (ISO equivalency)
10 Image adjustment
11 Image size
12 Image quality
13 Number of exposures remain-
ing at current settings
14 Exposure compensation
15 Aperture (f number)
16 Shutter speed
X2.0
31
6
7
8
28
29
ISO
9
10
11
VGA
30
15
141617
17 Exposure mode
18 Metering mode
19 Continuous (multi-shot) mode
20 Exposure bracketing indicator
21 Auto-exposure lock
22 White-balance lock
23 Best-shot selection
24 Lens converter indicator
25 Current folder
26 User set number
27 Self-timer indicator
28 Auto-exposure target (spot
metering)
29 Focus areas
30 Exposure display (manual expo-
sure mode)
31 “Date not set” icon
FINE
[
10
]
12
13
Camera Menus
Changes to some settings can be made with the help of menus
that appear in the LCD monitor. Separate menus are available
for each operating mode:
Mode
Menu
Controls
Basic camera setup (e.g., formatting
memory cards, setting time and
A-REC,
M-REC,
PLAY
SET-UP
date). SET-UP menus for M-REC
and PLAY accessible from SHOOT-
ING and PLAY BACK menus
respectively. Options available
depend on operating mode.
M-REC
PLAY
SHOOTING
PLAY BACK
Advanced shooting options (e.g.,
white balance, metering)
Playback options
Menu operations are performed with the multi selector, the
MENU button, and the command dial, as described on the pages
that follow.
7
First Steps: Getting to Know the COOLPIX 990

Viewing the menus
MENU
PAGE2
Press the MENU button to display the menu for the current mode.
W
HITE BALANCE
A
1
2
• The menu can be hidden by pressing the MENU button when is displayed in the lower left corner of the LCD monitor (to clear the M-REC menu
from the monitor when
A
S
A
MENU
PAGE2
SELECT SET
button twice: once to display the second page of the M-REC menu, the second
time to clear the menu from the screen).
Making a selection
Use the multi selector to make a selection.
8
First Steps: Getting to Know the COOLPIX 990
is displayed as shown at left, press the MENU
1
Highlight
menu item
4
Make selection
1
2
S
1
2
S
A
A
A
MENU
A
A
A
MENU
PAGE2
PAGE 2
METERING
SELECT SET
METERING
SELECT SET
2
Display
options
1
2
S
A
A
A
MENU
METERING
M
atrix
Spot
Center-Weighted
S
pot AF Area
OFF
SELECT SET
3
Highlight
option
1
2
S
MENU
A
A
A
OFF
METERING
M
atrix
Spot
Center-Weighted
S
pot AF Area
SELECT SET
• To go back one step, press the multi selector to the left.
• The selection for some menu options is made from a sub-menu. Repeat steps 3
and 4 to select the desired setting from the sub-menu.
• Changes to settings apply as soon as the selection is made.
• In M-REC mode, the view through the lens is visible behind the main menu. Photographs can be taken while the menu is displayed by pressing the shutter-release
button.
• In A-REC mode, the view through the lens can be restored by half-pressing the
shutter-release button. You can take a picture at any time by pressing the shutterrelease button all the way down. The A-REC menu will be restored when you
remove your finger from the shutter-release button.
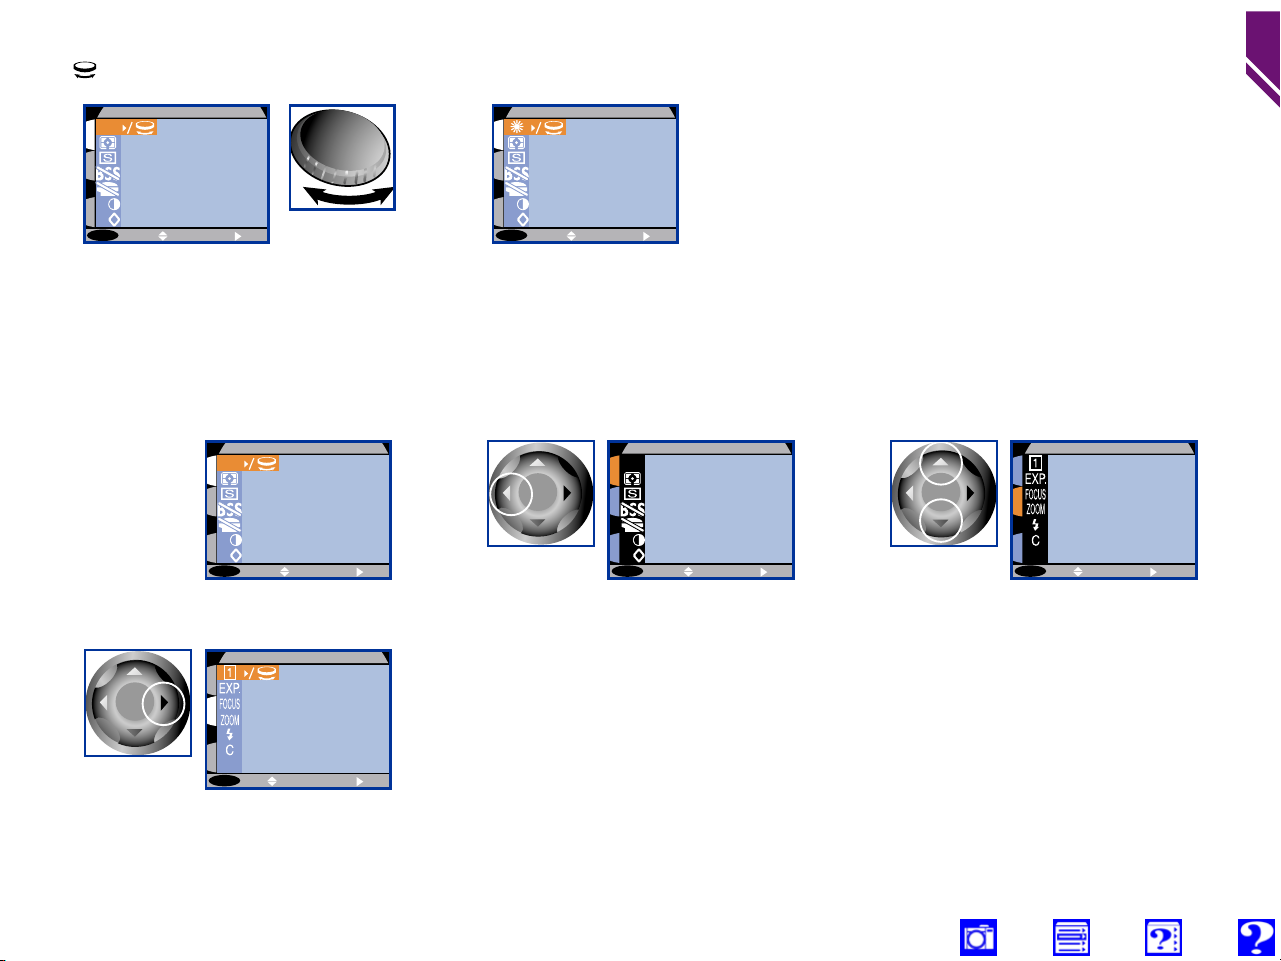
Using the command dial to make a selection
A icon next to a menu item indicates that the command dial can be used instead of the multi selector to make a selection.
W
1
W
HITE BALANCE
A
1
2
2
1
2
HITE BALANCE
Stop when
desired option
is displayed
• Changes to settings apply as soon as
the selection is made. You can then
make further changes to other settings
S
A
A
MENU
PAGE2
SELECT SET
Rotate
command dial
S
A
A
MENU
PAGE2
SELECT SET
as described above, or use the MENU
button to clear the menu from the display.
Multi-page menus
Use the multi selector to move between pages in the M-REC menu, or to access the SET-UP menu from the M-REC and
playback menus.
W
Position
1
cursor in main
menu
HITE BALANCE
A
1
2
2
A
1
2
SHOOTING MENU 1
3
SHOOTING MENU 2
1
2
9
First Steps: Getting to Know the COOLPIX 990
4
Display
selected page
S
1
2
S
A
A
MENU
MENU
S
SELECT SET
PAGE 2
USER SETTING
SELECT SET
OFF
A
Highlight page
tab
S
A
MENU
PAGE 2
SELECT SET
Highlight page
number (S for
S
MENU
S
OFF
SELECT SET
SET-UP menu)
• You can also go from Page 1 to Page 2 of the M-REC menu by pressing the MENU
button once.
• The SET-UP menu for playback mode can also be accessed from the main playback
menu. The SET-UP menu for M-REC can be accessed from the second page of the
M-REC menu.

The A-REC Menu
OFF
SET-UP
SELECT SET
Folders
Monitor Options
Shutter Sound
Auto Off
Seq. Numbers
CF Card Format
S
Date
MENU
Options
NIKON
Brightness
Hue
ON
OFF
30S
1M
5M
30M
OPTIONS
New
Rename
Delete
BRIGHTNESS
HUE
NEW
L
M
NIKON
O
P
RENAME
NOV
SHOW
DELETE
NOV
SHOW
RENAME
Q
R
SHOW
T
U
DELETE
SHOW
deleting folder?
No
Yes
10
First Steps: Getting to Know the COOLPIX 990
DATE
YMD
2000.01.01
00:00
ON
OFF
Reset
CF CARD FORMAT
WARNING!
All images will
be deleted!
No
Format
Click
for more information

g
The M-REC Menu, Page 1 The M-REC Menu, Page 2
hite
et
Incandescent
Fluorescent
loudy
W
A
1
2
A
S
A
MENU
IMAGE SHARPENING
Auto
A
High
Normal
Low
Off
A
W
HITE BALANCE
PAGE2
A
0
SELECT SET
IMAGE ADJUSTMENT
Auto
Normal
More Contrast
Less Contrast
Lighten Image
Darken Image
Black&White
HITE BALANCE
Auto
W
hite
Bal Preset
Fine
Incandescent
Fluorescent
C
loudy
S
peedlight
Normal
Wide Adapter
Telephoto 1
Telephoto 2
Fisheye 1
Fisheye 2
WHITE BALANCE PRESET
Cancel
Measure
METERING
M
atrix
Spot
enter-Weighted
C
S
pot AF Area
CONTINUOUS
Single
Continuous
Multi-shot 16
VGA Sequence
Ultra HS
Movie
BSS
OFF
ON
LENS
Click
for more information
RESET ALL
Reset all settings
to default values?
No
Reset
+
0.3
0
– 0.3
Int & Ext Active
Int Flash Off
le Power
1
2
S
S
MENU
SPEEDLIGHT OPT.
Variable Power
Speedli
ht Cntrl
OFF
USER SETTING
EXPOSURE OPTIONS
AE Lock
Auto Bracketing
Exp +/–
USER SETTING
SELECT SET
FOCUS OPTIONS
AF Area Mode
Auto Focus Mode
Focus Confirmation
Distance Units
ZOOM OPTIONS
Digital T ele
Startup Position
Fixed Aperture
OFF
ON
Reset
OFF
ON
+
0.3
0
– 0.3
Auto
M
anual
Off
Continuous AF
Single AF
MF
ON
OFF
m
ft
ON
OFF
Last Position
Wide
Tele
OFF
ON
11
First Steps: Getting to Know the COOLPIX 990

The M-REC Set-up Menu
NEW
L
M
NIKON
BRIGHTNESS
Display Mode
Brightness
Hue
DISPLAY MODE
ON
Review Only
Preview Only
Monitor Off
HUE
Click
for more information
12
First Steps: Getting to Know the COOLPIX 990
O
P
RENAME
NOV
SHOW
RENAME
Q
R
SHOW
T
U
DELETE
deleting folder?
No
Yes
SHOW
Options
NIKON
OPTIONS
New
Rename
Delete
DELETE
NOV
SHOW
NTSC
PAL
SET-UP
Folders
Monitor Options
Controls
Auto Off
Seq. Numbers
CF Card Format
Shutter Sound
Shot Confirm Lamp
Date
Video Mode
Language
D
E
F
J
DATE
ON
OFF
ON
OFF
30S
1M
5M
30M
ON
OFF
Reset
CF CARD FORMAT
Memorize
Func.1
Func.2
MEMORIZE
Mode
Done
FUNC. 1
Mode
White Balance
Metering
FUNC. 2
Mode
White Balance
Metering
YMD
2000.01.01
00:00
WARNING!
All images will
be deleted!
No
Format
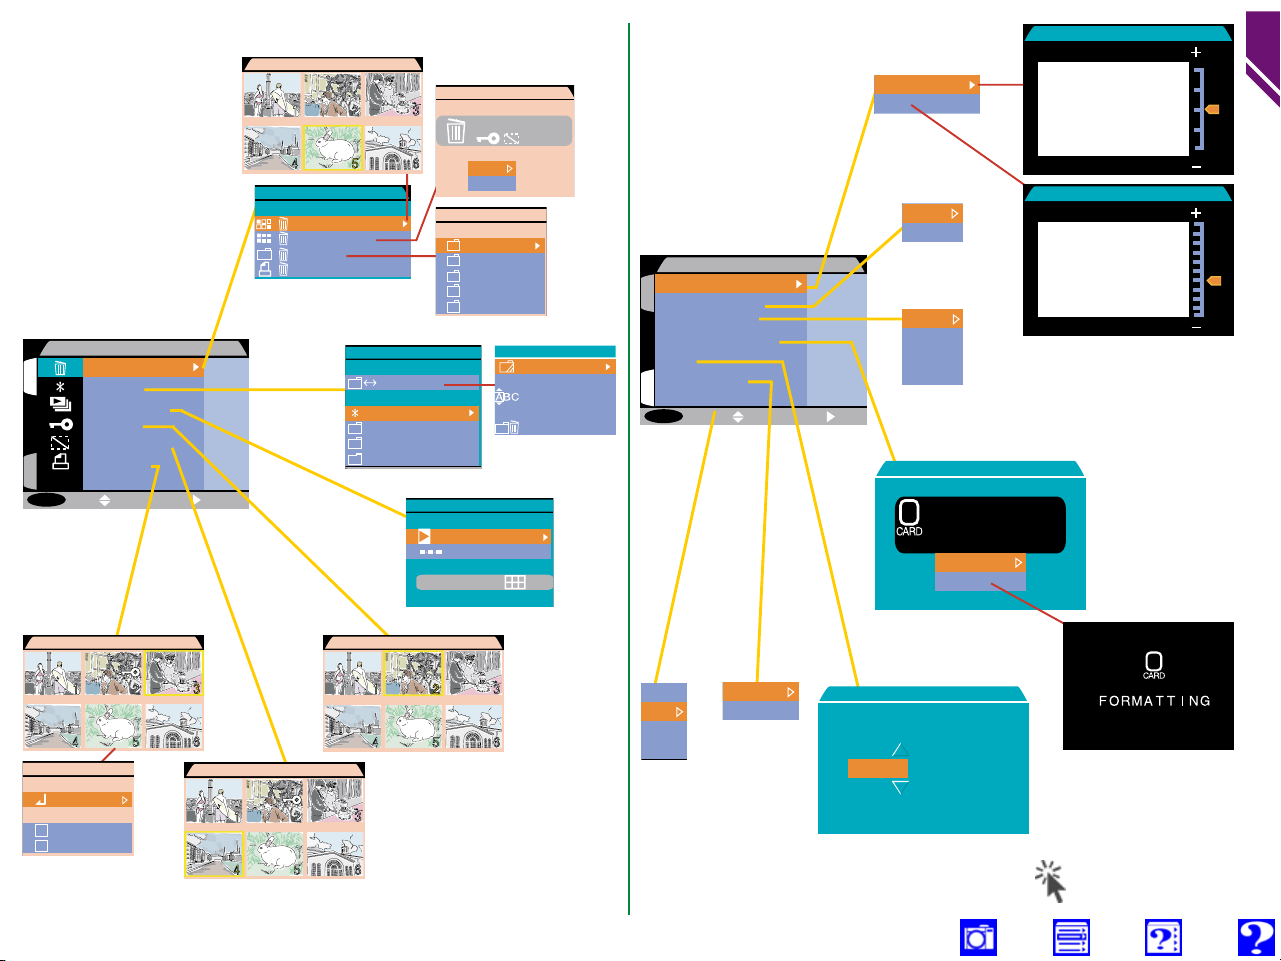
The Playback Menu The Playback Set-up Menu
DELETE
Brightness
Hue
ON
OFF
30S
1M
5M
30M
SET
1
S
MENU
PLAY BACK MENU
Delete
Folders
Slide Show
Protect
Hide Image
Print Set
Set-up
S
OFF
SELECT
SET
DELETE
Selected Images
All Images
Folder
Print Set
FOLDERS
Options
All Folders
NIKON
NOV
(Pause ➞ )
ERASE ALL IMAGES
Erasing all images
( excluded)
No
Yes
DELETE
NOV
SHOW
SLIDE SHOW
Start
Frame Intvl
OPTIONS
New
Rename
Delete
Monitor Options
1
Shutter Sound
Auto Off
CF Card Format
Date
Video Mode
S
Language
MENU
OFF
SET-UP
SELECT
CF CARD FORMAT
WARNING!
All images will
be deleted!
No
Format
BRIGHTNESS
HUE
13
First Steps: Getting to Know the COOLPIX 990
PRINT
PRINT SET
Done
Info
Date
HIDE IMAGE
PROTECT
D
E
F
NTSC
PAL
DATE
YMD
J
2000.01.01
00:00
Click
for more information

Putting Batteries in the Camera
Turn the camera off
1
Turn the mode dial to the off position.
If the camera is on a tripod, remove
the tripod before proceeding to the
next step.
Open the battery-chamber cover
2
Firmly pressing the button in the center of the latch, slide the latch to the
open position ( ), then open the battery-chamber cover as shown at right.
Insert the batteries
3
Insert four LR6 (AA) batteries with the
+ and – poles oriented as shown in
the label inside of the battery-chamber cover.
The batteries can be removed without affecting photographs stored on
the camera’s memory card. All M-REC settings except date and language
will, however, be reset.
Close and latch the battery-chamber cover
4
Close the battery-chamber cover and, keeping the cover
held firmly closed by pressing it where labeled “▼Push,”
return the latch to the locked position ( ). To prevent the
batteries from falling out of the camera during operation,
confirm that the cover is latched.
Check the battery level
5
Turn the mode dial to A-REC and check the battery level in
the control panel.
Batteries fully charged
Low battery
Replace the batteries as soon as possible.
Batteries exhausted
No photographs can be taken until the batteries
have been replaced.
14
First Steps: Putting Batteries in the Camera
The camera’s clock-calendar is powered by a separate rechargeable battery. When you put batteries in your camera for the first time or after a
long period of storage, wait a few hours for the clock battery to recharge
before removing the main batteries.
For more information on:
Battery types approved for use in your camera
Safe storage and handling of batteries

Extending battery life
The MONITOR button
15
While alkaline batteries are suitable for use in the COOLPIX 990, battery
life can be extended by using high-capacity lithium or nickel-metal hydride
(Ni-MH) batteries.
The following techniques can be used to extend battery life:
• Turn the LCD monitor off whenever possible (see right). Turning the
monitor off eliminates the single biggest draw on battery power.
• If the batteries become exhausted, try turning the camera off and warming
the batteries gently, for example in an inside pocket. The batteries may
recover sufficient charge for a few extra shots with the monitor turned
off.
• Use the AC adapter (available separately) when the camera is connected
to a computer, when playing images back, or when using the slide-show
option.
In M-REC mode, power consumption is also affected by the options in the
FOCUS OPTIONS > Autofocus Mode and the SET-UP > Monitor
Options > Display Mode sub-menus (see table below).
Power
Autofocus modeDisplay mode
consumption
Continuous AF
High
On/Preview Only
Single AF
Review Only N.A.
Monitor Off N.A.
* Single autofocus is used while Review Only or Monitor Off are in
effect.
*
*
Low
The MONITOR button controls the LCD monitor. Press the button to
cycle through monitor settings as shown below.
Monitor on,
settings hidden
Press
Monitor on,
settings displayed
Monitor off
Press
Press
For more information on:
Connecting to a computer
Playback
Autofocus mode
Focus options
First Steps: Putting Batteries in the Camera
Display mode

Inserting the Memory Card
MENU
OFF
S
SET-UP
Folders
Monitor Options
Shutter Sound
Auto Off
Seq. Numbers
CF Card Format
Date
SELECT SET
Turn the camera off
1
Turn the mode dial to the off position.
Insert the memory card
2
Open the card-slot cover (1) and insert the card (2) oriented as shown in
the ▲ INSERT label on the underside
of the cover, sliding it in until it is firmly
in place at the back of the slot and the
eject button pops up (3).
Close the card-slot cover
3
Fold the eject button back into position (4) and close the card-slot cover
(5). If the button is not folded over
when the cover is closed, closing the
cover may partially eject the card, causing errors in recording photographs or
during playback.
Formatting memory cards
Memory cards must be formatted for use in the COOLPIX 990 before
they can be used. To format the memory card:
1
Select A-REC
3
Highlight CF
2
Press
Folders
Monitor Options
Shutter Sound
Auto Off
Seq. Numbers
CF Card Format
S
Date
MENU
OFF
4
SET-UP
SELECT SET
Press
A-REC setup
menu displayed
Card Format
5
S
MENU
CF CARD FORMAT
WARNING!
All images will
be deleted!
No
Format
OFF
SELECT SET
Confirmation dialog displayed. Press multi
selector down to highlight Format, then press
to right to format card. Do not turn camera off
or remove card until “FORMATTING” message
has disappeared from display. All data on card
will be permanently deleted.
Removing memory cards
16
First Steps: Inserting the Memory Card
For more information on:
Safe handling of memory cards
Approved memory cards
Reading memory cards with a computer
Memory cards can be removed without loss of data
when the camera is off. To remove memory cards,
turn the camera off and open the card-slot cover.
Stand the eject button up (6) and press it down (7)
to eject the card.

Choosing a Language
MENU
OFF
1
S
SET-UP
Monitor Options
Shutter Sound
Auto Off
Date
Video Mode
CF Card Format
Language
SELECT
SET
MENU
OFF
1
S
LANGUAGE
SELECT
SET
Monitor Options
Shutter Sound
Auto Off
Date
Video Mode
CF Card Format
Language
D
E
F
J
MENU
OFF
1
S
LANGUAGE
SELECT
SET
Monitor Options
Shutter Sound
Auto Off
Date
Video Mode
CF Card Format
Language
D
E
F
J
Choose a language from the LANGUAGE sub-menu
4
17
The language in which menus and messages are displayed can
be set using the Language sub-menu.
Turn the mode dial to PLAY
1
Press the MENU button
2
The playback menu will be displayed (the appearance of the
menu will vary depending on the language currently selected).
PLAY BACK MENU
Delete
1
Folders
Slide Show
Protect
Hide Image
Print Set
S
Set-up
S
MENU
Display the SET-UP menu
3
A
Highlight
Set-up
B
Press
SELECT
OFF
PLAY BACK MENU
Delete
1
Folders
Slide Show
Protect
Hide Image
Print Set
S
Set-up
S
MENU
OFF
Monitor Options
1
Shutter Sound
Auto Off
CF Card Format
Date
Video Mode
S
Language
MENU
OFF
SELECT
SET-UP
SELECT
SET
SET
SET
A
First Steps: Choosing a Language
Highlight
Language
B
Press
CD
Highlight
option
The languages available in the Language sub-menu are:
D German (Deutsch)
E English
F French (Français)
J Japanese
Press

Setting the Time and Date
MENU
OFF
1
S
SET-UP
Monitor Options
Shutter Sound
Auto Off
Date
Video Mode
CF Card Format
Language
SELECT
SET
MENU
OFF
1
S
DATE
2000.01.01
00:00
YMD
SELECT S ET
Display the DATE menu
4
18
Turn the mode dial to PLAY
1
Press the MENU button
2
The playback menu will be displayed.
PLAY BACK MENU
Delete
1
Folders
Slide Show
Protect
Hide Image
Print Set
S
Set-up
S
MENU
Display the SET-UP menu
3
A
Highlight
Set-up
B
Press
SELECT
OFF
PLAY BACK MENU
Delete
1
Folders
Slide Show
Protect
Hide Image
Print Set
S
Set-up
S
MENU
OFF
Monitor Options
1
Shutter Sound
Auto Off
CF Card Format
Date
Video Mode
S
Language
MENU
OFF
SELECT
SET-UP
SET
SELECT
SET
SET
A
Highlight
Date
B
Press
Any photographs taken before the time and date have been set will have a
time stamp of “2000/01/01 0:00”. Until you have set the time and date, a
flashing clock icon will be displayed in the top right corner of the LCD
monitor when the camera is set to A-REC or M-REC.
The clock-calendar is powered by a separate, rechargeable battery, which
is charged as necessary when the main batteries are installed. If the camera has been stored with the main batteries removed for a long period of
time, the clock may need to be reset. Once the main batteries have been
reinserted, the clock battery will recharge in several hours, during which
time the batteries should be left in the camera.
First Steps: Setting the Time and Date

Set the time and date using the multi selector
5
A
Highlight
1
S
MENU
DATE
YMD
2000.01.01
00:00
SELECT SET
OFF
desired item
B
Edit selected
1
S
MENU
DATE
YMD
2000.02.01
00:00
SELECT SET
OFF
item
Exit the DATE menu
6
To set the time and date to the values displayed, highlight
YMD and press the multi selector to the right.
1
2000. 04. 24
20: 16
S
MENU
OFF
DATE
YMD
SELECT
SET
• To change the order in which the
year, month, and day
are displayed, highlight YMD and
To exit without changing the time
and date, press the MENU button.
press the multi selector up or down
to cycle through
settings in the following order:
YMD
DMY
19
First Steps: Setting the Time and Date
MDY

Taking a Photograph
The COOLPIX 990 offers two shooting modes, A-REC and
M-REC. In A-REC, the majority of camera settings are controlled by the camera in response to lighting conditions and
focus distance, producing the best possible results. M-REC
allows you greater control over such settings as shutter speed,
aperture, and white balance.
In
A-REC
you can control
• Optical and digital
zoom
• Flash settings
• Focus mode
(autofocus, macroclose-up, infinity, selftimer)
• Image size and quality
• Exposure compensation
the camera controls
• Shutter speed
• Aperture
• Focus distance (in
autofocus and macroclose-up modes)
• Exposure metering
• White balance
• Contrast
• Sharpness
20
First Steps: Taking a Photograph
M-REC
All settings listed above,
as well as:
• Focus area
• Focus distance
(manual focus)
• Sensitivity (ISO
equivalency)
• Advance rate (single
frame, continuous,
video)
• Best-shot selection for
sharper, clearer photographs
• Other settings
Depending on the
exposure mode selected, the camera can
control any or all of
shutter speed, aperture,
and focus distance in
response to other
settings made by the
user

1/60
2.7
NORMAL
10
This section outlines the basic steps involved in taking a pho-
1/60
2.7
NORMAL
10
tograph in A-REC mode.
Remove the lens cap
1
Remove the lens cap as shown below.
Lift latch and
remove cap
Turn the mode dial to A-REC
2
After a short pause, a beep will sound
and current settings will be displayed in
the LCD monitor and the control panel.
Check the number of exposures remaining
3
The control panel and LCD monitor show the number of
exposures remaining at current settings for image quality
and size.
NORMAL
[
2.7
10
1/60
P
F
]
Number of exposures remaining
When this number reaches zero, you will need to insert a
new memory card or delete some pictures before you will
be able to take more photographs. It may be possible to
record more photographs at a different image quality or
size.
The MONITOR button
21
First Steps: Taking a Photograph
NORMAL
[
1/60
F
P
2.7
10
For more information on:
Deleting photographs
Image quality and size
The monitor button controls the LCD monitor. Press the button to cycle
through monitor settings as shown below.
Monitor on,
settings hidden
]
Monitor on,
settings displayed
Press
Press
Monitor off
Press
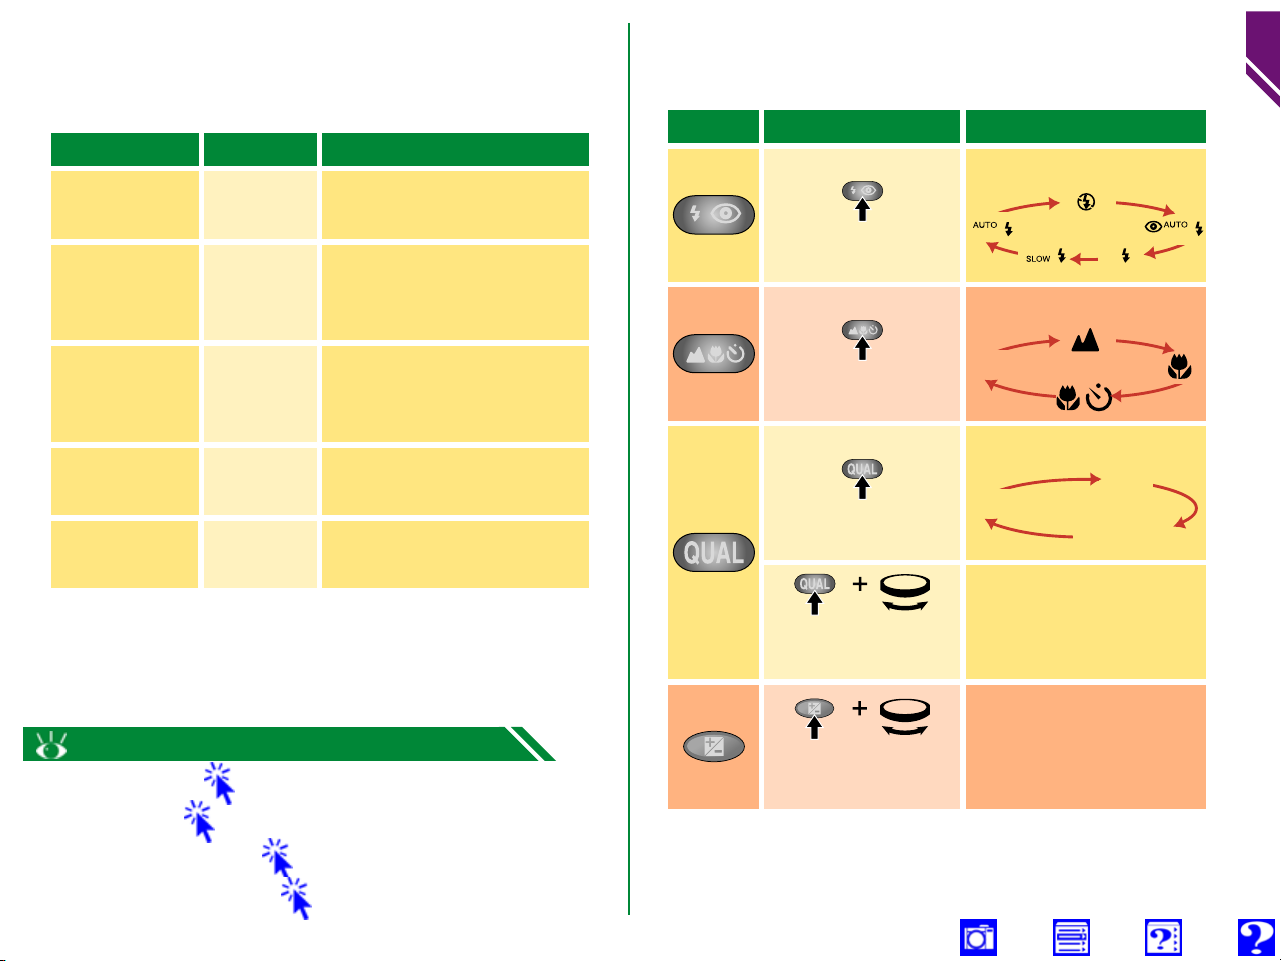
Adjust camera settings
4
When the mode dial is turned to A-REC, the following settings will return to their default values:
Setting
Flash mode
Default
Auto
Flash fires automatically
when lighting is poor
Description
Camera focuses automati-
Focus mode
Autofocus
cally at distances over
30 cm (1 ft)
Before taking a photograph, you can make changes to these
settings using the camera buttons and command dial.
OperationButton Controls
Flash mode
Press
Focus mode
22
First Steps: Taking a Photograph
Photographs compressed
Image quality
Normal
*
for best balance between
file size and image quality
Photographs are 2048 ×
Image size
Exposure
compensation
*
These settings apply the first time you turn the camera on.
Image quality and size are not restored to default settings the
next time the mode dial is turned to A-REC (an image-quality
setting of HI becomes FINE in A-REC).
*
Full
±0EV
1536 pixels in size
No exposure compensation performed
For more information on:
Using the flash
Focus mode
Image quality and size
Exposure compensation
Press
Autofocus
Image quality
FINE
Press
NORMAL
BASIC
Image size
Press while turn-
ing command dial
Full ⇔ XGA ⇔
VGA ⇔ 3:2
Exposure
compensation
Press while turn-
ing command dial
The icons shown above are displayed in the control panel.
(–2.0 EV to +2.0 EV in
increments of 0.3 EV)

Ready the camera
5
To reduce blurring caused by camera shake, hold the camera firmly in both hands. Photographs can be framed in the
LCD monitor (A) or the viewfinder (B).
AB
Frame photographs in the monitor when:
• you are using macro close-up
• you are using digital zoom
• you are using a lens converter
• image size is set to 3 : 2
• you want direct confirmation of camera settings or the
view through the lens
Frame photographs in the viewfinder when:
• you want to save power by turning the monitor off
• bright ambient lighting conditions make it difficult to see
the display in the monitor
23
First Steps: Taking a Photograph
When framing photographs in the viewfinder at ranges of 90 cm
(1 yd) or less, use the smaller of the two frames in the viewfinder
display (the area shaded in purple in the illustration at right).
Keep your fingers and other objects away from the lens and flash window
when taking photographs.

When framing photographs in the LCD monitor, you can
NORMAL
NORMAL
NORMAL
take advantage of the rotating lens section to hold the camera at almost any angle. You can even rotate the lens to
point at yourself and frame self-portraits in the monitor, as
shown below (in this case, all indicators are hidden and the
monitor shows a mirror image of what will appear in the
final photograph).
Select your subject
6
Frame the photograph using the zoom buttons.
Button Operation Function
Zoom camera out
(zoom position shown in LCD
monitor)
Press
1/60F2.7
P
Zoom camera in
Press
1/60F2.7
P
Enter digital zoom mode
X2.0
NORMAL
[
]
10
NORMAL
[
]
10
24
First Steps: Taking a Photograph
For more information on:
Macro close-up
Optical and digital zoom
Lens converters
Image size
Hold for
2s at
maximum
optical
zoom
position
NORMAL
[
]
1/60F2.7
P
10
Digital zoom ratio can be
adjusted using and
buttons. Press button at
minimum digital zoom ratio to
return to optical zoom.
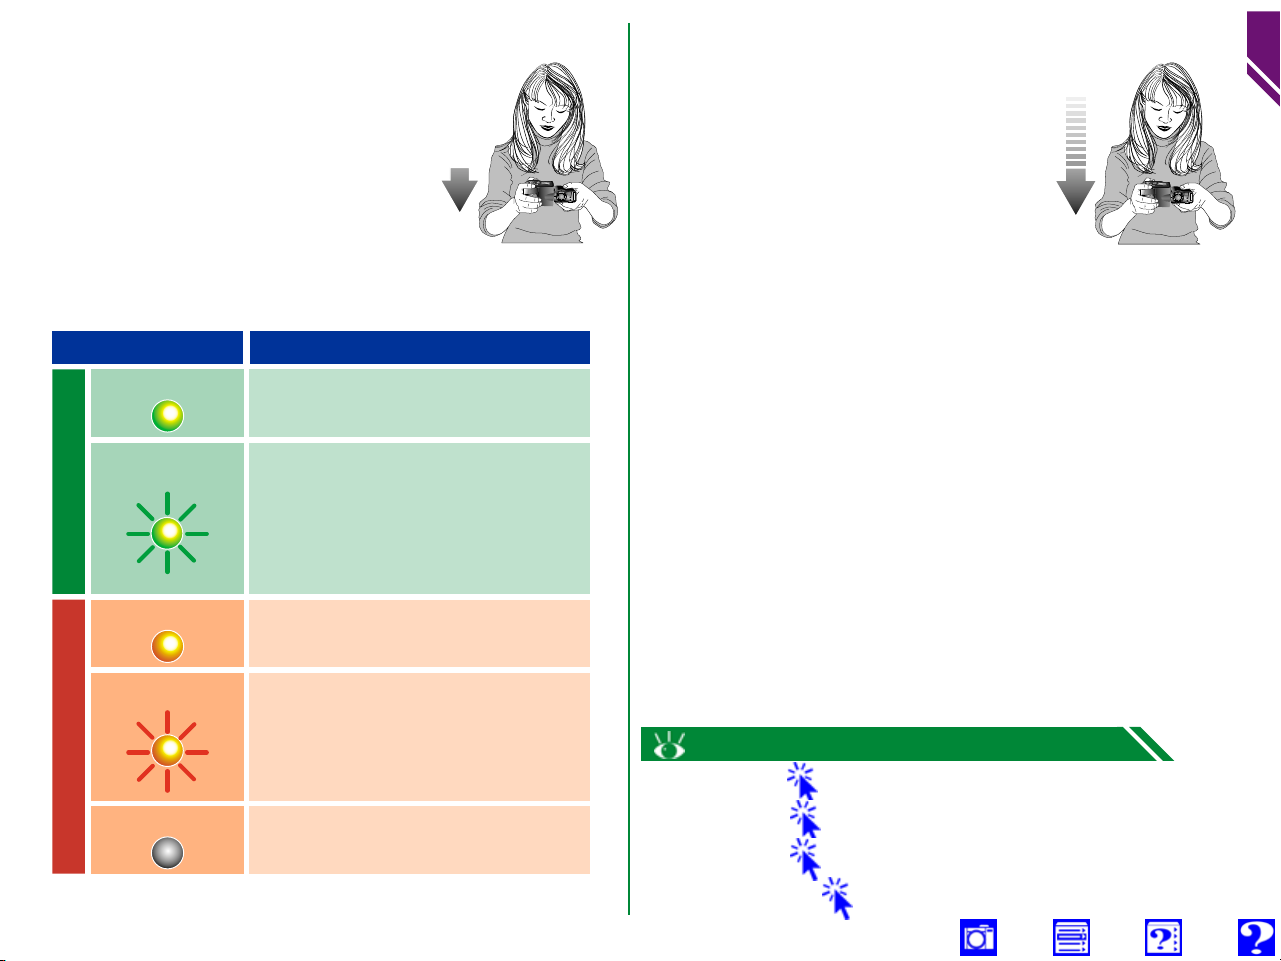
Focus
7
In A-REC, the camera focuses on the
center of the frame, shown by the focus target in the viewfinder. Before taking a photograph, press the shutter-release button halfway to initiate
autofocus, and check the status of the
autofocus lamp (green) and the flash
lamp (red) next to the viewfinder.
Take the photograph
8
To take a photograph, press the shutterrelease button all the way down. A beep
will sound to let you know that a photograph has been taken, and the green
AF lamp will blink slowly while the image is saved to the memory card.
MeaningLamp
25
First Steps: Taking a Photograph
Glows steadily
Flashes rapidly
AF lamp
Glows steadily Flash will fire when photograph is
Blinks
Flash lamp
Off
Subject in focus
Camera unable to focus using
autofocus. Use focus lock to
focus on another subject at same
distance, then recompose photograph.
taken
Flash charging. Remove finger
briefly from shutter-release
button, then try again.
Flash not required or flash set to
“off”
For more information on:
Autofocus
Focus lock
Focus area
Using the flash

Check the results
9
After a photograph has been taken, the autofocus lamp will
blink and an hourglass icon ( ) will be displayed in the LCD
monitor while the photograph is recorded. Before the photograph is transferred to the memory card, it will be displayed briefly in the LCD monitor.
▼ ▼
Press to delete
photograph
Press to pause display for 20 s.
Press again to record photograph,
or press ( ) to delete as
shown at left. Photograph re-
corded automatically after 20 s.
Turn the camera off
10
When you have finished using the camera, be sure to turn the mode dial to
OFF. To avoid wasting batteries, check
that the camera is off before putting it
away.
Replace the lens cap
11
Replace the lens cap as shown below.
26
First Steps: Taking a Photograph
Lift latch and
replace cap
MENU
DELETE
erase images?
No
Ye s
OFF
SELECT
Delete dialog displayed. Press multi
selector up or down to highlight option,
press to right to select.
• Select Ye s to delete photograph
• Select No to save photograph and
SET
return to shooting mode
While photographs are being recorded to the memory card, the autofocus lamp
will blink, and a flashing card icon will be displayed in the LCD monitor when the
camera returns to shooting mode. Although additional pictures can be taken
while the camera saves earlier photos to the card, you should not eject the
memory card, remove the batteries, or unplug the AC adapter (available separately) until the lamp has stopped blinking and the icon has disappeared from
the monitor. Removing the card or cutting power while recording is in progress
could result in loss of data.

Playback and Deletion
2000.04.252000.04.25
100NIKON
Single-image playback
27
Photographs stored on the memory card can be played back
for review or deletion.
Turn the mode dial to PLAY
1
The most recent photograph in memory will be displayed
in the LCD monitor.
14:20
NORMAL
0005.JPG
]
[
5/5
The MONITOR button
The monitor button controls the LCD monitor. Press the button to cycle
through monitor settings as shown below.
Monitor on,
photo info hidden
Press
Monitor on,
photo info displayed
Press
( )
( )
OperationButton Function
View additional infor-
mation on current
Rotate
View other photo-
graphs in memory one
Press up or left to
view earlier images,
down or right to
at a time (hold down
to scroll rapidly to
desired frame number)
view later images
Zoom in on current
photograph (use multi
Press
selector to view other
areas of image)
Cancel zoom
Press
Select current photo
Press
for deletion
Start or stop movie
Press
playback
First Steps: Playback and Deletion
photo
Press
Monitor off

Thumbnail playback Deleting photographs
252000.04.25
100NIK100NIKONON
28
( )
( )
OperationButton Function
Press once to display
menu of nine thumbnail
images, twice to display
four thumbnail images,
Press
a third time to return
to single-image play-
back
Scroll through thumb-
Rotate
nails page by page
Highlight thumbnail.
Use ( ) button
Press up, left,
down, or right
to view highlighted
thumbnail at full size.
Select highlighted
Press
thumbnail for deletion
Single-image
playback
.04.
4:20
ORMAL
DELETE
erase images?
No
Yes
MENU
OFF
[
SELECT
0005.JPG
]
5/5
Press ( )
Delete dialog displayed. Press multi
selector up or down to highlight
option, press to right to select.
• Select Ye s to delete photograph
• Select No to save photograph and
SET
Thumbnail
playback
button
return to shooting mode
First Steps: Playback and Deletion

Basic Photography
These topics are covered in the sections that follow.
29
This chapter covers operations that can be performed using
the camera’s dials and buttons in A-REC mode. A-REC mode
is a simple, “point-and-shoot” mode in which the majority of
settings are made automatically by the camera to produce the
best results. The user controls the following settings directly
by means of the camera’s buttons and dials:
• optical and digital zoom
• flash settings
• focus-mode settings
• image quality and size
• exposure compensation
In addition, you can also perform the following operations in
A-REC mode:
• focus lock
• delay shutter release using the self-timer
• review and delete photographs as they are taken
Basic Photography
Optical and Digital Zoom
Using the Flash
Focus
Using the Self-Timer
Image Quality and Size
Exposure Compensation
Reviewing Photographs
Click
to go

Optical and Digital Zoom
1/60
2.7
NORMAL
10
NORMAL
X2.0X2.0
NORMAL
The COOLPIX 990 is equipped with motor-driven, ×3 optical
zoom linked to the viewfinder. By changing the area visible in
the viewfinder (the “field of view”), zoom helps you establish
the right balance between subject and background. A wide
field of view is suitable for group portraits or landscapes, a
narrow field of view for close-ups or long-range photography.
Digital zoom can be used to further enlarge photographs elec-
tronically by up to ×4.0. Note that zooming in on a subject
tends to decrease the amount of light entering the camera,
resulting in slower shutter speeds, while simultaneously decreasing the apparent distance between the subject and the
background. Zooming out has the opposite effect.
Optical Zoom
Photos can be framed in the viewfinder or LCD monitor using
the zoom buttons.
Indicator in LCD
monitor displays amount
of zoom while either
Zoom inZoom out
1/60
P
F
2.7
NORMAL
button is pressed
[
]
10
Digital Zoom
At the maximum optical zoom position, holding the button down for two seconds triggers digital zoom.
Maximum optical
zoom position
1/60F2.7
P
NORMAL
[
10
]
Hold for two
seconds
AF lamp blinks slowly
to show that photos
can not be accurately
framed in viewfinder
Zoom factor displayed
in LCD monitor
NORMAL
[
1/60F2.7
P
10
While digital zoom is in effect, the zoom factor increases each
time the button is pressed, to a maximum of ×4.0. Press-
ing the button decreases the zoom factor. To restore optical zoom, press the button until the digital zoom indicator disappears.
30
Basic Photography: Optical and Digital Zoom
]
 Loading...