

AF
Nikon
DIGITAL CAMERA E900
4.8V/6V = 0.9A/0.8A (PAL)
N150
NIKON CORP.
MADE IN JAPAN
CARD
BATT.
PUSH
5
.
8
-
1
7
.
4
m
m
1
:
2
.
4
-
3
.
6
Z
O
O
M
N
I
K
K
O
R
FINE
NORMAL
BASIC
AUTO
SLOW
CARD
REC
RECA
PLAY
M
OFF
READ
THIS FIRST!
Nikon Digital Camera COOLPIX 900
Fast Track Guide
This display tells you about
camera settings.
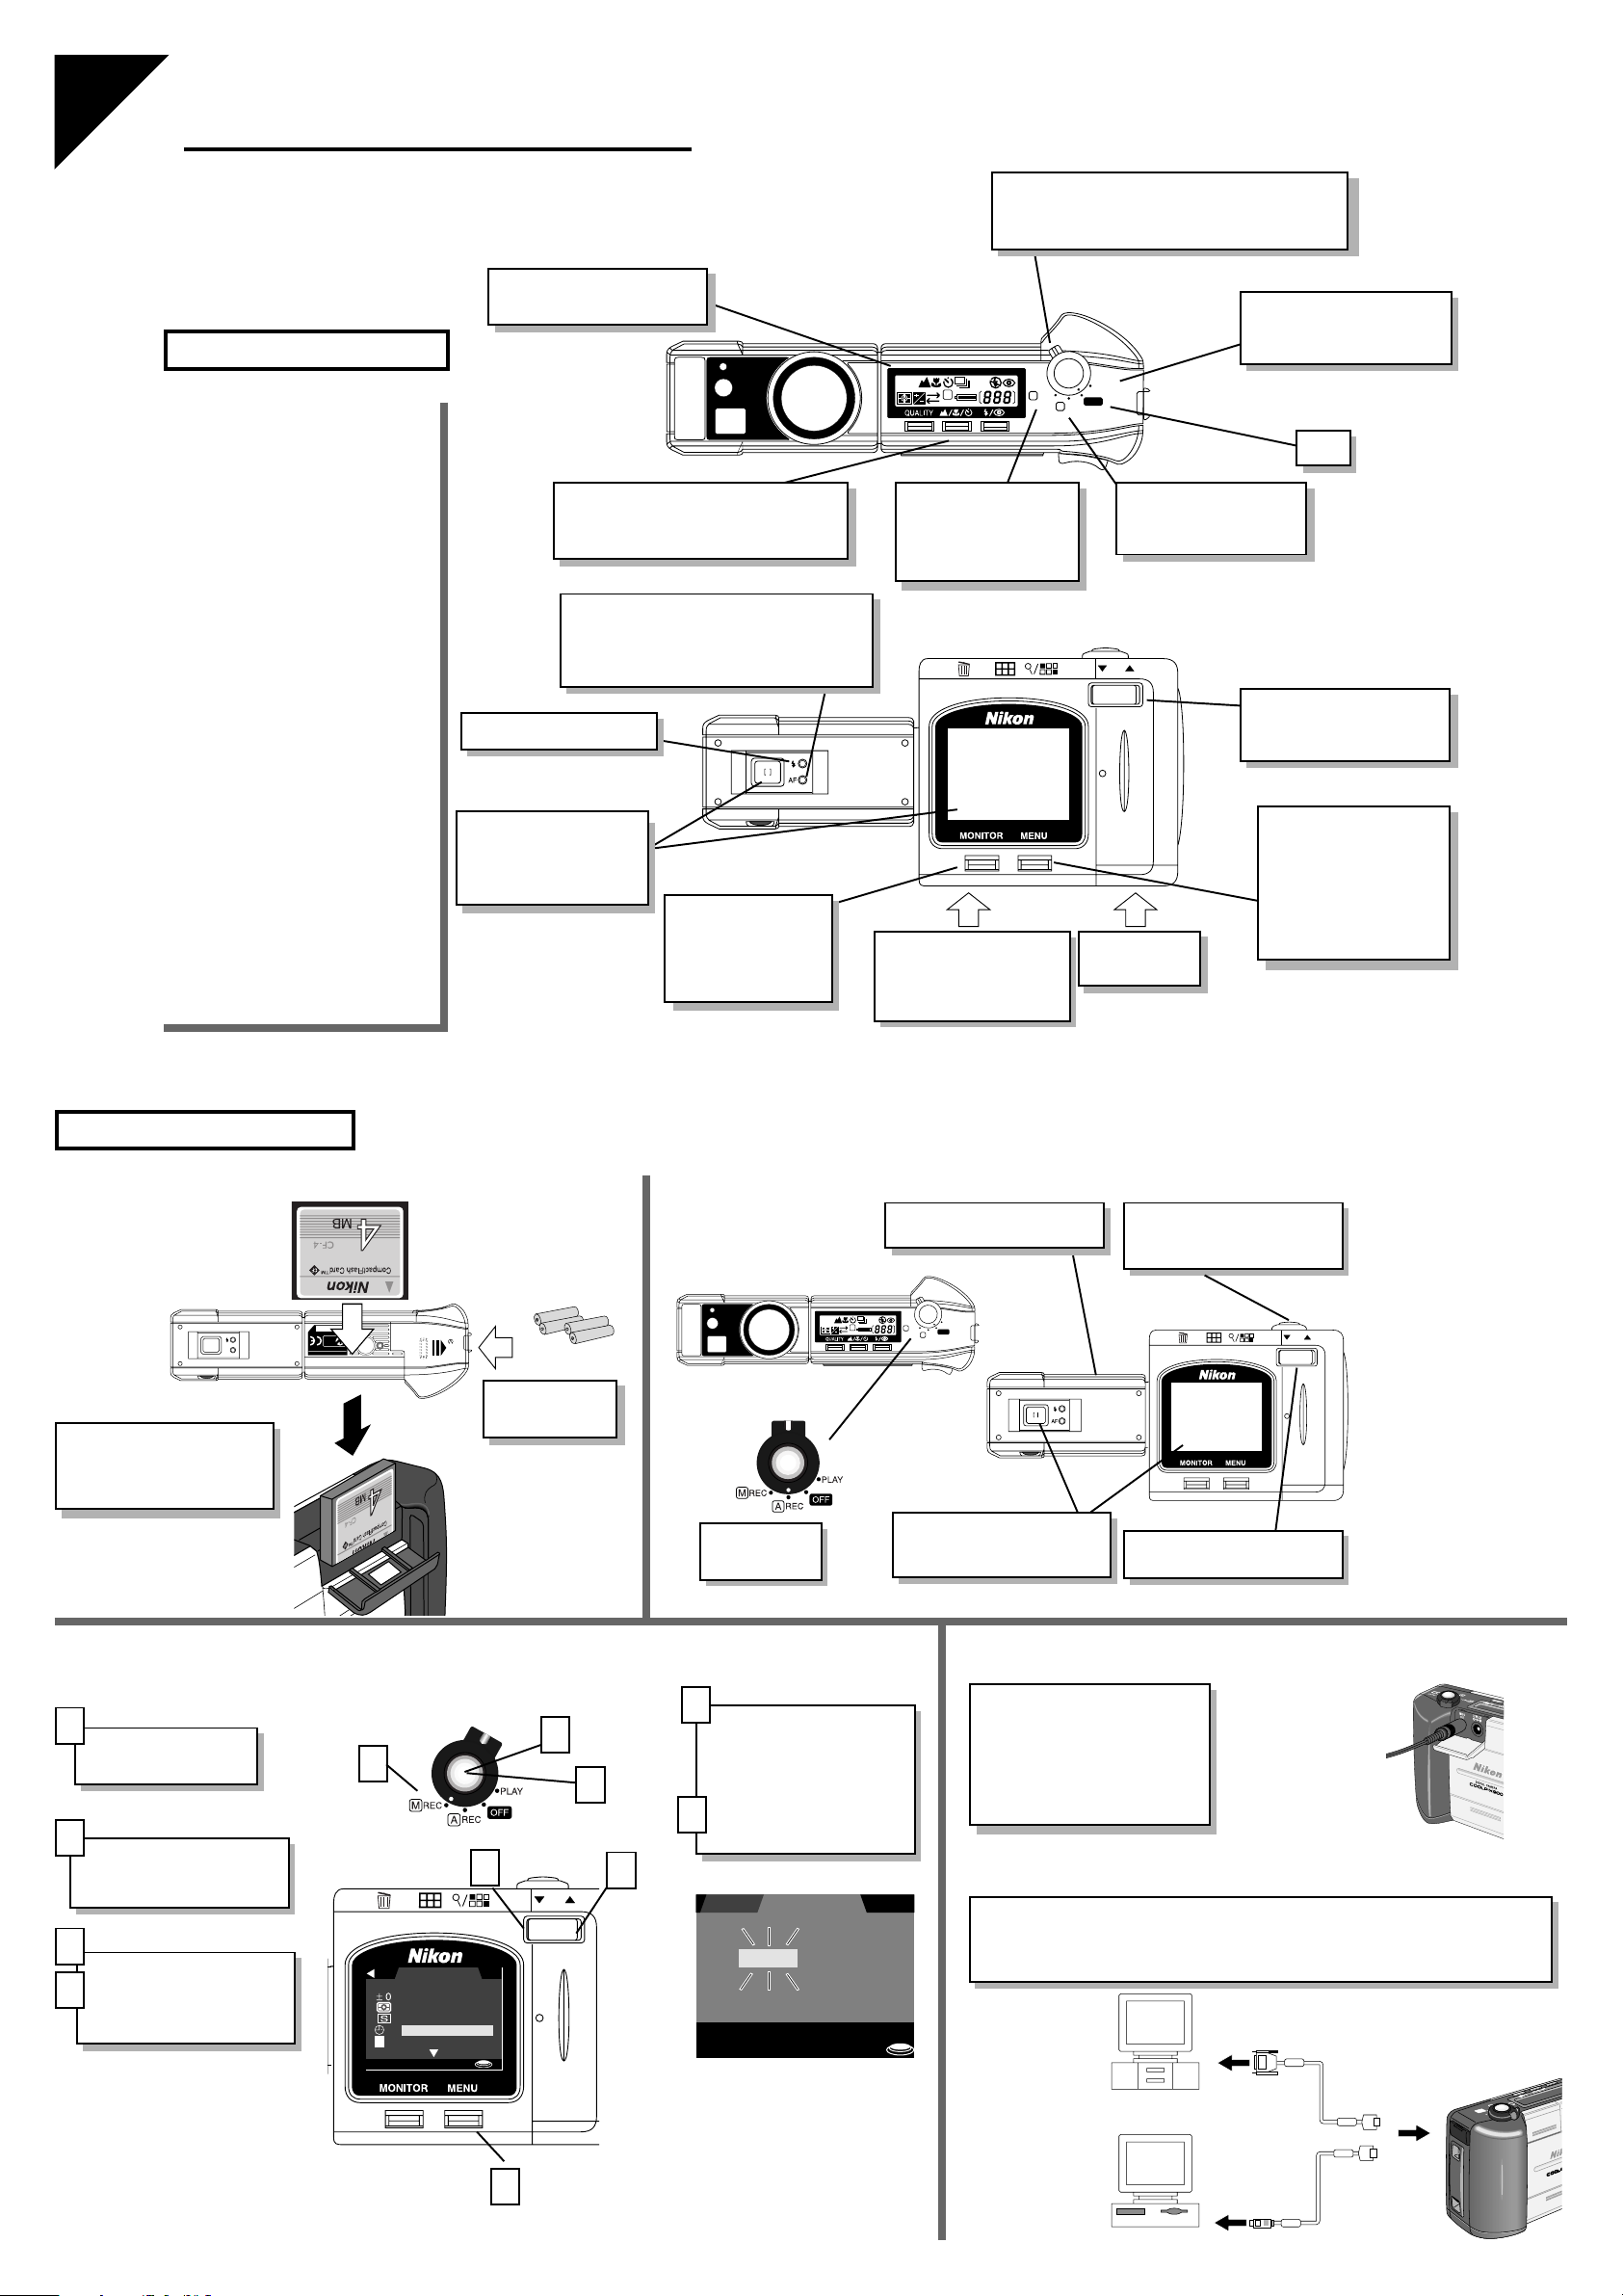
Your Camera and You
The COOLPIX 900 Digital
Camera incorporates many
controls and functions that will
be familiar to users of traditional
film cameras. For example, you
will find that the COOLPIX 900
features a zoom lens, exposure
metering control, autofocus and
a flash. As a digital camera, the
COOLPIX 900 stores images on
a memory card, instead of film,
and can be connected to a
computer. For the experienced
photographer there is a new set
of controls and concepts to
master as the possibilities of
digital imaging bring such
features as rapid-fire shooting,
compensation for indoor and
outdoor lighting, 2x digital zoom,
selective deletion of pictures,
and playback through a TV set.
Whether you are an experienced
photographer or a novice please
use this guide if you feel confident to start using your digital
camera with a minimum of
instruction.
Flicker = flash charging
Look here to compose
your picture
[ ] = focus target
Each of these three buttons
controls two functions. Learn about
them overleaf.
On = focus OK
Slow blink = digital zoom
Blink = saving photograph
Flicker = autofocus out of range.
Press to
1) Hide screen info
2) Turn off screen
3) Turn on screen
with info showing
The shutter release button and selector dial.
Rotate it to turn the camera on, press
halfway to focus, full press to take a picture.
M-REC—You take
control of camera
settings (see
overleaf)
Your camera needs a
memory card to store
images on. Think of it
as “digital film.”
A-REC—Take pictures
and let the camera
decide on settings
WT
Load four AA
batteries here
PLAY—View your
pictures on the screen or
TV if connected
OFF
Zoom In/Out
(Hold at Tele position to
activate digital zoom)
When you press the
MENU button, you can
see more camera
settings and change
the advanced features
of playback and
M-REC modes
First Steps
Inserting Batteries
and Memory Card
Your camera needs a
memory card to store
images on. Think of it as
“digital film”
Setting the Date and Time
Load four AA
batteries here
Taking a Picture
m
1
m
:
4
2
.
.
7
4
1
-
8
.
5
R
O
K
Set to A-REC
FINE
-
3
NORMAL
.
6
BASIC
Z
O
O
K
I
M
N
CARD
Swivel lens section to
desired position
AUTO
SLOW
PLAY
REC
M
OFF
RECA
Compose picture though
view finder or use the LCD
monitor
Viewing Your Pictures on TV
Half-press the shutter
release to focus, full press
to take a picture
WT
Zoom lens is controlled by
zoom (W/T) button
1
Set to M-REC
2
Press the “Menu”
button to view a list of
recording options
3
Use the zoom button to
highlight DATE and press
4
the shutter button to
select it
5
4
1
5
Use the shutter button to
highlight the item you
wish to change (hour,
minute, etc.). Change
the value of the selected
item with the zoom
6
Your camera can be connected to a TV using the
supplied video cable. The TV
will display the same view as
appears in the camera’s
monitor in M-REC, A-REC,
and PLAY modes.
➧
To VIDEO IN jack
on TV or VCR
switch.
3
WT
BK SHOOT I NG
EXP.+/–
ME T E R I N G
CONT I NUOUS
DAT E
E
LANGUAGE
SET➔SHU T TER
2
6
DA TE
YMD
▲
9198.01.01
▼
Connecting to a Computer
Your camera can be connected to a computer running MacOS or Windows
95/NT using the appropriate serial cable (separate cables are provided for
Macintosh computers and PCs). You will need the supplied
software. Your camera will function like an additional disk drive.
Nikon View
00:00
ADJ . ➔▼▲ZOOM SW
SET ➔SHUT T ER
IBM compatible
R
E
C
O
F
F
P
LA
Y
DIGITAL
Q
U
A
L
IT
Y
M
L
A
T
IG
D
Macintosh
6ME40350
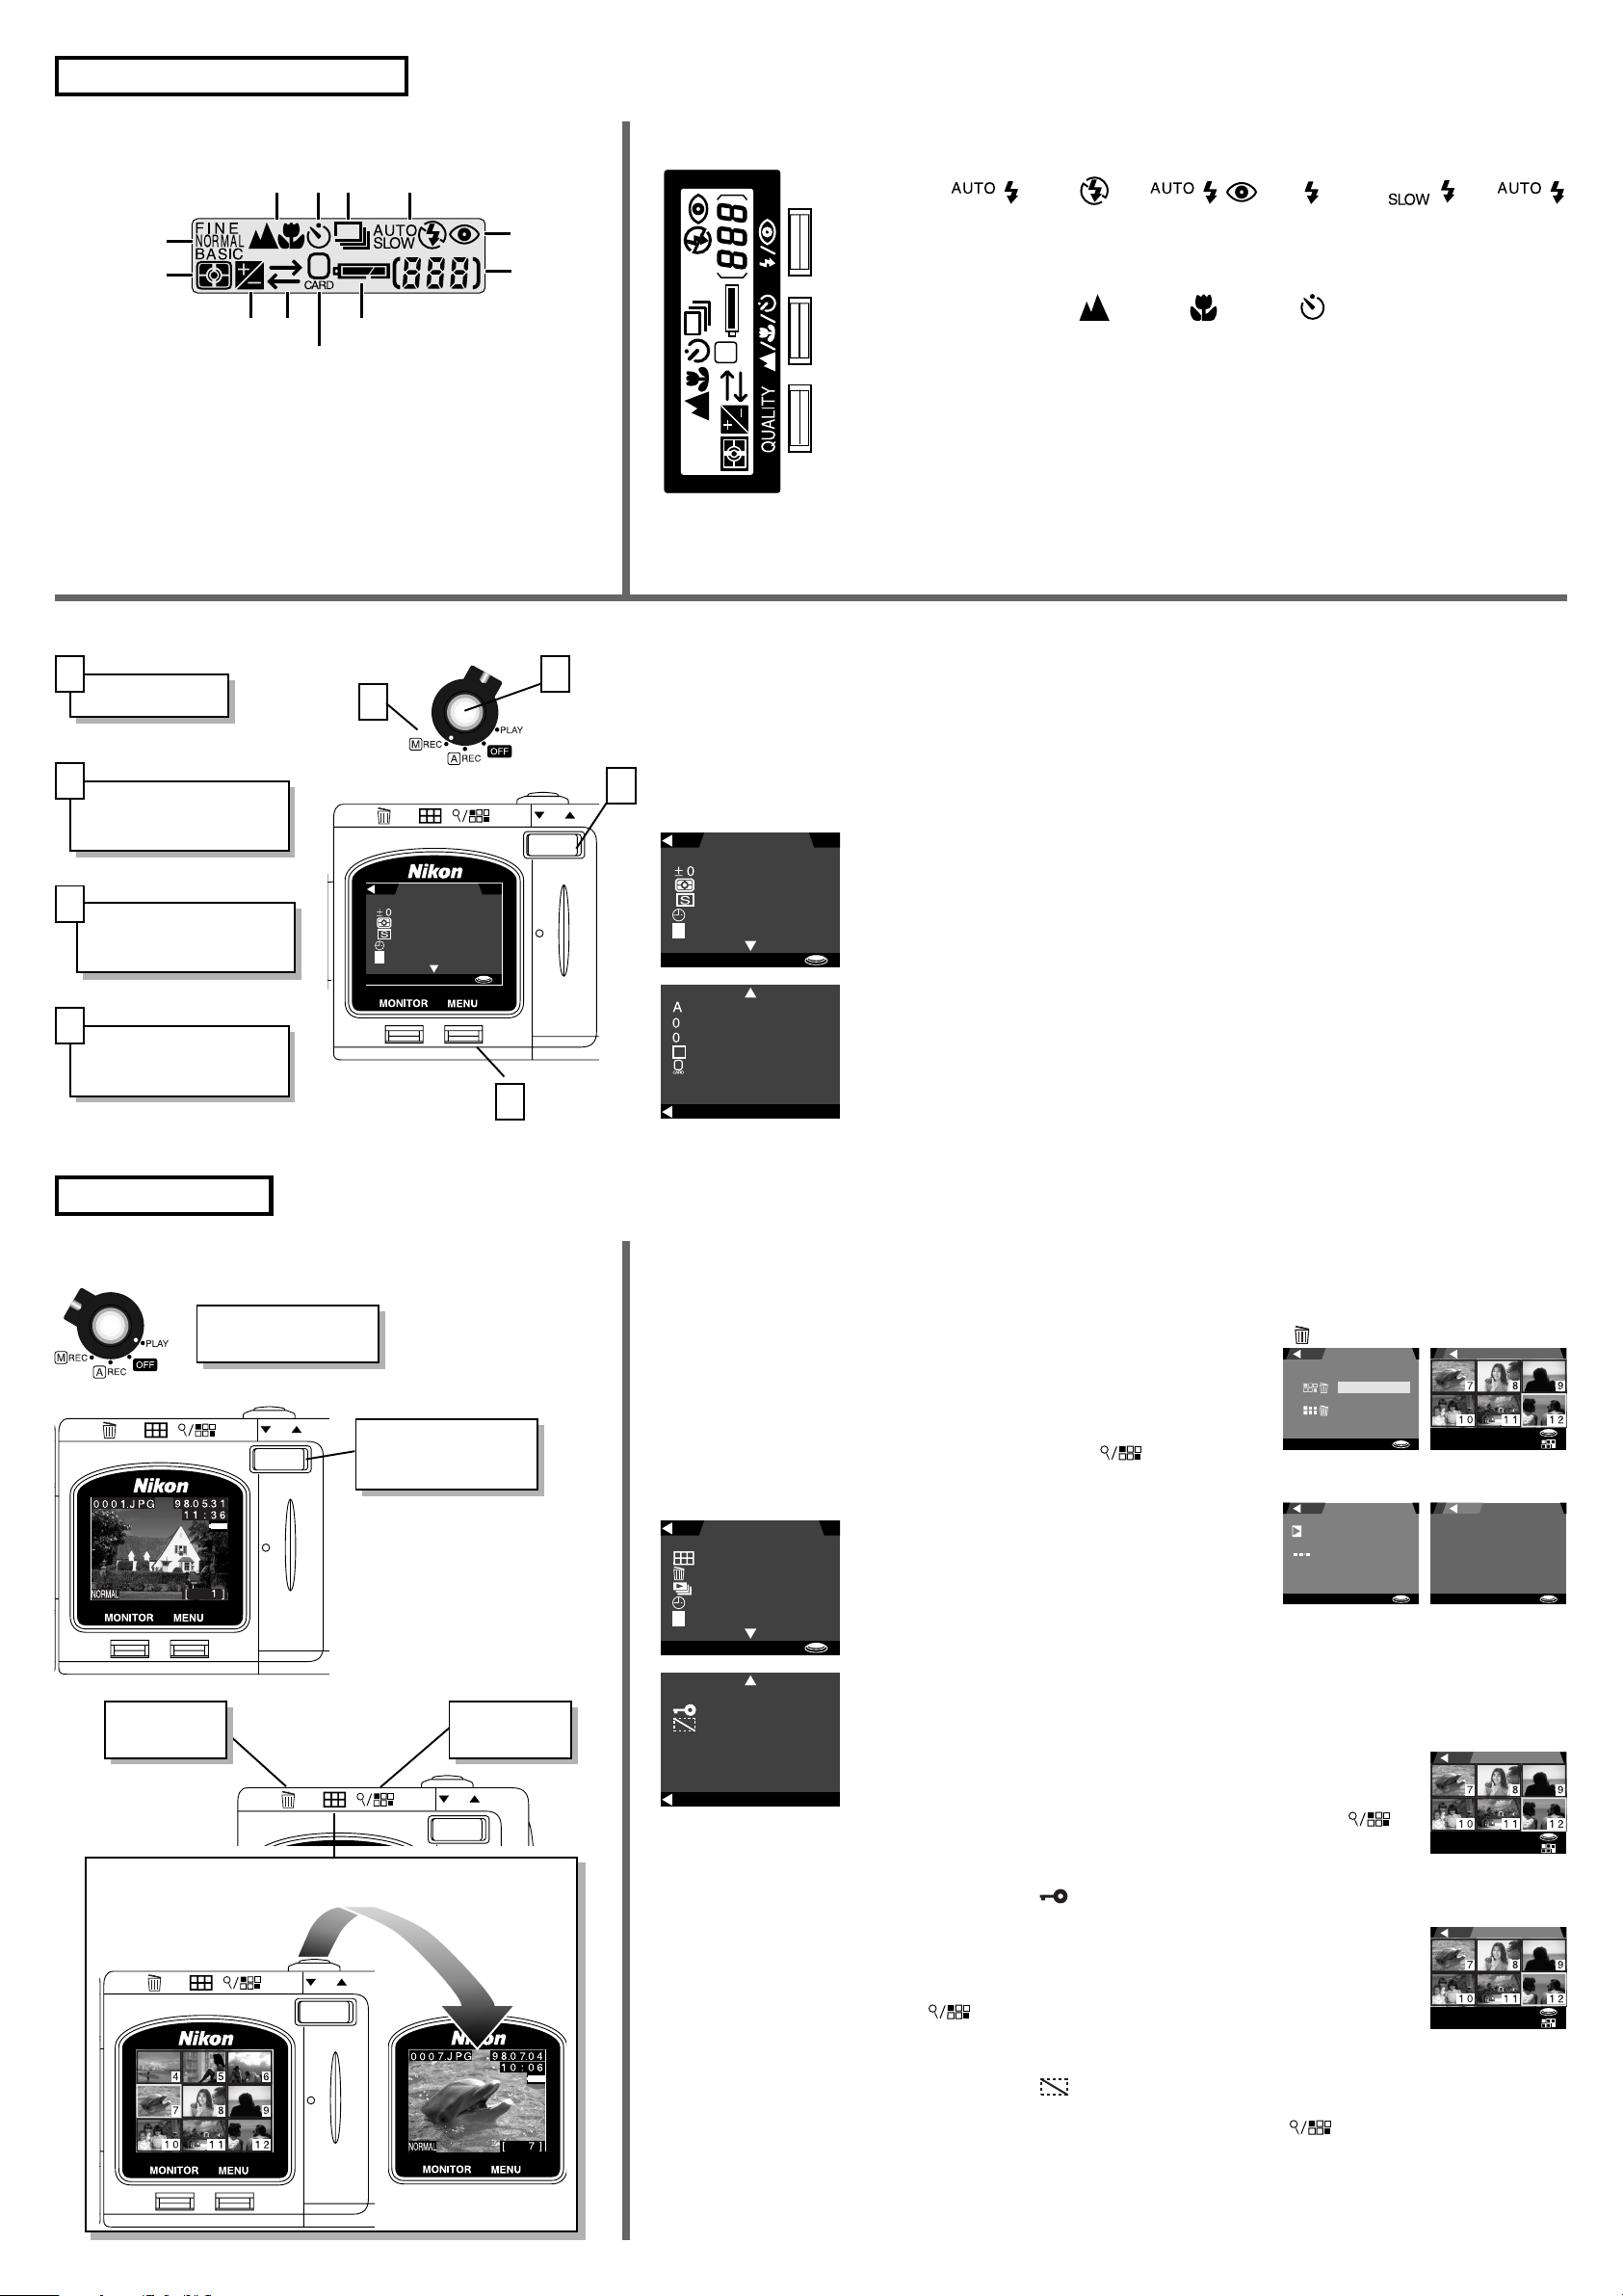
Getting to Know Your Camera
FINE
NORMAL
BASIC
AUTO
SLOW
CARD
The Camera Control Panel Display
[2] [3] [4] [5]
[1]
[8]
[10][9]
[12]
[11]
1) Image quality:
Fine (compression ratio 1:4)
Normal (1:8)
Basic (1:16)
2) Focus mode
3) Self Timer
4) Continuous
5) Flash setting
6) Red-Eye Reduction (for
portraits)
7) Number of exposures
remaining
8) Metering
9) Exposure compensation
10)Serial cable connected
11) Memory card in place?
12)Battery power indicator
Manual (M-REC) Mode Controls
1
Select M-REC
2
Use the shutter button
to select a highlighted
menu item
3
Use the zoom button to
highlight different menu
items
4
Use this button to hide
and reveal the manual
mode menu
1
BK SHOOT I NG
EXP.+/–
ME T E R I N G
CONT I NUOUS
DAT E
LANGUAGE
E
SET➔SHU T TER
Playback Features
[6]
[7]
4
2
WT
Camera Control Panel Settings
Flash setting: Auto ➧ Flash ➧ Auto with ➧ Anytime ➧ Slow ➧ Auto
Focus mode: Auto ➧ Infinity ➧ Macro ➧ Timer ➧ Auto
Image Quality: FINE ➧ NORMAL ➧ BASIC ➧ FINE
The manual mode (shooting)
menu allows access to camera
settings not accessible in AREC mode. To make changes
to a given feature, activate the
menu with the MENU button
and use the zoom switch to
highlight the item. Press the
shutter button to display the
3
options available for the
selected item.
BK SHOOT I NG
EXP.+/–
ME TE R I NG
CON T I NUOU S
DAT E
LANGUAGE
E
SET➔SHU T TER
WH I T E BAL
IMG ADJUST
LCD BRIGHT
EXTRA FUNC
CARDFORMAT
LCD ON/OFF
ON
RCESET ALL
BK
SET➔SHU T TER
Cancel Red-Eye Flash Sync
Reduction
(50cm–30m) (30m+) (8–50cm) 10s
Red-eye reduction
makes the subject’s
eyes react to light
Fewer pictures,
higher quality lower quality
↔
More pictures,
before the picture is
taken.
A flash setting of “slow
synchronized”
combines flash with
long exposure for
adding auto-triggered
flash lighting
Exposure: Use exposure compensation to cope with situations in which
autoexposure would make the picture too dark or too bright. Choose a value from
-2.0–+2.0 EV.
Metering: Choose from one of three methods for determining optimum exposure.
Matrix
metering analyzes the entire picture.
consideration to the center of the picture.
Center-weighted
Spot
metering measures lighting at the
metering gives more
center of the picture only.
Continuous: The camera behaves like a motor-driven film camera, taking up to
ten pictures at about two frames per second at a resolution of 640 × 480 dots (VGA
mode) or one frame every four seconds at full resolution.
Date: Set the time and date. This setting determines the time stamp on your pictures.
Language: Choose a language for the camera’s menus and messages from
English, French, German, and Japanese.
White Balance: Different lighting conditions can cause the colors in a photograph
to change. This feature compensates for a variety of indoor and daylight lighting
conditions.
Image Adjustment: Adjust image brightness and contrast.
LCD Brightness: Adjust the brightness of the color LCD monitor’s backlight.
Extra Functions (check the desired functions and select EXECUTE):
VGA: Store four times as many pictures by reducing the size of photographs to
640 × 480 dots (the quality indicator in the control panel will flash while the
camera is in VGA mode)
Black and white: Take monochrome (grayscale) photographs
Digital tele: 2× digital zoom
Fisheye/Wideadapter: These settings should be used in combination with the
fish-eye or wide-angle lens converters (available separately)
AE-lock: Lock autoexposure when creating a series of photographs for a
panorama or VRML image
Card format: Format compact flash-memory cards for use in the COOLPIX 900
(note that this erases all pictures on the card).
LCD ON/OFF: Set the LCD to turn on or off at start-up (off to save power).
Reset all: Restore factory default settings.
Viewing Pictures The Playback Menu
The playback menu allows a
Set to PLAY (playback mode)
Use the zoom switch
WT
to browse through
the pictures
Delete current
picture
WT
Show nine pictures (use the zoom switch to highlight a picture,
then press the shutter release to display it at full size)
WT
Zoom current
picture in (2×)
number of useful display
options to be selected and
altered. With the selector dial
turned to PLAY, activate the
menu with the MENU button.
Use the zoom switch to
highlight the desired item, then
press the shutter button to
view a list of options for the
item.
BK PLAY BAC
THUMBNA
DELETE
SLIDESHOW
DATE
LANGUAGE
E
SET➔SHU T TER
PROTECT
HIDE I
L0
CD BR IGH
03s
AUTO OFF
BK
SET➔SHU T TER
K
IL
MAGE
T
Thumbnail: Display the last nine pictures taken by the camera. Use the zoom
switch to select a picture and press the shutter button to display it full size. The
selected picture can be deleted by pressing the
Delete: Delete selected pictures or all items
in memory. To delete selected pictures,
highlight SELECTED in the delete menu and
press the shutter button. Using the zoom
switch, highlight any of the images to be
deleted and press the
button. After
button.
BK DELETE
LECTED
S
E
L
AL
SET➔SHU T TER
BK DELETE
SET➔SHUTT ER
MULT I SEL . ➔
selecting the last of the images to be
deleted, press the shutter button to delete all selected images.
Slideshow: All pictures in memory are
displayed one after the other in the order
taken. Choosing SLIDESHOW from the
playback menu displays a start screen.
Highlight START with the zoom switch and
press the shutter release to start the
BK S L I DESHOW
START
FRAME I NT
PM.T(E US SPEND
➔SHUT TER
SET➔SHUTT ER
VL
)
SET➔SHUTT ER
BK NI TERV AL
2s
3s
s
5
s
01
slideshow. If desired, the time each image is
displayed can be altered by highlighting FRAME INTVL with the zoom switch and
pressing the shutter release to display a menu of interval settings. Use the zoom
switch and shutter release to select and confirm the desired timing.
Date: Set the time and date. This setting determines the time stamp on your pictures.
Language: Choose a language for the camera’s menus and messages from
English, French, German, and Japanese.
Protect: This item is used to protect chosen pictures from
BK RPOTECT
deletion. Choosing PROTECT from the playback menu
displays the last six pictures in miniature. Use the zoom switch
to scroll through the pictures in the camera. Press the
button to protect the currently highlighted picture. After selecting the last of the images to be protected, press the shutter
SET➔SHUTT ER
MULT I SEL . ➔
button to return to the playback menu. Protected pictures are
marked with a
icon when viewed on the display and have read-only status
when viewed from a computer.
Hide: This item is used to conceal chosen pictures during
BK DI E I MAGE
playback and slide shows. Choosing HIDE from the playback
menu displays the last six pictures in miniature. Use the zoom
switch to scroll through the pictures in the camera. Press the
button to select the currently highlighted picture for
concealment. After selecting the last of the images to be
SET➔SHHUT T ER
MULT I SEL . ➔
hidden, press the shutter button to return to the playback menu.
Hidden pictures can only be seen from the hide-image menu, where they are
marked with a
icon. They are not visible on a computer unless the “show
hidden files” option is chosen. To display a hidden picture once more, return to the
hide menu, highlight the picture, and press the
button to remove the picture’s
hidden status.
LCD Brightness: Adjust the brightness of the color LCD monitor’s backlight.
Auto Off: When in playback mode, the camera will switch off after the selected
time to save batteries. The camera can be reactivated by pressing the shutter
release.
 Loading...