

Nikon COOLPIX 880 Owner Manual
The Guide to Digital Photography
with the
DIGITAL CAMERA
En

Product Documentation
The documentation for this product includes the manuals listed below. Please be sure to read all
instructions thoroughly to get the most from your camera.
Fast Track Guide/For Your Safety
In addition to taking first-time users step-by-step through the process of setting up and using the
camera, the Fast Track Guide provides a quick overview of camera settings. For Your Safety, printed on
the reverse of the Fast Track Guide, lists warnings and cautions that should be observed when using
and storing your camera, together with legal information. Please keep this document where all
those who use the product will read it.
Menu Guide
This reference is your guide to camera menus. Keep it handy when you use the camera.
Guide to Digital Photography (this manual)
This manual provides complete operating instructions for your camera.
i

Contents
Overview: About This Manual ............................... 1
Tutorial 3
Getting to Know the COOLPIX 880: The Parts
of the Camera and Their Functions ............. 4
Using the Camera Menus ......................................... 12
First Steps:
Getting Ready to Use Your Camera .......... 15
Inserting the Battery .................................................... 15
Inserting the Memory Card ..................................... 18
Choosing a Language................................................... 20
Setting the Time and Date ........................................ 21
Taking Photographs: The Basics .......................... 23
Getting the Camera Ready for Use (AUTO
Mode) ............................................................................. 23
Framing Photographs ...................................................26
Focus and Shoot ............................................................ 28
Assisted Creative Photography: Scene Mode . 32
Review and Deletion: Quick Review ................... 39
Putting the Camera Away ......................................... 44
ii
Where Do I Go from Here? 45
Getting the Most from Digital Images: Your
Camera and Your Computer ............................... 46
Viewing Photos on TV ................................................. 48
Ordering Prints: Digital Print Order Format
(DPOF) .......................................................................... 48
Taking Photographs for E-Mail and the Web ... 49
Taking Photographs for Printing ............................. 50
Reference 51
Beyond Point and Shoot:
Shooting Controls for All Modes ............... 52
Framing Photographs:
Optical and Digital Zoom ..................................... 52
Throwing Light on Your Subject:
The Flash Button ....................................................... 55
Focusing Near and Far:
The Focus-Mode Button .......................................58
Delaying Shutter Release: Self-Timer Mode ..... 62
Bright, Dark, and High-Contrast Subjects:
Exposure Compensation ...................................... 64
Choosing a Focus Area:
Manual Focus-Area Selection.............................. 66

Advanced Photography: P, A, M, and CSM ......... 68
Choosing a Mode: P, A, M, or CSM? ......................69
Adjusting Exposure: A and M Modes .................. 70
Reacting Faster to Light: Sensitivity (ISO
Equivalency) ................................................................. 74
Focusing at a Preset Distance: Manual Focus .. 76
The Shooting Menu...................................................... 78
Keeping Colors True:
The White-Balance Menu................................. 81
Measuring Light: The Metering Menu ..............85
Making Movies and Taking Photographs in a
Sequence: The Continuous Menu ................ 88
Getting Sharper Photographs:
The BSS Menu........................................................ 92
Contrast, Brightness, and Image Type:
The Image Adjustment Menu......................... 94
Making Edges More Distinct:
The Image Sharpening Menu .......................... 96
Modifying Sensitivity from a Menu:
The ISO Menu ....................................................... 98
Exposure Options..................................................... 98
Focus Options ......................................................... 103
Settings for Optional Lens Converters ....... 106
Restoring Default Shooting Settings:
The Reset Menus ............................................... 109
Playing Images Back: Playback Mode ................ 111
Basic Playback ............................................................... 112
Single-Image Playback........................................... 113
Viewing Multiple Images:
Thumbnail Playback .......................................... 118
Deleting Individual Photographs ..................... 119
The Playback Menu ................................................... 120
Deleting Photographs: The Delete Menu... 122
Selecting a Folder for Playback:
The Folders Menu ............................................. 126
Automated Playback:
The Slide-Show Menu ..................................... 127
Safeguarding Valuable Images:
The Protect Menu ............................................. 130
Hiding Images During Playback:
The Hide-Image Menu .................................... 131
Preparing Photographs for Printing:
The Print-Set Menu .......................................... 132
iii

Camera Setup: The Setup Menu....................... 134
Controlling the (File) Size of Photographs:
Image Quality and Size ........................................ 137
Organizing Your Photogr aphs:
The Folders Menu ................................................. 142
Monitor Options ......................................................... 149
The Auto Off Menu .................................................. 151
File Numbering: The Seq. Numbers Menu .... 153
Formatting Memory Cards:
CF Card Format ..................................................... 154
Storing Camera Settings:
The Controls Menu .............................................. 155
Shutter Release Confirmation and Photo
Information ................................................................ 156
The Date Menu ........................................................... 158
The Video Mode Menu ........................................... 158
The Language Menu.................................................. 159
The Distance Units Menu ...................................... 159
Restoring Default Settings:
The Reset All Menu .............................................. 160
iv
Connections: Connecting Your Camera to a
Computer, TV, or VCR ................................ 162
Connecting to a Television or VCR .................... 162
Connecting to a Computer................................... 164
Using Nikon View Software .............................. 164
Connecting Your Camera to a Computer . 166
Reading Photographs from Memory
Cards ........................................................................ 168
Technical Notes .................................................. 170
Caring for Your Camera .......................................... 170
Optional Accessories ................................................ 172
Troubleshooting ........................................................... 174
Specifications ................................................................. 181

Overview
About This Manual
Thank you for your purchase of a COOLPIX 880 digital camera. This manual has been written to help
you enjoy taking digital photographs with your COOLPIX 880. As you read through it, you will find
explanations not only of how the camera works but also of why certain features have been included,
and how they may be used to take photographs in many different situations.
The “Tutorial” section gives you enough information for simple “point-and-shoot” photography when
you first start using your camera. This section may be all you need to read if you want to take advantage
of the simplicity and immediacy of digital photography.
Once you have taken a few photographs, “Where Do I Go from Here” outlines how to view them on
a computer or television set and order prints using digital “print orders” that you create with the
camera. It also provides some tips on how to take photographs for electronic distribution and for
printing on a personal color printer.
Finally, the “Reference” section provides a comprehensive guide to all aspects of digital photography
with the COOLPIX 880, including manual control of exposure, tone, sharpness, taking movies, caring for
your camera, and troubleshooting, together with a list of optional accessories.
1

To make it easier to find the information you need, the following symbols and conventions are used:
This icon marks cautions, information that
you should read before use to prevent damage to your camera.
This icon marks notes, information that you
should read before using your camera.
This icon marks tips, additional information
you may find helpful when using your
camera.
This icon indicates that more information is
available elsewhere in this manual or in other
documentation.
Life-Long Learning
As part of Nikon’s “Life-Long Learning” commitment to ongoing product support and education, continually-updated information is available on-line at www.nikon-euro.com. Visit this site to keep up-todate with the latest product information, tips, answers to frequently-asked questions (FAQs), and general advice on digital imaging and photography.
2
This icon marks cross-references to the
Guide to Digital Photography (this manual).
The number next to the icon gives the page
on which more information may be found.
This icon marks cross-references to the Fast
Track Guide.
This icon marks cross-references to For Your
Safety.
This icon marks cross-references to the
Menu Guide.

Tutorial
Parts of the COOLPIX 880
First Steps/Taking Photographs
This section:
• Introduces you to the parts of the COOLPIX 880 and the camera menus
• Takes you step-by-step through the process of setting up your camera
• Outlines the steps involved in taking photographs and playing them back
Using the Menus
3

Getting to Know the COOLPIX 880
The Parts of the Camera and Their Functions
Take a few moments to familiarize yourself with camera controls, displays, and menus.
10 (56)
9 (55)
)
8 (
7 (166)
6
* Refer to the page numbers in parentheses for more information.
5 (15)
1 (26)
4 (15)
2 (181)
3
14 (162)
E
F
A B
L
H
G
M
D
11 (11)
C
N
12 (11)
I
13 (18)
J
K
1 Viewfinder window
2 Lens
3 Tripod socket
4 Battery-chamber cover
5 Battery-chamber latch
4
6 DC-IN connector
7 USB/serial connector
8 Eyelet for camera strap
9 Flash
10 Red-eye reduction lamp
11 Flash-ready lamp
12 Autofocus lamp
13 Memory-card slot
14 VIDEO OUT connector
A The Power Switch
B The Shutter-Release
Button
C The Zoom Buttons
The power switch is used to
turn the camera on and off.
23–24
The COOLPIX 880 has a twostage shutter-release button.
Press the shutter-release button
halfway to focus. Focus will re-
main fixed while the button is
held in this position (focus lock).
Press the shutter-release button all
the way down to take a picture.
28–30
Use the zoom buttons to frame
photographs. The button
zooms the camera out, increasing the area visible in the final
photograph. The button
zooms the camera in, enlarging
small or distant objects to fill the
frame.
When an image is played back
full screen, the
used to zoom in on the image
displayed in the monitor. Press
the button to cancel zoom.
52–54, 116
( ) button is
5
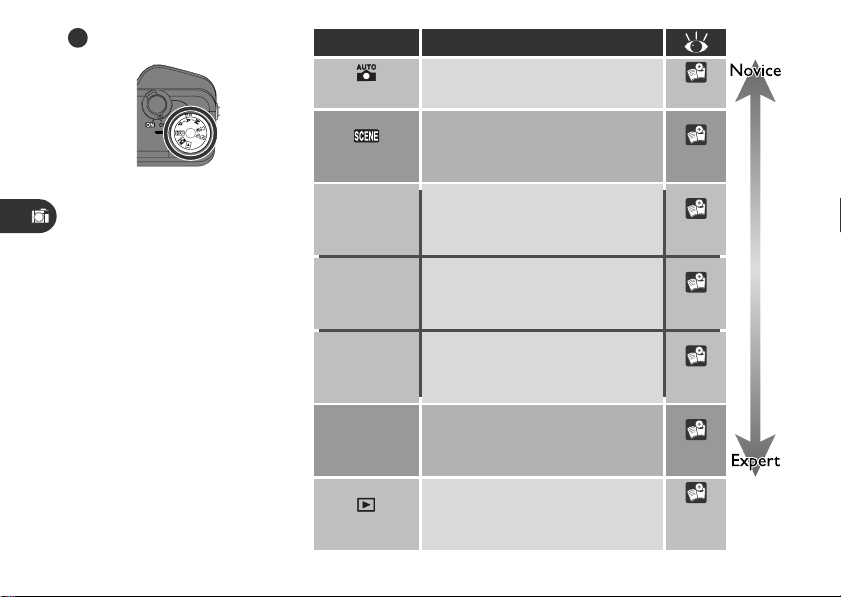
D The Mode Dial
Use the mode dial to select the
operating mode.
Mode
Auto
Scene
P
Programmed
auto
A
Aperture-
priority auto
M
Manual
CSM
Custom
Description
An automatic mode for simple,
“point-and-shoot” photography
This mode offers a choice of settings for specific scenes, such as
sunsets and portraits
This mode puts the camera in
charge of exposure, while leaving
you in control of all other settings
The camera sets the shutter
speed while you control aperture
and other settings
You control all camera settings, including shutter speed and aperture
Puts you in complete control of
all settings, including exposure
mode
23–31
32–38
68–69
68–71
68–73
68–73
Use this mode to play back and
Playback
6
delete photographs
111
–133
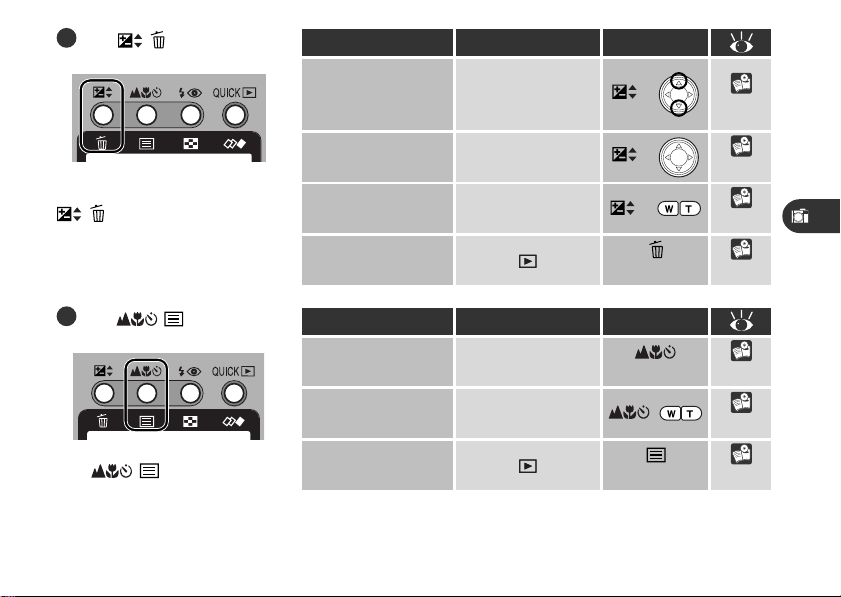
E The / Button
The functions controlled by the
/ button depend on the
operating mode and on the
combination of buttons used.
Function Mode Operation
Exposure
compensation
Shutter speed/
aperture
Sensitivity
(ISO equivalency)
Single-image
deletion Press 119
AUTO, SCENE,
P, A, CSM (expo-
sure mode P, A)
A, M, CSM (expo-
sure mode A, M)
P, A, M, CSM
+
+
+
64–65
71–72
74–75
F The / Button
The
the functions shown at right.
/ button controls
Function
Focus mode
Manual focus
distance
Photo-information
display Press 114
Mode
AUTO, SCENE,
P, A, M, CSM
P, A, M, CSM
Operation
Press 58–61
+
76–77
7
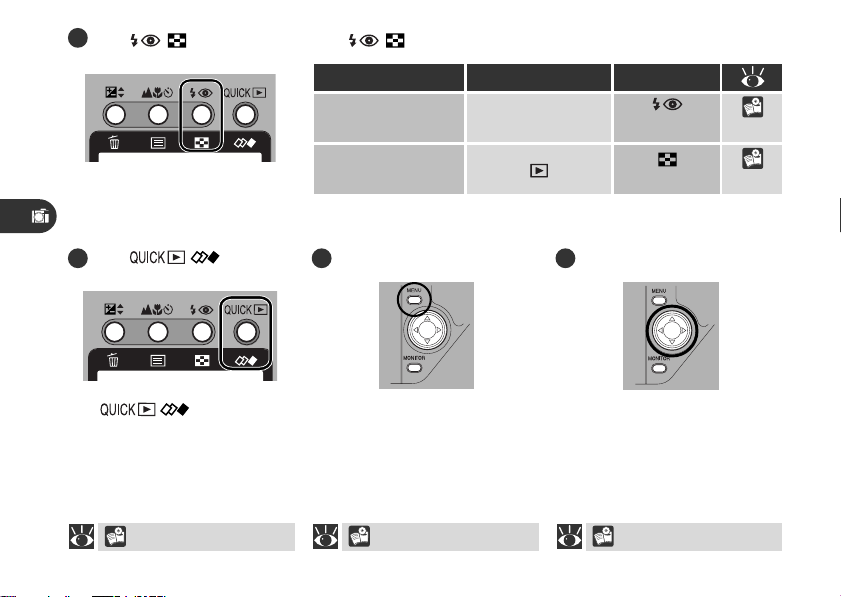
G The / Button The / button controls:
Function
Flash mode
Thumbnail display
H The / Button J The Multi Selector
The / button is used
to review photographs while
shooting. In playback mode, its
function is to start and stop
movie playback.
39–43, 117
8
I The MENU Button
Press the MENU button to display or hide the menu for the
current operating mode, or to
display the second page of a
two-page menu.
12 13–14
Mode
AUTO, SCENE,
P, A, M, CSM
Use the multi selector to select
items from the camera menus,
or to scroll through the images
in memory in quick-review or
playback modes.
Operation
Press
Press
55–57
118
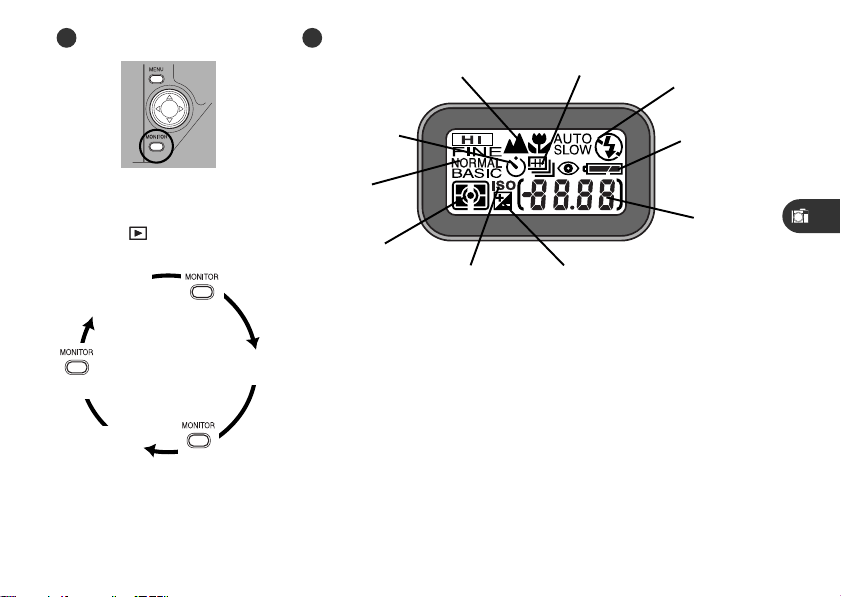
L The Control PanelK The MONITOR Button
9 (58)
10 (91)
1 (55)
The MONITOR button controls
the monitor in AUTO, P, A, M,
CSM, and modes.
Monitor on,
information icons
displayed
Press
Monitor
off
Press
Monitor on,
information icons
hidden
Press
The monitor can not be turned
off in SCENE and SETUP modes.
8 (62)
2 (16)
7 (139)
3 (24)
6 (85)
5 (74)
4 (64)
* Refer to the page numbers in parentheses for more information.
1 Flash mode
2 Battery indicator
3 Exposure-count display (shows
numbers of exposures remaining)
4 Exposure-compensation in-
dicator
5 Sensitivity (ISO equivalency)
indicator
6 Metering method
7 Image quality
8 Self-timer indicator
9 Focus mode
10 Continuous setting
9
M The Monitor
NIKON
AE-
VGA
NORMAL
2 3 465
NIKON
27
WBWB- L
29
AE-
L
+
0.7
1/60F2.8
P
0.66ft
1.25
5
28
ISO
30
VGA
NORMAL
[
+
2.0
16
10
151718
25
23
21
1
26
24
22
20
19
* Refer to the page numbers in parentheses for more information.
7
8
9
10
11
12
13
]
14
1 Scene indicator (33)
2 Zoom indicator (53)
3 Digital-zoom factor (53)
4 Focus mode/manual focus
distance (58)
5 “Date not set” icon (22)
6 Flash mode (55)
7 Battery indicator (16)
8 Sharpening (97)
9 White balance (84)
10 Sensitivity (ISO equivalency)
(74)
10
11 Image adjustment (95)
12 Image size (141)
13 Image quality (139)
14 Number of exposures remain-
ing at current settings (24)
15 Exposure compensation (64)
16 Aperture (f number) (71)
17 Shutter speed (72)
18 Exposure mode (71)
19 Metering method (86)
20 Continuous setting (91)
21 Exposure-bracketing indica-
tor (100)
22 Auto-exposure lock (99)
23 White-balance lock (99)
24 Best-shot selection (93)
25 Lens-converter setting (108)
26 Current folder (148)
27 Self-timer indicator (62)
28 Auto-exposure target (spot
metering) (87)
29 Focus areas (66)
30 Exposure display (manual-
exposure mode) (72)
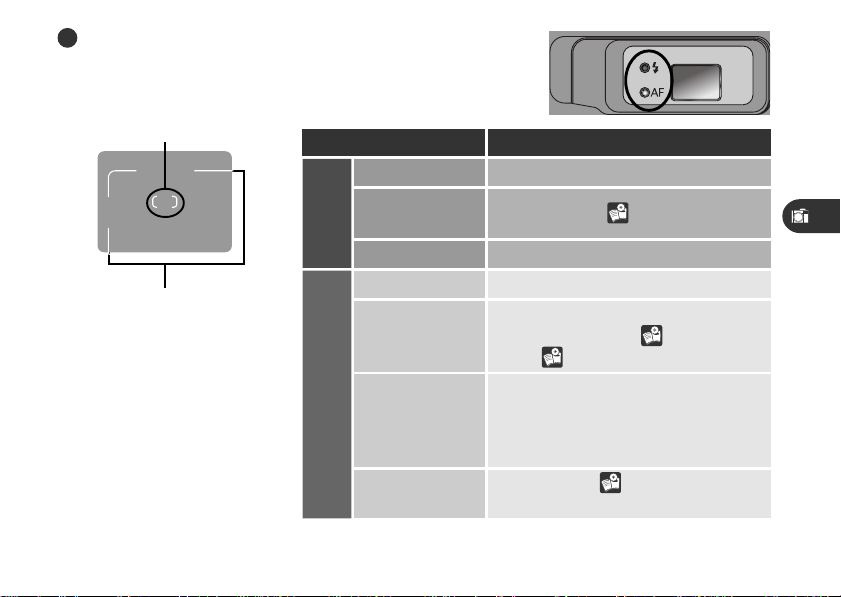
N The Viewfinder
Focus target (Auto/Scene)
Center focus area for manual or
automatic AF-area selection
(P•A•M/CSM)
Use this area to frame photo-
graphs at ranges of less than
90 cm (1 yd)
The flash lamp (red) and
autofocus (AF) lamp (green)
next to the viewfinder provide a
visual guide to camera status.
Lamp Meaning
Glows steadily
Flash will fire when photograph is taken
Blinks Flash charging ( 55)
(Red)
Flash Lamp
Off
Flash not required or flash set to “off”
Subject in focusGlows steadily
Camera unable to focus using autofo-
Flashes rapidly
cus. Use focus lock ( 29) or manual
focus ( 76).
Camera recording image(s) to memo-
Blinks
AF Lamp (Green)
Blinks slowly
ry card. Do not eject card or remove
or disconnect power source while lamp
is blinking.
Digital zoom ( 52) in effect; frame
photographs in monitor
11
PAGE2
1
2
MENU
SELECT SET
A
A
A
WHITE BALANCE
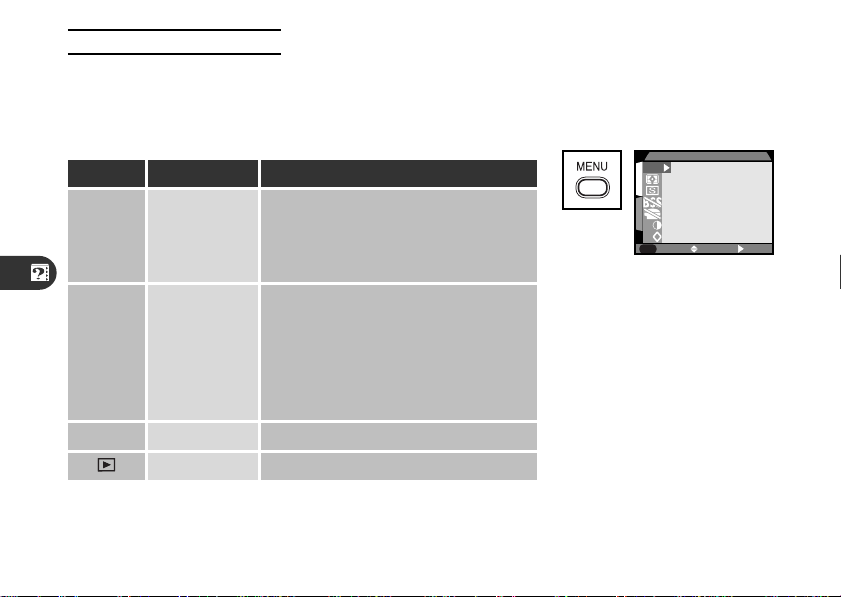
Using the Camera Menus
Changes to some settings can be made with the help of menus that
appear in the monitor. Separate menus are available for scene,
P•A•M, CSM, playback, and setup modes (no menu is available in
AUTO mode).
Viewing the menus
When the camera is on, the
menu for the current operating mode can be displayed by
pressing the MENU button.
Mode Menu
SETUP SET-UP
P•A•M
CSM
SHOOTING
SCENE SCENE Scene selection
PLAY BACK Playback options
12
Function
Basic camera setup (e.g., formatting
memory cards, setting the time and
date); image quality and size settings
for AUTO and SCENE modes
Advanced shooting options (e.g., white
balance, metering). Two menus are
available, one for P, A, and M modes,
the other for CSM mode. Changes to
settings in one menu do not affect the
other.
Press
Menu for current
mode displayed
If MENU PAGE2 is displayed in
the lower left corner of the
menu screen, pressing the
MENU button a second time
will display the second page of
the menu. Pressing the MENU
button when MENU OFF is displayed clears the menu from the
monitor.
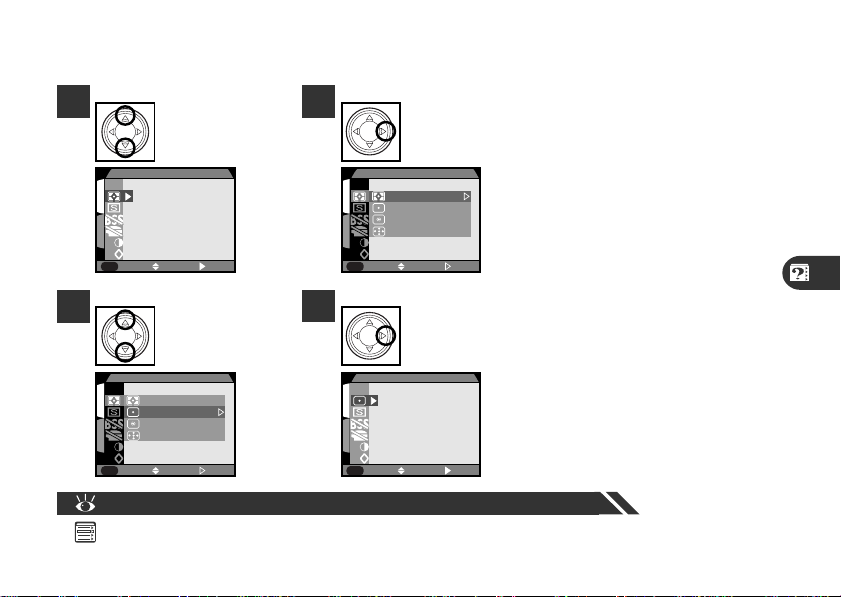
Making a selection
Use the multi selector to make a selection.
1
3
1
2
A
A
MENU
1
2
A
A
MENU
A
PAGE2
A
OFF
METERING
METERING
Matrix
Spot
Center-Weighted
Spot AF Area
Highlight menu
item
SELECT SET
Highlight option
SELECT SET
2
4
1
2
1
2
A
A
MENU
A
A
MENU
Pg. For more information on:
— Camera menus
A
OFF
A
PAGE2
Display options
METERING
Matrix
Spot
Center-Weighted
Spot AF Area
SELECT SET
Make selection
METERING
SELECT SET
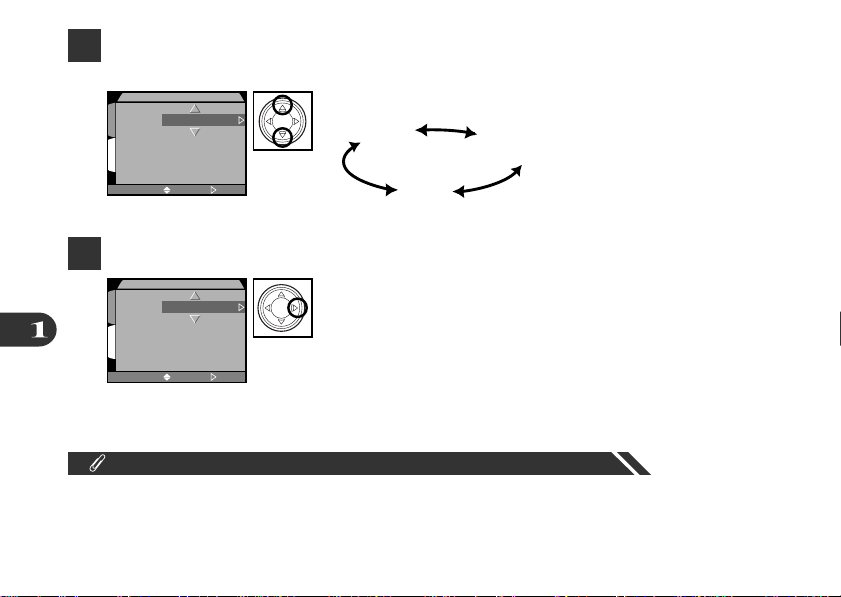
• To go back one step, press the
multi selector to the left.
• The selection for some
menu options is made from
a sub-menu. Repeat steps 3
and 4 to select the desired
setting from the sub-menu.
• Changes to settings apply as
soon as the selection is
made.
• In SCENE, P•A•M, and CSM
modes, the view through the
lens is visible behind the
menu. To take a photograph
while the menu is displayed,
press the shutter-release
button.
13
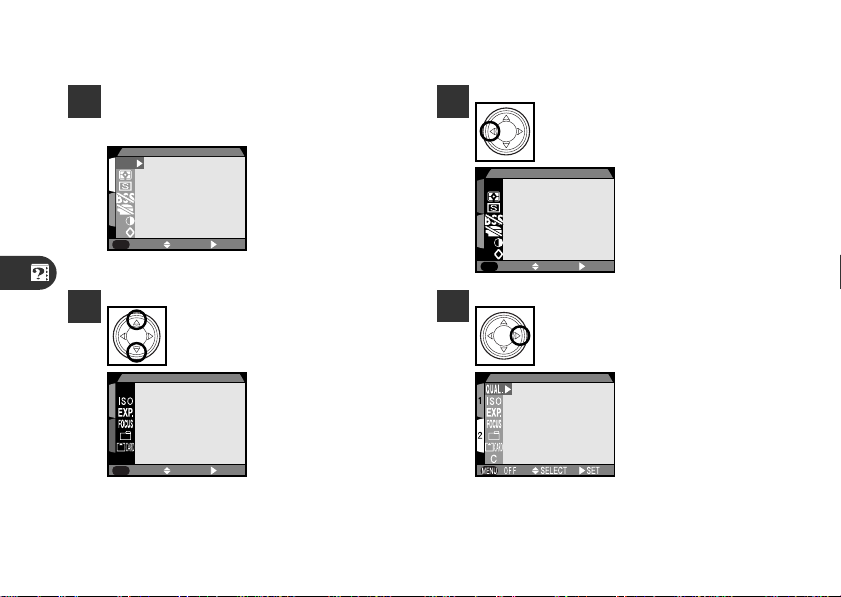
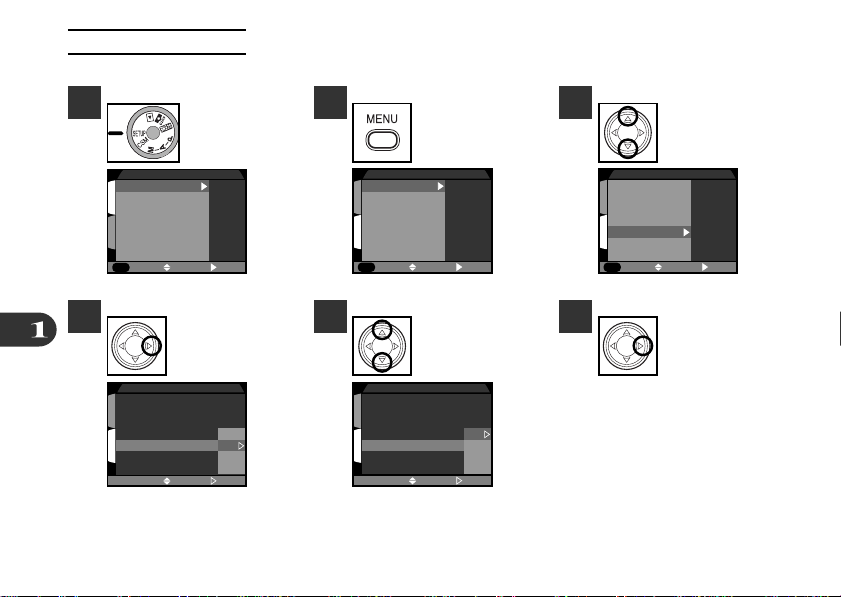
Multi-page menus
To move between pages of a multi-page menu.
1
Position cursor in main menu
WHITE BALANCE
A
1
2
A
A
SELECT SET
MENU
PAGE2
3
Highlight page
number
SHOOTING MENU2
QUAL.
1
2
C
SELECT SET
MENU
OFF
2
4
SHOOTING MENU1
A
1
2
A
A
MENU
PAGE2
IMAGE SIZE & QUALITY
Highlight page tab
SELECT SET
Display selected
page
• You can also go from the first to the second page of a multi-page menu by pressing the MENU
button once.
14
First Steps
Getting Ready to Use Your Camera
Before using your camera for the first time, you will need to:
• Check the contents of the package (see the packing list included in the “Open Me First” envelope)
• Attach the camera strap and lens-cap string as described in For Your Safety (
• Put the battery in the camera
• Insert the memory card
• Choose a language for the camera menus and messages
• Set the time and date
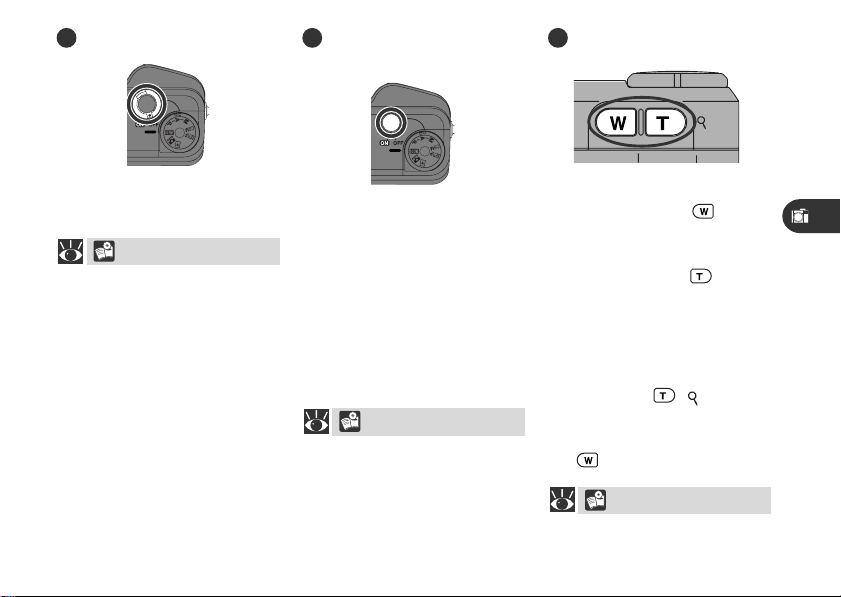
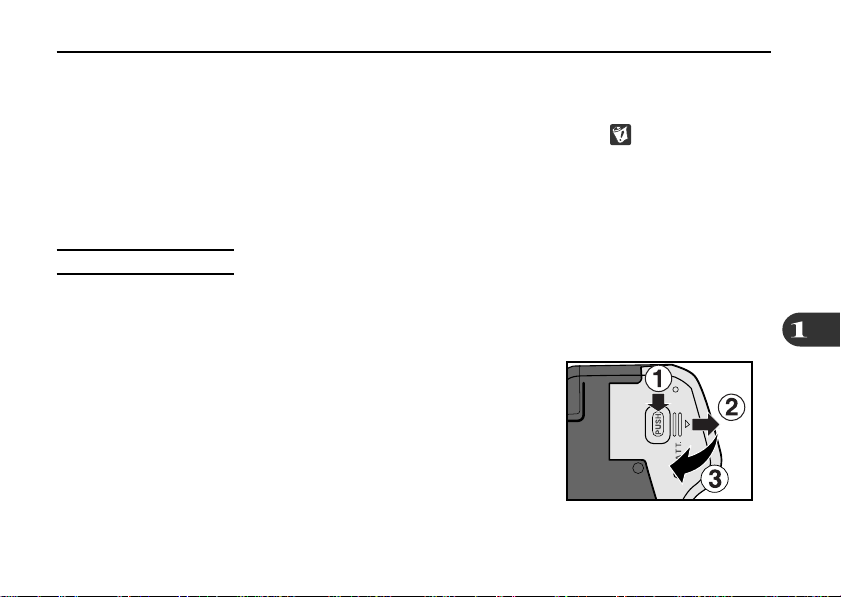
Inserting the Battery
Turn the camera off
1
If the camera is on a tripod, remove the tripod before proceeding to the next step.
Open the battery-chamber cover
2
Pressing the battery-chamber latch (1), slide the battery-chamber cover out (2) and flip it open (3).
)
15

Insert the battery
3
Insert a 2CR5 (DL245) lithium battery or a rechargeable
Nikon EN-EL1 lithium-ion battery (available separately) as shown
at right.
Close the battery-chamber cover
4
To prevent the battery from falling out of the camera during
operation, be sure the battery chamber is latched.
Check the battery level
5
After removing the lens cap ( 23), turn the camera on and
check the battery level in the control panel.
Battery fully charged
Low battery
Replace the battery as soon as possible.
Battery exhausted
No photographs can be taken until the battery has been
replaced.
The battery-level indicator may briefly show (battery fully charged) after an exhausted 2CR5 (DL245)
battery is re-inser ted in the camera.
16

Read and follow all warnings and instructions supplied by the battery manufacturer.
The battery can be removed without affecting photographs stored on the camera’s memory card. All
settings other than date and language will, however, be reset.
The clock-calendar is powered by a separate, rechargeable battery, which is charged as necessary when
the main battery is installed. If the camera has been stored for a long period of time with the main
battery removed, the clock may need to be reset. Once the main battery has been re-inserted, the
clock battery will recharge in several hours, during which time the main battery should be left in the
camera.
Alternative Power Sources
Although the COOLPIX 880 can be used with non-rechargeable 2CR5 (DL245) lithium batteries,
available at a wide variety of retail outlets, we recommend the rechargeable Nikon EN-EL1 Li-ion
battery, available separately from Nikon. This lithium-ion battery, for use exclusively with the COOLPIX
880, can be recharged with the EH-21 AC adapter/batter y charger, which doubles as an AC adapter.
While the battery recharges, you can connect the camera to the EH-21 and use an AC power source
for shooting or playback.
17
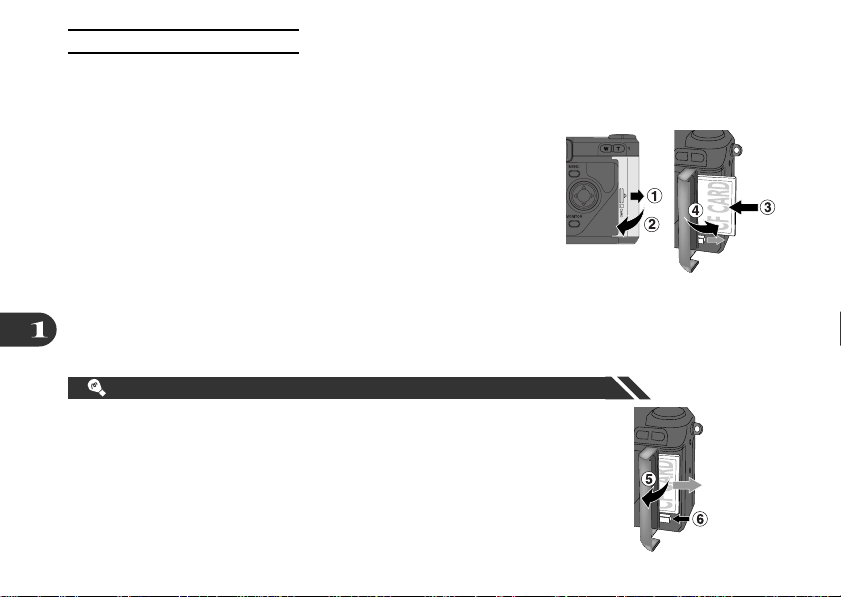
Inserting the Memory Card
Turn the camera off
1
Insert the memory card
2
Slide the card-slot cover out (1) and flip it open (2). Slide the
card in (3) until it is firmly in place and the eject button pops up.
Close the card-slot cover (4)
3
Removing memory cards
Memory cards can be removed without loss of data when the camera is off. To remove memory cards, turn the camera off and open
the card-slot cover (5). Press the eject button to partially eject the
card (6) and then remove the card by hand.
18
Formatting Memory Cards
PAGE2
1
2
MENU
SELECT SET
Folders
Monitor Options
Auto Off
Seq. Numbers
CF Card Format
SET-UP1
Image Quality
Image Size
Format memory cards before first use.
1 2
4
1
2
Select SETUP
Press
CF CARD FORMAT
WARNING!
All images will
be deleted!
No
Format
SELECT SET
Confirmation dialog displayed. Press multi selector down to highlight Format,
then press to right to format card. Do not turn camera off or remove card until
“FORMATTING” message has disappeared from display. All data on card will be
permanently deleted.
Pg. For more information on:
— Safe handling of memory cards
173 Approved memory cards
Image Quality
1
Image Size
Folders
Monitor Options
2
Auto Off
Seq. Numbers
CF Card Format
MENU
PAGE2
Turn camera on.
SET-UP menu will
be displayed.
SET-UP1
SELECT SET
3
Highlight CF
Card Format
19
Choosing a Language
PAGE1
1
2
MENU
SELECT SET
Controls
Pic data/Confirm
Date
Video Mode
Language
Distance Units
Reset All
SET-UP2
Camera menus and messages can be displayed in English, French, German, and Japanese.
1
4
20
Image Quality
1
Image Size
Folders
Monitor Options
2
Auto Off
Seq. Numbers
CF Card Format
MENU
PAGE2
Controls
1
Pic data/Confirm
Date
Video Mode
2
Language
Distance Units
Reset All
Turn camera on
and select SETUP
SET-UP1
SELECT SET
Press
LANGUAGE
D
E
F
J
SELECT SET
2
5
Controls
1
Pic data/Confirm
Date
Video Mode
2
Language
Distance Units
Reset All
MENU
PAGE1
Controls
1
Pic data/Confirm
Date
Video Mode
2
Language
Distance Units
Reset All
Press to display
3
second page of
SET-UP menu
SET-UP2
SELECT SET
Highlight option Press
LANGUAGE
D
E
F
J
SELECT SET
6
Highlight
Language

Setting the Time and Date
PAGE1
1
2
MENU
SELECT SET
Controls
Pic data/Confirm
Date
Video Mode
Language
Distance Units
Reset All
SET-UP2
1
2
SELECT SET
2000.02.01
00:00
YMD
DATE
1
Image Quality
1
Image Size
Folders
Monitor Options
2
Auto Off
Seq. Numbers
CF Card Format
MENU
4
1
2
Turn camera on
and select SETUP
SET-UP1
SELECT SET
PAGE2
Press to display
DATE menu
DATE
YMD
2000.00.00
00:00
SELECT SET
2
5
Controls
1
Pic data/Confirm
Date
Video Mode
2
Language
Distance Units
Reset All
MENU
PAGE1
1
2000.01.01
2
00:00
Press to display
second page of
SET-UP menu
SET-UP2
SELECT SET
Highlight desired
item (Year, Month,
or Day)
DATE
YMD
SELECT SET
3
6
Highlight Date
Edit selected item
21
7
To change order in which year, month, and date are displayed, press multi selector to right until Y M D is
highlighted, then press multi selector up or down
DATE
YMD
1
2000.03.02
2
23:05
SELECT SET
8
To save changes to settings, highlight Y M D and press multi selector to right
DATE
YMD
1
2000.03.02
2
23:05
SELECT SET
Camera cycles through settings as shown below:
YMD
DMY
MDY
Any photographs taken before the time and date have been set will have a time stamp of “2000/01/01
0:00.” Until you have set the time and date, a flashing clock icon will be displayed in the top right corner
of the monitor when the camera is in shooting mode.
22
Taking Photographs
The Basics
This chapter describes the basic steps involved in taking photographs in AUTO and SCENE modes. In
these automatic, “point-and-shoot” modes, the majority of settings are controlled by the camera in
response to lighting conditions and focus distance, producing the best possible results.
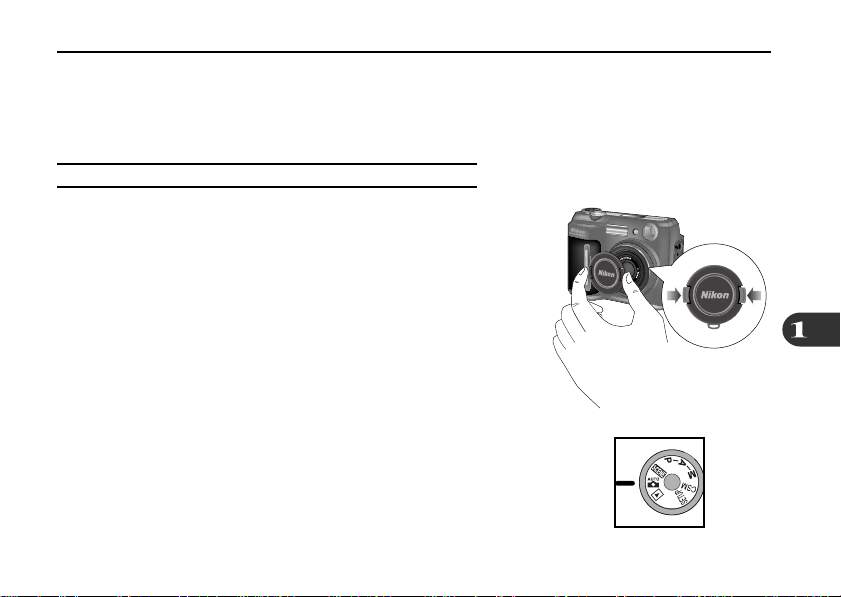
Getting the Camera Ready for Use (AUTO Mode)
Remove the lens cap
1
If you turn the camera on with the lens cap in place and the
mode dial set to AUTO, SCENE, P, A, M, or CSM, an error message will appear in the monitor. To clear the message from the
display, turn the camera off and remove the lens cap.
Release latch
and remove cap
Turn the mode dial to AUTO
2
23
NORMAL
1/60F2.8
NORMALNORMAL
[
10
]
P
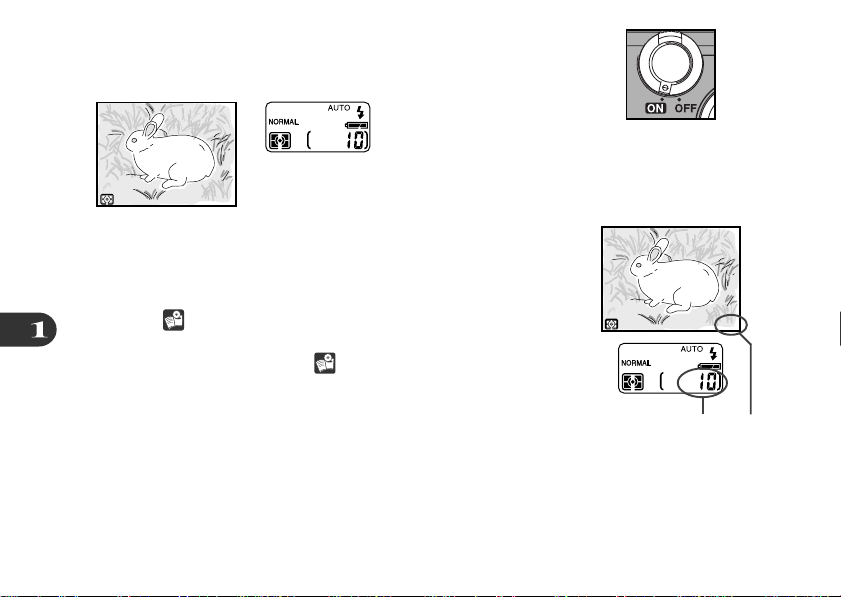
Turn the camera on
3
After a short pause, current settings will be displayed in the
monitor and control panel.
NORMAL
[
1/60F2.8
P
Check the number of exposures remaining
4
The monitor and control panel show the number of exposures
10
]
remaining at current settings. When this number reaches zero,
you will need to insert a new memory card or delete some
pictures ( 122) before you will be able to take more photographs. It may be possible to record more photographs at a
different image quality or size ( 137).
24
Number of exposures remaining

Adjust camera settings (optional)
5
In AUTO mode, you can use the buttons or menus listed below to control flash setting, focus mode,
image quality, and image size. The first time you turn the camera on, these settings will be set to the
default values shown. These settings are adequate for most situations, and the description in this
section assumes that the default settings are used. For information on changing these settings, refer
to the page numbers given below.
Setting
Default
Description
Control
Flash mode
Focus mode/
self-timer
Image quality NORMAL
Image size FULL
Auto
Autofocus
Flash fires automatically when lighting is poor
Camera focuses automatically at distances
over 40 cm (16˝); self-timer off
Photographs compressed for best balance
between file size and image quality
Photographs are 2048 ×1536 pixels in size.
When image quality is set to NORMAL,
about ten full-size images can be stored on
one 8 MB memory card.
SETUP
menu
SETUP
menu
55–57
58–61
138
140
25
 Loading...