

Page 1

Jp
En
De
Fr
使用説明書
User’s Manual
Benutzerhandbuch
Manuel d'utilisation
Manual del usuario
Användarhandbok
Pykoводство пользoвaтеля
AF-S DX NIKKOR 35mm f/1.8G
P. 2
P. 10
S. 18
P. 24
P. 30
S. 36
CTP. 42
Gebruikshandleiding
Manuale d'uso
Εγχειρίδιο οδηγιών χρήσης
P. 48
P. 54
Σελ. 60
P. 66
P. 76
P. 82
Es
Sv
Ru
Nl
It
Gr
Sc
Tc
Kr
Page 2
安全上のご注意
Jp
ご使用の前に「安全上のご注意」をよくお読みのうえ、正しくお使いください。この「安全上のご注意」は製品を安
全に正しく使用していただき、あなたや他の人々への危害や財産への損害を未然に防止するために、重要な内容を記
載しています。お読みになった後は、お使いになる方がいつでも見られる所に必ず保管してください。
表示について
表示と意味は次のようになっています。
警告
注意
お守りいただく内容の種類を、次の絵表示で区分し、説明しています。
この表示を無視して、誤った取り扱いをすると、人が死亡または重傷を負う可能性が想定される内容を
示しています。
この表示を無視して、誤った取り扱いをすると、人が傷害を負う可能性が想定される内容および物的損
害の発生が想定される内容を示しています。
絵表示の例
記号は、注意(警告を含む)を促す内容を告げるものです。図の中や近くに具体的な注意内容(左図の場合は
感電注意)が描かれています。
Gr
記号は、禁止の行為(してはいけないこと)を告げるものです。図の中や近くに具体的な禁止内容(左図の場
合は分解禁止)が描かれています。
記号は、行為を強制すること(必ずすること)を告げるものです。図の中や近くに具体的な強制内容(左図の
場合は電池を取り出す)が描かれています。
2
Page 3
警告
分解したり修理・改造をしないこと
感電したり、異常動作をしてケガの原因となります。
分解禁止
落下などによって破損し、内部が露出したときは、
接触禁止
露出部に手を触れないこと
感電したり、破損部でケガをする原因となります。
カメラの電池を抜いて、販売店またはニコンサー
すぐに
ビス機関に修理を依頼してください。
修理依頼を
熱くなる、煙が出る、こげ臭いなどの異常時は、速
やかにカメラの電池を取り出すこと
電池を取る
そのまま使用すると火災、やけどの原因となりま
す。電池を取り出す際、やけどに充分注意してくだ
さい。電池を抜いて、販売店またはニコンサービス
すぐに
機関に修理を依頼してください。
修理依頼を
水につけたり水をかけたり、雨にぬらしたりしな
いこと
水かけ禁止
発火したり感電の原因となります。
引火・爆発のおそれのある場所では使用しないこと
プロパンガス・ガソリンなど引火性ガスや粉塵の
発生する場所で使用すると、爆発や火災の原因と
使用禁止
なります。
レンズまたはカメラで直接太陽や強い光を見ない
こと
見ないこと
失明や視力障害の原因となります。
注意
ぬれた手でさわらないこと
感電の原因になることがあります。
感電注意
製品は幼児の手の届かないところに置くこと
ケガの原因になることがあります。
放置禁止
逆光撮影では、太陽を画角から充分にずらすこと
太陽光がカメラ内部で焦点を結び、火災の原因に
なることがあります。画角から太陽をわずかに外
使用注意
しても火災の原因になることがあります。
使用しないときは、レンズにキャップをつけるか
太陽光のあたらない所に保管すること
太陽光が焦点を結び、火災の原因になることがあ
保管注意
ります。
三脚にカメラやレンズを取り付けたまま移動しな
いこと
転倒したりぶつけたりしてケガの原因になること
移動注意
があります。
窓を閉め切った自動車の中や直射日光が当たる場
所など、異常に温度が高くなる場所に放置しない
こと
内部の部品に悪い影響を与え、火災の原因となる
放置禁止
ことがあります。
Jp
Gr
3
Page 4
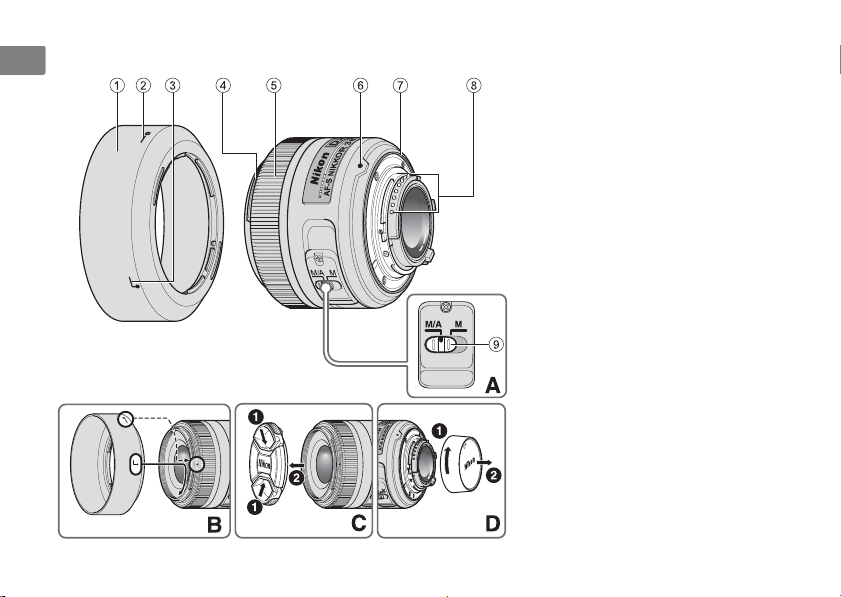
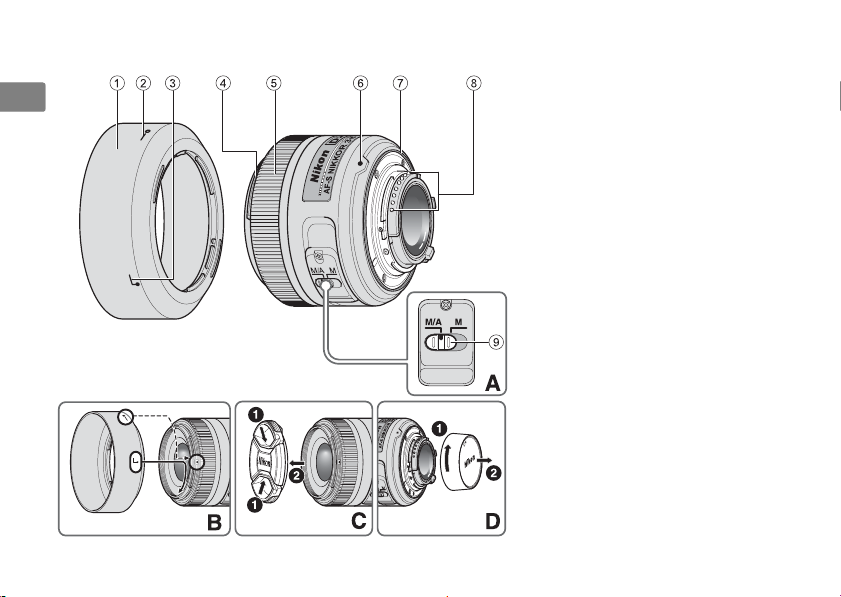
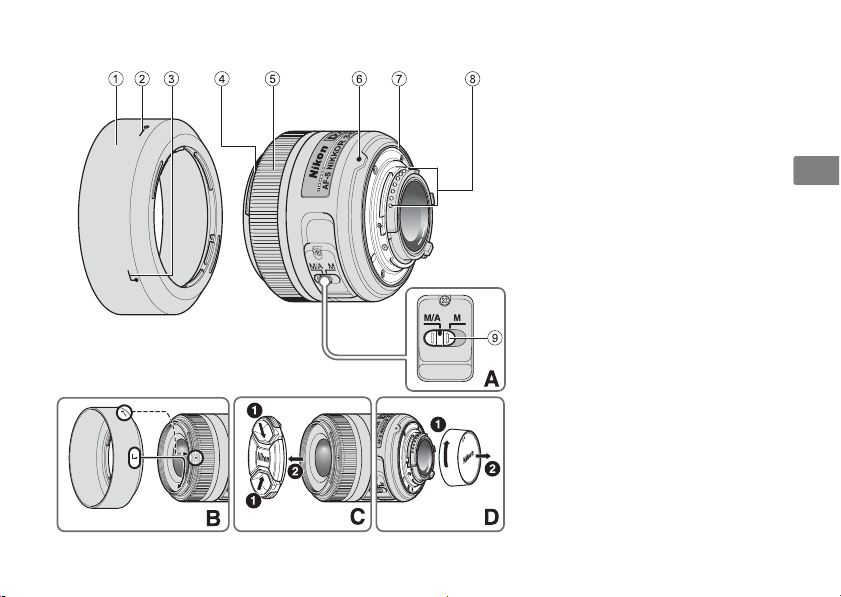
■ 各部の名称
Jp
Gr
4
1 フード(P. 6)
2 フードセット指標(
3 フード取り付け指標(
4 フード着脱指標(
5 フォーカスリング(
6 レンズ着脱指標(
7 レンズマウントゴムリング
P. 7)
(
8
CPU信号接点(P. 7)
9 フォーカスモード切り換え
スイッチ(
P. 6)
P. 6)
P. 6)
P. 6)
P. 6)
P. 5)
( ):参照頁
Page 5

このたびはDXニッコールレンズをお買い上げくださいまして、誠にありがとうございます。このレンズは、ニコン
DXフォーマットのニコンデジタル一眼レフカメラ(D300、D90など)専用です。
ニコンDXフォーマットでの撮影画角は、
ご使用の前に、この使用説明書をよくお読みの上、正しくお使いください。また、カメラの使用説明書もご覧ください。
■ 主な特長
・ レンズ内超音波モーター(サイレント・ウェーブ・
モーター)を採用し静かな
影が可能です。また、フォーカスモード切り換えス
イッチ9 により
AF(オートフォーカス)撮影および
MF(マニュアルフォーカス)撮影ができます。
・ 被写体までの距離情報をカメラ側に伝達する機能を
備え、
3Dマルチパターン測光機能を持ったカメラと
の組み合わせでは、より的確な露出制御を実現しま
す。
・ 非球面レンズや良好なボケ味が得られる円形絞りの
採用により優れた光学性能、描写性能を発揮します。
・ ワイヤレスリモートスピードライト
ズ先端に
2個まで装着できます。
AF(オートフォーカス)撮
35mm
判換算で焦点距離の約
SB-R200は、レン
1.5
倍の焦点距離に相当する画角になります。
■ レンズの取り付け、取り外し
カメラへの取り付け方
カメラの電源をOFFにします。
レンズの裏ぶたを取り外します。(図
レンズとカメラのレンズ着脱指標 6 を合わせ、反
時計回りにカチッと音がするまでレンズを回しま
す。このとき、レンズの着脱指標6が真上にきます。
レンズキャップを取り外します。(図
カメラからの取り外し方
カメラの電源をOFFにします。
カメラのレンズ取り外しボタンを押しながら、時計
回りにレンズを回します。
D)
C)
Jp
Gr
5
Page 6
■
Jp
フードの取り付け、取り外し
取り付け方
レンズ先端のフード着脱指標4 とフード取り付け指標
(
2ヶ所の のいずれか)3を合わせ、カメラ側から見
て反時計回りにカチッと音がするまでフードを回転さ
せ、確実に取り付けます。(図
・ フード着脱指標とフードセット指標( )2が合っ
ていることを確認してください。
・ フードが正しく取り付けられないと撮影画面にケラ
レを生じますのでご注意ください。
・ フード先端を強くつかむと着脱が困難になります。着
脱の際は、フードの根元(フード取り付け指標部分)
付近を持って回転させてください。
・ 収納時はフードを逆向きにしてレンズに取り付けら
れます。
B)
取り外し方
フードの根元(フード取り付け指標部分)付近を持ち、
カメラ側から見て時計回りにフードを回転させて取り
Gr
外します。
6
■ ピント合わせの方法(図A)
ご使用のカメラや撮影目的によって、下表のようなピン
ト合わせが選択できます。
カメラの
フォーカス
モード
AF
MF
カメラのフォーカスモードについては、カメラの使用説
明書をご覧ください。
M/A(マニュアル優先オートフォーカスモード)
の使い方
レンズのフォーカスモード切り換えスイッチ 9 を
M/A]にセットします。
[
AF(オートフォーカス)撮影時、カメラのシャッ
ターボタンを半押ししたまま、あるいは
タンを保持したまま、フォーカスリング5 を手で
回転させると、瞬時に
撮影が行えます。
カメラのシャッターボタンの半押しや
ンを再度操作すると
影が可能となります。
レンズのフォーカスモード
M/A M
マニュアル優先
オートフォーカス
マニュアルフォーカス(フォーカスエイド可)
マニュアルフォーカス
(フォーカスエイド可)
AF作動ボ
MF(マニュアルフォーカス)
AF 作動ボタ
AF(オートフォーカス)で撮
Page 7

■ 絞り値の設定
絞り値は、カメラ側で設定してください。
■ カメラの内蔵フラッシュ使用時のご注意
・ 撮影距離0.6m以上で使用してください。
・ ケラレを防止するために、レンズのフードは取り外し
て使用してください。
※カメラの内蔵フラッシュのケラレとは、フラッシュの
光がレンズのフードや撮影距離によってはレンズの
先端でさえぎられて影になり、写真に映り込む現象で
す。
■ レンズのお手入れと取り扱い上のご注意
・ CPU信号接点8 は汚さないようにご注意ください。
・ レンズマウントゴムリング 7 が破損した場合は、そ
のまま使用せず販売店またはニコンサービス機関に
修理を依頼してください。
・ レンズ面の清掃は、ホコリを拭う程度にしてくださ
い。指紋がついたときは、柔らかい清潔な木綿の布に
無水アルコール(エタノール)または市販のレンズク
リーナーを少量湿らせ、レンズの中心から外周へ渦巻
状に、拭きムラ、拭き残りのないように注意して拭い
てください。
・ シンナーやベンジンなどの有機溶剤は絶対に使用し
ないでください。
・
レンズ表面の汚れや傷を防ぐためには、NCフィルター
をお使いいただけます。また、レンズのフードも役立
ちます。
・ レンズをケースに入れるときは、必ずレンズキャップ
と裏ぶたを取り付けてください。
・ フードを持ってカメラを持ち上げたりしないでくだ
さい。
・ レンズを長期間使用しないときは、カビやサビを防ぐ
ために、高温多湿のところを避けて風通しのよい場所
に保管してください。また、直射日光のあたるとこ
ろ、ナフタリンや樟脳のあるところも避けてくださ
い。
・ レンズを水に濡らすと、部品がサビつくなどして故障
の原因となりますのでご注意ください。
・ ストーブの前など、高温になるところに置かないでく
ださい。極端に温度が高くなると、外観の一部に使用
している強化プラスチックが変形することがありま
す。
Jp
Gr
7
Page 8

■ 付属アクセサリー
Jp
・ 52mmスプリング式レンズキャップ LC-52
・ 裏ぶた
・ バヨネットフード
・ ソフトケース CL-0913
HB-46
■ 別売アクセサリー
・ 52mmネジ込み式フィルター
Gr
8
■ 仕 様
型式: ニコン
焦点距離:
最大口径比: 1:1.8
レンズ構成: 6群8枚(非球面レンズ1枚)
画角:
撮影距離情報: カメラへの撮影距離情報出力可能
ピント合わせ:
最短撮影距離: 撮像面から
絞り羽根枚数: 7枚(円形絞り)
絞り方式: 自動絞り
絞りの範囲:
測光方式: 開放測光
アタッチメントサイズ
寸法: 約
質量: 約
※ 仕様、外観の一部を、改善のため予告なく変更するこ
とがあります。
: 52 mm(P=0.75 mm)
FマウントCPU内蔵Gタイプ、
AF-S DXニッコールレンズ(ニコン
デジタル一眼レフカメラ[ニコン
フォーマット]専用)
35mm
44°
RF(リアフォーカス)方式、超音波
モーターによるオートフォーカス、
マニュアルフォーカス可能
0.3 m
f/1.8―22
70 mm(最大径)×52.5 mm(バヨ
ネットマウント基準面からレンズ先
端まで)
200 g
DX
Page 9

9
Jp
Gr
Page 10

Notes on Safety Operations
En
CAUTION
Do not disassemble
Touching the internal parts of the camera or lens
could result in injury. Repairs should be
performed only by qualified technicians. Should
the camera or lens break open as the result of a
fall or other accident, take the product to a Nikonauthorized service representative for inspection
after unplugging the product and/or removing
the battery.
Turn off immediately in the event of
malfunction
Should you notice smoke or an unusual smell
coming from the camera or lens, remove the
Gr
battery immediately, taking care to avoid burns.
Continued operation could result in injury.
After removing or disconnecting the power
source, take the product to a Nikon-authorized
service representative for inspection.
10
Do not use the camera or lens in the
presence of flammable gas
Operating electronic equipment in the presence
of flammable gas could result in an explosion or
fire.
Do not look at the sun through the lens or
viewfinder
Viewing the sun or other strong light sources
through the lens or viewfinder could cause
permanent visual impairment.
Keep out of reach of children
Particular care should be taken to prevent infants
from putting the batteries or other small parts
into their mouths.
Observe the following precautions when
handling the camera and lens
• Keep the camera and lens unit dry. Failure to do
so could result in fire or electric shock.
Page 11

• Do not handle or touch the camera or lens unit
with wet hands. Failure to do so could result in
electric shock.
• When shooting with back-lighting, do not point
the lens at the sun or allow sunlight to pass
directly down the lens as this may cause the
camera to overheat and possibly cause a fire.
• When the lens will not be used for an extended
period of time, attach both front and rear lens
caps and store the lens away from direct
sunlight. Failure to do so could result in a fire, as
the lens may focus sunlight onto a flammable
object.
En
Gr
11
Page 12
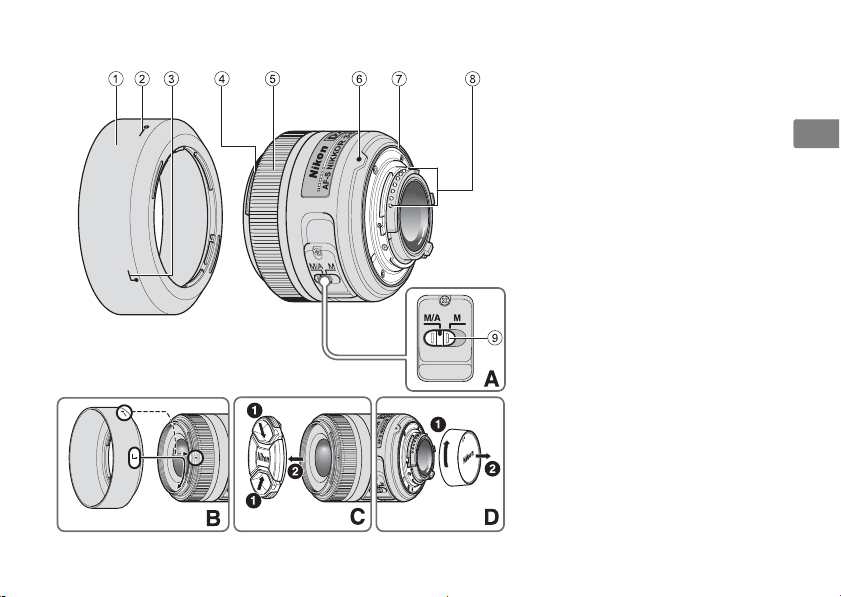
■ Nomenclature
En
Gr
12
1Lens hood (P. 14)
2Lens hood setting index (P. 14)
3Lens hood attachment index
(P. 14)
4Lens hood mounting index (P.
14)
5Focus ring (P. 15)
6Mounting index (P. 14)
7Lens mount rubber gasket (P.
16)
8CPU contacts (P. 16)
9Focus mode switch (P. 15)
( ) : reference page
Page 13

Thank you for purchasing the AF-S DX NIKKOR 35mm f/1.8G lens. DX Nikkor lenses are specially
designed for use with Nikon digital-SLR (Nikon DX format) cameras, such as the D300 and D90.
When mounted on Nikon DX format cameras, the lens picture angle is equivalent to
approximately 1.5× the focal length in 35mm format. Before using this lens, please read these
instructions and refer to your camera’s User’s Manual.
■ Major features
• This lens employs a Silent Wave Motor to
drive the focusing mechanism, making
autofocusing smooth, silent and almost
instantaneous. The focus mode switch 9 is
of pictures that are out-of focus are achieved
by the rounded diaphragm.
• Up to two Wireless Remote Speedlight SBR200s can be mounted on the edge of the
lens.
provided for simple selection of autofocus
(A) or manual focus (M) operation.
• More accurate exposure control is possible
when this is mounted on a Nikon camera
with 3D color matrix metering capability,
because subject distance information is
transferred from the lens to the camera.
• Superior optical performance and rendering
characteristics are maximized with the use of
one aspherical lens element. In addition, soft
and pleasing blur characteristics in portions
En
Gr
13
Page 14

■ Using the lens
Mounting the lens on the camera
En
Turn the camera off.
Remove the rear lens cap. (Fig. D)
Align the mounting index 6 on the lens
with the mounting index on the camera,
and rotate the lens counterclockwise until
it clicks into place. Be sure that the lens is in
the correct position when the mounting
index 6 is on the top of the lens.
Remove the front lens cap. (Fig. C)
Removing the lens from the camera
Turn the camera off.
Press and hold the lens release button on
Gr
the camera while turning the lens
clockwise.
■ Using the lens hood
Attaching the hood
Align the lens hood attachment index ( ,
either of two indexes) 3 on the hood with the
lens hood mounting index 4 on the lens, and
14
turn the hood counterclockwise (as viewed
when holding the camera with the lens facing
away from you) until it clicks into place (Fig. B).
• Be sure that the lens hood mounting index is
aligned with the lens hood setting index
() 2.
• If the lens hood is not correctly attached,
vignetting may occur.
• To facilitate attachment or removal of the
hood, hold it by the base (near the lens hood
attachment index) rather than its outer edge.
• To store the lens hood, attach it in the reverse
position.
Detaching the hood
Hold the lens hood by the base (near the lens
hood attachment index) and turn clockwise, as
viewed when holding the camera with the
lens facing away from you, to detach.
Page 15
■ Focusing (Fig. A)
Set your camera’s focus mode selector
according to the chart below:
Camera
focus mode
AF
MF
Lens’ focus mode switch
M/A M
Autofocus
with manual
override
Manual focus (Focus assist is
Manual focus
(Focus assist is
available.)
available.)
For more information on camera focus modes,
refer to your camera’s User’s Manual.
Autofocus with manual override (M/A
mode)
Set the lens focus mode switch 9 to M/A.
Autofocus is enabled, but autofocus
operation can be overridden by rotating
the separate focus ring 5 while pressing
the shutter-release button halfway, or by
pressing the AF-ON button on the camera
body of cameras so equipped.
Press the shutter-release button halfway or
the AF-ON button once again to cancel
manual focus and resume autofocus.
■ Setting the aperture
Use the camera to adjust the aperture setting.
■ The built-in flash and vignetting
• The built-in flash cannot be used over
distances of less than 0.6 m (2.0 ft.).
• To prevent vignetting, do not use the lens
hood.
* Vignetting is the darkening of the corners
around the image that occurs when the light
emitted by the flash is obstructed by the lens
hood, or lens barrel, depending on the
shooting distance.
En
Gr
15
Page 16

■ Lens care
• Be careful not to allow the CPU contacts 8
to become dirty or damaged.
En
• If the lens mount rubber gasket 7 is
damaged, be sure to visit the nearest Nikonauthorized service representative for repair.
• Clean lens surfaces with a blower brush. To
remove dirt and smudges, use a soft, clean
cotton cloth or lens tissue moistened with
ethanol (alcohol) or lens cleaner. Wipe in a
circular motion from the center to the outer
edge, taking care not to leave traces or touch
other parts of the lens.
• Never use organic solvent such as thinner or
benzene to clean the lens, as this could cause
damage, result in a fire, or cause health
problems.
Gr
• NC filters are available to protect the front
lens element. The lens hood also helps to
protect the front of the lens.
• When storing the lens in its flexible lens
pouch, attach both the front and rear lens
caps.
16
• When the lens is mounted on a camera, do
not pick up or hold the camera and lens by
the lens hood.
• When the lens will not be used for an
extended period of time, store it in a cool, dry
place to prevent mold and rust. Be sure to
store the lens away from direct sunlight or
chemicals such as camphor or naphthalene.
• Do not get water on the lens or drop it in
water as this will cause it to rust and
malfunction.
•Reinforced plastic is used for certain parts of
the lens. To avoid damage, never leave the
lens in an excessively hot place.
■ Standard accessories
• 52mm snap-on Front Lens Cap LC-52
•Rear Lens Cap
• Bayonet Hood HB-46
• Flexible Lens Pouch CL-0913
Page 17

■ Optional accessory
• 52mm screw-on filters
■ Specifications
Type of lens: G-type AF-S DX NIKKOR lens
with built-in CPU and Nikon
bayonet mount (specially
designed for use with Nikon
digital-SLR—Nikon DX
format—cameras)
Focal length: 35mm
Maximum
f/1.8
aperture:
Lens
construction:
8 elements in 6 groups (1
aspherical lens element)
Picture angle: 44º
Distance
Output to camera
information:
Focusing: Rear Focusing (RF) system,
autofocus using a focusing
Silent Wave Motor, manually
via separate focus ring
Closest
focusing
0.3 m (0.98 ft.) from focal
plane
distance:
No. of
7 pcs. (rounded)
diaphragm
blades:
Diaphragm: Fully automatic
Aperture
f/1.8 to f/22
range:
Exposure
Via full-aperture method
measurement:
Attachment
52 mm (P = 0.75 mm)
size:
Dimensions: Approximately 70 mm (dia.) ×
52.5 mm (extension from the
camera’s lens-mounting
flange)
Weight: Approximately 200 g (7 oz)
Specifications and designs are subject to change
without notice or obligation on the part of the
manufacturer.
En
Gr
17
Page 18

Hinweise für sicheren Betrieb
ACHTUNG
Keinesfalls zerlegen.
Beim Berühren der Innenteile von Kamera oder Objektiv
De
droht Verletzungsgefahr. Überlassen Sie Reparaturen
unbedingt ausschließlich qualifizierten Technikern. Kommt
es durch einen heftigen Stoß (z.B. Fall auf den Boden) zu
einem Bruch von Kamera oder Objektiv, so trennen Sie
zunächst das Produkt vom Stromnetz bzw. entnehmen die
Batterie(n) und geben es dann an eine autorisierte NikonServicestelle zur Überprüfung ab.
Bei einer Störung sofort die Stromversorgung
ausschalten.
Bei Entwicklung von Rauch oder ungewöhnlichem Geruch
durch Kamera oder Objektiv entnehmen Sie sofort die
Batterie(n); dabei vorsichtig vorgehen, denn es besteht
Verbrennungsgefahr. Bei einem Weiterbetrieb unter diesen
Umständen droht Verletzungsgefahr.
Gr
Nach dem Abtrennen von der Stromversorgung geben Sie
das Gerät an eine autorisierte Nikon-Servicestelle zur
Überprüfung ab.
Kamera oder Objektiv keinesfalls bei Vorhandensein
von brennbarem Gas einsetzen.
Wird elektronisches Gerät bei brennbarem Gas betrieben,
so droht u. U. Explosions- oder Brandgefahr.
18
Keinesfalls durch Objektiv oder Sucher in die Sonne blicken.
Beim Betrachten der Sonne oder anderer starker
Lichtquellen durch Objektiv oder Sucher droht eine
permanente Schädigung des Sehvermögens.
Dem Zugriff von Kindern entziehen.
Es ist unbedingt dafür zu sorgen, dass Kleinkinder keine
Batterien oder andere Kl einteile in den Mund nehmen können.
Beim Umgang mit Kamera und Objektiv unbedingt
die folgenden Vorsichtmaßnahmen beachten:
• Schützen Sie die Kamera und das Objektiv vor
Feuchtigkeit. Andernfalls droht Brand- oder
Stromschlaggefahr.
• Handhaben oder berühren Sie die Kamera bzw. das
Objektiv keinesfal ls mit nassen Händen. Andernfalls droht
Stromschlaggefahr.
•
Bei Gegenlichtaufnahmen nicht das Objektiv gegen die
Sonne richten oder das Sonnenlicht direkt durch das
Objektiv eintreten lassen. Dies könnte eine Überhitzung der
Kamera verursachen und ein Brand könnte die Folge sein
•
Vor einem längeren Nichtgebrauch des Objektivs bringen
Sie den vorderen und hinteren Deckel an und bewahren
das Objektiv gesch ützt vor direkter Sonnenlicht einwirkung
auf. Andernfalls droht Brandgefahr wegen möglicher
Fokussierung von Sonnenlicht durch das Objektiv auf
brennbare Gegenstände
.
.
Page 19
■ Nomenklatur
1
Gegenlichtblende (S. 21)
2 Markierung für die Ausrichtung der
Gegenlichtblende (S. 21)
3 Markierung für die Arretierung der
Gegenlichtblende (S. 21)
4 Markierung für das Ansetzen der
Gegenlichtblende (S. 21)
Entfernungseinstellring
5
6 Markierung für die Ausrichtung des
Objektivs (S. 20)
7 Dichtungsmanschette (S. 22)
8 CPU-Kontakte (S. 22)
9 Fokusmodusschalter (S. 21)
De
(S. 21)
( ): Seitennummer
Gr
19
Page 20

Wir danken Ihnen für das Vertrauen, das Sie Nikon mit dem Kauf des AF-S DX NIKKOR 35mm 1:1,8G
entgegenbringen. DX-NIKKOR-Objektive sind speziell für die Verwendung mit digitalen Nikon-Spiegelreflexkameras
mit DX-Bildformat konstruiert, wie etwa die D300 und die D90. Der Bildwinkel des Objektivs entspricht bei
Verwendung an einer DX-Format-Kamera dem eines Objektivs mit der ca. 1,5-fachen Brennweite an einer
Kleinbildkamera. Machen Sie sich bitte vor dem Gebrauch dieses Objektivs mit dem Inhalt dieser
De
Bedienungsanleitung und dem Benutzerhandbuch Ihrer Kamera vertraut.
■ Die wichtigsten Merkmale
• Der Fokussiermechanismus des Objektivs wird von einem
Silent Wave Motor angetrieben, so dass die Scharfeinstellung
per Autofokus stufenlos, geräuscharm und praktisch
verzögerungsfrei erfolgt. Mit dem Fokusmodusschalter
lässt sich mühelos zwischen Autofokus (A) und manueller
Scharfeinstellung (M) wechseln.
•
Eine besonders präzise Belichtungssteuerung resultiert, wenn
das Objektiv auf eine Nikon-Kamera mit 3D-ColorMatrixmessung montiert wird, da die Motiventfernungsdaten
vom Objektiv zur Kamera übertragen werden
• Durch eine aspharische ED-Glas-Linse (extra-low
Gr
dispersion) wird der Farbfehler effektiv korrigiert. So werden
eine außergewöhnlich hohe optische Leistung und
Abbildungsqualität erzielt. Die Blende mit abgerundeten
Lamellen erzeugt ein sehr natürliches Bokeh bei unscharf
abgebildeten Objekten in Vorder- und Hintergrund.
• Bis zu zwei Slave-Blitzgeräte SB-R200 können am
Objektiv angebracht werden.
.
■ Verwendung des Objektivs
Anbringen des Objektivs an der Kamera
Schalten Sie die Stromversorgung der Kamera aus.
9
Nehmen Sie den hinteren Objektivdeckel ab.
(Abb. D)
Fluchten Sie die Markierung für die Ausrichtung des
Objektivs 6 an Objektiv und Kamera, und drehen
Sie das Objektiv gegen den Uhrzeigersinn, bis es
hörbar einrastet. Stellen Sie sicher, dass sich das
Objektiv in der korrekten Position befindet, wenn
sich die Markierung für die Ausrichtung des
Objektivs 6 oben auf dem Objektiv befindet.
Nehmen Sie den vorderen Objektivdeckel ab.
(Abb. C)
Abnehmen des Objektivs von der Kamera
Schalten Sie die Stromversorgung der Kamera aus.
Halten Sie die Objektiv-Freigabetaste gedrückt und
drehen Sie das Objektiv im Uhrzeigersinn.
20
Page 21
■ Verwendung der Gegenlichtblende
Anbringen der Gegenlichtblende
Richten Sie die Markierung für die Arretierung der
Gegenlichtblende ( , eine der beiden Markierungen)
3 an der Gegenlichtblende und die Ma rkierung für das
Ansetzen der Gegenlichtblende 4 am Objektiv
aneinander aus und drehen Sie die Gegenlichtblende
gegen den Uhrzeigersinn (von der Rückseite der
Kamera aus betrachtet), bis sie mit einem Klicken
einrastet (Abb. B).
• Achten Sie darauf, die Markierung für das Ansetzen
der Gegenlichtblende und die Markierung für die
Ausrichtung der Gegenlichtblende ( ) 2
aneinander auszurichten.
• Wenn die Gegenlichtblende nicht richtig angebracht
ist, schattet sie u. U. einen Teil des Motivs ab.
• Das Anbringen bzw. Abnehmen der Gegenlichtblende
fällt leichter, wenn Sie diese an der Basis (in der Nähe der
Markierung für die Arretierung der Gegenlichtblende
und nicht an den äußeren Kanten fassen.
•
Die Gegenlichtblende kann zum Verstauen in
umgekehrter Position an das Objektiv angesetzt werden
Abnehmen der Gegenlichtblende
Die Gegenlichtblende zum Lösen an der Basis fassen (in
der Nähe der Markierung für die Arretierung der
Gegenlichtblende) und von der Rückseite der Kamera
aus gesehen im Uhrzeigersinn drehen.
■ Fokusierung (Abb. A)
Stellen Sie den Fokusmodusschalter Ihrer Kamera
entsprechend der nachstehenden Tabelle ein.
Fokussteuerung
(Kamera)
AF
MF
Weitere Informationen zum Kamera-Fokusmodus
finden Sie im Benutzerhandbuch Ihrer Kamera.
Autofokus mit Priorität der manuellen
Scharfeinstellung (M/A-Modus)
Stellen Sie den Fokusmodusschalter 9 am
Objektiv auf M/A.
Der Autofokus ist aktiviert, aber Sie können manuell
fokussieren, indem Sie den Entfernungeinstellring 5
drehen, während Sie den Auslöser am ersten
.
Druckpunkt gedrückt halten oder während Sie die AFON-Taste am Kameragehäuse gedrückt halten
(insofern die Kamera über eine AF-ON-Taste verfügt).
Drücken Sie den Auslöser erneut bis zum ersten
Druckpunkt oder drücken Sie die AF-ON-Taste
erneut,
wenn Sie von der manuellen
Scharfeinstellung zum Autofokusbetrieb
zurückwechseln möchten.
Fokussteuerung (Objektiv)
M/A M
Autofokus mit
Priorität der
manuellen
Scharfeinstellung
(mit elektronischer Einstellhilfe)
Manueller Fokus
(mit elektronischer
Manueller Fokus
De
Einstellhilfe)
Gr
21
Page 22

■ Blendeneinstellung
Stellen Sie die Blende an der Kamera ein.
■ Integriertes Blitzgerät und
De
Abschattung*
• Das integrierte Blitzgerät kann nicht für Entfernungen
von unter 0,6 m eingesetzt werden.
• Verwenden Sie beim Blitzen mit dem integrierten
Blitzgerät keine Gegenlichtblende.
* Abschattung tritt auf, wenn die Gegenlichtblende
oder – je nach Entfernung – der Objektivtubus einen
sichtbaren Schatten ins Motiv wirft.
■ Pflege des Objektivs
• Halten Sie die CPU-Kontakte 8 stets sauber und
schützen Sie sie vor Beschädigung.
•
Bei einer Beschädigung der Dichtungsmanschette 7
sollten Sie das Objektiv bei einer Nikon-Servicestelle zur
Reparatur abgeben
Gr
• Säubern Sie die Linsenobeflächen mit einem
Blasepinsel. Staub und Flecken entfernen Sie mit
einem sauberen, weichen Baumwolltuch oder OptikReinigungspapier, das Sie mit Ethanol (Alkohol) oder
Optikreinigungsflüssigkeit anfeuchten. Wischen Sie in
kreisförmigen Bewegungen von der Mitte nach
außen, ohne dass Wischspuren zurückbleiben oder
Sie andere Teile des Objektivs berühren.
22
.
• Verwenden Sie niemals organische Lösungsmittel
wie Verdünner oder Benzin zum Reinigen des
Objektivs. Dies könnte das Objektiv beschädigen,
einen Brand auslösen bzw. gesundheitliche Schäden
mit sich bringen.
• Zum Schutz der Frontlinse kann ein Klarglasfilter (NC)
verwendet werden. Die Gegenlichtblende wirkt als
zusätzlicher Frontlinsenschutz.
• Beim Verstauen des Objektivs in seinem flexiblen Etui
müssen der vordere und der hintere Deckel Deckel
aufgesetzt sein.
• Halten oder heben Sie das Objektiv oder die Kamera
nicht an der angesetzten Gegenlichblende.
• Bei längerer Nichtbenutzung sollte das Objektiv an
einem kühlen, trockenen Ort aufbewahrt werden, um
Schimmelbildung und Korrosion zu vermeiden.
Halten Sie das Objektiv von direkter
Sonneneinstrahlung oder Chemikalien wie Kampfer
oder Naphthalin fern.
• Halten Sie das Objektiv von Wasser fern, das zur
Korrosion und zu Betriebsstörungen führen kann.
• Einige Teile des Objektivs bestehen aus verstärktem
Kunststoff. Lassen Sie das Objektiv deshalb nie an
übermäßig heißen Orten liegen!
Page 23

■ Im Lieferumfang enthaltenes
Zubehör
• Vorderer Objektivdeckel LC-52 mit
Schnappverschluss (52 mm)
• Hinterer Objektivdeckel
• Bajonett-Gegenlichtblende HB-46
• Objektivbeutel CL-0913
■ Optionales Zubehör
• 52 mm-Schraubfilter
■ Technische Daten
Objektivtyp:
Brennweite: 35 mm
Lichtstärke: 1,8
Optischer Aufbau: 8 Linsen in 6 Gruppen
Bildwinkel: 44º
Entfernungsdaten:
Fokussierung:
AF-S-DX-NIKKOR-Objektiv vom Typ G
mit integrierter CPU und
F-Bajonettanschluss (speziell
ausgelegt für den Gebrauch mit
digitalen Nikon-Spiegelreflexkameras
mit DX-Bildformat)
(1 asphärische Linse)
Übermittlung an die Kamera
RF-System, Autofokus mit Silent
Wave Motor, manuell über separaten
Entfernungseinstellring
Naheinstellgrenze:
Blende: Irisblende mit 7 gerundeten
Blendensteuerung:
Blendenbereich: 1,8 bis 22
Belichtungsmessung:
Filtergewinde: 52 mm (P = 0,75 mm)
Abmessungen: ca. 70 (Durchm.) × 52,5 mm
Gewicht: ca. 200 g
Änderungen und Irrtümer vorbehalten.
0,3 m von der Sensorebene
gemessen
Lamellen
Vollautomatisch
Offenblendenmessung
(Länge ab Bajonettauflage)
De
Gr
23
Page 24

Remarques concernant une utilisation en toute sécurité
ATTENTION
Ne pas démonter
Le fait de toucher aux pièces internes de l'appareil ou de
l'objectif pourrait entraîner des blessures. Les réparations
doivent être effectuées par des techniciens qualifiés. Si
Fr
l'appareil ou l'objectif est cassé suite à une chute ou un
autre accident, apportez le produit dans un centre de
service agréé Nikon pour le faire vérifier après avoir
débranché le produit et retiré les piles.
En cas de dysfonctionnement, éteignez l'appareil
immédiatement
Si vous remarquez de la fumée ou une odeur inhabituelle
se dégageant de l'appareil photo ou de l'objectif, retirez
immédiatement les piles, en prenant soin de ne pas vous
brûler. Continuer d'utiliser son matériel peut entraîner des
blessures.
Après avoir retiré ou débranché la source d'alimentation,
Gr
confiez le produit à un centre de service agréé Nikon pour
le faire vérifier.
N'utilisez pas l'appareil photo ou l'objectif en
présence de gaz inflammable
L'utilisation de matériel électronique en présence de gaz
inflammable risquerait de provoquer une explosion ou un
incendie.
24
Ne regardez pas le soleil dans l'objectif ou le viseur
Regarder le soleil ou toute autre source lumineuse violente
dans l'objectif ou le viseur peut provoquer de graves
lésions oculaires irréversibles.
Tenir hors de portée des enfants
Faites extrêmement attention à ce que les enfants ne
mettent pas à la bouche les piles ou d'autres petites pièces.
Observez les précautions suivantes lorsque vous
manipulez l'appareil et l'objectif
• Maintenez l'appareil photo et l'objectif au sec. Le nonrespect de cette précaution peut provoquer un incendie
ou une électrocution.
• Ne manipulez pas et ne touchez pas l'appareil photo ou
l'objectif avec les mains humides. Le non-respect de
cette précaution peut provoquer une électrocution.
•
Lors d'une prise de vue à contre-jour, ne dirigez pas
l'objectif vers le soleil et évitez que les rayons du soleil
pénètrent dans l'objectif ; l'appareil photo pourrait chauffer
à l'excès, ce qui risquerait de provoquer un incendie
• Lorsque vous n'utilisez pas l'objectif pendant une
période prolongée, fixez les bouchons avant et arrière, et
rangez l'objectif à l'abri de la lumière directe du soleil. Le
non-respect de cette précaution peut provoquer un
incendie, car l'objectif peut concentrer la lumière du
soleil sur un objet inflammable.
.
Page 25
■ Nomenclature
1
Parasoleil (P. 27)
2 Repère de réglage du parasoleil
(P. 27)
3 Repère de fixation du parasoleil
(P. 27)
4 Repère de montage du parasoleil
(P. 27)
5 Bague de mise au point (P. 27)
6 Repère de montage (P. 26)
7 Joint en caoutchouc de l'objectif
(P. 28)
Contacts
8
9 Commutateur de mode de mise au
électriques (P. 28)
point (P. 27)
( ) : Page de référence
Fr
Gr
25
Page 26

Nous vous remercions d'avoir choisi l'objectif AF-S DX NIKKOR 35mm f/1,8G. Les objectifs DX Nikkor sont
spécialement conçus pour les reflex numériques Nikon (format Nikon DX), notamment ceux des séries D300 et D90.
Une fois monté sur des appareils photo au format Nikon DX, l'angle de champ de l'objectif équivaut à environ 1,5×
la focale en format 24 × 36 mm. Avant d'utiliser cet objectif, veuillez lire ces instructions et vous reporter au Manuel
d'utilisation de votre appareil photo.
■ Principales caractéristiques
Fr
• Cet objectif utilise un moteur silencieux SWM pour
entraîner le mécanisme de mise au point, permettant
un autofocus régulier, silencieux et presque
instantané. Le commutateur de mode de mise au
point 9 sert à sélectionner facilement les modes
autofocus (A) et mise au point manuelle (M).
•
Un co ntr ôl e d e l' ex po si tio n plus précis est possible lors
de l'installation de cet objectif sur un appareil photo
Nikon muni de la fonction de mesure matricielle
couleur 3D, car les informations de distance au sujet
sont transférées de l'objectif à l'appareil photo
L'utilisation d'une lentille asphérique offre de
•
Gr
remarquables performances optiques pour un rendu
exceptionnel. En outre, le diaphragme arrondi permet
de créer des effets de flou intéressants et de rendre les
zones de l'image non mises au point plus naturelles
• Vous pouvez fixer jusqu'à deux flashs asservis sans
câble SB-R200 sur l'objectif.
.
■ Utilisation de l'objectif
Fixation de l'objectif sur l'appareil photo
Éteignez l'appareil photo.
Ôtez le bouchon arrière de l'objectif. (Fig. D)
Alignez le repère de montage 6 de l'objectif avec
le repère de montage de l'appareil photo, puis
faites pivoter l'objectif dans le sens inverse des
aiguilles d'une montre jusqu'à ce qu'il se mette en
place. Assurez-vous que l'objectif est correctement
positionné lorsque le repère de montage 6 se
trouve au-dessus de l'objectif.
Ôtez le bouchon d'objectif avant. (Fig. C)
Retrait de l'objectif de l'appareil photo
Éteignez l'appareil photo.
Maintenez enfoncée la commande de
.
déverrouillage de l'objectif située sur l'appareil
photo tout en faisant pivoter l'objectif dans le sens
des aiguilles d'une montre.
26
Page 27
■ Utilisation du parasoleil
Fixation du parasoleil
Ali gnez le r epère de fixat ion d u para soleil ( , l'un de s
deux repères) 3 sur le parasoleil avec le repère de
montage du parasoleil 4 sur l'objectif et tournez le
parasoleil dans le sens inverse des aiguilles d'une
montre (vu à partir de l'arrière de l'appareil photo)
jusqu'au déclic de mise en place (Fig. B).
• Vérifiez que le repère de montage du parasoleil est
bien aligné sur le repère de réglage du parasoleil
() 2.
• Si le parasoleil n'est pas correctement fixé, il risque
d’entraîner du vignettage.
• Pour faciliter le montage ou le retrait du parasoleil,
tenez-le par la base (près du repère de fixation du
parasoleil) et non par le bord extérieur.
• Avant de ranger l'objectif, fixez le parasoleil à l'envers.
Démontage du parasoleil
Tenez le parasoleil par la base (près du repère de
fixation du parasoleil) et faites-le pivoter dans le sens
des aiguilles d'une montre pour le retirer (l'objectif de
l'appareil photo ne doit pas être dirigé vers vous).
■ Mise au point (Fig. A)
Réglez le sélecteur de mise au point de l'appareil photo
conformément au tableau ci-dessous.
Mode de mise
au point de
l'appareil
AF
MF
Pour plus de détails concernant le mode de mise au point de
l'appareil, reportez-vous au
Autofocus avec priorité manuelle (Mode M/A)
Réglez le commutateur de mode de mise au point
9 de l'objectif sur M/A.
L'autofocus est activé, mais il est possible d'utiliser
la mise au point manuelle en tournant la bague de
mise au point 5 manuelle séparée tout en
appuyant sur le déclencheur à mi-course ou en
enfonçant la commande AF-ON du boîtier, pour
autant que votre appareil en soit équipé.
Appuyez sur le déclencheur à mi-course ou appuyez
de nouveau sur la commande AF-ON pour annuler
la mise au point manuelle et revenir à l'autofocus.
Mode de mise au point de l'objectif
M/A M
Autofocus avec
priorité manuelle
Mise au point manuelle
(assistance à la mise au point disponible)
Manuel d'utilisation
Mise au point
manuelle (assistance
à la mise au point
disponible)
de l'appareil photo.
Fr
Gr
27
Page 28

■ Réglage de l'ouverture
Utilisez l'appareil photo pour régler l'ouverture.
■ Flash intégré et vignettage
• Il est impossible d'utiliser le flash intégré à des
distances inférieures à 0,6 m.
• Pour éviter le vignetage, n'utilisez pas le parasoleil.
Fr
* Le vignettage est l'assombrissement des coins de
l'image qui se produit lorsque la lumière émise par le
flash est retenue par le parasoleil ou la monture de
l'objectif en fonction de la distance de prise de vue.
■ Entretien de l'objectif
•
Il est important de nettoyer régulièrement les conta cts
électriques CPU
• Si le joint en caoutchouc de l'objectif 7 est
endommagé, rendez-vous dans un centre de service
agréé Nikon le plus proche pour réaliser les
réparations nécessaires.
Gr
• Nettoyer la surface de l'objectif avec une soufflette ou
une brosse de nettoyage. Pour enlever les poussières
ou les traces, utiliser de préférence un tissu de coton
doux, ou un tissu optique, légèrement humidifié avec
de l'alcool éthylique (éthanol). Procédez par légers
mouvements circulaires en partant du centre vers
l'extérieur, en prenant soin de ne pas laisser de traces
et de ne pas toucher d'autres zones de l'objectif.
28
8
et de ne pas les endommager
• N'utilisez jamais de solvants organiques, tels que
diluant ou benzène, pour nettoyer l'objectif, car vous
risqueriez d'endommager le produit, de provoquer
un incendie ou de vous blesser.
• Des filtres NC sont disponibles pour protéger la
lentille de l'objectif avant. Le parasoleil assure
également une bonne protection contre les chocs.
• Lorsque vous rangez l'objectif dans son étui souple,
fixez les deux bouchons avant et arrière de l'objectif.
• Lorsque l'objectif est installé sur un appareil photo, ne
saisissez et ne tenez pas l'appareil photo ainsi que
l'objectif par le parasoleil.
• Si vous n'utilisez pas l'objectif pendant une période
.
prolongée, rangez-le dans un endroit sec et frais afin
d'éviter la formation de moisissure ou de rouille.
Veillez à tenir le matériel éloigné des sources de
lumière et des produits chimiques (camphre,
naphtaline, etc.).
• Éviter les projections d'eau ainsi que l'immersion, qui
peuvent provoquer la formation de rouille et des
dommages irréparables.
• Certaines pièces de l'objectif sont en plastique
renforcé. Pour éviter tout problème, ne pas soumettre
l'objectif à de fortes chaleurs.
Page 29

■ Accessoires fournis
• Bouchon d'objectif av ant encliquetable 52mm LC-52
• Bouchon arrière de l'objectif
• Parasoleil à baïonnette HB-46
• Étui souple pour objectif CL-0913
■ Accessoire en option
• Filtres à visser 52mm
■ Caractéristiques
Type d'objectif : Objectif NIKKOR DX AF-S de type G
Focale : 35mm
Ouverture
maximale :
Construction
optique :
Angle de champ : 44º
Informations de
distance :
Mise au point :
avec CPU intégré et monture à
baïonnette Nikon (spécialement
conçu pour être utilisé sur des SLR
Nikon numériques au format Nikon
DX)
f/1,8
8 éléments dans 6 groupes
(1 lentille asphérique)
Communiquée à l'appareil photo
Système de mise au point arrière
(RF), autofocus avec moteur
silencieux, manuellement via une
bague de mise au point
indépendante
Distance minimale
de mise au point :
Nb. de lamelles du
diaphragme :
Diaphragme : Entièrement automatique
Plage des
ouvertures :
Mesure de
l'exposition :
Diamètre de
fixation pour
accessoires :
Dimensions : Env. 70 mm diam. × 52,5 mm
Poids : Env. 200 g
Les caractéristiques et la conception sont susceptibles
d'être modifiés sans préavis ni obligation de la part du
fabricant.
0,3 m à partir du plan focal
7 (circulaires)
f/1,8 à f/22
Via méthode pleine ouverture
52 mm (P = 0,75 mm)
(à partir du plan d'appui de la
monture d'objectif de l'appareil)
Fr
Gr
29
Page 30

Notas sobre un uso seguro
PRECAUCIÓN
No desarme el equipo
El contacto con las piezas internas de la cámara o del
objetivo puede provocar lesiones. Las reparaciones
solamente deben ser ejecutadas por técnicos cualificados.
Si a causa de un golpe u otro tipo de accidente la cámara o
el objetivo se rompen y quedan abiertos, desenchufe el
Es
producto y/o retire la batería, y a continuación lleve el
producto a un centro de servicio técnico autorizado Nikon
para su revisión.
Apague inmediatamente el equipo en caso de
funcionamiento defectuoso
Si observa que sale humo o que la cámara o el objetivo
desprenden un olor extraño, retire la batería
inmediatamente, con cuidado de no quemarse. Si sigue
utilizando el equipo corre el riesgo de sufrir lesiones.
Una vez extraída o desconectada la fuente de alimentación,
Gr
lleve el producto a un centro de servicio técnico autorizado
Nikon para su revisión.
No utilice la cámara ni el objetivo en presencia de gas
inflamable
La utilización de equipos electrónicos en presencia de gas
inflamable podría producir una explosión o un incendio.
30
No mire hacia el sol a través del objetivo ni del visor
Mirar hacia el sol u otra fuente de luz potente a través del
objetivo o del visor podría producirle daños permanentes
en la vista.
Mantener fuera del alcance de los niños
Se debe tener especial cuidado en evitar que los niños se
metan en la boca pilas u otras piezas pequeñas.
Adopte las siguientes precauciones al manipular la
cámara y el objetivo
• Mantenga la cámara y el objetivo secos. De no hacer esto
podría producirse un incendio o una descarga eléctrica.
• No manipule ni toque la cámara ni el objetivo con las
manos húmedas. De lo contrario podría recibir una
descarga eléctrica.
• En disparos a contraluz, no apunte el objetivo hacia el sol
ni deje que la luz solar pase directamente por él, ya que
podría sobrecalentar la cámara y, posiblemente, causar
un incendio.
• Cuando el objetivo no vaya a utilizarse por un período de
tiempo prolongado, colóquele la tapa frontal y guárdelo
alejado de la luz solar directa. De no hacer esto podría
producirse un incendio, ya que el objetivo podría enfocar
la luz solar directa sobre un objeto inflamable.
Page 31

■ Nomenclatura
1
Visera del objetivo (P. 33)
2 Indice de ajuste de la visera del
objetivo (P. 33)
3 Indice de acoplamiento de la visera
del objetivo (P. 33)
4 Indice de montura de la visera del
objetivo (P. 33)
5 Anillo de enfoque (P. 33)
6 Indice de monturas (P. 32)
7 Junta de goma de montaje del
objetivo (P. 34)
8 Contactos CPU (P. 34)
9 Interruptor de modo de enfoque
(P. 33)
( ): Página de referencia
Es
Gr
31
Page 32

Le agr ade cem os l a co mpr a de l ob jet ivo AF- S DX N IKK OR 3 5mm f/1 ,8G . Lo s ob jet ivo s DX Nik kor est án e spe cia lme nte
diseñados para su uso con cámaras digitales SLR de Nikon (formato DX de Nikon), como la D300 o la D90. Cuando
se montan en las cámaras de formato DX de Nikon, el ángulo de imagen del objetivo equivale aproximadamente a
1,5× de la distancia focal en formato 35mm. Antes de utilizar este objetivo, lea estas instrucciones y consulte el
Manual del usuario de la cámara.
■ Principales funciones
• Este objetivo utiliza un motor Silent Wave para
accionar el mecanismo de enfoque, en consecuencia,
Es
el enfoque automático es suave, silencioso y
prácticamente instantáneo. El interruptor de modo
de enfoque 9 ofrece una selección sencilla del
funcionamiento del enfoque automático (A) o el
enfoque manual (M).
• Es posible controlar la exposición de forma más
precisa si se monta en una cámara Nikon con función
de medición matricial en color 3D, ya que la
información de la distancia al sujeto se transfiere del
objetivo a la cámara.
Gr
• Para obtener el máximo rendimiento óptico y
características de visualización, utilice una lente de
objetivo esférico. Además, el diafragma redondeado
genera características de difuminación suave en las
zonas de imágenes desenfocadas.
• Es posible montar hasta dos flashes remotos
inalámbricos SB-R200 en el borde de este objetivo.
■ Uso del objetivo
Montaje del objetivo en la cámara
Apague la cámara.
Retire la tapa posterior del objetivo. (Fig. D)
Alinee la indice de monturas 6 del objetivo con la
indice de monturas de la cámara y gire el objetivo
en sentido contrario al de las agujas del reloj hasta
que quede fijo (escuchará un chasquido).
Asegúrese de que el objetivo se encuentra en la
posición correcta cuando la indice de monturas 6
está sobre el objetivo.
Retire la tapa frontal del objetivo. (Fig. C)
Extracción del objetivo de la cámara
Apague la cámara.
Presione el botón de liberación del objetivo de la
cámara y, sin soltarlo, gire el objetivo en el sentido
de las agujas del reloj.
32
Page 33

■ Utilización del visera del objetivo
Instalación de la visera
Alinee el indice de acoplamiento de la visera del
objetivo ( , cualquiera de las dos marcas) 3 del
parasol con el indice de montura de la visera del
objetivo 4 del objetivo, y gire el parasol hacia la
izquierda (vista con el objetivo mirando en dirección
opuesta a la suya) hasta que encaje en su posición
(Fig. B).
• Asegúrese de que el indice de montura de la visera
de l ob jet ivo est é al ine ada con el i ndi ce d e aj ust e de la
visera del objetivo ( ) 2.
• Si el parasol del objetivo no está correctamente
colocado, podría producirse viñeteo.
• Para facilitar el montaje y la extracción del parasol,
sujételo por la base (cerca del indice de acoplamiento
de la visera del objetivo) y no desde el borde exterior.
• Para guardar la visera del objetivo, instálela en la
posición inversa.
Desmontaje de la visera
Sujete el parasol por su base (cerca del indice de
acoplamiento de la visera del objetivo) y gírelo en el
sentido de las agujas del reloj (con el objetivo de la
cámara sin apuntar hacia usted) para desmontarlo.
■ Enfoque (Fig. A)
Ajuste el modo de enfoque de la cámara de acuerdo
con el cuadro de abajo.
Modo de
enfoque de la
cámara
AF
MF
Para más detalles sobre el modo de en enfoque de la
cámara, consulte el Manual del usuario de su cámara.
Enfoque automático con prioridad manual
(Modo M/A)
Ajuste el interruptor de modo de enfoque 9 del
objetivo a M/A.
El enfoque automático está habilitado, pero su
funcionamiento puede anularse girando el anillo
de enfoque 5 separado mientras se pulsa el botón
del disparador a medio recorrido, o pulsando el
botón AF-ON del cuerpo de las cámaras que
cuenten con este botón.
Pulse el botón del disparador a medio recorrido o el
botón AF-ON una vez más para cancelar el enfoque
manual y volver al enfoque automático.
Modo de enfoque del objetivo
M/A M
Enfoque
automático con
prioridad manual
(Con ayuda de enfoque)
Enfoque manual
(Con ayuda de
Enfoque manual
enfoque)
Es
Gr
33
Page 34

■ Ajuste de abertura
Utilice la cámara para ajustar el diafragma.
■ Flash incorporado y viñeteado
• El flash incorporado no se puede utilizar a distancias
inferiores a 0,6 m.
• Para evitar el viñeteado, no use el parasol del objetivo.
* El viñeteado es el oscurecimiento de las esquinas
alrededor de la imagen que ocurre cuando la luz
Es
emitida por el flash es obstruida por el parasol del
objetivo, o el cilindro del objetivo, dependiendo de la
distancia de disparo.
■ Forma de cuidar el objetivo
• Es importante mantener limpios los contactos CPU
8 y evitar que se dañen.
• Si la junta de goma de montaje del objetivo 7 se
daña, asegúrese de ir a un centro de servicio técnico
autorizado Nikon para que lo reparen.
Gr
• Limpiar la superficie del objetivo con un cepillo
soplador. Para eliminar la suciedad o las huellas,
utilizar un trapo de algodón suave y limpio o papel
especial para objetivos humedecido en etanol
(alcohol) o limpiador de objetivos. Limpiar
describiendo un movimiento circular del centro haci a
fuera, teniendo cuidado de no dejar restos ni tocar
otras partes del objetivo.
34
• No usar en ningún caso productos orgánicos, como
disolvente ni benceno para limpiar el objetivo ya que
podría provocar daños, un incendio o problemas de
la salud.
• Se dispone de filtros NC para proteger la parte frontal
del objetivo. También una visera del objetivo
contribuirá a proteger la parte frontal del objetivo.
• Al guardar el objetivo en su bolsa flexible, coloque las
tapas delantera y trasera del objetivo.
• Cuando el objetivo esté montado en una cámara, no
sostenga ni levante la cámara y el objetivo por la
visera del objetivo.
• Si no se va a utilizar el objetivo durante un periodo
largo de tiempo, guardarlo en un lugar fresco y seco
para evitar la formación de moho y óxido. Asegúrese
de guardar el objetivo, además, lejos de la luz solar
directa o de productos químicos tales como alcanfor
o naftalina.
• No mojar el objetivo ni dejarlo caer al agua, ya que se
oxidaría y no funcionaría bien.
• Algunas partes del objetivo son de plástico reforza do.
Para evitar daños, no dejarlo nunca en un lugar
excesivamente caliente.
Page 35

■ Accesorios estándar
• Tapa frontal a presión del objetivo de 52mm LC-52
• Tapa trasera del objetivo
•Parasol de bayonetaHB-46
• Bolsa flexible para objetivo CL-0913
■ Accesorio opcional
• Filtros con rosca de 52mm
■ Especificaciones
Tipo de objetivo: Objetivo de tipo G AF-S DX NIKKOR
Distancia focal: 35mm
Apertura máxima: f/1,8
Estructura del
objetivo:
Ángulo de
imagen:
Información de
distancia:
Enfoque:
con montaje de CPU y bayoneta de
Nikon integrado (diseñado
especialmente para su uso con
cámaras digitales SLR de Nikon
formato DX de Nikon)
8 elementos en 6 grupos
(1 lente asférica)
44º
Salida a la cámara
Sistema de enfoque trasero (RF),
sistema de enfoque automático con
motor Silent Wave; manualmente
mediante anillo de enfoque
separado
Distancia de
enfoque mínima:
No. de láminas del
diafragma:
Diafragma: Totalmente automático
Gama de
aperturas:
Medición de
exposición:
Tamaño de
accesorios:
Dimensiones: Aprox. 70 mm de diám. × 52,5 mm
Peso: Aprox. 200 g
Las especificaciones y los diseños están sujetos a cambios
sin previo aviso ni obligación por parte del fabricante.
0,3 m a partir del plano focal
7 piezas (redondeadas)
f/1,8 a f/22
Método de abertura total
52 mm (P = 0,75 mm)
(extensión de la brida de la montura
del objetivo de la cámara)
Es
Gr
35
Page 36

Att notera för en säker hantering
SE UPP!
Montera inte isär kameran
Om du rör vid delarna inne i kameran eller objektivet kan du
skada dig. Reparationer ska endast utföras av kvalificerade
tekniker. Om kameran eller objektivet skulle brytas upp
efter att de tappats i marken eller stötts till, ska du efter att
den kopplats bort från nätströmmen och/eller batteriet
lossats, lämna in produkten till ett auktoriserat Nikonservicecenter för inspektion.
Sv
Stäng genast av kameran om den slutar att fungera
korrekt
Om det kommer rök eller någon ovanlig lukt från kameran
eller objektivet ska du genast ta bort batteriet. Var försiktig
så att du inte bränner dig. Fortsatt användning kan medföra
personskada.
När du har avlägsnat eller kopplat bort strömkällan bör du
ta utrustningen till ett auktoriserat Nikon-servicecenter för
Gr
kontroll.
Använd inte kameran eller objektivet i närheten av
lättantändlig gas
Hantering av elektrisk utrustning i närheten av
lättantändlig gas kan resultera i explosion eller brand.
36
Titta inte in i solen genom objektivet eller sökaren
Om du tittar in i solen eller någon annan stark ljuskälla
genom objektivet eller sökaren kan ögonen skadas
permanent.
Förvara utom räckhåll för barn
Var försiktig och förvara produkten utom räckhåll för barn
så att de inte stoppar batterier eller andra smådelar i
munnen.
Observera följande försiktighetsåtgärder när du
hanterar kameran och objektivet
• Håll kameran och objektivet torra. Underlåtenhet att följa
denna anvisning kan resultera i brand eller elektrisk stöt.
• Hantera eller rör inte kameran eller linsen med våta
händer. Underlåtenhet att följa dessa anvisningar kan
resultera i elektrisk stöt.
• När du fotograferar i motljus ska du tänka på att inte rikta
objektivet mot solen och inte heller låta solstrålar gå rakt
in i objektivet. Annars kan kameran bli överhettad och
kanske orsaka brand.
• När objektivet inte ska användas under en längre
tidsperiod ska både främre och bakre objektivlock sättas
fast och objektivet placeras på en plats skyddad mot
direkt solljus. Underlåtenhet att följa denna anvisning kan
orsaka brand, eftersom objektivet kan fokusera solljuset
mot ett lättantändligt objekt.
Page 37

■ Terminologi
1
Objektivfattning (S. 39)
2 Motljusskydd inställningsindex
(S. 39)
3 Motljusskydd fästindex (S. 39)
4 Motljusskydd monteringsindex
(S. 39)
5 Fokusring (S. 39)
6 Monteringsindex (S. 38)
7 Gummipackning för montering av
objektiv (S. 40)
8 CPU-kontakter (S. 40)
9 Brytare för fokuslägesväljare (S. 39)
Sv
( ): Referenssida
Gr
37
Page 38

Tack för att du köpte objektivet AF-S DX NIKKOR 35mm f/1,8G. DX Nikkor-objektiv är speciellt konstruerade att
användas tillsammans med kameror av typen Nikon digital-SLR (Nikon DX-format), exempelvis D300 och D90. Vid
montering på kameror i Nikon DX-format motsvarar objektivets bildvinkel ungefär 1,5× brännvidden i 35mm format.
Innan du använder objektivet ska du läsa de här instruktionerna och kamerans Anvädarhandbok.
■ Huvudfunktioner
• Detta objektiv använder en Silent Wave Motor för
drivning av fokuseringsmekanismen, vilket gör
autofokuseringen smidig, tyst och nästan omedelbar.
Brytare för fokuslägesväljare 9 finns tillgänglig för att
du lätt ska kunna välja autofokusering (A) eller
Sv
manuell fokusering (M).
• Mer exakt exponeringskontroll när objektivet är
monterat på en Nikon-kamera med funktioner för 3Dfärgmatrixmätning eftersom information om
avståndet till motivet överförs från objektivet till
kameran.
• Ett asfäriskt linselement ger överlägsna optiska
Gr
prestanda och bästa möjliga återgivni ngsegenskaper.
Dessutom ger den rundade bländaren en mjuk och
fin oskärpa i de delar av bilden som inte är i fokus.
• Upp till två trådlösa SB-R200-speedlightblixtar kan
monteras på objektivets kant.
■ Använda objektivet
Montera objektivet på kameran
Stäng av kameran.
Ta bort det bakre objektivlocket (bild D).
Rikta in objektivets monteringsindex 6 mot
monteringsindex på kameran, och vrid sedan
objektivet moturs tills det klickar på plats.
Kontrollera att objektivet sitter rätt när
monteringsindex 6 befinner sig högst upp på
objektivet.
Ta bort det främre objektivlocket (bild C).
Ta loss objektivet från kameran
Stäng av kameran.
Tryck och håll ner objektivlåsknappen på kameran
och vrid samtidigt objektivet medurs.
38
Page 39

■ Använda motljusskyddet
Att fästa motljusskyddet
Rikta in motljusskyddets fästindex ( , en av de två
indikeringarna) 3 mot skyddet med motljusskyddets
monteringsindex 4 på objektivet och vrid skyddet
moturs (när du håller kameran med objektivet bort från
dig) tills det klickar på plats (bild B).
• Kontrollera att motljusskyddets monteringsindex är
riktat mot motljusskyddets inställningsindex av
motljusskyddet ( ) 2.
• Om motljusskyddet inte sitter korrekt kan vinjettering
uppstå.
• Det är lättare att fästa och ta av motljusskyddet om du
håller det vid basen (nära fästningsindikeringen) och
inte i ytterkanten.
• Montera motljusskyddet i omvänt läge när det ska
förvaras.
Att avlägsna skyddet
Ta av motljusskyddet genom att hålla i det vid basen
(nära fästningsindikeringen) och vrida det medurs, om
du håller kameran med objektivet riktat ifrån dig.
■ Fokusering (bild A)
Ställ in kamerans fokuslägesväljare enligt denna tabell.
Kamerans
fokusläge
AF
MF
Mer information om kamerans fokuslägen finns i
kamerans Anvädarhandbok.
Autofokus med möjlighet till manuell
styrning (M/A-läge)
Ställ in linsens brytare för fokuslägesväljare 9 på
M/A.
Autofokus har aktiverats, men den automatiska
fokuseringen kan åsidosättas om du roterar den
separata fokusringen 5 samtidigt som du trycker
in avtryckaren halvvägs, eller om du trycker på
AF-ON-knappen på kamerahuset om kameran har
en sådan.
Tryck in avtryckaren halvvägs eller tryck på
AF-ON-knappen en gång till om du vill avbryta den
manuella fokuseringen och gå tillbaka till
autofokus.
Objektivets fokusläge
M/A M
Autofokus med
möjlighet till
manuell styrning
(Möjlighet till fokuseringshjälp.)
Manuell fokusering
(Möjlighet till
fokuseringshjälp.)
Manuell fokusering
Sv
Gr
39
Page 40

■ Ställa in bländaren
Använd kameran för att justera bländarinställningen.
■ Inbyggd blixt och vinjettering
• Den inbyggda blixten kan inte användas för kortare
avstånd än 0,6 m.
• För att undvika vinjettering, använd inte
motljusskydd.
* Vinjettering är de mörka hörn som syns runt bilden
när ljuset som blixten sänder ut hindras av lins skyddet
eller objektivhuset, beroende på
Sv
fotograferingsavståndet.
■ Vård av objektivet
• Var försiktig så att inte CPU-kontakterna 8 blir
smutsiga eller skadas.
• Om gummipackningen för monteringen av
objektivet 7 skadats, besök hos närmaste
auktoriserade återförsäljare eller ditt servicecenter för
Gr
reparation.
• Rengör objektivets ytor med en blåsborste. Använd
en mjuk, ren bomullsduk eller linsduk fuktad med
etanol (alkohol) eller linsrengöringsmedel, för att ta
bort smuts och fettfläckar. Torka i en cirkulär rörelse
från mitten och utåt. Lämna inte kvar några spår av
rengöringsmedlet och rör inga andra delar av
objektivet.
40
• Använd aldrig organiska lösningsmedel som t ex
thinner eller bensen för rengöring av objektivet,
eftersom det kan skada det och orsaka brand eller
hälsoproblem.
• Det finns NC-filter som skyddar den främre linsen.
Linsskyddet hjälper också till att skydda den främre
linsen.
• När objektivet förvaras i sin flexibla objektivpåse ska
både främre och bakre linsskydd vara monterade.
• När objektivet är monterat på kameran bör du inte
lyfta eller hålla kameran och objektivet i linsskyddet.
• Om objektivet inte ska användas under en längre
tidsperiod ska det förvaras svalt och torrt så att mögel
och rost kan undvikas. Förvara det också skyddat mot
direkt solljus och kemikalier såsom kamfer och
naftalen.
• Se till att det inte kommer vatten på objektivet och
tappa det inte i vatten, eftersom det då kommer att
rosta och sluta fungera.
• Förstärkt plast används i vissa av objektivets delar.
Lämna aldrig objektivet på en alltför varm plats för att
undvika skador.
Page 41

■ Standardtillbehör
• 52mm främre objektivlock som knäpps på plats
LC-52
•Bakre objektivlock
• Bajonettskydd HB-46
• Flexibelt objektivfodral CL-0913
■ Extra tillbehör
• 52mm skruvfilter
■ Specifikationer
Objektivtyp: G-typs AF-S DX NIKKOR-objektiv
Fokallängd: 35mm
Maximal
bländare:
Linskonstruktion: 8 element i 6 grupper
Bildvinkel: 44º
Avståndsinformation:
Fokusering:
med inbyggd CPU och Nikonbajonettfäste (speciellt konstruerat
för användning tillsammans med
kameror i Nikon digital-SLR—Nikon
DX-format)
f/1,8
(1 asfäriskt linselement)
Visas i kamerahuset
RF-system (Rear Focusing),
autofokus med en fokuserande
Silent Wave-motor, manuellt med
separat fokusring
Minsta möjliga
fokuseringsavstånd
Antal slutarblad: 7 st. (rundade)
Bländare: Helautomatisk
Bländarskala: f/1,8 till f/22
Exponeringsmätning:
Storlek: 52 mm (P = 0,75 mm)
Mått: Ungefär 73,5 mm diameter × 54 mm
Vikt: Ungefär 200 g
Specifikationer och utförande kan ändras när som helst,
utan att tillverkaren meddelar detta och utan någon
skyldighet för densamme.
0,3 m från skärpeplanet
:
Via fullbländare
(utstick från objektivets monterade
fläns)
Sv
Gr
41
Page 42

Примечания по безопасности использования
ПРЕДУПРЕЖДЕНИЕ
Не разбирайте фотокамеру
Прикосновение к внутренним частям фотокамеры
или объектива может привести к получению травм.
Ремонт должен производиться только
квалифицированными специалистами. В случае
повреждения корпуса фотокамеры или объектива в
результате падения или другого происшествия
отключите сетевой блок питания и/или извлеките
батарею и доставьте изделие для проверки в
авторизованный сервисный центр Nikon.
Ru
В случае неисправности немедленно
выключите фотокамеру
При появлении дыма или необычного запаха,
исходящего из фотокамеры или объектива, немедленно
извлеките батареи, стараясь не допустить ожогов.
Продолжение работы с устройством может привести к
получению травм.
Gr
После извлечения батареи или отключения источника
питания доставьте изделие для проверки в ближайший
авторизованный сервисный центр компании Nikon.
Не пользуйтесь фотокамерой или объективом
при наличии в воздухе
легковоспламеняющихся газов
Работа с электронным оборудованием при наличии в
воздухе легковоспламеняющихся газов может
привести к взрыву или пожару.
42
Не смотрите на солнце через объектив или
видоискатель
Если смотреть на солнце или другие источники
яркого света через объектив или видоискатель, то это
может вызвать необратимое ухудшение зрения.
Храните в недоступном для детей месте
Примите особые меры предосторожности во избежание
попадания батарей и других небольших предметов детям в рот.
Соблюдайте следующие меры предосторожности
во время эксплуатации фотокамеры и объектива
•
Не допускайте попадания воды на фотокамеру и
объектив. Несоблюдение этого требования может
привести к пожару или поражению электрическим током
• Не прикасайтесь к фотокамере или объективу
мокрыми руками. Несоблюдение этого требования
может привести к поражению электрическим током.
При съемке с задним освещением не направляйте
•
объектив на солнце, а также не допускайте попадания
солнечного света в объектив, так как это может
привести к перегреву фотокамеры и ее возгоранию
Если объектив не будет использоваться в течение
•
длительного времени, прикрепите переднюю и заднюю
крышки объектива и не оставляйте объектив под
прямыми солнечными лучами. Несоблюдение этого
условия может привести к возгоранию, поскольку
объектив может сфокусировать солнечные лучи на
каком-либо легковоспламеняющемся предмете
.
.
.
Page 43

■ Компоненты
1 Бленда (CTP. 45)
2 Метка фиксации бленды (CTP. 45)
3 Метка крепления бленды
(CTP. 45)
4 Установочная метка бленды
(CTP. 45)
5 Фокусировочное кольцо (CTP. 45)
6 Установочная метка (CTP. 44)
7 Резиновый уплотнитель
крепления объектива (CTP. 46)
8 Разъемы процессора (CTP. 46)
9 Переключатель режимов
фокусировки (CTP. 45)
( ): справочная страница
Ru
Gr
43
Page 44

Благодарим за приобретение объектива AF-S DX NIKKOR 35мм f/1,8G. Объективы DX Nikkor разработаны
специально для использования с цифровыми зеркальными фотокамерами Nikon (формата Nikon DX),
например D300 и D90. При использовании с фотокамерами формата Nikon DX угол изображения
объектива эквивалентен фокусному расстоянию приблизительно 1,5× в формате 35мм. До использования
этого объектива ознакомьтесь с данными инструкциями и прочитайте
■ Основные возможности
• Данный объектив использует бесшумный
волновой привод Silent Wave Motor для
управления механизмом фокусировки, что
делает процесс автофокусировки плавным,
бесшумным и практически мгновенным.
Переключатель режимов фокусировки 9
используется для удобного переключения
Ru
между автоматическим (A) и ручным (M)
режимами фокусировки.
•
При использовании объектива с фотокамерами
Nikon с функцией 3D цветового матричного
замера обеспечивается более точный контроль
экспозиции, так как данные о расстоянии до
объекта передаются с объектива на фотокамеру
Gr
•
Благодаря использованию одной асферической
линзы улучшаются превосходные оптические
характеристики и возможности передачи. Кроме
того, скругленная диафрагма обеспечивает
более красивые мягкие и неясные очертания тех
частей снимка, которые находятся вне фокуса
• На краю объектива можно смонтировать до двух
беспроводных дистанционно управляемых
вспышек SB-R200.
■ Использование объектива
Установка объектива на камеру
Снятие объектива с камеры
.
.
Выключите фотокамеру.
Снимите заднюю крышку объектива. (рис. D)
Совместите установочную метку 6 на
объективе с установочной меткой на
фотокамере и поверните объектив против
часовой стрелки до щелчка. Убедитесь, что
объектив установлен правильно, при этом
установочная метка 6 должна находиться в
верхнем положении.
Снимите переднюю крышку объектива. (рис. C)
Выключите фотокамеру.
Нажмите и удерживайте кнопку отсоединения
объектива на фотокамере, и поверните
объектив по часовой стрелке.
Руководство пользователя
44
.
Page 45

■ Использование бленды
Присоединение бленды
Совместив метку крепления бленды (,
любая из двух меток) 3 на установочной метке
бленды 4 на объективе, поворачивайте
бленду против часовой стрелки (держа
фотокамеру объективом от себя) до полной
фиксации (рис. B).
• Убедитесь, что установочная метка бленды
совпадает с меткой фиксации бленды () 2.
• Если бленда установлена на объектив
ненадлежащим образом, может возникнуть
эффект виньетирования.
• Для облегчения установки или снятия бленды
удерживайте ее за основание (рядом с меткой
крепления бленды), а не за внешнюю кромку.
• Для хранения бленды присоединяйте ее в
обратном положении.
Отсоединение бленды
Чтобы отсоединить бленду, удерживайте ее за
основание (рядом с меткой крепления бленды) и
поверните по часовой стрелке, удерживая
фотокамеру объективом от себя.
■ Фокусировка (рис. A)
Установите селектор режима фокусировки камеры
в соответствии с нижеприведённой таблицей.
Режим
фокусировки
фотокамеры
AF
MF
Для получения дополнительных сведений о
режимах фокусировки фотокамеры см.
Руководство пользователя фотокамеры.
Автофокусировка с возможностью
коррекции вручную (режим M/A)
Установите переключатель режимов
фокусировки 9 в положение M/A.
Включенная функция автофокусировки
отменяется при вращении специального
фокусировочного кольца 5 ; при этом спусковая
кнопка затвора должна быть нажата наполовину
или должна быть нажата кнопка AF-ON, если она
имеется на корпусе фотокамеры.
Снова нажмите спусковую кнопку затвора
наполовину или кнопку AF-ON для отмены
ручной фокусировки и во
авт
офокусировки.
Режим фокусировки объектива
M/A M
Автофокусировка
с возможностью
коррекции
вручную
Ручной фокус (можно использовать
функцию помощи при фокусировке.)
Ручной фокус
(можно использовать
функцию помощи
при фокусировке.)
зобновления
Ru
Gr
45
Page 46

■ Установка диафрагмы
На фотокамере можно настроить параметры
диафрагмы.
■ Встроенная вспышка и
виньетирование
• Встроенную вспышку нельзя использовать для
съемки с расстояний менее 0,6 м.
• Во избежание виньетирования не используйте
бленду объектива.
* Виньетирование - это затемнение углов
изображения, возникающее при заграждении
света вспышки блендой объектива или его
оправой в зависимости от расстояния съемки.
Ru
■ Уход за объективом
• Не допускайте попадания грязи на разъемы
процессора 8 или их повреждения.
• В случае повреждения резинового уплотнителя
крепления объектива 7 обратитесь к
авторизованному сервисному центру Nikon или
в сервисный центр для проведения ремонта.
Gr
• Выполняйте очистку поверхности объектива
продуванием воздухом. Для удаления грязи и
пятен используйте мягкую, чистую
хлопчатобумажная ткань или протирочную
ткань для объектива, смоченную этанолом
(алкоголем) или жидкостью для чистки линз.
Протирайте круговыми движениями от центра к
краям, стараясь не оставлять следов или
дотрагиваться до других частей объектива.
46
• Никогда не используйте органические
растворители или бензол для чистки объектива,
так как это может привести к его повреждению,
пожару или проблемам со здоровьем.
• Для защиты передней линзы объектива можно
использовать нейтральные светофильтры.
Бленда объектива также помогает защитить
переднюю линзу объектива.
• При хранении объектива в мягком чехле
следует прикрепить переднюю и заднюю
крышки объектива.
• Не поднимайте и не носите объектив или
фотокамеру, держась за прикрепленную к
объективу бленду.
• Если объектив не будет использоваться в
течение длительного времени, храните его в
сухом, прохладном месте для предотвращения
образования гибка или коррозии. Никогда не
оставляйте объектив под воздействием прямых
солнечных лучей и не подвергайте его
воздействию химикатов, например камфарных
или нафталиновых средств.
• Избегайте попадания на объектив воды и не
бросайте его в воду, так как это может стать
причиной возникновения ржавчины или
неисправности.
• В некоторых частях объектива используется
пластиковый материал повышенной прочности.
Для предотвращения повреждения никогда не
оставляйте объектив в местах с повышенной
температурой.
Page 47

■ Стандартные принадлежности
• Передняя крышка объектива LC-52 диаметром 52мм
• Задняя защитная крышка объектива
• Бленда с байонетным креплением HB-46
• Мягкий чехол для объектива CL-0913
■ Дополнительная принадлежность
• Ввинчивающиеся фильтры диаметром 52мм
■ Технические характеристики
Тип объектива: Объектив AF-S DX NIKKOR
Фокусное
расстояние:
Максимальная
диафрагма:
Оптическая
схема:
Угол зрения:44°
Информация о
расстоянии:
типа G со встроенным CPU и
байонетной оправой Nikon
(разработана специально для
использования с цифровыми
фотокамерами Nikon SLR
формата Nikon DX)
35мм
f/1,8
8 элементов в 6 группах
(1 асферическая линза)
Передается в фотокамеру
Фокусировка:
Минимальное
расстояние съемки:
Число лепестков
диафрагмы:
Диафрагма: Полностью автоматическая
Шкала
диафрагмы:
Замер
экспозиции:
Установочный
размер:
Размеры:
Вес: Прибл. 200 г
Характеристики и дизайн могут быть изменены
без предупреждения и каких-либо обязательств
со стороны изготовителя.
Система фокусировки задней
группой линз (RF),
автофокусировка с
использованием бесшумного
волнового привода, ручная
фокусировка с помощью
отдельного кольца фокусировки
0,3 м от фокальной плоскости
7 (скругленные)
от f/1,8 до f/22
Методом с полностью
открытой диафрагмой
52 мм (P = 0,75 мм)
Прибл. 70 мм (диаметр) × 52,5 мм
(длина от крепежного фланца
объектива на фотокамере)
Ru
Gr
47
Page 48

Veiligheidsvoorschriften
WAARSCHUWING
Haal het toestel niet uit elkaar
Het aanraken van de inwendige delen van het fototoestel of
van het objectief kan een letsel veroorzaken. Herstellingen
mogen alleen worden uitgevoerd door bevoegde technici.
Indien het fototoestel of het objectief breekt na een val of een
ander ongeluk, laat u het product door een door Nikon
erkende servicedienst nakijken nadat u de stekker uit het
stopcontact hebt gehaald en/of de batterijen hebt verwijderd.
Schakel het toestel onmiddellijk uit bij storingen
Indien u merkt dat er rook of een ongewone geur uit het
fototoestel of het objectief komt, moet u de batterij onmiddellijk
verwijderen om brandwonden te vermijden. Verdere bediening
Nl
van het toestel kan een letsel tot gevolg hebben.
Nadat u de stroombron hebt verwijderd of losgekoppeld, laat u
het toestel nakijken door een door Nikon erkende servicedienst.
Gebruik het fototoestel of het objectief niet in de
Gr
buurt van ontvlambare gassen
Het bedienen van elektronische apparatuur in de buurt van
ontvlambare gassen kan leiden tot een ontploffing of brand.
Kijk niet naar de zon door het objectief of de
beeldzoeker
Kijken naar de zon of naar ander fel licht door het objectief
of de beeldzoeker kan een blijvend oogletsel veroorzaken.
48
Buiten het bereik van kinderen houden
Zorg ervoor dat kleine kinderen de batterijen of andere
kleine onderdelen niet in hun mond kunnen stoppen.
Let op de volgende punten bij het gebruik van het
fototoestel en het objectief
• Houd de camera en het objectief droog. Indien u deze
voorzorgsmaatregel niet in acht neemt, kan dit brand of
een elektrische schok tot gevolg hebben.
• Bedien het fototoestel of het objectief niet of raak deze
niet aan met natte handen. Indien u deze
voorzorgsmaatregel niet in acht neemt, kan dit een
elektrische schok tot gevolg hebben.
• Wanneer u opnames maakt bij tegenlicht, mag u het
objectief niet naar de zon richten en moet u vermijden
dat zonlicht rechtstreeks in het objectief valt. Dit kan
namelijk leiden tot oververhitting van de camera met
mogelijk brand tot gevolg.
• Wanneer u het objectief niet gebruikt gedurende een
langere periode, bevestig dan zowel de voorste als de
achterste objectiefdoppen om het objectief te
beschermen tegen direct zonlicht. Indien u deze
voorzorgsmaatregel niet in acht neemt, kan dit brand tot
gevolg hebben, aangezien het objectief het zonlicht kan
convergeren op een ontvlambaar voorwerp.
Page 49

■ Terminologie
1
Zonnekap (P. 51)
2 Instel-index voor zonnekap (P. 51)
3 Bevestigings-index voor zonnekap
(P. 51)
4 Montage-index voor zonnekap
(P. 51)
5 Scherpstelring (P. 51)
6 Montage-index (P. 50)
7 Rubberen pakking van
objectiefvatting (P. 52)
8 CPU-contacten (P. 52)
9 Scherpstelmodusschakelaar (P. 51)
( ): Referentiepagina
Nl
Gr
49
Page 50

Bedankt voor de aankoop van het AF-S DX NIKKOR 35mm f/1,8G-objectief. DX Nikkor-objectieven zijn speciaal
ontworpen voor Nikon digitale SLR-camera's (Nikon DX-formaat), zoals de D300 en D90. Wanneer het objectief is
geplaatst op camera's van Nikon DX-formaat, is de beeldhoek van het objectief gelijk aan circa 1,5× de
brandpuntsafstand in 35mm-formaat. Lees deze instructies eerst door en raadpleeg de Gebruikshandleiding van uw
camera alvorens u dit objectief gebruikt.
■ Belangrijkste functies
• Dit objectief maakt gebruik van een Silent Wavemotor om het scherpstellingsmechanisme aan te
drijven, waardoor de autofocus vloeiend, stil en bijna
onmiddellijk gebeurt. De Scherpstelmodusschakelaar
9 is voorzien om eenvoudig te kiezen tussen
autofocus (A) of manueel scherpstellen (M).
• Een nauwkeurigere belichtingsregeling is mogelijk
wanneer deze gemonteerd is op een Nikon-camera
met 3D-kleurenmatrixmeting, omdat de
Nl
afstandgegevens van het onderwerp worden
overgedragen van het objectief naar de camera.
• De superieure optische prestaties en de
weergavekenmerken worden gemaximaliseerd door
Gr
het gebruik van een asferisch objectiefelement.
Daarnaast produceert het afgeronde diafragma een
zachte en aangename beeldwaas in delen van het
beeld waarop niet is scherpgesteld.
• Tot 2 Draadloze Speedlights op afstand SB-R200
kunnen worden bevestigd op de rand van het
objectief.
■ Het objectief gebruiken
Het objectief bevestigen op de camera
Schakel de camera uit.
Verwijder de achterste objectiefdop (fig. D).
Breng de montage-index 6 op het objectief in een
lijn met de montage-index op de camera en draai
het objectief linksom totdat deze op de juiste plaats
klikt. Zorg ervoor dat het objectief correct gericht is
met de montage-index 6 bovenop het objectief.
Verwijder de voorste objectiefdop (fig. C).
Het objectief verwijderen van de camera
Schakel de camera uit.
Houd de objectiefontgrendeling op de camera
ingedrukt terwijl u het objectief rechtsom draait.
50
Page 51

■ Gebruik van de zonnekap
De zonnekap bevestigen
Lijn de bevestigings-index voor zonnekap ( , een
van beide indexen) 3 op de kap uit met de montageindex voor zonnekap 4 op het objectief en draai de
kap tegen de klok in (wanneer u het objectief van het
fototoestel van u wegricht) tot hij vastklikt (fig. B).
• Zorg ervoor dat de montage-index voor zonnekap
wordt uitgelijnd met de instel-index voor zonnekap
() 2.
• Als de zonnekap niet correct is bevestigd, kan er
vignettering voorkomen.
• Om het vastmaken of verwijderen van de zonnekap
te vergemakkelijken, neemt u deze aan de basis vast
(bij de bevestigings-index voor zonnekap) in plaats
van aan de buitenste rand.
• Om de zonnekap op te bergen, bevestigt u deze
omgekeerd op het objectief.
De zonnekap losmaken
Houdt de zonnekap vast bij de basis (bij de
bevestigings-index voor zonnekap) en draai rechtsom,
gezien vanuit het standpunt wanneer u de camera
vasthoudt met het objectief weg van u gericht, om los
te maken.
■ Scherpstellen (fig. A)
Stel de scherpstelfunctieschakelaar van de camera in
overeenkomstig de volgende tabel.
Camera’s
scherpstelling
stand
AF
MF
Raadpleeg de
meer informatie over de scherpstelmodi van de camera.
Autofocus handmatige aanpassing (M/A-stand)
Stel de scherpstelmodusschakelaar 9 in op M/A.
Autofocus is ingeschakeld, maar u kunt dit
opheffen door de aparte scherpstelring 5 te
draaien terwijl u de ontspanknop half ingedrukt
houdt of door te drukken op de AF-ON-knop op
fototoestellen die hiermee zijn uitgerust.
Druk de ontspanknop of de AF-ON-knop opnieuw
half in om de handmatige scherpstelling te
annuleren en autofocus te hernemen.
Scherpstelstand van objectief
M/A M
Autofocus
handmatige
aanpassing
Handmatige scherpstelling
(hulpverlichting is beschikbaar.)
Gebruikshandleiding
van de camera voor
Handmatige
scherpstelling
(hulpverlichting is
beschikbaar.)
Nl
Gr
51
Page 52

■ De diafragma instellen
Gebruik het fototoestel om de instellingen van de
diafragma aan te passen.
■ De ingebouwde flitser en
vignettering
• De ingebouwde flitser kan niet worden gebruikt op
afstanden van minder dan 0,6 m.
• Gebruik ter voorkoming van vignettering geen
zonnekap.
* Vignetteren is het verduisteren van de hoeken rond
een beeld, wat voorkomt wanneer het licht dat door
de flitser wordt weergegeven, wordt belemmerd
door de zonnekap of door het objectiefvat afhankelijk
van de opname-afstand.
■ Onderhoud van het objectief
Nl
• Zorg ervoor dat de CPU-contacten 8 niet vuil of
beschadigd worden.
• Als de rubberen pakking van de objectiefvatting 7 is
beschadigd, moet u het objectief voor reparatie naar
Gr
de dichtstbijzijnde door Nikon erkende servicedienst
brengen.
• Reinig het objectief met een blaasbalgje. Om vuil en
vlekken te verwijderen, gebruikt u een zachte, zuivere
katoenen doek of een objectiefdoekje met ethanol
(alcohol) of objectiefreiniger. Maak ronddraaiende
bewegingen van het midden naar de buitenkant en
let erop dat u geen strepen maakt of andere
onderdelen van het objectief aanraakt.
52
• Gebruik nooit organische oplosmiddelen zoals
thinner of benzeen om het objectief te reinigen. Deze
kunnen namelijk schade, brand of
gezondheidsproblemen veroorzaken.
• NC-filters zijn beschikbaar om het voorste
objectiefelement te beschermen. De zonnekap helpt
ook om de voorkant van het objectief te beschermen.
• Wanneer u het objectief in het flexibele objectiefetui
opbergt, maakt u zowel de voorste als de achterste
objectiefdoppen vast.
• Wanneer het objectief is geïnstalleerd op een
fototoestel, mag u het fototoestel en het objectief
niet optillen of vasthouden aan de zonnekap.
• Bewaar het objectief op een koele, droge plaats
wanneer u deze gedurende een lange periode niet
gebruikt om schimmel- en roestvorming te
voorkomen. Berg het objectief ook op om deze te
beschermen tegen rechtstreeks zonlicht of
chemicaliën zoals kamfer en naftaleen.
• Laat geen water op het objectief komen en laat het
objectief niet in water vallen. Hierdoor zal het objectief
roesten en slecht functioneren.
• Bepaalde onderdelen van het objectief zijn
vervaardigd uit versterkt plastic. Zet het objectief
nooit in een overmatig hete ruimte om schade te
voorkomen.
Page 53

■ Standaardaccessoires
• 52mm makkelijk te bevestigen voorste objectiefdop
LC-52
• Achterste objectiefdop
•BajonetkapHB-46
• Flexibel objectiefetui CL-0913
■ Optioneel accessoire
• 52mm vastschroefbare filters
■ Specificaties
Type objectief: G-type AF-S DX NIKKOR-objectief
Brandpuntsafstand:
Maximaal
diafragma:
Objectiefconstructie:
Beeldhoek: 44º
Afstandsinformatie:
Scherpstelling:
met ingebouwde CPU en Nikonbajonetvatting (speciaal ontworpen
voor gebruik met Nikon digitale
SLR—Nikon DX-formaat—camera's)
35mm
f/1,8
8 elementen in 6 groepen
(1 asferisch objectiefelement)
Doorgeven aan camerabody
Rear Focusing-systeem (RF),
autofocus met Silent Wave Motor;
handmatig scherpstellen met aparte
scherpstelring
Kortste
scherpstelafstand:
Aantal
diafragmalamellen:
Diafragma: Volledig automatisch
Diafragmaschaal: f/1,8 tot f/22
Belichtingsmeting:
Montageafmeting:
Afmetingen: Circa 70 mm (diameter) × 52,5 mm
Gewicht: Circa 200 g
Wijzigingen in ontwerp en technische gegevens
voorbehouden zonder voorafgaande kennisgeving of
verplichting vanwege de fabrikant.
0,3 m vanaf filmvlak
7 stuks (afgerond)
Door middel van de volledige
diafragmamethode
52 mm (P = 0,75 mm)
(afstand van de objectiefvatting op
de camera)
Nl
Gr
53
Page 54

Note sulle operazioni di sicurezza
ATTENZIONE
Non smontare
Toccando le parti interne della fotocamera o dell'obiettivo
si potrebbero causare dei guasti. Le riparazioni devono
essere eseguite solamente da tecnici qualificati. Qualora, in
caso di caduta o di qualsiasi altro incidente, la fotocamera
o l'obiettivo dovessero rompersi, portare il prodotto presso
un punto di assistenza Nikon autorizzato per l'ispezione,
dopo averlo disinserito dalla presa e/o rimosso la batteria.
In caso di malfunzionamento, disattivare
immediatamente la fotocamera
Qualora dalla fotocamera o dall'obiettivo dovesse uscire
del fumo o un odore insolito, rimuovere immediatamente
la batteria, facendo attenzione a non ustionarsi.
Continuando a utilizzare la fotocamera, sussiste il rischio di
It
lesioni.
Dopo aver rimosso o scollegato la fonte di alimentazione,
Gr
portare il prodotto presso un punto di assistenza Nikon
autorizzato per l'ispezione.
Non usare la fotocamera o l'obiettivo in presenza di
gas infiammabili
L'utilizzo di apparecchiature elettroniche in presenza di gas
infiammabili può causare esplosioni o incendi.
54
Non guardare il sole in modo diretto attraverso
l'obiettivo o il mirino
Guardando in modo diretto il sole o qualsiasi altra fonte
intensa di luce, si è soggetti al rischio di indebolimento
permanente della vista.
Tenere lontano dalla portata dei bambini
Fare molta attenzione che i bambini non ingeriscano le
batterie o altre piccole parti.
Nell'utilizzo della fotocamera e dell'obiettivo,
osservare le seguenti precauzioni
•
Mantenere la fotocamera e l'obiettivo asciutti. In caso
contrario si potrebbe verificare un incendio o scosse
elettriche
• Non maneggiare né toccare la fotocamera o l'obiettivo
•
• Se si prevede di non utilizzare l'obiettivo per un periodo
.
con le mani bagnate. In caso contrario, si potrebbero
verificare scosse elettriche.
Durante le riprese in controluce, non puntare l'obiettivo
verso il sole ed evitare che la luce solare passi direttamente
attraverso di esso, poiché la fotocamera potrebbe
surriscaldarsi ed eventualmente provocare un incendio
prolungato di tempo, montare entrambi i tappi di
protezione e riporlo lontano dalla luce diretta del sole. Il
mancato rispetto di questa istruzione può causare
incendi, poiché l'obiettivo potrebbe concentrare la luce
del sole su un oggetto infiammabile.
.
Page 55

■ Denominazione
1
Paraluce (P. 57)
2 Indice di regolazione del paraluce
(P. 57)
3 Indice di collegamento del paraluce
(P. 57)
4 Indice di montaggio del paraluce
(P. 57)
Anello di messa a fuoco
5
6 Indice di montaggio (P. 56)
7 Guarnizione in gomma della
montatura dell'obiettivo (P. 58)
8 Contatti CPU (P. 58)
9 Interruttore del modo di messa a
fuoco (P. 57)
( ): Pagina di riferimento
(P. 57)
It
Gr
55
Page 56

Grazie per aver acquistato l'obiettivo AF-S DX NIKKOR 35mm f/1,8G. DX Gli obiettivi Nikkor sono appositamente
studiati per l'utilizzo con le fotocamere SLR digitali Nikon (formato Nikon DX), come la D300 e la D90. Quando è
montato su fotocamere formato Nikon DX, l'angolo d'immagine dell'obiettivo è approssimativamente pari a 1,5× la
lunghezza focale nel formato 35mm. Prima di utilizzare l'obiettivo, leggere queste istruzioni e consultare il Manuale
d'uso della fotocamera.
■ Caratteristiche principali
• Questo obiettivo si avvale di un motore Silent Wave che
aziona il meccanismo di messa a fuoco, pertanto la
messa a fuoco automatica risulta agevole, silenziosa e
quasi immediata. L'interruttore del modo di messa a
fuoco
9
consente di selezionare facilmente la messa a
fuoco automatica (A) o manuale (M).
• Montando l'obiettivo su una fotocamera Nikon in
grado di eseguire la misurazione Color matrix 3D, è
possibile controllare l'esposizione con maggiore
precisione, in quanto le informazioni relative alla
It
distanza dal soggetto vengono trasferite dall'obiettivo
alla fotocamera.
Gr
• La soluzione costruttiva adottata, comprendente un
elemento asferico, offre prestazioni ottiche e di
riproduzione eccezionali. Inoltre, l'apertura
arrotondata del diaframma consente di ottenere un
effetto mosso più morbido e piacevole nelle zone
sfuocate dell'immagine.
• Lateralmente all'obiettivo è possibile montare fino a
due flash remoti senza cavi SB-R200.
■ Uso dell'obiettivo
Montaggio dell'obiettivo sulla fotocamera
Spegnere la fotocamera.
Togliere il copriobiettivo posteriore. (Fig. D)
Allineare il indice di montaggio obiettivo 6 con il
indice di montaggio posto sul corpo della
fotocamera e ruotare l'obiettivo in senso antiorario
finché non scatterà in posizione. Accertarsi che
l'obiettivo sia in posizione corretta quando il indice
di montaggio 6 sull'obiettivo è rivolto verso l'alto.
Togliere il copriobiettivo anteriore. (Fig. C)
Smontaggio dell'obiettivo dalla fotocamera
Spegnere la fotocamera.
Tenere premuto il pulsante di sblocco obiettivo
sulla fotocamera e contemporaneamente ruotare
l'obiettivo in senso orario.
56
Page 57

■ Utilizzo del paraluce
Collegamento del paraluce
Allineare l'indice di collegamento del paraluce ( ,
uno dei due riferimenti) 3 sul paraluce con l'indice di
montaggio del paraluce 4 sull'obiettivo, quindi
ruotare il paraluce in senso antiorario (guardato
impugnando la fotocamera con l'obiettivo rivolto in
direzione opposta a sé) fino a quando non scatterà in
posizione (Fig. B).
• Assicurarsi che l'indice di montaggio del paraluce sia
allineato con l'indice di regolazione del paraluce
() 2.
• Se il paraluce non è fissato correttamente, si può
verificare la vignettatura.
•Per facilitare il fissaggio e la rimozione del paraluce,
impugnarlo per la base (vicino all'indice di
collegamento del paraluce) anziché verso il bordo
esterno.
• Riporre il paraluce innestandolo in posizione invertita.
Smontaggio del paraluce
Per smontare il paraluce, impugnarlo per la base (vicino
all'indice di collegamento del paraluce) e ruotare in
senso orario (impugnando la fotocamera con
l'obiettivo rivolto in direzione opposta a sé).
■ Messa a fuoco (Fig. A)
Impostare il selettore di modo di messa a fuoco della
fotocamera in conformità alla seguente tabella.
Modo di messa
a fuoco della
fotocamera
AF
MF
Per ulteriori informazioni sui modi di messa a fuoco della
fotocamera, consultare il
Messa a fuoco automatica con esclusione per
il funzionamento in manuale (modalità M/A)
Impostare l'interruttore del modo di messa a fuoco
9 dell'obiettivo su M/A.
L'autofocus è attivo, ma è possibile escluderlo
ruotando l'anello di messa a fuoco 5 separato e
premendo contemporaneamente il pulsante di
scatto a metà corsa, oppure premendo il pulsante
AF-ON sul corpo macchina, se la fotocamera ne è
dotata.
Per disattivare la messa a fuoco manuale e riattivare
l'autofocus, premere il pulsante di scatto a metà corsa,
oppure premere nuovamente il pulsante AF-ON.
Modo di messa a fuoco dell'obiettivo
M/A M
Messa a fuoco automatica
con esclusione per il
funzionamento in manuale
Messa a fuoco manuale
(Aiuto per la messa fuoco dispobibile)
Manuale d'uso
Messa a fuoco manuale
(Aiuto per la messa fuoco
dispobibile)
della fotocamera
.
It
Gr
57
Page 58

■ Impostazione dell'apertura
Regolare l'apertura utilizzando la fotocamera.
■ Flash incorporato e vignettatura
• Il flash incorporato non può essere utilizzato a
distanze inferiori a 0,6 m.
• Per evitare la vignettatura (riduzione della luminosità
ai margini dell'immagine), non usare un paraluce.
* La vignettatura è la riduzione della luminosità ai
margini dell'immagine che si verifica quando la luce
emessa dal flash è ostacolata dal paraluce o dal
barilotto, in base alla distanza di ripresa.
■ Cura e manutenzione dell'obiettivo
• Fare attenzione a non sporcare o danneggiare i
contatti CPU 8.
• Nel caso in cui la guarnizione in gomma della
montatura dell'obiettivo 7 sia danneggiata,
It
provvedere alla relativa riparazione presso il punto
assistenza Nikon autorizzato più vicino.
Gr
• Pulire la superficie delle lenti con un pennello a
pompetta. Per rimuovere impronte e macchie, fare
uso di un fazzoletto di cotone, soffice e pulito, o di
una cartina ottica leggermente imbevuti con alcool o
con un liquido detergente specifico per obiettivi.
Strofinare delicatamente con movimento circolare
dal centro verso l'esterno, facendo attenzione a non
lasciare tracce o toccare altre parti.
58
• Non utilizzare solventi organici o benzene per pulire
l'obiettivo, in quanto potrebbero danneggiare
l'obiettivo, causare incendi o problemi di salute.
• Per la protezione dell'elemento anteriore
dell'obiettivo sono disponibili appositi filtri NC. Anche
il paraluce può essere utilizzato per proteggere la
parte anteriore dell'obiettivo.
• Prima di riporre l'obiettivo nella relativa custodia
flessibile, montare entrambi i coperchi anteriore e
posteriore.
• Quando l'obiettivo è montato sulla fotocamera, non
afferrare o reggere la fotocamera e l'obiettivo dal
paraluce.
• Se si prevede di non utilizzare l'obiettivo per periodi
prolungati, riporlo in un ambiente fresco e asciutto
per prevenire la formazione di muffe e ruggine.
Tenerlo inoltre lontano dal sole o da agenti chimici
come canfora o naftalina.
• Non bagnarlo e fare attenzione che non cada in
acqua. La formazione di ruggine potrebbe
danneggiarlo in modo irreparabile.
• Alcune parti della montatura sono realizzate in
materiale plastico rinforzato. Per evitare danni non
lasciare mai l'obiettivo in un luogo eccessivamente
caldo.
Page 59

■ Accessori in dotazione
• Copriobiettivo anteriore snap-on da 52mm LC-52
• Copriobiettivo posteriore
• Paraluce a baionetta HB-46
• Custodia morbida per obiettivo CL-0913
■ Accessori opzionale
• Filtri a vite da 52mm
■ Caratteristiche tecniche
Tipo di obiettivo: Obiettivo AF-S DX NIKKOR tipo G
Lunghezza focale: 35mm
Apertura
massima:
Costruzione
obiettivo:
Angolo di campo: 44º
Dati distanze: Misurati sul riferimento del piano
Messa a fuoco: Sistema RF (Rear Focusing),
Distanza minima
per la messa
fuoco:
con CPU incorporata e innesto a
baionetta Nikon (appositamente
studiato per l'utilizzo con
fotocamere digitali SRL Nikon DX)
f/1,8
8 elementi in 6 gruppi
(1 lente asferica)
focale fotocamera
autofocus con motore Silent Wave;
manuale mediante ghiera di messa
a fuoco separata
0,3 m dal piano focale
Nr. delle lamelle
diaframma:
Diaframma: Completamente automatico
Gamma di
apertura:
Misurazione
dell'esposizione:
Misura
dell'accessorio:
Dimensioni: Ca. 70 mm diam. × 52,5 mm
Peso: Ca. 200 g
Le specifiche e i disegni sono soggetti a modifica senza
preavviso od obblighi da parte del produttore.
7 pz. (arrotondati)
f/1,8 a f/22
Con metodo a tutta apertura
52 mm (P = 0,75 mm)
(estensione della flangia)
It
Gr
59
Page 60

Σημειώσεις για τους Χειρισμούς ασφαλείας
ΠΡΟΣΟΧΗ
Μην αποσυναρμολογείτε τη συσκευή
Εάν αγγίξετε τα εσωτερικά τμήματα της φωτογραφικής
μηχανής ή του φακού, μπορεί να προκληθεί τραυματισμός. Οι
επισκευές θα πρέπει να πραγματοποιούνται μόνο από
εξειδικευμένους τεχνικούς. Εάν η φωτογραφική μηχανή ή ο
φακός σπάσουν λόγω πτώσης ή άλλου ατυχήματος,
αποσυνδέστε το προϊόν από την πρίζα ή/και αφαιρέστε την
μπαταρία και απευθυνθείτε σε έναν εξουσιοδοτημένο
αντιπρόσωπο σέρβις της Nikon για επιθεώρηση.
Απενεργοποιήστε αμέσως τη φωτογραφική μηχανή σε
περίπτωση δυσλειτουργίας
Εάν παρατηρήσετε καπνό ή ασυνήθιστη οσμή να προέρχεται
από τη φωτογραφική μηχανή ή το φακό, αφαιρέστε αμέσως την
μπαταρία, προσέχοντας να μην καείτε. Η συνέχιση της
λειτουργίας μπορεί να προκαλέσει τραυματισμό.
Μετά την αφαίρεση ή την αποσύνδεση της πηγής τροφοδοσίας,
απευθυνθείτε σε έναν εξουσιοδοτημένο αντιπρόσωπο σέρβις
της Nikon για επιθεώρηση.
Μην χρησιμοποιείτε τη φωτογραφική μηχανή ή το φακό
Gr
όταν στο περιβάλλον υπάρχουν εύφλεκτα αέρια
Σε περίπτωση χρήσης ηλεκτρονικών συσκευών σε χώρους
όπου υπάρχουν εύφλεκτα αέρια ενδέχεται προκληθεί έκρηξη ή
πυρκαγιά.
Μην κοιτάζετε προς τον ήλιο μέσα από το φακό ή το
σκόπευτρο
Εάν κοιτάξετε προς τον ήλιο ή άλλες δυνατές πηγές φωτός μέσα
από το φακό ή το σκόπευτρο ενδέχεται να προκληθεί μόνιμη
βλάβη στην όρασή σας.
60
Φυλάσσετε μακριά από παιδιά
Θα πρέπει να δώσετε ιδιαίτερη προσοχή, ώστε να αποφευχθεί
το ενδεχόμενο μικρά παιδιά να βάλουν στο στόμα τους τις
μπαταρίες ή άλλα μικρά εξαρτήματα.
Τηρείτε τις ακόλουθες προφυλάξεις κατά το χειρισμό της
φωτογραφικής μηχανής και του φακού
• Η φωτογραφική μηχανή και ο φακός θα πρέπει να
διατηρούνται στεγνά. Διαφορετικά, ενδέχεται να προκληθεί
πυρκαγιά ή ηλεκτροπληξία.
• Μην χειρίζεστε ή μην αγγίζετε τη φωτογραφική μηχανή ή το
φακό με βρεγμένα χέρια. Διαφορετικά, ενδέχεται να
προκληθεί ηλεκτροπληξία.
• Κατά τη λήψη με οπίσθιο φωτισμό, μην στρέφετε το φακό
προς τον ήλιο και μην αφήνετε το φως του ήλιου να περάσει
απευθείας μέσα από το φακό, καθώς η φωτογραφική μηχανή
ενδέχεται να υπερθερμανθεί και είναι πιθανό να προκληθεί
πυρκαγιά.
• Εάν δεν πρόκειται να χρησιμοποιήσετε το φακό για μεγάλο
χρονικό διάστημα, προσαρτήστε το μπροστινό και το πίσω
καπάκι του φακού και αποθηκεύστε το φακό σε ένα σκιερό
μέρος. Διαφορετικά, ενδέχεται να προκληθεί πυρκαγιά,
καθώς το φως του ήλιου μπορεί να διοχετευτεί σε ένα
εύφλεκτο αντικείμενο μέσω του φακού.
Page 61

■ Ονοματολογία
1 Σκίαστρο φακού (Σελ. 63)
2 Δείκτης ρύθμισης σκιάστρου φακού
(Σελ. 63)
3 Δείκτης προσάρτησης σκιάστρου
φακού (Σελ. 63)
4 Δείκτης θέσης σκιάστρου φακού
(Σελ. 63)
5 Δακτύλιος εστίασης (Σελ. 63)
6 Δείκτης θέσης (Σελ. 62)
7 Ελαστικός μονωτικός σύνδεσμος
υποδοχής φακού (Σελ. 64)
8 Επαφές CPU (Σελ. 64)
9 Διακόπτης λειτουργίας εστίασης
(Σελ. 63)
( ): σελίδα αναφοράς
Gr
61
Page 62

Σας ευχαριστούμε που αγοράσατε το φακό AF-S DX NIKKOR 35mm f/1,8G. Οι φακοί DX Nikkor έχουν σχεδιαστεί ειδικά για
χρήση με ψηφιακές φωτογραφικές μηχανές SLR της Nikon (φορμά DX της Nikon), όπως την D300 και την D90. Όταν
τοποθετείται σε φωτογραφικές μηχανές με φορμά DX της Nikon, η οπτική γωνία του φακού ισοδυναμεί με περίπου 1,5× της
εστιακής απόστασης στο φορμά 35mm. Πριν από τη χρήση αυτού του φακού, διαβάστε τις παρούσες οδηγίες και
συμβουλευτείτε το Εγχειρίδιο οδηγιών χρήσης της φωτογραφικής σας μηχανής.
■ Κύρια χαρακτηριστικά
• Αυτός ο φακός ενσωματώνει ένα Αθόρυβο μοτέρ για την
κίνηση του μηχανισμού εστίασης, επιτρέποντας την
ομαλή, αθόρυβη και σχεδόν ακαριαία αυ τόματη εστίαση.
Με το διακόπτη λειτουργίας εστίασης 9 η επιλογή της
λειτουργίας αυτόματης εστίασης (A) ή χειροκίνητης
εστίασης (M) είναι απλή.
• Αν τοποθετηθεί σε μια φωτογραφική μηχανή της Nikon
με δυνατότητες μέτρησης 3D color matrix, είναι δυνατός
ο έλεγχος της έκθεσης με μεγαλύτερη ακρίβεια, επειδή οι
πληροφορίες απόστασης από το θέμα μεταδίδονται από
το φακό στη φωτογραφική μηχανή.
• Οι κορυφαίες οπτικές επιδόσεις και τα χαρακτηριστικά
απόδοσης μεγιστοποιούνται με τη χρήση ενός στοιχείου
ασφαιρικού φακού. Επιπλέον, το στρογγυλεμένο
Gr
διάφραγμα αναπαράγει απαλά και όμορφα
χαρακτηριστικά θαμπώματος στα εκτός εστίασης
τμήματα των φωτογραφιών.
• Στο άκρο του φακού μπορούν να πρ οσαρτηθούν έως και
δύο ασύρματα απομακρυσμένα φλας Speedlight
SB-R200.
■ Χρήση του φακού
Τοποθέτηση του φακού στη φωτογραφική
μηχανή
Απενεργοποιήστε τη φωτογραφική μηχανή.
Αφαιρέστε το πίσω καπάκι φακού. (Εικ. D)
Ευθυγραμμίστε το δείκτη θέσης 6 του φακού με το
δείκτη θέσης της φωτογραφικής μηχανής και
περιστρέψτε το φακό αριστερόστροφα μέχρι να
κλειδώσει στη θέση του. Βεβαιωθείτε ότι ο φακός έχει
τη σωστή θέση όταν ο δείκτης θέσης 6 βρίσκεται
πάνω από το φακό.
Αφαιρέστε το μπροστινό καπάκι φακού. (Εικ. C)
Αφαίρεση του φακού από τη φωτογραφική
μηχανή
Απενεργοποιήστε τη φωτογραφική μηχανή.
Πατήστε παρατεταμένα το κουμπί απασφάλισης του
φακού στη φωτογραφική μηχανή στρέφοντας το φακό
δεξιόστροφα.
62
Page 63

■ Χρήση του σκιάστρου φακού
Προσάρτηση του σκιάστρου
Ευθυγραμμίστε το δείκτη προσάρτησης σκιάστρου φακού
( , οποιονδήποτε από τους δύο δείκτες) 3 του
σκιάστρου με το δείκτη θέσης σκιάστρου φακού 4 του
φακού και στρέψτε το σκίαστρο αριστερόστροφα
(κρατώντας τη φωτογραφική μηχανή με το φακό να μην
κοιτάει προς εσάς) μέχρι να κλειδώσει στη θέση του (Εικ. B).
• Βεβαιωθείτε ότι ο δείκτης θέσης σκιάστρου φακού έχει
ευθυγραμμιστεί με το δείκτη ρύθμισης σκιάστρου φακού
() 2.
• Εάν δεν τοποθετήσετε σωστά το σκίαστρο φακού,
ενδέχεται να προκύψει δημιουργία βινιέτας.
• Για να διευκολύνετε την προσάρτηση ή την αφαίρεση
του σκιάστρου, κρατήστε το από τη βάση του (κοντά στο
δείκτη προσάρτησης σκιάστρου φακού) και όχι από τα
άκρα.
• Για να αποθηκεύσετε το σκίαστρο φακού, προσαρτήστε
το ανάποδα.
Απόσπαση του σκιάστρου
Κρατήστε το σκίαστρο φακού από τη βάση του (κοντά στο
δείκτη προσάρτησης σκιάστρου φακού) και, κρατώντας τη
φωτογραφική μηχανή με το φακό να μην κοιτάει προς
εσάς, στρέψτε το δεξιόστροφα για να το αποσπάσετε.
■ Εστίαση (Εικ. A)
Ρυθμίστε τον επιλογέα λειτουργίας εστίασης της φωτογραφικής
σας μηχανής σύμφωνα με τον παρακάτω πίνακα:
Λειτουργία
εστίασης της
φωτογραφικής
μηχανής
AF
MF
Για περισσότερες πληροφορίες σχετικά με τις λειτουργίες
εστίασης της φωτογραφικής μηχανής, ανατρέξτε στο
Εγχειρίδιο οδηγιών χρήση ς της φωτογραφικής σας μηχανής.
Αυτόματη εστίαση με χειροκίνητη παράκαμψη
αυτοματισμού (λειτουργία M/A)
Ρυθμίστε το διακόπτη λειτουργίας εστίασης του φακού
9 στη θέση M/A.
Η αυτόματη εστίαση ενεργοποιείται, αλλά μπορείτε να
παρακάμψετε τη λειτουργία αυτόματης εστίασης
περιστρέφοντας τον ξεχωριστό δακτύλιο εστίασης 5,
ενώ πατάτε παράλληλα το κουμπί λήψης μέχρι τη μέση
ή πατώντας το κουμπί AF-ON στο σώμα της
φωτογραφικής μηχανής στις φωτογραφικές μηχανές
που διαθέτουν αυτό το κουμπί.
Πατήστε ξανά το κουμπί λήψης μέχρι τη μέση ή το
κουμπί AF-ON, για να ακυρώσετε τη χειροκίνητη
εστίαση και να επαναφέρετε την αυτόματη εστίαση.
Διακόπτης λειτουργίας εστίασης του
M/A M
Αυτόματη εστίαση
με χειροκίνητη
παράκαμψη
αυτοματισμού
(Διατίθεται υποβοήθηση εστίασης.)
φακού
Χειροκίνητη εστίαση
(Διατίθεται
υποβοήθηση
εστίασης.)
Χειροκίνητη εστίαση
Gr
63
Page 64

■ Ρύθμιση του διαφράγματος
Χρησιμοποιήστε τη φωτογραφική μηχανή, για να
προσαρμόσετε τη ρύθμιση του διαφράγματος.
■ Ενσωματωμένο φλας και δημιουργία
βινιέτας
• Το ενσωματωμένο φλας δεν μπορεί να χρησιμοποιηθεί
σε αποστάσεις κάτω από 0,6 m.
• Για να αποτρέψετε τη δημιουργία βινιέτας, μην
χρησιμοποιήσετε το σκίαστρο φακού.
* Φαινόμενο δημιουργίας βινιέτας ονομάζεται η μείωση
της φωτεινότητας στις γωνίες γύρω από τη φωτογραφία
που δημιουργείται όταν το φως που εκπέμπεται από το
φλας μπλοκάρεται από το σκίαστρο φακού ή το βαρέλι
φακού, ανάλογα με την απόσταση λήψης.
■ Φροντίδα του φακού
• Μην αφήνετε τις επαφές CPU 8 να λερωθούν ή να
υποστούν φθορά.
• Εάν καταστραφεί ο ελαστικός μονωτικός σύνδεσμος
υποδοχής φακού 7, απευθυνθείτε στον κοντινότερο
εξουσιοδοτημένο αντιπρόσωπο σέρβις της Nikon για
Gr
επισκευή.
• Καθαρίζετε τις επιφάνειες του φακού με ένα βουρτσάκιφυσητήρι. Για να απομακρύνετε σκόνη και λεκέδες,
χρησιμοποιήσετε ένα μαλακό, καθαρό βαμβακερό πανί ή
πανάκι φακών εμποτισμένο με αιθυλική αλκοόλη
(οινόπνευμα) ή καθαριστικό φακών. Σκουπίστε κυκλικά
από το κέντρο προς τα άκρα, προσέχοντας να μην
αφήσετε ίχνη και να μην αγγίξετε άλλα τμήματα του
φακού.
64
• Μην χρησιμοποιείτε ποτέ οργανικούς διαλύτες, όπως
αραιωτικό ή βενζίνη, για να καθαρίσετε το φακό, καθώς
ενδέχεται να προκληθεί βλάβη, πυρκαγιά ή προβλήματα
υγείας.
• Διατίθενται φίλτρα NC για προστασία του μπροστινού
στοιχείου του φακού. Το σκίαστρο φακού συμβάλλει
επίσης στην προστασία του μπροστινού μέρους του
φακού.
• Εάν αποθηκεύσετε το φακό στην εύκαμπτη θήκη φακού,
προσαρτήστε και το μπροστινό και το πίσω καπάκι
φακού.
• Όταν ο φακός είναι τοποθετημένος στη φωτογραφική
μηχανή, μην σηκώνετε ή κρατάτε τη φωτογραφική
μηχανή και το φακό από το σκίαστρο φακού.
• Εάν δεν πρόκειται να χρησιμοποιήσετε το φακό για
μεγάλο χρονικό διάστημα, αποθηκεύστε τον σε ένα
δροσερό, ξηρό μέρος, για να αποφύγετε τη δημιουργία
μούχλας και σκουριάς. Αποθηκεύστε το φακό μακριά από
το άμεσο ηλιακό φως ή χημικές ουσίες, όπως καμφορά ή
ναφθαλίνη.
• Μην βρέχετε το φακό και μην τον βυθίζετε στο νερό,
διαφορετικά θα σκουριάσει και θα προκληθεί
δυσλειτουργία.
• Σε συγκεκριμένα τμήματα του φακού χρησιμοποιείται
ενισχυμένο πλαστικό. Για να αποφύγετε τη φθορά, μην
αφήνετε ποτέ το φακό σε μέρη με υπερβολικά υψηλές
θερμοκρασίες.
Page 65

■ Αξεσουάρ βασικού εξοπλισμού
• Μπροστινό καπάκι φακού snap-on 52mm LC-52
• Πίσω καπάκι φακού
• Σκίαστρο μπαγιονέτ HB-46
• Εύκαμπτη θήκη φακού CL-0913
■ Προαιρετικά αξεσουάρ
• Βιδωτά φίλτρα 52mm
■ Τεχνικά χαρακτηριστικά
Τύπος φακού:
Εστιακή
απόσταση:
Μέγιστο
διάφραγμα:
Κατασκευή φακού: 8 στοιχεία σε 6 ομάδες (1 στοιχείο
Οπτική γωνία: 44°
Πληροφορίες
απόστασης:
Εστίαση: Σύστημα πίσω εστίασης (RF),
Φακός NIKKOR AF-S DX τύπου G με
ενσωματωμένη CPU και μοντούρα
μπαγιονέτ της Nikon (ειδικά
σχεδιασμένος για χρήση με ψηφιακές
φωτογραφικές μηχανές SLR της Nikon μορφής DX της Nikon)
35mm
f/1,8
ασφαιρικού φακού)
Έξοδος στη φωτογραφική μηχανή
αυτόματη εστίαση με χρήση ενός
Αθόρυβου μοτέρ εστίασης και
χειροκίνητη εστίαση μέσω
ξεχωριστού δακτυλίου εστίασης
Κοντινότερη
απόσταση
εστίασης:
Αρ. λεπίδων
διαφράγματος:
Διάφραγμα: Πλήρως αυτόματο
Εύρος
διαφράγματος:
Μέτρηση έκθεσης: Μέσω μεθόδου πλήρους
Μέγεθος
προσαρτήματος:
Διαστάσεις: Περίπου 70 mm (διάμετρος) ×
Βάρος: Περίπου 200 g
Τα τεχνικά χαρακτηριστικά και ο σχεδιασμός υπόκεινται σε
αλλαγές χωρίς προειδοποίηση ή υποχρέωση από την πλευρά
του κατασκευαστή.
0,3 m από το εστιακό επίπεδο
7 τμχ. (στρογγυλεμένες)
f/1,8 έως f/22
διαφράγματος
52 mm (P = 0,75 mm)
52,5 mm (προέκταση από τη φλάντζα
προσάρτησης φακού της
φωτογραφικής μηχανής)
Gr
65
Page 66

ὁ䒽⡫䒌
使用产品前请仔细阅读本使用说明书。
■ 安全须知
请在使用前仔细阅读 “安全须知”,并以正确的方法使用。本 “安全须知”中记载
了重要的内容,可使您能够安全、正确地使用产品,并预防对您或他人造成人身伤
害或财产损失。请在阅读之后妥善保管,以便本产品的所有使用者可以随时查阅。
■ 有关指示
本节中标注的指示和含义如下。
警告
注意
本节使用以下图示和符号对必须遵守的内容作分类和说明。
图示和符号的实例
Gr
Sc
66
表示若不遵守该项指示或操作不当,则有可能造成人员死亡或负重伤的内容。
表示若不遵守该项指示或操作不当,则有可能造成人员伤害、以及有可
能造成物品损害的内容。
符号表示唤起注意(包括警告)的内容。
在图示中或图示附近标有具体的注意内容(左图之例为当心触电)。
符号表示禁止(不允许进行的)的行为。
在图示中或图示附近标有具体的禁止内容(左图之例为禁止拆卸)。
符号表示强制执行(必需进行)的行为。
在图示中或图示附近标有具体的强制执行内容(左图之例为取出电池)。
Page 67

警告
切勿自行拆卸、修理或改装。
否则将会造成触电、发生故障并导致受伤。
禁止拆卸
当产品由于跌落而破损使得内部
外露时,切勿用手触碰外露部分。
禁止触碰
否则将会造成触电、或由于破损
部分而导致受伤。取出照相机电
立即委托
池,并委托经销商或尼康授权的
修理
维修服务中心进行修理。
当发现产品变热、冒烟或发出焦味
等异常时,请立刻取出照相机电池。
取出电池
若在此情况下继续使用,将会导致火
灾或灼伤。取出电池时,请小心勿被
烫伤。取出电池,并委托经销商或尼
立即委托
康授权的维修服务中心进行修理。
修理
切勿浸入水中或接触到水,或被
雨水淋湿。
禁止
否则将会导致起火或触电。
接触水
切勿在有可能起火、爆炸的场所使用。
在有丙烷气、汽油等易燃性气体、粉尘的
禁止使用
场所使用产品,将会导致爆炸或火灾。
切勿用镜头或照相机直接观看太阳或强光。
否则将会导致失明或视觉损伤。
禁止观看
注意
切勿用湿手触碰。
否则将有可能导致触电。
当心触电
切勿在婴幼儿伸手可及之处保管产品。
否则将有可能导致受伤。
禁止放置
进行逆光摄影时,务必使太阳充分偏离画角。
阳光会在照相机内部聚焦,并有可能导致火灾。
小心使用
太阳偏离画角的距离微小时,也有可能会导致火灾。
不使用时请盖上镜头盖,或保存
在没有阳光照射处。
妥善保存
阳光会聚焦,并有可能导致火灾。
进行移动时,切勿将照相机或镜
头安装在三脚架上。
小心移动
摔倒、碰撞时将有可能导致受伤。
切勿放置于封闭的车辆中、直射
阳光下或其它异常高温之处。
禁止放置
否则将对内部零件造成不良影响,并导致火灾。
Gr
Sc
67
Page 68

Gr
Sc
■ 名称
1镜头遮光罩 (P. 70)
2遮光罩上锁定位置标志
(P. 70)
3镜头遮光罩上对齐标志
(P. 70)
4镜头上对齐标志 (P. 70)
5对焦环 (P. 71)
6镜头上安装标志 (P. 69)
7镜头卡口橡胶垫圈 (P. 71)
8CPU接点 (P. 71)
9对焦模式切换器 (P. 70)
( ):参考页
68
Page 69

感谢您购买AF-S DX 尼克尔 35mm f/1.8G镜头。DX 尼克尔镜头是配合D300和D90等尼
康DX格式数码单镜反光照相机使用的专用镜头。 如果安装在尼康 DX格式照相机
上,则镜头画角相当于35mm格式照相机的1.5倍焦距的画角。 使用本镜头之前,请
先阅读这些说明并参阅照相机的
■ 主要特色
• 本镜头采用宁静波动马达以驱动对焦
装置,使自动对焦变得顺畅、宁静和
快捷。 对焦模式选择器9可以方便地
选择自动对焦 (A)或手动对焦 (M)
操作。
• 当本镜头安装到具有3D 彩色矩阵测光
功能的尼康照相机时,由于拍摄对象
距离信息会从镜头传送到照相机,可
以实现更为精确的曝光控制。
• 通过采用一个非球面镜头片最大程度
地表现镜头的卓越光学性能和表现力。
另外,通过圆形光圈可以在照片成像
的焦外部分产生柔和美妙的朦胧感。
• 最多可以在镜头边缘安装2个无线遥控
闪光灯SB-R200。
使用说明书
。
■ 使用镜头
将镜头安装到照相机上
关闭照相机。
移除镜头后盖。 (图B)
将镜头上的安装标志6与照相机上
的安装标志对准,逆时针旋转镜头,
直到听到 “卡嗒”声示意到位为
止。 确保镜头的位置正确,此时镜
头上的安装标志6位于镜头顶部。
移除镜头前盖。 (图A)
从照相机上取下镜头
关闭照相机。
按住照相机上的镜头释放按钮,顺
时针旋转镜头。
Gr
Sc
69
Page 70

■ 使用镜头遮光罩
安装镜头遮光罩
将遮光罩上的镜
头遮光罩上对齐
标志 ( ,两
个标志中的任何
一个) 3对准镜
头上对齐标志
4,然后逆时针
方向转动遮光罩 (当将镜头朝外握住照
相机时),直到听到 “卡嗒”声示意到
位为止。
• 必须确保镜头上对齐标志与遮光罩上
锁定位置标志 ( ) 2 对准。
• 如果镜头遮光罩安装不当,则可能产
生渐晕。
Gr
• 为了方便安装或拆下遮光罩,请握住
Sc
底部 (镜头遮光罩上对齐标志附近),
请勿握住外缘。
• 存放镜头时,要将镜头遮光罩反方向
装在镜头上。
70
拆除镜头遮光罩
请握住镜头遮光罩底部 (镜头遮光罩上
对齐标志附近)并顺时针 (当将镜头朝
外握住照相机时)转动,将其拆下。
■ 对焦
按下表设定照相机对焦模式切换开关。
照相机对
焦模式
AF
MF
有关照相机对焦模式的更多信息,请参
阅照相机的
镜头对焦模式切换器
M/A M
手动优先自动
对焦
手动对焦 (有辅助对焦功能)
手动对焦
(有辅助对焦
功能)
使用说明书。
Page 71

手动优先的自动对焦 (M/A模式)
将镜头对焦模式切换器9设定在M/
A。
可以使用自动对焦,但通过半按住
快门释放按钮,同时转动独立对焦
环 5,或者在配备AF-ON按钮的照
相机上按此按钮,则可以使自动对
焦操作无效。
再半按一次快门释放按钮或再按一
次AF-ON按钮即可取消手动对焦并恢
复自动对焦。
■ 光圈设定
用照相机调整光圈设定。
■ 内置闪光灯和渐晕
• 对于距离不到0.6 m的情况,无法使用
内置闪光灯。
• 为避免渐晕,请勿使用镜头遮光罩。
* 渐晕是指闪光灯发出的灯光因拍摄距
离的差异被镜头遮光罩或镜筒遮住时,
图像的周边出现的变黑现象。
■ 镜头的维护保养
• 注意不要让CPU接点8变脏或受损。
• 如果镜头卡口橡胶垫圈 7 损坏时,请
务必让就近的尼康授权的维修服务中
心修理。
• 使用吹风刷清扫镜头表面。 如想清除
镜头上的污垢时,请用柔软干净的棉
布或镜头清洁纸沾酒精或镜头清洁液
擦拭。 在擦拭镜头时,请绕着圆圈自
中心向周围擦拭,注意不要在镜片上
留下痕迹或碰撞外部的部件。
• 切勿使用稀释剂或苯等有机溶剂清洁
镜头,否则可能会造成损坏、导致火
灾或引起健康问题。
Gr
Sc
71
Page 72

• 中性色滤镜可以保护镜头前面的组件。
镜头遮光罩也有助于保护镜头的正面。
• 当把镜头保存在半软镜头袋中时,请
盖好镜头前盖和镜头后盖。
• 当镜头安装在照相机上时,切勿通过
镜头遮光罩拎起或握持照相机和镜头。
• 当镜头长时间不用时,请将其保存在
凉爽干燥的地方以防生霉和生锈。 请
勿放在阳光直射或樟脑球/卫生丸等化
学品附近。
• 注意不要溅水于镜头上或使其落到水
中,因为这会使镜头生锈而发生故障。
• 镜头的一部分部件采用了强化塑料。
不要把镜头放置在高温的地方,以免
损坏。
Gr
• 运输产品时,请在包装箱内装入足够
多的缓冲材料,以减少 (避免)由于
Sc
冲击导致产品损坏。
72
■ 标准配件
• 52mm LC-52 搭扣式镜头前盖
• 镜头后盖
• HB-46卡口式镜头遮光罩
• CL-0913半软镜头袋
■ 选购附件
• 52mm旋入式滤色镜
Page 73

■ 规格
镜头类型: G型AF-S DX 尼克尔镜
焦距:
最大光圈:
镜头构造: 6组8片(1个非球面镜
画角:
距离信息: 输入机身
对焦: 后对焦 (RF)系统,采
最近对焦距离:0.3m (至焦平面)
光圈叶片数: 7片 (圆形)
光圈: 全自动
光圈范围: f/1.8至f/22
曝光测量: 采用全光圈方式
安装尺寸: 52 mm (P = 0.75 mm)
头,带内置CPU和尼康
卡口座 (专用于尼康DX
格式数码单镜反光照相
机)
35mm
f/1.8
片)
44°
用对焦宁静波动马达自
动对焦,手动则采用独
立对焦环
尺寸: 直径约70 mm,镜头长
约 52.5 mm (自照相机
的镜头安装边缘算起)
重量: 约200 g
设计和规格若有变更,制造商恕无义务
另行通知。
Gr
Sc
73
Page 74

标志 部件名称
外壳
机械元件
光学元件
电子元件
本表格依据SJ/T11364的规定编制。
:表示该有害物质在该部件所有均质材料中的含量均在 GB/T26572 规定的限
量要求以下。
✕:表示该有害物质至少在该部件的某一均质材料中的含量超出 GB/T26572 规
定的限量要求。
但是,以现有的技术条件要使照相机相关产品完全不含有上述有害物质极为
Gr
困难,并且上述产品都包含在 《关于电气电子设备中特定有含物质使用限制
指令2011/65/EU》的豁免范围之内。
Sc
74
产品中有害物质的名称及含量
有害物质
铅 (Pb) 汞 (Hg) 镉 (Cd)
✕
✕
六价铬
(Cr (VI))
多
溴联苯
(PBB)
多溴
二苯醚
(PBDE)
Page 75

进口商:尼康映像仪器销售 (中国)有限公司
(上海市茂名南路
尼康客户支持中心服务热线:
205
号瑞金大厦22楼
, 200020
400-820-1665
(周一至周日
http://www.nikon.com.cn/
在中国印刷
出版日期:2014年12月1日
)
9:00-18:00
,除夕下午休息)
Gr
Sc
75
Page 76

安全操作注意事項
警告
勿自行拆除
觸摸相機或鏡頭的內部零件可能會導致受傷。僅能由
合格維修技師修理。 如果由於掉落或其它事故導致相
機或鏡頭拆散,在切斷產品電源和(或)取出電池後,
請將產品送至 尼康 授權的維修中心進行檢查。
發生故障時立刻關閉電源
如果您發現相機或鏡頭冒煙或發出異味,請立刻取出
電池,注意避免燙傷。若繼續使用可能導致受傷。
取出電池或切斷電源後,請將產品送到 尼康 授權的維
修中心進行檢查。
勿在易燃氣體環境中使用相機或鏡頭
如果在易燃氣體環境中使用電子設備,可能會導致爆
炸或火災。
勿通過鏡頭或取景器觀看太陽
通過鏡頭或取景器觀看太陽或其它強光,可能會導致
Gr
永久性的視覺損傷。
請勿在兒童伸手可及之處保管本產品
請特別注意避免嬰幼兒將電池或其它小部件放入口
中。
Tc
76
使用相機和鏡頭時應注意以下事項
• 保持相機和鏡頭乾燥。否則可能導致火災或引起電
擊。
• 請勿以濕手操作或觸摸相機或鏡頭。否則可能會導
致電擊。
• 逆光拍攝時,請勿使鏡頭朝向太陽,或者使陽光直接
通過鏡頭,因為這可能導致相機過熱,引起火災。
• 當鏡頭長時間不用時,請蓋上鏡頭的前蓋和後蓋,並
且存放鏡頭時應避免陽光直射。否則可能會導致火
災,因為鏡頭可能會使陽光聚焦於易燃物。
Page 77

■ 術語
1 鏡頭遮光罩 (P. 79)
2 鏡頭遮光罩設置標記 (P. 79)
3 鏡頭遮光罩安裝標記 (P. 79)
4 鏡頭遮光罩接環標記 (P. 79)
5 對焦環 (P. 79)
6 接環標記 (P. 78)
7 鏡頭接環橡皮墊圈 (P. 80)
8 CPU 接點 (P. 80)
9 對焦模式開關 (P. 79)
( ):參考頁
Gr
Tc
77
Page 78

感謝您購買 AF-S DX 尼克爾 35mm f/1.8G 鏡頭。DX 尼克爾 鏡頭是配合 D300 和 D90 專用於 尼康 等數碼單
鏡反光(尼康 DX 格式)相機使用的專用鏡頭。 如果安裝在 尼康 DX 格式相機上,則鏡頭畫角與 35mm 格
式相機的 1.5倍焦距大致相等。 使用本鏡頭之前,請先閱讀這些說明並參閱相機的
■ 主要特色
• 本鏡頭採用寧靜波動馬達以驅動對焦機構,使自
動對焦變得順暢,靜音和快捷。 對焦模式開關
9 可以方便地選擇自動對焦 (A)或手動對焦
(M)操作。
• 因為主體距離資訊會從鏡頭傳送到相機,所以安
裝到具 3D 彩色矩陣測光功能的 尼康 相機,曝光
控制更加精準。
• 所應用的一片非球面鏡組件,可使優越的光學效
能和著色特性發揮到極限。 另外,圓形光圈可以
使虛化物體產生柔和舒適的模糊美感。
• 鏡頭邊緣最多可以安裝 2 個無線遙控閃光燈
SB-R200。
■ 使用鏡頭
將鏡頭安裝到相機上
關閉相機。
取下鏡頭後蓋。 (圖 D)
對齊鏡頭上的接環標記 6 與相機上的接環標
記,逆時針旋轉鏡頭,直到聽到卡嗒聲。 接環標
記 6 在鏡頭上邊時,確認鏡頭位在正確位置。
取下鏡頭前蓋。 (圖 C)
從相機取下鏡頭
關閉相機。
按住相機上的鏡頭釋放按鍵,順時針旋轉鏡頭。
使用說明書
Gr
Tc
78
。
Page 79

■ 使用鏡頭遮光罩
安裝遮光罩
將遮光罩上的鏡頭遮光罩安裝標記 ( ,兩個標
記之一) 3 對準鏡頭上的鏡頭遮光罩接環標記
4,然後逆時針方向轉動遮光罩 (如鏡頭朝外握
住相機),直至遮光罩卡入位置 (圖 B)。
• 必須確保鏡頭遮光罩接環標記與鏡頭遮光罩設置
標記對準 () 2。
• 如果遮光罩安裝不當,則可能產生邊暈。
• 為了方便安裝或取下遮光罩,請握持底座 (靠
近鏡頭遮光罩安裝標記的地方),不要握持周
圍。
• 存放遮光罩時,要反方向裝在鏡頭上。
取下遮光罩
透過底座 (靠近鏡頭遮光罩安裝標記的地方)握
持鏡頭遮光罩,然後根據握住相機時鏡頭轉離您
的方向,順時針旋轉鏡頭將其取下。
■ 對焦 (圖A)
請根據下表來設定相機的對焦模式選擇器。
相機對焦模式
AF
MF
有關相機對焦模式的更多資訊,請參閱相機的
使用說明書
自動對焦和手動
。
自動對焦和手動補償 (M/A 模式)
將對焦模式開關 9 設定在 M/A。
可以使用自動對焦,但通過半按住快門釋放按
鍵,同時轉動獨立對焦環 5,或者在配備AF-ON
按鍵的相機上按此按鍵,則可以使自動對焦操作
無效。
再半按一次快門釋放按鍵或再按一次AF-ON按鍵
即可取消手動對焦並恢復自動對焦。
鏡頭對焦模式
M/A M
補償
手動對焦 (有對焦輔助功能)
手動對焦
(有對焦輔助功能)
Gr
Tc
79
Page 80

■ 光圈設定
用相機調整光圈設定。
■ 內置閃光燈和邊暈現象
• 距離不到 0.6 m 時無法使用內置閃光燈。
• 為避免邊暈現象,請勿使用鏡頭遮光罩。
* 邊暈是指閃光燈發出的燈光因拍攝距離的差異被
鏡頭遮光罩或鏡筒時,圖像的周邊出現的變黑現
象。
Gr
Tc
80
■ 鏡頭的維護保養
• 小心不要讓 CPU 接點 8 弄髒或弄壞。
• 如果鏡頭接環橡皮墊圈 7 損壞時,請務必讓附
近的尼康授權的維修中心修理。
• 使用吹風刷清掃鏡頭表面。如想清除鏡頭上的污
垢時,請用柔軟乾淨的棉布或鏡頭清潔紙沾點酒
精或鏡頭清潔液擦拭。在擦拭鏡頭時,請繞著圓
圈自中心向周圍擦拭,注意不要在鏡片上留下痕
跡或碰撞外部的部件。
• 切勿使用稀釋劑或苯等有機溶劑清潔鏡頭,否則
可能導致損壞、火災或健康問題。
• NC濾鏡可以保護鏡頭前面的組件。 鏡頭遮光罩
也有助於保護鏡頭的正面。
• 當把鏡頭保存在柔性鏡頭袋中時,請蓋好前鏡頭
蓋和後鏡頭蓋。
• 當鏡頭安裝在相機上時,切勿透過鏡頭遮光罩拎
起或握持相機和鏡頭。
• 當鏡頭長時間不用時,請將其保存在涼爽乾燥的
地方以防發霉和生鏽。請勿放在陽光直射或樟腦
丸/衛生丸等化學品附近。
• 注意不要濺水於鏡頭上或落到水中,因為將會生
鏽而發生故障。
• 鏡頭的一部分部件採用了強化塑料。不要把鏡頭
放置在高溫的地方,以免損壞。
Page 81

■ 標準配件
• 52mm LC-52 扣入式前鏡頭蓋
• 鏡頭後蓋
• HB-46 刺刀式遮光罩
• CL-0913 軟鏡袋
■ 選購附件
• 52mm 旋入式濾鏡
■ 規格
鏡頭類型: G 型 AF-S DX 尼克爾 鏡頭內裝有
焦距:
最大光圈:
鏡頭構造: 6 組 8 片(1 片非球面鏡組件)
畫角:
距離信息: 輸入機身
對焦: 後對焦 (
最近對焦距離: 0.3 m (至焦平面)
光圈葉片: 7 片 (圓形)
光圈: 全自動
光圈範圍: f/1.8 至 f/22
曝光測量: 採用全開光圈方法
安裝: 52 mm (P = 0.75 mm)
尺寸:
重量: 約 200 g
設計和規格若有變更,製造商恕無義務另行通知。
CPU 和 尼康 刺刀式接環 (專用
於 尼康 數碼單鏡反光 尼康 DX 格
式相機)
35mm
f/1.8
44
°
RF
靜波動馬達自動對焦,經由獨立
對焦環手動對焦
直徑約
(自相機鏡頭卡口邊算起)
)系統,採用對焦寧
70 mm
,鏡頭長約
52.5 mm
Gr
Tc
81
Page 82

안전상의 주의 사항
사용하기 전에 '본 설명서 '를 자세히 읽고 올바르게 사용하십시오. 이 '본 설명서'에 는 제품을 안전하
고 올바르게 사용하게 함으로써 부상 또는 재산상의 손해를 사전에 방지하기 위한 중요한 내용이 기재
되어 있습니다. 읽은 후에는 반드시 사용하시는 분이 언제라도 쉽게 찾아볼 수 있는 장소에 보관해 주
십시오.
표시에 관하여
각 표시의 의미는 다음과 같습니다.
경고
주의
준수해야 될 사항의 종류를 다음의 그림 표시로 구분하여 설명하고 있습니다.
그림 표시 예
Gr
Kr
82
이 표시를 무시하고 잘못된 방법으로 취급하시면 사망 또는 부상을 입을 위험이 있는 내용
을 표시하고 있습니다.
이 표시를 무시하고 잘못된 방법으로 취급하시면 부상을 입을 위험이 있는 내용 및 물적
손해가 발생할 위험이 있는 내용을 표시하고 있습니다.
기호는 주의(경고 포함)를 알리는 표시입니다. 그림 내부, 또는 주변에 구체적인 주의 내용(좌
측 그림의 경우에는 감전 주의)이 표시되어 있습니다.
기호는 금지(해서는 안 되는 행위) 행위를 알리는 표시입니다. 그림 내부, 또는 주변에 구체적
인 금지 내용(좌측 그림의 경우에는 분해 금지)이 표시되어 있습니다 .
기호는 엄수 사항(반드시 준수해야 하는 사항)을 알리는 표시입니다 . 그림 내부, 또는 주변에
구체적인 엄수사항(좌측 그림의 경우에는 건전지 분리)이 표시되어 있습니다.
Page 83

경고
분해하거나 수리·개조하지 마십시오.
감전되거나 이상 작동에 의한 부상의 원인이 됩니다.
분해 금지
낙하 등으로 인한 파손으로 내부가 노출된 경
우에는 노출된 부분에 손을 대지 마십시오.
접촉 금지
감전되거나 파손된 부분에 의한 부상의 원인
이 됩니다.
카메라 전지를 분리하고 판매점 또는 니콘 서
즉시 수리 의뢰
비스 센터에 수리 요청을 하십시오.
를 하십시오.
뜨거워지거나, 연기가 나거나, 타는 냄새가
나는 등의 이상 현상 시에는 즉시 카메라 전
전지를 분리
지를 분리하십시오.
하십시오.
그대로 계속 사용하시면 화재 및 화상의 원인이 됩
니다. 전지를 분리할 때에는 화상을 입지 않도록 충
분히 주의해 주십시오. 전지를 분리하고 니콘 고객
즉시 수리 요청
만족 센터에 수리를 요청하십시오.
을 하십시오.
물에 담그거나 물을 뿌리거나 비에 적시지 마
십시오.
액체접촉
발화하거나 감전의 원인이 됩니다.
금지
인화·폭발의 위험이 있는 장소에서는 사용하
지 마십시오.
프로판 가스·가솔린 등의 인화성 가스 또는 분진이 발생하
사용 금지
는 장소에서 사용하면 폭발 또는 화재의 원인이 됩니다.
렌즈 또는 카메라로 직접 태양이나 강한 빛을
보지 마십시오.
사용 금지
실명 또는 시력 장애의 원인이 됩니다.
주의
젖은 손으로 만지지 마십시오.
감전의 원인이 될 수 있습니다.
감전 주의
제품은 유아의 손이 닿지 않는 곳에 두십시오.
부상의 원인이 될 수 있습니다.
보관 주의
역광 촬영의 경우에는 태양이 화각에서 충분히
벗어나게 하십시오.
태양광이 카메라 내부에서 초점을 형성하여
화재의 원인이 될 수 있습니다.
사용 주의
화각으로부터 태양을 살짝 벗어나게 하더라
도 화재의 원인이 될 수 있습니다.
사용하지 않을 경우에는 렌즈에 캡을 씌우거나
태양광이 닿지 않는 장소에 보관하십시오.
태양광이 초점을 형성하여 화재의 원인이 될
보관 주의
수 있습니다.
삼각대에 카메라 또는 렌즈를 장착한 상태로
이동하지 마십시오.
넘어지거나 부딪쳐서 부상의 원인이 될 수 있
이동 주의
습니다.
창문을 완전히 닫은 자동차 실내 또는 직사광
선이 닿는 장소 등, 온도가 매우 높아지는 장소
에 방치하지 마십시오.
내부 부품에 나쁜 영향을 미치며, 화재의 원
방치금지
인이 될 수 있습니다.
Gr
Kr
83
Page 84

Gr
Kr
■ 명칭
1 렌즈 후드 (P. 86)
2 렌즈 후드 세팅 인덱스 (P. 86)
3 렌즈 후드 부착 표시선 (P. 86)
4 렌즈 후드 마운팅 인덱스 (P. 86)
5 초점 링 (P. 86)
6 마운팅 표시선 (P. 85)
7 렌즈 장착 고무 패킹 (P. 87)
8 CPU 접점 (P. 87)
9 초점 모드 스위치 (P. 86)
( ): 참조 페이지
84
Page 85

AF-S DX NIKKOR 35mm f/1.8G 렌즈를 구입해 주셔서 감사합니다. DX NIKKOR 렌즈는 D300 및
D90과 같은 Nikon 디지털 SLR(Nikon DX 규격) 카메라에 사용하도록 특별히 설계된 렌즈입니다.
Nikon DX 규격 카메라에 장착하는 경우 렌즈의 촬영 화각이 35mm 형식의 약 1.5× 초점 거리와 동일
합니다. 본 렌즈를 사용하기 전에 아래의 사항을 읽고 카메라의
다.
■ 주요 기능
• 본 렌즈에는 초음파 모터(SWM)가 탑재되어 있
어서 빠르고 조용한 자동 초점 방식으로 빠르고
조용하게 초점을 잡습니다. 초점 모드 스위치 9
로 자동 초점(A) 또는 수동 초점(M)을 간편하게
조작할 수 있습니다.
• 3D-RGB 멀티 패턴 측광 기능이 있는 Nikon 카
메라 에 장착하면 렌즈와 피사체 사이의 거리 정
보가 카메라로 전달되어 더욱 정확한 노출 제어
가 가능합니다.
• 단일 비구면 렌즈를 사용함으로써 탁월한 광학
성능을 나타내고 렌더링 특성을 극대화합니다.
또한 원형 조리개를 통해 초점이 맞지 않는 사진
의 부분을 부드럽고 선명하게 마무리합니다.
• 무선 스피드라이트 SB-R200을 두개까지 렌즈
가장자리에 장착할 수 있습니다.
■ 렌즈 사용하기
카메라에 렌즈 부착하기
카메라에서 렌즈 탈착하기
사용설명서
카메라 전원을 끕니다.
렌즈 뒷캡을 분리합니다. (그림 D)
렌즈의 마운팅 표시선 6을 카메라의 마운팅 표
시선에 맞추고 찰칵하는 소리가 날 때까지 시계
반대방향으로 렌즈를 돌립니다. 마운팅 표시선
6이 렌즈 맨 위쪽에 있을 때 렌즈 위치가 올바
른지 확인합니다.
렌즈 앞캡을 분리합니다. (그림 C)
카메라 전원을 끕니다.
렌즈를 시계방향으로 돌리는 동안 카메라의 렌
즈 분리 버튼을 누르고 계십시오.
를 참조하여 주시기 바랍니
Gr
Kr
85
Page 86

■ 렌즈 후드 사용 방법
후드 장착 방법
후드의 렌즈 후드 부착 표시선( , 두 인덱스 중
하나) 3를 렌즈의 렌즈 후드 마운팅 인덱스 4에
맞추고 찰칵하는 소리가 날 때까지 후드를 시계 반
대 방향으로 돌립니다(렌즈를 바깥으로 돌려 잡
고 봤을 때)(그림 B).
• 렌즈 후드 마운팅 인덱스를 렌즈 후드 세팅 인덱
스( ) 2에 맞추십시오.
• 렌즈 후드가 올바로 장착되지 않으면 비네팅이
발생할 수 있습니다.
• 후드를 손쉽게 부착하거나 제거하려면 바깥쪽을
잡지 않고 렌즈 후드 부착 표시선 근처의 베이스
를 잡으십시오.
• 렌드 후드를 보관할 때에는 반대 방향으로 장착
하십시오.
후드 분리 방법
Gr
렌즈 후드 부착 표시선 근처의 렌즈 후드 베이스
부분을 잡고, 렌즈를 마주보지 않도록 카메라를
잡은 뒤 시계 방향으로 돌려 분리하십시오.
Kr
86
■ 포커싱(그림 A)
아래 차트에 따라 사용하는 카메라의 포커스 모드
선택 다이얼을 설정해 주십시오.
카메라
포커스 모드
AF
MF
카메라 초점 모드에 대한 자세한 내용은 카메라의
사용설명서
를 참조하십시오.
매뉴얼 우선 오토 포커스를 사용한 오토
포커스(M/A 모드)
렌즈 초점 모드 스위치 9을 M/A로 설정합니다.
자동 초점이 설정되지만 셔터 버튼을 반누름하
재로 멸도로 초점 링 5을 돌리거나, 카메라 본
체의 AF-ON 버튼을 누르면 자동 초전이 작동되
지 않 습니다.
셔터 버튼을 반누름하거나 AF-ON 버튼을 다시
한 번 눌러 수동 초점을 취소하고 자동 초점을 실
시합니다.
렌즈 포커스 모드
M/A M
매뉴얼 우선
오토 포커스를
사용한
오토 포커스
애뉴얼 포커스
(포커스 어시스트 가능)
애뉴얼 포커스
(포커스 어시스트 가능)
Page 87

■ 조리개 설정하기
카메라를 사용하여 조리개 설정을 조정하십시오.
■ 내장 플래시 및 비네팅
• 내장 플래시는 0.6 m 미만의 거리에서는 사용할
수 없습니다.
• 비네팅을 방지하기 위해서는 렌즈 후드를 사용
하지 마십시오.
* 비네팅 현상은 촬영 거리에 따른 렌즈 배럴 또는
렌즈 후드에 의해 플래시가 가려 져서 광량이 줄
어드는 경우 나타나는 현상으로 화상 주변부 모
서리가 어두워집니다.
■ 렌즈 관리
• CPU 접점 8이 더러워지거나 손상되지 않도록
주의하십시오.
• 렌즈 장착 고무 패킷 7이 손상된 경우에는 반드
시 가까운 니콘 서비스 센터로 가져가 수리를 받
으십시오.
• 블로어 브러시로 렌즈 표면을 청소하십시오. 먼
지나 얼룩을 제거하려면 면 소재의 부드럽고 깨
끗한 헝겊을 사용하거나 렌즈 티슈에 에탄올(알
코올)이나 렌즈 클리너를 적셔서 사용하십시오.
흔적을 남기거나 렌즈의 다른 부분을 건드리지
않게 조심하면서 가운데에서 바깥쪽으로 원을
그리듯이 닦으십시오.
• 시너나 벤젠과 같은 유기 용제를 사용하여 렌즈
를 닦지 마십시오. 그럴 경우 렌즈가 손상되고
화재가 발생하거나 건강 문제를 초래할 수 있습
니다.
• 렌즈 앞쪽을 보호하기 위해 NC 필터를 사용할
수 있습니다. 렌즈 후드도 렌즈 앞쪽을 보호합니
다.
• 렌즈를 신축성이 있는 렌즈 파우치에 보관하는
경우 앞뒤 양쪽 렌즈 캡을 부착하십시오.
• 렌즈를 카메라에 장착할 때 렌즈 후드 쪽을 잡고
카메라와 렌즈를 들어 올리거나 붙잡지 마십시
오.
• 렌즈를 장기간 사용하지 않을 경우 곰팡이 발생
이나 부식을 방지하기 위해 건조하고 서늘한 장
소에 보관하십시오. 또한 렌즈는 직사광선이나
장뇌 또는 나프탈렌 등의 화학물질을 피해 보관
해 주십시오.
• 렌즈에 물을 적시거나 물 속에 렌즈를 넣지 마십
시오. 부식 또는 고장의 원인이 됩니다.
• 렌즈에는 강화 플라스틱이 사용된 부분이 있습
니다. 손상 방지를 위해 절대로 뜨거운 장소에
렌즈를 방치하지 마십시오.
Gr
Kr
87
Page 88

■ 표준 액세서리
• 52mm 스냅식 렌즈 앞캡 LC-52
• 렌즈 뒷캡
• Bayonet 후드 HB-46
• 신축성 있는 렌즈 파우치 CL-0913
■ 별매 액세서리
• 52mm 스크류식 필터
Gr
Kr
88
■ 사양
렌즈 타입: 내장 CPU 및Nikon Bayonet 마
초점 거리: 35mm
최대 조리개: f/1.8
렌즈 구성: 6군 8매(비구면 렌즈 1개)
화각: 44
거리 정보: 카메라에 출력
초점 조절: 후부 초점 조절(RF) 시스템, 초
최단 초점 거리: 촬상면에서 0.3m
조리개 날개 수: 7매(원형)
조리개: 완전 자동
조리개 눈금: f/1.8-f/22
측광 방식: 개방 측광 방식
부착 사이즈: 52 mm(P = 0.75 mm)
크기: 직경 약 70 mm × 52.5 mm
무게: 약 200 g
사양 및 디자인은 제조업체의 부품에서 사전 통지
또는 약정 없이 변경될 수 있습니다.
운트(Nikon 디지털 SLR Nikon
DX 규격 카메라에 사용하기 위
해 특별 설계됨)가 장착된 G 타
입 AF-S DX NIKKOR 렌즈
°
음파 모터(SWM)를 사용한 자동
초점, 별도의 초점 링을 통한 수
동 조정
(렌즈 마운트로부터의 최대 길이)
Page 89

89
Gr
Kr
Page 90

90
Page 91

91
Page 92

使用説明書の内容が破損などによって判読できなくなったときは、
ニコンサービス機関にて新しい使用説明書をお求めください(有料)。
No reproduction in any form of this manual, in whole or in part (except for
brief quotation in critical articles or reviews), may be made without written
authorization from NIKON CORPORATION.
Printed in China
YP4L02(D9)
7MAA57D9-02
 Loading...