

Page 1

EN - Instructions and warnings
for installation and use
IT - Istruzioni ed avvertenze per
l’installazione e l’uso
FR - Instructions et avertissements
pour l’installation et l’utilisation
ES - Instrucciones y advertencias
para la instalación y el uso
DE - Installierungs-und Gebrauchsanlei-
tungen und Hinweise
PL - Instrukcje i ostrzeżenia do
instalacji i użytkowania
NL - Aanwijzingen en aanbevelingen
voor installatie en gebruik
Oview
Display programmer
Page 2
ENGLISH
original instructions
GENERAL SAFETY WARNINGS
AND PRECAUTIONS
TRADEMARK INFORMATION
®
The names BLUETOOTH
the respective owners; the product names stated in this manual may also be
registered by the respective owners.
This symbol indicates subjects that may constitute a
potential hazard source. Therefore all operations marked
with this symbol must be performed exclusively by skilled
and qualifi ed personnel, in observance of the instructions
in the manual, and current local legislation and safety
standards in the place of installation.
1 – English
, GPRS®, and GSM® are registered trademarks of
IMPORTANT
WORKING IN SAFETY!
CAUTION! – For personal safety it is important to observe these instruc-
tions.
CAUTION! – Important safety instructions: Keep these instructions in
a safe place.
CAUTION! – All installation procedures, connections, programming and
maintenance of the product must be performed by a qualified technician!
Nice reserves the right, at any time, to modify or deactivate, temporarily or
permanently, the services it provides also without informing the user. The user
agrees that Nice may not in any way be held responsible towards the same
user or third parties for the modification, suspension or deactivation.
Observe the following warnings:
– never make any modifications to part of the product other than those
specified in this manual. Unauthorised operations may constitute a
hazard and cause malfunctions. The manufacturer declines all liability
for damage caused by makeshift modifications to the product.
– the product is designed for use indoors. It may only be used outdoors
in adequate weather conditions. In fact the product housing does not
protect against the ingress of water or other liquids.
– if the product is used as a control device, it must be installed in a suitable location, out of the reach of children and at a height of at least 150
cm from the ground.
– For cleaning the product surfaces, use a slightly damp (not wet) cloth. Important – Never use substances containing alcohol, benzene, diluents or other
flammable substances. Use of such substances could damage the product.
– Handle the LCD screen with care, taking care to avoid scratching.
– Keep this manual in a safe place to enable future product maintenance and
programming operations.
– The product packaging material must be disposed of in full observance of
current local legislation governing waste disposal.
Page 3
(BusT4)
(BusT4)
(BusT4)
(Oview
Software Suite)
(BusT4)
10-15m
max
(Gprs)
(Wi Fi)
(Adsl)
(Oview
Software Suite)
(GSM®)
(Internet)
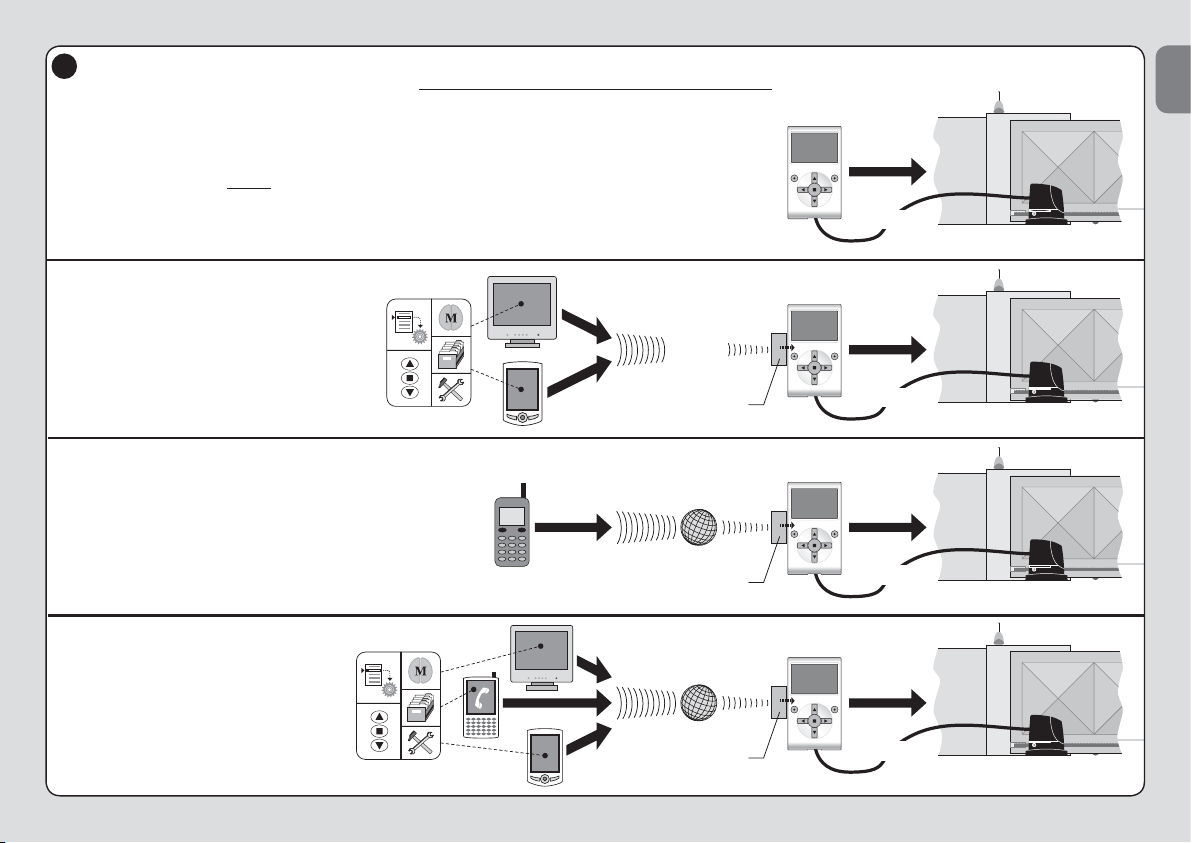
1
Use of Oview only
Use of
OVBT module
and Software
Use of OVBTGSM
module and
a mobile phone
Oview and accessories
OVBT
module
OVBTGSM
module
EN
Use of the
OVBTGSM module
and Software
OVBTGSM
module
English – 2
Page 4
PRODUCT DESCRIPTION AND USE
1
EN
Oview is a device designed for the programming and control of Nice devices
equipped with “BusT4”, used for the automation of gates, garage doors, road
barriers with mobile arms and similar applications.
Any other use is to be considered improper! The manufacturer declines
all liability for damage resulting from improper use of the product and
other than as specifi ed in this manual.
1.1 – Main operating characteristics of Oview
The Oview device dialogues with other devices via the BusT4 cable; therefore
it can only communicate with products fi tted with the BusT4 connector, i.e.
those in the “NiceOpera” system (for information on this system, refer to the
box alongside, entitled “What is Nice Opera?”).
Oview is only activated when connected to a device, as it is powered directly
by the latter.
Oview can be used both as a system for programming devices and as a system for automation control. Use of Oview is especially recommended in automation systems with an advanced technological content, as it enables:
– programming of a device or several devices connected on a network;
– control of one or more automations;
– diagnostics of a device or several devices connected on a network.
– storage(*) of settings and programming of devices (storage is useful for
example to enable rapid re-confi guration of devices in the event of a replace-
ment of a system component).
(*) Note – The storage operation is only available when using the optional software available for use with Oview (see chapter 7).
Oview is suitable for use both by the installer and user. Just one Oview device
enables the installer to program and modify data, and perform maintenance on
all devices present in a system. On the other hand, the user can use Oview to
control one or more automations on a daily basis.
If required, the installer can also provide the user with the programming settings
of a number of parameters. This can be useful if the user needs to change the
values of these parameters while using the automation.
If the case of a network of several devices, use of Oview enables the installer to
3 – English
confi gure all devices in a system one at a time, thus reducing the complexity,
times and movements normally required for such operations.
Note – For more information on how to construct a Bus network and how to
confi gure and manage the network by means of Oview, refer to the manual
“NiceOpera System Book” available on the website www.niceforyou.com
1.2 – Accessories (optional)
Oview is supplied with a 2 m cable for direct connection to a device and a support for wall-mounting.
All the other accessories listed below are optional:
®
– Bluetooth
– GSM
module, supplied with the Software “Oview Software Suite”;
®
module, supplied with the Software “Oview Software Suite”.
What is “NiceOpera”
Nice Opera is a system comprising various devices normally used in systems
for the automation of gates, garage doors, and road barriers with mobile arms.
These devices are:
– transmitters in the series NiceOne;
– receivers in the series NiceOne;
– control units of gearmotors with “Bus T4” connection.
There are also other supplementary software and hardware devices in addition to the above:
– O-Box programming unit with dedicated software, for transmitters
and receivers;
– Oview programming unit, for control units and receivers;
– a Bluetooth
tion between Oview and a Personal computer or Palmtop;
– a GSM
Internet between Oview and a Personal computer or Palmtop.
The GSM® module also enables the use of a smartphone and
standard mobile phone: these can be used to send a command
to an automation by means of a call or text message; also, the
smartphone, equipped with the Windows® Mobile operating system enables use of the software “Oview software suite”.
®
module and dedicated software, for data communica-
®
module and dedicated software, for data communication via
Page 5
OVIEW INSTALLATION
2
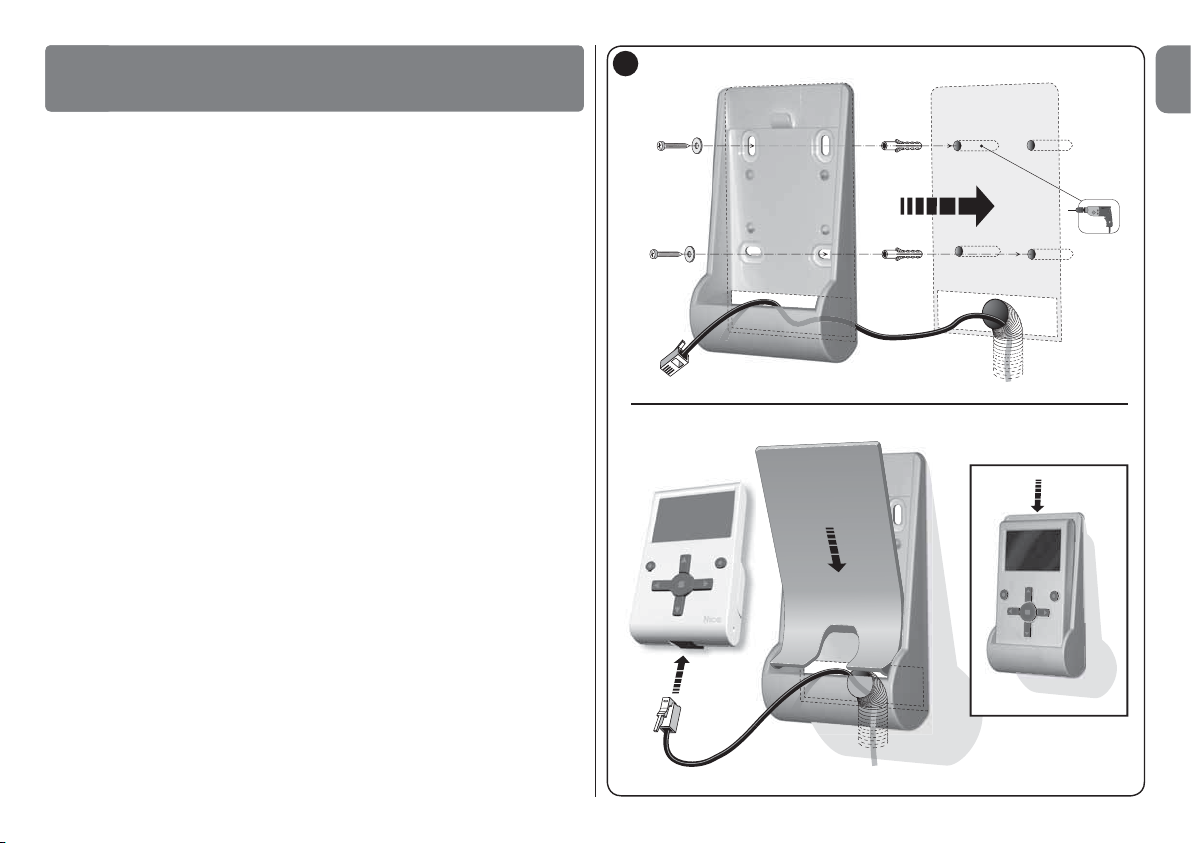
AS A CONTROL DEVICE
To use Oview as a fi xed control for automations, it must be installed in a suit-
able location, out of the reach of children and at a height of at least 150 cm
from the ground.
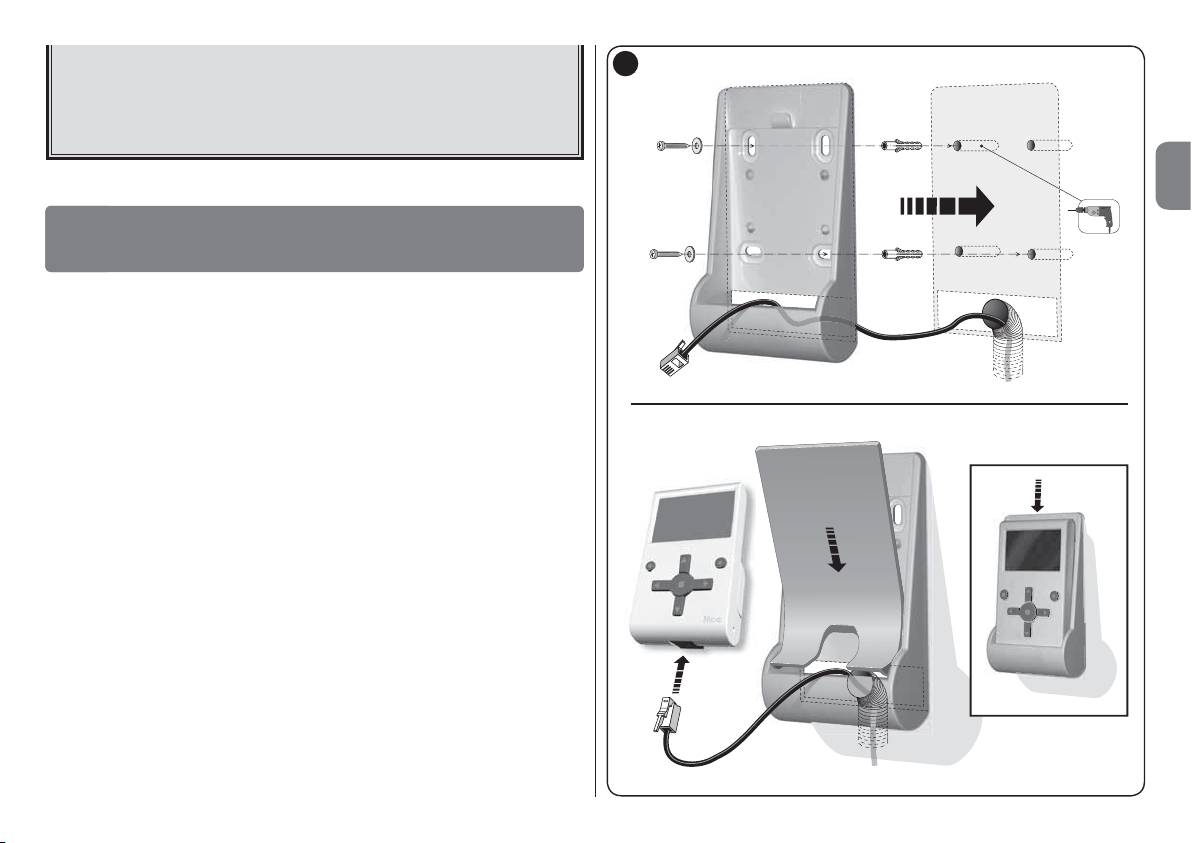
To mount the device on a wall, use the support supplied in the pack, as shown
in fi g. 2.
Then connect Oview to the automation with reference to the instructions in
Chapter 3.
––– OBLIGATIONS FOR THE INSTALLER –––
IMPORTANT – After installing and programming Oview as a control
device, the installer must provide the client with the part of this manual
entitled “User Manual”.
Also, if the installer intends to enable the client access to a number
of programming functions, the relative information on these functions
must also be supplied, contained in the web site www.nice-service.
com, under the “Download” section.
2
EN
English – 4
Page 6
EN
Oview can be connected to a device in two ways:
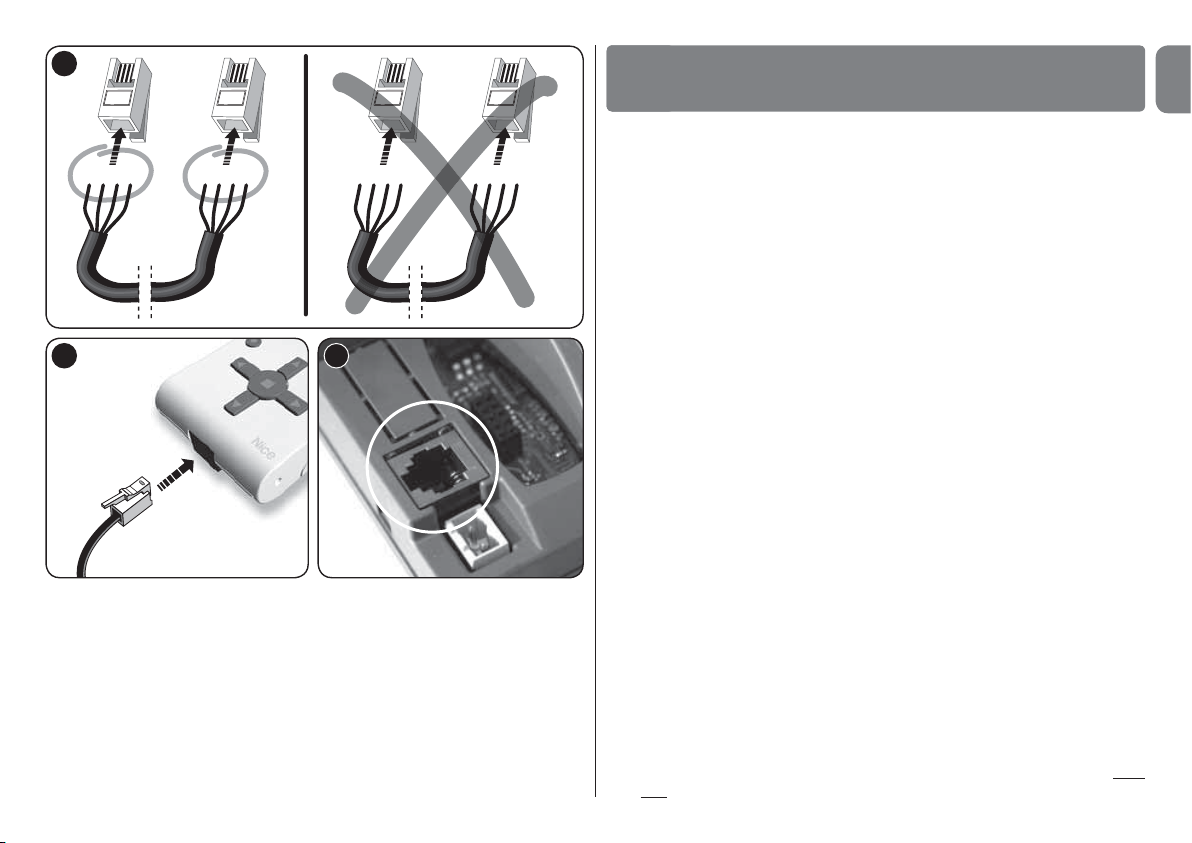
• random connection: this enables use of Oview as a “portable” programming unit. For this connection, the cable supplied (2 m) can be used, connecting it to the socket on Oview (fi g. 4) and the “BusT4” socket on the control unit
of the device to be programmed (fi g. 5 - To access this socket, refer to the
device instruction manual).
• permanent connection: this enables use of Oview as a “fi xed” control and
programming unit. For this connection, the length of the cable supplied (2 m) is
probably not suffi cient. Therefore an extension lead should be used, or a new
cable of suffi cient length with the following characteristics:
- type of connector to be used: RJ45 6/4 plug (body 6 with 4 contacts); con-
nectors normally used in telephone systems.
- types of cables admissible:
fl at telephone cable with 4 wires;
tamper-proof cable with wires (4 x 0,22 mm);
UTP cable category 2, with 4 wires (if the cable has more these must be
eliminated);
STP cable category 5, with 4 wires (if the cable has more these must be elimi-
nated) with shielding.
- maximum cable length: refer to the lengths specifi ed in Table 1.
5 – English
TO A DEVICE
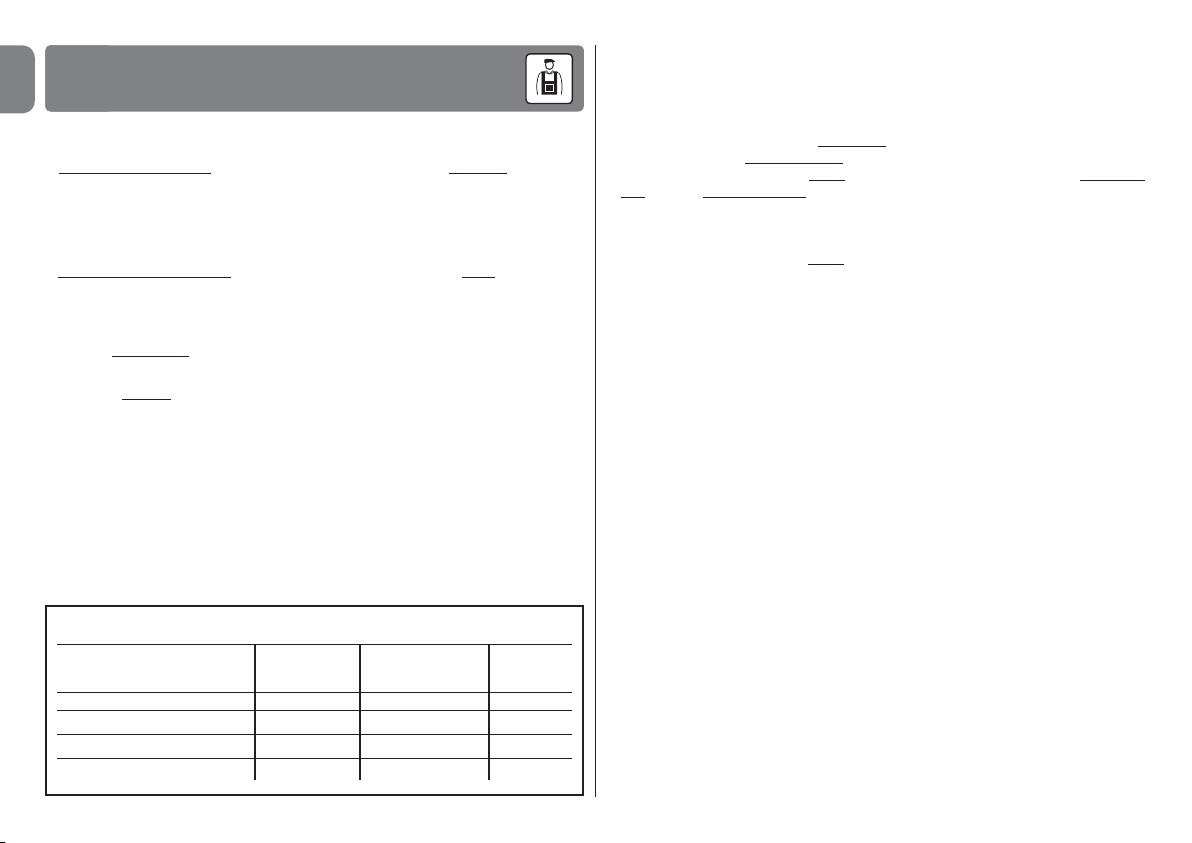
Table 1 – Maximum cable length
Oview Oview + Oview +
Bluetooth
Flat telephone cable 300 m 250 m 150 m
Tamper-proof cable 300 m 300 m 250 m
UTP Cable category 2 500 m 500 m 400 m
STP Cable category 5 700 m 700 m 400 m
®
GSM
OVIEW CONNECTION
3
General notes to Table 1:
• The maximum cable lengths are calculated for use in environments with “Civil” type electromagnetic emission levels. For increased reliability of data transmission on long cables,
STP type cables, category 5, are recommended, with connection of the cable shielding
to earth as follows:
– if the devices are connected “in cascade” (or “chain”), connect the shielding of the
device positioned at one of the ends of the chain;
– if the devices are connected “in star” mode, connect the shielding either of one device
only or at the centre of the star.
• In the case of a network of devices, the total cable length must be calculated as follows:
– if the devices are connected “in cascade” (or “chain”), the maximum cable length must
be calculated between the two devices at the ends of the chain.
– if the devices are connected “in star” mode, the maximum cable length must be calcu-
lated by adding the two longest sections plus the total of the half the lengths of the other
sections.
In general, for the connection of several devices in a network, special “T” sockets can be
used, usually known as “splitters”, as commonly used in telephone systems. The type of
splitter used is model RJ45 6/4 (body 6 with 4 contacts).
• To facilitate crimping of the RJ45 connector at the two ends of the cable, the internal
wires of the selected cable should be “fl exible (with strands)” and therefore not rigid
types.
After selecting the type of cable used for connecting Oview to a device, proceed as follows:
01. Before starting installation, ensure that there is all equipment and materials
required for the work concerned. Also ensure that all items are in good
condition and comply with local safety standards.
02. Establishing the position for Oview installation.
03. Perform all work required for laying hoses or protection ducting for the
electric cables. Note – The hoses or ducting serve to protect electrical
cables and prevent accidental damage in the event of impact.
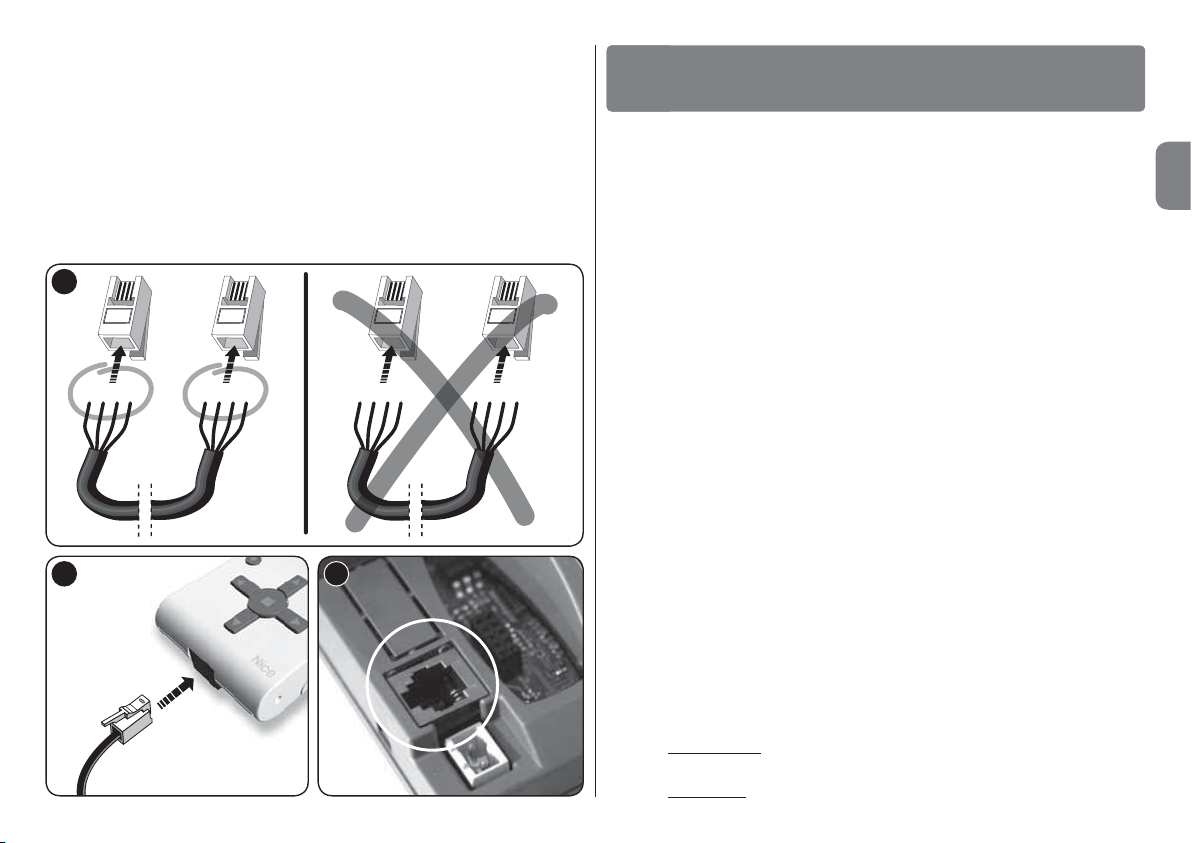
04. At this point, after routing the cable in the protection ducting, if using a
cable without connectors, assemble a connector on each end of the
®
cable, taking care to use the same sequence of wires on both connectors (fi g. 3).
05. Then connect the cable to the socket on Oview (fi g. 4) and to the “BusT4”
socket on the control unit of the device to be controlled (fi g. 5 - To access
this socket, refer to the device instruction manual).
Note – For more information on the procedures dealt with in this chapter, refer
to the manual “NiceOpera System Book”.
Page 7
1 2 3 4 1 2 3 4 4 3 2 1 1 2 3 4
3
4
5
GENERAL USE OF OVIEW
4
Oview is only activated when connected to a live device, as it is powered
directly by the latter.
On activation of Oview, the icon representing the connected device is displayed
on screen.
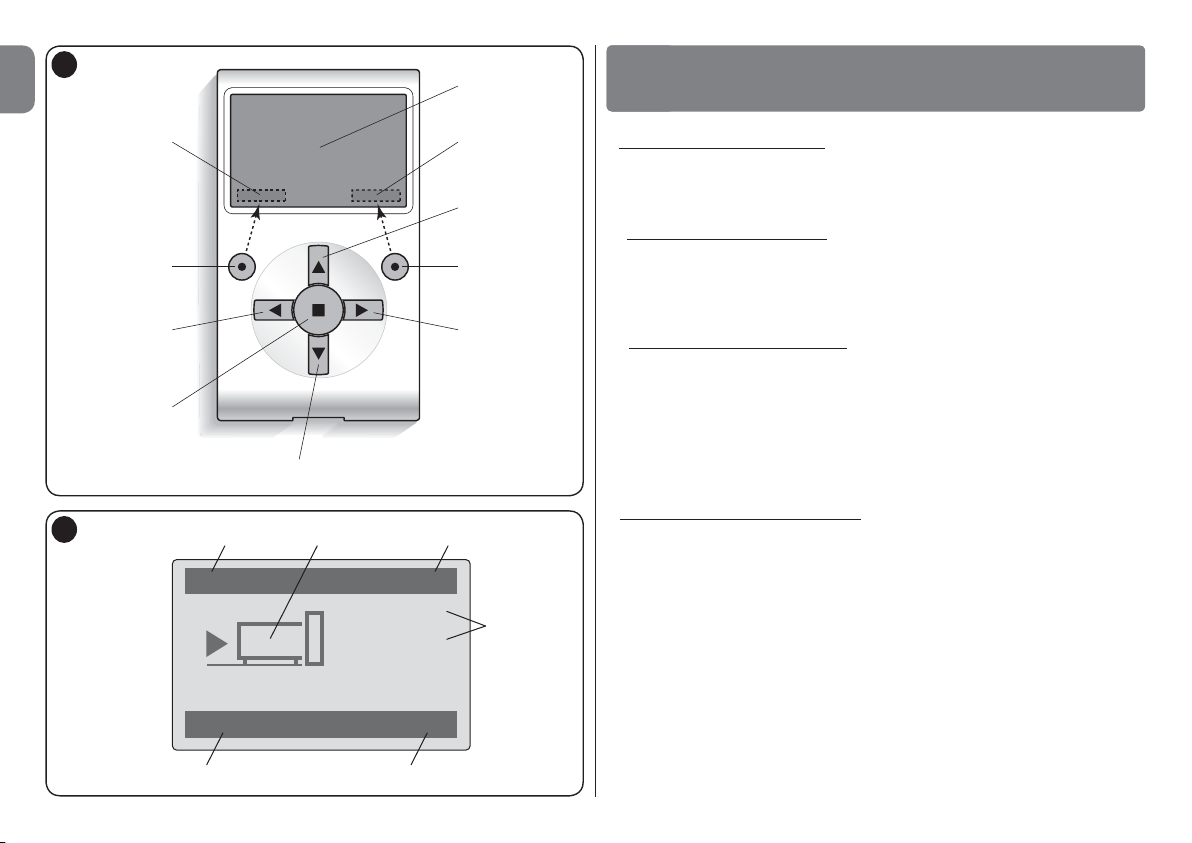
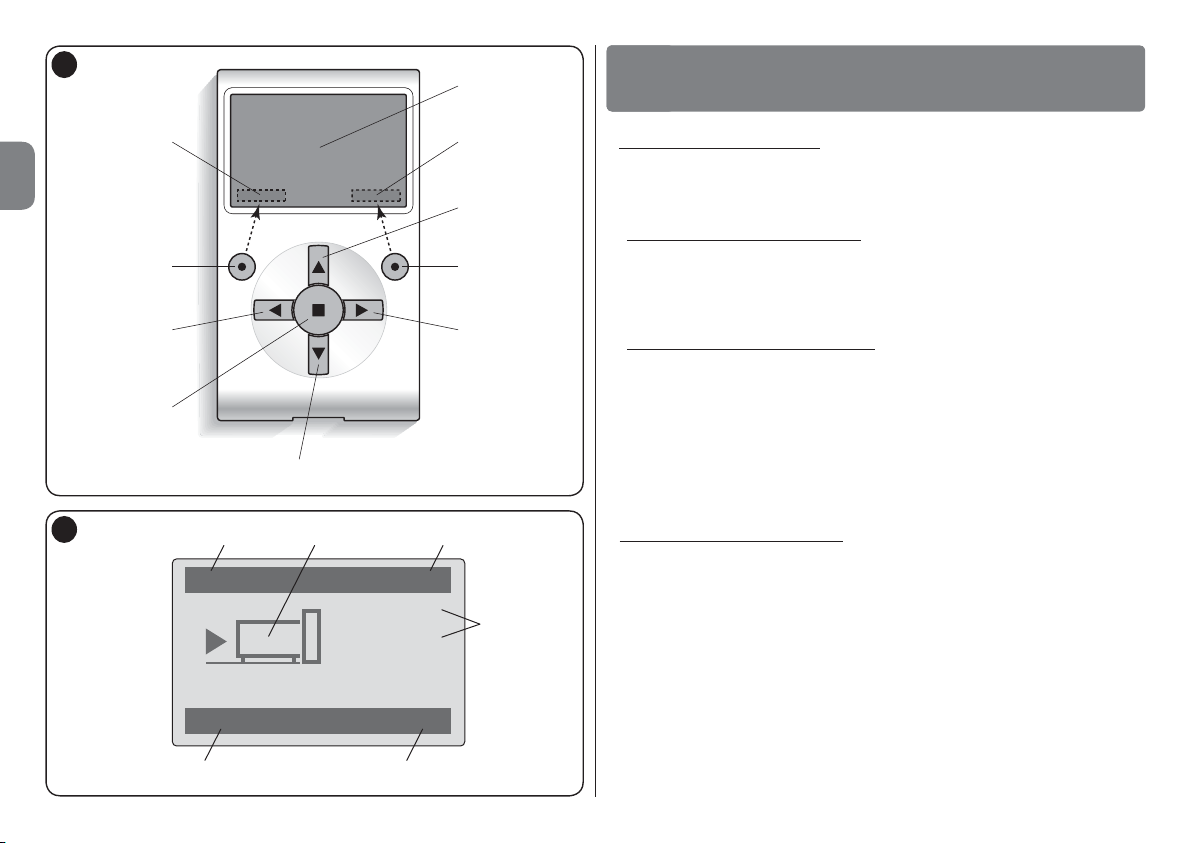
• Key to Oview keys
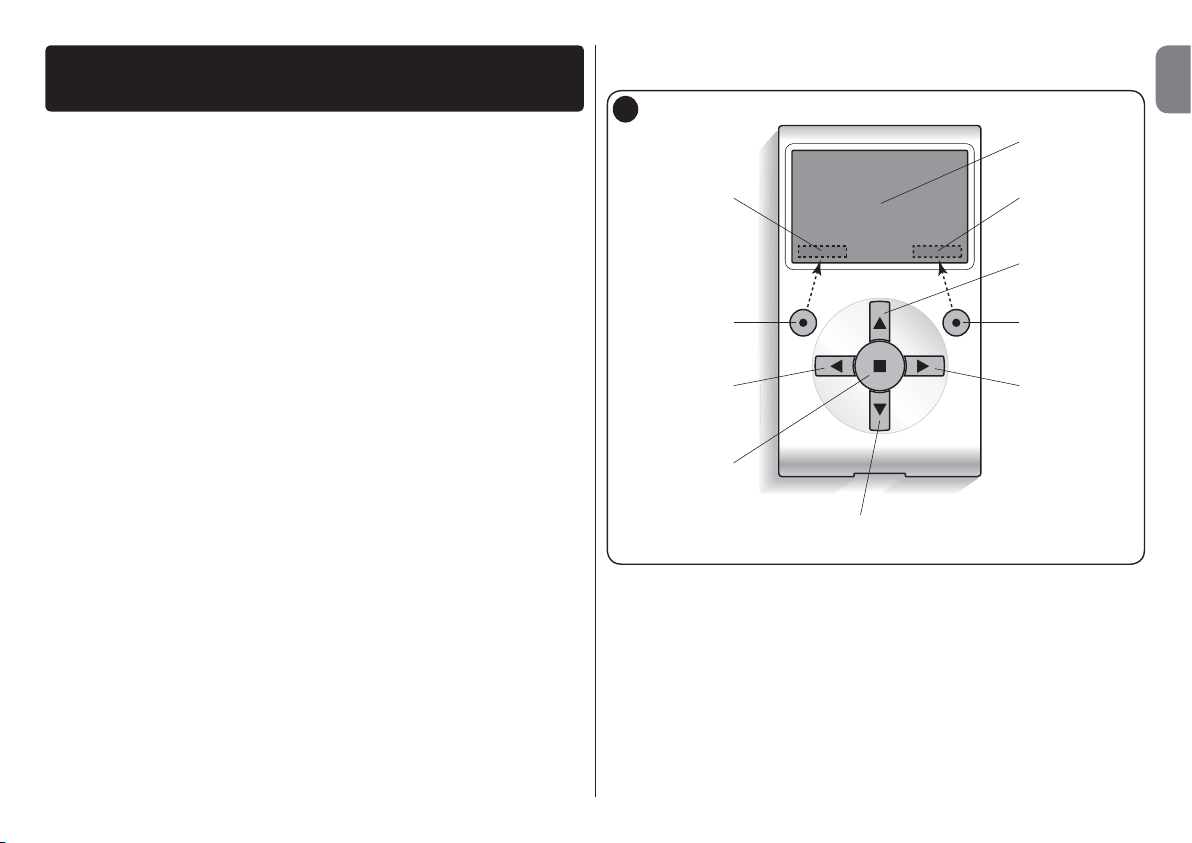
Oview comprises the following parts (fi g. 6):
1 – LCD screen;
2 / 4 – Arrow keys W and X : used to move from one fi eld to another in a
window and to move from one window to another;
3 / 5 – Arrow keys S and T: used to modify values in a selected fi eld or to
scroll within a list;
6 – Key used to confi rm a value;
7 – Key z used to select the item displayed at the bottom left of the screen
(9);
8 – Key z used to select the item displayed at the bottom right of the
screen (10).
• Oview home page
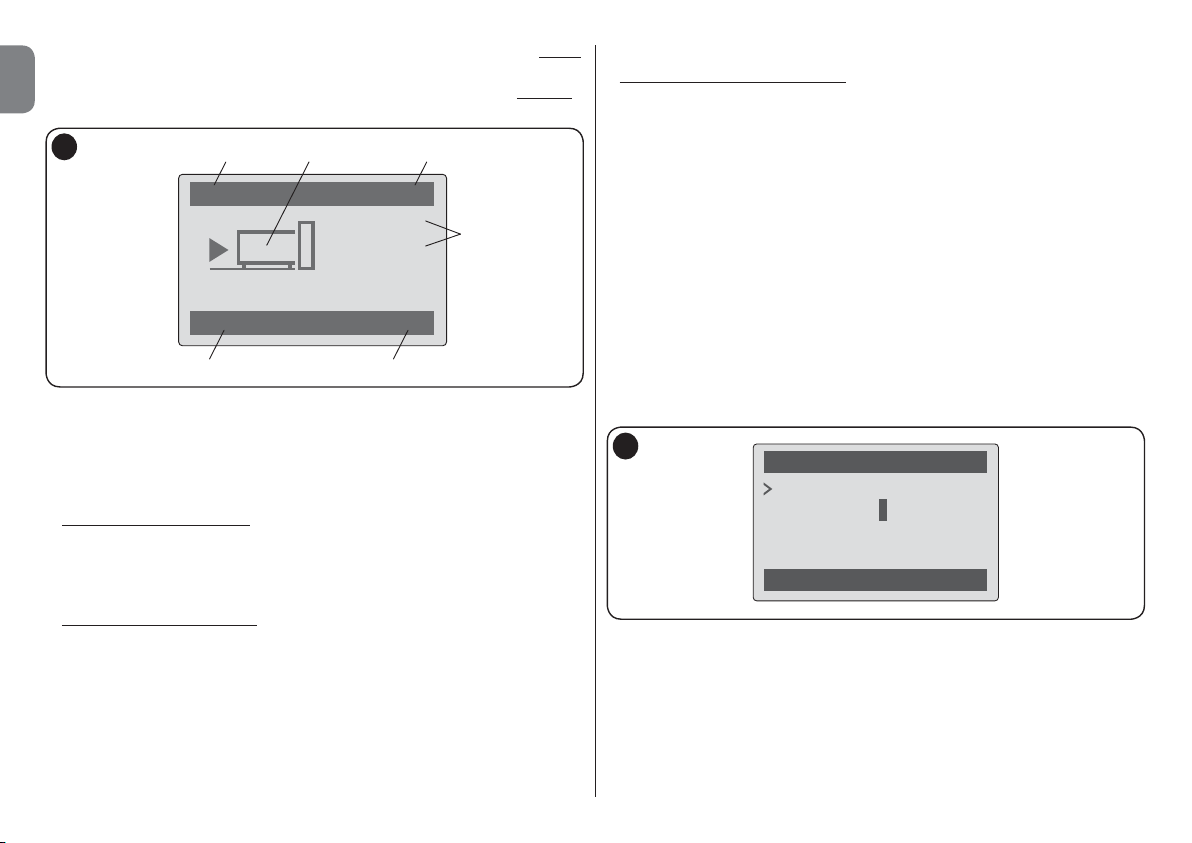
After activating Oview, the application home page is displayed. This window
comprises the following elements (see fi g. 7):
A – Name of selected device.
B – Icon defi ning the type of device connected; in the case of a network of
devices the screen displays the fi rst device found.
C – Number indicating the series to which the selected device belongs.
D – Local time and date.
E – “Menu”: this enables the user to access all functions available to program
a device.
F – “Options”: this enables the user to access all functions available to con-
trol one or more devices and confi gure Oview.
English – 6
EN
Page 8
8
1
4
3
7
2
5
6
10
9
6
run 2
Options Menu
02
00:01:14
09.11.07
B
EF
D
A C
EN
7
7 – English
OVIEW FUNCTIONS
5
• Controlling the automation
There are two ways to control an automation. After selecting the series to
which the automation to control belongs, send the command required in one
of the following ways:
A) to send a direct command, use one of the following keys:
– OPEN = key S (3 – fig. 6)
– STOP = key (6 – fig. 6)
– CLOSE = key T (5 – fig. 6)
B) to send a special command available on the automation, in the home
page (fig. 7) select “Options” by means of key z (7 – fig. 6) and then select
“Commands”. Then select the required command from the list displayed.
At this point, to confirm the selected command, select “Select” by means of
the key z (8 – fig. 6) or return to the previous window by selecting “Back” by
means of the key z (7 – fig. 6).
Note – The type and number of commands present in this list change according to the type of automation selected.
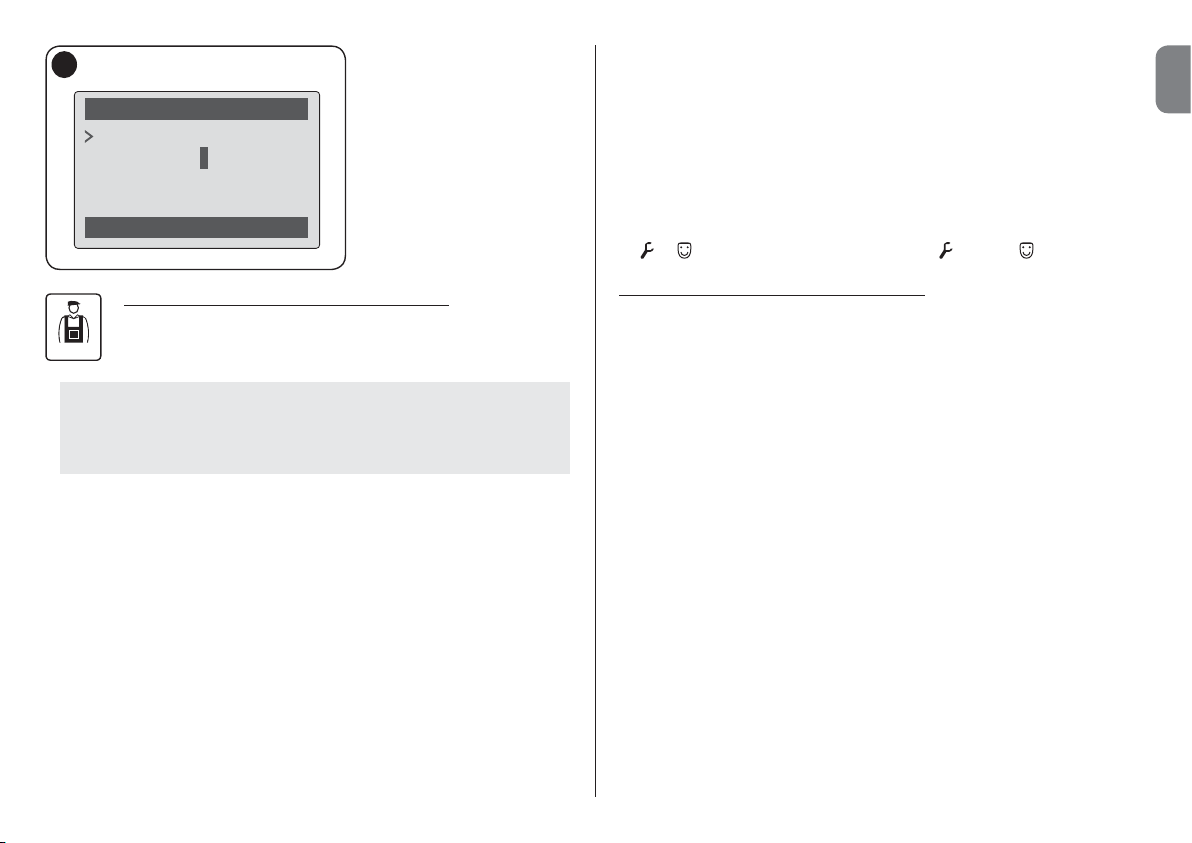
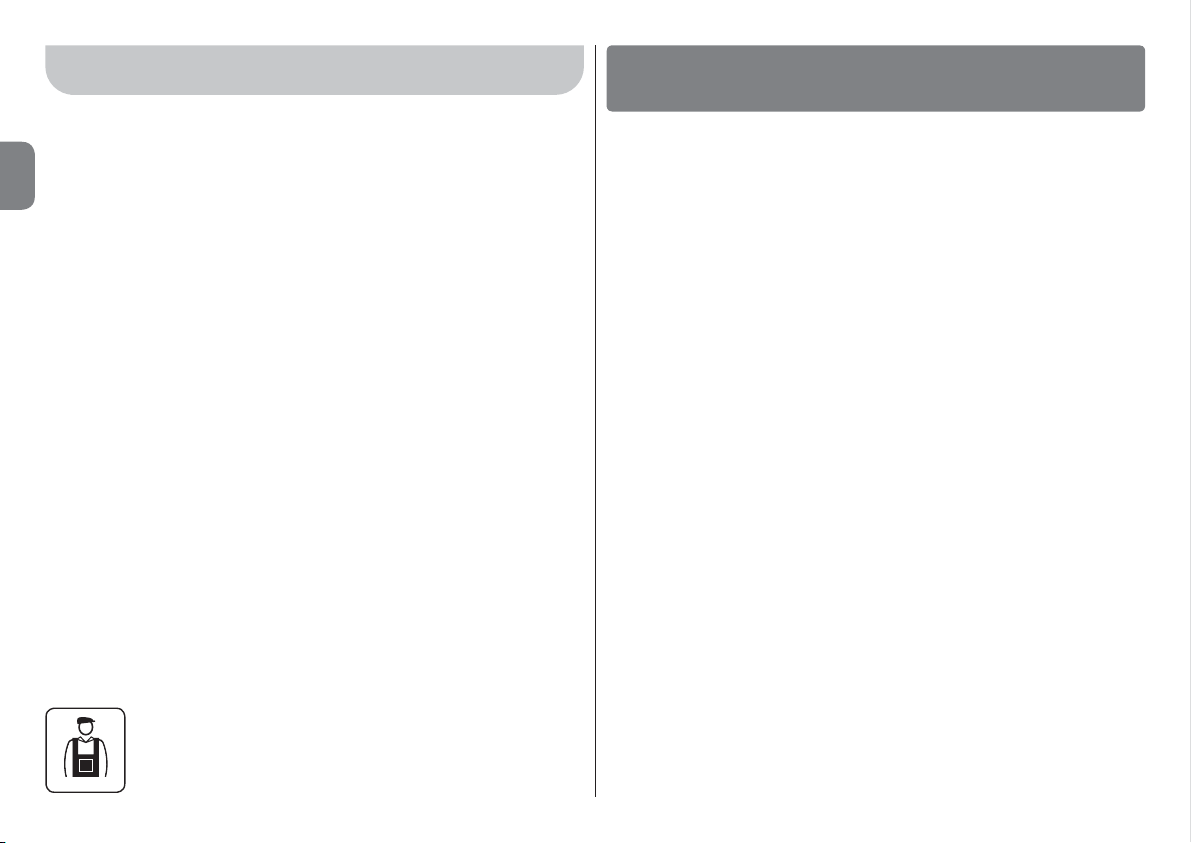
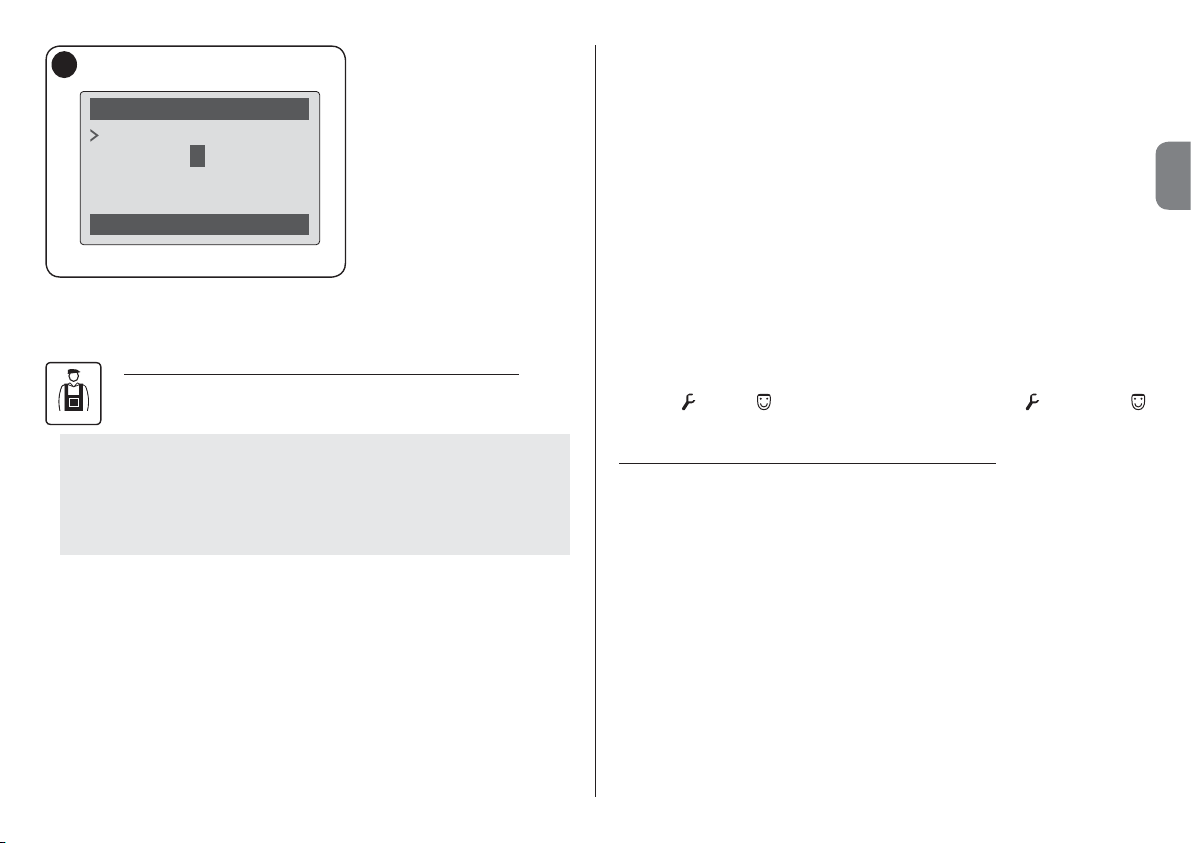
• Programming timed commands
Oview is equipped with an internal clock which can be used to program automatic delivery of commands to an automation on specific days and times as
required. Note – In the event of a power failure, the clock in Oview continues to
operate as normal, but if delivery of a command was programmed during the
black-out, this will not be performed.
To program automatic execution of commands on specific days and times as
required, proceed as follows:
a) select the series to which the automation to be programmed belongs;
b) in the home page (fig. 7) select “Options” by means of key z (7 – fig. 6) and
then select “Timed commands”;
c) ) in the window displayed select “New” to create a new timed command
(fig. 8) and enter the required days and times in the relative fields;
d) confirm the settings by selecting “OK” by means of the key z
(8 – fig. 6).
Page 9
8
Timed commands
New
22:50
mtwtfss
Back Select
on
Important – Ensure that the
clock is set precisely at the local
time.
Caution – The timed commands are only enabled if the
“Timed command activa-
tion” is activated (ON) under the
heading “Options”.
– “Advanced functions” (special functions present on all control units and
receivers);
– “Log in” (required to access an automation if a password has been previously set);
– (etc......)
Note – The presence or absence of some of the items in the “functions menu”
depends on the type of device selected.
Once an item has been selected, confirm with “Select”. At this point a screen
will appear with the functions relating to the device. Lower down there is an
or which indicates the access mode: installer, user.
icon
EN
• Programming the control unit and receiver
To program the parameters of a device, proceed as follows:
WARNING – Access to the functions under the heading “automations” may require entry of a password, if the installer has decided to restrict access to the programming functions. For further
information refer to the paragraph “Working with passwords”.
a) Select the series to which the device to be programmed belongs.
b) In the home page (fig. 7) select “Menu” by means of key z (8 – fig. 6): the
window displays the list of devices connected and present in this series.
c) This window enables the user to:
– scroll through the list of names of devices present, using the arrow keys S
or T;
– access the next series by using arrow key X or the previous series by means
of arrow key W;
– confirm selection of a device, by means of key 8.
d) On confirmation of the selection, a window is displayed with a function menu.
This menu normally comprises the following items:
– “Control unit functions” (functions specific to the control unit);
– “Radio functions” (functions specific to the receiver);
– “Common functions” (containing the functions present on all control units
and receivers);
• Setting the Oview operating parameters
• To set the Oview operating parameters, enter the home page (fig. 6), and
select “Options” by means of the key z (7 - fig. 6) and then select “Oview
Settings”.
The window displays the list of parameters available: “Name” - “Date/time”
- “Display brightness”- “Key brightness” - “Oview Password” - “Lan-
guage” - “Information” - “Network options”.
To display and modify individual parameters, select and proceed in the window
displayed.
– Name: used to assign a personal name to Oview, for easy identification in a
device network;
– Date/time: used to set the local date and time. The arrow keys W and X
(2 and 4 – fig. 6) enable the user to move between fields for the date and
time and keys S and T (3 and 5 – fig. 6) enable modification of the relative
values;
– Display brightness: used to adjust the display brightness. This can be set
with a value from minimum 0% to maximum 100%. Note – After 30 seconds
of inactivity, the display brightness is reduced to the minimum set value;
– Key brightness: used to adjust the key brightness. This can be set with
a value from minimum 0% to maximum 100%. Note – After 30 seconds of
inactivity, the brightness is reduced to the minimum set value;
– Oview Password: refer to paragraph “The Oview password”;
– Language: used to set the required language;
– Information: used to display the Oview technical data without the option for
modification;
English – 8
Page 10

– Network options: this item contains the parameters “Group” and “Ad-
dress”. These are used to modify the series to which Oview belongs and the
personal address of the latter;
EN
• Working with passwords
“NiceOpera” device passwords
All devices in the “NiceOpera” system, including Oview, offer the installer and
user the option of restricting access against unauthorised tampering of sensitive data of the device, by implementing an access password.
The password will be saved on the device and will restrict access to the
functions regardless of the Oview connected.
If a device is password-protected, the “Log in” procedure is compulsory before
programming is enabled, the subsequent log out will take place automatically
when you go back to the main screen.
There are two types of password that can be set on a control unit: “User Password” and “Installer Password”.
If the device is protected by both passwords, Oview will automatically ask the
password to be entered.
If the installer password is set and the correct password is not entered in “Log
in” on the screen relating to that control unit, access to the menus will be restricted. In particular, when entering the “Control unit functions” menu, some
items will not be visible and other will be, though not modifiable.
It is possible to also set a user password (valid only if the installer password
has been set), which will completely block access to the menus to those not
knowing the passwords.
The installer may decide which parts to make visible or modifiable to those who
access with the user password. The route to modify the access permissions is:
“Control unit functions” → “Advanced functions” → “User permissions”.
In particular: by moving the S and T arrows you can assign one of the following
permissions to each menu item:
read only permission (visible, but not modifiable)
■ read and edit permission (visible and modifiable)
∼ the item will not be visible to the user.
if no password is set, the entire menu is visible and modifiable (you access it as
installer, with all the permissions). At any time it is possible to understand which
profile you are accessing the menus with, by checking the icon on the lower bar
user or installer).
(
9 – English
– Caution! If items are missing from the menu when browsing, this means
that passwords have been set. To be able to access the complete menu it is
necessary to log in with the installer password.
– Caution! The installer and user passwords are independent from the Oview
password. They protect different parts of the menu.
Oview password
Oview enables the programming of an “Oview Password”.
The “Oview Password” is used to block access by the user to data and functions related to the correct operation of Oview (access to the “Options” menu).
This password also protects the parameters of the OVTB or OVBTGSM modules if connected.
– To set a password: in the home page (fig. 7) select “Options” by means
of key z (7 – fig. 6) and then select “Oview Settings”. Then select “Oview
Password” and set the desired password.
Note – When a password is enabled, it will be requested each time you access
the “Options” menu.
– To modify or delete an existing password: select “Options” in the
main screen. After entering the password, select “Oview Settings” and then
“Oview Password”
- program a new password and save modifications, or,
- delete the existing password leaving the dedicated space blank and save the
changes.
• Oview with firmware vers. OV04 onwards
Oview with firmware vers. OV04 onwards has two functions: “Event log” and
“Control unit update”.
Events log
This function enables the user to display on Oview all operations performed
by the devices on the network to which Oview is connected. Data acquisition
(events log) is performed from the start, automatically and not visible to the
installer, as soon as Oview is connected to the network: this searches for all
devices on the network and stores the events log of each in its specific memory, overwriting data of previous versions. After searching for devices on the
network, with Oview still connected, the events log of a device can be viewed
one at a time, as follows: select the device, followed by the item “Advanced
functions” → “Events log”. To scroll through events, use keys S and T.
The events log can also be viewed using “Oview Software Suite”. In this case,
Page 11

connect Oview to the Pc or to the palmtop in which the software is installed,
then in the main screen select “Oview”, followed by “O-View Functions” →
“Settings” → “Events log”. A list is displayed, with the events log of all devices on the network to which Oview was last connected and, to view the events
of a single device, use the field “Device filter”, selecting the required device
from the list displayed.
The maximum number of the events that can be saved is 300.
The acquired events log remains in the Oview memory until it is connected to
a different network.
Control unit update
This function enables the user to update the firmware of a control unit using the
internal memory of the additional module OVBT (or OVBTGSM) in conjunction
with Oview. The procedure involves two steps, which can also be performed
at different times and locations: 1) loading of new firmware in the additional
module of Oview only using Bluetooth; 2) downloading of the firmware onto
the control unit.
1. Loading the new firmware onto the additional module of Oview. To
load the firmware onto the additional module OVBT (or OVBTGSM), install
the module on Oview, open the software “Oview Software Suite” (version
1.3 or later), start up the search for devices and select the device Oview;
then select the item “Advanced functions” followed by “Load control
unit firmware”. At this point select the file with the new firmware and confirm. The file will be memorised automatically onto the additional module.
This operation may only be done by connecting Oview using Bluetooth and
not through the remote GPRS connection
2. Downloading the new firmware onto the control unit. To download the
firmware onto the control unit, connect the latter to Oview equipped with the
additional module with the memorised new firmware and proceed with the
update as follows: remove any passwords; then select the item “Menu” on
Oview, followed by “Control unit functions” → “Advanced functions”
→ “Update firmware”. At this point Oview checks whether the new firm-
ware is compatible with the control unit: if compatible, the item “Start” is
displayed; otherwise the update process cannot be started. After starting
the process, if the update fails the control unit remains blocked pending
completion of the procedure. To unblock, select the item “Options” →
“Devices in boot phase” and restart the firmware loading process.
EN
English – 10
Page 12
EN
USING OVIEW WITH THE
6
BLUETOOTH® AND GSM® MODULES
Product disposal
Oview functionality can be enhanced further using the Bluetooth® or GSM®
module and the software “Oview Software Suite” supplied with the products
(see fig. 1). These modules and the software are optional accessories; the software is supplied in 2 versions: one for PC and one for a palmtop. For use,
the software must be installed on a PC and/or Palmtop and/or Smartphone,
equipped with Bluetooth
– Bluetooth
tooth® module (to be installed on Oview). This type of connectivity enables
communication with Oview from a maximum distance of approx. 10-15 m
(obstacle free) or a few metres in the presence of obstacles (walls or similar).
– Internet connectivity: enables the user to connect to Oview using a Gsm
module (to be installed on Oview). This type of connectivity enables communication with Oview via the GSM® network. In this case communication can be
from any distance, provided there is network coverage.
The GSM® module also enables the use of a smartphone and standard mobile
phone: these can be used to send a command to an automation by means
of a call or text message; also, the smartphone, equipped with the Windows®
Mobile operating system enables use of the software “Oview software suite”.
The software “Oview Software Suite” offers detailed on-screen graphics, and
the PC keyboard or Palmtop keys facilitate scrolling and entry of data.
With this Software, the installer, as well as all the normal operations available
with Oview, can create a database to manage and save modifications applied
to programmed devices, and can also perform diagnostics with comprehensive
and immediate graphics, with the possibility of updating a device firmware.
®
connectivity: enables the user to connect to Oview using a Blue-
®
and/or Internet connectivity.
This product comprises various types of materials: some may be recycled while
others must be disposed of. Seek information on the recycling and disposal systems envisaged by the local regulations in your area for this product category.
Caution! some parts of the product may contain pollutant or hazardous substances which, if disposed of into the environment, may cause serious damage
to the environment or physical health.
The product contains a battery: this must be removed. Never dispose of in
common waste collection points as it contains pollutant substances. Dispose
of according to separate waste collection methods as envisaged by current
local standards
®
As indicated by the symbol alongside, disposal of this product
in domestic waste is strictly prohibited. Separate the waste into
categories for disposal, aaccording to the methods envisaged
by current legislation in your area, or return the product to the
retailer when purchasing a new version.
Caution! – local legislation may envisage serious fines in the
event of abusive disposal of this product.
11 – English
Page 13

Technical specifications of product
Oview is produced by Nice S.p.a. (TV) I.
Type: control, programming and diagnostics unit for devices equipped with
BusT4 connector
Technology adopted: half duplex 19200 Bps serial connection on differen-
tial bus for delivery of commands, modification or parameters and monitoring of diagnostic data
Graphic interface: LCD display 128 x 64 dots (46 x 29 mm); 2,2”
Operator input device: joypad con 5 + 2 keys
Display/key lighting: white light
(colour coordinates: X = 0,29–0,33; Y = 0,30–0,34)
Calendar/clock: internal, with backup battery (minimum lifetime 10 years)
Maximum number of hourly commands: 64
Event log: storage capacity of 400 events
Connection cable length:
– cable supplied: 2 m
– other cable: up to 700 m, measured from point to point
Power supply: supplied by devices present on BusT4
Absorbed current: Maximum 20 mA (without accessories)
Insulation: Class III
Casing protection rating: IP 20
(use indoors or in protected environments only)
Operating temperature: from –20°C to +55°C
Dimensions (mm): 107 x 61 x h 20
(with wall-mounting support: 125 x 70 x h 32)
Weight: 75 g (without cable)
EN
Optional accessories:
• module for connection via Bluetooth
®
technology
• module for connection via GSM®–GPRS® technology
English – 12
Page 14

EN
Note – The content of this declaration corresponds to the declaration made in the offi cial document fi led in the offi ces of Nice S.p.a., and particularly the latest version thereof available
prior to the printing of this manual. The text herein has been re-edited for editorial purposes.
A copy of the original declaration may be requested from Nice S.p.a. (TV) I.
CE DECLARATION OF CONFORMITY
Declaration in accordance with Directive 1999/5/EC
Declaration number: 278/OV Rev.: 6 Language: EN
The undersigned Luigi Paro, as Managing Director of the company, here by declares under his own responsibility that the product:
Name of manufacturer: NICE s.p.a.
Address: Via Pezza Alta 13, Z.I. Rustignè, 31046 Oderzo (TV) Italy
Type: Programming and control unit for automations
Models: OVIEW
Accessories: OVBT, OVBTGSM
Conforms to the essential requirements specifi ed in article 3 of the following community directive, for the products’ intended use:
• Directive 1999/5/EC OF THE EUROPEAN PARLIAMENT AND COUNCIL dated March 9, 1999 regarding radios and communications terminals and
reciprocal recognition of their conformity in accordance with the following harmonized standards
· Protection of health (art. 3(1)(a)): EN 50371:2002, EN50360:2001+A1:2006
· Electrical safety (art. 3(1)(a)): EN 60950-1:2006+A11:2009
· Electromagnetic compatibility (art. 3(1)(b)):
EN 301 489-1V1.8.1:2008; EN 301 489-17 V1.2.1.:2002,
EN301489-7 V1.3.1:2005
· Radio spectrum (art. 3(2)): EN300328 V1.7.1:2006, EN300440-2 V1.1.2:2004,
EN 301511 V9.0.2:2003
In accordance with directive 1999/5/EC (annex V), the product is classifi ed as class 1 and marked:
0682
In addition the product conforms to the provisions of the following EU directives:
• DIRECTIVE 2004/108/EC OF THE EUROPEAN PARLIAMENT AND COUNCIL of 15 December 2004 concerning alignment of Member States’ legislation
regarding electromagnetic compatibility and abrogating directive 89/336/EEC, according to the following harmonized standards:
EN 61000-6-2:2005, EN 61000-6-3:2007
Oderzo, 1 March 2012 Luigi Paro
(Managing Director)
13 – English
Page 15
USER MANUAL
GENERAL SAFETY WARNINGS AND PRECAUTIONS
8 – Key z used to select the item displayed at the bottom right of the screen
(10).
EN
A
1
CAUTION! – All installation procedures, connections, programming and
maintenance of the product must be performed by a qualified technician!
Observe the following warnings:
– keep Oview out of the reach of children.
– for cleaning the product surfaces, use a slightly damp (not wet) cloth. Important
– Never use substances containing alcohol, benzene, diluents or other flammable
substances. Use of such substances could damage the product.
– handle the LCD screen with care, taking care to avoid scratching.
– keep this manual in a safe place to enable future consultation.
– at the end of the product lifetime, ensure that it is recycled or scrapped
according to current standards in the place of use.
DESCRIPTION OF OVIEW
The use of Oview as a fixed wall-mounted control unit enables the product to remain
active at all times as it is powered directly and permanently by the automation to
which it is connected. However, if Oview is not used for a short period of time,
the screen sets to standby (reduced brightness). In this case, to restore brightness,
press any key.
To control an automation, simply recall the name and icon of the automation on the
Oview screen and send a command by pressing a key (for further information refer to
the chapter “Using Oview as a control device”).
• Key to Oview keys
Oview comprises the following parts (fig. A):
1 – LCD screen;
2 / 4 – Arrow keys W and X: used to move from one field to another in a window
and to move from one window to another;
3 / 5 – Arrow keys S and T : used to modify values in a selected field or to
browse within a list;
6 – Key used to confirm a value;
7 – Key z used to select the item displayed at the bottom left of the screen (9);
9
10
3
7
2
8
4
6
5
• Oview home page
After activating Oview, the application home page is displayed. This window comprises the following elements (see fig. B):
A – Icon defining the type of device connected; in the case of a network of devices
the screen displays the first device found automatically, belonging to specific
group.
B – Name of selected device.
C – Number indicating the series to which the selected device belongs.
D – Local date and time.
English – 14
Page 16
E – “Commands”: this enables the user to access all functions available to control
run 2
Options Menu
02
00:01:14
09.11.07
B
EF
D
A C
one or more devices.
EN
F – “Options”: this enables the user to access all functions available to program a
device.
B
OVIEW FUNCTIONS
• Programming timed commands
Oview is equipped with an internal clock which can be used to program automatic
delivery of commands to an automation. Note – In the event of a power failure, the
clock in Oview continues to operate as normal, but if delivery of a command was
programmed during the black-out, this will not be performed.
To program automatic execution of commands on specific days and times as
required, proceed as follows:
a) select the series to which the automation to be programmed belongs;
b) in the home page (fig. B) select “Options” by means of key z (7 – fig. A) and
then select
c) in the window displayed (fig. C) select “New” to create a new timed command
and enter the required days and times in the relative fields;
d) confirm the settings by selec ting “OK” by means of the key z (8 – fig. A).
Important – Ensure that the clock is set precisely at the local time.
Caution – The timed commands are only enabled if the “Timed command
activation” is activated (ON) under the heading “Options”.
“Timed commands”;
USING OVIEW AS A CONTROL DEVICE
There are two ways to control an automation. After selecting the series to which the
automation to control belongs, send the command required in one of the following
ways:
1) to send a direct command, use one of the following keys:
– OPEN = key S (3 – fig. A)
– STOP = key tasto (6 – fig. A)
– CLOSE = key T (5 – fig. A)
2) to send a special command available on the automation, in the home page (fig.
B) select “Options” by means of key z (7 – fig. A) and then select “Commands”.
Then select the required command from the list displayed.
At this point, to confirm the selected command, select “Select” by means of the key
z (8 – fig. A) or return to the previous window by selecting “Back” by means of the
key z (7 – fig. A).
Note – The type and number of commands present in this list change according to
the type of automation selected.
15 – English
C
Timed commands
New
22:50
mtwtfss
on
Back Select
• Setting the Oview operating parameters
To set the Oview operating parameters, enter the home page (fig. B) select
“Options” by means of key z (7 – fig. A) and then select “Oview Settings”.
The window displays the list of parameters available: “Name” - “Display bright-
ness”- “Key brightness” - “Oview Password” - “Information” - “Language” “Network options”.
To display and modify individual parameters, select and proceed in the window displayed. CAUTION! – Access to some of these parameters may have been restricted
Page 17

by the installer and are therefore not modifiable.
– Name: used to assign a personal name to Oview , for easy identification in a de-
vice network;
– Date/time: used to set the local date and time. The arrow keys W and X (2 and
4 – fig. A) enable the user to move between the date and time fields, while keys
S and T (3 and 5 – fig. A) enable modification of the relative values;
– Display brightness: used to ad just the display brightness. This can be set with a
value from minimum 0% to maximum 100%. Note – After 30 seconds of inactivity,
the display is reduced to the minimum set value;
– Key brightness: used to adjust the key brightness. This can be set with a value
from minimum 0% to maximum 100%. Note – After 30 seconds of inactivity, the
brightness is reduced to the minimum set value;
– Oview Password: refer to paragraph “The Oview password”;
– Information: used to display the Oview technical data without the option for modi-
fication;
– Language: used to set the required language;
– Network options: this item contains the parameters “Series” and “Address”
These are used to modify the series to which Oview belongs and the personal
address of the latter.
• Programming automation functions
To access the programmable functions of an automation, in the home page (fig. B)
select “Menu” by means of key z (8 – fig. A).
In the window displayed, selection of the automation to be programmed may require
entry of a password.
• Working with the “Oview Password”
To restrict access to a number of programmable functions (for example timed settings) by unauthorised personnel, e.g. strangers and children, Oview offers the
option of programming a “Oview Password”.
– To set a password: in the home page (fig. 7) select “Options” by means
of key z (7 – fig. 6) and then select “Oview Settings”. Then select “Oview
Password” and program the desired password.
Note – When password is enabled, it will be requested each time you access
the “Options” menu.
– To modify or delete an existing password: select “Options” in the
main screen. After entering the password, select “Oview Settings” and then
“Oview Password”
- program a new password and save modifications, or,
- delete the existing password leaving the dedicated space blank and save the
changes.
EN
English – 16
Page 18
ITALIANO
istruzioni originali
AVVERTENZE E PRECAUZIONI GE NERALI
PER LA SICUREZZA
INFORMAZIONE SUI MARCHI
I marchi BLUETOOTH
IT
lari; i nomi dei prodotti indicati nel presente manuale possono essere anche
registrati dai rispettivi titolari.
1 – Italiano
®
, GPRS®, GSM® sono marchi registrati dai rispettivi tito-
IMPORTANTE
Questo simbolo indica argomenti che possono essere
po tenziale fonte di pericolo. Pertanto, le operazioni che lo
ri portano devono essere eseguite esclusivamente da personale qualifi cato ed esperto, rispettando le norme di sicu-
rezza vigenti sul proprio territorio e le presenti istruzioni.
OPERARE IN CONDIZIONI DI SICUREZZA!
ATTENZIONE! – Per la sicurezza delle persone è importante rispettare
queste istruzioni.
ATTENZIONE! – Istruzioni importanti per la sicurezza: quindi, conserva-
re queste istruzioni.
ATTENZIONE! – Tutte le operazioni di installazione, di collegamento, di
programmazione e di manutenzione del prodotto devono es sere effettuate esclusivamente da un tecnico qualifi cato!
Nice si riserva il diritto, in ogni momento, di modifi care o disattivare, tempora-
neamente o permanentemente, i servizi che mette a disposizione anche senza
comunicazione all’utilizzatore. Costui conviene e concorda che Nice non potrà
in alcun modo essere ritenuta responsabile verso l’utilizzatore stesso o verso
terzi soggetti per la modifi ca, la sospensione o la disattivazione.
Rispettare le seguenti av vertenze:
– non eseguire modifi che su nessuna par te del prodotto, se non quelle pre-
viste nel presente manuale. Operazioni non autorizzate possono essere
fonte di pericolo e causa di malfunzionamento. Il costruttore declina ogni
re sponsabilità per danni derivanti da prodotti modifi cati arbitrariamente.
– il prodotto è progettato per essere utilizzato in ambiente interno. Può
essere utilizzato in ambiente esterno solo in presenza di adeguate condizioni climatiche. Infatti, il suo involucro non protegge dall’infi ltrazione
d’acqua o di altre sostanze liquide.
– se iI prodotto viene utilizzato come dispositivo di comando, è importante installarlo in un luogo appropriato, lontano dalla portata dei bambini e ad un’altezza da terra non inferiore a 150 cm.
– Per la pulizia superfi ciale del prodotto, utilizzare un panno morbido e legger-
mente umido (non bagnato!). Importante – Non utilizzare liquidi contenenti
alcool, benzene, diluenti o altre so stanze infi ammabili. L’uso di tali sostanze
potrebbe danneggiare il prodotto.
– Trattare con cura lo schermo LCD evitando di graffi arlo.
– Conservare con cura questo manuale per facilitare eventuali interventi futuri di
programmazione o di manutenzione del prodotto.
– Smaltire il materiale dell’imballaggio del prodotto nel pieno rispetto della normativa in vigore sul territorio.
Page 19

(BusT4)
(BusT4)
(BusT4)
(Oview
Software Suite)
(BusT4)
10-15m
max
(Gprs)
(Wi Fi)
(Adsl)
(Oview
Software Suite)
(GSM®)
(Internet)
1
L’Oview e i suoi accessori
Uso del solo Oview
Uso del modulo
OVBT e del
Software
Uso del modulo
OVBTGSM e di un
telefono cellulare
Uso del modulo
OVBTGSM e del
Software
OVBTGSM
modulo
OVBT
modulo
modulo
OVBTGSM
IT
Italiano – 2
Page 20
DESCRIZIONE DEL PRODOTTO E
1
DESTINAZIONE D’USO
Il prodotto Oview è un dispositivo destinato alla programmazione e al comando dei dispositivi Nice provvisti di “BusT4”, utilizzati per la movimentazione di
cancelli, portoni da garage, barriere stradali con asta mobile e altre applicazioni
IT
similari.
Ogni altro uso è da considerarsi improprio! Il costruttore non risponde
dei danni risultanti da un uso improprio del prodotto, diverso da quanto
previsto nel presente manuale.
1.1 – Principali caratteristiche funzionali dell’Oview
Il dispositivo Oview dialoga con altri dispositivi attraverso il cavo BusT4; perciò
può comunicare solo ed esclusivamente con i prodotti che dispongono del
connettore BusT4, cioè quelli che fanno parte del sistema “NiceOpera” (per
informazioni su questo Sistema, fare riferimento al riquadro a lato “Che cos’è
Nice Opera”).
L’Oview si attiva solo quando viene collegato ad un dispositivo, in quanto trae
alimentazione direttamente da quest’ultimo.
L’Oview può essere utilizzato sia come sistema per programmare dispositivi sia
come sistema per comandare automazioni. L’utilizzo dell’Oview è particolarmente indicato negli impanti di automatizzazione ad elevato contenuto tecnologico, in quanto permette di:
– programmare un dispositivo o più dispositivi collegati in rete;
– comandare una o più automazioni;
– effettuare una diagnostica di un dispositivo o di più dispositivi collegati in
rete.
– archiviare(*) le impostazioni e le programmazioni dei dispositivi (l’archivia-
zione è utile, ad esempio, per riconfi gurare rapidamente i dispositivi in caso di
sostituzione di un componente dell’impianto).
(*) Nota – L’operazione di archiviazione è disponibile solo con l’utilizzo del software accessorio abbinato all’Oview (fare riferimento al Capitolo 7).
L’Oview è adatto ad essere utilizzato sia dall’installatore sia dall’utilizzatore.
Usando un solo Oview, l’installatore può programmare, modifi care dati e fare la
manutenzione di ogni dispositivo presente in un impianto. Invece, l’utilizzatore
può usare l’Oview per comandare quotidianamente una o più automazioni.
Se l’installatore lo desidera, può rendere disponibili all’utilizzatore anche la pro-
3 – Italiano
grammazione di alcuni parametri. Questo può essere utile nel caso in cui l’utilizzatore abbia la necessità di cambiare i valori di questi parametri durante l’uso
dell’automazione.
In presenza di una rete di dispositivi, l’utilizzo dell’Oview offre all’installatore il
vantaggio di confi gurare uno alla volta tutti i dispositivi presenti in un impianto,
riducendo così la complessità, i tempi e gli spostamenti normalmente richiesti.
Nota – Per maggiori informazioni su come costruire una rete Bus e come
confi gurarla e gestirla tramite l’Oview, fare riferimento al manuale “NiceOpera
System Book” presente nel sito www.niceforyou.com
1.2 – Accessori (opzionali)
L’Oview ha in dotazione un cavo di 2 m per il collegamento diretto a un dispositivo e un supporto per il fi ssaggio del prodotto su una parete.
Tutti gli altri accessori sono opzionali; questi sono:
®
– Modulo Bluetooth
– Modulo GSM
, con in dotazione il Software “Oview Software Suite”;
®
, con in dotazione il Software “Oview Software Suite”.
Che cos’è “NiceOpera”
Nice Opera è un sistema formato da vari dispositivi impiegati solitamente
negli im pianti per l’automatizzazione di cancelli, portoni da garage e barriere
mobili stra dali. Questi dispositivi sono:
– i trasmettitori della serie NiceOne;
– i ricevitori della serie NiceOne;
– le centrali dei motoriduttori con collegamento “BUST4”.
A questi dispositivi si aggiungono altri dispositivi complementari, di tipo software e hardware che sono:
– l’unità di programmazione O–Box con software dedicato, per i trasmettitori e i ricevitori;
– l’unità di programmazione Oview, per le centrali di comando e i
ricevitori;
– un modulo Bluetooth
dei dati tra l’Oview e un Personal computer o un Palmare;
– un modulo GSM
dati via Internet tra l’Oview e un Personal computer o un Palmare.
®
e un software dedicato, per la comunicazione
®
e un software dedicato, per la comunicazione dei
Page 21
Con il modulo GSM® è possibile usare anche uno smartphone e un
comune telefono cellulare: con questi è possibile inviare un coman-
do all’automazione tramite una chiamata o un Sms; in più, con lo
smartphone, dotato di sistema operativo Window
utilizzare anche il software “Oview software suite”.
®
Mobile è possibile
INSTALLAZIONE DELL’OVIEW
2
COME DISPOSITIVO DI COMANDO
Per utilizzare l’Oview come dispositivo fi sso per il comando di automazioni, è
necessario installarlo in un luogo appropriato, lontano dalla portata dei bambini
e ad un’altezza da terra non inferiore a 150 cm.
Per installarlo su una parete, utilizzare il supporto presente nella confezione,
procedendo come indicato in fi g. 2.
Successivamente, collegare l’Oview all’automatismo facendo riferimento al
Capitolo 3.
––– OBBLIGHI DELL’INSTALLATORE –––
IMPORTANTE – Dopo aver installato e programmato l’Oview come
dispositivo di comando, l’installatore deve consegnare al cliente la parte di questo manuale intitolata “Manuale d’uso”.
Inoltre, se egli intende lasciare al cliente l’accesso ad alcune funzioni di
programmazione, è necessario che gli consegni anche le informazioni
riguardanti queste funzioni, contenute nel sito www.nice-service.com,
alla sezione “Download”.
2
IT
Italiano – 4
Page 22
COLLEGAMENTO DELL’OVIEW
3
A UN DISPOSITIVO
L’Oview può essere collegato a un dispositivo in due modi diversi:
• collegamento occasionale: questo permette di utilizzare l’Oview come uni-
IT
tà “portatile” di programmazione. Per questo collegamento si può utilizzare il
cavo in dotazione (2 m) collegandolo alla presa dell’Oview (fi g. 4) e alla presa
“BusT4” presente sulla Centrale di comando del dispositivo da programmare
(fi g. 5 – Per accedere a questa presa fare riferimento al manuale istruzioni del
dispositivo).
• collegamento defi nitivo: questo permette di utilizzare l’Oview come unità
“fi ssa” di comando e programmazione. Per questo collegamento è probabile
che il cavo in dotazione (2 m) non sia suffi cientemente lungo. Quindi occorre
utilizzare un cavo di prolunga oppure un nuovo cavo di lunghezza adeguata
con le seguenti caratteristiche:
- tipo di connettore da utilizzare: spina RJ45 6/4 (corpo 6 con 4 contatti);
sono connettori che si usano comunemente negli impianti telefonici.
- tipi di cavi che è possibile utilizzare:
cavo telefonico piatto con 4 conduttori;
cavo per antifurto con conduttori (4 x 0,22 mm);
cavo UTP categoria 2, con 4 conduttori (se il cavo ne ha di più occorre elimi-
nare quelli superfl ui);
cavo STP categoria 5, con 4 conduttori (se il cavo ne ha di più occorre elimi-
nare quelli superfl ui) e con schermatura.
- lunghezza massima del cavo: fare riferimento alle lunghezze riportate nella
Tabella 1.
Tabella 1 – Lunghezza massima del cavo
Oview Oview + Oview +
Bluetooth
Cavo telefonico piatto 300 m 250 m 150 m
Cavo per antifurto 300 m 300 m 250 m
Cavo UTP categoria 2 500 m 500 m 400 m
Cavo STP categoria 5 700 m 700 m 400 m
5 – Italiano
®
GSM
Note generali alla Tabella 1:
• Le lunghezze massime dei cavi sono calcolate per un utilizzo in ambienti con livelli di
emissione elettromagnetica di tipo “Civile”. Per ottenere maggiore affi dabilità nella tra-
smissione dei dati attraverso cavi lunghi, è consigliabile utilizzare cavi STP di categoria 5,
collegando a terra la schermatura del cavo nel modo seguente:
– se i dispositivi sono collegati “in cascata” (o “a catena”), collegare la schermatura in
corrispondenza del dispositivo posizionato ad una dell’estremità della catena;
– se i dispositivi sono collegati “a stella”, collegare la schermatura o in corrispondenza di
un solo dispositivo o in corrispondenza del centro della stella.
• In presenza di una rete di dispositivi, la lunghezza totale del cavo deve essere calcolata
nel modo seguente:
– se i dispositivi vengono collegati “in cascata” (o “a catena”), la lunghezza massima del
cavo deve essere calcolata tra i due dispositivi posti alle estremità della catena.
– se i dispositivi vengono collegati “a stella”, la lunghezza massima del cavo deve essere
calcolata sommando i due rami più lunghi e aggiungendo a questa la somma delle metà
delle lunghezze degli altri rami.
In generale, per il collegamento di più dispositivi in una rete, possono essere utilizzate
delle apposite prese a “T”, defi nite solitamente “sdoppiatori” e utilizzate comunemente
negli impianti telefonici. Il tipo di sdoppiatore da utilizzare è il mod. RJ45 6/4 (corpo 6
con 4 contatti).
• Per facilitare la crimpatura del connettore RJ45 alle due estremità del cavo, è preferibile
che i conduttori interni del cavo scelto, siano “a fi li trefoli” e, quindi, non di tipo “rigido”.
Dopo aver stabilito il tipo di cavo da utilizzare per il collegamento dell’Oview a
un dispositivo, procedere nel modo seguente:
01. Prima di iniziare l’installazione del prodotto, assicurarsi di avere a disposi-
zione tutti gli attrezzi e i materiali necessari per effettuare il lavoro. Inoltre,
verifi care che questi siano in buone condizioni e conformi a quanto previ-
sto dalle normative locali sulla sicurezza.
02. Stabilire la posizione in cui verrà installato l’Oview.
03. Effettuare i lavori per la posa dei tubi o delle canaline di protezione dei cavi
elettrici. Nota – I tubi o le canaline hanno lo scopo di proteggere i cavi elettrici da urti e rotture accidentali.
04. A questo punto, dopo aver passato il cavo nel tubo di protezione, se si
®
sta utilizzando un cavo sprovvisto di connettori, assemblare su ciascuna
estremità del cavo un connettore, facendo attenzione ad usare la stes-
sa sequenza dei fi li per entrambi i connettori (fi g. 3).
05. Quindi, collegare il cavo alla presa sull’Oview (fi g. 4) e alla presa “BusT4”
presente sulla centrale di Comando del dispositivo da comandare (fi g. 5
– Per accedere a questa presa fare riferimento al manuale istruzioni del
dispositivo).
Page 23
1 2 3 4 1 2 3 4 4 3 2 1 1 2 3 4
Nota – Per maggiori informazioni riguardanti gli argomenti trattati in questo
capitolo, fare riferimento al manuale “Nice Opera System Book”.
3
4
5
UTILIZZO GENERALE DELL’OVIEW
4
L’Oview si attiva esclusivamente quando è collegato ad un dispositivo alimentato, in quanto trae alimentazione da questo.
All’accensione dell’Oview, compare sul suo schermo un’icona che raffi gura il
dispositivo collegato.
• Legenda dei tasti dell’Oview
L’Oview è composto dalle seguenti parti (fi g. 6):
1 – Schermo LCD;
2 / 4 – Tasti con freccia W e X: servono per spostarsi tra un campo e l’altro
all’interno di una schermata o per spostarsi da una schermata all’altra;
3 / 5 – Tasti con freccia S e T: servono per modifi care i valori di un campo
selezionato o per spostarsi all’interno di un elenco;
6 – Tasto che serve per confermare un valore;
7 – Tasto z che serve per selezionare la voce che compare in basso, a
sinistra dello schermo (9);
8 – Tasto z che serve per selezionare la voce che compare in basso, a
destra dello schermo (10).
• Schermata iniziale dell’Oview
Dopo aver attivato l’Oview compare una schermata chiamata “Schermata iniziale”. Gli elementi che compongono questa schermata sono (fi g. 7):
A – Nome del dispositivo selezionato.
B – Icona che identifi ca il tipo di dispositivo collegato; in presenza di una rete
di dispositivi, sullo schermo viene visualizzato il primo dispositivo trovato.
C – Numero che indica l’insieme a cui appartiene il dispositivo selezionato.
D – Ora e Data locale.
E – “Menu”: questa voce permette di accedere a tutte le funzioni disponibili
per programmare un dispositivo.
F – “Opzioni”: questa voce permette di accedere a tutte le funzioni disponibili
per comandare uno o più dispositivi e confi gurare l’Oview.
Italiano – 6
IT
Page 24
8
1
4
3
7
2
5
6
10
9
6
run 2
Opzioni Menu
02
00:01:14
09.11.07
B
EF
D
A C
IT
7
7 – Italiano
LE FUNZIONALITÀ DELL’OVIEW
5
• Comandare l’automazione
Per comandare un’automazione, si può procedere in due modi. Dopo aver
scelto l’insieme a cui appartiene l’automazione da comandare, inviare il comando desiderato in una delle seguenti modalità:
A) per inviare un comando diretto, utilizzare uno dei seguenti tasti:
– APRI = tasto S (3 – fi g. 6)
– STOP = tasto (6 – fi g. 6)
– CHIUDI = tasto T (5 – fi g. 6)
B) per inviare un comando speciale disponibile nelll’automazione, scegliere
nella schermata iniziale (fi g. 7) la voce “Opzioni” con il tasto z (7 – fi g. 6) e, di
seguito, selezionare la voce “Comandi”. Quindi, selezionare il comando desiderato nell’elenco che appare.
A questo punto, per confermare il comando scelto, selezionare “Seleziona”
con il tasto z (8 – fi g. 6) oppure ritornare alla schermata precedente selezio-
nando “Indietro” con il tasto z (7 – fi g. 6).
Nota – Il tipo e il numero dei comandi presenti in questo elenco cambiano in
funzione della tipologia dell’automazione selezionata.
• Programmare i comandi orari
L’Oview dispone di un orologio interno che può essere utilizzato per programmare l’invio automatico dei comandi ad un’automazione, in giorni e orari desiderati. Nota – Se a causa di un black–out elettrico all’Oview non arriva l’alimen-
tazione il suo orologio continua a funzionare regolarmente; però se durante il
black–out era programmato l’invio di un comando, questo non verrà eseguito.
Per programmare l’esecuzione automatica dei comandi in giorni e orari desiderati, procedere nel modo seguente:
a) scegliere l’insieme a cui appartiene l’automazione da programmare;
b) nella schermata iniziale (fi g. 7) scegliere la voce “Opzioni” con il tasto z (7 –
fi g. 6) e, di seguito, selezionare la voce “Comandi orari”;
c) nella schermata che appare selezionare “Nuovo” per creare un nuovo
comando orario (fi
g. 8) ed inserire negli appositi spazi i giorni e gli orari deside-
Page 25
8
Comandi orari
Nuovo
22:50 |mmgvsd
Indietro Seleziona
on
rati. d) confermare la programmazione effettuata selezionando la vo ce “OK”con il tasto z
(8 – fi g. 6).
Importante – Assicurarsi che
l’oro logio sia regolato esattamente sull’ora locale.
Attenzione – I comandi orari
funzionano solo se viene attivato (ON) nella voce “Attivazione
comandi orari” (sotto la voce
“Opzioni”).
d) Confermata la scelta, appare una schermata con un menu di funzioni.
Questo menu può essere composto dalle seguenti voci:
– “Funzioni centrale” (contiene le funzioni specifi che della centrale di coman-
do);
– “Funzioni radio” (contiene le funzioni specifi che del ricevitore);
– “Funzioni comuni” (contiene le funzioni che sono presenti in tutte le centrali
di comando ed i ricevitori);
– “Funzioni avanzate” (contiene le funzioni speciali che sono presenti nelle
centrali di comando e nei ricevitori);
– “Log in” (serve per accedere a una automazione se in precedenza è stata
settata una password);
– (eccetera......)
Nota – La presenza o meno di alcune voci nel “menu funzioni” dipende dal tipo
di dispositivo selezionato.
IT
• Programmare la Centrale di comando e il Ricevitore
Per programmare i parametri di un dispositivo, procedere nel modo
se guente:
AVVERTENZA – L’accesso alle funzioni contenute nella voce
“Automazioni” può richiedere l’immissione di una password nel
caso che l’installatore abbia deciso di proteggere l’accesso alle
funzioni di programmazione. Per maggior chiarezza fare riferimento al paragrafo “Operare con le password”.
a) Scegliere l’insieme a cui appartiene il dispositivo da programmare.
b) Nella schermata iniziale (fi g. 7) scegliere la voce “Menu” con il tasto z (8
– fi g. 6): sullo schermo appare l’elenco dei dispositivi collegati e presenti in
quell’insieme.
c) In questa schermata è possibile:
– scorrere l’elenco dei nomi dei dispositivi presenti, utilizzando i tasti freccia S
o T;
– accedere all’insieme successivo utilizzando il tasto freccia X o all’insieme
precedente utilizzando il tasto freccia W;
– confermare la scelta di un dispositivo, utilizzando il tasto 8.
Una volta scelta una voce, confermare con “Seleziona”. A questo punto
appare una schermata con le funzioni relative al dispositivo. In basso si nota
una icona
utente.
• Regolare i parametri di funzionamento dell’Oview
Per regolare i parametri di funzionamento dell’Oview occorre selezionare nella
schermata iniziale (fi g. 6), la voce “Opzioni” con il tasto z (7 – fi g. 6) e, di
seguito, la voce “Impostazioni Oview”.
Sullo schermo appare l’elenco dei parametri disponibili: “Nome” - “Data/ora”
“Luminosità display”- “Luminosità tasti” - “Password Oview” - “Lingua” -
“Informazioni” - “Opzioni rete”.
Per visualizzare e modifi care ogni singolo parametro occorre selezionarlo e
operare nella schermata che appare.
– Nome: serve per assegnare al l’Oview un nominativo personale, per identifi -
carlo facilmente in una rete di dispositivi;
– Data/ora: serve per regolare la data e l’ora locale. Con i tasti freccia W e X
(2 e 4 – fi g. 6) è possibile spostarsi tra gli spazi de dicati alla data e all’ora e,
con i tasti S e T (3 e 5 – fi g. 6), è possibile modifi car ne i valori;
– Luminosità display: serve per regolare la lumino sità del display. Può essere
impostato con un valore compreso tra un minimo di 0% e un massimo di
100%. Nota – Dopo 30 secondi d’inattività del display, la luminosità si riduce
al valore minimo impostato;
oppure che indica la modalità di accesso: installatore,
Italiano – 8
Page 26

– Luminosità tasti: serve per regolare la lumino sità dei tasti. Può essere
impostato con un valore compreso tra un minimo di 0% e un massimo di
100%. Nota – Dopo 30 secondi d’inattività dei tasti, la luminosità si riduce al
valore minimo impostato;
– Password Oview: fare riferimento al paragrafo “La password del l’Oview”;
– Lingua: serve per impostare la lingua desiderata;
– Informazioni: serve per visualizzare i dati tecnici dell’Oview, senza la possi-
IT
bilità di modifi carli;
– Opzioni rete: questa voce contiene i parametri “Insieme” ed “Indirizzo”.
Questi si utilizzano per modifi care l’insieme a cui appartiene l’Oview e l’indi-
rizzo personale di quest’ultimo;
• Operare con le password
Le password dei dispositivi “NiceOpera”
Tutti i dispositivi del sistema “NiceOpera”, compreso l’Oview, offrono all’installatore o all’utilizzatore la possibilità di limitare l’accesso alle persone non
autorizzate ai dati sensibili del dispositivo, mediante la programmazione di una
password.
La password verrà memorizzata sul dispositivo e limiterà l’accesso alle
funzioni indipendentemente dall’Oview collegato.
Se un dispositivo è protetto da password, per iniziare un’attività di programmazione è indispensabile effettuare la procedura di “Log in”, il successivo log out
avverrà automaticamente quando si torna alla schermata principale.
Le password impostabili su una centrale sono di due tipi: “Password utente” e
“Password installatore”.
Se il dispositivo è protetto da tutte e due le password, l’Oview chiederà automaticamente l’inserimento della password.
Se si imposta la password installatore e non si inserisce la password corretta
nella voce “Log in” sulla schermata relativa a quella centrale, l’accesso ai
menu sarà limitato. In particolare, se si entra nel menu “Funzioni centrale”
alcune voci non saranno visibili e altre saranno visibili, ma non modifi cabili.
È possibile settare anche una password utente (valida solo se si è impostata la
password installatore) che bloccherà completamente l’accesso ai menu a chi
non conosce le password.
L’installatore potrà decidere quali parti rendere visibili o modifi cabili a colui che
accede con la password utente. Il percorso per modifi care i permessi di ac-
cesso è: “Funzioni centrale” → “Funzioni avanzate” → “Permessi utente”.
In particolare: muovendo le frecce S e T si può assegnare a ogni voce di menu
9 – Italiano
uno dei seguenti permessi:
permesso di sola lettura (visibile, ma non modifi cabile)
■ permesso di lettura e scrittura (visibile e modifi cabile)
∼ la voce non sarà visibile all’utente.
Se non si imposta nessuna password tutto il menu è visibile e modifi cabile (si
accede cioè da installatore, con tutti i permessi). In ogni momento è possibile
capire con quale profi lo si sta accedendo ai menù, verifi cando l’icona sulla barra
in basso (
– Attenzione! Se nella navigazione mancano voci di menù, signifi ca che sono
state impostate delle password. Per poter accedere al menu completo è
necessario fare il log in con la password installatore.
– Attenzione! Le password installatore e utente sono indipendenti dalla pas-
sword Oview. Esse proteggono parti diverse di menu.
La password dell’Oview
L’Oview permette di programmare una “Password Oview”.
La “Password Oview” serve per bloccare l’accesso all’utilizzatore, ai dati e alle
funzioni che regolano il corretto funzionamento dell’Oview (accesso al menu
“Opzioni”). Tale password protegge anche i parametri dei moduli OVTB o
OVBTGSM qualora essi siano collegati.
– Per impostare una password: selezionare nella schermata iniziale (fi g. 7) la
voce “Opzioni” con il tasto z (7 – fi g. 6) e, di seguito, la voce “Impostazioni
Oview”. A questo punto scegliere la voce “Password Oview” e programmare
la password desiderata.
Nota – Quando una password è attiva,verrà chiesta ogni volta che si accede
al menu “Opzioni”.
– Per modifi care o togliere una password esistente: scegliere la voce
“Opzioni” della schermata principale. Dopo aver inserito la password selezio-
nare “Impostazioni Oview” e di seguito “Password Oview” poi
– programmare una nuova password e salvare la modifi ca; oppure,
– togliere la password esistente lasciando vuoto lo spazio dedicato e salvando
la modifi ca.
utente o installatore).
Page 27

• Oview con fi rmware a partire dalla versione OV04
A partire dalla versione OV04 l’Oview dispone di due funzioni: “Storia eventi” e
“Aggiornamento centrale”.
Storia eventi
Questa funzione permette di visualizzare sull’Oview tutte le attività svolte dai
dispositivi presenti nella rete alla quale è collegato l’Oview. L’acquisizione dei
dati (storia eventi) avviene all’inizio, in modo automatico e non visibile all’installatore, appena l’Oview viene collegato alla rete: questo cerca tutti i dispositivi
in rete e memorizza nella propria memoria la storia eventi di ognuno, sovrascrivendo i dati su quelli precedenti. Dopo la ricerca dei dispositivi presenti in
rete, con l’Oview ancora collegato, è possibile visualizzare la storia eventi di un
dispositivo per volta, nel modo seguente: selezionare il dispositivo, quindi la
voce “Funzioni avanzate” → “Storia eventi”. Per scorrere gli eventi utilizzare
i tasti S e T.
La storia eventi può essere visualizzata anche con “Oview Software Suite”. In
questo caso, collegare l’Oview al Pc o al palmare in cui è installato il software, selezionare nella schermata principale la voce “Oview”, quindi “Funzioni
O-View” → “Impostazioni” → “Storia eventi”. Appare una lista con la storia
eventi di tutti i dispositivi presenti nella rete a cui è stato collegato l’Oview l’ultima volta e, per visualizzare gli eventi di un solo dispositivo, utilizzare il campo
“Filtro dispositivo”, selezionando il dispositivo desiderato nella lista che com-
pare.
Il numero massimo degli eventi memorizzabili è 300.
La storia eventi acquisita resta nella memoria dell’Oview fi no a quando questo
viene collegato a una rete diversa.
Aggiornamento centrale
Questa funzione permette di aggiornare il fi rmware di una centrale di comando
sfruttando la memoria interna del modulo aggiuntivo OVBT (oppure OVBTGSM)
in abbinamento all’Oview.
La procedura è divisa in due momenti operativi che possono essere eseguiti
anche a distanza di tempo e di luogo, l’uno dall’altro: 1) caricamento del nuovo
fi rmware nel modulo aggiuntivo dell’Oview solo attraverso il Bluetooth; 2) scari-
camento del fi rmware nella centrale.
1. Caricare il nuovo fi rmware nel modulo aggiuntivo dell’Oview. Per
caricare il firmware nel modulo aggiuntivo OVBT (oppure OVBTGSM),
installare il modulo sull’Oview, aprire il software “Oview Software Suite”
(versione 1.3 o superiore), avviare la ricerca dei dispositivi e selezionare
il dispositivo Oview; quindi, selezionare la voce “Funzioni avanzate” e,
successivamente, “Carica fi rmware centrale”. A questo punto selezio-
nare il fi le con il nuovo fi rmware e confermare. Il fi le verrà memorizzato
automaticamente nel modulo aggiuntivo. Questa operazione può essere
fatta solo collegando l’Oview tramite il Bluetooth e non attraverso la connessione remota GPRS.
2. Scaricare il nuovo fi rmware nella centrale. Per scaricare il fi rmware
nella centrale, collegare a questa l’Oview munito del modulo aggiuntivo
con il nuovo fi
seguente: eliminare eventuali password; quindi selezionare nell’Oview la
voce “Menu” e, a seguire, “Funzioni centrali” → “Funzioni avanzate” →
“Aggiornamento fi rmware”. A questo punto l’Oview verifi ca se il fi rmware
nuovo è compatibile o meno con la centrale: se risulta compatibile, mostra
la voce “Avvia”, altrimenti non sarà possibile avviare l’aggiornamento. Dopo
aver avviato l’aggiornamento, se questo non và a buon fi ne, la centrale
resta bloccata in attesa di poter completare la procedura. Per sbloccarla, è
necessario selezionare la voce “Opzioni” → “Dispositivi in fase di boot” e
riavviare il caricamento del fi rmware.
rmware in memoria e procedere all’aggiornamento nel modo
Italiano – 10
IT
Page 28
UTILIZZARE L’OVIEW CON I MODULI
6
BLUETOOTH® E GSM
®
Smaltimento del prodotto
L’operatività dell’Oview può essere ulteriormente potenziata con l’utilizzo del
modulo Bluetooth® o GSM® e il software “Oview Software Suite”, fornito con
quest’ultimi (vedere fi g. 1). Questi moduli e il software sono accessori opzio-
IT
nali; il software è fornito in 2 versioni: una per Pc e una per Palmare. Per usare il software è necessario installarlo in un Pc e/o in un Palmare e/o in uno
Smartphone, dotati di connettività Bluetooth
– Connetività Bluetooth
lo Bluetooth® (da installare sull’Oview). Questo tipo di connettività permette di
comunicare con l’Oview da una distanza massima di circa 10–15 m in assenza
di ostacoli, o di pochi metri in presenza di ostacoli (muri o altro).
– La connettività Internet: permette di collegarsi all’Oview grazie a un modulo
®
(da installare sull’Oview). Questo tipo di connettività permette di comu-
GSM
nicare con l’Oview attraverso la rete GSM®. In questo caso la comunicazione
può avvenire a qualsiaisi distanza, purché ci sia copertura di rete.
Con il modulo GSM® è possibile usare anche uno smartphone e un comune
telefono cellulare: con questi è possibile inviare un comando all’automazione
tramite una chiamata o un Sms; in più, con lo smartphone, dotato di sistema
operativo Window® Mobile è possibile utilizzare anche il software “Oview software suite”.
Il software “Oview Software Suite” presenta una grafi ca a video dettagliata e la
presenza della tastiera sul Pc e sul Palmare rende più comoda la navigazione
e la digitazione dei dati.
Con questo Software, l’installatore oltre a poter eseguire tutte le operazioni
normalmente eseguibili con l’Oview, ha la possibilità di creare anche un archivio dati per gestire e salvare le modifi che apportate ai dispositivi programmati;
inoltre ha la possibilità di effettuare una diagnosi con informazioni grafi camen-
te più complete ed immediate, e la possibilità di aggiornare il fi rmware di un
dispositivo.
®
: permette di collegarsi all’Oview grazie a un modu-
®
e/o Internet.
Questo prodotto è costituito da vari tipi di materiali: alcuni possono essere
riciclati, altri devono essere smaltiti. Informatevi sui sistemi di riciclaggio o di
smaltimento previsti dai regolamenti vigenti sul vostro territorio, relativi a questa
categoria di prodotto.
Attenzione! alcune parti del prodotto pos sono contenere sostanze inquinanti
o pericolose che, se disperse nell’ambiente, possono provocare effetti dannosi
sull’ambiente stesso e sulla salute umana.
Il prodotto contiene una pila: questa va rimossa e non deve essere buttata nei
rifi uti comuni, in quanto contiene sostanze inquinanti e quindi, occorre smaltirla
o reciclarla utilizzando i metodi di raccolta ‘separata’ previsti dalle normative
vigenti sul territorio.
Come indicato dal simbolo a lato, è vietato gettare questo prodotto nei rifi uti do mestici. Eseguire quindi la “raccolta se parata”
per lo smaltimento, se condo i me todi previsti dai re golamenti
vigenti sul territorio, oppure riconsegnare il prodotto al venditore nel mo mento dell’acquisto di un nuovo prodotto equivalente.
Attenzione! – i regolamenti vigenti a livello locale possono prevedere pesanti sanzioni in caso di smaltimento abusivo di questo prodotto.
11 – Italiano
Page 29

Caratteristiche tecniche del prodotto
L’Oview è prodotto da Nice S.p.a. (TV) I.
Tipologia: unità di comando, programmazione e diagnostica per dispositivi
dotati di connessione BusT4
Tecnologia adottata: comunicazione seriale half duplex 19200 Bps su bus
differenziale per l’invio dei comandi, la modifi ca dei parametri e la verifi ca dei
dati diagnostici
Interfaccia grafi ca: display LCD 128 x 64 dots (46 x 29 mm); 2,2”
Dispositivo di input operatore: joypad con 5 + 2 tasti
Illuminazione del display/tasti: luce bianca (coordinate cromatiche:
X = 0,29–0,33; Y = 0,30–0,34)
Orologio datario: interno, con batteria di backup (durata minima 10 anni)
Numero massimo dei comandi orari: 64
Storico eventi: capacità di registrazione di 400 eventi
Lunghezza del cavo di collegamento:
– cavo in dotazione: 2 m
– altro cavo: fi no a 700 m, misurato da punto a punto
Alimentazione: fornita dai dispositivi presenti sul BusT4
Corrente assorbita: massimo 20 mA (senza accessori)
Isolamento: Classe III
Grado di protezione del contenitore: IP 20 (utilizzo solo in ambienti inter-
ni e protetti)
Temperatura di esercizio: da –20°C a +55°C
Dimensioni (mm): 107 x 61 x h 20 (con supporto a muro: 125 x 70 x h 32)
Peso: 75 g (senza cavo)
Accessori opzionali:
• modulo per connessione in tecnologia Bluetooth
• modulo per connessione in tecnologia GSM®–GPRS
®
®
IT
Italiano – 12
Page 30

DICHIARAZIONE CE DI CONFORMITÀ
Dichiarazione in accordo alla Direttiva 1999/5/CE
Nota – Il contenuto di questa dichiarazione corrisponde a quanto dichiarato nel documento uffi ciale depositato presso la sede di Nice S.p.a., e in particolare, alla sua ultima revisione
disponibile prima della stampa di questo manuale. Il testo qui presente è stato riadattato per motivi editoriali.
Copia della dichiarazione originale può essere richiesta a Nice S.p.a. (TV) I.
IT
Numero dichiarazione: 278/OV Rev.: 6 Lingua: IT
Il sottoscritto Luigi Paro in qualità di Amministratore Delegato, dichiara sotto la propria responsabilità che il prodotto:
Nome produttore: NICE s.p.a.
Indirizzo: Via Pezza Alta 13, Z.I. Rustignè, 31046 Oderzo (TV) Italia
Tipo: Unità di programmazione e comando per automatismi
Modelli: OVIEW
Accessori: OVBT, OVBTGSM
Risulta conforme ai requisiti essenziali richiesti dall’articolo 3 della seguente direttiva comunitaria, per l’uso al quale i prodotti sono destinati:
• Direttiva 1999/5/CE DEL PARLAMENTO EUROPEO E DEL CONSIGLIO del 9 marzo 1999 riguardante le apparecchiature radio e le apparecchiature
terminali di comunicazione e il reciproco riconoscimento della loro conformità, secondo le seguenti norme armonizzate
· Protezione della salute (art. 3(1)(a)): EN 50371:2002, EN50360:2001+A1:2006
· Sicurezza elettrica (art. 3(1)(a)): EN 60950-1:2006+A11:2009
· Compatibilità elettromagnetica (art. 3(1)(b)):
EN 301 489-1V1.8.1:2008; EN 301 489-17 V1.2.1.:2002,
EN301489-7 V1.3.1:2005
· Spettro radio (art. 3(2)): EN300328 V1.7.1:2006, EN300440-2 V1.1.2:2004,
EN 301511 V9.0.2:2003
In accordo alla direttiva 1999/5/CE (Allegato V), il prodotto risulta di classe 1 e marcato:
0682
Inoltre il prodotto risulta conforma a quanto previsto dalle seguenti direttive comunitarie:
• DIRETTIVA 2004/108/CE DEL PARLAMENTO EUROPEO E DEL CONSIGLIO del 15 dicembre 2004 concernente il ravvicinamento delle legislazioni degli
Stati membri relative alla compatibilità elettromagnetica e che abroga la direttiva 89/336/CEE, secondo le seguenti norme armonizzate:
EN 61000-6-2:2005, EN 61000-6-3:2007
Oderzo, 1 marzo 2012 Luigi Paro
(Amministratore Delegato)
13 – Italiano
Page 31

MANUALE D’USO
8
1
4
3
7
2
5
6
10
9
AVVERTENZE E PRECAUZIONI GE NERALI PER LA
SICUREZZA
ATTENZIONE! – Tutte le operazioni d’installazione, di collegamento, di pro-
grammazione e di manutenzione del prodotto devono essere effettuate
esclusivamente da un tecnico qualifi cato!
Rispettare le seguenti av vertenze:
– non lasciare che i bambini accedano all’Oview.
– per la pulizia superfi ciale del prodotto, utilizzare un panno morbido e leggermente
umido (non bagnato!). Importante – Non utilizzare liquidi contenenti alcool, benzene, diluenti o altre so stanze infi ammabili. L’uso di tali sostanze potrebbe danneggia-
re il prodotto.
– trattare con cura lo schermo LCD evitando di graffi arlo.
– conservare con cura questo manuale per facilitare eventuali consultazioni future.
– al termine della vita del prodotto, assicurarsi che questo venga smaltito o
riciclato secondo le norme vigenti sul territorio.
DESCRIZIONE DELL’OVIEW
L’uso dell’Oview come dispositivio di comando fi sso a parete, permette a questo di
essere sempre attivo, in quanto viene alimentato direttamente e permanentemente
dall’automatismo a cui è collegato. Però, se l’Oview non viene utilizzato per un breve
periodo di tempo, il suo schermo entra in stand–by (si abbassa la luminosità). A questo punto, per riattivarlo è suffi ciente premere un tasto qualsiasi.
Per comandare un automatismo basta richiamare sullo schermo dell’Oview il nome e
l’icona dell’automatismo e inviare il comando con un tasto (per un approfondimento
leggere il capitolo “Utilizzo dell’Oview come dispositivo di comando”).
• Legenda dei tasti dell’Oview
L’Oview è composto dalle seguenti parti (fi g. A):
1 – Schermo LCD;
2 / 4 – Tasti con freccia W e X : servono per spostarsi tra un campo e l’altro
all’interno di una schermata o per spostarsi da una schermata all’altra;
3 / 5 – Tasti con freccia S e T : servono per modifi care i valori di un campo
selezionato o per spostarsi all’interno di un elenco;
6 – Tasto che serve per confermare un valore;
7 – Tasto z che serve per selezionare la voce che compare in basso, a sinistra
dello schermo (9);
8 – Tasto z che serve per selezionare la voce che compare in basso, a destra
dello schermo (10).
A
• Schermata iniziale dell’Oview
Dopo aver attivato l’Oview compare una schermata chiamata “Schermata iniziale”.
Gli elementi che compongono questa schermata sono (fi g. B):
A – Icona che identifi ca il tipo di dispositivo collegato; in presenza di una rete di
dispositivi, sullo schermo viene visualizzato il primo dispositivo trovato automaticamente, appartenente ad un determinato insieme.
B – Nome del dispositivo selezionato.
C – Numero che indica l’insieme a cui appartiene il dispositivo selezionato.
Italiano – 14
IT
Page 32

D – Data e ora locale.
E – “Comandi”: questa voce permette di accedere a tutte le funzioni disponibili per
comandare uno o più dispositivi.
F – “Opzioni”: questa voce permette di accedere a tutte le funzioni disponibili per
programmare un dispositivo.
B
IT
A C
run 2
B
02
00:01:14
09.11.07
D
Opzioni Menu
EF
FUNZIONALITÀ DELL’OVIEW
• Programmare i comandi orari
L’Oview dispone di un orologio interno che può essere utilizzato per programmare l’invio automatico dei comandi ad un’automazione. Nota – Se a causa di
un black–out elettrico all’Oview non arriva l’alimentazione il suo orologio continua a funzionare regolarmente; però se durante il black–out era in programma
l’invio di un comando, questo non verrà eseguito ma rimarrà ugualmente programmato.
Per programmare l’esecuzione automatica dei comandi in giorni e orari desiderati,
procedere nel modo seguente:
a) scegliere l’insieme a cui appartiene l’automazione da programmare;
b) nella schermata iniziale (fi g. 7) scegliere la voce “Opzioni” con il tasto z (7 – fi g.
6) e, di seguito, selezionare la voce “Comandi orari”
c) nella schermata che appare (fi g. C) selezionare “Nuovo” per creare un nuovo
comando orario ed inserire negli appositi spazi i giorni e gli orari desiderati.
d) confermare la programmazione ef fettuata selezionando la voce “OK” con il tasto
z (8 – fi g. A).
Importante – Assicurarsi che l’orologio sia regolato esattamente sull’ora locale.
Attenzione – I comandi orari funzionano solo se viene attivato (ON) nella voce “Attivazione comandi orari” (sotto la voce “Opzioni”).
UTILIZZO DELL’OVIEW COME DISPOSITIVO DI COMANDO
Per comandare un’automazione, si può procedere in due modi. Dopo aver scelto
l’insieme a cui appartiene l’automazione da comandare, inviare il comando desiderato in una delle seguenti modalità:
1) per inviare un comando diretto, utilizzare uno dei seguenti tasti:
– APRI = tasto S (3 – fi g. A)
– STOP = tasto (6 – fi g. A)
– CHIUDI = tasto T (5 – fi g. A)
2) per inviare un comando speciale disponibile nelll’automazione, scegliere nella
schermata iniziale (fi g. B) la voce “Opzioni” con il tasto z (7 – fi g. A) e, di seguito,
selezionare la voce “Comandi”. Quindi, selezionare il comando desiderato nell’elenco che appare.
A questo punto, per confermare il comando scelto, selezionare “Seleziona” con il
tasto z (8 – fi g. A) oppure ritornare alla schermata precedente selezionando “Indie-
tro” con il tasto z (7 – fi g. A).
Nota – Il tipo e il numero dei comandi presenti in questo elenco cambiano in funzio-
ne della tipologia dell’automazione selezionata.
15 – Italiano
C
Comandi orari
Nuovo
22:50 |mmgvsd
on
Indietro Seleziona
• Regolare i parametri di funzionamento dell’Oview
Per regolare i parametri di funzionamento dell’Oview occorre selezionare nella schermata iniziale (fi g. B), la voce “Opzioni” con il tasto z (7 – fi g. A) e, di seguito, la voce
“Impostazioni”.
Sullo schermo appare l’elenco dei parametri disponibili: “Nome” - “Data/ora” -
Page 33

“Luminosità display”- “Luminosità tasti” - “Password Oview” - “Informazioni”
- “Lingua” - “Opzioni rete”.
Per visualizzare e modifi care ogni singolo parametro occorre selezionarlo e operare
nella schermata che appare. Attenzione! – Alcuni di questi parametri possono risul-
tare bloccati dall’installatore e, dunque, non modifi cabili.
– Nome: serve per assegnare al l’Oview un nominativo personale, per identifi carlo
facilmente in una rete di dispositivi;
– Data/ora: serve per regolare la data e l’ora locale. Con i tasti freccia W e X (2 e
4 – fi g. A) è possibile spostarsi tra gli spazi de dicati alla data e all’ora e, con i tasti
S e T (3 e 5 – fi g. A), è possibile modifi car ne i valori;
– Luminosità display: serve per regolare la lumino sità del display. Può essere
impostato con un valore compreso tra un minimo di 0% e un massimo di 100%.
Nota – Dopo 30 secondi d’inattività del display, la luminosità si riduce al valore
minimo impostato;
– Luminosità tasti: serve per regolare la lumino sità dei tasti. Può essere imposta-
to con un valore compreso tra un minimo di 0% e un massimo di 100%. Nota
– Dopo 30 secondi d’inattività dei tasti, la luminosità si riduce al valore minimo
impostato;
– Password Oview: fare riferimento al paragrafo “La password dell’Oview”;
– Informazioni: serve per visualizzare i dati tecnici dell’Oview, senza la possibilità di
modifi carli;
– Lingua: serve per impostare la lingua desiderata;
– Opzioni rete: questa voce contiene i parametri “Insieme” ed “Indirizzo”. Questi
si utilizzano per modifi care l’insieme a cui appartiene l’Oview e l’indirizzo persona-
le di quest’ultimo.
• Programmare le funzioni di un’automazione
Per accedere alle funzioni programmabili di un’automazione è necessario selezionare nella schermata iniziale (fi g. B
Nella schermata che appare, selezionando l’automazione da programmare potrebbe essere richiesto l’inserimento di una password.
), la voce “Menu” con il tasto z (8 – fi g. A).
Oview”. A questo punto scegliere la voce “Password Oview” e programmare
la password desiderata.
Nota – Quando una password è attiva,verrà chiesta ogni volta che si accede
al menu “Opzioni”.
– Per modifi care o togliere una password esistente: scegliere la voce
“Opzioni” della schermata principale. Dopo aver inserito la password selezio-
nare “Impostazioni Oview” e di seguito “Password Oview” poi
– programmare una nuova password e salvare la modifi ca; oppure,
– togliere la password esistente lasciando vuoto lo spazio dedicato e salvando
la modifi ca.
IT
• Operare con la “Password Oview”
Per limitare l’accesso ad alcune funzioni programmabili (ad esempio, le programmazioni orarie) nei confronti di chi non è autorizzato, come ad esempio,
estranei e bambini, l’Oview offre la possibilità di programmare una “Password
Oview”.
– Per impostare una password: selezionare nella schermata iniziale (fi g. 7) la
voce “Opzioni” con il tasto z (7 – fi g. 6) e, di seguito, la voce “Impostazioni
Italiano – 16
Page 34

FRANÇAIS
instructions originales
RECOMMANDATIONS ET PRÉCAUTIONS
GÉNÉRALES POUR LA SÉCURITÉ
INFORMATION SUR LES MARQUES
®
Les marques BLUETOOTH
par leurs propriétaires respectifs; les noms des produits indiqués dans le présent manuel peuvent être enregistrées également par leurs propriétaires
respectifs.
, GPRS®, GSM® sont des marques enregistrées
FR
IMPORTANT
Ce symbole indique des points qui peuvent être source
potentielle de danger. Par conséquent, les opérations
décrites doivent être exécutées exclusivement par du
personnel qualifié et expert, dans le respect des normes
de sécurité en vigueur dans le lieu d’installation et des
présentes instructions.
1 – Français
OPÉRER EN CONDITIONS DE SÉCURITÉ!
ATTENTION! – Pour la sécurité des personnes, il est important de res-
pecter ces instructions.
ATTENTION! – Instructions importantes pour la sécurité: conserver
par conséquent ces instructions.
ATTENTION! – Toutes les opérations d’installation, de connexion, de
programmation et de maintenance du produit doivent être effectuées
exclusivement par un technicien qualifié!
Nice se réserve le droit, à tout moment, de modifier ou de désactiver, temporairement ou de façon permanente, les services qui sont mis à disposition même
sans avertissement à l’utilisateur. Ce qui suit convient et établit que Nice ne
pourra en aucun cas être tenu responsable envers l’utilisateur même ou vers
des tiers pour la modification, la suspension ou la désactivation.
Respecter les consignes suivantes:
– ne pas effectuer de modifications sur des parties du produit quelles
qu’elles soient, en dehors de celles qui sont décrites dans ce guide. Les
opérations non autorisées peuvent être source de danger et entraîner des
problèmes de fonctionnement. Le constructeur décline toute responsabilité pour les dommages dérivant de produits modifiés arbitrairement.
– le produit est conçu pour être utilisé dans un environnement fermé.
Il ne peut être utilisé à l’extérieur qu’en présence de conditions climatiques adéquates. En effet, son boîtier ne le protège pas contre les infiltrations d’eau ou autres substances liquides.
– si le produit est utilisé comme dispositif de commande, il est important de l’installer dans un endroit approprié, hors de portée des enfants
et à une hauteur par rapport au sol non inférieure à 150 cm.
– Pour le nettoyage superficiel du produit, utiliser un chiffon doux et légèrement
humide (pas mouillé!). Important – Ne pas utiliser de substances contenant
de l’alcool, du benzène, des diluants ou autres substances inflammables. L’utilisation de ces substances pourrait endommager le produit.
– Traiter avec précaution l’écran LCD en évitant de le rayer.
– Conserver avec soin ce guide pour faciliter les éventuelles interventions
futures de programmation et de maintenance du produit.
– Mettre au rebut les matériaux de l’emballage du produit dans le plein respect
des normes locales en vigueur.
Page 35

(BusT4)
(BusT4)
(BusT4)
(Oview
Software Suite)
(BusT4)
10-15m
max
(Gprs)
(Wi Fi)
(Adsl)
(Oview
Software Suite)
(GSM®)
(Internet)
1
Utilisation uniquement
de l’Oview
L’Oview et ses accessoires
Utilisation du module
OVBT et du
logiciel
Utilisation du module
OVBTGSM et d’un
téléphone mobile
Utilisation du module
OVBTGSM
et du logiciel
module
OVBT
module
OVBTGSM
module
OVBTGSM
Français – 2
FR
Page 36

DESCRIPTION DU PRODUIT
1
ET APPLICATION
Le produit Oview est un dispositif destiné à la programmation et à la commande des dispositifs Nice équipés de «BusT4», utilisés pour la motorisation
de portails, portes de garage, barrières levantes avec lisse mobile et autres
applications similaires.
Toute autre utilisation doit être considérée comme impropre! Le cons tructeur ne répond pas des dommages résultant d’une utilisation
impropre du produit, différente de ce qui est prévu dans ce guide.
FR
1.1 – Principales caractéristiques de fonctionnement de l’Oview
Le dispositif Oview dialogue avec d’autres dispositifs à travers le câble
BusT4 ; par conséquent, il peut communiquer exclusivement avec les produits qui disposent du connecteur BusT4, c’est-à-dire ceux qui font partie
du système « NiceOpera » (pour plus de détails sur ce système, se référer à
l’encadré ci-contre « Qu’est-ce que Nice Opera »).
L’Oview ne s’active que lorsqu’il est connecté à un dispositif, dans la mesure
où il est alimenté directement par ce dernier.
L’Oview peut être utilisé aussi bien comme système pour programmer des dispositifs que comme système pour commander des automatismes. L’utilisation
de l’Oview est particulièrement indiquée dans les installations d’automatisation
à haut contenu technologique dans la mesure où il permet de:
– programmer un ou plusieurs dispositifs connectés en réseau;
– commander un ou plusieurs automatismes;
– effectuer le diagnostic d’un ou de plusieurs dispositifs connectés en réseau.
– archiver(*) les paramètres et les programmations des dispositifs (l’archivage
est utile, par exemple, pour reconfigurer rapidement les dispositifs en cas de
remplacement d’un composant de l’installation).
(*) Note – L’opération d’archivage n’est disponible qu’en utilisant un logiciel
accessoire associé à l’Oview (se référer au chapitre 7).
L’Oview est adapté à une utilisation aussi bien de la part de l’installateur que de
l’utilisateur. En utilisant un seul Oview, l’installateur peut programmer, modifier
les données et faire la maintenance de tous les dispositifs présents dans une
installation. Quant à l’utilisateur, il peut utiliser l’Oview pour commander quotidiennement un ou plusieurs automatismes.
Si l’installateur le souhaite, il peut aussi permettre l’accès de l’utilisateur à la
3 – Français
programmation de certains paramètres. Cela peut se révéler utile si l’utilisateur a besoin de modifier les valeurs de ces paramètres durant l’utilisation de
l’automatisme.
En présence d’un réseau de dispositifs, l’utilisation de l’Oview offre à l’installateur l’avantage de configurer un à la fois tous les dispositifs présents dans une
installation, en réduisant ainsi la complexité, les temps et les déplacements
normalement nécessaires.
Note – Pour plus de détails sur comment construire un réseau Bus et comment le configurer et le gérer avec l’Oview, se référer au guide «NiceOpera
System Book» disponible sur le site www.niceforyou.com
1.2 – ACCESSOIRES (en option)
L’Oview est fourni avec un câble de 2 m pour le raccordement direct à un dispositif et avec un support pour la fixation du produit sur un mur.
Tous les autres accessoires sont en option; ils comprennent:
®
– Module Bluetooth
– Module GSM
, fourni avec le logiciel «Oview Software Suite»;
®
, fourni avec le logiciel «Oview Software Suite».
Qu’est-ce que «NiceOpera»
Nice Opera est un système formé de différents dispositifs utilisés générale-
ment dans les installations pour l’automatisation de portails, portes de garage
et barrières levantes. Ces dispositifs sont:
– les émetteurs de la série NiceOne;
– les récepteurs de la série NiceOne;
– les logiques de commande des opérateurs avec connexion «BUST4».
À ces dispositifs s’ajoutent d’autres dispositifs complémentaires, de type logiciel et matériel, qui sont:
– l’unité de programmation O–Box avec logiciel dédié, pour les émetteurs et les récepteurs;
– l’unité de programmation Oview, pour les logiques de commande et
les récepteurs;
– un module Bluetooth
des données entre l’Oview et un PC ou un ordinateur de poche ;
– un module GSM
nées à travers Internet entre l’Oview et un PC ou un ordinateur de poche.
®
et un logiciel dédié, pour la communication
®
et un logiciel dédié, pour la communication des don-
Page 37

Avec le module GSM®, il est possible d’utiliser également un smart-
phone ou un téléphone mobile ordinaire : avec ces appareils il est pos-
sible d’envoyer une commande à l’automatisme à travers un appel ou
un Sms ; de plus, avec le smartphone, qui fonctionne avec le système
d’exploitation Window
logiciel « Oview software suite ».
®
Mobile, il est possible d’utiliser également le
INSTALLATION DE L’OVIEW
2
COMME DISPOSITIF DE COMMANDE
Pour utiliser l’Oview comme dispositif fixe pour la commande d’automatismes,
il faut l’installer dans un endroit approprié, hors de portée des enfants et à une
hauteur par rapport au sol non inférieure à 150 cm.
Pour l’installer au mur, utiliser le support présent dans l’emballage, en suivant
les indications de la fig. 2.
Ensuite, connecter l’Oview à l’automatisme en suivant les indications du Cha-
pitre 3.
––– OBLIGATIONS DE L’INSTALLATEUR –––
IMPORTANT – Après avoir installé et programmé l’Oview comme dispositif de commande, l’installateur doit remettre au client la partie de
ce guide intitulée «Mode d’emploi».
De plus, si l’on entend laisser au client la possibilité d’accéder à certaines fonctions de programmation, il faut lui remettre également les
informations concernant ces fonctions, contenues sur le site www.
nice-service.com, dans la partie « Télécharger ».
2
FR
Français – 4
Page 38

CONNEXION DE L’OVIEW
3
À UN DISPOSITIF
L’Oview peut être connecté à un dispositif de deux manières différentes:
• connexion occasionnelle: elle permet d’utiliser l’Oview comme unité «por-
table» de programmation. Pour cette connexion, on peut utiliser le câble fourni
(2 m) en le connectant à la prise de l’Oview (fig. 4) et à la prise «BusT4» présente sur la logique de commande du dispositif à programmer (fig. 5 – Pour
accéder à cette prise, consulter les instructions spécifiques du dispositif).
• connexion définitive: elle permet d’utiliser l’Oview comme unité «fixe» de
FR
commande et de programmation. Pour cette connexion, il est probable que
le câble fourni (2 m) ne sera pas assez long. Il faut donc utiliser un câble de
rallonge ou un nouveau câble d’une longueur adéquate et ayant les caractéristiques suivantes:
- type de connecteur à utiliser: fiche RJ45 6/4 (6 plots – 4 contacts); il
s’agit de connecteurs couramment utilisés dans les installations téléphoniques
- types de câbles qu’il est possible d’utiliser:
câble téléphonique plat avec 4 conducteurs;
câble pour antivol avec 4 conducteurs (4 x 0,22 mm);
câble UTP catégorie 2, avec 4 conducteurs (si le câble en a plus, il faut élimi-
ner les conducteurs superflus) ;
câble STP catégorie 5, avec 4 conducteurs (si le câble en a plus, il faut élimi-
ner les conducteurs superflus) et avec blindage.
- longueur maximum du câble: se reporter aux longueurs reportées dans
le Tableau 1.
Tableau 1 – Longueur maximum du câble
Oview Oview + Oview +
Bluetooth
Câble téléphonique plat 300 m 250 m 150 m
Câble pour antivol 300 m 300 m 250 m
Câble UTP catégorie 2 500 m 500 m 400 m
Câble STP catégorie 5 700 m 700 m 400 m
5 – Français
®
GSM
Notes générales sur le Tableau 1:
• Les longueurs maximum des câbles sont calculées pour une utilisation dans des environnements avec des niveaux d’émission électromagnétique de type «civil». Pour obtenir une plus grande fiabilité dans la transmission des données en présence de grandes
longueurs de câbles, il est conseillé d’ utiliser des câbles STP de catégorie 5, en mettant
à la terre le blindage du câble comme suit:
– si les dispositifs sont connectés «en cascade» (ou « en chaîne»), connecter le blin-
dage au niveau du dispositif positionné à l’une des extrémités de la chaîne;
– si les dispositifs sont connectés «en étoile», connecter le blindage soit au niveau d’ un
seul dispositif soit au niveau du centre de l’étoile.
• En présence d’un réseau de dispositifs, la longueur totale du câble doit être calculée de
la façon suivante:
– si les dispositifs sont connectés «en cascade» (ou « en chaîne»), la longueur maxi-
mum du câble doit être calculée entre les deux dispositifs situés aux extrémités de la
chaîne.
– si les dispositifs sont connectés « en étoile», la longueur maximum du câble doit
être calculée en additionnant les deux branches les plus longues et en ajoutant à cette
somme, la somme des deux longueurs des autres branches.
En général, pour la connexion de plusieurs dispositifs dans un réseau, on peut utiliser
des prises spéciales «en T», appelées généralement « dédoubleurs» et couramment
utilisées dans les installations téléphoniques. Le type de dédoubleur à utiliser est le
modèle RJ45 6/4 (6 plots – 4 contacts).
• Pour faciliter le sertissage du connecteur RJ45 aux deux extrémités du câble, il est préférable que les conducteurs internes du câble choisi soient «multibrins» et donc pas de
type «rigide».
Après avoir établi le type de câble à utiliser pour connecter l’Oview à un dispositif, procéder de la façon suivante:
01. Avant de commencer l’installation du produit
, contrôler d’avoir à disposi-
tion tous les outils et les matériaux nécessaires pour effectuer le travail
plus, vérifier que ces derniers sont en bonnes conditions et conformes à ce
qui est prévu dans les normes locales sur la sécurité.
02. Choisir la position dans laquelle sera installé l’Oview.
03. Effectuer les travaux pour la pose des gaines ou conduits de protection
des câbles électriques. Note – Les gaines ou les conduits ont pour fonction
®
de protéger les câbles électriques contre les chocs et les ruptures accidentelles.
04. Ensuite, après avoir passé le câble dans la gaine de protection, si on uti-
lise un câble dépourvu de connecteurs, monter un connecteur sur chaque
extrémité du câble, en faisant attention à utiliser la même séquence
de connexion des conducteurs pour les deux connecteurs (fig. 3).
05. Ensuite, connecter le câble à la prise sur l’Oview (fig. 4) et à la prise
. De
Page 39

1 2 3 4 1 2 3 4 4 3 2 1 1 2 3 4
«BusT4» présente sur la logique de commande du dispositif à commander (fig. 5 – Pour accéder à cette prise, consulter les instructions spéci-
fiques du dispositif).
Note – Pour de plus amples détails sur les points traités dans ce chapitre, se
référer au guide «Nice Opera System Book».
3
4
5
UTILISATION GÉNÉRALE DE L’OVIEW
4
L’Oview s’active exclusivement quand il est connecté à un dispositif alimenté,
dans la mesure où son alimentation dépend de ce dernier.
À l’allumage de l’Oview, une icône représentant le dispositif connecté apparaît
à l’écran.
• Légende des touches de l’Oview
L’Oview se compose des parties suivantes (fig. 6):
1 – Écran LCD;
2 / 4 – Touches avec flèche W et X: elles servent à se déplacer d’un champ
à l’autre à l’intérieur d’une même page ou à passer d’une page à l’autre;
3 / 5 – Touches avec flèche S et T: elles servent à modifier les valeurs d’un
champ sélectionné ou à se déplacer à l’intérieur d’une liste;
6 – Touche qui sert à confirmer une valeur;
7 – Touche z qui sert à sélectionner l’option qui apparaît en bas à gauche
de l’écran (9) ;
8 – Touche z qui sert à sélectionner l’option qui apparaît en bas à droite
de l’écran (10).
• Page initiale de l’Oview
Après avoir activé l’Oview une page dite «Page initiale» s’affiche. Les éléments
qui composent cette page sont (fig. 7):
A – Nom du dispositif sélectionné.
B – Icône identifiant le type de dispositif connecté ; en présence d’un réseau
de dispositifs, l’écran affiche le premier dispositif trouvé.
C – Numéro indiquant l’ensemble auquel appartient le dispositif sélectionné.
D – Heure et date locale.
E – «Menu»: cette option permet d’accéder à toutes les fonctions dispo-
nibles pour programmer un dispositif.
F – «Options»
nibles pour commander un ou plusieurs dispositifs et configurer l’Oview.
: cette option permet d’accéder à toutes les fonctions dispo-
Français – 6
FR
Page 40

8
1
4
3
7
2
5
6
10
9
6
run 2
Options Menu
02
00:01:14
09.11.07
B
EF
D
A C
FR
7
7 – Français
LES FONCTIONS DE L’OVIEW
5
• Commander l’automatisme
Pour commander un automatisme, on peut procéder de deux manières. Après
avoir choisi l’ensemble auquel appartient l’automatisme à commander, envoyer
la commande désirée de l’une des façons suivantes:
A) pour envoyer une commande directe, utiliser l’une des touches suivantes:
– OUVERTURE = touche S (3 – fig. 6)
– STOP = touche (6 – fig. 6)
– FERMETURE = touche T (5 – fig. 6)
B) Pour envoyer une commande spéciale disponible pour l’automatisme
en question, sélectionner dans la page initiale (fig. 7) l’option «Options» avec
la touche z (7 – fig. 6) et sélectionner ensuite l’option «Commandes». Puis
sélectionner la commande désirée dans la liste qui apparaît.
À ce point, pour confirmer la commande choisie, sélectionner «Sélection»
avec la touche z (8 – fig. 6) ou revenir à la page précédente en sélectionnant
«Retour» avec la touche z (7 – fig. 6).
Note – Le type et le nombre de commandes présentes dans cette liste varient
en fonction de la typologie de l’automatisme sélectionné.
• Programmer les commandes horaires
L’Oview dispose d’une horloge interne qui peut être utilisée pour programmer
l’envoi automatique des commandes à un automatisme les jours et aux horaires
désirés. Note – Si à cause d’une panne de courant l’Oview n’est pas alimenté, son
horloge continue à fonctionner régulièrement; par contre, si l’envoi d’une commande était programmé pendant la panne, la commande ne sera pas exécutée.
Pour programmer l’exécution automatique des commandes aux jours et aux
horaires désirés, procéder de la façon suivante:
a) sélectionner l’ensemble auquel appartient l’automatisme à programmer;
b) dans la page initiale (fig. 7) sélectionner l’option «Options» avec la touche
(7 – fig. 6) puis sélectionner l’option «Commandes horaires »;
z
c) dans la page qui s’affiche sélectionner « Nouveau » pour créer une nouvelle
Page 41

commande horaire (fig. 8) et saisir dans les champs prévus à cet effet les jours
Commandes horaires
Retour Sélectionner
on
22:50
|mmjvsd
Nouveau
8
• Programmer la logique de commande et le récepteur
Pour programmer les paramètres d’un dispositif, procéder de la
façon suivante:
AVERTISSEMENT – L’accès aux fonctions contenues dans
l’option «Automatismes» peut demander la saisie d’un mot de
passe si l’installateur a décidé de protéger l’accès aux fonctions
de programmation. Pour plus de détails, se référer au paragraphe «Opérer avec les mots de passe».
a) Sélectionner l’ensemble auquel appartient le dispositif à programmer.
b) Dans la page initiale (fig. 7) sélectionner l’option «Menu» avec la touche
z (8 – fig. 6): l’écran affiche la liste des dispositifs connectés et présents dans
cet ensemble.
c) Dans cette page, il est possible de:
– faire défiler la liste des noms des dispositifs présents, en utilisant les touches
flèche S ou T;
– accéder à l’ensemble successif en utilisant la touche flèche X ou à l’ensemble précédent en utilisant la touche flèche W ;
– confirmer le choix d’un dispositif, en utilisant la touche 8.
et les horaires désirés;
d) confirmer la programma-
tion effectuée en sélectionnant
l’option «OK» avec la touche
z (8 – fig. 6).
Important – Contrôler que
l’hor lo ge est bien réglée sur
l’heure locale.
Attention – Les commandes
horaires ne fonctionnent que
si la commande « Activation
commandes horaires » (sous
l’option « Options ») est activée
(ON).
d) Quand le choix a été confirmé, la page contenant un menu de fonctions
s’affiche.
Ce menu peut comprendre les options suivantes:
– «Fonctions logique» (contient les fonctions spécifiques de la logique de
commande);
– «Fonctions radio» (contient les fonctions spécifiques du récepteur);
– «Fonctions communes» (contient les fonctions qui sont présentes dans
toutes les logiques de commande et les récepteurs) ;
– «Fonctions avancées» (contient les fonctions spéciales qui sont présentes
dans les logiques de commande et dans les récepteurs) ;
– “Log in” (sert à accéder à une automatisation si auparavant un mot de passe
a été établit) ;
– (etc......)
Note – La présence ou pas de certaines options dans le «Menu fonctions»
dépend du type de dispositif sélectionné.
Une fois une option choisie, confirmer avec « Sélection ». A ce stade apparaît
une page avec les fonctions relatives au dispositif. En bas, vous remarquerez
une note
sateur.
• Régler les paramètres de fonctionnement de l’Oview
Pour régler les paramètres de fonctionnement de l’Oview, il faut sélectionner
dans la page initiale (fig. 6), l’option «Options» avec la touche z (7 – fig. 6)
puis l’option «Positions Oview ».
L’écran affiche la liste des paramètres disponibles: « Nom » - « Date/heure » « Luminosité afficheur » - « Luminosité touches » - « Mot de passe Oview » -
« Langue » - « Informations » - « Options réseau ».
Pour afficher et modifier chaque paramètre, il faut le sélectionner et opérer
dans la page qui s’affiche.
– Nom : sert à attribuer à l’Oview un nom personnel, pour l’identifier facilement
dans un réseau de dispositifs ;
– Date/heure : sert à régler la date et l’heure locale. Avec les touches flèche
W et X (2 et 4 – fig. 6) il est possible de se déplacer entre les champs réser-
vés à la date et à l’heure et, avec les touches S et T (3 et 5 – fig. 6), il est
possible d’en modifier les valeurs;
– Luminosité afficheur : sert à régler la luminosité de l’afficheur. Elle peut
être réglée à une valeur comprise entre un minimum de 0% et un maximum
de 100%. Note – Au bout de 30 secondes d’inactivité de l’afficheur, la lumi-
nosité se réduit à la valeur minimum réglée ;
ou bien qui indique le mode d’accès : installateur, utili-
Français – 8
FR
Page 42

– Luminosité touches : sert à régler la luminosité des touches. Elle peut être
réglée à une valeur comprise entre un minimum de 0% et un maximum de
100%. Note – Au bout de 30 secondes d’inactivité des touches, la lumino-
sité se réduit à la valeur minimum réglée ;
– Mot de passe Oview: se référer au paragraphe «Le mot de passe de
l’Oview»;
– Langue: sert à paramétrer la langue désirée ;
– Informations: sert à afficher les données techniques de l’Oview, sans la
possibilité de les modifier ;
– Options réseau: cette option contient les paramètres « Ensemble» et
«Adresse». Ils sont utilisés pour modifier l’ensemble auquel appartient
l’Oview et l’adresse personnelle de ce dernier.
FR
• Opérer avec les mots de passe
Les mots de passe des dispositifs «NiceOpera»
Tous les dispositifs du système « NiceOpera », Oview inclus, offrent à l’installateur ou à l’utilisateur la possibilité de limiter l’accès aux personnes non autorisées à manipuler les données sensibles du dispositif, à travers la programmation d’un mot de passe.
Le mot de passe sera mémorisé sur le dispositif et limitera l’accès aux
fonctions indépendemment de l’Oview relatif.
Si un dispositif est protégé par un mot de passe, pour commencer une activité
de programmation il est indispensable d’effectuer au début la procédure de
«Log in» et le log out suivant sera automatique lorsqu’il reviendra à la page
principale. Si le dispositif est protégé de tout et en raison du mot de passe,
l’Oview demandera automatiquement l’insertion du mot de passe.
Les mots de passe imposés sur une centrale sont de deux types : « Mot de
passe utilisateur » et « Mot de passe installateur ».
Si le dispositif est protégé de tout et en raison du mot de passe, l’Oview demandera automatiquement l’insertion du mot de passe.
Si le mot de passe installateur est imposé et si vous n’insérez pas le mot de
passe correct dans le champ « Log in » sur la page relative à cette centrale,
l’accès au menu sera limité. En particulier, s’il est entré dans le menu « Fonc-
tions centrales » aucunes des options ne sera visibles et les autres seront
visibles mais pas modifiables.
Il est possible d’établir le même mot de passe utilisateur (validé uniquement si
le mot de passe utilisateur est imposé) qui bloquera complètement l’accès au
menu à celui qui ne connaît pas le mot de passe
L’installateur peut décider quelles sont les parties à rendre visibles ou modi-
9 – Français
fiables à celui qui accède avec le mot de passe utilisateur. Le parcours pour
modifier les permis d’accès est le suivant : « Fonctionnements de la cen-
trale » → « Fonctions avancées » → « Autorisations utilisateur ». Vous
pouvez assigner à chaque option de menu une des autorisations suivantes en
particulier en déplaceant S et T :
autorisation de lecture seule (visible, mais non modifiable)
■ autorisation de lecture et d’écriture (visible et modifiable)
∼ l’option ne sera pas visible par l’utilisateur.
S’il y a aucun mot de passe établit, le menu est visible et modifiable (on y
accède c’est-à-dire avec toutes les autorisations). A tout moment il est possible
de comprendre avec quel profil on accède au menu, en vérifiant l’icône sur la
barre du bas (
– Attention ! Si dans la navigation, les options de menu étaient absentes,
cela signifie qu’un mot de passe a été imposé. Pour pouvoir accéder au
menu complet, il est nécessaire de faire le log avec le mot de passe installateur.
– Attention ! Les mots de passe installateur et utilisateur sont indépendants
du mot de passe Oview. Ils protègent les différentes parties du menu.
Le mot de passe de l’Oview
L’Oview permet de programmer un « Mot de passe Oview ».
Le « Mot de passe Oview » sert à bloquer l’accès à l’utilisateur, aux données
et aux fonctions qui règlent le fonctionnement correct de l’Oview (accès au
menu « Options »). Un tel mot de passe protège également les paramètres des
modules OVTB ou OVBTGSM au cas où ils sont liés.
– Pour entrer un mot de passe: sélectionner dans la page initiale (fig. 7)
l’option «Options» avec la touche z (7 – fig. 6) puis l’option « Positions
Oview». Sélectionner ensuite le champ « Mot de passe Oview » et program-
mer le mot de passe souhaité.
Note – Quand un mot de passe est activé, il sera demandé à chaque accès au
menu « Options ».
– Pour modifier ou supprimer un mot de passe existant: choisir l’option
« Options » dans la page principale. Après avoir inséré le mot de passe, sélectionner « Positions Oview » et ensuite « Mot de passe Oview » puis
– programmer un nouveau mot de passe et enregistrer la modification; ou
bien,
– supprimer le mot de passe existant en laissant vide l’espace réservé au mot
de passe et en enregistrant la modification.
utilisateur ou installateur).
Page 43

• Oview avec le logiciel à partir de la version OV04
L’Oview avec le logiciel à partir de la version OV04 dispose de deux nouvelles
fonctions qui ne sont pas présentes dans le guide : « Historique évènements »
et « Mise à jour logique de commande ».
Historique évènements
Cette fonction permet d’afficher sur l’Oview toutes les activités effectuées par
les dispositifs présents dans le réseau auquel est connecté l’Oview. L’acquisition des données (historique évènements) s’effectue au début, de manière
automatique et non visible pour l’installateur, dès que l’Oview est connecté au
réseau : ce dernier cherche tous les dispositifs en réseau et mémorise dans sa
propre mémoire l’historique des évènements de chacun d’eux en écrivant les
données par écrasement des précédentes.
Après la recherche des dispositifs présents dans le réseau, avec l’Oview
encore connecté il est possible d’afficher l’historique des évènements d’un dispositif à la fois de la façon suivante : sélectionner le dispositif, puis la rubrique «
Fonctions avancées » → « Historique évènements ». Pour faire défiler les
évènements utiliser les touches S et T.
L’historique des évènements peut être affichée également avec « Oview
Software Suite ». Dans ce cas, connecter l’Oview au PC ou à l’ordinateur de
poche dans lequel est installé le logiciel, sélectionner dans la page principale
l’option « Oview », puis « Fonctions O-View » → « Consignes » → « Histo-
rique évènements ». Une liste s’affiche avec l’historique des évènements de
tous les dispositifs présents dans le réseau auquel a été connecté l’Oview la
dernière fois et, pour afficher les évènements d’un seul dispositif, utiliser le
champ « Filtre dispositif », en sélectionnant le dispositif désiré dans la liste
qui s’affiche.
Le nombre maximale des évènements mémorisés est de 300.
L’historique des évènements acquis reste dans la mémoire de l’Oview jusqu’au
moment où celui-ci est connecté à un autre réseau.
Mise à jour logique de commande
Cette fonction permet de mettre à jour le logiciel d’une logique de commande en
exploitant la mémoire interne du module supplémentaire OVBT (ou OVBTGSM)
associé à l’Oview. La procédure est divisée en deux moments qui peuvent être
exécutés à distance de temps et de lieu l’un de l’autre : 1) téléchargement du
nouveau logiciel dans le module supplémentaire de l’Oview seulement par le
biais du Bluetooth ; 2) téléversement du logiciel dans la logique de commande.
1. Télécharger le nouveau logiciel dans le module supplémentaire de
l’Oview. Pour télécharger le logiciel dans le module supplémentaire OVBT
(ou OVBTGSM), installer le module sur l’Oview, ouvrir le logiciel « Oview
Software Suite » (version 1.3 ou supérieure), lancer la recherche des dis-
positifs et sélectionner le dispositif Oview ; ensuite, sélectionner l’option «
Fonctions avancées » puis « Télécharger logiciel logique ». À ce point
sélectionner le fichier avec le nouveau logiciel et confirmer. Le fichier sera
mémorisé automatiquement dans le module sup plémentaire. Ces opérations peuvent être faites uniquement en reliant l’Oview par le Bluetooth et
non avec la connexion à distance GPRS.
2. Téléverser le logiciel dans la logique de commande. Pour téléverser le
logiciel dans la logique, connecter à celle-ci l’Oview muni du module supplémentaire avec le nouveau logiciel en mémoire et procéder à la mise à jour
de la façon suivante : éliminer les éventuels mots de passe ; sélectionner
ensuite dans l’Oview l’option « Menu » puis « Automatismes » → « Fonctions logiques » → « Fonctions avancées » → « Mise à jour logiciel ».
À ce point l’Oview vérifie si le nouveau logiciel est compatible ou pas avec
la logique : s’il résulte compatible, il montre l’option « Lancer », en cas
contraire il ne sera pas possible de lancer la mise à jour. Après avoir lancé
la mise à jour, si celle-ci ne va pas à bonne fin, la logique reste bloquée en
attente de pouvoir achever la procédure. Pour la débloquer, il faut sélectionner l’option « Menu » → « Dispositifs en phase de boot » et relancer le
chargement du logiciel.
Français – 10
FR
Page 44

UTILISER L’OVIEW AVEC LES MODULES BLUE-
6
TOOTH® ET GSM
®
Mise au rebut du produit
Le fonctionnement de l’Oview peut être renforcé en utilisant le module Bluetooth® ou GSM® et le logiciel «Oview Software Suite», fourni avec ces derniers (voir fig. 1). Ces modules et le logiciel sont des accessoires en option; le
logiciel est fourni en 2 versions: une pour PC et une pour ordinateur de poche.
Pour utiliser le logiciel, il faut l’installer dans un PC et/ou dans un ordinateur de
poche et/ou dans un Smartphone, avec connexion Bluetooth
– Connexion Bluetooth
module Bluetooth® (à installer sur l’Oview). Ce type de connexion permet de
FR
communiquer avec l’Oview d’une distance maximum d’environ 10–15 m en
l’absence d’obstacles, ou de quelques mètres en présence d’obstacles (murs
ou autres).
– La connexion Internet: permet de se connecter à l’Oview grâce à un module
®
(à installer sur l’Oview). Ce type de connexion permet de communiquer
GSM
avec l’Oview à travers le réseau GSM®. Dans ce cas la communication peut
s’effectuer à n’importe quelle distance, à condition que le signal soit présent.
Avec le module GSM®, il est possible d’utiliser également un smartphone ou
un téléphone mobile ordinaire : avec ces appareils il est possible d’envoyer une
commande à l’automatisme à travers un appel ou un Sms ; de plus, avec le
smartphone, qui fonctionne avec le système d’exploitation Window® Mobile, il
est possible d’utiliser également le logiciel « Oview software suite ».
Le logiciel «Oview Software Suite» présente un graphisme vidéo détaillé et la
présence du clavier sur le PC et sur l’ordinateur de poche facilite la navigation
et la saisie des données.
Avec ce logiciel, l’installateur en plus de pouvoir exécuter toutes les opérations
normalement exécutables avec l’Oview, a la possibilité de créer également un
fichier de données pour gérer et mémoriser les modifications apportées aux
dispositifs programmés; il peut également effectuer un diagnostic avec des
informations graphiquement plus complètes et immédiates, et mettre à jour le
micrologiciel d’un dispositif.
®
: permet de se connecter à l’Oview grâce à un
®
et/ou Internet.
Ce produit est constitué de différents types de matériaux: certains peuvent
être recyclés, d’autres doivent être mis au rebut. Informez–vous sur les systèmes de recyclage ou de mise au rebut prévus par les règlements locaux en
vigueur pour cette catégorie de produit.
Attention! certains composants du produit peuvent contenir des substances polluantes ou dangereuses qui pourraient avoir des effets nuisibles sur
l’environnement et sur la santé des personnes s’ils étaient jetés dans la nature.
Le produit contient une pile: elle doit être retirée du produit et ne doit pas être
mélangée aux ordures ménagères car elle contient des substances polluantes;
il faut donc la mettre au rebut ou la recycler en utilisant les méthodes de collecte sélective prévues par les normes locales en vigueur.
Comme l’indique lesymbole ci–contre, il est interdit de jeter ce
produit avec les ordures ménagères. Par conséquent, utiliser la
méthode de la «collecte sélective » pour la mise au rebut conformément aux prescriptions des normes locales en vigueur
ou restituer le produit au vendeur lors de l’achat d’un nouveau
produit équivalent.
Attention! – les règlements locaux en vigueur peuvent appliquer de lourdes
sanctions en cas d’élimination illicite de ce produit.
11 – Français
Page 45

Caractéristiques techniques du produit
L’Oview est produit par Nice S.p.a. (TV) I.
Typologie: unité de commande, programmation et diagnostic pour dis-
positifs munis de connexion BusT4
Technologie adoptée: communication série half duplex 19200 Bps sur
bus différentiel pour l’envoi des commandes, la modification des paramètres
et la vérification des données de diagnostic
Interface graphique: afficheur LCD 128 x 64 dots (46 x 29 mm); 2,2”
Dispositif d’input opérateur: manette avec 5 + 2 touches
Éclairage de l’afficheur/touches: lumière blanche (coordonnées chro-
matiques: X = 0,29–0,33; Y = 0,30–0,34)
Horloge/dateur: interne, avec pile de sauvegarde (durée minimum 10 ans)
Nombre maximum de commandes horaires: 64
Historique des évènements: capacité de mémoire de 400 évènements
Longueur du câble de connexion:
– câble fourni: 2 m
– autre câble: jusqu’à 700 m, mesuré de point à point
Alimentation: fournie par les dispositifs présents sur le BusT4
Courant absorbé: maximum 20 mA (sans accessoires)
Isolement: Classe III
Indice de protection du boîtier : IP 20 (utilisation exclusivement à
l’intérieur ou dans des locaux protégés).
Température de service: de –20°C à +55°C
Dimensions (mm): 107 x 61 x h 20 (avec support mural: 125 x 70 x h 32)
Poids: 75 g (sans câble)
FR
Accessoires en option:
• module pour connexion Bluetooth
®
• module pour connexion GSM®–GPRS
®
Français – 12
Page 46

DÉCLARATION CE DE CONFORMITÉ
Déclaration conforme à la Directive 1999/5/CE
Note - Le contenu de cette déclaration correspond aux déclarations fi gurant dans le document offi ciel déposé au siège social de Nice S.p.A. et, en particulier, à la dernière mise à jour
disponible avant l’impression de ce manuel. Le présent texte a été réadapté pour des raisons d’édition.
Une copie de la déclaration originale peut être demandée à Nice S.p.a. (TV) I.
Numéro de déclaration: 278/OV Rév.: 6 Langue: FR
Le soussigné Luigi Paro en qualité d’Administrateur délégué, déclare sous son entière responsabilité que le produit:
Nom du fabricant: NICE s.p.a.
Adresse : Via Pezza Alta 13, Z.I. Rustignè, 31046 - Oderzo (TV) Italie
FR
Type: Unité de programmation et de commande pour les automatismes
Modèles : OVIEW
Accessoires : OVBT, OVBTGSM
s’avère conforme aux conditions essentielles requises par l’article 3 de la Directive communautaire ci-après, pour l’usage auquel les produits sont destinés:
• Directive 1999/5/CE DU PARLEMENT EUROPÉEN ET DU CONSEIL du 9 mars 1999 (transposée en droit français par le décret 2003-961 du 8 octobre
2003) concernant les équipements hertziens et les équipements terminaux de télécommunications et la reconnaissance mutuelle de leur conformité, selon
les normes harmonisées suivantes:
· Protection de la santé (art. 3(1)(a)): EN 50371:2002; EN50360:2001+A1:2006
· Sécurité électrique (art. 3(1)(a)): EN 60950-1:2006+A11:2009
· Compatibilité électromagnétique (art. 3(1)(b)):
EN 301 489-1 V1.8.1:2008, EN 301 489-17 V1.4.1:2002
EN301489-7 V1.3.1:2005
· Spectre radio (art. 3(2)): EN300328 V1.7.1:2006, EN300440-2 V1.1.2:2004,
EN 301511 V9.0.2:2003
Conformément à la Directive 1999/5/CE (Annexe V), le produit appartient à la classe 1 et est marqué :
0682
En outre, le produit est conforme à ce qui est prévu par les directives communautaires suivantes:
• DIRECTIVE 2004/108/CE du PARLEMENT EUROPÉEN ET DU CONSEIL du 15 décembre 2004 relative au rapprochement des législations des États
membres concernant la compatibilité électromagnétique et abrogeant la Directive 89/336/CEE, selon les normes harmonisées suivantes:
EN 61000-6-2:2005, EN 61000-6-3:2007
Oderzo, le 1 mars 2012 Luigi Paro
(Administrateur délégué)
13 – Français
Page 47

MODE D’EMPLOI
8
1
4
3
7
2
5
6
10
9
AVERTISSEMENTS ET PRÉCAUTIONS GÉNÉRALES POUR LA
SÉCURITÉ
ATTENTION! – Toutes les opérations d’installation, de connexion, de pro-
grammation et de maintenance du produit doivent être effectuées exclusivement par un technicien qualifié!
Respecter les consignes suivantes:
– ne pas laisser les enfants accéder à l’Oview.
– pour le nettoyage superficiel du produit, utiliser un chiffon doux et légèrement
humide (pas mouillé!). Important – Ne pas utiliser de substances contenant de
l’alcool, du benzène, des diluants ou autres substances inflammables. L’utilisation
de ces substances pourrait endommager le produit.
– traiter avec précaution l’écran LCD en évitant de le rayer.
– conserver avec soin ce guide pour faciliter les éventuelles consultations futures.
– à la fin de la vie du produit, s’assurer que ce dernier est mis au rebut ou
recyclé en respectant les normes locales en vigueur.
DESCRIPTION DE L’OVIEW
L’utilisation de l’Oview comme dispositif de commande mural fixe, lui permet d’être
toujours actif dans la mesure où il est alimenté directement et en permanence par
l’automatisme auquel il est connecté. Toutefois, si l’Oview n’est pas utilisé pendant
une courte période, son écran passe en état de veille (baisse de la luminosité). De
cet état, pour le réactiver, il suffit d’appuyer sur n’importe quelle touche.
Pour commander un automatisme, il suffit de rappeler sur l’écran de l’Oview le nom
et l’icône de l’automatisme et d’envoyer la commande avec une touche (pour de
plus amples détails, lire le chapitre «Utilisation de l’Oview comme dispositif de commande»).
• Légende des touches de l’Oview
L’Oview comprend les parties suivantes (fig. A):
1 – Écran LCD;
2 / 4 – Touches avec flèche W et X: elles servent à se déplacer d’un champ à
l’autre à l’intérieur d’une même page ou à passer d’une page à l’autre;
3 / 5 – Touches avec flèche S et T: elles servent à modifier les valeurs d’un
champ sélectionné ou à se déplacer à l’intérieur d’une liste;
6 – Touche qui sert à confirmer une valeur;
7 – Touche z qui sert à sélectionner l’option qui apparaît en bas à gauche de
l’écran (9);
8 – Touche z qui sert à sélectionner l’option qui apparaît en bas à droite de
l’écran (10);
A
FR
• Page initiale de l’Oview
Après avoir activé l’Oview une page dite «page initiale» s’affiche. Les éléments qui
composent cette page sont les suivants (fig. B):
A – Icône qui identifie le type de dispositif connecté; en présence d’un réseau de
dispositifs, l’écran affiche le premier dispositif trouvé automatiquement, appartenant à un ensemble donné.
B – Nom du dispositif sélectionné.
Français – 14
Page 48

C – Numéro indiquant l’ensemble auquel appartient le dispositif sélectionné.
run 2
Options Menu
02
00:01:14
09.11.07
B
EF
D
A C
D – Date et heure locale.
E – «Commandes»: cette option permet d’accéder à toutes les fonctions dispo-
nibles pour commander un ou plusieurs dispositifs.
F – «Options»: cette option permet d’accéder à toutes les fonctions disponibles
pour programmer un dispositif.
B
FR
UTILISATION DE L’OVIEW COMME DISPOSITIF
DE COMMANDE
Pour commander un automatisme, on peut procéder de deux manières. Après avoir
choisi l’ensemble auquel appartient l’automatisme à commander, envoyer la commande désirée de l’une des façons suivantes:
1) pour envoyer une commande directe, utiliser l’une des touches suivantes:
– OUVERTURE = touche S (3 – fig. A)
– STOP = touche (6 – fig. A)
– FERMETURE = touche T (5 – fig. A)
2) Pour envoyer une commande spéciale disponible pour l’automatisme en
question, sélectionner dans la page initiale (fig. B) l’option «Options» avec la
touche z (7 – fig. A) et sélectionner ensuite l’option «Commandes». Puis sélectionner la commande désirée dans la liste qui apparaît.
À ce point, pour confirmer le commande choisie, sélectionner «Sélectionner» avec
la touche z (8 – fig. A) ou revenir à la page précédente en sélectionnant «Retour»
avec la touche z (7 – fig. A).
15 – Français
Note – Le type et le nombre de commandes présentes dans cette liste varient en
fonction de la typologie de l’automatisme sélectionné.
FONCTIONS DE L’OVIEW
• Programmer les commandes horaires
L’Oview dispose d’une horloge interne qui peut être utilisée pour programmer
l’envoi automatique des commandes à un automatisme. Note – Si à cause d’une
panne de courant l’Oview n’est pas alimenté, son horloge continue à fonctionner
régulièrement; par contre, si l’envoi d’une commande était en programmation
pendant la panne, la commande ne sera pas exécutée mais restera quand même
programmée.
Pour programmer l’exécution automatique des commandes les jours et aux horaires
désirés, procéder de la façon suivante:
a) sélectionner l’ensemble auquel appartient l’automatisme à programmer;
b) dans la page initiale (fig. B) sélectionner l’option «Options» avec la touche z
(7 – fig. A) puis sélectionner l’option «
c) dans la page qui s’affiche (fig. C) sélectionner « Nouveau » pour créer une nou-
velle commande horaire et pour programmer les jours et les horaires désirés dans
les champs prévus à cet effet ;
Commandes horaires»;
C
Commandes horaires
Nouveau
22:50
|mmjvsd
on
Retour Sélectionner
d) confirmer la programmation en sélectionnant l’option «OK» avec la touche z
(8 – fig. A).
Important – Contrôler que l’horloge est bien réglée sur l’heure locale.
Attention – Les commandes horaires ne fonctionnent que si la commande « Activation commandes horaires » (sous l’option « Options ») est activée (ON).
Page 49

• Régler les paramètres de fonctionnement de l’Oview
Pour régler les paramètres de fonctionnement de l’Oview, il faut sélectionner dans
la page initiale (fig. B) l’option «Options» avec la touche z (7 – fig. A) puis l’option
«Positions Oview ».
L’écran affiche la liste des paramètres disponibles: « Nom » - « Date/heure » « Luminosité afficheur » - « Luminosité touches » - « Mot de passe Oview » -
« Informations » - « Langue » - « Options réseau ».
Pour afficher et modifier chaque paramètre, il faut le sélectionner et opérer
dans la page qui s’affiche.
bloqués par l’utilisateur et ne sont donc pas modifi ables.
Attention ! – Chacuns de ces paramètres peut être
– Nom : sert à attribuer à l’Oview un nom personnel, pour l’identifier facilement
dans un réseau de dispositifs ;
– Date/heure : sert à régler la date et l’heure locale. Avec les touches flèche
W et X (2 et 4 – fig. A) il est possible de se déplacer entre les champs réser-
vés à la date et à l’heure et, avec les touches S et T (3 et 5 – fig. A), il est
possible d’en modifier les valeurs;
– Luminosité afficheur : sert à régler la luminosité de l’afficheur. Elle peut
être réglée à une valeur comprise entre un minimum de 0% et un maximum
de 100%. Note – Au bout de 30 secondes d’inactivité de l’afficheur, la lumi-
nosité se réduit à la valeur minimum réglée ;
– Luminosité touches : sert à régler la luminosité des touches. Elle peut être
réglée à une valeur comprise entre un minimum de 0% et un maximum de
100%. Note – Au bout de 30 secondes d’inactivité des touches, la lumino-
sité se réduit à la valeur minimum réglée ;
– Mot de passe Oview: se référer au paragraphe « Le mot de passe de
l’Oview »;
– Informations: sert à afficher les données techniques de l’Oview, sans la
possibilité de les modifier ;
– Langue: sert à paramétrer la langue désirée ;
– Options réseau: cette option contient les paramètres « ensemble» et
«adresse». Ils sont utilisés pour modifier l’ensemble auquel appartient
l’Oview et l’adresse personnelle de ce dernier.
• Programmer les fonctions d’un automatisme
Pour accéder aux fonctions programmables d’un automatisme il faut sélectionner
dans la page initiale (fig. B) l’option «Menu» avec la touche z (8 – fig. A).
Dans la page qui s’affiche, en sélectionnant l’automatisme à programmer, il pourrait
être demandé d’entrer un mot de passe.
• Opérer avec le «Mot de passe Oview»
Pour limiter l’accès à certaines fonctions programmables (par exemple, les programmations horaires) aux personnes non autorisées et aux enfants, l’Oview offre la possibilité de programmer un «Mot de passe Oview».
– Pour entrer un mot de passe: sélectionner dans la page initiale (fig. 7)
l’option «Options» avec la touche z (7 – fig. 6) puis l’option « Positions
Oview». Sélectionner ensuite l’option « Mot de passe Oview » et program-
mer le mot de passe souhaité.
Note – Quand un mot de passe est activé, sera demandé à chaque accès au
menu « Options ».
– Pour modifier ou supprimer un mot de passe existant: choisir l’option
« Options » de la page principale. Après avoir inséré le mot de passer, sélectionner « Positions Oview » et ensuite « Mot de passe Oview » puis
– programmer un nouveau mot de passe et enregistrer la modification; ou bien,
– supprimer le mot de passe existant en laissant vide l’espace réservé au mot
de passe et en enregistrant la modification.
FR
Français – 16
Page 50

ESPAÑOL
Instrucciones originales
ADVERTENCIAS Y PRECAUCIONES GENERALES
PARA LA SEGURIDAD
INFORMACIÓN SOBRE LAS MARCAS
Las marcas BLUETOOTH
propios titulares; los nombres de los productos indicados en este manual pueden estar registrados por los titulares respectivos.
®
, GPRS®, GSM® son marcas registradas por sus
ES
IMPORTANTE
Este símbolo indica argumentos donde existe un peligro
potencial. Por lo tanto, las operaciones indicadas con
este símbolo deben ser llevadas a cabo únicamente por
personal cualifi cado, respetando las normas de seguri-
dad vigentes locales y las presentes instrucciones.
1 – Español
¡TRABAJAR EN CONDICIONES SEGURAS!
¡ATENCIÓN! – Para la seguridad de las personas es importante respe-
tar estas instrucciones.
¡ATENCIÓN! – Instrucciones importantes para la seguridad: guarde
estas instrucciones.
¡ATENCIÓN! – Todas las operaciones de instalación, conexión, progra-
mación y mantenimiento del producto deben ser llevadas a cabo exclusivamente por un técnico cualifi cado!
Nice se reserva el derecho de modifi car o interrumpir en cualquier momento,
temporal o permanentemente, los servicios que ofrece al usuario sin previo aviso. Está de acuerdo en que Nice en modo alguno será considerado responsable frente al propio usuario o a terceros por cualquier modifi cación, suspensión
o desactivación.
Respete las siguientes advertencias:
– no modifi que ninguna pieza del producto salvo que esté previsto en
este manual. Las operaciones no autorizadas pueden ser peligrosas y
provocar problemas de funcionamiento. El fabricante no se asumirá
ninguna responsabilidad por daños originados por productos modifi -
cados arbitrariamente.
– el producto ha sido diseñado para ser utilizado en interiores. Puede
ser utilizado en exteriores sólo con condiciones climáticas adecuadas.
En efecto, su cubierta no lo protege de las infi ltraciones de agua ni de
las demás sustancias líquidas.
– si el producto se utiliza como dispositivo de mando, es importante
instalarlo en un lugar adecuado, lejos del alcance de los niños y a más
de 150 cm del pavimento.
– Utilice un paño suave y ligeramente humedecido (no mojado) para la limpie-
za superfi cial del producto. Importante – No utilice líquidos que contengan
alcohol, benceno, disolventes u otras sustancias infl amables. El uso de dichas
sustancias podría averiar el producto.
– Trate con cuidado la pantalla LCD sin rayarla.
– Conserve con cuidado este manual para facilitar las operaciones futuras de
programación o de mantenimiento del producto.
– El material de embalaje del producto debe ser eliminado respetando la normativa local.
Page 51

(BusT4)
(BusT4)
(BusT4)
(Oview
Software Suite)
(BusT4)
10-15m
max
(Gprs)
(Wi Fi)
(Adsl)
(Oview
Software Suite)
(GSM®)
(Internet)
1
Utilización del Oview solo
Utilización del
módulo OVBT
y del Software
Utilización del
módulo
OVBTGSM
y de un teléfono
móvil
El Oview y sus accesorios
módulo
OVBT
módulo
OVBTGSM
ES
Utilización del
módulo OVBTGSM
y del Software
OVBTGSM
módulo
Español – 2
Page 52

DESCRIPCIÓN DEL PRODUCTO Y
1
USO PREVISTO
El producto Oview es un dispositivo que sirve para programar y accionar los
dispositivos Nice dotados de “BusT4”, utilizados para el accionamiento de
cancelas, puertas de garaje, barreras con mástil móvil y otras aplicaciones
similares.
¡Cualquier otro uso es considerado inadecuado! El fabricante no responde de los daños que pudieran surgir por un uso inadecuado del
producto y diferente de aquel previsto en este manual.
1.1 – Características funcionales principales del Oview
El dispositivo Oview dialoga con otros dispositivos a través del cable BusT4;
por dicho motivo, se puede comunicar únicamente con los productos que
incorporan un conector BusT4, es decir, aquellos que forman parte del sistema
ES
“NiceOpera” (para más informaciones sobre este Sistema, consulte el recuadro de aquí al lado “Qué es Nice Opera”).
El Oview se activa sólo cuando está conectado a un dispositivo, puesto que
toma la alimentación directamente de este último.
El Oview puede ser utilizado como un sistema para programar dispositivos o
como un sistema para accionar automatizaciones. El Oview es indicado en las
instalaciones de automatización muy tecnológicas, porque permite:
– programar uno o varios dispositivos conectados en red;
– accionar una o varias automatizaciones;
– realizar un diagnóstico de un dispositivo o de varios dispositivos conec-
tados en red.
– almacenar(*) las configuraciones y programaciones de los dispositivos (por
ejemplo la memorización es útil para reconfigurar rápidamente los dispositivos
cuando se sustituye un componente de la instalación).
(*) Nota – La operación de almacenamiento está disponible sólo si se utiliza el
software opcional combinado con el Oview (consulte el Capítulo 7).
El Oview es adecuado para ser utilizado por el instalador y por el usuario. Utilizando un Oview solo, el instalador puede programar, modificar los datos y
hacer el mantenimiento de todos los dispositivos montados en la instalación.
Por el contrario, el usuario puede utilizar el Oview para accionar diariamente
una o varias automatizaciones.
3 – Español
Si el instalador lo desea, puede permitir que el usuario también tenga a disposición la programación de algunos parámetros. Esto puede ser útil cuando el
usuario necesite cambiar los valores de estos parámetros durante el uso de la
automatización.
Ante la presencia de una red de dispositivos, el Oview ofrece al instalador la
ventaja de poder configurar, uno por vez, todos los dispositivos montados en
una instalación, así disminuyendo la complejidad, los tiempos y los desplazamientos que normalmente se requieren hacer.
Nota – Para más informaciones sobre cómo construir una red Bus y sobre
cómo configurarla y gobernarla con el Oview, consulte el manual “NiceOpera
System Book” presente en la página web www.niceforyou.com
1.2 – Accesorios (opcionales)
El Oview incorpora un cable de 2 m para la conexión directa a un dispositivo, y
un soporte para la fijación a la pared.
Todos los demás accesorios son opcionales; a saber:
– Módulo Bluetooth
– Módulo GSM
®
, con el Software “Oview Software Suite” incorporado;
®
, con el Software “Oview Software Suite” incorporado.
Qué es “NiceOpera”
Nice Opera es un sistema formado de varios dispositivos utilizados, general-
mente, en las instalaciones de automatización de cancelas, puertas de garaje
y barreras móviles. Dichos dispositivos son:
– los transmisores de la serie NiceOne;
– los receptores de la serie NiceOne;
– las centrales de los motorreductores con conexión “BUST4”.
A dichos dispositivos se suman otros dispositivos complementarios, tipo software y hardware, a saber:
– la unidad de programación O-Box con software dedicado, para los
transmisores y receptores;
– la unidad de programación Oview, para las centrales de mando y los
receptores;
– un módulo Bluetooth
datos entre el Oview y un Ordenador Personal o un Ordenador Palmar;
®
y un software dedicado, para comunicar los
Page 53

– un módulo GSM® y un software dedicado, para comunicar los datos
por Internet entre el Oview y un Ordenador Personal o un Ordenador
Palmar.
Con el módulo GSM® se puede utilizar también un smartphone y un
teléfono móvil normal: con estos se puede enviar un mando de automa-
tización a través de una llamada o SMS. En el caso del smartphone, si
este dispone del sistema operativo Window® Mobile, también se puede
utilizar el software “Oview software suite”.
INSTALACIÓN DEL OVIEW
2
COMO DISPOSITIVO DE MANDO
Para utilizar el Oview como dispositivo fijo para el mando de automatizaciones,
es necesario instalarlo en un lugar adecuado, lejos del alcance de los niños y a
más de 150 cm del pavimento.
Para instalarlo en una pared, utilice el soporte entregado dentro del embalaje,
procediendo como se muestra en la fig. 2.
Posteriormente, conecte el Oview a la automatización tomando como referencia el Capítulo 3.
––– OBLIGACIONES DEL INSTALADOR –––
IMPORTANTE – Después de haber instalado y programado el Oview
como dispositivo de mando, el instalador debe entregar al cliente la
parte de este manual titulada “Manual de uso”.
Si el instalador desea que el cliente pueda acceder a algunas funciones
de programación, es necesario que también le entregue la información
sobre dichas funciones que se encuentran en el sitio web www.niceservice.com, en la sección “Download” (Descargas).
2
ES
Español – 4
Page 54

CONEXIÓN DEL OVIEW
A UN DISPOSITIVO
3
El Oview puede ser conectado a un dispositivo de dos maneras diferentes:
• conexión ocasional: esta permite utilizar el Oview como unidad de programación “portátil”. Para esta conexión se puede utilizar el cable suministrado (2
m) conectándolo a la toma del Oview (fig. 4) y a la toma “BusT4” presente en
la Central de mando del dispositivo a programar (fig. 5 – Para acceder a esta
toma, consulte el manual de instrucciones del dispositivo).
• conexión definitiva: esta permite utilizar el Oview como unidad “fija” de
mando y programación. Para esta conexión es probable que el cable suministrado (2 m) no sea suficientemente largo. Por consiguiente, hay que utilizar un
cable de prolongación o un cable nuevo de longitud adecuada con las siguientes características:
- tipo de conector a utilizar: conector RJ45 6/4 (cuerpo 6 con 4 contactos);
ES
son los conectores que se utilizan, generalmente, en los equipos telefónicos.
- tipos de cables que se pueden utilizar:
cable telefónico plano con 4 conductores;
cable para antirrobo con conductores (4 x 0,22 mm);
cable UTP categoría 2, con 4 conductores (si el cable tuviera más conducto-
res, elimine los conductores que no sirven);
cable STP categoría 5, con 4 conductores (si el cable tuviera más conducto-
res, elimine los conductores que no sirven) y apantallado ;
- longitud máxima del cable: tome como referencia las longitudes indicadas
en la Tabla 1.
Tabla 1 – Longitud máxima del cable
Oview Oview + Oview +
Bluetooth
Cable telefónico plano 300 m 250 m 150 m
Cable para antirrobo 300 m 300 m 250 m
Cable UTP categoría 2 500 m 500 m 400 m
Cable STP categoría 5 700 m 700 m 400 m
5 – Español
®
GSM
Notas generales de la Tabla 1:
• Las longitudes máximas de los cables están calculadas para un uso en entornos con
niveles de emisión electromagnética tipo “Civil”. Para obtener una mayor fiabilidad en la
transmisión de los datos por medio de cables prolongados, se aconseja utilizar cables
STP, categoría 5, conectando a tierra la trenza del cable de la siguiente manera:
– si los dispositivos están conectados “en cascada” (o “en cadena”), conecte la trenza
en el dispositivo colocado en un extremo de la cadena;
– si los dispositivos están conectados “en estrella”, conecte la trenza en un solo dispo-
sitivo, o en el centro de la estrella.
• Ante la presencia de una red de dispositivos, la longitud total del cable debe ser calculada de la siguiente manera:
– si los dispositivos están conectados “en cascada” (o “en cadena”), la longitud máxima
del cable debe ser calculada entre los dos dispositivos colocados en los extremos de la
cadena.
– si los dispositivos están conectados “en estrella”, la longitud máxima del cable debe
ser calculada sumando los dos tramos más largos y añadiendo el resultado de la suma
de las mitades de las longitudes de los demás tramos.
Por lo general, para conectar varios dispositivos en una red se pueden utilizar conecto-
res en “T”, llamados comúnmente “desdobladores” y utilizados en los equipos telefónicos. El tipo de desdoblador a utilizar es el modelo RJ45 6/4 (cuerpo 6 con 4 contactos).
• Para engarzar fácilmente el conector RJ45 en ambos extremos del cable, es preferible
que los conductores internos del cable sean trenzados y no rígidos.
Después de haber determinado el tipo de cable a utilizar para la conexión del
Oview a un dispositivo, proceda de la siguiente manera:
01. Antes de comenzar con la instalación del producto, asegúrese de tener
a disposición todas las herramientas y el material necesario para llevar
a cabo el trabajo. También es necesario controlar que dichos materiales
estén en buenas condiciones y que sean conformes con cuanto previsto
por las normativas locales de seguridad.
02. Establezca la posición donde instalar el Oview.
03. Realice las obras para la colocación de los tubos o de las canaletas de
protección de los cables eléctricos. Nota – Los tubos o las canaletas sirven para proteger los cables eléctricos de golpes y roturas accidentales.
04. Entonces, después de haber pasado el cable por el tubo de protección, si
®
se está utilizando un cable sin conectores, ensamble un conector en cada
extremo del cable teniendo cuidado de respetar la misma secuencia
de los hilos para ambos conectores (fig. 3).
05. Posteriormente, conecte el cable a la toma del Oview (fig. 4) y a la toma
“BusT4” presente en la central de mando del dispositivo a accionar (fig.
5 – Para acceder a esta toma, consulte el manual de instrucciones del
dispositivo).
Page 55

1 2 3 4 1 2 3 4 4 3 2 1 1 2 3 4
Nota – Para más informaciones sobre los argumentos tratados en este capítulo, consulte el manual “Nice Opera System Book”.
3
4
5
UTILIZACIÓN GENERAL DEL OVIEW
4
El Oview se activa sólo cuando está conectado a un dispositivo, puesto que
toma la alimentación directamente de este último.
Al encenderse el Oview, en su pantalla aparece un icono que representa el
dispositivo conectado.
• Leyenda de los botones del Oview
El Oview está formado de los siguientes componentes (fig. 6):
1 – Pantalla LCD;
2 / 4 – Botones con flecha W y X: sirven para desplazarse entre los diferen-
tes campos dentro de una ventana, o para desplazarse de una ventana
a otra;
3 / 5 – Botones con flecha S y T: sirven para modificar los valores de un
campo seleccionado o para desplazarse dentro de una lista;
6 – Botón : sirve para confirmar un valor;
7 – Botón z: sirve para seleccionar el elemento que aparece en la parte
inferior izquierda de la pantalla (9);
8 – Botón z: sirve para seleccionar el elemento que aparece en la parte
inferior derecha de la pantalla (10).
• Ventana principal del Oview
Después de haber activado el Oview, aparece una ventana llamada “Ventana
principal”. Los elementos que componen esta ventana son (fig. 7):
A – Nombre del dispositivo seleccionado.
B – Icono que identifica el tipo de dispositivo conectado; ante la presencia de una
red de dispositivos, en la pantalla aparece el primer dispositivo localizado.
C – Número que indica el conjunto al que pertenece el dispositivo seleccionado.
D – Hora y Fecha local.
E – “Menú”: este elemento permite acceder a todas las funciones disponibles
para programar un dispositivo.
F – “Opciones”: este elemento permite acceder a todas las funciones dispo-
nibles para accionar uno o varios dispositivos y configurar Oview.
Español – 6
ES
Page 56

8
1
4
3
7
2
5
6
10
9
6
run 2
Opciones Menú
02
00:01:14
09.11.07
B
EF
D
A C
ES
7
7 – Español
LAS FUNCIONES DEL OVIEW
5
• Accionamiento de la automatización
Para accionar una automatización se puede proceder de dos maneras. Después de haber seleccionado el conjunto al que pertenece la automatización a
accionar, envíe el mando deseado en una de las siguientes modalidades:
A) para enviar un mando directo, utilice uno de los siguientes botones:
– ABRIR = botón S (3 – fig. 6)
– STOP = botón (6 – fig. 6)
– CERRAR = botón T (5 – fig. 6)
B) para enviar un mando especial disponible en la automatización, seleccione en la ventana principal (fig. 7) el elemento “Opciones” con el botón z
(7 – fig. 6) y, posteriormente, seleccione el elemento “Mandos”. Después,
seleccione el mando deseado en la lista que aparece.
Entonces, para confirmar el mando escogido, seleccione “Seleciona” con el
botón z (8 – fig. 6) o vuelva a la ventana anterior seleccionado “atrás” con el
botón z (7 – fig. 6).
Nota – El tipo y el número de los mandos presentes en esta lista cambian
según el tipo de automatización seleccionada.
• Programación de los mandos horarios
El Oview incorpora un reloj interno que puede ser utilizado para programar
el envío automático de los mandos a una automatización, en días y horarios
deseados. Nota – Si por un corte de energía eléctrica el Oview se quedara
sin alimentación, su reloj seguirá funcionando regularmente; pero si durante
el corte de energía estaba programado el envío de un mando, éste no se
ejecutará.
Para programar la ejecución automática de los mandos en días y horarios
deseados, proceda de la siguiente manera:
a) seleccione el conjunto al que pertenece la automatización a programar;
b) seleccione en la ventana principal (fig. 7) el elemento “Opciones” con el
botón z (7 – fig. 6) y, posteriormente, seleccione el elemento “Mandos hora-
rios”;
Page 57

8
Mandos horarios
Nuevo
22:50
|mmjvsd
Atrás Seleccionar
off
c) en la ventana que se abre
selecione “Nuevo” para crear un
nuevo mando horario (fig. 8) e
los días y los horarios deseados;
d) confirme la programación
se leccionando el elemento
“OK” con el botón z (8 – fig. 6).
Importante – Controle que el
reloj esté ajustado exactamente
en la hora local.
Atención – Los mandos horarios funcionan únicamente si se
activa (ON) el mando “Activa-
ción mandos horarios” (en el
elemento “Opciones”).
d) Una vez confirmada la selección, se abrirá una ventana con un menú de
funciones.
Este menú puede estar formado de los siguientes elementos:
– “Funciones central” (contiene las funciones específicas de la central de
mando);
– “Funciones radio” (contiene las funciones específicas del receptor);
– “Funciones comunes” (contiene las funciones que están presentes en
todas las centrales de mando y en los receptores);
– “Funciones avanzadas” (contiene las funciones que están presentes en
todas las centrales de mando y en los receptores);
– “Inicio de sesión” (para acceder a un sistema de automatización si con
anterioridad se ha configurado una contraseña);
– (etcétera......)
Nota – La presencia o la ausencia de algunos elementos en el “menú funciones” depende del tipo de dispositivo seleccionado.
• Programación de la Central de mando y el Receptor
Para programar los parámetros de un dispositivo, proceda de la
siguiente manera:
ADVERTENCIA – Para acceder a las funciones contenidas en el
elemento “automatizaciones” podría ser necesario insertar una
contraseña si el instalador decidió proteger el acceso a las funciones de programación. Para más informaciones, consulte el
párrafo “Trabajar con las contraseñas”.
a) Seleccione el conjunto al que pertenece el dispositivo a programar.
b) Seleccione en el ventana principal (fig. 7) el elemento “Menú” con el botón
z (8 – fig. 6): en la pantalla aparecerá la lista de los dispositivos conectados y
presentes en ese conjunto.
c) En esta ventana es posible:
– hacer correr la lista de los nombres de los dispositivos presentes utilizando
los botones flecha S o T;
– acceder al conjunto siguiente utilizando el botón flecha X o acceder al conjunto anterior utilizando el botón flecha W;
– confirmar la selección de un dispositivo utilizando el botón 8.
Una vez que haya elegido una opción, confirme con “Selecciónar”. En este
momento, aparecerá una pantalla con las funciones del dispositivo. Más abajo se puede ver un icono
usuario.
• Regulación de los parámetros de funcionamiento del Oview
Para regular los parámetros de funcionamiento del Oview, hay que seleccionar
en la ventana principal (fig. 6) el elemento “Opciones” con el botón z (7 – fig.
6) y, posteriormente, el elemento “Configuración de Oview”.
En la pantalla aparece la lista de los parámetros disponibles: “Nombre” “Fecha/hora” - “Luminosidad display” - “Luminosidad botones” - “Con-
traseña de Oview” - “Idioma” - “Informaciones” - “Opciones red”.
Para visualizar y modificar cualquier parámetro es necesario seleccionarlo y
trabajar en la ventana que se abre.
– Nombre: sirve para asignar al Oview un nombre personal para identificarlo
fácilmente en una red de dispositivos;
– Fecha/hora: sirve para regular la fecha y la hora local. Con los botones fle-
cha W y X (2 y 4 – fig. 6) es posible desplazarse entre los espacios dedicados a la fecha y a la hora y, con los botones S y T (3 y 5 – fig. 6) es posible
modificar sus valores;
– Luminosidad display: sirve para regular la luminosidad del display. Puede
ser configurado con un valor comprendido entre un mínimo de 0% y un
máximo de 100%. Nota – Después de 30 segundos de inactividad del dis-
o indicando el modo de acceso: instalador,
Español – 8
ES
Page 58

play, la luminosidad disminuye al valor mínimo configurado;
– Luminosidad botones: sirve para regular la luminosidad de los botones.
Puede ser configurado con un valor comprendido entre un mínimo de 0% y
un máximo de 100%. Nota – Después de 30 segundos de inactividad de los
botones, la luminosidad disminuye al valor mínimo configurado;
– Contraseña de Oview: consulte el párrafo “Contraseña de Oview”;
– Idioma: sirve para configurar el idioma deseado;
– Informaciones: sirve para visualizar exclusivamente los datos técnicos del
Oview, sin la posibilidad de modificarlos;
– Opciones red: este elemento contiene los parámetros “Grupo” y “Direc-
ción”. Estos se utilizan para modificar el grupo al que pertenece el Oview y
la dirección personal de éste.
• Trabajar con las contraseñas
Las contraseñas de los dispositivos “NiceOpera”
Todos los dispositivos del sistema “NiceOpera”, incluido Oview, ofrecen al
instalador o al usuario la posibilidad de limitar el acceso a las personas no
autorizada para modificar los datos privados del dispositivo, mediante la pro-
ES
gramación de una contraseña
La contraseña se memorizará en el dispositivo y restringirá el acceso
a las funciones independientemente del dispositivo Oview conectado.
Si un dispositivo está protegido por una contraseña, para comenzar una programación es indispensable ejecutar al comienzo el procedimiento de “Inicio
de sesión” que fnalizará automáticamente cuando regrese a la pantalla principal. Si el dispositivo está protegido por ambas contraseñas, Oview pedirá de
forma automática la contraseña.
Las contraseñas configurables en una central son de dos tipos: “Contraseña de
usuario” y “Contraseña de instalador”.
Si el dispositivo está protegido por ambas contraseñas, Oview pedirá de forma
automática que se introduzca la contraseña.
Si se establece la contraseña de instalador y no se introduce la contraseña
correcta en la opción “Inicio de sesión” de la pantalla relativa a esa central, el
acceso a los menús estará limitado. Esto sucede, especialmente, si se accede
al menú “Funciones de la central”, donde algunas opciones no serán visibles
y otras lo serán pero no se podrán modificar.
Es posible establecer una contraseña de usuario (válida sólo si se establece
la contraseña de instalador) que bloqueará completamente el acceso a los
menús para los que se desconoce la contraseña.
El instalador puede decidir qué partes son visibles o modificables por quien ini-
9 – Español
cie la sesión con la contraseña de usuario. El procedimiento para modificar los
permisos de acceso es el siguiente: “Funciones de la central” → “Funciones
avanzadas” → “Permisos de usuario”. En especial: desplazando las S y
T es posible asignar a cada opción de menú uno de los siguientes permisos:
permiso de sólo lectura (visible pero no modificable)
■ permiso de lectura y escritura (visible y modificable)
∼ la opción no será visible por el usuario.
Si no se establece una contraseña, todo el menú será visible y modificable
(equivalente a acceder como instalador, con todos los permisos). En cualquier
momento se puede saber con qué perfil se está accediendo al menú comprobando el icono en la barra inferior (
– ¡Atención! Si al desplazarse faltan elementos de menú significa que se
ha establecido una contraseña. Para poder acceder al menú completo, es
necesario iniciar sesión con la contraseña de instalador.
– ¡Atención! Las contraseñas de instalador y de usuario son independien-
tes de la contraseña de Oview. Cada una protege diferentes partes del
menú.
Contraseña de Oview
El Oview permite programar una “Contraseña de Oview”.
La “Contraseña de Oview” sirve para bloquear el acceso por parte del usuario
a los datos y a las funciones que regulan el funcionamiento correcto de Oview
(acceso al menú “Opciones”). Esta contraseña protege los parámetros de los
módulos OVTB o OVBTGSM que estén conectados.
– Para configurar una contraseña: seleccione en la ventana principal (fig.
7) el elemento “Opciones” con el botón z (7 – fig. 6) y, posteriormente, el
elemento “Configuración de Oview” seguido de la opción “Contraseña de
Oview” y programe la contraseña deseada.
Nota – Cuando una contraseña está activa será solicitada cada vez que se
acceda al menú “Opciones”.
– Para modificar o eliminar una contraseña existente: seleccione el elemento “Opciones” en la pantalla principal. Después de introducir la contraseña,
seleccione “Configuración de Oview”, seguido de “Contraseña de Oview” y, a
continuación:
– programe una nueva contraseña y guarde las modificaciones; o bien,
– elimine la contraseña existente dejando vacío el espacio correspondiente y
memorizando la modificación.
usuario o bien instalador).
Page 59

• Oview con firmware a partir de la versión OV04
A partir de la versión OV04 del firmware, Oview incorpora dos funciones: “Historial de eventos” y “Actualización de la central”.
Historial eventos
Esta función permite visualizar en el Oview todas las operaciones hechas por
los dispositivos presentes en la red a la cual está conectado el Oview. La
adquisición de los datos (historial eventos) se ejecuta al inicio, de manera automática y no visible por el instalador, ni bien el Oview es conectado a la red: éste
busca todos los dispositivos conectados a la red y memoriza en su propia
memoria el historial de eventos de cada uno de ellos, sobreescribiendo los
datos sobre aquellos anteriores.
Después de buscar los dispositivos presentes en la red, con el Oview todavía
conectado, es posible visualizar el historial de eventos de un dispositivo a la
vez de la siguiente manera: seleccione el dispositivo y, posteriormente, “Fun-
ciones avanzadas” → “Historial eventos”. Para hojear los eventos, utilice
los pulsadoresS y T.
El historial eventos también se puede visualizar con “Oview Software Suite”.
En este caso, conecte el Oview al Pc o al ordenador de mano donde esté
instalado el programa, seleccione en la página principal el elemento “Oview”
y posteriormente “Funciones O-View” → “Configuraciones” → “Historial
eventos”. Se visualizará una lista con el historial eventos de todos los dispositivos presentes en la red a la cual ha sido conectado el Oview la última vez; para
visualizar los eventos de un solo dispositivo, utilice el campo “Filtro dispositi-
vo”, seleccionando el dispositivo deseado en la lista visualizada.
El número máximo de eventos memorizables es de 300.
El historial eventos adquirido quedará memorizado en el Oview hasta que éste
se conecte a otra red.
Actualización central
Esta función permite actualizar el firmware de una central de mando aprovechando la memoria interior del módulo adicional OVBT (o bien OVBTGSM) junto con el Oview.
El procedimiento está dividido en dos momentos operativos que pueden ejecutarse en diferentes momentos y lugar entre sí: 1) carga del nuevo firmware
en el módulo adicional del Oview solo por medio de Bluetooth; 2) descarga del
firmware en la central.
1. Cargar el nuevo firmware en el módulo adicional del Oview. Para car-
gar el firmware en el módulo adicional OVBT (o bien OVBTGSM), instale el
módulo en el Oview, abra el programa “Oview Software Suite” (versión 1.3
o superior), inicie la búsqueda de los dispositivos y seleccione el dispositivo
Oview; posteriormente, seleccione el elemento “Funciones avanzadas” y
luego “Cargar firmware central”. Entonces, seleccione el fichero con el
nuevo firmware y confirme. El fichero se memorizará automáticamente en el
módulo adicional. Esta operación solo puede hacerse mediante la conexión
de Oview por medio de Bluetooth y no a través de una conexión remota
GPRS.
2. Descargar el nuevo firmware en la central. Para descargar el firmware
en la central, conecte a ésta el Oview equipado con el módulo adicional
con el nuevo firmware en la memoria y proceda con la actualización de la
siguiente manera: elimine las posibles contraseñas; seleccione en el Oview
el elemento “Menú” y luego “Funciones centrales” → “Funciones avan-
zadas” → “Actualización firmware”. Entonces el Oview controlará que el
firmware nuevo sea compatible con la central: si fuera compatible, mostrará
el elemento “Iniciar”, en caso contrario la actualización no podrá iniciar. Si
la actualización no se concluye correctamente, la central quedará bloqueada esperando poder completar el procedimiento. Para desbloquearla habrá
que seleccionar “Opciones” → “Dispositivos en boot” y reiniciar la carga
del firmware.
ES
Español – 10
Page 60

UTILIZACIÓN DEL OVIEW CON LOS
6
MÓDULOS BLUETOOTH® Y GSM
®
Eliminación del producto
l funcionamiento del Oview puede potenciarse utilizando el módulo Bluetooth®
o GSM® y el software “Oview Software Suite”, entregado con estos últimos
(véase la fig. 1). Estos módulos y el software son accesorios opcionales; el
software se suministra en 2 versiones: una para PC y otra para ordenador
palmar. Para utilizar el software es necesario instalarlo en un PC, en un ordenador palmar y/o en un Smartphone que tengan una conexión Bluetooth
Internet.
– Conexión Bluetooth
Bluetooth® (a instalar en el Oview). Este tipo de conexión permite la comunicación con el Oview desde una distancia máxima de alrededor de 10-15 m sin
obstáculos, o de pocos metros con obstáculos (paredes o demás).
– La conexión Internet: permite conectarse al Oview gracias a un módulo
®
(a instalar en el Oview). Este tipo de conexión permite la comunicación
GSM
ES
con el Oview a través de la red GSM®. En este caso, la comunicación puede
hacerse desde cualquier distancia, siempre y cuando haya cobertura de red.
Con el módulo GSM® también es posible utilizar un smartphone y un teléfono móvil normal: con estos es posible enviar un mando a la automatización
mediante una llamada telefónica o un Sms; con el smartphone, dotado de sistema operativo Window® Mobile, también es posible utilizar el software “Oview
software suite”.
El software “Oview Software Suite” ofrece gráfica detallada y el teclado del PC
y del ordenador palmar agiliza la navegación y la escritura de los datos.
Con este Software el instalador puede realizar todas las operaciones que se
pueden ejecutar normalmente con el Oview y también puede crear un archivo
de datos para gestionar y memorizar las modificaciones realizadas a los dispositivos programados; además puede realizar un diagnóstico con informaciones
gráficamente más completas e inmediatas, y actualizar el firmware de un dispositivo.
®
: permite conectarse al Oview gracias a un módulo
Este producto está formado de varios tipos de materiales: algunos pueden ser
reciclados y otros deben ser eliminados. Infórmese sobre los sistemas de reciclaje o de eliminación previstos por las normativas vigentes locales para esta
categoría de producto.
¡Atención! algunas piezas del producto pueden contener sustancias contami-
®
y/o
nantes o peligrosas que, si se las abandonara en el medio ambiente, podrían
provocar efectos perjudiciales para el mismo medio ambiente y para la salud
humana.
El producto contiene una pila que debe quitarse y no debe arrojarse en los residuos normales porque contiene sustancias contaminantes; por consiguiente,
hay que eliminarla o reciclarla según los métodos de recogida selectiva previstos por las normativas vigentes locales.
Tal como indicado por el símbolo de aquí al lado, está prohibido arrojar este producto en los residuos urbanos. Realice
la “recogida selectiva” para la eliminación, según los métodos
previstos por las normativas vigentes locales, o bien entregue
el producto al vendedor cuando compre un nuevo producto
equivalente.
¡Atención! – Las normas locales vigentes pueden prever sanciones importantes en el caso de eliminación abusiva de este producto.
11 – Español
Page 61

Características técnicas del producto
El Oview es fabricado por Nice S.p.a. (TV) I.
Tipología: unidad de mando, programación y diagnóstico para dispositivos
con conexión BusT4
Tecnología adoptada: comunicación serial half duplex 19200 Bps en bus
diferencial para el envío de los mandos, la modificación de los parámetros y
el control de los datos de diagnóstico
Interfaz gráfica: pantalla LCD 128 x 64 dots (46 x 29 mm); 2,2”
Dispositivo de entrada operador: joypad con 5 + 2 botones
Iluminación de la pantalla/botones: luz blanca (coordenadas cromáti-
cas: X = 0,29–0,33; Y = 0,30–0,34)
Reloj fechador: interno, con batería de reserva (duración mínima 10 años)
Número máximo de mandos por hora: 64
Historial de eventos: capacidad de almacenamiento de 400 eventos
Longitud del cable de conexión:
– cable suministrado: 2 m
– otro cable: hasta 700 m, medido de punta a punta
Alimentación: suministrada por los dispositivos presentes en el BusT4
Corriente absorbida: 20 mA máximo (sin accesorios)
Aislamiento: Clase III
Grado de protección de la caja: IP 20 (utilización exclusiva en entornos
interiores y protegidos).
Temperatura de trabajo: de –20°C a +55°C
Dimensiones (mm): 107 x 61 x h 20
(con soporte de pared: 125 x 70 x h 32)
Peso: 75 g (sin cable)
ES
Accesorios opcionales:
• módulo para conexión con tecnología Bluetooth
®
• módulo para conexión con tecnología GSM®–GPRS
®
Español – 12
Page 62

DECLARACIÓN CE DE CONFORMIDAD
Declaraciones de conformidad con la Directiva 1999/5/CE
Nota: el contenido de la presente declaración se corresponde con cuanto se declara en el documento ofi cial presentado en la sede de Nice S.p.a. y, en particular, con la última revisión
disponible antes de la impresión de este manual. El texto aquí contenido se ha adaptado por cuestiones editoriales.
No obstante, se puede solicitar una copia de la declaración original a Nice S.p.a. (TV) I.
Número de declaración: 278/OV Rev.: 6 Idioma: ES
El abajo fi rmante, Luigi Paro, en calidad de Director General, conforme a las especifi caciones que se detallan a continuación y bajo su propia responsabi-
lidad, realiza la siguiente declaración:
Nombre del fabricante: NICE S.p.A.
Dirección: Via Pezza Alta 13, Z.I. Rustignè, 31046 Oderzo (TV) Italia
Tipo: Unidad de programación y mando para automatismos
Modelos: OVIEW
Accesorios: OVBT, OVBTGSM
ES
El producto cumple con los requisitos esenciales estipulados en el artículo 3 de la siguiente directiva comunitaria, conforme al uso para el que están previstos tales productos:
• Directiva 1999/5/CE DEL PARLAMENTO EUROPEO Y DEL CONSEJO, de 9 de marzo de 1999, sobre equipos radioeléctricos y equipos terminales de
telecomunicación y reconocimiento mutuo de su conformidad, en virtud de las siguientes normas armonizadas:
· Protección de la salud [art. 3, apartado 1, letra a)]: EN50371:2002, EN50360:2001+A1:2006
· Seguridad eléctrica [art. 3, apartado 1, letra a)]: EN 60950-1:2006+A11:2009
· Compatibilidad electromagnética [art. 3, apartado 1, letra b)]:
EN301489-1V1.8.1:2008, EN301489-17V1.4.1:2002,
EN301489-7 V1.3.1:2005
· Espectro radioeléctrico (art. 3, apartado 2): EN300328 V1.7.1:2006, EN300440-2 V1.1.2:2004,
EN 301511 V9.0.2:2003
En virtud de la Directiva 1999/5/CE (anexo V), el producto resulta ser de Clase 1 e incorpora la marca:
0682
Asimismo, el producto cumple los requisitos previstos en las siguientes directivas comunitarias:
• DIRECTIVA 2004/108/CE DEL PARLAMENTO EUROPEO Y DEL CONSEJO de 15 de diciembre de 2004 relativa a la aproximación de las legislaciones de los
Estados miembros en materia de compatibilidad electromagnética y por la que se deroga la Directiva 89/336/CEE, según las siguientes normas armonizadas:
EN 61000-6-2:2005 y EN 61000-6-3:2007
Oderzo, 1 de marzo de 2012 Luigi Paro
(Director general)
13 – Español
Page 63

MANUAL DE USO
8
1
4
3
7
2
5
6
10
9
ADVERTENCIAS Y PRECAUCIONES GENERALES PARA LA
SEGURIDAD
¡ATENCIÓN! – Todas las operaciones de instalación, conexión, programa-
ción y mantenimiento del producto deben ser llevadas a cabo exclusivamente por un técnico cualificado.
Respete las siguientes advertencias:
– no deje que los niños accedan al Oview.
– utilice un paño suave y ligeramente humedecido (no mojado) para la limpieza
superficial del producto. Importante – No utilice líquidos que contenga alcohol,
benceno, disolventes u otras sustancias inflamables. El uso de dichas sustancias
podría averiar el producto.
– trate con cuidado la pantalla LCD sin rayarla.
– conserve con cuidado este manual para facilitar las consultaciones futuras.
– al final de la vida útil del producto, controle que sea reciclado o eliminado
según las normas locales vigentes.
DESCRIPCIÓN DEL OVIEW
El Oview, utilizado como dispositivo de mando fijado a la pared, está siempre activo
porque está alimentado directa y continuamente por la automatización a la que está
conectado. Si el Oview no se utiliza por un breve período de tiempo, su pantalla
se coloca en stand-by (la luminosidad baja). Para reactivarlo es suficiente pulsar
cualquier botón.
Para accionar una automatización es suficiente escribir en la pantalla del Oview el
nombre de la automatización y enviar el mando con un botón (para más informaciones, lea el capítulo “Utilización del Oview como dispositivo de mando”).
• Leyenda de los botones del Oview
El Oview está formado de los siguientes componentes (fig. A):
1 – Pantalla LCD;
2 / 4 – Botones con flecha W y X: sirven para desplazarse entre los diferentes
campos dentro de una ventana, o para desplazarse de una ventana a otra;
3 / 5 – Botones con flecha S y T: sirven para modificar los valores de un campo
seleccionado o para desplazarse dentro de una lista;
6 – Botón : sirve para confirmar un valor;
7 – Botón z: sirve para seleccionar el elemento que aparece en la parte inferior
izquierda de la pantalla (9);
8 – Botón z: sirve para seleccionar el elemento que aparece en la parte inferior
derecha de la pantalla (10).
A
ES
• Ventana principal del Oview
Después de haber activado el Oview, se abre una ventana llamada “ventana principal”. Los elementos que componen esta ventana son (fig. B):
A – Icono que identifica el tipo de dispositivo conectado; ante la presencia de una
red de dispositivos, en la pantalla aparece el primer dispositivo localizado automáticamente que pertenece a un conjunto determinado.
B – Nombre del dispositivo seleccionado.
C – Número que indica el conjunto al que pertenece el dispositivo seleccionado.
Español – 14
Page 64

D – Fecha y hora local.
run 2
Opciones Menú
02
00:01:14
09.11.07
B
EF
D
A C
Mandos horarios
Atrás Seleccionar
off
22:50
|mmjvsd
Nuevo
E – “Mandos”: este elemento permite acceder a todas las funciones disponibles
para accionar uno o varios dispositivos.
F – “Opciones”: este elemento permite acceder a todas las funciones disponibles
para programar un dispositivo.
B
ES
UTILIZACIÓN DEL OVIEW COMO DISPOSITIVO DE MANDO
Para accionar una automatización se puede proceder de dos maneras. Después de
haber seleccionado el conjunto al que pertenece la automatización a accionar, envíe
el mando deseado en una de las siguientes modalidades:
1) para enviar un mando directo, utilice uno de los siguientes botones:
– ABRIR = botón S (3 – fig. A)
– STOP = botón (6 – fig. A)
– CERRAR = botón T (5 – fig. A)
2) para enviar un mando especial disponible en la automatización, seleccione en
la ventana principal (fig. B) el elemento “Opciones” con el botón z (7 – fig. A) y,
posteriormente, seleccione el elemento “Mandos”. Después, seleccione el mando
deseado en la lista que aparece.
Entonces, para confirmar el mando escogido, seleccione “Seleccionar” con el
botón z (8 – fig. A) o vuelva a la ventana anterior seleccionado “Atrás” con el botón
z (7 – fig. A).
Nota – El tipo y el número de los mandos presentes en esta lista cambian según el
tipo de automatización seleccionada.
15 – Español
FUNCIONALIDAD DEL OVIEW
• Programación de los mandos horarios
El Oview incorpora un reloj interno que puede ser utilizado para programar el envío
automático de los mandos a una automatización. Nota – Si por un corte de energía
eléctrica el Oview se quedara sin alimentación, su reloj seguirá funcionando regularmente; pero si durante el corte de energía estaba programado el envío de un
mando, éste no se ejecutará pero quedará igualmente programado.
Para programar la ejecución automática de los mandos en días y horarios deseados, proceda de la siguiente manera:
a) seleccione el conjunto al que pertenece la automatización a programar;
b) seleccione en la ventana principal (fig. B) el elemento “Opciones” con el botón z
(7 – fig. A) y, posteriormente, seleccione el elemento “Mandos horario”;
c) inserte en los espacios cor respondientes en la ventana que se abre (fig. C) sele-
cionar “Nuevo” para crear un nuevo mando horario con los días y los horarios
deseados;
d) confirme la programación se leccionando el elemento “OK” con el botón z (8 –
fig. A).
Importante – Controle que el reloj esté ajustado exactamente en la hora local.
Atención – Los mandos horarios funcionan únicamente si se activa (ON) el
mando “Activación mandos horarios” (en el elemento “Opciones”).
C
• Regulación de los parámetros de funcionamiento del Oview
Para regular los parámetros de funcionamiento del Oview hay que seleccionar en
la ventana principal (fig. B) el elemento “Opciones” con el botón z (7 – fig. A) y,
posteriormente, el elemento “Configuración de Oview”.
En la pantalla aparece la lista de los parámetros disponibles: “Nombre” “Fecha/hora” - “Luminosidad display” - “Luminosidad botones” - “Con-
traseña de Oview” - “Informaciones” - “Idioma” - “Opciones red”.
Page 65

Para visualizar y modificar cualquier parámetro es necesario seleccionarlo y
trabajar en la ventana que se abre.
puede bloquearse por el instalador y, por tanto, no ser modificables.
¡Atención! – Algunos de estos parámetros
– Nombre: sirve para asignar al Oview un nombre personal para identificarlo
fácilmente en una red de dispositivos;
– Fecha/hora: sirve para regular la fecha y la hora local. Con los botones fle-
cha W y X (2 y 4 – fig. 6) es posible desplazarse entre los espacios dedicados a la fecha y a la hora y, con los botones S y T (3 y 5 – fig. 6) es posible
modificar sus valores;
– Luminosidad display: sirve para regular la luminosidad del display. Puede
ser configurado con un valor comprendido entre un mínimo de 0% y un
máximo de 100%. Nota – Después de 30 segundos de inactividad del display, la luminosidad disminuye al valor mínimo configurado;
– Luminosidad botones: sirve para regular la luminosidad de los botones.
Puede ser configurado con un valor comprendido entre un mínimo de 0% y
un máximo de 100%. Nota – Después de 30 segundos de inactividad de los
botones, la luminosidad disminuye al valor mínimo configurado;
– Contraseña de Oview: consulte el párrafo “Contraseña de Oview”;
– Informaciones: sirve para visualizar exclusivamente los datos técnicos del
Oview, sin la posibilidad de modificarlos;
– Idioma: sirve para configurar el idioma deseado;
– Opciones red: este elemento contiene los parámetros “grupo” y “direc-
ción”. Estos se utilizan para modificar el grupo al que pertenece el Oview y
la dirección personal de éste.
• Programación de las funciones de una automatización
Para acceder a las funciones programables de una automatización es necesario
seleccionar en la ventana principal (fig. B) el elemento “menú” con el botón z (8
– fig. A).
En la ventana que se abre, al seleccionar la automatización a programar podría ser
necesario insertar una contraseña.
Oview” y programe la contraseña deseada.
Nota – Cuando una contraseña está activa será solicitada cada vez que se
acceda al menú “Opciones”.
– Para modificar o eliminar una contraseña existente: seleccione el elemento “Opciones” en la pantalla principal. Después de introducir la contraseña,
seleccione “Configuración de Oview”, seguido de “Contraseña de Oview” y, a
continuación:
– programe una nueva contraseña y guarde las modificaciones; o bien,
– elimine la contraseña existente dejando vacío el espacio correspondiente y
memorizando la modificación.
ES
• Trabajar con la “Contraseña de Oview”
Para que las personas no autorizadas, por ejemplo, desconocidos y niños, no puedan acceder a algunas funciones programables (por ejemplo, las programaciones
horarias), el Oview ofrece la posibilidad de programar una “Contraseña de Oview”.
– Para configurar una contraseña: seleccione en la ventana principal (fig.
7) el elemento “Opciones” con el botón z (7 – fig. 6) y, posteriormente, el
elemento “Configuración de Oview”, seguido de la opción “Contraseña de
Español – 16
Page 66

DEUTSCH
Originalanleitungen
HINWEISE UND GENERELLE
SICHERHEITSVORSCHRIFTEN
INFORMATION ÜBER DIE MARKENZEICHEN
Die Markenzeichen BLUETOOTH
Eigentümern registrierte Markenzeichen; die Namen der in diesem Handbuch
angegebenen Produkte können auch von den jeweiligen Eigentümern registriert werden.
®
, GPRS®, GSM® sind von den jeweiligen
DE
WICHTIG
Dieses Symbol zeigt die Themen an, die eine mögliche
Gefahrenquelle darstellen. Die dieses Symbol darstellenden Vorgänge dürfen nur von qualifi ziertem und erfahre-
nem Personal ausgeführt werden, wobei die örtlich geltenden Sicherheitsbestimmungen und die vorliegenden
Anleitungen eingehalten werden.
1 – Deutsch
UNTER SICHEREN BEDINGUNGEN ARBEITEN!
ACHTUNG! – Für die Sicherheit der Personen müssen diese Anleitun-
gen eingehalten werden.
ACHTUNG! – Für die Sicherheit bedeutende Anleitungen, somit müs-
sen sie aufbewahrt werden.
ACHTUNG! – Alle Installierungs-, Anschluss-, Programmierungs- und
Wartungsarbeiten des Produkts dürfen ausschließlich von einem qualifi zierten Techniker ausgeführt werden!
Nice behält sich das Recht vor, jederzeit, vorläufi g oder dauerhaft, die angebote-
nen Leistungen zu verändern oder zu deaktivieren, auch ohne den Benutzer davon
in Kenntnis zu setzen. Dieser stimmt zu und vereinbart, dass Nice in keiner Weise
gegenüber dem Benutzer selbst oder gegenüber Dritten aufgrund der Veränderung, der Unterbrechung oder der Deaktivierung haftbar gemacht werden kann.
Die folgenden Hinweise einhalten:
– Keine Änderungen an den Produktteilen vornehmen, außer die in diesem
Handbuch vorgesehenen. Nicht zugelassene Vorgänge können Gefahren
und eine mangelhafte Funktion hervorrufen. Der Hersteller lehnt jede Verantwortung für Schäden aus willkürlich geänderten Produkten ab.
– Das Produkt wurde entwickelt, um in Innenräumen benützt zu werden. Es darf nur bei geeigneten klimatischen Bedingungen in Außenbereichen benützt werden. Seine Hülle schützt nicht vor Einsickerungen
von Wasser oder anderen fl üssigen Substanzen.
– Wenn das Produkt als Steuerung verwendet wird, muss es an einem
geeigneten Ort installiert werden, der für Kinder nicht zugänglich ist,
und bei einer Höhe vom Boden nicht unter 150 cm.
– Zur Reinigung der Produktoberfl äche ein weiches leicht feuchtes Tuch (nicht
nass) verwenden. Wichtig – Keine Alkohol, Benzol, Lösungsmittel oder andere
brennbare Substanzen enthaltenden Flüssigkeiten verwenden. Die Anwendung
dieser Substanzen könnte das Produkt beschädigen.
– Den LCD-Bildschirm sorgfältig behandeln und Kratzer vermeiden.
– Dieses Handbuch sorgfältig aufbewahren, um eventuelle zukünftige Program-
mierungs- oder Wartungsarbeiten des Produkts zu erleichtern.
– Das Verpackungsmaterial des Produkts bei Einhaltung der örtlich geltenden
Bestimmung entsorgen.
Page 67

(BusT4)
(BusT4)
(BusT4)
(Oview
Software Suite)
(BusT4)
10-15m
max
(Gprs)
(Wi Fi)
(Adsl)
(Oview
Software Suite)
(GSM®)
(Internet)
1
Ausschließliche Anwendung des Oview
Anwendung des
Moduls OVBT
und der Software
Anwendung des
Moduls OVBTGSM und
eines Mobiltelefons
Das Oview und seine Zubehörteile
moduls
OVBT
moduls
OVBTGSM
DE
Anwendung des
Moduls OVBTGSM
und der Software
OVBTGSM
moduls
Deutsch – 2
Page 68

BESCHREIBUNG DES PRODUKTS UND
1
VERWENDUNGSZWECK
Das Produkt Oview ist eine Vorrichtung zur Programmierung und Steuerung
der Vorrichtungen Nice mit „BusT4“, die zur Bewegung von Toren, Garagentoren, Straßensperren mit beweglicher Stange und anderen ähnlichen Anwendungen verwendet werden.
Jede andere Anwendung wird als zweckentfremdet betrachtet! Der
Hersteller ist nicht für Schäden durch eine falsche Anwendung des
Produkts entgegen der Angaben dieses Handbuchs verantwortlich.
1.1 – Hauptsächliche Funktionseigenschaften des Oview
Die Vorrichtung Oview dialogiert mit den anderen Vorrichtungen durch das
Kabel BusT4; somit kann sie nur ausschließlich mit den Produkten kommunizieren, die über einen Stecker BusT4 verfügen, d.h. die Teil des Systems
„NiceOpera“ sind (für Informationen über dieses System bezieht man sich auf
den seitlichen Abschnitt „Was ist Nice Opera“).
Das Oview wird nur aktiviert, wenn es an eine Vorrichtung angeschlossen wird,
da seine Speisung direkt durch diese erfolgt.
Das Oview kann als System zur Programmierung von Vorrichtungen wie auch
DE
als System zur Steuerung von Automatisierungen angewendet werden. Die
Verwendung des Oview ist besonders für Automatisierungsanlagen mit einem
hohen technologischen Wert geeignet, da folgendes ermöglicht wird:
– Programmieren einer Vorrichtung oder mehrerer in einem Netz angeschlossener Vorrichtungen;
– Steuerung einer oder mehrerer Automatisierungen;
– Die Diagnose einer oder mehrerer in einem Netz angeschlossener Vorrich-
tungen ausführen.
– Archivierung(*) der Einstellungen und Programmierungen der Vorrichtungen
(die Archivierung ist zum Beispiel nützlich, um die Vorrichtung im Falle eines
Austausch eines Anlagenbestandteils schnell erneut zu konfi gurieren).
(*) Anmerkung – Die Archivierung ist nur bei Anwendung der zusätzlichen
Software des Oview verfügbar (Bezug: Kapitel 7).
Das Oview ist geeignet, um durch den Installateur wie durch den Anwender
angewendet werden zu können. Mit nur einem Oview kann der Installateur die
Daten programmieren und ändern und die Wartung jeder Vorrichtung in der
3 – Deutsch
Anlage. Der Anwender kann das Oview dagegen verwenden, um täglich eine
oder mehrere Automatisierungen zu steuern.
Wenn es der Installateur wünscht, kann er dem Anwender auch die Programmierung einiger Parameter zur Verfügung zu stellen. Das kann nützlich sein,
falls der Anwender den Wunsch hat, die Werte dieser Parameter während der
Anwendung der Automatisierung zu ändern.
Bei Anwesenheit eines Vorrichtungsnetzes bietet die Anwendung des Oview
dem Installateur den Vorteil, alle in einer Anlage vorliegenden Vorrichtungen
einzeln zu konfi gurieren, wodurch der normalerweise notwendige Aufwand, die
Zeit und die Versetzungen reduziert werden.
Hinweis – Für weitere Informationen, wie ein Bus-Netz gebildet wird und wie
dieses konfi guriert und durch Oview überwacht werden muss, bezieht man
sich auf das Handbuch „NiceOpera System Book“, das in der Web-Site www.
niceforyou.com gefunden werden kann.
1.2 – Zubehörteile (Optionals)
Das Oview besitzt ein 2 m langes Kabel für den direkten Anschluss an eine
Vorrichtung und eine Halterung zur Befestigung des Produkts an die Wand.
Alle anderen Zubehörteile sind Optionals; sie lauten:
– Modul Bluetooth
– Modul GSM
®
, mit der Software „Oview Software Suite“;
®
, mit der Software „Oview Software Suite“.
Was ist „NiceOpera“
Nice Opera ist ein System, das aus verschiedenen Vorrichtungen besteht,
die normalerweise in Automatisierungsanlagen von Toren, Garagentoren
und beweglichen Straßensperren angewendet werden. Diese Vorrichtungen
lauten:
– Die Sender der Serie NiceOne;
– Die Empfänger der Serie NiceOne;
– Die Zentralen der Getriebemotoren mit „BUST4“-Anschluss.
Diesen Vorrichtungen können andere vervollständigende Vorrichtungen (Software und Hardware) zugefügt werden:
– die Programmiereinheit O-Box mit diesbezüglicher Software für die
Sender und Empfänger;
– die Programmiereinheit Oview für die Steuerzentralen und die Empfänger;
Page 69

– ein Modul Bluetooth® und eine diesbezügliche Software für die Kom-
munikation der Daten zwischen Oview und einem Personal Computer
oder einem Handcomputer;
– ein Modul GSM
nikation der Daten via Internet zwischen Oview und einem Personal
Computer oder einem Handcomputer.
Mit dem Modul Gsm
males Mobiltelefon zu verwenden: mit diesen kann per Anruf oder SMS
ein Befehl an die Automatisierung gesendet werden; mit dem Smart-
phone und dem Betriebssystem Window
ware „Oview software suite“ angewendet werden.
®
und eine diesbezügliche Software für die Kommu-
®
ist es möglich, auch ein Smartphone und ein nor-
®
Mobile kann auch die Soft-
INSTALLIERUNG DES OVIEW
2
ALS STEUERVORRICHTUNG
Zur Anwendung des Oview als feste Vorrichtung zur Steuerung von Automatisierungen muss es an einem geeigneten Ort installiert werden, der für Kinder
nicht zugänglich ist, und bei einer Höhe vom Boden nicht unter 150 cm.
Zur Wandinstallierung wird die in der Verpackung vorliegende Halterung verwendet und laut Abb. 2 vorgegangen.
Daraufhin das Oview an den Automatismus schließen, wobei man sich auf
Kapitel 3 bezieht.
––– PFLICHTEN DES INSTALLATEURS –––
WICHTIG – Nach der Installation und Programmierung des Oview als
Steuervorrichtung, muss der Installateur dem Kunden den Teil dieses
Han d-buchs aushändigen, das als „Gebrauchsanweisung“ bezeichnet
wird.
Wenn er dem Kunden außerdem den Zugriff zu einigen Programmierfunktionen ermöglichen möchte, müssen auch die Informationen über
diese Funktionen ausgehändigt werden, die auf der Website www.niceservice.com im Bereich „Download“ enthalten sind.
2
DE
Deutsch – 4
Page 70

ANSCHLUSS DES OVIEW
AN EINE VORRICHTUNG
3
Das Oview kann auf zwei verschiedene Arten an eine Vorrichtung angeschlossen werden:
• vorübergehender Anschluss: Dieser Anschluss ermöglicht die Anwendung
des Oview als tragbare Programmiereinheit. Für diesen Anschluss kann das mitgelieferte Kabel (2 m) benützt werden, indem es an den Anschluss des Oview
(Abb. 4) und an den Anschluss „BusT4“ in der Steuerzentrale der zu program-
mierenden Vorrichtung angeschlossen wird (Abb. 5 – Um zu diesem Anschluss
zu gelangen, bezieht man sich auf die Gebrauchsanleitung der Vorrichtung).
• defi nitiver Anschluss: Dieser Anschluss ermöglicht die Anwendung des
Oview als feste Steuer- und Programmiereinheit. Bei diesem Anschluss ist es
wahrscheinlich, dass das mitgelieferte Kabel (2 m) nicht ausreichend lang ist.
Somit muss ein Verlängerungskabel oder ein neues Kabel mit passender Länge
und den folgenden Eigenschaften verwendet werden:
- zu verwendende Steckerart: Stecker RJ45 6/4 (Gehäuse 6 mit 4 Kontak-
ten); es handelt sich um Stecker, die normalerweise in Telefonanlagen verwendet werden.
- Kabel arten, die benützt werden können:
DE
fl aches Telefonkabel mit 4 Leitungen;
Kabel für Alarmanlage mit Leitungen (4 x 0,22 mm);
Kabel UTP Kategorie 2, mit 4 Leitungen (wenn das Kabel mehr aufweist, müs-
sen die überschüssigen beseitigt werden);
Kabel STP Kategorie 5, mit 4 Leitungen (wenn das Kabel mehr aufweist, müs-
sen die überschüssigen beseitigt werden) und Abschirmung.
- Höchstlänge des Kabels: Bezug auf die Längen der Tabelle 1.
Tabelle 1 – Höchstlänge des Kabels
Oview Oview + Oview +
Bluetooth
Flaches Telefonkabel 300 m 250 m 150 m
Kabel für Alarmanlage 300 m 300 m 250 m
Kabel UTP Kategorie 2 500 m 500 m 400 m
Kabel STP Kategorie 5 700 m 700 m 400 m
5 – Deutsch
®
GSM
Generelle Anmerkungen über die Tabelle 1:
• Die Höchstlängen der Kabel wurden für eine Anwendung in Umgebungen mit „privaten“
elektromagnetischen Emissionsniveaus kalkuliert. Um eine höhere Zuverlässigkeit der
Datenübertragung durch lange Kabel zu erreichen, sollten Kabel STP der Kategorie 5
verwendet werden, wobei die Abschirmung des Kabels wie folgt geerdet wird:
– wenn die Vorrichtungen über eine „Stufenschaltung“ (oder „Kettenschaltung“) ange-
schlossen werden, die Abschirmung an die Vorrichtung anschließen, die an einem Ende
der Kette positioniert ist;
– Wenn die Vorrichtungen eine „Sternschaltung“ aufweisen, die Abschirmung entweder
an nur einer Vorrichtung oder in der Mitte des Sterns anschließen.
• Bei Anwesenheit eines Vorrichtungsnetzes, muss die Gesamtlänge des Kabels wie folgt
kalkuliert werden:
– wenn die Vorrichtungen über eine „Stufenschaltung“ (oder „Kettenschaltung“) ange-
schlossen werden, muss die Höchstlänge des Kabels zwischen den beiden Vorrichtung
an den Enden der Kette kalkuliert werden.
– Wenn die Vorrichtungen eine „Sternschaltung“ aufweisen, muss die Höchstlänge de
Kabels durch Summierung der beiden längsten Abzweigungen kalkuliert werden, wobei
dieser Summe die Hälfte der Längen der anderen Abzweigungen zugefügt wird.
Generell können für den Anschluss mehrerer Vorrichtungen in einem Netz entsprechen-
de „T“-Anschlüsse benützt werden, die normalerweise als „Doppler“ bezeichnet und
normalerweise in Telefonanlagen benützt werden. Der anzuwendende Dopplertyp ist
das Mod. RJ45 6/4 (Gehäuse 6 mit 4 Kontakten).
• Zur Erleichterung des Pressens des Steckers RJ45 an den beiden Kabelenden, ist es
vorzuziehen, dass die internen Leitungen des gewählten Kabels „Litzen“ aufweisen und
somit nicht „starr“ sind.
Nachdem die zu benützende Kabelart für den Anschluss des Oview an eine
Vorrichtung festgesetzt wurde, wie folgt vorgehen:
01. Vor der Installierung des Produkts sicherstellen, dass alle notwendigen
Werkzeuge und Material zur Ausführung der Arbeit zur Verfügung stehen.
Außerdem prüfen, dass diese in einem guten Zustand sind und den örtlichen Sicherheitsbestimmungen entsprechen.
02. Die Position festsetzen, in der das Oview installiert wird.
03. Die Arbeiten zur Verlegung der Rohre oder der Schutzkanäle der Strom-
kabel vornehmen. Anmerkung – Die Rohre oder die Kanäle schützen die
®
Stromkabel vor Stößen und Brüchen.
04. Nachdem das Kabel nun in das Schutzrohr geführt wurde und ein Kabel
ohne Stecker verwendet wird, muss an jedes Ende des Kabels ein Stecker
montiert und darauf geachtet werden, dieselbe Kabelfolge für beide
Stecker anzuwenden (Abb. 3).
05. Dann das Kabel an den Anschluss des Oview (Abb. 4) und an den
An schluss „BusT4“ an der Steuerzentrale der zu steuernden Vorrichtung
Page 71

1 2 3 4 1 2 3 4 4 3 2 1 1 2 3 4
anschließen (Abb. 5 – Um an diesen Anschluss zu gelangen, bezieht man
sich auf die Gebrauchsanleitung der Vorrichtung).
Anmerkung – Für weitere Informationen bezüglich der in diesem Kapitel
behandelten Themen, bezieht man sich auf das Handbuch „Nice Opera System Book“.
3
4
5
GENERELLE ANWENDUNG DES OVIEW
4
Oview aktiviert sich ausschließlich, wenn es an einer gespeisten Vorrichtung
angeschlossen ist, da es von dieser gespeist wird.
Beim Einschalten des Oview erscheint auf dem Bildschirm eine Ikone, die die
angeschlossene Vorrichtung darstellt.
• Zeichenerklärung der Tasten des Oview
Das Oview besteht aus den folgenden Teilen (Abb. 6):
1 – LCD - Bildschirm;
2 / 4 – Tasten mit dem Pfeil W und X: Sie dienen dazu, um sich zwischen
einem Feld und dem anderen innerhalb einer Bildschirmseite oder von
einer Bildschirmseite zur anderen zu versetzen;
3 / 5 – Tasten mit Pfeil S und T: Sie dienen dazu, die Werte eines gewähl-
ten Felds zu ändern oder um sich innerhalb einer Liste zu versetzen;
6 – Taste zur Bestätigung eines Werts;
7 – Taste z zur Auswahl des Punkts, der sich unten links im Bild-
schirm befi ndet (9);
8 – Taste z zur Auswahl des Punkts, der sich unten rechts im Bild-
schirm befi ndet (10).
• Anfangsbildschirmseite des Oview
Nachdem Oview aktiviert wurde, erscheint eine Bildschirmseite, die als
„Anfangsbildschirmseite“ bezeichnet wird. Die diese Bildschirmseite zusammensetzenden Elemente lauten (Abb. 7):
A – Name der gewählten Vorrichtung.
B – Ikone, die die angeschlossene Vorrichtungsart identifi ziert; bei Anwesen-
heit eines Vorrichtungsnetzes wird auf dem Bildschirm die erste gefundene Vorrichtung angezeigt.
C – Nummer, die eine Gruppe anzeigt, zu der die gewählte Vorrichtung gehört.
D – Örtliche Uhrzeit und Datum.
E – „Menü“: Dieser Punkt ermöglicht den Zugang zu allen verfügbaren Funk-
tionen, um eine Vorrichtung zu programmieren.
Deutsch – 6
DE
Page 72

F – „Optionen“: Dieser Punkt ermöglicht den Zugriff auf alle verfügbaren
8
1
4
3
7
2
5
6
10
9
run 2
Optionen Menü
02
00:01:14
09.11.07
B
EF
D
A C
Funktionen, um eine oder mehrere Vorrichtungen zu steuern und Oview zu
konfi gurieren.
DIE FUNKTIONEN DES OVIEW
5
6
DE
7
7 – Deutsch
• Steuerung der Automatisierung
Zur Steuerung einer Automatisierung kann auf zwei Weisen vorgegangen werden. Nachdem die Gruppe gewählt wurde, zu der die zu steuernde Automatisierung gehört, wird die gewünschte Steuerung wie folgt übertragen:
A) um eine direkte Steuerung zu übertragen, eine der folgenden Tasten
nützen:
– ÖFFNEN = Taste S (3 – Abb. 6)
– STOPP = Taste (6 – Abb. 6)
– SCHLIESSEN = Taste T (5 – Abb. 6)
B) um eine spezielle Steuerung zu übertragen, die in der Automatisierung
ver fügbar ist, wird in der Anfangsbildschirmseite (Abb. 7) der Punkt „Optionen“
mit der Taste z (7 – Abb. 6) gewählt und daraufhin der Punkt „Steuerungen“.
Dann die gewünschte Steuerung in der erscheinenden Liste wählen.
Nun wird zur Bestätigung der gewählten Steuerung „Auswählen“ mit der
Taste z (8 – Abb. 6) gewählt oder man kehrt in die vorherige Bildschirmseite
zurück, indem „Zurück“ mit der Taste z (7 – Abb. 6) gewählt wird.
Anmerkung – Die Art und die Anzahl der in dieser Liste vorhandenen Steuerungen ändern sich aufgrund der Typologie der gewählten Automatisierung.
• Die Uhrzeitensteuerungen programmieren
Das Oview verfügt über eine interne Uhr, die genützt werden kann, um die
automatische Übertragung der Steuerungen an eine Automatisierung an den
gewünschten Tagen und Uhrzeiten zu programmieren. Anmerkung – Wenn
aufgrund eines Strom-Blackouts des Oview keine Speisung vorliegt, funktioniert die Uhr regulär weiter, wenn jedoch während des Blackouts die Übertragung einer Steuerung programmiert war, wird diese nicht ausgeführt.
Zur Programmierung der automatischen Ausführung der Steuerungen an den
gewünschten Tagen und Uhrzeiten, wie folgt vorgehen:
a) die Gruppe wählen, zu der die zu programmierende Automatisierung gehört;
b) in der Anfangsbildschirmseite (Abb. 7) den Punkt „Optionen“ mit der Taste z (7
– Abb. 6) wählen und danach den Punkt „Steuerungen Uhrzeiten“ auswählen;
c) in der erscheinenden Bildschirmseite „Neu“ wählen, um eine neue Uhr-
Page 73

zeit-Steuerung zu erstellen (Abb. 8) und in den vorgesehenen Bereichen die
Steuerungen Uhrzeiten
Zurück Auswählen
on
22:50 mdmdfss
Neu
8
wenn (ON) beim Punkt „Aktivierung Steuerungen Uhrzeiten“ aktiviert wird
(unter dem Punkt „Optionen“).
• Die Steuerzentrale und den Empfänger programmieren
Um die Parameter einer Vorrichtung zu programmieren, wie folgt vorgehen:
HINWEIS – Der Zugang zu den Funktionen im Punkt „Automatisierungen“ kann die Eingabe eines Passwords fordern, wenn
der Installateur entschieden hat, den Zugang zu den Programmierungsfunktionen zu schützen. Für weitere Klärungen bezieht
man sich auf den Abschnitt „Mit den Passwords vorgehen“.
a) Die Gruppe wählen, zu der die zu programmierende Vorrichtung gehört.
b) In der Anfangsbildschirmseite (Abb. 7) den Punkt „Menü“ mit der Taste z
(8 – Abb. 6) wählen: Im Bildschirm erscheint die Liste der in dieser Gruppe
angeschlossenen und vorliegenden Vorrichtungen.
c) In dieser Bildschirmseite ist es möglich:
– die Liste der Namen der vorliegenden Vorrichtungen mit den Pfeiltasten S
oder T durchzugehen;
– zugang zur folgenden Gruppe durch die Pfeiltasten X oder zur vorherigen
Gruppe mit der Pfeiltaste W;
– die Auswahl einer Vorrichtung mit der Taste 8 bestätigen.
d) Nach der Bestätigung der Auswahl erscheint eine Bildschirmseite mit einem
Menü der Funktionen.
Dieses Menü kann aus den folgenden Punkten bestehen:
gewünschten Tage und Uhrzeiten einfügen;
d) die ausgeführte Programmierung durch Wählen des Punkts
„OK“ mit der Taste z (8 – Abb.
6) bestätigen.
Wichtig – Sicherstellen, dass
die Uhr genau auf die örtliche
Uhrzeit eingestellt ist.
Achtung – Die Steuerungen
Uhrzeiten funktionieren nur,
– „Funktionen Zentrale“ (enthält die spezifi schen Funktionen der Steuerzent-
rale);
– „Radiofunktionen“ (enthält die spezifi schen Funktionen des Empfängers);
– „Gemeinsame Funktionen“ (enthält die Funktionen, die sich in allen Vorrichtungen befi nden);
– „Fortschrittliche Funktionen“ (enthält die Funktionen, die in den Steuerungen und Empfängern vorliegen);
– „Log in“ (dient zum Zugriff auf eine Automatisierung, wenn im Vorfeld ein
Password eingegeben worden ist);
– (usw.)
Anmerkung – Die Anwesenheit einiger Punkte im „Menü der Funktionen“
hängt von der gewählten Vorrichtungsart ab.
Nach Auswahl eines Punkts mit „Auswählen“ bestätigen. Im Bildschirm
erscheinen die Funktionen der Vorrichtung. Unten erscheint ein Symbol
oder das den Zugriffsmodus angibt: Installateur, Anwender.
• Einstellen der Funktionsparameter des Oview
Zur Einstellung der Funktionsparameter des Oview muss in der Anfangsbildschirmseite (Abb. 6) der Punkt „Optionen“ mit der Taste z (7 – Abb. 6) und
daraufhin der Punkt „Einstellungen Oview“ gewählt werden.
Im Bildschirm erscheint die Liste der verfügbaren Parameter: „Name“ - „Datum/
Uhrzeit“ - „Leuchtstärke Display“ - „Leuchtstärke Tasten“ - „Password
Oview“ „Sprache“ - - „Informationen“ - „Sprache“ - „Netz-Optionen“.
Zur Anzeige und Änderung jedes einzelnen Parameters muss dieser gewählt
und in der erscheinenden Bildschirmseite vorgegangen werden.
– Name: wird genützt, um dem Oview einen persönlichen Namen zuzuweisen,
um es leicht in einem Netz von Vorrichtungen identifi zieren zu können;
– Datum/Uhrzeit: wird genützt, um das Datum und die örtliche Uhrzeit einzu-
stellen. Mit den Pfeiltasten W und X (2 e 4 – Abb. 6) kann man sich zwischen
den Bereichen für das Datum und die Uhrzeit versetzen, mit den Tasten S
und T (3 und 5 – Abb. 6) ist es möglich, die Werte zu ändern;
– Leuchtstärke Display: dient zur Einstellung der Leuchtstärke des Displays.
Sie kann mit einem Wert zwischen mindestens 0% und höchstens 100%
eingestellt werden. Anmerkung – Nach 30 Sekunden Funktionsunterbrechung des Displays wird die Leuchtstärke auf den eingestellten Mindestwert
reduziert.
– Leuchtstärke Tasten: dient zur Einstellung der Leuchtstärke der Tasten.
Sie kann mit einem Wert zwischen mindestens 0% und höchstens 100%
eingestellt werden. Anmerkung – Nach 30 Sekunden Funktionsunterbre-
Deutsch – 8
DE
Page 74

chung der Tasten, wird die Leuchtstärke auf den eingestellten Mindestwert
reduziert;
– Password Oview: Bezugnahme auf Abschnitt „Das Password des Oview “;
– Sprache: wird genützt, um die gewünschte Sprache einzustellen;
– Informationen: ermöglicht ausschließlich, die technischen Daten des Oview
ohne Änderungsmöglichkeit anzuzeigen;
– Netzoptionen: Dieser Punkt enthält die Parameter „Gesamtheit“ und
„Adresse“. Sie werden benützt, um die Gruppe zu ändern, zu der Oview
und die diesbezügliche persönliche Adresse gehört;
• Mit den Passwords vorgehen
Die Passwords der Vorrichtungen „NiceOpera“
Alle Vorrichtungen des Systems „NiceOpera“, einschließlich das Oview,
bieten dem Installateur oder dem Anwender die Möglichkeit, den Zugriff auf
die sensiblen Daten für nicht autorisierte Personen durch die Programmierung
eines Passwords einzuschränken.
Das Password wird in der Vorrichtung gespeichert und schränkt den
Zugriff auf die Funktionen unabhängig vom angeschlossenen Oview
ein.
Wenn eine Vorrichtung mit einem Password geschützt ist, muss zum Beginn
einer Programmierung das Verfahren „Log in“ ausgeführt werden, das darauffolgende Log out erfolgt automatisch, wenn man zum Anfangsbildschirm
zurückgeleitet wird.
DE
Die an einer Steuerung einstellbaren Passwords sind von zweierlei Art: „Password Anwender“ und „Password Installateur“.
Wenn die Vorrichtung durch beide Passwörter geschützt ist, fordert Oview automatisch die Eingabe des Passwords.
Wenn das Password Installateur eingestellt und nicht das richtige Password unter
dem Punkt „Log in“ im auf diese Steuerung bezogenen Bildschirm eingegeben
wird, ist der Zugriff auf die Menüs eingeschränkt. Insbesondere wenn man auf das
Menü „Funktionen der Steuerung“ zugreift, werden einige Punkte nicht und
andere werden angezeigt, können jedoch nicht verändert werden.
Es besteht auch die Möglichkeit, ein Password Anwender einzustellen (nur dann
gültig, wenn das Password Installateur eingestellt ist), das den Zugriff auf die
Menüs durch diejenigen vollständig sperrt, die das Password nicht kennen.
Der Installateur kann entscheiden, welche Teile durch denjenigen, der mit dem
Password Anwender zugreift, angezeigt und welche veränderbar sein sollen.
Der Pfad zum Verändern der Zugriffsrechte ist: “Funktionen der Steuerung”
→ „Erweiterte Funktionen“ → „Anwenderrechte“. Insbesondere: Durch Be-
9 – Deutsch
wegen der Pfeile S und T kann jedem Menüpunkt eines der folgenden Rechte
zugeordnet:
Nur Leserechte (sichtbar, jedoch nicht veränderbar)
■ Lese- und Schreibrechte (sichtbar und veränderbar)
∼ Der Menüpunkt ist für den Anwender nicht sichtbar.
Wenn kein Password eingestellt wird, ist das gesamte Menü sichtbar und verän-
derbar (man greift also als Installateur zu, mit allen Rechten). Es ist zu jedem Zeitpunkt möglich, zu sehen, mit welchem Profi l man auf die Menüs zugreift, indem
man das Symbol auf der unteren Zeile prüft (
– Achtung! Wenn bei der Navigation Menüpunkte fehlen, bedeutet das, dass
Passwörter eingestellt worden sind. Um auf das vollständige Menü zugreifen
zu können, ist ein Log in mit dem Password Installateur erforderlich.
– Achtung! Die Passwords Installateur und Anwender sind unabhängig vom
Password Oview. Diese schützen verschiedene Menüteile.
Das Password des Oview
Das Oview ermöglicht die Programmierung eines „Password Oview“.
Das „Password Oview“ dient zum Sperren des Zugriffs durch den Anwender
auf Daten und Funktionen, die die ordnungsgemäße Funktion des Oview regeln
(Zugriff auf das Menü „Optionen“). Dieses Password schützt auch die Parameter der Module OVTB oder OVBTGSM, sofern diese angeschlossen sind.
– Zum Einstellen eines Passwords: Auswählen in der Anfangsbildschirmseite (Abb. 7) den Punkt „Optionen“ mit der Taste z (7 – Abb. 6) und daraufhin,
den Punkt „Einstellungen Oview“. Nun den Punkt „Password Oview“ wählen
und das gewünschte Password programmieren.
Anmerkung – Wenn ein Password aktiv ist, wird jedes Mal dann danach
gefragt, wenn man auf das Menü „Optionen“ zugreift.
– Zur Änderung oder Entfernung eines bestehenden Passwords: In der
Anfangsbildschirmseite den Punkt „Optionen“ wählen. Nach Eingabe des
Passwords „Einstellungen Oview“ und daraufhin „Password Oview“ wählen, dann
– das bestehende Password entfernen, wobei der leere Bereich belassen und
die Änderung gespeichert wird.
Anwender oder Installateur).
Page 75

• Das Oview mit der Firmware Vers. OV04
Ab der Version OV04 verfügt das Oview über zwei Funktionen: „Ereignisaufzeichnung“ und „Aktualisierung Steuerung“.
Ereignisaufzeichnung
Diese Funktion ermöglicht die Anzeige in Oview aller Tätigkeiten, die durch die
Vorrichtungen im Netz ausgeführt werden, an das Oview angeschlossen ist.
Die Erfassung der Daten (Ereignisaufzeichnung) erfolgt zu Beginn automatisch
und ist für den Installateur nicht sichtbar, wenn Oview an das Netz angeschlossen wird: Dieser sucht alle im Netz vorhandenen Vorrichtungen und speichert
die Ereignisse jedes einzelnen in seinem Speicher, wobei vorherige Daten überschrieben werden. Nach der Suche der im Netz vorliegenden Vorrichtungen
und bei noch angeschlossenem Oview, kann die Ereignisaufzeichnung jeweils
einer Vorrichtung wie folgt angezeigt werden: Die Vorrichtung wählen, dann
den Punkt „Fortschrittliche Funktion“ → „Ereignisaufzeichnung“. Um die
Ereignisse zu sehen, die TastenS und T verwenden.
Die Ereignisaufzeichnung kann auch mit „Oview Software Suite“ angezeigt werden. In diesem Fall wird Oview an den Pc oder den Handcomputer geschlossen, in dem die Software installiert ist; in der Hauptbildschirmseite den Punkt
„Oview“, dann die „Funktionen O-View“ → „Einstellungen“ → „Ereignis-
aufzeichnung“ wählen. Es erscheint eine Liste mit der Ereignisaufzeichnung
aller Vorrichtungen im Netz, an das Oview das letzte Mal angeschlossen wurde;
zur Anzeige der Ereignisse nur einer Vorrichtung das Feld „Filter Vorrichtung“
nutzen, indem die gewünschte Vorrichtung in der erscheinenden Liste gewählt
wird.
Die maximale Anzahl der speicherbaren Ereignisse liegt bei 300.
Die erfasste Ereignisaufzeichnung verbleibt im Speicher des Oviews, bis dieser
an ein anderes Netz angeschlossen wird.
Aktualisierung der Steuerung
Diese Funktion ermöglicht die Überarbeitung der Firmware einer Steuerung,
indem der interne Speicher des zusätzlichen Moduls OVBT (oder OVBTGSM)
gemeinsam mit Oview genützt wird.
Das Verfahren ist in zwei operative Momente unterteilt, die auch später und
entfernt und getrennt ausgeführt werden können: 1) Laden der neuen Firmware
in das zusätzliche Modul des Oview nur über Bluetooth; 2) Laden der Firmware
in die Steuerung.
1. Laden der neuen Firmware in das zusätzliche Modul von Oview. Um
die Firmware in das zusätzliche Modul OVBT (oder OVBTGSM) zu laden,
wird das Modul in Oview installiert, die Software „Oview Software Suite“
geöffnet (Version 1.3 oder höher), die Suche der Vorrichtungen gestartet
und die Vorrichtung Oview gewählt, dann den Punkt „Fortschrittliche
Funktionen“ und dann „Laden Firmware Steuerung“ wählen. Nun die
Datei mit der neuen Firmware wählen und bestätigen. Die Datei wird automatisch in das zusätzliche Modul gespeichert. Dieser Vorgang ist nur durch
Anschließen des Oview über Bluetooth möglich, und nicht über den GPRSAnschluss.
2. Laden der neuen Firmware in die Steuerung. Um die Firmware in die
Steuerung zu laden, wird diese mit Oview und dem zusätzlichen Modul mit
der neuen Firmware im Speicher verbunden und die Aktualisierung wie folgt
vorgenommen: Eventuelle Passwords beseitigen; dann im Oview den Punkt
„Menü“ wählen und dann „Funktionen Steuerungen“ → „Fortschrittli-
che Funktionen“ → „Aktualisierung Firmware“. Nun prüft Oview, ob die
neue Firmware mit der Steuerung kompatibel ist: Wenn sie kompatibel ist,
wird der Punkt „Start“ angezeigt, ansonsten kann die Aktualisierung nicht
gestartet werden. Nachdem die Aktualisierung gestartet wurde und diese
nicht erfolgreich abgeschlossen wird, bleibt die Steuerung gesperrt, bis das
Verfahren abgeschlossen werden kann. Um sie zu lösen, muss der Punkt
„Optionen“ → „Vorrichtungen in Boot-Phase“ gewählt und das Laden
der Firmware gestartet werden.
DE
Deutsch – 10
Page 76

OVIEW MIT DEN MODULEN
6
BLUETOOTH® UND GSM® VERWENDEN
Entsorgung des Produkts
Die Funktionstüchtigkeit des Oview kann durch Anwendung des Moduls Bluetooth® oder GSM® und der Software „Oview Software Suite“ erweitert werden,
die mit diesen geliefert wird (siehe Abb. 1). Diese Module und die Software
sind zusätzliche Zubehörteile; die Software wird in 2 Ausführungen geliefert:
Eine für PC und eine für einen Handcomputer. Zur Nutzung der Software ist es
notwendig, sie in einem PC und/oder in einem Handheld-Computer und/oder
in einem Smartphone zu installieren, die mit einem Anschluss Bluetooth
oder Internet ausgestattet sind.
– Anschluss Bluetooth®: ermöglicht den Anschluss an Oview dank eines
Moduls Bluetooth® (in das Oview zu installieren). Diese Anschlussart ermöglicht
die Kommunikation mit Oview bei einer max. Distanz von zirka 10–15 mm,
wenn keine Hindernisse vorliegen, oder wenige Meter, bei Anwesenheit von
Hindernissen (Mauern oder ähnliches).
– Anschluss Internet: ermöglicht den Anschluss an Oview dank eines Moduls
®
(in das Oview zu installieren). Diese Anschlussart ermöglicht die Kommu-
GSM
nikation mit Oview durch das GSM®-Netz. In diesem Fall kann die Kommunikation bei einem beliebigen Abstand erfolgen, vorausgesetzt, dass Netzempfang
vorliegt.
DE
Mit dem Modul GSM® ist es möglich, auch ein Smartphone und ein normales
Mobiltelefon zu verwenden: mit diesen kann per Anruf oder SMS ein Befehl
an die Automatisierung gesendet werden; mit dem Smartphone und dem
Betriebssystem Window® Mobile kann auch die Software „Oview software suite“ angewendet werden.
Die Software „Oview Software Suite“ weist eine detaillierte Bildschirmgraphik
auf und die Anwesenheit der Tastatur im PC und im Handcomputer erleichtert
die Navigation und die Eingabe der Daten.
Mit dieser Software hat der Installateur außer der Möglichkeit, alle normalerweise mit Oview auszuführenden Vorgänge vorzunehmen, auch die Möglichkeit,
ein Datenarchiv zu bilden, um die Änderungen an den programmierten Vorrichtungen zu überwachen und zu speichern; außerdem kann eine Diagnose mit
graphisch kompletten und sofortigen Informationen sowie die Überarbeitung
der Firmware einer Vorrichtung vorgenommen werden.
®
und/
Dieses Produkt besteht aus verschiedenen Materialarten: Einige können recycelt, andere müssen entsorgt werden. Informieren Sie sich über die Recyceloder Entsorgungssysteme gemäß den örtlich geltenden Bestimmungen und
hinsichtlich dieser Produktkategorie.
ACHTUNG! Einige Produktteile können Umwelt verschmutzende oder gefährliche Substanzen enthalten, die der Umwelt und der Gesundheit der Menschen
Schaden zufügen können.
Das Produkt enthält eine Batterie: Diese muss entfernt werden und darf nicht
in den allgemeinen Abfall geworfen werden, da sie Umwelt verschmutzende
Substanzen enthält; sie muss entsorgt oder recycelt werden, wobei die Mülltrennungsmethoden gemäß den örtlich geltenden Bestimmungen eingehalten
werden.
Wie von dem seitlichen Symbol angezeigt wird, darf dieses
Produkt nicht in den Hausmüll geworfen werden. Somit die
„Mülltrennung“ zur Entsorgung gemäß den örtlich geltenden
Bestimmungen vornehmen, oder das Produkt dem Verkäufer
aushändigen, wenn ein neues gleichwertiges Produkt gekauft
wird.
ACHTUNG! – Die örtlichen Behörden können hohe Strafen im Falle einer
gegen das Gesetz ausgeführten Entsorgung des Produkts verhängen.
11 – Deutsch
Page 77

Technische Eigenschaften des Produkts
Das Oview wird von Nice S.p.a. (TV) – I – produziert.
Typ: Steuereinheit, Programmierung und Diagnose für Vorrichtungen mit
Anschluss BusT4
Angewendete Technologie: serielle Kommunikation half duplex 19200
Bps an differentialem Bus zur Übertragung der Steuerung, Änderung der
Parameter und Prüfung der Diagnosedaten
Graphik-Schnittstelle: Display LCD 128 x 64 dots (46 x 29 mm); 2,2“
Bediener-Input-Vorrichtung: Joypad mit 5 + 2 Tasten
Beleuchtung des Displays/Tasten: weißes Licht (Farbkoordinaten:
X = 0,29–0,33; Y = 0,30–0,34)
Uhr – Datumseinstellung: intern, mit Backup-Batterie (Mindestdauer 10
Jahre)
Höchstzahl der Uhrzeitensteuerungen: 64
Ereignisspeicher: Registrierungskapazität: 400 Ereignisse
Länge des Anschlusskabels:
– mitgeliefertes Kabel: 2 m
– weiteres Kabel: bis 700 m, von Punkt zu Punkt gemessen
Speisung: durch die Vorrichtungen am BusT4 gegeben
Aufgenommener Strom: höchstens 20 mA (ohne Zubehörteile)
Isolierung: Klasse III
Schutzgrad des Behälters: IP 20 (Anwendung nur in Innen- und geschütz-
ten Bereichen)
Betriebstemperatur: von –20°C bis +55°C
Abmessungen (mm): 107 x 61 x h 20 (mit Wandhalterung: 125 x 70 x h 32)
Gewicht: 75 g (ohne Kabel)
DE
Zusätzliche Zubehörteile:
• Modul für Anschluss Technologie Bluetooth
®
• Modul für Anschluss Technologie GSM®–GPRS
®
Deutsch – 12
Page 78

EG-KONFORMITÄTSERKLÄRUNG
Erklärung in Übereinstimmung mit der Richtlinie 1999/5/EG
Anmerkung – Der Inhalt dieser Erklärung entspricht den Angaben im offi ziellen Dokument, das im Sitz der Nice S.p.a. hinterlegt ist und der letzten verfügbaren Revision vor dem Druck
dieser Anleitung. Dieser Text wurde aus redaktionellen Gründen angepasst.
Eine Kopie der Original-Erklärung kann bei der Firma Nice S.p.a. (TV) angefordert werden I.
Nummer der Erklärung: 278/OV Rev.: 6 Sprache: DE
Der unterzeichnende Luigi Paro, in seiner Funktion als Geschäftsführer, erklärt unter eigener Verantwortung, dass das Produkt:
Name des Herstellers: NICE s.p.a.
Adresse: Via Pezza Alta 13, 31046 Rustignè di Oderzo (TV) Italy
Typ: Programmier- und Steuereinheit für Automatisierungen
Modelle: OVIEW
Zubehörteile: OVBT, OVBTGSM
den grundlegenden Anforderungen von Artikel 3 der nachstehenden europäischen Richtlinie in Bezug auf den Verwendungszweck entspricht, für den die
Produkte bestimmt sind:
• Richtlinie 1999/5/EG DES EUROPÄISCHEN PARLAMENTS UND DES RATES VOM 9. März 1999 über Funkanlagen und Kommunikationsendgeräte und
die gegenseitige Anerkennung ihrer Konformität, gemäß den folgenden harmonisierten Normen
· Schutz der Gesundheit (Art. 3 (1) (a)): EN 50371:2002, EN50360:2001+A1:2006
· Elektrische Sicherheit (Art. 3 (1) (a)): EN 60950-1:2006+A11:2009
· Elektromagnetische Verträglichkeit (Art. 3 (1) (b)):
DE
EN 301 489-1V1.8.1:2008; EN 301 489-17 V1.2.1.:2002,
EN301489-7 V1.3.1:2005
· Funkspektrum (Art. 3 (2)): EN300328 V1.7.1:2006, EN300440-2 V1.1.2:2004,
EN 301511 V9.0.2:2003
In Übereinstimmung mit der Richtlinie 1999/5/EG (Anlage V) entspricht das Produkt der Klasse 1 und ist gekennzeichnet:
0682
Darüber hinaus entspricht das Produkt den Anforderungen der folgenden europäischen Richtlinien:
• RICHTLINIE 2004/108/EG DES EUROPÄISCHEN PARLAMENTS UND DES RATES vom 15. Dezember 2004 zur Angleichung der Rechtsvorschriften der
Mitgliedsstaaten über die elektromagnetische Verträglichkeit und zur Aufhebung der Richtlinie 89/336/EWG, gemäß den folgenden harmonisierten Normen:
EN 61000-6-2:2005, EN 61000-6-3:2007
Oderzo, 1. März 2012 Luigi Paro
(Geschäftsführer)
13 – Deutsch
Page 79

GEBRAUCHSANLEITUNG
8
1
4
3
7
2
5
6
10
9
HINWEISE UND GENERELLE VORSICHTSMASSNAHMEN
FÜR DIE SICHERHEIT
ACHTUNG! – Alle Installierungen, Anschlüsse, Programmierungen und War-
tungen des Produkts dürfen nur durch einen qualifi zierten Techniker aus-
geführt werden!
Die folgenden Hinweise einhalten:
– Nicht zulassen, dass Kinder Zugang zu Oview erhalten.
– Zur Reinigung der Produktoberfl äche ein weiches leicht feuchtes Tuch (nicht nass)
verwenden. Wichtig – Keine Alkohol, Benzol, Lösungsmittel oder andere brennbare
Substanzen enthaltenden Flüssigkeiten verwenden. Die Anwendung
dieser Substanzen könnte das Produkt beschädigen.
– Den LCD-Bildschirm sorgfältig behandeln und Kratzer vermeiden.
– Dieses Handbuch sorgfältig aufbewahren, um es für einen eventuellen zu künftigen
Bedarf zu Rate ziehen zu können.
– Am Ende der Lebensdauer des Produkts sicherstellen, dass dieses ge mäß
den örtlich geltenden Vorschriften entsorgt oder recycelt wird.
BESCHREIBUNG DES OVIEW
Die Anwendung des Oview als feste Wandsteuervorrichtung ermöglicht diesem,
immer aktiv zu bleiben, da es direkt und ständig durch den angeschlossenen Automatismus gespeist wird. Wenn das Oview über kurze Zeit nicht benützt wird, geht
sein Bildschirm auf stand-by über (die Leuchtkraft wird schwächer). Zur erneuten
Aktivierung ist es ausreichend, eine beliebige Taste zu drücken.
Zur Steuerung eines Automatismus ist es ausreichend, im Bildschirm des Oview
den Namen und die Ikone des Automatismus aufzurufen und die Steuerung mit
einer Taste zu übertragen (zur Vertiefung lesen Sie bitte das Kapitel Anwendung des
Oview als Steuervorrichtung).
• Zeichenerklärung der Tasten des Oview
Das Oview besteht aus den folgenden Teilen (Abb. A):
1 – LCD - Bildschirm;
2 / 4 – Pfeiltasten W und X: Sie dienen zur Versetzung zwischen einem Feld und
dem anderen innerhalb einer Bildschirmseite oder zur Versetzung von einer
Bildschirmseite zur anderen;
3 / 5 – Pfeiltasten S und T: Sie dienen zur Änderung der Werte eines gewählten
Felds oder zur Versetzung innerhalb einer Liste;
6 – Taste – dient zur Bestätigung eines Werts;
7 – Taste z – dient zur Auswahl des unten erscheinenden Punkts, links im Bild-
schirm (9);
8 – Taste z – dient zur Auswahl des unten erscheinenden Punkts, rechts im
Bildschirm (10).
A
DE
• Anfangsbildschirmseite des Oview
Nachdem das Oview aktiviert wurde, erscheint eine Bildschirmseite, die als
„Anfangsbildschirmseite“ bezeichnet wird. Die diese Bildschirmseite zusammensetzenden Elemente lauten (Abb. B):
A – Ikone, die die angeschlossene Vorrichtung identifi ziert; bei Anwesenheit eines
Vorrichtungsnetzes, wird im Bildschirm die erste automatisch gefundene Vorrichtung angezeigt, die zu einer bestimmten Gruppe gehört.
Deutsch – 14
Page 80

B – Name der gewählten Vorrichtung.
run 2
Optionen Menü
02
00:01:14
09.11.07
B
EF
D
A C
C – Nummer, die die Gruppe anzeigt, zu der die gewählte Vorrichtung gehört.
D – Datum und örtliche Uhrzeit.
E – „Steuerungen“: Dieser Punkt ermöglicht den Zugang zu allen verfügbaren
Funktionen, um eine oder mehrere Vorrichtungen zu steuern.
F – „Optionen“: Dieser Punkt ermöglicht den Zugang zu allen verfügbaren Funkti-
onen, um eine Vorrichtung zu programmieren.
B
ANWENDUNG DES OVIEW ALS STEUERVORRICHTUNG
DE
Zur Steuerung einer Automatisierung kann auf zwei Weisen vorgegangen werden.
Nachdem die Gruppe gewählt wurde, zu der die zu steuernde Automatisierung gehört,
wird die gewünschte Steuerung auf eine der zwei folgenden Weisen übertragen:
1) Zur Übersendung einer direkten Steuerung, eine der folgenden Tasten
benützen:
– ÖFFNEN = Taste S (3 – Abb. A)
– STOPP = Taste (6 – Abb. A)
– SCHLIESSEN = Taste T (5 – Abb. A)
2) um eine spezielle Steuerung zu übertragen, die in der Automatisierung verfügbar ist, wird in der Anfangsbildschirmseite (Abb. B) der Punkt „Optionen“ mit der
Taste z (7 – Abb. A) gewählt und daraufhin der Punkt „Steuerungen“. Dann die
gewünschte Steuerung in der erscheinenden Liste wählen.
Nun wird zur Bestätigung der gewählten Steuerung „Auswählen“ mit der Taste z
(8 – Abb. A) gewählt oder man kehrt in die vorherige Bildschirmseite zurück, indem
„Zurück“ mit der Taste z (7 – Abb. A) gewählt wird.
Anmerkung – Die Art und die Anzahl der in dieser Liste vorhandenen Steuerungen
ändern sich aufgrund der Typologie der gewählten Automatisierung.
15 – Deutsch
FUNKTIONEN DES OVIEW
• Programmieren der Uhrzeitsteuerungen
Das Oview verfügt über eine interne Uhr, die benützt werden kann, um die automatische Übertragung der Steuerungen an eine Automatisierung zu programmieren.
Anmerkung – Wenn das Oview aufgrund eines elektrischen Blackouts nicht mehr
gespeist wird, funktioniert seine Uhr regulär weiter; wenn dagegen eine Übertragung
einer Steuerung während des Blackouts programmiert war, wird diese nicht ausgeführt, bleibt aber programmiert.
Zur Programmierung der automatischen Ausführung der Steuerungen an den
gewünschten Tagen und Uhrzeiten, wie folgt vorgehen:
a) die Gruppe wählen, zu der die zu programmierende Automatisierung gehört;
b) in der Anfangsbildschirmseite (Abb. B) den Punkt „Optionen“ mit der Taste z
(7 – Abb. A) wählen und danach den Punkt „Steuerungen Uhrzeiten“ auswählen;
c) in der erscheinenden Bildschirmseite (Abb. C) „Neu“ wählen, um eine neue Steu-
erung Uhrzeiten zu erstellen und in den vorgesehenen Bereichen die gewünschten
Tage und Uhrzeiten einfügen;
d) die ausgeführte Programmie-
C
Steuerungen Uhrzeiten
Neu
22:50 mdmdfss
on
Zurück Auswählen
• Einstellen der Funktionsparameter des Oview
Zur Einstellung der Funktionsparameter des Oview muss in der Anfangsbildschirmseite (Abb. B) der Punkt „Optionen“ mit der Taste z (7 – Abb. A) und daraufhin der
Punkt „Einstellungen Oview“ gewählt werden.
Im Bildschirm erscheint die Liste der verfügbaren Parameter: „Name“ - „Datum/
Uhrzeit“ - „Leuchtstärke Display“ - „Leuchtstärke Tasten“ - „Password
Oview“ - „Informationen“ - „Sprache“ - „Netz-Optionen“.
Zur Anzeige und Änderung jedes einzelnen Parameters muss dieser gewählt und in
der erscheinenden Bildschirmseite vorgegangen werden. Achtung! – Einige dieser
rung dur ch Wählen des Punkts
„OK“ mit der Taste z (8 – Abb.
A) bestätigen.
Wichtig – Sicherstellen, dass die
Uhr genau auf die örtliche Uhrzeit
eingestellt ist.
Achtung – Die Steuerungen
Uhrzeiten funktionieren nur,
wenn (ON) beim Punkt „Akti-
vierung Steuerungen Uhrzeiten“ aktiviert wird (unter
dem Punkt „Optionen“).
Page 81

Parameter könnten vom Installateur gesperrt worden sein und sind demnach nicht
veränderbar.
– Name: wird genützt, um dem Oview einen persönlichen Namen zuzuweisen,
um es leicht in einem Netz von Vorrichtungen identifi zieren zu können;
– Datum/Uhrzeit: wird genützt, um das Datum und die örtliche Uhrzeit ein-
zustellen. Mit den Pfeiltasten W und X (2 e 4 – Abb. A) kann man sich
zwischen den Bereichen für das Datum und die Uhrzeit versetzen, mit den
Tasten S und T (3 und 5 – Abb. A) ist es möglich, die Werte zu ändern;
– Leuchtstärke Display: dient zur Einstellung der Leuchtstärke des Displays.
Sie kann mit einem Wert zwischen mindestens 0% und höchstens 100% eingestellt werden. Anmerkung – Nach 30 Sekunden Funktionsunterbrechung
des Displays wird die Leuchtstärke auf den eingestellten Mindestwert reduziert.
– Leuchtstärke Tasten: dient zur Einstellung der Leuchtstärke der Tasten.
Sie kann mit einem Wert zwischen mindestens 0% und höchstens 100%
eingestellt werden. Anmerkung – Nach 30 Sekunden Funktionsunterbre-
chung der Tasten, wird die Leuchtstärke auf den eingestellten Mindestwert
reduziert;
– Password Oview: Bezugnahme auf Abschnitt „Das Password des Oview“;
– Informationen: ermöglicht ausschließlich, die technischen Daten des Oview
ohne Änderungsmöglichkeit anzuzeigen;
– Sprache: wird genützt, um die gewünschte Sprache einzustellen;
– Netzoptionen: Dieser Punkt enthält die Parameter „Gesamtheit“ und
„Adresse“. Sie werden benützt, um die Gruppe zu ändern, zu der Oview und
die diesbezügliche persönliche Adresse gehört.
• Programmieren der Funktionen einer Automatisierung
Um zu den programmierbaren Funktionen einer Automatisierung zu gelangen, muss
in der Anfangsbildschirmseite (Abb. B) der Punkt „Menü“ mit der Taste z (8 – Abb.
A) gewählt werden.
In der folgenden Bildschirmseite könnte beim Wählen der zu programmierenden
Automatisierung die Eingabe eines Passwords gefordert werden.
den Punkt „Einstellungen Oview“. Nun den Punkt „Password Oview“ wählen
und das gewünschte Password programmieren.
Anmerkung – Wenn ein Password aktiv ist, wird jedes Mal dann danach
gefragt, wenn man auf das Menü „Optionen“ zugreift.
– Zur Änderung oder Entfernung eines bestehenden Passwords: In der
Anfangsbildschirmseite den Punkt „Optionen“ wählen. Nach Eingabe des
Passwords „Einstellungen Oview“ und daraufhin „Password Oview“ wählen, dann
– ein neues Password programmieren und die Änderung speichern, oder
– das bestehende Password entfernen, wobei der leere Bereich belassen und
die Änderung gespeichert wird.
DE
• Umgang mit dem „Password Oview“
Um den Zugang zu einigen programmierbaren Funktionen gegenüber nicht autorisierten Personen (wie Kinder und Fremde) zu limitieren (zum Beispiel die Uhrzeitprogrammierungen) – bietet Oview die Möglichkeit, ein „Password Oview“ zu programmieren.
– Zum Einstellen eines Passwords: Auswählen in der Anfangsbildschirmseite (Abb. 7) den Punkt „Optionen“ mit der Taste z (7 – Abb. 6) und daraufhin,
Deutsch – 16
Page 82

POLSKI
instrukcje oryginalne
OGÓLNE ZALECENIA I OSTRZEŻENIA
DOTYCZĄCE BEZPIECZEŃSTWA
INFORMACJE O ZNAKACH FIRMOWYCH
Znaki BLUETOOTH
nich właścicieli znakami towarowymi; nazwy produktów używane w niniejszej
instrukcji także mogą być zarejestrowane przez ich właścicieli.
®
, GPRS®, GSM® są zarejestrowanymi przez odpowied-
PL
WAŻNE
Symbol ten wskazuje na czynności, które mogą być
potencjalnym źródłem zagrożenia. Dlatego czynności
oznaczone tym symbolem powinny być wykonywane
wyłącznie przez personel wykwalifikowany i doświadczony, z zachowaniem obowiązujących na danym terenie
zasad bezpieczeństwa oraz niniejszej instrukcji.
1 – Polski
PRACUJĄC ZACHOWAJ ZASADY BEZPIECZEŃSTWA!
UWAGA! – Dla bezpieczeństwa osób ważne jest przestrzeganie poniż-
szych zaleceń.
UWAGA! – Zalecenia ważne dla bezpieczeństwa. Zachować poniższe
zalecenia.
UWAGA! – Wszystkie czynności instalacji, połączeń, programowania
i konserwacji produktu powinny być wykonywane wyłącznie przez
wykwalifi kowany personel.
Firma Nice zastrzega sobie prawo do modyfi kowania, lub tymczasowego bądź
stałego dezaktywowania świadczonych usług, w dowolnym momencie oraz
bez konieczności wcześniejszego powiadamiania użytkownika. Użytkownik
potwierdza, iż fi rma Nice nie może zostać pociągnięta do odpowiedzialności
względem użytkownika lub osób trzecich za modyfi kację, zawieszenie lub dez-
aktywację usług.
Przestrzegaj następujących zaleceń
– nie wprowadzaj zmian w żadnej z części produktu, o ile nie są to
zmiany przewidziane w niniejszej instrukcji. Takie działanie mogłoby
tylko przyczynić się do nieprawidłowej pracy instalacji. Producent nie
bierze na siebie żadnej odpowiedzialności za uszkodzenia powstałe w
wyniku użytkowania produktów zmodyfi kowanych na własną rękę.
– produkt został zaprojektowany do stosowania wewnątrz pomieszczeń. Może być użytkowany na zewnątrz tylko w przypadku sprzyjających wa runków klimatycznych. Obudowa produktu nie zabezpiecza go
bo wiem przed dostaniem się wody lub innych cieczy.
– jeżeli produkt będzie wykorzystywany jako urządzenie sterujące,
ważne jest, aby zainstalować je w odpowiednim miejscu, poza zasię-
giem dzieci i na wysokości od ziemi nie mniejszej niż 150 cm.
– Do czyszczenia powierzchniowego produktu należy używać miękkiej tkani-
ny lekko zwilżonej (nie mokrej!). Ważne
alkohol, benzen, rozpuszczalniki lub inne substancje łatwopalne. Użycie takich
substancji może doprowadzić do uszkodzenia produktu.
– Delikatnie obchodzić się z ekranem ciekłokrystalicznym (LCD), unikając pory-
sowania go.
– Przechowywać ze starannością niniejszą instrukcję, aby ułatwić ewentualne
przyszłe czynności programowania lub konserwacji produktu.
– Opakowania produktu muszą być zutylizowane zgodnie z lokalnymi przepisami.
:
– nie stosować płynów zawierających
Page 83

(BusT4)
(BusT4)
(BusT4)
(Oview
Software Suite)
(BusT4)
10-15m
max
(Gprs)
(Wi Fi)
(Adsl)
(Oview
Software Suite)
(GSM®)
(Internet)
1
Używanie samego Oview
Używanie modułu
OVBT oraz
oprogramowania
Używanie modułu
OVBTGSM oraz telefonu
komórkowego
Oview i akcesoria
modułu
OVBT
modułu
OVBTGSM
PL
Używanie modułu
OVBTGSM oraz
oprogramowania
OVBTGSM
modułu
Polski – 2
Page 84

OPIS PRODUKTU I
PRZEZNACZENIE UŻYTKOWANIA
1
Produkt Oview jest urządzeniem przeznaczonym do programowania i do sterowania innymi urządzeniami Nice, wyposażonymi w „Bus T4”, stosowanymi do
na pędu bram, bram garażowych, szlabanów oraz innych podobnych zastosowań.
Jakiekolwiek inne użycie jest uważane za niewłaściwe! Producent nie
ponosi żadnej odpowiedzialności za szkody wynikłe z niewłaściwego
użycia produktu, innego niż przewidziane w niniejszej instrukcji.
1.1 – Podstawowe cechy funkcjonalne Oview
Urządzenie Oview komunikuje się z innymi urządzeniami poprzez kabel Bus
T4; może komunikować się tylko i wyłącznie z produktami, które posiadają złą-
cze Bus T4, to jest takimi, które należą do systemu „NiceOpera” (informacje
dotyczących tego systemu można znaleźć poza tekstem w ramce: „Co to jest
Nice Opera”).
Oview uaktywnia się tylko wtedy, gdy jest podłączony do urządzenia, z którego
bezpośrednio jest zasilany.
Oview może być wykorzystywany zarówno jako system programowania urzą-
dzeń, jak też jako system sterowania automatyką
nie zalecane w instalacjach automatyki o zaawansowanej technologii, ponieważ umożliwia:
– programowanie urządzenia lub urządzeń połączonych w sieć;
– sterowanie jednym lub wieloma automatami;
– wykonywanie diagnostyki urządzenia lub urządzeń połączonych w sieć.
PL
– archiwizowanie(*) ustawień i parametrów programowania urządzeń (archi-
wizowanie jest przydatne, np. w celu szybkiego przekonfi gurowania urządzeń
w przypadku wymiany jednego z elementów instalacji).
(*) Uwaga – Czynność archiwizowania jest dostępna tylko z wykorzystaniem
dodatkowego oprogramowania dołączonego do Oview (patrz Rozdział 7).
Oview jest przystosowany do wykorzystania zarówno przez instalatora jak i
użytkownika. Instalator za pomocą Oview może programować, modyfi kować
dane oraz konserwować dowolne urządzenie występujące w instalacji. Użytkownik natomiast może używać
wieloma automatami.
Instalator może udostępnić użytkownikowi także programowanie niektórych
3 – Polski
Oview do codziennego sterowania jednym lub
. Użycie Oview jest szczegól-
parametrów. Może to być użyteczne w przypadku, gdy użytkownik potrzebuje
zmienić wartości tych parametrów podczas użytkowania automatyki.
W przypadku sieci urządzeń użytkowanie Oview daje instalatorowi możliwość
skonfi gurowania za jednym razem wszystkich urządzeń obecnych w sieci, uła-
twialąc ich obsługę, skracając czasy i eliminując konieczność przemieszczania się.
Uwaga - W celu uzyskania dodatkowych informacji na temat jak utworzyć sieć
Bus oraz jak ją skonfi gurować i zarządzać za pomocą Oview należy zapoznać
się z instrukcją „Nice Opera System Book” na stronie internetowej www.niceforyou.com
1.2 – Akcesoria (opcjonalnie)
Oview ma na wyposażeniu 2-metrowy kabel do bezpośredniego połączenia do
urządzenia oraz wspornik do zamocowania produktu na ścianie.
Pozostałe akcesoria są opcjonalne; są
– Moduł Bluetooth
żeniu;
– Moduł GSM® z oprogramowaniem „Oview Software Suite” na wyposażeniu;
®
z oprogramowaniem „Oview Software Suite” na wyposa-
to:
Co to jest „Nice Opera”
Nice Opera jest systemem utworzonym z wielu urządzeń, zwykle stosowa-
nych w instalacjach automatyki bram, bram garażowych i szlabanów. Są to
następujące urządzenia:
– nadajniki serii Nice One;
– odbiorniki serii Nice One;
– centrale siłowników z połączeniem „BUS T4”
Do tych urządzeń dołącza się inne urządzenia uzupełniające, typu software lub
hardware, takie jak:
– programator O-Box z dedykowanym oprogramowaniem dla nadajników i odbiorników;
– programator Oview dla central sterujących i odbiorników;
– moduł Bluetooth
pomiędzy Oview i komputerem typu PC lub palmtopem;
– moduł GSM
pośrednictwem Internetu pomiędzy Oview i komputerem typu PC lub
palmtopem;
®
i dedykowany software do przekazywania danych
®
i dedykowany software do przekazywania danych za
Page 85

Za pomocą modułu GSM® jest także możliwe używanie smartphone i
zwykłego telefonu komórkowego: za ich pomocą możliwe jest wysyła-
nie polecenia do automatyki poprzez połączenie telefoniczne lub SMS;
ponadto za pomocą smartphone wyposażonego w system operacyj-
ny Windows
„Oview software suite”.
®
Mobile możliwe jest także stosowanie oprogramowania
INSTALACJA OVIEW
2
JAKO URZĄDZENIA STERUJĄCEGO
Aby wykorzystać Oview jako urządzenie do sterowania automatyką, należy jest
zainstalować je w odpowiednim miejscu, poza zasięgiem dzieci i na wysokości
od ziemi nie mniejszej niż 150 cm.
Aby zamontować je na ścianie, należy wykorzystać wspornik (jest w komplecie), postępując jak pokazano na rys. 2.
Następnie podłączyć Oview do automatyki, zgodnie z opisem w Rozdziale 3.
––– OBOWIĄZKI INSTALATORA –––
WAŻNE – Po zainstalowaniu i zaprogramowaniu Oview jako urządzenia
sterującego instalator powinien przekazać klientowi część niniejszej
in strukcji, zatytułowaną „Instrukcja użytkowania”.
Ponadto, jeśli ma zamiar pozostawić klientowi dostęp do niektórych
funkcji programowania, niezbędne jest przekazanie mu informacji
dotyczących tych funkcji, znajdujących się na stronie www.nice-service.com, w dziale „Download”.
2
PL
Polski – 4
Page 86

PODŁĄCZENIE OVIEW
3
DO URZĄDZENIA
Oview może być podłączone do urządzenia na dwa różne sposoby:
• podłączenie chwilowe: umożliwia stosowanie Oview jako „przenośnego”
zespołu programowania. Do tego podłączenia można wykorzystać kabel będący na wyposażeniu (2 m), podłączając go do gniazda Oview (rys. 4) oraz do
gniazda „Bus T4” w centrali sterującej urządzenia programowanego (rys. 5 –
aby dostać się do tego gniazda, zobacz instrukcję urządzenia).
• podłączenie stałe: umożliwia stosowanie Oview jako „stałego” zespołu pro-
gramowania. Przy realizacji tego podłączenia może okazać się, że będący na
wyposażeniu kabel (2 m) nie będzie wystarczająco długi. Należy zatem wykorzystać kabel przedłu
żający lub nowy kabel o odpowiedniej długości o nastę-
pujących cechach:
- typ stosowanego złącza: wtyczka RJ45 (typu 6/4 pin); są to złączki, których
powszechnie używa się w telekomunikacji.
- rodzaje kabli, które można stosować:
kabel telefoniczny płaski z 4 przewodami;
kabel autoalarmu 4-przewodowy (4 x 0,22 mm);
kabel UTP kategorii 2 (skrętka nieekranowana) z 4 przewodami (jeżeli kabel
ma więcej przewodów, należy wyeliminować przewody zbędne);
kabel STP kategorii 5 (skrętka ekranowana) z 4 przewodami (jeżeli kabel ma
więcej przewodów, należy wyeliminować przewody zbędne);
- maksymalna długość kabla: porównaj długości podane w Tabeli 1.
PL
Tabela 1 – Maksymalna długość kabla
Oview Oview + Oview +
Bluetooth
Kabel telefoniczny płaski 300 m 250 m 150 m
Kabel do autoalarmu 300 m 300 m 250 m
Kabel UTP kategorii 2 500 m 500 m 400 m
Kabel STP kategorii 5 700 m 700 m 400 m
5 – Polski
®
GSM
Uwagi ogólne do Tabeli 1:
•
Maksymalne długości kabli są obliczone do stosowania w środowiskach o poziomie
emisji elektromagnetycznej typu „cywilna”. Aby uzyskać większą niezawodność transmisji danych przy długich kablach, zaleca się stosowanie kabli ekranowanych STP kat. 5,
podłączając do masy ekran kabla w następujący sposób:
– jeżeli urządzenia są połączone „kaskadowo” (lub „łańcuchowo”), podłączyć ekran
odpowiadający urządzeniu umieszczonemu na jednym z końców łańcucha;
– jeżeli urządzenia są połączone „w gwiazdę”, podłączyć ekran albo odpowiadającydo-
wolnemu pojedynczemu urządzeniu albo umieszczonemu w centrum gwiazdy.
•
W przypadku sieci urządzeń całkowita długość kabla powinna być obliczona w sposób
następujący:
– jeżeli urządzenia są połączone „kaskadowo” (lub „łańcuchowo”), maksymalna długość
kabla powinna być liczona jako odległość pomiędzy dwoma urządzeniami znajdującymi
się na krańcach łańcucha.
– jeżeli urządzenia są połączone „w gwiazdę”, maksymalna długość kabla powinna być
liczona jako suma dwóch najdłuższych gałęzi powiększona o sumę połowy długości
pozostałych gałęzi.
Ogólnie, w celu połączenia większej liczby urz
specjalne gniazda typu „T”, określane zwykle jako „rozgałęziacze”, stosowane powszechnie w telekomunikacji. Rodzajem rozgałęziacza do zastosowania jest model RJ45 6/4
(4 spośród 6 zestyków)
Aby ułatwić zaciskanie złącza RJ45 na dwóch końcach kabla, zaleca się, aby przewody
•
wewnętrzne wybranego kabla były żyłami wielodrutowymi tzn. nie typu jednodrutowego.
ądzeń w sieć, mogą być wykorzystane
Po ustaleniu typu kabla zastosowanego do połączenia Oview z urządzeniem,
należy postępować w sposób następujący:
01. Przed rozpoczęciem instalacji produktu upewnić się, czy są dostępne
wszystkie przyrządy i materiały niezbędne do wykonania tej pracy. Ponadto należy sprawdzić, czy są one w dobrym stanie i zgodne z tym, co przewidują lokalne normy bezpieczeństwa.
02. Ustalić położenie, w jakim będzie instalowany Oview.
03. Wykonać prace w celu położenia rurek lub korytek zabezpieczających
kable elektryczne. Uwaga – Rurki lub korytka mają na celu zabezpieczenie
kabli elektrycznych przed przypadkowymi uderzeniami i zerwaniami.
04. W tym miejscu, po wstawieniu kabla do rurki zabezpieczającej, jeżeli uży-
®
wało się kabli pozbawionych złączy, należy zamontować na każdym końcu
kabla złączkę, zwracaj
ąc uwagę na tę samą kolejność przewodów w
obydwóch złączach (rys. 3).
05. Następnie podłączyć kabel do gniazda na Oview (rys. 4) i do gniazda
„BusT4”, znajdującego się w centrali sterującej urządzeniem sterowanym (rys. 5 – aby dostać się do tego gniazda, zobacz instrukcję urzą-
dzenia).
Page 87

1 2 3 4 1 2 3 4 4 3 2 1 1 2 3 4
Uwaga – W celu uzyskania więcej informacji dotyczącej zagadnień porusza-
nych w tym rozdziale, należy zapoznać się z instrukcją „Nice Opera System
Book”.
3
4
5
OGÓLNE UŻYTKOWANIE OVIEW
4
Oview uaktywnia się wyłącznie wtedy, gdy jest podłączone do zasilanego urzą-
dzenia, z którego pobiera zasilanie.
Wraz z włączeniem Oview pojawia się na ekranie ikona, która przedstawia podłączone urządzenie.
•
Opis przycisków Oview
Oview jest złożony z następujących części (rys. 6):
1 – Ekran LCD;
2 / 4 – Przyciski ze strzałkami W i X: służą do przechodzenia pomiędzy
polami na ekranie lub pomiędzy ekranami;
3 / 5 – Przyciski ze strzałkami S i T: służą do zmiany wartości w wybra-
nym polu lub do przechodzenia pomiędzy pozycjami listy;
6 – Przycisk służący do zatwierdzania wartości;
7 – Przycisk z służący do wyboru opcji, która pojawia się na dole po lewej
stronie ekranu (9);
8 – Przycisk z służący do wyboru opcji, która pojawia się na dole po pra-
wej stronie ekranu (
• Ekran początkowy Oview
Po uaktywnieniu się Oview pojawia się ekran zwany „Ekranem początkowym”.
Zawiera on następujące elementy (rys. 7):
A – Nazwa wybranego urządzenia.
B – Ikona określająca typ podłączonego urządzenia; w przypadku sieci urzą-
dzeń na ekranie wyświetlane jest pierwsze znalezione urządzenie.
C – Numer określający zestaw, do którego należy wybrane urządzenie.
D – Godzina i data czasu lokalnego.
E – „Menu”: ta opcja umożliwia dostęp do wszystkich funkcji będących do
dyspozycji podczas programowania urządzenia.
F – „Opcje”: opcja ta umożliwia dostęp do wszystkich funkcji, dostępnych w
celu sterowania jednym, lub kilkoma urządzeniami oraz konfi guracji urzą-
dzenia Oview.
10);
Polski – 6
PL
Page 88

8
1
4
3
7
2
5
6
10
9
6
run 2
Opcje Menu
02
00:01:14
09.11.07
B
EF
D
A C
7
PL
7 – Polski
FUNKCJONALNOŚĆ OVIEW
5
• Sterowanie automatyką
W celu sterowania automatyką można postępować na dwa sposoby. Po dokonaniu wyboru zestawu, do którego należy automatyka sterowania, należy uruchomić żądane polecenie na jeden ze sposobów:
A) aby uruchomić polecenie bezpośrednie, użyć jednego z przycisków:
– OTWÓRZ = przycisk S (poz. 3 – rys. 6)
– STOP = przycisk (poz. 6 – rys. 6)
– ZAMKNIJ = przycisk T (poz. 5 – rys. 6)
B) aby uruchomić polecenie specjalne automatyki, wybrać na ekranie
początkowym (rys. 7) opcję „Opcje” przyciskiem z (poz. 7 – rys. 6) a następnie wybrać opcję „Wykonaj polecenia”. Następnie wybrać żądane polecenie,
jakie pojawi się na liście.
W tym miejscu, aby zatwierdzić wybrane polecenie, należy wybrać opcje
„Wybierz” przyciskiem z (poz. 8 –
go wybierając opcje „Wstecz” przyciskiem z (poz. 7 – rys. 6).
Uwaga – Typ i numer występujących poleceń w niniejszym wykazie zmieniają
się zależnie od wyboru rodzaju automatyki.
•
Programowanie poleceń czasowych
Oview dysponuje zegarem wewnętrznym, który może być wykorzystany do
programowania automatycznego uruchamiania poleceń automatyki w określo-
nych dniach i godzinach. Uwaga – Jeżeli na skutek braku zasilania elektryczne-
go Oview nie będzie zasilany, zegar wewnętrzny działa nadal; jeżeli jednak podczas braku zasilania miałoby nastąpić zaprogramowane uruchomienie jakiegoś
polecenia, to nie zostanie ono wykonane.
Aby zaprogramować automatyczne wykonywanie poleceń w określonych
dniach i godzinach, należy postępować w sposób następujący:
a) wybrać zestaw, do którego należy programowana automatyka;
b) na ekranie początkowym (rys. 7) wybrać opcję „Opcje” przyciskiem z (poz.
7 – rys. 6) a następnie wybrać opcję „Polecenia godzinowe”;
c) na pojawiającym się ekranie wybrać „Nowe”, aby utworzyć nowe polecenie
rys. 6) lub powrócić do ekranu poprzednie-
Page 89

Polecenia godzinowe
Wstecz Wybierz
on
22:50 pwscpsn
Nowy
8
• Programowanie centrali sterującej i odbiornika
Aby zaprogramować parametry urządzenia, należy postępować
na stępująco:
OSTRZEŻENIE – W przypadku, gdy instalator zabezpieczył
do stęp do funkcji programowania hasłem, wejście do opcji
„Automatyki” może wymagać wprowadzenia hasła. W celu lepszego zrozumienia tych zabezpieczeń należy zapoznać się z rozdziałem „Działanie z hasłami”.
a) Wybrać zestaw, do którego należy programowane urządzenie.
b) Na ekranie początkowym (rys. 7) wybrać opcję „Menu” przyciskiem z (poz.
8 – rys. 6): na ekranie pojawi się wykaz urządzeń podłączonych i występują-
cych w tym zestawie.
c) Na tym ekranie możliwe jest:
– przeglądanie nazw występujących urządzeń za pomocą przycisków ze strzał-
ką S lub T;
– dostęp do zestawu następnego za pomocą przycisku ze strzałką X lub do
zestawu poprzedniego za pomocą przycisku ze strzałką W;
– zatwierdzenie wyboru urządzenia za pomocą przycisku 8.
d) Po zatwierdzeniu wyboru pojawi się ekran zawierający menu funkcji.
godzinowe (rys. 8) i wprowadzić w
odpowiednich miejscach określone
dni i godziny;
d) zatwierdzić ustawione zaprogra-
mowanie wybierając opcję „OK”
przyciskiem z (poz. 8 – rys. 6).
Ważne – Upewnić się, czy ze gar
jest ustawiony dokładnie na czas
lokalny.
– Polecenia czasowe
Uwaga
działają tylko wtedy, kiedy funkcja „Aktywacja polecen czas”
jest aktywna (ON) (pod hasłem
„Opcje”).
To menu może zawierać następujące opcje:
– „Funkcje centrali” (obejmuje funkcje specjalne centrali sterującej);
– „Funkcje odbiornika” (obejmuje funkcje specjalne odbiornika);
– „Funkcje podstawowe” (obejmuje funkcje występujące we wszystkich cen-
tralach sterujących i odbiornikach);
– „Funkcje zaawansowane” (obejmuje funkcje specjalne central sterujących
i odbiorników);
– „Log in” (służy do logowania się do automatyki, jeżeli wcześniej ustawione
zostało hasło);
– (itd..…)
Uwaga – Występowanie lub brak niektórych opcji w „Menu funkcji” zależy od
rodzaju wybranego urządzenia.
Po wybraniu jakiegoś hasła, zatwierdzić za pomocą „Wybierz”. W tym
momencie pojawi się ekran z funkcjami danego urządzenia.W dolnej części
można zauważyć ikonkę
użytkownik.
• Ustawianie parametrów działania Oview
Aby ustawić parametry działania Oview należy wybrać na ekranie początkowym (rys. 6) hasło „Opcje” przyciskiem (poz. 7 – rys. 6) a następnie opcję
„Ustawienia Oview”.
Na ekranie pojawi się wykaz dostępnych parametrów: „Nazwa” - „Data/Czas”
- „Jasnosc wyswietlacza” - „Jasnosc przyciskow” - „Haslo Oview” -
„Jezyk” - „Informacja” - „Opcje sieciowe”.
W celu wizualizacji i modyfikacji każdego pojedynczego parametru należy
wybrać go i działać na ekranie, który się pojawi.
– Nazwa: tego parametru używa się w celu przypisania do Oview indywidual-
nej nazwy łatwo identyfi kującej sieć urządzeń;
– Data/Czas: tego parametru używa się w celu ustawienia daty i godziny cza-
su lokalnego. Za pomocą przycisków W
przemieszczanie pomiędzy polami przeznaczonymi na datę i godzinę a za
pomocą przycisków S i T (3 i 5 – rys. 6) – zmiana ich wartości;
– Jasnosc wyswietlacza: tego parametru używa się do regulacji jasności
wyświetlacza. Może on być ustawiany w zakresie od 0 % do 100%. Uwaga
- po 30 sekundach braku aktywności wyświetlacza jasność jest zmniejszana
do nastawionej wartości minimalnej;
– Jasnosc przyciskow: tego parametru używa się do regulacji jasności pod-
lub wskazującą na tryb dostępu: instalator,
i X (2 i 4 – rys. 6) możliwe jest
Polski – 8
PL
Page 90

świetlenia klawiatury. Może on być ustawiany w zakresie od 0 % do 100%.
Uwaga - po 30 sekundach braku aktywności klawiatury jasność jest zmniejszana do nastawionej wartości minimalnej;
– Haslo Oview: zobacz rozdział „Hasło urządzenia Oview”;
– Jezyk: tego parametru używa się w celu ustawienia wybranego języka;
– Informacja: ten parametr umożliwia tylko wyświetlenie danych technicz-
nych Oview, bez możliwości ich modyfi kacji;
– Opcje sieciowe: ta opcja zawiera parametry: „System” i „Adres”. Używa
się ich do zmiany zestawu, do którego należy Oview, oraz jego adresu indywidualnego.
• Działanie z hasłami
Hasła urządzeń „NiceOpera”
Wszystkie urządzenia systemu „NiceOpera”, w tym Oview, oferują instalatorowi lub użytkownikowi poprzez opcję programowania hasła możliwość zablokowania nieupoważnionym osobom dostępu do danych istotnych dla działania
tych urządzeń.
Hasło zostanie zapisane w urządzeniu i będzie ograniczało dostęp do
funkcji niezależnie od tego, czy urządzenie Oview będzie podłączone.
Jeżeli urządzenie jest zabezpieczone hasłem, w celu rozpoczecia programowania konieczne jest wykonanie na początku procedury „Log in”, kolejne wylogowanie odbędzie się automatycznie po powrocie do ekranu głównego.
W centrali można ustawiać dwa rodzaje haseł: „Hasło użytkownika” oraz „Hasło
instalatora”.
Jeżeli urządzenie jest chronione przez oba hasła, Oview zażąda automatycznie
wprowadzenia hasła.
PL
Jeżeli ustawione zostało hasło instalatora, a w polu „Log in” na ekranie centrali
nie zostanie wprowadzone prawidłowe hasło, dostęp do menu będzie ograniczony. Mówiąc dokładniej, w przypadku przejścia do menu „Funkcje centrali”
niektóre hasła bę
można ich zmienić.
Istnieje także możliwość ustawienia hasła użytkownika (aktywnego tylko po
wprowadzeniu hasła instalatora), które całkowicie zablokuje dostęp do menu
osobom nieznającym hasła.
Instalator będzie mógł zdecydować, które części będą widoczne i które z nich
będzie mogła zmieniać osoba, która zalogowała się z hasłem użytkownika.
Ścieżka zmiany dostępu to: „Funkcje centrali” → „Funkcje zaawansowane”
9 – Polski
dą widoczne, a inne będą tylko widoczne, natomiast nie będzie
→ „Zezwolenia użytkownika”. Dokładniej mówiąc: przesuwając strzałki S i T
do każdego hasła w menu można przypisać jedno z następujących zezwoleń:
zezwolenie tylko na odczyt (widoczne, ale niezmienialne)
■ zezwolenie na odczyt i zapisywanie (widoczne i zmienialne)
∼ hasło nie będzie widoczne dla użytkownika.
W przypadku nieustawienia żadnego z haseł, całe menu jest widoczne i kon-
fi gurowalne (następuje zatem dostęp z poziomu instalatora ze wszystkimi
zezwoleniami). W dowolnym momencie można dowiedzieć się, jaki profi l za-
logowany jest do menu. W tym celu należy sprawdzić ikonkę przedstawioną
w dolnej części (
– Uwaga! Jeżeli w nawigacji brakuje haseł menu, oznacza to, że zostały dla
nich ustawione hasła.. Aby możliwy był dostęp do kompletnego menu,
konieczne jest zalogowanie się z hasłem instalatora.
– Uwaga! Hasła instalatora i użytkownika są niezależne od hasła urządzenia
Oview. Chronią one poszczególne menu.
Hasło urządzenia Oview
Oview umożliwia programowanie „Hasła Oview”.
„Hasło Oview” służy do blokowania dostępu użytkownikowi do danych i funkcji, które zapewniają prawidłowe działanie urządzenia Oview (dostęp do menu
„Opcje”). Hasło to chroni także parametry modułów OVTB lub OVBTGSM,
jeżeli są podłączone.
– Aby ustawić hasło: wybrać na ekranie począ
ni” przyciskiem z (poz. 7 – rys. 6) a następnie opcję „Ustawienia Oview”.
W tym miejscu wybrać opcję „Hasło Oview” i zaprogramować żądane hasło.
Uwaga – Gdy hasło jest aktywne, będzie wymagane przy każdym wejściu do
menu „Opcje”.
– Aby zmienić lub usunąć istniejące hasło: wybrać hasło „Opcje” z ekranu głównego. Po wprowadzeniu hasła wybrać „Ustawienia Oview” i „Hasło
Oview”, a następnie
– zaprogramowanie nowego hasła i zapamiętanie zmiany; lub
– usunięcie istniejącego hasła pozostawiając puste pole przeznaczone na hasło
i zapamiętanie zmiany.
użytkownik, instalator).
tkowym (rys. 7) hasło „Opzio-
Page 91

• Oview z oprogramowaniem wer. OV04
Oview z oprogramowaniem wer. OV04 posiada dwie funkcje: „Pamięć zda-
rzeń” i „Aktualizacja centrali”.
Pamięć zdarzeń
Ta funkcja umożliwia wyświetlanie w Oview wszystkich operacji wykonanych
przez urządzenia znajdujące się w sieci, do której Oview jest podłączony.
Uzyskiwanie danych (pamięć zdarzeń) następuje w trybie automatycznym na
początku, bezpośrednio po podłączeniu Oview do sieci i nie jest widoczne
dla instalatora: wyszukuje on wszystkie urządzenia występujące w danej sieci
i wczytuje pamięć zdarzeń każdego z nich do własnej pamięci, nadpisując
dane w miejsce wcześniej wczytanych danych. Po wyszukaniu urządzeń
znajdujących się w sieci, podczas, kiedy Oview jest nadal podłączony, jest
możliwe wyświetlenie kolejno pamięci zdarzeń pojedynczych urządzeń w
następujący sposób: wybierz urządzenie, następnie „
wane” → „Pamięć zdarzeń”. Aby przejrzeć zdarzenia wykorzystaj przyciskiS i T.
Pamięć zdarzeń może być również wyświetlana z pomocą oprogramowania
„Oview Software Suite”. W tym przypadku podłącz Oview do komputera lub
do palmtopa, w którym oprogramowanie zostało zainstalowane, wybierz na
stronie głównej hasło „Oview”, następnie „Funkcje O-View” → „Ustawienia”
→ „Pamięć zdarzeń”. Wyświetli się lista zawierająca zdarzenia wszystkich
urządzeń występujących w sieci, do której Oview został podłączony ostatnim
razem i aby wyświetlić zdarzenia dotyczące tylko jednego urządzenia wykorzystaj hasło „Filtr urządzenia”, wybierając dane urządzenie z wyświetlonej listy.
Maksymalna liczba programowanych zdarzeń wynosi 300.
Uzyskana pamięć zdarzeń pozostanie w pamięci Oview dopóki nie zostanie on
podłączony do innej sieci.
Aktualizacja centrali
Ta funkcja umożliwia aktualizację oprogramowania centrali sterującej wykorzystując pamięć wewnętrzną modułu dodatkowego OVBT (lub OVBTGSM) w
połączeniu z Oview.
Ta procedura jest podzielona na dwie operacyjne, które mogą być wykonywane również w pewnych odstępach czasowych i odległościowych, jeden od
drugiego: 1) wprowadzanie nowego oprogramowania do modułu dodatkowego Oview tylko poprzez Bluetooth; 2) Ściąganie nowego oprogramowania do
centrali.
1. Wprowadzanie nowego oprogramowania do modułu dodatkowego
Oview. Aby wprowadzić oprogramowanie do modułu dodatkowego OVBT
(lub OVBTGSM), zainstaluj moduł w Oview, otwórz oprogramowanie „Oview
Funkcje zaawanso-
Software Suite” (wersja 1.3 lub kolejna), uruchom wyszukiwanie urządzeń i
wybierz urządzenie Oview; następnie wybierz „Funkcje zaawansowane” i
„Wprowadzanie oprogramowania centrali”. Teraz wybierz plik z nowym
oprogramowaniem i zatwierdź. Plik zo - stanie automatycznie wczytany do
modułu dodatkowego. Czynno
pomocą Bluetooth, a nie za pomocą połączenia zdalnego GPRS.
2. Ściąganie nowego oprogramowania do centrali. Aby ściągnąć opro-
gramowanie do centrali podłącz do niej Oview, wyposażony w moduł
dodatkowy z nowym oprogramowaniem zachowanym w pamięci i przystąp
do aktualizacji w następujący sposób: usuń ewentualne hasła; następnie
wybierz w Oview „Menu” i w kolejności „Funkcje central” → „Funkcje
zaawansowane” → „Aktualizacja oprogramowania” Teraz Oview ścią-
gnie nowe oprogramowanie, które będzie kompatybilne z centralą lub też
nie: jeżeli będzie ono kompatybilne, wyświetli się „Uruchom”, w przeciwnym przypadku uruchomienie aktualizacji nie będzie możliwe. Po uruchomienia aktualizacji, w przypadku, kiedy nie zakończy si
centrala pozostanie zablokowana w oczekiwaniu na zakończenie procedury. Aby ją odblokować należy wybrać „Opcje” → „Urządzenia w fazie
boot” i ponownie uruchomić wprowadzanie oprogramowania.
ść tę można wykonać, podłączając Oview za
ę ona prawidłowo,
Polski – 10
PL
Page 92

UŻYWANIE OVIEW Z MODUŁAMI
6
BLUETOOTH® I GSM
®
Utylizacja produktu
Funkcjonalność Oview może być istotnie zwiększona przez zastosowanie
modułów Bluetooth® lub GSM® oraz oprogramowania „Oview Software Suite”
dostarczonego wraz z tymi modułami (patrz rys. 1). Te moduły oraz software
są dostępne opcjonalnie; software jest dostarczany w dwóch wersjach: jedna
dla komputerów typu PC i druga dla palmtopów. Aby wykorzystać software,
ko nieczne jest wcześniejsze jego zainstalowanie na PC i/lub palmtopie i/lub
w telefonie Smartphone, wyposażonych w połączenie Bluetooth
– Połączenie Bluetooth
Bluetooth®(do zainstalowania w Oview). Ten typ łączności umożliwia komunikowanie się z Oview na odległość maksimum 10–15 m przy braku przeszkód, lub
kilku metrów w przypadku występowania przeszkód (mury lub inne przeszkody).
– Połączenie Internet: umożliwia podłączenie się do Oview dzięki modułowi
®
(do zainstalowania w Oview). Ten typ łączności umożliwia komunikowa-
GSM
nie się z Oview za pośrednictwem sieci GSM®. W tym przypadku komunikowanie się może odbywać się przy dowolnej odległości, jeżeli tylko urządzenie
pozostaje w zasięgu sieci.
Za pomocą modułu GSM® jest także możliwe używanie smartphone i zwykłego telefonu komórkowego: za ich pomocą możliwe jest wysyłanie polecenia
do automatyki poprzez połączenie telefoniczne lub SMS; ponadto za pomocą
smartphone wyposażonego w system operacyjny Windows® Mobile możliwe
jest także stosowanie oprogramowania „Oview software suite”.
Oprogramowanie „Oview Software Suite” prezentuje szczegółową grafi kę na
ekranie a klawiatura komputera PC lub palmtopa czyni bardziej wygodną nawi-
PL
gację i wprowadzanie danych.
Za pomocą tego oprogramowania instalator, oprócz możliwości wykonania
wszystkich czynności normalnie wykonywanych przez Oview, ma możliwość
utworzenia także archiwum danych w celu zarządzania i zapamiętywania zmian
dotyczących programowanych urządzeń; ma także możliwość wykonania diagnozy wraz z informacjami w postaci grafi cznej bardziej kompletnej i natych-
miastowej, a także możliwość uaktualnienia oprogramowania wbudowanego
w urządzenie.
®
: umożliwia podłączenie się do Oview dzięki modułowi
®
i/lub Internet.
Produkt ten składa się z różnego rodzaju materiałów, niektóre z nich mogą
być powtórnie użyte, inne muszą zostać poddane utylizacji. Zasięgnij informacji
odnośnie systemów recyklingu i utylizacji, przewidzianych zgodnie z lokalnymi
przepisami obowiązującymi dla tej kategorii produktu.
Uwaga! Niektóre elementy produktu mogą zawierać substancje szkodliwe lub
niebezpieczne, które po wyrzuceniu, mogłyby zaszkodzić środowisku lub zdrowiu ludzkiemu.
Produkt zawiera baterię: powinna ona zostać usunięta, ale nie należy jej wyrzucać wraz ze zwykłymi odpadkami, ponieważ zawiera substancje szkodliwe;
należy zatem poddać ją utylizacji lub recyklingowi, stosując metody ‘selektywnego’ gromadzenia odpadów, zgodnie z obowiązującymi lokalnymi przepisami.
Zgodnie ze wskazaniem symbolu obok, zabrania się wyrzucania tego produktu do odpadów domowych. Należy przeprowadzić „segregację odpadów” na potrzeby utylizacji, według
me tod przewidzianych lokalnymi przepisami lub zwrócić produkt sprzedawcy podczas zakupu nowego, równorzędnego
produktu.
Uwaga! – Lokalne przepisy mogą przewidywać powa
nielegalnej utylizacji produktu.
żne sankcje w przypadku
11 – Polski
Page 93

Dane Techniczne produktu
Oview jest produktem Nice S.p.a. (TV) Włochy.
Typologia: jednostka sterowania, programowania i diagnostyki dla
urządzeń wyposażonych w połączenie BusT4
Technologia: komunikacja szeregowa half duplex 19200 Bps na magistrali
różnicowej z wysyłaniem poleceń, zmianą parametrów i weryfi kacją danych
diagnostycznych.
Interfejs grafi czny: wyświetlacz LCD 128 x 64 pikseli (46 x 29 mm); 2,2”
Urządzenie wejściowe operatora: joypad z 5 przyciskami (+2)
Podświetlenie wyświetlacza: światło białe (współrzędne chromatyczne
X = 0,29–0,33; Y = 0,30–0,34)
Zegar kalendarz: wewnętrzny, zasilany baterią (trwałość min. 10 lat)
Maksymalna liczba poleceń czasowych: 64
Historia zdarzeń: zdolność rejestracji 400 zdarzeń
Długość kabla połączeniowego:
– kabel na wyposażeniu: 2 m
– dodatkowy kabel: do 700 m, mierzona od końca do ko
Zasilanie: dostarczane od urządzeń podpiętych do Bus T4
Pobierany prąd: maksimum 20 mA (bez akcesoriów)
Izolacja: Klasa III
Stopień ochrony obudowy: IP 20 (używanie tylko w pomieszczeniach
wewnętrznych i zabezpieczonych)
Temperatura pracy: od –20°C do +55°C
Wymiary (mm): 107 x 61 x h 20 (ze wspornikiem do ścian: 125 x 70 x h 32)
Ciężar: 75 g (bez kabla)
ńca
PL
Akcesoria opcjonalne:
moduł do połączenia w technologii Bluetooth
®
moduł do połączenia w technologii GSM®–GPRS
®
Polski – 12
Page 94

DEKLARACJA ZGODNOŚCI WE
Deklaracja zgodna z Dyrektywą 1999/5/WE
Uwaga - Treść niniejszej deklaracji jest zgodna z ofi cjalną deklaracją zdeponowaną w siedzibie Nice S.p.a., a w szczególności z jej najnowszą wersją dostępną przed wydrukowaniem
niniejszego podręcznika. Niniejszy tekst został dostosowany ze względów redakcyjnych.
Kopię oryginalnej deklaracji zgodności można otrzymać od fi rmy Nice S.p.a. (TV) I.
Numer deklaracji: 278/OV Akt.: 6 Język: PL
Ja, niżej podpisany Luigi Paro, jako Dyrektor Generalny, deklaruję na własną odpowiedzialność, że produkt:
Nazwa producenta: NICE s.p.a.
Adres: Via Pezza Alta 13, Z.I. Rustignè, 31046 Oderzo (TV) Italia
Typ: Jednostka programująca i sterująca do automatów
Modele: OVIEW
Akcesoria: OVBT, OVBTGSM
Jest zgodny z podstawowymi wymaganiami art. 3 poniższej dyrektywy wspólnotowej (dotyczącej zastosowania, do którego przeznaczone są produkty):
Dyrektywa 1999/5/WE PARLAMENTU EUROPEJSKIEGO i RADY z dnia 9 marca 1999 r., w sprawie urządzeń radiowych i końcowych urządzeń telekomu-
nikacyjnych oraz wzajemnego uznawania ich zgodności z normami zharmonizowanymi:
· Ochrona zdrowia (art. 3(1)(a)): EN 50371:2002, EN50360:2001+A1:2006
· Bezpieczeństwo elektryczne (art. 3(1)(a)): EN 60950-1:2006 i A11:2009
· Kompatybilność elektromagnetyczna (art. 3(1)(b)):
EN 301 489-1V1.8.1:2008; EN 301 489-17 V1.2.1.:2002,
EN301489-7 V1.3.1:2005
· Widmo radiowe (art. 3(2)(a)): EN300328 V1.7.1:2006, EN300440-2 V1.1.2:2004,
EN 301511 V9.0.2:2003
Zgodnie z dyrektywą 1999/5/WE (załącznik V) produkt został oznaczony i została mu przyznana klasa 1:
0682
PL
Ponadto produkt jest zgodny z postanowieniami następujących dyrektyw wspólnotowych:
• Dyrektywa PARLAMENTU EUROPEJSKIEGO I RADY NR 2004/108/WE z dnia 15 grudnia 2004 roku w sprawie ujednolicenia prawodawstwa państw
członkowskich w zakresie kompatybilności elektromagnetycznej, znosząca dyrektywę 89/336/EWG, zgodnie z następującymi normami zharmonizowanymi:
EN 61000-6-2:2005, EN 61000-6-3:2007
Oderzo, 1 marca 2012 Luigi Paro
((Dyrektor Generalny)
13 – Polski
Page 95

INSTRUKCJA UŻYTKOWANIA
8
1
4
3
7
2
5
6
10
9
OGÓLNE ZALECENIA I OSTRZEŻENIA DOTYCZĄCE
BEZPIECZEŃSTWA
UWAGA! – Wszystkie czynności instalacji, połączeń, programowania i kon-
serwacji produktu powinny być wykonywane wyłącznie przez wykwalifi ko-
wany personel.
Przestrzegaj następujących zaleceń:
– nie pozostawiaj Oview w zasięgu dzieci.
– do czyszczenia powierzchniowego produktu należy używać miękkiej tkaniny lek-
ko zwilżonej (nie mokrej!). Ważne – nie stosować płynów zawierających alkohol,
benzen, rozpuszczalniki lub inne substancje łatwopalne. Użycie takich substancji
może doprowadzić do uszkodzenia produktu.
– delikatnie obchodzić się z ekranem ciekłokrystalicznym (LCD), unikając poryso-
wania go.
– przechowywać ze starannością niniejszą instrukcję, aby ułatwić ewentualne
przyszłe konsultacje.
– pod koniec okresu eksploatacji produktu upewnić się, czy zostanie on
zutylizowany lub poddany recyklingowi zgodnie z obowiązującymi przepisami lokalnymi.
OPIS OVIEW
Użycie Oview jako urządzenia sterującego umocowanego na ścianie pozwala na
jego stałą aktywność, o ile będzie zasilane bezpośrednio i stale z układu automatyki,
z którym jest połączone. Jeżeli jednak Oview nie będzie używane przez krótki okres
czasu, jego ekran przejdzie w stan czuwania (zmniejsza się jasność świecenia). W
takiej sytuacji, aby przywrócić aktywność, wystarczy nacisnąć jakikolwiek przycisk.
W celu sterowania automatyką wystarczy przywołać na ekran Oview nazwę i ikonę
automatyki i wysłać polecenie za pomocą przycisku (aby pogłębić to zagadnienie,
należy przeczytać rozdział „Używanie Oview jako urządzenia sterującego”).
• Opis przycisków Oview
Oview jest złożony z następujących części (rys. A):
1 – Ekran LCD;
2 / 4 – Przyciski ze strza
na ekranie lub pomiędzy ekranami;
łkami W i X: służą do przechodzenia pomiędzy polami
3 / 5 – Przyciski ze strzałkami S i T: służą do zmiany wartości w wybranym
polu lub do przechodzenia pomiędzy pozycjami listy;
6 – Przycisk służący do zatwierdzania wartości;
7 – Przycisk z służący do wyboru opcji, która pojawia się na dole po lewej
stronie ekranu (9);
8 – Przycisk z służący do wyboru opcji, która pojawia się na dole po prawej
stronie ekranu (10);
A
• Ekran początkowy Oview
Po uaktywnieniu się Oview pojawia się ekran zwany „Ekranem początkowym”.
Zawiera on następujące elementy (rys. B):
A – Ikona określająca typ podłączonego urządzenia; w przypadku sieci urządzeń
na ekranie wyświetlane jest pierwsze znalezione urzą
B – Nazwa wybranego urządzenia.
dzenie.
Polski – 14
PL
Page 96

C – Numer określający zestaw, do którego należy wybrane urządzenie.
run 2
Opcje Menu
02
00:01:14
09.11.07
B
EF
D
A C
Polecenia godzinowe
Wstecz Wybierz
on
22:50 pwscpsn
Nowy
D – Godzina i data czasu lokalnego.
E – „Menu”: ta opcja umożliwia dostęp do wszystkich funkcji będących do dys-
pozycji podczas programowania urządzenia.
F – „Opcje”: ta opcja umożliwia dostęp do wszystkich dostępnych funkcji, służą-
cych do sterowania jednym lub kilkoma urządzeniami.
B
UŻYWANIE OVIEW JAKO URZĄDZENIA STERUJĄCEGO
W celu sterowania automatyką można postępować na dwa sposoby. Po dokonaniu wyboru zestawu, do którego należy automatyka sterowania, należy uruchomić
żądane polecenie na jeden ze sposobów:
1) aby uruchomić polecenie bezpośrednie, użyć jednego z Przycisków:
PL
– OTWÓRZ = przycisk S (poz. 3 – rys. A)
– STOP = przycisk (poz. 6 – rys. A)
– ZAMKNIJ = przycisk T (poz. 5 – rys. A)
2) aby uruchomić polecenie specjalne automatyki, wybrać na ekranie początkowym
(rys. B) hasło „Opcje” przyciskiem (poz. 7 – rys. A) a następnie wybrać opcję „Pole-
cenia”. Następnie wybrać żądane polecenie, spośród tych, które pojawią się na liście.
W tym miejscu, aby zatwierdzić wybrane polecenie, należy wybrać opcję
„Wybierz” przyciskiem
wybierając opcję „Wstecz” przyciskiem z (poz. 7 – rys. A).
Uwaga – Typ i numer występujących poleceń w niniejszym wykazie zmieniają się
zależnie od wyboru rodzaju automatyki.
15 – Polski
z (poz. 8 – rys. A) lub powrócić do poprzedniego ekranu
FUNKCJONALNOŚĆ OVIEW
• Programowanie poleceń czasowych
Oview dysponuje zegarem wewnętrznym, który może być wykorzystany do programowania automatycznego uruchamiania poleceń automatyki w określonych
dniach i godzinach. Uwaga – Jeżeli na skutek braku zasilania elektrycznego Oview
nie będzie zasilany, zegar wewnętrzny działa nadal; jeżeli jednak podczas braku
zasilania miałoby nastąpić zaprogramowane uruchomienie jakiegoś polecenia, to
nie zostanie ono wykonane, ale pozostanie zaprogramowane.
Aby zaprogramować automatyczne wykonywanie poleceń w określonych dniach i
godzinach, należy postępować w sposób następujący:
a) wybrać zestaw, do którego należy programowana automatyka;
b) na ekranie początkowym (rys. B) wybrać hasło „Opcje” przyciskiem z (poz.
7 – rys. A) a następnie wybrać opcję „Polecenia godzinowe”;
c) na pojawiającym się ekranie (rys. C) wybrać „Nowe
polecenie godzinowe i wprowadzić w odpowiednich miejscach określone dni i
godziny;
d) zatwierdzić ustawione za programowanie wybierając op cję „OK” przyciskiem z
(poz. 8 – rys. A).
Ważne – Upewnić się, czy ze gar jest ustawiony dokładnie na czas lokalny.
Uwaga – Polecenia czasowe działają tylko wtedy, kiedy funkcja „Aktywacja
polecen czas” jest aktywna (ON) (pod hasłem „Opcje”).
”, aby utworzyć nowe
C
• Ustawianie parametrów działania Oview
Aby ustawić parametry działania Oview należy wybrać na ekranie początkowym
(rys. B) opcję „Menu” przyciskiem (poz. 7 – rys. A) a następnie hasło „Opcje”.
Na ekranie pojawi się wykaz dostępnych parametrów: „Nazwa” - „Data/Czas” -
Page 97

„Jasnosc wyswietlacza” - „Jasnosc przyciskow” - „Haslo Oview” - „Informa-
cja” - „Jezyk” - „Opcje sieciowe”.
W celu wizualizacji i modyfi kacji każdego pojedynczego parametru należy wybrać go
i działać na ekranie, który się pojawi. Uwaga! – Niektóre z tych parametrów mogą
być zablokowane przez instalatora, zatem nie można ich zamieniać.
– Nazwa: tego parametru używa się w celu przypisania do Oview indywidualnej
nazwy łatwo identyfi kującej sieć urządzeń;
– Data/Czas: tego parametru używa się w celu ustawienia daty i godziny czasu
lokalnego. Za pomocą przycisków W i X (2 i 4 – rys. 6) możliwe jest przemieszczanie pomiędzy polami przeznaczonymi na datę i godzinę a za pomocą przycisków S i T (3 i 5 – rys. 6) – zmiana ich wartości;
– Jasnosc wyswietlacza: tego parametru uż
tlacza. Może on być ustawiany w zakresie od 0 % do 100%. Uwaga - po 30
sekundach braku aktywności wyświetlacza jasność jest zmniejszana do nastawionej wartości minimalnej;
– Jasnosc przyciskow: tego parametru używa się do regulacji jasności podświe-
tlenia klawiatury. Może on być ustawiany w zakresie od 0 % do 100%. Uwa-
ga - po 30 sekundach braku aktywności klawiatury jasność jest zmniejszana do
nastawionej wartości minimalnej;
– Haslo Oview: zobacz rozdział „Hasło urządzenia Oview;
– Informacja: ten parametr umożliwia tylko wyświetlenie danych technicznych
Oview, bez możliwości ich modyfi kacji;
– Jezyk: tego parametru używa się w celu ustawienia wybranego języka;
– Opcje sieciowe: ta opcja zawiera parametry: „System” i „Adres”. Używa się ich
do zmiany zestawu, do którego należy Oview, oraz jego adresu indywidualnego.
ywa się do regulacji jasności wyświe-
Uwaga – Gdy hasło jest aktywne, będzie wymagane przy każdym wejściu do
menu „Opcje”.
– Aby zmienić lub usunąć istniejące hasło: wybrać hasło „Opcje” z ekranu
głównego. Po wprowadzeniu hasła wybrać „Ustawienia Oview”, a następnie
„Hasło Oview”, następnie
– zaprogramowanie nowego hasła i zapamiętanie zmiany; lub
– usunięcie istniejącego hasła pozostawiając puste pole przeznaczone na hasło
i zapamiętanie zmiany.
• Programowanie funkcji automatyki
Aby dostać
początkowym (rys. B) opcję „Menu” przyciskiem (poz. 8 – rys. A).
Na ekranie, który się pojawi, wybierając automatykę do zaprogramowania może
być wymagane wprowadzenie hasła.
• Działanie z „Haslo Oview”
Aby ograniczyć dostęp do niektórych funkcji programowalnych (np. programowanie czasowe) osobom nieupoważnionym, jak np. osoby postronne czy dzieci,
Oview oferuje możliwość zaprogramowania „Hasła Oview”.
się do funkcji programujących automatykę należy wybrać na ekranie
– Aby ustawić hasło: wybrać na ekranie początkowym (rys. 7) hasło „Opcje”
przyciskiem z (poz. 7 – rys. 6) ), a następnie opcję „Ustawienia Oview”. W
tym miejscu wybrać opcję „Hasło Oview” i zaprogramować żądane hasło.
PL
Polski – 16
Page 98

NEDERLANDS
Originele instructies
VOORZORGSMAATREGELEN VOOR DE VEILIGHEID
ALGEMENE AANBEVELINGEN EN
INFORMATIE OVER DE MERKEN
De merken BLUETOOTH®, GPRS®, GSM® zij n merken die zij n geregistreerd
door de respectievelijke eigenaren; de namen van de in deze handleiding
genoemde producten kunnen ook geregistreerd zij n door de respectievelij ke
eigenaren.
NL
Dit symbool duidt op zaken die een mogelij ke bron van
gevaar kunnen vormen. De handelingen waarbij dit sym-
bool staat, mogen daarom uitsluitend worden uitgevoerd
door gekwalifi ceerd en ervaren personeel, in overeen-
stemming met de plaatselij k geldende veiligheidsvoor-
schriften en met de hier beschreven aanwij zingen.
1 – Nederlands
BELANGRIJK
WERK ONDER VEILIGE CONDITIES!
LET OP! – Voor de veiligheid van de betrokken personen is het belang-
rij k deze aanwij zingen op te volgen.
LET OP! – Belangrij ke aanwij zingen voor de veiligheid: bewaar deze
aanwij zingen.
LET OP! – Alle werkzaamheden in verband met de installatie, de aansluiting, de programmering en het onderhoud van het product mogen
uitsluitend worden uitgevoerd door een gekwalifi ceerde technicus!
Nice behoudt zich het recht voor op elk ogenblik, zonder voorafgaande kennisgeving aan de gebruiker, de ter beschikking gestelde diensten tij delij k of per-
manent te wij zigen of deactiveren. De gebruiker gaat ermee akkoord dat Nice
op geen enkele wij ze jegens de gebruiker of derden aansprakelij k kan gesteld
worden voor wij zigingen, onderbreking of deactivering.
Neem de volgende aanbevelingen in acht:
– Geen enkel onderdeel van het product mag gewij zigd worden, tenzij
dergelij ke wij zigingen in deze handleiding zij n voorzien. Werkzaamhe-
den waarvoor de fabrikant geen toestemming heeft verleend, kunnen
een bron van gevaar vormen en storingen veroorzaken. De fabrikant
aanvaardt geen enkele aansprakelij kheid voor schade die het gevolg is
van op willekeurige wij ze gewij zigde producten.
– Het product is ontworpen voor gebruik binnenshuis. Gebruik buitenshuis is alleen mogelij k indien het klimaat dit toelaat. De kast van het
product biedt namelij k geen bescherming tegen het binnendringen van
water of andere vloeistoffen.
–
Als het product gebruikt wordt als besturingsinrichting, is het belangrij k
dat het op een geschikte plaats wordt geïnstalleerd, buiten bereik van kinderen en op een hoogte vanaf de grond van niet minder dan 150 cm.
– Om de buitenkant van het product te reinigen gebruikt u een zachte, iets
bevochtigde (maar niet natte!) lap. Belangrij k – Gebruik geen vloeistoffen die
alcohol, benzeen, oplosmiddelen of andere ontvlambare substanties bevatten.
Gebruik van dergelij ke substanties kan het product beschadigen.
– Behandel het LCD-scherm voorzichtig en zorg ervoor dat u er geen krassen
op maakt.
– Bewaar deze handleiding zorgvuldig, om eventuele toekomstige programmeer- of onderhoudswerkzaamheden te vergemakkelij ken.
– Het verpakkingsmateriaal van het product moet overeenkomstig de plaatselij k van kracht zij nde voorschriften als afval worden verwerkt.
Page 99

(BusT4)
(BusT4)
(BusT4)
(Oview
Software Suite)
(BusT4)
10-15m
max
(Gprs)
(Wi Fi)
(Adsl)
(Oview
Software Suite)
(GSM®)
(Internet)
1
Gebruik van alleen de
Oview
Gebruik van de
OVBT module
en de software
Gebruik van de
OVBTGSM module en een
mobiele telefoon
De Oview en zijn accessoires
module
OVBT
module
OVBTGSM
Gebruik van de
OVBTGSM module
en de software
OVBTGSM
module
NL
Nederlands – 2
Page 100

BESCHRIJVING VAN HET PRODUCT EN
1
GEBRUIKSBESTEMMING
De Oview is een apparaat dat bestemd is voor de programmering en besturing
van Nice inrichtingen die voorzien zij n van “BusT4” en die gebruikt worden voor
het manoeuvreren van hekken, garagedeuren, wegbarrières met slagboom en
andere gelij ksoortige toepassingen.
Ieder ander gebruik dient als oneigenlij k te worden beschouwd! De fabri-
kant is niet aansprakelij k voor schade die het gevolg is van een oneigen-
lij k gebruik van het product, anders dan in deze handleiding is voorzien.
1.1 – Belangrij kste functionele kenmerken van de Oview
De Oview communiceert met andere inrichtingen via de BusT4 kabel; om die
reden kan hij enkel en alleen communiceren met producten die voorzien zij n
van de BusT4 connector, oftewel, de producten die deel uitmaken van het
“NiceOpera” systeem (zie voor meer informatie over dit systeem het tekstvak
hiernaast, “Wat is Nice Opera”).
De Oview wordt alleen actief wanneer hij wordt aangesloten op een andere
inrichting, aangezien hij voor zijn stroomvoorziening rechtstreeks op deze
andere inrichting is aangewezen.
De Oview kan als systeem voor het programmeren van inrichtingen en als systeem voor het besturen van automatiseringen worden gebruikt. Gebruik van de
Oview is met name nuttig bij technologisch geavanceerde automatiseringsin-
stallaties, waar het systeem de volgende operaties mogelij k maakt:
– programmeren van één of meerdere via een netwerk aangesloten inrichtingen;
– besturen van één of meer automatiseringen;
– uitvoeren van de diagnostiek van één of meerdere via een netwerk aan-
gesloten inrichtingen.
– archiveren(*) van de instellingen en de programmeringen van de inrichtin-
gen (archivering is bij voorbeeld nuttig om inrichtingen snel opnieuw te kunnen
NL
confi gureren in het geval er een onderdeel van de installatie wordt vervangen).
(*) Opmerking – De archiveerfunctie is alleen beschikbaar bij gebruik van de
extra software die bij de Oview hoort (zie Hoofdstuk 7).
De Oview kan zowel door de installateur als door de gebruiker worden gebruikt.
Met één enkele Oview kan de installateur iedere in een installatie aanwezige
inrichting programmeren, onderhouden of de gegevens ervan wij zigen. De
3 – Nederlands
gebruiker daarentegen kan de Oview gebruiken voor de dagelij kse besturing
van één of meer automatiseringen.
Als de installateur wil, kan hij de gebruiker ook de mogelij kheid geven om
bepaalde parameters te programmeren. Dit kan nuttig zij n wanneer het nodig is
dat de gebruiker de waarden van deze parameters gedurende het gebruik van
de automatisering verandert.
In het geval van via een netwerk met elkaar verbonden inrichtingen, biedt het
gebruik van Oview de installateur het voordeel alle in een installatie aanwezige
inrichtingen één voor één te kunnen confi gureren, waardoor zij n werk sneller
en eenvoudiger wordt en hij minder vaak naar de klant hoeft dan normaal het
geval zou zij n.
Opmerking – Zie voor meer informatie over het aanleggen van een Bus netwerk en het confi gureren en beheren hiervan via de Oview, de handleiding
“NiceOpera System Book”, die te vinden is op de site www.niceforyou.com
1.2 – Accessoires (optioneel)
Bij de Oview wordt een 2 meter lange kabel geleverd voor rechtstreekse aan-
sluiting op een inrichting, alsmede een houder waarmee het product aan de
wand kan worden bevestigd.
Alle andere accessoires zij n optioneel, te weten:
– Bluetooth
– GSM
®
module, inclusief de software “Oview Software Suite”;
®
module, inclusief de software “Oview Software Suite”.
Wat is “NiceOpera”
Nice Opera is een systeem dat is opgebouwd uit verschillende inrichtingen
die gewoonlij k gebruikt worden in installaties voor de automatisering van hek-
ken, garagedeuren en wegbarrières met slagboom. Deze inrichtingen zij n:
– de zenders van de serie NiceOne;
– de ontvangers van de serie NiceOne;
– de besturingseenheden van de reductiemotoren met “BUST4” aansluiting.
Naast deze inrichtingen kent het systeem nog andere aanvullende softwareen hardware-elementen, namelij k:
– de programmeereenheid O-Box met specifi eke software, voor de
zenders en de ontvangers;
 Loading...