

Page 1
c. Securely insert the Ethernet cable from your cable or DSL modem into the
Internet port (B) on the WGT634U.
c. Last, turn on your computer.
Note: If a dialup or network connection usually logs yo u in to the Internet on
startup, do not run that software or cancel it if it starts automatically.
Start Here
Follow these instructions to set up your router.
Verify That Basic Requirements Are Met
Assure that the following requirements are met:
• You have your broadband Internet service settings handy.
• The networking settings of the computer are set to obtain an IP address
automatically . For instructions on how to do this, please see the animated
tutorials on the Model WGT634U Resource CD for Windows computers or the
Reference Manual on the CD for Macintosh computers.
First, Connect the Router to the Internet
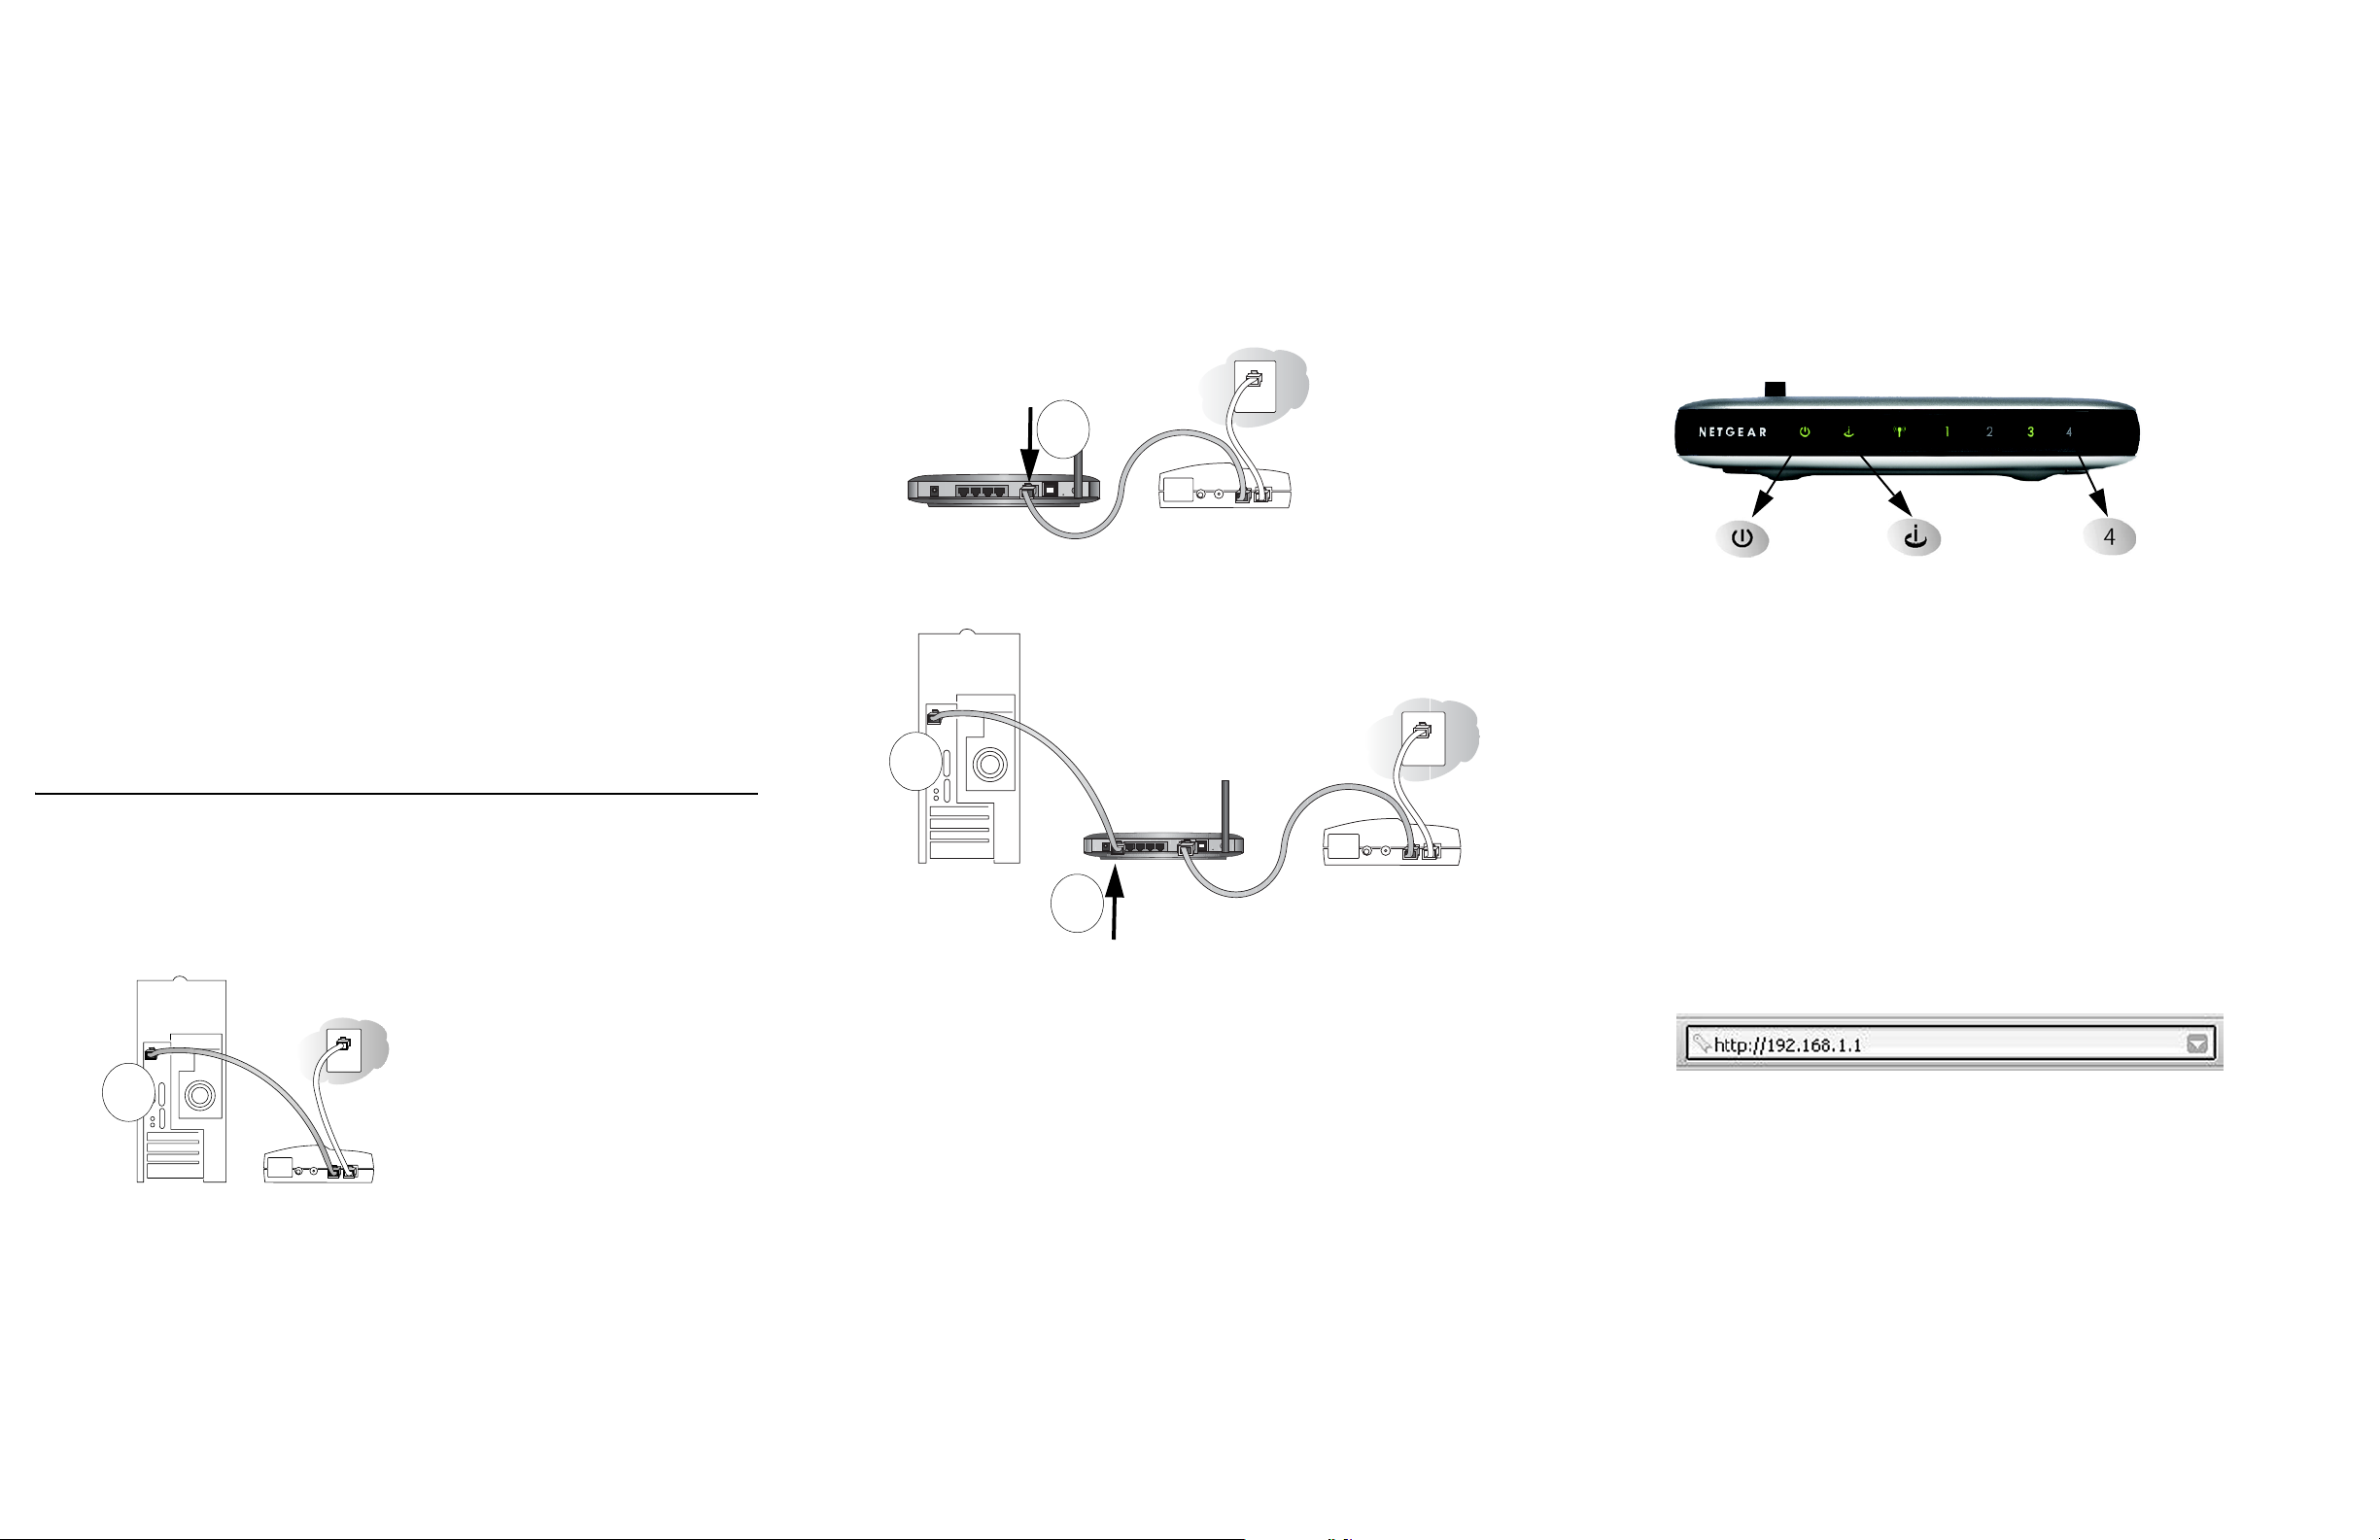
1. CONNECT THE ROUTER BETWEEN YOUR PC & MODEM
a. Turn off your computer and cable or DSL modem.
b. Disconnect the Ethernet cable (A) which connects from your computer to the
cable or DSL modem.
B
Broadband modem
d. Securely insert one end of the Ethernet cable that came with your router into
a LAN port on the router such as LAN port 4 (C), and the other end into the
Ethernet port of your computer (D).
D
BROADANDMODEM
C
/$13RUW
Power
Check the status lights and verify the following:
• Power: The power light goes on when you turn the router on.
• LAN: A LAN light on the router such as the one for LAN port 4 is lit. If no
LAN lights are lit, check that the Ethernet cable connecting the powered on
computer to the router is securely attached at both ends.
• Internet: The Internet light on the router is lit. If the Internet light is not lit,
make sure the Ethernet cable is securely attached to the router Internet port
and the powered on modem.
Internet Port
LAN Port 4
3. LOG IN TO THE ROUTER
a. From your PC, launch a browser such as Internet Explorer or Netscape®
Navigator.
b. Connect to the router by typing http://192.168.1.1 in the address field.
A
Broadband modem
2. RESTART YOUR NETWORK IN THE CORRECT SEQUENCE
Warning: Failure to restart your network in the correct sequence could prevent
you from connecting to the Internet.
a. First, turn on the cable or DSL modem and wait 2 minutes.
b. Now, turn on your router.
c. Enter admin for the router user name and password for the router password,
both in lower case letters.
d. Aft er logging in to the router , yo u will see a Firmware Upgrade prompt. Skip
the upgrade this time by clicking the No button. Use the Setup Wizard first
to connect to the Internet.
Page 2
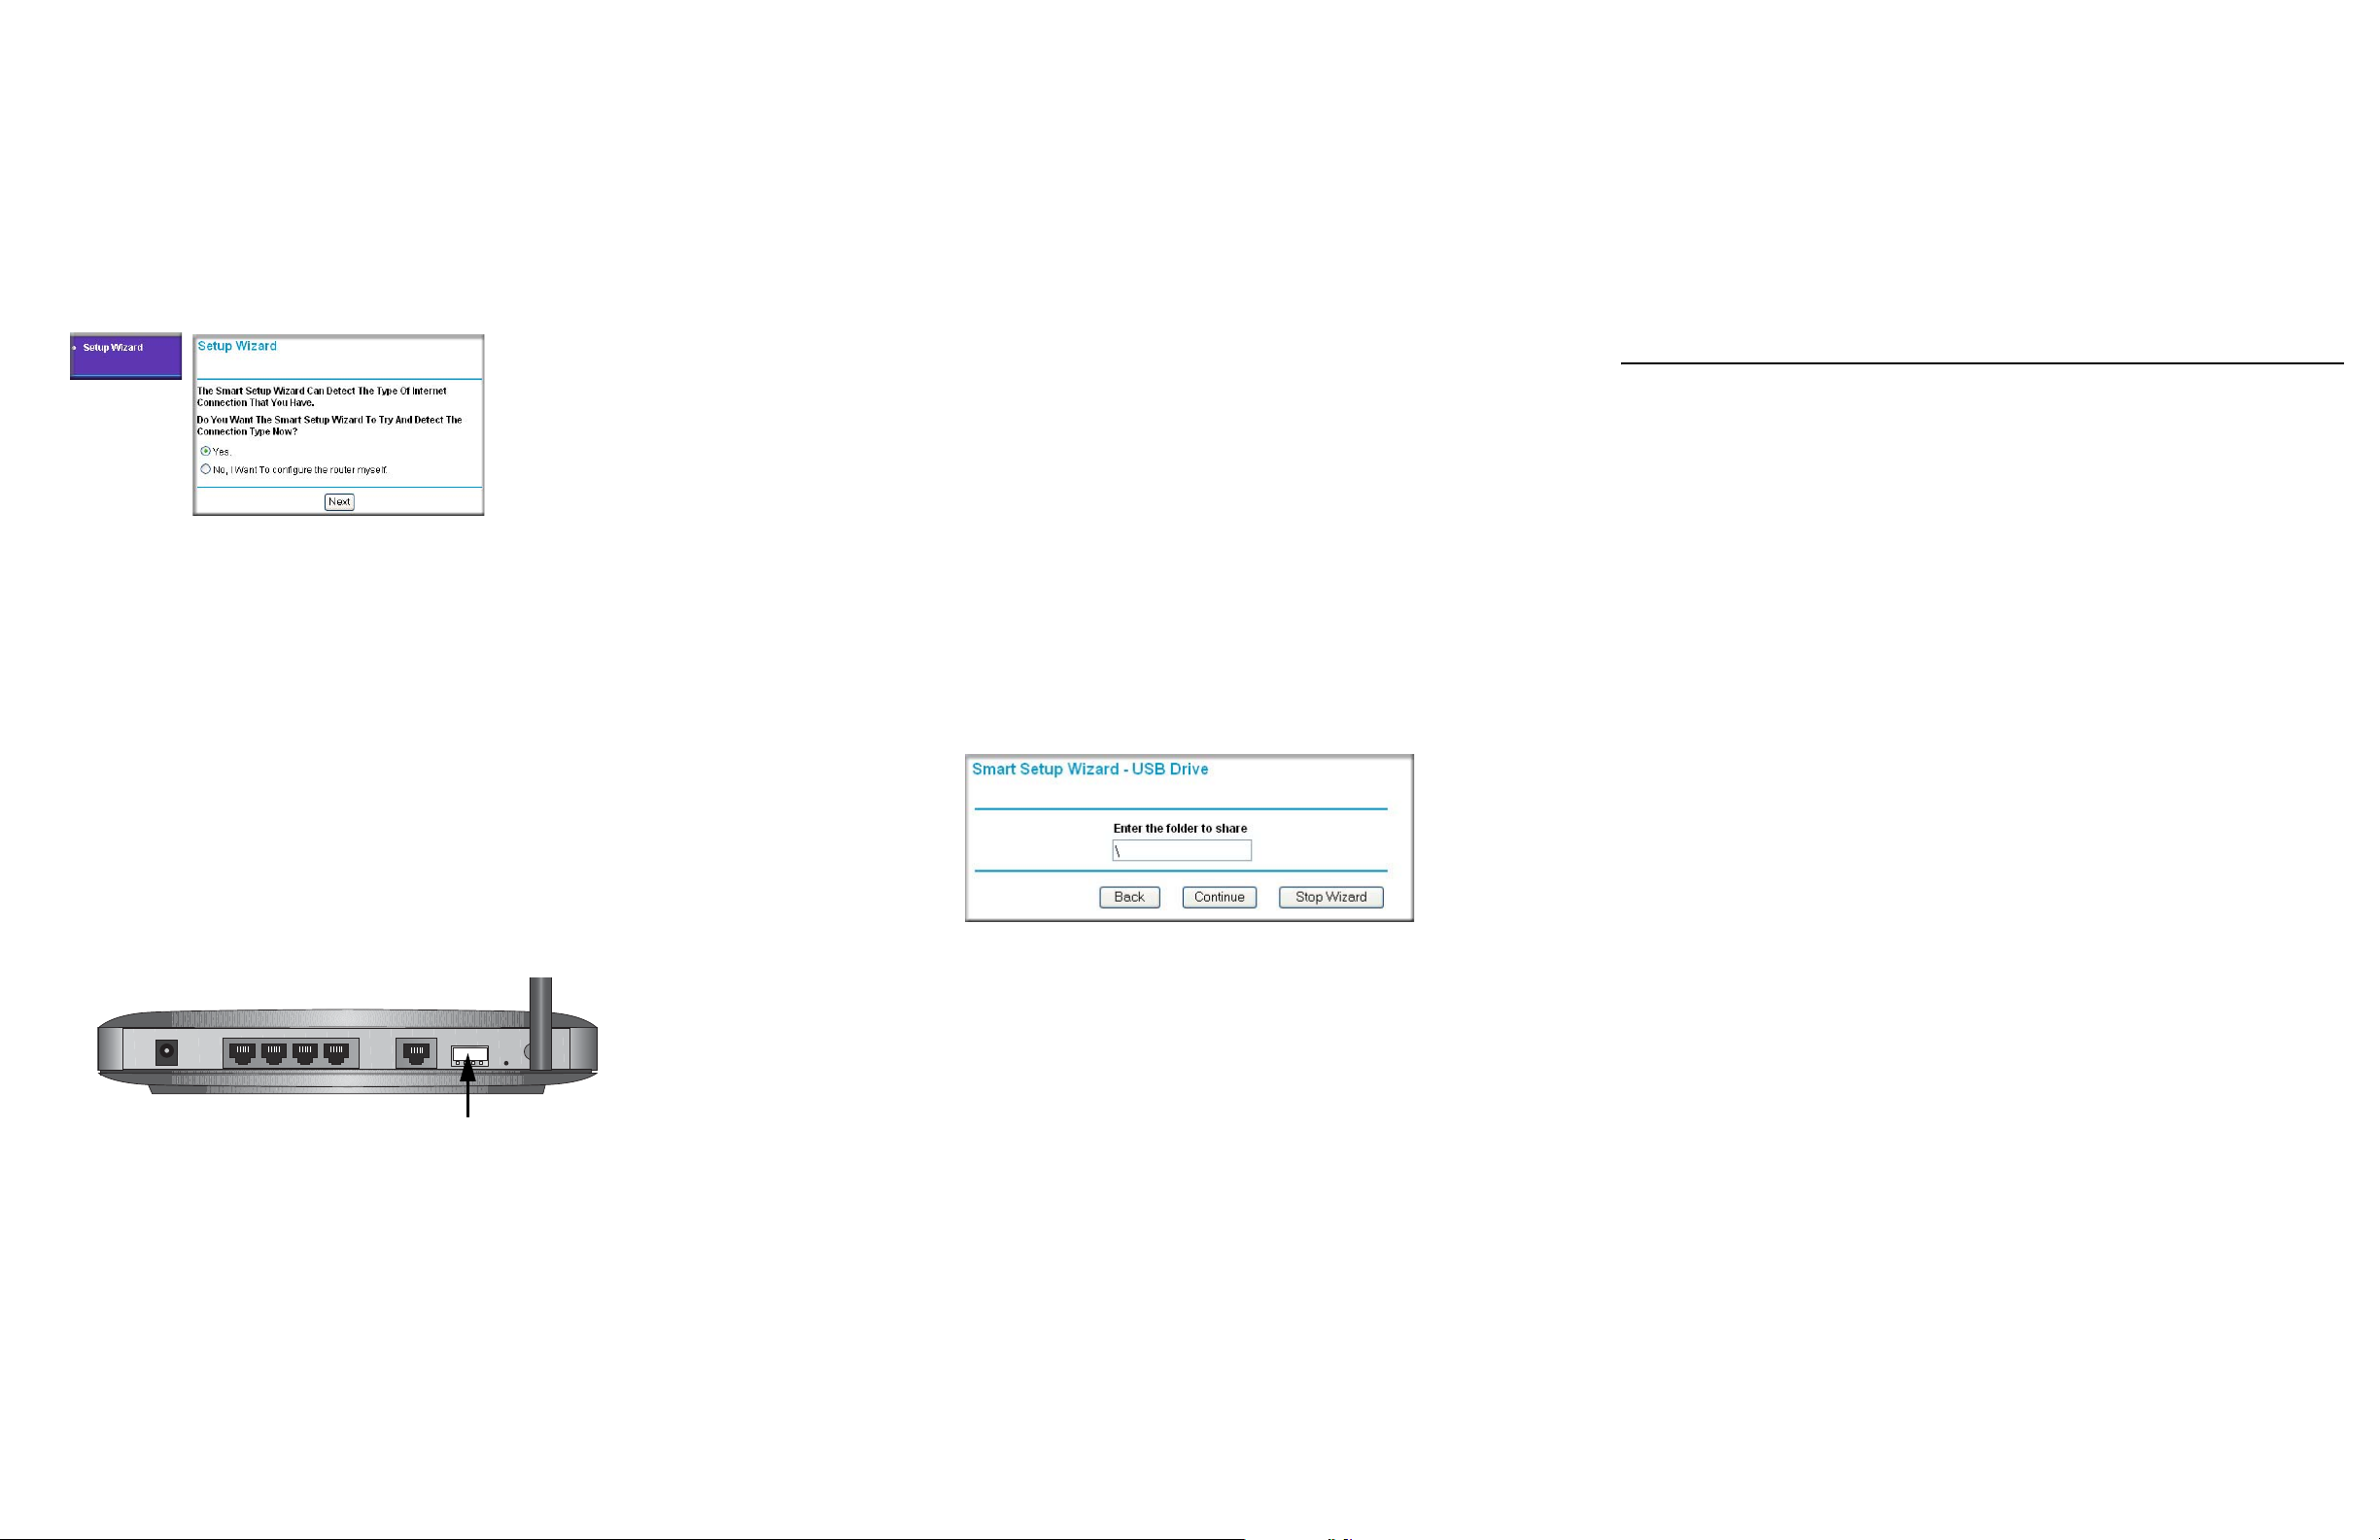
4. RUN THE SETUP WIZARD TO CONNECT TO THE INTERNET
• Connect a USB “flash drive”, also know as a “flash memory stick”, directly
to the port.
• Connect an external USB disk drive using a standard USB cable.
Connecting to the USB Drive From Your Home/
Office Network
a. You are now connected to the router. If you do not see the menu above, click
the Setup Wizard link on the upper left of the main menu.
b. Click Next to proceed. Follow the screen prompts and input your ISP
settings, as needed.
c. If prompted with the message that new software is available, click Yes to
update your router with the latest software enhancements.
d. At the end of the Setup Wizard, click the Test button to verify your Internet
connection and register your product. If you have trouble connecting to the
Internet, use the Troubleshooting Tips below to correct basic problems, or
refer to the Reference Manual on the CD.
You are now connec ted to the Internet!
5. CONNECT A USB DRIVE TO THE ROUTER
The USB port of the WGT634U Wireless Router is a standard USB connector.
USB Port
You can connect a USB drive to the WGT634U wireless router in the following
ways:
Note: The USB port on the WGT634U can be used with one USB hard drive at a
time. Do not attempt to use a USB hub attached to the USB port.
6. RUN THE USB DRIVE WIZARD TO ALLOW REMOTE ACCESS FROM THE
NTERNET
I
The settings here will allow you to access the shared folders that you specify below
to be accessible from the Internet away from the home or office where your
NETGEAR WGT634U Wireless Router is installed.
Note: Skip this step if you choose NOT to have remote Internet access to your shared
folders and files.
a. Select USB Drive Wizard in the left navigator to display the screen shown
below.
b. Type the folder name to share. To share the whole USB drive, type \. To
share a specific folder on the USB drive, type:
\<my folder>
where <my folder> is replaced with the name of your folder. All files and
subfolders below \ or \<my folder> will be accessible.
Click Continue.
c. Type the user login name you want to give FTP access to the drive. Follow
the prompts to assign the password and access rights. Users can have either
Read Only or Read & Write access.
You can access the USB drive from local computers on your home or office network
using Microsoft network settings. You must be running Microsoft Windows 2000,
XP, or older versions of W indows with File and Printer Sharing enabled. Y ou can use
normal Explorer operations such as drag and drop, file open, or cut/paste files.
Note: In Windows 2000 and Windows XP, File and Printer Sharing is enabled by
default.
Enabling File and Printer Sharing in Windows 98SE and
Windows ME
Each computer’s network properties must be set to enable network communication
with the USB drive. Microsoft File and Printer Sharing must be enabled.
The easiest way to get to your network properties is to go to your desktop, right click
on ‘Network Neighborhood’ and click Properties. File and printer sharing for
Microsoft Windows should be listed. If not, click Add and follow the installation
prompts.
Accessing the USB Drive from Windows Explorer
To access the USB Drive using Microsoft network connections:
1. From the Windows tool bar, click the Start button and select Run.
2. In the field provided, type:
\\ipaddress
The ipaddress entered is the local IP address or Host Name of the router, for
example, \\192.168.1.1 or \\WGT634U. The Host Name is specified in the USB
Drive Settings screen of the administrator console and is WGT634U by default.
3. Click OK. A new Explorer window will pop up displaying the root folders your
account has access to.
Page 3

Accessing the USB Drive from My Network Places
You can use Windows Network Neighborhood or Network Connections to view files
on the USB drive locally. For example, to connect to the USB drive from local
computers using Windows XP:
1. From the Start Menu, open My Network Places.
2. Open the folder containing the files to access, for example:
share/partition1/folder1
Connecting to the USB Drive Using FTP
You can connect to the router’s USB drive using an FTP program or a Web browser.
If you are connecting from your local LAN, use the router LAN Port IP address:
ftp://192.168.1.1
If you are connecting from the WAN, use the Internet port IP address, which can be
found on the Router Status menu in the Maintenance section of the main menu.
1. Connect to the router by typing ftp:// and the Internet port IP address in the
address field of Internet Explorer or Netscape® Navigator, for example:
ftp://10.1.65.4
If you are using dynamic DNS, you can type the DNS name rather than the IP
address.
2. Type the account name and password that has access rights to the USB drive.
3. The directories of the USB drive that your account has access to will be
displayed, for example, share/partition1/folder1. You can now read and copy
files from the USB directory.
Now, Set Up Basic Wireless Connectivity
1. Click Wireless Settings in the
main menu. Select a Region.
Leave the other settings
unchanged. Click Apply to save
your changes.
WIRELESS FEATURE DEFAULT SETTING
Network Name (SSID) NETGEAR
WEP Security Disabled
2. Configure the wireless adapter of your computer to match these settings exactly.
3. Verify wireless connectivity by connecting to the Internet or by logging in to the
router.
You are now wirelessly connected to the Internet! Set up wireless security according
to the instructions in the Wireless chapter of the Reference Manual on the CD.
Troubleshooting Tips
Here are some tips for correcting simple problems that can prevent you from
connecting to the Internet or connecting to the router:
Make sure the wireless settings in the computer and router match exactly.
The Wireless Network Name (SSID) and WEP settings of the router and wireless
computer must match exactly.
Be sure to restart your network in the correct sequence.
Follow this sequence. Turn off the modem, router, and computers. First, turn on the
modem and wait two minutes. Next, turn on the router and wait two minutes. Finally,
turn on the computers.
Make sure the Ethernet cables are securely plugged in.
• For each powered on computer connected to the router with a securely plugged
in Ethernet cable, the corresponding router LAN port status light will be lit. The
label on the bottom of the router identifies the number of each LAN port.
• The Internet port status light on the router will be lit if the Ethernet cable from
the router to the modem is plugged in securely and the modem and router are
both turned on.
Make sure the network settings are correct.
• LAN and wirelessly connected computers must be configured to obtain an IP
address automatically via DHCP. For instructions on how to do this, please see
the animated tutorials on the Model WGT634U Resource CD or Appendix C in
the Reference Manual on the CD.
• Some cable modem ISPs require you to set the router to use the MAC address of
the computer registered on the account. If so, in the Basic Settings menu, Router
MAC Address section, select “Use this Computer’s MAC address.” The router
will then capture and use the MAC address of the computer that you are
currently using. You must be using the computer that is registered with the ISP.
Click Apply to save your settings. Restart the network in the correct sequence.
Make sure your computer can access the router.
Check the network connection using the ping utility.
1. From the Windows tool bar, click the Start button and select Run.
2. In the field provided, type:
ping 192.168.1.1
3. Click OK. If the path is working, you will see a message like the following:
Reply from < IP address >: bytes=32 time=NN ms TTL=xxx
If the path is not working, you will see this message:
Request timed out
Make sure your IP address has been set by the router.
Check the IP configuration from a DOS command prompt.
1. From the Windows tool bar, click the Start button and select Run.
Page 4

2. In the field provided, type command and click OK.
3. In the DOS window, you can view your current IP settings by typing ipconfig.
4. Release your current IP settings by typing:
ipconfig /release
5. Type ipconfig again to verify that the settings have been released. Renew the IP
settings by typing:
ipconfig /renew
You should select your time zone before performing any copy operation. Select Email in the Content Filtering section of the main menu. Select the correct time zone
and whether to adjust for Daylight Savings Time.
Attach only one USB Drive to the router.
Only one USB flash disk or external disk is supported at this time. Do not attach a
USB hub.
Do not copy large files to a USB disk F AT32 file system.
If you cannot connect to the USB drive, make sure that the root folder name
already exists.
Each user is granted access to a root folder and all files under that folder. Make
sure that the root folder specified for the user name is a valid, existing folder on
the USB drive.
Technical Support
You may have to wait a few minutes for the router to assign an IP address to your
computer.
6. Type ipconfig again and verify that all the IP settings including the router
address (default gateway) are detected, for example:
IP address: 192.168.1.2
Subnet mask: 255.255.255.0
Default gateway: 192.168.1.1
Troubleshooting the USB Drive Connection
Here are some tips on using a USB drive with your WGT634U wireless router:
Check for firmware upgrades frequently.
Many features and bug fixes will be available via firmware upgrade. You can use the
Firmware Upgrade Assistant feature to locate and upgrade the firmware easily.
Write down your current settings before upgrading the firmware.
Write down your ISP settings (login name, password, IP addresses, etc.), then
upgrade the firmware. After the router has rebooted, press and hold the reset button
for 10 seconds (or until the power LED starts blinking) to reset to the factory default
settings. Finally, re-enter your ISP settings to establish the WAN and LAN
connections again.
The FAT32 file system only supports up to 4GB for an individual file. You cannot
copy a 5GB file from an NTFS system to a FAT32 file system.
Attach large USB Drives to the USB Port using a USB extension cable.
If your USB flash drive is too wide to attach to the USB port, you can purchase a
USB extension cable to attach your drive. USB cables are not included with the
WGT634U wireless router.
Use the IP address to connect to the router if the Host Name or DNS name fails.
If you cannot connect to the USB drive locally using the router name, you may have
problems with your Microsoft Networking. As a workaround, use the LAN IP
address from a Web browser instead:
192.168.1.1
If you cannot connect to the USB drive remotely using the router DNS name, use the
WAN port address instead, for example:
ftp://10.2.3.4
If you are using NetBEUI on Windows 98, use the router IP addr ess rather than
the router name.
If you have trouble accessing the USB drive by the router name, for example,
\\WGT634U, use the router IP address. If you want to use the router name for USB
drive access, you may need to uninstall NetBEUI and install TCP/IP instead.
Thank you for selecting NETGEAR products. PLEASE REFER TO THE SUPPOR T
INFORMATION CARD THAT SHIPPED WITH YOUR PRODUCT.
http://www.NETGEAR.com/support to browse for additional information.
Go to
Register Your Product
To register, point your browser to this location:
http://www.NETGEAR.com/register
By registering your product at www.NETGEAR.com/register, we can provide you
with faster expert technical support and timely notices of product and software
upgrades. Attention: When you configure the wireless settings of this device please
make sure to select the correct country settings. Due to EU-law the country settings
must be identical to the country, where the device is op erating (important due to n onharmonized frequencies in the EU).
802.11b Restrictions: European standards dictate maximum radiated transmit power
of 100 mW EIRP and frequency range of 2.400 - 2.4835 GHz. In France, the
equipment must be restricted to the 2.4465 - 2.4835 GHz frequency range and must
be restricted to indoor use.
Set the router time zone so that file copies will record the time correctly.
Page 5

©2004 NETGEAR, Inc. NETGEAR, the Netgear logo and Everybody's connecting
are trademarks or registered trademarks of Netgear, Inc. in the United States and/or
other countries. Microsoft and Windows are registered trademarks of Microsoft
Corporation in the United States and/or other countries. Other brand and product
names are trademarks or registered trademarks of their respective holders.
Information is subject to change without notice. All rights reserved.
 Loading...