

Page 1

Quick Start
AirCard 810
Mobile Hotspot
Page 2

Contents / Inhalt / Table des matières /
Sommario / Contenido / Содержание /
Sisältö / Innehåll
English .......................................1
Deutsch .....................................18
Français .....................................34
Italiano ......................................50
Español......................................66
Svenska .....................................82
Русский .....................................98
Suomi ......................................114
2
Page 3
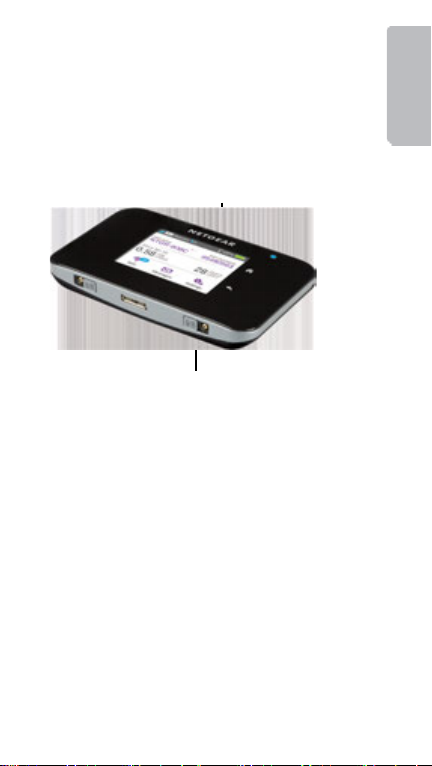
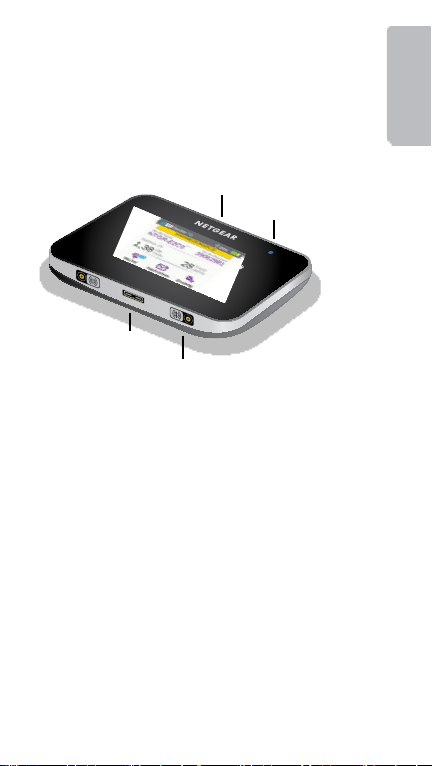
Meet Your Hotspot
Before you connect your mobile hotspot, familarize
yourself with its LCD screen, icons, buttons, and
connectors.
Buttons and Connectors
Power button
Status LED
Micro USB port
Primary antenna connector
Status LED
The status LED indicates data connection status:
• Blue, slow blink. The hotspot is ready.
• Blue, double blink. The hotspot is transferring
data.
• Amber, slow blink. The hotspot is not
connected to the network.
English
3
Page 4
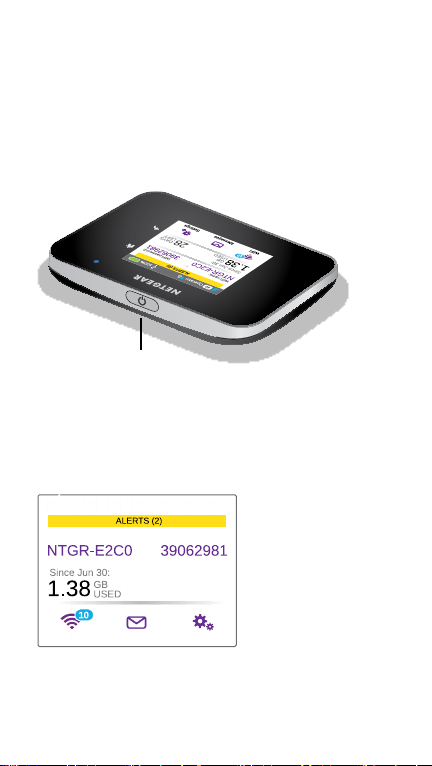
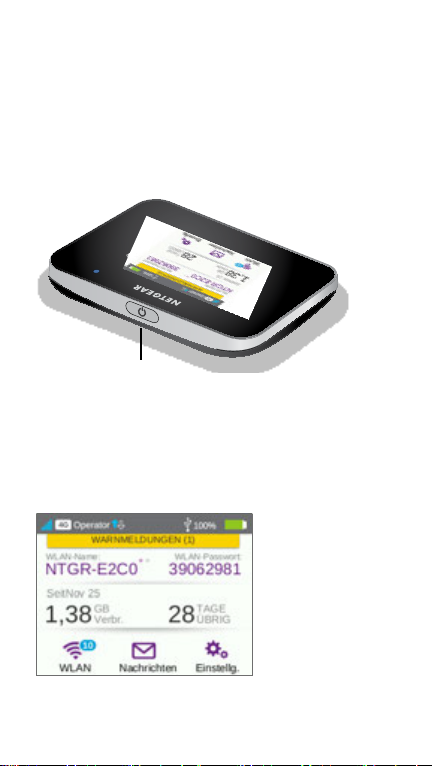
Power Button
Press and hold the Power button for two seconds to
power the hotspot on, five seconds to turn the hotspot
o.
Press and release the Power button to cycle through
LCD screens.
Power button
LCD Screen
You can use the touch screen icons and other screen
elements to view the mobile hotspot’s status, configure
WiFi band settings, view data usage details, and view
system alerts.
4
Page 5
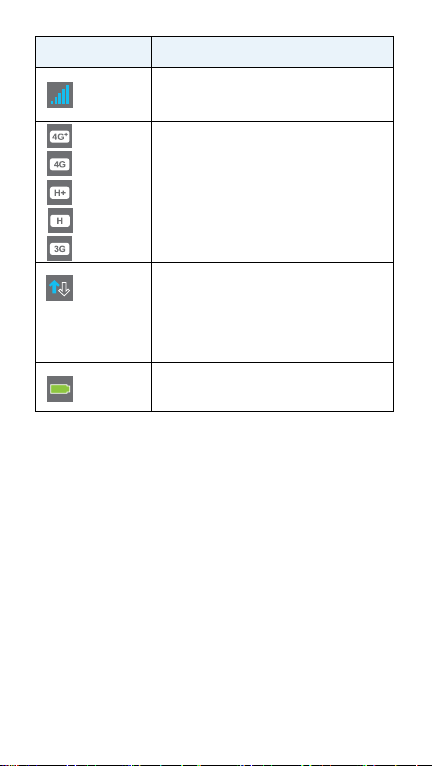
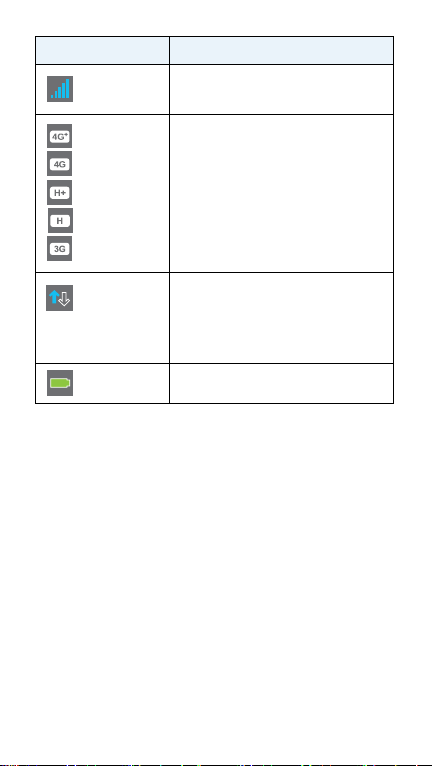
Icon Description
Signal
strength
Network
type
Trac
5 bars. Excellent.
1 bar. Low level.
4G+. An LTE Advanced network with
carrier aggregation is available.
4G. An LTE network is available.
H+. DC-HSPA+ HSPA+/DC HSPA.
H. HSPA.
3G. UMTS.
Outline. Connected.
Solid. Sending or receiving.
None. Not connected.
Battery
level
The percentage of the remaining
battery charge.
Set Up Your Hotspot
Before you connect to your mobile hotspot, you must
insert a micro SIM card (3FF), install the battery,
power on the mobile hotspot, and charge your battery.
Note: To obtain a micro SIM card, contact your
Internet service provider.
5
Page 6
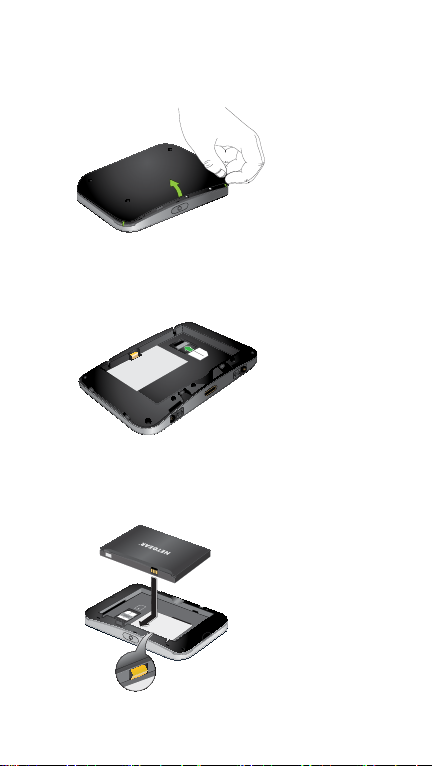
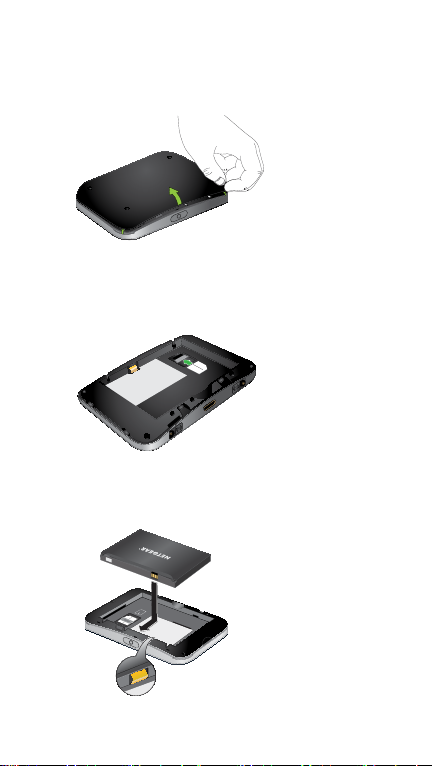
¾ To insert the micro SIM card:
1. Remove the back cover using the thumb catch
on the corner of the mobile hotspot.
2. Remove the battery.
3. Slide the micro SIM card into the slot with the
gold colored contacts facing down.
4. Ensure that the micro SIM card is seated
securely.
5. Reinsert the battery.
6.
Replace the cover.
6
Page 7

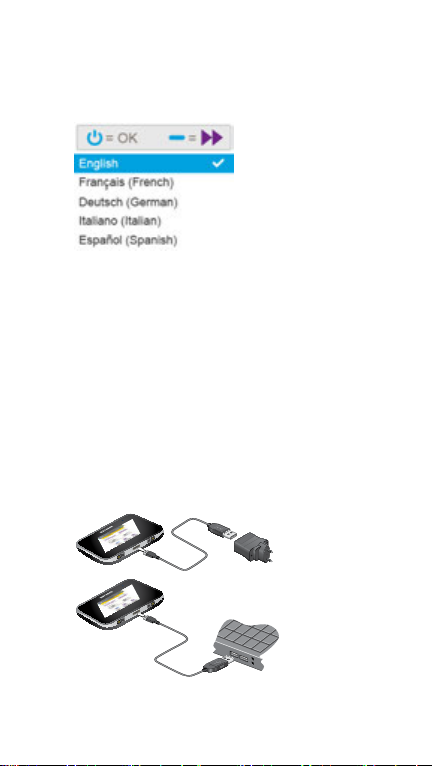
¾ To power on your hotspot:
Press and hold the Power button until the LCD
screen lights.
A language selection screen displays.
¾ To select a language:
1. Press the Navigation button to cycle through
the language options until your language is
highlighted.
2. Press the Power button to select the language.
You can change the language again later from the
hotspot web page.
¾ To recharge your battery:
1. Connect the micro USB cable to your hotspot.
2. Connect the other end of the cable to the USB
port on your computer or to the USB charger.
Note: Your battery comes partially charged.
7
Page 8
Create a Mobile Connection
Your hotspot comes preconfigured with the access
point name (APN) for your network service provider.
Your hotspot checks the APN to determine the type of
network connection to establish.
You are now ready to surf the web!
You must configure an APN for your hotspot if you are
setting up your hotspot for the first time or if you see
a message indicating that APN setup is required.
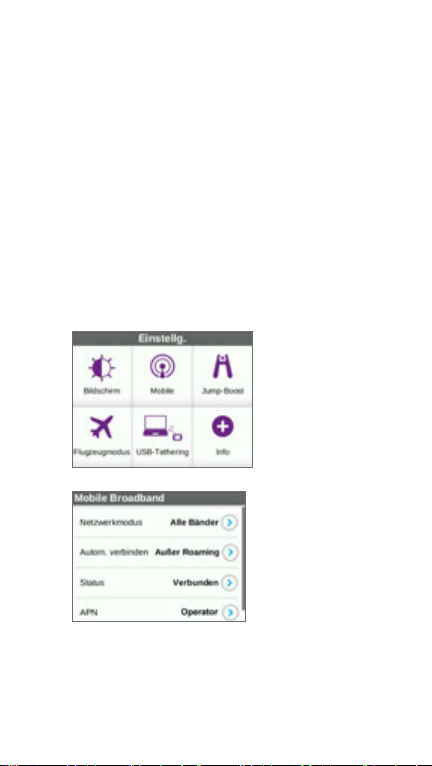
¾ To configure an APN:
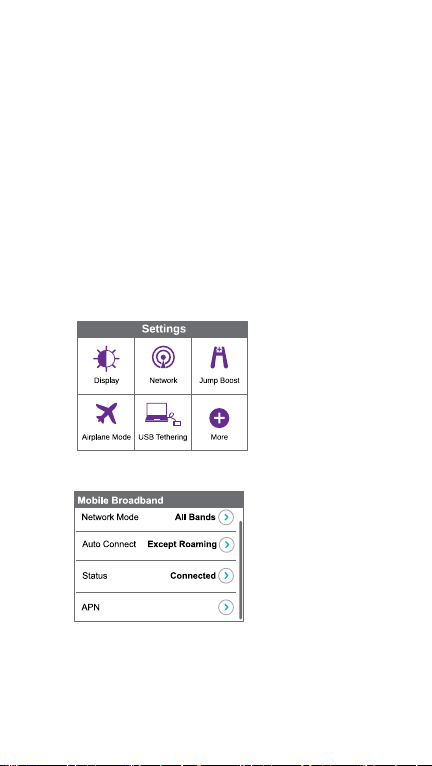
1. On the home screen, tap the Settings icon.
2. Tap the Network icon.
Operator
3. Tap the APN > button.
A list of preprogrammed APNs that might work
with your current SIM displays.
4. Select the appropriate APN.
8
Page 9
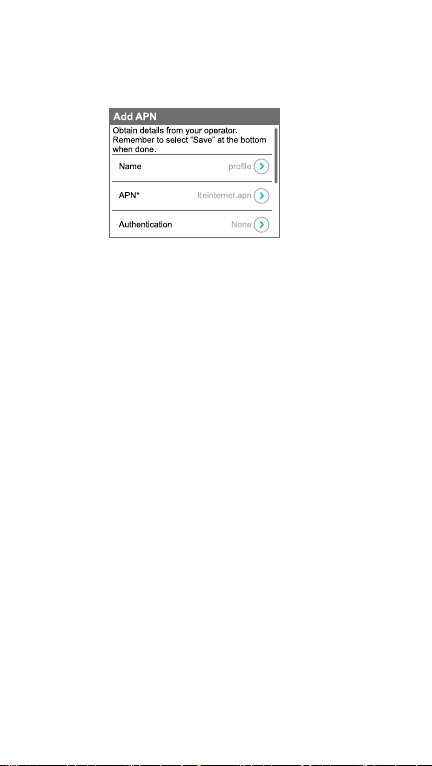
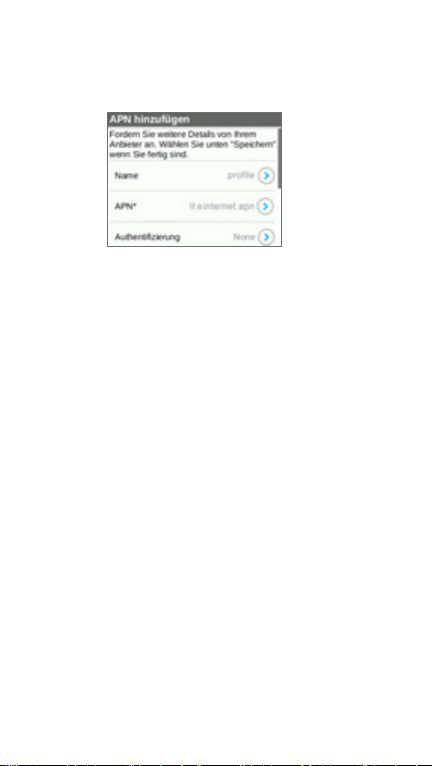
5. If none of the preprogrammed APNs are
appropriate, set up an APN.
a. Tap the +Add button.
b. Enter the APN details.
Contact your network service provider for
information about these specific details.
c. Tap the Save button.
A message indicating that an APN was
created displays.
¾ To connect to your hotspot:
1. Ensure that WiFi is enabled on your computer or
other device.
2. On your computer or other device, search for
WiFi networks:
• For Windows devices, click the Internet
Access icon.
• For Mac devices, from the WiFi menu,
select the network.
• For tablets, look for a settings option.
3. Select the WiFi name displayed on your LCD
screen.
4. Enter the WiFi password exactly as it appears on
the LCD screen.
9
Page 10

Passwords are case-sensitive.
When a computer or mobile device connects to
the hotspot, a 1 displays beside the WiFi icon on
the LCD screen.
Note: For you to connect to the mobile
broadband network, your SIM account must be
active. If you use a prepaid or pay-as-you-go
micro SIM, the account must show a positive
balance.
5. Launch your browser and, if desired, visit the
hotspot web page netgear.aircard to personalize
your settings.
Your mobile hotspot is ready to use out of the
box. You probably don’t need to personalize any
settings.
The mobile hotspot is completely secure using its
default security settings.
NETGEAR AirCard App
Download the complimentary mobile app from
netgear.com/AirCardApps. Use this app to view your
settings and connection and data usage information
from your smartphone or tablet. To manage all hotspot
settings, visit netgear.aircard.
Manage WiFi Settings
You can manage your WiFi settings by tapping the
WiFi icon on the hotspot touch screen.
10
Page 11
You can also manage your WiFi settings from your
hotspot web page.
Note: The hotspot resets when you change WiFi
settings. Connected devices are disconnected.
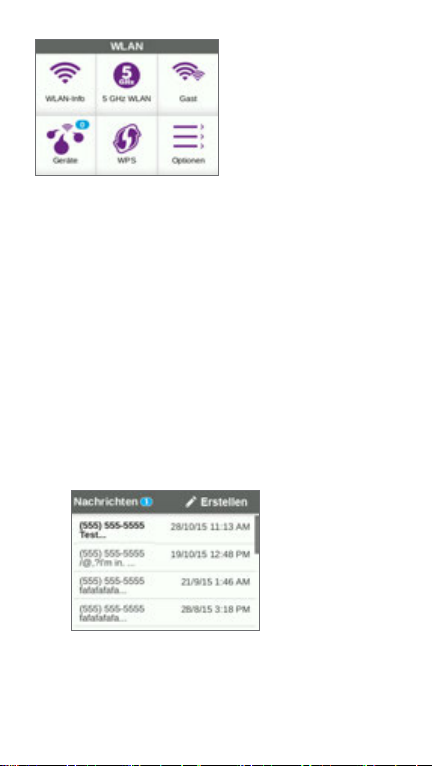
View or Compose SMS
Messages
Tap the Messages icon to view or compose SMS
messages.
¾ To read messages:
1. On the home screen, tap the Messages icon.
2. Tap a message line.
11
Page 12
¾ To compose a message:
1. On the home screen, tap the Messages icon.
2. Tap the Compose button in the upper right
corner.
If a valid SIM card is not inserted in your hotspot,
the Compose button appears grey.
3. Enter a telephone number.
4. Tap the Next button.
5. Compose the message.
6. Press the Send button.
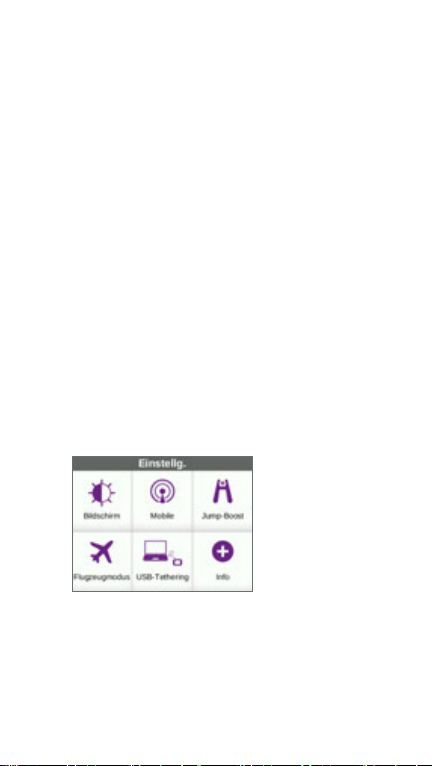
Customise Hotspot Settings
You can customise other settings as well.
¾ To customise your hotspot’s settings:
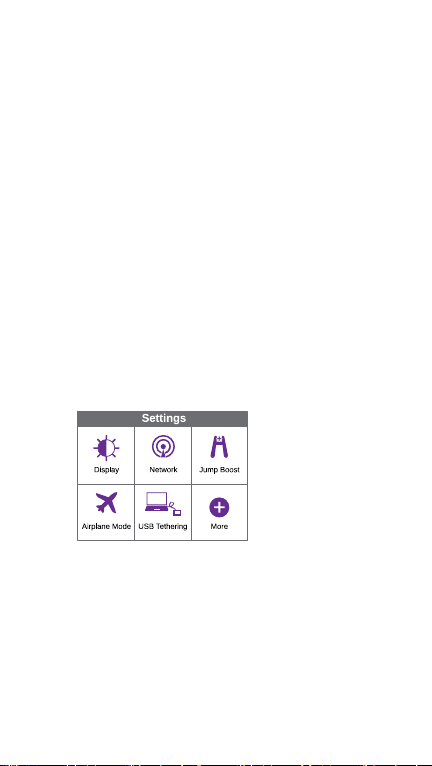
1. On the home screen, tap the Settings icon.
2. Tap any one of the icons to adjust a setting.
12
Page 13

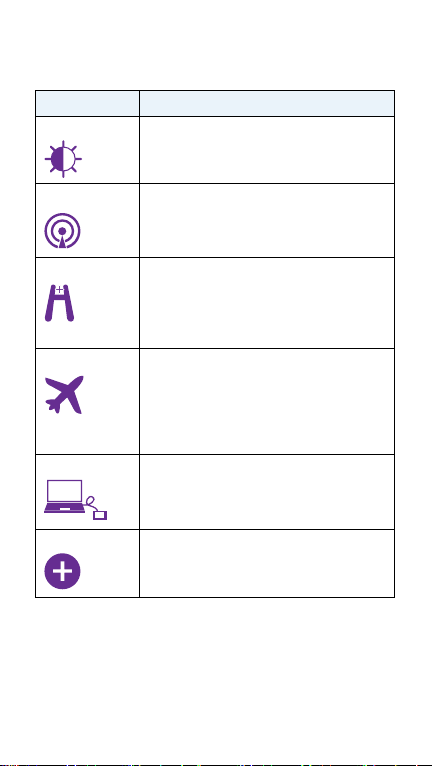
The following table describes the icons that display on
the Settings screen.
Icon Description
Display
Network
Jump Boost
Airplane
Mode
USB Tether
More
Configure the touch screen display
(brightness, time-out, display of WiFi
credentials, status LED display).
Choose the network types to use, set
roaming rules, display network connection
details.
Use your mobile hotspot to give a boost
to another device’s battery using the jump
boost cable provided with your device.
Disable the mobile hotspot’s WiFi and
cellular radios while on an airplane or in
areas where WiFi is restricted. The jump
boost feature can still be used in this
mode.
Connect to the Internet from supported
computers with a USB cable, and charge
your device at the same time.
See information about the device including
soware updates, factory reset, and
tutorial.
View Alerts
You can view alerts and notifications by swiping
downward from the ALERTS icon at the top of the
screen. Scroll across to view multiple alerts.
13
Page 14

Hotspot Web Page
On the hotspot web page, you can do the following:
• Change the WiFi SSID, WiFi password, admin
password, and WiFi encryption
• Set autoconnect options
• View data usage
• Read SMS messages
• View alerts
• View and change other settings
• Check device status
¾ To access your hotspot web page:
1. Launch an Internet browser from a computer or
WiFi device that is connected to the network.
2. Enter http://netgear.aircard.
3. Enter the administrator login password.
The default password is password.
The hotspot web page displays.
Change Security Settings
The WiFi network name and admin password provide
security. Your mobile hotspot comes with a randomly
generated and secured WiFi network name (SSID) and
password that you can continue to use as is. Read this
section if you want to change your security settings.
¾ To change the WiFi network name:
1. Launch an Internet browser from a computer or
WiFi device that is connected to the hotspot.
2. Enter http://netgear.aircard.
14
Page 15

3. Enter the administrator login password.
The default password is password.
The hotspot web page displays.
4. Select WiFi > Options.
5. Enter a new WiFi network name.
6. Click the Submit button.
¾ To change the WiFi password:
1. Launch an Internet browser from a computer or
WiFi device that is connected to the hotspot.
2. Enter http://netgear.aircard.
The hotspot web page displays.
3. Enter the administrator login password.
The default password is password.
The hotspot web page displays.
4. Select WiFi > Options.
The WiFi options page displays.
5. Enter a new WiFi password.
If you change your password, be sure to keep a
record of it and store it in a safe place.
6. Click the Submit button.
Connect Devices
You can add devices to your network using a WiFi
network manager or WPS if the device can use WPS.
Note: WPS enables you to connect WPS-enabled
devices to a WiFi network without entering a WiFi
password using a keyboard.
15
Page 16

¾ To connect additional WiFi-capable devices:
1. Open the WiFi network manager on your
computer or other WiFi device (such as a
smartphone, tablet, media player, or camera).
2. Select the WiFi network name displayed on the
LCD screen.
3. Enter the WiFi password displayed on the LCD
screen.
4. Launch your browser.
¾ To connect devices using WPS:
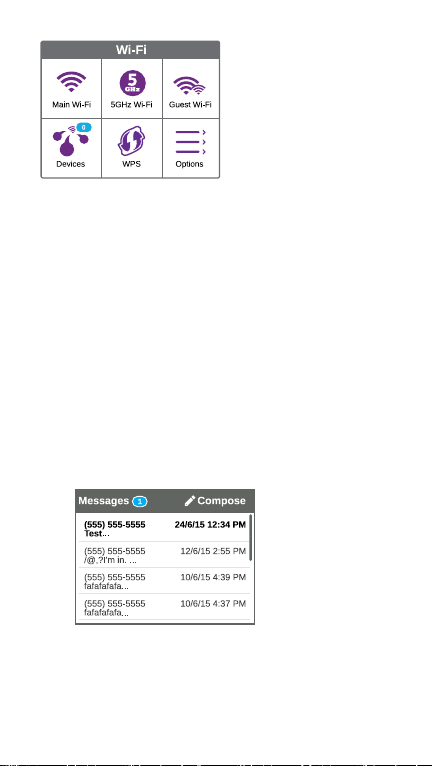
1. Press the Power button to awaken the LCD
screen.
2. Tap the WiFi icon.
The WiFi screen displays.
3. Tap the WPS icon.
The WPS screen displays.
4. Tap the Pair with Main Wi-Fi button.
5. Within two minutes, press the WPS button on
the device that you want to connect to your WiFi
network.
The hotspot and the WiFi device automatically
communicate and establish a secure connection.
16
Page 17

Support
Thank you for purchasing this NETGEAR product.
After installing your device, locate the serial number
on the label of your product and use it to register your
product at https://my.netgear.com.
You must register your product before you can use
NETGEAR telephone support. NETGEAR recommends
registering your product through the NETGEAR
website.
For product updates and web support, visit
http://support.netgear.com.
NETGEAR recommends that you use only the official
NETGEAR support resources.
You can get the user manual online at
http://downloadcenter.netgear.com or through a link
in the product’s user interface.
Trademarks
© NETGEAR, Inc., NETGEAR and the NETGEAR Logo
are trademarks of NETGEAR, Inc. Any non-NETGEAR
trademarks are used for reference purposes only.
Compliance
For the current EU Declaration of Conformity, visit
http://support.netgear.com/app/answers/detail/a_
id/11621/.
For regulatory compliance information, visit
http://www.netgear.com/about/regulatory/.
See the regulatory compliance document before
connecting the power supply.
Page 18
Kurzanleitung
AirCard 810
Mobiler Hotspot
Page 19
Ihr Hotspot
Machen Sie sich vor dem Verwenden des mobilen
Hotspots mit dem LCD-Bildschirm, den Symbolen,
Tasten und Anschlüssen vertraut.
Tasten und Anschlüsse
Ein-/Ausschalter
Status-LED
Micro-USB-Anschluss
Primärer Antennenanschluss
Status-LED
Die Status-LED zeigt den Status der Datenverbindung an:
• Blau, langsames Blinken: Der Hotspot ist bereit.
• Blau, doppeltes Blinken: Der Hotspot überträgt
Daten.
• Gelb, langsames Blinken: Der Hotspot ist nicht mit
dem Netzwerk verbunden.
Deutsch
19
Page 20
Ein-/Ausschalter
Halten Sie den Ein-/Ausschalter zwei Sekunden lang
gedrückt, um den Hotspot einzuschalten, und fünf Sekunden
lang gedrückt, um den Hotspot auszuschalten.
Halten Sie den Ein-/Ausschalter gedrückt, und lassen
Sie ihn wieder los, um zwischen den LCD-Bildschirmen zu
wechseln.
Ein-/Ausschalter
LCD-Bildschirm
Sie können die Symbole und anderen Elemente auf dem
Touchscreen zum Anzeigen des Status des mobilen Hotspots,
Konfigurieren der WLAN-Bandeinstellungen und Anzeigen
von Details zur Datennutzung und Systemmeldungen
verwenden.
20
Page 21
Symbol Beschreibung
Signalstärke
Netzwerktyp
5 Balken: Ausgezeichnet.
1 Balken: Niedrig.
4G+. Ein LTE-Advanced-Netzwerk
Carrier Aggregation ist verfügbar.
4G. Das LTE-Netzwerk ist verfügbar.
H+. DC-HSPA+ HSPA+/DC-HSPA.
H: HSPA.
3G: UMTS
mit
Datenverkehr
Akkuanzeige
Umriss. Verbunden.
Leuchtet: Beim Senden oder
Empfangen.
Keine. Nicht verbunden.
Anzeige der Restakkuladung in
Prozent.
Einrichten des Hotspots
Bevor Sie eine Verbindung zu Ihrem mobilen Hotspot
herstellen, müssen Sie eine Micro-SIM-Karte (3FF) sowie
den Akku einsetzen, den mobilen Hotspot einschalten und
den Akku laden.
Hinweis: Um eine Mikro-SIM-Karte zu erhalten, wenden
Sie sich an den Mobilfunk-/Netzanbieter.
21
Page 22
¾ So setzen Sie die Mikro-SIM-Karte ein:
1. Entfernen Sie die rückseitige Abdeckung am dafür
vorgesehenen Verschluss an der äußeren Kante des
mobilen Hotspots.
2. Entfernen Sie den Akku.
3. Schieben Sie die Micro-SIM-Karte in den Steckplatz
ein. Die goldfarbenen Kontakte müssen dabei nach
unten zeigen.
4. Stellen Sie sicher, dass die Micro-SIM-Karte sicher
eingesetzt ist.
5. Setzen Sie den Akku wieder ein.
6. Bringen Sie die Abdeckung wieder an
22
.
Page 23
¾ So schalten Sie den Hotspot ein:
Halten Sie den Ein-/Ausschalter gedrückt, bis der
LCD-Bildschirm leuchtet.
Der Bildschirm zur Sprachauswahl wird angezeigt.
¾ So wählen Sie eine Sprache aus:
1. Drücken Sie die Navigationstaste, um zwischen
den Sprachoptionen zu wechseln, bis Ihre Sprache
markiert ist.
2. Drücken Sie den Ein-/Ausschalter, um die Sprache
auszuwählen.
Sie können die Sprache später erneut von der Website
des Hotspots aus ändern.
¾ So laden Sie den Akku:
1. Schließen Sie das Micro-USB-Kabel an Ihren Hotspot an.
2. Schließen Sie das andere Ende des Kabels an den USBAnschluss des Computers oder an das USB-Ladegerät an.
Hinweis: Der mitgelieferte Akku ist teilweise aufgeladen.
23
Page 24
Herstellen einer mobilen Verbindung
In Ihrem Hotspot ist der Access Point Name (APN) für
Ihren Netzwerkdienstanbieter bereits vorkonfiguriert.
Der Hotspot prü den APN, um die Art der herzustellenden
zwerkverbindung zu bestimmen.
Net
Sie können nun im Internet surfen!
Sie müssen einen APN für Ihren Hotspot konfigurieren,
wenn Sie diesen zum ersten Mal einrichten oder eine
Meldung ange
erforderlich ist.
¾ So konfigurieren Sie einen APN:
1. Tippen Sie auf der Startseite auf das Symbol Settings
2. Tippen Sie auf das Symbol Network (Netzwerk).
zeigt wird, dass die Einrichtung eines APN
(Einstellungen).
3. Tippen Sie unter APN auf das Symbol >.
Eine Liste vorprogrammierter APN, die möglicherweise
zusammen mit Ihrer aktuellen SIM funktionieren, wird
angezeigt.
4. Wählen Sie den entsprechenden APN aus.
24
Page 25
5. Wenn keiner der vorprogrammierten APN passend ist,
richten Sie einen APN ein.
a. Tippen Sie auf die Schaltfläche +Add
(+Hinzufügen).
b. Geben Sie die Details des APN ein.
Wenden Sie sich an Ihren Netzwerkdienstanbieter,
wenn Sie mehr über die genannten Details
erfahren möchten.
c. Tippen Sie auf die Schaltfläche Save (Speichern).
Eine Meldung wird angezeigt, dass ein APN
erstellt wurde.
¾ So stellen Sie eine Verbindung zu Ihrem Hotspot her:
1. Stellen Sie sicher, dass WLAN auf Ihrem Computer
oder auf einem anderen Gerät aktiviert ist.
2. Suchen Sie auf Ihrem Computer oder auf einem
anderen Gerät nach WLAN-Netzwerken:
• Klicken Sie bei Windows-Geräten auf das
Symbol für Internet Access (Internetzugri).
• Wählen Sie bei MAC-Geräten das Netzwerk im
Menü WiFi (WLAN) aus.
• Suchen Sie auf Tablets nach den
Einstellungsoptionen.
3. Wählen Sie den auf Ihrem LCD-Bildschirm angezeigten
WLAN-Namen.
4. Geben Sie das WLAN-Passwort genau so ein, wie es
auf dem LCD-Bildschirm erscheint.
25
Page 26

Bei Passwörtern wird zwischen Groß- und
Kleinschreibung unterschieden.
Wenn ein Computer oder ein Mobilgerät eine Verbindung
zum Hotspot herstellt, wird eine 1 neben dem Symbol
WiFi (WLAN) auf dem LCD-Bildschirm angezeigt.
Hinweis: Damit Sie eine Verbindung zum mobilen
Breitband-Netzwerk herstellen können, muss Ihre
SIM-Karte aktiv sein. Bei Verwendung einer PrepaidKarte oder einer Pay-as-you-Go-SIM-Karte muss der
Kontostand positiv sein.
5. Starten Sie den Browser, und besuchen Sie,
falls gewünscht, die Webseite des Hotspots
netgear.aircard, um Ihre Einstellungen anzupassen.
Ihr mobiler Hotspo
Verwendung. Sie brauchen wahrscheinlich keine
Einstellungen anzupassen.
Der mobile Hotspot ist über die
Standardsicherheitseinstellungen bereits im
Auslieferungszustand sicher.
t ist bereit für die direkte
NETGEAR AirCard-App
Laden Sie die kostenlose mobile App auf
netgear.com/AirCardApps herunter. Mit dieser App können
Sie Ihre Eins
und Datennutzung auf Ihrem Smartphone oder Tablet
abrufen. Besuchen Sie zur Verwaltung aller HotspotEinstellungen netgear.aircard.
tellungen sowie Informationen zur Verbindung
Verwalten der WLANEinstellungen
Sie können die WLAN-Einstellungen verwalten, indem Sie
auf das Symbol WiFi (WLAN) auf dem Touchscreen des
Hotspots tippen.
26
Page 27
Darüber hinaus können Sie Ihre WLAN-Einstellungen von der
Webseite Ihres Hotspots aus verwalten.
Hinweis: Der Hotspot wird zurückgesetzt, wenn Sie die
WLAN-Einstellungen ändern. Verbundene Geräte werden
getrennt.
Anzeigen oder Erstellen von
SMS-Nachrichten
Tippen Sie auf das Symbol Messages (Nachrichten),
um SMS-Nachrichten anzuzeigen oder zu verfassen.
¾ So lesen Sie Nachrichten:
1. Tippen Sie auf der Startseite auf das Symbol
Messages (Nachrichten).
2. Tippen Sie auf eine Zeile in der Nachricht.
27
Page 28
¾ So verfassen Sie eine Nachricht:
1. Tippen Sie auf der Startseite auf das Symbol
Messages (Nachrichten).
2. Tippen Sie in der oberen rechten Ecke auf die
Schaltfläche Compose (Verfassen).
Wenn keine gültige SIM-Karte in Ihrem Hotspot
eingesetzt ist, wird die Schaltfläche Compose
(Verfassen) grau dargestellt.
3. Geben Sie eine Telefonnummer ein.
4. Tippen Sie auf die Schaltfläche Next (Weiter).
5. Verfassen Sie die Nachricht.
6. Drücken Sie die Schaltfläche Send (Senden).
Anpassen der HotspotEinstellungen
Sie können andere Einstellungen ebenso anpassen.
¾ So passen Sie Ihre Hotspot-Einstellungen an:
1. Tippen Sie auf der Startseite auf das Symbol Settings
(Einstellungen).
2. Tippen Sie auf eines der Symbole, um eine Einstellung
anzupassen.
28
Page 29
Die folgende Tabelle beschreibt die Symbole, die auf dem
Einstellungsfenster angezeigt werden.
Symbol Beschreibung
Anzeige
Konfigurieren Sie den Touchscreen
(Helligkeit, Timeout, Anzeige von WLANAnmeldeinformationen, LED-Anzeige).
Netzwerk
Jump-Boost
Flugzeugmodus
USB-Tethering
Mehr
Wählen Sie die zu verwendenden
Netzwerktypen aus, legen Sie RoamingRegeln fest, und zeigen Sie Details zur
Netzwerkverbindung an.
Verwenden Sie Ihren mobilen Hotspot, damit
der Akku eines anderen Geräts mithilfe eines
Jump-Boost-Kabels, das im Lieferumfang
Ihres Geräts enthalten ist, leistungsfähiger
wird.
Schalten Sie das WLAN des mobilen Hotspots
und Mobiltelefone aus, wenn Sie sich im
Flugzeug oder in Bereichen befinden, wo
WLAN verboten ist. Die Jump-BoostFunktion kann in diesem Modus immer noch
verwendet werden.
Stellen Sie mit einem USB-Kabel von
unterstützten Computern aus eine
Verbindung mit dem Internet her, und laden
Sie gleichzeitig Ihr Gerät auf.
Erhalten Sie weitere Informationen zum Gerät,
u. a. zu Soware-Updates, zum Zurücksetzen
auf Werkseinstellungen und Tutorial.
Warnungen anzeigen
Sie können Warnungen und Benachrichtigungen anzeigen,
indem Sie vom Symbol ALERTS (Warnungen) oben auf
dem Bildschirm nach unten wischen. Scrollen Sie darüber,
um mehrere Warnungen anzuzeigen.
29
Page 30

Hotspot-Website
Auf der Hotspot-Website können Sie Folgendes tun:
• WLAN-SSID, WLAN-Passwort, Administrator-
Passwort sowie WLAN-Verschlüsselung ändern
• AutoConnect-Optionen einstellen
• Datennutzung anzeigen
• SMS-Nachrichten lesen
• Anzeigen von Warnungen
• Weitere Einstellungen anzeigen und ändern
• Gerätestatus überprüfen
¾ So greifen Sie auf Ihre Hotspot-Website zu:
1. Starten Sie den Internet-Browser auf einem Computer
oder WLAN-Gerät mit Verbindung zum Netzwerk.
2. Geben Sie http://netgear.aircard ein.
3. Geben Sie das Administratorpasswort ein.
Das Standardpasswort lautet password.
Die Hotspot-Website wird angezeigt.
Ändern der Sicherheitseinstellungen
Der WLAN-Netzwerkname und das Administratorpasswort
sorgen für Sicherheit. Ihr mobiler Hotspot verfügt über
einen zufällig erzeugten und geschützten WLAN-
zwerknamen (SSID) sowie ein Passwort, die Sie genauso
Net
weiter verwenden können. Lesen Sie diesen Abschnitt, wenn
Sie Ihre Sicherheitseinstellungen ändern möchten.
¾ So ändern Sie den WLAN-Netzwerknamen:
1. Starten Sie den Internet-Browser auf einem Computer
oder WLAN-Gerät mit Verbindung zum Hotspot.
2. Geben Sie http://netgear.aircard ein.
30
Page 31

3. Geben Sie das Administratorpasswort ein.
Das Standardpasswort lautet password.
Die Hotspot-Website wird angezeigt.
4. Wählen Sie WiFi > Options (WLAN > Optionen).
5. Geben Sie einen neuen WLAN-Netzwerknamen ein.
6. Klicken Sie auf die Schaltfläche Submit (Senden).
¾ So ändern Sie das WLAN-Passwort:
1. Starten Sie den Internet-Browser auf einem Computer
oder WLAN-Gerät mit Verbindung zum Hotspot.
2. Geben Sie http://netgear.aircard ein.
Die Hotspot-Website wird angezeigt.
3. Geben Sie das Administratorpasswort ein.
Das Standardpasswort lautet password.
Die Hotspot-Website wird angezeigt.
4. Wählen Sie WiFi > Options (WLAN > Optionen).
Die Seite mit den WLAN-Optionen wird angezeigt.
5. Geben Sie ein neues WLAN-Passwort ein.
Wenn Sie Ihr Passwort ändern, notieren Sie sich dieses
und bewahren Sie es an einem sicheren Ort auf.
6. Klicken Sie auf die Schaltfläche Submit (Senden).
Hinzufügen von Geräten
Wenn das Gerät über die WPS-Funktion verfügt, können
Sie mit dem WLAN-Manager oder WPS Geräte zu Ihrem
Netzwerk hinzufügen.
Hinweis: Mit WPS können Sie eine Verbindung zwischen
WPS-fähigen Geräten und einem WLAN-Netzwerk
herstellen, ohne ein WLAN-Passwort auf einer Tastatur
eingeben zu müssen.
31
Page 32

¾ So schließen Sie weitere WLAN-fähige Geräte an:
1. Önen Sie den WLAN-Netzwerkmanager auf Ihrem
Computer oder einem anderen WLAN-Gerät (z. B. ein
Smartphone, Tablet, Media Player oder eine Kamera).
2. Wählen Sie den WLAN-Netzwerknamen aus, der auf
dem LCD-Bildschirm angezeigt wird.
3. Geben Sie das WLAN-Passwort ein, das auf dem
LCD-Bildschirm angezeigt wird.
4.
Starten Sie Ihren Browser.
¾ So schließen Sie Geräte über WPS an:
1. Drücken Sie den Ein-/Ausschalter, um den
LCD-Bildschirm zu aktivieren.
Tippen Sie auf das Symbol WiFi (WLAN).
2.
Der WLAN-Bildschirm wird angezeigt.
3. Tippen Sie auf das Symbol WPS.
Der WPS-Bildschirm wird angezeigt.
4. Tippen Sie auf die Taste Pair with Main Wi-Fi
(Koppeln mit Haupt-WLAN).
5. Drücken Sie innerhalb von zwei Minuten die WPS-
Taste auf dem Gerät, zu dem Sie eine Verbindung
herstellen möchten.
Der Hotspot und das WLAN-Gerät kommunizieren
automatisch und stellen eine sichere Verbindung her.
32
Page 33

Support
Vielen Dank, dass Sie sich für dieses NETGEAR Produkt
entschieden haben.
Registrieren Sie Ihr Gerät nach der Installation unter
https://my.netgear.com. Sie benötigen dazu die
Seriennummer, die sich auf dem Etikett des Produkts
befindet.
Die Registrierung ist Voraussetzung für die Nutzung des
telefonischen Supports von NETGEAR. NETGEAR empfiehlt,
das Gerät über die NETGEAR Website zu registrieren.
Produkt-Updates und Internetsupport erhalten Sie unter
http://support.netgear.com.
NETGEAR empfiehlt, nur die offiziellen NETGEAR SupportStellen zu nutzen.
Sie können das Benutzerhandbuch online unter
http://downloadcenter.netgear.com oder über einen Link
auf der Benutz
eroberfläche des Produkts herunterladen.
Marken
© NETGEAR, Inc., NETGEAR und das NETGEAR Logo sind
Marken von NETGEAR, Inc. Jegliche nicht zu NETGEAR
gehörende Marken werden nur zu Referenzzwecken
verwendet.
Vorschrifteneinhaltung
Die vollständige EU-Konformitätserklärung finden Sie unter
http://support.netgear.com/app/answers/detail/a_
id/11621/.
Informationen zur Einhaltung gesetzlicher Vorschriften
erhalten Sie unter
http://www.netgear.com/about/regulatory/.
Lesen Sie das Dokument zur Einhaltung rechtlicher
Vorschriften, bevor Sie das Gerät an die Stromversorgung
anschließen.
Page 34

Démarrage rapide
AirCard 810
Hotspot mobile
Page 35

Présentation de votre
point d'accès
Avant de vous connecter à votre hotspot mobile,
familiarisez-vous avec son écran LCD, ses icônes,
ses boutons et ses connecteurs.
Boutons et connecteurs
Bouton d'alimentation
Voyant d'état
Port Micro USB
Connecteur d'antenne principale
Voyant d'état
Le voyant d'état indique l'état de la connexion de
données :
• Bleu, clignotement lent. Le hotspot est prêt.
• Bleu, double clignotement. Le hotspot est en
train de transférer des données.
• Orange, clignotement lent. Le point d'accès
n'est pas connecté au réseau.
Français
35
Page 36

Bouton d'alimentation
Appuyez sur le bouton d’alimentation et maintenez-le
enfoncé pendant deux secondes pour allumer le point
d’accès ou pendant cinq secondes pour l’éteindre.
Appuyez puis relâchez le bouton d’alimentation pour
faire défiler les écrans LCD.
Bouton d'alimentation
Ecran LCD
Vous pouvez utiliser les icônes de l'écran tactile ainsi
que ses autres éléments pour acher l'état du hotspot
mobile, configurer les paramètres de la bande WiFi,
consulter les détails sur la consommation de données
et acher les alertes système.
36
Page 37

Icône Description
Puissance
du signal
Type de
réseau
5 barres. Excellente.
1 barre. Faible.
4G+. Un réseau LTE Advanced avec
agrégation opérateur est disponible.
4G. Un réseau LTE est disponible.
H+. DC-HSPA+ HSPA+/DC HSPA.
H. HSPA.
3G. UMTS.
Trafic
Niveau de
charge de
la batterie
Contours seuls. Connecté.
Flèche pleine. Envoi/réception de
données.
Aucun achage. Pas de connexion.
Pourcentage de charge de batterie
restante.
Configuration de votre
point d'accès
Avant de vous connecter à votre hotspot mobile, vous
devez insérer une carte Micro SIM (3FF), installer la
batterie, allumer le hotspot mobile et recharger la batterie.
Remarque : pour vous procurer une carte Micro SIM,
contactez votre fournisseur d’accès Internet.
37
Page 38

¾ Pour insérer la carte Micro SIM :
1. Retirez le couvercle arrière à l'aide de l'encoche
située au niveau de l'angle du hotspot mobile.
2. Retirez la batterie.
3. Faites glisser la carte Micro SIM dans le
logement, contacts dorés vers le bas.
4. Assurez-vous que la carte Micro SIM est
correctement installée.
5. Réinstallez la batterie.
6. Replacez le couvercle
.
38
Page 39

¾ Pour allumer votre point d'accès :
Appuyez sur le bouton d’alimentation et maintenezle enfoncé jusqu’à ce que l’écran LCD s’allume.
Un écran de sélection de la langue s'ache.
¾ Pour sélectionner une langue :
1. Appuyez sur le bouton de navigation pour faire
défiler les options de langue jusqu'à ce que la
langue souhaitée soit mise en surbrillance.
2. Appuyez sur le bouton d'alimentation pour
sélectionner la langue.
Vous pourrez toujours modifier la langue ultérieurement à partir de la page Web du point d'accès.
¾ Pour recharger la batterie :
1. Reliez le câble Micro USB à votre point d'accès.
2. Reliez l'autre extrémité du câble au port USB de
votre ordinateur ou du chargeur USB.
Remarque : la batterie est fournie partiellement chargée.
39
Page 40

Création d'une connexion mobile
Votre hotspot est fourni déjà configuré avec le nom du
point d'accès (APN) de votre fournisseur de services
réseau. Votre hotspot vérifie l'APN pour déterminer
le type de connexion réseau à établir.
Tout est prêt pour surfer sur le Web !
Vous devez configurer un APN pour votre hotspot si
vous configurez ce hotspot pour la première fois ou si
vous recevez un message indiquant que l'installation
d'un APN est nécessaire.
¾ Pour configurer un APN :
1. Sur l’écran d’accueil, appuyez sur l’icône
Settings (Paramètres).
2. Appuyez sur l'icône Network (Réseau).
Operator
3. Appuyez sur le bouton APN >.
Une liste d'APN préprogrammés potentiellement
compatibles avec votre carte SIM actuelle s'ache.
40
Page 41

4. Sélectionnez l'APN approprié.
5. Si aucun des APN préprogrammés ne convient,
configurez un nouvel APN.
a. Cliquez sur le bouton +Add (Ajouter).
b. Saisissez les informations de l'APN.
Contactez votre fournisseur de services
réseau pour plus d'informations sur ces
spécifications.
c. Appuyez sur le bouton Save (Enregistrer).
Un message confirmant la création d’un
APN s’ache.
¾ Pour vous connecter à votre hotspot :
1. Assurez-vous que le WiFi est activé sur votre
ordinateur ou autre appareil.
2. Sur votre ordinateur ou autre appareil,
recherchez les réseaux WiFi :
• Pour les appareils Windows, cliquez sur
l’icône Internet Access (Accès Internet).
• Pour les appareils Mac, sélectionnez le
réseau dans le menu WiFi.
• Pour les tablettes, recherchez l'option
relative aux paramètres.
3. Sélectionnez le nom de réseau WiFi aché sur
votre écran LCD.
41
Page 42

4. Saisissez le mot de passe WiFi exactement tel
qu'il apparaît sur l'écran LCD.
Les mots de passe sont sensibles à la casse.
Lorsqu'un ordinateur ou un appareil mobile se
connecte au hotspot, un 1 s'ache en regard
de l'icône WiFi sur l'écran LCD.
Remarque : afin que vous puissiez vous
connecter au réseau haut débit mobile, votre
compte SIM doit être actif. Si vous utilisez une
carte Micro SIM prépayée ou dont le paiement
se fait selon la consommation réelle, le compte
doit présenter un solde positif.
5. Lancez votre navigateur et, si vous le souhaitez,
consultez la page Web du hotspot netgear.aircard
pour personnaliser vos paramètres.
Votre hotspot mobile est prêt pour une utilisation
immédiate. Vous n'aurez probablement pas
besoin de personnaliser les paramètres.
Le hotspot mobile est entièrement sécurisé avec
ses paramètres de sécurité par défaut.
Application NETGEAR AirCard
Téléchargez l'application mobile gratuite sur
netgear.com/AirCardApps. Utilisez cette application
pour consulter vos paramètres, ainsi que vos
informations de connexion et d'utilisation des
données, depuis votre smartphone ou votre tablette.
Pour gérer tous les paramètres du hotspot, rendez-vous
à l'adresse suivante : netgear.aircard.
42
Page 43

Gestion des paramètres WiFi
Vous pouvez gérer vos paramètres WiFi en appuyant
sur l'icône WiFi sur l'écran tactile du hotspot.
Vous pouvez également gérer vos paramètres WiFi
depuis la page Web de votre hotspot.
Remarque : le hotspot se réinitialise lorsque vous
modifiez des paramètres WiFi. Les appareils connectés
se déconnectent alors.
Lecture et rédaction de
messages SMS
Appuyez sur l'icône Messages pour acher ou rédiger
des messages SMS.
¾ Pour lire les messages :
1. Sur l'écran d'accueil, appuyez sur l'icône Messages.
2. Appuyez sur la ligne correspondant à un message.
43
Page 44

¾ Pour rédiger un message :
1. Sur l’écran d’accueil, appuyez sur l’icône
Messages.
2. Appuyez sur le bouton Compose (Rédiger) en
haut à droite de l'écran.
Si aucune carte SIM n’est insérée dans votre
hotspot, le bouton Compose (Rédiger) est grisé.
3. Saisissez un numéro de téléphone.
4. Cliquez sur le bouton Next (Suivant).
5. Rédigez le message.
6. Appuyez sur le bouton Send (Envoyer).
Personnalisation des
paramètres du hotspot
Vous pouvez également personnaliser d'autres
paramètres.
¾ Pour personnaliser les paramètres de votre
hotspot :
1. Sur l'écran d'accueil, appuyez sur l'icône Settings
(Paramètres).
2. Appuyez sur l'une des icônes pour ajuster un
paramètre.
44
Page 45

Le tableau suivant décrit les icônes qui s'achent dans
la fenêtre Paramètres.
Icône Description
Ecran
Réseau
BatteryBoost Utilisez votre hotspot mobile pour donner
Mode avion Désactivez le hotspot mobile WiFi et les
Connexion
USB
Configurez l'écran tactile (luminosité,
délai de mise en veille, achage des
informations d'identification WiFi,
achage du voyant d'état).
Choisissez les types de réseau à utiliser,
définissez des règles d'itinérance et
achez les détails de la connexion réseau.
un surplus d'alimentation à la batterie
d'un autre appareil en utilisant le câble
BatteryBoost fourni avec votre appareil.
radios cellulaires lorsque vous prenez
l'avion ou si vous vous trouvez dans une
zone où le WiFi est interdit. La fonction
BatteryBoost peut tout de même être
utilisée dans ce mode.
Connectez-vous à Internet à partir d'un
ordinateur compatible via un câble USB et
rechargez votre appareil simultanément.
A propos de Consultez les informations sur l'appareil,
notamment les mises à jour du logiciel,
la réinitialisation des paramètres par
défaut et le didacticiel.
Achage des alertes
Vous pouvez acher les alertes et notifications en faisant
glisser l'icône ALERTS (ALERTES) vers le bas depuis le
haut de l'écran. Faites défiler pour acher plusieurs alertes.
45
Page 46

Page Web du point d'accès
Sur la page Web du point d'accès, vous pouvez
eectuer les opérations suivantes :
• Modifier le SSID WiFi, le mot de passe WiFi, le mot
de passe administrateur et le chirement WiFi
• Définir les options de connexion automatique
• Acher l'utilisation des données
• Lire des messages SMS
• Acher les alertes
• Acher et modifier d'autres paramètres
• Contrôler l’état des appareils
¾ Pour accéder à la page Web de votre point
d'accès :
1. Ouvrez un navigateur Internet sur un ordinateur ou
un appareil WiFi connecté au réseau.
2. Saisissez http://netgear.aircard.
3. Saisissez le mot de passe de connexion
administrateur.
Le mot de passe par défaut est password.
La page Web du point d'accès s'ache.
Modification des paramètres
de sécurité
Le nom de réseau WiFi et le mot de passe administrateur
garantissent la sécurité. Votre point d'accès mobile est
fourni avec un nom de réseau WiFi (SSID) et un mot de
passe sécurisés et générés de manière aléatoire que vous
pouvez continuer à utiliser ainsi. Lisez cette section si
vous souhaitez modifier vos paramètres de sécurité.
46
Page 47

¾ Pour modifier le nom de réseau WiFi :
1. Ouvrez un navigateur Internet depuis un ordinateur
ou un appareil WiFi connecté au point d’accès.
2. Saisissez http://netgear.aircard.
3. Saisissez le mot de passe de connexion
administrateur.
Le mot de passe par défaut est password.
La page Web du point d'accès s'ache.
4. Sélectionnez WiFi > Options.
5. Saisissez un nouveau nom de réseau WiFi.
6. Cliquez sur le bouton Submit (Soumettre).
¾ Pour modifier le mot de passe WiFi :
1. Ouvrez un navigateur Internet depuis un ordinateur
ou un appareil WiFi connecté au point d’accès.
2. Saisissez http://netgear.aircard.
La page Web du point d'accès s'ache.
3. Saisissez le mot de passe de connexion
administrateur.
Le mot de passe par défaut est password.
La page Web du point d'accès s'ache.
4. Sélectionnez WiFi > Options.
La page des options WiFi s’ache.
5. Saisissez un nouveau mot de passe WiFi.
Si vous modifiez votre mot de passe, veillez à en
garder une trace que vous conserverez en lieu sûr.
6. Cliquez sur le bouton Submit (Soumettre).
Connexion d’appareils
Vous pouvez ajouter des appareils à votre réseau en
utilisant un gestionnaire de réseau WiFi ou, pour les
appareils compatibles, le WPS.
47
Page 48

Remarque : le WPS permet de connecter des
appareils compatibles WPS à un réseau WiFi sans
saisir de mot de passe WiFi à l'aide d'un clavier.
¾ Pour connecter des appareils compatibles
WiFi supplémentaires :
1. Ouvrez le gestionnaire de réseau WiFi sur votre
ordinateur ou un autre appareil WiFi (tel qu’un
smartphone, une tablette, un lecteur multimédia
ou un appareil photo).
2. Sélectionnez le nom de réseau WiFi aché sur
l'écran LCD.
3. Saisissez le mot de passe WiFi aché sur l'écran LCD.
4. Ouvrez le navigateur.
¾ Pour se connecter à un appareil à l'aide du WPS :
1. Appuyez sur le bouton d'alimentation pour
réactiver l'écran LCD.
2. Appuyez sur l'icône WiFi.
L’écran WiFi s’ache.
3. Appuyez sur l'icône WPS.
L’écran WPS s’ache.
4. Appuyez sur le bouton Pair with Main Wi-Fi
(Coupler avec le WiFi principal).
5. Dans un délai de deux minutes, appuyez sur
le bouton WPS de l’appareil que vous voulez
connecter à votre réseau WiFi.
Le hotspot et l’appareil WiFi communiquent
automatiquement et établissent une connexion
sécurisée.
48
Page 49

Assistance
Nous vous remercions pour l'achat de ce produit
NETGEAR.
Après l'installation de votre appareil, notez le
numéro de série inscrit sur l'étiquette. Il vous sera
nécessaire pour enregistrer votre produit à l'adresse
https://my.netgear.com.
Vous devez enregistrer votre produit avant de
pouvoir utiliser l'assistance téléphonique de NETGEAR.
NETGEAR vous recommande d'enregistrer votre
produit sur le site Web de NETGEAR.
Pour obtenir des mises à jour de produits et accéder au
support Web, rendez-vous à l'adresse
http://support.netgear.com.
NETGEAR vous recommande d'utiliser uniquement les
ressources d'assistance officielles de NETGEAR.
Vous pouvez obtenir le manuel de l'utilisateur en ligne à
http://downloadcenter.netgear.com ou via un lien dans
l'interface utilisateur du produit.
Marques commerciales
© NETGEAR, Inc., NETGEAR et le logo NETGEAR sont
des marques commerciales de NETGEAR, Inc. Toutes
les marques commerciales autres que NETGEAR sont
utilisées à des fins de référence uniquement.
Conformité
Pour consulter la déclaration de conformité actuelle,
rendez-vous sur le site
http://support.netgear.com/app/answers/detail/a_
id/11621/.
Pour obtenir les informations relatives à la conformité
légale, rendez-vous sur
http://www.netgear.com/about/regulatory/.
Avant de brancher l'alimentation, reportez-vous au
document de conformité légale.
Page 50

Guida introduttiva
AirCard 810
Hotspot mobile
Page 51

Un primo approccio con
l'hotspot
Prima di collegare l'hotspot mobile, esaminare lo
schermo LCD, le icone, i pulsanti e i connettori.
Pulsanti e connettori
Pulsante di alimentazione
LED di stato
Porta micro USB
Connettore dell'antenna principale
LED di stato
Il LED di stato indica lo stato della connessione:
• Lampeggia lentamente in blu. L'hotspot è pronto.
• Lampeggia due volte in blu. L'hotspot sta
trasferendo i dati.
• Lampeggia lentamente in giallo. L'hotspot non è
collegato alla rete.
Italiano
51
Page 52

Pulsante di alimentazione
Tenere premuto il pulsante di alimentazione per due
secondi per accendere l'hotspot e per cinque secondi
per spegnerlo.
Premere e rilasciare il pulsante di alimentazione per
scorrere le diverse schermate LCD.
Pulsante di alimentazione
Schermo LCD
È possibile utilizzare le icone del touch screen e altri
elementi dello schermo per visualizzare lo stato
dell'hotspot mobile, configurare le impostazioni della
banda WiFi, visualizzare i dettagli sull'utilizzo dei dati
e visualizzare gli avvisi di sistema.
52
Page 53

Icona Descrizione
Indicatore
livello
segnale
Tipo di rete
5 barre. Eccellente.
1 barra. Livello basso.
4G+. È disponibile una rete LTE
avanzata con Carrier Aggregation.
4G. Una rete LTE è disponibile.
H+. DC-HSPA+ HSPA+/DC HSPA.
H. HSPA.
3G. UMTS.
Traco
Livello di
carica della
batteria
Contorno. Connesso.
Acceso. Invio o ricezione in corso.
Nessuno. Non connesso.
La percentuale di carica residua della
batteria.
Impostazione dell'hotspot
Prima di connettersi all'hotspot mobile, è necessario
inserire una scheda micro-SIM (3FF), installare la batteria,
accendere l'hotspot mobile e caricare la batteria.
Nota: per ottenere un scheda micro-SIM, contattare
il provider di servizi Internet.
53
Page 54

¾ Per inserire la scheda micro-SIM:
1. Rimuovere il coperchio posteriore, tenendo fermo
il pollice sull'angolo dell'hotspot mobile.
2. Rimuovere la batteria.
3. Far scorrere la scheda micro-SIM nello slot con
i contatti dorati rivolti verso il basso.
4. Accertarsi che la scheda micro-SIM sia inserita
saldamente.
5. Reinserire la batteria.
6. Riposizionare il coperchio
54
.
Page 55

¾ Per accendere l'hotspot:
Tenere premuto il pulsante di alimentazione finché
lo schermo LCD non si illumina.
Viene visualizzata la schermata di selezione della lingua.
¾ Per selezionare una lingua:
1. Premere il pulsante di navigazione per scorrere tra
le opzioni della lingua finché non viene evidenziata la
lingua desiderata.
2. Premere il pulsante di alimentazione per
selezionare una lingua.
È possibile modificare la lingua in un secondo
momento dalla pagina Web dell'hotspot.
¾ Per ricaricare la batteria:
1. Collegare il cavo micro USB all'hotspot.
2. Collegare l'altra estremità del cavo alla porta USB del
computer o al caricabatterie USB.
Nota: la batteria risulta parzialmente carica.
55
Page 56

Creazione di una connessione
mobile
L'hotspot viene fornito preconfigurato con il nome del
punto di accesso (APN) del proprio provider di servizi di
rete. L'hotspot controlla l'APN per determinare il tipo di
connessione di rete da stabilire.
È ora possibile navigare sul Web!
Se si sta configurando l'hotspot per la prima volta
o se viene visualizzato un messaggio che richiede
la configurazione dell'APN, è necessario per prima
cosa configurare quest'ultimo.
¾ Per configurare un APN:
1. Nella home page, toccare l'icona Settings
(Impostazioni).
2. Toccare l'icona Network (Rete).
3. Toccare il simbolo > accanto ad APN.
Viene visualizzato un elenco di APN preprogrammati
che potrebbero supportare la SIM in uso.
56
Page 57

4. Selezionare l'APN appropriato.
5. Se nessuno degli APN preprogrammati è appropriato,
configurarne uno nuovo.
a. Toccare il pulsante +Add (Aggiungi).
b. Immettere i dettagli relativi all'APN.
Contattare il provider di servizi di rete per
informazioni su questi dettagli specifici.
c. Toccare il pulsante Save (Salva).
Viene visualizzato un messaggio che indica
l'avvenuta creazione di un APN.
¾ Per connettersi all'hotspot:
1. Assicurarsi che il WiFi sia attivato sul computer o su
un altro dispositivo.
2. Sul computer o su un altro dispositivo, cercare le
reti WiFi:
• Per dispositivi Windows, fare clic sull'icona
Internet Access (Accesso Internet).
• Per i dispositivi Mac, dal menu WiFi,
selezionare la rete.
• Per i tablet, cercare un'opzione per le
impostazioni.
3. Selezionare il nome WiFi visualizzato sullo schermo LCD.
4. Immettere la password WiFi esattamente come
viene visualizzata sullo schermo LCD.
57
Page 58

Le password distinguono i caratteri minuscoli da
quelli maiuscoli.
Quando un computer o un dispositivo mobile si
connette a un hotspot, viene visualizzato un numero
1 accanto all'icona WiFi sullo schermo LCD.
Nota: per la connessione alla rete a banda larga
mobile, è necessario che il proprio credito SIM
sia attivo. Se si utilizza una scheda micro-SIM
prepagata o ricaricabile, il credito deve essere
in positivo.
5. Avviare il browser e, se desiderato, visitare la pagina
Web dell'hotspot all'indirizzo netgear.aircard per
personalizzare le impostazioni.
L'hotspot mobile è pronto per l'uso. Probabilmente
non è necessario personalizzare le impostazioni.
L'hotspot mobile è completamente protetto tramite
le impostazioni di protezione predefinite.
App NETGEAR AirCard
Scaricare l'applicazione mobile gratuita da
netgear.com/AirCardApps. Questa applicazione consente
di visualizzare le impostazioni e le informazioni su
connessione e utilizzo dati direttamente dal proprio
smartphone o tablet. Per gestire tutte le impostazioni
dell'hotspot, visitare il sito Web netgear.aircard.
Gestione delle impostazioni
WiFi
È possibile gestire le impostazioni WiFi toccando l'icona
WiFi sul touch screen dell'hotspot.
58
Page 59

È inoltre possibile gestire tali impostazioni dalla pagina
Web dell'hotspot.
Nota: l'hotspot viene ripristinato quando si modificano
le impostazioni WiFi. I dispositivi connessi vengono
disconnessi.
Visualizzazione o composizione
di messaggi SMS
Toccare l'icona Messages (Messaggi) per visualizzare
o comporre messaggi SMS.
¾ Per leggere i messaggi:
1. Nella home page, toccare l'icona Messages
(Messaggi).
2. Toccare la riga di un messaggio.
59
Page 60

¾ Per comporre un messaggio:
1. Nella home page, toccare l'icona Messages
(Messaggi).
2. Toccare il pulsante Compose (Componi) nell'angolo
in alto a destra.
Se nell'hotspot non è stata inserita una scheda
SIM valida, il pulsante Compose (Componi) viene
visualizzato in grigio.
3. Immettere un numero di telefono.
4. Toccare il pulsante Next (Avanti).
5. Comporre il messaggio.
6. Premere il pulsante Send (Invio).
Personalizzazione delle
impostazioni dell'hotspot
È possibile personalizzare anche altre impostazioni.
¾ Per personalizzare le impostazioni dell'hotspot:
1. Nella home page, toccare l'icona Settings
(Impostazioni).
2. Toccare una delle icone per regolare
un'impostazione.
60
Page 61

La seguente tabella fornisce le descrizioni delle icone
visualizzate nella finestra Settings (Impostazioni).
Icona Descrizione
Schermo
Rete
Jump Boost
Modalità Aereo
Tethering USB
Altro
Consente di configurare il display
touch screen (luminosità, timeout,
visualizzazione delle credenziali WiFi,
visualizzazione del LED di stato).
Consente di scegliere i tipi di rete da
utilizzare, impostare le regole per il
roaming, visualizzare i dettagli di una
connessione di rete.
Consente di utilizzare l'hotspot mobile
per potenziare la batteria di un altro
dispositivo utilizzando il cavo Jump Boost
fornito con il dispositivo.
Consente di disattivare il segnale cellulare
e WiFi dell'hotspot mobile mentre ci si
trova su un aereo o in aree in cui non è
consentito utilizzare il WiFi. In questa
modalità è ancora possibile utilizzare
la funzione Jump Boost.
Consente di connettersi a Internet da
computer supportati utilizzando un cavo
USB e di caricare il dispositivo allo stesso
tempo.
Consente di visualizzare le informazioni
sul dispositivo, tra cui gli aggiornamenti
soware, il ripristino alle impostazioni
predefinite e le esercitazioni.
Visualizzazione di avvisi
È possibile visualizzare gli avvisi e le notifiche facendo scorrere
il dito verso il basso dall'icona ALERTS (AVVISI) nella parte
superiore dello schermo. Scorrere per visualizzare più avvisi.
61
Page 62

Pagina Web dell'hotspot
Dalla pagina Web dell'hotspot, è possibile eettuare le
seguenti operazioni:
• Modificare il codice SSID WiFi, la password WiFi,
la password admin e la crittografia WiFi
• Impostare le opzioni di connessione automatica
• Visualizzare informazioni sull'utilizzo dati
• Leggere SMS
• Visualizza avvisi
• Visualizzare e modificare altre impostazioni
• Controllare lo stato del dispositivo
¾ Per accedere alla pagina Web dell'hotspot:
1. Avviare un browser Internet da un computer
o dispositivo WiFi collegato alla rete.
2. Accedere a http://netgear.aircard.
3. Inserire la password di accesso dell'amministratore.
La password predefinita è password.
Viene visualizzata la pagina Web dell'hotspot.
Modifica delle impostazioni
di protezione
Il nome rete WiFi e la password admin assicurano protezione.
L'hotspot mobile viene fornito con un nome rete WiFi (SSID)
e una password generati a caso, utilizzabili dall'utente
così come vengono forniti. Se si desidera modificare le
impostazioni di protezione, consultare questa sezione.
¾ Per modificare il nome della rete WiFi:
1. Avviare un browser Internet da un computer
o dispositivo WiFi collegato all'hotspot.
2. Accedere a http://netgear.aircard.
62
Page 63

3. Inserire la password di accesso dell'amministratore.
La password predefinita è password.
Viene visualizzata la pagina Web dell'hotspot.
4. Selezionare WiFi > Options (WiFi > Opzioni).
5. Inserire un nuovo nome rete WiFi.
6. Fare clic sul pulsante Submit (Invia).
¾ Per modificare la password WiFi:
1. Avviare un browser Internet da un computer
o dispositivo WiFi collegato all'hotspot.
2. Accedere a http://netgear.aircard.
Viene visualizzata la pagina Web dell'hotspot.
3. Inserire la password di accesso dell'amministratore.
La password predefinita è password.
Viene visualizzata la pagina Web dell'hotspot.
4. Selezionare WiFi > Options (WiFi > Opzioni).
Viene visualizzata la pagina delle opzioni WiFi.
5. Inserire una nuova password WiFi.
Se si modifica la password, assicurarsi di annotarla
e conservarla in un luogo sicuro.
6. Fare clic sul pulsante Submit (Invia).
Collegamento di dispositivi
È possibile aggiungere dispositivi alla rete tramite la
gestione rete WiFi o WPS, nel caso in cui il dispositivo
sia in grado di utilizzare la funzione WPS.
Nota: lo standard WPS consente di collegare dispositivi
WPS a una rete WiFi senza immettere una password WiFi
utilizzando una tastiera.
63
Page 64

¾ Per collegare altri dispositivi con funzionalità WiFi:
1. Aprire la gestione rete WiFi sul computer o su un
altro dispositivo WiFi (ad es., uno smartphone,
tablet, lettore multimediale o fotocamera).
2. Selezionare il nome della rete WiFi visualizzato sullo
schermo LCD.
3. Immettere la password WiFi visualizzata sullo
schermo LCD.
4. Avviare il browser.
¾ Per il collegamento di dispositivi che utilizzano
la funzione WPS:
1. Premere il pulsante di alimentazione per attivare lo
schermo LCD.
2. Toccare l'icona WiFi.
Viene visualizzata la schermata WiFi.
3. Toccare l'icona WPS.
Viene visualizzata la schermata WPS.
4. Toccare il pulsante Pair with Main Wi-Fi (Associa
con Wi-Fi principale).
5. Entro due minuti, premere il pulsante WPS sul
dispositivo da connettere alla rete WiFi.
L'hotspot e il dispositivo WiFi comunicano
automaticamente e stabiliscono una connessione
sicura.
64
Page 65

Supporto
Grazie per aver acquistato questo prodotto NETGEAR.
Una volta completata l'installazione del dispositivo,
individuare il numero di serie riportato sull'etichetta del
prodotto e utilizzarlo per registrare il prodotto all'indirizzo
https://my.netgear.com.
La registrazione del prodotto è necessaria per poter utilizzare
il servizio di assistenza telefonica di NETGEAR. NETGEAR
consiglia di registrare il prodotto dal sito Web di NETGEAR.
Per gli aggiornamenti del prodotto e l'assistenza via Web,
visitare il sito http://support.netgear.com.
NETGEAR consiglia di utilizzare solo risorse di assistenza
NETGEAR ufficiali.
È possibile scaricare il manuale utente online dal sito
Web http://downloadcenter.netgear.com o tramite un
collegamento presente nell'interfaccia utente del prodotto.
Marchi commerciali
© NETGEAR, Inc. NETGEAR e il logo NETGEAR sono marchi
di NETGEAR, Inc. Qualsiasi marchio non NETGEAR
è utilizzato solo come riferimento.
Conformità
Per la Dichiarazione di conformità UE corrente, visitare
il sito Web:
http://support.netgear.com/app/answers/detail/a_
id/11621/.
Per ulteriori informazioni sulla conformità normativa,
visitare il sito:
http://www.netgear.com/about/regulatory/.
Prima di collegare l'alimentazione, consultare il documento
relativo alla conformità normativa.
Page 66

Inicio rápido
Aircard 810
Hotspot móvil
Page 67

Introducción al dispositivo
hotspot
Antes de conectarse al hotspot móvil, familiarícese con
la pantalla LCD, los iconos, los botones y los conectores.
Botones y conectores
Botón de encendido
Indicador de estado
Puerto micro USB
Conector de antena principal
Indicador de estado
El indicador de estado indica el estado de la conexión de
datos:
• Azul, parpadeo lento. El hotspot está listo.
• Azul, parpadeo doble. El hotspot está transfiriendo
datos.
• Ámbar, parpadeo lento. El hotspot no está
conectado a la red.
Español
67
Page 68

Botón de encendido
Pulse y mantenga pulsado el botón de encendido durante
dos segundos para encender el hotspot y durante cinco
segundos cuando desee apagar el hotspot.
Mantenga pulsado el botón de encendido para
desplazarse por las pantallas LCD.
Botón de encendido
Pantalla LCD
Puede utilizar los iconos y otros elementos de la pantalla
para ver el estado del hotspot móvil, configurar opciones
de banda WiFi, ver la información de uso de datos y ver las
alertas del sistema.
68
Page 69

Icono Descripción
Intensidad
de la señal
Tipo de red
5 barras. Excelente.
1 barra. Nivel bajo.
4G+. Hay disponible una red LTE
avanzada con agregación del operador.
4G. Hay disponible una red LTE.
H+. DC-HSPA+ HSPA+/DC HSPA.
H. HSPA.
3G. UMTS.
Tráfico
Nivel de
batería
Contorno. Conectado.
Fijo. Enviando o recibiendo.
Ninguno. No conectado.
El porcentaje de carga que le queda a
la batería.
Configuración del hotspot
Antes de conectarse al hotspot móvil, debe insertar una
tarjeta micro SIM (3FF), instalar la batería, encender el
hotspot móvil y cargar la batería.
Nota: Para obtener una tarjeta micro SIM, póngase en
contacto con su proveedor de servicios de Internet.
69
Page 70

¾ Para insertar la tarjeta micro SIM:
1. Retire la carcasa trasera tirando con el dedo de la
pestaña en la esquina del hotspot móvil.
2. Extraiga la batería.
3. Deslice la tarjeta micro SIM en la ranura con los
contactos dorados hacia abajo.
4. Asegúrese de que la tarjeta micro SIM se ajusta
correctamente.
5. Vuelva a insertar la batería.
6. Vuelva a colocar la cubierta
70
.
Page 71

¾ Para encender el hotspot:
Mantenga pulsado el botón de encendido hasta que
la pantalla LCD se ilumine.
Aparece una pantalla de selección de idioma.
¾ Para seleccionar un idioma:
1. Pulse el botón de navegación para desplazarse por
las opciones de idioma hasta que se resalte el que
busca.
2. Pulse el botón de encendido para seleccionar el
idioma.
Puede cambiar el idioma más adelante desde la
página web del hotspot.
¾ Para recargar la batería:
1. Conecte el cable micro USB al hotspot.
2. Conecte el otro extremo del cable al puerto USB del
ordenador o al cargador USB.
Nota: La batería viene parcialmente cargada.
71
Page 72

Creación de una conexión móvil
El hotspot viene configurado con el nombre del punto
de acceso (APN) de su proveedor de servicios de red.
El hotspot comprueba el APN para determinar el tipo
de conexión de red que debe establecer.
Ya está preparado para navegar por
la web
Debe definir un APN para el hotspot si lo va a configurar
por primera vez o si recibe un mensaje en el que se le
indica que es necesario configurar el APN.
¾ Para configurar un APN:
1. En la pantalla de inicio, toque el icono Settings
(Ajustes).
2. Toque el icono Network (Red).
3. Toque el botón APN >.
Se desplegará una lista de APN programados que
podrían funcionar con sus pantallas SIM actuales.
4. Seleccione el APN correspondiente.
72
Page 73

5. Si ninguno de los APN programados resultan
adecuados, configure un APN.
a. Haga clic en el botón +Add (Añadir).
b. Introduzca los datos del APN.
Póngase en contacto con su proveedor de
servicios de red para obtener más información
sobre estos datos.
c. Pulse el botón Save (Guardar).
Aparece un mensaje en el que se le indica que
se ha creado un APN.
¾ Para conectarse al hotspot:
1. Asegúrese de que la recepción de WiFi está activada
en el ordenador u otro dispositivo.
2. Desde el ordenador u otro dispositivo, busque redes
WiFi:
• En dispositivos Windows, haga clic en el icono
Internet Access (Acceso a Internet).
• En dispositivos Mac, seleccione la red desde
el menú WiFi.
• En tablets, busque las opciones de
configuración.
3. Seleccione el nombre de la red WiFi que se muestra
en la pantalla LCD.
4. Introduzca la contraseña WiFi exactamente como
aparece en la pantalla LCD.
73
Page 74

En las contraseñas se distingue entre mayúsculas y
minúsculas.
Cuando un equipo o dispositivo móvil se conecta al
hotspot, aparece un 1 junto al icono de WiFi en la
pantalla LCD.
Nota: Para poder conectarse a la red de banda
ancha móvil, la cuenta de la tarjeta SIM debe estar
activa. Si utiliza una tarjeta de prepago micro SIM,
la cuenta debe tener un saldo positivo.
5. Abra el navegador y, si lo desea, visite la página
web del hotspot netgear.aircard para personalizar
la configuración.
El hotspot móvil está listo para el uso
inmediatamente. Lo más probable es que no
necesite personalizar la configuración.
El hotspot móvil está completamente protegido
gracias a la configuración de seguridad
predeterminada.
Aplicación NETGEAR AirCard
Descargue la aplicación móvil gratuita desde
netgear.com/AirCardApps. Utilice esta aplicación para ver
información sobre la configuración, la conexión y el uso de
datos desde su smartphone o tablet. Para administrar toda
la configuración del hotspot, visite netgear.aircard.
Administrar configuración
WiFi
Puede administrar la configuración WiFi tocando el icono
WiFi en la pantalla táctil del hotspot.
74
Page 75

También puede administrar la configuración WiFi desde la
página web del hotspot.
Nota: El hotspot se reinicia cuando cambia la
configuración WiFi. Los dispositivos conectados se
desconectan.
Ver o redactar mensajes SMS
Toque el icono Messages (Mensajes) para ver o redactar
mensajes SMS.
¾ Para leer los mensajes:
1. En la pantalla de inicio, toque el icono Messages
(Mensajes).
2. Toque la línea de un mensaje.
75
Page 76

¾ Para redactar un mensaje:
1. En la pantalla de inicio, toque el icono Messages
(Mensajes).
2. Pulse el botón Compose (Redactar) que aparece en
la esquina superior derecha.
Si no inserta una tarjeta SIM válida en el hotspot,
el botón Compose (Redactar) aparecerá en gris.
3. Introduzca un número de teléfono.
4. Pulse el botón Next (Siguiente).
5. Redacte el mensaje.
6. Pulse el botón Send (Enviar).
Personalización de la
configuración del hotspot
También puede personalizar otros ajustes.
¾ Para personalizar la configuración del hotspot:
1. En la pantalla de inicio, toque el icono Settings
(Ajustes).
2. Toque cualquiera de los iconos para ajustar una
opción.
76
Page 77

En la siguiente tabla se describen los iconos que se
muestran en la ventana de configuración.
Icono Descripción
Pantalla
Tipo
Jump Boost
Modo avión
Conexión
USB
Configure la pantalla táctil (brillo, tiempo de
espera, visualización de credenciales WiFi,
indicador de estado).
Elija los tipos de red que desea utilizar, definir
las reglas de itinerancia, mostrar los detalles
de la conexión de red.
Utilice su hotspot móvil para aumentar la
batería de otro dispositivo utilizando el cable
Jump Boost que se incluye con el dispositivo.
Desactive la conexión WiFi del hotspot móvil
y las radios móviles cuando se encuentre
en un avión o en áreas donde la conexión
WiFi esté restringida. La función Jump Boost
puede utilizarse en este modo.
Conéctese a Internet desde ordenadores
compatibles con un cable USB y cargue el
dispositivo al mismo tiempo.
Más
Consulte información sobre el dispositivo,
incluyendo actualizaciones de soware,
restauración de la configuración
predeterminada y tutorial.
Ver las alertas
Permite ver las alertas y notificaciones deslizando hacia
abajo el icono ALERTS (ALERTAS) de la parte superior de
la pantalla. Desplácese para ver las distintas alertas.
77
Page 78

Página web del hotspot
En la página web del hotspot, puede hacer lo siguiente:
• Cambiar el SSID WiFi, la contraseña WiFi, la
contraseña de administración y el cifrado WiFi.
• Configurar las opciones de conexión automática.
• Ver el uso de datos.
• Leer los mensajes SMS.
• Visualización de alertas.
• Ver y cambiar otros ajustes.
• Comprobar el estado del dispositivo.
¾ Para acceder a la página web del hotspot:
1. Abra un navegador de Internet en un equipo
o dispositivo WiFi conectado a la red.
2. Introduzca http://netgear.aircard.
3. Introduzca la contraseña de acceso de administrador.
La contraseña predeterminada es password.
Aparece la página web del hotspot.
Cambio de la configuración
de seguridad
El nombre de red WiFi y la contraseña de administración
protegen el dispositivo. El hotspot móvil incluye un
nombre de red WiFi (SSID) seguro y una contraseña
generados de forma aleatoria que puede seguir utilizando
sin necesidad de modificar. Lea esta sección si desea
cambiar la configuración de seguridad.
78
Page 79

¾ Para cambiar el nombre de la red WiFi:
1. Abra un navegador de Internet en un equipo
o dispositivo WiFi conectado al hotspot.
2. Introduzca http://netgear.aircard.
3. Introduzca la contraseña de acceso de administrador.
La contraseña predeterminada es password.
Aparece la página web del hotspot.
4. Seleccione WiFi > Options (WiFi > Opciones).
5. Introduzca un nuevo nombre de red WiFi.
6. Haga clic en el botón Submit (Enviar).
¾ Para modificar la contraseña WiFi:
1. Abra un navegador de Internet en un equipo
o dispositivo WiFi conectado al hotspot.
2. Introduzca http://netgear.aircard.
Aparece la página web del hotspot.
3. Introduzca la contraseña de acceso de administrador.
La contraseña predeterminada es password.
Aparece la página web del hotspot.
4. Seleccione WiFi > Options (WiFi > Opciones).
Aparecerá la página de opciones de WiFi.
5. Escriba una nueva contraseña WiFi.
Si cambia su contraseña, asegúrese de registrarla en
algún sitio y guárdela en un lugar seguro.
6. Haga clic en el botón Submit (Enviar).
79
Page 80

Conexión de dispositivos
Puede añadir dispositivos a la red mediante un administrador
de redes WiFi o WPS si el dispositivo puede emplear WPS.
Nota: WPS le permite conectar dispositivos compatibles
con WPS a una red WiFi sin necesidad de introducir la
contraseña WiFi mediante el teclado.
¾ Para conectar otros dispositivos con funciones
WiFi:
1. Abra el administrador de redes WiFi del ordenador
u otro dispositivo WiFi (como smartphones, tablets,
reproductores multimedia o cámaras).
2. Seleccione el nombre de la red WiFi que aparece en
la pantalla LCD.
3. Introduzca la contraseña WiFi que aparece en la
pantalla LCD.
4. Abra un navegador.
¾ Para conectar dispositivos que utilicen WPS:
1. Pulse el botón de encendido para activar la
pantalla LCD.
2. Toque el icono WiFi.
Aparecerá la pantalla WiFi.
3. Toque el icono WPS.
Aparecerá la pantalla WPS.
4. Toque el botón Pair with Main Wi-Fi (Emparejar
con red WiFi principal).
5. Al cabo de dos minutos, pulse el botón WPS del
dispositivo que desee conectar a la red WiFi.
El hotspot y el dispositivo WiFi se comunican
automáticamente y establecen una conexión segura.
80
Page 81

Soporte
Gracias por comprar este producto NETGEAR.
Una vez instalado el dispositivo, busque el número
de serie en la etiqueta del producto y regístrelo en
https://my.netgear.com.
Deberá registrar su producto para poder hacer uso de
nuestro servicio telefónico de soporte técnico NETGEAR.
NETGEAR recomienda registrar su producto a través del
sitio web de NETGEAR.
Podrá encontrar actualizaciones del producto y asistencia
técnica en http://support.netgear.com.
NETGEAR le recomienda que utilice solo los recursos del
soporte técnico oficial de NETGEAR.
Puede consultar el manual del usuario online en
http://downloadcenter.netgear.com o a través de
un vínculo en la interfaz de usuario del producto.
Marcas comerciales
© NETGEAR, Inc., NETGEAR y el logotipo de NETGEAR
son marcas comerciales registradas de NETGEAR, Inc.
Cualquier marca comercial distinta a NETGEAR que se
utilice, se usa únicamente a modo de referencia.
Cumplimiento normativo
Para consultar la declaración de conformidad de la UE
actual, visite:
http://support.netgear.com/app/answers/detail/a_
id/11621/.
Para consultar la información de cumplimiento normativo,
visite http://www.netgear.com/about/regulatory/.
Consulte el documento de cumplimiento normativo antes
de conectar la fuente de alimentación.
Page 82

Snabbstart
AirCard 810
Mobil hotspot
Page 83

Detta är din hotspot
Innan du ansluter din mobila hotspot bör du bekanta dig
med dess LCD-skärm, ikoner, knappar och kontakter.
Knappar och kontakter
Strömknapp
Statuslampa
Mikro-USB-port
Primärt antennuttag
Statuslampa
Statuslampan visar dataanslutningens status:
• Blå, blinkar långsamt. Hotspoten är klar.
• Blå, dubbel blinkning. Hotspoten överför data.
• Orange, blinkar långsamt. Hotspot är inte
ansluten till nätverket.
Svenska
83
Page 84

Strömknapp
Håll Power (strömknappen) intryckt i två sekunder för att
slå på hotspot, fem sekunder för att stänga av hotspot.
Tryck på Power (strömknappen) för att gå igenom LCDskärmarna.
Strömknapp
LCD-skärm
Du kan använda pekskärmsikonerna och andra
skärmelement för att visa statusen för din mobila hotspot,
konfigurera WiFi-bandinställningar, visa information om
dataanvändning och systemvarningar.
84
Page 85

Ikon Beskrivning
Signalstyrka
Nätverkstyp
5 staplar. Utmärkt.
1 stapel. Låg nivå.
4G+. Ett avancerat LTE-nätverk där
innehållsaggregering är tillgängligt.
4G. Ett LTE-nätverk är tillgängligt.
H+. DC-HSPA+ HSPA+/DC HSPA.
H. HSPA.
3G. UMTS.
Trafik
Batterinivå
Kontur. Ansluten.
Fast sken. Skickar eller tar emot.
Ingen. Ej ansluten.
Hur mycket batterikapacitet som
återstår.
Konfigurera din hotspot
Innan du ansluter till din mobila hotspot måste du sätta
i ett mikro-SIM-kort (3FF), installera batteriet, aktivera
den mobila hotspoten och ladda batteriet.
Obs! Kontakta din internetleverantör för att få ett
mikro-SIM-kort.
85
Page 86

¾ Så här sätter du i mikro-SIM-kortet:
1. Ta bort bakhöljet med hjälp av tumspärren i den
mobila hotspotens hörn.
2. Ta ur batteriet.
3. Skjut in mikro-SIM-kortet i kortplatsen med de
guldfärgade kontakterna vända nedåt.
4. Se till att mikro-SIM-kortet sitter ordentligt.
5. Sätt i batteriet igen.
6. Sätt tillbaka höljet
.
86
Page 87

¾ Så här slår du på strömmen till din hotspot:
Håll Power (strömknappen) intryckt tills LCDskärmen slås på.
En språkvalsskärm visas.
¾ Så här väljer du språk:
1. Tryck på Navigation (navigeringsknappen) för att
bläddra mellan språkalternativen tills önskat språk är
markerat.
2. Tryck på Power (strömknappen)för att välja språk.
Du kan ändra språk igen senare från hotspot-
webbsidan.
¾ Så här laddar du batteriet:
1. Anslut mikro-USB-kabeln till din hotspot.
2. Anslut andra änden av kabeln till USB-porten på
datorn eller till USB-laddaren.
Obs! Ditt batteri är delvis laddat vid köpet.
87
Page 88

Skapa en mobil anslutning
Din hotspot är förkonfigurerad med accesspunktens namn
(APN) för din nätjänstleverantör. Din hotspot kontrollerar
APN för att fastställa vilken typ av nätverksanslutning
som ska upprättas.
Du är nu redo att surfa på nätet!
Du måste konfigurera ett APN för din hotspot om du
ställer in din hotspot för första gången, eller om du ser ett
meddelande som anger att en APN-konfiguration krävs.
¾ Konfigurera ett APN:
1. Tryck på ikonen Inställningar på startskärmen.
2. Tryck på ikonen Network (nätverk).
3. Tryck på APN > knapp.
En lista med förprogrammerade APN som kanske
fungerar med ditt nuvarande SIM-kort visas.
4. Välj ett lämpligt APN.
88
Page 89

5. Om inget förprogrammerat APN är lämpligt,
konfigurera ett APN.
a. Tryck på knappen +Add (lägg till).
b. Ange APN-information.
Kontakta nättjänstleverantören för mer
information om detta.
c. Tryck på knappen Save (spara).
Ett meddelande som anger att ett APN har
skapats visas.
¾ Så här ansluter du till din hotspot:
1. Kontrollera att WiFi är aktiverat på datorn eller
annan enhet.
2. Sök eer WiFi-nätverk på datorn eller på en annan
enhet:
• För Windows-enheter klickar du på ikonen
Internet Access (Internetåtkomst).
• För Mac-enheter väljer du nätverk från
WiFi-menyn.
• För surfplattor letar du eer ett
inställningsalternativ.
3. Välj WiFi-namnet som visas på LCD-skärmen.
4. Ange WiFi-lösenordet exakt som det visas på
LCD-skärmen.
Lösenord är skilägeskänsliga.
89
Page 90

När en dator eller mobil enhet ansluts till denna
hotspot, visas en 1:a intill WiFi-ikonen på LCDskärmen.
Obs! Ditt SIM-konto måste vara aktivt
för att du ska kunna ansluta till det mobila
bredbandsnätverket. Om du använder ett
mikro-SIM-kort som är förbetalt eller betalas
löpande måste kontot ha ett positivt saldo.
5. Starta webbläsaren. Om du vill kan du besöka
hotspot-webbsidan på adressen netgear.aircard
och anpassa inställningarna.
Din mobila hotspot är klar att användas direkt när
du har packat upp den. Du behöver förmodligen inte
anpassa inställningarna.
Denna mobila hotspot är fullständigt säker om
standardsäkerhetsinställningarna används.
Appen NETGEAR AirCard
Hämta den kostnadsfria mobilappen från
netgear.com/AirCardApps. Använd appen om du vill visa
inställningar, anslutning och dataanvändningsinformation
från din smartphone eller surfplatta. Om du vill hantera
alla hotspot-inställningar går du till netgear.aircard.
90
Page 91

Hantera WiFi-inställningar
Du kan hantera dina WiFi-inställningar genom att trycka
på WiFi-ikonen på pekskärmen för hotspoten.
Du kan även hantera WiFi-inställningarna från din hotspotwebbsida.
Obs! Hotspoten återställs när du ändrar WiFi-
inställningarna. Anslutna enheter kopplas från.
Visa eller skriv SMSmeddelanden
Tryck på ikonen Messages (meddelanden) för att visa
eller skriva SMS-meddelanden.
¾ Så här läser du meddelanden:
1. Tryck på ikonen Meddelanden på startskärmen.
2. Tryck på en meddelanderad.
91
Page 92

¾ Så här skriver du ett meddelande:
1. Tryck på ikonen Meddelanden på startskärmen.
2. Tryck på knappen Compose (skriv) i övre högra
hörnet.
Om inget giltigt SIM-kort är isatt i hotspoten är
knappen Compose (skriv) grå.
3. Ange ett telefonnummer.
4. Tryck på knappen Next (nästa).
5. Skriv meddelandet.
6. Tryck på knappen Send (skicka).
Anpassa Hotspotinställningar
Du kan även anpassa andra inställningar.
¾ Så här anpassar du inställningarna för din
hotspot:
1. Tryck på ikonen Inställningar på startskärmen.
2. Tryck på någon av ikonerna om du vill justera en
inställning.
92
Page 93

De ikoner som visas i fönstret Inställningar beskrivs
i följande tabell.
Ikon Beskrivning
Visa
Nätverk
Jump Boost
Konfigurera pekskärmen (ljusstyrka, tidsgräns,
visning av WiFi-inloggningsuppgier, skärm
för statuslampa).
Välj de nätverkstyper som ska användas,
ange roamingregler, visa information om
nätverksanslutning.
Använd din mobila hotspot för att ge kra
till batteriet i en annan enhet med Jump
Boost-kabeln som medföljde enheten.
Flygplansläge
USB-delning
Mer
Avaktivera WiFi för din mobila hotspot och
mobila radioenheter om du befinner dig på
ett flygplan eller i WiFi-begränsade områden.
Det går fortfarande att använda Jump
Boost-funktionen i det här läget.
Använd en USB-kabel för att ansluta till
internet från datorer som stöds och ladda
enheten samtidigt.
Se information om enheten – till
exempel programvaruuppdateringar,
fabriksåterställning och självstudier.
Visa varningar
Du kan visa varningar och meddelanden genom att svepa
nedåt från ikonen VARNINGAR högst upp på skärmen.
Bläddra åt sidan om du vill visa flera varningar.
93
Page 94

Hotspot-webbsida
På hotspot-webbsidan kan du göra följande:
• Ändra WiFi-SSID, WiFi-lösenord,
administratörslösenord och WiFi-kryptering
• Ställa in alternativ för automatisk anslutning
• Visa dataanvändning
• Läsa SMS
• Visa varningar
• Visa och ändra andra inställningar
• Kontrollera enhetsstatus
¾ Så här går du till din hotspot-webbsida:
1. Starta en webbläsare på en dator eller WiFi-enhet
som är ansluten till nätverket.
2. Ange http://netgear.aircard.
3. Ange lösenordet för administratörsinloggning.
Standardlösenordet är password.
Hotspot-webbsidan visas.
Ändra säkerhetsinställningar
WiFi-nätverksnamnet och administratörslösenordet
ger säkerhet. Din mobila hotspot levereras med ett
slumpmässigt genererat och säkrat WiFi-nätverksnamn
(SSID) och ett lösenord som du kan fortsätta att använda
som det är. Läs det här avsnittet om du vill ändra
säkerhetsinställningarna.
¾ Så här ändrar du WiFi-nätverksnamnet:
1. Starta en webbläsare på en dator eller WiFi-enhet
som är ansluten till hotspoten.
2. Ange http://netgear.aircard.
94
Page 95

3. Ange lösenordet för administratörsinloggning.
Standardlösenordet är password.
Hotspot-webbsidan visas.
4. Välj WiFi > Options (Alternativ).
5. Ange ett nytt WiFi-nätverksnamn.
6. Klicka på knappen Submit (Skicka).
¾ Så här ändrar du WiFi-lösenordet:
1. Starta en webbläsare på en dator eller WiFi-enhet
som är ansluten till hotspoten.
2. Ange http://netgear.aircard.
Hotspot-webbsidan visas.
3. Ange lösenordet för administratörsinloggning.
Standardlösenordet är password.
Hotspot-webbsidan visas.
4. Välj WiFi > Options (Alternativ).
Sidan med WiFi-alternativ visas.
5. Ange ett nytt WiFi-lösenord.
Om du ändrar lösenord bör du skriva ner det och
förvara det på en säker plats.
6. Klicka på knappen Submit (Skicka).
Ansluta enheter
Det går att lägga till enheter i nätverket med en WiFi
network manager (WiFi-nätverkshanterare) eller WPS
om enheten har WPS-funktioner.
Obs! Med WPS kan du ansluta WPS-aktiverade enheter
till ett WiFi-nätverk utan att ange ett WiFi-lösenord med
ett tangentbord.
95
Page 96

¾ Så här ansluter du ytterligare WiFi-kapabla
enheter:
1. Öppna WiFi network manager (WiFi-
nätverkshanteraren) på datorn eller annan
WiFi-enhet (till exempel en smartphone,
surfplatta, mediaspelare eller kamera).
2. Välj WiFi-nätverksnamnet som visas på LCD-
skärmen.
3. Ange WiFi-lösenordet som visas på LCD-skärmen.
4. Starta webbläsaren.
¾ Så här ansluter du enheter med WPS:
1. Tryck på Power (strömknappen) för att återaktivera
LCD-skärmen.
2. Tryck på WiFi-ikonen.
WiFi-skärmen visas.
3. Tryck på WPS-ikonen.
WPS-skärmen visas.
4. Tryck på knappen Anslut till primär WiFi.
5. Inom två minuter ska du trycka på WPS-knappen på
den enhet som du vill ansluta till WiFi-nätverket.
Hotspot-enheten och WiFi-enheten kommunicerar
nu automatiskt och en säker anslutning upprättas.
96
Page 97

Support
Tack för att du köpt den här NETGEAR-produkten.
När du har installerat enheten letar du upp serienumret på
etiketten på produkten och använder det till att registrera
produkten på adressen https://my.netgear.com.
Du måste registrera denna produkt innan du kan använda
NETGEAR:s telefonsupport. NETGEAR rekommenderar att
du registrerar produkten via NETGEAR:s webbplats.
Produktuppdateringar och webbsupport finns på
http://support.netgear.com.
NETGEAR rekommenderar att du endast använder
officiella NETGEAR-supportresurser.
Du kan hämta användarhandboken på
http://downloadcenter.netgear.com eller via en länk
i produktens användargränssnitt.
Varumärken
© NETGEAR, Inc., NETGEAR och NETGEAR-logotypen är
varumärken som tillhör NETGEAR, Inc. Varumärken från
andra tillverkare än NETGEAR används endast för referens.
Efterlevnad
Om du vill se den aktuella EG-försäkran om
överensstämmelse går du till:
http://support.netgear.com/app/answers/detail/a_
id/11621/.
För information om efterlevnad av bestämmelser, gå till
http://www.netgear.com/about/regulatory/.
Läs dokumentet om överensstämmelse innan du ansluter
nätadaptern.
Page 98

Краткое
руководство
AirCard 810
Мобильная точка доступа
Page 99

Вводные сведения о точке
доступа
Перед тем как подключать мобильную точку доступа,
ознакомьтесь с информацией на ЖК-дисплее,
значками, кнопками и разъемами.
Кнопки и разъемы
Кнопка питания
Индикатор состояния
Порт микро-USB
Разъем основной антенны
Индикатор состояния
Индикатор состояния указывает состояние
соединения для передачи данных:
• Синий, мигает с небольшой частотой. Точка
доступа готова к работе.
• Синий, мигает с удвоенной частотой. Точка
доступа выполняет передачу данных.
• Желтый, мигает с небольшой частотой. Точка
доступа не подключена к сети.
Русский
99
Page 100

Кнопка питания
Для включения точки доступа нажмите и
удерживайте кнопку питания в течение двух секунд,
для выключения — удерживайте ее нажатой в течение
пяти секунд.
Для переключения между страницами на ЖК-дисплее
нажимайте и отпускайте кнопку питания.
Кнопка питания
ЖК-дисплей
С помощью значков и других элементов сенсорного
экрана можно просмотреть состояние мобильной точки
доступа, настроить параметры сети WiFi, просмотреть
сведения об использовании данных и системные
уведомления.
100
 Loading...