

Page 1

Quick Start
Aircard 797
Mobile Hotspot
Page 2
What’s in the box
• Mobile hotspot
• Battery cover
• Battery
• Micro USB cable
• AC adapter
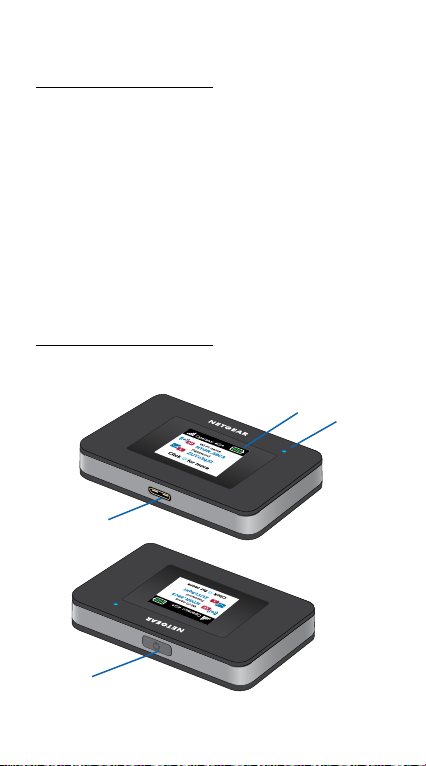
Meet your hotspot
Micro
USB port
Power
button
LCD
screen
2
Status
LED
Page 3
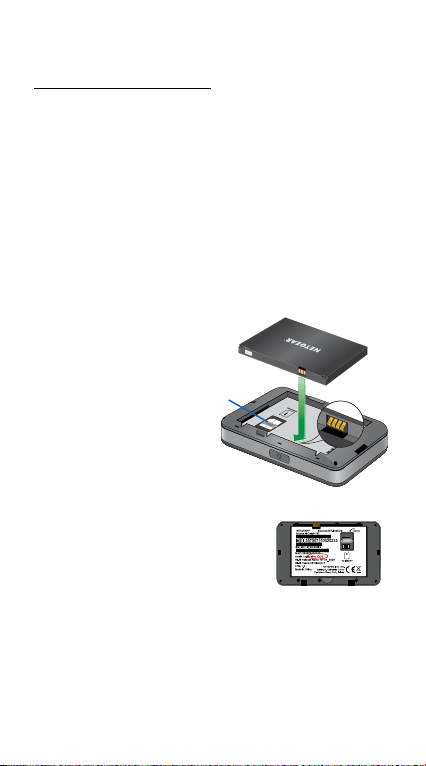
Install the SIM card
The SIM slot accepts a Micro SIM card
(3FF). If you have a Nano SIM card
(4FF), use it with a Nano-Micro SIM
card adapter. To obtain a Micro SIM
card or adapter, contact your service
provider.
1. Slide the SIM card into the slot
with the gold colored contacts
facing down.
2. Ensure that
the SIM card
is seated
securely.
3. Insert the
battery.
Note: Before
inserting the
battery, write
down the
administration login
password printed on
the label for accessing the web
admin page.
4. Install the back cover.
SIM
slot
3
Page 4

Charge the battery
The battery comes partially charged.
To fully charge the battery, connect the
USB cable to the mobile hotspot and
plug it into either:
• A wall socket (faster charge option)
• The USB port on your laptop
Set up your hotspot
To connect to the mobile broadband
network, your SIM account must be
active. If you use a prepaid or pay-asyou-go micro SIM, the account must
show a positive balance.
1. Press and hold the Power button
until the LCD screen lights and a list
of languages displays.
2. Press the Power button to select a
language.
3. To set this language as the default,
press and hold the Power button
until the progress bar completes,
and then release the Power button.
4
Page 5

If your SIM card supports
automatic APN conguration, the
hotspot sets the default APN for
your SIM card and your hotspot is
ready to use.
4. If APN Setup Required displays,
do the following:
a. Press the Power button to
view a list of APNs available for
your SIM card.
b. Press the Power button to
select the correct APN.
c. To set this APN as the default,
hold the Power button until
the progress bar completes,
and then release the Power
button.
Your hotspot is ready to use.
5. If only Other displays in the APN
list, do the following:
a. Press the Power button to
select Other.
b. Hold the Power button until
the progress bar completes
and then release the Power
button.
5
Page 6

c. Complete the Congure an
APN section to add a default
APN manually.
d. Press and hold the Power
button for ve seconds to turn
off the hotspot.
Hotspot status LED
The status LED indicates data
connection status:
• Blue, slow blink. The hotspot is
ready.
• Blue, double blink. The hotspot is
transferring data.
• Amber, slow blink. The hotspot is
not connected to the network.
6
Page 7

LCD home screen
The home screen displays the mobile
hotspot’s WiFi network name and
password. The network indicator lets
you know which mobile network you
are connected to.
Signal
strength
Network
Press the Power button to view
different screens such as Notications
and Device Information.
Battery level
WiFi
network
name
WiFi
password
7
Page 8

Congure an APN
You must congure an APN if a
message that APN setup is required
displays on the LCD.
1. On your computer or mobile
device, open your WiFi network
connection manager.
2. Find your mobile hotspot’s WiFi
network name and connect.
The LCD home screen displays the
WiFi network name and password.
3. Launch a web browser.
4. Enter http://mywebui.net or
http://192.168.1.1.
5. Enter the administrator login
password.
We recommend that you change
it to a password that you want to
use.
The hotspot web page displays.
6. Select Network > APN.
7. Click the Add button and enter
the APN details.
8
Page 9

Contact your network service
provider for information about
these details.
8. Click the Save button.
9. Click the radio button for the
newly created APN to set it as the
default.
Your hotspot is ready to use.
Connect to
the Internet
The LCD home screen displays the
WiFi network name and password.
1. On your computer or mobile
device, open your WiFi network
connection manager.
2. Find your mobile hotspot’s WiFi
network name and connect.
3. Launch a web browser and verify
that you can access the Internet.
9
Page 10

Customize your
hotspot
You can customize your hotspot by
using a web browser or by using the
NETGEAR Mobile app.
Use a web browser
1. On your computer or mobile
device, open your WiFi network
connection manager.
2. Find your mobile hotspot’s WiFi
network name and connect.
The LCD home screen displays the
WiFi network name and password.
3. Launch a web browser.
4. Enter http://mywebui.net or
http://192.168.1.1.
5. Enter the administrator login
password.
The hotspot web page displays.
For more information, see the user
manual. To download the user manual,
visit www.netgear.com/support/ and
search for AC797.
10
Page 11

Download the NETGEAR
Mobile app
Download the free NETGEAR Mobile
app from
https://www.netgear.com/mobileapps.
Use this app to view
your hotspot’s settings,
connection, and data
usage information from
your smartphone or
tablet.
Reset your hotspot
You can use the Power button to reset
the hotspot to its factory settings.
1. Press and hold the Power button.
The Shutting down screen
displays.
2. Continue to press and hold the
Power button.
The Factory Reset screen displays.
3. Follow the onscreen instructions to
complete the factory reset.
11
Page 12

Support and Community
Visit netgear.com/support to get your
questions answered and access the
latest downloads.
You can also check out our NETGEAR
Community for helpful advice at
community.netgear.com.
Si ce produit est vendu au Canada, vous pouvez
accéder à ce document en français canadien à
https://www.netgear.com/support/download/.
(If this product is sold in Canada, you can access
this document in Canadian French at
https://www.netgear.com/support/download/.)
For regulatory compliance information including
the EU Declaration of Conformity, visit
https://www.netgear.com/about/regulatory/.
See the regulatory compliance document
before connecting the power supply.
For NETGEAR’s Privacy Policy, visit
https://www.netgear.com/about/privacy-policy.
By using this device, you are agreeing to
NETGEAR’s Terms and Conditions at https://
www.netgear.com/about/terms-and-conditions.
If you do not agree, return the device to your
place of purchase within your return period.
© NETGEAR, Inc., NETGEAR and the NETGEAR Logo
are trademarks of NETGEAR, Inc. Any non-NETGEAR
trademarks are used for reference purposes only.
NETGEAR INTERNATIONAL LTD
Floor 1, Building 3
University Technology Centre
Curraheen Road, Cork,
T12EF21, Ireland
NETGEAR, Inc.
350 East Plumeria Drive
San Jose, CA 95134, USA
February 2020
 Loading...