

Page 1

FOR MORE INFORMATION
13 2200 or 13 2000 (BUSINESS)
telstra.com
visit a telstra store or partner
Page 2

gETTINg TO
kNOw yOuR
TELSTRA wI-FI
4g AdvANcEd
Page 3

LET’S gET THIS
SHOw ON THE ROAd
Your Telstra Wi-Fi 4G Advanced has
been tested to highest standards to
deliver you the best possible coverage
and speed experience on the network
without equal.
This guide will help you get connected
as quickly and as easily as possible.
It’ll guide you through installation
and run through all the handy extra
features that are included.
If all goes to plan you’ll be up and
running in no time.
Page 4

wHAT’S
INSIdE
03 Safety rst
05 Let ’s get started
11 Getting connected
17 Using the LCD touchscreen
23 Using the Web Inter face
33 Problem solving
39 Ex tra bits you should know
2
Page 5

SAFETy
FIRST
Please read all the safety notices before using this
device.
Do not use the Telstra Wi-Fi 4G Advanced near fuel or
chemicals or in any prescribed areas such as service
stations, reneries, hospitals, and aircraft. Obey all
warning signs where posted.
Radio FRequency SaFeTy inFoRMaTion
The Telstra Wi-Fi 4G Advanced has an internal antenna.
For optimum performance with minimum power
consumption, do not shield the device or cover with any
object. Covering the antenna affects signal quality, and
may cause the Telstra Wi-Fi 4G Advanced to operate
at a higher power level than needed, and may shorten
battery life.
Radio FRequency eneRgy
Your Telstra Wi-Fi 4G Advanced is a low-power
radio transmitter and receiver. When switched on it
intermittently transmits radio frequency (RF) energy
(radio waves). The transmit power level is optimised
for best performance and automatically reduces
when there is good reception. Maximum power is only
used at the edge of network coverage so under most
circumstances, the power output is very low. Under
poor network conditions the Telstra Wi-Fi 4G Advanced
transmits at a higher power, may get hot and have
signicantly shorter battery life.
3
Page 6

decLaRaTion oF conFoRMiTy — MaXiMuM
PeRMiSSiBLe eXPoSuRe
The Telstra Wi-Fi 4G Advanced is designed to be used
at least 20 cm from the body. We declare that the
product detailed in this manual, and in combination
with our accessories, conforms with the essential
requirements of the Radio Communications Standard
(Electromagnetic IC Radiation Human Exposure)
2003 and the Australian Communications and Media
Authority Section 376 of the Telecommunications Act
1997 when used at a distance of not less than 20cm
from the body. The worst case SAR test result for 10g
tissue size measured at 10mm distance is 1.45mW/g.
N10947
RoHS decLaRaTion
(ReSTRicTion oF HazaRdouS SuBSTanceS)
This device is compliant with the REACH Regulation
(Regulation EC No 1907/2006) and RoHS Directive
Recast (Directive 2011/65/EU). Batteries are compliant
with the Battery Directive (Directive 2006/66/EC).
4
Page 7

LET’S gET
STARTEd
youR Package conTainS THe FoLLoWing:
•Telstra Wi-Fi 4G Advanced device and bat tery
•This Getting Started Guide
•Micro USB charging
•Jump boost cable
•AC adapter
•Manufacturer’s warranty card
5
Page 8

you can aLSo PuRcHaSe THe FoLLoWing
acceSSoRieS FoR youR deVice:
•External antenna (MIMO Dual TS9 por t) – improves
performance in areas with low signal streng th. See
your local Telstra store or par tner for assistance with
picking the b est antenna option for you as well as
help with installation.
Information on acces sories is available at:
http://www.netgear.com/telstraaccessories
you can uSe youR TeLSTRa Wi-Fi
4g adVanced WiTH THeSe oPeRaTing
SySTeMS:
•Windows® 8 (32/64-bit)
•Windows
•Windows
•Windows Vista
•Windows XP (SP3, Me dia Centre Editions 32/64-bit)
•Mac OS
®
RT
®
7 ( 32/64-bit)
®
(SP2 32/64-bit)
®
X 10.6 or later
6
Page 9
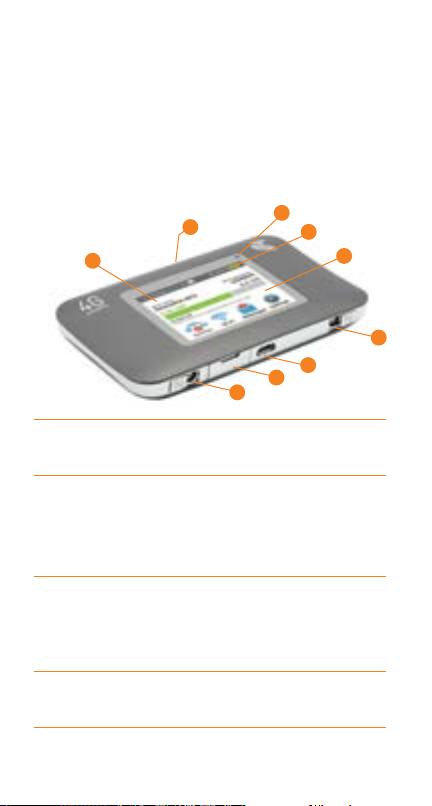
yOuR TELSTRA wI-FI
4g AdvANcEd
3
1
1 LCD touchscreen
Resistive touch screen with options to manage device
settings, data connection, and Wi-Fi network usage.
2 Status LED
Shows data connection status
• Ready (slow blue blink)
• Tr ansferring data (double blue blink )
• Not ready (slow amber blink)
3 Power key
•Turn the device on or off — Press the key for a few
seconds. The LED blinks blue when the device is ready.
•Wake the device and Wi-F i radio — Press and quickly
release the Power key.
4 SIM slot
Easy access to insert your account SIM. (See
page11.)
7
2
6
7
5
4
8
8
Page 10

5 AC adapter / Micro USB port
Recharge the battery faster by using the adapter
(See page15.)
6 Device status icons
Icons on the top row of the screen indicate device and
network status. See page9 for details.
7 Conguration / status elements
Data usage — Tap to view details
(page17).
Devices — Shows number of connected
devices. Tap to view device details
(page18).
Wi-Fi — Lit when on. Tap to congure Wi-Fi
settings (page18).
Messages — Tap to view SMS messages
(page20).
Settings — Tap to congure device settings
(page21).
8 External antenna ports
Connections for an optional MIMO Dual TS9 port
antenna, which is available from your retailer.
Connect the antenna carefully to avoid damage to
your device (see page37 for instructions).
8
Page 11
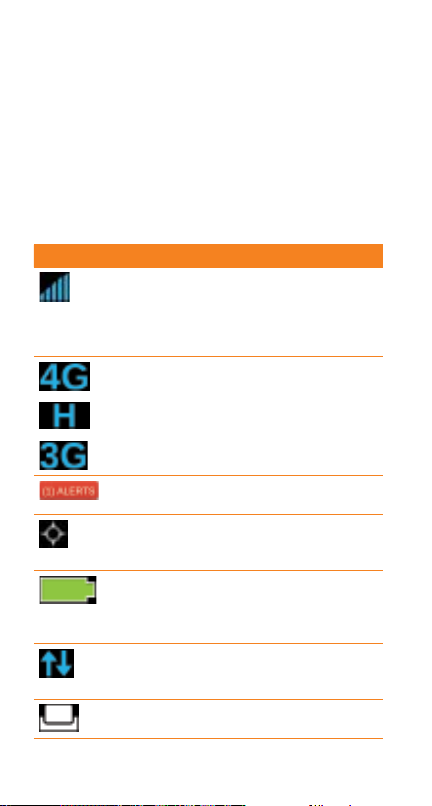
iconS10quick ReFeRence SecTion
ICON DESCRIPTION
Signal
strength/
roaming
Network
type
Alert Tap to view alerts.
GPS Continuous tracking or search-
Battery
level
Trafc Outline — Connected
Hub Appears when docked in a hub
9
1 bar — low level
5 bars — excellent
Triangle — roaming (connected to a network other than
Telstra’s)
4G and 4G CA (Carrier
Aggregation)
HSPA+ Dual-Carrier
3G
ing for satellite x. Glows while
searching / tracking.
Green — 26%-100% charged
Yellow — battery low
Red — critical
(Less than 10% charge)
Solid — Sending / receiving
None — Not connected
(sold separately)
Page 12
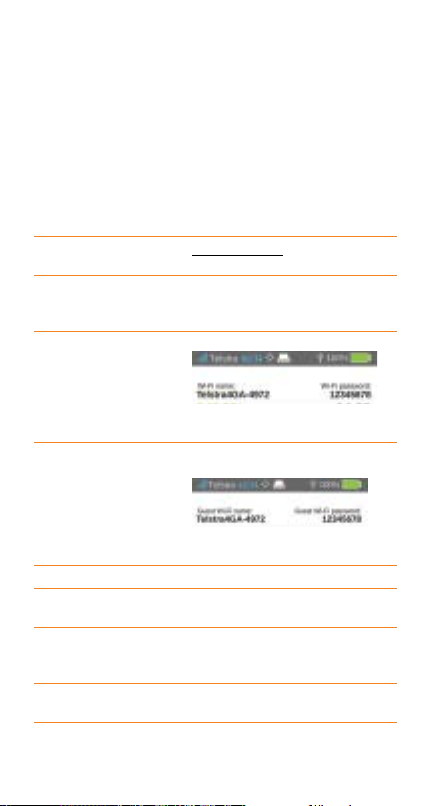
Web Interface
(home page)
Web Interface
Password
Default Main
Wi-Fi name and
password
Guest Wi-Fi name
and password
Restore Defaults Tap Settings > Reset
Enable/Disable
Dual-band Wi-Fi
Jump charge
another device
Update software Tap Settings > More > About,
http://m.home
admin
Printed on the label under the
battery.
Displayed on the LCD screen.
Tap Wi-Fi > Main Wi-Fi to view
or update.
Displayed on the LCD screen
(when Guest Wi-Fi is enabled).
Tap Wi-Fi > Wi-Fi Proles to
view or update.
Tap Wi-Fi > Wi-Fi Proles to
select a suitable Wi-Fi prole.
Use the jump boost cable to
connect to another device, then
tap Settings > JumpBoost.
then tap Software Updates.
Page 13
gETTINg
cONNEcTEd
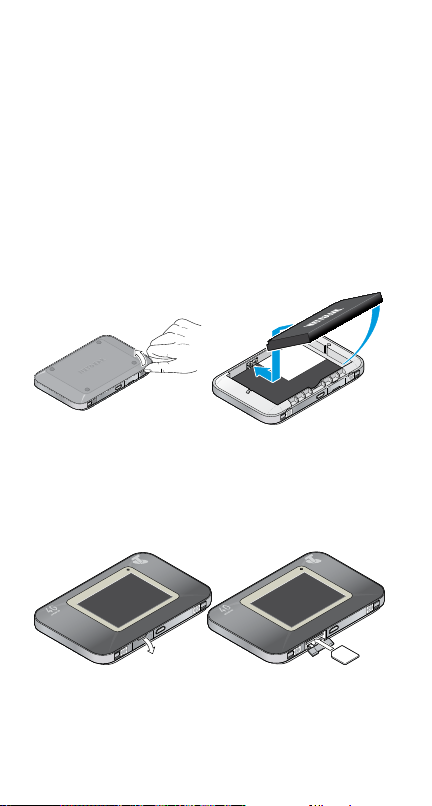
1. inSeRT BaTTeRy
Remove the back cover by lifting at the notch above
either ex ternal antenna por t. Then insert the batter y
as shown and replace the cover.
2. inSeRT SiM
Your microSIM card should already be inser ted.
However if you are replacing the microSIM, remove
the SIM slot cover, then insert the microSIM card as
shown below and close the slot cover.
11
Page 14
3. SWiTcH deVice on
Press and hold the Power key for a few se conds to
turn on your Telstra Wi-Fi 4G Advanced.
(Note: Remove the screen protector.)
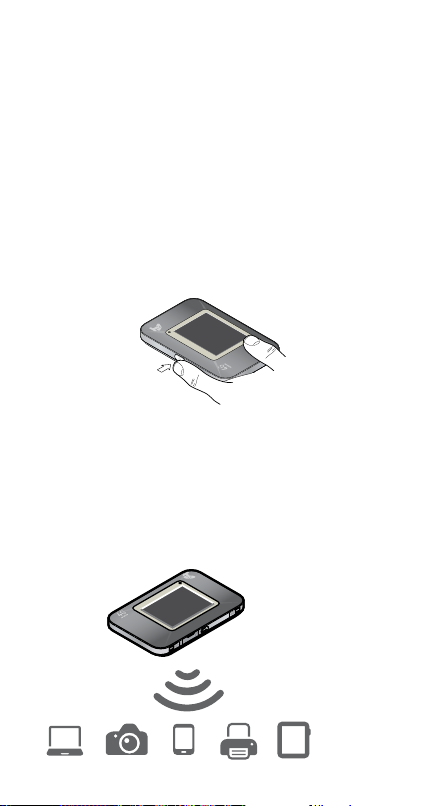
4.connecT To THe inTeRneT
You can connec t up to 10 wireless devices on
your Telstra Wi-Fi 4G Advanced’s Main and Guest
Wi-Fi networks. Devices c an connect using the
Wi-Fi network name and password, or using Wi-Fi
Protected Setup (WPS). See following page for
connection instructions.
12
Page 15

SeaRcH FoR WiReLeSS neTWoRkS
•Make sure your computer or other device has Wi-Fi
enabled and search for wireless networks. Refer to
your Wi-Fi enabled device manual for f urther details
on searching for wireless networks.
Mac users: Make sure AirPor t is turned on
•Select the Wi-Fi name displayed on the LCD of your
device, then click Connect.
•Type in the Wi-Fi password as it appears on the LCD
screen and click OK.
Your device is now connected to the Telstra Wi-Fi 4G
Advanced and ready to use.
Note: You can modif y the Main Wi-Fi or Guest Wi-Fi
names and passwords from the LCD touchscree n (tap
Wi-Fi > Main Wi-Fi or Wi-Fi > Wi-Fi Proles), or the web
interface (device h ome page) at http://m.home (see
page27 for more details).
13
Page 16

connecTing WPS-enaBLed deViceS
•Tap Wi-Fi > WPS.
•Tap Pair with Main Wi-Fi or, if Guest Wi-Fi is enabled,
Pair with Guest Wi-Fi.
•Within 2 minutes, press the WP S button on the device
you want to connect to your Wi-Fi network.
The Telstra Wi-Fi 4 G Advanced and the other device
communicate with each other and establish the
connection.
Your device is now connected to the Telstra Wi-Fi 4G
Advanced and ready to use.
14
Page 17

RecHaRging youR BaTTeRy
Your batter y comes partially charged. When you need
to recharge it:
•Plug the micro-USB cable into the device.
•Plug the other end of the cable into the AC adapter and
plug the adapter into an electrical outlet, or plug into
the USB por t on your computer.
15
Page 18

inTeRnaTionaL RoaMing
You can use your Telstra Wi-Fi 4G Advanced service
while overseas. International Roaming is available
by calling Telstra on 13 2200 or 13 2000 for business
customers.
It is impor tant to note that different charges apply
when using your Telstra service overseas and that
any monthly allowance included with your Telstra
plan exclude s use while overseas. For a full list of
available countries and charges, go to telstra.com.
au/roaming.
16
Page 19

uSINg THE
Lcd TOucHScREEN
daTa uSage
You can view your data usage on the LCD’s home
screen, and on the web interface (see page23).
Note: The plan data counter resets automatically
when the nex t billing cycle star ts, and the session
data counter resets automatically for each se ssion.
Data plan information is provided as a guide only; see
“Data Usage Details” on page 40.
On the home screen, the data usage bar colour
changes depending on the amount of data remaining
in the current billing cycle:
• Green — 26-100% remaining
• Yellow — 10-25% remaining
• Red — < 10% remaining
To view details about your data usage:
•On the home screen, tap the portion of the data
usage bar shown below (not outside of it.)
17
Page 20

dEvIcES
The Devices icon shows the numb er of users
currently connected to the Telstra Wi-Fi 4G
Advanced over Wi-Fi.
You can see which devices are connected to
your Main and Gue st Wi-Fi networks, and block
unauthorized devices from connecting.
•On the home screen, tap the Devices icon.
•Tap the name of a connecte d device to see its IP and
MAC addres ses, and if you want, to blo ck it from
connec ting to your Wi-Fi network.
Manage Wi-Fi
You can manage your Wi-Fi set tings on the
LCD touchscreen and on the web inter face
(see page27), including selecting a Wi-Fi
prole for using the device’s Dual-band Wi-Fi
radio or enabling a Guest Wi-Fi network.
By default, Main Wi-Fi is enabled and Guest Wi-Fi is
disabled.
18
Page 21

Dual-ban d Wi-Fi (2.4 GHz / 5 GHz)
Your device’s dual-band Wi-Fi radio gives you the
exibility of connecting devices that support dualband Wi-Fi to transfer data at higher throughputs. If
your devic es support dual-band Wi-Fi, enable this in
Wi-Fi>Wi-Fi Proles.
Guest Wi-Fi network
You can set up a Guest Wi-Fi net work for temporary
users, and use the Main Wi-Fi network for trusted
devices.
To change any of your Wi-Fi settings:
•On the home screen, tap the Wi-Fi icon.
•
•Use the options on the Wi-Fi screen to customize your
Wi-Fi set tings:
1. Main Wi-Fi — Set the Main Wi-Fi name and
password.
2. Wi-Fi Proles — Choose a Wi-Fi prole and set
the Guest Wi-Fi name and password.
3. WPS — Connect a WPS-enabled device tothe
Main or Guest Wi-Fi network.
19
Page 22

4. Options — Congure the Wi-Fi radio, the Main
and Guest Wi-Fi networks, and the number of
devices that can connect at the same time,
5. Block List — Prevent specic devices from
connec ting to your Wi-Fi networks.
Note: The device resets when you change Wi-Fi
settings and connected devices are disconnec ted.
MeSSageS
The Messages icon shows the number of
unread SMS messages received by your
device.
•On the home screen, tap the Messages icon.
•Tap a message line to read the full mes sage.
20
Page 23

Manage deVice SeTTingS
You can customize other options as well as
access additional features such as Jump
Boost and GPS in Set tings.
To customize your device’s settings:
•On the home screen, tap the Settings icon.
•Use the options on the Settings screen to customize
your devic e:
1. Display — Congure the touchscreen display
(brighness, timeout, display of Wi-Fi credentials,
status LED display)
2. Network — Choose the network types to use,
set roaming rules, display network connec tion
details.
3. Sleep — Set the device to sleep after being
inactive for a certain time period, to conserve
your battery.
4. GPS — Enable GPS, get one time lo cation xes
or continuous tracking .
5. Reset — Reset the device to factory defaults.
6. More — See information about the device.
21
Page 24

7. Jump Boo st — See below for details.
JuMP BooST
You can use the Telstra Wi-Fi 4G Advanced to
give a boo st to another device’s bat tery
using the Jump Boost cable provided with
your device.
To boost another device’s bat tery:
•Plug the jump boost cable into your Telstra Wi-Fi 4G
Advanced.
•Plug your other device’s USB cable into the boosting
cable’s female connector.
•On the home screen, tap Settings > Jump Boost.
•Tap one of the boo sting options (30 / 60 / 90 minutes).
Note: The Telstra Wi-Fi 4G Advanced cannot be
charged while it is boosting another device.
22
Page 25

uSINg THE
wEb INTERFAcE
Connec t to the web interface (device home page)
to change the settings of your Telstra Wi-Fi 4G
Advanced. The web interfac e can only be accessed
after connecting via Wi-Fi on your device.
Note: Many of these settings can be modied directly
on the device using its touchscreen. (See page17)
Login To THe WeB inTeRFace
•Open a web browser and enter ht tp://m.home in the
ad dre ss b ar.
•Login to make changes — In the Sign In eld, enter
the default Admin Password: admin. Username is not
required.
From the web interface, you can access all of the
features available on the touch screen, plus
advance d features such as technical Wi-Fi settings,
router set tings (for example, Por t Forwarding), and
white list (MAC Filter).
23
Page 26

daTa uSage
When you have logged in to the web inter face, your
data usage information for the current billing cycle
and current session is shown on the home page.
•You will receive SMS aler t notications when your
estimated data usage reaches approximately 50%,
85% and 100% of your included allowanc e.
•View your aler ts by selecting Messages on the LCD
touchscreen or the web interface home page.
•If you want to change your alert notications to email
using the Mobile Data Usage meter, you will need to
register for Telstra Online Servic es at
telstra.com/myaccount or
telstra.com/business/mdum (business) for more
information.
24
Page 27

ModiFy adMin Login, SSid and SecuRiTy
key
Once you have logged in to the web inter face, you can
modif y your device and Wi-Fi credentials if you want
to choose your own names and passwords:
•Admin login — Click Settings > General > Device and
change the Password eld in the Homepage section.
25
Page 28

•Main or Secondary/Guest Wi-Fi name and password
— Click Wi-Fi > Options, and then edit the Main or
Secondary/Guest Wi-Fi network credentials.
You can choose a predene d Wi-Fi prole or make a
custom prole, and customize the Wi-Fi net work
names and passwords.
If you make a custom prole, you c an enable/disable
the secondary Wi-Fi network, set it as a Guest Wi-Fi
network, and set the frequency bands used by each
network (2.4 GHz provides long range connections,
while 5 GHz provides shorter range connections with
potentially higher data rates and less interference).
26
Page 29

conFiguRe Wi-Fi SeTTingS
You can congure your Wi-Fi net work
settings, including the number of devices
that can connect at the same time, Wi-Fi
range, security, etc.
•Click Wi-Fi > Options, change any of the set tings, and
click Submit.
27
Page 30

VieW oR BLock connecTed deViceS
You can see the IP and MAC addresses of the
devices that are currently conne cted to your
Wi-Fi networks, and block unwanted devices.
•Click Devices.
•Click a device name to view its details.
• If you don’t want to allow the device to use your Wi-Fi
network, click Block Device.
28
Page 31

gPS
The Telstra Wi-Fi 4 G Advanced can be used to
get a one-time GPS x or c ontinuous xes.
•Click GPS.
•Enable GPS if it isn’t already enabled — Select Enable
GPS.
•Select the GP S mode (One-time or Continuous) and
click Submit.
•If the GPS mode is Continuous, the GPS data updates
automatically. Other wise, click Update location to do
a one-time x.
29
Page 32

MeSSaging
You can read and delete your new and
saved SMS messages from the web
interface.
•Click Messaging.
•Click a message line to read the full mes sage, and
then click D elete if you want to remove it from the
device.
30
Page 33

Manage deVice SeTTingS
You can congure general and ad vanced
device settings from the web interface.
•Click Settings.
•Click:
1. General > Device to congure the devic e display
options
2. General > Software and Reset to reset the device
default set tings or update the device software
3. Network > Preferences to update settings for
connec ting to data networks
31
Page 34

4. Network > APN to set up access p oint names for
connec ting to other networks
5. Network > SIM Security to require a PIN to use
the device
6. Network > Status D etails to view the current
data network connectiondetails
7. Router > Basic to congure your data connection
8. Router > Port For warding if your computer is
hosting a server
9. Router > Por t Filtering to choose which
applications can acc ess the Internet
BooST anoTHeR deVice’S BaTTeRy
See page22 for connection instructions,
and use the Jump Boost option in the menu
panel on the left side of the web inter face.
32
Page 35

pRObLEM
SOLvINg
Why can’t I connect a device to the Telstra Wi-Fi 4G
Advanced?
If you are having an issue connecting to the Telstra
Wi-Fi 4G Advanced, try the following sug gestions:
• Turn off your device and take the batter y out,
wait 10 seconds, put the bat tery back in and turn
your device on.
• Restart your computer.
• Turn off or temporarily dis able any Security
Programs or Firewalls.
• If possible tr y using another computer or Wi-Fi
device to connect to your Telstra Wi-Fi 4G
Advanced.
I cannot access the Internet at all
If you are having an issue accessing the Internet, try
the following suggestions:
• Che ck the colour display status.
• Make sure you have network coverage in your
area.
• Check that your SIM card is active and enabled
with data services.
• Please wait 1-2 minutes for the device to
initialize.
• Conrm that your account is activated and that
no other Internet connections are active.
33
Page 36

• Try switching your device off and on, and
restarting your PC or Wi-Fi device.
My battery has not charged while in use and
connected to the charger
If you are in a low coverage area, have been
transferring a lot of data, or left the device in a hot
location, the internal temperature of the device can
rise above 45°C. In these conditions the bat tery
cannot be charged due to safety limits with Li-ion
battery technology.
The Telstra Wi-Fi 4G Advanced will not charge
Note:
while it is boosting another device.
The signal indicator is always low.
Your device has poor reception. Try moving the device
to a location with a clear view of the sky (for example,
near a window).
The download or upload speeds are very slow.
The speed is dependent on signal streng th. Check
your signal strength and network type. (See
page9.)
How do I go back to the home page (web
interface)?
Open your browser and t ype in http://m.home or
http: //192 .168 .1.1
34
Page 37

What is my Admin Password?
The Admin Pas sword for the home page (web
interface) enables you to congure your Telstra Wi-Fi
4G Advanced from a c onnected device.
The default Admin Password is admin.
What do I do if I changed the Admin Password and
then forgot it?
On the LCD homescreen, tap Set tings > Reset to reset
the device to factor y defaults.
What do I do if I changed the Main or Guest Wi-Fi
password and then forgot it?
View the password:
• On the LCD homescreen, tap Wi-Fi > Main Wi-Fi,
or Wi-Fi > Wi-Fi Proles > Edit (for Guest Wi-Fi).
• On the web interface, log in and then click Wi-Fi.
The LCD screen is not lit. How do I know if the
device is powered on?
The LCD scre en dims to save energy. The Status LED
will be blinking if the devic e is still powered on. Press
and release the Power key to wake the device.
35
Page 38

Where can I get more information?
•Visit support.netgear.com, click Support for Home
Products, search for Telstra, and select Wi-Fi 4G
Advanced from the list of products to:
• Update the rmware
• View the User Guide
• View the Telstra Wi-Fi 4 G Advanced tutorial
• Learn tips and tricks at
www.netgear.com/learningcenter/mobile to get
the most from your Telstra Wi-Fi 4G Advanced
Information on acces sories is available at:
http://www.netgear.com/telstraaccessories
36
Page 39

connecTing an eXTeRnaL anTenna
•Slide the antenna doors open.
• Connect the antenna to the TS9 por t.
37
Page 40

TecHnicaL SPeciFicaTionS
Device
Category
LTE 4G CA 900+1800 MHz
UMTS/
HSPA+DC
Wi-Fi Dual-band 2.4/5 GHz
Dimensions 69 mm (H) x 110 mm (L) x 15 mm (W)
Weight 140 g
Touchscreen 2.4” resistive
Battery Continuous usage — Up to 10 hours
Operating
systems
Category 4 (FDD LTE)
Quad-band 4G
(900/1800/2100/2600 MHz)
Quad-band 3G
(850/900/1900/2100 MHz)
802.11 b/g/n
2x2 MIMO
Working range 30–90m radius in free
space
Up to 10 simultaneous connections
Standby time — Up to 10 days
2500mAh rating
Windows 8, Windows RT, Windows 7,
Windows Vista (32/64 bit), Windows XP
(32/64 bit)
Mac OS 10.6 and above
38
Page 41

EXTRA bITS yOu
SHOuLd kNOw
coVeRage
The Telstra Mobile Network of fers 4G in all capital
CBDs and associated airports, many surrounding
suburban are as and in over 100 regional areas. You’ll
automatically switch to our fastest available 3G in
other coverage areas around Australia. Actual speeds
vary due to factors such as location distanc e from
the base station, loc al conditions, user numbers,
hardware, software congurations and download
source/upload destination. If multiple users access
the device, speeds will be less.
Visit telstra.com/coverage for details of speeds and
coverage locations.
neTWoRk Lock
•Your wireless device is locked to the Telstra network.
•When you inser t a non-Telstra SIM card you are
presente d with unlock instructions.
•Contact Telstra to obtain your 8-digit unlock code.
•An unlocking fee may apply.
•5 incorrect attempts will block the unlock proc ess
and the device will then only work with a Telstra SIM
card.
•Contact Telstra for more information.
39
Page 42

daTa uSage deTaiLS
Notications will not show usage and charges for
current sessions, and should be us ed as a guide only.
Mobile Data Usage only shows estimated charges.
Charges shown do not include charges for current
sessions or discounts that may only be applied to
your account when your bill is issued. In addition,
My Data Usage does not show charge s for Telstra
Wireless Hotspot services, Wi-Fi data usage using PC
Packs, or International Roaming usage. Please check
your bill for a full list of actual charges.
TeRMS oF SeRVice
It is important that you read and understand the
terms that apply to your service. The terms for your
Telstra Wi-Fi4G Advanced service are set out in Our
Customer Terms (as varied from time to time). For
terms governing your Telstra Wi-Fi 4G Advanced
service, please see Our Customer Terms at
http://www.telstra.com.au/customer-terms. Your
pricing brochure contains a summary of the charges
that apply to your Telstra Wi-Fi 4G Advanced service.
40
Page 43

NOTES
41
Page 44

Windows and Windows Vista are trademarks of the Microsoft
group of companies. Mac is a trademark of Apple Inc.,
registered in the US and other countries. The spectrum device
is a trade mark of Telstra Corporation limited. ™ and ® are
trade marks and registered trade marks of Telstra Corporation
Limited ABN 33 051 775 556.
2400 321 Rev.2
42
 Loading...