

Page 1
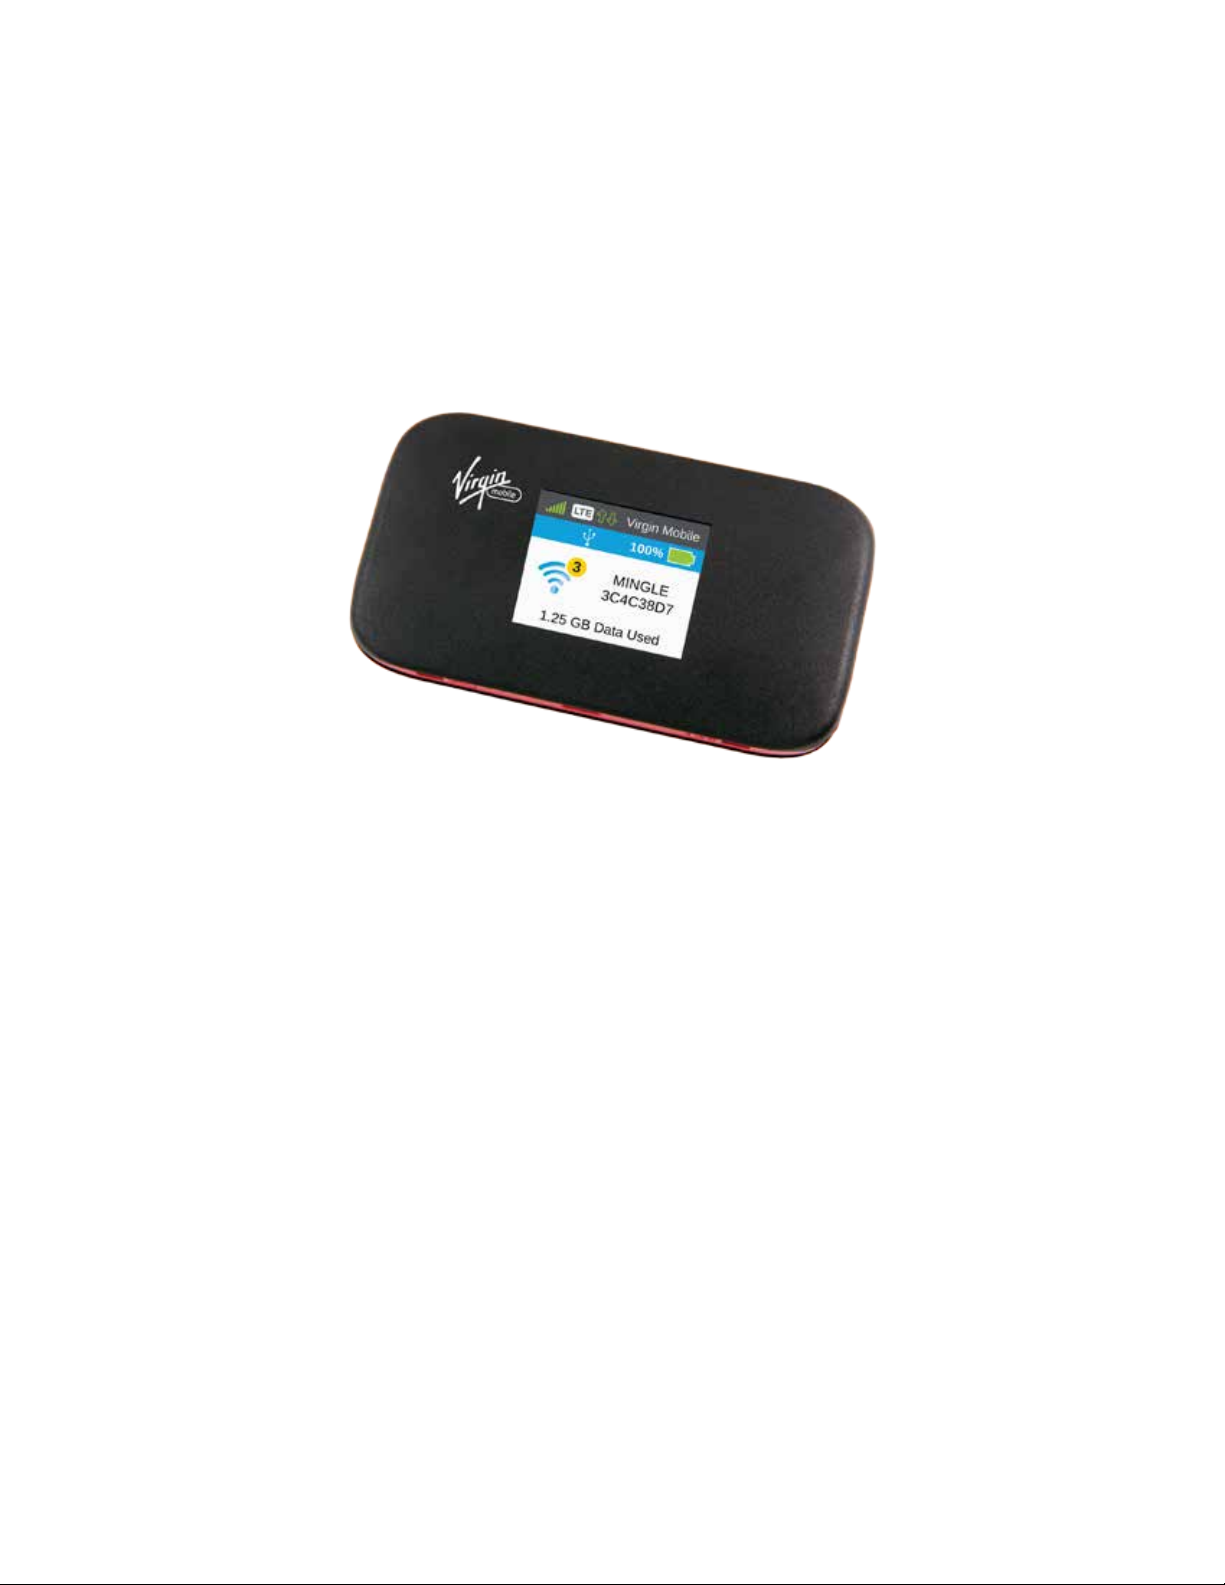
NETGEAR Mingle Mobile Hotspot
User Guide
2400364 Rev.2
Page 2

Table of Contents
Get Started .................................................................................................................................... 8
Your Device ........................................................................................................................... 8
Package Contents .......................................................................................................... 9
Care and Maintenance ................................................................................................. 10
System Requirements ......................................................................................................... 10
Setting Up Your Device ....................................................................................................... 10
Device Setup ................................................................................................................ 10
Starting Your Device for the First Time ........................................................................ 11
Getting Help ......................................................................................................................... 12
Visiting the Virgin Mobile Website ................................................................................ 12
Contacting Virgin Mobile Customer Service ................................................................. 12
Device Basics ............................................................................................................................. 13
Components of Your Device ................................................................................................ 13
3G, and LTE Networks ........................................................................................................ 13
Mobile Broadband Information and Settings ................................................................ 14
Signal Information ........................................................................................................ 14
Internet Connection Information .......................................................................................... 15
Battery ................................................................................................................................. 15
Installing the Battery ..................................................................................................... 15
Charging the Battery .................................................................................................... 16
Battery Information and Settings .................................................................................. 18
Power Button ....................................................................................................................... 19
Turning Your Device On and Off .................................................................................. 19
Controlling Your Device Using the Power Button ......................................................... 19
Restarting Your Device ........................................................................................................ 20
LCD ..................................................................................................................................... 20
Micro-SIM ............................................................................................................................ 20
Alerts ................................................................................................................................... 20
Your Network Connection ........................................................................................................... 22
Launching Your Network Connection .................................................................................. 22
TOC i
Page 3

Setting up a Guest Wi-Fi Network ....................................................................................... 22
Turning the Guest Wi-Fi Network On ........................................................................... 22
Turning the Guest Wi-Fi Network Off ........................................................................... 23
Randomizing the Guest Wi-Fi Password ...................................................................... 23
Change the Guest Wi-Fi Password .............................................................................. 24
Sharing Your Connection ..................................................................................................... 24
Manually Entering the Wi-Fi Information ...................................................................... 24
Connecting Through WPS ............................................................................................ 24
Connecting Through USB .................................................................................................... 26
Making a Tethered Connection .................................................................................... 27
TRU-Install ................................................................................................................... 28
LCD Interface .............................................................................................................................. 29
Interpreting the LCD ............................................................................................................ 29
LCD Information Screens .................................................................................................... 30
Alerts Screen ................................................................................................................ 30
Guest Wi-Fi Screen ...................................................................................................... 31
About Screen ................................................................................................................ 32
Mingle Manager (Browser) Interface ........................................................................................... 34
Home Page .......................................................................................................................... 34
Displaying the Mingle Manager Home Page ................................................................ 36
Logging In as an Administrator ..................................................................................... 36
Data Usage .................................................................................................................. 37
My Account Summary .................................................................................................. 38
Alerts ............................................................................................................................ 38
Status (Connection Details) .......................................................................................... 39
Devices Page....................................................................................................................... 40
Wi-Fi Page ........................................................................................................................... 41
Connect Tab ................................................................................................................. 41
Options Tab .................................................................................................................. 43
MAC Filter Tab ............................................................................................................. 47
GPS Page ............................................................................................................................ 48
Settings Page ...................................................................................................................... 50
General > Device Tab .................................................................................................. 51
TOC ii
Page 4

General > Software and Reset Tab .............................................................................. 53
General > System Logs Tab ......................................................................................... 55
Network > Preferences Tab .......................................................................................... 56
Network > APN (Access Point Name) Tab ................................................................... 57
Network > SIM Security Tab ......................................................................................... 58
Network > Status Details Tab ....................................................................................... 59
Router > Basic Tab ....................................................................................................... 62
Router > Port Forwarding Tab ...................................................................................... 64
Router > Port Filtering Tab ........................................................................................... 66
Support Page ....................................................................................................................... 67
About Page .......................................................................................................................... 68
Feedback Page.................................................................................................................... 72
Device Settings ........................................................................................................................... 74
Interface Language .............................................................................................................. 74
Setting the Default Language ....................................................................................... 74
Temporarily Setting the Mingle Manager Language .................................................... 74
Display Settings ................................................................................................................... 74
Setting the LCD Timeout .............................................................................................. 74
Setting the LCD Brightness .......................................................................................... 75
Router Settings .................................................................................................................... 75
Enabling VPN Passthrough .......................................................................................... 75
UPnP (Universal Plug and Play) .................................................................................. 76
DHCP ........................................................................................................................... 76
DNS Mode .................................................................................................................... 77
Enabling Port Forwarding ............................................................................................. 77
Enabling Port Forwarding for an Application ................................................................ 78
Disabling Port Forwarding for an Application ............................................................... 78
DMZ .............................................................................................................................. 78
Port Filtering Panel: Enabling Port Filterings ................................................................ 79
Port Filtering Panel: Enabling Port Filtering for an Application ..................................... 80
Port Filtering Panel: Disabling Port Filtering for an Application .................................... 80
Login Settings ...................................................................................................................... 80
Changing the Mingle Manager URL ............................................................................. 80
TOC iii
Page 5

Changing the Mingle Manager Password .................................................................... 81
Configuring Networks .................................................................................................................. 82
Viewing Network Activation Information .............................................................................. 82
Viewing Data Usage ............................................................................................................ 82
Network Settings .................................................................................................................. 83
Setting the Allowed Network Mode .............................................................................. 83
Configuring Access Point Names ........................................................................................ 83
Software and Reset .................................................................................................................... 85
Exporting and Importing Settings ......................................................................................... 85
Exporting Settings ........................................................................................................ 85
Importing Settings ........................................................................................................ 85
Update Mobile Hotspot Software and Firmware .................................................................. 86
Downloading Software Updates ................................................................................... 86
Resetting Your Device ......................................................................................................... 87
Clearing Account Details Only ...................................................................................... 87
Resetting Device Settings Only .................................................................................... 87
Resetting to Factory Default Settings ........................................................................... 88
GPS Settings .............................................................................................................................. 89
Enabling / Disabling GPS .................................................................................................... 89
Setting the GPS Mode ......................................................................................................... 89
Using Metric Units................................................................................................................ 90
Configuring the Wi-Fi Network .................................................................................................... 91
Setting the Maximum Number of Wi-Fi Devices .................................................................. 91
Wi-Fi Security ...................................................................................................................... 91
Change Wi-Fi Network Names and Passwords ........................................................... 92
Displaying Main Wi-Fi Network Name and Password on LCD Home Screen .............. 93
Enable / Disable the Block List ..................................................................................... 94
Displaying and Blocking Currently Connected Devices (Block List) ............................. 94
View and Unblock Devices (Block List) ........................................................................ 94
Allowing or Denying Computers Access to the Network (MAC Filter) .......................... 95
Disable Wi-Fi When Tethering Device (Connected Through USB) .............................. 96
Setting the Sleep (Inactivity) Timer ...................................................................................... 97
Wi-Fi Channel ...................................................................................................................... 97
TOC iv
Page 6

Frequently Asked Questions ....................................................................................................... 99
How Can I Tell I’m Connected to 3G or LTE? ..................................................................... 99
How Do I Connect to Wi-Fi? ................................................................................................ 99
What Do I Do if I Forget the Main or Guest Wi-Fi Password? ........................................... 100
What Do I Do if I Forget the Administrator Password? ...................................................... 100
If the Connection is “Always On,” Am I Always Being Billed? ............................................ 100
Questions About GPS........................................................................................................ 101
What is GPS? ............................................................................................................. 101
Where Can I Use GPS? ............................................................................................. 101
How Do I Enable or Disable GPS? ............................................................................. 101
What are some GPS Limitations? .............................................................................. 101
How Can I Stream GPS Data to Use With a Third-party GPS Application? ............... 101
Questions About WPS ....................................................................................................... 102
What is WPS? ............................................................................................................ 102
How do I Use WPS? ................................................................................................... 102
If a Wireless Device has a WPS Button or a WPS Software Option, Must I Use it to
Connect Via Wi-Fi? .................................................................................................... 102
How Do I Access My Corporate Network Through a VPN? ............................................... 102
Are Terminal Sessions Supported? ................................................................................... 102
Tips ........................................................................................................................................... 103
Extending Battery Life........................................................................................................ 103
Mobile Hotspot Location .................................................................................................... 103
Improving Signal Strength ................................................................................................. 103
Improving 3G Network Service .......................................................................................... 104
Improving Wi-Fi Performance ............................................................................................ 104
Security Tips ...................................................................................................................... 105
Finding the MAC Address .................................................................................................. 106
Finding the IP Address ...................................................................................................... 107
Troubleshooting ........................................................................................................................ 108
General Tips ...................................................................................................................... 108
LCD Is Dark ....................................................................................................................... 108
Insufficient Signal Strength ................................................................................................ 108
Cannot Connect to Wi-Fi ................................................................................................... 109
TOC v
Page 7

Cannot Connect Through USB .......................................................................................... 109
Cannot Display the Home Page ........................................................................................ 110
Cannot Connect to the Mobile Broadband Network .......................................................... 111
GPS Doesn’t Seem to Be Available ................................................................................... 111
Cannot Check for Updates ................................................................................................ 112
Technical Specifications ........................................................................................................... 113
Radio Frequency and Electrical Specifications .................................................................. 113
Software Specifications ..................................................................................................... 114
Environmental Specifications ............................................................................................. 115
Mechanical Specifications ................................................................................................. 116
Safety Information ..................................................................................................................... 117
Important Notice ................................................................................................................ 117
Safety and Hazards ........................................................................................................... 117
Proper Battery Use and Disposal ............................................................................... 117
Regulatory Notices .................................................................................................................... 119
Legal ......................................................................................................................................... 121
Patents .............................................................................................................................. 121
Licenses ............................................................................................................................ 121
GNU General Public License (Version 2) ................................................................... 121
GNU General Public License (Version 3) ................................................................... 127
GNU Lesser General Public License (Version 2.1) .................................................... 139
GNU Lesser General Public License (Version 3) ....................................................... 147
fontconfig License ...................................................................................................... 150
libxml2 License ........................................................................................................... 151
locapi License ............................................................................................................. 152
pimd License .............................................................................................................. 153
shadow License .......................................................................................................... 154
ISC License ................................................................................................................ 154
OpenSSL License ...................................................................................................... 155
Original SSLeay License ............................................................................................ 156
Trademarks........................................................................................................................ 157
Copyright ........................................................................................................................... 158
Limitation of Liability .......................................................................................................... 158
TOC vi
Page 8

Additional Information and Updates ................................................................................... 158
Index ......................................................................................................................................... 159
TOC vii
Page 9
Get Started
The following topics give you all the information you need to set up your device and Virgin
Mobile service the first time.
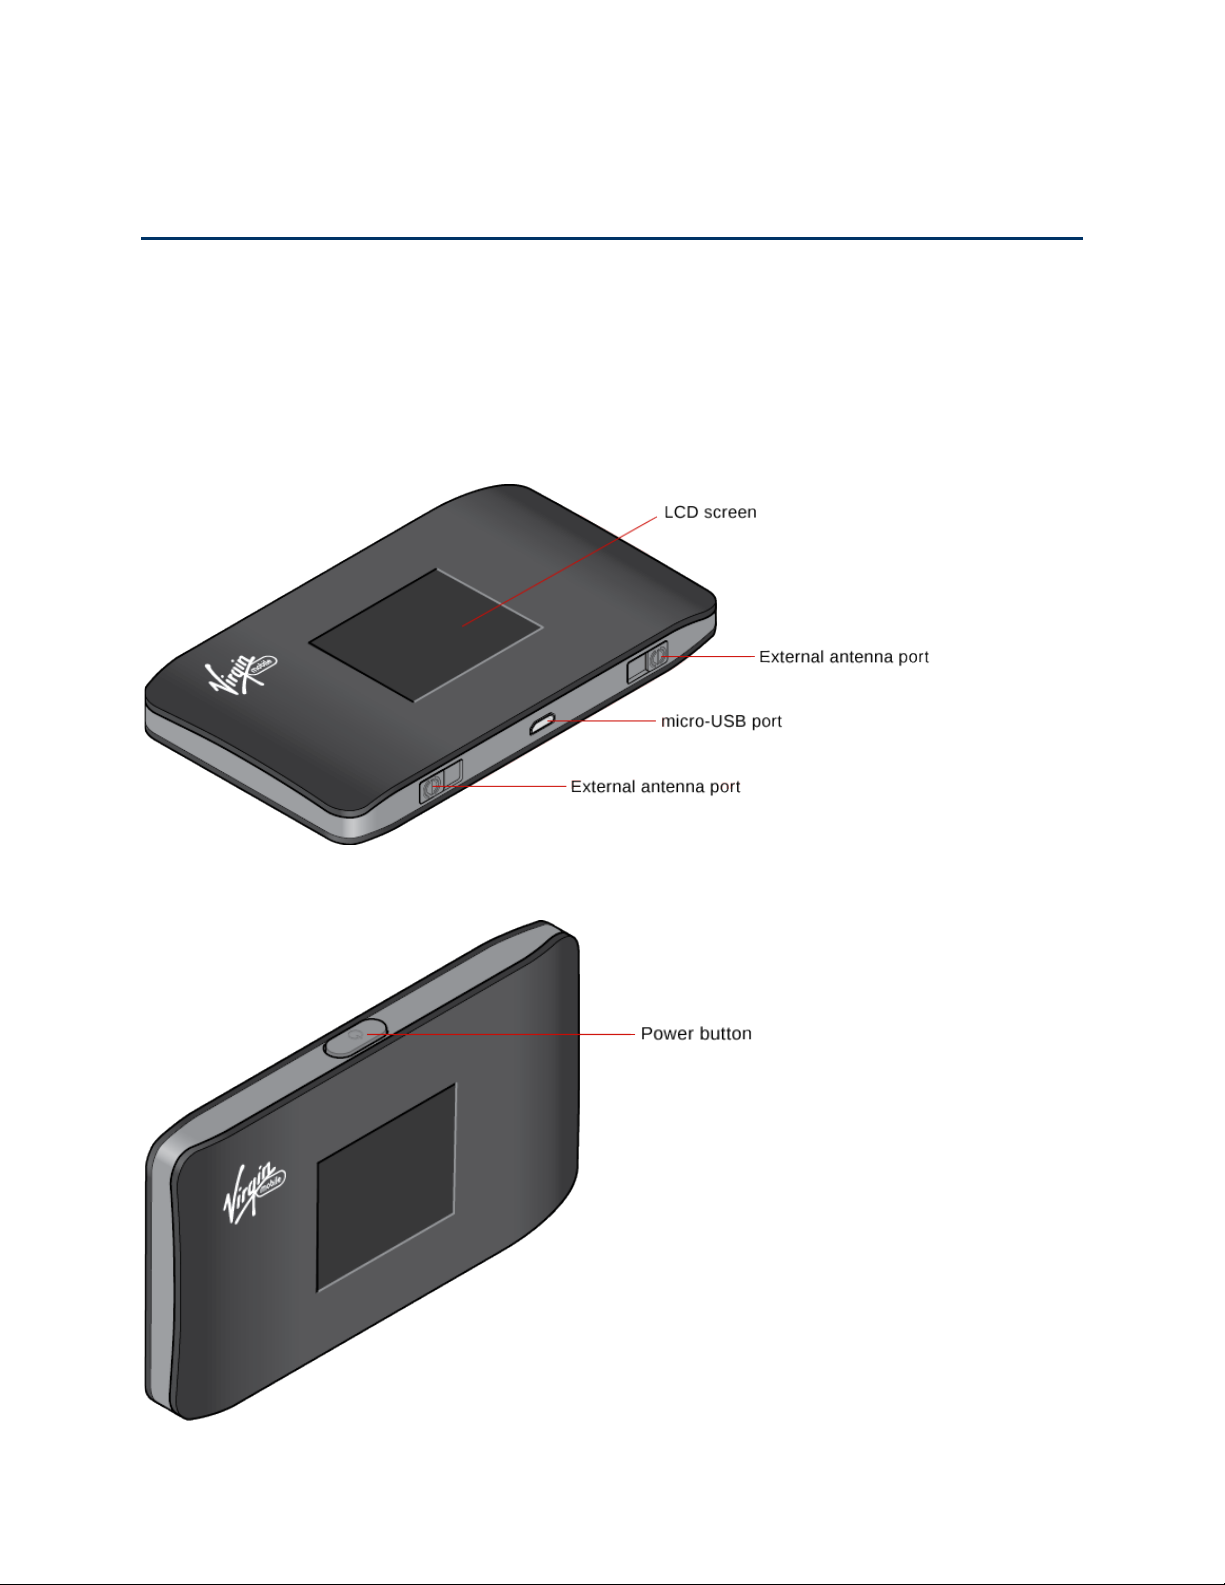
Your Device
The following illustrations show your device’s primary external features and buttons.
Front View
Top View
Get Started 8
Page 10
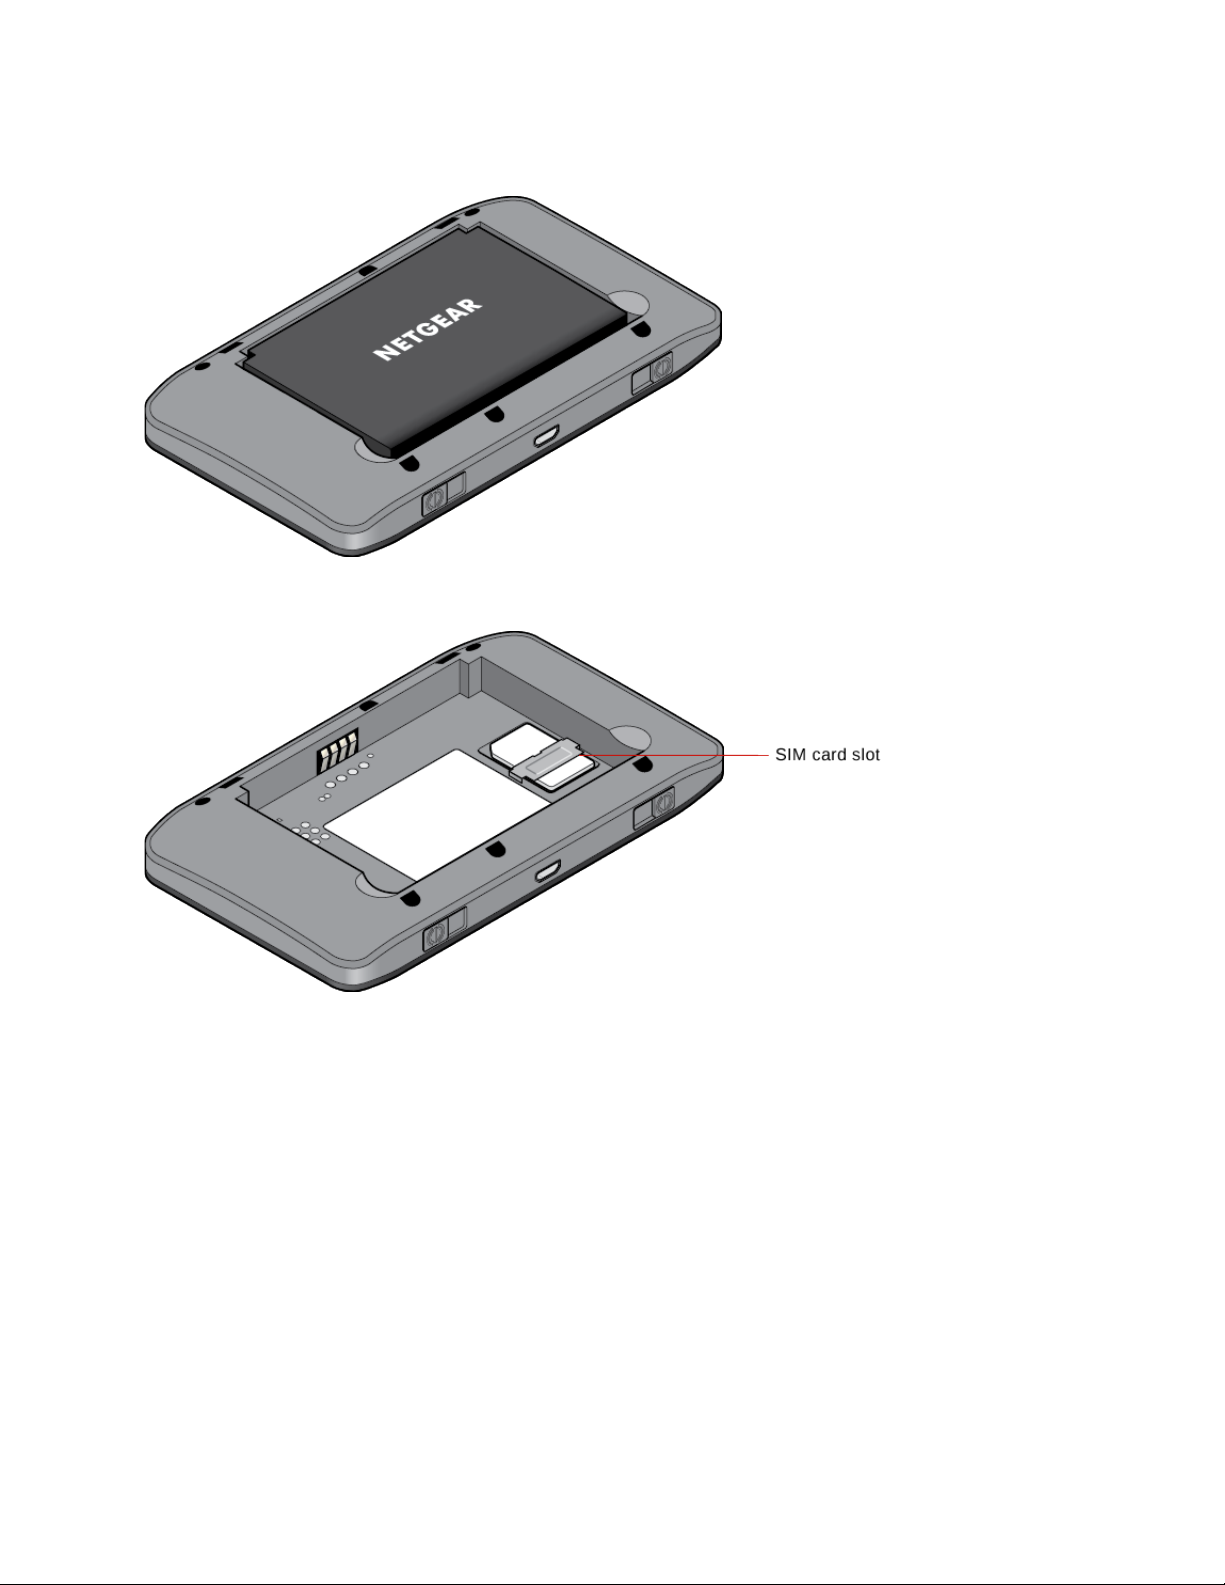
Back View (Battery Cover removed)
Interior View (Battery removed)
Package Contents
Your package includes several items.
● NETGEAR Mingle Mobile Hotspot
● Battery cover
● Rechargeable battery
● AC charger with type-A USB port
● Micro-USB cable
● Micro-SIM (pre-installed)
● Get Started guide
Get Started 9
Page 11

● Recycling envelope
Care and Maintenance
As with any electronic device, you should handle this device with care to ensure reliable
operation. Follow these guidelines in using and storing your device.
● Protect your device from liquids, dust, and excessive heat.
● Do not handle or operate your device while driving or operating a vehicle. Doing so may
distract you from properly operating the vehicle. In some jurisdictions, operating
communication devices while in control of a vehicle is a criminal offense.
● Do not apply adhesive labels to your device. They may cause your device to overheat
and may alter the antenna’s performance.
System Requirements
The following items are required to use your NETGEAR Mingle Mobile Hotspot.
● One or more computers that support Wi-Fi (802.11b/g/n)
● Web browser. The following browsers are supported:
§ Internet Explorer® (version 8.0 or higher)
§ Mozilla Firefox® (version 4.0 or higher)
§ Google Chrome™ (version 17 or higher)
§ Apple Safari® (version 5.0 or higher)
§ Apple Safari® Mobile (version iOS 4.0)
§ Android Browser (Android OS 2.2 or higher)
● The following operating systems are supported:
§ Windows® 8 (x86), Windows 7, Windows Vista®, Windows XP® SP3, or Mac OS® X
(version 10.5 or higher)
§ Mac OS 10.6–10.8, iOS4, Android 2.1, Blackberry 5.0
● If you’ll be connecting your device through USB, a USB2.0 slot
Setting Up Your Device
The following topics describe how to set up and start using your device.
Device Setup
This section describes how to set up your device.
Get Started 10
Page 12

1. Install the battery (see Installing the Battery for details).
2. The battery is shipped partially charged. If you want to fully charge the battery at this
time, connect your device to the AC charger (see Charging the Battery for details).
3. Plug the AC charger into an electrical outlet.
Important: Charge your device until the battery icon is full ( ).
Starting Your Device for the First Time
The NETGEAR Mingle Mobile Hotspot must be activated before you can use it to access the
Internet.
If you do not have an account with Virgin Mobile, you will connect to the mobile hotspot, use
your web browser to access the Mingle Manager, and be directed to Virgin Mobile to create your
account. Once your account is created, the device will activate using hands-free activation.
If you already have an account with Virgin Mobile, the device may activate automatically. If it
does, the LCD screen will show when you have connected to the network and can use the
device.
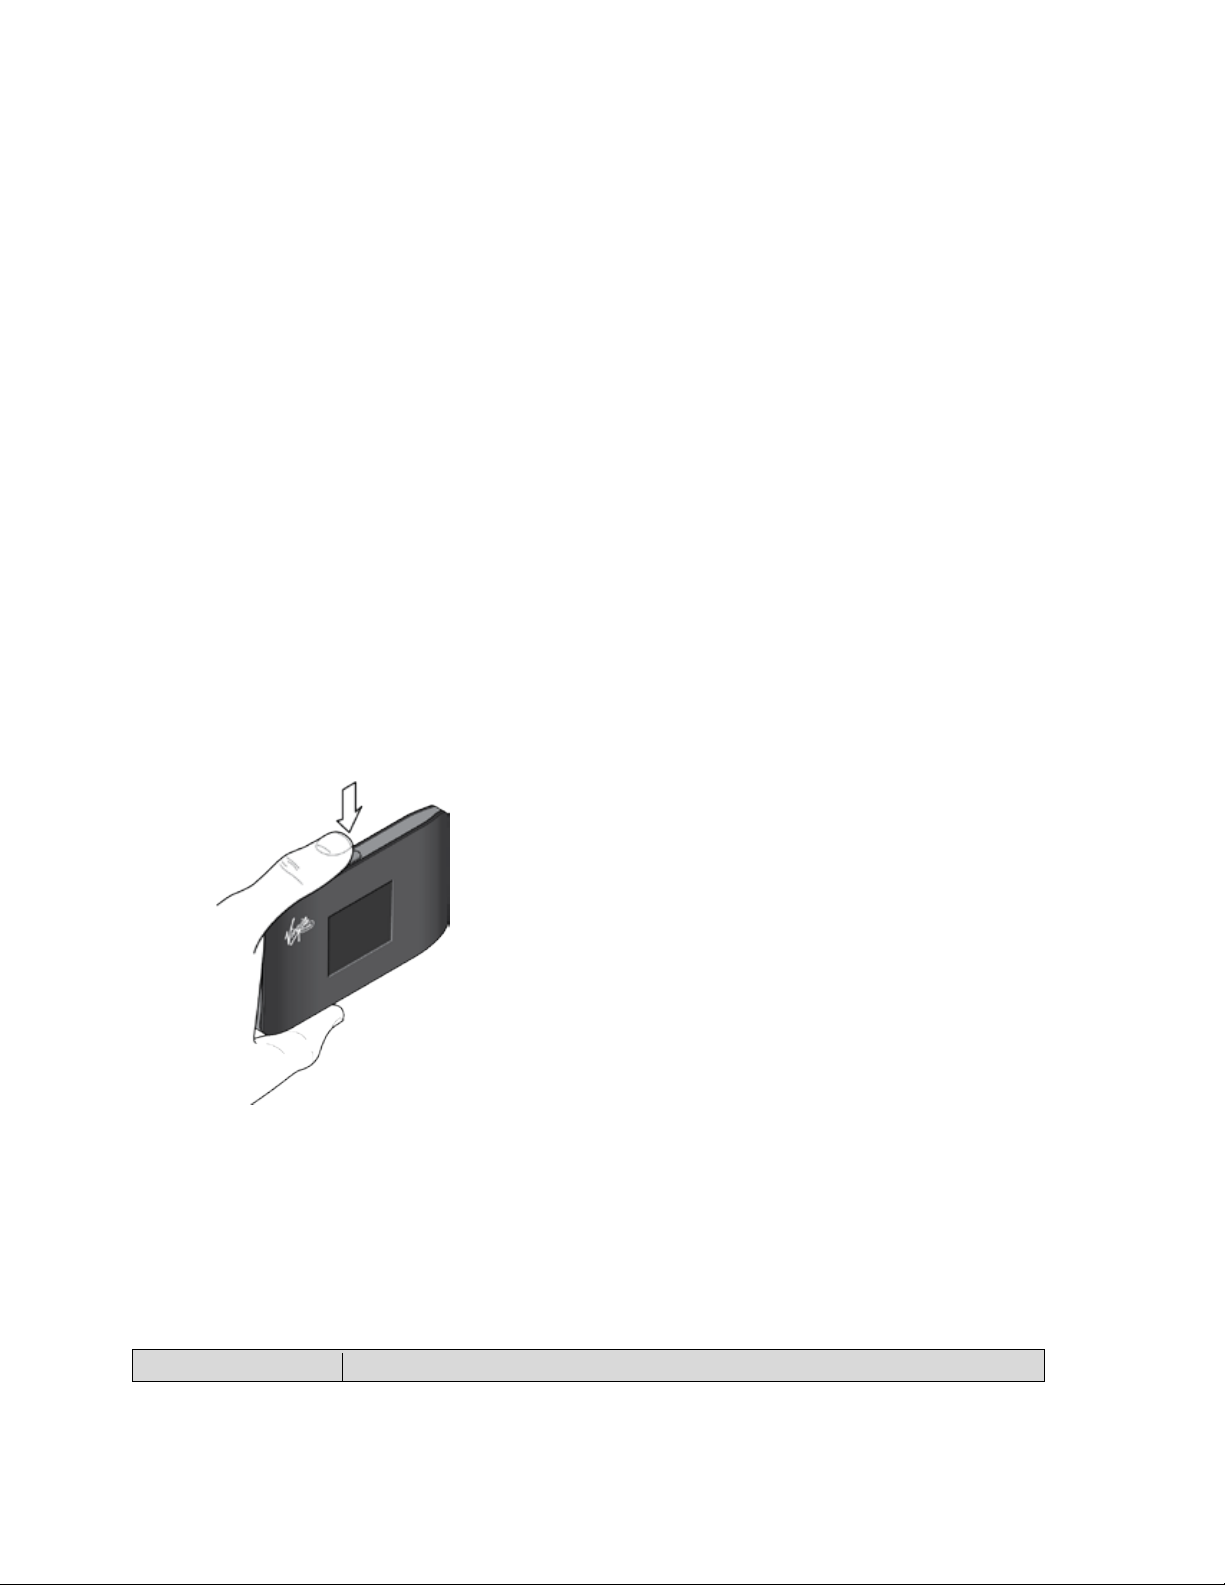
Power On and Activate Your Account
1. Turn on the hotspot (press and hold the Power button on the top of the device for at
least 2 seconds).
2. Connect your computer to the hotspot.
a. From your computer, display the Wireless Network Connections window.
b. Select the Wi-Fi name displayed, click Connect, and enter your Wi-Fi
password, which is displayed on the LCD display screen.
3. Navigate to http://minglehotspot (or http://192.168.1.1) in your Web browser to display
the Mingle Manager.
4. When the activation prompt appears, click Start Activation and follow the prompts to
set up your Virgin Mobile Broadband2Go account.
5. After your account is set up, you should see a Hands Free Activation notice in the Mingle
Manager, followed by a PRL update and a service update.
6. After the device is finished activating, you should see a notification in the Mingle
Manager that reads, “Your Network Settings are Updated.” Click on the link in this
notification to open the Virgin Mobile Broadband2Go account login page.
Note: If you are logged out of the Mingle Manager, sign in by entering your password (the
default password is “password”) in the Sign In field and clicking Sign In.
Get Started 11
Page 13

7. Enter your 6-digit account PIN to log into your account and follow the prompts to select a
data plan and pay with a credit/debit card or a Top-Up card.
8. Finally, launch your computer’s Web browser and navigate to a Web page to confirm
your connection. You may have to restart your device first.
Getting Help
Learn where you can get more information or assistance.
Visiting the Virgin Mobile Website
Sign on to virginmobileusa.com to get up-to-date information on Virgin Mobile services and
options.
● Review coverage maps.
● Access your account information.
● Add additional options to your service plan.
● Purchase accessories.
● Check out frequently asked questions.
● And more.
Contacting Virgin Mobile Customer Service
You can reach Virgin Mobile Customer Service online or by calling toll-free.
● Log in to your account at virginmobileusa.com.
● Call us toll-free at 1-877-877-8443.
Get Started 12
Page 14
Device Basics
Learn about the buttons, connectors, and other components of your NETGEAR Mingle Mobile
Hotspot.
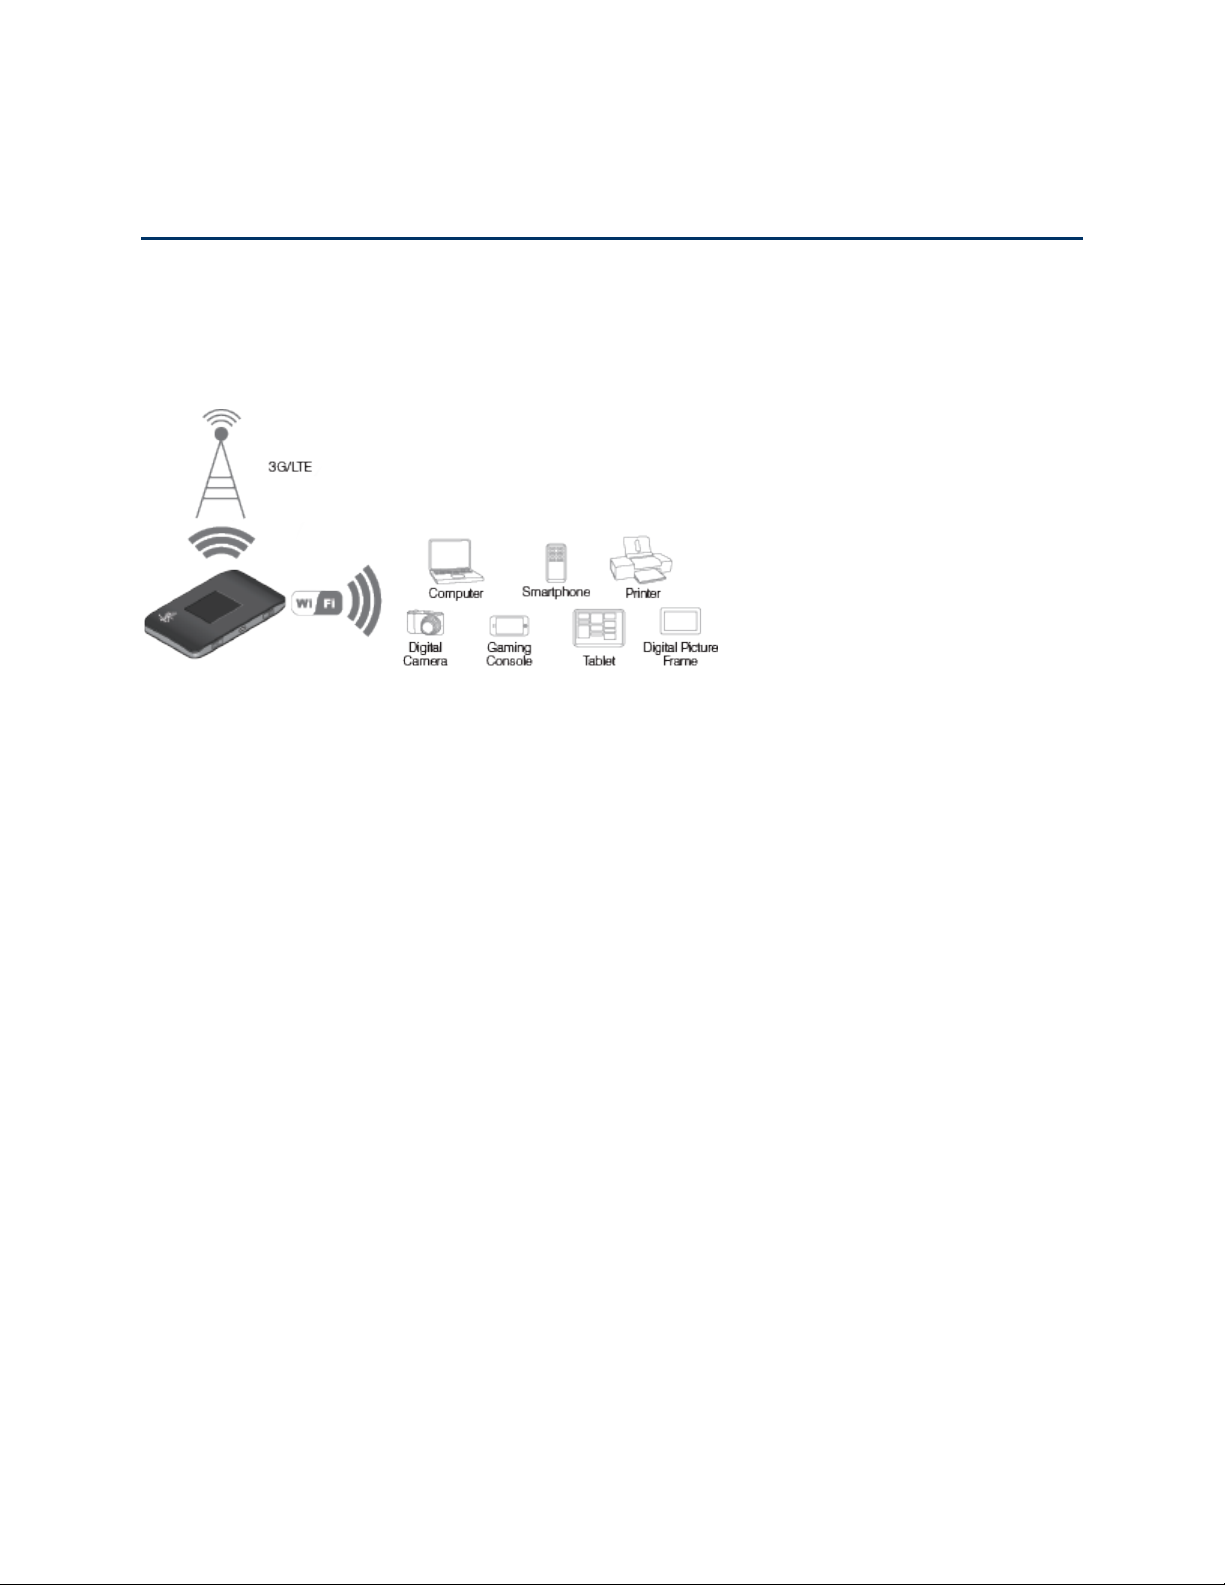
Your device provides a simple way to use your Internet connection (3G, or LTE) with any Wi-Fienabled device, and to share your Internet connection with friends and family.
Components of Your Device
Your device consists of several main components.
● Main and Guest Wi-Fi networks: The Wi-Fi networks (access points) connect your
computers and other Wi-Fi-enabled devices to your hotspot.
● Modem: The modem connects your device to the Internet via the best available network
(customizable):
§ LTE – Newer technology, faster speeds compared with 3G
§ 3G – CDMA technology, more widely available compared with LTE
● Routing hardware: The routing hardware handles traffic between the modem, the Wi-Fi
access point, and the Wi-Fi network.
3G, and LTE Networks
These wireless networks connect you to the Internet.
Depending on your coverage area, you may have:
● Only LTE coverage
● Only 3G coverage
● A combination of these networks
Device Basics 13
Page 15
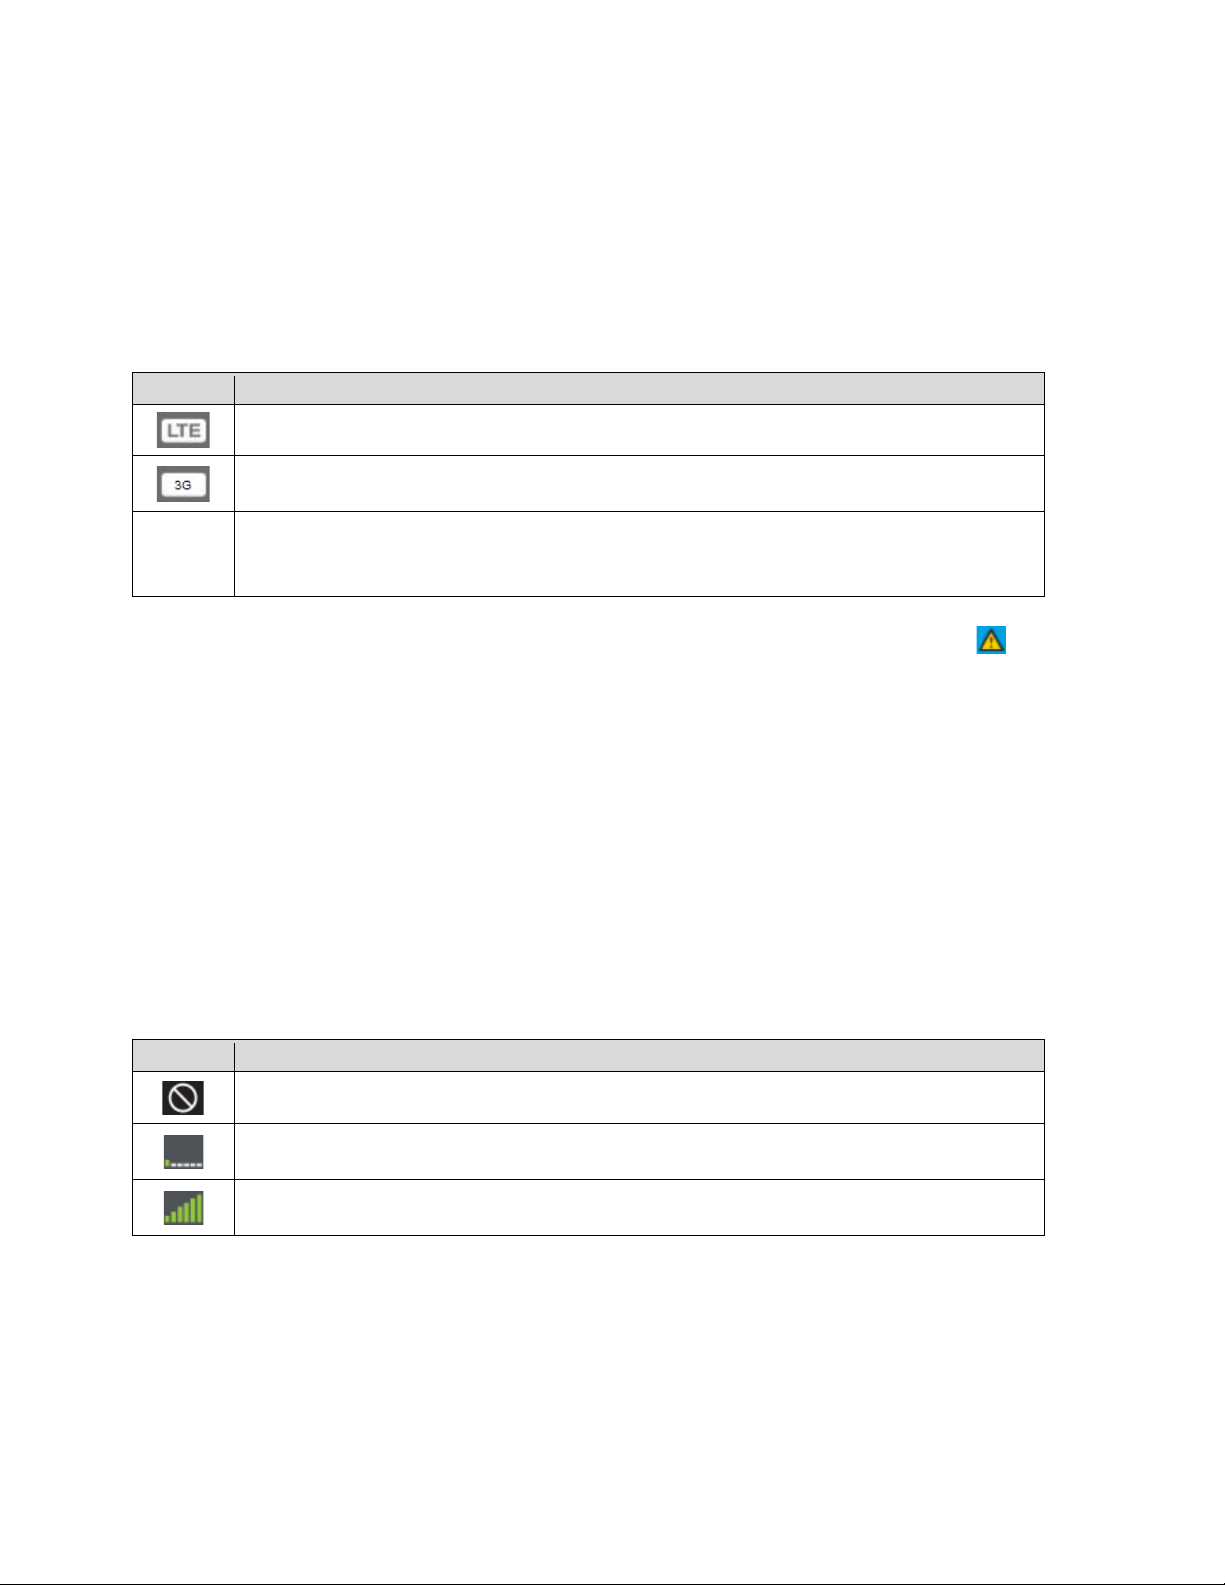
Your device automatically connects to the fastest network that is available to you. If you have
Icon
Status
CDMA (3G) service is available
You have no service. Try the suggestions in Cannot Connect to the Mobile
Icon
Status
Very weak signal
Excellent signal
both 3G and LTE coverage and your connection happens to get disrupted, your device can
automatically switch to the other network. (For more information, see Mobile Broadband
Information and Settings.)
Mobile Broadband Information and Settings
The network icon indicates the active network service type.
LTE service is available
No icon
Your device is designed to always connect to the Virgin Mobile network if possible. If your
device is not connected (dropped signal, outside of service area, etc.) the alerts icon ( )
appears on the LCD, and the connection status can be seen on the Mingle Manager Status
panel.
Your device can be set to connect automatically to the best available network, or to LTE or 3G
networks only. See Setting the Allowed Network Mode.
Broadband Network.
Signal Information
Learn how to determine the signal strength and get detailed network status information.
Signal Strength
The signal strength icon appears on your device’s home screen and in the Mingle Manager
Status panel.
No signal
Active Network
The network that is currently being used for your data connection appears on your device’s
home screen and in the Mingle Manager Status panel.
Device Basics 14
Page 16
Network Status
Detailed network information appears in the Mingle Manager under Settings > Network >
Status Details.
Internet Connection Information
Information about your Internet connection is available.
● Data usage for the current connection session and the current billing period. (See
Viewing Data Usage.)
● Router information. (See Router > Basic Tab, Router > Port Forwarding Tab, and Router
> Port Filtering Tab.)
Battery
The battery compartment is on the back of your device. The battery is replaceable. New
batteries, chargers, and other accessories are available at virginmobileusa.com.
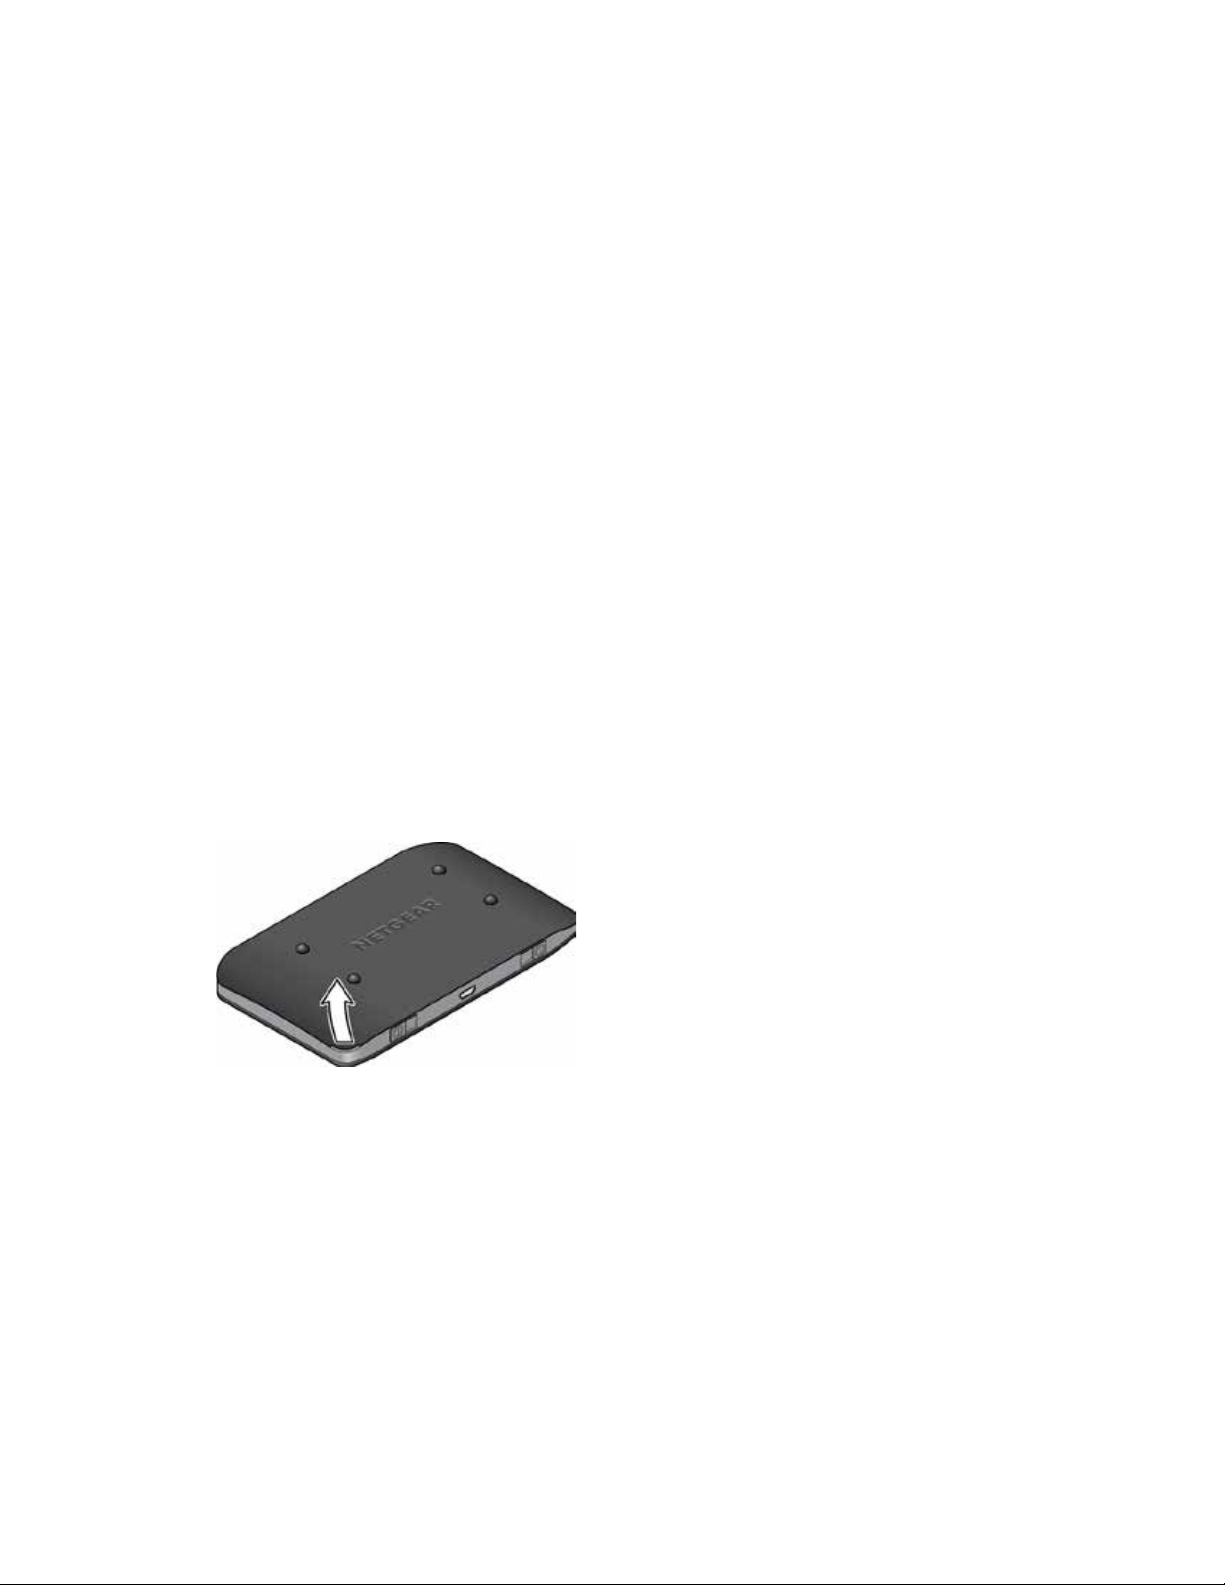
Installing the Battery
Before you use your device, install the battery.
1. At the antenna connector shown below, lift the raised edge of the battery cover to
remove it.
2. Insert the battery into your device, contacts end first. Make sure the battery contact
points align with those inside the battery compartment.
Device Basics 15
Page 17

3. Replace the battery cover.
Charging the Battery
You need to recharge your device’s battery periodically. You can continue using your device
while it is charging.
The faster method is to connect your device to the AC charger. Alternatively, you can connect
your device to your computer, although this charges more slowly.
Using the AC Charger with Your Device’s micro-USB Por t
Device Basics 16
Page 18
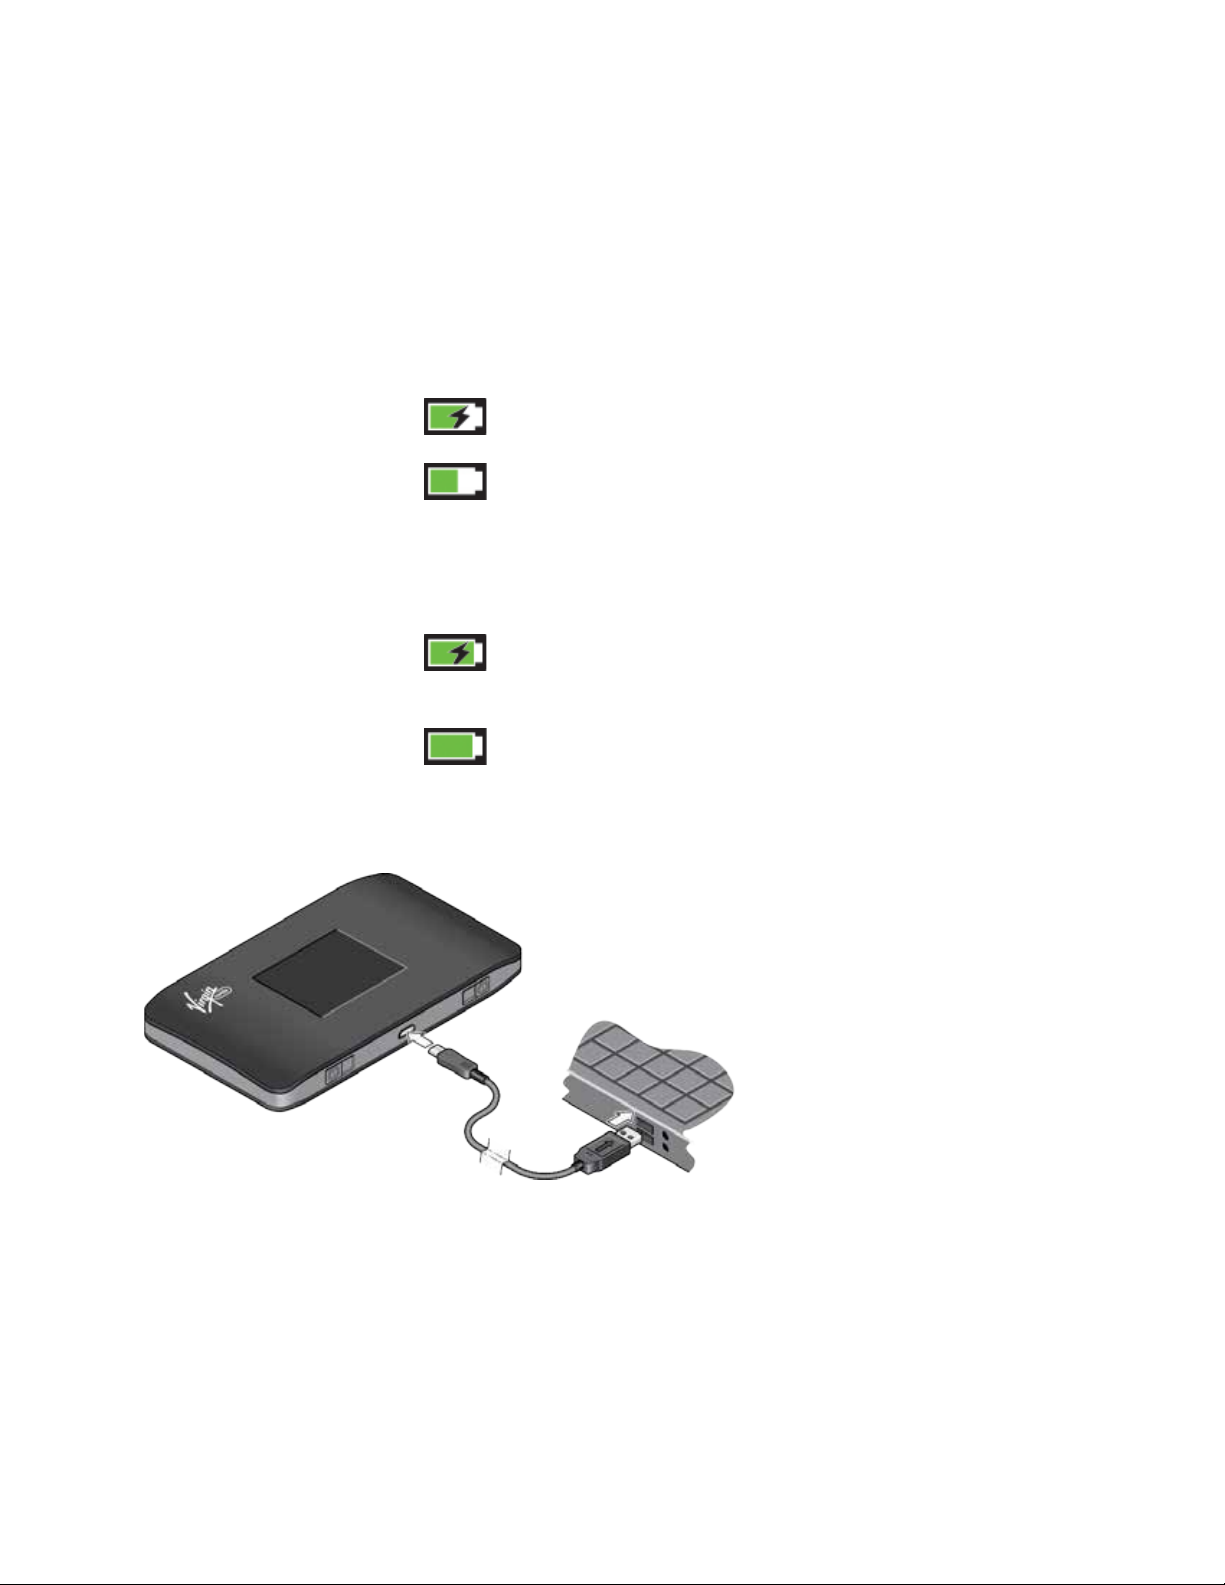
1. Insert the larger (Type A) end of the micro-USB cable into the AC charger.
2. Insert the other end of the cable into the micro-USB port on the side of your device.
3. Insert the AC charger into an electrical outlet. (If the battery is already partially changed
when the charger is plugged into the outlet, your device will power on automatically.)
While your device is charging, the LCD (and the Mingle Manager home page, if your device is
on) shows:
● If your device is on – and the percentage charged (for example, “92%”).
● If your device is off – , the percentage charged (for example, “92%”), and the
message “Charging…”
When your device is fully charged, the LCD (and the Mingle Manager home page, if your device
is on) shows:
● If your device is on – and the message “Battery is Fully charged. Please remove
power.” Click the power button to close the message.
● If your device is off – and the message “Battery is Fully charged. Please remove
power.” Click the power button to close the message.
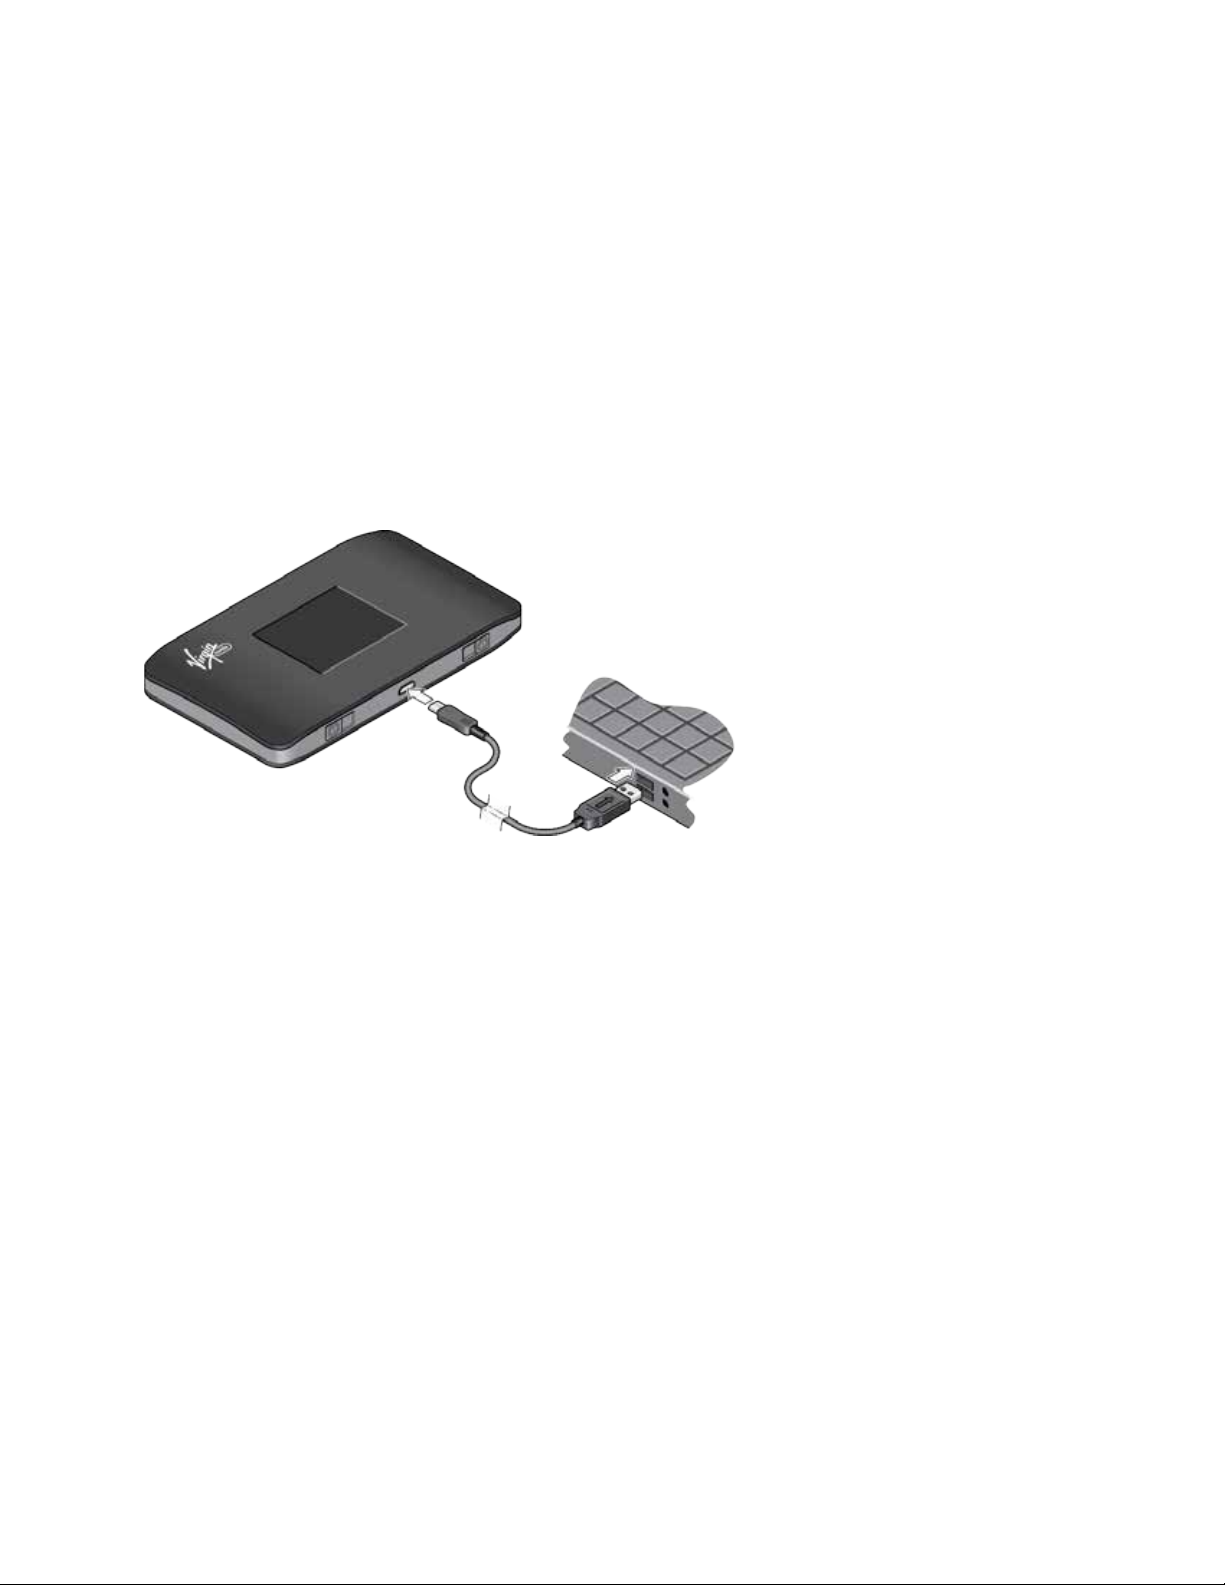
Charging Through Your Computer
Note: If you will be using the USB connection to connect to the Internet (and not just for
charging your device), you must install the device driver. (See TRU-Install.)
Note: If you are using Mac OS X 10.4.x, after you connect your device you may see a warning
message that your computer is running on UPS backup battery and that you should prevent a
computer shutdown. You can continue with your work. To prevent this message from being
displayed, install the device driver.
Device Basics 17
Page 19
1. Make sure your computer is turned on.
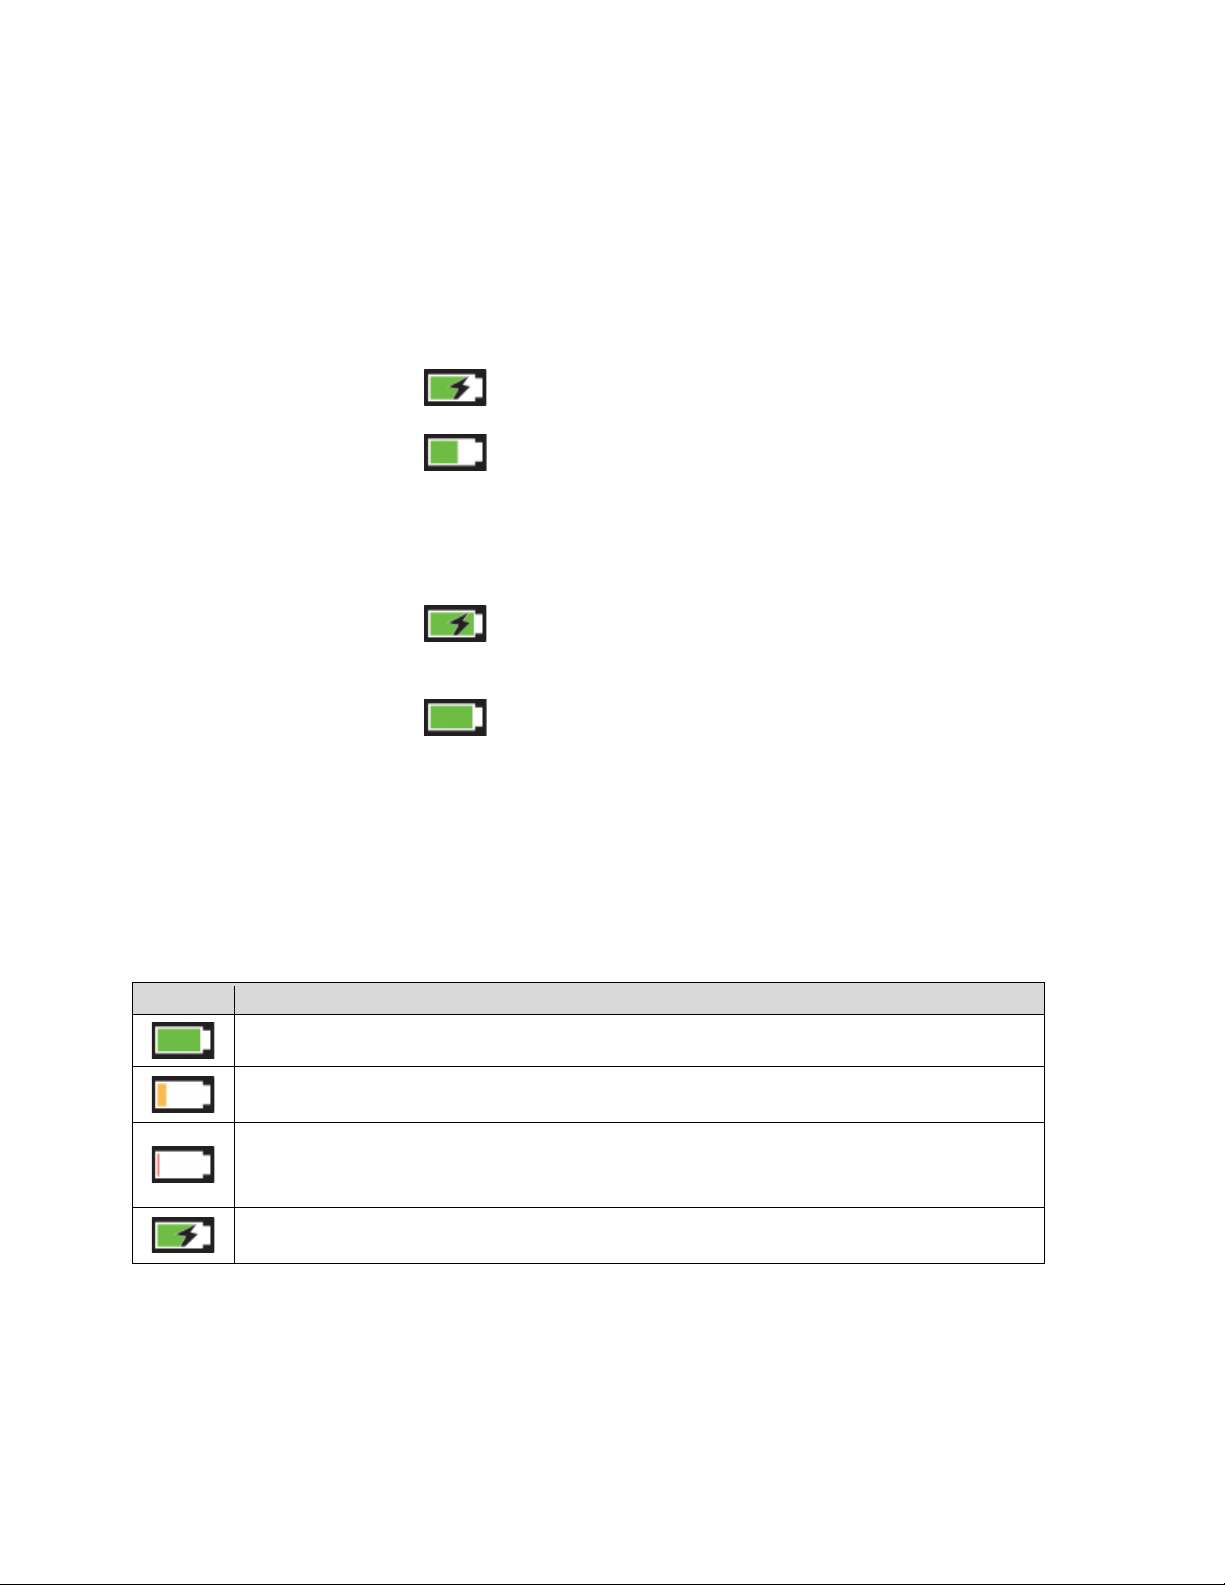
Icon
Status
Battery level is low (11%-25%). Charge your device. (See Charging the Battery.)
Battery level is critical (<10%). Charge your device immediately. (See Charging
Charging through the AC charger or computer.
2. Insert the larger (Type A) end of the micro-USB cable into your computer.
3. Insert the other end of the cable into the micro-USB port on the side of your device.
While your device is charging, the LCD (and the Mingle Manager home page, if your device is
on) shows:
● If your device is on – and the percentage charged (for example, “92%”).
● If your device is off – , the percentage charged (for example, “92%”), and the
message “Charging…”
When your device is fully charged, the LCD (and the Mingle Manager home page, if your device
is on) shows:
● If your device is on – and the message “Battery is Fully charged. Please remove
power.” Click the power button to close the message.
● If your device is off – and the message “Battery is Fully charged. Please remove
power.” Click the power button to close the message.
Battery Information and Settings
The battery icon indicates the state of the battery of your device.
The text next to the icon indicates the remaining charge.
The icon appears on your device’s home screen and in the Mingle Manager Status panel.
Battery is charged (26%-100%)
the Battery.)
The battery’s life is affected by the following conditions, some of which can be adjusted from
your device and from the Mingle Manager:
● Standby time (See Setting the Sleep (Inactivity) Timer.)
Device Basics 18
Page 20
● Data throughput
Desired result
Action
● Network signal strength (the better the signal, the longer the battery life)
Power Button
Use the power button to turn your device on and off.
Turning Your Device On and Off
Use the power button on your device to turn it on and off.
Turning Your Device On
1. Make sure that:
§ Your device has a charged battery inserted.
– or –
§ Your device is connected to the AC charger or a computer (through the micro-USB
cable).
2. If the LCD is blank, press and hold the Power button until the screen lights up.
Turning Your Device Off
Controlling Your Device Using the Power Button
The power button is used to turn the Mingle Mobile Hotspot on or off, and to choose which
information screen to display on the LCD.
Device Basics 19
■ Press and hold the Power button until the Shut Down message appears.
Page 21

Desired result
Action
Turn mobile
hotspot on
Turn mobile
Wake up Wi-Fi
Click (press and quickly release) the power button:
Press and hold the power button for 3-4 seconds
hotspot off
signal and device
screen
Cycle through
screens
Press and hold the power button for 3-4 seconds
Press and quickly release the power button
• Once – Go to next topic (switch between main screen, Alerts,
Guest Wi-Fi setup, About)
• Twice – Go to next page of the current topic (for example,
switch between pages of the ‘About’ screen)
Restarting Your Device
If you need to restart your device for some reason, you can use either of these methods.
● Press and hold the Power button for several (3-4) seconds until the device turns off,
then press and hold the Power button to turn it back on.
● If the device will not turn off, remove and replace the battery, then press and hold the
Power button to turn it back on.
LCD
The LCD has several icons that help you determine the status of your device and its
connections, and a series of screens that let you enable/disable Guest Wi-Fi, view system
alerts, and view device information. See LCD Interface for details.
If the LCD is not lit, see “Turning Your Device On” in Turning Your Device On and Off.
Micro-SIM
Your NETGEAR Mingle Mobile Hotspot comes with a pre-installed micro-SIM that gives you
access to the Virgin Mobile network.
Alerts
Alerts notify you about situations that require your attention and suggest the actions you need to
take to resolve them.
Device Basics 20
Page 22

Some of the alerts you may encounter include:
● Software Update Available
● Max Wi-Fi devices reached
● Mobile Broadband disconnected
● Wi-Fi is off
● Hotspot is not activated
● SIM errors
Device Basics 21
Page 23

Your Network Connection
Find out how to launch, share, and end your network connection.
Launching Your Network Connec t i on
After your device powers on and boots up, a connection to the best available network is
launched automatically.
Your device will remain connected at all times, unless:
● You are out of signal range or the signal is blocked (in a tunnel, etc.).
Note: Even though your device is connected, you are only billed when data is sent or received.
See If the Connection is “Always On,” Am I Always Being Billed?.
See also:
● Internet Connection Information
● Mobile Broadband Information and Settings
● Signal Information
Setting up a Guest Wi-Fi Network
Your NETGEAR Mingle Mobile Hotspot lets you create a separate Guest Wi-Fi network that you
can share with temporary users.
Devices on the Guest Wi-Fi network:
● Cannot access devices that are on the Main Wi-Fi network (such as printers or other
computers)
● Cannot use the Mingle Manager to change any device settings
Turning the Guest Wi-Fi Network On
You can turn on the Guest Wi-Fi network from your device’s Guest Wi-Fi screen, or from the
Mingle Manager’s Wi-Fi page.
On the LCD screen
1. From the homescreen, click the power button once to display the next screen. Repeat
until you reach the Guest Wi-Fi screen.
2. Click the power button twice to turn on Guest Wi-Fi.
Your Network Connection 22
Page 24

In the Mingle Manager (http://minglehotspot)
1. Log in to the home page. (See Logging In as an Administrator.)
2. Click Wi-Fi.
3. In the Guest Wi-Fi area, click Turn On.
Turning the Guest Wi-Fi Network Off
You can turn off the Guest Wi-Fi network from your device’s Guest Wi-Fi screen, or from the
Mingle Manager’s Wi-Fi page.
On the LCD screen
1. From the homescreen, click the power button once to display the next screen. Repeat
until you reach the Guest Wi-Fi screen.
2. Click the power button twice to turn off Guest Wi-Fi.
In the Mingle Manager (http://minglehotspot)
1. Log in to the home page. (See Logging In as an Administrator.)
2. Click Wi-Fi.
3. In the Guest Wi-Fi area, click Turn Off.
Randomizing the Guest Wi-Fi Password
You can set the hotspot to use the same Guest Wi-Fi password all the time, or for greater
security, you can have it generate a random password each time the Guest Wi-Fi network is
turned on.
Note: The password changes only when Guest Wi-Fi is turned on – for example, if Guest Wi-Fi
was on when your device was restarted, the password doesn’t change because the Guest Wi-Fi
is still on.
In the Mingle Manager (http://minglehotspot)
1. Make sure you’re logged in to the home page.
2. Click Wi-Fi > Options.
3. In the Guest Wi-Fi section, select Generate a new password each time I turn on the
Guest Wi-Fi.
4. Click Submit.
Your Network Connection 23
Page 25

Change the Guest Wi-Fi Password
You can change your Guest Wi-Fi password immediately.
Change it Manually
■ See Change Wi-Fi Network Names and Passwords.
Generate a Random Password
1. Make sure the random password setting is on (see Randomizing the Guest Wi-Fi
Password).
2. Turn off Guest Wi-Fi (see Turning the Guest Wi-Fi Network Off).
3. Turn Guest Wi-Fi back on (see Turning the Guest Wi-Fi Network On).
Sharing Your Connection
Your NETGEAR Mingle Mobile Hotspot provides two ways of sharing your network connection
with other users.
● User manually enters the Main or Guest Wi-Fi network information.
● User connects to the Main or Guest Wi-Fi network using WPS.
Manually Entering the Wi-Fi Information
Users can connect to the network by manually entering the Wi-Fi information.
Share your network connection with others:
1. Provide the Main or Guest Wi-Fi network name and password to them.
2. On their computers, users must open the Wi-Fi network manager and connect to the
Main or Guest Wi-Fi network of the NETGEAR Mingle Mobile Hotspot with the password
you provided. (See How Do I Connect to Wi-Fi?)
Connecting Through WPS
Wi-Fi Protected Setup (WPS) provides a fast, simple, and secure way to connect WPS-enabled
devices to your Wi-Fi network. You don’t have to give the name (SSID) and Wi-Fi password of
your Main or Guest network to other users.
The WPS feature is available on certain cameras, printers, smartphones, and laptops. These
devices have either a hardware button or a WPS-related option in the software. Please consult
the user documentation of your device.
WPS is always available for the Main and Guest Wi-Fi networks as long as the Wi-Fi radio is on
(device is not asleep due to sleep (standby) option, or off while device is tethered).
Your Network Connection 24
Page 26

WPS is not available in any of these situations:
● Wi-Fi radio is off while your device is sleeping due to inactivity.
● Wi-Fi radio is off while your device is tethered. See Disable Wi-Fi When Tethering
Device (Connected Through USB)).
● The Wi-Fi security option is WPA Personal, WEP, or WEP-related (for example, “WEP
64 Bit Open”). (Note: WPS is available if the Wi-Fi security option is WPA/WPA2
Personal.) (See Wi-Fi Security.)
● Broadcast network name is not enabled. (See Options Tab.)
● MAC Filter Mode is “White list (Allow only those in list)”, but no computers have been
added to the list. (See “Specifying Computers That Can Access the Network” in Allowing
or Denying Computers Access to the Network (MAC Filter).)
If the maximum number of connected devices on the chosen network (Main or Guest) has
already been met, an error message indicating that the maximum number of devices has been
reached is displayed when you attempt WPS. Disconnect one of the connected devices and
then retry.
In the Mingle Manager (http://minglehotspot)
1. Log in to the home page. (See Logging In as an Administrator.)
2. Click Wi-Fi.
3. Below the Main Wi-Fi or Guest Wi-Fi sections, click WPS.
4. Perform one of the following procedures, depending on whether the Wi-Fi device you are
adding to your Wi-Fi network supports the PBC (Push Button Configuration) method or
the PIN (Personal Information Number) method.
If the Wi-Fi device supports the PBC (Push Button Configuration) method:
a. Click WPS button pairing.
b. Within 2 minutes, press the WPS button on the wireless device you want to
connect or select the WPS-related option in your device’s software.
– or –
If the Wi-Fi device has a PIN associated with it:
a. Find out the PIN for the Wi-Fi device you are adding. To do this, use the PIN
option in your device’s software. Alternatively, use the Wi-Fi Protected Setup
Wizard that may be available, depending on the manufacturer of your device.
b. In the web page, click Enter WPS PIN.
Your Network Connection 25
Page 27
c. Enter your device’s PIN.
d. Click Submit.
Your NETGEAR Mingle Mobile Hotspot and the wireless device will communicate and establish
the connection. If no problems are encountered, the message “The device can now access your
hotspot” displays. If your device does not connect, the message “No device was connected …”
displays – try to connect it manually. (See How Do I Connect to Wi-Fi?)
Note: If you want to stop the pairing process, click Cancel.
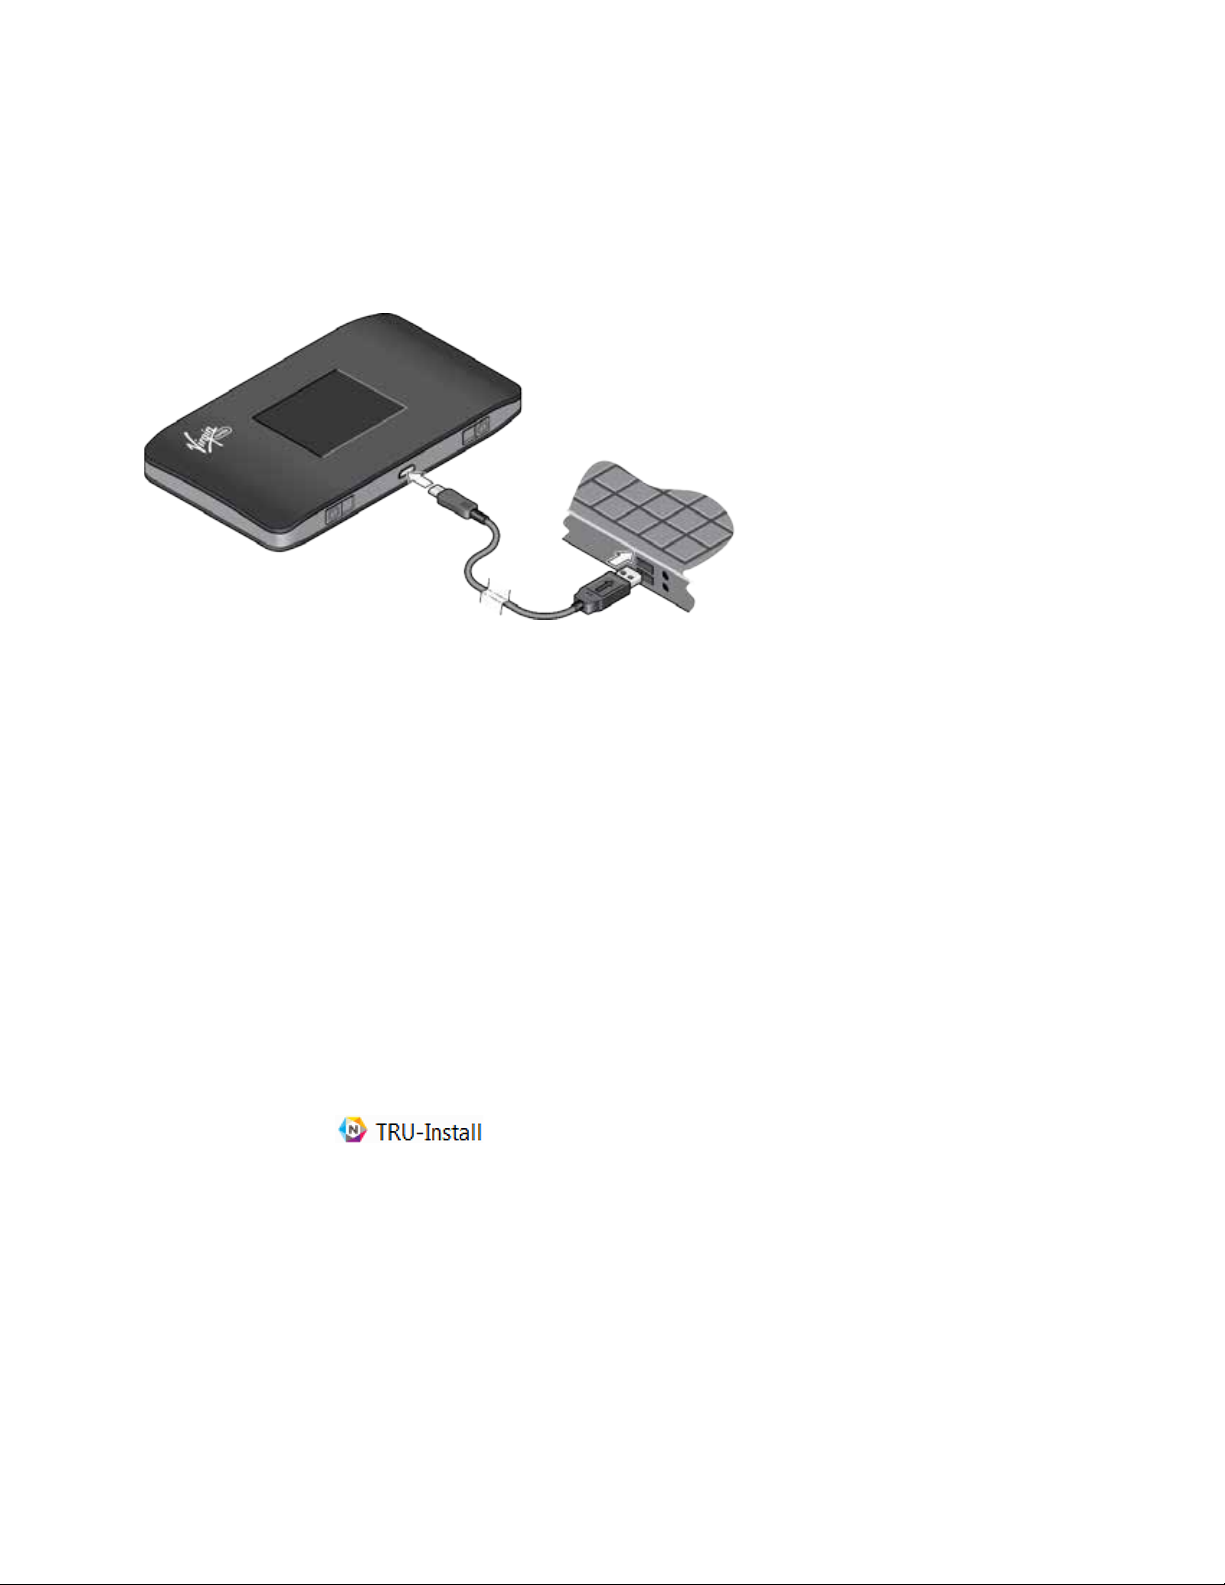
Connecting Through USB
Use the micro-USB cable (included) to connect your device to your computer.
Note: If you’ll be using USB to connect to the Internet (and not just for charging your device),
you must install the device driver. (See Making a Tethered Connection.)
Use the micro-USB cable when:
● You want to charge your device, but you don’t want to use the AC charger, or the AC
charger is not available.
● Your computer does not have Wi-Fi.
● You want to prevent any other devices from using the hotspot. (See Disable Wi-Fi When
Tethering Device (Connected Through USB).)
Note: You can also block individual devices. See Displaying and Blocking Currently Connected
Devices (Block List) and Allowing or Denying Computers Access to the Network (MAC Filter).
To connect your device to your computer:
1. Insert the larger (Type A) end of the micro-USB cable into your computer.
2. Insert the other end of the cable into the micro-USB port on the side of your device.
Your Network Connection 26
Page 28
Note: If you’re having problems, see Cannot Connect Through USB.
Making a Tethered Connection
Your device supports a direct connection through a USB cable to a Windows or Mac computer.
(This is commonly referred to as a “tethered” connection.)
Note: If you’ll be using USB for data transfer (and not just for charging your device), you must
install the device driver. (See “Windows” or “Mac”, below.) No Installation CD is required – your
device supports the TRU-Install feature.
Note: If you’re using Mac OS X 10.4.x, after you connect your device you may see a warning
message that your computer is running on UPS backup battery and that you should perform a
computer shutdown. You can continue with your work. To prevent this message from being
displayed, install the device driver (see “Mac”, below).
Windows
To install the device driver on Windows:
1. Make sure your device is turned on.
2. Connect your device to your computer through the micro-USB cable.
3. If the TRU-Install window is not displayed, in Windows Explorer browse to the TRU
Install entry (under My Computer), then browse to the Win folder and run
Setup.exe.
– or –
If the AutoPlay window opens, click Run setup.exe.
4. In the TRU-Install window, click OK.
5. Follow the onscreen instructions.
Your Network Connection 27
Page 29

Mac
To install the device driver on Mac:
1. Make sure your device is turned on.
2. Connect your device to your computer through the micro USB cable.
3. In the window that appears, double-click the .pkg file.
4. Follow the onscreen instructions.
5. When prompted for your password, enter your Mac password.
TRU-Install
TRU-Install is a feature that installs the necessary drivers the first time you connect your device
to your Windows or Mac computer through the micro USB cable. (For details, see Making a
Tethered Connection.) An installation CD is not required.
TRU-Install is enabled by default.
To change the setting:
1. In the address bar of your Web browser, type one of the following:
§ http://minglehotspot
§ http://192.168.1.1
2. In the Sign In field, enter the Mingle Manager administrator password (1 31 letters,
numbers, and symbols). (The default password is “password”.)
3. Click Settings > General > Software and Reset.
4. Select (to enable TRU-Install) or clear (to disable TRU-Install) the checkbox labeled
“Install driver when connecting to Windows or MAC computers with a USB cable”.
Your Network Connection 28
Page 30
LCD Interface
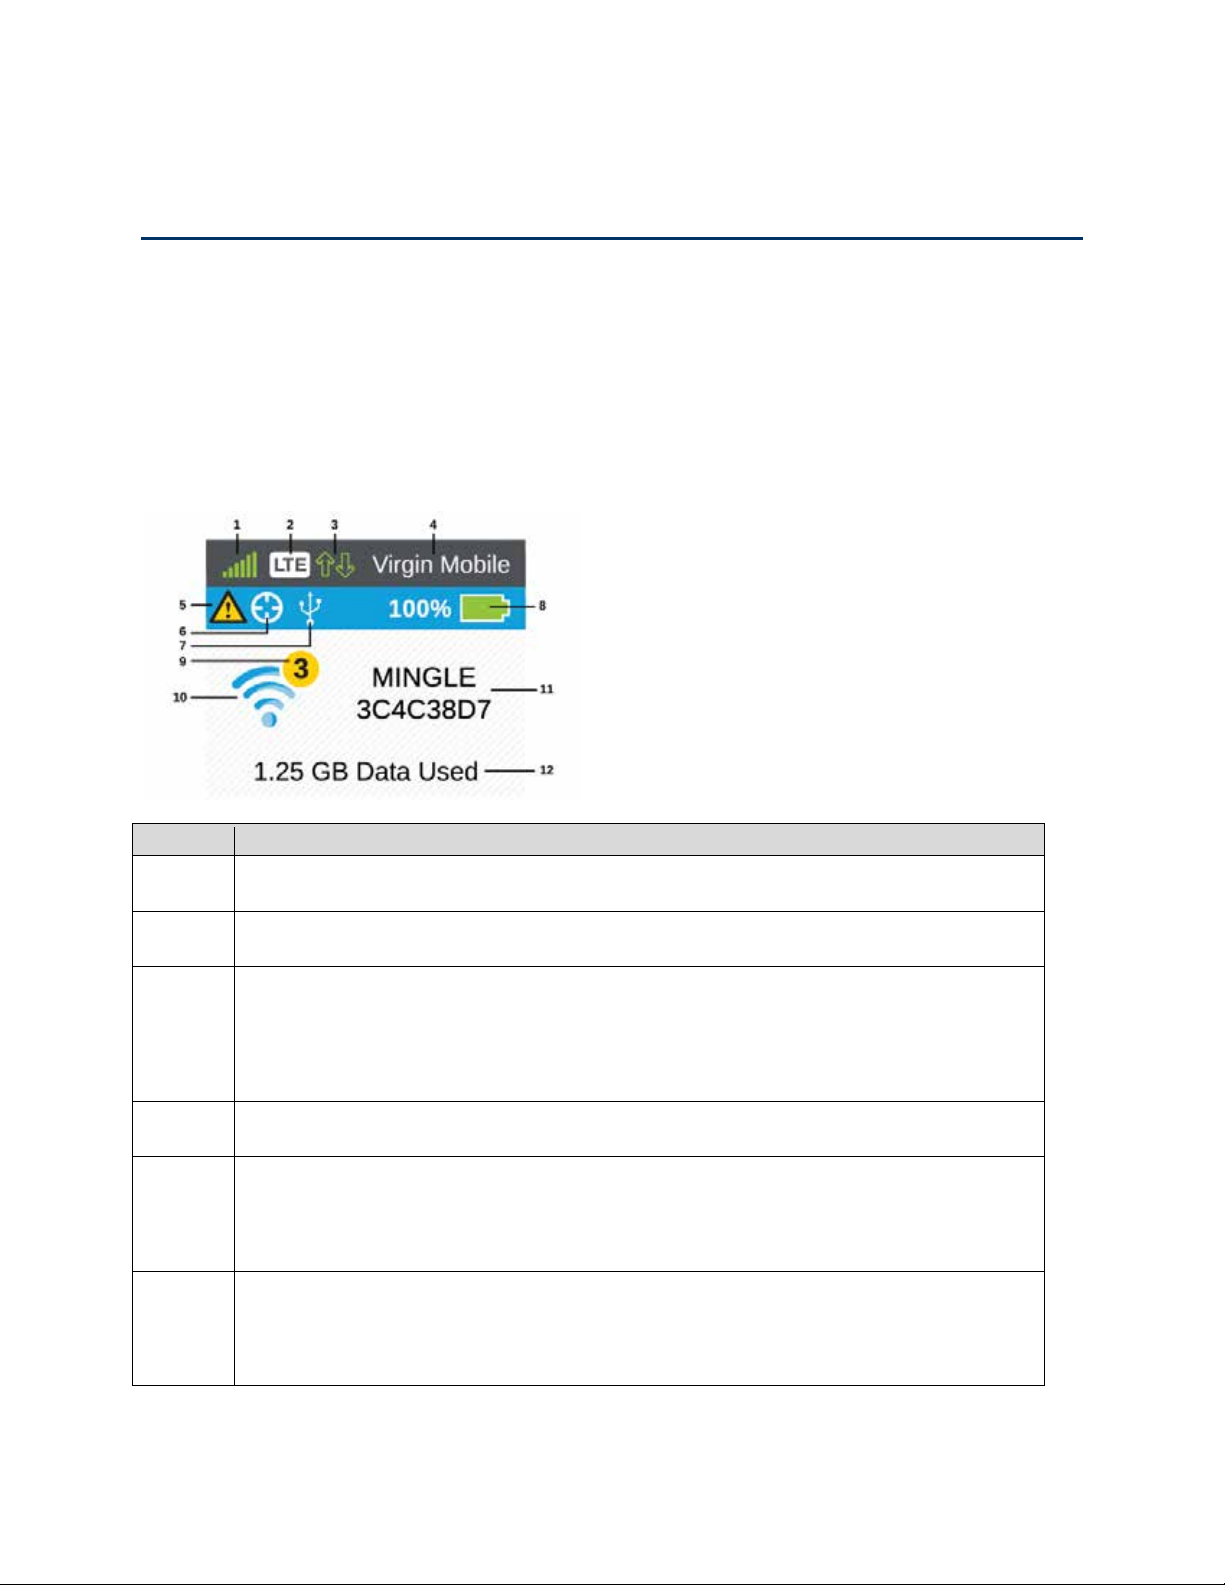
Item
Status
1
Signal strength
2
Network type (3G, LTE)
Data transfer indicator (WAN traffic – upload (send) / download (receive))
4
Network carrier name
Alerts – Indicates number of alerts to be read. Only appears when at least one
GPS indicator – Appears only when GPS tracking is on. The icon blinks
Access your device and connection information, and configure device settings from the LCD
interface.
If the LCD is not lit, see “Turning Your Device On” in Turning Your Device On and Off.
Interpreting the LCD
The LCD home screen shows icons and text that reflect the status of your device and your
connection, and screen elements that link to other configuration screens.
3
5
6
Icons are solid when data is transferring, and hollow when no data is
transferring.
alert is active.
Alerts Screen.)
(See
continually when the GPS mode is Continuous, or while searching for satellites
when the GPS mode is One-time. (See
GPS Settings.)
LCD Interface 29
Page 31

Item
Status
7
USB tether indicator – Appears when your device is tethered to a computer (See
Battery status
Number of connected devices – The number of devices connected to the hotspot
10
Wi-Fi Status – Indicates whether Wi-Fi is active (blue) or sleeping (gray).
11
Main Wi-Fi network name and password.
Data usage – Indicates the amount of data used.
Connecting Through USB.)
8
9
12
Tip: Information on the LCD can also be viewed and configured in the Mingle Manager
interface. See Mingle Manager (Browser) Interface.
(See Battery Information and Settings.)
via Wi-Fi is indicated in the circle that appears over the Wi-Fi Status icon.
(See Data Usage.)
LCD Information Screens
The LCD home screen links to several screens used to configure your device.
● Alerts – Show network and device messages. See Alerts Screen for details.
● Guest Wi-Fi – Turn Guest Wi-Fi on/off. See Guest Wi-Fi Screen.
● About – View device details.
Tip: Information on the LCD can also be viewed and configured in the Mingle Manager
interface. See Mingle Manager (Browser) Interface.
To move between these screens:
● Click the power button once to move between screens.
● On the Alerts and About screens, click the power button twice to see additional pages.
Alerts Screen
The Alerts screen shows network or device alerts for situations that require your attention.
LCD Interface 30
Page 32

Item
Description
To read more alerts:
■ If there is more than one alert to read, double-click the power button to view the next
alert.
To switch to the Guest Wi-Fi screen:
■ Click the power button once.
Guest Wi-Fi Screen
The Guest Wi-Fi screen allows you to turn the Guest Wi-Fi network on or off, and (when it is on)
shows the Guest Wi-Fi network’s name and password.
To turn Guest Wi-Fi on or off:
■ Double-click the power button.
To switch to the About screen:
■ Click the power button once.
LCD Interface 31
Page 33

Item
Description
Name
This is the name that identifies your Guest Wi-Fi network and is visible to
This is the password that other Wi-Fi enabled devices need to connect to
Turn the Guest Wi-Fi network on or off. See Setting up a Guest Wi-Fi
Item
Description
MEID
The MEID of your hotspot (displayed on the packaging and inside the
ICCID
The serial number of the SIM.
Activation
The hotspot’s activation status (Activated / Deactivated) and the date and
other Wi-Fi-enabled devices. See Change Wi-Fi Network Names and
Passwords.
Password
On/Off
the Guest Wi-Fi network. See Change Wi-Fi Network Names and
Passwords.
Network.
About Screen
The About screen shows detailed information about your mobile hotspot and account in a series
of pages.
To cycle through the About pages:
■ Double-click the power button to view the next page.
To switch to the home screen:
■ Click the power button once.
battery compartment).
status
LCD Interface 32
time the status changed.
Page 34

Item
Description
Mingle
Manager
The hotspot’s Main Wi-Fi network name. See Change Wi-Fi Network
MAC Address
The hotspot’s Media Access Control (MAC) address.
PRL
Preferred Roaming List version number.
My number
The hotspot’s telephone number.
FW Version
The hotspot’s firmware version.
FW Build Date
The date the firmware version was created.
Model
The manufacturer’s name for your device.
The PRI version for the hotspot’s routing hardware. The PRI (Product
Web App
Temperature
The current temperature of the battery.
Mobile apps
The web page’s URL.
Wi-Fi name
PRI Version
Version
Names and Passwords.
Release Instructions) is a file that contains the settings used to configure
wireless products for a particular service provider, customer, or purpose.
The web page version.
Reminder that a mobile application is available for your smartphone or
tablet.
LCD Interface 33
Page 35

Mingle Manager (Browser) Interface
Item
Status
1
Home page – Click to view the Home Page.
Access your device and connection information, and configure device settings from the Mingle
Manager (browser) interface.
Home Page
The home page is the entry page for the Mingle Manager interface.
You can:
● View your data usage and status information for your data connection.
● Manage your mobile broadband network connection and Wi-Fi connections.
● View alert messages.
Mingle Manager (Browser) Interface 34
Page 36

Item
Status
2
Devices page – Click to view the Devices Page.
3
Wi-Fi page – Click to view the Wi-Fi Page.
4
GPS page – Click to view the GPS Page.
5
Settings page – Click to view the Settings Page.
6
Mobile broadband connection information – See Mobile Broadband Information
7
List of devices connected to the hotspot’s Main or Guest Wi-Fi networks.
8
Your Wi-Fi Details – Your Main Wi-Fi network’s name and password.
Mobile app store link – Click to view the NETGEAR Mobile Application Page in a
Twitter® – Click to view the AirCard Twitter feed in a new browser window or tab.
Facebook® – Click to view the AirCard Facebook page in a new browser window
Important Information – Click to read important safety information about the
13
Language – Switch between English and Spanish.
14
About – Information about your account, the device, and network status.
15
Support – Links to online resources (user guide, online help, etc.).
16
Estimated data usage for current session.
Estimated data usage for since last time counters were reset.
My Account Summary – Basic information about your Virgin Mobile data plan.
and Settings.
9
10
11
12
new browser window or tab. Use the links on that page to download mobile
Mingle Manager apps for your Apple, Android, or Kindle device.
(Your device must be connected to the network for this option to work.)
or tab. (Your device must be connected to the network for this option to work.)
Mingle Mobile Hotspot.
17
For more details, click Check Carrier Usage.
18
Mingle Manager (Browser) Interface 35
For more details, click Manage My Account to connect to your account at
virginmobileusa.com.
Page 37

Item
Status
Alerts – Alerts appear above the Data Usage area and remain until issues are
resolved.
Displaying the Mingle Manager Home Page
There are two ways you can display the home page of your device.
Note: You can display the home page only when your device is turned on and you have
established a connection to it (through Wi-Fi or through the micro-USB cable).
To display the home page, type one of the following in the address bar of your Web browser:
● http://minglehotspot
● http://192.168.1.1
Note: If you’re using the Google Chrome Web browser, make sure your browser navigates to
the address you typed instead of performing a Google search.
If your Web browser displays an error message, see Cannot Display the Home Page.
Logging In as an Administrator
Logging in to the home page allows you to view more detailed information about your device,
and to manage its settings, broadband network connection, and Wi-Fi networks.
Note: To log in to the home page, your computer must be tethered to your device, or
connected to your device’s Main Wi-Fi network. You cannot log in over the Guest Wi-Fi network.
Note: If you don’t log in, you can only view the current network connection status and a list of
devices connected to the Main and Guest Wi-Fi networks.
Note: To be able to make changes to your device’s settings, you must be connected to your
device via the Main Wi-Fi network, or via a tethered connection.
To log in:
1. In the address bar of your Web browser, type one of the following:
§ http://minglehotspot
§ http://192.168.1.1
2. In the Sign In field, enter the Mingle Manager administrator password (1–31 letters,
numbers, and symbols). (The default password is “password”. It’s recommended you
change the password, if you haven’t already. See Changing the Mingle Manager
Password.)
Mingle Manager (Browser) Interface 36
Page 38

Item
Description
Billing cycle
Data
3. Click Sign In.
After a period of inactivity, you will be automatically logged off (timeout security feature).
Data Usage
Data usage estimates are shown in the Data Usage section of the home page.
Note: Data usage amounts are approximate and should not be used for billing purposes. For
accurate data usage amounts, check with Virgin Mobile or click the Check Carrier Usage link in
the My Account Summary section to view your account details.
The Data Usage section displays cumulative statistics and current session statistics.
Used
Mingle Manager (Browser) Interface 37
Total amount of data used since the last reset.
Page 39

Item
Description
Reset
Click to set the displayed monthly usage values to 0 MB.
Used
Session
Used
Data amount used since your device connected to the network.
Elapsed
Item
Description
My number
The telephone number linked to your data plan.
Manage My
Click to connect to your account at virginmobileusa.com.
Item
Description
button
Important: This does not reset the actual data usage for the billing cycle.
since last
reset
time
The amount of data sent and received during the billing period for each
network type.
Length of time that your device has been connected to the network.
My Account Summary
The My Account Summary section shows basic information about your plan, and includes a link
to see more detailed information.
The following information is displayed.
Account
Alerts
The Alerts section shows network or device alerts for situations that require your attention.
The following information is displayed for each alert.
Mingle Manager (Browser) Interface 38
Page 40

Item
Description
Alert title
A short description of the issue to be addressed.
Description
The alert message and, if appropriate, links or buttons to take action on the
Item
Description
Signal
The more bars, the stronger the signal. See Signal Information for details.
Network
Name of the available network. For example, “Virgin Mobile”.
Network
LTE, 3G
The alerts disappear only when the issues they describe are resolved.
You can also view the alerts on the hotspot’s LCD. See Alerts Screen.
See also Alerts for a list of alerts you may encounter and the corrective actions required.
alert. (For example, the “Connect” link in the alert shown above would
make the device attempt to connect to the network.)
Status (Connection Details)
The Status section shows details about your mobile broadband service and connection state,
your hotspot’s battery charge level, and lists the devices that are connected to the Main and
Guest Wi-Fi networks.
The following information is displayed.
strength
carrier name
type
Mingle Manager (Browser) Interface 39
Page 41

Item
Description
Send /
Up (sending data) / Down (receiving data).
Connect /
Click this button to connect or disconnect your device from the mobile
Battery
Indicates the remaining capacity of the battery, and its charging state. See
Main Wi-Fi – A list of devices currently connected to the Main Wi-Fi
Receive
indicators
These indicators appear when you are connected to the mobile network.
The indicators are solid when transferring data, and hollow when no data is
being transferred.
Disconnect
button
charge level
Connected
Devices
network.
Battery Information and Settings.
network.
Guest Wi-Fi – A list of devices currently connected to the Guest Wi-Fi
network.
You can click any of the device names to view their details, or to block
them from using your network. See Displaying and Blocking Currently
Connected Devices (Block List).
Devices Page
The Devices page lets you see lists of devices that are connected to your Main and Guest Wi-Fi
networks.
Note: These lists are also shown in the Connected Devices section on the left side of the
page.
1. Log in to the home page. (See Logging In as an Administrator.)
Mingle Manager (Browser) Interface 40
Page 42

2. Click Devices.
Item
Description
Main Wi-Fi
A list of devices currently connected to the Main Wi-Fi network.
Guest Wi-Fi
A list of devices currently connected to the Guest Wi-Fi network.
The following information is displayed.
You can click any of the device names to view detailed information, and to block them from
using your network. See Displaying and Blocking Currently Connected Devices (Block List).
Wi-Fi Page
From the Wi-Fi page, you can configure the Wi-Fi network, including Wi-Fi security.
Connect Tab
From the Connect tab of the Wi-Fi page, you can configure access to your Main and Guest WiFi networks.
1. Log in to the home page. (See Logging In as an Administrator.)
Mingle Manager (Browser) Interface 41
Page 43

2. Click Wi-Fi > Connect.
Item
Description
Main Wi-Fi
This is the name that identifies your Main Wi-Fi network and is visible to other
This is the password that other Wi-Fi enabled devices need to connect to the
Connect a device to the Main Wi-Fi network using WPS. See Connecting
Guest Wi-Fi
You can:
● Edit the Main or Guest Wi-Fi names and passwords. See Change Wi-Fi Network Names
and Passwords.
● Turn the Guest Wi-Fi network on or off. See Setting up a Guest Wi-Fi Network.
● Connect devices using WPS. See Connecting Through WPS.
The following information is displayed.
Name
Password
WPS
Wi-Fi-enabled devices. See Change Wi-Fi Network Names and Passwords.
Main Wi-Fi network. See Change Wi-Fi Network Names and Passwords.
Through WPS.
Mingle Manager (Browser) Interface 42
Page 44

Item
Description
Turn Off /
Click this button to turn the Guest Wi-Fi network on or off.
This is the name that identifies your Guest Wi-Fi network and is visible to
This is the password that other Wi-Fi enabled devices need to connect to the
Connect a device to the Guest Wi-Fi network using WPS. See Connecting
Turn On
Note: The rest of the Guest Wi-Fi fields / buttons appear only when the
Guest Wi-Fi network is on.
Name
Password
WPS
other Wi-Fi-enabled devices. See Change Wi-Fi Network Names and
Passwords.
Guest Wi-Fi network. See Change Wi-Fi Network Names and Passwords.
Through WPS.
Options Tab
From the Options tab of the Wi-Fi page, you can configure your Wi-Fi network’s connection
parameters and security, and additional Wi-Fi options.
1. Log in to the home page. (See Logging In as an Administrator.)
Mingle Manager (Browser) Interface 43
Page 45

2. Click Wi-Fi > Options.
Item
Description
You can:
● Edit the Main or Guest Wi-Fi names and passwords. See Change Wi-Fi Network Names
and Passwords.
● Limit the number of devices that can connect to the Main and Guest Wi-Fi networks.
● Configure your Wi-Fi network’s connection parameters and security, and additional Wi-Fi
options.
Note: For some of these Wi-Fi settings, if you change them, all connected devices will be
disconnected and have to reconnect after the settings are saved.
The following information is displayed.
Mingle Manager (Browser) Interface 44
Page 46

Item
Description
Main Wi-Fi
Wi-Fi Name
This is the name that identifies your Main Wi-Fi network and is visible to
This is the password that other Wi-Fi enabled devices need to connect
Guest Wi-Fi
This is the name that identifies your Guest Wi-Fi network and is visible
This is the password that other Wi-Fi enabled devices need to connect
Generate a
If selected, a random password is used each time Guest Wi-Fi is
Max Wi-Fi
You can limit the total number of Wi-Fi devices (1-10) that can connect
Set the maximum number of Wi-Fi devices that can connect to each of
Wi-Fi Options
other Wi-Fi-enabled devices. (See Change Wi-Fi Network Names and
Passwords.)
Wi-Fi
Password
Wi-Fi network
name
Password
new password
each time I
turn on the
Guest Wi-Fi
to the Main Wi-Fi network. (See Change Wi-Fi Network Names and
Passwords.)
to other Wi-Fi-enabled devices. (See Change Wi-Fi Network Names and
Passwords.)
to the Guest Wi-Fi network. (See Change Wi-Fi Network Names and
Passwords.)
restarted. See Randomizing the Guest Wi-Fi Password.
to the Main and Guest Wi-Fi networks. See Setting the Maximum
Max Wi-Fi
Main Wi-Fi /
Guest Wi-Fi
Mingle Manager (Browser) Interface 45
Number of Wi-Fi Devices.
Note: If you change Max Wi-Fi the Main Wi-Fi and Guest Wi-Fi values
adjust automatically.
the Wi-Fi networks (Main and Guest). The total is limited to the Max WiFi value.
Click to increase the Main Wi-Fi number, or to increase the
Guest Wi-Fi number.
Page 47

Item
Description
Wi-Fi Info on
Choose whether to show or hide the Wi-Fi network name and password
Choose whether the Wi-Fi radio turns off or stays on when your device
Connection
This setting determines the type of wireless devices that can connect to
This is the active channel of the Wi-Fi access point. If your network is
This setting specifies the smallest packet size, in bytes, for which
This setting specifies the largest allowable size, in bytes, for a packet. If
Home
on the hotspot’s home screen. (Choose Hide if you want to be sure
unwanted users can’t look at the home screen and log in.) See
Displaying Main Wi-Fi Network Name and Password on LCD Home
Screen.
USB Tether
Mode
is tethered to a computer. See Disable Wi-Fi When Tethering Device
(Connected Through USB).
your network.
Recommended options:
● 802.11 G – Choose only if you’re certain that all of the Wi-Fi
devices used with your hotspot support 802.11 G. This option
ensures faster Wi-Fi speeds.
● 802.11 B/G/N or 802.11 B/G – Choose if you’re not sure which
modes the Wi-Fi devices used with your hotspot support.
Note: If you change this value to 802.11 B/G/N and the specified Wi-Fi
security Encryption type is not supported by this value, the security
Encryption type may change to WPA/WPA2 Personal.
Wi-Fi Channel
RTS Threshold
Fragmentation
Threshold
Mingle Manager (Browser) Interface 46
having performance issues (possibly caused by other Wi-Fi networks in
the vicinity using the same channel), try a different Wi-Fi channel. See
Wi-Fi Channel.
RTS/CTS (Request to Send/Clear to Send) handshaking is used. The
recommended value is 2347. Change this value only if you’re
experiencing inconsistent data flow. Make only minor changes to this
value.
the packet is larger than this, it is fragmented into multiple packets
before it is transmitted. To prevent poor network performance, it’s
recommended to keep this value as large as possible (up to 2346).
Page 48

Item
Description
Security
Broadcast
If broadcast is enabled (Show), the wireless network is displayed in the
The type of security used by the Main Wi-Fi network. See Wi-Fi
Guest
The type of security used by the Guest Wi-Fi network. See Wi-Fi
Network Name
list of Wi-Fi networks available in the local area. For increased security,
set this field to Hide. You will need to give the Wi-Fi network name
(Main or Guest) to the people who will be accessing your network, and
WPS will not be available.
Encryption
Encryption
Security.
Security.
MAC Filter Tab
MAC (Media Access Control) filtering can prevent unauthorized wireless devices from
connecting to your network.
The MAC filter is used to grant (“white list”) or block (“black list”) wireless devices access to the
Wi-Fi and mobile broadband (3G, LTE) networks. Access is based on the MAC address of each
wireless device.
MAC filtering increases security of your network. You can give access to your network, based
on the MAC address of the wireless devices. This makes it harder for a hacker to use a MAC
address to access your network.
1. Log in to the home page. (See Logging In as an Administrator.)
2. Click Wi-Fi > MAC Filter.
You can:
Mingle Manager (Browser) Interface 47
Page 49

● Turn MAC filtering off (“None”) or on (“Black List” or “White List”).
Item
Description
● None – Any device can connect to the Wi-Fi networks.
Black List or White List
A description of the device (the owner’s name, the device’s purpose,
MAC Address
The device’s MAC address.
● Add or remove a device from the list. (See “Specifying Computers That Can Access the
Network” and “Specifying Computers That Are Not Allowed to Access the Network” in
Allowing or Denying Computers Access to the Network (MAC Filter)).
The following information is displayed.
MAC Filter
Mode
Name
● Black List – The listed devices will not be able to connect to the
Wi-Fi networks.
● White List – Only the listed devices will be allowed to connect to
the Wi-Fi networks.
etc.)
GPS Page
From the GPS page, you can obtain your current location coordinates (latitude, longitude,
altitude, etc.).
You can also enable or disable GPS tracking, and choose the tracking method being used (onetime or continuous).
1. Log in to the home page. (See Logging In as an Administrator.)
Mingle Manager (Browser) Interface 48
Page 50

2. Click GPS.
Item
Description
Most recent position fix
Update
If the GPS Mode is:
You can:
● Turn GPS on/off
● Start or Stop tracking (if GPS Mode is Continuous)
● Update the current location information (if GPS Mode is One-time)
Note: The first time that you access GPS, you will be prompted to read and accept the
Location-Based Services (LBS) end user license agreement. You must accept the agreement
before you can use the GPS feature.
Note: For best results, minimize the number of obstructions between your device and the GPS
satellites.
The following information is displayed.
location /
Cancel
or
Start / Stop
● One-time – Click Update location to get a location fix, or click
Cancel to stop waiting for the fix to complete.
● Continuous – Click Start to begin tracking and refreshing the
location fix information regularly, or click Stop to stop tracking.
Mingle Manager (Browser) Interface 49
Page 51

Item
Description
Status
Message indicating what the GPS system is doing (For example,
Time of fix
This is the date and time that the last fix was taken.
Latitude
Latitude at time of last fix. (For example, “33.1349”)
Longitude
Longitude at time of last fix. (For example, “-117.2805”)
Altitude
Elevation at time of last fix. (For example, “40 meters”)
Speed at which device was moving at time of last fix. (For example, “3.1
Direction in which device was moving at time of last fix, using 360°
Satellites
The number of satellites used to get the last fix.
GPS Settings
Turns the GPS service on or off. See Enabling / Disabling GPS.
This setting specifies whether to use metric units when displaying the
This setting determines how often your device should obtain a fix. See
“Tracking a fix”, “Searching for satellites”, “Inactive”)
Speed
Heading
Enable GPS
Use Metric
units
mph”)
compass (0 = North, 90 = East, 180 = South, 270 = West)
Note: For best results, minimize the number of obstructions between
your device and the GPS satellites.
GPS results (for example, for altitude and speed). See Using Metric
Units.
Setting the GPS Mode.
● One-time – A single fix is used. Use this option if you’ll be using
GPS mode
your device at the same location.
● Continuous – Fixes are obtained every few seconds (also
known as auto-tracking). This is useful for turn-by-turn (TBT)
navigation applications, such as driving directions, and for
NMEA-enabled applications.
Settings Page
From the Settings page, you can configure your device, network settings, and router settings.
Mingle Manager (Browser) Interface 50
Page 52

General > Device Tab
Item
Description
Language
From the General > Device tab of the Settings page, you can configure your device’s display,
sleep settings, Mingle Manager (web browser) URL and Mingle Manager administrator
password.
1. Log in to the home page. (See Logging In as an Administrator.)
2. Click Settings > General > Device.
The following information is displayed.
Mingle Manager (Browser) Interface 51
Page 53

Item
Description
Default
Choose the default language used for the Mingle LCD display and the
Screen
Set the brightness of the LCD to Bright or Dim. (Use Dim to make your
Screen Timeout
The length of time the LCD will display, while on battery power, before
The length of time the LCD will display, while using the AC charger,
The length of time the LCD will display, while tethered to the computer,
Sleep
Turns off the Wi-Fi radio if no devices have been connected for this
Turns off the Wi-Fi radio if no devices have been connected for this
Language
Mingle Manager (English or Español).
See Interface Language.
Screen
Brightness
Timeout on
Battery
Timeout on AC
Timeout on
USB
battery last longer.)
See Setting the LCD Brightness.
turning off.
Choose the shortest period to make your battery last longer. See Setting
the LCD Timeout.
before turning off.
Choose the shortest period to make your battery last longer. See Setting
the LCD Timeout.
before turning off.
Choose the shortest period to make your battery last longer. See Setting
the LCD Timeout.
Wi-Fi Sleep on
Battery
Wi-Fi Sleep on
AC
Mingle Manager (Browser) Interface 52
period of time, while on battery power. (Choose 5 minutes to make your
battery last longer.) See
period of time, while connected to the AC charger. (Choose 5 minutes to
make your battery last longer.) See
Setting the Sleep (Inactivity) Timer.
Setting the Sleep (Inactivity) Timer.
Page 54

Item
Description
Wi-Fi Sleep on
Turns off the Wi-Fi radio if no devices have been connected for this
Homepage
Mingle
The URL used to show the homepage. See Changing the Mingle
Show
Shows or hides the password on this screen.
Mingle
The password used to show the homepage. See Changing the Mingle
USB
period of time, while tethered to the computer. (Choose 5 minutes to
make your battery last longer.) See
Setting the Sleep (Inactivity) Timer.
Manager
Password \
Hide Password
Manager
Password
Manager URL.
Manager Password
General > Software and Reset Tab
From this tab, you can save your current device settings and restore them later, update your
software, reset your device to default settings, and set your device startup options.
1. Log in to the home page. (See Logging In as an Administrator.)
Mingle Manager (Browser) Interface 53
Page 55

2. Click Settings > General > Software and Reset.
Item
Description
Download /
Click Save to make a copy (export) of the hotspot’s current
You can:
● Backup and restore your hotspot’s configuration, if needed. See Exporting and Importing
Settings.
● Update your device’s software. See Update Mobile Hotspot Software and Firmware.
● Reset some or all of your device’s settings. See Resetting to Factory Default Settings,
Resetting Device Settings Only and Clearing Account Details Only.
● Configure the hotspot to install tethering drivers (if needed) when device is connected
via USB to a Windows or Mac system. See TRU-Install.
The following information is displayed.
Backup
Settings
configuration, so that you can restore it later if needed. See Exporting
Settings.
Mingle Manager (Browser) Interface 54
Page 56

Item
Description
Restore
Settings
Click Choose file to use a previously saved copy of your device
Click Check for update to see if a new version of your device’s
● Factory Reset – Click to reset your device to factory default
Select the checkbox to install tethering drivers (if needed) when device
Software
Update
configuration. See Importing Settings.
software has been released, and if there is, download and install it. The
last time you checked is shown on the screen (Last checked at). See
Update Mobile Hotspot Software and Firmware.
Note: Software downloads count against your plan’s data limit.
settings and clear your account details. See Resetting to Factory
Default Settings. (You can only do this with assistance from
Virgin Mobile.)
Reset
Startup
options
● Settings Reset – Click to reset your device to factory default
settings, but leave your Virgin Mobile account details unchanged.
See Resetting Device Settings Only.
● Clear Programming – Click to clear your account details. See
Clearing Account Details Only.
is connected via USB to a Windows or Mac system. See TRU-Install.
General > System Logs Tab
Technical support staff may need you to configure system logging in this tab for the purpose of
error diagnosis.
Note: You should only adjust settings in this tab under the direction of technical support staff.
1. Log in to the home page. (See Logging In as an Administrator.)
Mingle Manager (Browser) Interface 55
Page 57

2. Click Settings > General > System Logs.
You can:
● Enable logging
● Clear logs
● Download logs
Network > Preferences Tab
From this tab, you can configure your device’s configuration for selecting networks, and receive
network configuration updates from Virgin Mobile.
1. Log in to the home page. (See Logging In as an Administrator.)
2. Click Settings > Network > Preferences.
Mingle Manager (Browser) Interface 56
Page 58

You can:
Item
Description
The type of network that your device can connect to. See Setting the
Click to check if a new PRL (Preferred Roaming List) is available on the
Update Profile
Click to update network profile.
Advanced
Use only when instructed by Virgin Mobile.
● Configure network selection mode
● Check the network for a new Preferred Roaming List
● Update network profile
The following information is displayed.
Network Mode
Update PRL
Settings
Allowed Network Mode.
network, and use it to update your device.
Network > APN (Access Point Name) Tab
To connect to a different carrier’s network, your device must be configured with an Access Point
Name (APN) for that carrier. The APN is checked by the carrier to determine the type of network
connection to establish.
Note: Your NETGEAR Mingle Mobile Hotspot comes with the APN for Virgin Mobile
preconfigured.
In this tab, you can add (or modify) APNs for the networks you want to connect to.
1. Log in to the home page. (See Logging In as an Administrator.)
Mingle Manager (Browser) Interface 57
Page 59

2. Click Settings > Network > APN.
Item
Description
Active
The APN currently in use. Only one APN can be marked as active.
Name
Network carrier name (for example, “Virgin Mobile”).
APN
The operator’s access point name (obtained from the operator).
If required, the username (obtained from the operator) used to connect
If required, the password (obtained from the operator) used to connect
Authentication
The network authentication code (None, PAP, CHAP, PAP or CHAP).
To add (or modify) an APN, see Configuring Access Point Names.
The list of all APNs that have been set up includes the following information.
Username
Password
to the APN.
to the APN.
Network > SIM Security Tab
If you are using a SIM that has security enabled, you can disable SIM Security from this tab.
This tab shows the current status of this security feature, and allows you to disable SIM security
if it has been enabled.
Note: The SIM PIN is required to disable SIM Security.
1. Log in to the home page. (See Logging In as an Administrator.)
Mingle Manager (Browser) Interface 58
Page 60

2. Click Settings > Network > SIM Security.
Item
Description
The current state of the SIM PIN feature (Inactive or Active). Click
3. If the SIM has security enabled, SIM Security will be Active. Click Disable to disable SIM
security.
The following information is displayed.
SIM Security
Disable to disable SIM security.
Network > Status Details Tab
This tab shows you details about the current mobile broadband connection (3G, LTE).
1. Log in to the home page. (See Logging In as an Administrator.)
Mingle Manager (Browser) Interface 59
Page 61

2. Click Settings > Network > Status Details.
Item
Description
Status
Indicates whether you are connected to an LTE network.
PS service
Indicates the LTE service type.
The signal strength of the LTE network. (Reference Signal Received
The signal quality of the LTE network (Reference Signal Received
The information that is displayed depends on your current connection.
4G/LTE Details
type
RSRP
RSRQ
Mingle Manager (Browser) Interface 60
Power)
Quality). RSRQ is the ratio between the RSRP and the Received Signal
Strength Indicator (RSSI).
Page 62

Item
Description
RS-SINR
Signal to Interference Noise Ratio based on Reference Signals
Cell ID
The LTE cell that is currently serving the hotspot.
TX Power
The transmitter power. A higher number is better.
IP Address
The IP address of the 4G LTE connection.
Channel UL
The channel that is used to upload to the 4G LTE network.
Channel
The channel used by the 4G LTE radio. Technical support staff may
The International Mobile Station Identity is an identifier of a device on
Current radio
The LTE band being used for the connection.
Reject Code
Technical support staff may request this value from you.
ICCID
The Integrated Circuit Card ID.
Item
Description
Status
Indicates whether you are connected to a 3G network.
PS service
Indicates the 3G service type (for example, CDMA, HRPD,
IP Address
The IP address of the 3G connection.
Coverage type
The type of 3G network available.
RSSI
Signal strength of the network.
Dimensionless ratio of the average power of a channel, typically the pilot
MDN
Mobile Directory Number. This is your 10 digit telephone number.
(narrowband and wideband).
Number
IMSI
band
3G/LTE Details
type
request this value from you.
the network.
CDMA_HRPD).
Ec/Io
Mingle Manager (Browser) Interface 61
channel, to the total signal power.
Page 63

Item
Description
MSID
Mobile Station Identifier.
DRC Cover
Digital Rate Control Cover.
DRC Value
Digital Rate Control Value.
Channel
DRC Channel number.
PRL Version
Preferred Roaming List version. To update the PRL, see Network >
1xRTT PN
Technical support staff may request this value from you.
EVDO PN
Technical support staff may request this value from you.
PRev
Technical support staff may request this value from you.
Rx Power
Technical support staff may request this value from you.
The Serving System ID identifies your home network area and is used to
NID
Technical support staff may request this value from you.
Packet Zone ID
Technical support staff may request this value from you.
Frame Error
Used to determine the quality of a signal connection. Technical support
Subnet Color
Technical support staff may request this value from you.
AN-AAA
Technical support staff may request this value from you.
Packet Error
Technical support staff may request this value from you.
MIP Error
The Mobile IP Error Code. Technical support staff may request this
Preferences Tab.
Serving SID
Rate
Code
Rate
Code
determine if you are ‘home’ or ‘roaming’.
staff may request this value from you.
value from you.
Router > Basic Tab
From this tab you can configure the router’s UPnP feature, LAN settings, and DMZ settings.
1. Log in to the home page. (See Logging In as an Administrator.)
Mingle Manager (Browser) Interface 62
Page 64

2. Click Settings > Router > Basic.
Item
Description
UPnP
Current state of the Universal Plug and Play feature (On or Off). (See
LAN
IP Address
The routing hardware’s IP address on the LAN.
Netmask
The routing hardware’s internal LAN subnet mask.
USB IP
The IP address assigned to the hotspot by the computer to which it is
VPN
VPN connections are enabled (On) or disabled (Off). See Enabling VPN
3. You can make changes to any of these fields. When you finish, click Submit.
The following information is displayed.
UPnP
Address
UPnP (Universal Plug and Play).)
tethered.
Passthrough
Mingle Manager (Browser) Interface 63
Passthrough.
Page 65

Item
Description
DHCP Server
This field enables (On) or disables (Off) DHCP. See DHCP.
DHCP IP
This specifies the starting and ending address of the range of IP
This is the amount of time, in minutes, a computer can use its assigned
This specifies how the DNS servers (that the DHCP clients are to
Address of a manual DNS server. (This field appears only if DNS Mode
Address of a manual DNS server. (This field appears only if DNS Mode
DMZ
DMZ Enabled
Enable / disable demilitarized zone.
If DMZ is enabled, this is the IP address of a single computer used to
Range
DHCP lease
time
DNS mode
addresses available for your device to dynamically (that is, not
permanently) assign to computers connected to it. See
IP address before it is required to renew the lease. After this time is up,
the computer is automatically assigned a new dynamic IP address. See
DHCP.
Enter a number between 2 and 10080.
communicate with) are obtained.
§ Manual – The routing hardware assigns DHCP clients the
DNS servers specified in the DNS 1 and DNS 2 fields
Use this option to access a DNS server that provides
customized addressing or if you have a local DNS server on
your network.
Note: The DNS 1 and DNS 2 fields appear only if DNS Mode is
Manual.
DHCP.
§ Auto – The DNS server specified by Virgin Mobile is used.
DNS 1
DNS 2
DMZ Address
is Manual.)
is Manual.)
receive all unsolicited incoming connections.
Router > Port Forwarding Tab
Port forwarding lets you forward incoming traffic to specific ports and devices (per their local IP
address) on your network. (Normally, incoming traffic is blocked.)
Mingle Manager (Browser) Interface 64
Page 66

1. Log in to the home page. (See Logging In as an Administrator.)
2. Click Settings > Router > Port Forwarding.
You can:
● Enable or disable port forwarding. See Enabling Port Forwarding.
Note: You must enable port forwarding before you can view and update the port forwarding
list.
● Enter port forwarding details for an application. (See Enabling Port Forwarding for an
Application.)
For example, you can configure port forwarding so that:
● You can access your Remote Desktop from the Internet (by specifying the WAN [public]
IP address that your device is using).
● Internet users can access a Web, FTP, or email server, or gaming or Internet application
hosted by your computer.
● Remove an application from the port forwarding list. (See Disabling Port Forwarding for
an Application.)
Note: Port forwarding creates a security risk. When not required, port forwarding should be
disabled.
Note: Port forwarding does not apply to normal browsing, file downloading, running most
online games or other applications hosted on the Internet. (Some online games require port
forwarding.)
The following information is displayed.
Mingle Manager (Browser) Interface 65
Page 67

Item
Description
Port
Forwarding
Indicates whether port forwarding is on (Enable) or off (Disable).
List of forwarded ports – This list appears only if port forwarding is on. Each port displays:
Label
A name describing the application using the port.
IP
The IP address of the server being accessed.
The port that is forwarded. If the application uses more than one port,
Protocol
The protocol (TCP, UDP, etc.) being used for this application.
Port
each port must be forwarded separately.
Router > Port Filtering Tab
Port filtering lets you either allow (white list) or prevent (black list) which applications (for
example, http, ftp, email servers) can access the Internet.
1. Log in to the home page. (See Logging In as an Administrator.)
2. Click Settings > Router > Port Filtering.
You can:
● Enable port filtering. (See Port Filtering Panel: Enabling Port Filterings.)
● Add an application to a port filtering list. (See Port Filtering Panel: Enabling Port Filtering
for an Application.)
Mingle Manager (Browser) Interface 66
Page 68

● Remove an application from the port filtering list. (See Port Filtering Panel: Disabling
Item
Description
Indicates which type of filtering is being used.
List of filtered ports – This list appears only if port filtering is on (black list or white list).
Label
A name describing the application using the port.
Port
The port that the application uses to access the Internet.
Protocol
The protocol (TCP, UDP, etc.) being used by the application.
Port Filtering for an Application.)
The following information is displayed.
● No Filtering – All applications are allowed to access the
Internet.
● Black List – Applications in the list are not allowed to access the
Internet.
Port Filtering
● White List – Only the applications in the list are allowed to
access the Internet.
Note: Only one list can be active, either a Black List or a White List.
Note: The Black List and White List are separate – if you change the
Port Filtering type, the corresponding list is displayed.
Each port displays:
Support Page
This page provides links to resources that can help you use your device and manage your
Virgin Mobile account.
1. Log in to the home page. (See Logging In as an Administrator.)
Mingle Manager (Browser) Interface 67
Page 69

2. Click the Support link in the top right corner.
Item
Description
Open an online copy of this guide in a new Web browser window or tab.
Online Help
View the topics of this user guide in an online help format.
Visit the provided link to view the online support website where you can
Manage
Contact Virgin Mobile Customer Service by telephone (for business use
Feedback
Send NETGEAR your comments on your device. See Feedback Page.
The following information is displayed.
User Guide
Web
Account
(You must be connected to the Internet to use this link.)
find a variety of resources to help you with your hotspot. (You must be
connected to the Internet to use this link.)
or personal use).
About Page
View information about your device and account.
1. Log in to the home page. (See Logging In as an Administrator.)
Mingle Manager (Browser) Interface 68
Page 70

2. Click the About link in the top right corner.
Item
Description
Account Details
My number
The hotspot’s telephone number.
MSID
The Mobile Station ID associated with your phone number.
The MEID of your device (displayed on the packaging and inside the
ICCID
The serial number of the SIM.
You can:
● Save the image on this page to a file on your computer. Click Save to file.
The following information is displayed.
MEID
battery compartment).
Mingle Manager (Browser) Interface 69
Page 71

Item
Description
IMEI
The device’s unique IMEI (International Mobile Equipment Identity)
Wi-Fi Details
The hotspot’s Main Wi-Fi network name. (See also Change Wi-Fi
Wi-Fi
The hotspot’s Main Wi-Fi network password. (See also Change Wi-Fi
The MAC address of the LTE module. Each wireless device has a
Encryption
The security standard used for the Wi-Fi network. (See Wi-Fi Security.)
Wi-Fi Devices
Number of devices currently connected to the hotspot’s Wi-Fi networks.
Max Wi-Fi
Maximum number of devices that can connect to the hotspot’s Main Wi-
Maximum number of devices that can connect to the hotspot’s Guest
Indicates whether Wi-Fi network name is being broadcast. (See Options
Firmware
FW Version
The hotspot’s firmware version.
FW Build Date
The date the firmware version was created.
Web App
The Mingle Manager version.
Bootloader
The version of the software that starts up your device.
Device
code.
Wi-Fi name
password
MAC Address
Devices
Max Guest WiFi Devices
Broadcast
Network Name
Network Names and Passwords.)
Network Names and Passwords.)
unique MAC address (assigned by its manufacturer).
Fi network. (See also Setting the Maximum Number of Wi-Fi Devices.)
Wi-Fi network. (See also Setting the Maximum Number of Wi-Fi
Devices.)
Tab.) You could choose to not broadcast, and give the Wi-Fi name
directly to users.
Version
Version
Mingle Manager (Browser) Interface 70
Page 72

Item
Description
Model
The manufacturer’s name for your device.
Mingle
Manager
URL for the Mingle Manager web app.
PRL Version
Preferred Roaming List version number.
Power State
The hotspot’s power state (Online, Offline).
The hotspot’s temperature. If your device is too warm, make sure the
Current
The amount of power the hotspot is currently using.
Battery charge
The amount of charge remaining in the battery. (See Charging the
The current operating condition of the battery (Charging, No Battery,
Battery
The battery’s temperature. If the battery is getting too warm, turn your
WWAN Info
Activation
The date that the hotspot was activated on the Virgin Mobile network.
Refurbished
The date that your device was refurbished (if applicable).
IP Address
The IP address of the WWAN radio.
User NAI
3G network identifier
LTE APN NI
4G network identifier
Lifetime LTE
The total amount of data sent and received while connected to LTE
Current
temperature
voltage
level
Battery status
temperature
Date
area is well-ventilated and air can circulate around your device to cool it.
(See
Environmental Specifications.)
Battery.)
Normal, Low, Critical).
device off and do not connect to the charger.
Date
Transferred
Mingle Manager (Browser) Interface 71
networks.
Page 73

Item
Description
Lifetime 3G
Transferred
The total amount of data sent and received while connected to 3G
Lifetime Total
The total amount of data sent and received by the hotspot.
Network Status
View Details
Click the link to jump to the Network > Status Details Tab.
Item
Description
Connect with Us
Click to view the AirCard Facebook page in a new browser window or
Transferred
networks.
Feedback Page
Use the links on this page to send your comments on your device and look up support
information.
1. Log in to the home page. (See Logging In as an Administrator.)
2. Click Support.
3. Click Feedback.
The following page appears:
The following information is displayed.
Facebook
Mingle Manager (Browser) Interface 72
tab. (Your device must be connected to the network for this option to
work.)
Page 74

Item
Description
Twitter
Click to view the AirCard Twitter feed in a new browser window or tab.
Product Support
User Guide
Open a pdf version of this user guide in a new window or tab.
Online Help
Open an online version of this user guide in a new window or tab.
(Your device must be connected to the network for this option to work.)
Mingle Manager (Browser) Interface 73
Page 75

Device Settings
Use the Mingle Manager to configure and manage your device’s appearance, performance, and
access.
Interface Language
The mobile hotspot’s LCD screen and the Mingle Manager can be viewed in English or Spanish.
You can set the default language (for the LCD and the Mingle Manager) in the Mingle
Manager’s Settings > General > Device page, and you can temporarily change the Mingle
Manager’s language using the language selection box beside the Logout link at the top of the
screen.
Setting the Default Language
The default language is the language that will be used on the mobile hotspot’s LCD screen, and
whenever you first open the Mingle Manager.
In the Mingle Manager (http://minglehotspot)
1. Log in to the home page. (See Logging In as an Administrator.)
2. Click Settings > General > Device.
3. Beside the Default Language, select English or Español.
4. Click Submit.
Temporarily Setting the Mingle Manager Language
You can temporarily change the language used to display the Mingle Manager on your
computer. If you close the browser completely, the next time you open the Mingle Manager, the
default language will be used.
In the Mingle Manager (http://minglehotspot)
■ In the language box at the top right corner of the screen, select the language to use
temporarily.
Display Settings
Adjust your screen’s settings to suit your surroundings and to prolong the battery life.
Setting the LCD Timeout
Use this feature to select the delay times before the LCD automatically turns off while running
on battery power, connected to the AC charger, or tethered via USB.
Device Settings 74
Page 76

You can adjust these settings on the Mingle Manager’s Settings > General > Device page.
Note: The LCD turns on if an alert occurs.
In the Mingle Manager (http://minglehotspot)
1. Log in to the home page. (See Logging In as an Administrator.)
2. Click Settings > General > Device.
3. Beside the timeouts you want to set (Timeout on Battery, Timeout on AC, Timeout on
USB), select the desired timeout periods. (A smaller value helps prolong the battery life.)
4. Click Submit.
Setting the LCD Brightness
Use this feature to adjust your screen’s brightness to suit your surroundings and to prolong the
battery life.
You can adjust this setting on the Mingle Manager’s Settings > General > Device page.
In the Mingle Manager (http://minglehotspot)
1. Log in to the home page. (See Logging In as an Administrator.)
2. Click Settings > General > Device.
3. Beside Screen Brightness, select the desired brightness level (Bright or Dim).
(Choose Dim to prolong the battery life.)
4. Click Submit.
Router Settings
Adjust your device’s router settings through the Basic, Port Forwarding, and Port Filtering
tabs.
Enabling VPN Passthrough
If you want to connect to a corporate network using their VPN (Virtual Private Network), you
need to enable VPN Passthrough.
1. Log in to the home page. (See Logging In as an Administrator.)
2. Click Settings > Router > Basic.
3. Beside VPN Passthrough, select On.
4. Click Submit.
Device Settings 75
Page 77

UPnP (Universal Plug and Play)
UPnP provides simple and robust connectivity among consumer electronics, intelligent
appliances, and mobile devices from many different vendors. (For more information, see
upnp.org.)
Note: If UPnP is enabled, there are potential security risks.
Enabling UPnP
Before you can use UPnP, you must enable it.
1. Log in to the home page. (See Logging In as an Administrator.)
2. Click Settings > Router > Basic.
3. Next to UPnP, select On.
4. Click Submit.
DHCP
DHCP (Dynamic Host Control Protocol) automatically assigns an IP address to each device on
the network and manages other network configuration information for devices connected to your
network. You do not need to manually configure the IP address on each device that’s on your
network.
The assigned IP addresses are not permanent (as opposed to when using static IP).
Most ISPs (Internet Service Providers) use DHCP.
Normally, you should enable DHCP, in which case you must configure each device on the
network with one of the following:
● TCP/IP settings set to “Obtain an IP address automatically.”
● TCP/IP bound to the Ethernet connection with DHCP.
If DHCP is disabled, you must configure each device on the network with:
● Fixed (permanent/static) IP address.
● DNS server addresses (provided by Virgin Mobile).
Enabling DHCP
1. Log in to the home page. (See Logging In as an Administrator.)
2. Click Settings > Router > Basic.
3. Next to DHCP Server, select Enabled.
Device Settings 76
Page 78

4. You can set the following DHCP settings:
§ DHCP IP Range — This is the starting and ending address of the range of IP
addresses available for your device to dynamically (that is, not permanently) assign
to computers connected to it.
The start address must be 192.168.1.10 or above.
The ending address must be 192.168.1.50 or below.
§ DHCP Lease Time — This is the amount of time, in minutes, a computer can use its
assigned IP address before it is required to renew the lease. After this time is up, the
computer is automatically assigned a new dynamic IP address.
Enter a number between 2 and 10080.
§ DNS Mode — This specifies how the DNS servers (that the DHCP clients are to
communicate with) are obtained. (See DNS Mode.)
5. Click Submit.
DNS Mode
The DNS Mode setting specifies how the DNS servers (that the DHCP clients are to
communicate with) are obtained.
1. Log in to the home page. (See Logging In as an Administrator.)
2. Click Settings > Router > Basic.
3. Set DNS Mode to one of the following:
§ Auto — The DNS server specified by Virgin Mobile is used.
§ Manual — The routing hardware assigns to DHCP clients the DNS servers specified
in the DNS 1 and DNS 2 fields. (These fields appear when Manual is selected.)
Use this option to access a DNS server that provides customized addressing or if
you have a local DNS server on your network.
4. Click Submit.
Enabling Port Forwarding
Before you can use or configure Port Forwarding, you must enable it:
1. Log in to the home page. (See Logging In as an Administrator.)
2. Click Settings > Router > Port Forwarding.
3. Next to Port Forwarding, select Enable.
Device Settings 77
Page 79

4. Click Submit.
Enabling Port Forwarding for an Application
You can enable port forwarding for certain application types.
Note: Port forwarding must currently be enabled. (See Enabling Port Forwarding.)
1. Log in to the home page. (See Logging In as an Administrator.)
2. Click Settings > Router > Port Forwarding.
3. In the blank row of the list, enter a Label that describes the application (for example,
“RandomEmailApp”).
4. In the IP field, enter the IP address of the server to be accessed.
5. In the Port field, enter the port used by the application. (If the application uses more than
one port, each port must be forwarded separately.)
6. In the Protocol list, click the protocol(s) used for this application (TCP, UDP).
7. Click the to add this row to the list.
8. Click Submit.
Disabling Port Forwarding for an Application
If you want to stop forwarding any ports, you can remove them from the forwarding list.
Note: Port forwarding must currently be enabled. (See Enabling Port Forwarding for an
Application.)
1. Log in to the home page. (See Logging In as an Administrator.)
2. Click Settings > Router > Port Forwarding.
3. Click the beside the row that you want to remove.
4. Click Submit.
DMZ
You can select one computer to receive all unsolicited incoming connections.
The IP address of the DMZ (“demilitarized zone”) is the default recipient of incoming packets
(from the Internet) that are not handled by port forwarding rules or NAT’d connections:
● If port forwarding is enabled, incoming traffic is routed according to the port forwarding
rules or NAT’d connections.
Device Settings 78
Page 80

● If incoming traffic was not routed as a result of the above:
§ If DMZ is enabled, then incoming traffic is routed to the computer that uses the IP
address specified by the DMZ settings.
§ If DMZ is not enabled, the incoming traffic is blocked.
Note: Putting a computer in the DMZ opens all the ports of that computer, and exposes that
computer to various security risks. Use this option only as a last resort — if possible, use other
options instead (for example, port forwarding).
Enabling DMZ
Before you can use or configure DMZ, you must enable it.
1. Log in to the home page. (See Logging In as an Administrator.)
2. Click Settings > Router > Basic.
3. Next to DMZ Enabled, select On.
4. Click Submit.
Configuring DMZ
Specify which computer is to receive all unsolicited incoming connections.
Note: DMZ must currently be enabled. (See Enabling DMZ.)
1. Log in to the home page. (See Logging In as an Administrator.)
2. Click Settings > Router > Basic.
3. In the DMZ Address, enter the IP address of the computer that you want exposed to the
Internet. (If you don’t know how to find the IP address, see Finding the IP Address.)
4. Click Submit.
Port Filtering Panel: Enabling Port Filterings
Before you can use or configure Port Filtering, you must enable it.
1. Log in to the home page. (See Logging In as an Administrator.)
2. Click Settings > Router > Port Filtering.
3. In the Port Filtering list, select Black List to prevent specific applications from using the
Internet, or White List to allow only specific applications to use the Internet.
4. Click Submit.
Device Settings 79
Page 81

Port Filtering Panel: Enabling Port Filtering for an Application
You can enable port filtering for certain application types.
Note: Port Filtering must currently be enabled. (See Port Filtering Panel: Enabling Port
Filterings.)
1. Log in to the home page. (See Logging In as an Administrator.)
2. Click Settings > Router > Port Filtering.
3. In the Label field, enter a name that describes the application being filtered (for
example, “RandomEmailApp”).
4. In the Port field, enter the port used by the application.
5. In the Protocol list, click the protocol(s) used for this application (TCP, UDP, or both).
6. Click the to add this filter to the list.
7. Click Submit.
Port Filtering Panel: Disabling Port Filtering for an Application
If you currently have port filtering enabled and some ports already in the list (Black List or White
List), you can remove any of those rows.
Note: Port Filtering must currently be enabled. (See Port Filtering Panel: Enabling Port
Filterings.)
1. Log in to the home page. (See Logging In as an Administrator.)
2. Click Settings > Router > Port Filtering.
3. Make sure you’ve enabled the correct port filtering type (Black List or White List).
4. To remove an application from the list click the beside the row that you want to
remove.
5. Click Submit.
Login Settings
Changing the Mingle Manager URL
You may want to change the URL for the Mingle Manager to something more memorable.
To change the URL:
1. Log in to the home page. (See Logging In as an Administrator.)
Device Settings 80
Page 82

2. Click Settings > General > Device.
3. In the Mingle Manager field (in the Homepage section), type the new value (maximum
31 letters and numbers).
4. Click Submit.
Changing the Mingle Manager Password
For security reasons, you should change the Mingle Manager password on a regular basis.
Note: If you forget the Mingle Manager password, you’ll need to reset your device to its default
settings and go through the device setup. (See What Do I Do if I Forget the Administrator
Password?
To change the Mingle Manager administrator password:
1. Log in to the home page. (See Logging In as an Administrator.)
2. Click Settings > General > Device.
3. Click Show Password.
4. In the Mingle Manager Password field, type the new password (1–31 letters, numbers,
and symbols).
5. Click Submit.
Device Settings 81
Page 83

Configuring Networks
Find out how to check your activation status and data usage, and set up your device to connect
to the Virgin Mobile network.
Viewing Network Activat ion Inf or mation
You can check whether network access is activated.
1. Log in to the home page. (See Logging In as an Administrator.)
2. Click About in the top right corner of the page.
3. Check the Activation Date in the WWAN Info section. This is the date that the hotspot
was activated on the Virgin Mobile network.
Viewing Data Usage
You can view an estimate of your data usage on your device’s home screen, and on the Mingle
Manager’s home page.
Note: The data usage shown is an estimate only and is not accurate for billing purposes.
Note: The session data counter resets automatically each time your device is powered off and
on, and when the mobile broadband network connection disconnects and reconnects (for
example, when going through a tunnel). The plan data counter does not reset automatically, but
you can click Reset to reset it manually.
On the LCD screen
The data usage shown on the home screen is the total used since the counter was last
manually reset.
In the Mingle Manager (http://minglehotspot)
The data usage shown on the home page is the total used since the counter was last manually
reset.
To see detailed data usage, log in to the home page. (See Logging In as an Administrator.)
The Data Usage Session section shows:
● Amount of data used in the current session.
● The length of time the connection has been active.
The Data Usage Billing Cycle section shows:
Configuring Networks 82
Page 84

● Total amount of data used since the counter was last reset manually, and amounts used
for each network type.
● Check Carrier Usage – Click to connect to Virgin Mobile’s website and view detailed
billing plan information.
Network Settings
Adjust your device’s network settings to select the network types that can be connected.
Setting the Allowed Network Mode
Use this feature to select the types of networks that your device can connect to.
You can adjust this setting on the Mingle Manager’s Settings > Network > Preferences page,
to one of the following options:
● Automatic – The connection will be established on the fastest available network.
● LTE only – The connection can be established only on an LTE network. Your device will
not connect to CDMA networks.
● CDMA only – The connection can be established only on a CDMA (3G) network. Your
device will not connect to LTE networks.
In the Mingle Manager (http://minglehotspot)
1. Log in to the home page. (See Logging In as an Administrator.)
2. Click Settings > Network > Preferences.
3. Beside Network Mode, select the desired network mode that your device can connect
to.
4. Click Submit.
Configuring Access Point Nam es
Your device comes preconfigured with the Access Point Names (APN) for Virgin Mobile’s 3G
and LTE networks.
To add an APN for another network:
1. Log in to the home page. (See Logging In as an Administrator.)
2. Click Settings > Network > APN.
3. In the blank line, enter the APN details:
§ Active – If the new APN is going to be used now, select this button.
Configuring Networks 83
Page 85

§ Name – Enter a short description (for example, the carrier name).
§ APN – Enter the APN you obtained from the carrier.
§ Username – Enter the username you obtained from the carrier (if required).
§ Password – Enter the password you obtained from the carrier (if required).
§ Select the Authentication mode to be used (None, PAP, CHAP, PAP or CHAP).
4. Click the beside the new APN entry.
To select the APN to be used:
■ Select the Active button at the beginning of the entry.
To remove an APN from the list:
■ Click the beside the APN entry.
Configuring Networks 84
Page 86

Software and Reset
Find out how to export (backup) and import (restore) your device settings, update software, and
reset your device to default settings.
Exporting and Importing Settings
The NETGEAR Mingle Mobile Hotspot lets you save your device settings so that you can make
changes to your configuration and, if necessary, restore the original settings.
Exporting Settings
Settings include configuration information for your device, network, and Mingle Manager
interface.
You can, for example, export (save) the current configuration, then make some changes and
test them. You can then import (restore) the saved configuration.
To export the settings to a text file:
1. Log in to the home page. (See Logging In as an Administrator.)
2. Click Settings > General > Software and Reset.
3. In the Download / Backup Settings section, click Save.
4. Save the file to an appropriate location in your computer. By default, the file (export.cfg)
is saved to your Downloads folder.
Importing Settings
This feature lets you restore a saved configuration.
1. Log in to the home page. (See Logging In as an Administrator.)
2. Click Settings > General > Software and Reset.
3. In the Restore Settings section, click Choose File or Browse (the button name
depends on the browser you are using).
4. Navigate to the folder where your previously saved configuration file is stored.
5. Select your configuration file and click Open to restore your device with the imported
settings.
Note: Your device may reset, and you may need to reconnect to Wi-Fi and the Internet. (See
How Do I Connect to Wi-Fi? and Launching Your Network Connection.)
Software and Reset 85
Page 87

Update Mobile Hotspot Software and Fi rmware
From time to time, updates may become available for your device, and your device will receive
an alert. You can also check for new updates manually.
The updates may improve performance and add or modify features. The updates may include
the following:
● Device firmware
● The Mingle Manager interface
● Other files
Downloading Software Updates
You can download software updates from the Mingle Manager.
When a software update becomes available:
● If your device is connected to Virgin Mobile’s LTE network, the update downloads
automatically and an Alert message appears on your device and the Mingle Manager. In
the Mingle Manager, view the alert and click Install now to install the update. Your
device reboots automatically to use the new software. Any devices that were previously
connected will have to be reconnected.
● If your device is connected to Virgin Mobile’s 3G network, an Alert message appears on
your device and the Mingle Manager. In the Mingle Manager, view the alert and click
Download now to download and install the software update. Your device reboots
automatically to use the new software. Any devices that were previously connected will
have to be reconnected.
You can also check for updates manually without having received an alert.
In the Mingle Manager (http://minglehotspot)
There are two ways to get the software update from the Mingle Manager. You can get it from
the Alert message, or from the Software and Reset page.
To get the update from the Alert:
1. Log in to the home page. (See Logging In as an Administrator.)
2. In the Alert message for the available update, click Install Now.
3. Follow the onscreen instructions.
To get the update from the Software and Reset page:
1. Log in to the home page. (See Logging In as an Administrator.)
Software and Reset 86
Page 88

2. Click Settings > General > Software and Reset.
3. Click Check for update. If an update is available, an Install Now button appears.
4. Click Install Now.
5. Click Continue.
Resetting Your Device
In some cases, you may want or need to clear your account information to use your device with
another account, reset most settings (except for your account and network activation), or reset
your device to its factory default settings.
You can clear these settings from the Mingle Manager’s Software and Reset page.
Clearing Account Details Only
If you want to use your device with another account, you need to clear your current account.
You can clear these settings from the Mingle Manager’s Software and Reset page.
Note: All connected devices will be disconnected and your device will reboot automatically.
You will have to activate your device with your new account before they can reconnect.
In the Mingle Manager (http://minglehotspot)
1. Log in to the home page. (See Logging In as an Administrator.)
2. Click Settings > General > Software and Reset.
3. Below Clear Programming, click Reset.
4. Click Begin Reset.
Resetting Device Settings Only
If you want to reset your device to its default behavior, but don’t want to change your account or
network activation, you need to reset your device settings.
You can reset these settings from the Mingle Manager’s Software and Reset page.
Note: All connected devices will be disconnected and your device will reboot automatically.
After the reset finishes, they can reconnect.
In the Mingle Manager (http://minglehotspot)
1. Log in to the home page. (See Logging In as an Administrator.)
2. Click Settings > General > Software and Reset.
3. Below Settings Reset, click Reset.
Software and Reset 87
Page 89

4. Click Begin Reset.
Resetting to Factory Default Settings
In some cases you will need to reset your device’s software to its factory default settings.
WARNING: If you reset the software to default settings, you must go through the device
setup, as if you’ve just purchased your device. (See Starting Your Device for the First Time.)
You’ll need to reset the software to default settings if:
● You’ve forgotten the administrator password.
● You’ve changed the DHCP settings such that your device is inoperable. (For example,
there’s no communication with your device.)
You can reset your device to factory settings from the Mingle Manager’s Software and Reset
page or Support page.
Note: All connected devices will be disconnected and your device will reboot automatically.
In the Mingle Manager (http://minglehotspot)
Note: You can only do a factory reset of your device with Virgin Mobile’s assistance. Contact
Virgin Mobile Customer Service to obtain an SPC code that you will need to enter to perform the
reset.
1. Log in to the home page. (See Logging In as an Administrator.)
2. Click Settings > General > Software and Reset.
– or –
Click Support.
3. Below Factory Reset, click Reset.
4. Enter the MSL code provided by Virgin Mobile, then click Submit.
5. Click Begin Reset.
Software and Reset 88
Page 90

GPS Settings
Your NETGEAR Mingle Mobile Hotspot provides GPS functionality to help you figure out where
you are and get you where you’re going.
There are a couple of requirements to access the GPS service.
● You must accept the GPS privacy agreement.
● GPS must be enabled.
The GPS service may not be available if you are indoors. (You may be able to get a GPS lock if
your device is very close to a window.) GPS receivers must be able to lock onto the global
positioning satellites to accurately determine position. The number of obstructions present
indoors often makes accurate position determination impossible.
Enabling / Disabling GPS
Before you can access GPS services, you must enable GPS on the Mingle Manager’s GPS
page.
In the Mingle Manager (http://minglehotspot)
1. Log in to the home page. (See Logging In as an Administrator.)
2. Click GPS.
3. In the GPS Settings section, select Yes next to “Enable GPS” (or select No to disable
GPS).
4. Click Submit.
Setting the GPS Mode
The GPS mode determines how often location fixes are done.
Location fixes can be done:
● Once (“one-time”, which can prolong the battery life), or
● Periodically (“continuous”)
You can set the GPS mode on the Mingle Manager’s GPS page:
In the Mingle Manager (http://minglehotspot)
1. Log in to the home page. (See Logging In as an Administrator.)
GPS Settings 89
Page 91

2. Click GPS.
3. In the GPS Settings section, beside GPS Mode, select the desired mode (One-time or
Continuous).
4. Click Submit.
Note: The GPS service must be enabled before you can set the GPS mode. (See Enabling /
Disabling GPS.)
Using Metric Units
You can use metric units in the display of location information (for example, speed and altitude).
You can choose the units on the Mingle Manager’s GPS page.
Note: The GPS service must be enabled before you can choose the units. (See Enabling /
Disabling GPS.)
In the Mingle Manager (http://minglehotspot)
1. Log in to the home page. (See Logging In as an Administrator.)
2. Click GPS.
3. In the GPS Settings section, beside Use Metric units, select Yes (or select No to use
standard measurements).
4. Click Submit.
GPS Settings 90
Page 92

Configuring the Wi-Fi Network
Find out how to manage access to your device’s Wi-Fi network and set Wi-Fi configuration
options.
Setting the Maximum Number of Wi-Fi Devices
If your network is having performance issues, you might want to decrease the number of Wi-Fi
devices allowed to connect to your device at the same time, or change the maximum number of
devices that can connect to either the Main Wi-Fi or Guest Wi-Fi networks at the same time.
(When Guest Wi-Fi is turned on, the maximum number of Wi-Fi devices is shared between Main
Wi-Fi and Guest Wi-Fi.)
Note: Your device is factory preset to allow a maximum of ten (10) Wi-Fi devices, with eight (8)
on Main Wi-Fi and two (2) on Guest Wi-Fi.
You can change these limits on the Mingle Manager’s Wi-Fi > Options page.
In the Mingle Manager (http://minglehotspot)
1. Log in to the home page. (See Logging In as an Administrator.)
2. Click Wi-Fi > Options.
3. Beside Max Wi-Fi, select the total number of Wi-Fi devices that can connect to your
device at the same time.
4. Click to increase the Main Wi-Fi limit, or click to increase the Guest Wi-Fi
limit. (Increasing one decreases the other.)
Note: The Main Wi-Fi limit cannot be set to 0.
5. Click Submit.
Wi-Fi Security
Learn about the various Wi-Fi security options available to you.
By default Wi-Fi security is enabled for your device and its Wi-Fi networks.
Note: All devices used with the NETGEAR Mingle Mobile Hotspot must support the selected
security type.
Note: WPS is available only if you select either a WPA2 Personal option (including
WPA/WPA2 Personal) or (not recommended) no security. (See Connecting Through WPS.)
You can change (from the Mingle Manager) the security used for Wi-Fi:
Configuring the Wi-Fi Network 91
Page 93

1. Log in to the home page. (See Logging In as an Administrator.)
2. Click Wi-Fi > Options.
3. In the list beside Encryption (for Main Wi-Fi) or Guest Encryption (for Guest Wi-Fi)
select one of the following options. Note that not all options may be available, depending
on the Connection Mode.
§ None – No security is used (no password is required to access the Wi-Fi network);
this setting is not recommended. Anyone may access your device and use your
Internet connection. (You are responsible for payment for data usage fees.)
§ WPA Personal TKIP – This is a strong security standard that is supported by most
Wi-Fi devices.
§ WPA Personal TKIP/AES – This is a strong security standard that is supported by
most Wi-Fi devices.
§ WPA2 Personal AES – This is a stronger, newer security standard that is limited to
newer Wi-Fi devices.
§ WPA2 Personal TKIP/AES – This is a stronger, newer security standard that is
limited to newer Wi-Fi devices.
§ WPA/WPA2 Personal (recommended setting if any of your devices are more than
two years old) – Wi-Fi devices that use either WPA or WPA2 can connect to the
NETGEAR Mingle Mobile Hotspot. Supported by most Wi-Fi devices.
4. Click Submit.
The option you select determines the Wi-Fi security used and also the maximum length of the
Wi-Fi password.
Change Wi-Fi Network Names and Passwords
The Main and Guest Wi-Fi network names identify your Wi-Fi networks and are visible to other
Wi-Fi-enabled devices.
You can change the names and passwords for your Main and Guest Wi-Fi networks on the
Mingle Manager’s Wi-Fi > Options page.
For optimal security, you should make your Wi-Fi network names and passwords unique, and
change them on a regular basis.
Note: If you change either of the Wi-Fi network names or passwords, all connected devices will
be disconnected and will have to reconnect using the new values.
Note: For security reasons, it’s recommended you disable SSID Broadcast. (See Options Tab.)
To make your Wi-Fi passwords more secure:
Configuring the Wi-Fi Network 92
Page 94

● Use numbers and both uppercase and lowercase letters.
● Use special characters (for example, ‘@’, ‘#’, etc.).
Also, the password length depends on the Wi-Fi encryption type that you’ve selected. (See Wi-
Fi Security.)
● None – No password is required.
● WPA-Personal TKIP – The password must be 8 to 63 ASCII characters.
● WPA-Personal TKIP/AES – The password must be 8 to 63 ASCII characters.
● WPA2 Personal TKIP/AES – The password must be 8 to 63 ASCII characters.
● WPA/WPA2 Personal – The password must be 8 to 63 ASCII characters.
In the Mingle Manager (http://minglehotspot)
1. Log in to the home page. (See Logging In as an Administrator.)
2. Click Wi-Fi > Options.
3. In the Main Wi-Fi and Guest Wi-Fi sections, change the Network Name and Password
fields as desired. (The required lengths appear beneath the fields.)
4. If you want to have your device automatically change the Guest Wi-Fi password each
time Guest Wi-Fi is turned on, select Generate a new password each time I turn on
the Guest Wi-Fi.
5. Click Submit.
6. When prompted, click Submit again. (All devices that were connected will have to
reconnect with the new settings.)
Displaying Main Wi-Fi Network Name and Password on LCD Home Screen
You can choose whether to show the Main Wi-Fi network name and password on your device’s
home screen. You can do this from the Mingle Manager’s Options tab.
In the Mingle Manager (http://minglehotspot)
1. Log in to the home page. (See Logging In as an Administrator.)
2. Click Wi-Fi > Options.
3. Beside Wi-Fi Info on Home, select Show or Hide.
4. Click Submit.
Configuring the Wi-Fi Network 93
Page 95

Enable / Disable the Block List
You can enable your NETGEAR Mingle Mobile Hotspot’s block list on the Mingle Manager’s
Wi-Fi > MAC Filter page. This lets you identify devices that should not be allowed to access
your Wi-Fi networks.
In the Mingle Manager (http://minglehotspot)
1. Log in to the home page. (See Logging In as an Administrator.)
2. Click Wi-Fi > MAC Filter.
3. Beside MAC Filter Mode, select Black list to block devices, or select None to stop
blocking devices.
4. Click Submit.
Displaying and Blocking Currently Connected Devices (Block List)
To detect a potential intruder, you may want to display a list of the Wi-Fi-enabled devices that
are currently connected to your NETGEAR Mingle Mobile Hotspot. You can display this list on
the Mingle Manager’s home page.
If you want to stop a device from connecting to your network, you can add it to your device’s
block list. The blocked device will not be able to connect again until you choose to unblock it.
(See View and Unblock Devices (Block List).)
Note: You have to enable the block list before you can block devices from using your Wi-Fi
networks. (See Enable / Disable the Block List.)
In the Mingle Manager (http://minglehotspot)
1. Log in to the home page. (See Logging In as an Administrator.)
The Connected Devices section of the home page shows a list of the devices
connected to your Main and Guest Wi-Fi networks.
2. If you want to block a listed device, click the device name. The device’s IP address and
MAC address display.
3. Click Block Device.
4. Click Block Device again.
View and Unblock Devices (Block List)
You can view a list of devices that you have blocked (see Displaying and Blocking Currently
Connected Devices (Block List) from connecting to your NETGEAR Mingle Mobile Hotspot on
the Mingle Manager’s Wi-Fi > MAC Filter page.
Configuring the Wi-Fi Network 94
Page 96

If you want to allow any of these devices to connect to the network again, you can remove them
from your device’s block list.
In the Mingle Manager (http://minglehotspot)
1. Log in to the home page. (See Logging In as an Administrator.)
2. Click Wi-Fi > MAC Filter. A list of the devices blocked from using your Wi-Fi networks
appears.
3. Click the beside the device you want to unblock. The device is removed from the
list immediately.
Allowing or Denying Computers Access to the Network (MAC Filter)
MAC (Media Access Control) filtering can prevent unauthorized wireless devices from
connecting to your network.
The MAC filter is used to grant (“white list”) or block (“black list”) wireless devices access to the
Main and Guest Wi-Fi networks. Access is based on the MAC address of each wireless device.
In the MAC Filter page (Wi-Fi > Mac Filter), you can choose one of three modes:
● None – All computers are allowed to access the network.
● Black list – All computers are allowed to access the network, unless they’re in this list.
● White list – Only computers that are in this list are allowed to access the network.
Regardless of the mode, a user must provide the correct Wi-Fi password to access the network.
Specifying Computers That Can Access the Network
1. Log in to the home page. (See Logging In as an Administrator.)
2. Click Wi-Fi > MAC Filter.
3. Beside MAC Filter Mode, select White list.
4. In the empty Name field, enter a name for the device. For example, “Amy’s PC”.
5. In the empty MAC Address field, enter the MAC address of the device you’re adding to
the list. (If you don’t know this address, see Finding the MAC Address.)
Click the beside the row.
6. Repeat steps 4 and 5 for each computer for which you want to allow access.
Configuring the Wi-Fi Network 95
Page 97

IMPORTANT: Make sure you add the computer you are using, or else you will not be able to
access the network after your device resets.
7. Click Submit.
Specifying Computers That Are Not Allowed to Access the Network
1. Log in to the home page. (See Logging In as an Administrator.)
2. Click Wi-Fi > MAC Filter.
3. Beside MAC Filter Mode, select Black list.
4. Determine and block an undesired user of your network:
a. In the Connected Devices section, if you see a device you don’t recognize,
you can click its name and compare its MAC address to the MAC address of
each of the devices on your network.
To determine the MAC address of each device you have, see Finding the
MAC Address. If none of your devices have this MAC address, that device
might be an intruder.
b. In the empty Name field, enter a name for the device. For example, “Amy’s
PC”.
c. In the empty MAC Address field, enter the MAC address of the device you’re
adding to the list.
d. Click the beside the row.
5. For each device you want to block, repeat step 4.
Tip: You can also block the device from the device list. See Displaying and Blocking Currently
Connected Devices (Block List)
Removing a Device From the Allowed or Disallowed Lists
1. Log in to the home page. (See Logging In as an Administrator.)
2. Click Wi-Fi > MAC Filter.
3. In the list of allowed/disallowed devices, click the beside the row.
4. Click Submit.
Disable Wi-Fi When Tethering Device (Connected Through USB)
You can turn off your device’s Wi-Fi radio when connected via the micro-USB cable (‘tethered’).
This is done from the Mingle Manager’s Wi-Fi Options tab.
Configuring the Wi-Fi Network 96
Page 98

Note: If you change this option, your device must be reset before your change takes effect.
In this case:
● Only a computer that is tethered to your device can use it.
● You can prolong the battery life.
● The battery charges faster.
● WPS won’t be available. (See Connecting Through WPS.)
In the Mingle Manager (http://minglehotspot)
1. Log in to the home page. (See Logging In as an Administrator.)
2. Click Wi-Fi > Options.
3. Beside USB Tether, click Wi-Fi stays Off.
4. Click Submit.
Setting the Sleep (Inactivity ) Timer
Use this feature to prolong the battery life by making your device go to sleep (turn off the Wi-Fi
radio) if no devices are connected to Wi-Fi for a period of time.
You can adjust this setting on the Mingle Manager’s Settings > General > Device page.
In the Mingle Manager (http://minglehotspot)
1. Log in to the home page. (See Logging In as an Administrator.)
2. Click Settings > General > Device.
3. Beside the timeouts you want to set (Wi-Fi Sleep on Battery, Wi-Fi Sleep on AC, Wi-Fi
Sleep on USB), select the desired timeout periods. (A smaller value helps prolong the
battery life.)
4. Click Submit.
Wi-Fi Channel
The Wi-Fi channel is the active channel of the Wi-Fi access point. If your network is having
performance issues (possibly caused by other Wi-Fi networks in the vicinity using the same
channel), try a different Wi-Fi channel.
You can change the channel from the Mingle Manager’s Wi-Fi > Options page.
Note: All connected devices will be disconnected and have to reconnect if the channel is
changed.
Configuring the Wi-Fi Network 97
Page 99

In the Mingle Manager (http://minglehotspot)
1. Log in to the home page. (See Logging In as an Administrator.)
2. Click Wi-Fi > Options.
3. Select a different channel number in the Wi-Fi Channel list, or, to have your device
automatically determine the channel to use, select Auto.
Note: If you choose Auto, your device could reselect the same channel. If this happens, try
again.
4. Click Submit.
Configuring the Wi-Fi Network 98
Page 100

Frequently Asked Questions
Find out answers to questions you may have.
How Can I Tell I’m Connected to 3G or LTE?
There are a few ways you can tell whether you are connected to a network, and which network
type (3G, or LTE) you’re connected to.
When you’re connected to a network (3G or LTE):
● On the LCD screen, the network type icon (3G or LTE) and data transfer indicator
arrows appear on the home screen.
● In the Mingle Manager (http://minglehotspot), the network type icon (3G or LTE) and
data transfer indicator arrows appear in the Status section on the left side of the page,
and the connection status is shown on the Network > Status Details Tab.
If the device is not connected to a network, an alert will appear on the device and in the Mingle
Manager.
How Do I Connect to Wi-Fi?
You may have to manually connect to Wi-Fi after certain events — for example, as part of the
initial device setup, or after a software update.
Tip: The Wi-Fi network name and password are displayed on the home screen of the
NETGEAR Mingle Mobile Hotspot. (See LCD Information Screens.)
Tip: Alternatively, you can use WPS to connect a device to the NETGEAR Mingle Mobile
Hotspot, if your device supports WPS. (See Connecting Through WPS.)
To connect to Wi-Fi:
1. Do one of the following, depending on your operating system.
§ Windows 7: Click the Wi-Fi icon in the system tray.
§ Windows Vista: Click Control Panel > Network and Internet > Network and
Sharing Center > Connect to a network.
§ Windows XP: Click Control Panel > Network Connections > Wireless Network
Connections > View available wireless networks.
§ Mac: Click the AirPort icon (in the upper right corner of your screen).
§ Linux: Please see the user documentation of the Linux distribution.
Frequently Asked Questions 99
 Loading...