

Page 1
AT&T USBConnect
i
g
g
g
hti
Lightning
Quickstart
Page 2

Welcome to AT&T
Please use this Quickstart to get a brief
overview of the major features and services
available with your new LaptopConnect
service.
Or take advantage of our interactive web
tutorials at:
att.com/Tutorials
for the most complete and up-to-date
information available for setting up your new
device and services. These online tutorials
include step-by-step instructions and screen
shots to assist as well as providing an easy
search function.
Thanks again for choosing AT&T.
2
Page 3

Table of Contents
Three steps to get connected 4
What’s in the box? 5
Getting Started 6
Insert the SIM card 6
Insert the Lightning into the USB port 7
Windows 7, Vista and XP 8
Install the software 8
Connect to the AT&T network and access the Internet 8
AT&T Communication Manager 9
Using AT&T Communication Manager 10
Manage your DataConnect Usage Online 12
How much data am I using? 13
Using AT&T Communication Manager for Wi-Fi 14
To use AT&T Wi-Fi service 14
To connect to other Wi-Fi networks 15
Mac OS X 16
Install the software 16
Connect to the AT&T network and access the Internet 17
Using your Lightning on a Mac 17
Using the USB Extension Cable and Clip 18
Getting to Know Your Device 19
Using a Memory Card 20
Frequently Asked Questions 21
Troubleshooting Your Device 22
Find More Information 24
3
Page 4
Three steps to get connected
Some procedures differ for Mac users. For Mac installation,
see pages 16 and 17.
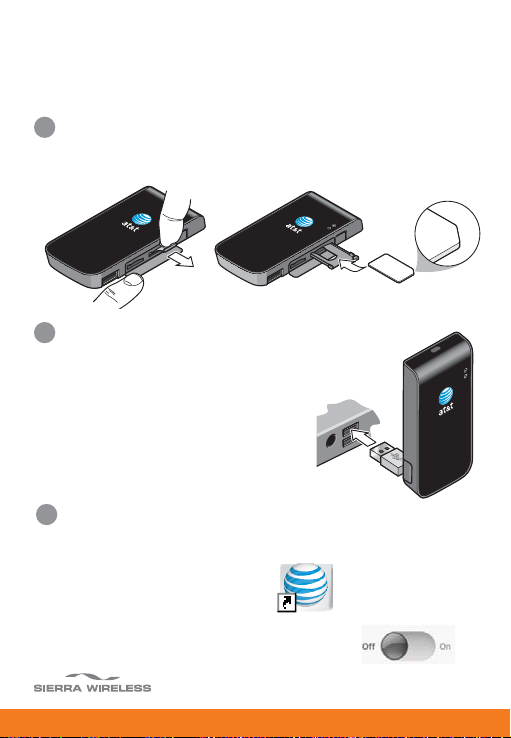
1
Insert the SIM card (see page 6)
Slide out the tray, place the SIM card in the tray, and
slide the tray back into the USBConnect Lightning.
2
Insert the Lightning into your laptop
(see pages 7–8, 16)
The software installation process
begins automatically and installs
AT&T Communication Manager
software.
3
Start the Communication Manager and
click Connect (see page 8, 17)
Double-click the shortcut icon.
After the Communication Manager detects
the network, click the Connect button.
4
Page 5
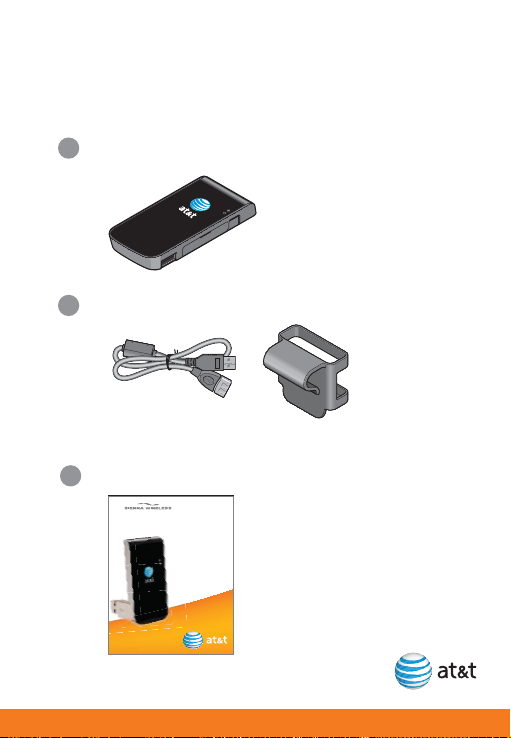
What’s in the box?
Your package contains:
AT&T USBConnect Lightning
1
USB cable and clip
2
Using the USB cable and clip is optional. See page 18
for additional information.
Quickstart
3
AT&T USBConnect
Lightning
Quickstart
5
Page 6

Getting Started
To get started, you need 5 to 8 minutes (depending on your
computer) and the following:
AT&T USBConnect Lightning
The Lightning sends and receives data
between your laptop and the AT&T
network.
The Lightning includes the necessary
software for your Windows and Mac laptop and will begin to auto-install when
inserted for the first time.
AT&T SIM card
The SIM card stores the Mobile number for your Lightning and subscriber
information enabling access to the AT&T
network.
Insert the SIM card
1. Open the flap on the side of the
USBConnect Lightning.
2. Grasp the end of the SIM card tray and
slide it out.
3. Place the SIM card in the tray,
with the SIM card notch in the
outer right-hand corner.
4. Slide the SIM card tray back
into the modem.
6
Page 7
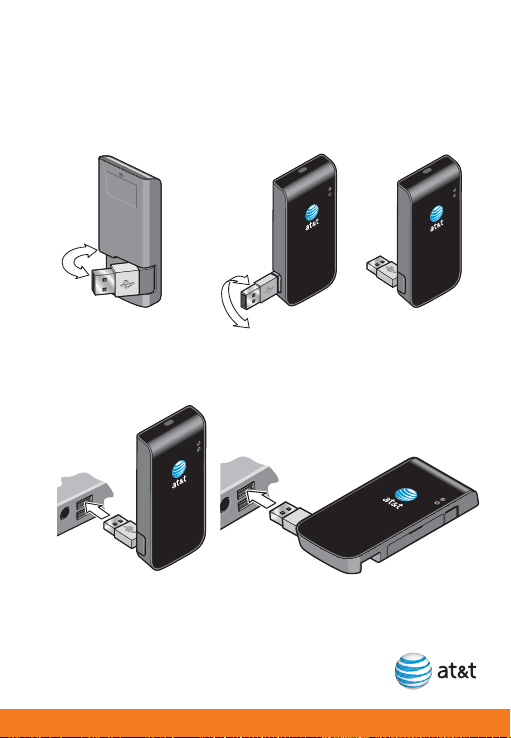
Insert the Lightning into the USB port
1. Flip open the USB connector and adjust the angle to
match the orientation of the USB port on your laptop.
180
2. Carefully push the Lightning into the USB port on your
laptop.
For instructions on using the optional USB extension cable
and clip to connect the Lightning to the laptop, see page 18.
7
Page 8
Windows 7, Vista, and XP
*
Install the software
After you insert the Lightning into the laptop for the first
1.
time, the AT&T Communication Manager (ACM) software
automatically starts and guides you through the installation process.
2. Once installation is complete, restart your laptop when
prompted.
Connect to the AT&T network and access
the Internet
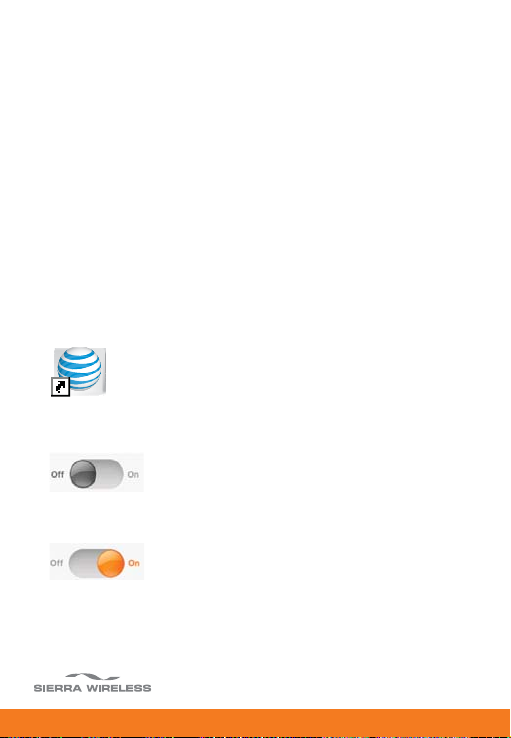
1. Double-click the ACM shortcut icon installed on your
desktop.
2. Wait while the USBConnect Lightning initiates.
3. Click the gray Connect button.
Once connected, the Connect button turns orange and
moves to the right.
4. Open your browser and access the Internet. Click the
Connect button to end your session.
* If you are running Mac OS X, go to
page 16. If you are running Windows
2000, visit www.att.com/acm.
8
Page 9

AT&T Communication Manager
AT&T Communication Manager (ACM) is a software application that lets you control your connections to either the
AT&T mobile network or available Wi-Fi networks, including
thousands of AT&T hotspots, using the built-in Wi-Fi capability of your laptop. ACM offers a range of tools and features
to manage connections, find the best connection available
and connect quickly. Please note that connections to the
AT&T mobile network require an active SIM card inserted into
your Lightning and a valid AT&T data plan.
To make the best use of your LaptopConnect service, please
take some time to familiarize yourself with the following
features of the ACM application.
Carrier
1
Mobile
network
interface
2
Wi-Fi
network
interface
10
9
Connection status
8
Mobile number
7
6
5
3G
Indicator
Signal
strength
Current
session
data used
Connect buttons
3
4
Cumulative total data used
9
Page 10

Using AT&T Communication
Manager
1. Mobile network interface
The Mobile network portion of the main window allows you
to control your connection to mobile networks worldwide.
2. Wi-Fi network interface
The Wi-Fi network section of the main window allows you
to control your connections with Wi-Fi networks, including
home, office, and public hotspot networks. See page 14 for
more information on using Wi-Fi with ACM.
3. Connect buttons
To connect to a mobile or Wi-Fi network, click the gray
Connect button in the Mobile or Wi-Fi section of the main
window. The button moves to the center and turns blue
while the modem is connecting to the network. When the
connection is established, the button moves to the right and
turns orange. Click the orange button to disconnect from the
network.
4. Cumulative total data used
The total data counter shows the amount of data sent since
the counter was last reset. To show the total, go to Tools >
Diagnostics > Event Viewer and set the desired options.
Being able to view the total helps you avoid going over your
monthly limit. Be sure to return to the Event Viewer
Advanced tab to click Clear Event Log each month when
your new bill cycle starts. For more information on interpreting the amounts of data used, see Frequently Asked Questions on page 21.
10
Page 11

5. Current session data used
The data session counter shows the amount of data sent
and received during your current data session.
6. Signal strength
This indicator shows the strength of the wireless signal that
you are receiving.
7. 3G Indicator
This indicator appears when the AT&T 3G network is available. The AT&T 3G network is available in almost all major
metropolitan areas and provides the highest data transfer
rates. When 3G networks are not available, ACM will automatically connect to EDGE (also known as 2G) networks.
8. Mobile number
This number is the mobile number associated with your AT&T
device and account. You will need this number to access
your myWireless account and to get support from AT&T.
9. Connection status
This indicator provides the connection status such as
“Initializing,” “Ready to Connect,” “Connecting,” etc.
10. Carrier
This indicator shows which wireless network your device is
associated with. For example, if you are connected to AT&T’s
mobile network, the wireless carrier indicator reads “AT&T.”
11
Page 12

Manage your DataConnect
Usage Online
Important: AT&T does not offer unlimited usage
plans for LaptopConnect devices.
Track your DataConnect usage online by accessing AT&T
online account management (myWireless Account). This tool
allows you to monitor your data usage, review and pay your
bill, or change your rate plan. To register for your free AT&T
online account, follow the steps below:
1. Go to att.com/wireless.
2. Select myWireless Account in the orange bar under the
AT&T logo.
3. Follow the on-screen prompts.
Your temporary password will be sent to AT&T Communication Manager. Select “Messaging” under the Tools menu and
then Inbox to see your incoming text messages.
To manage your monthly wireless data usage and avoid
overage charges:
• Use your Internet service (DSL, Cable, etc.) and home Wi-Fi
networks to connect while at home and in the office.
• Utilize Wi-Fi hotspots to connect. Access to thousands of
AT&T basic hotspots is included in qualified data plans.
Wi-Fi use is unlimited and does not apply towards your
wireless data plan allowance.
12
Page 13

Overage charges can occur when customers engage in
data-intensive activities such as video streaming, web
broadcasts, peer to peer file sharing, and redirecting
television signals for viewing on netbooks.
How much data am I using?
Sample Activity Estimated Size*
E-mail (plain text) 30KB
Web page view 200KB
Video clip 3MB
Download music 5MB
Movie (full length) 1.5GB
* Amounts estimated based on appropriate file size
assumptions. Actual file sizes and user experience will vary.
13
Page 14

Using AT&T Communication
Manager for Wi-Fi
If your laptop has Wi-Fi capability, you can use ACM to
manage your connection to any home, business or AT&T
hotspot. Please note that connections to AT&T hotspots
require a qualified AT&T DataConnect service plan. See
www.att.com/laptopconnect for eligibility details.
To use AT&T Wi-Fi service:
1. Insert your Lightning and launch ACM. ACM automatically
identifies available Wi-Fi networks.
2. Click the Wi-Fi Connect button.
3. Launch your browser, email or other Internet application.
14
Page 15

To connect to other Wi-Fi networks:
1. Launch ACM (you do not need to insert your Lightning).
ACM automatically identifies available Wi-Fi networks.
2. To see the list of available networks, click List Networks.
3. Click the Connect (On/Off) button next to the network
you wish to connect to.
4. If the network is secure or encrypted, you may be
prompted to enter additional information for access.
5. After ACM confirms a connection is established, launch
your browser, email, or other Internet application.
15
Page 16

Mac OS X
Install the software
1. Carefully push the Lightning into the USB port on your
laptop.
2. Double-click the installer package. If you do not see the
installer package, open Finder and go to “Lightning”
device.
3. After launching the installer package, follow the on-screen
instructions.
4. Restart your laptop. When the device is detected, the
WWAN icon appears as a triangle in the menu bar.
5. When the network is detected and the WWAN icon changes
to a signal strength icon, the Lightning is ready to use.
16
Page 17

Connect to the AT&T network and access
the Internet
1. Click the WWAN icon and from the drop-down list, select
Connect to USBConnect Lightning.
Using Your Lightning on a Mac
To see the connection status and change parameters, click
the WWAN icon and select Open Network Settings.
To display the signal strength (RRSI), hold the Option key
down and click the WWAN icon.
17
Page 18

Using the USB Extension Cable
and Clip
Use the extension cable and clip:
• When the orientation of the USB port prevents you from
inserting the Lightning directly into your laptop
• To improve the performance of your modem in areas
where the signal is weak
1. Place the Lightning into the
clip.
2. Place the clip on the top of
the laptop, with one end of
the cable attached to the USB
connector on your Lightning
and attach the other end to
the USB port on your laptop, as
shown in the illustration.
18
Page 19

Getting to Know Your Device
LED - Power
Color
Solid
Blinking
Blinking
Solid
Solid
Power LED Data LED
Not powered
Firmware is updating.
Do not remove your
Lightning.
Initializing
Powered on
Lightning error
Unable to detect
service
3G network
detected
2G network
detected
Connected to
3G network
Connected to
2G network
LED - Data
19
Page 20

Using a Memory Card
The Lightning is built to accommodate a microSD™ memory
card (not included in package). A memory card enables you
to store and transfer important data from one laptop to
another, expanding the already extensive functionality of this
device. The memory card appears as a USB memory drive.
You can copy, paste and drag files to and from it.
Inserting a memory card
1. Open the flap on the side of the Lightning.
2. Push the memory card into the left-hand slot on the side
of the Lightning until it clicks into place, as shown in the
illustration.
SIM card slot
Memory card slot
3. Insert the Lightning into the laptop’s USB port.
Removing a memory card
1. Open the flap on the side of the Lightning.
2. Push the memory card in and then release it.
3. Gently pull the
memory card out.
20
Page 21

Frequently Asked Questions
How can I monitor my usage and avoid going over my
monthly data plan limit?
AT&T recommends that you monitor your usage by taking
advantage of your free myWireless Account. Your myWireless
Account will provide the most accurate information regarding your usage and is available 24 hours a day, 7 days a
week for your convenience. For more information about how
to access your myWireless Account, see page 12.
21
Page 22

Troubleshooting Your Device
If AT&T Communication Manager does not automatically
start to install the first time you insert the Lightning into
your laptop:
1. Double-click My Computer (Windows XP) or Computer
(Windows 7 or Vista) on your desktop.
2. Click the TRU-Install drive (usually E: or F: drive).
3. Under the TRU-Install drive, go to Win/ATT and double-
click the Setup.exe file.
4. Leave the Lightning in the laptop and follow the onscreen instructions.
5. Restart your laptop when prompted to successfully complete the installation of AT&T Communication Manager.
You’ve followed the instructions above, and ACM still did
not install
If your Lightning came with a mini-CD:
1. Insert the CD into your CD-ROM drive.
2. Click Start > My Computer (Windows XP) or Com-
puter (Windows 7 or Vista).
3. Under the CD-ROM drive, go to Win/ATT and double-
click the Setup.exe file.
If there is no mini-CD in your package:
1. Go to www.att.com/acm and download ACM.
2. Follow the instructions on the web site to install ACM.
22
Page 23

ACM says “No SIM”?
Remove the Lightning from the laptop and insert your AT&T
SIM card. See page 6 for details. If you do not have a SIM
card, contact AT&T.
ACM says “Mobile Disabled”?
1. Enable the Lightning:
a. In the ACM window, click the Connections tab.
b. Highlight Adapters and click Turn on GSM. Wait for
the ACM to detect the Lightning.
2. If the ACM still reports “Mobile Disabled,” contact AT&T
Customer Support for assistance.
ACM says “No Wireless Device Detected”?
1. Click Start, and then click Control Panel.
2. Double-click TRU-Install.
3. When you are prompted to switch to modem mode, click
OK.
4. If ACM still reports “No Wireless Device Detected,”
contact AT&T Customer Support for assistance.
23
Page 24

Find More Information
On the Web
Interactive web tutorials are available at att.com/Tutorials.
Select Manufacturer: Sierra Wireless and Model: Lightning
from the drop down menus.
Detailed support information including device specifications,
troubleshooting, user forums and knowledge base articles are
available at att.com/DeviceSupport.
From a Phone
Call AT&T Customer Care at 800-331-0500 for assistance with
your device or service.
Please enter the 10-digit Mobile phone number associated
with your AT&T USBConnect Lightning when prompted. This
ensures that you are routed to a specialized Care team.
Sierra Wireless is a trademark of Sierra Wireless, Inc. Microsoft
and Windows are either registered trademarks or trademarks
of Microsoft Corporation in the United States and/or other
countries. All other brand or product names are or may be
trademarks of, and are used to identify products or services of,
their respective owners.
© 2009 AT&T Intellectual Property. All rights reserved. AT&T,
AT&T logo and other AT&T marks contained herein are trademarks of AT&T Intellectual Property and/or AT&T affiliated
companies.
24
2131200 - Rev. 1.0
 Loading...