

Netgear AirCard 503, AirCard 302U, AirCard 301U, AirCard 501, AirCard 306U Manual for Mac
...Page 1

Sierra Wireless AirCard Watcher Help for
Mac OS X
Sierra Wireless AirCard Watcher® allows you to manage and monitor
the connection between your modem and the network. With Watcher,
you can:
• Determine signal strength, roaming status, high-speed data availability, and other network connection parameters
• Initiate and end data calls
• Send and receive SMS messages
• Manage profiles
• Use GPS Monitor to track your position
Note: Depending on your device and your service provider, some of the
features described in this document may not be available.
Install Watcher
To install Watcher:
1. Insert the modem into a USB slot on your computer.
2. Double-click the installer package and follow the on-screen
instructions.
3. When instructed to do so, restart your computer.
Mac OS X 10.5 and later
1. When your computer detects the modem, the message "New
network interfaces have been detected" appears.
2. Click the
3. In the Network window, click Apply.
Network Preferences... button.
Mac OS X 10.4.11
1. After your computer restarts, go to Applications > System
Preferences > Network
opens on top of the network window.
2. Click
3. Click
Rev 2.1 Jun.10 1
OK.
Apply and then close the window.
. The New Port Detected pop-up window
Page 2

Watcher Help for Mac OS X
Launch Watcher
To launch Watcher:
1. Navigate to
2. Double-click
Tips
To keep the Watcher icon in the dock
1. Launch Watcher.
2. Click and hold the Watcher icon in the dock.
3. From the pop-up menu, select
To automatically launch Watcher at Login
1. On the AirCard Watcher menu, select
2. On the General tab, select Open AirCard Watcher at Login.
Applications > Sierra Wireless > AirCard Watcher.
Watcher.
Keep in Dock.
Preferences...
Close Watcher
To close Watcher:
1. Select
AirCard Watcher > Quit AirCard Watcher.
Upgrade Watcher
New versions of Watcher become available from time to time. You can download
the new versions free from www.sierrawireless.com/support.
You can also enable Watcher to check for updates automatically.
Note: The availability of these features depends on your carrier or your version of
Watcher.
To enable Watcher to check for updates:
1. Go to
2. Select the Automatically check for updates check box.
3. In the
Or if you want Watcher to check for updates immediately, click
Now
AirCard Watcher > Preferences... > General.
Check for updates list, select a time period.
Check for Updates
.
2 2131163
Page 3
Uninstall Watcher
HSPA
HSPA
HSPA
To uninstall Watcher:
1. Select
AirCard Watcher > Uninstall AirCard Watcher...
2. Follow the on-screen instructions.
Connect to the network
1. Click Connect.
a. If there is no profile defined, a message opens asking if you want to
create a new profile.
b. Click
Create a new profile. In the Profiles window, click + to create a profile.
For more information, see Create a profile on page 6.
To end a high-speed connection, click
Disconnect.
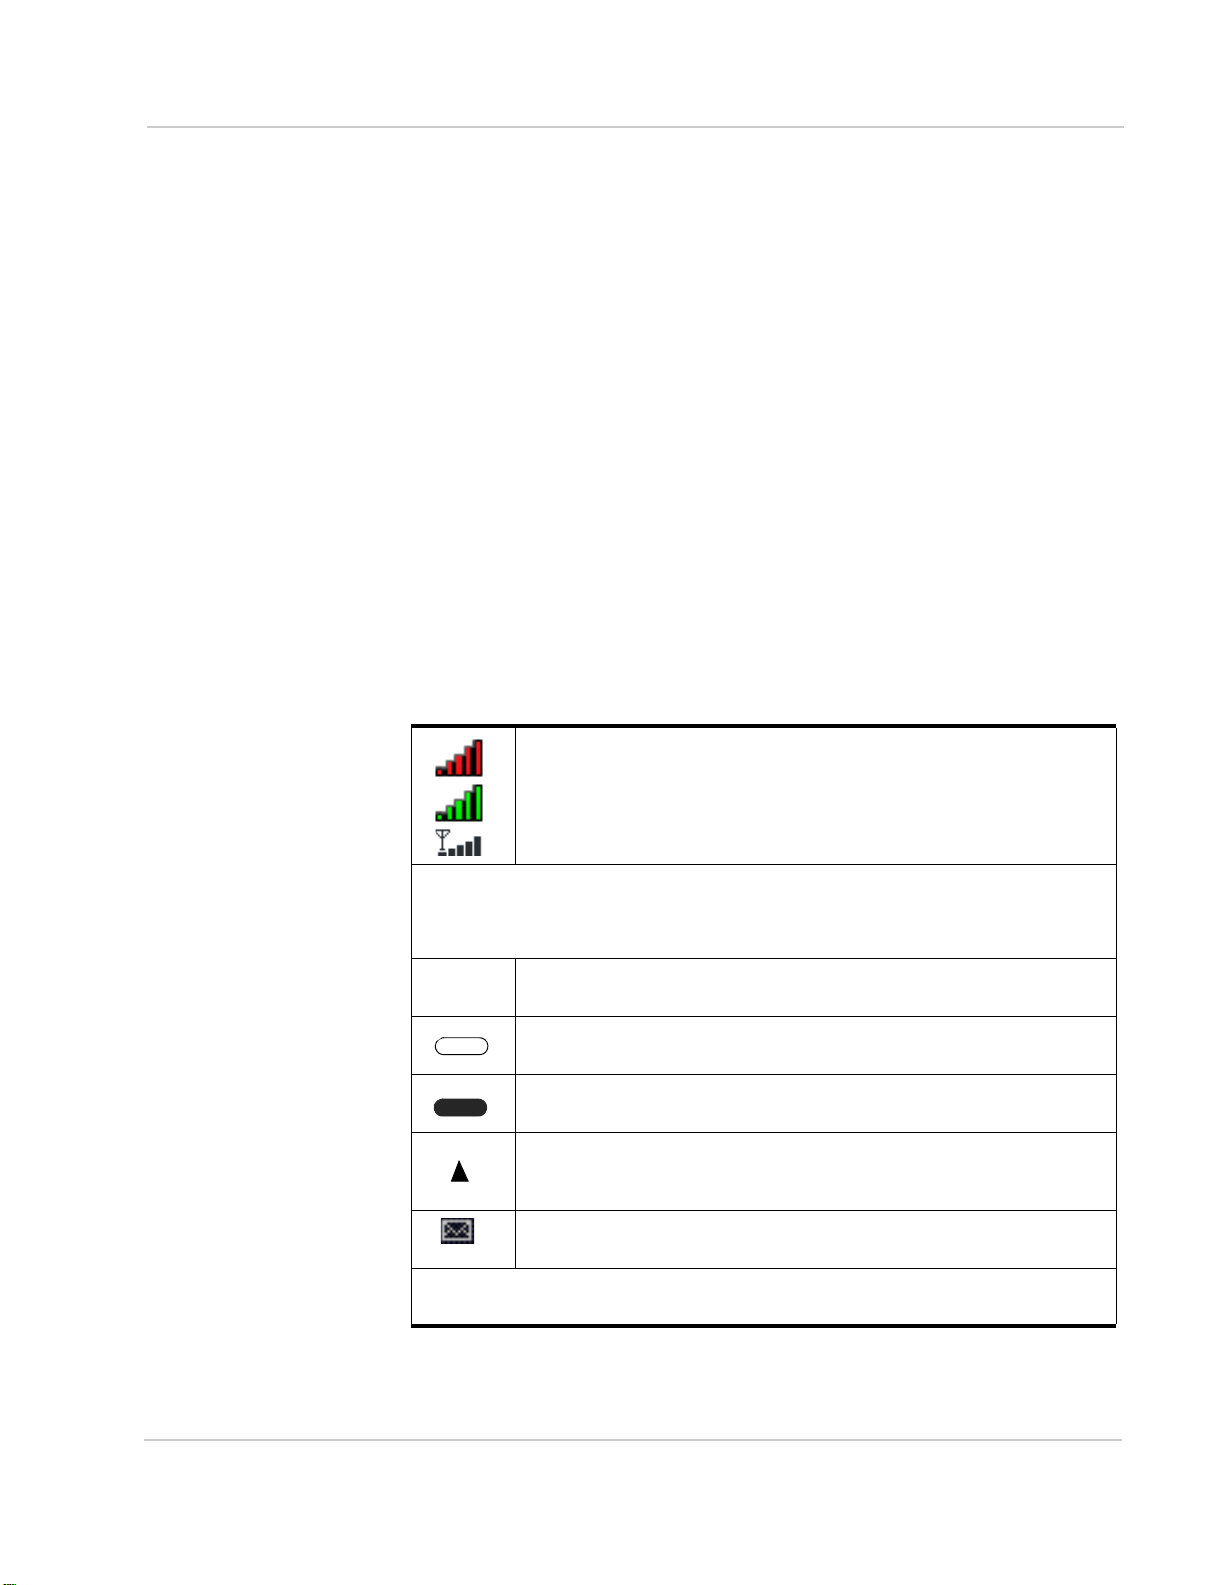
Interpret status icons
The main Watcher window uses these indicators:
Signal strength and service status. The number of bars increases as
signal strength increases, to a maximum of five bars.
In some cases, the appearance of the signal strength bars varies
depending on whether or not you are connected to the network.
(Green = connected; Red = not connected)
Coverage The icon indicates the fastest service that is:
• Available in your current coverage area
• Supported by your modem
When only the letters are displa yed, you are w ithin the cove rage area, b ut
have not yet acquired the service.
When the indicator has an outline, you have acquired service and are able
to establish a data connection.
When the indicator is filled, you have a data connection on the wireless
service.
Roaming. You are connected to a network other than your local carrier's.
Data transmission. When the modem is connected to the network, the main Watcher
window shows the amount of data received and sent.
There may be a surcharge for roaming service. (This service may not be
available.)
SMS message indicator. When this indicator is blinking, you have a new
SMS message.
Rev 2.1 Jun.10 3
Page 4

Watcher Help for Mac OS X
Wireless data connections
The type of connection your modem establishes depends on:
• The type of modem
• The type of service(s) available from your service provider
• The networks available in your current coverage area
Your modem always uses the fastest service available to it in a given area. The
icons on the main Watcher window indicate the type of service that is currently
available and the connection status of your modem.
Technology
4G — Fourth generation wireless. The next major evolution of wireless technology; faster d ata rates and new features.
3G — Third generation wireless. Increased network capacity and faster data rates compared to 2G.
HSPA+ (Evolved HSPA) 21 Mbps 5.76 Mbps
HSPA (concurrent HSDPA and HSUPA) 3.6 Mbps 1.5 Mbps
HSUPA (High-Speed Uplink Packet Access) Not applicable 2.0 Mbps (5.76 Mbps with
HSDPA (High-Speed Downlink Packet Access) 7.2 Mbps Not applicable
UMTS (Universal Mobile Telecommunications System) 384 kbps 384 kbps
2G — Second generation wireless. First launched in 1991; introduced wireless digital voice and data services.
EDGE (Enhanced Data for GSM Evolution) 236 kbps 236 kbps
GPRS (General Packet Radio Service) 114 kbps 114 kbps
a. Actual speed depends on network conditions
b. Sending data to the network
c. Receiving data from the network
Maximum theoretical speed
Downlink
b
future upgrade)
a
Uplink
c
Set preferences
To change Watcher preferences, open AirCard Watcher > Preferences...
Open Watcher at Login
When this feature is enabled, Watcher launches automatically when you log into
your computer.
To enable (or disable) this option:
1. Select
2. Select (or clear) the
4 2131163
AirCard Watcher > Preferences... > General.
Open Watcher at Login check box.
Page 5

Turn radio off on exit
When this option is enabled, the radio transmitter/receiver turns off when you exit
Watcher. If you do not need to receive or send data after shutting Watcher down,
using this option helps to extend the computer’s battery life.
To enable (or disable) this option:
1. Select
2. Select (or clear) the
AirCard Watcher > Preferences... > General.
Turn radio off on exit check box.
Prompt before exiting
If this feature is enabled, when you close Watcher, it displays a warning message.
To enable (or disable) this option:
1. Select
2. Select (or clear) the
AirCard Watcher > Preferences... > General.
Prompt before exiting check box.
Prompt when roaming
If this feature is enabled, when you connect to a network other than that of your
carrier, Watcher displays a warning message. It is important to know when you
are roaming, as there may be additional charges.
To enable (or disable) this option:
1. Select
2. Select (or clear) the
AirCard Watcher > Preferences... > General.
Prompt when roaming check box.
Manage profiles
You should not have to create or change a profile, but if the need arises, Watcher
allows you to:
• Create a profile
• Edit a profile
• Delete a profile
• Select a default profile
Profiles contain account information used to establish data connections. At least
one profile must be set up on the modem before you can establish data
connections.
Depending on your carrier, you may have more than one profile on your modem.
If you have multiple profiles, one of them must be set as the default profile. This
profile is used to establish a connection when you click the Connect button
without selecting a profile.
To access profile information:
1. Select
AirCard Watcher > Preferences... > Profiles.
Rev 2.1 Jun.10 5
Page 6

Watcher Help for Mac OS X
Create a profile
Watcher includes pre-defined profiles for many different carriers. You should
normally use one of these profiles, but if your carrier asks you to create one,
follow these instructions.
Your carrier can give you all the information you need to set up the profile(s) you
require. Depending on your carrier, you may need to enter some or all of the
following information into your profile:
• User name
• Password
• APN (Access Point Name)
• DNS (Domain Name Server) address or addresses
To create a profile:
1. Ensure that you are not connected to the network.
2. Select
3. Click the add button (+).
4. Select your carrier from the list.
5. If you have been given specific values for any of the following fields, enter
6. Select the connection type:
7. If you have a DNS address or addresses, enter the address(es). (In most
8. If you have more than one profile, in the Default Profile field, select a default
9. Click
AirCard Watcher > Preferences... > Profiles.
them now:
· Profile Name (any meaningful description of the profile, such as the name
of your carrier)
· User Name, if applicable
· Password, if applicable
· APN
(Check with your carrier for specific requirements for the user name and password.)
·
Manual—You click the Connect button on the main Watcher window to
make a connection (default setting).
·
Prompt for Password—When you click the Connect button, you are prompted
to enter a password.
·
Autoconnect—A connection is established automatically when you insert the
modem, provided this is your default profile.
cases, it is not necessary to enter a DNS address.)
profile. The default profile is used if you click
profile.
Apply.
Connect without selecting a
Edit a profile
To edit a profile:
1. Ensure that you are not connected to the network.
2. Select
6 2131163
AirCard Watcher > Preferences... > Profiles.
Page 7

Note: If all the entries in
the profile are unavailable,
the profile is a locked
profile that cannot be
edited or deleted.
3. Select the profile and field you want to edit.
4. Make any necessary changes.
5. Click
Apply.
Delete a profile
To delete a profile:
1. Ensure that you are not connected to the network.
2. Select
3. Select a profile and click the delete button (–).
4. Click
Note: If the delete button is unavailable, the profile you have selected is a locked profile
that cannot be edited or deleted.
AirCard Watcher > Preferences... > Profiles.
Apply.
Change the default profile
To change which profile is the default:
1. Select
2. In the Default Profile list, select the profile you want to use as the default.
3. Click
AirCard Watcher > Preferences... > Profiles.
Apply.
Network settings
The Network tab in the Preferences window is used to set:
•
Frequency Band — You can specify the frequency band you want the modem
to use or set it to automatically select the band.
•
Selection Mode — You can specify the network you want the modem to use or
set it to automatically select the network.
Select the frequency band
Note: By default, the modem will automatically select the frequency band. Unless your
carrier specifies otherwise, it is recommended that you use the Automatic setting.
If advised to do so, follow these steps to change the frequency band:
1. Select
2. In the Frequency Band field, select the desired frequency band from the list.
(Only bands available on your model of modem are displayed.)
AirCard Watcher > Preferences... > Network.
Rev 2.1 Jun.10 7
Page 8

Watcher Help for Mac OS X
Select networks manually and automatically
Depending on your location, you may be within the coverage area of several
networks. By default, the modem automatically selects a network based on your
account and network availability. If you prefer, you can set Watcher to display a list
of detected networks, from which you can select the network you want to use.
Your ability to obtain service on any network is dependent on your account.
To change the network selection mode:
1. Select
2. Beside Selection Mode, select one of these options:
SIM Security
The SIM (Subscriber Identity Module), USIM (Universal Subscriber Identity
Module), or MegaSIM card contains information used by the network to identify
your device. It also allows you to access your subscribed services. Generally,
when you obtain an account, your carrier gives you a SIM card.
AirCard Watcher > Preferences... > Network.
·
Automatic — The modem selects the network to use.
·
Manual — The modem scans the area and displays a list of carriers
(networks) in your area. After a few minutes, if the modem does not find any
networks, it switches to Automatic. If there is an exclamation mark (!) after
the network name, you may not be able to connect to that network.
In addition to other data, your unique International Mobile Subscriber Identity
(IMSI) is stored in your SIM. The IMSI, sometimes called your phone number,
identifies your account to your carrier. Depending on your carrier, you may be
able to use the same SIM card in other devices, such as mobile phones.
Insert and remove the SIM card
For instructions on how to insert and remove the SIM card, refer to the
documentation that came with your modem.
PIN assigned to the SIM
When you obtain your SIM, you should be given a PIN (Personal Identification
Number). The PIN is used to enable SIM security, which prevents others from
using your account should the SIM be lost or stolen.
If SIM security is enabled, you are asked to enter your PIN before you can access
Watcher.
To enable SIM security:
1. Select
2. Select
3. Click OK.
4. Enter the PIN.
5. Click
AirCard Watcher > Preferences... > SIM.
Enable SIM Security.
OK.
8 2131163
Page 9

Note: If SIM security is
enabled and you fail to
enter the correct PIN
number within the designated number of attempts,
your SIM card will be
disabled and become
unusable. If that happens,
contact your carrier.
Change your PIN
To change the PIN assigned to your SIM:
1. Select
2. Click Change PIN.
3. In the Old PIN field, enter your PIN.
4. Enter a new PIN in the New PIN and Verify New PIN fields.
5. Click
If you enter the wrong PIN, the fields are cleared and the remaining attempts field
is reduced by 1. If you fail to enter the correct PIN within the designated number
of attempts, the SIM card becomes blocked. If this happens, see Unblock the SIM
on page 13.
AirCard Watcher > Preferences... > SIM.
OK.
Blocked SIM
In any operation that requires you to enter the PIN, you are allowed a certain
number of attempts to enter the PIN correctly. If you fail to enter the PIN correctly
within that number of attempts, the SIM becomes blocked.
If the SIM becomes blocked, your SIM card is unusable until it is unblocked.
Watcher displays the message “Blocked SIM”. If your modem is configured to do
so, you are prompted to enter a PUK code, obtained from your carrier, to unblock
the SIM. See Unblock the SIM on page 13.
Send and receive SMS messages
SMS (Short Messaging Service) allows you to send and receive short messages
(usually not more than 160 characters) through the network. Check with your
service provider to determine if you have access to this service.
If you have access to this service, you can receive messages by any methods
supported by your service provider.
Ways to receive SMS messages
Depending on your service provider, others can send SMS messages to you in
one or more of these ways:
• Some wireless service providers have web pages from which anyone can
enter a message and direct it to your phone number. In this case, anyone who
has access to the Internet can send you a message, provided he or she
knows your phone number.
• Some service providers allow SMS messages to be sent through Internet email applications. Your phone number is then used as an e-mail address (for
example, 6045553993@serviceprovider.com or 1414960101@serviceprovider.co.uk).
• Some products, such as the modem and many mobile phones, have software
that allows you to send messages to other subscribers, using their phone
numbers to direct the message.
Rev 2.1 Jun.10 9
Page 10

Watcher Help for Mac OS X
Check with your service provider to determine which of these methods are
offered.
Using the SMS Inbox
You can read messages, send new messages, reply to messages or delete
messages from the SMS Inbox.
To view the SMS Inbox, select
To send new SMS messages, click
SMS > New Message.
SMS > Inbox.
New Message in the SMS Inbox, or select
Setting SMS Preferences
To set SMS preferences:
1. Select
The SMS preferences you can change are:
•
Service Center Number. The Service Center Number should only be changed
on the advice of your service provider.
•
Remember the last 10 SMS destinations. When selected, you can choose one of
the last 10 SMS numbers or addresses from a list in the To: field of new SMS
message.
AirCard Watcher > Preferences... > SMS.
Usage History
To view usage history for your account(s), select Window > Usage History.
Note: This information is not intended for billing purposes.
In the Usage History window, you can select the account for which you want to
view the usage history.
For each account, you can view the:
• Date and duration of each session
• Amount of data received and sent during each session
• Total amount of data sent and received for that account
You can also clear the usage history.
GPS Monitor
Note: Not all devices support GPS. You can confirm that you have GPS by looking for the
menu option Window > GPS Monitor. If that menu item does not appear , your modem does
not support GPS.
To open the GPS Monitor:
10 2131163
Page 11

1. Select Window > GPS Monitor.
To start a GPS session:
1. In the GPS Monitor window, click the
current location, or click the
Get Current Location button to get a single fix.
2. To view a map of the current location, click the
Start tracking button to begin tracking the
Map button. You can set which
online mapping web site is used. (See Setting GPS Preferences.)
The GPS display shows your:
• Latitude
• Longitude
• Direction
• Speed
• Altitude
It also shows the accuracy of the fix (HEPE), the number of satellites being
tracked, and the time the fix was updated.
Setting GPS Preferences
To set GPS Preferences, select AirCard Watcher > Preferences... > GPS.
The most commonly used preferences are:
• Map web site
• Measurement System
You can also set the Fix rate and enable Auto-track.
Map web site
You can choose which web site you want to use to display the map of your current
position when you click the Map button.
Measurement System
You can choose the system of measurement you want the GPS display to use —
metric or imperial.
Fix rate
You can specify the rate at which GPS fixes are taken.
To set the fix rate, in the
Fix Rate field, enter the desired rate (in seconds).
Auto-track
If Auto-track is enabled, a GPS tracking session begins (if one is not already
running). In addition, the next time you insert or power-up the modem, a GPS
tracking session begins.
Note: Some devices do not support Auto-track.
Rev 2.1 Jun.10 11
Page 12

Watcher Help for Mac OS X
Troubleshooting tips
If you experience a problem with your modem or the Watcher software, check the
status of the LEDs. Refer to the documentation that came with your modem to
interpret the meaning of the LEDs.
You can also check the Sierra Wireless Support web site for information on your
modem. Go to www.sierrawireless.com/support.
Insufficient signal strength
Insufficient signal strength may be because:
• You are outside the network coverage area.
• You are in or near a structure that is blocking the signal.
• You are near a device that is causing radio signal interference.
• A network or account problem is preventing you from obtaining service.
Searching...
If Watcher displays “Searching...” continuously:
• You may be outside the coverage area.
• The incorrect frequency band may be set.
Move to a location with better signal strength and restart Watcher.
Unless your service provider specifies which band to use, ensure that the Frequency Band field is set to Automatic. See Select the frequency band on
page 7.
Initialization Failed…
This message may be displayed if:
• The modem is not properly inserted. Try removing and re-inserting the
modem. You can also try using a different slot.
• There may be a resource conflict. If another card is inserted, you may be able
to resolve the problem by removing the other card. Otherwise, you may need
to disable the other device.
Failed to communicate with device
If this message appears when you try to establish a connection:
1. Close Watcher.
2. Remove and then re-insert the modem.
3. Restart Watcher.
4. If the problem persists, you may need to update the firmware.
a. Go to
b. Click Check for Updates Now.
c. Check www.sierrawireless.com/support for additional updates.
12 2131163
AirCard Watcher > Preferences... > General.
Page 13

Incorrect SIM
Watcher displays this message if the modem and SIM are incompatible. The most
likely reason for this is that the modem was purchased from one carrier and the
SIM was purchased from another carrier. (Your modem may be configured to
work only with the SIM of a specific carrier.)
Contact your carrier if this message appears.
New and confirmation PIN are different
When you change a PIN, you must enter the new PIN number twice. Watcher
displays the message, “The new PIN and confirmation PIN are different. Please
try again.” if the PINs you enter are not the same.
Please ask your carrier about PUK code
A SIM becomes blocked when SIM security is enabled and the wrong PIN is
entered three times. To unblock the SIM, you must obtain the unblocking code or
command from your carrier. See Unblock the SIM on page 13.
Unable to connect to the Internet
If you are unable to connect to the Internet the first time you use the modem see
Mac OS X 10.5 and later or Mac OS X 10.4.11 under Install Watcher on page 1.
Unblock the SIM
When the SIM is blocked, Watcher displays the message “SIM Blocked” in the
main window.
Depending on your modem configuration, Watcher may also display the prompt,
“Please enter UNBLOCKING code: Remaining attempts = x”. If you see this
prompt, follow the instructions below to unblock the SIM. If you do not see this
prompt, contact your carrier.
To unblock the SIM:
1. Obtain the unblocking (PUK) code from your carrier.
2. Enter the unblocking code in the top field.
3. Enter a new value for the PIN in the New PIN and Verify
click
OK.
Note: You must enter the unblocking code within a specific number of attempts. If you fail
to do so, your SIM becomes permanently blocked and you will not be able to use it again.
New PIN fields and
Collecting System and Application Logs
When troubleshooting an issue in consultation with technical support, you may be
asked to collect a system or application log. This section describes how to collect
logs using Watcher.
Rev 2.1 Jun.10 13
Page 14

Watcher Help for Mac OS X
1. On the AirCard Watcher menu select
Logging > Turn Logging On.
2. Wait for the events or problems to be captured in the Watcher log.
3. Click the AirCard Watcher menu again and select
4. When the Collect Logs tool appears, click
Proceed.
Logging > Collect Logs...
5. When requested, enter your admin password.
6. When the Collect Logs tool indicates that the log file is ready, click
Quit.
A compressed file containing the log files appears on your Desktop.
7. Attach the compressed file to an email message and send it to your technical
support provider.
© 2010 Sierra Wireless. All rights reserved.
Watcher
®
is a trademark of Sierra Wireless, registered in the European Community. Mac OS® is a trademark
of Apple Inc., registered in the US and other countries. Other trademarks are the property of the respective
owners.
 Loading...