

Page 1
User Guide
Nero AG
Page 2

Information on copyright and trade marks
The Nero Wave Editor user manual and all its contents are protected by
copyright and are the property of Nero AG. All rights reserved. This user manual
contains material that is protected by internationally valid copyright. This manual
may not - in whole or in part - be copied, transmitted or otherwise reproduced
without the express written permission of Nero AG.
All trade names and trademarks are the property of the respective owners.
Nero AG rejects any claims that transcend the legal guarantee rights. Nero AG
does not undertake any liability for the correctness of the content of the Nero
Wave Editor user manual. The contents of the software supplied, as well as of
the Nero Wave Editor user manual, may be changed without prior warning.
The trademarks mentioned here are only listed for information purposes.
Copyright © 2003-2005 Nero AG
REV 1.2
Page 3

Contents
1 Instructions in brief........................................................................5
1.1 What's new in Nero Wave Editor? ................................................. 5
1.2 Introduction ..................................................................................... 6
1.3 How this information is organized ................................................ 6
1.4 Notes for the user ........................................................................... 6
1.5 Important terms............................................................................... 7
2 About Nero Wave Editor ................................................................8
2.1 Introduction ..................................................................................... 8
2.2 Structure of the program................................................................ 8
2.2.1 Workspace ..................................................................................... 9
3 Settings .........................................................................................10
3.1 Selecting the input and output devices ...................................... 10
3.2 Setting the editor options............................................................. 10
3.2.1 Setting the display features.......................................................... 11
3.2.2 Specifying the directories used .................................................... 12
3.2.3 Audio output................................................................................. 13
3.2.4 VST Plug-ins ................................................................................ 14
4 View ...............................................................................................15
4.1 Specifying the view....................................................................... 15
4.2 How the audio files can be represented ..................................... 16
4.3 Zooming ......................................................................................... 17
4.3.1 Vertical zoom ............................................................................... 17
4.3.2 Horizontal zoom ........................................................................... 18
5 Audio files .....................................................................................19
5.1 Loading and playing back audio files ......................................... 19
5.2 Selecting sections of audio files ................................................. 20
5.2.1 Saving the selection as a new audio file ...................................... 21
5.3 Inserting an audio file ................................................................... 21
5.4 Recording a new audio file........................................................... 22
5.5 Converting an audio file ............................................................... 23
5.6 Editing audio files ......................................................................... 25
5.6.1 Muting .......................................................................................... 25
5.6.2 Normalization ............................................................................... 25
5.6.3 Changing volume ......................................................................... 26
5.6.4 Fading in and out ......................................................................... 27
Nero Wave Editor Contents • 3
Page 4

6 Recording gramophone records.................................................28
6.1 Preparation .................................................................................... 28
6.2 Recording ...................................................................................... 29
7 Effects ...........................................................................................31
7.1 Introduction ................................................................................... 31
7.1.1 Saving the effect settings............................................................. 31
7.1.2 Loading the effect settings ........................................................... 32
7.1.3 Deleting the effect settings........................................................... 32
7.2 Equalizer ........................................................................................ 33
7.3 Transposing................................................................................... 34
7.4 Dynamics ....................................................................................... 35
7.5 Time correction ............................................................................. 36
7.6 Delay............................................................................................... 37
7.7 Flanger ........................................................................................... 37
7.8 Chorus............................................................................................ 38
7.9 Reverberation ................................................................................ 40
7.10 Wah-Wah...................................................................................... 41
7.11 Phaser .......................................................................................... 42
7.12 Voice modification ...................................................................... 43
7.13 Pitch tuning ................................................................................. 44
7.14 Karaoke filter ............................................................................... 45
8 Enhancement................................................................................46
8.1 Introduction ................................................................................... 46
8.2 Band extrapolation........................................................................ 46
8.3 DC Offset Correction .................................................................... 47
8.4 Filter toolbox ................................................................................. 47
8.5 Declicker ........................................................................................ 48
8.6 Noise Reduction............................................................................ 49
8.7 Noise Analysis............................................................................... 50
9 Contact ..........................................................................................52
10 Index..............................................................................................53
Nero Wave Editor Contents • 4
Page 5

1 Instructions in brief
1.1 What's new in Nero Wave Editor?
In comparison with the first version of the software, Nero Wave Editor has a
number of new and enhanced features, such as support for DirectX and VST
plug-ins. In addition, an overview of the existing processing steps allows you to
return quickly to any stage of the process, and crossfading allows you to create
professional recordings without pauses and hissing noises. The high quality
Declicker which suppresses the individual hissing and clicking noises from
records and the Decrackler which removes constant background crackling are
just two of the great new features.
Of course, Nero Wave Editor is non-destructive, which means that the original
file is not modified. As well as protecting the original file, this also speeds up the
work, as the changes do not need to be saved individually and are implemented
in real time. You only save your new audio file once you are happy with the
results of your editing. If Nero Wave Editor should crash before you have
saved your file, you can use the crash restore function to restore the most
recent version of your work when you restart the program.
Another new feature is the automatic separation of tracks which can then be
stored in new files.
Nero Audio Plug-in-Manager 6.0 reads and writes files in the following formats:
'wav', 'mp3', 'wma' and 'aiff'. You need an additional license to be able to create
an unlimited number of MP3 files, which you can obtain from Nero AG.
Nero Wave Editor's new effects include a wah-wah filter (a bandpass filter
which allows the center frequency to be changed over time), a phaser which
allows a signal to be combined with a phase-shifted version of itself, voice
modification with which you can modify vocals to create interesting results and
pitch tuning, which corrects the intonation of vocal or instrumental recordings.
Another new feature is band extrapolation, which makes old and dull sounding
recordings seem fresher by generating high frequencies and corresponding
basses to extend the frequency spectrum. Band extrapolation can also be used
to improve MP3 recordings with a very low bit rate. Using the filter toolbox
allows interference frequencies can be filtered out. The Karaoke filter removes
the human voice from stereo recordings in which the voice has been mixed in
the center of the stereo field, which allows the original song to be saved without
the vocals. With the stereo processor the stereo field can be corrected and the
stereo effect artificially amplified.
Nero Wave Editor Instructions in brief • 5
Page 6

1.2 Introduction
These brief instructions are aimed at putting you in the position where you can
quickly create your own audio files or to edit existing ones. Because this is a
sizeable and powerful program, only the main points are dealt with here and
some parts of the program are not explained in detail (or at all).
You can find more detailed information on Nero Wave Editor in the online help
feature that you can call up at any time (press the F1 key). You can also find the
latest information on Nero Wave Editor at the www.nero.com
1.3 How this information is organized
These instructions contain practical examples of how to create and edit audio
files as well as details for reference.
The individual sections offer the following information:
Section 1 explains how the manual is organized and the symbols used.
Section 2 introduces Nero Wave Editor and its features and describes the
structure of the program.
Section 3 explains how you can set the input and output device and specify the
different program options.
Internet site.
Section 4 describes, how you can change the appearance of Nero Wave Editor
and work with the zoom function.
Section 5 shows how you can easily work with audio files including editing them.
Section 6 explains, how analog gramophone recordings can be saved as digital
audio files.
Section 7 shows you how to alter audio files by using special effects.
Section 8 shows you how to alter the sound of audio files by optimization.
Section 9 helps you find the Information you need with the aid of the index.
1.4 Notes for the user
The following symbols are used in these instructions:
This symbol stands for 'warning' or 'danger'.
Hints that bear this symbol are very important and the program may
behave incorrectly if you ignore them.
This symbol stands for 'useful tip' or 'worth knowing'.
Information marked this way is important and instructive.
Nero Wave Editor Instructions in brief • 6
Page 7

1.5 Important terms
A number of important terms relating to audio files are explained below. The
choice of sampling rate and bit depth has a significant influence on the quality of
the recording.
Bit depth /
resolution
Sampling rate The sampling rate indicates how often an analog-digital
In principle, audio data is made up of periodic vibrations,
which can be illustrated by a curve. The resolution shows
exactly how the sampling value of a curve should be
determined. The higher the resolution, the more exactly
this can be done.
converter determines the sample value from an analog
signal. This is measured in sample values per second
(Hertz, often abbreviated as Hz). In this case it is also true
that the higher the sampling rate, the more accurate the
results.
Nero Wave Editor Instructions in brief • 7
Page 8
2 About Nero Wave Editor
2.1 Introduction
Nero Wave Editor is a user-friendly program for editing and recording audio
files, which may be of the 'wav', 'mp3' or 'aiff' format. The other types of format
that can also be read by Nero Wave Editor depend on the plug-ins that have
been installed.
Individual audio-files can be created quickly and easily using the various filters
and sound optimization methods.
Nero Wave Editor is started by: Start > Programs > Nero > Nero 6 > Nero
Wave Editor.
2.2 Structure of the program
Nero Wave Editor's structure corresponds to that of the usual Windows
elements: a menu bar, various toolbars and a status bar. The Nero Wave
Editor workspace shows the selected audio file.
The individual elements of the window are arranged clearly and understandably,
making Nero Wave Editor very easy to use.
Nero Wave Editor About Nero Wave Editor • 8
Page 9
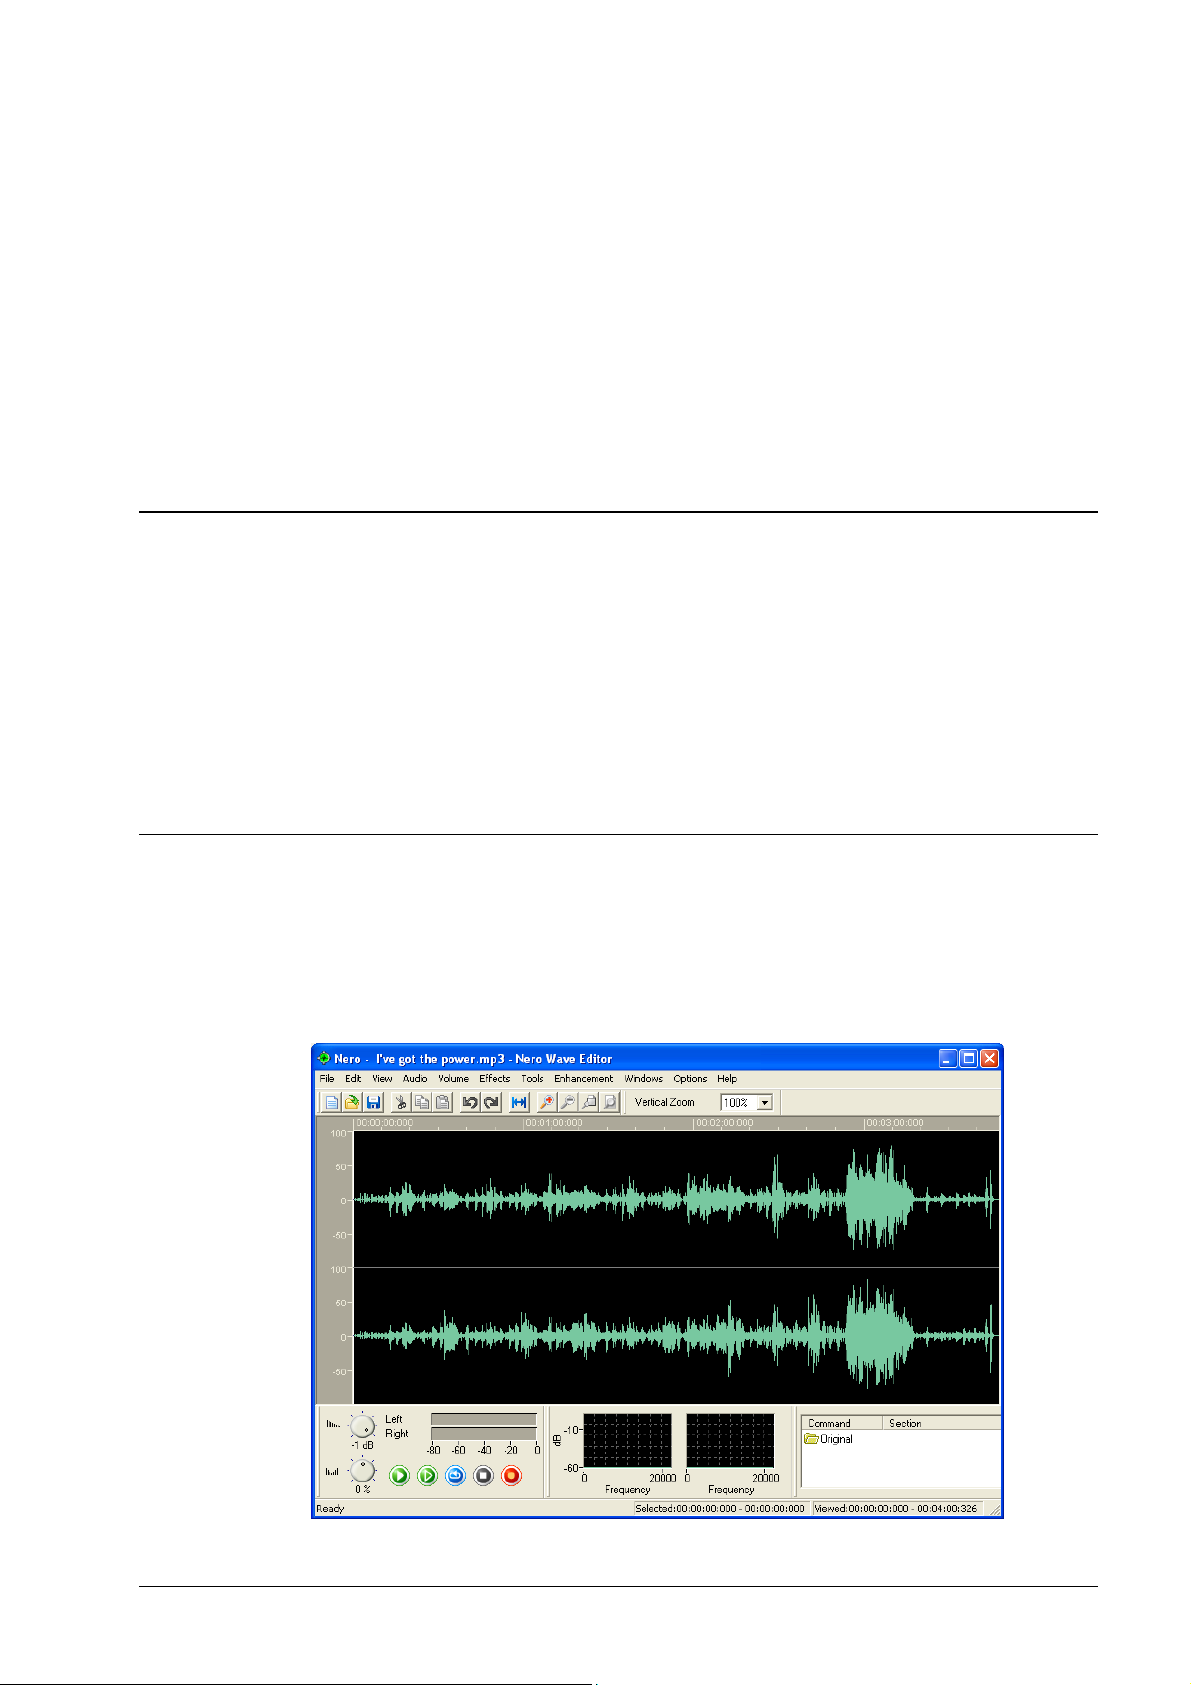
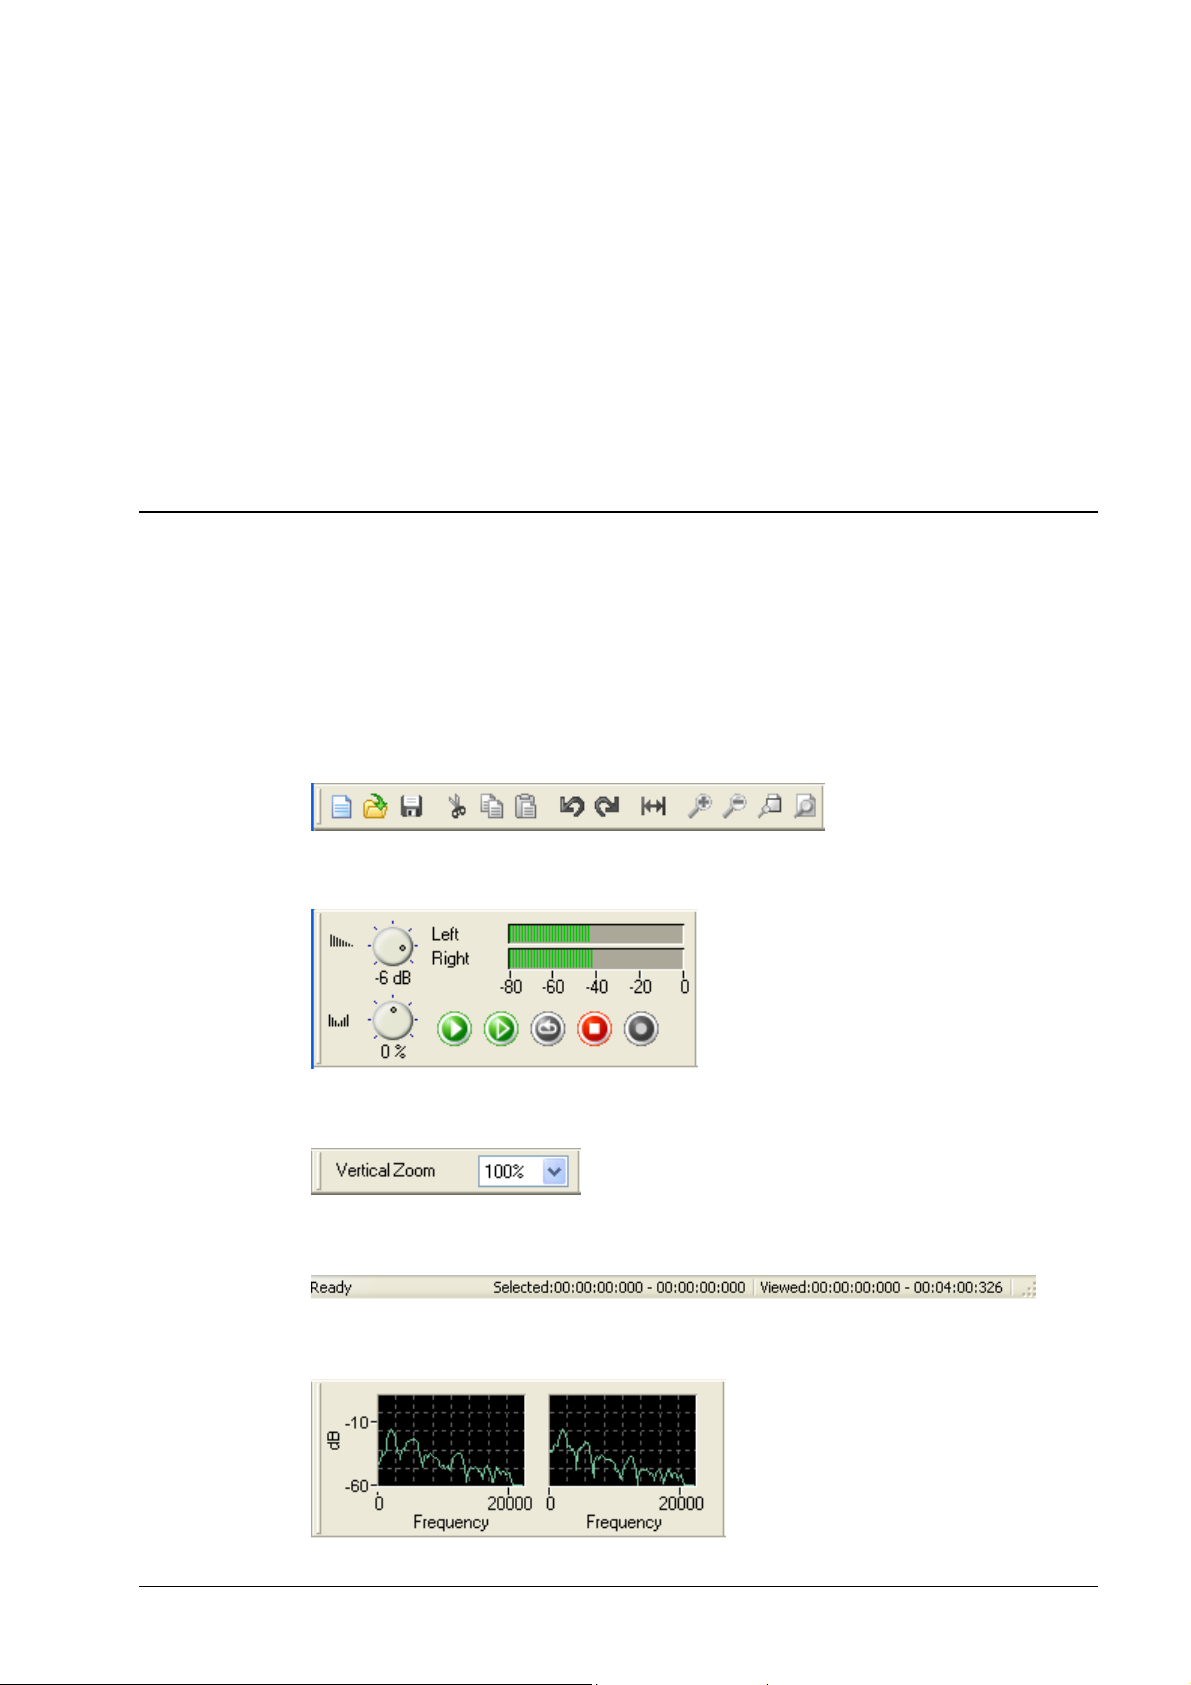
2.2.1 Workspace
The Nero Wave Editor workspace comprises three separate elements: the
'Sound Display', the 'Level Meter' and 'Spectrum Analyzer'.
The 'Sound Display' shows a graphic image of the audio file that is currently
open.
The 'Level Meter' regulates how the open audio file is played.
The 'Spectrum Analyzer' displays the bandwidth of the open audio file (in
decibels - dB).
Nero Wave Editor About Nero Wave Editor • 9
Page 10
3 Settings
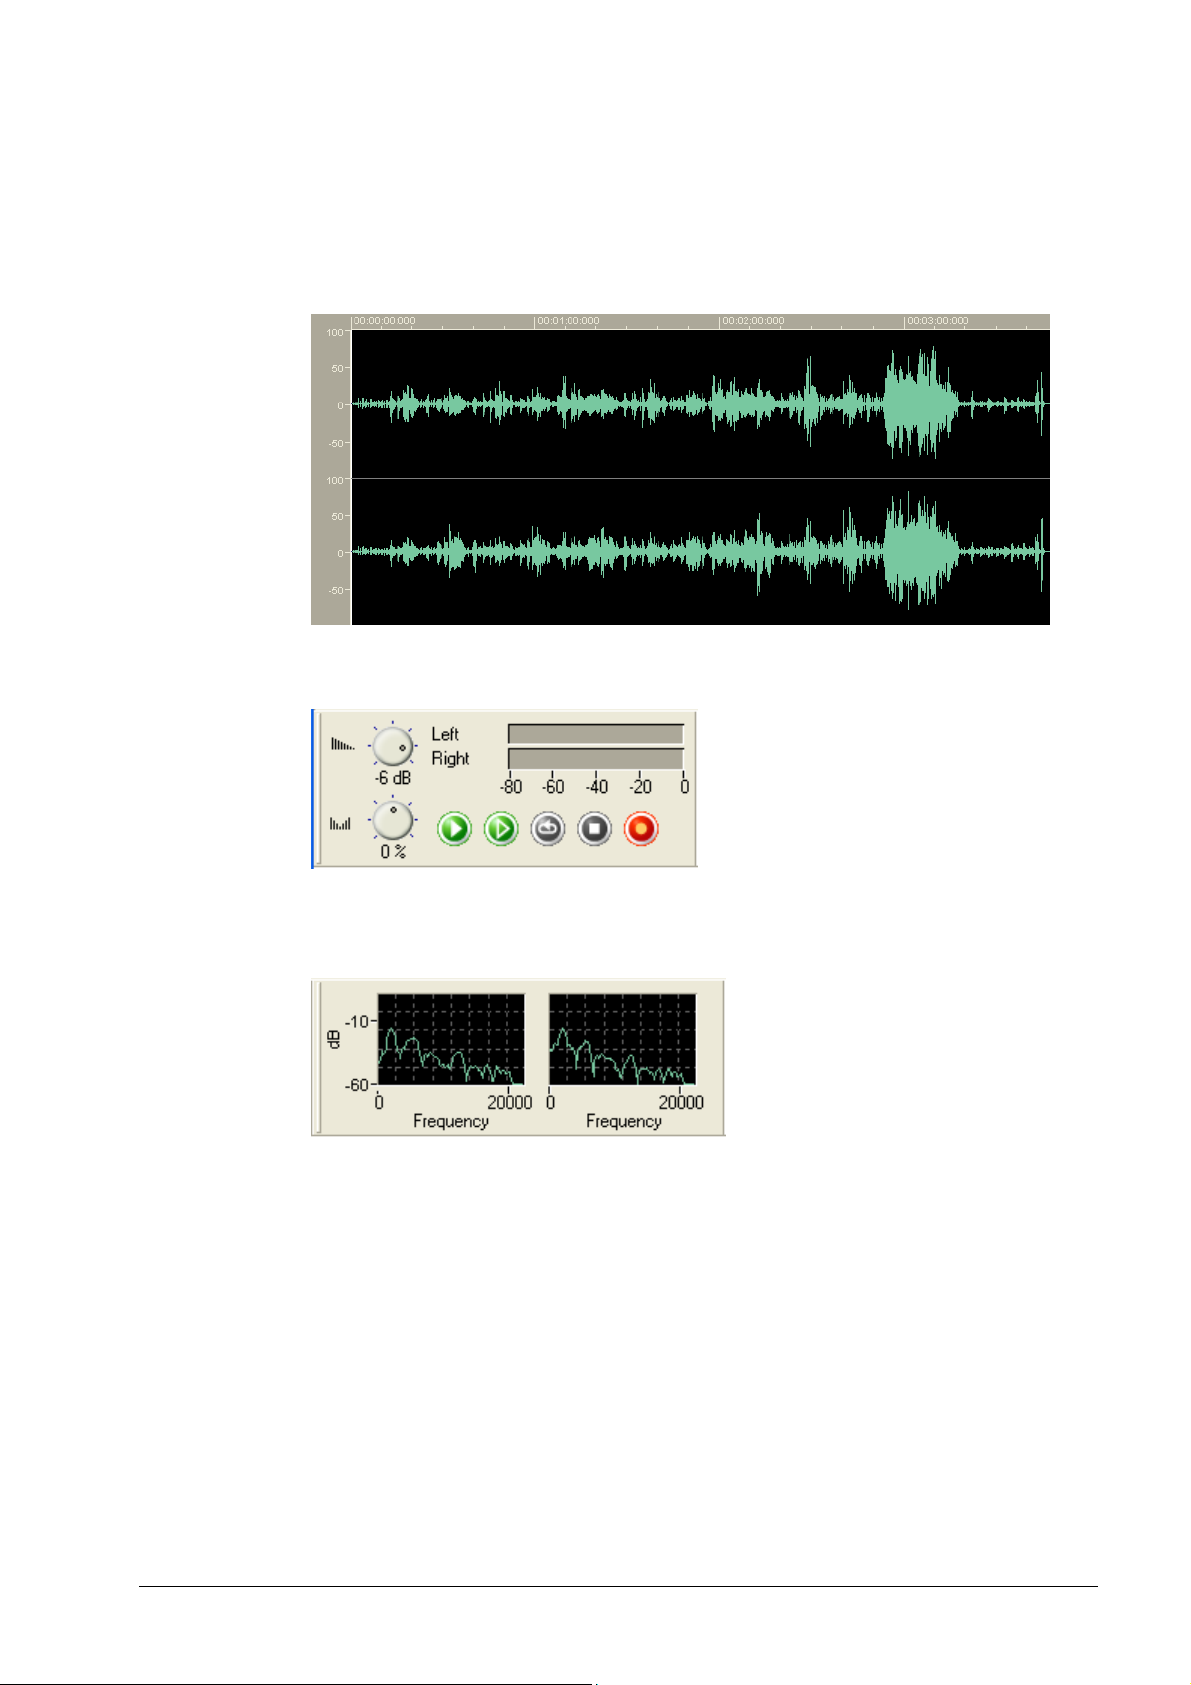
3.1 Selecting the input and output devices
To be able to record and reproduce audio files, a soundcard is needed. If a
number of components that can play audio files have been installed, select the
desired device.
1. In the 'Options' menu, select the 'Device Settings' command. The standard
devices set in the control panel will be selected.
If you wish to specify another device, click on the corresponding dropdown
button and highlight the desired device.
2. Click on the 'OK' button to save the devices chosen.
3.2 Setting the editor options
A number of various general 'Editor Options' can be configured. This area
comprises four 'tab' (index) cards. By clicking with the mouse you can bring one
of the index cards to the forefront and edit the settings.
Click on the 'OK' button to save the and close the dialog. 'Cancel' closes the
dialog without saving the changes. 'Apply' saves the changes, though without
closing the dialog so that additional changes can be made to the settings on
other index cards. 'Help' starts the online help feature.
Nero Wave Editor Settings • 10
Page 11
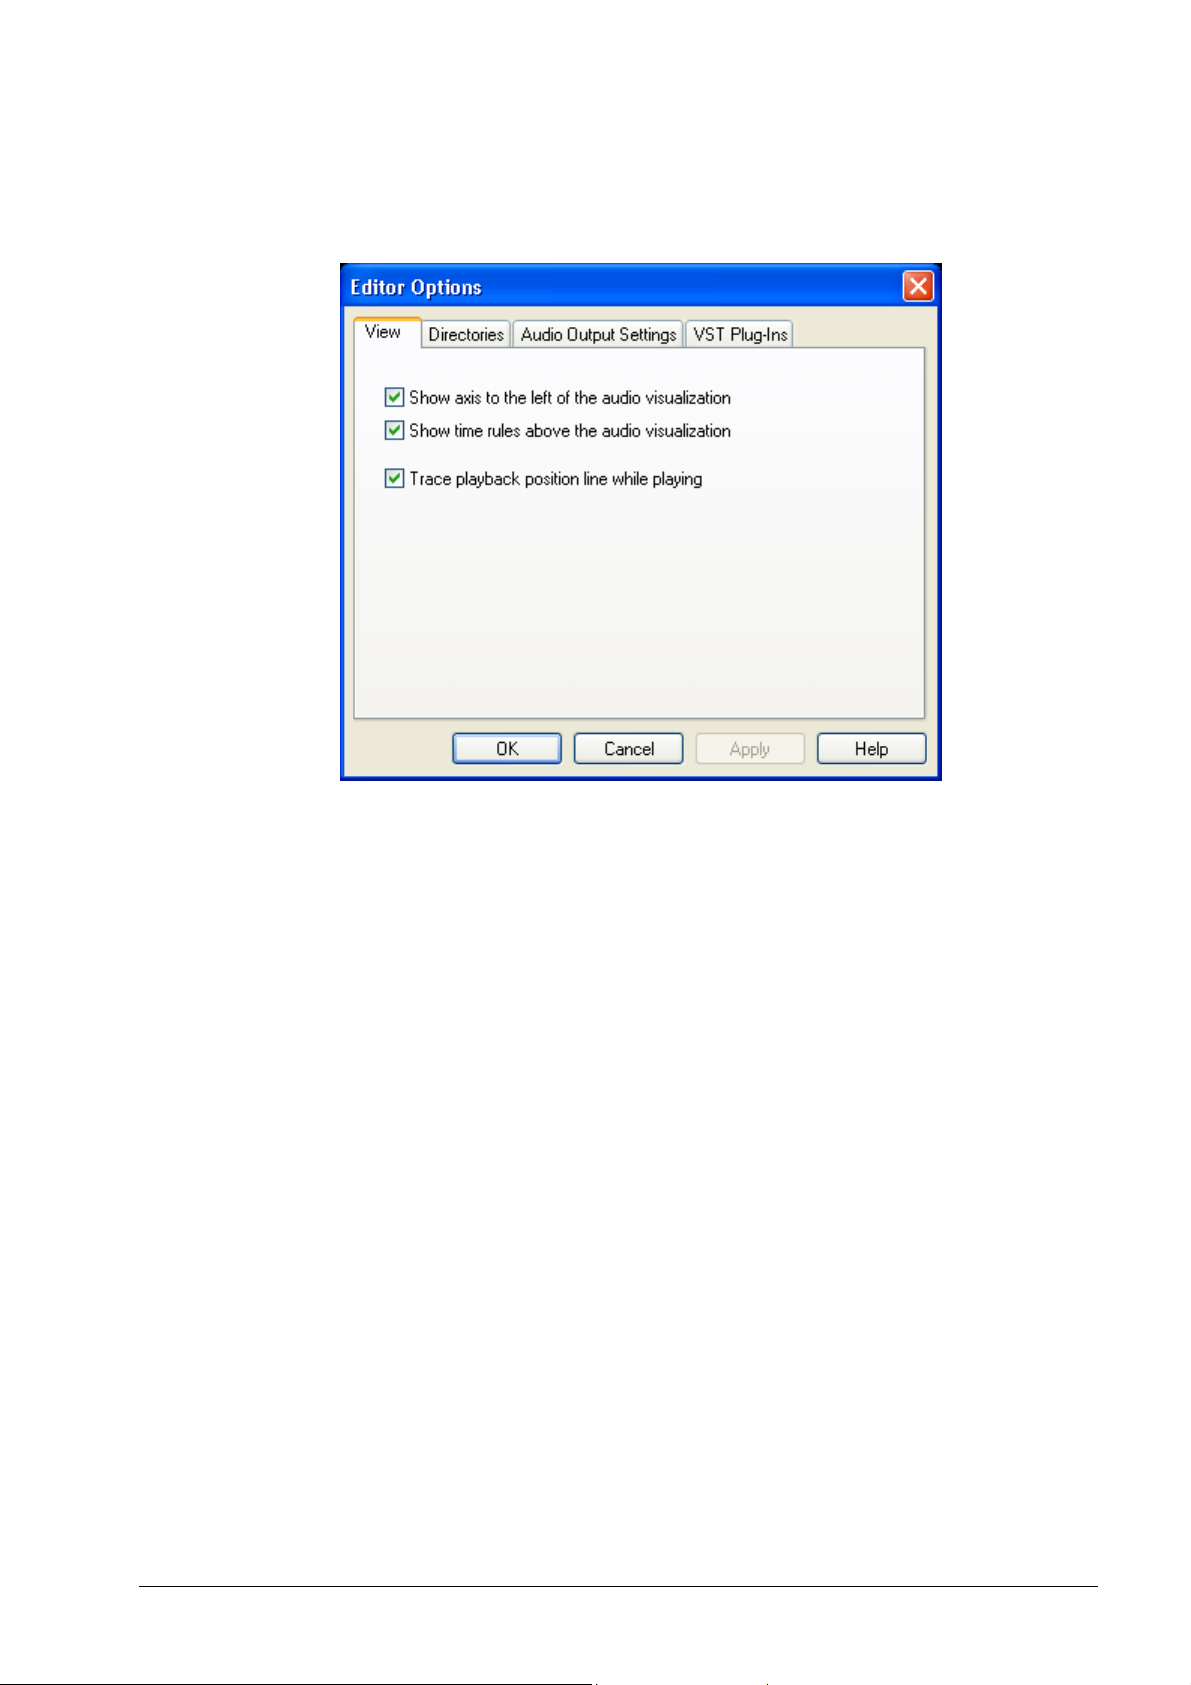
3.2.1 Setting the display features
The display options for the sound display can be changed on this index card.
1. In the 'Options' menu, select the 'Editor Options' command.
2. Click on the 'View' index card and specify whether the following control fields
should be activated or disabled:
Show axis to the left of the audio visualization
Show time rules above the audio visualization
Always keep the playback position in the window whilst playing
Nero Wave Editor Settings • 11
Page 12
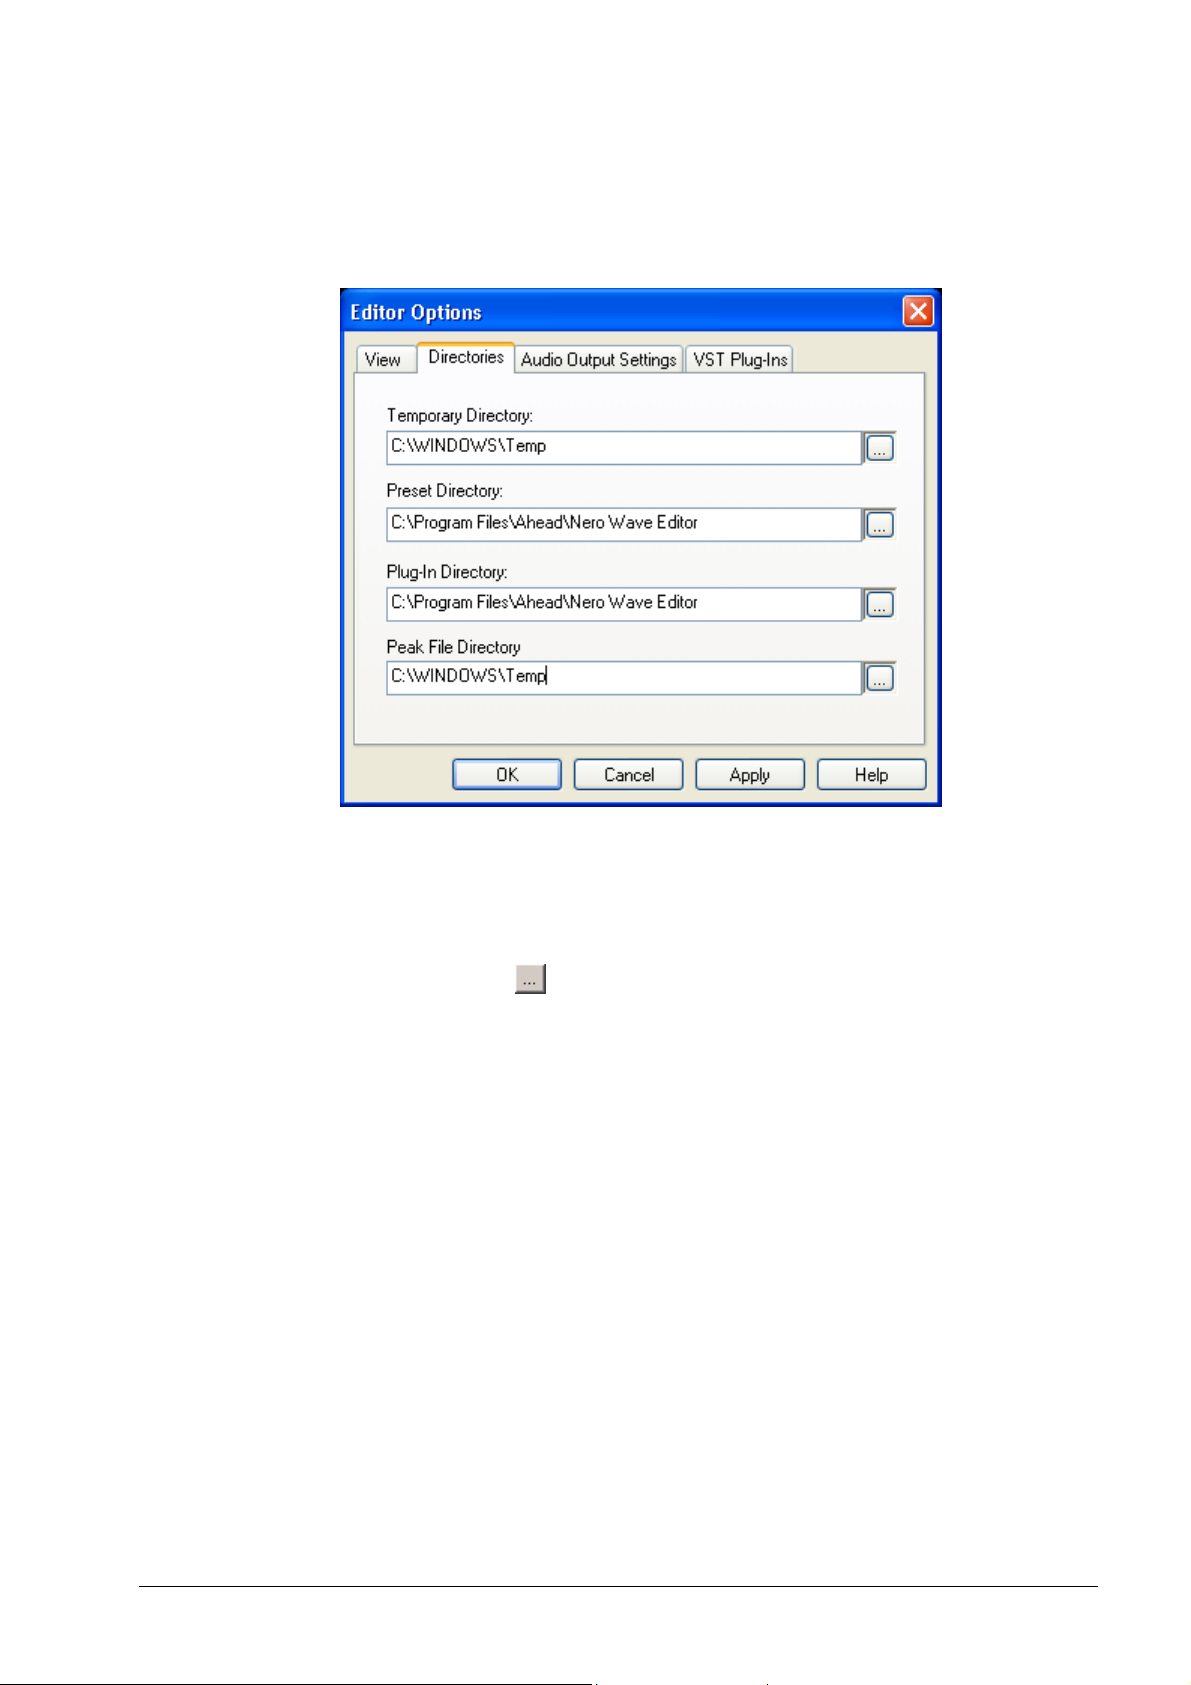
3.2.2 Specifying the directories used
The directories relevant for Nero Wave Editor can be specified on this index
card.
1. In the 'Options' menu, select the 'Editor Options' command.
2. Click on the 'Directories' index card and specify:
The directory for the intermediate storage of the temporary files
The directory in which the presettings are located
The directory in which the plug-in files are located
by clicking on the
button and selecting the appropriate directory.
Nero Wave Editor Settings • 12
Page 13
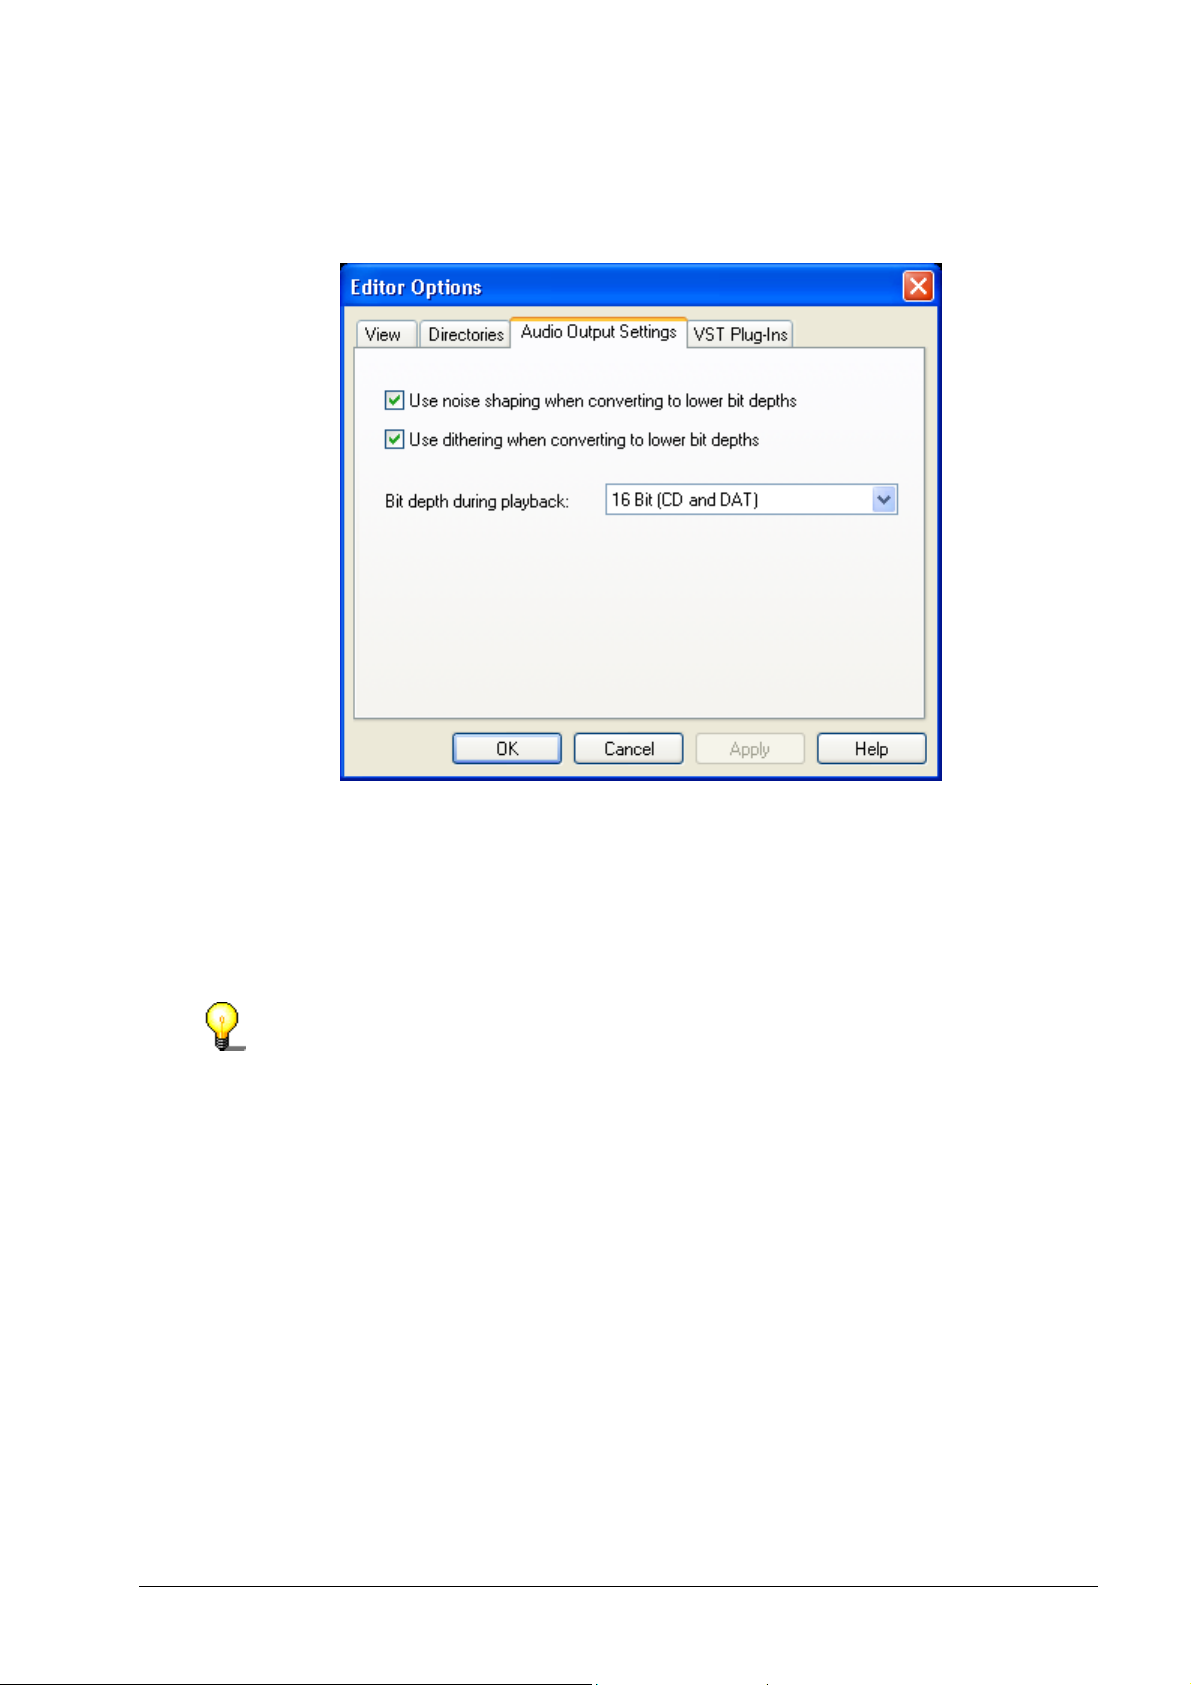
3.2.3 Audio output
The settings for audio output can be specified on this index card.
1. In the 'Options' menu, select the 'Editor Options' command.
2. Click on the 'Audio Output Settings' index card and specify whether the
following control fields should be activated or disabled:
Use noise shaping when converting to lower bit depths
Use dithering when converting to lower bit depths
Specify the bit resolution on the dropdown button and highlight the number
of bits wanted.
Dithering and noise shaping are used to minimize noise disturbance at low
resolutions. Noise shaping shifts the disturbance to bandwidths that the human
ear cannot hear particularly well. Dithering adds a quiet noise signal so that
there is no longer any correlation between the desired signal and the noise
signal causing the disturbance.
Nero Wave Editor Settings • 13
Page 14
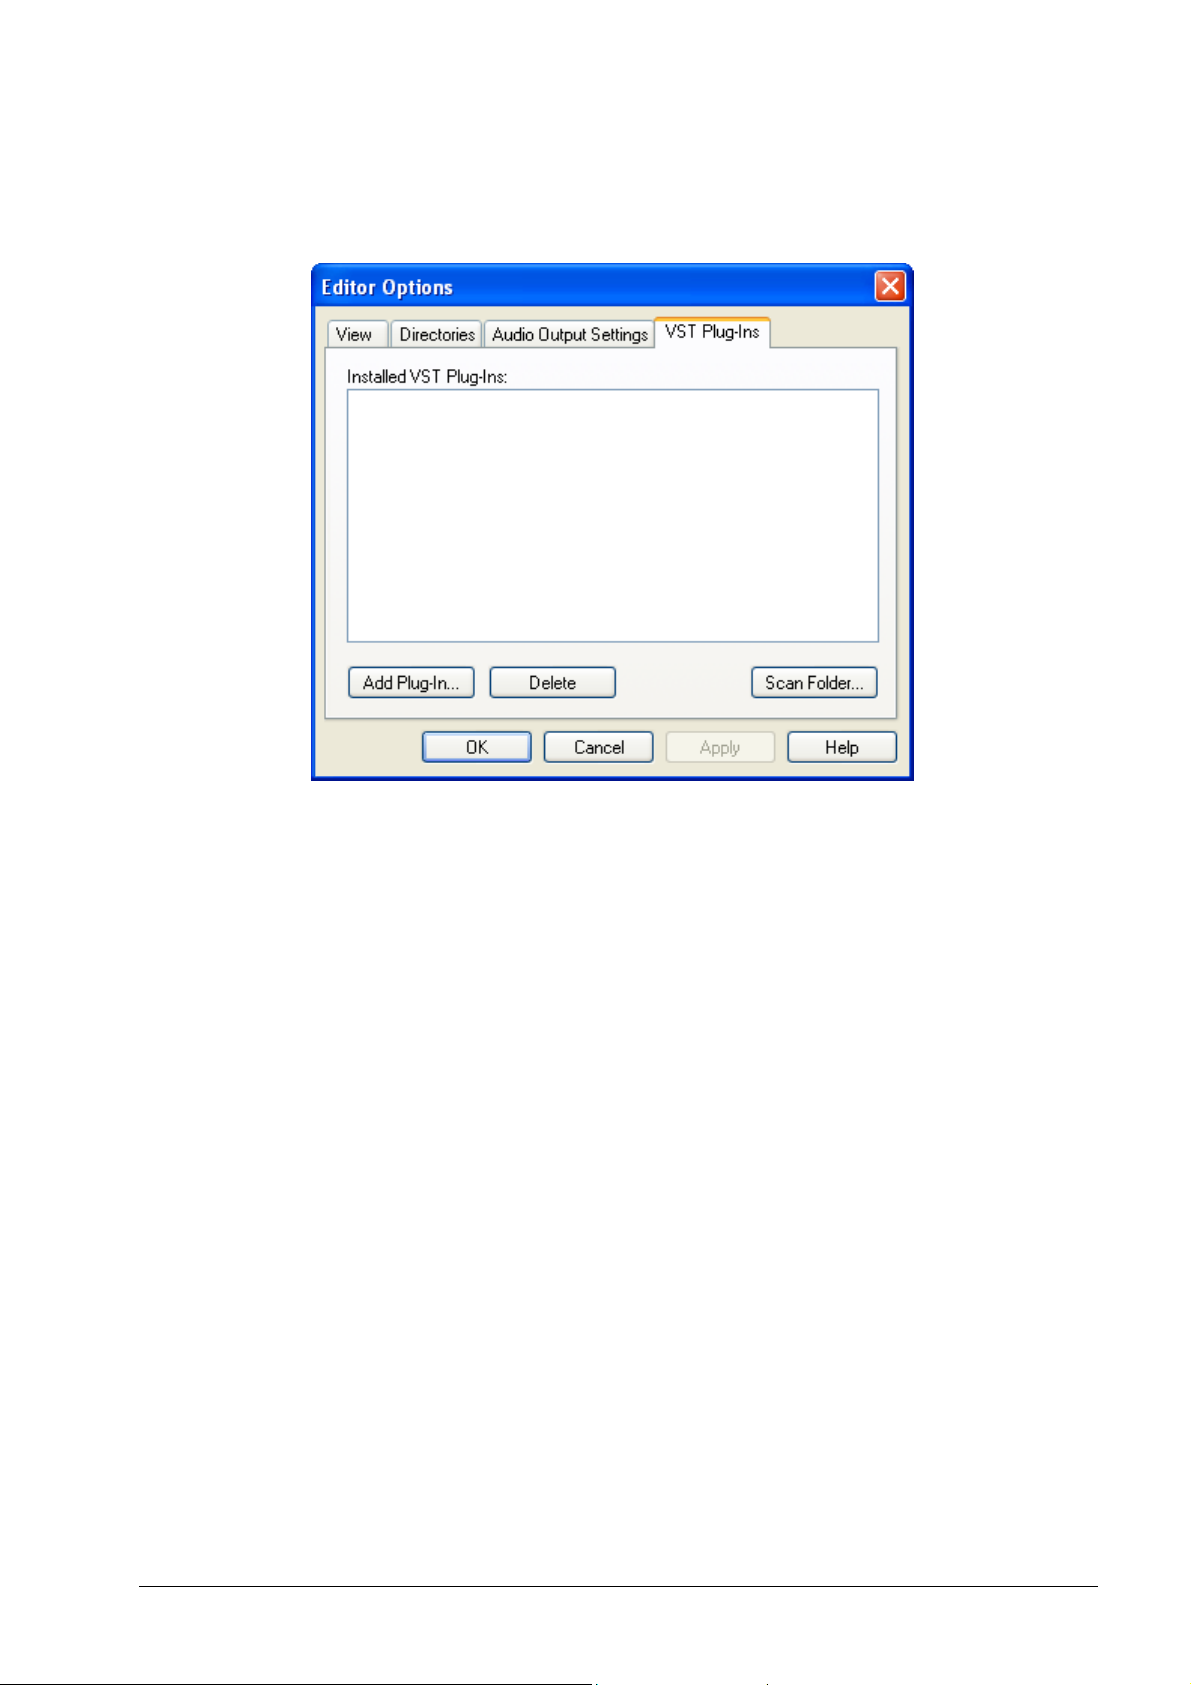
3.2.4 VST Plug-ins
On the ‘VST Plug-ins’ tab you will see the installed VST Plug-ins, if available.
To add VST-Plug-ins click on the ‘Add Plug-in’ button, select the directory
containing the plug-in, highlight and click on the ‘Open’ button.
To delete a VST-Plug-in, highlight the unwanted plug-in and click on the ‘Delete’
button.
Nero Wave Editor Settings • 14
Page 15
4 View
4.1 Specifying the view
The nature of the Nero Wave Editor display can be altered using the 'View'
menu.
Selecting (check mark in front of the command) of the respective command will
open the corresponding Nero Wave Editor element. Disabling this command
(no check mark before the command) will ensure that the element concerned is
not displayed.
Standard toolbar
Level meters
Vertical zoom bar
Status bar
Spectrum analyzer
Nero Wave Editor View • 15
Page 16
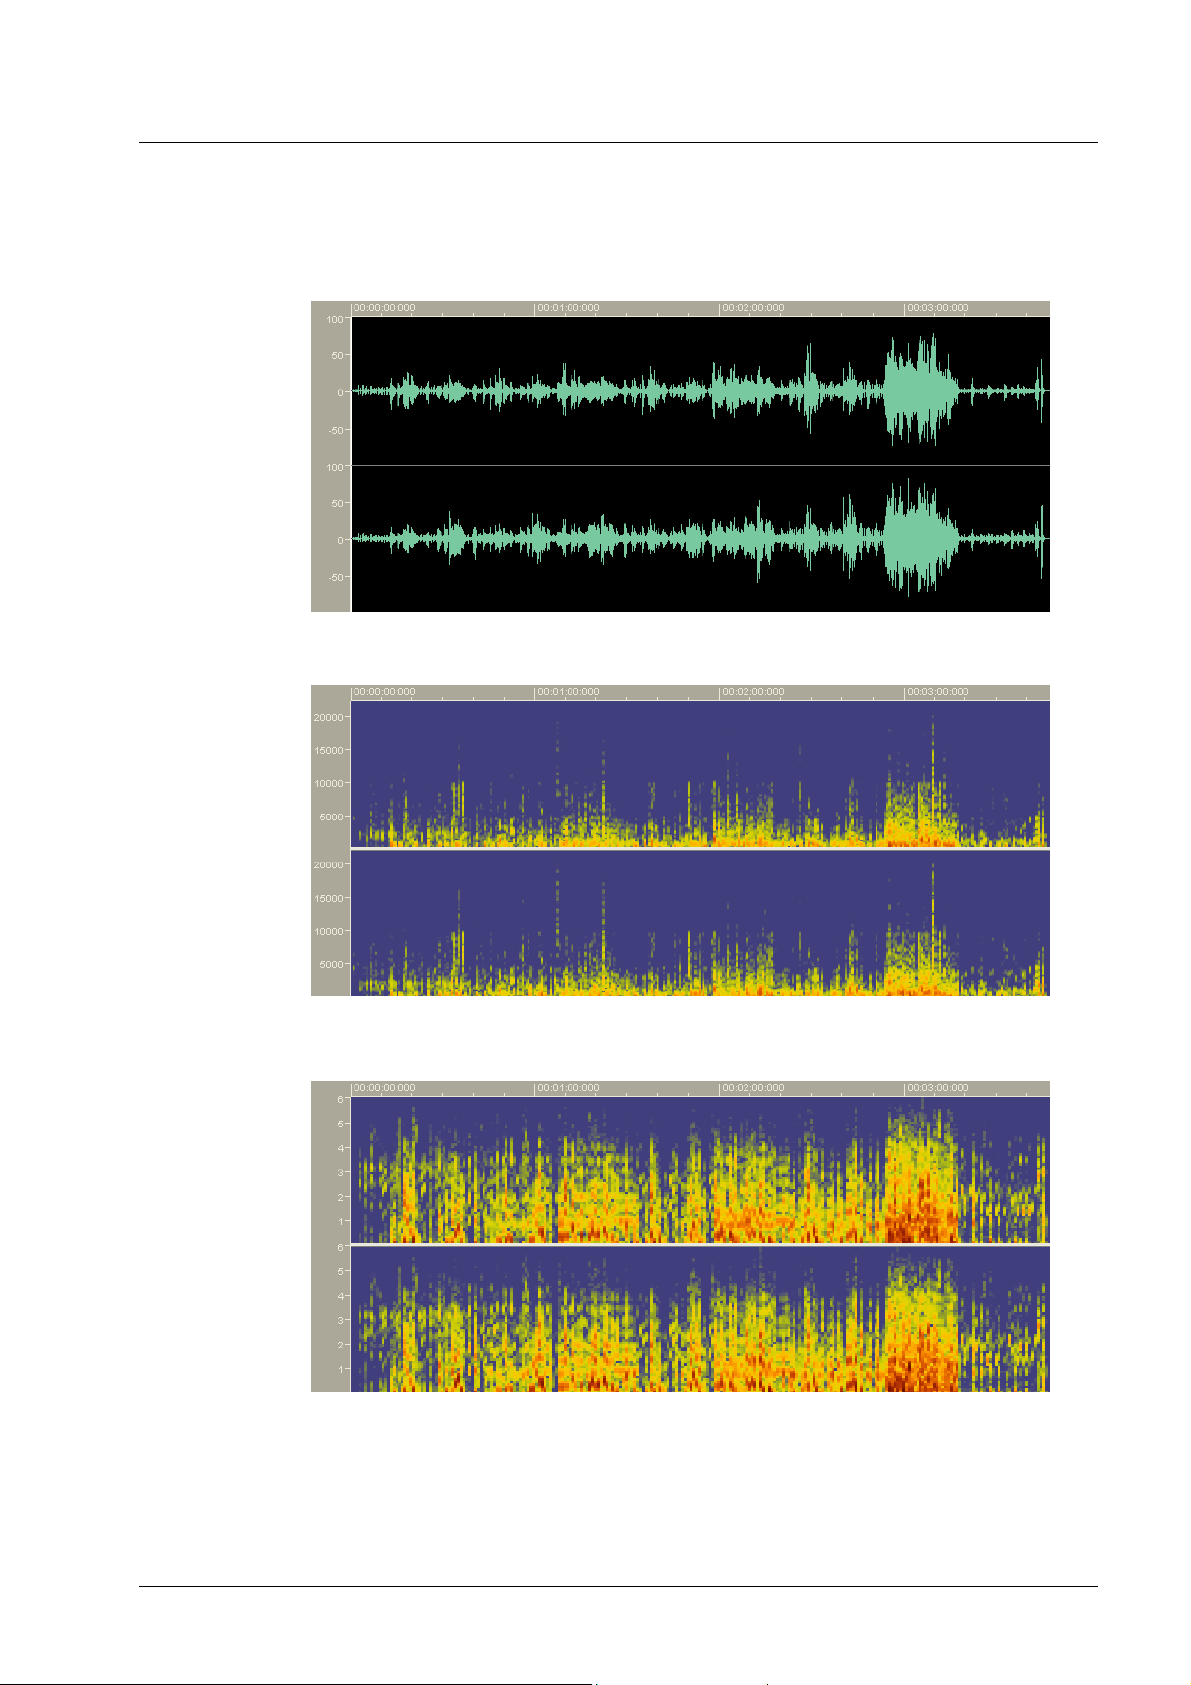
4.2 How the audio files can be represented
There are three different ways of displaying audio files. You can change them at
any time.
Wave display
Spectrogram display
Wavelet display
Nero Wave Editor View • 16
Page 17

4.3 Zooming
With Nero Wave Editor, audio files can be both horizontally and vertically
zoomed, so that special parts of the audio files or marked elements within them
can be viewed in more detail.
4.3.1 Vertical zoom
The vertical zoom determines the height of the curve progression displayed and
can be changed by selecting the desired zoom setting.
The vertical zoom setting can only be changed if the vertical zoom bar is
displayed. If it is not visible, it can be displayed via the 'View' menu and the
'vertical zoom bar' command.
The following example shows the 100% zoom, i.e. levels from –100% to +100%
of the maximum levels.
Selecting the 200% zoom reduces the displayed levels to –50% to +50% of the
maximum levels.
Nero Wave Editor View • 17
Page 18

4.3.2 Horizontal zoom
The horizontal zoom determines the size of the audio file that is visible in the
audio display. The size of the zoom determines how accurately the curve
progression can be recognized. It can be set using the appropriate button on the
standard menu bar (or via the 'View' menu).
The following example shows a complete audio file.
Click on the button
to zoom in on the section.
Nero Wave Editor View • 18
Page 19

5 Audio files
5.1 Loading and playing back audio files
Stored audio data can be quickly and easily loaded and played back.
1. In the 'File' menu select the command 'Open', highlight the audio file you
require and click on the 'Open' button.
2. Click on the button
meter will graphically display the level control for the left and right-hand audio
channels.
Parallel to this, the current playback time appears in the lower border of the
window.
Nero Wave Editor Audio files • 19
to play the whole audio file. While playing, the level
Page 20

5.2 Selecting sections of audio files
With Nero Wave Editor, you can quickly and easily select a specific section of
an audio file.
1. Open an audio file.
2. With the mouse, click in the 'Wave' section on the point that is to mark the
beginning of the selection and (keeping the mouse button pressed) drag the
mouse to the right until you have marked the section you want. Then release
your finger from the mouse button. The section selected is now highlighted in
white.
The exact times of the selected section can now be seen in the status bar.
3. Click on the button
playing, the level meter will graphically display the level control for the left
and right-hand audio channels.
4. Click on the gray area to the left of the 'Wave' window to revoke the
selection.
to play the selected section of the audio file. While
Nero Wave Editor Audio files • 20
Page 21

5.2.1 Saving the selection as a new audio file
A selection within an audio file can be saved as a new file.
1. Open an audio file and highlight the section you want.
2. In the 'Edit' menu, select the 'Copy to File' command.
3. In the window that now opens, enter the name of your choice in the 'File
name' field and click on the 'Save' button.
5.3 Inserting an audio file
A saved audio file can also be inserted in an existing file.
1. Open an audio file and mark the position where the other audio file is to be
inserted.
Nero Wave Editor Audio files • 21
Page 22

2. In the 'Edit' menu, select the command 'Insert File', highlight the file you
require and click on the 'Open' button.
The file will then be inserted and appears in the opened one as a marked
selection.
5.4 Recording a new audio file
Using the Nero Wave Editor, you can record your own audio files from a sound
source (line-in, microphone or CD audio). One particular reason for
(re)recording audio files is to capture the sound of vinyl records. You can then
use this new recording to make an audio CD with the aid of Nero. In the section
'Recording gramophone records', you can find more detailed information on how
to record tracks from a phonograph record.
1. In the 'File' menu, select the 'New' command.
If a file has been edited, you will be queried as to whether you wish to save
the changes.
Nero Wave Editor Audio files • 22
Page 23

2. In the 'Audio' menu, select the 'Record' command and determine the desired
sampling rate and sampling resolution. To so this, click on the dropdown
button and highlight the desired list box.
3. Click on the 'OK' button to take over these details. The recording console will
appear.
4. Click on the
the recording time as well as the recording level display.
5. Click on the 'OK' button to stop recording. The audio file recorded will appear
in the display area.
button to start recording. In the adjacent fields you will see
5.5 Converting an audio file
If needed, existing audio files can be converted in order to improve their quality
to a desired level.
Only an entire audio file can be converted, i.e. highlighted sections of a file
cannot be converted separately.
1. Open the desired file.
2. In the 'Edit' menu, select the 'Convert Sample Format' command.
Nero Wave Editor Audio files • 23
Page 24

3. Specify the sample format by selecting the desired sampling rate and the
sampling resolution. To so this, click on the dropdown button and highlight
the desired list box.
The higher the sampling rate and the sampling resolution, the more memory the
file will need.
4. If necessary, change the conversion settings by selecting the desired filter.
5. Click on the 'OK' button to make the changes to the file.
6. In the 'File' menu, select the 'Save' command to save the changes to the file
or select the 'save as' command to create a new audio file.
Nero Wave Editor Audio files • 24
Page 25

5.6 Editing audio files
One particular feature of Nero Wave Editor is its ability to edit audio files
nondestructively. This means that changes to the audio file (e.g. as a result of
using special effects or sound enhancement) can be checked immediately
without having to perform a time-consuming recalculation of the audio data. The
edited audio file is only computed while it is being saved.
5.6.1 Muting
Muting removes all the signals in the section selected.
1. Open an audio file and highlight the section you want.
2. In the 'Volume' menu, select the 'Mute' command. This will lead to the
selected position of the audio file being overwritten with 'silence'.
5.6.2 Normalization
Normalization leads to an the volume being matched to a standard value.
During normalization, the whole audio file or the selected section of the file is
proportionately increased or reduced on the basis of a measurement of the
maximum value.This does not mean that the volume at each point of the audio
file is equally high, but only how loud the loudest point in the selected section
may be. Normalization is largely used to give different audio files the same
volume spectrum.
1. Open an audio file and highlight the section you want.
2. In the 'Volume' menu, select the 'Normalize' command. Push the slider in the
direction required (pushing it upward will lead to a higher maximum level;
Nero Wave Editor Audio files • 25
Page 26

pushing it down will result in a lower maximum level) then click on the 'OK'
button.
The altered volume is shown in the section selected.
5.6.3 Changing volume
This section describes how to alter the volume of a selected section, for
example because it is too quiet.
1. Open an audio file and highlight the section you want.
Nero Wave Editor Audio files • 26
Page 27

2. In the 'Volume' menu, select the 'Volume change' command. Push the slider
in the direction required (if you push it upward it will increase the volume;
pushing downward will reduce the volume) then click on the 'OK' button.
The altered volume is shown in the section selected.
5.6.4 Fading in and out
There are four different methods available for fade-in and fade-out effects.
To fade in, the volume of the selected section is relatively intensely reduced at
the beginning and then reduced less and less towards the end. Fading out is
exactly the opposite; the volume of the selected section is reduced relatively
little at the beginning but then diminishes more and more toward the end. The
fade in and fade out effects follow a mathematical curve.
Linear – the volume is reduced or increased at a rate proportional to the time
Exponential – the volume increases in line with an exponential function.
Logarithmic – the volume increases in line with a logarithmic function.
Sinusoidal – the volume increases at an interval of half the wavelength of a
sinusoidal function.
1. Open an audio file and highlight the section you want.
2. In the 'Volume' menu, select the 'Fade In' or 'Fade Out' command and select
the effect you require.
Nero Wave Editor Audio files • 27
Page 28

6 Recording gramophone
r
records
6.1 Preparation
There are many ways of reproducing the sound of records on a computer; the
following example only describes the basic procedure for doing this.
The signal received from the record player's magnetic sampling system cannot
be directly fed into the soundcard's line-in input, as the signal is frequencydistorted for technical reasons. A so-called 'frequency corrector preamplifier'
between the sampling system and the soundcard is needed in order to correct
the frequency response. This is most easily performed using the amplifier's
phono input.
In order to rerecord, you will need:
a record player
an amplifier
a computer with a soundcard
around 700 MB free memory
cables to connect the individual components
Sometimes leakage pickups (humming) can arise when the soundcard is linked
to the amplifier. The humming is caused when two devices that have already
been grounded (earthed) are connected with one audio cable. A by-pass powe
filter or transformer can solve the problem. Sometimes it is simply enough if the
devices are connected to different power sources.
1. Connect the record player to the amplifier.
2. Connect the amplifier to the soundcard.
3. Clean the record.
Nero Wave Editor Recording gramophone records • 28
Page 29

6.2 Recording
1. Start Nero Wave Editor: Start > Programs > Nero > Nero 6 > Nero Wave
Editor.
2. In the 'File' menu, select the 'New' command.
3. In the 'Audio' menu, select the 'Record' command and determine the desired
sampling rate and sampling resolution. To so this, click on the dropdown
button and highlight the desired list box.
For a recording that is to be written on a CD, a sampling rate of 44100 Hz and a
sampling resolution of 16 bit are recommended.
4. Click on the 'OK' button to take over these settings. The recording console
will appear.
5. Click on the
You will see the recording time and the level control display in the recording
console while you are recording.
button to start recording, then place the stylus on the record.
If the level is too loud or too quiet, you can change it. Open the volume control
Nero Wave Editor Recording gramophone records • 29
and move the slider of the 'line' section in the desired direction.
Page 30

6. At the end of a track, click on the 'OK' button to stop recording. The audio file
recorded will appear in the display area.
7. Click on the
button check the recording.
You can best monitor the recording if you wear headphones.
8. Adjust the audio file as you wish, using a filter or optimize the sound.
9. Repeat the corresponding steps to record more tracks.
Nero Wave Editor Recording gramophone records • 30
Page 31

7 Effects
7.1 Introduction
One particular feature of Nero Wave Editor is its ability to nondestructively edit
audio files. This means that changes to the audio file (e.g. as a result of using
special effects or sound enhancement) can be checked immediately without
having to perform a time-consuming recalculation of the audio data. The edited
audio file is only computed during saving.
Click on the
allows you to check straightaway that you are happy with the results.
button to play back the audio file with the changes stated. This
7.1.1 Saving the effect settings
It is very easy to save the effect settings.
1. Use the mouse to click in the text window of the appropriate dialog and enter
a name.
2. Click on the 'Add' button to save the settings.
Nero Wave Editor Effects • 31
Page 32

7.1.2 Loading the effect settings
You can load your own effect settings and those supplied with Nero Wave
Editor as easily as you can save them.
1. In the dialog concerned, click on the dropdown button and, in the list box
field, highlight the name of the desired setting.
2. Click on the
button to check the setting.
7.1.3 Deleting the effect settings
It goes without saying that effect settings can also be deleted.
1. In the dialog concerned, click on the dropdown button. Then, in the list box
field, highlight the name of the setting you wish to delete.
2. Click on the 'Remove' button to remove the chosen setting.
3. In the dialog that follows, click on the 'Yes' button to confirm that you wish to
delete.
Nero Wave Editor Effects • 32
Page 33

7.2 Equalizer
With Nero Wave Editor's 6-band equalizer, you can amplify or reset any
frequency bands you want. This means that you can selectively modify these
frequency ranges.
1. Open the desired file.
2. Select the 'Equalizer' command in the 'Tools' menu.
3. Push the slider in the direction required – if you push it upward there will be
amplification; pushing it down will have the opposite effect.
Click on the
allows you to check straightaway that you are happy with the results.
4. Click on the 'OK' button to take over the changes.
button to play back the audio file with the changes stated. This
Nero Wave Editor Effects • 33
Page 34

7.3 Transposing
With the transposing tool, the key (tonality) of an audio file (or a selected section
of one) can be changed. Transposing is particularly important when creating
files that are composed of loops. For instance, if you raise the frequency of the
human voice by four semitones, it sounds as if the person speaking has helium
in his or her lungs (i.e. ridiculously high-pitched). If the frequency is lowered by
four semitones, voices sound very much deeper.
1. Open the desired file.
2. Select the 'Transpose' command in the 'Tools' menu.
3. Use the 'Interval' and/or 'Fine Tune' round buttons to set the type and
intensity of the transposing.
The file may become longer as a result of the type of transposing chosen. If
you select the 'Maintain Original Length' control field, the original file length
will be retained.
Click on the
allows you to check straightaway that you are happy with the results.
4. Click on the 'OK' button to take over the changes.
button to play back the audio file with the changes stated. This
Nero Wave Editor Effects • 34
Page 35

7.4 Dynamics
The dynamic processor changes the amplitude, i.e. the dynamic part of an audio
file. This is then limited, compressed or increased. This setting is made via
curve control; if the line runs from the lower left corner to the upper right-hand
corner, the amplitudes of the input (X) and output signals (Y) are the same at
each point. Editing this line will change the output in relation to the input.
1. Open the desired file.
2. Select the 'Dynamic Processor' command in the 'Tools' menu.
3. Place the mouse cursor on that part of the green line that you wish to alter –
a white square will appear at the place where you click the mouse – and drag
the square to the position desired.
Repeat this procedure for all the sections selected.
You can remove a dynamic position by clicking on the chosen square with the
right-hand mouse button.
Nero Wave Editor Effects • 35
Page 36

In addition, you can also change the reaction time of the dynamic processor
using the 'Attack time' and 'Release time' round buttons.
Click on the
allows you to check straightaway that you are happy with the results.
4. Click on the 'OK' button to take over the changes.
button to play back the audio file with the changes stated. This
7.5 Time correction
An audio file can be shortened or extended by means of time correction. When
sampling files that are made up of loops, time correction is particularly important
- in order that all the audio elements have the same length. The undesired side-
effects caused by time correction can be remedied selectively, depending on the
audio element.
1. Open the desired file.
2. Select the 'Time Correction' command in the 'Tools' menu.
3. Click on the radio button of your choice in the 'Time Scale Modification
Factor' area to determine the correction factor. This is either a percentage
modification factor or a new tempo in 'Beats Per Minute’ (BPM). You can set
the time scale modification factor by entering a figure or by turning the knob.
4. Choose the appropriate optimizing method by clicking on the dropdown
button and highlighting the desired list box field.
Nero Wave Editor Effects • 36
Click on the
allows you to check straightaway that you are happy with the results.
5. Click on the 'OK' button to take over the changes.
button to play back the audio file with the changes stated. This
Page 37

7.6 Delay
Delay generates echo effects by repeating the sound with an interval. The
combination of delay and feedback creates an effect like that of an echo from a
distant mountain.
1. Open the desired file.
2. Select the 'Delay' command in the 'Effects' menu.
3. Choose a presetting by clicking on the dropdown button and highlighting the
desired list box field or determine the delay or feedback yourself by turning
the appropriate knob and change the signal and the effect with the sliders.
Click on the
allows you to check straightaway that you are happy with the results.
4. Click on the 'OK' button to take over the changes.
7.7 Flanger
The flanger creates unusual sound effects through variable modulation and
mixing. The effect is caused by the change in the time delay. Using the flanger,
the original is mixed together with a signal that has been modulated (changed in
pitch). This signal is sometimes slower or sometimes faster than the original.
Pleasant stereo effects can be created if the signal then switches from "left" to
'right' and back again.
1. Open the desired file.
button to play back the audio file with the changes stated. This
Nero Wave Editor Effects • 37
Page 38

2. Select the 'Flanger' command in the 'Effects' menu.
3. Choose a presetting by clicking on the dropdown button and highlighting the
desired list box field or determine the depth or frequency yourself by turning
the appropriate knob and change the signal and the effect with the sliders.
Click on the
allows you to check straightaway that you are happy with the results.
4. Click on the 'OK' button to take over the changes.
7.8 Chorus
The chorus, like the flanger creates unusual sound effects through variable
modulation and mixing. In comparison with the flanger, the delay is longer and a
number of delayed, i.e. modulated signals are added at the same time. By these
means, the audio file receives a warm sound and the impression is created that
a greater number of voices can be heard.
1. Open the desired file.
2. Select the 'Chorus' command in the 'Effects' menu.
button to play back the audio file with the changes stated. This
3. Choose a presetting by clicking on the dropdown button and highlighting the
desired list box field or determine the depth or frequency yourself by turning
the appropriate knob and change the signal and the effect with the sliders.
Nero Wave Editor Effects • 38
Page 39

Click on the
allows you to check straightaway that you are happy with the results.
button to play back the audio file with the changes stated. This
4. Click on the 'OK' button to take over the changes.
Nero Wave Editor Effects • 39
Page 40

7.9 Reverberation
The reverberation effect simulates the reflections of a real room, allowing the
impression to arise that the recording was made in another environment, e.g. in
a concert hall.
1. Open the desired file.
2. Select the 'Reverb' command in the 'Effects' menu.
3. Choose a presetting by clicking on the dropdown button and highlighting the
desired list box field or set the reverberation, room size and/or 'brightness'
yourself by turning the appropriate knob, and change the signal and the
effect with the sliders.
Click on the
allows you to check straightaway that you are happy with the results.
4. Click on the 'OK' button to take over the changes.
button to play back the audio file with the changes stated. This
Nero Wave Editor Effects • 40
Page 41

7.10 Wah-Wah
The 'wah-wah' effect is generated by a bandpass filter which is mixed with the
direct signal. The filter allows the center frequency to be changed over time. The
modifications to the center frequency can be proportional to the volume level of
the input signal or they can follow a predefined function such as a sine or
triangle function.
1. Choose 'Wah-Wah' from the 'Effects' menu.
2. In the 'Modulation' area, choose a function to determine how the modulation
will be implemented. Choose a modulation frequency and enter the upper
and lower limits of the modulation range.
3. In the 'Mix' area specify the relationship between the direct and the effect
signal.
Clicking on the
allows you to check immediately whether you are happy with the results.
4. Click on the 'OK' button to accept the changes.
button plays the audio file with the specified changes. This
Nero Wave Editor Effects • 41
Page 42

7.11 Phaser
The phaser is a notch filter with several notches in its frequency band. The
notch filter alternately strengthens and weakens the harmonic components of
the audio input signal and produces an output signal with a 'floating effect'.
1. Choose 'Phaser' from the 'Effects' menu.
2. In the 'Modulation' area, choose a function to determine how the modulation
will be implemented. Choose a modulation frequency and enter the upper
and lower limits of the modulation range.
3. In the 'Mix' area specify the relationship between the direct and the effect
signal.
Clicking on the
allows you to check immediately whether you are happy with the results.
4. Click on the 'OK' button to accept the changes.
button plays the audio file with the specified changes. This
Nero Wave Editor Effects • 42
Page 43

7.12 Voice modification
Voice modification allows the voice components of audio files to be modified by
changing the smoothed frequency band. If the smooth frequency band is scaled,
for example, the voice will sound lighter (the resonances are higher) or darker
(the resonances are deeper). As well as scaling, it is also possible to enter a
curve with the input and output values of your choice. This allows you to modify
the voice until it becomes unrecognizable.
1. Choose 'Voice Modification' from the 'Effects' menu.
2. In the 'Envelope' area determine the appearance of the frequency band by
giving the curve the profile you want, and enter the scaling factor.
3. In the 'Pitch' area choose the interval and the fine tune by turning the knob. In
addition, you can check the 'Keep Length' box to keep the original length of
the recording.
4. If you need a different time scale modification factor, you can enter the
percentage by which the recording should be stretched by turning the knob in
the 'Time Stretch' area. To do this, you must check the 'Time Stretch' box.
Nero Wave Editor Effects • 43
Clicking on the
allows you to check immediately whether you are happy with the results.
5. Click on the 'OK' button to accept the changes.
button plays the audio file with the specified changes. This
Page 44

7.13 Pitch tuning
Pitch tuning allows you to correct the intonation of vocal or instrumental
recordings. The algorithm continuously analyses the pitch and corrects it, where
necessary, in order to ensure that the intonation remains correct.
1. Choose 'Pitch Tuning' from the 'Effects' menu.
2. Check the box in the 'Correction' area if you want to make corrections and
choose a scale to determine how pitch tuning will be carried out. In addition
you can choose the reference tone and the binding by turning the
corresponding knob. Binding is a measurement of the maximum permitted
deviation from the reference tone.
3. Check the box in the 'Vibrato' area if you want to add vibrato. You can specify
the frequency and depth of the vibrato by turning the respective knobs.
Clicking on the
allows you to check immediately whether you are happy with the results.
4. Click on the 'OK' button to accept the changes.
button plays the audio file with the specified changes. This
Nero Wave Editor Effects • 44
Page 45

7.14 Karaoke filter
The Karaoke filter filters the human voice out of audio files, so that the original
song can be saved without the vocals. The filter removes those parts of the
song which are the same in both stereo channels. This is generally the vocals.
Because of the way in which the filter works, the original file must be a stereo
file. Also, there is no guarantee that the voice can be removed successfully. The
success of the filtering depends on the mixing during the production of the
recording.
1. Choose 'Karaoke Filter' from the 'Tools' menu.
2. Determine the position of the vocals in the stereo field by turning the 'Vocal
Pan' knob.
3. Turn the knobs in the 'Vocal Frequency Band' area to specify the upper and
lower limits of the frequency range within which the filter will work.
Clicking on the
allows you to check immediately whether you are happy with the results.
4. Click on the 'OK' button to accept the changes.
button plays the audio file with the specified changes. This
Nero Wave Editor Effects • 45
Page 46

8 Enhancement
8.1 Introduction
The sound of audio files can be improved with the enhancement commands.
8.2 Band extrapolation
Band extrapolation improves the sound of dull recordings. This is done by
synthesizing the higher frequencies to produce artificial harmonics. Low
frequencies are also generated to produce powerful bass tones.
1. Open the audio file.
2. Choose 'Band Extrapolation' from the 'Enhancement' menu.
3. Choose an existing setting by clicking on the button on the drop-down list and
selecting an item from the list, or choose the volumes of the two frequency
ranges and of the original signal using the sliders in the 'Spectral Remixer'
area. You can also specify the cut off frequencies for high and low frequency
synthesis by turning the appropriate knobs.
Nero Wave Editor Enhancement • 46
Click on the
allows you to check straightaway that you are happy with the results.
button to play back the audio file with the changes stated. This
Page 47

4. Click on the 'OK' button to take over the changes.
8.3 DC Offset Correction
DC offset correction improves recordings from poorly calibrated equipment (not
centered around the zero point). The subsonic frequencies are removed and
with them the DC errors.
1. Open the file of your choice and select the appropriate area.
2. Select the 'DC Offset Correction' command in the 'Enhancement' menu. The
correction is made to the selected part of the audio file.
With this command, you do not have any selection choices and it is not possible
to check the result of optimization in advance.
8.4 Filter toolbox
The filter toolbox filters interference frequencies out of the recording. It has not
only the normal functions such as low, high and bandpass filters, but also a
user-defined frequency curve and three individual notch filters. The notch filters
can be used to remove specific interference such as the buzzing of the power
supply.
1. Choose 'Filter Toolbox' from the 'Enhancement' menu.
2. Check the box in the 'Band Pass Filter' area if you want to use this filter, and
specify the upper and lower limits of the frequency range by turning the
corresponding knobs.
3. In the 'Notch Filters' area, choose the filter you want and specify the center
frequency by turning the knob.
Nero Wave Editor Enhancement • 47
Page 48

4. Check the box in the 'User drawn filter response' area if you want to use your
own frequency. You can draw this using the green line.
Clicking on the
allows you to check immediately whether you are happy with the results.
5. Click on the 'OK' button to accept the changes.
8.5 Declicker
The Declicker effectively removes the clicks which are often heard on records.
The Decrackler is aimed at very short, impulse-type interference with small
amplitudes which occurs frequently (and sounds like crackling).
1. Choose 'Declicker' from the 'Enhancement' menu.
button plays the audio file with the specified changes. This
2. Check the box in the 'Declicker' area if you want to remove clicks. Specify the
sensitivity of the Declicker by turning the corresponding knobs to set the
detection threshold and the maximum length of the clicks. If you check the
'High Quality' box, a complex algorithm is used for interpolation. If your PC is
not fast enough for high quality mode, you should uncheck this box.
3. Check the box in the 'Decrackle' area if you want to remove crackling.
Specify the sensitivity of the Decrackler by turning the corresponding knobs
to set the detection threshold and the crackle reduction level.
Clicking on the
allows you to check immediately whether you are happy with the results.
4. Click on the 'OK' button to accept the changes.
button plays the audio file with the specified changes. This
Nero Wave Editor Enhancement • 48
Page 49

8.6 Noise Reduction
Noise reduction improves recordings where noise disturbs the sound of the
audio file by removing undesired noises (background noise, buzzing, etc.) in a
particular bandwidth.
1. Open the desired file.
2. In the 'Enhancement' menu, select the 'Noise Reduction' command.
3. Choose an existing setting by clicking on the button on the drop-down list and
highlighting an item from the list, or select the subtraction profile by choosing
the required mode. Select ‘Editable Noise Curve’, then click in the line in the
field you want to change, a white square will appear at this point and you can
drag the square to the required position.
You can also use the slider to set the reduction level and the ‘Gain Floor’ to
the required position.
Click on the
allows you to check straightaway that you are happy with the results.
4. Click on the 'OK' button to take over the changes.
button to play back the audio file with the changes stated. This
Nero Wave Editor Enhancement • 49
Page 50

8.7 Noise Analysis
Noise analysis helps in analyzing undesired noises such as background noises,
buzzing, etc. The results obtained by analyzing the frequency characteristics of
the noise can be used to filter this noise out of the recording.
'Noise analysis' does not itself alter the audio file. However it enables 'Noise
Reduction' to be made.
1. Open an audio file and highlight the section concerned (which should consist
of noise only).
2. In the ‘Enhancement’ menu select the command ‘Noise Analysis’. The
analysis is carried out and a window appears on closing which shows the
next steps to be performed. Click on the OK button to close the window.
Nero Wave Editor Enhancement • 50
Page 51

3. Highlight the whole field you want to enhance (normally the whole audio file),
and select the command ‘Noise Reduction’ on the ‘Enhancement’ menu. The
‘Noise Print’ option is active during noise reduction in the noise analysis
process.
If you select another option, ‘Noise Print’ is no longer available and noise
analysis must be re-started.
4. Set the reduction level to the required position using the slider.
5. Click on the 'OK' button to run noise reduction.
The next picture shows the audio file changed using noise reduction.
Nero Wave Editor Enhancement • 51
Page 52

9 Contact
Nero Wave Editor is an Nero AG product.
Nero AG
Im Stoeckmaedle 18
76307 Karlsbad
Germany
Web: http://www.nero.com
Help: http://englishsupport.nero.com
http://frenchsupport.nero.com/
http://germansupport.nero.com/
Mail: techsupport@nero.com
Fax: +49 7248 928 499
Copyright © 2003 - 2005 Nero AG. All rights reserved.
Nero Wave Editor Contact • 52
Page 53

10 Index
Efffects
Chorus 38
Reverberation 40
Enhancement
DC Offset Correction 47
Noise Analysis 50
Noise Reduction 49
F
Fade in 27
Fade out 27
I
A
Audio files
Converting 23
Editing 25
Inserting 21
Loading 19
Playing 19
Recording 22, 29
Saving section 21
Selecting section 20
Audio Output
Settings 13
B
Bit depth 7
Bitrate 7
C
Changing volume 26
D
Input Device
Selecting 10
L
Level meters 15
M
Muting 25
N
Normalization 25
O
Output device
Selecting 10
R
Recording 22
Gramophone records 29
Directories
Specifying 12
Display
Spectrogram 16
Wave 16
Wavelet 16
E
Effects
Deleting 32
Dynamics 35
Echo 37
Equalizer 33
Flanger 37
Loading 32
Saving 31
Nero Wave Editor Index • 53
S
Sampling rate 7
Select
Input device 10
Output device 10
Sound optimization
High frequency 46
Spectrum analyzer 15
Standard toolbar 15
Status bar 15
T
Time correction 36
Transposing 34
Page 54

V
Vertical zoom bar 15
Nero Wave Editor Index • 54
 Loading...