

Page 1
QuickStart
NeroNET
Ahead Software AG
Page 2

Information on copyright and trade marks
The NeroNET user manual and all its contents are protected by copyright and are
the property of Ahead Software AG. All rights reserved. This user manual
contains materials that are protected by internationally valid copyright laws. This
manual may not - in whole or in part - be copied, transmitted or otherwise
reproduced without the express written permission of Ahead Software AG.
All trade names and trademarks are the property of the respective owners.
Ahead Software AG rejects any claims that transcend the guarantee terms.
Ahead Software AG does not undertake any liability for the correctness of the
content of the NeroNET user manual. The contents of the software supplied as
well as of the NeroNET user manual may be changed without prior warning.
The trademarks mentioned here are referred to for purposes of information only.
Copyright © 2003 -2004 Ahead Software AG
REV 1.3
Page 3

Table of contents
1 NeroNET Server................................................................................. 6
1.1
What is NeroNET? ............................................................................ 6
1.2
How does NeroNET work? .............................................................. 6
2 Installation .........................................................................................8
2.1
System requirements....................................................................... 8
2.2
Installing NeroNET ........................................................................... 9
2.3
Deinstalling NeroNET..................................................................... 11
2.4
Starting the program...................................................................... 11
3 NeroNET user interface................................................................... 15
3.1
Configuration area ......................................................................... 15
3.2
Information area ............................................................................. 16
3.3
Status area...................................................................................... 17
4 Configuring the server .................................................................... 18
4.1
Preferences..................................................................................... 18
4.1.1 Entering the serial number ............................................................... 20
4.1.2 Creating logfiles ............................................................................... 21
4.1.3 Determining the size of the logfiles .................................................. 21
4.1.4 Viewing logfiles ................................................................................ 22
4.1.5 Determining the number of finished jobs.......................................... 22
4.1.6 Specifying the COM port for the robot.............................................. 22
5 Configuring the recorder ................................................................ 23
5.1
Introduction .................................................................................... 23
5.2
Selecting recorders........................................................................ 25
5.3
Setting the recording speed.......................................................... 25
5.4
Activating buffer underrun protection ......................................... 25
5.5
Deactivating a recorder ................................................................. 26
5.6
Accepting no further recording jobs ............................................ 26
5.7
Printing labels................................................................................. 26
5.8
Selecting the directory for the image file..................................... 27
Quickstart NeroNET Table of contents • 3
Page 4

6 User administration......................................................................... 28
6.1
Introduction .................................................................................... 28
6.2
Setting up the user account .......................................................... 30
6.3
Changing a user account .............................................................. 31
6.4
Deleting a user account................................................................. 32
7 Job administration .......................................................................... 33
7.1
Introduction .................................................................................... 33
7.2
For queue administrators .............................................................. 33
7.2.1 Deleting a job ................................................................................... 34
7.2.2 Adding copies................................................................................... 35
7.2.3 Deleting copies................................................................................. 35
7.2.4 Increasing the priority....................................................................... 35
7.2.5 Reducing the priority ........................................................................ 36
7.3
Users ............................................................................................... 37
7.3.1 Deleting a job ................................................................................... 38
7.3.2 Adding copies................................................................................... 38
7.3.3 Deleting copies................................................................................. 38
8 General information ........................................................................ 39
8.1
Jobs................................................................................................. 39
8.2
Recorder ......................................................................................... 40
8.3
Completed jobs .............................................................................. 41
8.4
Help ................................................................................................. 42
9 Status area ....................................................................................... 43
9.1
Introduction .................................................................................... 43
9.2
Elements of the status area........................................................... 43
10 Configuring the browser................................................................. 44
10.1 Entering the server address.......................................................... 44
Quickstart NeroNET Table of contents • 4
Page 5

11 Nero (Client)..................................................................................... 45
11.1 Installing Nero (Client) ................................................................... 45
11.1.1 Installation where there is an existing OEM version of Nero............ 45
11.1.2 Installation (no previous version of Nero)......................................... 46
11.1.3 Installation where there is an existing Retail version of Nero........... 46
11.2 Enable NeroNET support............................................................... 47
11.3 Special features when recording with Nero (Client) ................... 48
11.4 Usable discs ................................................................................... 48
11.5 Working with Nero Burning ROM or Nero Express..................... 48
11.6 CD + CD-RW compilations ............................................................ 49
11.7 DVD + DVDRW compilations......................................................... 49
11.8 Configuring network recorders..................................................... 50
11.9 Changing users .............................................................................. 54
11.10 Recording options.......................................................................... 57
11.10.1 Determining maximum speed ...................................................... 58
11.10.2 Simulation .................................................................................... 58
11.10.3 Write............................................................................................. 58
11.10.4 Finalize disc ................................................................................. 58
11.10.5 Write method................................................................................ 58
11.10.6 Number of copies ......................................................................... 58
11.10.7 Use multiple recorders ................................................................. 58
11.10.8 Do a virus check before burning .................................................. 58
12 Nero (Client) Preferences ...............................................................59
12.1 Introduction .................................................................................... 59
12.2 General............................................................................................ 59
12.3 Expert Features .............................................................................. 60
13 Creating a disc................................................................................. 61
13.1 Printing labels on recorded discs................................................. 61
14 Troubleshooting .............................................................................. 65
14.1 No burning possible....................................................................... 65
14.2 The server is not active ................................................................. 67
14.3 The recorder is deactivated........................................................... 68
14.4 Server does not accept any jobs .................................................. 69
15 Glossar ............................................................................................. 70
16 Index ................................................................................................. 78
Quickstart NeroNET Table of contents • 5
Page 6
1 NeroNET Server
1.1 What is NeroNET?
NeroNET extends the capabilities of the Nero recorder program so that it can be
used in an IP-based Intranet. Its aim is to give all users connected to the Intranet
comfortable access to the recorder on the NeroNET server. As a result, individual
staff members of do not need to have recorders installed in their own computers
but can record discs on the NeroNET server via Nero.
NeroNET consists of two components: NeroNET Server and Nero (Client). As
NeroNET Server, it runs on computers which have recording ('burning') functions
('burn servers'). Nero (Client) runs on the user’s computer and corresponds to
'normal' Nero, enhanced by the addition of NeroNET functions. A suitable label
can be made for the medium being recorded if the NeroNET server is also
connected to an appropriate printer. The Nero Cover Designer program
(included) makes this possible.
NeroNET is an extremely economical application because it makes it possible
for every member of staff to complete all recording orders on one central server.
In the simplest version, all that is needed is one full version of Nero at the client
and one CD/DVD recorder at the NeroNET server.
1.2 How does NeroNET work?
NeroNET is the client/server version of Nero. It combines the functions of Nero
with the client/server technology that many companies use to connect their
computers to a network. A user can put together his or her compilation at any
workstation where Nero (client) is installed, initiate the record procedure for the
medium concerned and transmit a suitable label to the NeroNET server. First, an
image of the medium and the label is generated locally on the user's computer
and this is then transmitted to the NeroNET server.
NeroNET comprises two components:
The server program, that controls everything concerned with recording
(e.g. recorder selection and the order of jobs to be recorded) and which
regulates user administration (e.g. assignment of rights and setting up new
users) and specifies the server configuration.
The client program, which generates the jobs to be recorded and transmits
them to the NeroNET server.
Quickstart NeroNET NeroNET Server • 6
Page 7

The user can follow the status of his job via a Web browser (like Internet
Explorer) and can receive information on when the job it was started and how far
it has progressed, for example. Recording jobs that have not yet been begun can
also be deleted by the user.
Once the server has recorded the medium, the user receives a message about
the result of the recording process.
Quickstart NeroNET NeroNET Server • 7
Page 8

2 Installation
2.1 System requirements
NeroNET runs on all currently commercially available computers and Windows
versions. In spite of the large range of features, the requirements for running the
program are very modest as far as processor performance, main memory (RAM)
and hard drive space requirements are concerned. Specifically, the following
components are necessary or are recommended by Ahead Software AG.
Operating system
(server)
Processor
Main memory
(RAM)
Hard disk (server)
Hard disk (client)
Browser
Monitor resolution
IP-capable
at least Windows 98
Windows 98 SE
Windows Me
Windows Server 2003
advised Windows 2000 (including SP 3)
Windows XP (including SP 1)
at least Celeron 500 MHz
(or comparable processor type)
advised Pentium III, 650 MHz
(or comparable processor type)
at least 128 MB RAM
advised 256 MB RAM
(for Windows 2000 or XP)
at least 20 GB
advised 40 GB (7200 RPM)
at least 700 MB
(for the transmission of a complete CD
image)
9 GB
(for the transmission of a complete DVD
image)
advised 40 GB
Internet
Explorer
Netscape
Navigator
at least 800 * 600
advised 1024 * 768
at least 10 MBit/s, half-duplex
Version 5.5 or later
Version 7 or later
Quickstart NeroNET Installation • 8
Page 9
network
Recorder
advised 100 MBit/s, full-duplex
strongly
advised
2.2 Installing NeroNET
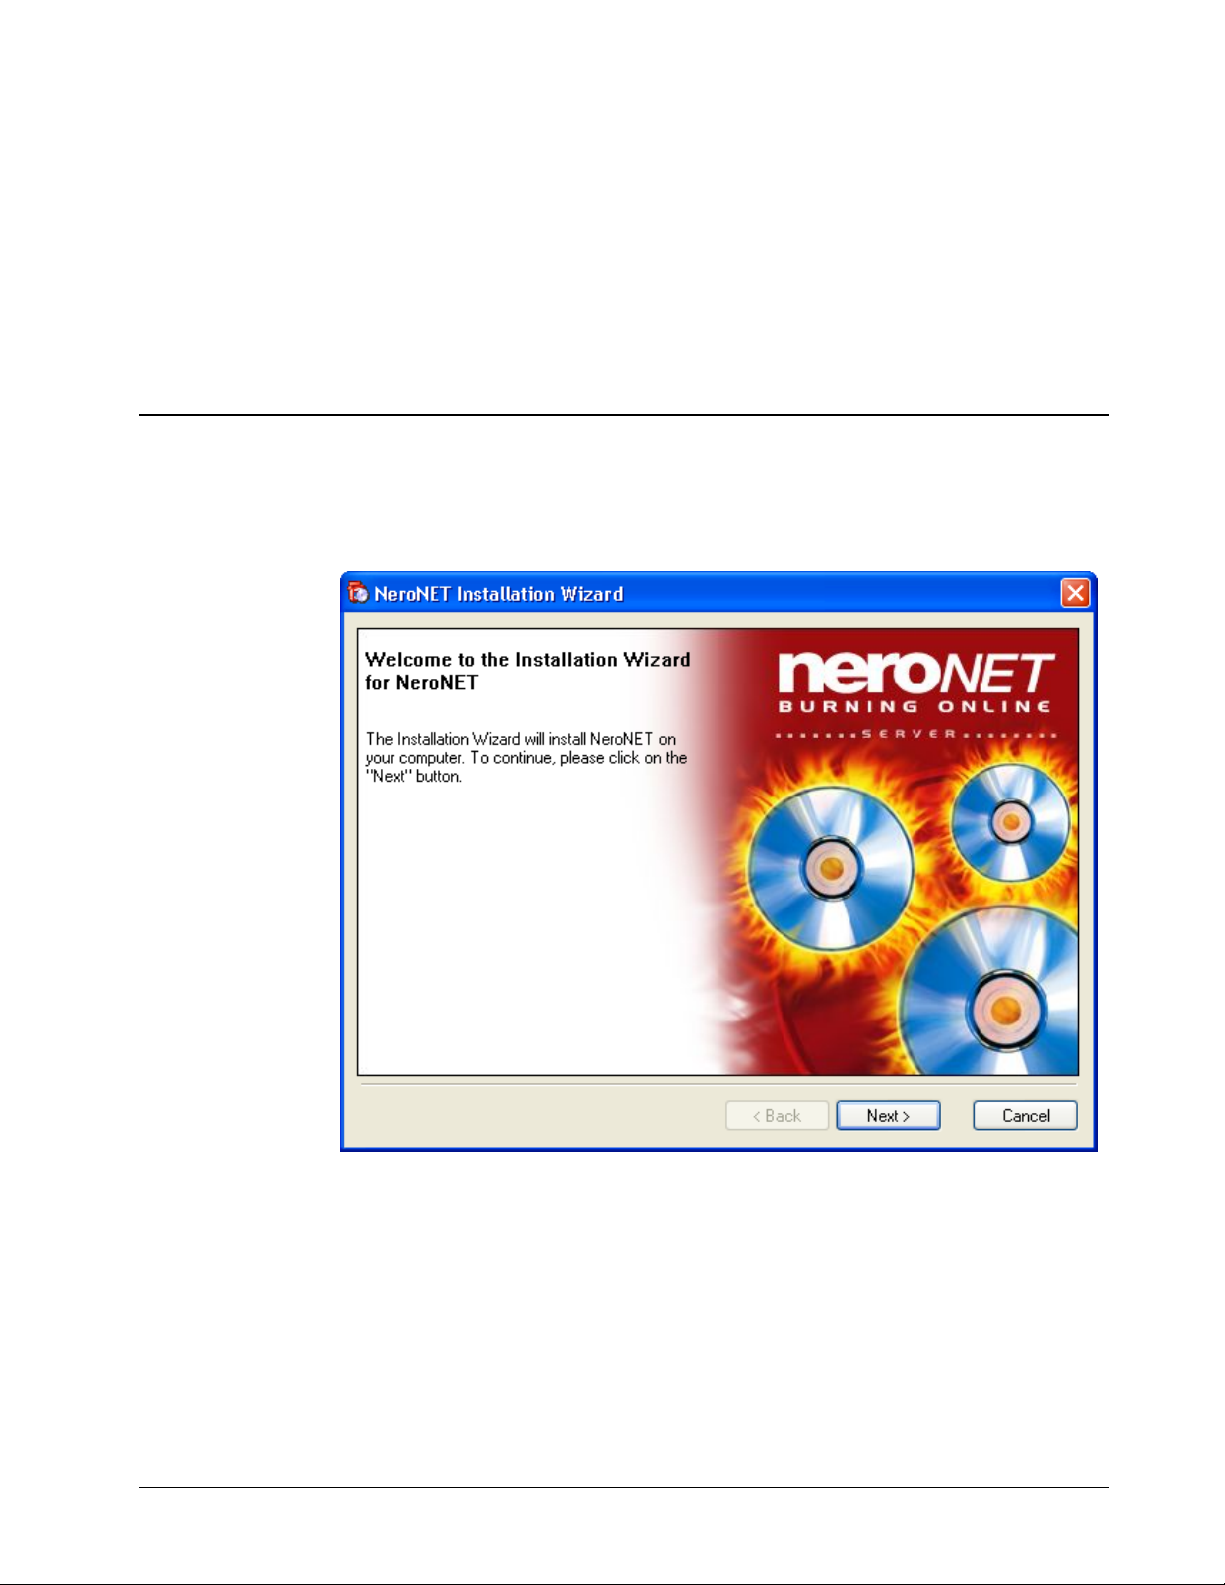
1. Double-click on the 'NeroNET1xxx.exe' file. The files needed to install and
work with NeroNET will be decompressed and the installation screen will
appear.
CD/DVD recorder protected against buffer
underrun. (Of course, a CD/DVD recorder
can be employed that does not have this
protection. However if high demands are
made on the server, the recording resources
may become scarce, which could lead to
defective discs as a result of buffer
underrun).
2. Follow the screen commands until the software installation is complete.
Please read the following information carefully and note that you must be set
up as a user before you can work with NeroNET. To do this, it is necessary
that you log on as administrator following installation. The 'Preferences' part of
the 'Configuring the server' section tells you how to do this.
After reading it, mark the 'I have read the previous information' check box and
then click on the 'OK' button.
Quickstart NeroNET Installation • 9
Page 10
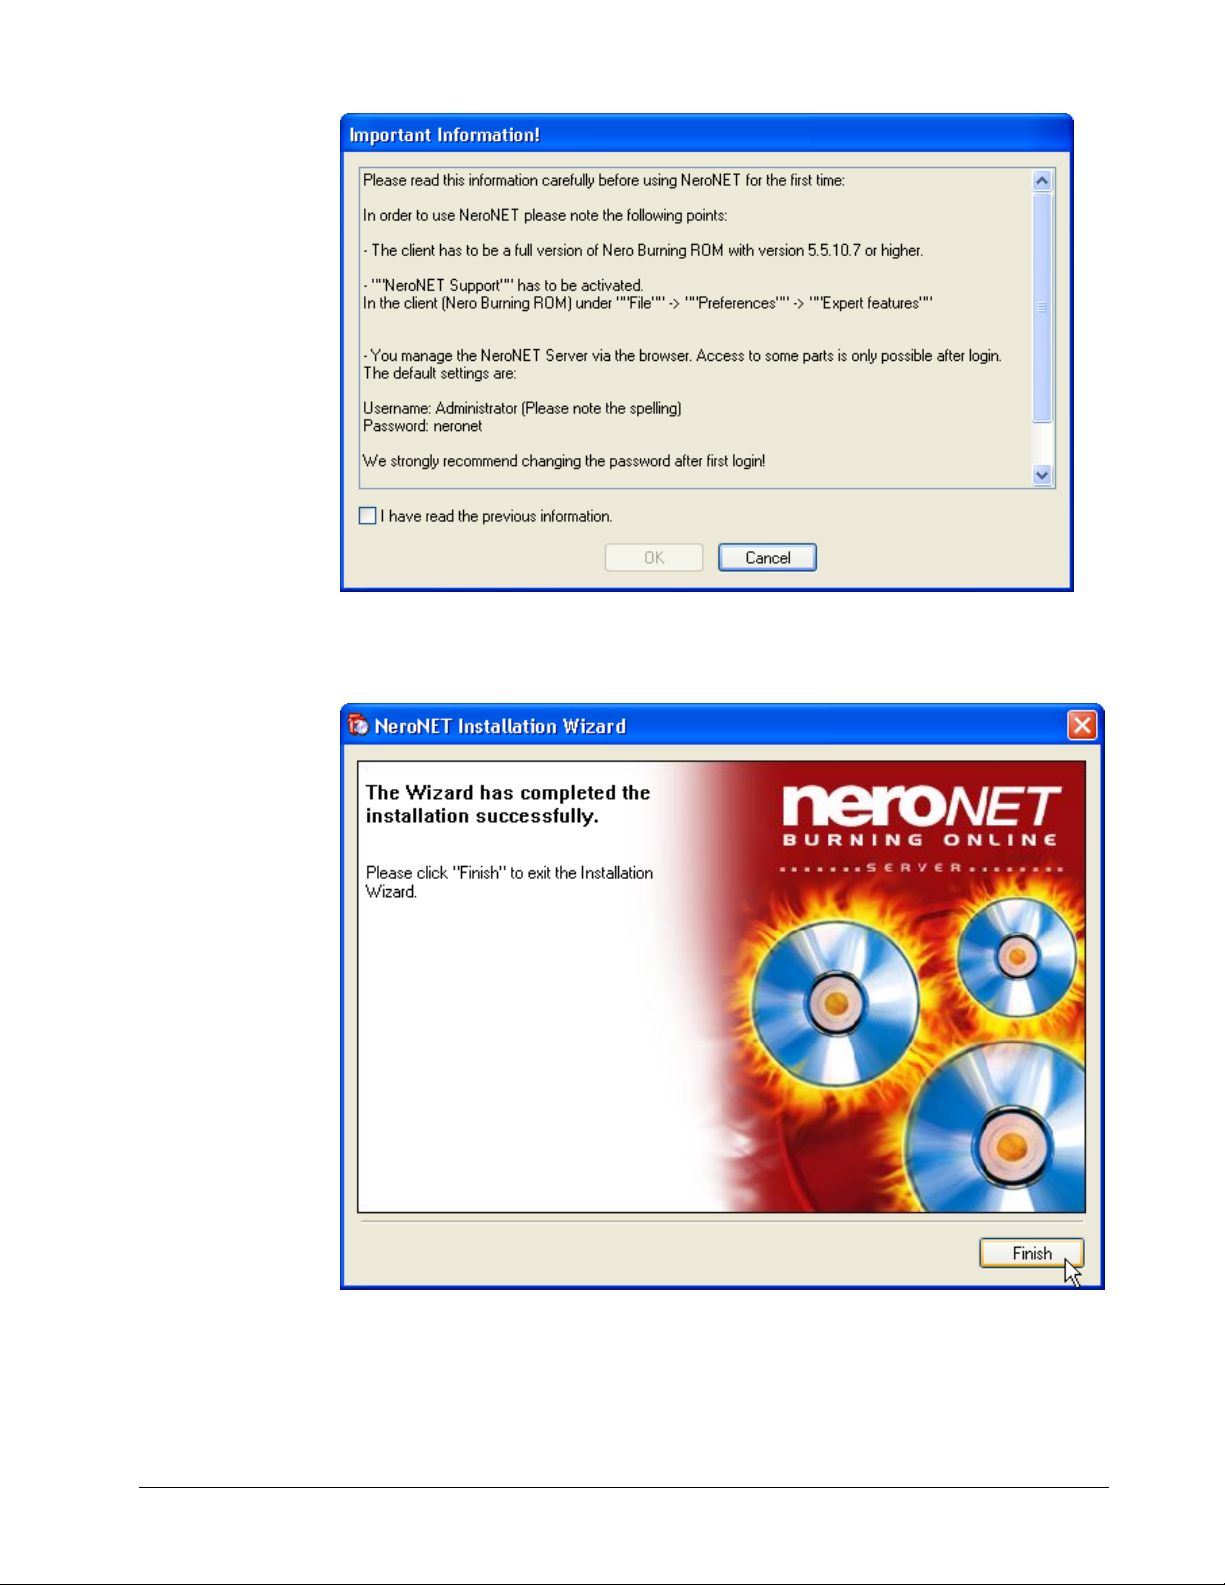
3. Click on the 'Finish' button to complete the installation procedure. If needed,
reboot the computer.
Quickstart NeroNET Installation • 10
Page 11
2.3 Deinstalling NeroNET
Step 1: Go to Start > Control panel > Add or remove programs.
(With some operating systems you will have to click on
Start > Preferences > Control panel > Add or remove programs).
Step 2: Highlight NeroNET in the list of installed programms, and then click on
button 'Change/Remove'.
Step 3: When you are deleting software, you may be asked by the operating
system if you really want to delete one or two files as these are also used by
other programs. If you are in doubt, do not delete these files.
2.4 Starting the program
If there are any rewritable (RW) discs in the recorder of the NeroNET server,
their contents will be deleted before recording starts - without any warning being
given or request being made.
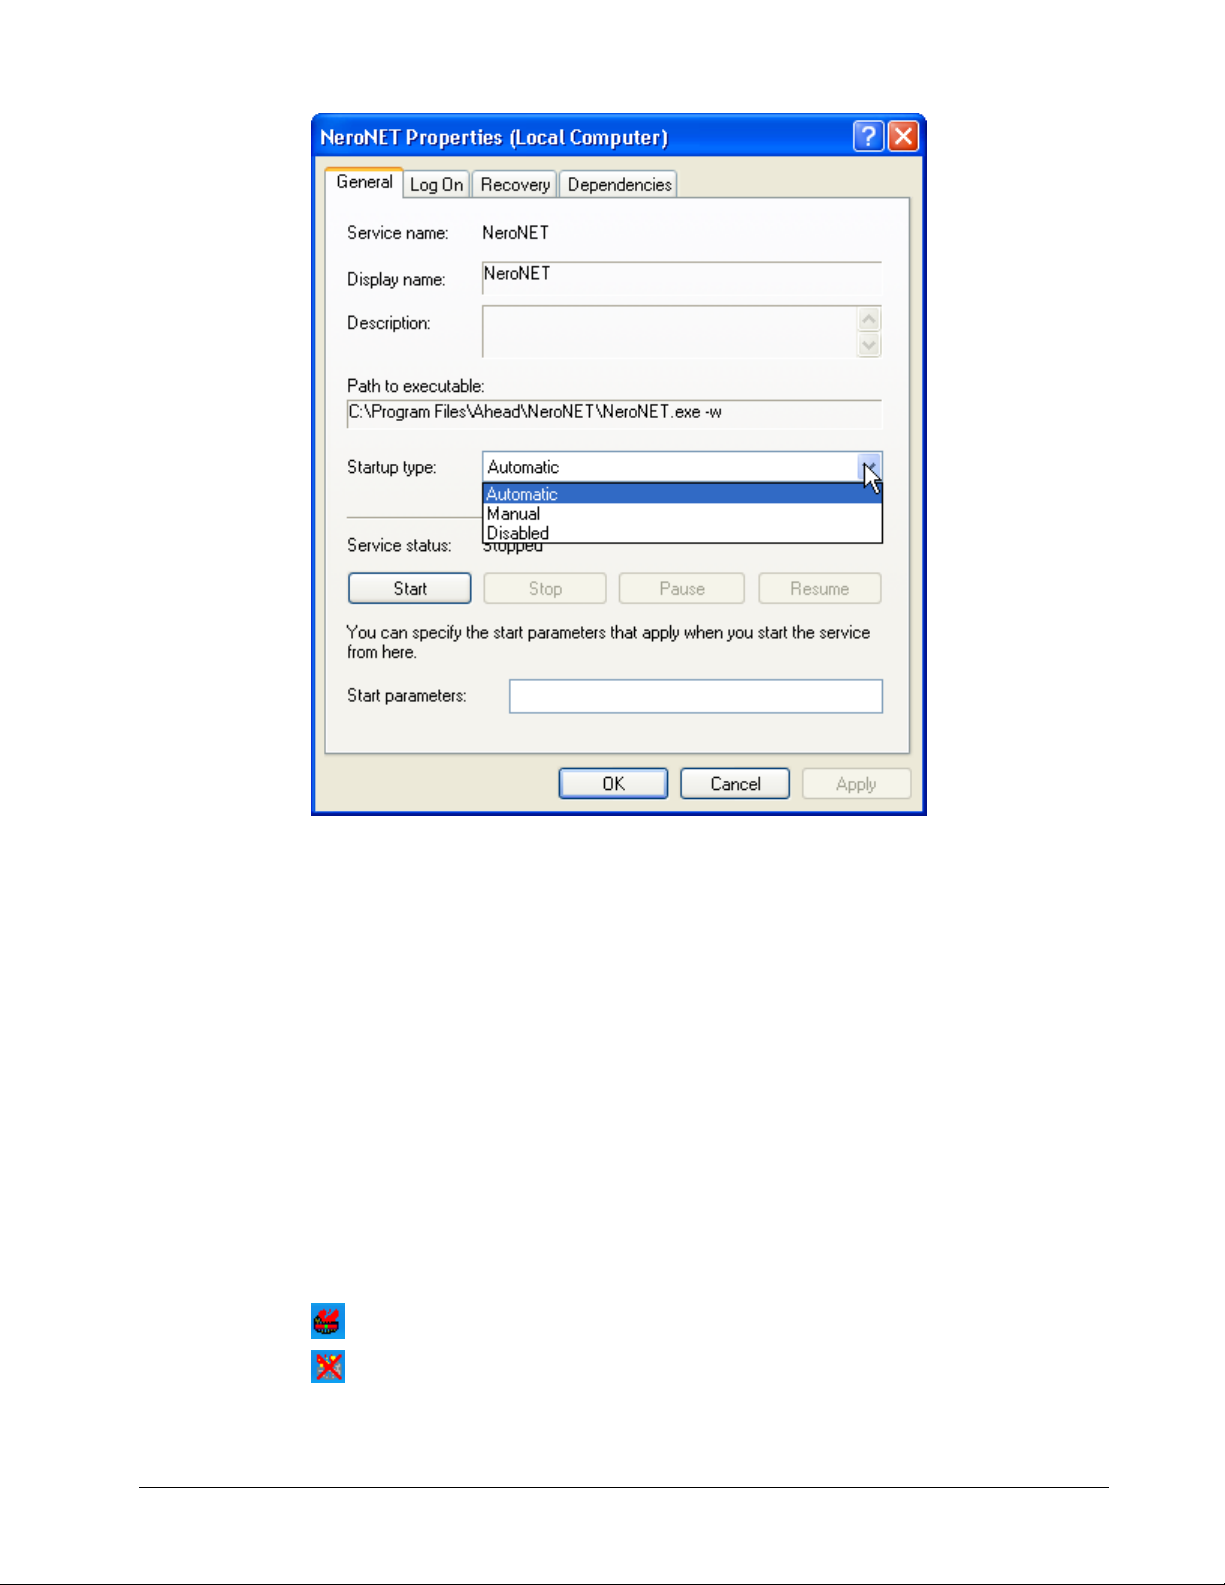
Windows XP, Windows 2000 and Windows Server 2003
With Windows XP, Windows 2000 and Windows Server 2003, NeroNET is
automatically started as a service. This means that the server on which NeroNET
is installed need only be switched on for the client to have access to the program.
If NeroNET is not launched automatically, the automatic start must be disabled.
This can be done as follows. Open the 'Control panel' and then the
'Administrative tools'. Double-click on 'Services' to display them and open the
'NeroNET' service. On the 'General' tab, which is now on top, the 'Automatic'
startup type will be presented. Click on the drop-down button, select 'Manual' as
the type of program start and click 'OK' to save the change and close the tab.
Quickstart NeroNET Installation • 11
Page 12
Windows 98 and Windows Me
NeroNET will not be automatically launched with Windows 98 and Windows Me.
If yu want NeroNET is to be launched manually, click on 'NeroNET Server'
from 'Start' > 'Programs' > 'Nero'.
If you would like NeroNET to be launched automatically when you boot the
computer, then you must copy a link to NeroNET and move this into the
'Autostart' folder. You can go about this as follows: Go via 'Start' > 'Programs'
and click once on 'NeroNET', so that it is highlighted. Click on the right-hand
mouse button and choose the 'Create link' command from the menu. A
shortcut called 'NeroNET (2)' will be created. Highlight the new link and drag it
into the 'Autostart' folder.
The Nero icon is located in the tray icon on the lower right-hand side of the
screen. The color of the icon tells you the current status of the program.
The NeroNET Server is now started and accepting recording orders.
The NeroNET Server is now closed down and will not accept any more
recording orders.
Quickstart NeroNET Installation • 12
Page 13
If you close down NeroNET using the 'Close' command in the tray icon field, you
will be able to reactivate it using the 'Start' > 'Programms' menu and the
'NeroNET Server' command. The program will be active again, though the
NeroNET server will be closed down and will not accept any more recording
orders. In order to record CDs on the server, the NeroNET server has to be
booted using the 'Start' command.
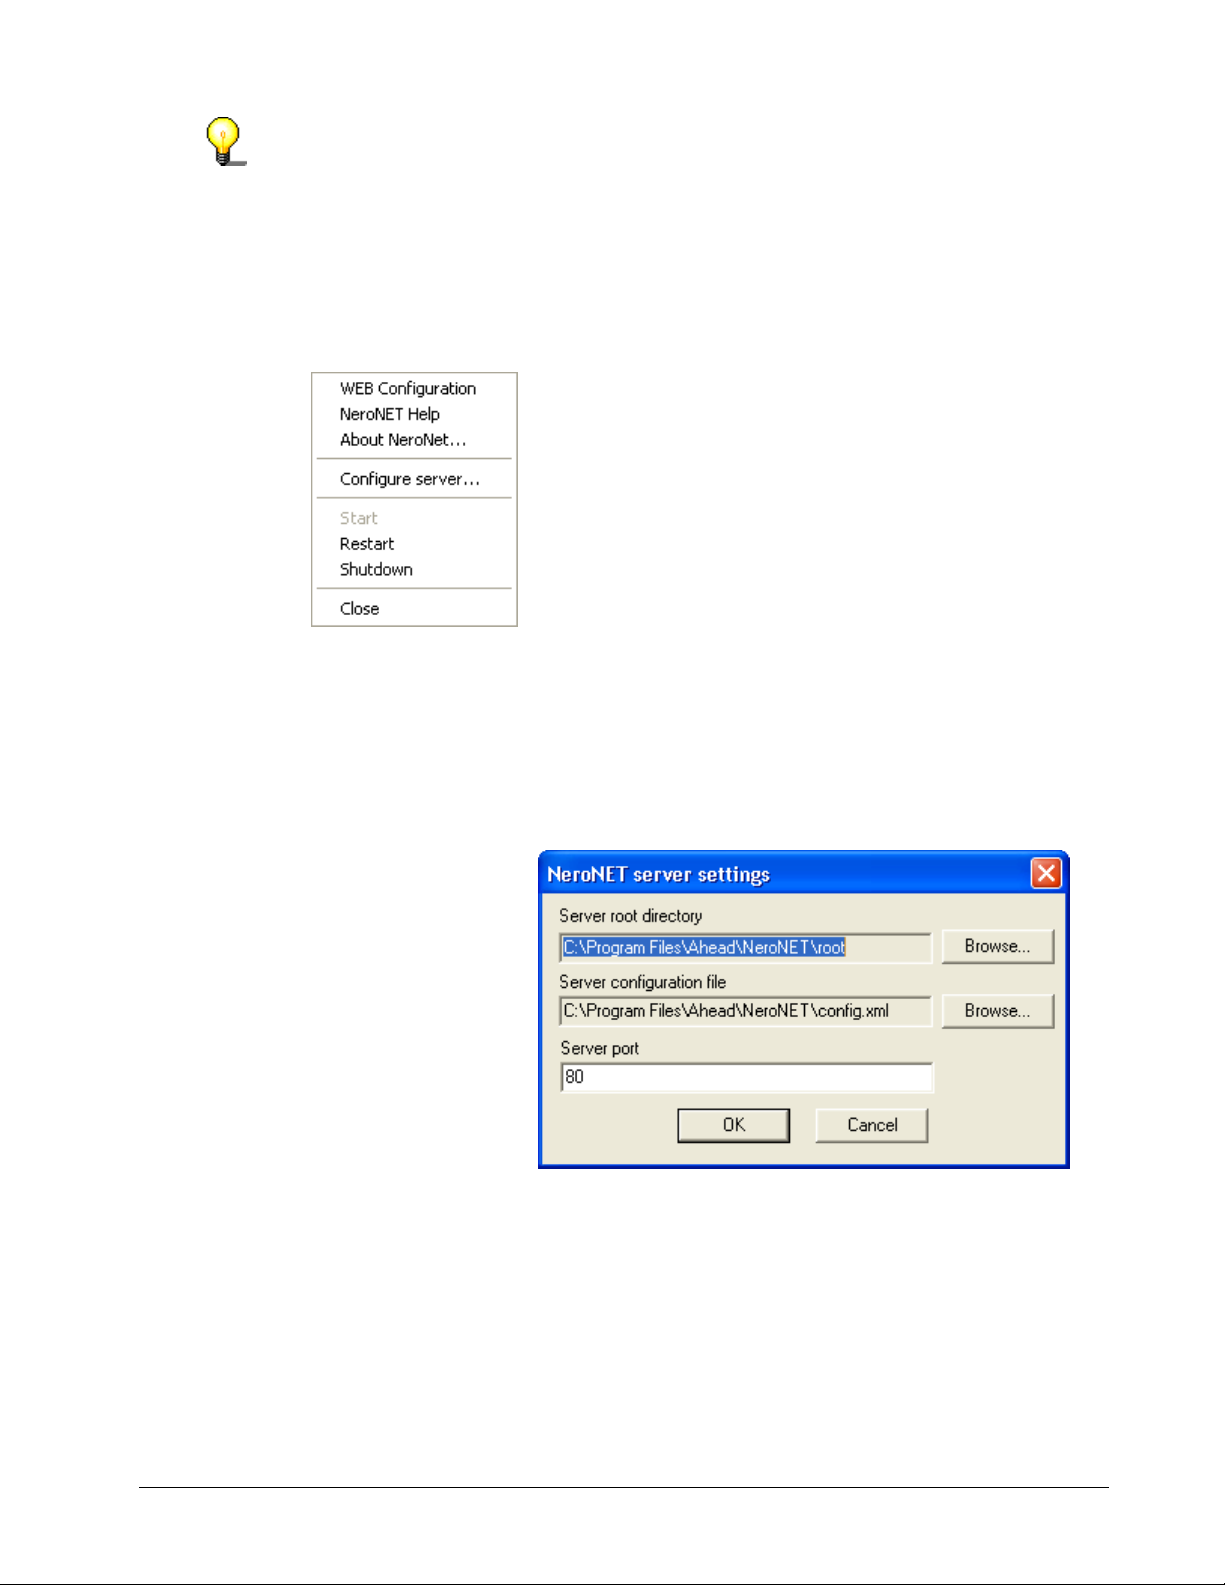
Run the mouse cursor onto the NeroNET icon and then click the right-hand
mouse button to open the pop-up menu.
WEB Configuration
NeroNET Help
About NeroNET
Configure Server
Opens the browser and displays the index page
Opens the Help file
Shows the version number
Opens the dialog window so that the server preferences
can be defined
Server root directory: Directory, in which the HMTL files
are located that belong to NeroNET.
Server configuration file: Name and directory of the
configuration file.
Server port: Number of the port on which the server is
running. You can only change the port if both NeroNET
Version 1.2 and Nero 6.3.1.0 (or later) have been
installed.
Clicking on 'Browse' will open a dialog window to allow
the selection of the directory / configuration file.
Quickstart NeroNET Installation • 13
Page 14

Start
Starts NeroNET. This command can only be carried out
when the server is closed down.
Restart
Shutdown
Close
Runs NeroNET down and then restarts.
Runs NeroNET-Server down – however, the control
program in the tray icon remains active.
Closes NeroNET.
Quickstart NeroNET Installation • 14
Page 15
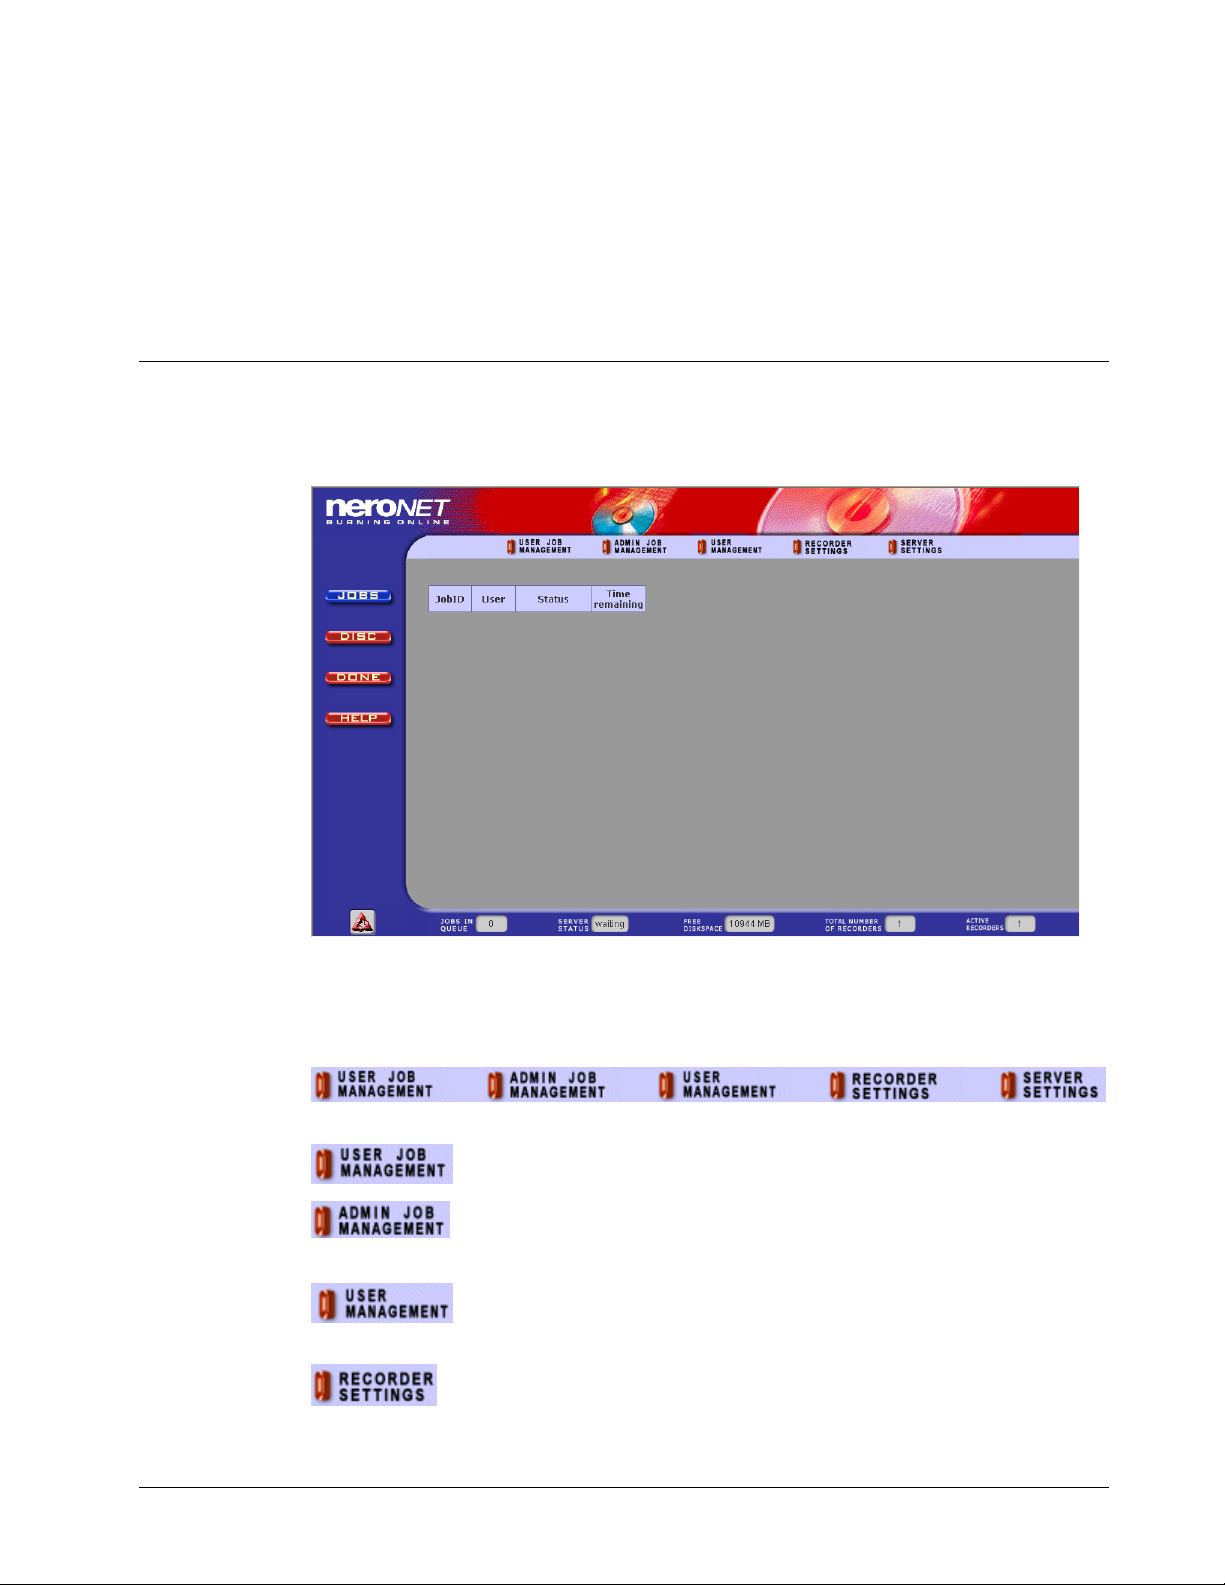
3 NeroNET user interface
r
r
r
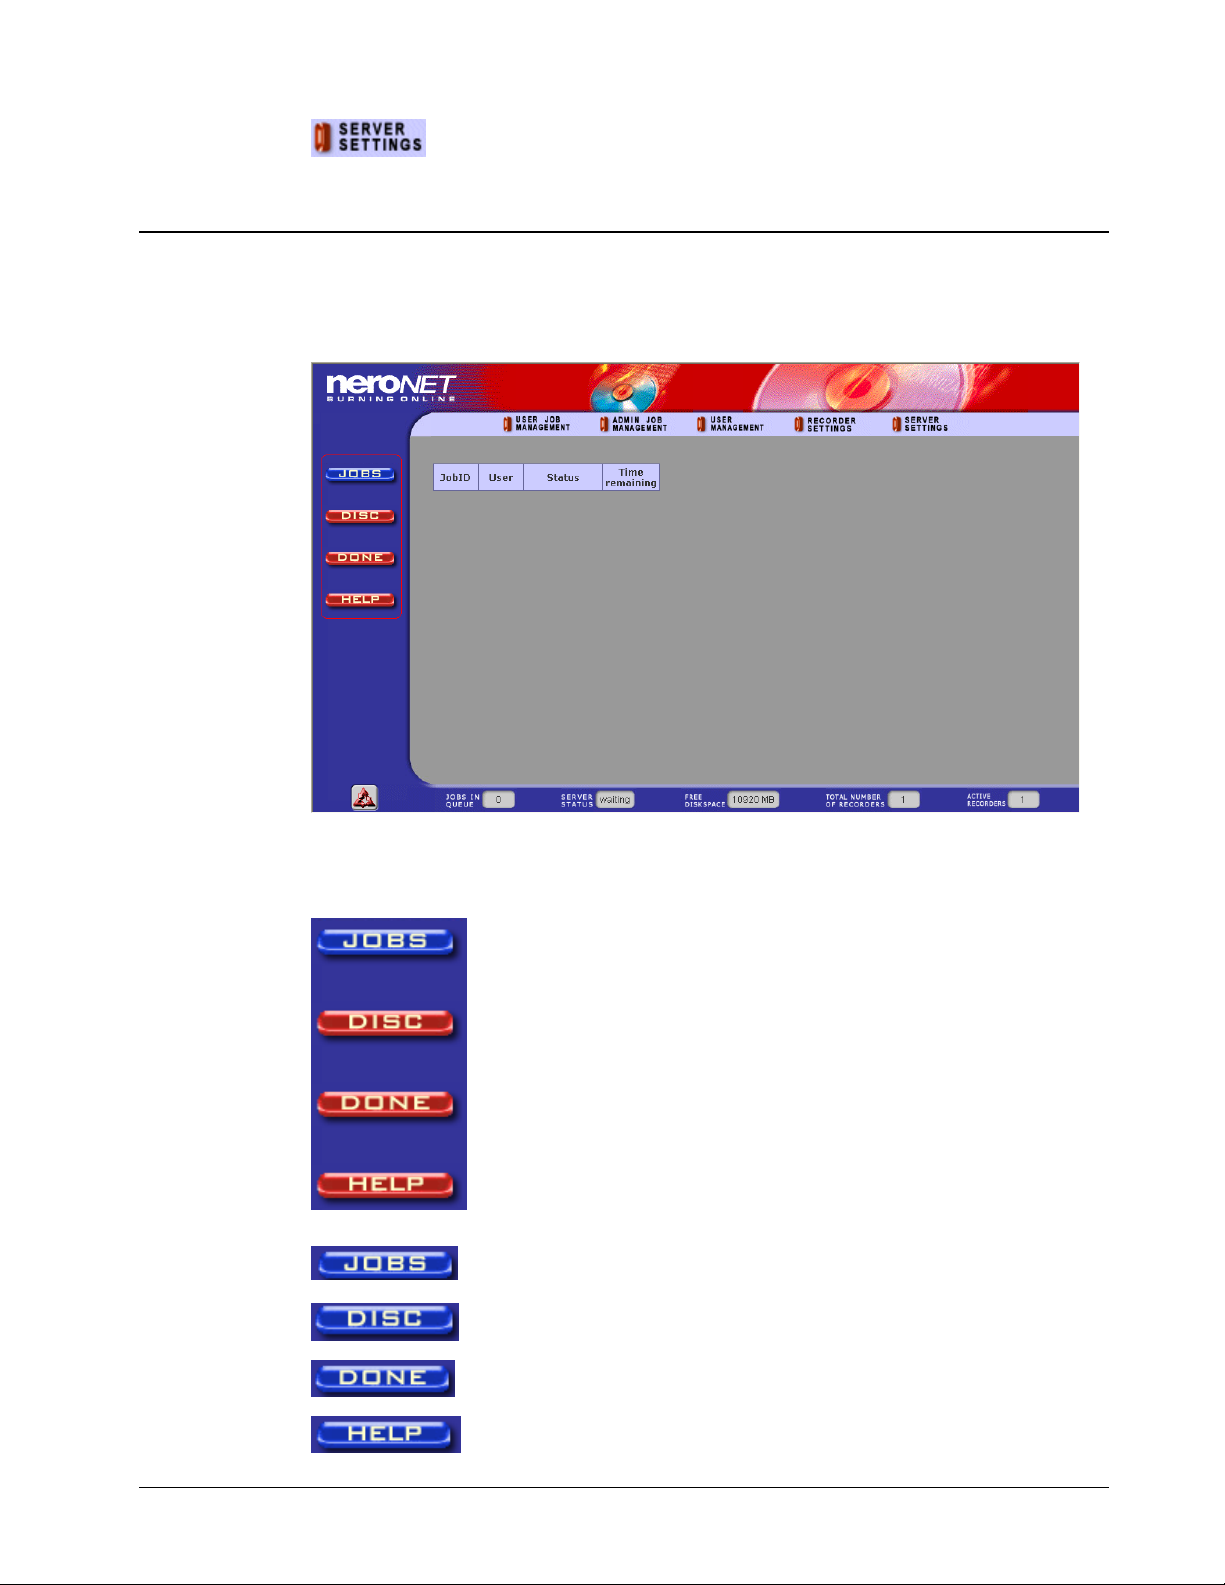
3.1 Configuration area
The NeroNET user interface consists of different areas, which each specify what
will be shown in the browser window.
The upper part contains the elements that allow the different areas of NeroNET
to be administered.
This area is available for users so that they can administe
their own recording jobs. See the 'Users' section.
Quickstart NeroNET NeroNET user interface • 15
This area is only accessible to users with queue
administrator rights. It allows all the existing recording jobs to
be administered. See the 'Job administration' section.
This area is only accessible to users with serve
administrator rights. It make it possible to administer the
users. See the 'User administration' section.
This area is only accessible to users with serve
administrator rights. It make it possible to administer the
recorder preferences. See the 'Configuring the recorder'
section.
Page 16
r
This area is only accessible to users with serve
administrator rights. It make it possible to administer the
server preferences. See the 'Configuring the server' section.
3.2 Information area
The NeroNET user interface consists of different areas, which each specify what
will be shown in the browser window.
The elements that call up the different NeroNET areas tells you about specific
procedures are located on the left-hand side.
This area shows all jobs in the queue. See the 'General
information' section.
This area shows all the recorders installed. See the 'Recorder'
section.
This area shows all the jobs which have already been
completed. See the 'Completed jobs' section.
This area opens the help file. See the 'Help' section.
Quickstart NeroNET NeroNET user interface • 16
Page 17
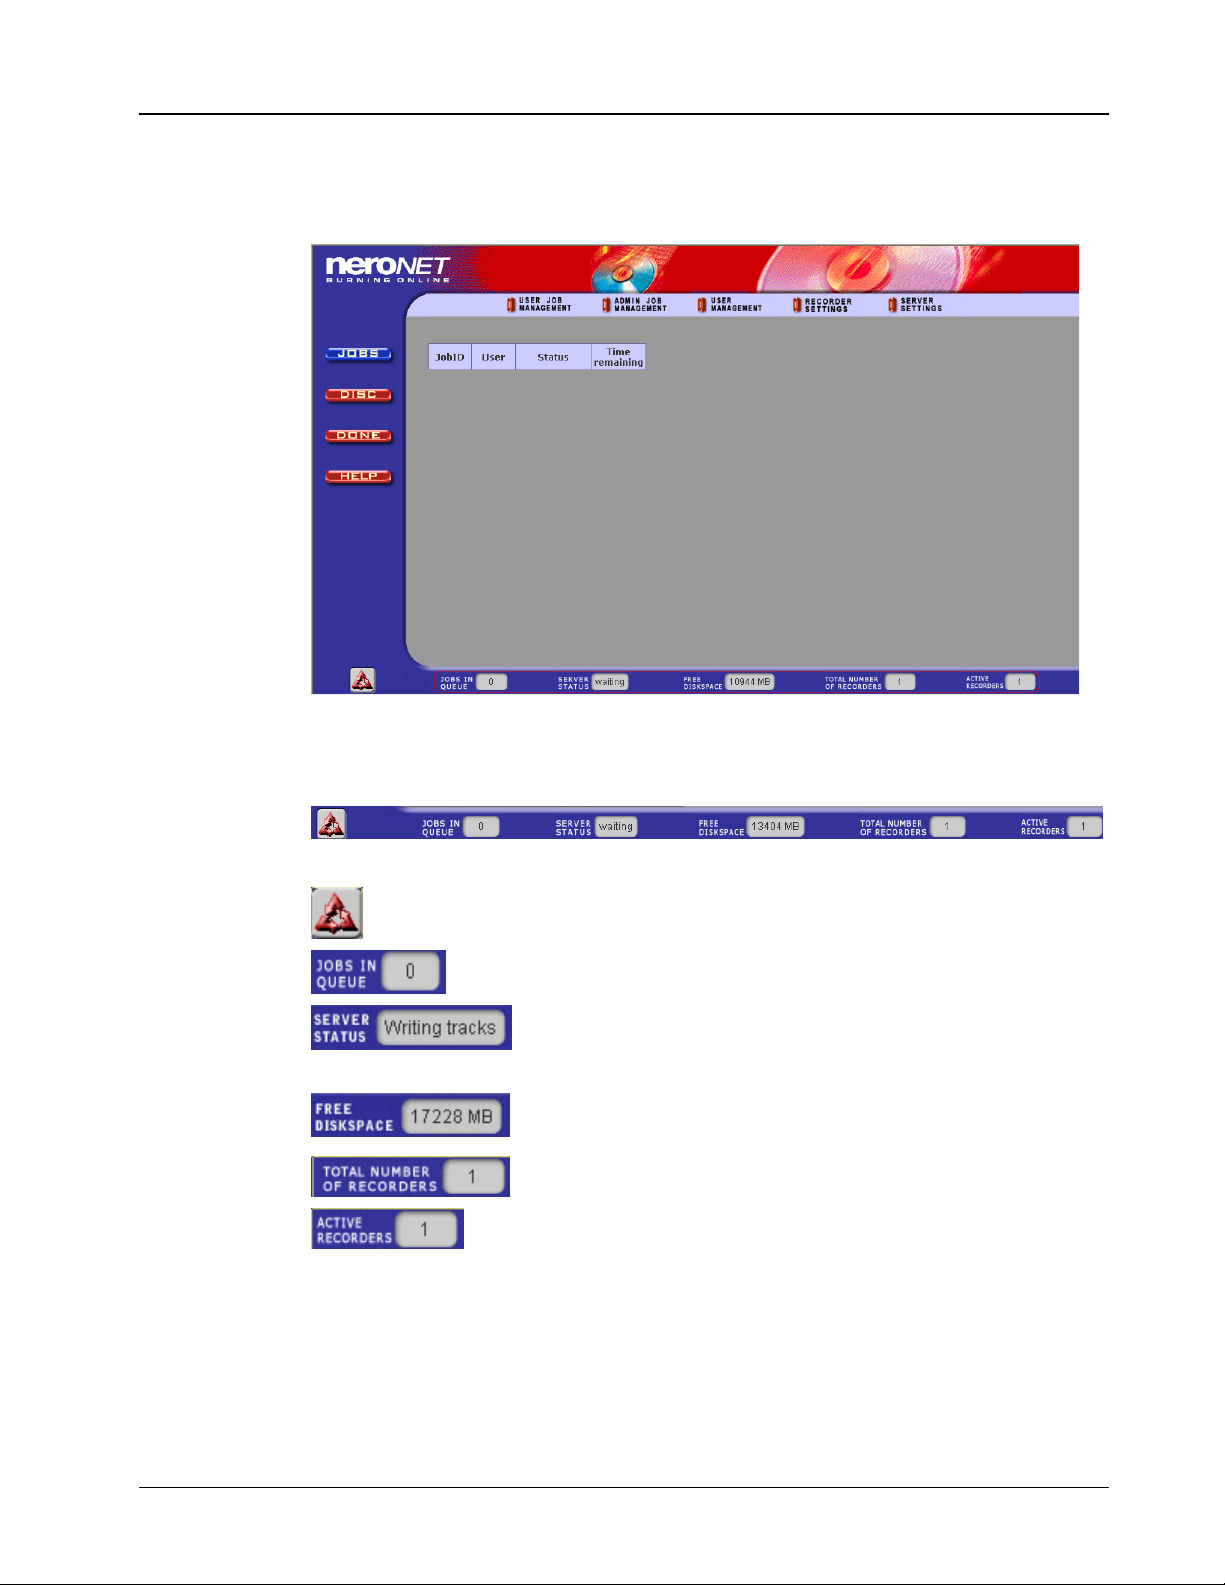
3.3 Status area
r
The NeroNET user interface consists of different areas, which each specify what
will be shown in the browser window.
The elements that call up the NeroNET areas that provide information are
located at the bottom of the screen.
Clicking on the button refreshes the status line.
Number of jobs waiting to be recorded.
Current status of the recorder. This area tells you whethe
intervention is necessary, e.g. when the message 'Please
insert at empty CD' appears
This area informs you of the free memory available on the
server.
Number of recorders connected
Number of active recorders
Quickstart NeroNET NeroNET user interface • 17
Page 18
4 Configuring the server
4.1 Preferences
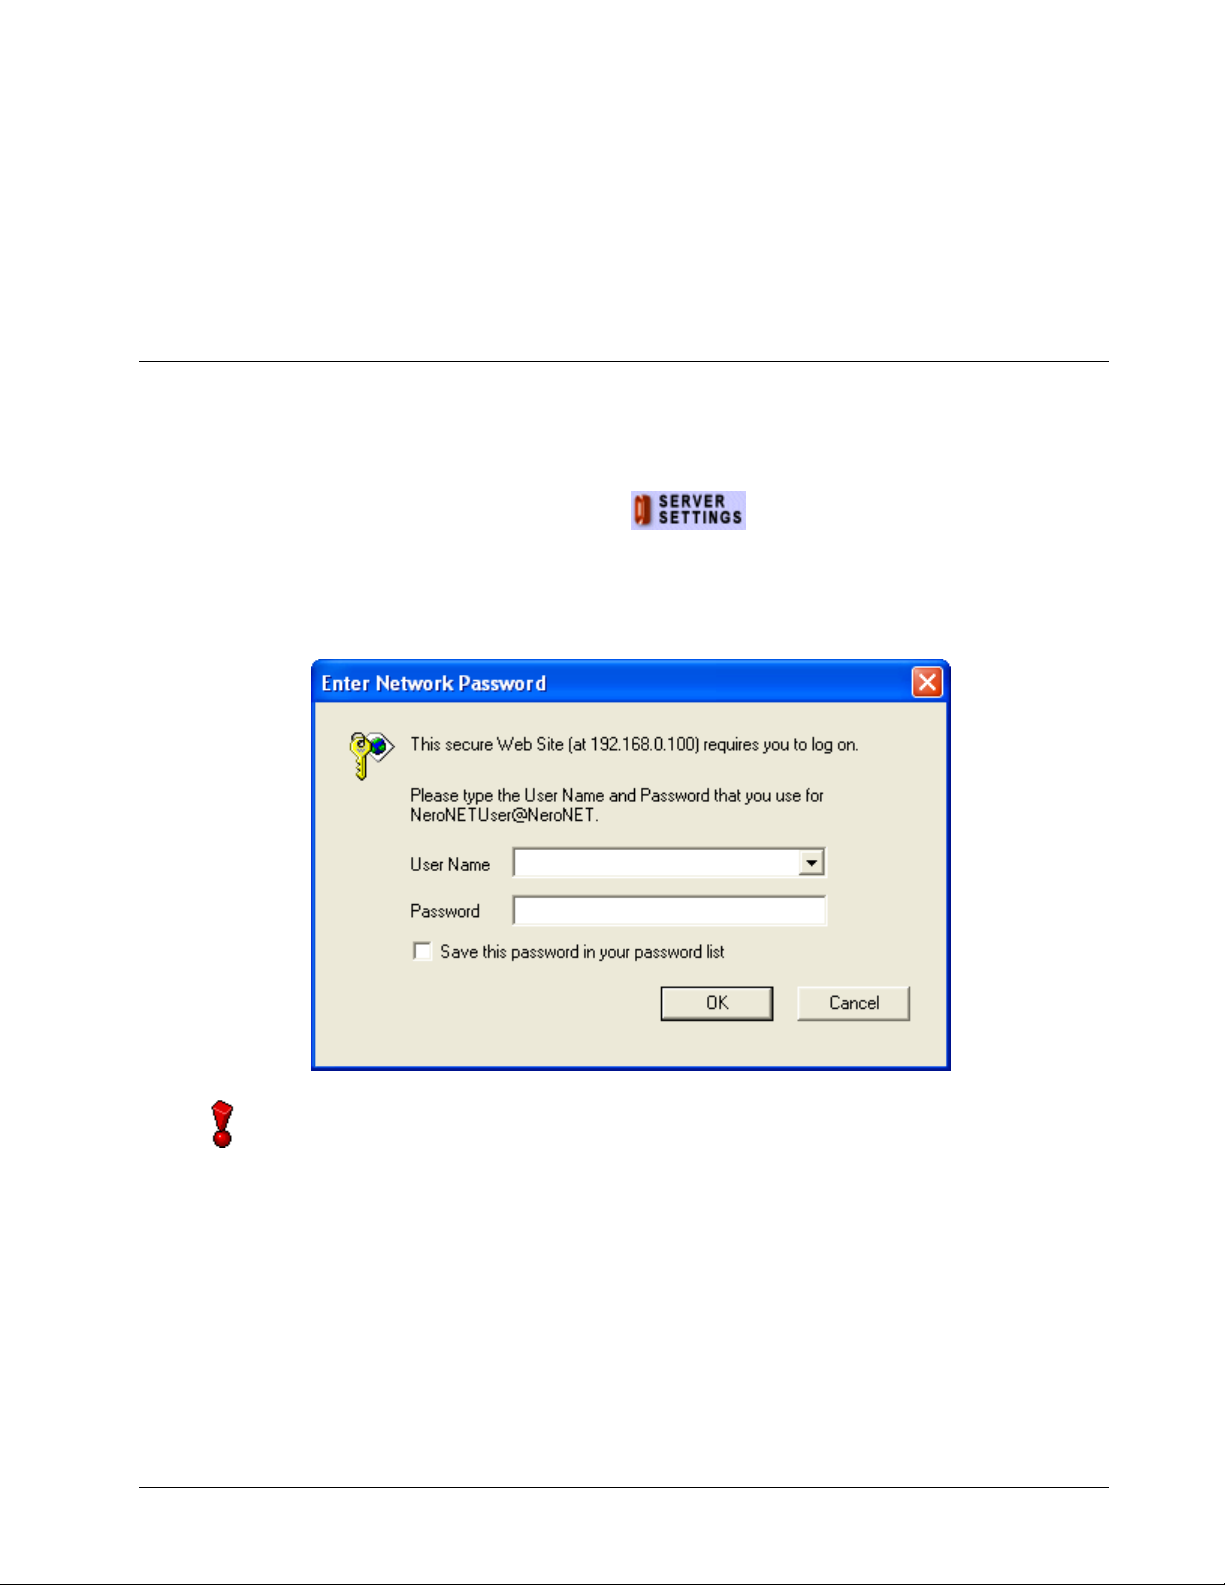
Only users with server administrator rights are allowed to configure the server.
No other users have any chance of accessing this part of NeroNET.
Open this area by clicking on the
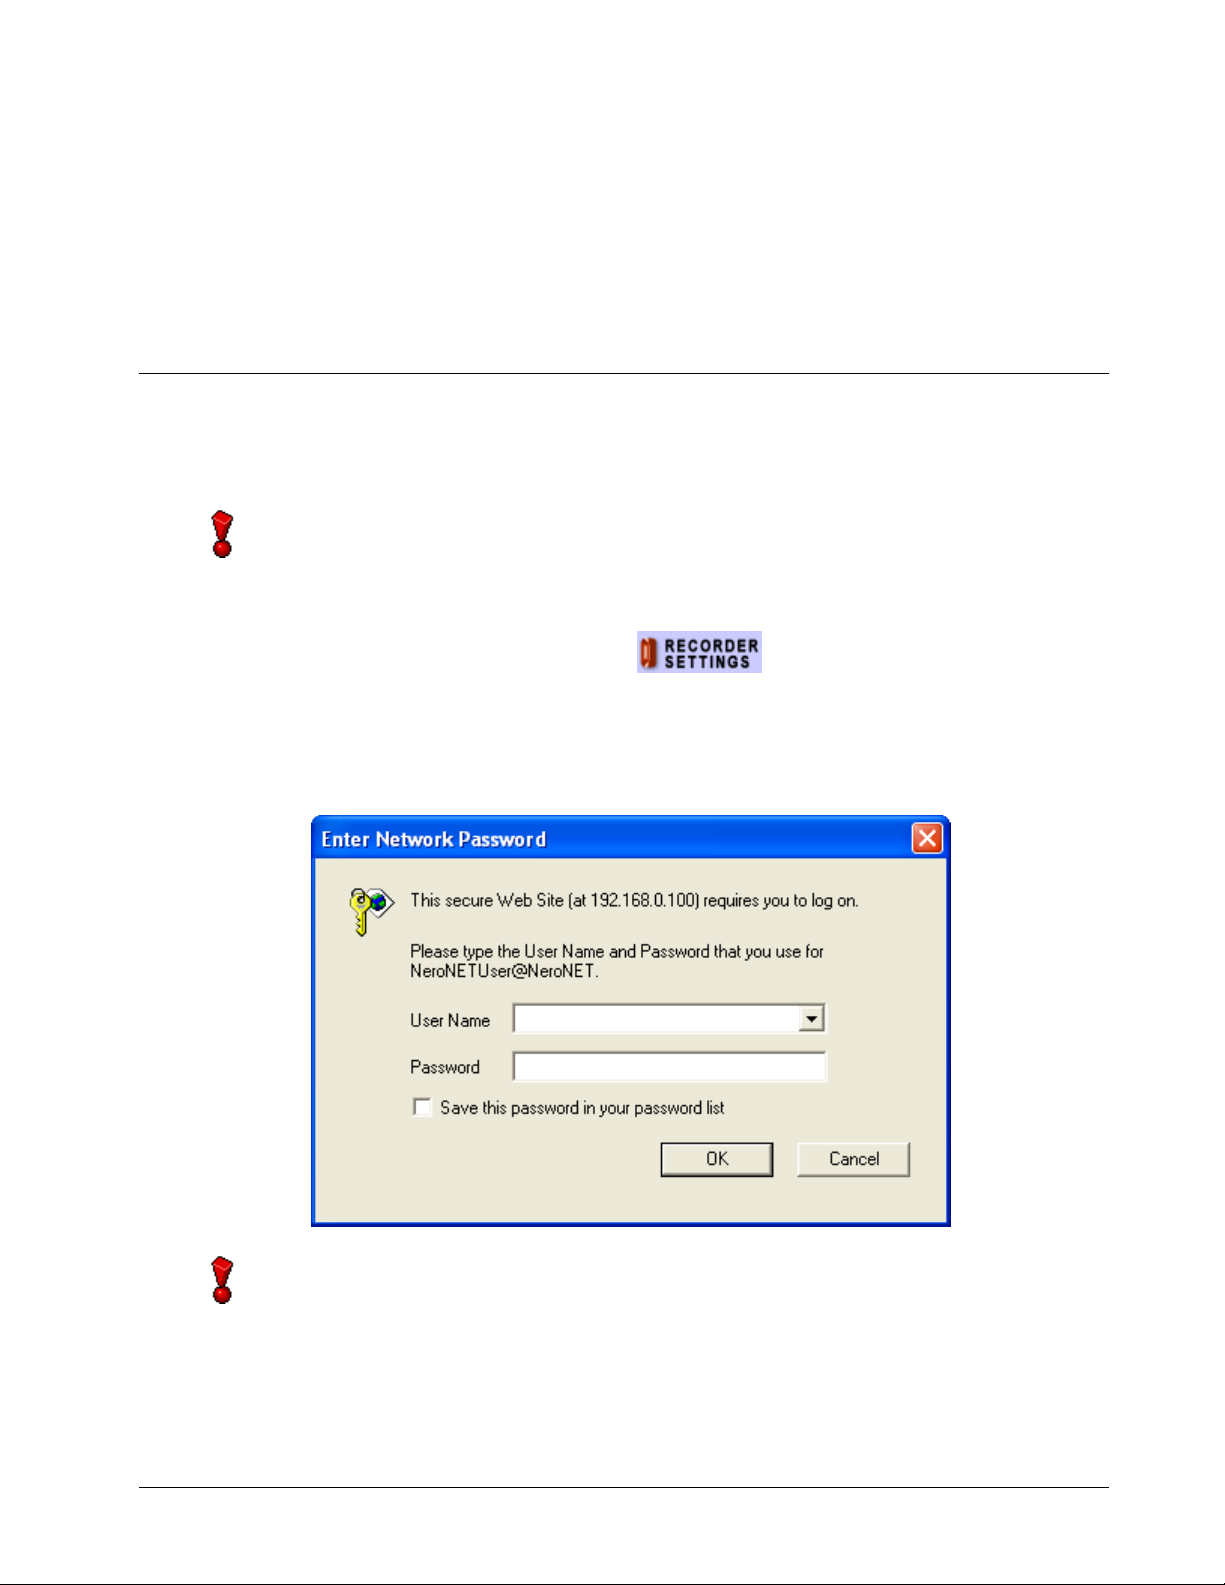
This area is password-protected and only accessible to users with server
administrator rights. Please enter your user name and password in the
appropriate fields.
Only the administrator can log on following the installation of the NeroNET
server. Since it is a standard procedure, the following information is needed. This
information is case sensitive - pay attention to the use of capital or small letters.
User Name: 'Administrator'
Password: 'neronet'
For security reasons, please change the password immediately after the first
login. You can find out how to change the password in the section on 'Changing
a user account'.
element.
The following input data is reasonable for the configuration of the server:
Server location: server location
Server description: details of whom this servers was configured for
Quickstart NeroNET Configuring the server • 18
Page 19
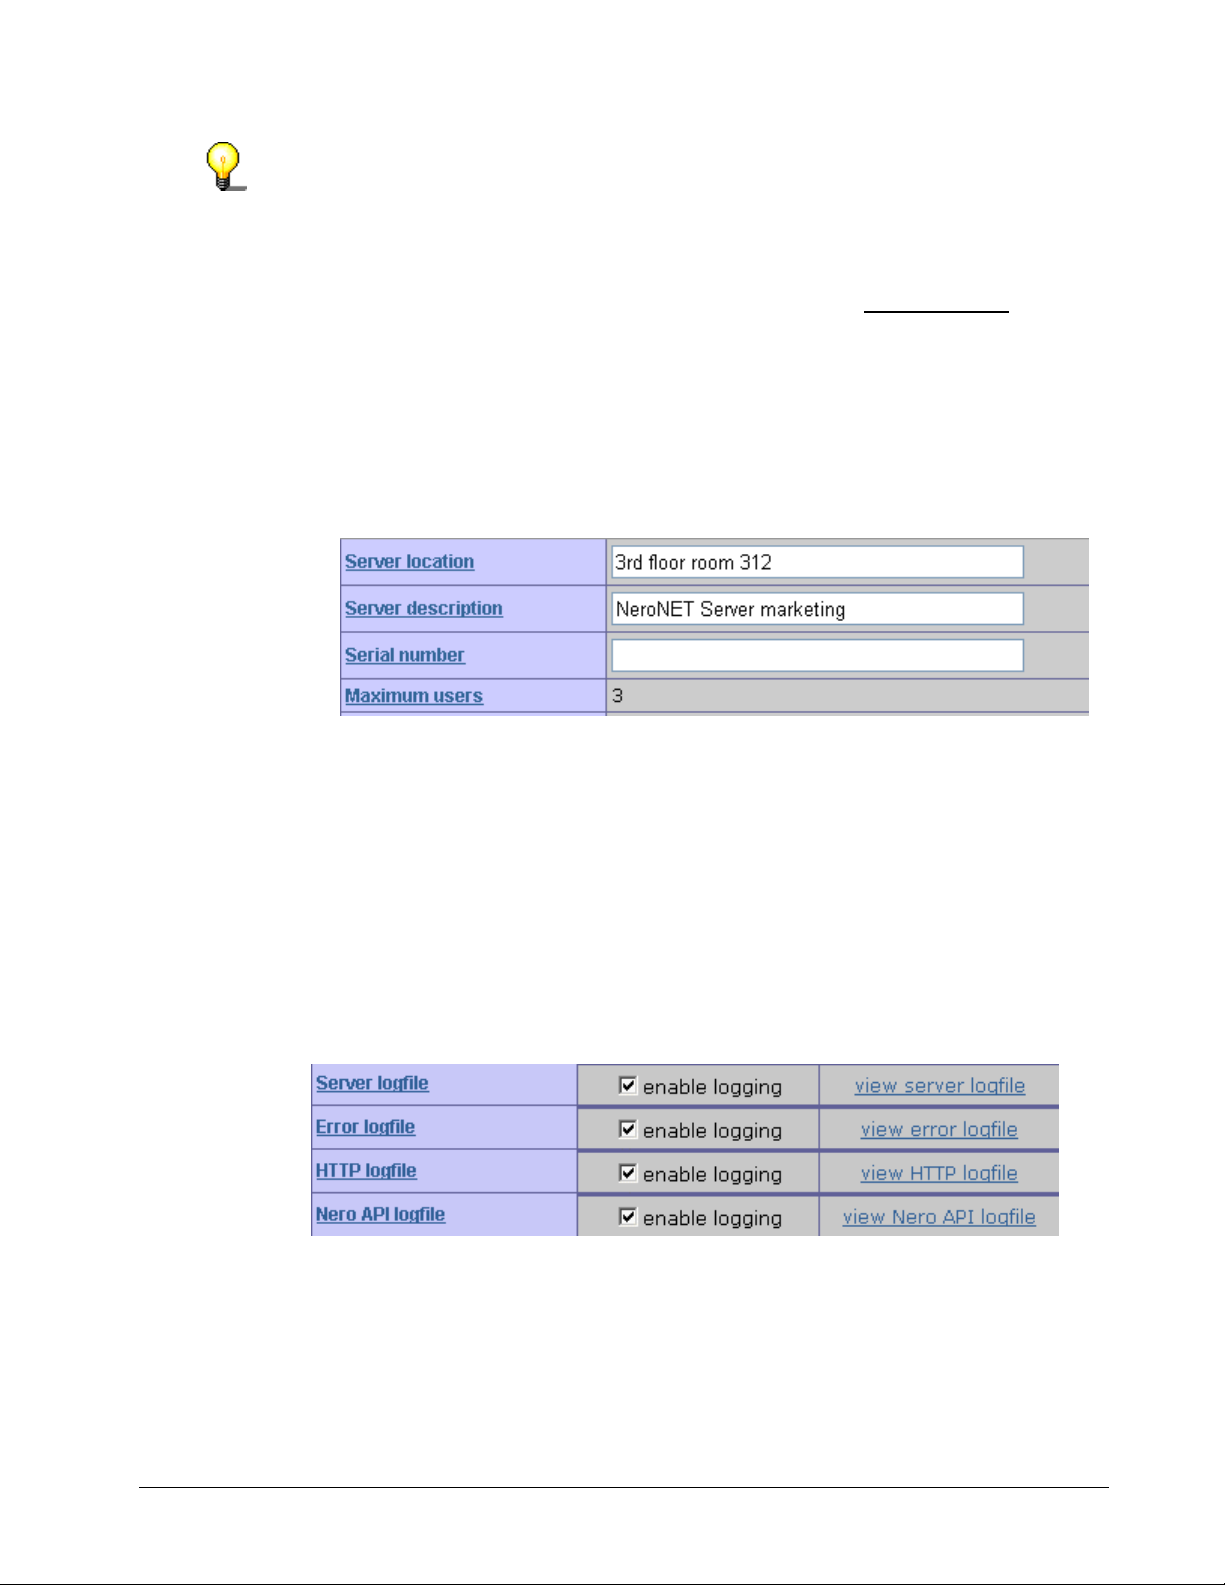
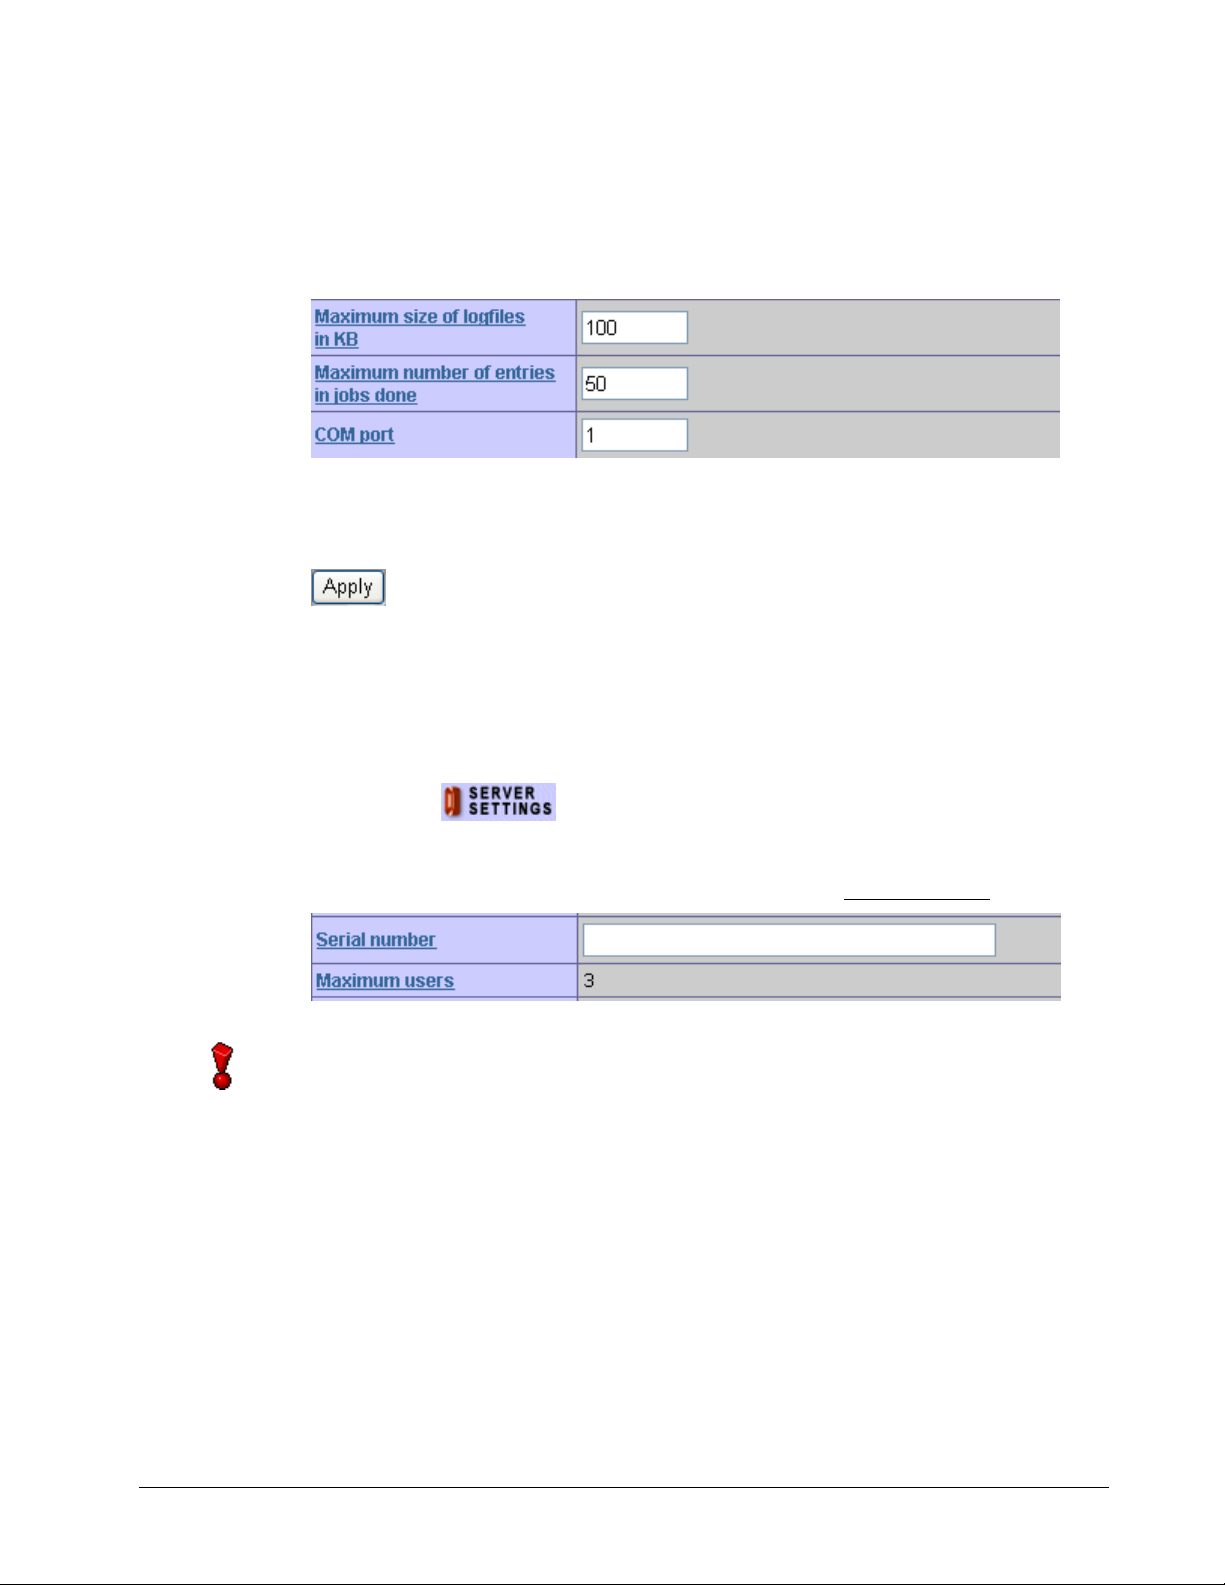
Additional information of up to 100 characters in length can be entered.
It is not absolutely necessary to enter a serial number since NeroNET is
delivered with a three-user license, i.e. up to 3 people have recording capabilities.
If this is insufficient, a license can be acquired from www.nero.com
, allowing
further users to have access.
Serial number (at the time license was acquired): Serial number of NeroNET,
if a license was acquired for more than 3 users. The number of users that can
work with NeroNET is determined by the serial number.
Maximum users: Number of persons who can be entered as users as well as
the administrator.
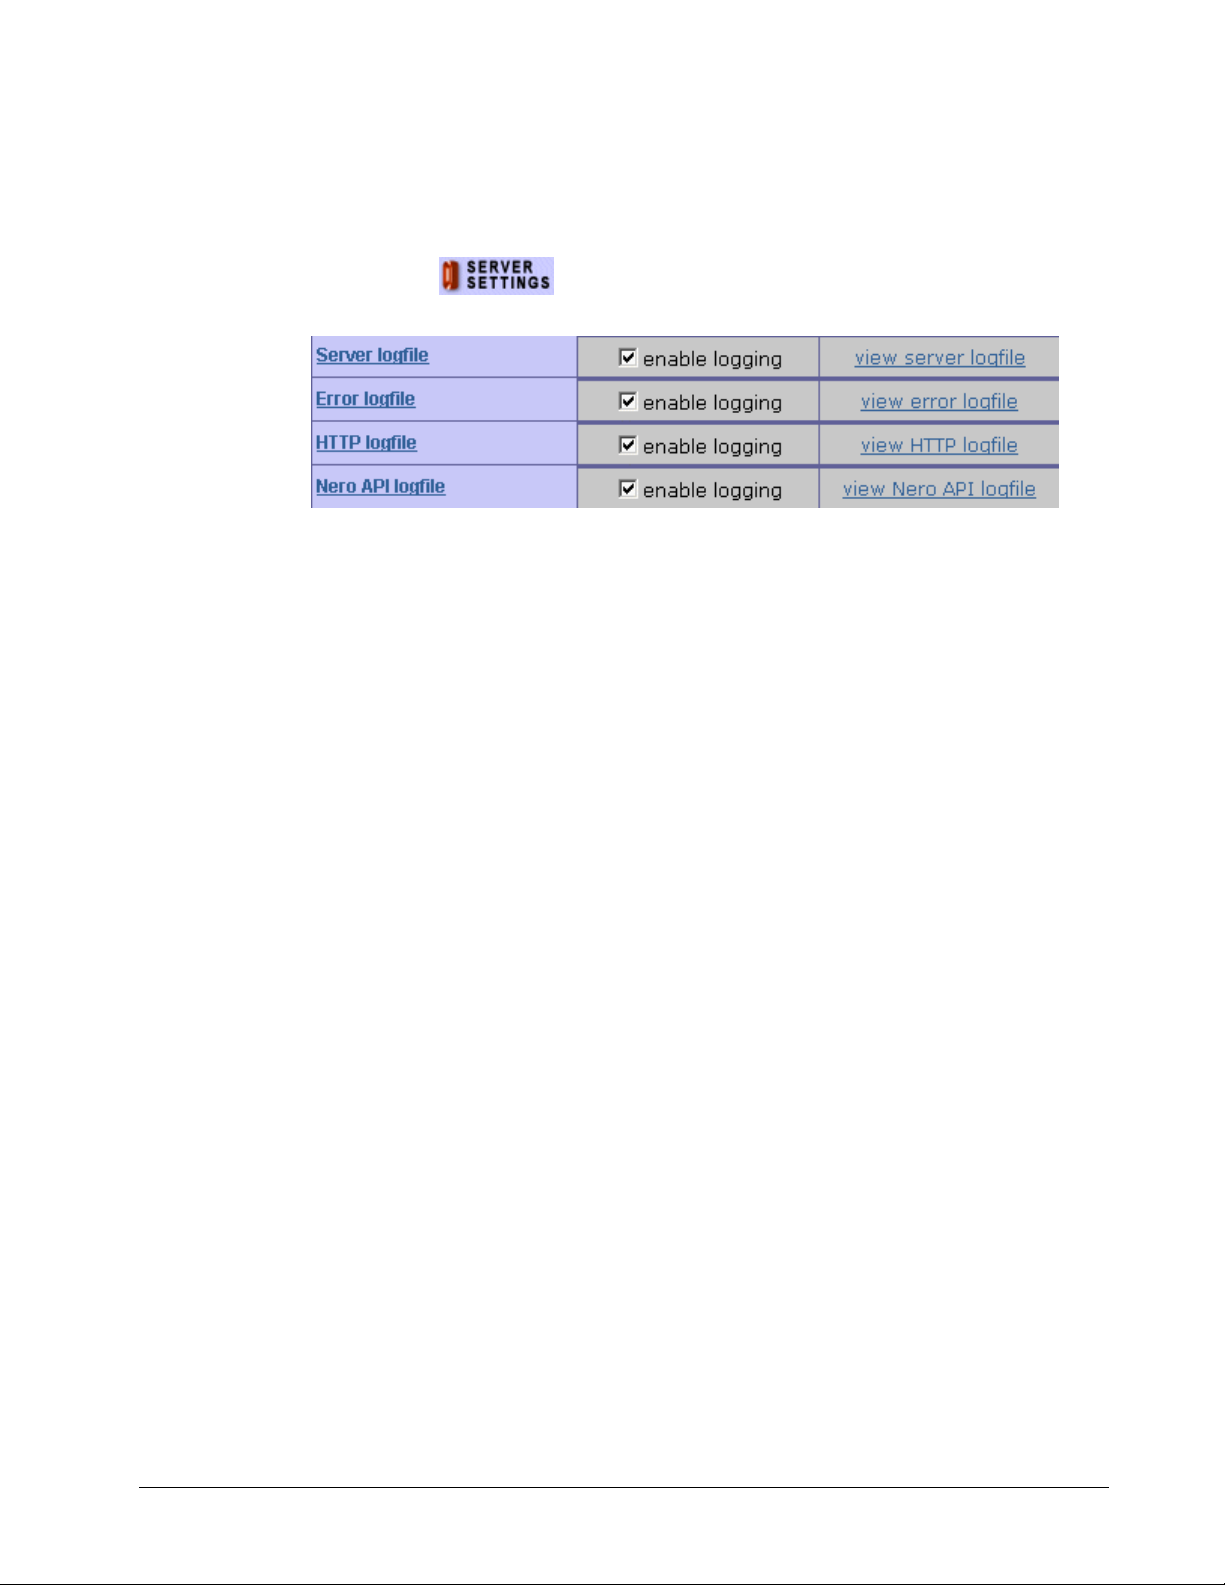
It is also possible to create different kinds of logfiles.
Server logfile
Error logfile
HTTP logfile
Nero Api logfile
The logfile concerned includes the directory as well as a checkbox that can be
activated (and/or deactivated) to permit (or not to permit) writing in the logfile.
The existing logfile will open by clicking on the corresponding link.
Quickstart NeroNET Configuring the server • 19
Page 20
In other input boxes you can specify the following:
r
Maximum size of the logfile in kB
Maximum number of jobs to be stored in the finished jobs area
Number of the COM port (in case a robot is connected)
The changes made are only stored if they are confirmed by clicking on the Apply
button.
4.1.1 Entering the serial number
As default, NeroNET comes with a three-user license. In other words, apart from
the administrator, three other users can be set up who will be able to record using
Nero (Client). Therefore the 'Serial number' field is empty.
Open the
you must enter a valid serial number in the field and then click on the Apply
button in order to save the changes. You can acquire the serial number and
the appropriate license from Ahead Software AG at www.nero.com
The number of NeroNET users depends on the license and not on the numbe
of active accounts. This means that a maximum of 13 users can be set up with a
10-user license (three users who may be set up regularly and 10 users with the
new license). If user accounts are deactivated in the 'User management' area,
they will still occupy one user license.
Circumventing the user license limitation by a user logging in from different
computers is also impossible, because NeroNET will also find out the IP address
of the user. If the same user logs in from another computer (which of course has
a different IP address) then he or she will be considered a different user. Thus in
the worst case, a user who logs on in this way from several computers, will be
using all licenses so that no other registered user will be able to log on.
area. If you need a license for more than three users,
.
Quickstart NeroNET Configuring the server • 20
Page 21
4.1.2 Creating logfiles
The logfiles (Server / Error / HTTP / Nero API) store the messages of the
NeroNET server in a separate file; these logfiles are located in the Root\Logs
folder.
Open the
checkbox and click on the Apply button to save the changes.
4.1.2.1 Server logfile
The server logfile contains information (in chronological order) on actions carried
out by the server; the work of the server can be followed with this file. In principle
this logfile is used for control purposes when the server is working unattended.
4.1.2.2 Error logfile
The error logfile contains information (in chronological order) about internal errors
of the NeroNET server that have occurred (not the Nero API).
4.1.2.3 HTTP logfile
area. To create the logfile, activate the 'logging Enable'
The HTTP logfile contains details (listed in chronological order) about errors that
occurred during the data transfer between the browser and the Web server.
4.1.2.4 Nero API
The Nero API logfile, the record DLL used for the controlling the recorders,
details (listed in chronological order) about Nero API errors.
4.1.3 Determining the size of the logfiles
NeroNET creates four logfiles (Server / Error / HTTP / Nero API) for each
section. As default, the size of a logfile is 100 kB. This means roughly enough
space for 1000 lines of text, depending on the size of the text strings. If the logfile
has reached the maximum size, a new file is created; if the first logfile is called
XXX.log, the subsequent files will be called XXX1.log, XXX2.log and XXX3.log.
Only once XXX3.log is full will XXX.log be overwritten again.
Quickstart NeroNET Configuring the server • 21
Page 22
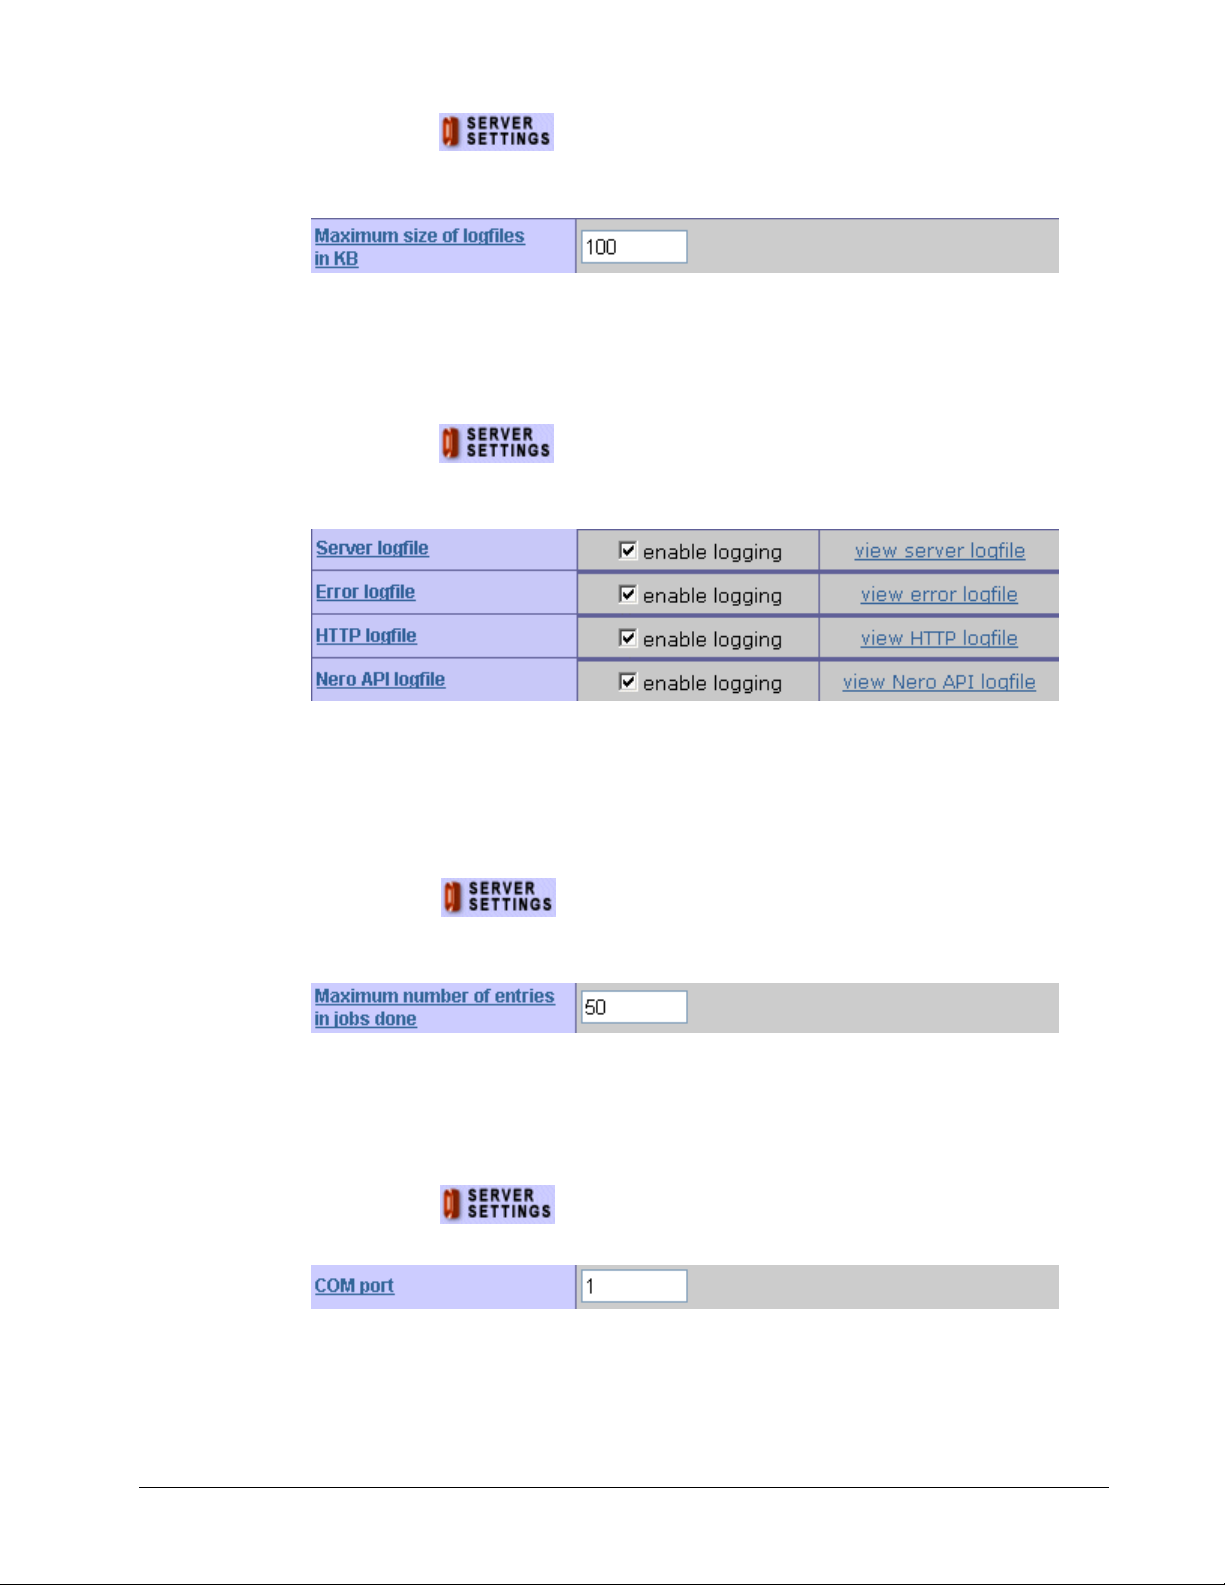
Open the area. To change of the size of the logfile, enter another
number in kB in the 'Maximum size of logfiles in KB' and click on Apply to
save the change.
4.1.4 Viewing logfiles
The logfiles contain details (listed in chronological order) about actions performed
by the server or errors that have occurred.
Open the
API), click on 'view XXX logfile' with the mouse button and a new browser
window will display the information.
area. To view the logfiles (Server / Error / HTTP / Nero
4.1.5 Determining the number of finished jobs
The number of jobs kept as a default in the finished jobs area is set at 50. When
additional jobs are recorded, the new information will be overwritten over the
oldest to guarantee that information on the current jobs is always available.
Open the
in the 'Maximum number of entries in jobs done' and click on Apply to save
the change.
area. To change of the number, enter another number
4.1.6 Specifying the COM port for the robot
If a robot is connected to the NeroNET server that is controlled via the serial
interface, it is necessary to specify which COM port the robot is connected to.
Open the
the robot is located and click on Apply in order to save the change.
Quickstart NeroNET Configuring the server • 22
area. Enter the number of COM port (1 or 2), at which
Page 23
5 Configuring the recorder
A
r
5.1 Introduction
Only users with administrator rights are allowed to configure recorders. No other
users are able to reach this part of the NeroNET program.
If there are any rewritable (RW) discs in the recorder of the NeroNET server,
their contents will be deleted before recording starts - without any warning being
given or request being made.
Open this area by clicking on the
This area is password-protected and accessible only to users with server
administrator rights. Please enter your user name and password in the
appropriate fields.
fter the NeroNET server has been installed, only the administrator will be able
to log on. Since it is a standard procedure, the following information is needed.
Pay attention to correct use of large and small letters (case sensitive)
User Name: 'Administrator'
Password: 'neronet'
For security reasons, please change the password immediately after the first
login. Find out how you change the password in the section on 'Changing a use
account'.
element.
Quickstart NeroNET Configuring the recorder • 23
Page 24
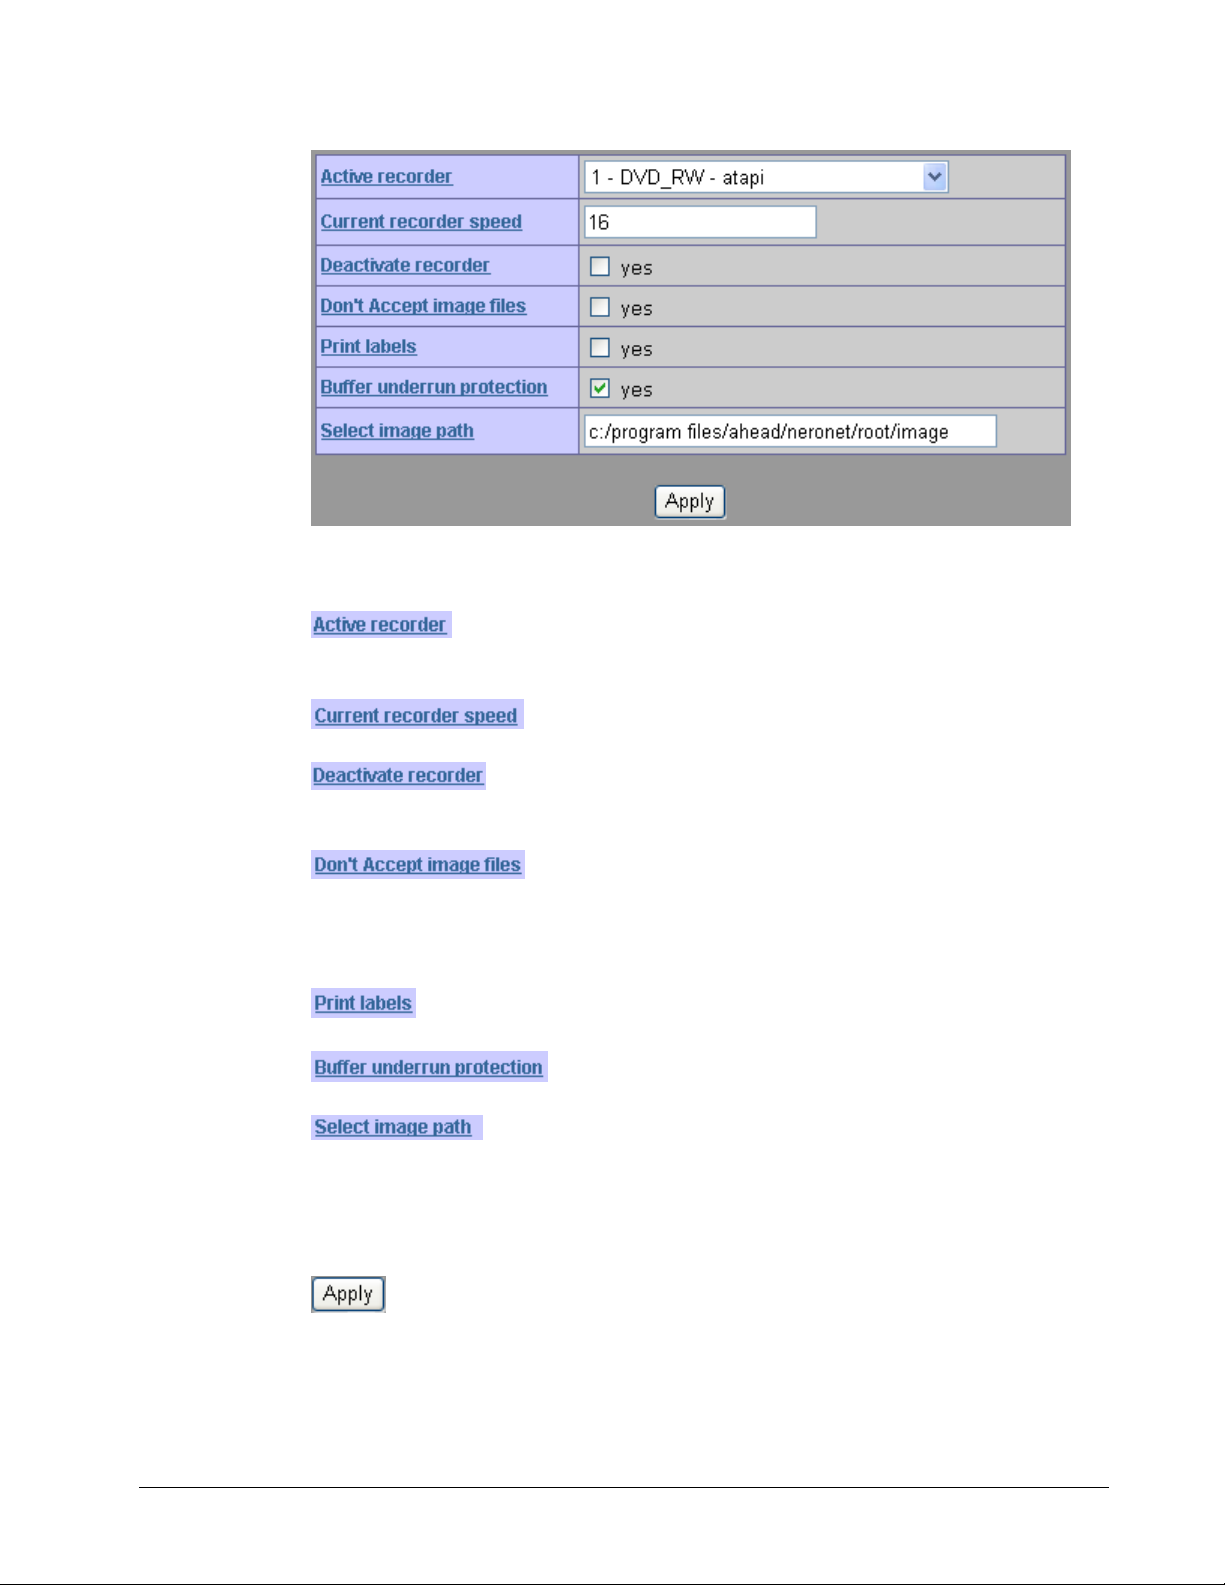
A
Area Function
Shows the recorder(s) installed. Clicking on the dropdown button and marking another printer will select this
as the active printer.
Configures rate of recording (if this is to be changed
manually).
Deactivates the recorder. However, recording jobs can
still be sent. The message 'halted' will be displayed in
the status line for deactivated recorders.
Recording jobs will no longer be accepted, for instance
because the recorder has been removed from the
server for reasons of maintenance. At the client, no
more jobs can be sent to the server. The user will
receive an error message ("server down").
While recording on the client, this allows you to print a
label.
ctivates protection from buffer underrun, if this feature
is supported by the recorder.
Shows the path where the image file is stored and
allows another (user-defined) path to be selected.
The changes made are only stored if they are confirmed by clicking on the Apply
button.
Quickstart NeroNET Configuring the recorder • 24
Page 25

5.2 Selecting recorders
The recorder actively employed by NeroNET is selected in the 'Active recorder'
field. All other fields in this sector then refer solely to the selected recorder.
Open the
recorder and click on 'Apply' to save the change.
Only one recorder can be selected at the server, i.e. it will not be possible to
record simultaneously on two or more recorders.
area. Click on the dropdown button, mark the desired
5.3 Setting the recording speed
Usually NeroNET automatically recognizes the recorder's maximum recording
speed. However, should this rate not be correctly recognized, the actual top
speed can be entered manually.
Open the
enter the number (multiple of the CD speed) that represents the recorder
speed and click on 'Apply' to save the change.
area. To set the maximum recording speed manually,
5.4 Activating buffer underrun protection
Usually NeroNET automatically recognizes whether a recorder offers protection
from buffer underrun or not. If recognition is impossible or incorrect, this
information can be entered manually.
Open the
protection using the 'buffer underrun protection' checkbox and click on 'Apply'
to save the change.
area. Activate manual input of buffer underrun
Quickstart NeroNET Configuring the recorder • 25
Page 26

5.5 Deactivating a recorder
If desired, the recorder can be deactivated, for example because the discs (at a
robot fitted at the input tray) are coming to an end and need to be refilled. This
checkbox is deactivated as a default, because the recorder at the server should
normally be in operation.
The jobs sent to the server wait in the queue with the message 'waiting for
equipment' and the message 'halted' for the server status appears in the status
line. The jobs already in the queue will still be recorded. After deactivating the
checkbox, the recorder resumes its work and records the jobs in the queue.
Open the
'Deactivate recorder' checkbox and click on the 'Apply' button to save the
change.
area. To deactivate the recorder, highlight the
5.6 Accepting no further recording jobs
If desired, the recorder can be set so that no new recording jobs more are
accepted, for instance because the server is being serviced and a
defragmentation program has to be run. If a robot is connected, it may be
necessary to remove the recorded discs and replenish the blank discs. If a printer
is employed, the cartridges may need changing.
This checkbox is deactivated as a default, because NeroNET server should
normally record the jobs of the clients.
Open the
to stop the NeroNET server accepting new recording jobs. Click on 'Apply' to
save the change.
area. Activate the 'Do not accept image files' checkbox
5.7 Printing labels
Normally, labels are not printed on the disc during the burning process. Choosing
this option only makes sense if an appropriate label printer has been connected
to the NeroNET server and special, printable discs are being used.
Open the
(Client) user print a label, then click on the 'Apply' button to save the change.
Quickstart NeroNET Configuring the recorder • 26
In order to print a label, the 'Print label' checkbox must be activated on the 'Misc'
tab in Nero (Client). You can find more detailed information in the section on
'Printing labels on recorded discs'.
area. Activate the 'Print labels' checkbox to let the Nero
Page 27

5.8 Selecting the directory for the image file
As a default the path is shown as:
'C:/Program Files/Ahead/NeroNET/Root/Image'. However, this path and thus the
folder to be stored can also be manually changed
Open the
'Apply' to save the change.
area. Enter details of the new directory and click on
Quickstart NeroNET Configuring the recorder • 27
Page 28

6 User administration
6.1 Introduction
User administration is only permitted for users with server administrator rights or
by the administrator personally. No other groups of users are able to reach this
part of the NeroNET program.
Open this area by clicking on the
This area is password-protected and accessible only to users with server
administrator rights. Please enter your user name and password in the
appropriate fields.
element.
After the NeroNET server has been installed, only the administrator will be able
Quickstart NeroNET User administration • 28
to log on. Since it is a standard procedure, the following information is needed.
Pay attention to correct use of large and small letters (case sensitive)
User Name: 'Administrator'
Password: 'neronet'
For security reasons, please change the password immediately after the first
login. Find out how you change the password in the section on 'Changing a user
account'.
Page 29

This area shows the users installed and provides information on:
r
f
r
User name (login name of the user)
Real name (of the user - for more precise identification)
Existing server administrator rights
Existing queue administrator rights
The activation of the user account
Clicking on 'view link of used licenses' shows those computers from which the
users have accessed the NeroNET server and also provides information on
existing licenses and the maximal possible number.
Clicking on 'Add User' allows a new user account to be created. See the 'Setting
up the user account' section.
Clicking on a user name allows user settings to be changed, e.g. the changing of
access rights. See the 'Setting up the user account' section.
Following the installation of NeroNET, only the administrator is able to log in and
to add new users As a default, three users can be set up in NeroNET. If furthe
licenses are needed, these can be acquired online from Ahead Software AG at
www.nero.com
. The number of possible users always refers to the number o
users excluding the administrator, so that with a license for three users, these
three persons plus one administrator can log in at the NeroNET server.
Should the number of users exceed that of the licenses, a message will appea
that the user cannot be added.
Quickstart NeroNET User administration • 29
Page 30
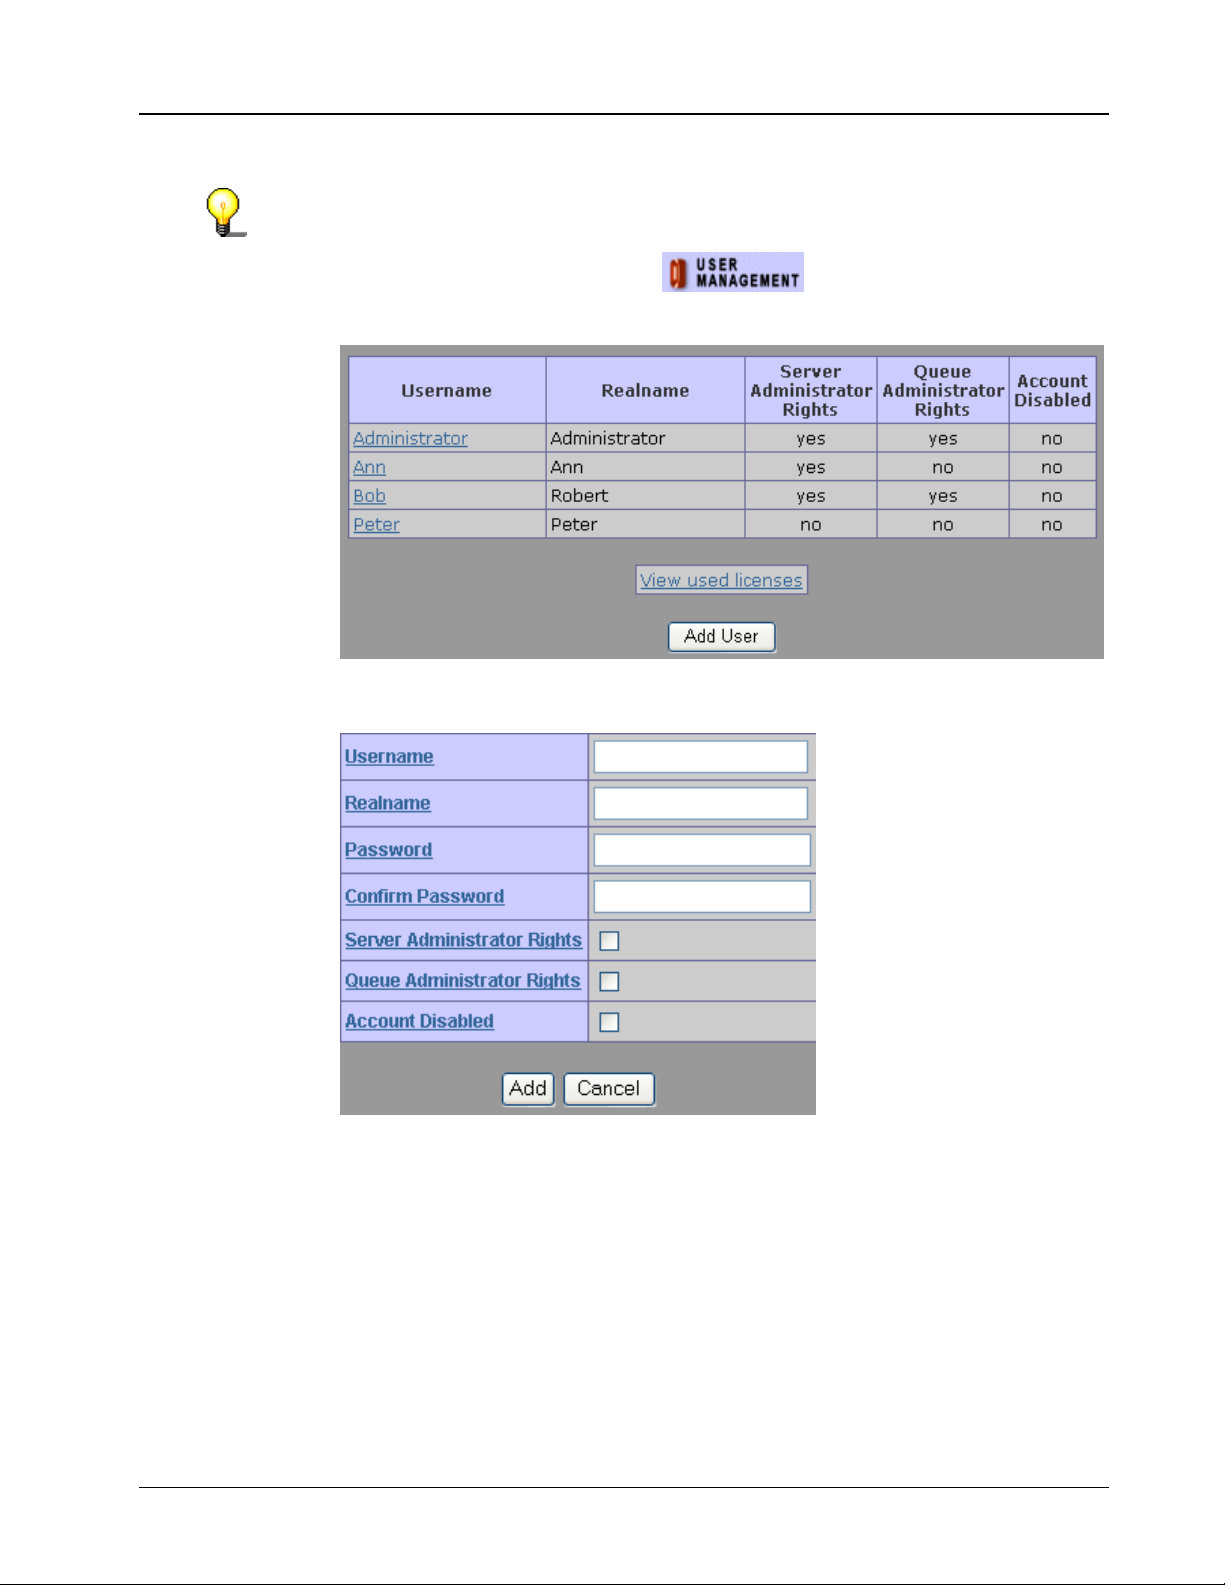
6.2 Setting up the user account
You can only set up a user account if you have server administrator rights.
1. Open the area by clicking on the
element.
2. Click on 'Add User'.
3. Enter the user name (for the login course procedure), the real name and the
password (twice).
4. Specify the user's rights by activating the checkboxes.
Server Administrator: The user has access to the 'Server Settings',
'Recorder Settings' and 'User Management' areas. With these access rights,
the user is able to configure server settings, to modify the recorder settings
and to implement user settings.
Queue Administrator: The user has access to the 'Admin Job Management'
area. With this access right, the user is able to shift jobs to the queue.
5. By marking the control field specify whether the user account should be
immediately unblocked or not. Subsequent activation follows as a result of
modifying the user account. See the 'Changing a user account' section.
Quickstart NeroNET User administration • 30
Page 31

6. Click on 'Add' to complete the set-up procedure and to return to the 'User
Management' area.
6.3 Changing a user account
You can only change a user account if you have server administrator rights.
1. Open the area by clicking on
.
2. Click on the user name of the user account to be changed.
3. Make the desired changes.
You can change the real name, the password, and the administrator rights or
the unblock or deactivated the account.
4. Click on 'Apply' to save the change and to close this area.
Quickstart NeroNET User administration • 31
Page 32
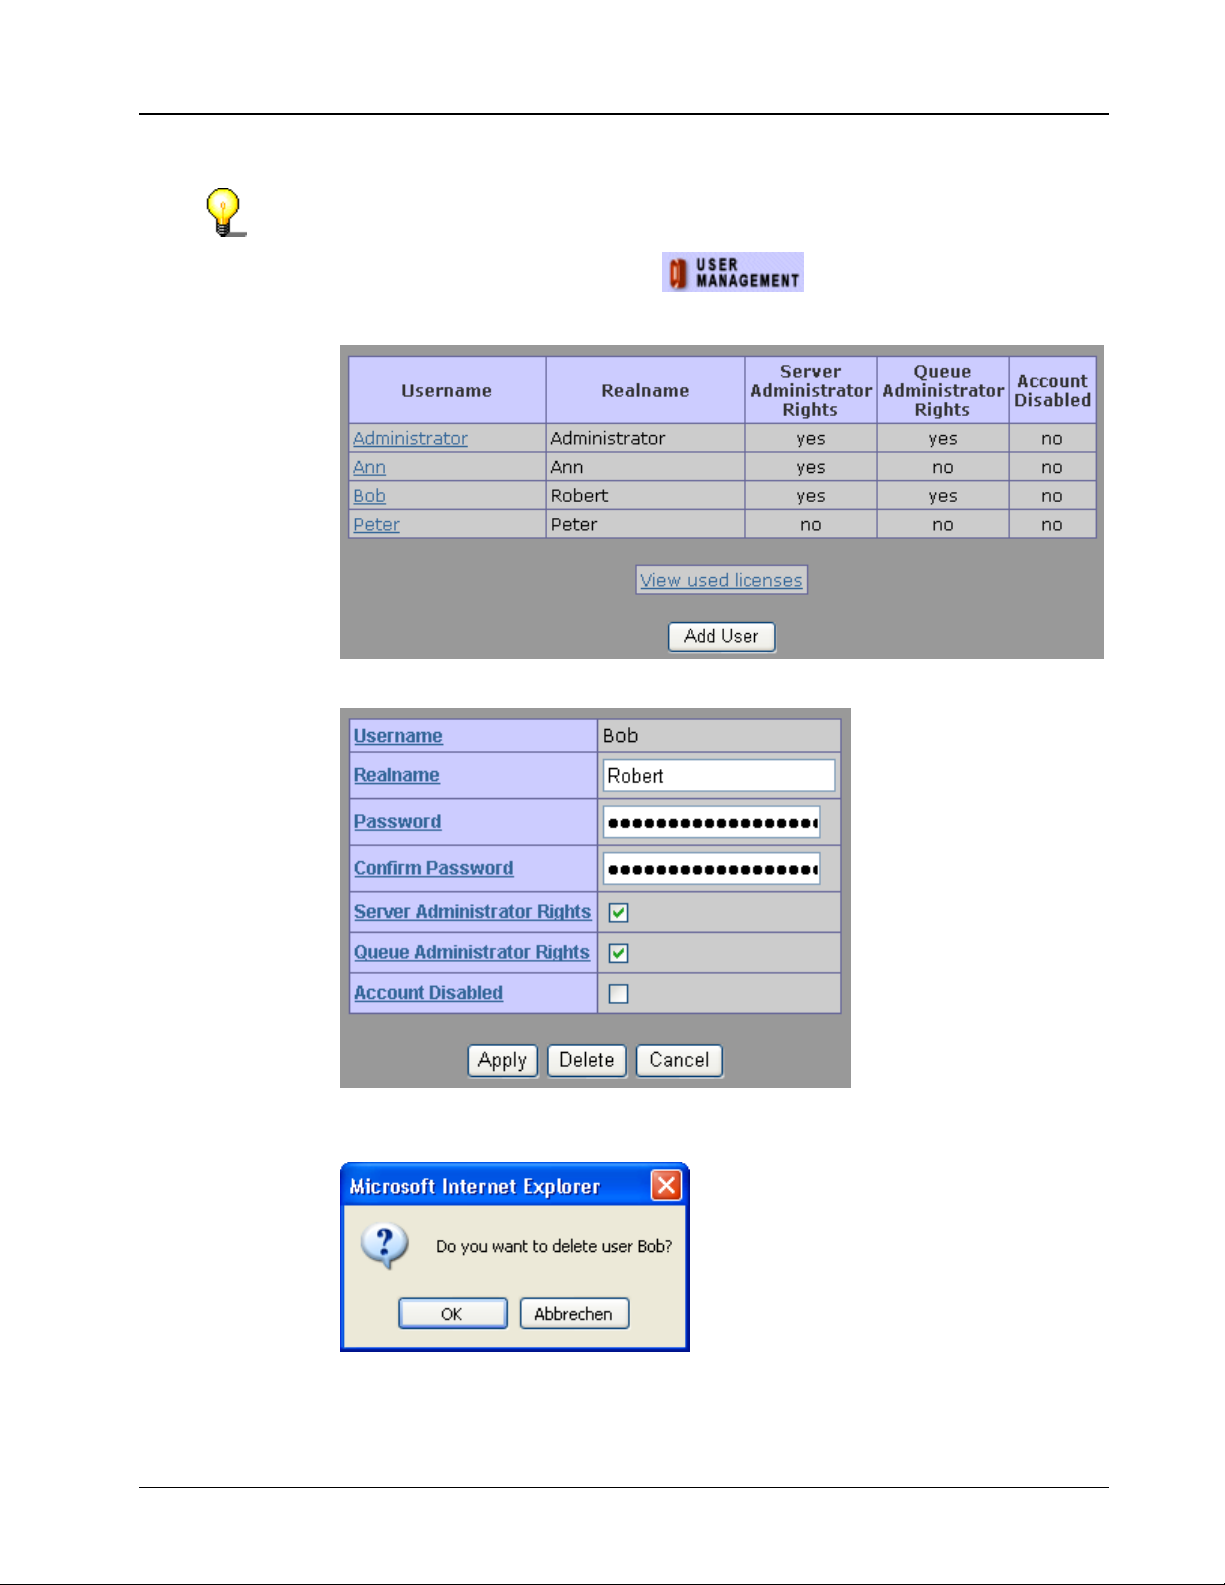
6.4 Deleting a user account
You can only delete a user account if you have server administrator rights.
1. Open the area by clicking on the
element.
2. In the ‘User name’ column, click on the user account to be deleted.
3. Click on 'Delete'.
4. Confirm the deletion in the dialog opening itself by clicking on the 'OK' button.
The dialog will be closed. You will return to the 'User Management' area.
Quickstart NeroNET User administration • 32
Page 33

7 Job administration
A
7.1 Introduction
The management of other jobs that have been sent to the server is possible only
for users who have queue administrator rights; all other users can only process
their own jobs.
7.2 For queue administrators
Open this area by clicking on the element.
This area is password-protected and accessible only to users with queue
administrator rights. Please enter your user name and password in the
appropriate fields.
fter the NeroNET server has been installed, only the administrator will be able
Quickstart NeroNET Job administration • 33
to log on. Since it is a standard procedure, the following information is needed.
Pay attention to correct use of large and small letters (case sensitive)
User Name: 'Administrator'
Password: 'neronet'
For security reasons, please change the password immediately after the first
login. Find out how you change the password in the 'Changing a user account'
section.
Page 34

r
r
This area shows
Job ID
User
Copies
Status
Action
Number of the job
User name of person who sent the recording job
Number of copies to be recorded
Recorder status message
Possible actions
Open the area by clicking on
you want in the 'Action' area. Click on the desired link.
Delete job
Add copies
Delete copies
Pos ↑
Pos ↓
7.2.1 Deleting a job
If it should become necessary to delete a job that has been sent to the server, a
queue administrator can do this at any time. Deleted jobs are placed in 'Done'.
Open the area by clicking on
'Delete job' link and confirm in the window that now opens that in fact the job
really is to be deleted. All the other jobs in the queue will then move one place
upwards.
. If necessary, make any changes
Deletes the highlighted job following confirmation
Increases the number of copies to be recorded
Reduces the number of copies to be recorded
Increases the priority of the job in the sequence of jobs to be
recorded. Exception: job number 2 cannot be given highe
priority since it is possible that job 1 is currently being
recorded.
Reduces the priority of the job in the sequence of jobs to be
recorded. Exception: job number 1 cannot be given lowe
priority since it is possible that it is currently being recorded.
. In the 'Action' column, click on the
Quickstart NeroNET Job administration • 34
Page 35
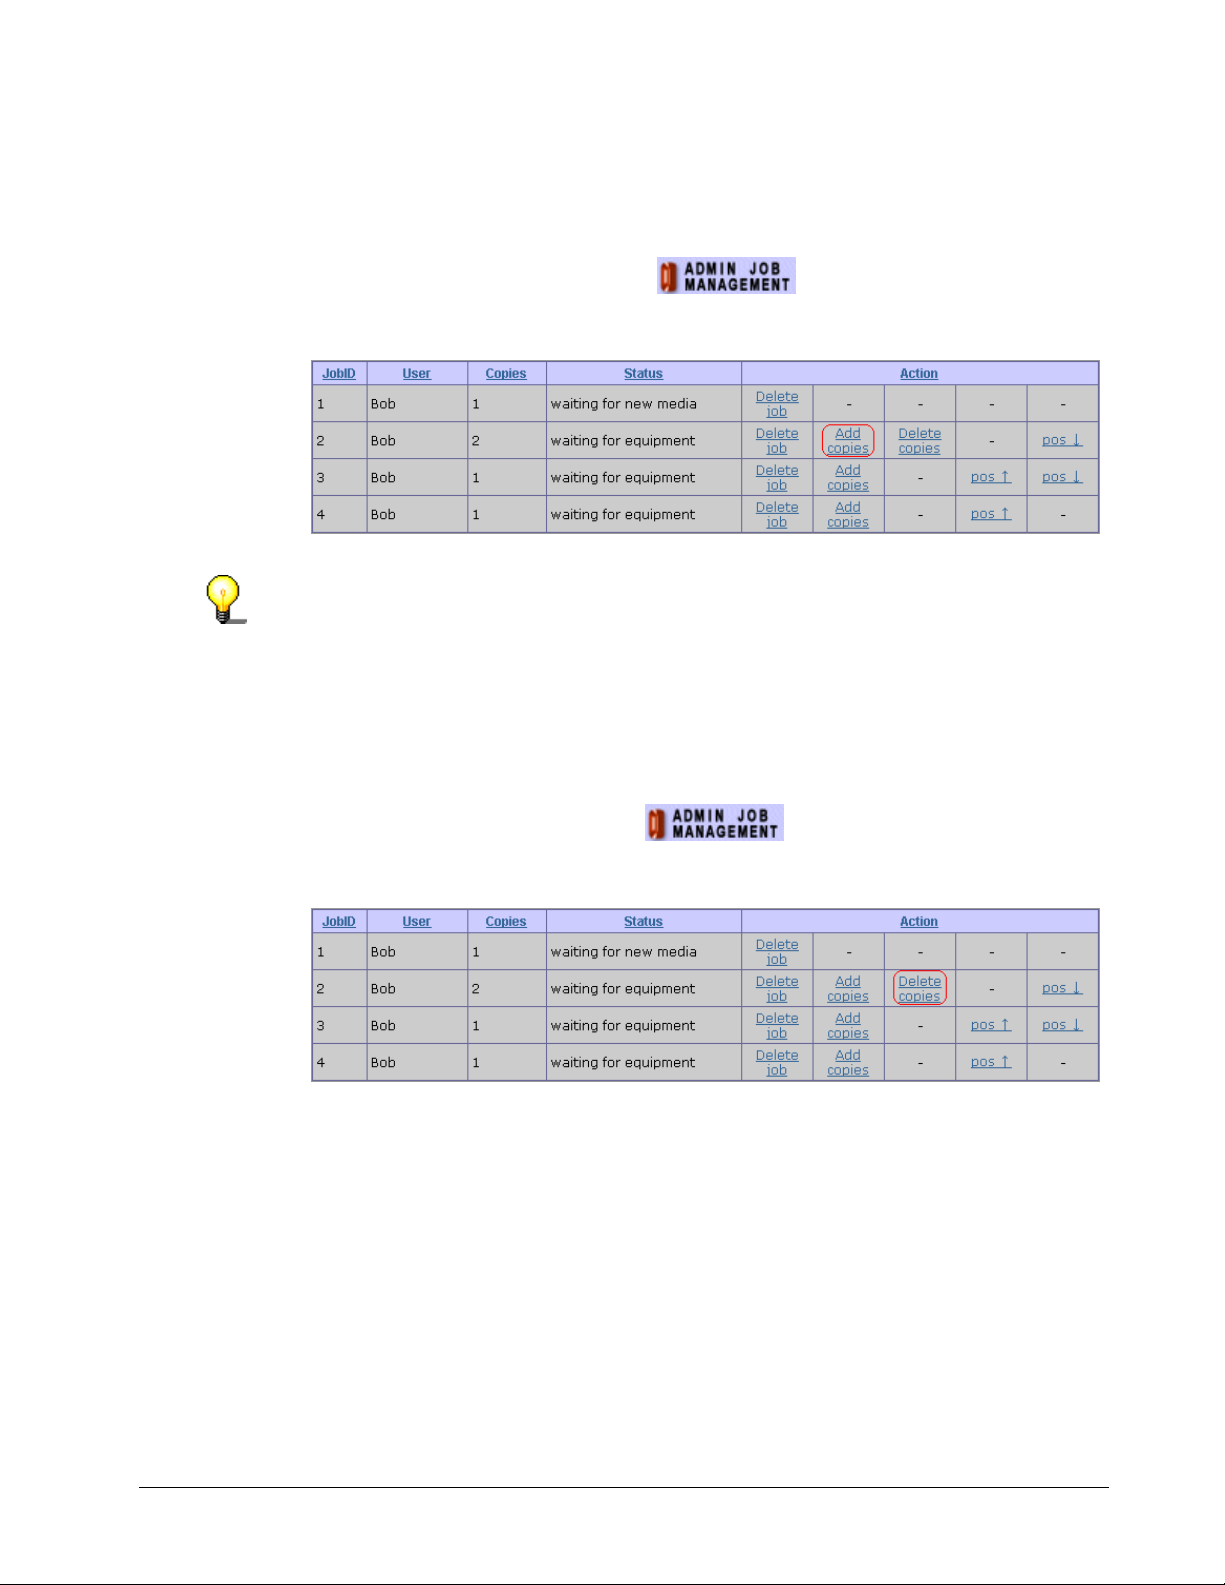
7.2.2 Adding copies
Until a job is recorded, is it possible to increase the number of copies to be
burned should the user need more copies than first thought.
Open the area by clicking on
copies' link and the number of copies to be made (which appears in 'Copies')
will increase by one with each click of the mouse.
It is not possible to add copies with the first job in the queue.
7.2.3 Deleting copies
Until a job is actually recorded, is it possible to reduce the number of copies to be
burned should the user need fewer copies than first thought.
Open the area by clicking on
copies' link and the number of copies to be made (which appears in 'Copies')
will decrease by one with each click of the mouse.
. In 'Action', click on the 'Add
. In 'Action', click on the 'Delete
7.2.4 Increasing the priority
Usually jobs are recorded by NeroNET in the order in which they arrive at the
server, in other words, the first jobs to arrive are recorded first. Until a job has
been recorded it is possible to increase its priority so that it moves forward in the
queue.
Quickstart NeroNET Job administration • 35
Page 36

Open the area by clicking on . In 'Action', click on the 'Pos ↑' link
and the job will move one recording position upward with each mouse click.
It is not possible to increase the priority of the first job in the queue since it
already has the highest priority.
7.2.5 Reducing the priority
Usually jobs are recorded by NeroNET in the order in which they arrive at the
server, in other words, the first jobs to arrive are recorded first. Until a job has
been recorded it is possible to reduce its priority so that it moves downward in the
queue.
Open the area by clicking on
and the job will move one recording position back with each mouse click.
It is only possible to reduce the priority of the first job in the queue if it has not yet
been recorded.
. In 'Action', click on the 'Pos ↓' link
Quickstart NeroNET Job administration • 36
Page 37

7.3 Users
Open this area by clicking on the element.
This area is password-protected. Users without administrator rights can only view
their own jobs and only perform such actions as adding copies or deleting jobs. It
is not possible to change the job priority by changing the sequence.
This area shows
Job-ID
User
Copies
Status
Action
1. Click on
recording jobs will appear.
2. Make the changes you want if necessary. Click on the desired link.
Delete job
Number of the job
The user name of the user currently logged on who sent the
recording job
Number of copies to be recorded
Recorder status message
Possible actions
, then log in as user and the list showing your own
Deletes the highlighted job following confirmation
Add copies
Delete copies
Quickstart NeroNET Job administration • 37
Increases the number of copies to be recorded
Reduces the number of copies to be recorded if this
number is greater than one
Page 38

7.3.1 Deleting a job
If it should become necessary to delete a job that has been sent to the server,
then this is possible right up to when the job has been recorded.
Open this area by clicking on
job' link and the job will be deleted following confirmation. All your other jobs in
the queue will then move one place upwards.
7.3.2 Adding copies
Until a job is actually recorded, is it possible to increase the number of copies to
be burned - should more copies be needed than first thought.
Open this area by clicking on
copies' link and the number of copies to be made (which appears in 'Copies')
will increase by one with each click of the mouse.
7.3.3 Deleting copies
Until a job is actually recorded, is it possible to reduce the number of copies to be
burned - should fewer copies be needed than first thought.
Open this area by clicking on
copies' link and the number of copies to be made (which appears in 'Copies')
will decrease by one with each click of the mouse.
. In 'Action', Click on the 'Delete
. In 'Action', click on the 'Add
. In 'Action', click on the 'Delete
Quickstart NeroNET Job administration • 38
Page 39

8 General information
8.1 Jobs
If there are any rewritable (RW) discs in the recorder of the NeroNET server,
their contents will be deleted before recording starts - without any warning being
given or request being made.
Open this area by clicking on the
This area is for information purposes only and shows all the recording jobs sent
to the server that have not yet been burned, as well as the job that is currently
being recorded.
The left hand side of this area provides quick information on:
element.
Job ID
User
Status
Time remaining
Quickstart NeroNET General information • 39
Number of the job. Clicking on the number on the right
hand side of this field displays more information on the
job.
User who sent the recording job
Current state of the recording job
Probable length of time until the job is finished
Page 40

The right-hand side of this area provides more information on the highlighted
j
recording job:
Job ID
User
Recorder
Time submitted
Est. Time Finished
Progress
Number
Write Speed
Image Size
Image Path
Label Path
Status
Number of the job
User who sent the recording job
ID number of the recorder. If the digit "0" is displayed, the
ob has not yet been recorded. If a different digit is
displayed, this is the ID of the recorder burning the job.
Clicking on the displayed digit will transfer to the 'recorder'
area. See the 'Recorder' section.
The time when the recording job was sent to the server
Time when the recording job will probably be complete
Details (in percent) of how much the job to be recorded
has already been completed
Number of copies to be recorded
Rate at which the job is being recorded
Size of the image file in kB
Location where the image file is stored and its name
Location where the label file to be printed is stored and its
name
Current state of the recording job
8.2 Recorder
If there are any rewritable (RW) discs in the recorder of the NeroNET server,
their contents will be deleted before recording starts - without any warning being
given and without you being prompted.
Open this area by clicking on the
This area is for information purposes only and shows all the recorders installed.
The left hand side of this area provides quick information on:
ID
Model
element.
ID number of the recorders installed. Clicking on the
number on the right hand side of this field shows
more information on the recorder.
Manufacturer and model designation of the recorder
Status
Quickstart NeroNET General information • 40
Current status of the recorder
Page 41

The right-hand side of this area provides more information on the highlighted
recorder:
Recorder ID
Device Model
Host adapter Interface
Buffer underrun protection
Status
8.3 Completed jobs
Open this area by clicking on the element.
This area is for information purposes only and shows all the jobs that have
already been completed.
ID number of the recorder.
Manufacturer and model designation of the
recorder
Details of the recorder interface (Atapi or SCSI)
Name of the method used to avoid buffer underrun
if this information is available.
Current status of the recorder
The left hand side of this area provides quick information on:
Job ID
User
Status
The right-hand side of this area provides more information on the selected job:
Job ID
User
Recorder
Quickstart NeroNET General information • 41
ID number of the job. Clicking on the number on the right
hand side of this field displays more information on the
job.
User who sent the job
Condition in which the job was completed
ID number of the job.
User who sent the job
ID number of the recorder. Clicking on the ID number
will transfer you to the 'Recorder' field and will allows
you access to further information about the recorder.
See the 'Recorder' section.
Page 42

Time submitted
Date and time when the job was started
Time Done
Number of copies
Write Speed
Image Size
Image Path
Label Path
Status
8.4 Help
Open this area by clicking on the element.
This calls up the NeroNET help feature.
Date and time when the job was ended
Number of copies already recorded and to be recorded
The first digit represents the number of copies recorded
while the second is shows the number still to be
recorded.
Rate at which the job was recorded
Size of the image file in MB
Location where the image file is stored and its name
Location where the label file to be printed is stored and
its name
Condition in which the job was completed
Quickstart NeroNET General information • 42
Page 43

9 Status area
9.1 Introduction
The status area of NeroNET is in the lower part of the window. It is for
information purposes and shows at a glance the status of the server to which the
recorders have been connected.
9.2 Elements of the status area
Clicking on this button refreshes the status line.
Number of jobs waiting to be recorded.
Current condition of the recorder This field tells you if it is
necessary to intervene, e.g. by the message 'Please
insert an empty CD'.
This field informs you of the free memory available on the
server.
Number of recorders installed
Number of active recorders
Quickstart NeroNET Status area • 43
Page 44

10 Configuring the browser
10.1 Entering the server address
The appropriate IP address or the computer name must be entered in the
browser's address field so that it can make the connection with the NeroNET
server.
In order to connect to the NeroNET server using a computer name, the network
must support a name recognition feature (e.g. via the WINS and/or DNS
services).
1. Open a browser and in the address field enter e.g. the IP address of the
NeroNET server in the 'http://xxx.xxx.xxx.xxx' format or the name of the
computer.
IP address
WINS
DNS
2. Store the address with the 'Add to favorites' (or similar) command in the
'Favorites' menu and by clicking on the ‘OK’ button in the window that will now
open.
http://192.168.0.100
If the server is running on a port other than number 80, the
port number (separated by a colon) must/can be added to the
address.
Example: http://192.168.0.100:5555, for a server running on
port 5555.
http://neronet
Address of the DNS. Example: http://neronet.company.com
Quickstart NeroNET Configuring the browser • 44
Page 45

11 Nero (Client)
r
11.1 Installing Nero (Client)
11.1.1 Installation where there is an existing OEM version of Nero
The NeroNET functions ('Enable NeroNET Support' check box) will not work if an
OEM version of Nero has been installed on the computer, in other words, if Nero
had been part of the standard package at the time a recorder was purchased. An
installation of the Web version of Nero would just be an update of the OEM
version, though without the NeroNET functions. So owners of the OEM version
first have to select the 'Deinstallation' option after downloading the Web version
of Nero (around 25 MB) in the installation menu. The OEM version of Nero will
then be removed completely. You can then install the Web version and test Nero
with its NeroNET functions for 30 days. After the trial period has come to an end,
you can purchase the NeroNET software at http://www.nero.com
OEM version.
or reinstall the
Step 1: The installation file that can be downloaded from the www.nero.com
Website has the name of the program and version number, e.g. 'Nero6xxx.exe'.
Step 2: Double-click on the program to prepare the installation of NeroNET.
Step 3: Follow the screen commands until you have to decide whether you wish
to update your current version or to deinstall Nero. Select the deinstallation
option and perform all the necessary steps until the software has been
deinstalled.
Step 4: Follow the screen commands until the software has been completely
installed.
Step 5: If needed, reboot the computer.
The basic version of NeroNET server for three users is free of charge, howeve
a full version of Nero 5.5 (or later) must be installed on the client computer.
Owners of an OEM version of Nero who did not acquire the program directly but
along with a recorder can acquire an upgrade to the full version from Ahead
Software AG (www.nero.com
).
Quickstart NeroNET Nero (Client) • 45
Page 46

11.1.2 Installation (no previous version of Nero)
r
r
Step 1: The installation file that can be downloaded from the www.nero.com
Website has the name of the program and version number, e.g. 'Nero6xxx.exe'.
Step 2: Double-click on the program to prepare the installation of NeroNET.
Step 3: Follow the screen commands until the software has been completely
installed.
Step 4: If needed, reboot the computer.
The basic version of NeroNET server for three users is free of charge, howeve
a full version of Nero 5.5 (or later) must be installed on the client computer.
11.1.3 Installation where there is an existing Retail version of Nero
Step 1: The installation file that can be downloaded from the www.nero.com
Website has the name of the program and version number, e.g. 'Nero6xxx.exe'.
Step 2: Follow the screen commands until the software has been completely
installed.
Step 3: If needed, reboot the computer.
The basic version of NeroNET server for three users is free of charge, howeve
a full version of Nero 5.5 (or later) must be installed on the client computer.
Quickstart NeroNET Nero (Client) • 46
Page 47

11.2 Enable NeroNET support
Nero (Client) allows access to the NeroNET server. The user therefore has the
chance to record media without having a recorder installed in his or her own
computer.
The checkbox 'Enable NeroNET support' must be activated to let NeroNET
(Client) access the recorder. Choose the 'Preferences' command in the 'File'
menu to check the setting and click on the 'Expert Features' tab.
Quickstart NeroNET Nero (Client) • 47
Page 48

11.3 Special features when recording with Nero (Client)
If there are any rewritable (RW) discs in the recorder of the NeroNET server,
their contents will be deleted before recording starts - without any prior warning
being given and without you being prompted.
You cannot create any multisession discs with Nero (Client). If you insert a disc
containing one or more multisession tracks, the existing data will become
useless, as no access to these tracks will be possible.
11.4 Usable discs
You can burn on the following media with Nero (Client).
CD-R
CD-RW
HD-BURN
DVD-R
DVD+R
DVD-RW
DVD+RW
DVD-RAM
DVD+R9
11.5 Working with Nero Burning ROM or Nero Express
With Nero (Client) you have two basic possibilities to make a compilation for
recording on a medium. For one thing, you can work with Nero Express or with
Nero Burning ROM.
Nero Express combines the performance of Nero Burning ROM with a
simplified interface. The Wizard-supported application guides you through every
desired recording task. Nero Express is particularly easy to use for beginners –
and especially comfortable for experts. Switch over to Nero Express by clicking
on the
command.
If you are working with Nero Express and would like to switch to Nero Burning
ROM, then simply click on the
If there are any rewritable (RW) discs in the recorder of the NeroNET server,
their contents will be deleted before recording starts - without any prior warning
being given and without you being prompted.
button or go to the 'Help' menu and select the 'Use Nero Express'
button.
Quickstart NeroNET Nero (Client) • 48
Page 49
11.6 CD + CD-RW compilations
f
This manual does not separately describe how to compile a disc with Nero
(Client) as the procedure is the same as with Nero to which the NeroNET
functions have been added. If you have any questions about recording on discs
read the manual or online help for Nero Burning ROM and/or Nero Express.
Examples of the creation of CD are described in the 'Creating a disc' section.
A CD disc allows the following compilations to be created:
CD-ROM (ISO)
Audio CD
Mixed Mode CD
CD Extra
CD copying
Video CD
Super Video CD
miniDVD
CD-ROM (boot)
CD-ROM (hybrid)
CD-ROM (UDF)
CD-ROM (UDF/ISO)
If you are working with Nero Express, you cannot make any CD compilations o
the CD-ROM (hybrid), CD-ROM (UDF) or CD-ROM (UDF/ISO) types; this is only
possible with Nero.
11.7 DVD + DVDRW compilations
This manual does not separately describe how to compile a disc with Nero
(Client) as the procedure is the same as with Nero to which the NeroNET
functions have been added. If you have any questions about recording on discs
read the manual or online help for Nero Burning ROM and/or Nero Express.
Section 'Creating a disc' provides examples of how to record on a DVD.
With a DVD disc, the following compilations can be created:
DVD-ROM (ISO)
DVD copy
DVD-ROM (Boot)
DVD-ROM (UDF)
DVD-ROM (UDF/ISO)
DVD-Video
If you are working with Nero Express, you cannot make any DVD compilations
of the CD-ROM (hybrid), CD-ROM (UDF) or CD-ROM (UDF/ISO) types; this is
only possible with Nero.
Quickstart NeroNET Nero (Client) • 49
Page 50

11.8 Configuring network recorders
f
The 'NeroNET' button will only appear when you select a recorder, if the
'NeroNET.dll' file is in the same directory as the 'nero.exe' file and a full version o
Nero (Version 5.5.10 or later) has been installed.
Owners of an OEM version of Nero can download the full version of Nero, which
has the NeroNET functions, from www.nero.com
charge for 30 days.
However, the OEM version must be deinstalled before you can install the test
version. In addition, the 'Enable NeroNET support' checkbox must be activated.
Choose the 'Preferences' command in the 'File' menu to check the setting and
Click on the 'Expert Features' tab.
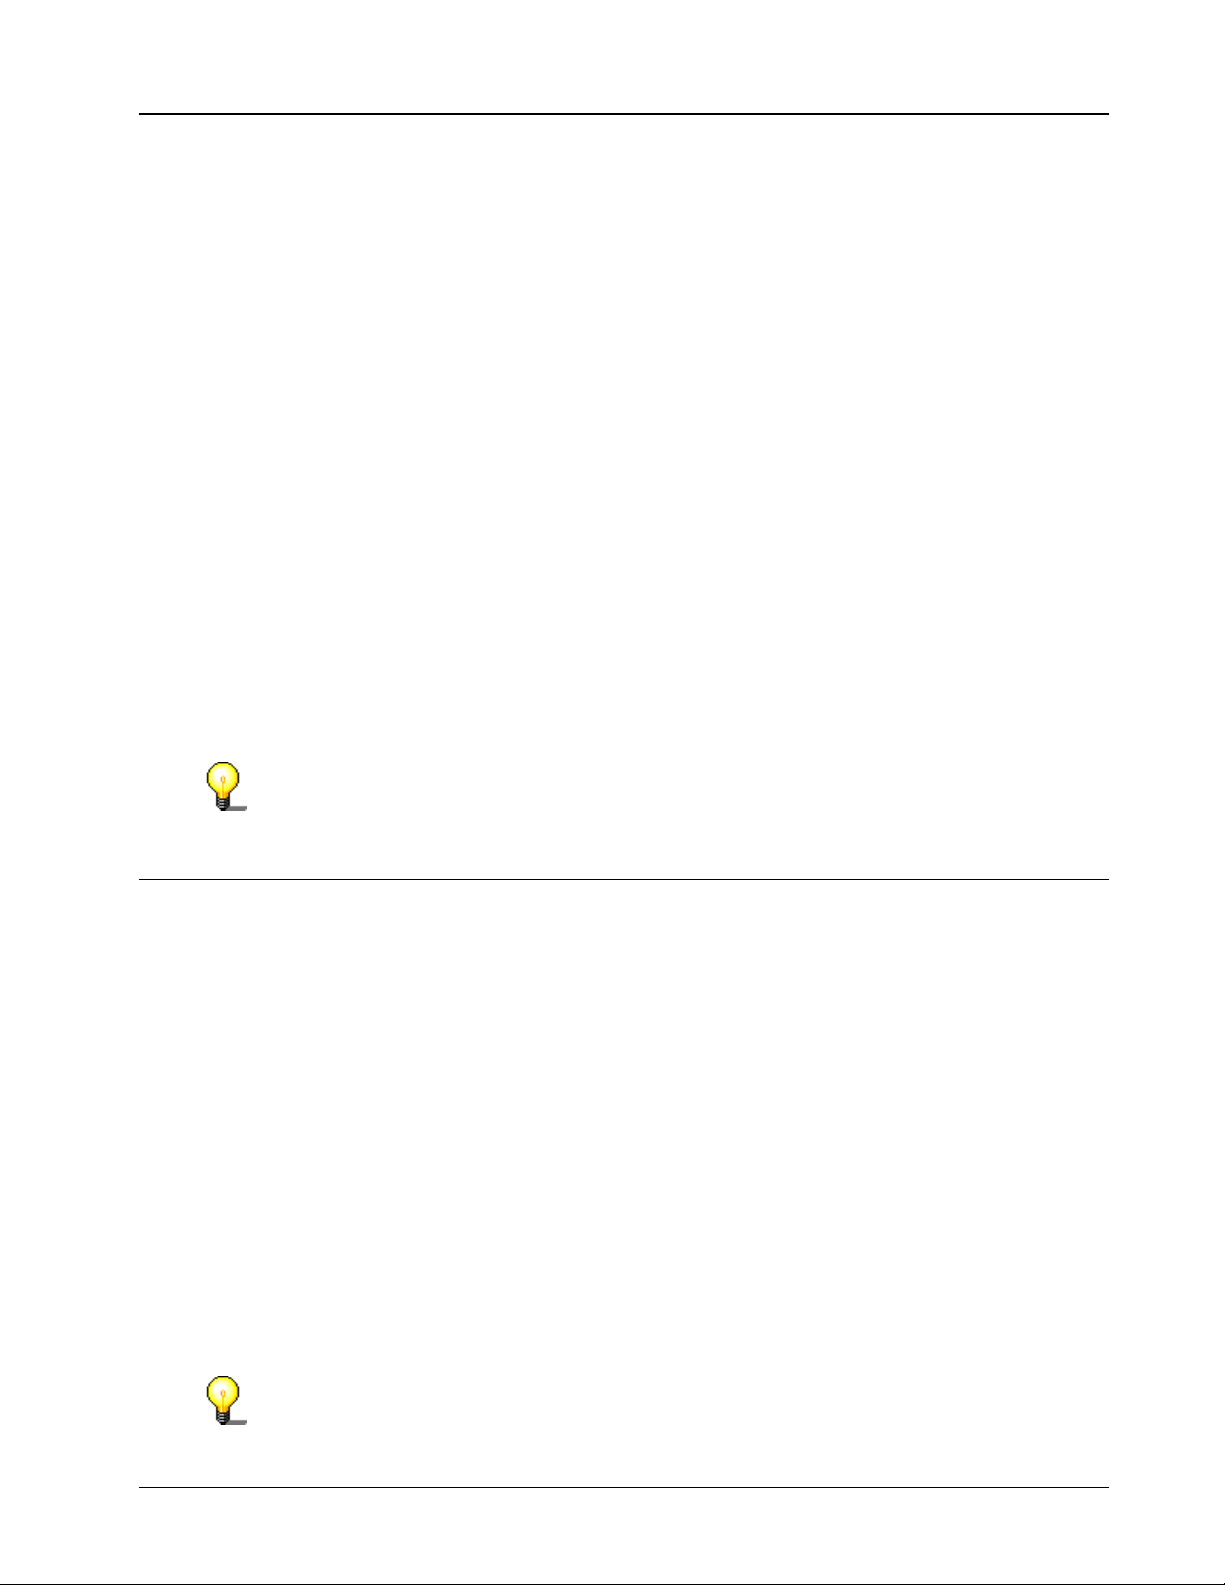
1. Launch Nero and choose the 'Choose recorders' command from the
'Recorder' menu.
and test NeroNET free-of-
The window displays the physical recorders available as well as the image
recorder.
Quickstart NeroNET Nero (Client) • 50
Page 51

2. Click on NeroNET, to set up the NeroNET server at the client. The existing
accounts appear in the dialog that opens.
3. Click on Create to set up the account for the NeroNET server.
4. In the 'User name' field, enter the user name which that you received from the
administrator of the NeroNET server and enter the password in the
appropriate field. As a default, the first account is given the name
'NeroNET_account 1'. The account number is increased by one for each
additional account. You can also change the name of the account.
The 'Auto-detected server' area contains all NeroNET servers found in the
network including their IP addresses, as well as the site and the designation of
the server (if entered).
The 'Port' field shows the number of the port on which the server is running.
With automatically recognized servers, the port number is automatically
recognized.
Nero has an 'Auto Detection' function. As a result, all the active NeroNET
servers in the same IP network will be found automatically. Servers in other IPnetworks must be entered by hand.
Quickstart NeroNET Nero (Client) • 51
Page 52

Activating the 'Save password' checkbox stores the password entered and so
allows an automatic login at the NeroNET server after Nero (Client) has been
started.
Activating the 'Deactivate account' checkbox deactivates the account entered.
This can be a reasonable choice, for instance if the server is not connected to
the network as a result of maintenance work, so preventing error messages
appearing.
Click on OK to conclude the login.
5. This closes the dialog and the client will be logged on at the NeroNET server.
Click on the Close button to quit the dialog.
Quickstart NeroNET Nero (Client) • 52
Page 53

6. The account for the authorization to burn media using the NeroNET server’s
recorder will now be added to the list of available recorders. Click on the 'OK'
button to close the window.
Quickstart NeroNET Nero (Client) • 53
Page 54

11.9 Changing users
1. Launch Nero and choose the 'Choose recorders' command from the
'Recorder' menu.
This window displays the physical recorders available as well as the image
recorder.
Quickstart NeroNET Nero (Client) • 54
Page 55

2. Highlight the NeroNET account and click on the 'NeroNET' button in order to
see the name of the account with which you logged in.
3. Highlight the desired server and click on 'Edit'.
4. In the dialog that opens enter the desired changes. You can change the
following:
Account name
User name
Password
Password saving
Deactivation of the account
After making the changes click on the 'OK' button to close the dialog.
Quickstart NeroNET Nero (Client) • 55
Page 56

5. Click on the 'Close' button to end the dialog.
Quickstart NeroNET Nero (Client) • 56
Page 57
6. Then click on the 'OK' button to exit the area.
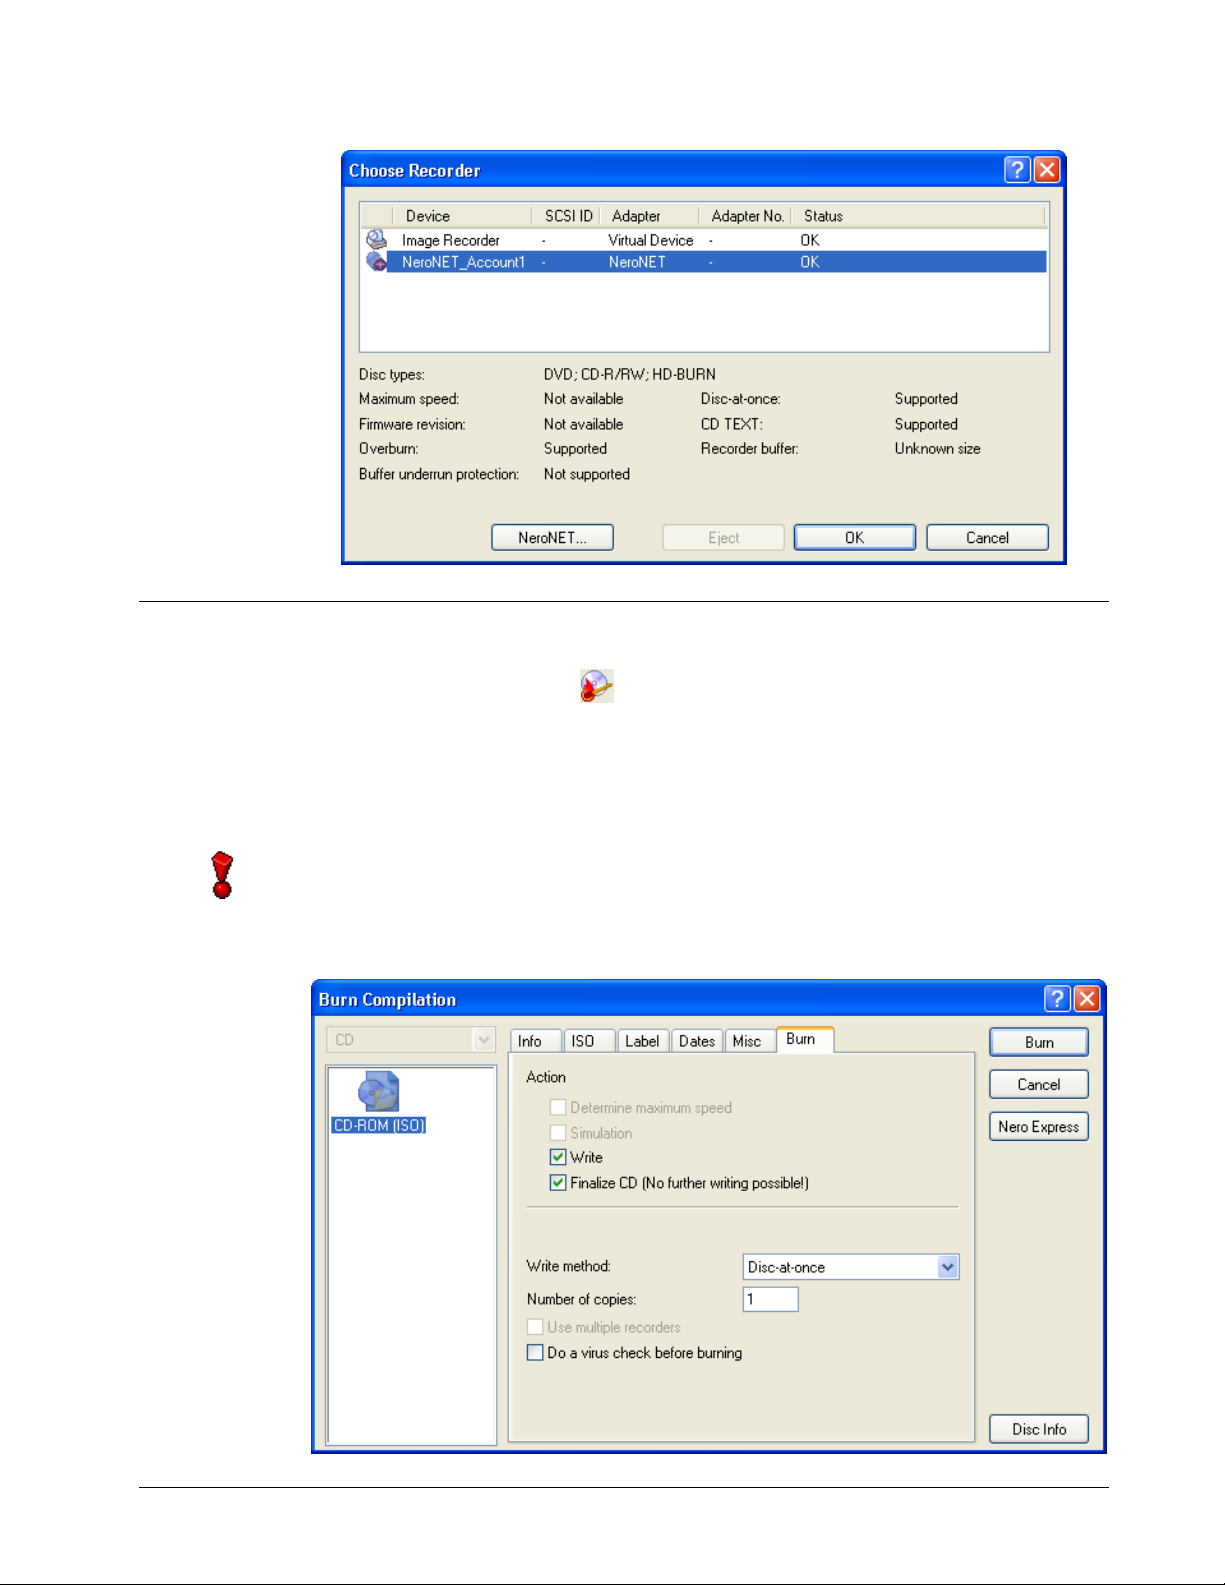
11.10 Recording options
Clicking on the burn button opens the burning dialog and the 'Burn' tab will be
on top. Not all the burn options that are possible with Nero are available with
NeroNET due to the limitations of burning on the NeroNET server. In other
words, some fields are deactivated and no configuration possibilities are
available.
If there are any rewritable (RW) discs in the recorder of the NeroNET server,
their contents will be deleted before recording starts - without any warning being
given or request being made.
Quickstart NeroNET Nero (Client) • 57
Page 58

11.10.1 Determining maximum speed
The checkbox is deactivated, i.e. it is not possible to determine the maximum
burning speed. This option cannot be changed.
11.10.2 Simulation
The checkbox is deactivated, i.e. it is not possible to simulate the burning
process. This option cannot be changed.
11.10.3 Write
This checkbox is activated as a default, because only then can the compilation be
recorded. The user can change this option.
11.10.4 Finalize disc
This check box is always activated, in other words every disc is finalized after the
recording procedure so that the disc is write-protected and it is not possible to
add further data. This option cannot be changed.
11.10.5 Write method
Depending on the kind of compilation to be recorded, Nero automatically selects
the best recording method. However, the user can change the recording method.
11.10.6 Number of copies
As a default, one copy of the chosen compilation is recorded. However the user
can also create a number of copies. In this case you only need to enter the
number of copies.
11.10.7 Use multiple recorders
It is not possible to burn simultaneously on a number of recorders physically
present in the NeroNET server. If a number of recorders have been installed in
the NeroNET-Server, the user may only select one recorder. Neither is it
possible to simultaneously 'burn' with the recorder of the NeroNET server and on
another local recorder that may be present. However, it is possible to record
simultaneously on the recorder of the NeroNET server and on the image
recorder.
11.10.8 Do a virus check before burning
This checkbox is deactivated as a default. In this case is no check is made before
the burning as to whether the data to be recorded contains viruses. If it is
activated, the data of the compilation is examined with the virus checker to
ensure that no viruses are present on the recorded disc.
Quickstart NeroNET Nero (Client) • 58
Page 59

12 Nero (Client) Preferences
12.1 Introduction
You reach the configuration area of Nero (Client) via the 'File' menu and the
'Preferences' command.
These tabs allow you to change the general settings for burning on media with
Nero (Client) to suit your own personal requirements. Clicking on the 'OK' button
saves the changes and closes this area. The 'Cancel' button closes this area,
without saving the changes. 'Apply' saves the changes, without closing the tab.
12.2 General
Some of the basic settings are defined with this tab. We recommend activating all
the checkboxes as this makes Nero (Client) easier to use. You can find more
detailed information in the Nero manual.
You will also be able to see which plugins have been installed, as well as which
are supported and which are not.
Quickstart NeroNET Nero (Client) Preferences • 59
Page 60

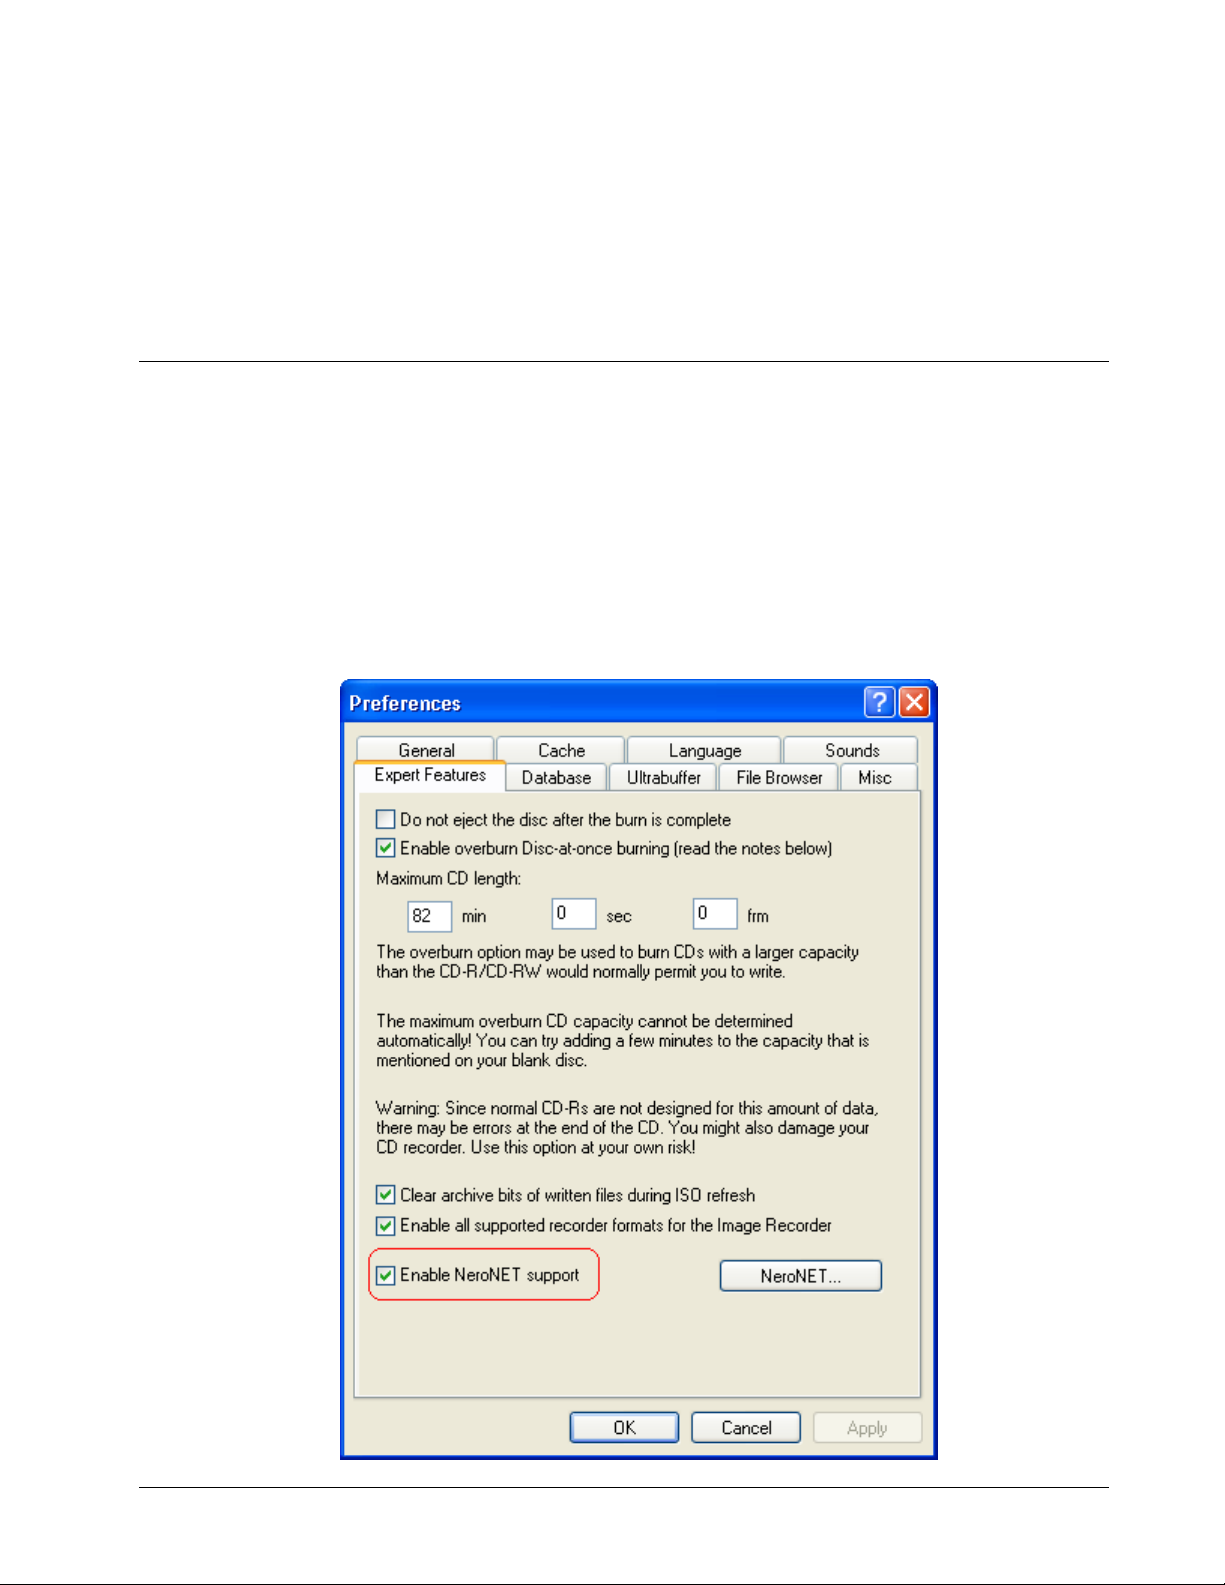
12.3 Expert Features
The 'Enable NeroNET support' check box must be activated to let NeroNET
Client access the recorder.
You can also make additional adjustments on this tab, those this feature is
something that has rather been conceived for the experienced user.
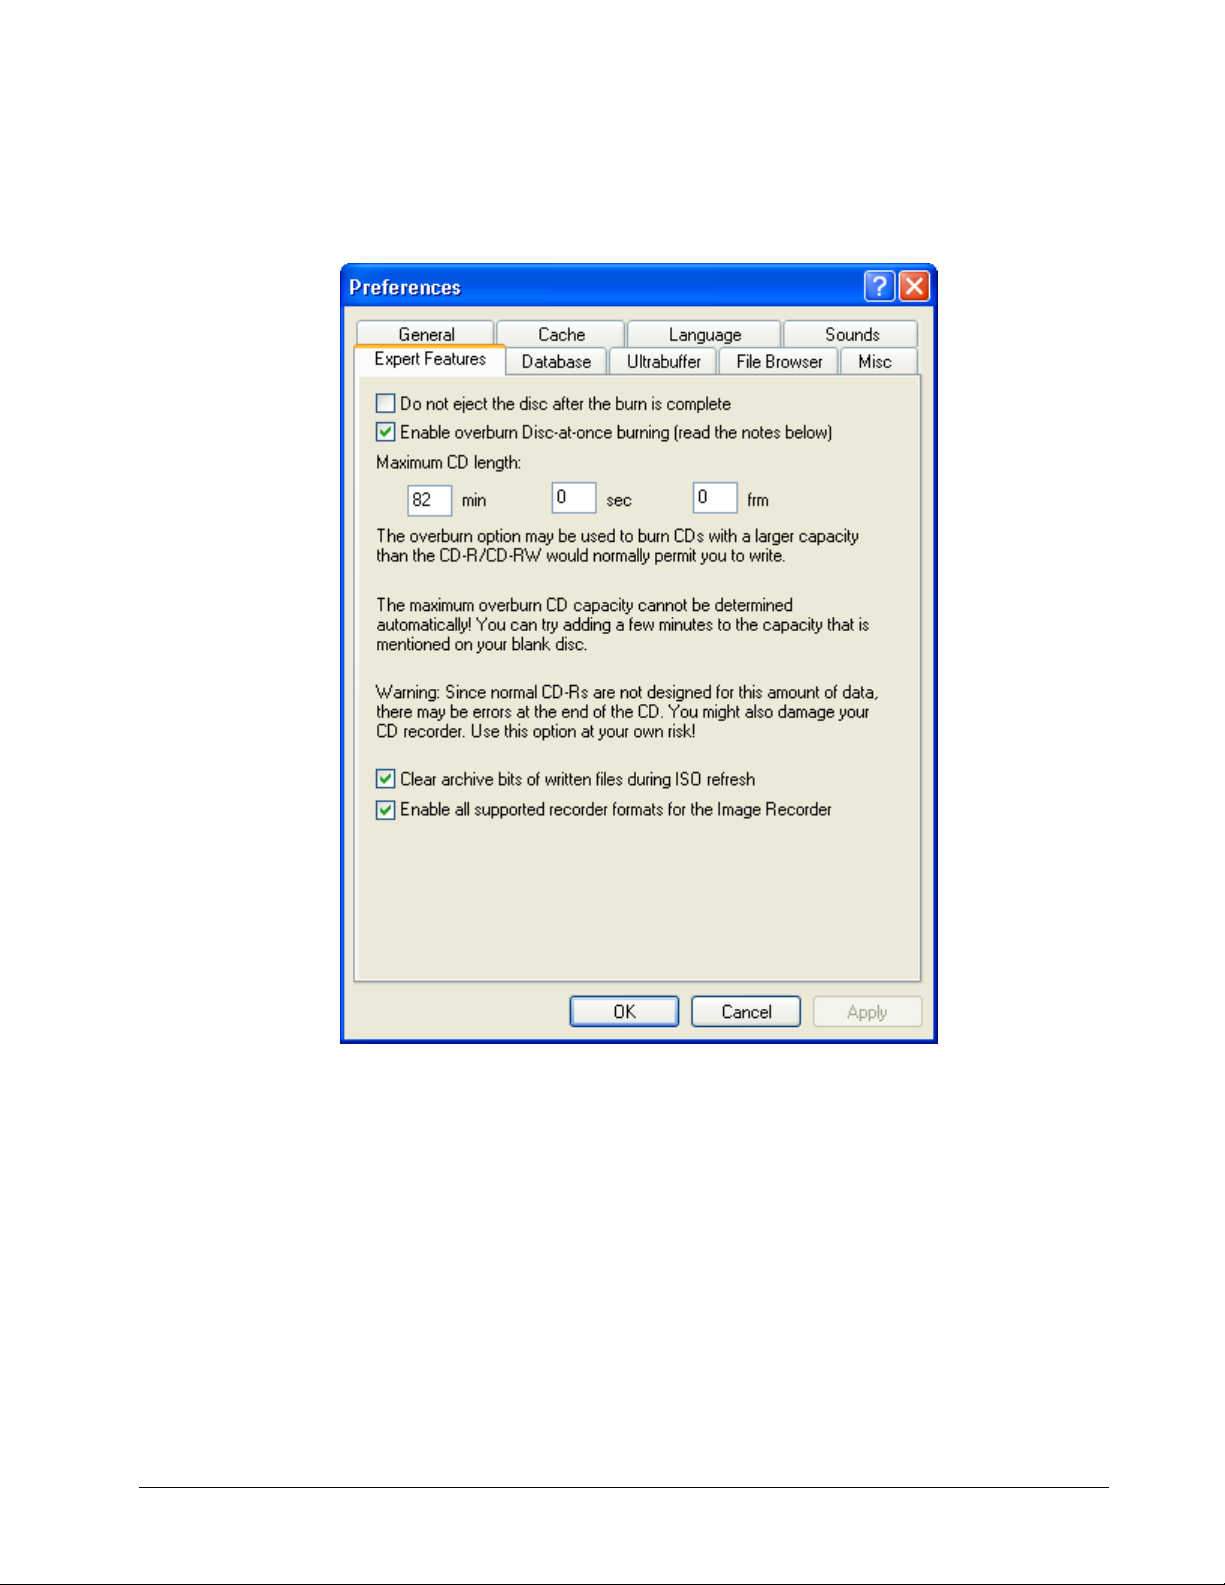
In particular, the 'Overburn' option should be used with particular caution, as it
can damage the recorder. This option must only be employed the user's own risk.
Normally Nero (Client) only offers the compilation options for discs which the
recorder installed also supports. In other words, the DVD recording option will be
only be displayed if a there is a DVD recorder present. By activating of the check
box that displays all compilation types, Nero (Client) will display all the options –
even those that the recorder installed does not support.
Quickstart NeroNET Nero (Client) Preferences • 60
Page 61

13 Creating a disc
This manual does not separately describe how to compile a disc, as the
procedure is the same as with Nero. Please refer to the Nero manual if you need
any further information. The only thing that is specifically described below is the
creation of a label, as this function is exclusive to NeroNET.
13.1 Printing labels on recorded discs
As a default, no label is printed onto a disc during the burning procedure, in
other words, this particular option has to be specially activated. The
configuration of the recorder and thus the option to print labels is only permitted
for those users with administrator rights. No other users will be able to reach this
part of NeroNET.
In order to check and (if necessary) change the settings, proceed as follows:
1. Open the NeroNET user interface, e.g. by entering the server’s IP address.
Quickstart NeroNET Creating a disc • 61
Page 62

2. Open the recorder settings area by clicking on the element and
when asked, enter your user name and password.
3. Check whether the check box in the 'Print labels' area has been ticked.
4. Tick the check box if this has not already been done and then click on the
'Apply' button to save the changes.
5. Create a compilation in the normal way, and then when you are ready click on
the 'Burn' button to begin the burning procedure. An image file will be created
and sent to the NeroNET server.
If the option for printing a label has been activated at the NeroNET server, the
Nero (Client) user can decide whether a label should be created or not. The
option for printing a label can be found on the 'Misc' tab. The 'Print label’
checkbox must be ticked.
Quickstart NeroNET Creating a disc • 62
Page 63

Use can use the label from the compilation and edit it, or select from an existing
template (*.ncd). Click on the dropdown button and choose the option you would
like.
6. Once the image file has been transferred, a window will appear that you can
close by clicking on the button.
7. Once the job has been burned, you will receive additional information. Click on
OK to close the window.
Quickstart NeroNET Creating a disc • 63
Page 64

You can save (button 'Save Log') the messages which appear during the
recording process, or else print (Button 'Print Log') them. Close the window by
clicking on 'Done'.
Quickstart NeroNET Creating a disc • 64
Page 65
14 Troubleshooting
14.1 No burning possible
If it is not possible to start NeroNET client but only Nero to launch without the
NeroNET functions, you have either not selected the NeroNET Support feature
or you have installed the OEM version of Nero.
In order to check the settings, proceed as follows:
Select the Preferences command in the File menu, and click on the 'Expert
features' tab.
If the 'Enable NeroNET support' check box is present but not enabled, then
tick it.
Quickstart NeroNET Troubleshooting • 65
Page 66
If there is no check box, you have installed the OEM version of Nero.
Either enter a valid retail version serial number or deinstall the existing OEM
version and then install the 30-day test version of the retail package with the
NeroNET functions. You can find more detailed information in the section on
‘Installation where there is an existing OEM version of Nero’.
There may be a number of reasons if it is not possible to transmit jobs to the
NeroNET server:
Quickstart NeroNET Troubleshooting • 66
Page 67
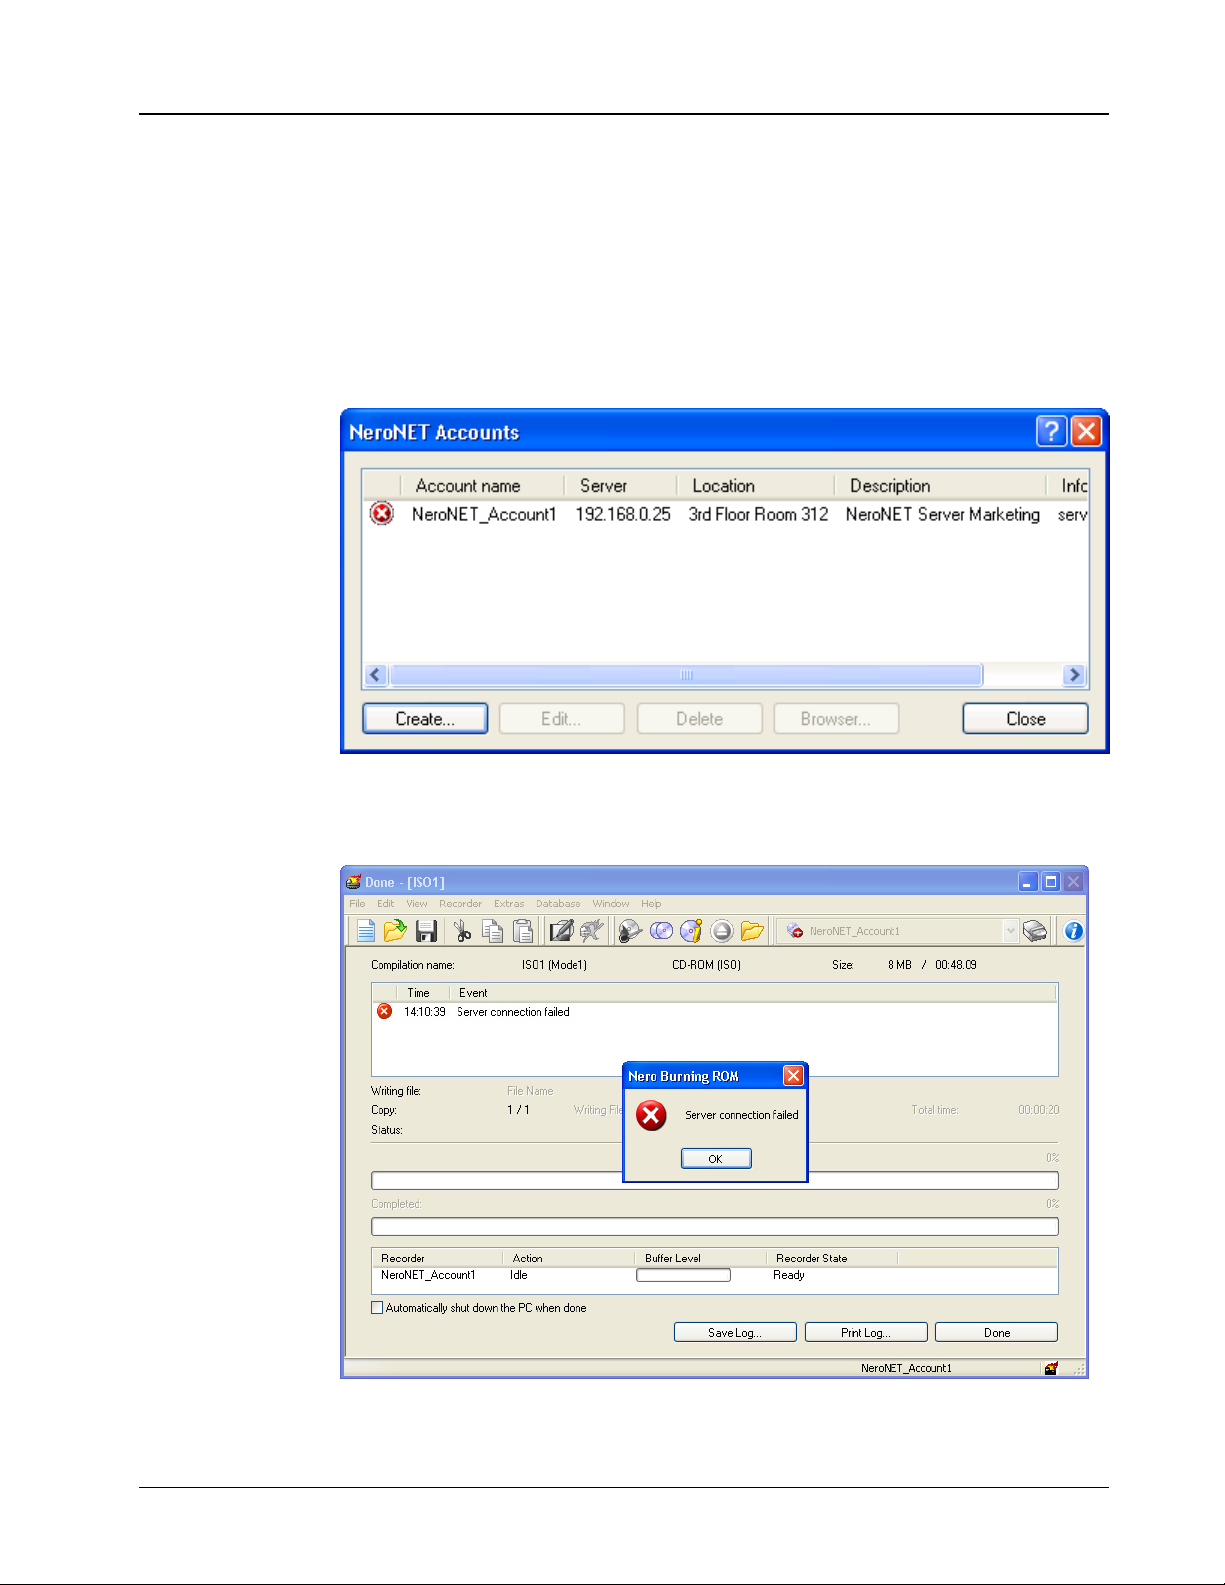
14.2 The server is not active
If the server is inactive, it will not be possible to burn. Proceed as follows to the
check the server status:
Choose the 'Select Recorder' command from the 'Recorder' menu and click on
'NeroNET' button. If the symbol with the NeroNET server is deactivated, there
is no connection with the server. You can recognize a deactivated server by
the fact that the symbol is crossed through (the symbol for an activated server
is a tick). Please check if there is a network connection with the server and
whether the server is active.
An error message will appear if there is no connection to the server and if a
burning job has been sent.
Quickstart NeroNET Troubleshooting • 67
Page 68
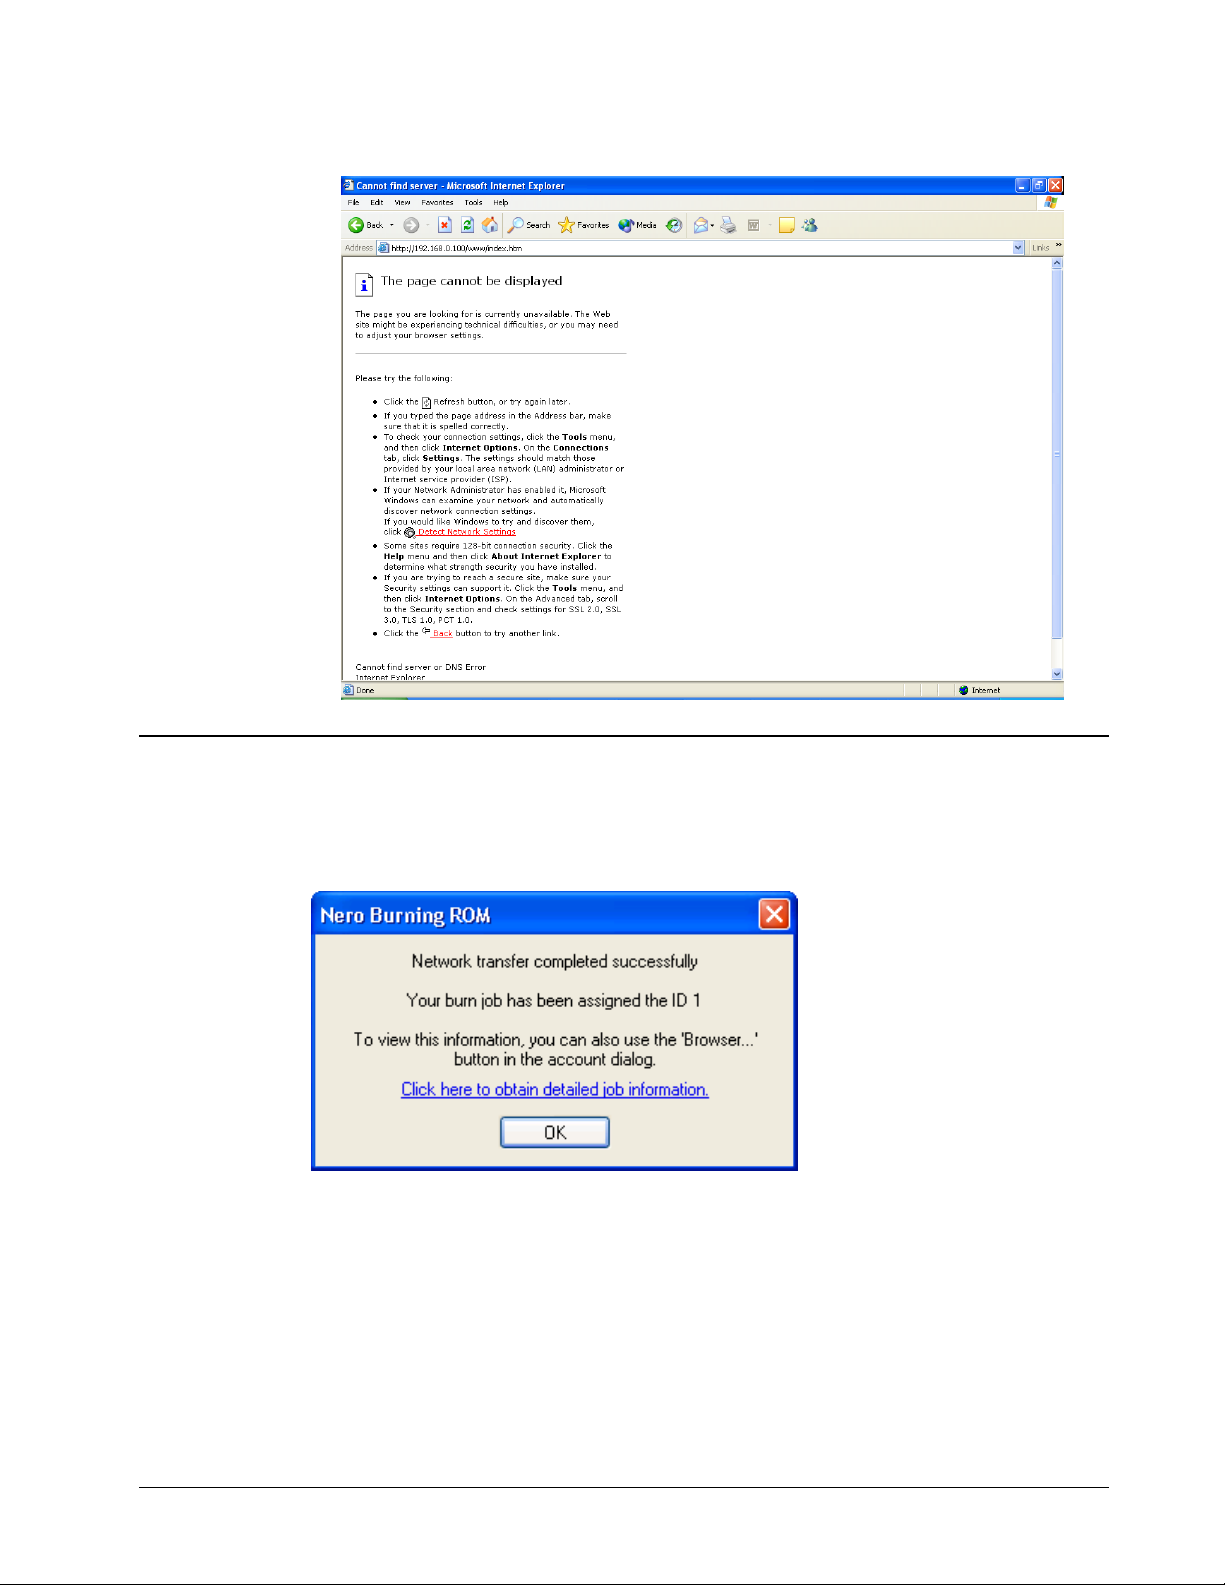
A lack of any connection to the server is also a possible reason if an error
message appears when you open the browser.
14.3 The recorder is deactivated
If your recording job was sent successfully to the server then the image file
created will have been saved on the server, and a message will appear
announcing the successful transfer.
If you do not receive a message about the job having been successfully burned
after certain time then a deactivated recorder may also be a possible cause.
Proceed as follows to the recorder:
Start the browser and check the 'Server status' box to see which status
message is displayed there. If the message shown is 'Halted', the recorder is
deactivated.
If you have server administrator rights, you can activate the recorder again by
deactivating the appropriate check box in 'Recorder Settings'.
Quickstart NeroNET Troubleshooting • 68
Page 69

14.4 Server does not accept any jobs
You will also receive an error message if the recording job has not been sent to
the server.
Besides the possibility of a server being shut down (see 'The server is not
active'), there may be another reason for this may be that burning jobs are not
being accepted.
Get in touch with the administrator (if you do not have server administrator
rights yourself) and ask him or her about the cause.
If you do have server administrator rights, you can have image files accepted
again if you deactivate the appropriate check box in 'Recorder Settings'.
Quickstart NeroNET Troubleshooting • 69
Page 70

15 Glossar
Buffer underrun
The successful burning of a disc calls for a continuous flow of data from the
computer to the recorder, and that from the start of the recording process (leadin) to the end (lead-out). If the recorder is burning too quickly and/or the data
stream from the computer to the recorder is too slow, this will result in the cache
memory in the recorder being emptied and the recording process coming to a halt
as no more data will be available.
CD-Text
As well as audio data, there is space on the CD for a wide variety of additional
information, such as text describing the title and artist on each track. Currently
very few audio CD players have a CD text function. If an audio CD player does
not support CD text, it can play CDs with CD text in just the same way as it does
"normal" audio CDs without CD text. This is possible because the additional CD
text information is stored before the start of the audio data in the lead-in area of
the CD.
CD-Extra
CD-i
You must have a CD recorder which supports CD text in order to be able to write
CD text to a CD. You can only write CD text in DAO recording mode (disc-atonce). You can find out whether your recorder supports this feature in the Nero
Choose Recorder dialog box.
CD-Extra is a Blue Book standard recording format. It was previously called CDPlus and CD-Enhanced (Enhanced CD). This format has none of the
disadvantages of standard mixed mode CDs. On mixed mode CDs the first track
always contains an ISO file system, which means that audio CD players cannot
play the first track of this type of CD. In contrast, CD-Extra has two sessions.
The first session contains up to 98 audio tracks conforming to the Red Book
standard. The second session contains the ISO track with the ISO9660 file
system and the directories CDPLUS and PICTURES. This means that CDs in
CD-Extra format can be played on both CD drives and audio CD players, as the
second session cannot be "seen" by the audio CD player.
The CD-i format (Compact Disc Interactive) was developed by Philips and Sony
and is described in the Green Book. This format is particularly suited to the
creation of interactive multimedia applications. These applications consist of sub-
Quickstart NeroNET Glossar • 70
Page 71

DAE
Fast copying
Disc-at-Once
programs which can access animations and video and audio sequences. Usually
special players with television screens are used to play CD-i media.
DAE is the acronym for Digital Audio Extraction. This means that the music tracks
on audio CDs are read in digital format. This is also referred to as audio grabbing.
Not all CD-ROM drives can read music in digital format. Generally, CD-ROM
drives read music tracks in analog format (via the sound card). Using the Nero
CDSpeed program, you can measure the DAE quality of CD drives.
This is a write process which does not involve storing the data to be written to the
CD on the hard disk first. The data is written directly onto the blank CD. Another
term used for fast copying is "on the fly".
This is a write process which does not create links between the individual
sessions. The recorder starts by writing the lead-in, which is followed by the data
and the lead-out. This process is used primarily by manufacturers of audio CDs.
DVD
Disc-at-Once/96 is an extension of Disc-at-Once which gives the software better
control of the burning process. This mode is preferable, if it is available.
DVD stands for Digital Versatile Disc. It was originally referred to as Digital Video
Disc.
The purpose of developing DVDs was to create a medium which could hold
significantly more data than a CD-ROM. You can store two layers of data on each
side of a DVD. The first layer can hold 4.7 GB and the second layer 3.8 GB,
which means that a single-sided DVD can store 8.5 GB of data. DVDs can only
be read by DVD drives, which can also read CD-ROMs. Unfortunately many DVD
drives are not able to read CD-Rs. Even fewer can read CD-RWs.
Currently the following types of DVD are available:
DVD-Audio: A high capacity audio medium.
DVD-R: DVD-Rs can store between 3.95, 4.7 and 9.4 GB of data. In order to
store 9.4 GB, you must use the second side of the DVD-R which means that
you have to turn it over.
DVD-RAM: This is a rewritable medium which can store either 2.6 GB (one
layer) or 5.2 GB (two layers) of data.
DVD-ROM: This is the data medium.
DVD-RW: This is a rewritable DVD which can be read by almost any standard
DVD-ROM drive or DVD player. DVD-RW drives can also read and write to
DVDs which are not rewritable. DVD-RWs have a storage capacity of 4.7 GB.
The difference between these and DVD-RAMs is that they can also be played
in standard DVD-ROM drives and standalone DVD players.
Quickstart NeroNET Glossar • 71
Page 72

El Torito
Finalizing
DVD+RW: This is a rewritable DVD which can be read by almost any standard
DVD-ROM drive or DVD player. DVD+RW drives can also read and write to
DVDs which are not rewritable. DVD+RWs have a storage capacity of 4.7 GB.
The difference between these and DVD-RAMs is that they can also be played
in standard DVD-ROM drives and standalone DVD players.
DVD-Video: DVD-Videos contain full-length feature films with high audio and
video quality. The videos are encoded in MPEG-2 format.
Additional information:
The UDF (Universal Disc Format) file system is used on DVDs. However the
data can also be accessed via an ISO9660 data system which is also included
on the DVD.
DVD format no longer corresponds to any of the formats specified in the
colored books.
El Torito is a specification which describes the structure of a CD used to boot a
PC. A PC with a suitable BIOS can start the operating system from the CD and
therefore does not need a floppy disk or a hard disk.
Firmware
Fixing
Image file
Finalizing is similar to fixing, but applies to the entire disc. No additional data can
be written to a finalized disc. When you burn a CD or DVD in DAO mode, the disc
is automatically finalized. However, the data on a finalized CD-RW can still be
deleted (by choosing the Erase ReWritable item from the Recorder menu).
The firmware in recorders (CD/DVD-ROM drives) functions as the operating
system of the drive and contains instructions which determine how the drive
reacts to commands from the computer. The firmware of the latest recorders can
generally be upgraded. For example, Ahead Software AG's website contains a
page with links to the latest firmware versions. To see the firmware version of
your drive, use the Choose Recorder menu item on the Recorder menu in Nero.
Fixing is similar to finalizing, but applies only to an individual session rather than
to the whole CD. Fixing means closing the session which has just been written,
so that it can be read. To do this, the lead-in and lead-out data are written to the
disc. In the current version of Nero, sessions are always fixed automatically.
This is a writing process which involves creating a physical image of a file. The
contents of the image correspond exactly to the data which will be written to the
CD.
Quickstart NeroNET Glossar • 72
Page 73

Grabbing
Grabbing is digital audio extraction that is reading audio tracks on a CD in digital
format.
Index positions
You can set index positions within an audio track. These index positions allow
you to move to specific points within the track using an audio CD player.
Unfortunately, very few audio CD players have the functionality which allows
them to move to index positions.
Please note that index positions are not the same as the start and end of tracks.
All audio CD players can move from one track to another on a CD, but very few
can read and move to index positions within a track.
Hybrid CDs
A hybrid CD contains files for more than one operating system. Generally, the
term hybrid CD is used to refer to CDs which can be read by PCs running
Windows and by Macs. If the data is to be accessible to both operating systems,
there must be two copies of it on the CD.
Lead-in
This is an area at the beginning of each session. However, it is only written to the
CD when the session is completed. The lead-in contains the table of contents
(TOC) of the session.
Lead-out
This is an area at the end of each session which is written at the same time as
the lead-in.
m3u playlist
An m3u file contains a list of MP3 file paths. An m3u file can be created, for
example, by NeroMIX or WinAmp. Nero can process m3u files, which means that
when you are creating an audio CD, you simply have to drag and drop the m3u
file into the audio window.
Mixed mode CDs
A mixed mode CD has one initial data track followed by audio tracks. This usually
means that audio CD players cannot process the first track. If you are creating
audio CDs to be played on a CD player, it is better to use the CD-Extra format,
because on this type of CD the data follows the audio tracks.
Quickstart NeroNET Glossar • 73
Page 74

MP3 / mp3PRO
MP3 is an acronym (or file extension) for "MPEG Audio Layer 3". These are
compressed audio files which can be played on a computer using an MP3 player.
(MPEG stands for Motion Pictures Expert Group, which is a US standards
organization responsible for full motion video standards.) MP3 was developed by
the Fraunhofer Institute IIS and is restricted to audio data, in the same way as
mp3PRO, which was developed by Coding Technologies.
Nero can compress both MP3 and mp3PRO files, both of which have the file
extension MP3. MP3. The quality of the signal depends on the compression rate.
The standard rates are 64 kbps at 44100 Hz stereo for mp3PRO and 128 kbps at
44100 Hz stereo for MP3. During the encoding process the original WAV file is
generally reduced to about 5 percent of its original size in mp3PRO format and to
about 10 percent in MP3 format. The encoding process is lossy, but the
psychoacoustic models remove only those parts of the audio file which are
considered to be inaudible. Audible parts of an audio file can only be lost at a
high compression rate.
Nero allows you to convert 30 files into MP3 or mp3PRO format. For licensing
reasons, it is not possible to convert more files. You can find both the plugins
which allow unlimited encoding on Ahead Software AG's website: Ahead
Webshop.
Multi Mounter
Multi Mounter is a program which is supplied with Nero. It allows you to access
sessions which have already been written to a multi-session CD. From all
Windows programs you can only see the tracks in the session you have selected.
To select a session, follow the instructions below:
1. In Windows Explorer right-click on the CD-ROM drive containing the CD.
2. In the pop-up menu which appears, choose Properties.
3. In the dialog box which appears, click on the Volumes tab.
4. From this dialog box, you can choose the session which you want all
programs to be able to see.
This allows you to access data which you may have thought was lost.
Nero (Nero Claudius Caesar)
Nero was born in 37 A.D. and died in 68 A.D. He was Roman emperor from 54 to
68 A.D. He was the son of Agrippina, and was adopted by the Emperor Claudius.
Seneca was appointed as Nero's tutor and Nero was brought up by his stepfather
to be his heir. In 53 A.D. he married Octavia, Claudius' daughter. The first years
of his reign were relatively calm, largely due to the influence of Seneca. Nero
respected the Senate and the existing order. Poets hailed him as the initiator of a
new golden age. Later he had his mother Agrippina murdered and banished his
wife who had not provided him with an heir. He became increasingly tyrannical
and rid himself of his more levelheaded advisers. He made eccentric public
appearances as an artist and charioteer, he prosecuted citizens for treason and
after the great fire in Rome in 64 A.D. threw suspicion for having started it on the
Christians. The suspicion that Nero himself started the fire cannot be proved, but
Quickstart NeroNET Glossar • 74
Page 75

it indicates what his citizens thought he was capable of. However, there was no
real systematic persecution of Christians, since the events which took place were
restricted to the city of Rome. After the failure of plot against Nero hatched in the
Senate and lead by Piso, repression increased. Uprisings in Gaul, Spain and
Africa caused the Praetorian Guard to withdraw its allegiance to Nero. The Guard
then declared its support for Galba as emperor and the Senate declared Nero to
be hostis populi Romani (an enemy of the Roman people), upon which he
committed suicide. His death marked the end of the Julian-Claudian imperial
dynasty.
On the fly
This is a write process which does not involve storing the data to be written to the
CD on the hard disk first. The data is written directly onto the blank CD. Another
term used for on the fly is "fast copying".
Packet CD / Packet writing
This is a write process which involves sending the data in blocks to the CD-RW
drive without first creating an image file. The CD-RW drive is used in the same
way as a hard disk or floppy disk, which means that any application can write the
data to the CD. CDs created using packet writing can only be read with a special
UDF driver.
PCM
Pre-gap
Session
Simulation
PCM is the main standard for digitizing audio files and speech. PCM stands for
pulse code modulation and involves digitally encoding analog signals.
This is also referred to as a pause. It is the area on a CD which separates one
track from another. In Nero the default pause is set to 2 seconds (Red Book
standard).
CDs are divided into tracks and sessions. A session consists of all the files which
are written to the CD in the course of one write process and can consist of one or
more tracks. There can be more than one session on a multisession CD.
Simulation corresponds to the burning process in every way, except that the
burning process is simulated and that nothing is written on the disc.
Use of the simulation feature is very helpful if you want to check whether the data
being burned is being sent by the computer to the recorder faster that the
recorder can burn it, so that the cache in the recorder always contains data – in
other words, that no buffer-underrun occurs.
In addition, simulation can be used to check whether the recorder can, in fact,
write on the disc at all.
Quickstart NeroNET Glossar • 75
Page 76

Simulation is no longer necessary if the recorder installed has a 'buffer-underrun'
prevention feature.
Track
On an audio CD a track corresponds to a piece of music. On a data CD a track is
a unit of data which joins consecutive sectors together.
Track-at-Once
This is a method of writing data which is used for multisession CDs. The CD-RW
drive writes all the tracks one after another and does not end the session until
this is finished.
UDF (Universal Disk Format)
This is a file system developed by OSTA (the Optical Storage Technology
Association). With a UDF driver and packet writing, data can be written to a CD
drive in the same way as to a hard disk or floppy disk drive.
Volume descriptor
The volume descriptor is added to every CD track. It contains information such as
the creation data, the publisher, the title etc. The volume descriptor has a special
significance for formats such as Video CD, Photo CD and CD-i. The volume
descriptor on these types of CD includes information about the program to be
used for reading the data on the CD.
Virtual Image
A virtual image is a project file which contains only references to the files which
are to be written to CD.
VQF
VQF or TwinVQ is a process developed by NTT Human Interface Laboratories to
compress audio information. It has been developed in competition with MP3.
Yamaha calls this process Sound VG. VQF files of similar quality are smaller than
MP3 files but larger than mp3PRO files. More processor power is used in the
decoding process than is the case with MP3 files.
White Book
The standard structure of a video CD is set out in the White Book.
XSVCD (Extended Super Video CD)
XSVCD stands for Extended Super Video CD. The difference between this and
SVCD is that the average bit rate can be anything up to 9.8 Mbit/s, whereas with
SVCD it is 2.6 Mbit/s. Unfortunately not all drives which can read Super Video
CDs support this format. In order to burn an XSVCD using Nero, you must
deactivate the "Create standard compliant CD" checkbox on the Video CD tab.
Quickstart NeroNET Glossar • 76
Page 77

XVCD (Extended Video CD)
XVCD stands for Extended Video CD. The difference between this and Video CD
is that the bitrate can be anything up to 3.5 Mbit/s, whereas with VCD it is 1.5
Mbit/s. Unfortunately not all drives which can read Video CDs support this format.
In order to burn an XVCD using Nero, you must deactivate the "Create standard
compliant CD" checkbox on the Video CD tab.
Yellow Book
The Yellow Book Standard specifies how computer data is stored on a CD-ROM.
In terms of physical structure, the division of data into frames and sectors is
identical to that in the Red Book, which means that every CD drive can also read
audio data.
Mode 1 is for computer data and mode 2 for compressed audio and video data.
The two modes differ in terms of the different sizes of the individual sectors
(Mode 1: 2048 bytes; Mode 2: 2336 bytes).
As data for computers should not contain any errors, Mode 1 sectors have
additional error recognition and correction mechanisms.
Quickstart NeroNET Glossar • 77
Page 78

Information area 16
16 Index
A
Accepting no further recording jobs 26
Adding copies 35, 38
C
CD + CD-RW compilations 49
Changing a user account 31
Changing users 54
Completed jobs 41
Configuration area 15
Configure the server 18
Configuring
Network recorders 50
The browser 44
The recorder 23
Creating logfiles 21
D
Deactivating a recorder 26
Deinstallation 11
Deleting
A job 34, 38
A user account 32
Copies 35, 38
DVD + DVDRW compilations 49
J
Job administration 33
Queue administrators 33
User 37
Jobs 39
N
Nero (Client) 6, 45
Creating a disc 61
Enable NeroNET support 47
Glossar 70
Installation where there is an existing OEM
version 45
Installation where there is an existing Retail
version of Nero 46
Installation, no previous version of Nero 46
No recording possible 65
Preferences 59
Printing labels on recorded discs 61
Recorder is deactivated 68
Server does not accept any jobs 69
Server is not active 67
Tab Expert Features 60
Tab General 59
NeroNET
Deinstallation 11
Explanation 6
Function 6
Installation 9
NeroNET-Server 6
P
Printing labels 26
Q
E
Entering the serial number 20
Entering the server address 44
H
Help 42
I
Increasing the priority 35
Quickstart NeroNET Index • 78
Queue Administrator 30
R
Recorder 40
Recording options 57
Reducing the priority 36
S
Selecting recorders 25
Page 79

Selecting the directory for the image file 27
Server Administrator 30
Setting up the user account 30
Specifying the COM port 22
Starting the program 11
Status area 17, 43
Elements 43
System requirements 8
U
Usable discs 48
User administration 28
W
Working with Nero Burning ROM 48
Working with Nero Express 48
Quickstart NeroNET Index • 79
 Loading...