

Nec VERSA P user Manual

PROPRIETARY NOTICE AND LIABILITY DISCLAIMER
The information disclosed in this document, including all designs and related
materials, is the valuable property of NEC Corporation (NEC) and/or its licensors.
NEC and/or its licensors, as appropriate, reserve all patent, copyright and other
proprietary rights to this document, including all design, manufacturing,
reproduction, use, and sales rights thereto, except to the extent said rights are
expressly granted to others.
The NEC product(s) discussed in this document are warranted in accordance with
the terms of the Warranty Statement accompanying each product. However, actual
performance of each such product is dependent upon factors such as system
configuration, customer data, and operator control. Since implementation by
customers of each product may vary, the suitability of specific product
configurations and applications must be determined by the customer and is not
warranted by NEC.
To allow for design and specification improvements, the information in this
document is subject to change at any time, without notice. Reproduction of this
document or portions thereof without prior written approval of NEC is prohibited.
Versa is a U.S. trademark of NEC Technologies, Inc.
All other product, brand, or trade names used in this publication are the trademarks or
registered trademarks of their respective trademark owners.
First Printing —November 1994
Copyright 1994 Copyright 1994
NEC Technologies, Inc. NEC Corporation
1414 Massachusetts Avenue 7-1 Shiba 5-Chome, Minato-Ku
Boxborough, MA 01719 Tokyo 108-01, Japan
All Rights Reserved All Rights Reserved

Using this Guide
This Versa™ P Series User’s Guide contains all the infor-
mation you need to use your notebook computer. To help
you get the most out of your Versa P, this guide describes
system features, options, and setup programs.
Read the following chapters to find out more about
your Versa P.
■ Chapter 1 gives basic information like setting up the
notebook computer, using function keys, and reading
LCD status icons.
Chapter 1 describes the Versa P buttons, controls,
PCMCIA slots, and other features.
■ Chapter 2 offers ideas for using your Versa P for
multimedia presentations.
■ Chapter 3 focuses on adding options, like PCMCIA
cards. This chapter also describes how to connect
external devices like printers, monitors, speakers,
and keyboards.
■ Chapter 4 describes the power-saving programs that
come with your Versa P. It introduces options for
conserving energy and saving battery power.
■ Chapter 5 introduces you to the Versa P Auto Setup
program. This software lets you change the system
date and time, set a password, and define many other
system options.
■ Chapter 6 gives you a checklist to follow if you
have problems with the Versa P. Solutions are
also suggested.
Using this Guide ix

TEXT SETUP
■ Chapter 7 provides telephone numbers for NEC help and
information lines. This chapter guides you to locating
the help you need for basic system service or upgrades.
■ Chapter 8 provides switch setting information on SW1.
■ Appendix A lists system specifications.
■ Appendix B describes the NEC Communications
Assistant.
■ Appendix C gives information on using the BIOS
Update utility.
Use this guide along with the software documentation that
comes with your Versa P.
To make this guide as easy to use as possible, text is set up
in the following ways.
■ Cautions, notes, and tips have the following format:
x Using this Guide
CAUTION: Cautions indicate situations that can
damage the system hardware or software.
NOTE: Notes give particularly important information
about whatever is being described.
TIPS: Tips give helpful hints about getting the most
out of your system.

■ Names of keys are printed as they appear on the key-
board, for example,
■ Text that you have to type or keys that you must press
are presented in bold type. For example, type
Enter.
press
RELATED DOCUMENTS
In addition to this guide, a number of other documents ship
with your Versa P system, including:
Hardware Documents
The Versa P Quick Setup shows you how to set up your
■
system after you unpack it.
■ The Versa P Series Battery Guide gives hints about
extending the life of your battery pack and suggests
energy conserving techniques.
■ The Versa Series Quick Reference Card contains
brief descriptions of function keys, LEDs, NEC help
telephone numbers and troubleshooting tips. Tuck this
card inside the notebook when you take it with you.
The card is designed as a quick, portable reference to
frequently-used functions.
Ctrl, Alt, or Enter.
dir and
■ The Versa Series PCMCIA User’s Guide contains
information about optional PCMCIA cards, their
installation, and use.
Software Documents
Microsoft Windows and MS-DOS 6 User’s Guide pro-
■
vides a comprehensive source of information for using
®
Windows™ and MS-DOS
.
Using this Guide xi

Contents
Using this Guide...................................................................... ix
Text Setup ............................................................... x
Related Documents................................................... xi
1 Getting to Know Your New Information Tool
What’s in the Box .................................................... 1-1
The Outside of the Unit ............................................ 1-2
Versa P Setup .......................................................... 1-5
Opening the LCD Panel....................................... 1-5
Closing the LCD Panel........................................ 1-6
Connecting the AC Adapter................................. 1-6
Installing a Battery.............................................. 1-7
Replacing a Battery............................................. 1-8
Turning on the Versa P............................................. 1-11
Features................................................................... 1-13
LCD Panel.......................................................... 1-13
Keyboard............................................................ 1-14
Function Keys................................................ 1-14
Key Combinations.......................................... 1-15
Typewriter Keys............................................. 1-17
Cursor Control Keys ...................................... 1-17
Numeric Keypad ............................................ 1-17
Control Keys.................................................. 1-19
VersaTrack Ball............................................... 1-19
Cleaning the VersaTrack ................................ 1-20
Buttons and Controls........................................... 1-21
Status Bar........................................................... 1-23
Microphone and Speaker ..................................... 1-27
PCMCIA Card Slots ........................................... 1-28
VersaBay............................................................ 1-29
Promotional Software.......................................... 1-29
Plug and Play...................................................... 1-29
Contents iii

Batteries.............................................................. 1-30
Main Battery.................................................. 1-30
Bridge Battery................................................ 1-31
CMOS Battery............................................... 1-32
Online Help......................................................... 1-32
System Care............................................................. 1-33
Precautions ......................................................... 1-33
Storage Requirements.......................................... 1-34
Routine Cleaning................................................. 1-34
2 Using Your Versa P for Multimedia
Audio....................................................................... 2-1
Recording............................................................ 2-1
Line-In........................................................... 2-2
Microphone.................................................... 2-2
CD-ROM Input................................................... 2-3
Mixing................................................................ 2-3
Playing Back....................................................... 2-3
MIDI Files ..................................................... 2-4
Using Headphones.......................................... 2-4
Using Internal Speaker ................................... 2-4
Using External Stereo Speakers ...................... 2-4
Video....................................................................... 2-5
Using Digital Video Files..................................... 2-5
Using Animation Files ......................................... 2-5
Versa MediaDock................................................ 2-5
ultimedia Applications............................................. 2-6
3 Adding Options
PCMCIA Cards ....................................................... 3-2
Modems................................................................... 3-4
Telephone Line Connections ................................ 3-4
Memory Expansion .................................................. 3-8
iv Contents
Inserting and Removing Cards........................ 3-3
Connecting a Phone Cable .............................. 3-4
Connecting a Phone and a Versa P.................. 3-6

Hard Disk ................................................................ 3-10
External Devices ...................................................... 3-13
Parallel Devices................................................... 3-13
Serial Devices ..................................................... 3-15
External Keyboard .............................................. 3-16
Mouse................................................................. 3-18
Monitor............................................................... 3-19
Stereo Speakers/Headphones ............................... 3-21
External Microphone........................................... 3-21
Line-In Audio...................................................... 3-21
Docking Station........................................................ 3-22
Expansion Bays................................................... 3-22
Expansion Slots................................................... 3-22
Ports................................................................... 3-22
Port Replicator......................................................... 3-23
Ports................................................................... 3-23
4 Understanding Power Management
What is Power Management?.................................... 4-1
Default Settings................................................... 4-1
Power-Saving Modes........................................... 4-2
Active Mode................................................... 4-2
Local Stand-by Mode ..................................... 4-2
Suspend Mode................................................ 4-3
Smart Power Switch....................................... 4-4
Prolonging Battery Life ............................................ 4-5
5 Using Auto Setup
Auto Setup............................................................... 5-1
How to Enter Auto Setup..................................... 5-2
With an Error at POST .................................. 5-2
With No Error at POST ................................. 5-2
How to Use Auto Setup....................................... 5-3
Looking at the Screen ..................................... 5-3
Using Key Functions ...................................... 5-4
Checking/Setting System Parameters .............. 5-5
Contents v

System Parameter Options........................................ 5-6
Comms ............................................................... 5-8
Drives................................................................. 5-8
Keyboard............................................................ 5-9
Power ................................................................. 5-10
System................................................................ 5-12
Time/Date........................................................... 5-12
Security Options....................................................... 5-13
System Password ................................................ 5-13
Keyboard Lock Hotkey........................................ 5-16
6 Problem Solving
Problem Checklist .................................................... 6-1
Start-Up Problems.................................................... 6-3
If You Need Assistance ............................................ 6-6
Direct Technical Support..................................... 6-6
Remote Technical Support................................... 6-7
Setting an Initial System Password ................. 5-13
Using the System Password ............................ 5-14
Removing/Replacing a Password .................... 5-15
Features......................................................... 6-8
7 If You Need Help
UltraCare Support.................................................... 7-3
Support from the NEC Reseller ................................ 7-4
Support from NEC................................................... 7-4
NEC FastFacts.................................................... 7-5
NEC Bulletin Board System ................................ 7-5
NEC Technical Support ...................................... 7-7
NEC Customer Service Response Center ............. 7-8
Mail-in Service......................................................... 7-9
Maintenance Contracts............................................. 7-9
vi Contents
What is the BBS?........................................... 7-6
How Do You Use the BBS?............................ 7-6
E-mail/Fax Technical Support Services .......... 7-7

8 Setting Switch Functions
A Specifications
B NEC Communications Assistant
C Using the BIOS Update Utility
Receiving the BUU................................................... C-4
Start-Up................................................................... C-6
Menu Functions ....................................................... C-7
Information......................................................... C-7
Display BIOS Version......................................... C-8
Customize BIOS ...................................................... C-9
Install New BIOS................................................ C-10
Restore Original BIOS ........................................ C-12
Exit..................................................................... C-14
Errors and Messages ........................................... C-14
Glossary
Index
List of Tables
Automatic Power-Saving Features............................ 4-1
Auto Setup Quick Reference..................................... 5-4
System Parameter Options........................................ 5-7
Troubleshooting ....................................................... 6-2
POST Error Messages.............................................. 6-4
Contents vii

viii Contents

Getting to Know Your
1
WHAT’S IN THE BOX
New Information Tool
Your Versa™ P is a terrific tool that’s so easy to take along
that you’ll soon find it indispensable. It’s easy to carry
around with you and can be used for most of your information and communication needs.
This chapter describes the basic features, connectors, buttons,
and controls on your Versa P notebook. It also describes
how to connect the basic devices you need to use the system.
Read it to familiarize yourself with the system.
Your Versa P comes with lots of features fully loaded on
the system. All you have to do is open the packing box,
unpack the notebook computer, the cables, and the Quick
Setup sheet. Look for the following.
Notebook
Computer
AC Power
Cable
AC/DC
Adapter
User
Guides
Box contents
Getting to Know Your New Information Tool 1-1
When you first unpack your Versa P, follow the instructions on the Quick Setup sheet. They’ll help you get
your notebook up and running quickly. After setting up
your system the first time, use the instructions found in
this chapter.
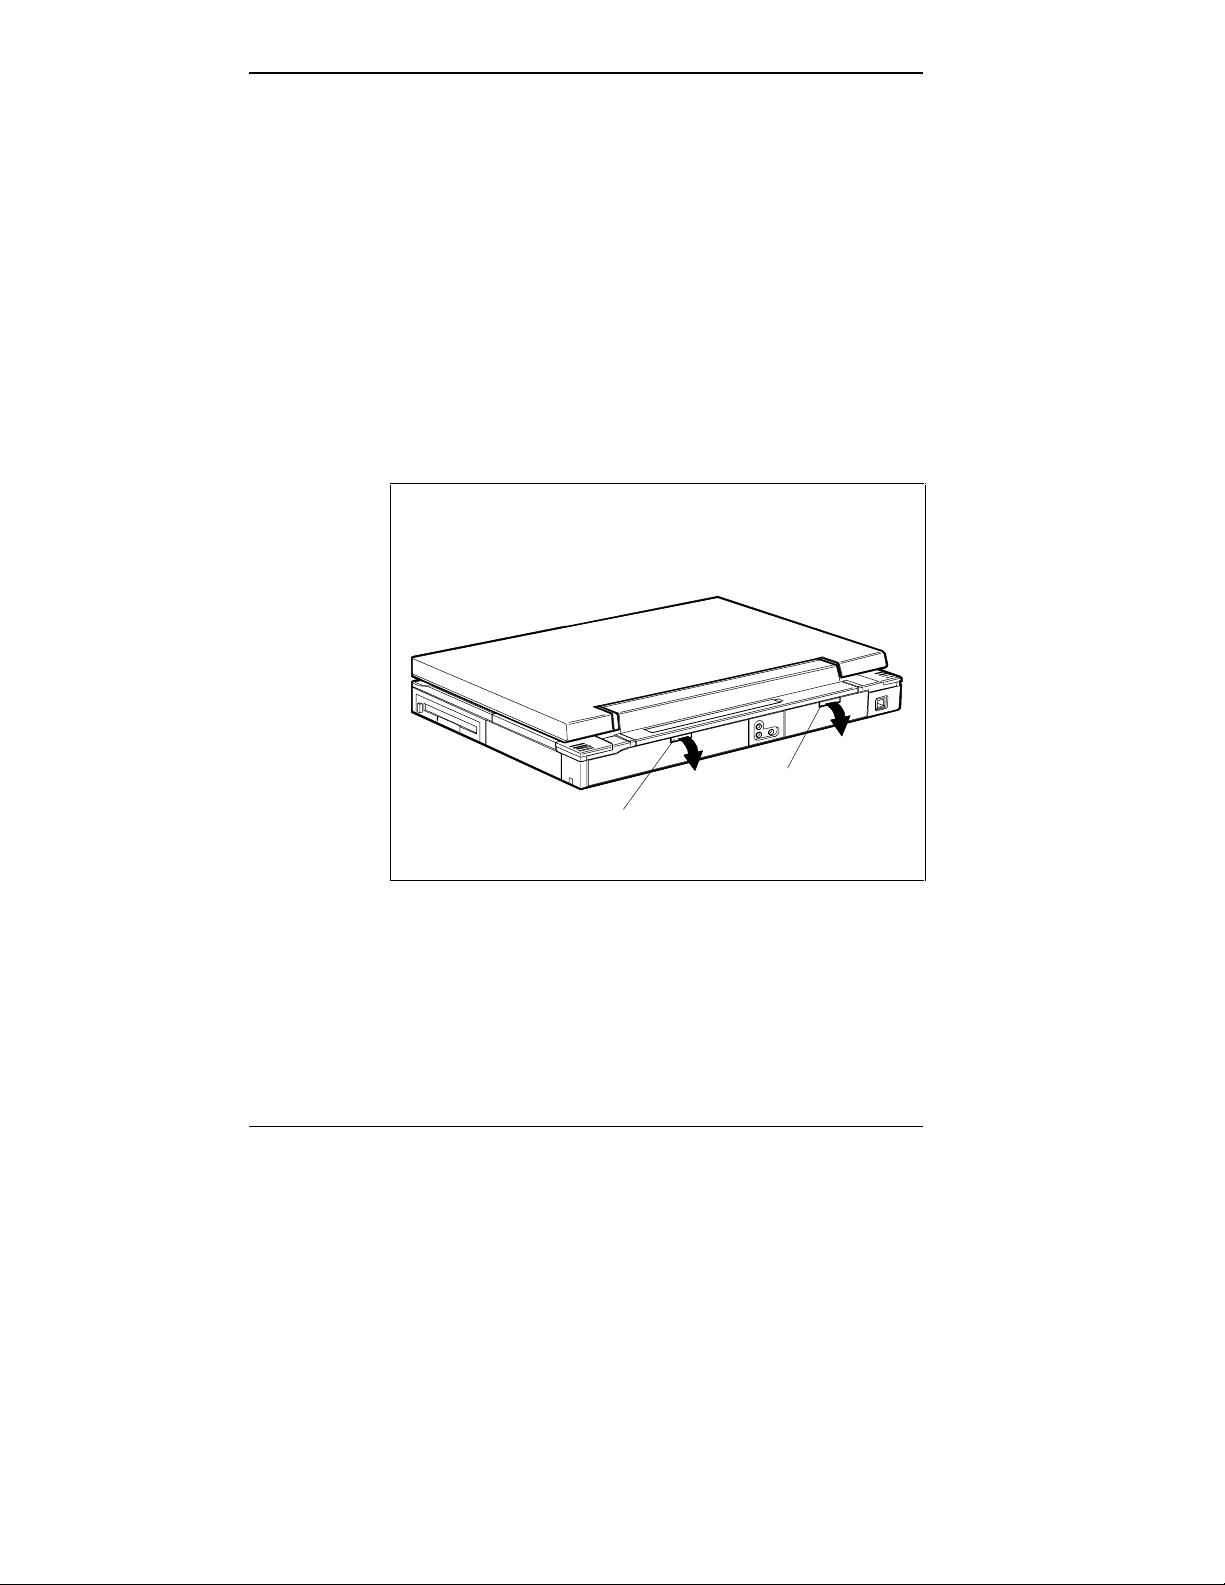
THE OUTSIDE OF THE UNIT
Look over the outside of the Versa P for the external ports,
buttons, and features without opening the LCD panel.
Some of the ports on the back of the system are behind a
protective cover. Use your fingernail to press down on the
port cover latch and swing the cover open.
Left-Rear Cover
and Latch
1-2 Getting to Know Your New Information Tool
Right-Rear Cover
and Latch
Opening the port covers
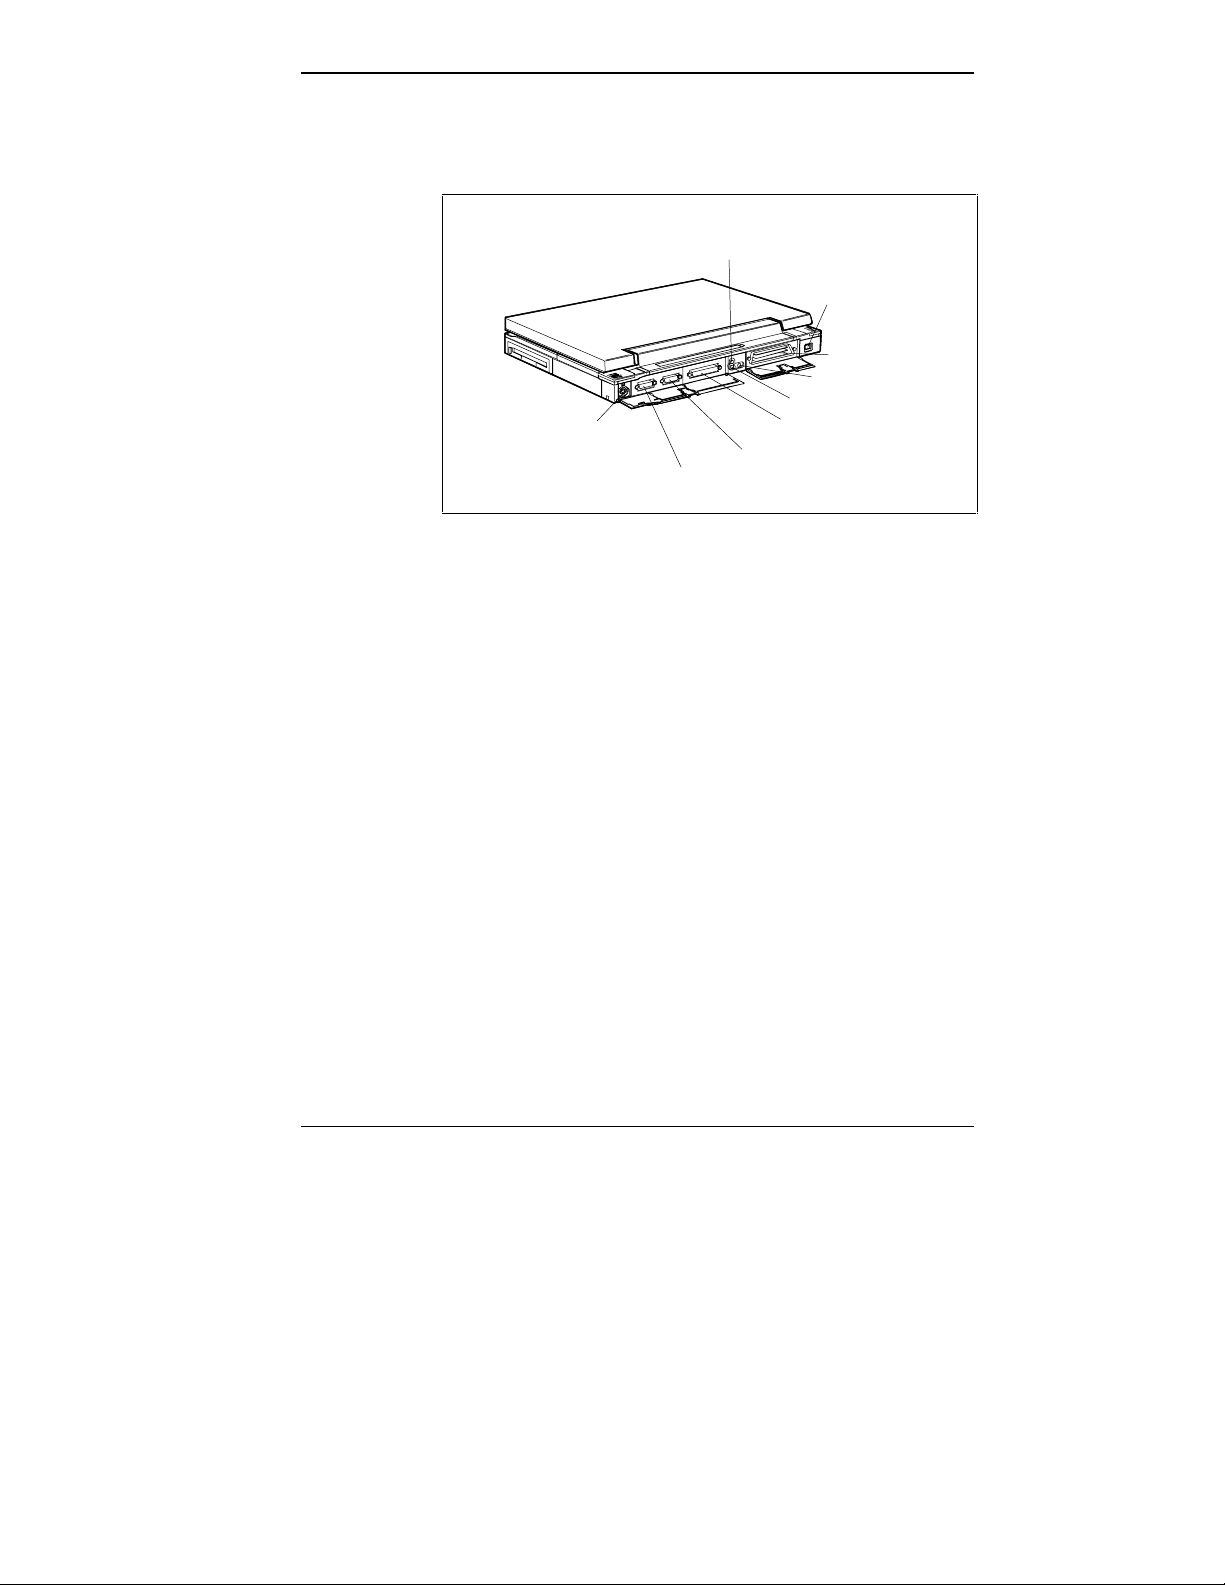
The following figure shows the ports on the back of the
system.
Line-In
Keyboard/Mouse
Port
Port
Serial Port
CRT Port
Power
Connector
Port
Expansion Port
Headphones Port
Microphone Port
Printer Port
Rear ports
■ Keyboard/Mouse port — gives you the option of attach-
ing a PS/2-style external keyboard or mouse to the system.
The system automatically determines whether a mouse
or keyboard is attached.
■ CRT port — allows you to attach a super VGA external
monitor for use with your system.
■ Serial port — lets you attach a serial device, like a serial
printer, to your Versa P.
■ Printer port — provides a place to connect an external
device, like a printer.
■ Microphone port — allows you to attach a microphone
to the system.
■ Headphones port — lets you attach stereo headphones
for use with the system.
Getting to Know Your New Information Tool 1-3
■ Line-In port — lets you attach a line-level stereo or CD
player to the Versa P.
■ Expansion port — allows you to connect the Versa to
the docking station or port replicator.
■ Power connector port — lets you plug in the AC adapter
so you can run the Versa P on AC power.
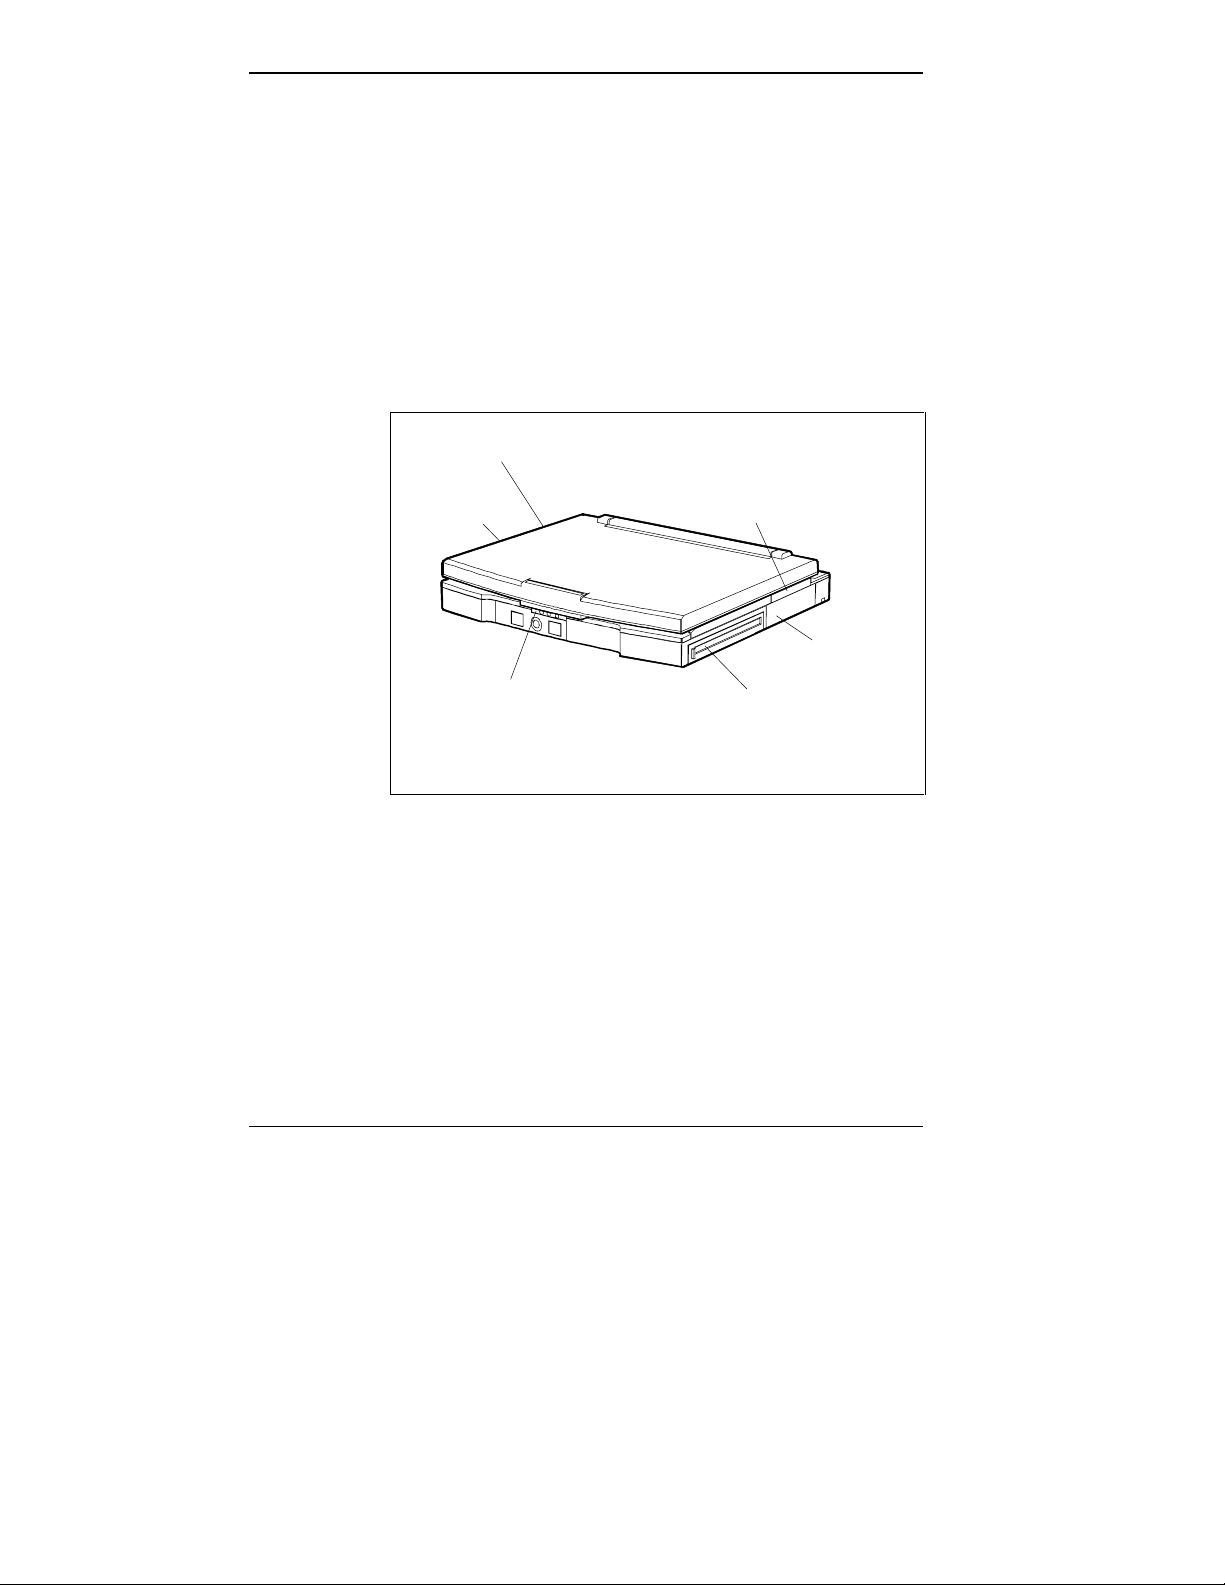
The following figure shows the features on the sides and
front of the Versa P.
PCMCIA Slots
Primary
Battery
LCD Release Latch
Expansion
Memory
Hard Disk
VersaBay Slot
(For Diskette Drive,
Secondary Battery,
PCMCIA,etc.)
Side and front features
■ Battery — provides battery power for running the
Versa P.
■ PCMCIA slots — allow you to add optional PCMCIA
cards to enhance your system. The protective cover
keeps dust and foreign objects from getting into the unit.
■ LCD release latch — locks the LCD panel when the
system is not in use. Also releases the LCD panel to let
you use the system.
1-4 Getting to Know Your New Information Tool

■ Expansion memory — lets you expand system memory
up to 40 MB.
■ VersaBay slot — DoubleTime™ allows the diskette
drive to be removed and replaced with a secondary
battery or other VersaBay option. Currently available
options include a PCMCIA Pak and a Video Pak.
■ Diskette drive — lets you use diskettes with the system.
■ Hard disk — this contains the system software to oper-
ate the Versa P.
VERSA P SETUP
Setting up your system is easy. Just follow these simple
instructions.
Opening the LCD Panel
1. Locate and press the front latch to open the notebook.
LCD Release Latch
Pressing the latch and opening the notebook
Getting to Know Your New Information Tool 1-5
2. Position the LCD panel to a comfortable viewing angle.
You can open the screen to an angle of 180 degrees.
NOTE: Do not attempt to change LCD panels while
system power is on.
You can, however, reverse the panel so it faces the
other way while system power is on but in Suspend
mode.
Closing the LCD Panel
To close the LCD panel, simply lower the panel over the
keyboard. Press down until the latch catches to secure the
LCD panel.
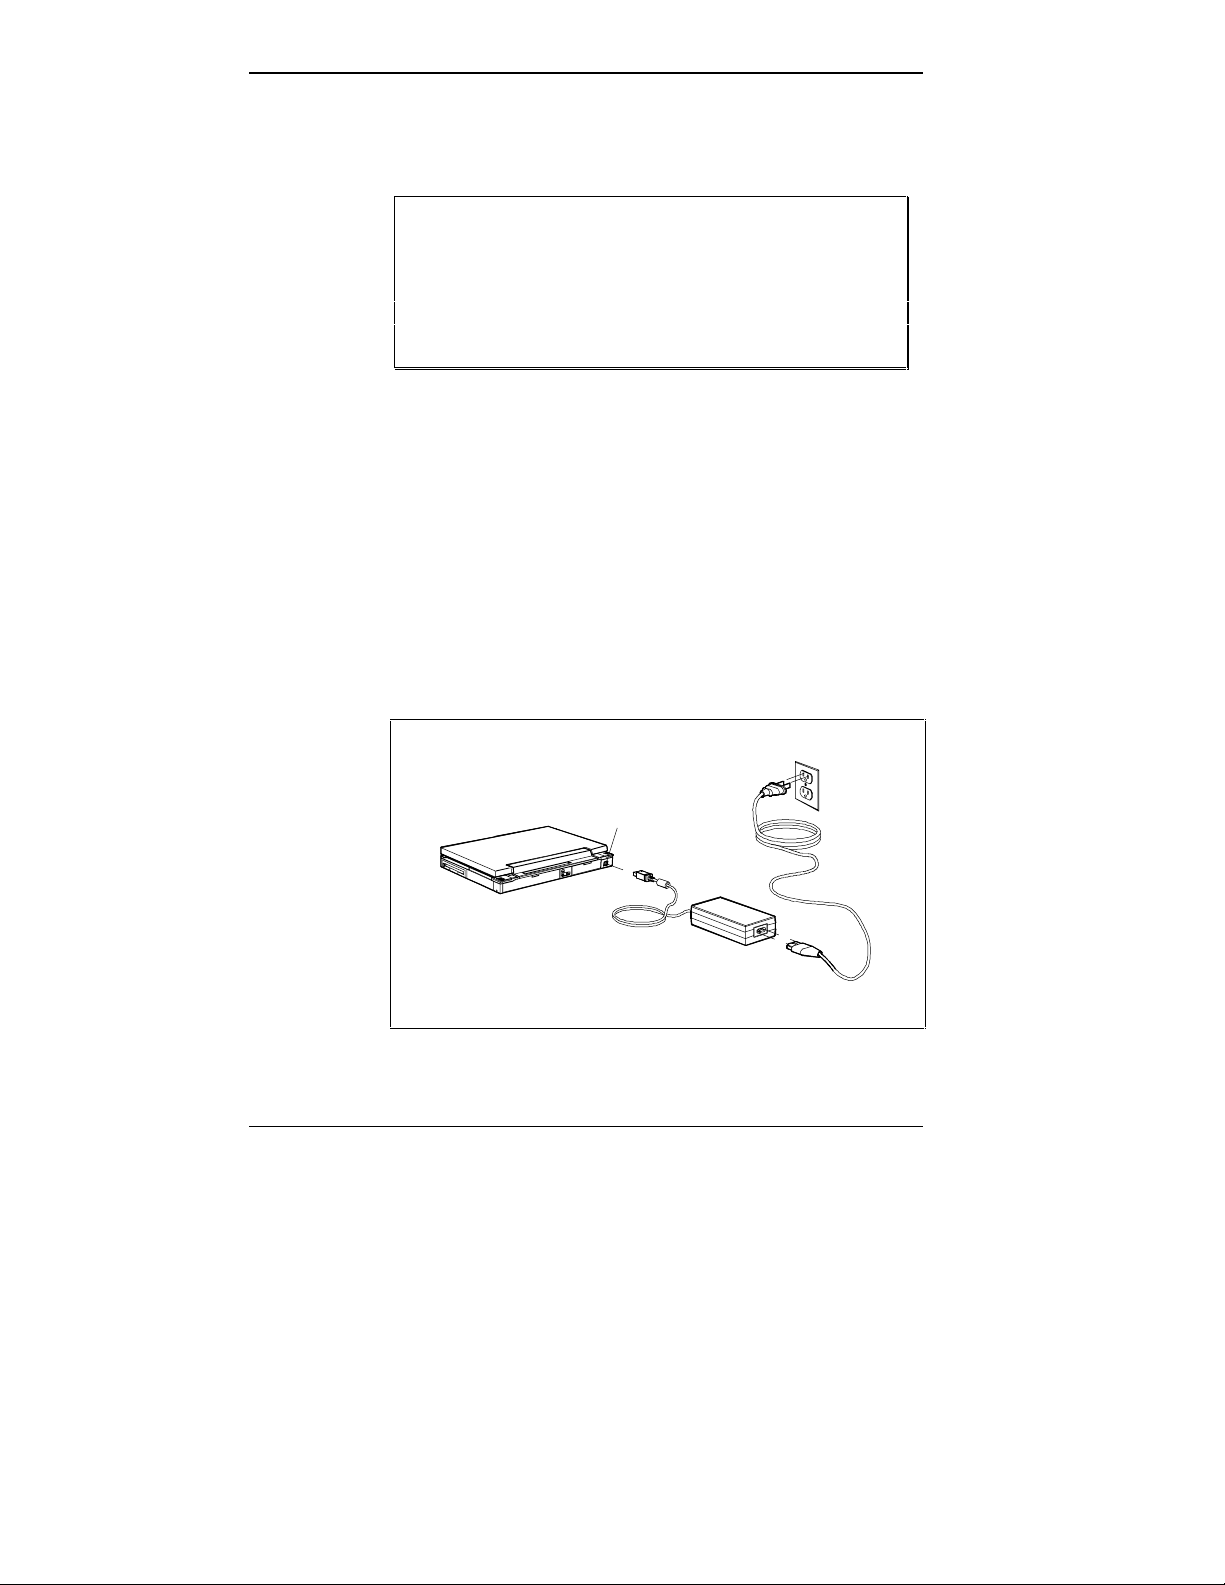
Connecting the AC Adapter
Connect the AC adapter to your computer as follows.
1. Insert the adapter’s DC cable into the power connector
port on the back of the system.
Power Connector
Port
1-6 Getting to Know Your New Information Tool
The power connector
2. Insert the matching end of the AC power cable into the
AC adapter.
CAUTION: Only use the AC adapter model pro-
vided with your notebook.
3. Connect the other end of the AC power cable to a 100-
to 240-volt wall outlet.
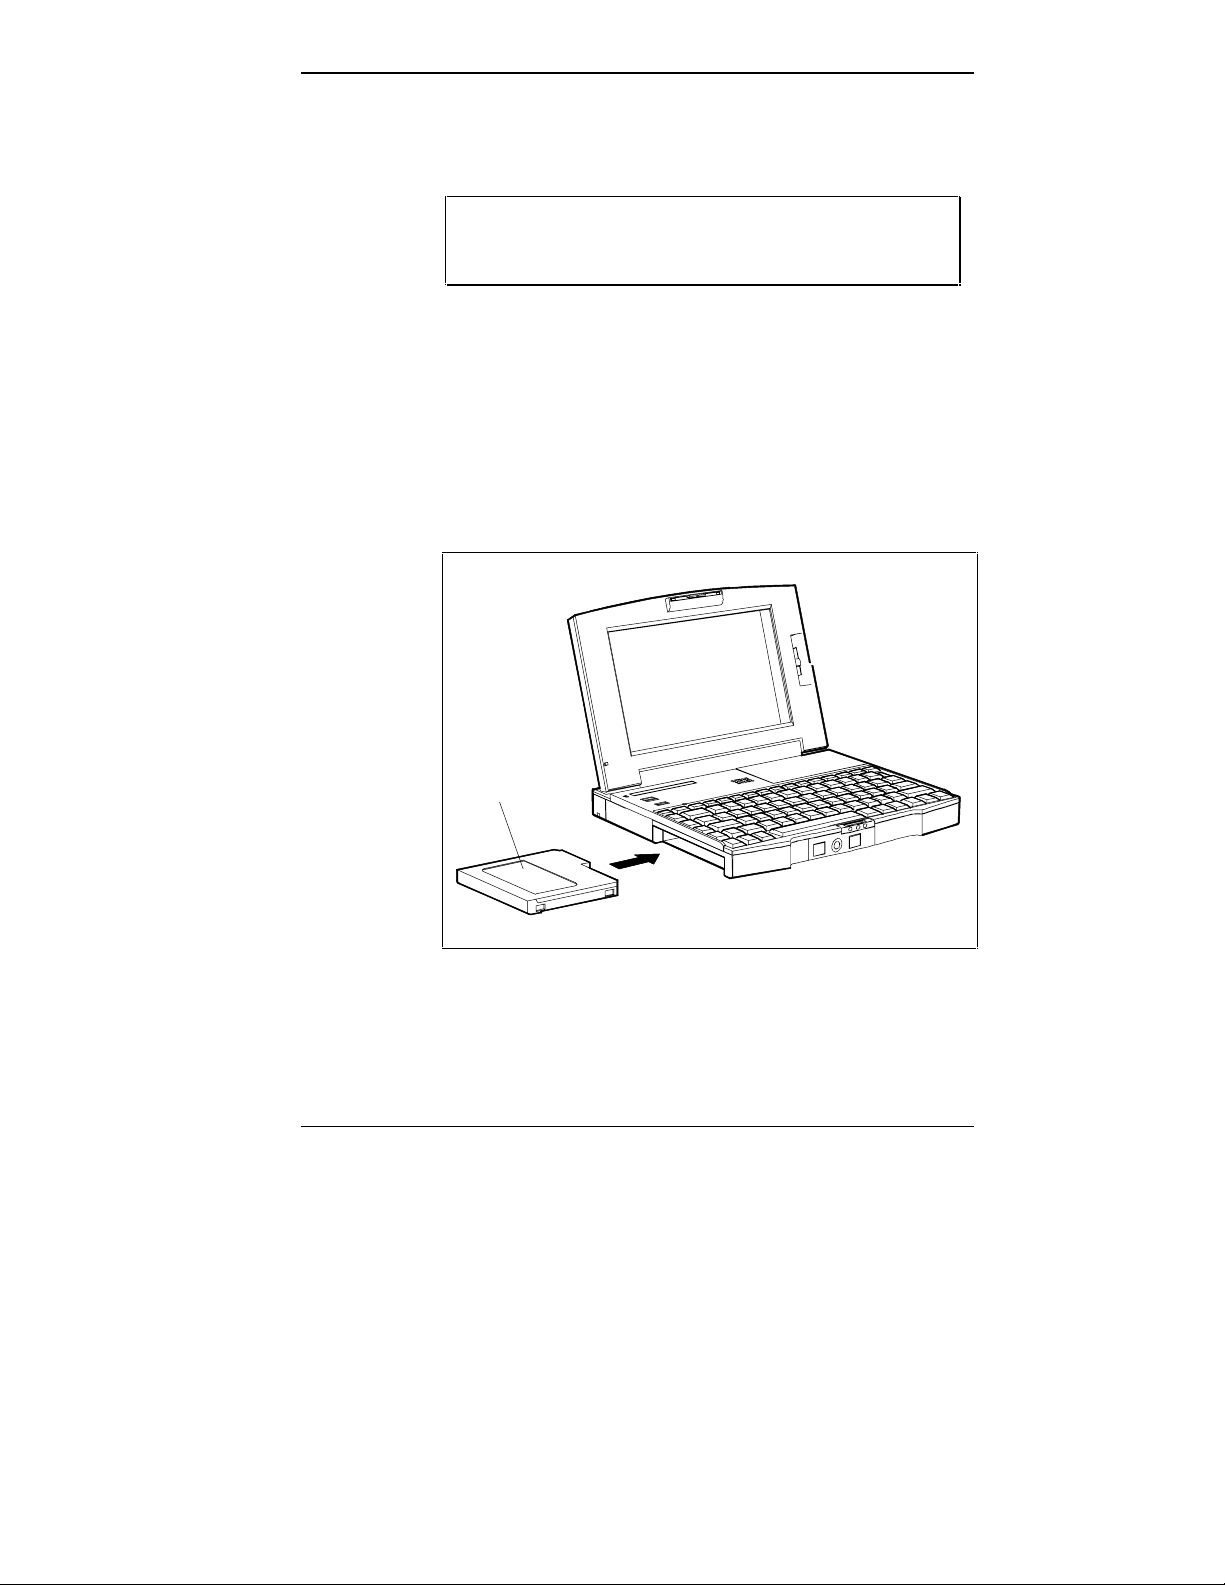
Installing a Battery
It is easy to install a battery in your notebook computer.
Simply insert the battery completely into the battery
compartment as shown in the figure.
Battery
Inserting the battery
Getting to Know Your New Information Tool 1-7

Replacing a Battery
Follow these instructions to replace a primary battery installed in your notebook computer. The system does not
have to be shut off if battery replacement requires less than
five minutes.
1. Press the suspend button to suspend the system if in use.
(Refer to “Buttons and Control” later in this chapter.)
If the system is attached to AC power, you need not put
it in Suspend mode.
2. Close the LCD panel securely. Disconnect any external
options you have connected.
3. Turn the Versa P upside down.
1-8 Getting to Know Your New Information Tool
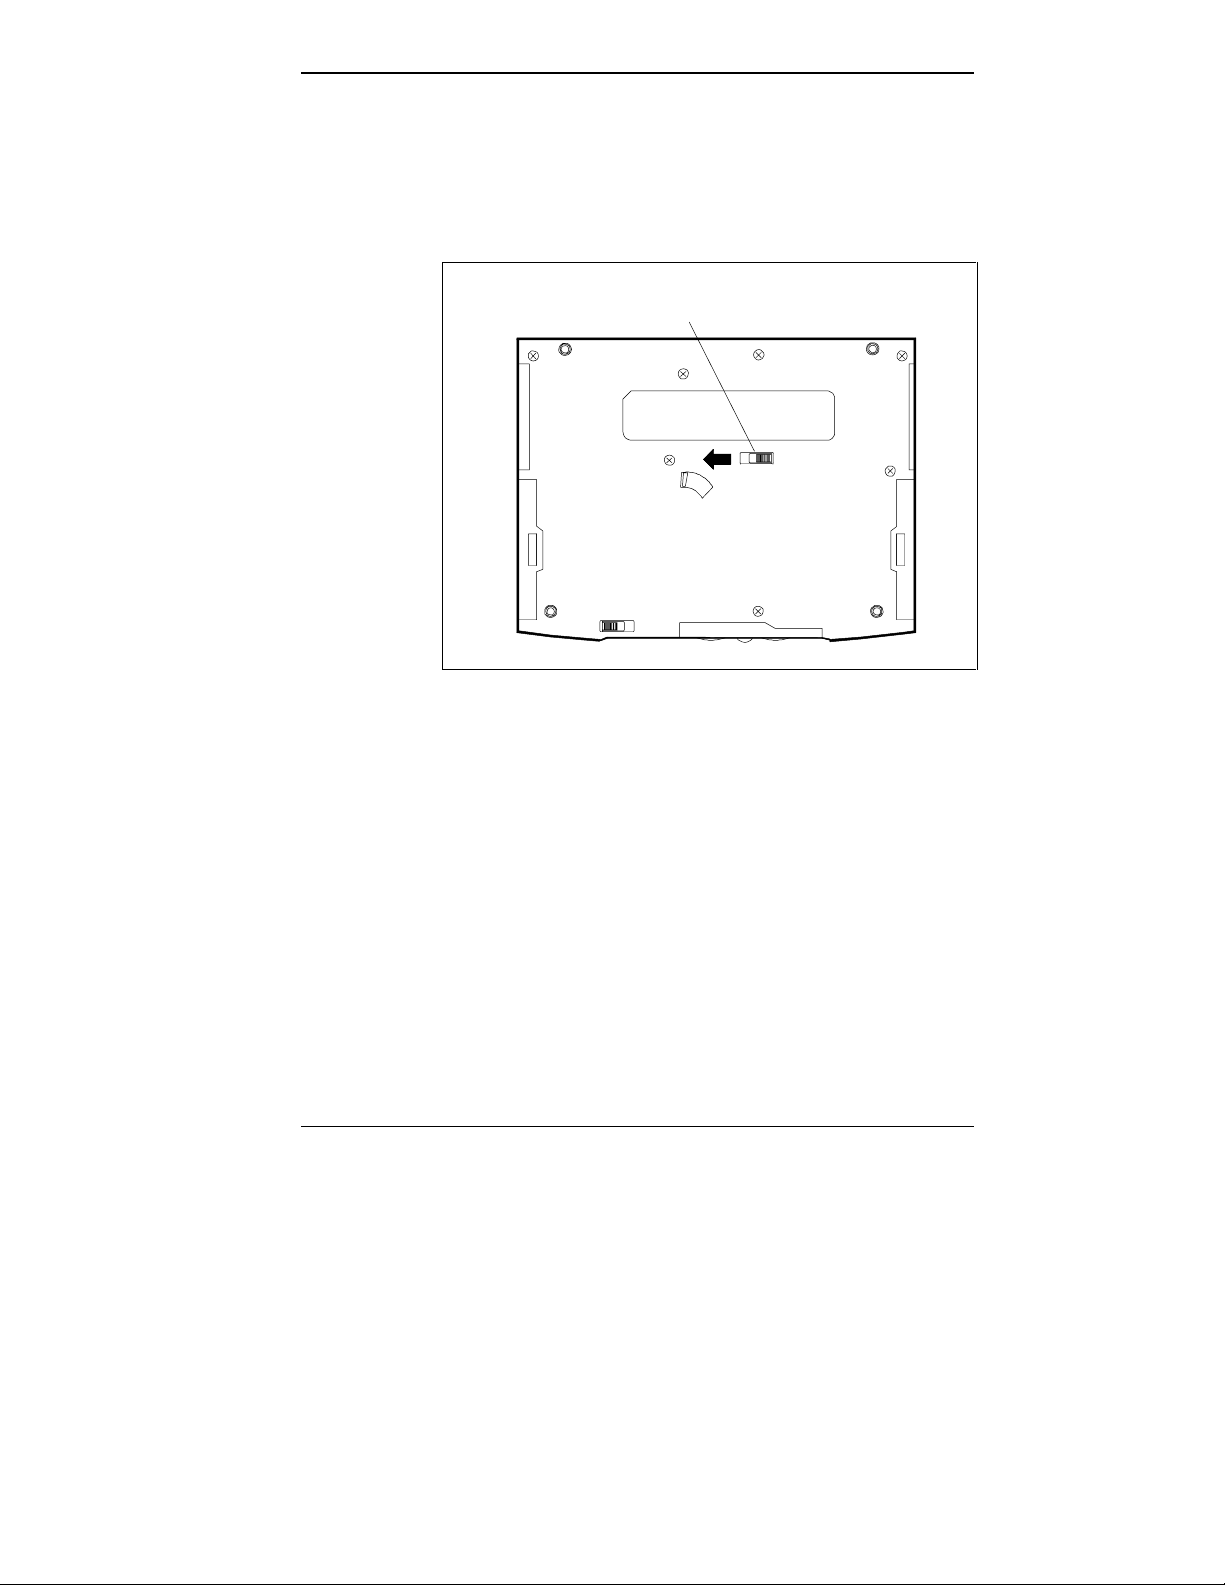
4. Locate the battery release latch on the bottom of the
system and slide it sideways.
The other latches are for removing and installing
VersaBay options.
Battery Release
Latch
Locating the release latch
5. Pull the battery out of the system.
6. Slide the new battery into the system until the release
latch clicks and locks the battery in place.
7. Turn the Versa P right side up and reconnect any
external options you disconnected.
8. Resume the system or turn on power to continue
operation.
Getting to Know Your New Information Tool 1-9

1
Getting to Know Your New Information Tool 1-9
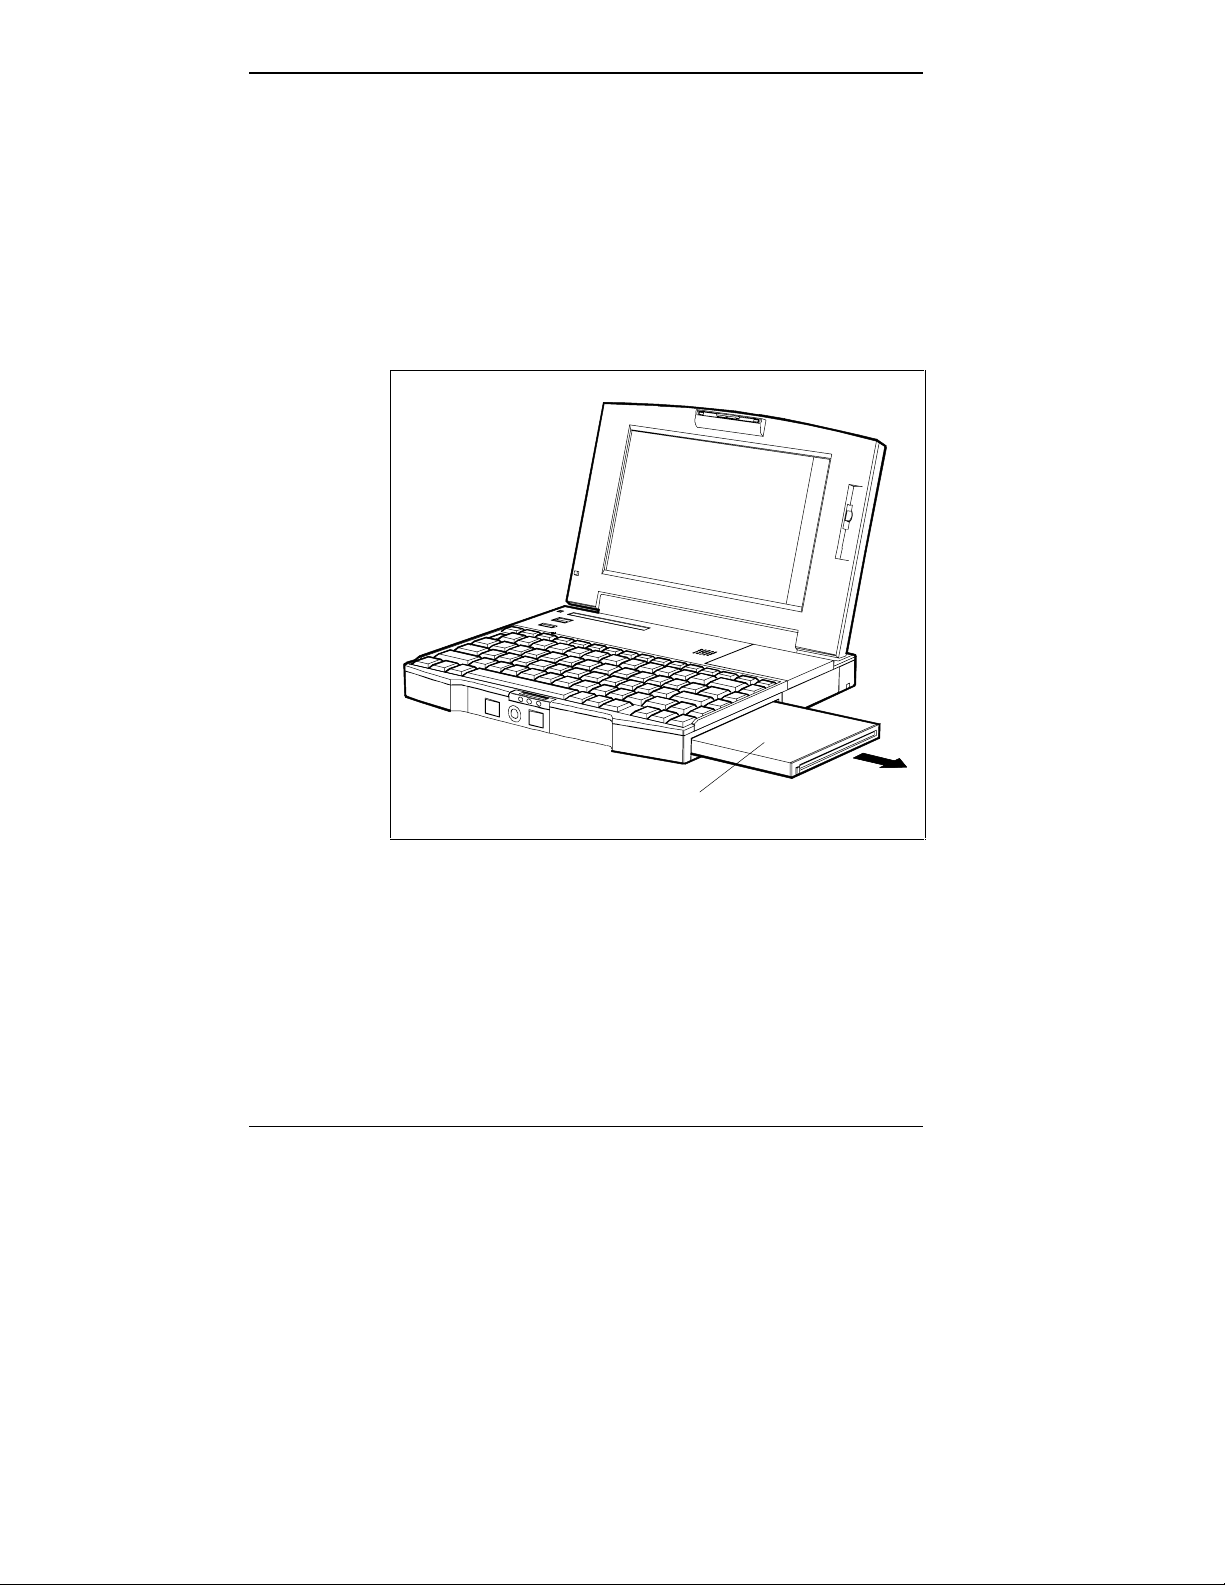
Replace the diskette drive with a secondary battery
as follows.
1. Turn off the system power (if using battery power)
or suspend.
2. Turn the Versa P upside down.
3. Slide the appropriate bottom release latch while pulling
the diskette drive out of the compartment.
1-10 Getting to Know Your New Information Tool
Diskette Drive
Removing the diskette drive
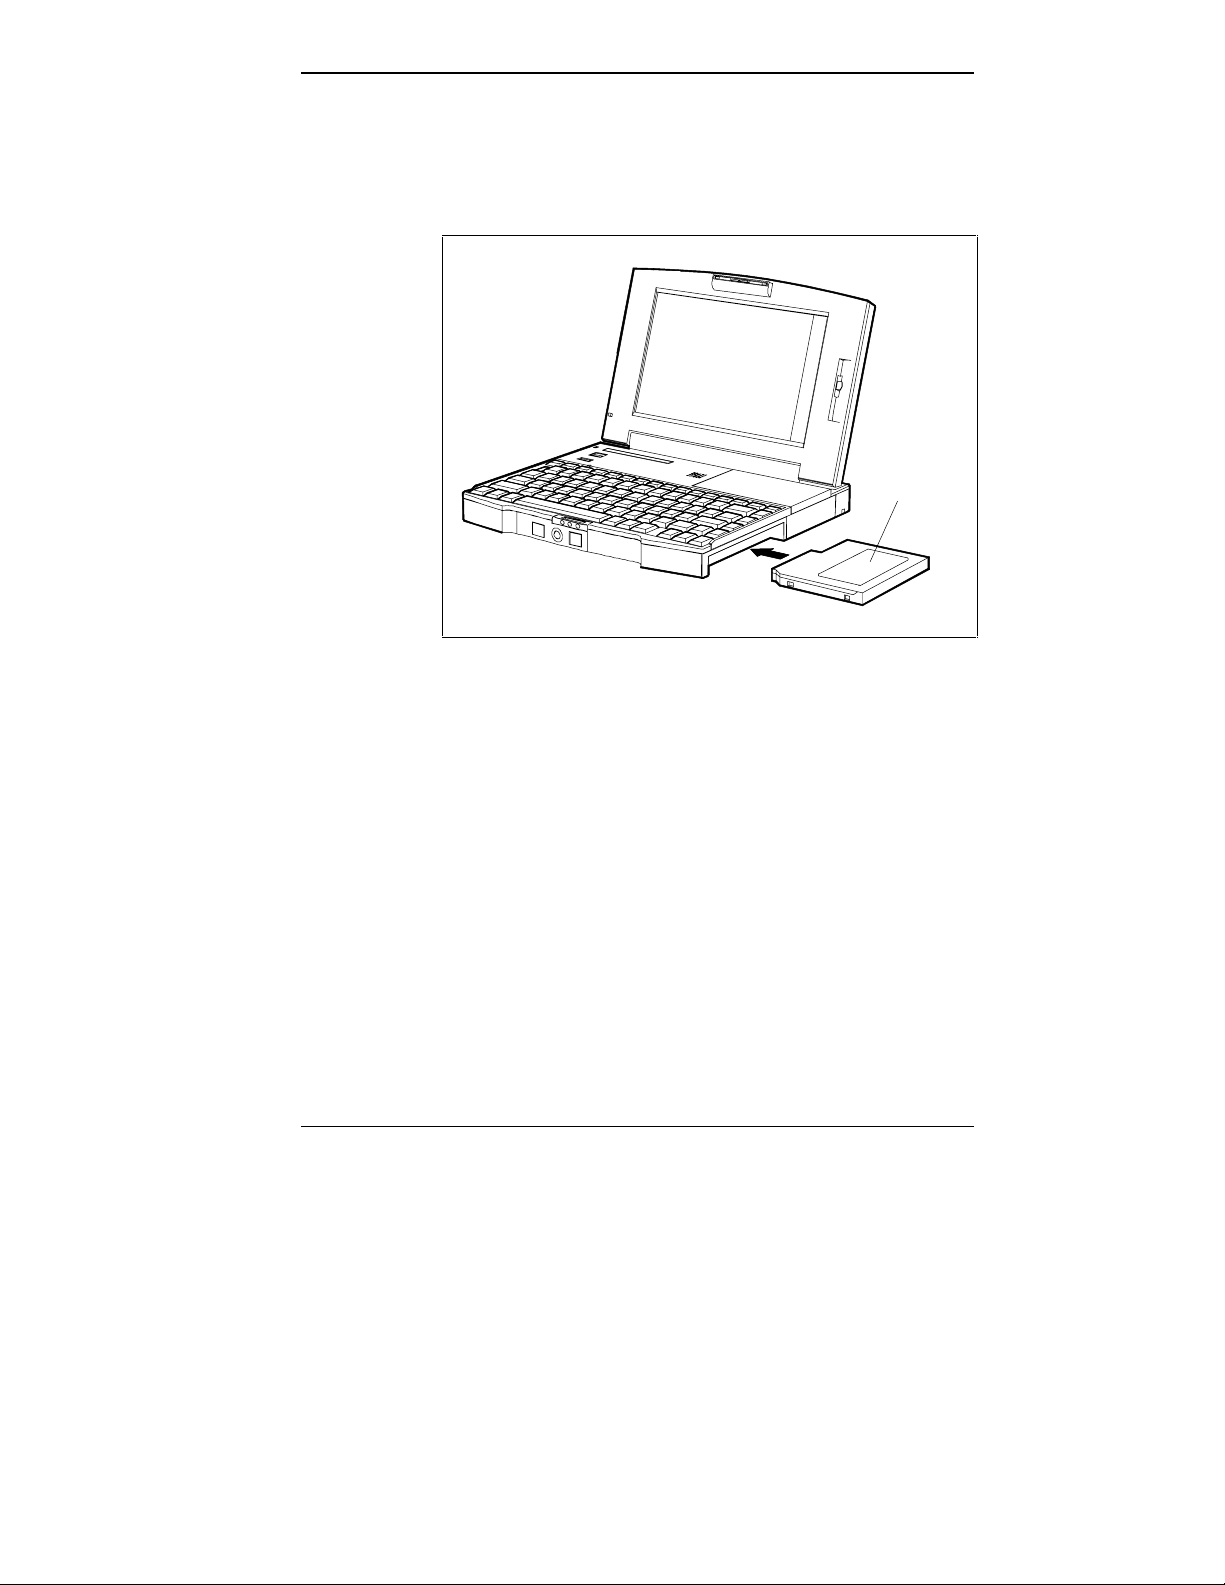
4. Insert the battery completely into the compartment.
5. Resume the system or turn on power to continue
operation.
Secondary
Battery
Inserting the secondary battery
Turning on the Versa P
Prepare to power on your system as follows.
1. Check that your power source is connected.
■ For battery power, make sure a charged battery pack
is installed in the Versa P. (See the previous section
for information about installing a battery pack.)
■ For AC power, make sure the AC adapter is plugged
into the Versa P and a wall outlet. (See “Connecting
the AC Adapter” for information about attaching the
AC adapter.)
Getting to Know Your New Information Tool 1-11

2. Open the LCD panel, if it is not already open.
3. Locate the power button. Pull forward, momentarily
hold, and then release the power button.
Power
Button
Pressing the power button
4. Adjust the brightness control using the button on the
right of the LCD panel for a sharp, clear display.
You are now ready to familiarize yourself with your
new Versa.
1-12 Getting to Know Your New Information Tool

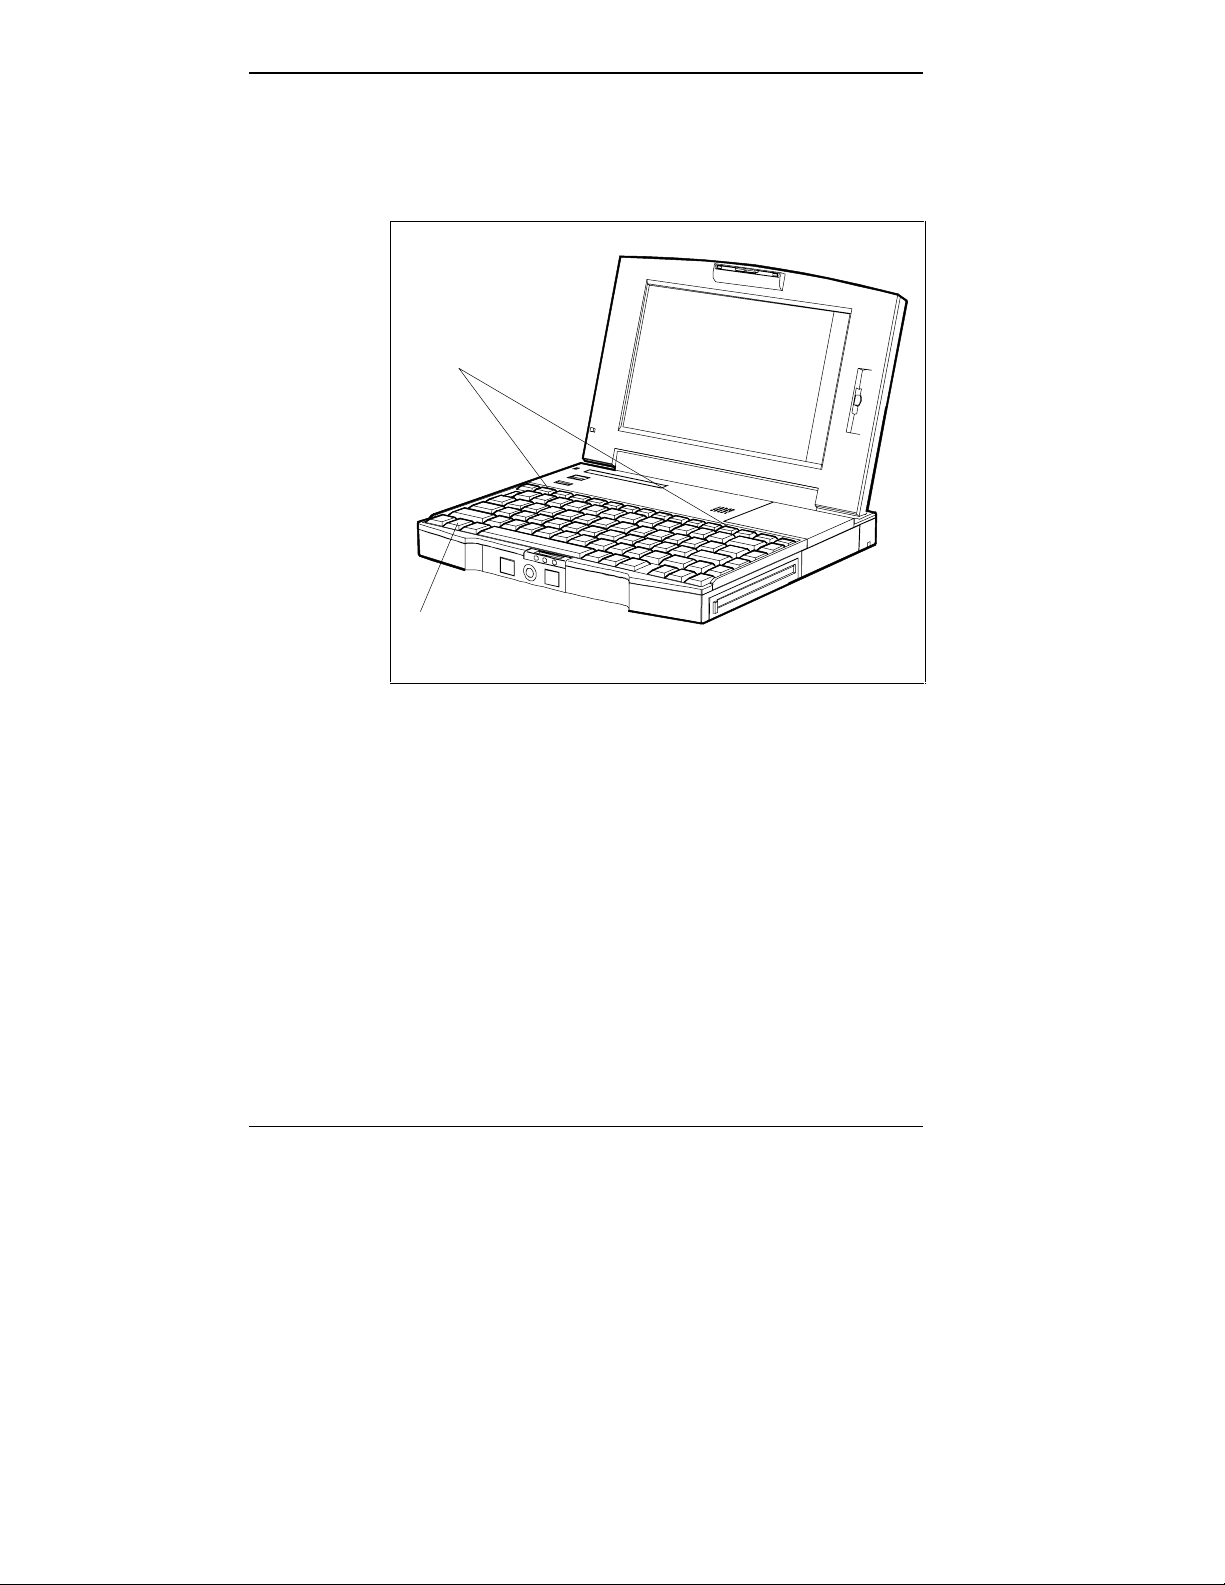
FEATURES
LCD Panel
Here are some of the Versa P’s features:
■ LCD Panel
■ Keyboard
■ VersaTrack™ Ball
■ Buttons and Controls
■ Status Bar
■ Microphone and Speaker
■ PCMCIA Card Slots
■ VersaBay
■ Promotional Software
■ Plug and Play
■ Batteries
■ Online Help.
These features are described next.
Your Versa P comes with a TFT color LCD panel. The activematrix thin-film transistor (TFT) color LCD comes in one
of two resolutions: 640 x 480 pixels or 800 x 600 pixels.
The backlit TFT LCD provides a 9.5-inch display area,
brilliant resolution, and an impressive array of colors.
NOTE: NEC LCD panels meet exacting manufactur-
ing standards. Of the 1,440,000 elements involved
in creating the display on your screen, NEC accepts
no TFT screen with more than six nonworking elements. Although this may mean a pixel or two is
nonfunctional, its impact on your display should be
minimal.
Getting to Know Your New Information Tool 1-13
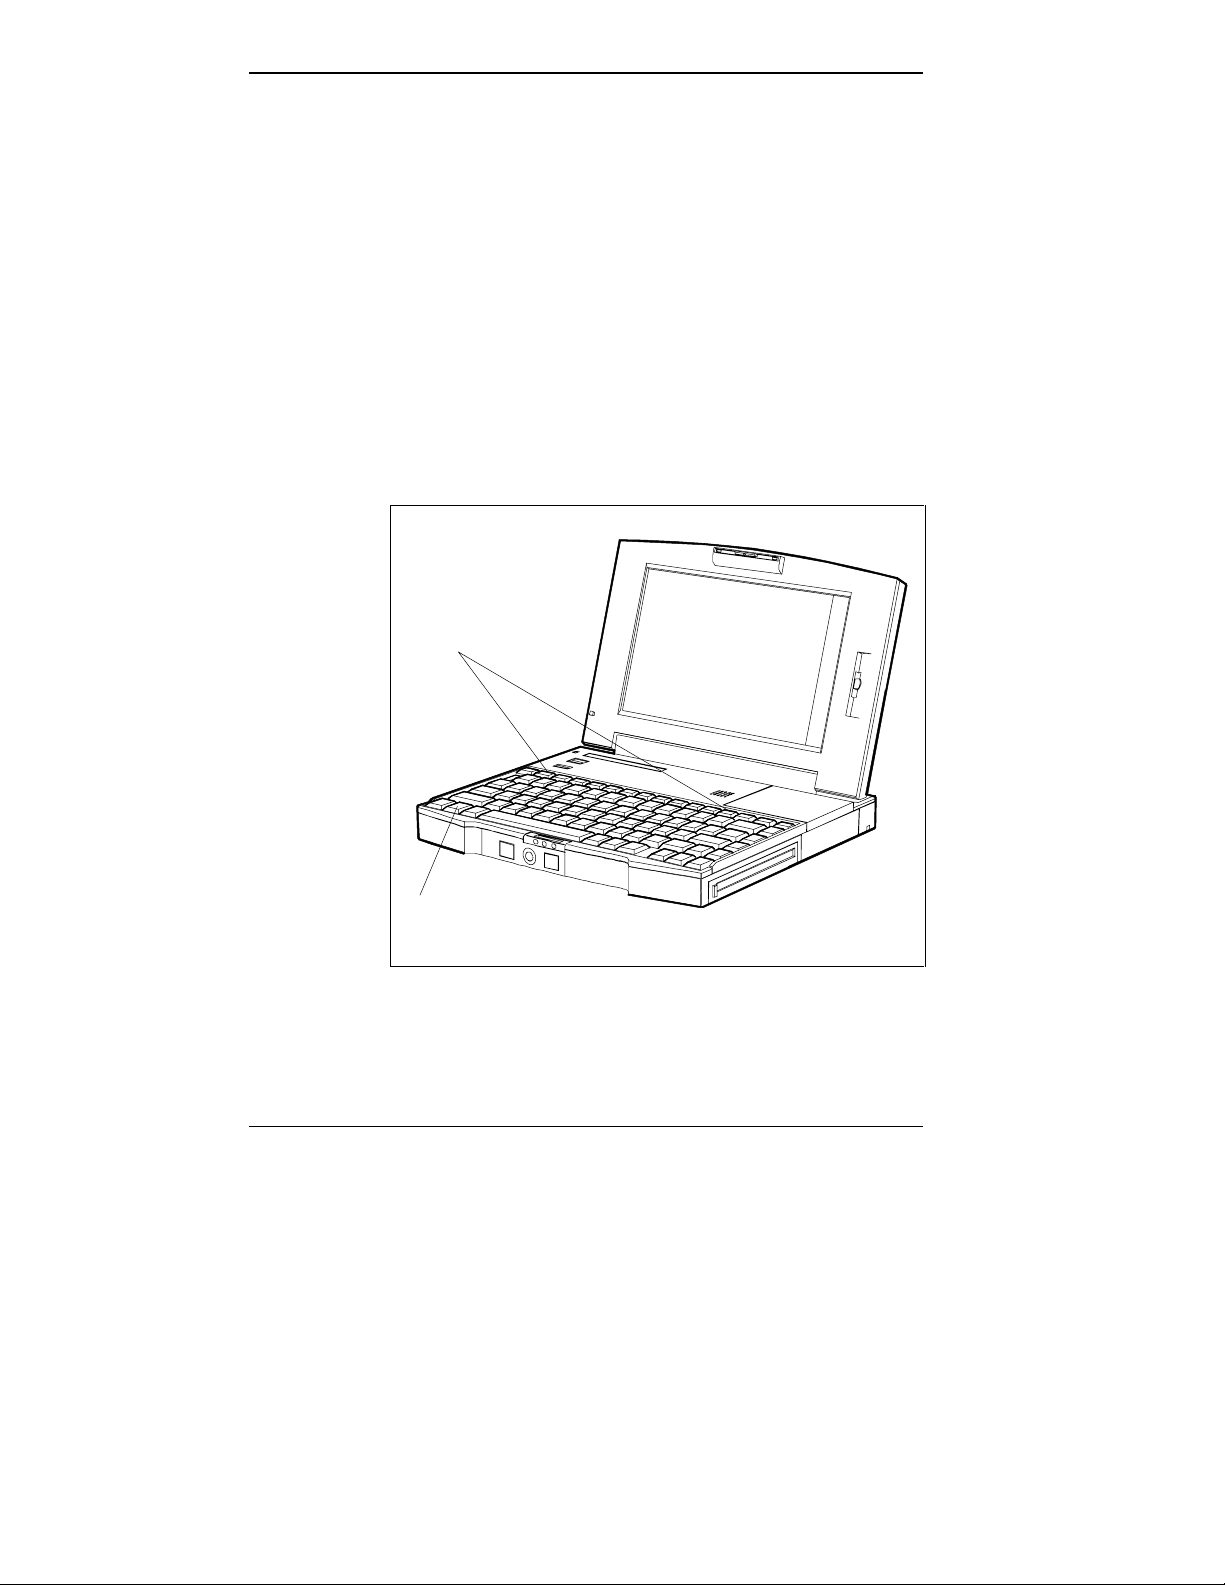
Keyboard
Function Keys
The Versa P keyboard is equipped with many features.
They include the following:
■ Function keys
■ Key combinations
■ Typewriter keys
■ Cursor control keys
■ Numeric keypad
■ Control keys.
The function keys are located along the top of keyboard.
The Fn (Function) key activates functions printed in blue on
keys having dual functions.
Function
Keys
Fn
Key
Some special functions are specific to the Versa P systems.
These keys set specific parameters that are built into ROM
(Read-Only Memory).
1-14 Getting to Know Your New Information Tool
Function keys
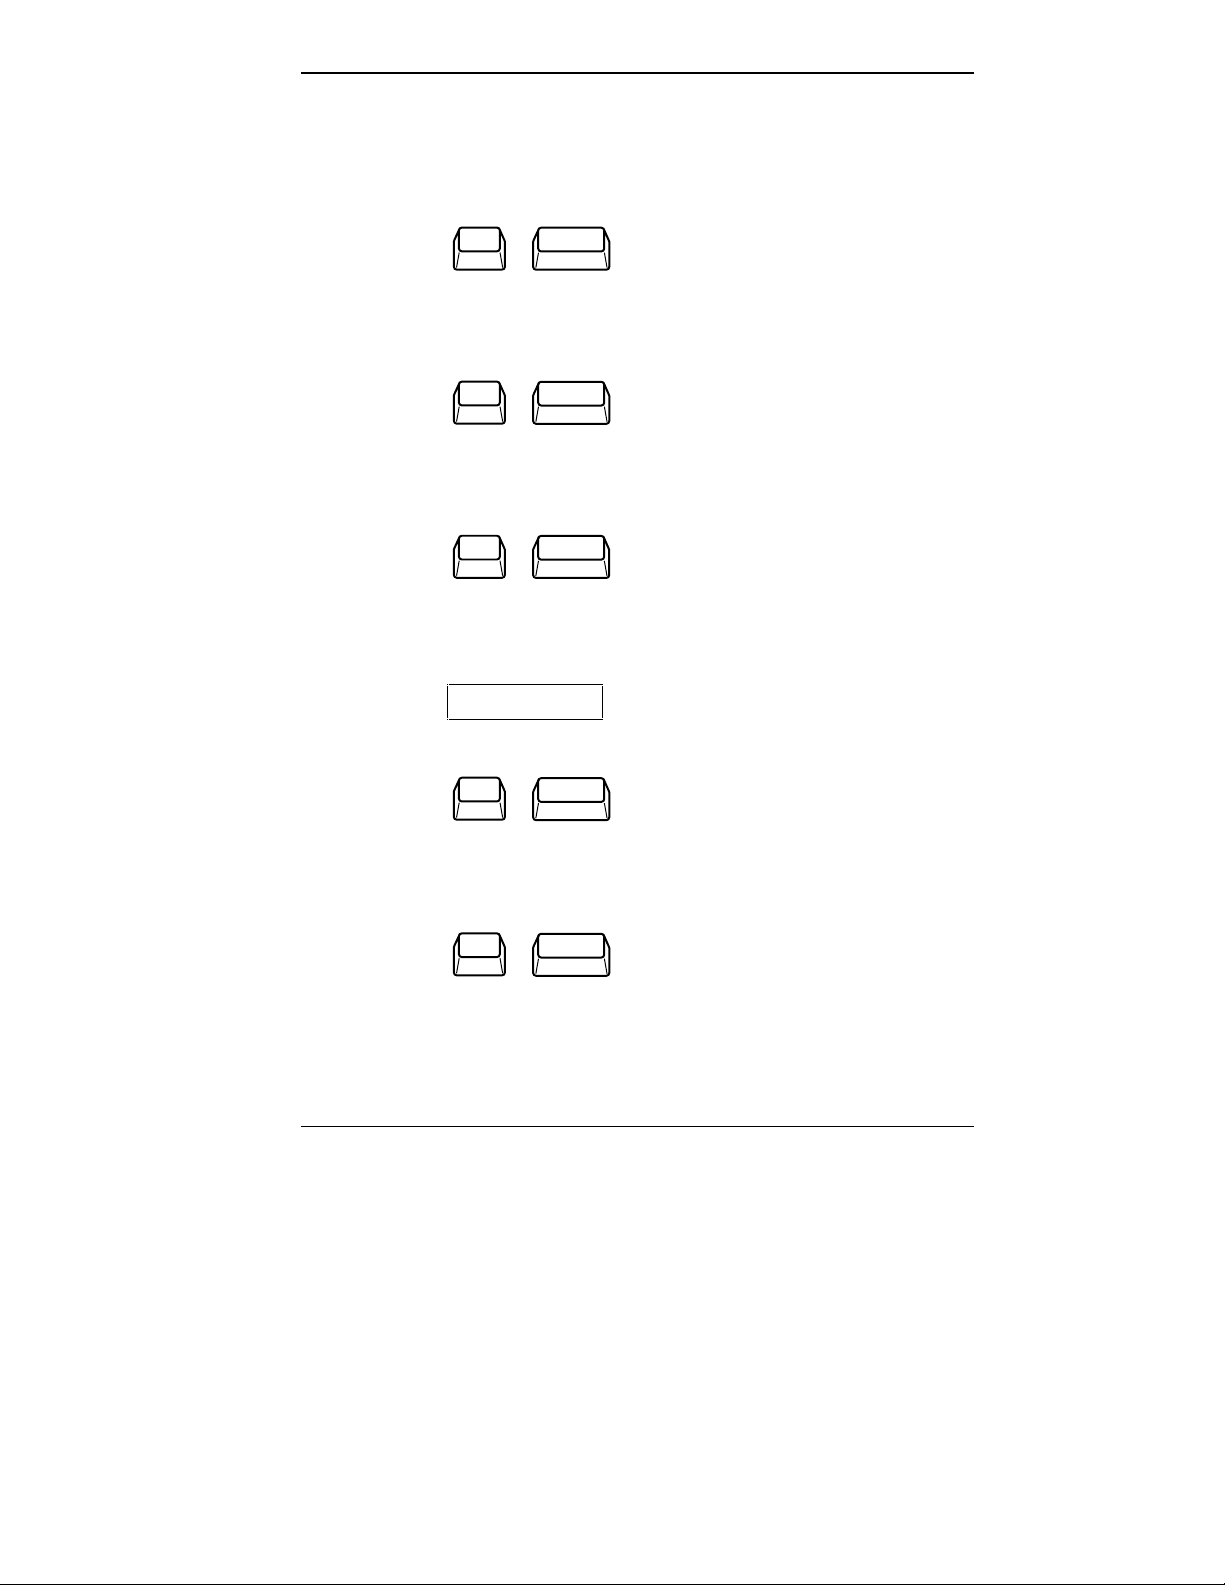
Key Combinations
The key combinations for system-specific functions are
as follows.
Fn
F1
+
Right Control
Use to simulate pressing the right control key for support of
IBM/SDLC connections.
Fn
+
F2
Highlight
Highlight
Use to set the color LCD contrast to standard or full highlight for DOS text mode.
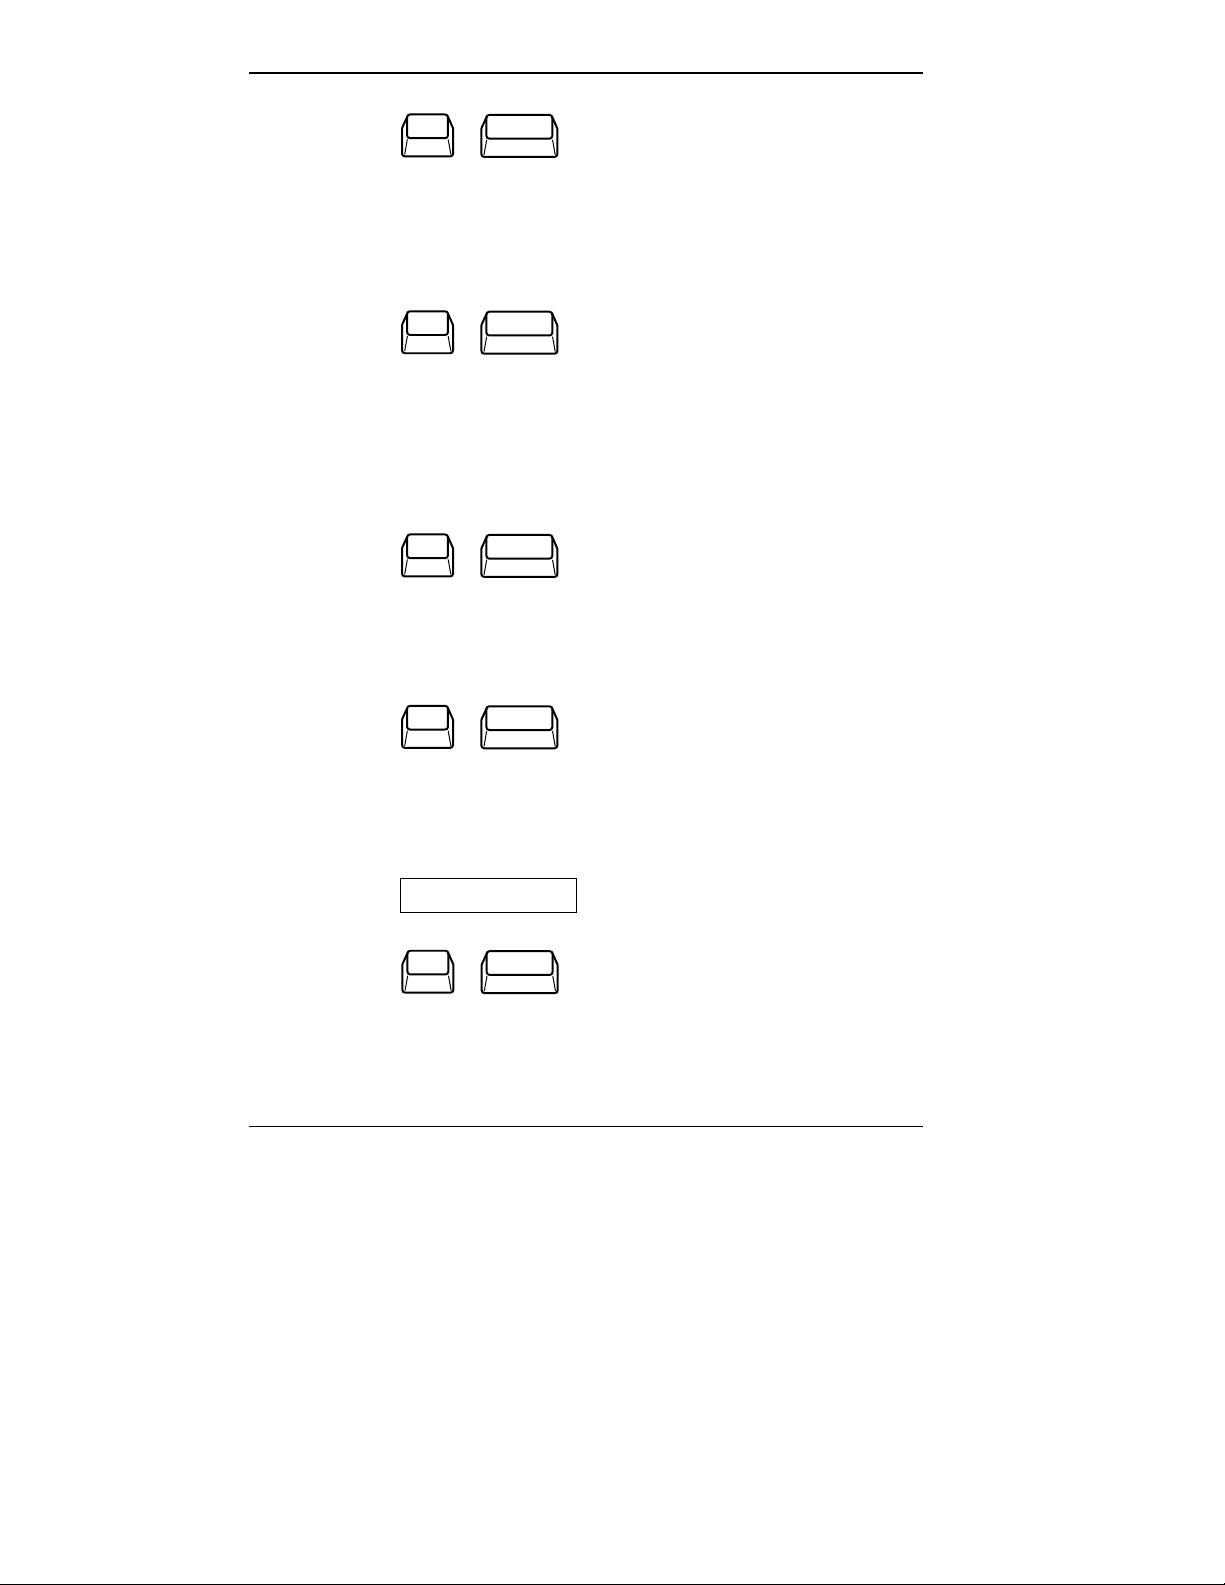
Fn
+
F3
LCD/CRT
LCD/CRT
Use to toggle between LCD mode only, LCD and CRT
modes simultaneously, and CRT only screen mode.
Fn F4 Not used
Fn
+
F5
Backlight
Backlight
Used to set the LCD backlight brightness to standard
or full.
Fn
F6
+
Speaker
Speaker
Use to regulate the speaker volume. Press Fn F6 to toggle
from off to low, medium, or high. A beep sounds when the
volume setting is changed.
Getting to Know Your New Information Tool 1-15
Fn
F7
+
P/M Lev
Power Management Levels
Use to set the power management level to off, custom, low,
or high. Notice the changes in the faucet icons on the LCD
panel as you toggle the key combination. This works only
when power management is enabled.
Fn
F8
+
HDD
Hard Disk Drive Spin Up/Down
Use to spin the hard disk up or down. Spin down means that
the motor that spins the disk within the hard disk drive shuts
off to save power. Spin up means the disk motor turns on
again. Pressing
Fn F8 bypasses any timeout. A beep sounds
when the hard disk spins down or up.
Fn
F9
+
Battery I
Battery I Status
Use to reset the primary battery icon to four bars on the
LCD status bar (❙❙❙❙) after the battery icon has shown an
unknown state.
Fn
+
F10
Battery II
Use to reset the secondary battery icon to four bars on
the LCD status bar (❙❙❙❙) after the battery icon has shown
an unknown state.
Fn F11
Fn
Not used.
F12
+
ScrLock
Use of this key combination depends upon the software
application you are using. Refer to the application
user’s guide.
1-16 Getting to Know Your New Information Tool
Battery II Status
Scroll Lock

Typewriter Keys
The typewriter keys (also called alphanumeric keys) are
used almost exactly as on a typewriter. Those that behave
differently do so when combined with control keys or function keys. They are noted in those descriptions.
Cursor Control Keys
Cursor control keys let you position the cursor on the screen
where you want. On the screen, the cursor is a blinking underli ne or block, depending on the application. It indicates
where the next text typed is inserted.
Numeric Keypad
Pressing Num Lock on the keyboard activates the numeric
keypad when an external keyboard is not connected. The
numeric keys are printed in blue. The keypad lets you type
numbers and mathematical operands (+,-) as you would on
a calculator. The keypad is ideal for entering long lists
of numbers.
When Num Lock is activated, you will see the following
icon on the LCD indicator panel.
1
Getting to Know Your New Information Tool 1-17

1
Getting to Know Your New Information Tool 1-17
When you press Num Lock again, the keys revert to their
normal function as typewriter keys and the Num Lock
icon disappears.
Function
Keys
Fn
Key
Numeric keypad
1-18 Getting to Know Your New Information Tool
 Loading...