


PROPRIETARY NOTICE AND LIABILITY DISCLAIMER.
The information disclosed in this document, including all designs and
related materials, is the valuable property of NEC Corporation (NEC)
and/or its licensors. NEC and/or its licensors, as appropriate, reserve all
patent, copyright and other proprietary rights to this document, including
all design, manufacturing, reproduction, use and sales rights thereto,
except to the extent said rights are expressly granted to others.
The NEC product(s) discussed in this document are warranted in
accordance with the terms of the Warranty Statement accompanying
each product. However, actual performance of each such product is
dependent upon factors such as system configuration, customer data, and
operator control. Since implementation by customers of each product
may vary, the suitability of specific product configurations and
applications must be determined by the customer and is not warranted by
NEC.
To allow for design and specification improvements, the information in
this document is subject to change at any time, without notice.
Reproduction of this document or portions thereof without prior written
approval of NEC is prohibited.
NEC Versa is a trademark of NEC Corporation.
All other product, brand, or trade names used in this publication are trademarks or registered
trademarks of their respective trademark owners.
First Printing — July 1995
Copyright 1995 Copyright 1995
NEC Technologies, Inc. NEC Corporation
1414 Massachusetts Avenue 7-1 Shiba 5-Chome, Minato-Ku
Boxborough, MA 01719 Tokyo 108-01, Japan
All rights reserved All rights reserved
Using this Guide
The NEC Versa™ 4000 Series User’s Guide contains
information about using your portable laptop computer.
Read the following chapters to find out more about your
NEC Versa 4000.
■ Chapter 1 introduces the NEC Versa 4000, its features,
and care.
■ Chapter 2 explains how to use the NEC Versa 4000
hardware.
■ Chapter 3 describes the software that comes with your
NEC Versa 4000.
■ Chapter 4 gives you useful information about traveling
with your notebook computer.
■ Chapter 5 gives you a checklist to follow if you have
problems with the NEC Versa 4000. Common problems
and solutions are included.
■ Chapter 6 provides a list of numbers for NEC customer
support services.
!
Prolonged or improper use of a computer workstation may pose a risk of serious injury. To reduce
your risk of injury, set up and use your computer i n
the manner described in Appendix A, Setting Up a
Healthy Work Environment.
WARNING
Using this Guide vii
TEXT SETUP
■ Appendix A, Setting Up a Healthy Work Environment,
contains guidelines to help you use your computer productively and safely. This appendix also instructs you on
how to set up and use your computer to reduce your risk
of developing nerve, muscle, or tendon disorders.
■ Appendix B provides system specifications and envi-
ronmental requirements.
To make this guide as easy to use as possible, text is set up
in the following ways.
■ Warnings, cautions, and notes have the following
format:
!
Warnings alert you to situations that could result in
serious personal injury or loss of life.
WARNING
viii Using this Guide
!
Cautions indicate situations that can damage the
system hardware or software.
NOTE
Notes give particularly important information
about whatever is being described.
CAUTION

■ Names of keys are printed as they appear on the key-
board, for example, Ctrl, Alt, or Enter.
■ Text that you must type or keys that you must press are
presented in bold type. For example, type
Enter.
RELATED DOCUMENTS
In addition to this guide, other documents ship with your
Versa system, including the following:
■ The NEC Versa 4000 Series Quick Setup shows how to
set up and start your system after you unpack it.
■ The NEC Versa 4000 Quick Reference Card contains
brief descriptions of function keys, LCDs, NEC help
telephone numbers and troubleshooting tips.
Tuck this card inside the notebook when you take it with
you. The card is designed as a quick, portable reference
to frequently used functions.
DIR and press
Using this Guide ix

Contents
Using this Guide
Text Setup ............................................................... viii
Related Documents................................................... ix
Getting to Know Your NEC Versa 4000
Around the System................................................... 1-2
Front................................................................... 1-2
LCD Panel..................................................... 1-2
Controls and Microphone ............................... 1-3
Status Icons ................................................... 1-5
Keyboard....................................................... 1-6
Infrared Port .................................................. 1-8
NEC VersaGlide ............................................ 1-8
Diskette Drive and the NEC VersaBay II........ 1-8
Back ................................................................... 1-8
Left Side ............................................................. 1-10
Right Side........................................................... 1-11
Bottom................................................................ 1-12
System Care............................................................. 1-13
Precautions ......................................................... 1-13
Storage Requirements.......................................... 1-14
Routine Cleaning................................................. 1-15
2 Using the Hardware
Powering Your NEC Versa.................................. 2-1
AC Adapter.................................................... 2-1
Bridge Battery................................................ 2-3
Battery Pack .................................................. 2-3
Replacing the Battery Pack............................. 2-4
DC Car Adapter............................................. 2-8
Keyboard............................................................ 2-8
The NEC VersaGlide Touchpad .......................... 2-10
Touchpad Adjustments................................... 2-11
Contents iii

Ergonomics.................................................... 2-11
Options and PC Card Expansion............................... 2-12
Hard Disk ........................................................... 2-12
Memory Expansion ............................................. 2-15
VersaBay II......................................................... 2-19
External Monitor................................................. 2-22
Printer................................................................. 2-23
Parallel Devices.............................................. 2-23
Serial Devices ................................................ 2-25
External Keyboard .............................................. 2-26
Mouse................................................................. 2-28
External Bar Code Scanner.................................. 2-29
External Audio Options....................................... 2-30
PC Cards ............................................................ 2-31
Docking the NEC Versa 4000.............................. 2-32
NEC Versa PortBar 4000............................... 2-32
NEC Versa Docking Station 4000 .................. 2-33
3 Understanding the Software
Windows Introduction .............................................. 3-1
Windows ’95....................................................... 3-2
Windows for Workgroups ................................... 3-2
DOS Introduction..................................................... 3-3
Guide to Online Help................................................ 3-4
NEC Versa 4000 InfoCenter................................ 3-4
Additional Topics................................................ 3-5
Guide to NEC Utilities ............................................. 3-5
Distribution Diskette Creator............................... 3-6
Setup Utility........................................................ 3-6
Using Setup.................................................... 3-6
Other Software......................................................... 3-7
The PowerPanel .................................................. 3-8
TranXit............................................................... 3-8
CardWizard ........................................................ 3-9
Taxi and OAG .................................................... 3-9
ESS Audio.......................................................... 3-9
iv Contents

4 Traveling with Your NEC Versa 4000
Power Connections................................................... 4-1
Checklists ................................................................ 4-2
What to Take ...................................................... 4-2
Things to Do....................................................... 4-3
5 Solving Problems
Problem Checklist .................................................... 5-1
Start-Up Problems.................................................... 5-3
POST Error Messages......................................... 5-3
If You Need Assistance ............................................ 5-6
Direct Technical Support..................................... 5-6
Remote Technical Support................................... 5-7
Features......................................................... 5-8
6 Getting Help
A Setting Up a Healthy Work Environment
Making Your Computer Work for You..................... A-1
Arrange Your Equipment.......................................... A-3
Adjust Your Chair.................................................... A-3
Adjust Your Input Devices ....................................... A-4
Adjust Your Screen or Monitor................................. A-5
Vary Your Workday................................................. A-6
Pre-Existing Conditions and Psychosocial Factors..... A-7
B Specifications and Environment
Contents v
Getting to Know Your
1
NEC Versa 4000
!
Prolonged or improper use of a computer workstation may pose a risk of serious injury. To reduce
your risk of injury, set up and use your computer i n
the manner described in Appendix A, Setting Up a
Healthy Work Environment.
After completing the steps in the quick setup sheet that
comes with your computer, your NEC Versa™ 4000 is
ready to go! It’s packed with features to make your work
experience fun and productive. To get started, look at the
following:
■ Read Appendix A, Setting Up a Healthy Work Environ-
ment, for guidelines that help you use your computer
productively and safely. Information includes how to set
up and use your computer to reduce your risk of developing nerve, muscle, or tendon disorders.
WARNING
■ Take the online System Tour to get acquainted with the
NEC Versa 4000. (The System Tour is in the Windows
NEC Information group under the NEC Versa 4000
InfoCenter.)
■ Wander through the online system Basics. (Basics is in
the Windows NEC Information group under the NEC
Versa 4000 InfoCenter.)
■ Flip through this guide to familiarize yourself with the
NEC Versa.
Getting to Know Your NEC Versa 4000 1-1
AROUND THE SYSTEM
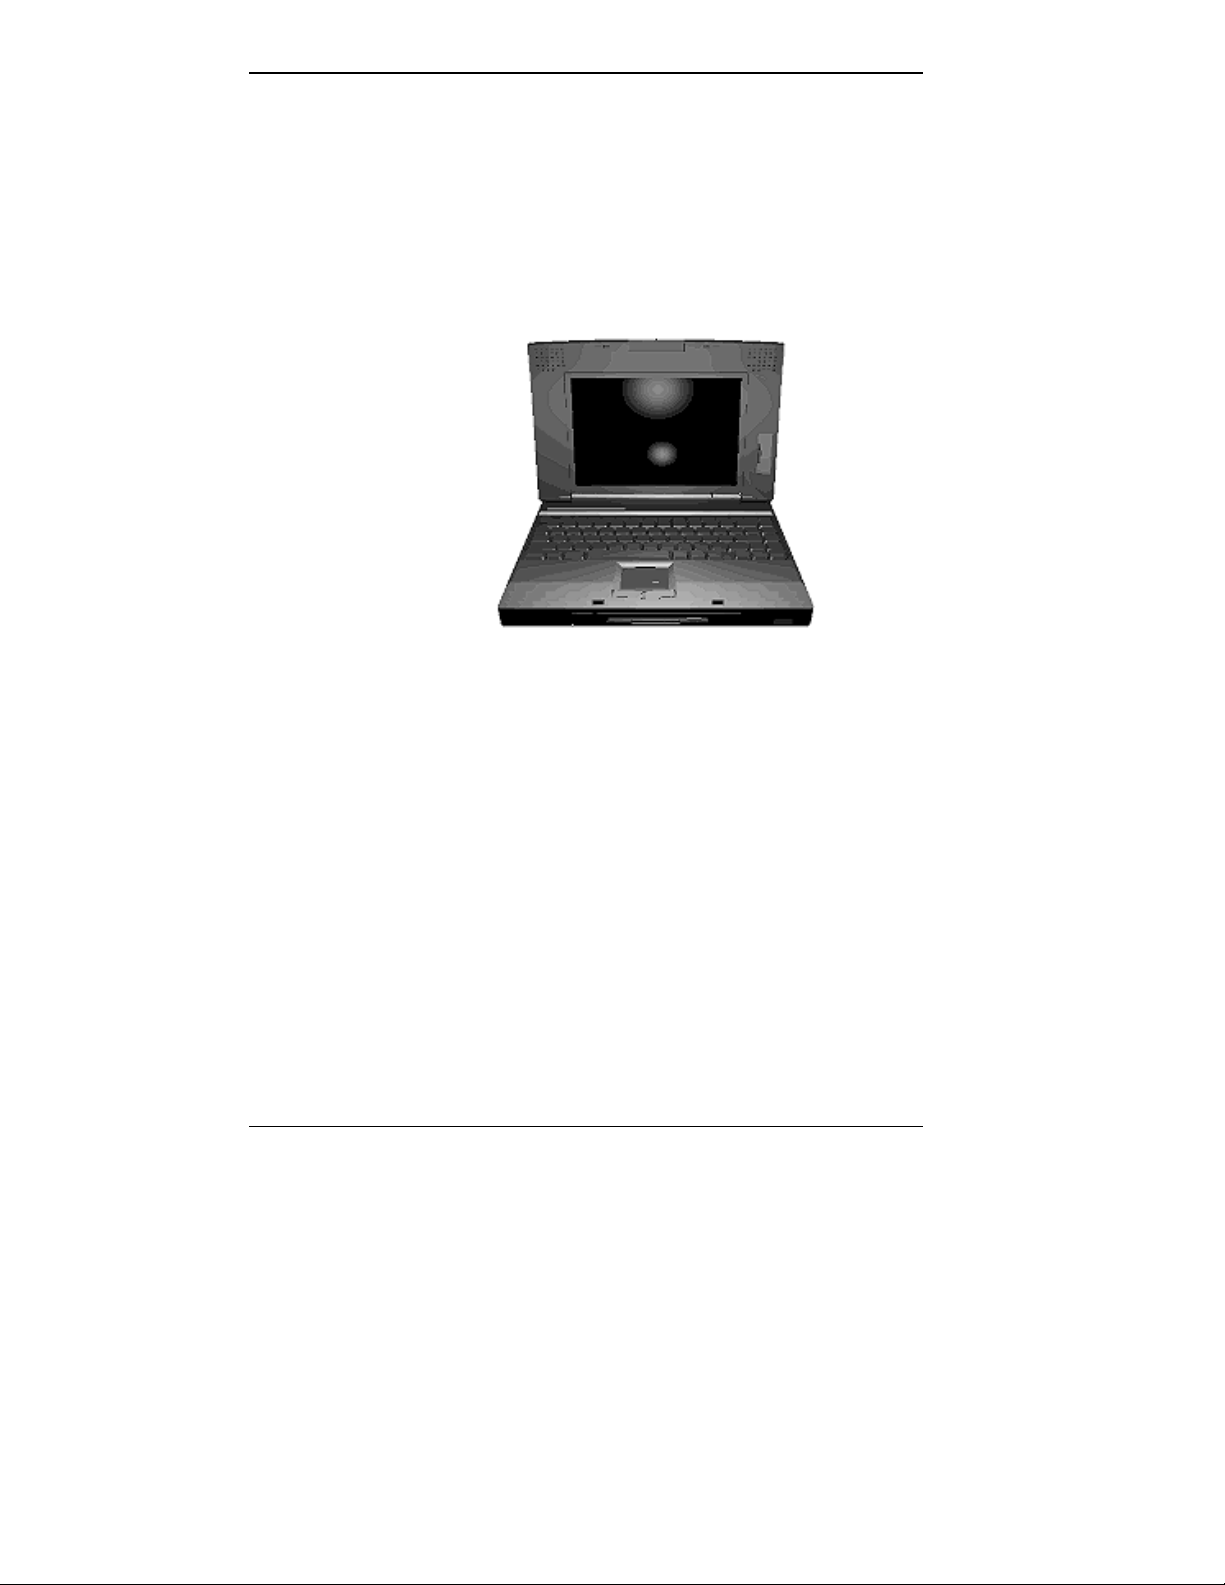
The NEC Versa 4000 is light and compact with features on
every side.
Front
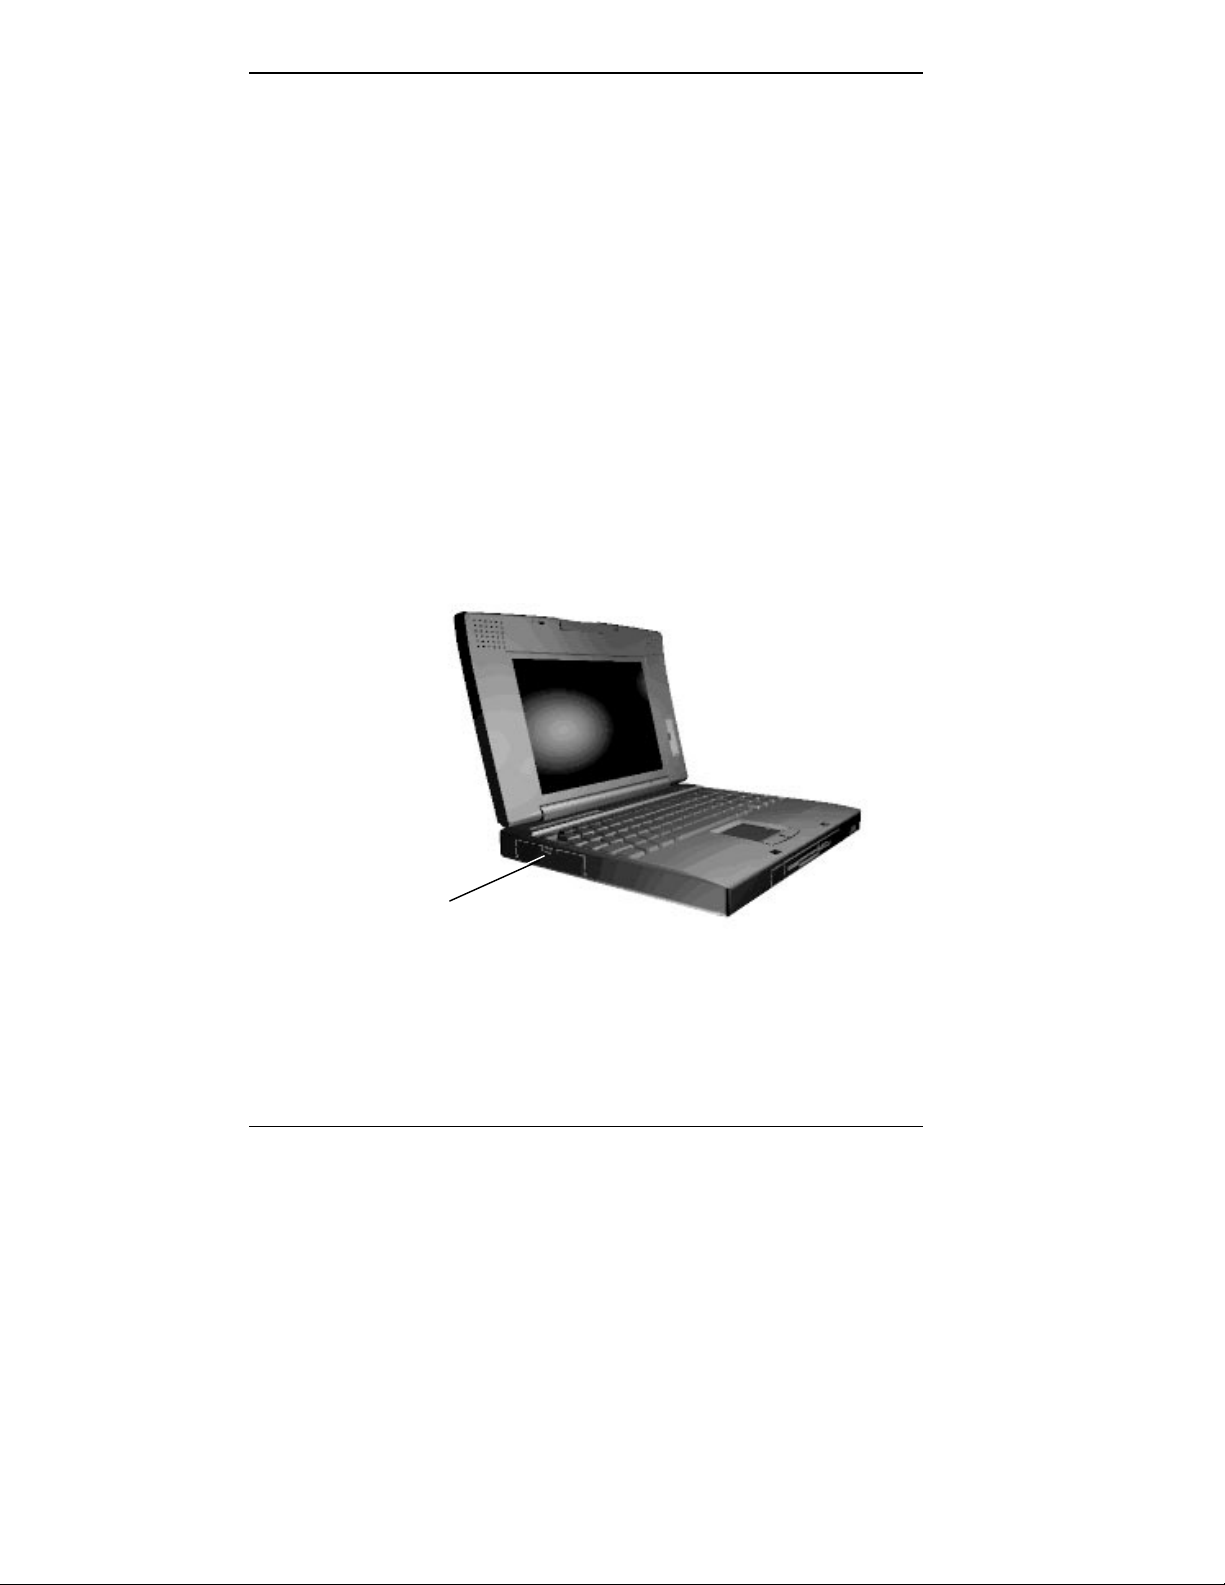
First, look at the front of the NEC Versa 4000.
The front
LCD Panel
Your NEC Versa 4000 comes with a 10.4-inch Dual-Scan
Super-Twisted Nematic (DSTN) color display, a 10.4-inch
High-Resolution color display, or a 10.1-inch color Thin
Film Transistor (TFT) active-matrix display. In addition to
the screen, the display panel offers a number of other features. They include the features shown next and described
after the figure.
1-2 Getting to Know Your NEC Versa 4000
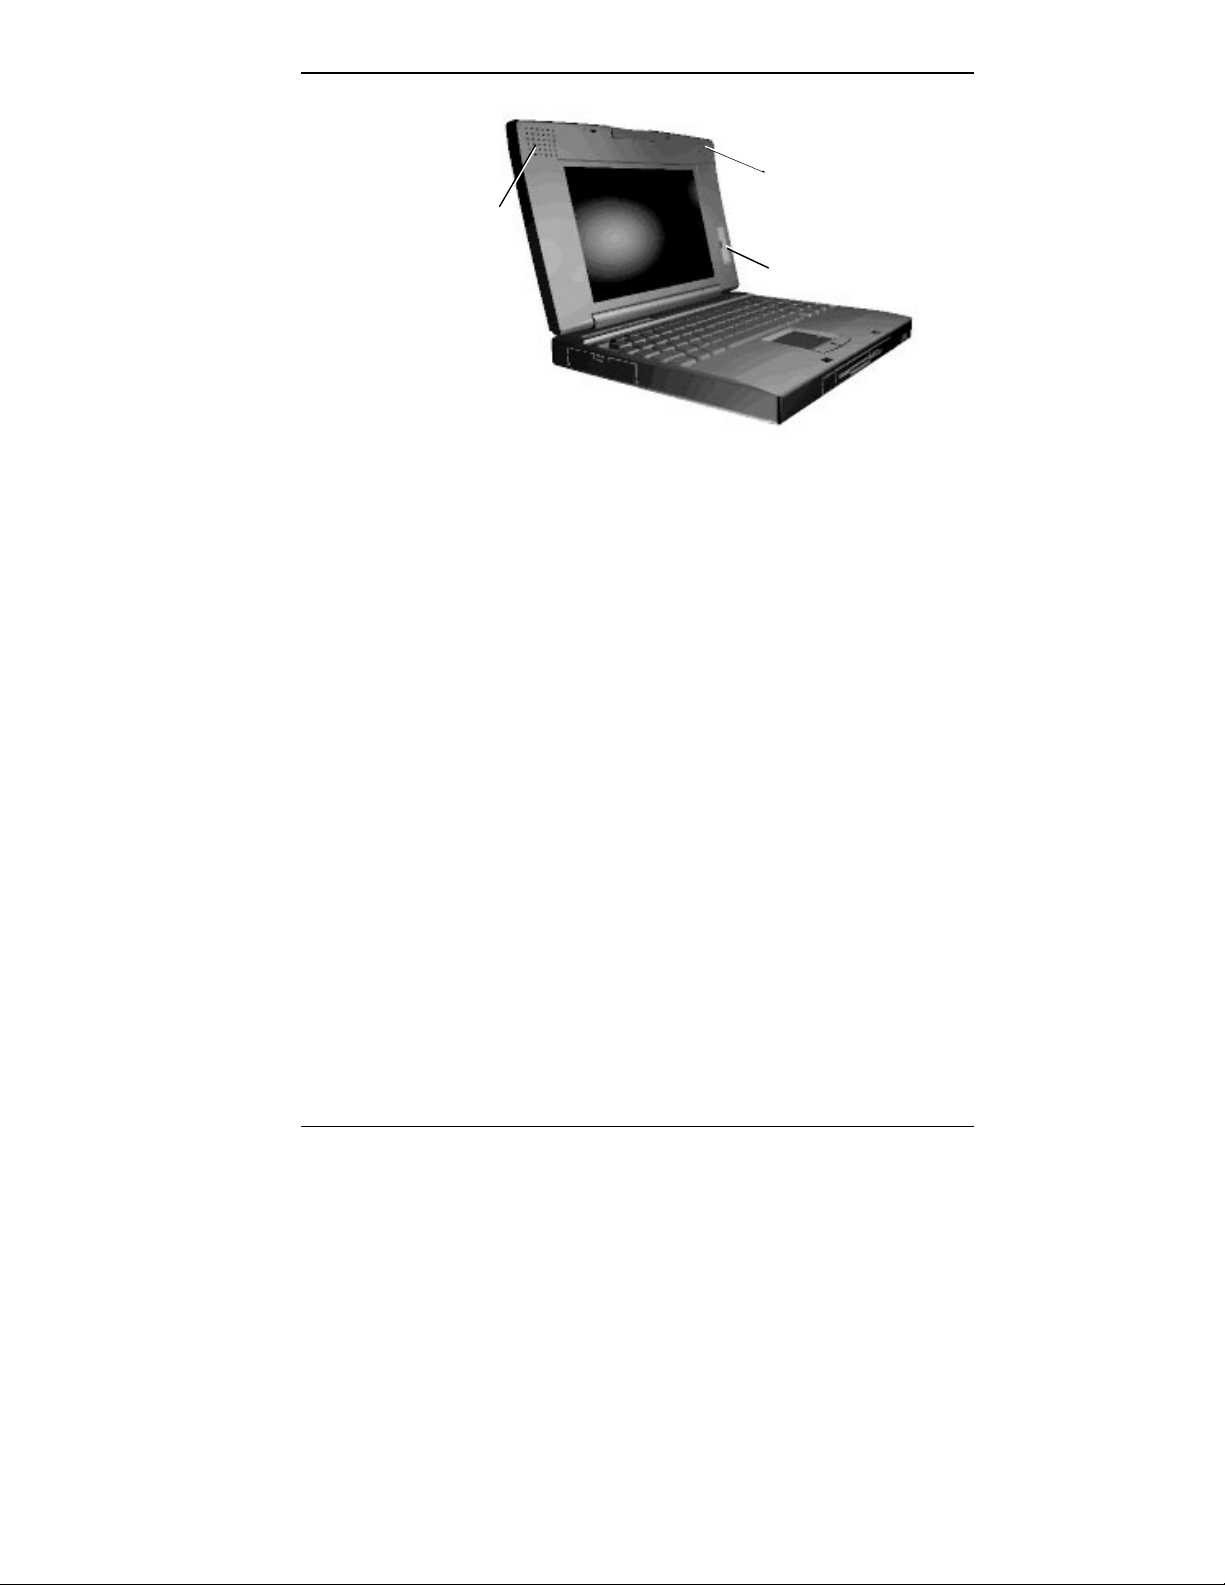
Speaker
Speaker
Brightness Control
LCD panel features
■ Built-in Stereo Speakers — positioned to play stereo
sound from your system.
■ Brightness Control — a slide switch to adjust the screen
backlight brightness.
■ Contrast Control — a slide switch to adjust the contrast
on the screen (DSTN screens only).
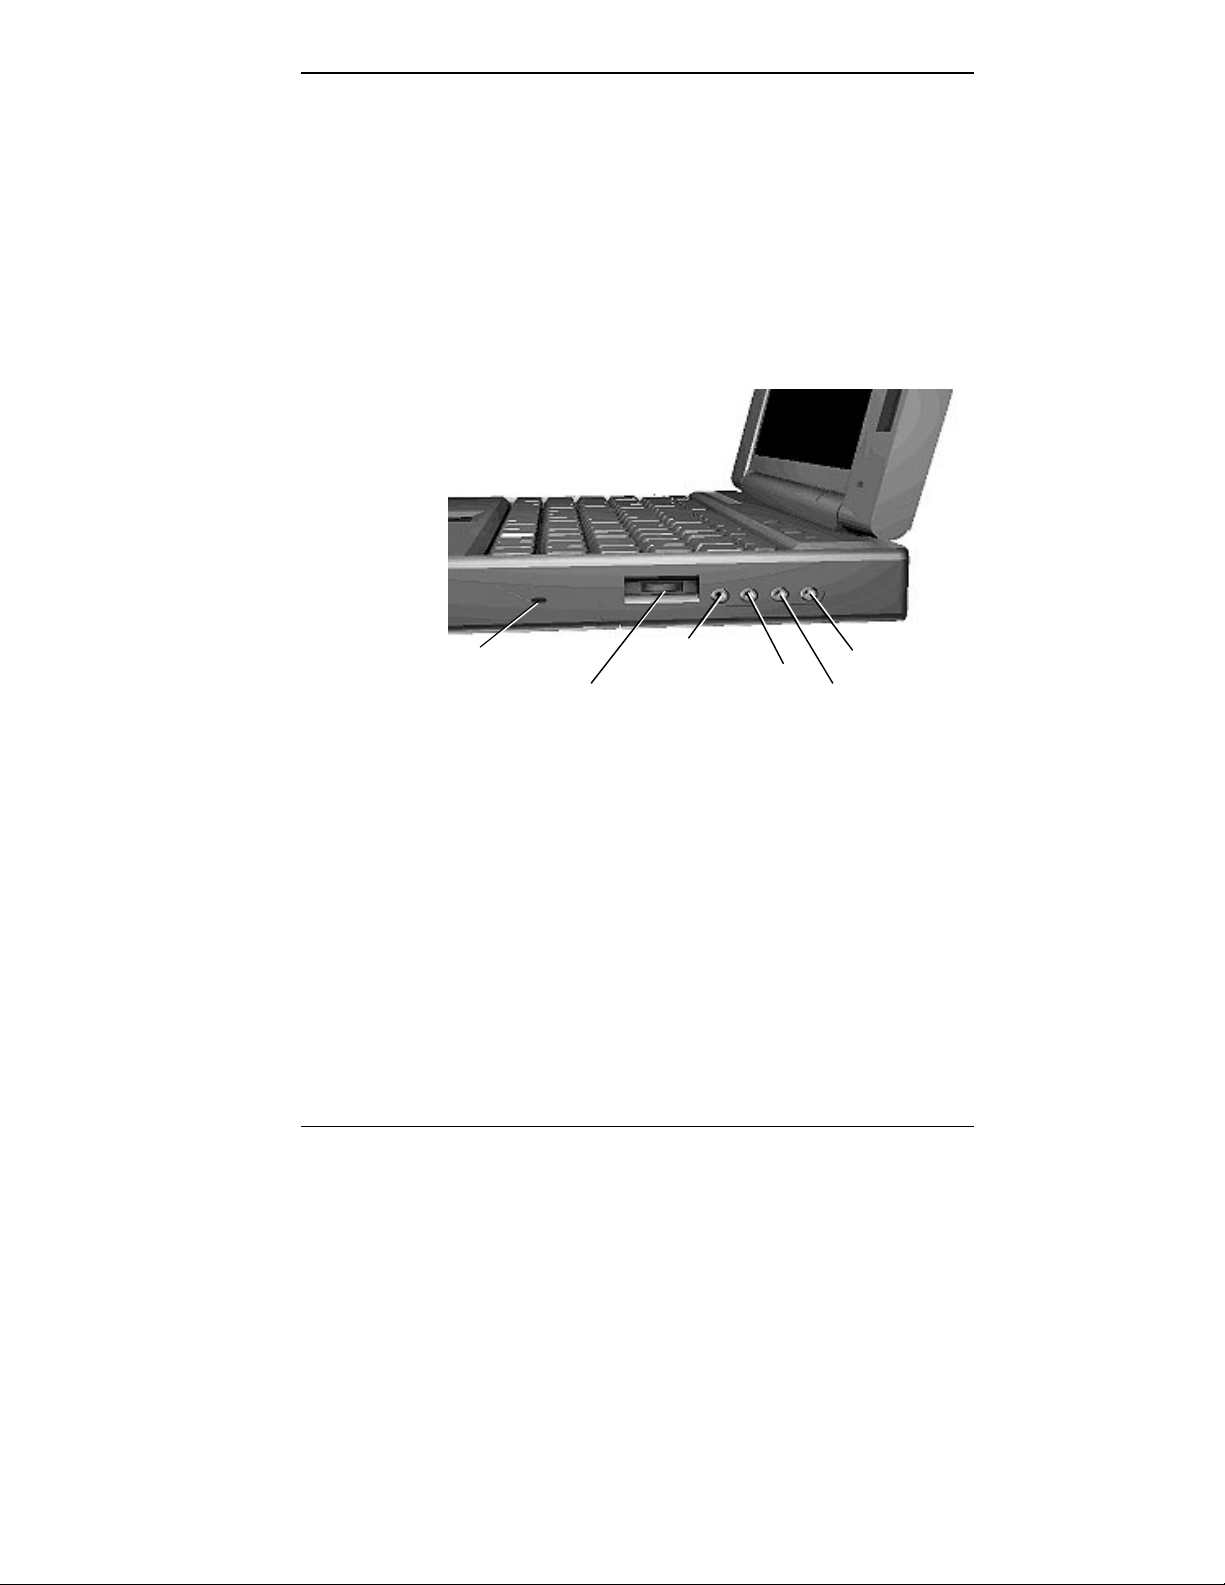
Controls and Microphone
NEC Versa 4000 controls and the built-in microphone are
shown in the following figure. These features are described
after the figure.
Getting to Know Your NEC Versa 4000 1-3

Microphone
Power LED
Suspend Button
LCD Panel Sensor
Power Button
Controls and microphone
■ Microphone — allows you to record monophonic sound
directly into your notebook computer.
■ Power LED
Lights green when the system is powered on.
Blinks green when the system is in Suspend mode.
Blinks yellow to indicate that battery power is low.
■ Suspend Button — press the Suspend button to put the
unit into Suspend mode or to resume operation mode.
■ LCD Panel Sensor— senses when the LCD panel is
closed and turns off the panel.
■ Power Button — slide the power button to power on and
off the notebook computer.
1-4 Getting to Know Your NEC Versa 4000
y
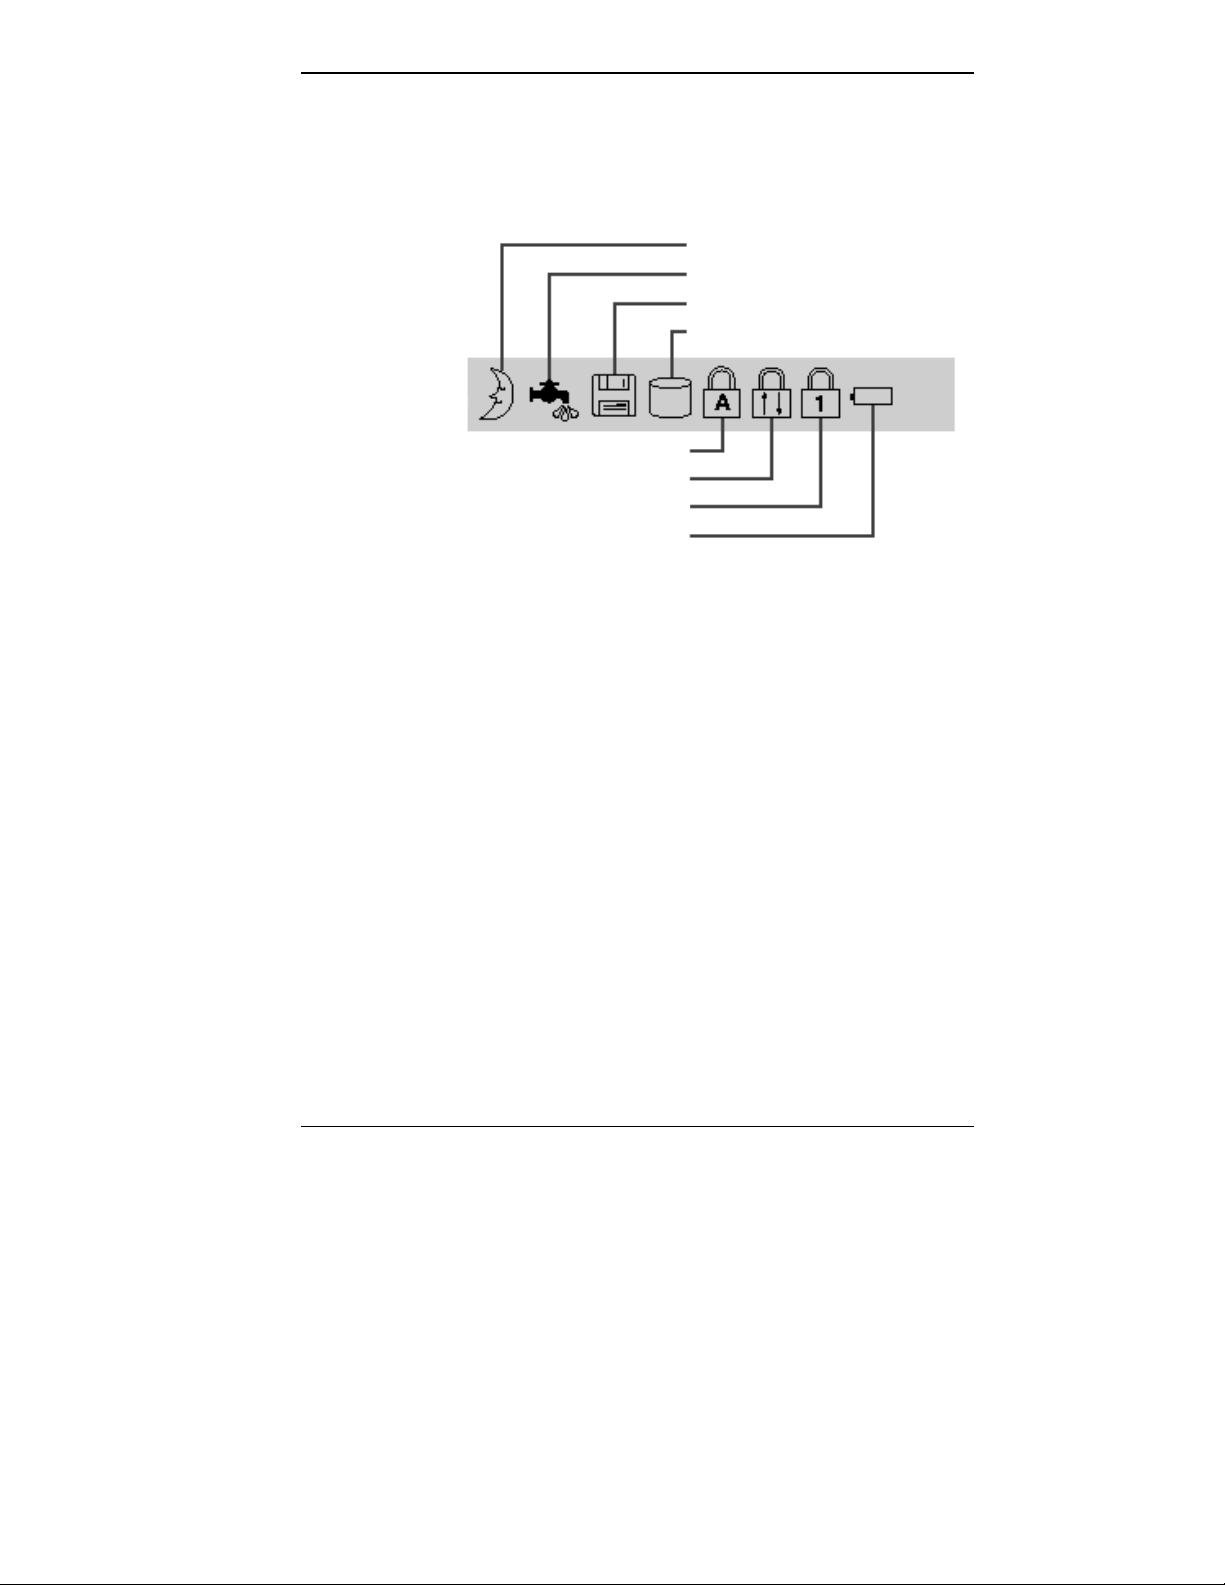
Status Icons
The NEC Versa 4000 has several LCD icons that show you
the system status.
Suspend
Power Management
Diskette Drive Access
Hard Disk Drive Access
Caps Lock
Scroll Lock
Num Lock
Batter
■ Suspend — appears when the system is in Suspend
mode.
■ Power Management — shows the current power man-
agement mode in use.
■ Diskette — appears when the NEC Versa writes data to
or retrieves data from a diskette.
■ Hard Disk — shows when the NEC Versa writes data to
or retrieves data from the system’s hard disk.
■ Caps Lock — appears when caps lock is in effect.
■ Scroll Lock — shows that scroll lock is in effect.
■ Num Lock — appears when Num Lock mode is active.
Getting to Know Your NEC Versa 4000 1-5
Keyboard
■ Battery Status — displays the battery pack charge
status. If you have two battery packs installed, two battery icons appear.
4 bars indicate a 76 – 100% charge
3 bars indicate a 51 – 75% charge
2 bars indicate a 26 – 50% charge
1 bar indicates a 1 – 25% charge.
The first and third bars on the battery gauge flash to indicate an unknown battery status. To correct the reading, recharge your battery for 8 hours. If the battery is
new and still shows an unknown status, contact the
dealer from whom you purchased the battery.
The NEC Versa 4000 keyboard is equipped with many
features, including the following. (For more details about
keyboard features, see Chapter 2 of this guide and the online information found in the NEC Versa 4000 InfoCenter.)
■ Function keys — Function (Fn) key combinations acti-
vate the functions printed in blue on keys with dual
functions. Press the Fn key and a function key at the
same time. For example, to adjust the speaker volume
press and hold
Fn while you press and hold F6.
Applications that you run determine what the key
functions do. See the application user guide for
information about how these keys function.
The following function key combinations are prepro-
grammed for the NEC Versa 4000.
Fn
Fn
1-6 Getting to Know Your NEC Versa 4000
+
+
F2
Highlight
F3
LCD/CRT
Highlight
LCD/CRT

Fn
Fn
Fn
Fn
Typewriter keys — The typewriter keys (also called al-
■
+
+
+
+
F5
Backlight
F6
Speaker
F7
P/M Lev
F12
ScrLock
Backlight
System Speaker Volume
Power Management (P/M)
Scroll Lock On/Off
phanumeric keys) are used almost exactly as those on a
typewriter. Keys that behave differently do so when
combined with control keys or function keys.
■ Cursor control keys — Cursor control keys let you po-
sition the cursor on the screen wherever you want. On
the screen, the cursor is a blinking underline, block or
pointer, depending on the application. The cursor shows
where the text typed next will appear.
■ Numeric keypad — Pressing Num Lock activates the
numeric keypad when no external keyboard or scanner is
connected. The numeric keys are printed in blue. The
keypad lets you type numbers and mathematical operands (+, –) as you would on a calculator. The keypad is
ideal for entering long lists of numbers.
■ Control keys — Control keys include Ctrl, Alt, Fn, and
Shift. They are used in conjunction with other keys to
change their functions. To use control keys, press and
hold the control key while pressing another key. For example, “press
and type the letter
Ctrl c” means to hold down the Ctrl key
c. How the key combination works
depends on the application you are running. Other control keys include
Num Lock, Scroll Lock, and Ins. (For
detailed descriptions, see the online information.)
Getting to Know Your NEC Versa 4000 1-7

Infrared Port
The infrared (IR) ports on your system let your NEC
Versa 4000 communicate with other devices having infrared
ports. For example, you can easily transfer files between
your NEC Versa and an IR-equipped desktop or print to an
IR-equipped printer without using cables.
These ports are Serial-Infrared (S-IR), IrDA compatible.
A second infrared port is located on the back of your note-
book system. When your NEC Versa ships, the back port is
enabled and the front port is disabled. When you dock your
system, the back IR port is automatically disabled and the
front IR port is enabled.
NEC VersaGlide
The NEC VersaGlide touchpad gives you control of the
pointer on the screen and replaces the mouse usually used
with computers. The VersaGlide touchpad is described in
detail in Chapter 2, Learning to Use the Hardware.
Diskette Drive and the NEC VersaBay II
A 1.44-MB diskette drive comes installed in the NEC
VersaBay II on the front of your system. You can save your
files to diskette and install software from diskette using the
diskette drive, called drive A.
The VersaBay II lets you install many other options, including an optional CD-ROM reader, a second battery pack, or
an additional hard disk drive.
VersaBay II release latches are on the bottom of the unit.
Back
The back of the system has ports for connecting your NEC
Versa 4000 to other devices, like a printer, an external
mouse, and power sources.
1-8 Getting to Know Your NEC Versa 4000
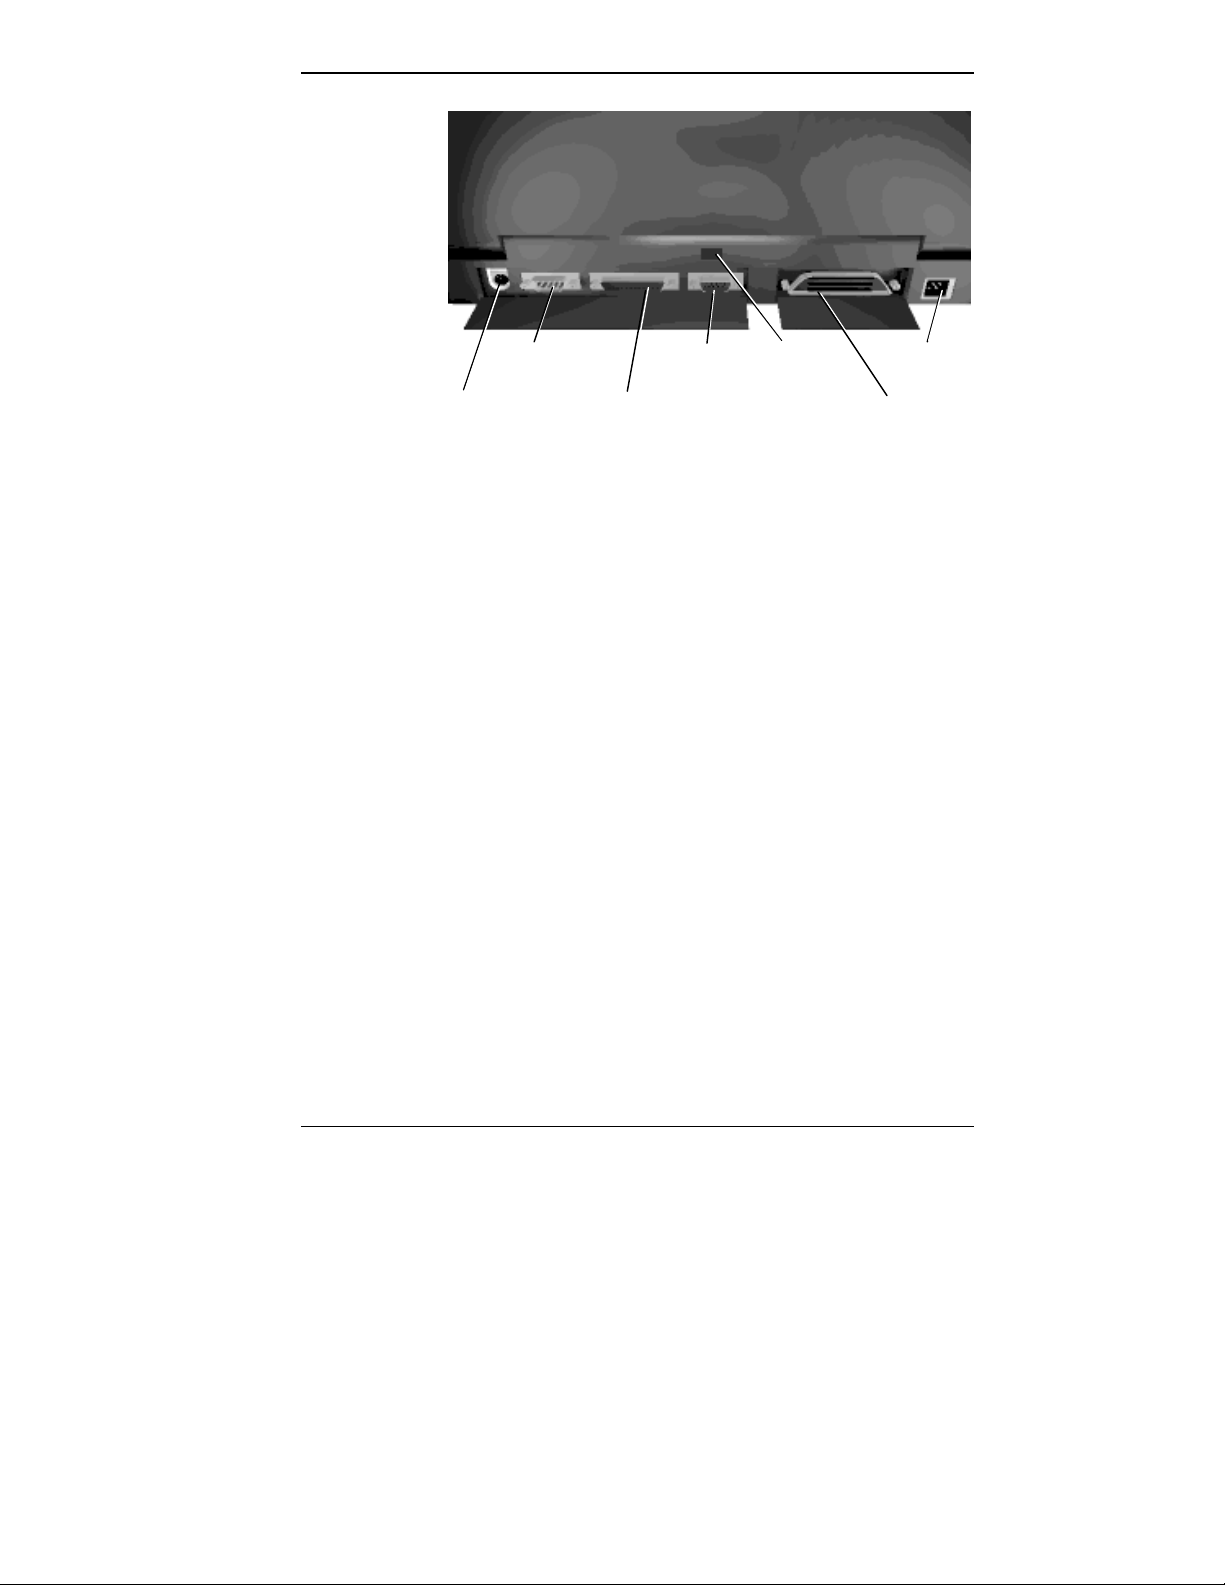
y
IR Port
Power Port
Expansion Port
Mouse/
Ke
Serial Port
board Port
Monitor Port
Enhanced
Parallel Port
Back system features
■ Keyboard and Mouse Port — Use the standard PS/2
port to connect an external PS/2-style mouse or a PS/2style keyboard to the system. With an optional Y-cable
adapter, you can connect both a mouse and a keyboard
at the same time.
■ Serial Port — Use this port to connect an external mo-
dem or other serial device. A serial cable has a 9-pin
connector.
■ Enhanced Parallel Port — Use this port to connect a
parallel printer or other parallel device. A parallel cable
has a 25-pin cable connector.
■ Monitor (Video) Port — Use this 15-pin connector port
to attach an external monitor to your NEC Versa. You
can run the LCD display and the external monitor simultaneously or run either alone.
Getting to Know Your NEC Versa 4000 1-9
Left Side
■ Infrared (IR) Port — Use the IR port to communicate
with other devices having IR ports. This port lets you
transfer files between your NEC Versa and an IRequipped desktop or print to an IR-equipped printer
without using cables.
■ Expansion Connector — Use this bus connector to at-
tach the NEC Versa to a PortBar 4000 or Docking Station 4000 to further expand your options.
■ Power Port — Use the power jack to attach the NEC
Versa to a DC power source such as the AC adapter or
the available DC car adapter.
The left side of your NEC Versa 4000 has two slots for inserting two Type I or Type II PC cards (formerly called
PCMCIA cards). You can also insert one Type III PC card.
PC Card Slots
1-10 Getting to Know Your NEC Versa 4000
Left side features
Right Side
The PC card is a standard interface for peripheral devices
like fax/modems, local area network (LAN) cards, storage
cards, and pagers. A PC card is about the size and shape of
a credit card and is inserted into one of the PC card slots.
Audio ports, the volume control dial, and the optional
Kensington lock socket are located on the right-hand side of
the NEC Versa 4000.
Kensington Lock
Socket
Volume Control Dial
Headphones
Microphone
Line In
Line Out
Right side features
■ Kensington Lock Socket — Lets you provide added se-
curity by installing an optional Kensington Lock.
■ Volume Control Dial — Allows you to control the
speaker volume.
■ Headphones — Lets you connect external headphones or
speakers to your NEC Versa 4000. Plugging in headphones disables the built-in system speakers.
Getting to Know Your NEC Versa 4000 1-11
(unde
e)
Bottom
■ Microphone (MIC) — Allows you to connect an exter-
nal microphone for monophonic recording or amplification through the unit. Plugging in an external microphone disables the built-in microphone.
■ Line Out — Lets the NEC Versa 4000 act as an input
source for another audio system. Connect this port to a
Line In port on another audio system to play or record.
■ Line In — Lets you use another audio system, like a
home stereo, as an input source. Use a cable to connect
to the Line Out port on the other audio system to record
or play.
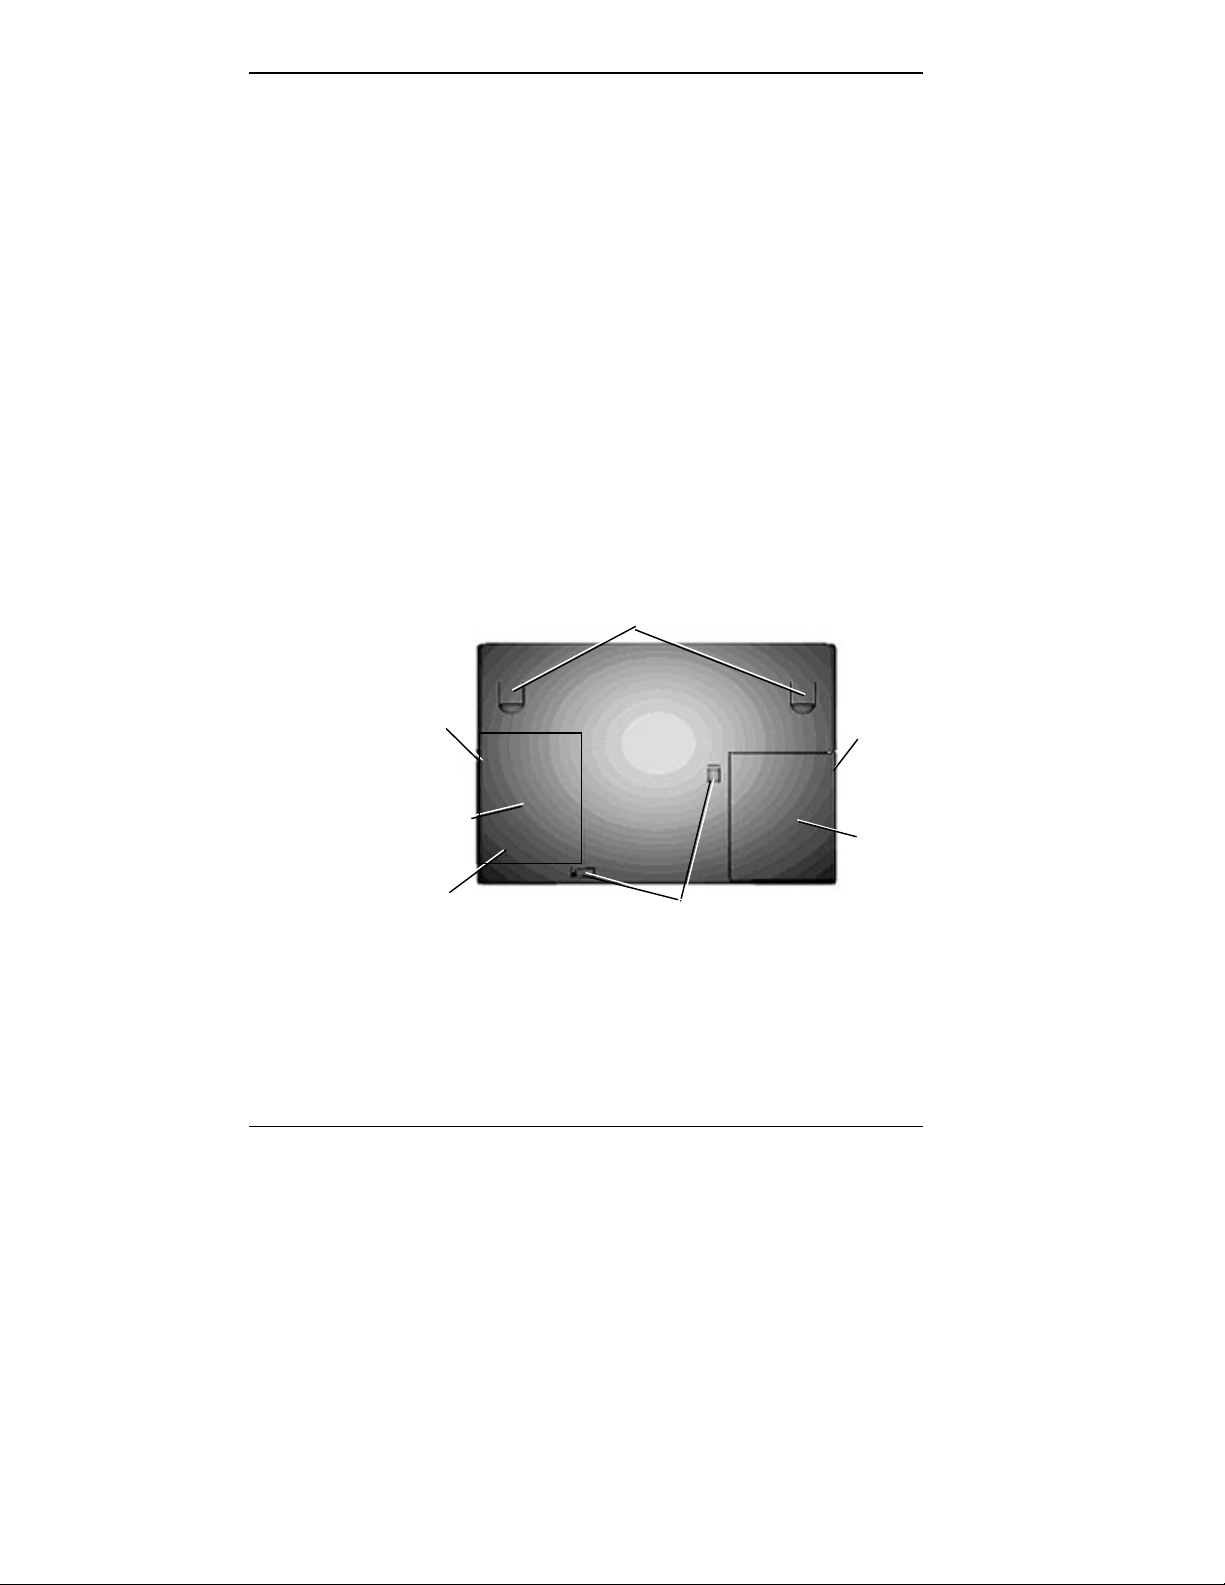
The bottom of the NEC Versa 4000 contains the features
shown in the following figure. Features are described after
the figure.
Adjustable Feet
Drive
Cover
Latch
Hard Disk
Drive Bay
Memory Module Slot
r Hard Disk Driv
1-12 Getting to Know Your NEC Versa 4000
Battery
Cover
Latch
Battery
Bay
VersaBay II Release Latches
Bottom features

■ Hard Disk Drive Bay — The hard disk drive bay con-
tains the removable hard disk drive. Depending on your
NEC Versa’s configuration, it contains a 540-MB or
810-MB hard disk drive. You can exchange hard disks
in the NEC Versa 4000.
When you turn the system upside down with the front
towards you, the hard disk drive is located on the left
front of the system.
■ Memory Expansion Slot — Located just under the hard
disk drive, this slot lets you add an optional memory
card to expand system memory.
■ Battery Bay — Contains a Lithium Ion (Li-Ion) battery
that lets you run your system on DC power. The battery
bay is located on the right front of the system when the
system is upside down with the front towards you.
■ NEC VersaBay II Release Latches — These latches let
you remove the option currently installed in the bay.
■ Adjustable Feet — Adjustable feet let you change the
angle and level of the NEC Versa 4000.
SYSTEM CARE
The NEC Versa 4000 is a durable, dependable system built
for extensive use and travel. Follow these guidelines to
maintain the condition and performance of your computer.
Precautions
Follow these precautions when using your NEC Versa
4000, AC adapter, and VersaBay II.
■ Avoid dropping or bumping the computer or the AC
■ Do not stack heavy objects on the computer.
adapter.
Getting to Know Your NEC Versa 4000 1-13

■ Avoid moving the NEC Versa 4000 during system op-
eration, especially while the hard disk or diskette drive is
being accessed.
■ When using the AC adapter, make sure the power source
falls within the system’s compatible range of 100–240
volts AC. Never use the AC adapter if the voltage falls
outside of this range. (Watch for this when traveling to
foreign countries.)
■ Turn computer power off before attaching or removing
non-plug and play devices.
■ Avoid using the computer or AC adapter for extended
periods in direct sunlight.
■ Do not use the system in humid or dusty environments.
■ Turn computer power off before cleaning it.
■ Avoid exposing the NEC Versa 4000 or AC adapter to
extreme changes in temperature or humidity. If it is unavoidable, allow your NEC Versa to adjust to room
temperature before using.
■ When cleaning the system, use a soft, clean, dry cloth.
Avoid wiping the display surface with abrasive material,
including rough fabric.
■ If the AC adapter becomes extremely hot, unplug the
adapter and let it cool.
■ Do not direct an IR port towards the LCD panel.
■ Keep the AC adapter away from the IR ports.
Storage Requirements
Store the computer and AC adapter in an environment that
meets the following conditions:
■ Maintain storage temperatures between –4°F and 104°F
(–20°C and 40°C).
1-14 Getting to Know Your NEC Versa 4000
■ Keep the storage area free from vibration and magnetic
fields.
■ Keep the system and its components away from organic
solvents or corrosive gases.
■ Avoid leaving the system and its components in direct
sunlight or near heat sources.
!
I f the temperature of the NEC Versa suddenly rises
or falls (for example, when you move the system
from a warm place to a cold place), vapor condenses inside the system. Turning on the system
under this condition can damage the internal system
components.
Before turning on the system, wait until the system’s
internal temperature equalizes with the new environment and any internal moisture can evaporate.
CAUTION
Routine Cleaning
Clean or dust your system as follows.
Never
spray cleaners that contain caustic materials on the
NEC Versa 4000.
These cleaners are usually high in alkalinity which is
measured in pH. Using these cleaners can cause
the plastic surface to crack or discolor.
!
use harsh solutions, household cleaners, or
CAUTION
Getting to Know Your NEC Versa 4000 1-15

■ LCD screen — Carefully wipe the LCD screen with a
soft cloth or a screen wipe designed for that purpose.
Special screen wipes are available through your local
computer dealer.
■ System case — NEC recommends that you carefully
wipe the case with a slightly damp, almost dry cloth.
1-16 Getting to Know Your NEC Versa 4000

2
Powering Your NEC Versa
Using the Hardware
Like any computer, the NEC Versa 4000 is made up of
hardware (the physical unit and its components) and software (the programs that run on the computer). This chapter
discusses the hardware.
■ Powering on the system
■ Keyboard features
■ NEC VersaGlide
■ Options and PC card expansion
The NEC Versa 4000 can be powered from a variety of different sources, making it a truly portable system. Operate
your NEC Versa 4000 just about anywhere using one of the
following power sources:
■ the AC adapter connected to an electrical wall outlet
(using AC power)
AC Adapter
■ the battery pack or an optional second battery pack
■ the optional DC adapter connected to a car cigarette
lighter.
Use the AC adapter that came with your NEC Versa to run
your computer on alternating current (AC) power, or to recharge the battery pack. Use the AC adapter whenever a
wall outlet is nearby.
Using the Hardware 2-1
Keep the adapter connected whenever possible. The AC
adapter charges the battery whether or not you are using the
NEC Versa.
NOTE
Check that the AC outlet voltage falls in the
range of 100–240 Volts AC. Verify that the cord and
plug are appropriate for your AC source.
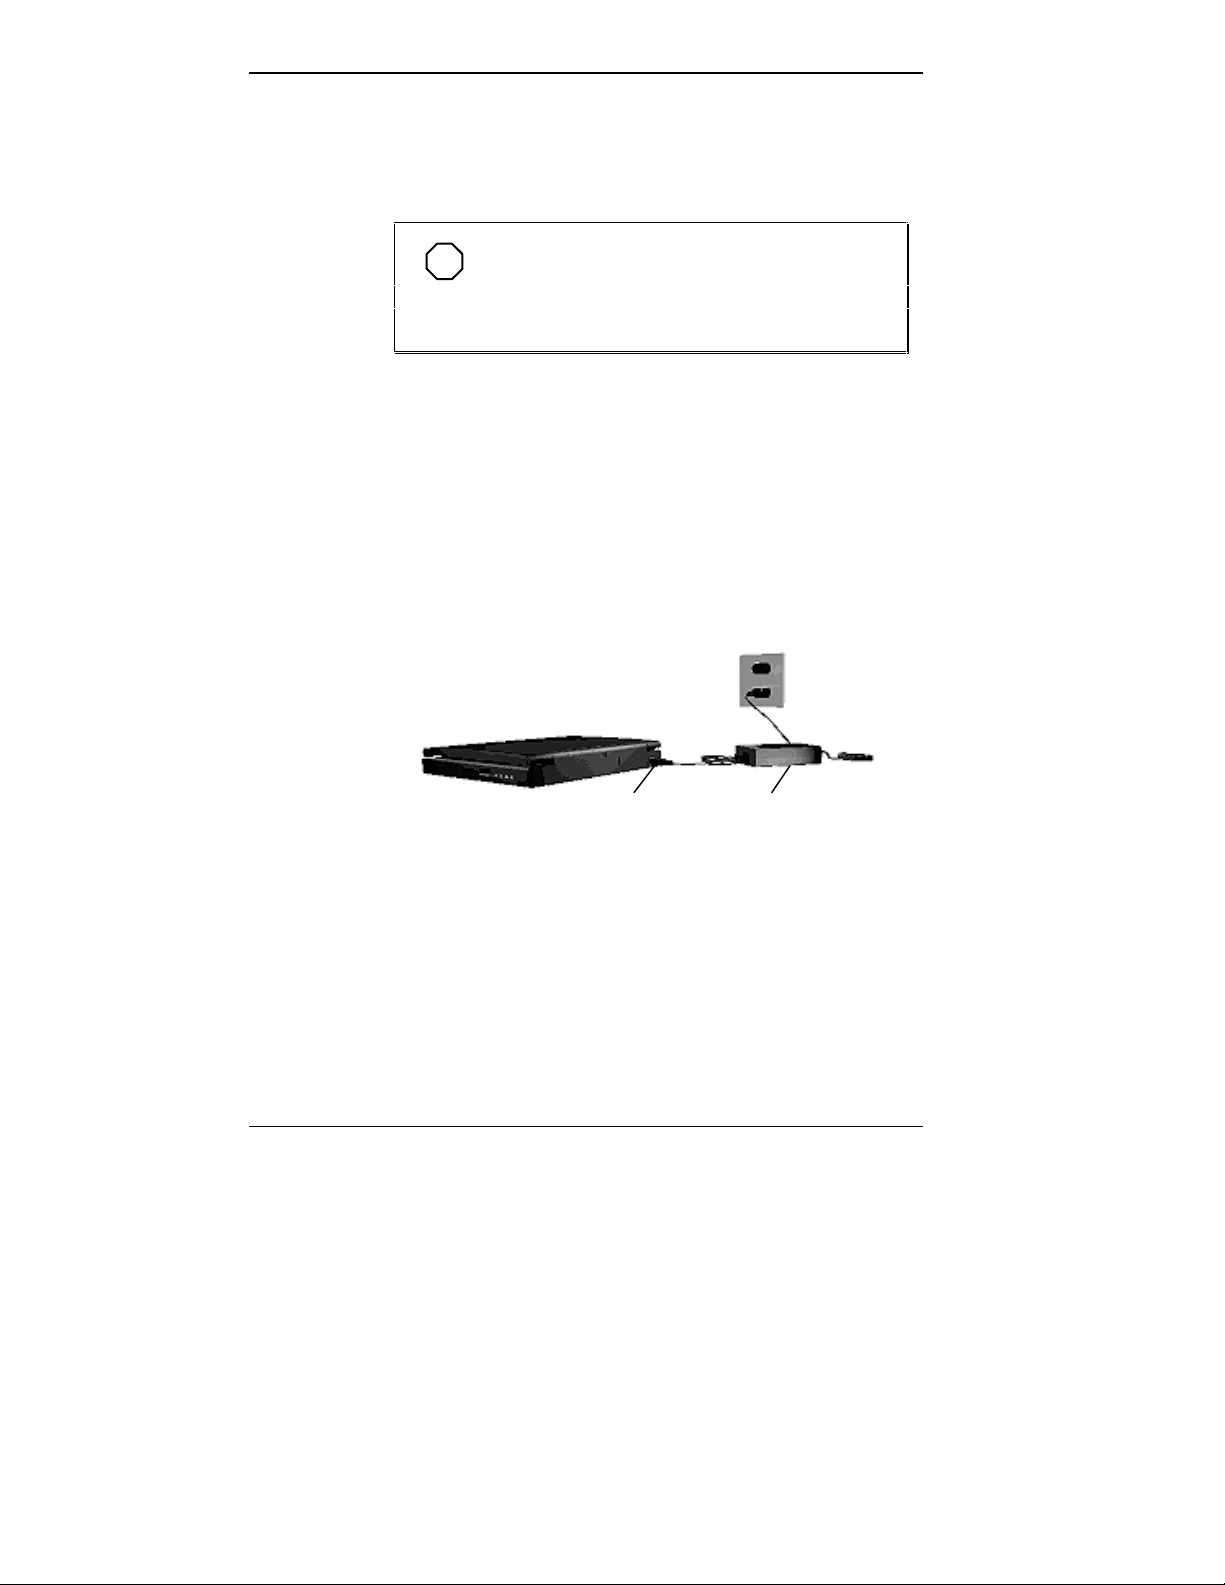
Connect the AC adapter as follows:
1. Connect the AC adapter cable to the power port on the
back of the NEC Versa 4000.
2. Plug one end of the AC power cable into the AC adapter
and the other end into a properly grounded 120- or 240volt wall outlet.
2-2 Using the Hardware
Power Port
AC Adapter
Connecting the AC adapter
Bridge Battery
Battery Pack
Your notebook computer comes with an internal bridge
battery. The bridge battery saves your system status in
Suspend mode for up to five minutes. This gives you time to
install a fully charged battery or plug in AC power when
your battery charge becomes low.
Only an authorized NEC dealer can change a bridge
battery.
The NEC Versa 4000 comes with a rechargeable Lithium
Ion (Li-Ion) battery pack. With it, you can run your system
on battery power for up to five hours with Power Management or 2.5 hours without Power Management. It's easy to
install and remove.
You can keep track of the battery's status through the status
LCDs on the front of the system or the battery gauge in the
power panel. Both let you know how much battery power
remains.
NOTE
When installing a new battery, the first and
third bars on the battery gauge may flash. This indi cates an unknown battery status. To correct the
reading, recharge your battery for 8 hours. If the
battery still shows an unknown status, contact
dealer from whom you purchased the battery for a
replacement.
When battery power is very low, the battery outline on the
battery status LCD blinks. If the system speaker is enabled,
3 low battery warning beeps are emitted.
Using the Hardware 2-3
When battery power gets low, do either of the following:
■ Put your system in Suspend mode, remove the battery
pack, and replace it with a fully charged Li-Ion battery.
■ Leave the battery pack in the system and connect your
NEC Versa to the AC adapter and a wall outlet. If you
connect the system to AC power and continue to use it,
the battery recharges in 2.5 to 7 hours. If you connect
the system to AC power and do not use it, the battery recharges in about 2.5 hours.
You can also buy an optional battery charger to quickly
charge your battery. See the online Options Catalog.
!
To prevent accidental battery ignition or explosion,
adhere to the following:
■ Keep the battery away from extreme heat.
■ Keep metal objects away from the battery termi -
nals to prevent causing a short circuit.
WARNING
■ Make sure the battery is properly installed in the
battery bay.
■ Read the precautions printed on the battery and
in the online
Replacing the Battery Pack
Replace the battery pack installed in your NEC Versa system as follows.
1. Turn the NEC Versa over so that it is upside down with
the front of the system facing you.
2-4 Using the Hardware
Basics
.

2. Remove the battery cover as follows:
■ Locate the battery cover latch and slide it towards the
front of the system.
■ Slide the cover about half an inch away from the
system to align the cover tabs and notches.
■ Lift the cover up and away from the system.
Battery Cover Latch
Removing the cover
3. Locate the notch on the battery. Placing your fingers in
the notch, lift the battery out of the system.
!
Always lift the battery out of the system by the
notched end. Failure to do so can damage the battery terminals.
CAUTION
Using the Hardware 2-5
 Loading...