

Page 1

NEC Computer Systems Division,
A Division of Packard Bell NEC, Inc.
DECLARATION OF CONFORMITY
We, the Responsible Party
NEC Computer Systems Division
Packard Bell NEC, Inc.
1414 Massachusetts Avenue
Boxboro, MA 01719
(508) 264-8000
declare that the product
NEC V6060 Series
is in conformity with part 15 of the FCC Rules. Operation of this
product is subject to the following two conditions: (1) this device
may not cause harmful interference, and (2) this devi ce must
accept any interference received, including interference that may
cause undesired operation.
Page 2

PROPRIETARY NOTICE AND L IABILITY DISCLAIM E R
The informa tion disc losed in this docu ment, inc luding a ll des igns a nd r ela t ed mat eri a ls, is t he
valua ble pr oper ty of NEC Compu ter S yst ems Division, P acka r d Bell NE C, Inc. ( NEC CS D,
PBNE C) and/ or it s licensors . NEC CS D and/or its lic ensors, as a ppr opr iate, reserve a ll pa tent, cop yright a nd other pr opriet ary r ights to t his document, including all design, manu facturing, reproduction, use, and sales rights thereto, except to the extent said rights are
expressly granted to others.
The NEC CSD produ ct(s) disc ussed in this document a re warr anted in acc ordance with t he
terms of the Wa r ra nt y St at ement acc ompanying ea ch p rodu ct. However , a ct ua l p erfor manc e
of each s uc h product is dependent u p on fa ct or s s uc h a s s ys t em configur a t ion, cu st omer da t a ,
and operator control. Since implementation by customers of each product may vary, the
suitability of specific product configurations and applications must be determined by the
customer and is not warrant ed by NEC CSD .
To allow for design and specification improvements, the information in this document is
subject to change at any time, without notice. Reproduction of this document or portions
thereof without prior writ ten approval of NECCSD is p rohibit ed.
NEC is a registered trademark of NEC Corporation; Versa is a U.S. registered trademark of NEC Technologies, Inc.; all are used
under license by NEC Computer Systems Division (NECCSD), Packard Bell NEC, Inc.
All other product, brand, or trade names used in this publication are the trademarks or registered trademarks of their respective
trademark owners.
First Pr inting — July 1997
Copyrigh t 1997
NEC Computer Systems Division, Packard Bell NE C , I nc.
1414 Massachusetts Avenue
Boxborough, MA 01719
All Rights Reserved
Page 3

Using this Guide
The NEC Versa® 6060 User’s Guide gives you the information you need t o
maximize t he u se of your NEC Versa notebook comp uter. Read this guide to
familiarize your self with your NEC Ver sa and its features. For s p ecif ic
information see
Cha pter 1, “Gett i ng Start ed,” to acquaint you rself with system har dware.
Cha pter 2, “Introducing the Software,” for a concise summary of the
applicat ions loaded on your system.
Chapter 3, “ Using Setup,” to cus tomize your notebook’s parameter and
power management settings .
Cha pter 4, “Using Your NEC Vers a,” f or a n understanding of syst em
feat u res a nd funct ionality. You’ll also mas ter procedures for c onnec ting
exter nal options like headp hone, microphone or speakers.
Chapter 5, “ Using Multimedia,” for st ep s on integrating video a nd sound
clips into impressive pres ent ations .
TEXT SETUP
Chapter 6 , “Traveling with Your N EC Vers a,” lists valua b le tips for
getting the most out of your s ystem while on the road.
Chapter 7, “ Solving Problems,” provides s i mple s olu tions t o common
problems that may a rise while oper ating you r notebook.
Appendix A, “Setti ng Up a Healthy Work Environment,” provides
guidelines to help promote a healthy work set ting.
Appendix B, “Specific ations,” to review NEC Versa sys tem specifications.
To make this guide as easy to use as possible, text is set up in the following
ways.
Warnings, c aut ions, a nd notes ha ve t he following f ormat :
Using this Guide ix
Page 4
!
W arni ngs alert you to situations that could resul t in seri ous personal
injury or loss of life.
Cauti ons indicat e situations that can dam age the system hardware
or software.
NOTE
Notes giv e particularly important inf ormation about whatever
is being described.
WARNING
!
CA UT ION
Names of keys are p rinted as they appear on the keyboard, for exa mp le,
Ctrl, Alt
Text tha t you must type or keys that you mu st press are p resented in bold
, or
type. For example, type
RELATED DOCUMENTS
See the following docu ments for additional infor ma tion on your NEC Versa
6060 notebook computer:
Your NEC Versa 6060 Quick Setup sheet.
Your NEC Versa 6060 Quick Reference card.
x Using this Guide
Enter
.
and press
dir
Enter
.
Page 5

Contents
Using this G uide
Text Setup..........................................................................................ix
Related Documents.............................................................................x
1 Getting Started
Getting to Know Your NEC Versa System..........................................1-2
Around the System — Front................................................................1-3
LCD.............................................................................................. 1-3
Controls.........................................................................................1-4
Keyboard.......................................................................................1-6
NEC VersaGlide............................................................................ 1-6
Diskette Drive, CD-ROM Reader and the NEC VersaBay II™.......1-7
IR Port and Mic rophone................................................................. 1-8
Around the System — Back ................................................................ 1-10
Around the System — Left Side..........................................................1-11
Around the System — Right Side........................................................1-12
Around the System — Bottom.............................................................1-14
Power Sources for Your NEC Versa ...................................................1-15
Using the AC Adapter ....................................................................1-15
Using the Main Battery Pack..........................................................1-17
Opt ional Second Batt ery ................................................................1-24
Extending Battery Life...................................................................1-25
Using the DC Car Adapter.............................................................1-25
Internal Batteries ................................................................................ 1-26
CMOS Battery..............................................................................1-26
Bridge Battery...............................................................................1-26
System Care.......................................................................................1-26
Status Icons..............................................................................1-5
Powering On.............................................................................1-17
Determining Battery Status.......................................................1-18
When to Replace the Battery.....................................................1-19
Battery Handling.......................................................................1-19
Replacing the Battery Pack.......................................................1-20
Battery Precautions...................................................................1-23
Recharging Battery Precautions ................................................1-24
Contents iii
Page 6

Precautions.................................................................................... 1-26
Storage Requirements....................................................................1-27
Routine Cleaning...........................................................................1-28
2 Introduc ing the Software
Windows Introduction.........................................................................2-2
Windows 9 5 ..................................................................................2-2
Windows N T .................................................................................2-3
Windows f or Wor kgroups.............................................................. 2-4
DOS Introduction...............................................................................2-5
NEC Versa Help Center......................................................................2-5
Additional Online Topics ............................................................... 2-6
Guide to NE C Utilities........................................................................2-7
Setup Ut ility..................................................................................2-7
NEC Cust omize Utilit y .................................................................. 2-7
HDPREPEZ Utility .......................................................................2-7
Other Software...................................................................................2-7
Client Manager..............................................................................2-8
LapLink.........................................................................................2-8
How to Use LapLink.................................................................2-9
McAfee VirusScan.........................................................................2-10
McAfee WebScan..........................................................................2-10
MediaMatics Arcade MPEG Player ............................................... 2-11
Xing MPEG Player........................................................................2-11
3 Using Setup
Setup Ut ility.......................................................................................3-1
Using Setup to Set Power Management...............................................3-12
iv Contents
How to Enter Setup........................................................................3-1
Setu p Utility M ain Menu ...............................................................3-2
How to Use Setup.......................................................................... 3-2
Looking at Screens....................................................................3-3
Using Keys...............................................................................3-4
Checking/Setting System Parameters.........................................3-4
Setup Menus.............................................................................3-8
Using the Save to File (STF) Feature..............................................3-12
STF Benefits ............................................................................3-13
Page 7

4 Using Your NEC Versa
LCD................................................................................................... 4-1
Keyboard............................................................................................4-2
NEC VersaGlide................................................................................. 4-4
Making VersaGlide Adjustments...............................................4-5
VersaGlide Tips........................................................................4-6
NEC VersaBay II...............................................................................4-6
Removing a Device from the VersaBay II ....................................... 4-7
Installing a Device in the VersaBay II.............................................4-9
Customizing Your System with the VersaBay II.............................4-11
20X CD-ROM Reader........................................................................ 4-12
CD Loading...................................................................................4-13
Card Bus/PC Card Slots................................................................4-14
Inserting a PC Card..................................................................4-14
Removing a P C Card f rom Windows for Workgrou ps ...............4-15
Removing a P C Card f rom Windows 9 5....................................4-16
Removing a P C Card f rom Windows NT...................................4-16
IR Port..........................................................................................4-17
Increasing System Storage and Memory.............................................. 4-18
Hard Disk Drive............................................................................4-18
Installing a Memory Module..........................................................4-21
Installing Options................................................................................4-25
External Monitor...........................................................................4-26
Printer...........................................................................................4-28
Parallel Devices........................................................................4-28
Serial Devices...........................................................................4-29
External Keyboard/Mouse..............................................................4-31
External Bar Code Scanner............................................................4-32
External Audio Options..................................................................4-33
NEC Versa Docking Station 6000 Plus..........................................4-34
NEC Versa MiniDock 6000...........................................................4-34
NEC Versa PortBar 6000 .............................................................. 4-35
Floppy Disk D rive (FD D) Connect or Kit........................................4-35
Setting Switches .................................................................................4-36
Updating the System BIOS ............................................................4-37
Contents v
Page 8

5
Using Multime dia
Audio..........................................................................................................5-1
Recording .............................................................................................5-1
Line-In .................................................................................................5-4
CD-ROM Input....................................................................................5-4
Microphone ..........................................................................................5-4
Mixing..................................................................................................5-5
Playing Back........................................................................................5-5
Using the Built-in Speakers.............................................................5-6
Using Hea dphones.......................................................................... 5-6
Using External Stereo Speakers......................................................5-6
MIDI Files............................................................................................5-7
Video ..........................................................................................................5-7
Using Digital Video Files...................................................................... 5-7
Using Animation Files...........................................................................5-8
Multimedia Applications.......................................................................5-8
VideoSaver...........................................................................................5-8
6 Traveling with Your NEC Versa
Power Connections ...............................................................................6-1
Checklists.............................................................................................6-2
What to Take...................................................................................6-2
Preparing Your NEC Versa for Travel.............................................6-3
7 Solving Problems
Problem Checklist.................................................................................7-1
Start-Up Problems................................................................................ 7-3
POST Error Messages.....................................................................7-4
Using the Restore CD...........................................................................7-6
Supplemental CD for Windows NT.......................................................7-7
If You Need Assistance.........................................................................7-8
Getting Help.........................................................................................7-8
NEC Warranty/Non-Warranty Repair Service.......................................7-9
vi Contents
Page 9

A Setting Up a Healthy Work Environment
Making Your Computer Work For You...............................................A-1
Arrange Your Equipment....................................................................A-2
Adjust Your Chair..............................................................................A-2
Adjust Your Input Devices..................................................................A-3
Adjust Your Screen or Monitor...........................................................A-4
Vary Your Workday...........................................................................A-5
Pr e-Existing Condit ions and Psychos oc ial Factors...............................A-5
B Specifications
Glossary
Index
Contents vii
Page 10
1
Getting Started
!
Prolonged or improper use of a computer workstation may pose a
risk of serious injury. To reduce your risk of i njury, set up and use
your comput er in the manner described in Appendix A.
After completing the steps in the quick setup sheet that comes with your
comput er, your NEC Vers a is ready to go! To get started, look at t he f ollowing:
Read Appendix A, Setting Up a Healt hy W ork Environment, for guidelines tha t help you u se your c omputer produ c tively and s afely. I nf ormation includes how to s et up and use you r compu ter t o reduce your r isk of
developing nerve, muscle, or tendon disorders.
Take the online System Tour to get acquainted with your N EC Ver sa.
(The System Tour is in the Windows NE C Information group under the
NEC Versa 6060 Help Center.)
WARNING
View the o n l i n e system The Bas i cs . (Th e B as ics is in t he Windows NEC
Information group under the NEC Versa 6060 Help Center).
Read t his guide to familiarize you rself wit h t he NEC Vers a.
Getting Started 1-1
Page 11
GETTING TO KNOW YO UR NEC VERSA SYSTEM
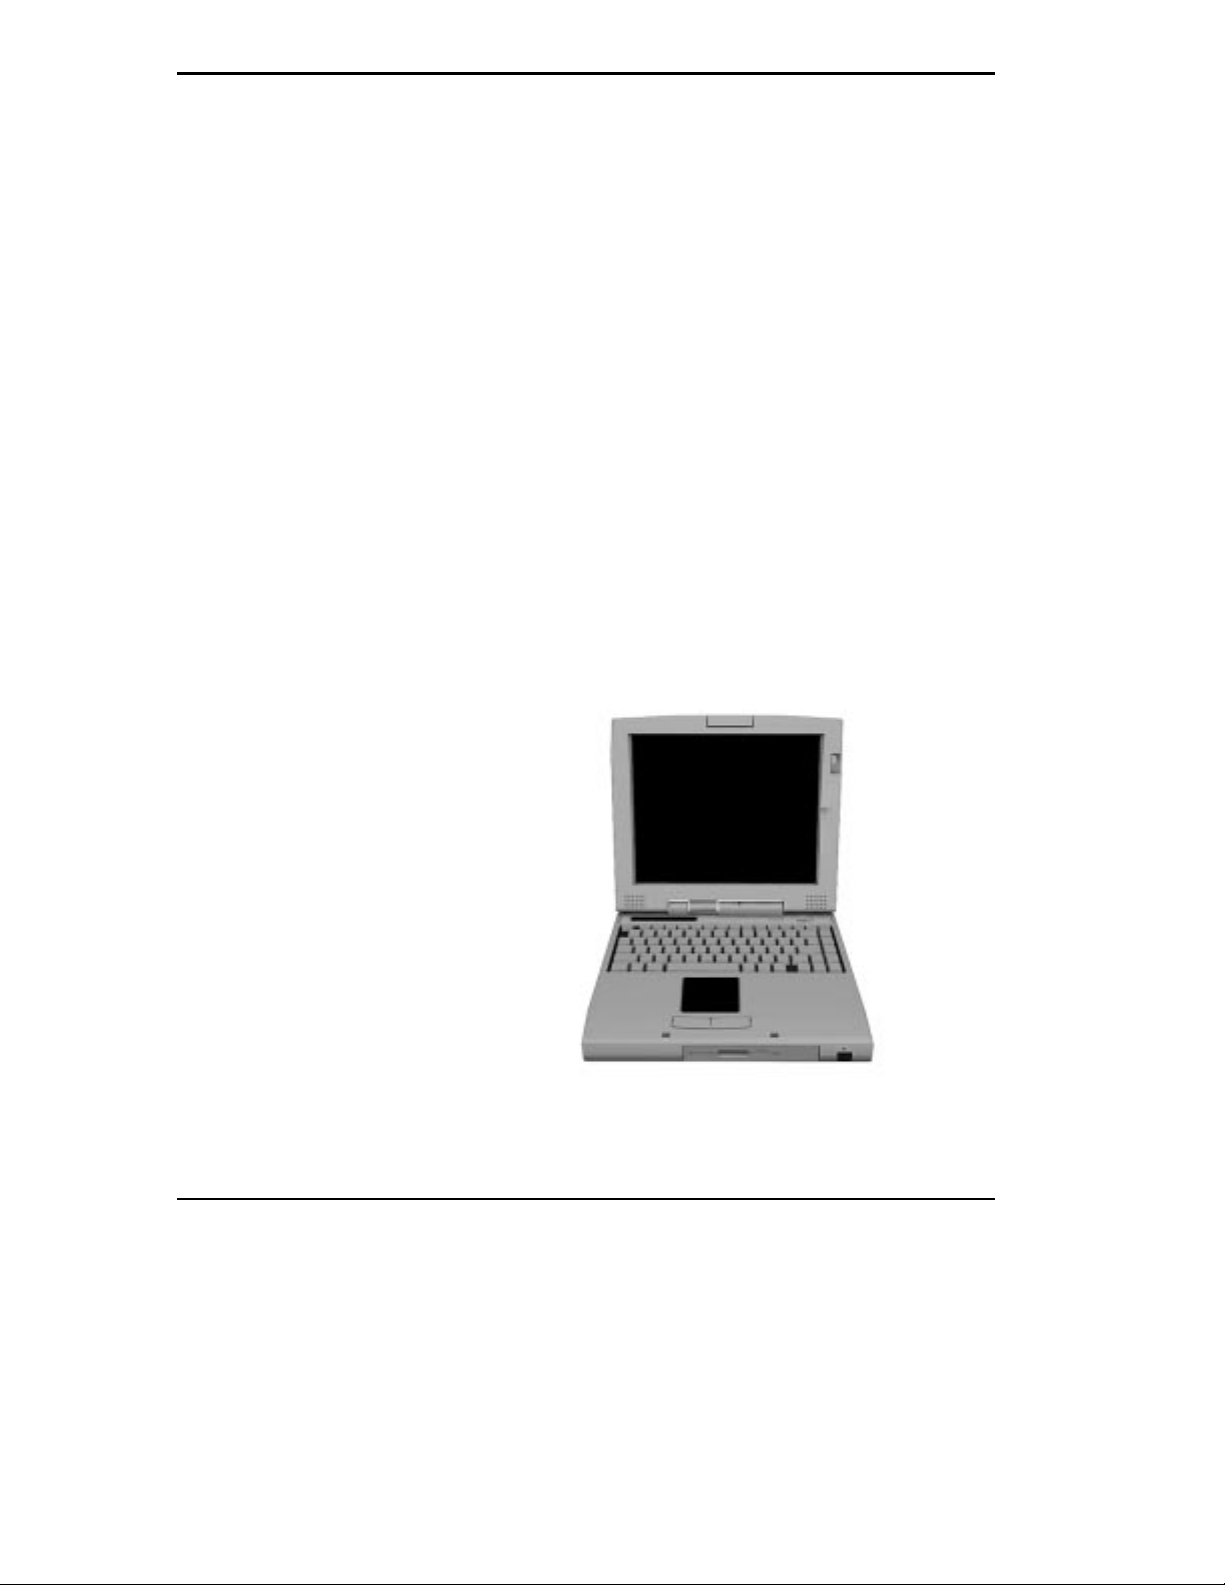
The NEC Versa 6060 Series notebook computer offer s you a port able system filled with exciting res ou rces f or home, bu siness or tr avel. Sta ndard
features include a powerful Intel
works together with the la test Perip heral Component Interconnect (PCI) architecture.
Your NEC Versa 6060 model integrates Intel’s MultiMedia Extensions
(MMX) technology. MMX speeds a udio, video, and 3D grap hics process ing, ultimately p roviding more distinct s ound and vis uals f or your pr es ent ations. More advantages inc l ude increa sed floating-point performance, and a
more efficient bus.
In addition, your sys tem provides a high-performance hard disk dr ive, diskette drive or VersaBay II SuperDisk LS-120 drive, interchangeable 20X
CD-ROM reader and Personal Computer Memory Card International Association (PCMCIA al so known as PC car d) support. As a multimedia system,
your NEC Versa also provides the tools needed to c reate and present impres sive images us ing video clips and sound.
To get c omfortable with you r notebook, read the following sections a nd take
a t our arou nd your s ystem!
®
Pentium 166 MMX microprocessor that
1-2 Getting Started
NEC Versa 6060 not ebook c om puter
Page 12
Around the System — Front
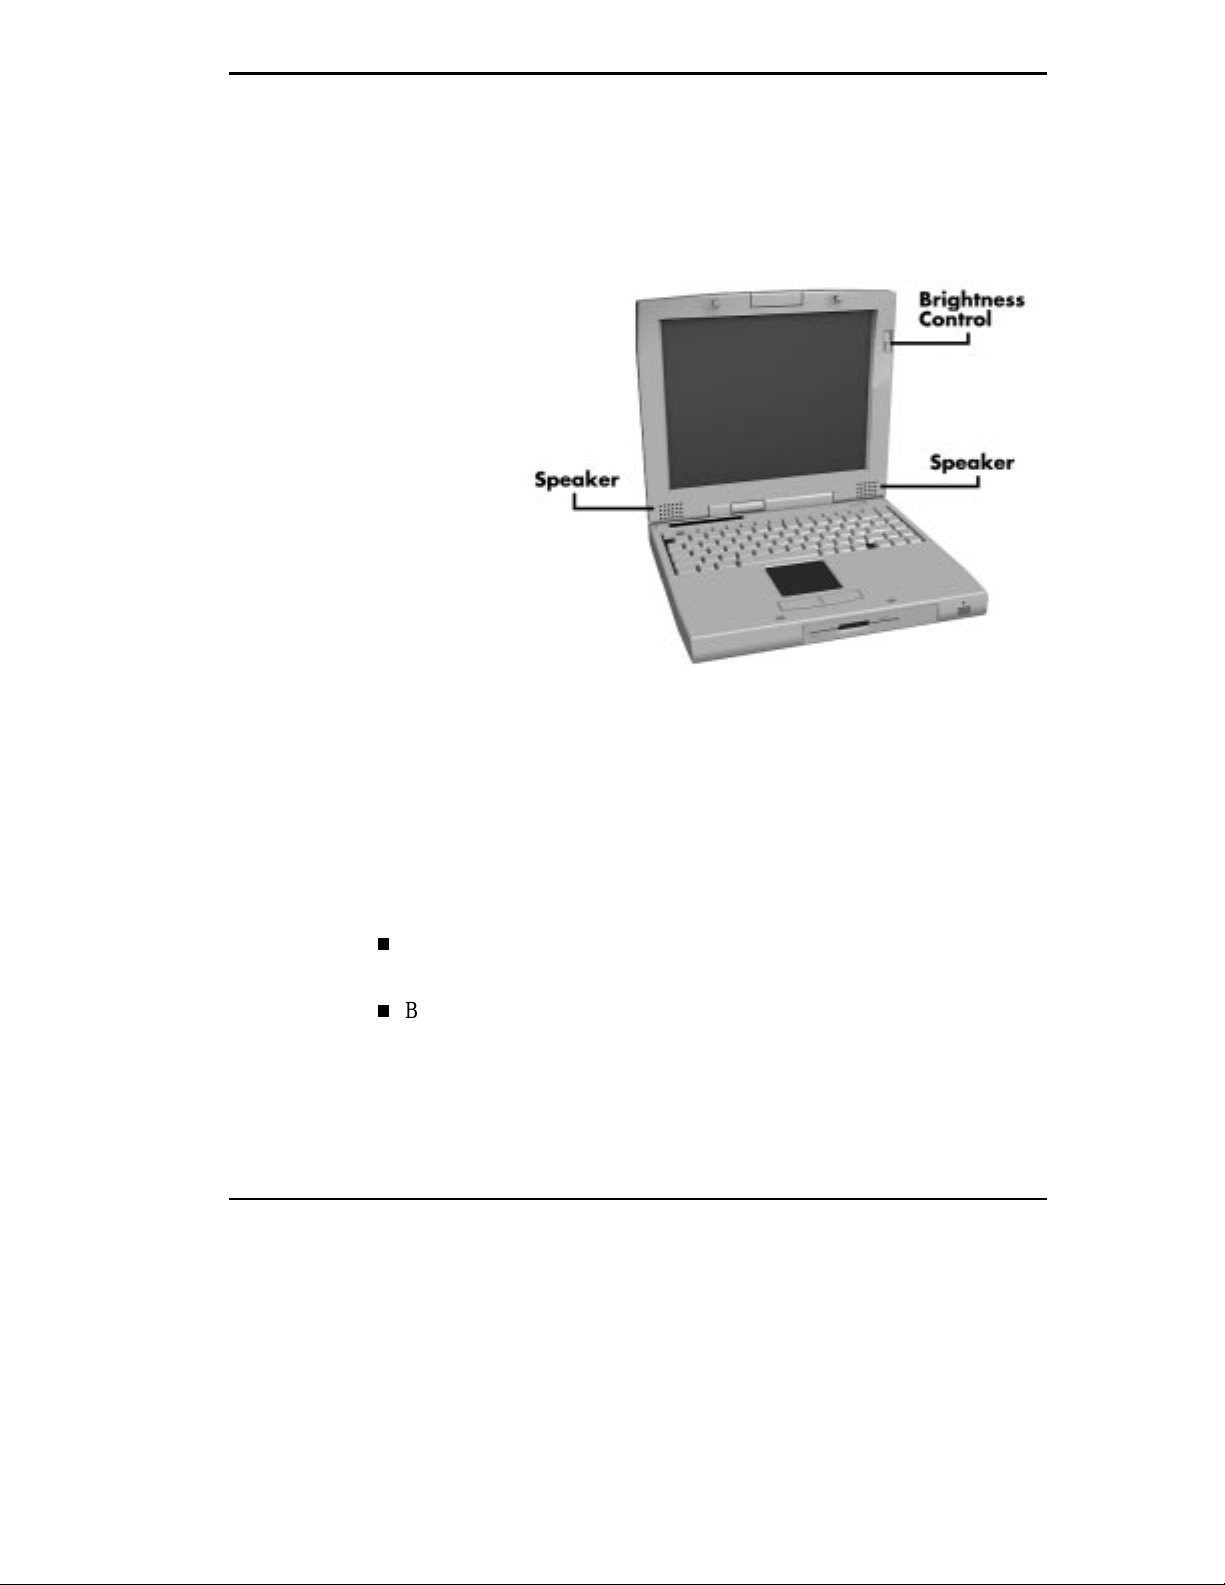
The NE C Vers a is comp act with featur es on every side. First, look at the
front of your NEC Versa sys tem. T he following sections des crib e f ront features, b eginning with the Liquid Crys tal Di splay ( LCD) panel (t he s c reen
area).
LCD features
LCD
Your NEC Versa system comes with a color LCD that you can adjust for a
comfort able viewing position. The LCD is a 12.1-inch Thin Film Tr ansistor
(TFT), S uper Video G raphics Array (SVGA) disp lay.
Additional LCD p anel feat ures inc lude:
Built- in Ster eo S peakers — provide ster eo s ound for you r multimedia
pres ent ations , or listening plea sure.
Brightness Control — a slide switch that adjusts screen brightness.
Moving the switch up increases the screen contrast.
Getting Started 1-3
Page 13
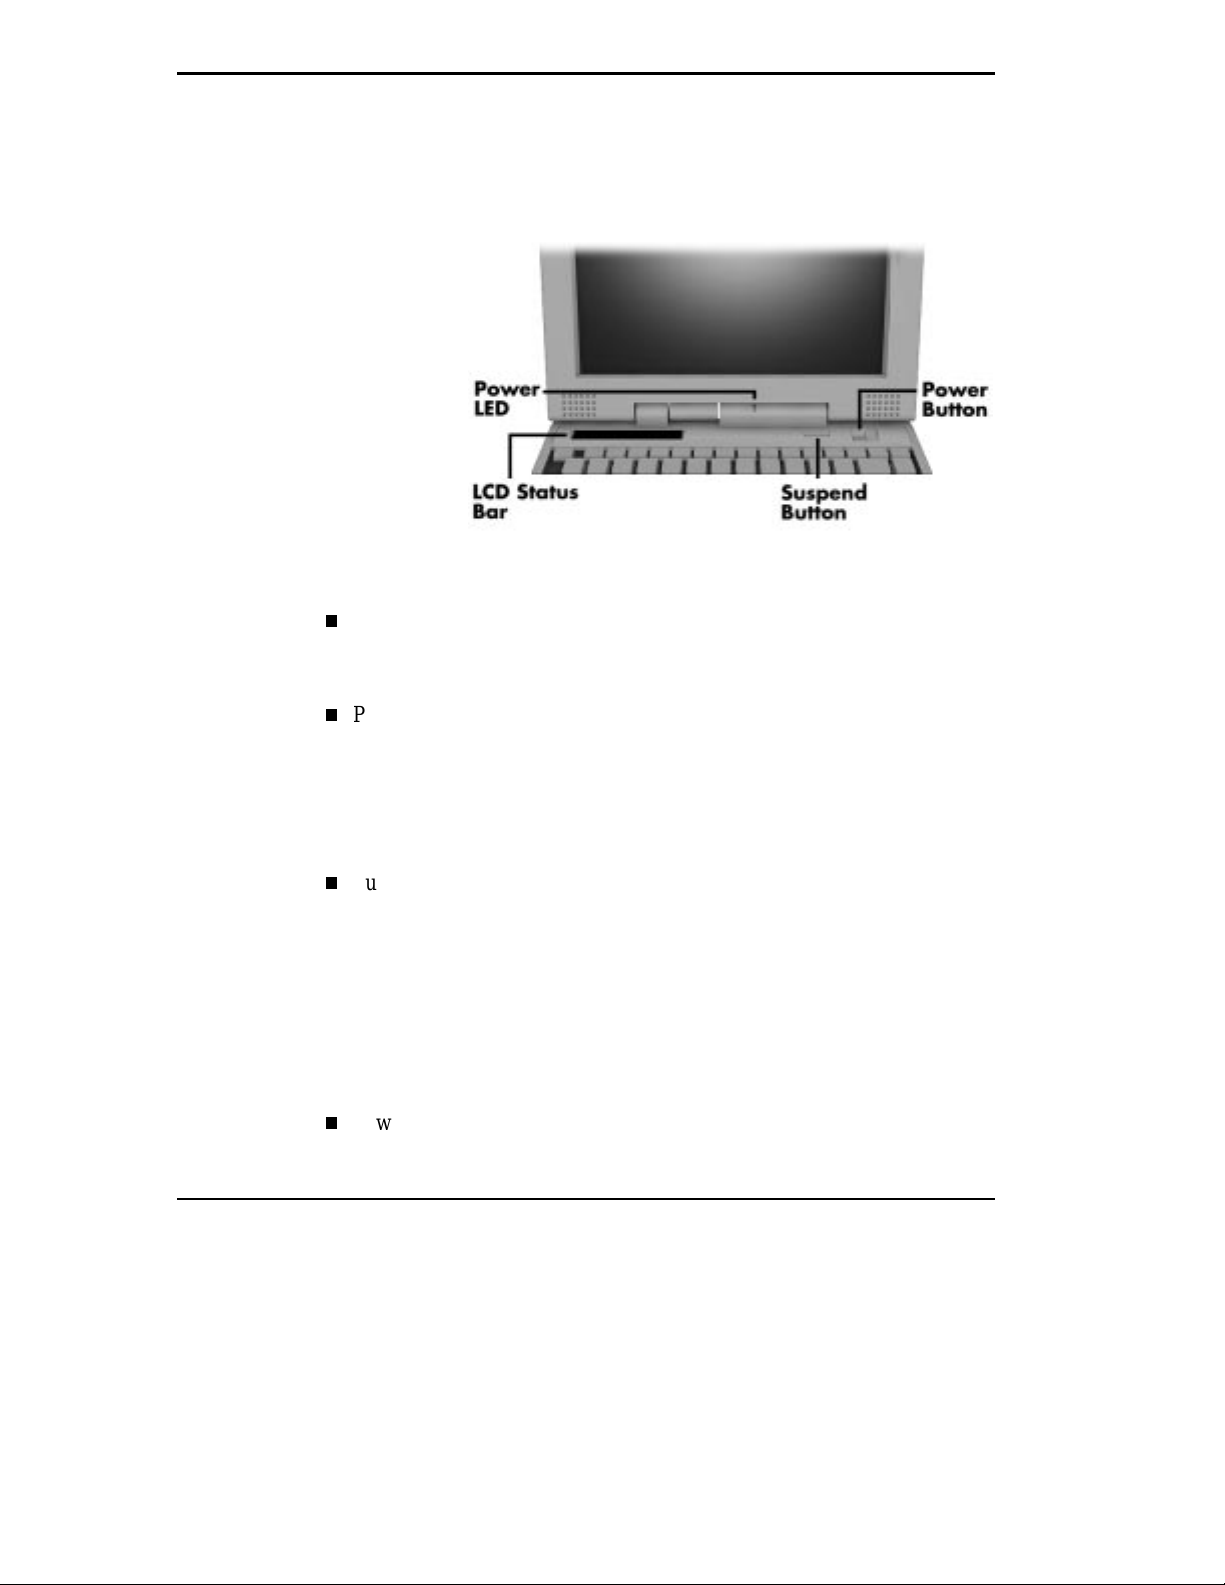
Controls
NEC Versa system cont rols are shown in the following figure. These features are described after the figure.
Controls
LCD Status Bar — A liquid crystal status bar that keeps you informed
of your NEC Versa’s current operat ing status. S ee a descr i ption of icons
in the following sect ion.
1-4 Getting Started
Power LED
Li ghts gr een when the system is powered on.
Blinks green when the system is in Suspend mode.
Blinks amber to indicate that battery power is low.
Suspend/Resume (S/R) Button — press the S/R button to put the unit
into Suspend mode when you need to b e away from your system for a
shor t peri od of time and want to return to wher e you left off . Press the
S/R button again to br ing your NEC Ver sa s ystem out of Sus pend mode
and back t o where you wher e b ef ore enter ing Sus pend.
Specif ic ally, Susp end mode shuts down a ll devices in the system while
retaining dat a and system st atus. You will fi nd mor e detailed informa tion
on using Suspend mode in your online NEC Versa 6060 Help Center.
Power Button — slide the power button to the right to power on and
power off the computer.
Page 14
Status Icons
The power button is a “s mart ” switch, mea ning that it recogniz es when
the sys tem is in Su spend mode. If in Sus pend mode, you cannot power
off the s ystem until you press the su spend bu tton a gain to b ring it ou t of
Suspend mode.
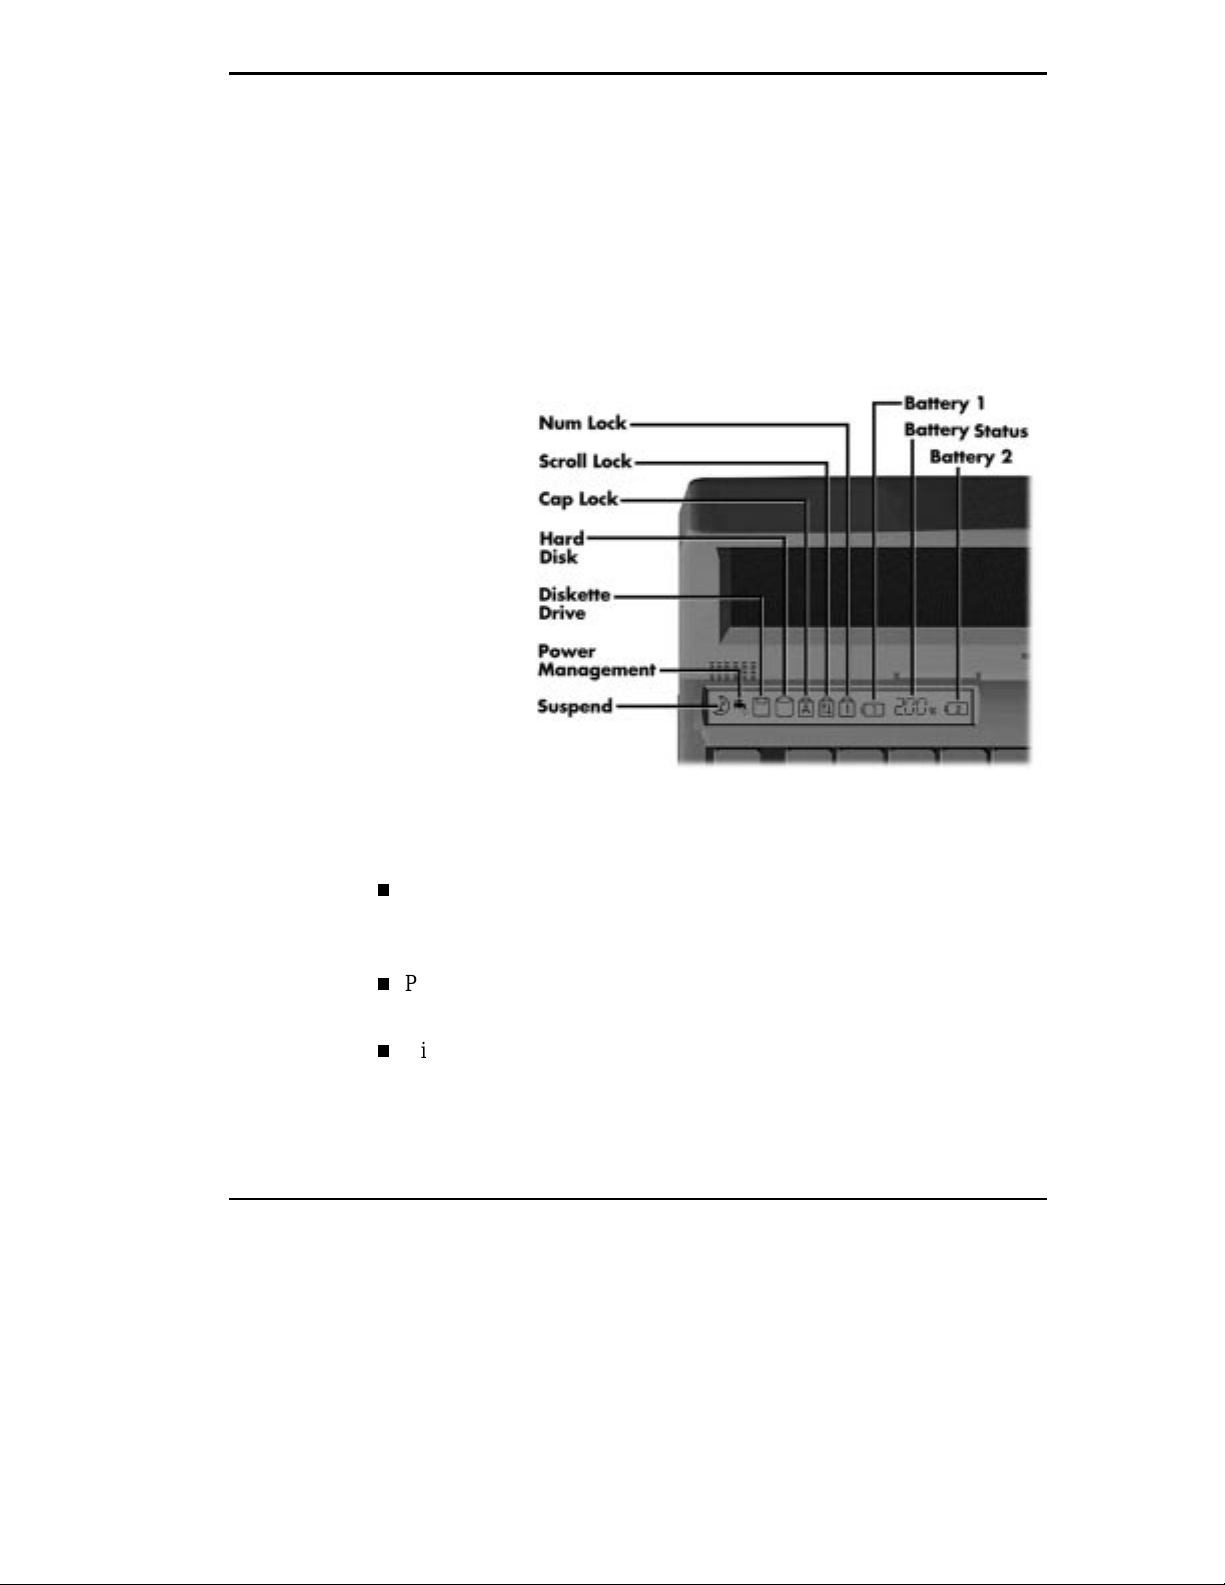
Your NEC Versa system uses an LCD status bar for communicating operating sta tus via ten status icons . See the following figure a nd list for each
icon’s meaning.
Reviewing status icons
Suspend — a ppears when the s ystem is in Suspend mode. Susp end mode
conser ves system power by shutting down a ll devic es in the syst em while
retaining data a nd system stat us.
Power Management — shows the current power management mode in
use, including Off, C ustom, High Perfor mance, or Longest Life.
Dis k ette D rive — appears when you r NEC Versa wr i tes dat a to or re-
tr ieves data from a diskette drive or VersaBay II S uperDisk LS-120
drive.
Getting Started 1-5
Page 15

Keyboard
The NE C Vers a keyboa rd us es 83 keys ( 79 keys for internat ional sys tems),
with the s tandard QW ERT Y- key layout. See Chapt er 4, “Using the K eyboard” for c omplete details. You can als o refer t o the online informat ion in
the NEC Versa 6060 Help Center.
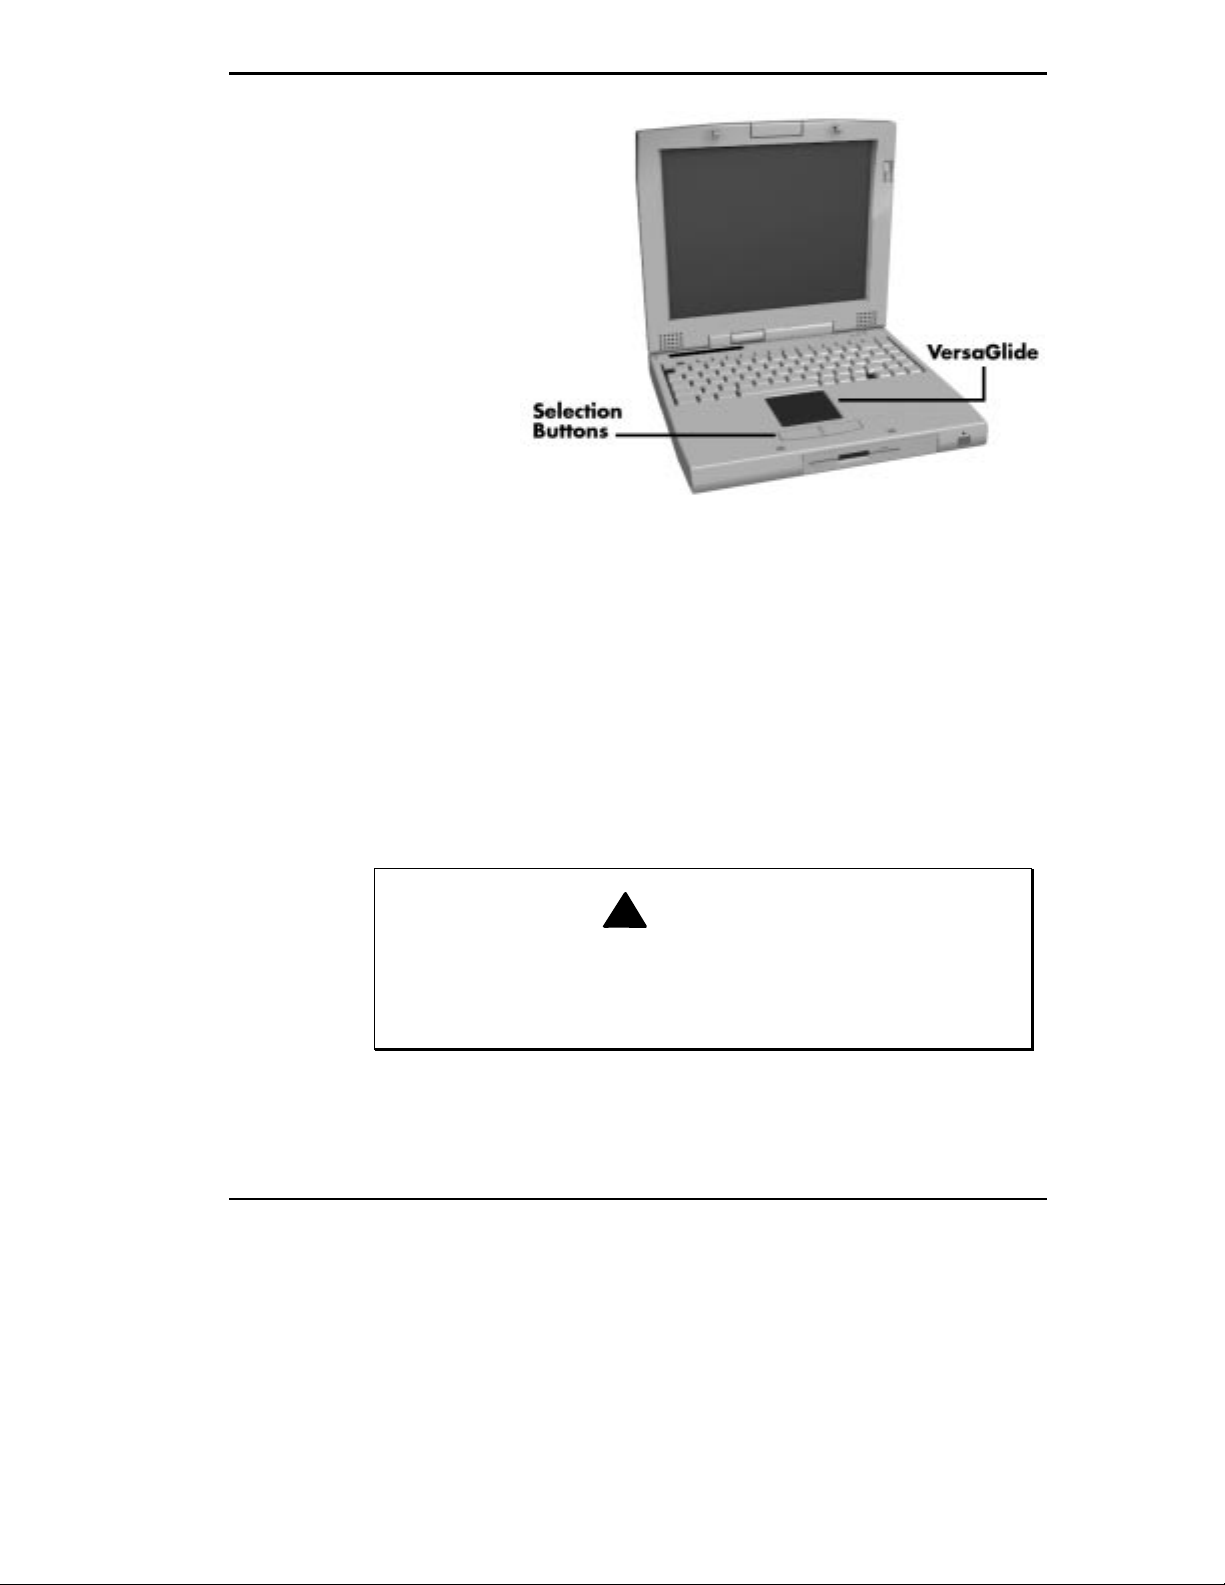
NEC VersaGlide
The NEC VersaGlide works l i k e a sta n dard comp uter mouse. Simpl y mov e
your fingert ip over the Versa Glide to control the p osition of the cursor . Use
the selection b uttons below the Vers aGlide to s elect menu it ems, or u se the
adva nc ed tapping features. More deta iled Ver saGlide inf ormation app ears in
Chapter 4, “Using Your NEC Versa.”
Hard Dis k — shows when you r NEC Vers a writes da ta t o or r et rieves
data fr om t he hard dis k.
Caps Lock — appears when Caps Lock is in effect.
Scroll Lock — shows that Scroll Lock is in eff ect.
Num Lock — appears when Number Lock mode is active.
Battery Status — displays the percentage of battery power available.
Battery 1 a ppears when you have one or more batt eries installed.
Battery 2 a ppears when you have an optional b attery installed in the
VersaBay II . See “Optional Second Battery,” later in this chapter for
more information.
1-6 Getting Started
Page 16
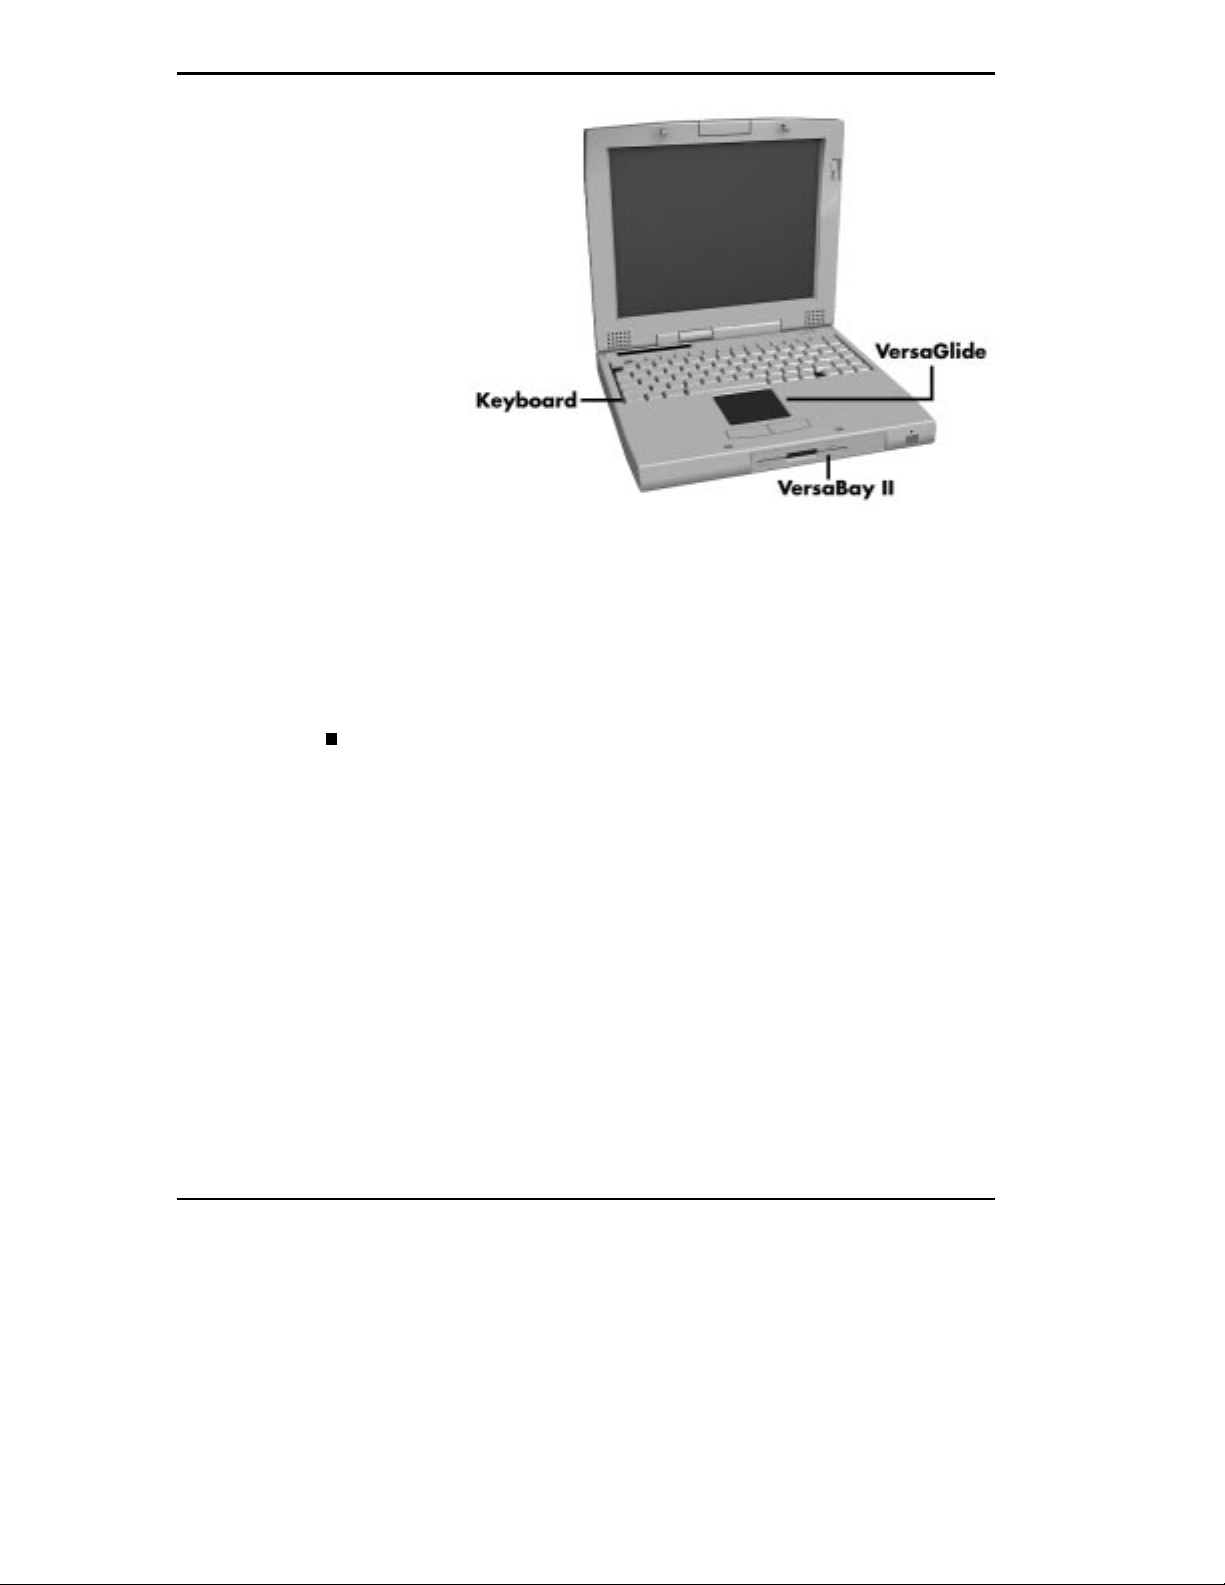
Diskette Drive, CD-ROM Reader and the NEC VersaBay II™
A diskette drive or NEC Versa SuperDisk LS-120 drive comes installed in
the NEC Vers aBay II on the front of your system, depending on the NEC
Versa model pur c hased. You can u se this device, or remove it from the Ver saBay II and replace it with the 20X CD-ROM reader that also ships with
your system. I t’s you r choice!
NEC VersaG lide
The VersaBay II let s you a dd options , including a second L i-Ion battery, or
an a dditional hard dis k drive, s ee “ Customizing Your Syst em with the VersaBay II,” in Chapt er 4 .
!
Remem ber to power of f or suspend your system bef ore i nstall ing an
option. Hot swapping is not supported, although warm swapping
(W indows 95) is supported and when swapping the CD-ROM reader,
diskette drive or S uper Disk LS-120 drive.
WARNING
Getting Started 1-7
Page 17
IR Port and Microphone
You will find a n I R por t for c onnec ting your N EC Versa s ystem to ext ernal
devices (like printers, other computers and any device that supports IR technology) and a built in microp hone for recording with you r NEC Vers a. For
an underst anding of each feat ure, see the descript ions tha t follow the f igure.
Keyboard area
1-8 Getting Started
Built- in Micr ophone — allows you to r ec ord monophonic sound direct ly
into your notebook c omp uter. You do not have to speak directly into the
microphone. Feel free to sp eak into t he microphone a t a comfortable dis-
tance.
Page 18
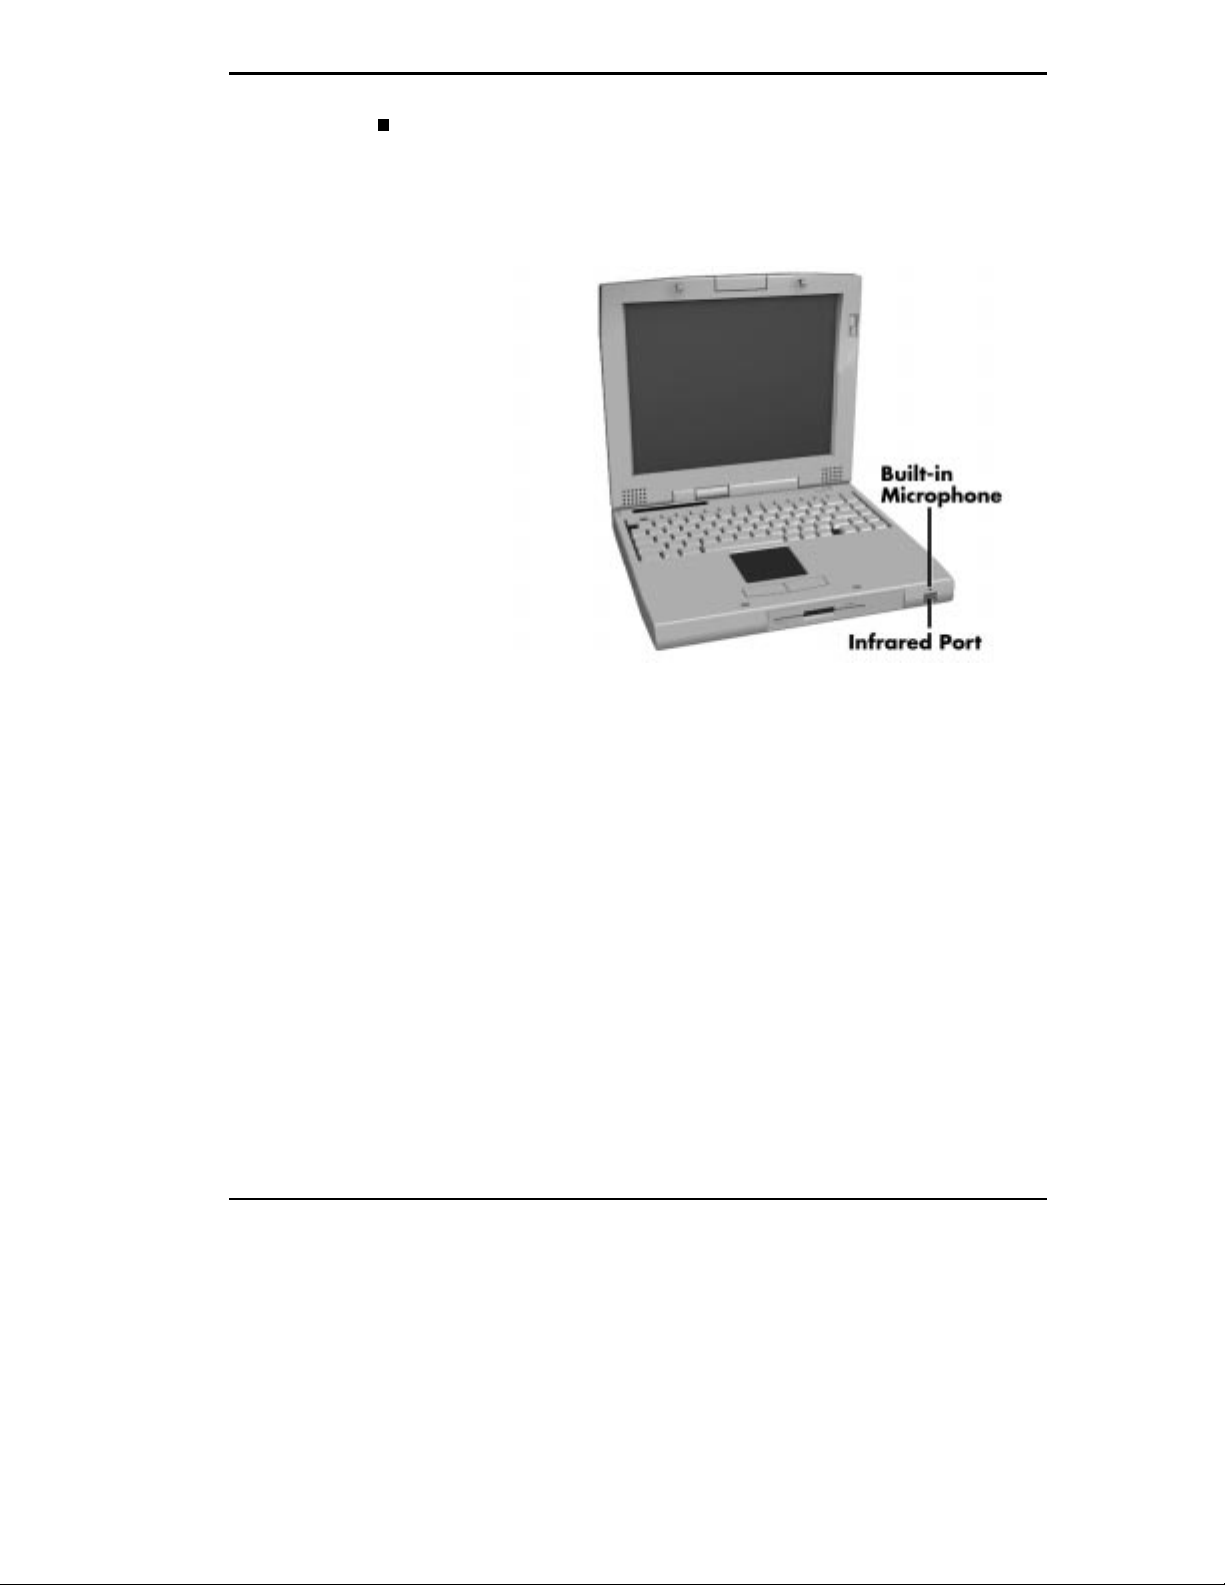
Infrared Port — This port lets you transfer files between your NEC
Versa and an IR-equipped des ktop or notebook compu ter. You can als o
print to an IR-equipped printer without using cables. Your NEC Versa
will support either FIR (Windows 95 only), MIR or SI R trans f er rates .
IR Port and Built - in M ic r ophone
Getting Started 1-9
Page 19
AROUND THE SYSTEM — BACK
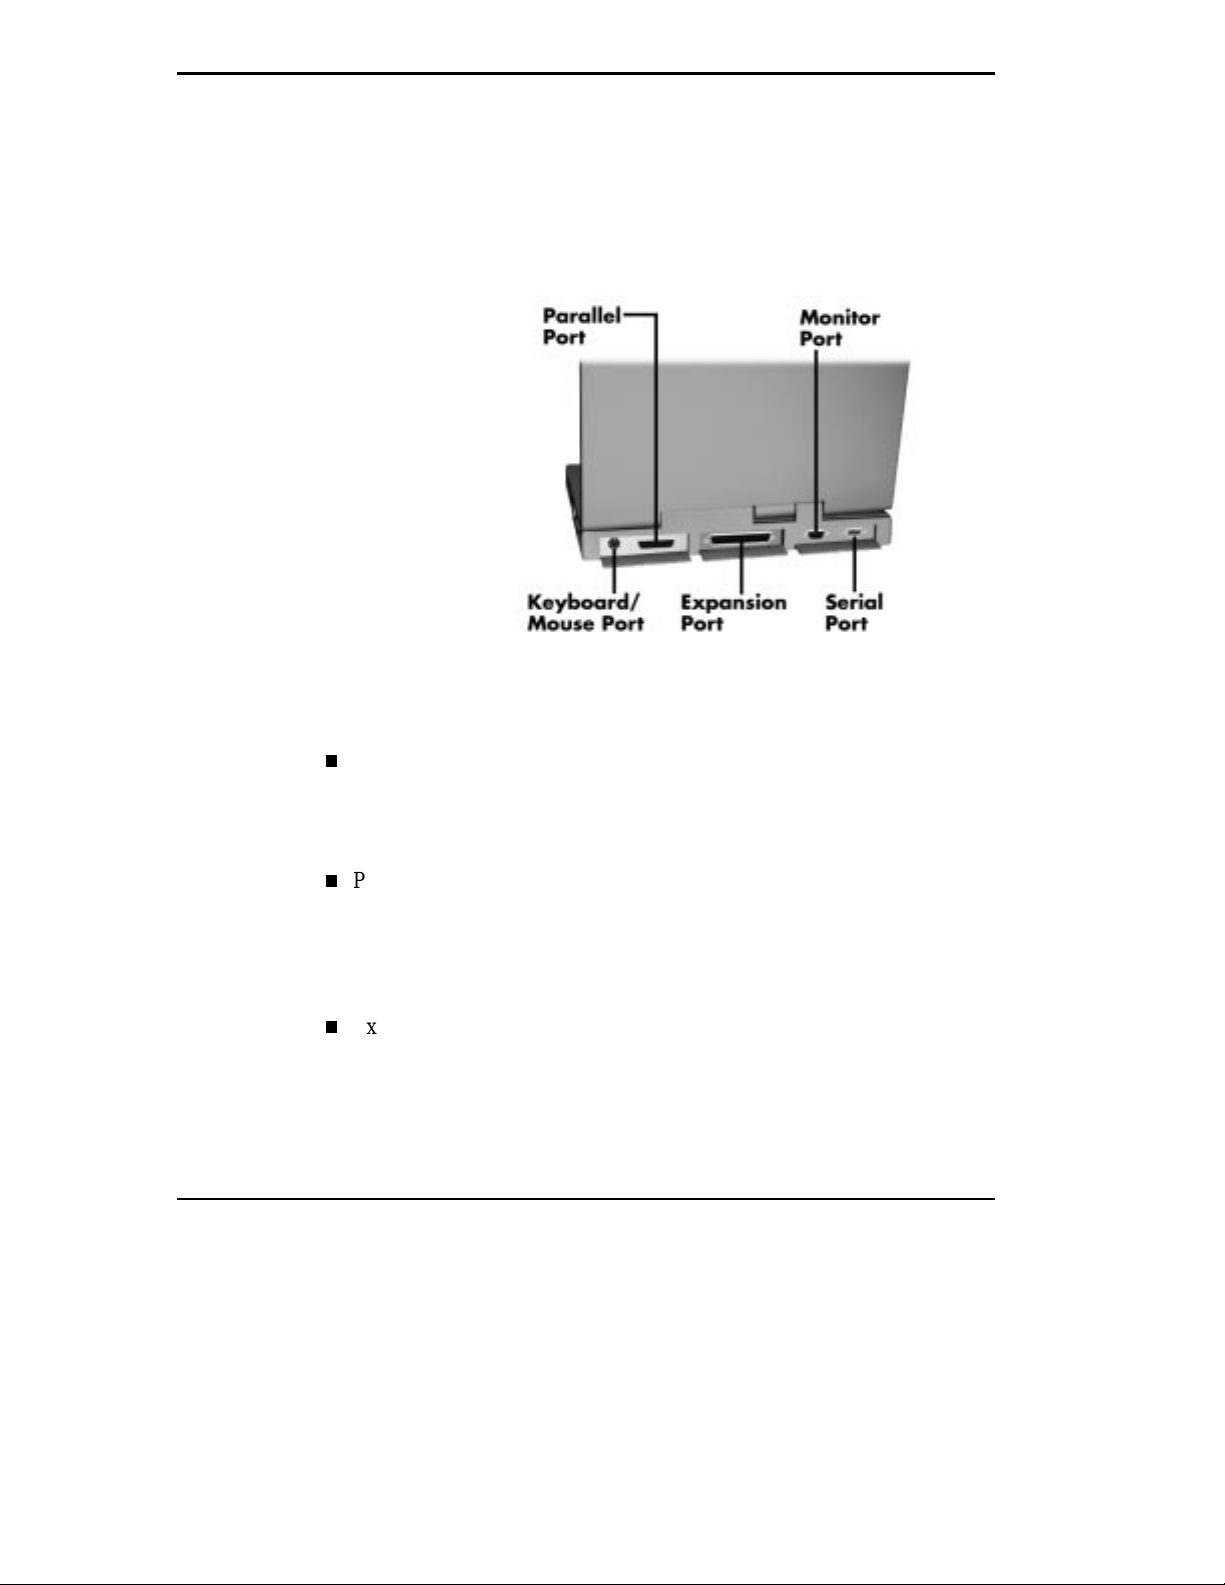
You’ll find syst em ports f or connect ing your N E C Vers a sys tem to opt ional
devices (like a print er, docking sta tion, or exter nal monitor ) on to the back of
your NEC Versa . For an understanding of each feature, see t he desc riptions
that follow the figure.
Back system features
1-10 Getting Started
Keyboa rd/Mouse Port — Use the standard PS/2 port to connect an
exter nal PS/2- style mouse or a P S/2 - style keyboa rd to the syst em. W i th
an optional Y- adapter , you can connect both a mou se and a keyb oard at
the same time.
Pa rallel P ort — Use this port t o c onnect a p arallel printer or other paral-
lel device. The port is an Ext ended Capa bilities P ort (E CP). The ECP
standard provides you wit h a greater proces sing sp eed t han the conven-
tional parallel port. It also supports bi-directional and unidirectional and
Enhanced Parallel Port (EPP).
Exp ansion P ort — This p ort p rovides a c onnec tion for N EC Ver sa op-
tions including the NEC PortBar 6000, NEC Versa Docking Station
6000 Plus, NEC Versa MiniDock 6000 and floppy adapter.
Page 20
Monitor (Video) Port — Use this 15-pin port to attach an external
monitor to your N EC Ver sa. You can run the LCD display and the external monitor simultaneously or ru n eit her alone.
Seri al Port — Use this port to connect an ext ernal modem or ot her ser i al
device. This port does not support serial pointing devices.
AROUND THE SYSTEM — LEFT SIDE
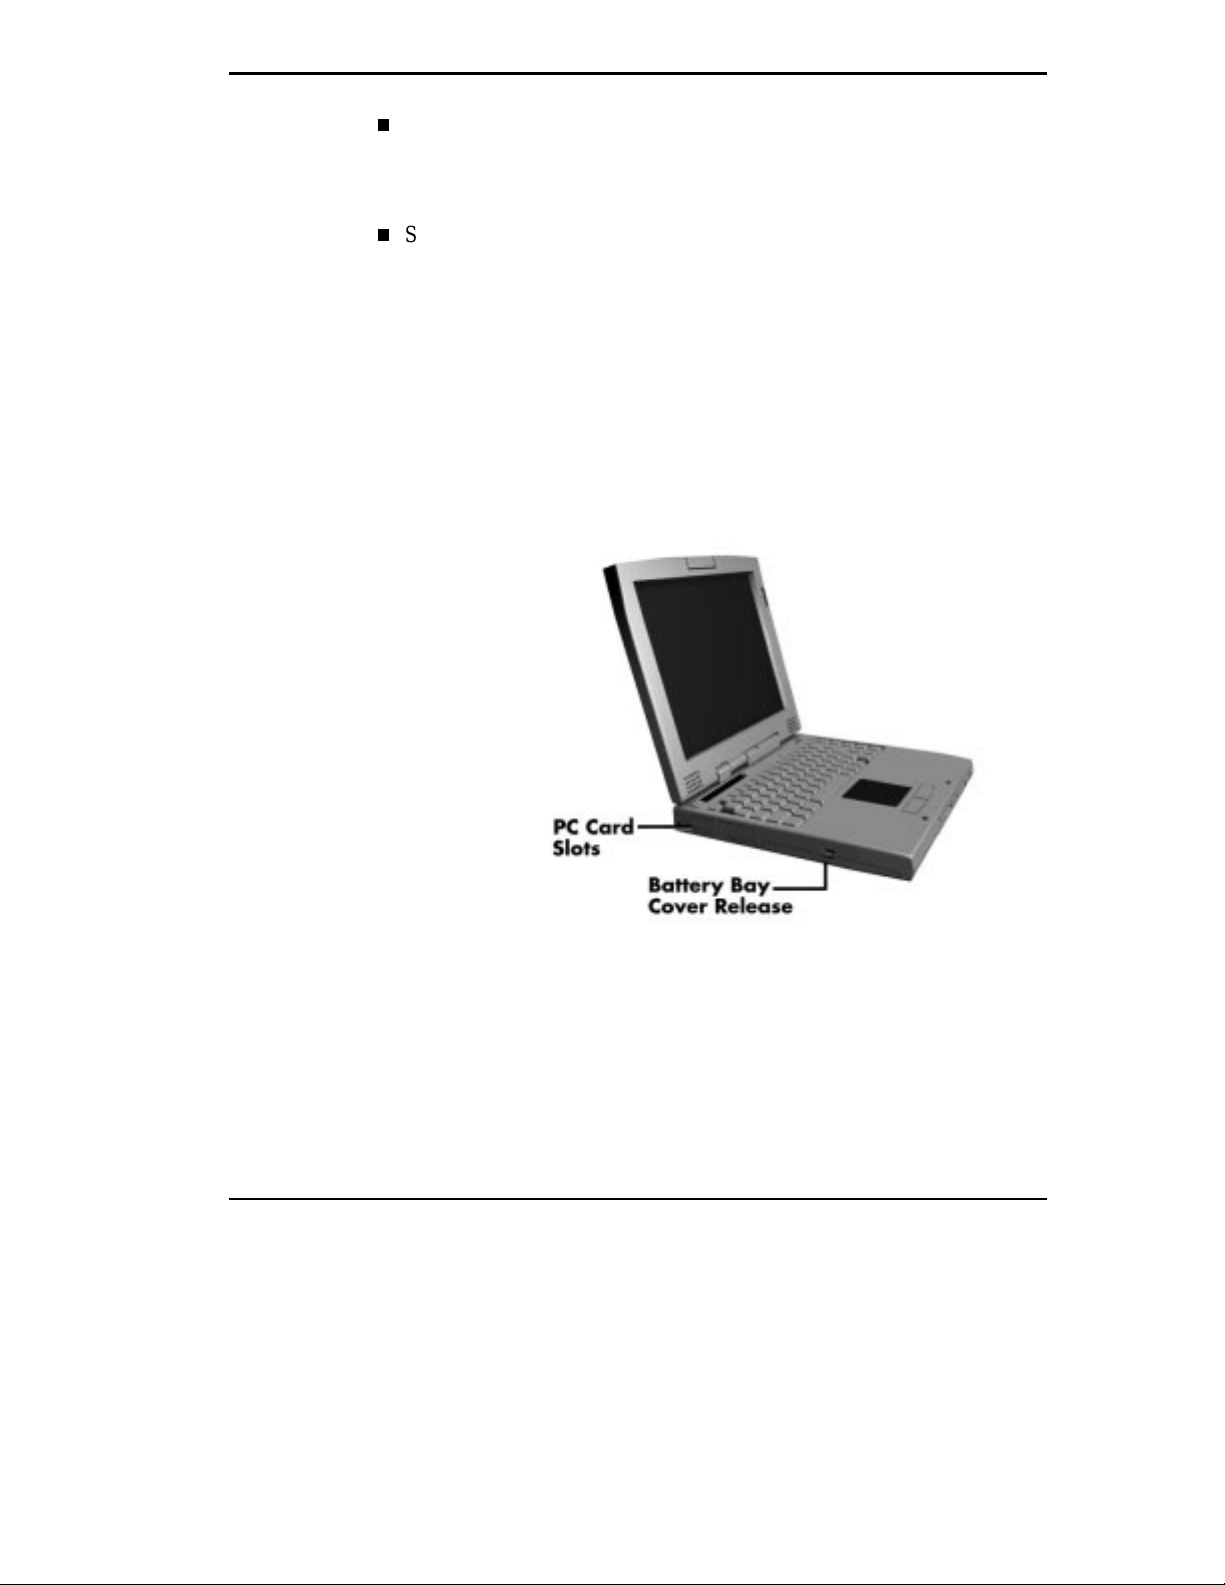
The left side of your NEC Versa has two slots for inser ting two Type II PC
cards (formerly called PCMCIA cards). You can a lso insert one Type III PC
card.
The battery ba y c over releas e is also located on the left side of the unit . The
batter y b ay contains a Lit hiu m Ion ( Li-Ion) b attery that lets you r un your
system on DC power.
Left side features
Getting Started 1-11
Page 21
AROUND THE SYSTEM — RIGHT SIDE
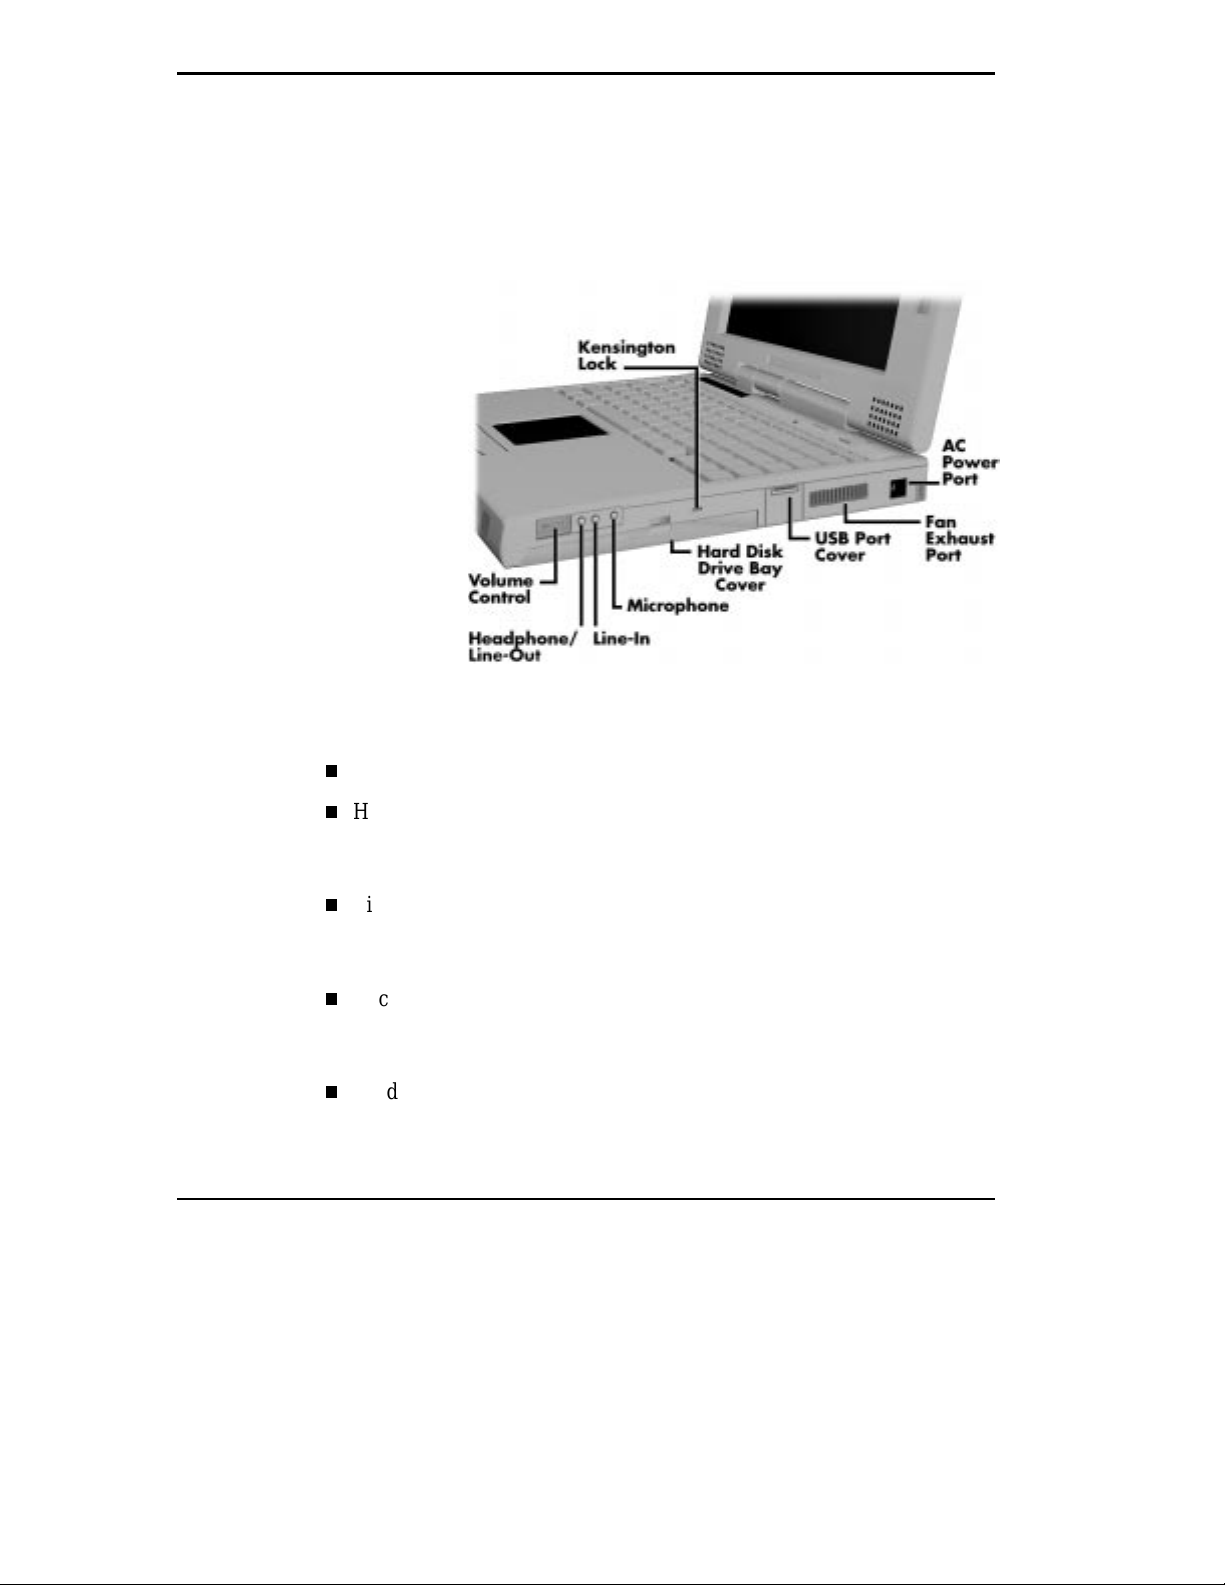
The ha rd disk drive cover r elea se, Kens ington lock socket , au dio port s, USB
port, f an exha ust port and AC power port are located on t he right-side of
your NEC Versa syst em. For an under sta nding of each feature, see the descr i ptions that f ollow the figure.
1-12 Getting Started
Right side features
Volume Control — Allows you to cont rol the speaker volume.
Headp hones /Line-O ut — L ets you c onnect external headphones, speak-
ers or audio system to your NEC Versa syst em. Using this port disab les
the built-in system speakers.
Line-In — L ets you u se another au dio system, like a home stereo, as an
input source. Use a the cable t o connect to the Line-Out port on the other
audio system to record or play.
Microphone (MIC) — Allows you t o c onnect an ex terna l microphone for
monophonic recording or amplifica tion thr ou gh the unit. Plugging in an
exter nal microphone disab l es the built - i n microphone.
Hard Disk D rive Bay Cover — The hard disk drive bay contains the re-
movable ha rd disk drive. Dep ending on your NEC Ver sa’s configura tion,
it cont ains a 2.1-GB hard dis k drive or 3 .2-G B hard dis k drive.
Page 22

Refer to the “H ard D isk” sect ion in Chap ter 4 f or installation and removal instructions.
Kensington Lock — Let s you provide added security by inst alling an op-
tiona l K ens ington Lock.
USB P ort — The Univer sal S erial Bus (USB) allows the connection of
up to 127 peripheral devices (printers, monitors, scanners, etc.) to your
NEC Versa.
Fa n E xhau st P ort — This p ort p rovides a ir flow from the inter i or of the
comput er to a ssist in keeping the system running at op timal performance.
AC Power Port — Use the power jack to attach the NEC Versa to a DC
power source, such as the AC adapter or the optional DC car adapter.
Getting Started 1-13
Page 23
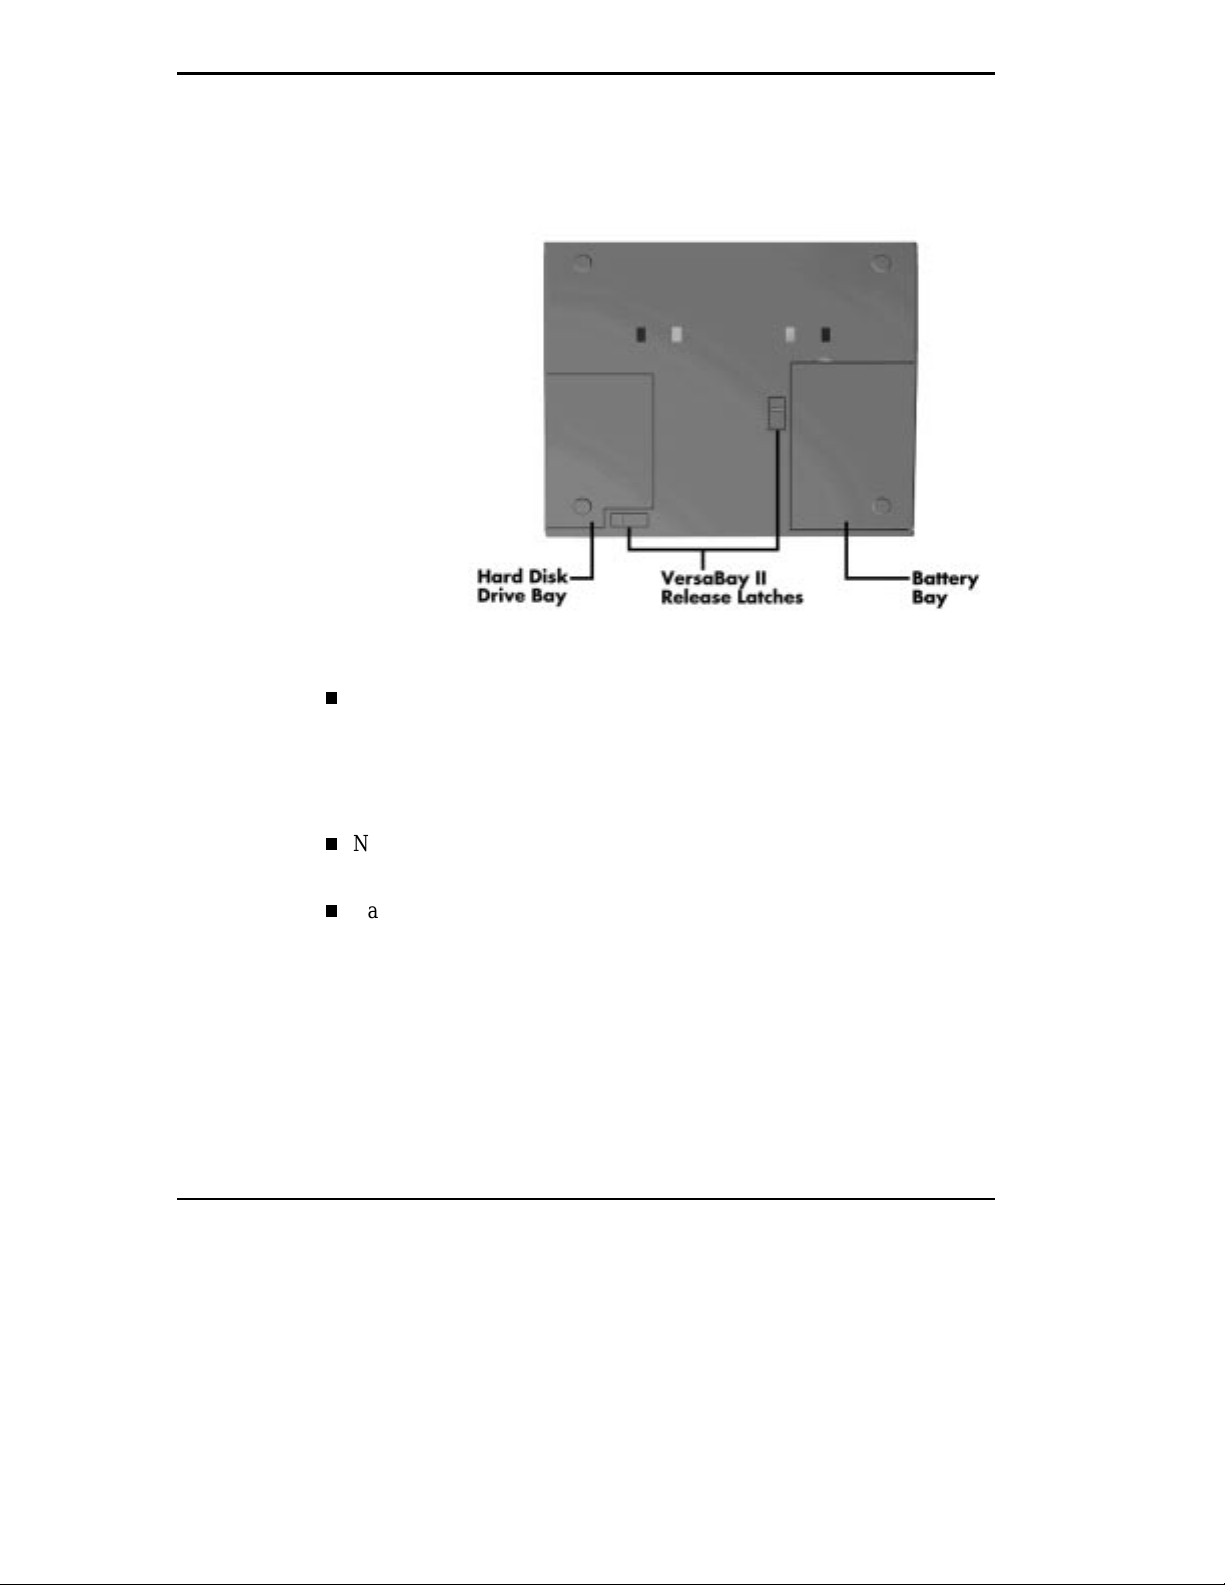
AROUND THE SYSTEM — BOTT OM
The bottom of the NEC Versa system conta ins the features s hown. For an
understa nding of each fea tur e, see the desc riptions that follow the figure.
Bottom features
1-14 Getting Started
Hard Disk D rive Bay — Contains the syst em’s sta ndard hard dis k drive.
Also, if you remove the hard disk drive, you’ ll see two connectors for in-
stalling one additional memory module. T he ha rd disk drive bay also
conta i ns six dip switch settings. These are expla i ned in C hapt er 4, “Us-
ing Your NEC Versa.”
NEC Versa Bay II Release Latches — These latches let you r emove the
option c urrently inst alled in the bay.
Bat tery Bay — Contains the system’s main batt ery. It is a removable
Lithiu m Ion (Li-Ion) b att ery.
Page 24
POWER SOURCES FOR YOUR NEC VERSA
Your NEC Versa can be p owered using three different sources, making it a
tr uly por tab le system. O pera te your N EC Ver sa s ystem just ab out anywhere
using one of the following power sour c es:
the AC adap ter connected to a n electric al wall outlet ( using AC power)
the ba tter y pack or an op tional s ec ond bat tery pack
the opt ional DC adap ter connected to a c ar c igarette lighter .
Read the following sections for specific steps on powering on the s ystem.
Using the AC Adapter
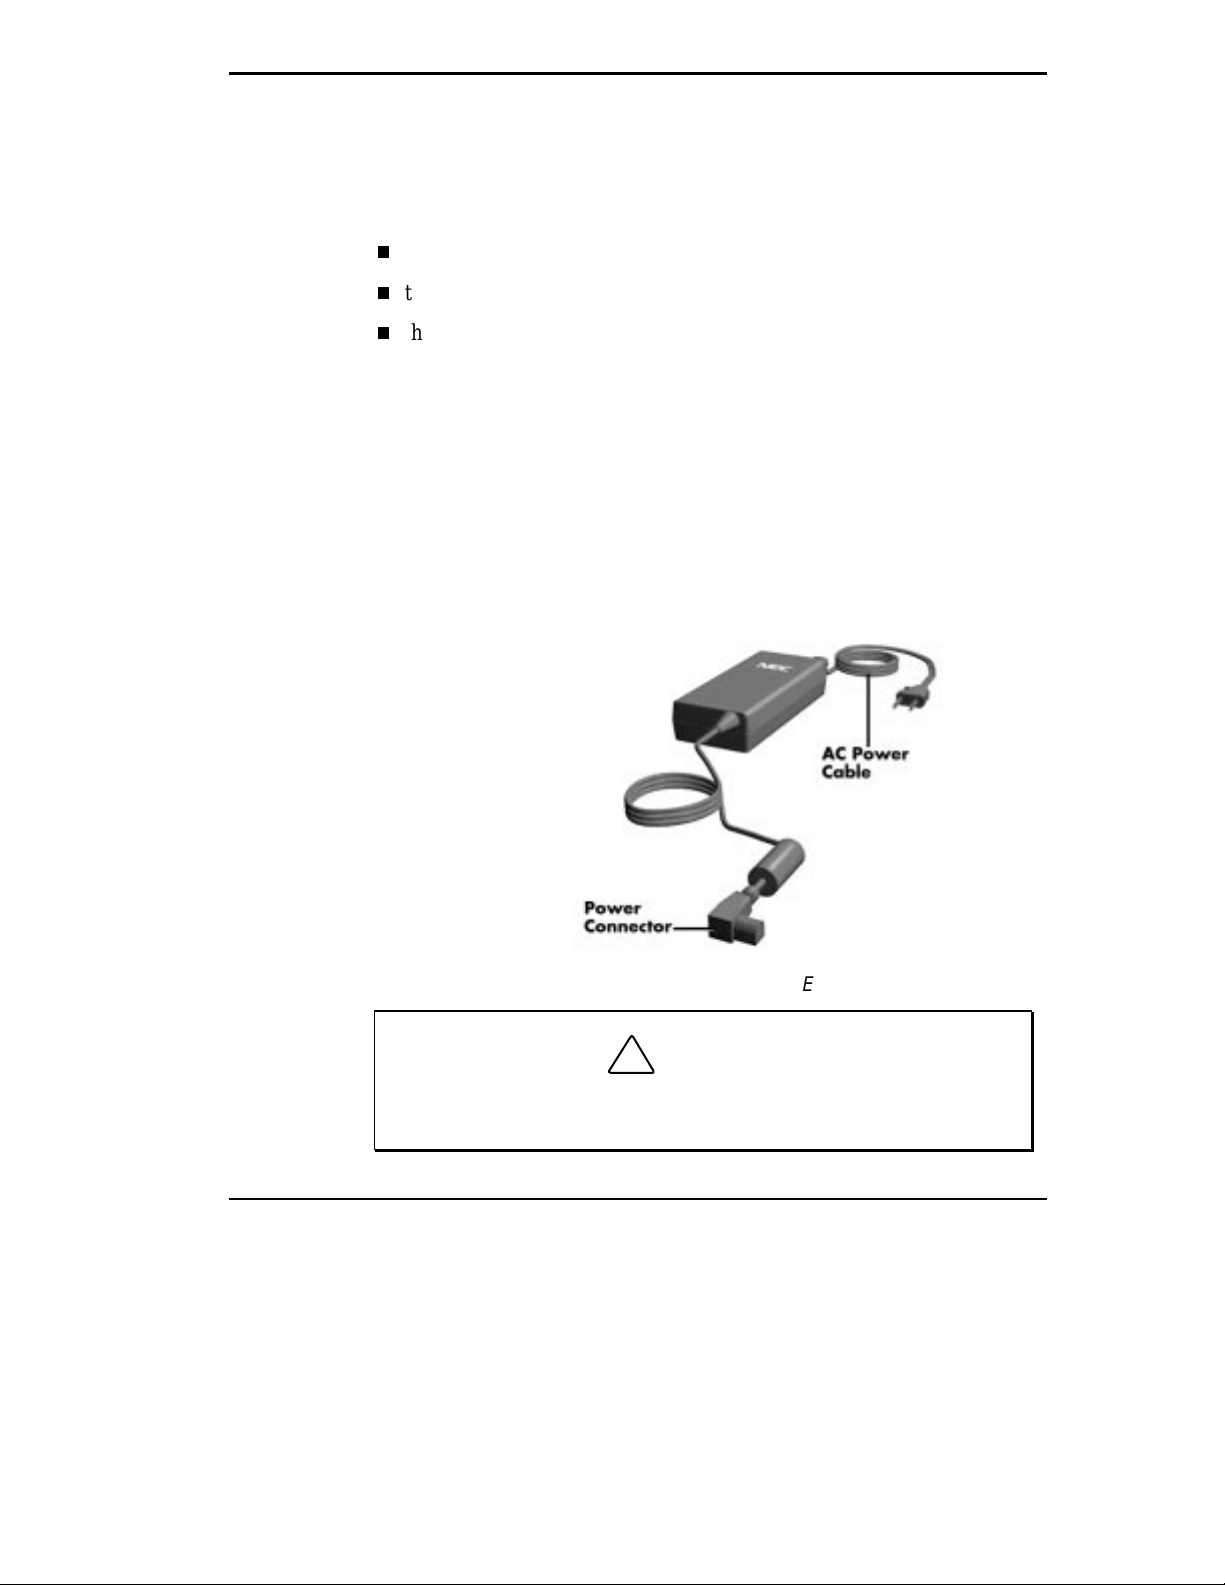
Use t he AC ad apter and power cable that ca me with your NE C Versa to r un
your c omp uter on AC power, or to recharge the b attery p ack. Use the AC
adapter when ev er a wall outl et is n ear by.
Keep the adap ter connec ted whenever pos sible. The AC adapter charges the
batter y whether or not you a re us ing your NEC Ver sa.
NEC Versa 6060 AC adapter
!
Do not cover or place objec ts on the AC adapter. Doing so will not
allow heat to dissipate properly.
CA UT ION
Getting Started 1-15
Page 25
NOTE
Check that the AC outlet volt age f al ls i n the range of 100–240
Volts AC. Ver ify t hat the cord and pl ug are appropriate for your AC
source.
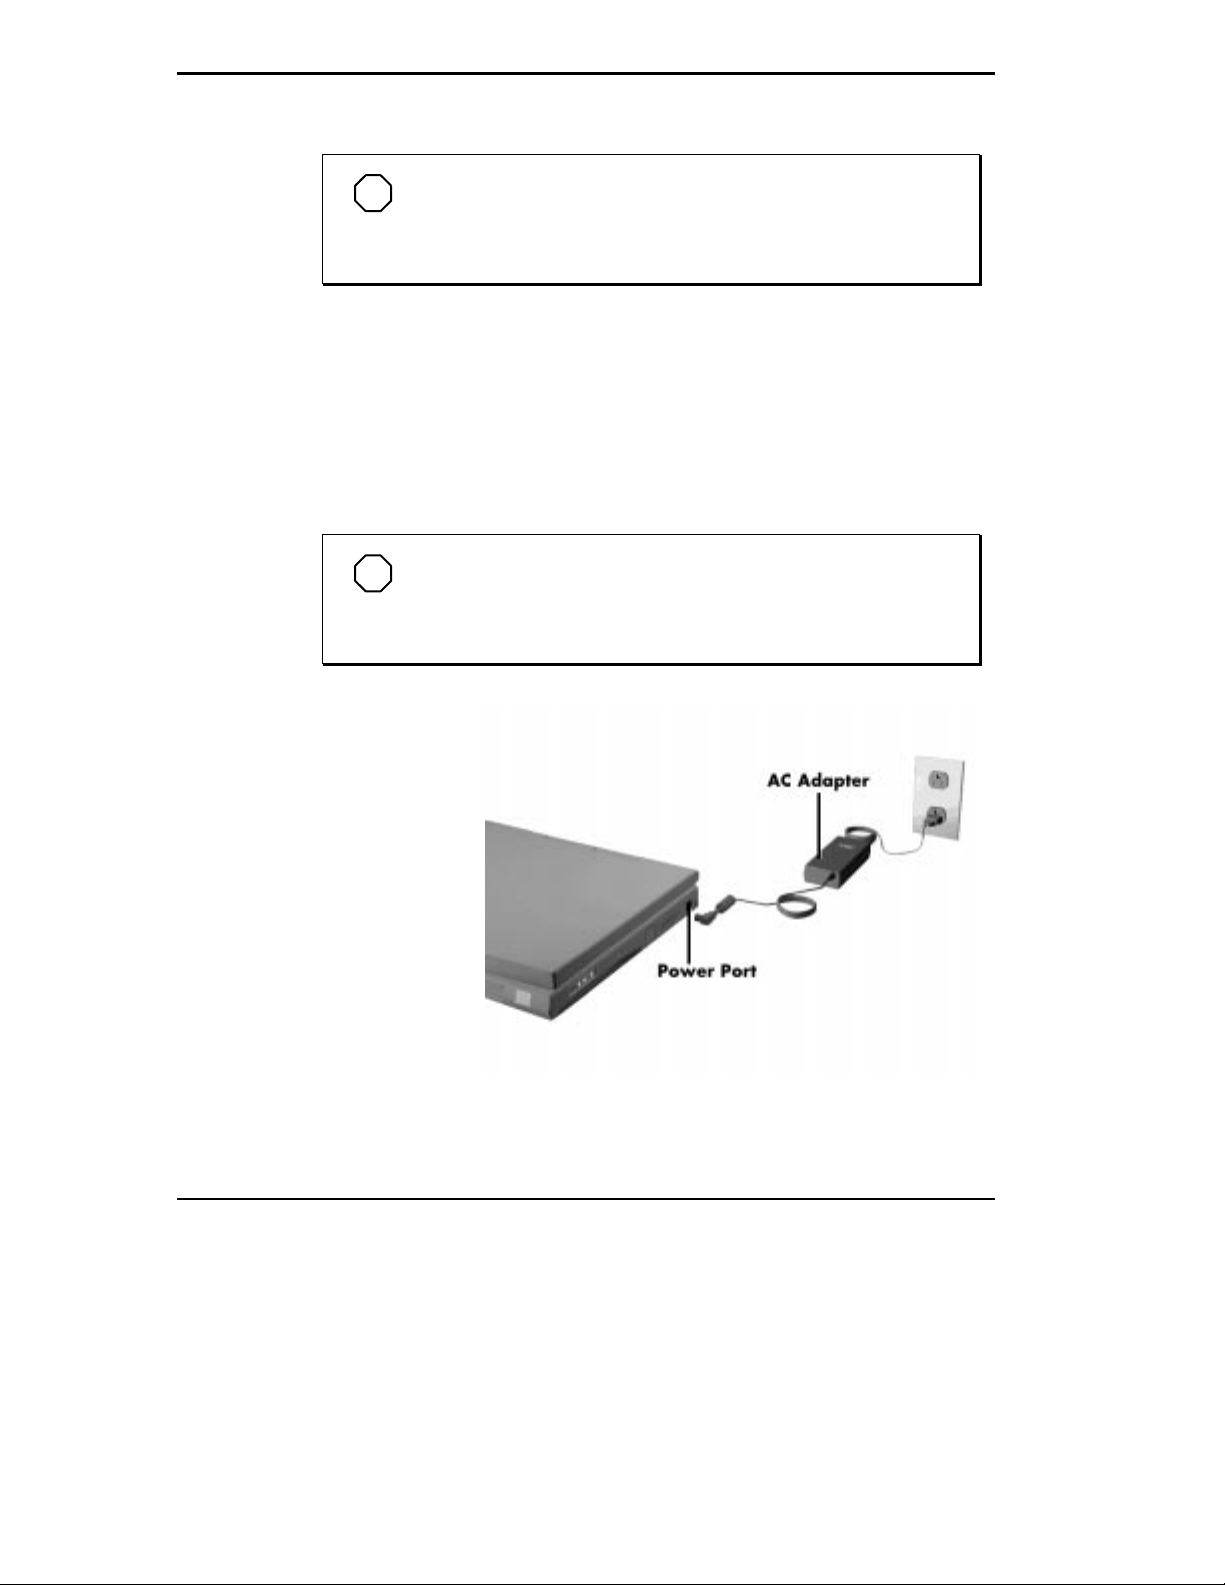
Connect the AC a dapter a s follows:
Connect the AC a dapter cable t o the power port on the r ight side of your
1.
NEC Versa system.
Plu g one end of the AC power ca ble into t he AC adapter and the other
2.
end into a properly grounded 120- or 240-volt wall outlet.
NOTE
The AC power cable type t hat your system uses depends on
the country you’r e using it in. Contact the l ocal dealer to purchase
the correct power cable.
1-16 Getting Started
Connecting the A C adapter
Page 26
Powering On
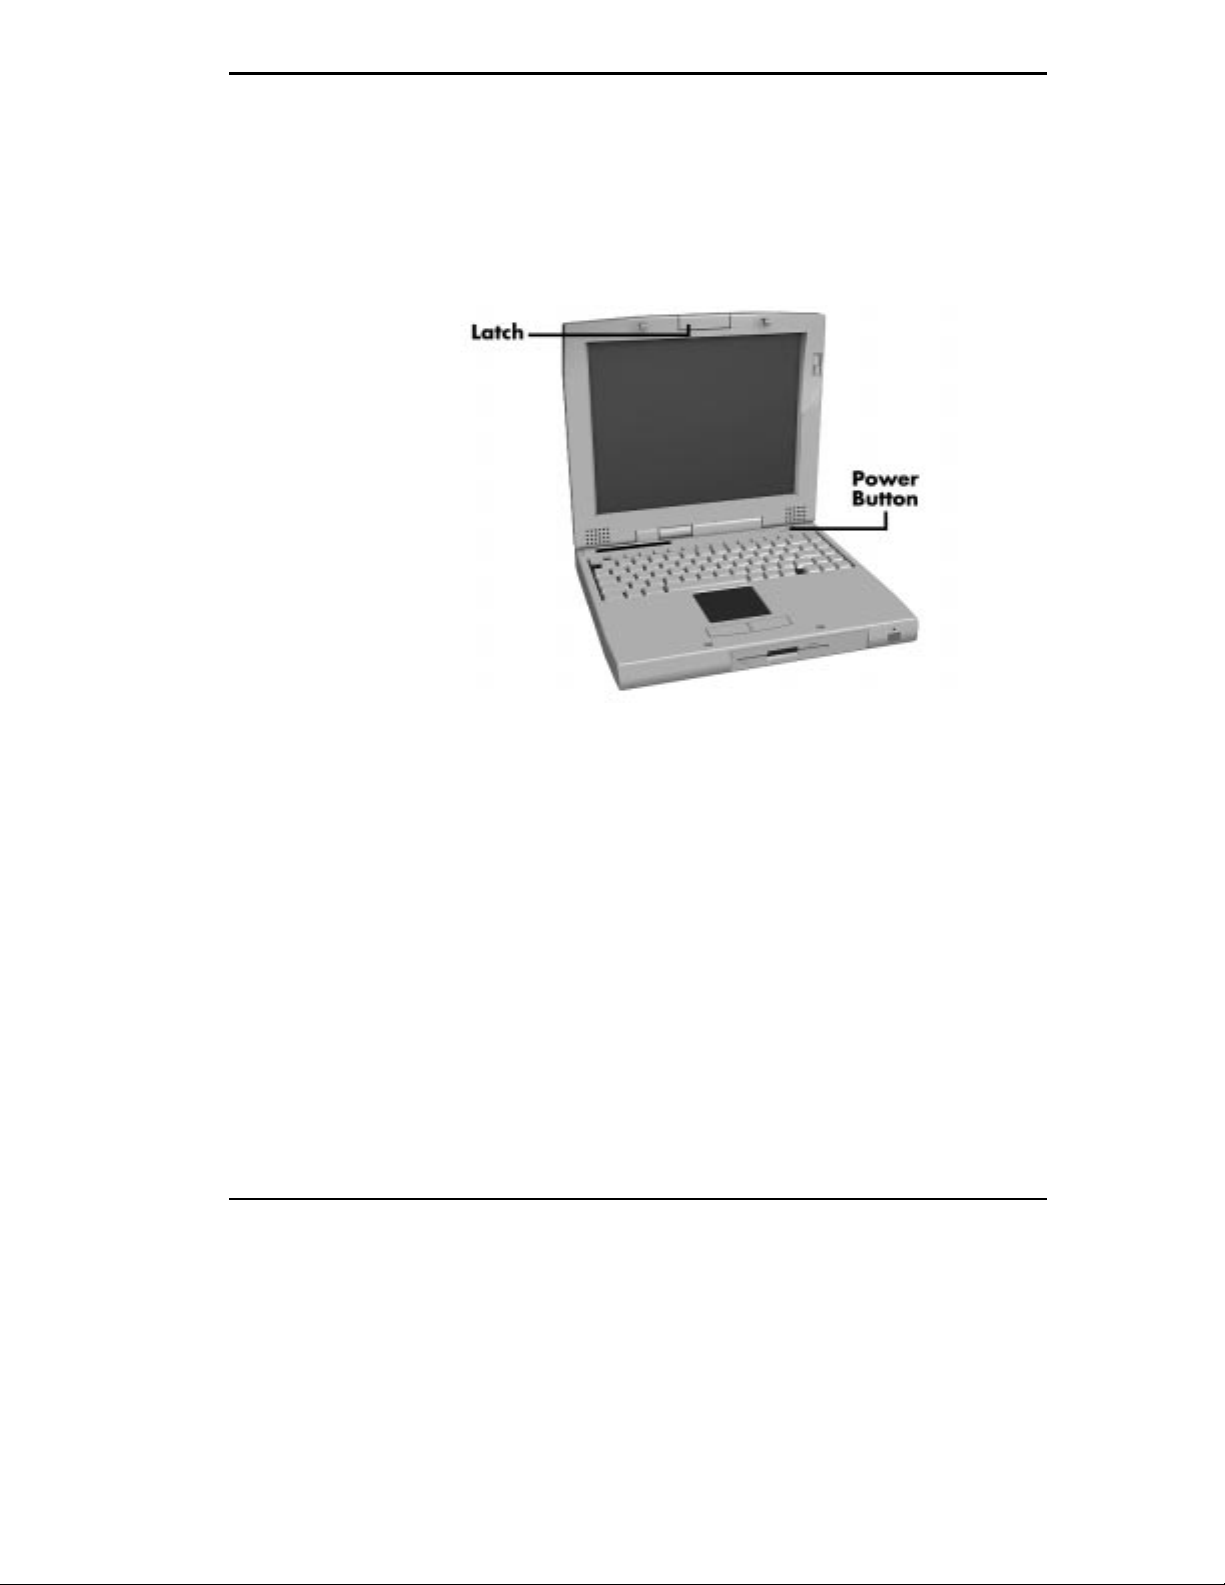
Power on the system as follows.
Locate the latch on the front of the LCD panel, press the latch up, and
1.
rais e the panel.
Locate the power button and slide it to the right to turn on system power.
2.
Using the Main Battery Pack
Your NEC Versa system comes with a rechargeable Lithium Ion (Li-Ion)
battery pack. You can run your system on battery power for approximately
one to three hours with power mana gement f eatures enabled. It’s easy to install and remove.
Your NEC Versa system integrates status icons in the LCD Status Bar that
appear in the window panel located a bove your keyb oard. Two b att ery icons
display to help you keep track of the main bat tery (or second battery if installed) power level. S ee the “Status Icons” section earlier in this c hapter for
a description of the batt ery icons. Both let you know how much battery
power remains.
When battery power is very low, the power LED flashes amber.
Powering on the system
Getting Started 1-17
Page 27
When batter y power gets low, do eit her of the f ollowing:
Pr ess the s uspend b utt on to put your system in S uspend mode, remove
the ba tter y p ack, and rep lace it wit h a fully c harged L i- I on bat tery.
Leave t he b att ery pack in the system and c onnect your NEC Versa to the
AC adapter and a wall outlet. The battery recharges in approximately 2
hours.
You ca n also b uy an optional N EC Versa b att ery charger to quickly charge
your bat ter y . S ee the online NEC Versa Accessories and Solutions Catalog.
NOTE
Use only the NEC battery charger designed for your NEC
Versa battery type. Different NEC Versa models require different
batteries and battery chargers.
!
To prevent accidental battery ignition or explosion, adhere to the
following:
WARNING
Keep the battery away from extreme heat.
Keep metal objects away from the battery termi nals to prevent
causing a short circ uit.
Make sure the battery is properly i nstalled in t he battery bay.
Read the precauti ons printed on the batt er y and in t he online
Basics
.
Determining Battery Status
You can determine battery status via the battery icon in the status bar discussed earlier in this chapt er. If you have one ba ttery pack ins talled, one
batter y ic on appears . If you have two batt eries installed, two ba ttery ic ons
appear.
1-18 Getting Started
The
Page 28

A blinking battery icon indica tes that t he b att ery is charging. A fast blinking
battery ic on oc c urs:
when installing a new battery
duri ng unknown battery statu s
when there is a problem with the battery.
To return the battery to its normal state, try the following:
remove and then reinstall the battery
reinstall the battery in your NEC Versa and fully recharge the battery (to
100%).
The batt ery perc ent age icon blinks under the f ollowing c onditions:
when battery power is low, the nu mber icon blinks ,
if ba tter y power is ex tremely low, t he nu mber icon blinks rapidly.
When to Replace the Battery
The following symptoms indicate that ba ttery lif e is nearing an end. Replace
batteries that display these symptoms:
Battery Ha ndling
Keep the following in mind when removing or repla c ing a battery.
shorter work times
discolor ation, warping
hot to the touch
strange odor.
Use Li-I on bat teries only in the NEC Versa comput er for whic h they are
designed.
Use only the Li-Ion battery designed for your system in t he NEC Ver sa.
Mixing other manu f act u rer’ s batter ies , or using a c ombination of very
old and new batt eries can deteriora te batter y and equipment performance.
Turn off p o wer to the s ystem after use. Keep i n g sys tem power on can
degrade b attery performa nc e and shor ten batter y lif e.
Getting Started 1-19
Page 29
Clean the ba tter y terminals with a dry cloth when they get dirty.
Keep the batt ery out of the reach of children.
Replacing the Battery Pack
Repla c e the bat tery pack inst alled in your N EC Versa system as f ollows.
NOTE
Use Li-Ion batter ies in the NEC Versa computer f or whic h they
are designed. Installing another manufacturer’s battery, or using a
combination of very old and new batteries can deteriorate battery
and equipment per form anc e.
Sa ve you r files, exit Windows, and pr es s the Suspend button or turn off
1.
system power.
Close t he L CD Panel and turn the system over.
2.
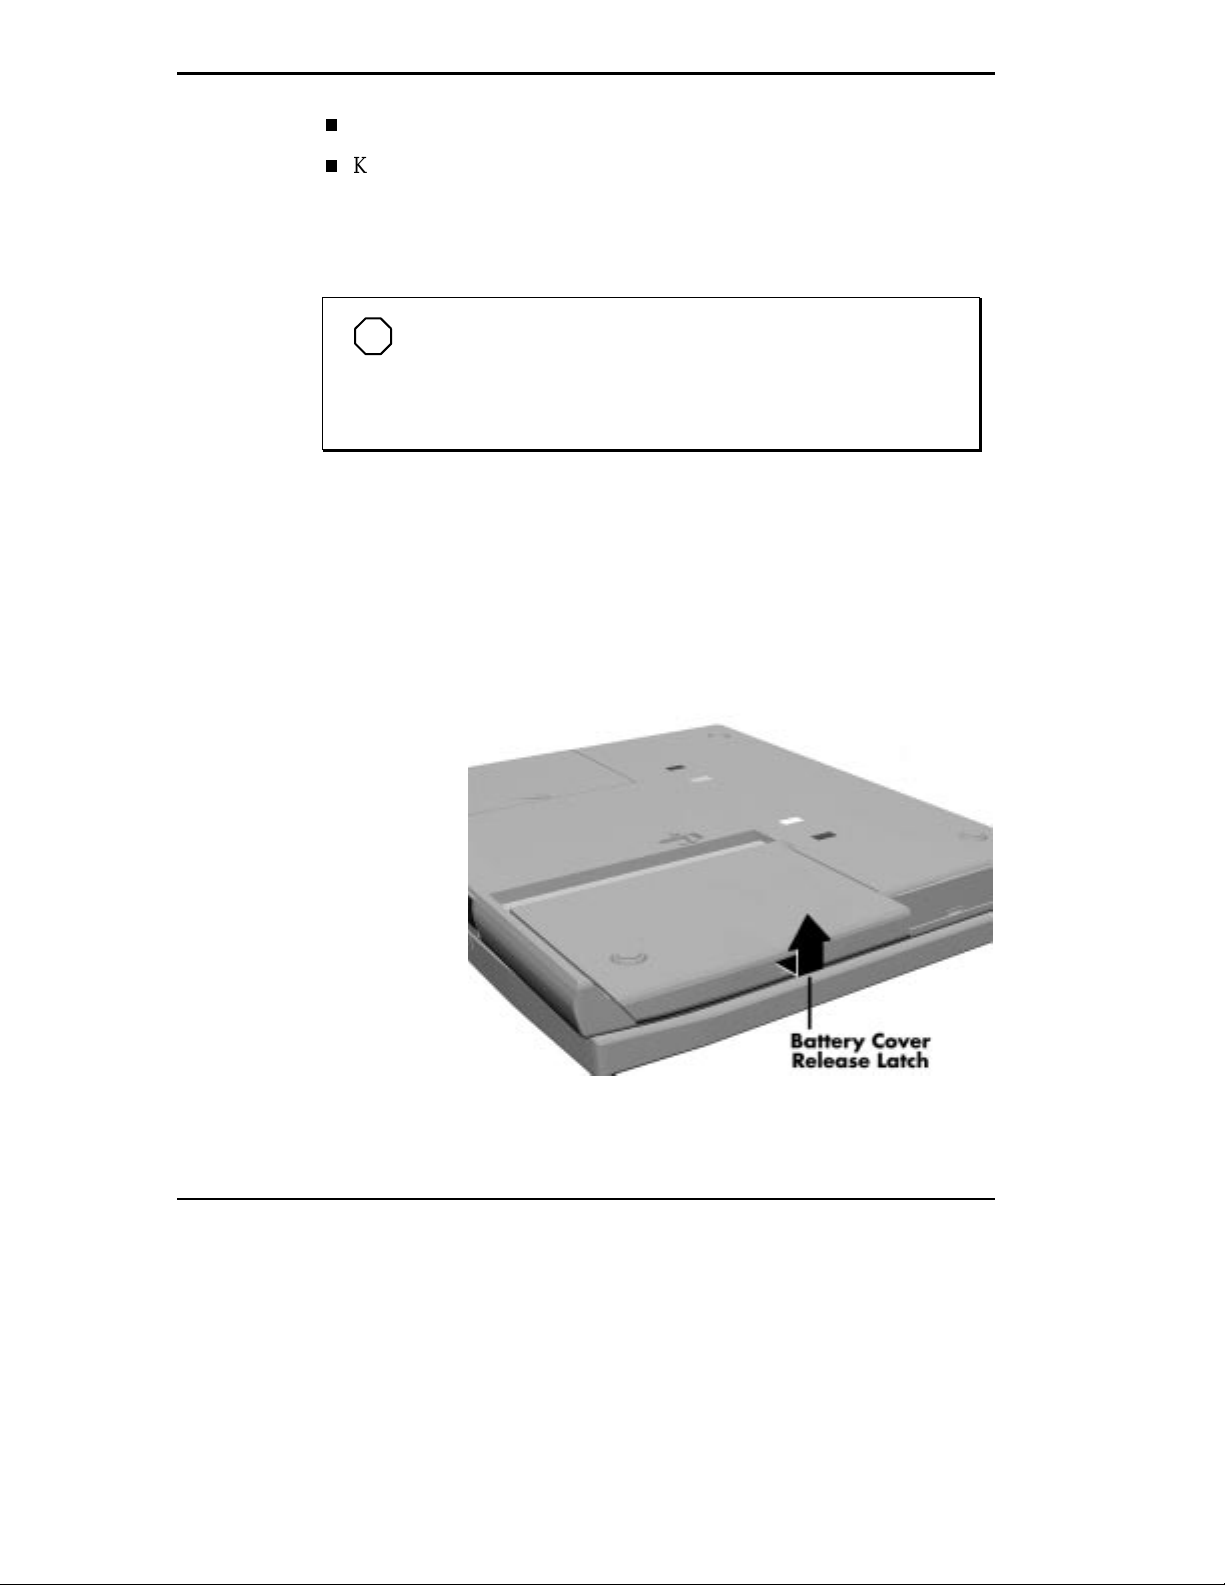
Releas e t he b att ery cover latch and slide the b att ery ba y c over away from
3.
the system.
1-20 Getting Started
Removing the cov er
Page 30
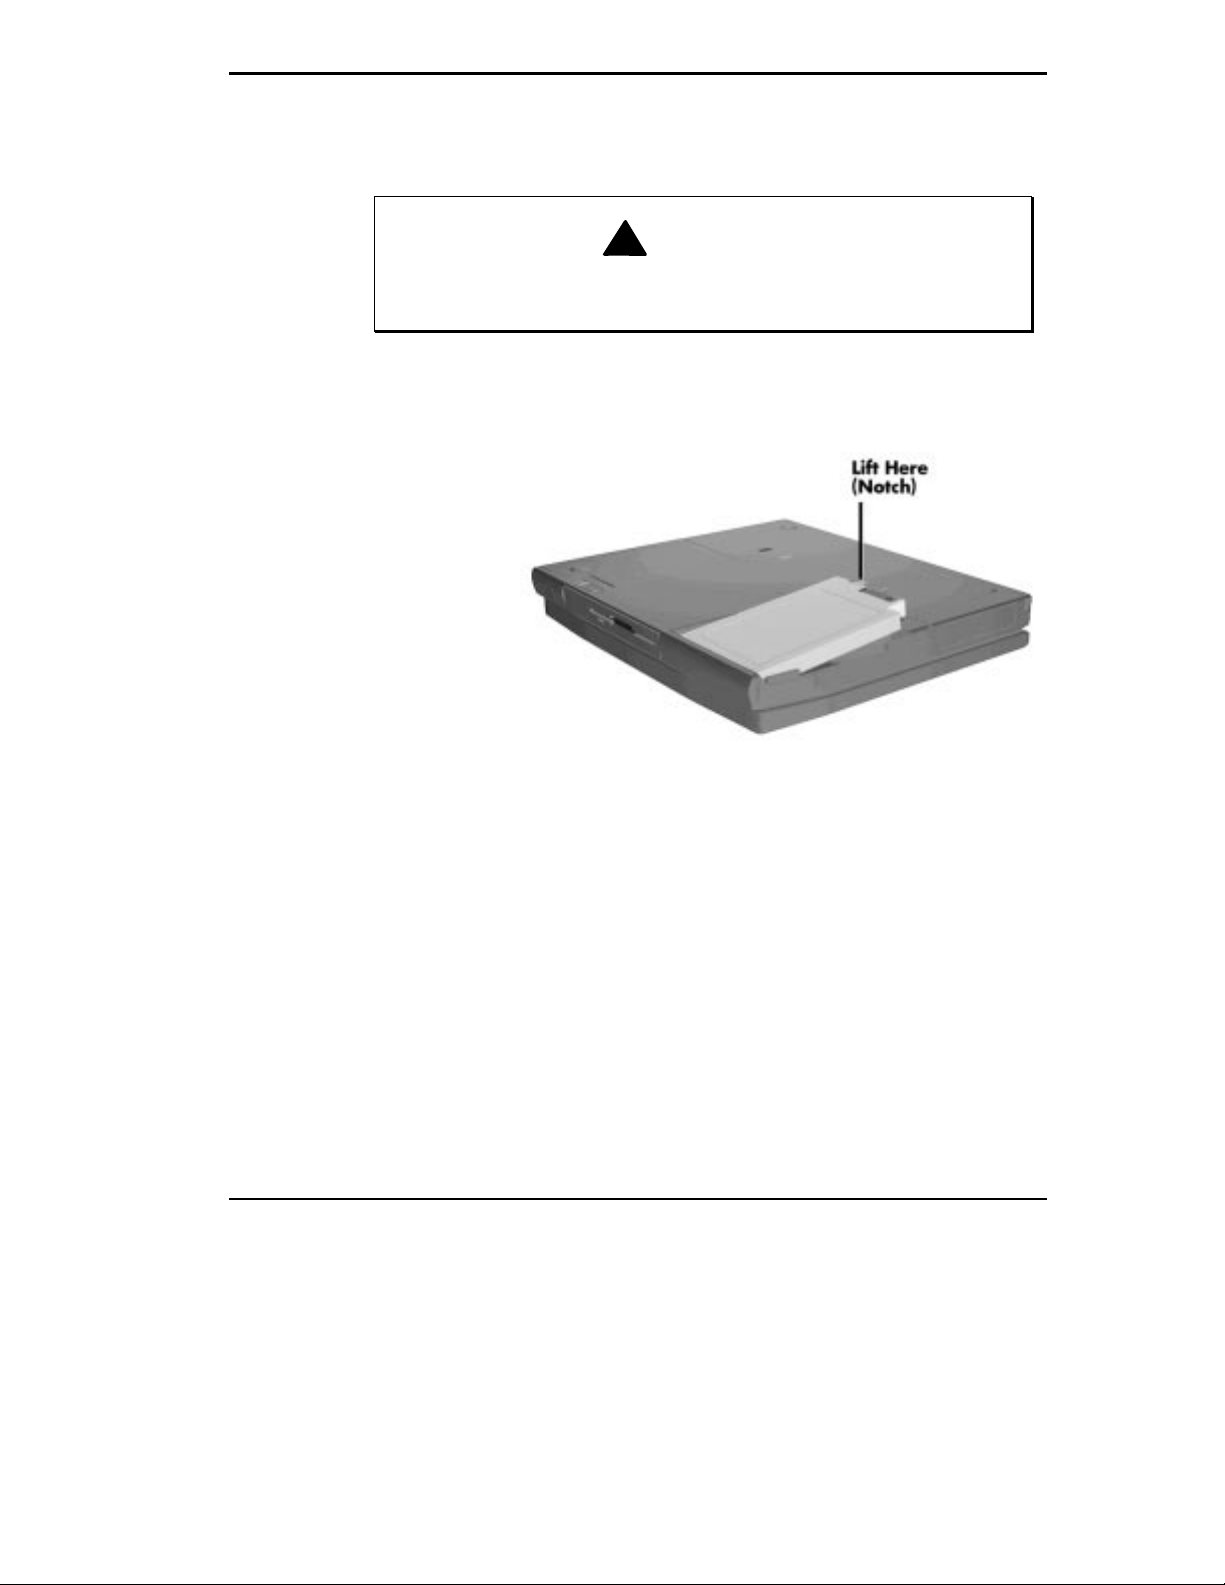
Place a finger in the notch on the battery and lift the battery out of the
4.
system.
!
Always li ft t he battery out of the system by the notc h. Fai lure to do
so can damage the batt er y termi nals.
WARNING
Removing the bat tery
Getting Started 1-21
Page 31
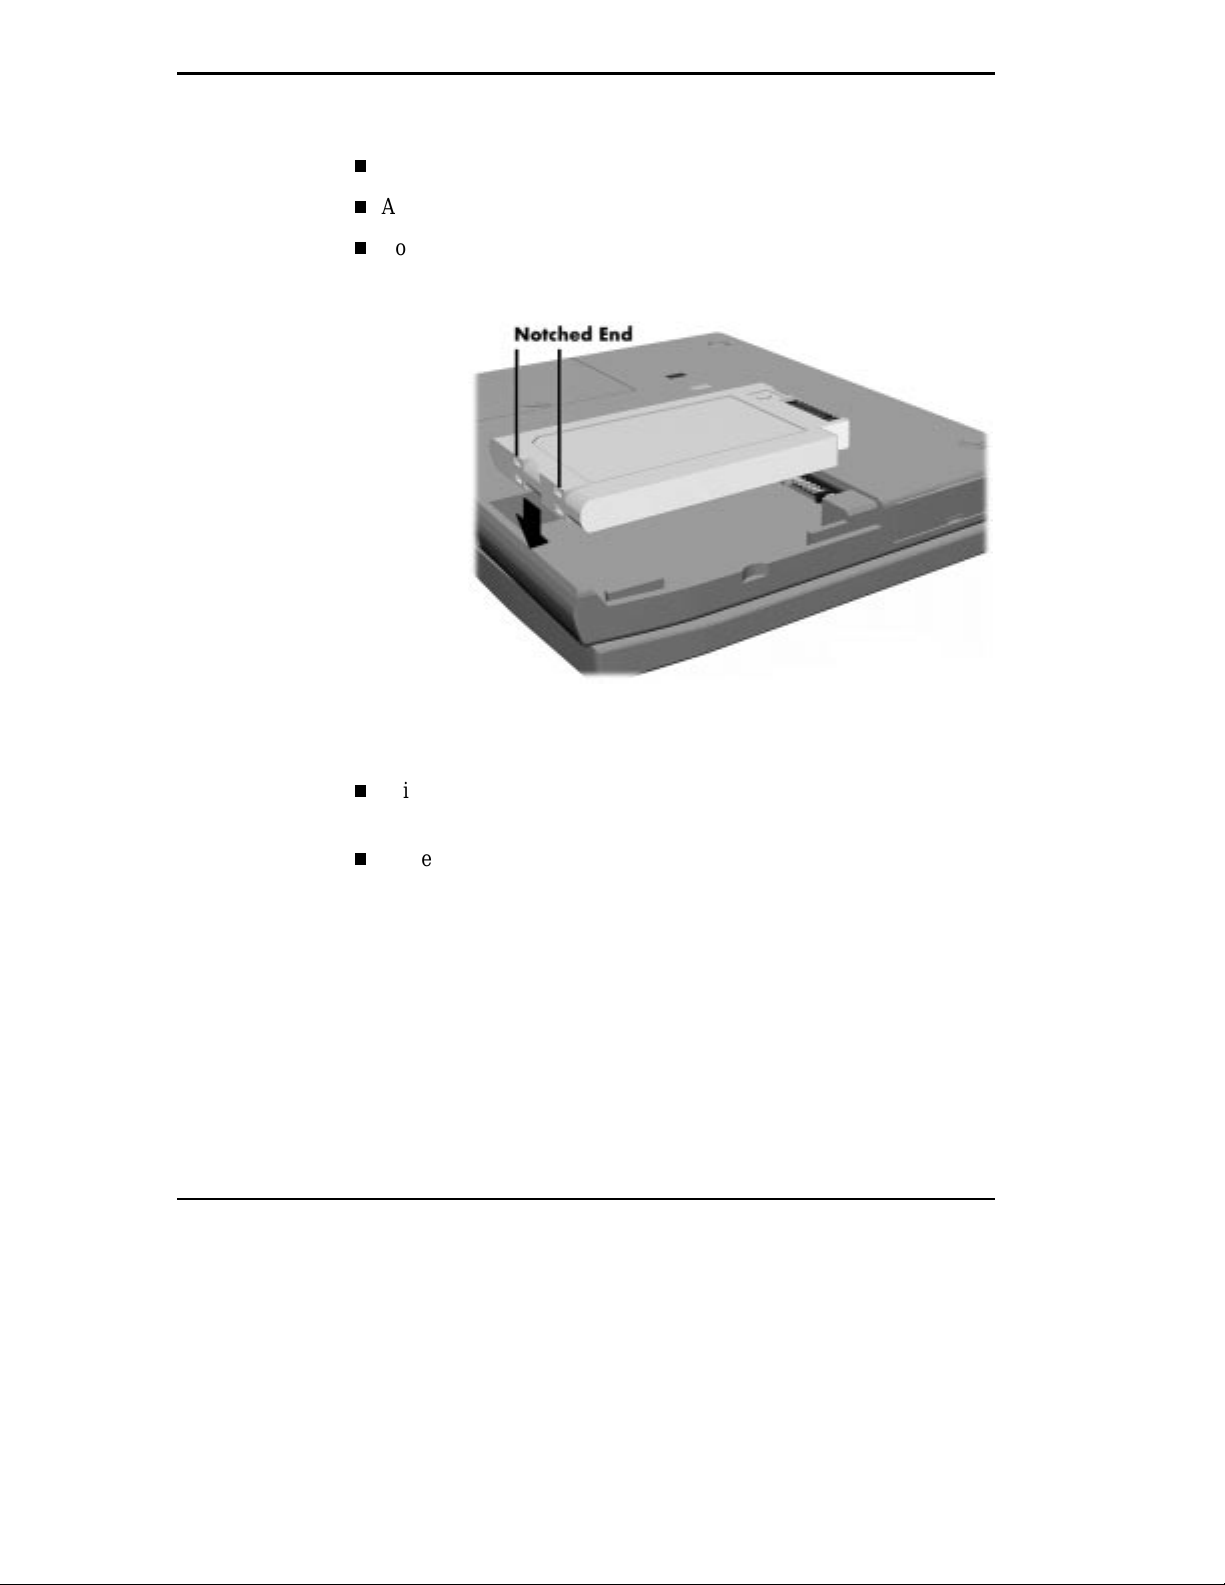
Insert the new battery as follows:
5.
Loca te the grooves on the end of the b attery opposit e t he terminals.
Align the grooves with the projections inside the ba tter y bay.
Lower the notched end of the battery into the battery compartment.
6.
1-22 Getting Started
Inserting the battery pack
Replace the battery bay cover as follows:
Align the tabs on the bay cover with the grooves on the system
chassis.
Lower t he cover onto the b ay and s lide it into pla c e u ntil the relea se
latc hes loc k.
Page 32
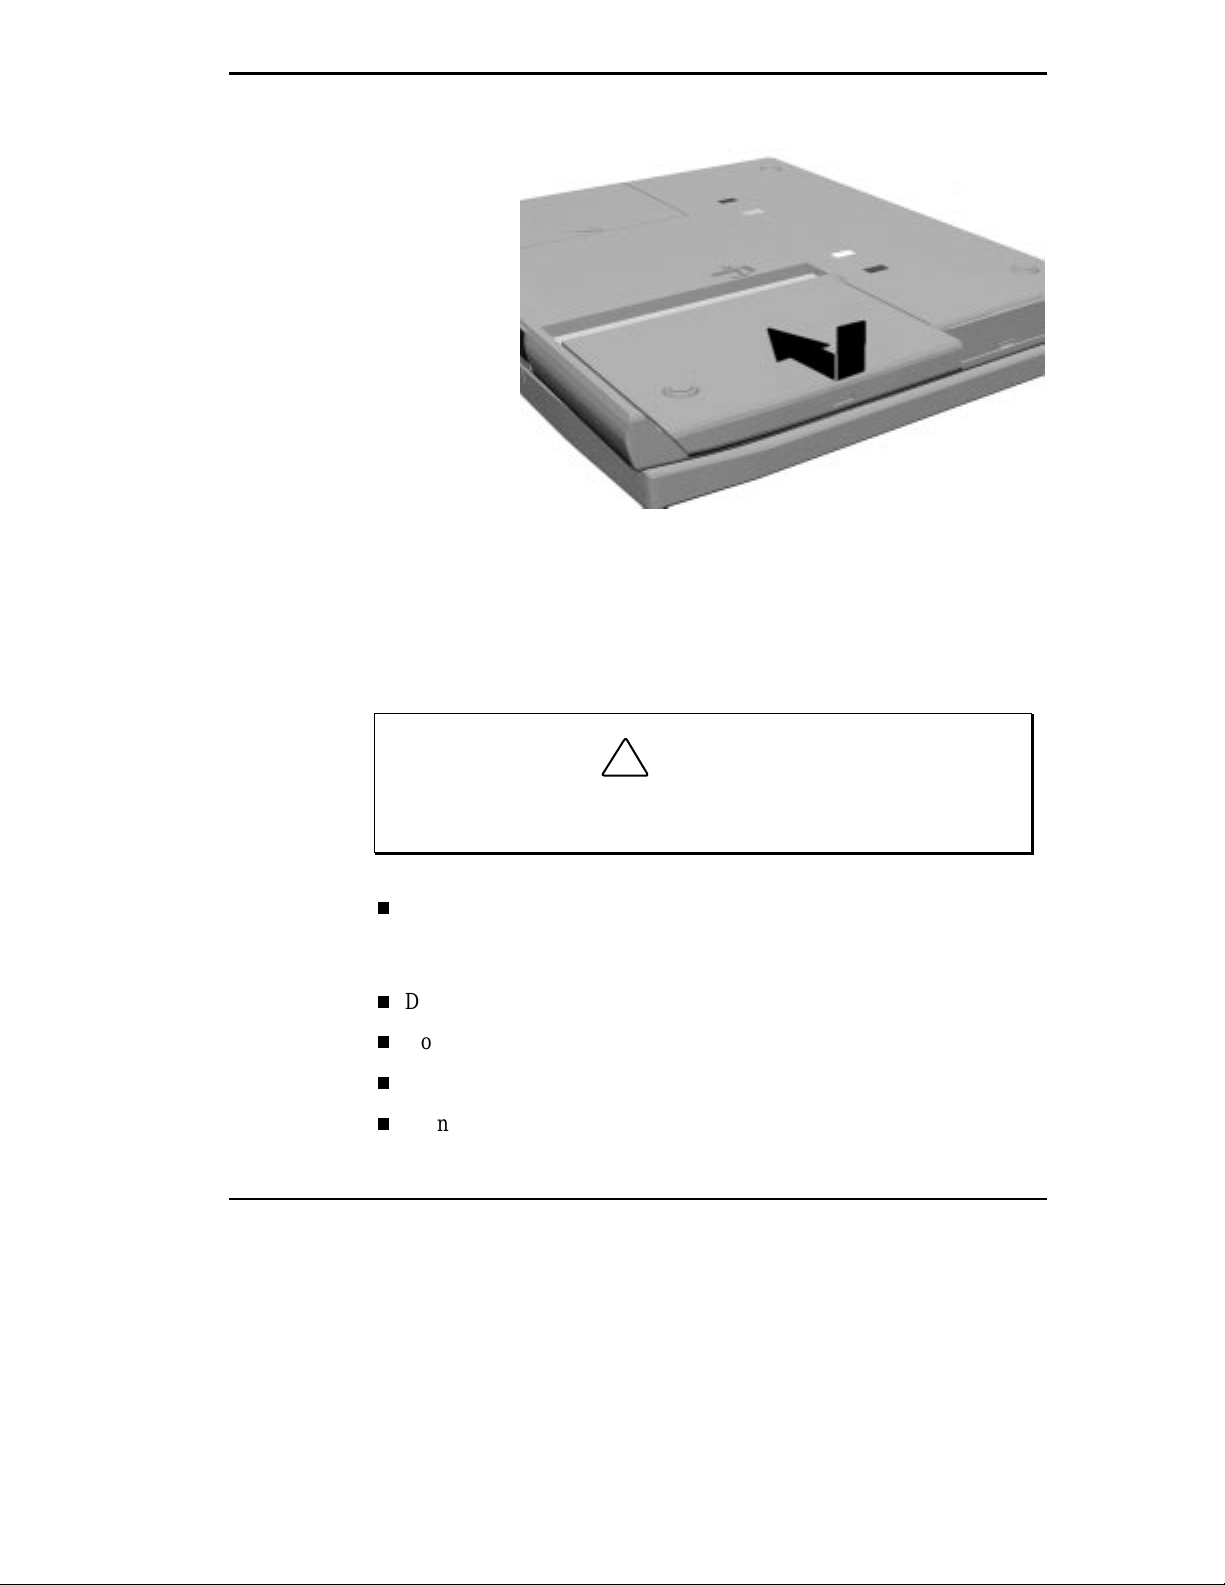
Turn the system over.
7.
Battery Precautions
To prevent a c c idental b att ery ignition, rup tur e, or explosion, adhere to the
following:
Replacing the cover
!
To av oid personal injury and property damage, read these battery
precautions on handling, chargi ng, and disposing Li-Ion batteries.
Keep the batt ery away from heat sources including direct sunlight, open
WARNING
fires, microwave ovens, and high-voltage containers. Temperatu res over
140º F (60ºC) may cause damage.
Do not drop or impact the batter y.
Do not disass emble the b att ery.
Do not solder the battery.
Do not puncture the battery.
Getting Started 1-23
Page 33

Do not u se a battery that appears damaged or def ormed, ha s any rust on
its casing, is discolored, over heats, or emits a foul odor.
Keep the b attery dry and away from wat er.
Keep metal objects a way from battery terminals. Meta l objects in c ontact
with the terminals can c aus e a shor t cir c uit and damage.
If the battery leaks:
If the b att ery leaks onto skin or c l othing, wash the area immediately with
clean water . Batter y fluid can cause a skin rash a nd damage fabric.
If battery fluid gets into eyes, DO NOT Rub; rinse with clear water im-
mediately a nd c onsult a doctor.
Ta ke extra pr ecauti ons to keep a leaking battery away from fire. Ther e is
a da nger of ignition or explosion.
Recharging Battery Precautions
Adhere to the following pr ecautions when rec harging the Li-Ion bat tery.
Use only the NEC battery charger designed for your NEC Vers a battery
type. Different NEC Versa models requir e different b att eries a nd bat tery
chargers.
Charge the battery for the specified charge time only.
During charging, keep the environmental temperatur e b etween 32°F and
104°F (0°C to 40°C).
Read the instructions that came with the battery charger before charging
the battery.
Optional Second Battery
You ca n add a second batter y to boost the sys tem’s power level. You’ll need
to purchase the NEC VersaBay II Battery and Adapter Kit. See the online
Versa Tools Catalog in the NEC Versa 6060 Help Center, or your author-
ized NEC dealer for details about the NEC VersaBay II Battery and Adapter
Kit.
1-24 Getting Started
Page 34
The kit provides a Lit hium-Ion (Li- I on) bat tery a nd plas tic a dapter that installs in the Vers aBay I I . See “I nstalling a Device in the Vers aBay II ,” in
Chapter 4, for battery adapter installation instructions. Inserting a second
fully charged battery increases battery life approximately 3 to 6 hours.
Extending Battery Life
You will find a n extensive explanation of how best to a p ply the power management tools that your s ystem offer s within Advan ced T o p i cs in the NEC
Versa 6060 Help Center. Other important topics to view in the online document includ e Maximizing Battery Life, Battery Charging and Disposal.
Using the DC Car Adapter
Another way to power your NEC Versa system is via car battery power using the opt ional DC c ar adap ter. Connect you r sys tem to the opt ional DC
car adapter as follows.
Disconnec t the AC adapter from the s ystem if connect ed.
1.
Plug the appropriate end of the car DC adapter into the power port on the
2.
system.
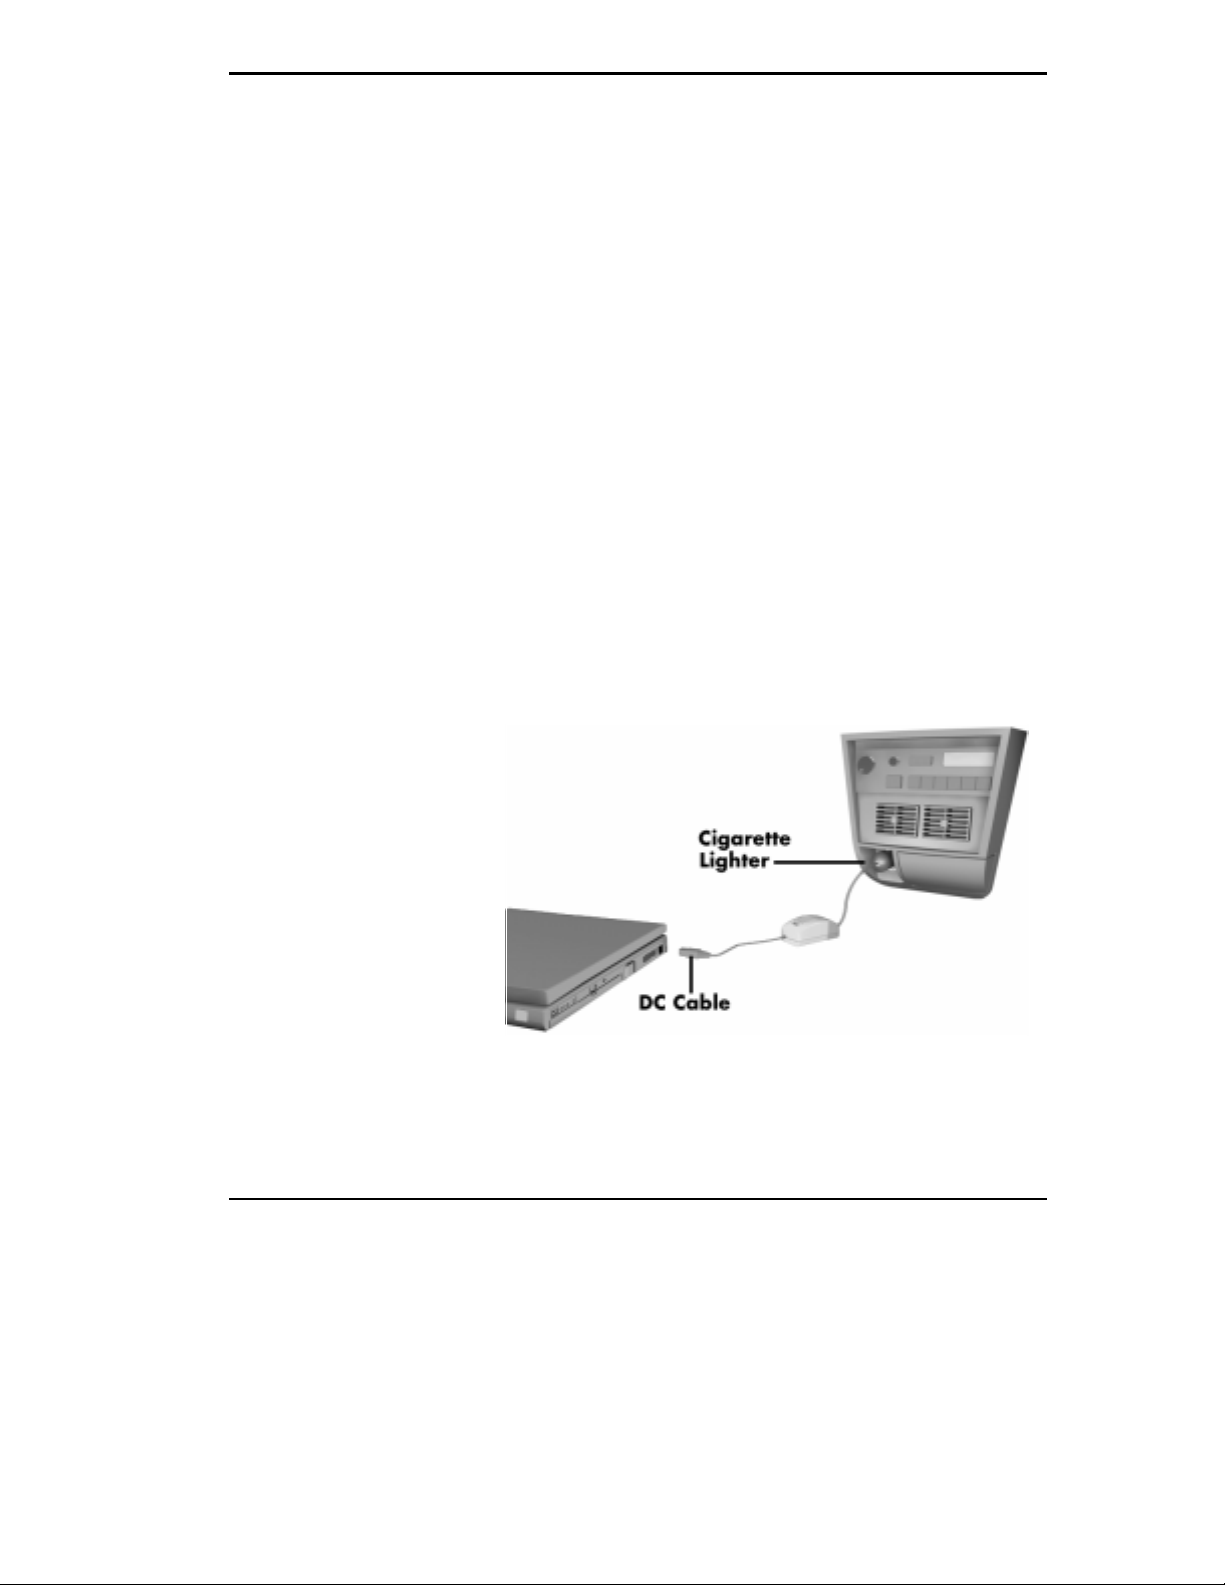
Connect the plug of the DC car adapter to a car c i garet te lighter.
3.
Connecting the c ar DC adapter
Getting Started 1-25
Page 35

INTERNAL BATTERIES
As you have seen, a Lithium Ion (Li-I on) batter y provides the main power
source in your NEC Versa computer. See Appendix B for a list of Li-Ion
battery specifications. In addition to this battery, the CMOS battery and
bridge bat tery a l so pr ovide s ystem power .
CMOS Ba ttery
This lithium battery provides battery backup and prevents data loss in the
syst em’s c omplementa ry metal ox ide s emiconduc tor ( CMOS) RAM. This
memory area contains information on the system’s configuration, for exa mple date, time, drives, and memory. The CMOS battery lasts approximately
two years. An aut horized NEC servic e technician should r ep lace the C MOS
battery for you.
Have your NEC Versa ser vic ed by an NEC authorized s ervice center. Call
Customer Service at (800) 632-4525 for the dealer nearest you.
Bridge Battery
The internal 7.2 volt bridge battery saves your system status in Suspend
mode for up to five minutes. Su spend mode is a fea tur e that halts all system
operations temporarily when you need t o be awa y f rom your N EC Ver sa for
a short p eriod. This gives you time to install a f ully charged battery or plug
in AC p ower when your battery ch arge becomes low. An au thori z ed NEC
service technician should r ep lace the bridge ba tter y f or you.
Have your NEC Versa ser vic ed by an NEC authorized s ervice center. Call
Customer Service at (800) 632-4525 for the dealer nearest you.
SYSTEM CARE
Your NEC Versa system is a durable, dependable system built for extensive
use a nd travel. F ollow these guidelines to mainta in the condition and performa nce of your c omp uter .
Precautions
Foll o w these precaution s when using your NEC Versa comput er, AC
adapter, and VersaBay II.
1-26 Getting Started
Avoid dropping or bumping t he comp uter or the AC adapter .
Do not s tack any object s on the computer.
Page 36

Avoid moving your NEC Ver sa computer during system operat ion, espe-
cially while the hard dis k or diskette drive is being access ed.
When using the AC adapter, make sure the power source falls within the
system’s compatible range of 100–240 volts AC. Never use the AC
ada p ter if the voltage falls outside of this range. (Watch for this when
traveling to other countries.) Use of a surge suppressor while traveling is
highly recommended.
Tu rn computer p ower off b efore atta c hing or r emoving non-p lug and
play devices .
Avoid using the computer or AC adapter for ex tended periods in direct
sunlight .
Avoid using t he s ystem in humid or dusty environments.
Turn computer power off before cleaning it.
Avoid expos ing the NEC Vers a compu ter or AC a dapter t o ex treme
changes in tempera tur e or humidity. If it is una voidable, allow your NEC
Versa to adjust to room temperature before using.
When cleaning the syst em, use a soft, clean, dry c l oth. Avoid wip ing the
display surfa c e wit h abrasi ve material, including rou gh f abr ic . Do not
use a c leaning solution, t his may da ma ge t he not eb ook’ s pla stic.
If the AC adapter becomes extremely hot, unplug the adapter and let it
cool.
Storage Requirements
Store the computer and AC adapter i n an environment that meets the following conditions :
Maintain storage temperatures between –4°F and 104°F (–20°C and
40°C).
Getting Started 1-27
Page 37
If the tem perature of t he NEC Versa suddenly rises or fall s (for example, when you move the system from a warm place to a cold
place), v apor condenses inside the system. Turni ng on the system
under this condition can dam age the internal system components.
Before turning on the system, wait until the system’s internal temperature equalizes with the new environment and any internal
moisture c an evaporat e.
Keep the storage ar ea free from vibration and magnetic f i elds .
Keep the system and it s components away f rom orga nic solvents or cor-
rosive gases.
Avoid leaving the system and it s components in direct s unlight or near
heat sources.
Routine Cleaning
Clean or dust your sys tem as follows.
!
CA UT ION
1-28 Getting Started
!
Never
use harsh solutions, household cleaners, or spray cleaners
that contain caustic material s on your NE C V er sa computer.
These cleaners are usually high in alkalinity which is measured in
pH. Using these cleaners can cause the pl astic surf ace to crack or
discolor.
LC D screen — Ca refully wipe the L CD screen with a soft c l o th or a
screen wipe designed for that purpose. Special screen wipes are available
thr ou gh your local computer deal er.
System case — Carefully wipe the case with a slightly damp, almost dry
cloth.
CA UT ION
Page 38

2
Introducing the Software
This chapter introduces you to the software* that comes with the NEC
Versa 6060, including:
the Windows 95 operating system, the Windows NT 4.0 operating
system or the Windows for W orkgr oups op erating system with MS -
DOS
Online Help
NEC Ut ilities
Setup
NE C Customize Utility
HD PREPEZ Utilit y
Other Software
Intel LANDesk C lient Manager
LapLink
®
M cAfee Virus Scan™
McAfee WebScan™
MediaMatics Arcade™ MPEG Player
XingMPEG Player™
*
The software listed here is current as of July 1997. The list is subject to change
without notice. The software on your system is predicated by the operating system that
shipped on your notebook computer.
Introducing the Software 2-1
Page 39

WINDOWS INTRODUCTION
Your NEC Versa 6060 was purchased with Windows 9 5, Windows NT or
Windows for Workgrou ps as your operating s ystem. These Mic rosoft
operating systems provide a means of running applications , navigating
thr ou gh your file s tru c tur e, and u sing your notebook computer. E ach
operating system offer s its own look and tools .
All these Mic rosoft Windows opera ting systems employ a gr aphical inter fa ce to make t h e oper at i n g systems easy to use.
Windows 95
Windows 9 5 gives you t he newest featur es offered by Micr osoft, including a
Desktop with r oom to maneuver, a T askbar f or quick navigation between
open windows, plug and pla y f eatures, online networking functions, and
more.
With Windows 95, the following icons are loaded on your desktop:
My Compu ter — provides access to drives, pr inters, the cont rol pa nel,
and network features.
Inbox — lets you access the Microsof t fax and mail software a s well as
Microsoft network services.
Inter net Exp l orer — provides an Internet browser for those systems with
Inter net access via an optional modem or network PC card.
Recycle Bin — gives you a tr ash container in which to put unwant ed
files.
Networ k Neighborhood— shows you the network, int egrat ed L ANs, and
WANs (i f your s ystem is connect ed t o a networ k) .
My Brief case — allows easy tra n sfer of f i l es between th e NEC
Versa 6060 and another system.
Install Intel C lient — helps your manage your NEC Ver sa.
NEC Customize — inst alls NE C-designed deskt op f eatures, inc luding
custom wallpaper, the latest VersaGlide soft ware cont rols, warn swap
utility and t he automa tic running of McAf ee Anti Virus software eac h
time you boot.
2-2 Introducing the Software
Page 40

Windows NT
NEC Versa O nline H elp — provides quick a c c ess to a variety of online
topics. (In some countries, the system ships with an online user’s guide
instea d of the NEC Versa O nline Help .)
Start — displays a pop - up menu with which to st art pr ograms and applicat i ons, open documents, access system settings , look at online help, and
shut down your syst em.
See the onlin e Us ing Windows 95 in the NEC Versa 6060 InfoCenter group
for det ailed instructions on using Windows 9 5.
Windows NT 4.0 is the high-end member of t he Windows oper ating s ystem
family. W indows NT p rovides a ll the benefits of the other W i ndows opera ting syst ems inc luding a means of running you r ap plications a nd navigating
through your file structure in a n easy-to-use gr aphical inter f ace. In addition,
Windows NT ext ends these benefits with a dditional p erfor ma nc e, security,
and fault protection in a powerfu l platform of client-ser ver computing.
Windows NT allows you to run applications crea ted specific ally for W i ndows NT and Wi ndows 95. You can also ru n app lic ations created for other
versions of Windows , MS -DOS ®, and charac ter-bas ed MS® OS/ 2® 1.x a s
well as P O SIX-compliant a pplica tions.
Windows NT gives you the newest features off ered by Mic rosof t, including
a deskt op with r oom t o ma neu ver, a ta skbar for quick na vigation b etween
open windows, and more. The following icons appear on t he desktop.
My Compu ter — provides access to drives, pr inters, the Control Panel,
and network featur es.
Networ k Neighborhood — shows you the network, int egrat ed L ANs, and
WANs.
Inbox — lets you access the Microsof t fax and mail software a s well as
Microsoft network services.
Inter net Explorer — let s you browse Web pages on your local network
and on t he Internet.
Recycle Bin — gives you a tr ash container in which to put unwant ed
files.
Introducing the Software 2-3
Page 41
Install Intel C lient — helps your manage your NEC Ver sa.
My Br iefc ase — allows ea sy tr ansfer of files and dat a synchroniza tion
between your NEC Vers a and another sys tem.
In addition, the Start button at the bottom left of the desktop displays a popup menu wit h whic h to start pr ograms and applica tions, open documents,
acces s system settings, look a t online help, and shut down your system.
For c omplete information on Windows N T, inc l uding feat ures and st ep - bystep procedu res for us ing tools, see the Mic rosof t Windows N T docu mentation provided with your noteb ook.
NOTE
If you ar e using Windows NT 4.0 Workstati on and change t he
system conf iguration, you m ay need to run the Microsoft Wi ndows
NT 4.0 W or kstati on Ser v i ce P ack. From t he Windows NT 4.0 Workstation desktop, press
C:\sp3\update.exe,
to complete the update.
click on
, select
Start
Follow the on screen instructi ons
OK.
Run…,
and type
Windows for Workgroups
Windows for Wor kgroup s offers the well-est ablis hed Windows inter f ace.
Application icons are plac ed in groups, which are repres ent ed b y group
icons. To st art an a pplica tion, highlight and doubl e clic k or double tap the
applicat ion ic on.
The P rogram Manager c ontains the following groups .
Main — Includes programs and tools to help you control p rinting; set u p
printers , plot ters, and modems; c ustomize t he desktop; and mana ge files.
Access ories — Inclu des desktop programs that come with Windows,
such as a simple word proces sing progra m, a drawing program, a
calenda r, and a calculator .
Startup — Lets you add programs to start automatically when you enter
Windows.
Games — Gives you a way to prac tice your VersaG lide s kills or ju st
relax.
2-4 Introducing the Software
Page 42

Applications — Includes any applica tions t hat Windows detects on your
har d disk dur ing insta llation.
NEC Utilities — I nc ludes small p rograms writ ten by NEC to help you
manage you r NE C Vers a compu ter.
See the onlin e Windows QuickStart 3.11 for detailed instru c tions on using
Windows f or Wor kgroups.
DOS INTRODUCTION
MS- DOS is the Microsoft disk operating s ystem tha t ru ns the computer
when Windows for Wor kgroup s is loa ded. DOS uses c ommands that every
pers onal computer user needs t o know at lea st a little a bout. The Windows
environment makes it possible for you to manage your system a nd applic ation programs without knowing DO S commands, bu t as you become more
comfort able wit h c omputers you may want to begin learning DOS.
For det ailed instructions on how t o use MS - DOS, refer to the online book
MS-DOS 6.22 QuickStart in the NEC Versa InfoCent er pr ogram group.
Guide to Online Help
The NEC Versa 6060 has plenty of information for you online. The NEC
Versa 6060 InfoCenter group contains information about your NEC Versa
6060, warranty coverage, and customer services. For Windows for Workgroups see t he p rinted documentat i on provided with your s ystem.
NEC VERSA HELP CENTER
The NEC Versa Help C ent er contains several specific a reas of informa tion
to help you. Audio t rac ks and animated examples make this an exc iting
learning experience. (In some countries, the system ships with an online
us er’s gui d e i n stead of the Help C enter.)
System Tour
The NEC Versa System Tour gives you a complet e t our of the system,
pointing ou t components, switc hes , softwar e and utilities. Take the tour
to become comfortable with your new NEC Versa 6060.
The Basi cs
The Basi cs describes the NEC Versa 6060 main features, how to travel
with the sy stem, use power man agement , a n d care for t h e system.
Introducing the Software 2-5
Page 43
Advanced T op i cs
Advanced T op i cs c overs s p ec if ic areas such as adding opt i ons, changing
setup settings, and solving problems.
Questions and Answers
Questions and Answers provides frequently a sked quest ions and answers
about porta ble computers to help you solve common prob lems you rself.
Versa Tools Catalog
The Versa Tools Catalog lists options such as memory cards, hard
drives, carrying c ases, and PC cards that you ca n pur c hase for use wit h
the NEC Versa 6060.
Service and Support
Service and Support provides infor ma tion on the ext ens ive p ost sale sup-
port provided for your NEC Versa 6060.
NOTE
The price information i n the
cable f or Nor th America.
Additional Online Topics
In addition to the H elp Center, your NEC Versa also contains the following
online help.
Customer Support Guide
The NEC Customer Support Guide discusses the various levels of sup-
port NEC offers you, our customer. We provide lots of inf ormation to
help you become self- suffi c ient with your NEC Versa , but if you need
help, we’re t here fo r you. If you pu rch ased the co mput er outside t he
U.S ., p l ease cont act a loca l NEC of f i c e or dealer for t he warranty pr ogra m in your area.
UltraCare Guide
The NEC UltraCare Guide descr i bes NEC’s three-year warranty pro-
gra m t o help you protect your inves tment in an N E C Vers a Series computer . If you purchased the computer outside t h e U.S ., plea se contact a
local N E C office or dealer for t he warrant y program in your area.
Versa Tools Catalog
is only appli -
2-6 Introducing the Software
Page 44

Using Windows 95
This online help f ile let s you explore Windows 9 5 (if Windows 95 is installed) and learn about navigating through the new interfac e.
GUIDE TO N EC UTILITIES
NEC provides several programs and rou tines designed to ma ke you r NEC
Versa 6060 run more efficiently. These programs are called utilities.
Setup Utility
The Set up utility automat i c ally configures your NEC Versa each t ime you
start it up. This utility is not a c c es sible fr om Windows . To view b oot-up
messages press
the following prompt at boot-up :
ESC
, press F2 to access Setup when the NEC screen dis pla y s
Press <
See Chapter 3, “Using Setup ,” a nd A dva n ced Topics for a discus sion of the
Setu p utilit y. In a ddition, online help a ssists you in ma king appropriat e
settings.
NEC Customize Utility
In Windows 9 5 systems, the NEC Customize utility installs NEC-desi gned
desktop f eatures, inc luding custom wallpaper, the latest VersaGlide s of tware
controls, and the a utomatic r unning of McAfee AntiVirus sof tware each
time you boot.
HDPREPEZ Utility
NEC provides the HDPREPEZ ut ility to a utomat ic ally configu re your N EC
Versa system hard disk space when you increase system memory.
OTHER SOFTWARE
Your NEC Versa 6060 comes with other programs that let you take full advantage of your system resources. The rest of this chapter discusses each
program, including what it c an do for you, how t o get started, and how to
use the p rogram help.
> for Boot Messages, F2 for Setup
Esc
Introducing the Software 2-7
Page 45

Client Manager
Client M anager pr ovides the cap abilit y f or mana ging c omp onent s in your
NEC Versa comput er. These component s include network inter face cards,
memory, printers, s of tware applications etc. Client Mana ger pr ovides you
with self- help diagnost i c s, including a P C healt h meter, local alerting of potential pr oblems and ha rdware and s of tware inventory. (Windows 95 a nd
Windows N T)
Install Client b y double clicking on the Install I ntel Client icon on t he Des ktop s c reen. On sc reen instruct ions will guide you through t he installation
procedure.
Explore the features of LAN Desk as follows:
LapLink
1.
Press
, slide t he c u rsor over t o Programs, and locate LAN Desk Cli-
Start
ent Ma nager folder. In the folder, highlight the LAND es k Client Manager
line and press t he VersaGlide s elect ion button or t ap t he VersaGlide p ad
once.
Highlight
2.
HELP,
pres s the VersaGlide s election but ton or tap the
VersaGlide pad once.
Highlight Contents , press t he Ver saG lide s elect ion button or tap the
3.
VersaGlide pad once.
This section introduces and guides you throu gh the capabilit ies , features
4.
and instru c tions on using LANDes k Client Manager.
LapLink helps you stay in tou c h with your home offic e s ystem or get in
touc h with other systems through infrared p ort, modem, network, or c able.
Use LapLink to transfer files, gain access to files on a remote system, or exchange written inf ormat ion with anot her us er on a remote system. La pLink
even bridges the communication gap between Windows f or Wor kgroup s
3.11 a nd W i ndows 95 syst ems.
LapLink offers the following f eatures:
File Transfer — lets you move or copy files between computers. To
sp eed file t ransf er, LapL i n k compares files b ei n g updat ed and trans fers
only the changed inf ormation.
2-8 Introducing the Software
Page 46

Remote Cont rol — gives you acc es s and control over a remote computer .
Activit y you perf orm on a local system, su c h as keystrokes, file ac c es s
and change, a nd p rogr am execution, ac tually occur s on the r emote
system.
Chat — provides a way for you to exchange information, instruct ions, or
other messages with a u ser at a remote computer.
LapLink software must be loaded on bot h the sending (loca l ) and receiving
(r emote) systems fo r commu n i cation between them to wo rk p rop erly.
How to Use LapLink
Follow thes e s teps to get st arted using L apLink. Once you have LapLink up
and r unning, refer t o L apL ink’ s online help for more information.
Start the LapLink Traveling soft ware as follows :
1.
In Windows f or Wor kgroup s, locate a nd double click t he L apLink
group icon. Select LapLink f or Windows.
In Windows 95, pres s
locate the LapLink for Windows 9 5 folder. In the folder, highlight the
LapLink line and p ress the VersaGlide selection button or tap the
VersaGlide pad once.
, slide t he c u rsor over t o Programs, and
Start
If you do not have a p ort enabled, L apLink prompt s you to enable one.
Press
port. Otherwise, press
Once your ports a re configu red, s elect your communication method b y
2.
to do so and follow the on-screen instru c tions t o c onf igure the
Yes
.
No
pres sing the a ppropriate button. The b uttons give you the following connection options. ( B alloon help disp lays ea c h button’s function.)
Connect over ca ble
Connect over wireless
Connect over modem
Connect over networ k
Connect over dial- up network
Once communication is estab lished between systems, the L apLink wi ndow is disp layed.
Introducing the Software 2-9
Page 47

Select the proc edure you wa nt to use by pressing one of the last thr ee
3.
but tons in t he LapL ink toolbar at the top of the sc reen. (Balloon help
displays eac h button’s function.)
When you finis h, pr es s the disconnec t but ton to b reak t he link b et ween
4.
the local and remote systems. Press
The other syst em is notified of the break in communications.
To find out more a b out LapLink c apa bilities and uses, refer to the online
help tha t is a vailab le when you op en L apLink.
McAfee VirusScan
The McAfee VirusScan software is set up to scan your system daily. You
can change these s ettings throu gh the VShield C onf iguration Manager for
Windows 9 5 and Windows for W orkgroups. If you r operat ing system is
Windows NT, access the Mc Af ee VirusScan NT Console.
Press the file transfer button to transfer files between systems.
Pr es s the Remote C ontrol b utton to exerc ise control over a remote
system.
Pr ess the Chat button to converse with another user at the remote
system.
.
OK
Fr om t he M cAfee VirusScan95 in W indows 95 or McAfee Virus Sca n in
1.
Windows for Workgrou ps program group, highlight the VShield C onfigurat i on Manager; and from Windows NT highlight M c Afee Virus Sca n
Console.
Open the conf iguration manager or c onsole. It contains a set of fou r tabs
2.
with various c onfiguration f eatures. The Detection ta bs give you control
over wha t is sc anned and when s c anning occu rs.
McAfee WebScan
Scans data and files that you import from Web sites befor e loading the files
onto your sys tem. If the data or f iles contain viruses, WebScan wa rns you
and lets you canc el the act ion.
WebSc an is ready to insta ll onc e you have installed a Web brows er (Windows for Workgroup s and Wi ndows 95 only) .
2-10 Introducing the Software
Page 48

MediaMatics Arcade MPEG Player
Pr ovides MP EG Playback sof tware for W i ndows 95. See C hapt er 5, “Usi ng
Mult imedia,” for ins tru c tions on us ing this a p plication.
Xing MPEG Player
Pr ovides MPEG Playback sof tware for W indows for W orkgroups and
Windows NT. See Chap ter 5, “Usi ng Multimedia,” for instr uctions on u sing
this application.
Introducing the Software 2-11
Page 49

3
SETUP UTILITY
How to Enter Setup
Using Setup
Your NEC Versa syst em comes wit h a hardware pr ogram called Setup that
allows you to view and set sy stem parameters. Setup also allows you to set
password features that prot ect your syst em from unauthoriz ed use.
Use Setup to
set the current time and date
customize your opera ting system to refl ect your comput er hardware
secure your system with a password
balance your per f ormance needs with power c onservation.
Access Setup at power-on. Just press F2 when the following prompt a p-
pears.
Press <
> for B oot Messages, F2 for Setup
Esc
When you press F2 to enter Setup, the system automatically detects current
parameter settings with the Power-On Self-Test (POST).
If the s ystem detects an error du ring POST, it prompts you with a double
beep and a message: "Press <F1> to resume." If you press
enters Setup automatically. If you want to fix the error, carefully read the
err or message that ap pears above the prompt (taking notes if you want), and
F2
.
press
the system
,
F1
Using Setup 3-1
Page 50
Setup Utility Main Menu
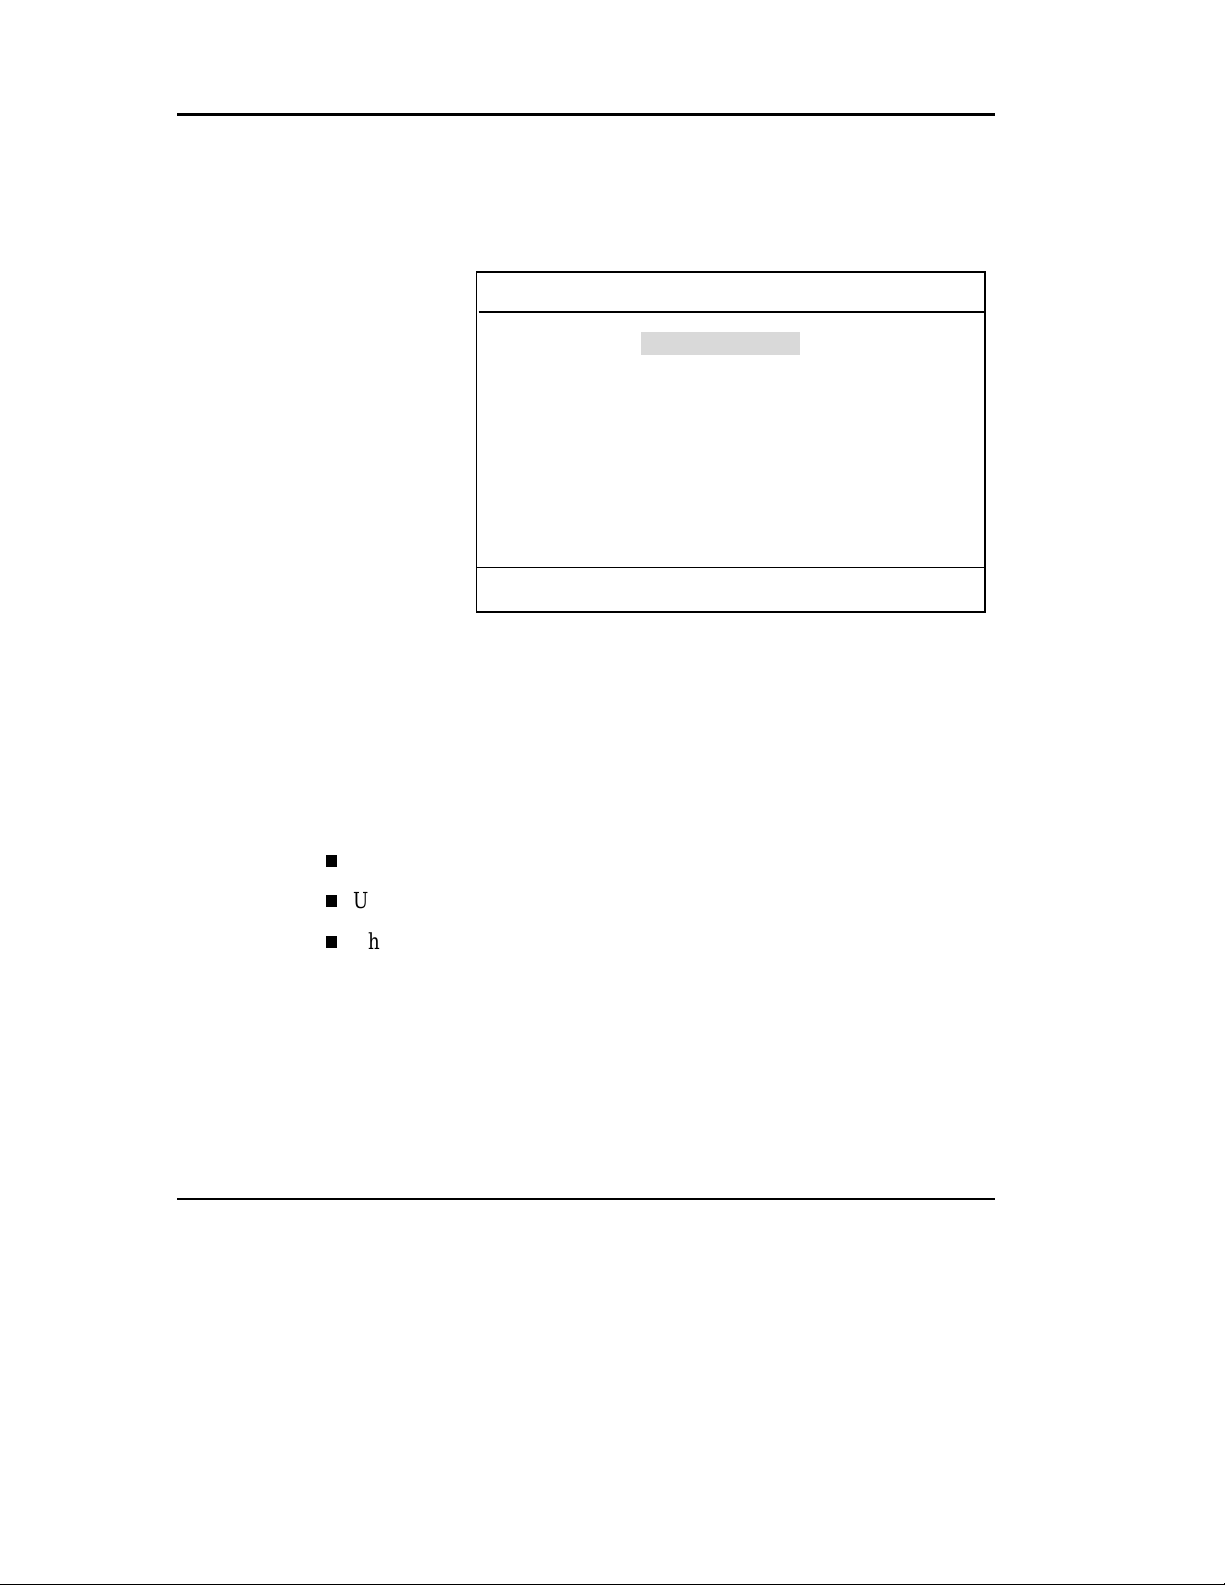
After you press F2, the system displays the Setup Main Menu screen, simi-
lar to the following.
AMIBIOS HIFLEX SETUP UTILITY - VERSION 1.05
(C)1996 American Megatrends, Inc. All Rights Reserved
Standard CMOS Setup
Advanced CMOS Setup
Power Management Setup
Peripheral Setup
Change User Password
Change Supervisor Password
Auto Configuration with Defaults
Save Settings and Exit
Exit Without Saving
Standard CMOS setup for changing time, date, hard disk type, etc.
Setup Main Menu
Use the u p and down arrow keys (loc ated on t he lower right corn er of the
keyboard) to toggle through the Set up menu items.
How to Use Setup
The following s ections describe how t o use Set up, inc l u ding these top ic s:
Looking at screens
Using keys
Checking/setting system parameters.
3-2 Using Setup
Page 51
Looking at Screens
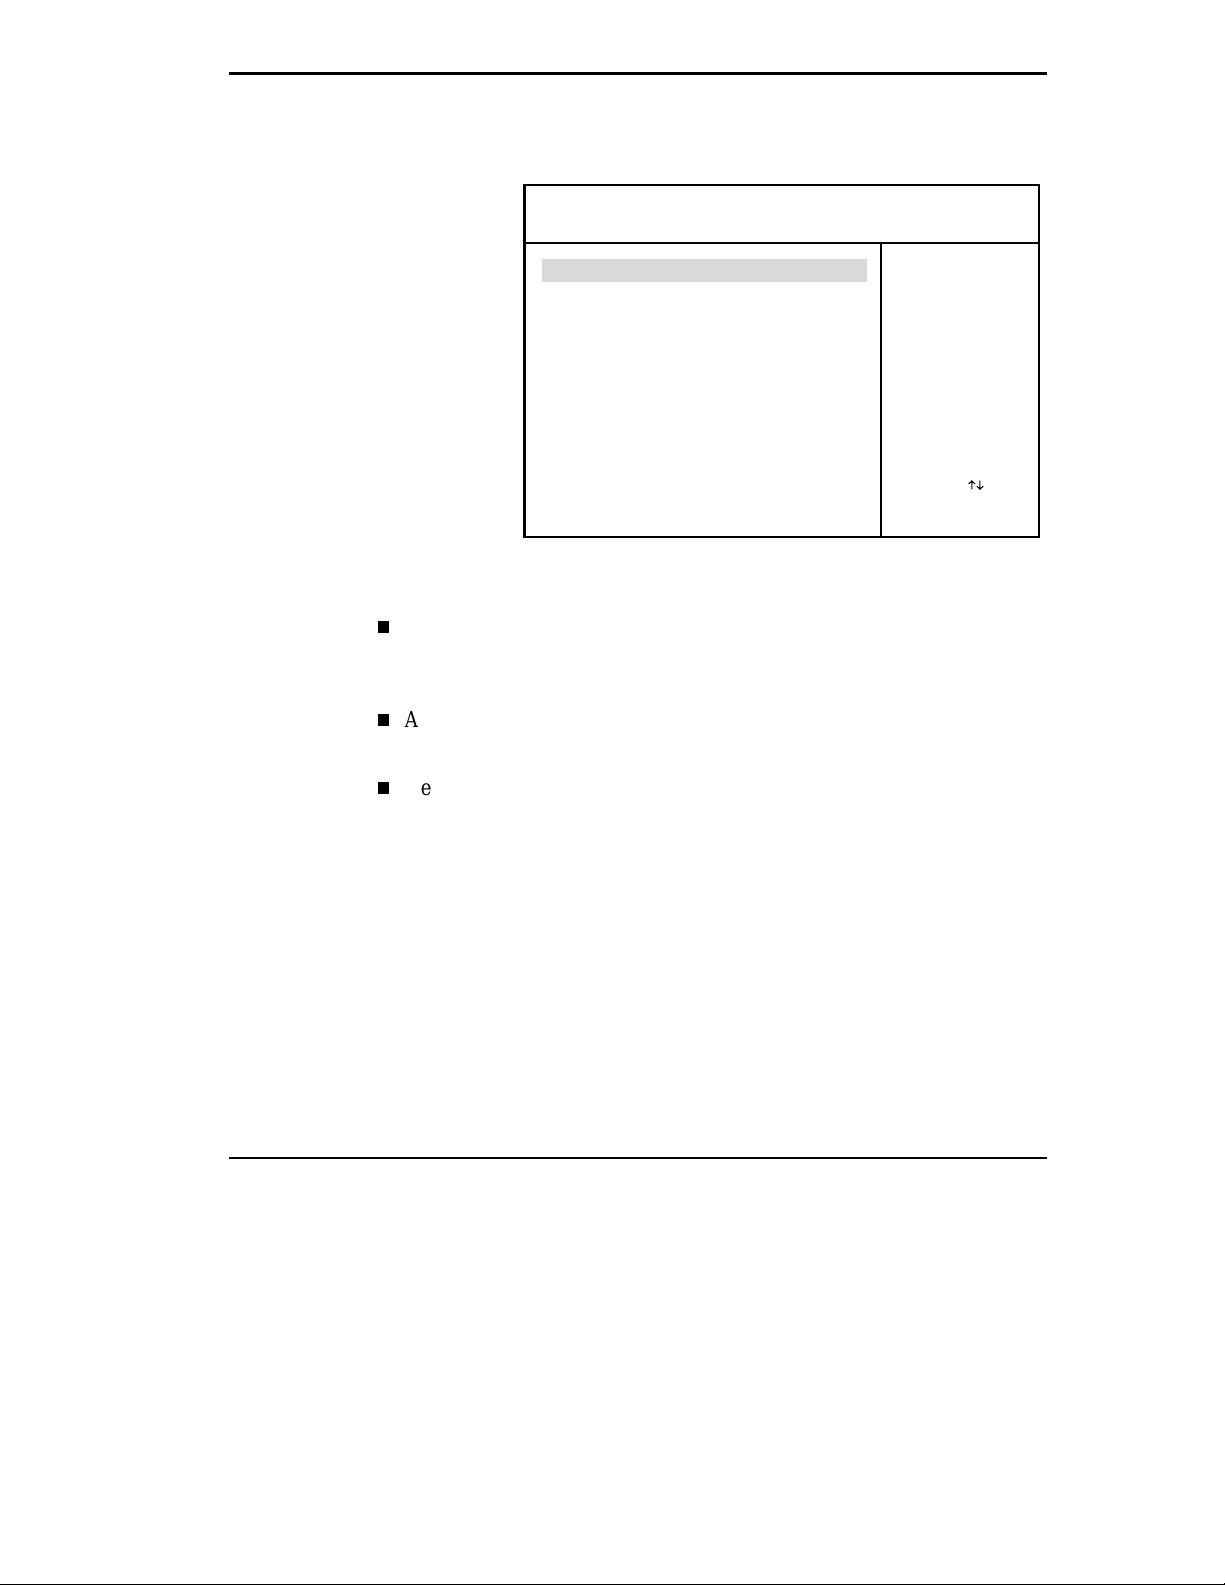
Setu p screens have three areas as shown next.
AMIBIOS SETUP - ADVANCED CMOS SETUP
(C)1996 American Megatrends, Inc. All Rights Reserved
BootUp Sequence A:,C:
Plug and Play Aware O/S
NumLock (at BOOT)
Keyboard Auto-repeat Rate
Keyboard Auto-repeat Delay
Password Check
Auto
Off
30/sec
1/2 sec
Setup
Available Options:
C:,A:
A:,C:
ESC:Exit
PgUp/PgDn:Modify
F3/F4:Color
Advanced CMO S S etup menu
Parameters
The left part of the screen. This area lists parameters and their current
settings.
Available Options
The righ t par t of the s creen. This area l i sts al ternate setti n g s.
Key Legend
The bot tom r i g h t corner of the screen. These l i n es display t h e key s th at
move the cursor and select p arameters .
:Sel
Using Setup 3-3
Page 52

Using Keys
The following t able lists S et up keys and their f unctions .
Setup Key Functions
KEY
Esc Di spl ays t he “Quit without saving” pr ompt in the Main Menu
↓
↑
PgUp/PgDn Modif ies the current parameter settings.
F3/F4 Changes the screen color.
F10 Save changes and exit (works only from main menu).
WHAT IT DOES
screen or exits out of cur r ent Menu.
Moves the cursor between the displayed parameters.
Checking/Setting System Parameters
See the following table for a list of parameters, their factory default settings,
and a l terna te settings. A des crip tion of eac h setting f ollows the table.
To reset all parameters to the default settings, select “Auto Configuration
with Defaults” from the Setup Main Menu and press Y.
3-4 Using Setup
Page 53

Setup Parameters
PARAMETER
Standard CMOS Setup
System Date
System Time
Diskette Drive A: **
Diskette Drive B: *
Internal Hard Disk Drive
Int Master Auto Not Installed
Int Slave Auto Not Installed
DEFAULT
SETTING
mm/dd/yyyy
hh:mm:ss
1.44MB, 3 1/2"
Not Installed
Enabled
ALTERNATE
SETTING(S)
Not Installed
1.2 MB, 5 1/4"
1.44 MB, 3 1/2”
1.2 MB, 5 1/4”
1.44MB, 3 1/2"
Not Installed
Disabled
Enabled
BIOS Defined
User Defined
Auto
CD-ROM
LS-120
BIOS Defined
User Defined
Auto
CD-ROM
LS-120
Docking Station Hard Drives* Enabled Disabled
Enabled
Ds Master *
DS Slave *
Boot Docking St at ion IDE *
System Memory
Auto Not Installed
BIOS Defined
User Defined
Auto
CD-ROM
LS-120
Auto Not Installed
BIOS Defined
User Defined
Auto
CD-ROM
LS-120
No
16MB
Yes
No
(Auto detect)
Using Setup 3-5
Page 54

Advanced CMOS Setup
Plug and Play Aware O/S
Bootup Sequence
Docking Station Video
BootUp NumLock
Graphic/Text Panel View
Expansion
Password Check
Power Management Setup
Power Management
Under AC
Power Savings Level
Hard Disk Timeout ***
Video Timeout ***
Peripheral Timeout ** *
Audio Device Timeout ***
Standby Timeout ***
Auto Suspend Timeout ***
Suspend Option
Auto Save To File
Panel Backlight
Suspend Warning Tone
Modem Ring Resume
Setup Paramete rs (c ont’ d . )
No
A:, C:
Dock Stn.
Off
Off
Setup
Off
Longest Life
2 min
2 min
ON
On
4 min
10 min
Suspend
Enable
Auto
On
On
No
Yes
Auto
C:, A:
A:, C:
Portable
Dock Stn
On
Off
Off
On
Setup
Always
On
Off
Off
Custom
High Perform
Longest Life
Off
5, 30 or 45 sec, 1, 2,4, 6, 8, 10, 15
min
Off
30 or 45 sec, 1, 2, 4, 6, 8, 10, or 15
min
Off
On
Off
On
Off
1, 2, 4, 6, 8,10 or 15 min
Off
5, 10, 15, 20, 25 or 30 min
STF (Save-To-File)
Suspend
Disable
Enable
Full
Standard
Auto
Off
On
Off
On
3-6 Using Setup
Page 55

Wake Up Alarm
Resume Alarm Time
Off
8:00 AM
On
Off
12:00 AM to 11:55 PM, 5 min.
increments
Peripheral Setup
Serial Por t
Parallel Port
Parallel Mode
IR Serial Port
IR Serial Mode
Sound
Sound IRQ
SB-Compatible DMA
Full Duplex Mode DMA
Docking Station Midi
(MPU-401) ****
Docking Station Joystick ****
Auto
Auto
ECP
Auto
FIR
Auto
N/A
N/A
N/A
N/A
Auto
Disabled
COM1, IRQ4
COM2, IRQ3
COM3, IRQ4
COM4, IRQ3
Auto
(PnP OS Setup)
Disabled
LPT1
LPT2
Auto
(PnP OS Setup)
Uni-Directional
Bi-Directional
EPP
ECP
Disabled
COM2, IRQ3
COM3, IRQ9
COM4, IRQ3
Auto
PnP OS Setup
SIR
MIR
FIR
Disabled
IO address 220h, 240h, 260h, 280h
Auto
(PnP OS Setup)
5, 7, 9, 10, 11
DMA #0, DMA #1
, DMA #3
DMA #0, DMA #1, DMA #3
Disabled
300h, 310h, 320h, 330h
Disabled
Auto
PnP OS Setup
* Only visible when cold docked.
** When the portable diskette drive is present, the portable diskette drive is the bootable diskette drive.
*** Only changeable when power saving is set to Custom.
**** Only assessable when docked.
Using Setup 3-7
Page 56

Setup Menus
Read the following descr i p tions for an explanation of each item tha t ap pear s
in th e Set up menus, as listed i n the preced i n g table.
Standard CMOS Setup
When you select the Standard CMO S Setup screen you will see Sys tem
Time and System Date parameters as well as drive parameters.
Date/Time
Lets you set you r NEC Vers a’s c alendar month/yea r and syst em clock.
The calendar clock is year 2000 compliant. These settings remain in
memory even after you turn off system power.
To s et the date use t he Tab key to move from field to field. Use the Pg
Up or Pg Dn key to c hange the numbers wit hin each field.
To s et the time, enter t he current hour, minute, and second in hr/min/sec,
24- hour format. Us e t he Tab key to move fr om field to field. Use the Pg
Up or Pg Dn key to c hange the numbers wit hin each field.
Drives
The dr ives parameter let you check and c hange sett i ngs for your drives,
including internal hard drives, dis ket te drives, and C D - ROM reader . This
parameter als o let s you check t he doc king sta tion’s hard drives, diskette
drives, and C D-RO M rea der.
Advanced CMOS Setup
Sets CMOS settings for the following functions .
Plug and Play Operat ing System
Allows the s elect ion of a Plug and P l ay aware system to operat e at
bootup.
BootUp Sequence
Sets the order that the drives (A:, C:) initialize, or sets the order to search
for the boot dis k.
Docking Stat ion Video
Sets the video contr oller when the notebook is docked.
3-8 Using Setup
Page 57
BootUp NumLock
Selects NumLock On or Off at system startup.
Graphic/ Test Panel View Exp ansion
Exp ands or compres ses the on sc reen viewing area. When in expand
mode the graphic/t ex t qua lity maybe adversely affect ed.
Pa sswor d Check
When the system prompts you to enter a passwor d, the password is ver i fied. If Always is s elect ed, press i ng Ctr l- Alt-Backspac e will lock u p the
keyboard until the password is entered. The Nu m Loc k, Cap Loc k and
Scroll Lock LED ’ s will flas h in sequence until you ent er the pa ssword.
Power Management Setup
The Power Ma nagement Setup menu lets you ba lance high per f ormance a nd
energy conservat ion using parameters inc luding the following.
NOTE
Some operating systems such as Windows for W orkgroups,
Wi ndows 95 and W indows NT hav e their own power managem ent
software which overrides CMOS settings. In this case, be sure to set
your desired power management settings accor dingly.
Power Management Under AC
Norma lly, whenever AC power is c onnected to your NEC Vers a sys tem,
power ma nagement is disabled. I f you enable t his pa rameter , the system
automatic ally ac tivat es the power ma nagement profile you set.
Power Savings Level
A High Perfor m setting provides t he great es t sys tem performance. Longest Li f e p rovides max imum p ower sa ving, and O f f disab les all device
timeouts . You can also cus tomize power management by select ing Custom Settings a nd ent ering values for device t i meout s.
Hard Disk Timeout
Allows you t o select the amount of time before your hard disk shuts
down when Power Management is set to custom.
Using Setup 3-9
Page 58

Video Timeout
Allows you to select the amount of time before you r video shu ts down
when Power Mana gement is set to Custom.
Peripheral Timeout
If this f eature is On, onb oard s erial, parallel, diskette or Super D isk
LS-120 devices are power managed after 2 seconds of ina c tivity.
Audio Device Timeout
If this feat ure is O n, the a udio device turns off when no s ou nd device activity oc c urs f or 30 s ec onds.
Standby Timeout
You ca n specify when the s ystem enters Standby mode after total s ystem
inactivity.
Auto Sus pend Timeout
You ca n select the s ystem sus pend timeout p eriod. I f no system activity
has oc c u rred for the sp ecif ied t imeout , the sys tem will enter the selected
Suspend Option.
Suspend Option
Suspend mode is the default power management mode. When you s elect
Suspend, after a specified amount of inac tivity, your N E C Vers a shuts
down all devices as sp ecif ied b y the user in Setup ( or ap plies default
timeouts). All you r data is aut oma tica lly recovered from where you left
off when you Resume.
3-10 Using Setup
Auto Save to File (STF)
The system enters STF after 30 minutes in Suspend mode.
Pa nel Backlight
Lets you choose the b acklight intensity.
Suspend Wa rning T one
This p arameter lets you enable or disable a warning tone when Suspend
mode starts. It is best to keep this option On.
Modem Ring R es ume
Lets you choose whether the system resumes automat ic ally when the external serial port modem receives a transmission.
Page 59

Peripherals Setup
The Peripher als Setup menu displays the connect ion loc ation b etween the
system and the Input/Output (I/O) ports.
Wake Up Alarm/Resume Alarm Ti me
Lets you set a resume time from Suspend mode.
Serial Port
Disables or reassigns the serial port.
Parallel P ort/Parallel Mode
Disables or reas signs the p arallel port, a nd/or select a p arallel port mode.
IR Serial Port
Allows you to disable or reas sign the IR Serial port.
IR Seria l Mode
Allows you to select the IR transfer rate.
Sound/Sou nd I RQ/SB-compatible DMA/ Full du plex Mode
DMA/Docking Station Midi (MPU-401)
Select the sound p arameter to user defined, dis abled or Auto. Change additional sound r elated items a s needed.
Docking Stat ion Joyst ic k
Select the parameter to Disabled, Auto, or Plug and Play Operating System a s needed.
Change User Password
You must set the Supervisor password first. Then you can set the user
passwor d. You can have a supervisor password withou t having a user pa ssword. This gives the system a second level of password secu rity.
Change Supervisor Password
Sets a Supervisor password at system startup.
Auto Configuration with Defaults
Loads or cancels default settings.
Using Setup 3-11
Page 60

Save Settings and Exit
Accept s changes made to curr ent , or def ault setti ngs and exits S et up.
Exit Without Saving
Revert s to the previously selected sett ings and exits Setup.
USING SETUP TO SET POWER MANAGEMENT
As you have seen in this c hapter, Setup allows you to use the fa c tory s et
power s avings level (Longes t Life), or c hoose between High Perform, Custom, or Off. Ea c h p rovides a specia l value to your cu rr ent work effor t.
These p ower management levels have been designed with you in mind. For
example, you ca n use them under the following cir c u ms tances :
Longest L i f e — Provides best bat tery life and good per f ormance. Use
while traveling long distances.
High Perfor m — Provides best performance a nd good bat tery life. Use
while on the road, traveling s hort dis tances.
Custom — You dec ide! S et power management levels a ccording to your
own needs and p resent environment.
Off — Office envir onment , using AC power .
See the online documentation in t he Windows NEC Infor ma tion grou p under
the NEC Versa 6060 Help Center for a lengthier discussion of Power Management. See the following sect ion for information on how using the s pecial
Sa ve t o File (STF) f eature can benefit you.
Using the Save to File (STF) Feature
ST F is a f eature tha t pr otects the integrit y of your working files. For example, if you get ur gent ly c alled awa y from your system without saving t he
cur rent data , it a utomatically goes into Su spend mode. After 30 minu tes
pass, and you don’t return, your working environment is saved t o a special
file on your hard disk.
3-12 Using Setup
Page 61
STF Benefits
Ther e are t wo ways t o set your NEC Vers a’s STF feature. One method is
via the Setup utility. Select Power Management from the Setu p Main Menu.
Move the cu rsor down and highlight Suspend Mode. Pr ess the
PgUp
key
and select STF. Save t he s et tings a nd ex it Setup.
The second method is to press the Fn Suspe nd buttons simultaneously, be-
fore you leave your NEC Versa . This function initia tes STF on dema nd.
NOTE
When the status bar reads that there is only 3% power remaining in the system, the NEC Versa automatically performs a
STF.
Using STF c an benefit you in the following ways.
When in ST F, there is mi n i mum battery d rain.
Preserves the life of yo ur NEC Versa.
Sa ves you time. When you retu rn fr om t hat u rgent call or meeting, you
don’t have to per f orm a full reboot. You will only have to press the
Power but ton.
Using Setup 3-13
Page 62

4
Using Your NEC Versa
The more you u se your N EC Versa system, the more p roficient you will become at ever ything, from using the function keys to setting up a pres ent ation.
This c hapt er gives concis e information on these and ot her import ant t asks,
including how t o u se:
the LCD panel
the keyboa rd
the NEC Ver saGlide
the NEC VersaBay II
the 20X CD- ROM reader
the PC card slots
the IR port.
In addition, t his chap ter foc uses on ins talling op tions, ex panding hard disk
space and memory, and (if approp ria te) updating the system Basic I nput/Output System (BIOS).
LCD
When you open your NEC Versa notebook LCD, you’ll notice the brightness control a nd speakers. Slide the brightness c ontrol u p to make you r
scr een brighter. S lide the brightness control down t o make your screen
darker.
The two system sp eakers work automat i c ally with you r au dio app lic ation
soft ware. However, if you p l an on us ing ex ternal speakers, see “ External
Audio Op tions. ”
Using Your NEC Versa 4-1
Page 63
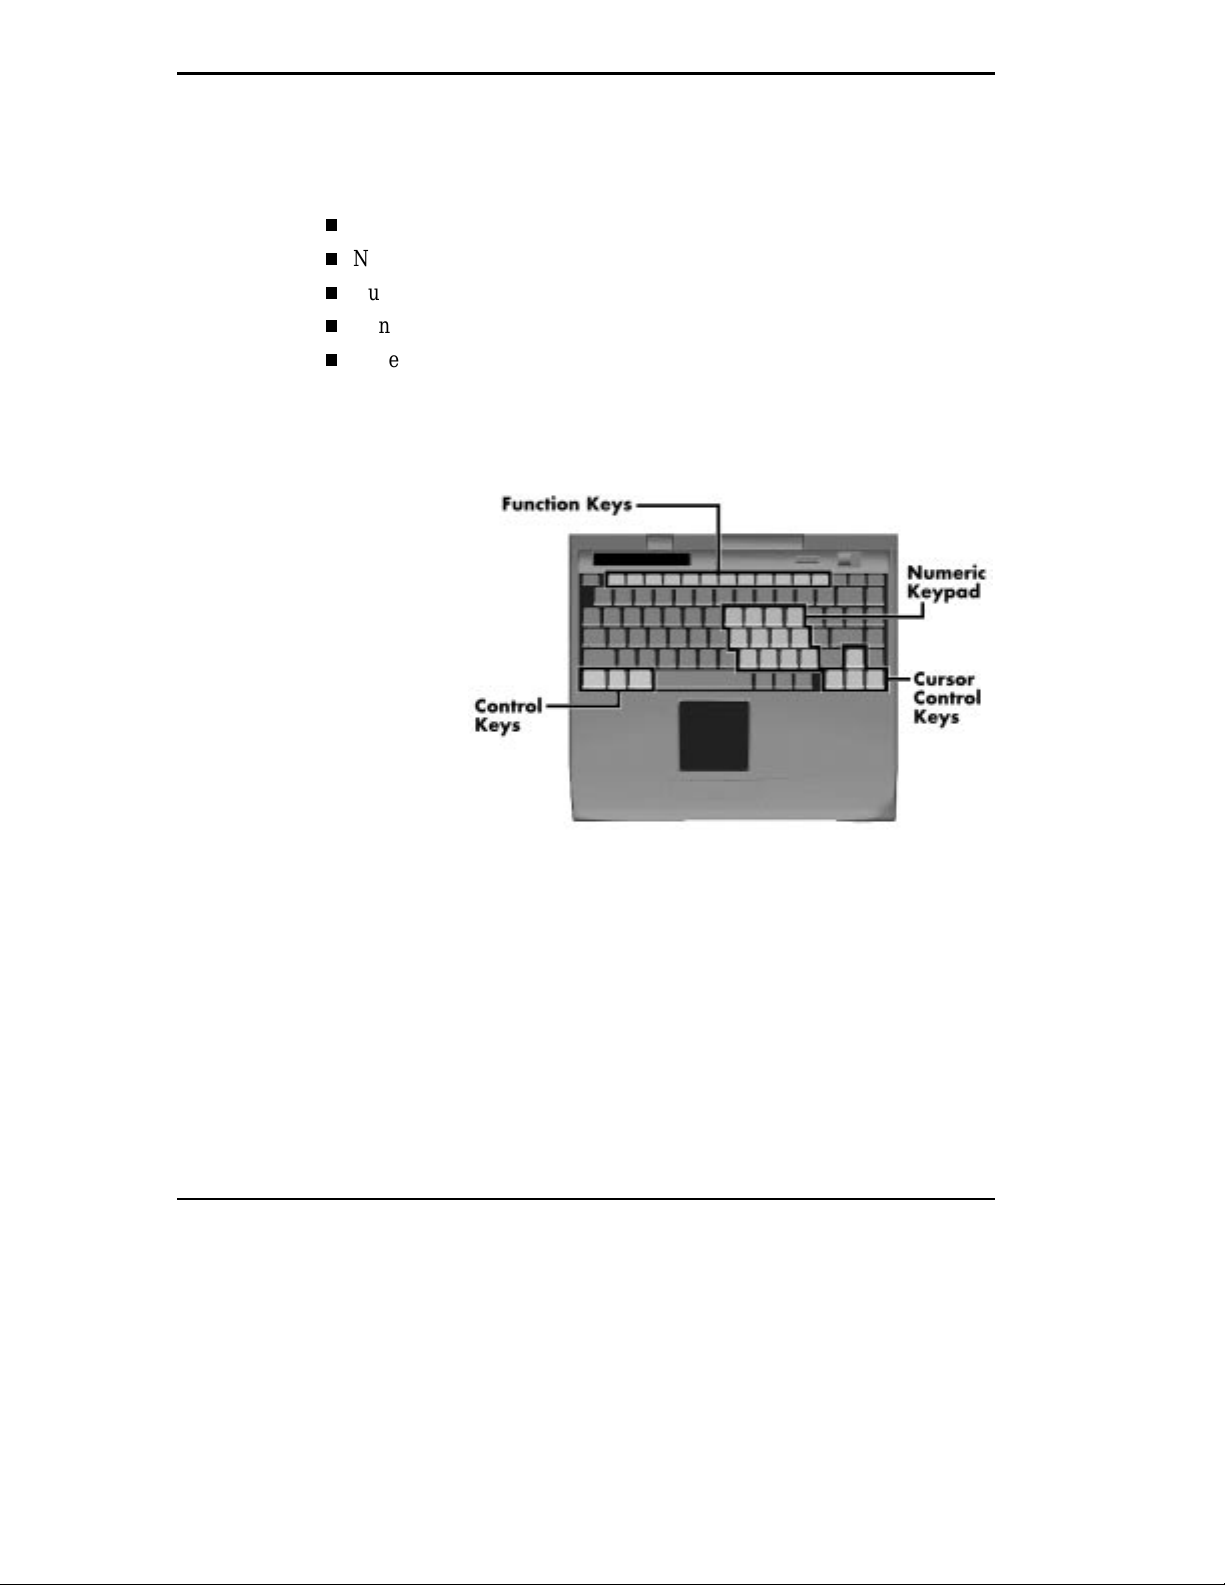
KEYBOARD
Your NEC Versa syst em keyboard is equ ipped with ma ny features. T hes e
include:
Func tion keys
Numeric keyp ad
Cursor control keys
Control keys
Typ ewriter keys .
Featur e keys are located a s shown in the f ollowing f igure. K ey op erations
are descri bed aft er the figure.
Func tion keys — Twelve function keys, F1 thr ough
your N EC Ver sa keyb oard. These keys work together with the
act i vate special functions . Six keys are pr eprogr ammed with dual
functions, whic h are printed in b lue on the key.
Function keys are ap plication-driven. See the specific app lic ation’s user
guide for inf ormat ion abou t how each f unction key works within the
applicat ion you are using.
4-2 Using Your NEC Versa
Keyboard
are available on
F12,
key to
Fn
Page 64
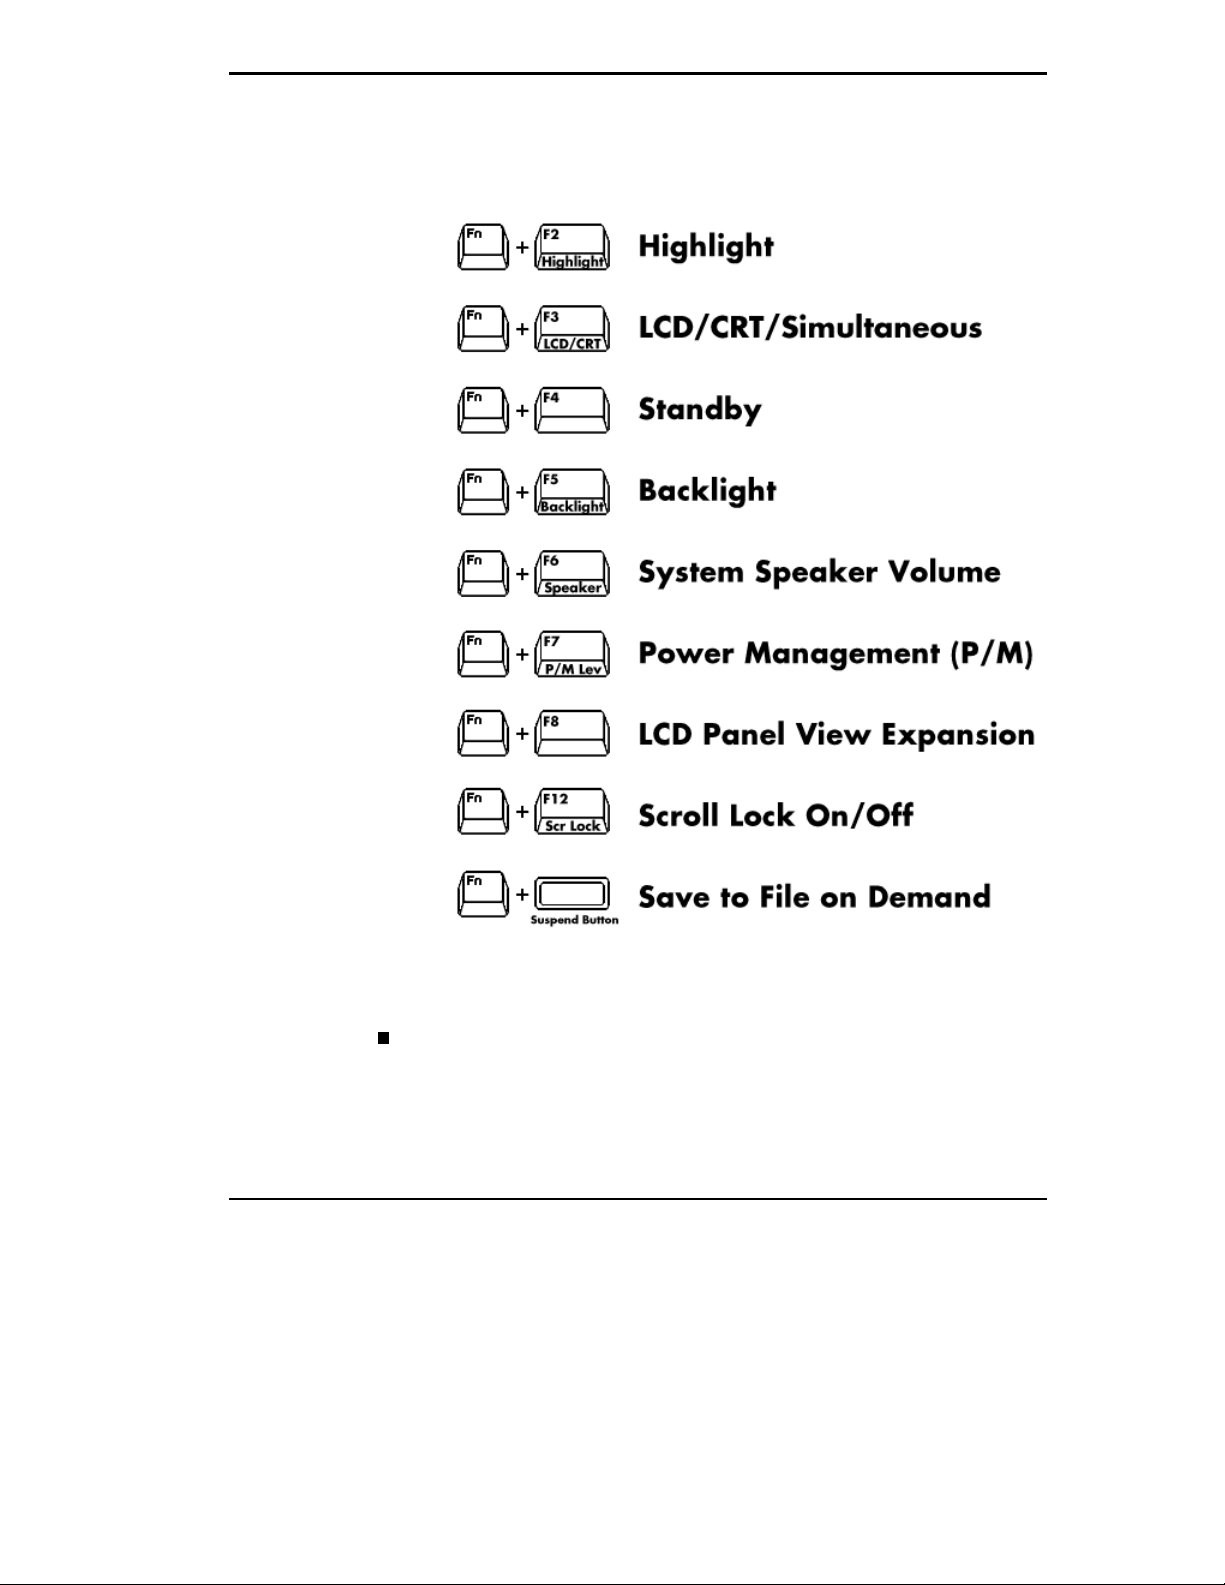
The following function key combinations are p re-programmed for your
NEC Versa system.
Windows 9 5 keys — If you have Windows 95, you can use the following
two key combinations to f acilitate your work.
Fn + x – Quic k access to shortc ut menus
Fn + y – Display the Start menu
Using Your NEC Versa 4-3
Page 65

Numeric Keypad — Pr essing Nu m L oc k on the keyboard ac tivates the
numeric keyp ad number s and f unctions pr inted in blue on t he keys.
The keypad lets you type number s and mathematical oper ands (+, – ) as
you would on a calc ulat or. The keypad is ideal for entering long lists of
numbers.
When you press Num Lock again, the keys rever t to their norma l f unctions as t ypewrit er keys.
Cursor Control keys — Cur sor control keys let you position the cu rsor
on the screen where you want . On the s creen, t he cursor is a blinkin g underline, b l oc k, or vertical line depending on the ap plication. The cur sor
indicates where the next text typed is inserted.
Control keys —
Ctrl, Alt, Fn
, a nd
ar e controls used in conjunction
Shift
with other keys to c hange their funct ions. To us e control keys , press and
hold the control key while pres sing anot her key. F or exa mple, “p ress
” means to hold down the
c
key and typ e the letter c. How the key
Ctrl
Ctrl
combination works dep ends on the applica tions you are running.
Typewriter keys — The t ypewriter keys (a lso called alpha numeric keys)
are used to enter text a nd c haracters. Thos e keys that have blue printing
on them behave differently when combined with control keys or the F n
key. Dou ble ta p your f i nger on the VersaGlide.
NEC VERSAGLIDE
The NE C VersaGlide is an easy way to control the cur sor wit h your finger.
Lightly glide your finger acr oss the N EC VersaGlide and the cursor follows.
You ca n select items in one of two ways:
Doub le tap your f inger on the VersaG lide.
Double clic k the left bu tton (t his is the p rimar y button).
4-4 Using Your NEC Versa
Page 66
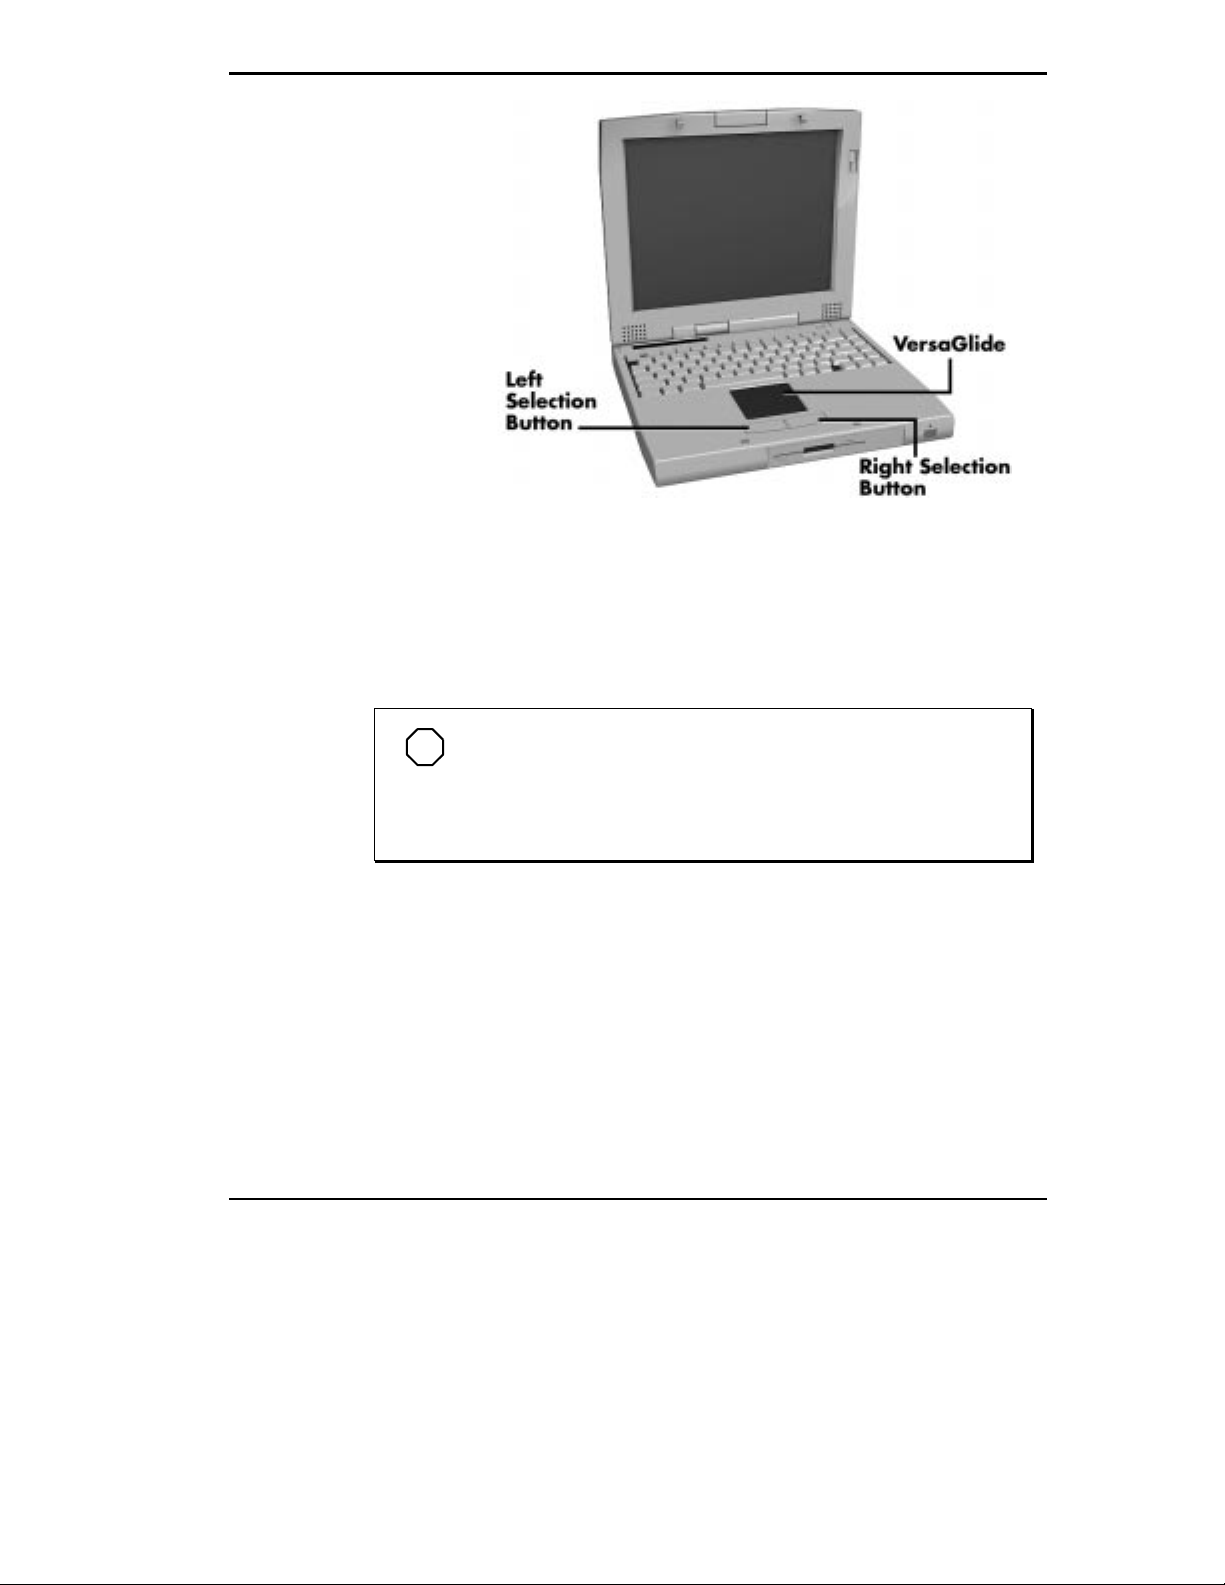
VersaGlide features
Try both ways and decide which you p refer. If you find the doub l e t ap diffi-
cult to use, go to the next section for general directions about adju sting the
touchpad properties.
NOTE
If you install another mouse driver over the shipped default
driv er, the double-tap capability may be lost. You will have to reinstall the VersaGli de driver l ocated on y our Restore CD t o get doubl e
tap back.
Making VersaGlide Adjustments
The NE C VersaGlide offers a number of op tions t hat let you cus tomize how
it fu nc tions with the cursor. T o access these options, loc ate the Contr ol
Pa nel and double clic k on the VersaGlide icon. (In Windows f or Wor kgroups, look in the Ma in program gr oup; in W indows 95 and Windows N T,
look in the Set tings gr oup. )
Using Your NEC Versa 4-5
Page 67

The options let you c ontrol the size and c olor of t he curs or, the cur sor s p eed,
the accepted doub l e-c lic k speed, and selection b utton orientation. Use the
NEC Versa G lide online help b utt on f or deta ils ab out configuring you r VersaG lide.
VersaGlide Tips
Follow thes e b asic ergonomic tips while working:
See App endix A, “Sett ing Up a H ealthy Work Environment,” for mor e
information.
Use a light touc h on the VersaGlide surface.
Set u p the NE C Vers a with you r keyboa rd a nd Versa G lide at a
comfort able height. Keep your for earms p arallel to the fl oor. You r wrists
should b e relaxed and straight.
While using t he keyboard and Vers aGlide, keep you r shou lders a nd arms
as relaxed as possible.
Take regular breaks from the compu ter t o rest your eyes. Per f orm
stretching exercises to rela x your fingers, hands, wrists, forearms, a nd
shoulder s.
NEC VERSABAY II
The NEC VersaBay I I is the drive b ay located below the VersaGlide. You r
NEC Versa system ships with a standard 3.5 inch, 1.44-MB diskette drive
or SuperDisk LS-120 drive installed in the bay. However, if you choose, you
can remove the drive and install t he 2 0X CD-ROM reader that also ships
with your system.
Your NE C Versa Bay II will support warm swapping of the diskette drive,
SuperDisk LS-120 drive and CD-ROM reader. Warm Swapping allows you
to r ep lace devices while your system is in Suspend mode. You do not have to
reboot your system t o reconfigure for the new device. T o warm s wap pl ace
the system in Suspend mode, by pressing the S uspend/Resu me (S/R ) button.
Then follow the instruc tions to repl ace ei ther the diskette dr ive or CD- ROM
reader.
4-6 Using Your NEC Versa
Page 68
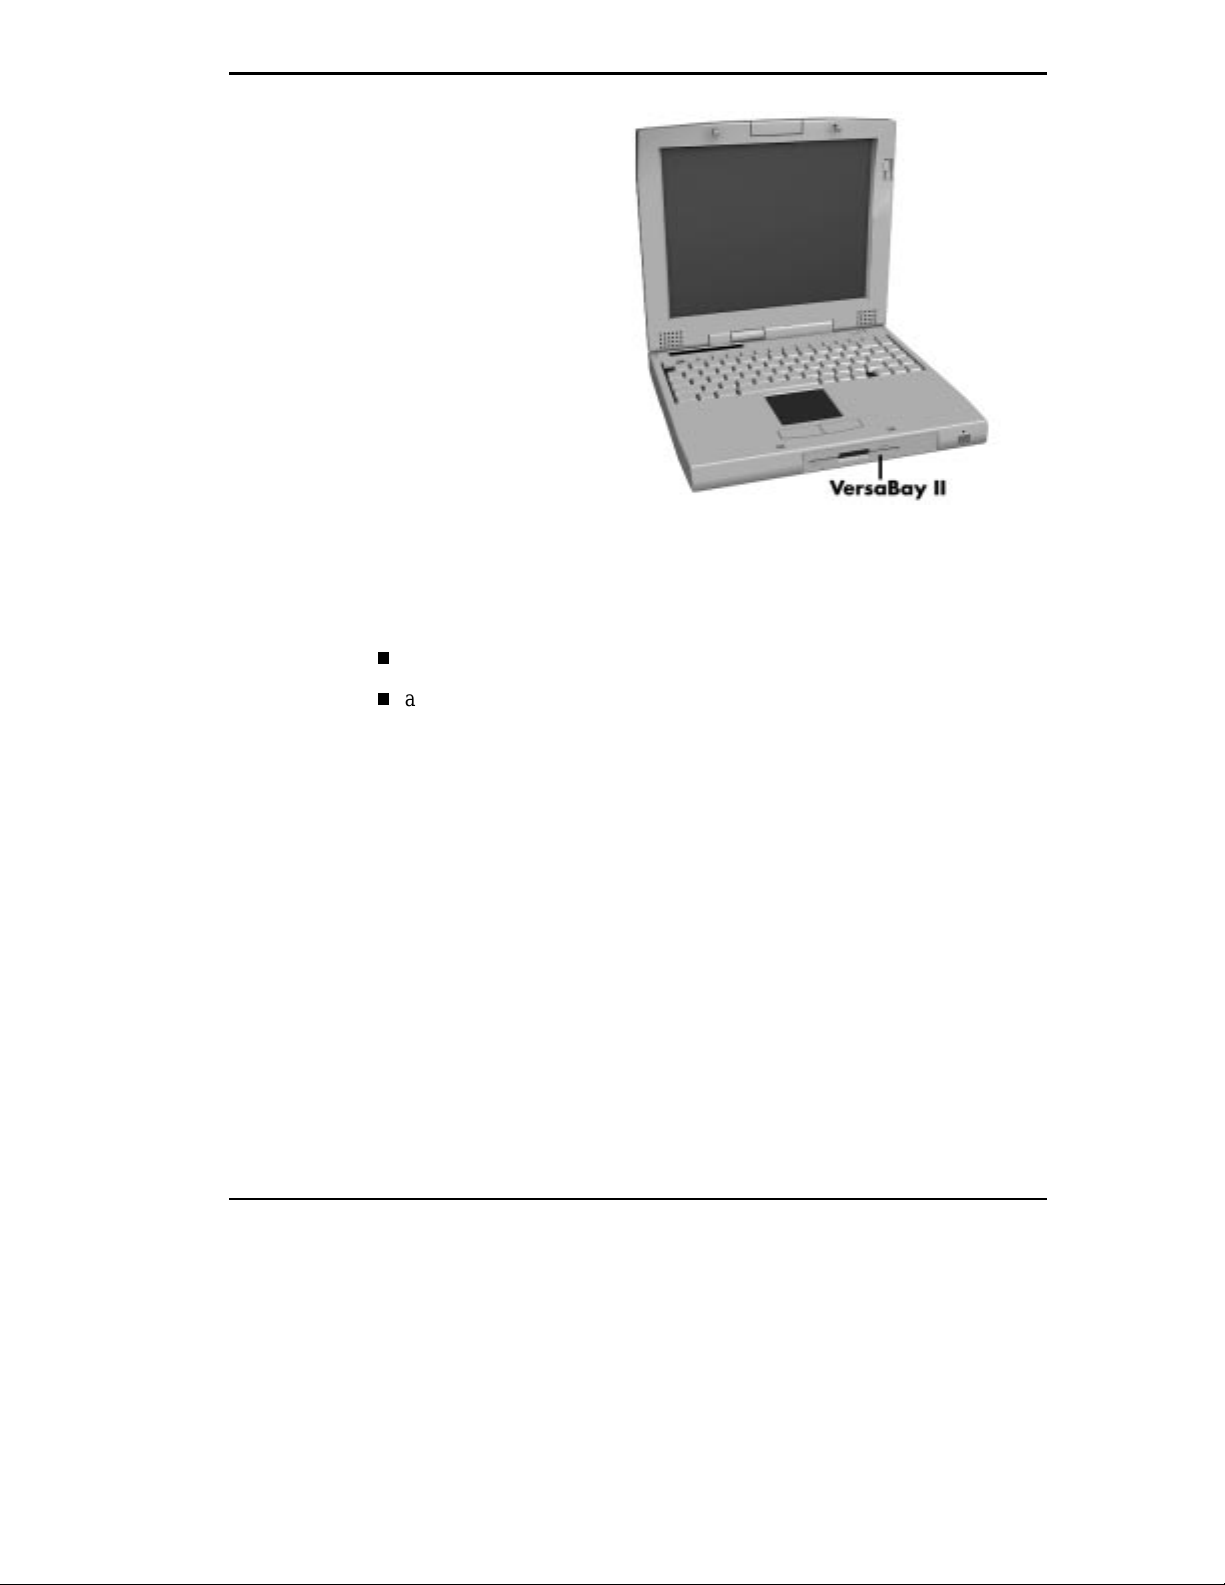
Locating the V er s aB ay II
In addition to the CD-ROM reader, the VersaBay II accepts the following
options:
a sec ond bat tery pack
a second hard disk drive.
See the NEC Versa Tools Catalog or you r author iz ed NEC deal er for det ails
about t hese VersaBay II options.
Removing a Device from the VersaBay II
Use the following s teps t o remove the standard diskette drive (or other device) from the Versa Ba y II.
Make s ure the N EC Versa is powered off or in Su spend mode, all op-
1.
tions are dis c onnected, a nd the LCD panel is c losed.
Tu rn the s ystem upside down with the front f acing you.
2.
Locate the VersaBay II release latches on the bottom of the unit.
3.
Using Your NEC Versa 4-7
Page 69
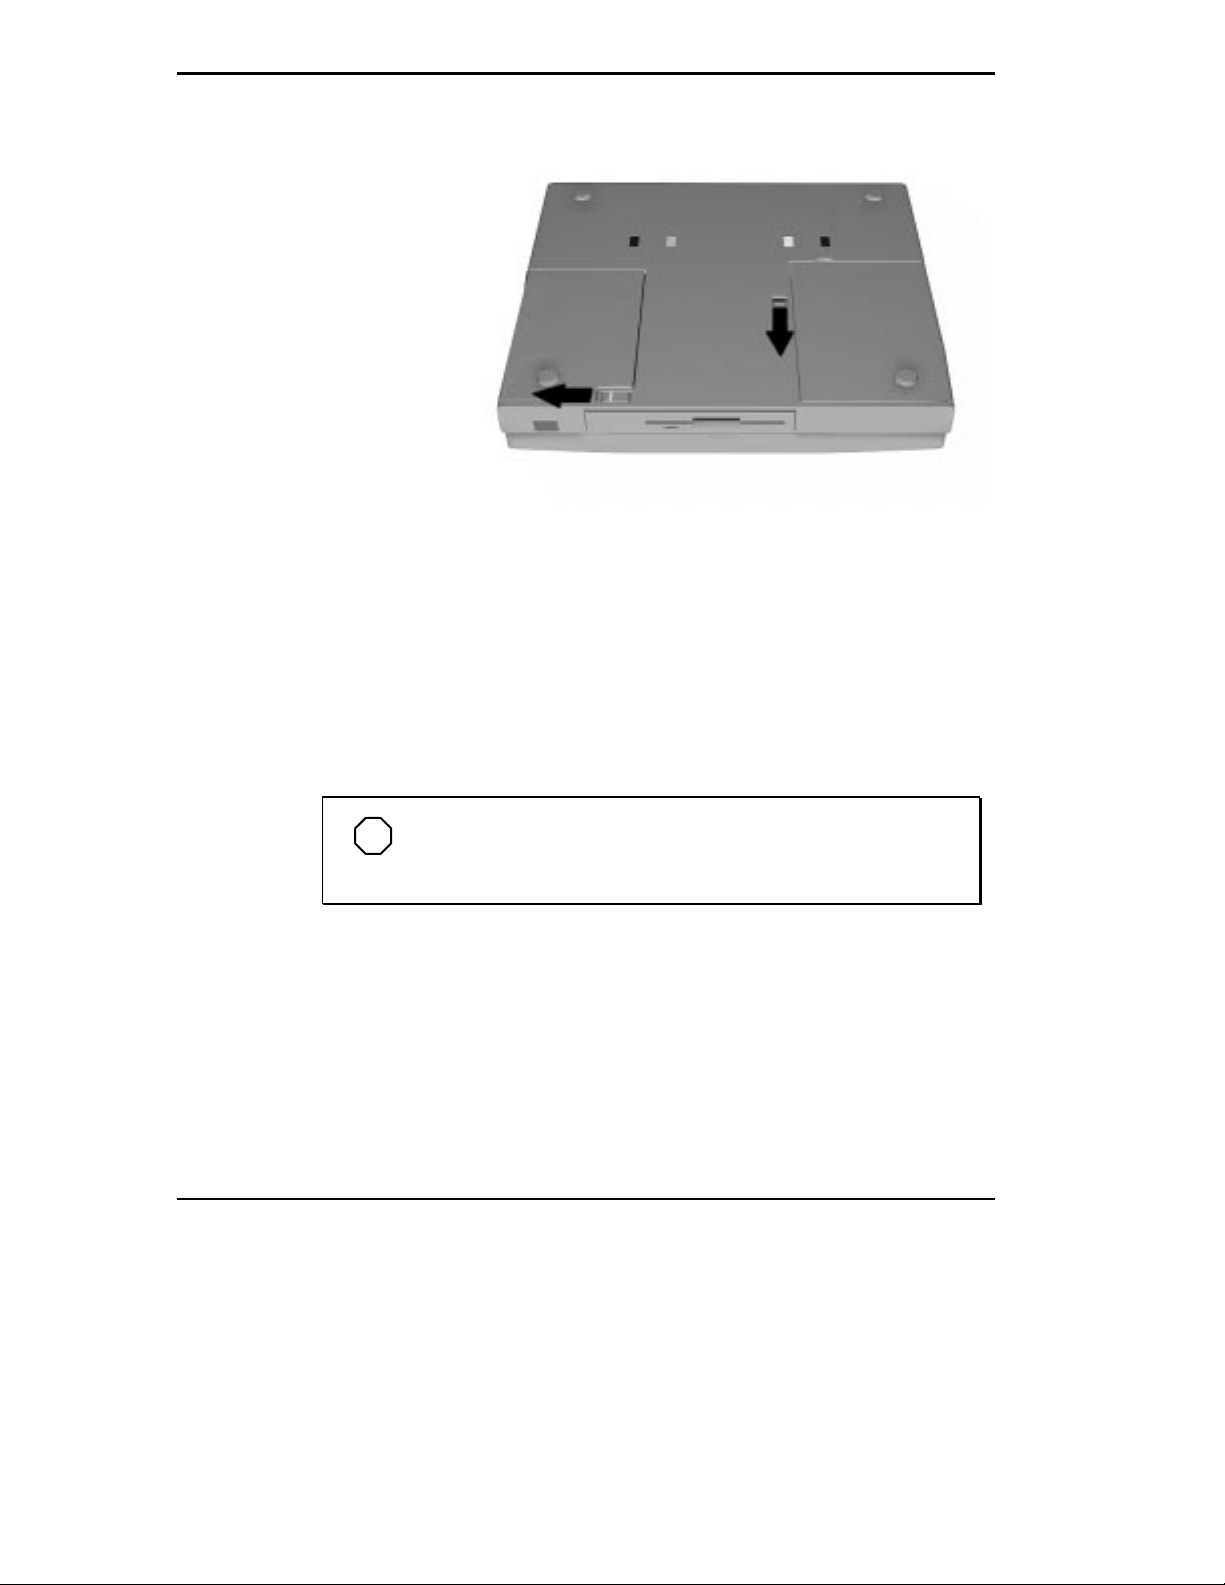
VersaBay II release latches
Slide the front latch t owards the hard disk drive side of the s ystem, a nd
4.
hold it.
Push the middle latc h towards you u ntil the dr ive p ops part way out of
5.
the unit.
Continue to hold the la tch near the front of the syst em to the left, and pul l
6.
the device the r est of the way out of the s ystem.
NOTE
device, the device casi ng may catch on t he inside of the latch.
4-8 Using Your NEC Versa
If you release the fr ont latch bef ore completel y remov ing the
Page 70
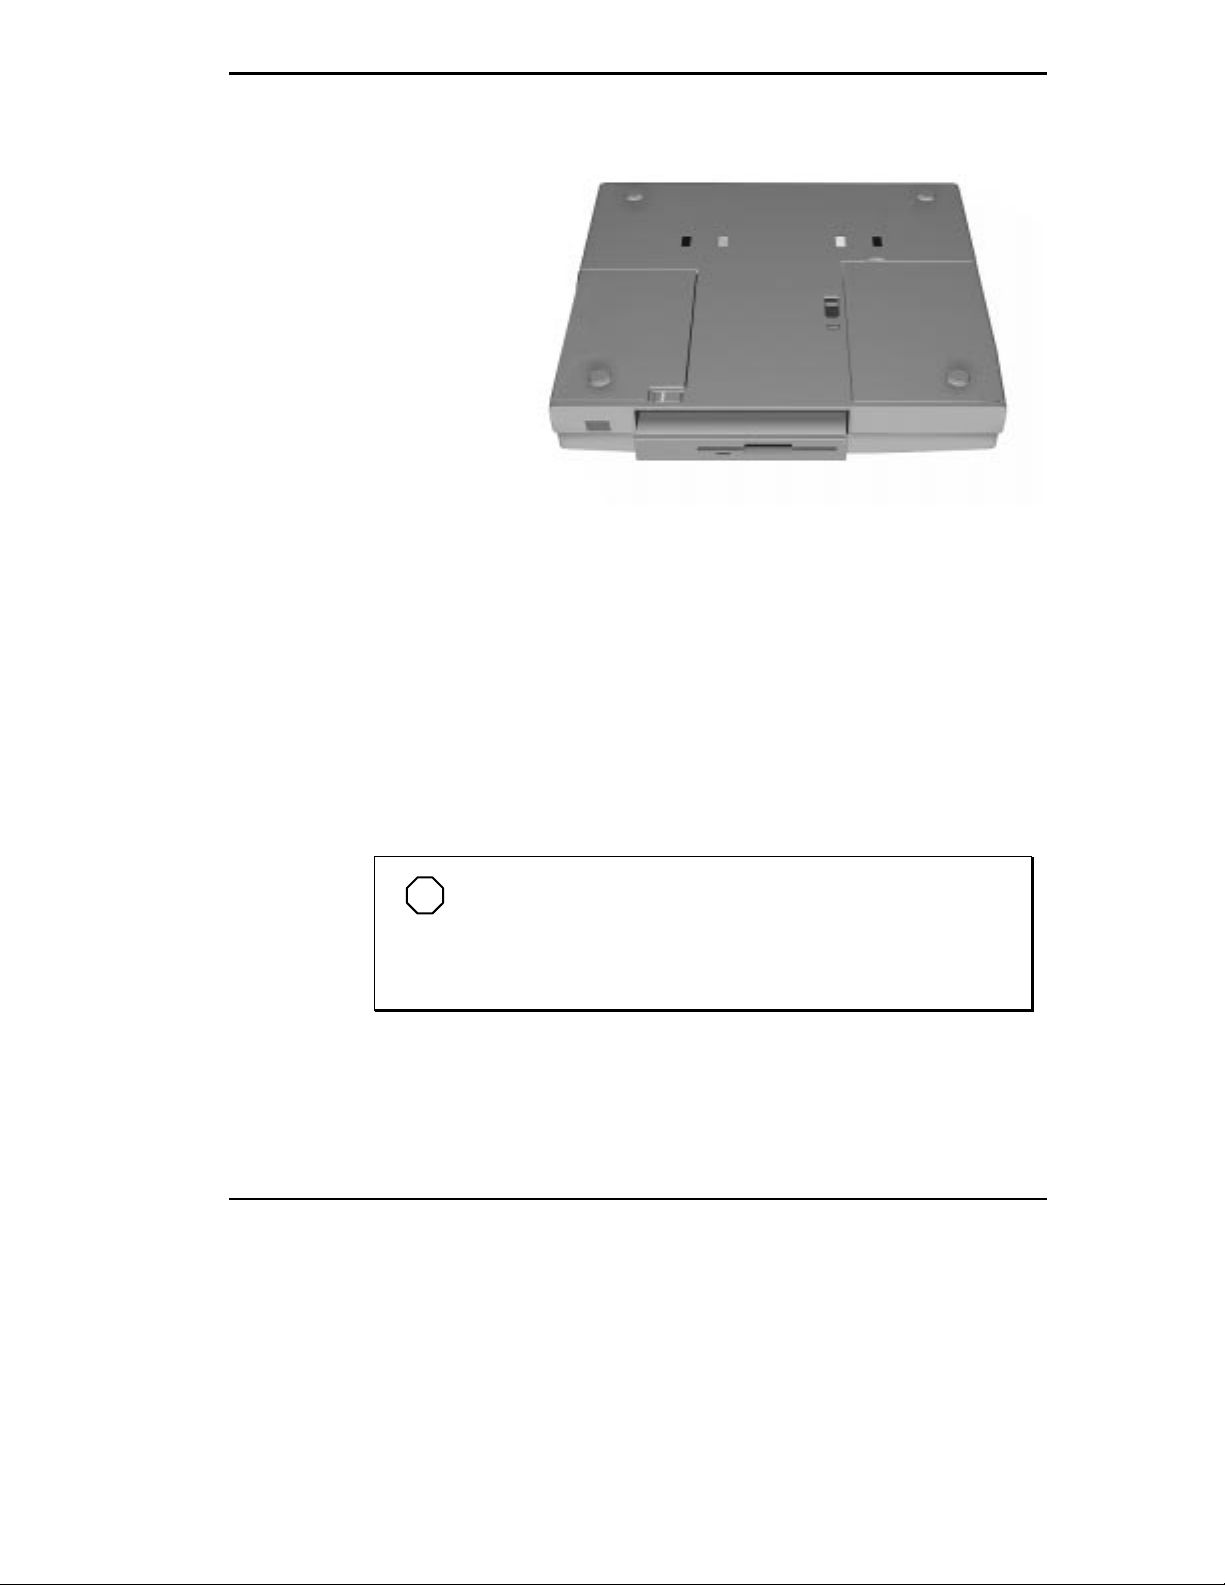
Installing a Device in the VersaBay II
Use the following step s to install a device in t he VersaBa y I I . Sp ecif ic ally,
these steps show how to install the 20X CD-ROM reader that ships standard
with the system.
Releasing the device
If you install a hard disk drive from a Versa model E, V, M , or P in the Ver-
saBay II, it becomes the master dr ive from which the syst em will boot.
Your syst em must be powered off or placed in s uspend mode before remov-
ing or inserting devices in the VersaBay I I .
NOTE
To use a hard disk drive in the VersaBay II, the drive must be
connected to the appropriate adapter. See the
Catalog
Disk Drive Adapter K it.
Locate the switc h labeled S (slave) and M (master) on your C D - ROM
1.
or your authorized NEC dealer for details about the Hard
NEC Versa Tools
pack.
Using Your NEC Versa 4-9
Page 71
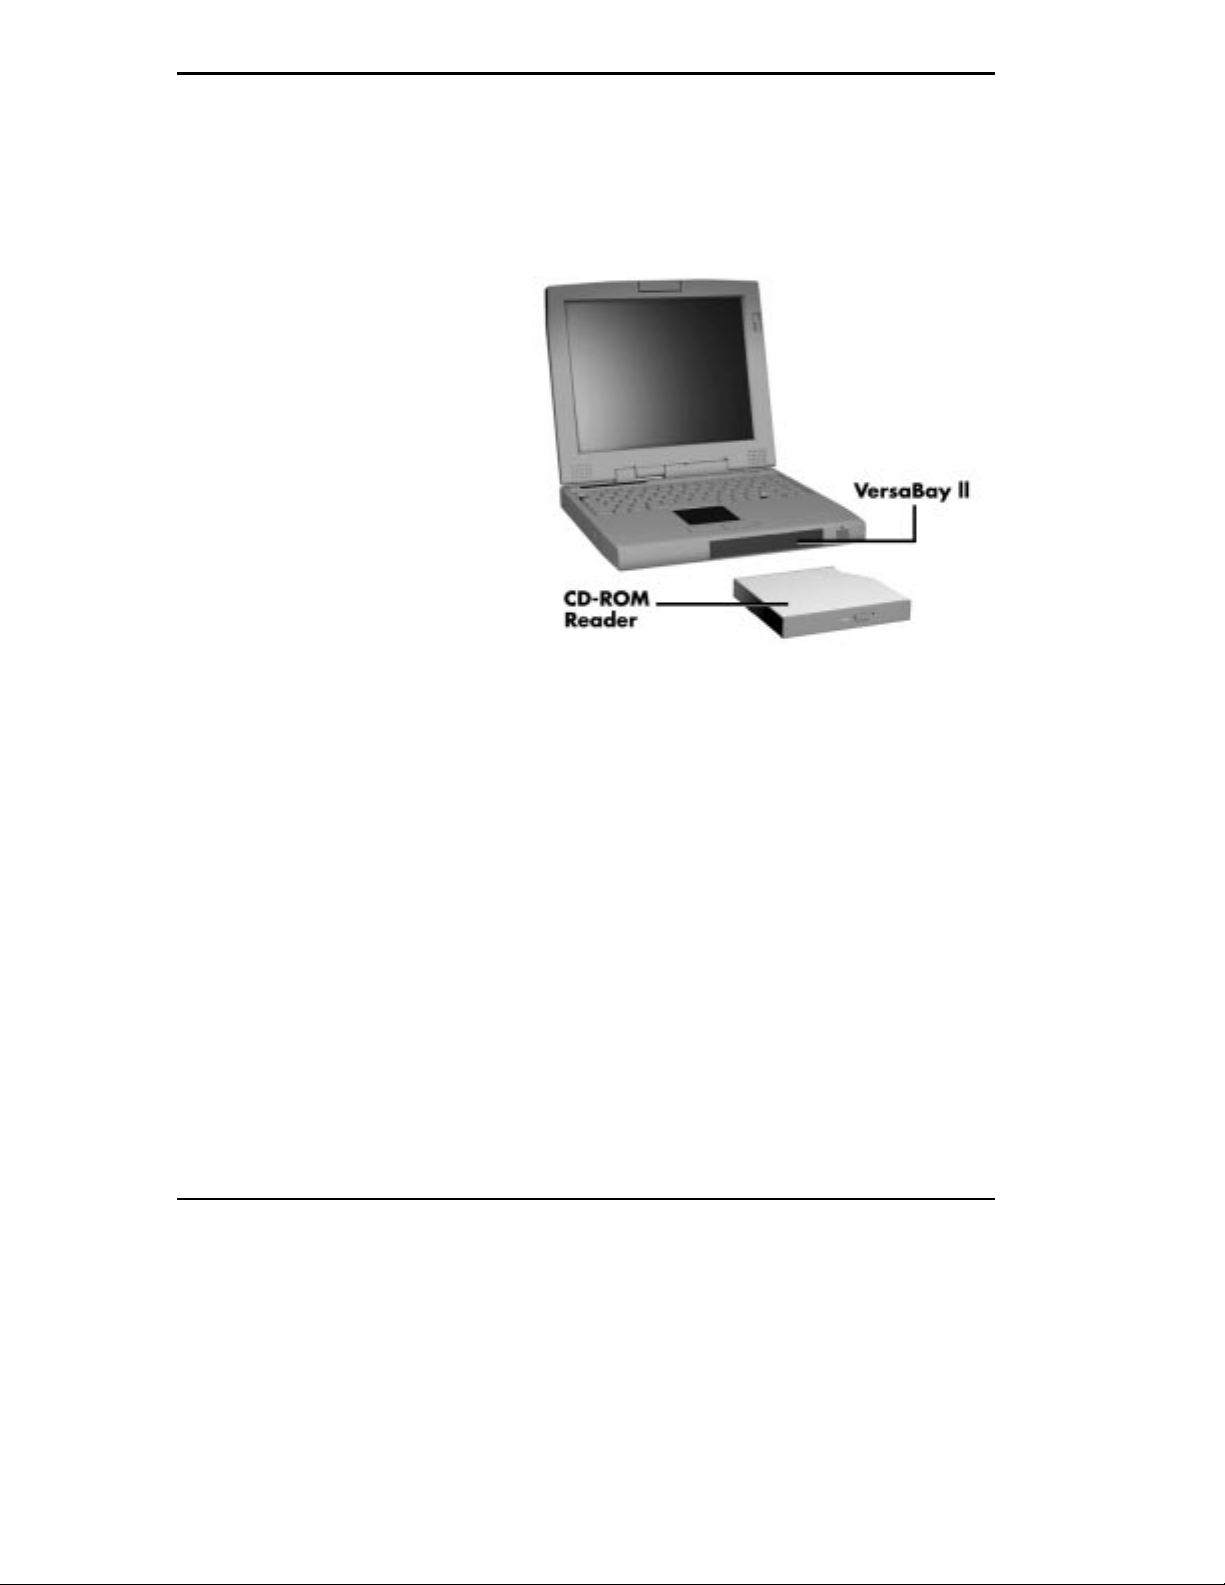
The slave/master switch default setting is S. Keep this default setting
2.
even if you are booting to a bootab le CD-R O M.
Align the CD-ROM reader in t he VersaBay II and push it in until it loc ks
3.
into place.
Inserting the CD- ROM reader
Power on the system or r etur n f rom Su spend mode.
4.
4-10 Using Your NEC Versa
Page 72
Customizing Your System with the VersaBay II
It’s easy to customize your NEC Versa us ing the VersaBay II. I f you find
you requ ire addit ional hard disk space or inc reas ed b att ery longevity, s i mply
remove the st andard device and pl u g in an opt ional hard disk drive or battery.
NOTE
If you i nstall a second hard disk driv e in the VersaBay II, it
can be set to either master or slave.
However , if you use a 19m m hard disk driv e from a previ ous NEC
Versa model, the driv e is automatical ly set to master. (T he Master
drive is the dri ve from which the system boots.)
Add anot her hard disk dr ive, or second Li-I on bat tery pack a s follows.
Remove the st andard diskette drive or CD-ROM reader from the Ver -
1.
saBay II as described earlier, steps 1 through 4.
Pr ep are you r opt ion for installation as follows :
2.
To install a batter y p ack, f irst c onnect it to the bay adap ter that came
with the battery. (Follow the instructions that came with the battery
pack.)
To install a hard disk drive, first connect it to t he a ppr opriate ba y
adapter. (Follow the instructions that come with the hard disk drive.)
Align the opt ion and its c arrier in the VersaBay I I and push it in until the
3.
option clic ks into place.
Tu rn the system over and power on or retur n f rom Su spend mode. T he
4.
syst em a utomat ic ally rec ogniz es the newly insta lled op tion.
Using Your NEC Versa 4-11
Page 73

NOTE
If a diskette drive is installed in the VersaBay II, it automatically def aults to t he A: driv e when docked. You cannot change thi s
default .
W hen an optional hard disk driv e, battery, or CD-ROM reader i s installed in the VersaBay II, then the docking station diskette drive
defaults to drive A:.
20X CD-ROM READER
Your NEC Versa system comes with a 20X CD-ROM reader that features
the latest in C D-RO M technology. The CD- ROM reader is as signed the next
available dr ive letter.
Use the C D -ROM reader to loa d and start programs from a compact disc
(CD ) . You can also use t he CD-R OM r eader t o play you r audio CDs (see
“CD-ROM Input” in Chapter 5). The CD-ROM readers are fully compatible with Kodak Mu ltisess ion Photo CDs™ and st andard audio CDs.
The C D - ROM reader operates at different speeds depending on whether the
CD you are u sing contains da ta or music. This allows you to get your dat a
fas ter and to see smoot her animation and video.
The 20X CD-RO M r eader fea tures are shown i n the fol l o wi n g figures . Descr i ptions of the feat ures f ollow.
4-12 Using Your NEC Versa
Page 74
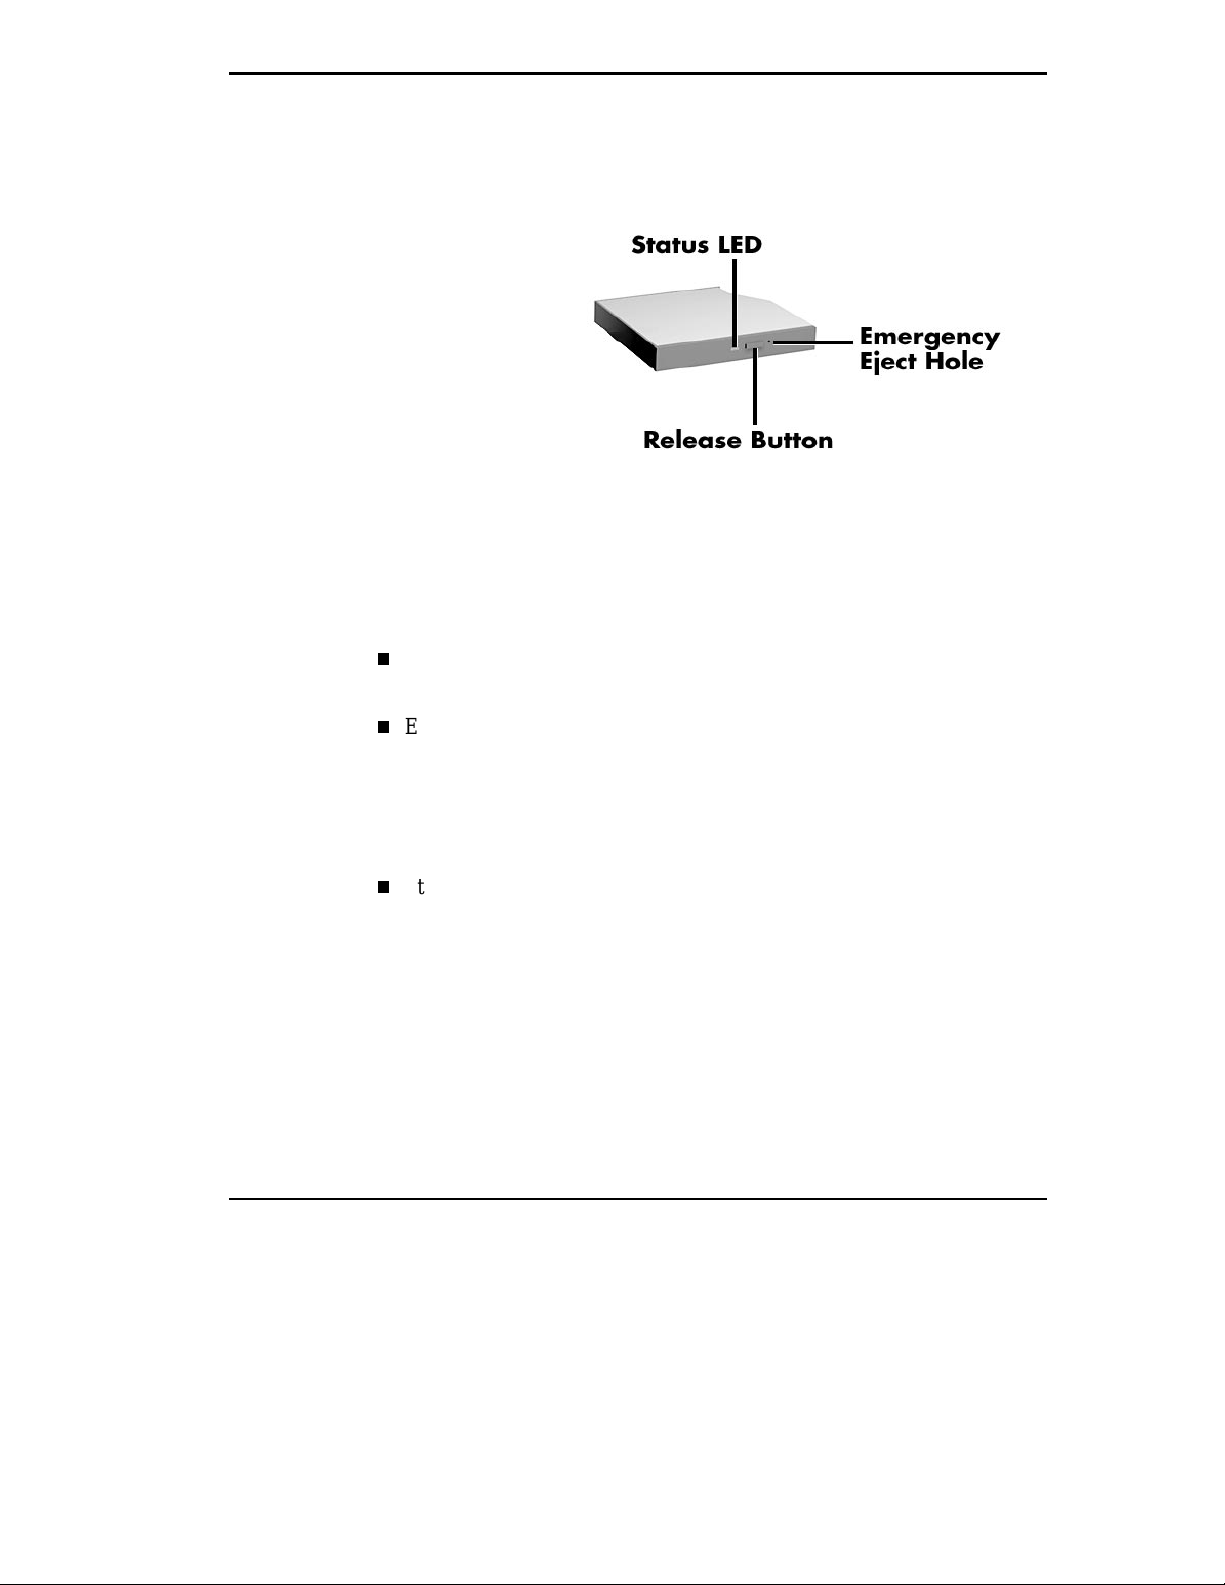
20X CD-ROM r eader
Release Button — ejects the CD tray. Press this button when power is on
to insert a CD into or remove a CD from the reader.
CD Loading
Emergency Eject Hole — a llows you to manually remove a disc f rom the
CD -RO M r eader if the eject fu nctio n i s dis abl ed by so ftware o r a power
failure occurs.
To remove a disc, insert the end of a paper c lip into the eject hole, and
pus h in until you hear a click. Now you ca n manually open the drawer.
Statu s LED — lights during da ta read operat ions. Do not eject the C D or
turn off the NEC Versa when this indicator is lit.
To i n ser t a CD i nto t h e CD- ROM reader, f o l l o w thes e steps
Pr es s the release button. The CD tray emerges fr om t he reader door.
1.
Put your CD, printed side up, into the circular impression in the tray.
2.
Pus h the CD tray in until it clicks shut.
3.
Using Your NEC Versa 4-13
Page 75
NOTE
Some CDs v i brate when play ing. Thi s does not ef f ect the CDROM reader.
Card Bus/PC Card Slots
Your NEC Versa notebook integrates two card bus slots f or inserting two
Type II PC cards. You can also insert one Type III PC card. The 32 bit ca rd
bus also has zoomed video support in the bottom slot only.
NOTE
This 32-bit CardBus structure is backward compatible, but
also accepts new CardBus cards.
Using the s ystem’s CardBus slots, you can add optional PC c ards and con-
nect ext ernal devices to your NEC Vers a. These devices inc lude periphera l
devices, s uch as modems, LAN cards, a nd storage ca rds. For details on how
to obtain these o pti on s, see the o n l i n e NEC Versa Tools Catalog. Also, for
more informa tion on PC card technology, see the online Advanced T o p i cs in
the NEC Versa 6060 Help Center.
Inserting a PC Card
To ins ert a PC c ard, open the s l ot cover and follow these steps.
NOTE
when using PC cards, especiall y if using the card in a warm env ironment or ov er an extended period of time. Fai lure to do so may
cause some cards to overheat and damage the card or the system.
Align the ca rd so t hat the 68-pin connector points towards the slot.
1.
Slide the card int o either slot. A low t one f ollowed b y a high tone lets you
2.
know that the card is f u lly insert ed and recognized. (If you decide to turn
off the s ound thr ough Setu p, no s ound is emitted.)
4-14 Using Your NEC Versa
We recommend that you keep the PC card slot cover open
Page 76
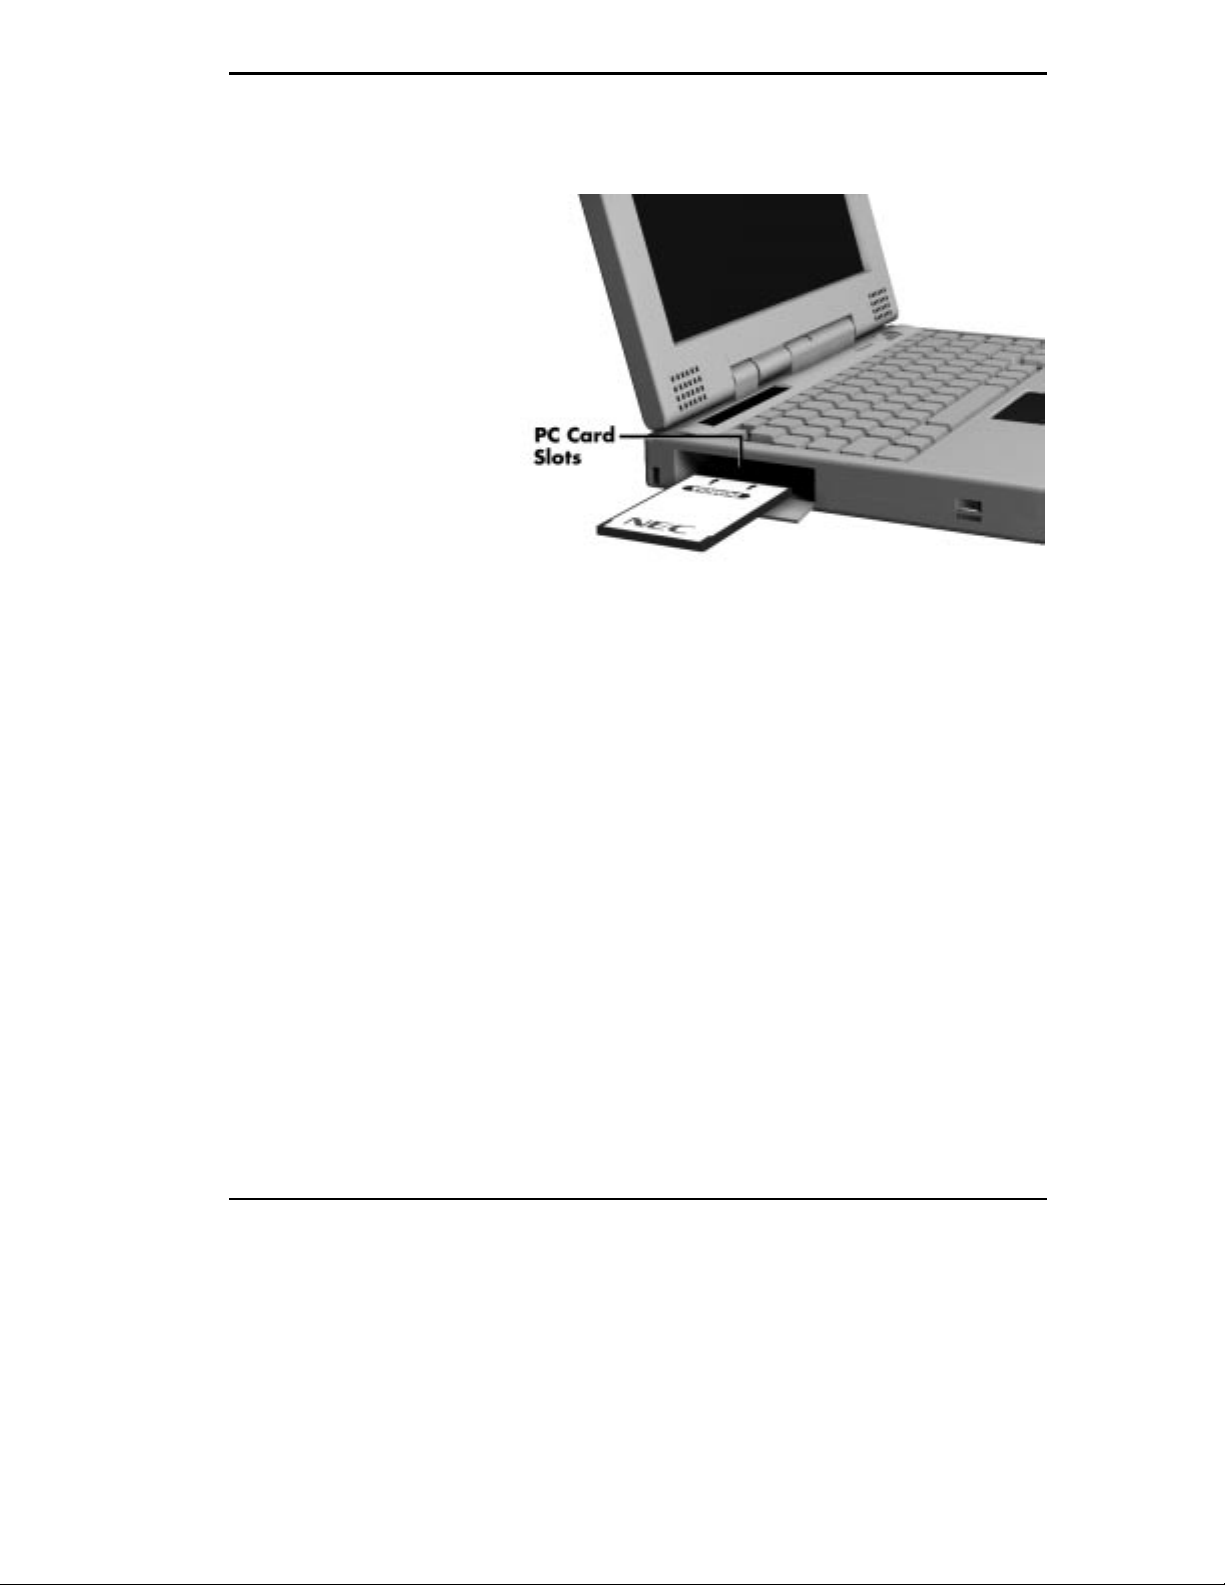
Other two-t one s equences su c h as high, then low tones indic ate t hat the
card is inserted, b ut the card type is unknown.
Inserting a card
You ca n use the C ar dBus™ software p reinst alled on your system t o
3.
check PC c ard s l ot ava ilabilit y. For example, look for the SystemSoft
icon on the Windows Program Manager or t he PC C ard icon in the Contr ol Panel on Windows 95 and Windows NT op erating systems. It shows
which slot c ontains a PC card and whic h is empty.
Removing a PC card from Windows for Workgroups
To remove a PC card follow these steps.
To remove a PC c ard, press the but ton on the side of the slot. A doub le
1.
tone sou nds.
Pull the card firmly out of the slot.
2.
Using Your NEC Versa 4-15
Page 77

NOTE
PC cards draw power even when not i n use. T o sav e ener gy,
press the button to disconnect the card when it is not in use. You
can leav e the card in t he slot while i t is disconnected f or easy storage.
Removing a PC card from Windows 95
To remove a PC card follow these steps.
From th e screen, select “My C o mputer,” then “ Contro l Pa n el .”
1.
Select the PC Card (PCMCIA) icon.
2.
Select t he PC card to remove, and s elect “Stop.” W indows 95 will a lert
3.
you if a ny applications are still using the car d. If a ll applic ations using
that card are closed, then services for that card will b e s hu t down, and
you will get a message telling you it is safe to remove the card.
Pr ess the b utton on the side of t he PC C ard in the slot.
4.
Pull the card firmly out of the slot.
5.
Removing a PC ca r d from Windows NT
From th e screen, select “My C o mputer,” then “ Contro l Pa n el .”
1.
Select the PC Card (PCMCIA) icon.
2.
Select t he PC card to remove, and s elect “Stop.” W indows NT will alert
3.
you if a ny applications are still using the car d. If a ll applic ations using
that card are closed, then services for that card will b e s hu t down, and
you will get a message telling you it is safe to remove the card.
Pr ess the b utton on the side of t he PC C ard in the slot.
4.
Pull the card firmly out of the slot.
5.
4-16 Using Your NEC Versa
Page 78
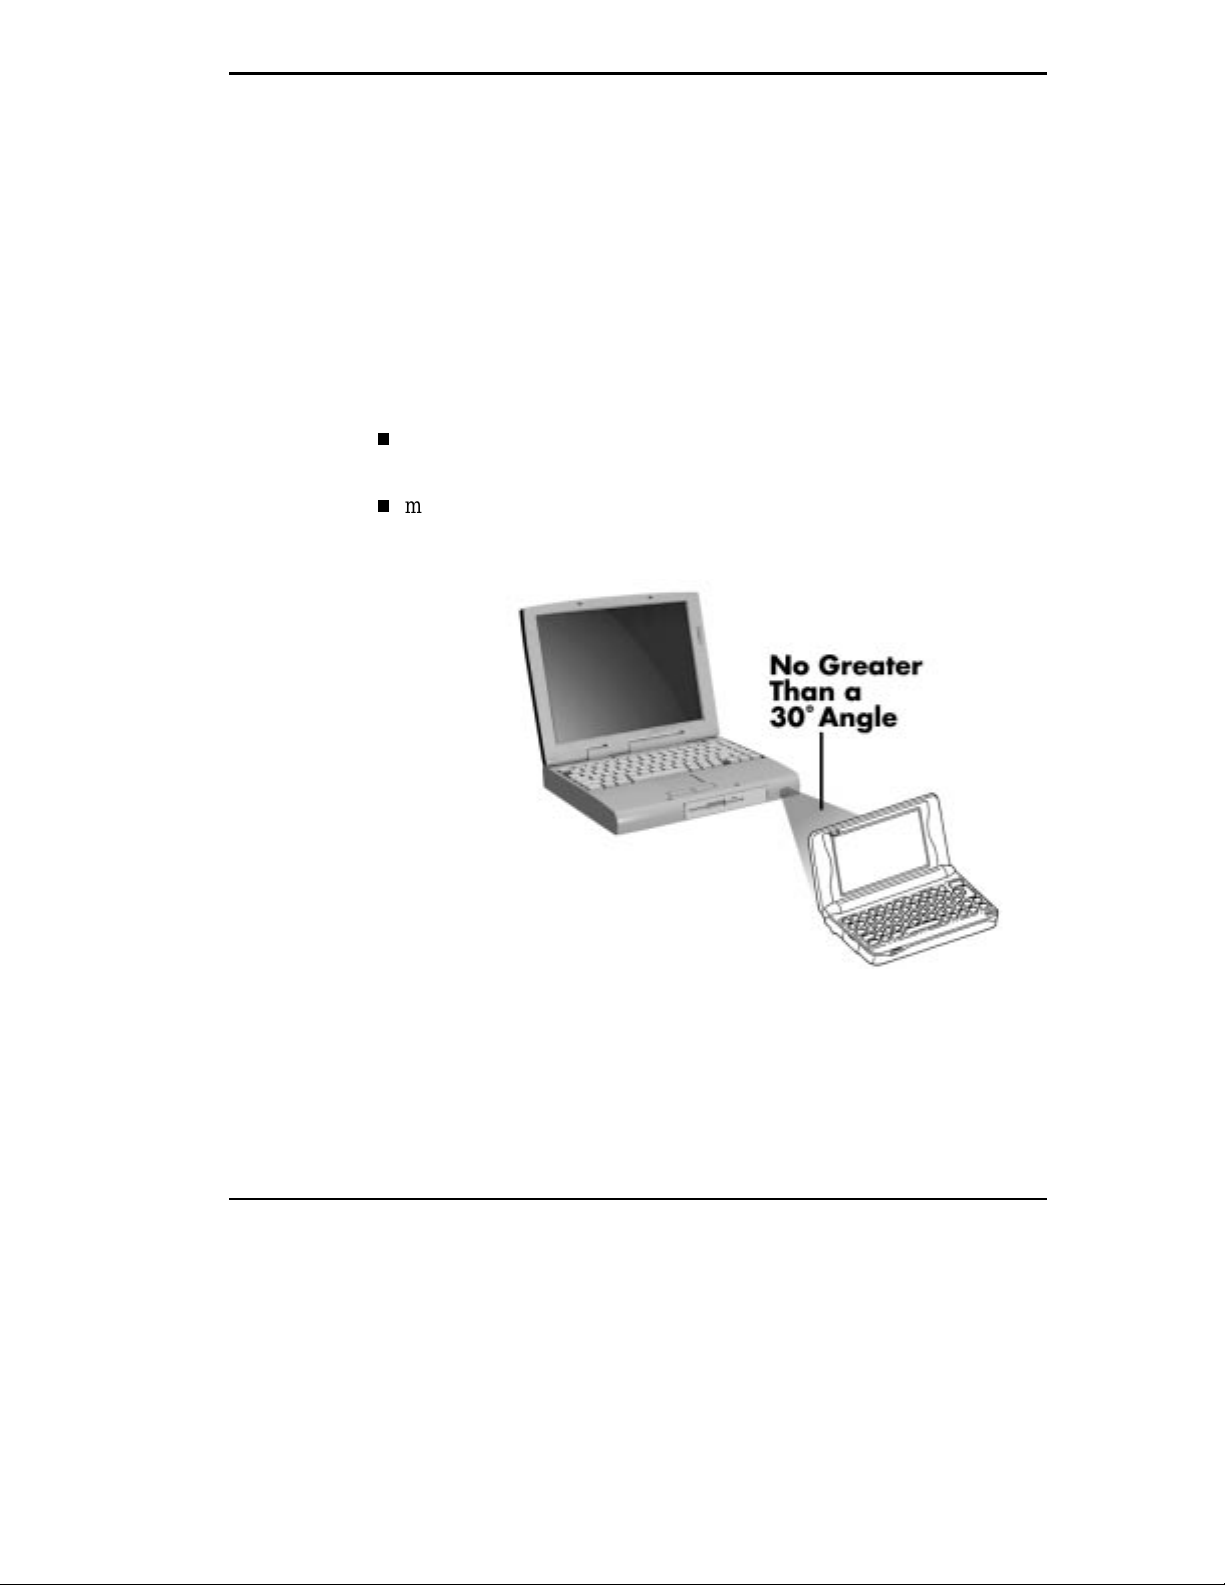
IR Port
The IR por t on the front of your s ystem lets you r NE C Vers a communica te
with other devices that a l s o use infr ared technology. The IR ports are Fas tInfrared (F-IR), Infr ared Data Association (IrDA) compatible. You can easily tr ansfer files bet ween your NEC Versa and an IR-equipped desktop computer, or print to an IR-equipped printer without using cables.
There are three tran sfer r ates for t h e IR port on yo ur NEC Versa FIR (Fast
Infrared - 4.0 Mbit/sec), MIR (Medium Infrared - 1.152 Mbit/sec) and SIR
(Ser ial Infrared Standard - 2. 4 Kbit /sec). W i ndows 95 supports F IR.
For the infrared t echnology to work, you need to follow t hes e gu idelines :
pos ition the NEC Versa no more than t h ree feet way fro m the infrared
device you are using.
make sure there is no greater than a 30° angl e between the computer and
the device.
Using an IR port
Using Your NEC Versa 4-17
Page 79
The LapLink software t hat ships with your N EC Ver sa s ystem (Windows 95
or Windows for Workgroups operating s ystems) provides ways for you t o
use the IR port. Read the instructions in Chapter 2, “How to Use LapLink,”
for steps on using t he s of tware with the I R port.
INCREASING SYSTEM STORAGE AND MEMORY
As your needs grow and cha nge, you may need to add an optional hard disk
drive with a grea ter capa c i ty, or addit ional memory. R ead the following sections to lear n how to install an optiona l hard disk drive, or a memory module.
Hard Disk Drive
You can increase the s ystem’ s stor age capaci ty by repl aci n g the s tan d ar d
har d disk drive or adding a second hard disk dr ive in t he VersaB ay II.
(Adding a s econd hard disk drive is des c ribed in t he s ection “Cust omizi ng
Your Sys tem with the Ver saB ay II.” )
NOTE
NEC Versa 6060 model hard disk dri v es can be used in other
NEC notebook computers such as the NEC Versa 2000 and 4000
Series systems. Howev er, hard disk dri ves f rom earlier models c an
only be used in the VersaBay II. Check the top of the hard dri v e f or
a blue dot. If t he driv e case has the blue dot on it , you can use the
drive in either the inter nal drive bay or the Ver saBay II.
Replace the hard disk drive as f ollows.
Check that the NEC Versa power is off.
1.
Tu rn the NEC Versa system up side down with the f ront of the unit ( Ver-
2.
saBay II) facing you.
4-18 Using Your NEC Versa
Page 80
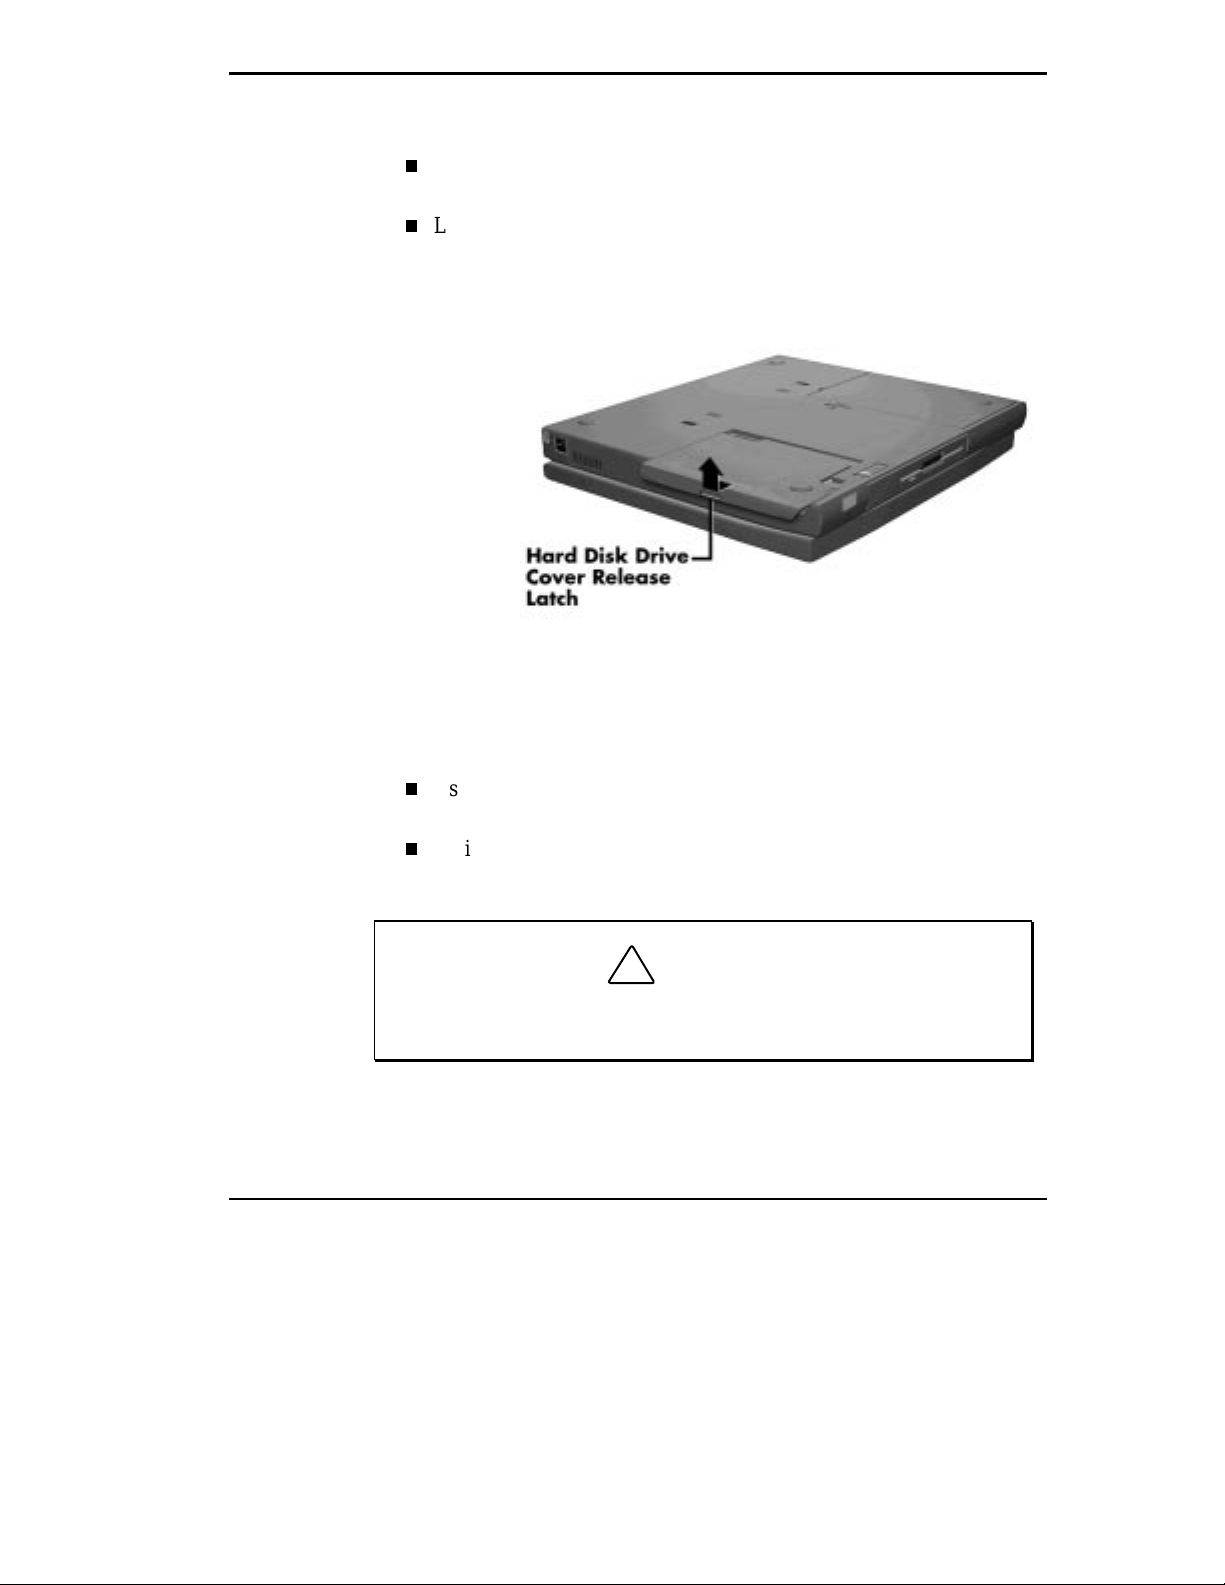
Remove the drive cover as follows:
3.
Locate the drive cover releas e latch. Push the drive cover release latch
up while using some pressure to s lide t he cover to the left.
Lift the cover u p and off the system.
Removing the hard dis k dr iv e bay c ov er
Remove the hard disk drive as follows:
4.
Using your fingers, p ress down on the har d disk drive at the end closest t o the connector.
While mainta ining pressure, slide the dr ive t owards the front of the
system.
!
Do not l ift the dri ve out of t he system before releasing it from t he
system connector. Doing so can damage t he c onnec tors.
CA UT ION
Using Your NEC Versa 4-19
Page 81
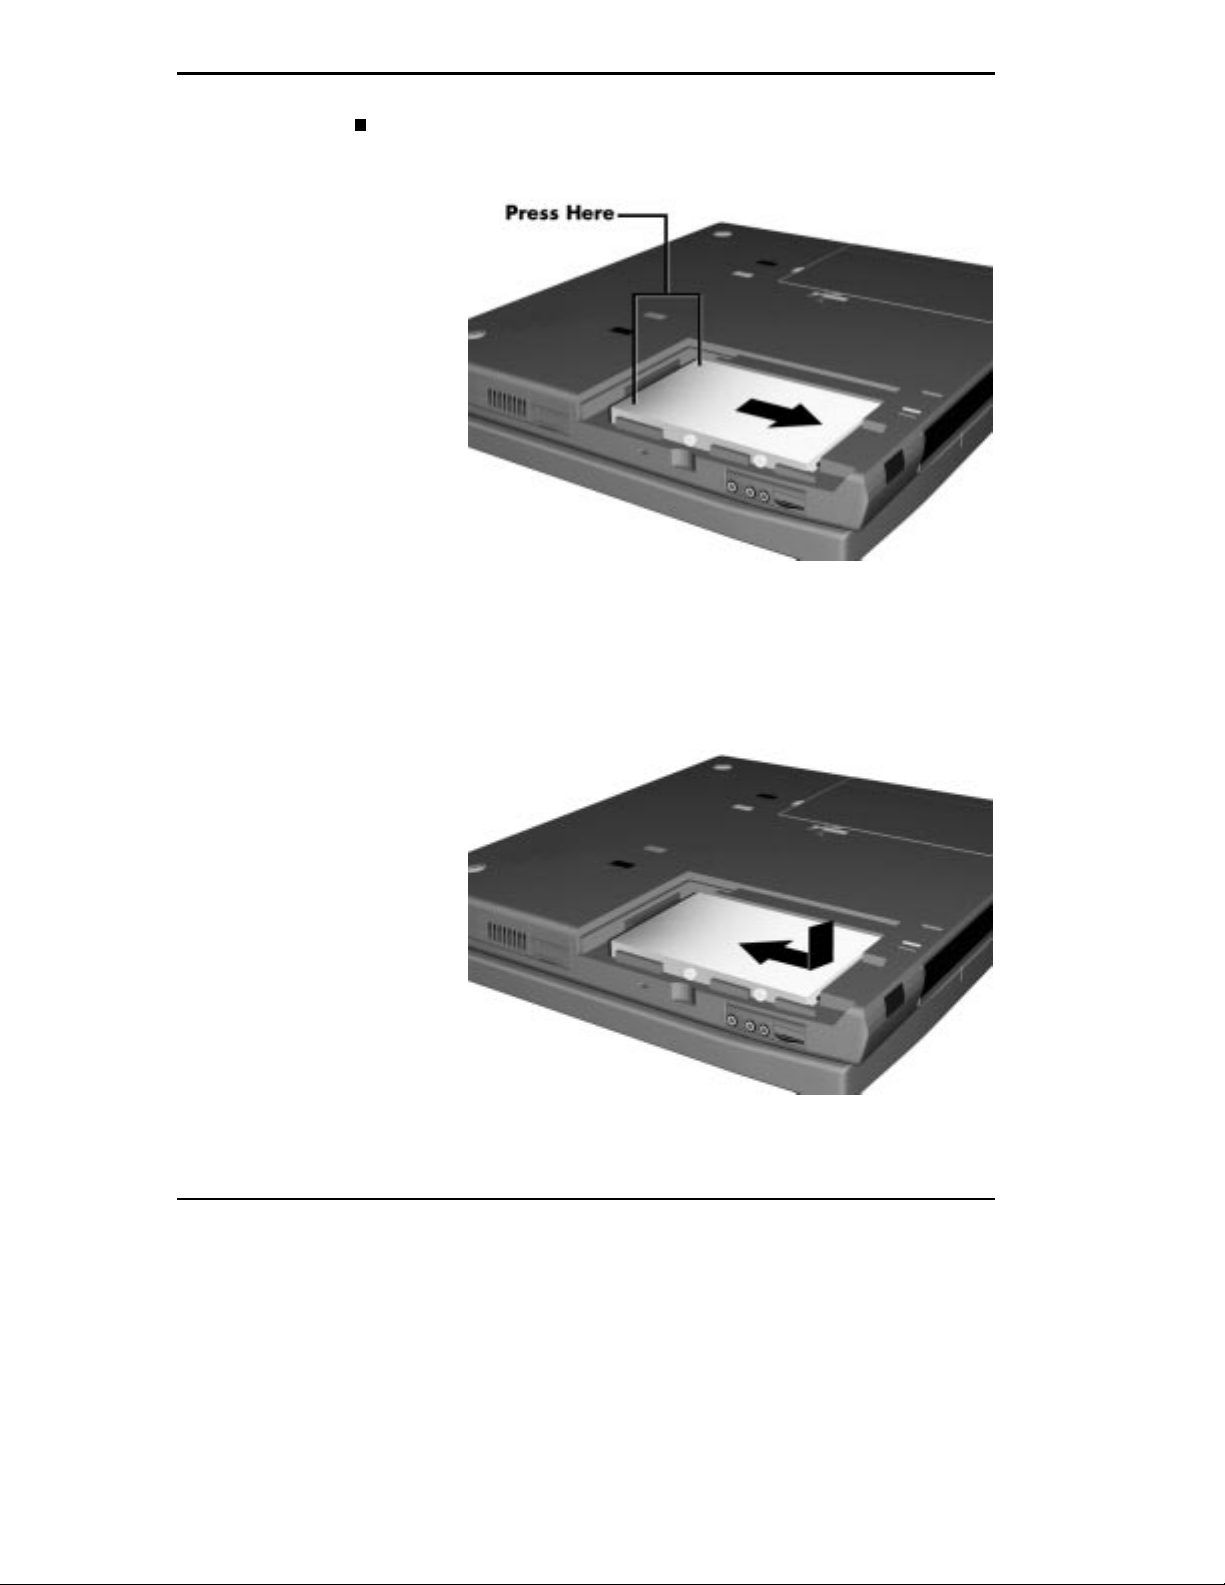
Once the drive is disconnected, lif t the drive u p and out of the system.
Removing the hard dis k dr iv e
Lower t he new drive into the dr ive b ay and align its c onnector with the
5.
har d disk drive connector in t he s ystem.
4-20 Using Your NEC Versa
Inserting the har d dis k dr iv e
Page 82
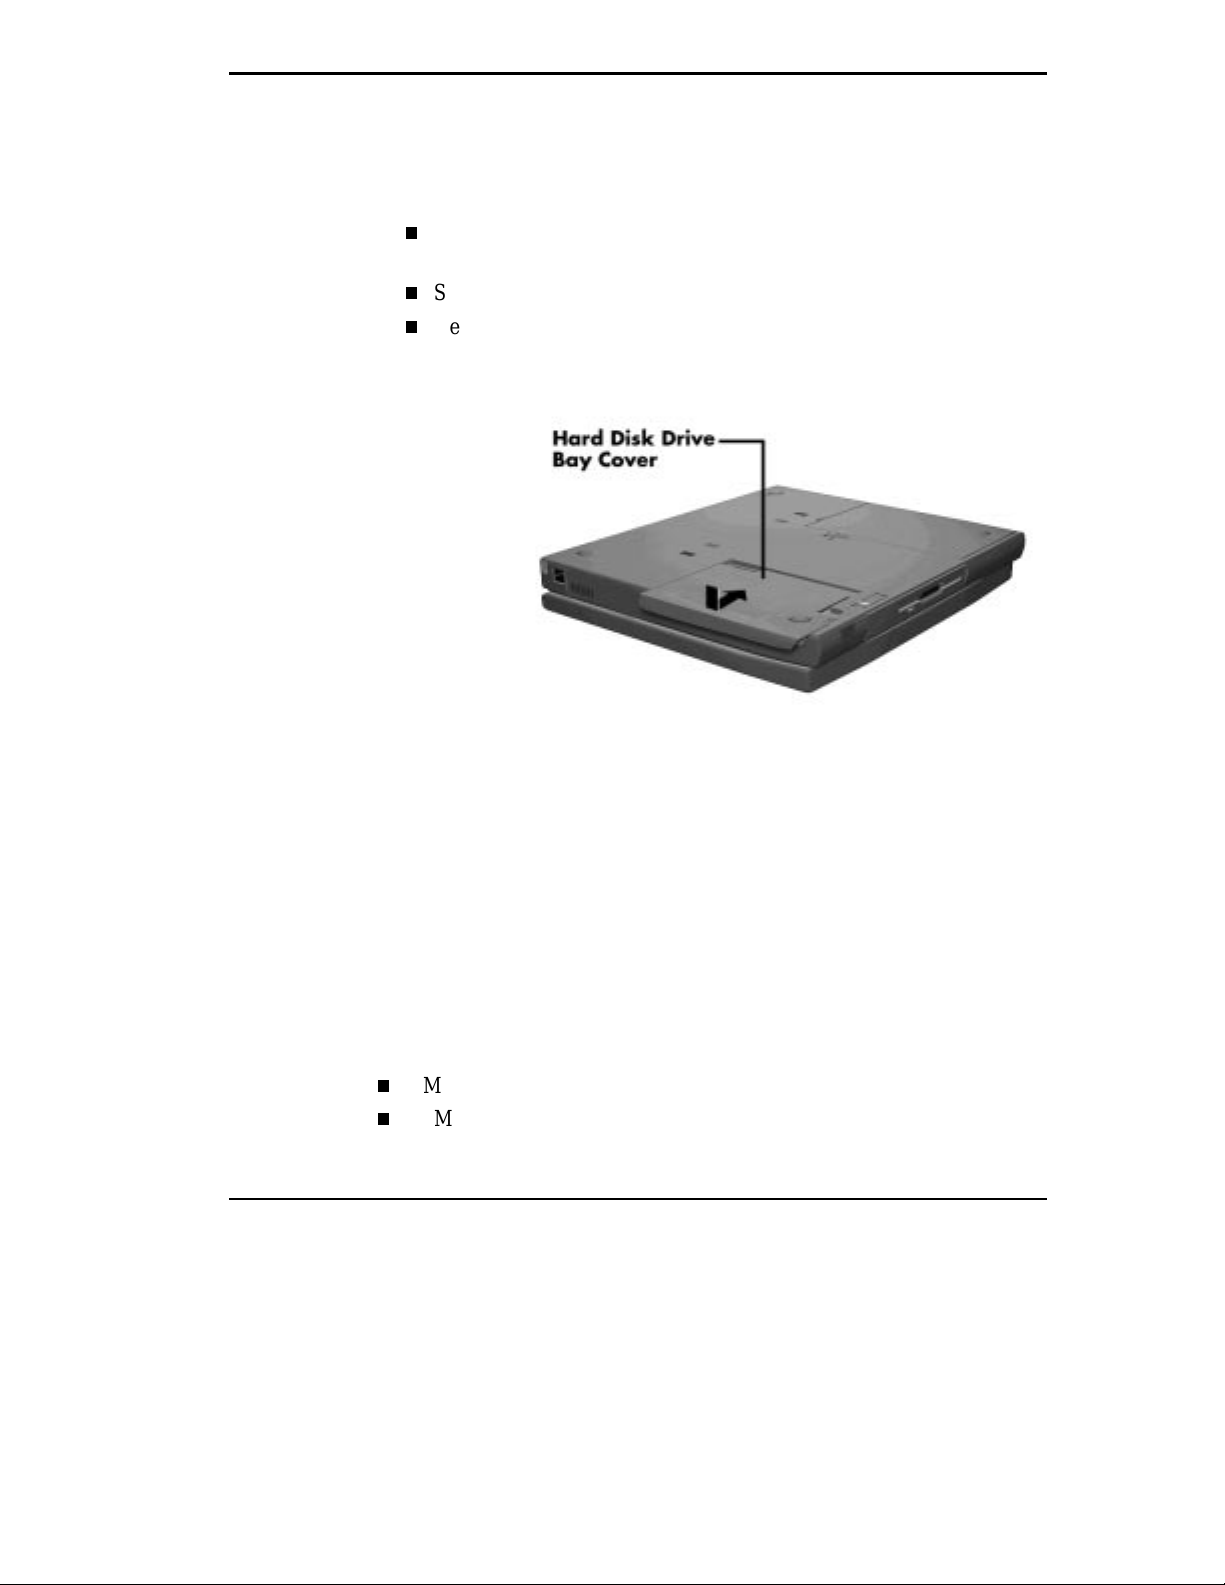
Slide the ha rd disk drive towards t he connec tor, and push firmly to se-
6.
cur e the connection.
Rep l ace the cover a s foll ows:
7.
Align the tabs on the drive cover with the not c hes on the system chas-
sis.
Sli d e the cover t o war d s th e center of the unit.
Gently pu sh the cover until it snaps into place.
Tu rn the system over, power on, and run S etup to check the new conf igu-
8.
ra tion.
Installing a Memory Module
Your NEC Versa system comes standard with 16 megabytes (MB) of random access memory (RA M). Yo u can increas e syste m memory to a maximum of 80 MB b y insta lling one of the following memory modules in the
system.
8- MB me mo ry module
16-MB memory modu le
Replacing the drive bay c ov er
Using Your NEC Versa 4-21
Page 83
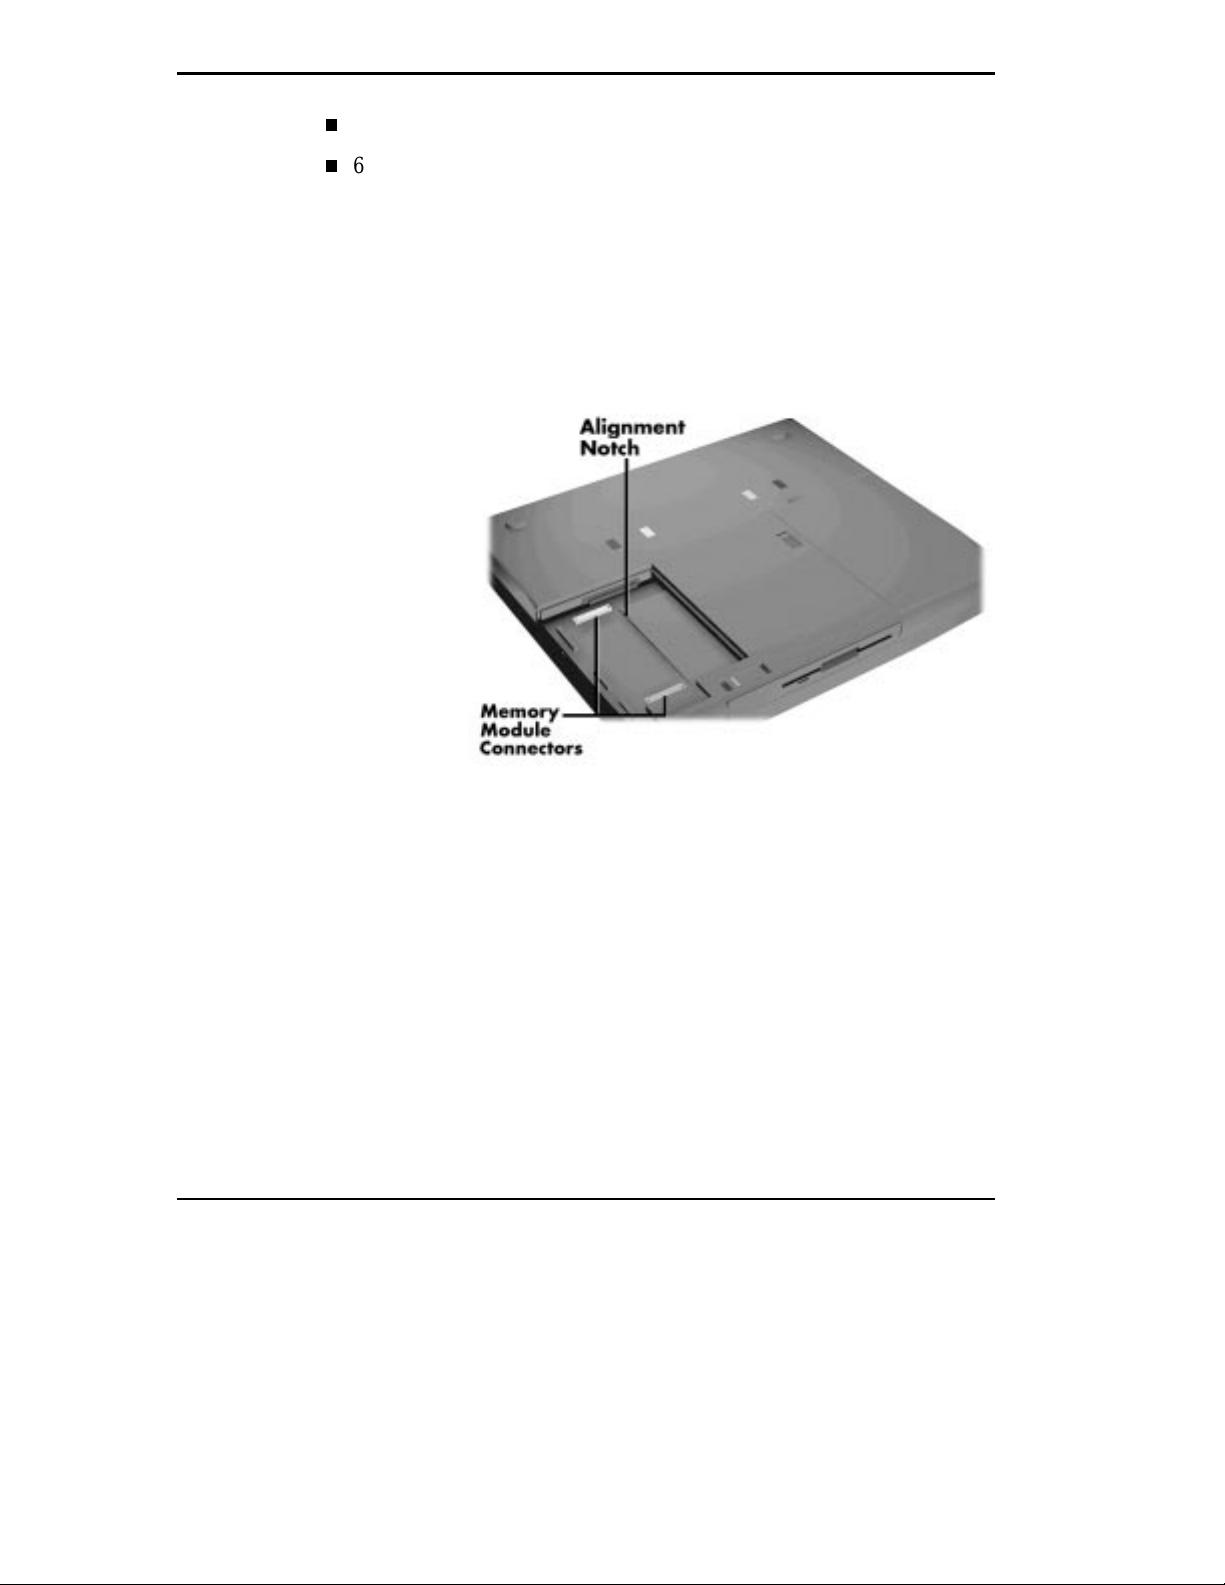
32-MB memory modu le
64-MB memory modu le
Use the following steps to insta ll a memory module.
Follow steps 1 throu gh 4 in the preceding section, “Hard D i sk,” to re-
1.
move the hard disk drive.
Loca te the two memory module connectors in t he drive bay.
2.
4-22 Using Your NEC Versa
Locating the c onnec tor
Page 84
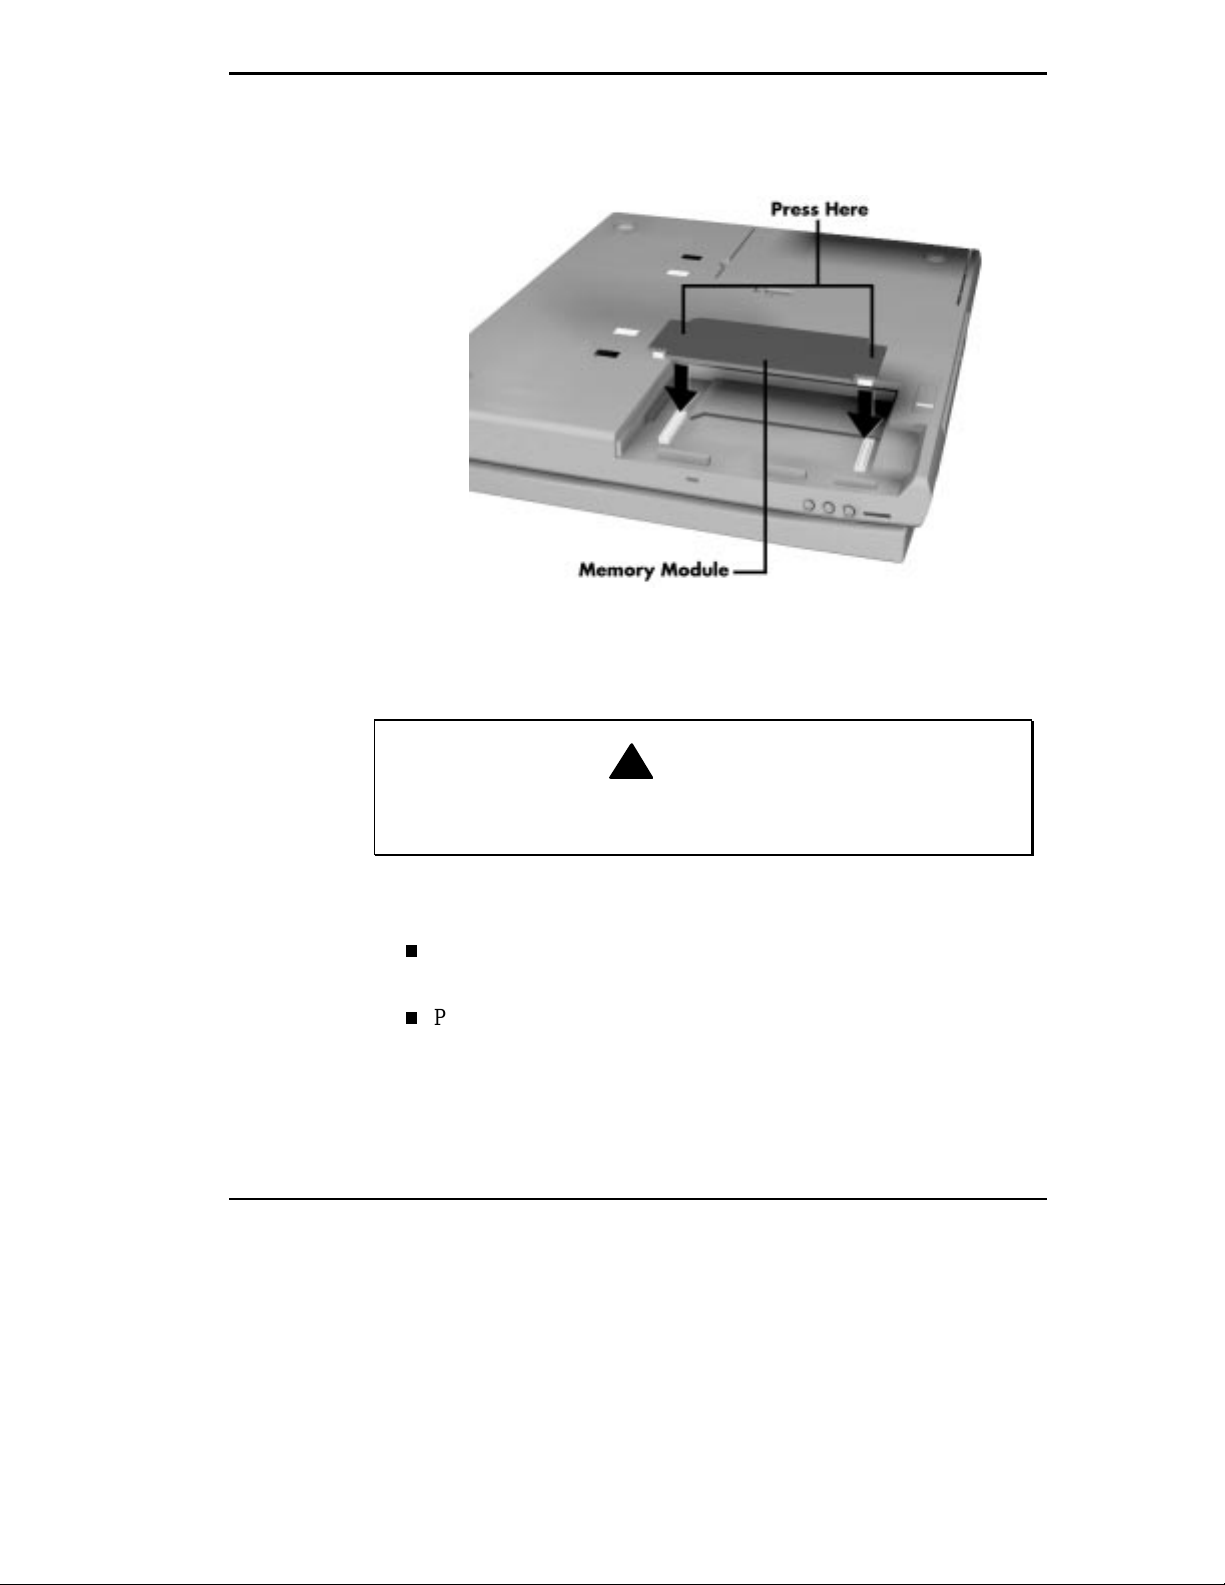
Lower t he module int o the drive bay. Align t he module wit h the syst em
3.
connectors a nd corner tab .
Inserting the m em or y m odule
Pr es s the module into t he connectors.
4.
!
Onl y press the module direct ly over the connector s. Pressing elsewhere can damage the m odule.
Rep l ace the hard d i sk drive in the bay as fo l l o ws:
5.
Lower t he hard dis k drive into t he drive bay and align its connect or
with the connector in t he system.
Push the hard disk drive firmly to secur e t he connec tion.
CA UT ION
Using Your NEC Versa 4-23
Page 85
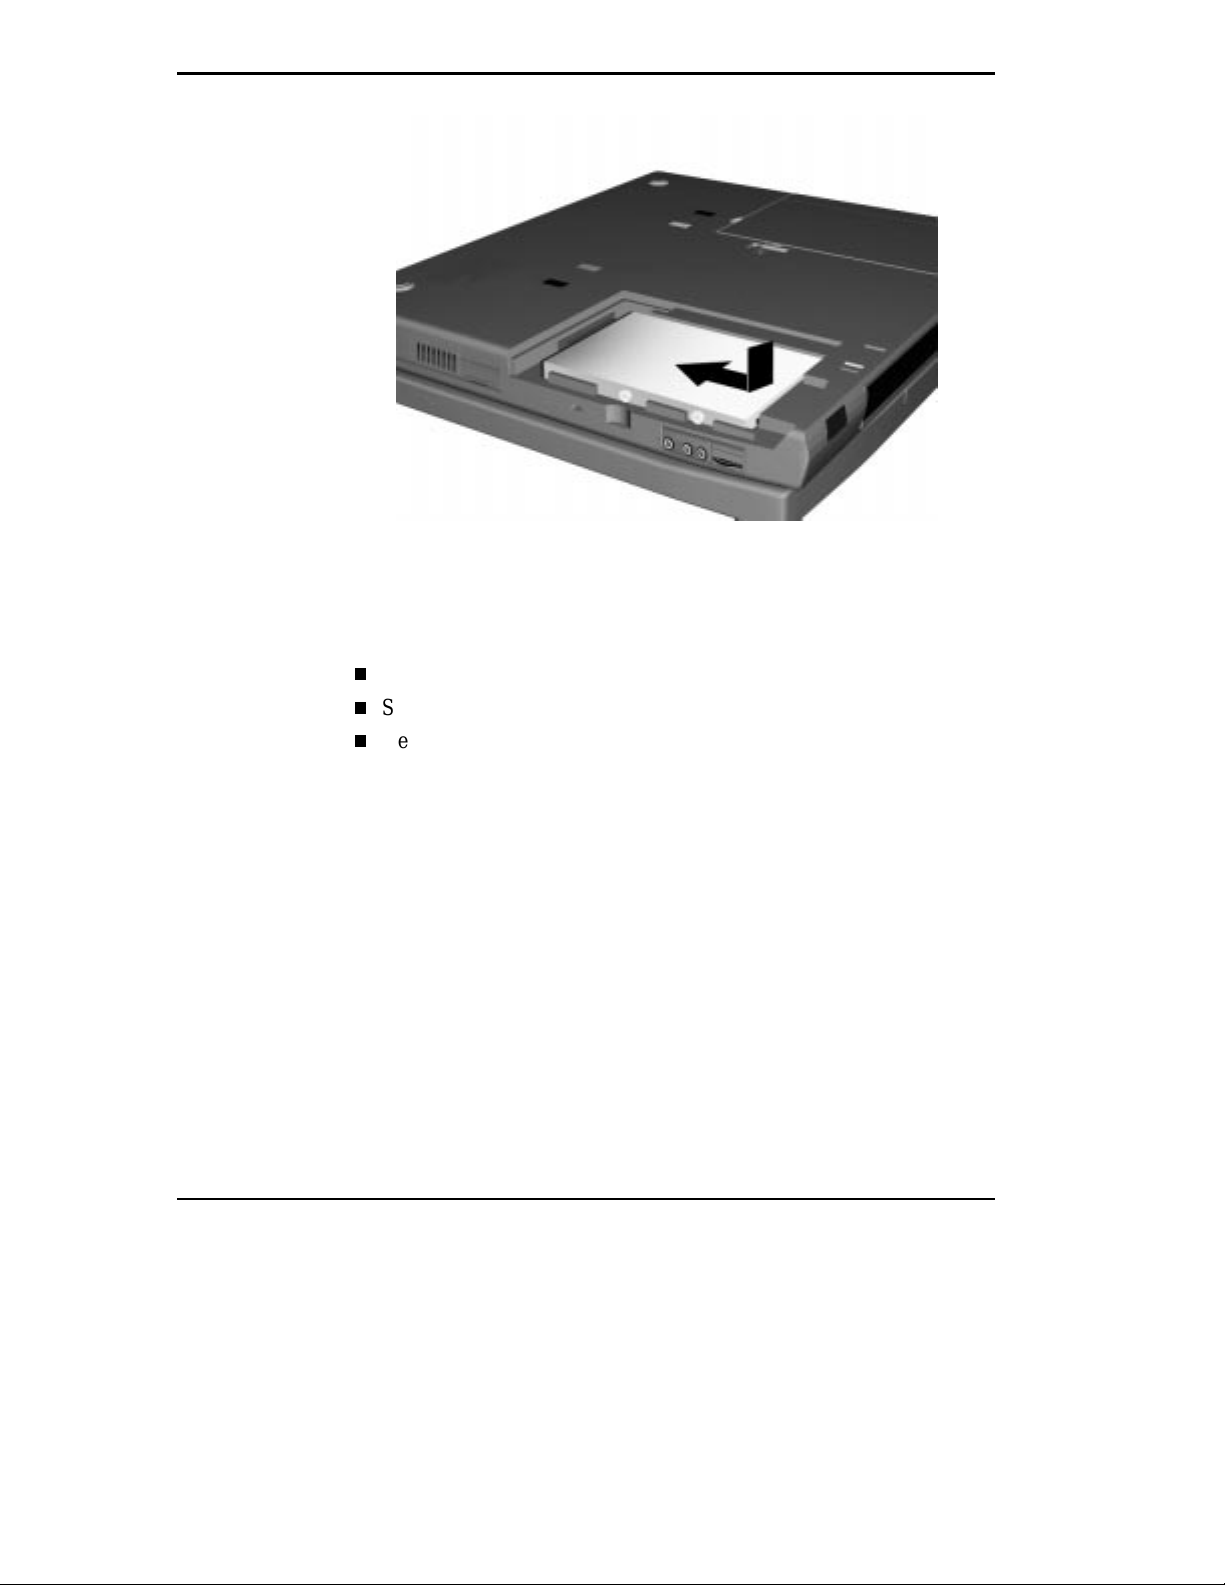
Inserting the har d dr iv e
Rep l ace the cover as fol l ows:
6.
4-24 Using Your NEC Versa
Align the tabs on the drive cover with the slots on the s ystem chassis.
Sli d e the cover t o war d s th e center of the unit.
Gently pu sh the cover until it snaps into place.
Page 86
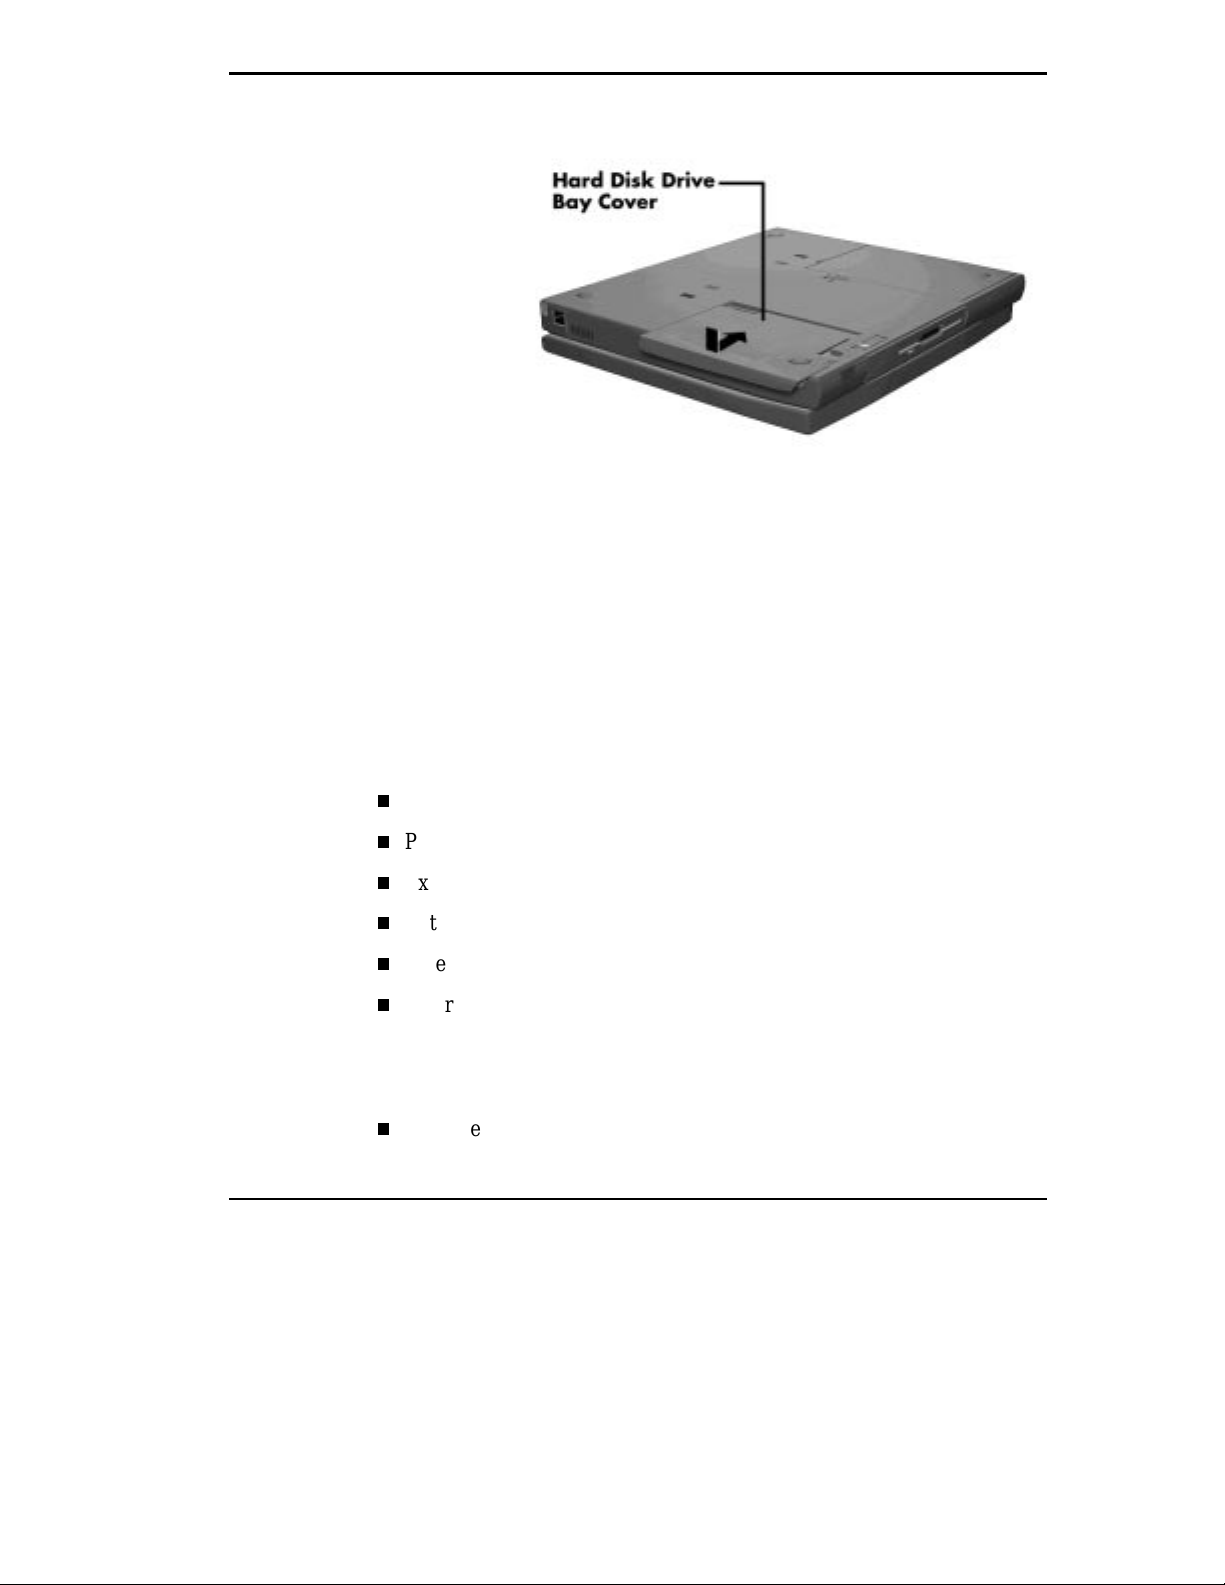
Replacing the cover
Tu rn the system over and power on. The system a utomatically c onfigur es
7.
th e new memory. The Setup summa ry screen displays the total memory
insta lled.
INSTALLING OPTIONS
Your NEC Versa notebook provides industr y-standard connect ors s o that
you ca n integra te the following.
External monitor
Pr inters (parallel and serial)
Ext ernal keyb oard
External mouse
Ext ernal bar code scanner
Ext ernal audio options
In addition, NEC offers t he following optiona l equ ipment developed to work
with you r NE C Versa.
NEC Versa Docking Station 6000 Plus
Using Your NEC Versa 4-25
Page 87
NEC MiniDock 6000
NEC Versa PortBar 6000
NEC Versa 6000 DC Car Adapter (see Chapter 1 for car adapter information.
Floppy Disk D rive (FD D) Connect or Kit.
See the following sections for steps on installing the optional equipment.
External Monitor
You can add a standard external monit or to your N EC Ver sa s ystem. You
need a display signal cable (usually p rovided with the monitor). O ne end of
the ca ble must have a 1 5-pin c onnector f or the s ystem.
Follow these steps to connect an external monitor to your NEC Versa system.
Check that the NEC Versa is in Su spend mode or powered off a nd the
1.
monitor power switch is turned off.
NOTE
while the m onitor is bei ng c onnec ted.
4-26 Using Your NEC Versa
The NEC Versa must be in Suspend mode or powered off
Page 88
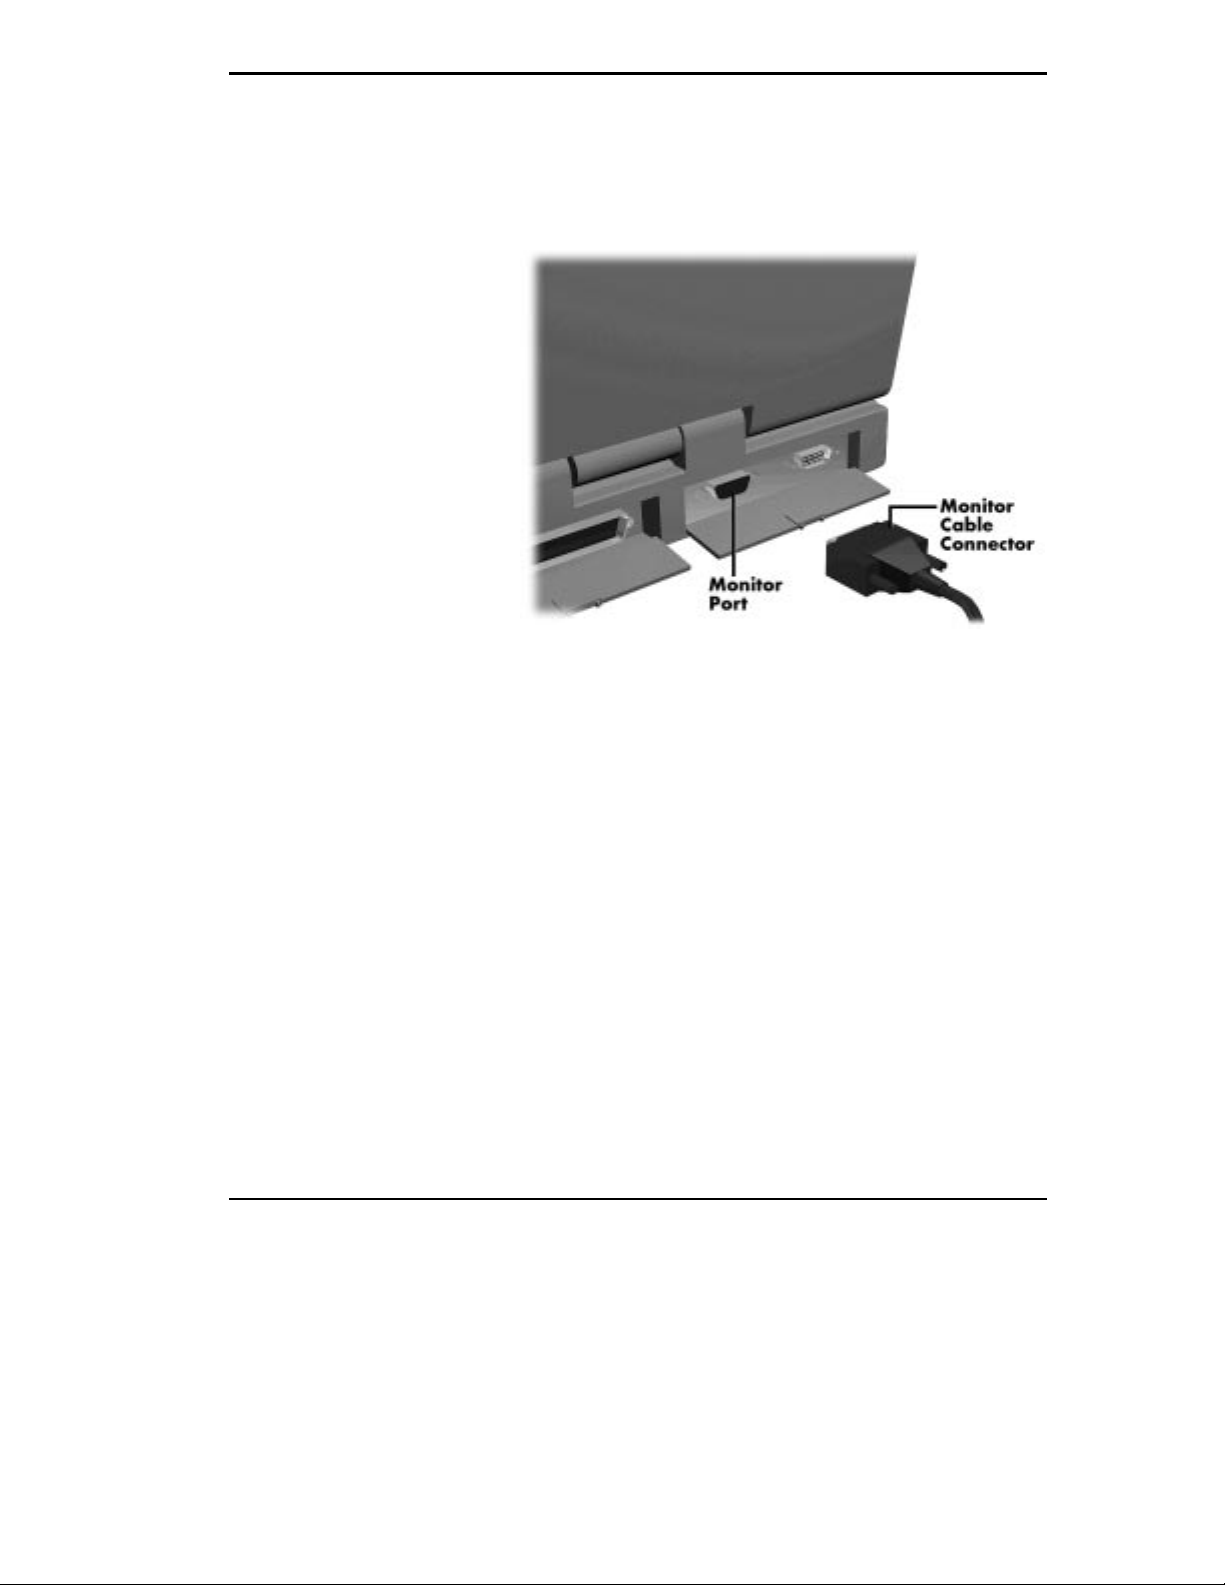
Open the po rt cover on th e back of the sy stem.
2.
Attach the 1 5-pin c able connector to the monitor port on the sys tem. Se-
3.
cure the cable connection with the screws p rovided.
Connecting a monit or
Connect the monitor p ower cable and plug it into a properly grounded
4.
wall out let .
Follow a ny setup instr uctions in the monitor’s user’s gu ide.
5.
Tu rn on power to the monitor.
6.
Pr ess the Sus pend but ton to resume Act i ve mode or power on you r NE C
7.
Versa system.
Press the
Fn + F3
function key combinat ion to toggle bet ween the L CD,
CRT, or simult aneous dis play on both.
Using Your NEC Versa 4-27
Page 89
Printer
You ca n att ach a print er with either a p arallel or a serial connect or. A p arallel printer c onnector has 25 pins; a s erial connec tor has 9 or 25 pins. Some
printers c ome wit h both types of connectors.
Parallel Devices
To install a parallel device, such as a pr inter, you need a c able with a ma le
25-pin connector for the syst em a nd, for most pa rallel p rinter s, a Centronics
Connect a para llel device t o your NEC Ver sa system as f ollows.
1.
®
-compa tible 36-pin c onnector.
NOTE
When you connect a printer, be sure to i nstal l t he appropri at e
printer driv er through the Windows Control P anel, the Wi ndows 95
Start menu or v ia the Windows NT Start menu.
Check that b oth the NEC Vers a and p arallel device power are off .
Open the po rt cover on th e back of the s ystem and lo cate the pa ra llel
2.
port.
Align and connect the 25-p i n par allel cable connector to the pa rallel p ort
3.
on the system. Secure the cable wi th t h e screws p rovi ded .
Align and connect the other end of the cab le t o the parallel p ort on
4.
the device. Lock the connector c lips.
4-28 Using Your NEC Versa
Page 90
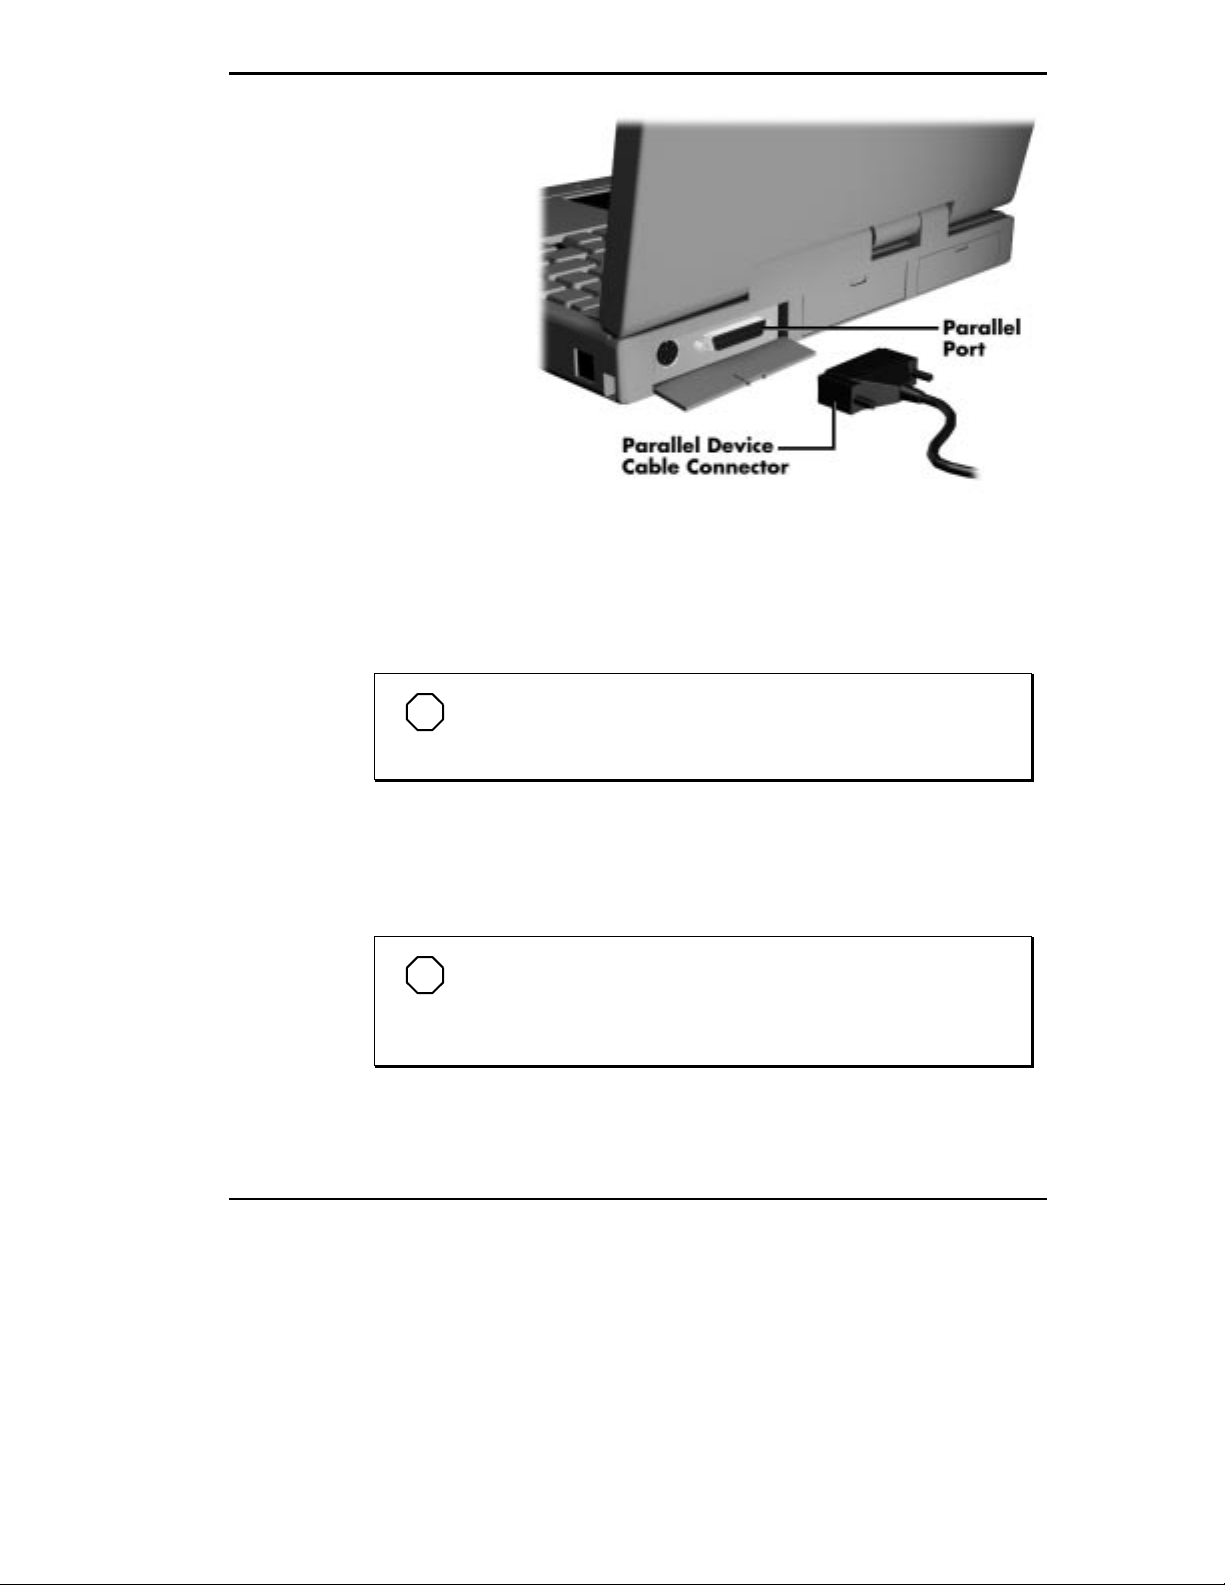
Connecting a parallel devic e
Connect the power c able t o the device and a prop erly grounded wall
5.
outlet.
Tu rn on power to the system and t he device.
6.
Serial Devices
NOTE
Check that the dev ice is online bef ore you try to use it. See
the instruct ions that cam e with the dev ice for more informat ion.
To ins tall a serial device, s uch as a printer or an exter nal modem, you need a
cab le with a female 9 - pin connector.
NOTE
When you connect a print er, be sure to i nstall the appropri ate
printer dri ver through the W indows for Workgroups Control Panel,
the Windows 95 Start m enu or via the Windows NT Start m enu.
Follow these steps to connect a s erial devic e t o your N EC Versa system.
Using Your NEC Versa 4-29
Page 91
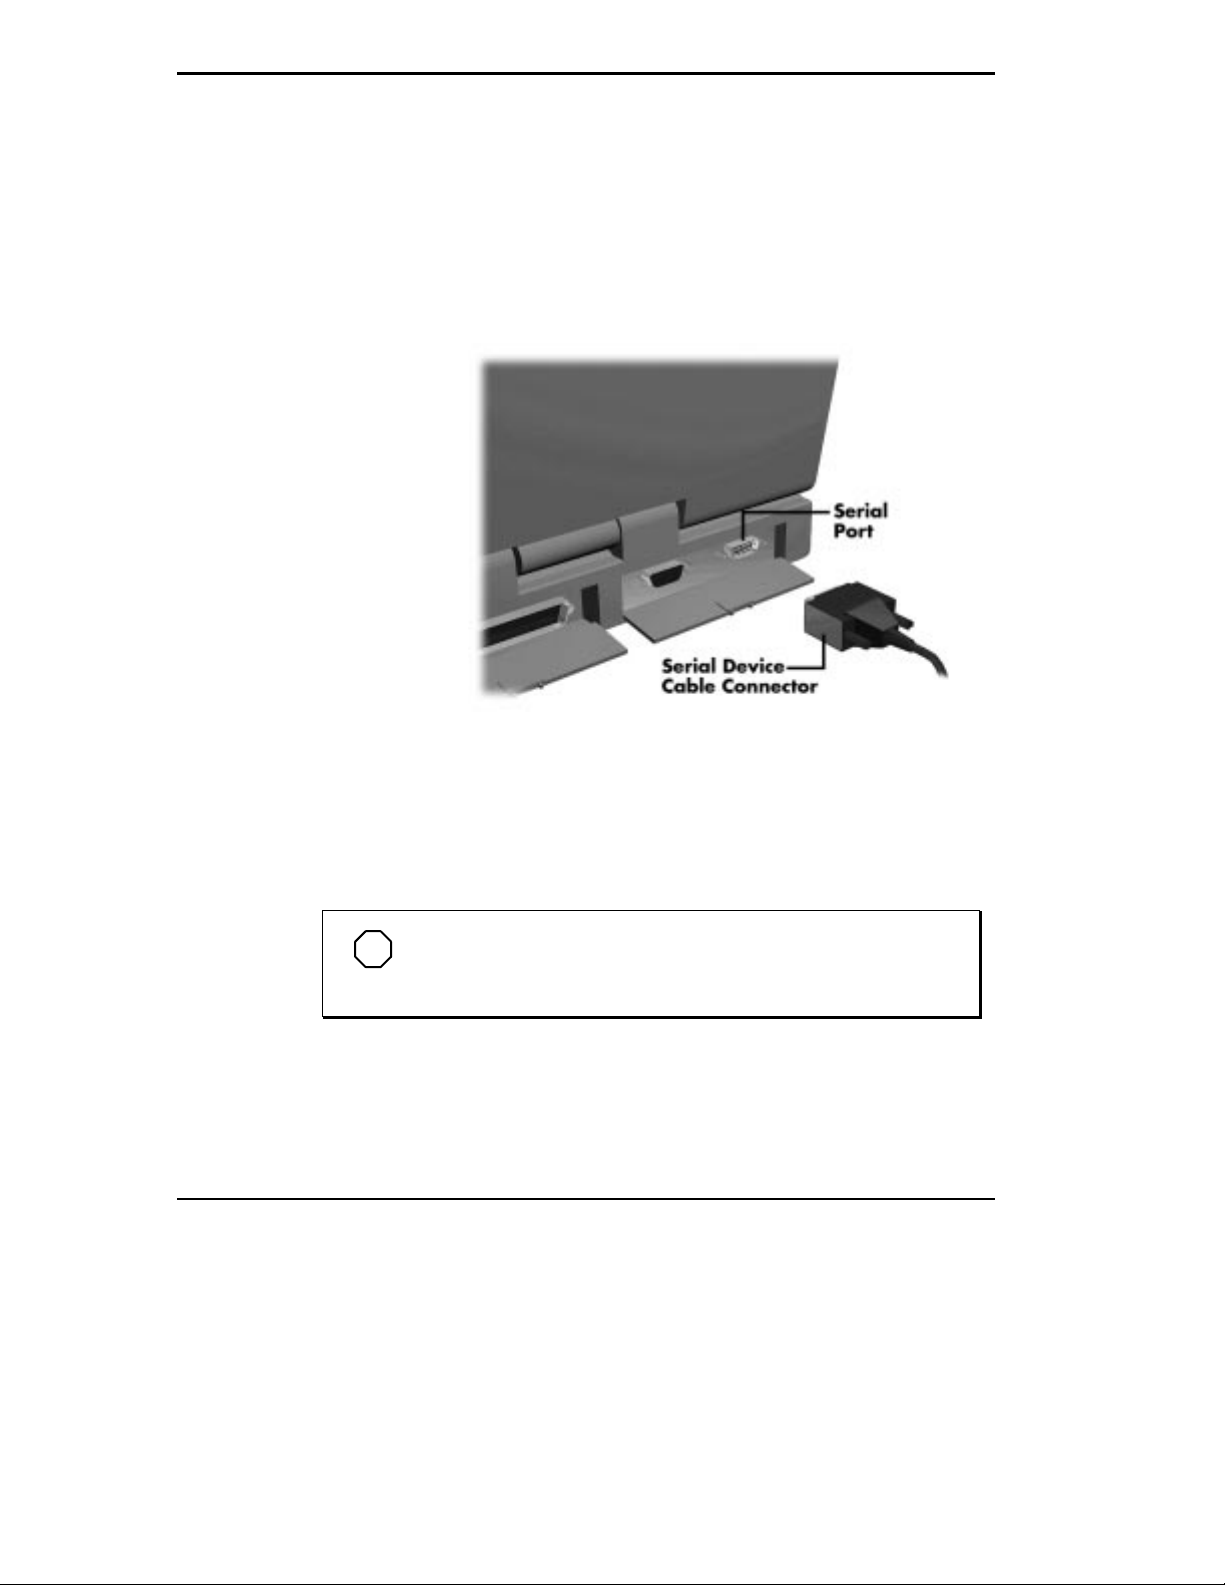
Check t hat b oth the NEC Ver sa and the device power are off.
1.
Open the po rt cover on th e back of the s ystem and lo cate the ser i al port.
2.
Align and connect the 9- pin connector with the serial port on the system.
3.
Secure the connection with the screws provided.
Align and connect the other end of the cable to the approp ria te port on
4.
the device. Secur e the connections with the sc rews provided.
Connect the power c able t o the device and a prop erly grounded wall out-
5.
let.
Tu rn on power to the system and the device.
6.
NOTE
printer guide for instructions.
4-30 Using Your NEC Versa
Connecting a serial dev ic e
Make sure your print er i s onli ne bef ore tr yi ng t o pri nt. S ee t he
Page 92
External Keyboard/Mouse
You ca n add a f ull-size PS/ 2-st yle keyboard or PS/2- style mouse t o your
NEC Versa system. You can continue to us e the syst em keyboard while an
exter nal keyboa rd is connected.
If you want to at tac h both an external keyb oard and an extern al mouse at t he
same time, use the optional NEC Y-adap ter. For ordering inf ormation see
the on l i n e NEC Versa Tools Catalog.
Follow these steps to connect an external keyboard/mouse to your sys tem.
Press the Suspend button o n the NEC Versa. Chec k that the system is in
1.
Suspend mode.
Make sure the NEC Versa is in Suspend mode (l ook for the moon
icon on the St atus Bar) or Powered off whenev er you add or remove
the keyboard. Connect i ng an ex ternal key board to t he system i n Active mode can damage the keyboard controller c hip.
!
CA UT ION
Connect either t he keyboar d/mouse cable connect or to the key-
2.
board/mouse port on the system.
Using Your NEC Versa 4-31
Page 93
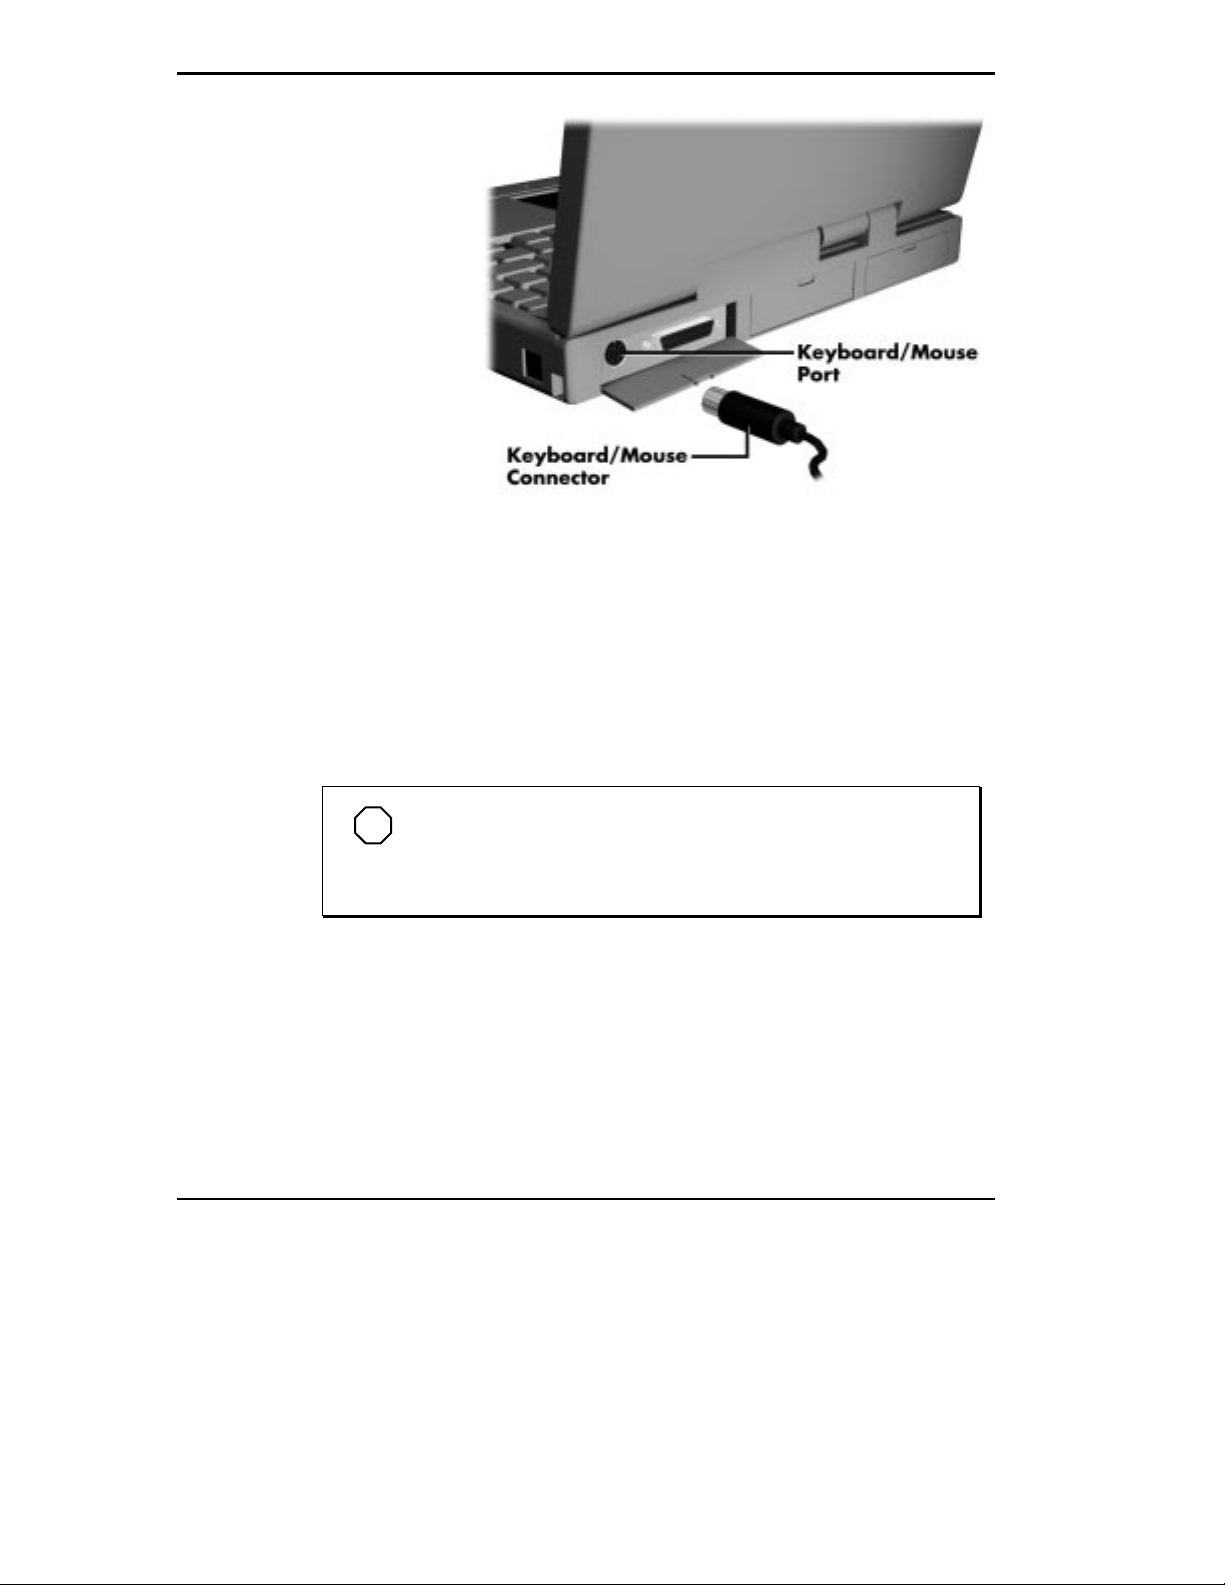
Connecting an ext er nal k ey boar d/mouse
Pr ess the Sus pend but ton again to resume Active mode.
3.
The system immediately recognizes the keyboard/mous e.
After you connect an external keyb oard, you can us e b oth the built-in key-
board and ex terna l keyb oard simulta neou sly. (The numeric keyp ad on the
internal keyboard will not wor k in this configu ration.)
NOTE
For instructions on connecti ng an external keyboard or external
mouse to a docki ng station, see the use r' s g ui d e t hat c am e wi t h y ou r
docking station.
External Bar Code Scanner
You ca n use an ex ternal ba r code sc anner u sing a PS/ 2-st yle c onnector with
your N EC Versa system’s P lug and P lay featur e. You can s till use t he s ystem keyboard while a sc anner is c onnected.
To connect a b ar code sca nner, follow the instructions u nder “E xternal
Keyboa rd/M ouse.”
4-32 Using Your NEC Versa
Page 94
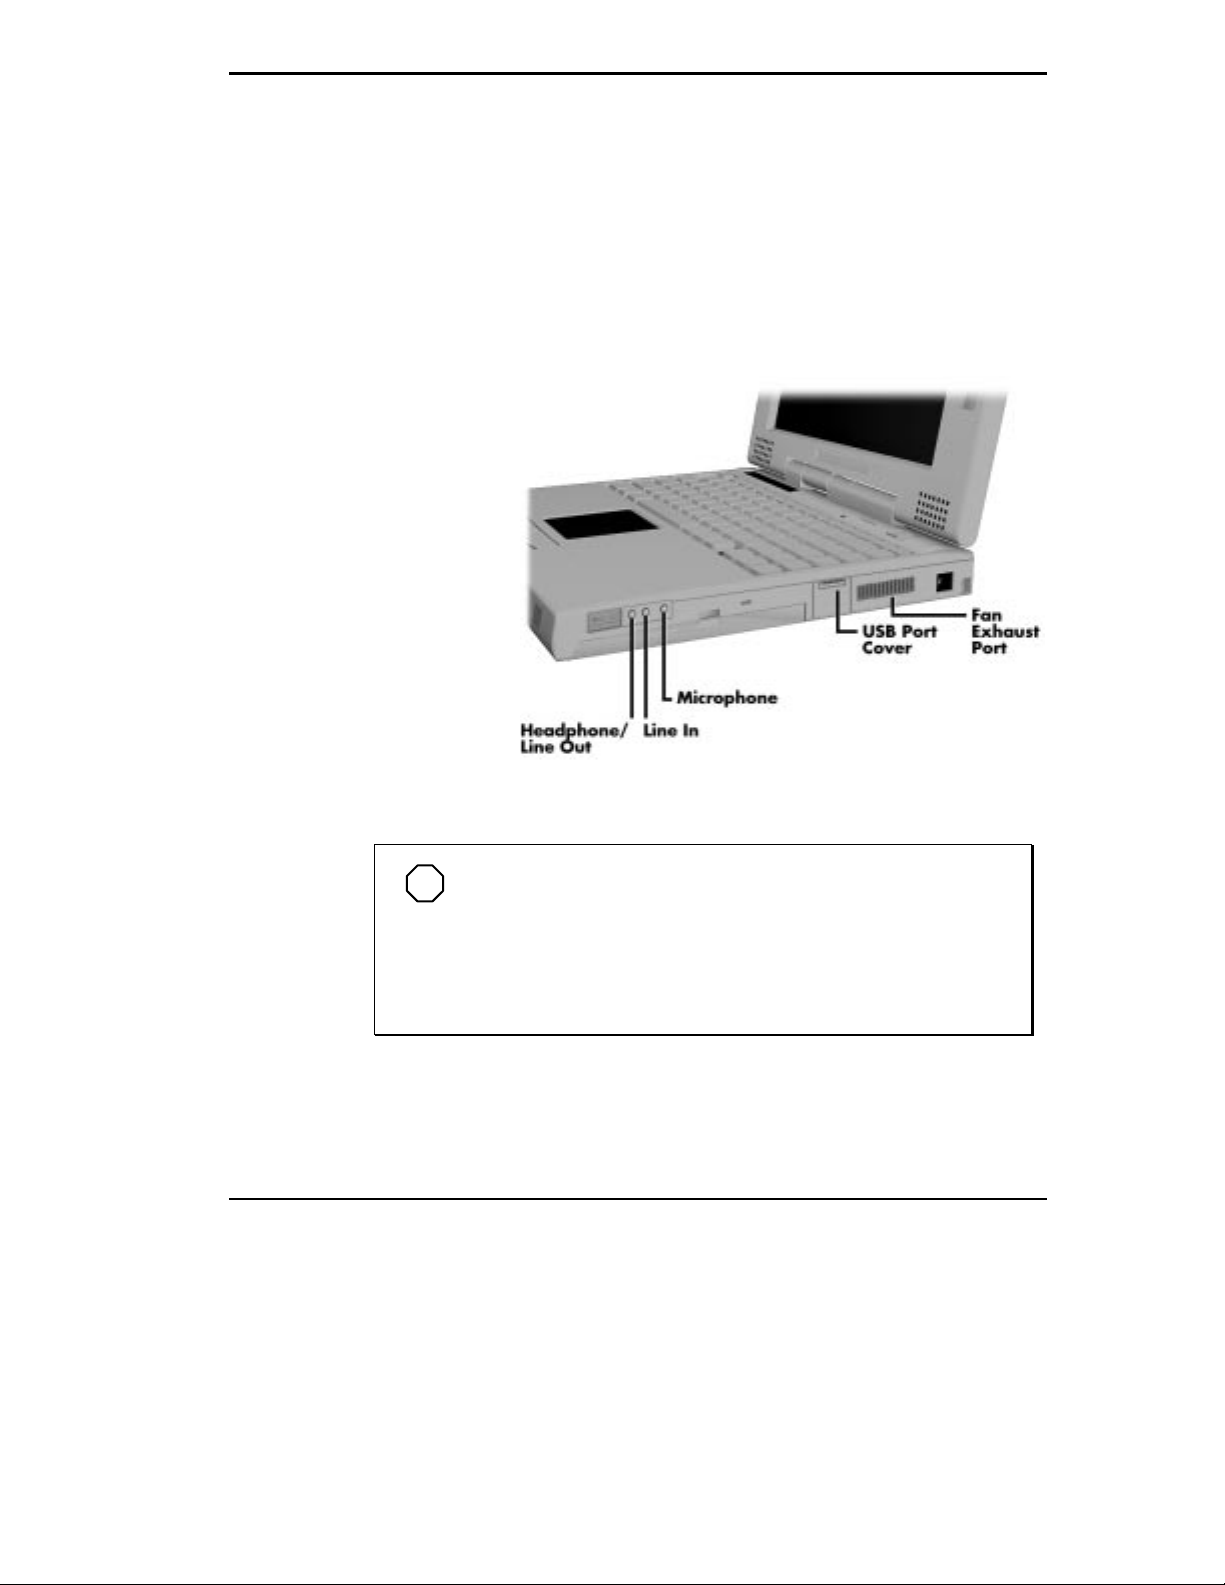
External Audio Options
The NEC Versa system comes equipped with built-in audio ports that let
you rec ord and play s ound.
Connect audio jacks, like a microp hone, headphones , or external speakers to
the au dio port s as f ollows.
Loca te the audio por t that you want to use.
1.
Plug the jack into the port on t he right side of the NE C Vers a.
2.
Audio ports
NOTE
If you ar e using external speakers or an external micr ophone
and experienc e sound di stor tion or feedback, lower the volume.
Som e feedback is caused by hav ing the m icrophone and speakers
too close to each other, so mov ing the external audio option away
from the unit may also help.
Using Your NEC Versa 4-33
Page 95
NEC Versa Docking Station 6000 Plus
The optional NEC Versa Docking Station™ 6000 Plus lets you turn your
portable computer into a desktop or a full-blo wn multim edia workstation, providing:
thr ee internal expans ion slots
one internal ba y f or a hard dis k drive or two exter nal bays for a 5.25 -
inch device
high-qua lity speakers.
See the NEC Versa Docking Station 6000 Plus User's Guide for instruc-
tions on c onnecting and u sing the docking station.
NOTE
Follow the i nstructions for i nstalling t he NEC Versa Docki ng
Station Software Setup Utility provided with your docking station.
See the user's guide that c am e with your docki ng station f or detai led
installation instructions.
NEC Versa MiniDock 6000
The NEC Versa MiniDock™ 6000 provides the following ports or slots.
VersaBay II
Monitor Port
Audio Ports
Parallel Port
Serial Port
Keyboa rd Port
Mouse Port
CardBus Slots (two) (Zoomed Video not supported)
USB Port
Floppy Disk D rive Connect or
4-34 Using Your NEC Versa
Page 96

Midi Port
DC In Port.
Keep the MiniDock™ 6000 in your office connected to peripherals while
you take your NEC Versa on the r oad.
See the instruction sheet that comes with the MiniDock™ 6000 or the online
Advanced T op i cs for details a bout ins talling and using the MiniDock™
6000.
NEC Versa PortBar 6000
The NEC Versa PortBar™ 6000 duplicates the ports found on the back of
your NEC Versa system providing the following,
Monitor Port
External Diskette Drive Port
Parallel Port
Serial Port
Keyboa rd Port
Mouse Port
Line Out Port
DC In Port.
Keep the PortBar 6000 in your office connected to peripherals while you
ta ke you r NE C Vers a on the road.
See the ins tr uct i o n sheet tha t comes with the P ort B ar or the onl i ne A dvanced
Topics for details a bout insta lling and using the PortBar.
Floppy Disk Drive (FDD) Connector Kit
The NEC Versa 6000 Series FDD Connector Kit lets you u se an ext ernal
diskette drive with your NEC Versa system and the optional PortBar 6000.
The kit inc ludes an ex terna l diskette dr ive c onnector wit h c able, plus an
ada pter that lets you use the op tion with you r NEC Vers a sys tem only.
Using Your NEC Versa 4-35
Page 97
SETTING SWITCHES
A six- position dip switc h is located next to the har d disk drive connector in
the hard disk dr ive bay. The following list s each switch setting and it s
special function.
NOTE
Switch settings 3, 4 and 6 are reserv ed for NEC fact ory use
only.
Switch 1, BIO S Flash P rotect ion Switch — The defau lt sett i ng is “ON .”
Cha nge t he setting to “O FF” when you need t o upda te your syst em’s basic input/output system (or BIOS) flash memory. See “Updating the
System BIOS”, to complete this procedure.
Switch 2, P ass word Override Switc h — The defau lt setting is “ O FF.”
For ex ample, if you for get your p ass word and c annot access the data on
your NEC Versa , cha nge the sett ing to “O N” to er ase t his pa sswor d and
requires you to enter a new one.
To enter a new password, reset the switch to “OFF,” and follow the instructions in C hapt er 3, “Using Setup ,” to set up a new pa sswor d. You
may want to keep this new password in a sp ecial place so that you don’ t
forget it again!
Switch 3 — Reserved for factory use.
Switch 4 — Reserved for factory use.
Switch 5 — Not used.
Switch 6 — Reserved for factory use.
4-36 Using Your NEC Versa
Page 98
Updating the System BIOS
Use t h e following steps to up d ate y our NEC Versa s ystem BIOS wi th t he
BIOS Update diskette (BUD). Specifically, the BIOS is the code transmitted
onto your system’s microproces sor, or cent ral proces sing unit (CPU) .
NOTE
You only need to update the B IOS if NEC m akes significant
improv em ents or f ix es to the cur rent system BI OS. Your authoriz ed
NEC dealer, or T echnical Support Serv ice representat ive c an help
you determine this.
If you are informed that the default BIO S needs an upgrade, you c an receive
a cop y of the BUD by contacting the NEC Versa Diskett e F ulfillment Center
at (800) 842-6446, or NEC Customer Service and Support (800) 632-4525,
Fax (508) 635-4666. You can also download from NEC’s BBS at (508)
635-4706.
You must use only the BIO S upgrade disket te for you r sp ecif ic model.
NOTE
If you purchased and are using this computer outside the
U.S., please contact a local NEC office or dealer in your country.
They will provide you with BIOS upgrades .
Check that computer power is off. Turn your NEC Versa system upside
1.
down with the front of the unit (VersaBay II) facing you.
Follow the ha rd disk dr ive removal pr oc edu res listed previously in the
2.
“Hard D isk Dr ive” section, and remove the ha rd disk drive.
Using Your NEC Versa 4-37
Page 99
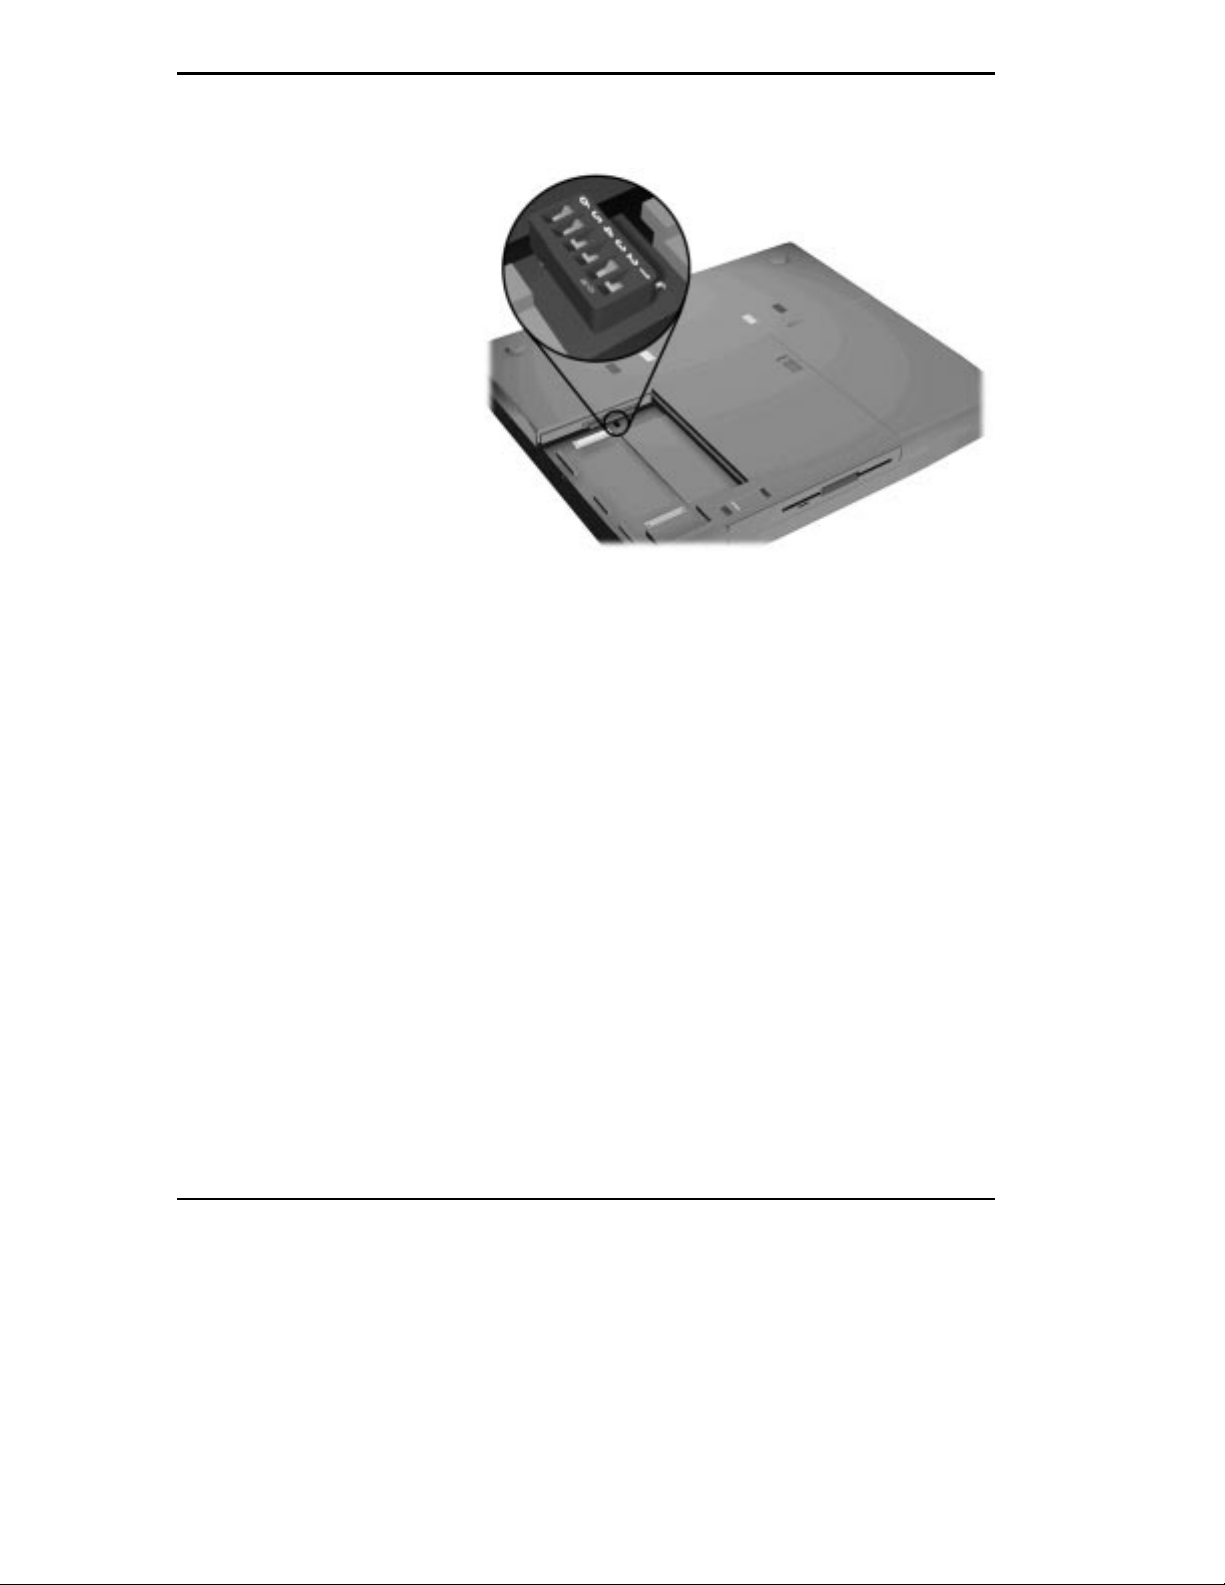
Locate switch 1 on the six-posit i on dip switch in t he hard disk drive ba y.
3.
Locating the s witch sett ings
Set the switch to “off” to enable BIOS reprogramming.
4.
Replace the hard disk drive and the compartment cover.
5.
Now you a re ready to begin t he actu al up date procedur e u sing the following steps.
Make sur e t hat the comput er is connected to AC power, and that t he
6.
power is off. Insert the BIOS Update diskette into diskette drive A.
Power on the computer with the BUD diskette in drive A. T he compu ter
7.
boots and au tomatic ally loads the utilit y. A message s imilar t o the following appear s:
Pr ess any key to continu e.
8.
The ut ility checks t he currently inst alled BIOS version and the diskette’ s
BIOS version. The Ma in Menu appears.
4-38 Using Your NEC Versa
The NEC BIOS Update Utility should not be used to modify
the BIOS in a Versa system which is do cked. If your Versa is
docked, ple ase ex it the BIOS Update Utility, power down, and
undock your Versa before running the utility. Plug in your AC
cable before re-starting the flash utility.
Page 100

Use the a rrow keys to highlight the “Display BIOS Version” option on
9.
the Ma in Menu. Use this op tion to check the cur rently installed BIO S
version and the ver sion of the new r ep l acement BIOS.
Pr ess any key to ret urn t o the Ma in Menu.
.
Highlight t he “Install New BI O S” option and p ress
10.
Enter
11.
Press
Y
, then press
Enter
.
After a brief pause, a message appears tell-
ing you to remove the diskette in drive A.
Remove the diskett e and pr es s any key t o c ontinue. The utility updates
12.
the BIOS . You will see a message indicat ing that the update is now in
progress .
Next, you will see the following message,
Your system has been updated.
To complete the flashing procedure you shoul d
power off y our system, thi s i nsures proper
applicat ion operation on the next power cycle.
After reading this message, p ower off you r computer. The next time
13.
you power on, you will see the following message during the P ower On
Self Test (POST).
CMOS Checksum B ad
RUN SETUP
Press F1 to Resume.
This mess age simply means t he previous CMOS RAM value is differ -
ent fr om t he current CM OS R AM value.
Press the F1 key to enter the Setup utility.
14.
Use the a rrow keys to highlight “Aut o Configuration with Defaults. ”
15.
Press
16.
Press Y, then press Enter.
17.
Highlight “Save Sett ings and Exit” and pr es s
18.
Press
19.
Enter
Enter
.
.
Enter
.
The system reboots automatically. You now ha ve the lates t NEC Versa BIOS revisi on level
for your NEC Versa 6060 Series computer.
Using Your NEC Versa 4-39
 Loading...