

Page 1

PROPRIETARY NOTICE AND LIABILITY DISCLAIMER
The information disclosed in this document, including all designs and related
materials, is the valuable property of NEC Corporation (NEC) and/or its licensors.
NEC and/or its licensors, as appropriate, reserve all patent, copyright and other
proprietary rights to this document, including all design, manufacturing,
reproduction, use, and sales rights thereto, except to the extent said rights are
expressly granted to others.
The NEC product(s) discussed in this document are warranted in accordance with
the terms of the Warranty Statement accompanying each product. However, actual
performance of each such product is dependent upon factors such as system
configuration, customer data, and operator control. Since implementation by
customers of each product may vary, the suitability of specific product
configurations and applications must be determined by the customer and is not
warranted by NEC.
To allow for design and specification improvements, the information in this
document is subject to change at any time, without notice. Reproduction of this
document or portions thereof without prior written approval of NEC is prohibited.
Versa is a U.S. registered trademark of NEC Corporation.
All other product, brand, or trade names used in this publication are the trademarks or
registered trademarks of their respective trademark owners.
First Printing — February 1996
Copyright 1996 Copyright 1996
NEC Technologies, Inc. NEC Corporation
1414 Massachusetts Avenue 7-1 Shiba 5-Chome, Minato-Ku
Boxborough, MA 01719 Tokyo 108-01, Japan
All Rights Reserved All Rights Reserved
Page 2
Using This Guide
This Versa® 2205C Notebook User’s Guide contains in-
formation on using your notebook computer. Read the following chapters to find out more about the system.
■ Chapter 1 introduces the computer, its features, and how
to care for it.
■ Chapter 2 explains how to use the NEC Versa 2205C
hardware.
■ Chapter 3 describes the software that comes with your
NEC Versa 2205C.
■ Chapter 4 discusses traveling with your NEC Versa
2205C.
■ Chapter 5 gives you a checklist to follow if you have
problems with the NEC Versa 2205C. Common problems and their solutions are also included.
■ Chapter 6 provides a list of numbers for NEC customer
support services.
!
Prolonged or improper use of a computer workstation may pose a risk of serious injury. To reduce
your risk of injury, set up and use your computer i n
the manner described in Appendix A, Setting Up a
Healthy Work Environment.
WARNING
Using This Guide vii
Page 3
TEXT SETUP
■ Appendix A, Setting Up a Healthy Work Environment,
contains guidelines to help you use your computer productively and safely. This appendix also instructs you on
how to set up and use your computer to reduce your risk
of developing nerve, muscle, or tendon disorders.
■ Appendix B, Specifications and Environment, provides
system specifications and environment recommendations.
■ Appendix C, Modem Commands, Registers, and Codes,
lists commands, registers and return codes for network
communication use via the internal modem (or an optional PC card modem).
To make this guide as easy to use as possible, text is set up
in the following ways.
■ Warnings, cautions, and notes have the following
meanings:
viii Using This Guide
!
Warnings alert you to situations that could result in
serious personal injury or loss of life.
Cautions indicate situations that can damage the
system hardware or software.
WARNING
!
CAUTION
Page 4
NOTE
Notes give particularly important information
about whatever is being described.
TIP: Tips give helpful hints about getting the
most out of your system.
■ Names of keys are printed as they appear on the key-
board, for example, Ctrl, Alt, or Enter.
■ Text that you have to type or keys that you must press
are presented in bold type. For example, type
Enter.
press
RELATED DOCUMENTS
In addition to this guide, a number of other documents ship
with your Versa system, including:
DIR and
■ The NEC Versa 2205C Notebook Quick Setup shows
you how to set up your system after you unpack it.
■
The Versa 2200 Series Notebook Quick Reference
Guide contains brief descriptions of function keys,
LEDs, NEC help telephone numbers and troubleshooting
tips.
Tuck this card inside the closed notebook when you take
it with you. The card is designed as a quick, portable
reference to frequently-used functions.
Using This Guide ix
Page 5

Contents
Using This Guide
Text Setup ............................................................... viii
Related Documents................................................... ix
1 Getting to Know Your NEC Versa 2205C
Around the System ................................................... 1-2
Front................................................................... 1-2
LCD Screen ................................................... 1-2
Brightness Control.......................................... 1-2
Switches......................................................... 1-3
LEDs............................................................. 1-4
Keyboard....................................................... 1-5
NEC VersaGlide ............................................ 1-7
Rear.................................................................... 1-8
Left Side ............................................................. 1-9
Right Side ........................................................... 1-10
Underside............................................................ 1-11
System Care............................................................. 1-12
Precautions ......................................................... 1-12
Storage Requirements.......................................... 1-13
Routine Cleaning................................................. 1-13
2 Learning to Use the Hardware
Powering Your NEC Versa....................................... 2-1
AC Adapter......................................................... 2-1
Battery Pack ....................................................... 2-2
Removing the Battery Pack.................................. 2-3
Keyboard................................................................. 2-4
The NEC VersaGlide................................................ 2-6
Personalized Modes............................................. 2-7
Pointer Size, Speed.............................................. 2-7
Ergonomics......................................................... 2-7
Contents iii
Page 6

Options and PC Card Expansion............................... 2-7
Hard Disk ........................................................... 2-8
Memory Expansion ............................................. 2-9
External Monitor................................................. 2-11
Printer................................................................. 2-12
Parallel Devices.............................................. 2-13
Serial Devices ................................................ 2-15
External Keyboard .............................................. 2-18
Mouse................................................................. 2-17
Internal Modem................................................... 2-19
PCMCIA ............................................................ 2-20
NEC Versa MediaDock 2000 .............................. 2-22
NEC Versa MiniDock 2000................................. 2-22
3 About the Software
Windows Introduction .............................................. 3-1
Windows 95........................................................ 3-1
Guide to Online Help................................................ 3-3
NEC Versa 2205C InfoCenter ............................. 3-3
Additional Topics................................................ 3-4
Guide to NEC Utilities ............................................. 3-5
Distribution Diskette Creator............................... 3-5
PowerCenter ....................................................... 3-5
Preference Tools Utility....................................... 3-5
NEC Battery Gauge ............................................ 3-5
PhDisk................................................................ 3-6
Auto Setup Utility ............................................... 3-6
Using Auto Setup........................................... 3-6
4 Traveling with Your NEC Versa 2205C
Power Connections................................................... 4-2
Checklists ................................................................ 4-3
What to Take ...................................................... 4-3
Things to Do ....................................................... 4-3
iv Contents
Page 7

5 Solving Problems
Problem Checklist .................................................... 5-1
Start-Up Problems.................................................... 5-3
POST Error Messages......................................... 5-4
If You Need Assistance ............................................ 5-6
6 Getting Help
A Setting Up a Healthy Work Environment
Making Your Computer Work for You ..................... A-1
Arrange Your Equipment.......................................... A-3
Adjust Your Chair.................................................... A-3
Adjust Your Input Devices ....................................... A-4
Adjust Your Screen or Monitor................................. A-5
Vary Your Workday................................................. A-6
Pre-Existing Conditions and Psychosocial Factors..... A-7
B Specifications and Environment
C Modem Commands, Registers, and Codes
AT Commands.................................................... C-1
S Registers.......................................................... C-8
Result Codes....................................................... C-10
Contents v
Page 8

vi Contents
Page 9

Getting to Know Your
1
NEC Versa 2205C
!
Prolonged or improper use of a computer workstation may pose a risk of serious injury. To reduce
your risk of injury, set up and use your computer i n
the manner described in Appendix A, Setting Up a
Healthy Work Environment.
After completing the steps in the Quick Setup sheet that
comes with your computer, your NEC Versa™ 2205C is
ready to go! It’s packed with features to make your work
experience fun and productive. To get started, look at the
following:
■ Read Appendix A, Setting Up a Healthy Work Envi-
ronment, for guidelines that help you use your computer
productively and safely. Information includes how to set
up and use your computer to reduce your risk of developing nerve, muscle, or tendon disorders.
WARNING
■ Take the online System Tour to get acquainted with the
NEC Versa 2205C. (The System Tour is located in the
Windows NEC Information group under the NEC Versa
2205C InfoCenter.)
■ Wander through the online system Basics. (Basics is in
the Windows 95 NEC Versa 2205C InfoCenter group.)
■ Flip through this guide to familiarize yourself with the
NEC Versa 2205C.
Getting to Know Your NEC Versa 2205C 1-1
Page 10
AROUND THE SYSTEM
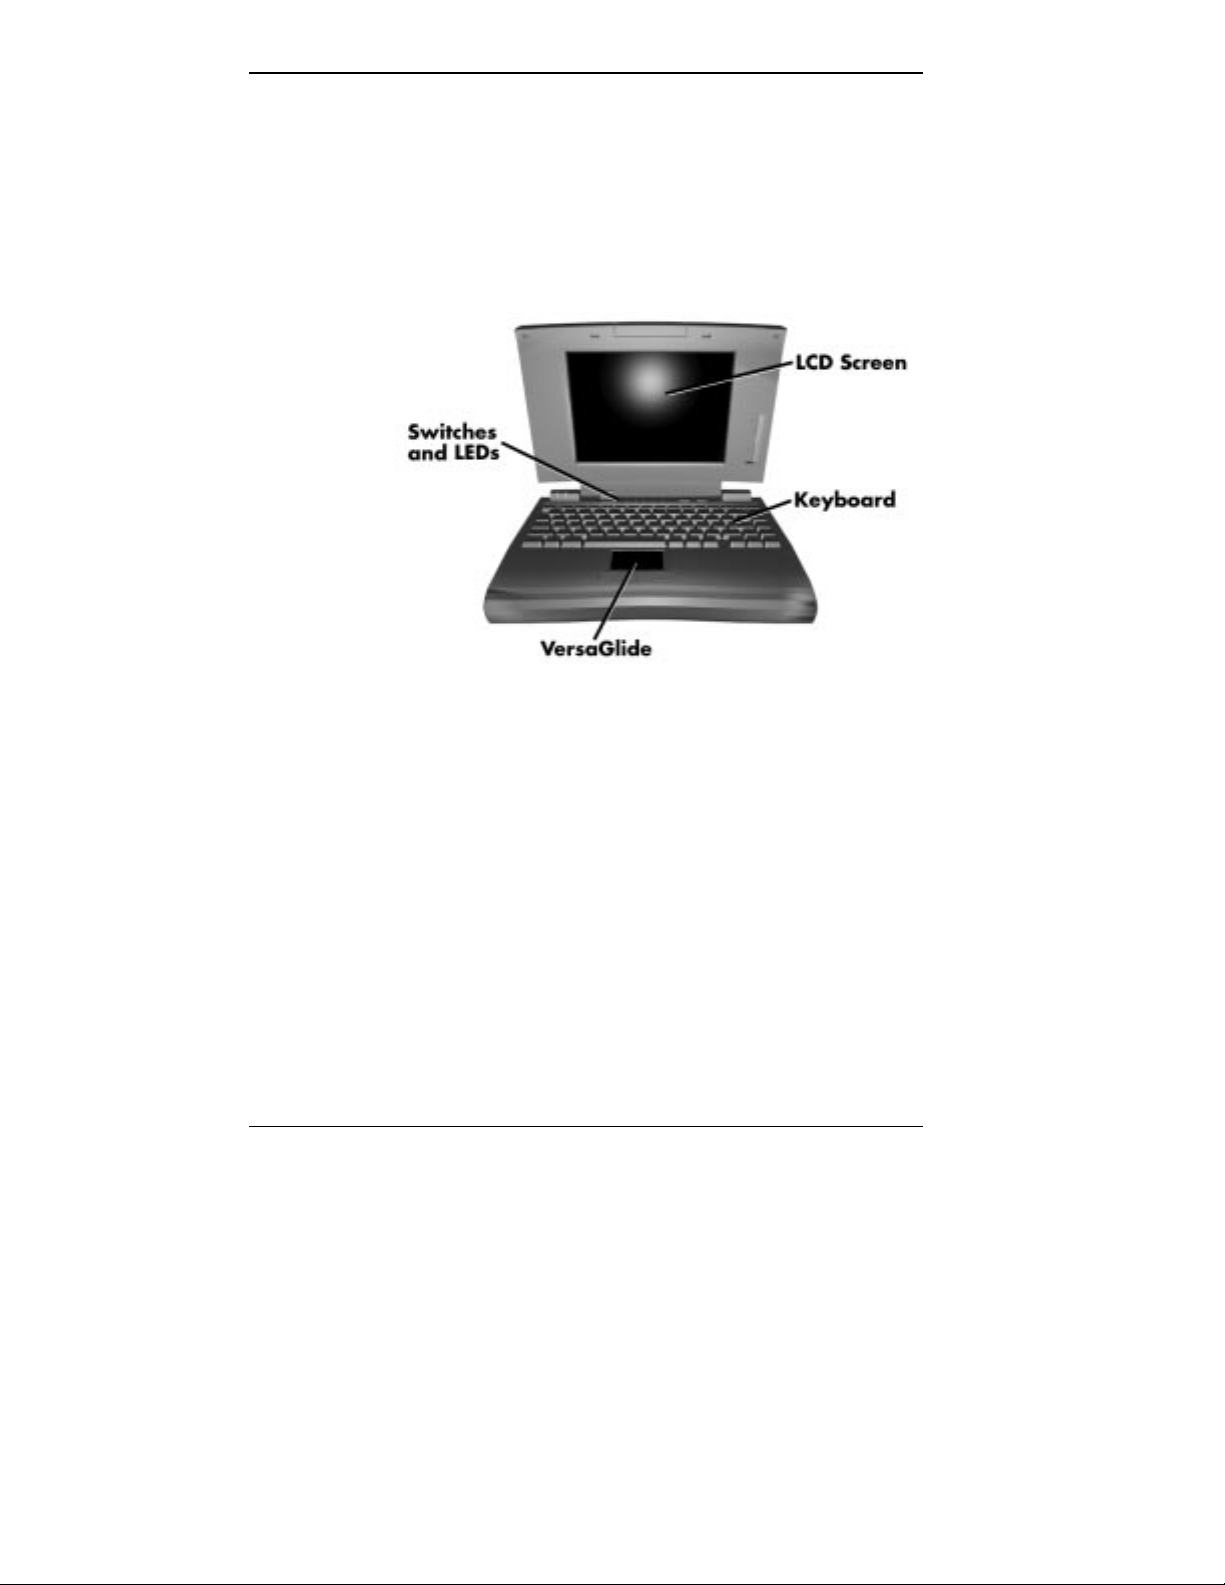
The NEC Versa 2205C is light and compact with features
all around it.
Front
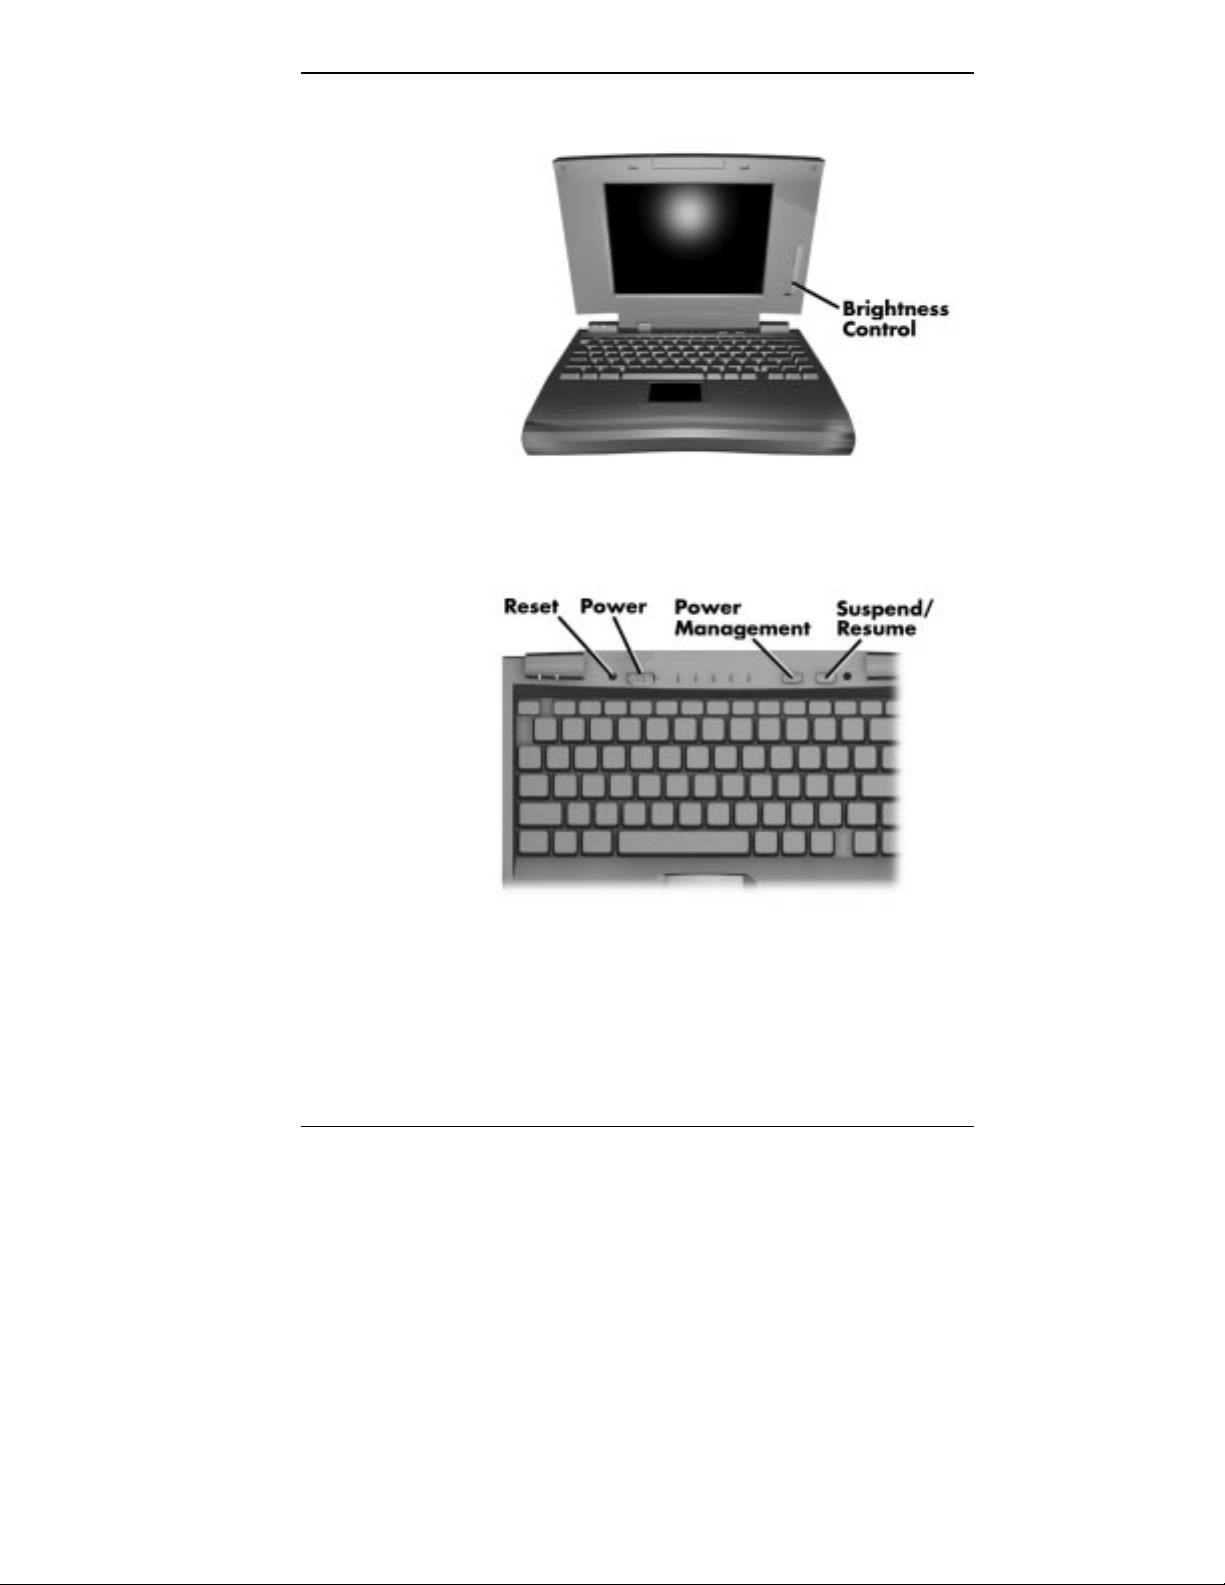
Take a look at the front of the NEC Versa 2205C.
LCD Screen
Your NEC Versa 2205C comes with a 9.5-inch color TFT
(Thin Film Transistor) active-matrix display.
Brightness Control
You can adjust the screen backlight brightness with the
control slide switch located on the side of the screen.
1-2 Getting to Know Your NEC Versa 2205C
Front of system
Page 11
Switches
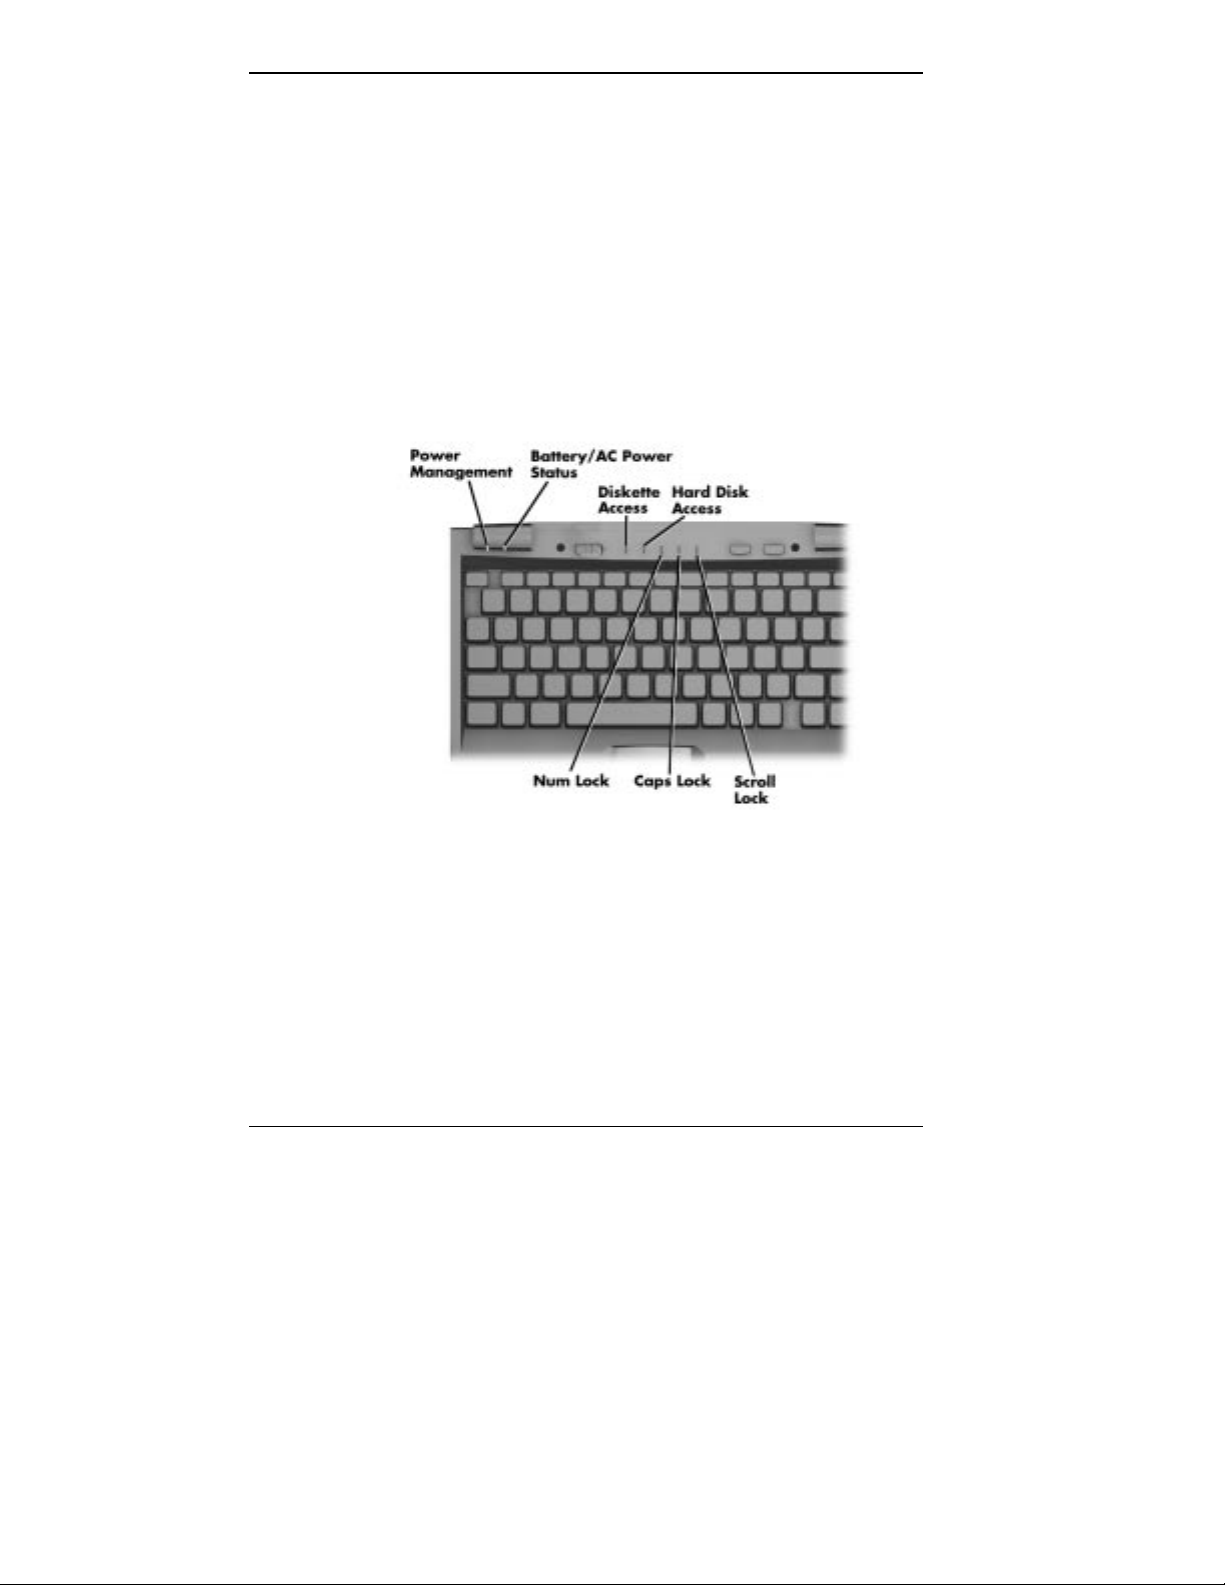
The NEC Versa 2205C has the following switches:
Reset — This recessed switch resets the system if the NEC
Versa does not respond to keyboard input or VersaGlide
movement. This is an alternative to powering down the
system and restarting it. (Use a non-metallic pointed object
to press the switch.)
Getting to Know Your NEC Versa 2205C 1-3
Page 12
LEDs
Power — Slide to turn on; slide right again to turn off.
Power Management — Press the switch down to turn
Power Management on; press again to turn it off.
Suspend/Resume — Press the switch down for Suspend
mode; press again to resume active mode.
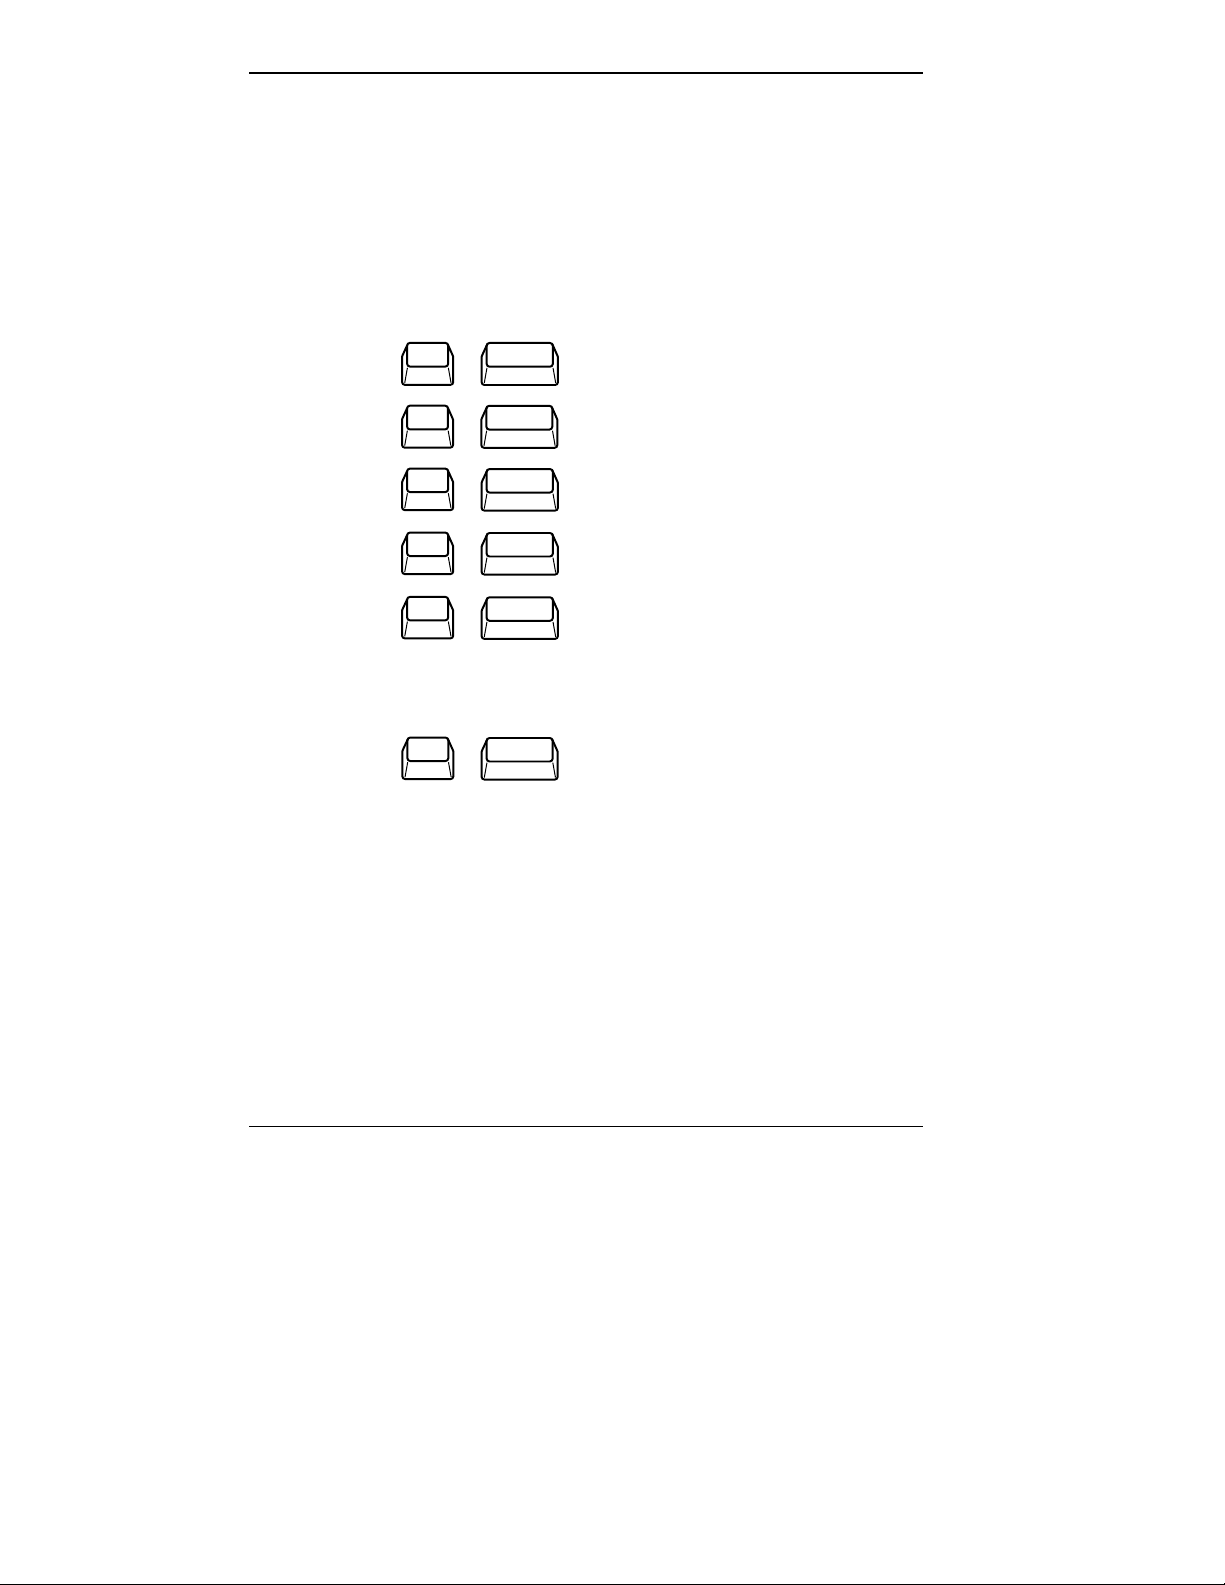
The NEC Versa 2205C has several LED lights to let you
know what’s happening on your system.
Power Management — Green when On; no color when
Off; blinking green when the system is in Suspend mode.
1-4 Getting to Know Your NEC Versa 2205C
Page 13

Battery/AC Power Status — There are several light indi-
cators.
Keyboard
BATTERY
STATUS
AC Powered Green
50% to 100% charged Green
25% to 49% charged Yellow
10% to 24% charged Red
0% to 9% charged Blinking Red
Charging Blinking Green
Powered off No color
LED
Diskette — Green when the NEC Versa 2205C is writing
data to or retrieving from the diskette in the diskette drive.
Hard Disk — Green when the NEC Versa is writing data to
or retrieving from the system’s hard disk.
Num Lock — Green is On; no color is Off.
Caps Lock — Green is On; no color is Off.
Scroll Lock — Green is On; no color is Off.
The NEC Versa 2205C keyboard is equipped with many
features, including:
■ Function keys
■ Windows 95 keys
■ Typewriter keys
■ Cursor control keys
■ Numeric keypad
■ Control keys.
Getting to Know Your NEC Versa 2205C 1-5
Page 14
Function keys — The Fn (Function) key activates the
functions printed in blue on keys having dual functions.
Press and hold the Fn key and the desired function key
simultaneously.
The applications that you run determine how these keys
function. See the user’s guides for the applications.
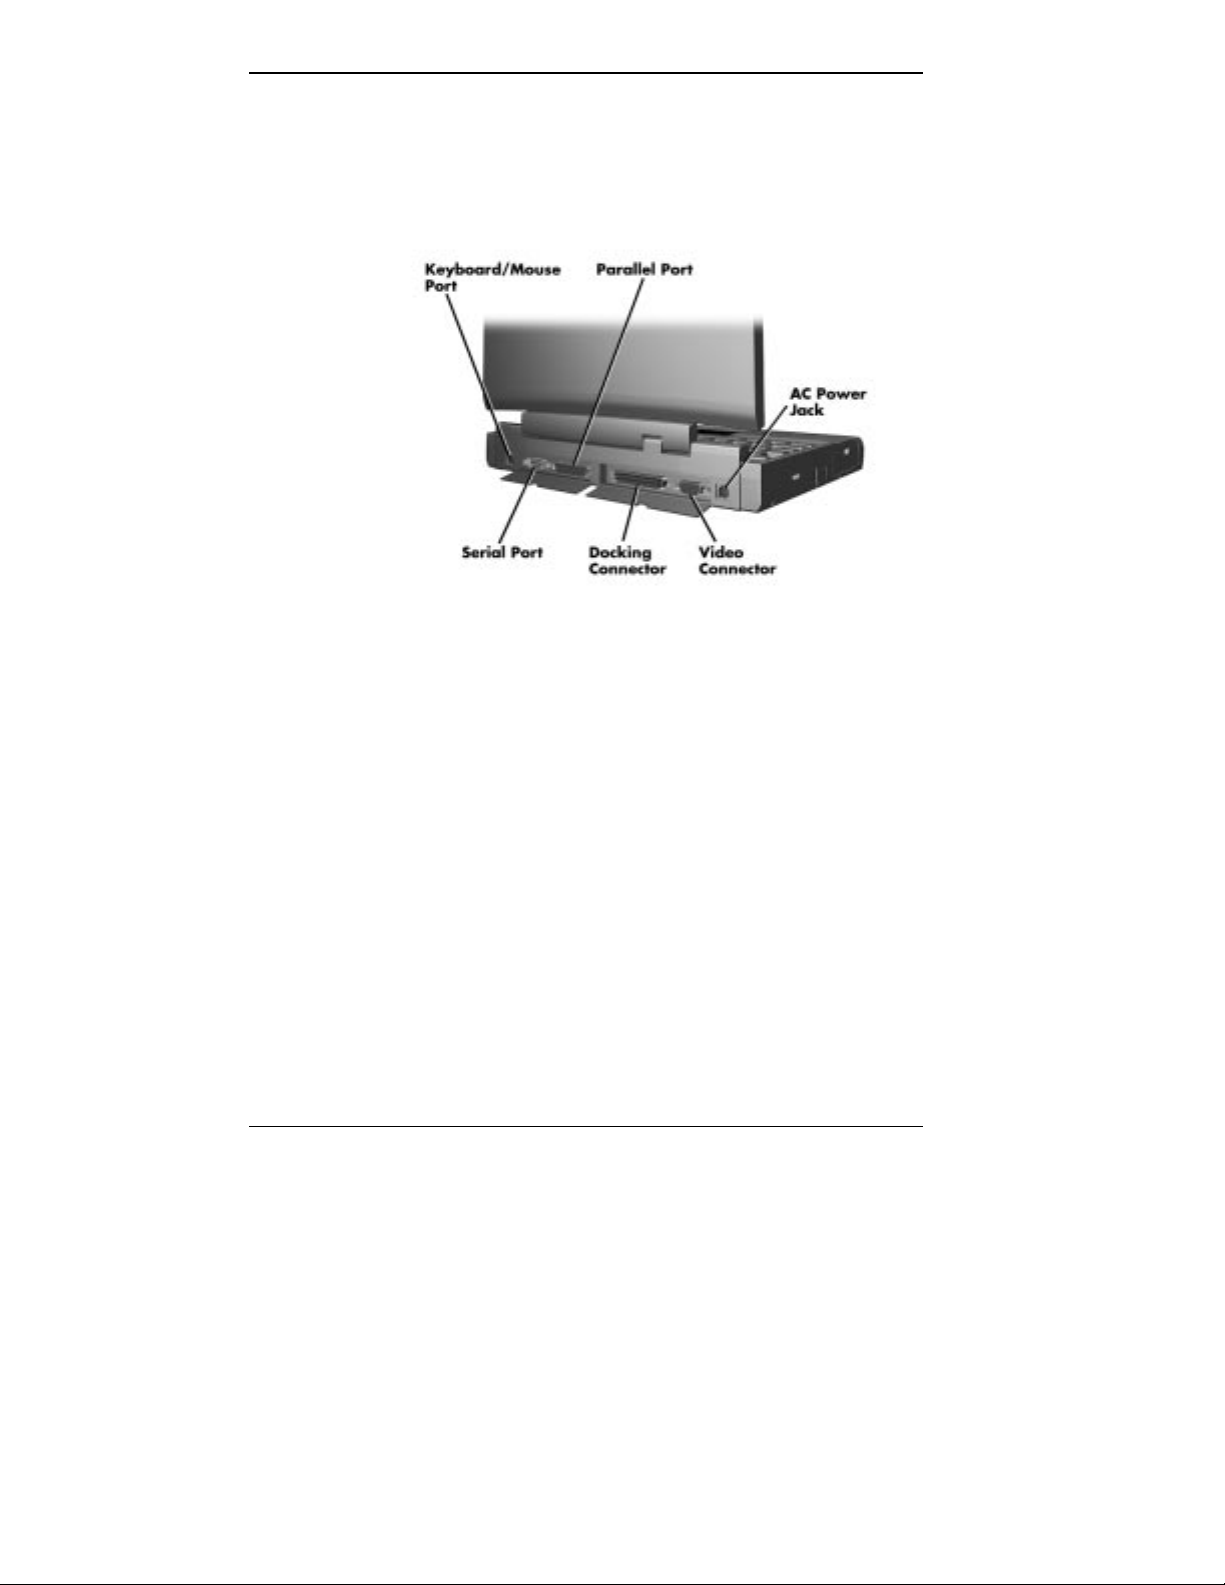
Function key combinations —
Fn
Fn
Fn
Fn
Fn
+
+
+
+
+
F2
Highlight
F3
LCD/CRT
F5
Backlight
F6
Speaker
F7
P/M Lev
Highlight On/Off
LCD/CRT/Both
Backlight On/Off
Speaker Volume On/Off
Power Management (P/M)
Longest Battery Life/Maximum
Performance/Personal Setup/
Off
Fn
F12
+
ScrLock
Windows 95 keys — Within Windows 95, you can use the
following two key combinations to facilitate your work.
Fn + x – Quick access to shortcut menus
Fn + z – Displays the Start menu
Typewriter keys — The typewriter keys (also called al-
phanumeric keys) are used almost exactly as on a typewriter. Those that behave differently do so when combined
with control keys or function keys.
1-6 Getting to Know Your NEC Versa 2205C
Scroll Lock On/Off
Page 15

Cursor control keys — Cursor control keys let you posi-
tion the cursor on the screen wherever you want. On the
screen, the cursor is a blinking underline, block, or pointer,
depending on the application. It indicates where the next
text type will be inserted.
Numeric keypad — Pressing the Num Lock on the key-
board activates the numeric keypad on your Veresa 2205C
when an external keyboard is not connected. The numeric
keys are printed in blue. The keypad lets you type numbers
and mathematical operands (+, -) as you would on a calculator. The keypad is ideal for entering long lists of numbers.
Control keys — Control keys include Ctrl, Alt, Fn, and
Shift. They are used in conjunction with other keys to
change their functions. To use these control keys, press and
hold the
press Ctrl c” means to hold down the Ctrl key and type
“
the letter
Ctrl key while pressing another key. For example,
c. How the key combination works depends on
the applications you are running. Other control keys include
Num Lock, Scroll Lock, Ins, Del, Home, End, PgUp,
and PgDn.
NEC VersaGlide
This is the mechanism by which you control the pointer on
the screen with your finger. It serves the same function as
the mouse or trackball on other systems. For more information on the VersaGlide, see “Learning to Use the Hardware.”
Getting to Know Your NEC Versa 2205C 1-7
Page 16
Rear
The rear of the system has ports for connecting your NEC
Versa 2205C to other devices, like a printer or an external
mouse, and power sources.
Keyboard and Mouse Port — Use the standard PS/2 port
to connect an external PS/2 mouse or an external PS/2 keyboard. If you want to connect both, use the optional NEC
Versa Y Adapter. (See the online NEC Versa 2205C Op-
tions Catalog.)
Serial Port — Use this to connect an external modem or a
serial printer. You can tell that it’s serial by looking at the
cable. A serial cable has a 9-pin connector.
Parallel Port — Use to connect a parallel printer, tape
drive, or CD-ROM reader. A parallel device has a 25-pin
cable connector.
Docking Connector — Use this connector to attach the
NEC Versa 2205C to a MiniDock 2000 or MediaDock
2000 to further expand your options.
1-8 Getting to Know Your NEC Versa 2205C
Rear of system
Page 17
Left Side
Video Port — Use this 15-pin connector port to attached
an external CRT monitor to your NEC Versa. You can run
both the LCD display and the external monitor simultaneously, or each alone.
AC Power Jack — Use the power jack to attach the NEC
Versa 2205C to an AC power source such as the AC
adapter or the optional car adapter.
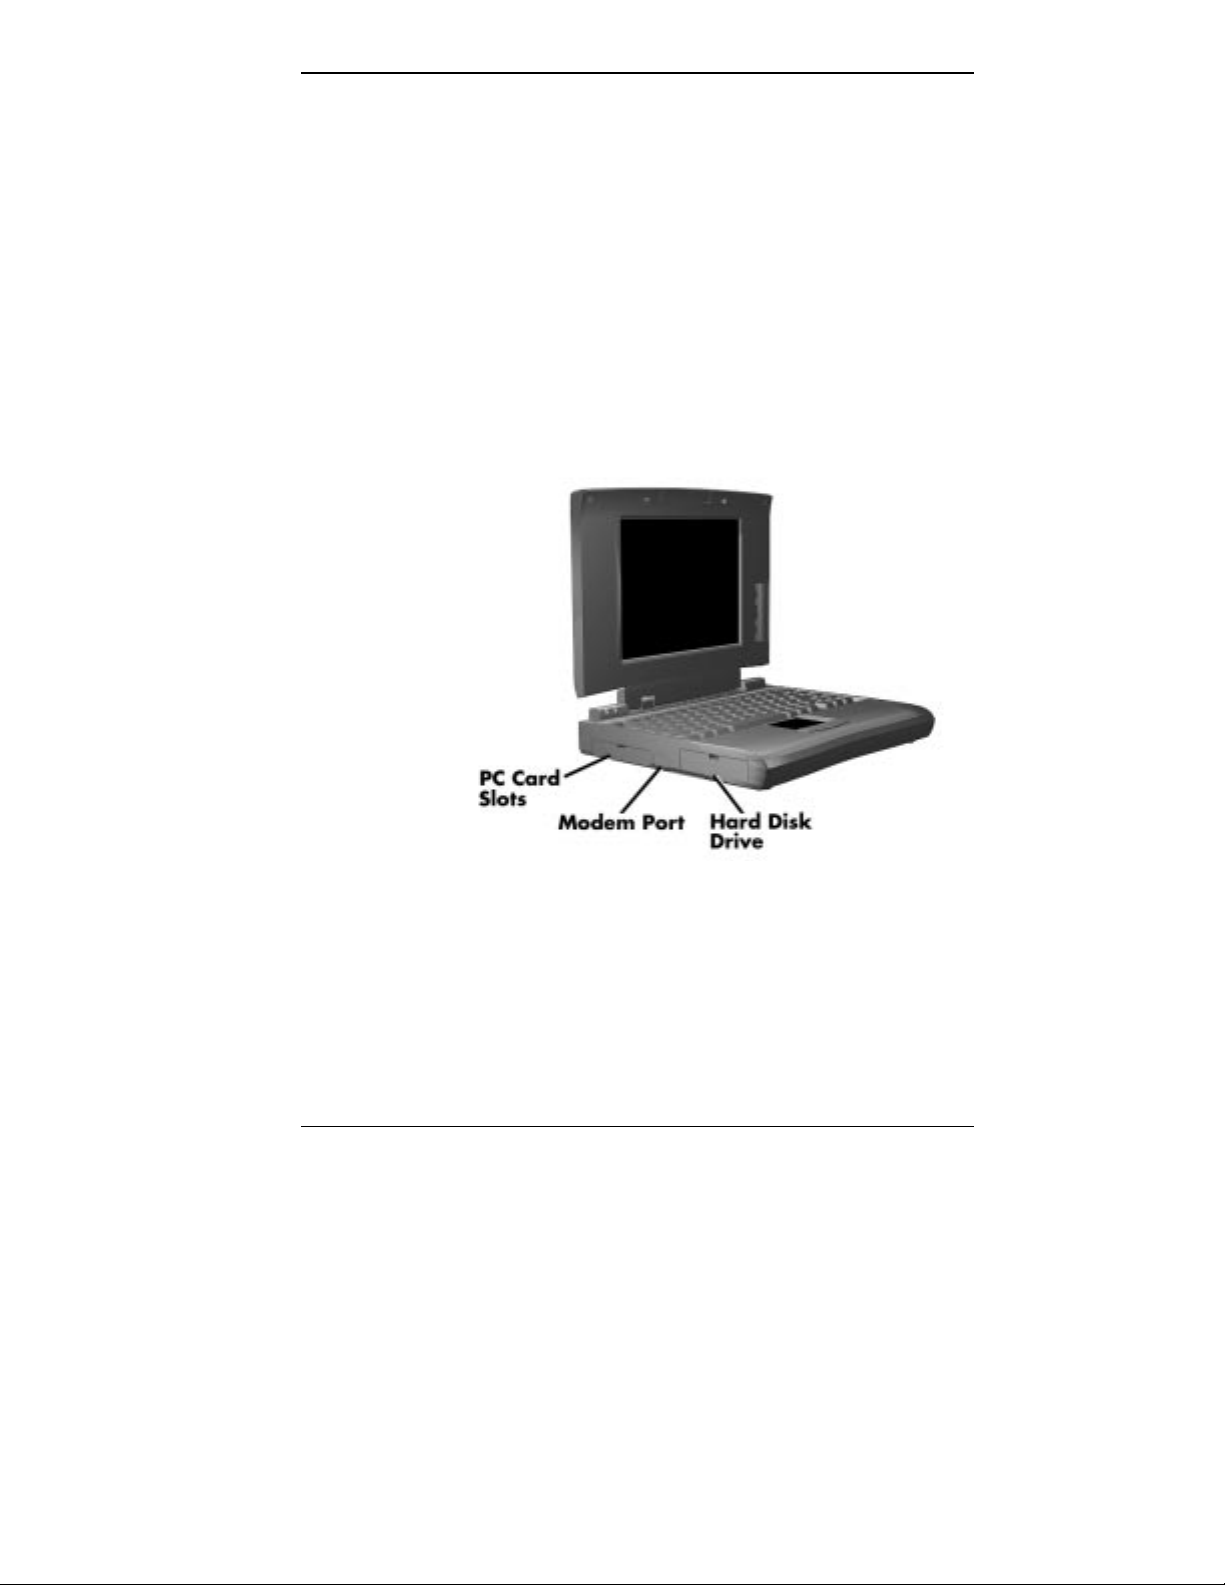
The left side of your NEC Versa 2205C has two slots for
PC cards, a port for an internal modem, and a hard disk
drive compartment.
Left side
PC Card Slots — PCMCIA is a standard interface for pe-
ripheral devices like fax/modems, local area network (LAN)
cards, storage cards, and pagers. A PC card is about the
size and shape of a credit card and inserts into one of the
two slots.
Getting to Know Your NEC Versa 2205C 1-9
Page 18
Right Side
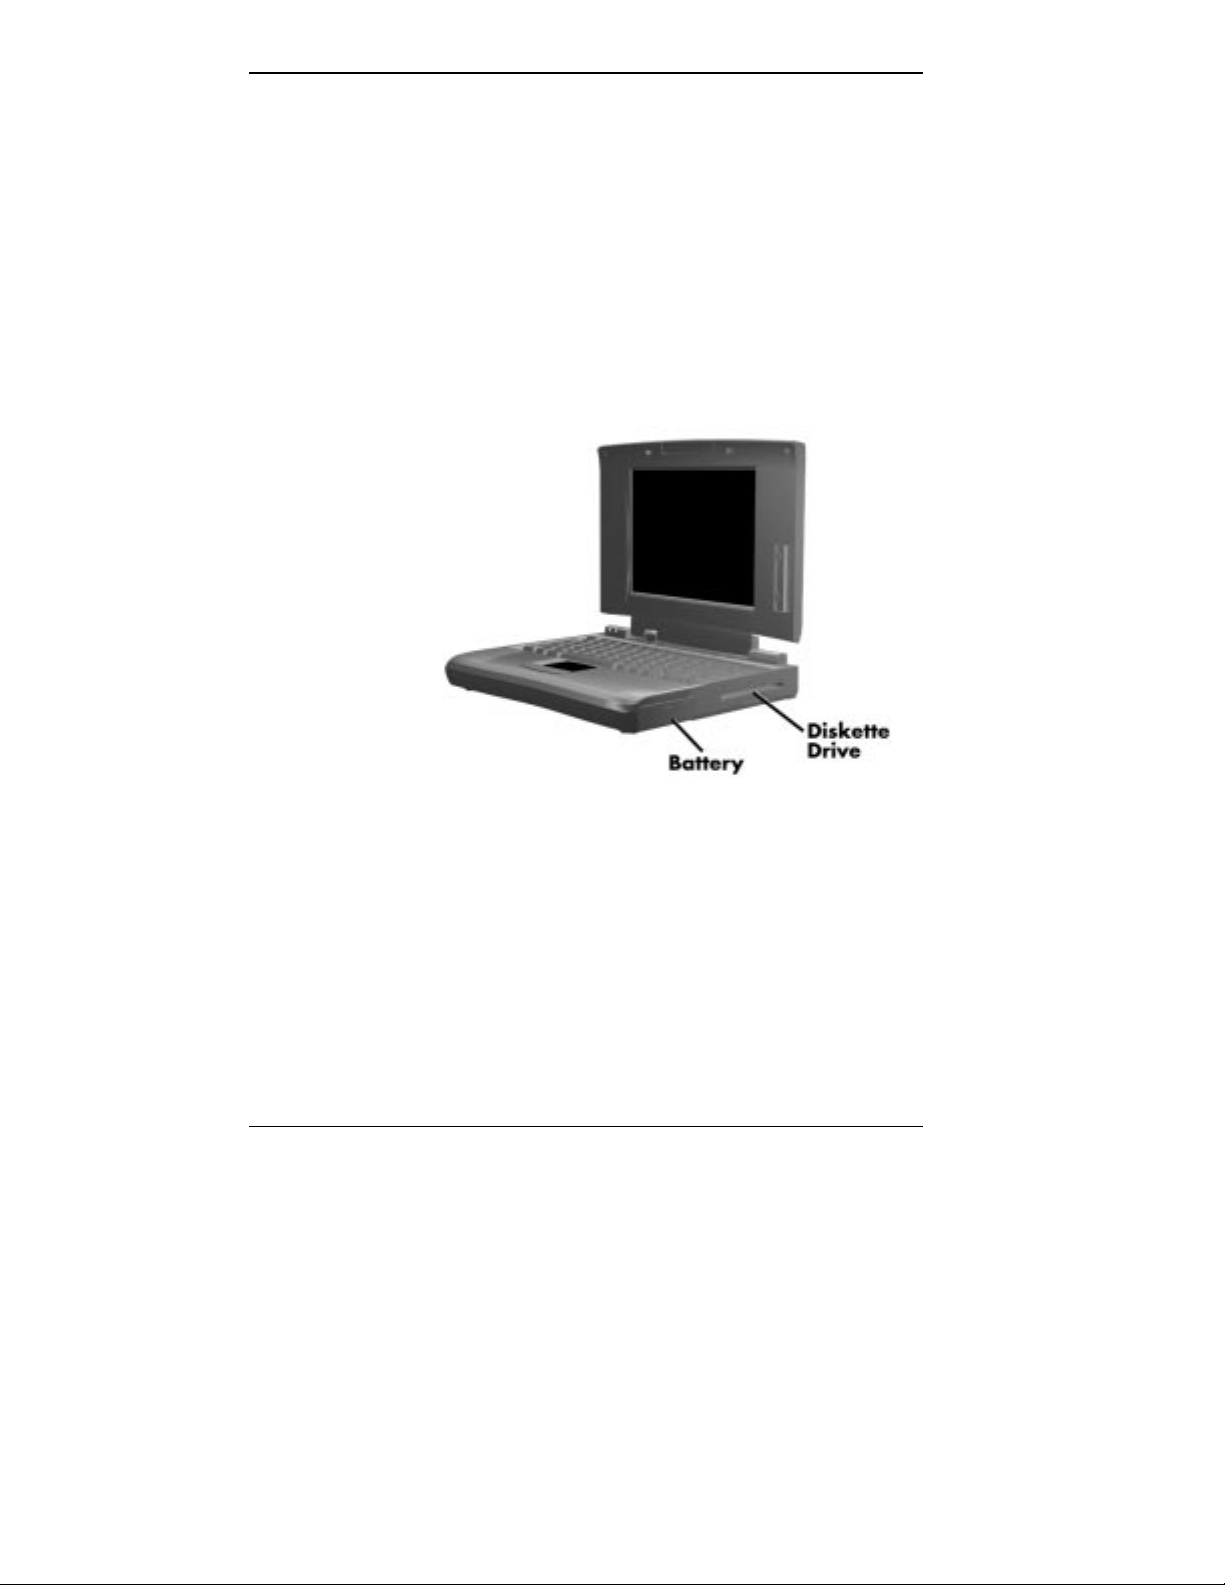
Modem Port — The NEC Versa 2205C has an internal
modem. Attach the modem cable that came with the system
to your system and a telephone line.
Hard Disk Drive — The NEC Versa 2205C hard disk drive
is removable. You can exchange hard disks in the NEC
Versa 2205C.
On the right side of the NEC Versa 2205C is a diskette
drive and a compartment for the removable battery.
Diskette Drive — You can save your files to diskette and
install software from diskette using the diskette drive, called
drive A.
Battery — On the front side is the removable Lithium Ion
(Li-Ion) battery.
1-10 Getting to Know Your NEC Versa 2205C
Right side
Page 19
Underside
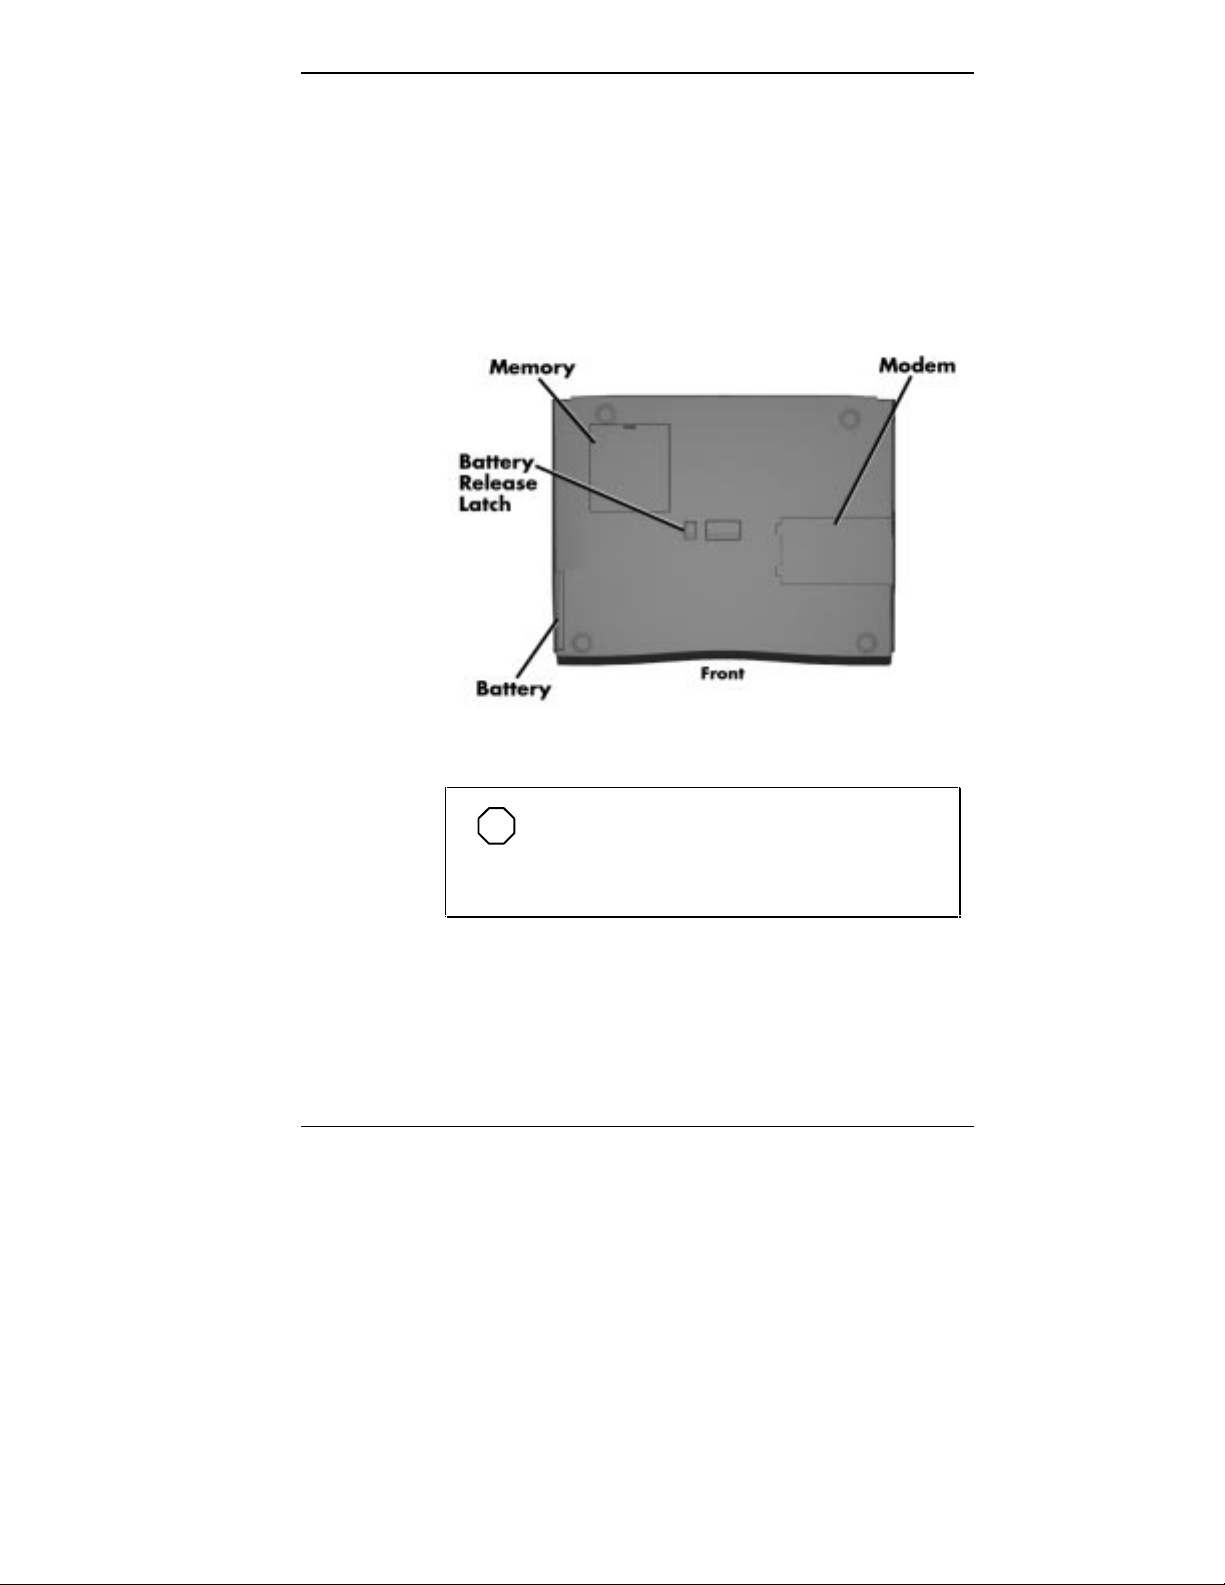
Every inch of the NEC Versa 2205C has a purpose — even
the underside! Turn your system upside down. You’ll see
three compartments. The small compartment is for expansion memory modules. Another compartment contains the
Lithium Ion (Li-Ion) battery. The battery release latch releases the battery. There is also a compartment for the internal data/fax modem.
Bottom of system
NOTE
There is a small compartment in the center of
the underside that contains the CMOS battery. You
should not attempt to remove this battery.
Getting to Know Your NEC Versa 2205C 1-11
Page 20

SYSTEM CARE
The NEC Versa 2205C is a durable, dependable system
built for extensive use and travel. Follow these guidelines to
maintain the condition and performance of your computer.
Precautions
Follow these precautions when using your NEC Versa
2205C and the AC adapter.
■ Avoid dropping or bumping the computer or the AC
■ Do not stack heavy objects on the computer.
■ Avoid moving the NEC Versa 2205C during system op-
■ When using the AC adapter, make sure the power source
adapter.
eration, especially while the hard disk or diskette drive is
being accessed.
falls within the system’s compatible range of 100–240
volts AC. Never use the AC adapter if the voltage falls
outside of this range. (Watch for this when traveling to
foreign countries.)
■ Turn computer power off before attaching or removing
non-plug and play devices.
■ Avoid using the computer or AC adapter for extended
periods in direct sunlight.
■ Do not use the system in humid or dusty environments.
■ Avoid exposing the NEC Versa 2205C or AC adapter to
extreme changes in temperature or humidity. If it is unavoidable, allow your NEC Versa to adjust to room
temperature before using.
■ When cleaning the system, use a soft, clean, dry cloth.
Avoid wiping the display surface with abrasive material,
including a rough cloth.
1-12 Getting to Know Your NEC Versa 2205C
Page 21

■ The VersaGlide has a sealed surface that resists normal
dust and moisture and should require nothing more than
an occasional cleaning. To clean the VersaGlide, simply
wipe it off with a clean cloth. For stubborn grime, use a
lightly moistened (with water) cloth.
Storage Requirements
Store the computer and AC adapter in an environment that
meets the following conditions:
■ Maintain storage temperatures between –4°F and 104°F
(–20°C and 40°C).
■ Keep the storage area free from vibration and magnetic
fields.
■ Keep the system and its components away from organic
solvents or corrosive gases.
■ Avoid leaving the system and its components in direct
sunlight or near heat sources.
Routine Cleaning
Clean or dust your system as follows.
■ LCD screen — Carefully wipe the LCD screen with a
soft cloth or a screen wipe designed for that purpose.
Special screen wipes are available through your local
computer dealer.
■ System plastic — If the NEC Versa 2205C plastic gets
dirty, carefully wipe it with a slightly damp, almost dry
cloth. Be extremely careful not to drip any moisture onto
or into the NEC Versa 2205C. Never use harsh solutions
or spray chemical cleaning products on the NEC Versa
2205C.
Getting to Know Your NEC Versa 2205C 1-13
Page 22
!
If the environmental temperature of the NEC Versa
suddenly drops (for example, when you move the
system from a warm place to a cold place), vapor
condenses inside the system. Turning on the system
under this condition can cause damage to the
internal components. Wait before turning the
system on so that the internal temperature of the
system can equalize with the cooler environment
and any moisture can dry.
CAUTION
■ VersaGlide — Wipe the pad surface with a clean cloth.
For stubborn grime, use a lightly moistened (with water)
cloth.
!
Never use household cleaning solvents that contain
caustic materials. The use of these cleaners may
cause cracking or discoloration of the plastic surface.
CAUTION
1-14 Getting to Know Your NEC Versa 2205C
Page 23

Learning to Use
2
POWERING YOUR NEC VERSA
the Hardware
Like any computer, the NEC Versa 2205C is made up of
the hardware — the physical unit and its components —
and the software — the programs that run on the computer.
This chapter discusses the hardware. The topics include:
■ Powering the system
■ Keyboard
■ NEC VersaGlide
■ Options and PC Card Expansion
Since the NEC Versa 2205C is a truly portable computer,
you can use it practically anywhere with any one of a number of power sources, including:
■ the AC adapter connected to an electrical wall outlet
(using AC power)
AC Adapter
■ the battery pack
■ the optional DC adapter connected to a car cigarette
lighter.
Use the AC adapter that came with your NEC Versa 2205C
to run your computer with AC (alternating current) power,
or to recharge the battery pack. Use the AC adapter whenever a wall outlet is nearby.
Learning to Use the Hardware 2-1
Page 24
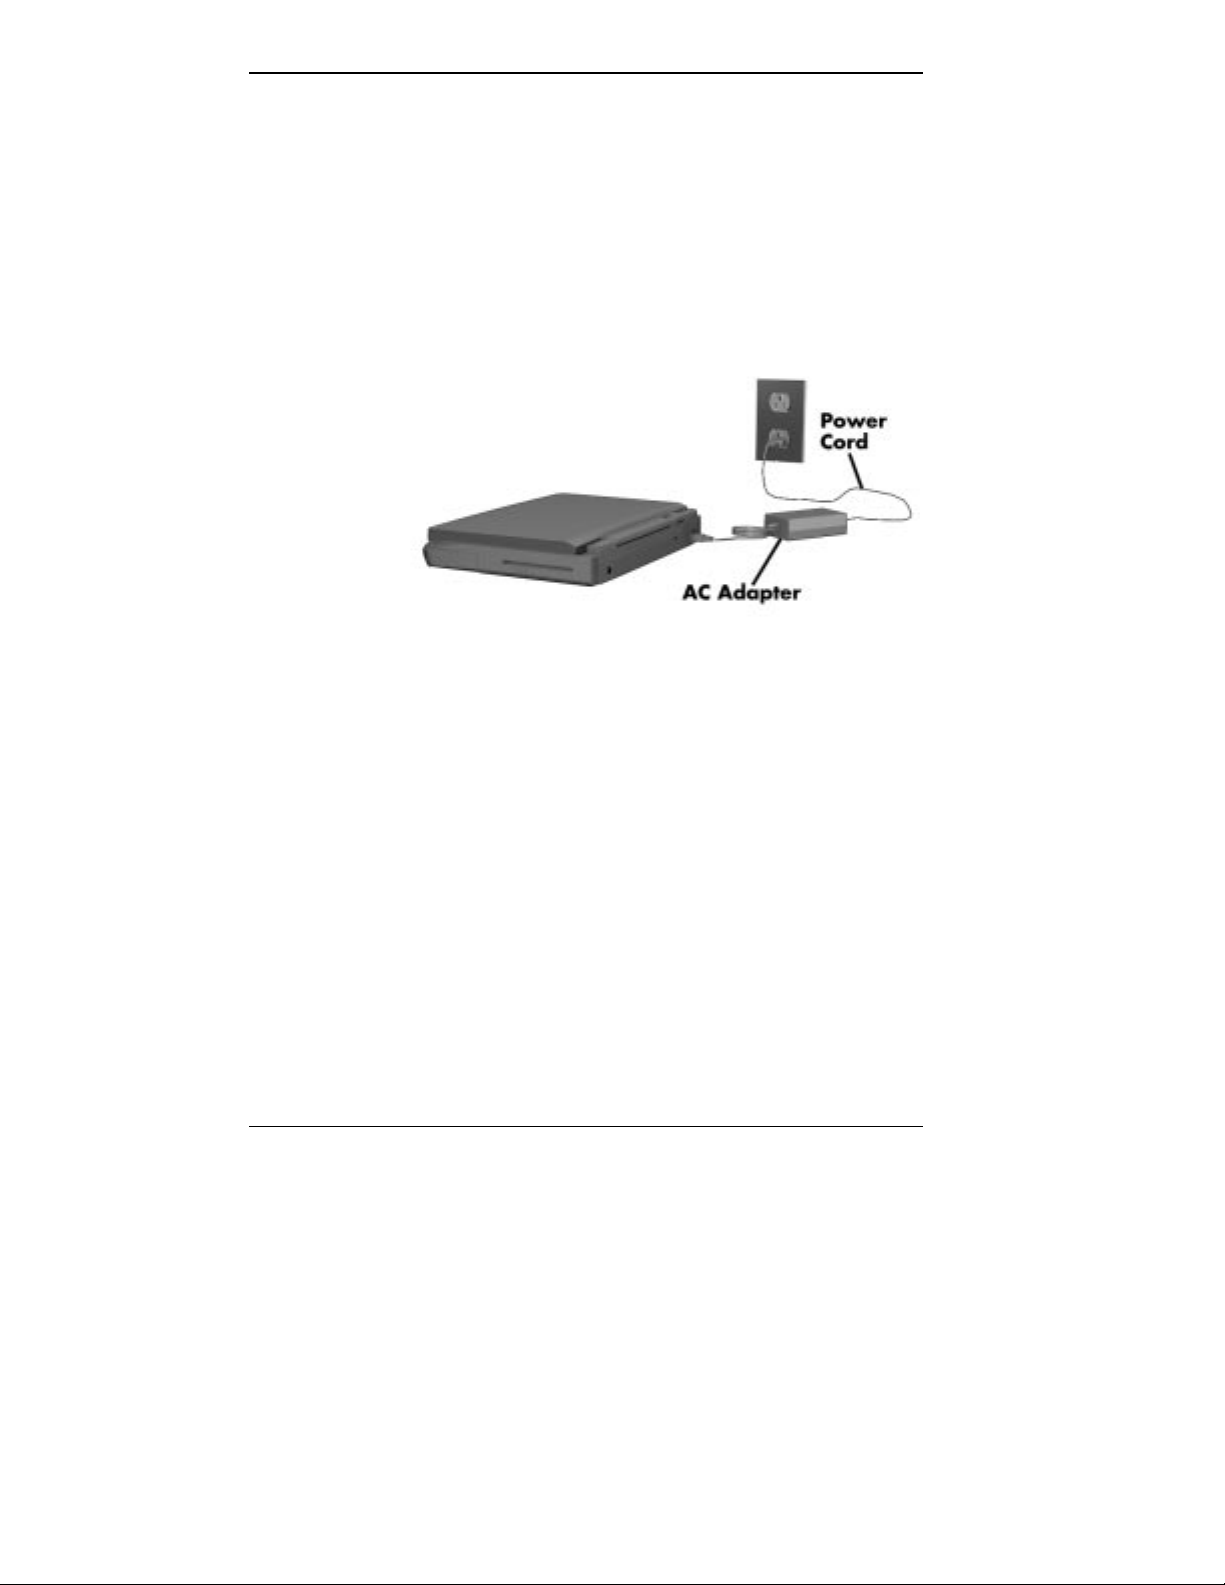
Keep the adapter connected whenever possible. The AC
adapter keeps the battery charged while you use the system
and when the NEC Versa 2205C is powered off.
Here's how you connect the AC adapter:
1. Connect the AC adapter to your NEC Versa 2205C.
2. Connect the end of the power cable to the AC adapter.
3. Connect the other end of the power cable to a 100- or
240-volt wall outlet.
Battery Pack
The NEC Versa 2205C comes with a rechargeable Lithium
Ion (Li-Ion) battery. With it, you can run your system without a wall outlet for up to four hours with Power Management or two hours without Power Management. It's easy to
install and remove.
2-2 Learning to Use the Hardware
Connecting the AC adapter
Page 25

You can keep track of the battery's status through the LED
on the front of the system or with the battery gauge in Windows 95. Both let you know how much battery power you
have left.
When your battery power is getting low, you can replace
the battery with a charged Li-Ion battery while your system
is off or in Suspend mode or leave the original battery in the
system and simply plug in your NEC Versa 2205C AC
adapter into a wall outlet. The battery recharges over a period of two hours while in the NEC Versa 2205C and the
system is powered off. You can recharge the battery in six
to seven hours while the system is on.
Optionally, you can buy a battery charger to quickly charge
your battery. See the online NEC Versa 2205C Options
Catalog.
Removing the Battery Pack
Use the following procedure to remove the battery pack.
1. Power off the NEC Versa 2200 and turn it over.
2. With the front of the system facing you, press on the
battery compartment cover and slide it upward to remove it.
3. Locate the battery release latch on the bottom of the
system. Slide the latch in the direction of the arrow. The
battery pack pops out slightly.
4. Gently pull out the battery pack.
See the online NEC Versa 2205C InfoCenter Basics for a
demonstration of this procedure.
Learning to Use the Hardware 2-3
Page 26

KEYBOARD
!
To prevent accidental battery ignition or explosion,
adhere to the following:
■ Keep the battery away from extreme heat.
■ Keep metal objects away from the battery termi -
nals to prevent causing a short circuit.
■ Make sure the battery is properly installed in the
battery bay.
■ Read the precautions printed on the battery and
in the online
WARNING
Basics
.
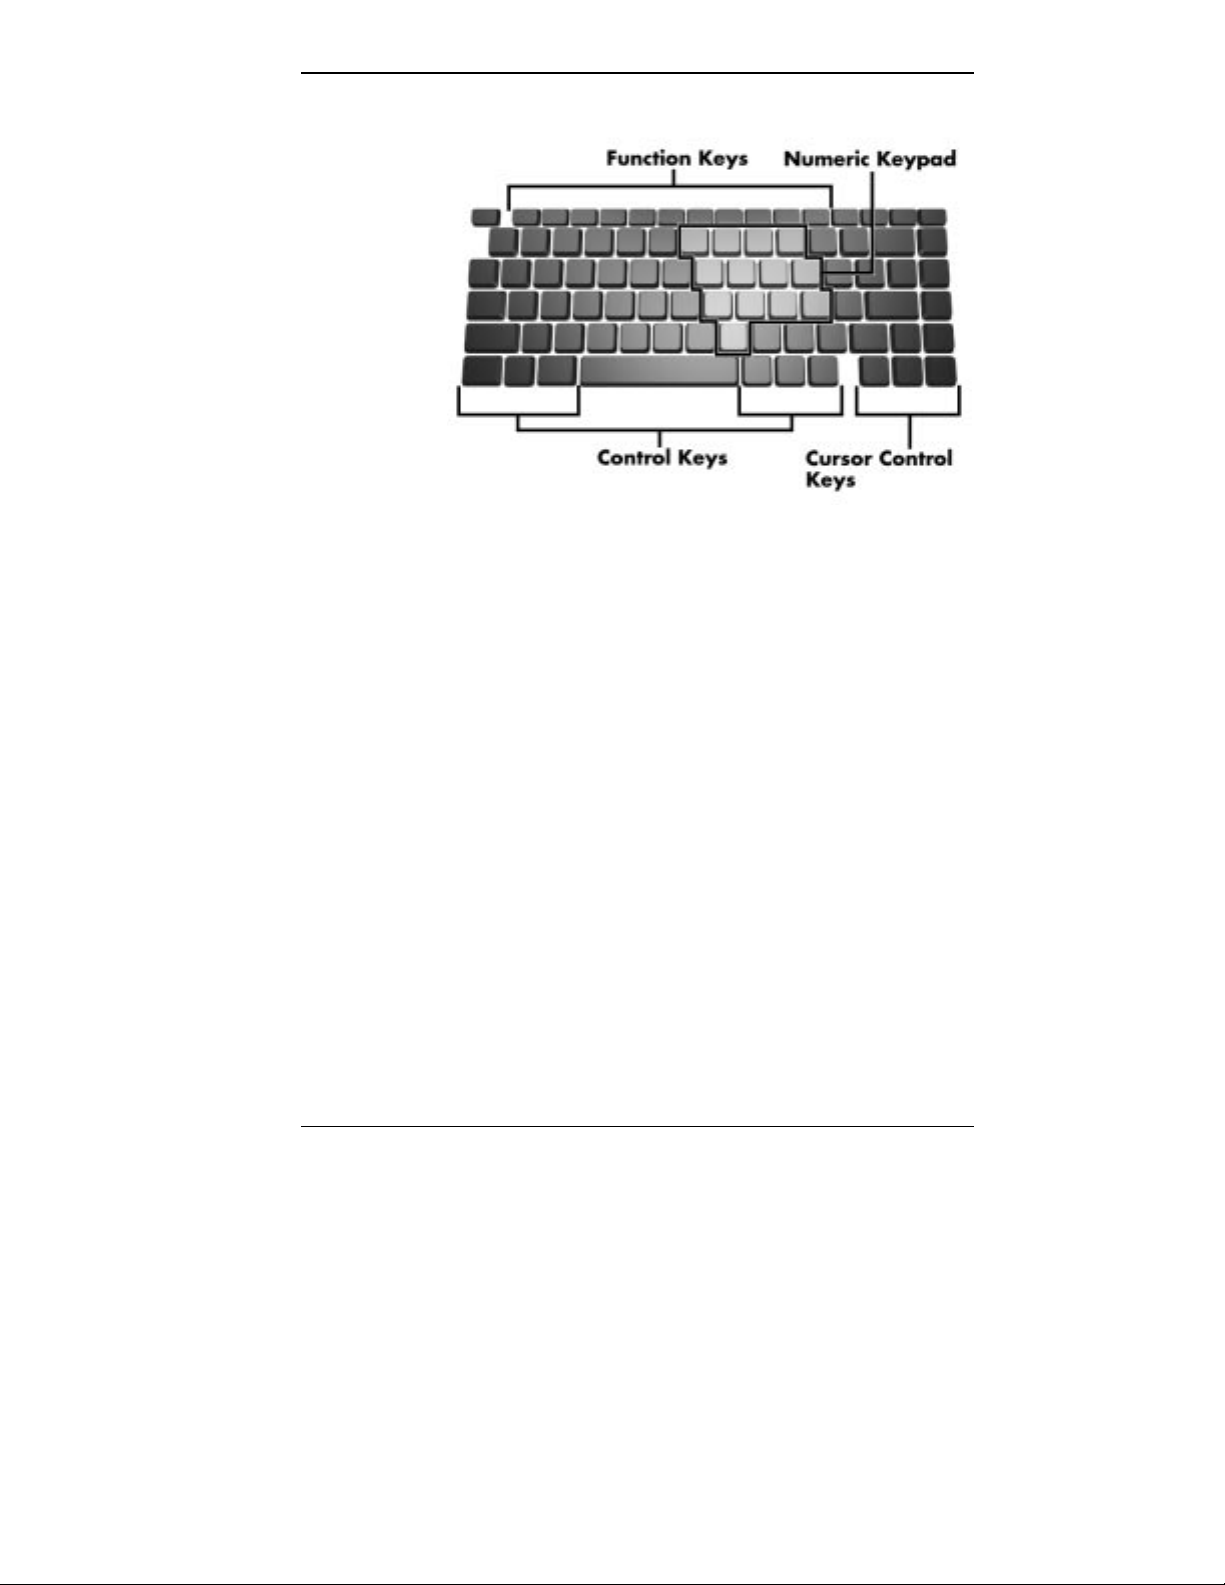
The NEC Versa 2205C keyboard is equipped with many
features. They include the following.
■ Function keys
■ Cursor control keys
■ Typewriter keys
■ Numeric keypad
■ Control keys
2-4 Learning to Use the Hardware
Page 27
Keyboard
Function keys — There are 12 function keys, F1 through
F12. The Fn key activates key functions printed in blue on
keys having dual
functions.
Cursor Control keys — Cursor control keys let you posi-
tion the cursor on the screen where you want. On the screen,
the cursor is a blinking underline or block, depending on the
application. It indicates where the next text typed is inserted.
Typewriter keys — The typewriter keys (also called al-
phanumeric keys) are used to enter text and characters.
Those keys that have blue printing on them behave differently when combined with control keys or Fn keys.
Learning to Use the Hardware 2-5
Page 28

Numeric Keypad — Pressing Num Lock on the keyboard
activates the numeric keypad (when an external keyboard is
not connected). The keypad lets you type numbers and
mathematical operands (+, –) as you would on a calculator.
The keypad is ideal for entering long lists of numbers.
When you press
normal functions as typewriter keys.
Control keys — Ctrl, Alt, Fn, Ins, and Shift are controls
that are used in conjunction with other keys to change their
functions. To use these control keys, press and hold the
key while pressing another key. For example, “press Ctrl c”
means to hold down the
the key combination works depends on the applications you
are running.
THE NEC VERSAGLIDE
The NEC VersaGlide is an easy way to control the screen
pointer (cursor) with your finger. Simply move your finger
across the NEC VersaGlide touchpad and the cursor follows. You select an object on the screen in either of two
ways:
■ Double click the left button (this is the default primary
button)
■ Double tap your finger on the VersaGlide touchpad.
Num Lock again, the keys revert to their
Ctrl
Ctrl key and type the letter c. How
Try both ways and decide which you prefer. You can also
reverse the primary (left) and secondary (right) buttons.
For details on using the NEC VersaGlide, see the online
NEC Versa 2205C InfoCenter Basics.
2-6 Learning to Use the Hardware
Page 29

Personalized Modes
The NEC VersaGlide has four personalized modes that
make finding the cursor on your screen quick and easy.
Click on the key sequence you’ve defined in NEC Mouse
Shortcuts, and the cursor jumps to the spot on the screen
you have preselected. See the Windows 95 Settings, Control
Panel, Mouse.
Pointer Size, Speed
You can change the size, color, and speed of the pointer
controlled by the NEC VersaGlide. See Settings, Control
Panel, Mouse.
Ergonomics
Follow these basic ergonomic tips while working:
■ Use a light touch on the VersaGlide surface.
■ Set up your NEC Versa 2205C with your keyboard and
VersaGlide at a comfortable height. Keep your forearms
parallel to the floor. Your wrists should be relaxed and
straight.
■ While using the keyboard and VersaGlide, keep your
shoulders and arms as relaxed as possible.
■ Take regular breaks from the computer to rest your eyes,
and perform stretching exercises to relax your fingers,
hand, wrists, forearms, and shoulders.
See Appendix A, “Setting Up a Healthy Work Environment,” for more information.
OPTIONS AND PC CARD EXPANSION
You can add a number of options and connect several external devices and PC cards to your NEC Versa 2205C.
You can get details on how to obtain these options from the
online NEC Versa 2205C Options Catalog.
Learning to Use the Hardware 2-7
Page 30
Hard Disk
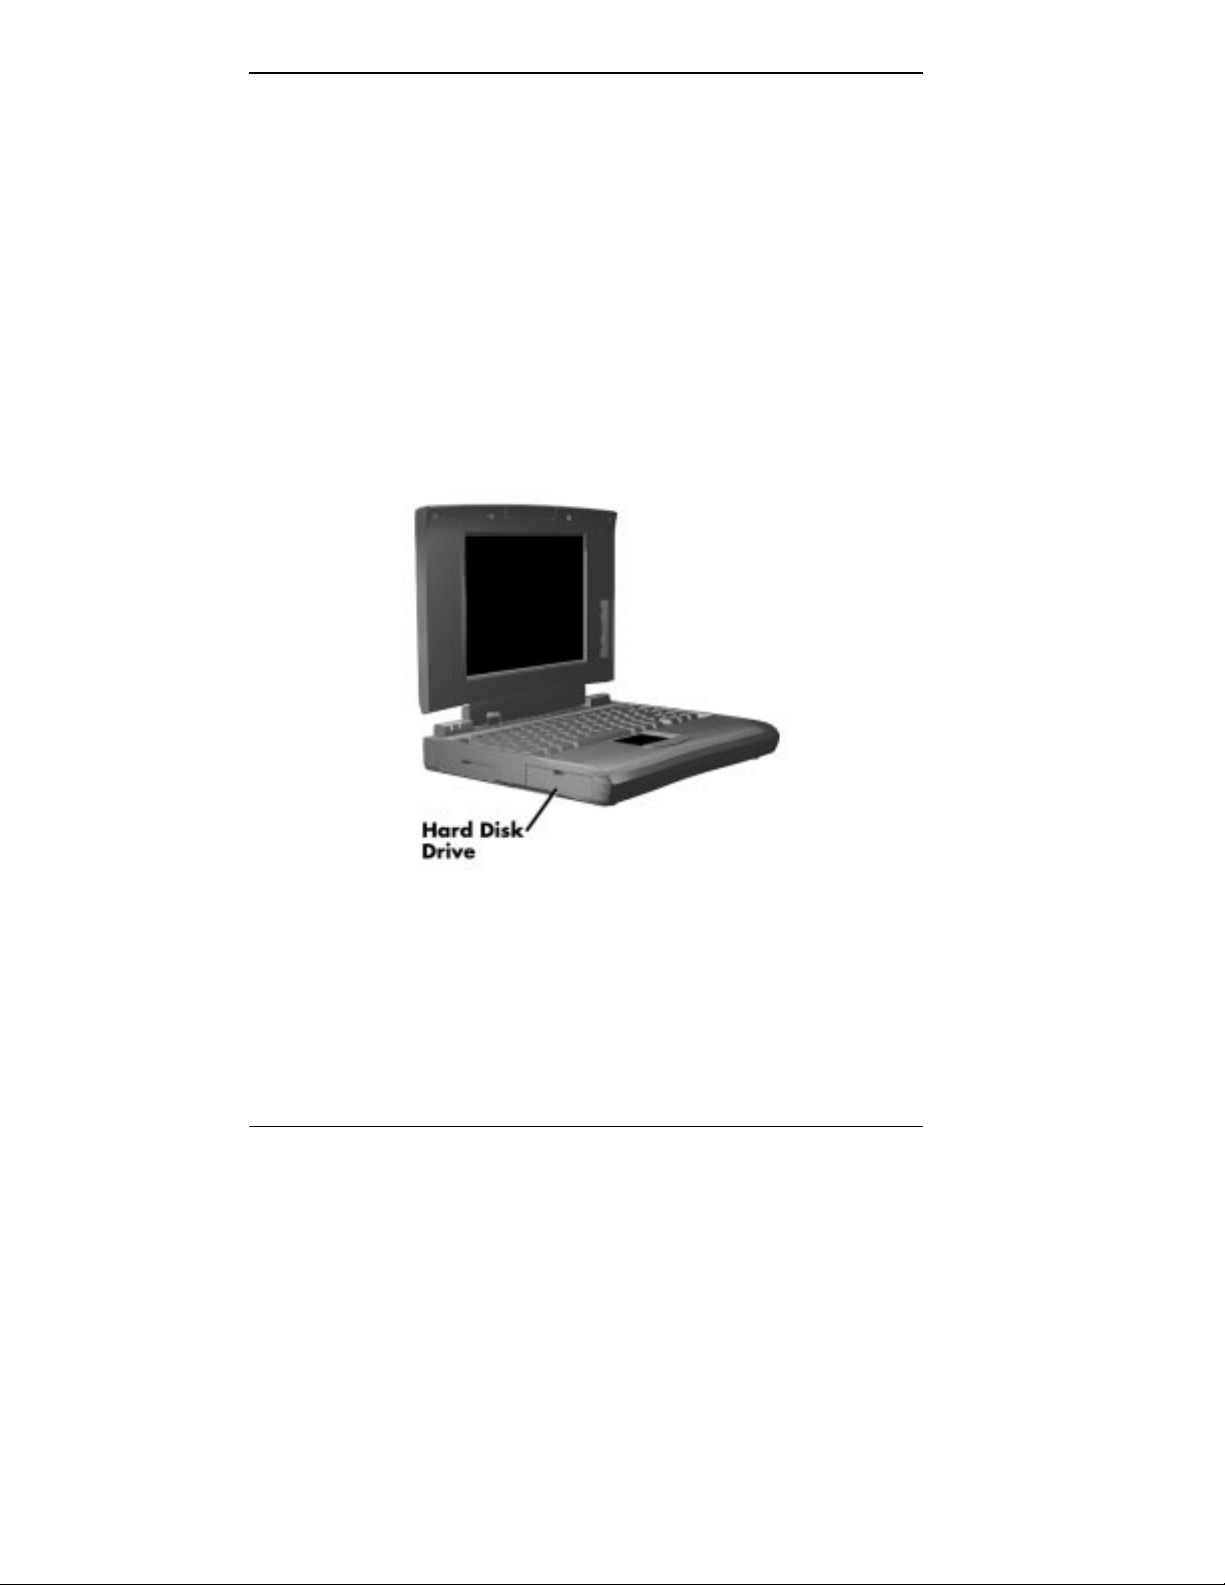
You can increase the system’s storage capacity by replacing
the standard hard disk, or you can have two hard drives for
alternate usage (for example, one for office use and one for
home use). Here is how to replace the hard disk:
1. Check that the NEC Versa 2205C power is off.
2. Open the hard disk compartment cover, swing the drive
handle down, and pull the drive out of the compartment.
3. Swing the handle on the new drive down. Install the
drive, sliding it into the compartment. Press firmly to
make sure the drive is fully inserted. Swing the drive
handle up.
4. Close the disk compartment cover. Turn on the NEC
Versa 2205C.
5. Press F1 to run Auto Setup to check the new configura-
tion. Auto Setup recognizes the new drive if it’s a different size from the first drive. Refer to “Auto Setup
Utility” in Chapter 3 of this guide or to the online Ad-
vanced Topics for details on using Auto Setup.
2-8 Learning to Use the Hardware
Page 31
Memory Expansion
Your NEC Versa 2205C comes standard with 8 megabytes
(MB) of random access memory (RAM). You can increase
system memory to a maximum of 40 MB by installing any
one or combination of two of the following memory modules in the system.
■ 4-MB memory card
■ 8-MB memory card
■ 16-MB memory card
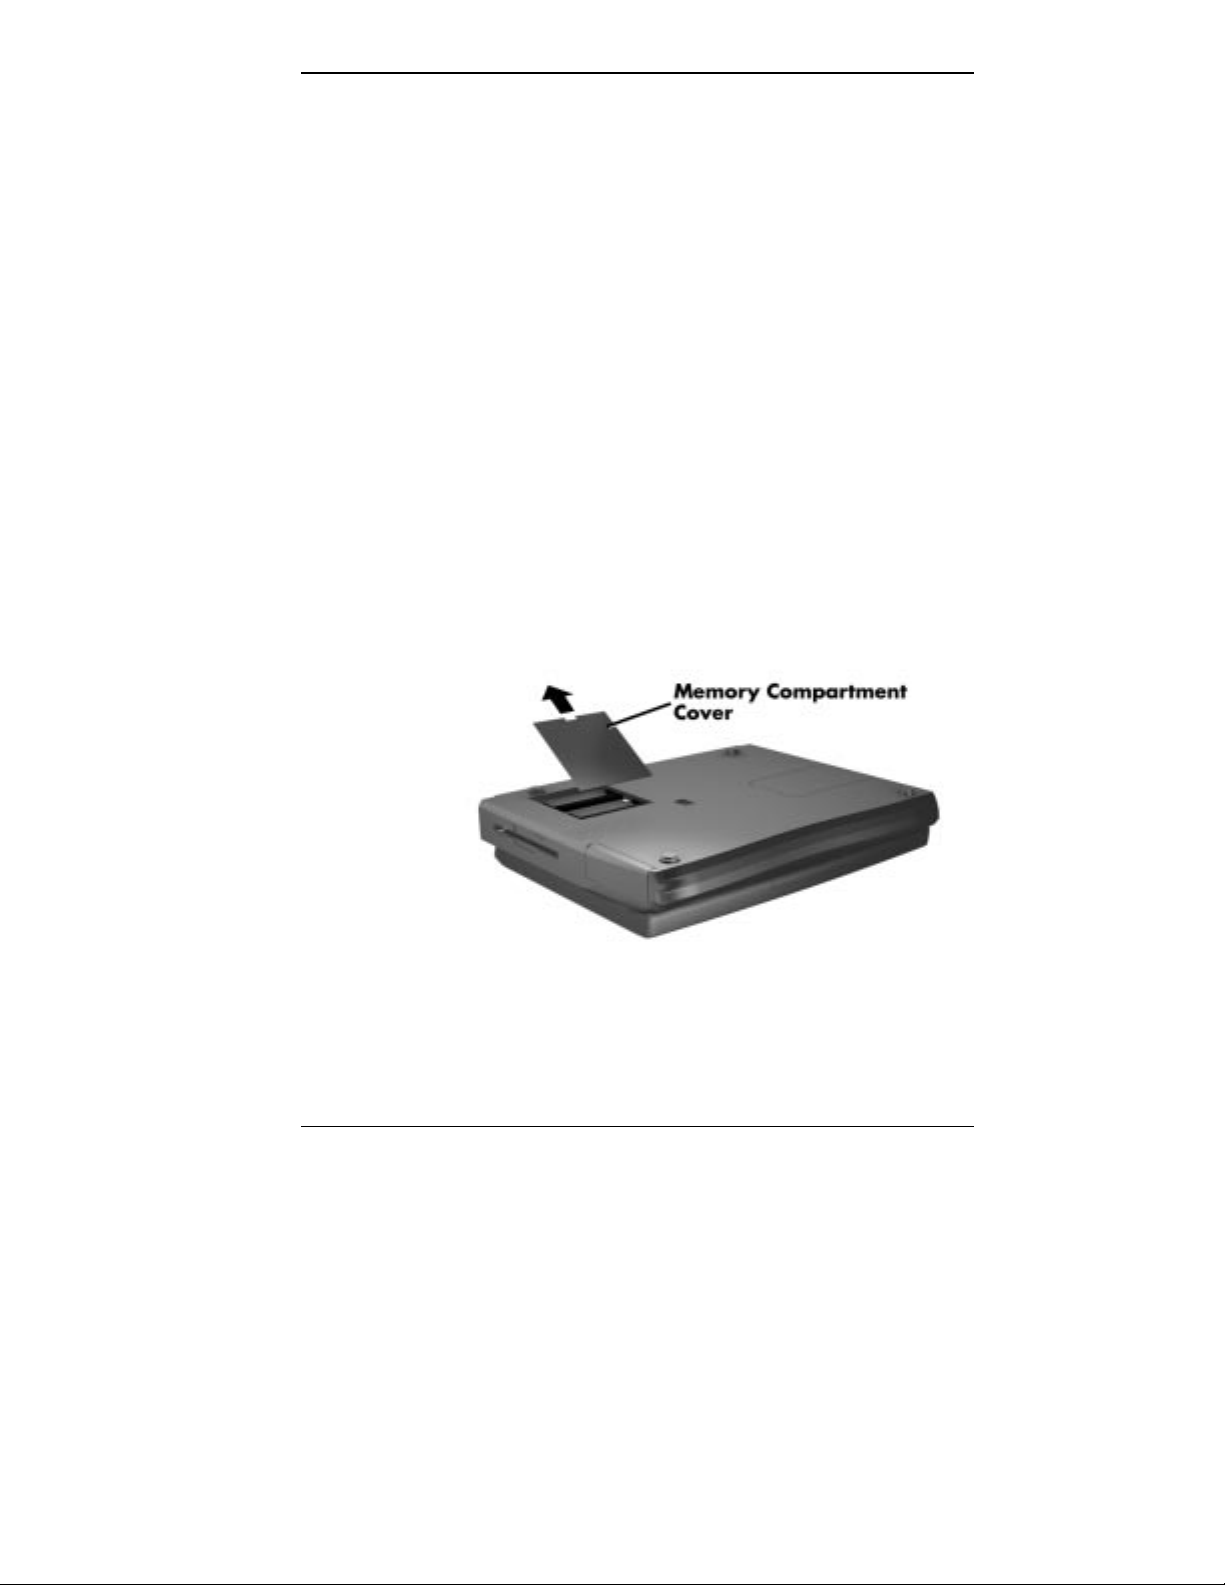
Use the following steps to install a memory card.
1. Make sure the system power is off.
2. Turn the NEC Versa 2205C upside down.
3. Remove the memory compartment cover from the sys-
tem by releasing the small latch and lifting the cover off
the system
Removing cover
Learning to Use the Hardware 2-9
Page 32
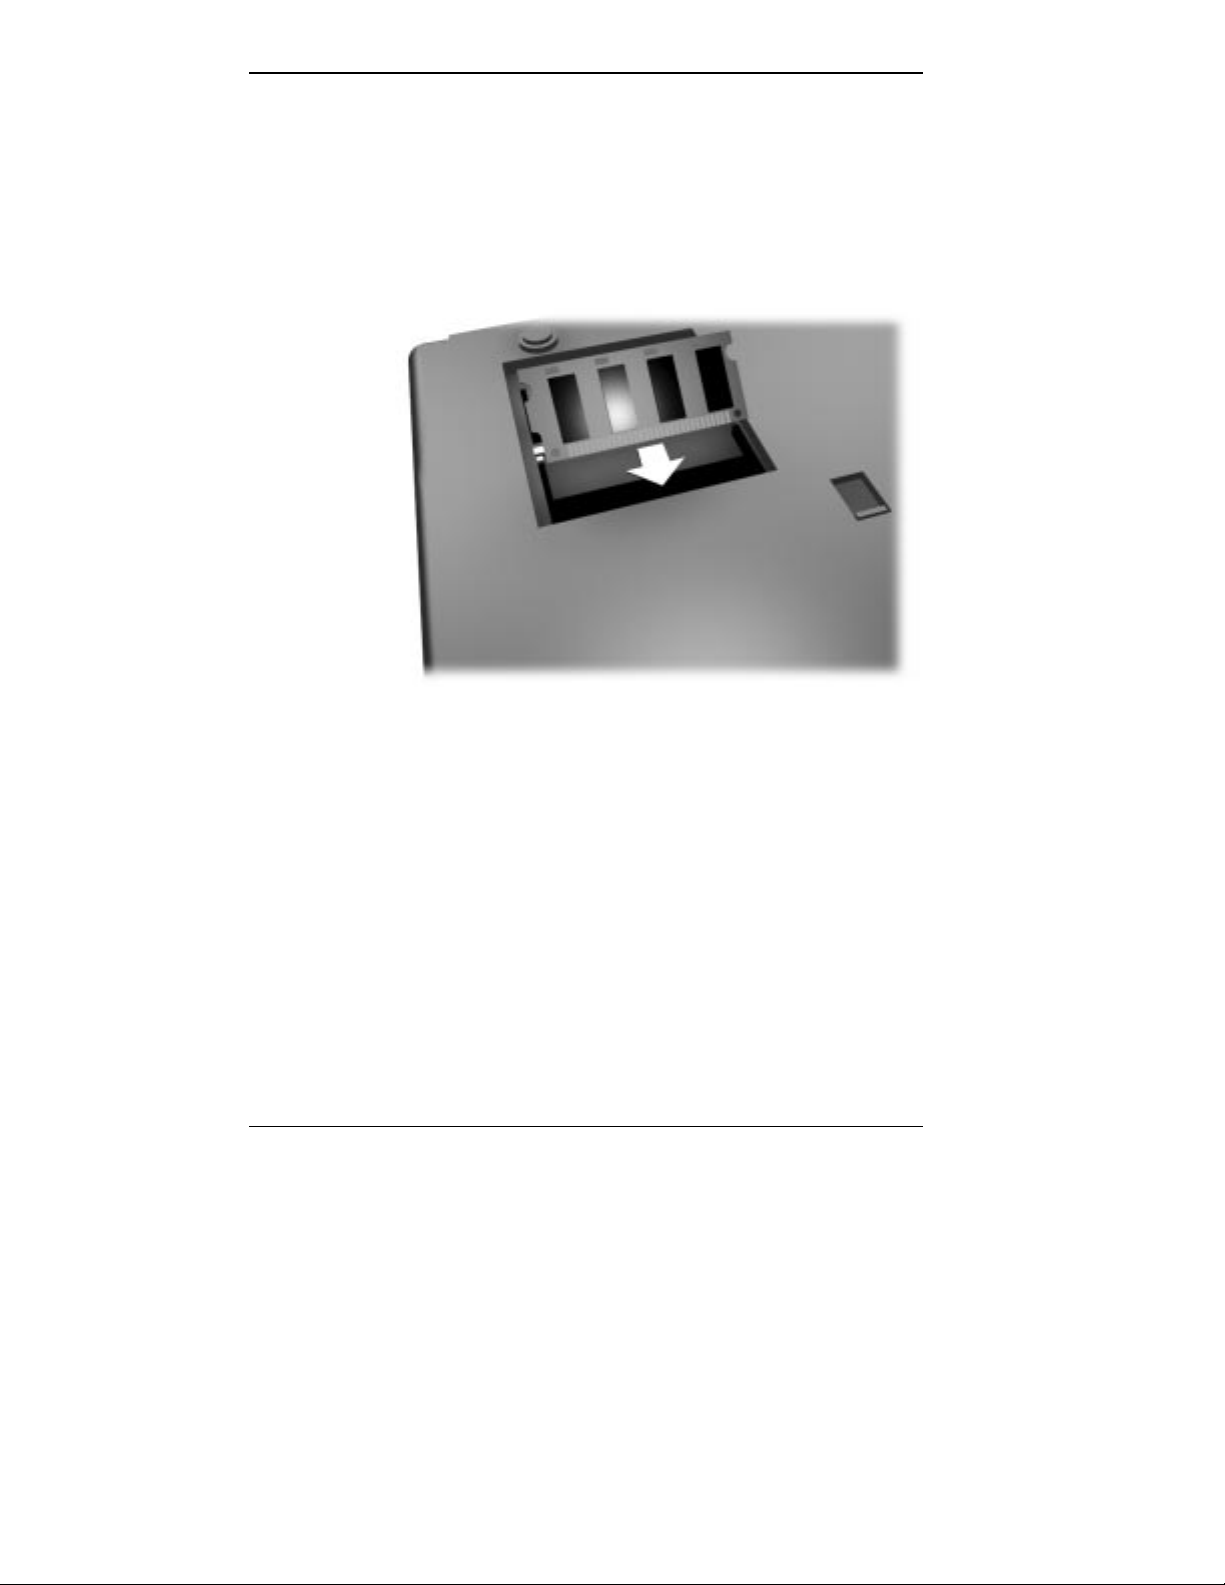
4. Install the memory card as follows.
■ Align the memory card connector with the connectors
in the system. (The card fits in either slot.)
■ Insert the card connector by sliding it into the system
connector. Press the card to make sure it is securely
seated.
5. Replace the memory compartment cover.
6. Run Auto Setup to check the new configuration. Auto
Setup should show a blinking arrow next to the extended
memory field. The new value should reflect the increase
in memory. (Refer to “Using Auto Setup” in the online
Advanced Topics.) If it does not verify, make sure the
memory card is properly seated in the slot.
2-10 Learning to Use the Hardware
Inserting an optional memory card
Page 33

2
2-10 Learning to Use the Hardware
Page 34
External Monitor
You can add a standard external monitor to your NEC
Versa 2205C. You need a display signal cable (usually
provided with the monitor). One end of the cable must have
a 15-pin connector for the system. (See the back of the NEC
Versa 2205C, behind the right-rear cover, for the monitor
connector.)
Follow these steps to connect an external monitor to your
NEC Versa 2205C.
1. Check that the NEC Versa 2205C is in Suspend mode or
powered off and the monitor power switch is turned off.
powered off while the monitor is being connected.
2. Open the right-rear cover of the system.
3. Attach the 15-pin cable connector to the video port
on the system. (The video port is the second
from the right.) Secure the cable connection with the
screws provided.
NOTE
The NEC Versa must be in Suspend mode or
Learning to Use the Hardware 2-11
Page 35
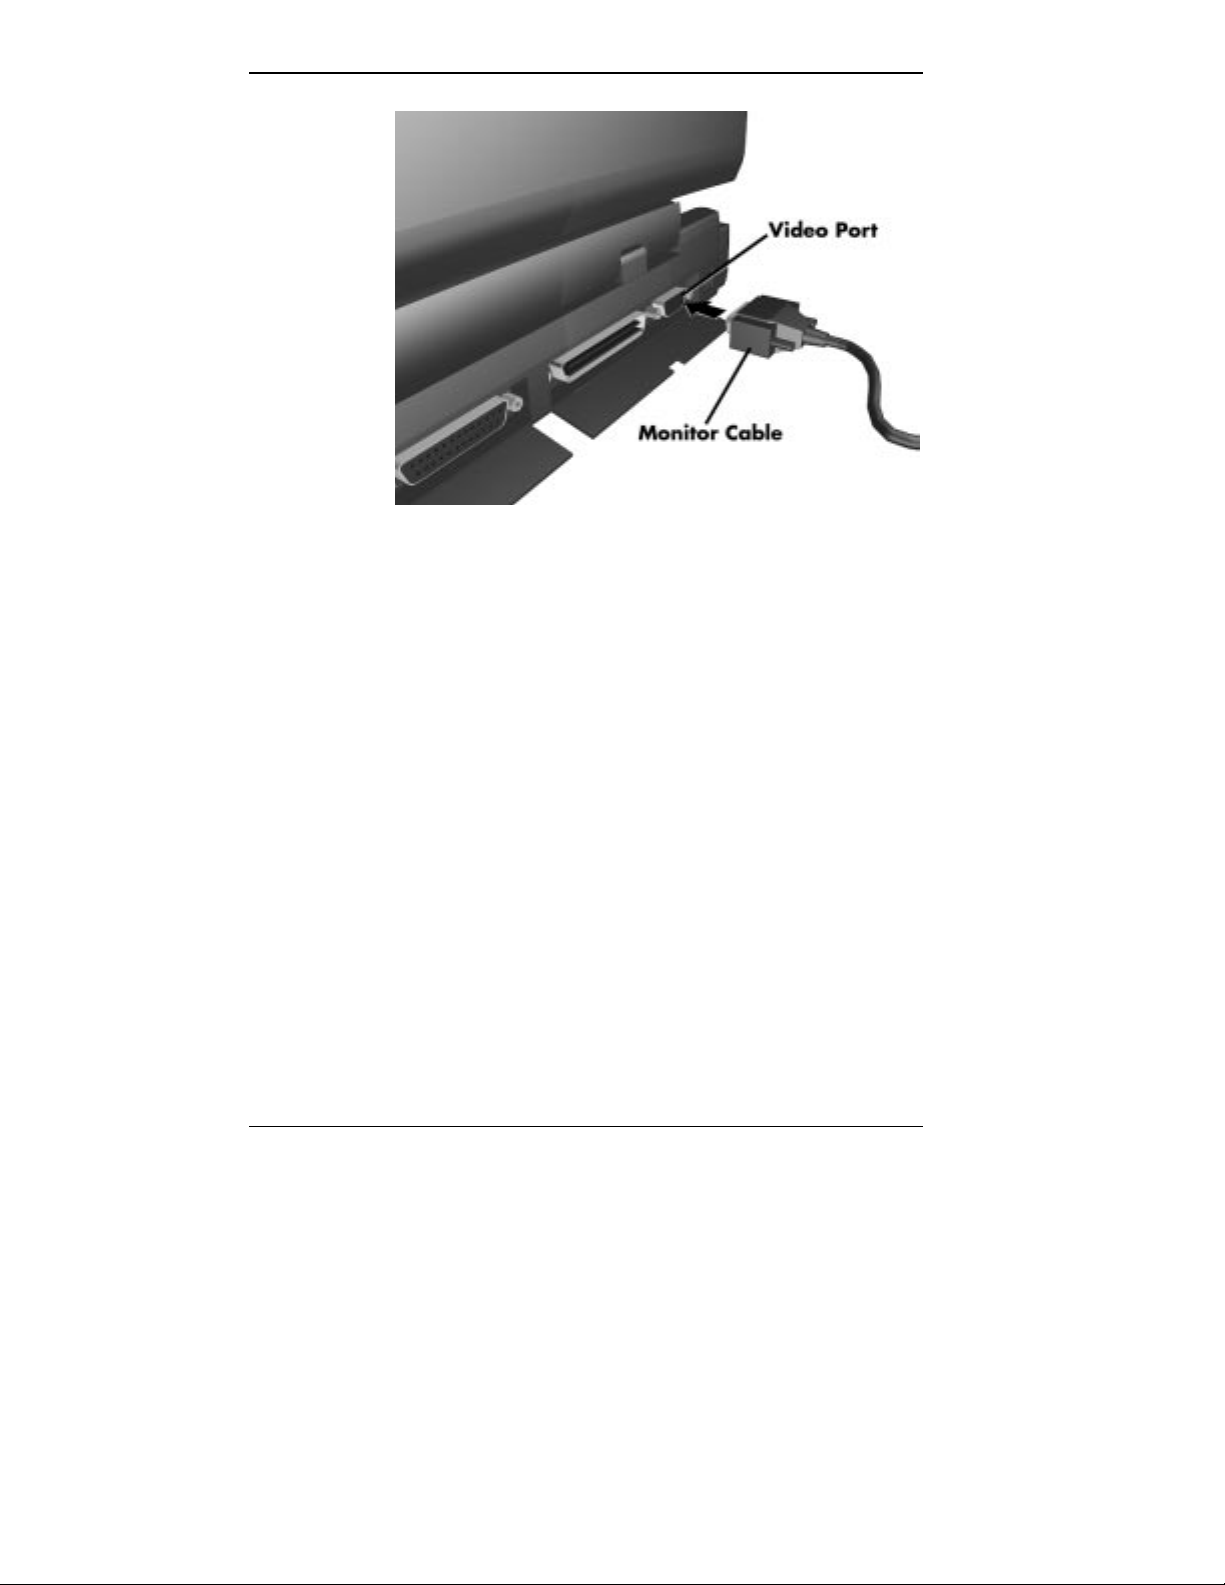
Connecting a monitor
4. Connect the monitor power cable and plug it into a
properly grounded wall outlet.
5. Follow any setup instructions in the monitor manual.
6. Turn on power to the monitor.
7. Press the Suspend button to resume Active mode or
power on the NEC Versa 2205C.
Toggle the
Fn + F3 function key combination to select both
the LCD and CRT monitor, CRT monitor only, or LCD
only.
Printer
You can attach a printer with either a parallel or a serial
connector. A parallel printer connector has 25 pins; a serial
connector has 9 pins.
2-12 Learning to Use the Hardware
Page 36
Parallel Devices
To install a parallel device (such as a printer, CD-ROM
reader, or tape drive), you need a cable with a male 25-pin
connector for the system and, for most parallel printers, a
Centronics® compatible 36-pin connector.
To connect a parallel device to your NEC Versa 2205C, do
the following.
1. Check that both the NEC Versa 2205C and device
2. Open the left-rear cover of the system and locate the
NOTE
When you connect a printer, be sure you install the appropriate device driver through the W indows 95 Control Panel. See the online
Windows 95
for instructions on installing the driver.
Using
power are off.
parallel port. (The parallel port is the third from the
left.)
3. Align and connect the 25-pin cable connector to the
parallel port on the system. Secure the cable with the
screws provided.
Learning to Use the Hardware 2-13
Page 37
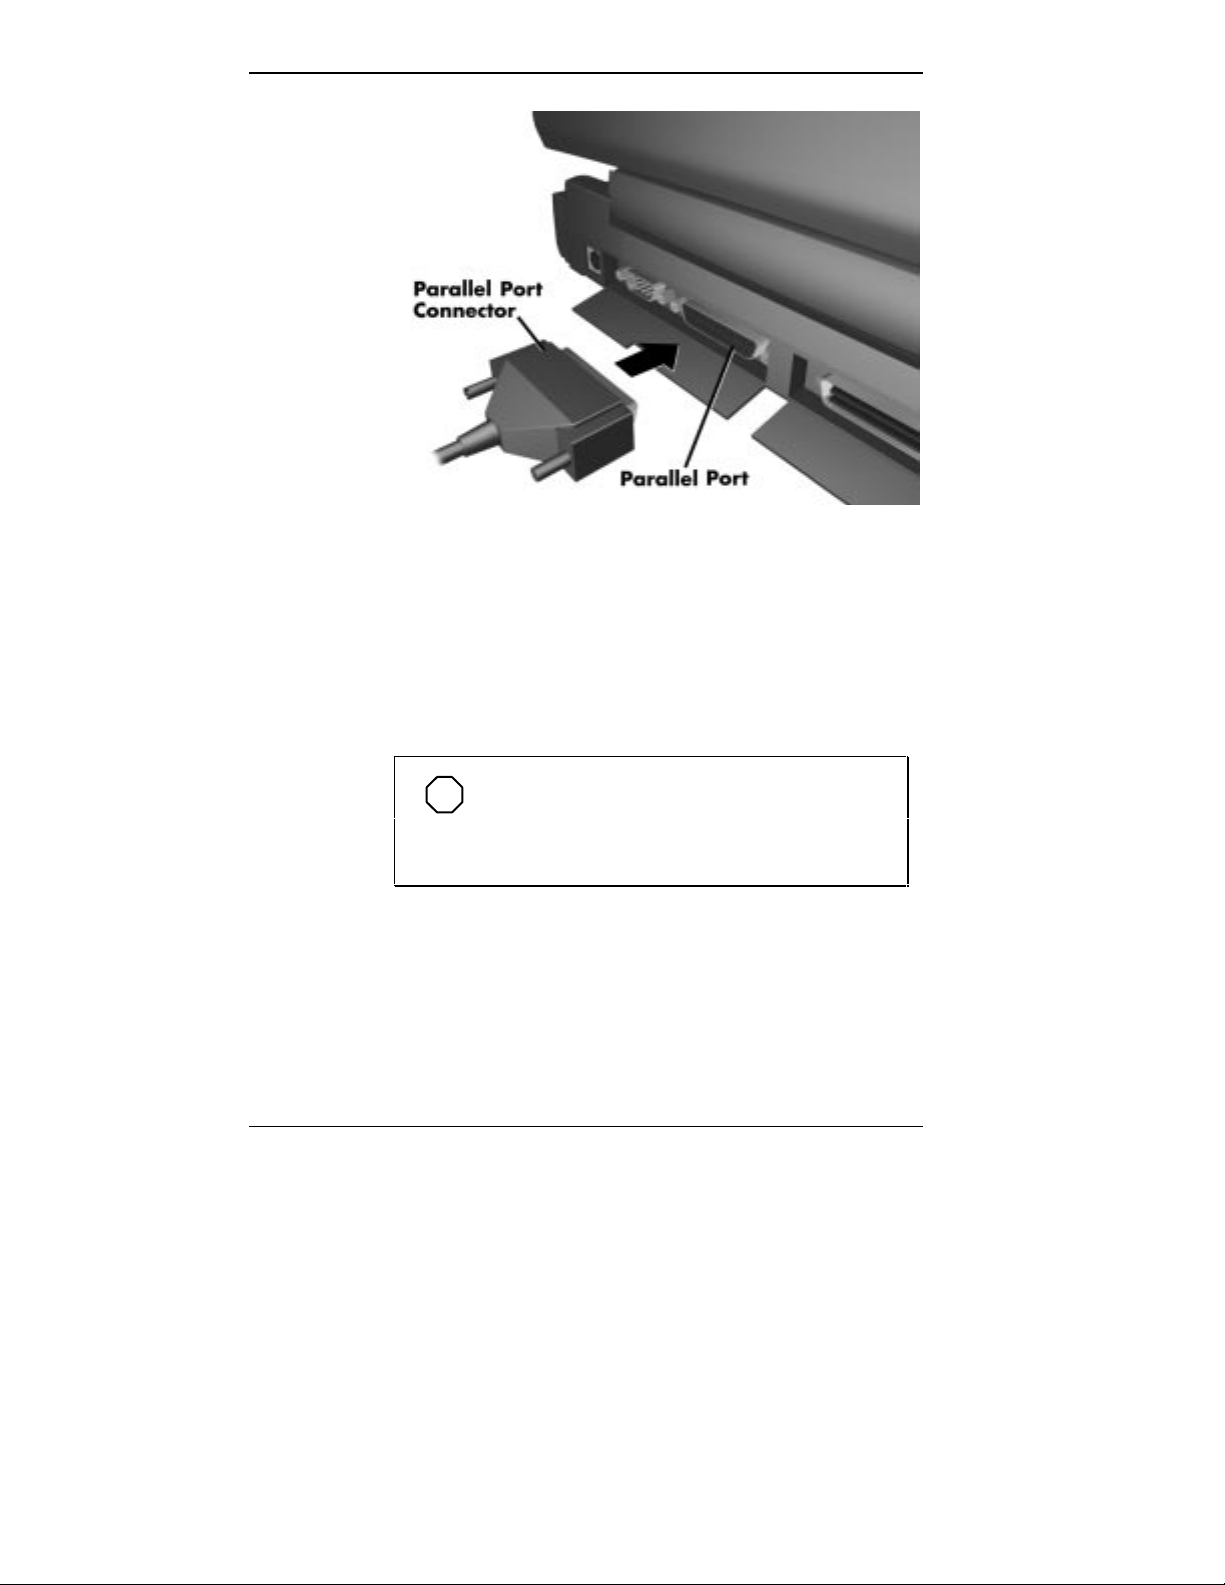
Connecting a parallel device
4. Align and connect the other end of the cable to the parallel
port on the device. Lock the connector clips.
5. Connect the power cable to the printer and a properly
grounded wall outlet.
6. Turn on power to the system and then to the device.
NOTE
Check that the device is online before you try
to use it. See the instructions that came with your
device for further information.
2-14 Learning to Use the Hardware
Page 38
Serial Devices
To install a serial device such as a printer or an external
modem, you need a cable with a female 9-pin connector.
NOTE
When you connect a printer, be sure you install the appropriate printer driver through the Wi ndows Control Panel. See the online
95
for instructions on using the Control Panel.
Using Windows
Follow these steps to connect a serial device to your NEC
Versa 2205C.
1. Check that both the NEC Versa 2205C and the device
power are off.
2. Open the left-rear port cover and locate the serial port
(second from left).
3. Align and connect the 9-pin connector with the serial
port on the system. Secure the connection with the
screws provided.
4. Align and connect the other end of the cable to the ap-
propriate port on the device. Secure the connections with
the screws provided.
5. Connect the power cable to the device and a properly
grounded wall outlet.
6. Turn on power to the system and then to the device.
NOTE
Make sure your device is online before trying
to use it. See the device guide for instructions.
Learning to Use the Hardware 2-15
Page 39
External Keyboard
You can add a full-size PS/2-style keyboard to your NEC
Versa 2205C using the Plug and Play feature. You cannot
use the system keyboard while an external keyboard is connected. If you press the
enable the numeric keypad while the external keypad is installed, the keypad works on the external keyboard only.
If you want to attach both an external keyboard and a PS/2style external mouse at the same time, use the optional NEC
Y-adapter. See the online NEC Versa 2205C Options
Catalog.
Follow these steps to connect an external keyboard to
your system.
1. Press the Suspend button on the NEC Versa 2205C.
Check that the system is in Suspend mode or system is
powered off.
Fn + NumLock key combination to
Make sure the NEC Versa 2205C is in Suspend
mode whenever you add or remove a keyboard.
Doing so with the power on in Active mode may
damage either the keyboard controller chip or the
keyboard.
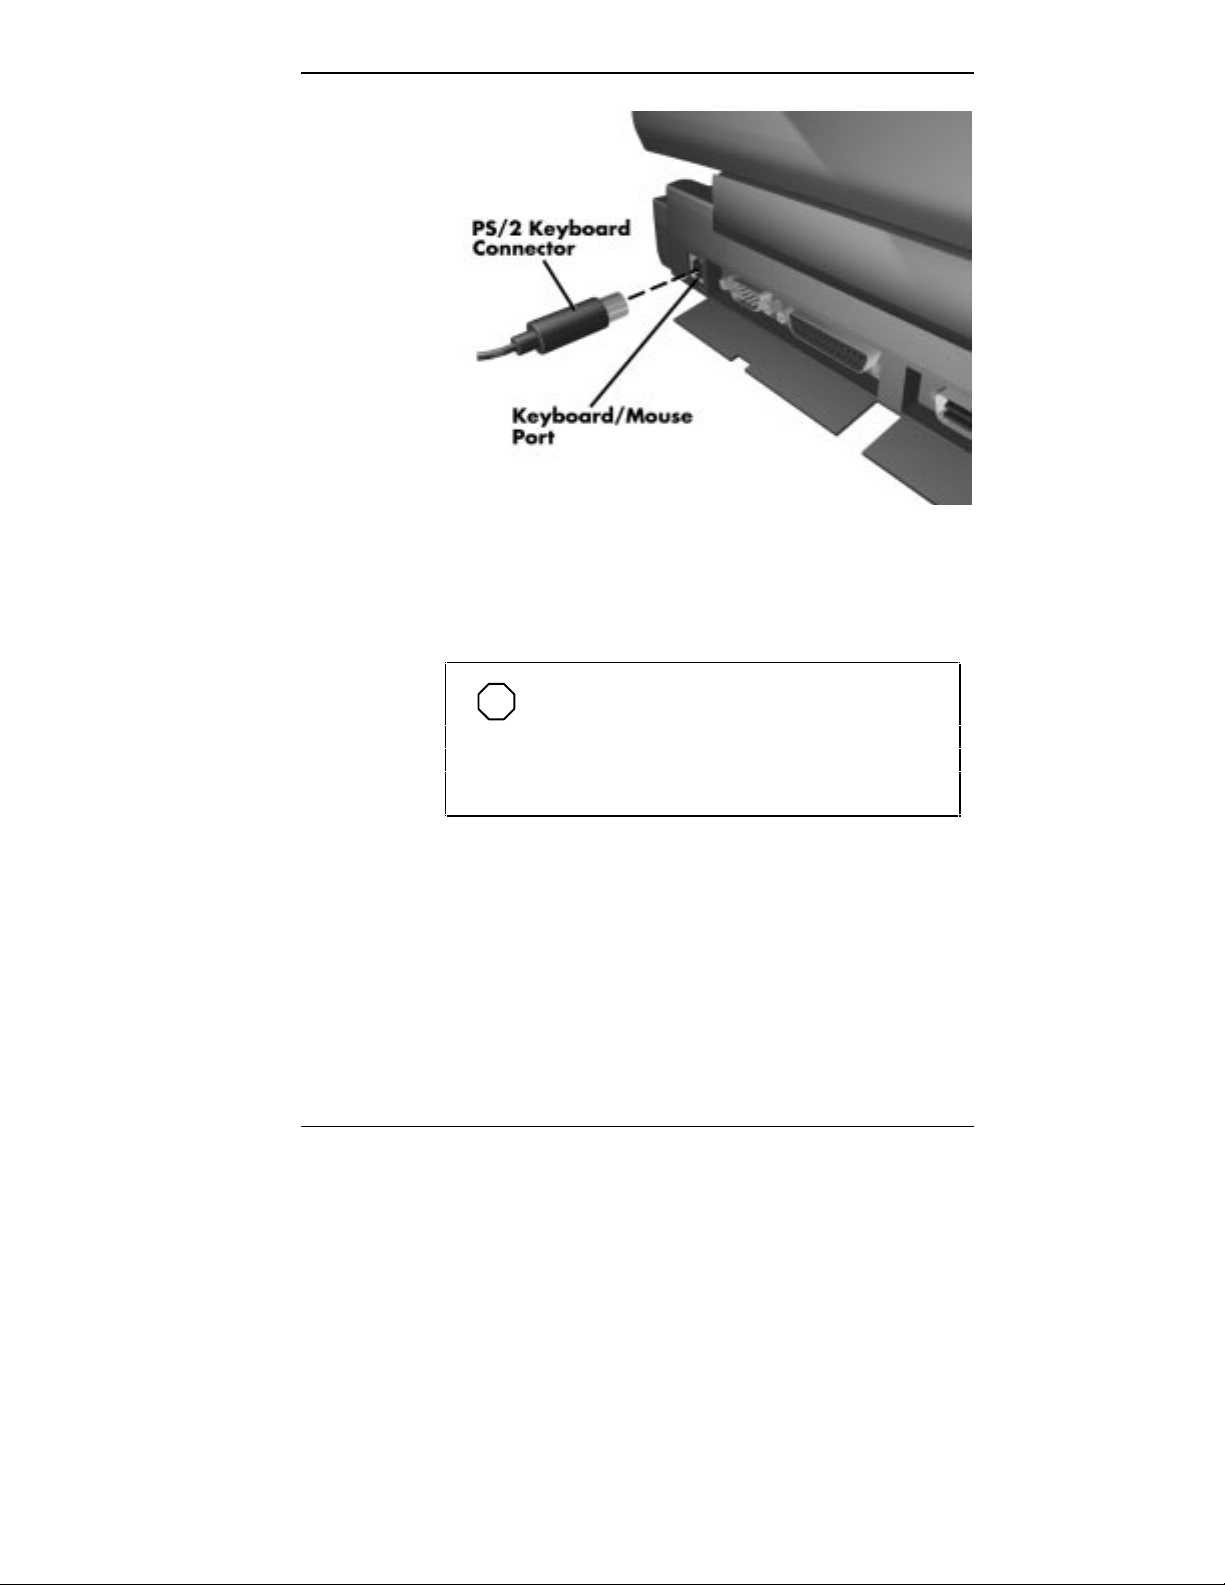
2. Connect the keyboard cable connector to the keyboard
port on the system. (The keyboard/mouse port is the
first one on the left rear of the system.)
2-16 Learning to Use the Hardware
!
CAUTION
Page 40
Mouse
Connecting an external keyboard
3. Press the Suspend button again to resume Active mode.
The system will immediately recognize the keyboard.
NOTE
For instructions on connecting an external
keyboard to either the NEC Versa Medi aDock 2000 or
MiniDock 2000, see the user's guide that came with
your specific docking device.
You can add an external mouse to your NEC Versa 2205C
to use in place of the NEC VersaGlide for moving the
pointer. Use the following procedure to connect a PS/2-style
mouse to the system. The Plug and Play feature allows you
to do this with the system powered on, but in Suspend
mode.
1. Check that the NEC Versa 2205C is powered off.
Learning to Use the Hardware 2-17
Page 41
!
Make sure the NEC Versa 2205C is powered off
whenever you add or remove a mouse. Doing so
with the power on may damage either the system or
the mouse.
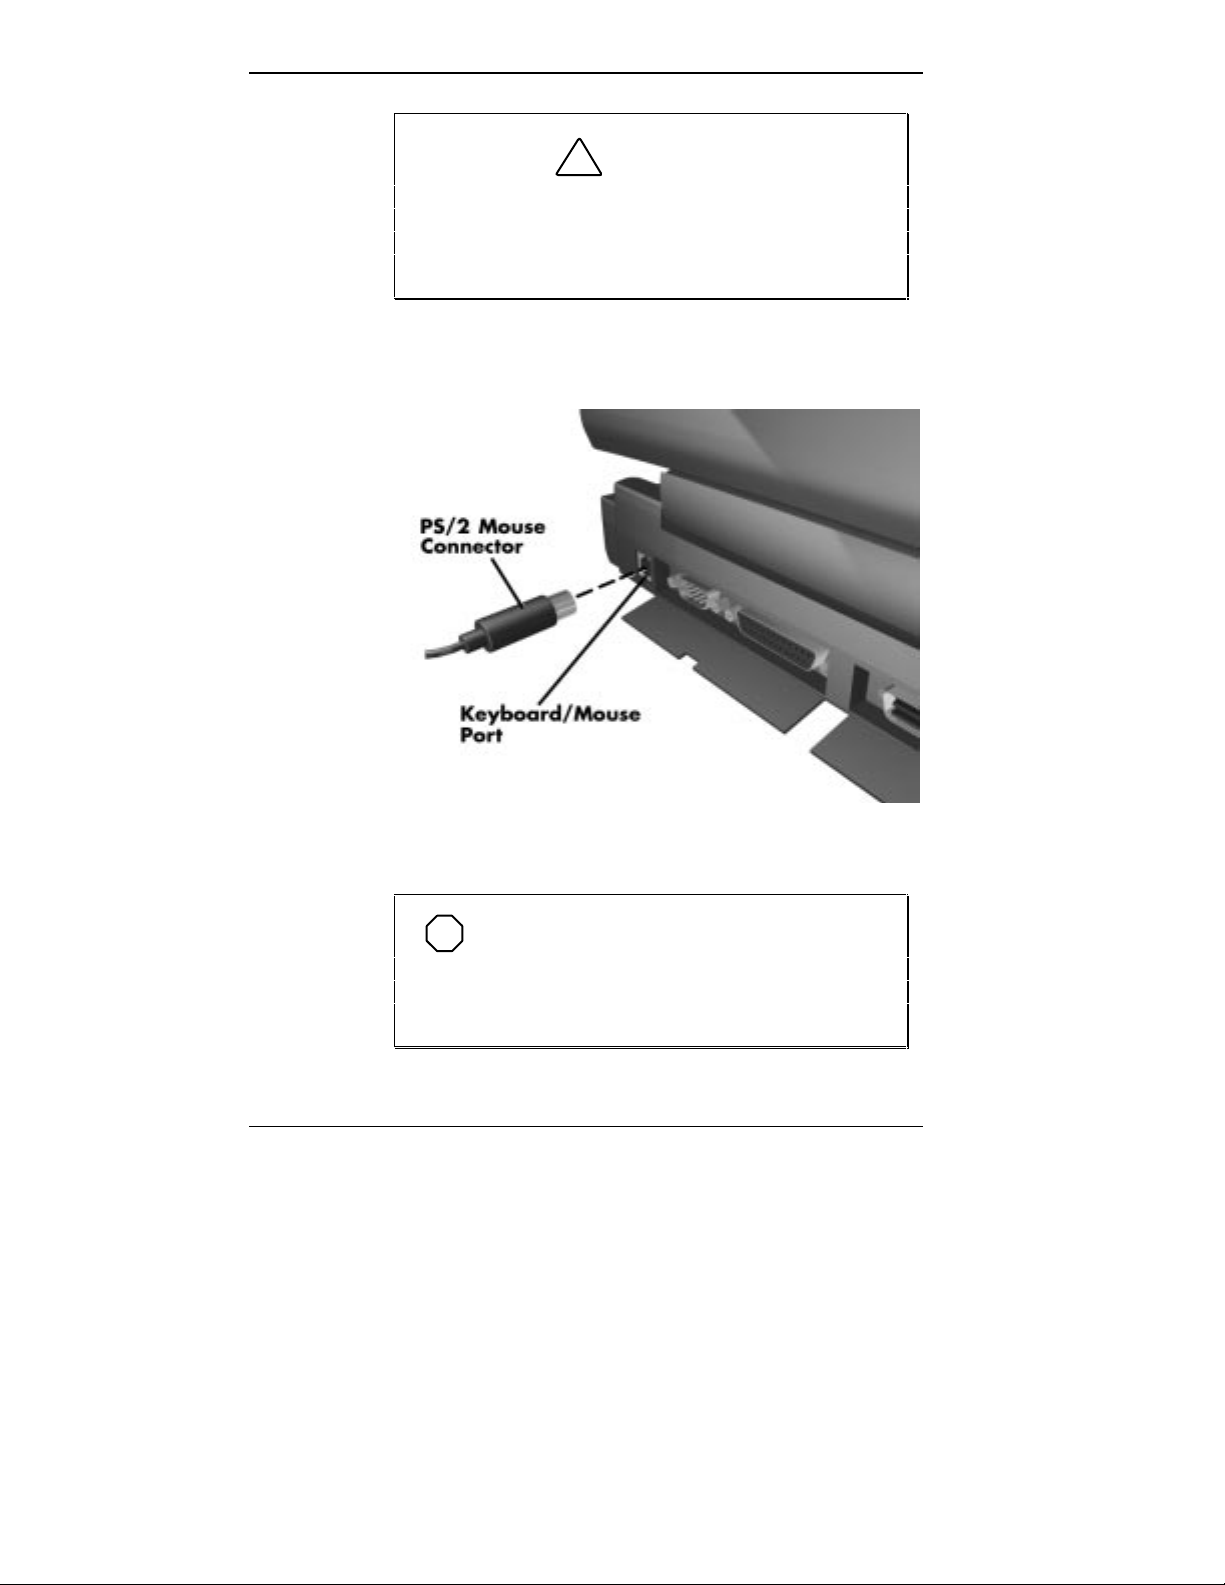
2. Connect the mouse cable connector to the key-
CAUTION
board/mouse port on the system. (The keyboard/mouse
port is the first one on the left.)
3. Power on the NEC Versa 2205C again.
NOTE
For instructions on connecting an external
mouse to either the NEC Versa MediaDock 2000 or
MiniDock 2000, see the user’s guide that came with
your specific docking device.
2-18 Learning to Use the Hardware
Connecting an external mouse
Page 42

Internal Modem
The NEC Versa 2205C has an internal modem that you can
use to send and receive faxes, cruise the Internet, and
download information. A modem converts data so it can be
transmitted over phone lines and then converts it back again
so you can read it on your computer.
Your NEC Versa 2205C comes with several online service
gateways — all the basic software you need to communicate with the outside world.
Use the following procedure to connect a phone line to the
NEC Versa 2205C.
NOTE
You also can use a PC card modem. This will
necessitate disabling the internal modem. See the
online
Basics
for how to disable the internal modem.
See the online
for information on how to purchase the modem PC
card option.
NEC Versa 2205C Options Catalog
1. Unplug the telephone cable from the telephone.
2. With the internal modem, plug the telephone cable into
the modem port on the NEC Versa 2205C.slot.
Learning to Use the Hardware 2-19
Page 43
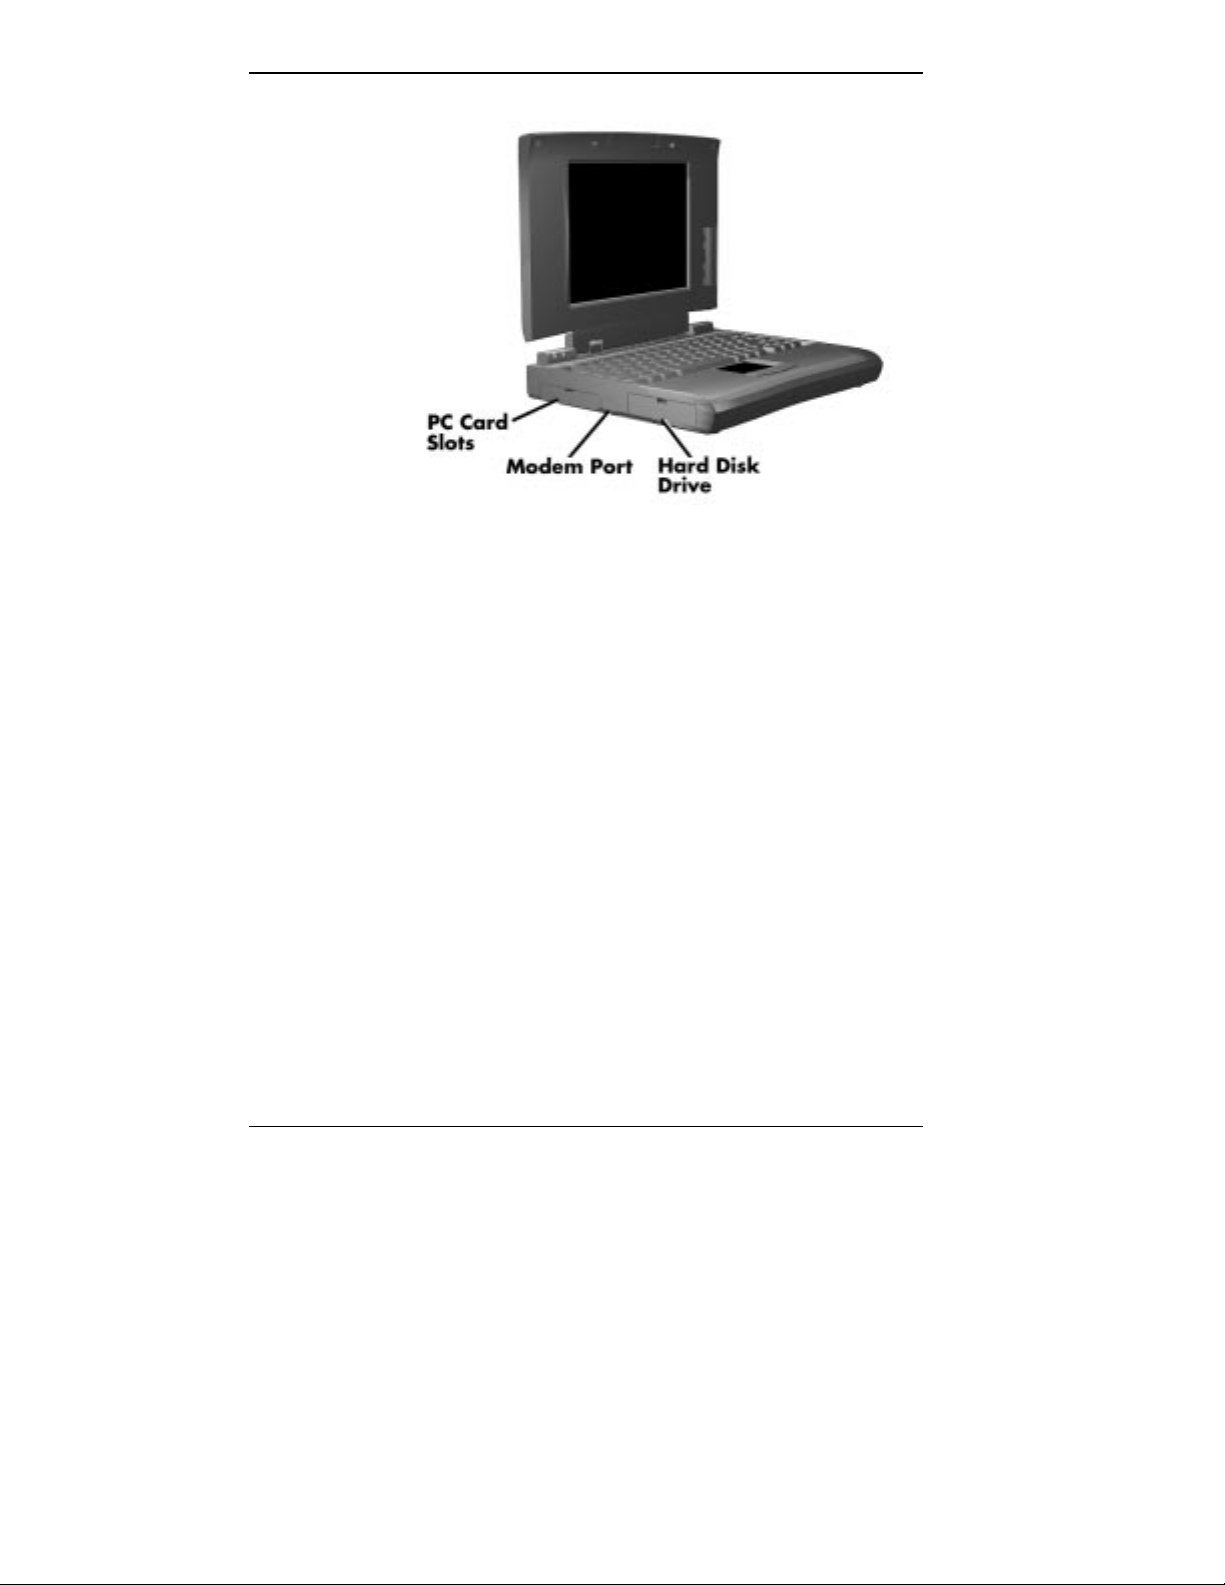
Connecting to the internal modem
You are now ready to use your communication software to
send faxes, run an online service, or download the latest
NEC Bulletin Board Services information.
PCMCIA
You can easily install and interchange peripheral devices,
such as modems, LAN cards, and storage cards in your
NEC Versa 2205C. The NEC Versa 2205C series notebook
computers have software that automatically allocates system resources when you install or remove a PC card using
PCMCIA technology. Refer to the user’s guide that came
with your PC card for any special information.
To insert a PC card, open the slot cover and follow these
steps.
1. Align the card so the 68-pin connector points toward the
slot.
2-20 Learning to Use the Hardware
Page 44
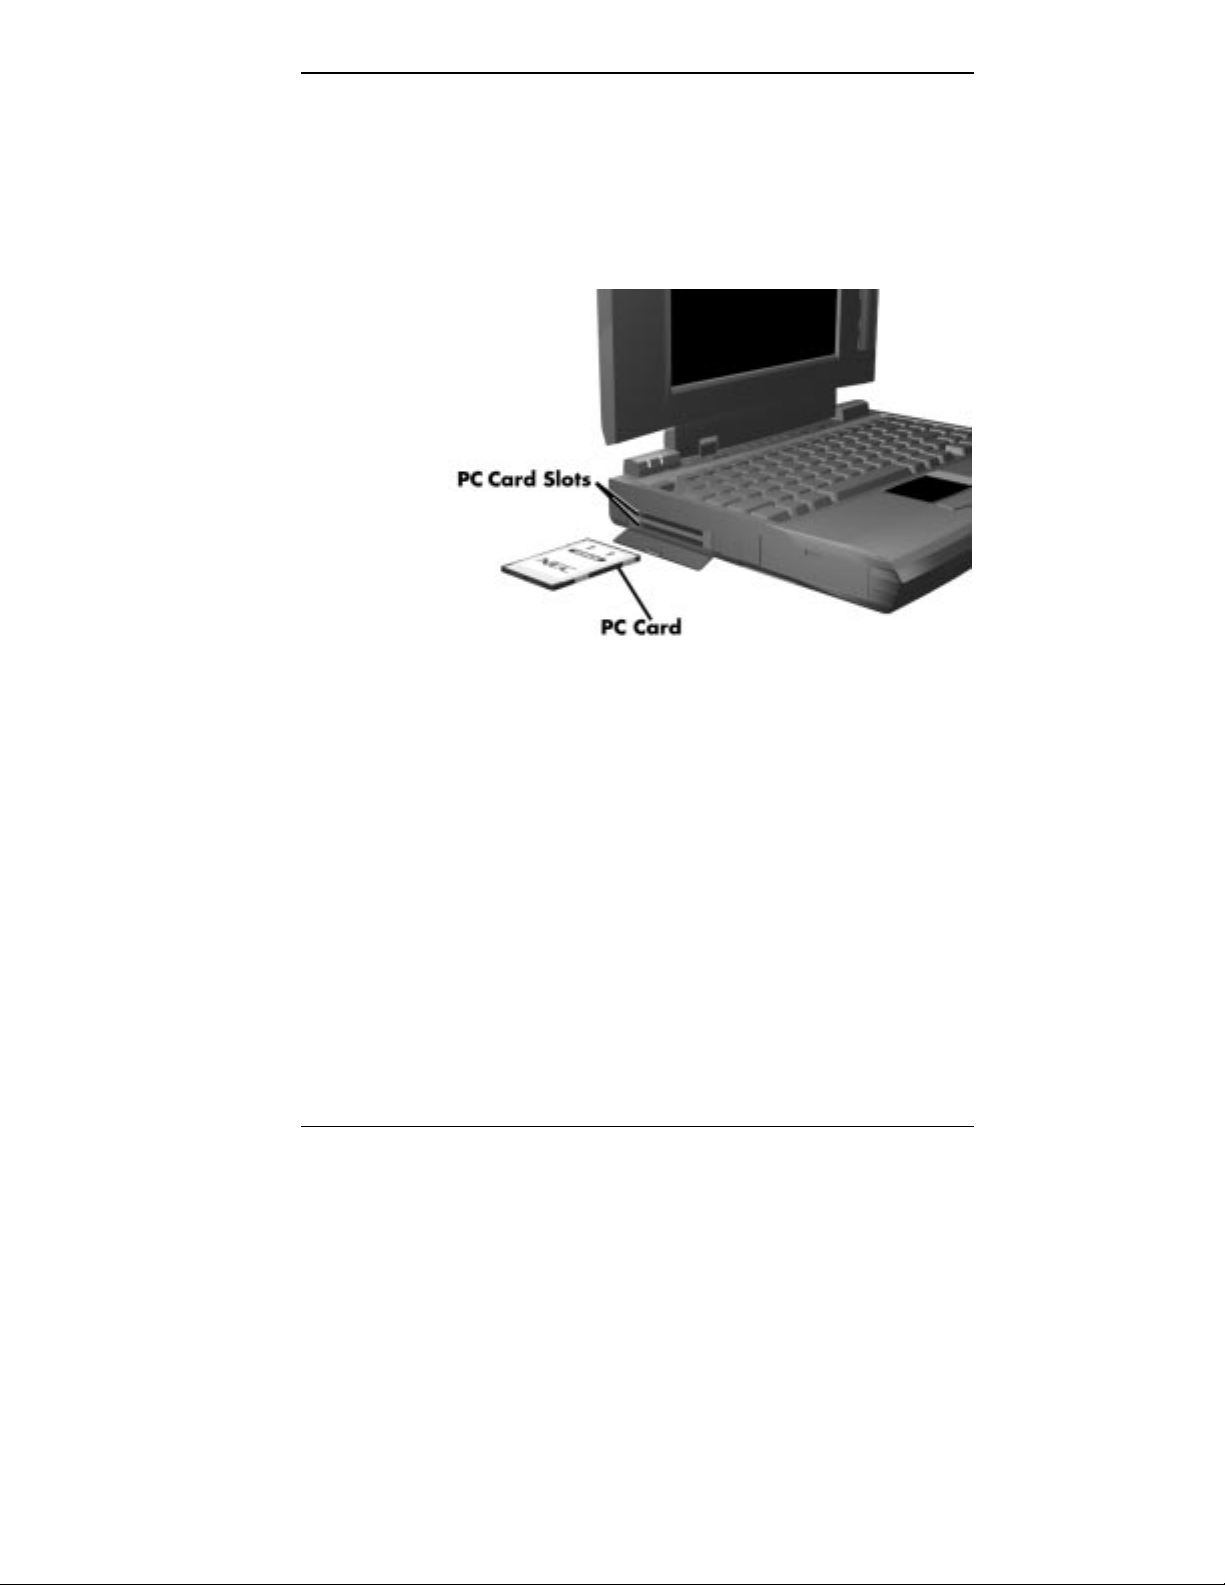
2. Slide the card into either slot. A low, then high tone lets
you know that it’s fully inserted and recognized. (If you
turned off the sound on the Versa, the tones do not
sound.) Other two-tone sequences such as high, then low
tones indicate the card is inserted, but the type is unknown.
Inserting a PC card
3.
Click on Settings, Control Panel, and the PC Card icon
to see which slot contains the PC card and which is
empty.
4. To remove the card, double click on the PC card icon on
the task bar. Select the PC card to be removed, and click
Stop. When you get a prompt, click OK, then press
on
the button on the side of the slot and remove the card.
Learning to Use the Hardware 2-21
Page 45
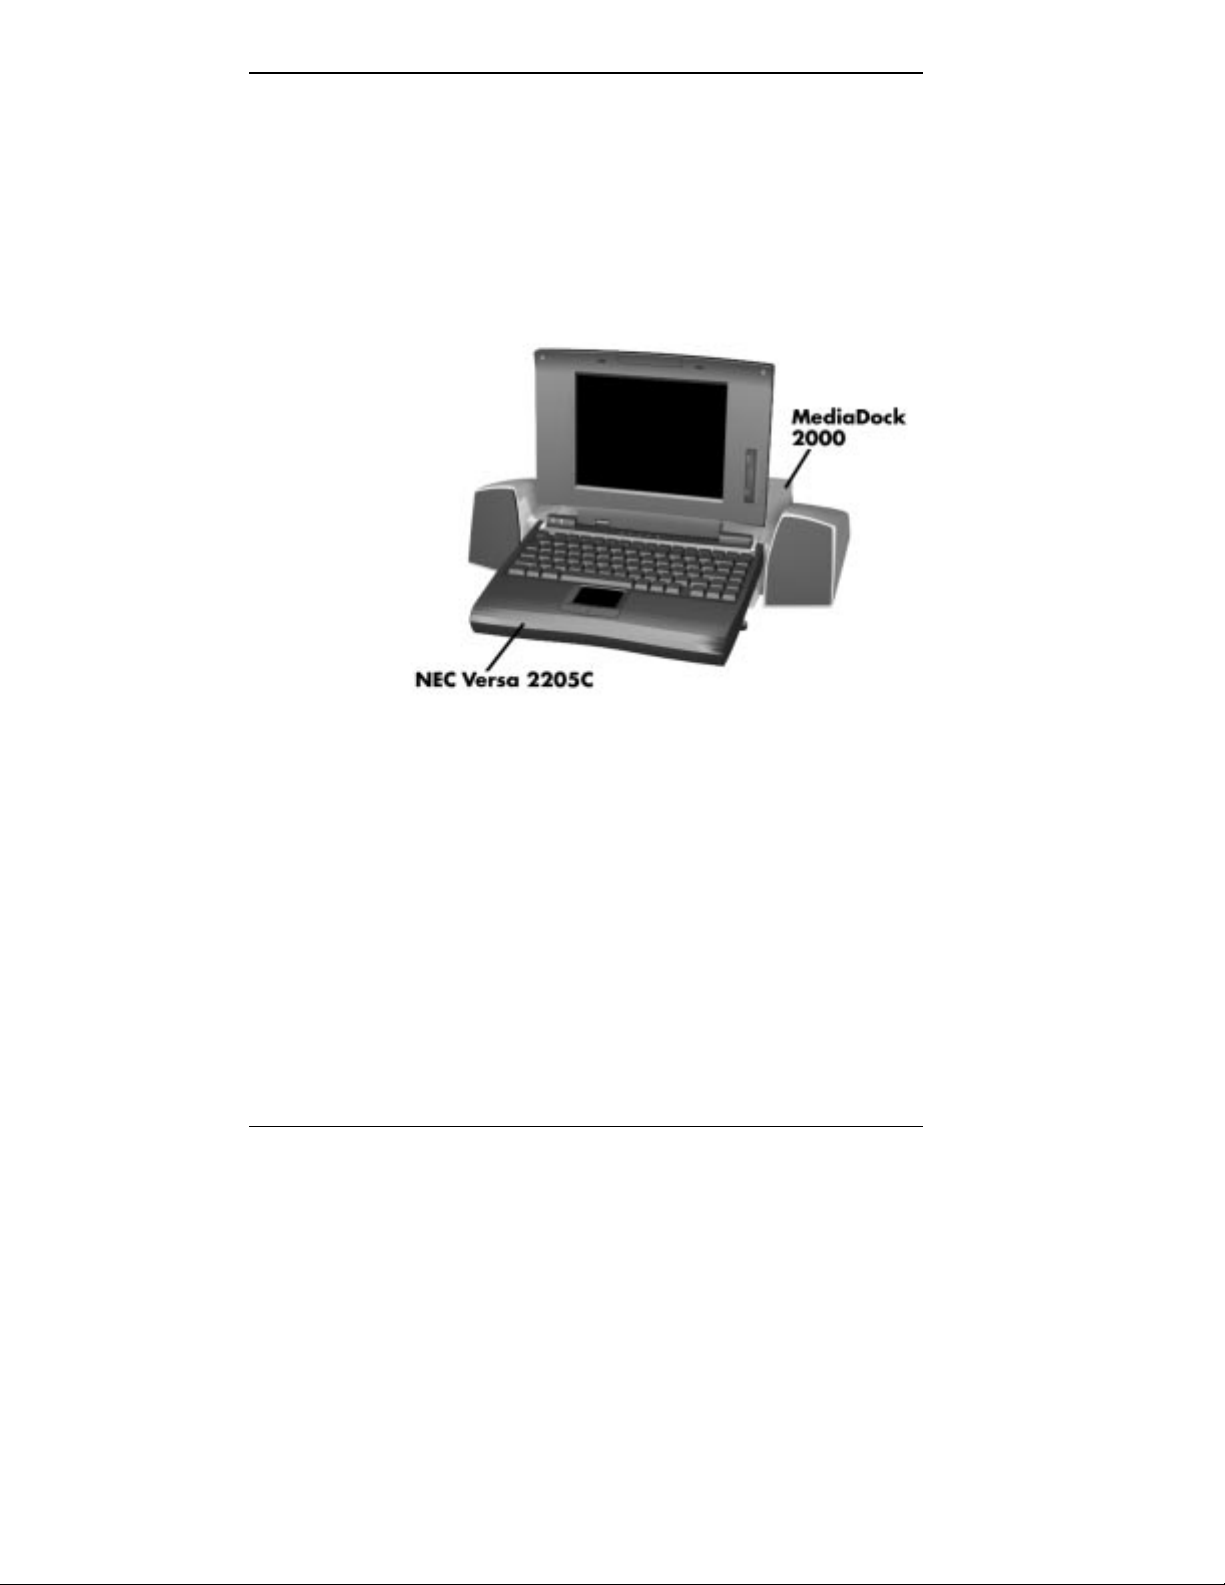
NEC Versa MediaDock 2000
The NEC Versa 2205C expansion options give you one
touch connection to external peripherals or a full-blown multimedia station. The MediaDock 2000 provides CD-ROM
capability and a stereo sound system. See the NEC Versa
MediaDock 2000 User's Guide for instructions on connecting the NEC Versa 2205C to it.
NEC Versa 2205C docked with a MediaDock 2000
NEC Versa MiniDock 2000
The Versa MiniDock 2000 option provides you with the
convenience of a dock at your desk without taking up a lot
of space. With your NEC Versa 2205C securely attached to
the MiniDock, you can have one connection with all your
peripheral resources — printer, local area network, monitor,
mouse, and keyboard — instead of five separate connections. The NEC MiniDock 2000 also provides two additional PCMCIA slots.
2-22 Learning to Use the Hardware
Page 46
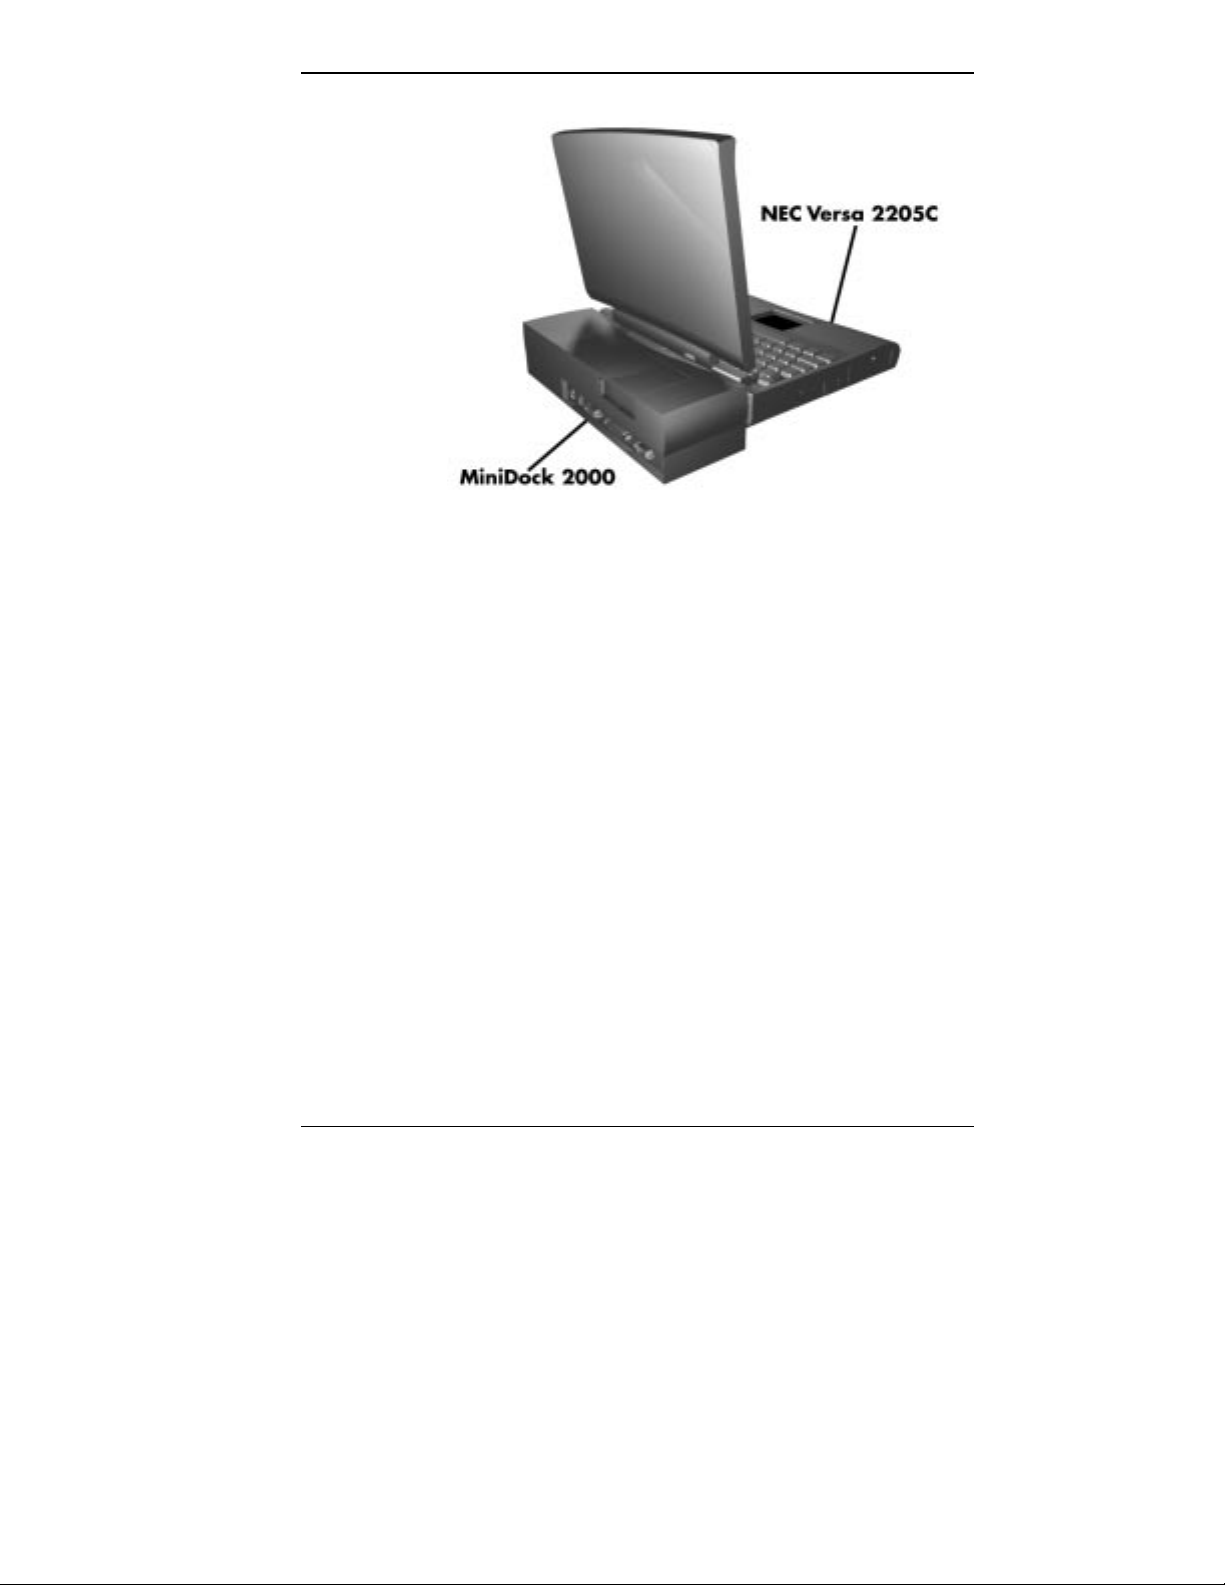
NEC Versa 2205C docked with a MiniDock 2000
Learning to Use the Hardware 2-23
Page 47

About the Software
3
This chapter introduces you to the software that comes with
the NEC Versa 2205C, including:
■ Windows® 95
■ Online Help
■ NEC Utilities
WINDOWS INTRODUCTION
Your NEC Versa 2205C gives you the Windows 95 operating system to use on your system. This Microsoft operating
system provides a means of running applications, navigating through your file structure, and using your notebook
computer. Windows 95 uses a graphical interface to make
the operating systems easy to use.
Windows 95
Most popular programs today are designed specifically for
Windows, using menus and dialog boxes that operate in
much the same way. Learning one program, therefore, helps
you learn other Windows programs.
Windows 95 gives you the newest features offered by
Microsoft, including a Desktop with room to maneuver, a
Taskbar for quick navigation between open windows, plug
and play features, online networking functions, and more.
Windows 95 provides the following icons on your desktop:
■ My Computer — provides access to drives, printers, the
Control Panel, and network features.
About the Software 3-1
Page 48

■ Inbox — lets you access the Microsoft Fax and Mail
software as well as Microsoft Network Services.
■ Recycle Bin — gives you a trash container in which to
put unwanted files.
■ The Internet — lets you set up a connection via a mo-
dem or network PC card to the Internet.
■ Microsoft Network — lets you access the Microsoft
Network online service via the internal modem.
■ Network Neighborhood — shows you the network, inte-
grated LANs, and WANs if your system is connected to
a network.
■ NEC Versa 2205C InfoCenter — provides several levels
of information about your NEC Versa 2205C. (This is
further described later in this section.)
■ My Briefcase — gives you quick access to files you fre-
quently use.
■ Start — lets you access a pop-up menu to start pro-
grams and applications, open documents, and shut down
your system.
See the online Using Windows 95 for instructions on using
Windows 95.
3-2 About the Software
Page 49
GUIDE TO ONLINE HELP
The NEC Versa 2205C has plenty of information for you
online.
NEC Versa 2205C InfoCenter
The NEC Versa 2205C InfoCenter contains several specific
areas of information to help you.
System Tour
The NEC Versa 2205C System Tour takes you completely
around the computer, pointing out components, switches,
software, and utilities. It’s intended to get you comfortable
with your new notebook computer. The Tour takes about
five minutes.
Basics
Basics describes the NEC Versa 2205C main features, how
to travel with the system, use power management, and care
for the system. It includes a glossary.
Advanced Topics
Advanced Topics covers more specific areas such as adding
options, changing setup options, and solving problems. It
also includes a glossary.
Questions and Answers
Questions and Answers provides frequently asked questions
and their answers about notebook computers to help you
solve common problems yourself.
About the Software 3-3
Page 50

Additional Topics
NEC Versa 2205C Series Options Catalog
The NEC Versa 2205C Series Options Catalog lists options such as memory cards, hard drives, carrying cases,
and PCMCIA cards that you can purchase for the NEC
Versa 2205C.
Customer Service Guide
The NEC Customer Service Guide discusses the various
levels of support NEC offers you, our customer. We provide lots of information to help you become self-sufficient
with your NEC Versa 2205C, but if you need help, we’re
there for you.
UltraCare Guide
The NEC UltraCare Guide describes NEC’s one-year war-
ranty program to help you protect your investment in an
NEC Versa 2205C Series computer.
Using Windows 95
This online “book” provides a series of lessons on using
Microsoft Windows 95 on the NEC Versa 2205C.
3-4 About the Software
Page 51
GUIDE TO NEC UTILITIES
NEC provides several programs and routines designed to
make your NEC Versa 2205C run more efficiently. These
programs are known as utilities.
Distribution Diskette Creator
This utility lets you create distribution diskettes for the
system contents. Use the distribution diskettes to make a
backup copy of the programs that came on your NEC Versa
2205C. Save the diskettes in case you need to reload the
software. Windows 95 operating system backup diskettes
are available through NEC Backup Disk Fulfillment at 1800-842-6446.
PowerCenter
This utility lets you select the specific Power Management
you want.
Preference Tools Utility
This utility displays your preferred system settings such as
screen backlight on/off and other settings.
NEC Battery Gauge
You can use this utility to periodically check on your battery status. The gauge shows you the percentage of power
left in your Li-Ion battery.
About the Software 3-5
Page 52

PHDisk
This utility creates a file on the hard disk that is large
enough to contain all the software in memory. Its default
size is approximately 16-MB. You will need to update this
utility only if you upgrade the amount of memory to more
than 16-MB in your NEC Versa 2200. This utility must be
run in DOS. (It will not run on a compressed drive.)
Auto Setup Utility
Auto Setup automatically configures your NEC Versa
2205C each time you start it up. This utility also lets you
change your system start-up settings.
Using Auto Setup
Use Auto Setup as follows:
1. Reboot your system. When the screen displays the large
blinking block at boot-up, press
2. When the Auto Setup Summary screen is displayed, en-
ter the highlighted letter in the menu bar to that represents the category you want.
F1.
3. Use the up and down arrows to move between selections
4. Follow the instructions at the bottom of the screen to
3-6 About the Software
For example, type
D to open the Disk Drive Settings
window.
displayed on the screen. Press
Alt + the arrow keys to
display setting options.
make selections, change values, and exit.
Page 53

NOTE
Be sure to keep track of any password you
enter. If you set a system password, a key icon appears at bootup. You must enter the password to
access the system. To change the password, enter
the password followed by a forward slash (/) and a
new password. To remove the password, enter the
password followed by a forward slash (/).
Refer to the online Advanced Topics for details on Auto
Setup.
About the Software 3-7
Page 54

Traveling with Your
4
NEC Versa 2205C
The NEC Versa 2205C makes a natural traveling companion. Using a battery, you can use the computer anywhere
you go. Here is some information you might find helpful
when taking the NEC Versa on the road.
■ Carry an extra charged battery pack for additional
battery power.
■ Check that you have everything you need before you leave
on a trip. Be sure you have all the necessary cables and
accessories. (See the checklist at the end of this chapter.)
■ If you run your system with battery power, maximize
battery life by using power-saving features whenever
possible.
■ Take the AC adapter in case you have an electrical
outlet handy. This saves battery power for when you
really need it.
■ Carry along any application or data files on diskette that
you might need.
TIP: Speed the trip through airport security by
carrying a charged system. Inspectors want to see
the screen display a message. The boot message is
usually sufficient.
If your system is fully charged, the inspection only
takes a minute or so. Otherwise, be prepared to
attach the AC adapter and power cable. If you don’t
have these, the inspection might include a
disassembly of the system.
Traveling with Your NEC Versa 2205C 4-1
Page 55
POWER CONNECTIONS
With the right accessories, you can run your NEC Versa
2205C almost anywhere! Your system self-adjusts to various power sources. The United States, Canada, and most of
Central and South America use 110-volt alternating current
(AC). Most other countries of the world use 220-volt AC.
The NEC Versa 2205C adapts to voltages ranging from
100 to 240 volts.
There are a few countries with areas that use direct current
(DC) as their main power source. You need a DC-to-AC
converter in particular areas of Argentina, Brazil, India,
Madeira, and South Africa.
To use your system overseas, you need an adapter plug and
transformer. There are five different plugs available worldwide.
You can buy these at an electronics supply store.
TIP: When using a modem outside the U.S.
and Canada, you might need an international telephone adapter. You can buy this at an electronics
supply store.
For more information on using a modem, see Chapter 2,
"Learning to Use the Hardware" and Appendix C, “Modem
Commands, Registers, and Codes” in this guide.
4-2 Traveling with Your NEC Versa 2205C
Page 56

CHECKLISTS
What to Take
The following checklists can help you prepare for your trip
with your NEC Versa 2205C. Look them over and use what
fits your situation.
The following are what you should take with you when you
travel with your NEC Versa 2205C.
■ At least two fully charged batteries
■ Single-outlet surge protector
■ Long telephone exte nsion cord with RJ-11 plugs
■ Appropriate AC plug adapter
■ Copy of proof of purchase for computer and other
equipment for customs check
■ Customer support phone numbers for your software
■ NEC Versa 2200 Series Quick Reference
Things to Do
■ AC extension cord.
Here is what you should do before you leave home:
■ Back up your NEC Versa 2205C’s hard disk.
■ Put your system into Suspend or Standby mode so you
can quickly boot up at the airport security check.
■ Fully charge all your batteries.
■ Tape your business card to your NEC Versa 2205C, AC
adapter, and batteries.
Traveling with Your NEC Versa 2205C 4-3
Page 57

Solving
5
PROBLEM CHECKLIST
Problems
Once in a while you may encounter a problem with your
NEC Versa 2205C. The NEC InfoCenter has Questions
and Answers that might be helpful to you.
If the screen is blank, the instructions don't help, or no error
message appears, use the information here to determine and
fix the problem. You still may be able to solve the problem
yourself!
First check the items in the following list. If these items
don't help, see the table that follows the list.
■ Power is on to the computer.
■ The electrical outlet to which your AC adapter is
connected is working. Test the outlet by plugging in
a lamp or other electrical device.
■ All cables are tightly connected.
■ When you are using the internal modem, check that it is
properly inserted.
■ The display setting is configured correctly.
■ The display's brightness control is adjusted properly.
■ If using battery power, check that the battery pack is
properly inserted and fully charged.
Solving Problems 5-1
Page 58

Troubleshooting
PROBLEM WHAT TO DO
The system does not
power on
If you have the AC adapter attached, check that
LCD screen is dark
and blank
Brightness control may need adjustment. Adjust the
The system entered Suspend mode due to low
Battery power does
not last long
Information on the LCD
screen is difficult to see
An optional component
does not work
If you are operating the system with battery power,
check that the battery pack is correctly inserted.
Attach the AC adapter to recharge the battery.
the electrical outlet you are using works.
Power-saving mode may have shut off the
backlight. Press any key, Fn+F5, or use the
suspend button. The built-in LCD may not be
selected. Press Fn+F3
control.
battery power. Press the suspend button to resume
operation. If the system does not resume, plug in
the AC adapter or replace the battery pack, then
press the suspend button again.
Use power-saving modes.
Adjust the brightness control.
Make sure the component is securely installed or
connected. Verify that the system parameter for the
I/O port configuration is set correctly in Auto Setup.
once or twice.
5-2 Solving Problems
Page 59

Troubleshooting
PROBLEM WHAT TO DO
The power
management button
does not work
The docking station might be connected to the NEC
Check that Power management isn’t set to off on
the Preference toolbar.
Power management may be disabled in Auto
Setup.
A disk drive might be busy. Wait until the disk drive
stops and try again.
Versa 2205C. Some power management functions
do not work when the docking station is connected.
START-UP PROBLEMS
The system displays an invalid configuration error message
at power on when there are the following conditions:
■ current configuration information doesn't match configu-
ration information stored in Auto Setup, such as when
an internal option is added or changed.
■ the system loses configuration information.
If either of these conditions is true, the system displays an
“invalid configuration information” message.
To continue start-up procedures, press
Setup to set current system parameters.
F1 and run Auto
Solving Problems 5-3
Page 60

If an error message appears before the operating system
starts, look up the error message in the following table.
Follow the instructions. If you see other error messages, the
hardware might need repair.
NOTE
When the NEC Versa 2205C detects an error
related to display devices, it cannot display on either
the LCD or a CRT. The system warns you by beeping.
POST Error Messages
The NEC Versa 2205C has a built-in checking program
that automatically tests its components when you turn the
system power on. This diagnostic test is called the PowerOn Self-Test (POST) . If the system finds a problem d uring t he
POST, the system displays an error message. If this happens, follow the instructions in the POST error message
table.
POST Error Messages
MESSAGE WHAT TO DO
Diskette drive A
failure
If there’s still a problem, drive A might need repair.
Diskette read failure –
F1 to run Auto
press
Setup. Press any other
key to retry boot
5-4 Solving Problems
Drive A does not work or the diskette is not properly
inserted. Drive A is the diskette drive.
Press F1 to start Auto Setup to check the diskette
drive parameters.
Remove the diskette from drive A and press
enter Auto Setup to confirm that the diskette drive is
configured properly, or press any key to start the
system from the hard disk.
Or, insert a bootable disk in drive A and press any
key to restart the system from diskette.
F1 to
Page 61

POST Error Messages
MESSAGE WHAT TO DO
Non-system disk or
disk error; replace
and press any key
when ready
No boot device
available – press F1
to run Auto Setup
Invalid configuration
information – run
Setup program
Real time clock
failure
Time-of-day not set –
run Setup program
Fixed disk
configuration error
Insert a bootable diskette in the diskette drive and
Remove the diskette from drive A and press any
key to start the system from the hard disk.
Or, insert a bootable diskette in drive A and press
any key.
Press F1 to start Auto Setup. Change the hard
disk type to the correct setting. Exit and save
Auto Setup.
Or, turn off the system and check to see that the
hard disk is properly installed.
One or more system configuration parameters
are not properly set. Press F1 to start Auto Setup,
set them correctly, exit, and save to update
the parameters.
Set time and date using Auto Setup. Exit and save
to update the parameters.
Set the time and date using Auto Setup. Exit and
save to update the parameters.
Start Auto Setup. Exit and save to update the
parameters. Turn the system off and check to see if
the hard disk is installed properly.
press Ctrl+Alt+Del to start the system from diskette.
The hard disk might need repair.
Fixed disk failure
Turn the system off and check to see if the hard disk
Insert a bootable diskette in the diskette drive and
Press F1 to start Auto Setup. Exit and save to
update the parameters.
is inserted properly.
press Ctrl+Alt+Del to start the system from diskette.
The hard disk might need repair.
Solving Problems 5-5
Page 62

POST Error Messages
MESSAGE WHAT TO DO
Fixed disk controller
failure
Turn off the system and check to see if the hard disk
The hard disk controller may not work and might
Press F1 to start Auto Setup. Exit and save to
update the parameters.
is installed properly.
need repair.
Keyboard clock line
failure
Keyboard data line
failure
Keyboard controller
failure
Keyboard stuck
key failure
If the error message remains, you may have to have
Unplug the external keyboard, if attached. Have the
external keyboard repaired.
Unplug the external keyboard, if attached. Have the
external keyboard repaired.
Unplug the external keyboard, if attached, and
reboot the system. If it still fails, have the external
keyboard repaired.
NOTE:
Repeated keystrokes during boot may
produce an error message.
A key is jammed. Remove any obstruction you find.
You may have repeatedly pressed the F1 key when
trying to enter Auto Setup.
the keyboard repaired.
IF YOU NEED ASSISTANCE
If you have a problem with your computer, first review the
checklist and troubleshooting table in the previous section.
If you still have a problem, call the NEC Technical Support
Center (TSC), toll free, at 1-800-632-4525 Direct technical
assistance is available 24 hours a day, seven days a week.
5-6 Solving Problems
Page 63

Getting
6
NEC Versa Diskette Fulfillment Center (800) 842-6446
NEC Customer Service and Support (800) 632-4525
NEC FastFacts (800) 366-0476 (U.S and Canada)
NEC Electronic Bulletin Board (508) 635-4706
Help
NEC is ready and willing to help you with our products.
Here's how to reach us.
To purchase backup diskettes and manuals.
Fax (508) 635-4666
Spare parts ordering, warranty claims, repair services,
technical support, and service authorizations.
(708) 238-7800 (International)
Automated fax service that offers product brochures, installation procedures, quick reference guides, promotional
forms, troubleshooting information, and more.
Remote database system containing files that are dedicated
to enhancing the functions of NEC products. It also gives
the general public access to drivers for NEC products to be
used with various software applications.
CompuServe Password: "GO NECTECH"
Internet Address: [email protected]
America Online: nectech
Getting Help 6-1
Page 64

Worldwide Web Address: www.nec.com
NEC is a member of TSANet (Technical Support Alliance
Network).
6-2 Getting Help
Page 65
Setting Up a Healthy
A
MAKING YOUR COMPUTER WORK FOR YOU
Work Environment
!
Prolonged or improper use of a computer workstation may pose a risk of serious injury. To reduce
your risk of injury, set up and use your computer i n
the manner described in this appendix.
Contact a doctor if you experience pain, tenderness,
swelling, burning, cramping, stiffness, throbbing,
weakness, soreness, tingling and/or numbness in
the hands, wrists, arms, shoulders, neck, back,
and/or legs.
Computers are everywhere. More and more people sit at
computers for longer periods of time. This appendix
explains how to set up your computer to fit your physical
needs. This information is based on ergonomics — the
science of making the workplace fit the needs of the worker.
WARNING
Some nerve, tendon, and muscle disorders (musculoskeletal
disorders) may be associated with repetitive activities, im-
proper work environments, and incorrect work habits. Examples of musculoskeletal disorders that may be associated
with certain forms of repetitive activities include: carpal
tunnel syndrome, tendinitis, tenosynovitis, de Quervain’s
tenosynovitis, and trigger finger, as well as other nerve, tendon, and muscle disorders.
Setting Up a Healthy Work Environment A-1
Page 66
Although some studies have shown an association between
increasing hours of keyboard use and the development of
some musculoskeletal disorders, it is still unclear whether
working at a computer causes such disorders. Some doctors
believe that using the keyboard and mouse may aggravate
existing musculoskeletal disorders.
Some people are more susceptible to developing these
disorders due to pre-existing conditions or psychosocial
factors (see “Pre-existing Conditions and Psychosocial
Factors” later in the appendix).
To reduce your risk of developing these disorders, follow
the instructions in this appendix. If you experience
discomfort while working at your computer or afterwards,
even at night, contact a doctor as soon as possible. Signs of
discomfort might include pain, tenderness, swelling,
burning, cramping, stiffness, throbbing, weakness, soreness,
tingling and/or numbness in the hands, wrists, arms,
shoulders, neck, back, and/or legs.
NOTE
To increase your comfort and safety when
using your notebook computer as your primary
computer system at your home or office, note the
following recommendations:
■ use a separate, external keyboard attached to
your notebook computer
■ use a separate, external monitor attached to
your notebook computer.
A-2 Setting Up a Healthy Work Environment
Page 67

ARRANGE YOUR EQUIPMENT
Arrange your equipment so that you can work in a natural
and relaxed position. Place items that you use frequently
within easy reach. Adjust your workstation setup to the
proper height (as described in this appendix) by lowering
the table or stand that holds your computer equipment or
raising the seat height of your chair. Position your notebook
computer directly in front of you for increased safety
and comfort.
ADJUST YOUR CHAIR
Your chair should be adjustable and stable. Vary your
posture throughout the day.
Check the following:
■ Keep your body in a relaxed yet upright position. The
backrest of your chair should support the inward curve
of your back.
■ Use the entire seat and backrest to support your body.
Tilt the backrest slightly backwards. The angle formed
by your thighs and back should be 90° or more.
■ Your seat depth should allow your lower back to com-
fortably contact the backrest. Make sure that the backs
of your lower legs do not press against the front of the
chair.
■ Extend your lower legs slightly so that the angle between
your thighs and lower legs is 90° or more.
■ Place your feet flat on the floor. Only use a footrest
when attempts to adjust your chair and workstation fail
to keep your feet flat.
■ Be sure that you have adequate clearance between the
top of your thighs and the underside of your workstation.
Setting Up a Healthy Work Environment A-3
Page 68

■ Use armrests or forearm supports to support your fore-
arms. If adjustable, the armrests or forearm supports
should initially be lowered while all the other adjustments discussed in this appendix are made. Once all
these adjustments are completed, raise the armrests or
adjust the forearm supports until they touch the forearms
and allow the shoulder muscles to relax.
ADJUST YOUR INPUT DEVICES
Note the following points when positioning your notebook
computer or any external input devices.
■ Position your keyboard directly in front of you. Avoid
reaching when using your keyboard or mouse.
■ If you use a mouse, position it at the same height as the
keyboard and next to the keyboard. Keep your wrists
straight and use your entire arm when moving a mouse.
Do not grasp the mouse tightly. Grasp the mouse lightly
and loosely.
■ Adjust the keyboard height so that your elbows are near
your body and your forearms are parallel to the floor,
with your forearms resting on either armrests or forearm
supports, in the manner described previously. If you do
not have armrests or forearm supports, your upper arms
should hang comfortably at your sides.
■ Adjust the keyboard slope so that your wrists are
straight while you are typing.
■ Type with your hands and wrists floating above the key-
board. Use a wrist pad only to rest your wrists between
typing. Avoid resting your wrists on sharp edges.
■ Type with your wrists straight. Instead of twisting your
wrists sideways to press hard-to-reach keys, move your
whole arm. Keep from bending your wrists, hands, or
fingers sideways.
A-4 Setting Up a Healthy Work Environment
Page 69

■ Press the keys gently; do not bang them. Keep your
shoulders, arms, hands, and fingers relaxed.
ADJUST YOUR SCREEN OR MONITOR
Correct placement and adjustment of the screen or external
monitor can reduce eye, shoulder, and neck fatigue. Check
the following when you position the screen or external
monitor.
■ Adjust the height of your screen or external monitor so
that the top of the screen is at or slightly below eye level.
Your eyes should look slightly downward when viewing
the middle of the screen or external monitor.
■ Position your screen or external monitor no closer than
12 inches and no further away than 28 inches from your
eyes. The optimal distance is between 14 and 18 inches.
■ Rest your eyes periodically by focusing on an object at
least 20 feet away. Blink often.
■ Position the screen or external monitor at a 90° angle to
windows and other light sources to minimize glare and
reflections. Adjust the monitor tilt so that ceiling lights
do not reflect on your screen or external monitor.
■ If reflected light makes it hard for you to see your screen
or external monitor, use an anti-glare filter.
■ Clean your screen or external monitor regularly. Use a
lint-free, non-abrasive cloth and a non-alcohol, neutral,
non-abrasive cleaning solution or glass cleaner to minimize dust.
■ Adjust the screen or external monitor’s brightness and
contrast controls to enhance readability.
■ Use a document holder placed close to the screen or ex-
ternal monitor.
Setting Up a Healthy Work Environment A-5
Page 70
■ Position whatever you are looking at most of the time
(the screen or reference material) directly in front of you
to minimize turning your head while you are typing.
■ Get regular eye check-ups.
VARY YOUR WORKDAY
If you use your computer for prolonged periods, follow
these instructions.
■ Vary your tasks throughout the day.
■ Take frequent short breaks that involve walking,
standing, and stretching. During these breaks, stretch
muscles and joints that were in one position for an
extended period of time. Relax muscles and joints that
were active.
■ Use a timer or reminder software to remind you to
take breaks.
■ To enhance blood circulation, alter your sitting posture
periodically and keep your hands and wrists warm.
NOTE
For more information on workstation setup,
see the American National Standard for Human
Factors Engineering of Visual Display Terminal
Workstations. ANSI/HFS Standard No. 100-1988.
The Human Factors Society, Inc., P.O. Box 1369,
Santa Monica, California 90406
A-6 Setting Up a Healthy Work Environment
Page 71

PRE-EXISTING CONDITIONS
AND PSYCHOSOCIAL FACTORS
Pre-existing conditions that may cause or make some people
more susceptible to musculoskeletal disorders include the
following: hereditary factors, vascular disorders, obesity,
nutritional deficiencies (e.g., Vitamin B deficiency), endocrine disorders (e.g., diabetes), hormonal imbalances, connective tissue disorders (e.g., arthritis), prior trauma (to the
hands, wrists, arms, shoulders, neck, back, or legs), prior
musculoskeletal disorders, aging, fluid retention due to
pregnancy, poor physical conditioning and dietary habits,
and other conditions.
Psychosocial factors associated with these disorders
include: workplace stress, poor job satisfaction, lack of
support by management, and/or lack of control over
one’s work.
Contact a doctor if you experience pain, tenderness,
swelling, burning, cramping, stiffness, throbbing, weakness,
soreness, tingling and/or numbness in the hands, wrists,
arms, shoulders, neck, back, and/or legs.
This appendix was prepared in c onsultation with Dr. David
Rempel of the University of California/San Francisco
Ergonomics Program and Mr. M.F. Schneider of
HUMANTECH, Inc., Ann Arbor, Michigan.
Setting Up a Healthy Work Environment A-7
Page 72

Specifications and
B
System Processor
Random Access Memory (RAM)
Read-only Memory (ROM)
Environment
The following specifications are standard except where
noted.
Intel P54LM-75MHz
Standard Main Memory — 8-MB high-speed interleaved
access
Expansion (optional) Two slots for DIMM sockets. Ex-
pandable in 4-MB, 8-MB, 16-MB increments up to a total
of 40-MB.
Video RAM 1 MB
Cache RAM L1: 8-KB code, 8-KB data
256-KB x 8 bit, Flash ROM
Calendar Clock
Year/month/day/hour/minute/second maintained by internal
back-up battery
Input/Output (I/O) Facilities
Integrated industry-standard interfaces
■ Parallel 1 port, 25-pin D-sub
■ Serial 1 port, 9-pin D-sub
■ VGA — 1 port, 15-pin high-density D-sub
32bit Local Bus
Hardware Windows Acceleration
Specifications and Environment B-1
Page 73

■ External Keyboard/External Mouse 1 port, PS/2, 6-
pin MiniDin; exclusionary use
■ Expansion 1 port, VGA CRT signal, external key-
board signal, PS/2 mouse signal
■ Phone — 1 port, RJ11
■ Power — 3-pin Mini Jack
Card Slots
Two slots for two Type I/Type II PCMCIA cards or one
Type III PCMCIA card. 3.3V interface.
Internal Fax/Modem
Ready to accept an optional NEC (Sierra Chip Set) 14.4
Kbps v32 bis Fax/Modem with RJ11connector.
See Appendix C for common modem commands.
Display
LCD
■ 9.5-inch Thin-film transistor (TFT) CCFT backlit color
Resolution — 640 x 480 pixels
■ Dot Pitch 0.3 mm
■ Colors 4,096 (64K colors on external CRT with
video subsystem)
■ Viewing Area 9.5 in. diagonal
■ Aspect Ratio 4:3 (or true CRT aspect ratio)
Keyboard
Membrane Ultra Low Profile 83 keys with standard
QWERTY-key layout (79 keys for International)
■ Function keys 12 keys
■ Cursor Control keys 8 keys; arrow keys arranged in
inverted T layout
■ Numeric keypad — embedded
B-2 Specifications and Environment
Page 74

Diskette Drive
Hard Disk Drive
■ Fn key function key for ROM-based key functions (5
keys for the Versa 2205C) (2 additional function keys
for Windows 95)
■ Stroke 3 mm
Standard 1.44-MB drive
■ Size 3.5 inch
■ Capacity 720 KB or 1.44 MB
■ Access Time (average) — 94 ms
■ Transfer Rate 250 to 500K bps
■ Interleave 1:1
■ Controller NS PC87334VJG
Internal 2.5-inch, 810-MB or 1-GB drive, removable
■ Track-to-track seek rate 4ms
■ Average seek 13ms (read), 14ms (write)
■ Revolutions per minute 4000
■ I/F data rate Μode 3-11 MB per second
■ Media data rates 39.5 − 27 Μbps
■ 1579 cylinders x 16 heads x 63 sectors per track
Specifications and Environment B-3
Page 75

Power
AC Adapter
■ Input Voltage 100 to 240 volts (V) AC, 50 or 60 Hz,
1.5 A maximum
■ Output Voltage 19 V DC, 2200mA (42W)
Battery Pack
■ Type — Lithium Ion (Li-Ion)
■ Output Voltage — 14.4 V
■ Capacity — 2,700 mA
■ Battery Life Power Management off: 2 - 4 hours
Power Management on: 3 - 4 hours
Recharging Time
Approximately 2 hours when the system is Off
(Quick Charge)
Approximately 6 to 7 hours when the system is On
(Normal Charge)
Bridge Battery
Fully charged, backs up memory contents and system status for up to 30 minutes under Suspend
mode, but battery change time is under 5 minutes.
Charge time: 24 hours.
Dimensions
System Unit
■ Width 11.8 in. (302 mm)
■ Depth 9.4 in. (241mm)
■ Height 2.1 in. (53.8 mm)
Battery Pack
■ Width 4.2 in. (108 mm)
■ Depth 4.5 in. (114.5 mm)
■ Height 0.85 in. (21.8 mm)
B-4 Specifications and Environment
Page 76

Weight
System 6.51 lb (2.95 kg)
Battery Pack 1.16 lb (527.6 kg)
Recommended Environment
Operation
■ Temperature 41°F to 95 F (5 C to 35 C)
■ Relative Humidity 20% to 80% (Noncondensing)
Storage
■ Temperature -4°F to 104°F (-20°C to 40°C)
■ Relative Humidity 20% to 80% (Noncondensing)
Memory Map
The system supports system miser and video shadowing.
The system supports BIOS as a cacheable area with write
protection. The following table shows the system's memory
map.
MEMORY SPACE SIZE FUNCTION
00000h-9FFFFh 640 KB Base Memory
A0000h-AFFFFh 64KB Video Memory (graphics)
B0000h-B7FFFh 32KB Upper Memory Block (UMB)
B8000h-BFFFFh 32KB Video Memory (text)
C0000h-C9FFFh 40KB Video BIOS
CA000h-E7FFFh 120KB Available Upper Memory
Block (UMB)
E8000h-EFFFFh 24KB Miser BIOS
F0000h-FFFFFh 64 KB System BIOS ROM
Specifications and Environment B-5
Page 77

Interrupt Controllers
Using interrupts, it is possible to change the code sequence.
To change the sequence, reassign the interrupt levels. Fifteen interrupts can be used with a cascade connection of
8259INTC x 2. The table shows interrupt level assignments
0 through 15, in order of decreasing priority.
CONTROLLER
MASTER/SLAVE PRIORITY NAME DEVICE
Master 0 IRQ0 Timer 1 counter 0
Master 1 IRQ1 Keyboard (Output buffer
Master 2 IRQ2 INT output from
Slave 3 IRQ8 Real time clock
Slave 4 IRQ9 Reserved
Slave 5 IRQ10 Reserved
Slave 6 IRQ11 Reserved
output
full)
controller 2
Slave 7 IRQ12 Mouse
Slave 8 IRQ13 (Co-processor)
Slave 9 IRQ14 Hard disk controller 1
Slave 10 IRQ15 Reserved
Master 11 IRQ3 Serial port 2 (Internal
Master 12 IRQ4 Serial port 1
Master 13 IRQ5 Reserved
Master 14 IRQ6 Floppy disk controller 1
Master 15 IRQ7 Parallel port 1
B-6 Specifications and Environment
Fax/Modem)
Page 78

Modem Commands,
C
AT Commands
Registers, and Codes
AT commands, S registers, and result codes are universally
understood instructions for network communications. Most
fax/modem applications automatically initialize your
modem with the proper AT commands and you do not need
to change anything. In case you ever do need to
communicate directly with your modem, or change a setup
string, the following tables list the most commonly-used AT
commands, S registers, and result codes that you can use to
configure and use your optional internal 14.4 Kbps data/fax
modem.
AT commands tell the modem how to operate. Except for
the escape sequence (+++) (switch to command mode) and
the
commands in the following table with the letters
Entering a command without a value is the same as entering
a command with zero (0) as the value. Bold indicates the
default value.
A/ command (repeat last command), precede all the
AT.
Modem Commands, Registers, and Codes C-1
Page 79

AT COMMANDS
COMMAND DESCRIPTION
A Manual answer.
A/
AT
B, B0 CCITT V.22 mode at 1200 bps; V.21 at 300 bps.
B1 Bell 212 A mode at 1200 bps; Bell 103 at 300
D
Modifiers:
Repeat last command (No AT needed).
Attention code; precede all commands except A/
and +++
bps.
Dial the number that follows D in the command
line. For example, ATDP555-1234 commands
the modem to pulse dial the phone number
555-1234.
0 to 9 Dialing digits.
A,B,C,D,*,# Tone dial characters.
P Pulse dial.
R Reverse originate mode.
n
Dials the telephone number
S=
(0-3) stored with the &Zn=x
command.
T Tone dial.
W Wait for dial tone. (Time specified
in register S6)
, Pause. (Time specified in register
S8)
! Flash hook.
@ Wait for quiet answer. (Time
specified in register S6)
; Return to command mode.
L Dial last number.
n
E, E0 Disable modem echo to terminal in command
mode.
E1
H, H0
H1 Go off-hook.
C-2 Modem Commands, Registers, and Codes
Enable modem echo to terminal in command
mode.
Go on-hook (hang up).
Page 80

AT COMMANDS
COMMAND DESCRIPTION
I, I0 Display 14,400 (Identification code).
I1 Return actual checksum on ROM.
I2 Return OK/ERROR on RAM checksum.
I3 Display firmware revision.
I4 Display configuration settings.
L0, L1 Low speaker volume.
L2
L3 High speaker volume.
M, M0 Turn speaker off.
M1
M2 Set speaker to always on.
M3 Turn speaker on until CD except during dialing.
N0 Force line speed set by S37 register.
N1
O, O0 Return to Online Data mode from Online
O1 Go online and initiate retrain.
Q, Q0
Q1 Do not display result codes (Quiet enabled).
Q2 No call progress messages in answer mode.
Sr=n Set S register r to value n.
Sr? Show value in S register
V, V0 Display numeric result codes (Verbose disabled).
Medium speaker volume.
Turn speaker on until Carrier Detect (CD).
When originating, auto line speed starting with
speed set in S37 register.
Command mode.
Display result codes (Quiet disabled).
r.
V1
Display full-word result codes (Verbose enabled).
Modem Commands, Registers, and Codes C-3
Page 81

AT COMMANDS
COMMAND DESCRIPTION
W0 No negotiation progress messages, report
connect at DTE speed.
W1 Return negotiation progress messages, report
connect at DTE speed.
W2 No negotiation progress messages, report
connect at DCE speed.
X, X0 Modem ignores dial tone and busy signal,
enables and displays CONNECT result code.
X1 Modem ignores dial tone and busy signal;
CONNECT speed result code enabled.
X2 Modem ignores busy signal; CONNECT speed
result code enabled. (Includes dial tone
detection.)
X3 Modem ignores dial tone; CONNECT speed
result code enabled.
X4
Y, Y0
Y1 Enable long-space disconnect.
Z, Z0
Z1 Reset modem and recall User Profile 1.
+++ Escape sequence. (Allows AT commands while
&C, &C0 Carrier Detect always on.
&C1
&D, &D0
&D1 Go to command mode for ON-to-OFF DTR
C-4 Modem Commands, Registers, and Codes
Modem recognizes dial tone and busy signal;
CONNECT speed result code enabled.
Disable long-space disconnect.
Reset modem and recall User Profile 0.
online; use AT0 to go back on line.)
Carrier Detect follows data carrier.
Modem ignores Data Terminal Ready (DTR)
option.
transition.
Page 82

AT COMMANDS
COMMAND DESCRIPTION
&D2 Hang up and go to command mode for ON-to-
OFF DTR transition. (Turn off auto answer.)
&D3 Reset for ON-to-OFF DTR transition.
&F Reset modem and recall factory defaults (only
affects current user session; is not permanent.)
&G, &G0
&L, &L0 Operate on common dialup telephone line.
&L1 Not supported.
&M, &M0
&P, &P0
&P1 Set pulse dial make/break ratio 33%/67%
&Q, &Q0 Use asynchronous mode.
&Q1, &Q2,
&Q3
&Q4
&Q5
&Q6
&S, &S0
&S1 Set DSR to follow CCITT V.24 specification.
&T, &T0 Terminate test.
&T1 Initiate local analog loopback test (mode selected
Disable guard tones (USA setting).
Operate in asynchronous mode. (Same as Q0)
Set pulse dial make/break ratio 39%/61%
(USA/Canada) .
(UK/HK).
Not supported.
Return error.
Data connection using V.42 or MNP.
Data connection using normal mode.
Set Data Set Ready (DSR) to be always true.
with the command %B
n
).
&T3 Initiate local activated Remote Digital Loopback
(RDL) test.
&T4
Grant request from remote for Remote Digital
Loopback (RDL) test.
Modem Commands, Registers, and Codes C-5
Page 83

AT COMMANDS
COMMAND DESCRIPTION
&T5 Deny remote request for RDL test.
&T6 Initiate RDL test.
&T7 Initiate RDL test with self-test.
&T8 Initiate local analog loopback with self-test.
&V, &V0 View active configuration, profiles phone
numbers, and S register contents.
&W, &W0 Save active configuration as User Profile 0.
&W1 Save active configuration as User Profile 1.
&X, &X0
&Y, &Y0
&Y1 Recall User Profile 1 on power up.
&Zn=x
\G0
\G1 Turn on Xon/Xoff software flow control.
\N0 Normal mode (non MNP, buffered data)
\N1 Direct mode (non MNP, data not buffered)
\N2 Reliable MNP mode (Attempts MNP connection;
\N3 Auto reliable mode (MNP if remote is MNP;
\N4 Reliable LAPM mode.
Modem source transmit clock.
Recall User Profile 0 on power up.
Store telephone number
(n=0-3, x=36 characters maximum.)
For example, to store phone number (555)555-
5555, you enter AT&Z0=5555555555. This stores
the phone number in position 0. To dial the
number, issue the following command:
ATDS=0
Turn off Xon/Xoff software flow control. (See also
\Q3 hardware flow control).
if unsuccessful, then disconnects.)
otherwise, normal.)
x
in directory entry
n
\N5 Auto-reliable LAPM and buffer mode.
C-6 Modem Commands, Registers, and Codes
Page 84

AT COMMANDS
COMMAND DESCRIPTION
\N6 Auto-reliable LAPM, MNP, and buffer mode.
\Q0 Disable DTE flow control.
\Q1 Bi-directional Xon/Xoff.
\Q2 Unidirectional CTS interface signal.
\Q3
\T0
\V0
\V1 Enable MNP responses.
%C0 Disable Data Compression.
%C1
%E0 Disable Auto Retrain.
%E1
#CC0
#CC1
Bidirectional hardware flow control. (RTS/CTS)
Disconnects if no activity for specified time; use
values 0-90 (seconds). If value = 0 (default), the
time is disabled.
Disable MNP responses.
Enable Data Compression.
Enable Auto Retrain.
Disable Caller ID.
Format modem for single message sent to DTE.
Modem Commands, Registers, and Codes C-7
Page 85

S Registers
The modem provides S registers to let you control many of
its parameters. Some of these S registers are Read-Only
(RO) registers. Some are bit mapped. For bit-mapped S
registers, each option controlled by the register is assigned a
bit. The state of the bit determines whether the option is enabled. The value of the S register is then set by adding the
values of all bits representing enabled options.
S Register
REGISTER DEFAULT DESCRIPTION
S0 0 Auto-answer on number of rings.
S1 0 Ring count.
S2 43 Escape Character (+) (ASCII value
in decimal; disabled above 127)
S3 13 Carriage Return character code
(ASCII value in decimal).
S4 10 Line Feed character code (ASCII
value in decimal).
S5 08 Backspace character code (ASCII
S6 02 Seconds to wait before dialing
S7 40 Seconds to wait for carrier after
S8 02 Seconds to pause for comma (,)
S9 06 Tenths of seconds for Carrier Detect
S10 14 Tenths of seconds to detect Carrier
S11 75 DTMF tone and pause duration.
S12 40 Return to data mode timer.
C-8 Modem Commands, Registers, and Codes
value in decimal).
without detecting dial tone.
dial.
dial modifier.
(CD) response time
loss time.
Page 86

S Register
REGISTER DEFAULT DESCRIPTION
S14 170 Read-only bit mapped register.
S16 00 Read-only bit mapped test register.
S18 00 Modem test timer in seconds.
S21 00 Read-only bit mapped.
S22 118 Read-only bit mapped.
S23 21 Read-only bit mapped.
S25 05 DTR delay detect timer in seconds.
S26 01 .01-second delay from RTS true to
CTS true.
S27 64 Read-only bit mapped.
S37 00 Maximum DCE line speed. Use the
following values (See also ATN
command):
0 =Speed of last AT command
issued.
1 = 75 bps
2 = 110 bps
3 = 300 bps
5 = 1200 bps
6 = 2400 bps
7 = 4800 bps
8 = 7200 bps
9 = 9600 bps
10 =12000 bps
11 = 14400 bps
Modem Commands, Registers, and Codes C-9
Page 87

Result Codes
The following table shows the numeric and verbose forms
of result codes the modem returns.
RESULT CODES
NUMERIC VERBOSE DESCRIPTION
0 OK Command executed.
1 CONNECT Connection at 300 bps.
2 RING Ring signal detected.
3 NO
CARRIER
4 ERROR Invalid command, checksum, error
5 CONNECT
1200
6 NO DIAL
TONE
7 BUSY Busy signal detected; enabled by
8 NO
ANSWER
10 CONNECT
2400
Carrier signal not detected or lost.
in command line, or command line
too long (exceeds 40 characters).
Connection at 1200 bps; disabled
by X0.
No dial tone detected; enabled by
X2, X4, or W dial modifier.
X3 or X4.
No silence detected when dialing a
system not providing dial tone;
enabled by @ dial modifier.
Connection at 2400 bps; disabled
by X0.
C-10 Modem Commands, Registers, and Codes
Page 88

BATTERY REPLACEMENT
A lithium battery in your computer maintains system configuration information.
In the event that the battery fails to maintain system configuration information,
NEC recommends that you replace the battery.
WARNING: There is a danger of explosion if the battery is incorrectly replaced.
Replace only with the same or equivalent type recommended by the manufacturer.
Discard used batteries according to the manufacturer’s instructions.
ATTENTION: Il y a danger d’explosion s’il y a replacement incorrect de la
batterie. Remplacer uniquement avec une batterie du même type ou d’un type
recommandé par le constructeur. Mettre au rébut les batteries usagées
conformément aux instructions du fabricant.
BATTERY DISPOSAL
Your bridge battery (not your main battery) is made of nickel-cadium (Nicad).
the Nicad bridge battery must be collected, recycled, or disposed of in an
environmentally-approved manner.
Your main battery, made of Lithium Ion (Li-Ion), and your CMOS lithium battery
are not recyclable.
The incineration, landfilling, or mixing of Nicad batteries with the municipal
solid wasted stream is prohibited by law in most areas.
Return Nicad batteries to a federal or state-approved recycler.
This may be where you purchased the battery or a local seller of automotive bat-
teries. In MINNESOTA, call 1-800-225-PRBA if you need further disposal information.
Contact your local waste management officials for other information regarding
the environmentally sound collection, recycling, and disposal of the batteries.
Page 89

(For United States Use Only)
FEDERAL COMMUNICATIONS COMMISSION
RADIO FREQUENCY INTERFERENCE STATEMENT
WARNING: Changes or modifications to this unit not expressly approved by the
party responsible for compliance could void the user’s authority to operate the
equipment.
NOTE: This equipment has been tested and found to comply with the limits for a
Class B digital device, pursuant to Part 15 of the FCC Rules. These limits are designed to provide reasonable protection against harmful interference in a residential installation. This equipment generates, uses and can radiate radio frequency
energy and, if not installed and used in accordance with the instructions, may
cause harmful interference to radio communications.
However, there is no guarantee that interference will not occur i n a particular installation. If this equipment does cause harmful interference to radio or television
reception, which can be determined by turning the equipment off and on, the user
is encouraged to try to correct the interference by one or more of the following
measures.
■ Reorient or relocate the receiving antenna.
■ Increase the separation between the equipment and receiver.
■ Connect the equipment to an outlet on a circuit different from the one to
which the receiver is connected.
■ Consult the dealer or an experienced radio/TV technician for help.
Use shielded and properly grounded I/O cables and power cable to ensure compliance of this unit to the specified limits of the rules.
(For Canadian Use Only)
This Class B digital apparatus meets all requirements of the Canadian
Interference-Causing Equipment Regulations.
Cet appareil numérique de la classe B repecte toutes les exigences du
Règlement sur le matériel brouillage du Canada.
 Loading...