

Page 1

PROPRIETARY NOTICE AND LIABILITY DISCLAIMER
The information disclosed in this document, including all designs and related
materials, is the valuable property of NEC Computer Systems Division, Packard
Bell NEC (NECCSD, PBNEC) and/or its licensors. NECCSD and/or its licensors,
as appropriate, reserve all patent, copyright and other proprietary rights to this
document, including all design, manufacturin g, reproduction, use, and sales rights
thereto, except to the extent said rights are expressly granted to others.
The NECCSD product(s) discussed in this document are warranted in accordance
with the terms of the Warr anty Statement accompanying each product. However,
actual performance of each such product is dependent upon factors such as system
configuration, customer data, and operator control. Since implementation by
customers of each product may vary, the suitability of specific product
configurations and applications must be determined by the customer and is not
warranted by NECCSD.
To allow for design and specification improvements, the information in this
document is subject to change at any time, without notice. Reproduction of this
document or portion s thereof with out prior written approval of NECCSD is pr ohibited.
NEC is a registered trademark of NEC Corporation and Versa is a U.S. registered trademark of NEC
Technologies, Inc.; all are used under license by NEC Computer Systems Division (NECCSD), Packard
Bell NEC, Inc.
All other product, brand, or trade names used in this publication are the trademarks or registered trade-
marks of their respective trademark owners.
First Printing — January 1997
Copyright 1997
NEC Computer Systems Division, Packard Bell NEC, Inc.
1414 Massachusetts Avenue
Boxborough, MA 01719
All Rights Reserved
Page 2
(For United States Use Only)
FEDERAL COMMUNICATIONS COMMISSION
RADIO FREQUENCY INTERFERENCE STATEMENT
!
Changes or modifications to this unit not expressly approved by the party responsible for compliance could void the user’s authority to operate the equipment.
NOTE
This is a Class B Digital Device. This equipment has been tested
and found to comply with the limits for a Class B digital device, pursuant to
Part 15 of the F CC Rules . T hes e limi ts ar e des ign ed to provid e reas onabl e
protection against harmful interference in a residential installation. This
equipment generates, uses and can radiate radio f requency energy and, if not
installed and used in accordance with the instructions, may cause harmful interference to radio communications.
However, there is no guarantee that interference will not occur in a particular
installation. If this equipment does cause harmful interference to radio or television reception, which can be determined by turning the equipment off and on, the
user is encouraged to try to correct the interference by one or more of the following measures.
WARNING
Reorient or relocate the receiving antenna.
Increase the separation between the equipment and receiver.
Connect the equipment to an outlet on a circuit different from the one to
which the receiver is connected.
To meet FCC standards, shielded cables and power cords are requir ed to connect
this device to a personal computer or other Class B certified device.
__________________________________________________________________
Canadian Department of Communications Compliance Statement
This equipme nt doe s not e xcee d t he Cl ass B l imi ts for radio noise emi ssi ons from digital apparatus
set out in the Radio interference Regulations of the Canadian Department of Communications.
Avis de conformité aux normes du ministère des Communications du Canada
Cet appareil respe cte le s limit es de brui ts radioélectri ques applicables aux appareils numé riques
de Classe B prescrites dans le Règlement sur le brouillage radioélectrique édicté par le ministère
des Communications du Canada.
European Community Directive Conformance Statement
This product is in conformity with the protection requirements of EC Council Directive
89/336/EEC on t he approximation of laws of the Member S tates relating to electro-magnetic
compatibility. This product satisfied the Class B limits of EN 55022.
NEC Computer Systems Division, Packard Bell NEC, Inc.
1414 Massachusetts Avenue
Boxborough, Massachusetts 01719
1-800-632-4525
Page 3

Using this Guide
The NEC Versa® 2500 Series User’s Guide gives you the
information you need to maximize the use of your NEC
Versa 2500 Series notebook computer. Read this guide to
familiarize yourself with the system and its features. For
specific information see
Chapter 1, “Getting Started,” to acquaint yourself with
system hardware.
Chapter 2, “Introducing the Software,” for a summary
of the applications loaded on your system. Software
included lets you experience the full spectrum of the
system, from creating vivid multimedia presentations to
accessing the Internet via Netscape Navigator.
Chapter 3, “Using Setup and Power Management,” to
customize your notebook’s parameter and power management settings.
Chapter 4, “Using Your NEC Versa,” for an understand-
ing of NEC Versa features and functionality. You’ll also
master procedures for connecting external options like
headphone, microphone or speakers.
Chapter 5, “Using Multimedia,” for steps on integrating
video and sound clips into impressive presentations.
Chapter 6, “Traveling with Your NEC Versa,” lists
valuable tips for getting the most out of your system
while on the road.
Chapter 7, “Solving Problems,” provides simple solutions to common problems that may arise while operating your notebook.
Setting Up Your Computer ix
Page 4
TEXT SETUP
Appendix A, “Setting Up a Healthy Work
Environment,” provides guidelines to help promote a
healthy work setting.
Appendix B, “Specifications and Environment,” to review NEC Versa 2500 Series system specifications.
To make this guide as easy to use as possible, text is set up
in the following ways.
Warnings, cautions, and notes have the following
format:
!
Warnings alert you to situations that could result i n
serious personal injury or loss of life.
WARNING
Cautions indicate situations that can damage the
system hardware or software.
NOTE
about whatever is being described.
x Setting Up Your Computer
!
Notes give particularly important information
CAUTION
Page 5

Names of keys are printed as they appear on the key-
board, for example,
Text that you must type or keys that you must press are
presented in bold type. For example, type
.
Enter
RELATED DOCUMENTS
See the following documents for additional information on
your NEC Versa 2500 Series notebook computer:
The NEC Versa 2500 Series Quick Setup sheet helps
you get your system up and running.
The NEC Versa 2500 Series Quick Reference card pro-
vides an easy-to-carry reference to LED meanings, controls, function key combinations, and NEC help
numbers.
Depending on the operating system installed, the
Microsoft
MS-DOS operating system online documentation comes
loaded on your NEC Versa computer.
Ctrl, Alt
®
Windows 95 or Windows for Workgroups
, or
Enter
.
and press
dir
An online version of this user’s guide also comes on
your hard disk drive. That way, you can leave the guide
at home and still have all the information you need at
your fingertips.
Setting Up Your Computer xi
Page 6

Contents
Using this Guide
Text Setup................................................................ x
Related Documents................................................... xi
1 Getting Started
Getting to Know Your NEC Versa............................ 1-2
Around the Front of the System............................ 1-3
Around the Back of the System ................................. 1-7
Around the Sides of the System................................. 1-9
The Left Side....................................................... 1-9
The Right Side..................................................... 1-10
Around the Bottom of the System.............................. 1-11
NEC Versa Power Sources ....................................... 1-12
Using the AC Adapter.......................................... 1-12
Using the Main Battery Pack................................ 1-15
When to Change the Battery Pack ........................ 1-17
Battery Handling.................................................. 1-17
Battery Life......................................................... 1-19
Extending Battery Life......................................... 1-19
Battery Charging ................................................. 1-20
Battery Precautions.............................................. 1-21
Battery Disposal.................................................. 1-22
Internal Batteries ...................................................... 1-22
CMOS Battery .................................................... 1-22
LCD Panel...................................................... 1-3
Speakers and Status LEDs.............................. 1-4
Keyboard........................................................ 1-6
NEC VersaGlide............................................. 1-6
Battery Pack Bay............................................ 1-7
Powering On................................................... 1-15
Installing the Battery Pack .............................. 1-16
Replacing the Battery Pack ............................. 1-18
Setting Up Your Computer iii
Page 7

System Care ............................................................. 1-23
Precautions.......................................................... 1-23
Storage Requirements.......................................... 1-26
Routine Cleaning................................................. 1-27
2 Understanding the Software
Windows Introduction............................................... 2-2
Windows 95 ........................................................ 2-3
Windows for Workgroups.................................... 2-4
DOS Introduction ..................................................... 2-5
Guide to Online Help ................................................ 2-5
Guide to NEC Utilities.............................................. 2-7
Setup................................................................... 2-7
Battery Gauge Utility........................................... 2-7
PHDisk................................................................ 2-7
Other Software......................................................... 2-8
Phoenix Card Manager ........................................ 2-8
LapLink............................................................... 2-8
How to Use LapLink....................................... 2-9
McAfee Anti-Virus Software ............................... 2-10
VideoSaver.......................................................... 2-12
XingMPEG Player™........................................... 2-12
Microsoft Works.................................................. 2-13
Microsoft Money................................................. 2-13
Microsoft Return of Arcade ................................. 2-13
Microsoft Sampler............................................... 2-13
Online Services......................................................... 2-14
America Online.................................................... 2-16
CompuServe and WOW! from CompuServe......... 2-17
AT&T WorldNet................................................. 2-18
Netscape Navigator Dial Up Edition..................... 2-19
Official Airline Guide (OAG)............................... 2-20
iv Setting Up Your Computer
Page 8

3 Using Setup and Power Management
Setup Utility............................................................. 3-1
How to Enter Setup.............................................. 3-2
How to Use Setup................................................ 3-2
Looking at Screens.......................................... 3-3
Using Keys..................................................... 3-4
Checking/Setting System Parameters.................... 3-4
Main............................................................... 3-7
Peripherals...................................................... 3-8
Security.......................................................... 3-8
Power Savings................................................ 3-10
Using Power Management......................................... 3-11
Power Saving Modes ........................................... 3-11
Power Management Settings ................................ 3-12
Using Fn-Esc....................................................... 3-13
4 Using Your NEC Versa Computer
LCD......................................................................... 4-1
Keyboard.................................................................. 4-2
Function Keys...................................................... 4-2
NEC VersaGlide....................................................... 4-5
Making VersaGlide Adjustments.......................... 4-6
Windows 95 VersaGlide Adjustments................... 4-6
Windows for Workgroups VersaGlide
Adjustments......................................................... 4-7
VersaGlide Tips................................................... 4-9
Drive Bays ............................................................... 4-9
Removing Devices from Drive Bays..................... 4-10
Installing Devices in Drive Bays........................... 4-11
Customizing Your System.................................... 4-11
Optional 8X CD-ROM Reader.................................. 4-12
CD Loading......................................................... 4-13
Using Audio CDs in Windows for
Workgroups.................................................... 4-13
Setting Up Your Computer v
Page 9

Adding the CD Audio Option.......................... 4-13
Playing Audio CDs......................................... 4-14
Using Audio CDs under Windows 95.............. 4-14
Playing Entertainment CDs using
Windows 95 ................................................... 4-14
CD Care.............................................................. 4-15
PC Cards.................................................................. 4-15
Type II Cards ...................................................... 4-15
Type II Extended Cards ....................................... 4-16
Type III Cards..................................................... 4-16
Communication Cards..................................... 4-17
PC Card Modems ........................................... 4-17
Storage Cards................................................. 4-17
Interface Cards............................................... 4-17
Other Cards.................................................... 4-18
PCM Plus Drivers ............................................... 4-18
PC Card Enablers................................................ 4-19
Disabling Preloaded PCMCIA Drivers................. 4-20
PC Card Slots...................................................... 4-21
Inserting a PC Card ........................................ 4-21
Removing a Card............................................ 4-22
IR Port................................................................ 4-23
Increasing System Storage and Memory .................... 4-24
Hard Disk............................................................ 4-24
Installing a Memory Module ................................ 4-24
Reviewing the Memory Map ........................... 4-27
Installing Options...................................................... 4-28
External Monitor ................................................. 4-28
Printer................................................................. 4-30
Parallel Devices.............................................. 4-30
Serial Devices................................................. 4-31
Serial Mouse Use................................................. 4-33
Windows 95 Systems...................................... 4-33
MS-DOS Mode .............................................. 4-34
Windows for Workgroups Systems ................. 4-35
External Keyboard/Mouse.................................... 4-37
External Audio Options........................................ 4-38
vi Setting Up Your Computer
Page 10

NEC Port Replicator 2400................................... 4-39
5 Using Multimedia
Audio ....................................................................... 5-1
Recording............................................................ 5-1
Line-In ................................................................ 5-3
Microphone ......................................................... 5-4
Playing Back ....................................................... 5-4
MIDI Files........................................................... 5-5
Video........................................................................ 5-6
Using Animation Files.......................................... 5-6
Multimedia Applications........................................... 5-6
VideoSaver.......................................................... 5-7
Using the Port Replicator 2400 ....................... 4-40
Using TV Output............................................ 4-41
Changing Video Settings................................. 4-42
Connecting Your Notebook to a TV ................ 4-43
Setting the System BIOS to TV Mode............. 4-43
Disabling TV Mode ........................................ 4-44
Using Headphones .......................................... 5-5
Using the Built-In Speakers............................. 5-5
Using External Stereo Speakers....................... 5-5
6 Traveling with Your NEC Versa
Power Connections ................................................... 6-1
Checklists................................................................. 6-2
What to Take....................................................... 6-2
Preparing Your NEC Versa for Travel ................. 6-3
7 Solving Problems
Problem Checklist..................................................... 7-1
Start-Up Problems.................................................... 7-3
POST Error Messages ......................................... 7-3
Setting Up Your Computer vii
Page 11

If You Need Assistance............................................. 7-6
Getting Help ............................................................. 7-7
Updating the System BIOS .................................. 7-8
Distribution Diskette Creator (DDC)......................... 7-9
NEC Warranty/Non-Warranty Repair Service........... 7-10
A Setting Up a Healthy Work Environment
Making Your Computer Work for You...................... A-1
Arrange Your Equipment .......................................... A-3
Adjust Your Chair .................................................... A-3
Adjust Your Input Devices........................................ A-4
Adjust Your Screen or Monitor................................. A-5
Vary Your Workday ................................................. A-6
Pre-existing Conditions and Psychosocial Factors...... A-7
B Specifications and Environment
Glossary
Index
viii Setting Up Your Computer
Page 12
1
Getting Started
!
Prolonged or improper use of a computer workstation may pose a ri sk of serious inj ury. To reduce
your risk of injury, set up and use your comput er in
the manner descri bed in Appendix A, S etting Up a
Healthy Work Environment.
After completing the steps in the quick setup sheet that
comes with your computer, your NEC Versa 2500 Series
system is ready to go! To get started:
Read Appendix A, Setting Up a Healthy Work Envi-
ronment, for guidelines that help you use your computer
productively and safely. Information includes how to set
up and use your computer to reduce your risk of developing nerve, muscle, or tendon disorders.
WARNING
Read through this guide to familiarize yourself with the
NEC Versa.
Getting Started 1-1
Page 13
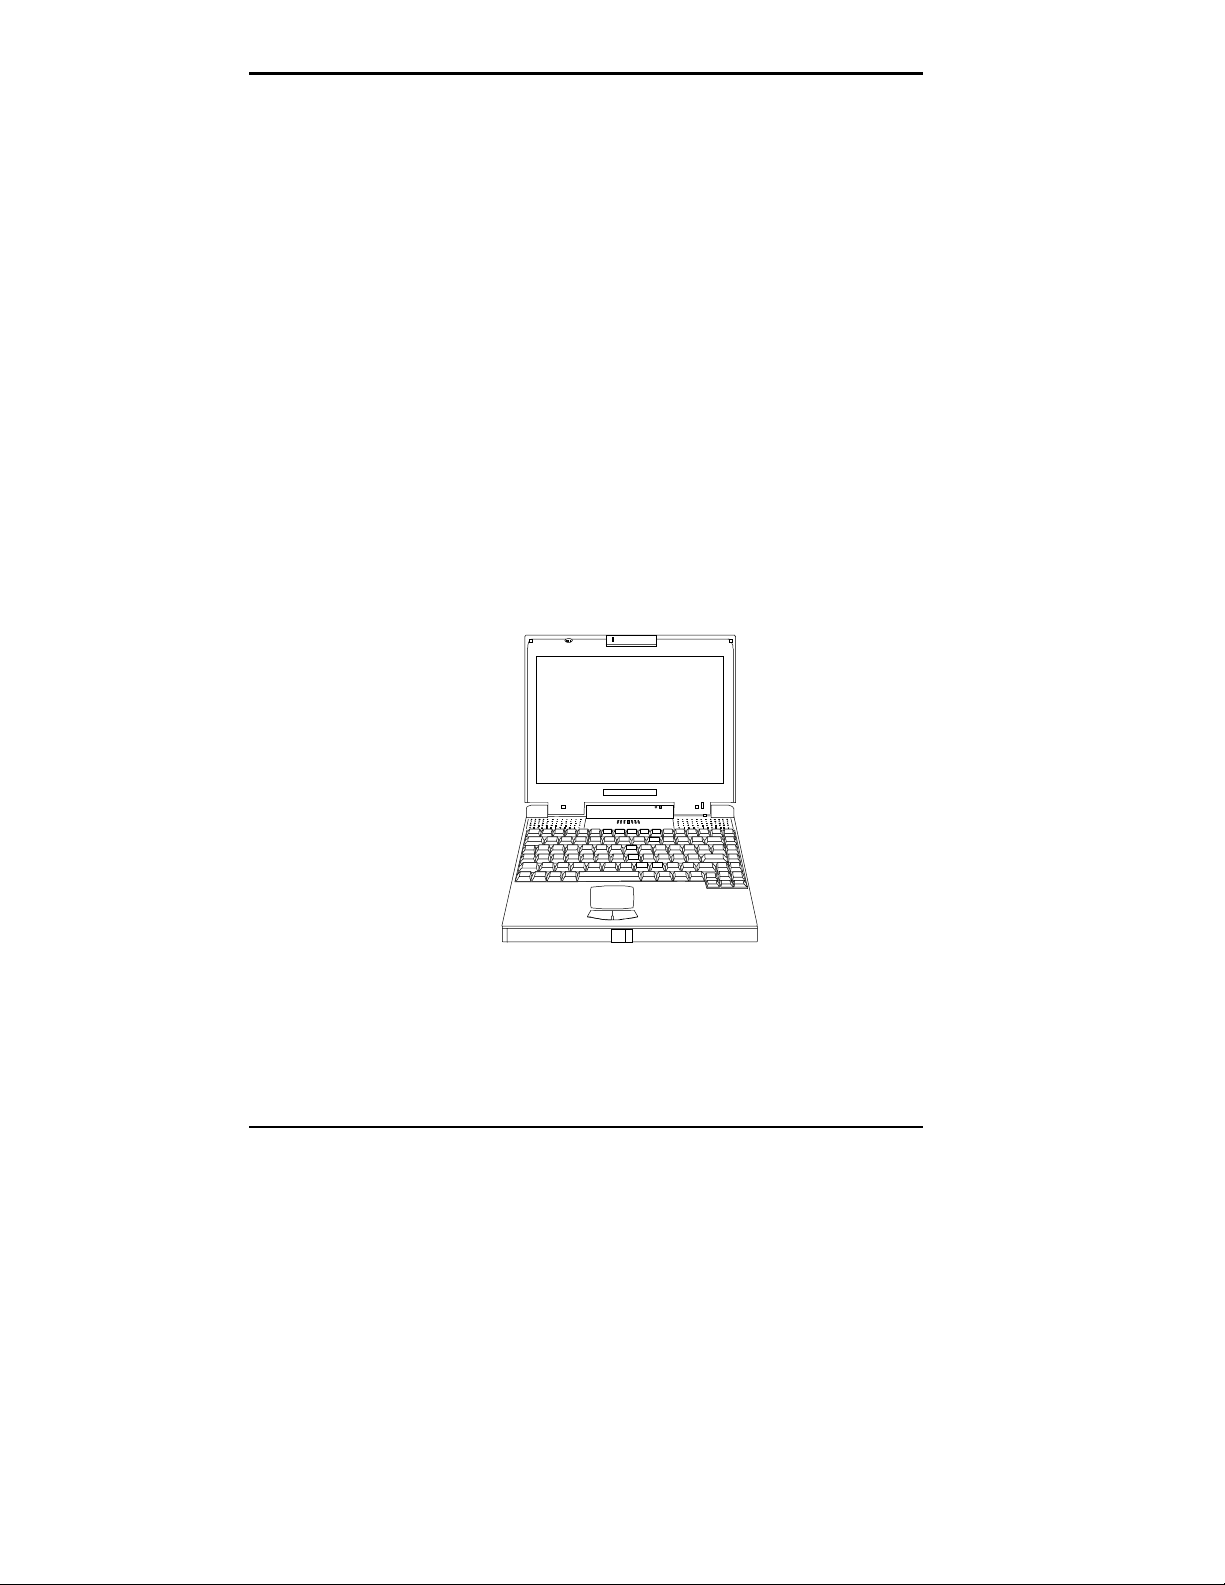
GETTING TO KNOW YOUR NEC VERSA
The NEC Versa 2500 Series notebook computer offers you
a portable system filled with exciting resources for home,
business or travel. Standard features include a powerful
®
Pentium 133-MHz microprocessor that works
Intel
together with the latest Extended Data Out (EDO) Random
Access Memory (RAM) for exceptional performance.
In addition, your system gives you a high-performance hard
disk drive, diskette drive, built-in VersaGlide and PC card
slots for Personal Computer Memory Card International
Association (PCMCIA) PC cards. NEC also gives you the
drive bay space for installing an optional CD-ROM reader.
As a multimedia system, your NEC Versa provides the
tools needed to create and present impressive images using
video clips and sound.
To get comfortable with your notebook, read the following
sections and take a tour around your system!
1-2 Getting Started
NEC Versa 2500 Series notebook computer
Page 14
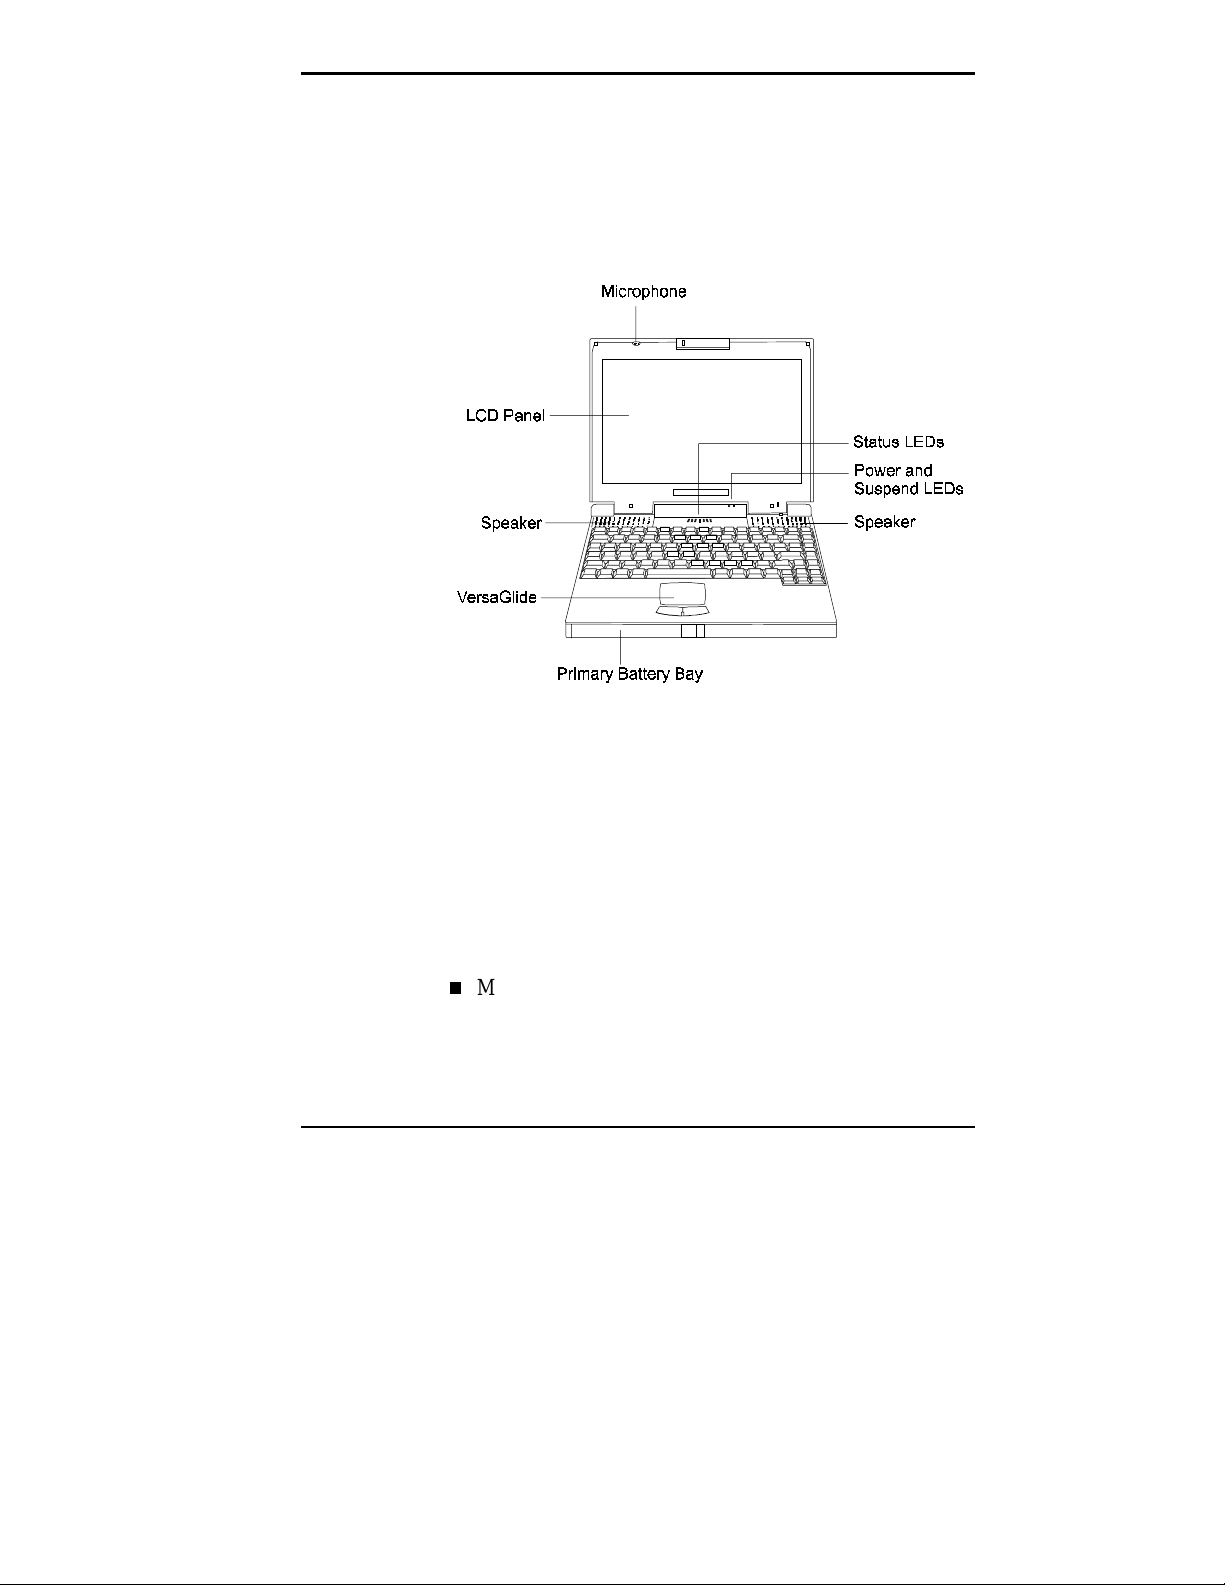
Around the Front of the System
The NEC Versa is compact with features on every side.
First, look at the front of the system. The following sections
describe front features, beginning with the liquid crystal
display (LCD) panel.
LCD Panel
Front features
Your NEC Versa 2500 Series system comes with a color
LCD that you can adjust for a comfortable viewing position. The LCD is a 12.1-inch Dual Scan Super-Twisted
Nematic (DSTN), cold cathode fluorescent tube (CCFT),
backlit Super Video Graphics Array (SVGA) color display.
The LCD panel offers the following features:
Microphone — allows you to record monophonic sound
directly into your notebook computer.
Getting Started 1-3
Page 15
Brightness and Contrast Controls — use convenient Fn
key combinations to adjust LCD brightness and contrast.
Press and hold the
key and cursor arrow as follows:
Fn
increases LCD brightness.
Fn-
↑
decreases LCD brightness.
Fn-
↓
increases LCD contrast.
Fn-
→
decreases LCD contrast.
Fn-
←
Speakers and Status LEDs
NEC Versa systems offer the following features on the
LCD hinge and the upper part of the keyboard panel:
Built-in Stereo Speakers — provide stereo sound for
your multimedia presentations or listening pleasure.
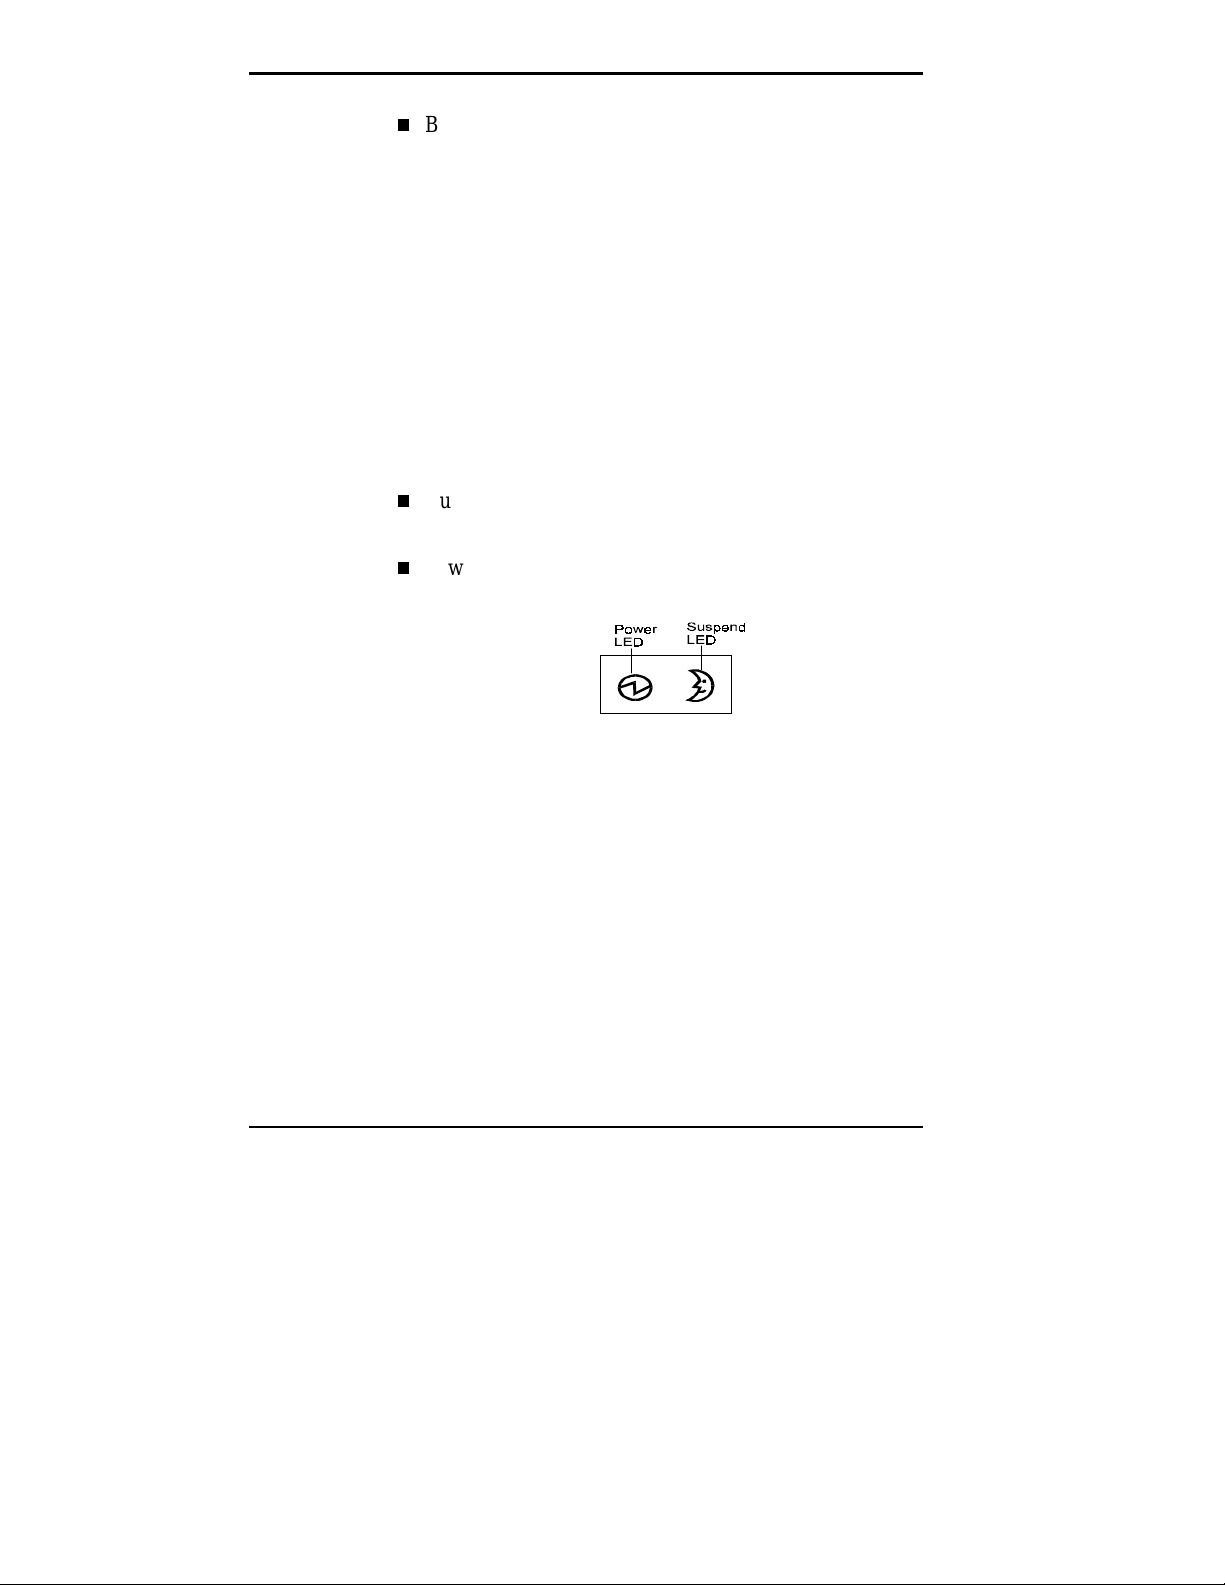
Power and Suspend status LEDs — (identified by icons)
are found on the hinge just under the LCD panel.
Power and Suspend LEDs
1-4 Getting Started
Power LED — lets you know that power to the sys-
tem is turned on. This LED is positioned so that you
see the power state whether the LCD panel is opened
or closed.
– Lights green when the system is powered on.
– Blinks green when battery power is low.
Page 16
Suspend Mode LED — lets you know that the
system is currently in Suspend mode. This LED is
positioned so that you see the system state when the
LCD panel is opened or closed.
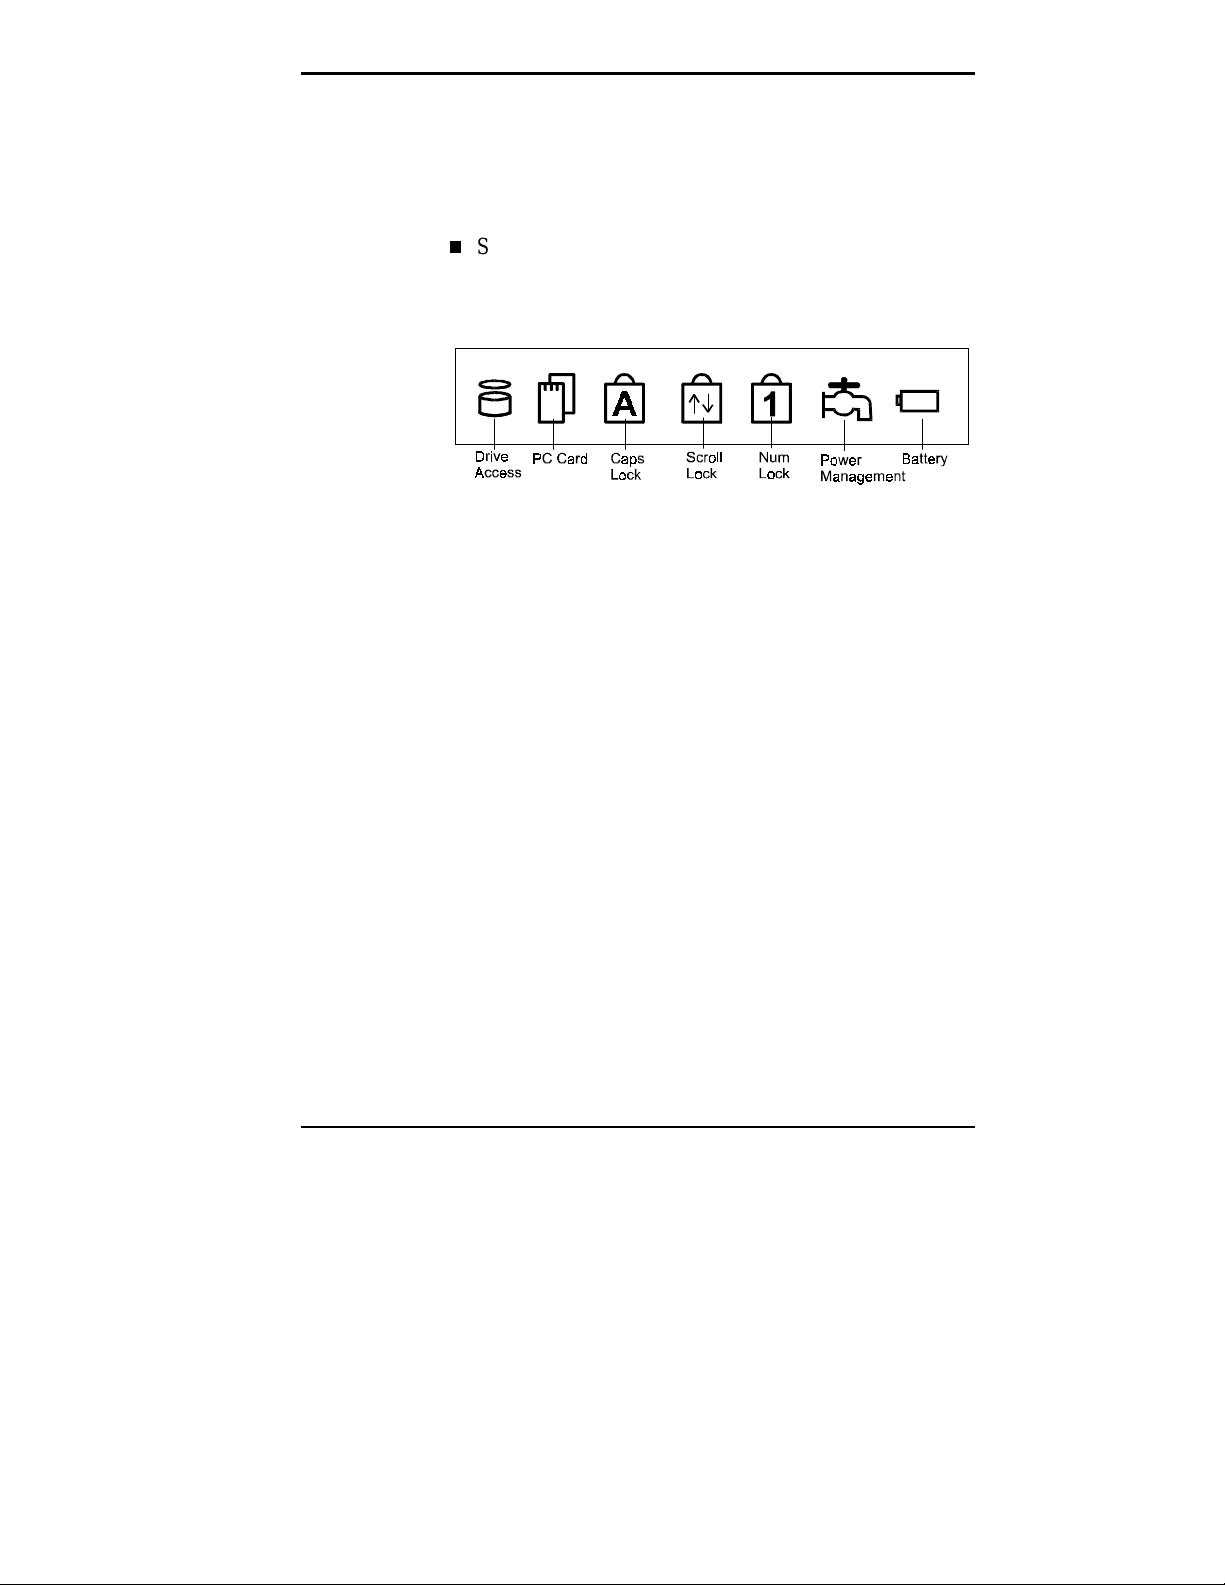
Status LEDs — status lights inform you of the status of
your system and its components. Status LEDs have the
following meanings and light under the conditions noted:
Status LED icons
Drive Access – lights when the NEC Versa writes
data to or retrieves data from the hard disk drive,
CD-ROM reader, or diskette drive.
PC Card – lights when a PC Card installed in the
PC slot is being accessed.
Caps Lock – lights when caps lock is in effect.
Scroll Lock – lights when scroll lock is in effect.
Num Lock – lights when Num Lock mode is active.
Power Management – lights when power manage-
ment features are enabled.
Getting Started 1-5
Page 17
Keyboard
Battery Charging Status – lights to indicate the
following:
Green indicates that the battery is charging.
Blinking green indicates that either the battery
charge is very low or the battery is overheating.
No color indicates that battery charging is complete,
or no battery is installed.
NOTE
A blinking battery icon indicates that system
battery power has reached dangerously low lev els.
When this occurs, a function called trickle charge
automati cally acti vates. Tric kle charge prot ects the
battery by rec harging i t, and ret urning t he batt ery t o
a usable state.
The NEC Versa 2500 Series system comes with an 87-key
keyboard with inverted T cursor keys. (European models
come with 88 keys.) See Chapter 4, “Using the Keyboard,”
for details about control keys, function keys, and keyboard
features.
NEC VersaGlide
The NEC VersaGlide works like a standard computer
mouse. Simply move your fingertip over the VersaGlide to
control the position of the cursor. Use the selection buttons
below the VersaGlide to select menu items. The left button
is configured to function like the left button on a mouse.
The right button is configured as a right-mouse button.
See “NEC VersaGlide” in Chapter 4 for information about
customizing VersaGlide settings.
1-6 Getting Started
Page 18
Battery Pack Bay
The NEC Versa comes with a rechargeable nickel-metalhydride (NiMH) battery pack. You can remove the battery
pack from the front bay and install an optional 8X CDROM reader.
!
Instal l onl y t he batt ery pac k or opt ional 8X CD-RO M
reader in the f ront bay .
driv e into the front bay. Doing so can damage the
drive and the bay connectors.
CAUTION
Never
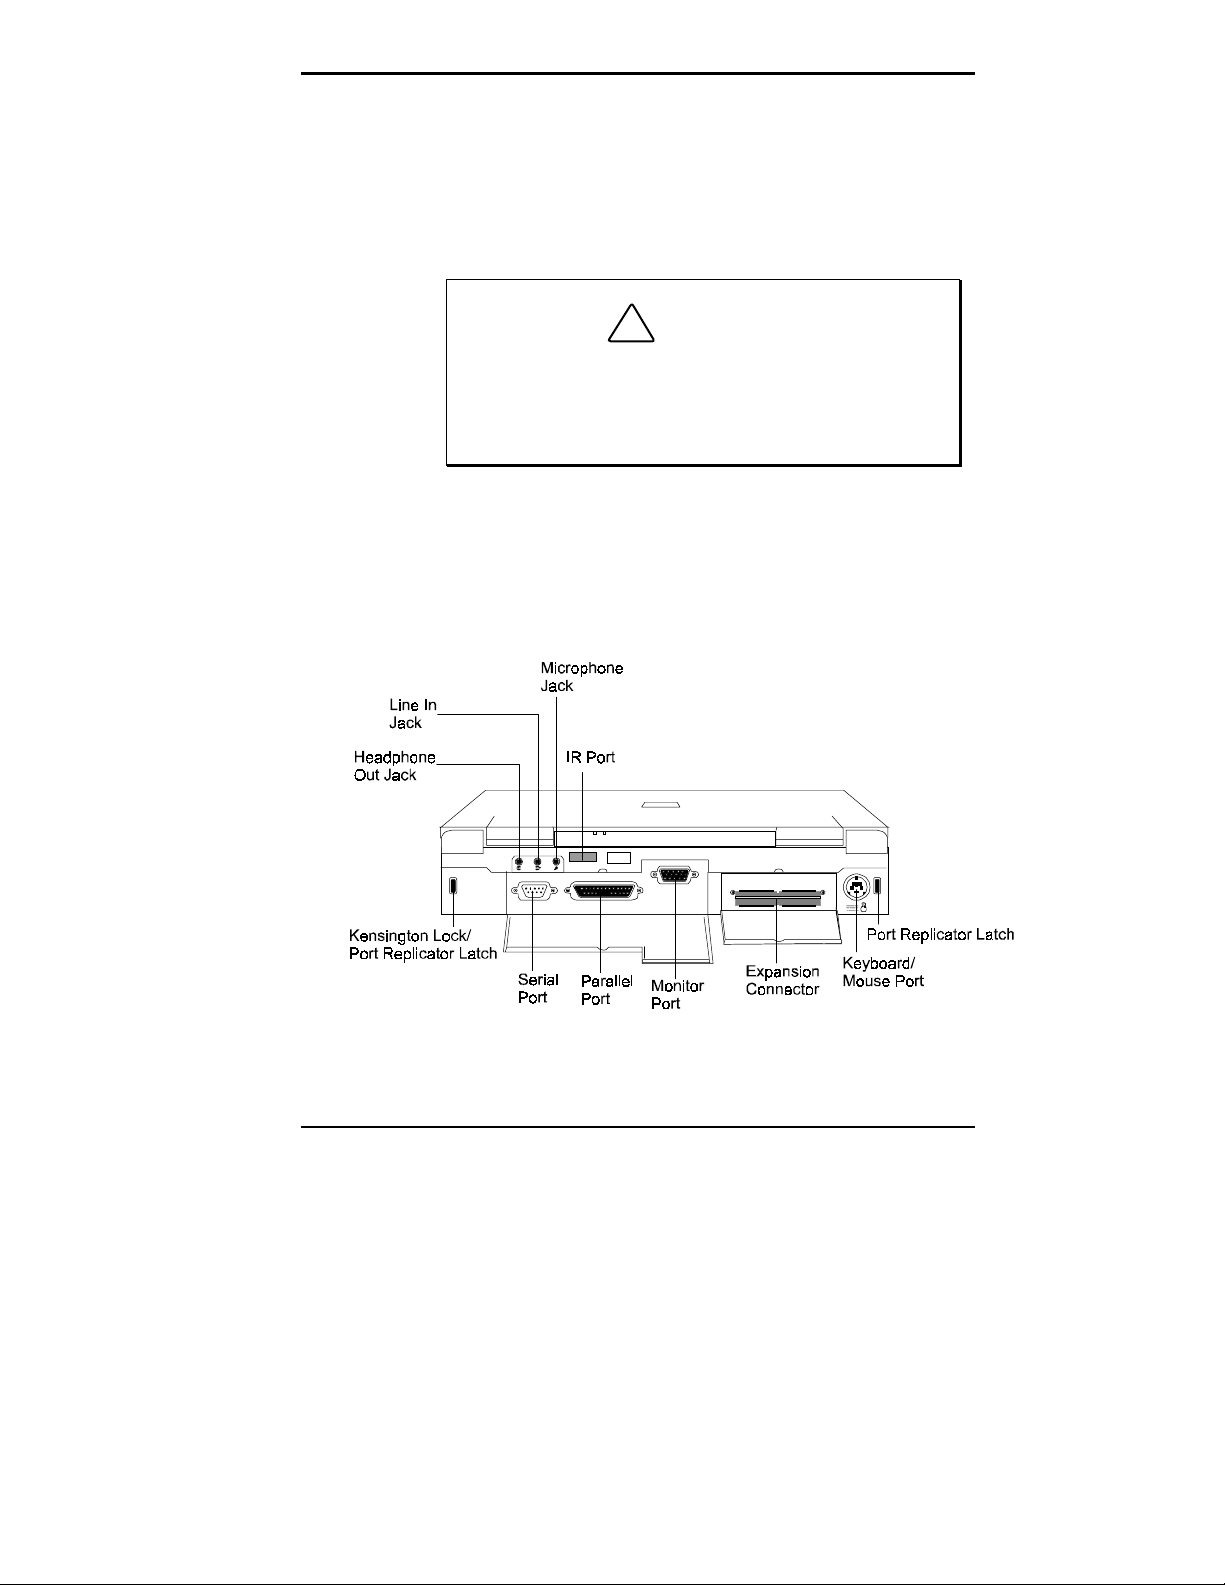
AROUND THE BACK OF THE SYSTEM
You’ll find system ports for connecting your NEC Versa to
optional devices (like a printer or external monitor) on the
back of your NEC Versa. For an understanding of each
feature, see the descriptions that follow the figure.
try to put t he diskett e
Back system features
Getting Started 1-7
Page 19

Audio Ports
Line In — Lets you use another audio system, like a
home stereo, as an input source. Use a cable to connect to the Line-Out port on the other audio system
to record or play.
Headphones — Lets you plug in stereo headphones
or powered speakers.
Microphone — Allows you to connect an external
microphone for monophonic recording or amplification through the unit. Plugging in an external microphone disables the built-in microphone.
Infrared Port — Use this port to transfer files between
your NEC Versa and an IR-equipped desktop or notebook computer. You can also print to an IR-equipped
printer without using cables.
Kensington Lock/Port Replicator Latch — Use this
“port” for added security by using an optional Kensington Lock. This port also doubles as a latch for securing
the port replicator. (You cannot connect both a lock and
the port replicator at the same time.) A second Port
Replicator Latch is located at the other end of the back
of the system.
1-8 Getting Started
Serial Port — Use this port to connect an external mo-
dem or other serial device.
Parallel Port — Use this port to connect a parallel
printer or other parallel device. The parallel port supports Enhanced Capabilities Port (ECP) and Enhanced
Parallel Port (EPP) standards. Both standards provide
you with a greater processing speed than the conventional parallel port. Both also support bi-directional and
uni-directional protocols.
Page 20
Monitor (Video) Port — Use this 15-pin port to attach
an external monitor to your NEC Versa. You can run the
LCD display and the external monitor simultaneously or
run either alone.
Expansion Port — This port provides a connection for
the NEC Port Replicator 2400.
Keyboard/Mouse Port — Use the standard PS/2 port to
connect an external PS/2-style mouse or a PS/2-style
keyboard to the system. With an optional Y-cable
adapter, you can connect both a mouse and a keyboard
at the same time
AROUND THE SIDES OF THE SYSTEM
Your NEC Versa comes with features on both sides. This
section shows you where those features are located and
provides descriptions to familiarize you with their use.
The Left Side
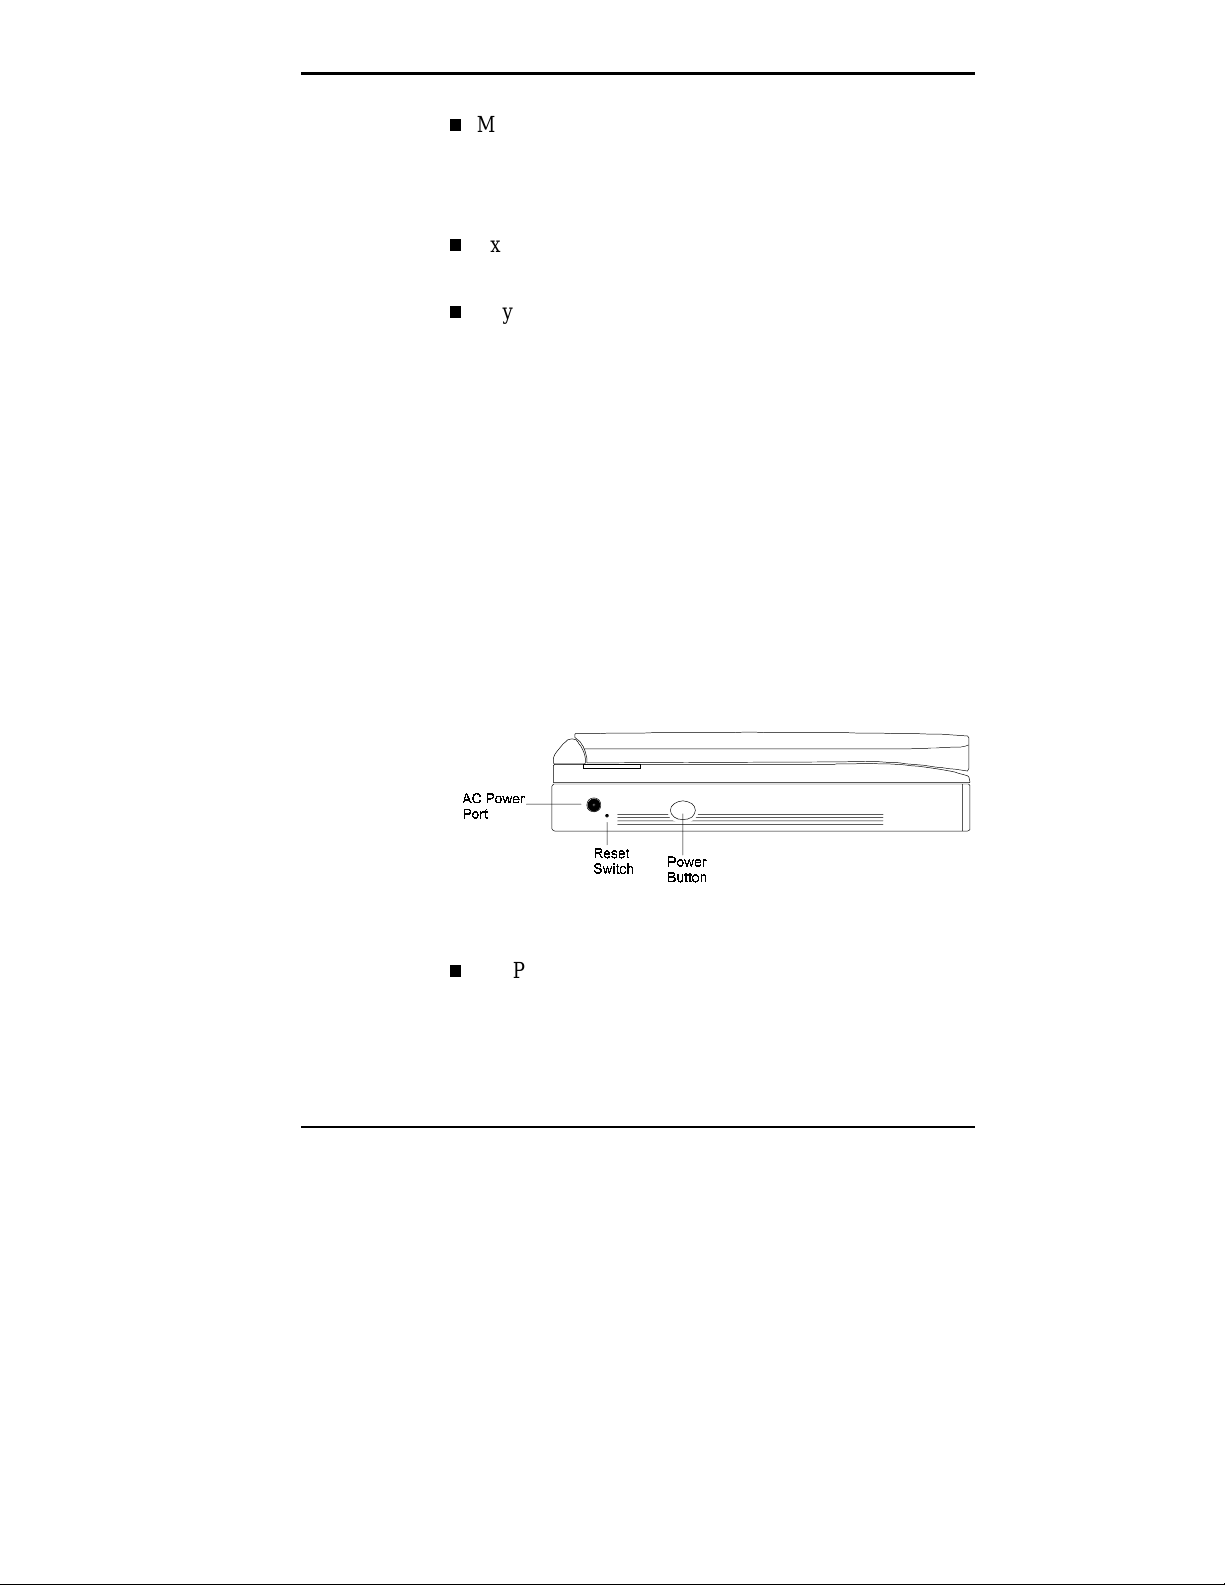
The left side of your NEC Versa provides the features
shown in the following figure. (Features are described after
the figure.)
Left side features
AC Power Port — The AC power port lets you attach
the NEC Versa to the AC power source using the AC
adapter that comes with your system. Keep the system
connected to AC power whenever possible to keep the
battery pack and internal CMOS battery charged.
Getting Started 1-9
Page 21
The Right Side
The right side of the NEC Versa offers the features shown
in the following figure. (Features are described after the
figure.)
Reset Switch — This recessed switch lets you restart
your system. Use a pointed object, like a straightened
paper clip, to push in the Reset button. Use this button
only if your system locks up, fails to respond to keystrokes, or fails to respond to the Power button.
Power Button — The Power button turns NEC Versa
power on and off. Press the button to turn power on;
press it again to turn power off. When power is on, the
Power LED lights.
NOTE
After turning off the system, wait 5 seconds
before tur ning i t back on. Thi s gi ves system com ponents a chance to power down properly.
The Power button also acts as a Resume button when
the system is in Save-to-File mode.
1-10 Getting Started
Right side features
Page 22
Diskette Drive — A 3.5-inch, 1.44-MB diskette drive
comes installed in the NEC Versa 2500 Series system.
The drive accepts 1.44-MB high-density diskettes as
well as 720-KB double-sided double-density diskettes.
If you remove the diskette drive, the diskette drive bay
also supports an optional second battery pack.
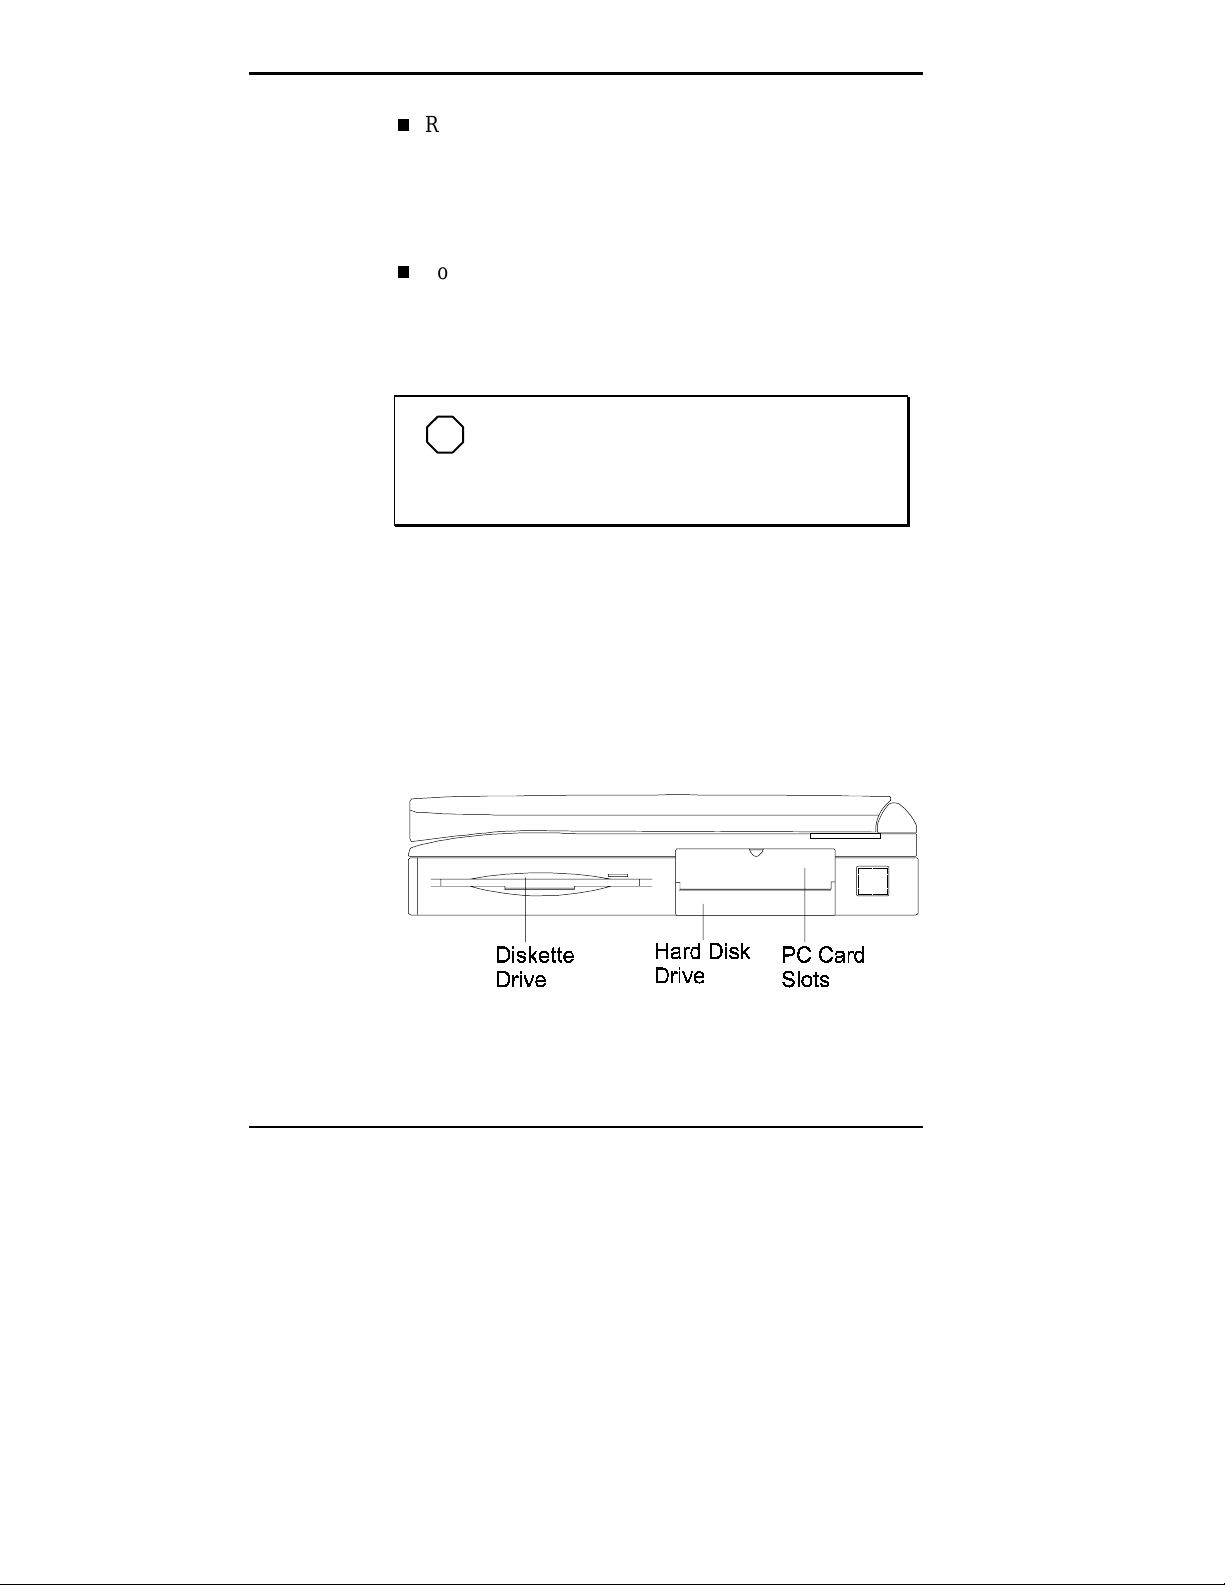
PC Card Slots — Two PC card slots let you insert two
Type II PC cards or one Type III PC card.
Hard Disk Drive — A removable hard disk drive ships
standard with your system and is located in a drive bay
below the PC Card Slots. This bay contains a 1-gigabyte
(GB) hard disk drive. See Appendix B for hard disk
drive specifications.
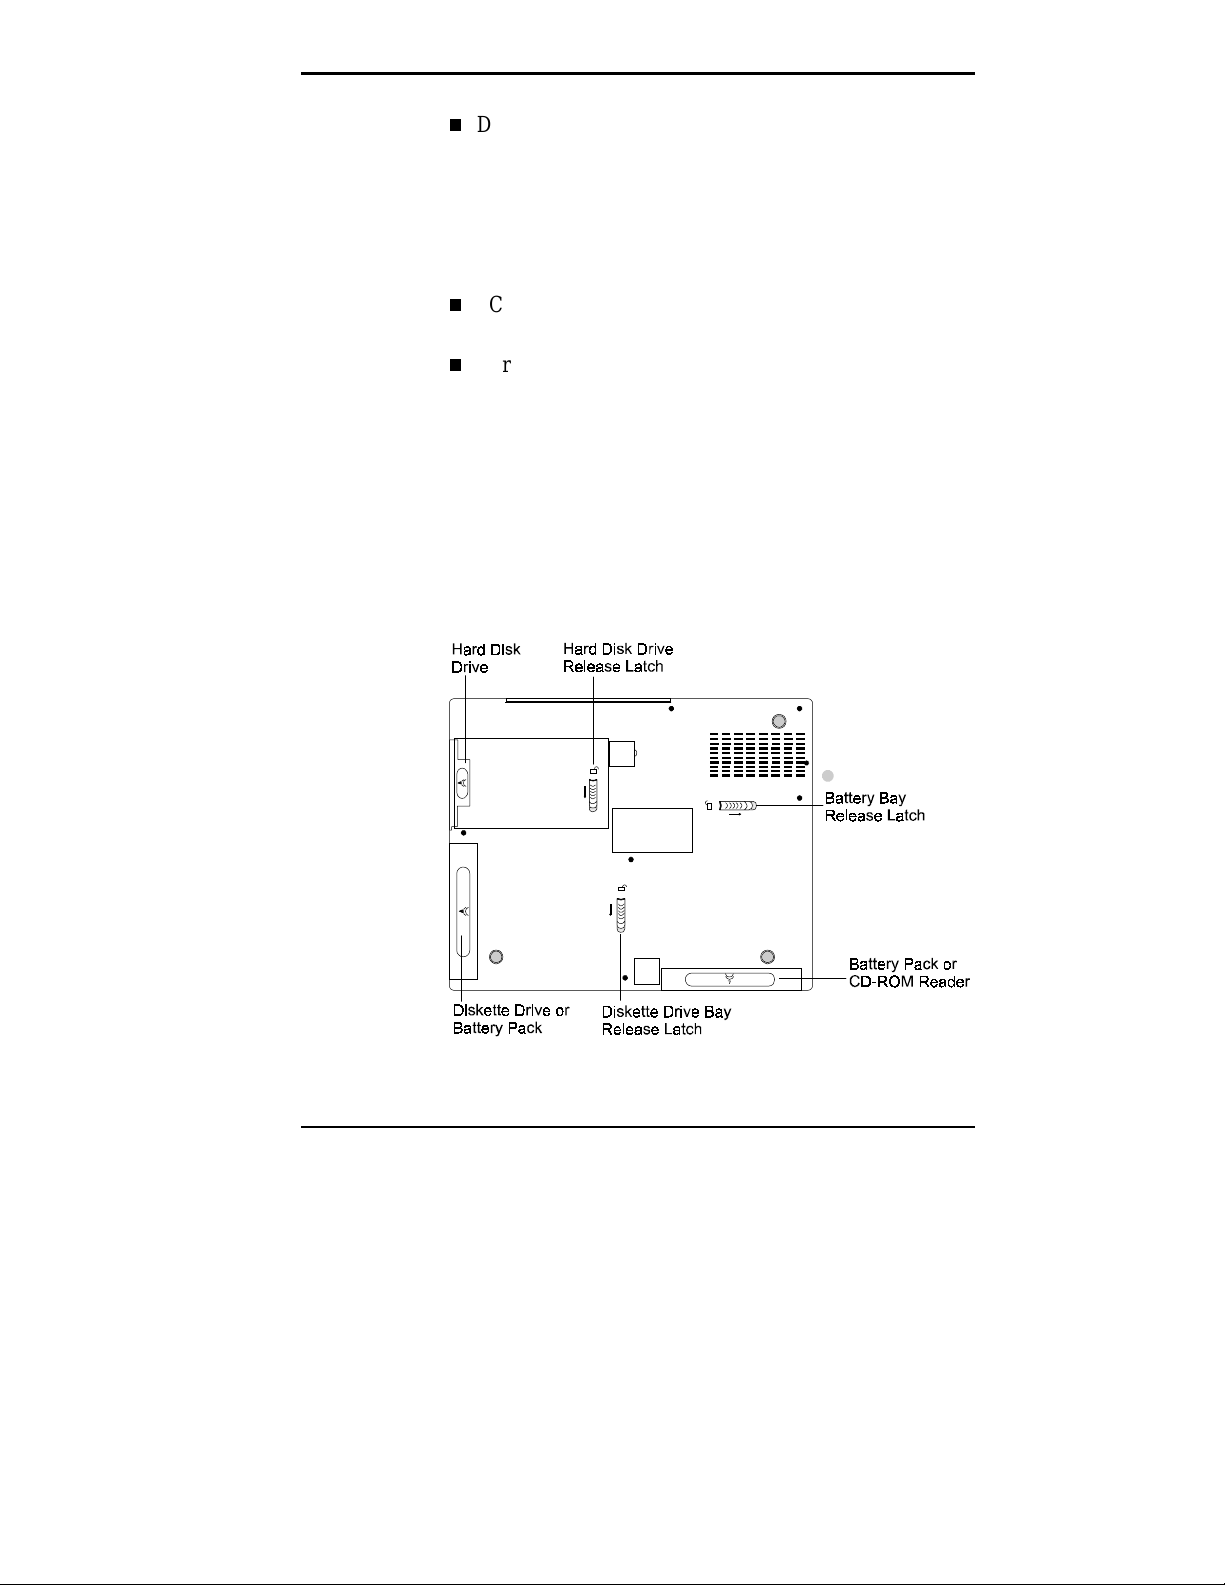
AROUND THE BOTTOM OF THE SYSTEM
The bottom of the NEC Versa contains the release latches
shown in the following figure. Pressing the release latch lets
you remove the option installed in the corresponding bay.
Bottom of the system
Getting Started 1-11
Page 23

The following release latches are provided:
Diskette drive bay release latch — allows you to remove
the diskette drive or an optional second battery pack installed in the bay.
Hard disk drive release latch — lets you remove the hard
disk drive installed.
Battery bay release latch — lets you remove the battery
pack or optional CD-ROM reader.
NEC VERSA POWER SOURCES
The NEC Versa can be powered using different sources,
making it a truly portable system. Operate your NEC Versa
system just about anywhere using one of the following
power sources:
the AC adapter connected to an electrical wall outlet
(using AC power)
the battery pack and/or an optional second battery pack.
Read the following sections for specific steps on powering
on the system.
Using the AC Adapter
Use the AC adapter and power cable that came with your
NEC Versa to run your computer on alternating current
(AC) power, or to recharge the battery pack. Use the AC
adapter whenever a wall outlet is nearby.
1-12 Getting Started
Page 24
!
Do not att empt to disassemble t he AC adapter. The
AC adapter has no user-replaceable or serviceabl e
parts inside. Dangerous voltage in the AC adapter
can cause serious personal injury or deat h. The AC
adapter is intended for use with a computer. Both
must meet EN60950 standards.
WARNING
When connected, the AC adapter charges the battery
whether or not the NEC Versa is powered on. The LED on
the AC Adapter indicates the current battery charge status
as follows:
Green indicates that the battery is fully charged.
Orange indicates that the battery is charging.
NOTE
Check that the AC outlet v oltage falls in the
range of 100–240 Vol ts AC. Veri f y t hat t he cord and
plug are appropriate for your AC source.
Getting Started 1-13
Page 25
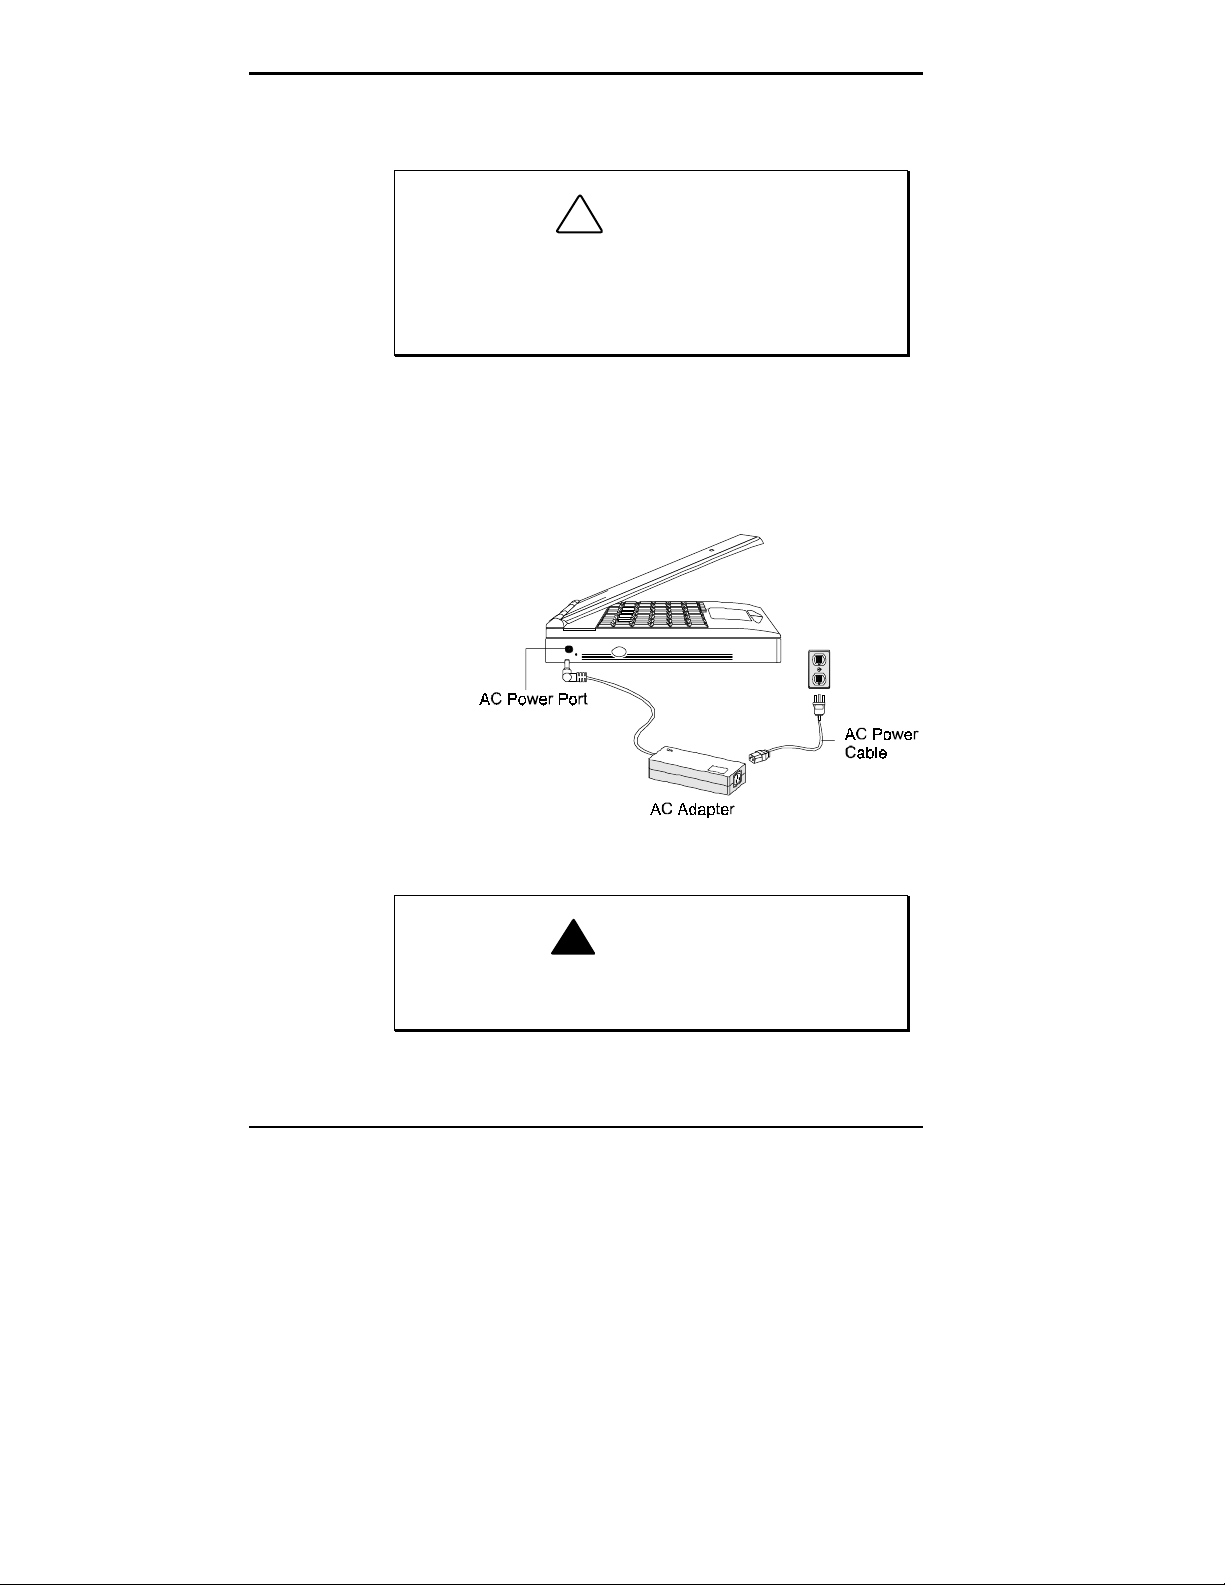
Connect the AC adapter as follows:
!
Use only the AC Adapter t hat com es with your NEC
Versa 2500 Series system. Although other AC
adapters may l ook simil ar, using t hem c an damage
the system.
1.
Connect the AC adapter cable to the power port on the
left side of your NEC Versa 2500 Series system.
2.
Plug one end of the AC power cable into the AC adapter
and the other end into a 120- or 240-volt wall outlet.
CAUTION
1-14 Getting Started
Connecting the AC adapter
!
Do not cover or place objects on the AC adapter.
Doing so can cause the adapter to overheat.
WARNING
Page 26
Powering On
To power on, locate the power button on the left side of the
system and push it in. To power off the system, push the
power button a second time.
Using the Main Battery Pack
The NEC Versa 2500 Series system comes with a rechargeable nickel metal-hydride (NiMH) battery pack. You can
run your system on battery power for up to 4 hours with 2
batteries installed and power management features enabled.
Battery packs are easy to install and remove.
NOTE
Although the battery is fully charged at the
factor y, transit and shelf ti me may reduce the ini tial
battery charge. We recommend that the first time
you use your system, you connect it to AC power
using the AC adapter. This will also recharge your
battery.
Your NEC Versa 2500 Series system provides two tools to
help you keep track of the main (or an optional) battery's
power level. These include the status LEDs described earlier in this chapter, and the Battery Gauge utility. Both let
you know how much battery power remains. See Chapter 2,
“Introducing the Software,” for more details on using the
Battery Gauge utility.
When battery power is very low, the power LED blinks and
the system beeps a warning.
Getting Started 1-15
Page 27
Installing the Battery Pack
Install the battery pack in your system as follows. (For information about replacing a battery pack, see “Replacing
the Battery Pack,” a little later in this section.)
Be sure to sav e your data bef ore replaci ng the battery pack or connecting the AC adapter. Failure to
do so can result in data loss.
1.
If your system is on, save your data, close any applications running, and power off the system.
2.
Align the battery pack with the bay where you plan to
install it. Make sure the battery contacts are aligned
properly with the connector inside the bay.
The primary battery pack is usually installed in the front
bay. However, you can install it in the Diskette Drive
bay instead.
!
CAUTION
3.
1-16 Getting Started
Push the battery pack into the bay until the locking latch
on the bottom of the system clicks into place.
Page 28
When to Change the Battery Pack
When battery power gets low, proceed as follows:
If your system is on, save your data, close any applica-
1.
tions running, and power off the system.
Connect your system to the AC adapter and AC power
2.
or install a charged battery pack.
Power on your system.
3.
!
To prev ent accidental battery igni tion or ex plosion,
adhere to the following:
Keep the battery away from extreme heat.
Keep metal object s away from the batt ery termi nals to prevent causing a short circuit.
Make sure the battery is properl y install ed in the
battery bay.
Read the precautions printed on the battery.
WARNING
Battery Handling
Review the following before handling a NiMH battery
Use NiMH batteries only in the NEC Versa computer
for which they are designed. Mixing other manufacturer’s batteries, or using a combination of very old and
new batteries can deteriorate battery and equipment performance.
Turn off power to the system after use. Keeping system
power on can degrade battery performance and shorten
battery life.
Getting Started 1-17
Page 29

Clean the battery terminals with a dry cloth if they get
dirty.
When not in use, store the battery in a cool dry area.
The following symptoms indicate that battery life is nearing
an end. Discard batteries that display these symptoms:
shorter work times
discoloration, warping
hot to the touch
strange odor.
Replacing the Battery Pack
Replace the battery pack installed in your NEC Versa system as follows.
Save your files, exit Windows, and turn off system
1.
power.
Close the LCD and turn the system over.
2.
3.
4.
5.
1-18 Getting Started
Press the battery release latch and slide the battery out
of the system. (See “Drive Bays” in Chapter 4 for release latch location.)
Insert the new battery into the bay, pressing it firmly
until the release latch clicks.
Turn the system over, open the LCD panel, and power
on the system.
Page 30

Battery Life
The NEC Versa NiMH battery has an approximate life of 2
hours under the following conditions:
When it is new and fully charged.
When no peripherals are connected to your NEC Versa.
When you have no options installed.
Enabling power management features increases battery life.
Extending Battery Life
While on the road, it is important to be aware of the simple
things you can do to extend the life of the system’s main
battery. Use the power management features enabled
through Setup to extend battery life. See “Using Power
Management” in Chapter 3 for details.
Getting Started 1-19
Page 31

Battery Charging
Charge time depends on whether or not you are using the
system. There are two ways to charge your battery while it
is installed in the NEC Versa:
When the system is off or in Suspend mode and the AC
adapter is connected, charge time is approximately 2
hours.
When the system is powered on and the AC adapter is
connected, charge time is approximately 4 hours.
For maximum battery performance, fully discharge the
battery before recharging it. To do so, unplug the AC
adapter, turn off power management features (through
Setup and Windows), and turn on the system. (Do not leave
any applications running.) Once the battery is fully discharged, plug in the AC adapter and recharge the battery.
If you do not discharge the battery completely, it not only
fails to accept a full recharge, but also sends incorrect information to the Battery Gauge utility. The utility may indicate that you have plenty of battery power when you
actually have very little. This can result in data loss when
the battery suddenly dies.
The warning beep that sounds when battery power becomes
critically low is always a true indicator that battery power is
low. Be sure to save your data when you hear the beep and
take proper steps to provide power to your system.
1-20 Getting Started
Page 32
Battery Precautions
Comply with the following NiMH battery precautions.
There is a danger of ex plosion if the battery is incorrectly replaced. Replace only with the same or
equiv alent t ype recom mended by the manuf act urer.
Discard used batteries according to the manufacturer’s instructions.
Keep the battery away from heat sources incl uding direct sunlight , open f i res, m icrowav e ov ens,
and high-v oltage contai ners. Temperat ures over
60ºC (140ºF) may cause damage.
Do not drop or impact the battery.
Do not disassemble the battery.
Do not solder the battery.
Do not puncture the battery.
!
WARNING
Do not use a battery that appears damaged or
deformed, has any rust on its casing, is discolored, overheats, or emits a foul odor.
Keep the battery dry and away from water.
Keep metal object s away from batt ery t ermi nals.
Metal objects in contact with the terminals can
cause a short circuit and damage.
If the battery leaks onto skin or clothing, wash
the area im mediately. Battery flui d can cause a
skin rash and damage fabric.
If bat tery fluid get s in eyes, DO NOT r ub; rinse
with clear water immediately and see a doctor.
Getting Started 1-21
Page 33

Battery Disposal
Before disposing of the NiMH battery, put adhesive tape on
the terminals. The main battery is made of nickel metalhydride (NiMH).
Contact your local waste management officials for information regarding environmentally sound collection, recycling, and disposal of batteries.
INTERNAL BATTERIES
A nickel metal-hydride battery is the main power source in
your NEC Versa computer. Appendix B lists NiMH battery
specifications. In addition to this battery, the CMOS battery
provides power to maintain system configuration settings.
CMOS Battery
This battery provides battery backup and prevents data loss
in the system’s complementary metal oxide semiconductor
(CMOS) RAM. This memory area contains information on
the system’s configuration, for example date, time, drives,
and memory. The CMOS battery lasts approximately two
years. An authorized NEC service technician can replace
the CMOS battery for you.
1-22 Getting Started
Page 34
SYSTEM CARE
The NEC Versa is a durable, dependable system built for
extensive use and travel. Follow these guidelines to maintain the condition and performance of your computer.
Precautions
Follow these precautions when using your NEC Versa and
AC adapter.
!
Im medi ately turn of f and unpl ug the NEC Versa under the following conditions:
The power cord is damaged or frayed.
Liquid spills on or into the NEC Versa.
Someone drops the system or damages the
casing.
CAUTION
Always plug the AC adapter cord into an easily accessible outlet. It is important to be able to easily shut off
power to the computer by unplugging the AC adapter.
Avoid dropping or bumping the computer or the AC
adapter.
Do not stack heavy objects on the computer, the AC
adapter, or the battery packs.
Avoid moving the NEC Versa during system operation,
especially while the hard disk or diskette drive is being
accessed.
Getting Started 1-23
Page 35

When using the AC adapter, make sure the power source
falls within the system’s compatible range of 100–240
volts AC. Never use the AC adapter if the voltage falls
outside of this range. (Watch for this when traveling to
other countries.)
Turn computer power off before attaching or removing
non-plug and play devices.
Do not push any foreign objects into the NEC Versa option bays, connectors, and slots.
Avoid using the computer or AC adapter for extended
periods in direct sunlight.
Do not use the system in humid or dusty environments.
Keep liquids and food away from the system.
Turn computer power off before cleaning it.
Avoid exposing the NEC Versa or AC adapter to extreme changes in temperature or humidity. If it is unavoidable, allow your NEC Versa to adjust to room
temperature before use.
When cleaning the system, use a soft, clean, dry cloth.
Avoid wiping the display surface with abrasive material,
including rough fabric. Do not use a cleaning solution,
this may damage the notebook’s plastic.
If the AC adapter becomes extremely hot, unplug the
adapter and let it cool.
Do not use the IR port directly under fluorescent light-
ing, or near flashing incandescent light.
1-24 Getting Started
Page 36

!
This equipment uses an ungrounded power cable.
Replace the cord i f it bec omes damaged. U.S. and
Canadian replacem ent cords must be UL-approved
(CSA certified in Canada) type SPT-2, 18 AWG,
2-conductor cord with a permanently attached
NEMA type 5-15P plug at one end, and a permanently attached connector body on the other. Cord
length may not exceed 15 feet. Outside the U.S.
and Canada the cord must be rated for at least
250VAC at 10 amps, and must indi cate i nt ernati onal
safety agency approval. The plug must be a type
appropriate for the country where it is used.
Obtain replacement cords at an authorized serv ice
center. The r eplacement m ust be of the same type
and voltage rating as the original cord.
Disconnect all supply lines before the expansion
memor y slot cover is remov ed. Replac e the expansion memory slot cover before the unit is restarted.
CAUTIONS
Getting Started 1-25
Page 37
Storage Requirements
Store the computer and AC adapter in an environment that
meets the following conditions:
Maintain storage temperatures between –20°C and 60°C
(–4°F and 140°F).
If the tem perature of t he NEC Versa suddenly rises
or falls (for example, when you move the system
from a warm place to a cold place), vapor condenses inside the system. Turning on the system
under this condition can damage the internal system
components.
Before turning on the system, wait until the system’s
internal temperature equalizes with the new environment and any internal moisture can evaporate.
Keep the storage area free from vibration and magnetic
fields.
!
CAUTION
1-26 Getting Started
Keep the system and its components away from organic
solvents or corrosive gases.
Avoid leaving the system and its components in direct
sunlight or near heat sources.
Page 38
Routine Cleaning
Clean or dust your system as follows.
Never
spray cleaners that contai n caustic m aterials on the
NEC Versa.
These cleaner s are usually high i n alkal inity which i s
measured in pH. Using these cleaners can cause
the plastic surface to crack or discolor.
LCD screen — Carefully wipe the LCD screen with a
soft cloth or a screen wipe designed for that purpose.
Special screen wipes are available through your local
computer dealer.
System case — NEC recommends that you carefully
wipe the case with a slightly damp, almost dry cloth.
!
use harsh solutions, household cleaners, or
CAUTION
Getting Started 1-27
Page 39

Understanding the
2
Software
This chapter introduces you to the software that comes with
the NEC Versa 2500 Series system, including:
the Windows 95 operating system or the Windows for
Workgroups operating system with MS-DOS
Online Help
NEC Utilities
Setup
Battery Gauge Utility (Windows for Workgroups
only)
PHDisk
Other Software
Phoenix Card Manager
LapLink® for Windows
McAfee VirusScan™
McAfee WebScan™
VideoSaver™
XingMPEG Player™
Microsoft Works (standard on Windows 95-only
models)
Microsoft Money (standard on Windows 95-only
models)
Understanding the Software 2-1
Page 40

NOTE
Wi ndows 95-only system s are only av ailable
in the United States.
Microsoft Return of Arcade (standard on Windows
95 only models)
Microsoft Sampler (Windows 95 only models)
Netscape Navigator Dial Up Edition
Win 95 Online Services
– AT & T WorldNet Signup
– America Online
– CompuServe & WOW!
– Official Airline Guide (OAG®)
– Internet Explorer (Windows 95 only models)
Windows for Workgroups Online Services
– Netscape Navigator Dial Up Edition
– America Online
– Compuserve
WINDOWS INTRODUCTION
Your NEC Versa either comes with the Windows 95 operating system preinstalled, or gives you the option of installing
either Windows 95 or Windows for Workgroups on your
system. Both Microsoft operating systems provide a means
of running applications, navigating through your file structure, and using your notebook computer. Each operating
system offers its own look and tools.
2-2 Understanding the Software
Page 41

Windows 95
Both Windows 95 and Windows for Workgroups employ a
graphical interface to make the operating systems easy to
use.
Windows 95 gives you the newest features offered by
Microsoft, including a Desktop with room to maneuver, a
Taskbar for quick navigation between open windows, plug
and play features, online networking functions, and more.
In Windows 95, the following icons are loaded on your
desktop:
My Computer — provides access to drives, printers, the
control panel, and network features.
Inbox — lets you access the Microsoft fax and mail
software as well as Microsoft network services.
Recycle Bin — once you delete a file, it’s placed here,
providing a safety area for files deleted by mistake.
The Internet — lets you automatically set up a new connection to the Internet, or manually configure an existing
account for your NEC Versa.
NEC Setup — Double click the NEC Setup shortcut and
select Customize to give your desktop a distinct NEC
look and feel.
For example, NEC customizations include loading
McAfee VirusScan 95 and the Vshield icon on your
toolbar, and removing the default Microsoft Windows
95 desktop wallpaper, and installing NEC’s unique
desktop wallpaper.
The Microsoft Network — shows you the computers
connected to your workgroup and those on the entire
network (if your system is connected to a network).
Understanding the Software 2-3
Page 42

My Briefcase — allows easy file transfer between the
NEC Versa and other systems.
Online Services — a folder containing your system’s
online service setup programs including America Online,
AT&T WorldNet Setup, Setup CompuServe 3.0, and
Setup WOW! from CompuServe.
VideoSaver — VideoSaver is a very special addition to
your desktop. Select from a great list of screen savers
that reflect your lifestyle!
Start — displays a pop-up menu with which to start
programs and applications, opens documents, accesses
system settings, looks at online help, and shuts down
your system.
NEC Versa 2500 InfoCenter — gives you easy access to
NEC Versa system online help and customer service information.
Windows for Workgroups
Windows for Workgroups offers the well-established Windows interface. Application icons are placed in groups,
which are represented by group icons. To start an application, highlight and double click or double tap the application
icon.
The Program Manager contains the following groups.
Main — Includes programs and tools to help you control
printing; set up printers, plotters, and modems; customize the desktop; and manage files.
Accessories — Includes desktop programs that come
with Windows, such as a simple word processing program, a drawing program, a calendar, and a calculator.
Startup — Lets you add programs to start automatically
when you enter Windows.
2-4 Understanding the Software
Page 43

Games — Gives you a way to practice your VersaGlide
skills or just relax.
NEC Versa 2500 InfoCenter — Includes online topics
specific to the NEC Versa 2500 Series, NEC customer
support, Windows, and DOS.
NEC Utilities — Includes small programs written by
NEC to help you manage your NEC Versa computer.
DOS INTRODUCTION
MS-DOS is the Microsoft disk operating system that runs
the computer. It is helpful if personal computer users have a
little background using DOS commands. The Windows environment makes it possible for you to manage your system
and application programs without knowing DOS commands, but as you become more comfortable with computers you may want to begin learning DOS.
GUIDE TO ONLINE HELP
The NEC Versa has online information for you. You can
access online documents from the NEC Versa 2500 InfoCenter icon on the desktop. The NEC Versa 2500 InfoCenter contains information about your NEC Versa, as
follows.
NEC Versa 2500 Series Online User’s Guide
The NEC Versa 2500 Series Online User’s Guide pro-
vides general information on system usage as well as
more extensive topics including using power management, PC card technology and system memory map.
NEC Customer Support Guide
Understanding the Software 2-5
Page 44

The NEC Customer Support Guide discusses the vari-
ous levels of support NEC offers you, our customer. We
provide information to help you become self-sufficient
with your NEC Versa, but if you need help, we’re there
for you. (If you purchased your system outside of the
United States, please contact your local NEC dealer for
customer support information.)
NEC UltraCare Guide
The NEC UltraCare Guide describes NEC’s extended
warranty program to help you protect your investment in
an NEC Versa Series system. (If you purchased your
system outside of the United States, please contact your
local NEC dealer for extended warranty information.)
Using Windows 95
This online “book” lets you explore Windows 95 and
learn about navigating through the new interface. (This
file is available only when Windows 95 is the operating
system loaded.)
The Windows QuickStart Guide
This online “book” provides lessons on using Microsoft
Windows, which runs on the NEC Versa. (This file is
available only when Windows for Workgroups 3.11 is
the operating system loaded.)
The MS-DOS QuickStart Guide 6.22This online “book”
offers lessons on using MS-DOS, which also runs on the
NEC Versa. (This file is available only when Windows
for Workgroups 3.11 is the operating system loaded.)
2-6 Understanding the Software
Page 45

GUIDE TO NEC UTILITIES
NEC provides several programs and routines designed to
make your NEC Versa run more efficiently. These programs are known as utilities.
Setup
The Setup utility automatically configures your NEC Versa
each time you start it up. This utility is not accessible from
Windows. Access Setup at power-on. Just press
the following prompt appears.
Press <F2> to enter SETUP
See Chapter 3, “Using Setup,” for a discussion of the Setup
utility. In addition, online help assists you in changing settings.
Battery Gauge Utility
This utility lets you quickly identify how much battery
power you have available. (Windows for Workgroups
modesl only)
F2
when
PHDisk
This utility creates a file on the hard disk that is large
enough to contain all the program and data residing in the
NEC Versa dynamic memory. Your system ships with a file
that is approximately 17 MB. You only need to update this
file size if you upgrade the amount of memory in your system to more than 16-MB. Run this utility in DOS mode or
DOS environment. It will not run on a compressed drive
To use this utility, exit Windows and go to the DOS
prompt. Enter the following at the DOS prompt:
PHDisk /create
After executing this command, the file is resized based on
the current NEC Versa memory size.
Understanding the Software 2-7
Page 46

OTHER SOFTWARE
Your NEC Versa comes with other programs that let you
take full advantage of your system resources. The rest of
this chapter discusses each program, including what it can
do for you, how to get started, and how to use the program
help.
Phoenix Card Manager
The Phoenix Card Manager lets you manage your PC Cards
and slots in your Windows for Workgroups system.
Through Phoenix Card Manager, you can do the following:
view card slot activity and availability
be alerted to missing or improperly installed card drivers
receive help to address resource conflicts and memory
window allocation problems.
Once Phoenix Card Manager identifies and resolves configuration issues, it automatically configures PC cards each
time they are installed.
Phoenix Card Manager is only available in Windows for
Workgroups systems. Card management software is built
into Windows 95.
LapLink
LapLink offers the following features:
File Transfer — lets you move or copy files between
computers. To speed file transfer, LapLink compares
files being updated and transfers only the changed information.
Remote Control — gives you access and control over a
remote computer. Activity you perform on a system,
such as keystrokes, file access and change, and program
execution, actually occurs on the remote system.
2-8 Understanding the Software
Page 47

Chat — provides a way for you to exchange informa-
tion, instructions, or other messages with a user at a remote computer.
LapLink software must be loaded on both the sending
(local) and receiving (remote) system for communication
between them to work properly.
How to Use LapLink
Follow these steps to get started using LapLink. Once you
have LapLink up and running, refer to the LapLink online
help for more information.
Start LapLink as follows:
1.
In Windows for Workgroups, locate and double click
the LapLink for Windows icon in the LapLink for
Windows program group.
In Windows 95, press Start, slide the cursor to Programs, and locate LapLink for Windows 95. Highlight the LapLink for Windows 95 line and press the
VersaGlide selection button or tap the pad once.
If you do not have a port enabled, LapLink prompts
you to enable one. (The IR port is enabled for wireless communications when the system ships.) Press
to do so and follow the on-screen instructions to
Yes
configure the port. Otherwise, press
Once your ports are configured, select your communica-
2.
No
.
tion method by pressing the appropriate button. The
buttons give you the following connection options.
Connect over cable
Connect over wireless
Connect over modem (if installed)
Connect over network
Understanding the Software 2-9
Page 48

Connect over dial-up network
Once communication is established between systems, the
LapLink window is displayed.
Select the procedure you want to use by pressing one of
3.
the last three buttons in the LapLink toolbar at the top of
the screen.
Press the file transfer button to transfer files between
systems.
Press the Remote Control button to exercise control
over a remote system.
Press the Chat button to converse with another user
at the remote system.
When you finish, press the disconnect button to break
4.
the link between the local and remote systems. Press
OK
.
The other system is notified of the break in
communication.
To find out more about LapLink capabilities and uses, refer
to the online help that is available when you open LapLink.
McAfee Anti-Virus Software
The McAfee Anti-Virus software is installed to scan your
system for any virus infections. WebScan and VirusScan
are two scanning software tools included on the NEC
Versa 2500 Series system. In Windows for Workgroups, a
Vshield icon is shipped minimized as an icon on the desktop
to easily determine whether protection-level software is
running or not, as well as provide a virus alert chime message when a virus is resident.
2-10 Understanding the Software
Page 49
WebScan software protects your system against virus
infection from files attached to mail messages or from
files you download from the Internet. WebScan is activated any time you download executable and Microsoft
Word document files and scans mail through the Pegasus Mail system. Also included is the SPRY Mosaic
browser and the WebScan Web browser, which gives
access to the Internet.
VirusScan, detects, identifies and disinfects known
DOS, Windows for Workgroups, and Windows 95 computer viruses. It checks memory as well as both the system and data areas of disks for virus infections. In most
cases, it will eliminate and fully repair infected programs
or system areas to their original condition.
Set up the WebScan software on your NEC Versa 2500
computer using the easy-to-follow setup program.
NOTE
Before you can use the WebScan software
and connect to the I nternet, you must f i rst purc hase
and install a modem card or ex ternal serial modem .
Make sure the PC Card is connected to a working
phone line. T he line must be an anal og line. If you
are unsure what type of l ine you have, call your l ocal telephone company.
It i s strongly recomm ended that you instal l the modem card in your NEC Versa prior to running the
WebS can Setup program . As part of the Setup pr ogram, it recognizes the modem information. If you
run the Setup program without an instal led modem ,
you will have to manually enter the modem information the first time you use the online service.
Understanding the Software 2-11
Page 50
VideoSaver
The VideoSaver software package that comes preloaded on
selected systems gives a variety of full-screen video clips
that you can use as screen savers. Simply select VideoSaver
from the list of screen savers in your Windows list.
NOTE
You can only use this as a screen saver when
running on AC power.
For Windows 95, modify how the screen saver runs as follows:
Double click the VideoSaver icon on the desktop.
1.
Click the Preview button to see the current clip selected.
2.
To modify the video settings, press the Settings button.
3.
The settings screen shows the available video clips and
gives you options to:
Rearrange the order in which the clips appear.
Mute the sound.
Preview the videos available.
XingMPEG Player™
Provides MPEG Playback software for Windows 95 or
Windows for Workgroups. See Chapter 5, “Using Multimedia” for instructions on using this application.
2-12 Understanding the Software
Page 51
Microsoft Works
Microsoft Works gives you all that you need to create
forms, format letters, start a data base and pull it all together to create reports. Works includes a word processing
program, data base program, and sets of preformatted
documents for you to use. (Available in Windows 95-only
systems.)
NOTE
Windows 95-only systems are available exclusively in the United States.
Microsoft Money
Microsoft Money gives you a new option for handling your
finances. With this package, you can balance your checking
account, track spending trends, and even make payments
over the network. (Available in Windows 95-only systems.)
Microsoft Return of Arcade
Provides you with several of the favorite classic computer
games, including Pac-Man. (Available in Windows 95-only
systems.)
Microsoft Sampler
This CD offers demonstration versions of games and other
Microsoft software. (Available in Windows 95-only
systems.)
Understanding the Software 2-13
Page 52
ONLINE SERVICES
In Windows 95 systems, your NEC Versa comes with the
most popular online services available including America
Online, CompuServe, and AT&T WorldNet Signup. These
can be found in the Online Services program group on the
desktop. To use the services, you need to install the
software. Simply highlight and click on the installation icon
and follow the on-screen instructions.
In Windows for Workgroups, online services include the
Install America Online and Install CompuServe programs.
Simply highlight and click on the installation icon and
follow the onscreen instructions.
For a fee, online services give you access to the Internet, email, the World Wide Web, travel information, news reports, and more, depending on the service selected. Some
online services give you a free trial period.
NOTE
modem card (or an ex ternal serial m odem) in your
NEC Versa prior to r unning the onl ine serv i ce setup
program. A s part of the setup progr am, it r ec ognizes
your modem inform ation. If you run the setup program without an installed modem , you will have to
manuall y ent er the m odem i nf or m ati on the fir st ti m e
you use the online service.
It is strongl y recommended that y ou install a
2-14 Understanding the Software
Page 53

Here are the things you must do in order to use an online
service:
purchase and install a modem card into your NEC
Versa. Make sure the PC card is connected to a working
phone line. The line must be an analog line. If you are
unsure what type of line you have, call your local telephone company. You can also use an external modem
connected to the serial port.
set up the selected online service on your NEC Versa
using an easy-to-follow setup program.
select the newly created online service icon, register with
the service, and begin your online adventure.
Just follow these steps to set up and use your selected online
service:
Connect your modem card to a phone line.
1.
Continue as follows:
2.
From the Program Manager in Windows for Workgroups, locate and double click on the Online Install
program group. Double click on the icon for the
service you want to install.
In Windows 95, press Start, move to the Programs
group, slide to Online Install, and slide to the online
service group that you want to install. Tap the VersaGlide pad once or click once.
The setup screen for the selected online service displays.
3.
Follow the on-screen instructions to install the service on
your NEC Versa.
For both Windows for Workgroups and Windows 95, a
program group will be created for your selected online
service.
Understanding the Software 2-15
Page 54
4.
America Online
If you subscribe to America Online, you can use the service
to obtain information about NEC and its products. Use
America Online to E-mail technical questions to NEC’s
Technical Support staff, post technical questions and messages on the Message Board, and access the NEC Software
Library to download files.
Use the following steps to access America Online and
NEC’s online information services.
To use the selected online service, follow the on-screen
instructions to log onto the service.
NOTE
If you are using this computer outside North
Ameri ca, there may not be any local access points
for this online service. It may require a long distance
or international call.
Log onto America Online.
1.
At the opening screen, click on Go To in the Main
2.
Menu.
At the Go To menu, click Keyword.
3.
At the prompt, type either NECTECH or NEC, then ei-
4.
ther press
At the NEC menu, double-click on one of the following
5.
topics, then follow the prompts:
About NEC
Terms and Conditions
News
2-16 Understanding the Software
Enter
or click on Go.
Page 55
Product Information
Questions and Answers
NEC Web Site
Message Board
Software Library.
Exit anytime by double-clicking on the rectangle in the
6.
upper left corner of the screen.
CompuServe and
WOW! from CompuServe
Installation programs for CompuServe, and its youthoriented counterpart WOW! from CompuServe are part of
your Windows 95 software.
If you subscribe to CompuServe, you can use the service to
obtain information about NEC and its products. Use
CompuServe to E-mail technical questions to NEC’s
Technical Support staff, post technical questions and
messages on the Bulletin Board, and access NEC’s Bulletin
Board.
NOTE
You cannot download information from the
NEC Bulletin Board from CompuServe. You must
call the NEC Bul leti n Board directl y to download information.
If you are using this com puter outside North America, there may not be any local access points for
online services. It may require a long distance or
international call.
Understanding the Software 2-17
Page 56

Use the following steps to access CompuServe and NEC’s
online information services.
Log onto CompuServe.
1.
At the opening screen, click on Service, type in NEC
2.
TECH at the prompt, and click OK.
At the NEC menu, double-click on one of the following
3.
topics, then follow the prompts:
NEC Bulletin Board
Information About This Service
Access NEC BBS
Access CompuServe Information Services
Exit.
Exit anytime by double-clicking on the rectangle in the
4.
upper left corner of the screen.
You may obtain information about NEC and its
products by visiting our web site at WWW.NEC.COM.
AT&T WorldNet
One of the world’s largest telephone service providers now
offers internet access. Click on AT&T WorldNET Signup
in the Online Services group to install this software, learn
more about it, and sign up with this service. (Available on
Windows 95 systems only.)
2-18 Understanding the Software
Page 57
Netscape Navigator Dial Up Edition
The first time you use Netscape Navigator, you must register your copy of the program and allow the system to detect
your modem.
NOTE
Before setting up Netscape Navigator, connect your m odem. During the setup procedure, the
system tries to detect the m odem. If it is not connected, the process stops.
If you connect the modem and the system fails to
detect it, open the Windows Control Panel, select
the modem icon, and specif y your m odem type and
port.
Set up Netscape Navigator as follows:
Windows for Workgroups systems — In the Program
Manager, double-click the Netscape Navigator icon.
Next double-click the Netscape Navigator Install icon to
establish dial-up networking services within Windows
for Workgroups. When you complete the required information, the system restarts Windows for Workgroups. Continue the installation by running the Account
Setup Wizard.
Windows 95 systems — use the Netscape Navigator
Install program in the Windows 95 Programs menu.
The Install program includes the a Read.me document,
Online Books, Account Setup Wizard and Netscape
Navigator Install. Choose the Netscape Navigator Install
icon first to establish dial-up networking services within
Windows 95. When you complete the required
information, the system restarts Windows 95. Continue
the installation by running the Account Setup Wizard.
Understanding the Software 2-19
Page 58

The completion of Netscape Navigator Install generates
a Netscape Navigator group and a shortcut icon on your
desktop.
Official Airline Guide (OAG)
This program demonstrates the convenience of “information
to go.” You can purchase the full package or subscribe to
future releases through the software publisher. The software
publisher also provides technical support for these programs.
The Official Airline Guide is an online service that gives
you access to flight details for all commercial airlines
worldwide. NEC provides a sample of the monthly data that
OAG provides. You can call OAG for a free copy of the
most current information. OAG offers NEC Versa owners a
special rate when they subscribe to OAG for monthly updates.
OAG is an invaluable service for anyone who travels on a
regular basis. All you have to do is enter your departure
city, destination city, and date. If you have a preferred airline, you can also enter its name. The service then lists all
the flights available from the departure city, the times, and
the flight numbers. You can also check on seat availability
and prices.
Access OAG as follows.
1.
Purchase and install a modem card into your NEC
Versa. Make sure the card is connected to a working
phone line.
From the Program Manager in Windows for Work-
groups, locate and double click on the OAG FlightDisk Worldwide Edition icon in the OAG FlightDisk
program group.
2-20 Understanding the Software
Page 59

In Windows 95, press
, move the cursor to the
Start
Programs group and open the OAG FlightDisk
group. In the group, highlight “OAG FlightDisk
Worldwide Edition” and release the mouse button.
The first time you open OAG, an agreement screen ap-
2.
pears. Follow the on-screen instructions.
In the Trip Plan screen, fill in the fields with the trip in-
3.
formation requested. Press
after making selections
Enter
from the available drop-down lists.
To retrieve seat availability and price information, press
4.
the appropriate button.
Follow the on-screen instructions to register for a free
5.
trial of the OAG travel service.
Understanding the Software 2-21
Page 60

3
Using Setup and Power Management
Your NEC Versa 2500 Series system comes with a hardware configuration program called Setup that allows you to
view and set system parameters. Setup also allows you to
set power management levels. This lets you conserve energy, save battery power, extend the life of your LCD
backlight, and protect against data loss due to low battery
power.
The chapter describes these NEC Versa features.
SETUP UTILITY
The NEC Versa Setup pro gram lets you vie w and set syste m
parameters. Setup also includes security features that protect your system from unauthorized use.
Use Setup to
set the current time and date
customize your operating system to reflect your computer hardware
secure your system with a password
balance your performance needs with power conservation.
Using Setup and Power Management 3-1
Page 61

How to Enter Setup
Access Setup at power-on. Just press F2 when the following
prompt appears.
The Setup Main screen appears, displaying current parameter settings.
Press <F2> to enter SETUP
When you press
detects current parameter settings with the Power-On SelfTest (POST).
If the system detects an error during POST, it prompts you
with a double beep and a message: "Press <F1> to resume
boot attempt, <F2> for Setup." If you press
tinues. If you want to fix the error, carefully read the error
message that appears above the prompt (taking notes if you
want), and press
After you press
screen.
How to Use Setup
The following sections describe how to use Setup, including
these topics:
Looking at screens
Using keys
Checking and setting system parameters.
F2
to enter Setup, the system automatically
F1
, POST con-
.
F2
F2
, the system displays the Setup Main
3-2 Using Setup and Power Management
Page 62
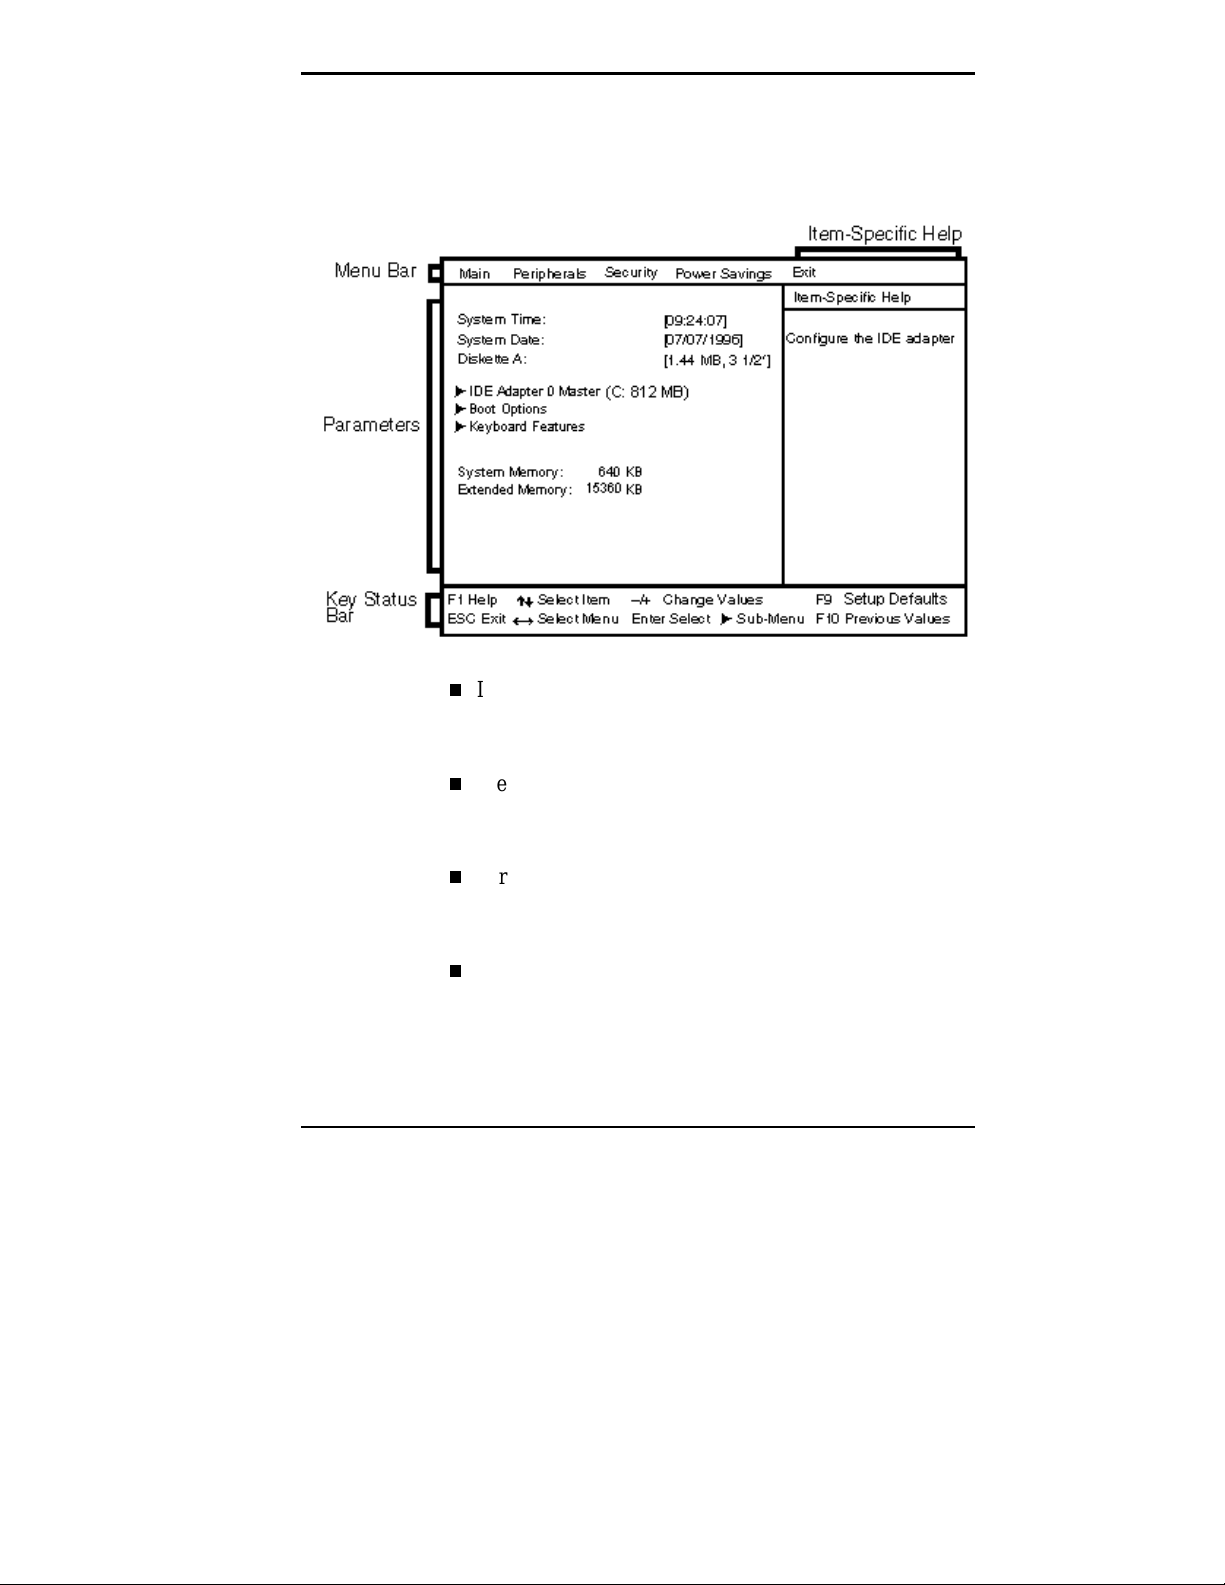
Looking at Screens
Setup screens look similar to the one shown next and have
four basic areas.
Item-Specific Help
The right part of the screen. This area describes each
parameter and its available settings.
Menu Bar
The top line of the screen. Each of the five selections
displays its own screen.
Parameters
The left part of the screen. This area lists parameters
and their current settings
Key Status Bar
The bottom part of the screen. These lines display the
keys available to move the cursor, select a particular
function, and so forth.
Using Setup and Power Management 3-3
Page 63

Using Keys
The following table lists Setup keys and their functions.
Setup Key Functions
KEY
← →
Home/End Moves to the first/last parameter on the current screen.
PgUp/PgDn Displays the previous/next page of the current screen if
↑ ↓
Enter
Tab For some parameter settings, moves the cursor between the
–/+
F9 Selects the default settings for the displayed parameters only.
F10 Selects the settings of the displayed parameters as they were
Esc Displays the Exit screen.
F1 Displays the General Help screen.
WHAT IT DOES
Chooses a selection from the menu bar.
scrollable.
Moves the cursor between the displayed parameters.
Displays additional fields for parameters marked with a
subfields. For example, for System Time, Tab moves the
cursor from hour to minute to second.
Selects the next lower/higher setting.
upon entering the screen.
.
Checking/Setting System Parameters
See the following table for a list of parameters, their factory
default settings, and alternate settings. As you set each parameter, its available settings are explained in the ItemSpecific Help area in the right part of the screen.
Reset the parameters on the displayed screen to their factory
default settings by pressing
selecting Set Default Values on the Exit screen.
3-4 Using Setup and Power Management
. Or, reset all parameters by
F9
Page 64

Setup Parameters
PARAMETER
Main
System Time
System Date
Diskette Drive A
IDE Adapter 0 Master
Autotype Fixed Disk
Boot Options
Boot Sequence
SETUP prompt
POSTS Errors
Keyboard Features
Numlock
Keyboard auto-repeat rate
Keyboard auto-repeat delay
System Memory 640 KB
Extended Memory 15360 KB
DEFAULT
SETTING
HR:MIN:SEC
MO/DAY/YEAR
1.44MB, 3.5"
Auto User, CD, None
A:, CD-ROM (If
installed)
then C:
Enabled
Enabled
Off
30 per second
1/2 second
ALTERNATE
SETTINGS
Not Installed
C: then A; C: only
Disabled
Disabled
On
2, 6, 10, 13.3, 18.5, 21.8,
26.7, 30 per second
1/4, 1, 3/4 second
Peripherals
Serial Port
Infrared Serial Port
Parallel Port
Parallel Mode
Diskette Controller Enabled Disabled
IDE Adapter
On Board Audio
I/O Channel
IRQ Channel
DMA Channel
3F8, IRQ 4
2F8, IRQ 3
378, IRQ 7
ECP
Enabled
Enabled
220h
IRQ5
DMA CH1
Using Setup and Power Management 3-5
2E8, IRQ 3; 3E8, IRQ 4;
2F8, IRQ3; Disabled
3F8, IRQ 4; 2E8, IRQ 3;
3E8, IRQ 4; Disabled
278, IRQ 5; 3BC IRQ 7;
378, IRQ 5; Disabled
Enhanced, Bi-directional,
Unidirectional
Disabled
Disabled
230h; 240h; 250h
IRQ7; IRQ10; IRQ9
DMA CH3; DMA CH0
Page 65

PARAMETER
MPU I/O
Game Port
Display to TV
Plug & Play O/S
Security
User Password is
Set Password
Password on boot
Password on resume
Power Savings
Power Savings
Standby Timeout
Auto Suspend Timeout
Suspend Mode
Hard Disk Timeout
Video Timeout
Cover Switch Control
DEFAULT
SETTING
300h
Enabled
Disabled
No
Disabled
Enter
Press
Disabled
Disabled
Disabled on AC
2 min.
2 min.
Suspend
2 min.
2 min.
Backlight Off
.
ALTERNATE
SETTINGS
310h; 320h; 330h
Disabled
NTSC; PAL
Yes
Enabled
Enabled
Enabled
Disabled/Enabled
1, 4, 8, 16 min., Off
1, 4, 8, 16 min., Off
Save to File
1, 4, 8, 16 min., Off
1, 4, 8, 16 min., Off
Suspend
Serial Port Ring Resume
3-6 Using Setup and Power Management
Off
On
Page 66

Main
The Setup Main screen displays the System Time and System Date parameters as well as drive parameters.
Time/Date
Use System Time and System Date to set the current
time and date. The settings remain in memory even after
you turn off system power.
To set the time, enter the current hour, minute, and second in hr::min:sec, 24-hour format. Use the Tab key to
move from field to field. For example, type
13:30:00
,
tabbing from field to field for 1:30 p.m.
To set the date, enter the current day, month, and year in
mo/day/year format.
The drive parameters let you check and change settings for
your drives, including the internal hard drive, diskette drive,
or the CD-ROM reader.
Boot Options lets you specify the boot sequence that the
system follows. For example, you specify if the system
looks only to C: drive for start up information, or if it looks
to the diskette drive first. Boot options also let you specify
whether the setup prompt to press F2 appears. You can also
have the system stop during POST if an error occurs.
Using Setup and Power Management 3-7
Page 67

Peripherals
Security
The Peripherals screen displays the connection location
between the system and the Input/Output (I/O) ports.
Your NEC Versa supports a password for system security
on several levels. Using the Security screen, you can require
that a password be entered
to use Setup
at each startup or boot
each time the system resumes from Suspend mode.
You are not prompted to enter a password until you set an
initial password. Your system is not protected until you set
a password.
Once you set a password, you must enter it before you can
enter Setup; this feature allows only an authorized user to
change system parameters. In addition, you can choose to
require the password be entered each time you start the
system and each time the system resumes from Suspend
mode.
3-8 Using Setup and Power Management
Page 68

Setting an Initial System Password
Set an initial password as follows.
Select Security from the menu bar.
1.
Select "Set Password" by pressing
2.
At the prompt, enter a password up to seven characters
3.
Enter
.
long. Then, as prompted, reenter your password for
verification. Write your password down and keep it in a
secure place in case you forget it.
Press
4.
If you want to require the password each time you start
5.
to return to the Security screen.
Enter
your system, move the cursor to “Password on boot”
and select “Enabled.”
If you want to require the password each time the system
6.
resumes from Suspend mode, move the cursor to
“Password on Resume” and select “Enabled.”
7.
Press
to display the Exit screen. Here you can se-
ESC
lect “Save Changes and Exit” to save your password and
reboot your system.
You will have three attempts to enter the password correctly. After the third attempt, the system will be disabled. Press the Power button to reboot the system and
try to reenter the password.
Removing a Password
To re move a passwo r d, press
Press
at “Enter new password” and press
Enter
at “Set Password.”
Enter
again at “Re-enter new password.” Your password
clears and you are no longer prompted to enter one.
You can also use the “Enter new password” and “Reenter new password” prompts to change to a new password.
Using Setup and Power Management 3-9
Enter
Page 69
Power Savings
The Power Savings screen lets you balance high performance and energy conservation using parameters including
the following.
NOTE
Some operating systems such as Windows
for Workgroups and Windows 95 have their own
power management software which overrides
CMOS settings. In this case, be sure to set your
desired power management settings accordingly.
Power Savings -- This option lets you turn on and off
power management features. You can specify that power
management is enabled all the time (Enabled) or disabled
all the time (Disabled). You can also disable power
management when using AC power.
Suspend Mode -- Suspend mode includes a method of
operation called Suspend/Resume that stores information
in RAM and maintains RAM contents after shutting
down all local devices. You can also select Save to File,
which saves all your open data files to a special file on
the hard disk whenever the system goes into Suspend
mode. All your data is automatically recovered from
where you left off when you Resume.
Power Savings also lets you set timeouts for various
peripherals and control the cover switch function.
3-10 Using Setup and Power Management
Page 70

USING POWER MANAGEMENT
Power Management in the NEC Versa lets you conserve energy, save battery power, extend the life of your LCD
backlight, and protect against data loss due to low battery
power.
You can set some features to function automatically or activate them manually with the keyboard or a button.
It is wise to keep your Power Management features enabled,
even when using AC power.
Power Saving Modes
The NEC Versa has three different power consumption
states, these include:
Active Mode — All components are turned on and
active.
Standby Mode — This mode eliminates unnecessary
power consumption when you operate the system on
battery or AC power. Standby mode shuts down the
LCD panel, providing privacy as well as power savings.
Suspend Mode — This power-saving mode shuts down
all possible devices in the system while retaining data
and system status.
The system resumes Active mode when you press
Fn-Esc
or any key, the system detects a modem ring, or
you press the Power button. Suspend mode lets you save
power without first saving the working data.
Press the
Fn-Esc
to enter Suspend mode when you need
to be away from your system for a short period of time
and want to return to where you left off. You can toggle
between Suspend mode and Active mode.
Using Setup and Power Management 3-11
Page 71
You can set your system to enter Suspend mode automatically after a specified number of minutes of system
inactivity. You specify how long system inactivity
elapses before the system enters Suspend mode. System
activity includes keyboard, VersaGlide, diskette or hard
disk drive access, PCMCIA modem, network, or LAN
card, serial, or printer port communications.
Power Management Settings
The system arrives set up with many power-saving features
already enabled. You can change the timeout period for
these devices using Setup. See the following table.
Automatic Power-Saving Features
Default
Device
Standby Timeout 2 minutes System enters Standby mode after total
Auto Suspend Timeout 2 minutes This settings specifies how long the
Timeout
Comment
system inactivity.
system remains in Standby mode before
entering Suspend mode.
Hard Disk Timeout 2 minutes Hard disk motor stops when hard disk is
not accessed for specified timeout.
Video Timeout 2 minutes The video screen shuts off after the
timeout specified elapses.
NOTE
In Wi ndows 95 systems, power managem ent
settings under W indows ov erride t he setti ngs established in Setup. Make the Windows 95 power sav ing
settings match those in Setup for the best results.
3-12 Using Setup and Power Management
Page 72
Using Fn-Esc
Press the
Fn-Esc
to put the NEC Versa into Suspend mode
when you need to be away from your system for a short period of time and want to return to where you left off. Press
the key combination again to bring the NEC Versa out of
Suspend mode.
Suspend mode shuts down all possible devices in the system
while retaining data and system status. The screen goes
dark when the system is in Suspend mode.
NOTE
If the system goes into Suspend while in
CRT-only di splay mode (Fn-F10), it resumes in the
same mode whether or not the CRT i s still attached.
Press Fn-F10 to toggle to LCD or LCD/CRT mode.
Using Setup and Power Management 3-13
Page 73

Using Your
4
NEC Versa Computer
The more you use your NEC Versa 2500 Series system, the
more proficient you will become at everything — from using function keys to setting up presentations.
This chapter gives concise information on these and other
important tasks, including how to use:
the LCD panel
the keyboard
the NEC VersaGlide
drive bays
the optional 8X CD-ROM reader
PC Card slots
IR port.
In addition, this chapter focuses on installing options, expanding hard disk space and memory.
LCD
The LCD panel on your NEC Versa 2500 Series system is
fully adjustable to provide comfortable viewing. To adjust
the viewing angle, gently push the LCD panel into position.
Using Your NEC Versa Computer 4-1
Page 74
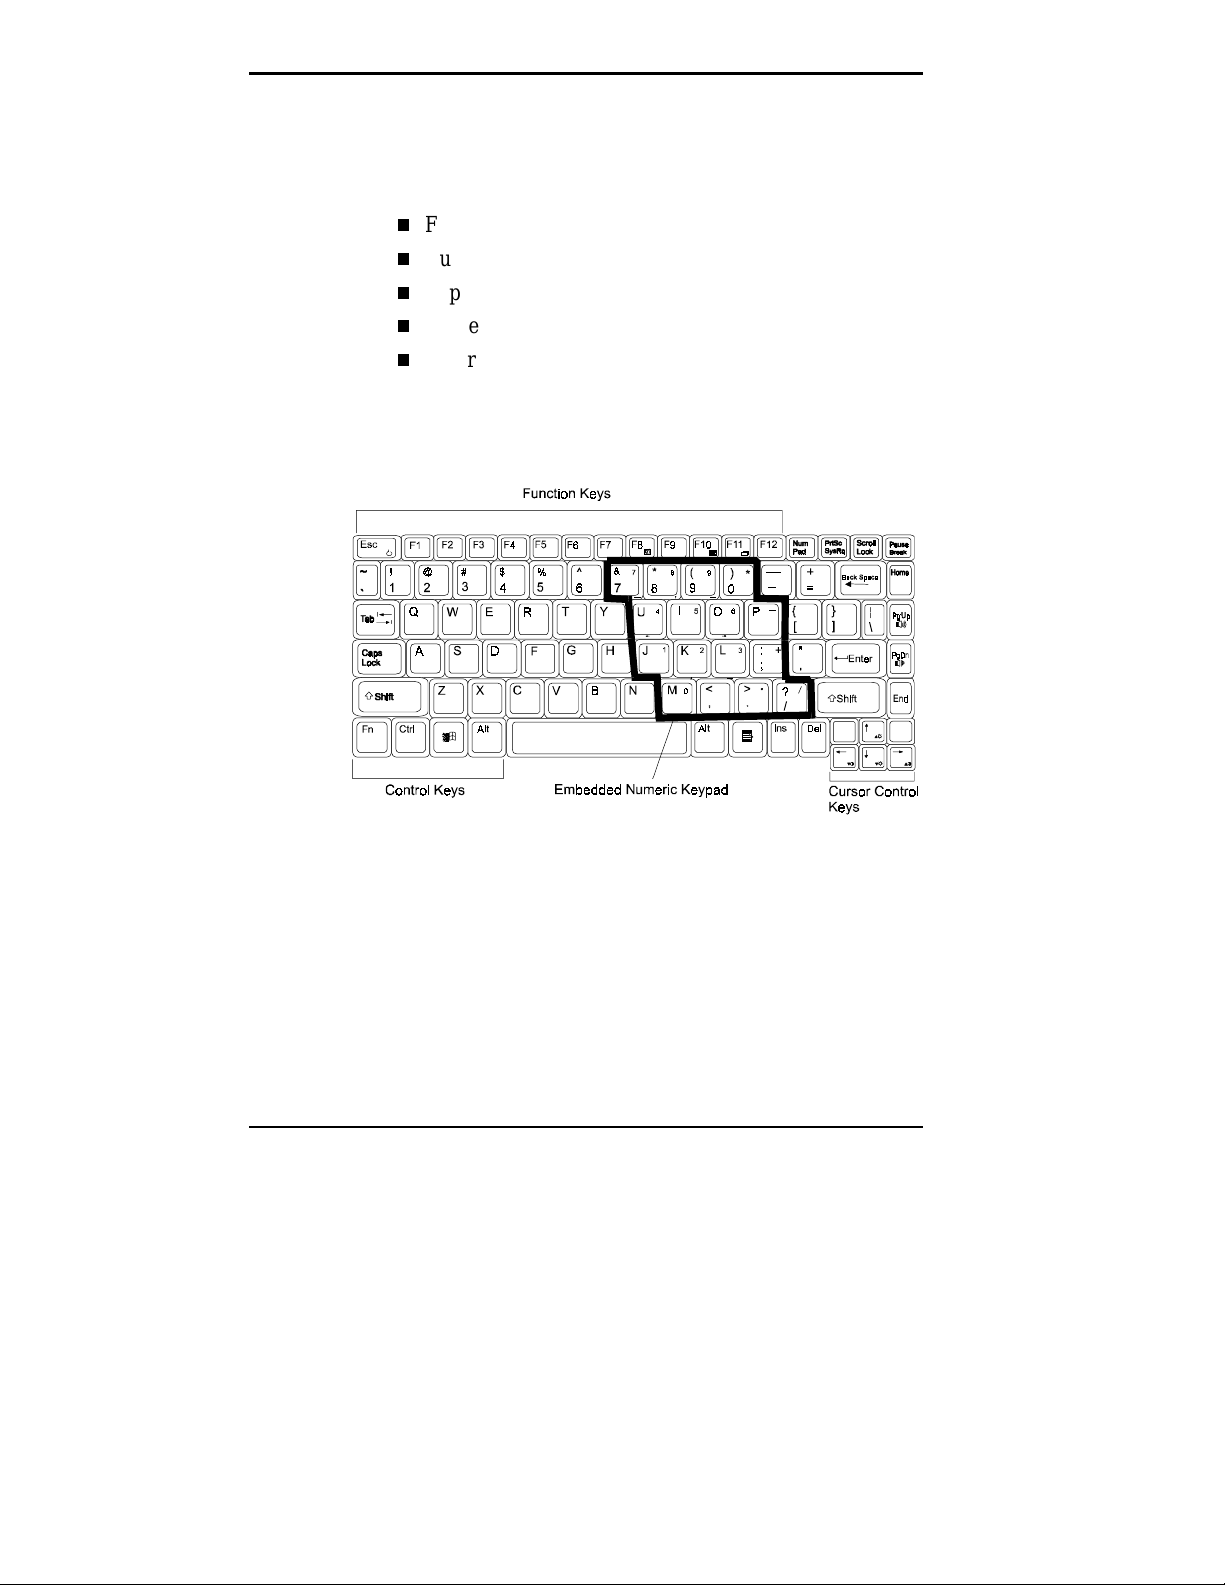
KEYBOARD
The NEC Versa keyboard is equipped with many features.
These include:
Function keys
Cursor control keys
Typewriter keys
Numeric keypad
Control keys.
Feature keys are located as shown in the following figure.
Key operations are described after the figure.
Function Keys
A number of function keys (F1 through
PgDn, NumLock)
board. These keys work together with the
special functions. Keys that are preprogrammed with dual
functions have an icon representing the function printed in
blue on the key.
4-2 Using Your NEC Versa Computer
Keyboard
F12, Esc, PgUp,
are available on the NEC Versa key-
key to activate
Fn
Page 75

Function keys F1 through
are application-driven. See
F12
the specific application’s user guide for information about
how each function key works within the application you are
using.
The following function key combinations are pre-
programmed for the NEC Versa.
Fn-Esc
puts the system into Suspend mode; resumes
—
system operation when pressed a second time. (The
Power button also acts as a Resume switch when your
system is in Save-to-Disk mode.)
— toggles the battery low warning speaker on
Fn-F8
and off.
Fn-F10 —
toggles between using the LCD display
panel, an external CRT monitor, or both simultaneously.
Fn-F11 —
toggles the LCD display panel backlight on
and off.
Fn-NumLock
— activates the embedded numeric
keypad.
Fn-PgUp
Fn-PgDn
Windows 95 keys — You can use the following two key
— increases speaker volume.
— decreases speaker volume.
combinations to facilitate your work
Shortcut/Application key– provides quick access to
shortcut menus. (This key acts like a right mouse
button.)
Floating Window key – displays the Start menu.
Using Your NEC Versa Computer 4-3
Page 76

Cursor Control keys — Cursor control keys let you
position the cursor on the screen where you want. On the
screen, the cursor is a blinking underline, block, or
vertical bar depending on the application. The cursor
indicates where the next text typed is inserted.
When combined with the
key, the cursor control ar-
Fn
rows also let you control LCD contrast and brightness
as follows:
Typewriter keys — The typewriter keys (also called
increases LCD brightness.
Fn-
↑
decreases LCD brightness.
Fn-
↓
increases LCD contrast.
Fn-
→
decreases LCD contrast.
Fn-
←
alphanumeric keys) are used to enter text and characters.
Keys that have blue printing on them behave differently
when combined with control keys or
Numeric Keypad — Pressing
Fn-NumLock
Fn
.
on the
keyboard activates the numeric keypad numbers and
functions printed in blue on top of the keys.
The keypad lets you type numbers and mathematical operands (+, –) as you would on a calculator. The keypad
is ideal for entering long lists of numbers.
When you press Num Lock again, the keys revert to
their normal functions as typewriter keys.
To use the functions printed on the front of the keys,
press
and the key. (These functions are not available
Fn
when NumLock is enabled.)
4-4 Using Your NEC Versa Computer
Page 77
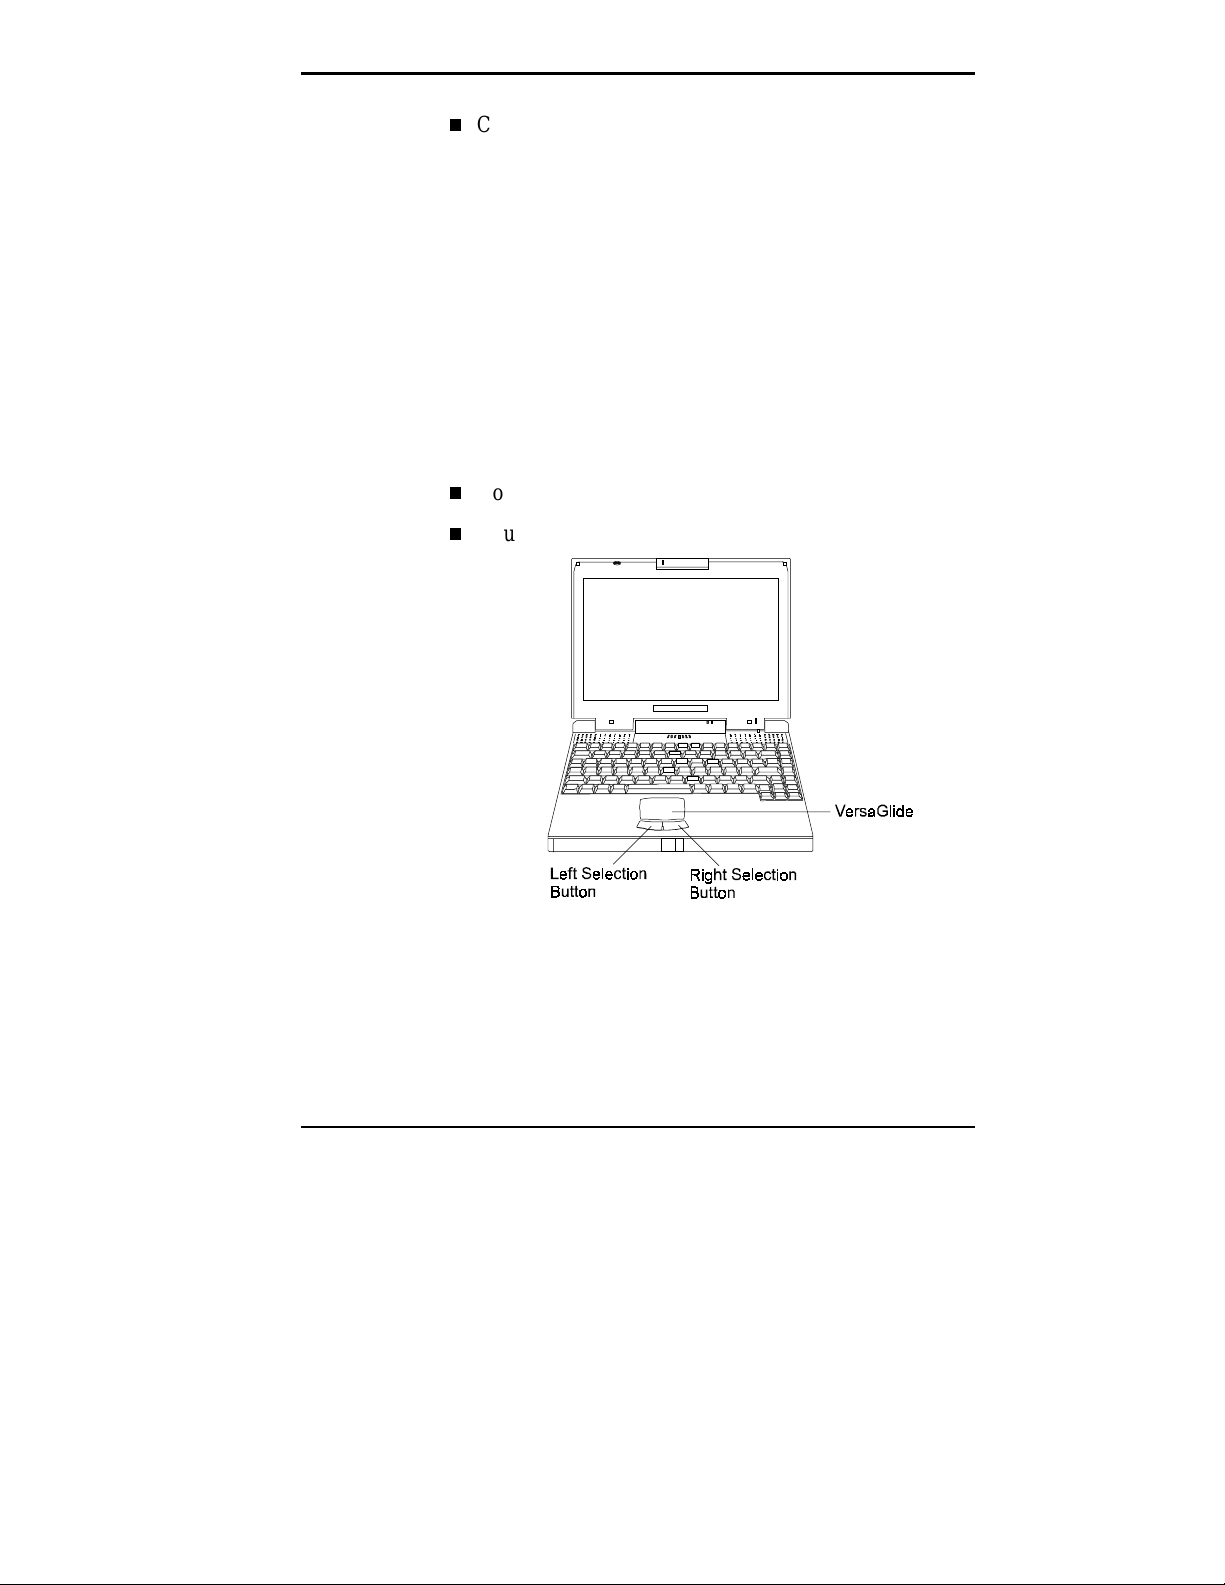
Control keys —
used in conjunction with other keys to change their
functions. To use control keys, press and hold the control key while pressing another key. For example, “press
Ctrl c
letter
cation you are running.
NEC VERSAGLIDE
The NEC VersaGlide is an easy way to control the cursor
with your finger. Lightly glide your finger across the NEC
VersaGlide and the cursor follows. You can select items in
one of two ways:
Double tap your finger on the VersaGlide.
Double click the left button (this is the primary button).
Ctrl, Alt, Fn
” means to hold down the
. Key combinations work depending on the appli-
c
, and
Ctrl
are controls
Shift
key and type the
VersaGlide features
Using Your NEC Versa Computer 4-5
Page 78

Try both ways and decide which you prefer. If you find the
double tap difficult to use, go to the next section for general
directions about adjusting the touchpad properties.
NOTE
If you install another mouse driver over the
shipping default, the double-tap capability is lost.
Making VersaGlide Adjustments
The NEC VersaGlide (also called the Synaptics Touchpad)
lets you customize how it functions with the cursor. You
can control the size and color of the cursor, cursor speed,
double-click speed, and selection button orientation.
You can also disable the touchpad tap and drag feature. Use
the online help button for details about configuring your
VersaGlide. See the appropriate section that follows for
your operating system.
Windows 95 VersaGlide Adjustments
To access and adjust your VersaGlide and cursor, follow
these steps.
Select “Start,” “Settings,” “Control Panel.”
1.
From the Control Panel, tap (or click) on the Mouse
2.
icon. A Mouse Properties screen appears.
4-6 Using Your NEC Versa Computer
Page 79

Along the top of the Mouse Properties screen, tabs rep-
3.
resent the primary functions available.
Button – lets you select or change which button is the
Primary or Secondary button. Also lets you modify
the speed required when double clicking selection
buttons.
Pointers – lets you change the pointer scheme and
define which symbols you want to use for various
Windows tasks.
Motion – lets you adjust the pointer speed and spec-
ify a short or long pointer trail.
Touchpad – lets you change features specific to the
touchpad, including touch threshold, tap features,
and edge motion properties.
General – lets you change or update mouse drivers.
Click OK or
4.
Cancel
to accept or cancel the adjustments
you make.
Another way to reset VersaGlide properties is to select the
mouse icon on the bottom right of the system tray. This allows you to view a TouchPad Enhancements menu. This
menu gives you immediate access to the Mouse Control
Panel, and lets you set Scroll Zone and Speed settings.
Windows for Workgroups VersaGlide Adjustments
To access and adjust your VersaGlide and cursor, follow
these steps.
From the Program Manager, open the Main program
1.
group, and double-click the Control Panel icon.
Double click on Synaptics TouchPad icon. A control
2.
panel screen appears.
Using Your NEC Versa Computer 4-7
Page 80

Along the top of the screen, tabs represent the primary
3.
functions available.
Pointer – lets you define the color and size of the on-
screen mouse cursor; also lets you set all touchpad
settings back to their defaults.
Motion – fine-tunes the responsiveness of the screen
pointer, VersaGlide double-click speed, cursor acceleration, and extra precision functions for using
key/button combinations for some pointer functions.
Orientation – adjusts the direction of the pointer de-
vice motion (rotation) and lets you specify the Primary and Secondary VersaGlide button.
Shortcuts – assigns autojumps and hotspots to reduce
the keystrokes or button clicks needed. You can also
customize keyboard functions or VersaGlide buttons.
Touchpad – fine-tunes VersaGlide movement,
including:
Edge Motion – helps with long distance cursor
movements.
Touch Threshold – controls the finger pressure
needed for the VersaGlide to respond.
Gestures – provides the option of recognizing
several gestures that simulate mouse clicks simply by pressing the pad surface.
Click OK or
4.
you make.
4-8 Using Your NEC Versa Computer
Cancel
to accept or cancel the adjustments
Page 81
VersaGlide Tips
Follow these basic ergonomic tips while working:
See Appendix A, “Setting Up a Healthy Work Environment,” for more information.
DRIVE BAYS
The NEC Versa comes with three drive bays — one in the
front of the system and two on the right-hand side. The bays
support the following:
Use a light touch on the VersaGlide surface.
Set up the NEC Versa with your keyboard and
VersaGlide at a comfortable height. Keep your forearms
parallel to the floor. Your wrists should be relaxed and
straight.
While using the keyboard and VersaGlide, keep your
shoulders and arms as relaxed as possible.
Take regular breaks from the computer to rest your eyes.
Perform stretching exercises to relax your fingers,
hands, wrists, forearms, and shoulders.
Front Bay — You can install the battery pack or the op-
tional 8X CD-ROM reader into the front bay. Contact
your NEC Versa dealer to purchase the 8X CD-ROM
reader. To run on battery power while using the CDROM reader, insert the battery into the Diskette Drive
Bay.
!
Install only the battery pack or optional CD-ROM
reader in the f ront bay .
driv e into the front bay. Doing so can damage the
drive and the bay connectors.
CAUTION
Never
try to put t he diskett e
Using Your NEC Versa Computer 4-9
Page 82
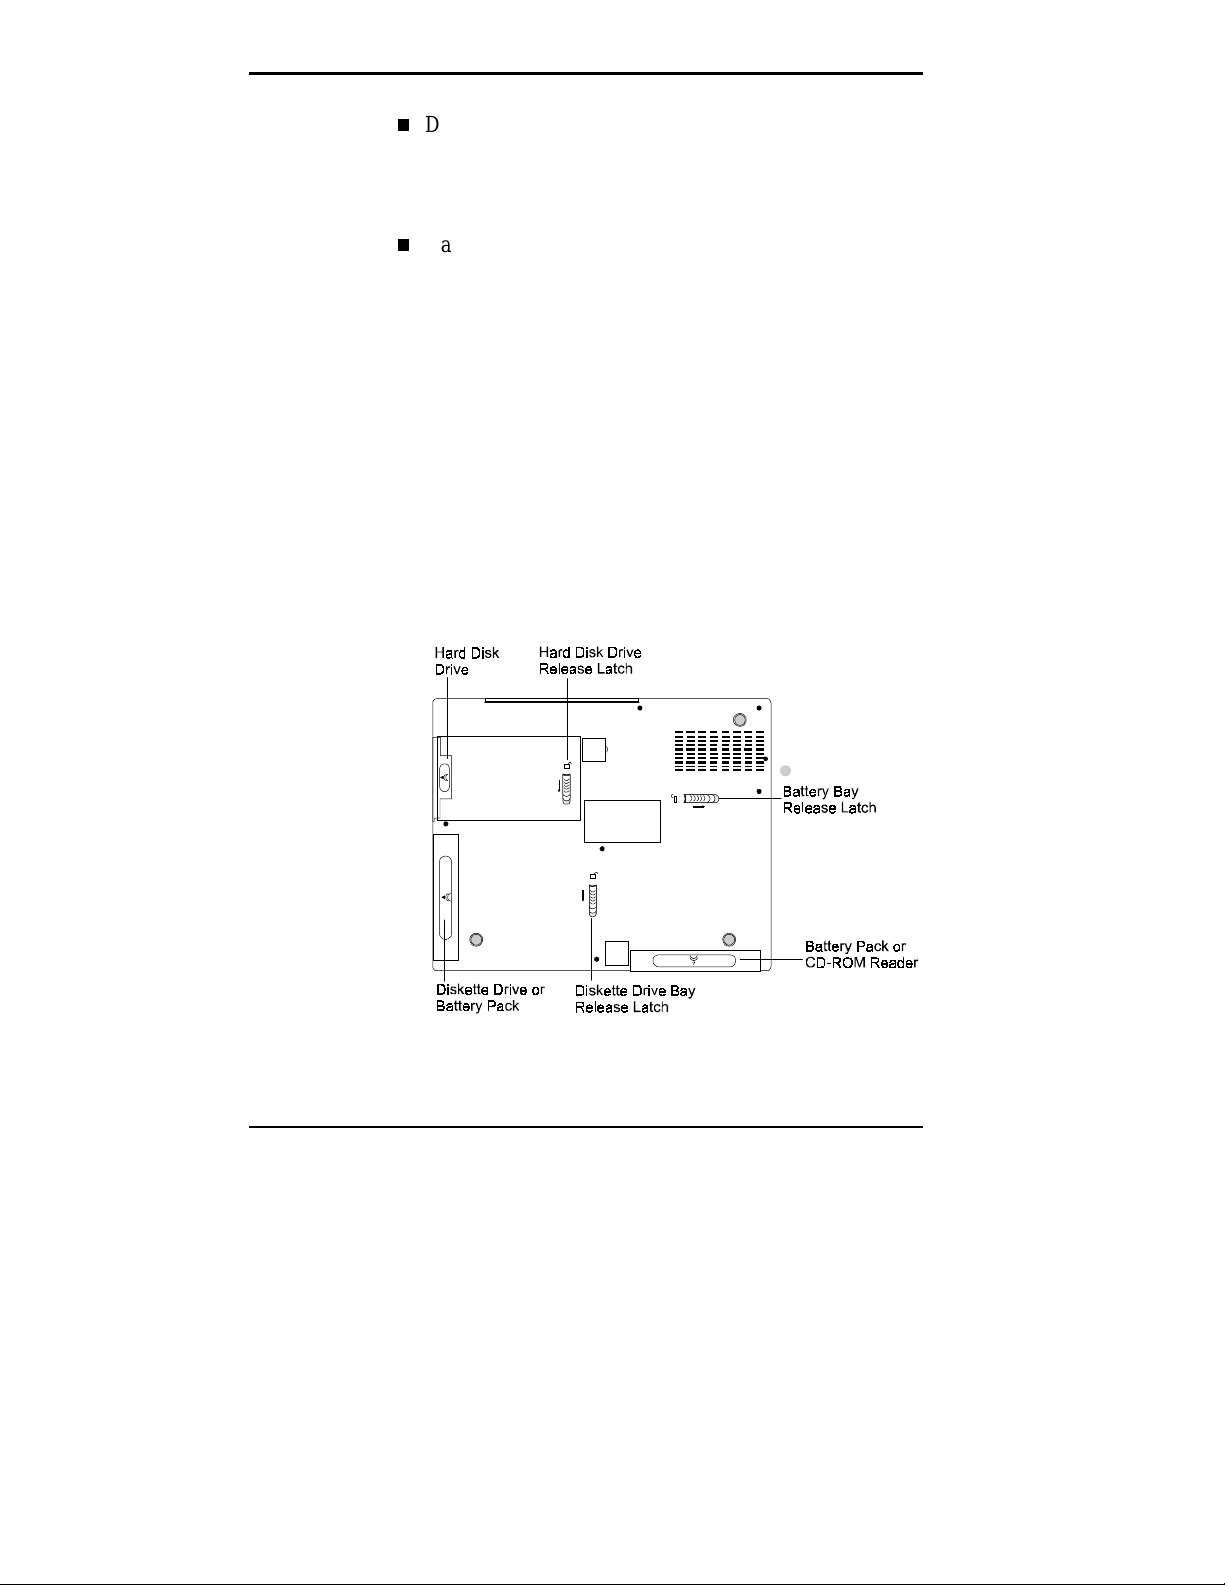
Diskette Drive Bay — Your system ships with a stan-
dard 3.5-inch 1.44-MB diskette drive already installed in
the front bay. You can remove the diskette drive and install an optional second battery pack into this bay.
Hard Disk Drive Bay — The side bay closest to the
back of the system contains the hard disk drive. PC Card
slots are located directly above the hard disk drive bay.
Removing Devices from Drive Bays
Use the following steps to remove the diskette drive (or
other device) from the drive bay.
Make sure the NEC Versa is powered off, all external
1.
options are disconnected, and the LCD panel is closed.
Turn the system upside down.
2.
Locate the bay release latches on the bottom of the
3.
unit. Each latch releases the component installed in its
associated bay.
Slide the bay release latch and hold it.
4.
4-10 Using Your NEC Versa Computer
Bay release latches
Page 83

Firmly grasp the device and pull it away from the sys-
5.
tem. Each device has a depression marked with a direction icon,
NOTE
If you r elease the latch before compl etely r e-
moving the device, the device casing catches.
for easy removal
))>,
Installing Devices in Drive Bays
Use the following steps to install a device in a drive bay.
Your system must be powered off before removing or in-
serting devices in drive bays.
Verify that system power is turned off and the LCD
1.
panel is closed. Turn the system upside down.
Align the device in the bay you plan to use. Push the
2.
device into the bay until it locks into place.
.
Turn the system over, open the LCD panel (if needed),
3.
and power on the system.
Customizing Your System
It’s easy to customize your NEC Versa 2500 Series system
using the drive bays. You can work with AC power and
have the diskette drive installed. If you need additional battery power, you can remove the diskette drive and plug in
an optional second battery pack. Do so as follows:
Remove the standard diskette drive or CD-ROM reader
1.
from the drive bay as described in the previous section.
Align the option with the drive bay opening and push it
2.
in until the option clicks into place.
Turn the system over and power on.
3.
Using Your NEC Versa Computer 4-11
Page 84

OPTIONAL 8X CD-ROM READER
You can purchase the optional 8X CD-ROM reader from
your local NEC Versa dealer. The 8X CD-ROM reader
features the latest in CD-ROM technology. The CD-ROM
reader is assigned the drive letter E: in Windows for Workgroups systems. It is assigned to the next available drive
letter in Windows 95 systems.
Use the CD-ROM reader to load and start programs from a
compact disc (CD). You can also use the CD-ROM reader
to play your audio CDs (see “Audio CDs” in this chapter).
The optional 8X CD-ROM reader is compatible with Kodak Multi-session Photo CDs™ and industry data and
audio CDs.
The CD-ROM reader operates at different speeds depending
on whether the CD you are using contains data or music.
This allows you to get your data faster and to see smoother
animation and video.
The CD ROM reader is a Class 1 Laser Product.
CD-ROM reader features include the following:
Release Button — ejects the CD tray. Press this button
when power is on to insert a CD into or remove a CD
from the reader.
Emergency Eject Hole — allows you to manually remove a CD from the reader if the eject function is disabled by software or a power failure occurs. (Available
on most CD-ROM readers.)
To remove a CD, insert the end of a paper clip into the
eject hole, and push in until you hear a click. Now you
can manually open the drawer.
Status LED — lights during data read operations. Do
not eject the CD or turn off the NEC Versa when the
indicator is lit.
4-12 Using Your NEC Versa Computer
Page 85
CD Loading
To insert a CD into the optional 8X CD-ROM reader, follow these steps.
Press the release button and pull the CD tray out from
1.
the reader door.
Put your CD, printed side up, into the circular impres-
2.
sion in the tray.
Push the CD tray in until it clicks shut.
3.
NOTE
Some CDs vibrate when playing. This does
not affect CD-ROM reader functioning.
Using Audio CDs in Windows for Workgroups
Follow these instructions to play audio CDs in Windows for
Workgroups. The first time you play an audio CD, you
need to add the device to the Media Player’s Device option
list or select the icon Audio Rack. Follow these steps to do
so. You only need to perform this procedure the first time.
After that, go directly to “Playing the CD.” For more details, see your Microsoft Windows 3.11 User’s Guide.
Adding the CD Audio Option
Add the CD Audio option to the Media Player’s Device list
as follows:
Insert the audio CD into the CD-ROM reader tray.
1.
From the Program Manager, open the Main program
2.
group and double click the Control Panel icon.
Double click the Drivers icon and select Add.
3.
Using Your NEC Versa Computer 4-13
Page 86

Scroll through the list of drivers and highlight
4.
and click “OK.”
Audio
A message similar to the following appears:
One CDROM drive was detected. Installation is complete.
If you see a prompt stating that the mcicda.drv is already on the system, select “New.”
Press “OK” and close the Control Panel.
5.
Go to the next section, “Play Audio CDs.”
6.
Playing Audio CDs
Play audio CDs in Windows for Workgroups as follows:
If you have not yet done so, insert a CD into the tray.
1.
Double click the icon Audio Rack.
2.
Click the Play button.
3.
Using Audio CDs under Windows 95
Follow these instructions to play audio CDs in Windows
95. For more details, see your Microsoft Windows 95
User’s Guide.
[MIC] CD
Double click the Audio Rack 32 icon.
1.
Click the Play button.
2.
Playing Entertainment CDs using Windows 95
Use the following steps to run a game or educational CD.
Press the Stop/Eject button to open the CD tray. Insert a
1.
CD into the tray. Push the CD tray in until it clicks shut.
Follow the installation instructions that come with your
2.
CD-ROM title. For example, you will have to enter the
drive letter assigned to the CD-ROM reader.
4-14 Using Your NEC Versa Computer
Page 87

CD Care
PC CARDS
Exit the setup utility. Select
3.
Click on the game icon created when you ran the CD
4.
Yes
to save your settings.
title’s setup utility. You are now ready to play!
When handling CDs, keep the following guidelines in mind.
Always pick up the CD by its edges.
Avoid scratching or soiling the side of the CD that has
no printing or writing on it.
Do not write on or apply labels to either side of the CD.
Keep the CD away from direct sunlight or high
temperatures.
Clean fingerprints or dust from the CD by wiping it with
a soft cloth.
PC cards are all approximately the same size and vary only
in thickness. All have a standard 68-pin connector. There
are three types of cards, which vary in thickness.
Type II Cards
Type II cards have a thickness of 5.0 millimeters (mm).
Type II cards are often storage or communications devices
such as battery backed Static Random Access Memory
(SRAM), Read Only Memory (ROM), Flash Memory,
LAN, and Small Computer System Interface (SCSI). Typical Type II cards include input/output (I/O) features such as
modems and LANs.
Using Your NEC Versa Computer 4-15
Page 88

Type II Extended Cards
Many PC cards are Type II extended cards. The extended
card has an additional physical component that protrudes
beyond the traditional card size. The extension can be as
large as 40 mm deep by 9.65 mm high. This extension provides room for additional electronics as well as a location
for external connectors.
Type III Cards
Type III cards are thicker (10.5 mm) than Type II cards and
allow no extensions. Type III card uses include advanced
function I/O cards with additional features such as wireless
modems, multimode cards (cards with more than one function such as a combined modem and LAN card), and small
hard drive storage.
Communication Cards
You can use both fax/modem and network PC cards with
your NEC Versa. Here are some suggestions to help you get
the best system performance.
Network Cards
Fax/Modem Cards
You can insert a fax/modem in either slot.
Always insert the fax/modem card before using your
fax/modem software application. If you start the application before inserting the fax/modem card, the application typically does not find the card.
4-16 Using Your NEC Versa Computer
Page 89

PC Card Modems
You can use a PC card modem with your NEC Versa to
communicate with others via fax, e-mail, or connect to an
online service or bulletin board.
Follow these steps to connect your system to a phone line.
1.
2.
Storage Cards
When you insert a memory or storage card in an NEC notebook computer, it appears as a unique drive depending on
the type of card and the slot you are using.
The following table provides sample drive designations.
Connect the telephone cable to the modem port.
Connect the other end of the telephone cable to the wall
outlet (you might have to unplug the telephone if it is
plugged into the outlet.)
Sample Drive Designations
DRIVE LETTER LOCATION/DEVICE
C: Internal hard disk
D: Internal hard disk, 2nd partition
E: Slot 0, IDE/ATA memory card
F: Slot 1, IDE/ATA memory card
G: Slot 0, high-speed memory card
H: Slot 1, high-speed memory card
Interface Cards
You can connect most standard Small Computer System
Interface (SCSI) devices using the optional NEC PCMCIA
SCSI card. This PC card is also known as the New Media
"Visual Media" 500-KB Card.
Using Your NEC Versa Computer 4-17
Page 90
Other Cards
Many other kinds of PC cards are available to notebook
computer users. They include the following cards:
Global Positioning System (GPS) − to enable the track-
ing of remote units (for example, delivery trucks)
Paging − for receiving remote paging messages
Serial − for adding an extra serial communications port
Multimedia − for combining animation and sound
Video − for recording, displaying, and capturing full-
motion video (NEC VersaVideo™)
Audio − to enable the use of sound.
PCM Plus Drivers
The PCM Plus drivers are installed on your system. When
installed, the program assigns parameters to the driver,
indicated such things as memory allocation, slot assignment,
and address size.
NOTE
The fol l owing dri v er s do not apply to the Wi n-
dows 95 operating environment.
DRIVER PURPOSE
CNFIGNAM.EXE Specifies which PCM Plus configuration
PCMATA.SYS Used with SRAM, rotating disk cards, or
PCMCSFUL.EXE or Supports Card Services. Works at the
4-18 Using Your NEC Versa Computer
PCM Plus Drivers
should be accessed from the PCM.INI
file.
solid-state mass storage cards for IDE
hard disk emulation.
Page 91

DRIVER PURPOSE
PCMCS.EXE operating system level to manage all
PCMFFCS.EXE Acts as a high-level bridge between
DRIVER PURPOSE
PCMMTD.EXE Supports the Microsoft Flash File
PCMRMAN.SYS Initializes the Card Services resource
PCMSCD.EXE Used with Fax/Modem and LAN cards.
PCMSS.EXE Supports Socket Services. Works at the
PC Card Enablers
Some PC cards have custom software written by the card
manufacturer, known as Enablers, instead of Card and
Socket Services. This custom software works well if only
one or two PC cards are used on a particular system.
PCM Plus Drivers
PC cards. PCM Plus installs PCMSFUL
only if you plan to use Flash memory
cards. Otherwise, it installs PCMCS.
MSFLASH.SYS and Card Services.
System (FFS) protocol. Used with
SRAM and Flash memory cards.
database.
BIOS level as an interface between the
PCMCIA card socket and the Card
Services program.
Although many of these were considered compliant with
PCMCIA Release 2.0 specifications, they did not provide a
truly compatible environment for exchanging and sharing
PCMCIA operations. The following are some guidelines for
using PC cards with Enablers.
Do not use more than one Enabler at once unless you
know what system resources are used by each Enabler.
One Enabler may crash another if there is a conflict.
Hot swap may not work with some Enablers.
Using Your NEC Versa Computer 4-19
Page 92

An Enabler may only work in Windows Standard Mode.
Enablers have minimal memory requirements. For ex-
ample, they require as little as 4 KB for a modem, 16
KB for Ethernet, and 24 KB for Token Ring.
Know your system resources (see the CONFIG.SYS file);
command line arguments cannot use resources being used
by other devices.
Disabling Preloaded PCMCIA Drivers
You can disable all of the PCMCIA drivers that come preloaded in your NEC notebook computer. However, doing so
limits some of the flexibility of PCMCIA. You can still use
PC cards that have Enabler software, but you can install
and run only one at a time. The card must rely on the software supplied by the card vendor (Enablers).
Remove the preloaded PCMCIA drivers by modifying the
CONFIG.SYS file as follows.
Select the File menu in Windows Program Manager.
1.
2.
Select
Enter
, type
Run
. This should take you to the System Configuration
Editor.
Click on the CONFIG.SYS window and scroll down to
3.
the following line:
====== PCMCIA Device Drivers ======
4.
Type
for "remark" in front of all lines showing
rem
PCMCIA device drivers. This tells the operating system
to ignore those lines.
Save and exit the file.
5.
Reboot the system for the changes to take effect.
6.
4-20 Using Your NEC Versa Computer
sysedit
in the command line, and press
Page 93
PC Card Slots
Your NEC Versa integrates two PC card slots for inserting
two Type II PC cards or one Type III PC card.
NOTE
but also accepts new cards.
Using the system’s PC card slots, you can add optional PC
cards and connect external devices to your NEC Versa.
These devices include peripheral devices, such as modems,
LAN cards, and storage cards.
Inserting a PC Card
To insert a PC card, open the slot cover and follow these
steps.
NOTE
slot cover open if you are using a PC card for a long
period of time. Some PC cards can overheat and
damage the system.
This 32-bit st ructure is backward compat ible,
NEC recomm ends that you keep the PC car d
Align the card so that the 68-pin connector points to-
1.
wards the slot.
Slide the card into either slot. A low tone followed by a
2.
high tone lets you know that the card is fully inserted
and recognized. (If you turn off the sound, no sound is
emitted.)
Using Your NEC Versa Computer 4-21
Page 94
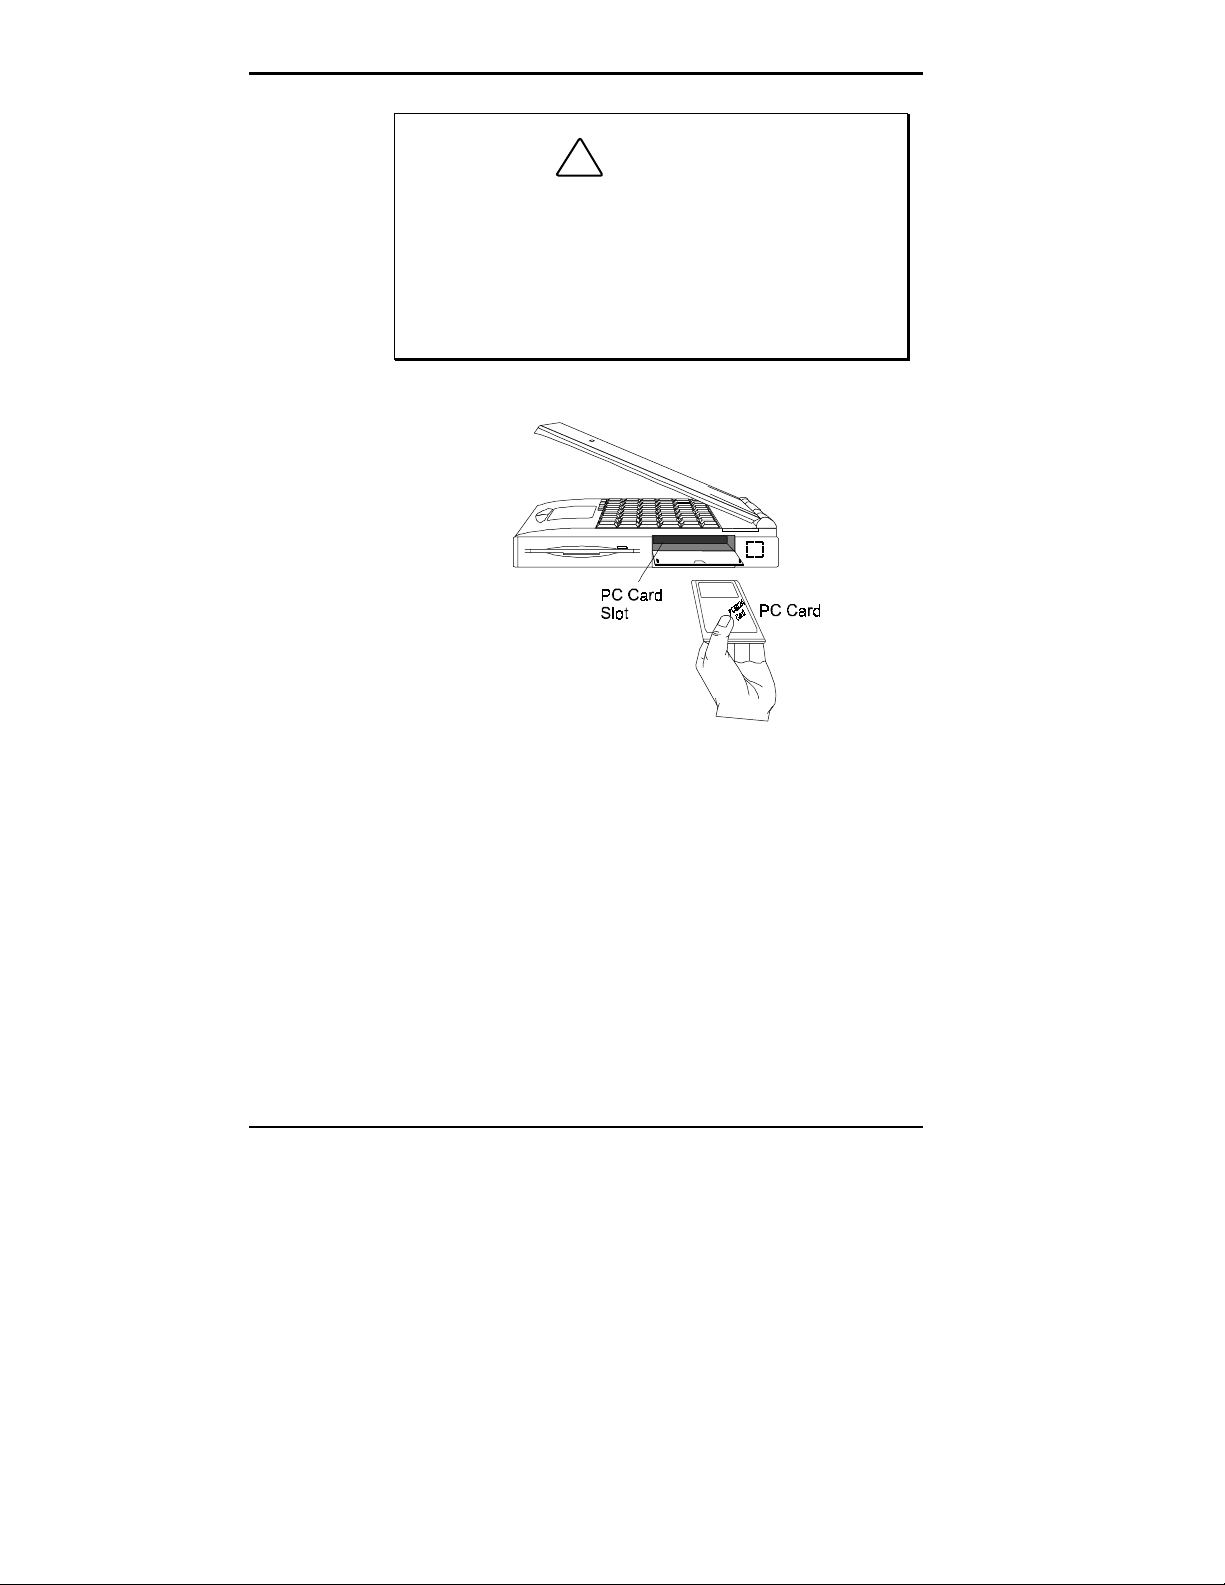
!
W hen pushing the PC card into t he slot, be careful
not to press the Power button on the other side of
the unit. This can accidentally power off the system.
Other two-tone sequences such as high, then low
tones indicat e that the c ard is i nserted, but t he card
type is unknown.
CAUTION
3.
You can use the Phoenix Card Manager software preinstalled on your system to check PC card slot availability.
For example, look for the PCM icon in the Windows
Program Manager or the PC Card icon. It shows which
slot contains a PC card and which is empty.
Removing a Card
Remove PC cards from Windows for Workgroups
(Windows 3.11) systems as follows. Go to step 3 for Windows 95 systems.
4-22 Using Your NEC Versa Computer
Inserting a PC card
Page 95
To remove the card, press the eject button on the side of
1.
the slot. A double tone sounds.
Pull the card firmly out of the slot.
2.
NOTE
PC cards draw power even when not in use.
To save energy , press the button to disconnect the
card when it is not i n use. You can l eave the c ard in
the slot while it is disconnected for easy storage.
Or, remove PC cards from Windows 95 system as follows.
From the screen, select “My Computer,” then “Control
3.
Panel.”
Select the PC Card icon.
4.
Select the PC Card to remove and select “Stop.”
5.
Windows 95 alerts you if any applications are still using
the card. If all applications using that card are closed,
services for that card are shut down, and you get a
message telling you it is safe to remove the card.
IR Port
Press the button on the side of the PC card in the slot.
6.
Pull the card out of the slot.
7.
The IR port on the back of your system lets your NEC
Versa communicate with other devices that also use infrared
technology. The IR port is Infrared Data Association
(IrDA) compatible. You can easily transfer files between
your NEC Versa and an IR-equipped desktop, or print to an
IR-equipped printer without using cables.
When your NEC Versa ships, the IR port is enabled.
Using Your NEC Versa Computer 4-23
Page 96

For the infrared technology to work, follow these guidelines:
position the NEC Versa no more than three feet way
from the IR peripheral device you are using, also
keep the IR ports between the computer and the device
parallel.
The LapLink software that ships with your NEC Versa
system provides ways for you to use the IR port. Read the
instructions in Chapter 2, “How to Use LapLink.”
INCREASING SYSTEM STORAGE AND MEMORY
As your needs grow and change, you may need to add an
optional hard disk drive with a greater capacity or additional memory. Read the following sections to learn how to
install an optional hard disk drive or a memory module.
Hard Disk
You can increase the system’s storage capacity by replacing
the standard hard disk drive with a drive with greater storage capacity. See the section “Drive Bays” for details about
removing a hard disk drive and adding a new one. After you
install the drive, you may need to go into Setup to specify
your new drive type.
Installing a Memory Module
Your NEC Versa comes standard with 16 megabytes (MB)
of Extended Data Out (EDO) memory. This new technology
gives your system higher performance. You can increase
system memory to a maximum of 48 MB by installing two
double inline memory modules (DIMM) in the system.
The following module capacities are available:
8-MB memory module
16-MB memory module.
4-24 Using Your NEC Versa Computer
Page 97
NOTE
Always use modules of the same capacity
when installi ng two modules. Modul es with dif ferent
capacities that are installed together do not work
properly.
Install DIMMs as follows.
Make sure the system is powered off and that no periph-
1.
eral devices are attached.
Open the LCD panel.
2.
Locate the two speaker caps. Slide each one away from
3.
the system and pop it off the unit.
Gently lift the edge of the keyboard nearest the LCD up,
4.
turn it upside down, and rest it on the VersaGlide. Be
careful not to twist the keyboard cable.
!
Be caref ul not t o remov e the keyboard or keyboard
cable entirely from the system.
Locate the LED guard and pry it up and off of the sys-
5.
CAUTION
tem.
Locate the DIMM sockets. The top socket is connector 0
6.
and should be used when installing only one module.
The bottom socket sits a little in front of the top socket
for easier access. However, installation for both sockets
is the same.
Using Your NEC Versa Computer 4-25
Page 98
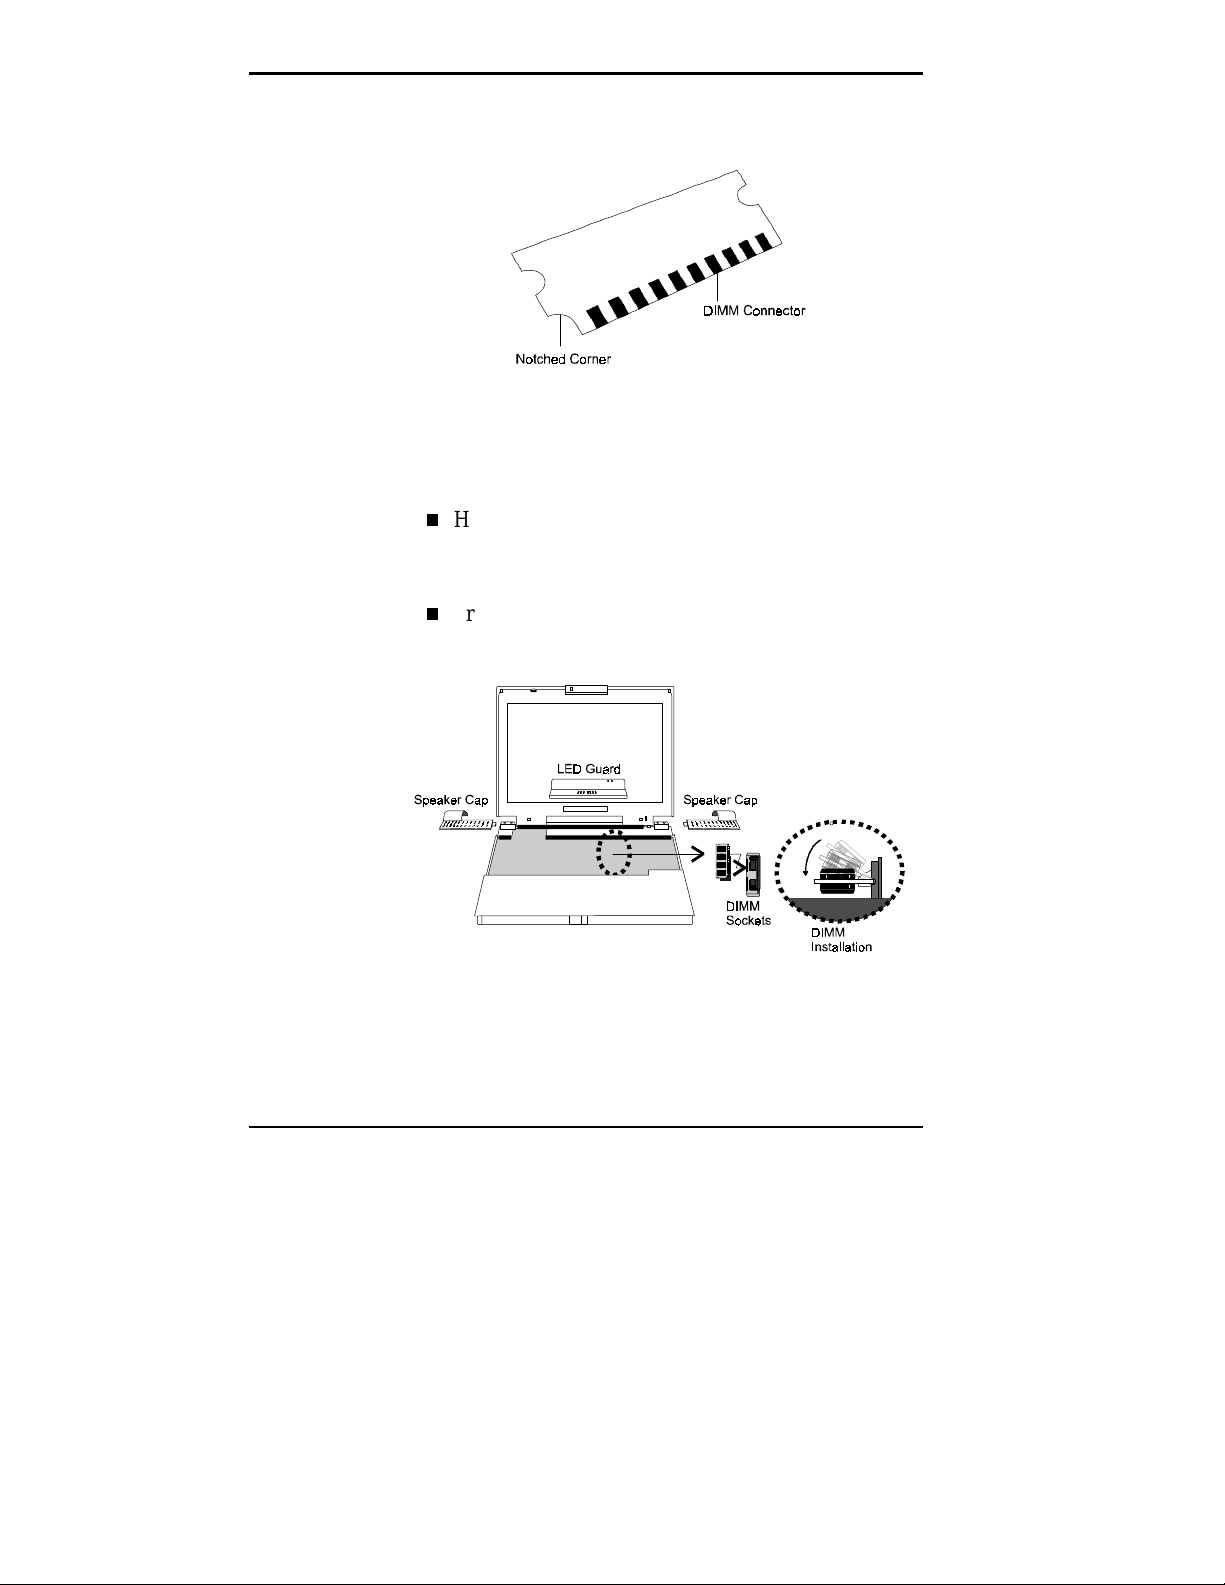
Locate the notched corner on the DIMM.
7.
DIMM features
Hold the notched corner towards the front of the system
8.
and insert the module as follows:
Hold the DIMM at a 60 degree angle and align the
DIMM connector with the socket in the system. Push
the connector into the socket.
Press down on the DIMM until the locking tabs on
the sides snap into place, securing the module.
4-26 Using Your NEC Versa Computer
Inserting DIMMs
Page 99

To remove a DIMM, press the locking tabs away from
the sides of the module until the module pops up. Then,
remove the DIMM.
Replace the NEC Versa components as followins.
9.
Snap the LED guard back into place.
Gently reposition the keyboard.
Slide the speaker caps from the sides of the system
over the speakers.
Run the Setup program to register the new memory.
10.
Reviewing the Memory Map
The system supports system and video shadowing, both
controlled through complementary metal oxide semiconductor (CMOS). The system supports BIOS as a cacheable
area with write protection. The following table shows the
system's memory map.
Memory Map
MEMORY SPACE SIZE FUNCTION
00000000h-0009FFFFh 640 KB Base Memory
000A0000h-000AFFFFh 64 KB Video Memory (graphics)
000B0000h-000B7FFFh 32 KB Upper Memory Block (UMB)
000B8000h-000BFFFFh 32 KB Video Memory (text)
000C0000h-000CBFFFh 48 KB Video BIOS
000CC000h-000D0FFFh 20 KB PCMCIA Window (available as UMB
in Windows '95)
000D1000h-000E3FFFh 76 KB Upper Memory Block (UMB)
000E4000h-000FFFFFh 128 KB System BIOS ROM
00100000h-02FFFFFFh 47 MB Extended Memory
Using Your NEC Versa Computer 4-27
Page 100
INSTALLING OPTIONS
The back of your NEC Versa notebook provides industrystandard connectors so that you can integrate the following.
External monitor
Printers (parallel and serial)
External keyboard
External mouse
External audio options.
In addition, NEC offers the NEC Port Replicator 2400
which was developed to work specifically with your NEC
Versa.
See the following sections for steps on using the options.
External Monitor
You can add a standard external monitor to your NEC
Versa. You need a display signal cable (usually provided
with the monitor). One end of the cable must have a 15-pin
connector for the system.
Follow these steps to connect an external monitor to your
NEC Versa.
Check that the NEC Versa is powered off and the
1.
monitor power switch is turned off.
NOTE
The NEC Versa must be powered off while
the monitor is being connected.
4-28 Using Your NEC Versa Computer
 Loading...