


IP DECT
C944 Cordless Handset
User Guide
WARNING
LIABILITY DISCLAIMER
NEC Business Solutions Ltd. reserves the right to change
the specifications, functions, or features, at any time,
without notice.
NEC Business Solutions Ltd. has prepared this
document for use by its employees and customers.
The information contained herein is the property of
NEC Business Solutions Ltd. and shall not be
reproduced without prior written approval from NEC
Business Solutions Ltd.
© Copyright 2006
NEC Business Solutions Ltd.
Produced in Australia
The earpiece of this instrument can magnetically attract objects,
and thus could cause ear injuries.
WARNING
DANGER
ATTENTION
Do not incine
Do not short circuit batteries.
Do not disassemble batteries.
Avoid using this device in flammable atmospheres, due to the
potential radio frequency ignition hazard.
This equipment will be inoperable if the AC power fails,
so Emergency Services access will not be available.
rate batteries.

Contents
1 Important Safety Information ........ 3
Sensitive Electronic Environment .......3
Power Supply .......... ..........................3
Safety Precautions ............................4
Usage ...............................................4
2 Installation ......................................5
Installation Location ......... ... ... ... .. ... ....5
Commissioning your Handset ............5
Installing the Charger .........................6
3 Important Battery Information ...... 7
Charging and Discharging .................7
4 Charging the Batteries ...................8
Initial Setup and Operation ................8
Charging and Operating Times ..........8
Charge Display ........................... ... ... .8
Battery Capacity Icon ........................9
Charge Warning ...... .. ........................9
5 Initial Setup and Operation ......... 10
Handset Registration ................ .. .....10
6 Keys, Display and Connectors .... 11
Display Arrangement .......................12
Icons ...............................................12
Text Lines/Softkey Line ...................13
Illumination ......................................13
7 Softkeys and the Cancel Key ...... 14
The Softkeys ...................................14
Softkey: Arrow Keys .......................14
Softkey: OK .....................................14
Softkey: Options .............................14
Softkey: Esc ....................................14
Cancel Key ......................................14
Example: Menu ...............................15
Example: Telephone Book ..............15
Entering a Telephone Number .........15
8 Calling ........................................... 16
Handset On/Off ...............................16
Loudspeaker Volume ...................... 16
Handsfree .......................................16
Muting ............................................16
Making a Call ..................................17
Making a Call from the Last Number
Redial List ............................ ... ... ...18
Making a Call from the Telephone
Book ............................................19
Making a Call from the Caller List ....19
Making a SOS-call ..........................20
Muting Ringer/Trembler ..................20
Answering a Call ....................... ...... 20
Changes During a Connection ........20
Enquiry Call/Call Transfer ................ 21
9 Messages ..................................... 22
Urgent messages ............................ 22
Normal messages ........................... 22
Receipt confirmation .......................23
Message memory full ...................... 23
10 Message waiting indication for
Voice Mail ................................... 24
11 The Menus: Operating
Procedures ................................. 25
Menu Control .................................. 25
Example ..........................................25
Menu Timer ..................................... 25
12 Menu: Telephone Book Settings 26
Adding a New Entry ........................26
Entering Characters/Names ............ 27
Editing an Entry ............................... 27
Deleting an Entry .............................27
Deleting all Entries ...........................27
Adding an Entry to the Caller Filter .. 27
Quick Call .......................................28
Transferring Phone Numbers to
the Telephone Book .....................28
1

13 Menu: Redial List ..........................29
14 Menu: Key Lock ............................30
Key Lock On Off ..............................30
15 Menu: Caller List .......................... 31
Accepted and Missed Calls .............31
Calling .............................................31
16 Menu: Messages .......................... 32
Writing a new message ...................32
Sending a message .........................33
Reading a message ........................33
Deleting a message .........................33
Deleting all messages .................... ..33
Details .............................................33
17 Menu: Ringer Settings ................. 34
Melody: Internal ...............................34
Melody: External ..............................34
Melody: Unknown Number ..............34
Melody: VIP calls .............................34
Melody: Normal Message ................34
Melody: Urgent Message ................34
Melody: Emergency Call ..................35
Melody: Alarm Call ..........................35
Type ................................................35
Volume ............................................35
Device .............................................35
18 Menu: Volume Settings ................ 36
Earpiece ..........................................36
Hands-free ......................................36
19 Menu: Caller Filter ........................37
List of Numbers ...............................37
Adding a New Entry ........................ 37
Editing an Entry ...............................37
Deleting an Entry ............................. 37
Deleting all Entries ........................... 37
Filter Options ...................................37
Blocking or receiving calls ............... 38
Deactivate Filter ...............................38
Wild Card Feature ...........................38
Transferring Phone Numbers to
the Caller Filter ..............................38
20 Menu: System ............................... 39
Registration Code ........................... 39
Registering the Handset to
the DECT System .........................39
Selecting the DECT System ............ 39
Automatic Search System ............... 40
Deleting a System ...........................40
Changing a System's Name
and Phone Number ...................... 40
Equipment ID ..................................40
21 Menu: Telephone Options ........... 41
Alarm ..............................................41
Setting the Alarm Clock ................... 41
Activating/Deactivating the Alarm
Clock ............................................ 41
User Name .....................................41
Changing the Language .................. 41
Emergency Call Messages .............. 42
SOS number ................................... 42
Attention tones ...............................42
Silent Charging ............................... 42
Charger Answer ..............................42
Auto Quick Hook ............................42
Auto Answer ...................................42
Normal Message Display ................. 43
Message Memory Overwrite ........... 43
Display Contrast ............................. 43
22 Menu: Security Functions ........... 44
Changing the PIN ............................44
Read Only ....................................... 44
Resetting the Handset ....................44
23 Menu Shortcuts ............................ 45
Ringer on / off .................................45
Silent charging on / off .................... 45
User name ...................................... 45
Registering / Deregistering ..............45
Toggles the ringer ........................... 45
Key Lock on ....................................45
24 Accessories .................................. 46
25 Care and Maintenance ................ 49
26 Menu Tree ..................................... 50
27 Notice to the user ........................ 51
2

1 Important Safety Information
Only use this product in countries where the appropriate
authorities have given their authorisation.
The A9 symbol on the product certifies its conformity with the
Australian technical requirements concerning user safety and
electro-magnetic compatibility valid at the time of approv al.
Sensitive
Electronic
Environment
Any radio-based equipment can potentially cause interference
with other equipment and can be interfered from other equipment. This also applies for DECT equipment. However due to
the very low transmission power level the chan
ence are very small. Research proves that operational DECT
phones normally don't influence electronic equipment however
some precautions must be taken into account for sensitive
electronic equipment e.g. sensitive laboratory equipment.
When DECT phones operate in
electronic equipment incidental influence can
advised not to place the DECT phone on or close (less then
10cm) to this kind of equipment, even in standby mode.
Please also use the other documentation supplied with the various parts of your telephone system.
close proximity to sensitive
ces for interfer-
occur. You are
Power Supply The mains voltage of the adapter should match the local mains
voltage,
of 240V AC.
3

Safety
Precautions
• Do not open the handset or charger, this could expose you
to high voltages. Have all repairs carried out by authorized
service personel.
• Do not allow the charger and the battery contacts to come
into contact with conductive objects such as keys, paper
clips, rings or bracelets.
• Do not allow the handset and charger to come into contact
with water or chemicals.
ly use the plug-in AC adapter DVE Model No: DV-7515RSAA.
• On
Only use rechargable batteries type, AAA, 1.2V, NiMH, 800mAh.
•
• Do not use AC adapters which are visibly damaged (cracked
or broken housing) and keep the ventilation slits on the
plug-in AC adapters free.
• Do not use the handsets in vehicles or in hazardous locations.
• This product contains magnetic material. Be aware that small
metallic objects may stick for example to the loudspeaker.
This may deteriorate the audio quality and can be harmfull.
Usage Like all other cordless telephones, this handset uses radio
signals which do not guarantee a connection set-up under
all circumstances. Generally, you should therefore not rely
exclusively on cordless telephones when making indispensable
calls (e.g. medical emergencies).
4

2Installation
Installation
Location
Commissioning
your Handset
Place the charger on a flat, even surface. Do not install the
charger, handset and accessories in the proximity of:
• Water, moisture or damp areas.
• Sources of heat, direct sunlight or unventilated areas.
• Devices which generate strong magn et ic fields , elec tr ical
appliances, fluorescent lamps, computers, radios, televisions
or fax and telephone terminals.
• Areas where the handset can be covered, its ventilation is
impaired and liquid can get inside.
• Areas where there is excessive dust and areas subject to
vibration, shock or extreme temperature fluctuations.
• Install / keep the handset and accessories out of reach of
small children.
Your handset is only operational after the batteries have been
charged. You can then use the handset to make and receive
calls.
Placing the batteries in the handset
The battery compartment is on
the back of the handset. It
takes the three type AAA batteries which are supplied.
Please refer to the Important
Battery Information on page 7.
Opening the battery compartment cover:
Insert a suitable item (e.g. the
top of a ballpoint-pen) into the
hole at the bottom of the compartment cover (1). Push it in
and lift the cover at the same
time (2).
Inserting the batteries:
Insert the batteries in the battery compartment, taking care
to observe the correct polarity.
The + - poles of the batteries
must correspond to the + markings in the battery compartment.
5

Closing the battery compartment cover:
Replace the cover by placing it
on the compartment at a slight
angle (1) and pressing it down
until it clicks into place (2).
Note: if the batteries are inserted incorrectly, the handset will
not function, and may be damaged.
Installing the
Charger
To operate the charger a mains connection is required.
Check if the mains voltage
does match the adapter mains
voltage.
Connect the cable on the
plug-in AC adapter to the terminal on the bottom of the
charger and plug the AC
adapter into the mains socketoutlet.
Mains plug
6

3 Important Battery Information
Note: use only rechargable AAA NiMh battery of typical 800
mAh, 1.2 V. Never use a battery which is damaged or worn
out.
Heat or cold reduces the performance and service life of the
batteries. It is possible that a handset with hot or cold batteries
can be temporarily out of operation even if the batteries are fully
charged.
Used batteries should be disposed of in accordance with local
authority regulations. Hand them in for recycling!
Do not throw batteries in a fire.
Charging and
Discharging
The batteries can be charged and di scharged hundreds of
times, but sooner or later they will be worn out. If the operating
time (i.e. talk and standby time) is significantly shorter than
usual, then it is time to replace the batteries.
To maintain optimum operating time, the batteries should be
discharged from time to time by not placing the handset in the
charger but leaving it switched on until it switches itself off.
Only use this method to discharge the batteries.
Extreme temperatures influence the charging capability of the
batteries.
7

4 Charging the Batteries
Initial Setup
and Operation
Charging and
Operating
Times
Charge the batteries approximately 6 to 7 hours before initial
use of the handset. This protective measure extends the service life of the batteries.
The maximum power output is only attained after three to five
charging and discharging cycles.
Place the handset regularly in the charger thus ensuring optimum charging of the batteries.
When replacing the batteries, pay attention to the correct
polarity. It is essential to make sure that only battery types
approved by the manufacturer are used.
Use only rechargable AAA NiMh battery of 800 mAh, 1.2 V. The
manufacturer does not accept liability for malfunctions or damage caused by using other battery types or normal batteries.
Charging time: (empty batteries) to full capacity in app rox.
6 to 7 hours.
Talk time: approx. 20 hours (with fully charged batteries).
Standby time: from 200 up to 300 hours (with fully charged
batteries).
Charge Display The charge status of the batteries is indicated by ƒ on the
display. This means:
ƒ batteries fully charged (80 – 100 %)
„ batteries 60 – 80 %
A batteries 40 – 60 %
… batteries 20 – 40 %
† batteries 0 – 20 %
†
(frame flashes) batteries are empty: alert tone has been given.
8

Battery
Capacity Icon
When batteries are replaced, no icon will be displayed befor e a
complete charge cycle has been completed, except when
almost empty batteries are inse rted in the phon e, then the ico n
will be shown immediately.
When the battery capacity icon is displayed the indication is
reliable.
If charged batteries are inserted, the batteries can become hot
during the first charge cycle, and if the fully charged batt erie s
are removed from the phone and inserted again, the batteries
can become overcharged.
Charge
Warning
When the batteries’ capacity is almost exhausted, an acoustic
warning is given in the form of 3 short ”beep” signals (only during a call). Approximately 5 minutes of talk time is left.
9

5 Initial Setup and Operation
The handset can be operated on up to 10 different DECT systems. To do so, it has to be registered to each DECT system.
Handset
Registration
Register the handset on the DECT system as described in
”Menu: System”.
10
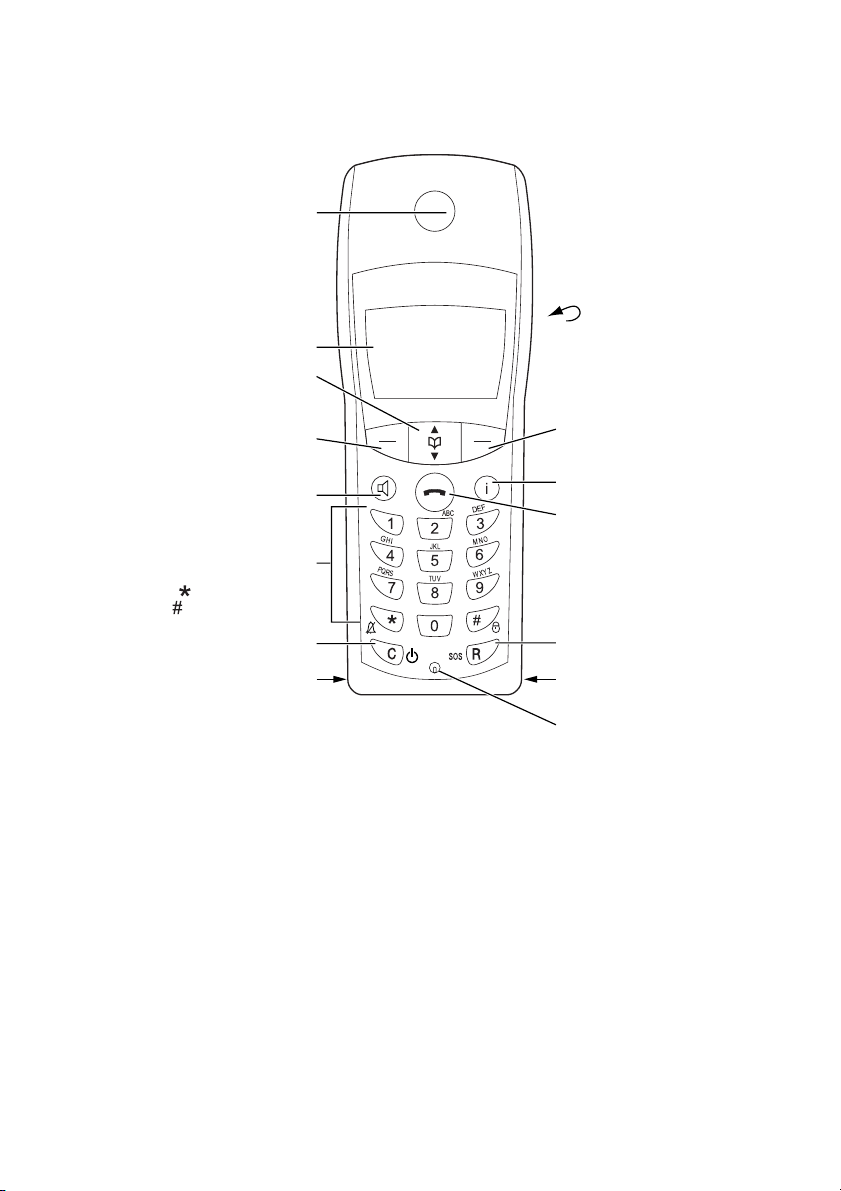
6 Keys, Display and Connectors
s
Earpiece
Earpiece
Display
Display
Up and Down keys
Up and Down keys (arrow keys)
selecting the menu and entering the
for selecting the menu and
entering the telephone book
for controlling the functions and features
for entering numbers and characters
for entering numbers and characters
Press R-key and -key: Buzzer on/off
Press R-key and -key: Buzzer on/off
Press R-key and -key: key lock on/off
Press R-key and -key: key lock on/off
"C"-key for cancel and delete
"C"-key
(arrow keys) for
telephone book
Softkey
for controlling the
functions and features
for cancel and delete
Connector for Headset
Connector for Headset
Softkey
Handsfree key
Handsfree key
Dialling keypad
Dialling keypad
Power on/off
Power on/off
NEC
Rear:
Rear:
Loudspeaker
Loudspeaker
Softkey
for controlling the functions
Softkey
and features
for controlling the
functions and features
Info key
for caller list and messages
Info key for caller list and message
Hook key enabling answering,
Hook key
setting up the connection,
setting up the connection,
disconnecting
disconnecting
"R"-
"R"-(Recall) key for PABX facilities
SOS/Emergency call
SOS/Emergency call
Connector for PC-adapter
Connector for PC-adapter
enabling answering,
(Recall)
key
for PABX facilities
Microphone
Microphone
11

Display
Arrangement
œ¢ƒ
Station 1
Peters
10:00
Menu •D
Icon / textline
3 text lines
Softkey line
Icons
‹ Ringer deactivated
B Caller filter active
œ At least 2 bars: Good radio link
¢ On: Handset has a conn ec tion
Flashing: Handset has an incoming call
» On: Handsfree is activated
C Flashing: Message in voicebox
‚ On: One or more unread messages in the memory
Flashing: Message memory full
ƒ Charge status of the batteries
ª On: An alarm time is set and activated
º On: Keypad is locked
12

Text Lines/
Softkey Line
In the top line of the display, informa tion is given concerning the
current status of the telephone during a call or in standby
mode. When using the menus, this line displays an additional
line of text containing the name of the active menu. With this
feature, you always know where you are in a menu. The text
lines display important information about the current connection status or menu lists and texts. In an idle state the top text
line is replaced by the icon line. Below this icon line the system
name, your programmed name and the phone number of the
handset are displayed
Selection lists (e.g. caller filter) and
Key Lock
Ringer Settings
Menu
Volume Settings
Caller Filter
System
Options ‘ Esc
Telephone Options
Security
the features menu are displayed as
a three-line excerpt. Th e lines can
be moved up or down via the
arrow keys. A selectable entry is
shown inversely with a dark background.
The texts and symbols on the softkey line refer to the keys below.
The contents of the line changes
according to the operating state.
Illumination The display and the keys are automatically illuminated when
there is an incoming call or a key is pressed. The display illumination is automatically switched off after 10 seconds if no key is
pressed.
13

7 Softkeys and the Cancel Key
The Softkeys
Softkey:
Arrow Keys
TelBook
Miller
Newman
Peters
Options ‘ Esc
Symbols are displayed above the arrow keys which identify the
respective functionality of the arrow keys:
E If a continuous text is displayed (e.g. a message), the text
can be scrolled up / down via the arrow keys.
‘ When a selection list (e.g. telephone book or menu) is dis-
played, the arrow keys move the cursor to the desired
entry.
D Enables selection from the redial list.
{} When entering phone numbers or names, changes can
be made by moving the position of the cursor. The arrow
keys shift the cursor to the left or right.
The four large keys below the display (see picture) are called the
softkeys. The functions allocated to
the keys are shown on the bottom
line of the display. The key function
changes automatically according
to the respective operating state of
the handset.
Softkey: OK OK is used to confirm the selected function. If a function only
permits you to switch between two opti ons, the
this to take place. In the display, active settings (ON) are indicated by a ”“” in front of the respective word. In the case of
settings that are not active (OFF), the space in front of the
respective word is left empty.
OK key causes
Softkey: Options
Using the Options softkey on the left, you can perform actions
on the selected item in the menu you are currently in.
Softkey: Esc The Esc softkey is used to quit the respective menu section
which is displayed. The display then shows the selection of the
previous menu branch or the current idle / connection display.
Holding down the
quits the present menu and returns to the idle display.
Esc softkey for a longer time (approx. 2 sec.)
Cancel Key Pressing C during editing names and/or numbers results in
deleting the last entered character or digit. Pressing
longer period deletes the whole entry.
14
C for a

Example: Menu
Menu
Key Lock
Ringer Settings
Volume Settings
OK ‘ Esc
Press Menu. Use the arrow keys to
scroll through this list and confirm
the desired function with
OK.
Example:
Telephone
Book
Entering a
Telephone
Number
Search:_
Miller
Newman
Peters
Options ‘ Esc
Enter Number:
367_
OK {} Esc
If the telephone book has been
opened ( • -key), the arrow keys
can be used to select a name and
A can be used to dial.
To change entries, switch over to
the next menu using the
softkey and choose for example
Edit . Now you can edit the tele-
phone number and then the name
with which it is associated. Save
your changes by selecting
end of each procedure.
The arrow keys can be used to
shift the input position (cursor) to
the left or right. Additional characters are always added in front of
the flashing cursor. Use
firm your entry ,
C deletes individual
characters or the complete entry
(press
C for a longer period).
Options
OK at the
OK to con-
15

8 Calling
Handset On/
Loudspeaker
Volume
The handset can be switched off by pressing C for more than
1 second when it is in an idle state. The handset is switched on
Off
by pressing
set in the charger.
During a conversation you can change the volume of the earpiece or the loudspeaker with the arrow keys in 7 steps. When
the minimum or maximum value is reached, you will hear a
beep. In the display a bar will be shown which will increase/
decrease in size symbolizing the actual volume setting.
C for more than 1 second or by placing the hand-
Handsfree To enable several people in a room to listen to a call, the hand-
set includes a handsfree feature. This can be activated during
the call via the
For best results, the handset should be placed upright on a
smooth, flat surface (e.g. a table top), leaving the loud speaker
and microphone free. For best results keep about 0.5 m distance between yourself and the handset when speaking.
To switch off the function, press the luminous
Note: When the handsfree function is active, the hook icon is
replaced by a loudspeaker icon.
H-key.
H-key again.
Muting During a call, you can deactivate the microphone of your hand-
set using the
keys and pressing
Pressing
Options softkey, selecting Mute with the arrow
OK.
OK in this state activates the microphone again.
16

Making a Call
œ¢ƒ
367_
Options {} D
Predial
0123_
Options {} Esc
Note: In pre-dialling, if the input cursor is positioned behind the
telephone number, the number to be chained will be suffixed to
that telephone number. If the input cursor is at any other point,
the number to be chained will be prefixed to the telephone
number.
Dialing:
Press
A and dial the phone num-
ber.
Pre-dialling:
Enter the phone number and
press
A. You can use pre-dialling
to chain telephone numbers from
different list s. Press
one of the lists with the arrow keys
and
OK. Select a telephone number
from the list. A long press on the
hook key will add the number to
the number predialled before.
Correcting an entry during predialling:
Options, select
C: deleting individual digits; press
for a longer period: deletes the
whole phone number.
Note: If the selected digit sequence does no t fit on the d ispla y
any more, the display is switched to a smaller font (up to 32
digits on two lines).
Long key press on ”0” inserts P (for pause) in the pre-dialmode.
17

Making a Call
from the
Last Number
Redial List
Redail
Miller
Newman
0309987
Options ‘ Esc
Selection:
Press the
of the arrow keys (several times if
necessary) with the handset in an
idle state. The last 30 phone numbers dialed are then displayed. The
beginning / end of the number
redial list is marked by a dashed
line.
Dialing:
Press
ber is dialed.
Pre-dialling:
If you press
the selected phone number is
entered into the pre-dial mode.
Digits can be added to the displayed phone number, as required
(see: Making a Call). To dial, press
D-softkey and then one
A, the selected phone num-
A for a longer period,
A. The pre-dial mode is terminated
by pressing
You can call direct ly f rom the redial
list or transfer a phone number to
the telephone book or the caller filter (refer to ”Menu: Redial list”).
Esc.
18

Making a Call
from the
Telephone
Book
Search:_
Miller
Newman
Peters
Options ‘ Esc
Selection:
Press the arrow keys with the
handset in an idle state. Use the
arrow keys to select an entry or
type in the first character(s) of the
name. If the arrow keys are not
pressed for a while, the selected
entry will be shown with name and
complete phone number.
Dialing:
Press
A and the phone number is
dialed.
Pre-dialling:
If you press
the selected phone number is
taken up into pre-dialling. To dial,
press
minated by pressing
A for a longer period,
A. The pre-dial mode is ter-
Esc.
Making a Call
from the
Caller List
The handset stores the phone numbers of the last 20 callers in
the caller list (dependent on the transmission of the phone
number). If a call is not answered within 10 seconds the user is
notified via the text ”Missed calls” in the idle display and the
flashing Info key
is entered. Calls that are successfully established from the
caller list will be removed from the list.
Selection:
Press the Info key
are new calls stored the list will open immediately. Otherwise
you have to select
Dialing:
Use the arrow keys to select an entry. Press
number is dialed.
Pre-dialling:
If
A is pressed for a longer period, the phone number is
entered into the pre-dial mode. Digits (e.g. a code) can be
added as required. The phone number is dialed by pressing
The pre-dial mode is terminated by pressing
Y ou can call back directly from the caller list or transfer a phone
number to the telephone book or the caller filter (refer to
”Menu: Caller List”).
B. This text will disappear when the caller list
B with the handset in an idle state. If there
Caller list .
A and the phone
A.
Esc.
19

Making a
SOS-call
This handset can be used to send emergency calls to a certain
telephone number. The number and the text message is stored
in the menu ”Telephone Option”.
To make the emer gency call press the SOS-/
r-key for longer
than 2 seconds. (only possible in idle mode).
Muting Ringer/
Trembler
Answering
aCall
Changes
During a
Connection
During the call alert phase, it is possible to mute the ringer alert
signal and the trembler simply by pressing the softkey
Silence,
now only the handset icon is signalling the incoming call.
œ¢ƒ
External
Peters
Options Silence
At an incoming call the number of
the caller is displayed (if transmitted). If this number is already listed
as an entry in the phonebook, the
corresponding name of this entry is
displayed during an incoming call.
Press
A to answer the call or lift
the handset of the charger when
”Charger Answer” is enabled.
Options:
Reject rejects the call.
Silence mutes the ringer and trembler.
Add To adds the caller’s number to the
telephone book or the call filter.
œ¢ƒ
01:05
Peters
Options ‡
‡ switches off/on the microphone in the handset.
Options:
Telephone book opens the telephone book.
Redail opens the redial list.
Add To select from the following menu
During a connection the loudspeaker volume can be adjusted
by pressing the arrow keys.
”Caller filter” or ”Tele ph on e B ook”
where the telephone number
should be copied to.
20

Enquiry Call/
Call Transfer
During a connection another party can be consulted (enquiry
call).
r holds the first call. Now dial the other phone number.
Press
r again to switch back to the first caller (press r to
speak alternately with the other parties).
A transfers the first call to the enquir y call party when you are
connected to the enquiry call party.
21

9 Messages
This handset can be used to send and receive text messages.
A differentiatio n is made between urgent and no rmal messages
which are signalled in different ways on the handset. Every
message is stored in a list which can contain up to 10 entries.
You can set the behavior of the handset for more than 10 messages by means of the ”Message Memory: Overwrite” menu
item. You can also receive and send messages during a connection.
The signalling of normal and urgent messages can be effected
by means of different ringer melodies (refer to menu: Ringer
Settings).
Messages cannot be sent or received if the handset is outside
the range of the system or is in the charger whilst ”Silent char ging” is switched on.
If a message cannot be delivered, the sender always hears an
error beep. If a message is received whilst you are making a
menu setting, the menu is aborted and all entries which have
not yet been saved are not stored. Furthermore, phone numbers which have already been entered and the text of a message which you are currently writing are lost if you receive a
message.
*
22
Urgent
messages
Normal
messages
Urgent messages are messages which you must confirm. An
activated key lock is temporarily deactivated when receiving
such a message so that its receipt can be acknowledged. If
you receive an urgent message, this is immediately signalled on
the display.
If you use the ringer, you can hear the melody for urgent messages. The ringer volume increases to the maximum during the
signalling process. If you receive an urgent message during a
call, you hear a repeated alert tone in the speech path.
Normal messages are messages which you don’t need to confirm. The ”Normal Message Display” setting can be used to
select whether or not a normal message is shown. When
selected normal messages are immediately signalled on the
display.
If you use the ringer, you hear the melody for normal messages
once. If you receive a normal message during a call, then you
hear a short alert tone in the speech path.
* Only useable when supported by your telephone system

Receipt
confirmation
You have to confirm the receipt of an urgent message. When
an urgent message is not confirmed within 60 seconds, the initiator will be signalled the message has not been received successfully.
œ ƒ
MEETING HAS BEEN
POSTPONED UNTIL
11:00
OK E Delete
OK confirms the receipt of mes-
sages.
Delete confirms the receipt of mes-
sages and deletes the message.
All other keys are blocked until you
confirm the message with
Delete.
OK or
Message
memory full
If the message list already contains 10 entries, the storage/ non
storage of a message depends on the setting of the ”Message
Memory: Overwrite” menu item:
If the
• Overwrite setting has been selected ( ”“” in front of
”Overwrite”), the oldest message is deleted before the new
message is stored.
If the ”Overwrite” setting has not been selected, the message is
not stored.
A full message memory is indicated by the flashing
‚ symbol
on the display.
23

10 Message waiting indication for
Voice Mail
When the user has a message in his voice mail box, the C icon
appears on the display (when in idle mode) and the i-key starts
flashing.
After pressing the I-key, the voice ma il bo x will be selected in
the menu and after pressing the
voice mail box will be dialed.
In case the handset is switched off, is ou t of coverage or is in
the charger while silent ”charging”, the message waiting indication is updated after the handset is locked to the DECT system
again.
*
OK softkey or the hook key , the
24
* Applicable only if this function is supported by your telephone system.

11 The Menus: Operating Procedures
In this and subsequent sections, all features are activated via
the softkey
shown in short form, and then a short discription follows.
Menu Control The symbols have the following meaning:
F Input of numbers or characters
Menu Texts shown in this font represents a softkey
Key Click Inversely displayed texts indicate the menu item
A Press hook key.
Example Saving user names (in the next chapters all representations of
the operating sequences have the followin g for m .):
Menu Telephone Option OK User Name OK F name OK
System
Telephone Option
Security
OK ‘ Esc
Telephone Option
Alarm
User Name
Language
OK ‘ Esc
Menu. The individual operating sequences are
Operate arrow keys
to be selected.
Menu
In this example, first press Menu
and select
Telephone Option
with the arrow keys.
Confirm the selection by pressing
the
OK softkey.
Then select User Name with the
arrow keys. Confirm again by
pressing
OK.
User Name
Geor_
OK {} Esc
Now enter the name, confirm by
pressing
OK. Instructions on enter-
ing the name can be found at
”Entering characters / names”.
Menu Timer The menu activation is time-monitored. If no entries are made
within 60 seconds, then the menu is automatically quit.
25

12 Menu: Telephone Book Settings
At least 100 phone numbers and names can be stored in the
telephone book and the names ar e sort ed alphab etically, therefore the telephone book offers an alphabetic search function.
Entering the same name more than once is not accepted, but
the same telephone number can be stored with different
names. An entry can consist of a maximum of 32 digits for the
number and 16 characters for the name (refer to ”Entering
Characters/Names”). When viewing an entry, only 14 characters of the name are visible. The beginning / end of the telephone book list is marked by a dashed line. If a caller is listed in
the telephone book and his phone number has been transmitted at the incoming call, then his name appears on the display.
All entries in this chapter are started in idle state by pressing
the softkey...
/
Options …
Adding a
New Entry
until New OK F phone number OK F name OK
When entering the name, the keypad keys are automatically
switched over to character input. It is not possible to store a
phone number without an associated name. A name consists
of maximum 16 characters.
26

Entering
Characters/
Names
The following characters can be entered by pressing the keypad keys several times. The entry position is automatically
advanced if no entries are made for a short while or a new
character is entered. Pressing the
tals to non-capitals and the same action switches back. While
entering characters the first displayline shows all characters
assigned to the key. The actual position is marked by > <.
Key Capital letter Small letter
1 ?!1-+*/=&()%¿¡ ?!1-+*/=&()%¿¡
2 ABC2ДЕАБГЖЗ abc2деабгжз
3 DEF3ÈÉÊË def3èéêë
4 GHI4ÌÍÎÏ ghi4ìíîï
5JKL5 jkl5
6 MNO6СЦТУФХШ mno6сцтуфхш
7 PQRS7ß pqrs7ß
8TUV8ÜÙÚÛ tuv8üùúû
9 WXYZ9 wxyz9
0 (space) ,.0:;_”‘^~ (space) ,.0:;_”‘^~
* A –> a a –> A
##@€$£¥§<>{|}[\] #@€$£¥§<>{|}[\]
*-key switches from capi-
Editing an
Entry
Deleting an
Entry
Deleting all
Entries
Adding an
Entry to the
Caller Filter
until Edit OK C short / long F new digits OK C
short / long F new characters OK
Select the entry to be changed with the arrow keys before con-
firming
the beginning or end of the entry via the arrow keys.
characters by using the
change a phone number or a name.
Use the arrow keys to select the entry to be deleted before
choosing
This function deletes all entries.
number to the caller filter. When the name is already in the
caller filter, the handset will give a beep.
Edit . Changes can be made by moving the cursor to
Delete
C-key. Press Esc if you do not wish to
until Delete OK Sure? OK
Options Delete
until Delete All OK Sure? OK
until Add to Filter OK transfers the selected phone
27

Quick Call Activate an entry in the telephone book and then select
Quick Call from the Options menu. Key in a one-digit num-
ber from 1 to 9 as your quick call number and confirm your
selection by pressing
Note: quick call numbers can only be allocated once. To dial a
number, press the key you have allocated the number to and
hold it down for a second or two while the handset is idle. The
number you wish to call will then be entered automatically in
pre-dial mode or is dialed immediately (depends on settings in
the menu “Telephone Option /Au to Quick Hoo k“). In the telephone book the names allocated to the quick call function have
the corresponding quick call number in front of the names.
Removing a quick call number can only be performed by
assigning a new quick call number to the tele phone book en try
in question without giving it any number. To delete the quick
call number use
OK.
C.
Transferring
Phone
Numbers to
the Telephone
Book
Every selectable phone number in the ”caller list” or ”redial list”
can be transferred to the telephone book. To do so, the
Options softkey in the Caller list Menu or Redial List Menu is
available for this purpose, depending on the state of the handset. If
OK is pressed, the phone number is stored immediately
and is treated as a new entry:
Options Add To OK Telephone Book OK
F Edit number / enter name OK
Edit number press OK and enter/edit a name for the phone
number. Confirm by pressing
phone number without an associated name.
When entering characters and numbers, the arrow keys can be
used to shift the entry position to the left or right.
The
Esc softkey cancels the entry.
OK. It is not possible to store a
28

13 Menu: Redial List
In the idle state, press the D-softkey and then one of the arrow
keys (several times if necessary). You will see the last 30 internal and external parties dialled (telephone number or name).
Dialing:
Dial the phone number by pressing
pressing
Options:
Add To ... transfers the phone number to the
A for a longer period.
telephone book (refer to ”Menu:
T elephone Book Settings”) or to the
caller filter (refer to ”Menu: Caller
Filter”).
Details shows the receiving time/date of
the respective call
Delete OK Sure OK deletes the selected
entry.
Delete All OK Sure OK deletes all entries.
a Only useable when supported by your telephone system.
A. Pre-dialling is started by
a
.
29

14 Menu: Key Lock
Key Lock
On Off
The keypad can be locked to prevent any accidental operation:
press the
and confirm by pressing
bottom left-hand corner of the display.
To unlock the keypad, press the left softkey and then
(as shown on the display).
Calls can be answered in the normal way when the key lock is
active and all keys can be used. The key lock is activated again
after the call has been terminated.
Menu softkey, select Key Lock via the arrow keys
OK. A lock icon is then shown in the
#
30

15 Menu: Caller List
Accepted and
Missed Calls
Calling B Caller List OK Selection of a phone number…
Accepted and missed calls with a transmitted phone number,
are entered into the caller list. A missed call is a call which has
not been answered and has been alerted for at least 10 seconds. When calls have been missed the text ”Missed Calls” is
shown in the display. Every call is marked with a time stamp*,
and it is possible to monitor the time stamp for each call via the
details softkey. If the caller is registered in the telephone book,
the name is displayed.
The last 30 telephone numbers are listed. Every additional
phone number overwrites the oldest entry. When a call back is
successfully executed to an entry in the caller list, the entry is
removed from the caller list.
The beginning / end of the caller list is mar ked by a specia l line.
Multiple calls with the same phone number are only stored
once and the timestamp of the last call is stored.
The following symbols in front of the entries indicates the kind
of call:
’ missed call
“ accepted call
B filtered call
Πrejected call
Dialing:
Dial the phone number by pressing
pressing
Options:
Add To ... transfers the phone number to the
Details shows the receiving time/date of
Delete OK Sure OK deletes the selected
Delete All OK Sure OK deletes all entries.
a Only useable when supported by your telephone system.
A for a longer period.
telephone book (refer to ”Menu:
T elephone Book Settings”) or to the
caller filter (refer to ”Menu: Caller
Filter”).
the respective call
entry.
A. Pre-dialling is started by
a
.
31

16 Menu: Messages
*
Your handset can be used to send and receive text messages.
These messages can be stored in a list with up to 10 entries.
There are normal and urgent messages which are signalled to
the recipient in different ways. Every stored message is displayed in the message list with the first few words of the message and can be shown in full length by means of
Read
OK.
Every received message is marked with a time stamp
Options
†
, and it is
possible to monitor the time stamp for each message via
Options Details .
The following symbols in front of the message indicate it’s status:
G urgent message
› normal message read
‚ normal message unread
“ transmitted message confirmed
H transmitted message not yet confirmed
I message could not be transmitted successfully
J messages in the list downloaded from the PC
All entries in this chapter are started in idle state by pressing
the softkeys:
B Messages OK …
Then select...
Writing a new
message
32
Options until New OK F new text Options Normal
Messages
/ Urgent Message OK F number OK
If the message list is not full, you can use the New function and
enter new text. Refer to the key assignment for entering characters.
After entering the text and pressing
whether it is a normal or urgent message. After pressing
will be asked to enter the phone number. If you press
Options, you can select
OK you
OK again
after that, the message is sent.
* Only useable if supported by your telephone system
† Only when time and date is supported by your telephone system

Sending a
message
Select message Options Send OK F edit text Options
Normal Message / Urgent Message OK F edit number
OK
If the message list is not full, you can use the ”Send” function.
Select the desired message by means of the arrow keys before
choosing
played. Y ou can change the text as required via the arrow keys
and the
whether a normal or urgent message is transmitted. On pressing
going to be sent (you can also change this).
The message is sent by pressing
played message list indicate whether the transmission was
successful. If an urgent message is sent, then there is a maximum waiting time of 60 seconds for the recipient's confirmation. During this time you cannot send or receive other
messages.
Options Send . The complete message is then dis-
C key. After pressing Options, you can choose
OK, you will see the phone number to which the message is
OK. The symbols on the dis-
Reading a
message
Deleting a
message
Deleting all
messages
Select message Options Read OK
Select the desired message by means of the arrow keys before
choosing
Select the desired message by means of the arrow keys before
choosing
you have deleted the message because there is no memory
space available for new messages, the flashing ‚ symbol is
switched off.
All messages are then deleted.
Options Read . The complete message is displayed.
Select message Options Delete OK Sure? OK
Options Delete (and thus deleting the message). If
Select message Options Delete All OK Sure? OK
Details Select message Options Details OK
Shows the arriving phone number, date/time belonging to the
message.
33

17 Menu: Ringer Settings
A different melody can be set for every type of call (internal,
external, unknown number, VIP, normal message, urgent message, emergency call and alarm call).
National anthems first lines are integrated in the handset and
they are selected in the ringer settings by choosing one of the
numbers shown below.
21: United Kingdom, 22: Germany, 23: Holland, 24: Italy,
25: France, 26: Spain, 27: Portugal, 28: Sweden,
29: Denmark, 30: Norway.
All entries in this chapter are started by pressing the softkeys:
Menu Ringer Settings OK
Then select…
Melody:
Internal
Melody: External
Melody:
Unknown
Number
Melody:
VIP calls
Melody:
Normal
Message
Melody:
Urgent
Message
Melody OK Internal OK or F 1…30 OK
Select the melody for internal calls by entering a nu mber 1…30
or use the arrow keys.
Melody OK External OK or F 1…30 OK
Select the melody for external calls by entering a number
1…30 or use the arrow keys.
Melody OK Unknown Number OK or F 1…30 OK
Select the melody for calls without transmitting a phone num-
ber by entering a number 1…30 or use the arrow keys.
Melody OK VIP OK or F 1…30 OK
Select the melody for VIP calls by entering a number
1... 30 or use the arrow keys.
Melody OK Normal Message OK or F 1…30 OK
Select the melody for normal messages by entering a number
1... 30 or use the arrow keys.
Melody OK Urgent Message OK or F 1…30 OK
Select the melody for urgent messages by entering a number
1... 30 or use the arrow keys.
34

Melody:
Emergency Call
Melody OK Emergency Call OK or F 1…30 OK
Select the melody for Emergency Calls by entering a nu mber
1... 30 or use the arrow keys.
Melody:
Alarm Call
Melody OK Alarm OK or F 1…30 OK
Select the melody for Alarm calls by entering a number 1... 30
or use the arrow keys.
Type Melody OK Chirp OK OK
This function is used to switch on the ringer signalling
function with a chirp (short melody). When activated it is
marked with ”“” on the left side.
Melody OK Full Melody OK
This function is used to switch on the ringer signalling function
with a full melody. When activated it is marked with ”“” on the
left side.
Volume Volume Settings OK or F 1…8 OK
The ringer signalling volume can be changed via digits 1... 8 or
the arrow keys.
Device Device OK Buzzer OK
This activates/deactivates the buzzer. When activated it is
marked with ”“” on the left side. If the buzzer is switched off,
the bell symbol
buzzer on/off you can also use the
idle state of the handset.
Device OK Vibrator OK
This activates/deactivates the vibrator. When activated it is
marked with ”“” on the left side.
Device OK Headset OK
This activates/deactivates the headset alerting. When activated
it is marked with ”“” on the left side.
‹ is shown on the idle display. To switch the
r-key and *-key in the
35

18 Menu: Volume Settings
Earpiece Menu Volume Settings OK Earpiece OK OK
The voice volume of the earpiece can be changed in 8 steps
via the arrow keys.
Hands-free Menu Volume Settings OK Hands-free OK OK
The voice volume of the loudspeaker can be changed in 8
steps via the arrow keys.
36

19 Menu: Caller Filter
Via the caller filter it is possible to block or receive incoming
calls if the calling phone number is stor ed in the call er filter. The
phone numbers in question have to be stored ahead to the
caller filter, before it is possible to use the filter functions.
Phone numbers can be entered manually or transferred from
caller list, redial list or telephone book. An entry can consist of a
maximum of 32 digits for the number and 16 characters for the
name (refer to ”Entering Characters/Names”). It is possible to
store a maximum of 10 numbers in the caller filter. The caller filter only works for calls not for messages.
List of
Numbers
Adding a New
Entry
Menu Caller Filter OK List of numbers OK
OK
Select an entry…
Options:
until New OK F phone number OK F name OK
When entering the name, the keypad keys are automatically
switched over to character input. It is not possible to store a
phone number without an associated name.
Editing an Entry until Edit OK C short / long F new digits OK
C short / long F new characters OK
Select the entry to be changed with the arrow keys before
choosing
the cursor to the beginning or end of the entry via the arrow
keys. Press
or a name.
Options Edit . Changes can be made by moving
Esc if you do not wish to change a phone number
Deleting an Entry until Delete OK Sure? OK
Use the arrow keys to select the entry to be deleted before
Deleting all
Entries
choosing
This function deletes all entries.
Options Delete .
until Delete All OK Sure? OK
Filter Options The filter options menu provide blocking or receiving of incom-
ing calls with the numbers from the list.
37

Blocking or
receiving calls
Menu Caller Filter OK Filter Options OK…
select
The selected mode is marked ”“” and the filter is activated!
When the filter is active, the handset is showing the ”icon filter
active” (
Caution - If the filter mode is set to receive and the caller filter
is activated, the numbers in the caller filter are the only numbers, from which the calls will be received by the phone !
Example:
If the characters ”0S” are entered as a number in the caller filter
and the filter mode is set to receive, only calls beginning with
the digits ”0” (external numbers) will be received by the phone.
Accept List or Block List OK.
B ) on the idle display.
Deactivate
Filter
Wild Card
Feature
Transferring
Phone
Numbers to
the Caller
Filter
until Filter off OK
The deactivated caller filter is marked ”“”. To switch it on again
you have to select “Accept List“ or “Block List“.
When entering numbers in the caller filter a wild card feature is
provided, so that a group of numbers is selected as entries in
the caller filter.
Example:
If the characters ”0S” are entered as a number in the caller filter, all numbers beginning with the digit ”0” (external numbers)
are selected as entries in the caller filter.
If only the character ”S” is entered as a number in the caller filter, all numbers are selected as entries in the caller filter.
Remember - when using the wild card function, the ”S” character must always be the last character entered in the number.
For transferring phone numbers from the Telephone Book, the
Redial List and the Caller List to the Caller Filter refer to:
Menu: Telephone Book Settings,
Menu: Redial List and
Menu: Caller List.
38

20 Menu: System
Registration
Code
Registering the
Handset to the
DECT System
The handset can be operated with a maximum of 10 DECT
systems. Before you can make a call via the DECT system, the
handset has to be registered to the respective system. A system ID and registration code may be necessar y for t he r egist ration process. Ask the respective system administrator for the
valid registration code. When the handset is not yet subscribed
to the system the display is showing ”No subscription”.
All settings in this chapter are started by pressing the softkeys:
Menu System OK
Then select…
Subscription OK Options New / OK F PARK
OK F PIN (Authentication code) OK F System name OK
F Local phone number OK
The following entries must be made when logging on:
Enter PARK : a system ID should only be entered
if you are at a location where two
DECT systems overlap. If only one
DECT system is available, then just
press
OK.
Enter Auth.Code : this code is used to register the
handset (authenticatio n cod e) . T he
DECT System supplies this code.
Enter System Name : give the name of the DECT system
to which you are registering. This
will be shown on the idle display.
For information concerning the
entry of characters, refer to ”Entering Characters / Names”.
Enter Local Number : the phone number, assigned to
your DECT handset can be entered
here (ask your system administrator for the phone number).
Selecting the
DECT System
Subscription OK select a System Options
Select OK
If the handset has been registered to several DECT systems,
then you can select which one the handset is to use. Select the
system via the arrow keys before confirming ”Select”. By
choosing
disabled. The selected system is shown in the idle display.
Options Select , the function automatic search is
39

Automatic
Search System
Subscription OK Auto. Search OK
If you have registered your handset with several DECT systems
and this function is active (”“”), then the hand se t will aut om a tically select one of the systems. Thus, your handset is automatically ”logged-in” to another of your registered DECT systems,
as soon as you move out of the effective range of the current
system. This function is disabled if a specific system is selected
by the select option.
Deleting a
System
Changing a
System's Name
and Phone
Number
Subscription OK select a System Options
Delete OK Sure? OK
Deleting subscription is only possible, when the handset is out
of coverage from the system or when it is not succesfully registered to a system. Consequently, the handset can only be used
on this system again after completion of the registration process. Use the arrow key to select the system, before you
choose
information from your handset for the selected DECT system.
Note that after execution of this function, the handset cannot
be used on that DECT system anymore! To use it again, you
must go through the registration procedure at the DECT system and at the handset.
Edit OK F System name OK F Local phone number OK
You can select a system and then edit the name of the system
and your telephone number.
Options Delete . This function removes subscription
Subscription OK select a System Options
Equipment ID IPEI OK
You can read the international handset identification.
40

21 Menu: Telephone Options
All entries in this chapter are started by pressing the softkeys:
Menu Telephone Option OK
Then select…
Alarm The C944 allows you to set a time between 00:00 and 23:59 at
which the handset will emit an acoustic signal (preset tone for
internal calls). The signal lasts 60 seconds and can be
switched off by pressing any key . Powering the handset On/Off
doesn´t affect the Alarm Setting.
The Alarm time can only be set when date and time are available on the handset.
When the Alarm goes off, ”Alarm” is shown on the display.
No Alarm will be given, when the handset has been switched
to ”OFF”.
*
Setting the Alarm
Alarm OK Set OK F time 00:00 - 23:59 OK
Clock
Activating/
Deactivating the
Alarm Clock
Alarm OK Active OK
Once you have set an alarm time, you can activate it by press-
ing
OK, in which case the ”“” appears. Press OK again to deacti-
vate it.
Note: When the Alarm Clock is active, the Alarm symbol is dis-
played behind the time on the display when the handset is idle.
User Name User Name OK F Name OK
This function can be used to store the name of the telephone
user. The user name consists of maximum 16 characters. The
name is shown on the idle display. Further information concerning the input of character s can be foun d at ”Enter ing cha racters / names”.
Changing the
Language
Language OK English OK
Sets the desired display language. It is possible to select from
12 different languages.
* Only useable when supported by your telephone system.
41

Emergency Call
Messages
Emergency Call OK Messages OK F text OK
You can store the message text for the SOS-function (max.
160 characters).
SOS number Emergency Call SOS number F number OK
The phone number for the SOS-function can be stored here.
Attention tones Attention tones OK
Key Click or Coverage Warn or Batteryalarm or
Error tone
If activated ”“” an acoustic warning signal is given when a key
is pressed (Key Click), if there is a danger of losing the radio link
(Coverage Warning), if the battery charge becomes too low
(Batteryalarm), an error is signaled (Error tone) or if the end of a
menu list is displayed (End of Menu).
or End of menu / OK
Silent Charging Silent Charging OK
If activated ”“” the handset does not setup and receive any
calls (and messages) whilst it is placed in the charger. The first
display line shows ”Silent Charging” when placed into the
charger. Calls are signalled again once it is taken out of the
charger.
Charger
Answer
Auto Quick
Hook
Charger Answer OK When the function is enabled, you can answer incoming calls
when the handset is placed in the charger e. g. by lifting it off
the charger . The ”“” is shown when activated. The call is ended
and the handset goes on hook by placing it on the charger
again.
Auto Quick Hook OK If activated ”“” a QuickCall-Number (see menu: Telephone
Book Settings) will be dialed immediately. If deactivated the
number will be entered in pre-dial mode.
Auto Answer Auto Answer OK
When signalling an incoming call the handset automatically
goes off hook after one ringer alert signal and the call will proceed. The ”“” is shown when activated. To deactivate it press
OK again. The Auto Answer function works regardless if the
headset is connected or not. The first line of the idle display
shows ”Auto Answer” if activated. Auto answer can also be
used in combination with a headset.
42

Normal
Message
Display
Message Options OK Display OK
You can determine whether normal messages* received are
immediately displayed ”“”, or should only be stored.
Message
Memory
Overwrite
Display
Contrast
Message Options OK Overwrite OK
The message* memory can contain a maximum of 10 mes-
sages. You can select whether each additional new message
deletes the oldest message ”“” or whether the new message is
not stored.
Disp.Contrast OK or F 1…7 OK
The display contrast can be changed via digits 1…7 or the
arrow keys.
* Applicable only if this function is supported by your telephone system.
43

22 Menu: Security Functions
The security functions are protected by a PIN code (4 digits).
The PIN entry is only necessary when read only is switched on .
In the delivery state the PIN is set to 0 0 0 0. For additional
security,
which have been entered can be dele ted by pr essing
have forgotten your PIN, please consult your system administrator.
All entries in this chapter are started by pressing the softkeys:
Menu Security OK F Enter PIN OK
Then select…
is displayed when entering the PIN. Numbers
****
C. If you
Changing the
PIN
Change PIN OK F old PIN OK F new PIN OK
F repeat new PIN OK
For additional security, the new PIN must be entered twice. The
numbers of the PIN are displayed as
Read Only Read-Only OK
If read only is active ”“”, all features in the menu can be
checked. However the settings cannot be changed.
Resetting the
Handset
Reset OK Sure? OK
All functions with the exception of the telephone book, the PIN
and system registrations are deleted and reset to the delivery
state.
****
.
44

23 Menu Shortcuts
Several frequently used menu items can also be activated with
shortcuts, so you do not have to scroll through the menu.
When the handset is idle, press one of the following key combinations within 3 seconds:
Ringer on / off r1 switches the ringer signalling off. The bell symbol ‹
appears in the display.
r2 switches the ringer signalling back on.
Silent charging
on / off
r3 switches on your handset for ”Silent Charging”.
r4 switches ”Silent Charging” off.
User name r5 allows you to change the user name.
Registering /
Deregistering
Toggles the
r6 activates the registration menu (for registering / deregis-
tering the handset with the DECT system.
r * toggles the ringer on/off.
ringer
Key Lock on r # switches the key lock on.
45

24 Accessories
• Battery: NiMh (Nickel-Metal Hydride), rechargable AAA
battery of 850 mAh, 1.2V
• C944 Desktop Charger
Mains plug
46
• C944 Charger Rack
A maximum of eight handsets can be charged simultaneously.
The charger rack is designed for desktop use and for wall
mounting.
(Future availability)

• Belt Clip
Belt clip and adapter for the handset. The adapter is clipped
onto the handset and is removable without any remains or
damages.
• Data cable
Cable to connect the handset with a PC.
•Headset
The headset in combination with the belt clip makes really
handsfree telephoning possible. This is finally optimized by the
handset feature ”Auto Answer”.
Note: Only use the devices and accessories approved by the
manufacturer of the handset. Guarantee claims cannot be
made if other types are us ed. The accessories c an be obtained
via the supplier of the handset.
47

• CD ROM
The system prerequisites for the installation of the PC software
are as follows:
• IBM or 100 % compatible computer
• Pentium 133 MHz or higher
• Min. 16 MB RAM
• Microsoft Windows 95/98/NT4, 2000 or XP
•COM port
• CD-ROM drive
On the CD-ROM you find the C944 software, consisting of the
following components:
- Telephony Application Programmer's Interface (TAPI)
- This is also a standardised interface, and enables remote
control of the C944.
- Configuration
You can use this program to configure your C944 comfortably from your PC.
To complete the installation you must restart your PC.
48
The start menu of your PC will now contain a new folder with
the name ”C944”, unless you have changed the standard setup. In this directory you will find the ”Configuration Program”
and a ”Readme.TXT” file.

25 Care and Maintenance
Your telephone is a product which meets high demands with
regard to design. It should therefore be treated with care. We
want this product to give you pleasure for a long time and
therefore make the following suggestions.
Pay attention to all safety instructions. These instructions apply
to the handset, charger, batteries (the whole telephone) as well
as the accessories.
To clean the telephone, first of all disconnect the mains plug on
the charger. Wipe the device using an antistatic cloth or a
slightly moistened soft chamois leather and then wipe with a
dry cloth.
Note: never spray the telephone with cleaning agents or solvents.
Clean the charge contacts on the handset and the charger by
means of a fluff-free cloth.
If the telephone or one of the accessory parts does not function perfectly, please contact your supplier‘s customer service.
Do not carry the telephone in the pocket of your trousers!
49

26 Menu Tree
V
T
Key Lock
Ringer Settings Melody Internal
External
Unknown Number
VIP
Normal Message
Urgent Message
Emergency Call
Alarm
Type Full Melody
Chirp
Device Buzzer
Vibrator
Headset
Volume Settings
olume Settings Earpiece
Hands-free
Caller Filter List of numbers
Filter Options Accept List
Block List
Filter off
System Subscription <Options / New>
Enter PARK
Enter Auth.Code
Enter System Name
Enter Local Number
... select DECT system <Options / Select>
<Options / Edit>
<Options / Delete>
Auto. Search
IPEI
elephone Options Alarm Set
Active
User Name
Language
Emergency Call Messages
SOS number
Attention tones Key Click
Coverage Warn
Batteryalarm
Error tone
End of menu
Silent Charging
Charger Answer
Auto.Quick Hook
Auto Answer
Message Options Display
Overwrite
Disp.Contrast
Security Change PIN
Read only
Reset
50

PRODUCT DISPOSAL INFORMATION
The symbol depicted here has been affixed to your
product in order to inform you that electrical and
electronic products should never be disposed of as
municipal waste.
Disposal of electrical and electronic products in Australia should be done
in line with local regulations. If no arrangement has been made with
NEC Business Solutions Ltd. or your supplier, please contact the local
authorities for further information.
 Loading...